

Page 1

Pigtronixtm
Echolution
User’s Guide
All contents © Pigtronix 2006
Page 2

Index:
Welcome………………………………………………………………..…
Anatomy of the Echolution……………………………………….
Getting Started…………..…………………………………………….
Guided Tour…………..…….……………………………………………
Sample Settings………………………………………………………..
Limited Warranty…………………………………………….…….…
Safety Precautions…………………………..………………………..
Page 3

Welcome!
Thank you for entering the realm of Pigtronix. Your Echolution pedal is a
unique hybrid of analog and digital circuit design. Our goal in putting together
this musical device was to provide the tonal richness of the finest analog echo
machines with the flexibility of a programmable digital delay line.
In keeping with Pigtronix tradition. The controls on the Echolution have been
tuned to provide the fattest possible tone and widest range of musical
possibilities.
The Echolution will accept instrument or line level signals, making it a suitable
effect for guitars, basses, keyboards, turntables, laptops, studios, amplified
brass and wind instruments… you name it.
Our Echolution was born out of a passion for versatile, expressive musical
effects; it is built to last and designed to inspire.
We hope it will provide you with years of creative satisfaction.
Peace,
Pigtronix
Page 4
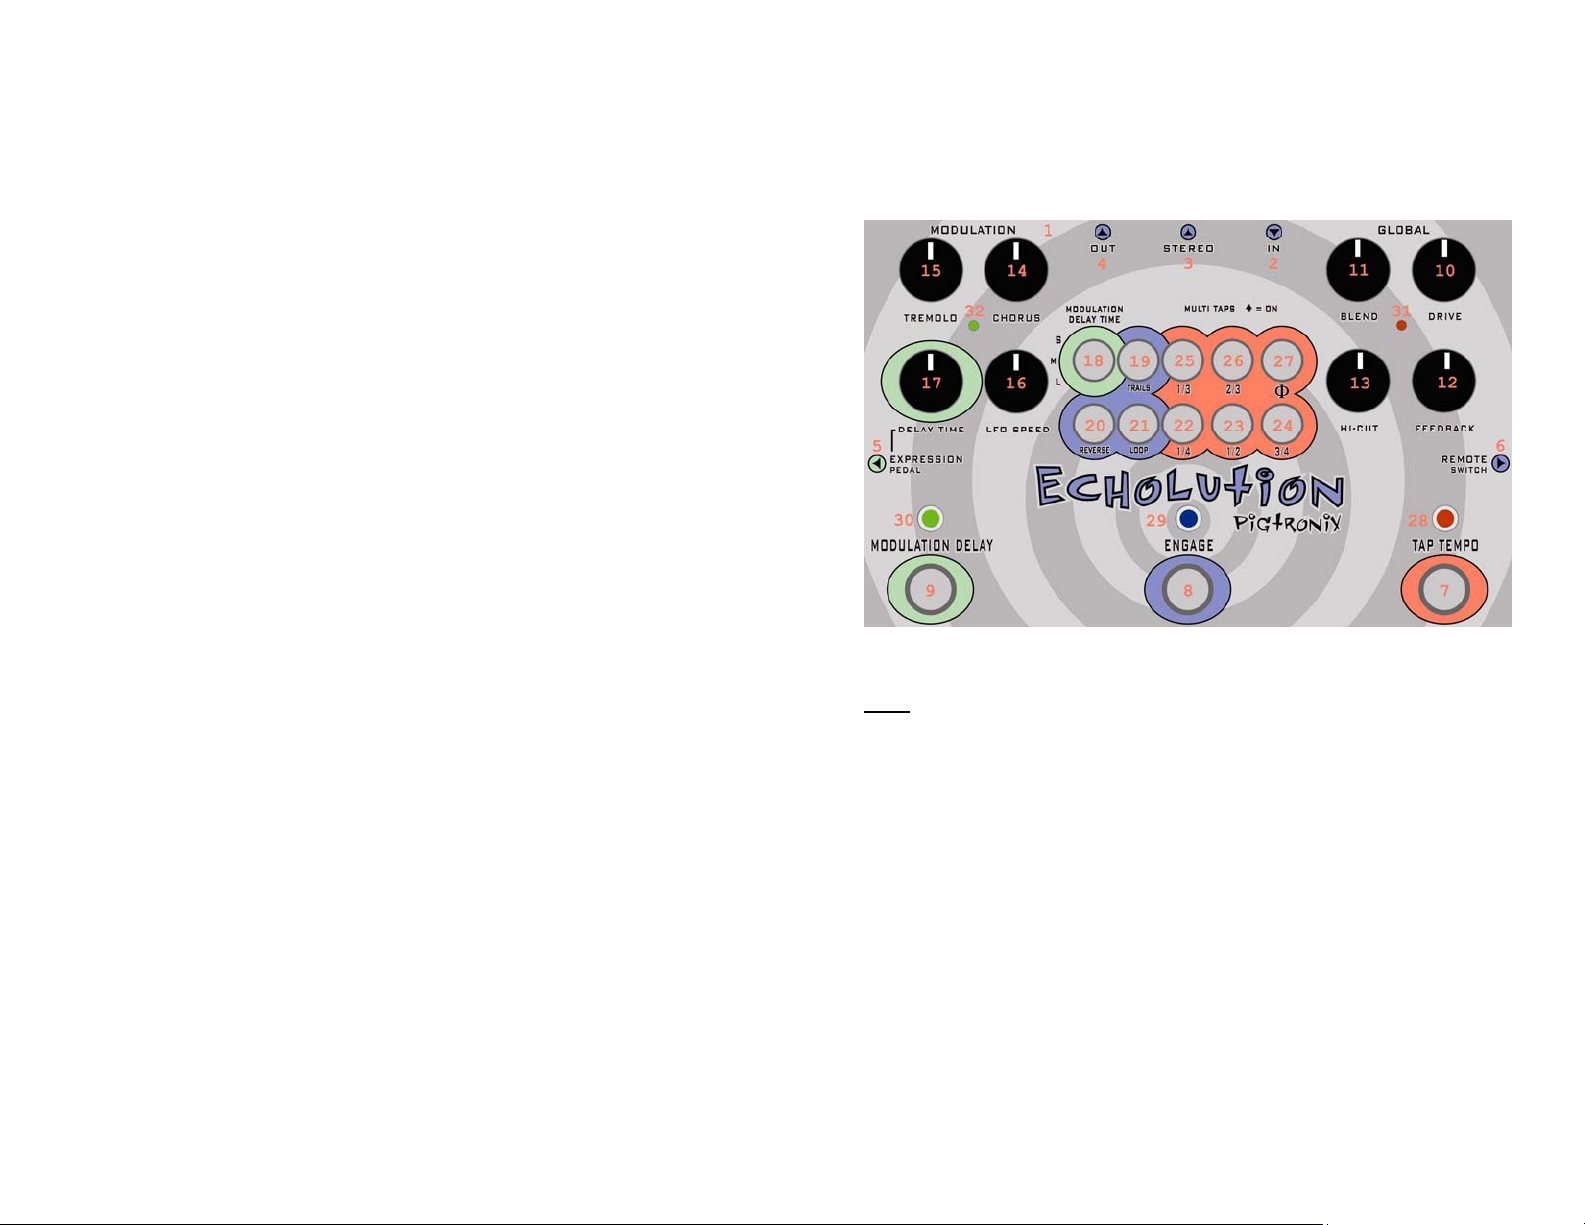
Anatomy of the Echolution:
The Interface:
Jacks: – Plug In and Turn On!
1. DC POWER 15VOLTS – Use only the 15-Volt, negative tip power supply that
came with your Pigtronix Echolution. Using the wrong power supply could
result in a damaged pedal.
2. IN – Plug in your instrument here.
3. STEREO – This is a phase inverted output for use in stereo setups.
4. OUTPUT – Effect output – Plug in your amp, mixer, DI box, etc. here.
5. EXPRESSION PEDAL – This jack allows foot-pedal control of delay time when
the Modulation section is engaged. The Pigtronix 20K Expression pedal is
recommended for this application.
6. Remote Switch – This jack allows the use of a two-button, TRS (stereo)
remote switch for turning the REVERSE and LOOP functions on and off. A
single button, TS (mono) remote switch can be used to activate the LOOP
function only.
Page 5

Footswitches - Step On It
7. TAP TEMPO – This footswitch is used to set the delay time when the Tap
Tempo function is in use. The Echolution’s Tap Tempo function employs a
complex math algorithm called a “rolling average” to set the delay time.
This allows the musician to achieve remarkable accuracy in setting the
delay time, as well as the ability to change the delay time quickly. While
only three taps on the switch are required to set the delay time, tapping
the switch 4-6 times will cause small deviations to be averaged out,
providing the most accurate representation of the actual desired tempo.
Maximum delay time in Tap Tempo mode is 20 seconds.
8. ENGAGE – This footswitch turns the effect on and off.
9. MODULATION DELAY – This footswitch selects between the Tap Tempo
mode and the Modulation Delay mode, allowing the musician to switch
between different delay sounds on the fly. When modulation delay, is
selected, the overall delay time is set by the position of the delay time
knob and the three-way, modulation delay time switch.
Global Controls – Find Your Sound
10. DRIVE – This dial determines the amount of gain that is added to the input
signal when the effect is engaged. When turned fully counterclockwise, no
gain is added. By cranking up the DRIVE control you can push the
Echolution’s non-linear stages into thick analog saturation.
11. BLEND – This dial determines the balance of clean and effected signal at
the two outputs. When turned fully counterclockwise, you will hear only
the pure analog input signal. When turned fully clockwise you will hear
only the delayed signal. At the 12:00-o-clock position, the two signals are
blended in a 50/50 mix. When you have found the desired balance of
clean and delay levels, use the DRIVE control to bring your signal level
up so that there is no loss of level in the clean signal when the effect is
engaged.
12. FEEDBACK – This sets the number of repeats. When turned
counterclockwise, there will be only a single echo with no repeats. With
this control turned fully clockwise, the Echolution will cascade into selfoscillation.
13. HI-CUT – This control sets the cutoff frequency for the LPF (low pass filter)
that comes after the delay line. When turned fully counterclockwise, the
echoes are more crisp and articulate. When turned fully clockwise, the
echoes become warmer and darker.
Page 6

Modulation Controls – Warp Your Mind
The modulation section of the Echolution allows both pitch (chorus) and
amplitude (tremolo) modulation of the delay signal. This can add a beautiful,
three-dimensional ambience to your sound, particularly in stereo. The
modulation controls are only active when the green Modulation Delay LED
is on.
14. CHORUS – - This control sets the depth of the pitch modulation. When
turned fully counterclockwise, there will be no pitch modulation. The
CHORUS control has an inverse relationship to the DELAY TIME control.
With longer delay times, less chorus depth is needed. This means that
when you turn the DELAY TIME control clockwise, you will want to bring
the CHORUS control counterclockwise.
15. TREMOLO – This control sets the depth of the amplitude modulation. When
turned fully counterclockwise, there will be no amplitude modulation.
16. LFO SPEED – This control sets the rate of the Chorus and Tremolo effects.
17. DELAY TIME – This control works along with the modulation delay range
switch to set the length of the delay time.
Toggle Switches – Up = On
18. MODULATION DELAY TIME – This three-way toggle switch determines the
range of the delay time knob.
S (short) mode runs between 10ms –120ms.
M (medium) mode runs between 100ms -1.2sec.
L (long) mode runs between 1sec and 12sec.
19. TRAILS – This switch lets the echoes fade naturally (according to the
FEEDBACK setting) when the effect is bypassed. This makes for smooth
transitions between the “effect on” and “bypass” settings.
20. REVERSE – This switch causes the delay line to run backwards. Reverse is
only available in Tap Tempo mode and in the L (long) setting of the
Modulation Delay mode.
21. LOOP – This switch causes the content of the delay line to be repeated
indefinitely. Although the Echolution can be used as a stand-alone loop
machine, you will get better results by this function in combination with a
dedicated looping device.
22. 1/4 - This switch introduces an additional echo at 1/4 of the length of the
master delay time.
23. 1/2 - This switch introduces an additional echo at 1/2 of the length of the
master delay time.
24. 3/4 - This switch introduces an additional echo at 3/4 of the length of the
master delay time.
Page 7

25. 1/3 - This switch introduces an additional echo at 1/3 of the length of the
master delay time.
26. 2/3 - This switch introduces an additional echo at 2/3 of the length of the
master delay time.
27. Phi – This switch realigns each fraction to a value that is derived from the
Golden Ratio. More on this later.
LEDs – Lighting the Way
28. – This LED indicates when the Tap Tempo delay mode is active, providing a
visual representation of the delay time.
29. - This LED indicates when the effect is engaged.
30. – This LED indicates when the Modulation delay mode is active.
31. – This LED is an input overdrive indicator. The Echolution is designed to
sound pleasing when overdriven, but most players will want to set the
DRIVE control so that this LED lights up only during the loudest passages.
32. – This LED’s behavior corresponds to the rate of the modulation LFO.
Getting Started:
Basic Hook Up
1. Unpack your Echolution and place it on a flat, stable surface.
2. Make sure you are using the 15-Volt DC (negative center) power supply
that came with your Pigtronix Echolution.
3. Plug the power cord into the 15VDC jack on the back of the Echolution and
then plug the power adaptor into an electrical socket.
The Echolution is now powered up. To turn the device off, unplug it from
the wall or turn off the power going to the socket that the power supply is
plugged into.
Because of the complex switching that is necessary to make the
Echolution do all that it does, true bypass was not possible in this
design. The Echolution uses a buffered bypass and must be powered up
for audio to pass through the pedal.
When the unit is bypassed, there is no degradation of the audio signal.
We recommend that you do not leave your Echolution powered up for long
periods of time when it is not in use.
4. Plug your instrument into the “IN” jack and plug your Amplifier into the
“OUT” jack.
Page 8

Guided Tour:
The following steps guide you through the sonic palette of Echolution and show
you how to get at the range of tones that it has to offer.
Global Controls – Get a grip
1. Set all of the Echolution’s controls fully counterclockwise and set all of the
toggle switches to the down (off) position. The Tap Tempo light should be
blinking, but the other LEDs should be off. The Echolution is in bypass
mode. Play your instrument and make sure your hear your clean sound.
2. Click the Engage footswitch to turn the Echolution on. Play your
instrument. You should hear the same sound as in bypass. Turn the BLEND
control up to 12:00. You will now hear an echo.
3. Turn the Drive control up to 12:00. Notice how the sound gets much
louder. Explore the range of this control and then set the drive control so
that your clean sound gets a slight level boost when the Echolution is
engaged. This should be around 10:00.
4. Turn the feedback control up to 12:00. You will now hear an echo with
multiple repeats. Turn the feedback control fully clockwise. You will now
hear “runaway” self-oscillation. Bring the FEEDBACK control back to 12:00.
5. Experiment with the Hi-Cut control. Notice how the echoes grow darker as
you turn this control clockwise.
6. Change the delay time by stepping on the Tap Tempo footswitch 3-6 times.
Modulation Delay (S) - Chorus, Tremolo and Leslie
7. Put the Echolution in Modulation mode by clicking the “Modulation Delay”
footswitch. The green LED above this footswitch should now come on. Flip
the “Delay Time Rage” switch to the S (short) mode and explore the range
of the Delay Time control in this mode (10ms – 120ms)
8. Bring the DELAY TIME, LFO SPEED and CHORUS controls up to 12:00. You
will now hear a Chorus effect. Experiment with various LFO SPEED, DELAY
TIME and CHORUS settings to grasp the range of available textures. Longer
delay times will require less chorus depth and shorter delay times will
require more chorus depth.
9. Bring the DELAY TIME control back to 12:00 and set the Chorus depth fully
counterclockwise. Bring the TREMOLO control up to 12:00. You will now
hear the TREMOLO effect occurring at the rate set by the LFO SPEED.
10. Turn the TREMOLO, CHORUS, LFO SPEED and BLEND controls fully
clockwise. This provides a rotary speaker sound. You can vary the texture
of this effect by altering the balance of CHORUS and TREMOLO levels as
well as changing the LFO speed.
Page 9

Modulation Delay (M) – Classic Analog Delay
11. Turn all of the modulation controls fully counterclockwise, put the BLEND
control back to 12:00 and flip the “Delay Time Rage” switch to the M
(medium) mode. Explore the range of the DELAY TIME control in this mode
(100ms – 1.2sec).
12. Bring the DELAY TIME, LFO SPEED and CHORUS controls up to 12:00. You
will now hear a modulated delay effect. Experiment with various LFO
SPEED, DELAY TIME and CHORUS settings to grasp the range of available
textures. Longer delay times will require less chorus depth and shorter
delay times will require more chorus depth.
13. Bring the TREMOLO control up to 12:00 to mix in some amplitude
modulation of the delay signal.
Modulation Delay (L) – To Infinity… and beyond!
14. Bring all of the controls back to 12:00 and flip the “Delay Time Rage”
switch to the L (long) mode. Explore the range of the DELAY TIME control
in this mode (1sec – 12sec).
15. Repeat steps 12 and 13.
Multi-Taps – Get Rhythm
Each multi tap toggle switch is assigned to a fraction of the master delay time.
When a toggle switch is turned on, an echo is introduced at that fraction of the
master delay time. You may use any combination of the five available multitaps. The (phi) switch changes the values of all the fractions, but we’ll get to
that later.
*Note* - Each time an additional multi-tap is added, the delay signal is slightly
attenuated. If you wish to compensate for this attenuation, simply turn the
BLEND and DRIVE controls clockwise as needed.
*Note* - Turning the FEEDBACK clockwise will cause rhythmic patterns to
increase in complexity. Turning the FEEDBACK control counterclockwise will
keep things rhythmically tighter.
16. Bring all of the controls back to 12:00 and turn off the modulation section
by clicking the “Modulation Delay” footswitch. Using the Tap Tempo
footswitch, make sure the Tap Tempo delay time is set to approximately 1
second.
17. Play a single note to hear the echo occur at 1 second. Flip the toggle
switch marked 3/4 to the on position. Play a single note. You will now hear
two distinct echoes, the master delay at 1 second and the 3/4 tap.
18. Flip the toggle switches marked 1/4 and 1/2. Play a single note. You will
now hear four distinct echoes, the master delay at 1 second, as well as the
1/4, 1/2 and 3/4 taps. If you set the tap tempo to cycle once for each bar
Page 10

of music, then these multi-taps are quarter notes. Turn up the BLEND and
DRIVE controls slightly and play another note.
19. Flip the 1/4, 1/2, 3/4 switches back down into the off position. Flip the
toggle switches marked 1/3 and 2/3 to the on position. Play a single note.
You will now hear three distinct echoes, the master delay at 1 second as
well as the 1/3 and 2/3 taps. If you set the tap tempo to cycle once for
each bar of music, then these multi-taps are triplets.
20. Keeping the 1/3 and 2/3 taps turned on, add the 1/2 tap. This is one of my
favorite delay rhythms, 2 against 3.
The Golden Ratio – Phi
This feature is intended to “humanize” the feel of the Echolution’s delay
rhythms. The most common visualization of the golden ratio is the nautilus
shell or the spiral galaxy - “The Rhythm of the Universe.” To learn more about
the math behind the golden ratio, please visit: www.pigtronix.com/phi
*Note* - When the phi switch is turned on, the values of all multi-tap fractions
are changed. The phi switch has no effect on the master delay time. You must
have at least one of the multi-tap switches turned on to hear the golden ratio
function take effect.
21. Flip the (phi) switch and play.
22. Turn all of the taps off except for the 2/3 tap. Notice how the rhythms of
the delay sync up to the tap tempo.
23. Try different combinations of multi-taps with the golden ratio turned on.
Notice how the rhythms reinforce one another. Adjust the FEEDBACK
control to get a sense of how these rhythms change and dance.
24. Switch on the modulation delay and put it on the short delay time range.
You can get some wonderful multi-tap chorus textures this way.
25. Switch the delay time range setting to medium. The multi-taps will give
you some killer slapback and multi-head tape echo effects. Brian May!
26. Switch the delay time range setting to long. You now have a six-part multitap modulated analog delay. Have fun!
REVERSE – Back to the Future
27. Turn off all of the taps and flip on the reverse switch. The echoes will now
come out backwards.
28. Flip the ½ tap and turn the BLEND control full clockwise. You will now hear
only the reverse echoes in double time.
*Note* - Reverse playback is disabled in the (S) Short and (M) Medium
modulation delay settings.
Page 11

LOOP – Come Again
29. Set the Modulation Delay Range switch to the long (L) setting. Put the
Echolution in Modulation Delay mode by clicking the Modulation Delay
footswitch. Bring the BLEND control back to 12:00 and turn off the reverse
switch.
30. With the 3/4 tap turned on, play something and then flip the LOOP switch.
Whatever was going through the delay line is now captured as a sample.
31. Turn on the other multi tap switches to change the rhythmic content of
the loop.
32. Modulate the loop by turning up the Chorus and Tremolo knobs.
33. Change the position of the delay time range switch to medium (M).
34. Change the setting of the delay time control. As you turn it clockwise,
the pitch of the loop will get lower. As you turn it counter-clockwise,
the pitch of the loop will get higher.
35. Change the position of the delay time range switch to medium (S). Now the
loop will become a droning tone.
36. Crank up the LFO speed and TREMOLO controls all the way and then
change the position of the delay time control.
37. Switch different combinations of the multi-tap switches on and off to get
different timbres.
38. Put the Modulation Delay range switch back to long (L) setting and turn the
Chorus and Tremolo controls full counterclockwise.
39. Turn off the LOOP function and keep playing!
Remote Switch – Loop and Reverse on the Fly
Both the REVERSE and LOOP functions can be turned on and off remotely with
an optional two button TRS latching footswitch.
A single button latching footswitch can be used with a mono cable to operate
the LOOP function only.
Page 12
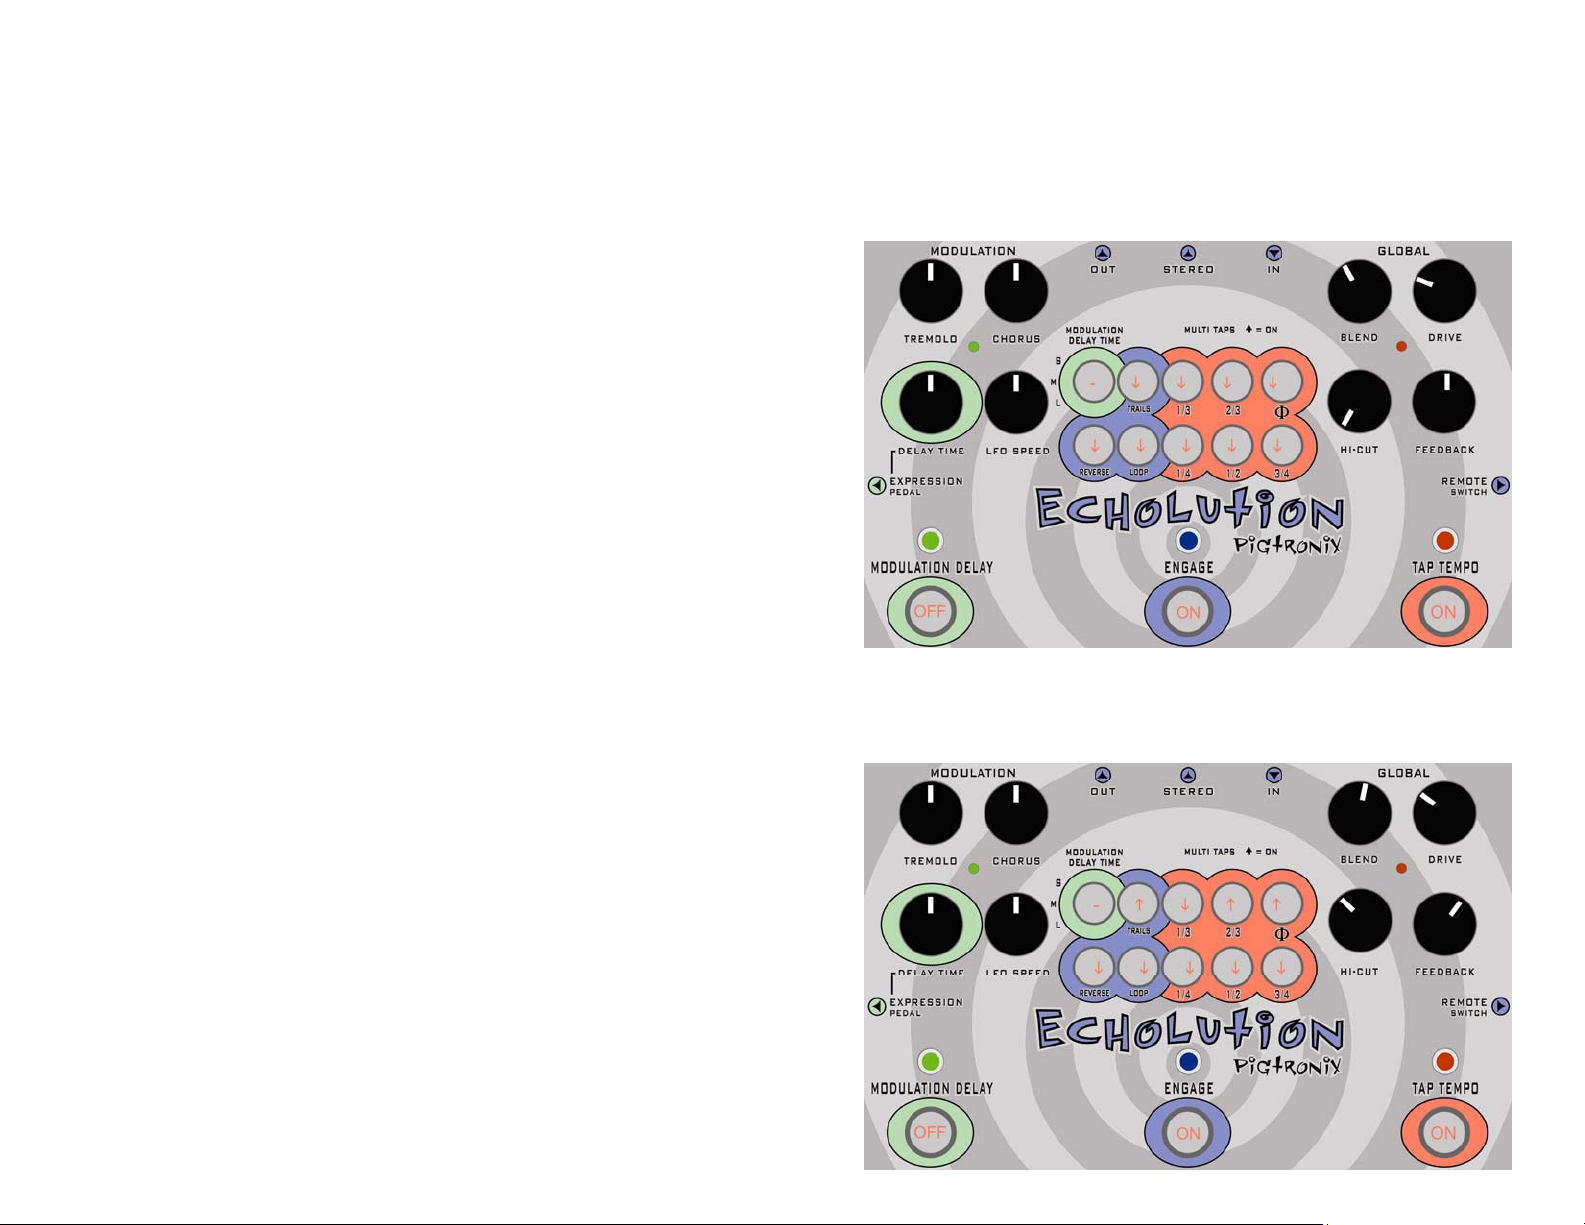
Sample Settings:
Tap Tempo Analog Del
Ay
Tap Tempo Golden DelAy
Page 13
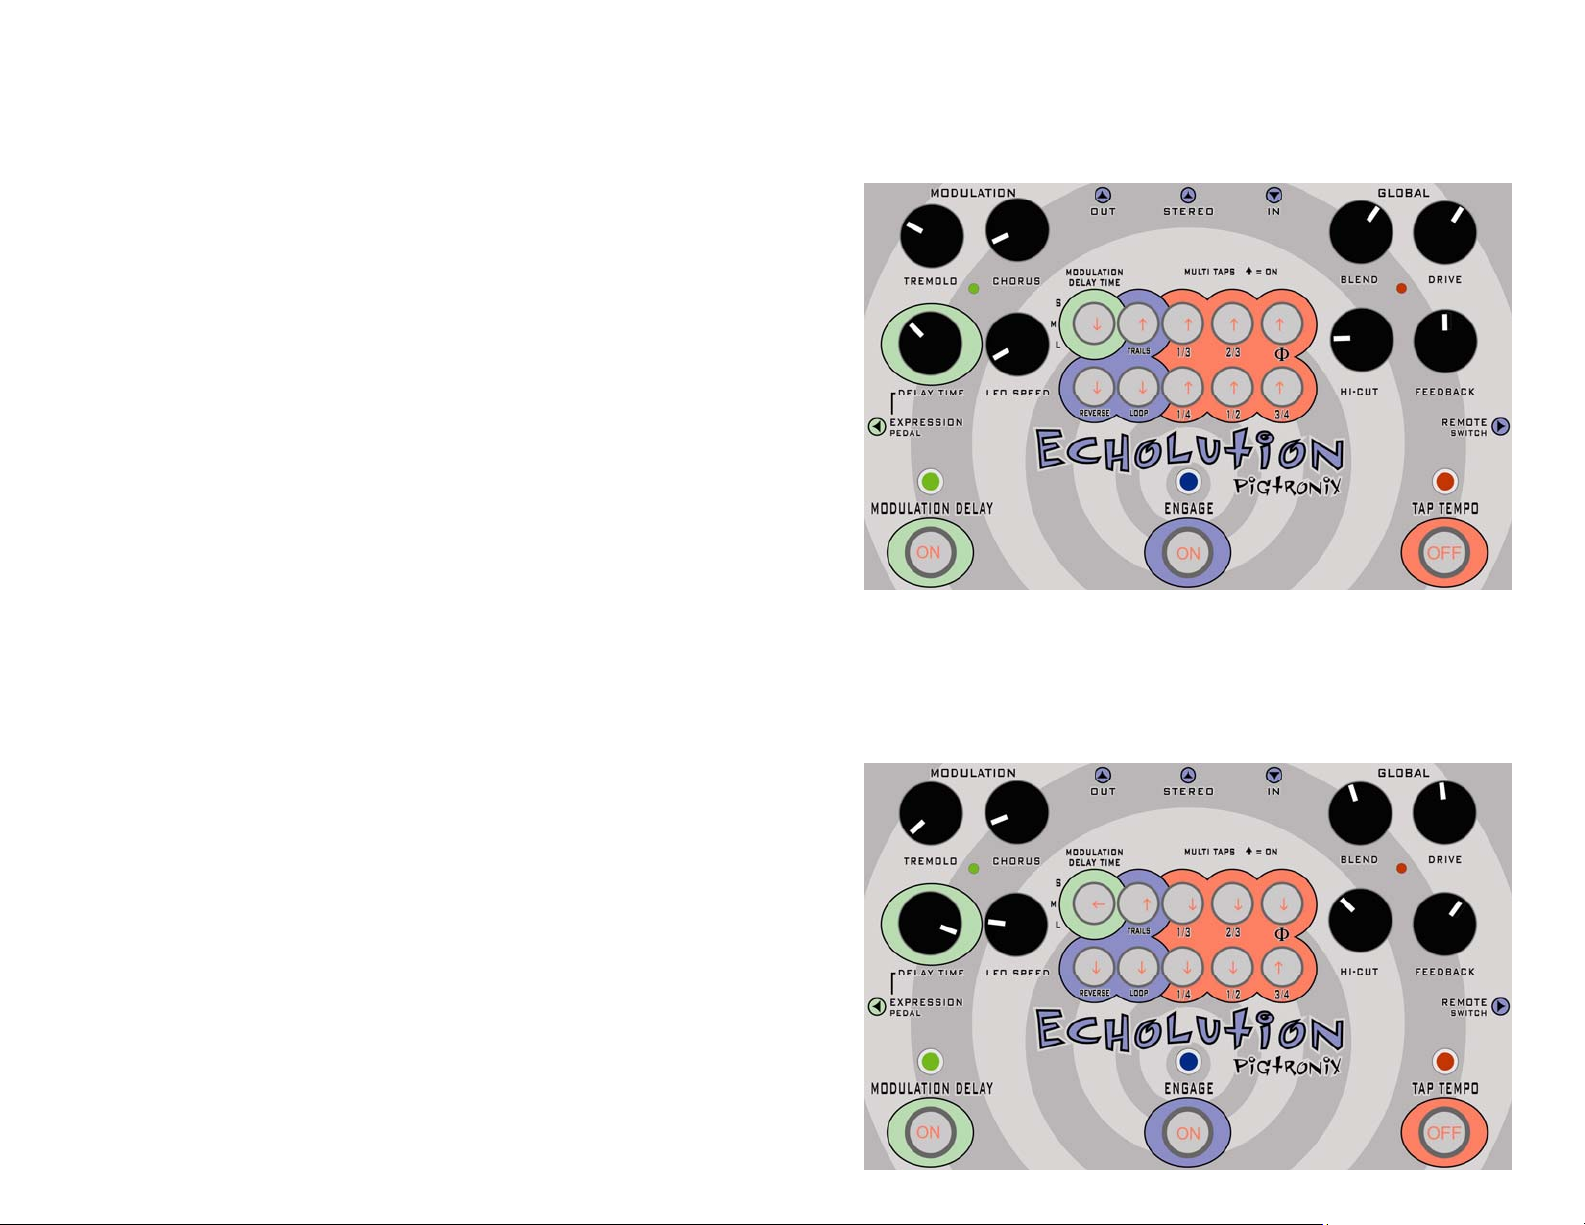
Spiral Delay
Edge Del
Ay
Page 14

Rhythm Delay (3 over 2)
Deluxe Memory… Man
Page 15

MXR Analog Delay
Tape Echo SlapBack
Page 16

Echo-plexi
Stereo Chorus
Page 17

Tremolo Delay
Rotary Speaker Simulation
Page 18

Tape Reverse
Runaway Oscillation
Page 19

Limited Warranty:
Your Pigtronix effect pedal comes with a 1 year limited warranty on parts and
workmanship. During the warranty period we will repair or replace, at our
option, defective parts or pedals free of charge, and return them to the owner.
Warranty service does not include damaged, modified, or misused pedals and
such pedals will be subject to a standard repair charge.
What we will not do: Pay for shipping or transportation charges from you to us,
or pay for any international shipping charges.
What you must do: First, contact us directly via email and describe the
problem to us. If the problem cannot be resolved we will have you send your
pedal directly to us for servicing.
How to contact us for warranty service:
Email: tech@pigtronix.com
Warranty Limitations: This warranty does not cover defects resulting from
improper or unreasonable use, accident, unauthorized tampering or
modifications; and, warranty shall be considered void if Echolution chassis has
been opened. Please consult the instructions and warnings in this manual for
proper use. Warranty is only valid if your Echolution has been properly
registered within 30 days of original purchase date, and upon warranty
registration, will be valid for 12 months from original purchase.
To validate your 1-year, limited
warranty, please register your
ECHOLUTION, within 30 days of
purchase, on the web at:
www.pigtronix.com/warranty
Page 20

Safety Precautions:
Please be sure to observe these precautions. The safety precautions listed
below are intended to ensure your safety whenever you use the equipment.
NEVER OPEN THE CASE – Never try to separate the two pieces of the chassis
from one another and/or modify the equipment. Opening this device will
effectively void the warranty.
STOP USE IN CASE OF PROBLEM – Stop using the equipment if ever you should
notice smoke or a strange odor coming from it. Contact your original dealer or
nearest authorized service provider for service.
AVOID HIGH TEMPERATURES & HEAT BUILD UP – Never cover the power supply
with cloth or other objects. Built up heat creates a danger of equipment
deformation and fire. Do not expose the Echolution to direct sunlight, heating
devices, or other extreme temperatures.
USE SPECIFIED POWER ADAPTOR ONLY – Be sure to use only the 15-Volt DC
300mA Adapter that came with your Pigtronix Echolution and is specified in this
user’s guide.
DO NOT EXPOSE TO WATER/BEER – To reduce the risk of fire or electric shock,
do not expose your Echolution to rain or moisture. If water gets inside the
unit, turn off the power supply and consult your dealer or nearest authorized
service provider.
Final Notes
Years of work have gone into making this pedal a reality. We would like to
thank the following people for their help along the way:
Howard Davis, Steve Spano, Lisa Rickmers, the Bethke and Koltai families,
Craig Brodhead, Matt Smith, Hugh Pool, Maroon 5, Soulive, Dave Burnett, Nate
Mars, Ed Supple, Analogman, Sky, Candy and B-Dawg.
Howard “Mick” Davis, David Koltai and Steve Spano designed the Pigtronix
Echolution during 2005/2006 in Brooklyn and Ithica, NY.
That is it folks, have fun with your new Echolution pedal!
Peace,
Dave Koltai & Brian Bethke
Pigtronix
 Loading...