

Page 1
V2
USER MANUAL
Model: PICZO 1
Page 2

1 FCC Compliance Statement .................................................................................................... 3
1.1 FCC Requirement ...................................................................................................................... 3
2 Disposal and Recycling Information ...................................................................................... 4
3 Precautions ............................................................................................................................... 4
4 Package Contents .................................................................................................................... 5
4.1 Projector ..................................................................................................................................... 6
4.1.1 Key Operations ........................................................................................................................... 7
4.2 Remote ....................................................................................................................................... 7
5 Basic Operations ...................................................................................................................... 8
5.1 Power ON ................................................................................................................................... 8
5.2 Power OFF ................................................................................................................................. 8
5.3 Adjusting Focus .......................................................................................................................... 8
5.4 Resizing Projection Screen ........................................................................................................ 8
6 Charging .................................................................................................................................... 9
6.1 Indicator Light Status .................................................................................................................. 9
6.2 Battery Capacity ......................................................................................................................... 9
7 User Interface ......................................................................................................................... 10
7.1 Menu Options ........................................................................................................................... 11
8 Input Sources ......................................................................................................................... 12
8.1 HDMI ........................................................................................................................................ 12
8.2 microSD Card ........................................................................................................................... 12
8.2.1 Inserting microSD Card ............................................................................................................ 12
8.2.2 Ejecting microSD Card ............................................................................................................. 12
9 Product Maintenance ............................................................................................................. 13
9.1 Projector ................................................................................................................................... 13
9.2 Remote Control ........................................................................................................................ 13
10 Technical Specifications ....................................................................................................... 14
11 Frequently Asked Questions ................................................................................................. 15
12 Trademarks ............................................................................................................................. 16
13 Regulatory Information .......................................................................................................... 16
Page 3

3
1 FCC Compliance Statement
This device complies with Part 15 of the FCC Rules. Operation is subject to the following two
conditions: (1) this device may not cause harmful interference, and (2) this device must accept any
interference received, including interference that may cause undesired operation.
1.1 FCC Requirement
Changes or modifications not expressly approved by the party responsible for compliance could void
the user’s authority to operate the equipment.
This device complies with Part 15 of the FCC Rules. Operation is subject to the following two
conditions:
• This device may not cause harmful interference, and
• This device must accept any interference received, including interference that may cause
undesired operation.
Note: This equipment has been tested and found to comply with the limits for a Class B digital device,
pursuant to Part 15 of the FCC Rules. These limits are designed to provide reasonable protection
against harmful interference in a residential installation. This equipment generates, uses, and can
radiate radio frequency energy, and if not installed and used in accordance with the instructions, may
cause harmful interference to radio communications. However, there is no guarantee that interference
will not occur in a particular installation. If this equipment does cause harmful interference to radio or
television reception, which can be determined by turning the equipment off and on, the user is
encouraged to try to correct the interference by one or more of the following measures:
• Reorient or relocate the receiving antenna.
• Increase the separation between the equipment and receiver.
• Connect the equipment into an outlet on a circuit different from that to which the receiver is
connected.
• Consult the dealer or an experienced radio/TV technician for help.
This equipment complies with FCC radiation exposure limits set forth for an uncontrolled environment.
The end user must follow the specific operating instructions for satisfying RF exposure compliance.
This transmitter must not be co-located or operating in conjunction with any other antenna or
transmitter. The device is designed to meet the requirements for exposure to radio waves established
by the Federal Communications Commission (USA). These requirements set a SAR limit of 1.6 W/kg
averaged over one gram of tissue. The highest SAR value reported under this standard during product
certification for use when properly worn on the body is 1.245 W/kg.
Page 4

4
2 Disposal and Recycling Information
Damaged batteries should be treated as hazardous materials. Do not return the device if the battery is
swelling, leaking, or if you in any other way suspect that the battery is damaged. In this case, please
make sure you dispose of or recycle the item and its accessories according to local laws and
regulations. Do not puncture, drop or incinerate the battery.
3 Precautions
• To prevent electric shock, do not open the case. If needed, please ask your local retailer for
repair or replacement services.
• When operating the projector: do not look into the lens, as this may cause injury to the eyes.
• To prevent fire or electric shock, do not operate this product in wet or moist environments.
• When using the projector: avoid dropping and impact, as this may damage internal
components.
• Always use the included Power Adapter when charging the projector.
• Avoid keeping the Power Adapter plugged in to the projector when it is not in use, unless
charging is needed.
Page 5
5
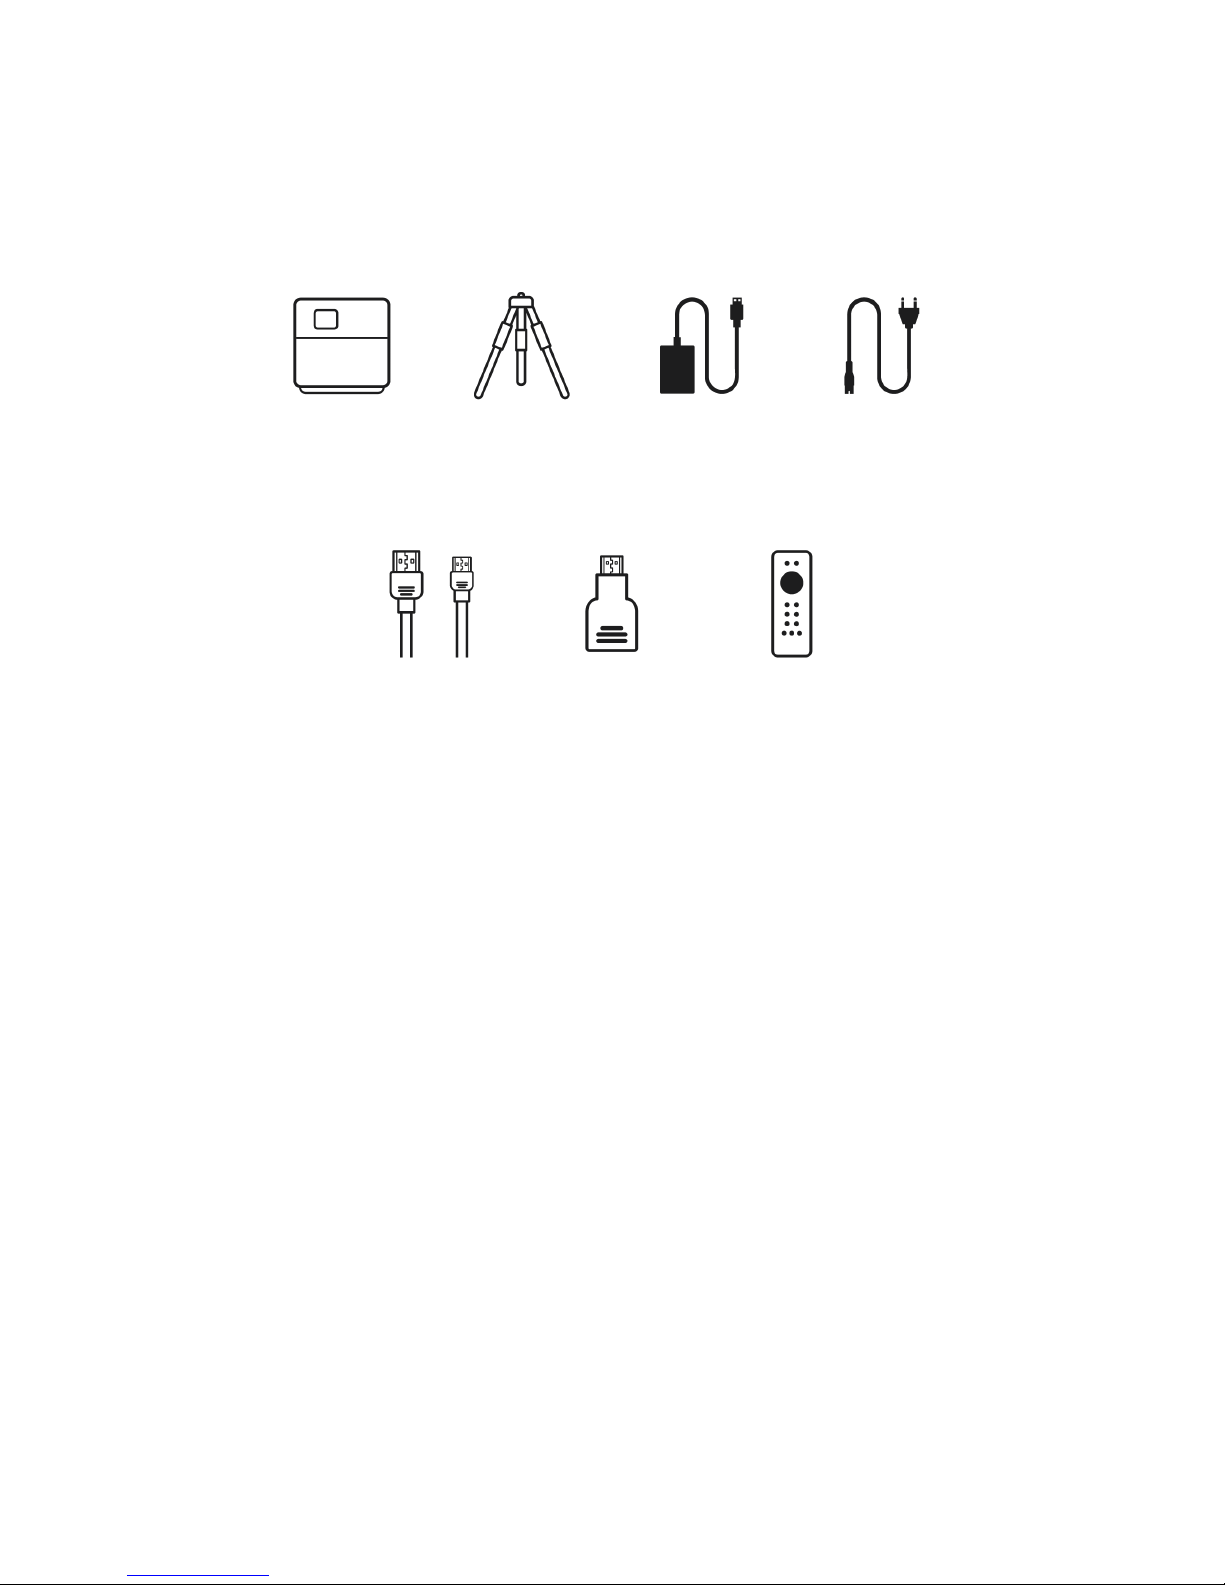
4 Package Contents
Projector
Mini Tripod
Power Adapter
Power Plug
(Type C)
HDMI® to Mini
HDMI Cable
HDMI to Mini
HDMI Adapter
Remote
Page 6
6
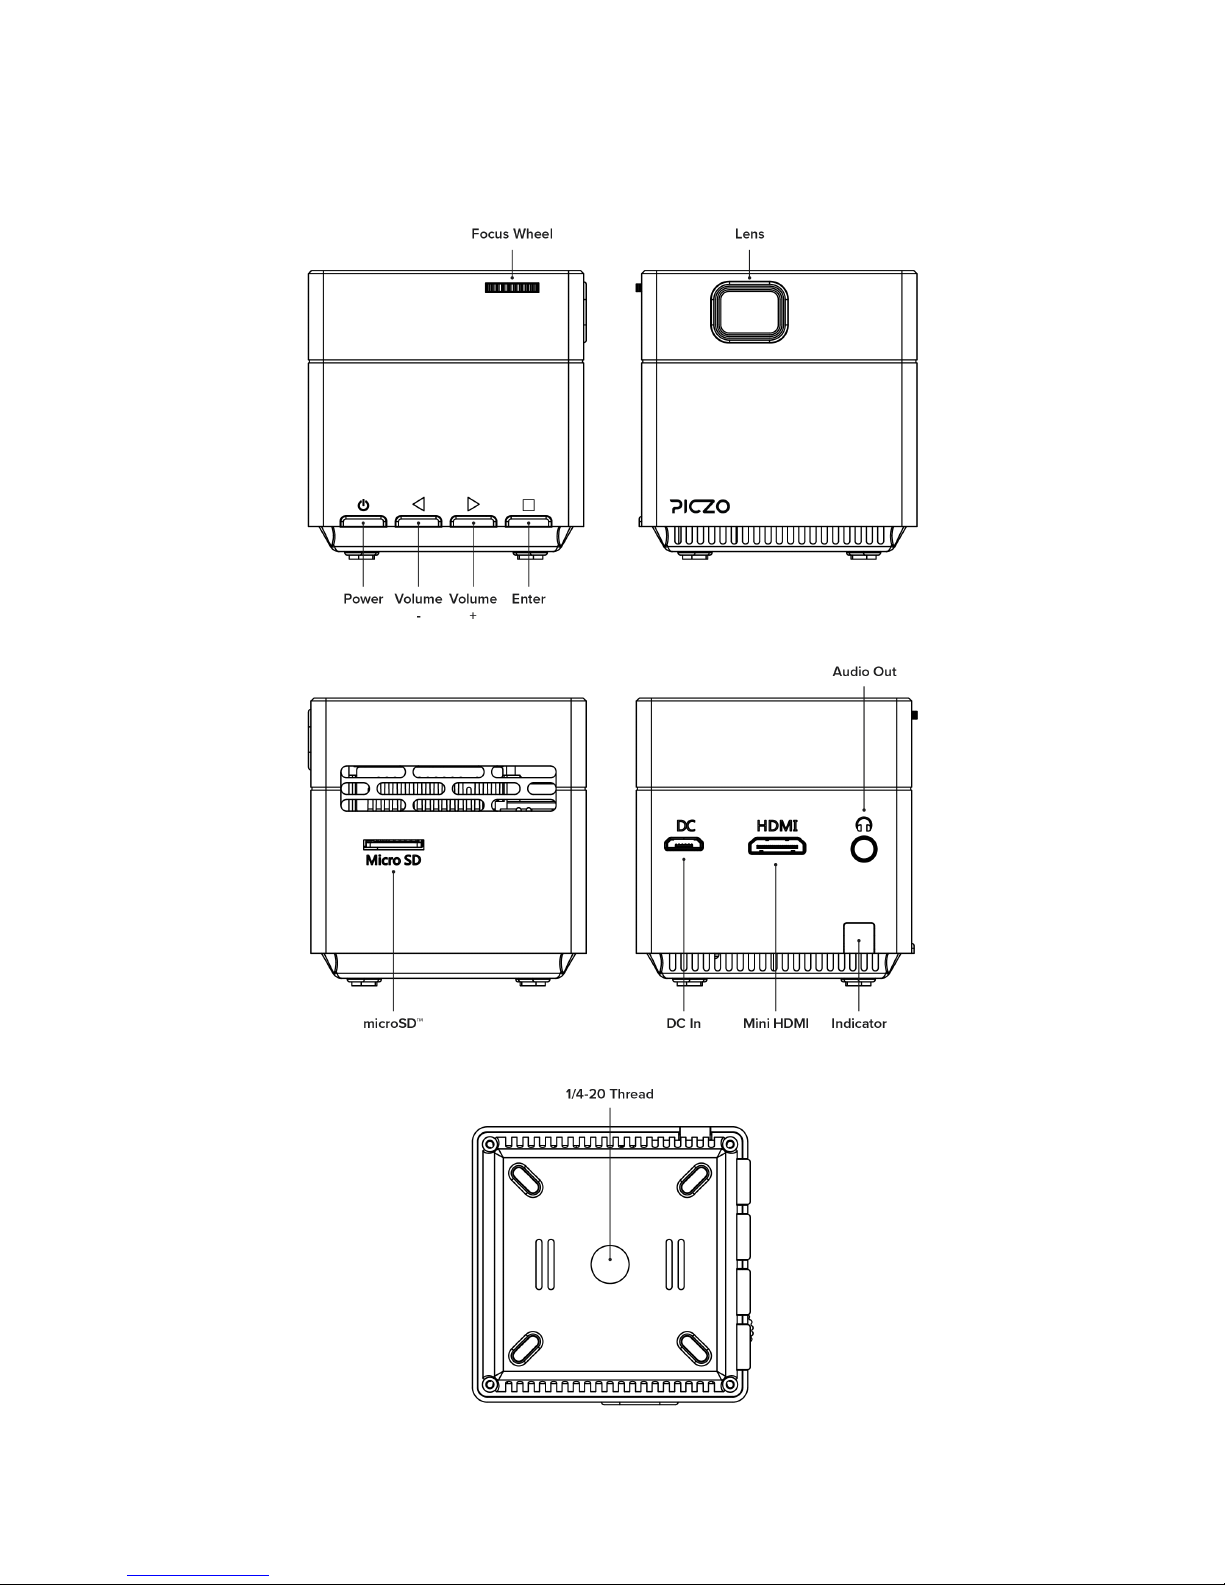
4.1 Projector
Page 7
7
4.1.1 Key Operations
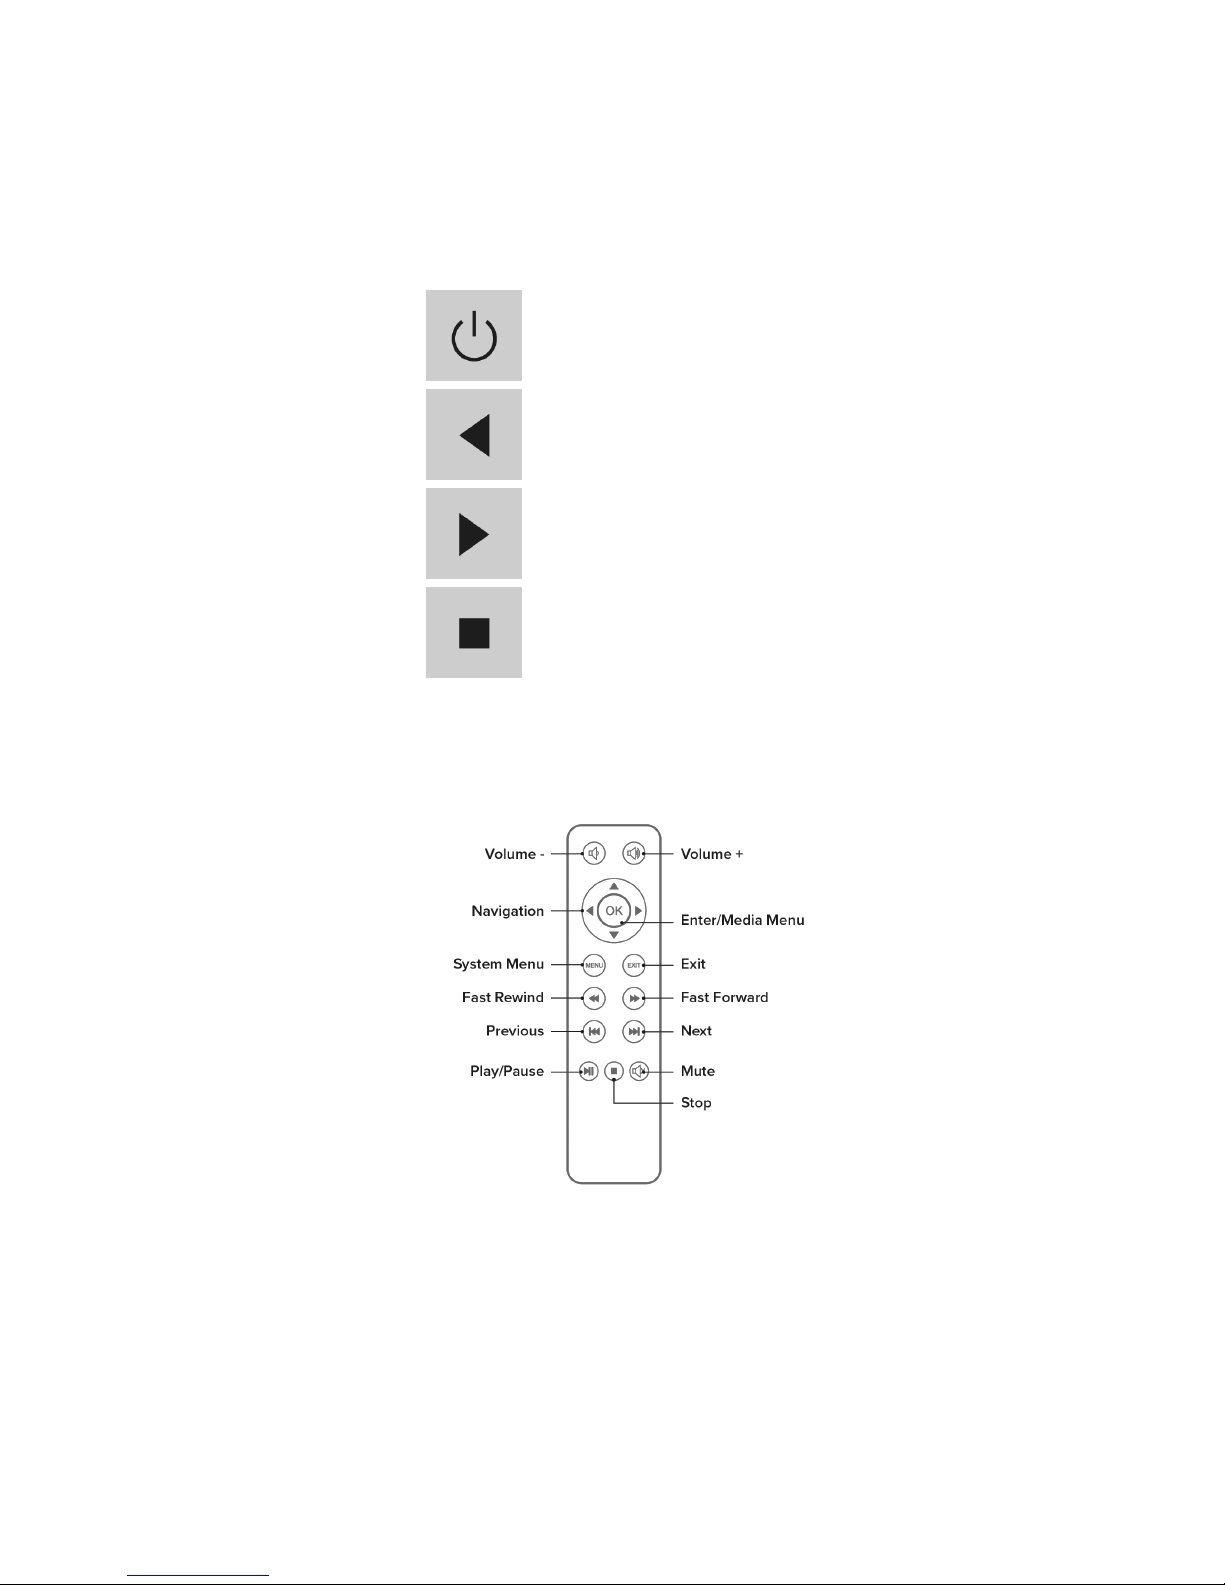
Please refer to the following table for information about the physical keys on the projector:
Power
Return (in sub-menu)
Volume Previous
Volume +
Next
Enter
Play/Pause
System Menu (in HDMI Mode)
4.2 Remote
Please note:
• Handle the remote control carefully. Dropping or jarring the remote can damage internal
components.
• Exposure to direct sunlight, smoke or steam can also harm internal components.
Page 8

8
5 Basic Operations
5.1 Power ON
Press and hold the Power key on the projector for 3 seconds to turn on the projector.
5.2 Power OFF
1. Press and hold the Power key on the projector for 3 seconds to turn off the projector.
2. At the Home Screen: select the Power option and then select Yes by pressing OK on the
remote control or the Enter key on the projector.
5.3 Adjusting Focus
Roll the focus wheel to adjust the clarity of the projected image. Stop rolling the wheel once the
projected image becomes clear.
5.4 Resizing Projection Screen
The projection screen size is related to the distance from the projector to the surface on which the
display is being projected onto, also known as throw distance. Please refer to the following table for
the relationship between throw distance and screen size:
Screen Size
Throw Distance
7"
0.18m
38"
1m
56"
1.5m
100"
2.5m
Please note:
• The measured values are estimated for reference only.
Page 9
9
6 Charging
The projector can be powered by the included Power Adapter or the internal rechargeable battery. To
obtain maximum battery life, it is highly suggested that you charge the battery for at least 4 hours the
first time.
1. Ensure the projector is turned off and connect it to the Power Adapter.
2. Connect the Power Adapter and the Power Plug (Type C).
3. Insert the Power Plug (Type C) into a wall outlet to charge the battery.
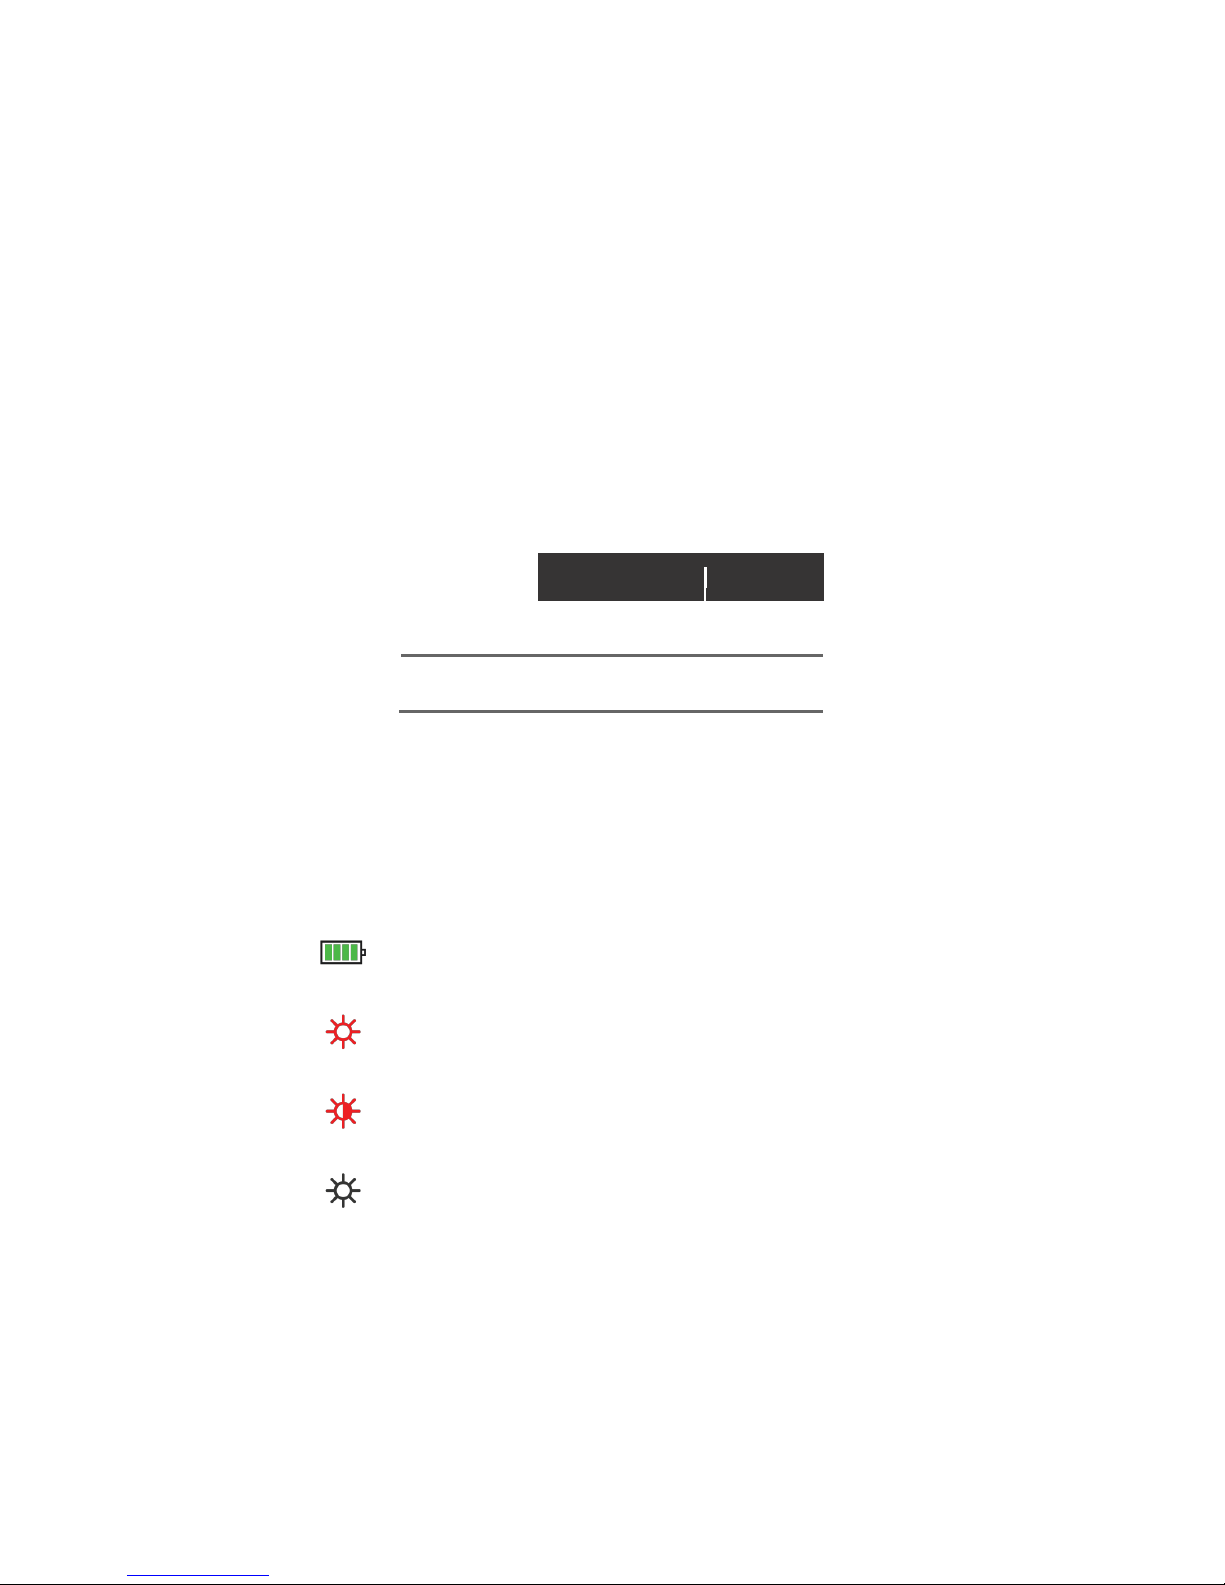
6.1 Indicator Light Status
Please refer to the following table for information about indicator light status:
Power OFF
Power ON
Red Light
Charging
Charging
Blue Light
Fully Charged
Working
6.2 Battery Capacity
Please refer to the following table for information about the battery capacity and the battery level
indicator:
The battery capacity status will be shown in the upper right
corner of the screen.
The main battery level indicator will be shown next to the
battery capacity status in the upper right corner of the screen.
Battery is running low. Please connect projector to
Power Adapter.
Battery depleted. Projector will power off unless connected
to Power Adapter.
Page 10
10
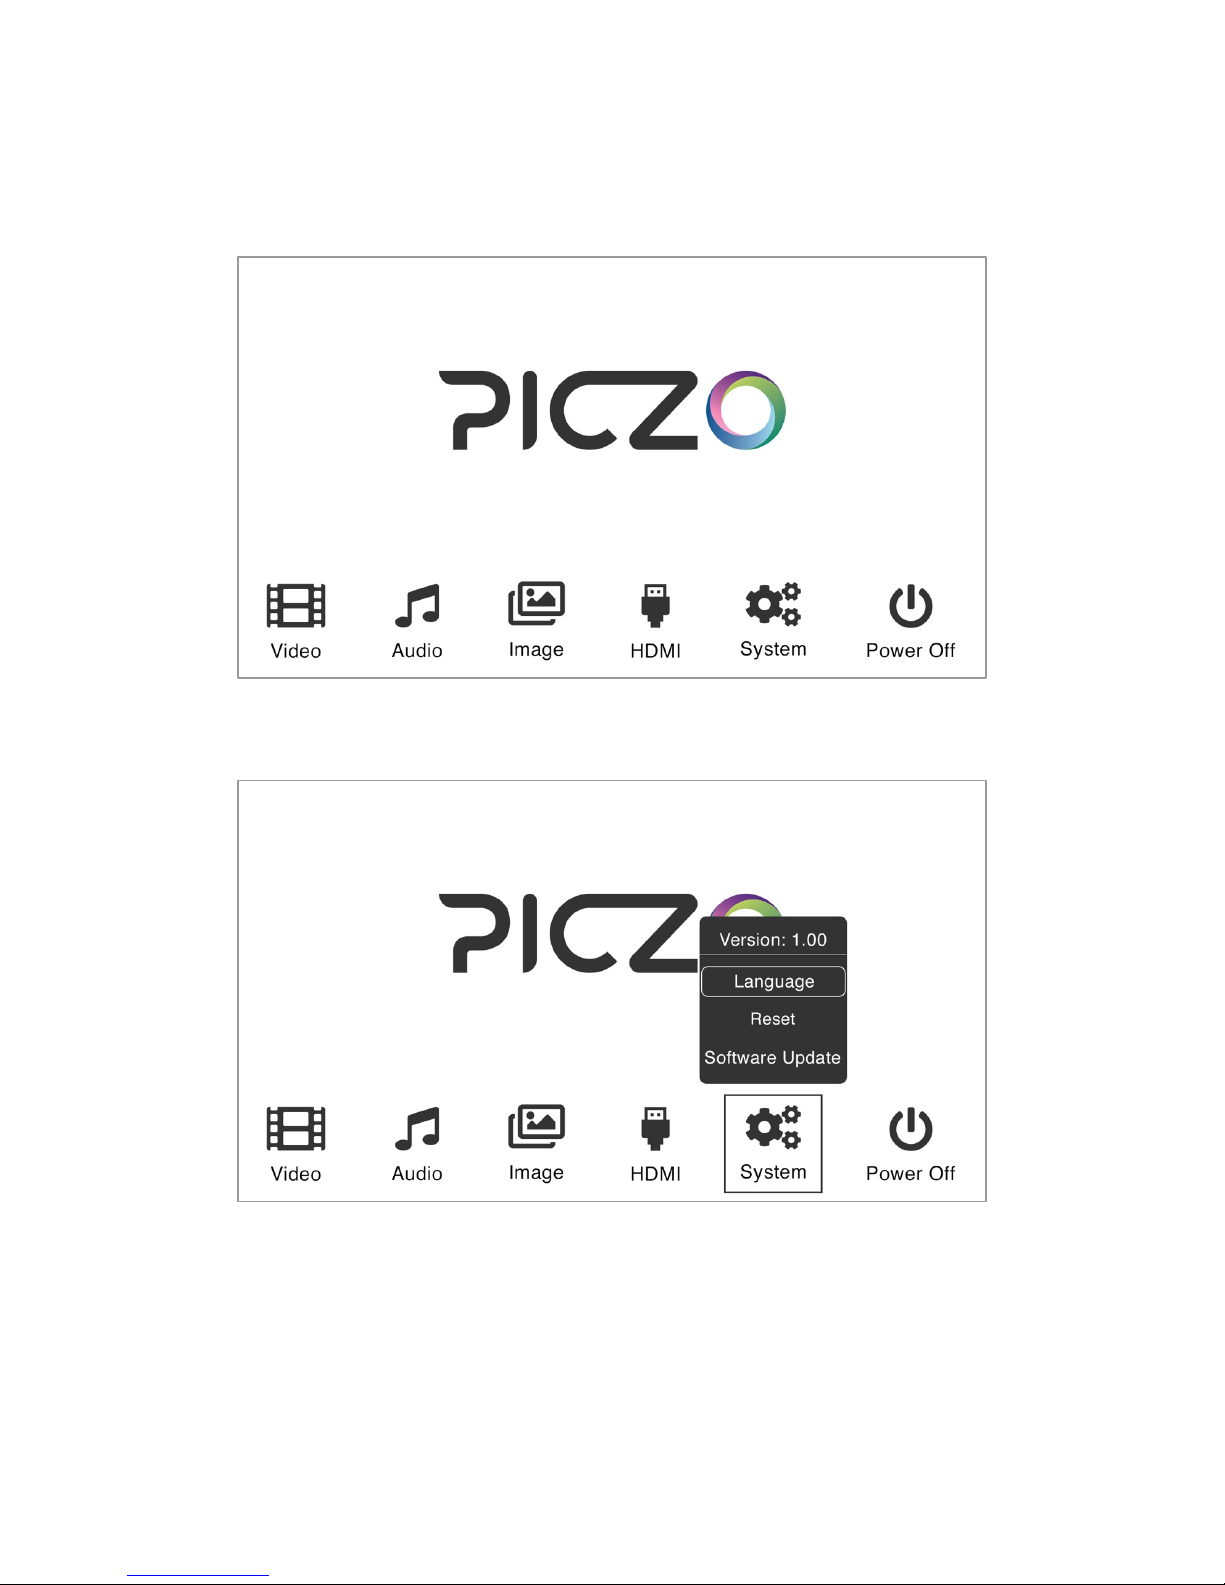
7 User Interface
Home Screen
System sub-menu
Page 11
11
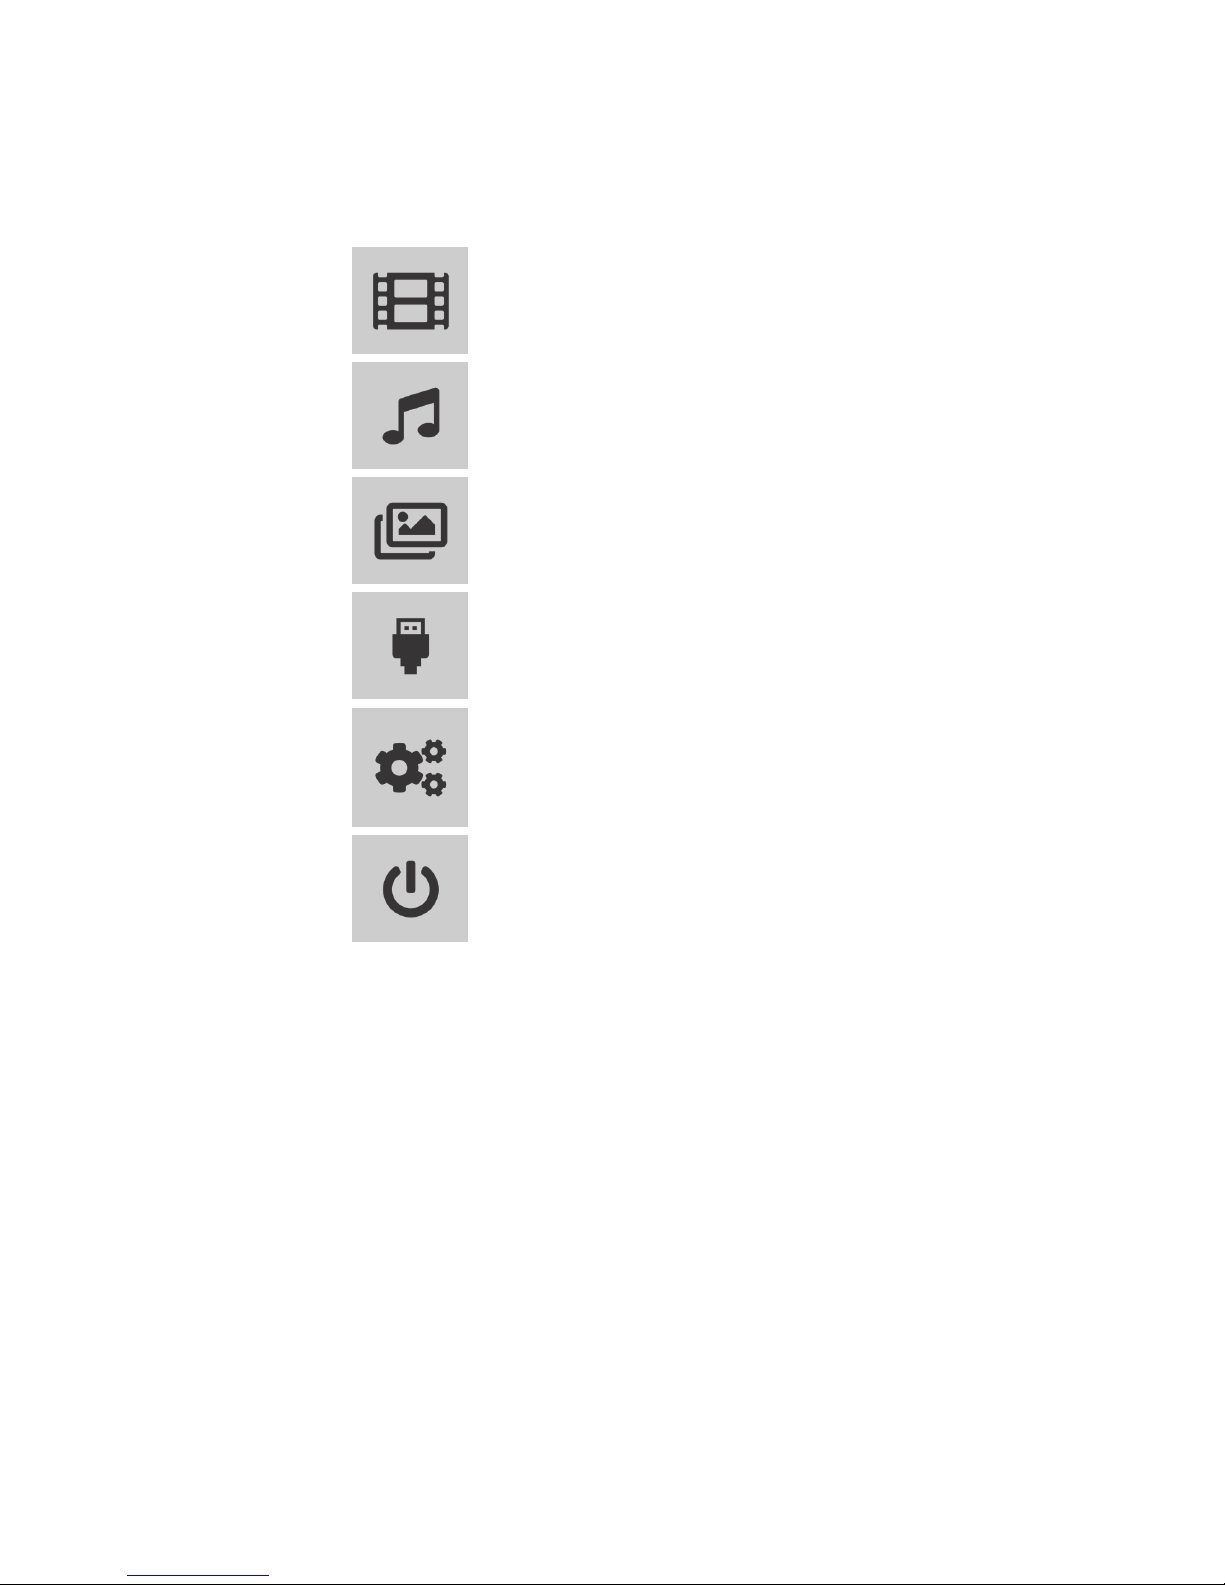
7.1 Menu Options
Video
Access this option to play video files stored
on a microSD card.
Audio
Access this option to play audio files stored
on a microSD card.
Image
Access this option to view image files stored
on a microSD card.
HDMI
Access this option to activate HDMI Mode on
the projector.
System
Access this option to select Language, Reset
to factory defaults and System Update.
Please ask your local retailer for information
on how to update the system.
Power Off
Use this option to power off the projector.
Page 12
12
8 Input Sources
8.1 HDMI
Project the display from any device supporting HDMI by activating the HDMI Mode from the Home
Screen and connecting the device via an HDMI cable. Use appropriate adapters if needed.
Please note:
• The projector supports a full 1080p HDMI input source at 60Hz.
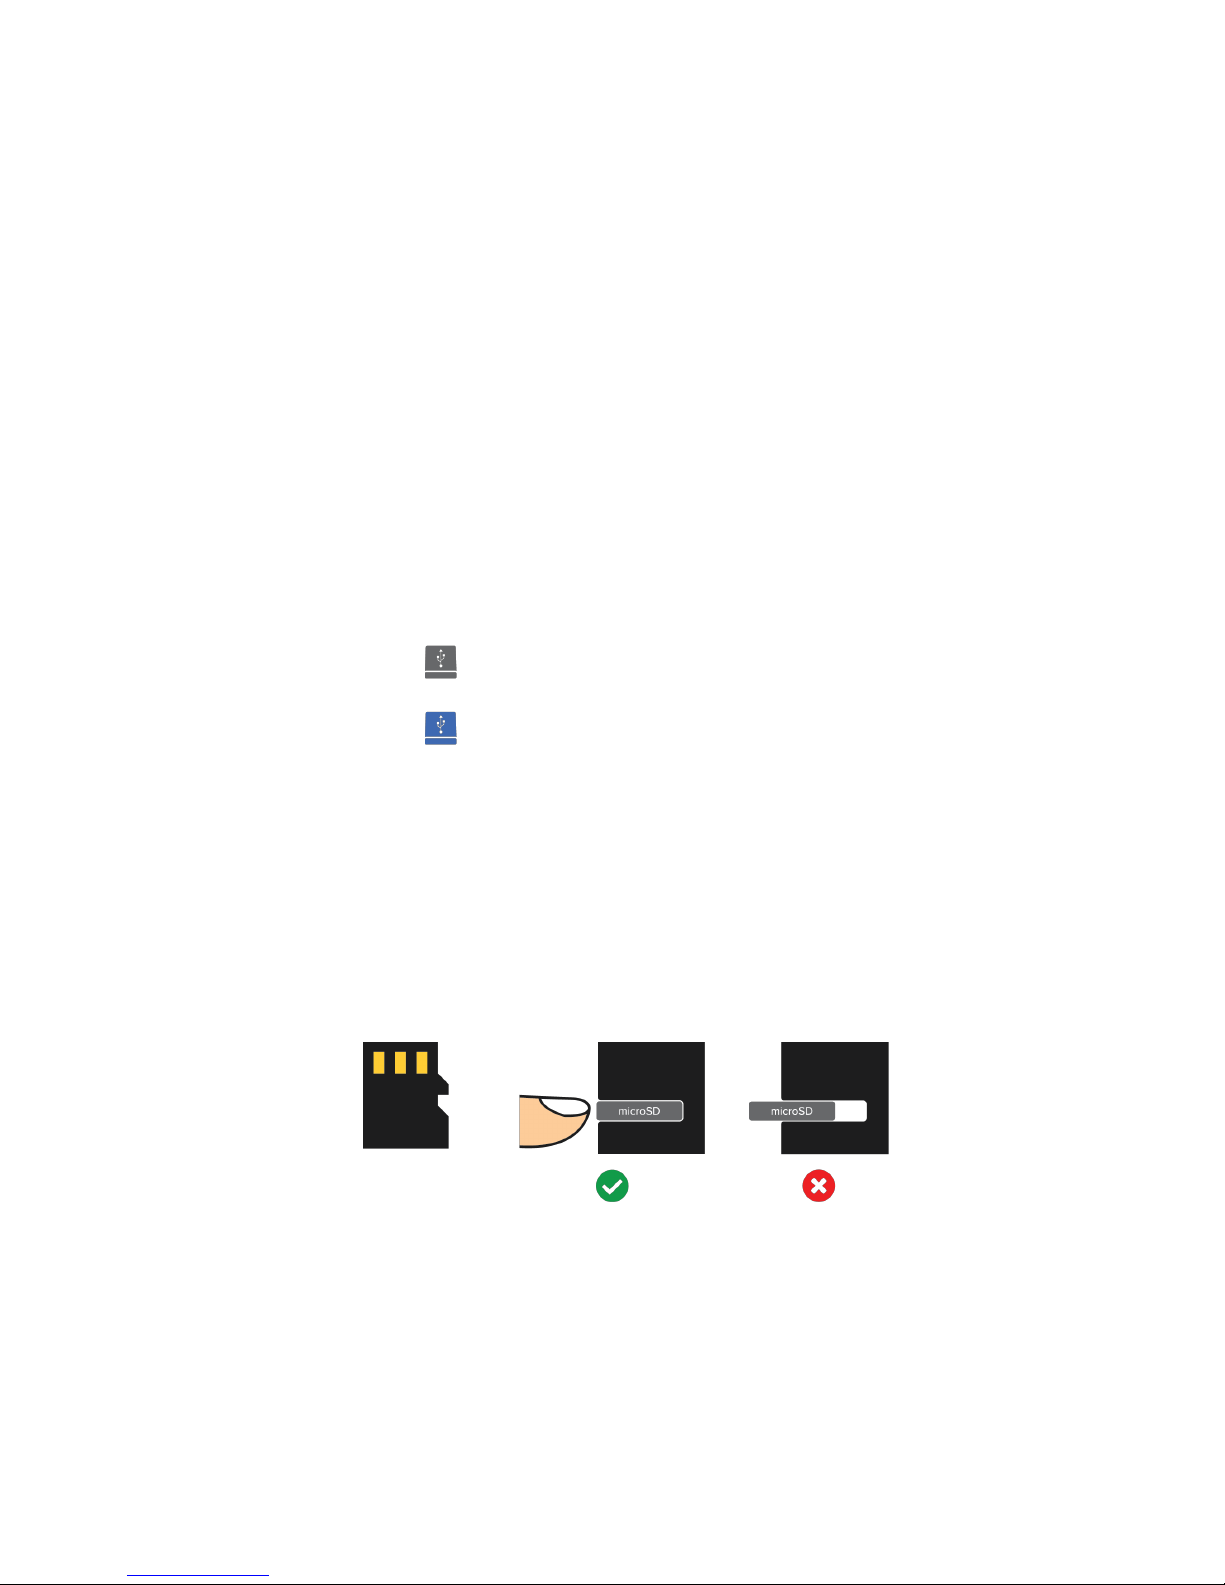
8.2 microSD Card
Make sure to insert the microSD card the correct way to playback and view content. The microSD card
should gently be inserted all the way inside the card slot, leaving the microSD card flush with the
surface of the projector.
The microSD card read status will be shown in the upper right corner of screen:
No microSD card or incompatible card.
microSD card successfully connected.
Please note:
• The projector supports microSD cards up to 64GB.
8.2.1 Inserting microSD Card
Use the tip of a fingernail to gently push the microSD card in place with a forwards and down motion.
This side up
Correct
Wrong
8.2.2 Ejecting microSD Card
Use the tip of a fingernail to gently push the microSD card inwards to release and eject. Now it is safe
to remove the microSD card.
Page 13

13
9 Product Maintenance
9.1 Projector
• Charge the battery for at least 4 hours the first time.
• If the projector gets dirty: wipe clean with a dry cloth.
• Do not wipe the projector with a damp cloth.
9.2 Remote Control
The remote control comes with an included CR2025 3V battery in the original package. Please use the
same type of battery when replacement is needed.
Page 14

14
10 Technical Specifications
Native Resolution
854*480 (FWVGA)
Compatible Resolution
640*480~1920*1080
Display Technology
TI DLP®
Light Source
RGB LED OSRAM
Focus
Manual
Brightness (ANSI)
100 Lumens
Contrast
1000:1
Power Supply
DC 5V/2A (Micro-USB)
Power
8.5W
Built-in Speaker
8Ω1.5W
Input
Mini HDMI, microSD (up to 64GB)
Output
3.5mm Audio Out
Battery
3.7V 2500 mAh
Dimensions
55 x 55 x 55mm
Net Weight
174g
LED Life Expectancy
30,000 Hours
Supported Video
File Formats
DAT, FLV, MKV, MOV, MP4,
MPG, RM, TRP, TS, WMB, RMVB
Supported Audio
File Formats
AAC, FLAC, M4A, OGG, MP3,
WAV, WMA
Supported Image
File Formats
PNG, BMP, JPEG, JPG
Please note:
• The specifications are subject to change without notice.
Page 15

15
11 Frequently Asked Questions
Question: Why is the indicator light status showing blue, but the projection screen is not showing?
Answer: Make sure not to press and hold the Power key too long. Release the Power key as soon
as the indicator turns blue. Please be patient and do not push the Power key repeatedly during the
system boot process, which may cause the projector to crash.
Question: Why can I not view the files on my microSD card?
Answer: If the capacity of the microSD card is higher than 64GB, the projector will not be able to
read the content on the card. The maximum capacity supported by the projector is up to 64GB.
Also, ensure that the microSD card is formatted to NTFS (up to 64GB) or FAT32 (up to 32GB).
Question: Why can some video files not be played?
Answer: Make sure that the file format is supported by the projector and that the video resolution
is 1080p or lower. The maximum supported video resolution is full 1080p at 60Hz. Please refer to
Supported Video File Formats in chapter 10 Technical Specifications for more information.
Question: Why does some videos not have sound?
Answer: Due to a copyright issue with Dolby®, this projector does not support Dolby Audio
Decoding. You might not get sound from some videos if they are using Dolby Audio Decoding.
Question: Why does the system crash or get stuck?
Answer: This usually occurs when the computing power of the projector cannot perform on the
same level as the connected device. It is also common when trying to display a device running a
higher resolution than the projector can support.
Please note:
• Most issues can be solved by restarting the projector. Press and hold the Power key on the
projector for 3 seconds to power off the projector. Then press and hold the Power key on the
projector for 3 seconds to power on the projector again, completing the process.
Page 16
16
12 Trademarks
Piczo is a registered trademark of Swede Invent AB, registered in Sweden. Distributed by Swede
Invent AB, Säterivägen 16, 65341 Karlstad, Sweden. © 2019 All Rights Reserved. Made in China.
SD and related marks and logos are trademarks of SD-3C LLC in the United States, other countries or
both. HDMI, the HDMI logo, and High-Definition Multimedia Interface are trademarks or registered
trademarks of HDMI Licensing, LLC in the United States and/or other countries. DLP and the DLP
logo are registered trademarks of Texas Instruments. Dolby is a registered trademark of Dolby
Laboratories.
13 Regulatory Information
 Loading...