

Page 1

Zymatic
User Manual
V15-0730
Page 2

Important Safety Information
!
• Exercise common sense while operating the Zymatic.
• Always use the keg cozy to shield the hot metal of the keg.
• Close supervision is needed when used around children.
• Allow machine to fully cool before removing or replacing
parts.
• Do not operate with a frayed cord or broken plug.
• Test the GFCI circuit breaker on the plug before every brew.
• Do not remove step filter from the Zymatic unless in pause
mode or brew cycle is completed.
• The step filter and contents may be hot when removing
from the machine.
• Do not immerse or soak the machine.
• Make sure all hoses are connected before starting a
brewing, rinsing or cleaning cycle.
© 2015 PicoBrew Inc. Zymatic® is a registered trademark and KegSmarts is a trademark
of PicoBrew, Inc. All other marks are property of their respective owners.
• To avoid risk of electrical shock hazard do not disassemble
the Zymatic. There are no user serviceable parts inside.
• Various surfaces can get extremely hot during the brewing
cycle, use caution when handling the keg, hoses and
components.
• Do not remove the hose clamps, hot liquid spray may result.
• Do not remove the keg attachments while brewing.
Page 3

TABLE OF CONTENTS
SECTION 4 — Care and Maintenance
Important Safety Information .................................2
SECTION 1 — Introduction to the Zymatic
1.1 Zymatic Components ......................................6
1.2 How the Zymatic Works ................................. 10
1.3 Required Materials ...................................... 12
SECTION 2 — Setting Up Your Zymatic
2.1 Zymatic Setup ............................................14
2.2 Zymatic Assembly ....................................... 15
2.3 Initial Rinse ............................................... 18
SECTION 3 — Brewing on your Zymatic
3.1 Selecting/Crafting a Recipe .............................22
4.1 General Cleaning (after every brew) .................... 44
4.2 General Maintenance .................................... 45
4.3 Deep Clean (every 3-4 brews) ........................... 46
SECTION 5 — Advanced Brewing Techniques
SECTION 6 — Menu Screens
6.1 Main Menu ................................................ 50
6.2 Brew Menu ............................................... 52
SECTION 7 — Troubleshooting
3.2 Preparing Ingredients ................................... 29
3.3 Brewing ................................................... 33
3.4 Chill ....................................................... 33
3.5 Pitch Yeast ............................................... 36
3.6 Fermentation .............................................37
3.7 Rack ....................................................... 39
3.8 Carbonate ................................................ 41
54
Page 4

SECTION 1
1.1 Zymatic Components
Please check to make sure you have all components before
continuing. If any parts are missing contact PicoBrew
immediately.
A - Zymatic
B - 6’ Power cord
C - USB cable
D - 25’ Ethernet cable
E - Diptube cleaning brush
F - Transfer tube
G - IN hose (gray ball lock)
H - OUT hose (black ball lock)
I - Step filter lid
J - 2 Mash screens (1 large and 1 small)
K - 4 Hop cages and lids
L - Adjunct compartment
M - Adjunct screen
N - Step filter
I
K
L
A
E
B C D
F
J
G
H
N
M
6 7
Page 5

O - Foam trap (with spindle and felt washer)
P - Needle-less syringe
Q - Package of PBW
R - Dishwasher tablet
S - Bottle of antifoam
T - 2 Cleaning tubes
U - Keg cozy
O P Q R S
T U
Included, not pictured:
‒ Plastic hose wrench
‒ 4 small white nylon washers
‒ 4 silicone bands
‒ Keg seal
‒ Airlock
‒ Pico Pale ingredient kit
8 9
SECTION 1: HOW THE ZYMATIC® WORKS - CONTINUED
Page 6

1.2 How the Zymatic Works
Heat
To heat the wort up to temperature, the Zymatic will bypass
the grain and hops in an area of the Step Filter called the Pass
Through. The Pass Through is the narrow area between the
Mash Compartment and the Adjunct Compartment. When
wort is heating up, it passes directly to the bottom of the step
filter, where it circulates through the drain and back into the
keg. The wort flow is controlled by the stepper (fluid) arm,
which is located above the step filter lid, in the Zymatic. The
Zymatic has been calibrated to keep the water level in the
bottom of the step filter below the grain and hops, so they are
only incorporated when the recipe calls for them.
Mash
Grains go in the mash compartment, where water is filtered
through the top and bottom mesh filter screens and
recirculated through the keg and Zymatic. This circulation
allows for temperature control.
Boil
Hops are boiled in cages in the Adjunct Compartment.
Each cage corresponds to a timed addition to the boil. The
cascading motion caused by the Adjunct Compartment
mimics manually adding hops to a boil pot. When a new hop
addition is added, the cascading motion allows the previous
addition to continue to boil, as well as the new addition
1 2 3 4
10 11
Page 7

1.3 Required Materials
Before Your First Brew
1. Zymatic (A)
(assembled with power cord (B), IN hose (G), OUT hose
(H), and plastic hose wrench)
2. Step filter lid (I)
3. Step filter (N)
4. Small mash screen (J)
5. Adjunct screen (M)
6. Corny keg
7. Keg seal
8. 1 gallon of water
During Your Brew
1. Zymatic
2. Step filter lid (I)
3. Adjunct compartment (L)
4. Hop cages (K)
5. Step filter (N)
6. Adjunct screen (M)
7. Small and large mash screens (J)
8. Foam trap (with spindle and felt washer) (O)
9. Anti-foam (S)
10. Keg cozy (U)
11. 5-gallon corny keg
12. Keg seal
13. Water (amount varies by recipe)
14. Recipe kit (grains, hops, yeast)
Rinse
1. Zymatic
2. Step filter (N)
3. 2 large containers for water
4. 1 gallon of water
5. 2 cleaning tubes (T)
Miscellaneous
1. Sampling from the Sampling Port
(a) Needleless syringes (P)
2. Keg Cleaning
(a) Diptube cleaning brush (E)
(b) Pro Brewers Wash (Q)
(c) Racking/transferring
(d) Transfer tube (F)
3. Non-WiFi Internet Connection
(a) Ethernet cord (D)
4. Firmware Updates
(a) USB cable (C)
Post-Brew
1. Yeast
2. Airlock
3. Sanitized water or alcohol
4. 5-gallon corny keg (with wort)
5. Ice (optional)
6. 5-10 gallon bucket (optional)
12 13
SECTION 2: SETTING UP YOUR ZYMATIC® - CONTINUED
Page 8

SECTION 2
2.2 Zymatic Assembly
Setting Up Your Zymatic
2.1 Zymatic Setup
A - On/Off switch
B - OLED display
C - Control knob (twist to scroll, press to select)
D - White nylon washers
E - Inline filter
F - OUT (black) hose connects to OUT post of keg,
controls flow into step filter
G - IN (gray) hose connects to IN post of keg, controls
flow into keg
H - Drip tray
I - Step filter
A
B C
D E
F
Set the Zymatic on a sturdy, level surface. Peel off any
1
remaining white protective film from all surfaces.
Insert the white nylon washers into the flare nut fittings on
2
the ends of each hose. This prevents the hoses from pumping
air or leaking.
1. Match the BLACK hose to the BLACK sticker and the
GRAY hose to the GRAY sticker.
← Front
Back →
GRAY
I
H
G
14 15
SECTION 2: SETTING UP YOUR ZYMATIC® - CONTINUED
“IN hose”
BLACK
“OUT hose”
Page 9

2. Hand tighten by screwing the flare nut onto the Zymatic,
then use the black plastic wrench to tighten further.
3. Keep the black plastic wrench and extra nylon washers
with this manual in case they are needed for any repairs
or replacements.
Remove red plug from the stepper arm. During plug removal
3
exercise caution so as to not yank or pull on stepper arm.
Plug the power cord into the back of the machine and into
4
an outlet. The Zymatic requires at least a 15 amp outlet
(standard in most houses). Do not overload the outlet with
other appliances that will use more than 15 amps.
If you are using Ethernet, plug the Ethernet cord into the back
of the machine. If you are using WiFi, skip this step. WiFi set
up will be completed upon the initial startup of the Zymatic
with on-screen instructions.
16 17
SECTION 2: SETTING UP YOUR ZYMATIC® - CONTINUED
Page 10

2.3 Initial Rinse
Before you start your first brew, you need to run a quick rinse
1
cycle using an empty bucket, your keg, and the cleaning wand.
Step filter set-up:
1. Place the smaller of the mash screens into the mash
compartment, so that it rests on the bottom ledge of
the step filter. This is the false bottom that the grain
will sit on.
2. Place the adjunct screen on the other side of the step
filter (the adjunct compartment), also resting on the
bottom ledge.
Slide step filter into Zymatic. There should be a little
2
resistance as the drain slides into place and the step filter
presses against the back of the Zymatic. Do not excessively
force step filter into drain. The step filter will stick out of the
machine by about an inch to allow for easy removal. If you
are having issues sliding step filter into place please contact
[email protected] for assistance.
Switch on Zymatic. Scroll and click through menus. Follow the
3
on screen instructions if you are using WiFi.
Fill your keg with approximately 1.5 gallons of clean, hot tap
4
water. Place the keg either on the floor or on the counter next
to your Zymatic.
Connecting your keg to the Zymatic: Connect the black ball
5
lock to the keg post labeled OUT, and the gray ball lock to the
keg post labeled IN. Lift the outer ring of the ball lock, place it
on the appropriate keg post, let go of the outer ring and press
down firmly. The ball lock will click when it fits into place.
In the same manner, attach a cleaning wand to the GRAY ball
lock. Allow the gray hose to sit in an empty bucket.
3. Place the lid on top of the step filter, ensuring that the
holes are aligned correctly. The indented (beveled) side
of the center hole should be facing up.
18 19
SECTION 2: SETTING UP YOUR ZYMATIC® - CONTINUED
Page 11

A welcome screen will appear on the OLED display. Press the
6
control knob once to get to the menu. Select “Clean/Rinse.”
Then, select “Rinse” and the Zymatic will begin the initial
rinse cycle.
Once the rinse cycle completes, the Zymatic returns to
7
the main menu. Remove your step filter and dump out any
remaining water.
Disconnect the keg from the machine. To disconnect the
8
ball locks, pull up on the outer ring of the ball lock, and pull the
ball lock off of the kegpost. Dump any remaining water out
of the keg.
20
SECTION 2: SETTING UP YOUR ZYMATIC® - CONTINUED
21
Page 12

SECTION 3
Brewing on your Zymatic
3.1 Selecting/Crafting a Recipe
NOTE: If you prefer to use metric units in the recipe crafter,
change the option on the “Settings” tab in your picobrew.com
account. This adjusts all recipe measurements except text in
recipe notes.
Selecting a recipe
Login to your PicoBrew account, click the Community tab, and
1
choose “Recipe Library.”
Find the recipe you wish to brew by searching for the recipe
2
name or beer style in the “Search by Name” field. You can also
find recipes by author using the “Search by Author” field. Click
the recipe name to view recipe details and notes.
When you find a recipe you want to brew, click “Copy to My
3
Brewhouse” at the top of the recipe. The recipe will appear in
your Brewhouse and transfer automatically to your Zymatic.
Crafting a recipe
Login to your PicoBrew account, click the My Recipes tab and
1
choose “Craft Recipe.”
Recipe Name: Enter the name of your recipe. This will be
2
shown on your OLED display during your brew and if you
choose, shared with other users in our Recipe Library. Recipe
names cannot be longer than 20 characters, and can contain
only alphanumeric characters, single quote (‘), period (.), dash
(-), or underscore (_). Accented characters (such as è and ü) are
not allowed.
Recipe Type: Choose Beer or Sous Vide.
BJCP Style: Choose the style of beer you wish to create. If
you’re unsure about the beer styles offered, check http://
www.bjcp.org/2008styles/catdex.php for descriptions.
Finished Beer: Input the desired amount of finished beer.
This is the amount of drinkable beer you will have after
fermentation and racking. The default amount is 2.5 gallons.
To increase or decrease this volume, please contact info@
picobrew.com for assistance.
Tasting Notes: A description of the recipe. This field will
auto-fill while you create your recipe with a description of
the color, bitterness, and body. If you wish to give a different
description, click on the field and enter your own.
OG: As the recipe is crafted, the Original Gravity (OG) will
update depending on the amount of fermentables selected.
The OG is shown in the Vital Statistics box in the upper right
hand corner of the Recipe Crafter page. You can also input the
OG and your recipe will scale accordingly.
FG: A general prediction of the final gravity of your beer
based on the given OG and yeast attenuation. Fermentation
time, temperature, and other variables are not taken into
account here.
22 23
Page 13
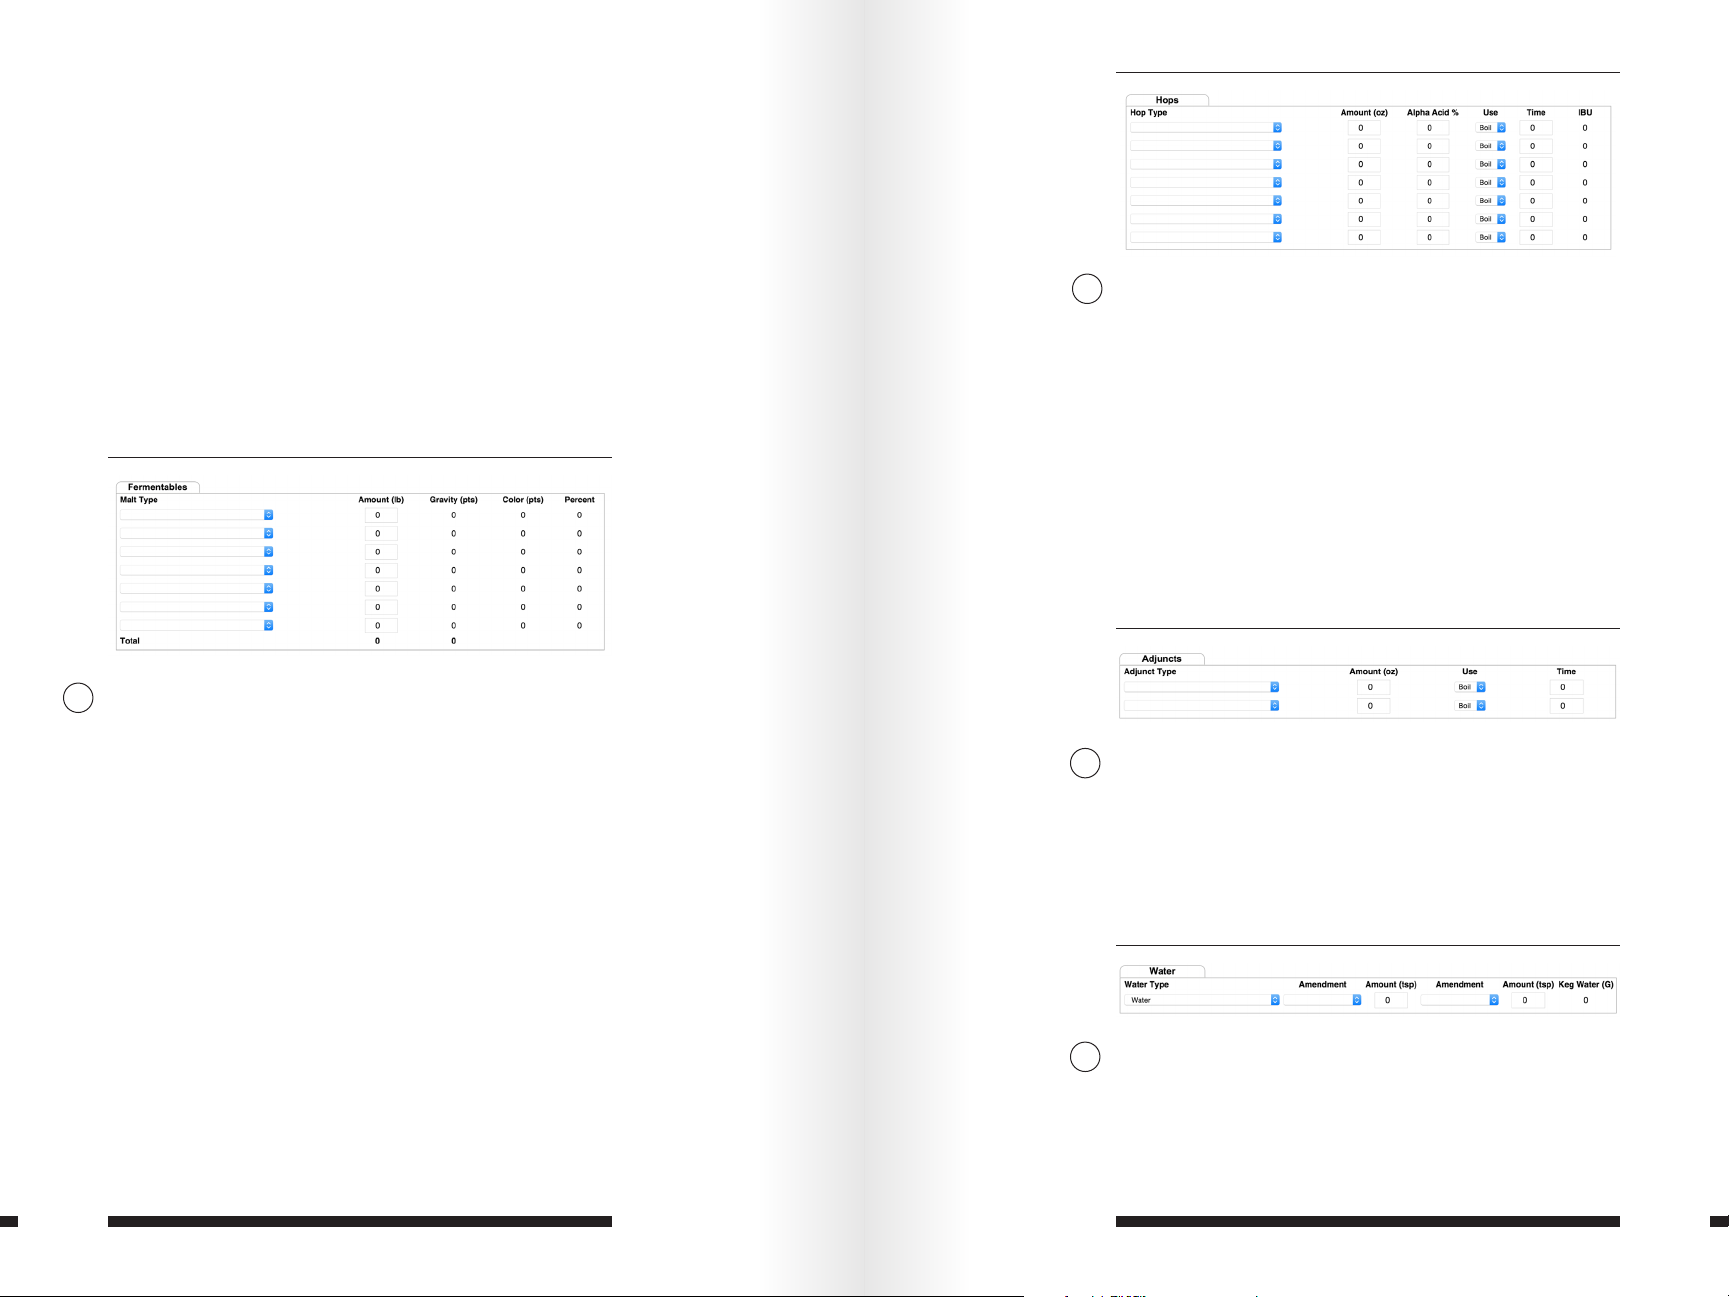
IBU: Calculated IBU (International Bittering Units) is based
on the hop types, amounts, alpha acid% (AA%), content,
and given time. The recipe crafter uses a Tinseth calculation
that is modified for the Zymatic’s boiling system based off
laboratory IBU testing. This field does not require editing,
but if you wish to input a specific IBU, select hops being used,
input the AA% and the time. Change the IBU number in the
Vital Statistics box to your desired IBU level and the recipe
crafter will scale accordingly.
SRM: The calculated Standard Reference Method (SRM) is
based on the color points of the malts selected. Use the pint
glass located to the left of the Vital Stats box as a visual aid.
As malts are selected, the pint glass changes color.
ABV%: A prediction of the alcohol by volume of your finished
beer. The actual ABV % is a calculation of the OG and FG.
Hop Type: Select the hops you are using.
4
Amount (oz): Input the desired amount of hops (max 1.5 oz
per compartment). If you are adjusting a recipe for a larger
batch, you can choose to scale to the correct IBU amount
afterward.
Alpha Acid %: This field will auto-fill with the average AA%
for the hop type you select. If you know the AA% of the hop
type (generally printed on the bag of hops), you can edit
this field.
Time: The time (in minutes) that you would like to boil each
hop. You may input the same time for different hop types. If
you do, you need to combine them in the same cage. You are
limited to four timed additions.
Fermentables: Enter all grains, extracts and sugars that will
3
be used in your brew.
The maximum grain weight the step filter can hold is 9
lbs and the recipe crafter will produce a warning message
if you exceed the 9 lbs limit, although it will still attempt to
calculate. The only time a finished recipe should exceed 9
lbs is if you are adding sugar/extract to the keg and wish
to calculate the gravity including the addition. If you are
adjusting a recipe that wasn’t created for the Zymatic (for
example, a 5 gallon batch recipe), enter the recipe the way
Adjuncts: Adjuncts is an optional field where you can select
5
ingredients which do not fall under fermentables or hops—
e.g. spices, wood, flowers, etc. These do not impact the
schedule —this section is for recipe notation only.
If you don’t see the adjunct you’d like to use, select “Other,”
and note the ingredient in the Notes section at the bottom of
the page.
that it appears (this will probably exceed 9 lbs, but will be
adjusted) and then enter the desired OG for the recipe into
the OG field. The recipe will adjust itself to match the OG and
keep the correct ratios of grains. If your desired OG exceeds
1.060, you need to select the High Efficiency Multi-Step
Water Type: Do not used distilled or reverse osmosis water
program under Mash Profile. Adjust the IBU levels in the
same manner.
6
(excessive foaming may result). If you are using tap water, be
sure it is water that you would be willing to drink.
24 25
SECTION 3: BREWING ON YOUR ZYMATIC® - CONTINUED
Page 14

Amendment: You can choose between Calcium Carbonate,
Calcium Chloride, Calcium Sulfate, or Magnesium Sulfate,
which are the most common types of amendments. If you are
not amending your water, just leave the field blank.
Amount: Amount of each amendment. You can make specific
notes about the amendments in the Notes section.
Mash Type: Choose between Single Step Infusion or High
7
Efficiency Multi-Step mash. If you choose Single Step
Infusion, you can adjust the mash temperature and time (we
do not recommend using less than 60 minutes for a single
step infusion).
The High Efficiency Multi- Step schedule will increase
your OG without changing your grain load. Notice that you
cannot change the temperature and time if you select High
Efficiency Multi-Step. Choosing a High Efficiency Multi-Step
schedule will run the following steps:
• Dough In at 102°F for 20 minutes
• Mash 1 at 152°F for 30 minutes
• Mash 2 at 154°F for 60 minutes
• Mash Out at 175°F for 10 minutes
(typical schedule)
The High Efficiency Multi-Step schedule is longer than a
typical brew—from start to finish, it takes approximately 5
hours to complete.
Temperature: 207°F is the default. We do not recommend
changing it unless you are an advanced user or plan on
brewing at a high altitude. The Zymatic is designed to
operate at temperatures below the boiling point of water.
Temperatures above 207°F may result in machine damage.
Time: The time will auto-fill to be the same as the longest
boiling hop. If you want to boil your wort before adding
hops, extend this time so that it is longer than your longest
boiling hop. Adding extra time will result in circulation of the
boiling wort through the pass-through area before the first
hop addition.
Yeast Name: Select your yeast. The yeast list includes yeasts
9
from Fermentis, White Labs, and Wyeast.
Range AA%: Range of attenuation given by the yeast
manufacturer.
Expected AA%: Defaults to the average attenuation
from the range. If you know your attenuation will be closer
to the end of one of the ranges (due to closely controlled
fermentation temps, yeast starters, etc.), this is an editable field.
Range Temp: The range of fermentation temperatures for the
yeast strain given by the yeast manufacturer.
Pitch Temp: Defaults to the average temperature within the
range. If you know what temperature you will be pitching your
yeast, enter the temperature here. This field will dictate what
temperature the batch will chill to if using a separate cooling
apparatus such as chiller or bucket methods.
Boil Type: The only choice is Normal Single-Temp Boil. This
8
means that all hops will be boiled at 207°F by default.
If you are a high altitude user—use the ADVANCED edit tool
in the recipe crafter to change the boil temperature to 203°F.
You may also want to check boiling temperature guidelines
from your area for an accurate temperature assesment.
Fermentation Type: Select either Normal Primary or
10
Advanced/Custom and either Ale or Lager. Normal
Primary fermentation will default to a typical ale or lager
fermentation schedule.
The Advanced/Custom fermentation option allows you to
input Names, Temperatures, and durations for custom steps.
These fermentation steps are used by the PicoBrew
KegSmarts system for automatic fermentation management.
26 27
SECTION 3: BREWING ON YOUR ZYMATIC® - CONTINUED
Page 15
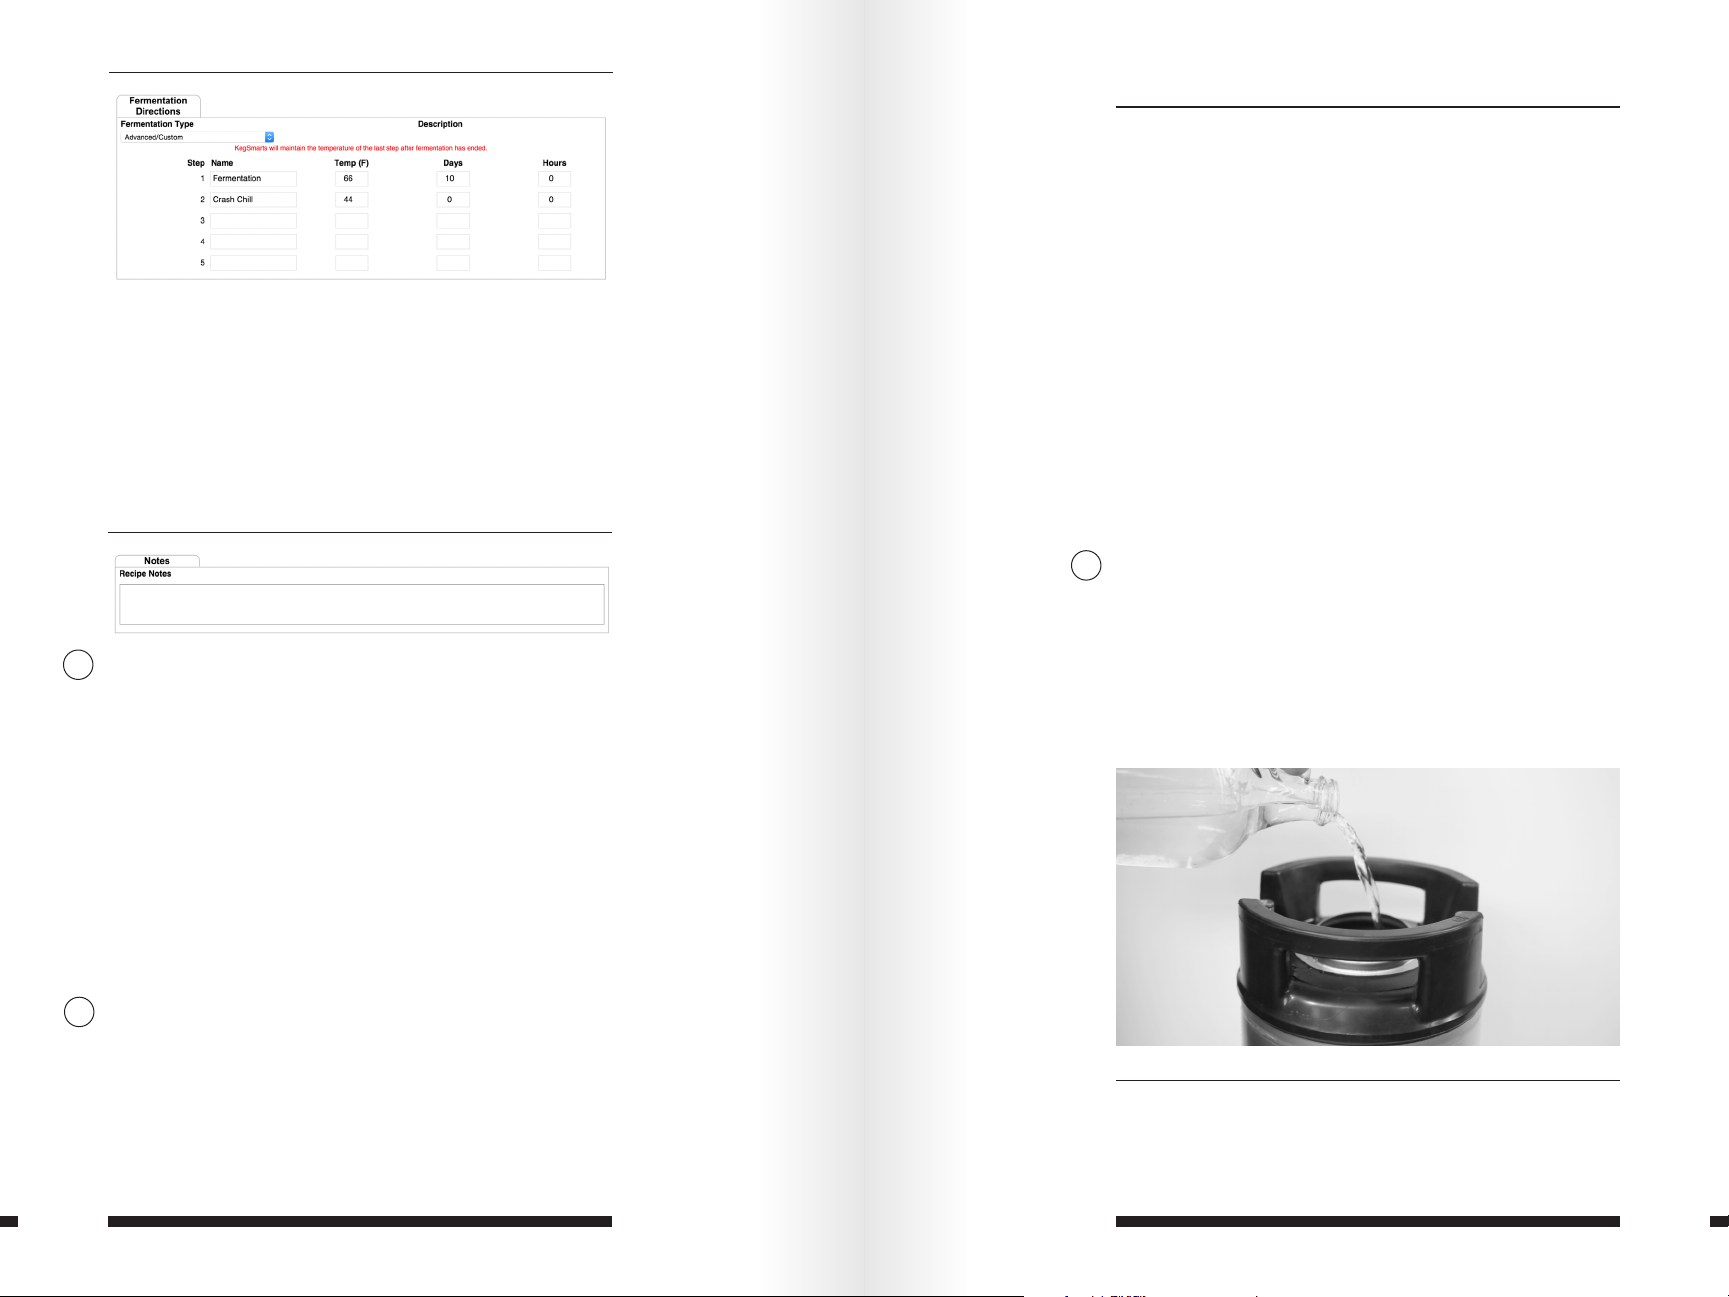
Name: Input the name of your fermentation step. You may
have up to 5 fermentation steps.
Temp: Input the temperature required for the fermentation
step.
Days: Input the number of days the fermentation step
will take.
Hours: Input the number of hours the fermentation step will
take (in addition to, or in lieu of the Days section).
Any other notes you would like to add should go in the notes
11
section. We encourage lots of detail—this is a great place to
note dry-hopping and anything that was not already covered
in the recipe crafter.
If you plan on using the Advanced Recipe Control Program
Editor for your recipe—please note that here! Changes made
to the Advanced Recipe Control Program Editor are not
reflected on the recipe page so noting this in the Notes field
is especially critical and helpful for those downloading your
recipe from the library.
Note that any temperatures listed in this section do not
automatically adjust if the units change between Imperial
and Metric.
3.2 Preparing Ingredients
NOTE: Proper cleaning and sanitizing of brewing equipment
is a CRITICAL part of the brewing process. Without it, you risk
the introduction of bacteria and contaminants into your beer.
• Cleaning: All equipment that comes into contact with
beer must be thoroughly cleaned and rinsed prior to
brewing. Unscented dish soap is effective, but must
be thoroughly rinsed off before brewing.
• Sanitizing: All equipment that comes into contact
with beer after it has been brewed needs to be
sanitized. We recommend using Star-San, or a
similar food-grade sanitizing solution. Generally, all
equipment should be soaked in a diluted sanitizing
solution for about 10 minutes before use. Kegs
should be filled with a diluted sanitizing solution, and
left to soak for about 10 minutes.
Fill your keg with the amount of water listed in your recipe.
1
Use a gallon jug and measuring cup or a scale (8.33 lbs water
= 1 gallon of water) to measure your water.
Accurate water measurement is important to ensure the
best results for your brew. Water measurement errors are
one of the most common problems brewers encounter. If you
use a scale to measure your water, don’t forget to tare it to
your container before adding water!
Save. Click the Save button when recipe crafting is complete.
12
This will sync and upload to the Zymatic automatically.
If you run into any issues selecting or crafting a recipe,
visit “Troubleshooting” under the “Support” tab of your
PicoBrew account.
28 29
SECTION 3: BREWING ON YOUR ZYMATIC® - CONTINUED
Page 16
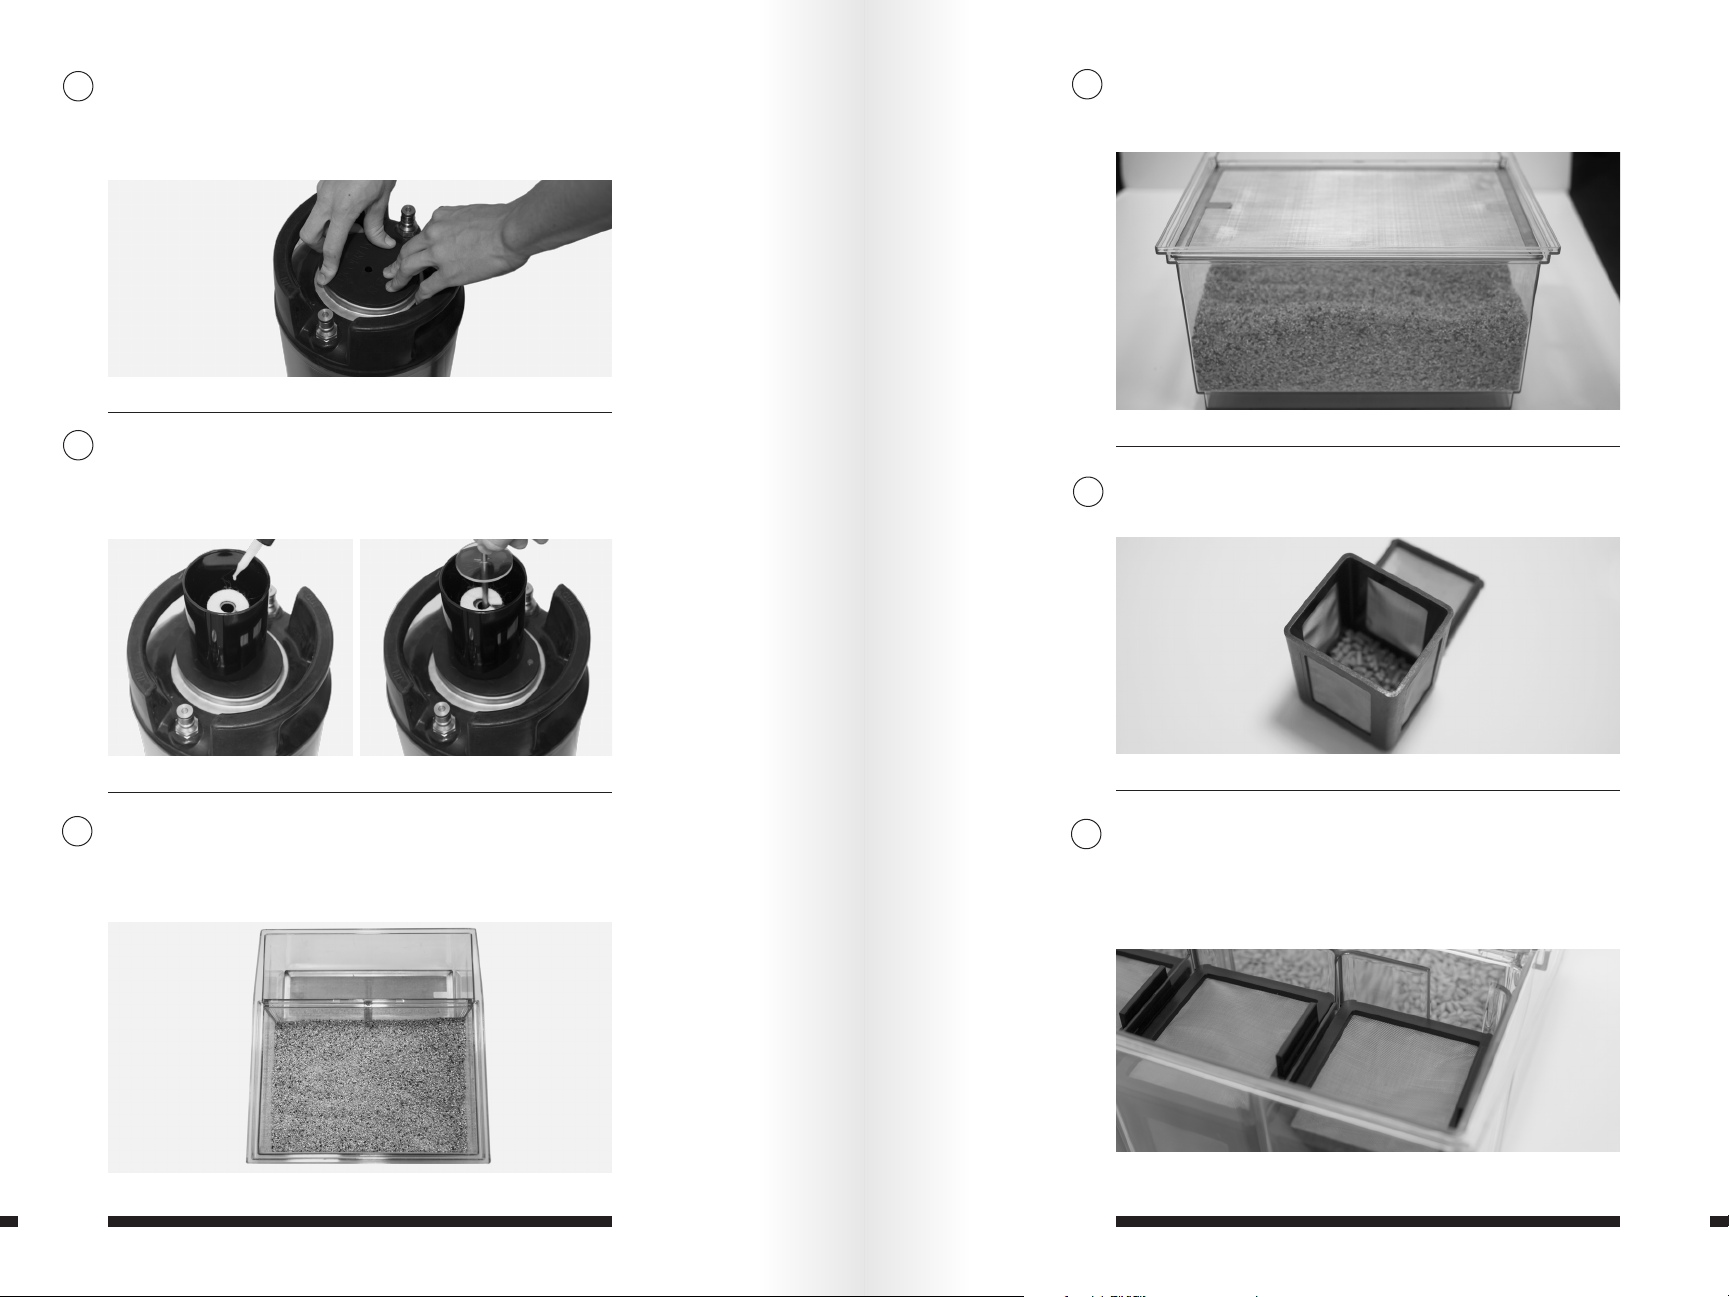
To insert the black keg seal, start by inserting one end and
2
firmly pressing around the edge of the seal until it has been
pushed into place. Do not put too much pressure on the
center of the seal as it may fall into your keg.
Assemble the foam trap. Place a few drops of antifoam on to
3
the felt washer. Place the spindle on top of the felt washer
(long side of spindle pointing down). Insert the assembled
foam trap into the hole in the keg seal.
Level the grain with your hand. Do not compact. Place the
5
large mash screen on the top ledge of the step filter so it
rests over the grain.
Measure hops and place in appropriate cages. Secure lids.
6
Secure with silicone bands if lids feel loose.
Measure (and grind, if necessary) your grain. Place the
4
smaller of the mash screens into the mash compartment, so
that it rests on the bottom ledge of the step filter. Pour grain
into the mash compartment on top of the small mash screen.
Place the adjunct screen in the adjunct compartment of the
7
step filter, resting on the bottom ledge. Place each cage into
the adjunct compartment, on top of the adjunct screen, with
the longest boiling hop going into the first compartment (the
one with the notch).
30 31
SECTION 3: BREWING ON YOUR ZYMATIC® - CONTINUED
Page 17
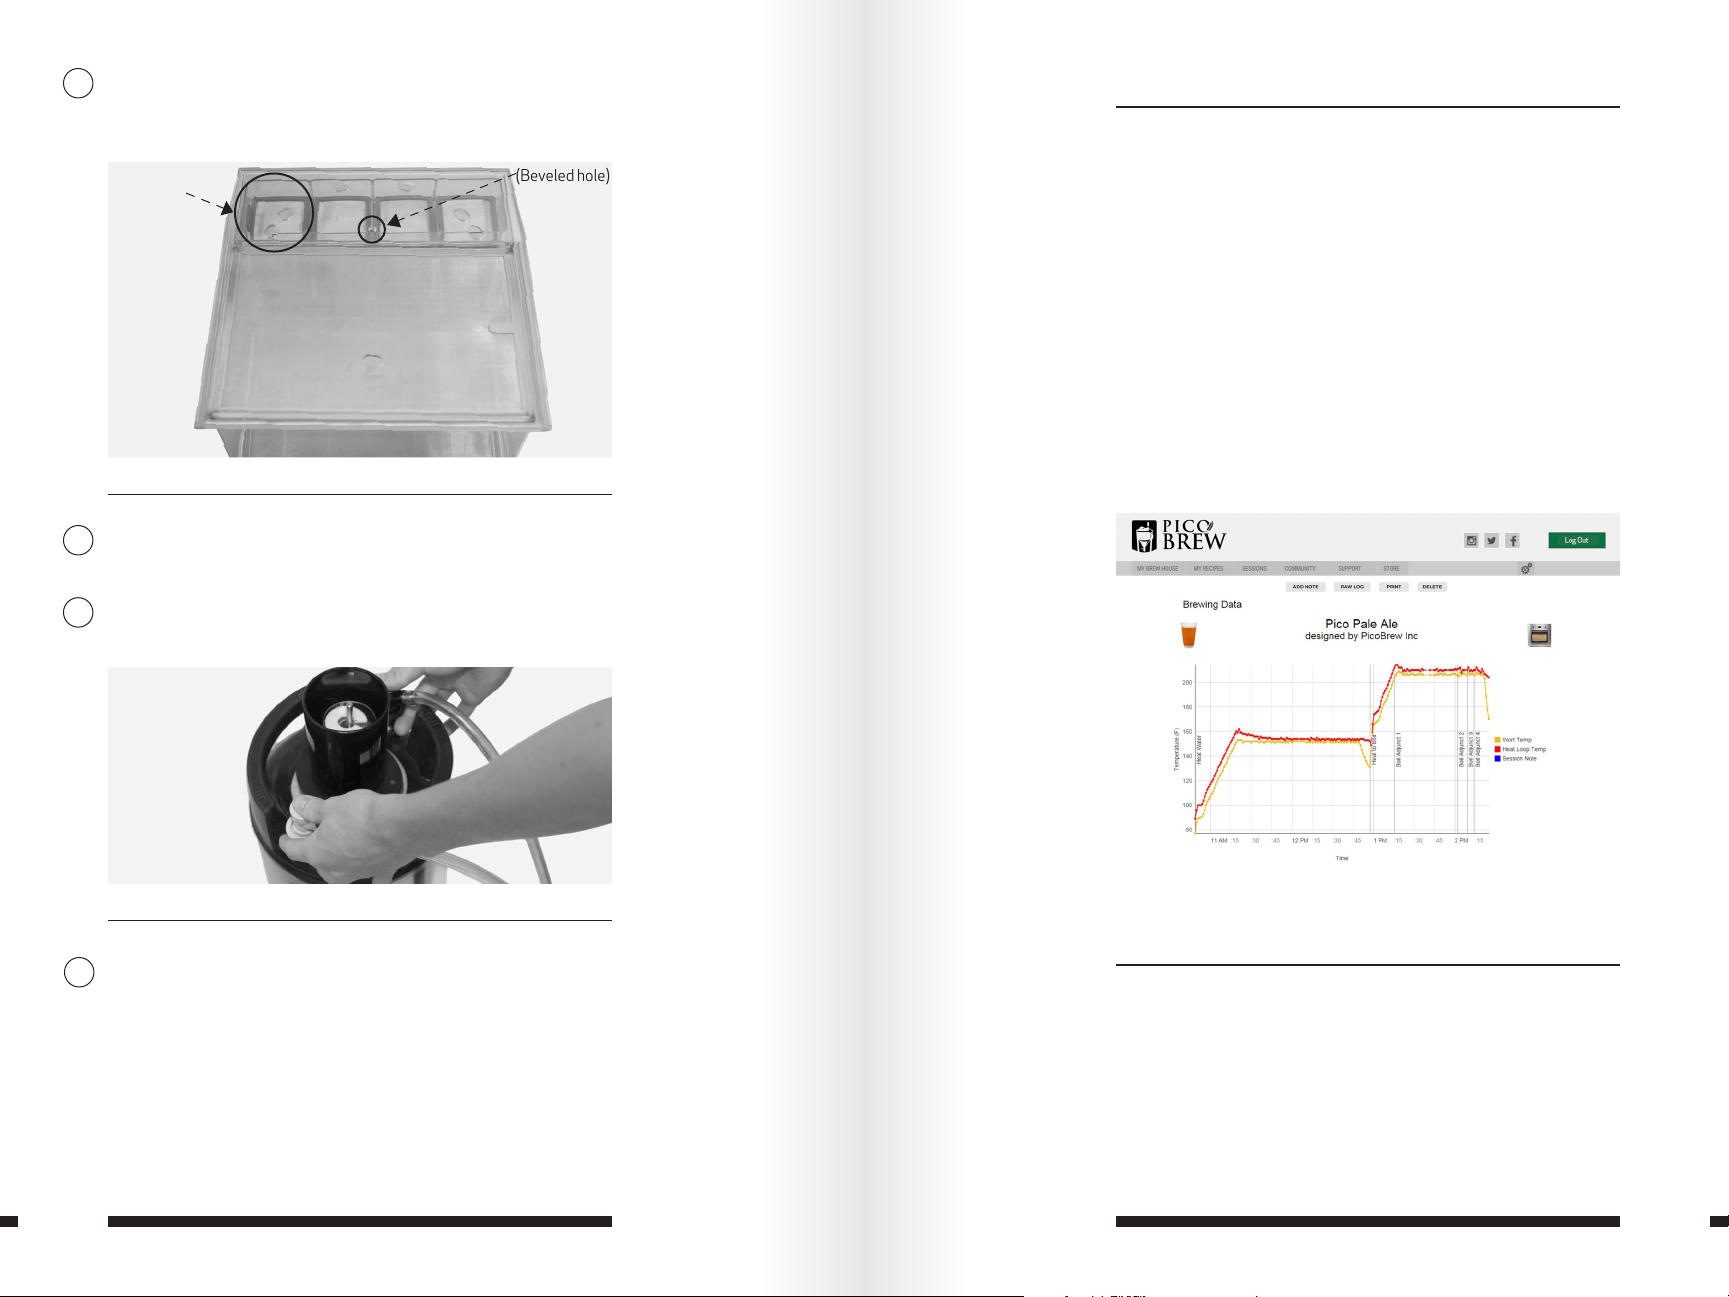
Place the lid on the step filter, ensuring the holes are aligned
8
correctly. The indented (beveled) side of the center hole
should be facing up.
(Beveled hole)(Hop Cage #1)
Slide the step filter into the Zymatic. The step filter will
9
protrude slightly over the drip tray.
Connect the black ball lock to the OUT keg post and the gray
10
ball lock to the IN keg post of your filled keg.
3.3 Brewing
Your brew will require little to no work on your behalf for
the next few hours. Be sure to read through the recipe
notes to see if any sugar, kettle finings, or any other special
ingredients need to be added to the keg during the brew. We
recommend that you do not add Irish Moss directly to your
keg. You may add Irish Moss to your shortest boiling adjunct
compartment or use other finings such as Whirfloc or Super
Moss which can be added directly to the keg.
While your Zymatic brews, you can watch its progress online.
Login to your PicoBrew account, click the Sessions tab and
choose “Brewing”. Click your active session to view session
data with current wort and heat loop temperatures. You may
add notes to your Brewing Data graph by clicking a data point,
adding, and saving text.
3.4 Chill
On the Brew Menu, press the selector knob and scroll to your
11
recipe to begin the brewing cycle!
32 33
SECTION 3: BREWING ON YOUR ZYMATIC® - CONTINUED
After your brew finishes, you need to chill the wort and then
pitch your yeast. Chilling your wort beforehand is vital, as high
temperatures will kill the yeast, resulting in no fermentation.
We recommend chilling overnight but there are a variety of
other chilling methods that could be used.
Page 18

Chilling Overnight
After your brew is complete, the Zymatic will pause and
1
beep to alert you to prepare your chilling set up. Pressing the
control knob once will silence the alarm.
The next screen will give you an option to Begin the Chilling
2
Process or End the Brewing Session. Choose End the Brewing
Session.
Detach the hoses from the keg and gently pull off keg cozy.
3
CAUTION: The keg will be extremely hot!
Leaving the foam trap in place, let your keg sit for 10-12
4
hours, undisturbed. Once your wort has chilled to room
temperature, you may pitch your yeast. Replace the foam
trap with a sanitizer filled 3-piece airlock.
Ice Bucket Chill Method
In order to run the ice bucket chill, you will need two 5-10
gallon buckets, a long handled spoon, and about 10-15
pounds of ice. This process takes about 45 minutes.
After your brew cycle completes, your Zymatic will pause and
1
beep to alert you that it is time to chill the wort. Pressing the
control knob once will silence the alarm. A second press will
begin the chill process.
Monitor the ice bath. As it warms, switch to the second
5
bucket in the same manner. Occasionally stir the ice water
with a long handled spoon to ensure the wort is chilling
uniformly.
After the Zymatic has indicated that the wort has reached
6
pitching temperature, it will continue to circulate wort for 10
more minutes to ensure all wort is the same temperature.
The Zymatic will then drain the remainder of the wort.
7
While the Zymatic is paused, remove ball locks, carefully pull
2
off your keg cozy, and reattach the ball locks.
Once the chill cycle is complete, you may remove the ball
8
locks and pitch your yeast.
CAUTION: The keg will be extremely hot!
There are a variety of other wort chilling methods that one
Fill both buckets or large containers about a third with cold
3
water and half the ice. Carefully place the keg in the ice bath.
could use—a copper coil chiller, a plate chiller, etc. Find the
method that suits you best. Consult the brewing videos and
forums for help and advice.
4
Select “Continue” and the Zymatic will begin the chill cycle.
34 35
SECTION 3: BREWING ON YOUR ZYMATIC® - CONTINUED
Page 19

3.5 Pitch Yeast
Yeast comes in either dry or liquid form. Both types of yeast
can be used to ferment your wort. If you are using liquid
yeast, be sure to take it out of refrigeration when you start
your brew to give the yeast time to warm up. Prepare yeast
following manufacturer’s instructions. Dry yeast usually does
not require any preparation, although some brewers prefer to
proof their yeast.
After your wort is chilled to pitch temperature, remove the
1
keg seal and pour in your yeast. Your keg may have a large
head of foam depending on the chilling method used. This is
normal; give your keg a few swirls to incorporate the yeast
fully into the wort. Replace the keg seal.
Insert the airlock into the keg seal hole until it feels snug.
3
Carefully place your keg in a temperature controlled area,
such as a garage or closet or fermentation chamber such as
the KegSmarts system. Fermentation can take anywhere
from a week to several weeks depending on the brew. Make
sure to read your recipe for fermentation specifics.
Ales generally ferment at between 64°-70 °F (18°-21°C), while
lagers generally ferment between 49°-55°F (9°-13°C).
3.6 Fermentation
For best results, ensure your keg stays in a temperature
controlled area where it can sit undisturbed for a few weeks.
The exact temperature range depends on what yeast you’ve
selected, and what beer you’ve brewed.
Sanitize your airlock and fill with sterile water (or liquor) to
2
the fill line. The airlock keeps the keg properly sealed against
any wild yeast or bacteria, while still allowing it to release CO2
As your beer ferments, CO
During the first few days of fermentation, you will likely see
the water in your airlock bubbling. This is a sign of active
fermentation.
is released through the airlock.
2
as the beer ferments.
The bubbling will slow down or completely stop when
fermentation is nearing completion (on average, 10 days).
OPTIONAL:
If you have a hydrometer, use it to take a gravity reading after
the recommended fermentation time is over to make sure the
beer has fermented completely. Take an initial reading, then
wait two days and take another reading. If the gravity reading
has not changed, fermentation is complete. If the gravity
continues to drop, your beer is still fermenting. If your beer did
36 37
SECTION 3: BREWING ON YOUR ZYMATIC® - CONTINUED
Page 20

not ferment to the desired gravity ( a condition referred to as
“stuck fermentation”), you may have fermented in an area that
was too cool, or pitched with weak yeast. Try either moving the
keg to a warmer area or pitching more yeast.
Once fermentation has completed, you may either rack your
beer right away or keep it in cold condition (refrigerator
temperature), and “cold crash” for a few days to drop the
yeast out of suspension and give your beer a bit more clarity.
If you are looking for more precise fermentation control,
PicoBrew also offers a smart kegerator called KegSmarts,
which monitors fermentation temperatures and keg weights
in order to track the fermentation process. To learn more
about KegSmarts, visit http://www.picobrew.com/store
3.7 Rack
NOTE: It is CRITICAL that all equipment used in the racking
process is both cleaned and sanitized. Check Section 3.2 for
more information on cleaning and sanitization.
The racking process consists of transferring beer from the
fermenting vessel to a serving vessel. This is an important
step because it removes beer from the yeast cake that
formed in the bottom of the keg fermentation. If beer is
left on the yeast cake for too long (4 weeks or more) after
fermentation is complete, off flavors will result.
To rack your beer via the transfer tube included with your
Zymatic, you need a CO2 tank and regulator to pressurize
your keg, as well as a separate 2.5 or 5-gallon serving keg.
Your regulator will allow you to control the amount of CO2
coming out of the tank. Attach a gray (IN) ball lock to the hose
on your regulator if it does not already have one attached.
Ensure that all parts that may come into contact with your
beer are sanitized before starting.
If you do not wish to rack with CO2 and a transfer tube, you
can use a siphon—just be sure to avoid any trub or yeast that
has settled at the bottom of your keg. Siphons are available
at your local homebrew shop.
Consult the brewing videos at www.picobrew.com/about/
brewingvideos if you have further questions about how to
rack or bottle your beer.
38 39
SECTION 3: BREWING ON YOUR ZYMATIC® - CONTINUED
Page 21

Try not to move your fermentation keg very much during
1
this process as it will stir up any yeast and trub sitting at the
bottom of the keg.
Remove the airlock and keg seal from the keg. Re-seal with
2
metal lid.
Ensure that your serving keg is sanitized before beginning.
3
Attach the transfer tube to the two kegs by connecting the
ball locks to the OUT posts of both kegs.
When racking is complete the transfer tubing will blow empty.
6
Turn off the CO2 tank, close any valves on the regulator and
remove the transfer tubing from both kegs. At times, you
may need to bleed off built of CO2 pressure in the receiving
keg. Periodically pull up on the Pressure Relief Valve (PRV) to
relieve the built up pressure and restore a food flow of beer.
The bottom few inches of beer in the fermentation keg will
be full of trub and yeast. The diptube of the keg included with
your Zymatic is cut shorter as to avoid the majority of the
yeast and trub. Discard the trub and thoroughly clean and
sanitize your keg as mentioned previously.
3.8 Carbonate
To carbonate your beer, you can either keg condition or
connect your keg up to a CO2 tank. CO2 absorbs better in
cold temperatures. Keep your keg and CO2 tank in a cold area
while it carbonates. (32°-42°F)
Forced Carbonation
Set your CO2 regulator to a low pressure (4- 6 psi).
4
Connect your CO2 regulator hose to the IN post of the
5
fermentation keg. Open the CO2 gas valve; this will fill your
keg with CO2 and push the beer out of the fermentation keg
through the transfer tube and into the diptube of the serving
keg, which will fill slowly from the bottom up to minimize
any splashing.
Before serving, you need to carbonate your beer. Traditionally,
beers were carbonated by adding sugar post-fermentation,
which reacted with the residual yeast to produce carbon
dioxide gas. This process can take weeks to complete, so
most commercial breweries and many homebrewers use a
process called “forced carbonation”. With forced carbonation,
CO2 gas from an external tank is forced into suspension and
typically carbonates a beer in 3-5 days.
To carbonate, attach a gas line from the CO2 tank to your beer
keg’s IN post.
Set the gas line’s regulator to the appropriate pressure
setting. Carbonation charts and calculators, available on
the Internet or from your local brewing supply shop, can
provide detailed information about carbonation pressures
and gas volumes for different beer styles. Generally, 10psi is
sufficient to carbonate most beers in 3-5 days.
The carbonation period depends on the beer brewed and the
psi pressure. In general it takes a pale ale seven to ten days to
carbonate at 10psi. You may increase the pressure to speed
the process, for example 4 days at 26psi.
40
SECTION 3: BREWING ON YOUR ZYMATIC® - CONTINUED
41
Page 22

CAUTION: Use extreme caution of setting your regulator psi
over 28psi. Use the calculators!
To adjust pressure, pull red regulator knob straight out and
turn clockwise to increase pressure and counter-clockwise
to decrease pressure. Push regulator knob in to lock the
pressure setting.
A - CO2 tank pressure (gas remaining)
B - Gas line pressure (adjusted with corresponding
regulator knob)
C - Gas line cut-off switch (shown here in closed position)
BB
A
C
42 43
Page 23
SECTION 4
through the machine, and rinse out any wort of grain that was
left behind. Always allow this feature to complete fully.
Care and Maintenance
4.1 General Cleaning (after every brew)
In order to complete the general cleaning process, you will
need two cleaning wands and two buckets.
Remove the step filter from the Zymatic and compost or
1
dispose of the spent grain. Caution as the grain may still be
hot. Be careful not to accidentally toss the screens.
After the Rinse cycle, remove the step filter from the
6
Zymatic. Remove the rubber drain plugs from the step filter
and place them in a safe place while you wash the step filter.
All pieces, including the step filter and all pieces of the foam
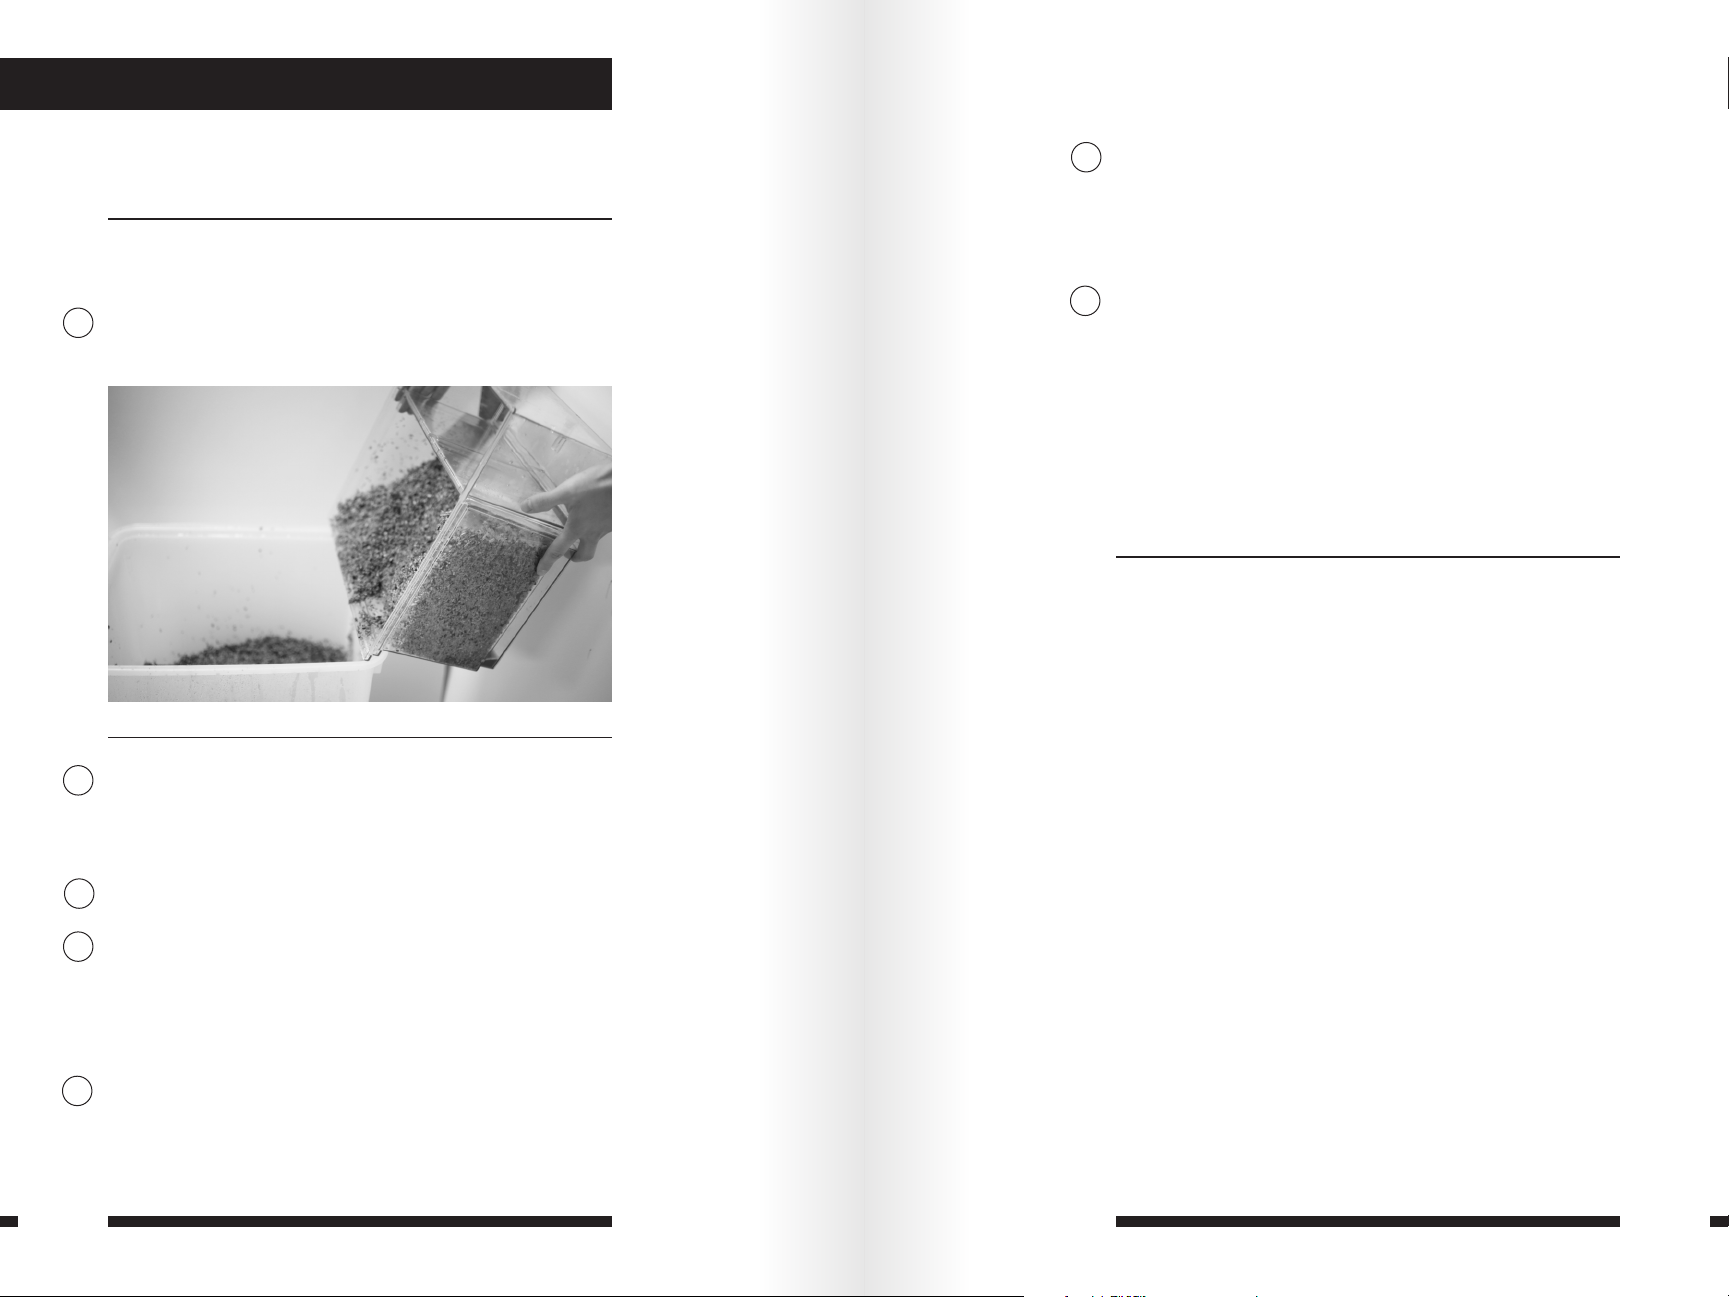
trap, can now be washed in the dishwasher.
Cleaning the inline filter (after every brew). The inline filter
7
located in the OUT hose functions to catch debris and keeps
the pumps and heat exchanger clean. This filter should be
cleaned before every brew. To do this, unscrew the filter and
remove the screen. Rinse the screen and scrub off all debris.
A toothbrush comes in handy to scrub the fine mesh. Place
the screen back inside the filter and screw the filter on tightly.
Clean the inline filter after each deep clean.
4.2 General Maintenance
Cleaning the Zymatic:
Stainless steel cleaners are recommended for cleaning
the outside of the Zymatic. Follow the instructions on the
bottle and only use soft cloths during cleaning. Do not use
abrasive materials or cleaners. Do not use cleaners on the
OLED screen.
Remove adjunct compartment, hop cages, and all screens.
2
Rinse each and place in dishwasher. Dispose of spent
hops. Please note that hops are toxic to animals. Rinse the
compartment, cages and place in dishwasher.
3
Rinse and place the empty step filter in the Zymatic.
Connect cleaning wands to both ball locks by lifting ledge of
4
ball lock, and pressing firmly into place. Place the black (OUT)
ball lock’s cleaning wand into a bucket of approximately 1
gallon clean water. Place the gray (IN) ball lock’s cleaning
wand into an empty bucket to collect the rinse water.
On the Main Menu, scroll to the Clean/Rinse option and press
5
selector knob. Scroll to Rinse and begin the rinse cycle. Select
Rinse and begin the rinse cycle. This will cycle the clean water
44 45
Cleaning the Step Filter, Cages, and Screens
The step filter, adjunct compartment, mesh screens, hop
cages, cage lids, and foam trap (including spindle and fabric
washer) are all dishwasher safe. Hot water soaks can be used
in place of dish washing. DO NOT use PBW on the step filter.
Cleaning the Keg
Cleaning your keg is extremely important—a dirty keg can
lead to contaminated batches. Using a wrench, remove both
keg posts and clean out any debris that is inside. Remove the
dip tube and use the dip tube brush to scrub the inside. Use a
scrub brush to loosen any hardened yeast or trub on the walls
of the keg. We highly recommend using Pro Brewer’s Wash
(included in your kit) to clean and Star San to sanitize your
keg before the next brew. Consult the “How to clean your keg
video” on the PicoBrew website for help here.
Page 24

4.3 Deep Clean (every 3-4 brews)
Every 3-4 brews, you will need to run a deep clean cycle on
your Zymatic. The deep clean cycle removes any buildup in
the hoses, pumps, and heat exchanger and will keep your
Zymatic running smoothly and efficiently. For the deep clean
cycle, you will need Zymatic cleaning tabs.
CAUTION: The deep clean heats water to boiling temperature,
do not use any unsafe cleaning agents.
To begin the deep clean cycle:
Fill a keg with 1 gallon of water and attach hoses to keg. Place
1
keg cozy on keg and insert a keg seal.
Load your step filter with the small mash screen and adjunct
2
screen.
3
Place the cleaning tablet on the small mash screen.
Place the lid on the step filter, ensuring the holes are
4
correctly aligned.
5
Slide the step filter into the Zymatic.
6
Select Clean/Rinse on the OLED display.
7
Select Clean Cycle and press to begin.
After the Clean Cycle is complete, it is important to rinse with
8
clean water. Run 5 gallons of water through your machine
using the rinse cycle (section 4.1). Discard the rinse water.
The clean cycle will run for approximately 2 hours. You may
notice the keg running empty, which will cause the flow from
the nozzle to look erratic. This is normal—pulling air through
the machine aids in removing buildup.
46 47
SECTION 4: CARE AND MAINTENANCE - CONTINUED
Page 25
SECTION 5
Advanced Brewing Techniques
Sample port
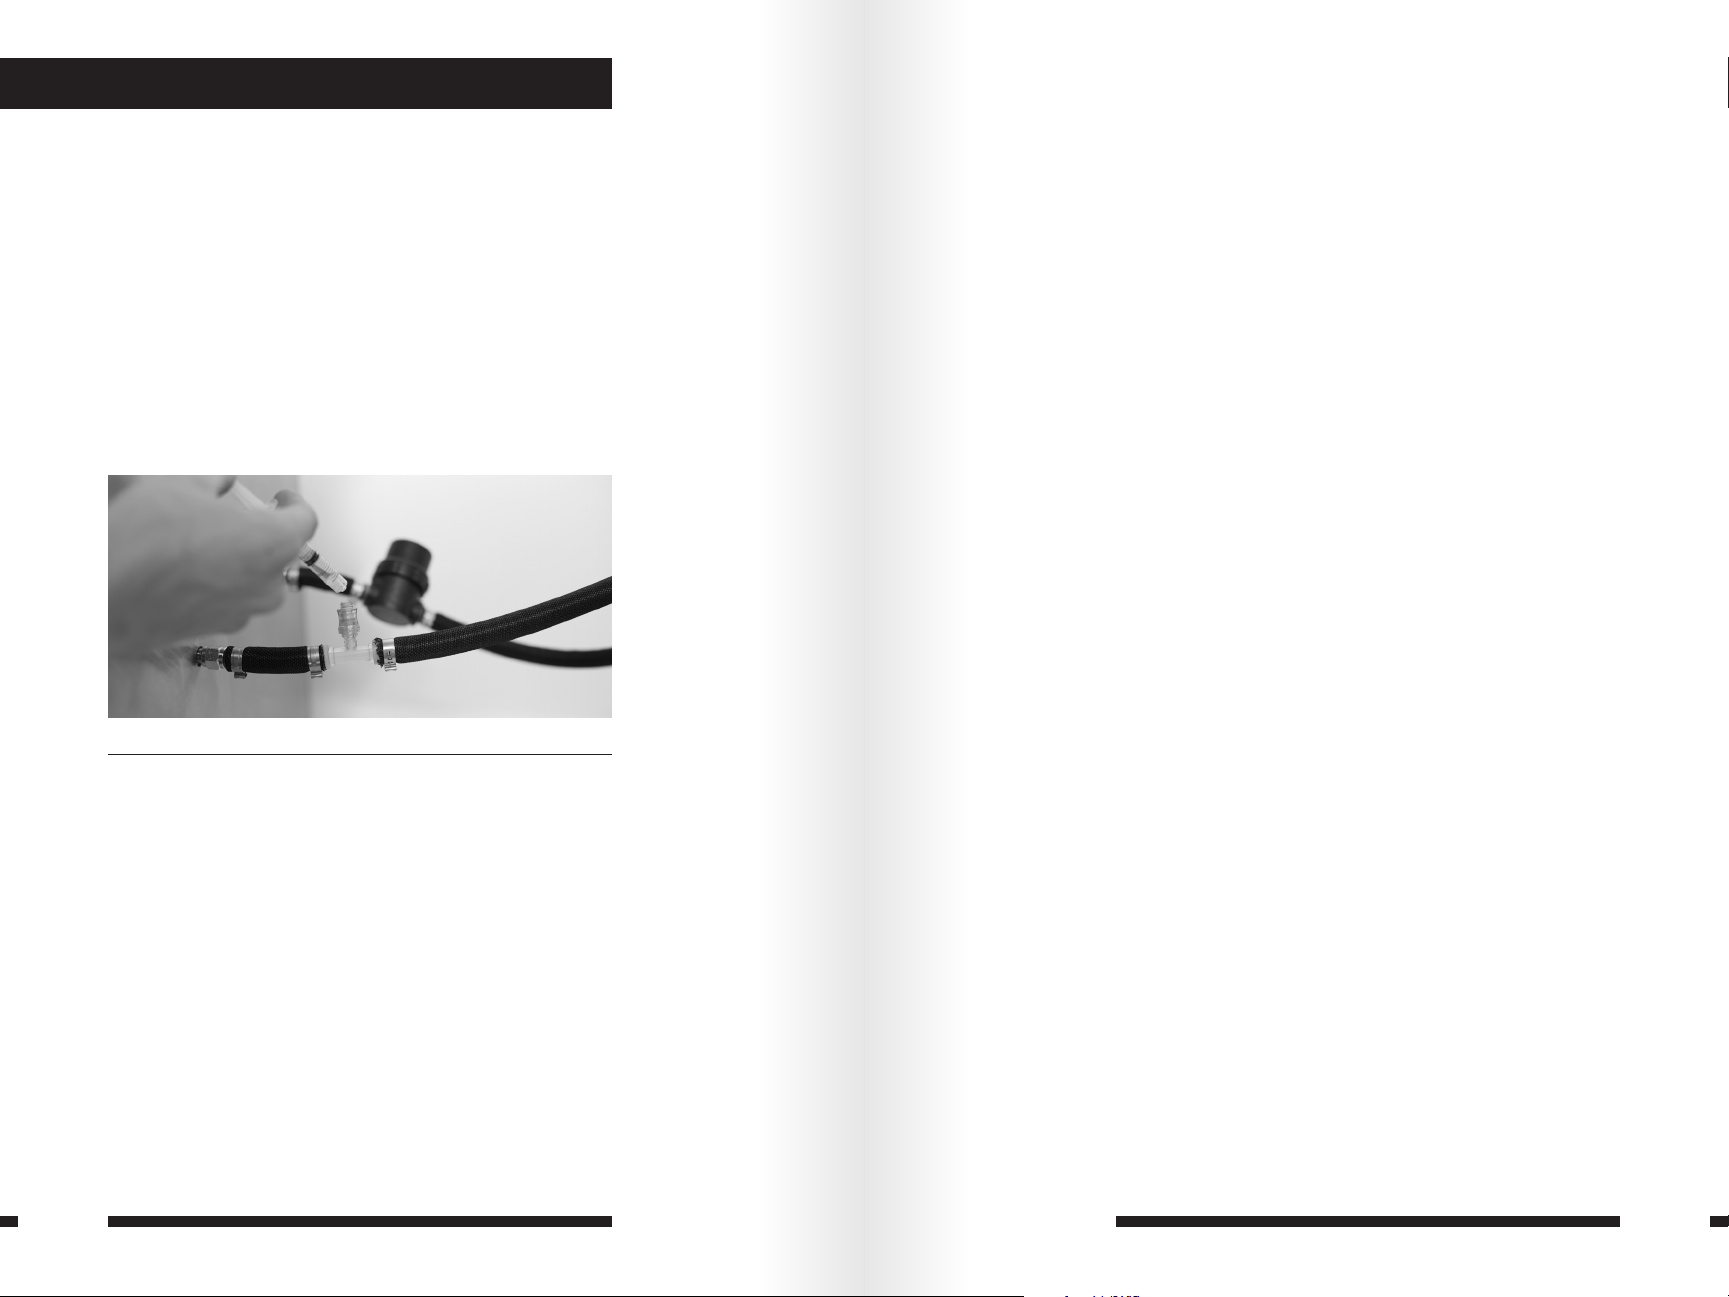
Your Zymatic comes equipped with a sampling port on the
IN hose. Standard size needleless syringes, such as the one
that came with your kit, will fit into the sample port. You
can use the sample port to draw a small sample of the beer
for refractometer readings, tasting, or proofing yeast. The
sample port may also be used to inject liquids into your beer.
To use, take a needleless syringe and twist it into the sample
port. Once it is connected, draw your sample by pulling the
plunger. Carefully unscrew the syringe. Be aware that over
tightening can crack the port.
Adding Clarifiers
If you wish to add any clarifiers to your beer that are typically
added during the brew (such as whirlfloc, irish moss, or yeast
nutrient) you can either place them in a hops cage (10-15
minute boil), or dissolve them into a liquid and inject it using
the syringe and sample port. Use caution while putting
anything into the keg during the brew. The keg will be
extremely hot and there will be steam. Use heat protection,
such as a towel or potholder when handling the keg and
keg seal.
Dry Hopping
If your recipe calls for dry hopping after fermentation, you
can sanitize a muslin bag to hold the hops and drop it into
your keg. Dry hop at fermentation temperature for 5-7 days,
then rack your beer out of the keg and leave the bag behind,
or carefully pull the bag out of the keg before racking. Leaving
dry hops in your beer for too long may lead to off flavors.
Adding Sugar During Boil
Some recipes call for the addition of sugars or Dry Malt
Extract (DME) during boil. You can add sugars directly to the
keg during boil by removing the keg seal and slowly adding
it, giving the keg a few gentle swirls to incorporate. Always
hydrate any granulated or rock type sugars and DME with 1-2
cups of hot water before adding to keg.
Use caution while putting anything into the keg during the
brew. The keg will be extremely hot and there will be steam.
Use heat protection, such as a towel or potholder when
handling the keg and keg seal.
48 49
Page 26

SECTION 6
Menu Screens
6.1 Main Menu
Main Menu
The Zymatic Main Menu appears when you click the control
knob after the machine starts up.
Rinse: Use this program after initial set-up and after every
brew to keep your Zymatic clean.
Machine Set-Up
Ethernet: Use to check your Ethernet connection. You must
have an Ethernet cable connected.
WiFi: Use to check your WiFi connection.
Account Sync: Use to sync recipes to your account if they
didn’t automatically sync.
Factory Reset: Reset your Zymatic to all factory default
settings. Do not choose this option unless directed to by
PicoBrew support personnel.
Brew a Recipe
Select to see the list of recipes synced to your Zymatic, then
select one to brew.
Help
Drain: Drains the machine for 5 minutes or until you manually
press stop.
Circulate: Runs the keg and drain pump while displaying
the current temperature. Do not select this option if you do
not have a step filter inserted and a keg or cleaning wands
connected to your ball locks.
Help from PicoBrew: Select if you have any issues with
Clean/Rinse
Clean: Use this program for a deep clean every 3-4 brews
with a Zymatic cleaning tablet.
50 51
your machine, and your Zymatic will send an error log to
PicoBrew’s customer support team.
Page 27

Continue from Last Brew: If your Zymatic ran into an error
and stopped your brew, and it is now safe to continue the
brew, select this option to continue where it left off.
Wifi Diagnostics: This option runs a diagnostics test to help
PicoBrew support personnel determine the cause of any
issues you may encounter with your Zymatic.
About Zymatic
Information regarding account details, serial numbers, and
firmware version.
6.2 Brew Menu
Pressing the control knob during a brew displays the Brew
Menu. Note that brewing continues while the Brew Menu is
shown.
Next Step
Skips brewing immediately to the next programmed step in
the brew. It does not recognize programmed drains, however,
so use caution if you are skipping through during mash, as it
will not automatically drain.
Drain
Flow from the keg will stop, and the Zymatic will drain the
step filter until you press Continue.
Continue
Leaves the menu and returns to brewing. The time and
temperature regulation continues while you are in the
menu, although it will not move to a new step until you leave
the menu.
52 53
SECTION 6: MENU SCREENS - CONTINUED
Exit Brew
Exits brew immediately and goes to the main menu. Use
caution as this will also skip all programmed drains and will
not continue where you left off.
Page 28

SECTION 7
Troubleshooting
My Zymatic won’t turn on.
‒ Ensure the GFCI plug is securely inserted into the
back of the Zymatic and into your outlet.
‒ Try resetting the GFCI by pressing “Reset” on the
brick. The green light on the brick should turn off and
back on.
‒ Check fans: if the Zymatic fan is not running, your
machine is not on.
My Zymatic reset.
‒ “Power failure”: Your Zymatic is designed to detect
power interruptions and offer you the ability to
pick up brewing where it left off. If your machine
shows this error screen, you may have had a power
fault. If power service seems normal, restart the brew
by selecting “Continue From Last Brew” from the
Help Menu.
‒ “Error#”: Your Zymatic encountered a critical error
that required a system reset. After verifying there is
no obvious fault in the system (for example, the step
filter is in place and the correct hoses are attached
and not blocked), you can continue the brew by
selecting “Continue from Last Brew” from the Help
menu. If the Zymatic does not continue the brew or
displays additional error messages, please contact
PicoBrew support personnel.
My Zymatic is leaking.
‒ If you see puddles of wort underneath your machine
or see it spilling from the sides, stop brewing
immediately, run a drain cycle, and remove your step
filter from the Zymatic.
‒ Thoroughly check your step filter for any cracks in
the plastic.
‒ Check that both hoses are tightened and washers are
in place.
‒ If you suspect the spilling was caused by the nozzle
missing the holes in the lid (in this case, there will be
a large puddle of wort on the lid), please dry off all
surfaces and check to see if the nozzle aligns with the
mash hole in front upon restart. If not, please contact
PicoBrew Product Support.
During mash, the fluid level is not covering my grain and I
didn’t hit my target gravity.
‒ This is a sign of a slowed flow, typically caused by
a lack of cleaning. Try a deep clean on the machine.
Remember to clean out the inline filter after
every brew.
‒ Make sure to use the amount of water given in the
recipe. If you are emptying your keg of water before
the mash compartment fills up, you will end up with
dry grain.
‒ You may be grinding your grain too fine which can clog
the drain.
During a heating cycle or a boil cycle, the fluid level is
rising into the mash.
‒ This is a sign of a slowed drain pump, typically caused
by a lack of cleaning. Try a deep clean on the machine
and include 1 tablespoon of Pro Brewer’s Wash,
especially if you haven’t cleaned the machine recently.
There is no flow into or out of the keg during a brew.
‒ Make sure your ball locks are correctly attached. You
should hear a small click when pushing them onto the
keg posts.
‒ Make sure your dip tube is not clogged.
‒ Make sure hoses and washers are in place and secure.
I am consistently missing target gravity, even when
following the recipe.
‒ If you are consistently low on gravity, there are a few
things that could be interfering with your efficiency.
Water chemistry and grind of the grain are the two
most likely factors. Most cities have a water report
available online for free—if you have very soft or hard
water, it may not be ideal for your mash and you may
need to use brewing salts to amend your water. Grind
size of the grains can vary with different homebrew
shops—the Zymatic can handle finely ground grains
without getting a stuck mash, so a finer grind may be
the solution to your low efficiency. A note of caution,
never grind flaked grains or adjuncts such as oats,
rice, etc.
54 55
Page 29

My display went black, but the Zymatic is still running.
‒ Check the back of your Zymatic and look at the fan
in the top center. If the Zymatic is on, the fan should
be running. If it is not running, your display was likely
overheated and shut off. Please contact PicoBrew
Product Support for further information.
My hops cage lids are too loose and keep popping off.
‒ If this happens to you, please contact PicoBrew
Product Support. Included with your kit are 4 orange
silicone bands that can be wrapped around a cage if a
lid is too loose.
If you have any problems, questions, or comments, contact
PicoBrew:
• Email: [email protected]
• Submit a Support Request Ticket: http://www.
picobrew.com
• Support Forums: http://picobrew.com/forum
56 57
SECTION 6: TROUBLE SHOOTING - CONTINUED
Page 30

NOTES:
58 59
SECTION 6: TROUBLE SHOOTING - CONTINUED
Page 31

60 61
SECTION 6: TROUBLE SHOOTING - CONTINUED
Page 32

62 63
SECTION 6: TROUBLE SHOOTING - CONTINUED
Page 33

 Loading...