

Page 1
Page 2

Dear Customer,
Thank you for having chosen one of our products, which is the result of years of experience and continuous research aimed at making a
superior product in terms of safety, reliability and performance.
T
his booklet contains information and advice for safe and efficient use of your product.
D
T2010001-01
See the guarantee certificate enclosed with the product for the terms, limitations and exclusions.
In line with its policy of constant product improvement and renewal, the manufacturer may make changes without notice.
This document is the property of Gruppo Piazzetta S.p.A.; no part of it may be disclosed to third parties without the written permission
of Gruppo Piazzetta S.p.A.
All rights reserved by Gruppo Piazzetta S.p.A..
• This instruction booklet has been prepared by the manufacturer
and is an integral part of the product. In the event of sale or
relocation of the product make sure this booklet accompanies it,
since the information contained in it is addressed to the purchaser
and to anyone involved in the installation, use and maintenance
of the product.
• Read the instructions and the technical information contained in
this booklet carefully before proceeding with installation, use or
any repairs.
• The observance of the instructions and technical information in
this instruction booklet guarantees the safety of persons and
property; it also ensures more efficient operation and an increased
lifespan.
• Gruppo Piazzetta S.p.A. cannot be held responsible for damage or
injury due to failure to comply with the instructions for
installation, use and maintenance given in this booklet, or due to
unauthorised alterations or to the use of other than original spare
parts.
• Appliance installation and use must conform with the
manufacturer’s instructions as well as with European and national
legislation and local regulations.
• The wall against which the product is to be placed must not be of
wood or any other flammable material. For correct installation it
is also important to maintain safety distances (refer to the section
entitled “MINIMUM SAFETY DISTANCES”).
• Prior to completing installation of the surround, light the heating
appliance and when it has heated up check that the grate and that
the flue connection is correct.
• Check that the floor where the product is to be installed is
perfectly level.
• Do not fix the heating appliance in any way whatsoever, but simply
place it next to the surround.
• When handling the steel parts of the surround or the ceramic
parts it is advisable to use clean cotton gloves to avoid leaving
fingerprints that are difficult to remove at first time of cleaning.
• The fireplace/stove must be assembled by two persons.
• This appliance has been designed solely for heating. It is not
recommended for cooking foods.
• Stop using the appliance in the event of fault or malfunctioning.
• The product you have purchased may differ slightly from the one
illustrated in this booklet since the pictures are only given as an
indication and not an exact portrayal.
UNI EN 832 . . . . . . . . . . . . . . . . . . . . . . . .Thermal performance of buildings - Calculation of energy use for heating
UNI EN 13229 . . . . . . . . . . . . . . . . . . . . . .Inset appliances including open fires fired by solid fuels - Requirements and test methods
UNI 10683:2005 . . . . . . . . . . . . . . . . . . . . .Heating appliances fired by wood or other solid biofuels - Installation requirements
UNI EN 13384 . . . . . . . . . . . . . . . . . . . . . .Chimneys - Thermal and fluid dynamic calculation methods
UNI 7129 . . . . . . . . . . . . . . . . . . . . . . . . . .Gas plants for domestic use fed by network distribution
UNI 10847 . . . . . . . . . . . . . . . . . . . . . . . . .Chimneys for generators feeded with liquid and solid flues - Maintenance and inspection
EN 1856-1 . . . . . . . . . . . . . . . . . . . . . . . . .Chimneys - Requirements for metal chimneys - Part 1: System chimney products
EN 1856-2 . . . . . . . . . . . . . . . . . . . . . . . . .Chimneys - Requirements for metal chimneys - Part 2: Metal liners and connecting flue pipes
UNI EN 1443 . . . . . . . . . . . . . . . . . . . . . . .Chimneys – General requirements
DIN 18 895 . . . . . . . . . . . . . . . . . . . . . . . . .Fireplaces
DIN 51731 class of measurement HP2 . .Fuels
IMPORTANT INFORMATION
D
T2010139-00
REFERENCE STANDARDS
DT2010140-02
H07025140 / DT2000666 - Rev. 02
40
English
Page 3

CONTENTS
DT2010187-01
S
ECTION TITLE . . . . . . . . . . . . . . . . . . . . . . . . . . . . . . . . . . . . . . . . . . . . . . . . . . . . . . . . . . . . . . . . . . . . . . . . . . . . . . . . . . . . . . . . . . . .PAGE
1.0 GENERAL RULES . . . . . . . . . . . . . . . . . . . . . . . . . . . . . . . . . . . . . . . . . . . . . . . . . . . . . . 42
1
.1 SINGLE FLUEWAY OR CHIMNEY . . . . . . . . . . . . . . . . . . . . . . . . . . . . . . . . . . . . . . . . . . 43
1.2 SOOT INSPECTION . . . . . . . . . . . . . . . . . . . . . . . . . . . . . . . . . . . . . . . . . . . . . . . . . . . . . 43
1.3 CHIMNEY STACK . . . . . . . . . . . . . . . . . . . . . . . . . . . . . . . . . . . . . . . . . . . . . . . . . . . . . . 44
1
.4 FRESH AIR INTAKE . . . . . . . . . . . . . . . . . . . . . . . . . . . . . . . . . . . . . . . . . . . . . . . . . . . . . 45
1.5 INSTALLATION ENVIRONMENT . . . . . . . . . . . . . . . . . . . . . . . . . . . . . . . . . . . . . . . . . . . 46
1.6 CAPACITY LOAD OF THE FLOOR . . . . . . . . . . . . . . . . . . . . . . . . . . . . . . . . . . . . . . . . . . 46
1
.7 HEATING CAPACITY . . . . . . . . . . . . . . . . . . . . . . . . . . . . . . . . . . . . . . . . . . . . . . . . . . . . 46
1.8 SUITABLE HEAT INSULATING MATERIALS . . . . . . . . . . . . . . . . . . . . . . . . . . . . . . . . . . . 47
1.9 MINIMUM SAFETY DISTANCES . . . . . . . . . . . . . . . . . . . . . . . . . . . . . . . . . . . . . . . . . . . 47
1.10 CONNECTION TO THE FLUEWAY . . . . . . . . . . . . . . . . . . . . . . . . . . . . . . . . . . . . . . . . . . 48
1.11 LINING WALL . . . . . . . . . . . . . . . . . . . . . . . . . . . . . . . . . . . . . . . . . . . . . . . . . . . . . . . . . 49
1.12 HOOD GRILLE . . . . . . . . . . . . . . . . . . . . . . . . . . . . . . . . . . . . . . . . . . . . . . . . . . . . . . . . 49
1.13 WOOD MANTEL PROTECTION . . . . . . . . . . . . . . . . . . . . . . . . . . . . . . . . . . . . . . . . . . . . 49
1.14 PREVENTION OF DOMESTIC FIRES . . . . . . . . . . . . . . . . . . . . . . . . . . . . . . . . . . . . . . . . 50
2.0 TECHNICAL DATA AND SPECIFICATIONS . . . . . . . . . . . . . . . . . . . . . . . . . . . . . . . . . . . . 51
2.1 DESCRIPTION OF THE APPLIANCE . . . . . . . . . . . . . . . . . . . . . . . . . . . . . . . . . . . . . . . . 51
2.2 FEATURES . . . . . . . . . . . . . . . . . . . . . . . . . . . . . . . . . . . . . . . . . . . . . . . . . . . . . . . . . . . 51
2.3 TECHNICAL DATA . . . . . . . . . . . . . . . . . . . . . . . . . . . . . . . . . . . . . . . . . . . . . . . . . . . . . . 52
2.4 PRODUCT IDENTIFICATION DATA . . . . . . . . . . . . . . . . . . . . . . . . . . . . . . . . . . . . . . . . . 52
2.5 ACCESSORIES . . . . . . . . . . . . . . . . . . . . . . . . . . . . . . . . . . . . . . . . . . . . . . . . . . . . . . . . 53
2.6 DIMENSION MT 361 OPEN TANK . . . . . . . . . . . . . . . . . . . . . . . . . . . . . . . . . . . . . . . . . . 56
2.7 DIMENSION MT 361 CLOSED TANK . . . . . . . . . . . . . . . . . . . . . . . . . . . . . . . . . . . . . . . . 56
3.0 SAFETY DEVICES . . . . . . . . . . . . . . . . . . . . . . . . . . . . . . . . . . . . . . . . . . . . . . . . . . . . . . 57
3.1 TEMPERATURE/PRESSURE RELIEF VALVE . . . . . . . . . . . . . . . . . . . . . . . . . . . . . . . . . . 57
3.2 EXPANSION TANK . . . . . . . . . . . . . . . . . . . . . . . . . . . . . . . . . . . . . . . . . . . . . . . . . . . . . 58
3.3 VENT AND EXPANSION PIPE . . . . . . . . . . . . . . . . . . . . . . . . . . . . . . . . . . . . . . . . . . . . . 59
3.4 SELF-OPERATED SAFETY VALVE . . . . . . . . . . . . . . . . . . . . . . . . . . . . . . . . . . . . . . . . . . 59
4.0 INSTALLATION . . . . . . . . . . . . . . . . . . . . . . . . . . . . . . . . . . . . . . . . . . . . . . . . . . . . . . . . 61
4.1 HANDLING - UNPACKING . . . . . . . . . . . . . . . . . . . . . . . . . . . . . . . . . . . . . . . . . . . . . . . . 61
4.2 PREPARATIONS FOR INSTALLATION . . . . . . . . . . . . . . . . . . . . . . . . . . . . . . . . . . . . . . . 62
4.3 INSTALLATION OF THE SMOKE DAMPER . . . . . . . . . . . . . . . . . . . . . . . . . . . . . . . . . . . 63
4.4 PLUMBING . . . . . . . . . . . . . . . . . . . . . . . . . . . . . . . . . . . . . . . . . . . . . . . . . . . . . . . . . . . 64
4.5 FILLING THE SYSTEM . . . . . . . . . . . . . . . . . . . . . . . . . . . . . . . . . . . . . . . . . . . . . . . . . . 67
5.0 USE . . . . . . . . . . . . . . . . . . . . . . . . . . . . . . . . . . . . . . . . . . . . . . . . . . . . . . . . . . . . . . . . . 68
5.1 FUEL . . . . . . . . . . . . . . . . . . . . . . . . . . . . . . . . . . . . . . . . . . . . . . . . . . . . . . . . . . . . . . . . 68
5.2 SMOKE DAMPER REGULATION . . . . . . . . . . . . . . . . . . . . . . . . . . . . . . . . . . . . . . . . . . . 69
5.3 COMBUSTION AIR REGULATION . . . . . . . . . . . . . . . . . . . . . . . . . . . . . . . . . . . . . . . . . . 70
5.4 LIGHTING FOR THE FIRST TIME . . . . . . . . . . . . . . . . . . . . . . . . . . . . . . . . . . . . . . . . . . 70
5.5 LIGHTING . . . . . . . . . . . . . . . . . . . . . . . . . . . . . . . . . . . . . . . . . . . . . . . . . . . . . . . . . . . . 71
5.6 OPENING THE DOOR . . . . . . . . . . . . . . . . . . . . . . . . . . . . . . . . . . . . . . . . . . . . . . . . . . . 71
5.7 OPERATION UNDER ADVERSE WEATHER CONDITIONS . . . . . . . . . . . . . . . . . . . . . . . . 71
5.8 OVERHEATING AND EXTINGUISHING . . . . . . . . . . . . . . . . . . . . . . . . . . . . . . . . . . . . . . 71
6.0 MAINTENANCE . . . . . . . . . . . . . . . . . . . . . . . . . . . . . . . . . . . . . . . . . . . . . . . . . . . . . . . . 72
6.1 PERIODIC CONTROL . . . . . . . . . . . . . . . . . . . . . . . . . . . . . . . . . . . . . . . . . . . . . . . . . . . 72
6.2 CLEANING THE CERAMIC CLADDING . . . . . . . . . . . . . . . . . . . . . . . . . . . . . . . . . . . . . . 72
6.3 CLEANING THE STEEL PARTS . . . . . . . . . . . . . . . . . . . . . . . . . . . . . . . . . . . . . . . . . . . . 72
6.4 CLEANING THE PAINTED METAL PARTS . . . . . . . . . . . . . . . . . . . . . . . . . . . . . . . . . . . . 72
6.5 CLEANING THE GLASS (DAILY) . . . . . . . . . . . . . . . . . . . . . . . . . . . . . . . . . . . . . . . . . . . 73
6.6 CLEANING THE GRATE AND THE ASH DRAWER (EVERY DAY) . . . . . . . . . . . . . . . . . . . 73
6.7 DISPOSAL OF ASHES . . . . . . . . . . . . . . . . . . . . . . . . . . . . . . . . . . . . . . . . . . . . . . . . . . . 73
6.8 CLEANING ALUKER
®
. . . . . . . . . . . . . . . . . . . . . . . . . . . . . . . . . . . . . . . . . . . . . . . . . . . 73
6.9 CLEANING THE SMOKE BAFFLE PLATE AND BOILER . . . . . . . . . . . . . . . . . . . . . . . . . . 74
6.10 MAINTENANCE OF THE WATER SYSTEM . . . . . . . . . . . . . . . . . . . . . . . . . . . . . . . . . . . . 75
6.11 WHEN THE BOILER STOVE HAS NOT BEEN USED FOR SOME TIME . . . . . . . . . . . . . . . 75
6.12 DOOR CLOSING SYSTEM . . . . . . . . . . . . . . . . . . . . . . . . . . . . . . . . . . . . . . . . . . . . . . . . 75
7.0 TROUBLESHOOTING . . . . . . . . . . . . . . . . . . . . . . . . . . . . . . . . . . . . . . . . . . . . . . . . . . . 76
H07025140 / DT2000666 - Rev. 02
41
English
This booklet code H07025140 / DT2000666 - Rev. 02 - (12/2010) comprises 80 pages.
Page 4
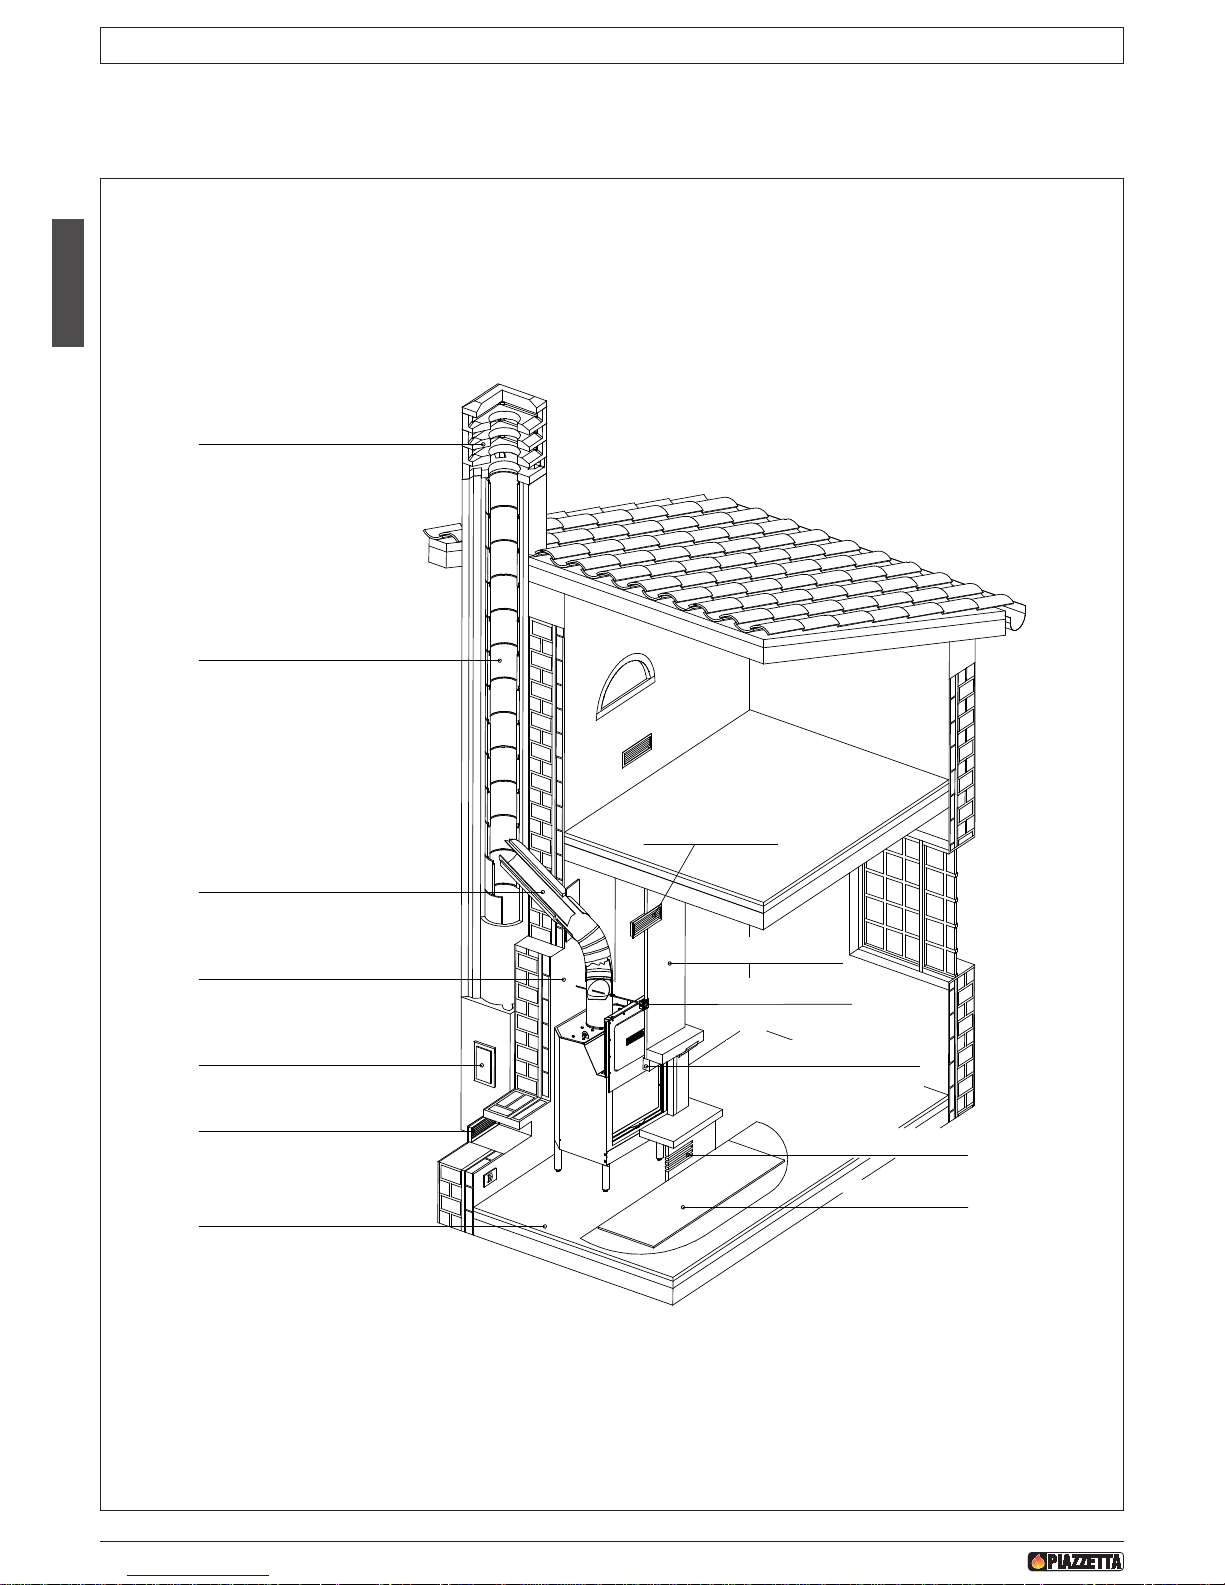
1.0 GENERAL RULES
DT2011911-00
Before proceeding with installation, choose the most suitable position for your fireplace according to the indications given in the section
“MINIMUM SAFETY DISTANCES” and to all the indications below.
DT2033152-00
FLOOR
PROTECTION
CHIMNEY STACK
FLUE
CONNECTION TO FLUE
SAFETY DISTANCES
SOOT REMOVAL
INSPECTION HOLE
FRESH AIR INTAKE
CHECK FLOOR
LOAD-BEARING CAPACITY
FIXED OPENING
SMOKE DAMPER
ADJUSTMENT
LINING WALL
HOOD GRILLE
PROTECTION FOR
ORNAMENTAL LEDGE
F
ig. 1
H07025140 / DT2000666 - Rev. 02
42
English
Page 5
DT2010169-00
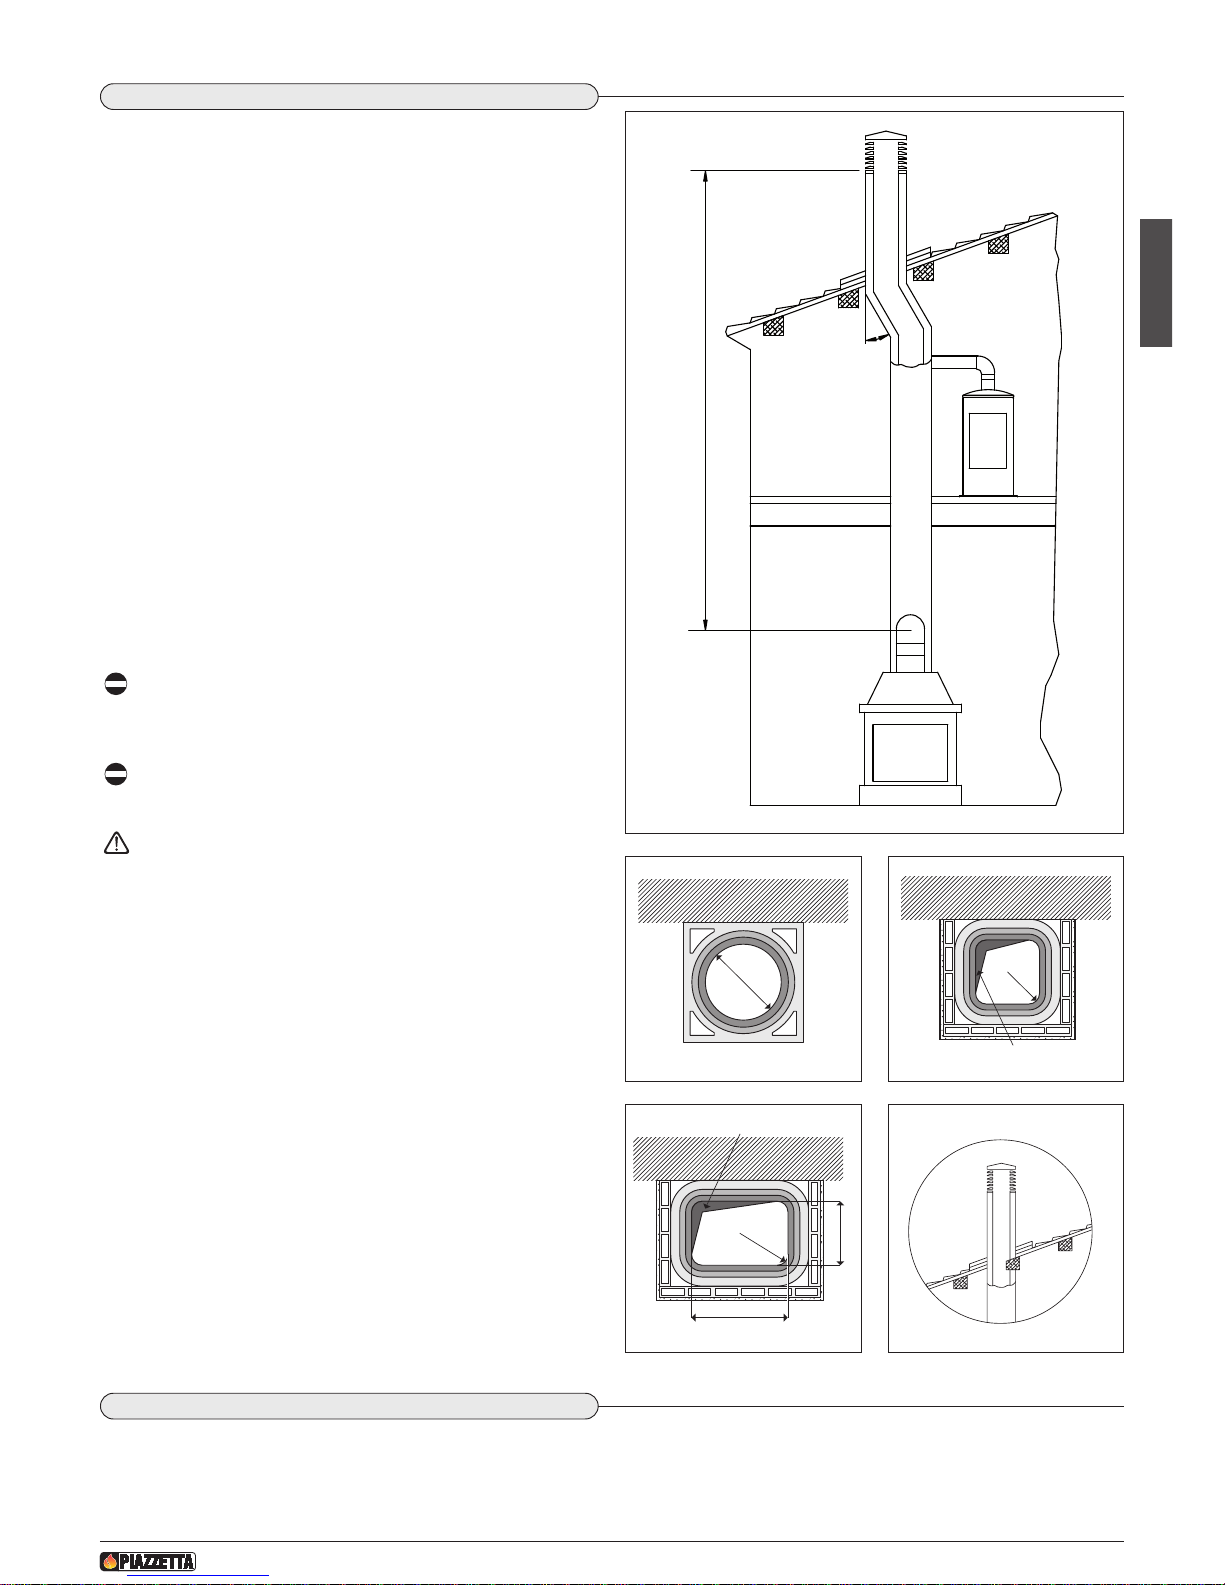
1.1 SINGLE FLUEWAY OR CHIMNEY
Every appliance must have a vertical flue pipe operating by natural
draught to discharge the combustion gases outdoors.
T
he flue must:
- comply with regulations in force in the place of installation of the
appliance;
- be tight to the products of combustion, waterproof, suitably
insulated and made with materials resistant to corrosion by the
g
ases and to stress;
- be connected to just one stove, fireplace or extraction hood;
- be properly sized, with constant free internal section, equal to or
greater than the diameter of the flue pipe of the stove and at least
3.5 m in length;
- be mainly in a vertical position with a deflection from the axis of no
more than 45° (Fig. 2);
- be at a suitable distance from combustible or flammable materials,
ensured by an air gap or suitable insulating material;
- be of uniform internal section, preferably round. Square or
rectangular sections must have rounded corners with a radius of at
least 20mm and a maximum ratio between the sides of 1.5
(Fig. 3-4-5);
- have smooth walls if possible and without narrowing. Bends must
be regular and without discontinuity (Fig. 6).
It is forbidden to make fixed or mobile apertures on the flue
to connect appliances other than the one to which it is already
connected.
It is forbidden to pass other air ducts or service pipes inside
the flue, however large it is.
If the flue is an incorrect size or installed other than in
compliance with the above instructions, Gruppo Piazzetta
S.p.A. cannot be held liable for malfunctioning of the
appliance, damage to property or injury to persons or
animals.
DT2010031-01
1.2 SOOT INSPECTION
We recommend that the flue have a chamber for collecting solid matter and any condensate located below the connection and which may
be easily inspected by means of an airtight door. (Fig.1)
D
T2030258-00
DT2030050-00
Fig. 2
Fig. 3
MAX 45°
NO
X
MINIMUM 3.5 M
Ø
DT2030188-00
Fig. 4
R (
min
.
2
0
)
D
epos
i
t
of
c
reos
ot
e
DT2030189-00
Fig. 5
P
R (m
in.
20)
L (<_ 1.5 x P)
Deposit of creosote
DT2030190-00
Fig. 6
NO
H07025140 / DT2000666 - Rev. 02
43
English
Page 6
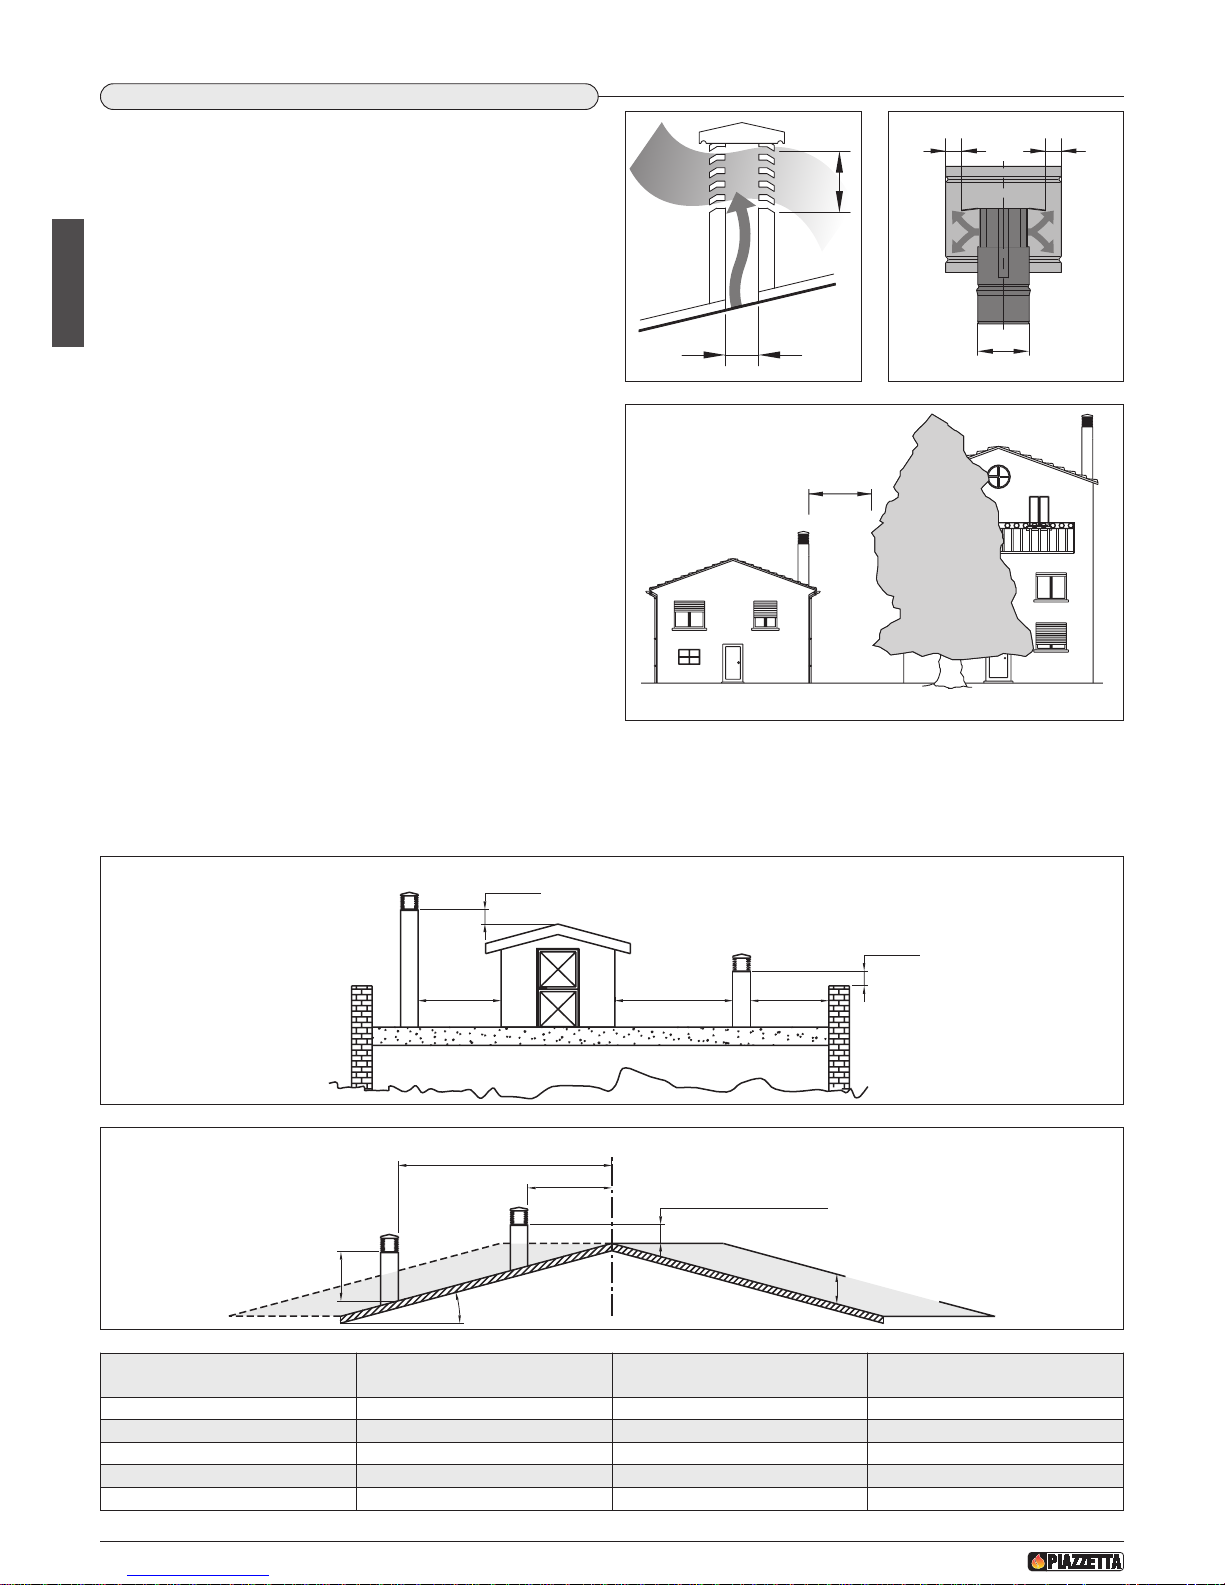
The chimney stack is a device fitted on the top of the chimney that is
designed to aid dispersion of the flue gas into the atmosphere.
The chimney stack must comply with the following requirements:
-
it must have an internal section and shape the same as the flue (A);
- it must have a useful outlet section (B) of not less than twice that of
the flue (A);
- the part of the chimney that emerges from the roof or remains in
contact with the outside (e.g. in the case of a flat roof), must be
c
overed with brick or tile elements and in any case be well insulated;
- It must be built in such a way as to prevent the penetration of rain,
snow and foreign matter into the flue and to ensure that in the event
of winds from all directions and angle, discharge of the combustion
products is assured (chimney stack with down-draught cowl).
Recommended distances for correct chimney operation.
To ensure trouble-free operation of the chimney and allow correct
dispersion of the flue gas in the air, the chimney stack must be
installed at the distances given below:
- 6-8 metres from any buildings or other obstacles that are higher
than the chimney stack;
- 50 centimetres higher than any obstacles located at a distance less
than 5 metres away;
- outside the reflux area. The size and shape of this area differ
according to the angle of inclination of the roof and it is therefore
necessary to adopt the minimum heights shown below.
Example: Check the slope of the roof (column α), and the
anticipated distance of the chimney stack from the axis of the ridge (column A); if the distance is greater than “A” the height of the chimney
stack may be read in (column H); if the distance is less than “A” the chimney stack must rise above the ridge by 0.5 metres.
6
-8 m
A
B*
* B is
double A
A
B
B
FLAT ROOF
0.50 m
0.50 m
over 5 m5 m
or less
5 m
or less
FLAT ROOF
SLOPING ROOF
0.50 m
0.50 m
0.50 m above the ridge
height of reflux
area Z
ridge axis
distance more than A
α
H min.
distance
less than A
over 5 m5 m
or less
5 m
or less
Pitch of the roof
Horizontal width of reflux
area from ridge axis
Minimum height of
outlet from roof
Height of reflux area
αα
A Minimum H Z
15° 1.85 m 1.00 m 0.50 m
30° 1.50 m 1.30 m 0.80 m
45° 1,30 m 2.00 m 1.50 m
60° 1.20 m 2.60 m 2.10 m
Fig. 7 Fig. 8
F
ig. 9
Fig. 10
Fig. 11
DT2030051-00
D
T2030052-00
DT2030053-00
DT2030192-00
DT2030191-00
1.3 CHIMNEY STACK
DT2010025-03
H07025140 / DT2000666 - Rev. 02
44
English
Page 7
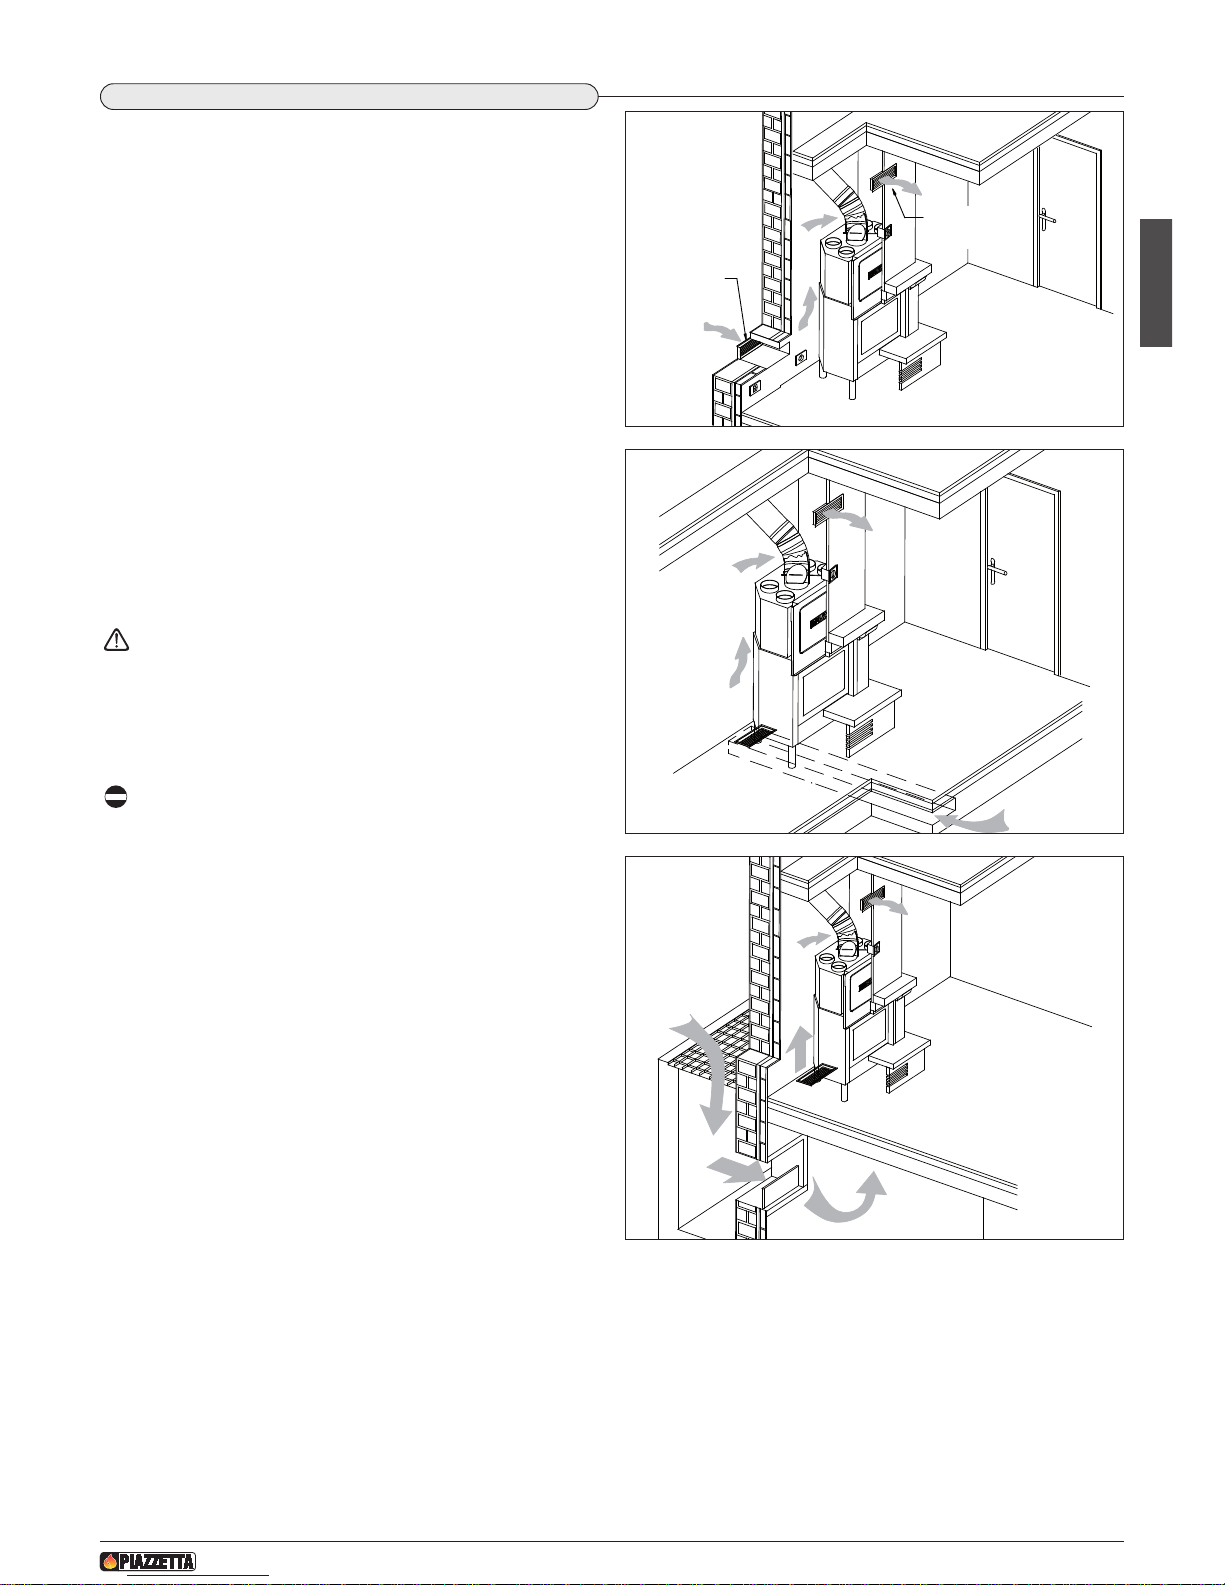
To ensure trouble-free operation the stove/fireplace must have the
necessary air available for combustion and this is provided through
the fresh air intake.
The fresh air intake must:
- have a total free cross section at least equal to the size given under
“TECHNICAL DATA”;
- be protected by a grille or suitable guard provided it does not
r
educe the minimum recommended section;
- be in a position where it cannot be obstructed.
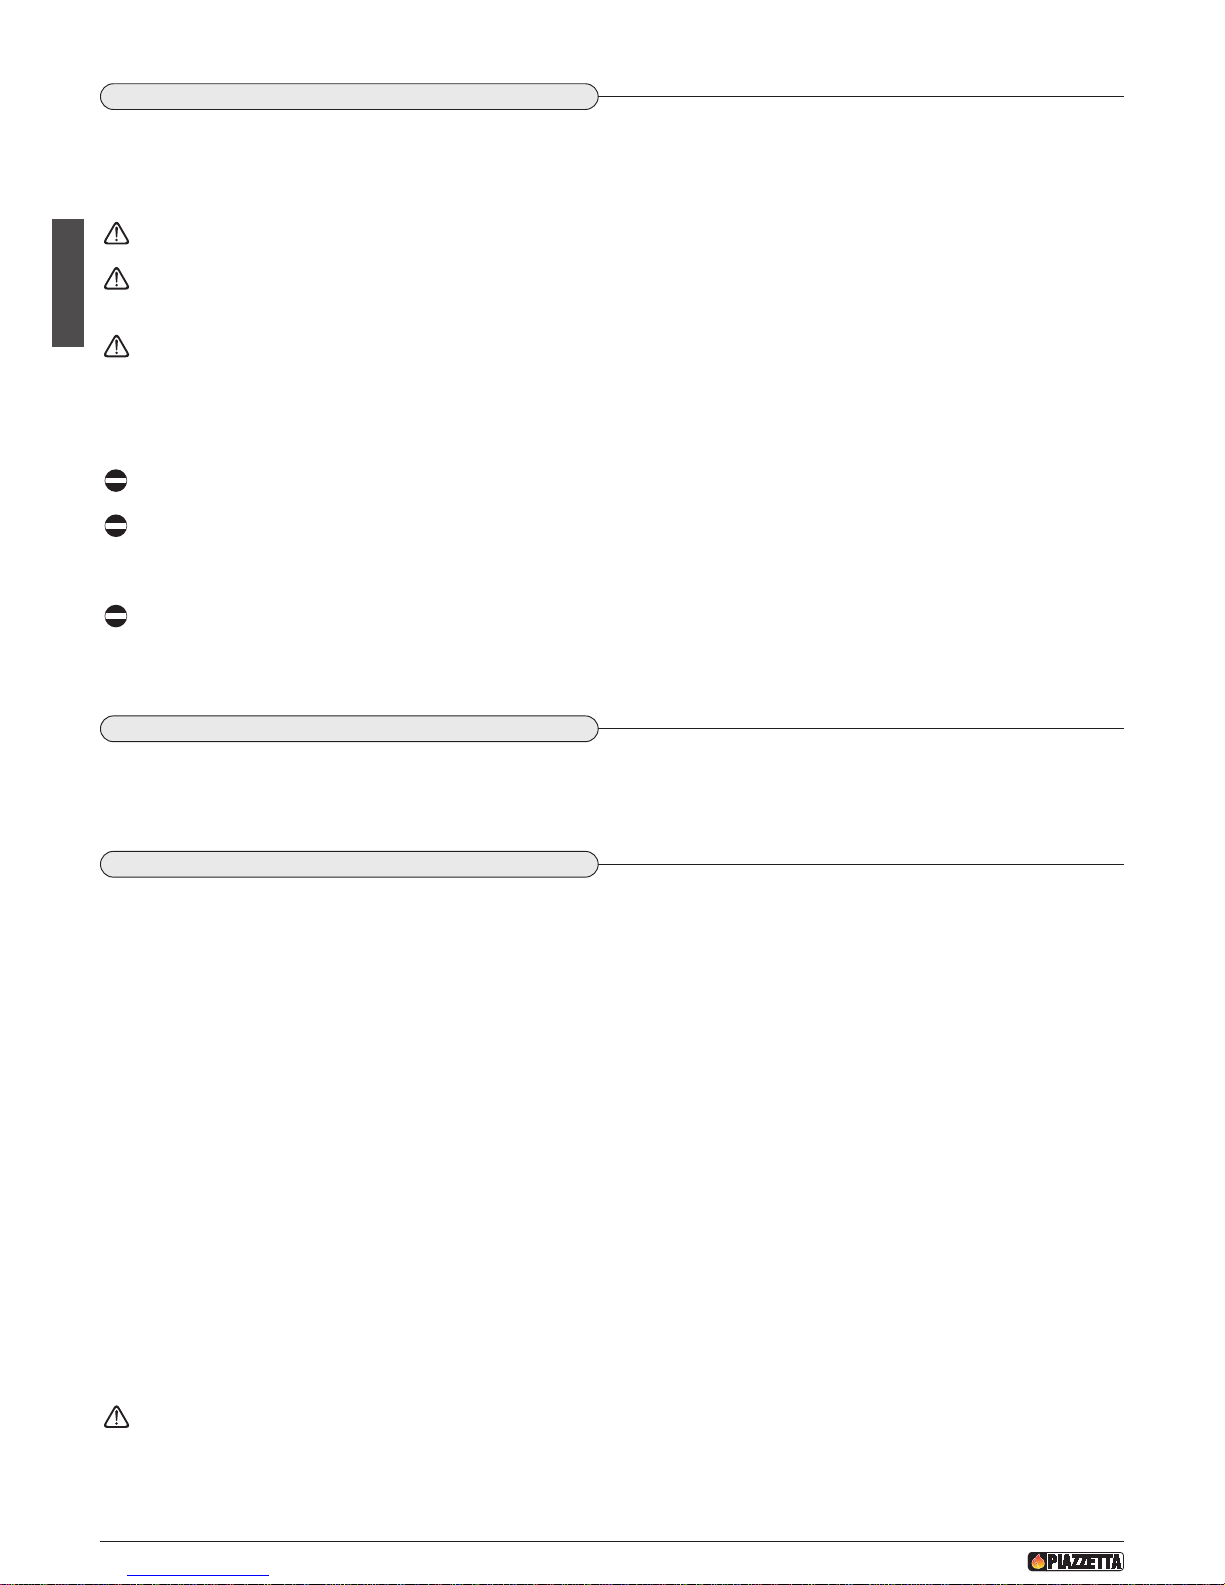
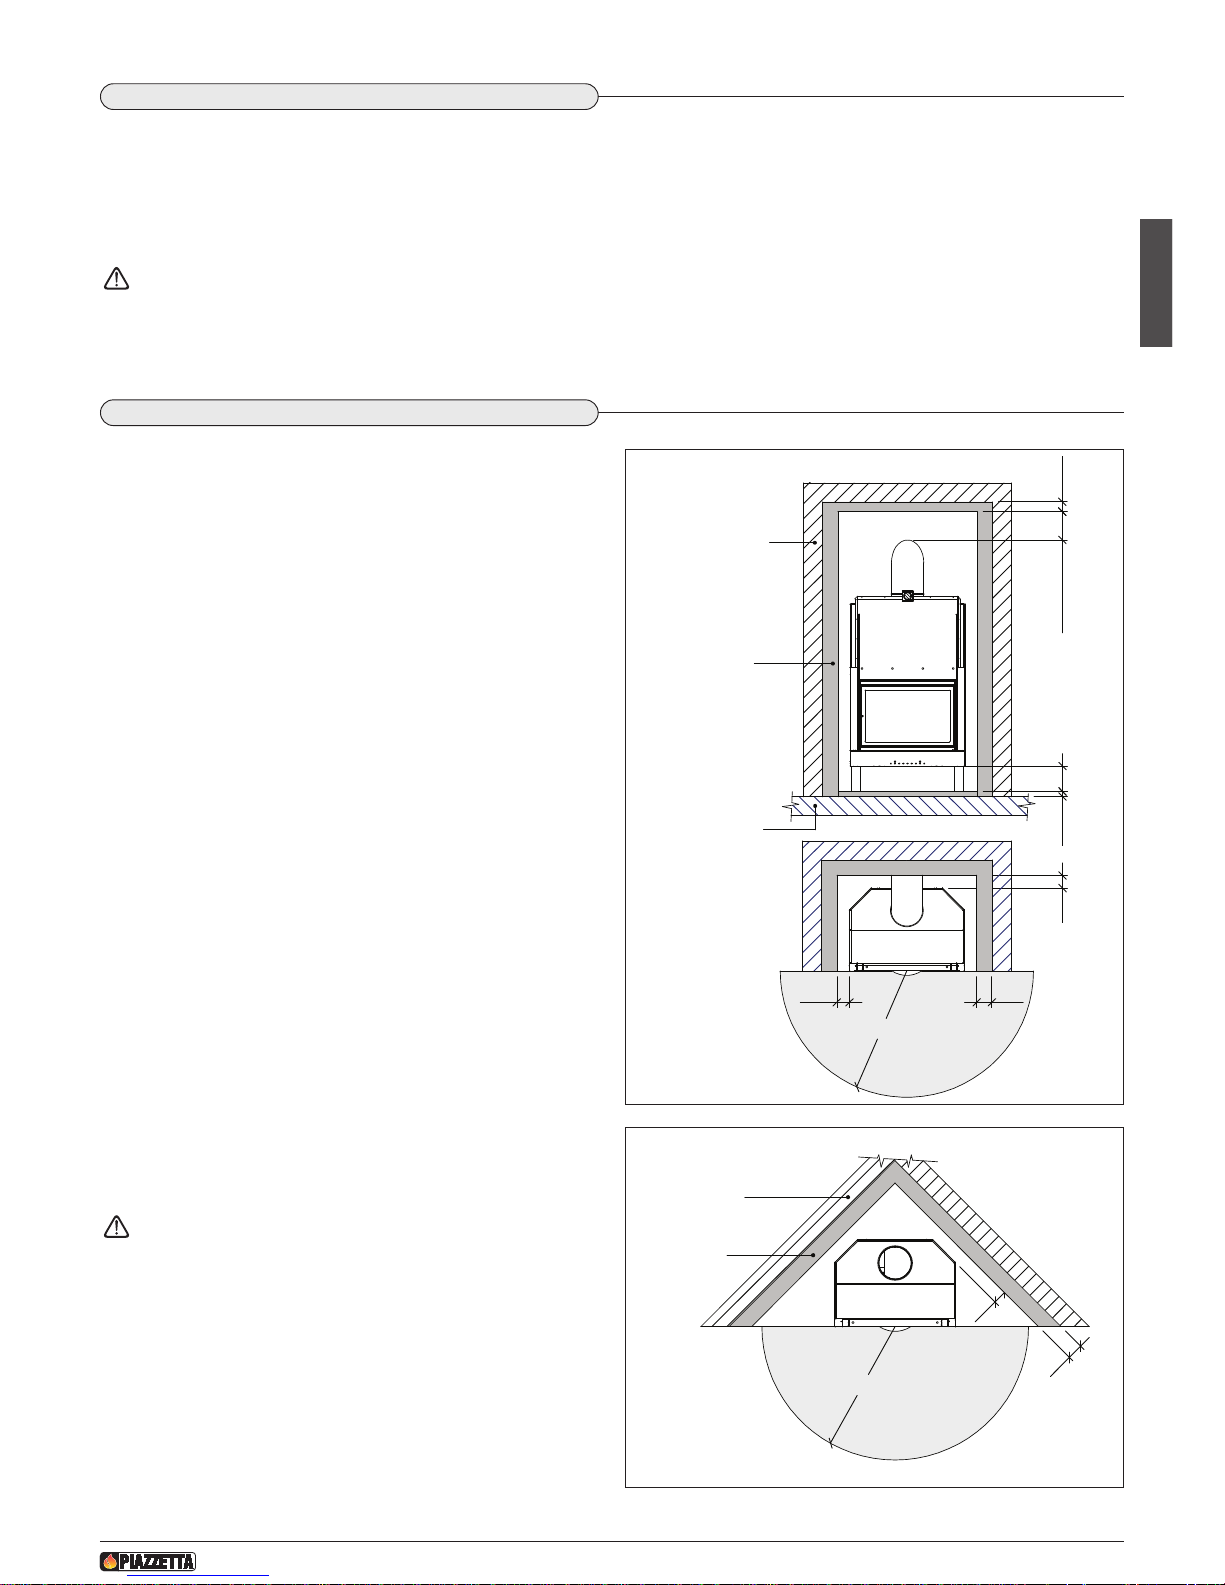
The airflow necessary for the fire may be obtained in different ways:
- through a fresh air intake direct into the room of installation (it is
advisable to place the air intake behind the appliance so that the air
warms up before flowing into the room through the hood grille);
- with ducting through pipes direct to the room of installation,
increasing the recommended minimum free cross section by at
least 15%;
- from an adjacent room to the place of installation provided this air
flows freely through permanent apertures communicating with the
outside.
The pressure in the adjacent room from which air is taken
must not be lower than the exterior pressure because of a
counter draught caused by the presence in that room of
another appliance in use or of a suction device.
The permanent apertures in the adjacent room must comply
with the requirements given above.
Combustion air must not be taken from adjacent rooms used
as a garage or a combustible materials store or for activities
posing a fire hazard.
1.4 FRESH AIR INTAKE
DT2010170-01
H07025140 / DT2000666 - Rev. 02
45
English
Fig. 13
D
T2030260-01
Fresh air
intake
H
ood
grille
Fig. 12
D
T2030259-01
Fig. 14
DT2030261-01
Page 8
DT2010033-01
1.5 INSTALLATION ENVIRONMENT
The appliance must be installed in a location which allows safe and convenient use as well as easy maintenance. If the appliance being
installed requires an electrical socket, the room must also be provided with an earthed power supply in accordance with current regulations.
T
he room where the appliance is to be installed must comply with the following requirements:
it must not be used as a garage, store for combustible material or for activities posing a fire hazard;
it must not be in a vacuum in relation to the outside environment due to the effect of contrary draught caused by the presence in
t
he room where the appliance is installed of another appliance or an extractor device.
Do not use two stoves, a fireplace and a stove, a stove and a wood-fired cooking range, etc. in the same environment, since the
draught of one could affect the draught of the other.
- Devices suitable for cooking food with relative hoods without an extractor fan may only be used in kitchens.
- Gas appliances of type C are allowed (refer to current legislation and regulations in the place of installation)
Gas appliances of type B are not allowed (refer to current legislation and regulations in the place of installation)
The heating appliance must not be used simultaneously with collective type ventilation ducts with or without extractor fan, other
devices or other appliances such as: forced ventilation systems or other heating systems using ventilation to change the air. Such
systems could cause a vacuum in the environment of installation even if installed in adjoining or communicating rooms.
The appliance must not be used: in stairwells except in buildings with no more than two apartments; in corridors for common use;
in bedrooms; in bathrooms or shower-rooms.
D
T2010171-00
1.6 CAPACITY LOAD OF THE FLOOR
Check the load-bearing capacity of the floor by adding together: the weight of the protection (lining walls), insulating materials, surround (given
in the surround instruction booklet) and the appliance (given under “TECHNICAL DATA”).
If the floor has an unsuitable load-bearing capacity, take adequate countermeasures.
D
T2010130-01
1.7 HEATING CAPACITY
Check the heating capacity of the appliance by comparing the rated power given under
“TECHNICAL DATA”
with the power required by the
environment to be heated.
The energy requirement may be calculated approximately by multiplying the square metres of area by the height of the ceiling; the result is
then multiplied by a coefficient, which depends on the degree of insulation of the building, that is, on internal and external factors of the
dwelling, as described below.
a) Internal factors: type of window and door frames, thickness of the insulation and walls, type of building materials, presence of stairwells,
walls with extensive glazing, high ceilings, position of the rooms to be heated in relation to other adjacent heated or unheated rooms, …
b) External factors: geographical position, average outdoor temperature, exposure, wind speed, latitude, altitude, …
Example of approximate calculation of the energy requirement to heat a fixed volume to 18/20° C
The coefficient that is normally used is determined according to the real conditions as they occur case by case.
- From 0.04 to 0.05 kW per cubic metre in a well insulated environment
- From 0.05 to 0.06 kW per cubic metre in a poorly insulated environment
3 rooms measuring 20m2 X (H ceiling) 2.7m = 162 m
3
(volume)
In an environment with a good degree of insulation, an average value (coefficient) of 0.045 kW may be taken
162 (volume) X 0.045 (kW) = 7.3 kW necessary (6300 kcal/h)
Conversion 1kW = 860 kcal/h
Consult a heating technician or engineer for a correct check and calculation of the requirement of the environments to be heated
(see “REFERENCE STANDARDS”).
H07025140 / DT2000666 - Rev. 02
46
English
Page 9
English
DT2010173-01
1.8 SUITABLE HEAT INSULATING MATERIALS
Type of suitable heat insulating materials.
Material: mineral fibre; ceramic fibre; rock wool.
Form: sheets; mat; shells.
S
pecifications: specific weight of at least 245 kg/m³ with working temperature limit of at least 1000°C.
Thermal conductivity λ (400°C) ≤ 0.1 W/mK
Thickness: as shown in the figures under “MINIMUM SAFETY DISTANCES”.
If the insulating material is not lining the walls, it must be fixed all over the surface of the walls with anchorage points every
3
0cm.
Material coded “AGI Q132” or “DIN 18895” is allowed for heat insulation.
D
T2011906-00
1.9 MINIMUM SAFETY DISTANCES
WALLS
- FLAMMABLE WALLS: the heating appliance may be installed near
flammable walls provided suitable protection consisting of
insulating and non-combustible material is inserted.
To insulate the appliance and to install the surround correctly,
construct a lining wall in non-flammable material (e.g.
plasterboard) and insert a thick layer of insulating material “C”
between the two walls.
Always leave a gap “A” between the appliance and the lining wall.
(Fig. 15 - 16)
- NON-FLAMMABLE WALLS: always leave a gap of 5 cm between
the heating appliance and the lining wall.
CEILING
- FLAMMABLE CEILING: create an 8 cm false ceiling of non-
flammable material.
The minimum distance between the false ceiling and connection to
the flueway must be 20 cm, while the flue connection must be
insulated with at least 3 cm thick non-flammable material that is
resistant to high temperatures. (Fig. 15-16)
If the surround canopy and the flue connection are metal, the
minimum distance from the false ceiling may be reduced to 10 cm,
but the insulation of the connection to the flueway must be at least
6 cm thick.
- NON-FLAMMABLE CEILING: the minimum distance between the
ceiling and connection to the flueway must be 20 cm.
FLOOR
If the floor is made of flammable material, it must be protected with
a layer of insulating material of thickness “E” while an air space “D”
must be left between the heating appliance and the floor. (Fig. 15)
For insulation, use insulating material with the
characteristics given under “SUITABLE HEAT INSULATING
MATERIALS”.
H07025140 / DT2000666 - Rev. 02
47
English
A C
B E D
Flammable
wall
Insulating
material
Flammable
floor
R
8 cm20 cm min.
Fig. 15
DT2032811-00
A
C
R
Flammable
wall
Insulating
material
Fig. 16
DT2032812-00
Page 10
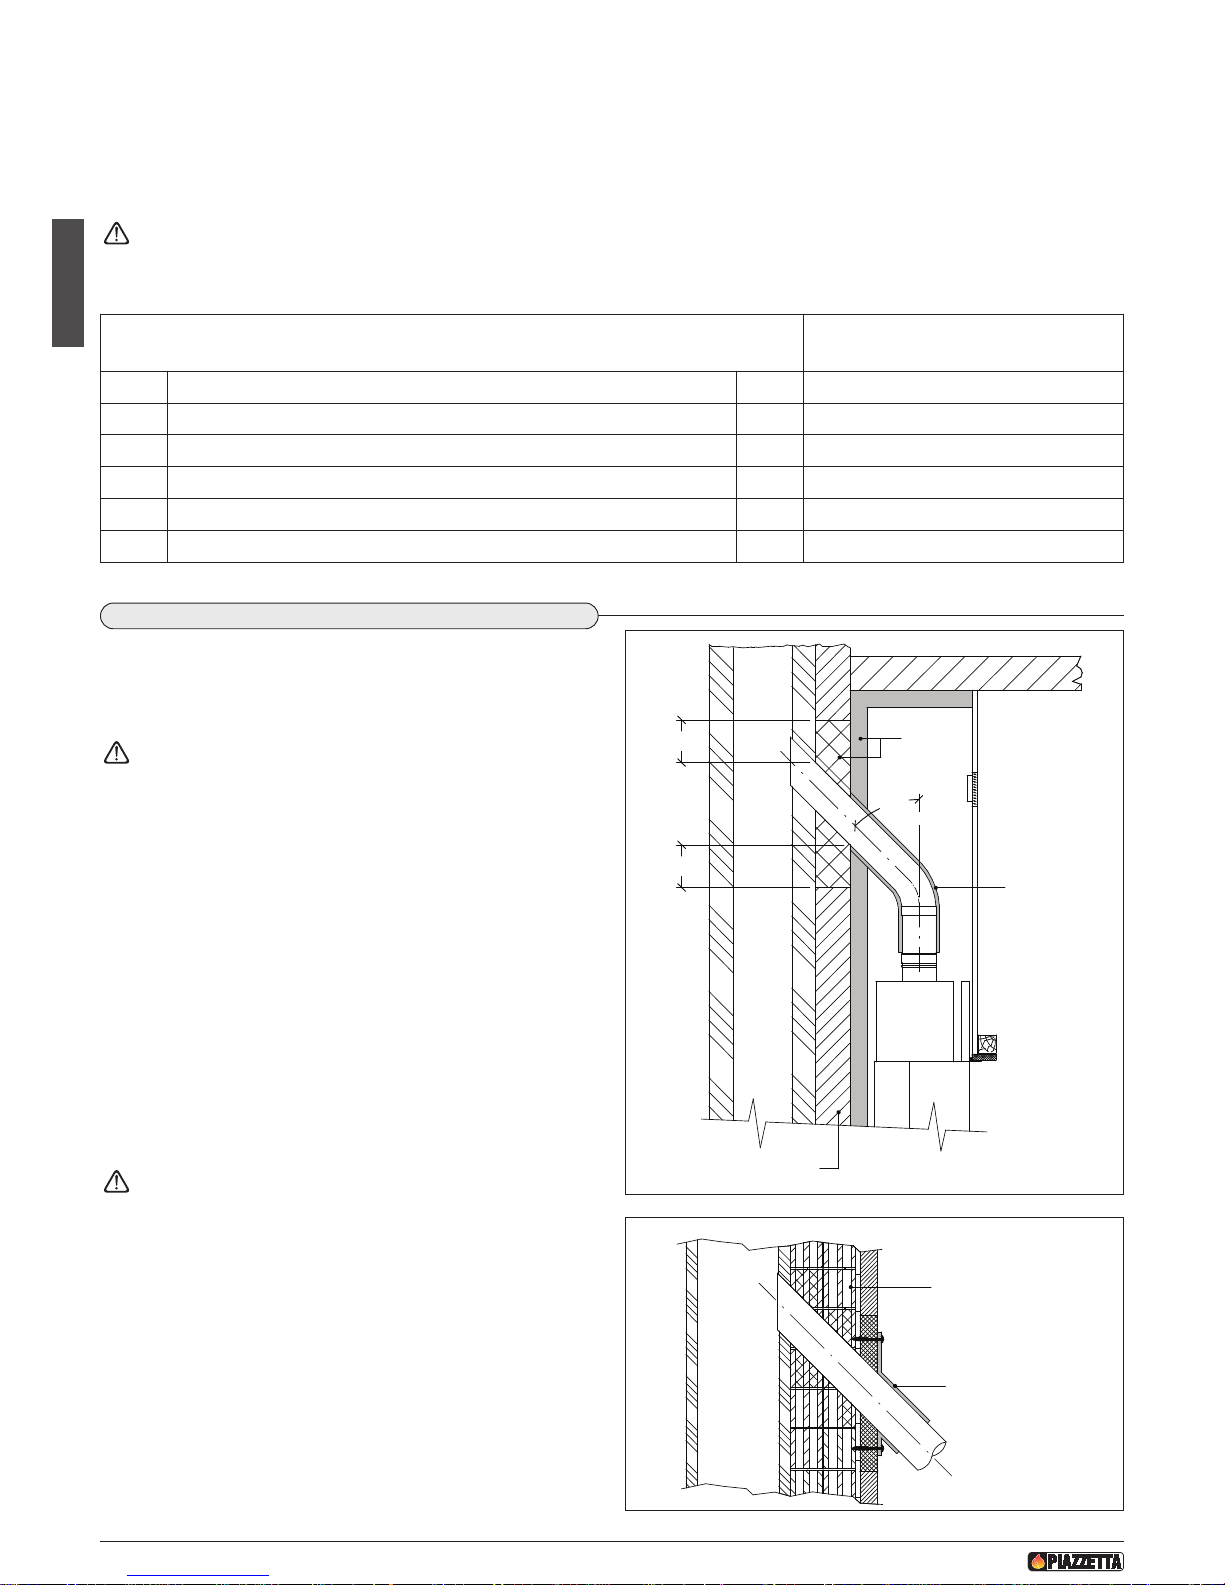
DANGER AREA FOR RADIATION
There is a radiation area in front of the stove which must be kept free of any flammable element, such as: carpets, curtains, wood furnishings,
ornaments, flammable liquids, fire-lighting products or firewood, etc.
T
his area is defined by the distance “R”. (Fig. 15 - 16)
Failure to comply with the above could cause a fire!!!
The minimum safety distances to be observed are given in the table below:
H07025140 / DT2000666 - Rev. 02
48
English
MODELS
MT 361
A clearance from appliance to flammable wall at the side cm 10
B clearance from appliance to flammable wall at the rear cm 10
C thickness of insulating material for wall to side/rear cm 12
D clearance from appliance to flammable floor cm 26 (foot height)
E thickness of floor insulating material cm 4
R minimum clearance from appliance front to flammable material cm 150
D
T2011907-00
1.10 CONNECTION TO THE FLUEWAY
Connection to the flueway must be done using pipes as short as
possible without narrowing or restrictions and with a maximum slope
of 45°.
Flexible metal or asbestos-cement pipes must not be used
Pipes and bends or elbows must be made in compliance with current
regulations
WARNINGS WITH REGARD TO FLAMMABLE WALLS OR CEILING:
If the connection has to go through elements or walls in heatsensitive flammable materials, create a layer of at least 20 cm
insulation around the pipe. (Fig. 17)
After having drilled a hole in the wall to insert the pipe through into
the flueway, the air gaps must be filled with non-flammable, resilient
materials with a reduced capacity of heat transmission (e.g.
lightweight concrete). Fig. 18
Check that the connection to the flueway is gas/smoke-tight, since
the appliance operates in a vacuum.
It is recommended that the connector pipes be insulated with
insulating material having the characteristics given in the
section “SUITABLE HEAT INSULATING MATERIALS”.
Check that the pipe does not penetrate too far into the flueway,
thereby choking the pipe for the passage of smoke and combustion
gases.
45°
FLUE
20
20
Insulation
Wall to be protected
Insulation
Maximum
Fig. 17
DT2030269-01
FLUE
Air gaps
Wall connection
flange
Fig. 18
DT2030270-00
D
T2011912-00
Page 11
English
H07025140 / DT2000666 - Rev. 02
49
English
DT2011913-00
1.11 LINING WALL
The surround or the lining wall of the fireplace must be self-supporting regardless of the materials with which it is made and under no
circumstances must it come into contact with the heating appliance. Furthermore, the surround must be made with non-flammable materials
in compliance with regulations.
F
or Gruppo Piazzetta S.p.A. surrounds, follow the instructions enclosed with the product.
Testing and lighting for first time
Only a visual inspection can be made in the intermediate stage for heating appliances that must be assembled or clad with brickwork or require
the use of cement binders. In this case operation of the whole installation must be tested after all the building works directly connected with
t
he “LIGHTING FOR THE FIRST TIME” test have been completed, following the instructions given in the booklet.
D
T2010177-00
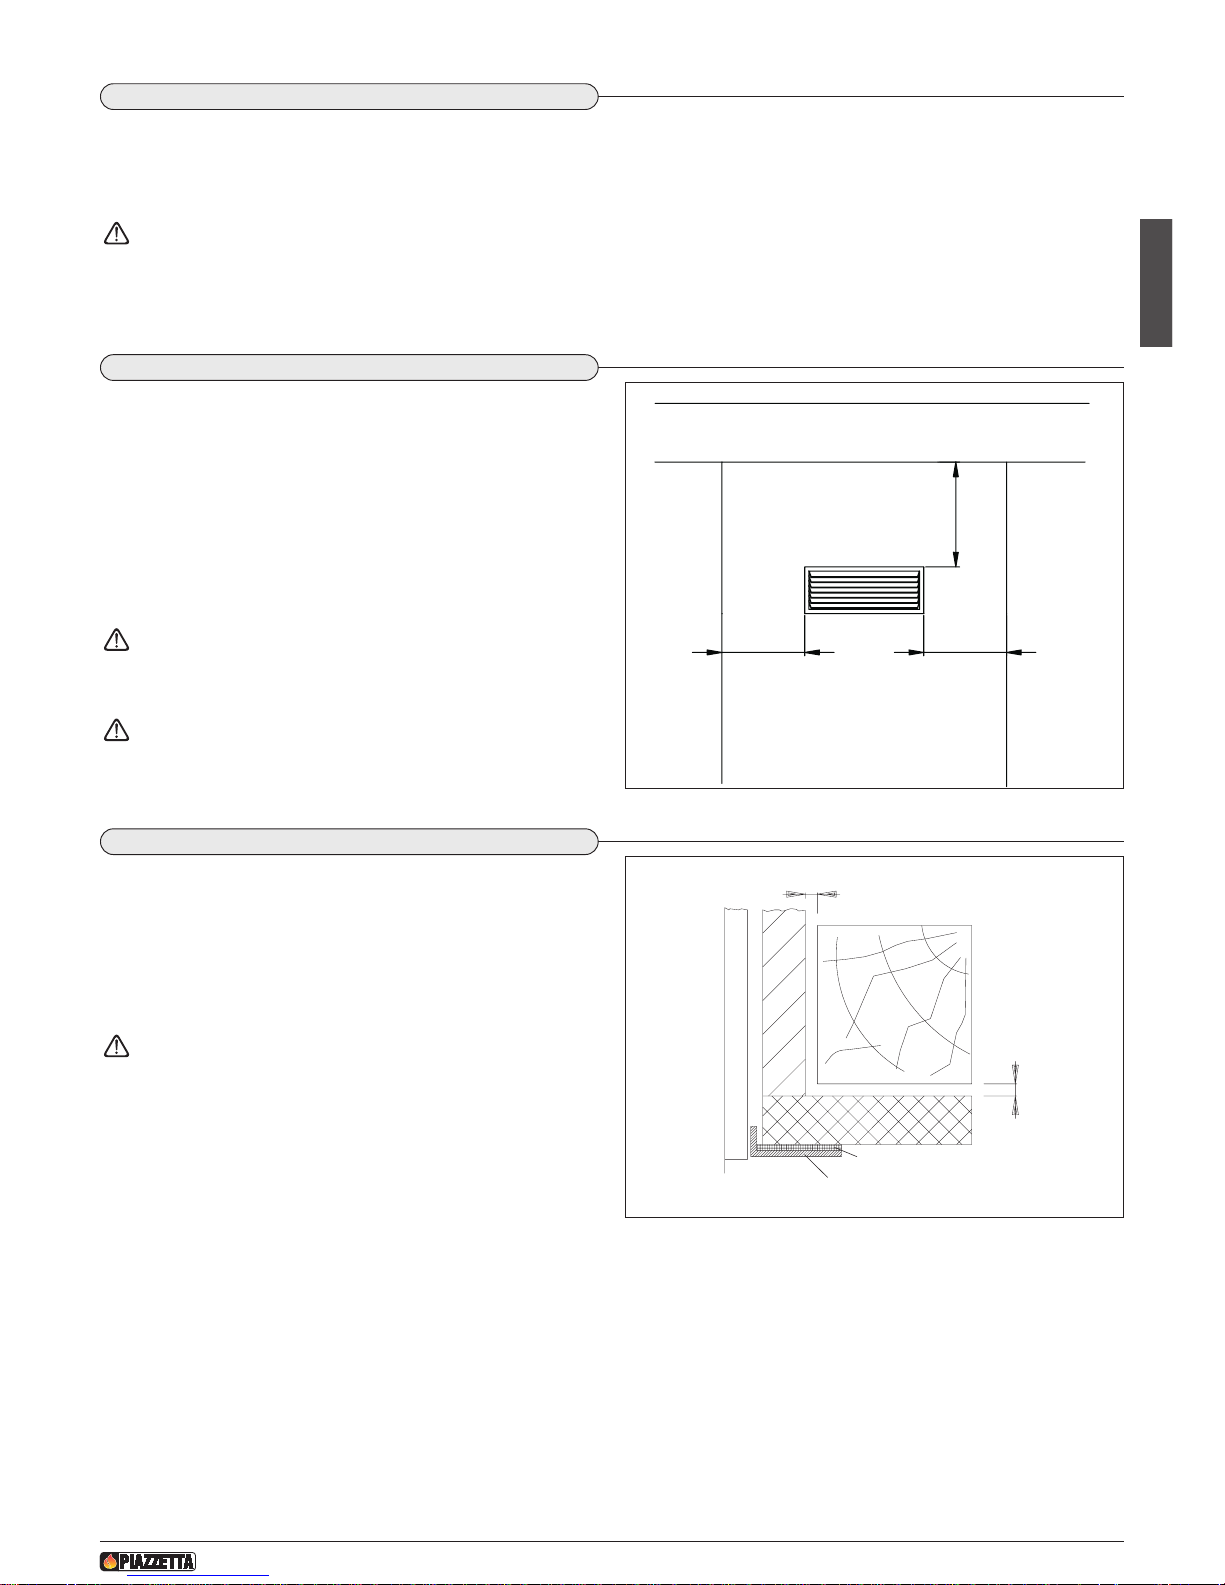
1.12 HOOD GRILLE
The hood grille has the function of allowing air to pass from inside
the hood to the environment or vice versa if the Multifuoco system
is installed.
Warm air comes out of the hood grille with the natural convection
system and it is therefore necessary to maintain the safety distances
from flammable materials such as: flammable ceilings or walls,
ledges/beams, furniture, curtains, etc.. The hood grille must be
installed at least 50cm from the ceiling and with at least 30cm safety
distance to the sides.
For the hood grille size, see “TECHNICAL DATA”.
A non-closable hood grille must be installed without
connecting it to the stove so that the warm air that has
stratified inside the lining wall can flow out.
With a ceiling over 3 metres high, a NON-CLOSABLE hood
grille must be installed on the hood lining at a height of 30cm
from the ceiling to allow the stratified air to flow out.
MIN. 30 CM MIN. 30 CM
MIN. 30 CM
FLAMMABLE MATERIALS
FLAMMABLE MATERIALS
CEILING IN FLAMMABLE MATERIAL
F
ig. 19
D
T2030271-00
D
T2010178-00
1.13 WOOD MANTEL PROTECTION
Wooden finishes, e.g. wood mantels, may be mounted on the
surround.
Wood mantels must be:
- installed outside the heat radiation area;
- self-supporting;
- installed with 1cm air gap from the surround or from the heating
appliance;
The expansion joint is in ceramic fibre, which has the
function of insulating the surround from the metal structure of
the appliance.
1 cm
Appliance
Hood or surround
1 cm
Surround
Expansion joint
Load-bearing axis
Wood
mantel
Fig. 20
DT2030272-00
Page 12

English
50
H07025140 / DT2000666 - Rev. 02
DT2010027-02
1.14 PREVENTION OF DOMESTIC FIRES
The appliance must be installed and used in compliance with the manufacturer’s instructions and European and national standards as well
as local regulations.
W
hen a flue pipe passes through a wall or a ceiling, special installation methods must be applied (protection, thermal insulation,
distances from heat-sensitive materials, etc.) See “CONNECTION TO THE FLUEWAY”
- It is also recommended that all elements made of combustible or flammable material, such as beams, wooden furniture, curtaining,
flammable liquids, etc. be kept outside the heat radiation range of the appliance and at a distance of at least 1.5m from the actual firebox.
-
For other information, see “MINIMUM SAFETY DISTANCES” and “CONNECTION TO THE FLUEWAY”.
- The flue, chimney stack, chimney and fresh air intake must always be free of obstructions, clean and checked periodically, that is, at least
twice during the seasonal period from the lighting of the stove and during its use. When the stove has not been used for some time it is
advisable to carry out the checks mentioned above. For further information, consult a chimneysweep.
- Only use recommended fuels (See “FUEL”).
Page 13
English
51
H07025140 / DT2000666 - Rev. 02
2.0 TECHNICAL DATA AND SPECIFICATIONS
DT2012202-00
DT2012189-00
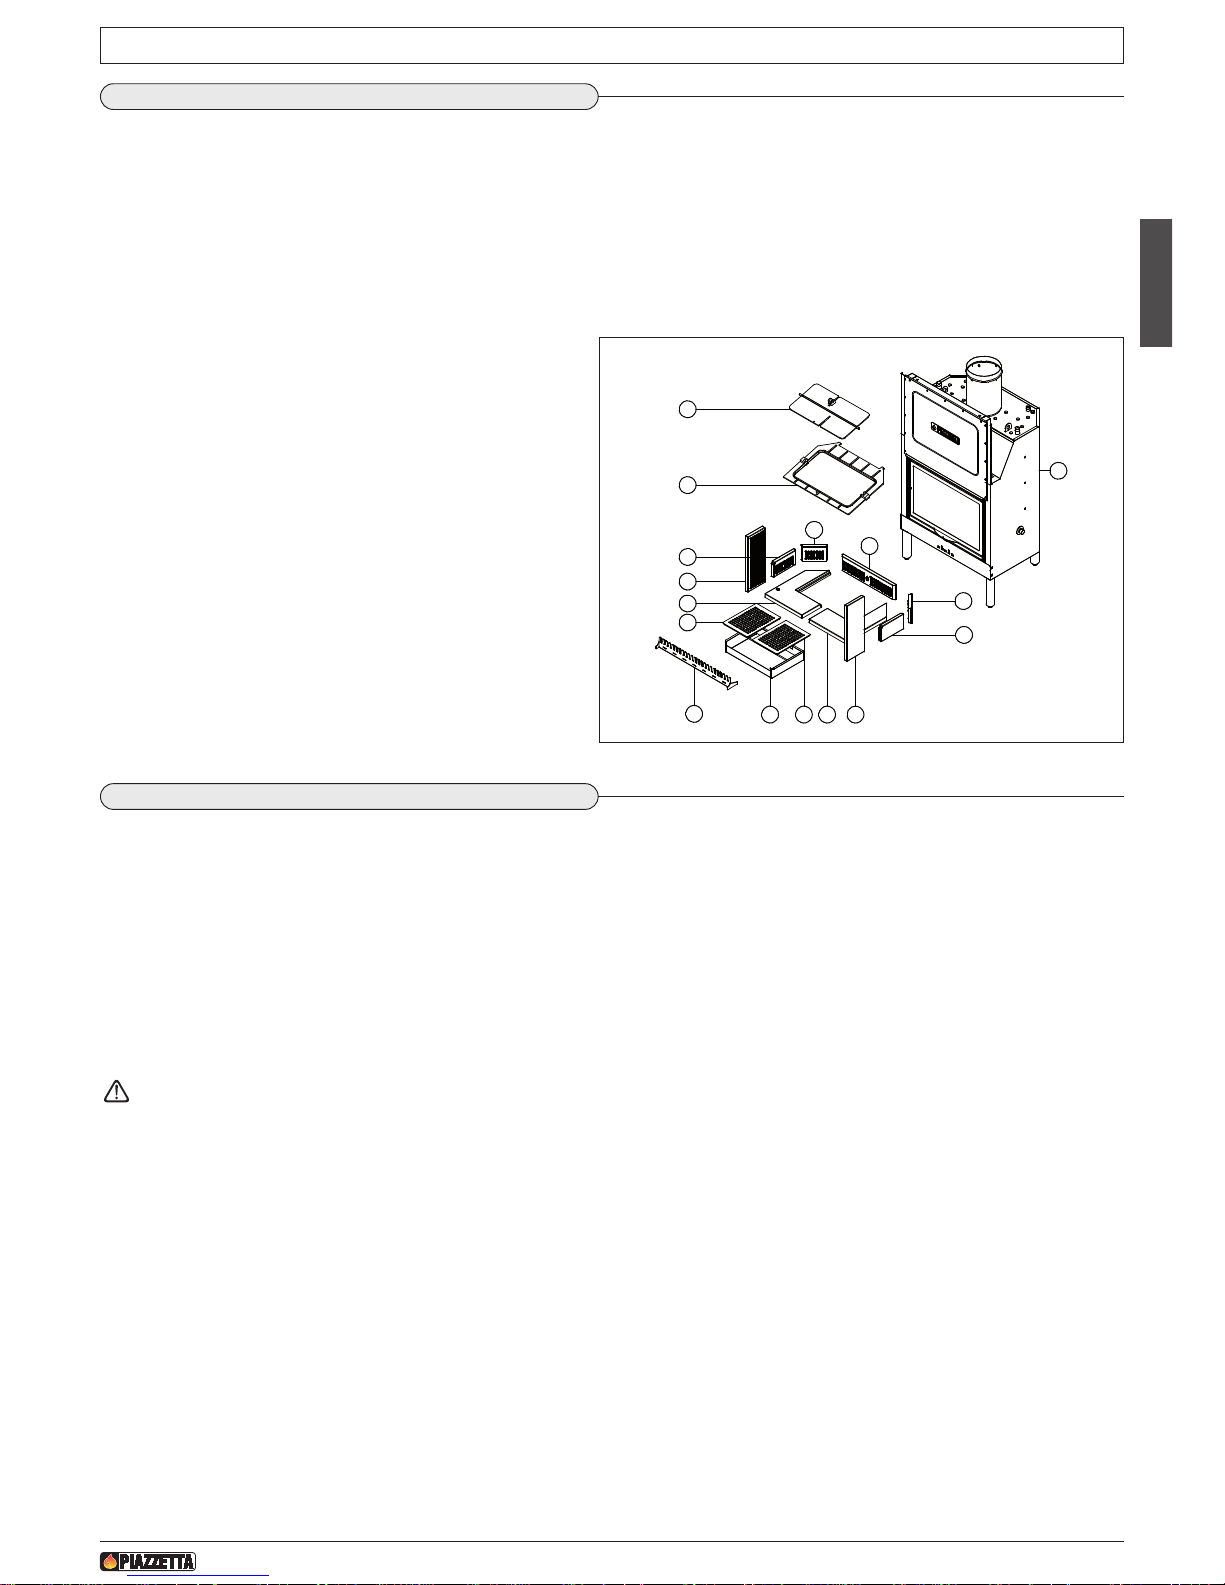
2.1 DESCRIPTION OF THE APPLIANCE
The Thermo boiler stove has been specially designed to produce hot water for the central heating system.
The peculiarity of this product lies in the fact that there is a true boiler fitted inside the actual appliance. The boiler is a tank where the
circulating water “receives” heat both directly from the flame and from the smoke.
E
fficiency is also optimized by the structure of the grate with perforated grid to ensure even distribution of the primary air, which is heated
before arriving in the firebox.
Once the water has reached the set temperature, it flows into the system and starts to circulate, becoming a source of heat for the heating
system or, through a boiler, for the hot water system.
1
4
5
5
6
7
8
8
9
9
10
11
12
2
3
13
MT 361
D
T2033106-00
No Description . . . . . . . . . . . . . . . . . . . . . . . . . .Qty
1) Enamelled stove MT 361 . . . . . . . . . . . . . . . . . . . . . .1
2) Left grate MT 361 . . . . . . . . . . . . . . . . . . . . . . . . . . . .1
3) Right grate MT 361 . . . . . . . . . . . . . . . . . . . . . . . . . .1
4) Aluker rear panel 538x140 MT . . . . . . . . . . . . . . . . . .1
5) Aluker rear side panel 190x140 MT . . . . . . . . . . . . . .2
6) Aluker right side panel 237x140 MT . . . . . . . . . . . . . .1
7) Aluker left side panel 237x140 MT . . . . . . . . . . . . . . .1
8) Aluker front panel 485x170 MT 361 . . . . . . . . . . . . . .2
9) MT grate grid . . . . . . . . . . . . . . . . . . . . . . . . . . . . . . .1
10) Ash drawer . . . . . . . . . . . . . . . . . . . . . . . . . . . . . . . . .1
11) Fireguard . . . . . . . . . . . . . . . . . . . . . . . . . . . . . . . . . .1
12) Smoke baffle plate . . . . . . . . . . . . . . . . . . . . . . . . . . .1
13) Swivelling smoke baffle plate . . . . . . . . . . . . . . . . . .1
D
T2012190-00
2.2 FEATURES
The constructional features of the THERMO MT 361 wood-fired boiler stoves/fireplaces with heat-transfer water are:
- stainless steel stove complete with boiler.
- firebox interior in Aluker.
- grate in Aluker.
- rise n’fall door in ceramic glass heat resistant up to 750°C.
- boiler (4 mm steel).
- manually adjustable primary air.
- calibrated secondary air.
- swivelling smoke baffle plate.
Criteria and devices have been used in designing and making the THERMO MT 361 boiler stoves that satisfy the essential safety
requirements laid down by the Directives: CPD 89/106 EEC.
Page 14
H07025140 / DT2000666 - Rev. 02
52
English
Fig. 21
DT2011543-00
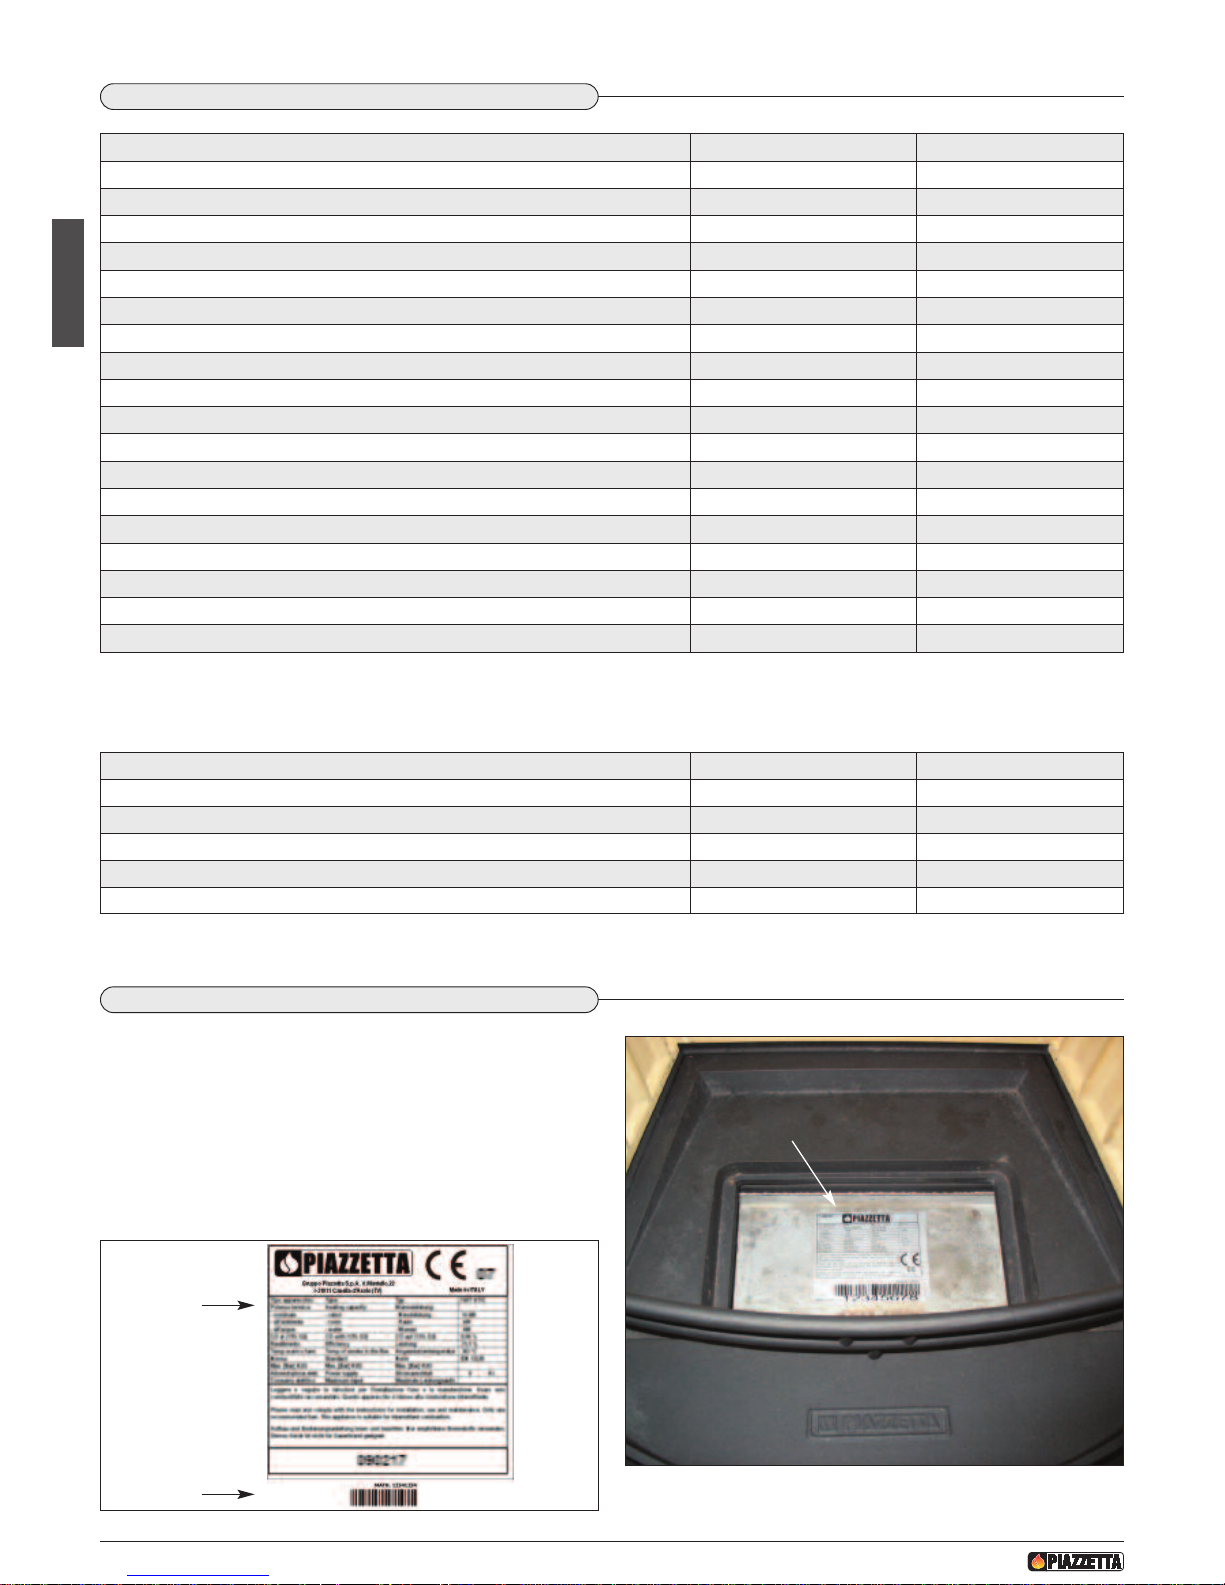
2.4 PRODUCT IDENTIFICATION DATA
DT2030945-00
PRODUCTION
IDENTIFICATION AND
RATING PLATE
Fig. 22
Product name
Serial number
DT2030944-00
DT2012191-00
2.3 TECHNICAL DATA
These data are obtained using beech wood with moisture content below 20% and with intervals between stoking-up of approximately one hour.
Appliance for intermittent use.
Technical data for flue calculations.
U.M. MT 361
Rated heat output kW 26.0
Heat output to the water kW 18.0
H
eat output to the room
k
W
8
.0
Consumption at rated heat output kg/h 8.0
Thermal efficiency % 76
CO content (with 13% O2) % Approved in accordance with standard - EN 13229
Test report No. - Boiler capacity l 95
Maximum working pressure bar 1.5
Flue diameter cm 25
Firebox opening (WxH) cm 79x55
Firebox surface area cm
2
3024
Weight (dry – without water) kg 315
Size with packaging (WxDxH) cm 97x76x190
Fresh air intake (recommended minimum section) cm
2
250
Combustion air flow rate with open intake m3/h Convective air inlet/outlet (recommended minimum section) cm
2
350/350
U.M. MT 361
Rated heat output kW 26.0
Flue gas flow rate g/s 25.1
Average flue gas temp. in the flue °C 278.0
Maximum flue gas temperature °C 318.0
Minimum draught Pa 12
The above values correspond approximately to a flue with section: Ø 30 cm up to 4.5 m in length and Ø 25 over 4.5 m.
Every product is identified by a rating plate showing the model and
the performance of the appliance as well as a plate giving the serial
number.
Both plates are located on the bottom shield below the ash drawer.
A label bearing the serial number is also applied on the back cover of
the “Installation, operation and maintenance” booklet.
Always give the information shown on these plates to the dealer or
the Service Centre when requesting service or spare parts.
Page 15
H07025140 / DT2000666 - Rev. 02
53
English
DT2012194-00
2.5 ACCESSORIES
Standard accessories
- Front fireguard.
-
Removable ash drawer.
- Smoke damper with control.
- Hood grille.
- Fresh air intake with manual control.
- Pipe fittings
-
Sensor pocket/holder
Optional accessories
- Rapid heat exchanger / circulation pump kit
- Safety unit kit with open tank
- Safety unit kit with closed tank
- Self-operated valve kit for safety relief system with closed tank
- Heat control kit
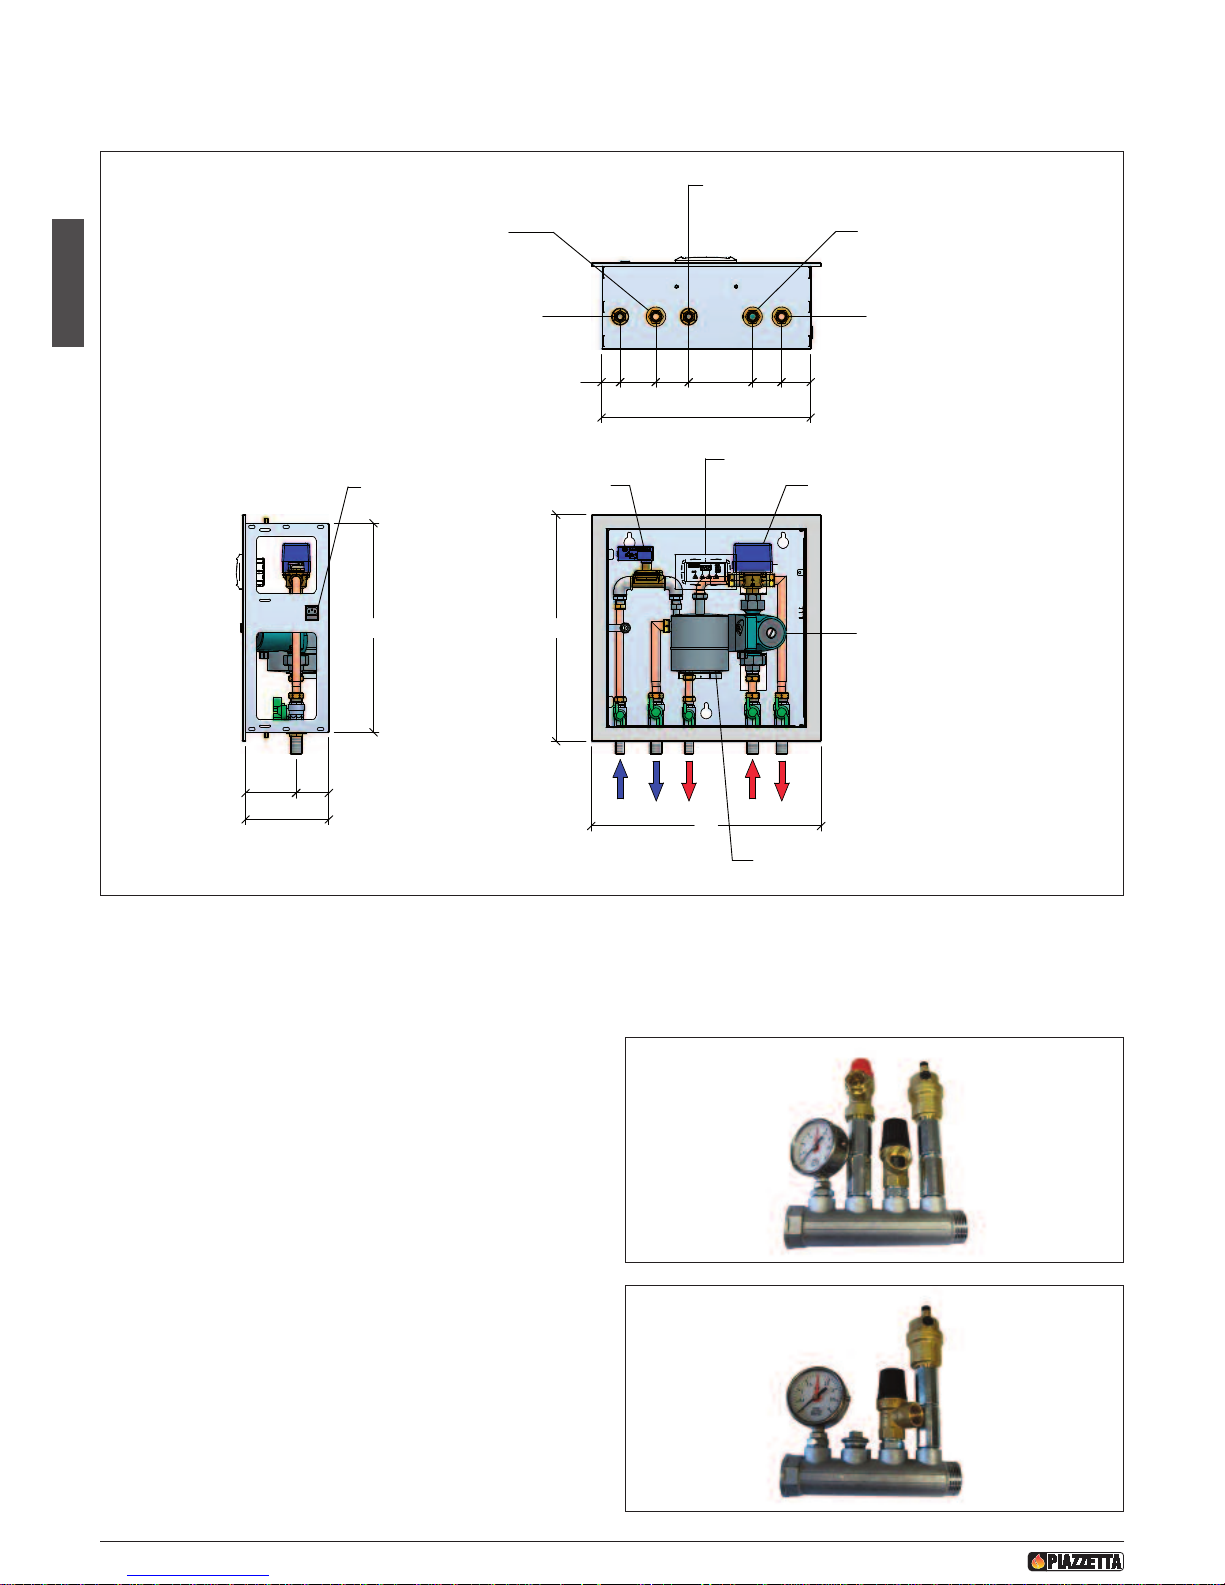
1) RAPID HEAT EXCHANGER / CIRCULATION PUMP KIT (optional) consisting of:
- Circulation pump
- Rapid heat exchanger
- Diverter valve
- Ball valves
- Ball check valve
- Water flow switch
- Heat regulator
N.B. Consult a plumbing and heating technician to assess your hot water requirement.
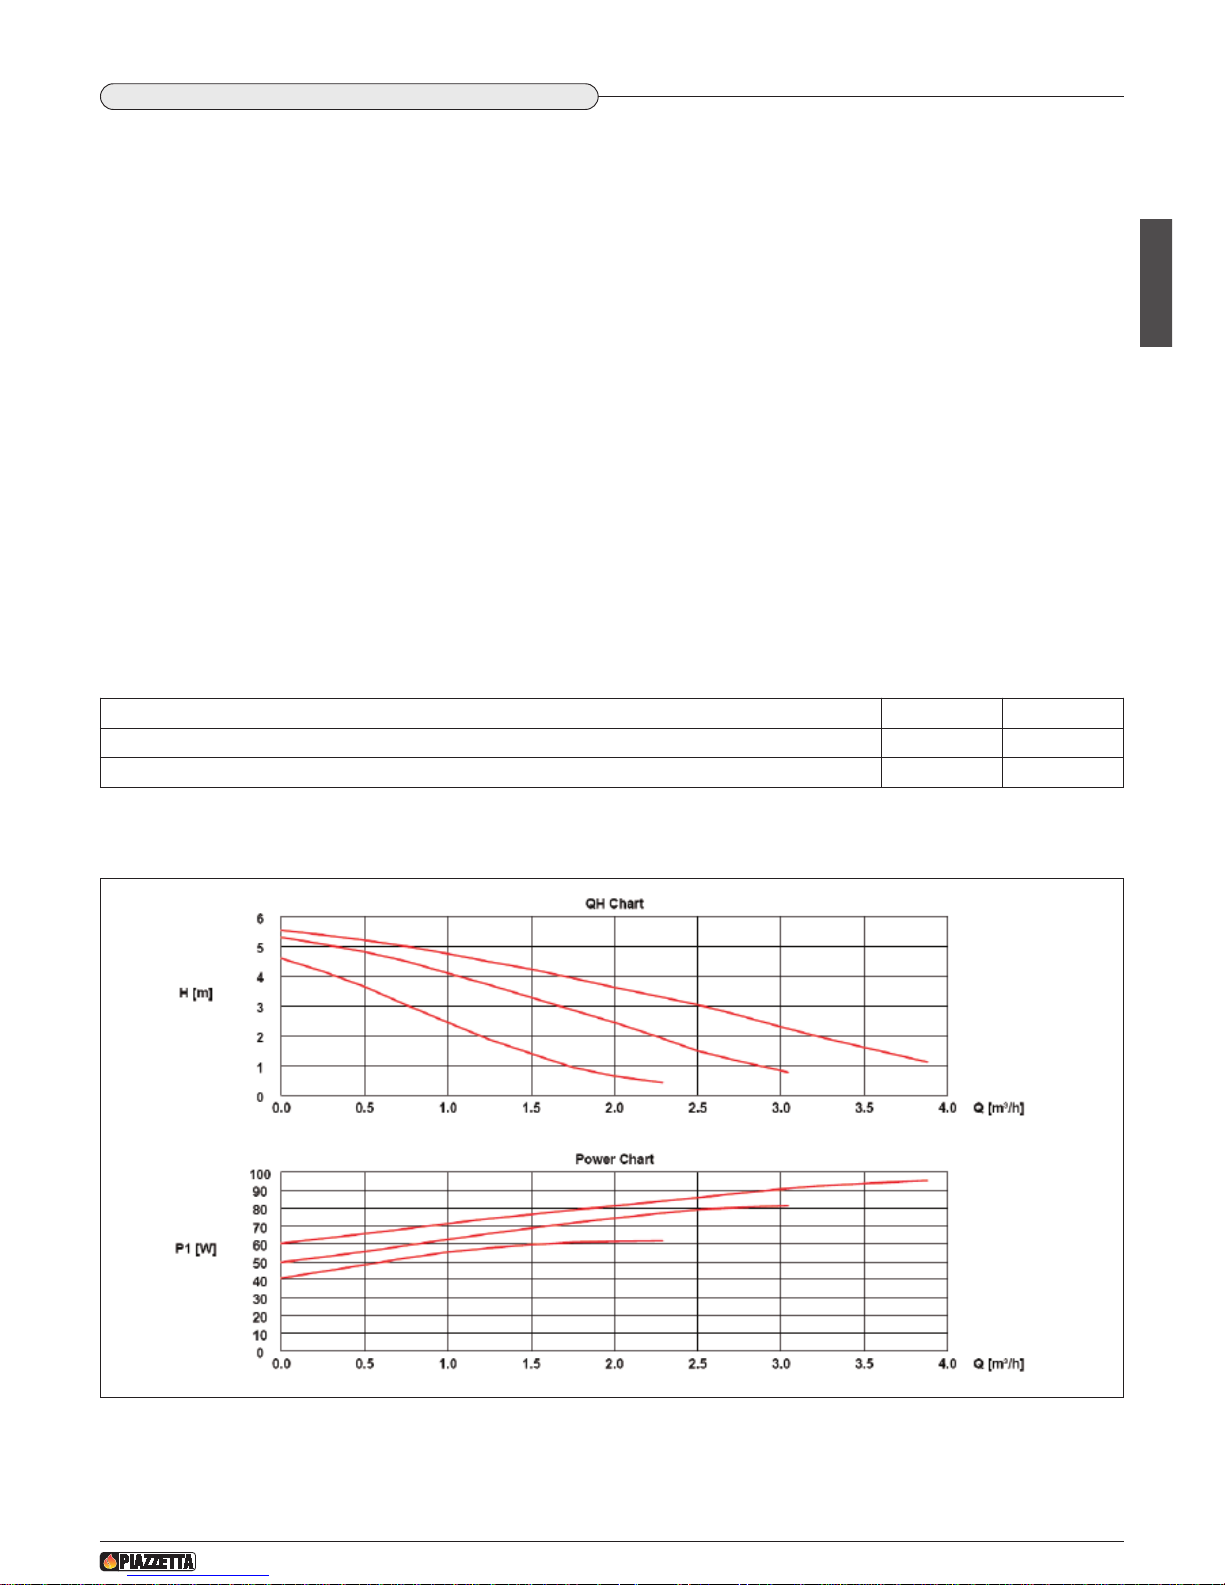
Circulation pump characteristic curves provided with the kit.
Quantity of hot water Δ T 30°C with boiler water at an average temperature of 65°C
Litres/min 9.7
Connection Ø “ ¾
Hot water connections Ø “ ½
DT2033005-00
Page 16
H07025140 / DT2000666 - Rev. 02
54
English
Water flow switch Diverter valve
Heat regulator
Heat exchanger
Circulation pump
Cold domestic
water inlet Ø 1/2 ”
Boiler return
pipe Ø 3/4"
Hot domestic
water outlet Ø 1/2 ”
Delivery to heating
s
ystem Ø 3/4"
Inlet for hot water
from fireplace
boiler Ø 3/4"
49
4 8,58 156,57
49
7,5
12
19,5
53
54
Alimentation
DT2033120-00
DT2033122-00
DT2033121-00
Fig. 24
Fig. 25
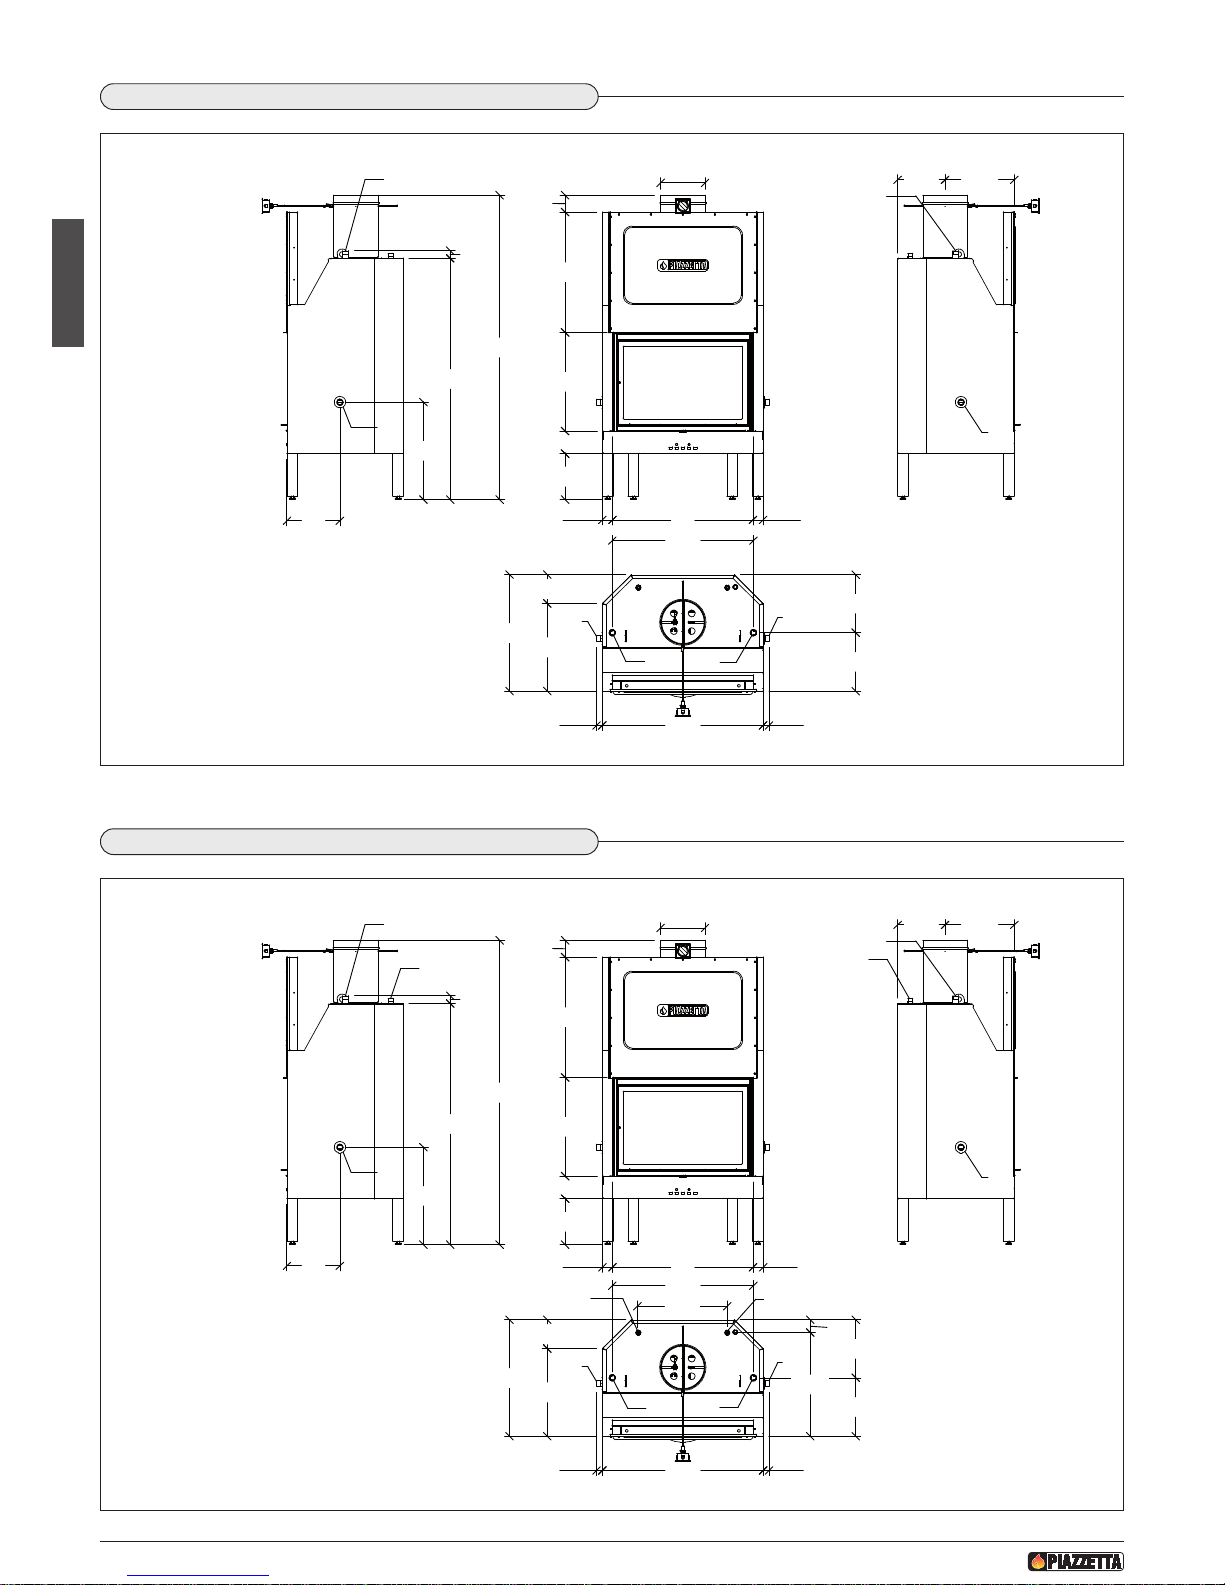
2) SAFETY UNIT KIT WITH OPEN TANK (optional) consisting of:
- Temperature/pressure relief valve 90° C / 3 bar
- Safety valve 1.5 bar
- Pressure gauge
- Automatic air valve
- Fittings for connection to the Thermo appliance.
Refer to “TEMPERATURE/PRESSURE RELIEF VALVE”.
3) SAFETY UNIT KIT WITH CLOSED TANK (optional) consisting of:
- Safety valve 2.0 bar
- Pressure gauge
- Automatic air valve
- Fittings for connection to the Thermo appliance.
The RAPID HEAT EXCHANGER – CIRCULATION PUMP is enclosed in a box so that it can be positioned according to available space and needs.
Operation
When a tap is opened to draw off hot water the diverter valve automatically ensures that the hot water leaving the boiler passes into the heat
exchanger instead of going to the heating system, thereby allowing faster heating of hot water.
Rapid heat exchanger – circulation pump kit diagram
Fig. 23
Page 17

English
H07025140 / DT2000666 - Rev. 02
55
English
4) SELF-OPERATED VALVE KIT FOR SAFETY RELIEF SYSTEM WITH CLOSED TANK (optional) consisting of:
- Self-operated relief valve
- Self-operated valve sensor pocket/holder
5) HEAT REGULATOR KIT (optional) consisting of:
- Heat regulator
- 3 sensors
- 3 pockets/holders
Sensor specifications
• Sensor: NTC 10K @25°
• Operating limits: - 50°C / 130°C
• Measurement limits: 0 – 99°C
• Precision: ±1°C
SUBSTITUTE CIRCULATION PUMP
If the optional kit is not used, the minimum requirements for the substitute circulation pump must be:
- Maximum input: 90 W
- Supply voltage: 230 V a.c.
- Frequency: 50 Hz
- Minimum protection rating: IP 44
- Temperature: 110 °C
- Insulation class: F
- Conformity with standard: CEI EN 60335-2-51
It is also important to check that the relative characteristic curve corresponds as closely as possible to the one given in the diagram on
page 53.
Page 18
English
56
H07025140 / DT2000666 - Rev. 02
DT2033123-00
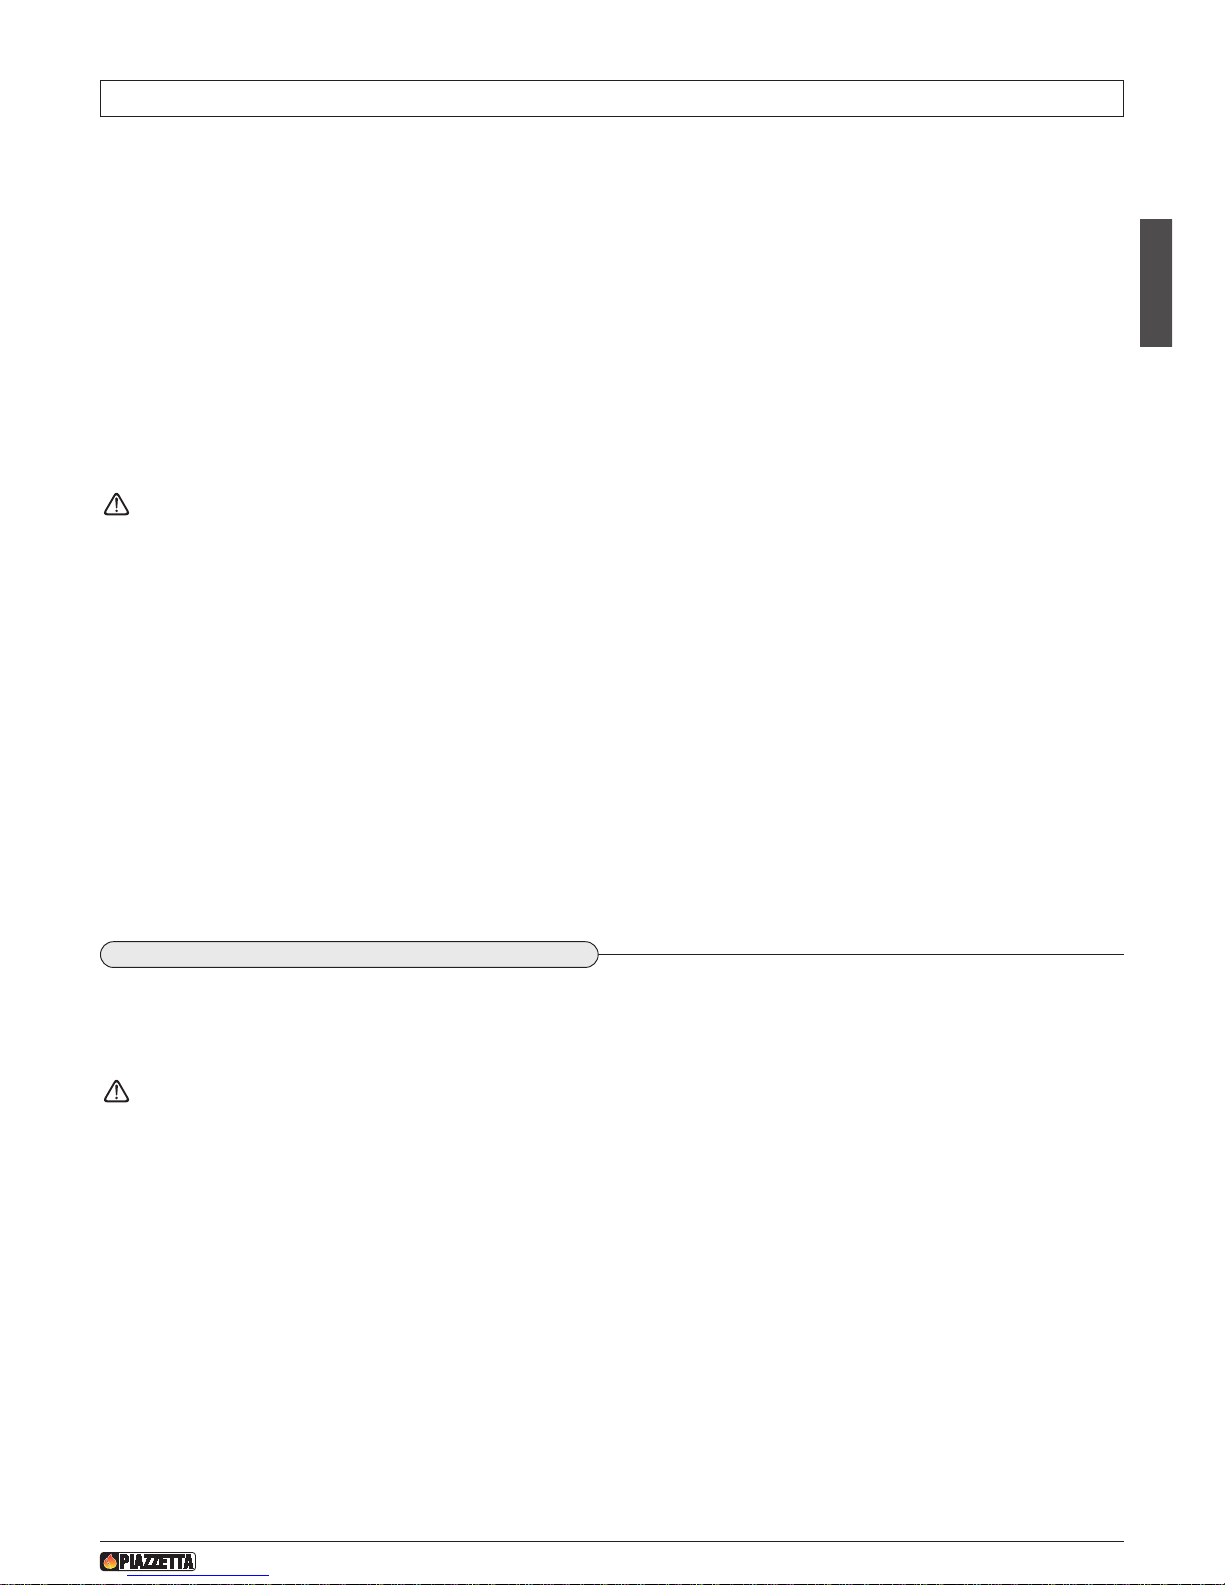
2.6 DIMENSIONS MT 361 OPEN TANK
79.4
30
5
4.8
135.5
3
9.2
2
6.7
M
M
M
R
R
M
4.5
1
3
55.5
67.5
9
.5
5.7
79
5.7
65.5
16
49 .5
3.3
90.4
3.3
R
R
26
171.5
M= MANDATA 1"
R= RITORNO 1"
33
32.5
Ø 25
D
T2033124-00
2.7 DIMENSIONS MT 361 CLOSED TANK
79.4
30
54.8
135.5
39.2
26.7
M
M
M
R
R
M
4.5
13
55.5
67.5
9.5
5.7
79
5.7
65.5
16
49 .5
3.3
90.4
3.3
R
R
26
171.5
M= MANDATA 1"
R= RITORNO 1"
CS= CIRCUITO SICUREZZA 3/4"
CS
CS
CS
CS
50.5
33
32.5
7
Ø 25
58.5
M = DELIVERY Ø 1”
R = RETURN Ø 1”
M = DELIVERY Ø 1”
R = RETURN Ø 1”
CS = SAFETY CIRCUIT Ø ¾”
Page 19
English
57
H07025140 / DT2000666 - Rev. 02
3.0 SAFETY DEVICES
D
T2012195-00
It is very easy to use the closed boiler fireplace, but the minimum safety requirements laid down by standard UNI 10412-2:2009 and the laws and
r
egulations in the country of installation must be observed.
Devices for installation with OPEN TYPE EXPANSION TANK
- Open type expansion tank
- Vent and expansion pipe
-
Filler pipe
- Circulation pump control thermostat (except for systems working with natural circulation)
- Circulation system (except for systems working with natural circulation)
- Warning buzzer activation device
- Warning buzzer
- Temperature indicator
- Pressure indicator
- Automatic thermal cutout (shutdown thermostat– for boilers with automatic fill valve only – in our case useless)
It is also advisable to install a temperature/pressure relief valve, which, upon reaching an upper water temperature limit (90°C),
discharges a minimum flow of water (40 l/h for a direct output of 1000 kcal/h).
Devices for installation with CLOSED TYPE EXPANSION TANK
- Safety valve
- Circulation pump control thermostat
- Temperature indicator
- Pressure indicator
- Automatic temperature control device
- Safety heat exchanger with visible open drain (already mounted and tested inside the boiler fireplace)
- Self-operated valve connected to the safety heat exchanger
- Warning buzzer activation device
- Warning buzzer
- Circulating system
- Closed type expansion tank
When designing the closed boiler fireplace, Gruppo Piazzetta has ensured that it complies with current laws and regulations and has fitted
the actual product with some important safety systems.
DT2012196-00
DT2010945-00
3.1 TEMPERATURE/PRESSURE RELIEF VALVE
Supplied with safety unit kit
Device that acts by discharging water from the boiler when the boiler reaches a preset temperature. The supplied temperature/pressure relief
valve activates at 90°C and is coupled to a safety valve that activates at 1.5 bar.
The valves must be connected to a pipe that takes the water to the drains of the dwelling.
Page 20
H07025140 / DT2000666 - Rev. 02
58
English
DT2012197-00
3.2 EXPANSION TANK
As already indicated, an expansion tank is compulsory when using a closed boiler fireplace.
T
he function of this device and its importance must be emphasised.
The expansion tank has a dual function: for heating and for plumbing purposes.
From a heating point of view its function is to allow the water, which is an incompressible fluid, to expand or contract. For this to happen the
fluid must be in contact with a gas that can compensate the dilations and contractions of the actual fluid.
T
hree arrangements are possible:
tank open to the air;
closed tank, containing water and air (or another inert gas) without any separation (self pressurised or pressurised with air or gas under
pressure put in from the exterior);
closed tank, diaphragm type tank with membrane that separates the water from an inert gas (e.g. nitrogen).
The tank open to the air is generally installed at the highest point of the system, since it also has the job of keeping the actual system at a
certain pressure, while the other 2 types can be installed anywhere in the system.
For this reason the ideal location for an open tank is in the loft of a dwelling and therefore requires meticulous protection against freezing:
if the water inside the tank freezes, the tank would no longer be able to cope with the expansion of the water.
The open expansion tank must have a breather pipe 1” minimum dia. which should be positioned at a minimum height of 3 metres
above the highest point of the radiators.
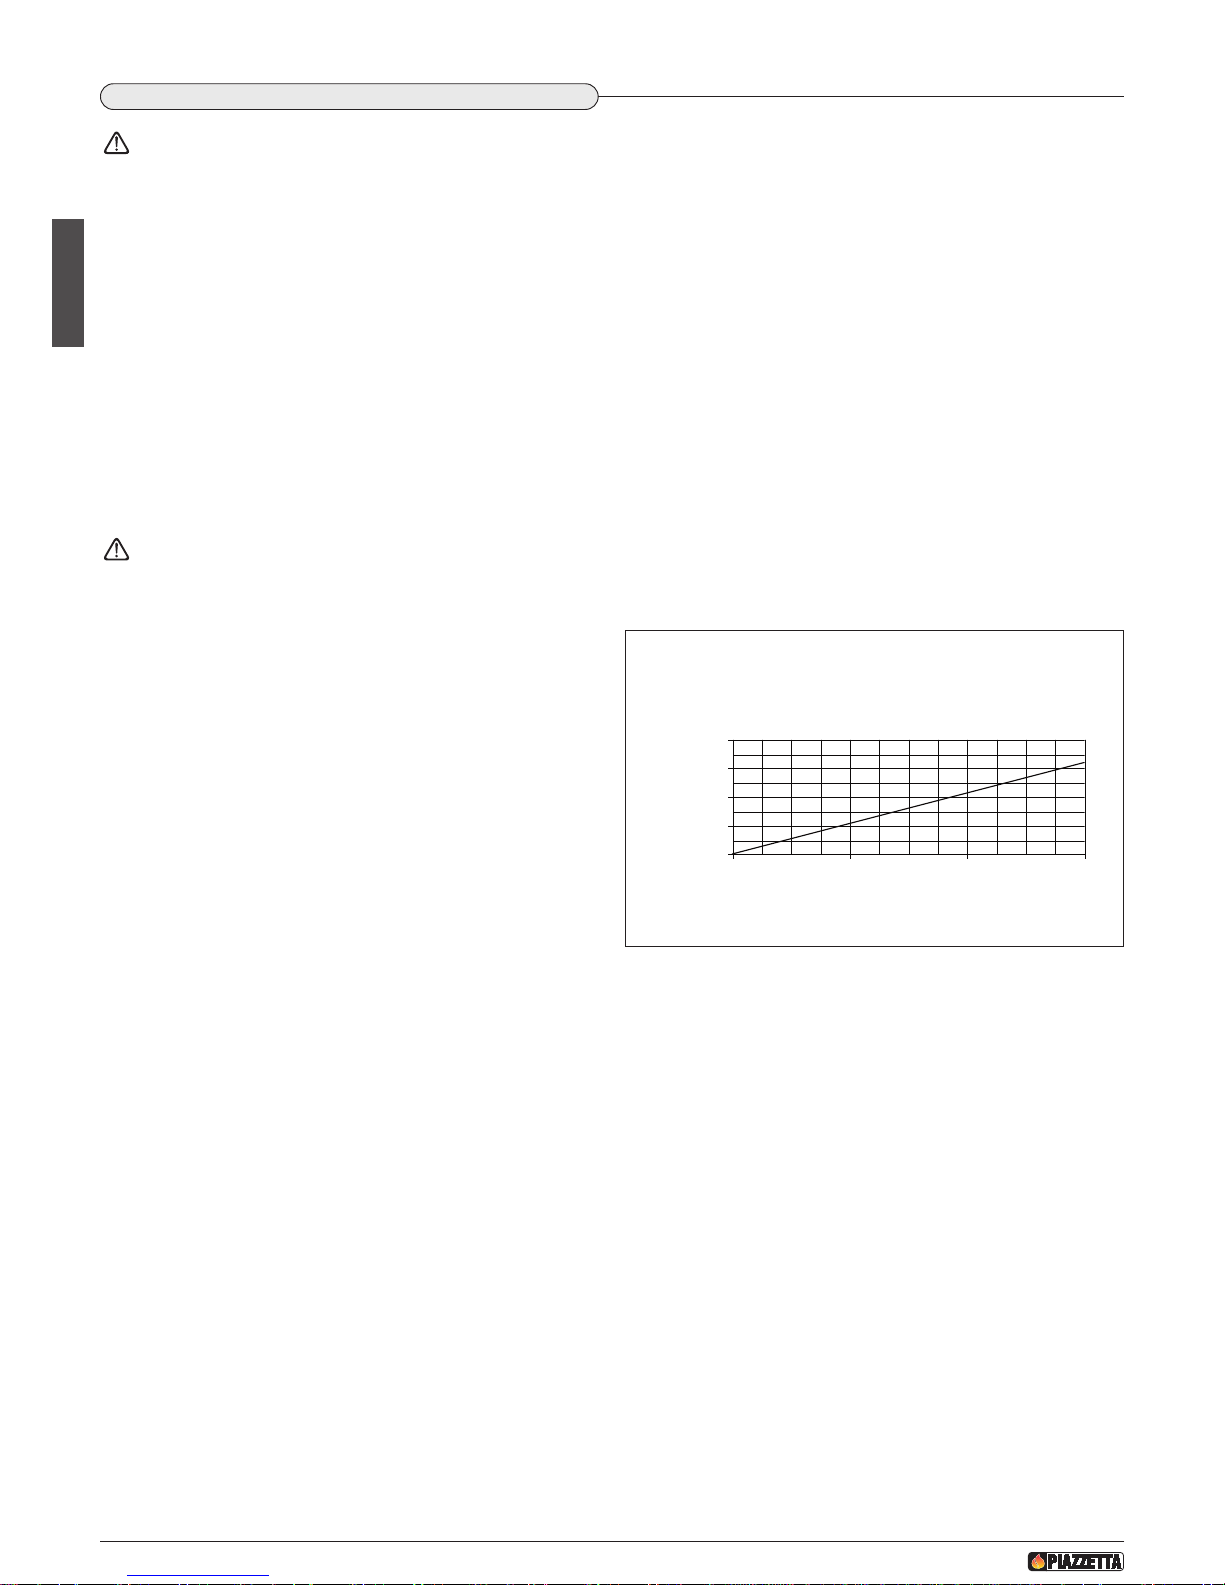
Example of OPEN TYPE EXPANSION TANK sizing
a) Water content in the system: 140 l
b) Water coefficient of expansion: 0.035
Expansion volume: 140 x 0.035 = 4.9 l
Tank geometric volume: 4.9 x 3 = 14.7 => 15 l
Example:
water heated from 10 to 90°C increases in volume by 3.5%: this
means that in a system containing 140 l water, at 90°C there are
another 4.91 litres.
The tank volume must be approx. 3 times the expansion volume.
The volume of the expansion tank for a system containing 140 l must
therefore be at least 15 l.
Example of CLOSED TYPE EXPANSION TANK sizing
a) Water content in the system: 140 l
b) Water coefficient of expansion: 0.035
Expansion volume: 140 x 0.035 = 4.9 l
Tank geometric volume: (Ve ) / [1-(Pi / Ps)] => (140 x 0.035) / [1-(2 / 2.5)] = 24.5 l
Where:
Ve = Expansion volume
Pi = Lower absolute pressure that can be reached [bar]: this is the pre-load pressure of the filling unit or the established minimum limit (e.g.
1 bar) to which the atmospheric pressure must be added (= 1 bar)
Ps = Upper absolute pressure that can be reached [bar]: this is the maximum allowed pressure in the system, guaranteed by the safety
valves (=1.5 bar), to which the atmospheric pressure must be added (=1 bar).
Example:
water heated from 10 to 90°C increases in volume by 3.5%: this means that in a system containing 140 l water, at 90°C there are another
4.91 litres.
The tank volume must be appropriate in relation to the absolute pressure values.
The volume of the expansion tank for a system containing 140 l must therefore be at least 24.5 l.
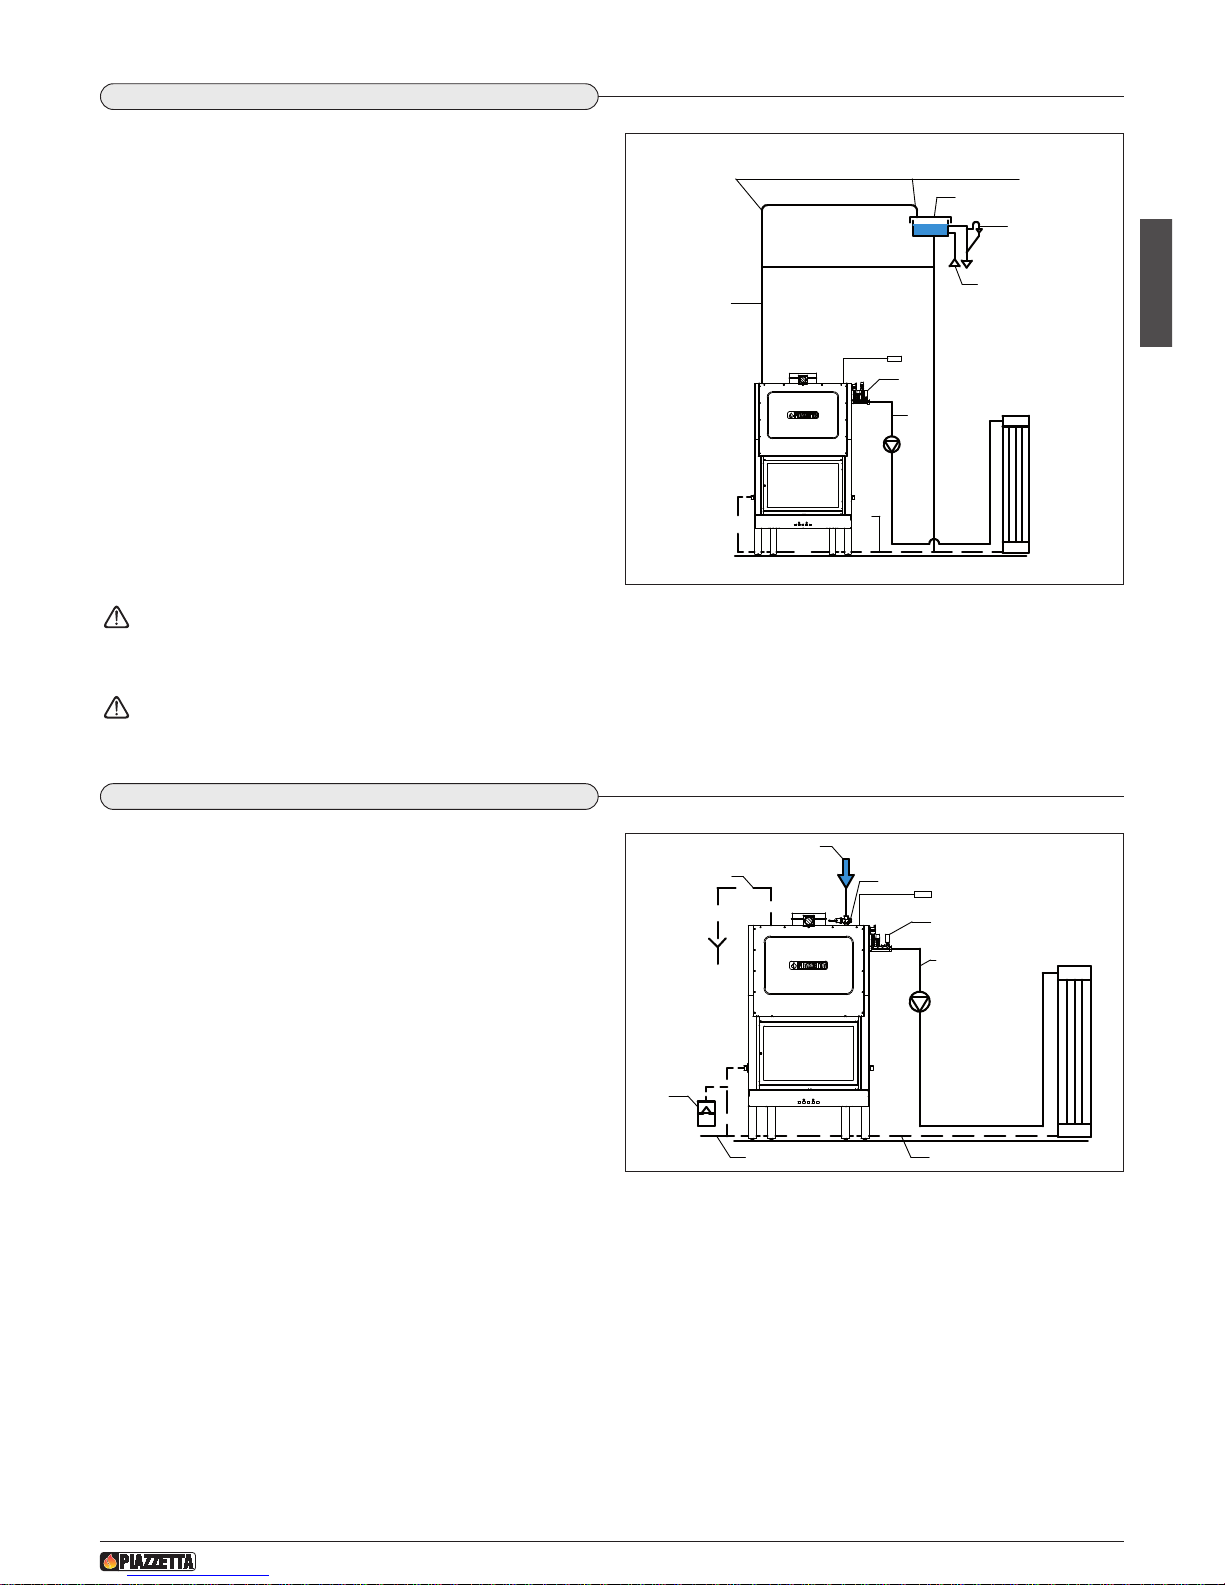
OPEN TANK
0
10
20
30
40
0 100 200 300
Water content of system (l)
Tank geometric volume (l)
QUICK SELECTION DIAGRAMS FOR EXPANSION TANK
Fig. 26
Page 21
H07025140 / DT2000666 - Rev. 02
59
English
DT2012198-00
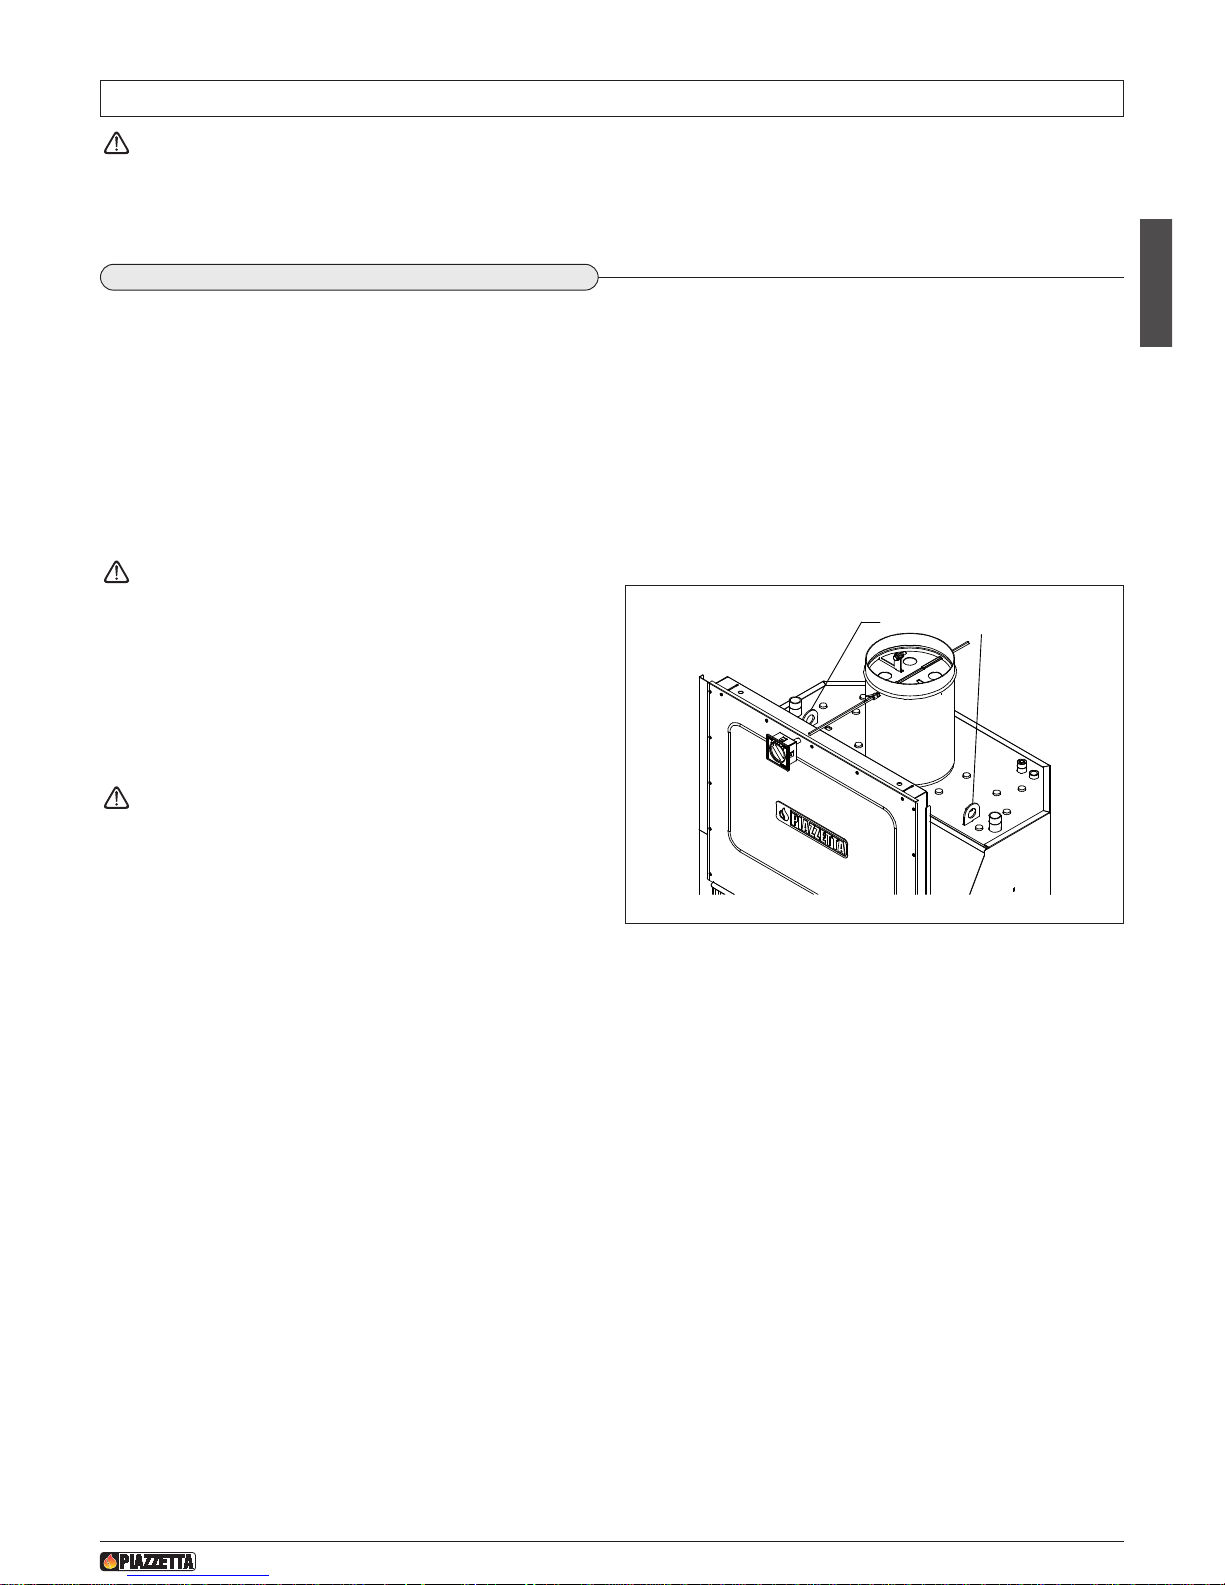
3.3 VENT AND EXPANSION PIPE
1 – Vent and expansion pipe
2 – Open type expansion tank
3
– Vent and overflow pipe
4 – Delivery
5 – Return
6 – Fill pipe
7 – Safety unit (optional)
The vent and expansion pipe is the pipe that connects the boiler to the
expansion tank and has an equally important function.
Current safety regulations lay down that:
1. no on-off valve, whether total or partial, must be fitted on it;
2. any bends must be "gentle” having a radius of curvature of more
than 1.5 times the inside diameter of the pipe;
3. the diameter and length of the pipe are established by current
safety regulations according to the water power and the inside
diameter of the pipe must never be less than 18 mm;
4. the vent and expansion pipe must not have any sections sloping
in the reverse direction.
It is advisable to install the vent and expansion pipe in the delivery pipe that remains free, as shown in the figure. If this is
impossible, install an automatic air or bleeder valve in the free delivery pipe.
It is also advisable to install the delivery pipe so that it runs “diagonally” to the return pipe (see “PLUMBING”).
These two devices are essential for system safety; failure to install them could put the safety of the dwelling and the persons in it
at risk. The installation of these two elements is the responsibility of the plumber.
1
4
3
2
6
5
7
M
INIMUM RADIUS OF BEND: PIPE DIAMETER X 1.5
Fig. 27
D
T2033127-00
D
T2012299-00
3.4 SELF-OPERATED SAFETY VALVE
1 – Self-operated safety valve
2 – Closed type expansion tank
3 – Safety valve drain pipe
4 – Delivery
5 – Return
6 – Fill pipe
7 – Safety unit (optional)
8 – Mains water supply
In the case of installation with CLOSED TYPE EXPANSION TANK, to
comply with the essential safety requirements laid down by the
product standards EN 13229, and UNI 10412-2:2009, it is
compulsory to install a self-operated temperature/pressure relief
valve (see MT VC TEMP/PRESSURE RELIEF VALVE KIT - optional),
which activates a flow of cooling water (mains water) ensuring that
the maximum temperature limit in the boiler established by current
regulations and standards is not exceeded.
The following conditions must also be complied with:
- the drain must be visible, accessible and must discharge in the immediate vicinity of the valve;
- THERE MUST BE NO ON-OFF VALVES on the connection between the supply unit and the valve;
- the pressure upstream of the cooling circuit (mains water) must be at least 1.5 bar.
2
4
3
1
6 5
7
8
Fig. 28
DT2033129-00
Page 22

English
60
H07025140 / DT2000666 - Rev. 02
Self-operated safety valve specifications (part of the Piazzetta kit)
Body: brass UNI EN 12165 CW617N, chromed
S
tem: brass UNI EN 12164 CW614N
Plug seal: EPDM
Seals: EPDM
Spring: stainless steel
Bellows support: POM
Self-operated safety valve performance (part of the Piazzetta kit)
Maximum working pressure 10 bar
Set temperature: 95°C
Setting range: 5 ÷ 110°C
Drain flow rate at 110°C with Dp of 1 bar: 3000 l/h
Room temperature: 0 ÷ 80°C
Type of action (EN 14597): 2KP
Maximum sensor temperature: 130°C
Medium: water
PED category: IV
Fittings: ¾” F x ¾” F
Sensor pocket/holder: 1/2” M
Length of capillary tube: 1300 mm
Page 23
English
61
H07025140 / DT2000666 - Rev. 02
Only professionally qualified persons must install, connect and test the closed boiler fireplace in full compliance with current
regulations and the enclosed instructions for installation and operation.
I
n the case of incorporation into an existing system, the relative compatibility must be carefully checked. Gruppo Piazzetta S.p.A.
is relieved from all liability for any damage caused to property or injury to persons by the system.
D
T2010936-00
DT2033130-00
4.0 INSTALLATION
D
T2012203-00
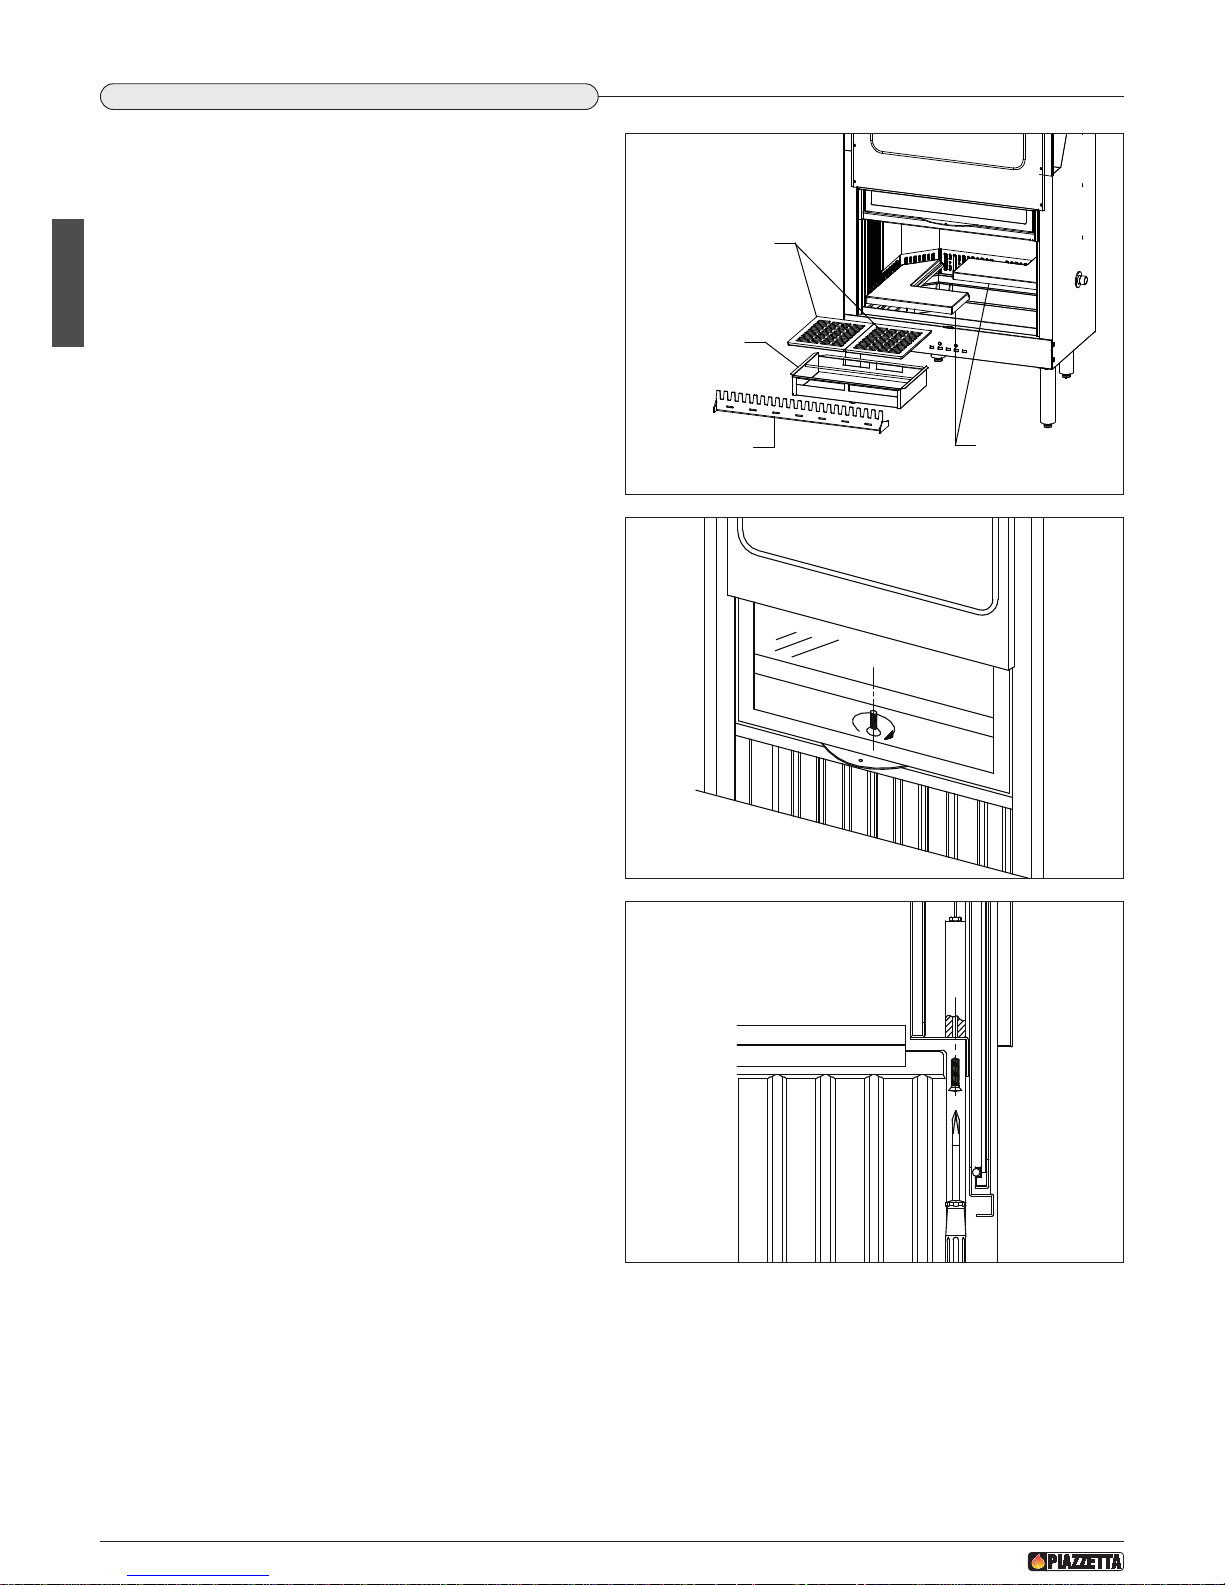
ANCHORING HOOKS
Fig. 29
To avoid accidents or damage to the product, it is recommended
complying with the following instructions.
• Unpacking and installation must be carried out by at least two
persons.
• All handling must be carried out using suitable equipment and in full
compliance with current safety regulations and laws.
• The packaged product must be kept the right way up as shown by
the writing printed on the packaging.
• If ropes, belts, chains, etc. are used, ensure that they are suitable
for the weight to be unloaded and that they are in good condition.
The actual appliance has two hooks on the top for anchoring
ropes; these hooks are sized for lifting only.
• Move the pack slowly and continuously to avoid any jolting of ropes,
chains, etc.
• Do not tilt the pack too much to avoid it tipping over.
• Never loiter within the radius of action of the loading/unloading
equipment (lift trucks, cranes, etc.) and ensure that there are no
persons or objects within the area.
Unpack the product taking care not to damage or scratch it;
remove the accessories pack from the firebox and any pieces
of polystyrene or cardboard used to wedge removable parts,
etc.
Also remember not to leave any packaging (plastic bags,
polystyrene, etc.) within the reach of children, since they
could be potential sources of danger; dispose of them in
accordance with current law.
D
T2012204-00
4
.1 HANDLING - UNPACKING
Page 24
English
62
H07025140 / DT2000666 - Rev. 02
• Before installing the closed boiler fireplace, carefully read all the
information contained in the section “GENERAL RULES”.
•
Check:
- suitable load-bearing capacity of the underlying floor;
- adequate insulation of adjacent walls and the floor;
- compliance with safety distances;
- compatibility of the room of installation with the appliance, obtained
b
y comparing the sum of the volumes of the installation room with
that of the volumes of the rooms heated by the system;
- requirements of the smoke extraction system (section, shape,
direction, materials, etc. of the flueway, the chimney stack and the
fresh air intake), in accordance with recommendations given for
the closed boiler fireplace;
- full compliance with current applicable regulations and standards.
• Unpack the closed boiler fireplace.
• Take the accessories provided in the kit and the securing elements
used during transportation out of the firebox.
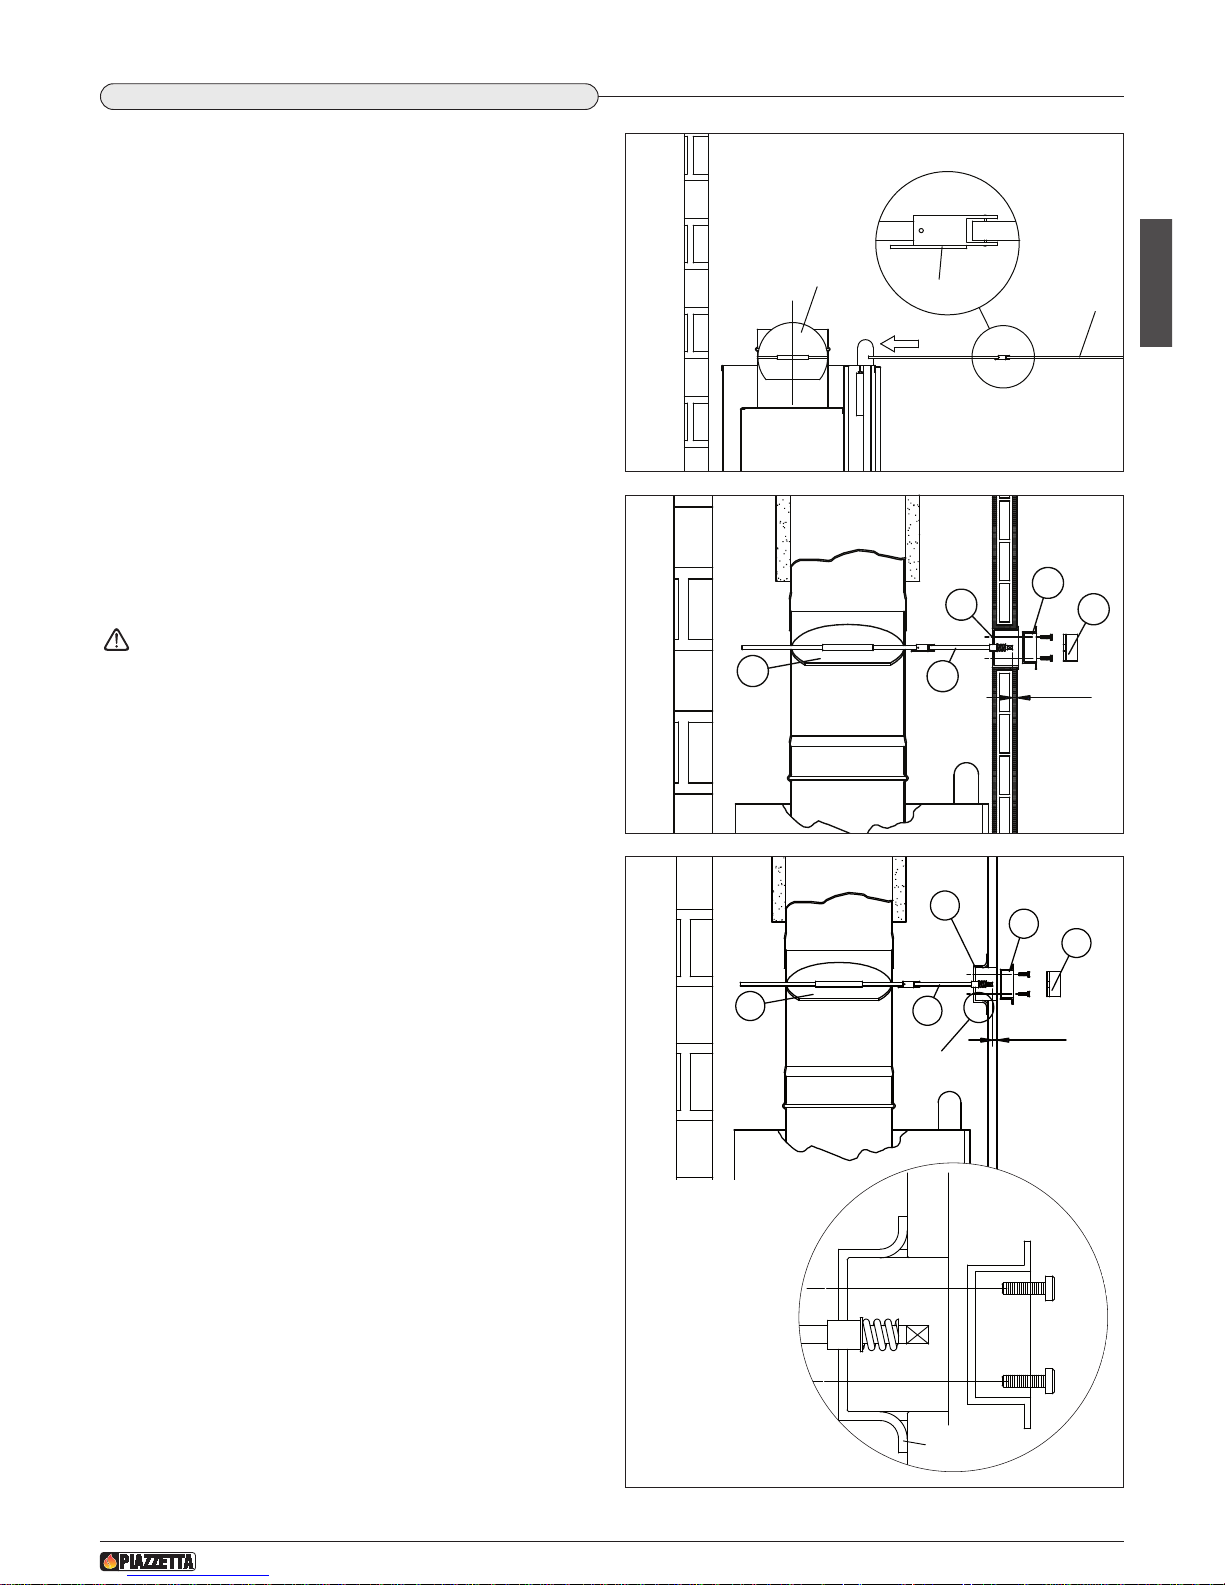
• Complete the grate by inserting in the following order: the Aluker
elements, the ash drawer and lastly the grids contained in the
accessories pack (Fig. 30).
• Release the counterweight by loosening the relative screw to be
found inside the top part of the door (Fig. 31 and 32).
• Adjust the height of the appliance from the ground in relation to
the chosen surround. If it is necessary to increase the height, insert
suitable shims. If a PIAZZETTA surround is to be installed, the exact
height of the firebox is given in the “ASSEMBLY INSTRUCTIONS”
in the surround booklet.
• Make sure that the appliance is standing level.
• Mount the smoke damper (see “INSTALLATION OF THE SMOKE
DAMPER”).
• Connect the appliance to the flueway, as described in the section
“CONNECTION TO THE FLUEWAY”.
• Carry out the water connections.
• Light for the first time and check that operation is correct (see the
section “LIGHTING FOR THE FIRST TIME”).
• If the appliance is working correctly, proceed with assembling the
surround.
DT2012205-00
4.2 PREPARATIONS FOR INSTALLATION
F
ig. 31
DT2030516-00
Fig. 32
DT2030517-00
PARTS IN ALUKER
G
RIDS
ASH DRAWER
FIREGUARD
Fig. 30
D
T2033151-00
Page 25
English
63
H07025140 / DT2000666 - Rev. 02
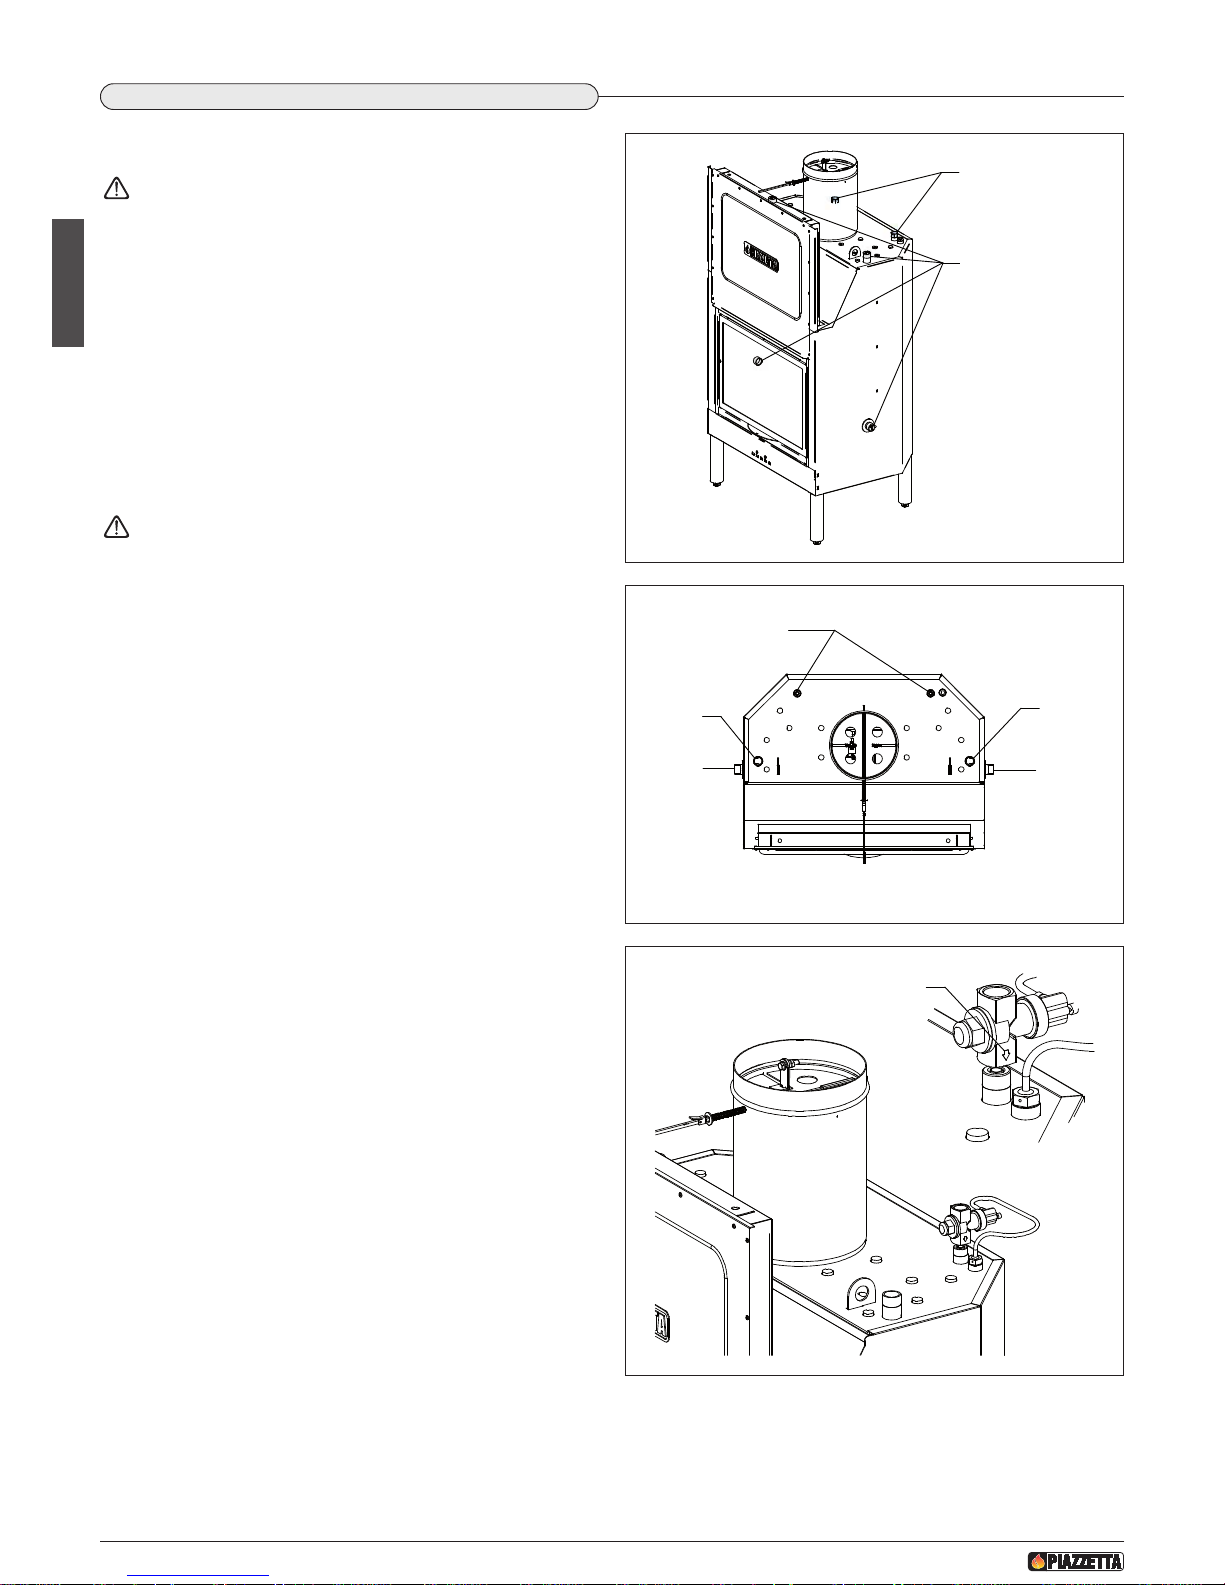
The firebox is provided with a smoke damper with articulated rod so
that hoods with different angles of inclination can be fitted. For
i
nstallation purposes proceed as follows:
- Fit the damper [2] into place and keep it in a vertical position.
- Insert the rod [1] fully into the damper [2], taking care that the tab
[3] is facing downwards.
- Proceed with installation of the flue gas outlet pipe and its
c
onnection to the flue as indicated under “CONNECTION TO THE
FLUEWAY”.
- Construct or finish the preparation of the lining and of the facing
wall.
- Insert the wooden plug provided in the kit into the box [4] and
thread it onto the rod [1].
- Then determine the exact position of the box, which must follow the
angle of the facing wall. By moving the box with the plug, the rod
[1] remains as a guide and it will thus be possible to determine the
ideal position of the box, rod and facing wall.
- Cut off the rod [1] at 1 cm inside the outer face of the wall.
- Thread on the plate [5] and screw it to the box [4].
- Fit the handle [6], ensuring that the position of the damper
corresponds to that of the plate.
If the facing wall is made of plasterboard (Fig. 35), the box
[4] is secured to the wall by screwing on the plate [5] after
turning up the side edges.
DT2010328-00
4.3 INSTALLATION OF THE SMOKE DAMPER
D
T2030520-00
2
3
1
Fig. 33
D
T2030521-00
2
1
6
5
4
1 CM
Fig. 34
DT2030522-00
2
PART."A"
1
6
PART. "A"
RISES
5
4
1 CM
Fig. 35
PART. "A"
RISES
Page 26
English
64
H07025140 / DT2000666 - Rev. 02
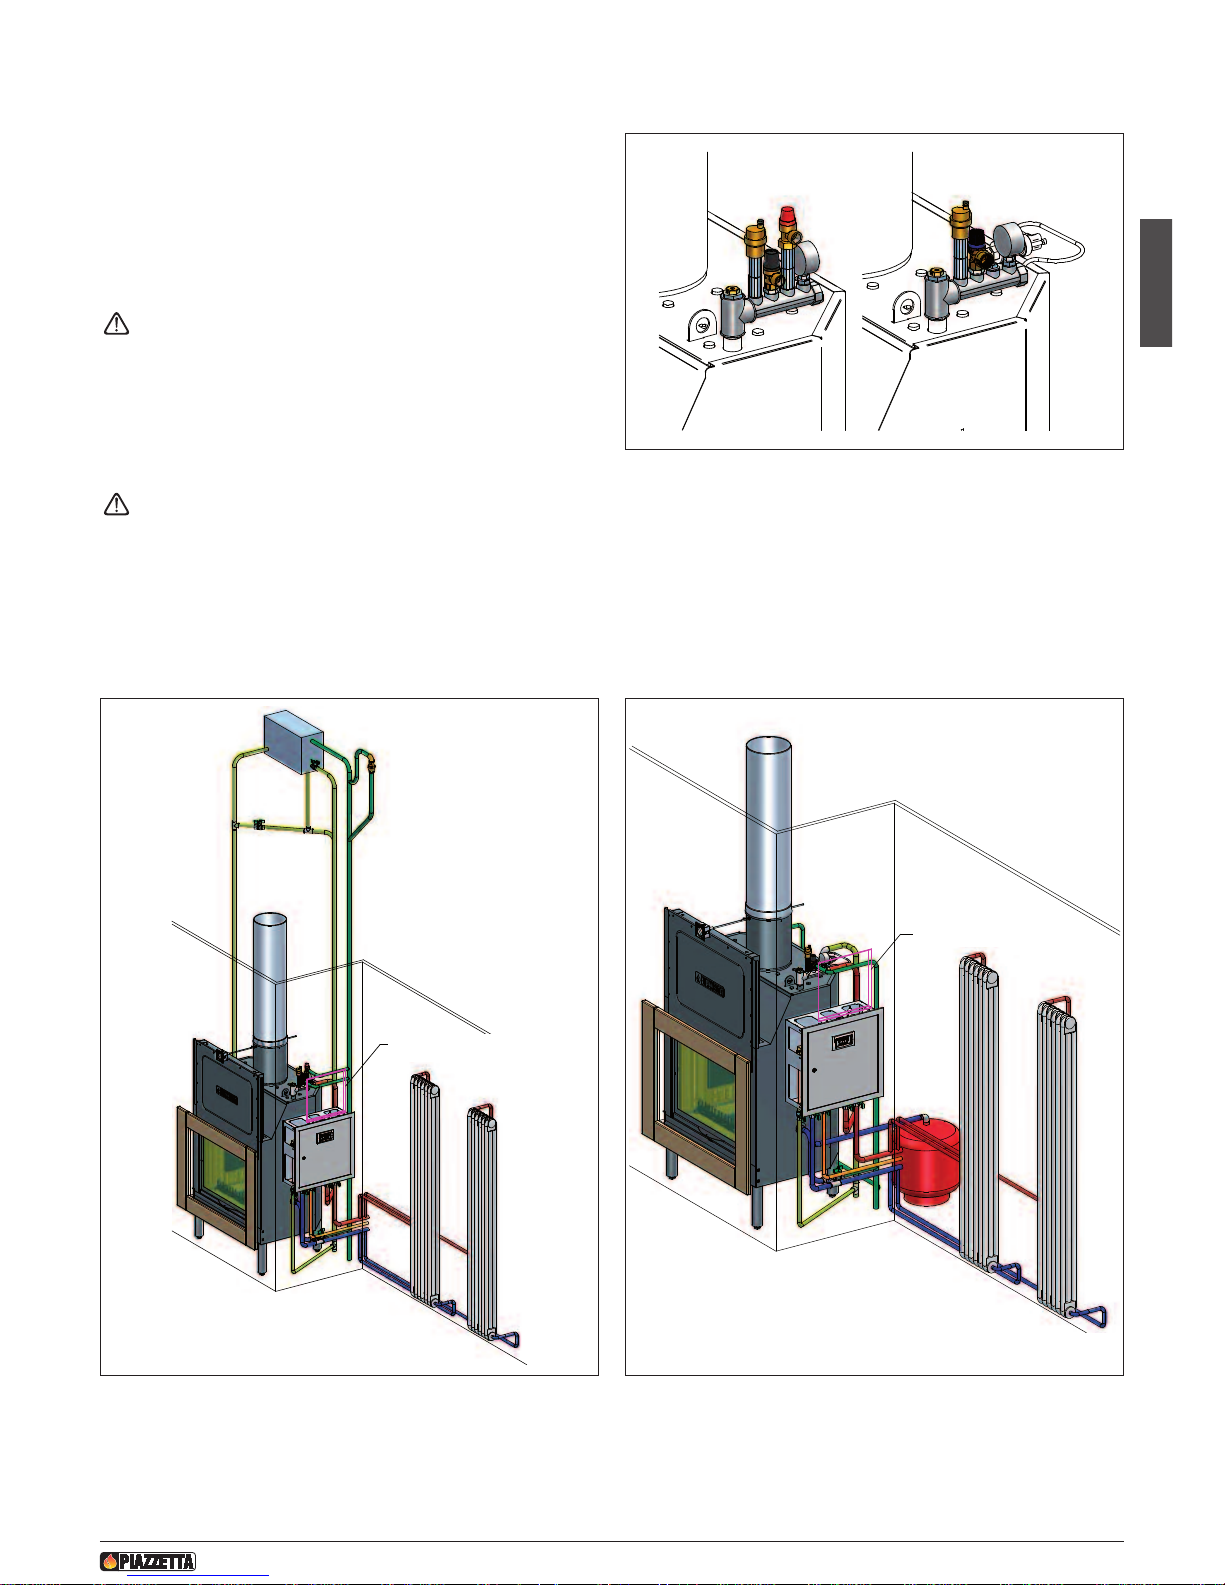
Remove the protectors from the 1” fittings.
I
n the case of OPEN TYPE TANK installation, UNDER NO
CIRCUMSTANCES REMOVE THE TWO ¾” PLUGS.
Removal of these plugs could lead to incorrect use of the
boiler and as a consequence to its early deterioration with
high probability of malfunction or breakage.
R
emoval of these plugs in the case of OPEN TYPE expansion
TANK installation is therefore considered as TAMPERING
WITH THE APPLIANCE.
For best appliance efficiency, connect the system delivery and return
crosswise (M1-R1 or M2-R2, see fig. 38), using the other delivery
fitting for the vent and expansion pipe (in the case of OPEN TYPE
TANK installation) or plugging the two fittings that remain open (in
the case of CLOSED TYPE TANK).
In the case of CLOSED TYPE EXPANSION TANK installation, to
comply with the essential safety requirements laid down by
the product standards EN 13229, and UNI 10412-2:2009, it is
compulsory to install a self-operated temperature/pressure
relief valve (see MT VC TEMPERATURE/PRESSURE RELIEF
VALVE KIT - optional), which activates a flow of cooling water
(mains water) ensuring that the high temperature limit in the
boiler established by current regulations and standards is not
exceeded.
The following conditions must also be complied with:
- the drain must be visible, accessible and must discharge in the
immediate vicinity of the valve;
- THERE MUST BE NO ON-OFF VALVES on the connection between
the supply unit and the valve;
- the pressure upstream of the cooling circuit (mains water) must be
at least 1.5 bar.
Install the valve body with the arrow indicating the direction of flow
pointing towards the boiler, connecting it to the mains water inlet
into the boiler (see fig. 38).
Install either on the right or left ¾” coupling.
In conformity with current provisions, the safety valve outlet must
be free, visible and connected to special collection pipework. The
diameter of the pipework connecting to the drain must be at least
double the minimum cross-sectional area of the valve.
DT2012206-00
4.4 PLUMBING
D
T2033131-00
TAPPI 3/4"
PROTEZIONI
Fig. 36
DT2033132-00
M 2
R 2
M 1
R 1
TAPPI 3/4"
Fig. 37
DT2033133-00
IMPORTANTE
Fig. 38
¾” PLUGS
¾” PLUGS
IMPORTANT
PROTECTORS
Page 27
English
65
H07025140 / DT2000666 - Rev. 02
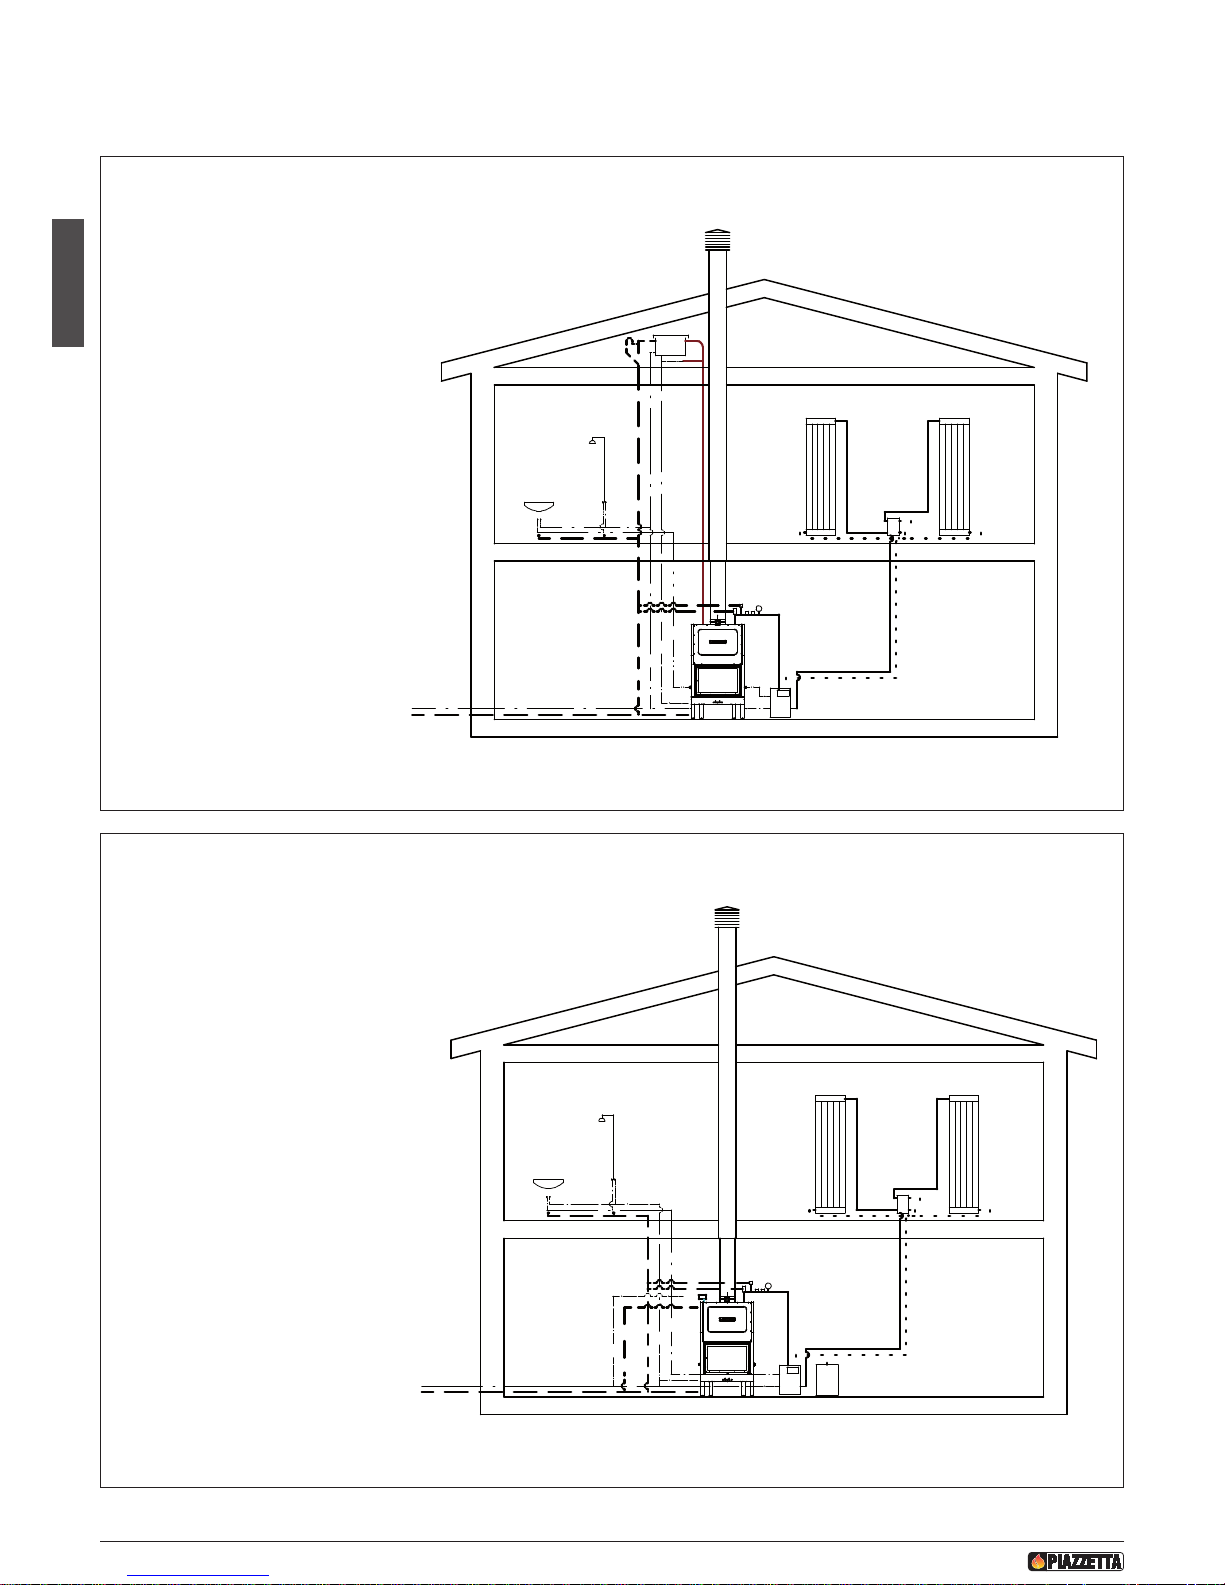
Mount the union tee, reducing coupler and the pocket/holder for the
heat regulator sensor, to be found in the ACCESSORIES kit, onto the
1
” fitting chosen for boiler delivery. (Fig. 39)
Safety unit kit (optional)
To assemble the safety unit, fit together the parts as shown in the
figure and proceed with installation of the system.
It is advisable to make an inspection door on the hood lining
or wherever it is deemed most suitable, so that the
installation safety systems are visible and readily accessible
for controls.
It is strongly recommended that an inspection flap be
installed at the point where the pump and the control
elements are inserted to make maintenance and control of
the various parts easier.
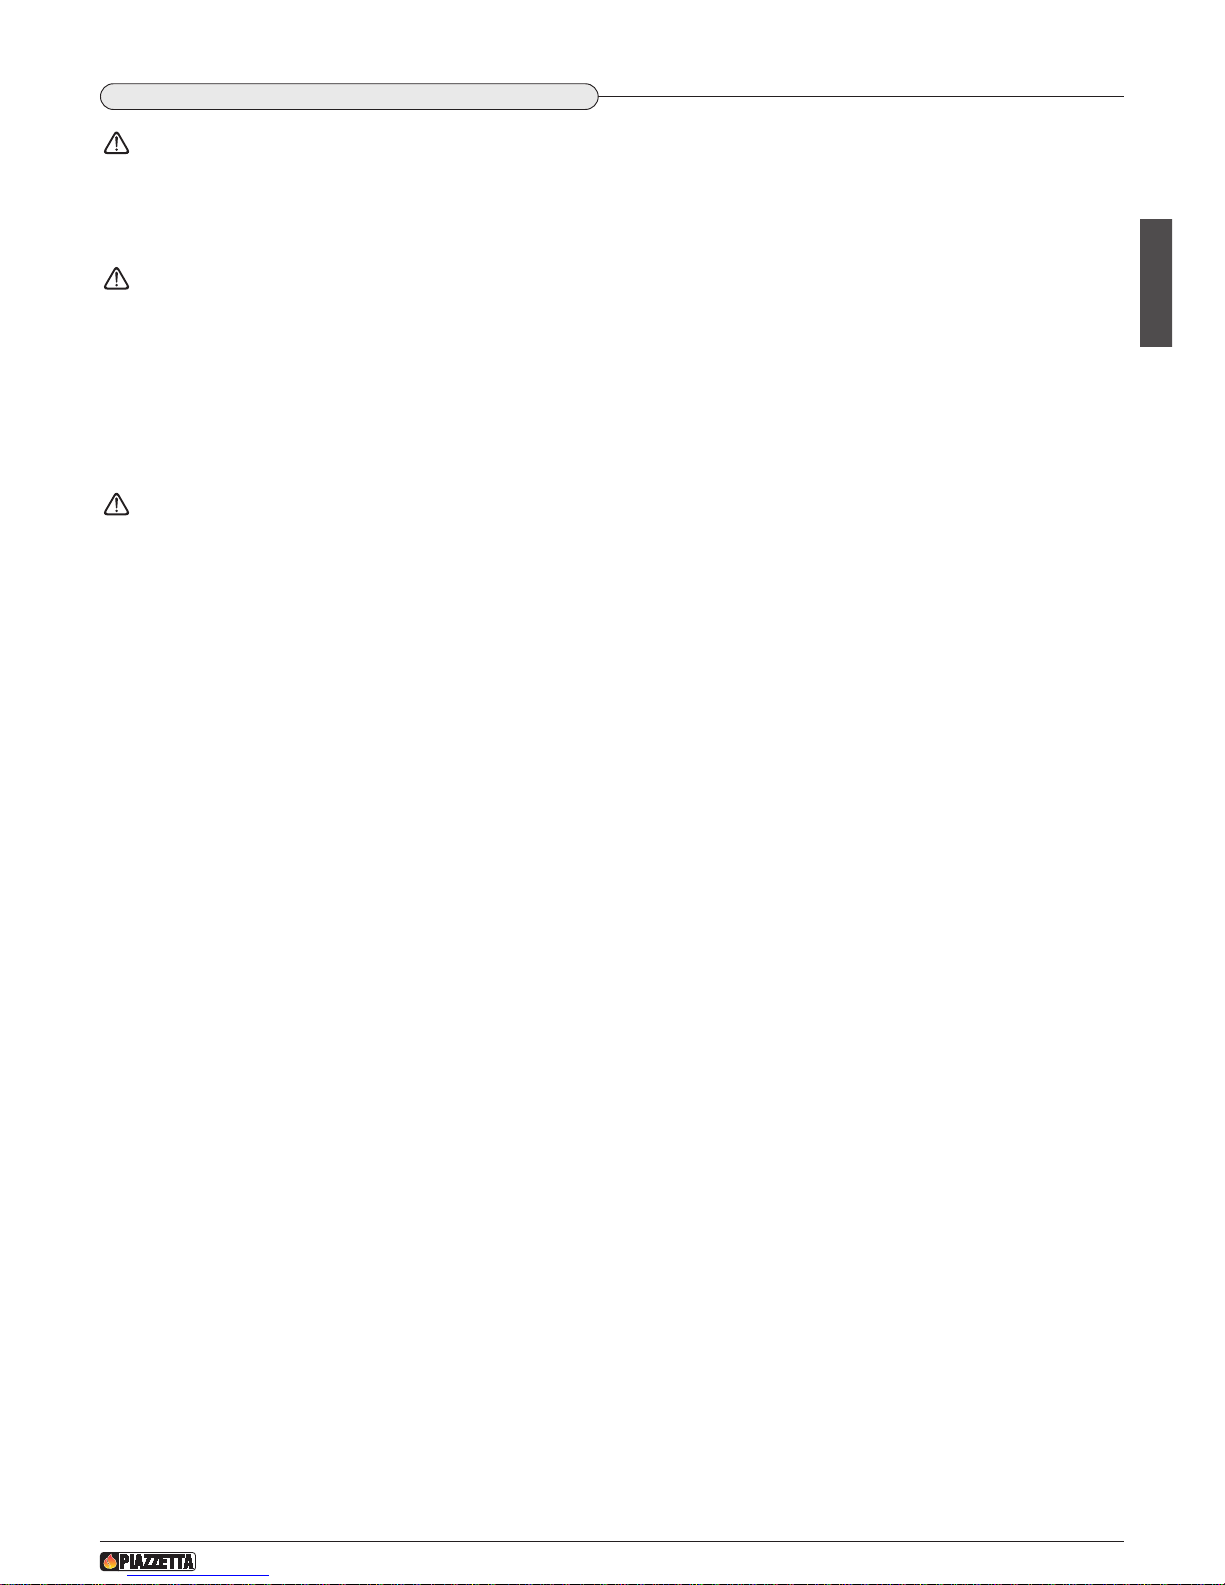
The following figures give an indication of possible installation
layouts of the closed boiler fireplace both with OPEN TYPE TANK and
with CLOSED TYPE TANK.
Portina d'ispezione
Portina d'ispezione
F
ig. 40
DT2033134-00
F
ig. 41
DT2033135-00
Open type tank
Inspection flap
Inspection flap
Closed type tank
Vaso aperto Vaso chiuso
Fig. 39
D
T2033126-00
Open type tank Closed type tank
Page 28
English
66
H07025140 / DT2000666 - Rev. 02
D
T2033137-00
DT2033138-00
1
2
3
7
8
5
6
9
11
4
13
12
10
6
1
2
3
7
8
5
6
9
11
4
13
12
10
6
14
15
Water heating
Key
1) MT 361
2) Heat exchanger/circulation pump kit, which
comprises:
Rapid heat exchanger
Circulation pump
Diverter valve
Control unit
Temperature sensor
3) Safety unit, which comprises:
Manifold
Temperature/pressure relief valve
Safety valve
Pressure gauge
Sensor pocket/holder
4) Closed type expansion tank
5) Manifold
6) Radiator
7) Boiler delivery
8) Boiler return
9) Vent and expansion pipe
10) Hot domestic water
11) Boiler fill pipe
12) System water supply
13) Drain
14) Safety valve supply
15) Self-operated safety relief valve
Key
1
) MT 361
2) Heat exchanger/circulation pump kit, which
comprises:
Rapid heat exchanger
Circulation pump
D
iverter valve
Control unit
Temperature sensor
3) Safety unit, which comprises:
Manifold
Temperature/pressure relief valve
Safety valve
Pressure gauge
Sensor pocket/holder
4) Open type expansion tank
5) Manifold
6) Radiator
7) Boiler delivery
8) Boiler return
9) Vent and expansion pipe
10) Hot domestic water
11) Boiler fill pipe
12) System water supply
13) Drain
Open type tank
Closed type tank
Page 29
English
67
H07025140 / DT2000666 - Rev. 02
Once the appliance has been installed and all the required connections completed, carry out the operating test together with the
installers before fitting the surround, after which the declaration of installation must be written out.
If it is an OPEN TYPE TANK installation
• Only fill the fireplace boiler and system through the expansion tank by gravity filling.
The system must only be gravity filled from the expansion tank located on the boiler return with pipework in compliance with reg
ulations in force in the country of installation.
Filling must not be carried out directly from the mains supply at mains pressure. Maximum working pressure must not exceed 1.5
bar (15 m water column).
If it is a CLOSED TYPE TANK installation
• Fill the fireplace boiler and system by connecting the boiler return to the mains water supply.
• Before lighting the fire ensure that the fireplace boiler and the whole system are full of water.
Under no circumstances light the closed boiler fireplace unless the circuit is completely filled with water.
• During filling, open all the radiator bleeds and any air valves to prevent the formation of air pockets that could hinder normal circulation of
water in the circuit.
Supply water specifications
• The pressure of the mains water supply to the heating system must be between 1 - 2 bar (if the pressure is higher, install a pressure reducer).
• The hardness of the supply water affects heat exchanger operation. If the water is excessively hard (above 20°F), install a water softening
device between the mains outlet and the system. Every municipality provides water analyses free of charge.
DT2012207-00
4.5 FILLING THE SYSTEM
Page 30
English
68
H07025140 / DT2000666 - Rev. 02
* Approximate values.
It is a good rule to purchase timber during the summer (June-July), since woods are cut down mostly in the autumn and you can therefore
be sure that the timber has already been seasoned for approximately 1 year.
Firewood can be classified in two qualities: “good” and “mediocre or poor".
This classification is according to the heat yield of the wood, the longest flame time it provides, its composition and density.
Good fuels
- Recommended timber comes from the family of broadleaf
hardwoods: beech, hornbeam, oak, false acacia, ash, birch,
maple, elm.
- All low-resin and close-grained woods (that is hard and heavy
timber) are most suitable, since they provide the stove with a
steady, continuous flame.
Mediocre or poor fuels
- Timber that is not recommended comes from the family of conifers,
willow, poplar and alder. These light soft woods are resinous and
therefore create more soot, few embers and incandescent sparks,
while requiring more frequent cleaning of the flue and the firebox.
- Another characteristic of softwood is that it gives a lively but shortlived flame and the consumption is higher for the same heat output.
Unsuitable fuels
- Never use wet wood, tarred wood or pellets.
- It is also best not to use: refuse (rubbish), waste paper; paper briquettes; plywood or chipboard; fibreboard; packaging materials; painted
wood or wood coated with synthetic material, plastic laminates, cardboard or milk cartons.
Under no circumstances use liquid fuel of any kind whatsoever.
All these materials or similar ones could be hazardous for the user, damage the firebox, the flue connection and the flue, and, last
but not least, pollute the environment.
5.0 USE
DT2011917-00
D
T2010043-01
5.1 FUEL
Use well-seasoned and dry wood with less than 20% moisture content.
Wood that is ready to burn must have been dried in the open air sheltered from rain or snow for at least 2 years after having been cut.
The lower the moisture content of the wood the higher its heating power. Freshly cut wood has 50% less heat value than dry wood.
Burning wood that is too wet means wasting most of the calories for evaporation of the water contained in it and, in particular, the walls of
the firebox and the flue become fouled and encrusted thereby affecting efficiency.
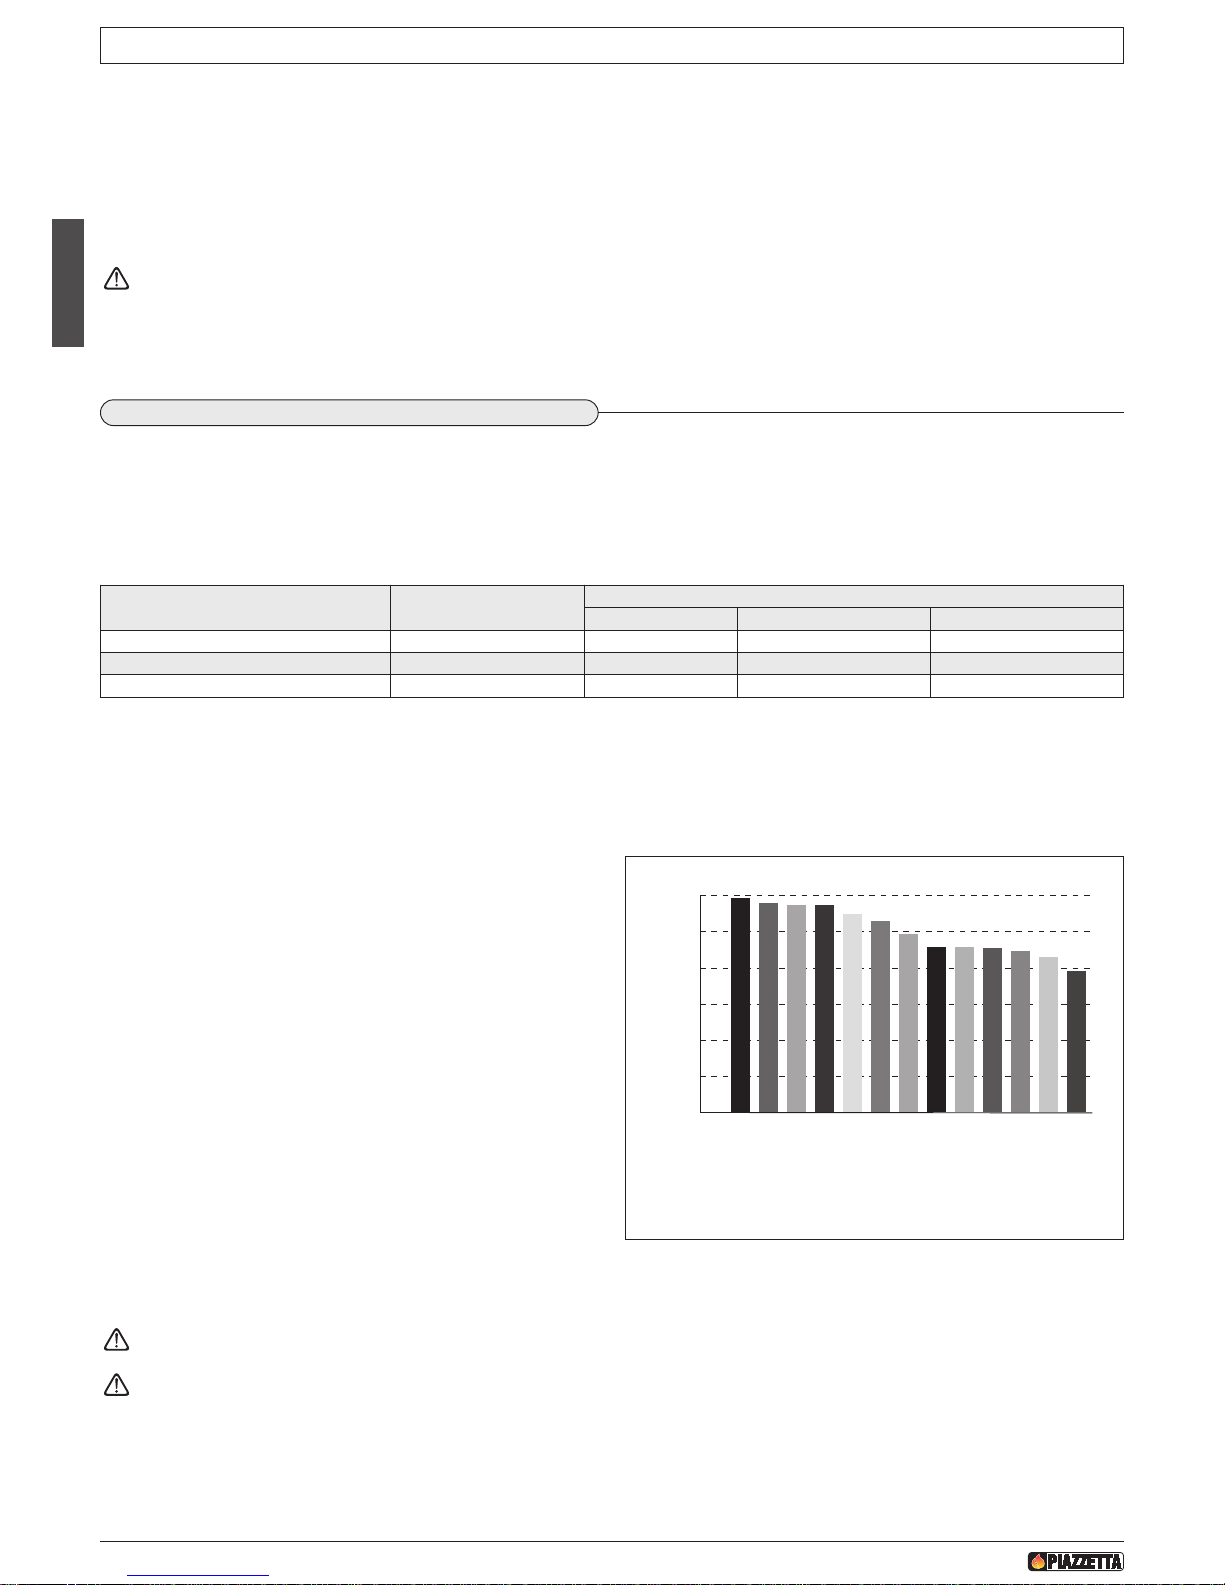
The table below shows how the heating power decreases as the moisture content increases.
• Certain basic facts can be all-important for best performance and getting the most out of your appliance. Please find below some basic
information intended to be of use with regard to the choice of firewood, the adjustment of the dampers and proper operation of the appliance.
• During operation, some parts of the appliance (door, handle, dampers, surround) can reach high temperatures. Therefore exercise great
c
are and take all necessary precautions.
• When you need to stoke up the firebox or to adjust the air flow, use the glove or the hand protector provided.
• If the appliance does not have automatic door closure, the fire must be constantly supervised if the firebox is left open.
Keep any combustible product well away from the fireplace/stove when it is lit (minimum distance from the heat radiation area),
f
or example: wooden furniture, curtains, carpets, combustible liquids, etc.
D
T2010055-00
0
0.5
1.0
1.5
2.0
2.5
3.0
Hea tin g P owe r ( kW h/d m
3
w= 20% )
S
P
RUC
E
S
IL
V
E
R
FIR
WIL
LOW
A
L
D
ER
P
O
P
L
AR
PIN
E
L
A
RCH
BIRCH
BE
E
CH
A
SH
O
AK
L
OC
UST
W
H
IT
E
BE
E
CH
Approximate value referred to ONE cubic decimetre of evenly shaped pieces of
wood with approx. 20% moisture content.
DT2010053-00
Moisture content (W) Seasoning time
HEATING POWER OF THE WOOD (Beech)*
kWh/kg Kcal/kg kWh/dm
3
20 after 2 years 4 3400 2.9
30 after 1 year 3.4 2900 2.8
40 after 6 months 2.8 2410 2.7
Fig. 42
Page 31
English
69
H07025140 / DT2000666 - Rev. 02
DT2010615-02
5.2 SMOKE DAMPER REGULATION
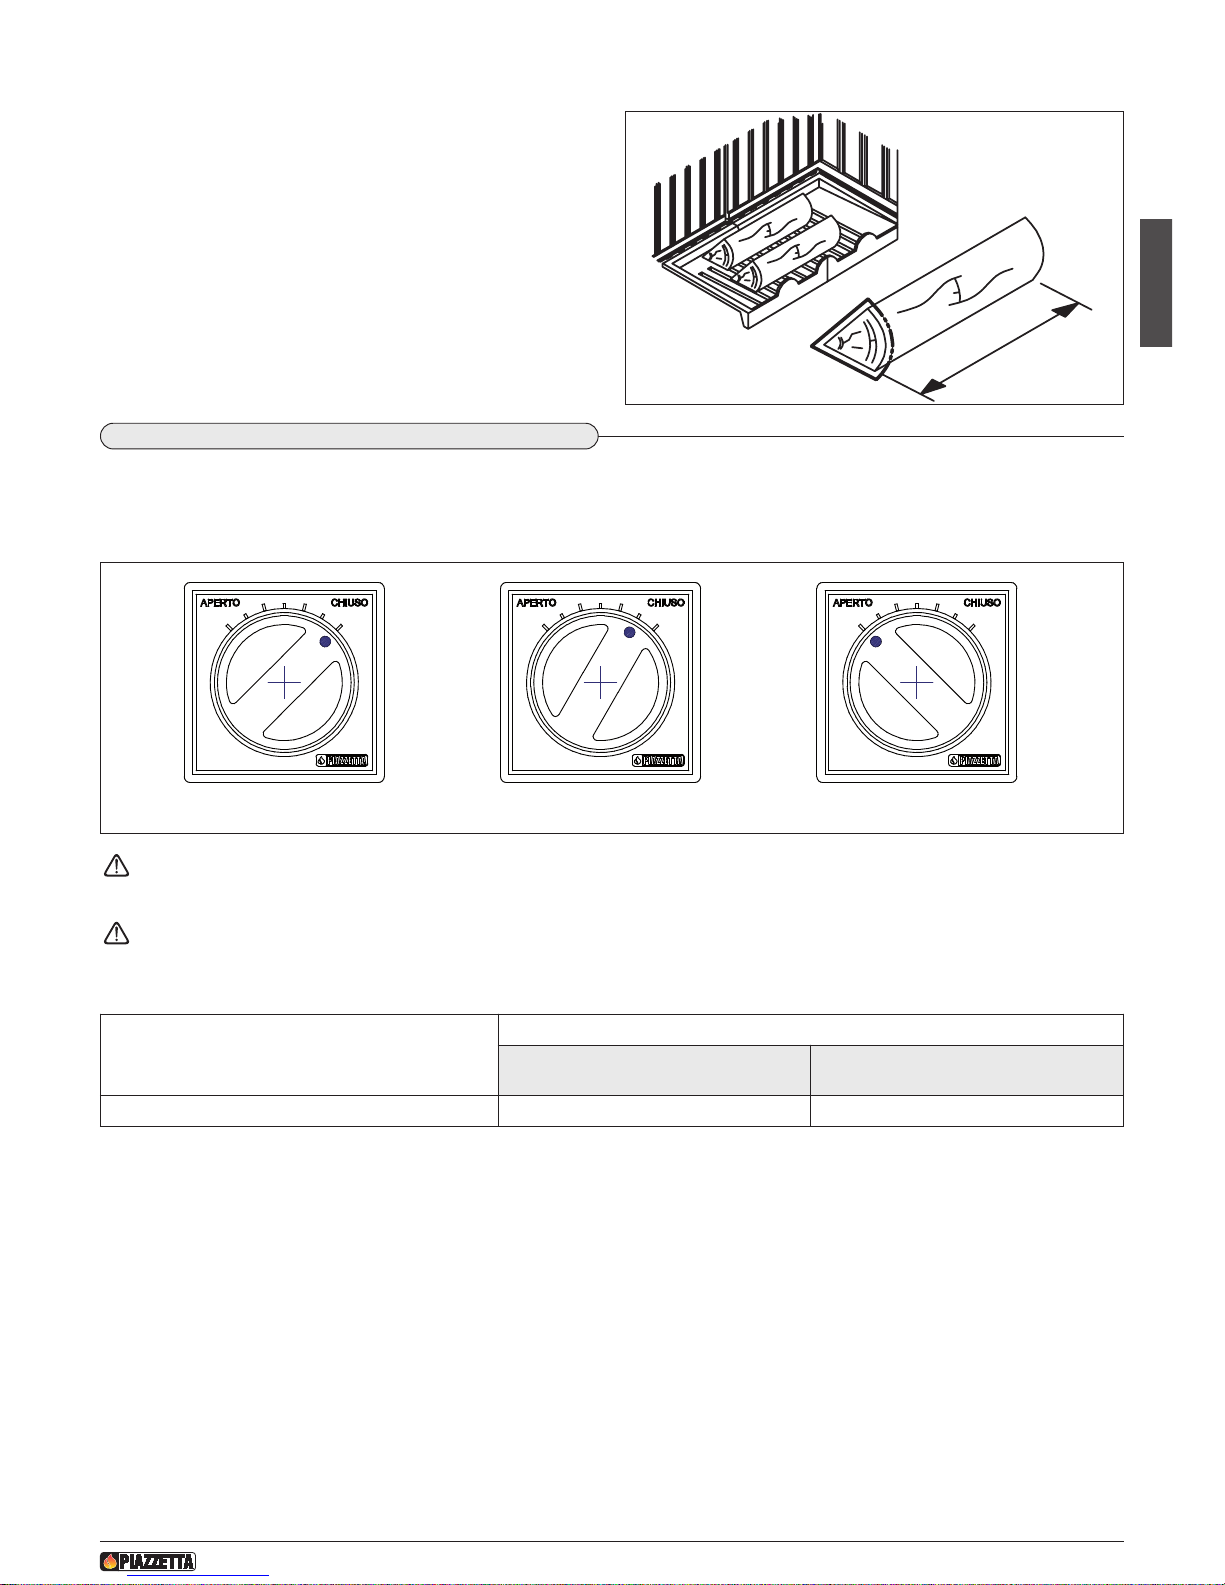
Log size
The size of the wood logs can also affect the efficiency of the product.
- It is essential for the wood to be arranged on the grate on top of a
l
ayer of embers.
- The logs must not touch the aluker or the glass window nor must
they be put on top of each other. Place the wood as shown in figure
43.
- We therefore recommend using logs of the following size:
p
erimeter approx. 30/35 cm;
length approx. 20–25–30 cm according to the type of firebox.
Per ime ter
L
e
n
g
t
h
Fig. 43
DT20300063-00
SMOKE DAMPER POSITION
FIREPLACE LIT
LIGHTING OR STOKING-UP
OF FIREPLACE
MT 361 1/6 OPEN (*) OPEN
(*) Position referred to a draught of 12 Pa
A CB
F
ig. 44
D
T2030515-02
A - smoke damper closed B - smoke damper 1/6 open C - smoke damper open
When lighting the fireplace, put the damper to the open "APERTO" position until a bed of embers has been formed.
Once the fireplace is properly lit, put the damper to the operating position, which may vary according to the atmospheric conditions, the type
of flue and consequently the draught. You will learn by trial and error which is the best position for the smoke damper.
Should the flue have a strong draught exceeding 12 [Pa], the smoke damper must be moved towards the closed “CHIUSO” position.
Before stoking up with logs, always set the damper to the open "APERTO" position. After having stoked up, set the damper back to
the operating position.
An excessive increase in fuel and excessive opening of the smoke damper leads to an increase in appliance heat, decrease in
efficiency and an increase in wood consumption.
Page 32
English
70
H07025140 / DT2000666 - Rev. 02
DT2012302-00
5.4 LIGHTING FOR THE FIRST TIME
Before lighting, remove the supplied accessories (see “ACCESSORIES”) and flammable elements from the grate or from the ash
drawer and remove any elements of carriage used to protect any part of the stove.
If provided in the kit, it is very important to remove the paint spray can, which could explode.
There are two important stages when lighting the appliance for the first time: the operating test and start-up.
1. Operating test
• Before carrying out the operating test, check that everything has been installed correctly (see “GENERAL RULES”).
• Put the ON-OFF switch of the control unit to “ON”. Check and if necessary set the starting temperature of the circulation pump as
described in the “TEMPERATURE CONTROL UNIT” booklet.
• Start with the lighting phase (see “LIGHTING”).
• The fire must be lit the first time (and also when it has not been used for some time) with only 50% of the normal recommended fuel
load so that it produces a moderate flame, which allows correct thermal expansion and uniform heating of the appliance.
Should smoke come out:
• do not open the door of the fireplace;
• close the combustion air dampers (CLOSED position);
• let the fire go out slowly;
• air the room before staying in it;
• check the cause of malfunctioning.
Do not extinguish the fire with water as this could damage the grate
2. Start-up
• During this first time of operation it is recommended that the appliance be used at minimum capacity, stoking the grate for at least the
first day with only 50% of the logs usually indicated as normal.
• Keep the air dampers in the operating position (except for lighting), see “COMBUSTION AIR REGULATION”.
• This phase allows all the parts to settle down and fumes caused by paint/varnish, grease or oily liquids used in manufacture to disappear.
• Air the room well in this initial phase.
After this, the appliance will no longer emit odours due to paint evaporation and must only be stoked up with the indicated nominal amounts.
• Upon reaching the required water temperature, adjust the smoke damper and the next stoking-up will then be determined by the water
temperature.
DT2011909-00
5.3 COMBUSTION AIR REGULATION
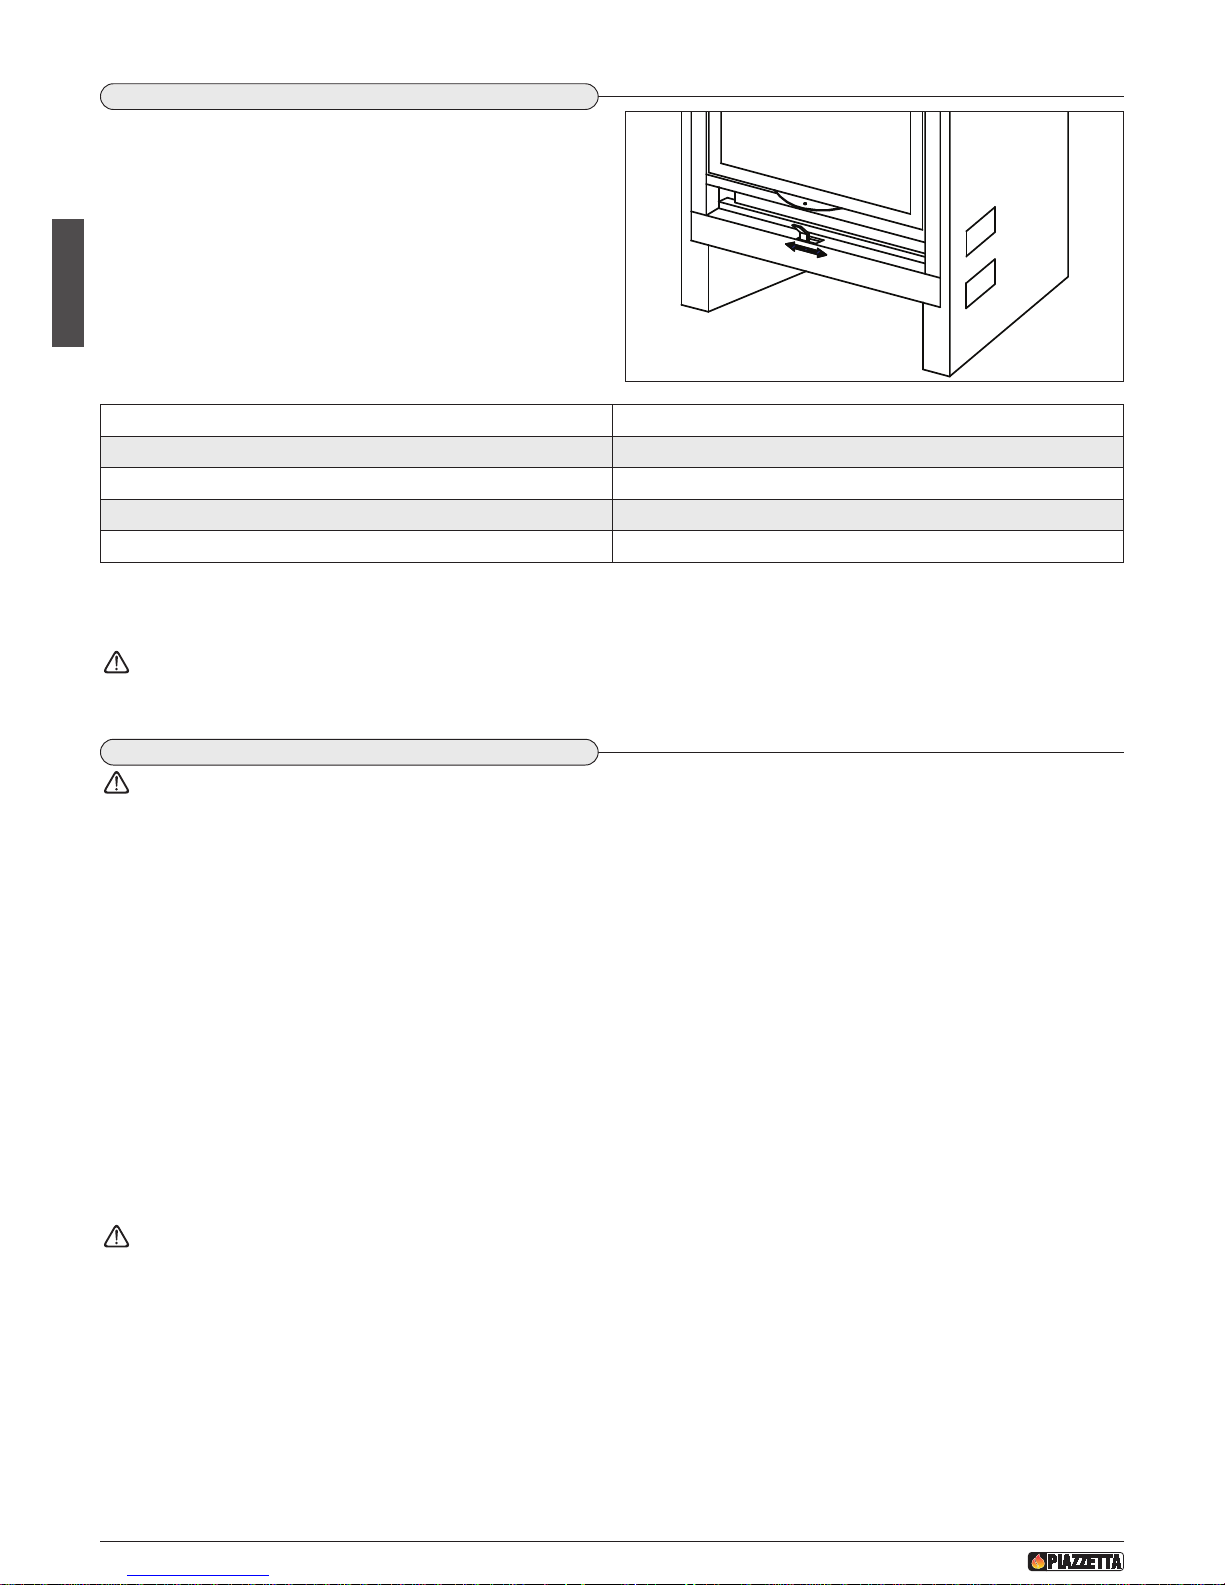
The rated thermal efficiency is determined with the air damper. Pay
attention to the positions given in the table below according to the
fuels being used.
T
he positions given below refer to rated efficiency. Since efficiency
also depends on atmospheric and climatic conditions and therefore
on the draught, the most suitable position will be found with experience.
Regulation is carried out as shown in the figure to the side. Refer
ence should also be made to the section “SMOKE DAMPER REGU-
LATION”.
Regulation and quantity of material to be burned for rated power:
C
LO
S
E
D
O
P
E
N
Fig. 45
DT2030526-00
Data obtained in a laboratory qualified to issue certification.
Should the flue have a strong draught exceeding 12 [Pa], the smoke damper must be moved towards the “CLOSED” position.
An excessive increase in fuel and excessive opening of the air/smoke dampers, compared to the values given in the table, leads
to an increase in appliance heat, decrease in efficiency and an increase in wood consumption.
MT 361
Material to be burned See “FUEL” section
Air damper position 5 mm OPEN
Smoke damper position 1/6 OPEN
Maximum quantity of fuel to be burned See “TECHNICAL DATA” section
Page 33
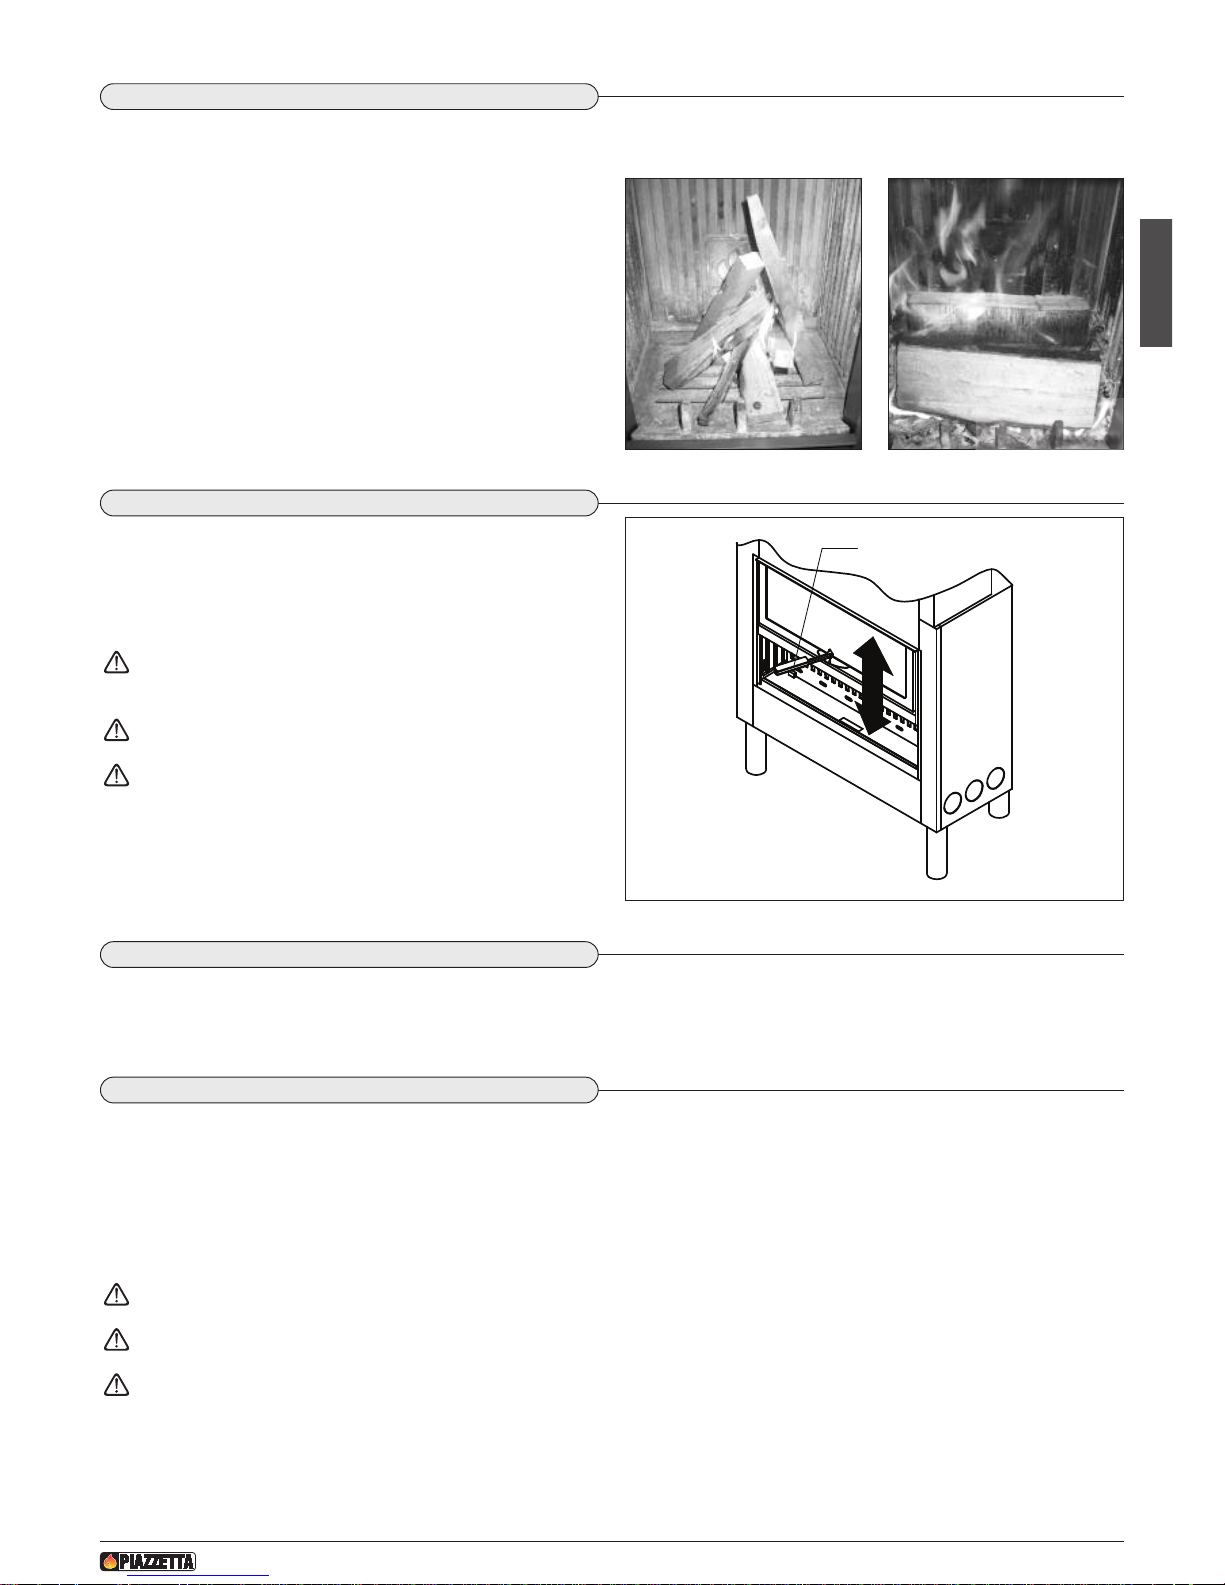
English
71
H07025140 / DT2000666 - Rev. 02
DT2010048-00
5.7 OPERATION UNDER ADVERSE WEATHER CONDITIONS
During the intermediate seasons with adverse weather conditions or when outdoor temperatures are higher, changes in the weather can
cause malfunctioning of the draught, thereby impeding proper smoke discharge. In this case the grate must be loaded with only a little wood
and the primary air damper must be set fully open so that the wood burns faster and thereby stabilises the draught.
DT2012276-00
5.8 OVERHEATING AND EXTINGUISHING
If the water temperature is such that it activates the safety devices:
- immediately stop adding fuel;
- close the air damper and the smoke damper;
- check that the flame becomes less intense and the water temperature drops;
- do not open the door.
When the appliance has cooled down, find the cause of the problem and if necessary call in specialised personnel (C.A.T. – Piazzetta AfterSales Service Centre).
In the event of fire, extinguish with a fire extinguisher.
Do not extinguish the fire with water.
Air the room well before using it again in order to get rid of any smoke and combustion gases.
DT2010617-01
5.5 LIGHTING
When lighting the fire, the grate should be brought quickly to working temperature. If it is done slowly, condensation will inevitably form and
cause blackening of the grate and the glass.
P
ut the fuel into the grate as described below:
- put the air damper and the smoke damper, if installed, to the OPEN
position (see “COMBUSTION AIR REGULATION” and “SMOKE
DAMPER REGULATION”);
- place the material for kindling (paper, firelighter, etc.) in the centre
o
f the grate and add small pieces of soft wood (fir) in the form of
a pyramid. To light the soft wood quickly, open the door by approx.
two centimetres for 5 – 10 minutes;
- once a bed of embers has formed, stoke up as recommended and
adjust the air damper and the smoke damper, if installed, as
described under “COMBUSTION AIR REGULATION” and “SMOKE
DAMPER REGULATION”.
D
T2010046-00
5.6 OPENING THE DOOR
During operation, only open the door when there is nothing more
than embers in the grate. Opening the door when the flames are
intense is hazardous both for the user and the dwelling. The door
must be opened slowly, holding it slightly ajar for a moment before
opening it completely.
Before opening the door, put the smoke damper to the OPEN
position.
Always use the hexagonal door handle tool provided.
Do not slam the door shut otherwise the glass could break.
F
ig. 46
D
T2030064-00
F
ig. 47
D
T2030065-00
E06030230
Hexagonal door handle tool
F
ig. 48
DT2031080-00
Page 34
English
72
H07025140 / DT2000666 - Rev. 02
6.0 MAINTENANCE
DT2011918-00
D
T2010058-00
6.1 PERIODIC CONTROL
Check for any formation of creosote in the pipes connecting to the flue and inside the flue during the seasons when the appliance is in
operation, inspecting them at least once every two months.
The combustion of the wood (especially if moisture content is higher than 30%) produces pitch and other organic vapours that give rise to
creosote. The formation of creosote causes fouling, which obstructs the flue and the passage of smoke.
“Creosote” is inflammable and can catch fire, causing serious damage to both the flue and to the structure of the dwelling.
Only use recommended fuels (see “FUEL”).
If creosote has accumulated, it must be removed to reduce the risk of fire and to improve heat exchange.
The following must be free from obstruction and inspected at least once every two months:
- the flueway (connection to the flue, flue, chimney stack);
- the fresh air intake;
- the appliance firebox (correct position of the plates, the ash drawer, the grate and grid, baffle plates, smoke dampers, etc);
- the ventilation system (apertures, air ducts, grilles) if installed.
Check that the automatic door closing system and the air dampers are in proper working order.
Maintenance of all the above heating system must be carried out at least once a year before the season when it will be used. We
also recommend periodically checking the whole heating system during the period of operation until the time when it will not be
used for several months.
DT2010060-00
6.3 CLEANING THE STEEL PARTS
The steel sections of the cladding should be cleaned with a soft, dry cloth before applying any detergents.
Afterwards it is recommended that you use a degreasing agent such as acetone or vinegar diluted in water.
D
T2010059-03
6.2 CLEANING THE CERAMIC CLADDING
The ceramic cladding must first be cleaned with a soft dry cloth before using any detergent (even mild detergent).
Products are available on the market which are suitable for cleaning ceramics as well as concentrated products for cleaning porcelain. These
will remove oil, ink, coffee and wine stains, etc.
Never soak the ceramic cladding or clean it with cold water when it is still hot as the thermal shock could cause it to crack.
• Maintenance is to be considered compulsory for correct and efficient appliance operation. If maintenance is not carried out with the
recommended frequency, appliance performance could suffer. The manufacturer will not be responsible for appliance deterioration or
malfunction if due to poor maintenance.
•
All maintenance work (cleaning, any replacements, etc.) must be carried out when the appliance is shutdown and completely cold.
D
T2010057-02
DT2010061-03
6.4 CLEANING THE PAINTED METAL PARTS
When cleaning the parts of the product in painted metal use a soft cloth moistened with water.
Never clean metallic parts using alcohol, solvents, petroleum-based agents, acetones or other degreasing or abrasive substances.
In the event of such substances being used the manufacturer cannot be held responsible for any damage caused.
Discolouration of metallic parts may be the result of improper use.
Page 35
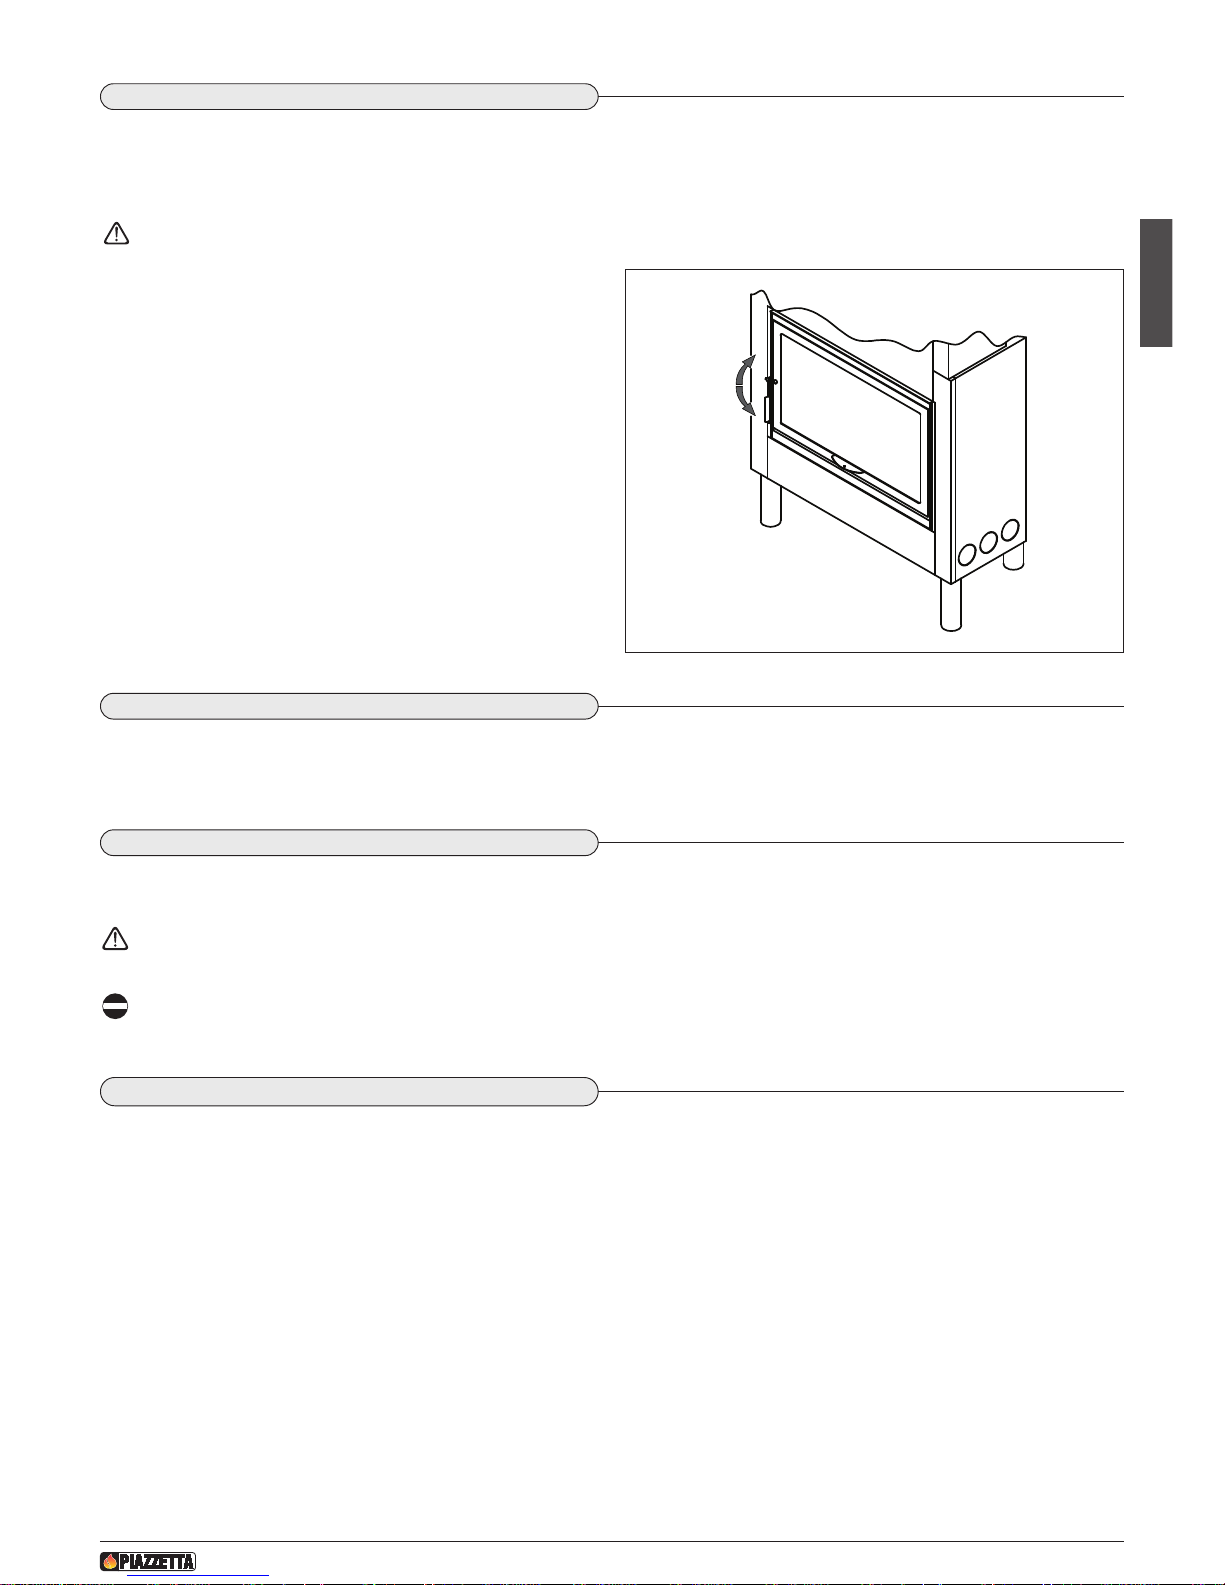
English
73
H07025140 / DT2000666 - Rev. 02
EnglishEnglish
DT2010700-00
6.5 CLEANING THE GLASS (DAILY)
If the appliance is very slow to heat up in the ignition phase due to fuel that isn’t completely dry, this is likely to cause a build-up of tar on
the glass. This will eventually burn off when the appliance is operating at full capacity. If the tar is left to build up over a long period it will
require more effort to remove. We therefore recommend that the glass be cleaned daily before lighting the fire.
T
he glass should be cleaned when cold using ammonia-based degreasing agents and not corrosive substances such as solvents.
Do not use any material that could scratch or spoil the glass, as scratches may develop into cracks or breaks.
Only for the purpose of cleaning the glass, the hinged-type door may
b
e opened using the door handle tool provided in the kit. Insert the
door handle tool into the relative hole in the door and turn to open.
In case of breakage
Every one of our fireboxes comes with a door fitted with a 4 mm thick
pyroceram panel resistant to thermal shock up to 750°C. This can
only be broken by heavy impact, such as banging the door too hard.
In the event of breakage replace with original Gruppo Piazzetta S.p.A.
parts only.
Seal control
Proper tightness of the door seal is essential for optimal product
performance. It is therefore recommended that the seals be checked
periodically or after a long period of use for signs of wear or damage.
If necessary replace them using Gruppo Piazzetta S.p.A. original
spare parts.
D
T2010049-04
6.7 DISPOSAL OF ASHES
Ash from natural (non-treated) wood burned in stoves or open fireplaces is composed mainly of calcium, silicon, potassium and magnesium
oxides. The ashes can therefore be used as a fertiliser for plants or in the garden, albeit not exceeding 2.6 kg per 10m2 annually.
The ashes should be placed in a metal container with a sealed cover. The sealed container should be placed on a non-combustible
surface at a safe distance from combustible materials until the cinders have been completely extinguished.
Only when they have been fully extinguished can the ashes be thrown away with organic waste, assuming that nails or other nonorganic material are not present.
D
T2010063-00
6.6 CLEANING THE GRATE AND THE ASH DRAWER
The grate and the ash drawer must be cleaned daily. Using the grate for a whole day contributes to the accumulation of ash or residual
combustion products. If cleaning is not done regularly there will be an excess of residues, which will affect appliance efficiency.
The ash drawer also needs emptying regularly, because if it fills up and obstructs the grate grid it will cause appliance malfunction.
DT2010064-00
6.8 CLEANING THE ALUKER
®
The interior of the firebox has been constructed from an innovative material called “Aluker®”.
Aluker®is based on substances that are completely non-toxic and is heat-resistant up to 1400°C.
In spite of its considerable strength it is not recommended that you throw large logs forcefully
against the bricks.
Aluker®darkens when the stove is first lit but returns to its natural colour gradually as the bricks warm up.
Some advice for optimum use of Aluker®bricks:
- Do not use water to put out the fire - leave the bricks to cool by themselves;
- Do not scratch the Aluker®bricks with metal objects;
To clean Aluker®bricks use an ordinary brush.
Fig. 49
D
T2031079-00
Page 36
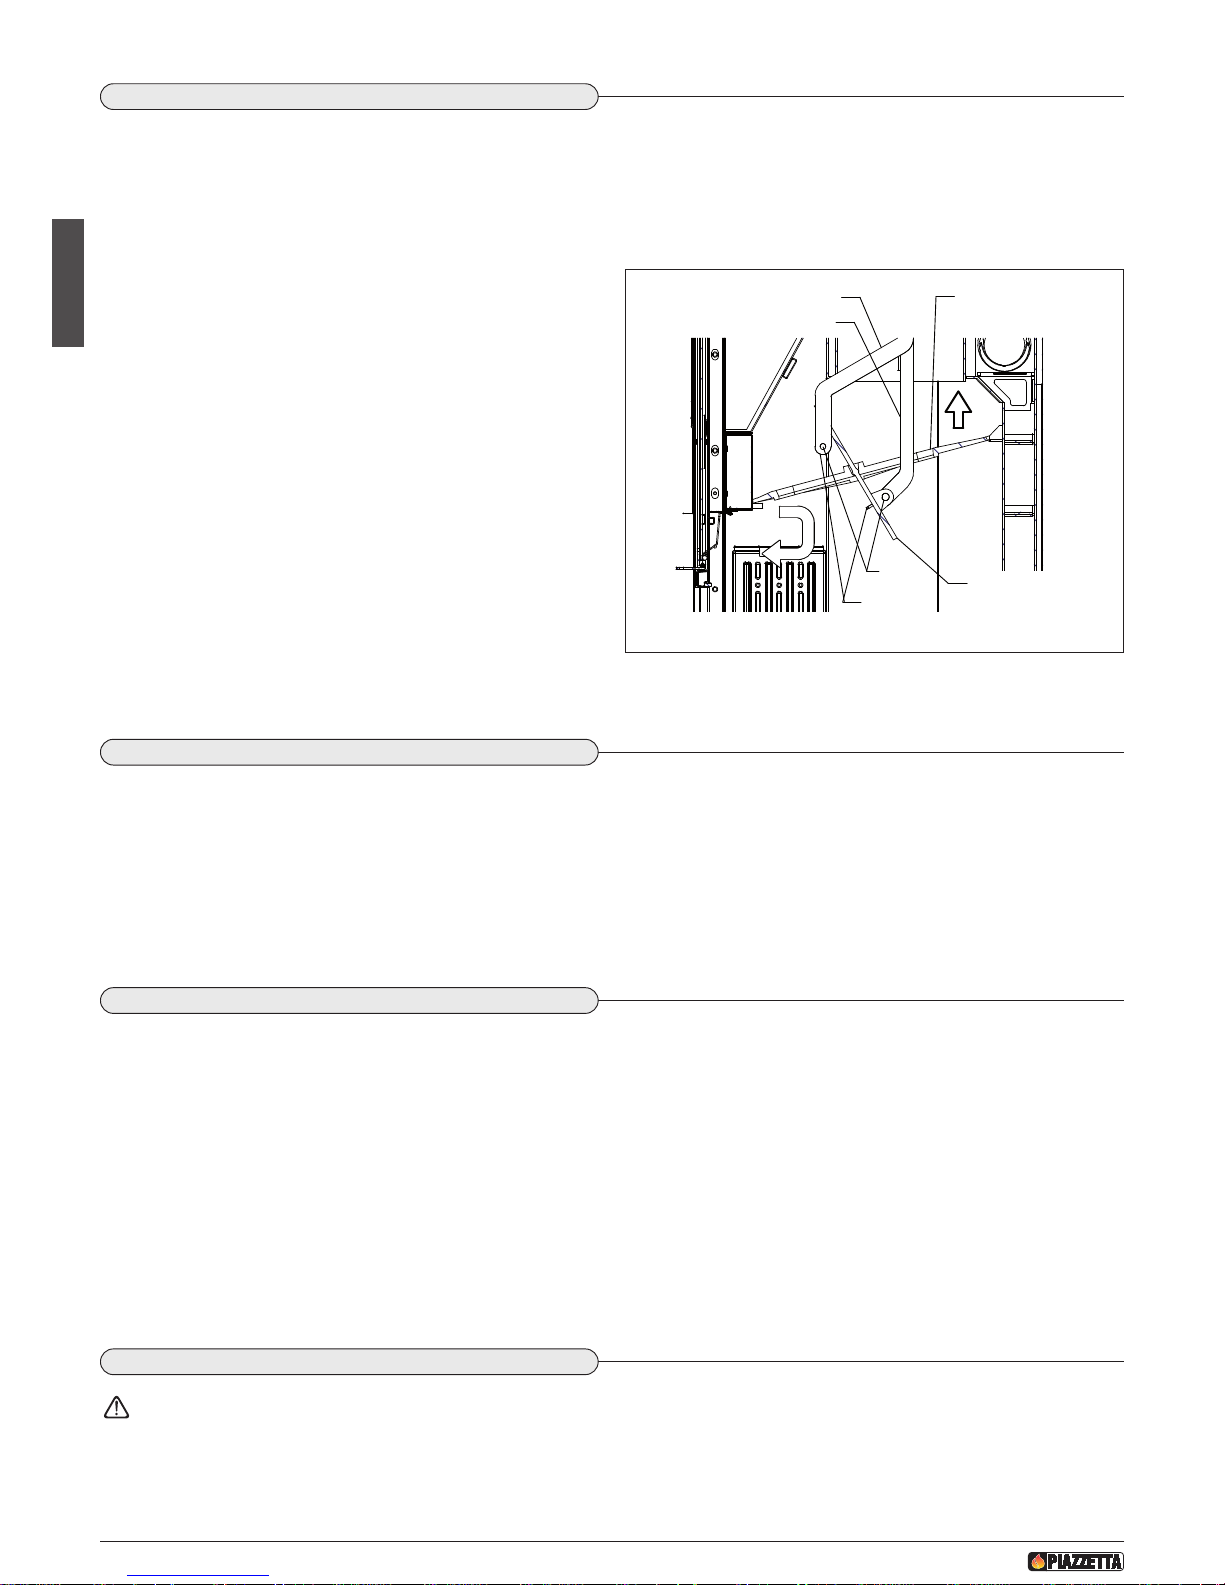
English
74
H07025140 / DT2000666 - Rev. 02
DT2010379-01
6.12 DOOR CLOSING SYSTEM
This work must be carried out by specialised personnel.
The “rise n’fall” door closing system must be checked periodically, at least once every two years; attention must be paid in particular to
lubricating the roller located inside the double glazing or, depending on the model, the pulleys located outside the double glazing.
DT2010929-00
6.10 MAINTENANCE OF THE WATER SYSTEM
At least once a year, when the system is cold:
• check the water level inside the open expansion tank and the conditions of the tank, ensuring that the filling cock, the bleeder pipe and/or
overflow are in proper working order;
• check the state of the thermal insulation, the visible parts, the vent and expansion pipe and the filler pipe;
• check the heating circuit water pressure using the pressure gauge/manometer provided in the kit;
• check the condition of the temperature/pressure relief valve and safety valve; if they are open or are “leaking”, contact After-Sales Service:
UNDER NO CIRCUMSTANCES TAMPER WITH OR REMOVE THESE ACCESSORIES.
DT2010941-00
6.11 WHEN THE BOILER STOVE HAS NOT BEEN USED FOR SOME TIME
If the THERMO boiler stove has not been used for some time, it is advisable to proceed as follows
• Check the smoke extraction/flue system and clean if necessary.
• Check the level of water inside the expansion tank and if necessary bleed the system through the radiators.
• Check correct operation of the electrical and plumbing accessories connected to the system.
• In particular check correct operation of the circulation pump impeller; if it is locked, using a screwdriver unscrew the plug on the pump and
release it. To be able to do this on the THERMO boiler stove fitted with the heat exchanger kit, remove the bottom shield to access the
compartment where the pump is located or use the access flap made at the time of installation.
• Carry out all the maintenance work (described in the previous section) and checks required for correct operation and compliance with safety
regulations.
• Light the fire in accordance with the instructions given under “LIGHTING FOR THE FIRST TIME”.
• Check the tightness of the glazing gaskets and all the elements subject to wear and replace any that are worn.
DT2012208-00
6.9 CLEANING THE SMOKE BAFFLE PLATE AND BOILER
The boiler and smoke baffle plate must be cleaned periodically.
The baffle plate consists of a fixed and a movable part, the latter tilting
every time the smoke damper control is moved.
T
o clean the baffle plate simply use a vacuum cleaner with hose approx.
one metre long which can be inserted through the opening of the
inspection flap to remove soot that has deposited both on the rear part
and on the front part.
The concealed part of the boiler must be checked and cleaned once a
y
ear. To do this, the smoke baffle plate must be removed.
Proceed as follows:
- move the smoke damper control to the left to the “OPEN” position;
- remove the securing split pins and remove the pins that connect the
moving part of the baffle plate to the rods connecting to the smoke
damper valve;
- if preferred, move the smoke damper control to the right to the
“CLOSED” position;
- tilt the moving part and take it out of its seat, pulling it downwards;
- rotate the rear part of the baffle plate upwards, then slide the front part
towards the rear of the firebox (Fig. 50).
Having completed the inspection and cleaning, refit all the parts in the
reverse order to removal, making sure that the rods are correctly
positioned.
Split pin
Pin
Moving part
of the smoke
baffle plate
Fixed part
of the smoke
baffle plate
Rod
R
od
Fig. 50
D
T2033139-00
Page 37
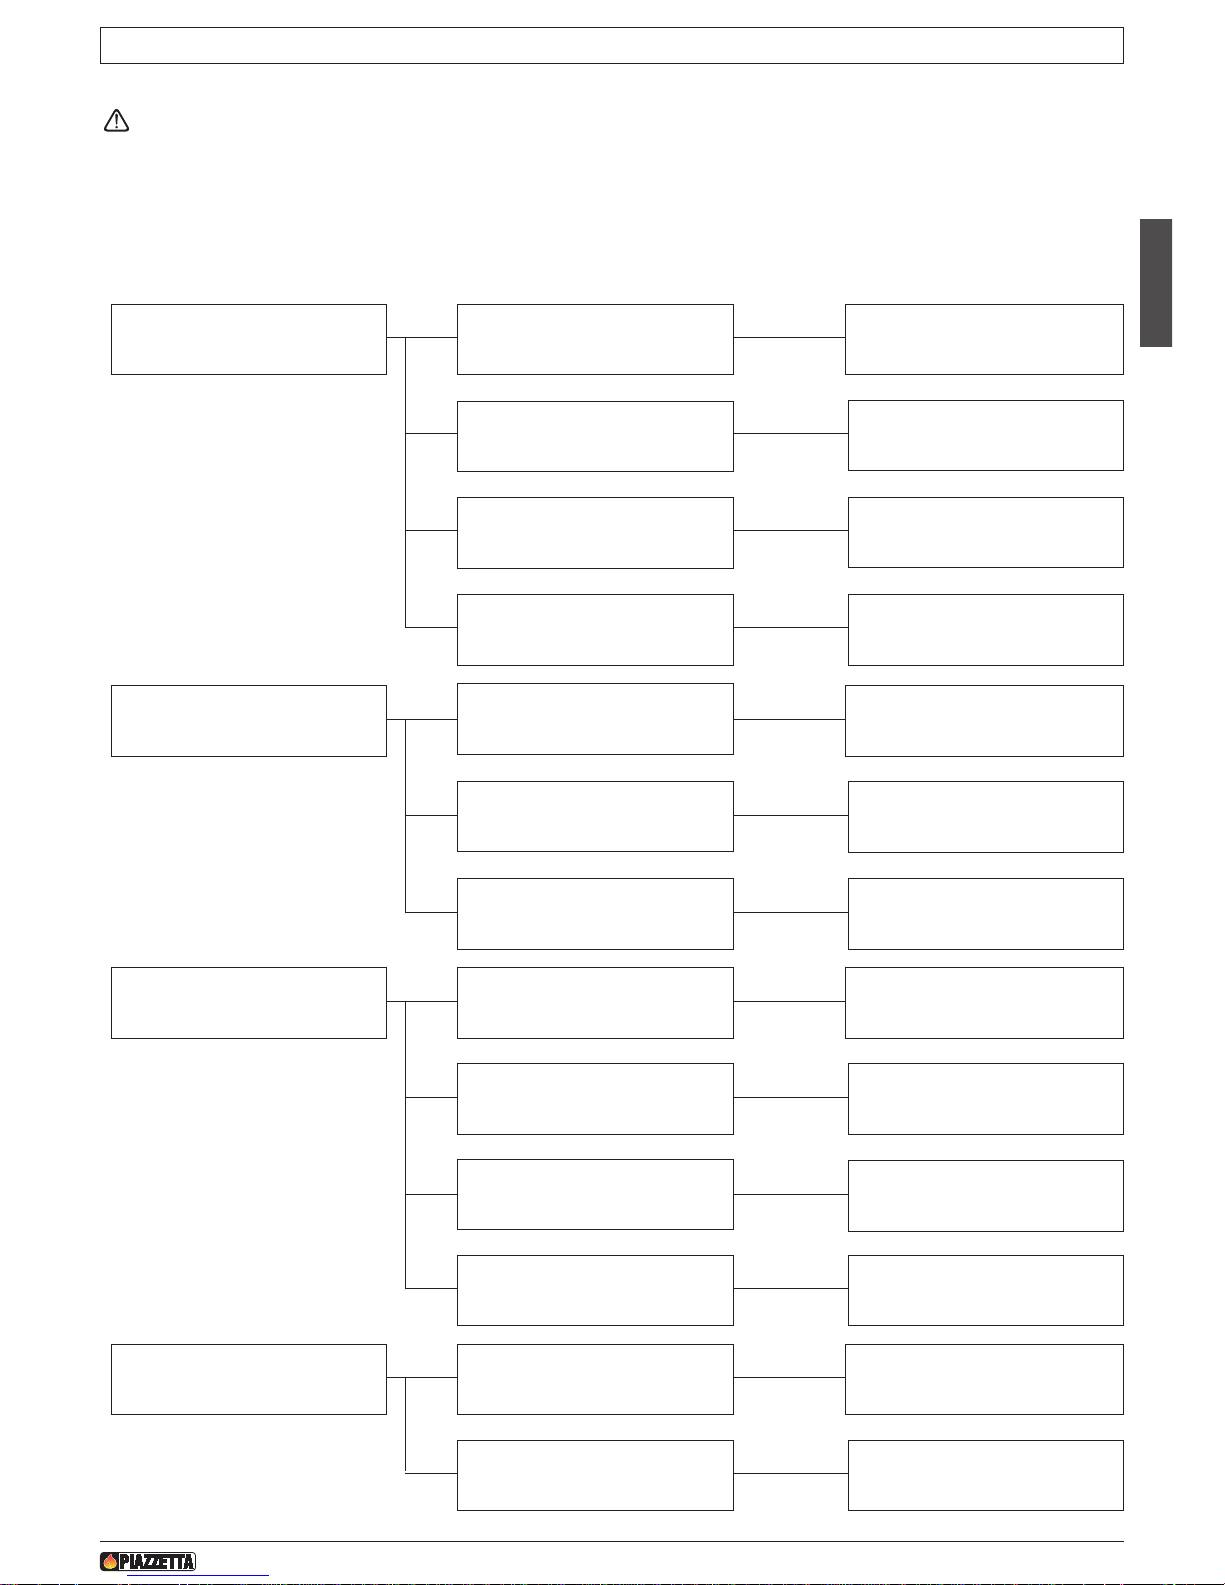
English
75
H07025140 / DT2000666 - Rev. 02
Some of the above problems could be resolved by following the instructions. Only qualified persons must carry out work on the
appliance and only when it is cold and disconnected from the power supply (pull out the plug).
Unauthorised tampering with the appliance or use of other than original spare parts invalidates the warranty and relieves the
m
anufacturer of all and any liability.
The manufacturer shall not be liable for any problems caused by lack of or inefficient maintenance or by failure to comply with the
instructions in the product installation and operating guide.
7.0 TROUBLESHOOTING
DT2012306-00
P
roblem Cause Remedy
The window becomes
excessively dirty
Lack of draught
Open the smoke damper.
Check the smoke/flue gas outlet pipe
W
et wood
Use dry wood
Use of mediocre or poor class fuels
Change the type of fuel
(See “FUEL”)
Too little combustion air Open the air dampers more, if installed
Condensation forms
Section of flue too large
Reduce the section by inserting a well
insulated pipe with suitable section
inside the flue
Flue not adequately insulated
Clad the flue with hollow tiles or
other insulating materials
Slow combustion and therefore low
flue gas temperature
Low boiler water temperature
Burn smaller and dry logs.
Open the air damper more, if installed.
Smoke comes out of the fireplace in
adverse weather conditions
Chimney stack has no down-draught
cowl
Replace the chimney stack with one
that has a down-draught cowl
Flue not suitably insulated
Clad the flue with hollow tiles or
other insulating materials
Difficulty in lighting Air or smoke dampers closed
Put the combustion air dampers, if
installed, to maximum position and
fully open the smoke damper.
Logs too large
Use smaller logs
Wood too wet
Burn drier wood
Lack of draught
Open the smoke damper.
Check the smoke/flue gas outlet pipe
Page 38
English
76
H07025140 / DT2000666 - Rev. 02
Problem Cause Remedy
The appliance does not warm the
room or the water system
Quantity of wood less than necessary
for nominal efficiency
Use the quantity of wood indicated in
t
he instructions (See “TECHNICAL
DATA”)
Appliance too small for the room or
the water system to be heated
Integrate with another product
Inadequate insulation for the environment in which the fireplace is installed
Insulate well with suitable materials
Oversized fresh air intake Decrease the intake section
Smoke comes out upon opening the
door
D
oor opened too fast
K
eep the door just ajar for a few
seconds before fully opening
There are still flames
Only open the door when just embers
remain in the grate
Page 39

Page 40

Page 41

Page 42

www.miotto.it
Gruppo Piazzetta S.p.A. Technical Department - cod. H07025140 / DT2000666 - Rev. 02 - (12/2010)
Via Montello, 22
31011 Casella d’Asolo (TV) - ITALY
Tel. +39.04235271 - Fax +39.042355178
www.piazzetta.it
e-mail: [email protected]
N° matricola prodotto, da comunicare al Centro Assistenza Tecnica
del Gruppo Piazzetta in caso di richiesta assistenza.
Product serial number, to be quoted when requesting service
from the Gruppo Piazzetta After-Sales Service Centre.
IT
UK
IT
 Loading...