

Page 1

ProRecord
User guide
Ver. B0
Page 2

Contents
Chapter 1 ProRecord Features ・・・・・・・・・・・・・・・・ 1
Chapter 2 Precautions・・・・・・・・・・・・・・・・・・・・・2
Chapter 3 Panel Description ・・・・・・・・・・・・・・・・・ 3
Chapter 4 Getting Started ・・・・・・・・・・・・・・・・・・ 6
Chapter 5 Playing Back Demonstration Songs・・・・・・・・・・ 7
Chapter 6 Selecting Instruments ・・・・・・・・・・・・・・・ 8
Chapter 7 Metronome ・・・・・・・・・・・・・・・・・・・・・12
Chapter 8 Recording and Playback・・・・・・・・・・・・・・・14
Chapter 8.1 Recording ・・・・・・・・・・・・・・・・・・・・14
Chapter 8.2 Playing Back Recorded Songs・・・・・・・・・・・・15
Chapter 9 Setting Note Repeat Limits・・・・・・・・・・・・・17
Chapter10 Adjustments and Configurations ・・・・・・・・・・18
Chapter10.1 Tuning(Adjusting the Pitch) ・・・・・・・・・・・19
Chapter10.2 Sensor Calibration・・・・・・・・・・・・・・・・・20
Chapter10.3 Automatic Sensor Calibration・・・・・・・・・・・・21
Chapter10.4 Touch Control (Adjusting the Touch) ・・・・・・・・22
Chapter10.5 Pedal Positioning ・・・・・・・・・・・・・・・・・23
Chapter10.6 Setting the Key Depth (note on/off) ・・・・・・・ 24
Chapter10.7 Black Keys Volume Control ・・・・・・・・・・・・・25
Chapter10.8 Volume Control for Individual Keys(BassKeys)・・・26
Chapter10.9 Volume Control for Individual Keys(TrebleKeys)・・・27
Chapter10.10 Returning Settings to Their Default Configuration 28
Chapter11 MIDI (Connecting to Other Device) ・・・・・・・・・30
Chapter11.1 MIDI Implementation Chart ・・・・・・・・・・・・・32
Chapter12 Specifications ・・・・・・・・・・・・・・・・・・33
Chapter13 Troubleshooting ・・・・・・・・・・・・・・・・・・34
Chapter14 Maintenance ・・・・・・・・・・・・・・・・・・・・36
Page 3

Chapter1ProRecord Features
●ProRecord can detect a wide range of key positions (shallow to deep) therefore
providing a the touch of an acoustic piano.
●Rapid trills and quick repeats of staccato notes are possible.
●ProRecord can be adjusted to match the touch of a particular piano by changing the
force needed to produce the sound.
●ProRecord is capable of expressing a wide volume range from pianissimo to fortissimo.
●The damper pedal can be setup with either on/off or proportional output.
(Proportional pedal is not recommended when used with a player system)
●8 instruments can be select from the control panel plus an additional 80 instruments
from the piano keyboard.
●Built in Metronome function.
●Your performance can be recorded, and then played back. The tempo of the recorded
data can also be changed.
●ProRecord can be connected to a computer using a USB cable or a MIDI cable. By
connecting with a personal computer, this instrument can be used as a MIDI sound
source or a MIDI keyboard.
●ProRecord can be connected to external audio devices using Line-out jacks.
●The maximum simultaneous polyphony is 108 notes.
- 1 -
Page 4

Chapter2 Precautions
Please observe the following precautions.
●Use only the proper AC adaptor to power ProRecord or use a compatible EXT
connector to an external system.
●Turn off the power before disconnecting the power cord from the control
unit.
●If the system is not going to be used for a long period of time, unplug
the AC adaptor.
●Do not use ProRecord in areas with high temperature or high humidity.
- 2 -
Page 5
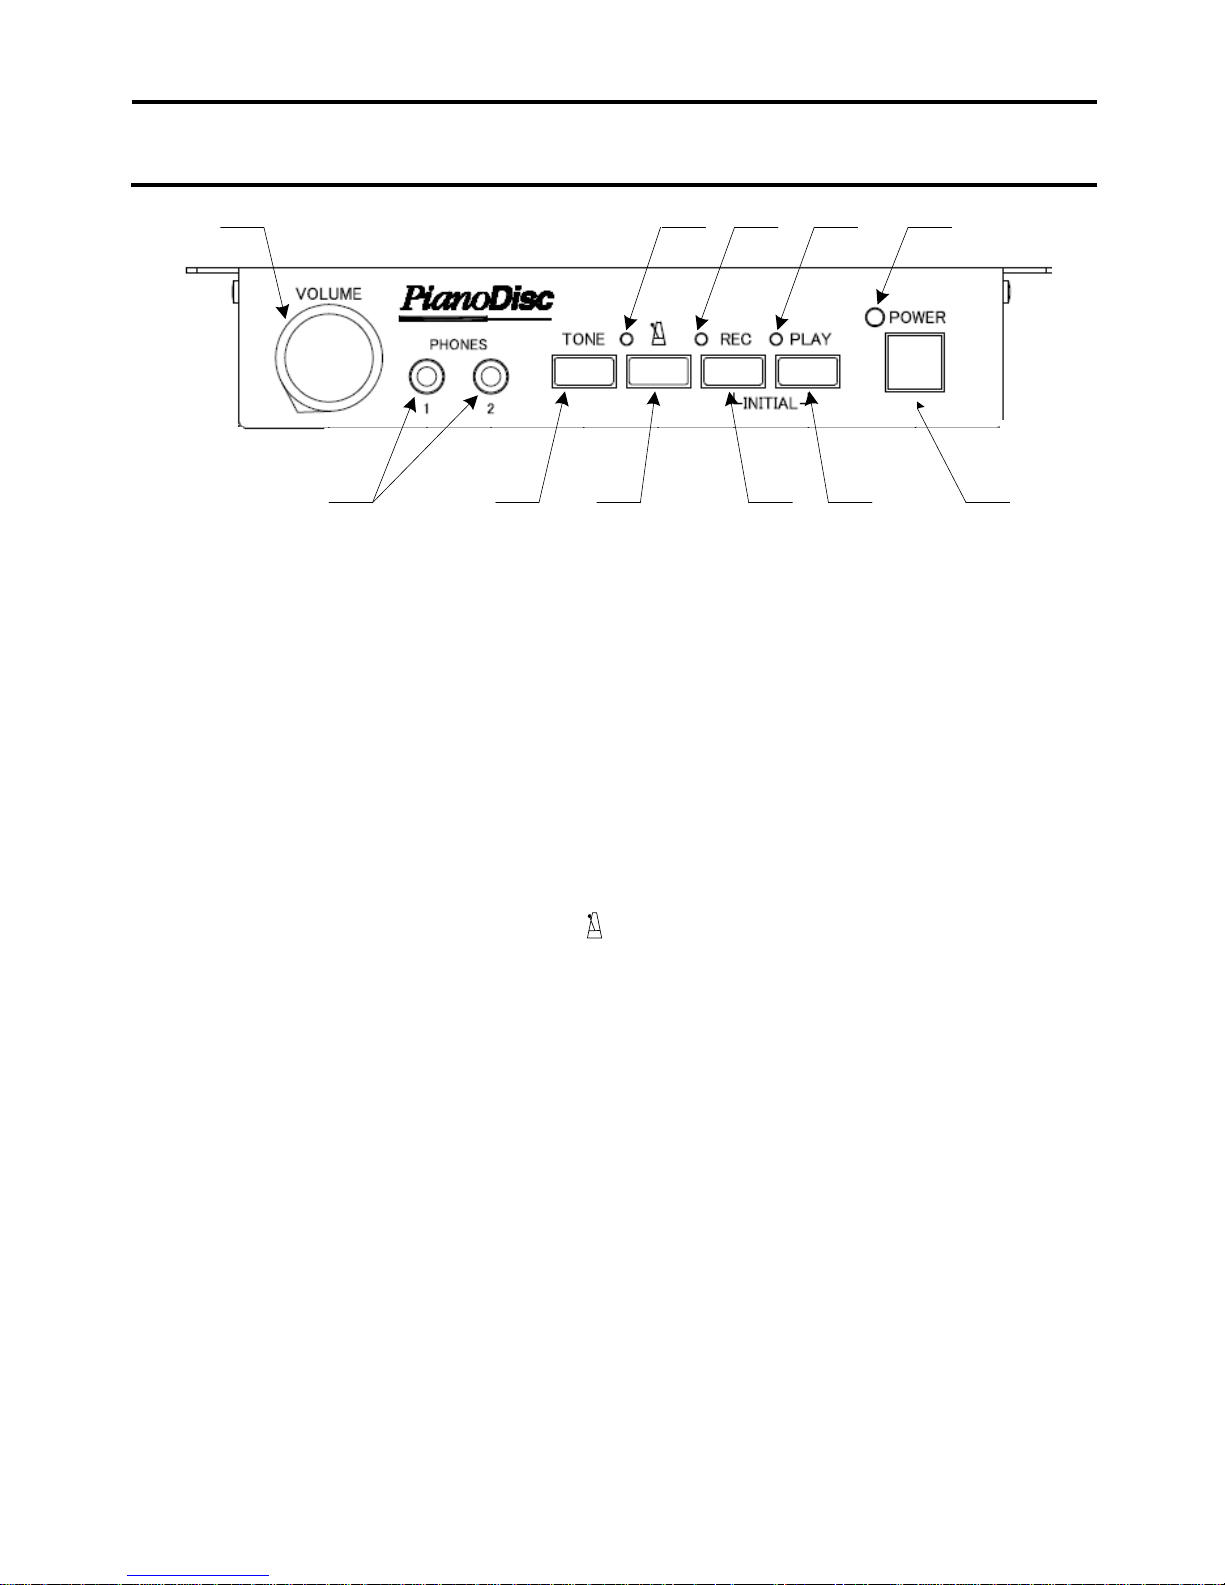
Chapter3 Panel Description
①
②
③ ④ ⑥ ⑧
Control-BOX - Front Panel
①Volume Control (VOLUME)
Controls the volume of headphones and LINE OUT.
②Headphones Jacks (PHONES)
Connections for up to two stereo headphones.
③Tone Select Button (TONE)
Selects the 8 main instruments as follows:
Piano, Bright Piano, Mellow Piano, Electric Piano1, FM Electric Piano
Church Organ, Warm Organ, Percussive Organ
⑤
⑦
⑨
⑩
⑪
④Metronome Control Button ( )
Controls the metronome functions, (start/stop and setup).
⑤Metronome Status Display Lamp
Indicates when metronome is in use. (flashes when in setup mode)
⑥Record Control Button (REC)
Controls start/stop of record function.
⑦Record Status Display Lamp
Indicates when system is recording.
⑧Playback Control Button (PLAY)
Controls start/stop of playback function.
⑨Playback Status Display Lamp
Indicates when system is in playback mode.
- 3 -
Page 6
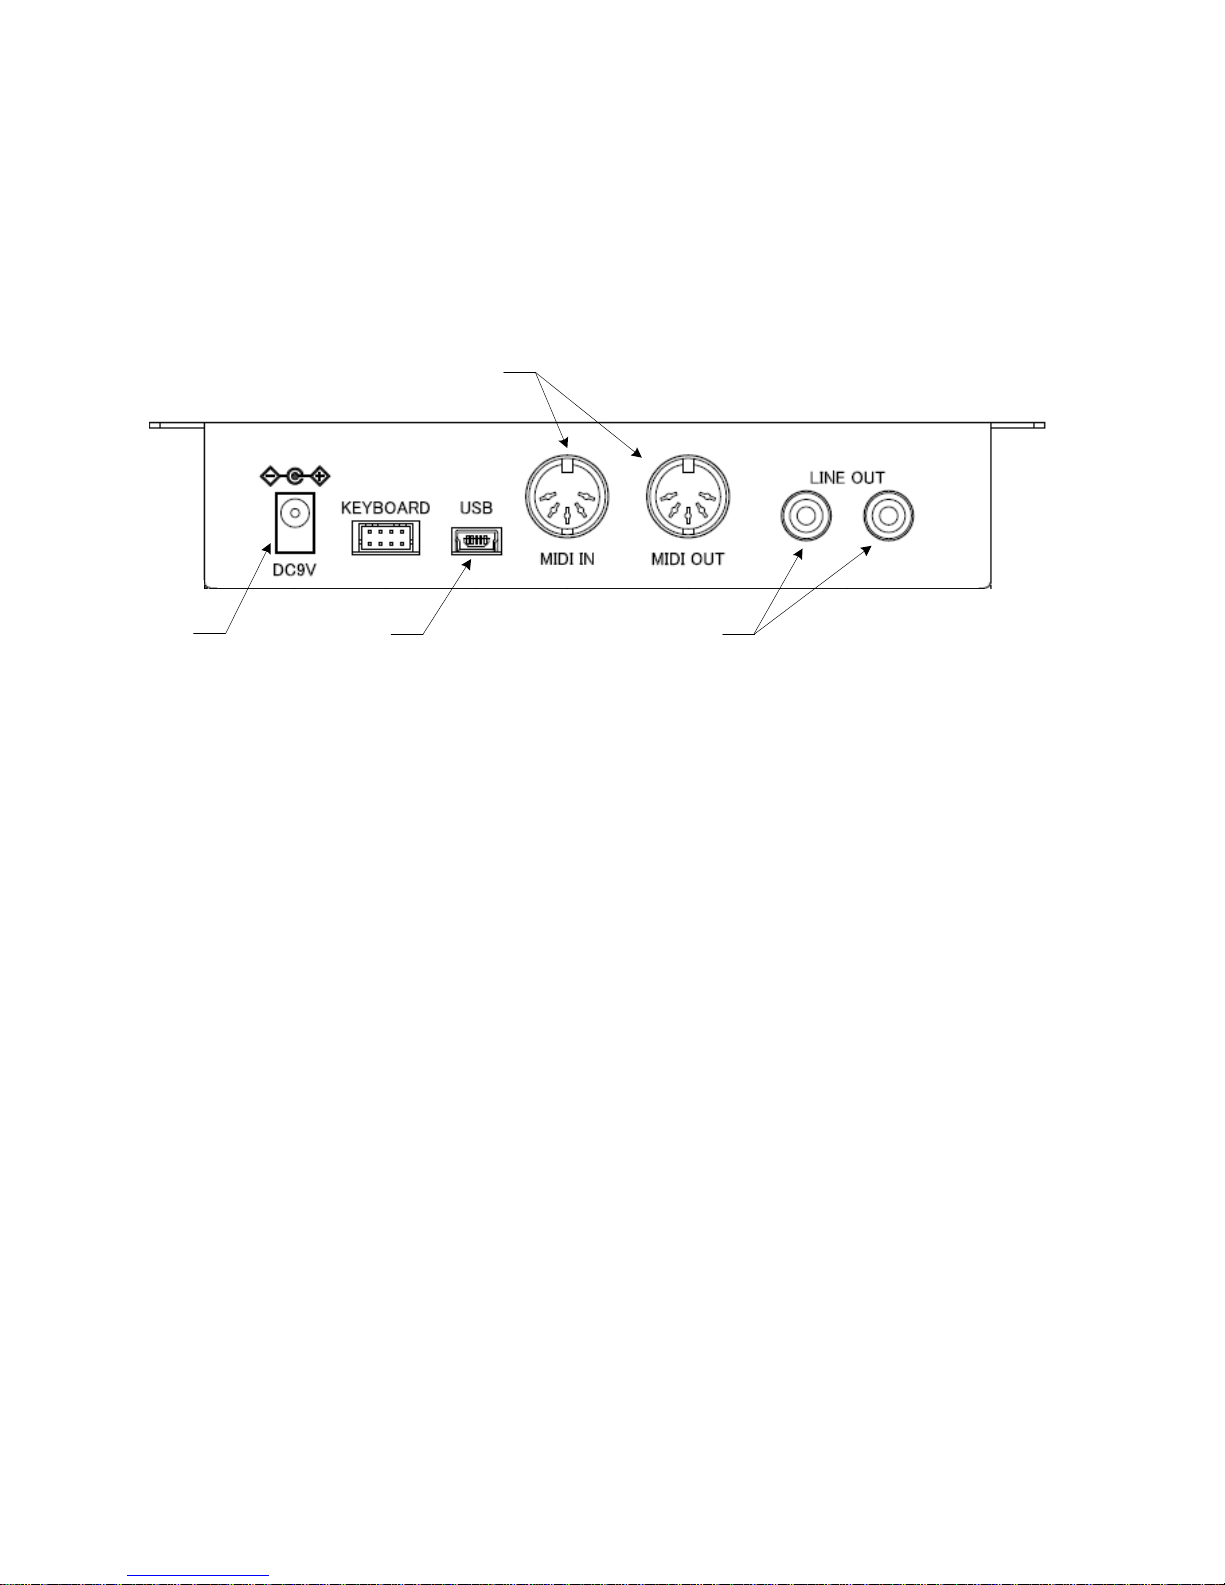
⑩Power Indicator Lamp
Indicates when power is tuned on. Flashes when keys and pedals are played.
Also flashes the tempo of the metronome when used.
⑪Power Switch
Used to turn the power on and off.
[Note]
Power should be turned off after each use.
⑫ ⑬
⑭
⑮
Control-BOX – Back Panel
⑫DC Power Socket (DC9V)
For AC power adaptor.
[Caution!]
To avoid damage to the unit, use only AC adaptors of proper voltage. (9VDC
out).
Note: If power is supplied from EXT connector (see item ⑯below) do not
connect AC adaptor.
⑬USB mini B Jack (USB)
Used for connecting to a computer or other USB device.
⑭MIDI Jacks (MIDI)
Used for connecting to an external MIDI device or computer.
⑮RCA Jack (LINE OUT)
For connecting to an external stereo system.
- 4 -
Page 7
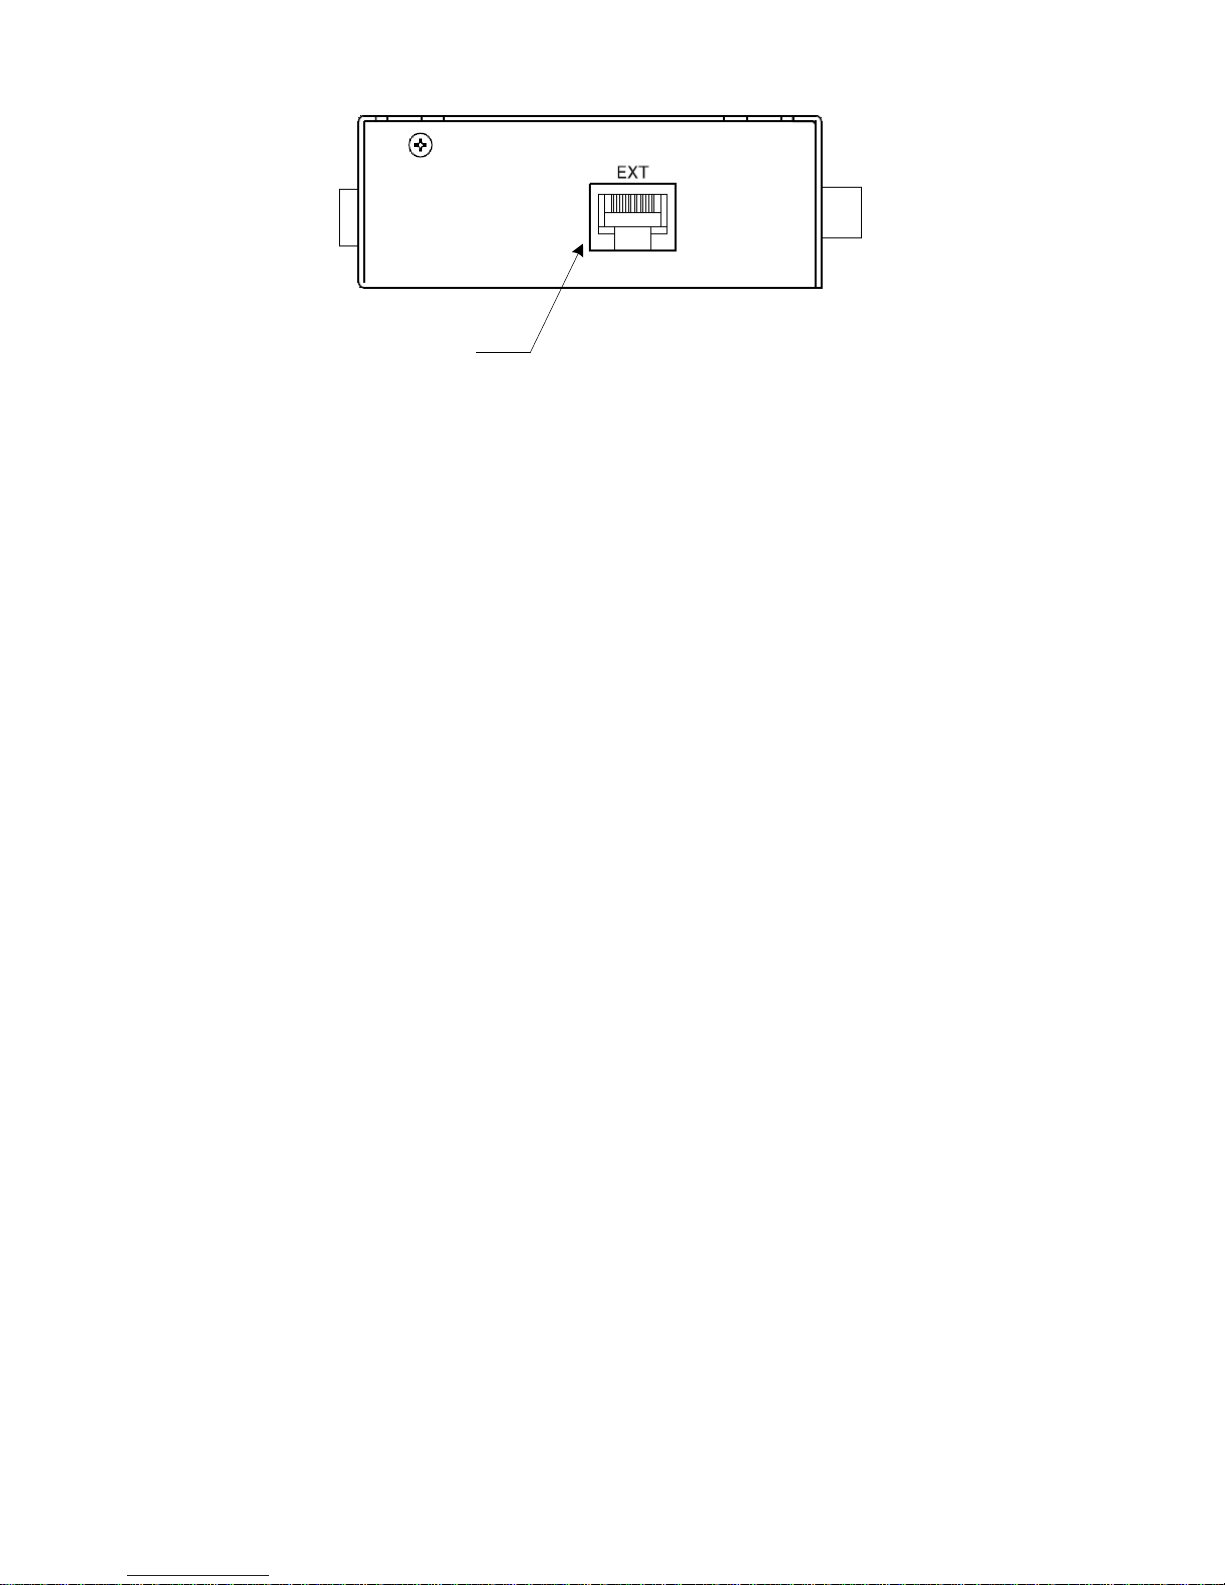
⑯
Control-BOX – RIGHT SIDE
⑯External Connecter (EXT)
For connecting to an external system. This connector contains a MIDI interface,
and power input from a compatible external system.
- 5 -
Page 8

Chapter4 Getting Started
An initial setup procedure must be performed after installation before the system
will operate correctly. This procedure should have been done by the person who
initially installed the system.
(1)Engage the mute rail (if equipped) to silence the acoustic piano.
(2)Be sure the power is connected, either from an AC adapter or from a
compatible external system.
(3)Turn the power on by pressing the “POWER” button. Do not press any keys
or pedals while powering on.
(4)Plug the headphones into the PHONE socket.
(5)Select the desired instrument using the “TONE” button.
(6)Adjust the volume to a comfortable level.
- 6 -
Page 9
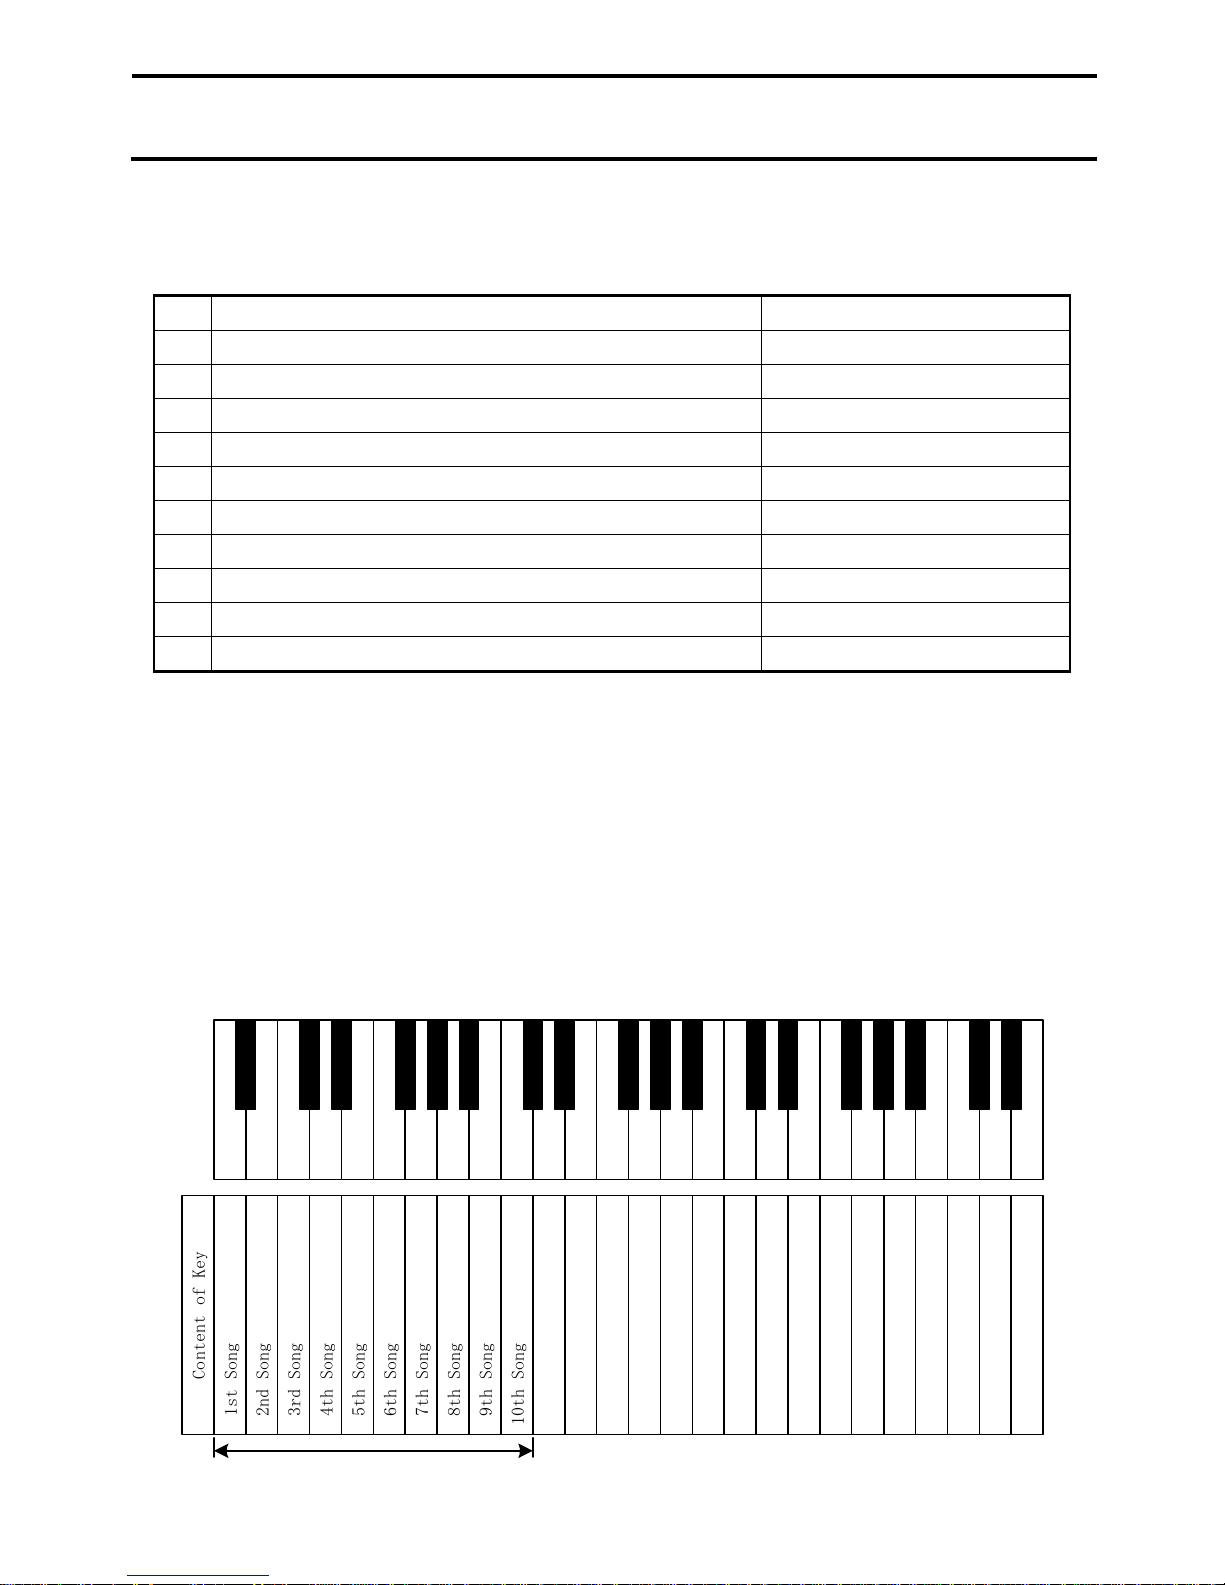
Chapter5 Playing Demonstration Songs
Ten demonstrations songs are included in the control box. Refer to the chart
below.
No. Title Composer
1 Prelude(Wohltempericrte Klavier I No.1) Johann Sebastian Bach
2 Für Elise Ludwing van Beethoven
3 Piano Sonate op.27-2 “Mondschein” 1st mov. Ludwing van Beethoven
4 Shenandoah American folk song
5 Danny boy Ireland folk song
6 I love you,porgy George Gershwin
7 Someday my prince will come Frank Churchill
8 All the things you are Jerome Kern
9 Someone to watch over me George Gershwin
10 My wild irish rose Chancellor Olcott
< To play demos >
(1)Push the “PLAY” button for about 2 seconds. The “PLAY” lamp will start
flashing.
(2)When the “PLAY” lamp stops flashing, playback will begin starting with
the first demo song and continue in order through all demo songs. To
select another demo song, press one of the white keys that corresponds
to the song desired (see chart below).
(3)To stop playback, push the “PLAY” button.
L e ft S ide
A0
(la)B0(ti)
D1
C1
(re)
(do)E1(mi)F1(fa)A1(la)
G1
(so)B1(ti)C2(do)E2(mi)
D2
(re)F2(fa)G2(so)B2(ti)
A2
(la)C3(do)D3(re)F3(fa)
E3
(mi)G3(so)A3(la)C4(do)
B3
(ti)
D4
(re)
(mi)
y
e
K
f
o
t
n
e
t
g
g
g
g
g
g
g
g
g
n
n
n
n
n
n
n
n
o
o
o
o
o
o
C
S
S
S
t
d
s
n
1
2
S
d
h
r
t
3
4
o
S
S
h
h
t
t
5
6
n
o
o
S
S
h
h
t
t
7
8
Dem onstration S ongs
g
n
n
o
o
S
S
h
h
t
t
9
0
1
E4
- 7 -
Page 10

Chapter6 Selecting Instruments
8 different instruments can be selected by pressing the “TONE” button on the
control box. Each push of the “TONE” changes to the next instrument in sequence
as follows:
Piano → Bright Piano → Mellow Piano → Electric Piano1 → FM Electric Piano
→ Church Organ → Warm Organ → Percussive Organ → (Back to the Piano)
A sample of each instrument will sound with each push of the “TONE” button.
88 different instruments can be selected using the “TONE” button in conjunction
with the piano keys (including the 8 instruments listed above).
< Selecting one of the 88 instruments using the piano keys >
(1)Push and hold the “TONE” button, then press one of the piano keys for
the instrument desired. (See the keyboard chart on the following page.)
A sample of each instrument will sound with each key pressed.
(2)Release the “TONE” button once you have selected an instrument.
[Note]
・If the power is turned off, the instrument will return to Piano.
・Some of the instruments have pre-set effects (such as chorus & reverb)
as part of their default setting. In some cases, the effect may continue
when a different instrument is selected, depending on the instrument
selected.
・The rotary speaker effect is pre-set on the following instruments:
Warm Organ, Percussive Organ, Drawbar Organ 1, Drawbar Organ 2, Rock Organ
When these instruments are selected, the damper pedal acts as a switch
which changes the speed of the rotary effect.
- 8 -
Page 11
In strum en t selections
*Pia no 1 (normal )
*Pia no 2 (bright)
*P i ano 3 (Me l l o w )
Pian o + strings
*Electric Pia n o 1
*FM Electric Piano
*Ch urch O rg a n
Pian o 1 + choi r
Brig ht Pian o + Re verb
Harps ichord
*Pe rcuss ive Orga n
*Wa r m O rg a n
C1A0 B0 D1 F1 G1 A1 B1E1 D2 E2 F2 G2 A2 B2 D3 E3 F3 G3 A3 B3 D 4E4
Bass end of keyboard
Trumpet
Trombo ne
Slo w S t rin g s
Ch oir
Cho ir 2
Strings + H orn
Synth String s
Tuba
Syn t h V o i c e
Fre n ch Hor n
Synth Brass 2
Bra ss + Tru m p e t
Synth Brass 1
Electric Piano2
Honk-tonk Pian o
Pan Rhodes
Clav in e t
Celes t a
Glockenspiel
Music B o x
Vib raphon e
Santur
Draw bar Organ 1
Draw bar Organ 2
Ro ck O r gan
C2 C3
Instrument selections
Alto S a x
Soprano Sax
Tenor Sa x
Syn t h B ra ss 3
Syn t h B ra ss 4
Bar itone Sa x
Clarinet
Eng lish H o rn
Basso on
Pic c o lo
Recorde r
Flu te
Small Chu rch O rgan
Reed Organ
Aco u st ic Gui ta r (ny lo n )
Fren ch A cco rdian
Harm onica
Bandon eo n
Aco ustic G u itar (St e el )
Ele ctric Guitar (ja zz )
Chorus Guitar
Acoust ic Bass
Overdrive G uita r
Slap B a s s
Synt h B a s s
Violin
Cell o
Trem elo St rings
Dist ortion Guita r
Finger Electric B ass
Strings
Ha r p
C4
Synth Lead 2 (sawto oth)
Pan Flute
Synth Lea d 6 (voice )
Synth Pad 2 (warm )
Synth Pad 3 (polysynth )
Synth Pad 4 (ch oir)
Oca rina
Synth Le ad 5 (chara ng )
Synth Lea d 8 (bass + le ad )
Synth Pad 5 (bowed )
FX 5 (brightn ess )
FX 7 (ech o)
Synth Pa d 7 (halo )
FX 3 (crys ta l)
FX 4 (atmosphe re)
Koto
Si t ar
Bagp ipe
Steel Drums
F4 G4 A4 B4 D5 E5 F5 G5 A5B5 D6 E6 F6 G6 A6 B6 D7E7 F7 G 7 A7 B7
NOTE: Instruments marked with an asterisk can also be selected with the “TONE” button alone.
C5
C6
- 9 -
C7
C8
Treble end o f keyboard
Page 12

Chapter7 Metronome
Quiet Time has a built-in metronome function which can be setup with various
parameters, such as beat, tempo, and volume.
< Metronome instructions, ON/OFF >
(1)Press the metronome button to start the metronome. The metronome lamp
will turn on and you will hear the metronome beating. Also, the “POWER”
lamp will flash at the set tempo of the metronome.
(2)Press the metronome button again to stop the metronome.
< Metronome Setup Instructions >
(1)Press and hold the metronome button for about two seconds. The metronome
lamp flash indicating that you are in the setup mode. The metronome
will also begin to sound.
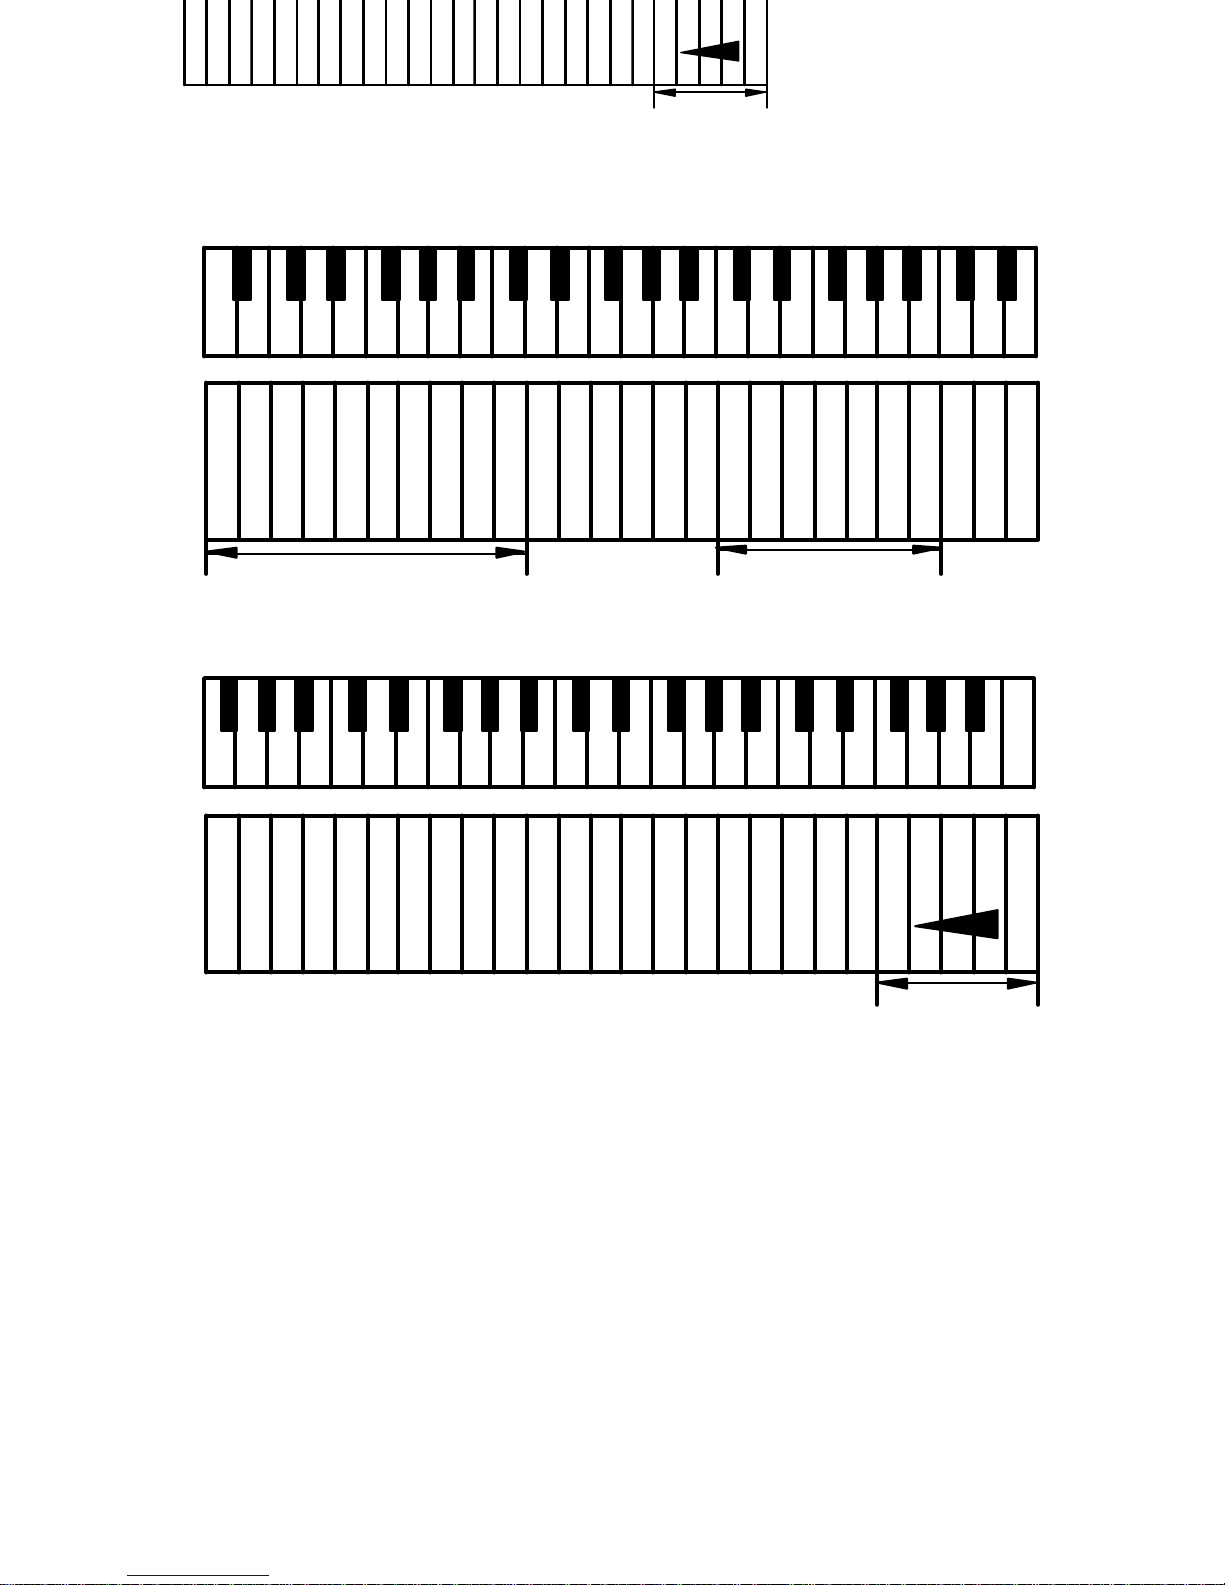
(2)Choose beat. (Refer to the figure on the next page). The metronome can
be set up with the following beat patterns:
0, 2, 3, 4, 5, 6, 8. Use the piano keys indicated to select the desired
beat pattern.
(3)Choose tempo. (Refer to the figure on the next page).
To set the tempo, enter the desired tempo using the lowest 10 white
keys on the piano. It is necessary enter the tempo as a 3 digit number,
so tempos less than 100 need to be preceded by a “0”. (see the examples
below). The allowable tempo range 30 to 250.
・example 1: To set tempo to 132. ・example2:To set tempo to 60.
↓ ↓
①Push A0(“1”) ①Push C2(“0”)
↓ ↓
②Push C1(“3”) ②Push F1(“6”)
↓ ↓
②Push B0(“2”) ②Push C2(“0”)
(4)Choose volume. (Refer to the figure on the next page).
(5)Exit setup mode by pressing the metronome button. The metronome lamp
changes from flash to solid. The metronome will continue to sound until
the metronome button is press again.
[NOTE]
・The metronome settings are saved when power is turned off.
- 10 -
Page 13
Quie t
Bass End of Keyboard
Defau
Loud
A 0 B0 D1 E1 F1 G1 A1 B 1 D2 E2 F2 G2 A2 B2 D3 E3 F3 G3 A3 B3 D4 E4
Values
C1 C2 C3
1234567890
Tempo
Default
0234568
Bea t
C4
Treble End of Keyboard
C5 D5 E5 F5 G 5 A5 B5F4 G4 A4 B4 D6 E6 F6 G6 A6 B6C6 C7 D7 E7 F7 G7 A7 B7 C8
Default
Quie t
Loud
Volu me
- 11 -
Page 14

Chapter 8 Recording and Playback
QUIET TIME can record your piano performance and play it back at a later time.
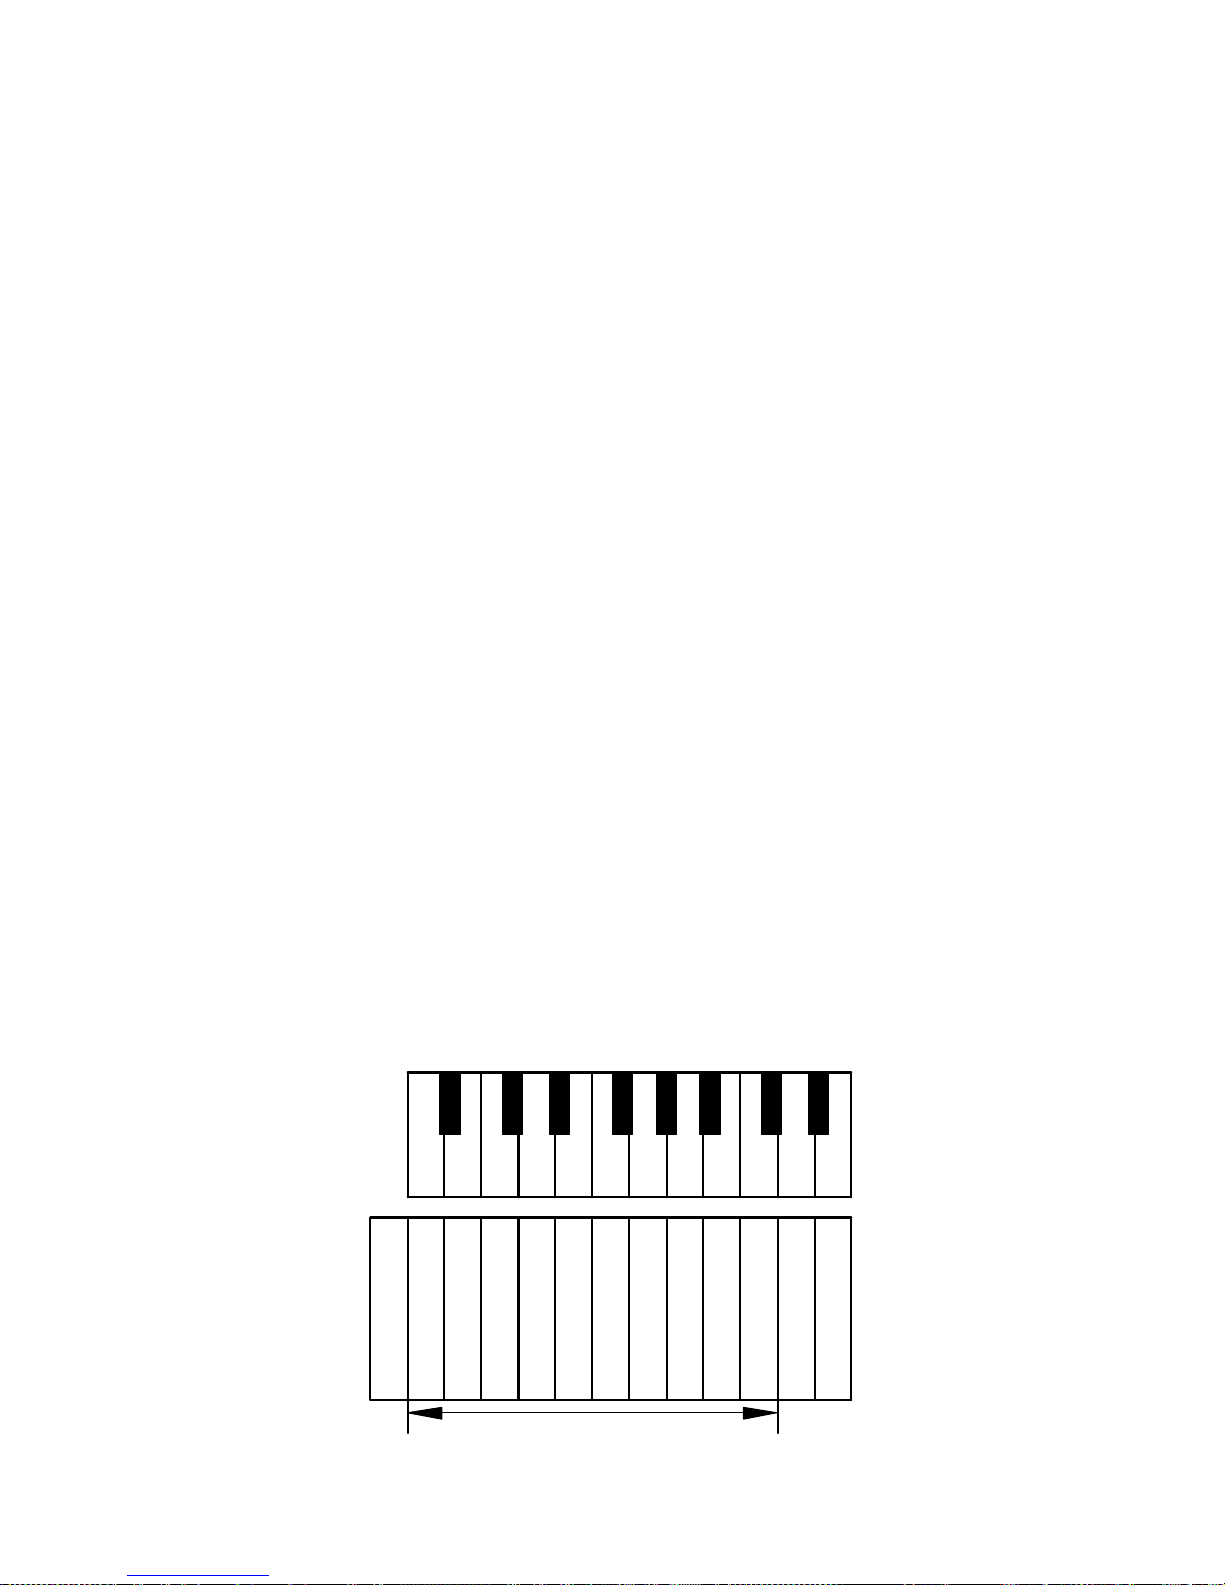
There are 10 banks that act as memory storage for the recorded song. The figure
on the next page show which piano keys are used to access the storage banks.
Chapter 8.1 Recording
< Record Instructions >
(1)Press and hold the piano key for the bank you wish to record to. Then
press the “REC” button. The “REC” lamp will light up to indicate that
you are in the record mode.
Note:If you do not select a bank to record to, bank 1 will be selected
by default.
(2)Recording will start when you play the first note or press a pedal.
(3)When you are finished, press the “REC” button. The “REC” lamp will turn
off and data will be saved in the selected bank.
[NOTE]
・ Recording to a bank that already has data will cause the previously stored
data to be overwritten.
・ Any instrument can be setup to record. However it cannot be changed during
the recording.
・ The Metronome can be used during recording but the sound is not recorded.
・ Each bank can store about 10,000 key or pedal strokes. Once this limit
is reached, recording will be stopped automatically.
・ The recorded data is saved when power is turned off.
< To Delete a Recorded Song >
(1) Press and hold the sustain pedal, then press and hold the “REC”
button.
(2) Press the piano key for the bank you wish to delete (see the figure
on the next page). A chime will sound confirming that the data has been
deleted. Performing a System Default (see Chapter 11.10) deletes any
data stored in all 10 banks.
- 12 -
Page 15
Chapter
8.2 Playing Back Recorded Songs
< Playback Instructions >
(1)Press the “PLAY” button. The “PLAY” l a m p turns on to confirm that Quiet
Time is in play mode. The recorded song in bank 1 will begin to play
about 1 second later.
(2)To select a different bank, press the piano key for the bank desired.
You can also play the piano during playback.
(3)To stop the playback, press the “PLAY” button. The “PLAY” lamp will turn
off and playback stops.
[Note]
・ The first 10 white keys of the piano are assigned to bank selection
during playback. Therefore they will not sound if you play along with
the recording. If they are pressed during playback, a different bank
will be selected for playback. Likewise, the last three white keys
of the piano are assigned to tempo change functions during playback
and will not sound.
・ Playback will not start if there is no data in bank 1. If there is data
in any of the other banks, Press and hold the bank you want to play,
and then press the “PLAY” button.
Rec Bank #
Bass End of Keyboard
A0 B0 D1 E1 F1 G1 A1B1 D2 E2
C1 C2
2
3
4
5
1
6
Record Banks
- 13 -
7
8
9
10
Page 16
Changing the tempo of a recorded song.
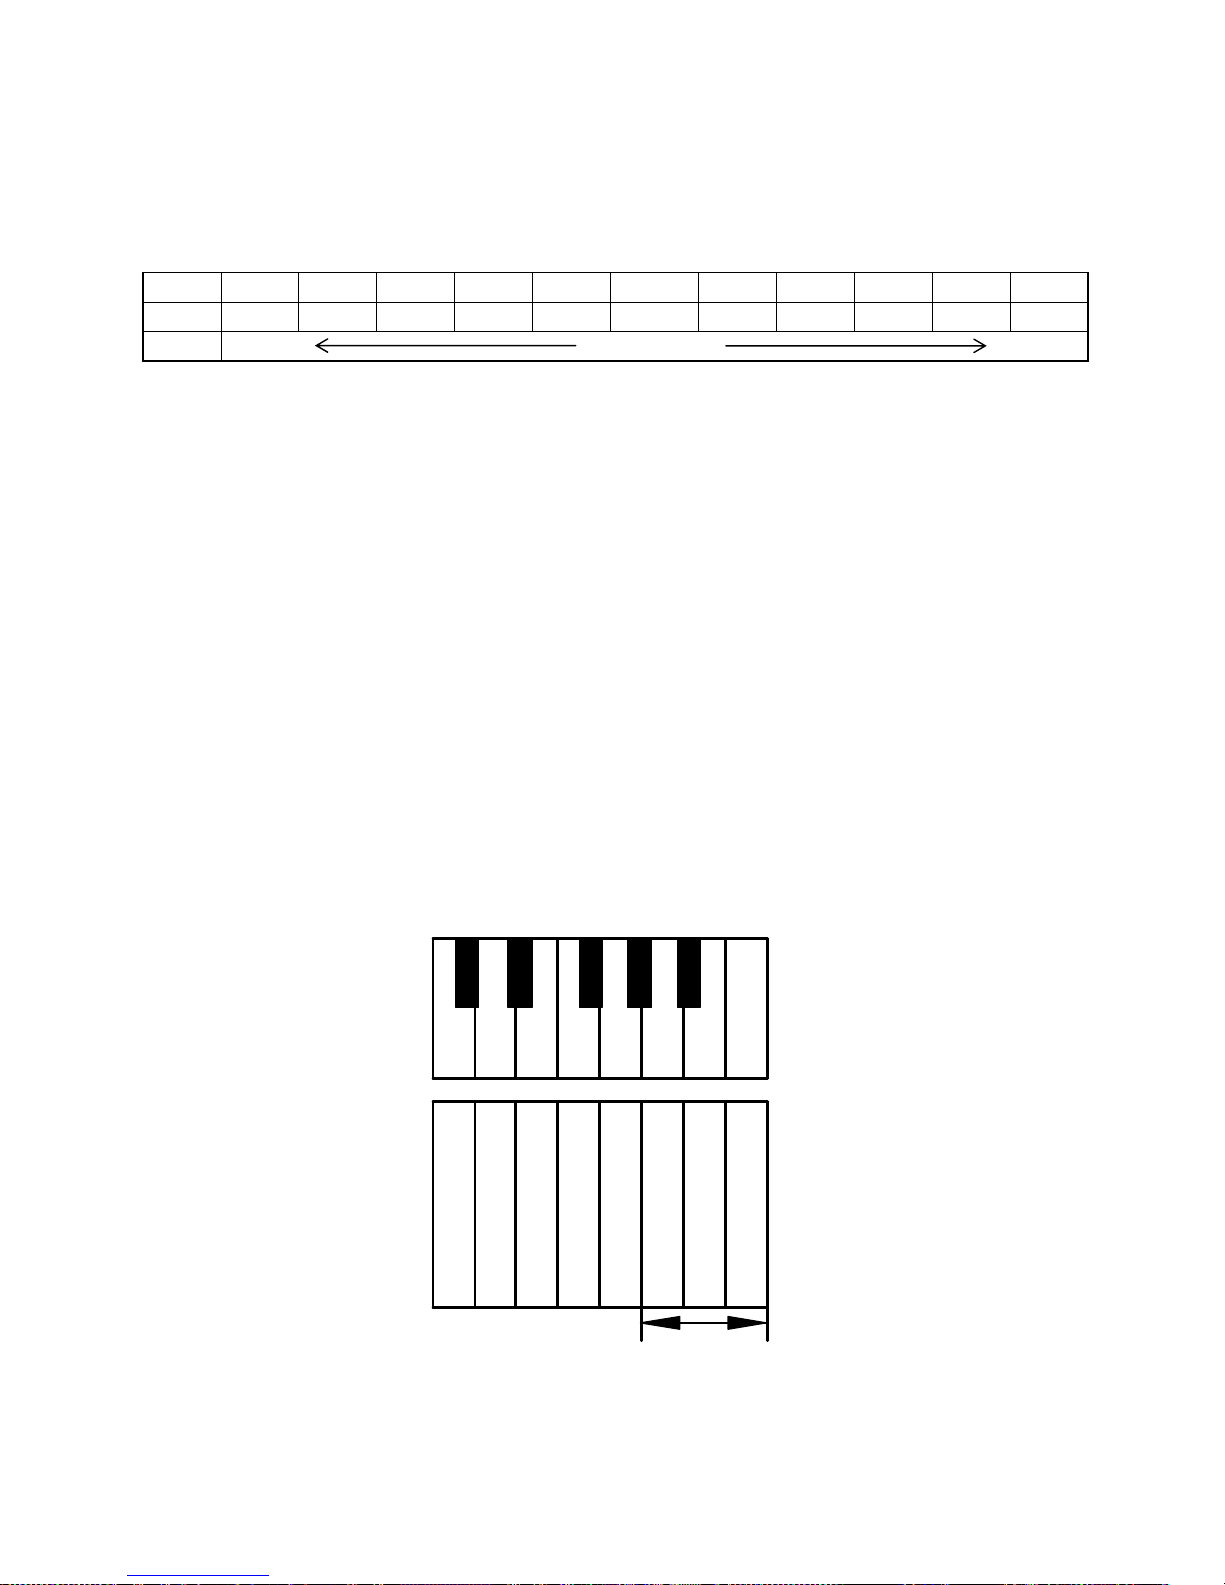
The tempo of a recorded song can be changed during playback. The range of
adjustment is from 0.5 times to 2.0 times the normal tempo (see chart below).
Step -5 -4 -3 -2 -1 ±0 +1 +2 +3 +4 +5
Speed 0.5 0.6 0.7 0.8 0.9 1.0 1.2 1.4 1.6 1.8 2.0
Slow Normal Fast
< Tempo Instructions >
(1)Select a bank that has recorded data and play it back as described above
(see <Playback Instructions>).
(2)Press one of the piano keys that control tempo (Refer to the following
figure.) A7 decreases the tempo and C8 increases the tempo in 5 steps
either direction from normal. B7 returns the tempo to normal.
Treble End of Keyboard
C7
D7 E7 F7 G7 A 7 B7
C8
Slower Tempo
Normal Tempo
Faste r Tempo
Pla yback Tempo
- 14 -
Functions
Page 17
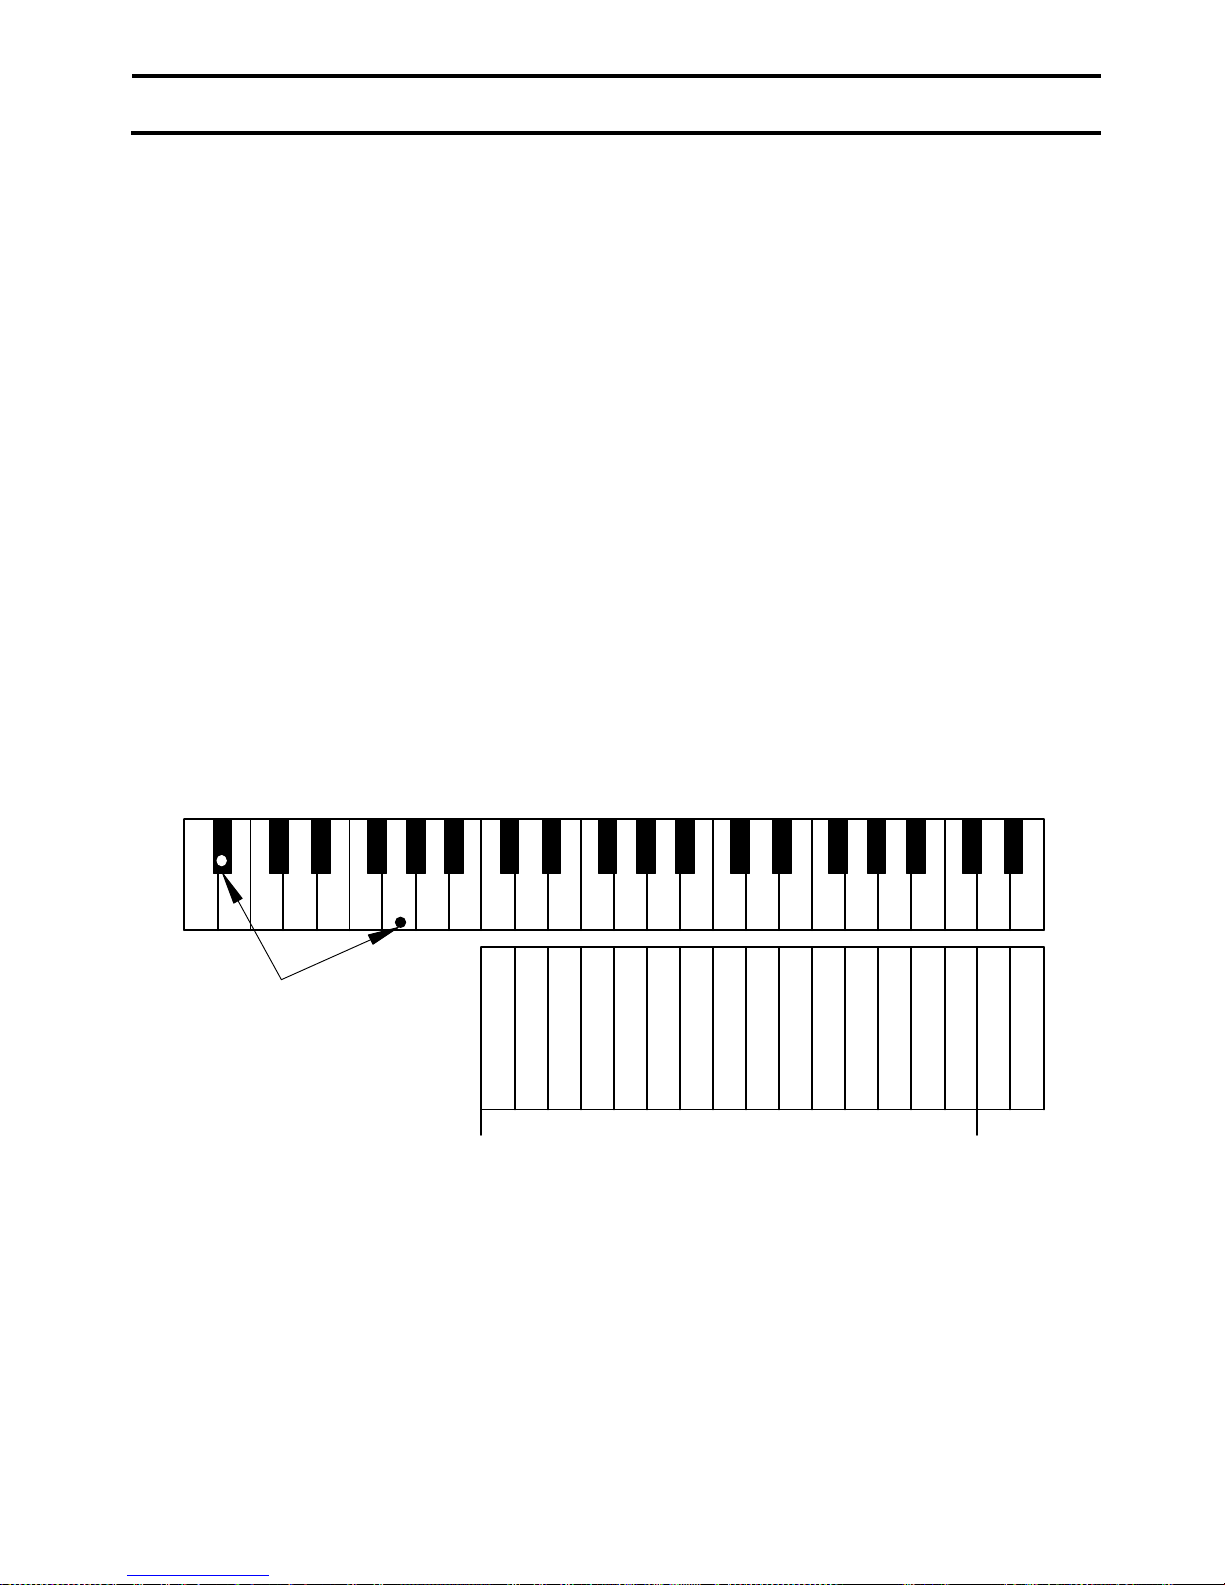
Chapter 9 Setting Note Repeat Limit
ProRecord can be set up with limits to how many times a note can be repeated
per second.
< Setup Instructions >
(1)Press and hold A#0 and G1 while turning the power on (refer to the figure
below). If a MIDI device is connected, a MIDI signal will sound
confirming that the system is in setup mode. Continue holding the two
piano keys.
(2)Select the repeat limit desired from the keyboard (see figure below).
(3)Release the two piano keys to store your setting and to exit setup mode.
[Caution!]
Choosing a re-strike limit that exceeds the pianos capability may cause
undesirable effects.
Bass end of keyboard
A0 B0 C1D1 E1 F1 G1 A1 B1 C2D2 E2 F2 G2 A2 B2 C3 D3 E3 F3 G3 A3 B3 C4 D4 E4
Hold A #0 and G1
While Po wer ing On
5
6
7
8
9
10
11
12
13
14
15
16
17
Num ber of restrikes per second
No Limit
18 (Default)
- 15 -
Page 18
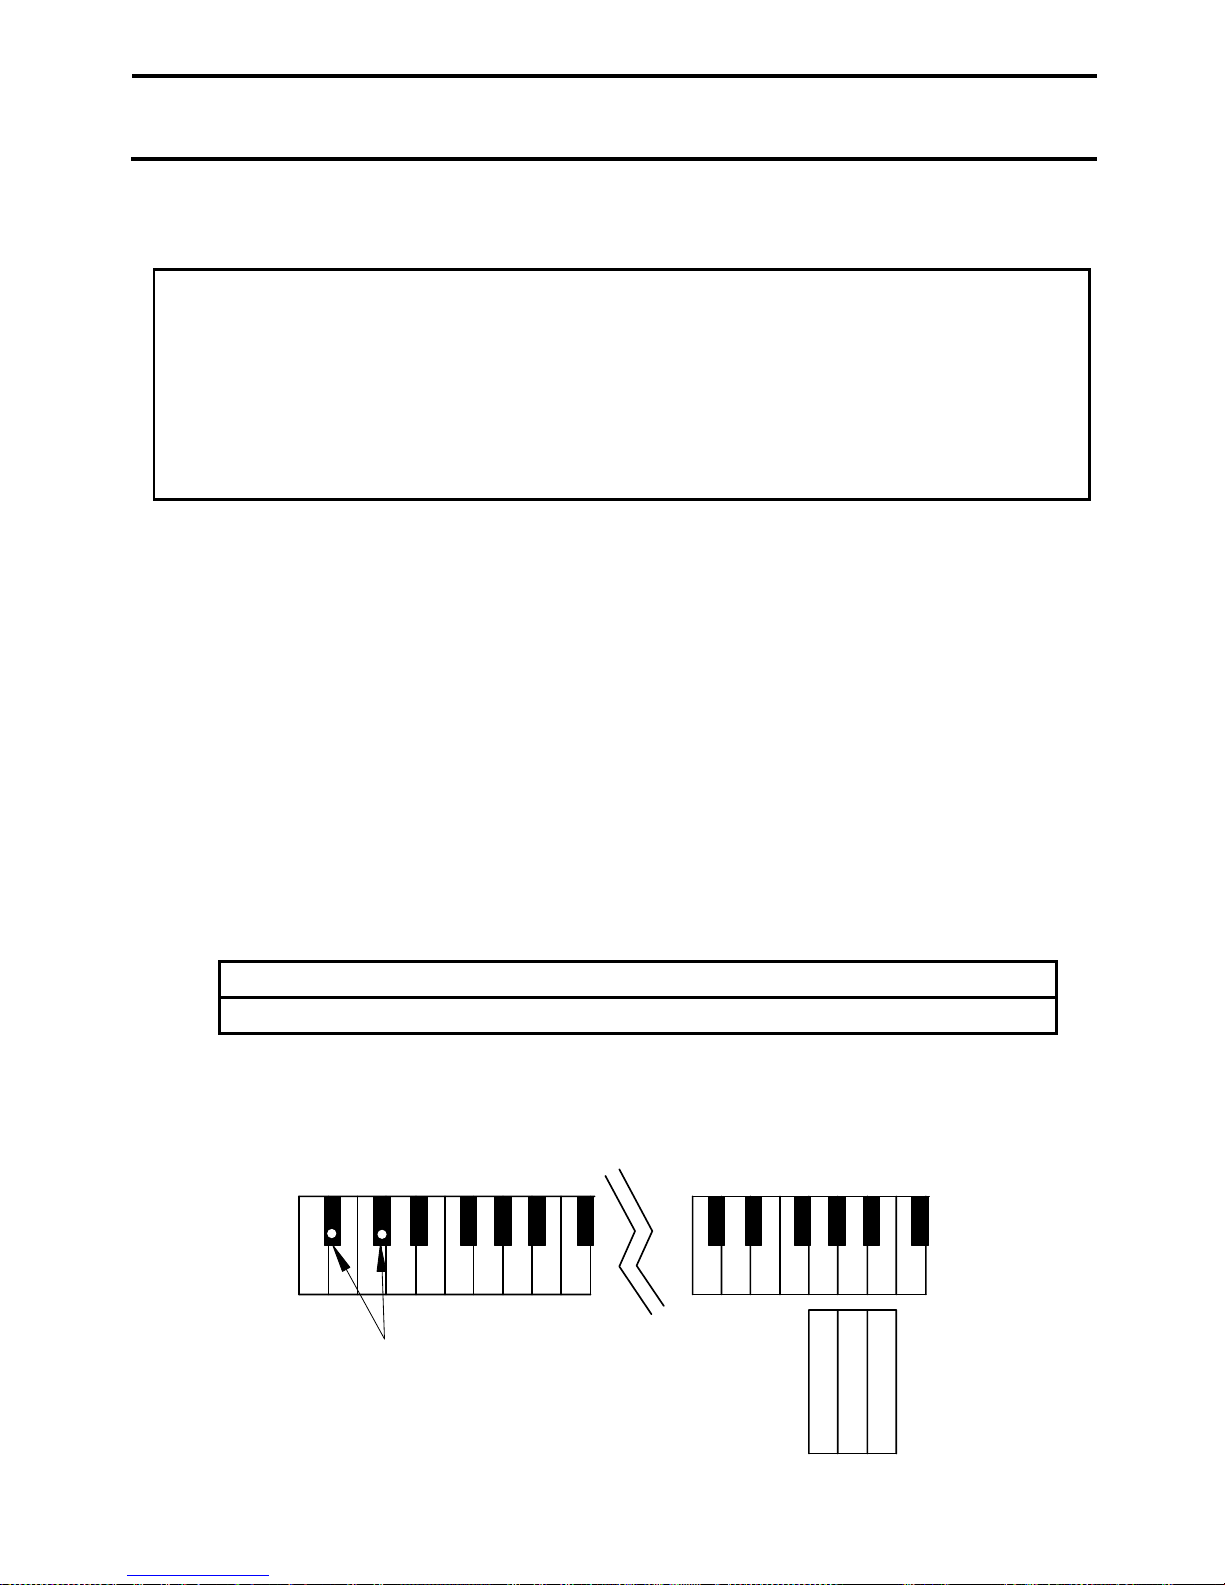
Chapter10 Adjustments and Configurations
ProRecord can be setup to suit your preference.
[Caution!]
The installer should perform the initial setup procedure after the
installation has been completed. If the system is reset to factory
default (see section 8.9), all settings will be lost and the initial setup
procedure must be performed again before the system will work properly.
Chapter10.1 Tuning(Adjusting the Pitch)
The pitch of this instrument is set at A4=440 Hz. You can fine-tune the pitch
up or down in 0.5 Hz steps. The maximum adjustment either direction is 13 Hz.
< Tuning Instructions >
(1)Press and hold keys A#0 and C#1 while turning the power on. A chime
will sound confirming that you are in the setup mode. Continue holding
the two keys.
(2)To lower the pitch, press G4 repeatedly until the desired pitch is
established. To raise the pitch, press B4 repeatedly until the desired
pitch is established. To return to A-440, press A4.
B4 raises pitch by about +0.5 Hz per step (maximum of +13 Hz).
G4 lowers pitch by about -0.5 Hz per step (maximum of -13 Hz).
(3)Release the two keys to save your setting and exit setup. Setting will
be retained when the unit is powered off.
Bass end of keyboard
A0 B0 C1 D1 E1 F1 G1 A1 B1 C2
C4 D4 E4 F4 G4 A4 B4 C5
Hold A #0 and C#1
Wh il e Powering On
- 16 -
A 440 htz.
Raise
Lower
Page 19

Chapter10.2 Sensor Calibration
The sensitivity of the keyboard and pedal sensors can change with time and/or
temperature. Periodic adjustments are required to keep your system operating
at its optimum performance.
< Calibration Instructions >
(1)Press and hold the “PLAY” a n d “REC” while turning the power on. A chime
will sound to confirm that the system is in calibration mode, and the
“PLAY” and “REC” lamps will flash alternately.
(2)Press and release any key or keys that need to be re-calibrated. Be
sure to press the key(s) to full depth and use the same force for all
keys. A note will sound slightly delayed indicating that the key was
re-calibrated. If no note is heard, it did not need calibration. It
is not necessary to play each key. Only those that need re-calibration.
(3)Press and release any pedal that needs to be re-calibrated. Be sure
and press the pedal to its full depth. A chime will sound indicating
that the pedal was re-calibrated. If no chime was heard, it did not
need re-calibration. It is only necessary to press the pedal(s) that
needs re-calibration.
(4)Press the “PLAY” button. If the calibration procedure was successful,
a chime will sound and the “PLAY” and “REC” lamps will stop flashing.
[Note]
If the system is powered off before the “PLAY” button is pressed, the
calibration procedure will not be completed and must be done again.
- 17 -
Page 20
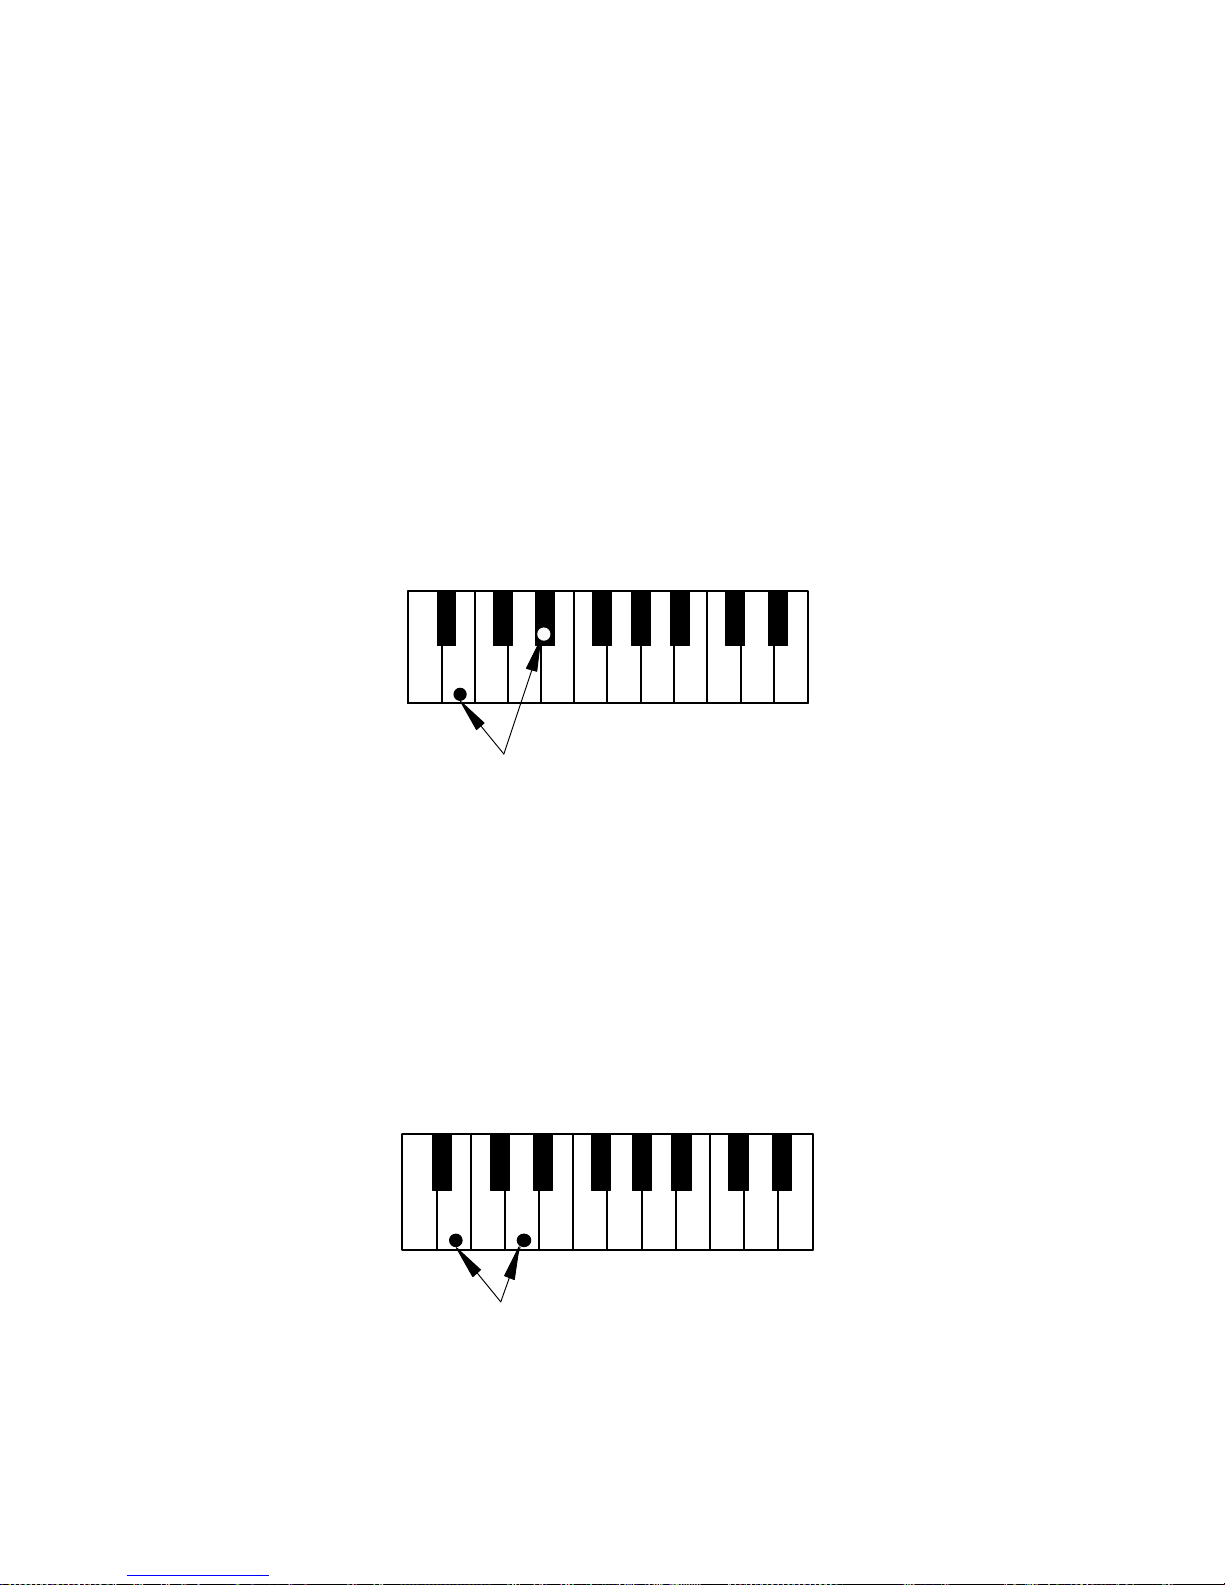
Chapter10.3 Automatic Sensor Calibration
ProRecord has the capability of calibrating the key and pedal sensors
automatically. This function is enabled by default but can be disabled if
desired.
< To Disable Automatic Sensor Calibration >
Press and hold keys B0 and D#1 while turning the power on. A MIDI signal
will sound indicating that the automatic sensor calibration function has
been disabled (see figure below).
Bass end of keyboard
A0 B0 C1 D1 E1 F1 G1 A1 B1 C2 D2 E2
Hold B 0 and D#1
To Turn Auto Calibration Off
While Power ing On
< To Enable Automatic Sensor Calibration >
Press and hold keys B0 and D1 while turning the power on. A MIDI signal
will sound indicating that the automatic sensor calibration function has been
enabled (see figure below).
Bass end of keyboard
A0 B0 C1D1 E1 F1 G1 A1B1 C2D2 E2
Hol d B0 and D1
To Turn Auto Calibration On
While Po werin g On
- 18 -
Page 21
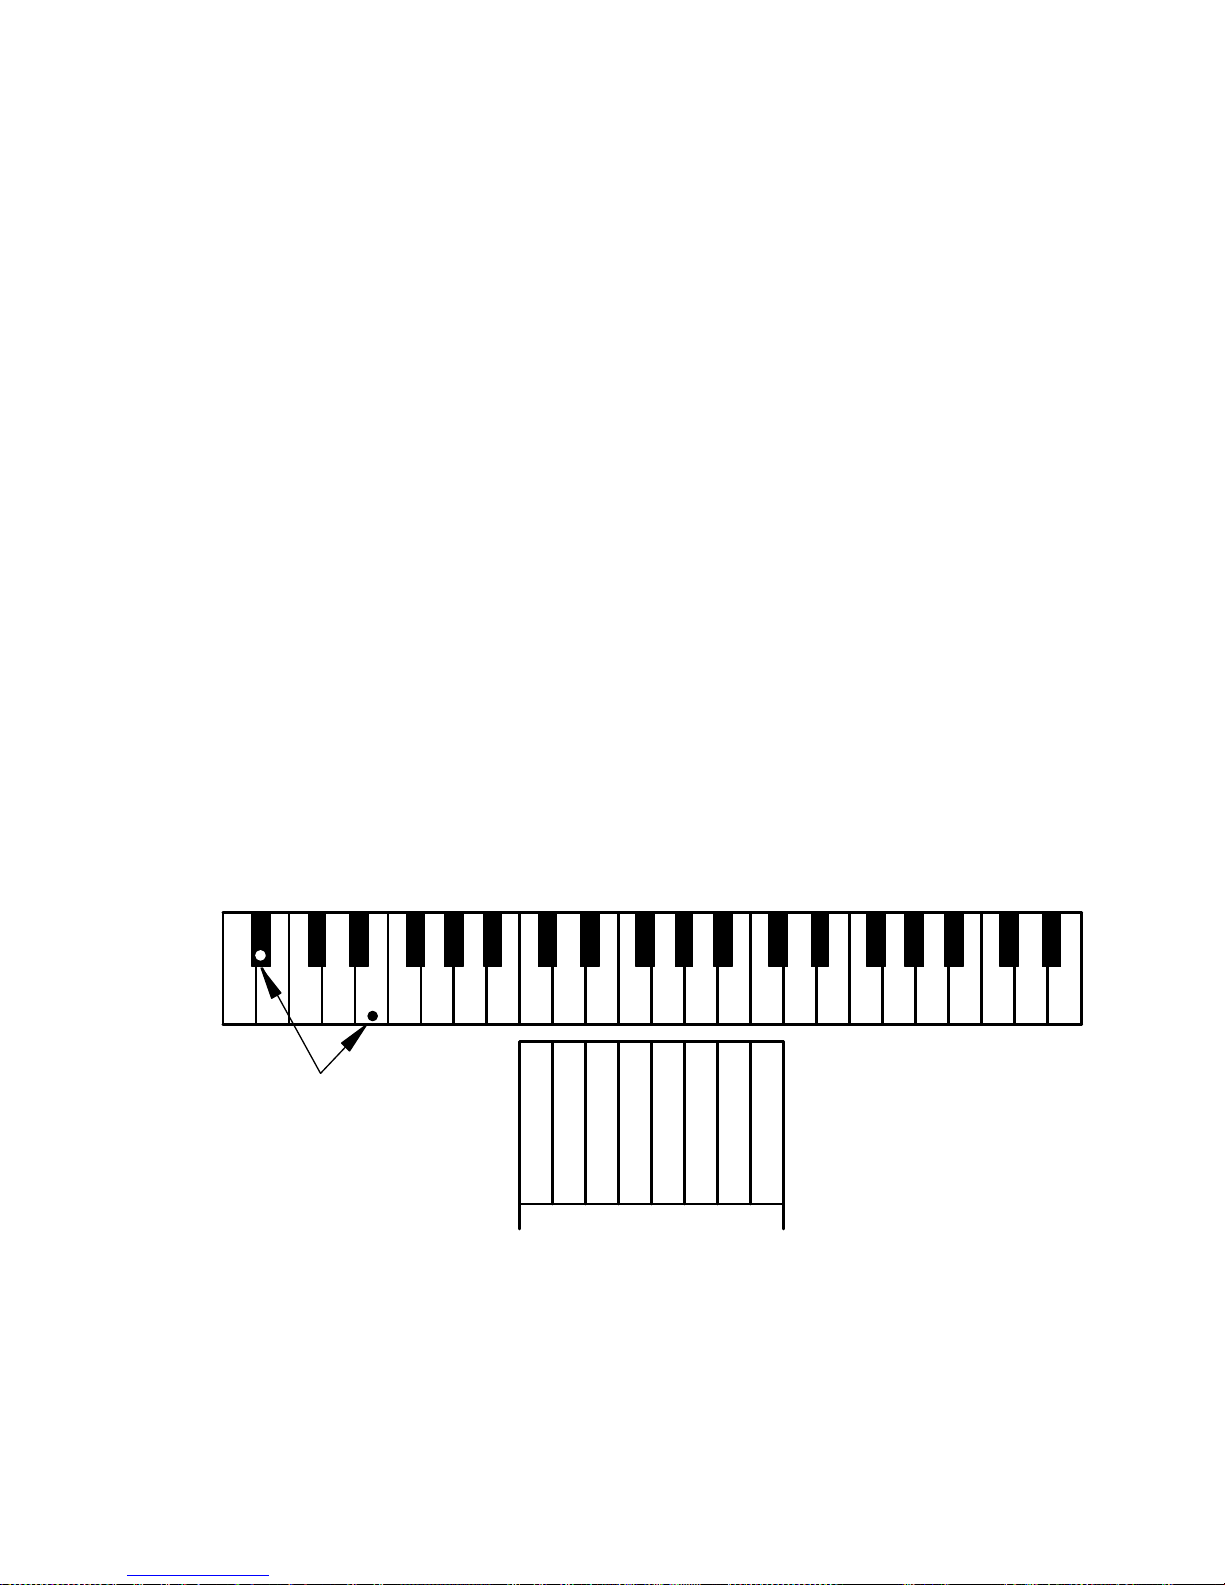
Chapter 10.4 Touch Control (Adjusting the Touch)
ProRecord has the capability of changing the touch control of the keyboard
(lighter or heavier). While it does not actually change the touch of the piano
action, it can give the impression that the action is lighter or heavier. The
idea is to match the feel of your piano. A heavier action would use a setting
of 1 or 2 and a lighter action would be set to 7 or 8. The factory default for
Touch Control is based on a Yamaha U3.
< Touch Control Instructions >
(1)Press and hold down keys A#0 and B1 (see figure below) while turning
the power on. You will hear a MIDI signal that confirms that the system
is in the setup mode. Continue holding the two keys.
(2)Select the desired touch control setting. (Refer to the figure below).
Here are some typical settings:
YAMAHA :3~5
KAWAI :2~3
(3)Release the two keys to store your setting and to exit setup. The setting
is retained when the power is turned off.
Bass end of keyboard
A0B0 C1 D1 E1 F1 G1 A1 B1 C2 D2 E2 F2 G2 A2 B2 C3 D3 E3 F3 G3 A3 B3 C4 D4 E4
Hold A#0 and E1
While Powering On
Heavy
Touch Control Settings
Default
56781234
Light
- 19 -
Page 22
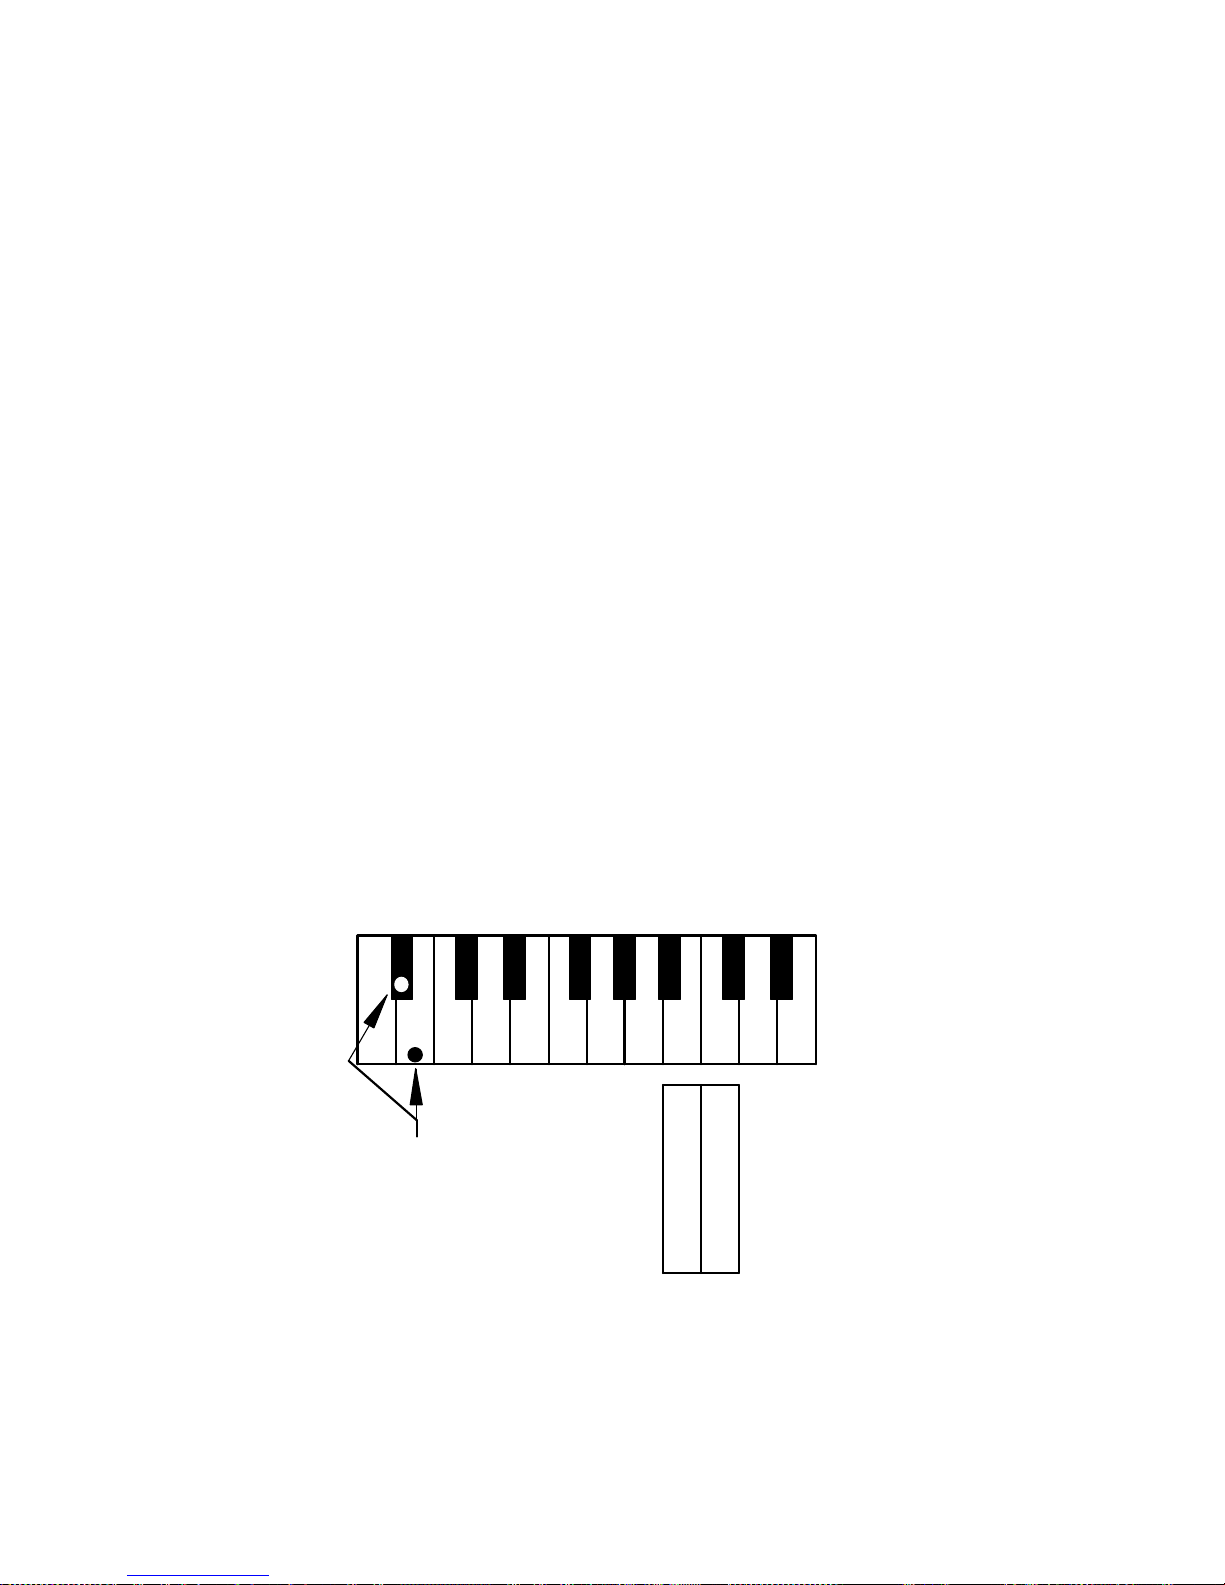
Chapter 10.5 Pedal Positioning
ProRecord allows you to set the depth to which the pedal function turns on. You
can also enable a proportional pedal function for the sustain pedal if desired.
Note: Proportional pedal is not recommended for use with a piano player system.
< Pedal Positioning Instructions > (refer to the figure below)
(1)Press and hold A#0 and B0 while turning the power on. A chime will
sound to confirm that you are in pedal setup mode. Continue holding
the two piano keys.
(2)Press the pedal you wish to set to the depth which you want it to turn
on. Hold the pedal at this position.
(3)Press the “PLAY” button. A chime will sound indicating that the pedal
“ON” position has been set.
(4)Release the two piano keys.
(5)To enable or disable proportional damper pedal, Press and hold A#0 and
B0. Then press C2 for proportional pedal or B1 for ON/OFF pedal.
Release the two piano keys to exit setup mode.
Bass End of Keyboard
C1 C2A0 B0 D1 E1 F1 G1 A1 B1 D2 E2
Hol d A# 0 and B0
While pow ering on.
Damper Pedal Function
(Default)
ON/OFF
Proportional
- 20 -
Page 23
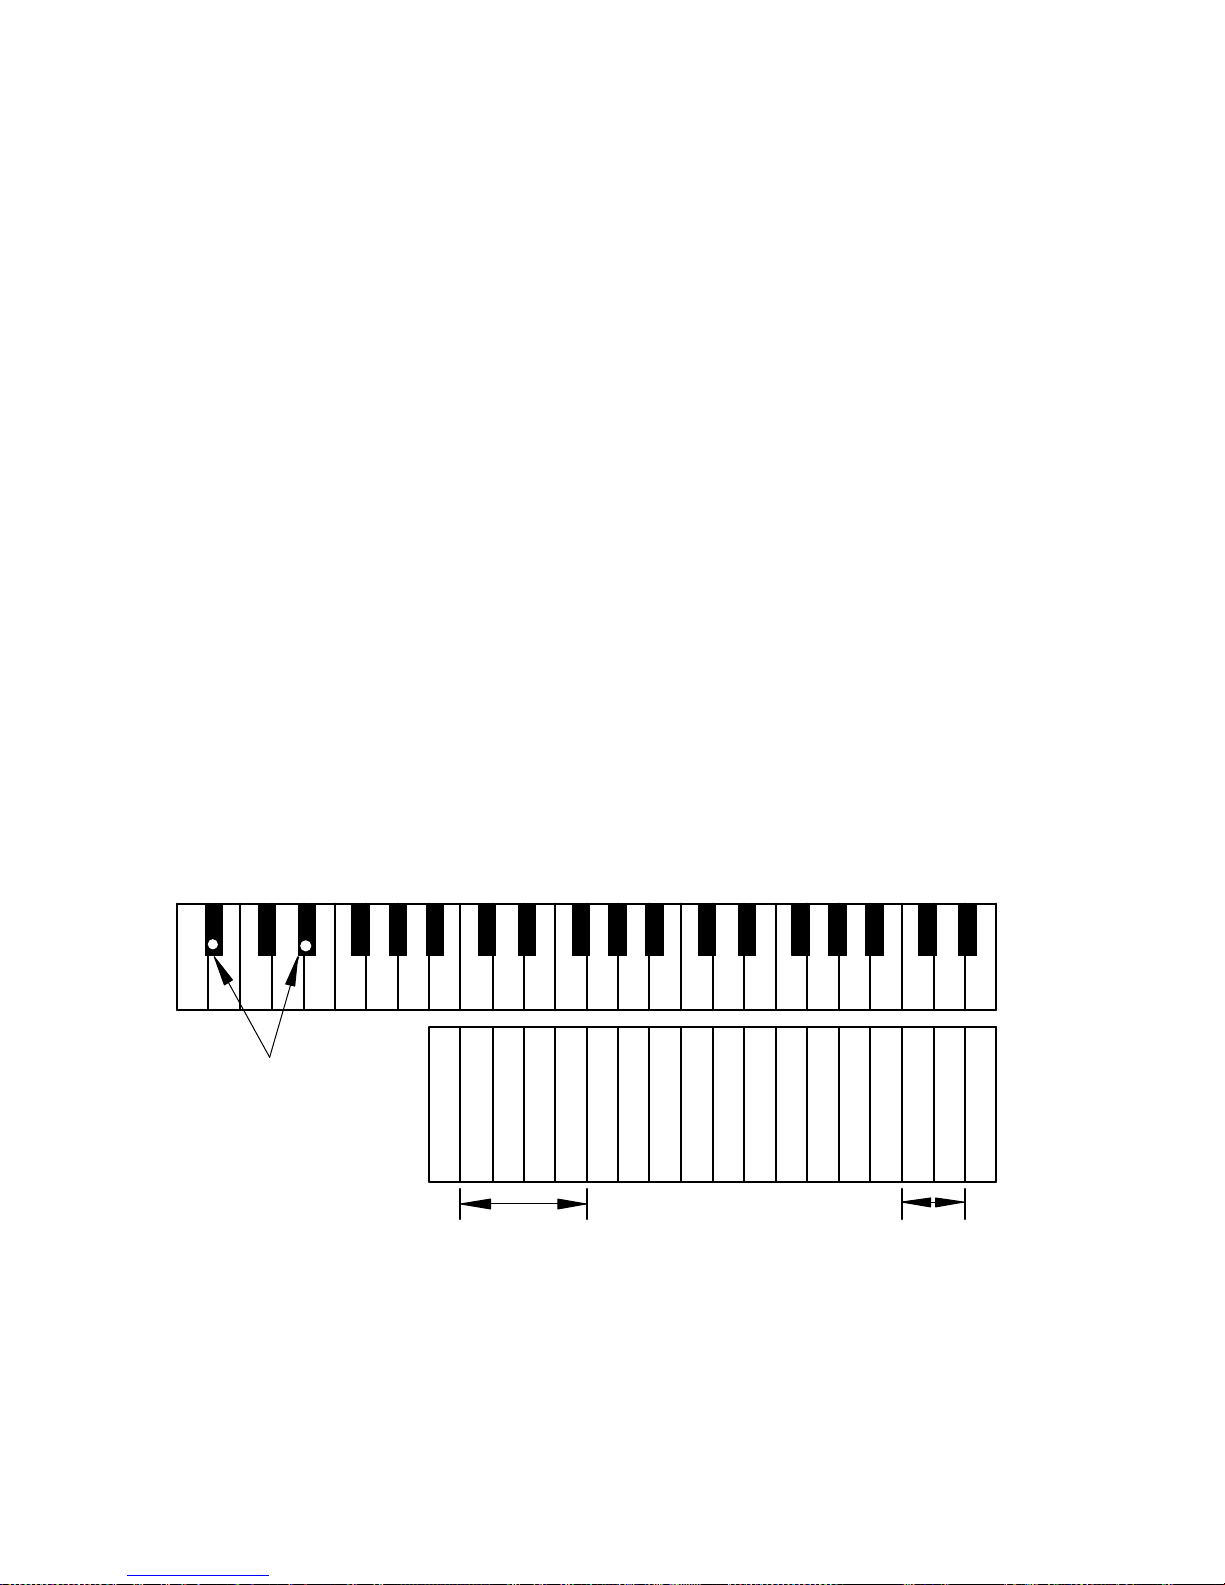
Chapter10.6 SettingKeyDepthforNote‐onandEnabling/Disabling
ContiguousNote‐on
< Key depth instructions > (refer to the figure below)
(1)Press and hold A#0 and D#1 while turning the power on. A MIDI signal
will sound confirming that you are in the setup mode. Continue holding
the two keys.
(2)Using keys C2 – F2, select the depth desired for the note to turn on.
Minus 2 & minus 1 will cause the note to turn on earlier in the key
travel while plus 1 causes the note to turn on later. (Refer to the
following figure.)
(3)Release the two keys to save your setting and exit setup.
< Continuous note-on instructions > (Refer to figure below)
(1)Press and hold A#0 and D#1 while turning the power on. A MIDI signal
will sound confirming that you are in the setup mode. Continue holding
the two keys.
(2)Select Enabled or Disable (Refer to the following figure.)
(3)Release the two keys to save your setting and exit setup.
Bass end of key board
A0
B0C1D1E1F1
Hold These Two Key s
G1
A1
B1
Values
Dep th Set ting
C2
-2 (S hallow)
-1
E2D2F2
0 (Default)
+1 (Deep )
G2
A2
B2C3D3E3F3
A3
G3
B3C4D4
(def ault )
Enable
Disable
Contiuous Not e On
E4
- 21 -
Page 24
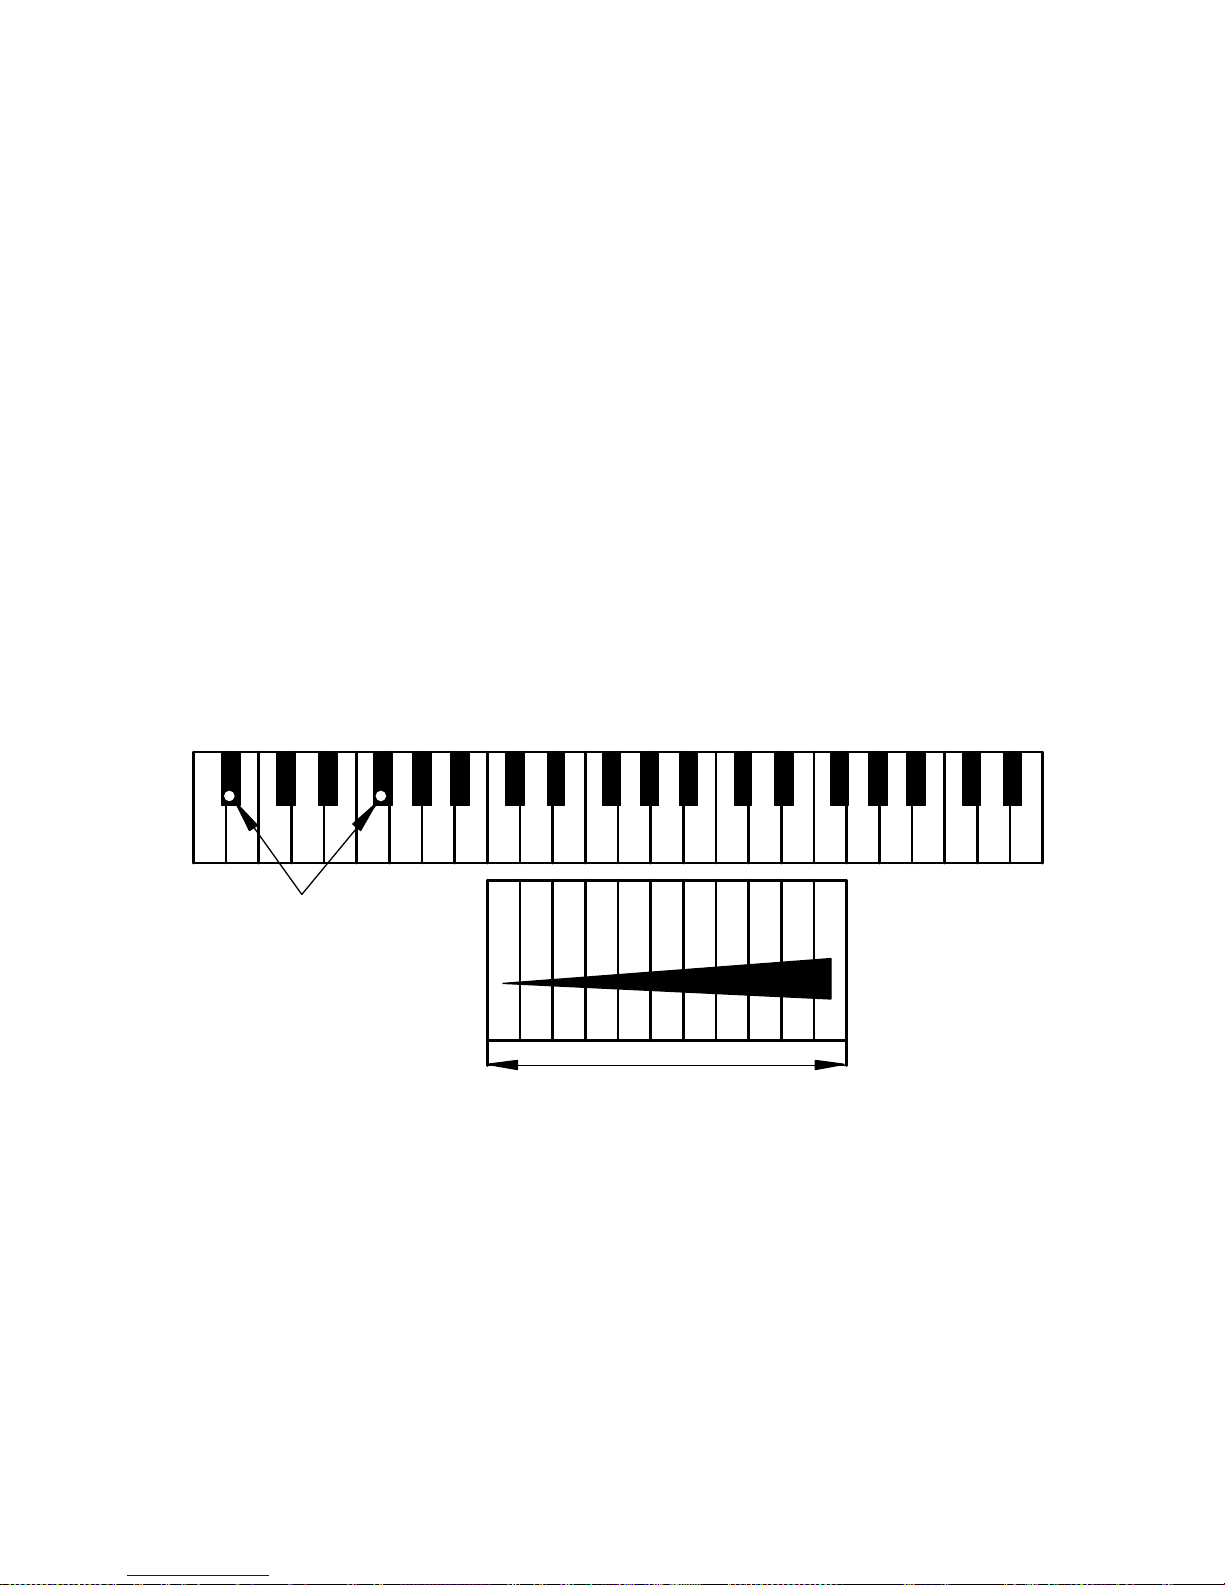
Chapter 10.7 Black Keys Volume Control
If the volume of the black keys is different than the white keys, they can be
adjusted to match. (refer to the figure below)
< Black Key Volume instructions >
(1)Press and hold A#0 and F#1 while turning the power on. A chime will
sound confirming that you are in the setup mode. Continue holding the
two keys.
(2)Select the volume level that best matches the white key volume. (Refer
to the following figure.)
(3)Release the two keys to save your setting and exit setup mode.
Bass end of keyboar d
A0 B0 C1 D1 E1 F1 G1 A1 B1 C2 D2 E2 F2 G2 A2 B2 C3 D3 E3 F3 G3 A3 B3 C4 D4 E4
Press and hold A#0 and F#1
Whi le powering on
Low
Black key volume
Default
0+1+2+3+4+5
-1-2-3-4-5
High
- 22 -
Page 25
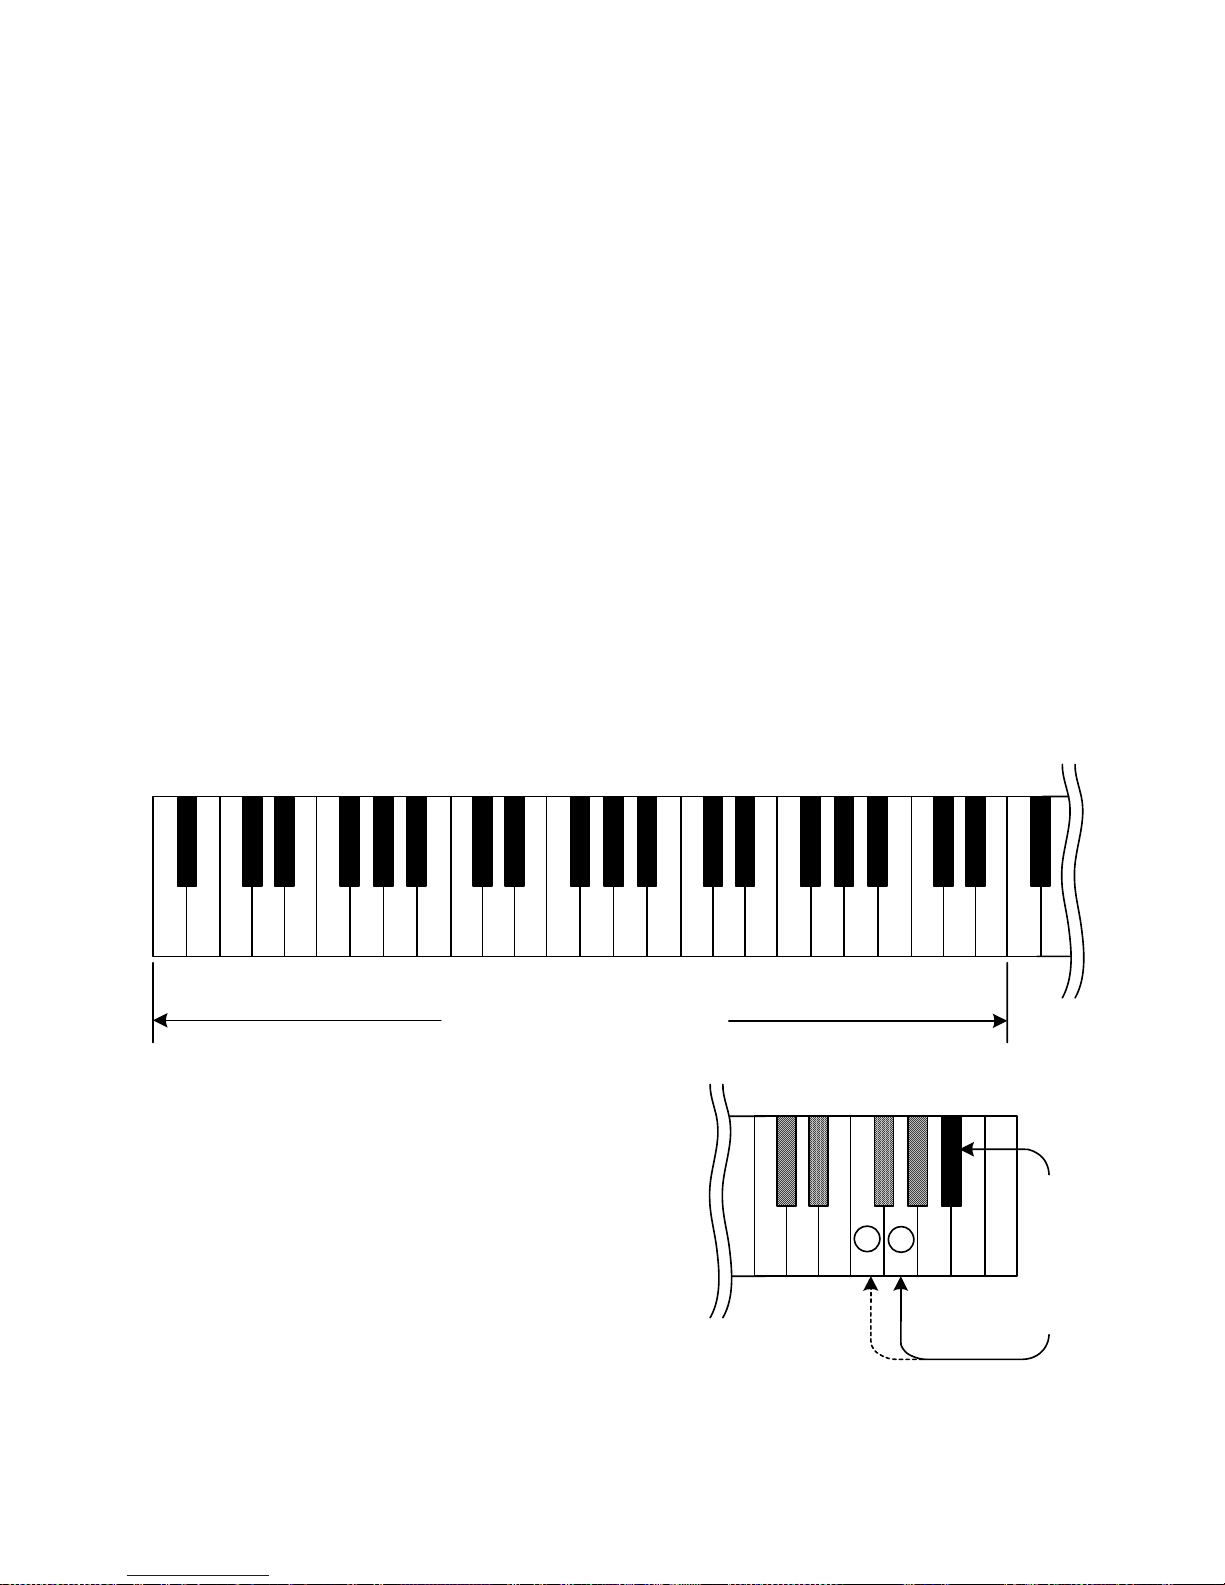
Chapter10.8 Volume Control for Individual Keys(Bass Keys)
The volume level for individual keys can be adjusted in order to get even volume
from note to note. The lower half of the keyboard must be done separately from
the upper half.
The range of the adjustment is from -5 to +5. (default is ±0)
< Volume Setting Instructions >
(1) To increase volume, press and hold A#7 and G7 (see figure below) while
turning the power on. A chime will sound to confirm that you are in
the setup mode. Continue holding the two keys.
(2) Select the note that needs to be adjusted from the lower half of the
keyboard (A0 through E4) and press the key repeatedly until the desired
volume is reached. Adjust other notes as needed.
(3) Release the two keys to save the setting and exit setup mode.
(4) To decrease volume, press and hold A#7 and F7 while turning on the
power.
(5) Repeat steps (2) and (3) above.
Left Side
(la)B0(ti)
A0
D1
C1
(re)
(do)E1(mi)F1(fa)A1(la)
G1
(so)B1(ti)D2(re)
C2
(do)E2(mi)F2(fa)A2(la)
G2
(so)B2(ti)D3(re)
Left 44 keys
C3
(do)E3(mi)F3(fa)A3(la)
G3
(so)B3(ti)D4(re)
-
D7C7 E7 F7 A7G7 B7 C8
B6
Select one
C4
(do)E4(mi)F4(fa)
Right S ide
+
Push simultaneously
- 23 -
Page 26
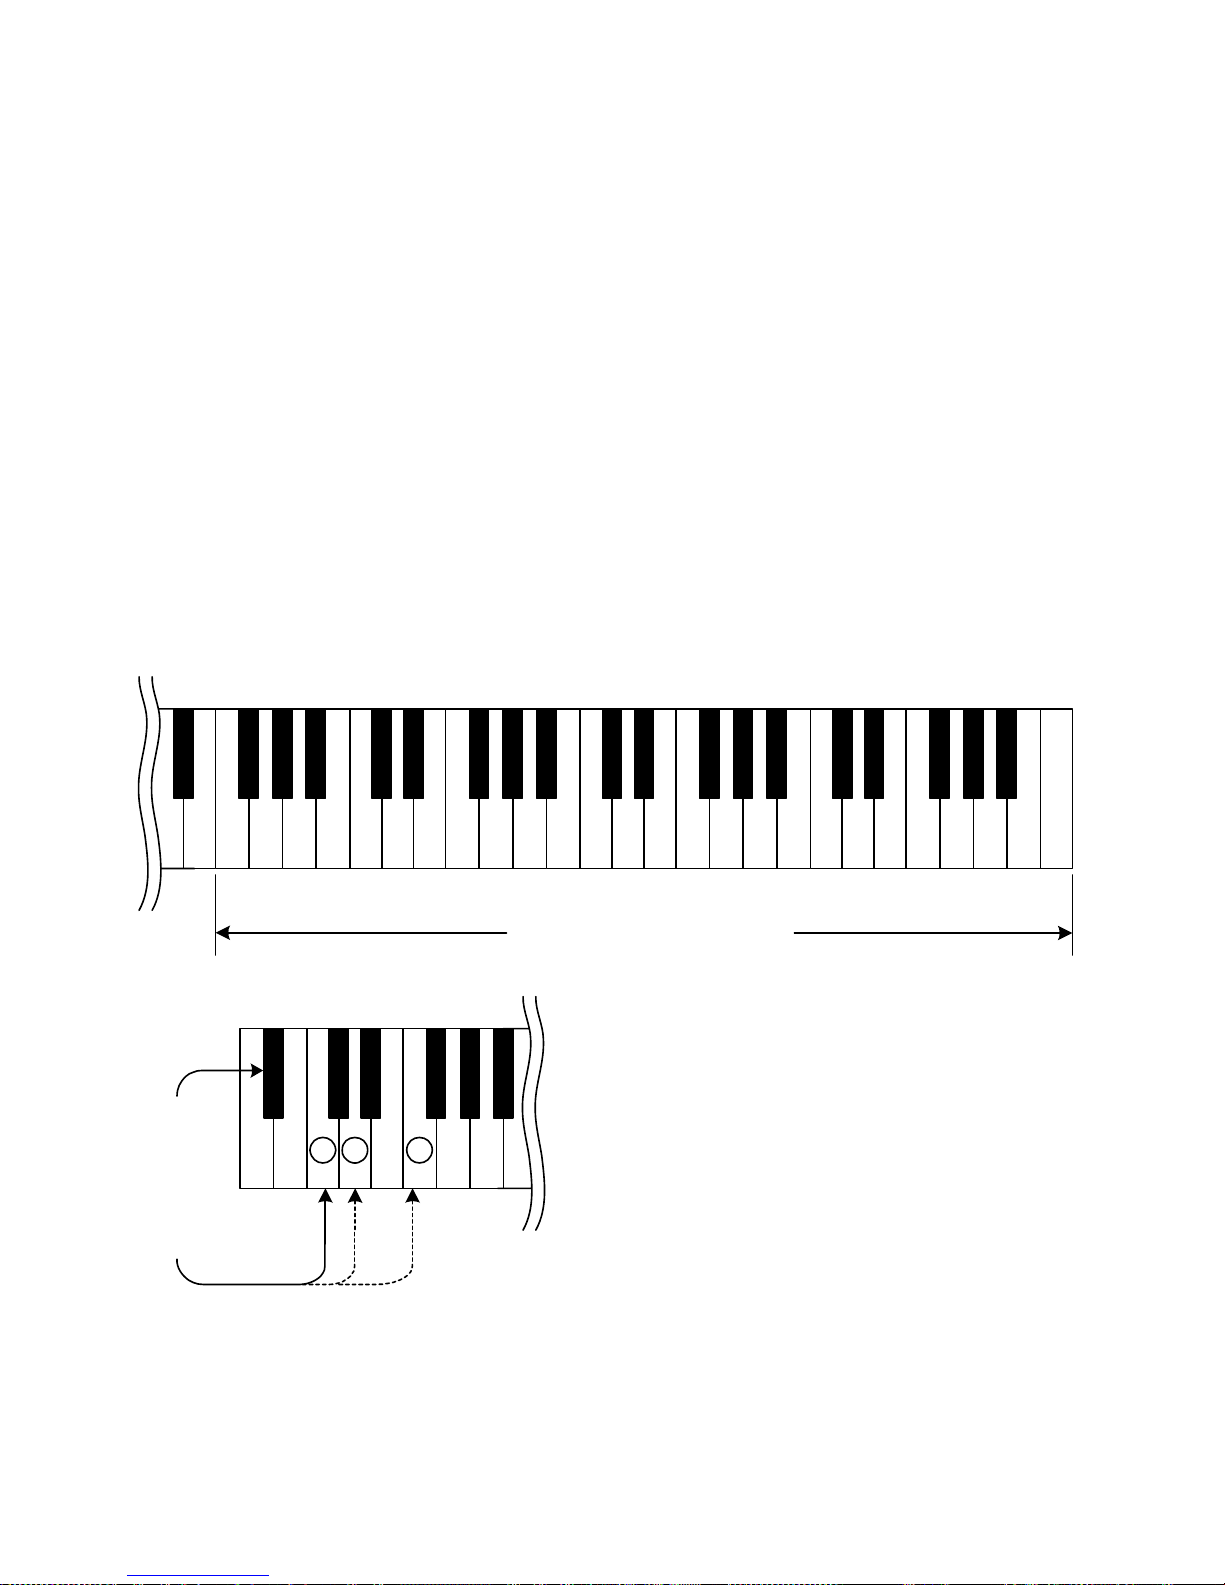
Chapter10.9 Volume Control for Individual Keys(TrebleKeys)
Volume adjustment for individual keys in the upper half or the keyboard (F4
through C8) is done in the same way as the lower half except that the setup keys
are different (See figure below). In addition, there is a reset key which returns
all values to the default setting of “0”.
< Volume Setting Instructions >
(1) To increase volume, press and hold keys A#0 and D1 while turning the
power on.
(2) To decrease volume, press and hold keys A#0 and C1 while powering on.
(3) Select the notes that need to be adjusted in the upper half of the
keyboard.
(4) To reset all values to “0”, press and hold keys A#0 and F1 while turning
on the power.
(5) Release the two keys to save your settings and to exit setup mode.
F4
E4
(mi)
Push simultaneously
G4
(fa)A4(la)
(so)B4(ti)D5(re)
Left Side
A0 B0 D1C1 E1 F1 A1G1
C5
(do)E5(mi)F5(fa)A5(la)
+- R
Select one
G5
(so)B5(ti)D6(re)
C6
(do)E6(mi)F6(fa)A6(la)
Right 44 keys
B1
G6
(so)B6(ti)D7(re)
C7
(do)E7(mi)F7(fa)A7(la)
Right S ide
G7
(so)B7(ti)C8(do)
- 24 -
Page 27
Chapter10.10 Returning Settings to their Default Configuration
[Caution!]
When this process is performed, ProRecord will cease to operate normally.
An initial setup is required in order to continue using. The initial setup
procedure is outlined on the next page.
The following charts show the default settings:
Default Configuration
Recorded song:All Deleted
Number of Re-strikes Per Second:18
Initial Setting:Clear
Sensor Calibration:Clear
Sensor Automatic Calibration:ON
Touch Control:4
Pedal Positioning:Clear
Damper pedal function:ON/OFF
Adjusting the Depth to Sound:0
Continuous note-on MIDI commands:disabled
Black Keys Volume Control:0
Volume Control for Each Key:All 88 keys=“0”
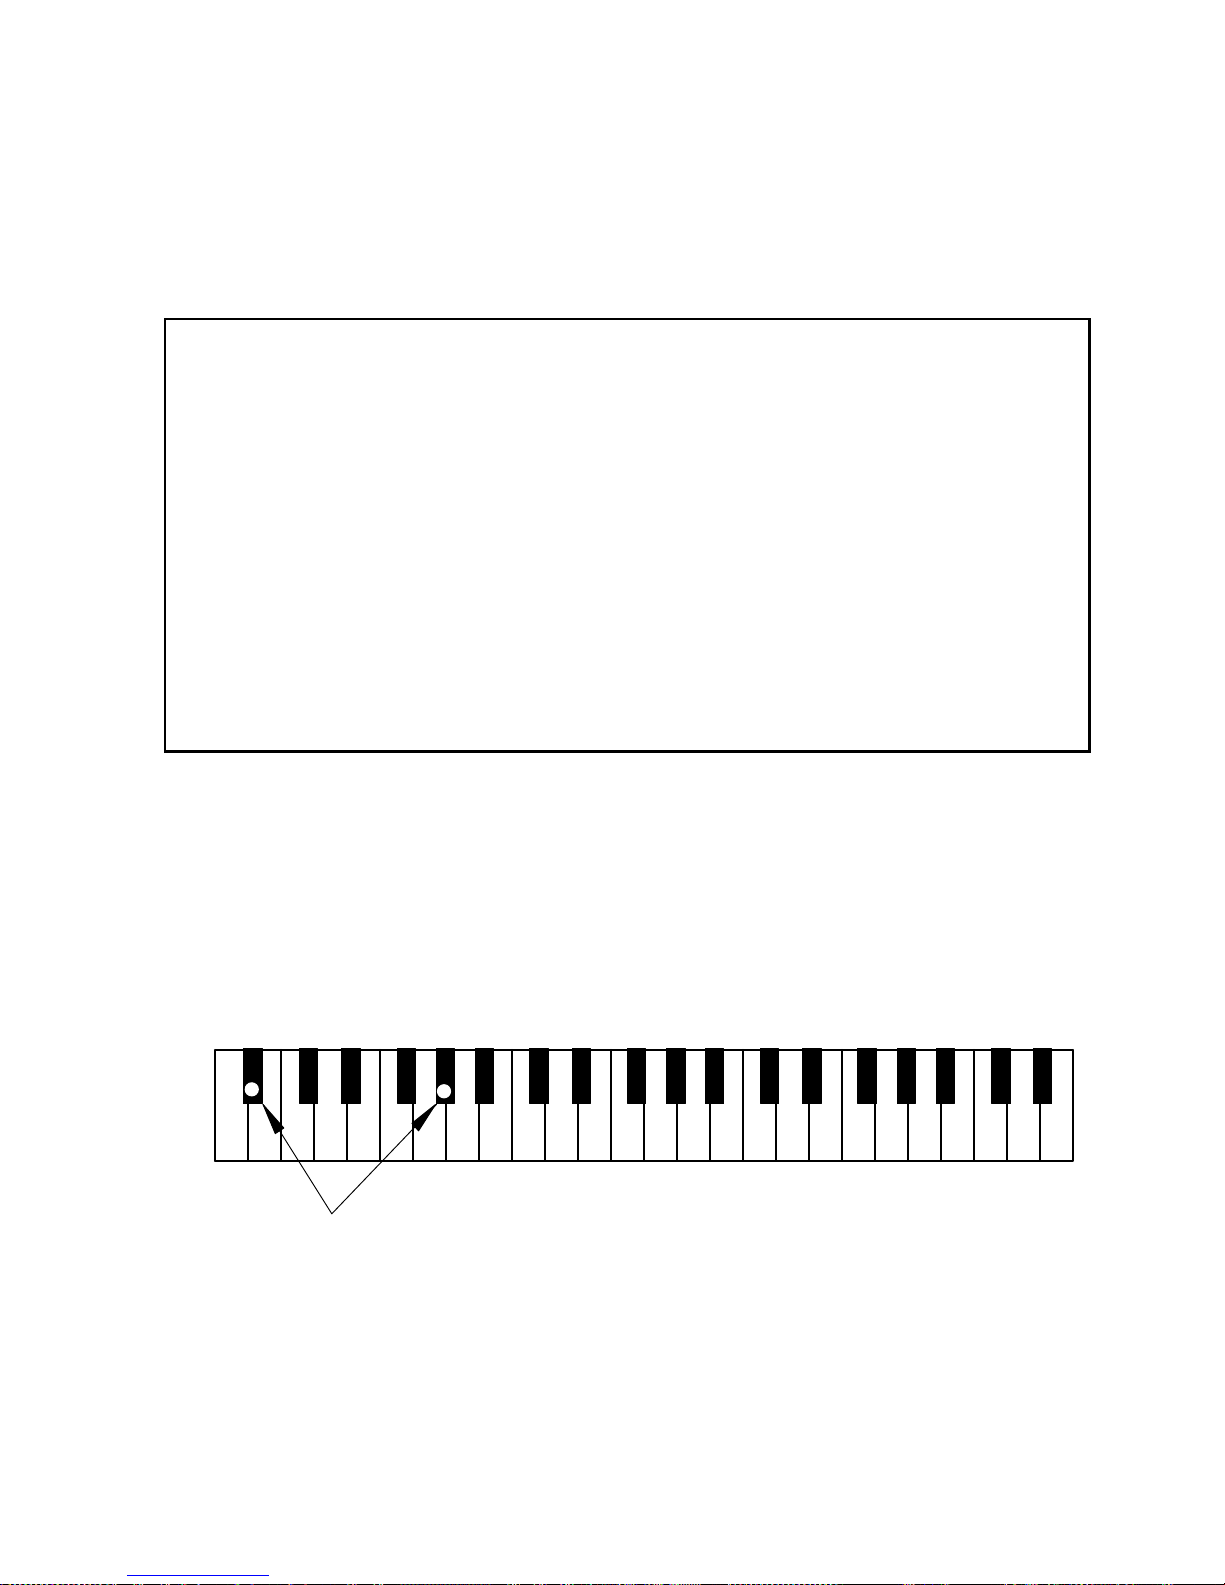
< Setting Default Configuration >
(1)Press and hold A#0 and G#1 while turning the power on (see figure below).
A MIDI signal will sound and the “PLAY” and “REC” lamps will flash
alternately.
(2)Release the two keys. The “PLAY” and “REC” lamps will stop flashing and
the system as been reset to default values.
Bass end of keyb oard
A0 B0 C1D1 E1 F1 G1 A1 B1 C2D2 E2 F2 G2 A2 B2 D3 E3 F3 G3 A3 B3 C4D4 E4
Hold A#0 and G#1 wh i le powering on .
C3
- 25 -
Page 28

< Initial Setup Instructions >
(1) Turn the power on. A chime will be heard and the “PLAY” a n d “REC” lamps
will flash alternately indicating that the system is in “Initial Setup
Mode”.
(2) Play each note of the keyboard with equal force, making sure each key
goes to full depth. When each note is release, the note will sound
slightly delayed indicating that each key was calibrated.
Note: It may be helpful to pause a moment between each note to ensure
that the note calibrates properly.
(3) Press each pedal with equal force and full depth. A chime will sound
after each pedal is press indicating that the pedal was calibrated.
The chime for each pedal will be a different pitch.
(4) Push the “PLAY” button. If the calibration of all keys and pedals was
successful, a chime will be heard and the “PLAY” and “REC” lamps will
stop flashing.
(5) If any key or pedal did not calibrate properly, setup cannot be
completed until the keys and/or pedals have be calibrated. The system
will play the MIDI note of the keys or pedals that need to be calibrated.
Play the keys or pedals again and then push “PLAY”.
[Note]
The Initial setup procedure will reset the touch control setting. Therefore,
you must repeat the procedures outlined in section 8.3 to restore to your
desired setting.
- 26 -
Page 29

Chapter11 MIDI(Connecting to Other Device)
ProRecord can be connected to a personal computer or MIDI device using the
dedicated USB cable or MIDI interface cable.
・ For Personal Computer:USB Cable
・ For MIDI Device :MIDI interface Cable
(Connection with a personal computer)
If a personal computer is connected to your ProRecord, the information is
transmitted to the computer as MIDI data. The MIDI data can then be edited
and saved on the computers hard drive or other storage device.
(Connection with a MIDI device)
If a MIDI device is connected to your ProRecord, the information coming from
ProRecord is transmitted to the MIDI device as MIDI data. The MIDI data can
then be used by the MIDI device.
MIDI channel Specifications
ProRecord outputs data from the keyboard to the MIDI channel 1. Playback
of the recorded data is output to the MIDI channel 2.
About MIDI
MIDI is an abbreviated name of Musical Instrument Digital Interface. The
performance information on a musical instrument, the change information on a
tone, etc. can be transmitted. It is a common protocol in the world.
- 27 -
Page 30
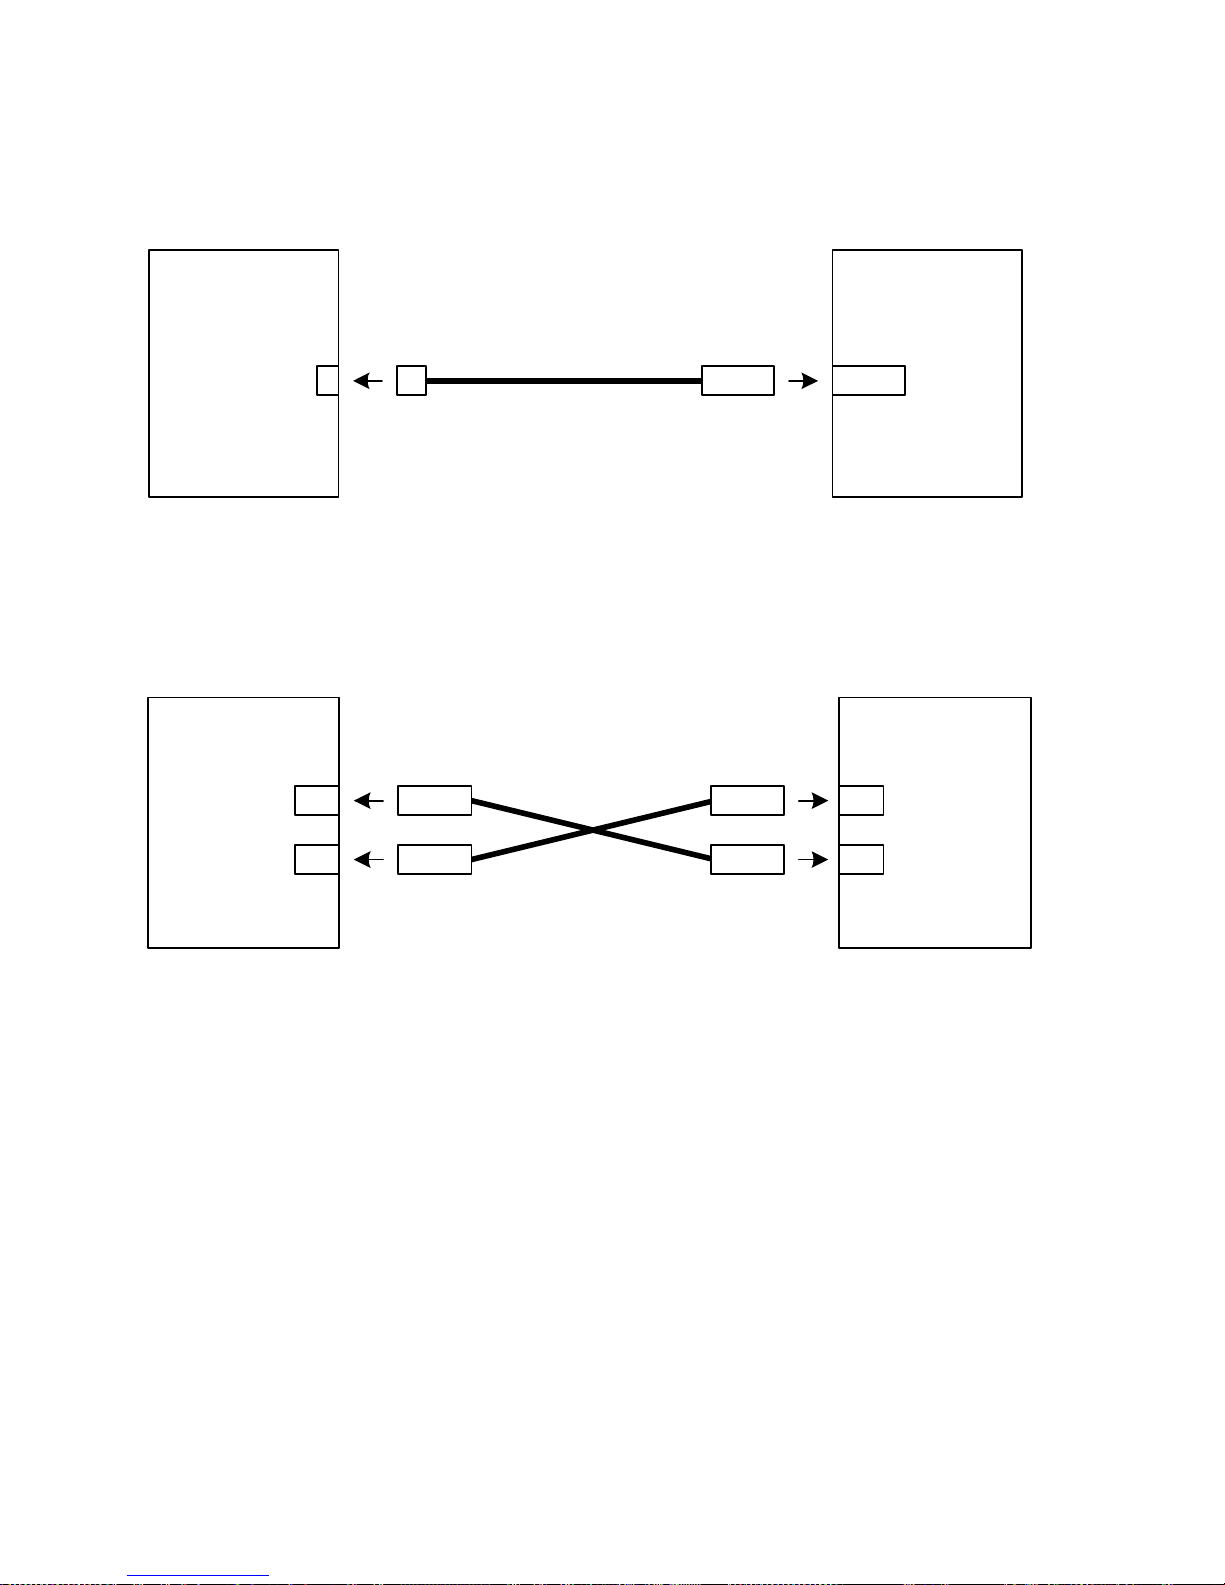
Example of connection with a personal computer
Connect a personal computer with the USB miniB jack of the Control-BOX.
Connection will install MIDI drivers automatically.
(Compliant OS:WindowsXP, WindowsVISTA, Windows7)
C on tro l-B O X
miniB
USB
USB Cable
USB
Window s P C
USB
Example of connection with a MIDI device
Connect a MIDI device with the MIDI jack of the Control-BOX.
C on tro l-B O X
MIDI
Jack
OUT
(fe m a le)
(fe m a le)
IN
DIN5pin
OUT
IN
DIN5pin
[Note]
MIDI and USB cables cannot be used simultaneously.
MIDI Cable
(male)
(male)
DIN5pin
OUT
IN
DIN5pin
(male)
(male)
MIDI Device
OUT
(fe m a le)
MIDI
Term inal
(fe m a le)
IN
- 28 -
Page 31
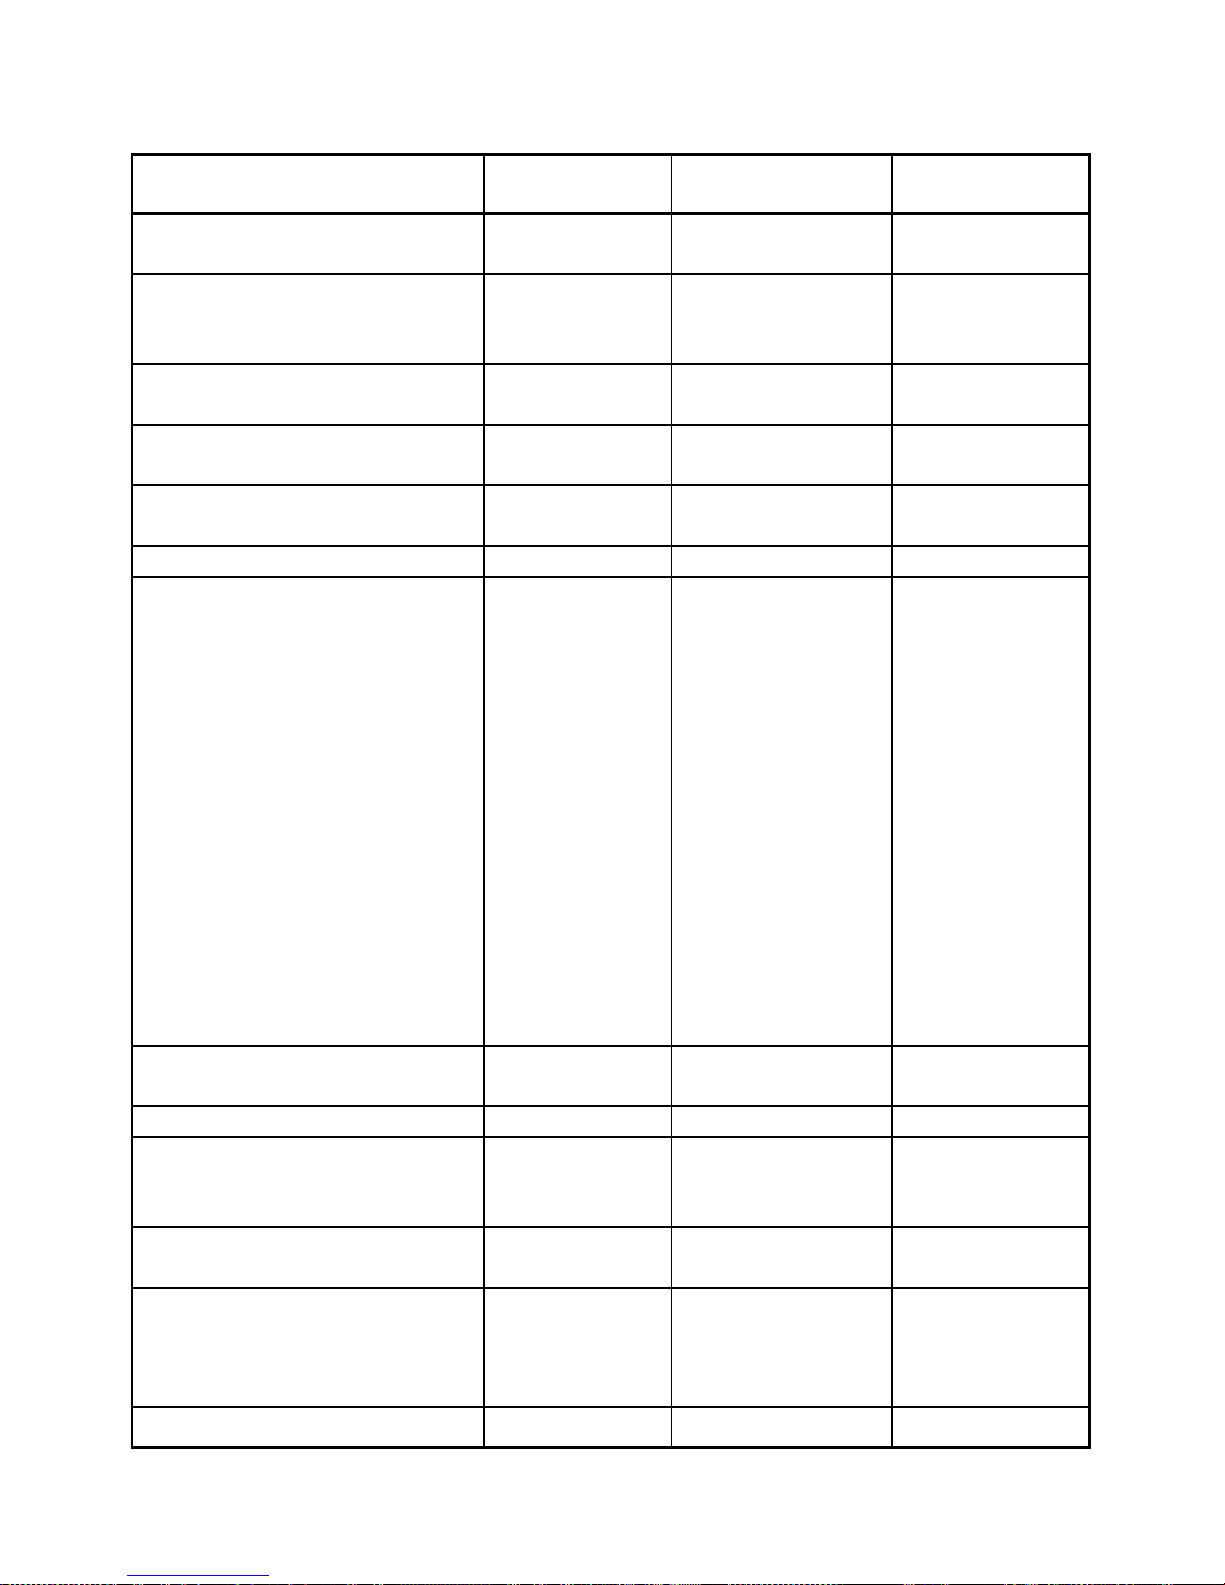
Chapter 11.1 MIDI Implementation Chart
Function Transmitted Recognized Remarks
Basic Channel Default
Changed
Mode Default
Messages
Altered
Note Number
: Range
Velocity Note ON
Note OFF
After Touch Keys
Channels
********
********
1
×
3
×
21-108
○
○
×
×
1-16
1-16
3
×
×
0-127
0-127
○
○
×
○
Pitch Bend × ○
Control Change 64
66
67
00
01
05
06
07
10
11
65
91
93
120
98,99
100,101
Program Change
: True#
********
○
○
○
○
○
○
○
○
○
○
○
○
○
○
○
○
○
○
○
○
○
0-127
System Exclusive ○ ○
Common : Song Position
: Song Select
: Tune
SystemRealTime : Clock
: Commands
Aux : Local ON/OFF
: All Notes OFF
: Active Sense
: Reset
Notes
×
×
×
×
×
×
×
×
×
×
×
×
×
×
×
○
×
×
Damper Pedal
Sostenuto Pedal
Soft Pedal
Bank Select
Modulation
Portament Time
Data Entry
Volume
Panpot
Expression
Portament ON/OFF
Effect(Reverb)
Effect(Chorus)
All Sound OFF
NRPN LSB,MSB
RPN LSB,MSB
Mode1:OMNI ON 、POLY Mode2:OMNI ON 、MONO ○:Yes
Mode3:OMNI OFF、POLY Mode4:OMNI OFF、MONO ×:No
- 29 -
Page 32
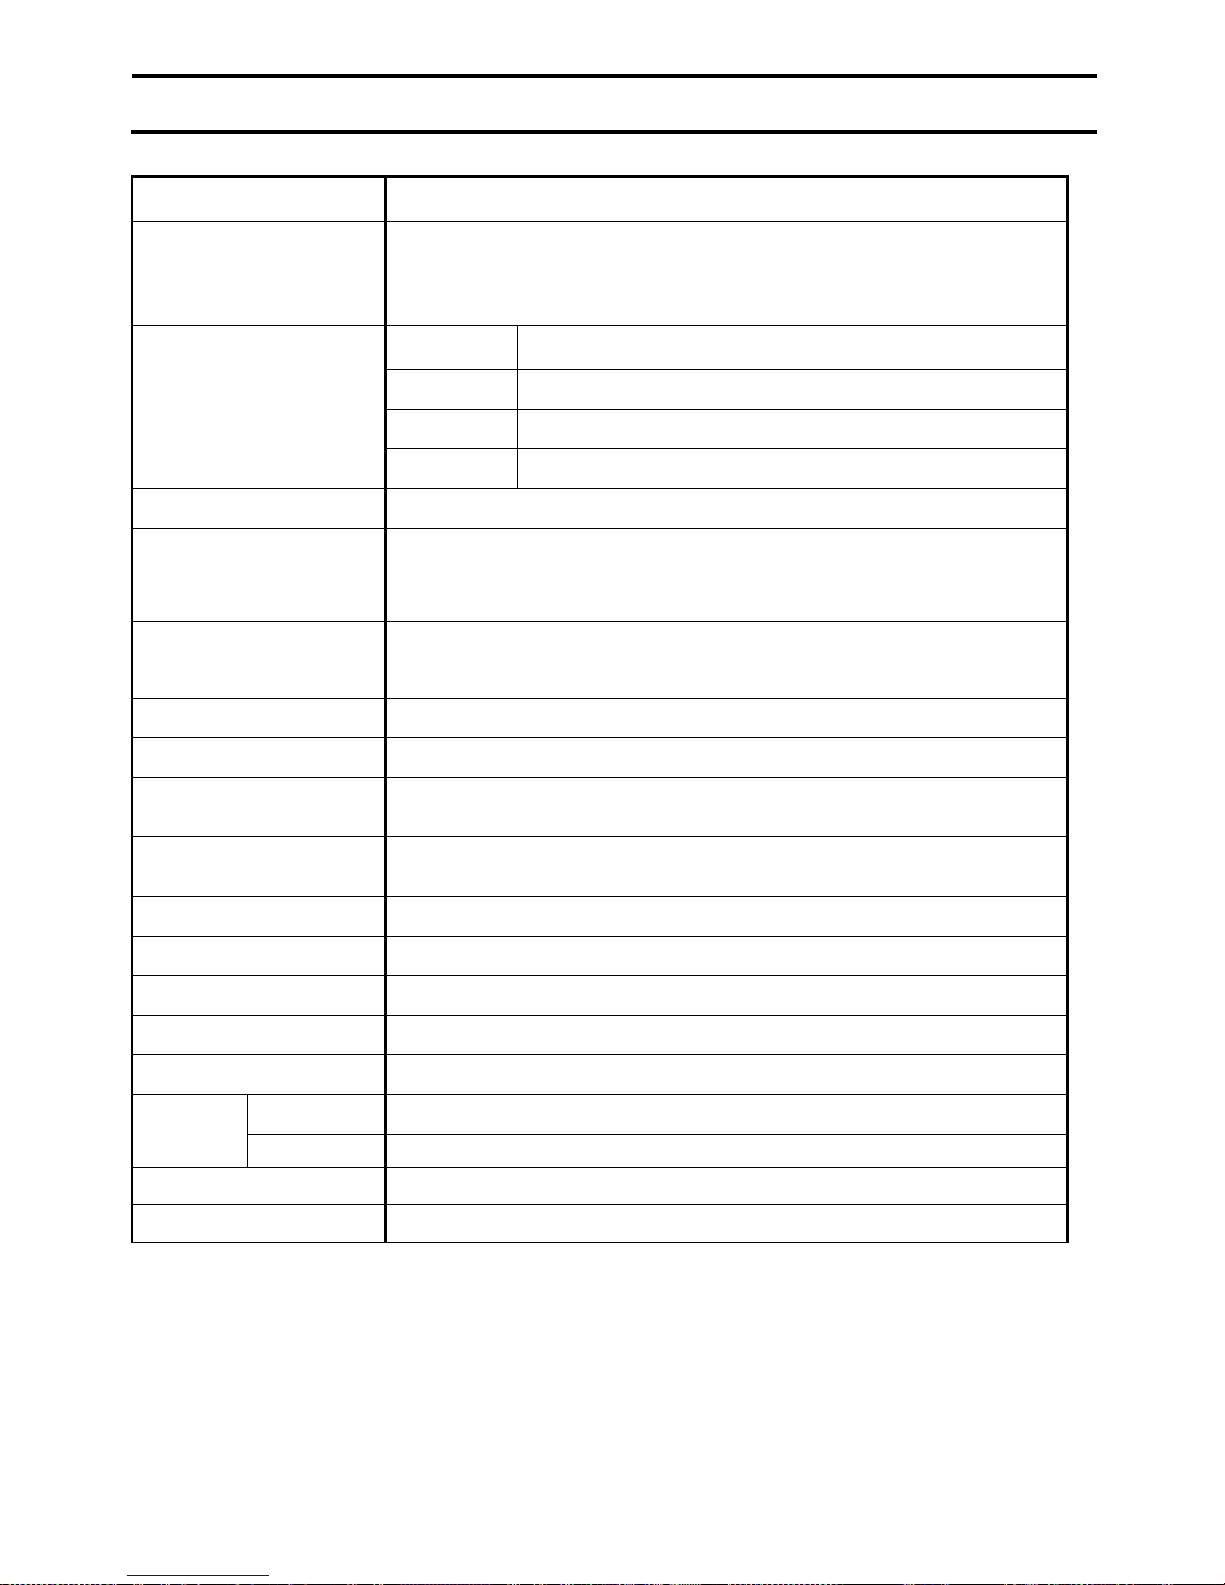
Chapter 12 Specifications
Polyphony 108-notes
Piano、Bright Piano、Mellow Piano、Electric Piano1、
Instrument List
FM Electric Piano、Church Organ、Warm Organ、Percussive Organ、
etc…(can choose from 80 additional instruments)
Beat : OFF、2、3、4、5、6、8
Metronome
Tempo :30~250
Volume:5 Level
Record :10 Banks、 Memory Size about 10,000 notes per Bank
Record/Playback
Playback: Variable Speed(0.5x~2x)
Tuning ±13Hz(427~440~453Hz)
Pedal Positioning ON/OFF、Proportional (Damper Pedal only)
Number of Repeats
Per Second
Setting Key Depth for
Note-on
15 Step
4 Step
Touch Control 8 Step
Continuous note-on Enable / Disable
Black Key Volume ±5 Step
Volume for Each Key ±5 Step
Demonstration Song 10
Analog Headphones×2、LINE-OUT×1
Terminals
Digital MIDI (IN/OUT)×1、USB×1
Power supply voltage DC+9V(AC adaptor or supply from EXT IF)
Accessories Owner's manual (this book)
●The specification and/or appearance of this product may be changed without
prior notice.
- 30 -
Page 33

Chapter13 Troubleshooting
●The unit turns on but does not play. And the “PLAY” and the “REC”
lamps are blinking alternately.
・ProRecord is in initial setup mode. Complete initial setup as described in section
8.9 (page 20).
●Power does not turn on.
・Checktoseethatthepowercordis connected correctly? Insert the AC adaptor firmly into
the DC9V socket and AC outlet.
・Check for power at the AC outlet.
・If the problem persists, contact an authorized repair source.
●Some notes play louder or softer than others or not at all.
・It may be necessary to re-calibrate the system or adjust volume levels. See sections
8.1 to re-calibrate the system. If the black key volume does not match the white
keys, see section 8.6. See sections 8.7 and 8.8 to adjust the volume on individual
notes.
●Pedal does not work, or is "stuck".
・It may be necessary to re-calibrate the pedal sensors. See sections 8.1 and 8.4.
If the problem persists, contact and authorized repair source.
●The tempo of the metronome can’t be set up.
・Tempomustbesetbyinputtinga3digitnumberusingthepianokeyboard.Atemposettingof
lessthan100mustbeprecededby“0”.Theallowablerangeis30to250.Temposlessthan30or
morethan250willnotbe recognized.
I
- 31 -
 Loading...