

Page 1
Thank you very much for purchasing PIAA product.
Please read this entire manual before installation and use of this product.
Installation Instructions
ShockLampRS800HALOGEN
Please give this Installation Manual to customer after installing.
For Installers
• Lighting laws vary state to state, check your
• When installing two lamps on vehicle it is necessary to purchase another rely
harness PN 34088(LR-25E) - one harness is required for each lamp
.
local laws before use.
• The lamps get very hot when they have been in use.
Do not touch them as they may cause burns.
• After the lights have been on do not place them near
flammable objects.
• Do not splash water directly on the hot lamps, as this may cause cracking of the
lens due to dramatic change in temperature.
• To avoid potential damage to your eyes do not look directly into the lamp.
• This product is designed for 12v automotive electrical systems only.
• Using this light system while the engine is not running will drain the battery.
• Do not repeatedly turn the light system on and off as it will shorten the life
of the system.
• To avoid potential damage to your lights make sure your lights are turned off prior
to starting or shutting off your vehicle.
• Using the wrong bulbs may cause a malfunction, use only specified PIAA bulbs.
• When changing bulbs or lenses follow the lamp assembly/disassembly diagram.
P0806RS800HALOGENManual
Page 2

CONTENTS
TOOLS
One (1) Lamp assembly
Diagonal cutters
Ornament remover Black sealer
Phillips-head screwdriver Flathead screwdriver
8mm 19 mm
Wrench
Pliers Box wrench
1.
One (1) Largehexagonalwrench
One (1) SmallHexagonalwrench
One (1) Rubbercushion
* Make sure that all parts are in the package.
If something is missing, please contact
the store where you purchased the product.
Page 3
LAMP
INSTALLATION
2.
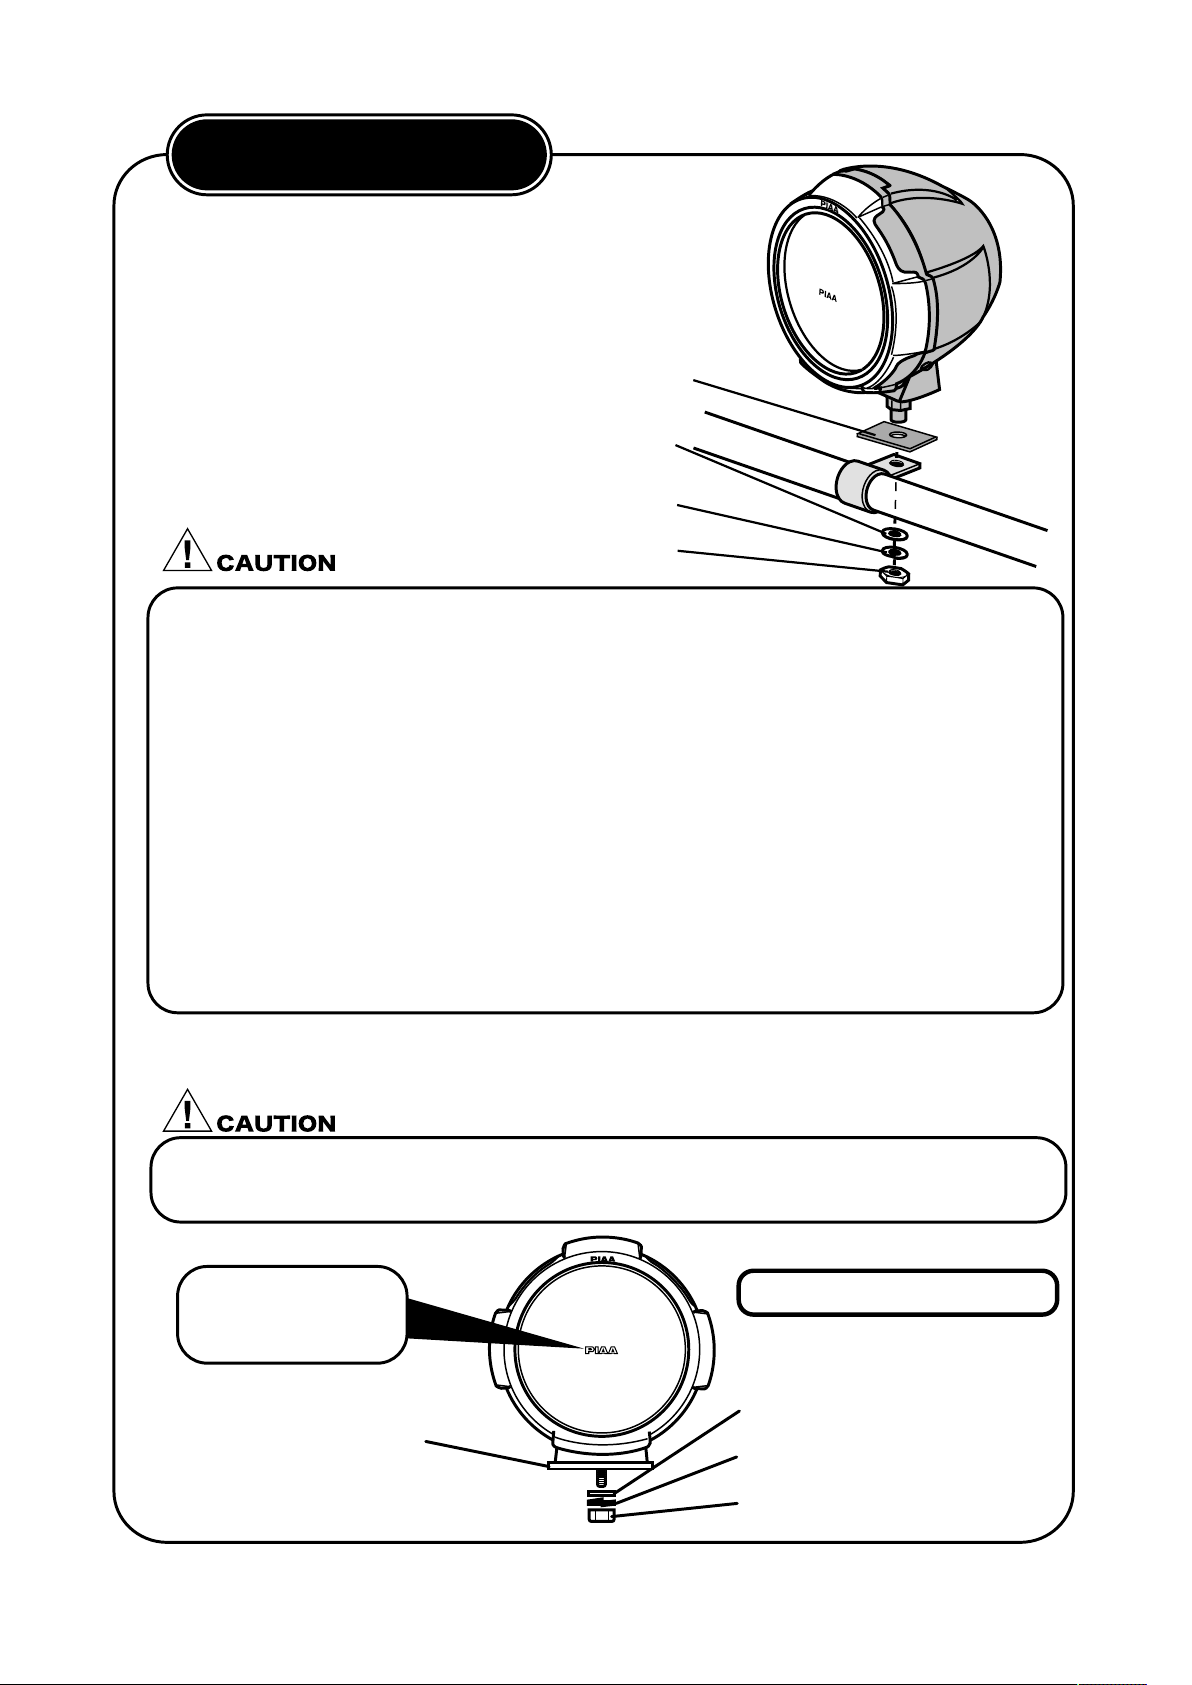
(1) For lamp installation, a hole with a diameter
of 14mm is required. Make necessary
preparation such as installation of lamp bracket.
(2) Using the Rubber cushion, flat washer, spring washer and nut install the lamp
to the car ensuring the PIAA logo reads right side up for proper mounting/draining.
• When using a commercially supplied lamp bracket, before removing the bolt
that is already installed on the car body, make sure that it is safe to do so.
• The lamp should be mounted in an area sufficient to support its size and weight.
Failure to do so may result in excess vibration leading to shorter bulb life and or
physical damage to the lamp or your vehicle.
• Do not attempt to install the lamp directly to any plastic part of the car body
.
If the lamp needs to be installed on the plastic reinforcement materials should be
placed on both sides of the plastic part.
• When installing, make sure the lamp body, lens and rim are not touching th
e
bumper and other plastic parts. Such plastic parts might deform.
• The lamp installation surface should be flat.
Flat washer
Spring washer
Nu
t
• The lamp should be tightened to the degree that the lamp body cannot be
moved by hand.
Orientation of logo
Tightening torque : 30N-m
Flat washer
Spring washer
Nu
t
Rubber cushion
Rubber cushion
Page 4
HARNESS
INSTALLATION
When connecting the wires on the harness, follow the
wiring diagram and the sequence below.
Before connecting any wires disconnect the negative (-) battery terminal.
Note: When running the wires through the engine compartment be sure to
Note: Holding the cord securely with pliers make sure the one-touch
connector is properly closed.
keep them securely away from moving parts such as the fan and the
throttle cable and away from hot parts such as the exhaust manifold.
Pull the connector for the relay harness switch into the car and connect to the
switch harness.
Identify the best location for the switch then attach the switch to the vehicle
using the double-sided adhesive tape (included).
As shown, fix the relay unit with the hexagonal bolt and the hexagonal nut so
that the cord comes to the bottom side.
Connect the switch power wire (white w/ red stripes) to your power source with
the supplied splicing connector.
Connect the lights to the wiring harness at this time.
Ground the (-) cord on the body side.
Connect the (+) cord (white) and the battery (+) terminal, and the black
(-) ground wire to the negative terminal of the battery.
Connect the (-) power cord (black) and the battery (-) terminal to the battery.
Use the harness band (included with P.N.34088) to fix the relay harness to the
car body side harness so that it will not come in contact with any movable
engine and or high temperature parts.
3.
10
Page 5

WIRING
DIAGRAM
Switch Power (+)
White with Red Dots
Black Relay Ground (-)
Black Ground (-)
White Main Power (+)
PIAA Supplied Connector
4.
8
9
10
Relay-harnessPN34088(LR-25E)
Page 6

DRIVING LIGHT
AIMIN
G
Typically, driving lights are mounted above the front bumper about 14-30 inches
from the ground to provide extra high beam illumination. Driving lights can be
mounted below the bumper, although they will not be as effective because the
light will hit the ground sooner and reduce the range of the light
.
Visual aim is made with the center of the beam hot spot 1.5 inches below the
lamp center at 25 feet with the lamp facing straight forward. (see below.)
Since the RS800 Halogen shock lamp is a dual filament lamp, you should aim
your lights with the high beams of the lights turned on.
Do not use driving lights into oncoming traffic.
Driving lights should never be the only foreword light source.
Driving lights should only be used with the headlamp high beams.
5.
Page 7
BULB CHANGE METHOD
The customers should not do
the installation work.
6.
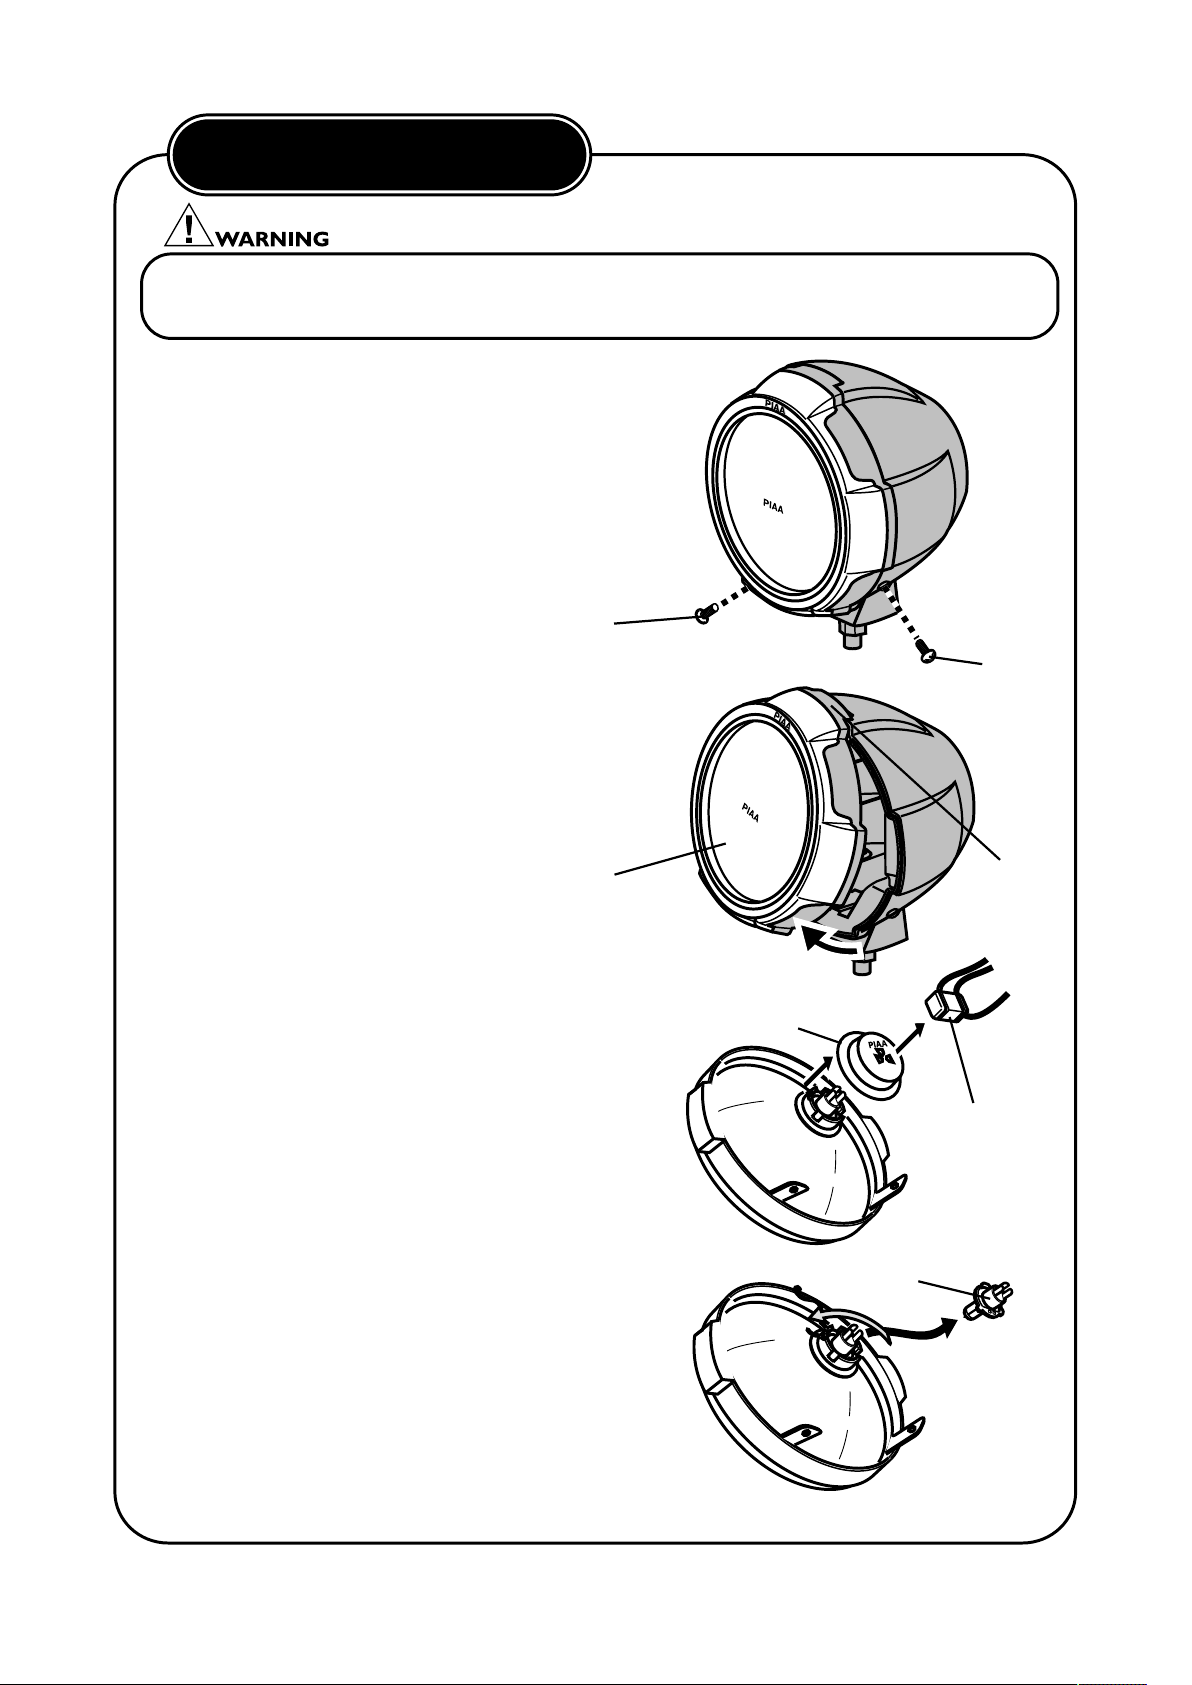
•Never change the bulb when the lamp switch is turned on. Abnormal electric
discharge occurs, and electrification might result. It can be very dangerous.
(1) Remove two screws at the bottom
of the lamp.
screw
Lens unit
Water proofing cap
ceramic
connector
Tab
screw
(2) Raise the lens unit by lifting the bottom
of the lamp. Then, remove the tab at
the top of the lamp.
(4) Release the bulb spring and then
remove the halogen bulb.
(5) Replace the bulb and reassemble the lamp
by following the exact instructions in reverse.
※
Do not directly touch the bulbs while service of the lamps.
(3) Pull the ceramic connector straight
out from the bulb located in the lens unit.
Then remove the water-proof cap.
bulb
Page 8
With the exception of bulbs, PIAA Corporation, USA ("PIAA") warrants its products
to be free from defects in workmanship and materials under normal use for as long
as the original purchaser owns them.
EXCLUSIONS
This Limited Warranty specifically excludes defects resulting from misuse, abuse,
neglect,
alteration, modification, improper installation, unauthorized repairs,
submersion, theft, vehicle crash, or by any other type of impact. Except for the
Limited Warranty stated above, there are no warranties of PIAA products or any
part thereof, whether express or implied. Any implied warranty of merchantability or
any warranty of fitness for a particular purpose is expressly disclaimed. Some states
do not permit the disclaimer of implied warranties.
LENS CRACKS
Crash or impact damage is not covered. This can be determined by a chip or scrape
on the lens or the housing. Stress cracks sometimes occur when the lens is subjected
to sudden and extreme temperature changes. A stress crack has no chip or other
sign of impact. Stress cracks are covered under warranty.
EXCLUSION OF DAMAGES
In no event shall PIAA be liable for any damages whatsoever (including, without
limitation, consequential damages, incidental damages, or damages for loss of use, loss
of business profits, business interruption, loss of business information, loss of time,
inconvenience, or other losses) arising out of the use, misuse, or inability to use a
PIAA product. PIAA reserves the right to change the design its products without any
obligation to modify any previous product. This warranty gives you specific legal
rights. You may also have other rights that vary from state to state.
REPAIR AND REPLACEMENT
If a PIAA product is suspected of being defective, it must be submitted freight
prepaid, to either an authorized dealer or distributor for warranty inspection. The
receipt or other proof of purchase and a description of the problem must be
included. The returned product will be inspected. If the product is found to be
defective an
d covered by this Limited Warranty, the sole remedy is repair or
replacement, at PIAA's option. A repaired or replacement product will be shipped
back at no charge, and will be warranted to be free from defects in workmanship and
materials under normal use for as long as the original purchaser owns it. Removal,
installation, or reinstallation costs are not covered by this Limited Warranty.
PIAA LIMITED
WARRANTY
PIAA CORPORATION, USA
3004 NE 181st Avenue
Portland, Oregon 97230
Telephone: 503.489.6666
Fax: 503.489.6600
Web: www.piaa.com
 Loading...