

Page 1
Thank you very much for purchasing PIAA product.
Please read this entire manual before installation and use of this product.
Installation Instructions
525
Please give this Installation Manual to customer after installing.
For Installers
• Lighting laws vary state to state, check your
local laws before use.
• Do not splash water directly on the hot lamps, as this
may cause cracking of the lens due to dramatic change
in temperature.
• The lamps and relay harness are to be used only with 12 volt automotive
electrical systems.
• Using this light system while the engine is not running will drain the battery.
• Do not repeatedly turn the light system on and off as it will shorten the life
of the system.
• Some automobiles generate high voltage at start up and when it is turned off,
do not have lights on as you start or turn off your vehicle.
• Using the wrong bulbs may cause a malfunction, use only specified PIAA bulbs.
• When changing bulbs or lenses follow the lamp assembly/disassembly diagram.
• Leave at least 1/8” clearance between the lamps and the front spoiler,
as the heat may damage the spoiler.
Page 2
CONTENTS
TOOLS
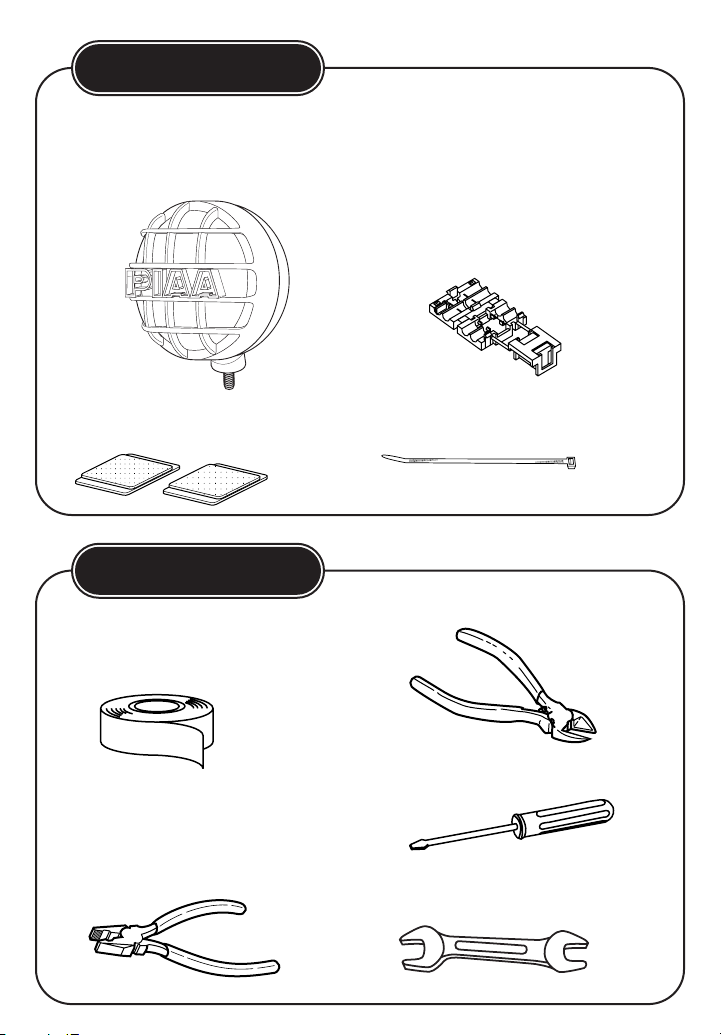
Two (2) PIAA 525
lamps with
black stamped steel housing
and mesh guard.
One (1) piece of Velcro
One (1) PIAA one touch connector
One (1) PIAA preassembled relay
harness with fuse and switch
Five (5) wire ties
Vinyl electrical tape
Diagonal cutters
Flat head screwdriver (medium)
17mm Wrench
Pliers
1.
Page 3
LAMP
INSTALLATION
• The installation area must be clean, and level with enough working space
to do the job without distractions.
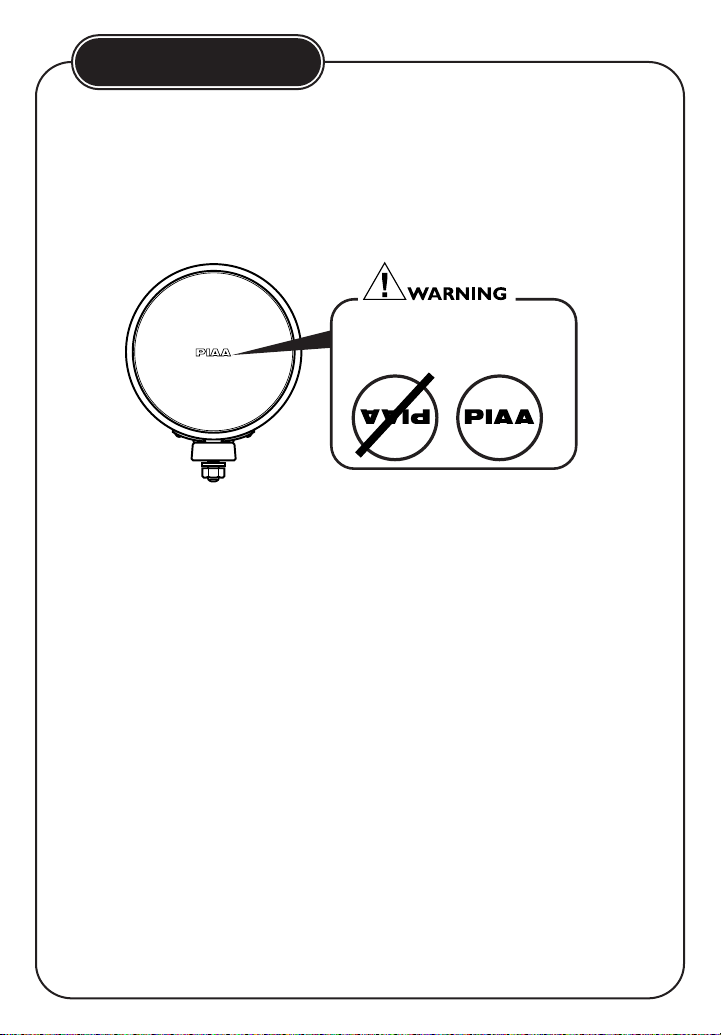
• The PIAA 525 lamps are designed to be mounted upright. It is very important
that you make sure that the “PIAA” etched in the glass reads right side up.
• When mounting the lamps mount them in such a place that they are free
of obstructions.
• Do not modify the lamp system in any way or it will void the warranty.
• Do not mount the lamp system in a place that may obstruct an existing
automotive function.
• Do not mount the lamps in a place that they will come in contact with the
road or curbs.
• When a mounting location is decided upon a 10mm hole will be needed to
mount the lamp via the mounting stud. If a hole is not available one will have
to be drilled.
• When lamp is mounted make sure to leave at least 1/8 inch clearance around
the lamp to avoid heat damage to front spoilers and/or grills.
PIAA logo must read
right side up.
2.
Page 4
HARNESS
INSTALLATION
When connecting the wires on the harness, follow the
wiring diagram and the sequence below.
Before connecting any wires the negative (-) battery terminal should
be disconnected.
When running the wires through the engine compartment be sure to keep them
securely away from moving parts such as the fan and the throttle cable and away
from hot parts such as the exhaust manifold.
For proper lamp operation it is recommended that you connect the positive (+)
and negative (-) power supply wires directly to the corresponding battery
terminals. Do not take power directly from the alternator.
Find a power source to connect the switch power wire to. For legal operation
of driving lights the power source must be one that is only powered when
the high beam of the headlamps is on. To make this connection use the supplied
connector or any connector that is suitable for this application.
Do not connect lights to turn signals or to lights that flash with
an automotive alarm.
Splice the power wire for the marker lights to a source that will give them
the desired function. (i.e. parking lights, headlamp low beams or headlamp
high beams)
Plug harness into lamps.
When the wiring is complete, test the system for operation. Do this by turning
on the system.
If the system works, securely fasten the relay boxes and
fuse holders or tie them out of the way with wire ties. If the system does
not come on, please contact your PIAA dealer for assistance.
Aim lamps according to Light Aiming instructions on page 5.
Tighten all fasteners.
3.
Page 5
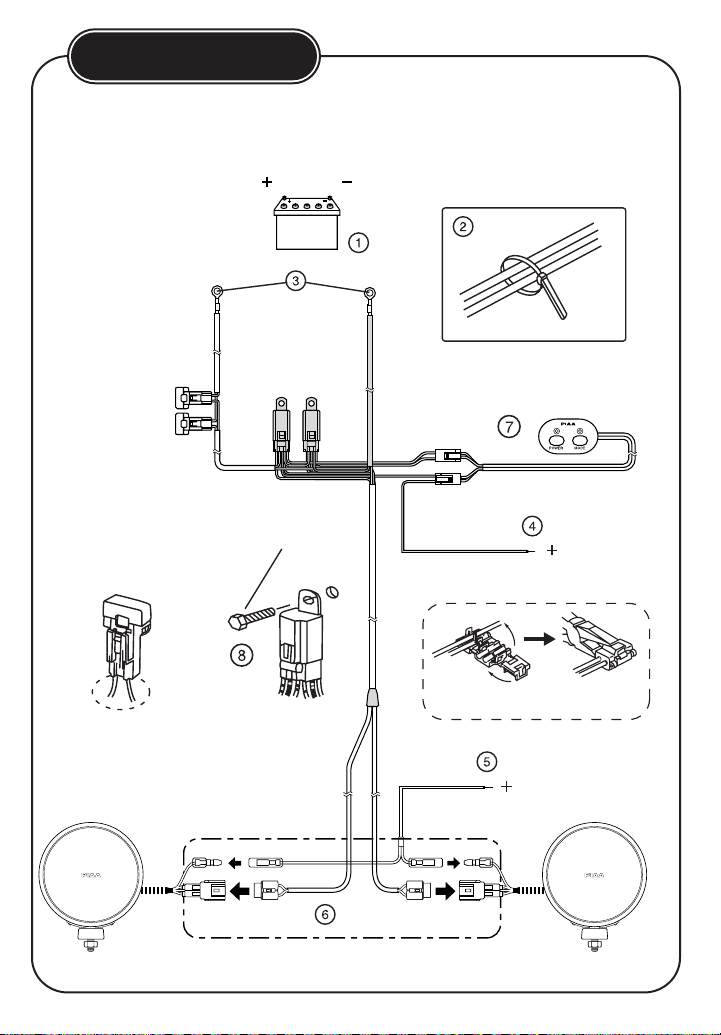
WIRING
DIAGRAM
4.
Battery
PIAA Supplied Connector
White
Main Power (+)
Ground (-)
Black
Switch Power
Marker Lamp Power
Power: red=on / green=off
Mode: red=high / green=low
White With Red Dots
Not Supplied By PIAA
Fasten Fuse Boxes
So Wires Point Down
Page 6
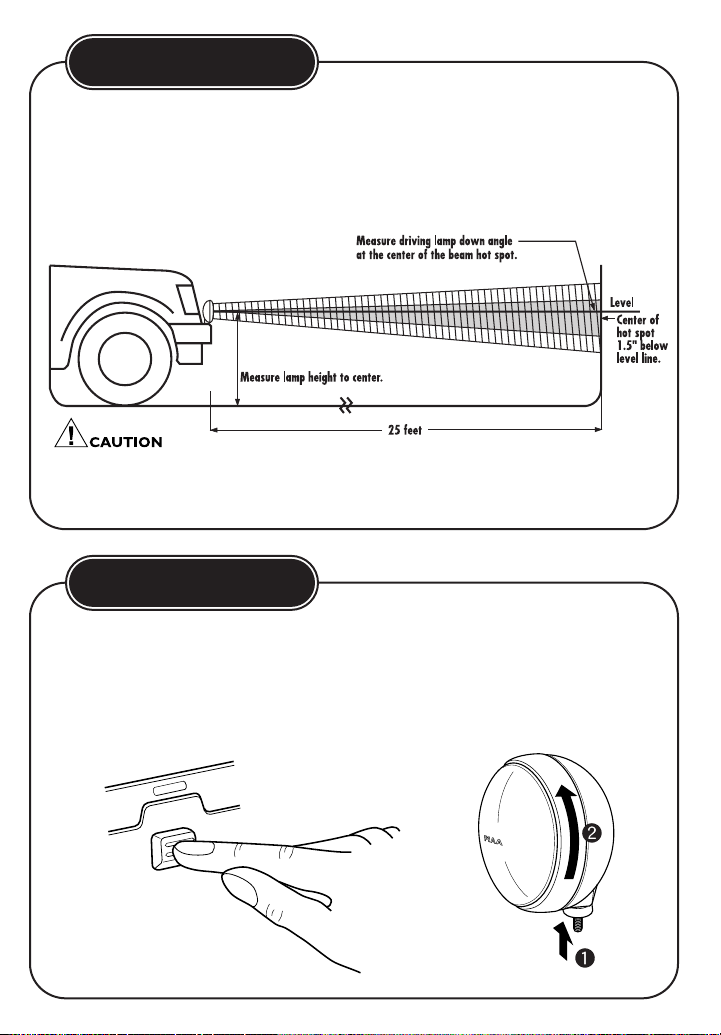
LAMP SERVICE
DRIVING LIGHT
AIMING
To open the 525 lamp press the lens release button
at the bottom of the lamp next to the mounting bolt.
Turn the lens counterclockwise until the arrows line up.
The PIAA 525 lamp comes preassembled and ready to use.
The only reasons to disassemble the lamp is to change the bulb.
Typically, driving lights are mounted above the front bumper about 14-30 inches
from the ground to provide extra high beam illumination. Driving lights can be
mounted below the bumper, although they will not be as effective because the
light will hit the ground sooner and reduce the range of the light.
Visual aim is made with the center of the beam hot spot 1.5 inches below the
lamp center at 25 feet with the lamp facing straight forward. (see below.)
Do not use driving lights into oncoming traffic.
Driving lights should never be the only foreword light source.
Driving lights should only be used with the headlamp high beams.
5.
Page 7
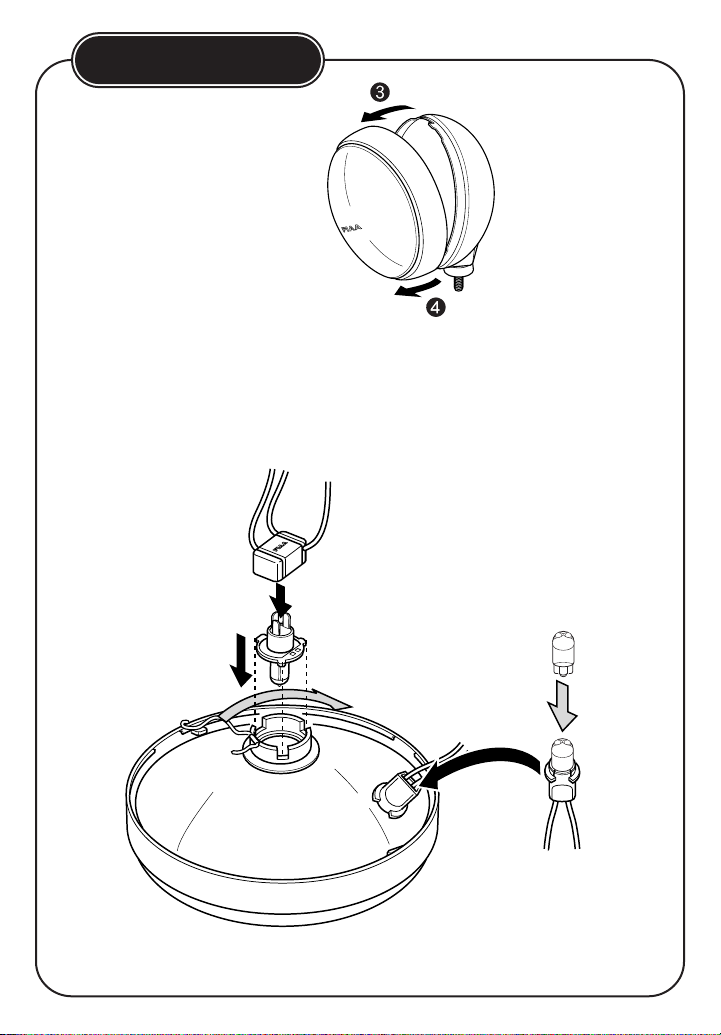
To remove the LED bulbs twist the socket out of the lamp and pull the bulb out
of the socket.
To replace bulbs reverse steps above.
If the bulb is hot from use let it cool before touching or removing it from the lamp.
To remove the main bulb (H4) unplug the socket from the back of the bulb. Release
the wire retainer and pull the bulb out of the lamp. Remember to only touch the
bulb by the metal base, do not touch the glass part of the bulb.
LAMP SERVICE
(CONT'D)
Pull the lens unit from the housing.
6.
Page 8
With the exception of bulbs, PIAA Corporation, USA ("PIAA") warrants its products
to be free from defects in workmanship and materials under normal use for as long
as the original purchaser owns them.
EXCLUSIONS
This Limited Warranty specifically excludes defects resulting from misuse, abuse,
neglect, alteration, modification, improper installation, unauthorized repairs,
submersion, theft, vehicle crash, or by any other type of impact. Except for the
Limited Warranty stated above, there are no warranties of PIAA products or any
part thereof, whether express or implied. Any implied warranty of merchantability or
any warranty of fitness for a particular purpose is expressly disclaimed. Some states
do not permit the disclaimer of implied warranties.
LENS CRACKS
Crash or impact damage is not covered. This can be determined by a chip or scrape
on the lens or the housing. Stress cracks sometimes occur when the lens is subjected
to sudden and extreme temperature changes. A stress crack has no chip or other
sign of impact. Stress cracks are covered under warranty.
EXCLUSION OF DAMAGES
In no event shall PIAA be liable for any damages whatsoever (including, without
limitation, consequential damages, incidental damages, or damages for loss of use, loss
of business profits, business interruption, loss of business information, loss of time,
inconvenience, or other losses) arising out of the use, misuse, or inability to use a
PIAA product. PIAA reserves the right to change the design its products without any
obligation to modify any previous product. This warranty gives you specific legal
rights. You may also have other rights that vary from state to state.
REPAIR AND REPLACEMENT
If a PIAA product is suspected of being defective, it must be submitted freight
prepaid, to either an authorized dealer or distributor for warranty inspection. The
receipt or other proof of purchase and a description of the problem must be
included. The returned product will be inspected. If the product is found to be
defective and covered by this Limited Warranty, the sole remedy is repair or
replacement, at PIAA's option. A repaired or replacement product will be shipped
back at no charge, and will be warranted to be free from defects in workmanship and
materials under normal use for as long as the original purchaser owns it. Removal,
installation, or reinstallation costs are not covered by this Limited Warranty.
PIAA LIMITED
WARRANTY
 Loading...