

Phytec FireWire-CAM-011H, FireWire-CAM-012H, FireWire-CAM-111H, FireWire-CAM-112H User Manual

FireWire-CAM-011H
FireWire-CAM-012H
FireWire-CAM-111H
FireWire-CAM-112H
Manual
Edition May 2006
A product of a PHYTEC Technology Holding company

FireWire-CAM-011H/-012H
In this manual are descriptions for copyrighted products that are not explicitly
indicated as such. The absence of the trademark (™) and copyright (©) symbols
does not imply that a product is not protected. Additionally, registered patents and
trademarks are similarly not expressly indicated in this manual.
The information in this document has been carefully checked and is believed to be
entirely reliable. However, PHYTEC Messtechnik GmbH assumes no
responsibility for any inaccuracies. PHYTEC Messtechnik GmbH neither gives
any guarantee nor accepts any liability whatsoever for consequential damages
resulting from the use of this manual or its associated product. PHYTEC
Messtechnik GmbH reserves the right to alter the information contained herein
without prior notification and accepts no responsibility for any damages which
might result.
Additionally, PHYTEC Messtechnik GmbH offers no guarantee nor accepts any
liability for damages arising from the improper usage or improper installation of
the hardware or software. PHYTEC Messtechnik GmbH further reserves the right
to alter the layout and/or design of the hardware without prior notification and
accepts no liability for doing so.
© Copyright 2006 PHYTEC Messtechnik GmbH, D-55129 Mainz.
Rights - including those of translation, reprint, broadcast, photomechanical or
similar reproduction and storage or processing in computer systems, in whole or
in part - are reserved. No reproduction may occur without the express written
consent from PHYTEC Messtechnik GmbH.
For further information:
EUROPE NORTH AMERICA
Address:
Ordering
Information:
Technical
Support:
Fax: +49 (6131) 9221-33 1 (206) 780-9135
Web Site: http://www.phytec.de http://www.phytec.com
PHYTEC Technologie Holding AG
Robert-Koch-Str. 39
D-55129 Mainz
GERMANY
+49 (800) 0749832
order@phytec.de
+49 (6131) 9221-31
support@phytec.de
PHYTEC America LLC
203 Parfitt Way SW, Suite G100
Bainbridge Island, WA 98110
USA
1 (800) 278-9913
sales@phytec.com
1 (800) 278-9913
support@phytec.com
1st Edition May 2006
© PHYTEC Messtechnik GmbH 2006 L-680e_1

Table of Contents
Table of Contents
1 Delivery Contents................................................................................1
1.1 Accessories................................................................................... 1
1.2 What you Need for the Initial Start-Up........................................ 3
1.3 Features or the FireWire-CAM-011H / 012H.............................. 5
1.4 Features of the FireWire-CAM-111H / 112H.............................. 5
1.5 Important Notes............................................................................ 6
1.6 Declaration of Conformity ........................................................... 7
1.7 Overview of Connectors and Settings..........................................8
1.7.1 Connectors....................................................................... 8
1.7.2 Settings............................................................................ 9
2 First Steps ..........................................................................................11
2.1 Hardware-Installation on a Standard PC....................................11
2.1.1 Der FireWire Connection.............................................. 11
2.1.2 Installation of a FireWire Interface Card (PC).............. 14
2.2 Laptop Installation...................................................................... 16
2.2.1 The FireWire Connection.............................................. 16
2.2.2 Installation of a FireWire Interface Card (Laptop) .......19
2.3 Installation of the Driver Software.............................................21
2.4 Mounting a Lens......................................................................... 27
2.5 Installation of the Demo Program ..............................................30
2.6 Starting Up the Camera with the Demo Program ......................34
2.6.1 The First Live Image..................................................... 34
2.6.2 Problem Solving............................................................36
2.6.3 Adjusting Camera Settings............................................ 37
3 The Camera in Detail........................................................................43
3.1 Camera Connections ..................................................................43
3.1.1 IEEE 1394 Interface...................................................... 43
3.1.2 External Triggering, FCAM-111H /112H Only ...........43
3.2 Connecting the Lens...................................................................45
3.3 Mechanical Attachment.............................................................. 48
3.4 Camera Settings.......................................................................... 50
3.4.1 Camera Settings: Standards........................................... 50
3.4.2 Camera Settings in Detail.............................................. 50
3.5 The Spectral Behavior................................................................ 54
3.5.1 FireWire-CAM-011H / -111H (monochromatic) .........54
3.5.2 FireWire-CAM-012H / -112H (Color) .........................55
3.6 How to Maximize Image Quality...............................................59
3.6.1 Lens ............................................................................... 59
3.6.2 Lighting ......................................................................... 59
3.6.3 Camera Setup ................................................................ 65
© PHYTEC Meßtechnik GmbH 2006 L-680e_1

FireWire-CAM-011H/-012H
4 The Software Concept......................................................................71
4.1 Layers Standards of the FireWire-CAM Series ......................... 71
4.2 Accessing the Camera Driver .................................................... 73
4.3 Working with the Filter Graph Editor........................................ 74
4.3.1 How to Get the Filter Graph Editor .............................. 74
4.3.2 Working with the Filter Graph Editor........................... 74
4.3.3 How the Camera Appears in the Filter Graph Editor ... 75
5 Technical Data...................................................................................77
6 Dimensions......................................................................................... 79
4 © PHYTEC Messtechnik GmbH 2006 L-680e_1

Table of Contents
Table of Figures
Figure 1: FireWire Connecting Cable 6-Pin/6-Pin Type........................... 1
Figure 2: FireWire Connecting Cable 6-Pin/4-Pin/Power Type ...............2
Figure 3: Components of a FireWire System ............................................ 3
Figure 4: VCAM-011H and VCAM-012H ............................................... 8
Figure 5: VCAM-111H and VCAM-112H ............................................... 8
Figure 6: 6-Pin FireWire Socket.............................................................. 11
Figure 7: FireWire and i.LINK Logos..................................................... 12
Figure 8: FireWire Connecting Cable 6-Pin/6-Pin Type......................... 12
Figure 9: Insertion of the Card into the PCI Slot..................................... 15
Figure 10: 4-Pin FireWire Socket.............................................................. 16
Figure 11: FireWire and i.LINK logos ......................................................16
Figure 12: FireWire Connecting Cable 6-Pin/4-Pin Type......................... 17
Figure 13: Power Connections: 6-pin/4-pin+power type ..........................19
Figure 14: Power Connection: PC-110 Card............................................. 21
Figure 15: Title Menu of the „Vision Tools“ CD...................................... 22
Figure 16: Installation Menu for the FireWire Camera............................. 23
Figure 17: Driver Installation, Step 1 ........................................................ 24
Figure 18: Driver Installation, Step 2 ........................................................ 25
Figure 19: Driver Installation, Compatibility Warning............................. 25
Figure 20: Driver Installation, Step 3 ........................................................ 26
Figure 21: Lens Assembly (C-Mount)....................................................... 27
Figure 22: Flange Back Distances and Mounting of C-Mount (Top) /
CS-Mount (Bottom) Lenses .....................................................
28
Figure 23: Title Menu of the‚ Vision Tools‘ CD....................................... 31
Figure 24: Installation Menu for the FireWire Cameras ...........................31
Figure 25: Demo Installation, Step 1......................................................... 32
Figure 26: License Agreement, Step 2 ......................................................32
Figure 27: License Key, Step 3.................................................................. 33
Figure 28: Installation Completed, Step 4 ................................................. 33
Figure 29: The Program „PHYTEC Vision Demo“ .................................. 34
© PHYTEC Meßtechnik GmbH 2006 L-680e_1

FireWire-CAM-011H/-012H
Figure 30: PHYTEC Vision Demo – Select Device ................................. 35
Figure 31: PHYTEC Vision Demo – Live View Function Activated....... 35
Figure 32: Camera Setting „Device Settings“........................................... 38
Figure 33: Camera Setting „Properties Exposure“.................................... 39
Figure 34: Camera Setting „Properties Image“......................................... 40
Figure 35: Camera Setting „Properties Color“.......................................... 40
Figure 36: Camera Setting „Properties Device“........................................ 41
Figure 37: Further possible Settings of the PHYTEC-Vision-Demo........ 41
Figure 38: Connections FCAM-111H and FCAM-112H ......................... 43
Figure 39: Mounting Plate......................................................................... 48
Figure 40: Attachment of the Mounting Plate........................................... 49
Figure 41: Mounting Options of the FireWire-CAM................................ 49
Figure 42: Spectral Response (FireWire-CAM-x11H) ............................. 54
Figure 43: Bayer Pattern Filter (Colour Sensor) ....................................... 56
Figure 44: Spectral Filter Characteristics
(FireWire-CAM-012H / -112H) ..............................................
57
Figure 45: FireWire-CAM-012H / -112H : UR Rejection Filter .............. 58
Figure 46: PHYTEC Ring Light Order No.: VZ-001-x, VZ-002-x .......... 60
Figure 47: Light-Field- (Left) and Dark-Field-Lighting (Right) .............. 61
Figure 48: The Shadow Projection............................................................ 62
Figure 49: The Structured Light................................................................ 63
Figure 50: The Silhouette Projection......................................................... 64
Figure 51: Transillumination..................................................................... 65
Figure 52: Dimensions .............................................................................. 79
6 © PHYTEC Messtechnik GmbH 2006 L-680e_1

Delivery Contents
1 Delivery Contents
The standard scope of supply includes the following components:
• the camera
• a C/CS-mount adapter
• a tripod adapter (bolted together with the camera)
• the software-CD SO-221
• this manual
1.1 Accessories
For the operation of the camera you normally need some additional
components.
You can obtain following material designed to be compatible with the
camera from PHYTEC:
Figure 1: FireWire Connecting Cable 6-Pin/6-Pin Type
• FireWire Connecting Cable (6-pin/6-pin type), 1.8 m
Order number WK096-1.8
• FireWire Connecting Cable (6-pin/6-pin type), 3.0 m
Order number WK096-3.0
• FireWire Connecting Cable (6-pin/6-pin type), 4.5 m
Order number WK096-4.5
© PHYTEC Messtechnik GmbH 2006 L-680e_1
1

FireWire-CAM-011H/-012H
Figure 2: FireWire Connecting Cable 6-Pin/4-Pin/Power Type
• FireWire Connecting Cable (6-Pin/4-Pin/Power Type), 2 m
Order number. WK113-2.0
Hint:
• The FireWire cables with a 4-pole plug are usually needed for
connecting the camera to a laptop.
The 4-pin FireWire connection does not provide supply voltage.
When using such a cable you need a separate mains adapter for the
power supply.
• Please note that the full data rate is specified for a cable length of
up to 4.5 m. The usage of longer cables is possible but the data rate
will be reduced according to the bus specifications. This means
that you possibly cannot use the full image resolution or framerate.
• AC-adapter 12 V / 600 mA for separate power supply
Order code SV001 (suitable for 230 V 50 Hz AC mains voltage
only)
• Video lenses:
In our product range we keep a variety of high-quality lenses for
several purposes. We will gladly assist you in choosing an
adequate lens.
• Additional accessories:
Depending on your application you may need further components.
We are happy to assist you in case any questions should occur.
2 © PHYTEC Messtechnik GmbH 2006 L-680e_1

Delivery Contents
1.2 What you Need for the Initial Start-Up
For the initial basic start-up you usually need some further
components besides the FireWire-CAM itself.
These are partially dependent on the computer with which you use the
camera. In
accessories:
Figure 3 you get a first overview of the appropriate
Figure 3: Components of a FireWire System
© PHYTEC Messtechnik GmbH 2006 L-680e_1
3

FireWire-CAM-011H/-012H
A C- or CS-Mount lens. Please note however that the high quality
of digital cameras should not be reduced by using lenses of low
quality (see section
3.6, “How to Maximize Image Quality”).
PHYTEC provides a wide range of compatible high-quality lenses.
A PHYTEC FireWire camera.
In case the IEEE 1394 bus does not provide supply voltage (which
is common to almost all laptop solutions), you will need an extra
mains adapter (e.g. the SV001, see above). You can use a stabilised
quality-mains adapter of your choice alternatively if it provides 8
to 30 VDC and 500 mA. Please read section
1.5,“Important
Notes"
A cable for the connection between camera and IEEE 1394 bus.
This will usually be the IEEE 1394 interface (host controller) of
your computer. PHYTEC provides several IEEE 1394 cables. You
can use any other cable alternatively if they comply with the IEEE
1394 standard. Please read section
1.5,,“Important Notes"
A computer (PC, laptop) that meets the following requirements
Caution!
The host computer has to meet following requirements:
• 1394 interface, compatible with the standards IEEE 1394-1995 and
IEEE 1394a (OHCI), 400 MBit/s
• processor: Pentium II, 300 MHz or higher
recommended: Pentium II, 500 MHz, 128 MB RAM or higher
for “FireWire-SDK”: PIII, 800 MHz or higher
• Graphics adaptor with 24 or 32-bit colour depth
• Operating system: Windows 2000/SP2 or Windows XP
• DirectX 8.1 or higher
Note:
In case you purchased a Starter-Kit, most components needed are
already contained.
Please compare the contents of your kit with the list of required
components first.
4 © PHYTEC Messtechnik GmbH 2006 L-680e_1

Delivery Contents
1.3 Features or the FireWire-CAM-011H / 012H
Both FireWire cameras feature following attributes:
• 1/3" progressive-scan CCD
• 1024 x 768 pixel
• up to 30 images/s
• IEEE 1394a interface
• DCAM 1.31 protocol
• WDM Stream Class driver included
• PHYTEC-FireWire SDK included
• connection for C-/CS-Mount lenses (lens not included)
• FireWire-CAM-011H: monochrome model („b/w“)
• FireWire-CAM-012H: color model
Note:
• Find the detailed technical data in section 5.
• In this document and in the application software, the cameras are
sometimes referred to as FCAM-011H resp. FCAM-012H.
1.4 Features of the FireWire-CAM-111H / 112H
Both FireWire cameras are identical with the FireWire-CAM-011H
and 012H. Additionally these cameras have a BNC socket for the feed
of an external trigger signal.
• FireWire-CAM-111H: monochrome model („b/w“)
• FireWire-CAM-112H: color model
© PHYTEC Messtechnik GmbH 2006 L-680e_1
5

FireWire-CAM-011H/-012H
1.5 Important Notes
• We hereby expressly note that, according to the product liability
law, we cannot be made responsible for damages caused by our
devices if they have been used or repaired inappropriately or if, in
case of a component replacement resp. system construction, other
parts than our original components or components approved by us
have been used, and especially if the operating instructions were
not correctly followed.
• Handle the camera with care. Avoid hard shocks, concussions, etc.
The camera can be damaged by incorrect handling and wrong
storage.
• Do not try to disassemble the camera. To avoid electric shocks, do
not remove neither screws nor the case. There are no components
in the camera that need user maintenance. Maintenance work may
only be carried out by qualified maintenance personnel.
• Never use strong or abrasive detergents (e. g. alcohol, benzene or
turpentine) to clean the case of the camera. Wipe the case with a
soft cloth slithtly moistened with a neutral cleanser.
• Never expose the camera to humidity, dust or dirt. This camera is
intended for indoor use only. Humidity can damage the camera and
cause the risk of electric shock.
• Never point the camera towards the sun or very bright objects.
Otherwise this may lead to blooming and smear.
• Keep the camera shut or mount a lens to avoid getting dust on the
CCD chip.
6 © PHYTEC Messtechnik GmbH 2006 L-680e_1

Delivery Contents
• Clean the CCD front panel carefully. Never use strong of abrasive
detergents for the cleaning of the CCD front panel.
• Only use the original cable and power supply intended for the
camera. The warranty expires if other cables or power supplies are
used.
• If you would like to use the camera with another power supply,
please note that it may only be used with a low voltage of +8 to
+40 V DC (direct current). Connecting it directly to mains voltage
(e.g. 230 V AC) is a danger to life!
• The mains adapter provided with the camera (depending on supply
option) should not be used with other devices.
1.6 Declaration of Conformity
The cameras FireWire-CAM-011H, FireWire-CAM-012H, FireWireCAM-111H and FireWire-CAM-112H meet the EC directive
89/336/EEC for a digital device of class B. They have been tested and
thus conform to EN55024/CISPR22 and EN55024/CISPR24.
To conform to EU standards, shielded cables have to be used to
connect other devices to the camera. The cameras have been tested in
a typical environment complying with class B. It is therefore assumed
that the cameras will also be functioning in other environments
complying with class B.
© PHYTEC Messtechnik GmbH 2006 L-680e_1
7
FireWire-CAM-011H/-012H
1.7 Overview of Connectors and Settings
1.7.1 Connectors
Usually you only need the IEEE 1394 bus for connecting the camera.
That bus transmitts the video data, the control data and the supply
voltage for the camera.
In case the IEEE 1394 bus does not provide supply voltage, you will
need the possibility to feed supply voltage into the cable.
Figure 4: VCAM-011H and VCAM-012H
Additionally to the VCAM-011H and VCAM-012H the VCAM-111H
and VCAM-112H are equipped with a BNC socket for the connection
to an external trigger signal.
Figure 5: VCAM-111H and VCAM-112H
8 © PHYTEC Messtechnik GmbH 2006 L-680e_1

Delivery Contents
1.7.2 Settings
All parameters of the camera are adjustable via the IEEE 1394 bus.
The camera is delivered with a sample application (requires Windows
2000/SP2, XP or higher and DirectX 8.1 or higher), that allows for the
acquisition of images and streams of images and the adjustment of the
basic parameters (see section
2.6)
It is, of course, possible to adjust the camera parameters independently
from this program. For this purpose, PHYTEC offers a WDM Stream
Class driver (see section
4) which allows the parameters to be set with
every image processing software compatible to DirectX 8 or higher.
Alternatively the PHYTEC-SDK (DirectX wrapper) can be used. It
allows for a very convenient access to all features of the
FireWire-CAMs without the programmer having to become
acquainted with the complexity of DirectX.The SDK includes
connections to several programming interfaces:
- .NET Komponenten: for MS Visual Basic .NET and C# .NET
- ActiveX Control: for Microsoft Visual Basic 6
- C++ Class Libary: Microsoft Visual C++ 6 and Visual C++ .NET
For each of these interfaces the SDK provides all binaries, headers and
libraries needed, a detailed help as well as sample projects and demo
programs with source codes.
You will find an overview dealing with the programming in section
The Software Concept“. The complete specifications for the features
„
4
you will find in the help files dealing with the respective programming
environments on the „Vision-Tools“-CD, SO-221.
An outline of standardised dialogues is available in section
details on these parameters you will find in section
3.4.
2.6.3,
© PHYTEC Messtechnik GmbH 2006 L-680e_1
9

FireWire-CAM-011H/-012H
10 © PHYTEC Messtechnik GmbH 2006 L-680e_1

First Steps
2 First Steps
This chapter explains how to connect the FireWire camera to your
computer and how to install the software needed for the first image
acquisitions.
The individual sections discuss the proceedure for different hardware
constellations.
Please check which hardware version you are using and read on in the
corresponding section:
Section
Section
Section
variants.
2.1: Installation of the camera on a standard desktop-PC
2.2: Installation of the camera on a laptop
2.3 describes the installation of the software for all hardware
2.1 Hardware-Installation on a Standard PC
2.1.1 Der FireWire Connection
Check first if your computer is already equipped with a FireWire
interface.
You will usually find a 6-pole FireWire socket on your PC (
Figure 6: 6-Pin FireWire Socket
Figure 6).
© PHYTEC Messtechnik GmbH 2006 L-680e_1
11

FireWire-CAM-011H/-012H
You will be able to identify this socket by the FireWire logo
(
Figure 7):
Figure 7: FireWire and i.LINK Logos
Note:
The FireWire interface sometimes is also called i.LINK or
IEEE-1394.
All signals and the supply voltage necessary for operating the camera
are usually available on this socket.
Therefore only one single cable is necessary for the camera.
This cable has to feature a 6-pin plug on each end (
Figure 8):
Figure 8: FireWire Connecting Cable 6-Pin/6-Pin Type
Depending on the desired length of the cable, you can use one of these
FireWire cables for the connection:
12 © PHYTEC Messtechnik GmbH 2006 L-680e_1

First Steps
• FireWire connecting cable (6-pin/6-pin type), 1.8 m
Order number WK096-1.8
• FireWire connecting cable (6-pin/6-pin type), 3.0 m
Order number WK096-3.0
• FireWire connecting cable (6-pin/6-pin type), 4.5 m
Order number WK096-4.5
Hints:
• In case your PC should not have a FireWire interface, you would
first have to install a FireWire interface card to be able to use the
camera. Refer to section 2.1.2.
• In case your PC should have a smaller 4-pin FireWire socket,
please proceed as explained in section 2.2“Laptop Installation”. If
your computer features both types of sockets, we recommend the
connection on the 6-pin socket.
• Please note that the full data rate is specified only for a cable
length of up to 4.5 m. The use of longer cables is possible but the
data rate will be reduced according to the bus specification. This
means that you possibly will not be able to use the full image
resolution or framerate.
The FireWire interface is „hot-plug“-capable. This means that you can
connect and disconnect the camera without having to shut down your
computer. Please mind however to close all programs that access the
camera to avoid data loss.
To put the camera into operation, simply plug one end of the FireWire
cable into the socket „In“ on the back of the camera and the other end
into the 6-pin FireWire socket of your computer.
Further connections are not required.
Caution!
You will have to install the respective driver software on your PC
prior to the initial operation. Without the installation of the driver, the
camera will not function at all or merely in a limited way.
Please read section 2.3 how to install the driver.
© PHYTEC Messtechnik GmbH 2006 L-680e_1
13

FireWire-CAM-011H/-012H
2.1.2 Installation of a FireWire Interface Card (PC)
This step is necessary if your computer is not yet equipped with a
FireWire interface.
In this case you require an additional PCI card with FireWire
interfaces. Below we describe the installation of the PHYTEC
FireWire card, ordering number PC-109.
Depending on the option of order, this card may already be included
as part of your kit’s delivery contents.
Caution!
For this step the computer has to be disconnected from the mains
voltage supply. It is important that you are absolutely certain that the
device is not receiving voltage from any source.
Be aware that if this is not the case, parts of the device can carry
voltages at levels that could cause electrocution.
• Remove the PC housing (usually screwed).
• Choose a free PCI slot (usually the white, short parallel slots on the
motherboard).
• Remove the slot bracket from the PC case (unscrew or break it off
if necessary).
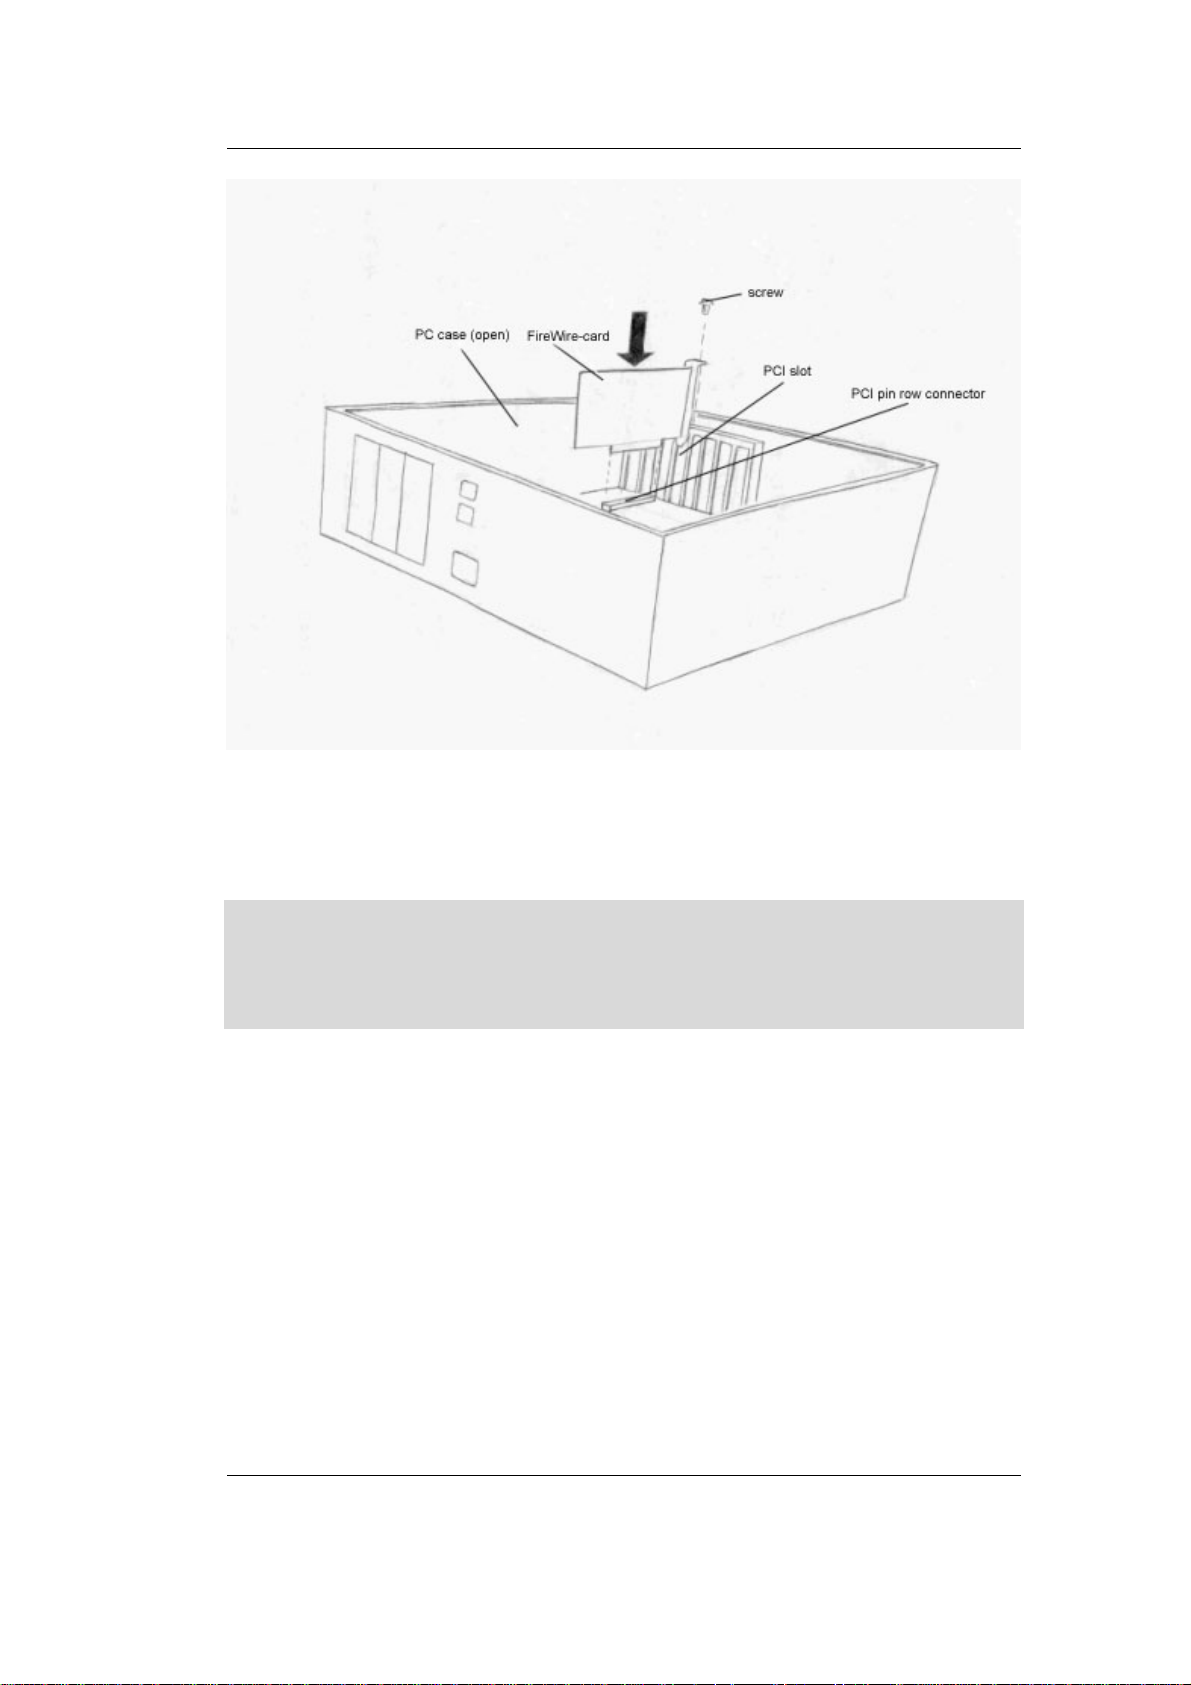
• Carefully insert the FireWire interface card PC-109 into the slot (as
depicted in
Figure 9) with the slot bracket towards the outside. The
card should lock firmly.
• Do not push the card into the slot with force, motherboard or card
could be damaged!
• Mind that the card's golden contact stripes match the contact
springs of the slot.
14 © PHYTEC Messtechnik GmbH 2006 L-680e_1
First Steps
Figure 9: Insertion of the Card into the PCI Slot
• Make sure that the card is straight and that no neighboring contacts
have been short circuited.
Attention!
Fix the card with a screw to the case for reasons of stability and to
ensure that the card has a safe bonding to the computer case (see
Figure 9).
• Close the computer’s housing.
• Reconnect the mains supply.
• Do not yet connect the camera with the FireWire socket of the
interface card.
• Now start the computer. Windows XP / Windows 2000
automatically identifies the newly installed interface card. Since
the software drivers are already included in the operating system,
you usually will not need an installation CD.
© PHYTEC Messtechnik GmbH 2006 L-680e_1
15
FireWire-CAM-011H/-012H
2.2 Laptop Installation
2.2.1 The FireWire Connection
Check first if your computer is already equipped with a FireWire
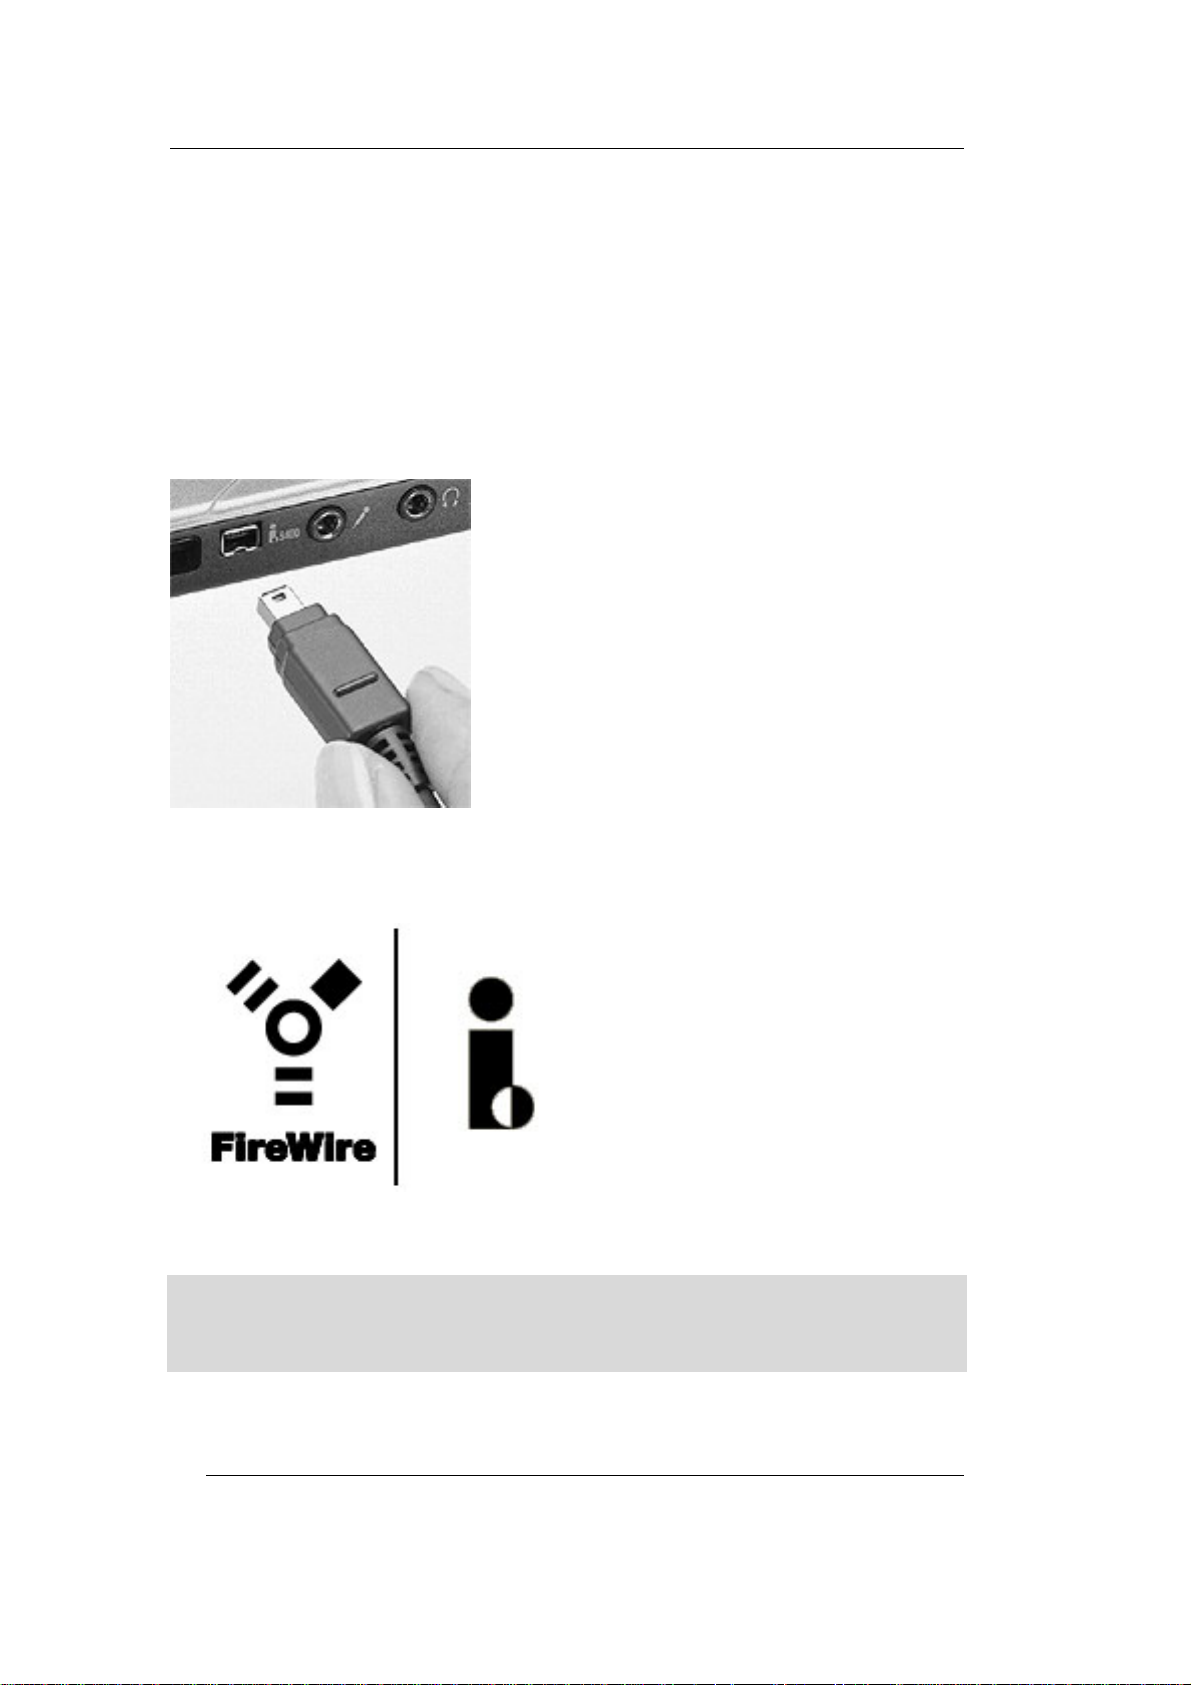
interface.
A laptop usually is provided with a 4-pin FireWire socket (
Figure 10).
Figure 10: 4-Pin FireWire Socket
You will also recognize this socket by the FireWire logo (
Figure 11):
Figure 11: FireWire and i.LINK logos
Note:
The FireWire interface sometimes is also called i.LINK or
IEEE-1394.
16 © PHYTEC Messtechnik GmbH 2006 L-680e_1

First Steps
The 4-pin socket – other than the 6-pin socket – transmits data signals
but no supply voltage for the camera. Therefore a separate power
supply is required to provide the camera with electricity.
This cable has to feature a 6-pin plug on one end and a 4-pin plug on
the other (
Figure 12):
Figure 12: FireWire Connecting Cable 6-Pin/4-Pin Type
In case your device only has a 4-pin socket, you can use the following
FireWire cable for the connection:
• FireWire connecting cable (6-pin/4-pin+Power type), 2 m
order number WK113-2.0
© PHYTEC Messtechnik GmbH 2006 L-680e_1
17

FireWire-CAM-011H/-012H
Hints:
• In case your PC should not have a FireWire interface, you would
first have to install a FireWire interface card to be able to use the
camera. Most laptops offer the possibility to insert an additional
card in form of a “PC-card” (resp. „PCMCIA“ card). Please read
section 2.2.2 on this.
• If your laptop is equipped with a 6-pole FireWire socket, proceed
as described in section 2.1“Hardware-Installation on a Standard
PC“. Check the manual if your laptop supplies voltage via this
socket. Otherwise an additional mains adapter for the camera is
required.
• Please note that the full data rate is specified only for a cable
length of up to 4.5 m. The use of longer cables is possible but the
data rate will be reduced according to the bus specification. This
means that you possibly will not be able to use the full image
resolution or frame rate.
The FireWire interface is „hot-plug“-capable. This means that you can
connect and disconnect the camera without having to shut your
computer down. Please mind however to close all programs that
access the camera to avoid data loss.
To connect the camera, please proceed as follows:
• First supply the camera with power. For this you can use a
stabilised quality mains adapter of your choice in case it provides 8
to 40 VDC (direct current) and 500 mA. We recommend the use of
the PHYTEC mains adapter SV001 (for 230V 50Hz mains voltage
only). Depending on the option of order, this adapter may already
be included in your kit contents.
• Check the voltage setting of the adapter and select the appropriate
low voltage connector (5.5 mm outer diameter). When connecting
be sure that the polarity is correct! (minus outside, plus inside).
Connect the adapter to the power socket of the connecting cable
WK-113-2.0 (
Figure 13).
18 © PHYTEC Messtechnik GmbH 2006 L-680e_1

First Steps
Figure 13: Power Connections: 6-pin/4-pin+power type
• You can now establish the FireWire connection. To do this insert
the cables 6-pin plug into the „In“ socket on the back of the camera
and the 4-pin plug into the FireWire socket on your computer.
Caution!
Before initial start up you will first need to install the corresponding
software on your PC. Without the driver the camera will function in a
limited capacity or not at all. Refer to section 2.3 for installation of the
driver.
2.2.2 Installation of a FireWire Interface Card (Laptop)
This step is only required if your laptop is not equipped with a
FireWire interface.
In this case you will require an interface card for FireWire. In the
following paragraphs we describe the installation of the PHYTEC
FireWire Card, order Nr. PC-110.
Depending on the order option you have, this card may already be
included as part of your kit contents.
The card PC-110 is an add-on card for the PC-Card receptacle socket
(also identified as „Cardbus“). Your laptop must be equipped with a
socket of this type.
Please note the additional system requirements are listed in the card
manual.
© PHYTEC Messtechnik GmbH 2006 L-680e_1
19

FireWire-CAM-011H/-012H
The interface card is „hot-plug“-capable. You can therefore insert it
into the cardbus receptacle socket of your laptop while it is turned on.
With Windows 2000/Windows XP the card is automatically
recognized and installed.
In general no installation CD is required, since the software drivers are
already present in the operating system.
The FireWire card is equipped with 6-pin FireWire sockets.
Depending on the desired cable length, one of the following FireWire
cables can be used to establish a connection:
• FireWire Connector Cable (6-pin/6-pin Type), 1.8 m
order Nr. WK096-1.8
• FireWire Connector Cable (6-pin/6-pin type), 3.0 m
order Nr. WK096-3.0
• FireWire Connector Cable (6-pin/6-pin Type), 4.5 m
order Nr. WK096-4.5
Caution!
Although the interface card has 6-pin sockets, the laptop will
generally not provide a power supply for the camera. Therefore you
will have to use an external power adapter for the camera.
To connect the camera proceed as described below:
• First connect the camera’s power supply. You can use a high-
quality stabilized adapter of your choice, as long as it delivers 8 to
30 VDC (Direct Current) and 500 mA. We recommend that you
use the PHYTEC adapter SV001. Depending on the kit option you
have, this adapter may already be included on delivery.
Check the voltage settings of the adapter and select the appropriate
low voltage plug (5.5 mm outer diameter). When connecting be
sure that the polarity is correct (negative terminal, positive
terminal)
Plug the adapter into the power socket of the PCMCIA-FireWire
adapter PC-110 (
Figure 14: Power Connection: PC-110 Card).
20 © PHYTEC Messtechnik GmbH 2006 L-680e_1

First Steps
Figure 14: Power Connection: PC-110 Card
• You can now establish the FireWire connection. Insert one end of
the FireWire cable in the socket „In“ on the back of the camera and
the other side in the 6-pin FireWire socket on the interface card.
Caution!
Upon initial start up you have to install the corresponding driver
software on the PC. Without installing the driver, the camera will
function in a limited capacity or not at all. Refer to section 2.3 for
driver installation.
2.3 Installation of the Driver Software
The appropriate software device driver has to be installed so that the
camera can be addressed by the application software.
This device can be found on the CD that is included with the camera.
You can also download driver software updates from the PHYTEC
website.
Caution!
Check first to see if your computer meets the following system
requirements for operating the camera:
• Pentium II, 300 MHz or higher and 1394-interface
• Graphic card with 24 or 32-bit color depth
• Windows 2000/SP2 or Windows XP
• DirectX 8.1 or higher
Make sure that your computer is equipped with this software.
© PHYTEC Messtechnik GmbH 2006 L-680e_1
21

FireWire-CAM-011H/-012H
To install the driver software for the FireWire camera, proceed in the
following manner:
Caution!
The DirectX driver must be installed prior to installation of the driver
software for the FireWire camera. Otherwise not all driver functions
will be supported and/or the system may crash.
• Connect the camera to your computer. To install the driver the
camera must be ready for operation. Follow the instructions in the
previous sections for this.
• Insert the CD SO-221 in your computer’s CD-ROM drive.
• The CD should start automatically, bringing up the title menu
shown in
Figure 15.
If the CD doesn’t start automatically: open the content folder of
the CD (from your desktop or using Windows Explorer) and
double click on SO-221.exe.
Figure 15: Title Menu of the „Vision Tools“ CD
22 © PHYTEC Messtechnik GmbH 2006 L-680e_1

First Steps
• Click on FireWire-CAM. You will be taken to the installation
menu for the PHYTEC FireWire Camera. Select
FCAM-011H/-012H resp. FCAM-111H/112H (
Figure 16) and
click on Install Driver.‚
Figure 16: Installation Menu for the FireWire Camera
© PHYTEC Messtechnik GmbH 2006 L-680e_1
23

FireWire-CAM-011H/-012H
• The installation program of the FireWire Camera’s software driver
(DCAM-Driver) will appear,
Figure 17:
Figure 17: Driver Installation, Step 1
• Select the camera model that is connected to the FireWire
interface. (This model should already be selected.)
If no selection appears, check to see if the camera is connected
correctly and ready for operation. This is required before the driver
can be installed. Click on „Next“.
• The driver is now installed (
Figure 18)
In some cases a software compatibility warning will appear
(
Figure 19). Click on „Continue Installation“.
24 © PHYTEC Messtechnik GmbH 2006 L-680e_1

First Steps
Figure 18: Driver Installation, Step 2
Figure 19: Driver Installation, Compatibility Warning
© PHYTEC Messtechnik GmbH 2006 L-680e_1
25

FireWire-CAM-011H/-012H
• At the end of the installation you will receive a message
(
Figure 20). Click on „Finish“.
Figure 20: Driver Installation, Step 3
• Now remove the FireWire cable from the camera and wait a
moment, than reconnect the cable.
• The driver installation is now complete.
Note:
• If you would like to run several different type cameras of the
PHYTEC FireWire series on the same computer, you have to
perform the installation procedure for each camera.
• After the installation procedure has been performed on a computer,
you can connect and disconnect the camera as often as you like.
The FireWire interface automatically activates the driver.
In the next two sections, you will be shown how to mount a lens on
your camera and then how to display your first live picture on your
screen.
26 © PHYTEC Messtechnik GmbH 2006 L-680e_1

First Steps
2.4 Mounting a Lens
At first glance mounting a lens seems simple. However, when dealing
with high-quality digital cameras, the selection of an appropriate lens
and its correct mounting can play a decisive role in the image quality.
There are a few recommendations for selecting an appropriate lens in
section
connection of a lens. The FireWire-CAM series works with C- resp.
CS-Mount lenses.
The difference between these two lens types is marginal: If you want
to connect a C-Mount lens, you need to attach a CS/C-adaptor-ring
between the lens and the camera. With CS-Mount lenses, this ring
cannot be used.
3.1.1. The following paragraphs provide instructions on the
Figure 21: Lens Assembly (C-Mount)
© PHYTEC Messtechnik GmbH 2006 L-680e_1
27

FireWire-CAM-011H/-012H
The C/CS-Mount ring influences the so-called „flange focal distance“.
This is the distance between the back of the lens and (the part that is
attached to the camera) and the picture plane– in our case the surface
of the CCD sensor. The pictures shown in
Figure 22 illustrate the
difference.
Figure 22: Flange Back Distances and Mounting of C-Mount (Top) / CS-Mount
(Bottom) Lenses
In reality the mechanics of the lens and the cameras can vary slightly
from one model to another, which may also influence the flange focal
distance. If, for example, you are not able to set your lens to „infinite
focus“, this is a typical sign of an incorrect flange focal distance.
28 © PHYTEC Messtechnik GmbH 2006 L-680e_1

First Steps
In this case you can solve the problem with the help of the camera’s
flange focal distance setting ring. As shown in
Figure 21, this ring is
attached with two set-screws.
You can access these screws through two holes on the side and the
bottom of the camera housing. After you have loosen the set-screws,
you can adjust the camera’s flange focal distance setting ring
according to your requirements.
Hints:
• Adjustment of the flange focal distance is usually only required if
you are having problems with focusing in „infinite“ or with objects
close to the lens. Since adjusting the flange focal distance can
quickly lead to problems with the imaging system, it should only
be done if absolutely necessary!
• If the picture is out of focus in all of the lens ranges, please check
to see if you have a C-Mount lens (use adapter ring) or a CSMount lens (remove adapter ring).
• It is possible that the lens is not suited for the desired object
distance. In this case you will be able to focus on remote objects,
but not on close objects. The required minimum distance between
the object and the lens is called the minimum object distance
(M.O.D.) and is provided in the lens data. PHYTEC support will
be happy to advise you on the selection of an alternative lens or on
the implementation of extension rings, which reduce the M.O.D.
Caution!
Some lenses have very high insertion depth. In these cases the above
portioned parts of the lens can damage the CCD and/or the filter of the
same (FireWire-CAM-xx2). Please note that when you are using this
type of lens your warranty is made void.
© PHYTEC Messtechnik GmbH 2006 L-680e_1
29

FireWire-CAM-011H/-012H
2.5 Installation of the Demo Program
Use the PHYTEC demo program to test the functions of the camera.
You can find it on the CD enclosed with the camera.
You can download updates of the demo software on the PHYTEC
website.
Caution!
Check first to see if your computer meets the following system
requirements for operating the camera:
• Pentium II, 300 MHz or higher and 1394-interface
• Graphic card with 24 or 32-bit color depth
• Windows 2000/SP2 or Windows XP
• DirectX 8.1 or higher
Make sure that your computer is equipped with this software.
To install the driver software for the FireWire camera, proceed in the
following manner:
Caution!
The DirectX driver must be installed prior to installation of the driver
software for the FireWire camera. Otherwise not all driver functions
will be supported and/or the system may crash.
• Connect the camera to your computer. To install the driver the
camera must be ready for operation. Follow the instructions in the
previous sections for this.
• Insert the CD SO-221 in your computer’s CD-ROM drive.
• The CD should start automatically, bringing up the title menu
shown in
Figure 23: Title menu of the ‚Vis ion Tools‘ CD.
If the CD doesn’t start automatically: open the content folder of
the CD (from your desktop or using Windows Explorer) and
double click on start.exe.
30 © PHYTEC Messtechnik GmbH 2006 L-680e_1

First Steps
Figure 23: Title Menu of the‚ Vision Tools‘ CD
• Click on FireWire-CAM. You will be taken to the installation
menu for the PHYTEC FireWire cameras. Select
FCAM-011H /012H resp. FCAM-111H/112H (
Figure 24) and click
on Demo Software.
Figure 24: Installation Menu for the FireWire Cameras
© PHYTEC Messtechnik GmbH 2006 L-680e_1
31

FireWire-CAM-011H/-012H
• The demo program’s installation program for the FireWire cameras
will appear,
Figure 25:
Figure 25: Demo Installation, Step 1
• Click on „Next“.
• The license agreement will appear,
Figure 26:
Figure 26: License Agreement, Step 2
• If you accept the agreement, select „I accept the agreement“ and
click on „Next“.
32 © PHYTEC Messtechnik GmbH 2006 L-680e_1

First Steps
• You will then be asked to enter your license key, Figure 27:
Figure 27: License Key, Step 3
• Please enter the license key „ISmvBAUUB142U“ and click on
„Next“.
• Follow the instructions and place the path and list entries.
Figure 28: Installation Completed, Step 4
• After successfully completing the installation, finish the procedure
with „Finish“,
© PHYTEC Messtechnik GmbH 2006 L-680e_1
Figure 28.
33

FireWire-CAM-011H/-012H
2.6 Starting Up the Camera with the Demo Program
2.6.1 The First Live Image
After you have established the necessary connections, installed the
driver and the demo software and mounted a lens following the
instructions in the previous sections, you can now start up the camera
and display a live image on the screen.
You can also use the program amcap.exe by Microsoft™ (in the path:
„FireWireCAM001_002\Demo\Amcap“) included on the CD SO-221
for the display of a live image.
To use all of the cameras’ features, we nevertheless recommend the
PHYTEC Vision Demo program as described in the following.
Start the „PHYTEC Vision Demo“ from the list you chose during the
installation.
• The program surface will appear (
Figure 29).
Figure 29: The Program „PHYTEC Vision Demo“
• Choose then the correct image source.
34 © PHYTEC Messtechnik GmbH 2006 L-680e_1

First Steps
Select therefor in „Select Device“ the desired camera from
„FCAM-xxx“(
Figure 30).
Figure 30: PHYTEC Vision Demo – Select Device
• A live image will appear in the program window (Figure 31).
• In case the live image does not appear, choose the entry „Live“
under „Device“.
Figure 31: PHYTEC Vision Demo – Live View Function Activated
© PHYTEC Messtechnik GmbH 2006 L-680e_1
35

FireWire-CAM-011H/-012H
2.6.2 Problem Solving
Check the following points if the live picture is poor or doesn’t
appear:
• No „Video Device“ is recognized
- Is the camera connected to the computer correctly?
- Is the camera connected to a power supply? (use adapter if
necessary)
- Is the software driver installed?
- Is DirectX, Version 8.1 or higher installed?
• The picture is black
- Is the iris of the lens open?
• The picture is only black and white (gray levels)
- Do you have the color version VCAM-xx2?
- Is the software driver installed?
- Is the correct camera model selected?
- Was a color format selected with the settings?
- Is your graphics card configured for more than 256 colors?
- Is DirectX, Version 8.1 or higher installed?
• The picture quality is poor
- Is the iris of the lens opened sufficiently?
- Is the illumination sufficient?
- Is your graphic card configured for more than 256 colors?
- Try to adapt the camera parameters or set them to their „default“
values (see next section)
• The image is not focussed/cannot be focussed
- Check the lens setting
- Has the minimum object distance (M.O.D.) been met?
- Does the extension ring need to be removed/mounted?
- If necessary adjust the flange focal length (Caution!).
36 © PHYTEC Messtechnik GmbH 2006 L-680e_1

First Steps
• The image display is too slow / flickers
- the exposure time is set at a higher rate as the display speed (see
next section)
- You can set the display speed (see next section)
- It is possible that your computer’s processor performance
is too low
• The picture flickers under artificial lighting
- Adjust the picture frequency to the frequency of the artificial
lighting. The camera frequency is 30 Hz (resp. 15/ 7.5/
3.75 Hz), which results in interference with the 50 Hz mains
frequency in Europe. Use either a high exposure time or use
frequency-independent lighting.
Note:
• Occurring interference at 30 Hz is not a defect. Conventional TV
cameras in Europe always work with the lower image frequency of
25 Hz, to avoid these interferences.
• The exposure time is (largely) independent from the image
frequency. Thus the settings do not influence each other.
2.6.3 Adjusting Camera Settings
The FireWire-CAM series offers a large number of setting options,
which can be adjusted via software from the computer.
The setting options are grouped in multiple dialogs (menus).
Depending on the application the call of the dialogs can occur at
various locations.
This section provides a brief overview of the setting options and the
call of the dialogs in the program PHYTEC-Vision-Demo. A complete
description of the functions can be found in section
3.4.
© PHYTEC Messtechnik GmbH 2006 L-680e_1
37

FireWire-CAM-011H/-012H
• Setting the Video Format
Setting in the PHYTEC-Vision-Demo:
DeviceSettings...
Here you can make basic settings for the image format and color
depth. The highest picture quality can be achieved by setting the color
depth to UYVY (for FCAM-x12H) resp. Y800 (for FCAM-x11H).
Furthermore you can see the serial number of the camera and you can
also set the picture refresh rate.
Figure 32: Camera Setting „Device Settings“
Note:
The button „Properties“ will take you to the dialog described in the
following.
38 © PHYTEC Messtechnik GmbH 2006 L-680e_1

First Steps
• Changing the Capture Settings
Settings in the PHYTEC-Vision-Demo:
DeviceProperties
This dialog enables you to adjust the image capture precisely to your
image capture specifications.
In the camera’s default setting all parameters are regulated
automatically. In order to make the settings manually remove the
„Auto“ check from behind the desired parameter (;
Æ ) and set the
desired value with the sliding control.
Please note that depending on the camera model not all setting options
can be selected.
• Properties – Exposure (
Figure 33)
In this dialog you can set the brightness and the gain. Furthermore
you can set the reference parameter for the automatic exposure
timer. This allows the general lighting impression to be adjusted to
the application.
Figure 33: Camera Setting „Properties Exposure“
© PHYTEC Messtechnik GmbH 2006 L-680e_1
39

FireWire-CAM-011H/-012H
• Properties – Image (Figure 34)
In this dialog you can set the gamma correction. Formula of
calculation: gamma = reference input/10.
Figure 34: Camera Setting „Properties Image“
• Properties – Color (Figure 35): FCAM-012H / FCAM-112H only
In this dialog you can set the values for hue, saturation and white
balance.
Figure 35: Camera Setting „Properties Color“
40 © PHYTEC Messtechnik GmbH 2006 L-680e_1

First Steps
• Properties – Device (Figure 36) FCAM-111H / FCAM-112H
only
In this dialog you can activate the external trigger. Depending on
selection, the camera either is on hold in the trigger mode or behaves
as a “free running” camera.
Figure 36: Camera Setting „Properties Device“
The dialog Special (FCAM-111H / FCAM-112H only) allows the
access to several special parameters of the camera that are usually not
disclosed.
Further on the PHYTEC-Visio-Demo offers a mulitude of
functionalities that can be adjusted directly in the main window when
all the possible toolbars are activated (
Figure 37).
Figure 37: Further possible Settings of the PHYTEC-Vision-Demo
© PHYTEC Messtechnik GmbH 2006 L-680e_1
41

FireWire-CAM-011H/-012H
Further functions of the PHYTEC-Vision-Demo:
• Recording an AVI file
• Storing of an individual image (BMP / JPG)
• Recording of an image sequence
• Setting and displaying ROI
• Mirroring and rotating
• Zooming
• Noise reduction
• Histogram display
These functions can be selected either via the respective menu entries
or directly by activating the respective toolbar.
42 © PHYTEC Messtechnik GmbH 2006 L-680e_1

The Camera in Detail
3 The Camera in Detail
3.1 Camera Connections
Power Supply
If the IEEE 1394 Bus does not deliver the operating voltage (this also
applies for nearly all laptop solutions) you will need the possibility to
feed the power into the FireWire connecting (section
Use a stable, high-quality adapter of your choice, as long as it delivers
8 to 30 VDC and 500 mA. Please read the section
Notes“
3.1.1 IEEE 1394 Interface
2.1.1.)
1.5,“Important
The camera is equipped with an IEEE 1394-1995/1394a, 6-pin,
400 Mb/s connector. PHYTEC offers a variety of suitable IEEE 1394
cables. As an alternative you can use other cables, as long is they meet
the IEEE 1394 standard. Please refer the section
1.5, “Important
Notes “ before proceeding.
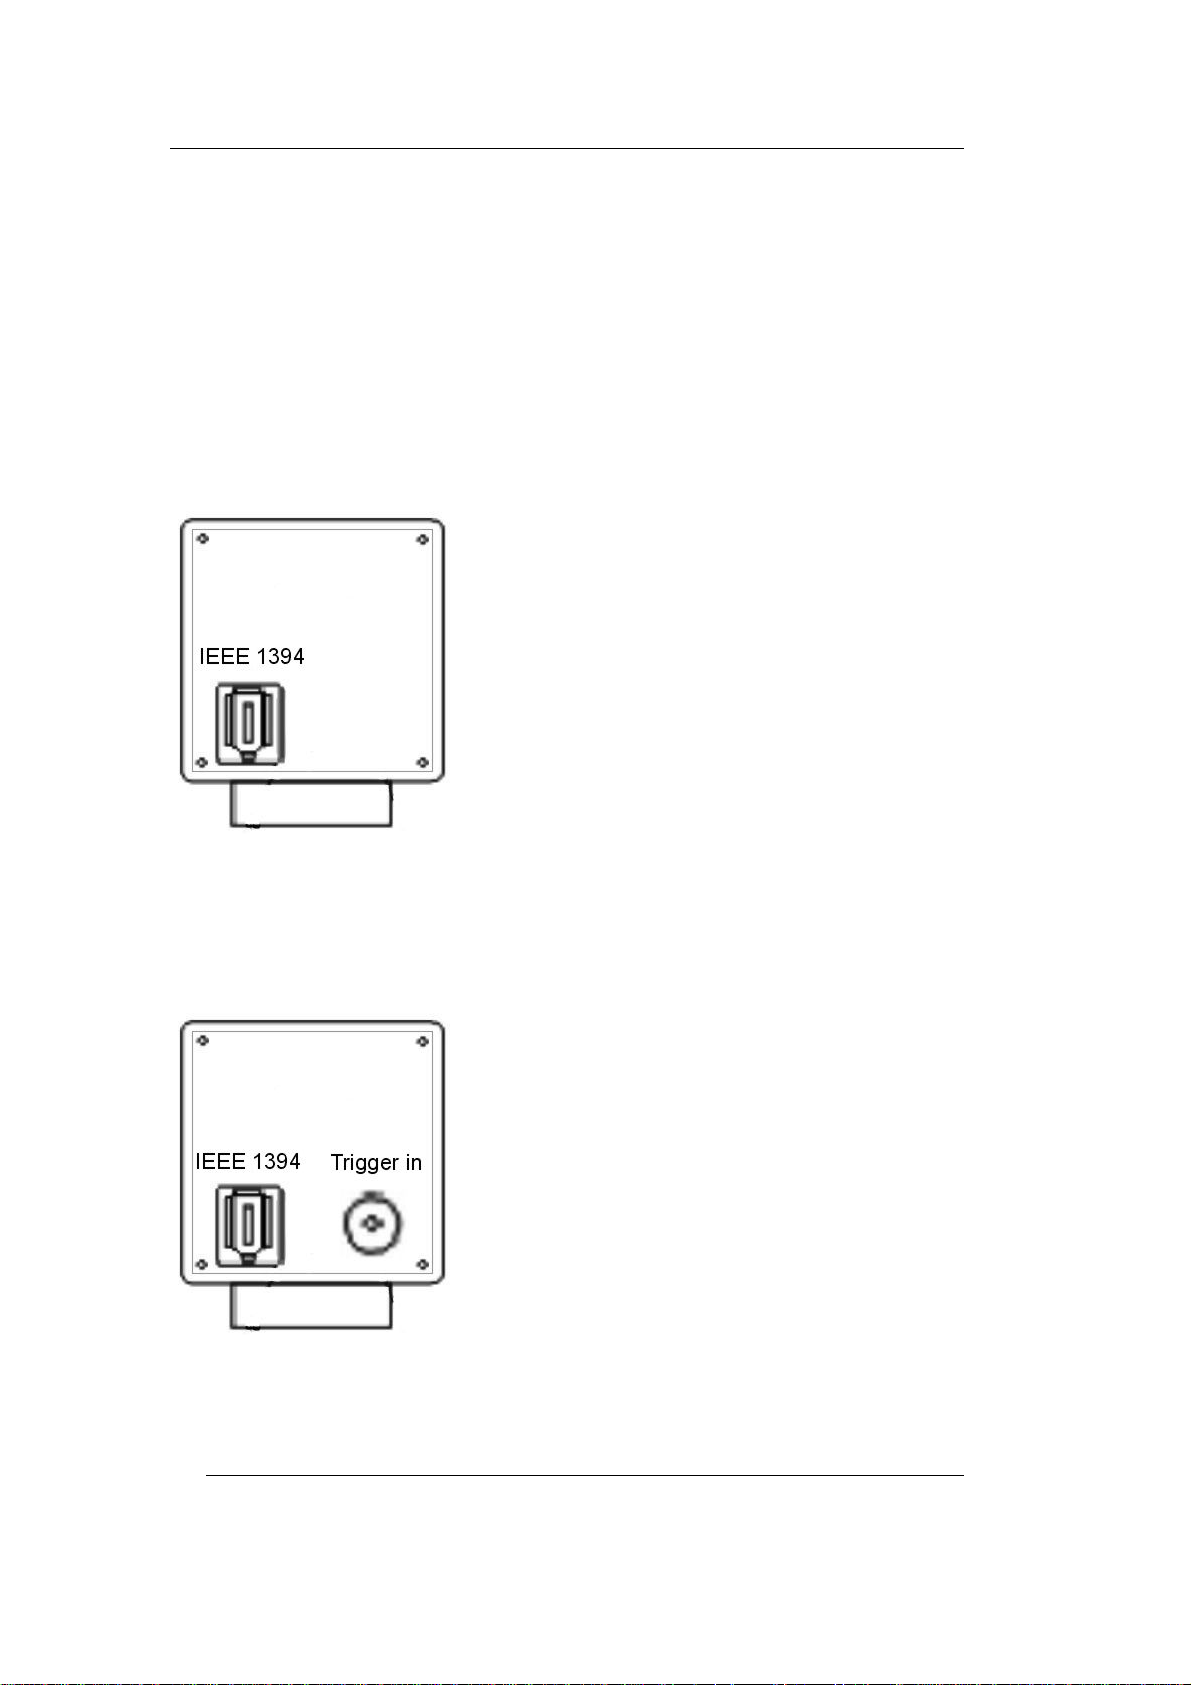
3.1.2 External Triggering, FCAM-111H /112H Only
The cameras have a BNC socket (see
Figure 38) for the feeding of an
external trigger signal. Use a 50 Ω BNC cable for this.
Figure 38: Connections FCAM-111H and FCAM-112H
The Trigger_in entry is opto-decoupled and can be triggered with a
voltage of 3.3 V to 12 V.
© PHYTEC Messtechnik GmbH 2006 L-680e_1
43

FireWire-CAM-011H/-012H
The cameras can be operated free running or triggerd.
free running operation:
Depending on the selected image repeat rate and exposure time, the
cameras continuously deliver an image data stream just like a standard
camera. The signal behavior at the external trigger entry is
insignificant. The exposure time can be adjusted via software from
100 µs up to 30 s.
triggered operation:
As long as there is no flank change from Low to High, the camera will
not deliver image data.
The exposure of the sensor will start 4.8 µs after the Low-High
change-over at the external trigger entry.
In this mode, an image repeat rate of up to 15 fps is possible. The
exposure time can be adjusted via software from 100 µs up to 30 s.
If a repeated trigger impulse is triggered during an exposure
(transmission), undefined conditions may happen during the picture
recording.
To test the trigger functions, please use the PHYTEC demo program
(section
2.5).
44 © PHYTEC Messtechnik GmbH 2006 L-680e_1

The Camera in Detail
B
3.2 Connecting the Lens
The camera supports lenses with C-Mount or CS-Mount connectors.
Refer to section
Hints for Selecting the Lens
In order to take full advantage of the quality and the features of the
camera, it is important that you select a lens that is optimized to your
application. In the following section we have provided some helpful
hints on how to proceed in the selection of a suitable lens.
• Focal Length
With the focal length you determine the visible screen window, or
image portion captured by the camera.
The focal length depends on the size of the CCD chip, the distance
from the object and the focal length of the lens being used.
The screen window should be optimized so that the object being
captured is always fully visible on the screen, and also so that the
amount of unused screen space surrounding the object is
minimized. Otherwise the object would be displayed unnecessarily
small and the camera’s resolution would not be fully utilized.
The FireWire-CAM-011H / -012H / 111H and 112H are both
equipped with a ⅓“ – CCD-sensor.
The following formula can be used to calculate the required focal
length f from the desired frame width B and the distance between
the object and the lens (L) (all values in millimeters):
2.4 for instructions on connecting the lens.
mm
f ⋅=
8,4
L
Round the resulting value up to the next available focal distance.
This will give you a slightly bigger screen window than necessary
but it ensures that the entire object will be captured on the screen.
© PHYTEC Messtechnik GmbH 2006 L-680e_1
45

FireWire-CAM-011H/-012H
The image height H is calculated from the image width B based on
the following relationship:
3
BH ⋅=
4
Please note that wide angle lenses will produce some edge
distortion, which can have a detrimental effect during image
capture or analysis. In this case try increasing the distance to the
object and set a larger focal length.
Reference points for selecting focal length:
Focal Length Lens Type
< 8 mm Wide Angle
8 ... 16 mm Normal Range
> 16 mm Telephoto Lens
A selection of standard lens focal lengths can be found in our
catalog and on our web site. Please ask us about other available
focal lengths.
• Resolution
How good will the picture resolution be for a given focal length?
This depends on the picture size (size of the screen window) and
the number of pixels the sensor has.
Die FireWire-CAM-x11H / -x12H have a pixel count of
1024 x 768 pixels (H x V).
You can now begin to determine the special resolution by dividing
the picture width in mm by the number of horizontal pixels (1024)
(corresponding vertically).
Example:
You have a screen window that is 100 mm x 75 mm.
The maximum resolution that can be achieved is
100 mm : 1024 = 0.09765 mm horizontal resp.
75 mm : 768 = 0.09756 mm vertical
46 © PHYTEC Messtechnik GmbH 2006 L-680e_1

The Camera in Detail
The actual resolution that can be achieved is usually smaller, since
the quality of the lens and some technical characteristics of the
camera (e.g. the band width of the analog amplifier) also play a
role. With color cameras in single chip technology, you must also
consider that the pixels have color filters, which also reduce the
resolution (primarily the local resolution of the color information).
The actual resolution of a system (lens – camera) can be
determined automatically and is given in terms of so-called TV-
lines. This is the number of perpendicular black/white lines per
screen window that can be differentiated.
• Minimum Object Distance
The minimum object distance (M.O.D.) determines the minimum
distance between the object and the lens at which the picture can
be rendered in focus.
The M.O.D. value is given in the lens data.
An input M.O.D. = 0.3 m means that the object has to be at least
30 cm from the lens.
Often the camera has to be brought closer to the object than the
M.O.D. will allow for technical reasons. In this case you can use
an extension ring. The extension ring is inserted between the
camera and the lens and reduces the M.O.D. value. Since it is
difficult to calculate the required length of the extension ring,
extension ring sets are available (PHYTEC order number AZ005),
that can be used to achieve the required value in application.
• Aperture
A lens with a manually adjustable aperture (iris) offers two
advantages:
1. The depth of field can be adjusted. By closing the aperture the
distance range in which objects are shown in focus is increased.
This is of particular importance if the object distance is very
small. However the amount of light allowed through by the lens is
reduced which means that exposure times will increase and/or the
picture will be noisy.
© PHYTEC Messtechnik GmbH 2006 L-680e_1
47

FireWire-CAM-011H/-012H
2. The amount of light allowed through the lens can be controlled.
This makes sense primarily in applications where there is a lot of
light, which could result in overexposure or blooming.
In some cases a fixed exposure time may be desired for an
application. In this case you can enter the exposure time manually
(in the camera dialog) and set the aperture so that the image is
properly lit.
In normal cases the aperture should only be closed as much as
necessary to prevent noise in the picture.
In industrial applications it usually makes sense to be able to lock the
selected aperture setting. For this purpose some lenses are equipped
with fixing screws.
3.3 Mechanical Attachment
The camera is equipped with a mounting plate with three threaded
screw holes (
Figure 39). The middle hole has a ¼“ – photo thread.
This enables the camera to be attached to all standard tripods.
The two outer holes have a metric M6 threads. They can be used to
attach the camera to a device or in a system without requiring special
screws.
Please note that the maximum screw depth is 8 mm.
Figure 39: Mounting Plate
48 © PHYTEC Messtechnik GmbH 2006 L-680e_1

The Camera in Detail
The mounting plate is attached to the camera with two screws
(
Figure 40). It can be connected to any side of the camera (Figure
401).
The attachment is therefore very flexible and can be easily adapted to
a given application.
Figure 40: Attachment of the Mounting Plate
Figure 41: Mounting Options of the FireWire-CAM
© PHYTEC Messtechnik GmbH 2006 L-680e_1
49

FireWire-CAM-011H/-012H
3.4 Camera Settings
3.4.1 Camera Settings: Standards
One of the most interesting properties of the FireWire-CAM-001/002
is that they are based on standards that are widely circulated. One of
these standards is called DCAM. It describes the parameters and the
data structures of IEEE 1394 cameras that do not feature audio
processing and transmit the picture data uncompromised. Additional
information on DCAM can be found in section
Concept”.
Note:
Please note that some FireWire-CAM models offer setting options in
addition to these DCAM parameters, which can be very useful in
certain applications, but are not (yet) included in the DCAM
specification. In the following sections the DCAM-conformant
parameters are marked.
4, “The Software
3.4.2 Camera Settings in Detail
All camera parameters can be set over the IEEE 1394 Bus. In order to
access these, install the camera and the included software as described
in the section
2 „First Steps“.
In the following section the individual setting options and their effects
are described in detail.
3.4.2.1 Camera Settings - Settings The dialog Settings (
Figure 32) offers you the selection between the
various resolutions and frame rates, therefore defining the basic
structure of the video signal.
You will achieve the highest picture quality if you use UYVY (for
FireWire-CAM-xx2) and Y800 (for FireWire-CAM-xx1) for the color
space and select 1024 x 768 as the output size.
However, these operating modes also require the highest bandwidth.
All parameters are DCAM-conformant.
For addtional information refer to section 3.6, “How to Maximize
Image Quality”.
50 © PHYTEC Messtechnik GmbH 2006 L-680e_1

The Camera in Detail
3.4.2.2 Camera Settings - Properties
The dialog Properties gives you access to all basic parameters that
can be used to set the function blocks of the camera described in the
introduction.
For additional information refer to section 3.6, „How to Maximize
Image Quality”.
Shutter/Exposer (DCAM): sets the exposure time.
This parameter can be set manually or automatically (along with the
amplification Gain; see below). Technically this parameter is based on
an internal feedback loop. This loop takes 4048 gray level samples
from the picture and calculates a average brightness level from them.
Gain and shutter influence the picture in a similar manner. A reduction
in the gain can be compensated by an increase in the shutter and vice
versa. There are therefore many combinations of gain and shutter that
will result in an identical picture.
The gain, however, is the electrical amplification of the image signal,
while the shutter influences the exposure time.
A higher gain value will result in a noisy image. For this reason the
gain should not be set unnecessarily high.
On the other hand, longer exposure times may result in motion blur
and other picture distortions.
Practically, a balance between the two settings is preferable.
If satisfactory image quality cannot be achieved, a brighter light
source may be required.
The dialog Auto Exposure/Gain gives you access to all parameters
that determine the behavior of the regulation loop in automatic mode
of Shutter/Gain.
With that you can influence the behavior of the automatic exposure
regulation and adjust it to your exposure situation.
You can find further information in section 3.6, „How to Maximize
Image Quality”.
© PHYTEC Messtechnik GmbH 2006 L-680e_1
51

FireWire-CAM-011H/-012H
Exposure reference (DCAM): The automatic Shutter/Gain mode is
based on a regulation loop that extracts grey scale value samples from
the image and calculates the average brightnes from them. This
average value is then compared with the exposure reference and in
case of a discrepancy, Shutter resp. Gain will be changed accordingly.
The image area from where the random samples are taken determines
the according setting of the backlight correction (see below).
Thus this value sets the average brightness (background brightness) of
the image in the automatic mode.
Gain/Contrast (DCAM): The amplification gain (also called contrast)
influences the electrical output signal of the CCD. This is an electrical
amplification of the image signal. More details are provided in the
shutter description above.
Offset/Brightness (DCAM): The offset (also called brightness)
influences the direct voltage offset of the CCD output signal directly.
Visually this is perceived to be an adjustment of the picture
brightness. As opposed to the contrast setting, the brightness setting
does not change the relationship of dark to light.
This parameter can be set manually or automatically.
Gamma (DCAM): If gamma correction is switched on the camera
will output the gray levels adapted to the non-linear characteristics of
picture tube based monitors.
With activated gamma correction the image looks richer in contrast –
expecially with monochrome cameras.
Hue (DCAM): The adjusting controller for the tone, Hue, sets the
particular hue. With that a correction or even a deliberate distortion
can be made.
Saturation (DCAM, FireWire-CAM-x12H only): This parameter
allows the manual setting of color saturation from black and white to
extremely saturated colors. This allows the picture display to be
adapted to color sensitivity or the picture environment.
You can shut off this function if it is not required.
52 © PHYTEC Messtechnik GmbH 2006 L-680e_1

The Camera in Detail
White balance (DCAM, FireWire-CAM-x12H only): U/R (red/green)
and V/B (green/blue) influence the red and blue portions of the
picture. You can therefore set the camera to the applied light to
achieve a color-neutral impression. In most cases the automatic white
balance is the preferable setting. For color evaluation tasks, the
automatic white balance must be shut off.
In manual operation both parameters can be linked to quickly find an
initial setting. Depending on the lighting, some fine tuning may be
required. To do this the parameter link must be broken.
There are two possibilities for the automatic mode. If Auto is selected,
the white balance is carried out continuously. However, if you click
on the button One push white balance, you will trigger off only a
single adaption process.
You can shut off this function if it is not required.
© PHYTEC Messtechnik GmbH 2006 L-680e_1
53

FireWire-CAM-011H/-012H
3.5 The Spectral Behavior
3.5.1 FireWire-CAM-011H / -111H (monochromatic)
Figure 42 shows the spectral behavior of the monochromatic
FireWire-CAM-x11H.
Please note that this camera is not equipped with an IR-band
elimination filter. Therefore you can use the IR-sensitivity of these
cameras in various applications.
In some applications it is a good idea to block certain ranges of wave
length. You can do this by attaching a special filter to the lens. We
will be happy to advise you in the selection of an appropriate filter.
Figure 42: Spectral Response (FireWire-CAM-x11H)
54 © PHYTEC Messtechnik GmbH 2006 L-680e_1

The Camera in Detail
3.5.2 FireWire-CAM-012H / -112H (Color)
Simply put, the CCD-Chip converts photons to electrons. Three color
filters (red, green, and blue) are used for color display. With these
three color levels it is possible to create the picture colors. With
single-chip cameras (like the FireWire-CAM series) very small filter
elements of the three colors are placed alternatingly in front of the
individual pixels of the CCD chip (called Mosaic or Bayer filters).
Figure 43 demonstrates the function of this filter.
Each pixel of the sensor delivers only one particular colour
information (Bayer Pattern Filtering). Via interpolation from the
adjoining pixels, the electronic part then calculates the probable colour
value. In this process, the colour resolution is reduced regarding the
pixel resolution.
© PHYTEC Messtechnik GmbH 2006 L-680e_1
55

FireWire-CAM-011H/-012H
Figure 43: Bayer Pattern Filter (Colour Sensor)
Figure 44 shows which spectral ranges actually represent the values
R, G and B. If, for example, a G-Pixel has a high brightness level, this
means that the light that hit this point was made up mostly of
wavelengths between approximately 500 and 600 nm.
56 © PHYTEC Messtechnik GmbH 2006 L-680e_1

The Camera in Detail
Figure 44: Spectral Filter Characteristics (FireWire-CAM-012H / -112H)
Please note that with a G-pixel it is impossible to say anything about
the red or blue portion of the light. Wavelengths between 400 and
500 nm can only be measured with B-pixels. Wavelengths between
600 and 700 nm can only be measured with R-pixels.
The problem is therefore that a pixel can only measure one of the three
colors, while we require all three color values at each pixel position
for an RGB image.
The Bayer pattern model uses the „spatial color interpolation“ to
generate an RGB image from the neighboring color pixels.
Let’s assume that we have an R-pixel and we require the missing Gand B-values. The interpolation algorythm estimates these values
based on the neighboring pixels of the R-pixel. If it finds a
neighboring B-pixel with a high gray value and a G-pixel with a low
gray value, then it is quite probable that the R-pixel is probably
colored lilac.
For each pixel we have one measured and two estimated color values.
As with all modern cameras this interpolation is carried out in the
color cameras of the FireWire-CAM series by a signal processor.
© PHYTEC Messtechnik GmbH 2006 L-680e_1
57

FireWire-CAM-011H/-012H
In order not to distort the colour effect by ultrared parts of the light
(especially day light), the FireWire-CAM additionally has an URrejection filter.
Otherwise the colour effect would be unnaturally red when exposed
with day light.
Figure 45 shows the characteristics of this filter.
Figure 45: FireWire-CAM-012H / -112H : UR Rejection Filter
58 © PHYTEC Messtechnik GmbH 2006 L-680e_1

The Camera in Detail
3.6 How to Maximize Image Quality
„Image Quality“ is always a relative term. However, the definition of
quality really depends on the requirements of the application in
question.
3.6.1 Lens
The video lens has a significant influence on the picture quality. Refer
to section
should use a high quality lens. PHYTEC offers high-quality lenses
from Pentax. If you have a special requirement profile we recommend
lenses from Schneider Kreuznach. We will be happy to advise you on
the selection of an appropriate lens.
3.6.2 Lighting
3.6.1 for selection of an appropriate lens. In any case you
With image processing applications the selection of the right lighting
plays a major role.
Ideally the lighting will illuminate the object evenly and with high
contrast. Undesired structures (shadow, and overexposed areas)
should therefore occur as little as possible in the picture.
Correct lighting can drastically reduce processing times in many
applications. For industrial image processing a series of special
lighting techniques have been developed that can increase picture
display quality in various applications.
© PHYTEC Messtechnik GmbH 2006 L-680e_1
59

FireWire-CAM-011H/-012H
In this section we briefly describe a few lighting procedures.
• reflected-light method
The reflected light method is one of the most commonly used lighting
methods.
In this method a light source (e.g. a standard lamp or a special ring
light, see
Figure 456) is pointed at the object from above.
This lighting technique is used if structures need to be recognizable on
the object, such as print, dirt, color (in this case a color-stable lighting
is recommended) or mounted parts (attendance monitor or position
monitor). There are different variations of this method.
Problems that may occur with this procedure are uneven lighting,
reflection (particularly on shiny surfaces) and shadows.
Figure 46: PHYTEC Ring Light Order No.: VZ-001-x, VZ-002-x
• Diffuse Lighting
With diffuse lighting no direct light rays hit the viewed object. This
reduces problems with reflections and overexposed areas.
The Ring Light (
Figure 456) can generate diffuse lighting if a
corresponding filter ring is attached, thereby solving this problem.
For especially critical applications, such as highly reflective surfaces,
special shapes are available that shine the light on the object indirectly
over a dome shaped lighting bell.
60 © PHYTEC Messtechnik GmbH 2006 L-680e_1

The Camera in Detail
• Light-Field or Dark-Field Lighting
These two methods differ from one another considerably in terms of
the camera position in relation to the object. The position of the
lighting source in relation to the object remains the same.
The light field lighting leaves the ranges of interest dark (e.g. a drill
hole in a workpiece). The dark field lighting functions in the opposite
manner (
Figure 457).
The type of lighting should be selected based on the object surface. If
necessary tests should be performed with both variants to determine
which method displays the structures of interest the best.
Figure 47: Light-Field- (Left) and Dark-Field-Lighting (Right)
© PHYTEC Messtechnik GmbH 2006 L-680e_1
61

FireWire-CAM-011H/-012H
• Shadow projection
If object areas and their background are similar in terms of their gray
value, the object border can be difficult to discern (contrast problems).
If the background isn’t too dark, you can measure the object’s cast
shadow instead of the object edge (
Figure 458).
Figure 48: The Shadow Projection
• Structured Light
In place of the homogenous light described up to this point it is also
possible to use a special structured light. This structured light makes it
possible to mesaure the height of an object with a light band or
crosshairs (e.g. from a laser). This is an expansion of the shadow
projection.
62 © PHYTEC Messtechnik GmbH 2006 L-680e_1

The Camera in Detail
The light line (band) is projected at a known angle α toward the
object. The camera is positioned perpendicular to the object. The
picture therefore contains two parallel lines, that are a distance d from
one another. This distance can be easily measured by the image
process ing software and converted to height h using the angle
Figure 459).
(
α
Figure 49: The Structured Light
© PHYTEC Messtechnik GmbH 2006 L-680e_1
63

FireWire-CAM-011H/-012H
• Silhouette Projection
This method is very useful if you are only interested in the outline of a
flat object (e.g. for measurement purposes).
It generates high contrast pictures and is not dependent on the surface
of the object.
With the silhouette projection the object is placed before a
luminescent plate. It is a diffuse lighting surface that lights the object
from below. The camera is pointed at the object from the front, i.e.
toward the light source (
Figure 50).
Figure 50: The Silhouette Projection
The result is a grayscale image. The bright pixels are the background,
the dark pixels are the object.
64 © PHYTEC Messtechnik GmbH 2006 L-680e_1

The Camera in Detail
• Transmitted Light Method
The transmitted-light-method (transillumination) can be very useful
with transparent objects like glass. The transillumination makes the
inner structures visible (
Figure 51).
Figure 51: Transillumination
It is possible, for example, to depict the steel wire inside a security
glass or the liquid level within a bottle. X-ray images in medical
technology are also an example of transillumination.
3.6.3 Camera Setup
The FireWire-CAM offers a wide range of setting options that enable
it to be optimally adapted to the picture requirements.
The individual parameters are listed in section
3.4.
In the following paragraphs the settings used for typical automation
and visualization applications are described.
With visualization applications the focus of optimization is primarily
the picture as it is seen by the viewer (e.g. remote monitoring, security
applications). Automation usually requires constant environmental
conditions set according to the given task. The general visual
impression is therefore usually a secondary consideration. Instead it is
more important that the recognizable features for the subsequent
image processing are easily and reliably discernable.
Of course in practicle applications there may be instances where a
mixture of both requirement profiles is needed.
© PHYTEC Messtechnik GmbH 2006 L-680e_1
65

FireWire-CAM-011H/-012H
3.6.3.1 Setting for Visualization with Stable Lighting
The typical camera for these purposes is the FireWire-CAM-012H /
-112H. Under the assumption that there are stable lighting conditions
we recommend the following settings (see Windows dialogs in
section
2.6.3):
Shutter and Gain: Keep Gain as low as possible and Shutter as high
as possible, since Gain not only amplifies the picture signal but also
amplifies image noise.
High Shutter values (longer exposure times) can also lead to motion
blur. Determine through calculation or experimentation the highest
reasonable value and set the Gain accordingly, so that the picture
brightness is optimized. If necessary adjust the lens aperture to
improve the image.
Brightness: Keep the Brightness setting as low as possible. This
guarantees the highest gray value dynamic.
Sharpness: Adjust the sharpness of the picture according to the visual
impression that it makes. Be aware that too high of a Sharpness setting
will also show noise more clearly and may have an unnatural effect on
the image. Before adjusting the Sharpness setting, be sure that focus
and aperture (= depth of field) settings on the lens are optimized.
Gamma: If you are displaying the pictures on a tube monitor, Gamma
should be active. For most other cases Gamma should be shut off.
Select the setting according to the visual impression you desire.
Saturation: For a „realistic“ image, in most cases it is recommended
that the color saturation adjustment is deactivated. Otherwise a value
between 50 and 80 will usually deliver the best results.
White Balance: Use the switch One Push White Balance to get a
base value. With some slight adjustments afterwards you should easily
be able to find the optimal setting.
In most cases the automatic white balance („Auto“) does an adequate
job.
66 © PHYTEC Messtechnik GmbH 2006 L-680e_1

The Camera in Detail
3.6.3.2 Visualization Applications with Variable Lithting
If you have to work with changing lithting, you cannot avoid setting
some parameters automatically:
Shutter and Gain usually have to be operated automatically. In this
case the dialog Auto Exposure offers the following two parameters
that you can use to influence the behavior of the Shutter/Gain
regulation.
Exposure Reference: The presetting of this reference value for the
automatic lighting is 30. Do not change this value by more than 10.
Otherwise it could result in instabilities.
Backlight Correction: If this parameter is set to OFF, then the
automatic exposure control measures the brightness value of the entire
image. If the lighting conditions between the various image portions
are considerably different, then you can compensate for this effect
with another method of measurement.
This enables you to limit the measuring range to the relevant picture
area.
Brightness: Try to avoid using the automatic setting. It is better to
keep this value as low as possible. This guarantees the highest gray
value dynamic.
Sharpness: Adjust the sharpness to achieve the desired picture effect.
As described in the previous section, the proper lens and its correct
connection can also be decisive for picture sharpness.
Gamma: If you display the image on a tube monitor then Gamma
should be active. For most other cases Gamma should be shut off.
Select the setting that gives you the best image in your opinion.
Saturation: For a „realistic“ picture, the deactivation of the color
saturation setting is recommend.
Otherwise values between 50 and 80 should deliver the best results.
© PHYTEC Messtechnik GmbH 2006 L-680e_1
67

FireWire-CAM-011H/-012H
White Balance: Variable lighting doesn’t only result in changes in
brightness but also results in spectral variation (changes in color tone).
Since the human eye is capable of adapting to these types of
variations, we rarely notice even relatively major color variations in
light in the course of a day. The camera can also adapt to color
variations with the help of the Automatic White Balance.
If only the brightness values change (e.g. if an artificial light source is
obscured), then the White Balance can be set manually. By clicking
on the switch One Push White Balance you will establish a base
setting. If necessary you can make slight adjustments afterwards to
achieve the optimal setting.
68 © PHYTEC Messtechnik GmbH 2006 L-680e_1

The Camera in Detail
3.6.3.3 Setting for Automated Applications
Automated applications usually require stable lighting and therefore
manual parameter settings (see dialog in section
2.6.3).
Shutter and Gain: Keep the Gain setting as low as possible and the
Shutter setting as high as possible, since Gain not only amplifies the
image signal but also the noise.
High Shutter values (longer exposure times) can result in motion blur.
Determine through calculation or experimentation the highest sensible
value and then set the Gain to achive the optimal picture brightness.
If necessary adjust the lens aperture to improve the picture.
Brightness: Keep the brightness as low as possible. This guarantees
the highest gray value dynamic.
Sharpness: Adjust the image sharpness to the level you desire. In
automated applications you should try to set the sharpness to the
lowest possible value to avoid noise.
Before adjusting the sharpness setting, be sure that the focus and
aperture (sharpness depth) settings on the lens are optimized.
Since the sharpness function cannot compensate for a low quality lens,
you should be sure to use a lens that is suitable for your application.
Gamma: With some automated applications a linear brightness
characteristic may be desired. In this case the Gamma correction
should be deactivated.
Usually the Gamma correction should be set so that the picture output
is optimized for the application in question.
Therefore with applications that involve object recognition it makes
sense to work with the Gamma correction switched on.
© PHYTEC Messtechnik GmbH 2006 L-680e_1
69

FireWire-CAM-011H/-012H
70 © PHYTEC Messtechnik GmbH 2006 L-680e_1

The Software Concept
4 The Software Concept
One of the most interesting properties of the PHYTEC FireWire-CAM
in terms of software is that it can run with standardized interfaces.
This makes the FireWire-CAM-001/002 compatible to the existing
Windows driver models.
4.1 Layers Standards of the FireWire-CAM Series
Hardware / Protocol
At the hardware layer the standard IEEE 1394 (FireWire) is used.
Since IEEE 1394 defines a data bus certain protocols are required that
establish the data exchange between the devices.
With DCAM (described in the specification DCAM V1.31) The
PHYTEC cameras use a protocol that defines the transmission of
uncompressed image data streams as well as the camera parameter
settings (e.g. exposure time).
Driver
The protocol is realized on the processor end with the help of a WDM
Stream Class driver. WDM stands for „Windows Driver Model“. For
mice, keyboards, drives etc. this is standard for a long time. For
automated image processing, practical application with support of the
FireWire interface with Windows 2000 or better or DirectX 8 is
recommended.
Software Interface
Application software should ideally access the operating system
functions and not the hardware itself. Windows offers DirectX for
image and audio processing. Since the PHYTEC FireWire-CAM only
delivers image data streams, only the portion DirectShow is required.
DirectShow automatically recognizes the WDM Stream Class driver.
Therefore when using the FireWire-CAM no additional software is
required (excluding the actual application software).
© PHYTEC Messtechnik GmbH 2006 L-680e_1
71

FireWire-CAM-011H/-012H
Consequence for the Application Software
a) If you want to use a ready-made application software, it must be
compatible with DirectX (nearly all multimedia products fulfill
this requirement).
b) If you plan on creating your own application software and already
have experience programming with DirectX, you can access the
PHYTEC FireWire-CAM WDM driver directly with DirectX. The
corresponding programming description is available in the
DirectX-SDK from Microsoft. The functions made available by
the PHYTEC FireWire-CAM are described in section
„
Camera Settings“.
3.4,
c) If instead you are accustomed to programming frame grabbers
(such as the PHYTEC pciGrabber-4plus), then the enormous
complexity of DirectX is a hurdle that shouldn’t be under-
estimated. Therefore PHYTEC offers a DirectX-Wrapper in the
FireWire-SDK which enables easy access to all of the
FireWire-CAM’s functions without requiring that the programmer
become familiar with the complexities of DirectX.
The SDK includes the connections to various programming interfaces:
- .NET Components: for MS Visual Basic .NET and C# .NET
- ActiveX Control: for Microsoft Visual Basic 6
- C++ Class Libary: Microsoft Visual C++ 6 and Visual C++ .NET
Note:
The FireWire-SDK is included with the camera package. You will find
it on the „Vision Tools“-CD SO-221.
You can install it in the CD’s FireWire dialog (see Figure 16). For
each of these interfaces the SDK makes all required binaries, Headers
and Libraries available, including an extensive help menu as well as
example projects and demo programs with source code.
The DirectX-Wrapper reduces the complexity of DirectX and makes a
logically simple interface available to the programmer.
72 © PHYTEC Messtechnik GmbH 2006 L-680e_1

The Software Concept
4.2 Accessing the Camera Driver
Section 4.1 describes the standard layer in terms of the PHYTEC
FireWire-CAM series.
A progammer sees these cameras at the layer of a WDM Stream Class
driver. The communication between this type of driver and an
application software is defined by the standard called DirectX /
DirectShow.
There are three typical ways of accessing a WDM Stream Class
driver.
• Programmers who have experience using DirectX can access
these drives directly using DirectX.
• Programmers who are not experienced with DirectX can
access the driver with the help of the PHYTEC FireWireSDKs. The SDK allows easy access from standard Windows
programming environments. In terms of software the camera
behaves similarly to a standard camera-framegrabber unit.
The FireWire-SDK with the DirectX-Wrapper is included
with the PHYTEC FireWire-CAM series. It can be found on
the CD SO-221 along with the detailed descriptions of the
functions.
• If you would rather avoid programming entirely, you can use
the Filter Graph Editor to parameter WDM Steam Class
drivers.
© PHYTEC Messtechnik GmbH 2006 L-680e_1
73

FireWire-CAM-011H/-012H
4.3 Working with the Filter Graph Editor
The following sections are a brief introduction to the Filter Graph
Editor.
With the Filter Graph Editor you can graphically program and test
(multimedia-) applications completely or partially.
The functions shown as „DirectShow Filters“ are available to you for
this purpose.
4.3.1 How to Get the Filter Graph Editor
The Filter Graph Editor (also called „graphedit“ or „graphedt.exe“ ) is
a component of Microsoft’s DDK, that can be downloaded for free
from
It is also part of Microsoft’s DirectX SDK, which is available at
www.msdn.microsoft.com/downloads/default.asp (once on that page
click on „Downloads by Topic“, „Graphics and Multimedia“,
„DirectX“ and „DirectX 9.0b SDK“).
Please note that Microsoft does not include the Filter Graph Editor
source code or permit redistribution.
www.microsoft.com/ddk/.
4.3.2 Working with the Filter Graph Editor
The Filter Graph Editor is a limited tool. It consists only of the
executable program graphedt.exe and is therefore easy to locate in the
DDK/SDK-Kit. No special installation is required. graphedt.exe can
be started easily from any folder.
A detailed description of the Filter Graph Editor is available in
program’s help function.
74 © PHYTEC Messtechnik GmbH 2006 L-680e_1

The Software Concept
4.3.3 How the Camera Appears in the Filter Graph Editor
In the „Graph“ menu select „Insert Filters...“. You will be shown a list
of Filters, that are available in the operating system.
The camera’s WDM Stream Class driver is also considered a filter of
this type and is located in the folder „Video Capture Sources“.
The filter parameters (i.e. the camera settings) can be modified by
right-clicking on the name of the filter in question. In our case this is
either FCAM-xxx. By selecting „Filter Properties...“ you will be taken
to the setting dialog shown in section
3.4.
Please note that the camera parameters are not stored in the camera
but rather in the registry of the computer that the camera is connected
to.
© PHYTEC Messtechnik GmbH 2006 L-680e_1
75

FireWire-CAM-011H/-012H
76 © PHYTEC Messtechnik GmbH 2006 L-680e_1

Technical Data
5 Technical Data
FCAM-011H = AK062, monchromatic
FCAM-012H = AK063, Color
FCAM-111H = AK064, monchromatic with trigger
FCAM-112H = AK065, Color with trigger
Characteristic Data
Video Format
Refresh Rate
Sensitivity
Gamma 1 bis 2,2 selectable (0,1 step size)
Dynamic Range
S/N – Ratio ADC: 9-bit (25°C, Gain. 0 dB)
Optical Data
Image Sensor
Type
Sensor Format 1/3"
Resolution 1024 x 768 (H x V)
Pixel Size
Lens Attachment C / CS – Mount
Electrical Interface
Power Supply 8 ... 30 V DC
Current Consumption ca. 200 mA (at 12 V)
Data Interface
Remote Control (Input) IEEE 1394a
Synchronization (Input) IEEE 1394a
Synchronization (Output) IEEE 1394a
Video (Output) IEEE 1394a
Connections:
Trigger_In AK064 / AK065: 3,3 ... 12 V
AK062 / AK064: 1024 x 768 Y800 (8-bit)
AK063 / AK065: 1024 x 768 YUV (4:2:2)
AK062 / AK064: 3,75 / 7,5 / 15 / 30
picture/s
AK063 / AK065: 3,75 / 7,5 / 15 frames/s
AK062 / AK064: 0,05 lx
AK062 / AK064: 0,5 lx
(exposure time 1/30s, Gain 20 dB)
ADC: 10-bit
Exit: 8-bit
AK062 / AK064: Sony ICX 204AL
AK063 / AK065: Sony ICX 204AK
CCD Interline-Transfer
Progressive Scan
5,6μm x 5,6μm
IEEE 1394a
(FireWire / i.LINK)
Data: 6-pin. IEEE 1394 socket
additionally
AK064 / AK065: BNC socket (50 Ω)
© PHYTEC Messtechnik GmbH 2006 L-680e_1
77

FireWire-CAM-011H/-012H
Mechanical Data
Dimensions 50 mm x 50 mm x 55,7 mm (HxBxT)
Housing Aluminium, black
Monting plate with photo thread
1/4" x 8mm (max.) and M6 x 8mm
Dimensions:37,5 x 35 x 8 mm
Attachment
Weight approx. 180 g
Setting Options (manual via IEEE 1394a Bus)
Exposure Time 1/10.000 ... 30 s
Gain 0 ... 36 dB
Offset 0 ... 255
Gamma 1 / 2,2 (0,1 step size)
Hue (AK063/065 only) -180° to 179°
Color Saturation (AK063/065
only)
White Balance(AK063/065
only)
Automatic Operation
Exposure Time Control 1/10.000 ... 30 s
Gain Control 0 ... 36 dB
Offset 0 ... 255
White Balance (AK061 only) -2...10 dB
Environmental Conditions
Operating Temperature -5 °C ... 45 °C
Storage Temperature -20 °C ... 60 °C
Max. Humidity 90 % no condensation
Mountable on 2 sides (with M2 x 6)
alternatively direct mounting on 4
mounting holes M2
Spacing 23 x 30 mm (BxT)
Insertion depth max. 2 mm
0 ... 200 %
-2...10 dB
78 © PHYTEC Messtechnik GmbH 2006 L-680e_1

Dimensions
6 Dimensions
Figure 52: Dimensions
© PHYTEC Messtechnik GmbH 2006 L-680e_1
79

Document: FireWire-CAM-011H / 012H / 111H / 112H
Dokument Number: L-680e_1, May 2006
Suggestions for Improvement
How would you improve this manual?
Did you find any mistakes in this manual? Seite
Submitted by:
Customer number:
Name:
Company:
Address:
Return to:
PHYTEC Technologie Holding AG
Postfach 100403
D-55135 Mainz, Germany
Fax : +49 (6131) 9221-33
© PHYTEC Messtechnik GmbH 2006 L-680e_1

Published by
© PHYTEC Messtechnik GmbH 2006 Ordering No. L-680e_1
Printed in Germany
 Loading...