

Page 1
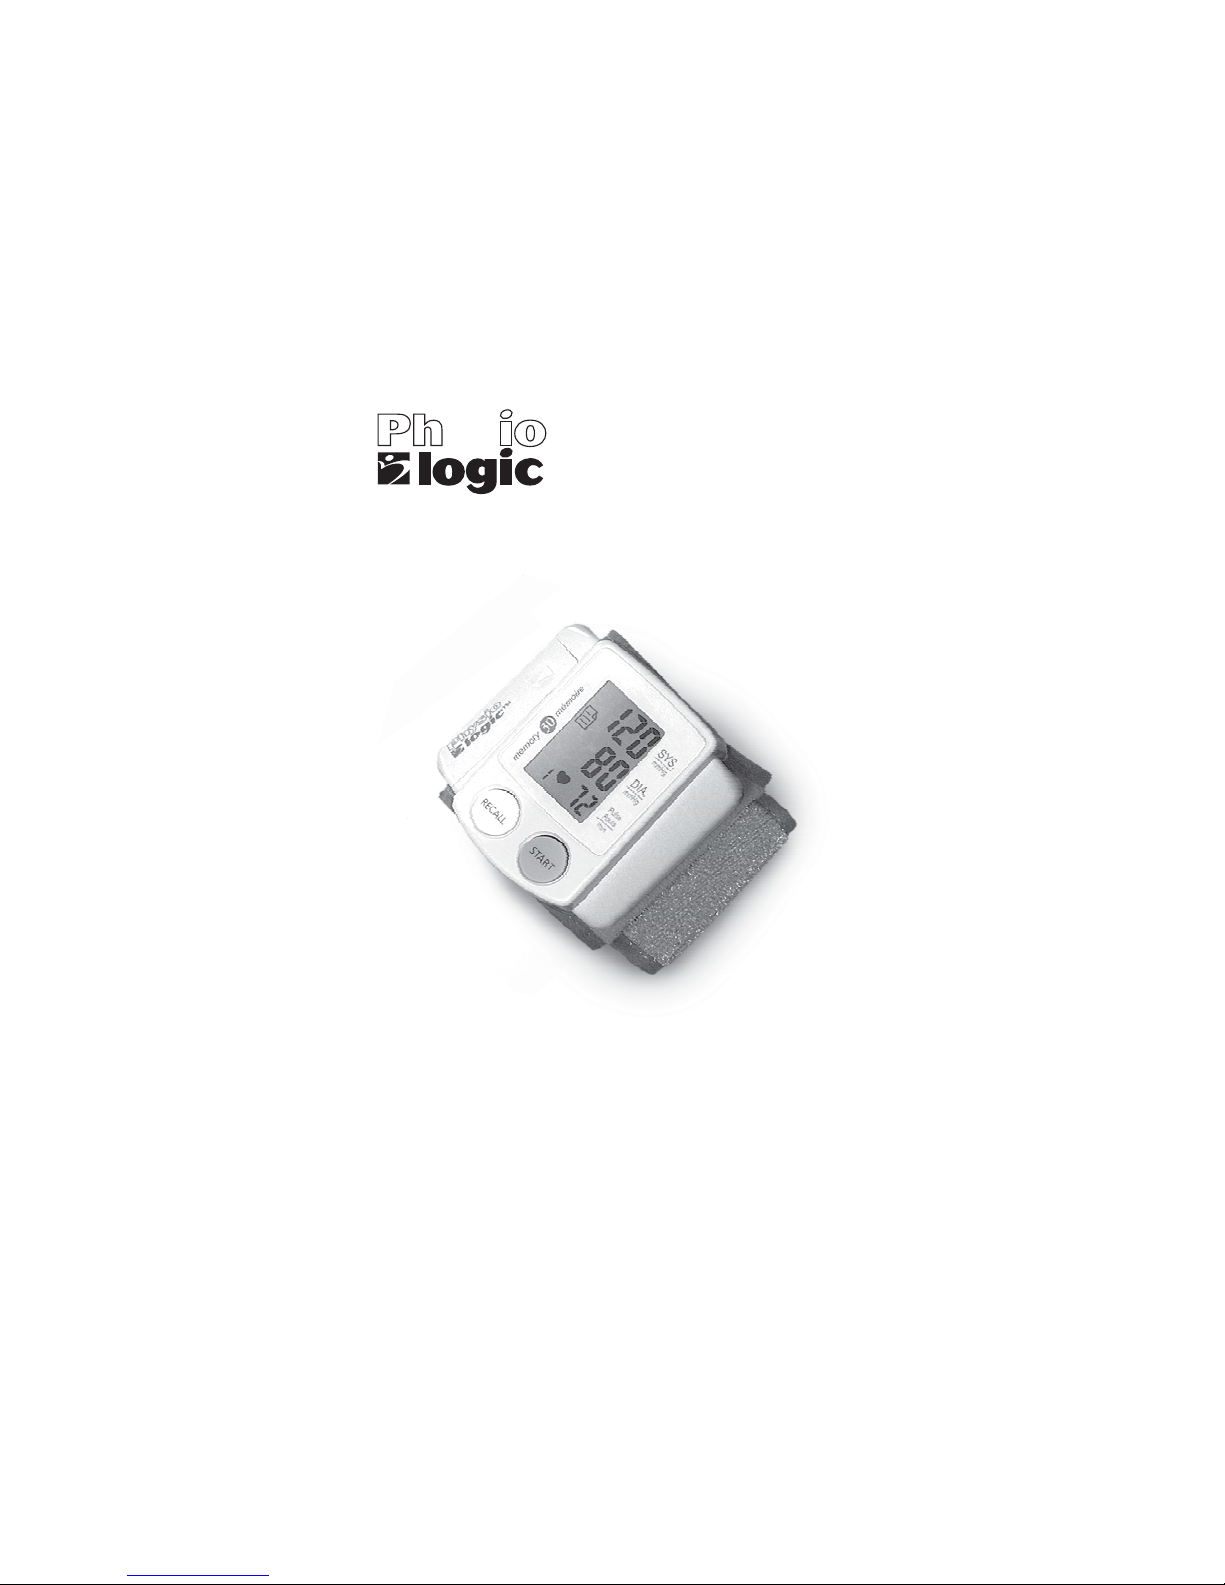
ys
Automatic Wrist
Blood Pressure Monitor
TM
with Step Valve Technology
Instruction Manual
Features:
• Step Valve Technology
• Memory for up to 30 readings
• One-Touch Operation
• Easy-to-read Display
• Auto Shut-Off
106-965
Page 2

Table of Contents
Step valve measuring technology ........................3
Statement of accuracy .................................3
About blood pressure .................................3
Blood pressure standard ...............................4
Blood pressure fluctuation .............................4
Before taking a measurement ...........................5
Name / function of each part............................6
Installing batteries....................................7
Carrying case .......................................7
Display explanation ..................................8
Recalling memory....................................8
Applying the arm cuff.................................9
Correct measuring posture .............................9
Taking a measurement ...............................10
Troubleshooting ....................................11
Cautionary notes ....................................11
Specifications ......................................12
2
Page 3

Step Valve Measuring Technology
This Physio Logic™ monitor uses the oscillometric method to
detect your blood pressure. Before the cuff starts inflating, the
device will establish a baseline cuff pressure equivalent to the air
pressure. Your Physio Logic™ monitor will determine the
appropriate inflation level based on your pressure oscillations,
followed by cuff deflation. Step valve technology uses an
electronic valve system as opposed to the traditional mechanical
valve system, allowing the monitor to analyse oscillations during
measurement and adjust cuff pressureaccordingly.Adjustments in
cuff pressure occur in steps and result in an audible ticking as the
valve releases air from the cuff. Releasing pressure in steps allows
the monitor to analyse oscillations in thecuff and evaluate them for
accuracy.During the deflation, the device willdetect the amplitude
and slope of the pressure oscillations and determine the systolic,
diastolic, and pulsefor you.
Statement of Accuracy
Blood pressure measurements determined with Physio Logic™
are equivalent to those obtained by a trained observer using cuff /
stethoscope auscultation method, within the limits prescribed by
the American National Standard for Electronic or Automated
Sphygmomanometers (ANSI /AAMI).
About Blood Pressure
Blood pressure is the pressure exerted on the arterial wall while
blood flows through the arteries. The pressure measured when the
heart contracts and sends blood out of the heart is systolic
(highest). The pressure measured whenthe heartdilates with blood
flowing back into the heart is called diastolic (lowest) blood
pressure.
3
Page 4
Blood Pressure Standard
The World Health Organization (WHO) and the National High
Blood Pressure Education Program Coordinating Committee
have developed a blood pressure standard, in which areas of low
and high risk blood pressure are identified. This standard is a
guideline as blood pressure varies among different people and
different age groups.
It is important that you consult with your physician regularly.
Your physician will tell you your normal blood pressure range as
well as the point atwhich you willbe considered at risk.
Blood Pressure for Adults Age 18 and Older
Category Systolic (mm Hg) Diastolic (mm Hg)
Stage 2 Hypertension 160 100
Stage 1 Hypertension 140-159 90-99
Prehypertension 120-139 80-89
Normal < 120 < 80
³³or
or
or
and
Blood Pressure Fluctuation
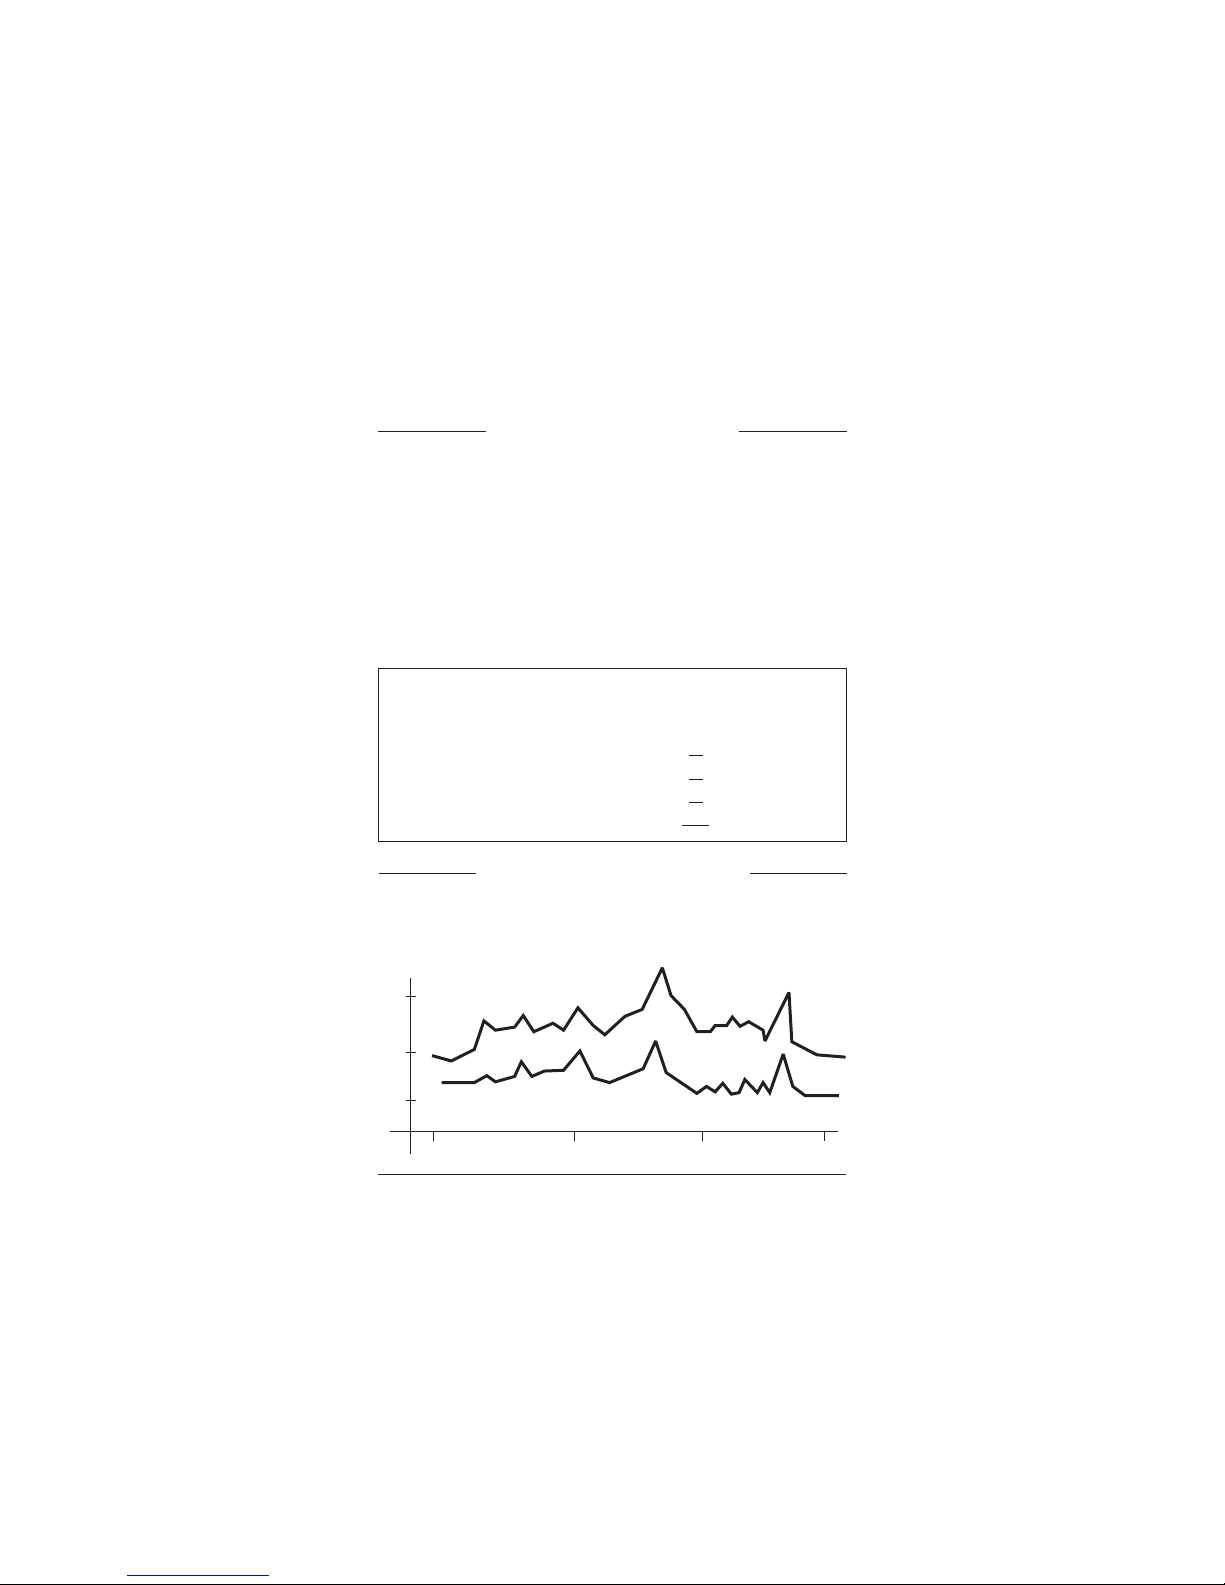
Blood pressure fluctuates all the time! You should not be overly
worried if you encounter two or three measurements at high levels.
Blood pressure changes over themonth and throughoutthe day.
mmHg
150
100
50
WakeupArrive
6:00
(Case:
Male, 35 years old)
office
Telephone
Discussion
12:00
Argument
in a meeting
4
Systolic
Diastolic
18:00
Leave
office
Dinner
/ Sleep
Midnight
Page 5

Before Taking a Measurement
Tohelp you obtainmore accurate readings:
• Urinate if necessary.
• Remove any clothing and jewellery from your left arm. Placing
the cuff on anything other than bare skin can result in an
inaccurate reading.
• Sit in a comfortable position with your legs and ankles uncrossed
and your backsupported.
• Sit quietly for 15 minutesbefore measuring yourblood pressure.
• If you need to retake a reading, wait at least 5 minutes to allow
your circulation toreturn tonormal.
• Pick a time of day, and take your blood pressure at about the same
time everyday. Since your blood pressure variesat differenttimes
of the day, this will make it easier for you to compare your daily
blood pressure readings. A good time to take your blood pressure
is in themorning, before breakfast.
• Don't smoke, eat or exercise for 30 minutes before taking your
blood pressure. Theseactivities can change yourblood pressure.
• Do not measure your blood pressure immediately after
consuming a large meal. To obtain more accurate readings,
please wait onehour beforemeasuring.
• Only take your blood pressure in a quiet place and when you are
relaxed. Don't take your blood pressure when you are under
stress.Any stress will raiseyour blood pressure.
• Position your arm so thatthe cuff isat the level of yourheart.
• If the monitor is stored at very low temperature (near freezing),
place it ina warmlocation for atleast one hour beforeusing it.
5
Page 6
Name / Function of Each Part
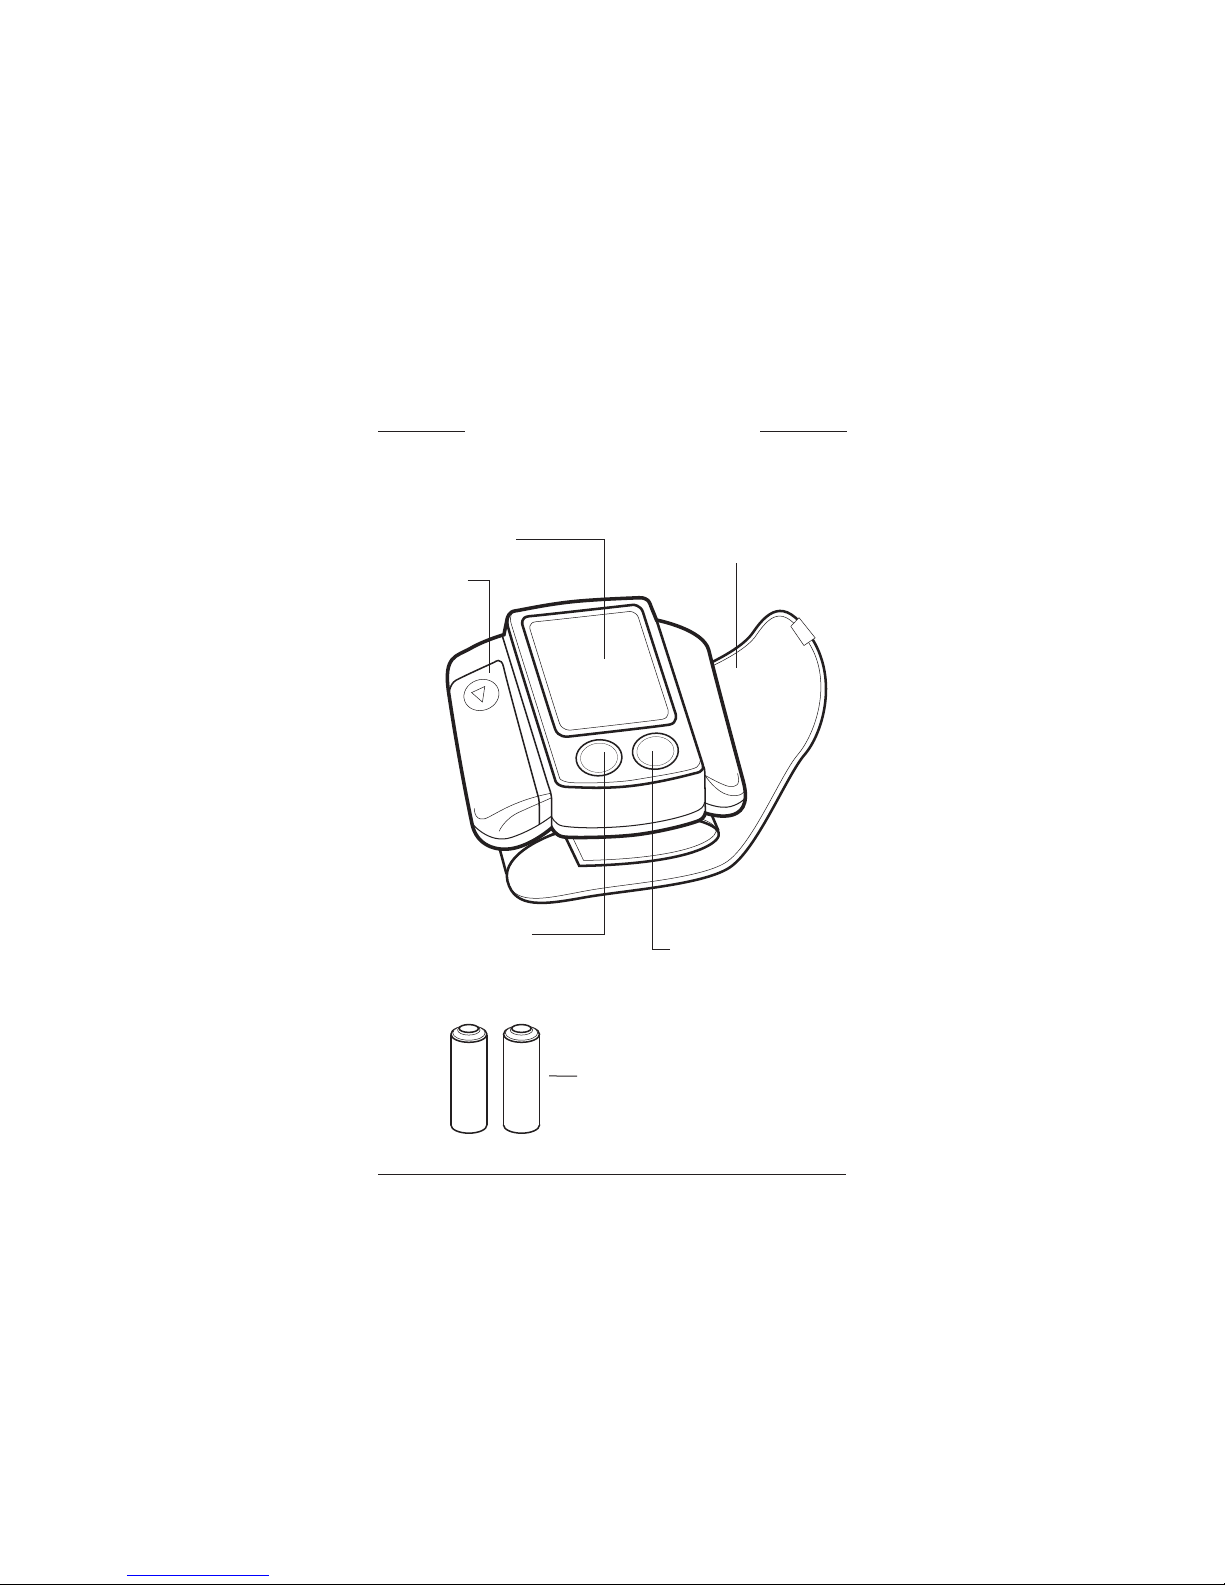
LCD display
Battery
cover
Memory
Recall key
Wrist cuff
Start key
2 “AAA” size,
1.5 V Alkaline batteries
6
Page 7
Installing Batteries
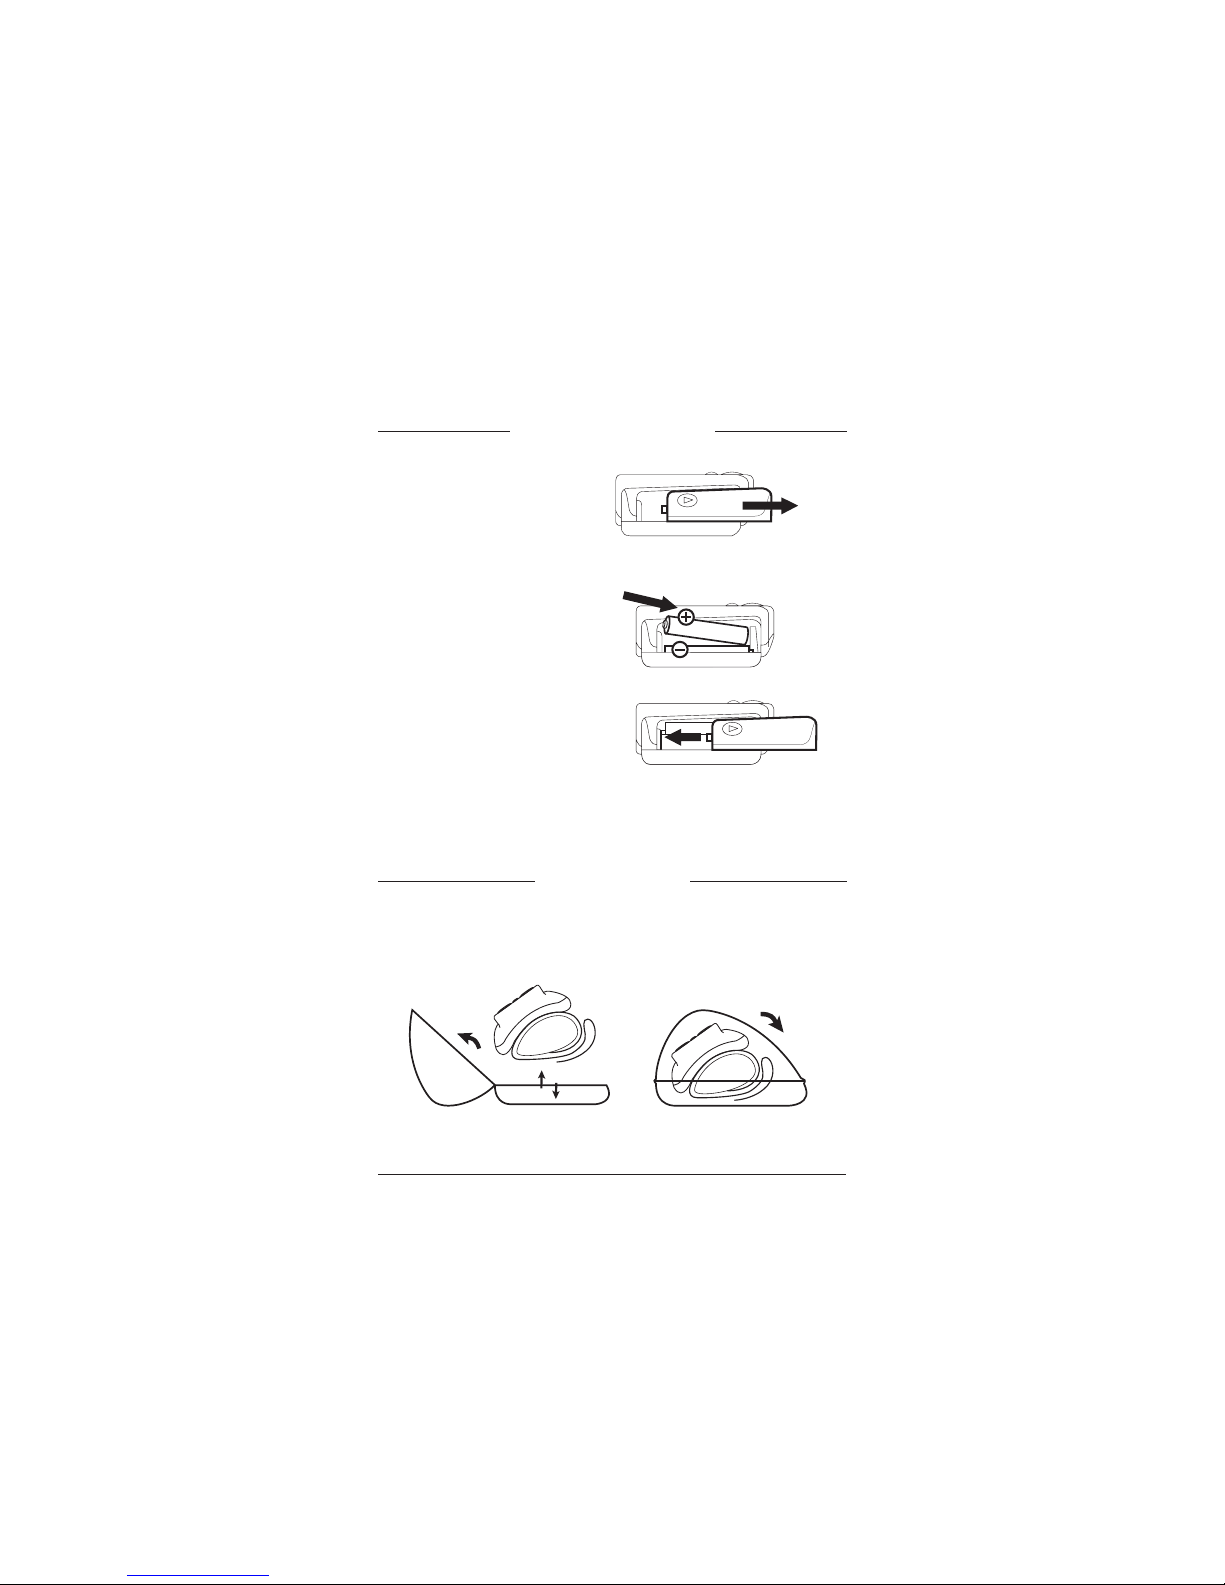
1. Slidebattery cover off.
2. Installlower battery first.
Ensure correct polarity.
Battery type: 2Alkaline 1.5V
LR03 (AAA) size.
3. Replacethe battery cover.
Replace batteries when:
1. Lowbattery icon appears
on display.
2. Nothing appears in the
display when the power
is switched on.
Carrying Case
Please store your blood pressure monitor in the carrying case
as shown below.
7
Page 8
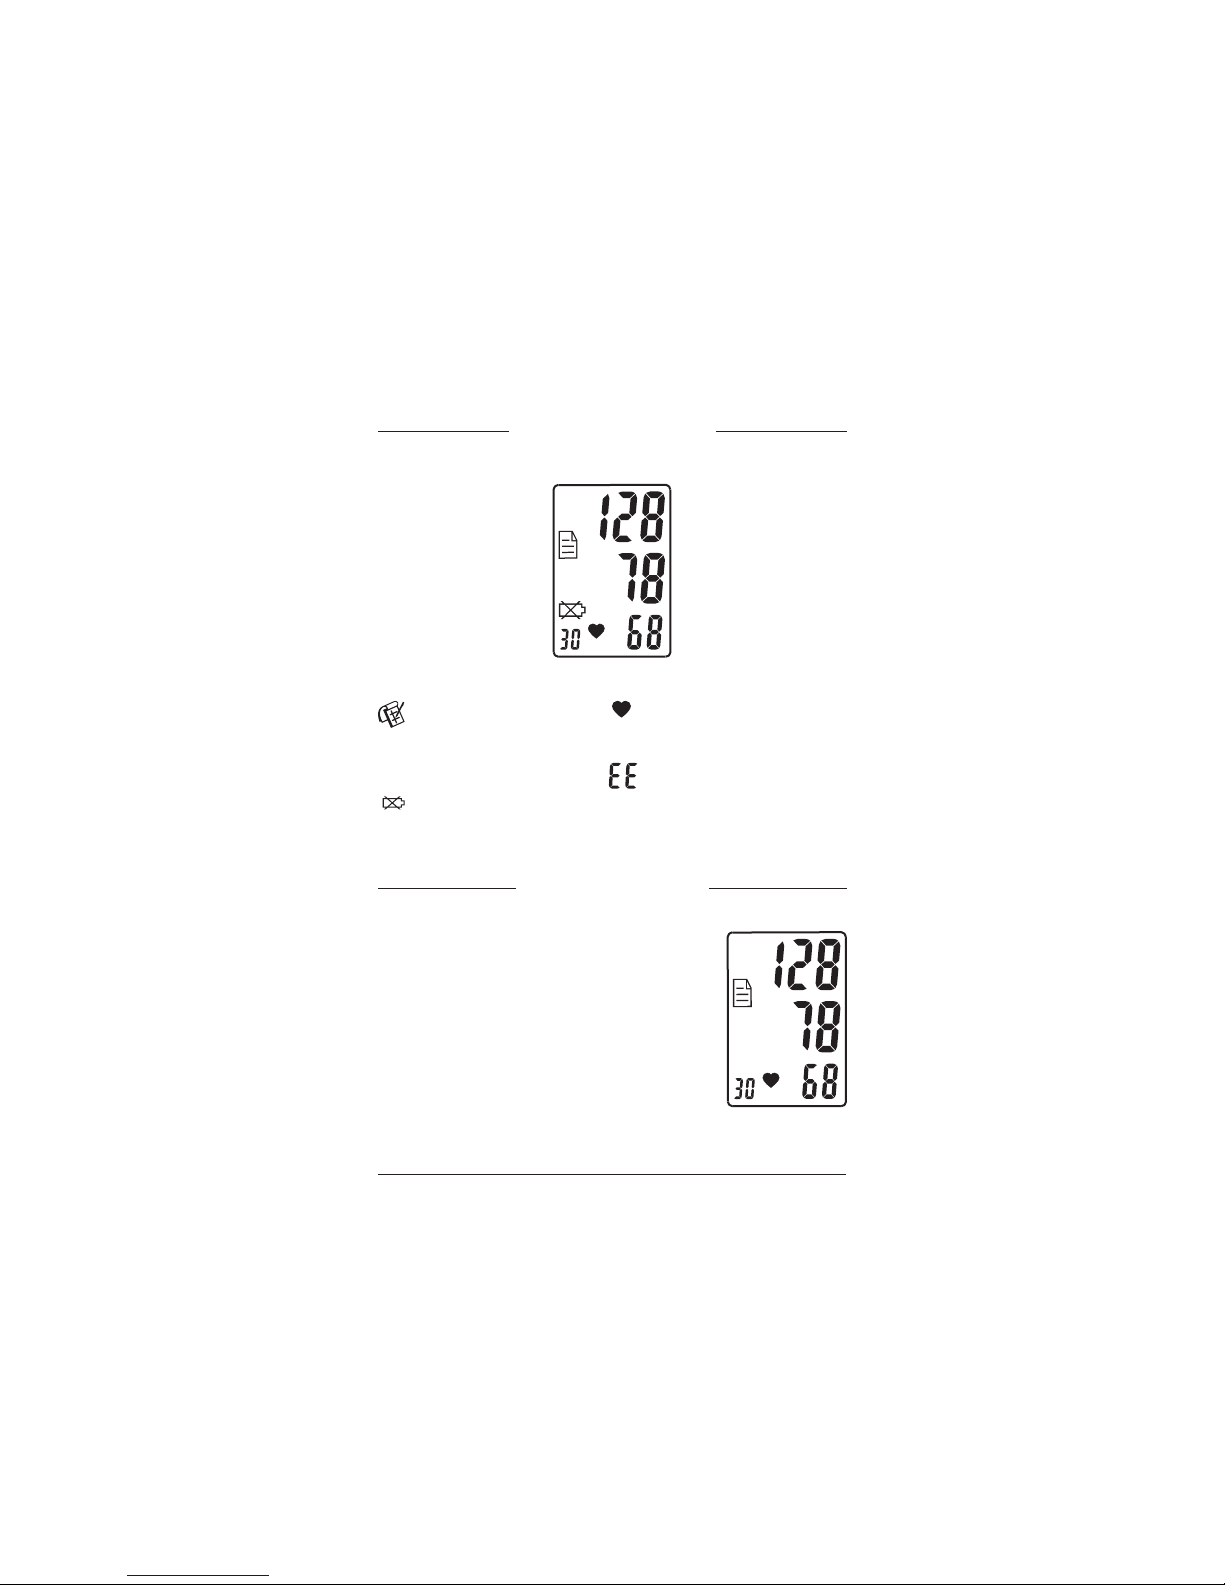
Display Explanation
Memory mark
Weak battery mark
No. of memory
sequence
Systolic pressure
Diastolic pressure
Pulse rate
Appears when a
measurement value is
stored in memory or is
recalled from memory.
Appears when batteries
should be replaced.
Shows the pulse rate per
minute.
Occurs when an error was
made during measurement.
Recalling Memory
1. To recall stored blood pressure readings
from memory, simply press the Recall key.
The last set of memorized readings will be
displayed.
2. Another press of the Recall key will recall
the previous set of readings.
Note: The data will be erased when any of the
batteries are removedfor atleast 10 seconds
8
Page 9
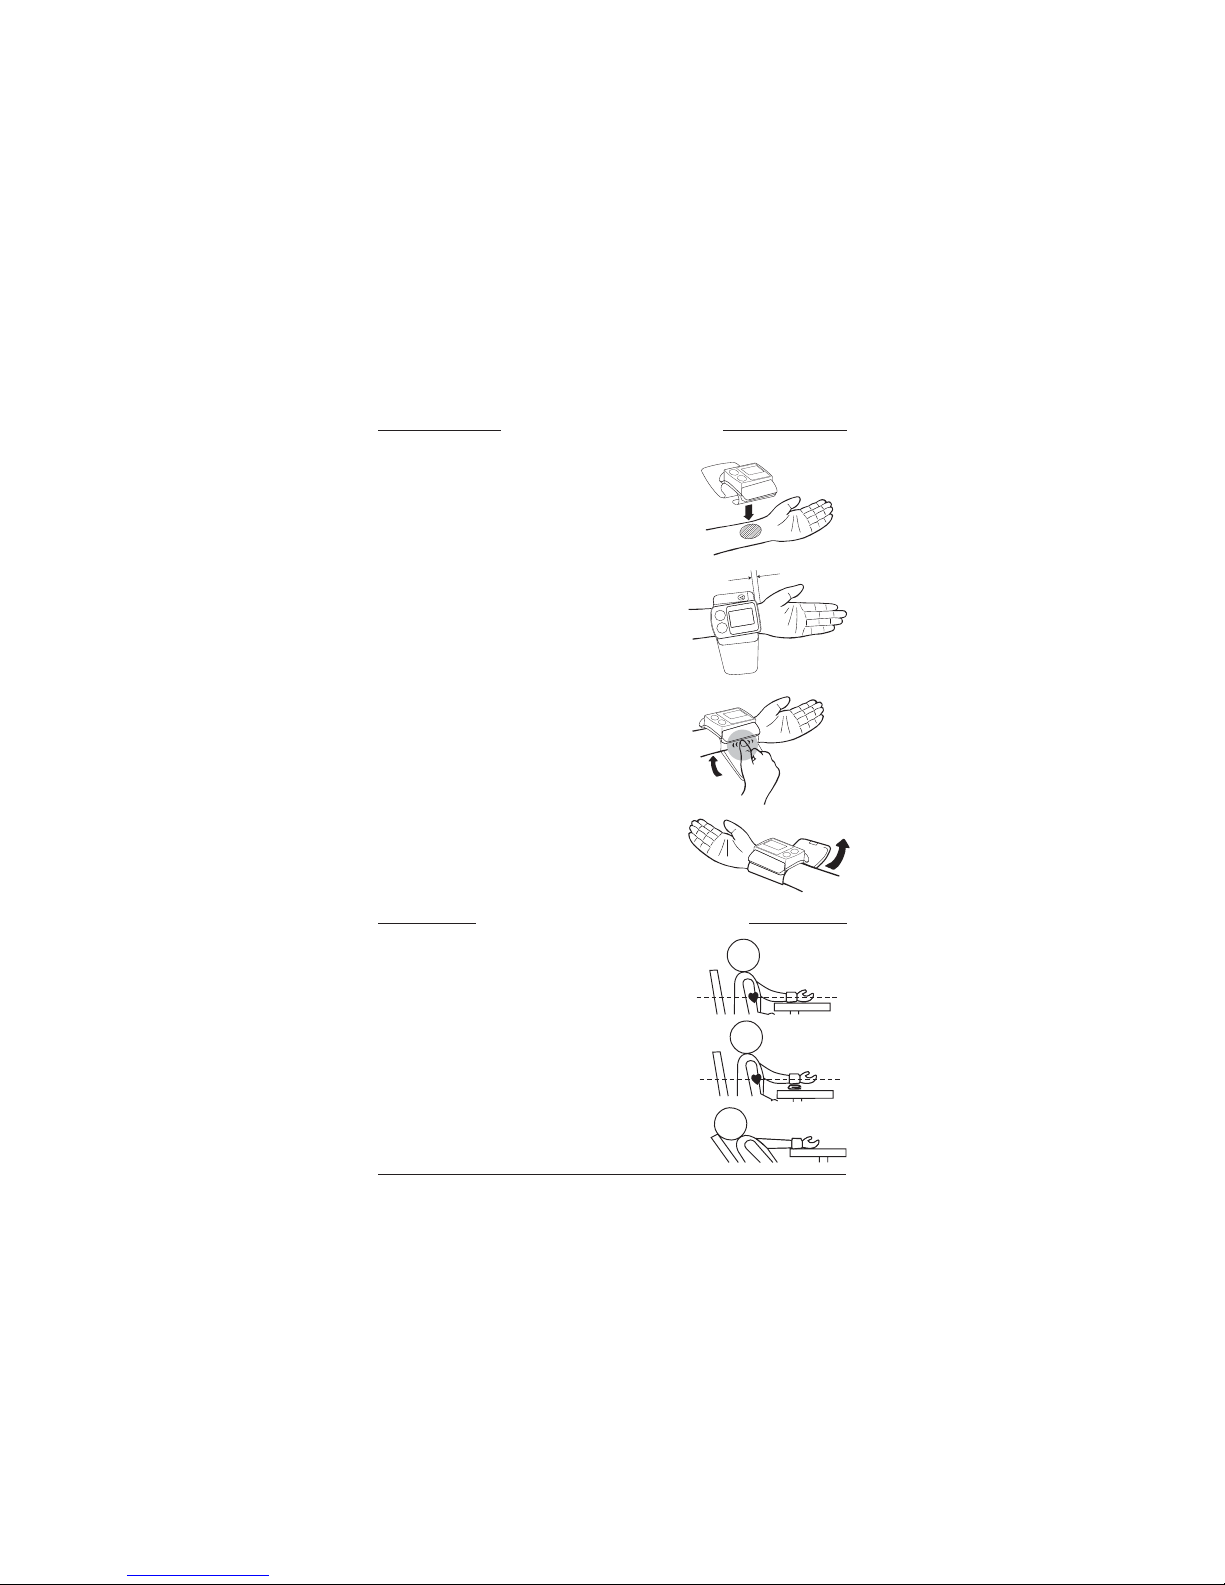
Applying the Arm Cuff
1. Remove all watches, jewellery, etc.
prior to attaching the wrist monitor.
Clothing sleeves should be rolled up
and the cuff should be wrapped on bare
skin for correct measurements.
2. Apply cuff to the left wrist with the
palm facing upas inFigureA.
3. Make sure the edge of the cuff is about
1 cm from the palmas in FigureB.
4. Fasten the velcro strap securely around
your wrist so there is no extra space
between the cuff and the wrist as in
Figure C. If the cuff is not wrapped
snugly enough (snug, not tight), the
measurement will befalse.
5. If your physician has diagnosed you
with poor circulation in your left arm,
carefully place the cuff around your
right wrist as shown inFig. D.
Correct Measuring Posture
1. Place your elbow on a table so that the
cuff is atthe same level asyour heart.
2. If the cuff is not at the same level as
your heart, use a soft object such as a
folded towel to support your forearm
in a horizontalposition.
3. Turn your palm upwards, sit upright in
a chair, and take 5-6 deep breaths.
Avoidleaning back.
Fig. A
Fig. B
Fig. C
Fig. D
(X)
9
Page 10
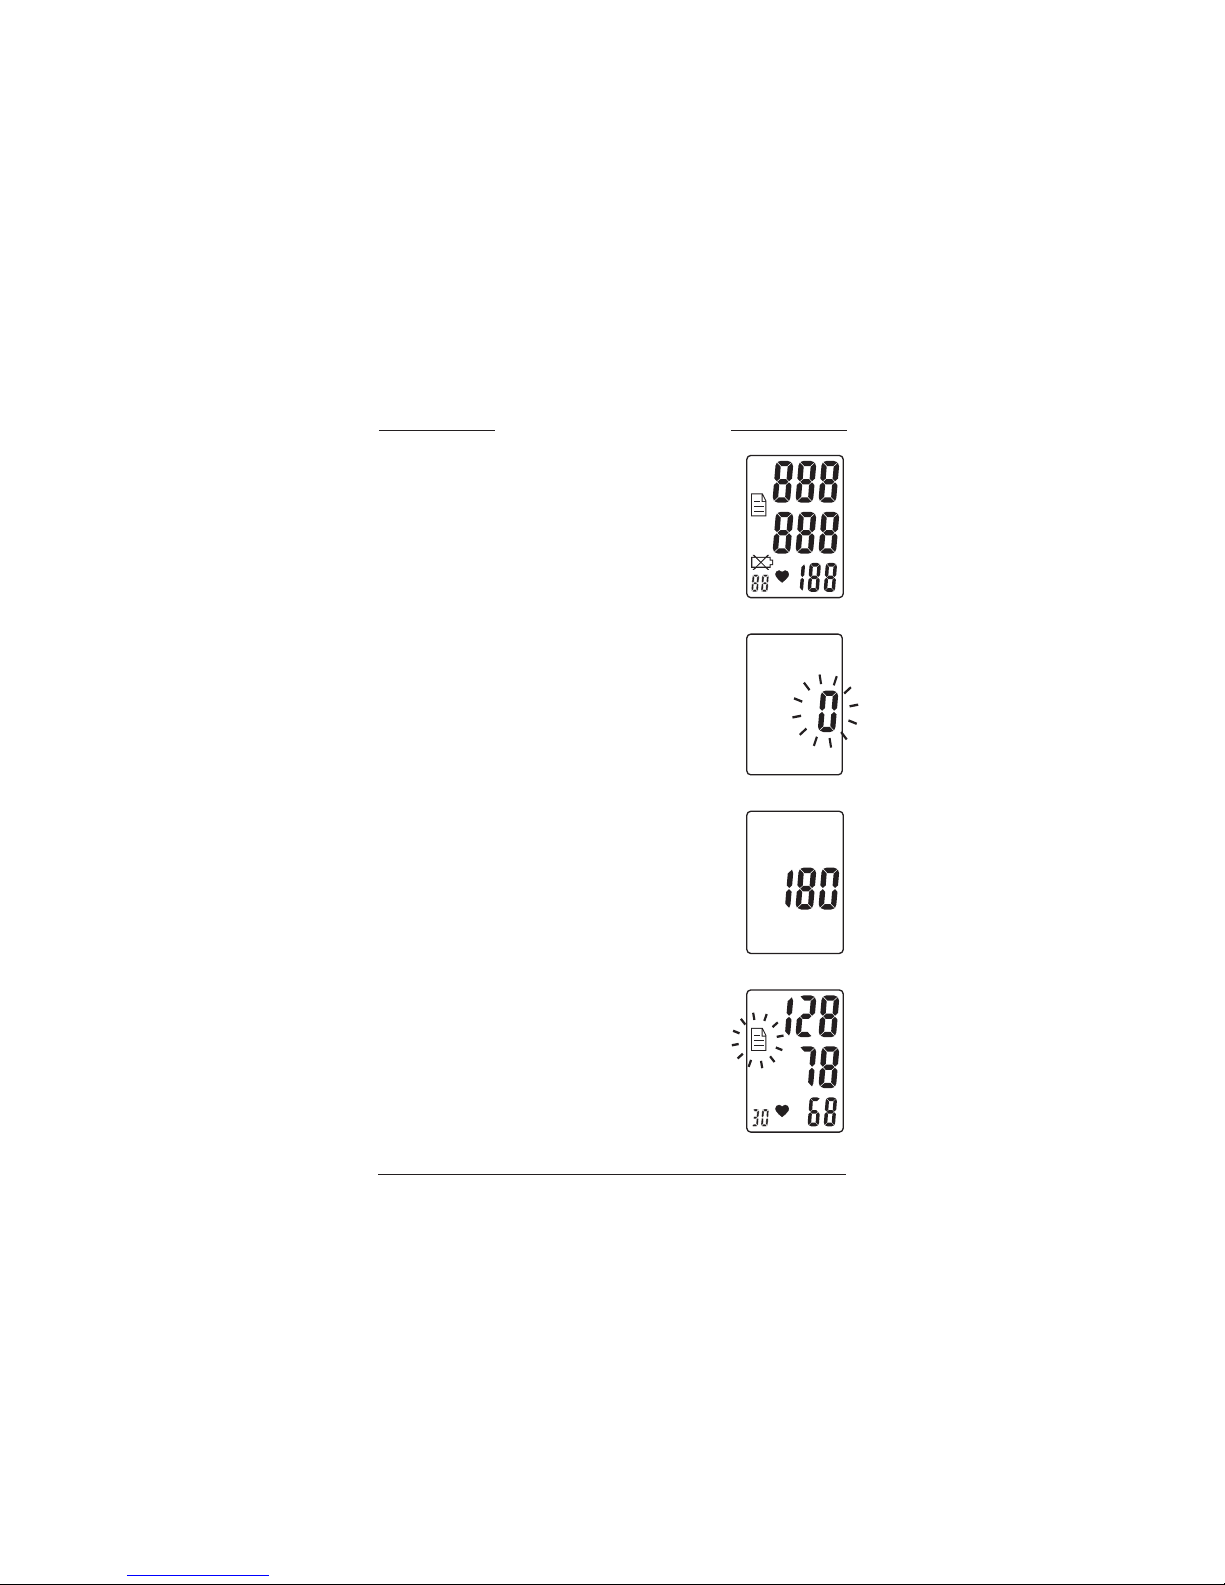
Taking a Measurement
1. Wrap the cuff on the wrist. Press the START
key. All digits will light up checking the
display functions . This will take
approximately 2 seconds.
2. After all the symbols appear, the display
will show a “0” . The monitor is
now ready to measure.
3. Once the monitor inflates the cuff to
approximately 180 mmHg, the measurement
will begin .
4. When the measurement is completed,
systolic, diastolic and pulse will show
simultaneously on the LCD screen (see fig.4)
and be saved automatically in the memory
system. A maximum of 30 measurements can
be saved in the unit’s memory .
Note: The monitor will re-inflate
automatically to approximately 220 mmHg if
the system detects that it needs more pressure
to do a measure.
(see fig.1)
(see fig.2)
(see fig.3)
Fig. 1
Fig. 2
Notes: This monitor automatically switches off
approximately 30 seconds after last key
operation.
To interrupt the measurement, simply
press any key. The cuff will deflate
immediately after any key is pressed.
During the measurement, do not talk or
move your arm or hand muscles.
10
Fig. 3
Fig. 4
Page 11

Troubleshooting
Symptom:
new alkaline batteries. If the batteries are not in the correct
position, re-insert themwith thecorrect polarities.
Symptom:
is displayed excessivelylow (high).
correctly.If you talked or movedduring the measurement,measure
it again quietly. If the wrist was shaken during the measurement,
repeat measurement.
Note: If the unit does not work, please call our consumer
information line at 1-800-363-2381. Under no circumstance
should you disassemble the unitand attempt repairs.
No display when the STARTbutton ispressed.
Correction:
Correction:
If the batteries have run down, replace them with
EE
mark shown on display or the blood pressure value
Wrap the cuff properly so that it is positioned
Cautionary Notes
1. Avoid extreme temperatures, humidity, and direct sunlight.
Avoidstrongly shocking themain unit, and protectit from dust.
2. Clean the blood pressure monitor body and the cuff carefully
with a slightly damp, soft cloth. Do not press. Do not wash the
cuff or usechemical cleaner.
3. Donot press the Startkey when the cuffis not onthe wrist.
4. Removethe batteries when theunit isnot used fora long time.
5. Theunit should not beoperated bychildren.
6. This device might not be suitable for use by people with poor
blood circulation, common arrhythmias, such as atrial or
ventricular premature beats or atrial fibrillation. It is not
designed for ambulatoryuse.
11
Page 12

Specifications
Measurement method : Oscillometric
Measurement range : Pressure: 20 to 280 mmHg ;
Pulse: 40 to 180 beats / min.
Pressure sensor : Semi conductor
Accuracy : Pressure: ± 3 mmHg;
Pulse:±5%ofreading
Inflation : Pump driven
Deflation : Automatic pressure release valve
Memory : Up to 30 readings
Auto-shut-off : 30 seconds after last button operation
Operation temperature :
Operation humidity : 40 to 85 % RH maximum
Storage temperature :
Storage humidity : 10 to 95 % RH maximum
Power source : 3V DC, two LR03 1.5 V “AAA”
Dimensions : 81 (L) x 78 (W) x 78 (H) mm
Weight : 115 g (G.W.) (without batteries)
Wrist circumference : 13.5 to 19.5 cm (5.3” to 7.7”)
Minimum age to use : 18 years old
* Specifications are subject to change without notice.
10°C to 40°C (50°F to 104°F)
-5°C to 60°C (23°F to 140°F)
batteries
Consumer Info-Line: 1-800-363-2381
AMG MEDICAL INC.
8505 Dalton, Montreal, QC H4T 1V5
www.amgphysiologic.com
www.amgmedical.com
12
P/N 803-041 REV: 1.0 0504
 Loading...