


N-Pen N 110
Manual and User Guide
Please read this manual before operating this product
PSI, spol. s r. o., Drásov 470, 664 24 Drásov, Czech Republic
FAX: +420 511 440 901, TEL: +420 511 440 011, www.psi.cz

© PSI (Photon Systems Instruments), spol. s r. o.
2
© PSI (Photon Systems Instruments), spol. s r. o. (hereinafter PSI), 2018
This document and its parts can be copied or provided to a third party only with the express permission of PSI.
The contents of this manual have been verified to correspond to the specifications of the device. However, deviations cannot
be ruled out. Therefore, a complete correspondence between the manual and the real device cannot be guaranteed. The
information in this manual is regularly checked, and corrections may be made in subsequent versions.
The visualizations shown in this manual are only illustrative.
This manual is an integral part of the purchase and delivery of equipment and its accessories and both Parties must abide
by it.

© PSI (Photon Systems Instruments), spol. s r. o.
3

© PSI (Photon Systems Instruments), spol. s r. o.
4
TABLE OF CONTENTS
1 Information Before Using N-Pen Device ......................................................................................................................... 5
2 Technical Specification .................................................................................................................................................... 6
3 General Information ....................................................................................................................................................... 7
3.1 Device Description ................................................................................................................................................. 8
4 List of Equipment and Customer Information ................................................................................................................ 9
5 Care and Maintenance .................................................................................................................................................. 10
6 Principle of Measurement ............................................................................................................................................ 11
7 How to Get Started ....................................................................................................................................................... 12
7.1 Measurement ...................................................................................................................................................... 12
8 Control Menu Tree ........................................................................................................................................................ 13
9 USB and Bluetooth Connection..................................................................................................................................... 18
9.1 USB Connection ................................................................................................................................................... 18
9.2 Bluetooth Connection ......................................................................................................................................... 19
9.3 Bluetooth Pairing ................................................................................................................................................. 19
10 FluorPen Software ................................................................................................................................................... 23
10.1 Software Installation ........................................................................................................................................... 23
10.2 Menu and Icon Explanation ................................................................................................................................. 24
10.2.1 Main Menu ................................................................................................................................................. 24
10.2.2 Menu Settings ............................................................................................................................................. 25
10.2.3 Menu Online Control .................................................................................................................................. 26
10.3 Data Transfer ....................................................................................................................................................... 27
10.4 Firmware Update ................................................................................................................................................. 29
11 GPS Module ............................................................................................................................................................. 31
11.1 GPS / N-Pen Operation ........................................................................................................................................ 31
11.2 Data Download .................................................................................................................................................... 32
12 Warranty Terms and Conditions .............................................................................................................................. 33
13 Troubleshooting and Customer Support ................................................................................................................. 34

© PSI (Photon Systems Instruments), spol. s r. o.
5
1 INFORMATION BEFORE USING N-PEN DEVICE
Read this manual carefully before operating the device. If you are not sure about anything in the manual, contact the
manufacturer for clarification.
By accepting the device, the customer agrees to follow the instructions in this guide.
Always follow corresponding manuals while working with the N-Pen device or doing the maintenance.
It is forbidden to interfere with the hardware or software of the N-Pen device in any way without previous agreement with
the manufacturer.
The following table presents basic highlight symbols used in this manual:
Symbol
Description
Important information, read carefully.
Complementary and additional information.
Tab. 1 Used symbols.

© PSI (Photon Systems Instruments), spol. s r. o.
6
2 TECHNICAL SPECIFICATION
Measured Parameters:
Nitrogen content calibrated for particular plant
Measuring Light:
Dual wavelength light source – 565 nm, 760 nm
Detector Wavelength Range:
500 to 800 nm bandpass filters
Memory Capacity:
16 Mbit
PC Communication modules:
Bluetooth and USB
FluorPen Software:
Windows 7 or higher compatible*
Internal Data Logging:
Up to 100,000 data points
Display:
Graphical display
Keypad:
Sealed, 2-key tactile response
Keypad Escape Time:
Turns off after 8 minutes of no use
Power Supply:
Li-Ion rechargeable battery
Battery Capacity:
2000 mAh
Max. Charging Current:
0.5 A
Charging via USB port:
PC, power bank, USB charger, etc.
Battery Life:
48 hours typical with full operation
Low Battery Detection:
Low battery indication displayed
Size:
135 mm x 65 mm x 33 mm
Weight:
188 g
Operating Conditions:
Temperature: 0 to +55 ºC, 32 to 130 ºF; Relative humidity: 0 to 95 % (non-condensing)
Storage Conditions:
Temperature: -10 to +60 ºC, 14 to 140 ºF; Relative humidity: 0 to 95 % (non-condensing)
Warranty:
1 year parts and labor (see the last page of this Operation Manual for precise warranty conditions)
* Windows is a registered trademark of Microsoft Corporation.

© PSI (Photon Systems Instruments), spol. s r. o.
7
3 GENERAL INFORMATION
N-Pen N 110 is a light-weight, battery-powered reflectance-based instrument that provides a convenient, cost-effective
method for effective nitrogen management in plants throughout their growing season. Essentially, the N-Pen characterizes
nitrogen amount by means of reflectance and by the concept of a close link between chlorophyll content and nitrogen
content in plants.
Rugged and compact N-Pen can be used for plant biology research or for education. Due to an inbuilt GPS module and
splash-proof cover is N-Pen suitable for field experiments. The measurement is non-destructive and permits quick,
repeated monitoring throughout the growing season. The device is equipped with rechargeable Li-ion battery.
Measured data are sequentially stored in the internal N-Pen memory. Data transfer is via USB or Bluetooth communication.
Comprehensive FluorPen 1.1 software provides data transfer routines and many additional features for data presentation
in tables and graphs.
Currently Available Calibrations:
• Maize
• Wheat
• Barley

© PSI (Photon Systems Instruments), spol. s r. o.
8
3.1 DEVICE DESCRIPTION
Fig. 1 Device description.

© PSI (Photon Systems Instruments), spol. s r. o.
9
4 LIST OF EQUIPMENT AND CUSTOMER INFORMATION
Standard version of the N-Pen device package consists:
• N-Pen N 110
• Carrying Case
• FluorPen software and driver (on a USB flash disc)
• Operation Manual (PDF on a USB flash disc)
• USB Cable
• Other Accessories or Optional Features (according to your specific order)
For USB connection you need to have the USB driver installed in your PC. You find the driver on the
installation disk (USB driver folder).
If any item is missing, please, contact the manufacturer. Also check the carton for any visible external
damage. If you find any damage, notify the carrier and the manufacturer immediately. The carton and
all packing materials should be retained for inspection by the carrier or insurer.
For customer support, please write to: support@psi.cz

© PSI (Photon Systems Instruments), spol. s r. o.
10
5 CARE AND MAINTENANCE
N-Pen N 110
• Never submerge the whole device in the water!
• Keep the optical part clean and dry!
• Inspect visually the optical window after each deployment. Use soft, non-abrasive tissue for cleaning the
optical part!
• The device should not come in contact with any organic solvents, strong acids or bases.

© PSI (Photon Systems Instruments), spol. s r. o.
11
6 PRINCIPLE OF MEASUREMENT
Nitrogen content is correlating with Normalized Difference Greenness Index:
NDGI = (R
780
– R
565
) / (R
780
+ R
565
)
There are different formulas for nitrogen content in plant and grain.
After perform a measurement, the device calculates automatically the nitrogen content. The result is displayed in %.
N-Pen is pre-set by the manufacturer for a series of 10 measurements. You can change number of measurements from 6
to 20. For example, after perform a series of 10 measurements, the average value of nitrogen content is automatically
determined and displayd in %. The average value is calculated as follows: the maximum and minimum values are extracted
and the average is calculated of the remaining eight values. If one (or more) of the 8 values significantly differs from the
rest, the device does not accept it (them) and asks you to repeat one or more measurements. The display shows how many
measurements must be repeated, for instance, “Measure left: 2“.
Fig. 2 Principle of measurement.

© PSI (Photon Systems Instruments), spol. s r. o.
12
7 HOW TO GET STARTED
For more detailed information on particular steps of N-Pen operation please refer to chapter 8.
The device works on Li-Ion battery or is charged via USB cable from PC or grid.
The N-Pen is controlled using two buttons:
• Use the MENU key to scroll through sequential menu options on the digital display.
• Use the SET key to select a menu option based on cursor (>) position.
7.1 MEASUREMENT
• Before measuring is necessary to perform calibration. There is a white pad on the inner part of the leaf clip for
calibration step.
• Go to Calibration (“Insert white sample” appears on display).
• Press SET to confirm.
• Calibration is automatically stored into the device memory.
• The device is now ready to measure other samples.
It is necessary to calibrate N-Pen after every switch ON.
Before performing the calibration, make sure that the optical part of the device, including the inner
part of the sample holder, is clean.
• Insert a leaf sample into the leaf clip. The leaf clip is important for the sample stabilization.
• Go to Measurement > choose required plant and part of it.
• Press SET to confirm.
• It is necessary to perform series of 10 measurements for result in %. Always perform series of measurements on
10 different plants of the same species (wheat, barley or corn).
• Measurement must be done on the 2nd or 3rd youngest leaf of the particular plant.
• Perform the measurement as close as possible to the mid part of the leaf.
• Value of required parameter appears on display after measuring.
• During the measurement all results in % are stored into the device memory and can be downloaded to PC.
The device turns off automatically after 8 minutes of no use.

© PSI (Photon Systems Instruments), spol. s r. o.
13
8 CONTROL MENU TREE
The next pages show the structure of the operation scheme, which includes the Main Menu and first-level Sub-Menus.
• The blue color represents the Main Menu and its Options.
• The yellow color represents the first-level Sub-Menus and their Options.
• Full-line arrows are used for the SET key.
• Dashed-line arrows are used for the MENU key.

© PSI (Photon Systems Instruments), spol. s r. o.
14

© PSI (Photon Systems Instruments), spol. s r. o.
15

© PSI (Photon Systems Instruments), spol. s r. o.
16

© PSI (Photon Systems Instruments), spol. s r. o.
17

© PSI (Photon Systems Instruments), spol. s r. o.
18
9 USB AND BLUETOOTH CONNECTION
9.1 USB CONNECTION
Connect the USB cable with the N-Pen device. Please note that lock in system is used.
Pay attention when connecting the USB cable not to damage the outlet connector on the Pen
device. Make sure that you orient the cable correctly prior connecting the inlet with the outlet and
the cable is upright towards the device.
To connect N-Pen with your computer please follow steps below in Fig. 3:
Fig. 3 How to connect N-Pen with PC.
A) Outlet connector on N-Pen device. B) Inlet part on the USB cable. C – E) Position the cable horizontally, plug in the inlet
and screw the securing screw. F) Correct connection of the USB cable and Pen device.
Connect the USB cable to a computer. The N-Pen switches ON automatically after connecting the cable to the PC. For USB
connection you need to have the USB driver installed in your PC. You find the driver on the installation disk (USB driver
folder). If you check the Device Manager in Windows you should see the USB serial port in the device tree. In case of
missing driver, you may download it from PSI websites. When the driver is installed correctly you should be able to connect
to the device in the FluorPen software menu Setup > Device ID.
For more information about FluorPen software see chapter 10.

© PSI (Photon Systems Instruments), spol. s r. o.
19
9.2 BLUETOOTH CONNECTION
Before you set up the Bluetooth connection between the N-Pen and your PC, make sure you have these components:
1. Bluetooth enabled PC
The PC with which you connect must have Bluetooth wireless technology, either built-in or through a Bluetooth card. Make
sure that the PC's Bluetooth setting is "discoverable" (meaning that it shows up when other devices search for nearby
Bluetooth connections). Consult the user guide for your PC or Bluetooth card to learn how to do this.
2. Bluetooth configuration software properly set up on PC
Before you can download files to your PC, you will need to set up the Bluetooth software that came with your PC, or your
PC's Bluetooth card. This software varies by manufacturer. Please consult your PC's Bluetooth documentation for more
information.
3. Bluetooth must be switched on visible on both devices
To pair the N-Pen with another Bluetooth device, such as a computer, you will need to ensure that Bluetooth is switched
on visible on both devices.
9.3 BLUETOOTH PAIRING
1. Enabling Bluetooth in the N-Pen
• Switch ON the N-Pen (press and hold the SET key).
• Scroll to the Accessories menu (press the MENU key, then press the SET key).
• Select Bluetooth On (press the MENU key, then press the SET key) to enable Bluetooth.
Keep in mind that the N-Pen turns off automatically after about 8 minutes of no action.
Turning off the N-Pen always turns off Bluetooth.
2. Starting Bluetooth Application on Your PC
Be aware that this description is working on Windows 7; some of the steps may be different on your PC.
• Select: Start > Devices and Printers (Fig. 4).
You may also start your Bluetooth application via the Control Panel: Start > Control Panel >
Hardware and Sound > Devices and Printers.

© PSI (Photon Systems Instruments), spol. s r. o.
20
Fig. 4 Start Bluetooth Application.
3. Opening the Add Bluetooth Device Application
• Select: “Add a device” to start searching new Bluetooth device. Be sure that the N-Pen is in discoverable mode
(see step 1).
Fig. 5 Add a device.
4. Selecting the N-Pen
• Select: PSI Pen icon.
• Select: Next (Fig. 6).
Fig. 6 Select the PSI Pen.

© PSI (Photon Systems Instruments), spol. s r. o.
21
5. Starting the Pairing Process
Your Bluetooth Pairing Code is: 0000
• Select: “Enter the device’s pairing code”.
• Enter: 0000 (four digits).
• Select: Next (Fig. 7).
Fig. 7 Pairing process.
New version:
• Select: Yes (Fig. 8). Please note that the N-Pen device does not display the verification number. The
verification code is not important for the BT connection.
• Select: Next.
Fig. 8 Verifying of the BT pairing.
6. Completing the N-Pen Pairing
• Select: Close (Fig. 9).

© PSI (Photon Systems Instruments), spol. s r. o.
22
Fig. 9 Finishing.
On computer run the program FluorPen 1.1. For more information about FluorPen software see chapter 10.

© PSI (Photon Systems Instruments), spol. s r. o.
23
10 FLUORPEN SOFTWARE
10.1 SOFTWARE IN STALLATION
1. Save the FluorPen software provided on the USB flash disk to your computer and launch the FluorPen program.
2. To connect and recognize your N-Pen device in the FluorPen software proceeds first with the registration of your
FluorPen software (Fig. 10).
• Select: Help > Register
• Enter: your serial registration number.
• Select: OK
Fig. 10 Software registration.
Please note that you will find your serial (registration) number in the file SN.txt, which is
included on the enclosed USB flash disk.
Please remember: it is not possible to download data from the N-Pen device without
software registration.
3. Switch on the N-Pen and enable Bluetooth or connect USB cable to the PC.
4. Make sure that your PC and the N-Pen are properly paired (see chapter 9 for complete information on USB and
Bluetooth pairing).
5. Select: Setup > Device ID (Ctrl+I). If properly connected, the message “Device: NPen” appears in the bottom part
of the screen (Fig. 11).

© PSI (Photon Systems Instruments), spol. s r. o.
24
Fig. 11 Connecting N-Pen with Software.
10.2 MENU AN D IC ON EXPLANAT ION
10.2.1 MAIN MENU
MENU: File
Load Loads previously saved data files.
Save Saves data to hard disc.
Export Exports data in .txt format.
Export to JSON Exports data in JavaScript Object Notation.
Close Closes the current experiment.
Close All Closes all running experiments.
Exit Exits the program.
MENU: Device
Download Downloads data from the N-Pen to your PC.
Erase Memory Erases data from the N-Pen memory.
Online Control Online control of N-Pen device.
Attach GPS File Used for download data from GPS module (active
only in older N-Pen version N 100).

© PSI (Photon Systems Instruments), spol. s r. o.
25
MENU: Setup
Device ID Detects the connected device.
Update Firmware Used for firmware updates.
Settings Used for modification of the program
settings.
MENU: Help
About Offers basic information about the program.
Register Used for the FluorPen software registration.
Icon Explanation:
10.2.2 MENU SETTINGS
MENU > Setup > Settings
After Download – Memory Erase
If the box is checked the N-Pen memory is erased after each data
download.
Data – Inverted
If the box is checked the polarity of data is inverted, e.g., multiplied
by -1. This feature can be helpful for a certain type of experiment
when the measured data are undesirably interpreted as negative
values.
Data – Add to opened
If the box is checked the downloaded data are added to that of the
current opened experiment.
Download
Downloads data from the N-Pen to PC.
Load
Loads (opens) previously saved data files.
Save
Saves data to hard disc.
Export
Exports data in .txt format.
© PSI (Photon Systems Instruments), spol. s r. o.
26
Data – GPS Visible
This option is active only in older N-Pen version N 100. In new version N 110 the GPS data are automatically downloaded
and paired with protocol measurements.
Graf – Single
This function is not available for N-Pen device.
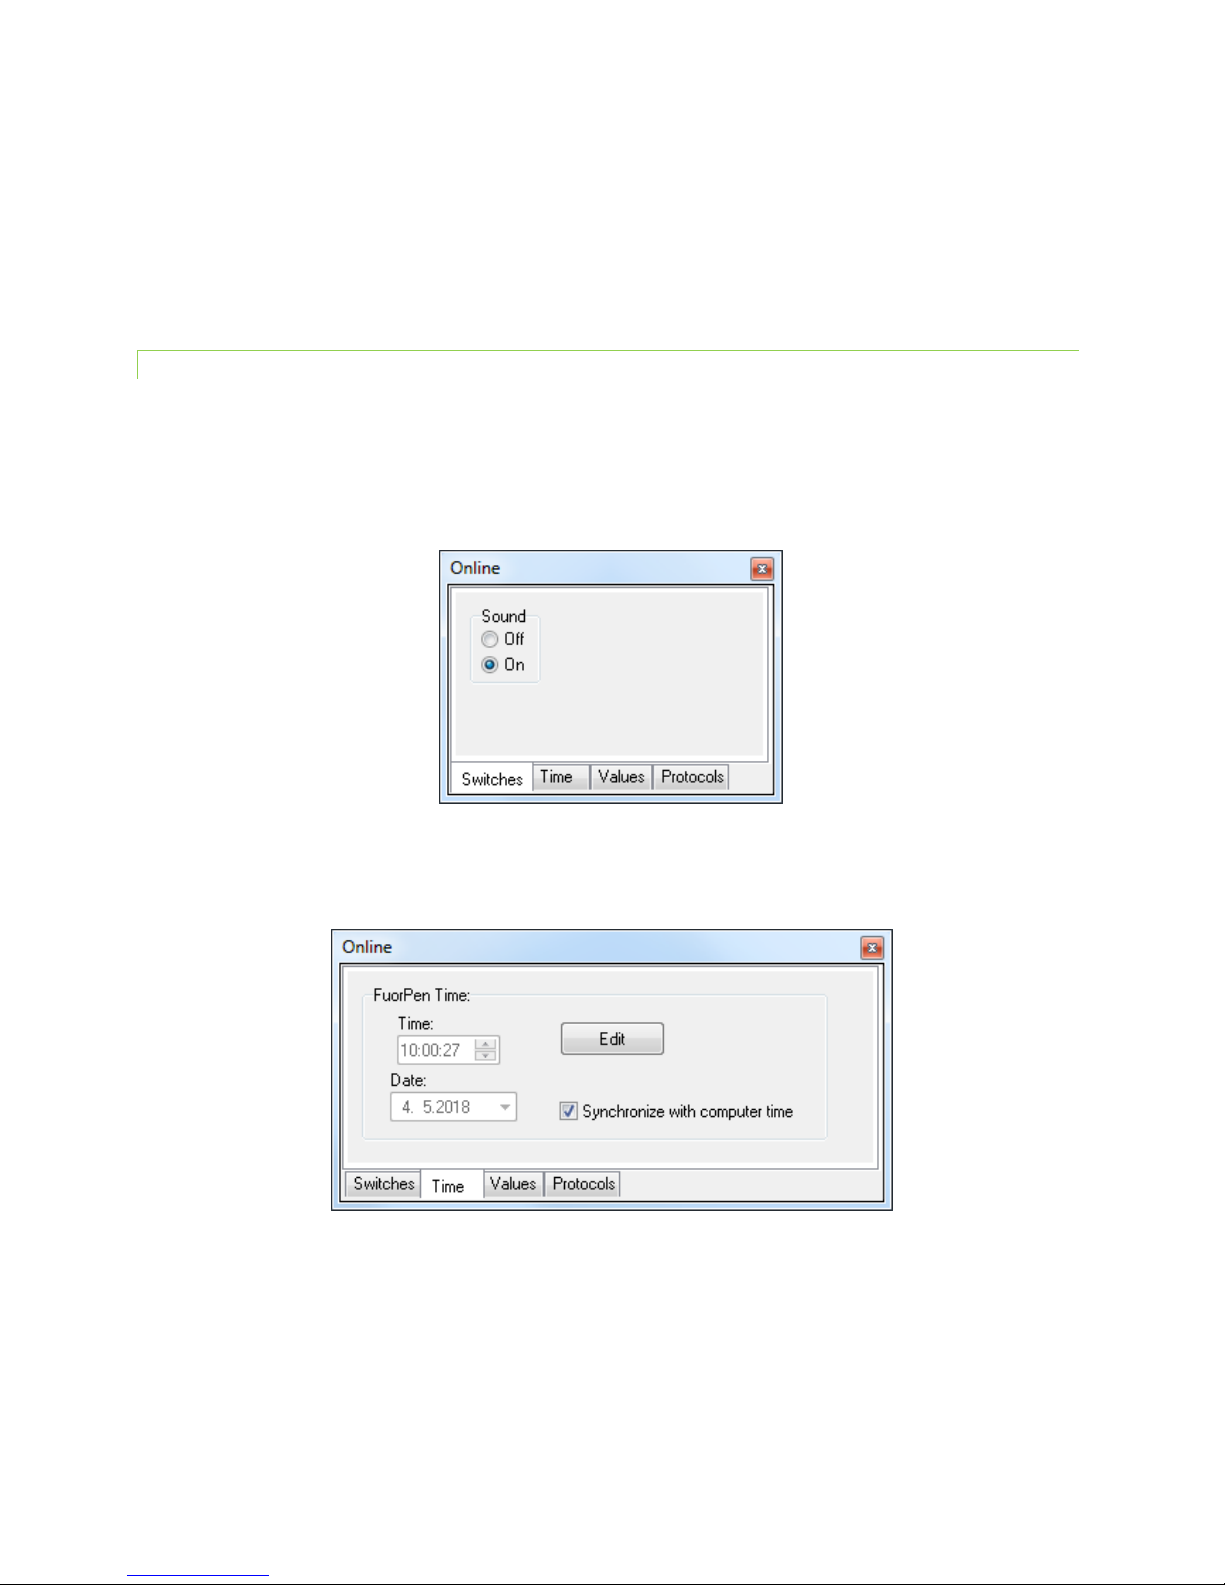
10.2.3 MENU ONLINE CONTROL
This function can be used for Online Control your N-Pen device after connection with your PC.
• Select: Menu > Device > Online Control
Online Control – Switches
Sound On/Off - choose On/Off for device beeping.
Online Control – Time
Set the N-Pen time a date. You can also synchronize time of N-Pen device with computer time.
Online Control – Values, Online Control – Protocols
These functions are not available for N-Pen device.

© PSI (Photon Systems Instruments), spol. s r. o.
27
10.3 DATA TRANSFER
1. Perform a measurement with your N-Pen.
2. Click the Download icon or select Device > Download.
3. The Data table appears - Fig. 12.
Fig. 12 Example of Data Transfer.

© PSI (Photon Systems Instruments), spol. s r. o.
28
4. For export press File > Export or Export icon, select what you want to export - Fig. 13.
Selected only – exports only one measurement that is selected by mouse, otherwise it will export everything.
Source data – exports raw data, in case of nitrogen content: NDGI.
Description – exports the data description if any.
Computed values – export calculated data, in case of nitrogen content: N (%).
Fig. 13 Export data.

© PSI (Photon Systems Instruments), spol. s r. o.
29
10.4 FIRMWARE UPDATE
All data in the N-Pen memory are erased during the firmware update!
Before starting any firmware update, export all your data from the N-Pen memory into your
computer!
1. Starting Update
• Select: Setup > Update Firmware From File (Fig. 14).
Fig. 14 Update Firmware.
2. Warning
• Select: OK to start update (Fig. 15).
Fig. 15 Warning.
3. Selecting .bxn file
• Find: Binary file (with the extension .bxn) (Fig. 16).
• Select: Open.

© PSI (Photon Systems Instruments), spol. s r. o.
30
Fig. 16 Select .bxn file.
4. Finishing Upload
• Select: OK to start uploading of the update (Fig. 17).
Fig. 17 Finishing upload.
• The bottom bar indicates the upload progress (Fig. 18).
Fig. 18 Upload progress.
• Press: OK to finish upload (Fig. 19).
Fig. 19 Finish upload.

© PSI (Photon Systems Instruments), spol. s r. o.
31
11 GPS MODULE
N-Pen device has integrated GPS module which can be turned on during the measurement and the GPS coordinated will
be added to the downloaded data.
For proper GPS reading, the time in your N-Pen and in your computer must be synchronized. Preset
time and time zone must correspond to GPS time (time zone) in your location.
11.1 GPS / N-PEN OPERATI ON
1. Check the time setting in N-Pen device: Settings > Date & Time
2. Switch the GPS module on:
• Select: Accessories > GPS
• Press SET to confirm.
• Wait until the GPS position is found – “Starting GPS”.
• The GPS module is ready when the icon in upper panel change – see on Fig. 20.
Fig. 20 GPS icons.
3. Go to Measurement and choose required protocol.
The device may need a clear view of the sky to acquire satellite signal.
Keep in mind that the N-Pen turns off automatically after about 8 minutes of no action.
Turning off the N-Pen always turns off GPS module.
For prompt determination of the coordinates use the option Accessories > GPS > Location.

© PSI (Photon Systems Instruments), spol. s r. o.
32
11.2 DATA DOWNLOAD
1. Enabling Communication:
• Switch on the computer and the N-Pen. Set your computer to N-Pen communication: enable Bluetooth or
connect to USB port.
2. Downloading Data from the N-Pen
• Start FluorPen program.
• Connect N-Pen device: Setup > Device ID (Ctrl+I)
• Download measured data from the N-Pen to your PC. Data measured with activated GPS module are
downloaded with GPS coordinates (Fig. 21).
Fig. 21 GPS coordinates.

© PSI (Photon Systems Instruments), spol. s r. o.
33
12 WARRANTY TERMS AND CONDITIONS
• This Limited Warranty applies only to the N-Pen device. It is valid for one year from the date of shipment.
• If at any time within this warranty period the instrument does not function as warranted, return it and the
manufacturer will repair or replace it at no charge. The customer is responsible for shipping and insurance
charges (for the full product value) to PSI. The manufacturer is responsible for shipping and insurance on return
of the instrument to the customer.
• No warranty will apply to any instrument that has been (i) modified, altered, or repaired by persons
unauthorized by the manufacturer; (ii) subjected to misuse, negligence, or accident; (iii) connected, installed,
adjusted, or used otherwise than in accordance with the instructions supplied by the manufacturer.
• The warranty is return-to-base only and does not include on-site repair charges such as labor, travel, or other
expenses associated with the repair or installation of replacement parts at the customer's site.
• The manufacturer repairs or replaces faulty instruments as quickly as possible; the maximum time is one month.
• The manufacturer will keep spare parts or their adequate substitutes for a period of at least five years.
• Returned instruments must be packaged sufficiently so as not to assume any transit damage. If damage is
caused due to insufficient packaging, the instrument will be treated as an out-of-warranty repair and charged as
such.
• PSI also offers out-of-warranty repairs. These are usually returned to the customer on a cash-on-delivery basis.
• Wear & Tear Items (such as sealing, tubing, padding, etc.) are excluded from this warranty. The term Wear &
Tear denotes the damage that naturally and inevitably occurs as a result of normal use or aging even when an
item is used competently and with care and proper maintenance.

© PSI (Photon Systems Instruments), spol. s r. o.
34
13 TROUBLESHOOTING AND CUSTOMER SUPPORT
In case of troubles and for customer support, please, visit FAQ on our websites, write to support@psi.cz or contact your
local distributor.
 Loading...