

Page 1
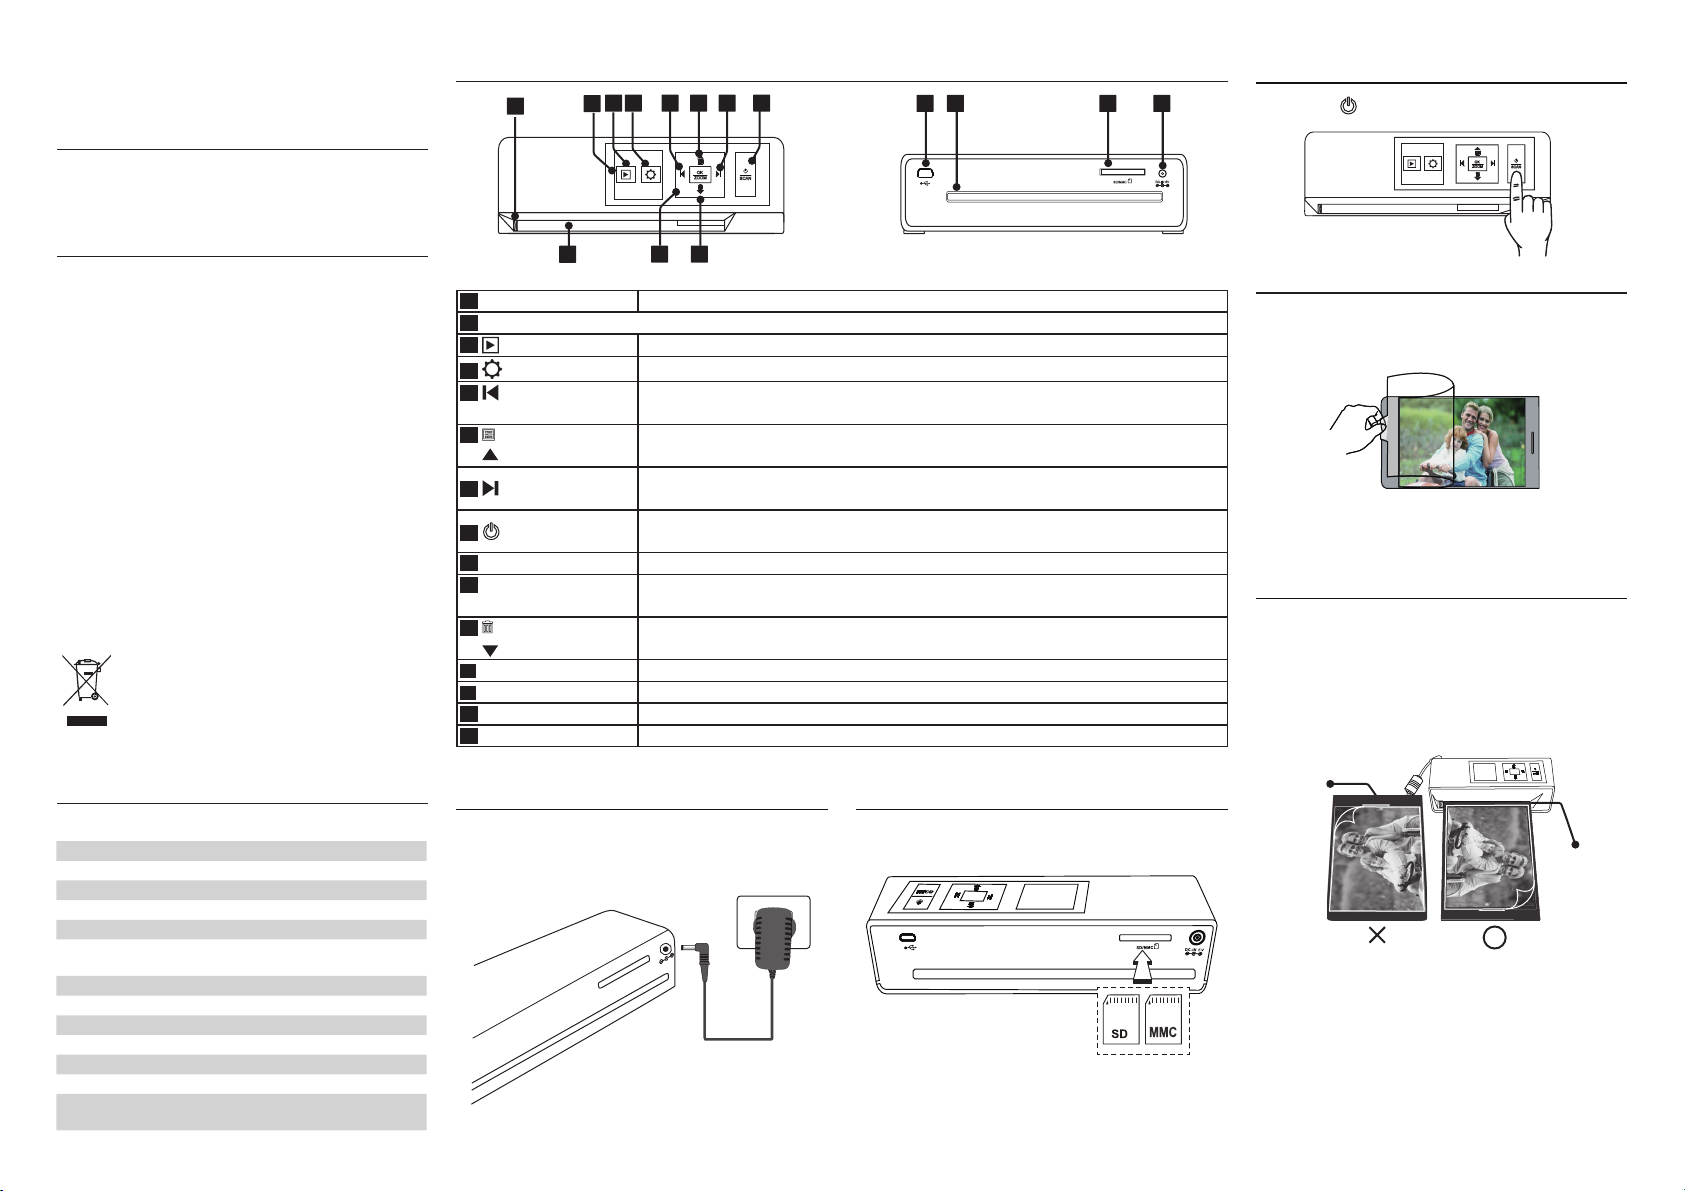
Photo Scanner
Quick Guide
Package Contents
•
Scanner
•
Calibration Paper• Photo Protective Sleeve• Lens Cleaner
•
Roller Cleaner • Power Adapter
•
Mini USB Cable
•
Quick Guide
Product Overview
3 4 5 6 7 8
1
2
Turning on/off the Power
12 14 1513
OK
ZOOM
SCAN
DC-IN 5V
SD/MMC
Long press button to turn on/off the scanner.
OK
ZOOM
SCAN
Important Safety Instruction
• Keep away from water or moisture and dusty areas.
• Never store in hot and very cold areas.
• Only use at tachments/accessories specifi ed by the
manufacturer.
• No objects fi lled with liquids, such as vases, shall be
placed on apparatus.
• Avoid dust contamination when the scanner is not in use.
• When left unused for a long period of time, the unit
should be disconnected from the power adapter.
• Avoid environments where the scanner would be exposed
to direct sunlight (or any other source of excessive heat)
for long periods of time.
• Protect the scanner from potential liquid spills such as
soda, coffee, tea, etc.
• Be carefully to keep it without dropping it or strong
impact.
• Operate the scanner on a level, well -grounded work
surface, free of excessive vibration.
• Don’t open the scanner case alone without technical
suppor t because there is danger of electrical shock.
This symbol on the product or in the instruc tions means
that your electrical and electronic equipment should be
disposed at the end of its life separately from
your household waste. There are separate
collection systems for recycling in the EU. For
more information, please contact the local
authority or your retailer where you purchased
the product.
Specifi cations
Scanner Type: A6 CIS Sheet-fed Scanner
Display:1.45” color TFT LCD (128 x 128 pixels)
Scan Size: Up to 4"x 6" size
Scan Mode: Color / Gray
Scan Resolution: 300 / 600 dpi
Scan Speed: 3.8 seconds for a 4"x 6" color photo at 300dpi
6.2 seconds for a 4"x 6" color photoat 600dpi
Memory Card Slot: MMC/SD (SDHC)
I/O Ports: USB mini-B/DC-In
Power Supply: 5V 1A
File Format: JPG/PDF
Dimensions: 180 x 55 x 44.5 mm
Weight: 270g/0.6lbs
Supported OS for Mass Storage: Windows XP
Mac OS X (10.4 / 10.5 / 10.6)
/ Vista / 7 ;
1110
• Adjustable paper guide makes easy for guiding paper.
• Press to view the scanned images.
• Press to make Scan Setting and System Setting.
• Moves left in the menus.
1
Paper guide
2
LCD screen
3
Playback
Setting
4
5
Left button
9
• Moves to the previous scanned image.
6
Menu button
Up button
7
Right button
/SCAN button
8
9
Feed slot
10
OK/Zoom button
• Brings up the Mode menu.
• Moves up in the menus.
• Moves right in the menus.
• Moves to the next scanned image.
• Long press to turn the power on/off.
• Press slightly to start the image scan.
• Feeds the paper or photo for scanning.
• Press to make or confi rm the selections in the menus.
• Zoom the scanned image.
11
Delete button
Down button
Mini USB port • Connects to PC for fi le transfer.
12
Paper exit slot • Outputs the paper after scanning.
13
14
Card slot
15
DC-IN jack
• Brings up the Delete menu.
• Moves down in the menus.
• Accommodates a MMC/SD card
• Connects to the supplied AC power adapter.
Connecting to Power
Connect one end of the supplied power adapter to
the scanner’s DC-IN 5V jack and the other end to a
power socket.
Inserting a MMC/SD Card
Insert your MMC or SD card into the card slot with
the gold contacts facing up.
Note: The MMC/SD card must be formatted by the
scanner for the
refer to the Setting for respective setting.
fi rst time use. To format the card,
Using the Photo Protective Sleeve
It is recommended to use the supplied photo
protective sleeve for photo scanning. Please place
the photo inside the protective sleeve.
Note: Do not place the photo into the protective
sleeve if the photo you wish to scan has been
laminated.
Scanning
Make sure the sealed end of the protective sleeve
goes fi rst into the feed slot for scanning.
1. Insert the photo, or document facing UP into the
feed slot.
2. Adjust the paper guide against the edges of the
photo.
Open End
Sealed End
3. Press SCAN, the photo will be rolled through and
scanned.
When the scanning is done, the scanned image will
appear on the LCD screen and will be saved into the
memory card.
Note: Be sure to align the photo, or document
against the right side of the feed slot if it is smaller
than the width of the feed slot.
Page 2
Playback
View and Zoom the Images
Under
until the desired size is displayed. Press / / / buttons to move around the image.
(Playback) mode, press OK/ZOOM button repeatedly to zoom in the
scanned image
Playback Menu
Note: You can not view the fi les that are not scanned by this scanner on the LCD screen.
Playback
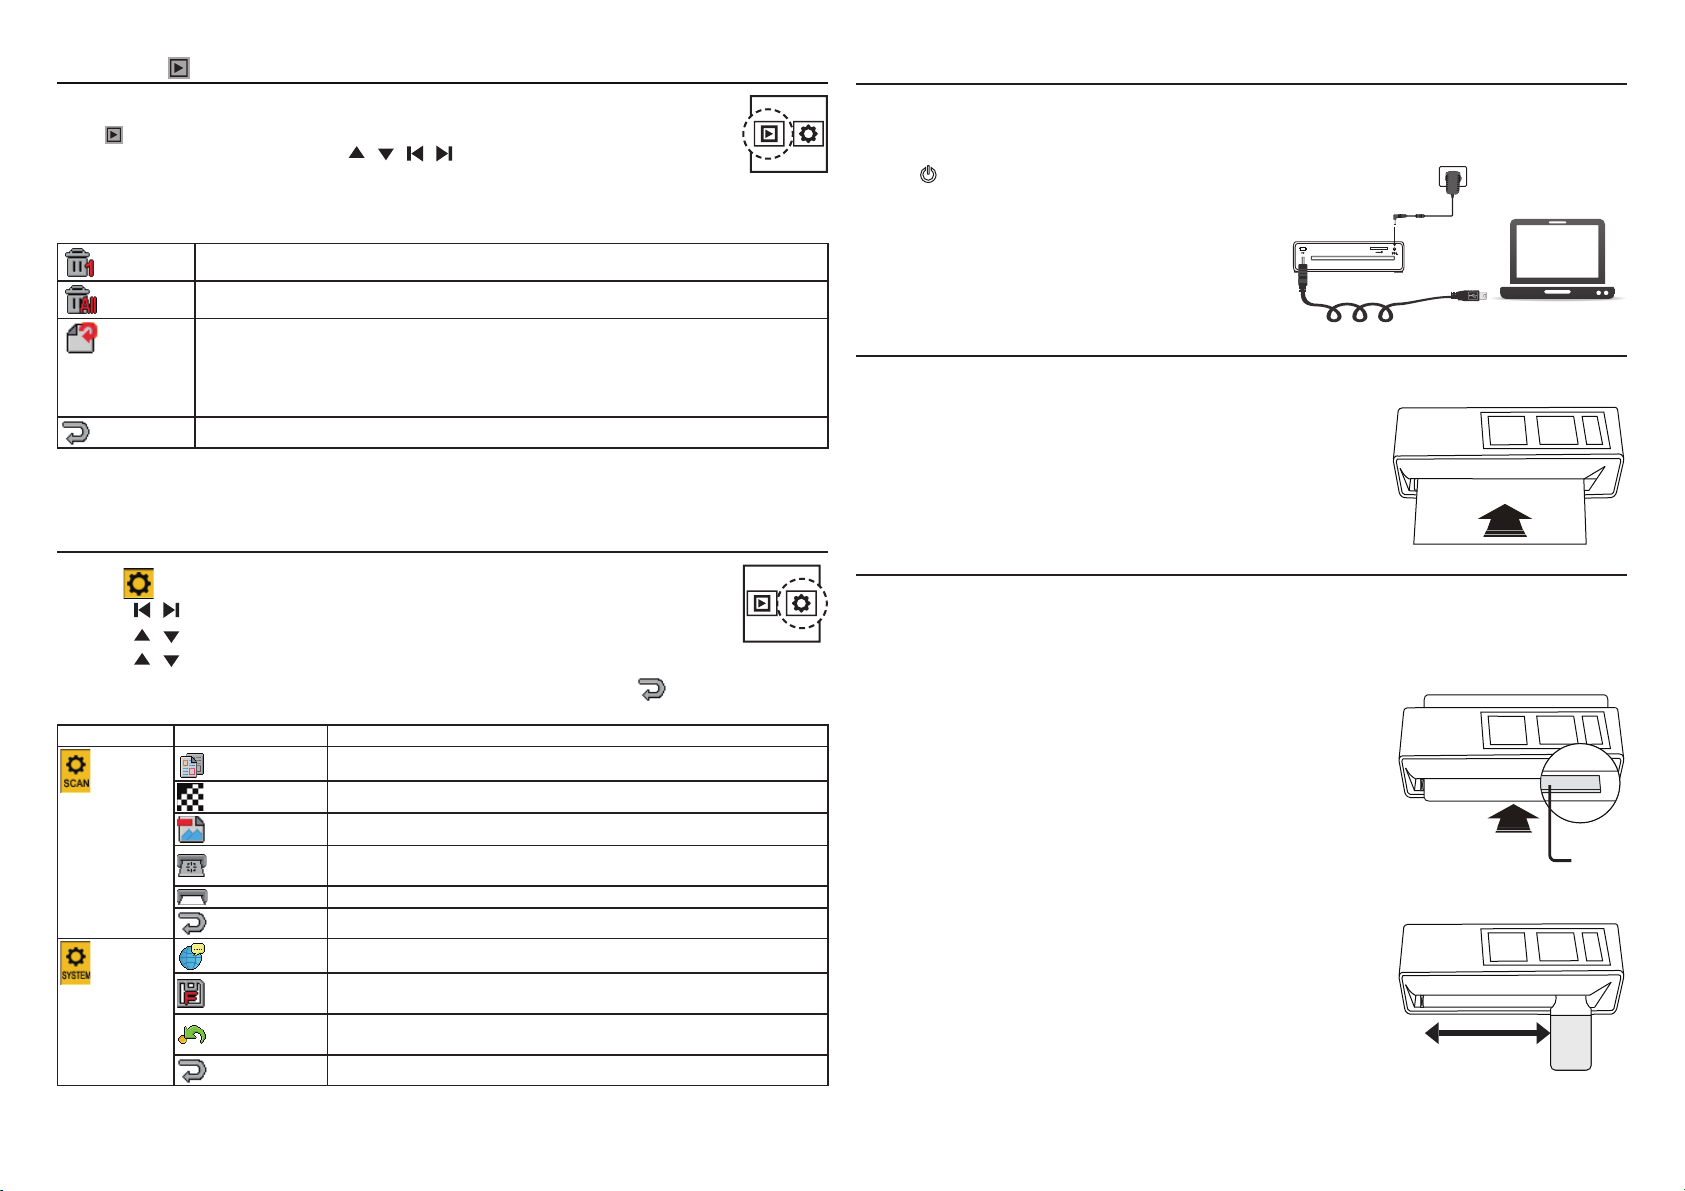
Connecting to a PC
Note: Please power off the scanner before connecting to a PC.
1. With the MMC/SD card inserted into the scanner, connect the mini USB cable to the Scanner and then to a
USB 2.0 port on your computer.
2. Press
3. A “Removable Disk” window will appear on the PC. Drag
and drop the scanned images to your PC.
button to turn on the scanner.
Delete One Delete the current displayed image. Select Yes to proceed or No to cancel.
Delete All Delete all the images stored in the memory card.
Rotate
Exit To exit from the current menu.
Options: 0°/90°/180°/270°.
Each time you perform the rotation, the image will be rotated based on its original
scanned orientation. To undo the rotation, select 0° from the menu.
Note: The orientation of the scanned images remain unchanged when transferring
images to PC, although they have been rotated with this setting.
Setting
1. Select (Setting), then press OK/ZOOM button to enter the Setting Menu.
2. Use the / buttons to select a menu and press OK/ZOOM button.
3. Use the / buttons to select a sub-menu and press OK/ZOOM button.
4. Use the / buttons to select an option and press OK/ZOOM button to confi rm the
selection. To exit from the current menu and return to the Setting Menu, select
Menu Sub-menu Descriptions
Color Mode Select Color or Gray mode for the scanning.
Scan Setting
System Setting
Resolution Select 300 dpi or 600 dpi for the scanning.
File Type Select JPG or PDF fi le format for the scanning.
Calibration
Clean Select to start roller cleaning.
Exit To exit from the current menu.
Language Select a screen display language.
Format
Factory Default
Exit To exit from the current menu.
Calibrates the scanner. Refer to “Calibrating the scanner” for
details.
Formats all the data stored in the memory card. Select Yes to proceed
or No to cancel.
Restores the current settings to the factory presets. Select Yes to
proceed or No to cancel.
Disconnecting the Scanner from PC
Double click the "Safely Remove Hardware" icon in Windows
to remove the scanner.
Calibrating the Scanner
• To get high image quality and good recognition results, please perform the step below from time to time.
• Make sure the calibration paper is clean without any dust before use.
1. Insert the calibration paper with the printing side UP into the feed slot.
2. Select Setting >Scan Setting > Calibration > Yes.
When the calibration is done, the scanner will power itself off automatically.
Cleaning the scanner
• To get high image quality, please clean your scanner from time to time.
• Make sure the roller cleaner and lens cleaner are clean without any dust before use.
Setting
.
Use a roller cleaner
1. Power on the scanner.
2. Hold the grip handle of the roller cleaner with the sponge side facing
down.
3. Insert the roller cleaner into the front side of the feed slot all the way to
the end.
4. Select Clean by following the steps below: Setting > Scan Setting >
Clean > Yes.
5. The clean starts. After few seconds, it will stop and output the roller
cleaner from the feed slot automatically.
Use a lens cleaner
1. Power off the scanner.
2. Hold the grip handle of the lens cleaner wth the sponge side facing
down.
3. Insert the lens cleaner with the fabric side facing up into the front side of
the feed slot.
4. Move the lens cleaner from one side to the other slightly a few times,
then remove it.
Sponge
Side
 Loading...