

Page 1
Quick Start Guide
HIGH-PERFORMANCE
ACTIVE CPU COOLER
-
For quick start user guides in additional
languages, please visit Phononic.com/hex
HEX 2.0
Page 2
2 • HEX 2.0 Quick Start Guide
HEX 2.0 performance is compatible with the highest power CPUs on the market, with room
for overclocking.
Note: Most newer PC cases include access to the bottom of the motherboard. If your case does not
include this access, you may need to remove your motherboard from the case before installation.
Intel Sockets: LGA2011/LGA1156/LGA1155/LGA1150
AMD Sockets: AM3/3+; AM2/2+
COMPATIBILITY
Socket LGA2011 LGA115x AM2/+, AM3+
MAX
TDP
140W +
Max OC
95W +
Max OC
220W
Intel AMD
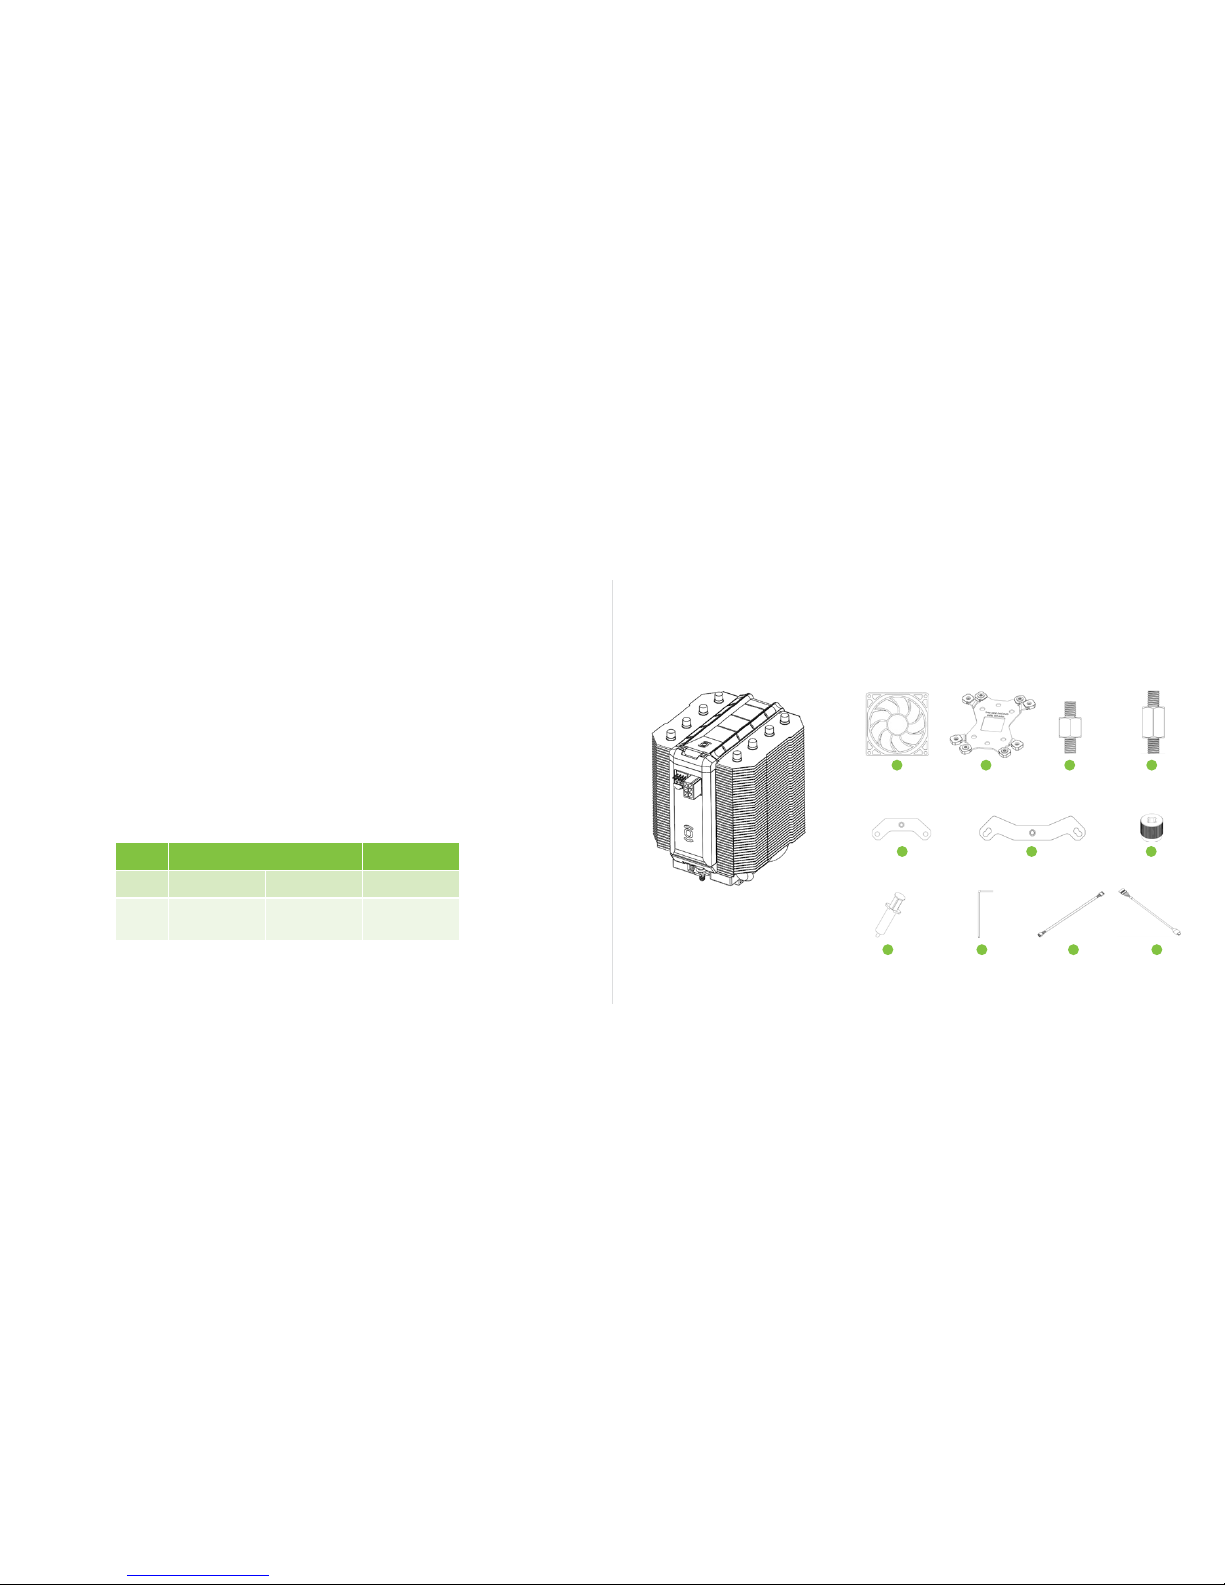
HARDWARE
FAN
AMD BRACKET
(X2)
BACKPLATE
SCREWDRIVERTHERMAL INTERFACE
MATERIAL
INTEL BRACKET
(X2)
SMALL
STANDOFF (X4)
FAN EXTENSION
LARGE
STANDOFF (X4)
USB CABLE
NUTS
(X4)
A
E
B
IH
F
C
J
D
K
G
HEX 2.0
NOTE: To release the HEX 2.0 from
the plastic retention wrap, remove
carrier from package and unfold
retention tabs, then slide unit out.
Page 3
4 • HEX 2.0 Quick Start Guide
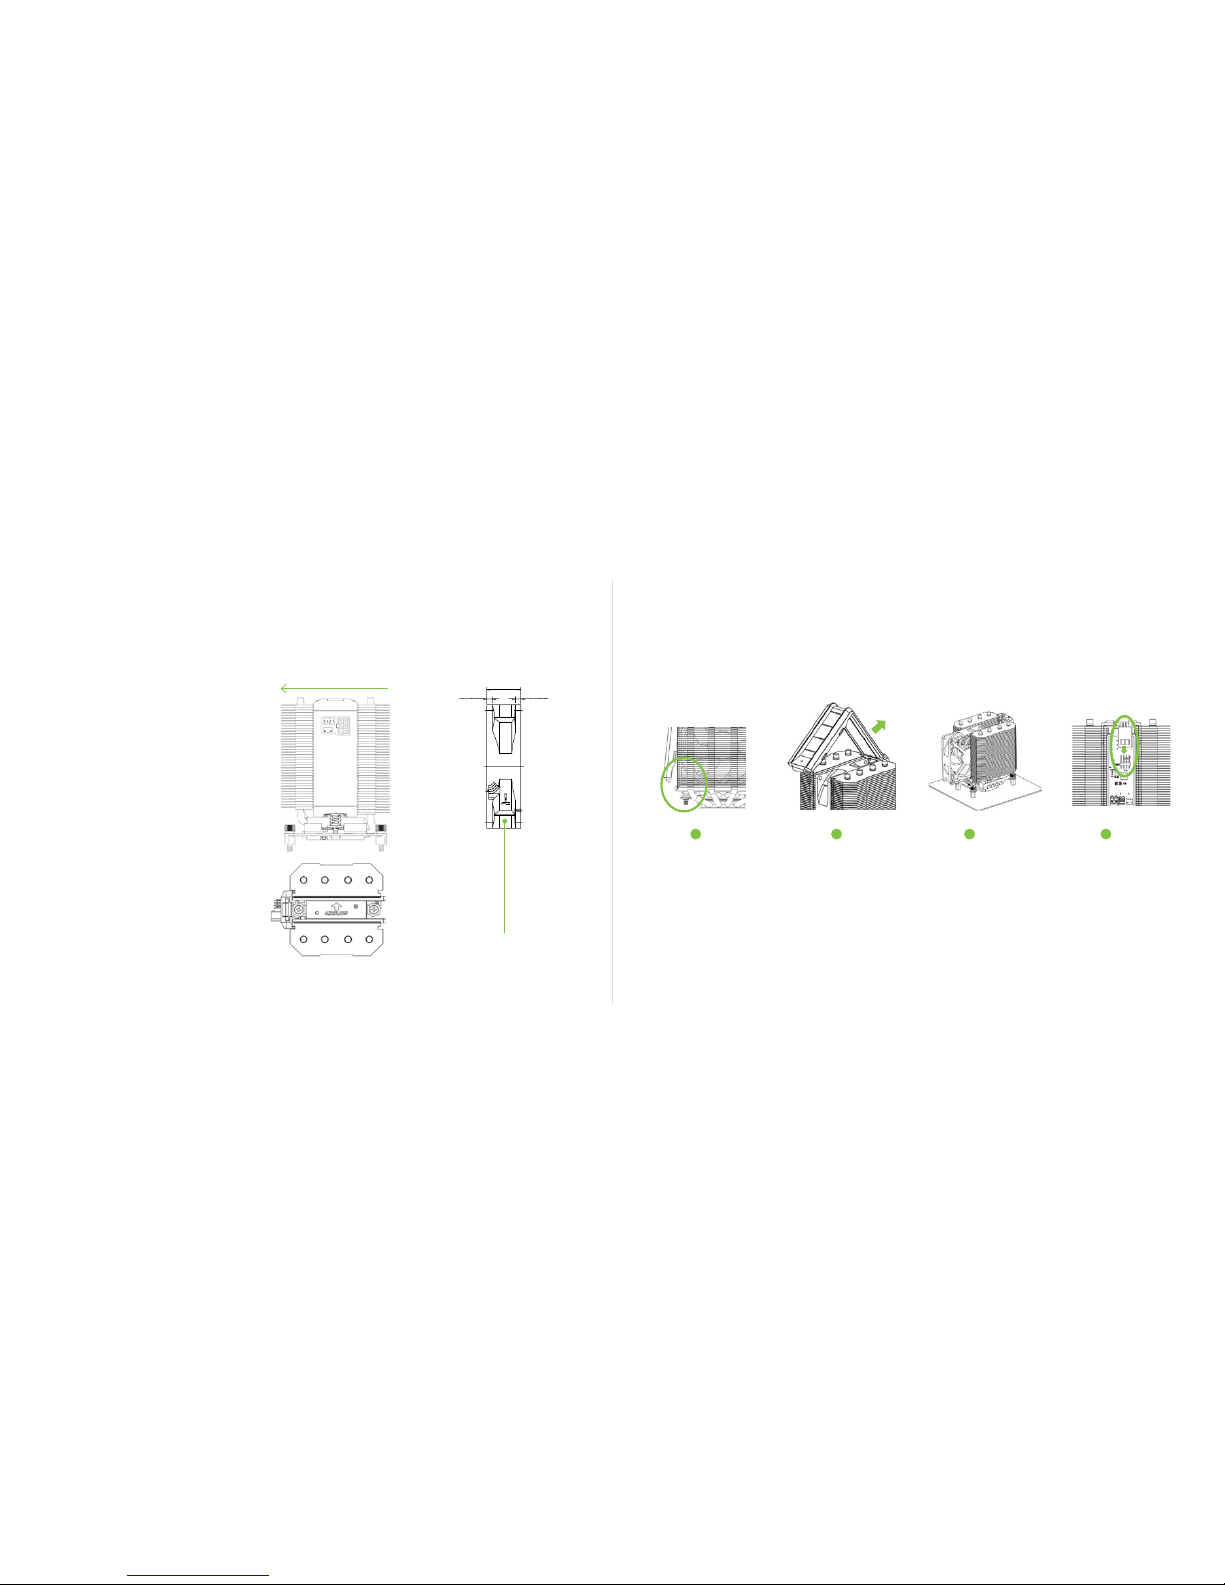
SHROUD REMOVAL
AIR FLOW
air ow direction
indicator on HEX 2.0 fan
UNLOCK SHROUD
Carefully unlock
the shroud at the
base of the cooler.
REMOVE
SHROUD TOP
Raise the shroud and
remove top portion
by sliding the shroud
from the hinge.
MOVE FAN
Slide the fan out from
HEX 2.0.
FAN CONNECTOR
The fan can stay
connected to the control
board for easy installation
later; however, it can be
removed by unplugging
the 4-pin fan connector
from the pin connection
on the PC board inside
the cooler.
STEP STEP STEP STEP
1 2 3 4
Air ow direction is important
for peak performance.
See gure for preferred air
ow direction
• Orient internal CPU cooler fan
for this air ow direction
• Orient the CPU cooler with
respect to case air ow (case
fans) as well
• Air ow direction is marked
on bottom plastic fan
shroud housing
Installation brackets for Intel
sockets allow for installation in
any orientation.*
*Check clearance for memory
DIMS before installing CPU cooler
air ow
Page 4
6 • HEX 2.0 Quick Start Guide
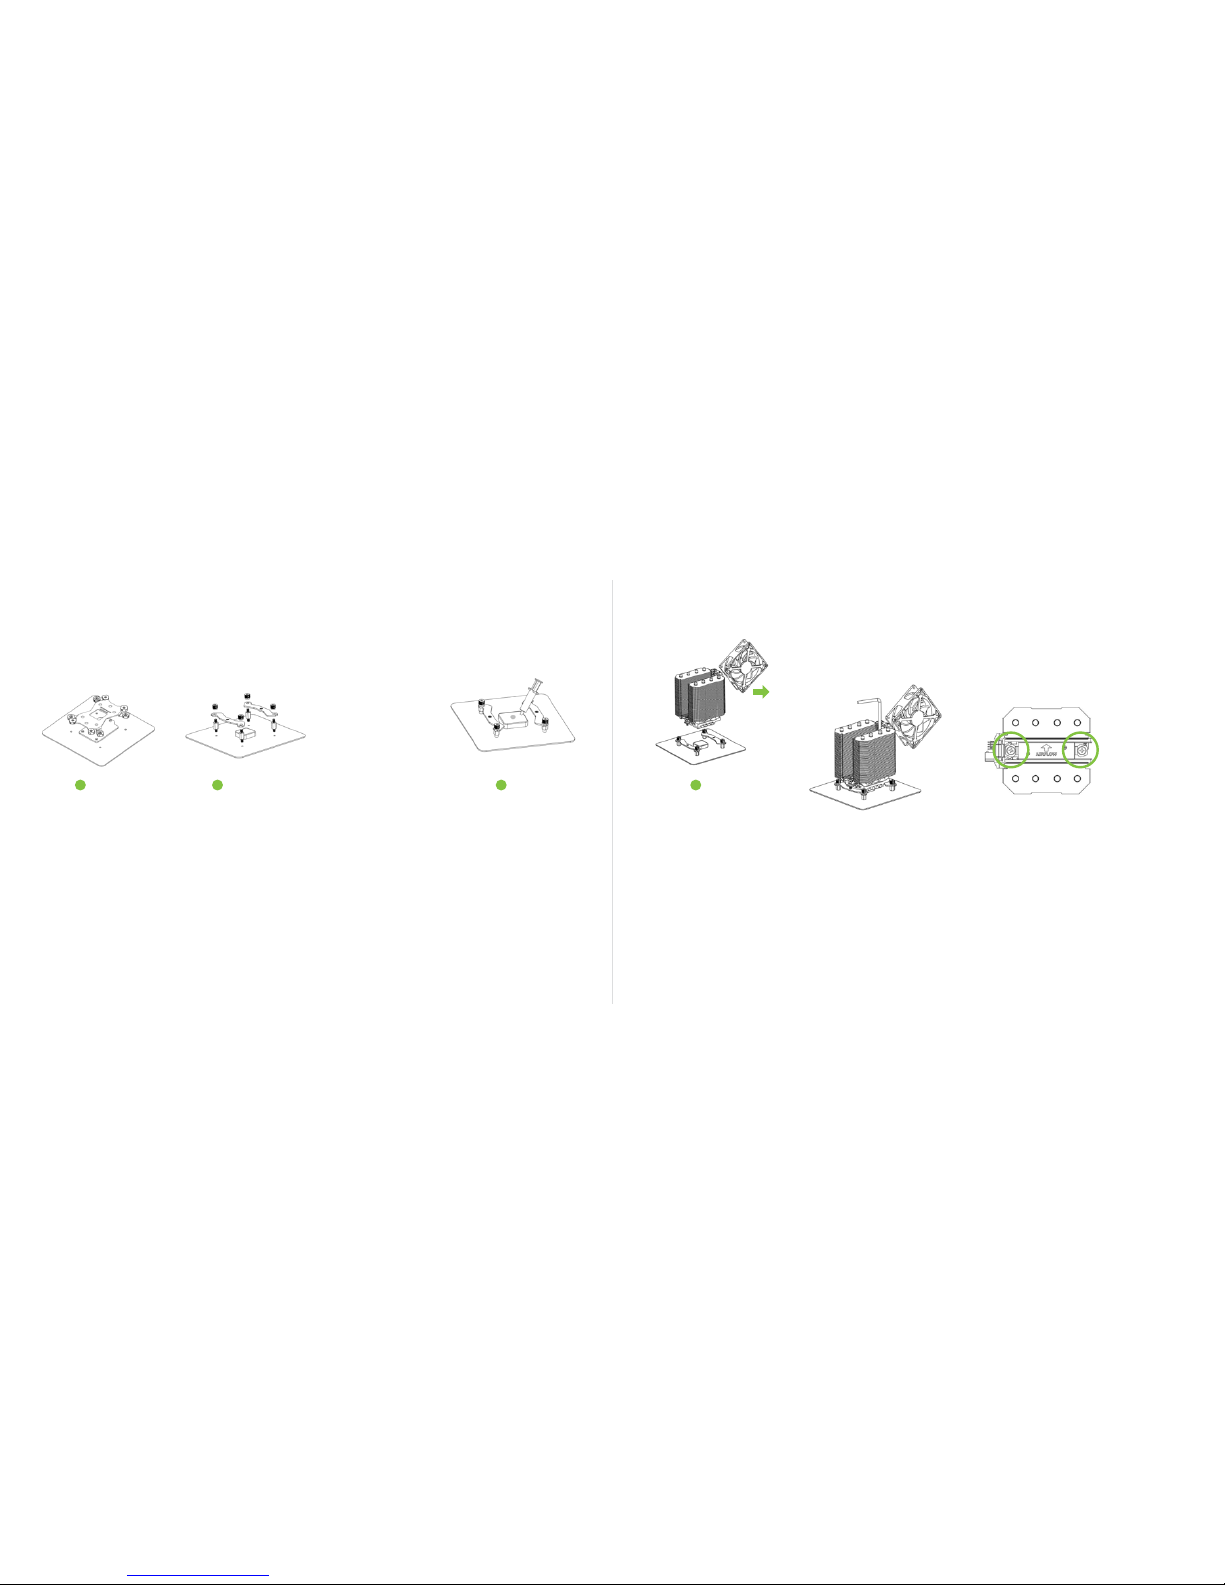
INSTALLING
BRACKETS
On the front side of
the motherboard,
attach the Intel mounting
brackets (F) (using inside
holes) to the standoffs
using the knurled nuts
(G). Note that curve of
bracket should be
facing outward.
4a
4b 4c
INSTALL GUIDE
INTEL LGA115X
STEP
4
ATTACH COOLER
TO BRACKETS
Remove fan shroud and
fan to provide access to
the bolts that attach to
the brackets.
Use a screwdriver to
screw the bolts into the
brackets, alternating
between screws every
half-turn.
APPLYING
THERMAL PASTE
Clean off any residual
paste or thermal pads.
Apply included thermal
paste (H) in the center
of CPU package – use a
4-5mm circle. Excessive
thermal paste can
hinder performance.
STEP
3
NOTE: Pay attention to
the bracket orientation
– any orientation you
desire is ne, but
cooler performance is
maximized when airow
direction through the
cooler matches the
direction of the PC case.
ATTACHING
BACKPLATE
Attach backplate (B)
to the back of the
motherboard using
included large standoffs
(D). Note the side
labeled “This side facing
Intel board” should face
the motherboard.
STEP
1
STEP
2
Page 5
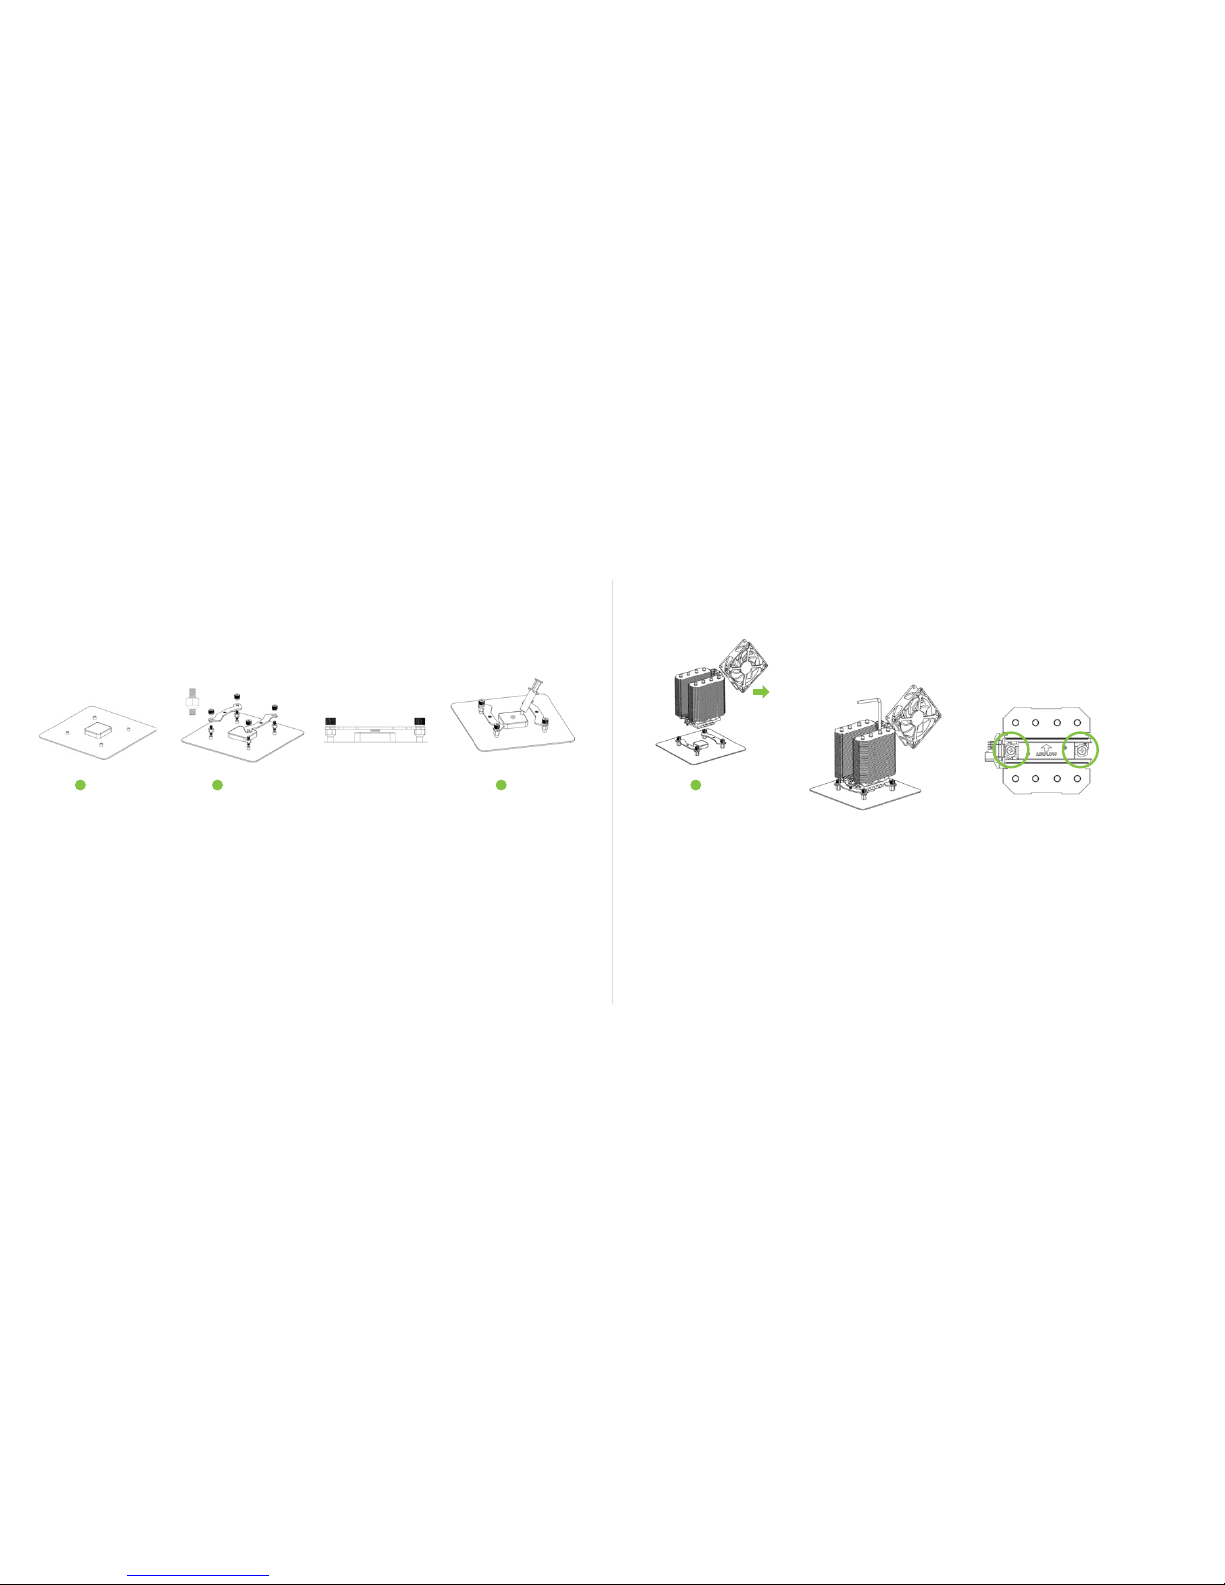
8 • HEX 2.0 Quick Start Guide
INSTALLING THE
MOUNTING BARS
The motherboard
should have a stock
backplate with
mounting holes ready
to receive the included
small standoffs (C).
INSTALL GUIDE
INTEL LGA2011
APPLYING
THERMAL PASTE
Clean off any residual
paste or thermal pads.
Apply included thermal
paste (H) in the center
of CPU package – use a
4-5mm circle. Excessive
thermal paste can
hinder performance.
NOTE: Pay attention to
the bracket orientation
– any orientation you
desire is ne, but
cooler performance is
maximized when airow
direction through the
cooler matches the
direction of the PC case.
STEP STEP STEP
21 3
4b 4c
STEP
4
ATTACH COOLER
TO BRACKETS
Remove fan shroud and
fan to provide access to
the bolts that attach to
the brackets.
4a
Use a screwdriver to
screw the bolts into the
brackets, alternating
between screws every
half-turn.
INSTALLING
BRACKETS
Stand-offs for LGA 2011
are rounded on one end
and should be placed
with rounded-side
down into motherboard
hardware.
Brackets should be
installed with curve
of the bracket as
indicated and the nut
facing down toward the
motherboard.
Page 6
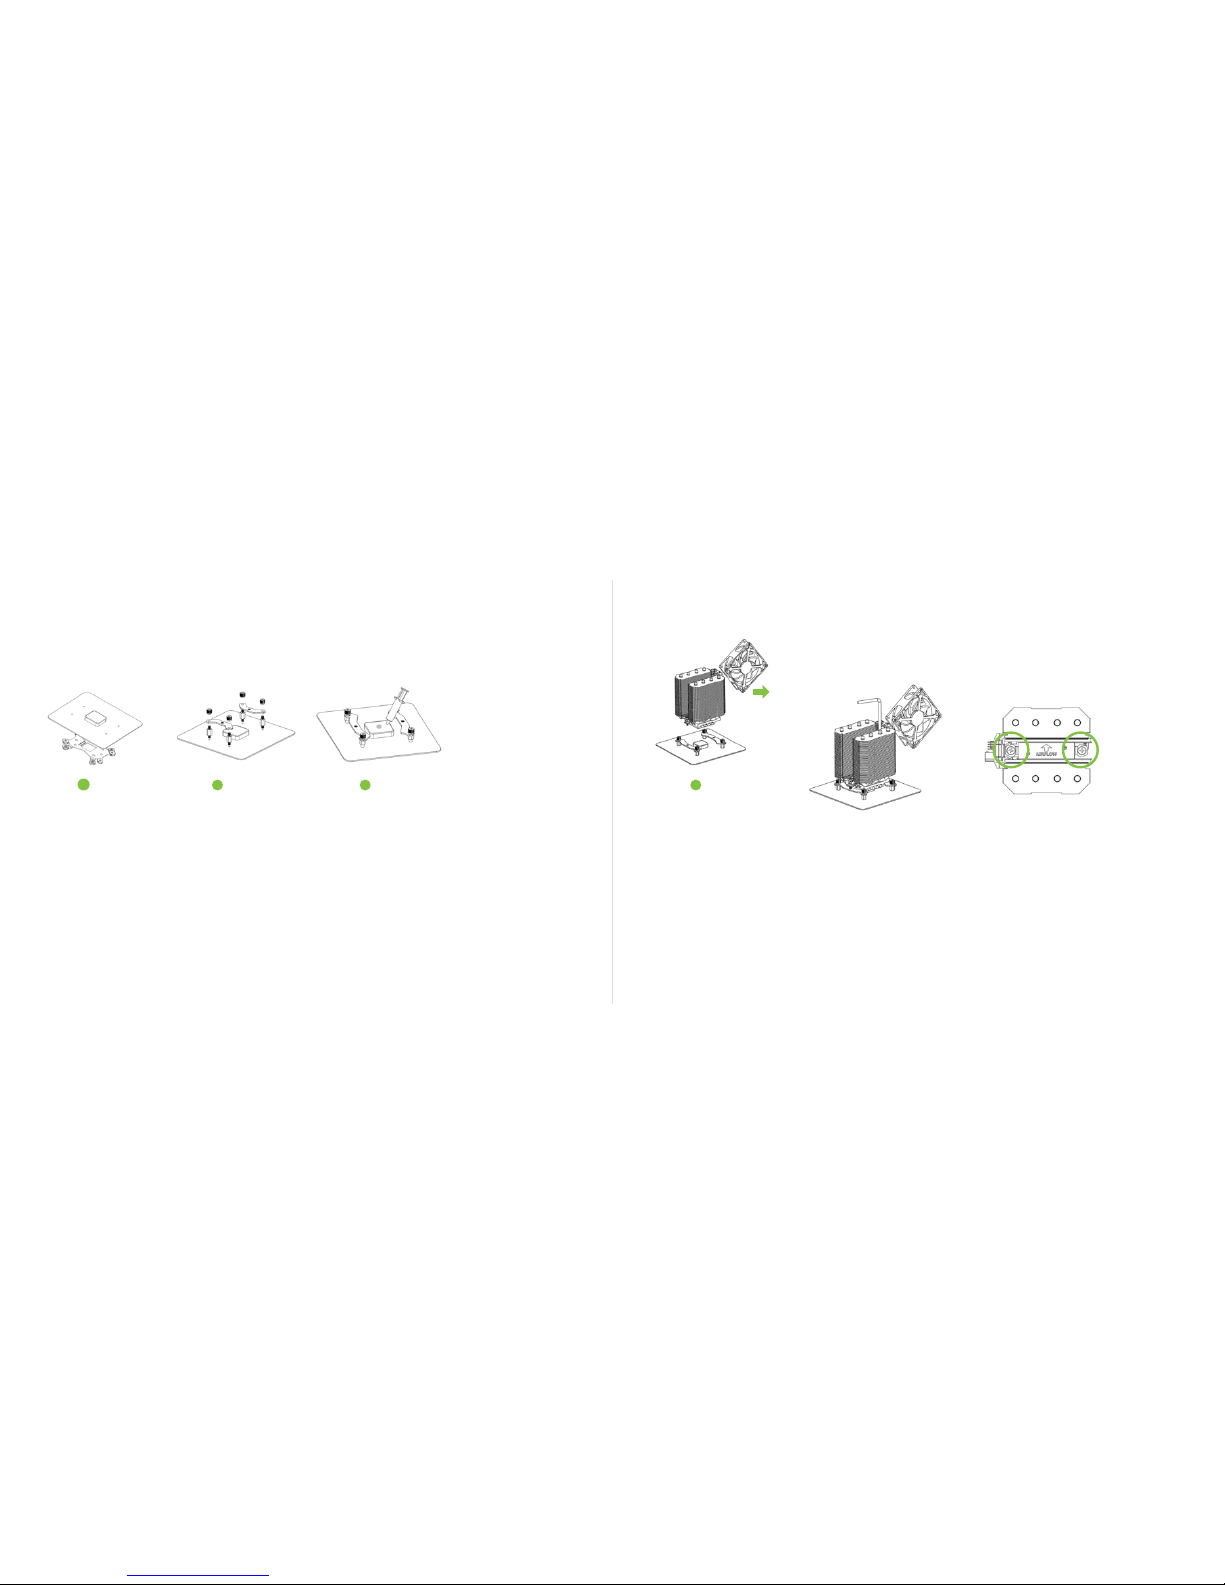
INSTALL GUIDE AMD
ATTACHING
BACKPLATE
Attach backplate (B)
to the back of the
motherboard using
included large standoffs
(D). Note the side
labeled “This side facing
AMD board” should
face the motherboard.
INSTALLING
BRACKETS
On the frontside of the
motherboard, attach the
AMD mounting brackets
(E) to the standoffs
using the knurled nuts
(G). Note that curve of
bracket should be
facing inward.
APPLYING
THERMAL PASTE
Clean off any residual
paste or thermal pads.
Apply included thermal
paste (H) in the center
of CPU package – use a
4-5mm circle. Excessive
thermal paste can actually
hinder performance.
STEP STEP
2 3
10 • HEX 2.0 Quick Start Guide
STEP
1
4b 4c
STEP
4
ATTACH COOLER
TO BRACKETS
Remove fan shroud and
fan to provide access to
the bolts that attach to
the brackets.
4a
Use a screwdriver to
screw the bolts into the
brackets, alternating
between screws every
half-turn.
Page 7
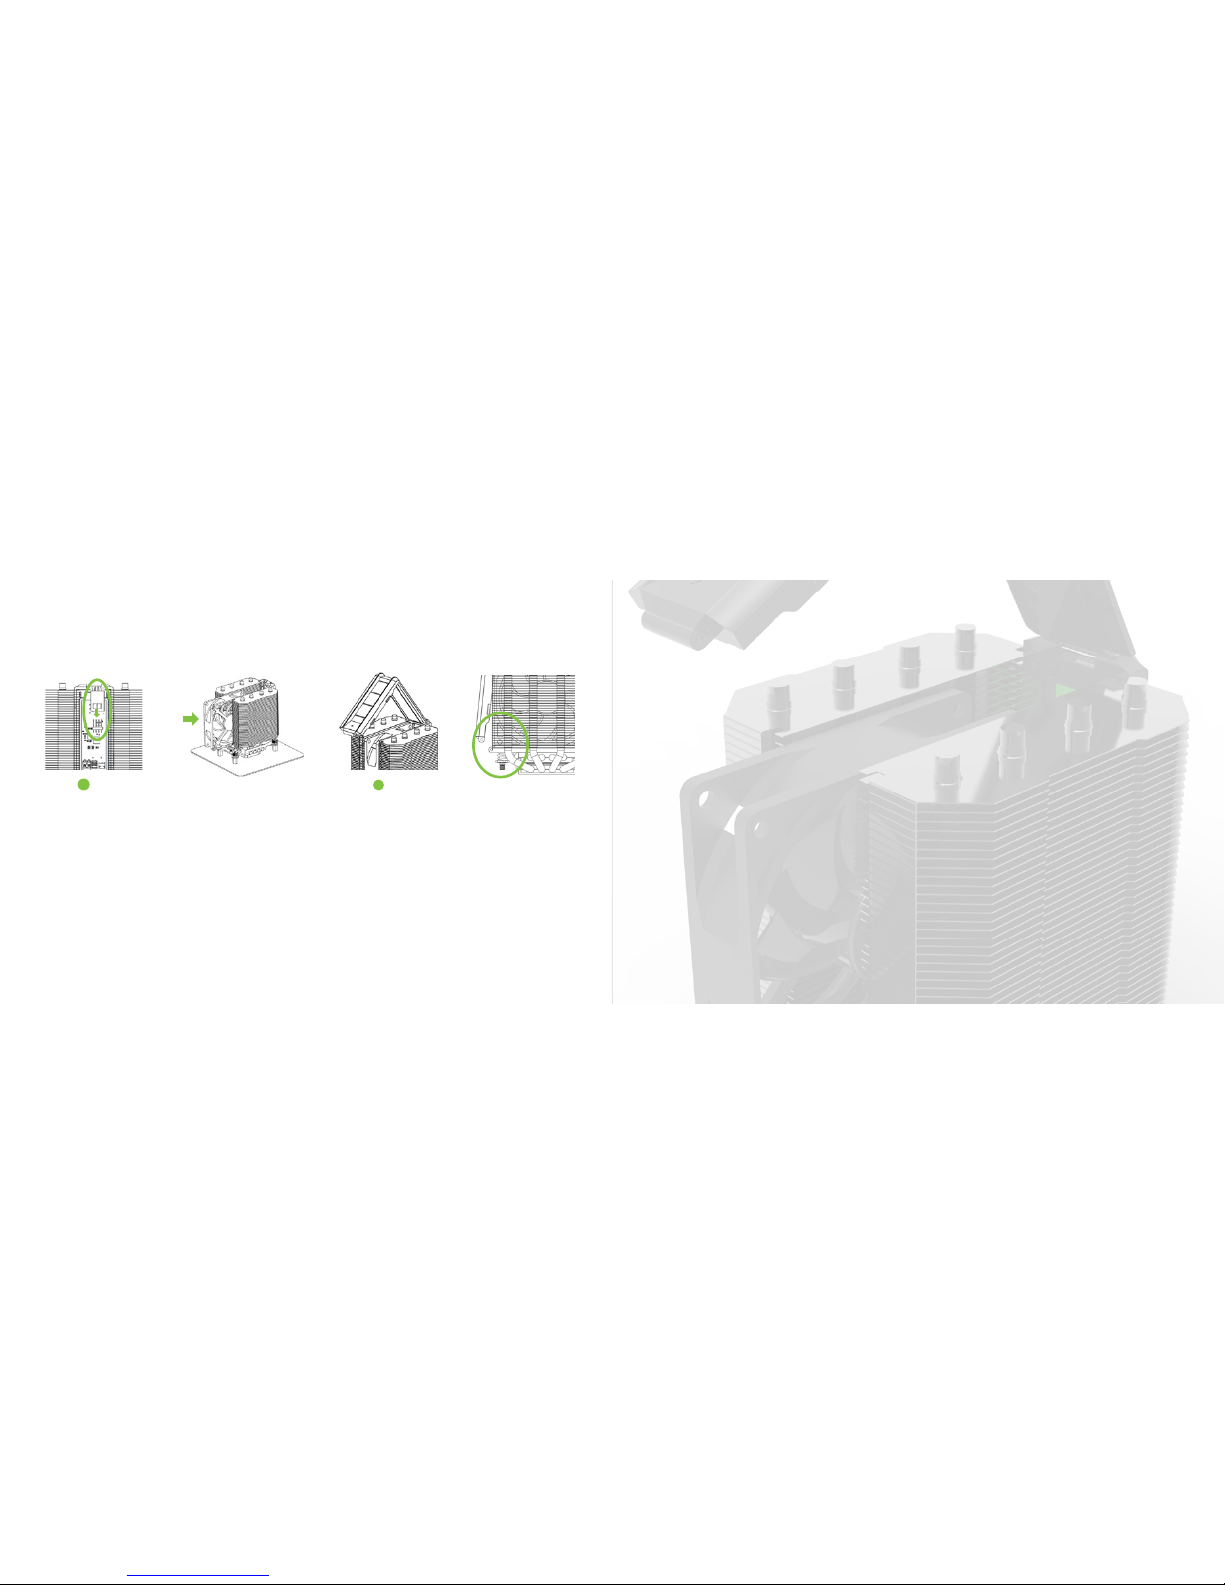
12 • HEX 2.0 Quick Start Guide
FAN INSTALL
CONNECT FAN
If the fan has been
completely removed,
plug 4-pin fan connector
into the pin connection
on the PC board inside
the cooler. Slide fan in
between n sets.
STEP
5
SHROUD INSTALL
Re-attach the fan shroud
and close it over the fan.
The fan shroud will snap
into place at the bottom
of the cooler.
STEP
6
Page 8
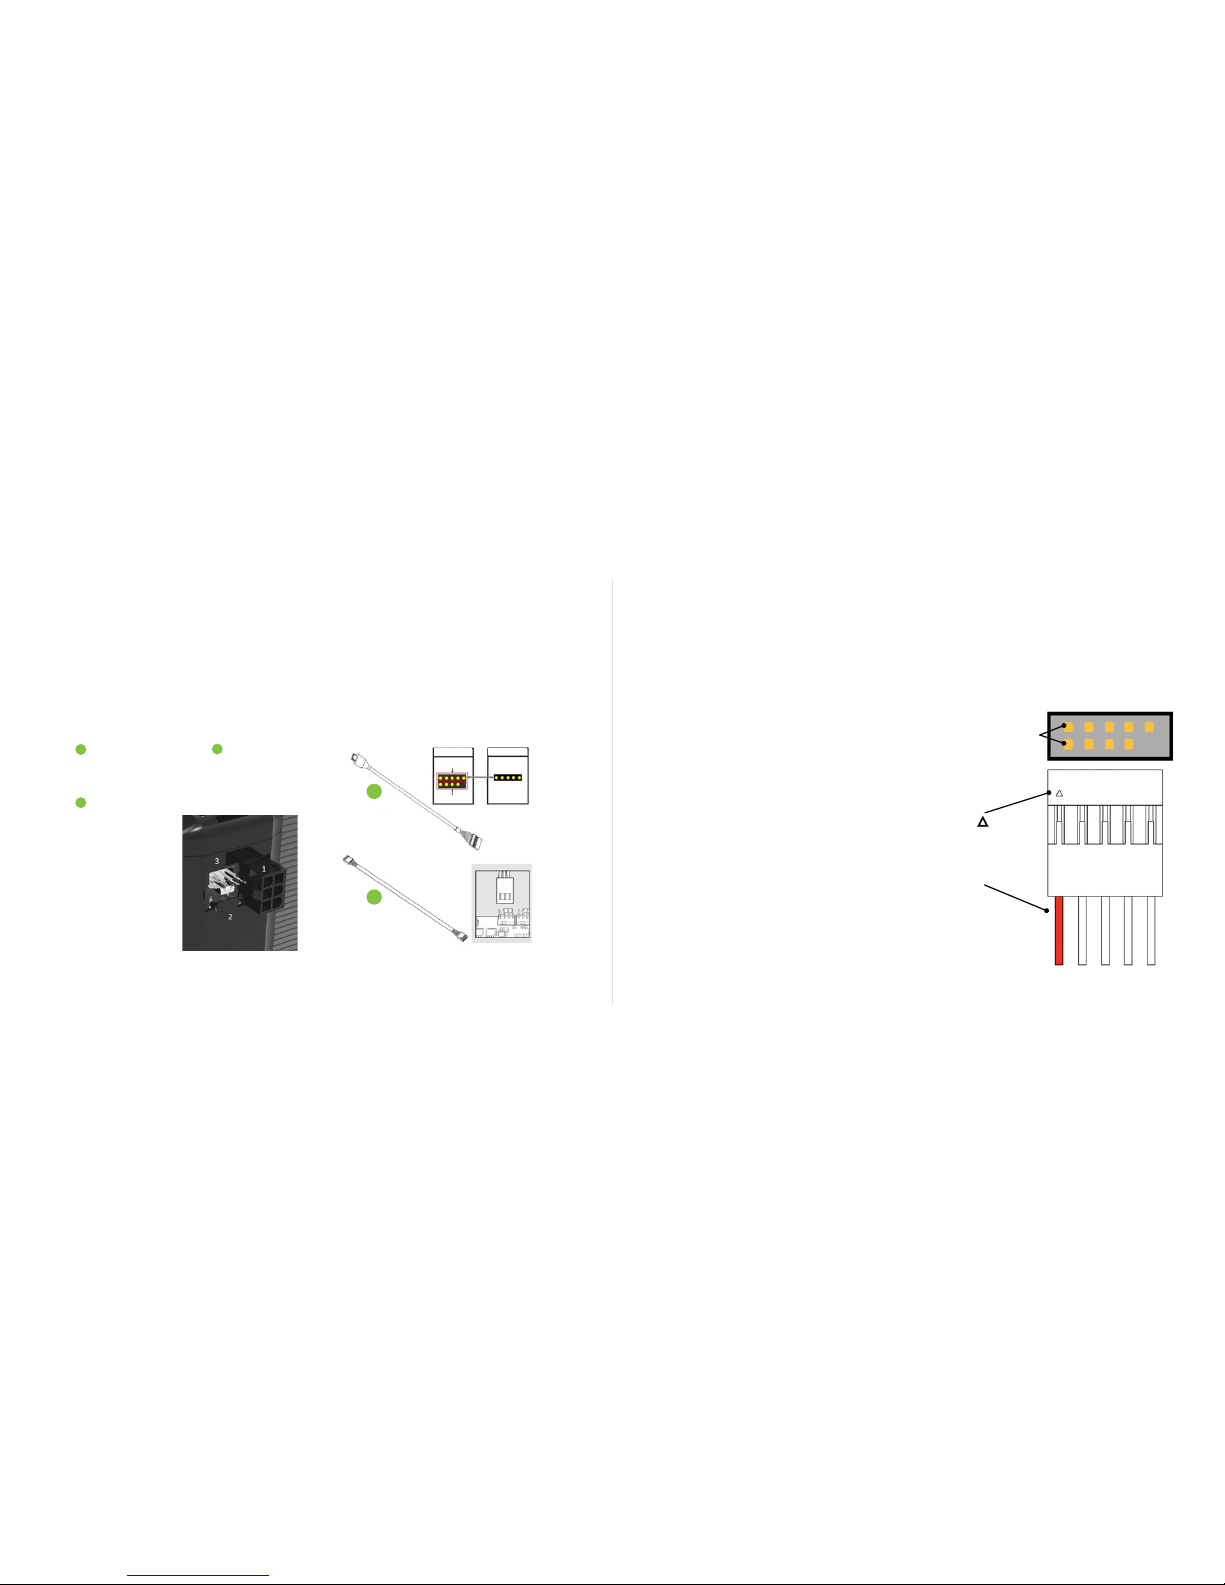
14 • HEX 2.0 Quick Start Guide
ATTACHING CABLES
Connect the included cables to the HEX 2.0 cooler. To make connections easier, it is recommended
to connect the cables in the following order:
6-pin PCIe power cable
from power supply.
Micro USB cable (K) –
Connect 5-pin side to USB
header on motherboard.
See diagram to the right –
most motherboard
headers have two (2) USB
positions per header. USB
connection is not required
for operation, but enables
customization via the HEX
2.0 dashboard software
application.
STEP
STEP
1
2
4-pin fan extension
cable (J) – Connect other
end to CPU fan input
on motherboard.
STEP
3
K
J
4-PIN
Motherboard Header Device Header
Device 1
Device 2
Indicates
pin-1 of USB
header; Also
indicated by
red wire
Pin-1 of
motherboard
header
ATTACHING CABLES
Please refer to the diagram to the right for details
on installing USB cable.
Installing the USB cable with the correct orientation
is important for system performance.
Page 9
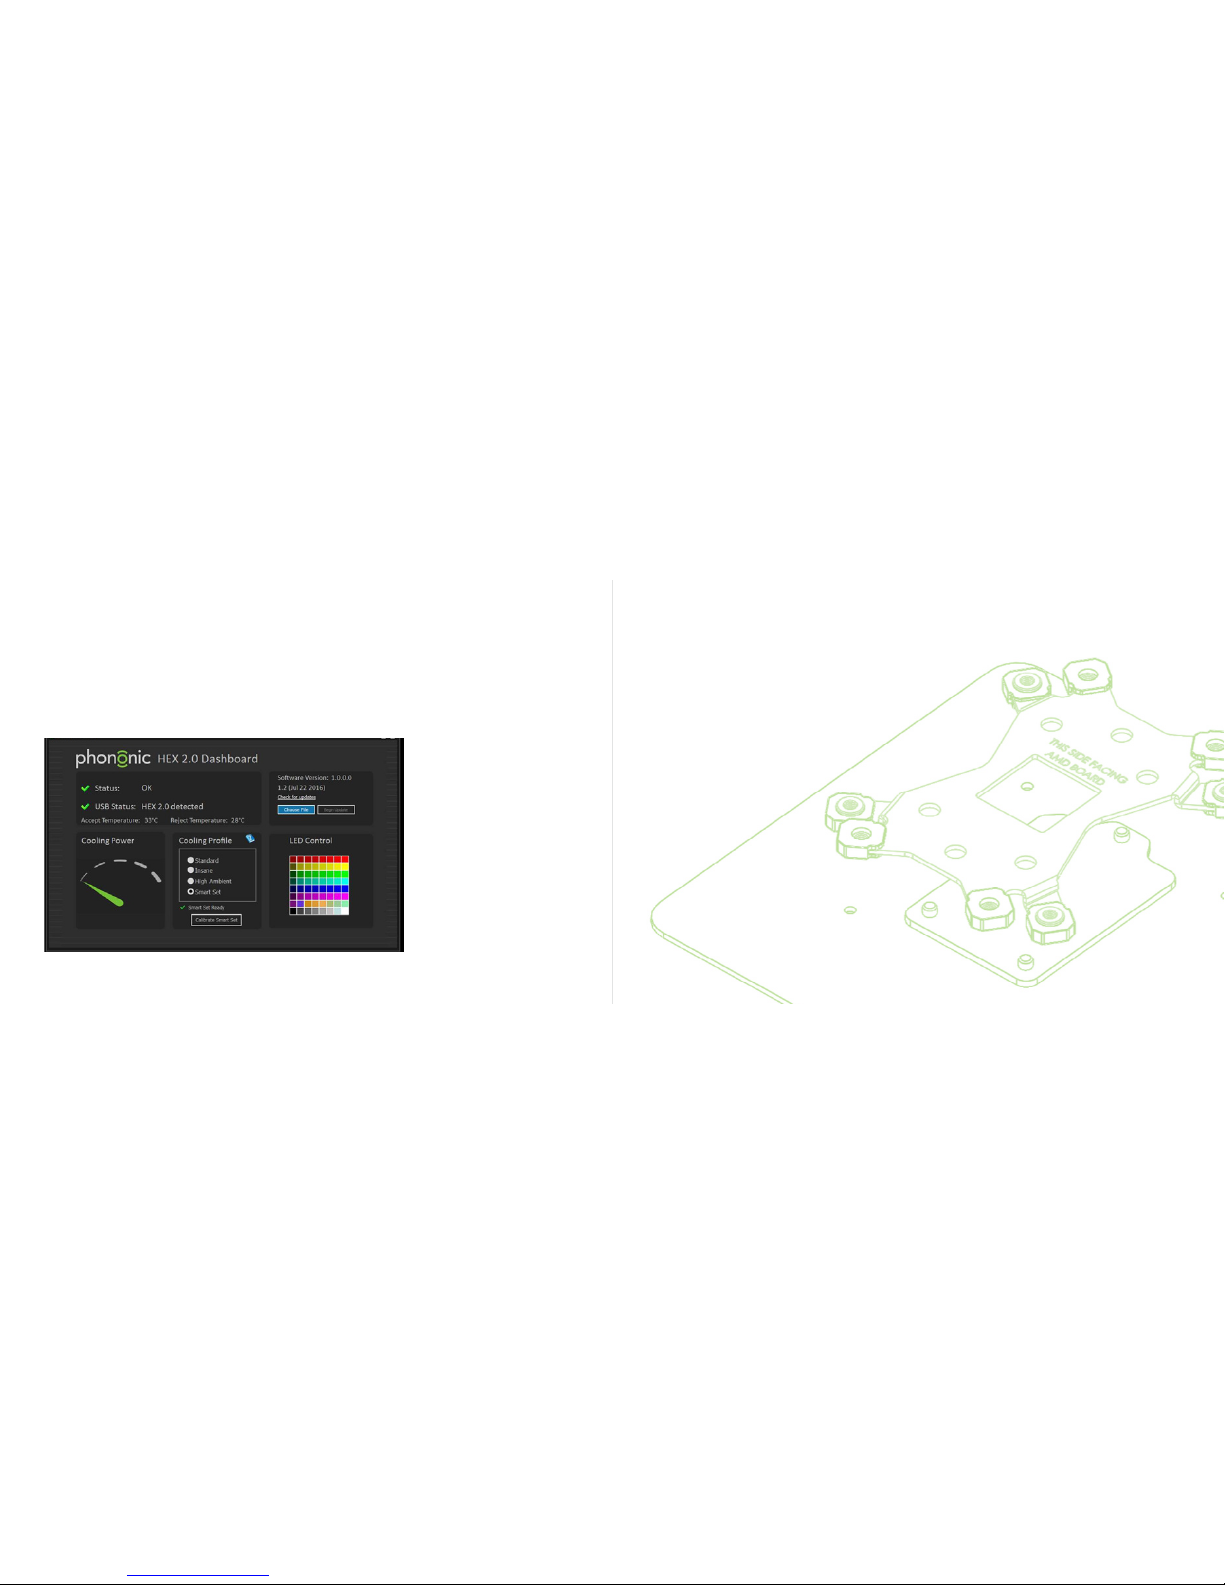
16 • HEX 2.0 Quick Start Guide
HEX 2.0 SOFTWARE
APPLICATION
Using the included USB
cable to connect the HEX
2.0 to your motherboard
unlocks customization
options like LED color and
cooling performance when
you visit phononic.com/
hex to download the
software application.
You can also check the status
of the cooler, check your
HEX 2.0 rmware revision,
and update the rmware to
the latest version.
Page 10

18 • HEX 2.0 Quick Start Guide
FAQS
1. Does it matter which direction/orientation the cooler is installed?
Yes – for optimal performance, the air ow should move from one direction and be in line with
case fan air ow.
2. Does the unit control the fan speed?
No – the fan connector simply passes the BIOS setting through the HEX 2.0 control board. You can
still control the fan and set fan curves via BIOS or other utilities.
3. How do I know if the HEX 2.0 active cooling is working?
The best way to see how the unit is operating is to download the HEX 2.0 Software Application,
which runs on Windows OS. The app will describe the unit operation, let you know of any faults
and allow you to set LED color and change the set-point when the active cooling powers up.
4. Where can I nd HEX 2.0 rmware and app updates?
Go to phononic.com/hex for all HEX 2.0 related news, updates, and downloads.
5. I am having a technical question and/or need support.
Go to phononic.com/hex to contact customer support or call 844-476-4202 Mon-Fri during
business hours.
6. My HEX 2.0 LED is ashing red. What does this mean?
If the HEX 2.0 LED is ashing red, then there is an error that is keeping the thermoelectric device
from turning on. The heat sink will still operate in the passive mode and the fan is not effected.
However, you can run the HEX 2.0 application to see what error is being reported and then
contact Phononic support for help.
7. The cables (power/USB/fan) on my HEX 2.0 are hitting my graphics card (or other component).
What should I do?
The HEX 2.0 can be turned 180-degrees from the optimal orientation, which will move the cables
to the other side – however, remember to make sure the fan is pulling/pushing air the same way
the case fans are running. You may experience a small drop in performance. Contact Phononic
support for help with installation.
8. Will the HEX 2.0 software application run on a Linux platform?
The HEX 2.0 application is designed for Microsoft Windows platforms only at this time. We don’t
offer Linux support at this time.
FAQS
Page 11
HEX 2.0 CPU Cooler is designed by Phononic, Durham, NC 27713, USA. Made in China.
PRODUCT
REGISTRATION
Thank you for purchasing the HEX 2.0.
To register your product, please visit phononic.com/hex.
The HEX 2.0 has a 1-year limited warranty.
Page 12
NOTES
Page 13

© 2016 Phononic, Inc.
 Loading...