

Page 1
MONITOR
USB/SD PLAYER
17” - TFT/LCD
ISTRUZIONI DI MONTAGGIO
MOUNTING INSTRUCTIONS
INSTRUCTIONS DE MONTAGE
MONTAGE-ANLEITUNGEN
INSTRUCCIONES PARA EL MONTAJE
VM 198
ITALIANO
ENGLISH
FRANÇAIS
DEUTSCH
ESPAÑOL
Page 2
3
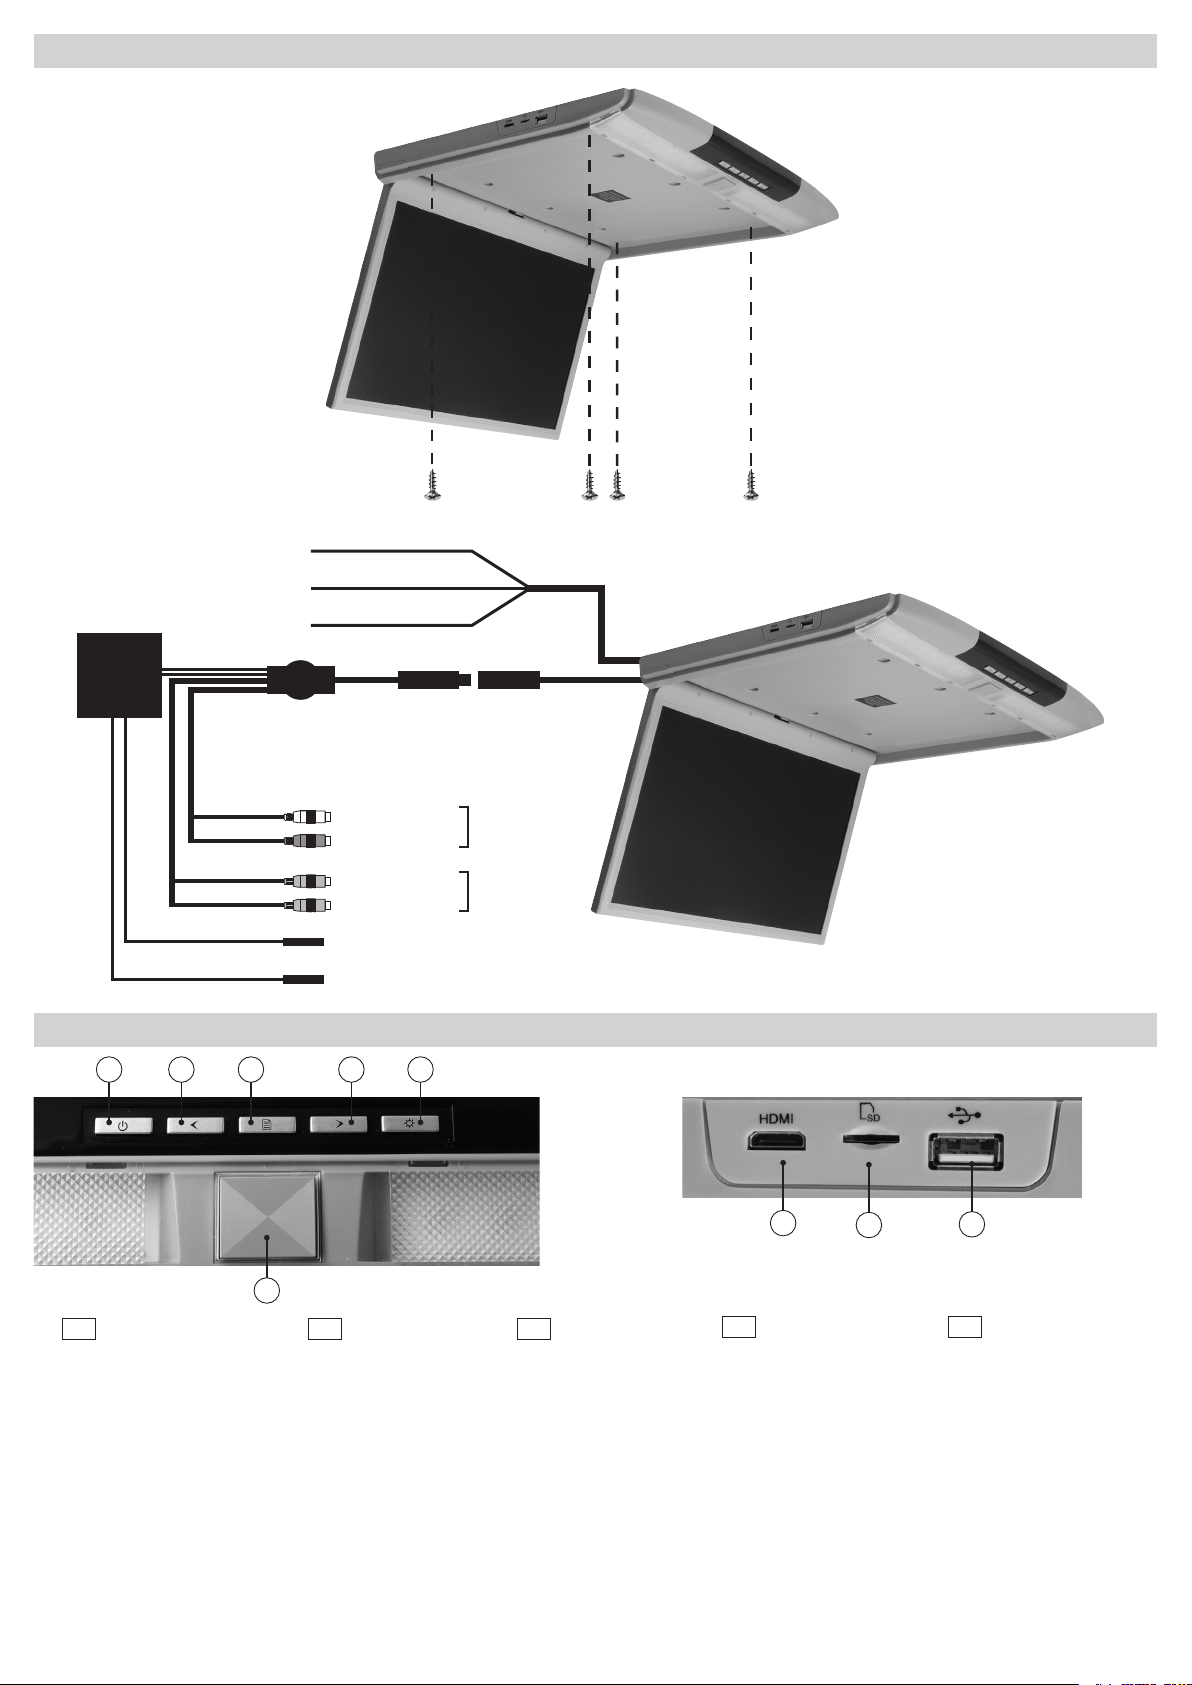
COLLEGAMENTI • CONNECTIONS • CONNEXIONS • ANSCHLÜSSE • CONEXIONS
LUCI DI CORTESIA/ COURTESY LIGHTS
+12 V SIGNAL DETECTION
GND
NERO/BLACK
ROSSO/RED
FUNZIONI / FUNCTIONS / FONCTIONS / FUNKTIONEN / FUNCIÓNES
1 2 3
ROSSO/RED
GIALLO/YELLOW
NERO/BLACK
BIANCO/WHITE
ROSSO/RED
GIALLO/YELLOW
GIALLO/YELLOW
GND
+12V
5 6
AUDIO IN
SOLO/ONLY IN AV1
VIDEO IN
4
I GB FR
1) Premere per accendere
Premere una volta per cambio sorgente
Tenere premuto per spegnere
2+5) Tenere premuto per volume
Premere una volta per traccia
3) Menù in AV1 e AV2
Pausa e riproduzione con
sorgenti USB e SD
Tenere premuto per menù precendente
4) Apertura schermo LCD
6) Luci di cortesia
7) Ingresso HDMI
8) Slot micro SD Card
9) Porta USB
Press to switch-on
Press once to change source
Keep pressed to switch-off.
For Volume, keep pressed
For Track, press once.
Menu for AV1 and AV2
Pause and reproduction with
USB-SD
For previous Menu keep pressed.
Opening the LCD screen
Courtesy-lights
HDMI input
Micro SD Card slot
USB port
Appuyer pour allumer / Appuyer
une fois pour changer de source
Faire pression pour éteindre
Faire pression pour le volume
Appuyer une fois pour trace
Menu sur AV1 et AV2 / Pause et
reproduction avec sources USB
et SD / Faire pression pour le
menu Précédent
Touche ouverture LCD
Lumière de courtoisie
Entrée HDMI
Slot Micro Carte SD
Port USB
7
8
D E
Zum Einschalten, drücken / Ein Mal
drücken um Quelle zu wählen / Zum
Ausschalten, gedrückt halten.
Lautstärke, gedrückt halten
Musikstück, ein Mal drücken.
Menü bei AV1 und AV2
Pause und Wiedergabe
bei USB-SD / Zum Menü davor,
gedrückt halten.
LCD-Bildschirm öffnen
Stand-Licht
Eingang HDMI
SD CARD-Öffnung
USB-Öffnung
9
Presionar para encender / Presionar
una vez para cambio fuente / Tener
presionado para apagar.
Tener presionado para el volumen.
Presionar una vez para la pista.
Menú in AV1 y AV2 / Pausa y reproducción con fuentes USB e SD
Tener presionado para el menú
precedente.
Abertura pantalla LCD
Luces de cortesía
Entrada HDMI
Ranura SD CARD
Puerto USB
Page 3
TELECOMANDO • REMOTE CONTROL • TÉLÉCOMMANDE • FERNBEDIENUNG • MANDO A DISTANCIA
1
2
3
4
5
6
7 9
8
15
14
13
12
11
I
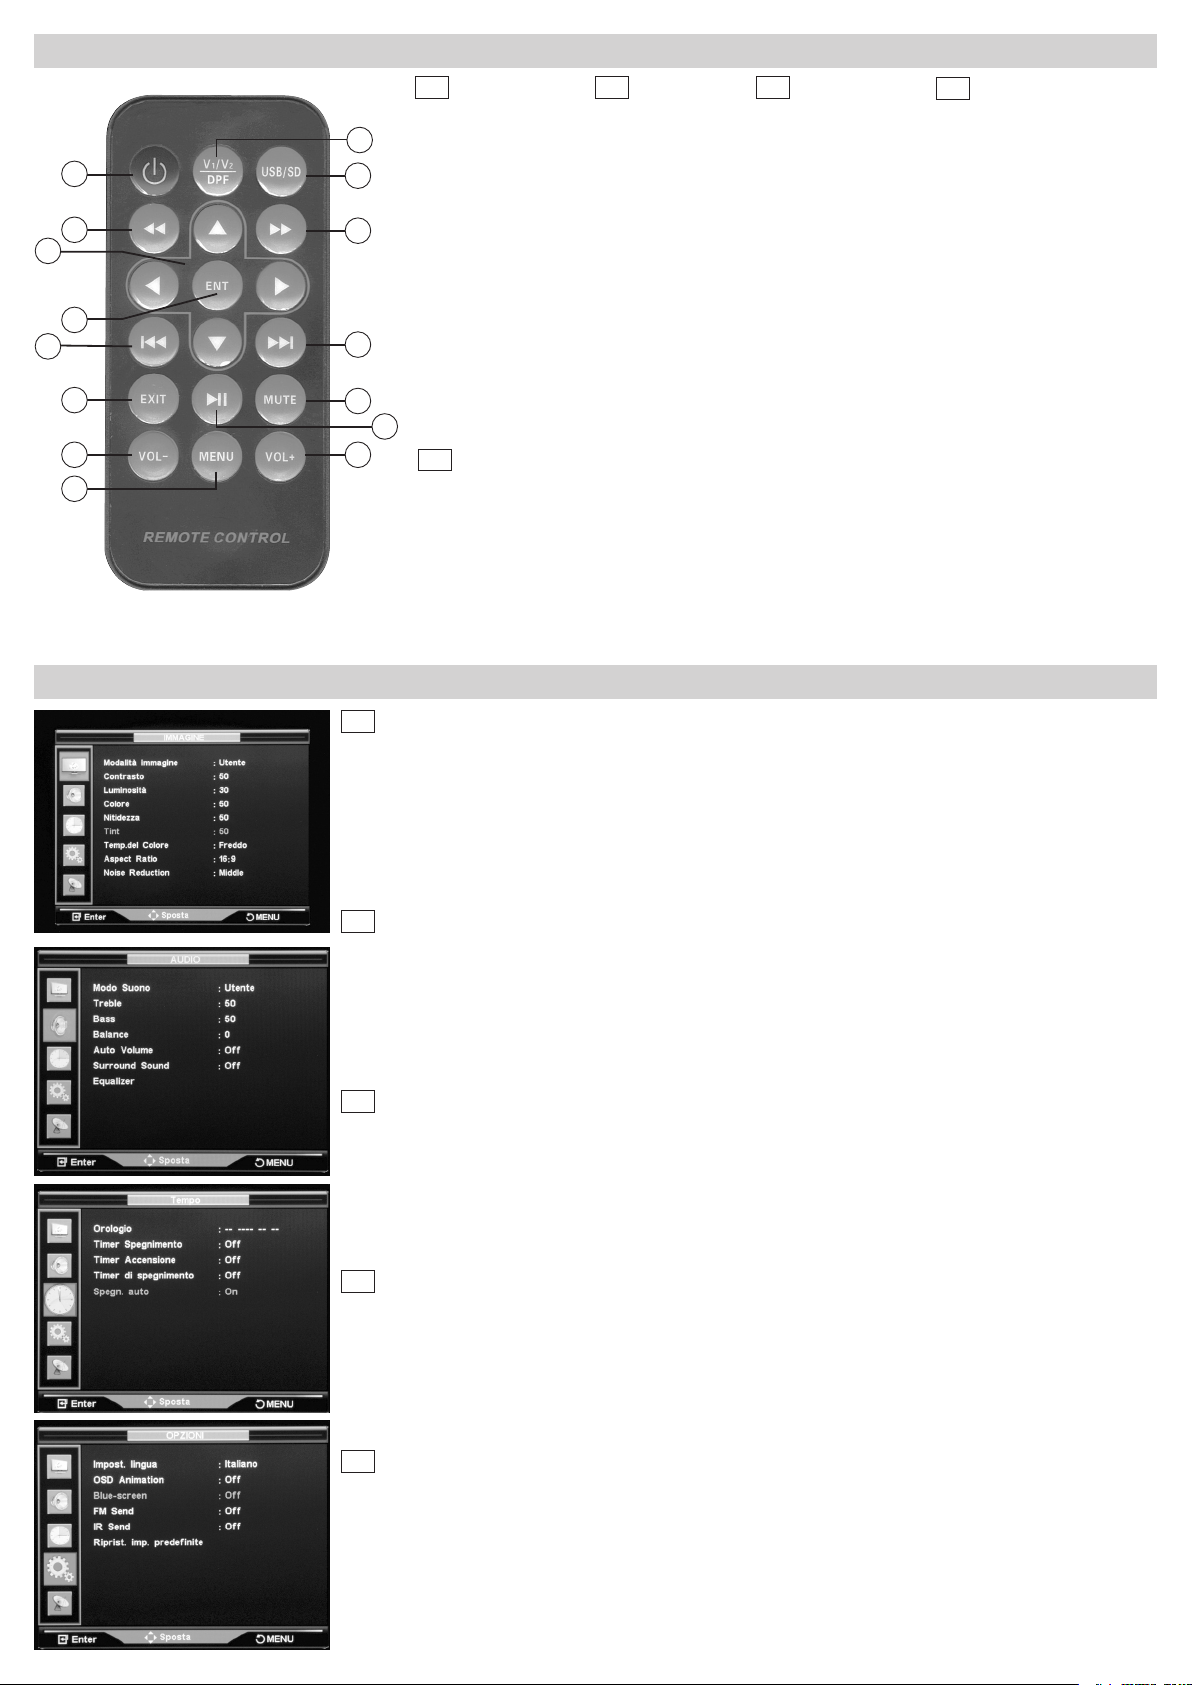
1) ON/OFF
2) Indietro veloce
3) Tasti direzionali
4) Conferma selezione
5) Traccia precedente
6) Esci dal menù
7) Volume -
8) Menù configurazione
9) Volume +
10) Riproduzione / Pausa
11) Silenzia audio
12) Traccia succcessiva
13) Avanti veloce
14) Seleziona USB e
Micro SD Card
15) Menù sorgenti
10
E
1) ON/OFF
2) Atrás
3) Desplazamiento del cursor
4) Confirma selección
5) Canción precedente
6) Salir del menú
7) Volumen -
8) Menú de configuración
9) Volumen +
GB FR
1) ON/OFF
2) Fast backward
3) Cursor-moving keys
4) Confirm selection
5) Previous track
6) Quit Menu
7) Vol -
8) Settings menu
9) Vol+
10) Play / Pause
11) Mute
12) Next track
13) Fast forward
14) Select USB
Micro SD Card
15) Menu sources
10) Pausa / Reproducción
11) Mute
12) Pista siguiente
13) Avance rápido
14) Selección USB
Micro SD Card
15) Menú fuentes
1) ON/OFF
2) Retour rapide
3) Déplacement curseur
4) Confirm selection
5) Tr. précédente
6) Sortir du Menu
7) Vol -
8) Menu configuration
9) Vol+
10) Reproduction/Pause
11) Mute
12) Trace suivante
13) Avancement rapide
14) Sélectionne USB
Micro SD Card
15) Menu sources
D
1) ON/OFF
2) Vorwärts
3) Läufer-Bewegungstasten
4) Wahl bestätigen
5) Titel vorher
6) Menü verlassen.
7) Laut -
8) Konfigurations-Menü
9) Laut +
10) Wiedergabe / Pause
11) Mute
12) Musikstück danach.
13) Schnell vorwärts.
14) Wählen Sie USB
Micro SD Card
15) Quelle-Menü
IMPOSTAZIONI • SETUP • REGLAGE • EINSTELLUNGEN • CONFIGURACIÓN
I
Per accedere al Menu premere il tasto MENU sul telecomando o il tasto (3 se su AV IN) sul pannello per
accedere alle seguenti impostazioni:
PICTURE: Regolazioni impostazione MODALITÁ IMMAGINE, CONTRASTO, LUMINOSITÀ, COLORE, NITIDEZZA,
TINTA, TEMPERATURA DEL COLORE, ASPECT RATIO, NOISE REDUCTION. (non abilitato se in modalità solo
AUDIO)
SOUND: Regolazioni impostazione MODO SUONO, TREBLE, BASS, BALANCE, AUTO VOLUME (per un
ottimizzazione del suono), SURROUND SOUND, EQUALIZER.
TIME: Regolazioni impostazione OROLOGIO, TIMER ACCENSIONE-SPEGNIMENTO.
OPTION: Regolazioni impostazione LINGUA, OSD, FM, IR, RIPRISTINO DATI DI FABBRICA.
GB
To enter the Menu, press MENU on the remote-control or related key on the panel (n°3, if situated on AV IN),
to enter the following Settings:
PICTURE: setting PICTURE MODE, CONTRAST, BRIGHTNESS, COLOUR, CLEARNESS, TINT, COLOURTEMPERATURE, ASPECT RATIO, NOISE REDUCTION. (not activated if AUDIO-mode only)
SOUND: setting SOUND-MODE, TREBLE, BASS, BALANCE, AUTO VOLUME (sound-optimization), SURROUND
SOUND, EQUALIZER.
TIME: Setting CLOCK, TIMER ON/OFF.
OPTION: Setting LANGUAGE, OSD, FM, IR, RE-ESTABLISH FACTORY-DATA
F
Pour accéder au menu, appuyer sur la touche MENU de la télécommande ou sur la touche (3 si sur AV IN) sur
le panneau pour accéder aux réglages suivants:
PICTURE: Ajustements des réglages: Modalité image, Contraste, Luminosité, Couleur, Netteté, Teinte, Température
de la couleur, Aspect Ratio, Noise, Réduction. (pas activé si en modalité seulement AUDIO)
SOUND: Ajustements des réglages: MODE SON, TREBLE, BASS, BALANCE, VOLUME AUTO (pour une optimisation
du son), SURROUND, SOUND, EQUALIZER.
TIME: Réglages Horloge, Timer allumage-extinction
OPTION: Réglages Langue, OSD, FM IR, restaure données d’origine
D
Um zum Menü zu gelangen, MENU auf der Fernbedienung drücken, oder die betreffende Taste auf dem
Bedienteil (Nr. 3, bei AV IN), um folgende Einstellungen zu betreten:
PICTURE: Einstellungen BILD-MODUS, KONTRAST, HELLIGKEIT, FARBE, SCHÄRFE, NUANCE, FARBTEMPERATUR, ASPECT RATIO, GERÄUSCH-REDUZIERUNG (im nur-Audio-Modus, nicht wählbar)
SOUND: Einstellungen TON-MODUS, TREBLE, BASS, BALANCE, AUTO VOLUME (Ton-Optimierung), SURROUND
SOUND, EQUALIZER.
TIME: Einstellung UHRZEIT, ZEITGEBER EINSCHALTEN-AUSSCHALTEN.
OPTION: Einstellung SPRACHE, OSD, FM, IR, FABRIK-EINSTELLUNGEN WIEDER AUFNEHMEN.
E
Para acceder al Menú presionar la tecla MENU en el mando a distancia o bien la tecla (3 si está en AV IN)
en el panel para acceder a los siguientes ajustes:
PICTURE: Ajuste configuración MODO IMAGEN, CONTRASTE, BRILLO, COLOR, NITIDEZ, TINTADO,
TEMPERATURA DEL COLOR, ASPECT RATIO, NOISE REDUCTION. (No habilitado in modo solo AUDIO)
SOUND: Ajustes configuración MODO SONIDO, TREBLE, BASS, BALANCE, AUTO VOLUME (para una
optimización del sonido), SURROUND SOUND, EQUALIZER
TIME: Ajustes RELOJ, TEMPORIZADOR ENCENDIDO - APAGADO.
OPTION: Ajustes IDIOMA, OSD, FM, IR, VOLVER A LOS AJUSTES DE FABRICA.
3
Page 4
FUNZIONI • FUNCTIONS • FONCTIONS • FUNKTION • FUNCION USB / SD CARD
I
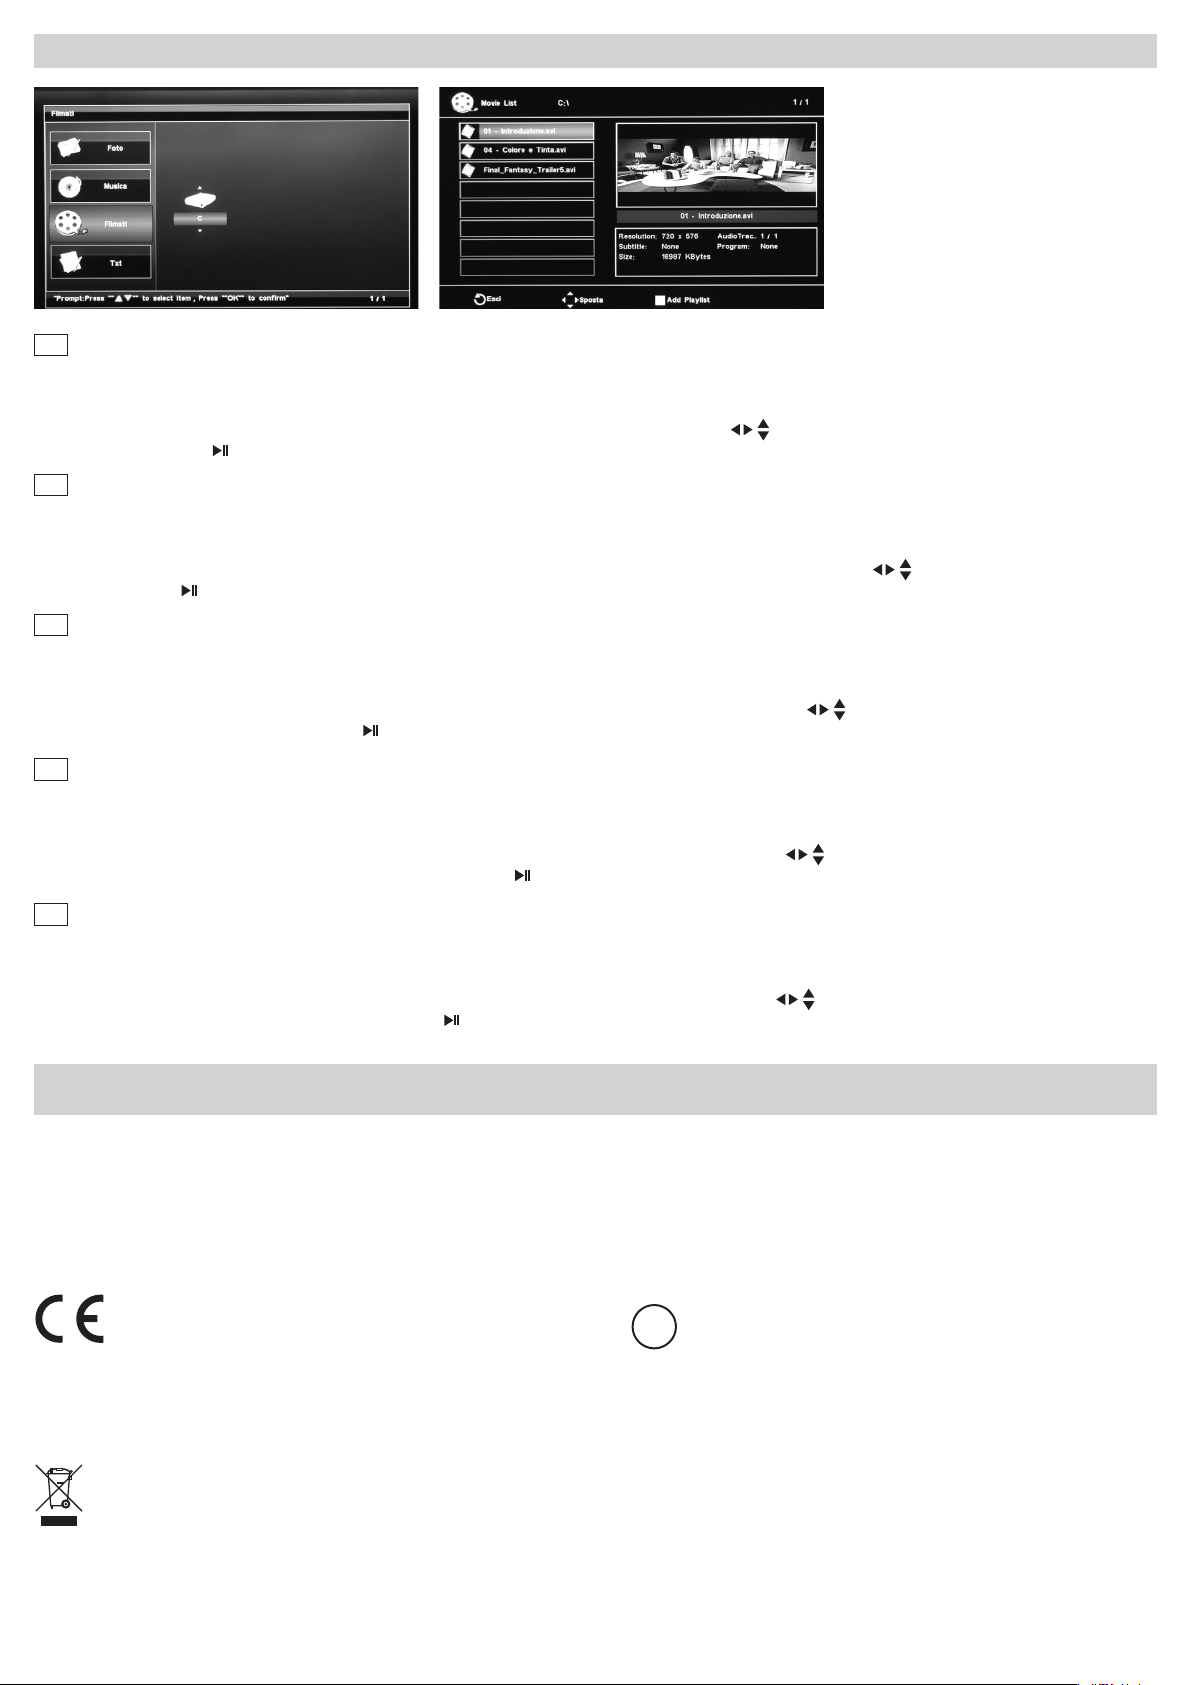
RIPRODUZIONE MP3/WMA/JPEG/AVI
Dopo aver inserito un supporto Micro SD Card o USB il lettore visualizzerà le cartelle automaticamente e inizierà la riproduzione. In presenza di file AUDIO/VIDEO
verranno riprodotti prima i file video.
RIPRODUZIONE IMMAGINI JPEG
Il lettore visualizzerà automaticamente la prima immagine della prima cartella. Usare i tasti direzionali
In modalità PLAY/PAUSE
GB
REPRODUCTION OF MP3/WMA/JPEG/AVI
, premendo i tasti direzionali si cambia l’angolo di visione.
After having introduced a micro-SD-card, or a USB-stick, the Player will automatically visualize the Folders and start reproduction. In the presence of AUDIO/
VIDEO-files, reproduction will start with the VIDEO-files first.
REPRODUCTION OF JPEG-PICTURES
The Player will automatically visualize the first Picture of the first Folder. To select the wanted Files, use the Direction-keys
During PLAY/PAUSE
F
REPRODUCTION MP3/WMA/JPEG/AVI
, you can change Vision-Angle, by pressing the Direction-keys.
Après avoir introduit un support micro Carte SD ou USB, le lecteur visualisera automatiquement les dossiers et commencera la reproduction. En présence de
fichiers AUDIO/VIDEO, les fichiers vidéo sont reproduits en premier.
REPRODUCTION IMAGES JPEG
Le lecteur visualisera automatiquement la première image du premier dossier. Utiliser les touches directionnelles
fichiers à reproduire. En modalité PLAY/PAUSE
, on change l’angle de vision en appuyant les touches directionnelles,.
sul telecomando per selezionare i file da riprodurre.
on the remote-control.
sur la télécommande pour sélectionner les
D
WIEDERGABE MP3/WMA/JPEG/AVI
Nach Einstecken einer Mikro-SD oder einEs USB-Stifts, weist der Player automatisch alle Ordner aus und beginnt mit der Wiedergabe. Sind AUDIO/VIDEO-Dateien
vorhanden, so werden immer erst die VIDEO-Dateien wiedergegeben.
WIEDERGABE VON JPEG-BILDERN
Der Player weist automatisch das erste Bild des ersten Ordners aus. Durch die Pfeiltasten der Fernbedienung
Wiedergabe wählen. Sichtwinkel-Einstellung: im Modus PLAY/PAUSE
, Pfeiltasten drücken.
lassen sich die gewünschten Dateien für die
E
REPRODUCION MP3/WMA/JPEG/AVI
Después de haber introducido un soporte Micro SD o USB el lector visualizará las carpetas automáticamente e iniciará la reproducción. En presencia de archivo
AUDIO/VIDEO tendrán la prioridad los que contienen videos.
REPRODUCION IMAGENES JPEG
El lector visualizará automáticamente la primera imagen de la primera carpeta. Usar las teclas direccionales
archivos que se desean reproducir. En modo PLAY/PAUSE
, presionando las teclas direccionales se cambia de ángulo de visión.
en el mando a distancia para seleccionar los
CARATTERISTICHE TECNICHE • TECHNICAL SPECIFICATIONS • CARACTERISTIQUES TECHNIQUES
TECHNISCHE DATEN • CARACTERISTICAS TECNICAS
• Formato / Aspect ratio16:9•Sistema / System PAL/NTSC auto-switch•Risoluzione / Resolution RGB1920(H)x1080(V)•Angolo di visione / View angle 70° orizzont. - 65° vertic.
• Inclinazione schermo 160° /Tiltscreen160°•Regolazioni colore/contrasto/luminosità / Regulations color/contrast/brightness
• Trasmettitore IR integrato per cuffie senza fili/ Built in infrared transmitter for wireless headphones •Trasmettitore IR 2 canali / Double channel IRtransmitter
• 1 Porta / Port USB 8 GB MAX • 1 Slot SD Card 8 GB MAX • Con 2 altoparlanti integrati / With 2 integrated speakers
• Memoria ultima posizione (solo video) / Last memory position (only video) • Menù multilingue / Multilanguage menu
• Telecomando infrarossi con tutte le funzioni / Full Function Wireless Remote Control
• 1 Ingresso video / 1 Video ouput • 1 Ingresso HDMI / 1 HDMI input •Alimentazione / Power DC12•Dimensioni / Dimensions: L. 450 - P. 335 - H. 30 mm.
• Compatibilità / Compatible: MP3-MPEG4-JPEG
DICHIARAZIONE DI CONFORMITÀ aIle direttive 1999/5/EC R&TTE
DECLARATION OF CONFORMITY to the directives 1999/5/EC R&TTE
IT Phonocar dichiara che il VM112 è conforme ai requisiti essenziali e a tutte le altre disposizioni pertinenti stabilite dalla direttiva 1999/5/CE.
GB Phonocar declares that this unit VM112 is in compliance with the essential requirements and other revelant provisions of Directive 1999/5/EC.
FR Phonocar dèclare que l’appareil VM112 est conforme aux exigences essentielles et aux autres dispositions pertinentes de la directive 1999/5/EC.
D Phonocar erklärt, dass dieser VM112 in Übereinstimmung ist mit den grundlegenden Anforderungen und den anderen relevanten Vorschriften der Richtlinie 1999/5/EC.
E Phonocar declara que el VM112 cumple con los requisitos esenciales y cualesquiera otras disposiciones aplicables o exigibles de la Directiva 1999/5/EC.
EN 55022:2010+A1:2011 • EN 55024:2010 • EN 61000-3-2:2006+A1:2009+A2:2009 • EN 61000-3-3:2013
Il prodotto non deve essere smaltito con i rifiuti domestici. Si ricorda che le pile/accumulatori devono essere rimosse dall’apparecchiatura prima che questa sia conferita come rifiuto.
Per rimuovere le pile/ accumulatori fare riferimento alle specifiche indicazioni del costruttore. L’utente dovrà, pertanto, conferire gratuitamente l’apparecchiatura e la pila giunta a fine vita agli
idonei centri comunali di raccolta differenziata dei rifiuti elettrici ed elettronici, oppure riconsegnarle al rivend itore. L’adeguata raccolta differenziata contribuisce ad evitare possibili effetti
negativi sull’ambiente e sulla salute e favorisce il reimpiego e/o riciclo dei materiali di cui essi sono composti. Per ulteriori informazioni consultare il sito www.phonocar.it
This product must NOT be treated as a domestic waste. Please remember that batteries/chargers must be extracted from the
appliance before throwing the appliance away. How to extract batteries/chargers: please follow the manufacturer’s specific instructions.
The end-user is requested to carry the appliance and its related battery, with no cost, to the municipal waste-recycling-spots for electrical and electronic parts, or take them to the related Retailer
shop. Recycling-spots help to avoid negative effects on the environment & health and promote the re-use and/or recycling of the various materials. For further information, please read homepage
www.phonocar.it
ViaF.lliCervi,167/C•42124ReggioEmilia(Italy)•Tel.++390522941621• www.phonocar.com • e-mail:[email protected]
•
Interruttore luci / Car lighting switch •1 Ingresso Audio/Video / 1 Audio/Video input
E9
10R - 04 1253
 Loading...