

Page 1
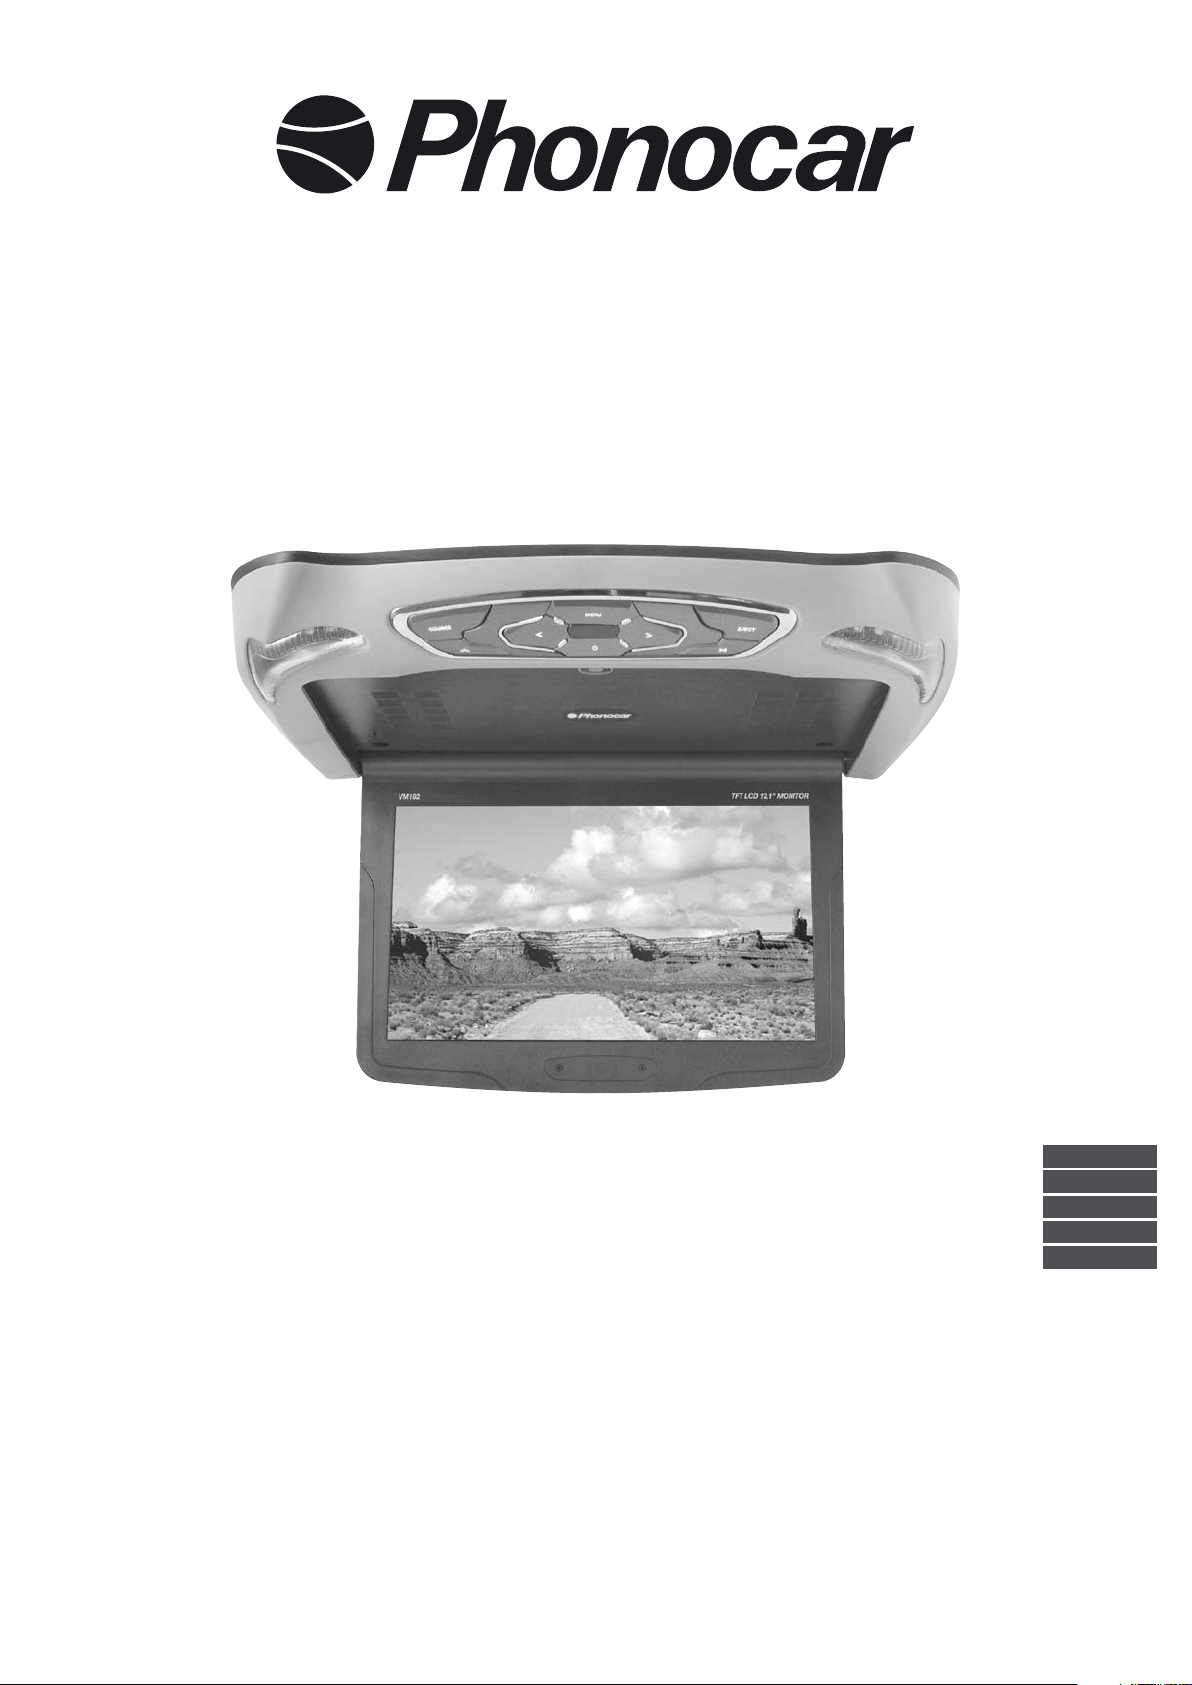
MONITOR
12,1” - TFT/LCD
ISTRUZIONI DI MONTAGGIO
MOUNTING INSTRUCTIONS
INSTRUCTIONS DE MONTAGE
MONTAGE-ANLEITUNGEN
INSTRUCCIONES PARA EL MONTAJE
VM 192
ITALIANO
ENGLISH
FRANÇAIS
DEUTSCH
ESPAÑOL
Page 2
3
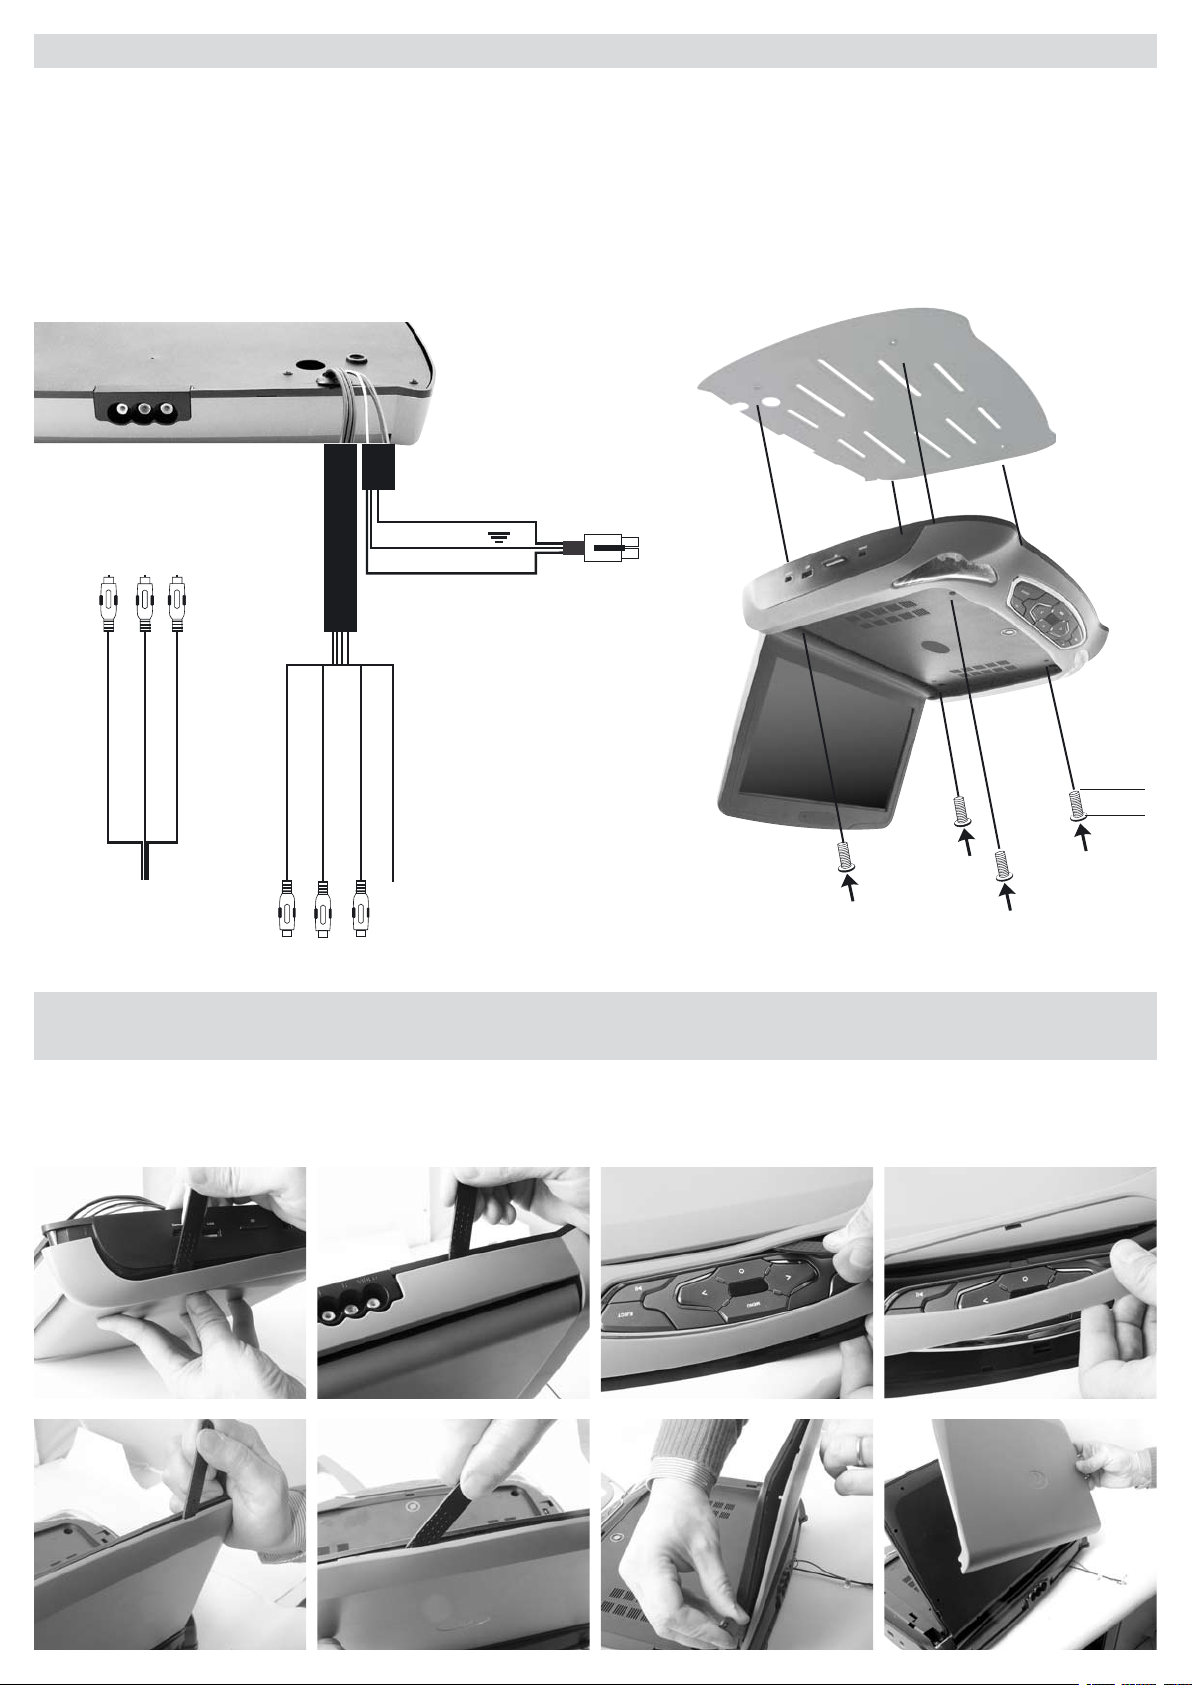
COLLEGAMENTI • CONNECTIONS • CONNEXIONS • ANSCHLÜSSE • CONEXIONS
ATTENZIONE / ATTENTION / SEHR WICHTIG / ATENCIÓN
• Per aprire lo schermo è necessario alimentare e accendere il VM192. NON FORZARE L’APERTURA DA SPENTO.
• Before opening the screen, connect the VM192 to the current-supply and switch-ON the unit. NEVER OPEN THE SCREEN BY FORCE,
• Pour ouvrir l’écran, il faut alimenter et allumer le VM192. NE PAS FORCER L’OUVERTURE LORSQUE L’APPAREIL EST ÉTEINT.
• Vor dem Öffnen des Bildschirms, immer erst VM192 an den Strom anschließen und EINSCHALTEN. In ausgeschaltetem Zustand NIEMALS versuchen,
den Bildschirm zu forcieren.
• Para poder efectuar el montaje del monitor es imprescindible alimentar el VM192 y encenderlo. NO FORZAR LA ABERTURA SI ESTA APAGADA.
+12 V
BIANCO / WHITE
ROSSO / RED
GIALLO / YELLOW
ROSSO / RED
NERO / BLACK
BIANCO / WHITE
LUCI DI CORTESIA
STAND-BY LIGHT
FM
INGRESSO / INPUT AUDIO (R)
INGRESSO / INPUT AUDIO (L)
INGRESSO / INPUT VIDEO
USCITA / OUTPUT VIDEO
USCITA / OUTPUT AUDIO (L)
USCITA / OUTPUT AUDIO (R)
VERDE - GREEN
SOSTITUZIONE COVER • TO REPLACE THE COVER • POUR REMPLACER LA COVER
UM DIE COVER ZU ERSETZTEN
Per sostituire la cover utilizzare la chiavetta fornita nella dotazione. • To replace the cover, use the supplied key.
Pour remplacer la cover, utiliser la clé fournie. • Um die Cover zu ersetzten, beigelegten Stift verwenden.
Para volver a colocar la tapa, utilice la llave suministrada.
6 mm.
Page 3
3
IT / GB / FR
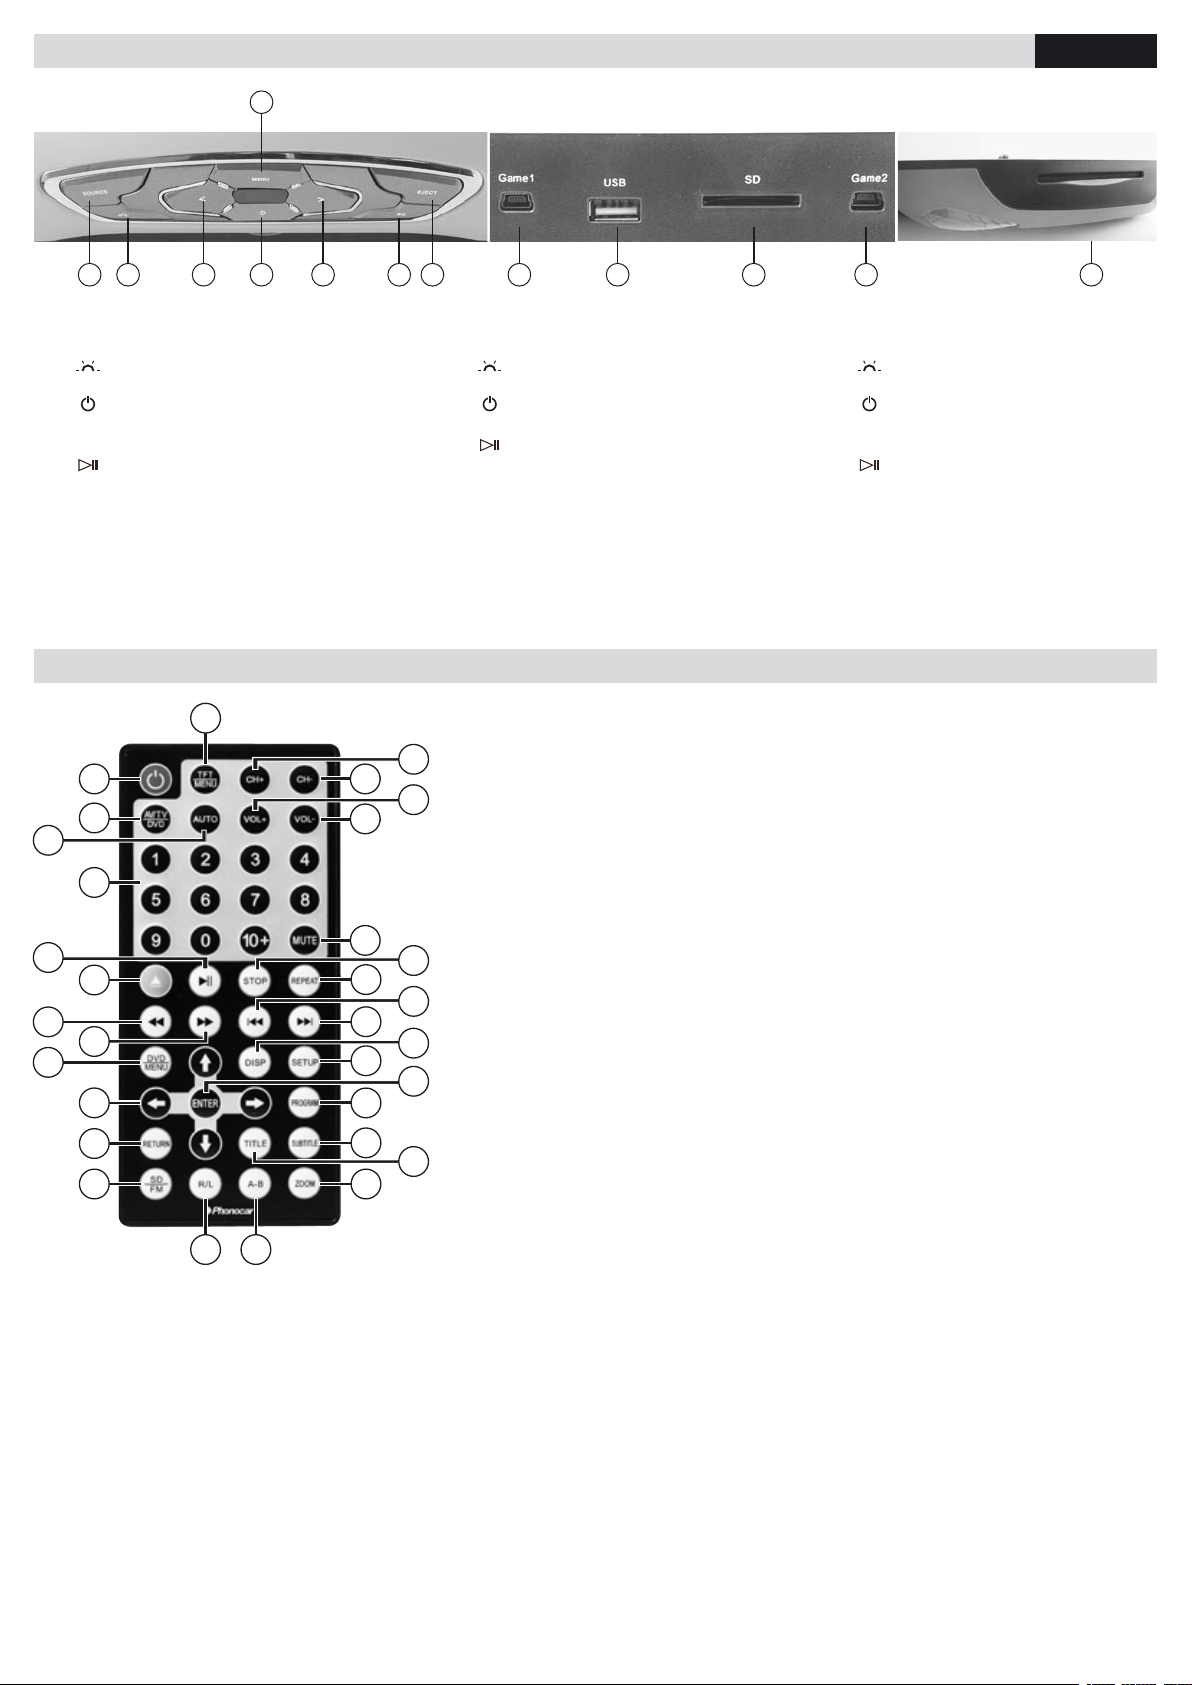
FUNZIONE TASTI • FUNCTION KEYS • FONCTIONS DES TOUCHES
8
5
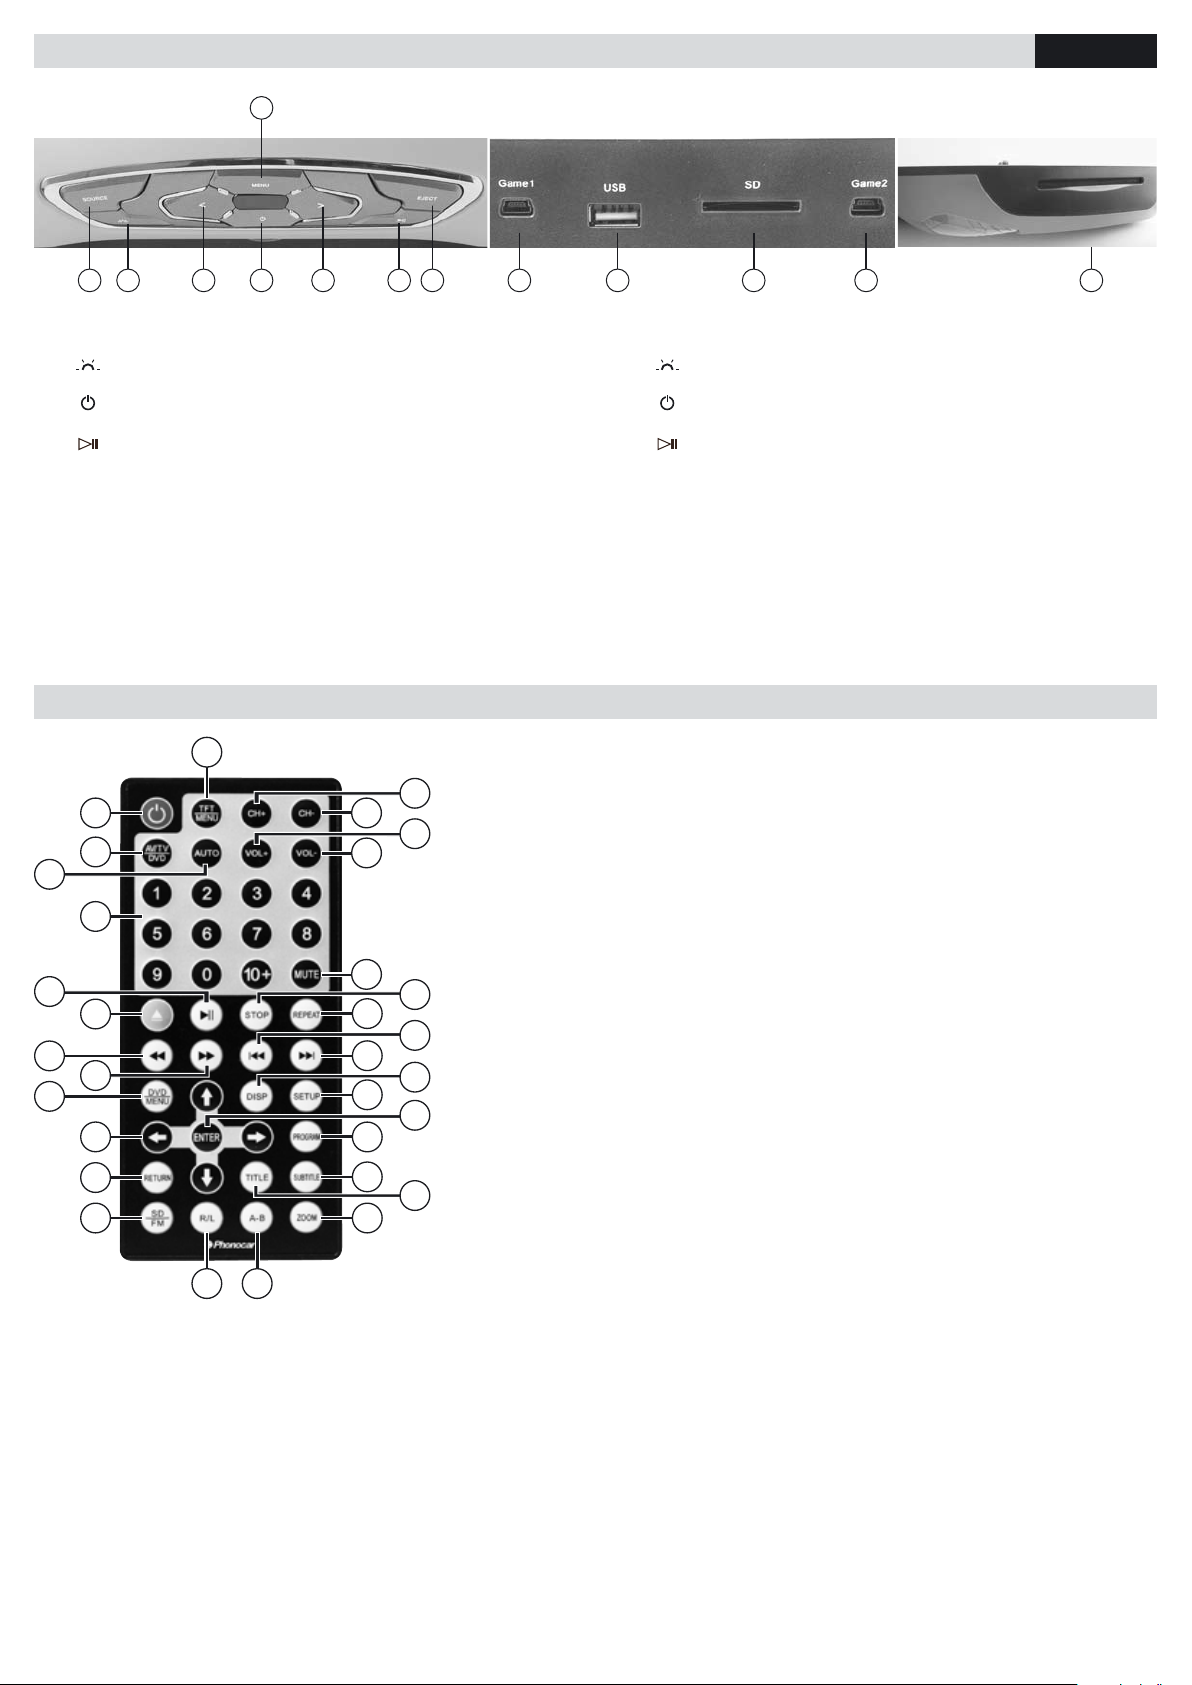
1 SOURCE Selezione sorgenti:
DVD / USB / MMC/SD CARD / AV
2
3 < Indietro veloce 2x/4x/8x/16x/32x
4
Apertura schermo LCD
5 > Avanti veloce 2x/4x/8x/16x/32x
6
7 EJECT Tasto espulsione disco
8 MENU Tasto Menù
9 GAME1 Entrata Joystick-1
10 USB Porta USB
11 SD Porta SD Card
12 GAME2 Entrata Joystick-2
13 Feritoia DVD
Luci di cortesia ON/OFF
Accensione / Spegnimento
Pausa e riproduzione
TELECOMANDO • REMOTE CONTROL • TÉLÉCOMMANDE
31
1
2
29
27
3
4
26
5
6
7
24
22
8
9
10
11
12
14
13
20
18
17
15
9 10 11 12 131 2 3 4 6 7
1 SOURCE
DVD / USB / MMC/SD CARD / AV
2
3 < Fast Rewind 2x/4x/8x/16x/32x
4
5 > Fast Forward 2x/4x/8x/16x/32x
6
7 EJECT Disk eject
8 MENU Menu
9 GAME1 Joystick-1 input
10 USB USB Port
11 SD SD Card Slot
12 GAME2 Joystick-2 input
13 DVD input
1) ......... Accensione - Apertura schermo LCD
2) ......... Selezione sorgenti: AT / TV / DVD
3) ......... Seleziona sistema PAL / NTSC
30
4) ......... Tastera numerica-tasto 10+
5).......... Riproduzione / Pausa
28
6) ......... Espulsione CD
7-8) ...... Avanti - Indietro
9) ......... Ritorno al menù principale DVD
10) ....... Tasti per spostamento cursore
11) ....... Ritorno al menù di riproduzione
12) ....... Seleziona sorgenti: USB / SD card / CD
13) ....... Cambio lingua
14) ....... Ripetizione A-B
25
15) ....... Zoom
16) ....... Titoli
23
1).......... ON / OFF - LCD Lock button
21
2) ......... Select: AT / TV / DVD
3) ......... System selection PAL / NTSC
19
4) ......... Number-keys and 10+ key
5).......... Play / Pause
6) ......... Disk eject
7-8) ...... Forward / Backward
16
9) ......... DVD menu
10) ....... Cursor-moving keys
11) ....... Return to the playback menu
2) ......... Select sources: CD / USB / SD card
13) ....... Change language
14) ....... Repeat A-B
15) ....... Zoom
Select Sources:
Dome light switch ON/OFF
ON / OFF - LCD Lock button
Pause and play
1 SOURCE Sélection sources:
DVD / USB / MMC/SD CARD / AV
2
3 < Revient rapide 2x/4x/8x/16x/32x
4
Touche ouverture LCD
5 > Avance rapide 2x/4x/8x/16x/32x
6
7 EJECT Expulsion CD
8 MENU Menu
9 GAME1 Mini port USB Gamepad-1
10 USB Entrées AUX-IN / USB
11 SD Slot Carte SD
12 GAME2 Mini port USB Gamepad-2
13 Entrées DVD
17) ....... Seleziona e attiva sottotitoli
18) ....... Programma la sequenza di riproduzione
19) ....... Conferma selezione
20) ....... Menù configurazione
21) ....... Visualizzazione info riproduzione
22-23) . . Traccia successiva / precedente
24) ....... Imposta ripetizione Brano / Cartella
Capitolo
25) ....... Ferma riproduzione
26) ....... Silenzia audio
27-28) . . Volume+ / Volume-
29-30) . . Ricerca canali
31) ....... Menù OSD
16) ....... Title
17) ....... Select and activate subtitles
18) ....... Programming sequence playback
19) ....... Confirm selection
20) ....... Configuration menu
21) ....... Display playback info
22-23) . . Next / Previous Track
24) ....... Repeat Track / Folder / Chapter
25) ....... Play stop
26) ....... Audio-Mute
27-28) . . Volume+ / Volume-
29-30) . . Channels select
31) ....... OSD Menu
Lumière Courtoisie ON/OFF
Allumage / Extinction
Pause et Reproduction
1) ......... Allumage - Touche ouverture LCD
2) ......... Sélection sources: AT / TV / DVD
3) ......... Sélectionnez le système PAL / NTSC
4) .........
Clavier numérique - Touches
5)..........
Reproduction / Pause
6) ......... Expulsion CD
7-8) ...... Avance - Revient reproduction
9) ......... Retour aux DVD menu
10) ....... Touches de déplacement du curseur
11) ....... Retour au menu de reproduction
12) ....... Sélection sources: CD / USB / SD card
13) ....... Sélection langue
14) ....... Répétition A-B
15) ....... Zoom
16) ....... Titres
17) ....... Sélectionner et activer les sous-titres
10+
18) ....... Planification de la séquence de
reproduction
19) ....... Confirme sélection
20) ....... Menu de configuration
21) ....... Visualise temps de reproduction
22-23) . . Trace suivante ou précédente
24) ....... Répétition Trace / Dossier / Chapitre
25) ....... Stop
26) ....... Met l’audio à zéro
27-28) . . Volume+ / Volume-
29-30) . . Recherche canaux
31) .......
OSD Menu
Page 4
4
IT / GB / FR
5
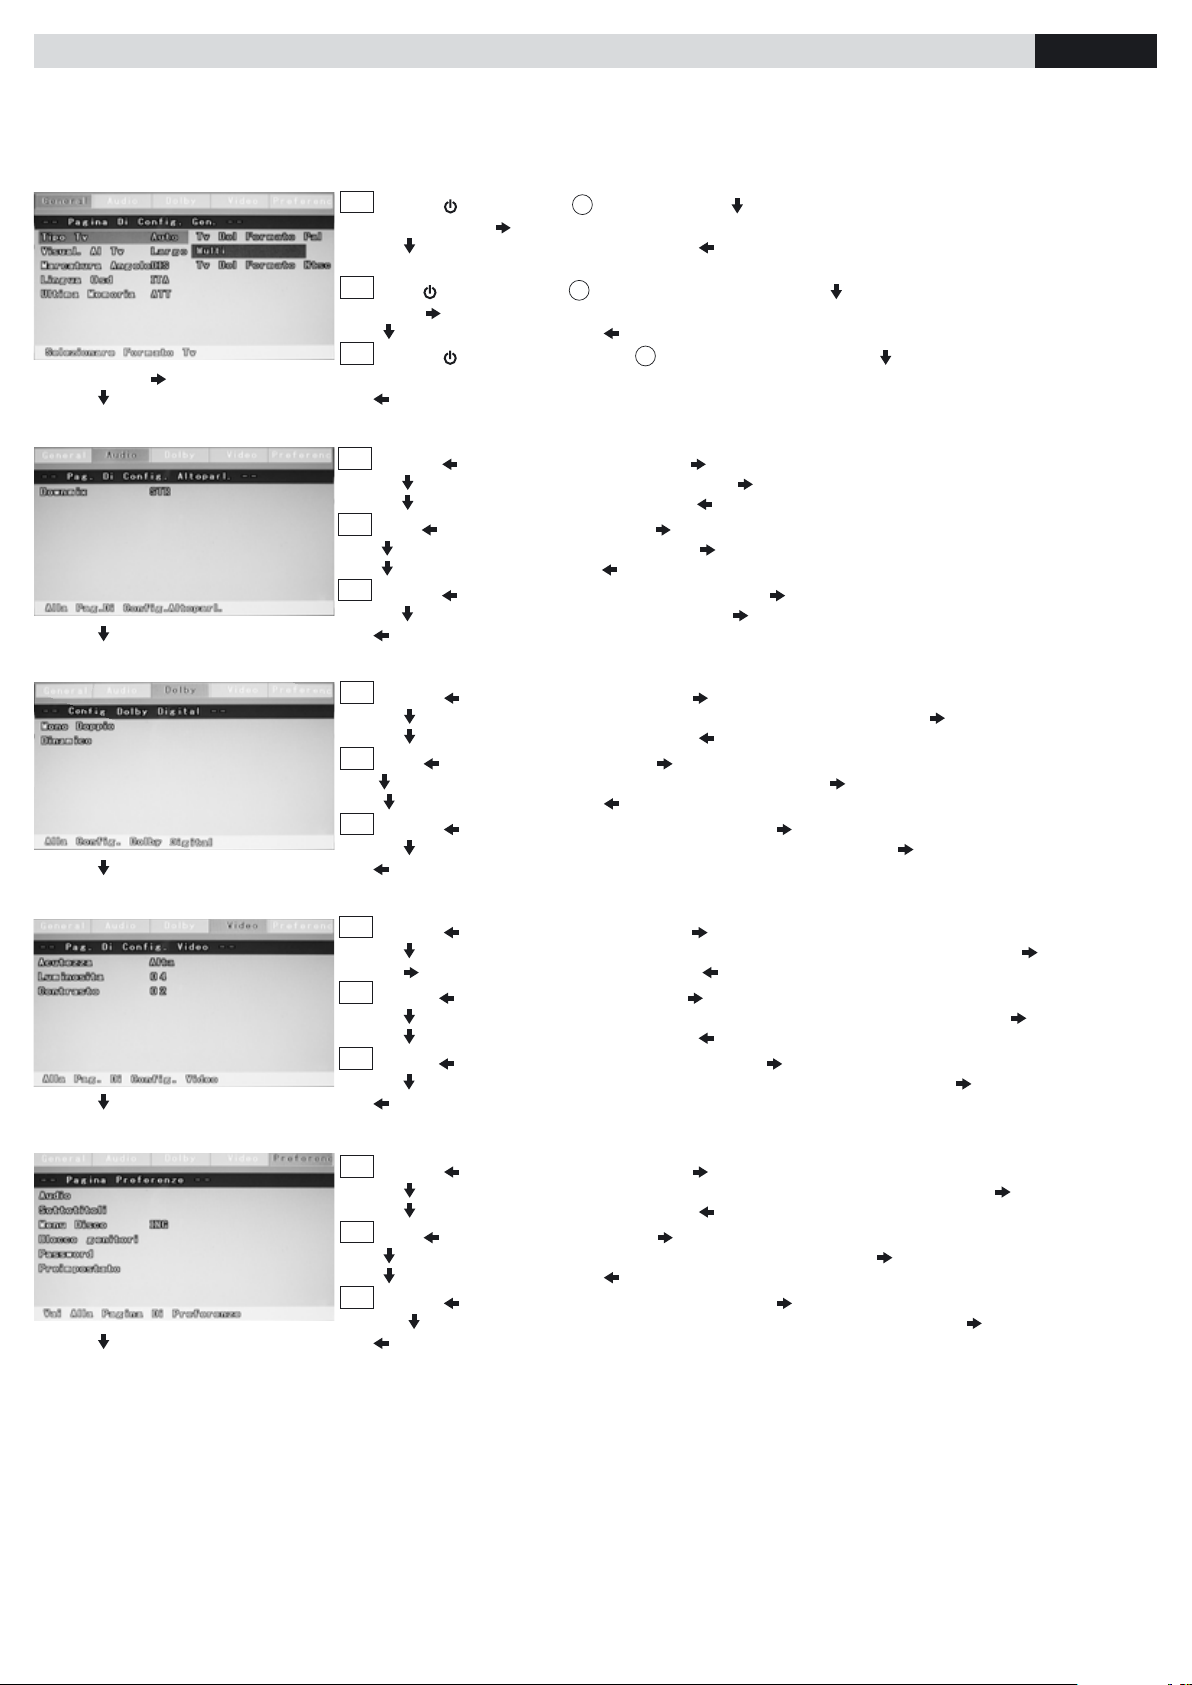
IMPOSTAZIONI DI SISTEMA • SYSTEM SETTING • REGLAGE SYSTEME USB/MMC/SD CARD
ATTENZIONE / ATTENTION
Lo schermo LCD si sgancia all’accensione del monitor. • The LCD-screen will open when monitor gets switched-on. • L’écran LCD se décroche à
l’allumage du Monitor.
MENU SETUP
Appuyer encore
Appuyer
pour choisir, ENTER pour confirmer, pour quitter. La même opération est valable aussi pour des autres sous-menus.
MENU AUDIO
Appuyer
pour choisir, ENTER pour confirmer, Pour quitter.
MENU DOLBY
Appuyer
pour choisir, ENTER pour confirmer, Pour quitter.
Premere nuovamente
Premere
sottomenu.
GB
Press again
Press
sur les options visualisées.
Premere
Premere
GB
Press
Press
Appuyer
Premere
Premere
GB
Press
Press
Appuyer
I
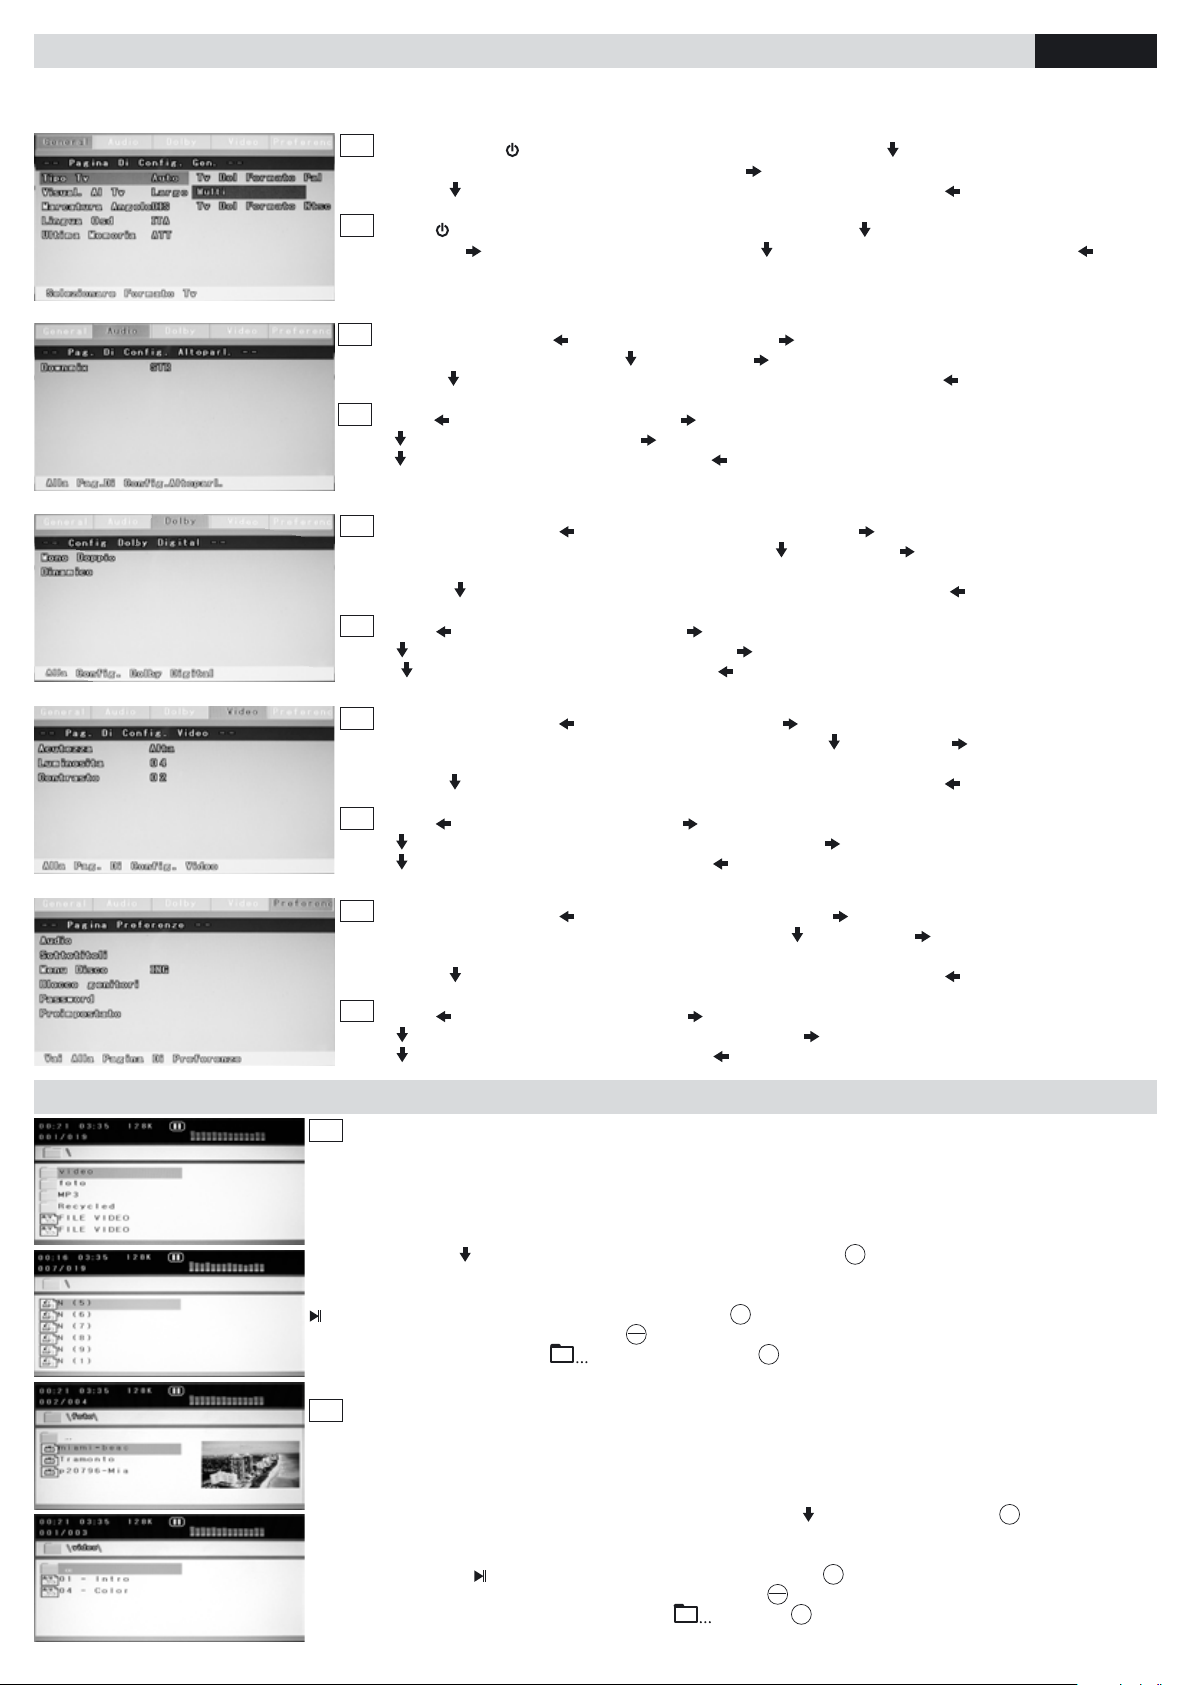
Premere per accendere,
SETUP
sul telecomando e per scegliere i sottomenu.
dove verranno mostrate le opzioni.
per selezionare ENTER per confermare per uscire. La stessa operazione può essere utilizzata per altri
Press to switch-on and
SETUP
on the remote-control unit. Press to select sub-Menu.
on the options that will appear.
to select, ENTER to confirm, to quit. The same procedure applies to other sub-Menus.
F
Appuyer pour allumer et, ensuite,
I
Premere per tornare al menu principale e per andare al menu AUDIO.
SETUP
sur la télécommande. Appuyer pour choisir les sous-menus.
dove verrà mostrato il sottomenu DOWNMIX per le opzioni.
per selezionare ENTER per confermare per uscire.
Press to return to Main Menu. Press to get AUDIO-Menu.
where DOWNMIX-menu will appear. Press for Options.
to select, ENTER to confirm, to quit.
F
Appuyer pour retourner au Menu principal. Appuyer pour le Menu AUDIO.
pour visualiser le menu DOWNMIX. Appuyer pour les Options.
I
Premere per tornare al menu principale e per andare al menu DOLBY DIGITAL.
dove verranno mostrati i sottomenu come MONO, DOPPIO, DINAMICO per le opzioni.
per selezionare ENTER per confermare per uscire.
Press to return to Main Menu. Press to get DOLBY DIGITAL-Menu.
where menus MONO, DOUBLE, DYNAMIC will appear. Press for Options.
to select, ENTER to confirm, to quit.
F
Appuyer pour retourner au Menu principal. Appuyer pour le Menu DOLBY DIGITAL.
pour visualiser les menus MONO, DOUBLE, DYNAMIQUE. Appuyer pour les Options.
MENU VIDEO
Appuyer
pour choisir, ENTER pour confirmer, Pour quitter.
MENU PREFERENZE
Appuyer
pour choisir, ENTER pour confirmer, pour quitter.
I
Premere per tornare al menu principale e per andare al menu VIDEO.
Premere
Premere
GB
Premere
Premere
F
Appuyer
I
Premere
Premere
GB
Press
Press
F
Appuyer
dove verranno mostrati sottomenu come ACUTEZZA,LUMINOSITÁ e CONTRASTO… per le opzioni.
per selezionare ENTER per confermare per uscire.
Premere per tornare al menu principale e per andare al menu VIDEO.
dove verranno mostrati sottomenu come ACUTEZZA,LUMINOSITÁ e CONTRASTO per le opzioni.
per selezionare ENTER per confermare per uscire.
Appuyer pour retourner au Menu principal. Appuyer pour le Menu VIDEO.
pour visualiser les menus NETTETE, LUMINOSITE, CONTRASTE. . Appuyer pour les Options.
Premere per tornare al menu principale e per andare al menu PREFERENZE.
dove verranno mostrati sottomenu come AUDIO, SOTTOTITOLI, MENÚ DISCO... per le opzioni.
per selezionare ENTER per confermare per uscire.
Press to return to Main Menu. Press to get the Menu PREFERENCES.
where menus AUDIO, SUB-TITLES, DISC-MENU will appear. Press for Options.
to select, ENTER to confirm, to quit.
Appuyer pour retourner au Menu principal. Appuyer pour le Menu PREFERENCES.
pour visualiser les menus AUDIO, SOUS-TITRES, MENU DISQUE. . Appuyer pour les Options.
Page 5
5
IT / GB / FR
FUNZIONI • FUNCTIONS • FONCTIONS USB/MMC/SD CARD
I
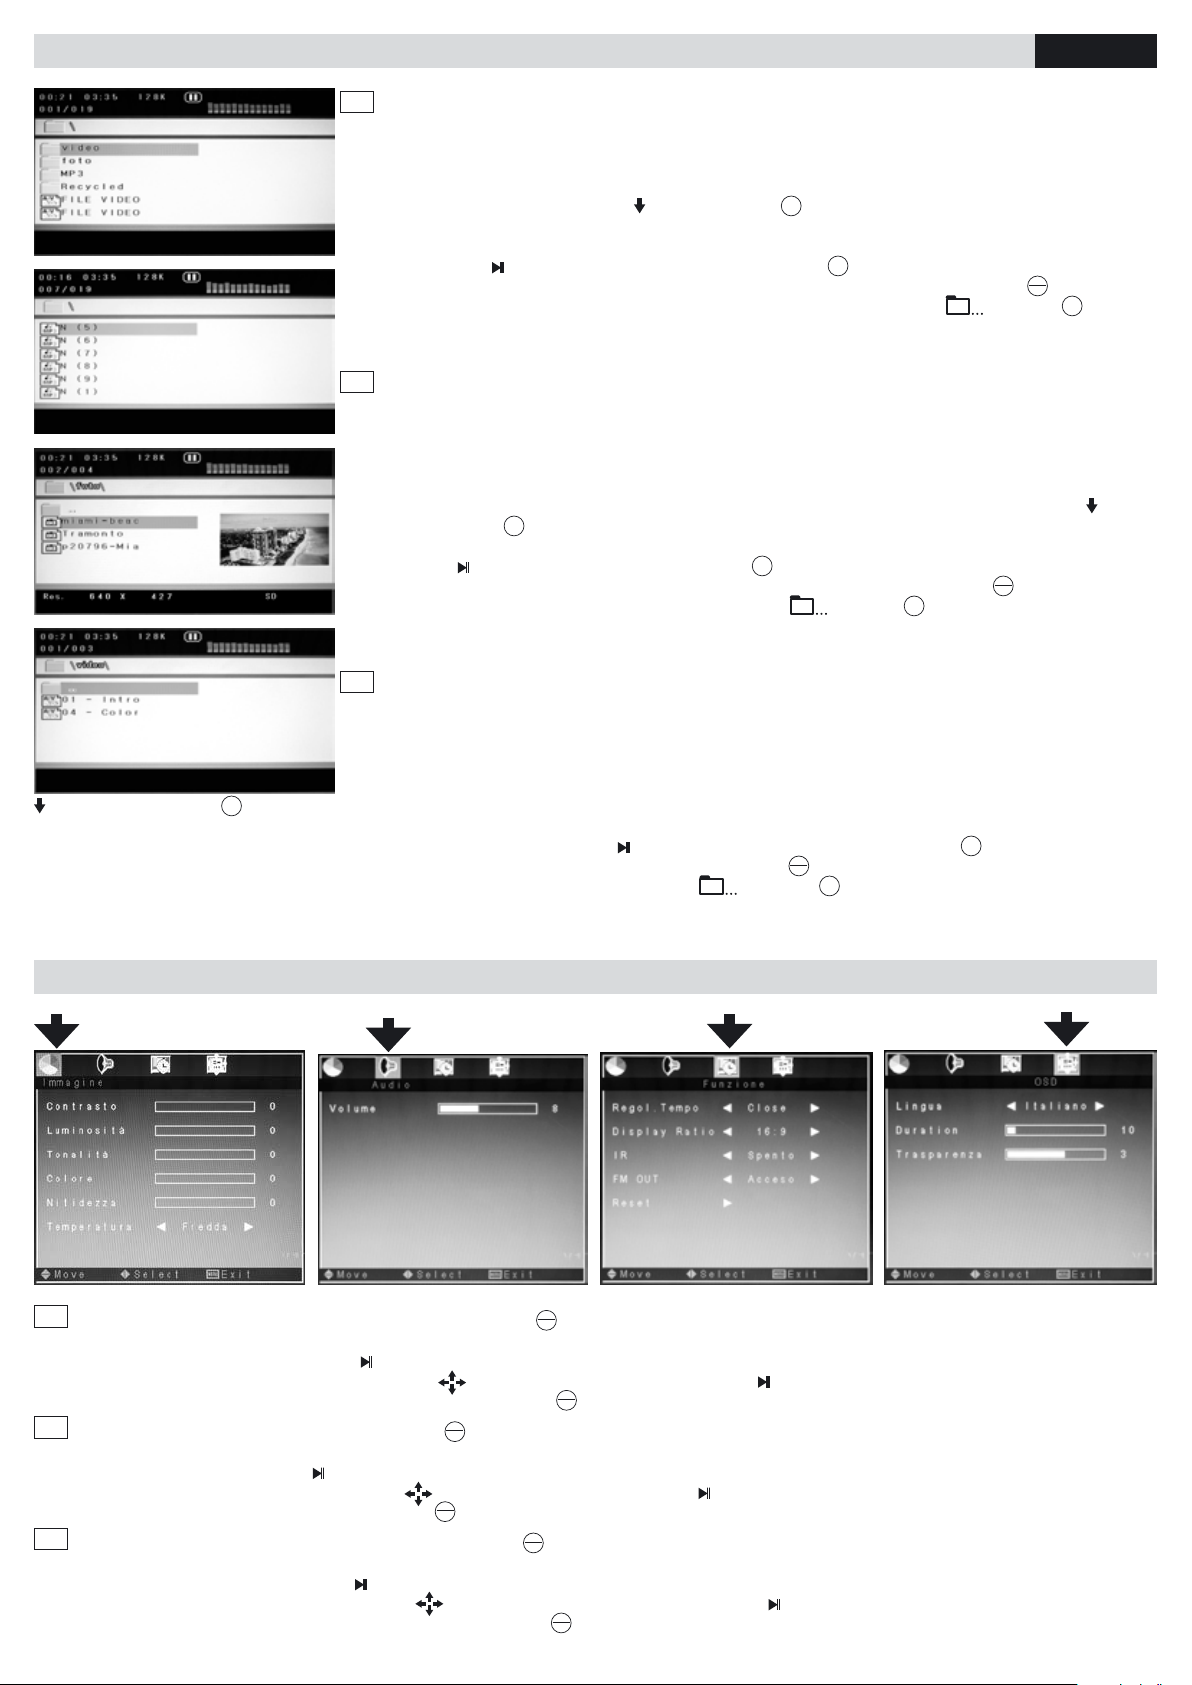
Dopo aver inserito la DVD, USB, MMC/SD CARD il VM192 cercherà automaticamente le foto, la musica e i
video. Il tempo di caricamento varia in base alla dimensione della USB, MMC/SD CARD e dalla quantita di dati caricati
ed è necessario attendere la schermata principale. Rilevata la sorgente, in presenza di MP3 la riproduzione verrà
eseguita in automatico e avrà priorità su VIDEO e FOTO. Se sulla sorgente (USB / MMC/SD) sono presenti delle
cartelle, verranno visualizzate in sequenza prima dei file MP3, seguiti dai file video e le foto. Per far partire la
riproduzione, selezionare il file, premendo
sul telecomando e
ENTER
.
Selezionando una foto, la riproduzione verrà eseguita in sequenza, a schermo intero, di tutte le foto con lo stesso
formato presenti in quella cartella. Ogni foto verrà riprodotta per circa 5 secondi. Per fermare la sequenza di
riproduzione premere
. Per uscire dal menù di riproduzione premere
Per tornare al menù USB / SD/MMC CARD durante la riproduzione di un file video, premere il tasto
Per spostarsi dall’interno di una cartella alla schermata principale posizionarsi sull’icona
STOP
.
DVD
MENU
.
e premere
ENTER
Inserendo un disco DVD video nel lettore, la riproduzione si avvia automaticamente e sullo schermo compare il
menù.
GB
After having introduced the USB, MMC/SD-CARD, the VM192 will automatically start searching the PHOTOS,
MUSIC and VIDEOS. The charging-time depends from the USB, MMC/SD-CARD-dimensions and from the Dataquantity charged. It is therefore necessary to wait until the Main Menu appears. As soon as the Source has been
recognized, the reproduction of MP3-files will, when available, automatically start, MP3 having the priority on VIDEOS
and PHOTOS.
When there are Folders on the Source (USB / MMC/SD), the folders will be visualized in a row, as follows: first the,
MP3-files then Video-files and the PHOTOS last. To start reproduction, select MP3-FOTOS-VIDEOS, press
the remote-control and
ENTER
. By selecting a PHOTO, reproduction will start showing all Photos, full-screen, in the
format memorized in the folder. Every single Photo will be visualized for about 5 seconds. To stop the reproductionsequence, press
. To quit the Reproduction-Menu, press
To return to the Menus USB / SD/MMC-CARD, while Video-file reproduction is running, press
To move from a Folder to the Main-Menu, position onto the icon
STOP
.
and press
ENTER
DVD
MENU
.
.
By inserting a DVD video into the player, reproduction will start automatically and screen will show the Trackmenu.
.
on
F
Après avoir introduit la clé USB, la Carte MMC/SD, le VM192 fera la recherche automatique des photos, la
musique et les vidéos. Le temps de téléchargement vari en fonction de la dimension de la clé USB, Carte MMC/SD et
de la quantité des données téléchargées; il faut nécessairement attendre la page-écran principale. En cas
d’identification d’une source MP3, la reproduction sera automatique et aura la priorité sur VIDEO e PHOTO. Si la
source (USB / MMC/SD) contient des dossiers, ceux-ci seront visualisés en séquence en commençant par les fichiers,
MP3 ensuite les fichiers vidéo et les photos. Pour lancer la reproduction, sélectionner MP3-PHOTO-VIDEO, appuyer
sur la télécommande et
ENTER
.
En sélectionnant une photo, la présentation de toutes les photos du dossier se fera sous le même format, en séquence et sur écran entier. Chaque photo sera
visible pendant 5 secondes. Pour interrompre la séquence de présentation, appuyer
. Pour sortir du menu de reproduction appuyer
Pour retourner au menu USB / Carte SD/MMC pendant le reproduction d’un fichier vidéo, appuyer la touche
Pour se déplacer de l’intérieur d’un dossier à la page-écran principale, se positionner sur l’icône
et appuyer
MENU
DVD
.
ENTER
.
STOP
.
Si on met un disque DVD video dans le lecteur, la reproduction démarre automatiquement et sur l’écran on pourra lire le menu du morceau.
IMPOSTAZIONI • SETTINGS • PARAMETRES MONITOR
MENU 1
MENU 2
MENU 3
MENU 4
I
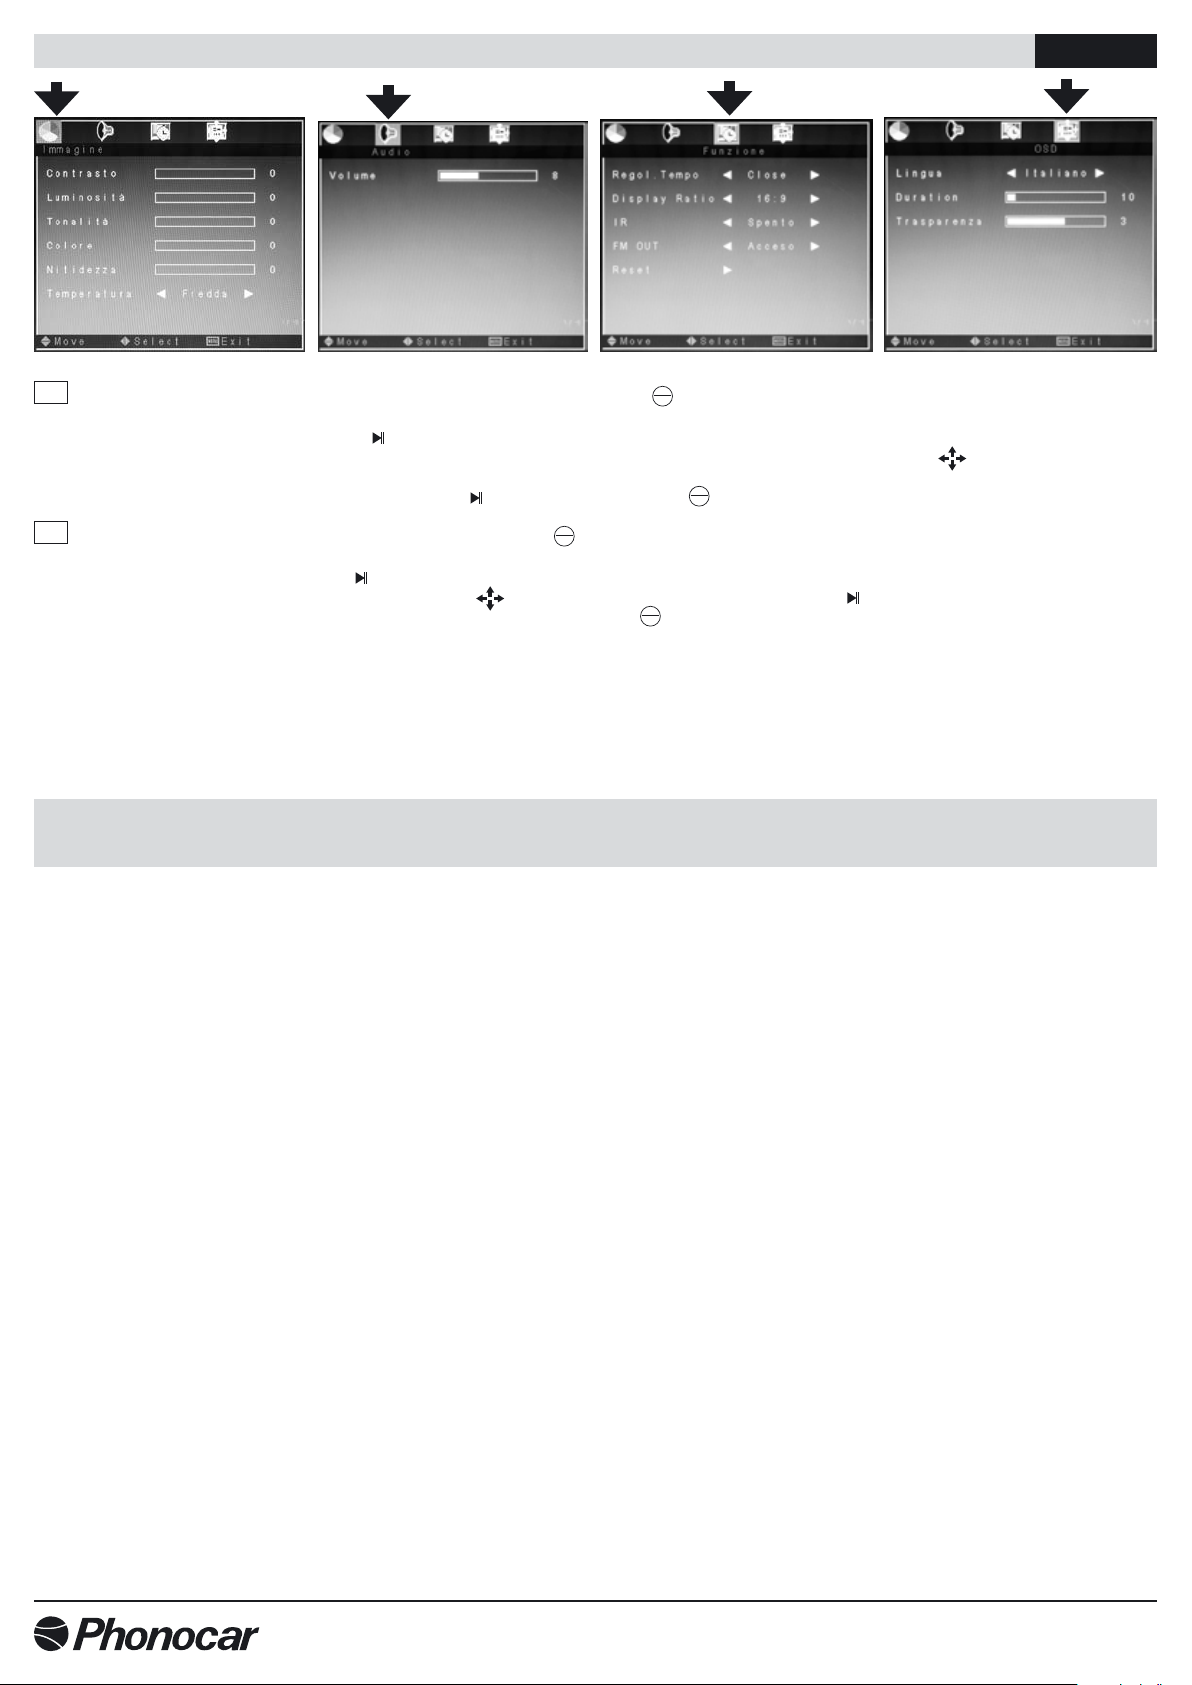
Per accedere al Menu premere il tasto MENU sul monitor, oppure
MENU
TFT
.
Per selezionare il sottomenu desiderato (1-2-3-4) premere i tasti < / > sul monitor oppure i tasti direzionali sul telecomando.
Per selezionare la funzione desiderata premere
Per modificare i valori premere < / > sul Monitor, oppure
Per uscire dal menù impostazioni premer il tasto MENU sul monitor oppure
GB
To get the Menu, press MENU-key on the Monitor or
sul Monitor, oppure ENTER sul Telecomando.
sul Telecomando e confermare con tasto sul monitor o ENTER sul Telecomando.
TFT
MENU
.
MENU
TFT
.
To select the requested Sub-Menu (1-2-3-4) press the keys < / > on the Monitor or the Direction-keys on the remote-control.
To select the requested Function, press
To modify the Values, press < / > on the Monitor, or
To quit the Set-Up-Menu, press MENU on the Monitor or
F
Pour accéder au Menu, appuyer la touche MENU sur l’écran, ou
on the Monitor, or ENTER on the remote-control.
on the remote-control. Confirm with on the Monitor or with ENTER on the remote-control.
TFT
MENU
.
TFT
MENU
.
Pour sélectionner le sous-menu désiré (1-2-3-4) appuyer les touches < / > sur l’écran ou les touches directionnelles sur la télécommande.
Pour sélectionner la fonction désirée, appuyer
Pour modifier les valeurs, appuyer < / > sur l’écran, ou
Pour sortir du menu des réglages, appuyer la touche MENU sur l’écran ou
sur l’écran, ou ENTER sur la télécommande.
sur la télécommande et valider avec la touche sur l’écran ou ENTER sur la télécommande.
MENU
TFT
.
Page 6
6
D / E
7
FUNKTIONS-TASTEN • FUNCION TECLAS
8
5
1 SOURCE Quellen-Wahl: DVD / USB / MMC/SD CARD / AV
2
3 < Seek - / Rückwärts
4
5 > Seek + / Vorwärts
6
7 EJECT CD-Auswurf
8 MENU Menü-Taste
9 GAME1 Eingang Joystick-1
10 USB USB-Öffnung
11 SD MMC/SD CARD-Öffnung
12 GAME2 Eingang Joystick-2
13 Eingang DVD
Stand-Licht ON/OFF
Einschalten / Ausschalten / LCD-Bildschirm öffnen
Pause und Wiedergabe
FERNBEDIENUNG •
1) .........Einschalten – LCD-Bildschirm öffnen
31
1
2
29
27
3
4
26
5
6
7
24
22
8
9
10
11
12
14
13
20
18
17
15
2) .........Quelle wählen: AT / TV / DVD
3) .........System wählen: PAL / NTSC
4) .........Nummern-Tasten / Taste 10+
30
5)..........Wiedergabe / Pause
6) .........CD-Auswurf
28
7-8) ...... Vorwärts - Rückwärts
9) .........Zurück zum DVD-Haupt-Menü
10) .......Läufer-Tasten
11) .......Zurück zum Wiedergabe-Menü
12) .......Quelle wählen: USB / SD / CD
13) .......Sprache wählen
14) .......Wiederholung A-B
15) .......Zoom
25
16) .......Titel
17) .......Untertitel wählen und aktivieren
23
21
1) .........Encendido - Abertura pantalla LCD
2) .........Selección fuentes: AT / TV / DVD
19
3) .........Selecciona sistema PAL / NTSC
4) .........Teclado numérico-tecla 10+
5)..........Reproducción / Pausa
6) .........Expulsión CD
16
7-8) ...... Adelante - Atrás
9) .........Volver al menú principal DVD
10) .......Teclas para desplazamiento del cursor
11) .......Volver al menú de reproducción
12) .......Selecciona fuentes: USB / SD card / CD
13) .......Cambio idioma
14) .......Repetición A-B
15) .......Zoom
16) .......Títulos
9 10 11 12 131 2 3 4 6 7
1 SOURCE Selecciona fuentes: DVD / USB / MMC-SD CARD / AV
2
3 < Seek - / Atrás
4
5 > Seek + / Adelante
6
7 EJECT Tecla expulsión disco
8 MENU Tecla Menù
9 Entrada Joystick (1)
10 Insercion USB
11 Insercion MMC/SD CARD
12 Entrada Joystick (2)
13 Entrada DVD
Luz de Cortesìa ON/OFF
Encender / Apertura schermo LCD
Pausa / Reproduccion
MANDO A DISTANCIA
18) .......Wiedergabe-Reihenfolge programmieren
19) .......Wahl bestätigen
20) .......Konfigurations-Menü
21) .......Wiedergabe-Infos ausweisen
22-23) . . Stück danach / davor
24) .......Wiederholung von Stück / Ordner /
Kapitel
25) .......Wiedergabe stoppen
26) .......Audio abstellen (Mute)
27-28) . . Lautstärke+ / Lautstärke-
29-30) . . Kanal-Suche
31) .......Einstellung des LCD-Bildschirms:
Helligkeit, Kontrast, Farbton, Sättigung.
17) .......Selecciona y activa subtítulos
18) .......Programa la secuencia de reproducción
19) .......Confirma selección
20) .......Menú configuración
21) .......Visualización info reproducción
22-23) . . Canción siguiente / precedente
24) .......Configura repetición Canción / Carpeta
Capitulo
25) ....... Parar la reproducción
26) .......Silencia el audio
27-28) . . Volumen+ / Volumen-
29-30) . . Búsqueda canales
31) .......Ajuste LCD Brillo-Contraste-Color-
Saturación
Page 7
7
D / E
SYSTEM-EINSTELLUNGEN • PLANTEAMIENTO SISTEMA
SEHR WICHTIG / ATENCIÓN
Der LCD-Bildschirm öffnet sich nur wenn der Monitor eingeschaltet ist. • La pantalla LCD se desengancha cuando se enciende el monitor.
MENU SETUP
D
Zum Einschalten, drücken und dann SET-UP auf der Fernbedienung. drücken, um die Unter-Menüs zu
wählen. Auf den jeweils angezeigten Optionen, nochmals
Um zu wählen,
E
Apretar para activaciòn y SETUP sobre el radiocomando. Apretar para selecciòn des sub-menus.
Apretar de nuevo
drücken. Zur Bestätigung, ENTER drücken. Um Menü zu verlassen, drücken.
sobre les opziones mostrados. Apretar para selecciòn, ENTER para confirmaciòn, para
drücken.
Salida.
MENU AUDIO
D
Zurück zum Hauptmenü drücken. Zum AUDIO-Menü, drücken.
Um das DOWNMIX-Menü auszuweisen,
Um zu wählen,
E
Apretar por regresar el menu principal y por el menu AUDIO.
Apretar
Apretar
drücken. Zur Bestätigung, ENTER drücken. Um Menü zu verlassen, drücken.
sobre el sub-menu DOWNMIX y para les opziones.
para selecciòn, ENTER para confirmaciòn, para salida.
drücken. Dann drücken, um die Optionen zu wählen.
MENU DOLBY
D
Zurück zum Hauptmenü, drücken. Zum DOLBY-DIGITAL-Menü, drücken.
Um die Menüs MONO, DOPPEL, DYNAMISCH auszuweisen,
drücken. Dann drücken, um die Optionen zu
wählen.
Um zu wählen,
E
Apretar por regresar el menu principal y por el menu DOLBY DIGITAL.
Apretar
Apretar
drücken. Zur Bestätigung, ENTER drücken. Um Menü zu verlassen, drücken.
para la visual MONO, DOUBLE, DYNAMIC y para les opziones.
para selecciòn, ENTER para confirmaciòn, para salida.
MENU VIDEO
D
Zurück zum Hauptmenü, drücken. Zum VIDEO-Menü, drücken.
Um die Menüs SCHÄRFE, HELLIGKEITE, KONTRAST auszuweisen,
drücken. Dann drücken, um die Optionen
zu wählen.
Um zu wählen,
drücken. Zur Bestätigung, ENTER drücken. Um Menü zu verlassen, drücken.
MENU PREFERENZE
E
Apretar por regresar el menu principal y por el menu VIDEO.
Apretar
Apretar
Um die Menüs AUDIO, UNTERTITEL, CD-MENÜ auszuweisen,
para la visual AGUDEZA, LUMINOSIDAD, CONTRASTE y para les opziones.
para selecciòn, ENTER para confirmaciòn, para salida.
D
Zurück zum Hauptmenü, drücken. Zum PRÄFERENZ-Menü, drücken.
drücken. Dann drücken, um die Optionen zu
wählen.
Um zu wählen,
E
Apretar por regresar el menu principal y por el menu PREFERENCIAS.
Apretar
Apretar
drücken. Zur Bestätigung, ENTER drücken. Um Menü zu verlassen, drücken.
para la visual AUDIO, SUB-TITULOS, MENU DISCO y para les opziones.
para selecciòn, ENTER para confirmaciòn, para salida.
FUNKTION • FUNCION USB/MMC/SD CARD
D
Nach Eingabe von DVD, USB, MMC/SD sucht der VM192 automatisch nach Foto-Musik-bzw. Video-Dateien.
Das Herunterladen richtet sich ganz nach der Größe des vorliegenden Mittels (USB, MMC/SD) und der Anzahl der darauf
enthaltenen Dateien. Daher bitte so lange warten, bis das Haupt-Menü erscheint. Sobald die Quelle feststeht, startet die
Wiedergabe automatisch mit den MP3-Dateien (soweit diese enthalten sind), da MP3 immer den Vorrang hat gegenüber
VIDEOS und FOTOS. Falls sich auf den benutzten Mitteln (USB / MMC/SD) Ordner befinden, so werden, der Reihe nach,
erst die MP3, dann die VIDEO-und zuletzt die FOTO-Dateien ausgewiesen. Um die Wiedergabe zu starten, MP3-FOTO
VIDEO wählen. Dann
auf der Fernbedienung drücken, und dann nochmals
Wählt man ein Foto, so startet die Wiedergabe aller Fotos, der Reihe nach, in Bildschirm-Größe, im Format, das im Ordner
enthalten ist. Jedes einzelne Foto bleibt circa 5 Sekunden auf dem Bildschirm. Um die Wiedergabe zu stoppen, Taste
drücken. Um das Wiedergabe-Menü zu verlassen, Taste
Menü USB/SD/MMC zurückzukehren, Taste
zurückzugehen, sich auf die Ikone
DVD
MENU
drücken. Um, von einem bestimmten Ordner aus, auf das Haupt-Menü
positionieren und Taste
STOP
drücken. Um, während der VIDEO-Wiedergabe, zum
ENTER
drücken. Legt man eine DVD video-Platte in den DVD-
Player, so startet die Wiedergabe automatisch. Auf dem Bildschirm erscheint das Titel-Menù.
ENTER
.
E
Después de haber introducido la USB, MMC/SD CARD la VM192 buscará automáticamente las fotos, la música y los
videos. El tiempo de carga varia en base a la dimensión de la USB, MMC/SD CARD y de la cantidad de datos cargados y
es necesario esperar la ventana principal. Una vez detectada la fuente en presencia de MP3 la reproducción será ejecutada
en automático y tendrá la prioridad sobre VIDEO y FOTO. En el caso de que en la fuente (USB / MMC/SD) están presentes
carpetas, serán visualizadas en secuencia antes de los archivos de MP3, a continuación por los archivos video y las fotos.
Para iniciar la reproducción, seleccionar MP3-FOTO-VIDEO, presionar
en el mando a distancia y
ENTER
.
Seleccionando una foto, la reproducción será ejecutada en secuencia, a toda pantalla, de todas las fotos con el mismo
formato presentes en aquella carpeta. Cada foto será reproducida durante unos 5 segundos. Para parar la secuencia de
reproducción presionar
. Para salir del menú de reproducción presionar
durante la reproducción de un archivo de video, presionar la tecla
a la ventana principal posicionarse encima del icono
y presionar
STOP
DVD
MENU
. Para volver al menú USB / SD/MMC CARD
. Para desplazarse desde el interior de una carpeta
ENTER
. Introduciendo un DVD video en el lector la
reproducción se inicia automáticamente y aparece en el display el menú de los archivos contenidos.
Page 8
EINSTELLUNGEN
• CONFIGURACIÓN MONITOR
D / E
MENU 1
D
Um das Menü zu betreten, MENÜ-Taste auf dem Monitor drücken, oder die Taste
Um das gewünschte Unter-Menü zu betreten (1-2-3-4), die Tasten < / > auf dem Monitor, (oder die Richtungs-Tasten auf der Fernbedienung), betätigen.
Um die gewünschte Funktion zu wählen, Taste
Um die Werte zu ändern, die Tasten < / > drücken (egal ob auf dem Monitor oder auf der Fernbedienung) und dann mit der Taste
der Taste ENTER auf der Fernbedienung) bestätigen.
Um das Einstellungs-Menü wieder zu verlassen, MENÜ-Taste
E
Para acceder al Menú presionar la tecla MENU en el monitor, o bien
Para seleccionar el submenú deseado (1-2-3-4) presionar las teclas < / > en el monitor o bien las teclas direccionales en el mando a distancia.
Para seleccionar la función deseada presionar
Para modificar los valores presionar < / > en el Monitor, o bien
a distancia. Para salir del menú de ajuste presionar la tecla MENU en el monitor o bien
MENU 2
TFT
MENU
.
auf dem Monitor, (oder ENTER auf der Fernbedienung), drücken.
TFT
TFT
MENU
MENU
.
auf dem Monitor, oder Taste
TFT
MENU
.
en el Monitor, o bien ENTER en el mando a distancia.
en el mando a distancia y confirmar con la tecla en el monitor o bien ENTER en el mando
MENU 3
drücken.
MENU 4
auf dem Monitor (oder mit
CARATTERISTICHE TECNICHE • TECHNICAL SPECIFICATIONS • CARACTERISTIQUES TECHNIQUES
TECHNISCHE DATEN • CARACTERISTICAS TECNICAS
• Formato 16:9
• Sistema PAL/NTSC
• Luminosità 350 cd/m
• Risoluzione RGB 1366x768
• 1 Porta / Port USB 16 GB
• 1 Slot SD Card 16 GB
• Angolo di visione 70° orizzont. - 65° vertic.
• Inclinazione schermo 110°
• Memoria ultima posizione
• Regolazioni colore/contrasto/luminosità
• Funzioni visibili su schermo (OSD)
• Trasmettitore IR e FM integrato
• Telecomando infrarossi con tutte le funzioni
• Con altoparlanti
• 1 Ingresso Audio/Video
• 1 Uscita Audio/Video
• 2 Porte giochi per joystick
• 1 Joystick e CD ROM con 300 giochi
• Alimentazione DC12
• Dimensioni : L. 390 - P. 315 - H. 60 mm.
2
• Aspect ratio 16:9
• System PAL/NTSC
• Brightness 350 cd/m2
• Resolution RGB 1366x768
• 1 Porta / Port USB 16 GB
• 1 Slot SD Card 16 GB
• View angle 70° orizzont. - 65° vertic.
• Tilt screen 110°
• Last memory position
• Regulations color/contrast/brightness
• IR and FM transmitter built-in
• On screen display functions (OSD)
• Full Function Wireless Remote Control
• With speakers
• 1 Audio/Video input
• 1 Audio/Video output
• 2 Joystick input
• 1 Joystick and CD ROM whit 300 games
• Power DC12 V
• Dimensions: L. 390 - P. 315 - H. 60 mm.
S.p.A. - Via F.lli Cervi, 167/C • 42124 Reggio Emilia (Italy) • Tel. ++39 0522 941621 • Fax ++39 0522 942452
8
 Loading...