

Page 1
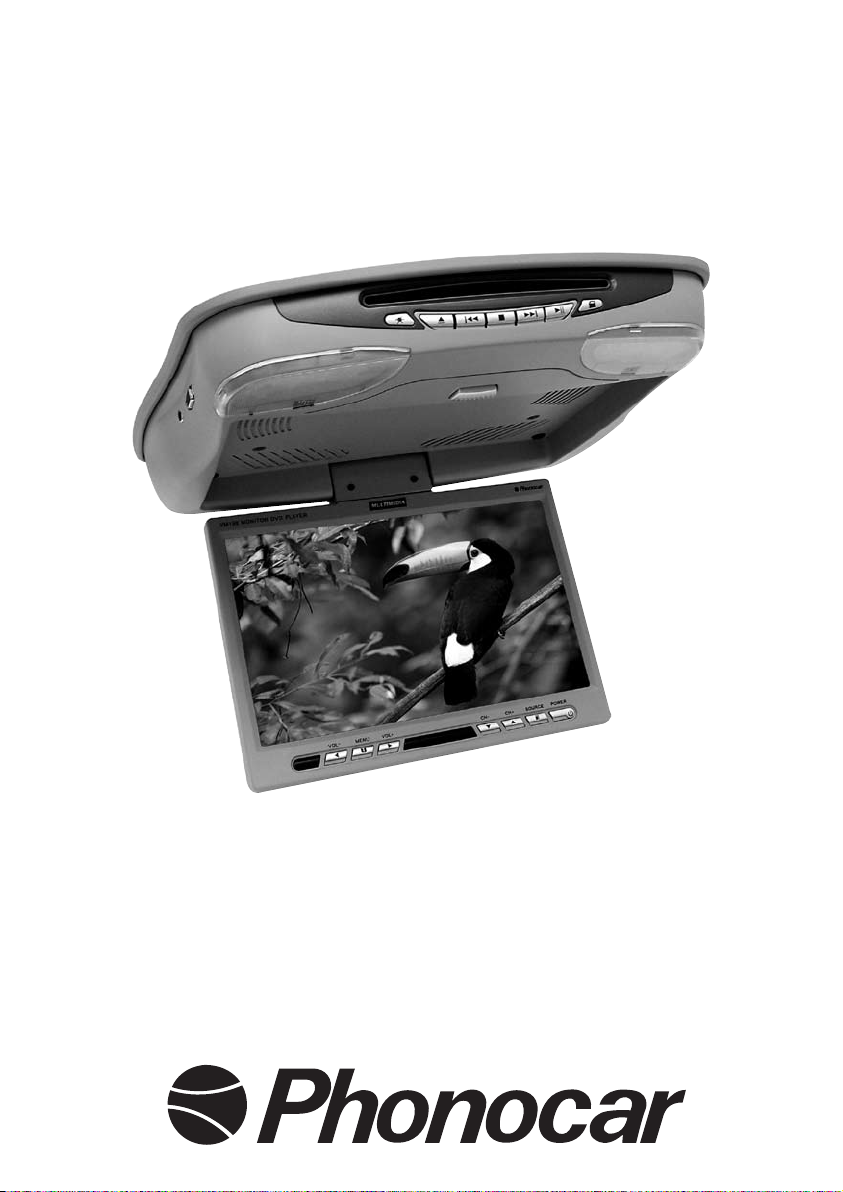
MONITOR - DVD
VM190
ISTRUZIONI DI MONTAGGIO
ASSEMBLING INSTRUCTIONS
INSTRUCTIONS DE MONTAGE
MONTAGEANLEITUNG
INSTRUCCIONES PARA EL MONTAJE
Page 2

ITALIANO.......................................................................................................................................... 5
ENGLISH .......................................................................................................................................... 21
Accessori in dotazione
Accessories supplied in package • Accessoires en dotation
Zubehör im Lieferumfang enthalten • Accesorios en dotación
n. 1 Telecomando con batteria
Remote-control unit with battery
Télécommande avec batterie
Fernsteuerung, mit Batterie
n. 1 Cavo alimentazione
Current Cable
Câble alimentation
Stromkabel
n. 1 Cavo Ingresso Audio/Video 2
Cable for Audio/Video 2-Input
Câble Entrée Audio/Vidéo 2
Kabel für Audio/Video2-Eingang
n. 1 Cavo Uscita Audio/Video + Ingresso Audio/Video1
Cable for Audio/Video-Output+ Audio/Video1-Input
Câble Sortie Audio/Vidéo + Entrée Audio/Vidéo1
Kabel für Audio/Video-Ausgang + Audio/Video1-Eingang
n. 1 Cavo antenna trasmettitore audio FM
Câble antenne transmetteur audio FM
Cable antenne transmitter audio FM
Kabel antenne Übersender Audio-FM
n. 1 Bustina viti di fissaggio
Sachet de vis de fixation
Bag of lived of fixation (binding)
Beutel gelebt Fixierung (Schwergängigkeit)
n. 1 Antenna TV
TV antenna
Antenne TV
Antenne TV
Page 3
I
Questi prodotti sono garantiti secondo le leggi vigenti. La garanzia da diritto alla riparazione gratuita
dei pezzi difettosi. Non sono coperti da garanzia i danni causati da: avarie da trasporto, errata installazione, condizioni ambientali, incapacità d’uso o riparazioni effettuate da personale non autorizzato.
Eventuali componenti difettosi dovranno essere riconsegnati al rivenditore o inviati presso il centro
assistenza Phonocar, via F.lli Cervi, 167/C - 42100 Reggio Emilia - Tel. 0522.941621.
GB
All products contained in this catalogue have a warranty according to the law. When warranty is
applicable, the defect parts are repaired free of charge. Damage caused through transport, wrong
installation, climatic conditions, wrong use, unauthorized repairs, will not be covered by warranty.
The defect parts should be given to your local Dealer, who will forward to our Distributor for repair.
F
Tous les produits présents dans ce catalogue sont garantis selon les conditions de loi. La Garantie
donne droit à la reparation gratuite des pièces défectueuses. La Garantie ne couvre pas: les dommages de transport, installation erronée, conditions environnementales, climatiques ou autres, les
pannes causées par une négligence, une intervention incompétente, une incapacité d’utilisation ou
des réparations effectuées par du personnel non autorisé. Pour être remplacés ou réparés gratuitement, les éventuels composants défectueux devront être retournés au revendeur.
D
Alle Produkte des vorliegenden Katalogs verfügen über die gesetzlich vorgesehene Garantie. Alle
defekten Teile werden, bei Garantieanspruch, KOSTENLOS durch uns repariert. Bei Schäden, die
auf den Transport, Installationsfehler, Klimaverhältnisse, unsachgemäße Anwendung, unbefugten
Reparaturversuch, zurückzuführen sind, besteht leider KEIN Anspruch auf Garantie. Defekte Teile
bitten wir FREI, über Ihren Händler, bei Phonocar einzureichen.
E
Todos los productos de este catálogo están garantizados según lo establecido por la ley. La garantía da derecho a la reparación gratuita de piezas defectuosas, pero no cubre daños producidos
durante el transporte o causados por errores de instalación, condiciones ambientales, usos incorrectos o reparaciones efectuadas por personal no autorizado. Si el usuario comprueba la existencia
de componentes defectuosos, debe entregarlos al revendedor o enviarlos al centro de asistencia
técnica, delegado comercial:
Sr. Verderese - Tel. 958 30 22 95 - Fax 958 30 24 70.
✄ ✄
VM190
CertifiCaDo De garantia
Page 4

Serie N°
Cognome/Surname/Nom/Nachname/ApellidoNome/First name/Prènom/Vorname/Nombre
Indirizzo/Adress/Adresse/Anschrift/Dirección
Città/City/Ville/Ort/Ciudad
Data d’acquisto/Purchase Date/Date d’achat/Kaufdatum/Pecha compra
Nazione/Country/Pays/Land/PaisCAP
✄ ✄
Serie N°
Allegare documento d’acquisto/Enclose purchase document/Joindre le document d’achat/Kauf-Nachweis bitte beilegen/Adjuntar documento de compra
Page 5

INDICE
Precauzioni di sicurezza........................................................ 6
Schema di collegamento ....................................................... 7
Installazione ................................................................. 8-9
Indentificazione comandi ....................................................... 10-11
Impostazioni Modalità TV....................................................... 11
Sostituzione pila telecomando ................................................... 12
Funzioni telecomando ......................................................... 12-13
USB-SD CARD: Note e Compatibilità ............................................. 14
Memorizzazione della posizione di lettura .......................................... 15
Impostazioni di Set-Up......................................................... 15-16-17
Riproduzione files Mp3/AVI/MPG................................................. 17
Visualizzazione immagini Jpeg................................................... 17
Cause e Rimedi ai problemi d‘installazione ......................................... 18
Caratteristiche tecniche ........................................................ 19
I
5
Page 6

6
Precauzioni di sicurezza
Allo scopo di operare in sicurezza osservare attentamente le seguenti precauzioni:
• Installare i dispositivi all’interno dell’auto in posizioni che non ostacolino le normali operazioni di guida e
che non interferiscano con i dispositivi di sicurezza del veicolo (ABS, Air-bag, etc.).
• Per ottenere le migliori condizioni operative, collegare i cavi come dagli schemi di seguito riportati.
• La temperatura di utilizzo va da 0° a 55°C.
• Se la temperatura interna del veicolo é molto alta, é necessario un breve periodo di raffreddamento prima
dell’utilizzo.
• A basse temperature il display potrebbe risultare leggermente scuro alla sua accensione, ma tornerà alla
corretta luminosità dopo pochi minuti (situazione dovuta alle caratteristiche siche dei cristalli liquidi).
• Accertarsi che il monitor DVD NON venga installato in posizioni soggette a:
-Calore diretto o esposizione al sole
-Elevata umidità o acqua
-Polvere eccessiva
-Vibrazioni eccessive
• Potrebbe succedere che il playback del CD sia rumoroso a causa della formazione di condensa. In questo caso togliere il disco dal lettore ed attendere un’ora per far evaporare l’umidità.
• Non afferrare o togliere il disco quando il meccanismo di caricamento é già partito.
• Non inserire il disco quando il lettore DVD é spento.
• Inserire il disco sempre con l’etichetta verso l’alto.
• Il playback su strade molto dissestate potrebbe subire delle interruzioni.
• In caso di problemi, fermare immediatamente il lettore DVD.
• Prima dell’installazione dell’unità, assicurarsi di rispettare le regolamentazioni del codice della strada.
• Il codice della strada vieta di guardare programmi televisivi durante la guida.
Page 7
7
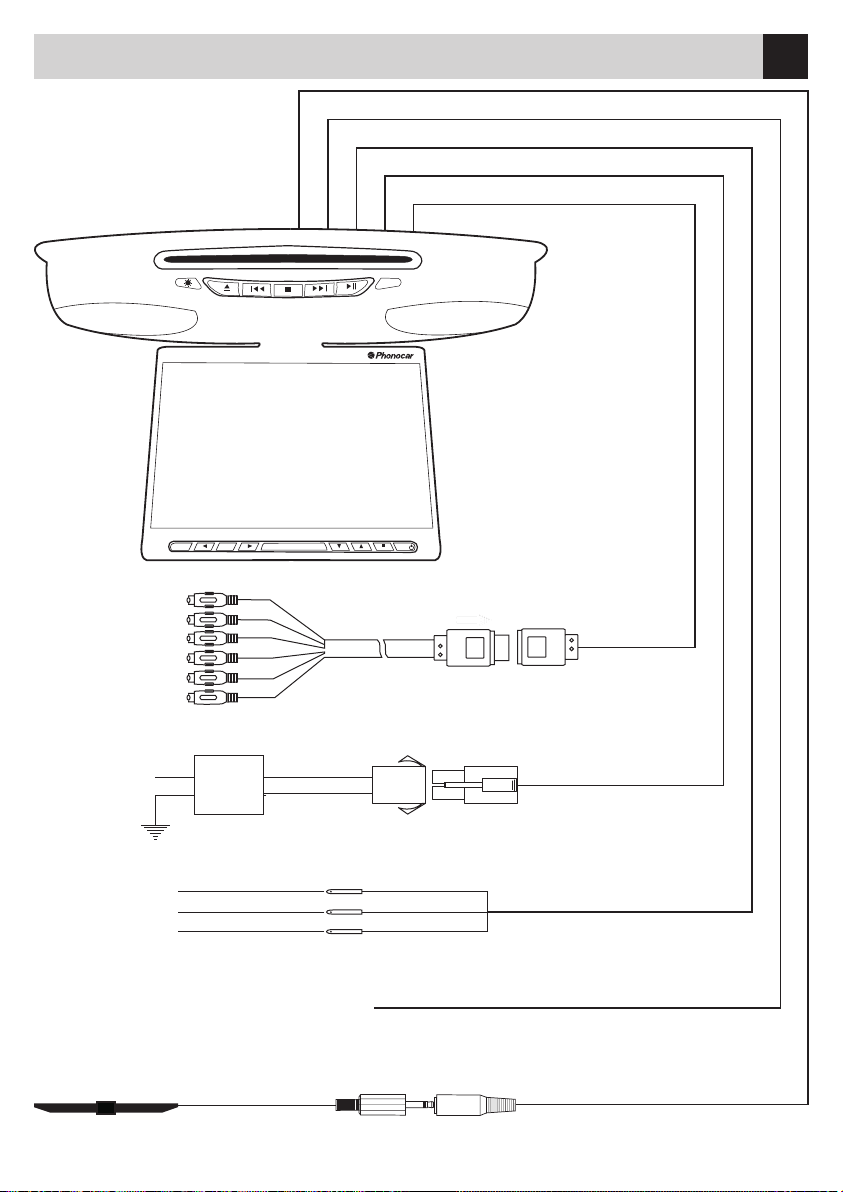
Schema di collegamento
VM190
BIANCO/WHITE AUDIO IN 1 L
ROSSO/RED AUDIO IN 1 R
GIALLO/YELLOW VIDEO IN 1
BIANCO/WHITE AUDIO OUT L
ROSSO/RED AUDIO OUT R
GIALLO/YELLOW VIDEO OUT
I
ROSSO/RED + 12V
NERO/BLACK GROUND
+ 12V LIGHT
+ 12V BATTERY
GROUND
TV ANTENNA
VM811
GIALLO/YELLOW
ROSSO/RED
NERO/BLACK
FM-AIR WIRE
ALIMENTAZIONE PRINCIPALE
MAIN POWER SUPPLY
ALIMENTAZIONE LUCI DI CORTESIA
DOME LIGHT POWER
NERO
BLACK
JACK 3,5“
INGRESSO ANTENNA TV
TV AERIAL INPUT
Page 8
8
Installazione
Page 9
9
Installazione
I
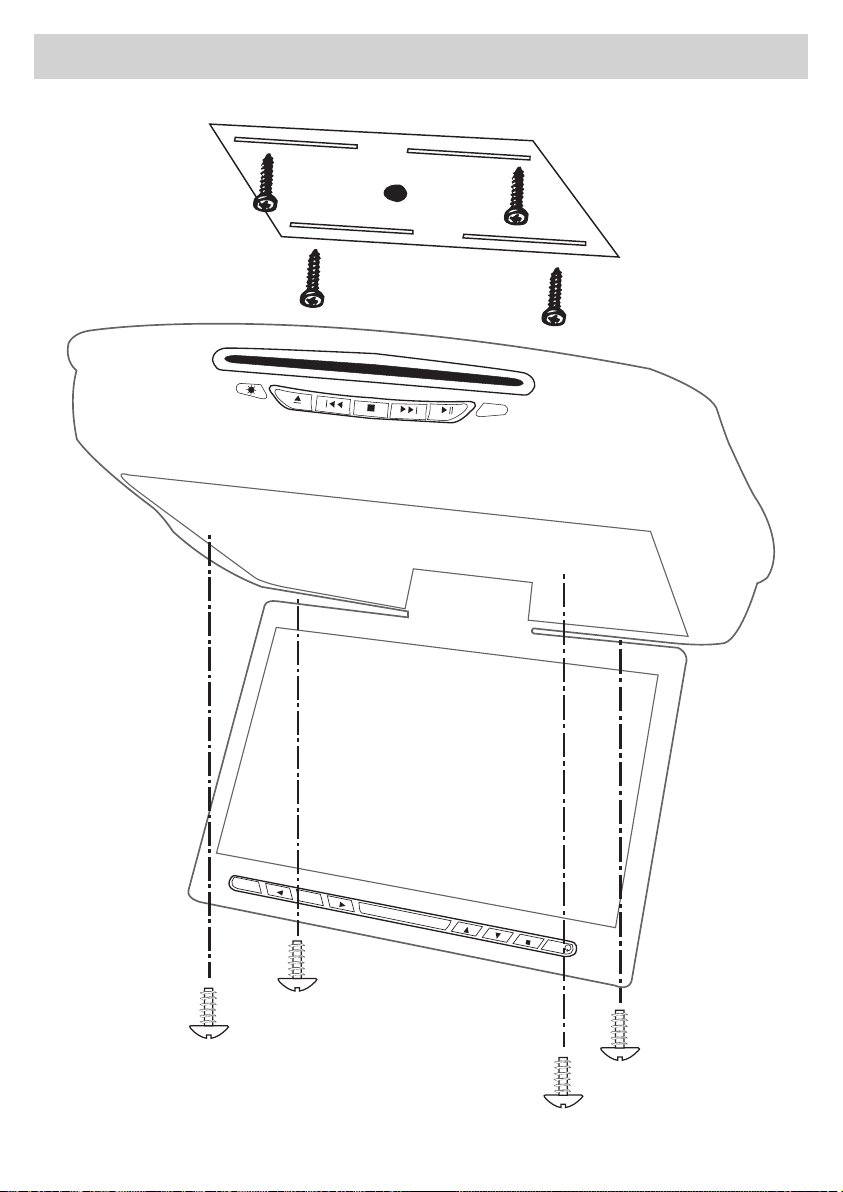
ATTENZIONE:
Non installare l’unità in zone che possono ostacolare la visuale.
• Utilizzare esclusivamente le viti fornite nella dotazione.
• Fissare al tetto la piastra metallica, facente funzione da supporto all’unità.
• Agganciare l’unità alla piastra fissata al tetto mediante le 4 viti fornite nella dotazione.
Il fissaggio dell‘unità al tetto della vettura deve essere solido.
Vibrazioni eccessive, durante la marcia del veicolo, comprometteranno irrimediabilmente il corretto funzionamento della meccanica di lettura del DVD player.
Page 10
10
Identificazione comandi
2 3 41 5 6 7 8 9
10 11 12 13 14 15 16
17 18 19 20
Page 11
11
Identificazione comandi
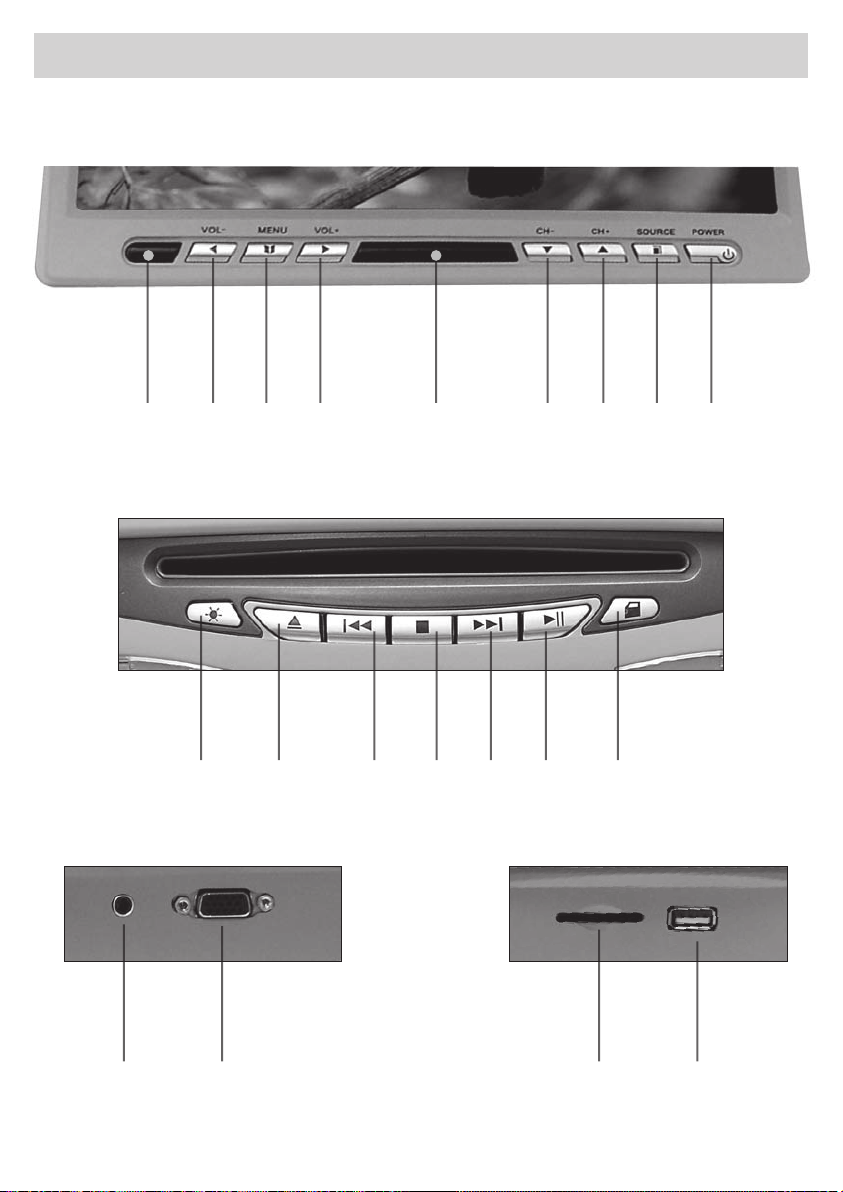
1 Ricevitore telecomando I/R
2-4 Aumenta/Diminuisce volume e valori nel MENU’ regolazioni
3 Accede al MENU’ di regolazione Luminosità / Contrasto / Saturazione / Formato immagine / Lingua
Trasmissione FM / Rotazione immagine / Auto spegnimento / Reset
5 Trasmettitore ad infrarossi
6-7 Scorre i canali memorizzati in modalità TV; scorre all‘interno del menù di regolazione
8 Seleziona tra DVD / TV / AUX1 /AUX2 / VGA
9 Accensione / Spegnimento
10 Accensione / Spegnimento luci di cortesia
11 Espelle il disco inserito
12-14 Passa alla traccia audio video successiva o precedente
13 Ferma la riproduzione
15 Inizia o Sospende la riproduzione
16 Accensione / Spegnimento luci di cortesia (attivo solo se collegato alla luce di cortesia della vettura)
17 Ingresso Audio / Video ausiliario (AV2)
18 Porta VGA per connessione con PC
19 Feritoia per l‘inserimento di SD/MMC card
20 Feritoia per l‘inserimento di USB
I
ATTENZIONE:
Le funzioni di lettura di USB e SD Card si attivano SOLTANTO se è presente un disco all‘interno
dell‘unità DVD.
Impostazioni Modalità TV
• Premere tasto "Source" (8) e selezionare "TV"
• Premere "Menù" (3) e scorrere all'interno dei menù con i tasti(6 and 7) per selezionare:
- TV-System
- Auto-Search
- Manual-Search
- Channels
• Effettuare le regolazioni mediante i tasti (2 and 4)
I
Page 12
12
Funzioni telecomando
CR 2025
3
2
4
11
20
22
25
27
13
17
18
19
24
26
POWER
1
1 2 3
4 5 6
MUTE
TFT
DISPLAY
POWER
ANGLE
SUBTITLE
6
7
5
9
7 8 9
-- 0
DISPLAY
REPEAT
REPEAT
TFT
MENU‘
DVD
MENU‘
DVD
VOL-
SLOW
SETUP
PROG
VOL+
STOP
A-B
A-B
RETURN
CH+
ENTER
CH-
PBC
AUDIO
TFT
MODE
DVD
MODE
ZOOM
8
10
12
15
14
13
16
21
23
29
28
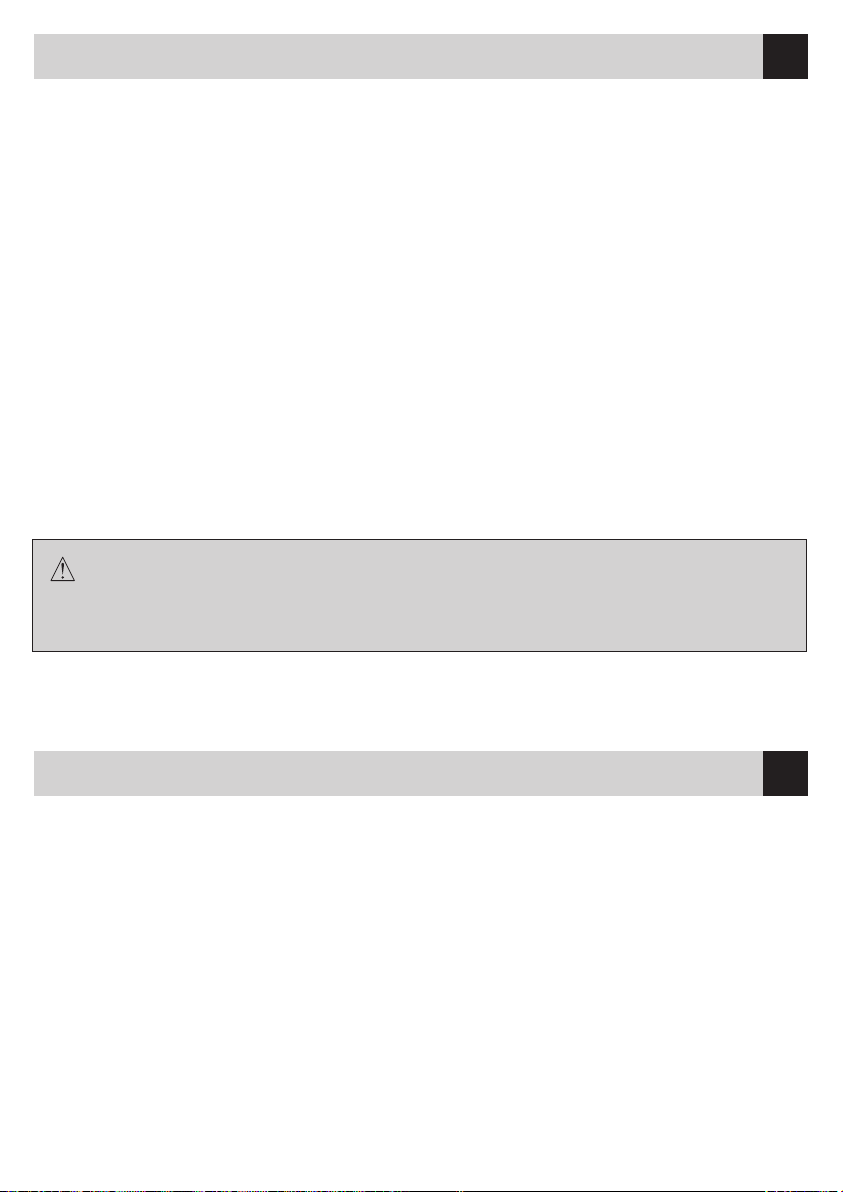
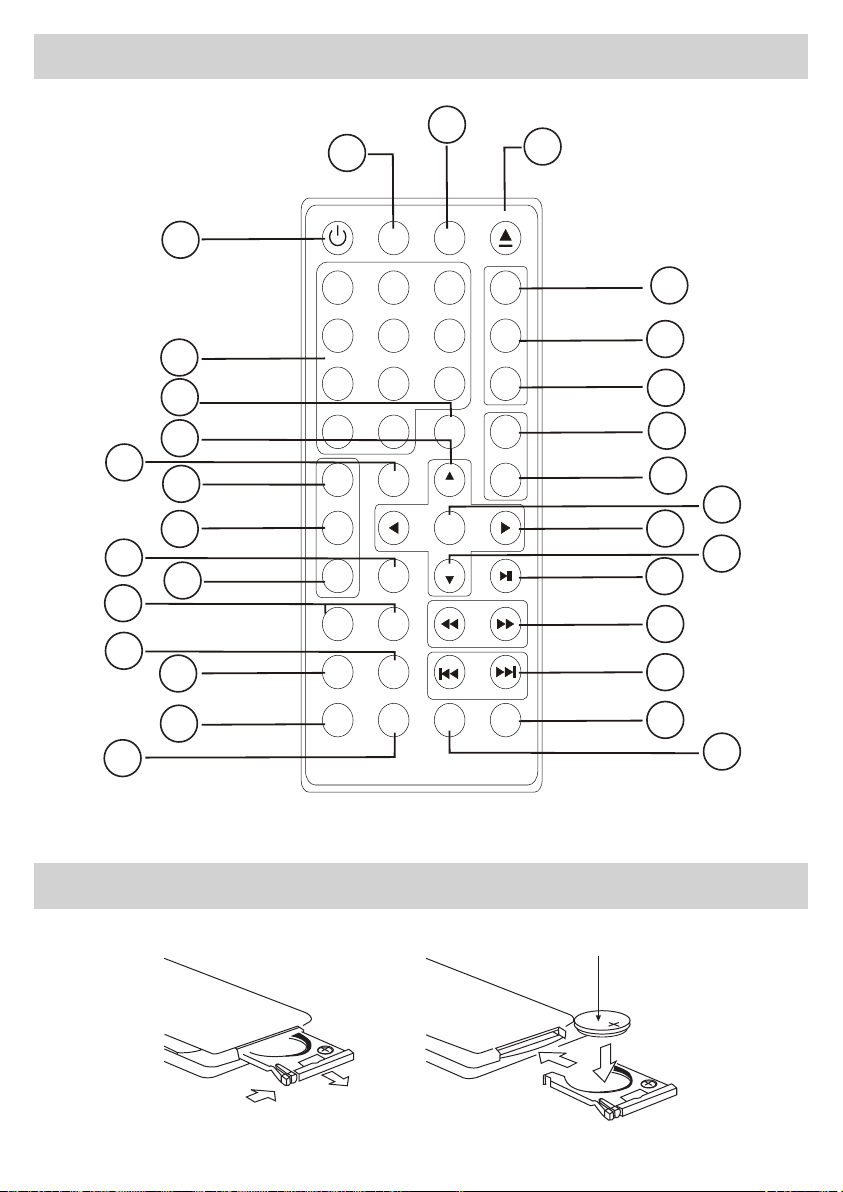
Sostituzione pila telecomando
Page 13

13
Funzioni telecomando
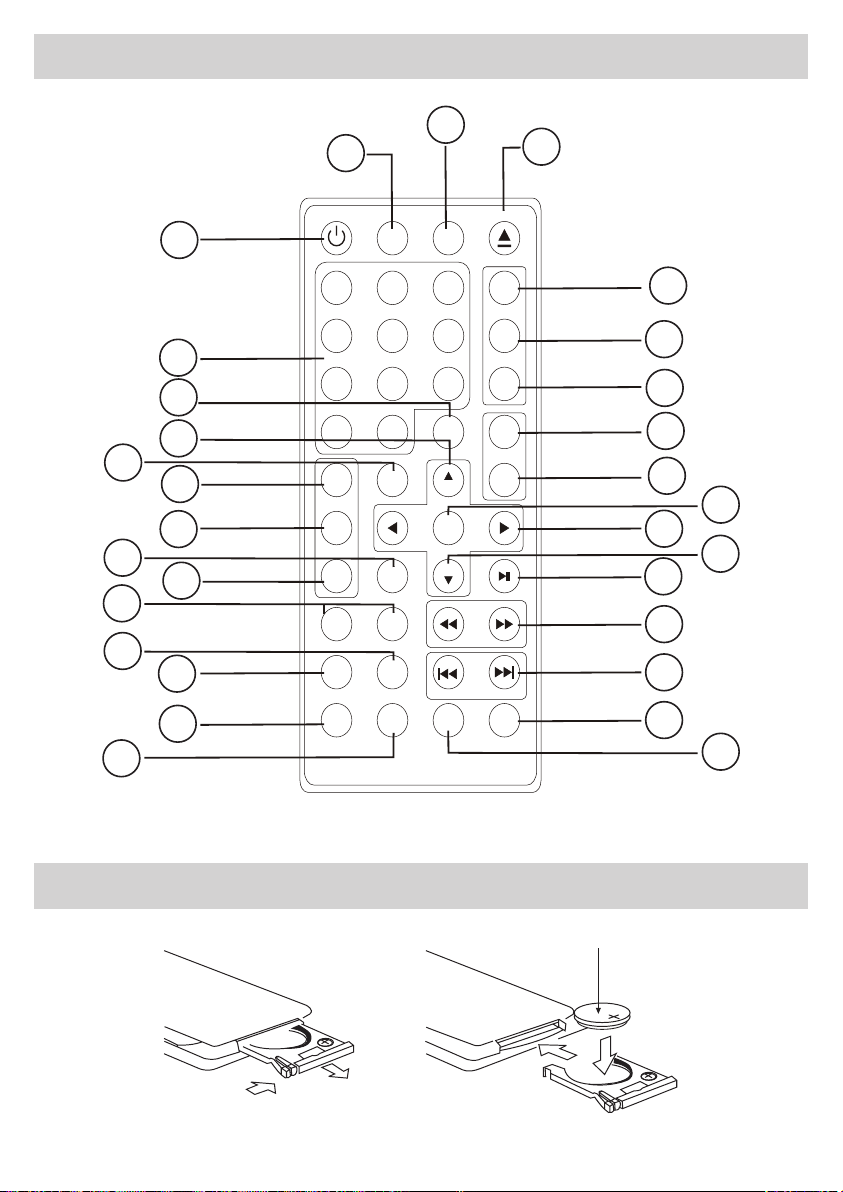
1. POWER Accensione/Spegnimento.
2 . MUTE Elimina l’audio.
3. TFT DISPLAY Visualizza lo stato corrente sul display (DVD, TV, AV1, AV2, VGA)
4. EJECT Tasto espulsione disco.
5. TAST. NUM. Tasti di digitazione numerica.
6. ANGLE Cambia l’angolo di visione nei DVD se presente sul supporto.
7. SUBTITLE Cambia il linguaggio dei sottotitoli del DVD.
8. AUDIO Seleziona la modalità audio nei CD e VCD, cambia la lingua nei DVD.
9. RETURN Interrompe la riproduzione del disco e torna al menù principale.
10. TFT MODE Passa da modalità DVD a TV/VGA/AV1/AV2
11. SETUP Entra o esce dal menù di SETUP.
12. DVD MODE Passa da modalità DVD/CD a USB/SD-MMC card
13. CH+CH- Permettono lo spostamento su è giù all’interno dei menù.
Cambiano i canali nella modalità TV.
14. Permettono lo spostamento a sinistra e destra all’interno dei menù.
15. ENTER Conferma le selezioni nel menù.
16. Inizia o sospende la riproduzione.
17. TFT MENU’ Accede al menù di regolazione dello schermo (immagine/luminosità/saturazione
formato immagine/lingua/trasmissione FM/rotazione immagine/auto spegnimento
reset.
18. DVD MENU Entra nel menù principale del DVD e attiva il menù dei VCD.
19. DVD DISPLAY Mostra sullo schermo le informazioni del disco in riproduzione.
20. PROGRAM Permette la programmazione della sequenza di riproduzione di CD e MP3.
21. / Attiva il riavvolgimento/avanzamento veloce.
22. VOL-/VOL+ Decrementa il volume. Incrementa il volume.
23. NEXT :/BACK 9 Passa alla traccia successiva. Passa alla traccia precedente.
24. SLOW Attiva la riproduzione rallentata.
25. STOP Ferma la riproduzione.
26. REPEAT Attiva la modalità di riproduzione traccia.
27. A-B Ripete una parte definita del disco.
28. PBC Non attiva.
29. ZOOM Ingrandisce l’immagine sullo schermo.
I
Page 14
14
USB - SD CARD: note e compatibilità
ATTENZIONE:
Le funzioni di lettura di USB e SD Card si attivano SOLTANTO se è presente un disco all‘interno
dell‘unità DVD.
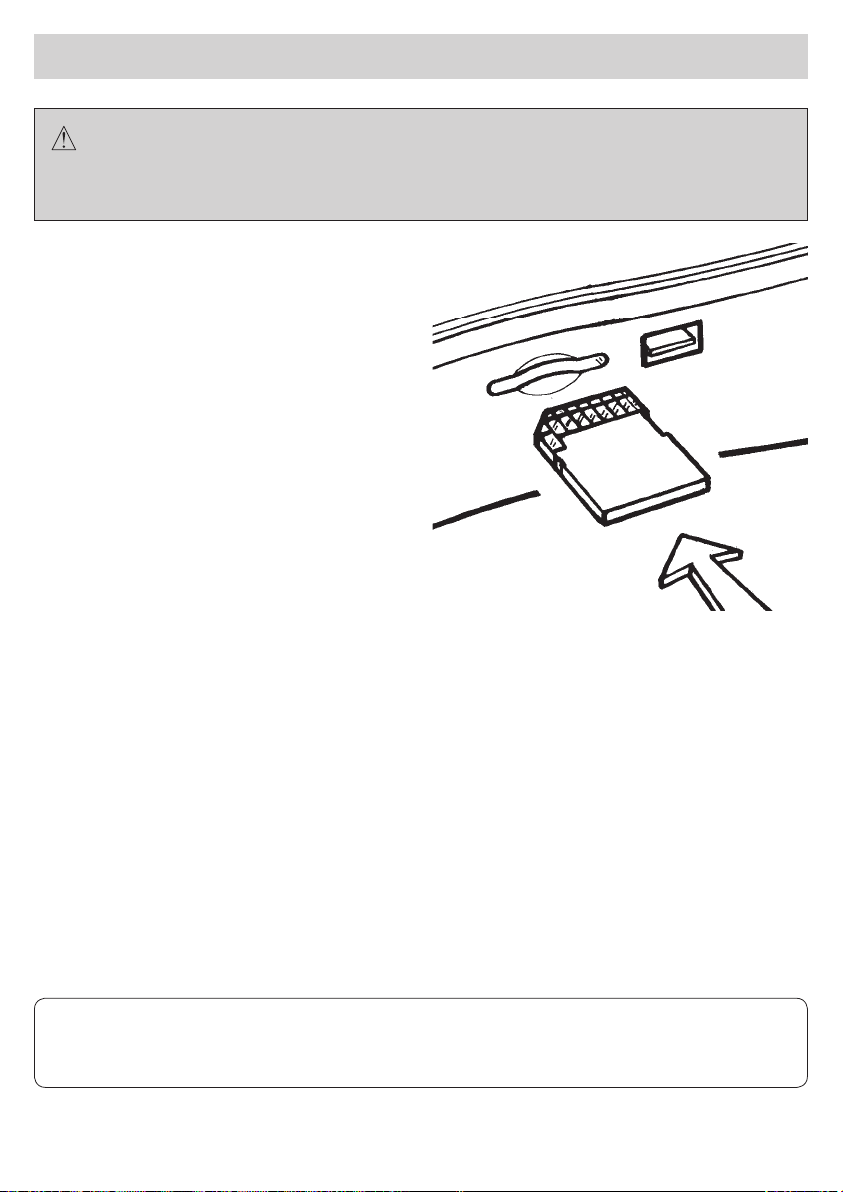
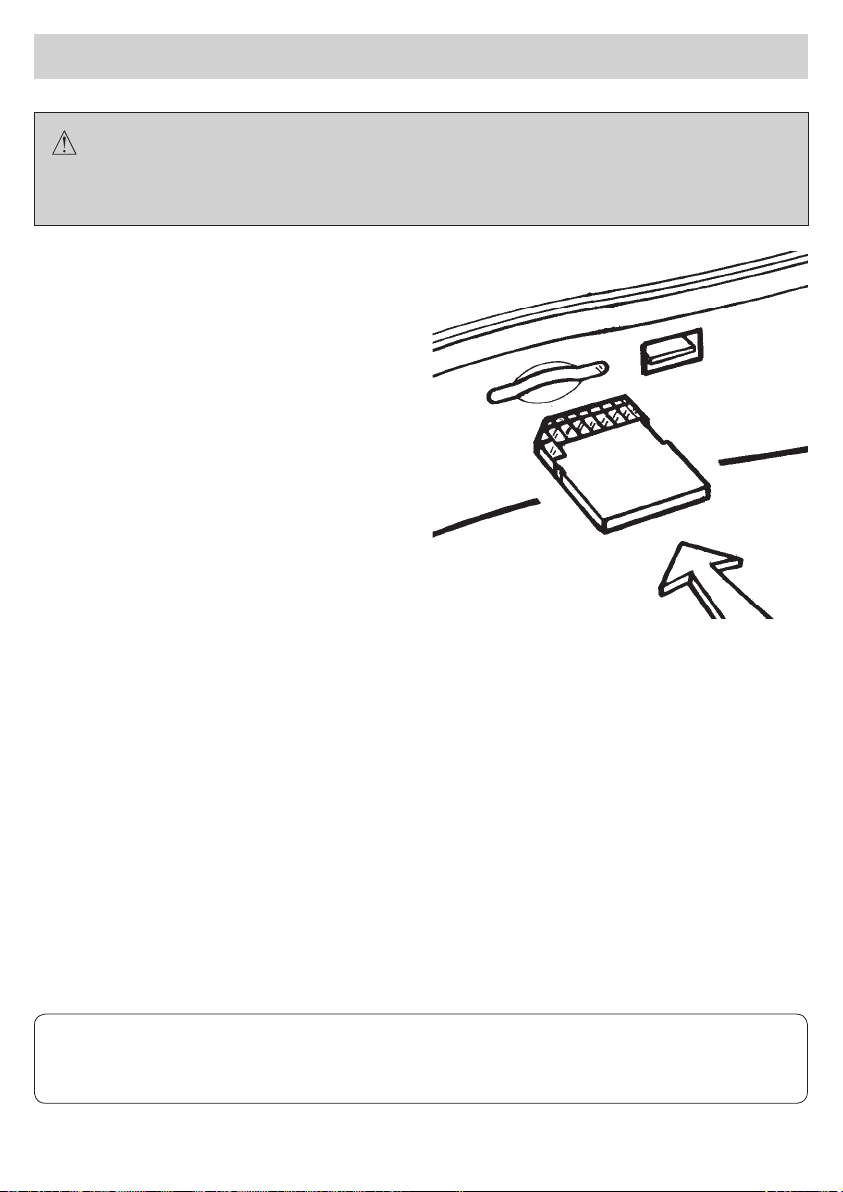
1 Caricamento SD/MMC Card
Inserire la SD/MMC Card nella fessura
CON L’ETICHETTA RIVOLTA VERSO IL
BASSO (vedi disegno).
L’apparecchio riprodurrà automaticamente i
contenuti della card e sul display apparirà la
scritta READ-CARD.
2 Rimozione SD/MMC Card
Premere il tasto Source per uscire dalla modalità
READ-CARD. Premere leggermente sulla
SD/MMC Card per sganciarla. Estrarre la card.
3 Caricamento USB
Inserire la USB Card nella fessura.
L’apparecchio riprodurrà automaticamente i
contenuti dell’USB e sul display apparirà la
scrittaREAD-USB.
4 Rimozione USB
Premere il tasto Source per uscire dalla modalità
READ-USB. Rimuovere il dispositivo USB.
NOTE su USB/SD/MMC
La funzione USB (flash memory type) è vincolata dalla compatibilità tra la chiave USB ed il lettore DVD,
verificare sempre la compatibilità.
1. SD/MMC card supportate (Max 2 Gb)
2. USB flash memory 2 in 1 (SD/MMC) supportata
3. Fat12 / fat16 / fat 32 consentiti / Fat 12/16 (cartelle: 200; file: 1000) / Fat 32 (cartelle: 200; file: 1000)
4. Nomi files: 32 caratteri Cartelle: 32 caratteri Titoli: 32 caratteri
5. Tag (id3 tag ver. 2.0) title / artist / album: 32 byte consentiti
6. Multi card reader: NON supportato
7. USB 1.1 supportata USB 2.0 supportata (la USB 2.0 speed non è supportata, quindi verrà letta alla
stessa velocità dell’USB 1.1)
Nota: qualora ad USB inserita non avvenga il riconoscimento da parte dell’unità, procedere come segue:
rimuovere il dispositivo USB, spegnere e riaccendere l’unità, reinserire la chiave USB.
Note: verificare SEMPRE la compatibilità tra l’unità e i dipositivi USB e SD-CARD. Alcuni dispositivi USB
o SD-CARD possono non essere riconosciuti dal lettore o avere un funzionamento anomalo.
Nel caso in cui la USB o SD-CARD non venga riconosciuta dal lettore, procedere come segue:
estrarre l’USB/SD-CARD, spegnere e riaccendere l’unità, re-inserire nuovamente l’USB/SD-CARD.
Page 15
15
Memorizzazione della posizione di lettura
Spegnendo il lettore DVD o il motore del veicolo mentre il playback é in corso oppure cambiando la sorgente
video, al riavvio la riproduzione riprenderà dal punto esatto in cui è stata interrotta. La memoria sarà cancellata
quando il disco viene espulso o alla pressione del tasto RESET.
USB e SD-Card non hanno la memoria della posizione di lettura.
I
Impostazioni di Setup
SETUP SISTEMA
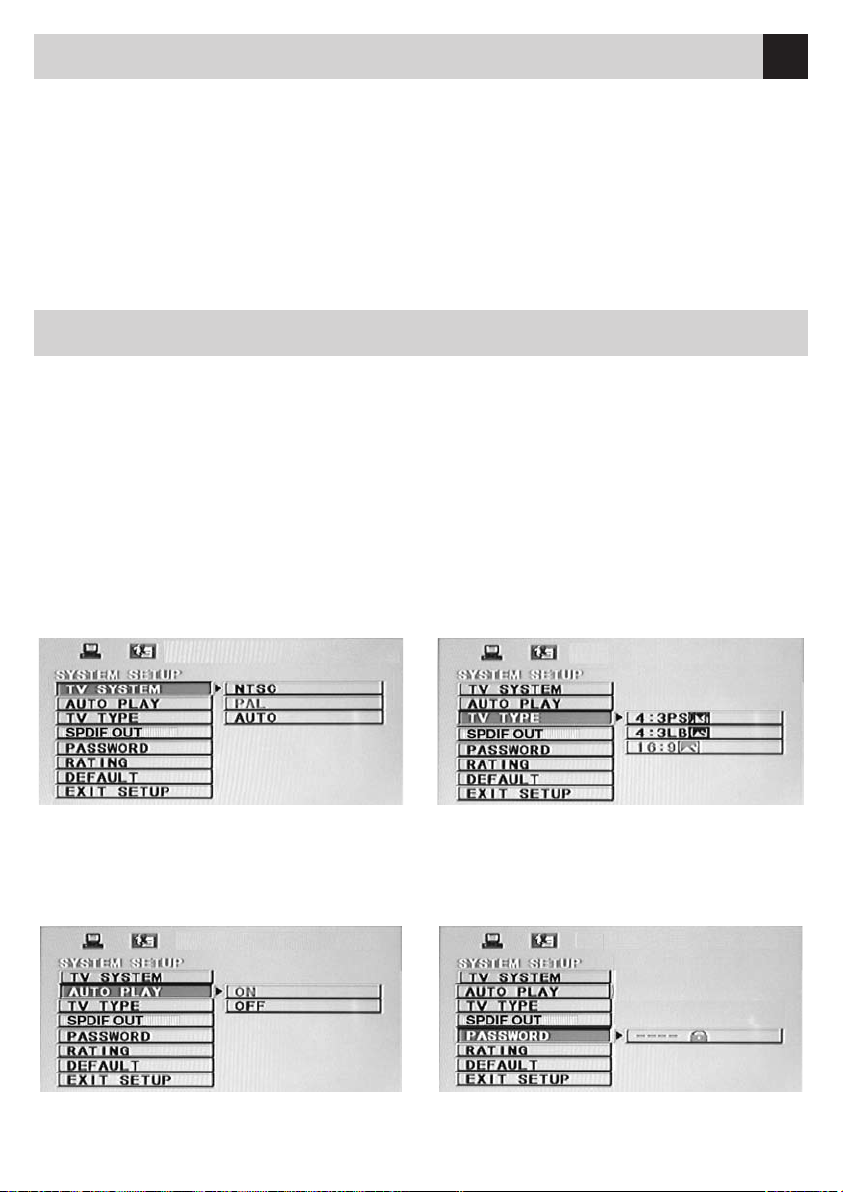
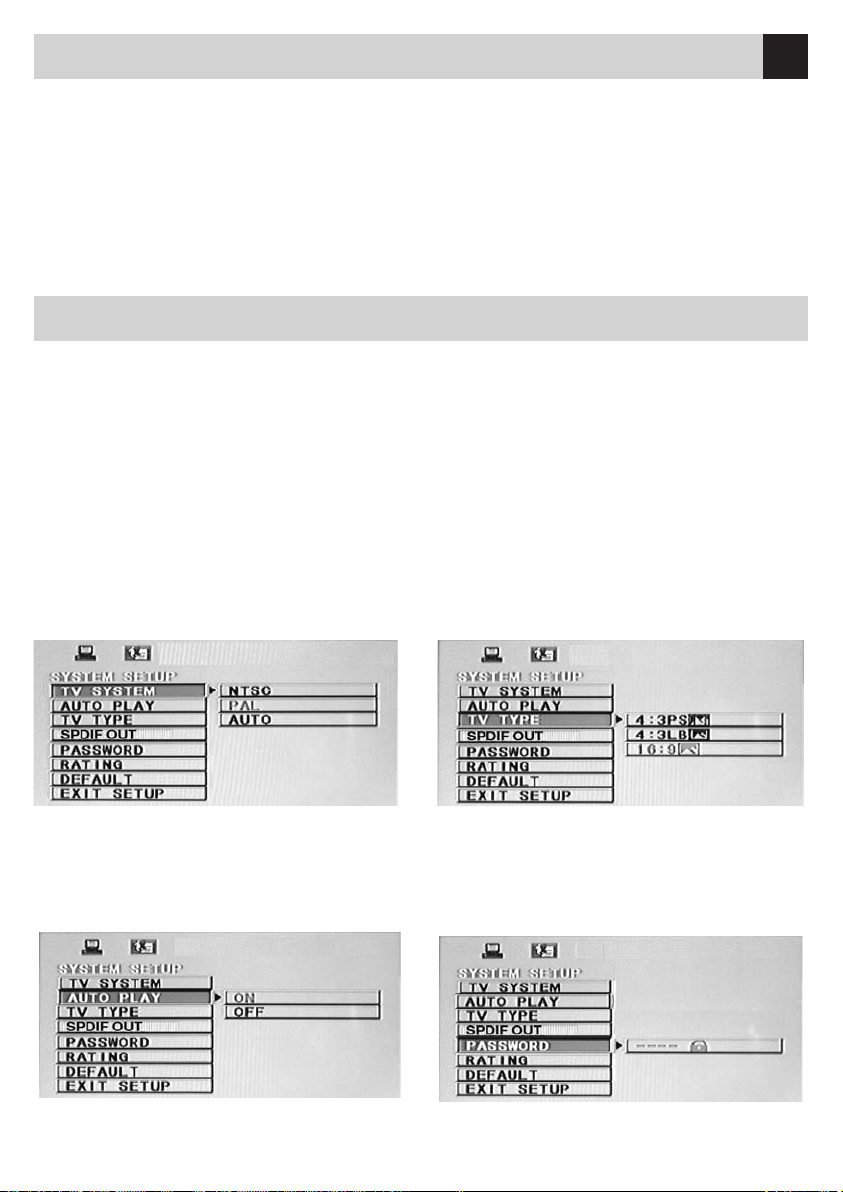
Spostarsi con i tasti cursore del telecomando ( ) e selezionare con il tasto ENTER l’impostazione.
SISTEMA TV
Spostarsi con i tasti cursore in basso e posizionarsi sulla linea TV System.
Premere ENTER e selezionare successivamente il
sistema appropriato a seconda del DVD inserito.
Selezionando AUTO il VM190 selezionerà automaticamente il formato in base al DVD inserito.
Premere il tasto SETUP per uscire dal menù
AUTO PLAY
Spostarsi con i tasti cursore su AUTOPLAY e
selezionare ON per attivare o OFF per disattivare
la funzione.
FORMATO TV
Spostarsi con i tasti cursore in basso e posizionarsi sulla linea TV TYPE.
Premere ENTER e selezionare successivamente
il formato appropriato (4:3LB, 4:3PS o 16:9) a seconda del DVD inserito.
Premere il tasto SETUP per uscire dal menù
SPDIF OUT
Funzione disabilitata.
IMPOSTAZIONE PASSWORD
VISIONE PER ADULTI
Page 16
16
Impostazioni di Setup
Posizionarsi nel riquadro con le quattro stelle tramite i tasti cursore e digitare la vecchia password
(nell’impostazione di fabbrica la password è nulla),
dopodichè digitare la nuova a propria scelta.
Quando la password è sbloccata posizionarsi sulla
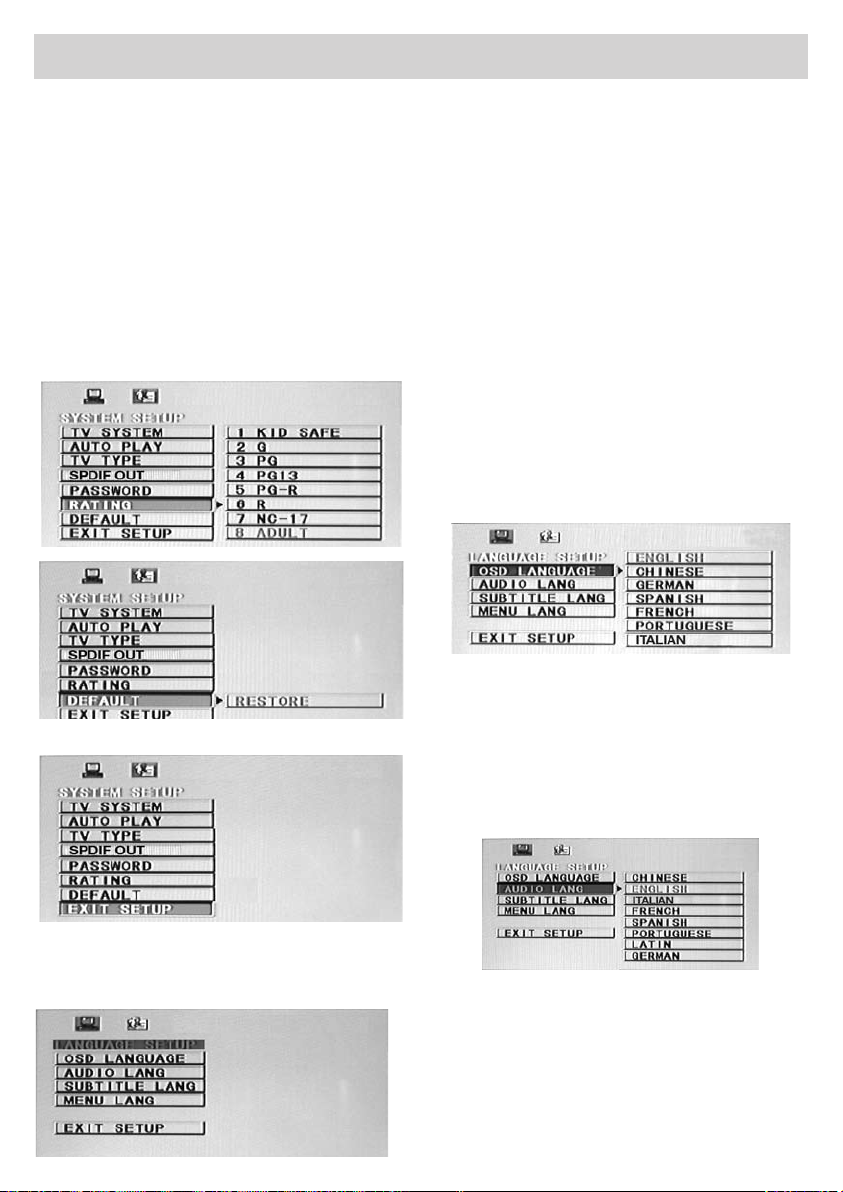
linea Rating per modificare il livello di protezione
voluto tra quelli elencati qui di seguito:
8.Adult → 1. Kid safe → 2.G → 3.PG → 4.PG-13 →
5.PG-R → 6.R → 7.NC-17
Posizionandosi sulla linea DEFAULT e premendo il
tasto ENTER verranno cancellate tutte le modifiche
effettuate e ripristinate le impostazioni di fabbrica.
Spostarsi con i tasti cursore del telecomando (
) e selezionare con il tasto ENTER l’impostazione
da modificare (Language, Audio, Subtitle, Menù).
Nella sezione LANGUAGE è possibile modificare il
linguaggio delle funzioni del DVD player, dell’audio
e dei sottotitoli dei DVD.
Le impostazioni della lingua dei film dipendono
direttamente dal DVD e possono essere differenti
da quelle impostate nel setup.
Sono nella maggior parte dei casi i DVD stessi
a richiedere prima dell’avvio del menù titolo
l’impostazione della lingua.
LINGUAGGIO FUNZIONI DEL MENÙ
Spostarsi con i tasti cursore in basso e posizionarsi sulla linea OSD Menù.
Premere ENTER e selezionare successivamente la
lingua desiderata.
Premere il tasto SETUP per uscire dal menù.
EXIT SETUP
SETUP LINGUA
Per entrare nel menù premere il tasto SETUP, sul
monitor compare la schermata iniziale di SETUP:
LINGUAGGIO AUDIO
Spostarsi con i tasti cursore in basso e posizionarsi sulla linea Audio.
Premere ENTER e selezionare successivamente la
lingua desiderata.
Premere il tasto SETUP per uscire dal menù
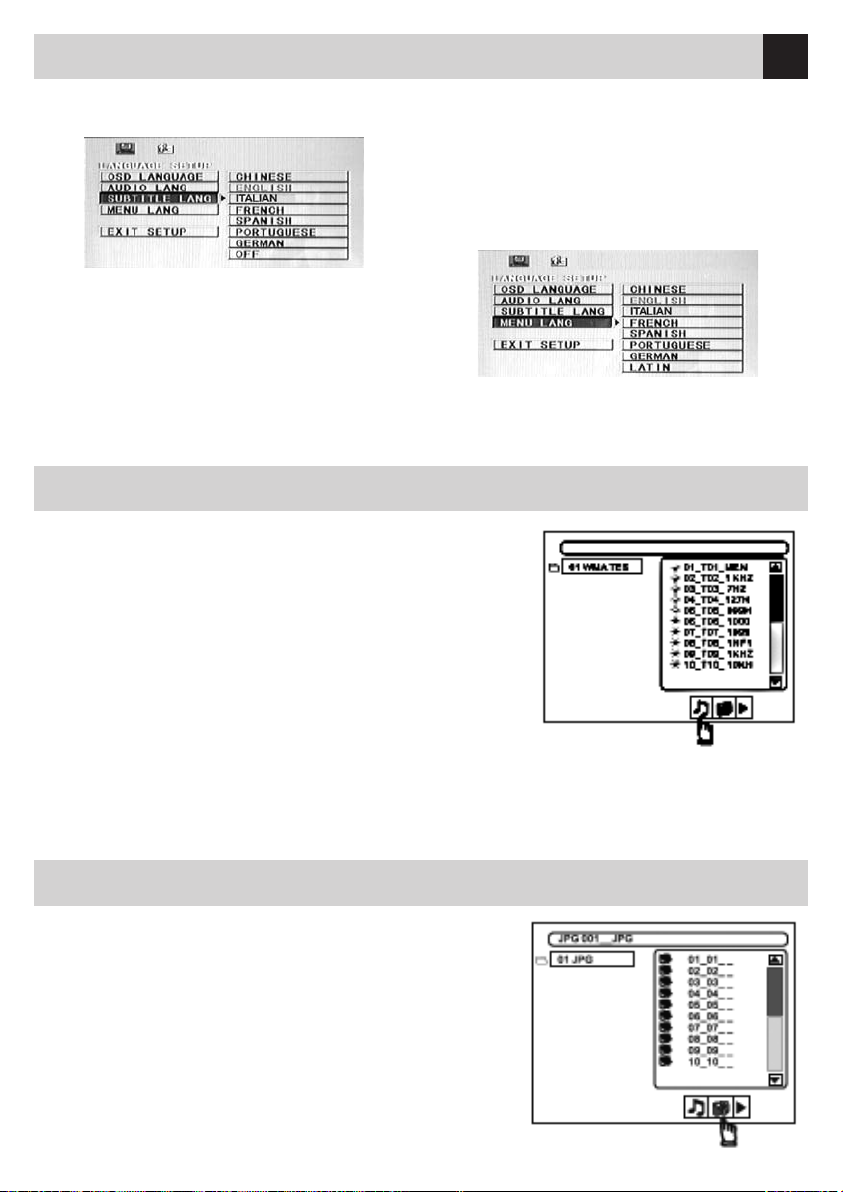
LINGUAGGIO SOTTOTITOLI
Spostarsi con i tasti cursore in basso e posizionarsi sulla linea Subtitle Lang.
Premere ENTER e selezionare successivamente la
lingua desiderata.
E’ possibile disattivare i sottotitoli selezionando Off
al posto di una delle lingue indicate.
Page 17
17
Impostazioni di Setup
I
Premere il tasto SETUP per uscire dal menù.
LINGUAGGIO MENÙ DEL DISCO
Spostarsi con i tasti cursore in basso e posizionarsi
sulla linea Disc Menù.
Premere ENTER e selezionare successivamente la
lingua desiderata.
Premere il tasto SETUP per uscire dal menù.
Riproduzione files Mp3 / AVI / MPG
Inserendo un disco nel lettore DVD, la riproduzione si avvia
automaticamente e sullo schermo compare il menù dei brani.
Esempio: Un disco con brani MP3 viene riprodotto nel formato FOLDER
(cartella).
Usare i tasti cursore ( ) per muoversi all’interno delle
tracce e premere il tasto ENTER per riprodurre quella desiderata.
E’ possibile utilizzare il tasto REPEAT per utilizzare la funzione
di ripetizione brano/cartella.
Durante la riproduzione è possibile passare da una traccia
all’altra mediante i tasti 9 : .
Visualizzazione immagini Jpeg
Nella visione di immagini JPEG si potranno scorrere con i tasti 9 : e
premendo il tasto TITLE si visualizzerà una schermata con le anteprime
delle immagini registrate.
Page 18

18
Cause e Rimedi ai problemi d’installazione
Problema Causa Rimedio
Non compare nessuna immagine sullo schermo.
Il telecomando non interagisce con il monitor.
L’immagine appare scura.
Il cavo di alimentazione non é connesso correttamente o il fusibile é
guasto.
Vericare la selezione della sorgente
video
Batteria scarica.
Ostacoli tra telecomando e monitor.
Non é stata tolta la pellicola di isolamento della batteria nel telecomando
Troppo freddo nell’abitacolo.
La regolazione della luminosità é
settata troppo bassa.
Vericare le connessioni del cavo
alimentazione o sostituire il fusibile.
Commutare tra video interno e
video esterno in base alla sorgente.
Sostituire la batteria.
Effettuare la pulizia dei sensori e
controllare che non vi siano oggetti
che interferiscono nella trasmissione.
Slare la pellicola.
Attendere che si riscaldino i cristalli
liquidi.
Controllare la funzione
“BRIGHTNESS”
Non si sente l’audio nelle
cufe.
La riproduzione non parte
L’immagine non é chiara
o disturbata
La riproduzione é a scatti
Compare la scritta
“INVALID DISC FORMAT”
Manca il suono
La cufa é spenta oppure le batterie
sono scariche.
Ostacoli per il segnale
Trasmettitore troppo distante
Disco inserito capovolto
Disco sporco
Disco inserito non compatibile con il
lettore DVD
Il blocco genitori è inserito
La batteria dell’auto é molto debole
(quasi scarica)
Disco graffiato o rovinato Sostituire il disco.
Nessun disco é presente
Il disco é molto sporco
Selezione audio sbagliata Selezionare l’uscita audio in base al
Accendere la cufa oppure
sostituire le batterie
Rimuovere gli ostacoli.
Avvicinarsi al monitor.
Controllare il disco ed inserirlo con
l’etichetta rivolta verso l’alto.
Pulire il disco
Controllare che i formati da riprodurre siano compatibili con il lettore
DVD.
Eliminare il controllo genitori o spostare il livello di visione.
Controllare batteria e cavi. Il lettore
DVD non funziona correttamente se
la tensione di alimentazione é sotto
i 10,8 V.
Inserire il disco.
Pulire il disco.
collegamento effettuato.
Page 19

19
Caratteristiche tecniche
I
GENERALI
Alimentazione ....................................................................................................................................... 12V DC
Tensione di prova ........................................................................................................ 13.2V negative ground
Uscite Pre-Amplicate ....................................................................................................2 CH 1V Rms (10KΩ)
Segnale Video ................................................................................................ PAL/NTSC/AUTO 1±0,2V(75Ω)
Trasmettitore ................................................................................................................................... IR integrato
Modulatore Audio FM integrato: ................... frequenze selezionabili 87.8-87.9-88.1-8.3-88.5-88.8-89 MHz
Porta VGA per connessione PC: ..........................................................................risoluzione 800x480 - 60Hz
Porta USB: ............................................................................................................ supporta formato USB 2.0
Porta SD: ............................................................................................supporta Sd card/MMC card max. 2Gb
Temperatura di esercizio: ..................................................................................................................... 0÷55°C
Assorbimento: ................................................................................................................................. ≤4 Ampere
SCHERMO
Formato ......................................................................................................................................................16:9
Dimensione ............................................................................................................................................... 10.2”
Risoluzione .............................................................................................................. 262K pixel 800(H)x480(V)
Luminosità ....................................................................................................................................... 400 Cd/m
Angolo di Visione ................................................................................................ orizzontale-verticale 65°/65°
2
SEZIONE DVD
Risposta in fequenza ..................................................................................................................20Hz – 20KHz
Sistema Disc ................................................................................................................... Digital Audio System
Rapporto Segnale/Rumore ................................................................................................>100dB (JIS)(1KHZ)
Separazione Stereo .................................................................................................................... >90dB (1KHz)
Formati Compatibili ..........................DVD±R/VCD/SVCD/DVCD/CD/CD-R/CD-RW/CD-ROM/MP3/AVI/MPG
Supporta ......................................................................................................................................... DivX e Xvid
Formati NON Compatibili ..............................................................................................DVD-ROM/CDV/CD-G
SEZIONE TV
Sitema TV selezionabile ...................................................... PAL-BG/PAL –I/PAL-N/PAL-M/PAL-DK/NTSC-M
Ingresso antenna: ......................................................................... Jack 3,5” (compatibile con VM811/VM815)
Caratteristiche tecniche ed estetiche possono subire variazioni senza alcun preavviso. • The stated Technical Specifications and the product-design may
evolve, without prior notice. • Caractéristiques techniques et esthétiques peuvent subir des variations sans aucun préavis. • Technische Änderungen am
Produkt bzw.am Design behalten wir uns vor. • Las especificaciones y el diseño están sujetos a cambios sin preaviso por motivos de mejoras.
Page 20

20
Page 21

21
INDEX
Precautions ................................................................. 22
Connection scheme ........................................................... 23
Installation .................................................................. 24-25
Functions ................................................................... 26-27
TV-Mode Settings ............................................................ 27
Changing the remote control battery .............................................. 28
Remote control functions ....................................................... 28-29
USB - SD CARD: remarks and compatibility ........................................ 30
Memory of the reproduction-position ............................................. 31
Setup-Regulations ............................................................ 31-32-33
Reproduction of Mp3 / AVI / MPG ................................................ 33
Visualizing Jpeg-pictures ....................................................... 33
Causes and remedies to installation problems ...................................... 34
Technical specifications ........................................................ 35
GB
Page 22

22
Precautions
To operate under security, please carefully observe the following precautions:
• Install the appliances inside the car, in a position leaving free space for the normal car-driving operations
and the security-devices situated within the car (ABS, Air-Bag etc.).
• Use system at a temperature between 0 and +55°C.
• If the temperature inside the car is very high, a short cooling-down period has to be observed before
using the Appliance.
• At low temperatures, the display could be slightly dark after switch-on. The display will, in any case,
come to its normal brightness after a few minutes. This situation is normally due to the physical characteristics of the liquid cristals.
• Before installing the Unit, please check that everything is in line with your Road Regulations.
• Remember that Trafc Security Rules do NOT allow watching TV while driving the car.
• Make sure that the DVD-player will NOT be installed in positions subject to:
- direct heat or sun
- high degree of humidity or water
- heavy dust
- elevated vibrations.
• In the presence of water condensation, the CD-playback may result rather noisy. In such case, eject the
disc and wait for 1 hour until the water condensation has evaporated.
• Do not try to withdraw and hold the disc when the mechanical charging system has already started.
• Do not insert disc when the DVD-player is switched off.
• Always insert disc with label showing upward.
• Playback on very bumpy roads could be subject to interruptions.
• To avoid damage or injuries, always ask a professional car-video-Installer for advice.
Page 23
23
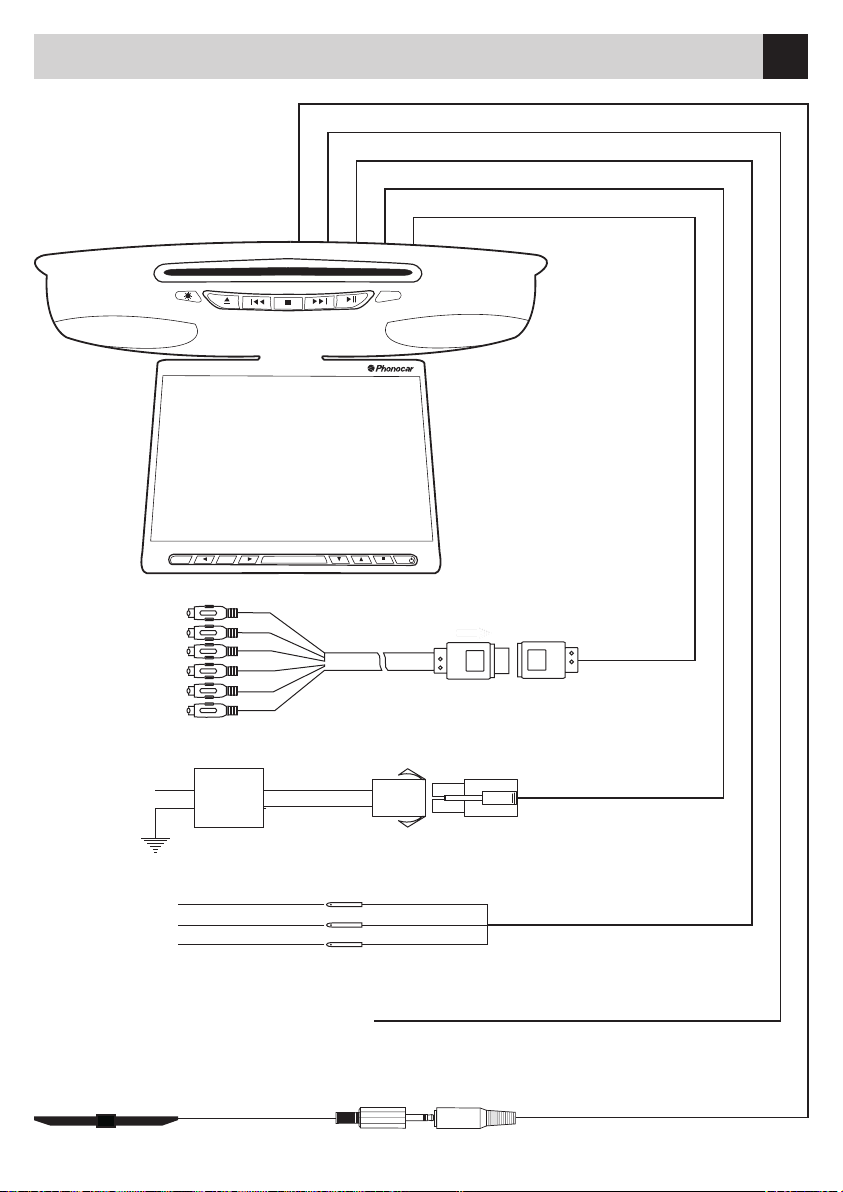
Connection scheme
VM190
WHITE AUDIO IN 1 L
RED AUDIO IN 1 R
YELLOW VIDEO IN 1
WHITE AUDIO OUT L
RED AUDIO OUT R
YELLOW VIDEO OUT
GB
RED + 12V
BLACK GROUND
+ 12V LIGHT
+ 12V BATTERY
GROUND
TV ANTENNA
VM811
YELLOW
RED
BLACK
FM-AIR WIRE
MAIN POWER SUPPLY
DOME LIGHT POWER
BLACK
JACK 3,5“
TV AERIAL INPUT
Page 24
24
Installation
Page 25
25
Installation
GB
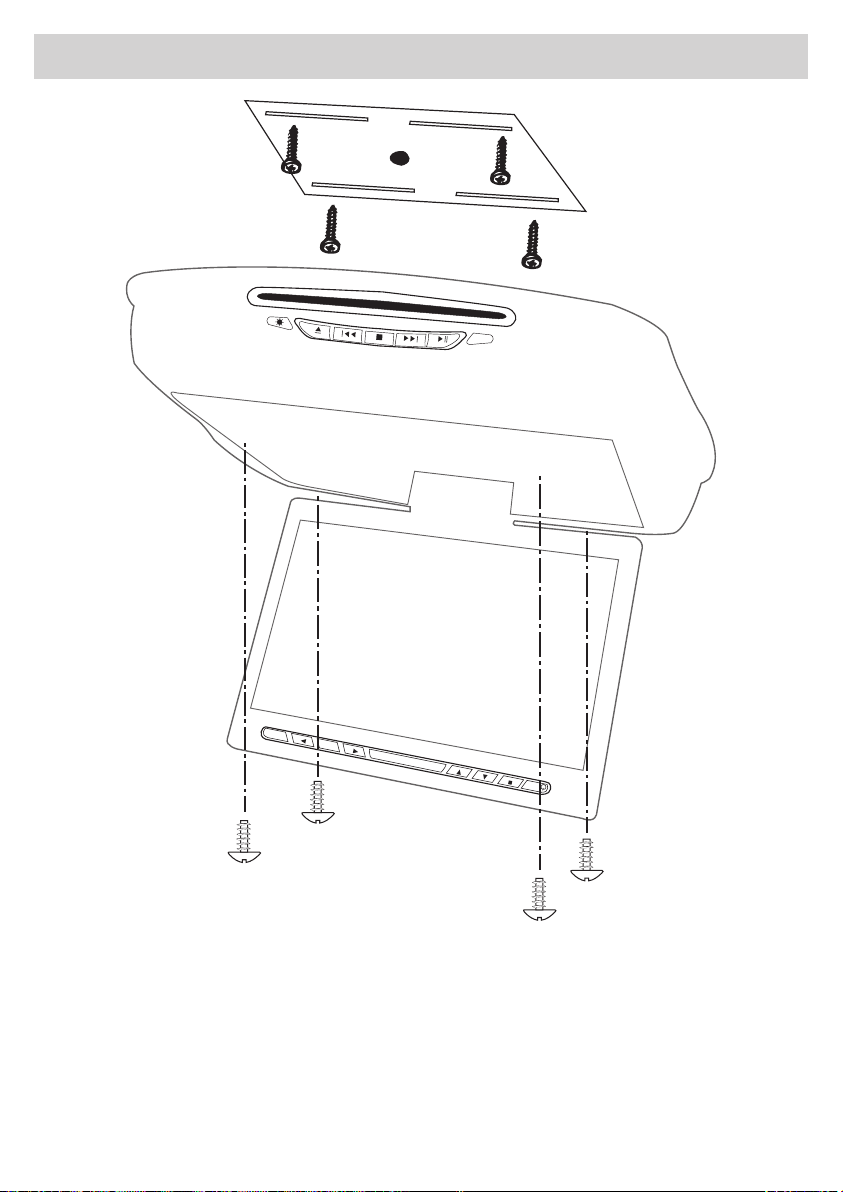
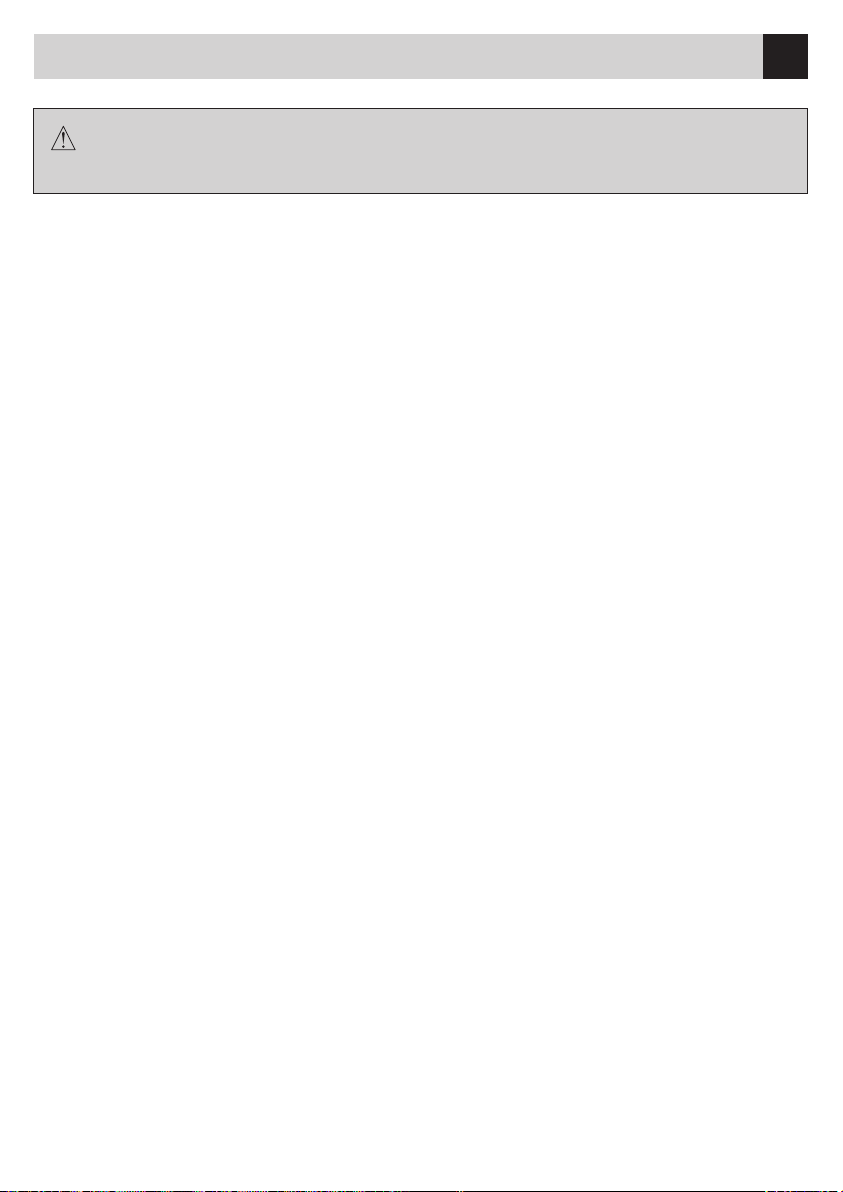
ATTENTION:
Do not install in areas which could compromise the driver’s visibility
• Do not use screws other than those supplied within the package
• Install the metal-plate, supposed to hold the Unit, on the car-ceiling
• Fix the monitor to the plate mounted on the ceiling, by using the 4 supplied screws.
Please make sure that the unit is solidly installed on the car-ceiling.
To be noted that extremely marked vibrations caused by the moving car, will, necessarily, affect the DVDplayer-mechanism and its good reproduction-quality.
Page 26
26
Functions
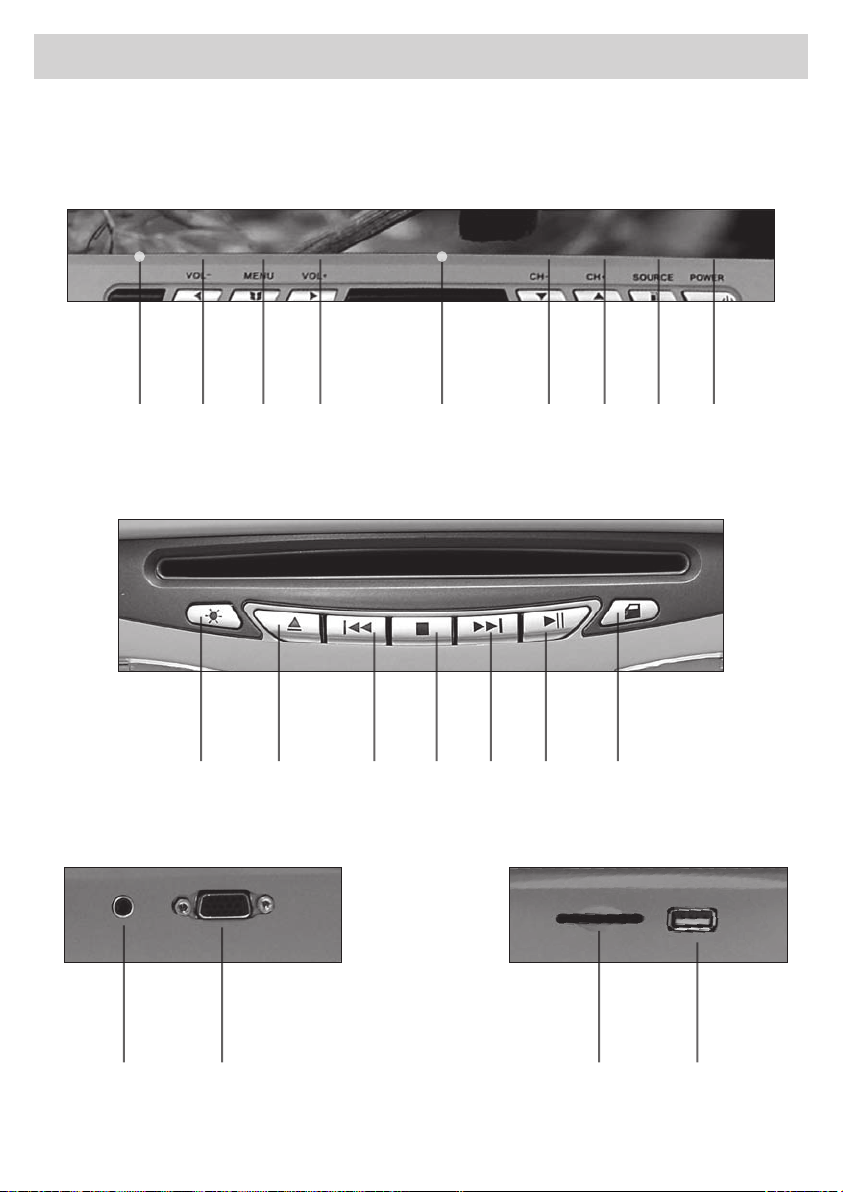
1 2 3 4 5 6 7 8 9
10 11 12 13 14 15 16
17 18 19 20
Page 27
27
Functions
1 I/R Receiver window
2-4 Increase/Decreaser the volume and the menù regulations values
3 To enter the regulation-menù for BRIGHTNESS/CONTRAST/HUE/SATURATION/IMAGE FORMAT
LANGUAGE/FM TRANSMITTER/ROTATION IMAGE (?)/AUTOPOWER DOWN/RESET
5 Infrared trasmitter
6-7 Scrolling of the channels memorized in TV-mode. Scrolling within the Setting-Menu.
8 Switch from DVD/TV/AUX1/AUX2/VGA
9 Power ON/OFF
10 Done Led Light ON/OFF
11 Eject the inserted disc
12-14 Go to subsequent or previous Audio/Video track
13 Stops reproduction
15 Starts/Pauses reproduction
16 Switch-on / Switch-off Dome-lights(active only if connected to dome-lights of the car)
17 Aux Audio/Video input
18 VGA port for PC connection
19 Slot for SD/MMC Card-introduction
20 Slot for USB-introduction
GB
ATTENTION:
USB and/or SD-CARD reading-functions get activated ONLY in the presence of a disc inside the
DVD-player.
TV-Mode Settings
• Press key "Source" (8) and select "TV"
• Press "Menù" (3) and move with keys (6 and 7) to select:
- TV-System
- Auto-Search
- Manual-Search
- Channels
• Effect the settings by means of the keys (2 and 4)
GB
Page 28
28
Remote control functions
CR 2025
3
2
4
11
20
22
25
27
13
17
18
19
24
26
POWER
1
1 2 3
4 5 6
MUTE
DISPLAY
POWER
TFT
ANGLE
SUBTITLE
6
7
5
9
7 8 9
-- 0
DISPLAY
REPEAT
REPEAT
TFT
MENU‘
DVD
MENU‘
DVD
VOL-
SLOW
SETUP
PROG
VOL+
STOP
A-B
A-B
RETURN
CH+
ENTER
CH-
PBC
AUDIO
TFT
MODE
DVD
MODE
ZOOM
8
10
12
15
14
13
16
21
23
29
28
Changing the remote control battery
Page 29

29
Remote control functions
1. POWER Switch-on/Switch-off.
2 . MUTE Eliminates Audio.
3. TFT DISPLAY Visualizes the current mode on the display (DVD, TV, AV1, AV2, VGA)
4. EJECT Eject Disc
5. TAST. NUM. Number selection-keys.
6. ANGLE Change watching-angle with DVDs, if supported.
7. SUBTITLE Change language of DVD sub-titles.
8. AUDIO To select audio-mode of CD and VCD, to change language with DVD’s.
9. RETURN Interrupt disc-reproduction and return to main Menu.
10. TFT MODE Switch from DVD mode to TV/VGA/AV/AV
11. SETUP Enter/Leave SETUP-Menu.
12. DVD MODE Select required source: DVD, USB/SD-card.
13. CH+CH- To move UP/DOWN within the menu-to change preset channels within TV mode.
14. To move left/right within the menu.
15. ENTER Confirm selection made.
16. Starts/pauses reproduction.
17. TFT MENU’ To enter into the Screen-Setting-Menu (picture/brightness/saturization/picture
format/language/FM-transmission/picture-rotation/automatic shut-down/Reset)
18. DVD MENU Enter the DVD main Menu / activate the VCD-Menu.
19. DVD DISPLAY Display shows status of disc being reproduced.
20. PROGRAM To programme reproduction-sequence of CD and MP3.
21. / Fast Forward - Fast Rewind.
22. VOL-/VOL+ Increase Volume - Reduce Volume.
23. NEXT :/BACK 9 Goes over to the next track - Goes back to the previous track.
24. SLOW For slow reproduction.
25. STOP Stops reproduction.
26. REPEAT Activates Track-repetition-mode.
27. A-B Repeats certain part of disc.
28. PBC Not active.
29. ZOOM Enlarge picture on screen.
GB
Page 30
30
USB - SD CARD: remarks and compatibility
ATTENTION:
USB and/or SD-CARD reading-functions get activated ONLY in the presence of a disc inside the
DVD-player.
1 Insert SD/MMC-Card
Insert the SD/MMC-Card with its label showing
upward. The Player will automatically reproduce
the contents of such card, while the display will
indicate READ-CARD.
2 Eject SD/MMC-Card
Press Source-key to leave the READ-CARDfunction. Slightly press onto the SD/MMC-card
to unlock and extract the card.
3 Insert USB
Insert the USB-card into the related slot. The
Player will automatically reproduce the contents
of the USB, while the display will indicate READUSB.
4 Eject USB
Press Source-key to leave the READ-USB-function. Extract the USB-card.
USB/SD/MMC NOTES
The USB function (flash memory type) directly depends on the compatibility between the USB-key and
the DVD-player. Therefore always check for this compatibility.
(1) SD/ MMC card supported (max 2 Gb)
(2) USB flash memory 2in 1 (SD/MMC ) supported
(3) Fat 12/fat 16/fat 32 possible Fat 12/16 (dir: 200; file : 1000) Fat 32 (folders : 200; files : 1000) / Fat
32 (folders: 200; files: 1,000)
(4) File name : 32 digits. ˙Folders: 32 digits; Titles: 32 digits
(5) Tag (id3 tag ver 2.0) title / artist / album: 32 byte supported
(6) Multi card reader NOT supported.
(7) USB 1.1 supported, USB 2.0 supported it can not support USB2.0 speed. It will automatically
read at the same speed as USB1.1
NOTE: whenever the player does not recognise the USB-key introduced, proceed as follows: remove the
USB-key and switch the device OFF and ON again. Then re-introduce the USB-key.
Note: Always check the compatibility between the Player and the USB / SD-CARD, as certain USB or
SD-CARDs may not be recognized or present difficulties for the Player.
If the USB or SD-CARD is not recognized by the Player, proceed as follows:
Take USB/SD-CARD away. Switch Player off and on again. Insert USB/SD-CARD again.
Page 31
31
Memory of the reproduction-position
By switching-off the DVD-player or the car-engine while playback is in course, or by changing the videosource, reproduction will resume from the interrupted position. Interruption-memory will be cancelled when
disc is ejected or by pressing RESET.
USB and SD-Cards do not offer this reproduction memory.
GB
Setup-Regulations
SYSTEM SETUP
Move with cursors ( ) of the remote-control unit and select the function needed, by pressing ENTER.
TV-SYSTEM
Use cursors to move to the bottom and go to the
line TV System.
Press ENTER and select the required system, according to the DVD inserted. By selecting AUTO,
the DVD-player will automatically choose the Format suitable for the inserted DVD.
Press SETUP to leave the menu.
AUTO PLAY
Use the cursors to move to AUTOPLAY and select ON to activate, or OFF to de-activate the
function.
TV FORMAT
Use cursors to move to the bottom and go to the
line TV Type.
Press ENTER and select the required format
(4:3LB, 4:3PS or 16:9), according to the DVD
inserted.
Press SETUP to leave the menu.
SPDIF OUT
Function deactivated.
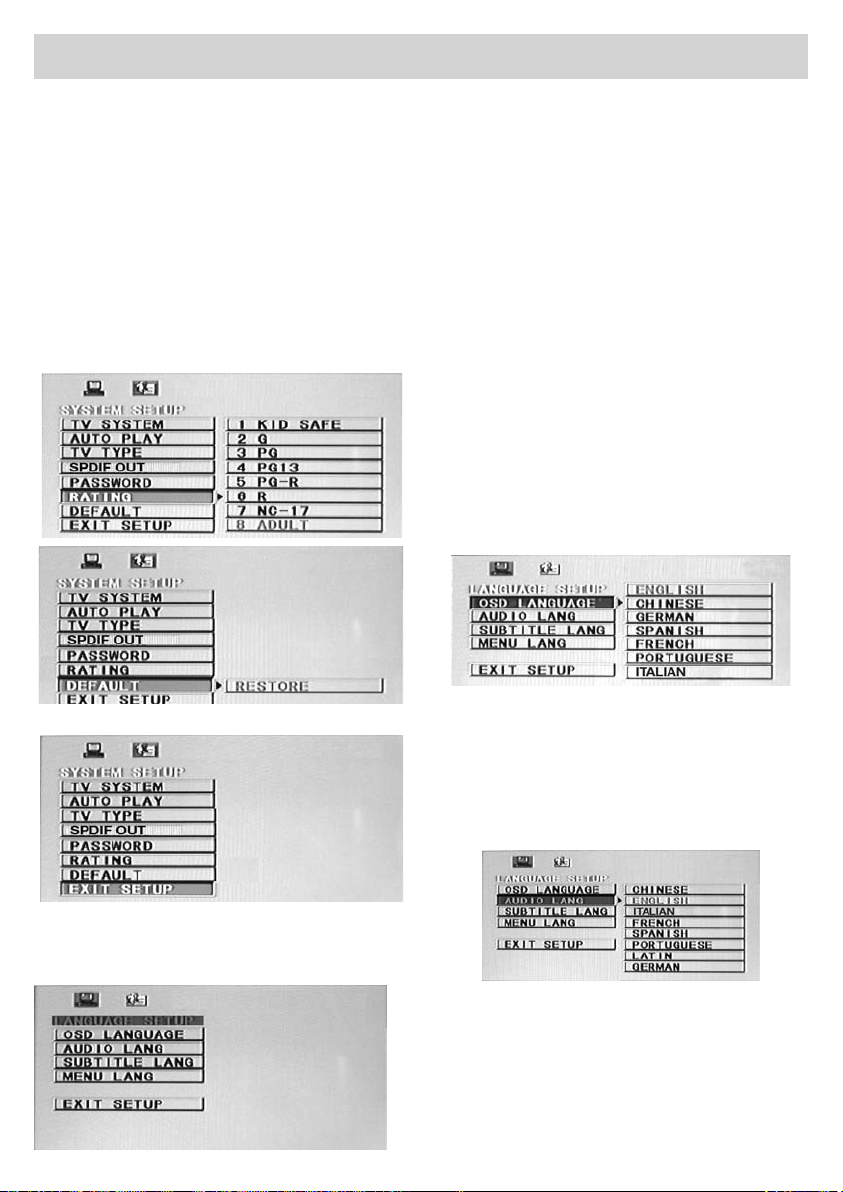
CREATING A PASSOWORD
WATCHING RESERVED TO ADULTS
Page 32
32
Setup-Regulations
Use the cursors to move to the location containing the four stars. Digit the old Password (in the
Factory Setup the password is VOID). Now digit
the new password you wish to adopt.
When the password is de-blocked, go to the line
Rating to modify the protection-level by choosing
one of the following levels:
8.Adult → 1. Kid safe → 2.G → 3.PG → 4.PG-13 →
5.PG-R → 6.R→ 7.NC-17
By going to the line DEFAULT and pressing
ENTER, all changes will be cancelled and the Factory Setup will return.
The monitor will show the SET-UP-menu.
Move with the remote-control keys ( 34 ) and select
with ENTER-key the function required (Language,
Audio, Subtitle, Menù).
Within the LANGUAGE-section, it is possible to
change the language, audio and subtitles of the
DVD-player.
The set-up of the film-language depends from the
DVD and can therefore vary from the selected setup.
Normally, the DVDs ask for the language-set before
showing the title-menu.
LANGUAGE OF MENU-FUNCTIONS
With cursors, move to bottom and go to the line
OSD menu.
Press ENTER and select the required language.
Press SETUP to leave the menu.
EXIT SETUP
LANGUAGE SET-UP
To enter the menu, press the SETUP-key.
LANGUAGE FOR AUDIO
Use cursors to move to the bottom and go to the
line Audio.
Press ENTER and select the required language.
Press SETUP to leave the menu.
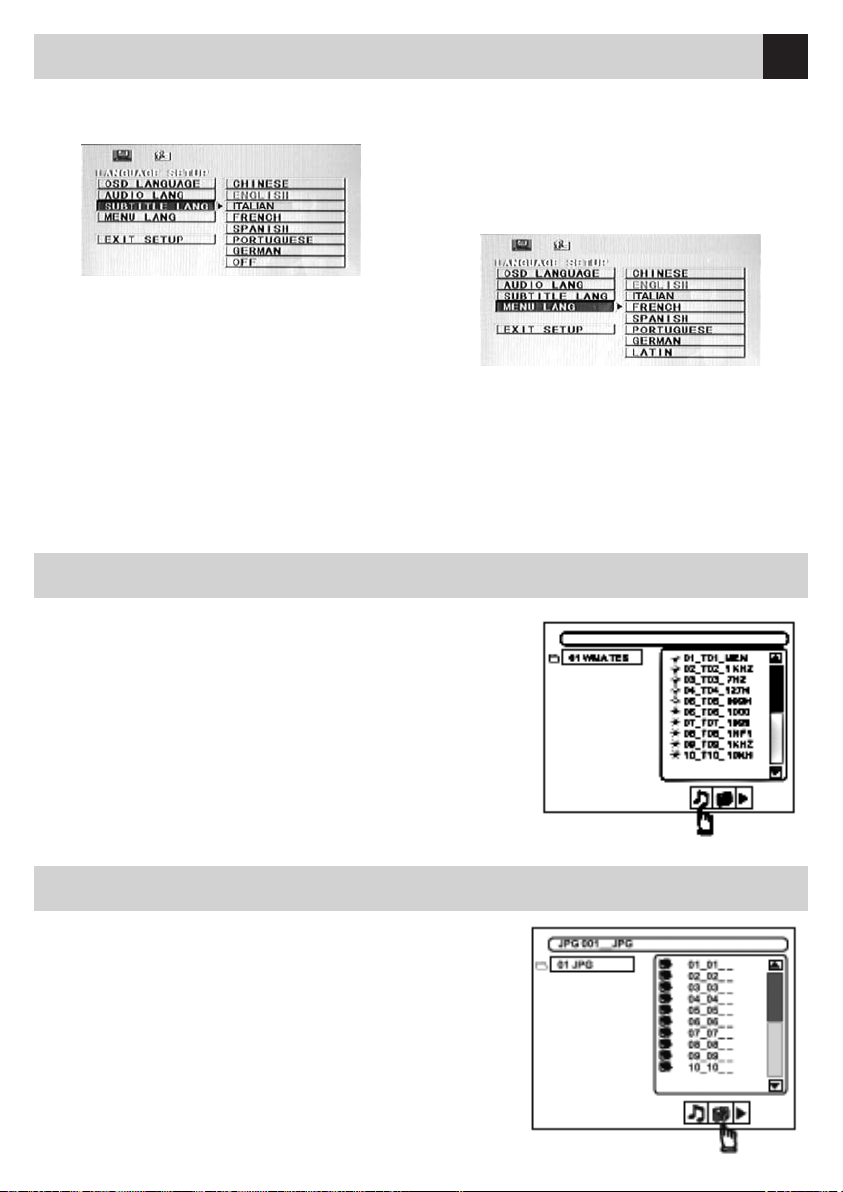
LANGUAGE OF SUB-TITLES
Use cursors to move to the bottom and go to the
line Subtitle Lang.
Press ENTER and select the required language.
It is possible to de-activate the sub-titles by selecting OFF, instead of choosing one of the given
languages.
Page 33
33
Setup-Regulations
GB
Press SETUP to leave the menu.
LANGUAGE OF DISC MENU
Use cursors to move to the bottom and go to the
line disc Menu.
Press ENTER and select the required language.
Press SETUP to leave the menu.
Reproduction of Mp3 / AVI / MPG
By inserting a disc into the DVD-player, reproduction will start
automatically and screen will show the Track-menu.
Example: Discs containing MP3-tracks are reproduced in the
FOLDER-format.
Use the cursors ( ) to move within the various Tracks
and press ENTER to have the desired Track reproduced.
It is possible to use the REPEAT-key to select the repetitionfunction Track/Folder.
During reproduction, it is possible to move from one track to
another, by using the keys 9 : .
Visualizing Jpeg-pictures
JPEG-pictures can be watched by moving around with the keys
9 :. Pressing TITLE an overall-sight of all registered pictures
will appear on the screen.
Page 34

34
Causes and remedies to installation problems
Problema Causa Rimedio
Display does not show
anything
If the remote-control-unit
does not interact with the
Monitor.
The current-supply cable may not
have been inserted correctly or the
fuse may be defect.
Check selected video-source
Remote-control battery is at.
There are obstacles between remotecontrol and monitor.
Consequently, check the currentsupply cable or replace the fuse
Select internal or external video, in
relation to the source.
Replace battery (as per instructions)
Clean the sensors and make sure
there are no objects capable of
interfering in transmission.
The picture on the display
is rather dark.
There is no sound in the
head-phones.
Reproduction does not
start.
Pictures is not clear or
disturbed.
The battery isolation-strip has not
been taken off.
The in-car temperature is too low.
The luminosity-level is too low.
The head-phones are Off or batteries
are empty
Objects may be hindering the reception of the signal.
You are beyond the transmitter’s
maximum action eld
Disc wrong inserted
Disk dirty
Insert disk is not compatible with
Player
Watching is reserved to adults only.
Car-battery is exstremely weak
(nearly flat)
Consequently, take off the battery
isolation-strip.
Wait a few seconds until the liquid
cristals get warm.
Control the “Brightness”-function.
Switch head-phones ON.Replace
the battery
Remove the obstacles placed before the signal
Move nearer to the Screen.
Check and insert disc with label
upward.
Clean disk.
Check that the formats to be reproduced are compatible with the
player.
Eliminate child-protection or change
protection-level.
Check battery and cables DVD-player does not work correctly if tension
is lower than 10,8 Volt
Reproduction is bympy.
“INVALID DISC FORMAT”
Missing Sound
Disk is scratched or damaged Replace disk
No disk is inserted
Disk is very dirty
Wrong Audio-selection Select the Audio-Exit in due respect
Insert a disk
Clean disk
of the effected connections.
Page 35

35
Technical specifications
GB
MAIN FEATURES
Current-Supply…………..12V DC
Test-Tension……………..13.2V negative ground
Pre-amplified Exits……….2 CH !V Rms (10KOhm)
Video-Signal……………...PAL/NTSC/AUTO 1+/- 0.2V (75 Ohm)
Transmitter………………..IR integrated
Integrated FM Audio-Modulator ……selectable frequencies 87.8-87.9–88.1–8.3–88.5-88.8-89 MHz
VGA-port for PC-connection……….. resolution 800 x 480 – 60 Hz
USB-port……………………………..supports format USB 2.0
SD-Card-port…………………………supports SD-card/MMC-card max. 2Gb
Working-Temperature………………..0 – 55 ° C
Absorption……………………………> 4 Ampere
SCREEN
Format………………………….16:9
Dimension………………………10.2”
Resolution………………………262K pixel 800(H) x 480(V)
Luminosity………………………400 Cd/m2
Vision-Angle……………………horizontal-vertical 65°/65°
DVD-SECTION
Frequence-Response……………20Hz – 20KHz
Disc-System…………………….Digital Audio System
Signal/Noise-ratio………………> 100 dB (JIS) (1KHZ)
Stereo-Separation……………….>90 dB (1KHz)
Compatible Formats….DVD+/-R/VCD/SVCD/DVCD/CD/CD-R/CD-RW/CD-ROM/MP3/AVI/MPG
Supported……………………………..DivX and Xvid
NON-compatible Formats…………….DVD-ROM/CDV/CD-G
TV-SECTION
Selectable TV-Systems……….PAL-BG/PAL-I/PAL-N/PAL-M/PAL-DK/NTSC-M
Antenna-Input: Jack 3,5” (compatible with VM811/VM815)
Caratteristiche tecniche ed estetiche possono subire variazioni senza alcun preavviso. • The stated Technical Specifications and the product-design may
evolve, without prior notice. • Caractéristiques techniques et esthétiques peuvent subir des variations sans aucun préavis. • Technische Änderungen am
Produkt bzw.am Design behalten wir uns vor. • Las especificaciones y el diseño están sujetos a cambios sin preaviso por motivos de mejoras.
Page 36

S.pA. - Via F.lli Cervi, 167/C - 42100 Reggio Emilia (Italy) - Tel. ++39 0522 941621 - Fax ++39 0522 942452
www.phonocar.com - e-mail:[email protected]
FRANCE
Vente et Assistance assurées par le Fabricant italien Tél/Fax N° Vert 0800.90.43.99
www.phonocar.fr • e-mail:[email protected]
DEUTSCHLAND
71711 - MURR - Rudolf Diesel Strasse, 13 - Tel. 07144 82302-0 / Fax 07144 282114
www.phonocar.de - e-mail:[email protected]
ESPAÑA
Delegado Comercial Sr. VERDERESE DOMENICO
Tel. 958 302295 - Fax 958 302470 - Movil 607592406
e-mail: [email protected]
 Loading...