

Page 1

MANUALE ISTRUZIONI • INSTRUCTIONS MANUAL • NOTICE DE MONTAGE ET D’EMPLOI
GEBRAUCHSANWEISUNGEN • MANUAL DE INSTRUCCIONES
VM082
TOYOTA
CON NAVIGATORE / WITH NAVIGATOR
AURIS - AVENSIS ‘04> - COROLLA ‘99>‘02 - ‘08> - YARIS ‘07>’12 - RAV4 ‘01>’05 - MR2 ‘00>‘03 - CELICA ‘00>‘05 - HIGHLANDER ‘01>’07 - 4RUNNER ‘03>‘07
FJ CRUISER ‘07> ‘08
VM083 TOYOTA
RAV 4 ‘06>
VM081 SEAT-SKODA-VOLKSWAGEN
• SEAT LEON 11> - ALTEA 11>
• SKODA FABIA 07> - ROOMSTER 07> - OCTAVIA 07>
• VOLKSWAGEN CADDY 10> - GOLF V - GOLF VI - MAGGIOLINO (BEETLE) - PASSAT 05> - PASSAT CC 08> - POLO 09> - SCIROCCO 08> - SHARAN 10> - TIGUAN
TOURAN
VM081C SEAT-SKODA-VOLKSWAGEN CON CLIMATRONIC
• SEAT LEON 11> - ALTEA 11>
• SKODA FABIA 11> - ROOMSTER 11> - OCTAVIA 11>
• VOLKSWAGEN CADDY 10> - GOLF V - GOLF VI 10> - MAGGIOLINO (BEETLE) - PASSAT 10> - PASSAT CC 08> - POLO 10> - SCIROCCO 10> - SHARAN 10>
TIGUAN 10> - TOURAN 10>
VM084 TOYOTA
YARIS ‘07>‘12
VM085 FORD
C-MAX >‘11 - FOCUS ‘04>’11 - GALAXY ‘07> - MONDEO ‘08>
VM093 CHRYSLER-DODGE-JEEP
• CHRYSLER
300 • 300c
• DODGE CALIBER ‘11> • NITRO ‘07>’08 • DAKOTA ‘08> • JOURNEY ‘08>
• JEEP COMPASS ‘11> • WRANGLER ‘07> • LIBERTY ‘08>
Page 2
2
IT/GB
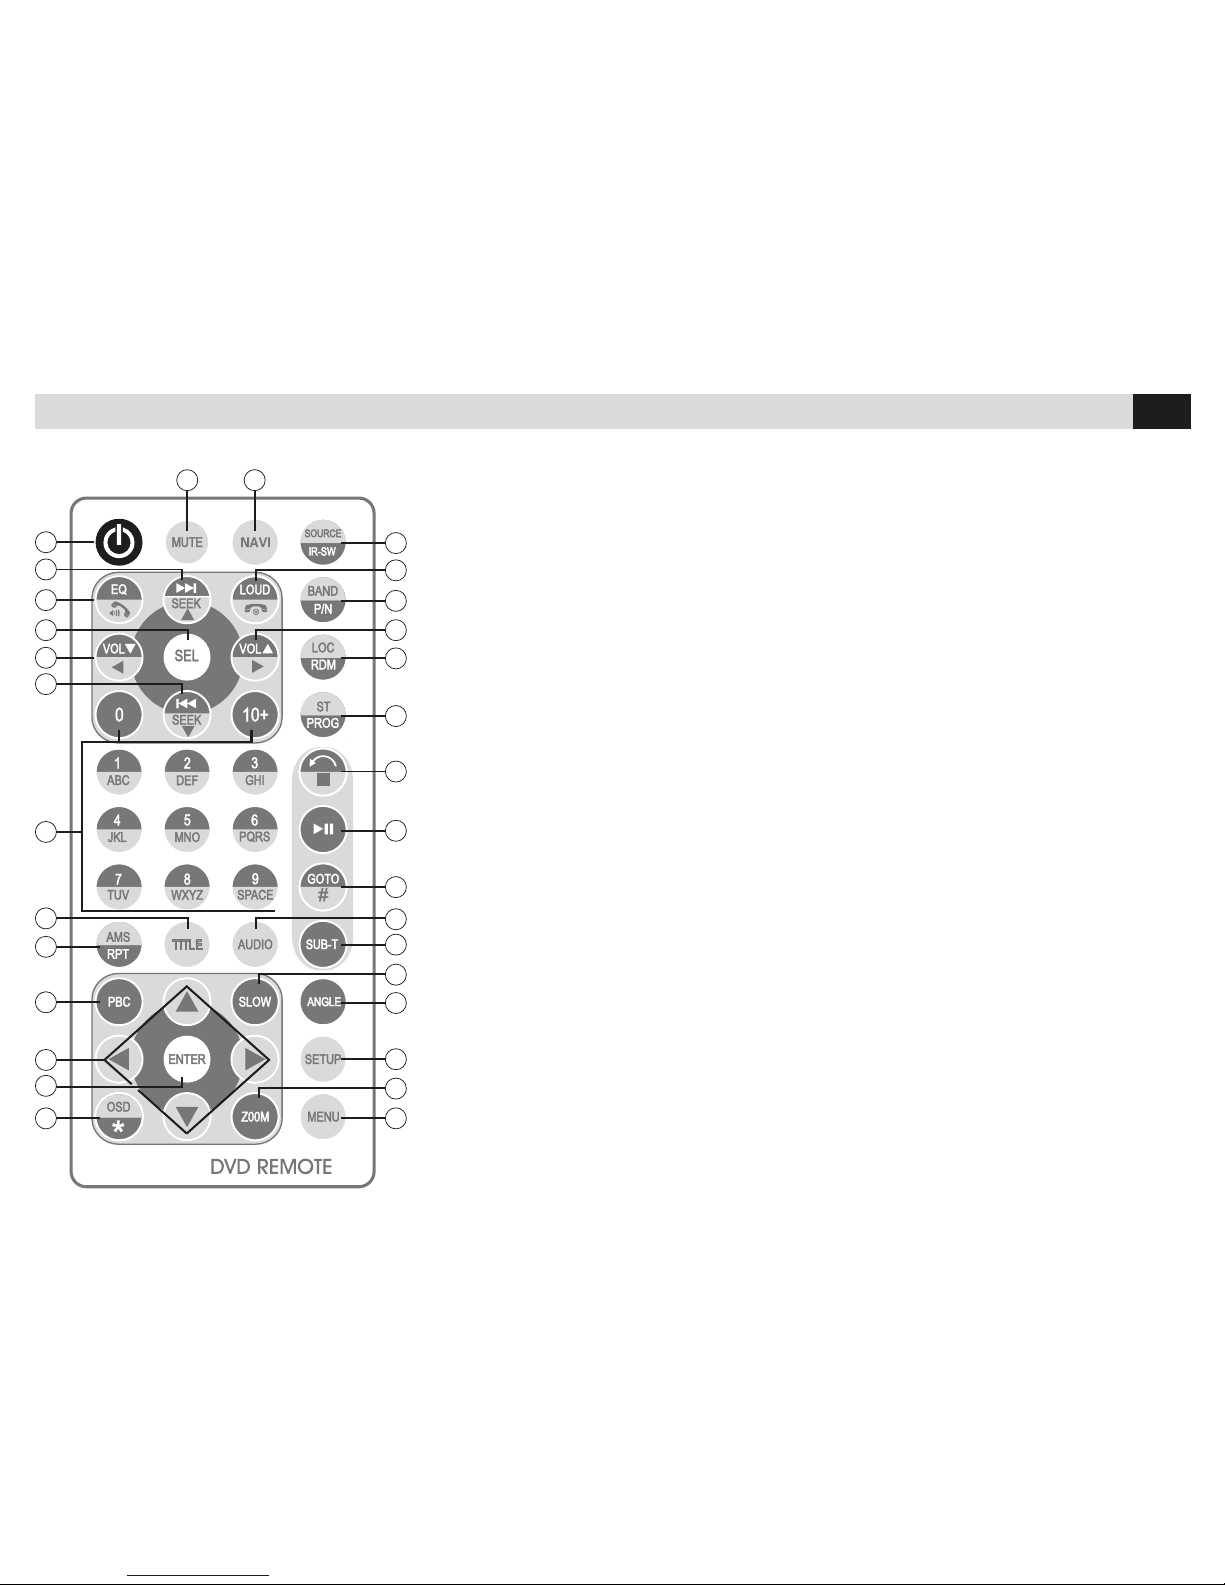
FUNZIONI
TELECOMANDO
• REMOTE-CONTROL FUNCTIONS
1 Accensione/Spegnimento.
2-6 Ricerca stazioni / tracce / files.
3 Equalizzatore / Risponde chiamata.
4 Regolazioni audio.
5-26 Volume.
7 Tastierino numerico.
8 Titoli DVD.
9 Automemorizzazione stazioni radio
Ripetizione tracce
10 Menù titoli DVD.
11 Spostamento cursore in menù DVD.
12 ENTER Conferma selezione.
13 Visualizzazione informazioni DVD.
14 Torna al menù principale.
15 Zoom.
16 Impostazioni DVD.
17 Cambio angolo visione DVD.
18 Riproduzione rallentata,
19 Cambio lingua sottotitoli DVD.
20 Cambio lingua DVD.
21 Seleziona traccia di riproduzione.
22 Avvia-Interrompe riproduzione.
23 Interruzione riproduzione.
24 Radio Stereo-Mono
Programmazione riproduzione.
25 Radio Locale-Distante
Riproduzione casuale.
27 Seleziona banda radio.
28 Loudness / Termina-rifiuta chiamata
29 Selezione sorgente.
30 Navigazione
Visualizzazione tempo riproduzione
31 Silenzia audio
1
3
5
7
2
6
12
9
14
16
17
19
20
21
22
23
24
25
27
29
31 30
15
18
4
8
13
10
26
28
11
ATTENZIONE: Il codice VM083 non è fornito con il telecomando. / WARNING: The VM083 code is not supplied with the remote control.
1 ON/OFF.
2-6 Research Stations / Track / File.
3 Equalizer / Answer call.
4 Audio-Settings.
5-26 Volume.
7 Number-keys.
8 DVD-Titles.
9 Auto Store radio stations.
Tracks repeat.
10 DVD-Title-Menu.
11 Move cursor within DVD-Menu.
12 ENTER confirm selection.
13 Visualize DVD-Information.
14 Go from Source to Main Menu and vice verse.
15 Zoom.
16 DVD-Settings.
17 Change DVD angle-vision.
18 Slow playback.
19 Change DVD-subtitle-Language.
20 Change DVD-Language.
21 Select playback track.
22 Start/stop playback.
23 Interrupt playback.
24 Radio Stereo/Mono.
Playback programming
25 Radio Local/Distant.
Random playback.
27 Radio Frequency-Band.
28 Loudness / Finish-refuse call.
29 Select Source
30 Navigation
Visualize reproduction-time
31 Mute
Page 3
3
IT/GB
MENÙ • MENU
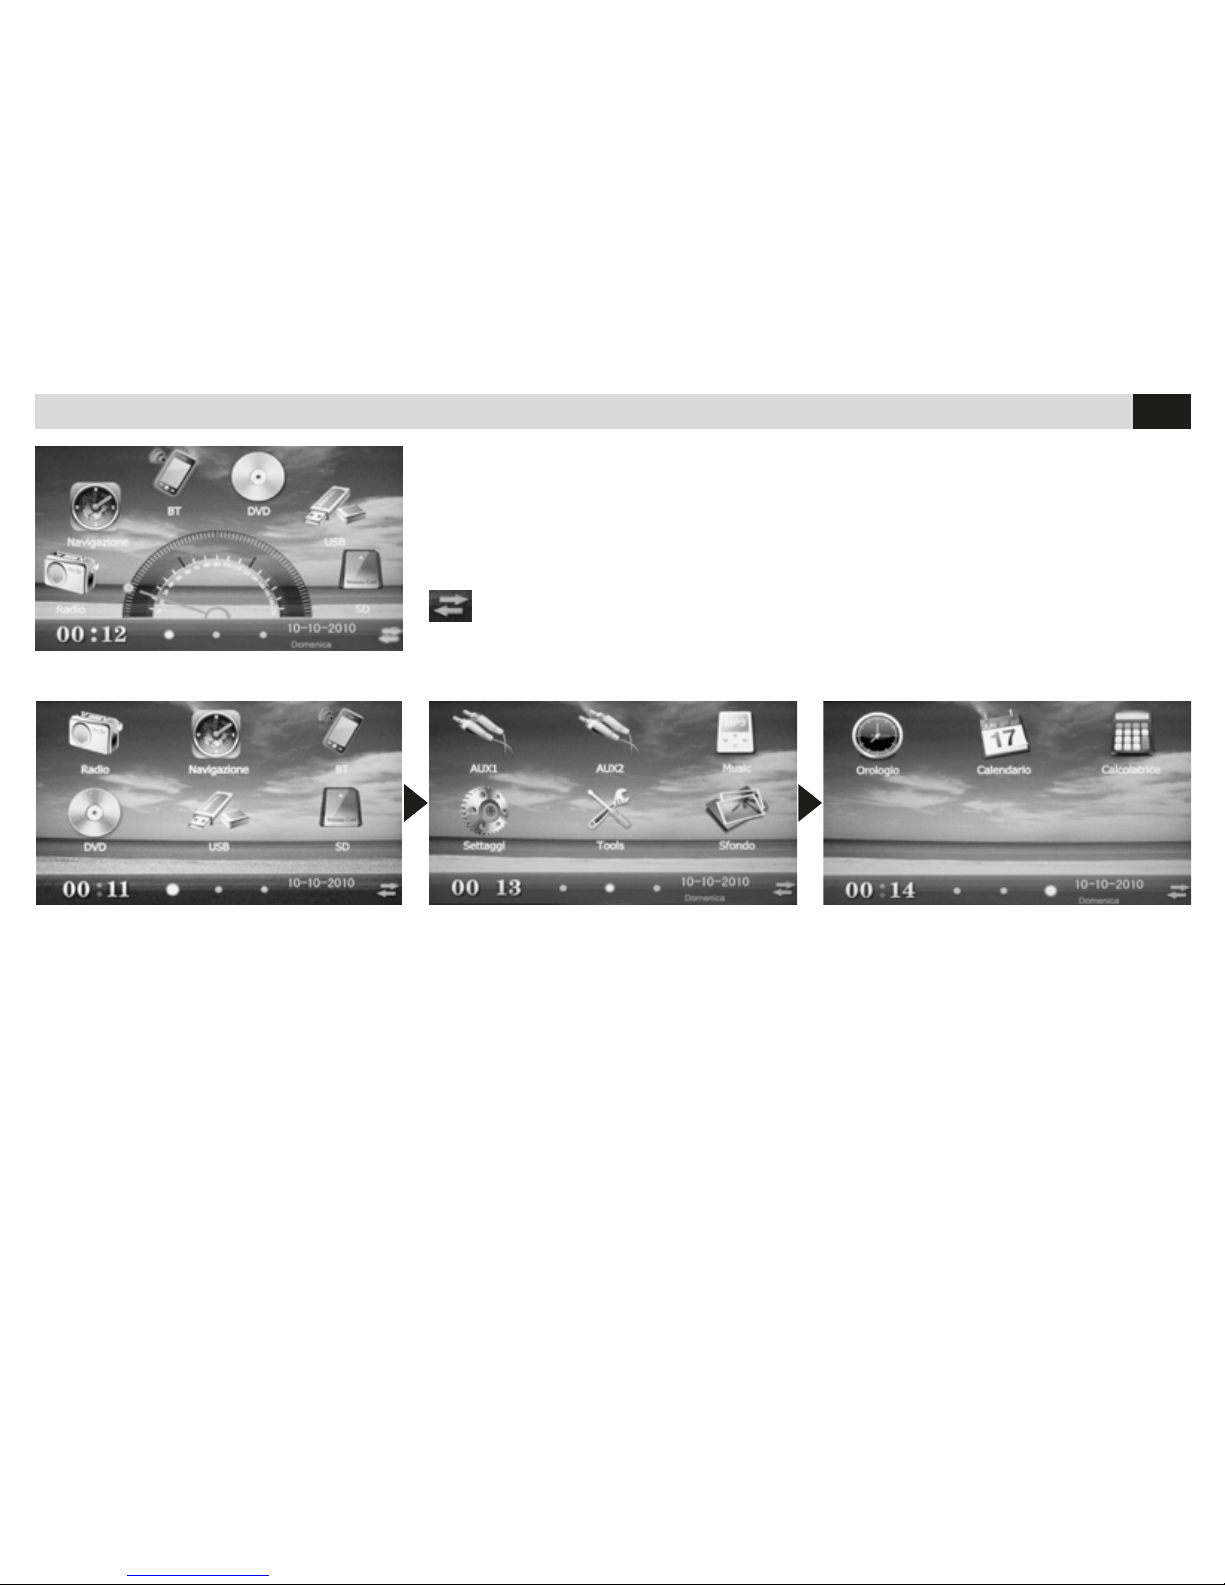
Menù tradizionale. Per spostarsi da un pannello all’altro toccare trascinando lo schermo col dito o con il pennino in dotazione.
Toccando le icone si seleziona la sorgente o la funzione desiderata.
Traditional Menu. To move from one panel to the other, touch the screen and drag it away with a nger or with the supplied pencil.
By touching the icons you select the Source and Functions.
Il menù principale è in due versioni.
Una versione con menù rotativo a trascinamento.
L’altra versione con menù tradizionale rappresentato da tre schermate.
The Main Menu is in two versions.
One version with a dragging-type rotation-menu.
The other version with a traditional menu formed by 3 panels.
Toccare per cambiare interfaccia grafica. / Tap to change graphical interface
Page 4
4
IT/GB
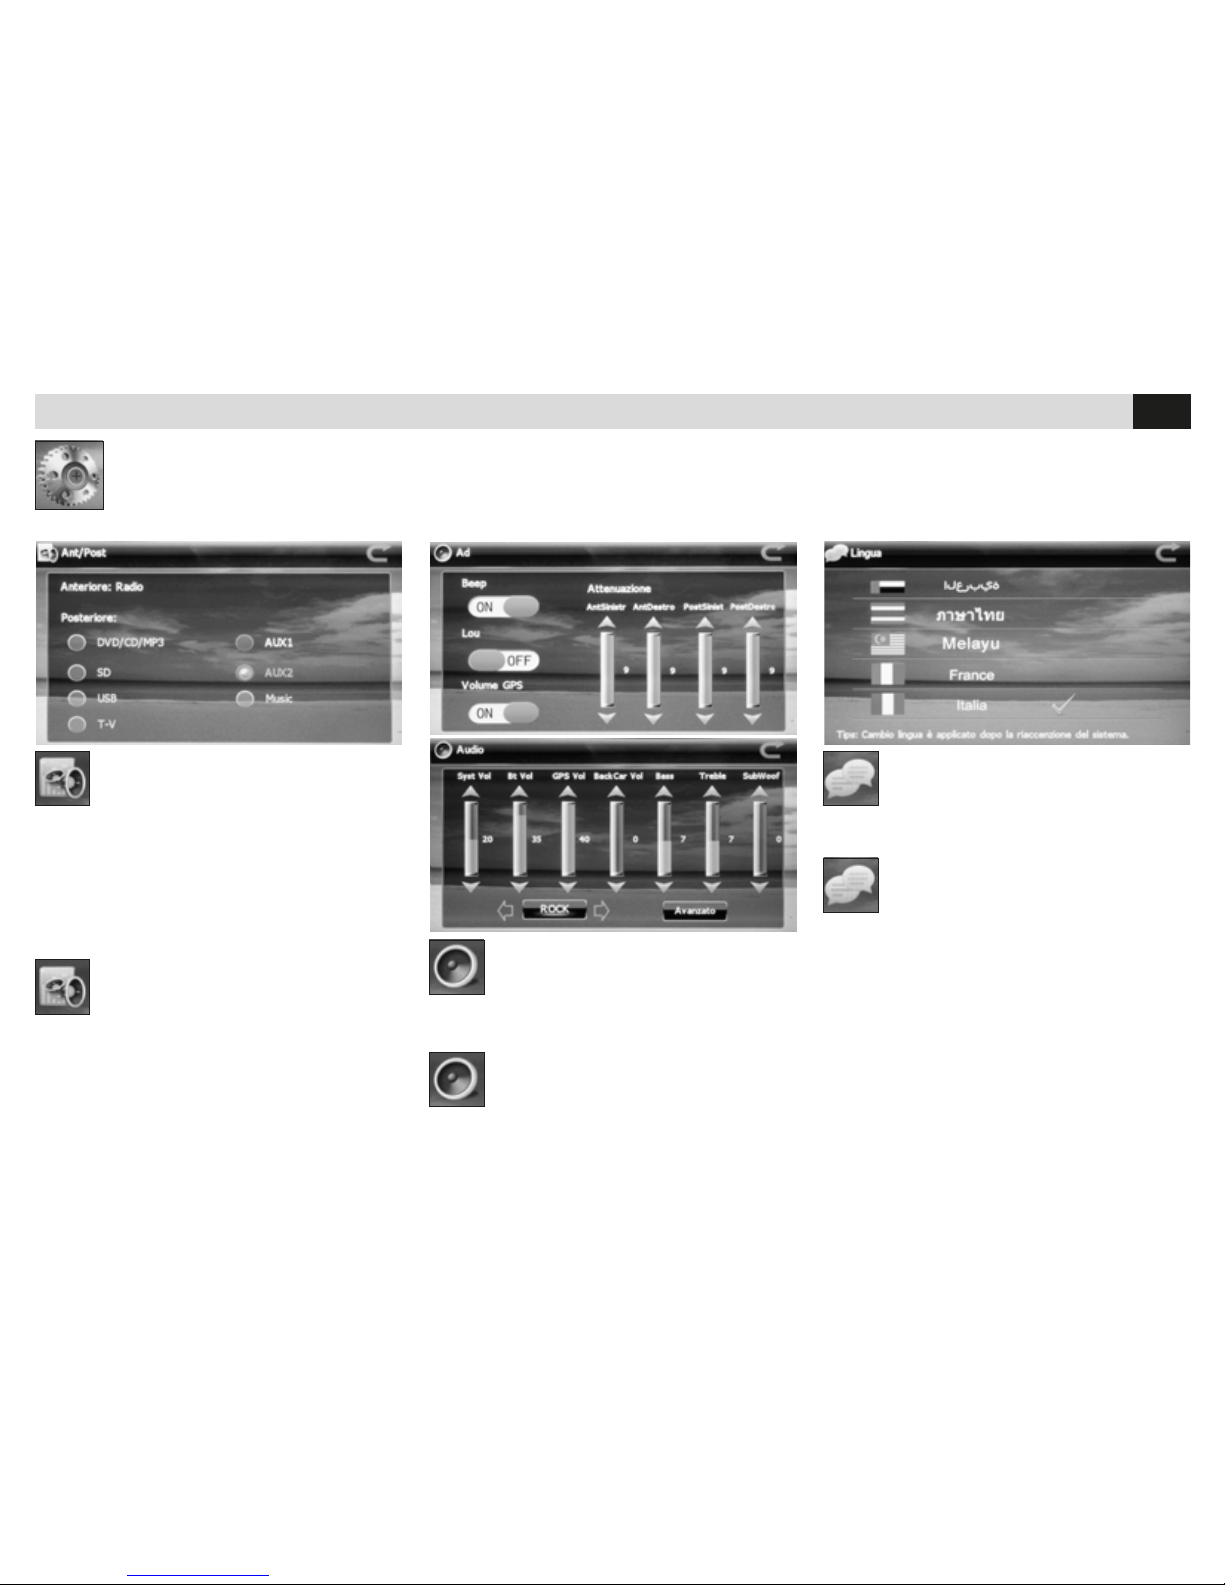
SELEZIONE
SORGENTE POSTERIORE
• Imposta la sorgente di riproduzione per la
sezione audio/video posteriore.
E possibile riprodurre nell’uscita audio/video
posteriore una sorgente differente da quella anteriore. La sorgente anteriore deve essere Radio o
Navigazione.
SELECTION
REAR SOURCE
• Determine the reproduction-source for the rear
Audio/Video-section.
The reproduction-sources on rear and front
Audio/Video-exits can be different from one
another. The front source must, in any case, be a
Radio or Navigation-unit.
REGOLAZIONE AUDIO
• Regolazioni volume sorgenti.
• Selezione modalità equalizzazione.
• Regolazione fader, loudness, suono touch.
AUDIO SETTINGS
• Source-Volume-settings
• Equalizer-Mode
• Settings for Fader, Loudness, Touch-tone
IMPOSTAZIONE LINGUA
• Imposta la lingua dei menù sullo schermo.
LANGUAGE-SELECTION
• Set the wanted Menu-Language on the screen.
IMPOSTAZIONI DI SISTEMA • SYSTEM SETUP
Regolazioni: sorgente posteriore, regolazione audio, lingua, area radio, luminosità schermo, le navigazione, calibrazione schermo, zona fuso
orario, data e ora, sfondo, logo iniziale.
Settings: rear Source, Audio, Language, Radio-Area, Screen-Brightness, Navigation-le, Screen-Calibration, Time-Zones, Date and Time, Background, Start-Logo.
Page 5
5
IT/GB
IMPOSTAZIONI DI SISTEMA • SYSTEM SETUP
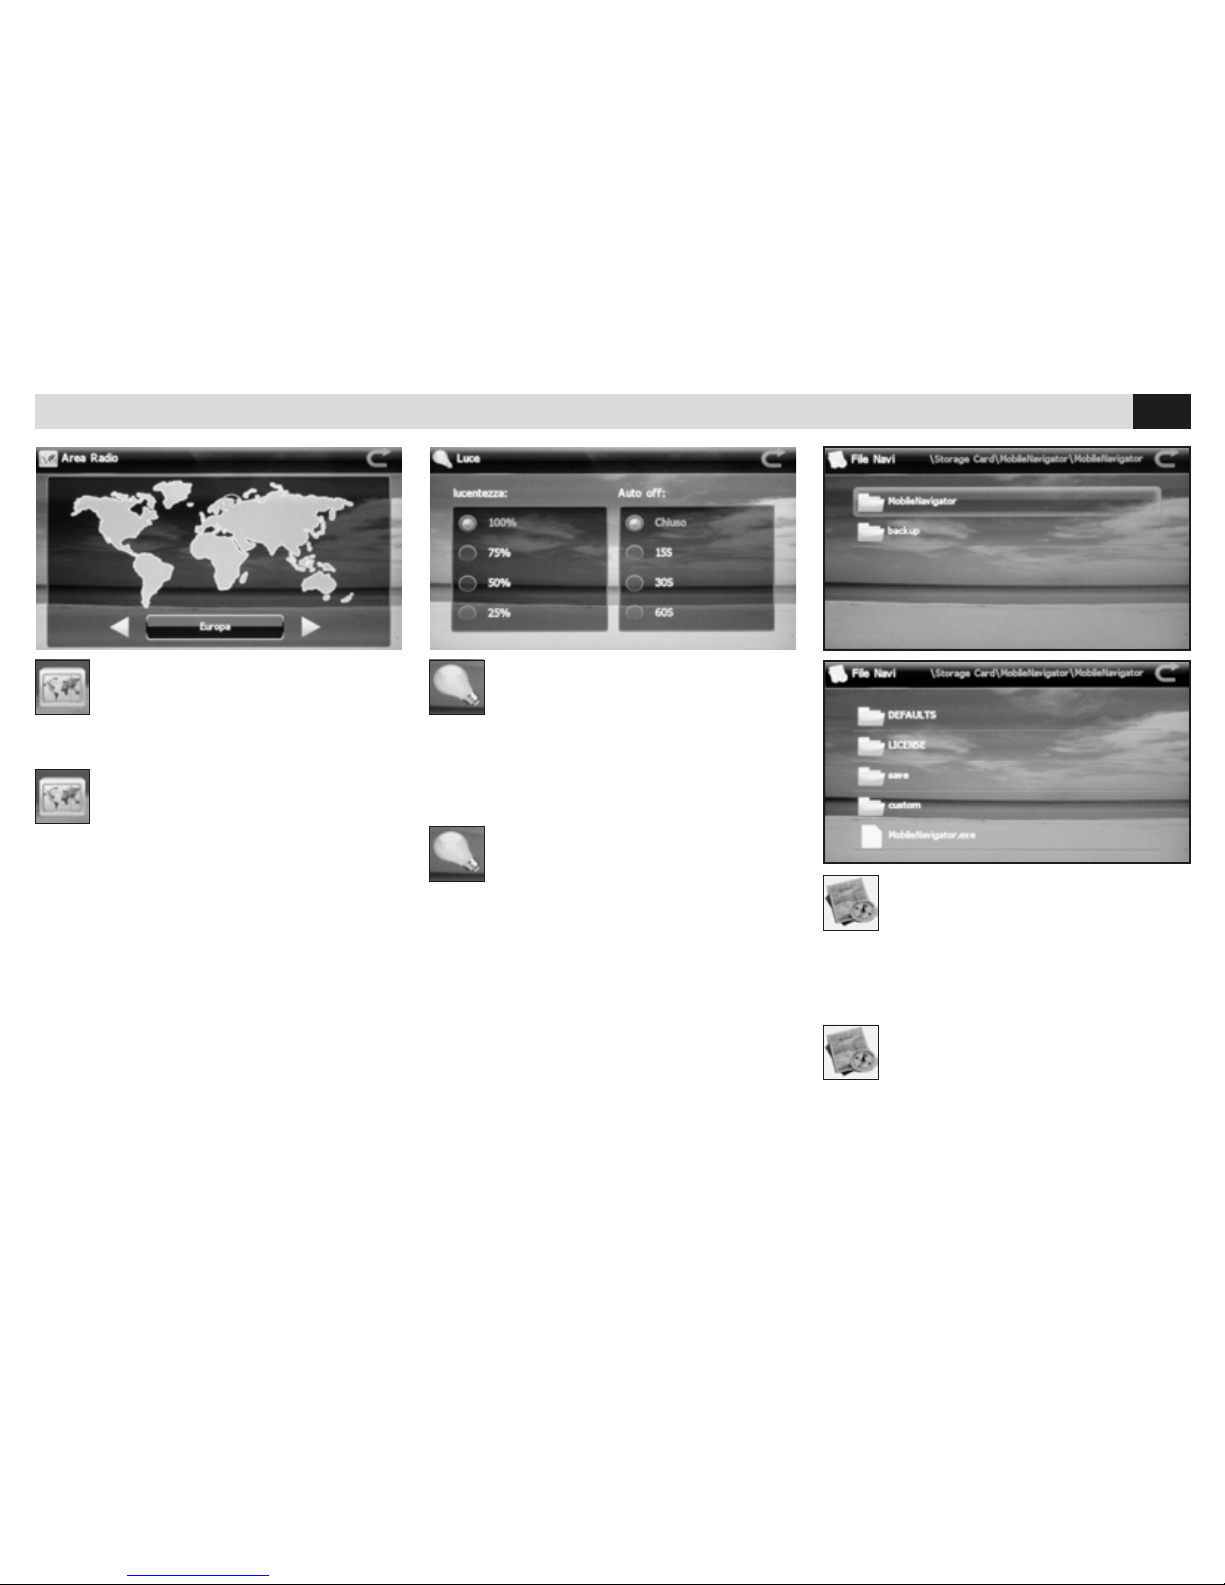
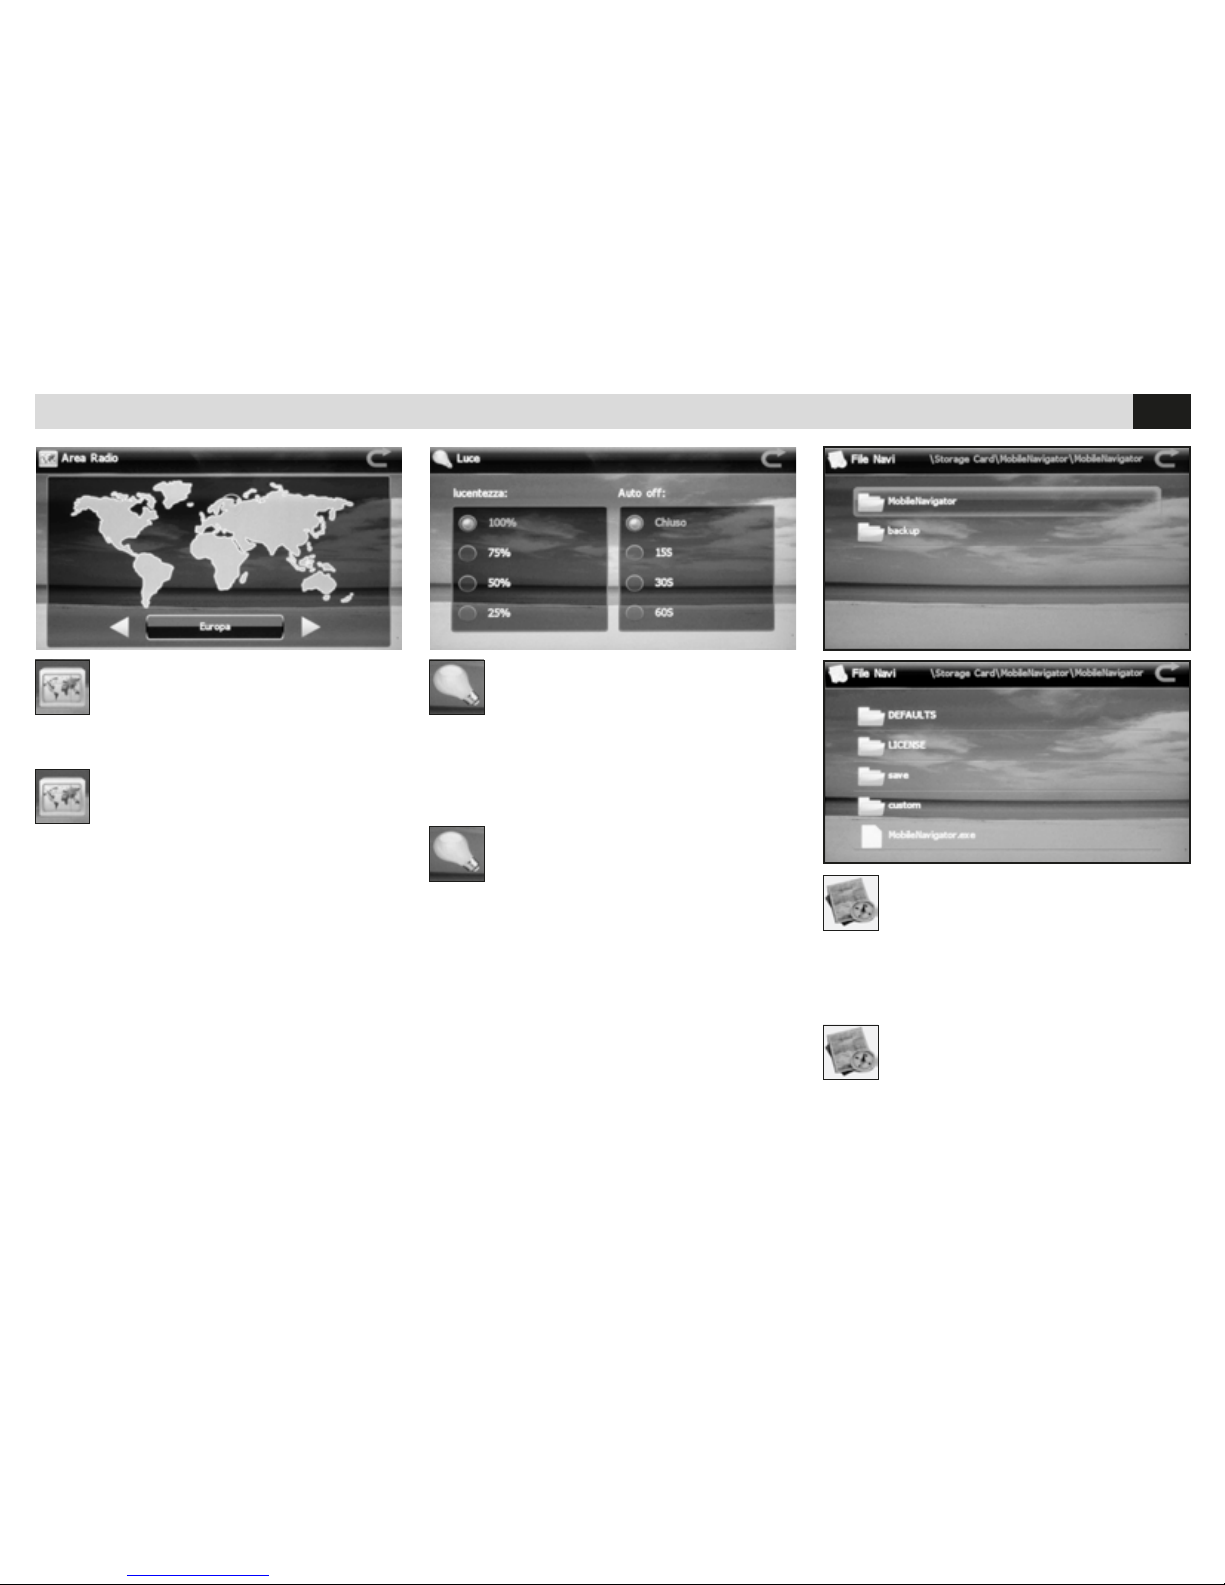
AREA RADIO
• Seleziona la zona di ascolto della radio FM
RADIO-AREA
• Select FM-radio listing-area.
LUMINOSITÁ SCHERMO (LUCE)
• Lucentezza: regola la luminosità dello schermo
(100%-75%-50%-25%)
• Auto-Off: Spegne lo schermo dopo il tempo
impostato (chiuso-15-30-60 sec.)
SCREEN BRIGHTNESS (LIGHT)
• Brightness: sets the screen-brightness
(100%-75%-50%-25%)
• Auto-Off: Shuts-off the screen when the fixed
period of time is over (shut-off-15-30-60 sec.)
FILE NAVI
• Dopo aver inserito la mappa di navigazione
iGO NV995 (OPTIONAL) imposta il le esecutivo
del software.
NAVIGATION-FILE
• Once the iGO navigation-maps NV995 (OPTIONAL) are introduced, set the Software
execution-file.
Page 6
6
IT/GB
IMPOSTAZIONI DI SISTEMA • SYSTEM SETUP
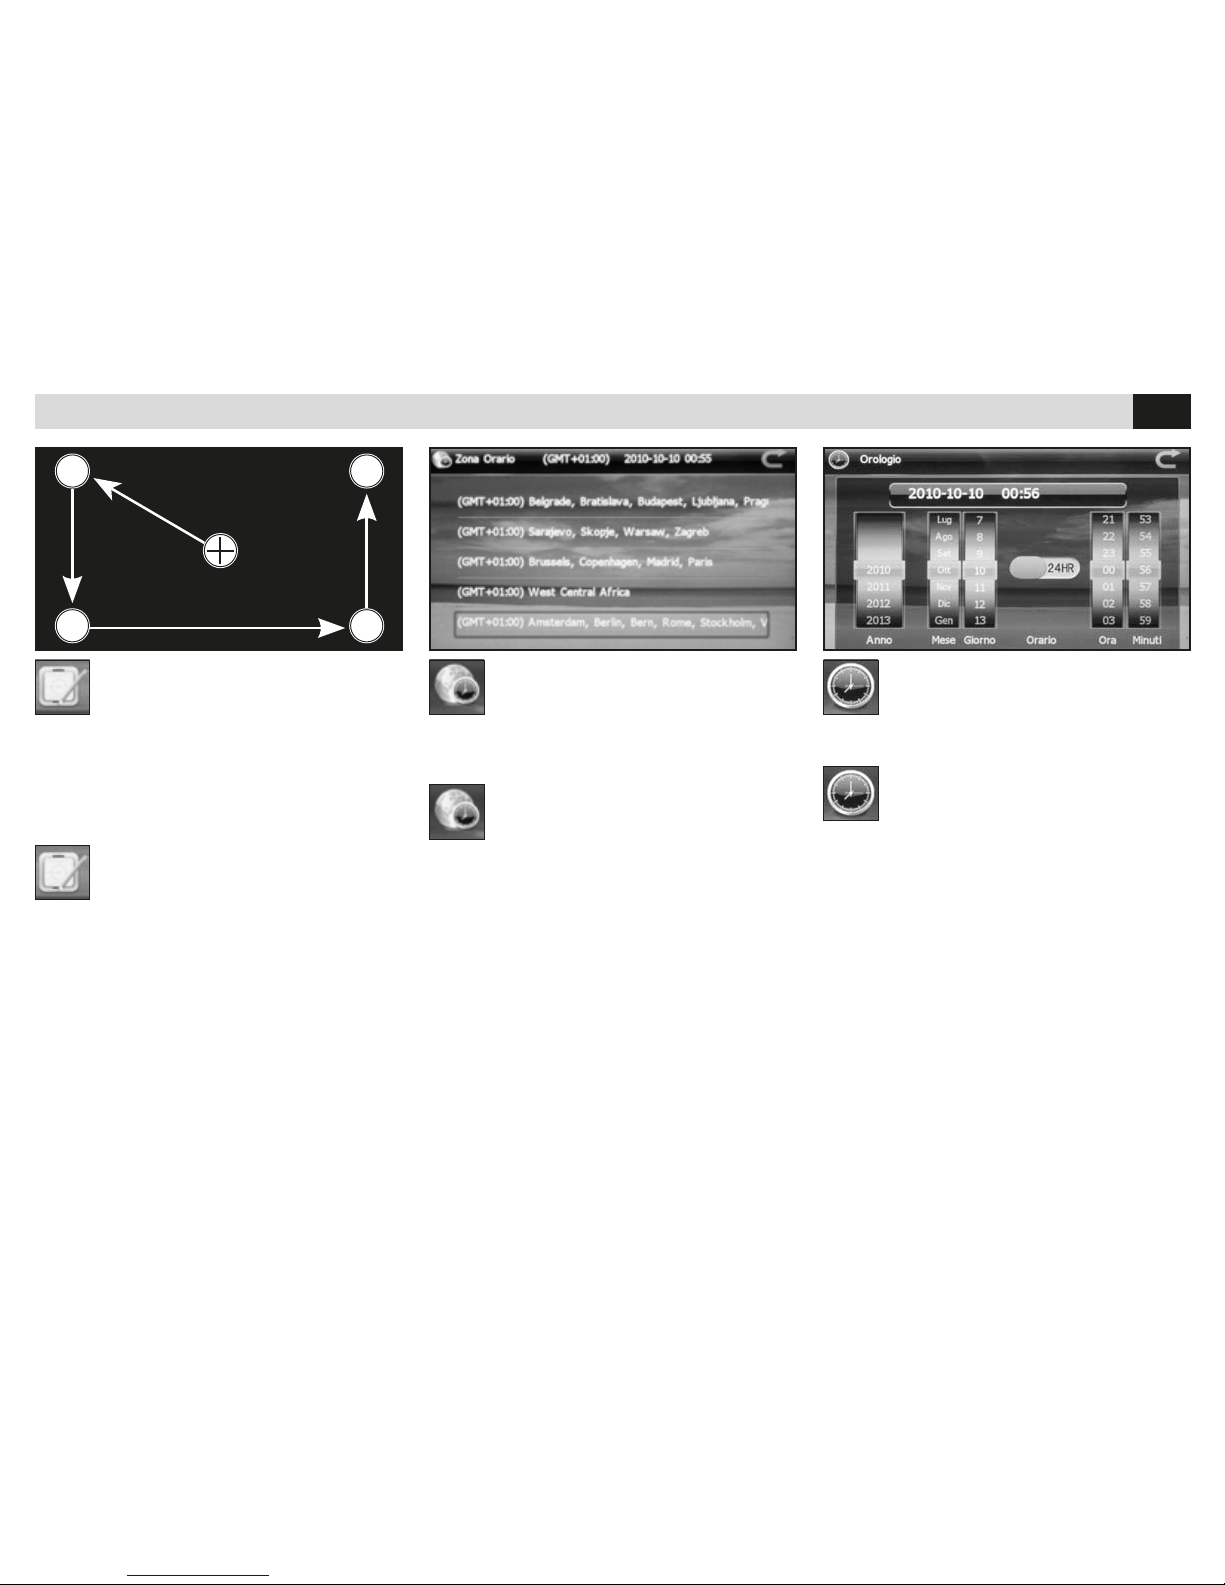
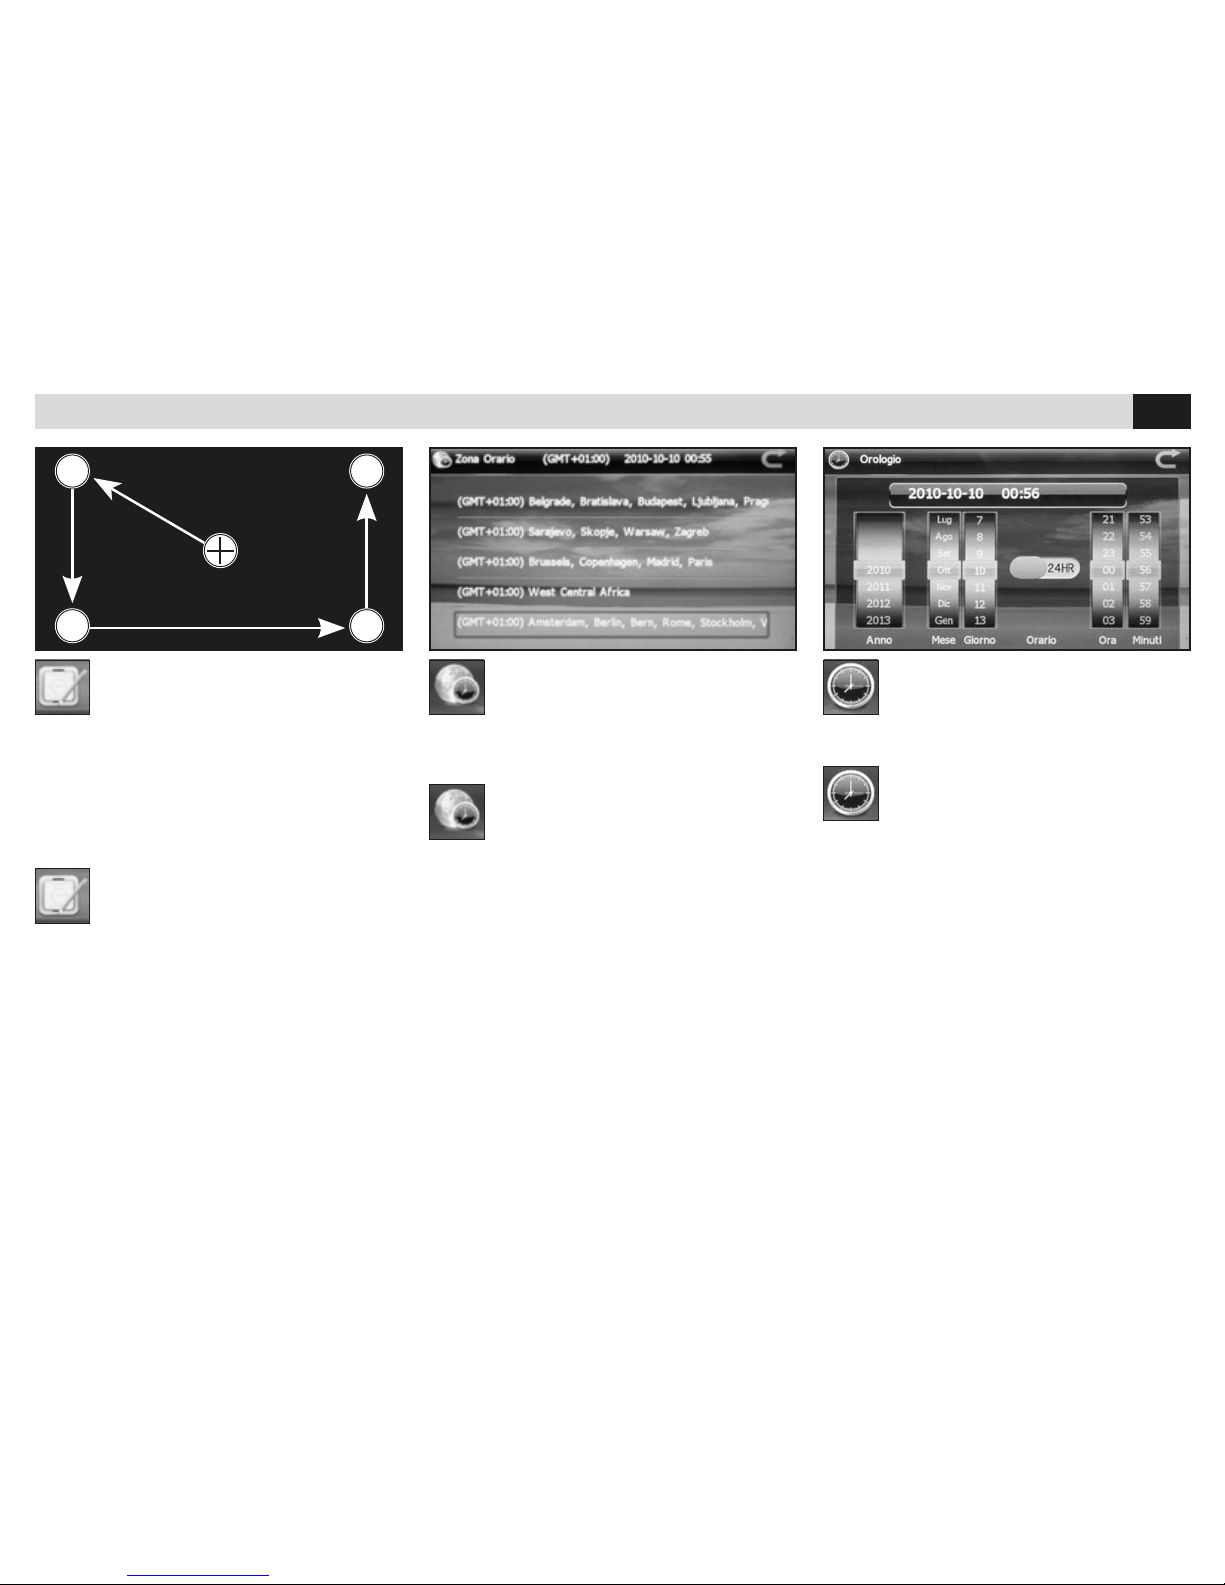
CALIBRAZIONE
• Effettua la calibrazione del touch screen.
Utilizzare il pennino in dotazione e toccare lo
schermo nel simbolo “+” al centro dello schermo.
Continuare con la sequenza fino alla fine della
calibrazione.
CALIBRATION
• Carries out the touch-screen calibration.
By using the supplied pencil, touch the symbol
“+” on the screen-centre.
Now follow the stated sequence and finish the
calibration-procedure.
ZONA ORARIO
• Imposta il fuso orario per la corretta visualizzazione dell’ora.
TIME-ZONE
• Set the time-zone, to get the correct timevisualization.
OROLOGIO
• Regolazione data e ora.
CLOCK
• Setting Date and Time.
Dopo la calibrazione, cliccare sullo
schermo per uscire, alrtimenti la
calibrazione non verrà salvata.
Page 7
7
IT/GB
IMPOSTAZIONI DI SISTEMA • SYSTEM SETUP
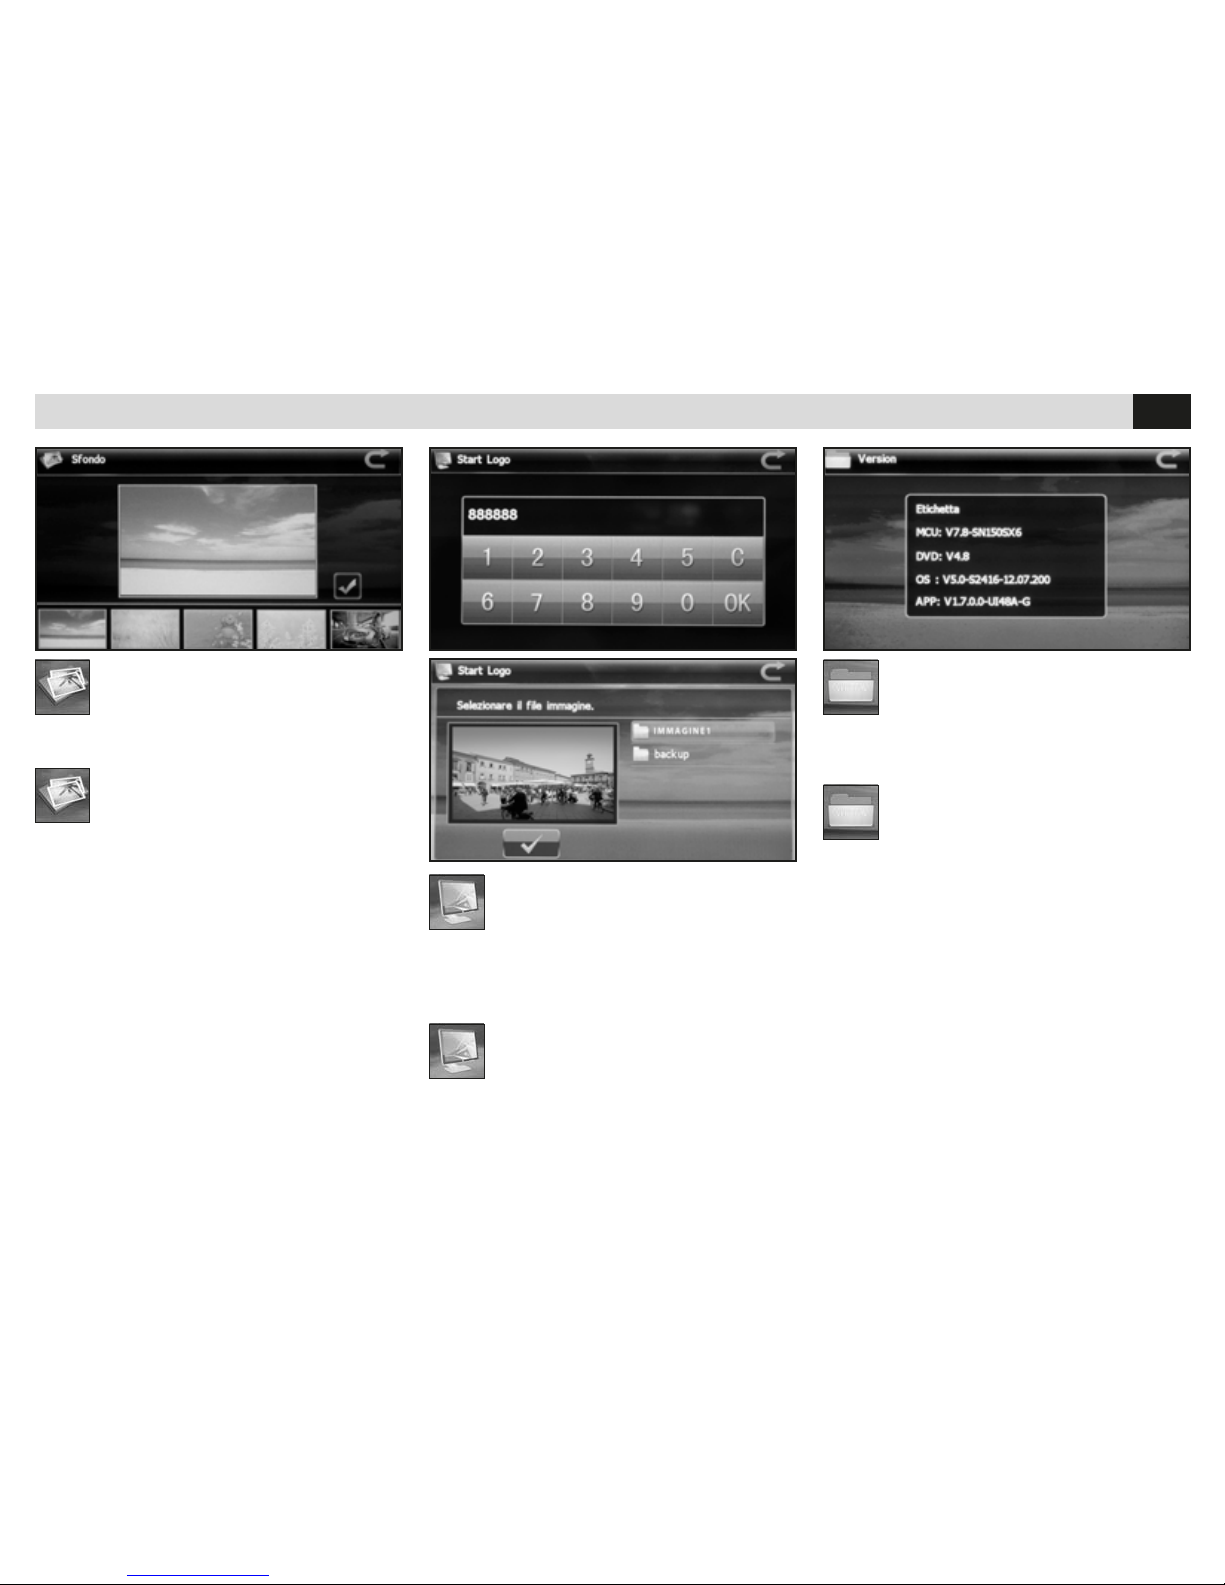
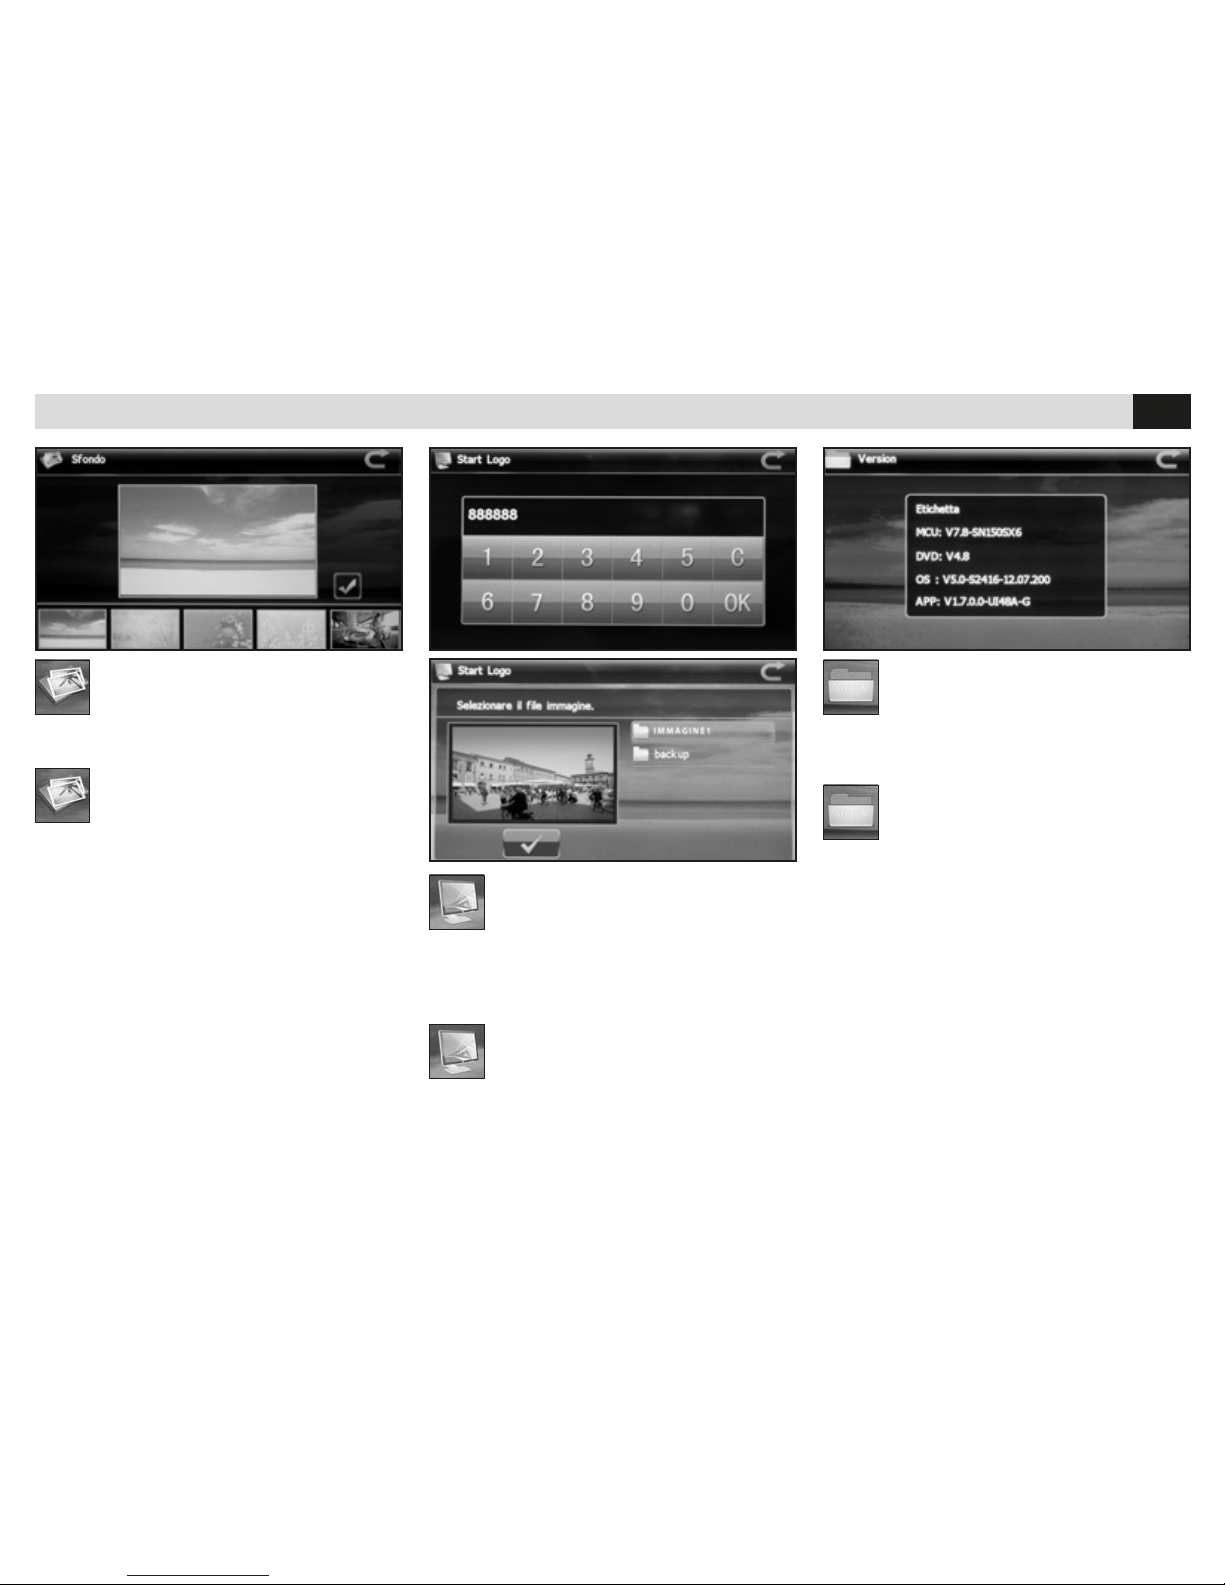
SFONDO
• Cambia lo sfondo dei menù.
BACKGROUND
• Changes the Menu-Backgrounds.
START LOGO
• Caricare il le su una micro SD Card
ed inserirla nello slot di navigazione.
Dopo aver inserito la password 888888 caricare
un file immagine con risoluzione 800x480 pixels
in formato BMP.
VERSION
• Visualizza la versione del software e le informazioni sull’hardware.
START-LOGO
• Charge the file onto a micro-SD-card
and introduce the micro-SD-card into
the navigation-slot. Once the password 888888
has been introduced, charge a picture-file having
800x480 pixels resolution, in BMP format.
VERSION
• Visualize the Software-version and the
hardware-information.
Page 8
8
IT/GB
RADIO
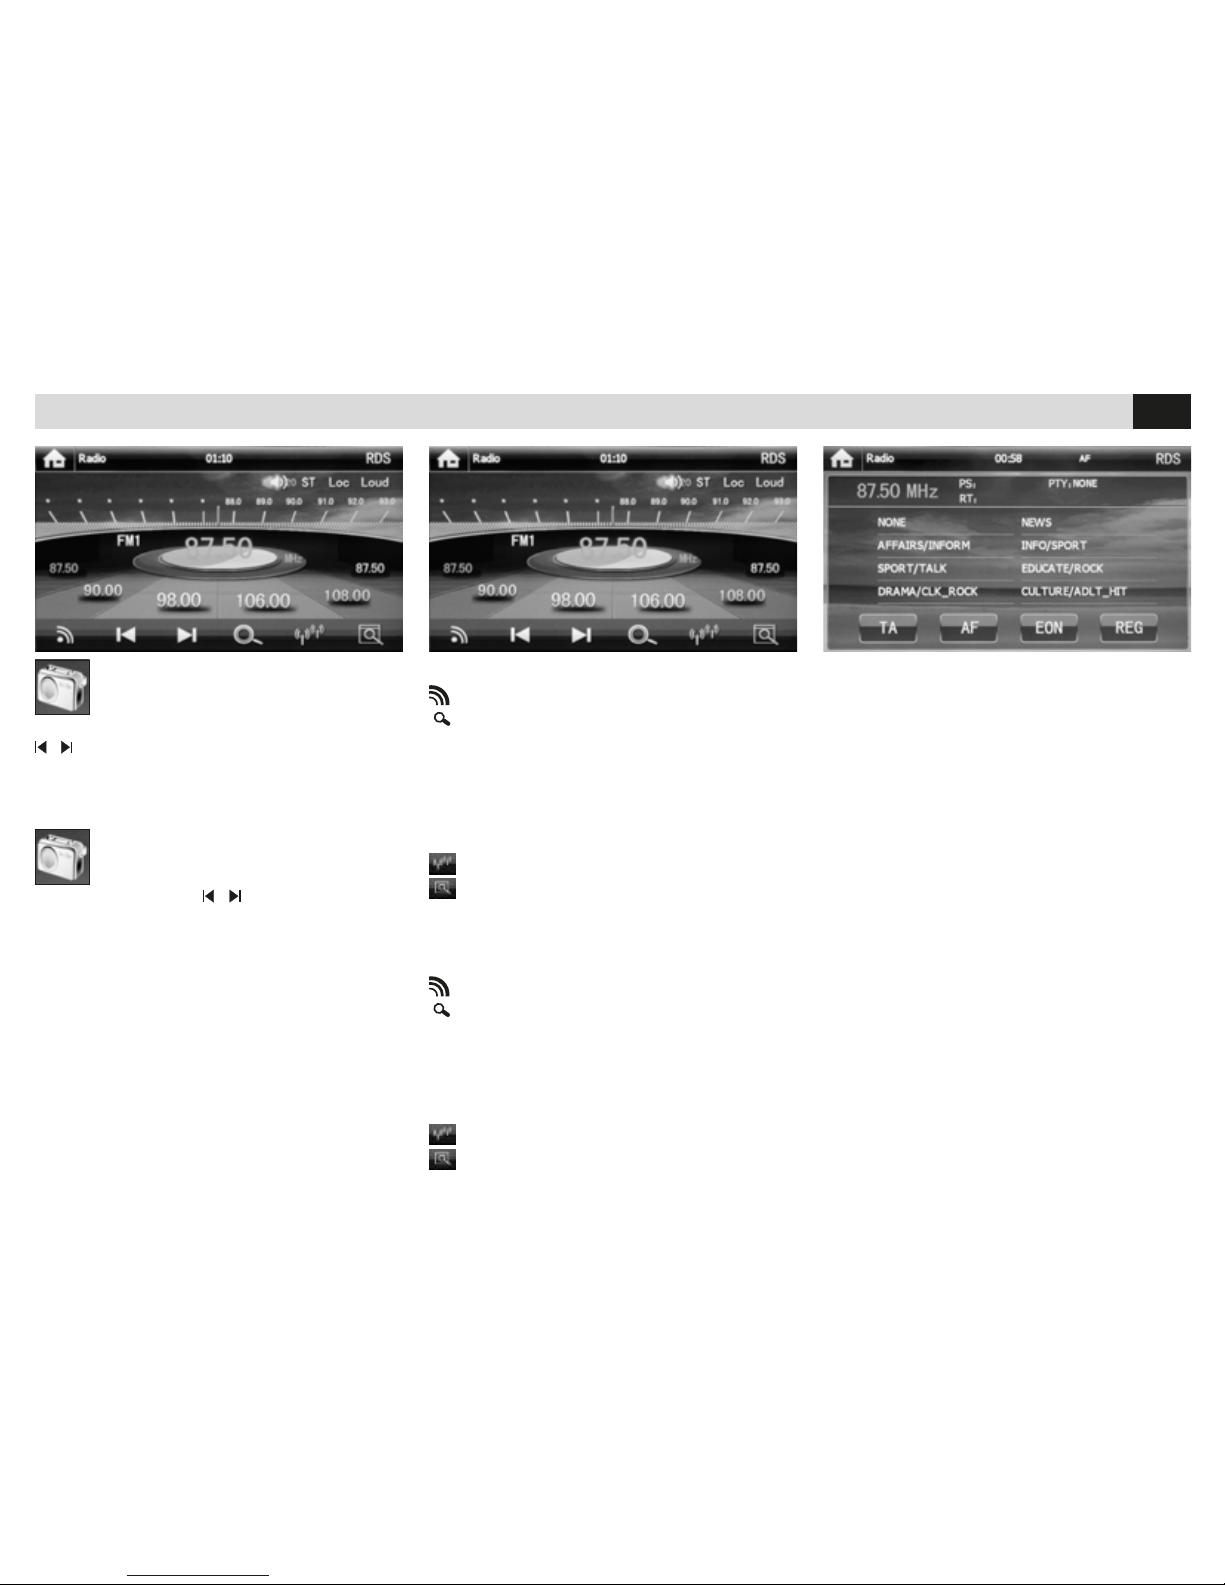
RICERCA STAZIONI
• Tenendo premuto per più di un secondo i tasti
/ sul telecomando o sullo schermo, l’unità
ricercherà automaticamente le stazioni.
Per la ricerca manuale premere brevemente.
RESEARCH STATIONS
• If you keep the keys
/ pressed for more
than 1 second, on the remote-control or on the
screen, the unit will automatically research the
stations.
For manual research, press keys only briefly.
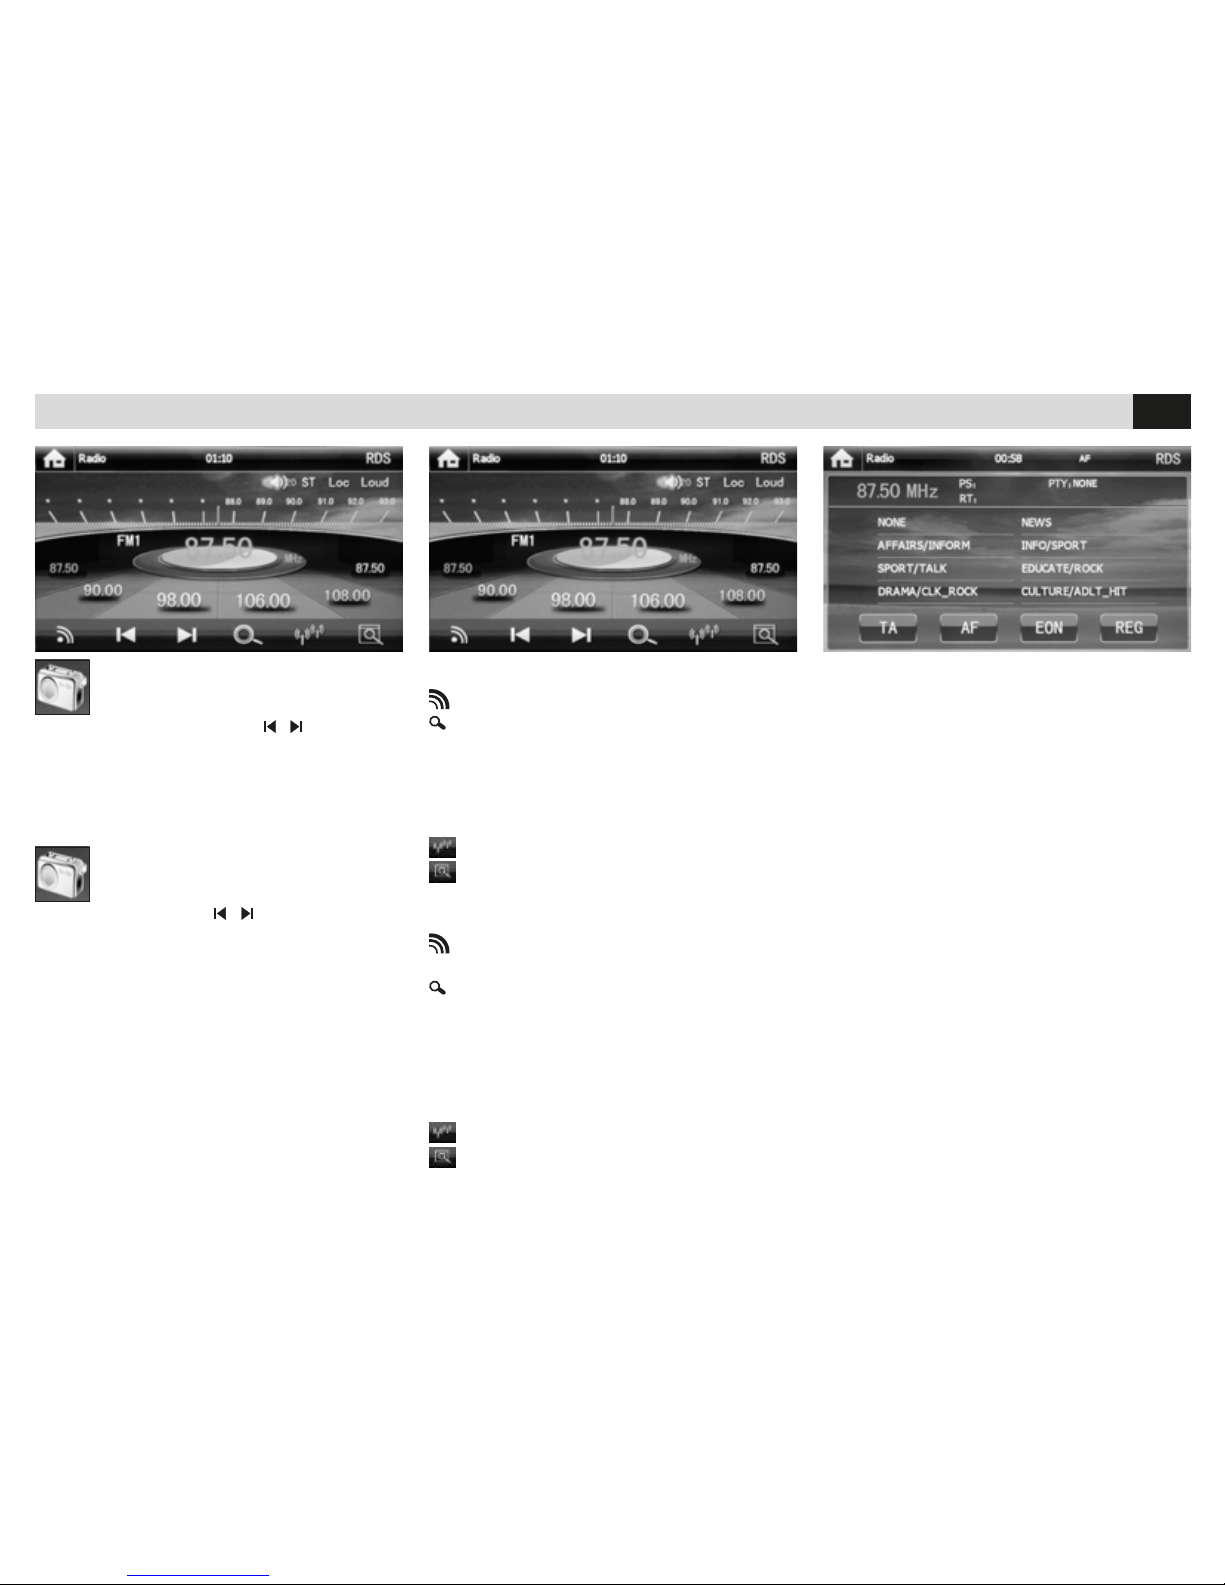
FUNZIONI RADIO
Seleziona Bande Radio 3 FM - 2 AM.
Scansione delle frequenze memorizzate.
Per memorizzare premere direttamente la frequenza nella posizione desiderata.
Per richiamare una stazione premere il nome
corrispondente.
LOUD Esaltazione basse frequenze.
RDS Impostazioni avanzate RDS.
Seleziona le stazioni vicine o lontane.
10 Secondi di ascoto per ogni stazione
memorizzata.
RADIO-FUNCTIONS
Selection of Radio Frequency-Bands: 3 FM - 2 AM.
Scrolling of memorized frequencies.
To memorize, directly press the position of the
requested Frequency.
To select a Station, press the related name.
LOUD Boosting low frequencies.
RDS Advanced RDS-settings.
Selects near and far Stations.
10 seconds’ listening of each memorized station.
FUNZIONI AVANZATE RDS
• AF Ricerca di una frequenza alternativa con
informazioni sullo schermo della stazione.
• TA Informazioni traffico.
• PTY Seleziona tipo di programma musicale.
ADVANCED RDS-FUNCTIONS
• AF Research of an alternative Frequency, with
Stations-information on the screen.
• TA Trafc-Information.
• PTY Select Type of musical programme.
Page 9
9
IT/GB
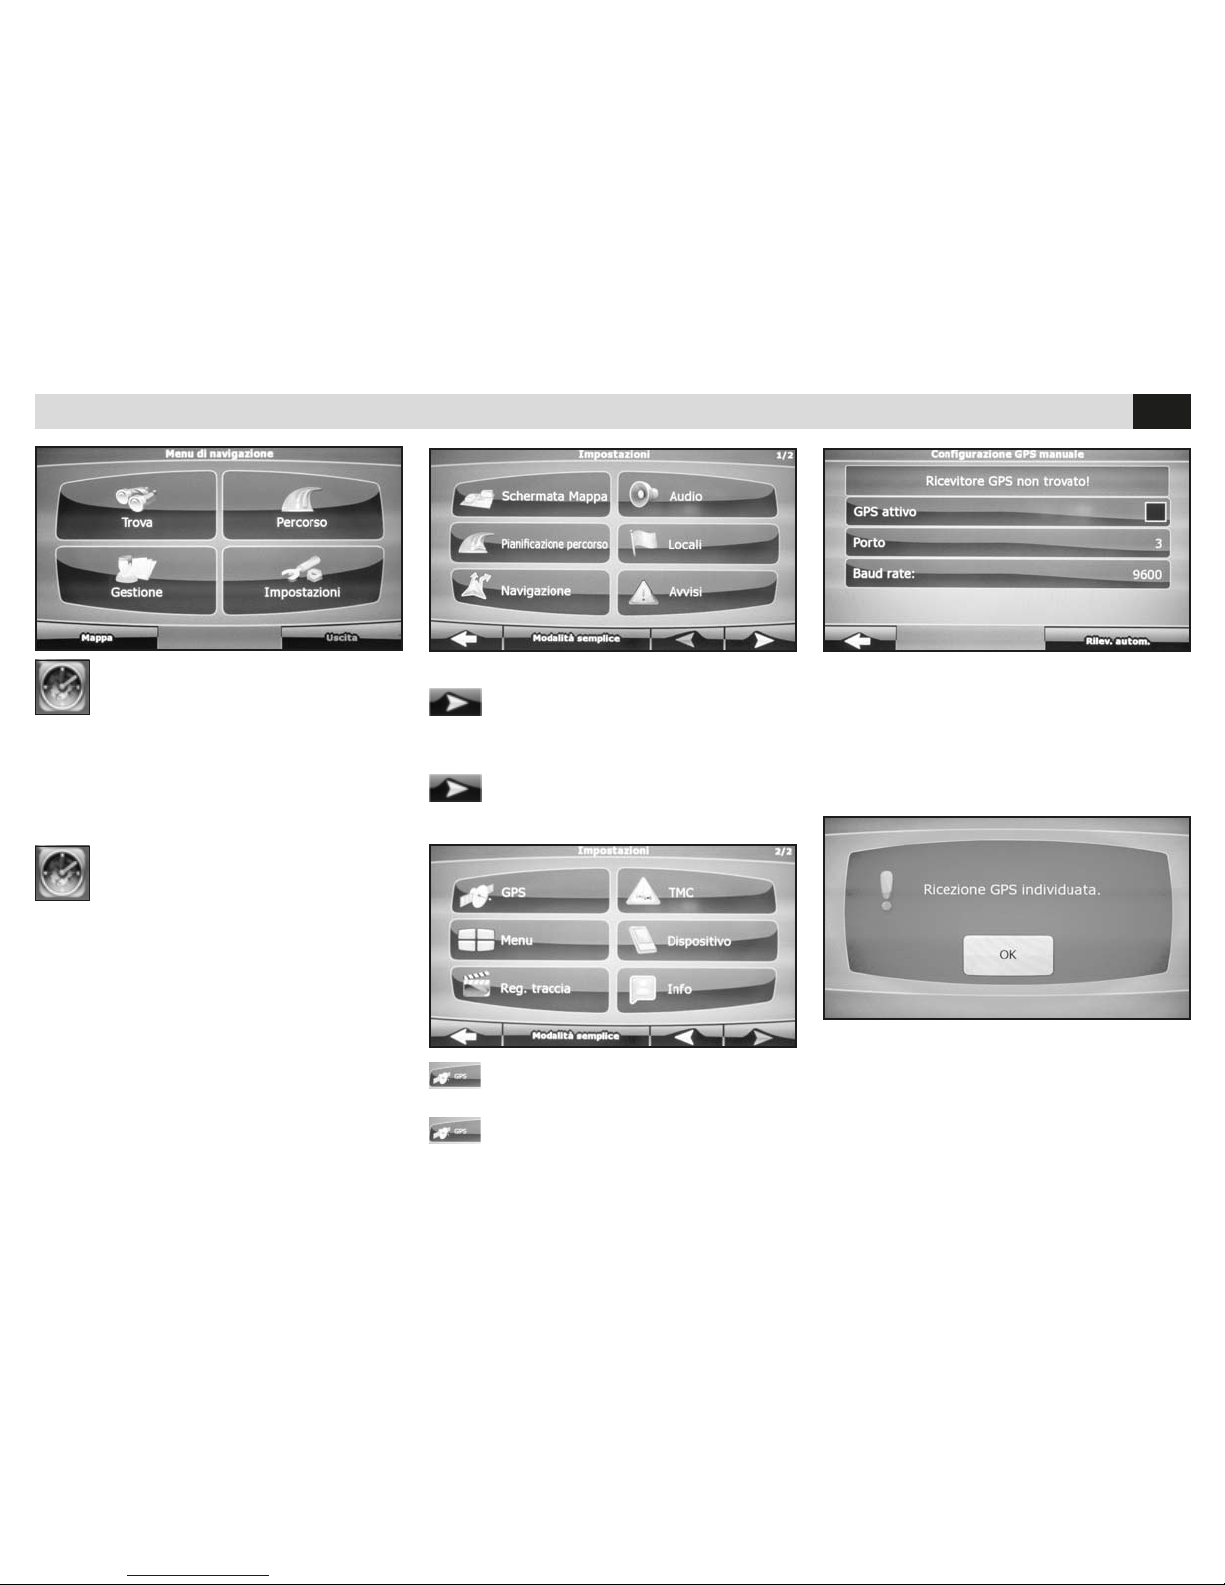
IMPOSTAZIONE MODULO GPS
• Passa alla seconda schermata
SETTING THE GPS-MODULE
• Go to the second panel
NAVIGAZIONE
Alla prima attivazione della mappa iGO (optional)
selezionare il file esecutivo mobilenavigator.exe
nei settaggi.
• Accedere al menu impostazioni del software.
NAVIGATION
When iGO-maps (Optional) are put into operation
for the first time, you have to select the executive
file mobilenavigator.exe and its settings.
• Enter the Software-Setup-Menu.
• Premere GPS.
• Press GPS.
IMPOSTAZIONI GPS • GPS-SETTINGS
• Premere sulla spunta di GPS ATTIVO
poi su RILEVAMENTO AUTOMATICO.
• Press to tick GPS-ACTIVE then press
AUTOMATIC REVEALING.
• Attendere l’acquisizione dei dati e premere ok.
• Riferirsi al manuale iGO per le istruzioni sul
software di navigazione.
• Wait for Data-collection and press ok.
• Check iGO-Manual and follow the related
navigation-software instructions.
Page 10
10
IT/GB
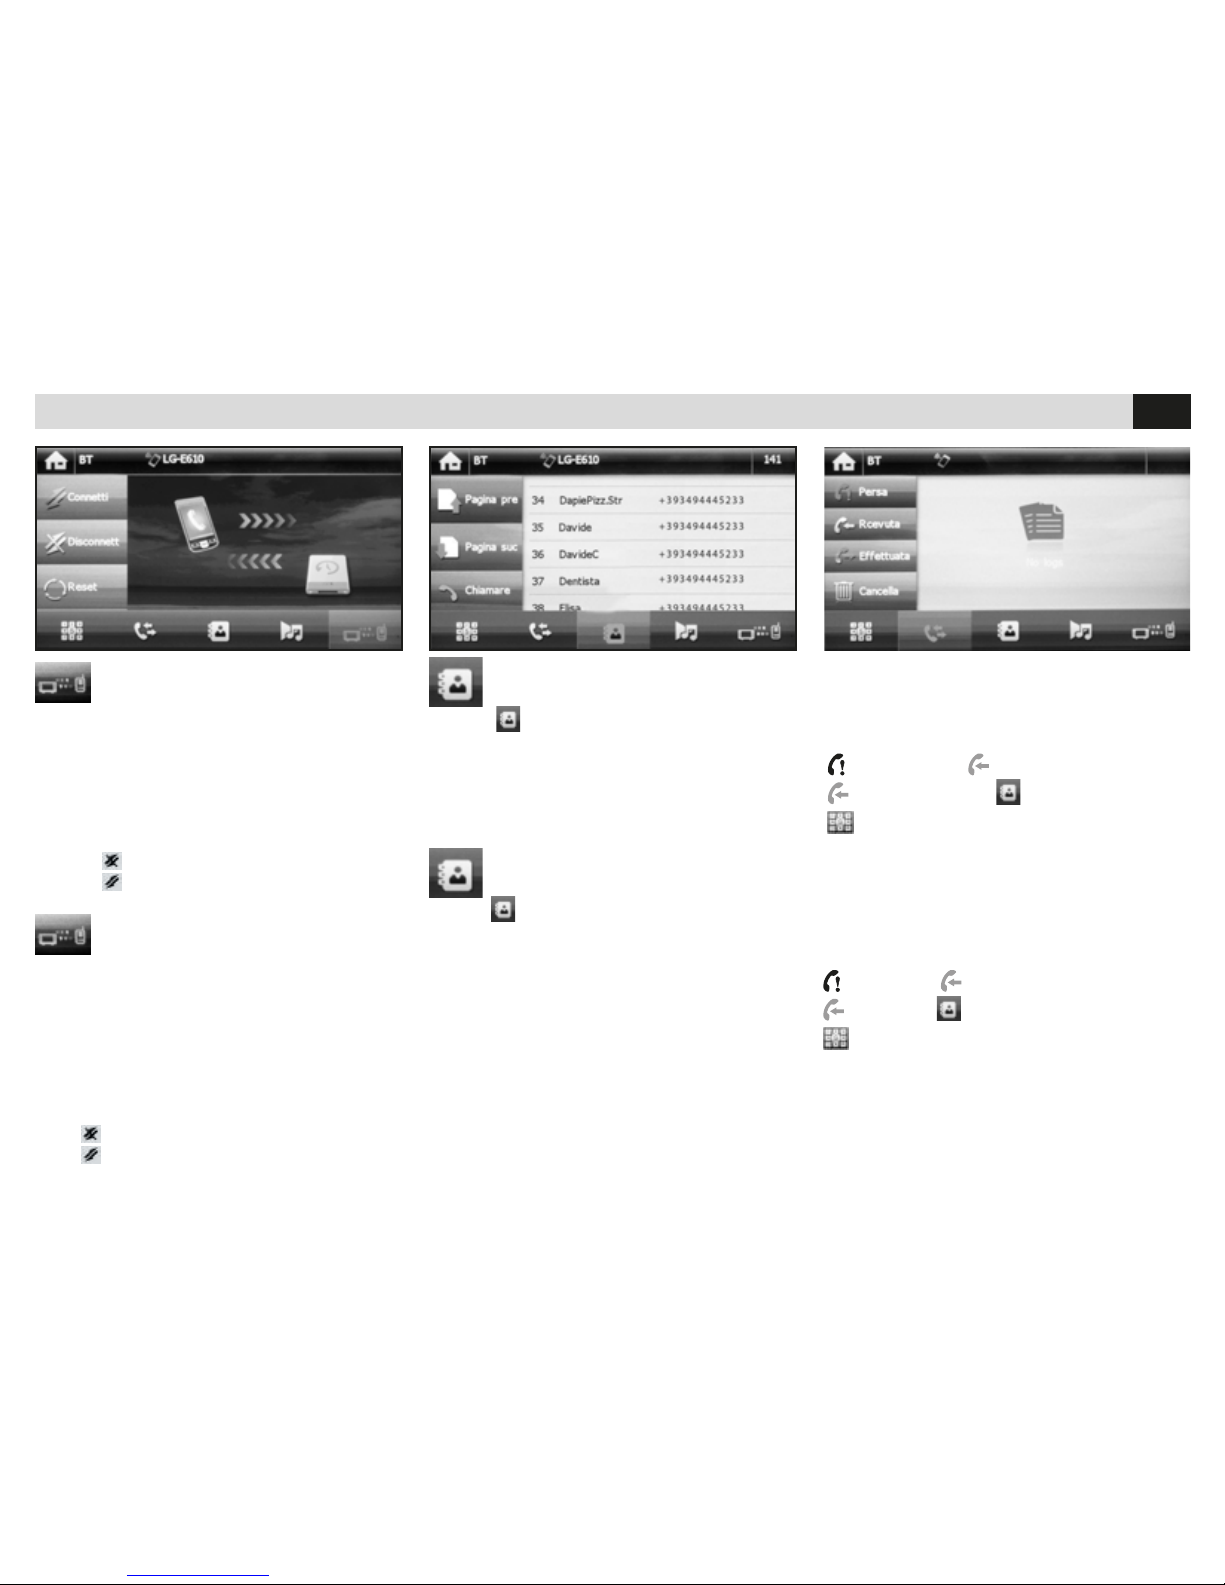
IMPOSTAZIONI BLUETOOTH • BLUETOOTH-SETTINGS
SINCRONIZZAZIONE RUBRICA
Premere
per accedere alle impostazioni.
Automaticamente la rubrica del telefono verrà
scaricata nella memoria dell’autoradio. Il tempo
per l’operazione varia in base al numero dei
contatti.
ACCOPPIAMENTO TELEFONO
E’ possibile accoppiare fino a 8 telefoni.
• Attivare la funzione bluetooth sul telefono e
ricercare nuovi dispositivi.
• Selezionare VM... nella lista dispositivi,
inserire la password 0000 quando richiesta.
Ad accoppiamento avvenuto comparirà il nome
del telefono.
Premere
per disconnettere il telefono.
Premere
per riconnettere.
PHONE-PAIRING
Up to 8 phones can be coupled to the Device.
• Activate the Bluetooth-function on the phone
and search for new devices.
• Select VM... from the devices-list,
digit the password 0000, on request.
As soon as the coupling-process has been successfully accomplished, the phone-name will be
shown.
Press
to disconnect the phone.
Press
to reconnect the phone.
PHONE-BOOK SYNCHRONIZATION
Press
to enter the setting options.
The phone-book of your telephone will automatically be downloaded into the car-radio’s memory.
The time required for this operation depends on
the number of contacts contained in the phonebook.
CHIAMARE DALLO SCHERMO
• Selezionare Bluetooth dal menù principale.
• Premere una delle icone presenti sullo schermo
per chiamare da uno degli elenchi.
chiamate perse chiamate ricevute
chiamate effettuate rubrica telefonica
chiamata dal tastierino numerico.
CALLING FROM THE SCREEN
• Select Bluetooth from the Main Menu.
• Press one of the icones available on the screen, to call from one of the given phone-books. .
missed calls received calls
dialed calls phone-book
calls effected through number-keys
Page 11
11
IT/GB
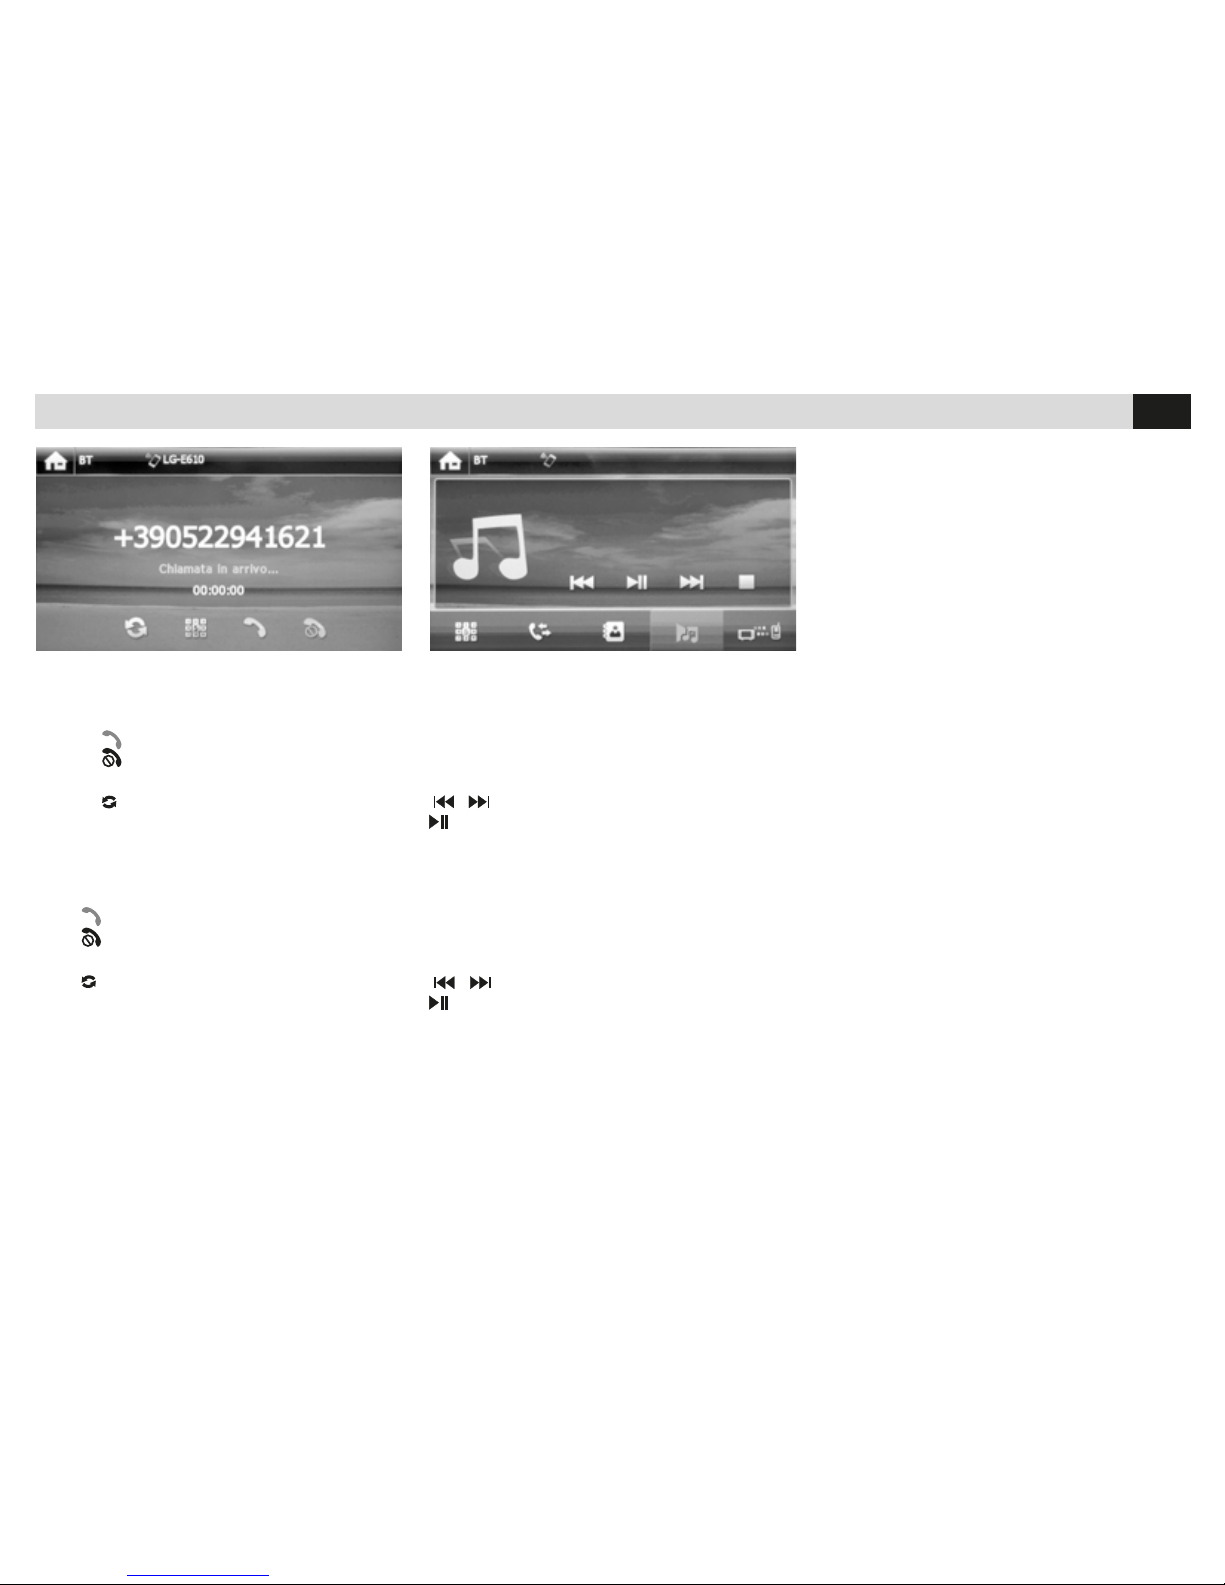
RICEVERE UNA CHIAMATA
Quando è in arrivo una chiamata, il dispositivo
passa automaticamente in modalità bluetooth.
Premere
per rispondere.
Premere
per terminare la conversazione o per
rifiutare la chiamata in arrivo.
Premere
per escludere/attivare il vivavoce.
RECEIVING A CALLING
When a phone-call arrives, the device automatically switches to Bluetooth-mode.
Press
to answer the phone
Press
to end the conversation or refuse the
in-coming call.
Press
to deactivate/activate the hands-free
device.
RIPRODUZIONE MUSICA BLUETOOTH
Se il telefono connesso supporta il profilo A2DP
è possibile ascoltare i brani musicali.
Se il dispositivo supporta AVRCP sarà possibile
controllare i brani musicali direttamente dal touch
screen.
/ brano precedente/successivo.
avvia/interrompe la riproduzione.
BLUETOOTH MUSIC PLAY
If the connected phone supports the A2DPProfile, you can listen to music.
If the device supports AVRCP, the musical tracks
can be handled on the touch-screen directly.
/ Previous/next Track.
Start/interrupt reproduction.
IMPOSTAZIONI BLUETOOTH • BLUETOOTH-SETTINGS
Page 12
12
IT/GB
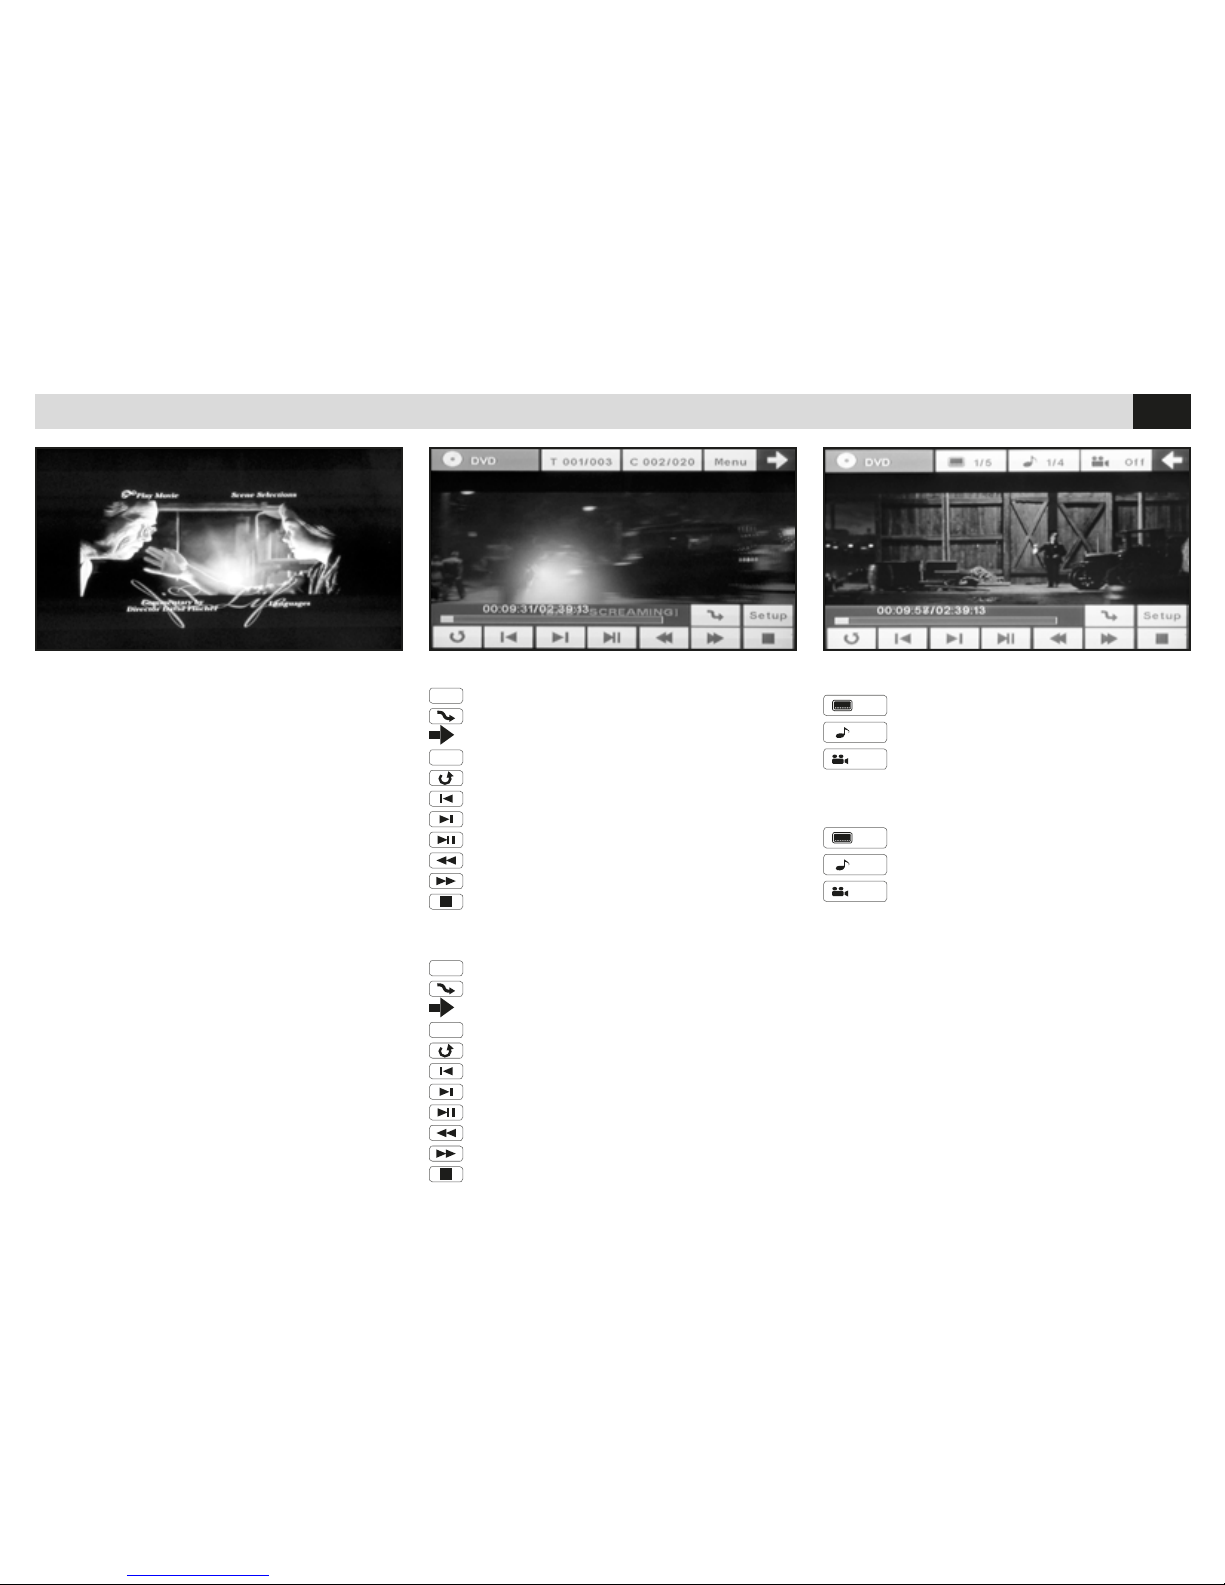
FUNCTIONS AVAILABLE IN DVD-VIDEO-MODE.
1/2
DVD-Subtitles
1/2
DVD-Audio
OFF
Select DVD watching-angle
DVD VIDEO
RIPRODUZIONE DVD
• Inserire disco
• Toccare lo schermo per visualizzare il menù.
FUNZIONI PRESENTI IN MODALITÀ DVD VIDEO
Menu
Menù principale DVD
Riproduzione casuale
Passa al secondo menù impostazioni DVD
Setup
Accede alle impostazioni DVD/USB/SD
Ripetizione traccia/capitolo/disco
Traccia/capitolo precedente
Traccia/capitolo successivo
Pausa/riproduzione
Indietro veloce
Avanti veloce
Interrompe riproduzione
FUNCTIONS AVAILABLE IN DVD-VIDEO-MODE.
Menu
DVD Main Menu
Random playback
Move to second Menu for DVD-settings
Setup
DVD/USB/SD-settings
Repeat track/chapter/CD
Track/chapter before
Track/chapter after
Pause/Playback
Fast Backward
Fast Forward
Interrupt playback
FUNZIONI PRESENTI IN MODALITÀ DVD VIDEO
1/2
Sottotitoli DVD
1/2
Audio DVD
OFF
Cambia angolo visione DVD
DVD PLAYBACK
• Insert Disk
• Touch the screen to display the menu.
Page 13
13
IT/GB
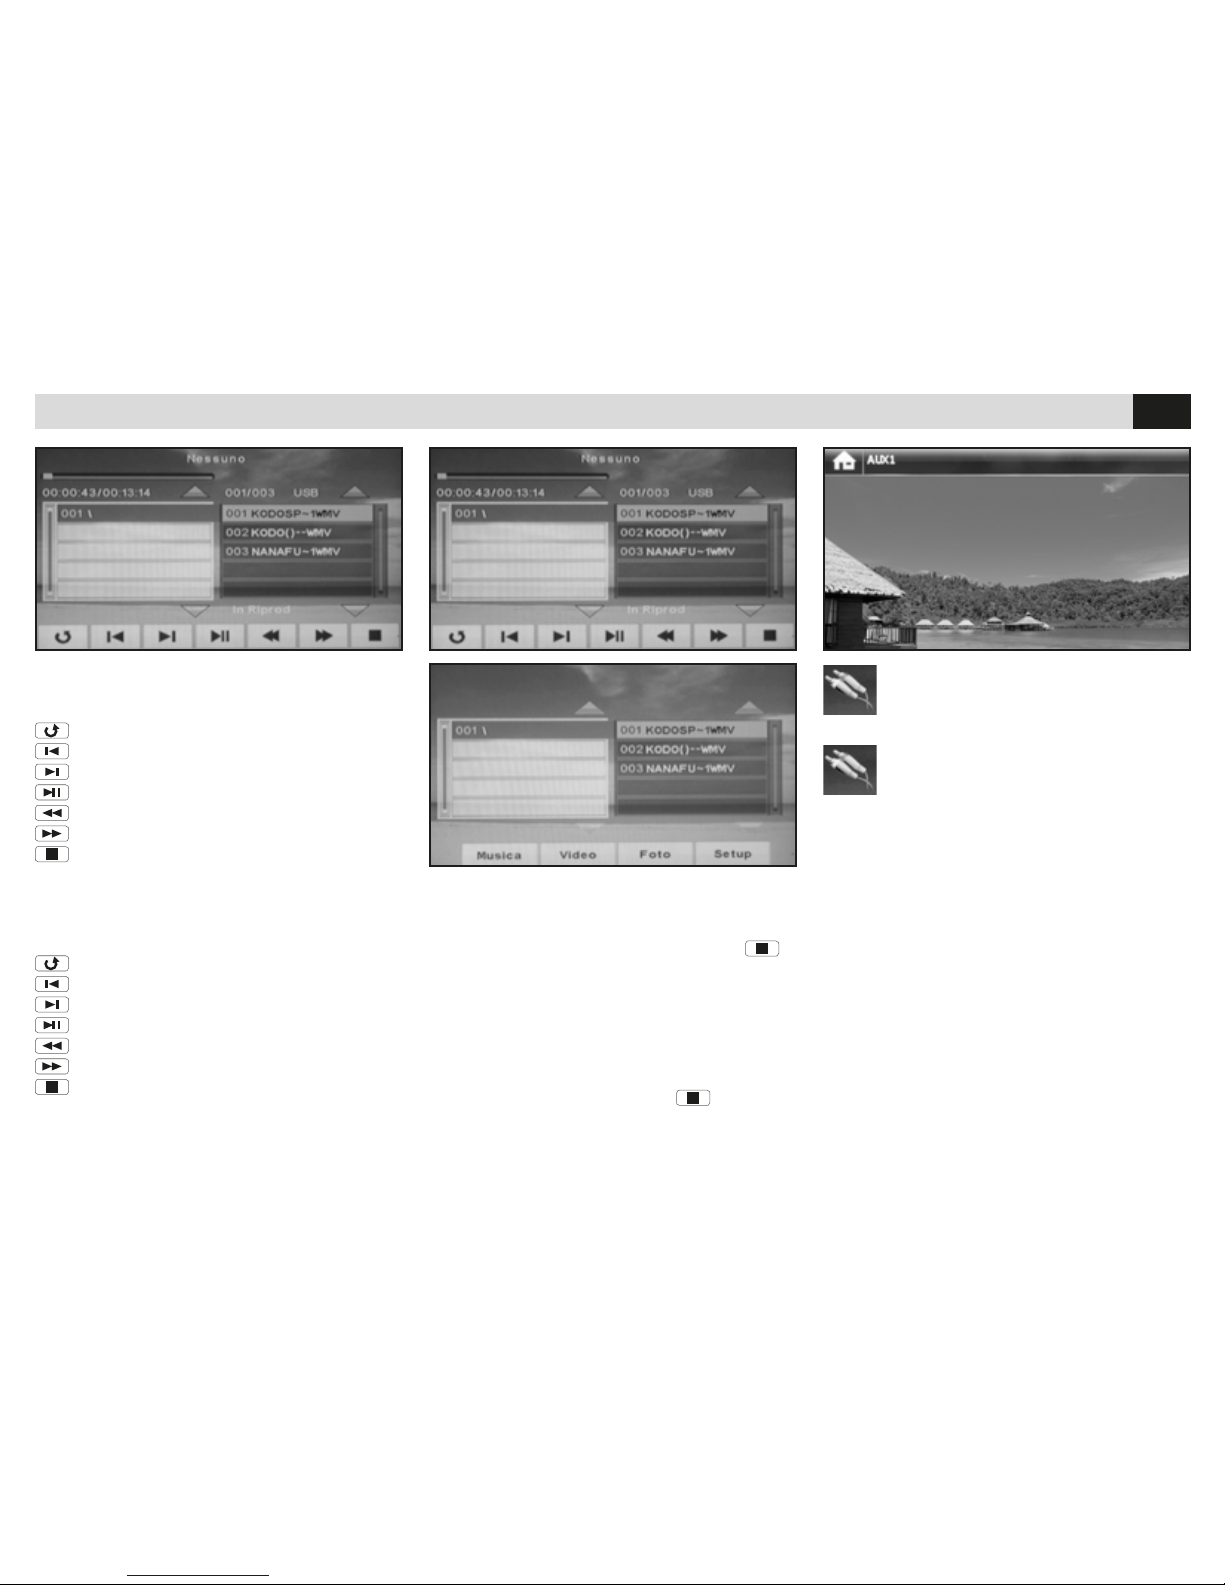
USB-SD CARD • AUX-IN
• Insert USB-stick
• Touch the screen to display the menu.
• All’inserimento di USB-SD CARD la riproduzione si avvia con il primo brano presente nella
ROOT principale o nella prima cartella.
Per selezionare video o immagini premere
poi selezionare il tipo di file che si intende riprodurre.
Selezionare per visualizzare una sorgente
esterna(DVBT).
Select to visualize an external
source(DVBT).
Ripetizione traccia/capitolo/disco
Traccia/capitolo precedente
Traccia/capitolo successivo
Pausa/riproduzione
Indietro veloce
Avanti veloce
Interrompe riproduzione
Repeat Track/Chapter/CD
Track/Chapter before
Track/Chapter after
Pause/Reproduction
Fast Backward
Fast Forward
Interrupt reproduction
• Inserire USB/SD card
• Toccare lo schermo per visualizzare il menù
• When USB/SD-CARD is inserted, reproduction
starts with the first Track available on the main
ROOT or on the first Folder.
To select Video or Picture, press
and then
the file.
Page 14
14
IT/GB
IPOD
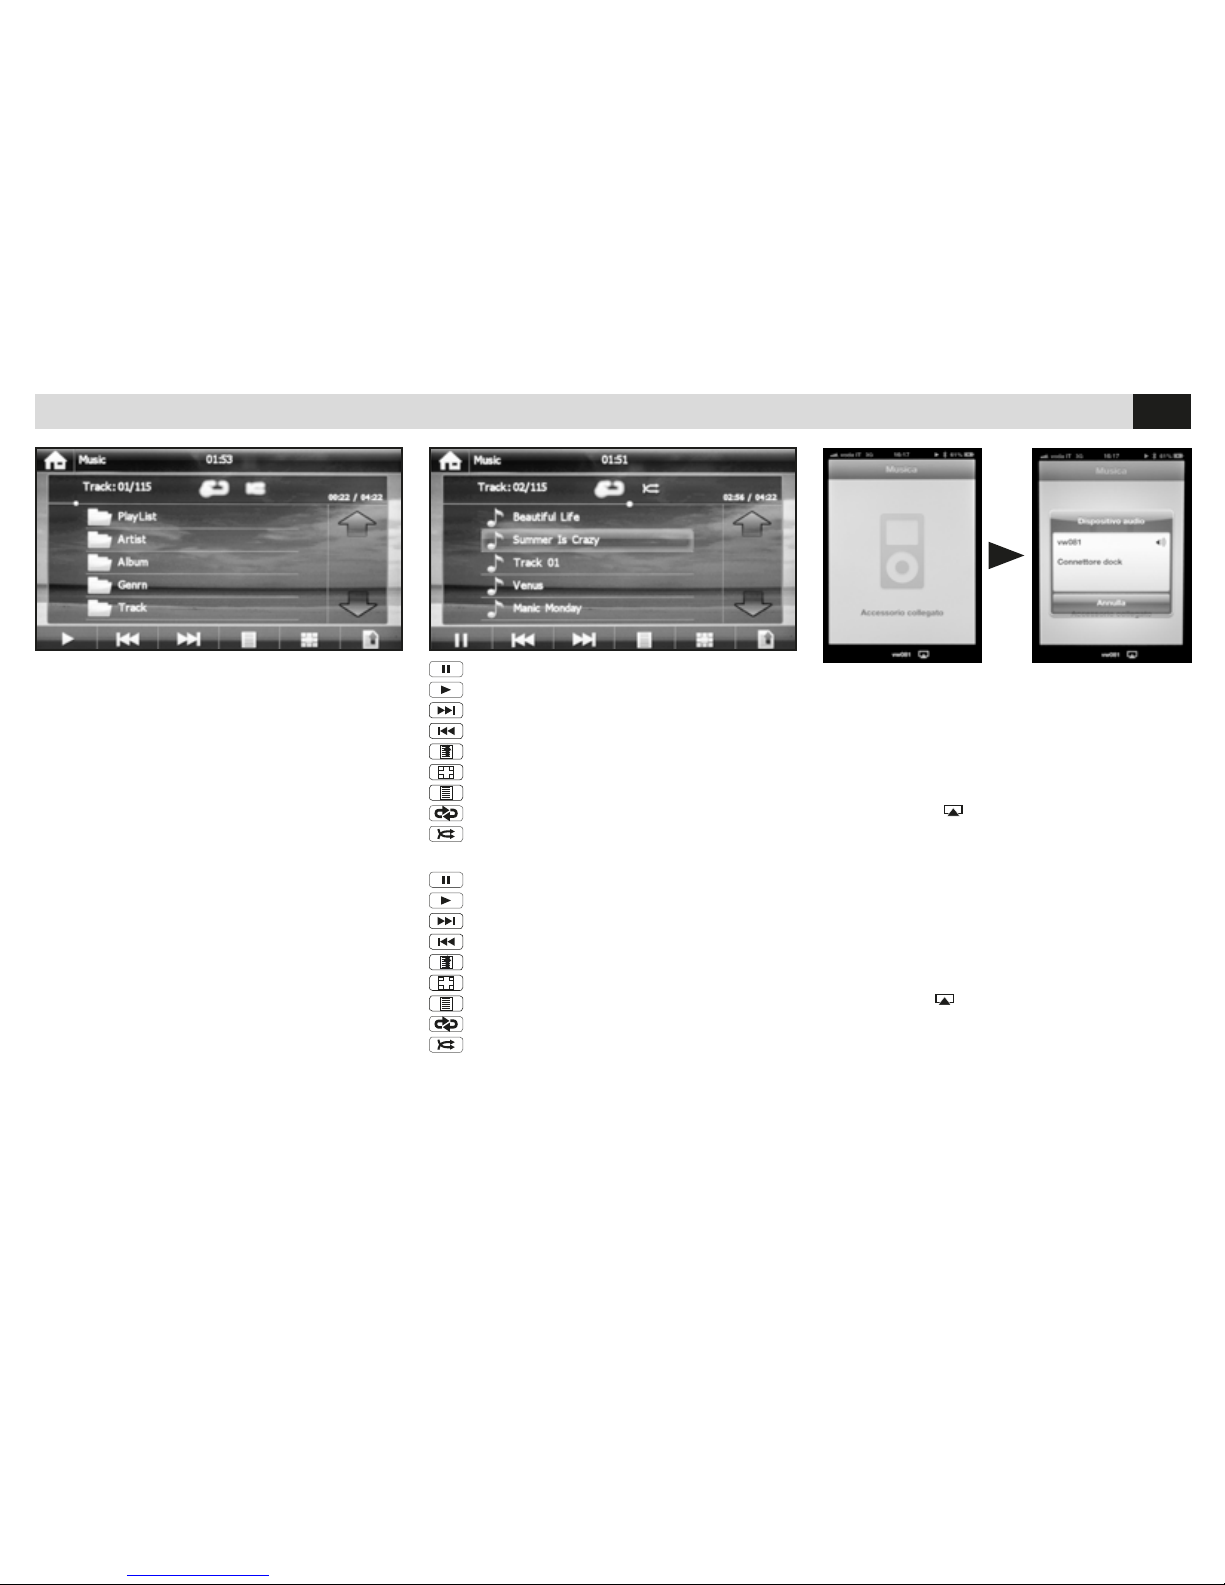
Il prodotto supporta iPOD/iPHONE iOS 6.0 no al
10/2012 e riproduce solo brani musicali.
Collegando il dispositivo viene visualizzata auto-
maticamente la schermata iPOD selezionare la
propria musica.
This product supports iPOD/iPHONE iOS 6.0 up
to 10/2012 and reproduces only musical tracks.
Once the device has been connected, the iPODpanel will automatically appear. Now you can
choose your own music.
Pausa
Avvia
Traccia successiva
Traccia precedente
Menù principale
Passa alla traccia selezionata
Visualizza informazioni brano
Ripetizioni Brano / Album / Tutto
Riproduzione Casuale
Pause
Start
Track next
Track before
Main Menu
Go to selected Track
Visualize Track-information
Repeat Track / Album / All
Random Reproduction
ATTENZIONE:
Quando un iPHONE è accoppiato via bluetooth e
collegato tramite connettore dock all’autoradio è
necessario selezionare manualmente nell’applicazione MUSICA dell’iPhone il dispositivo audio
“Connettore Dock”.
Premere l’icona
e successivamente selezio-
nare la voce “Connettore Dock”.
ATTENTION:
When an iPHONE is coupled via Bluetooth and
connected to the car-radio through a dockconnector, the Audio-device “Dock-Connector”
needs to be manually selected within the MUSIC-application of the iPhone.
Press the icon
Then select “Dock Connector”.
Page 15
15
FR/D
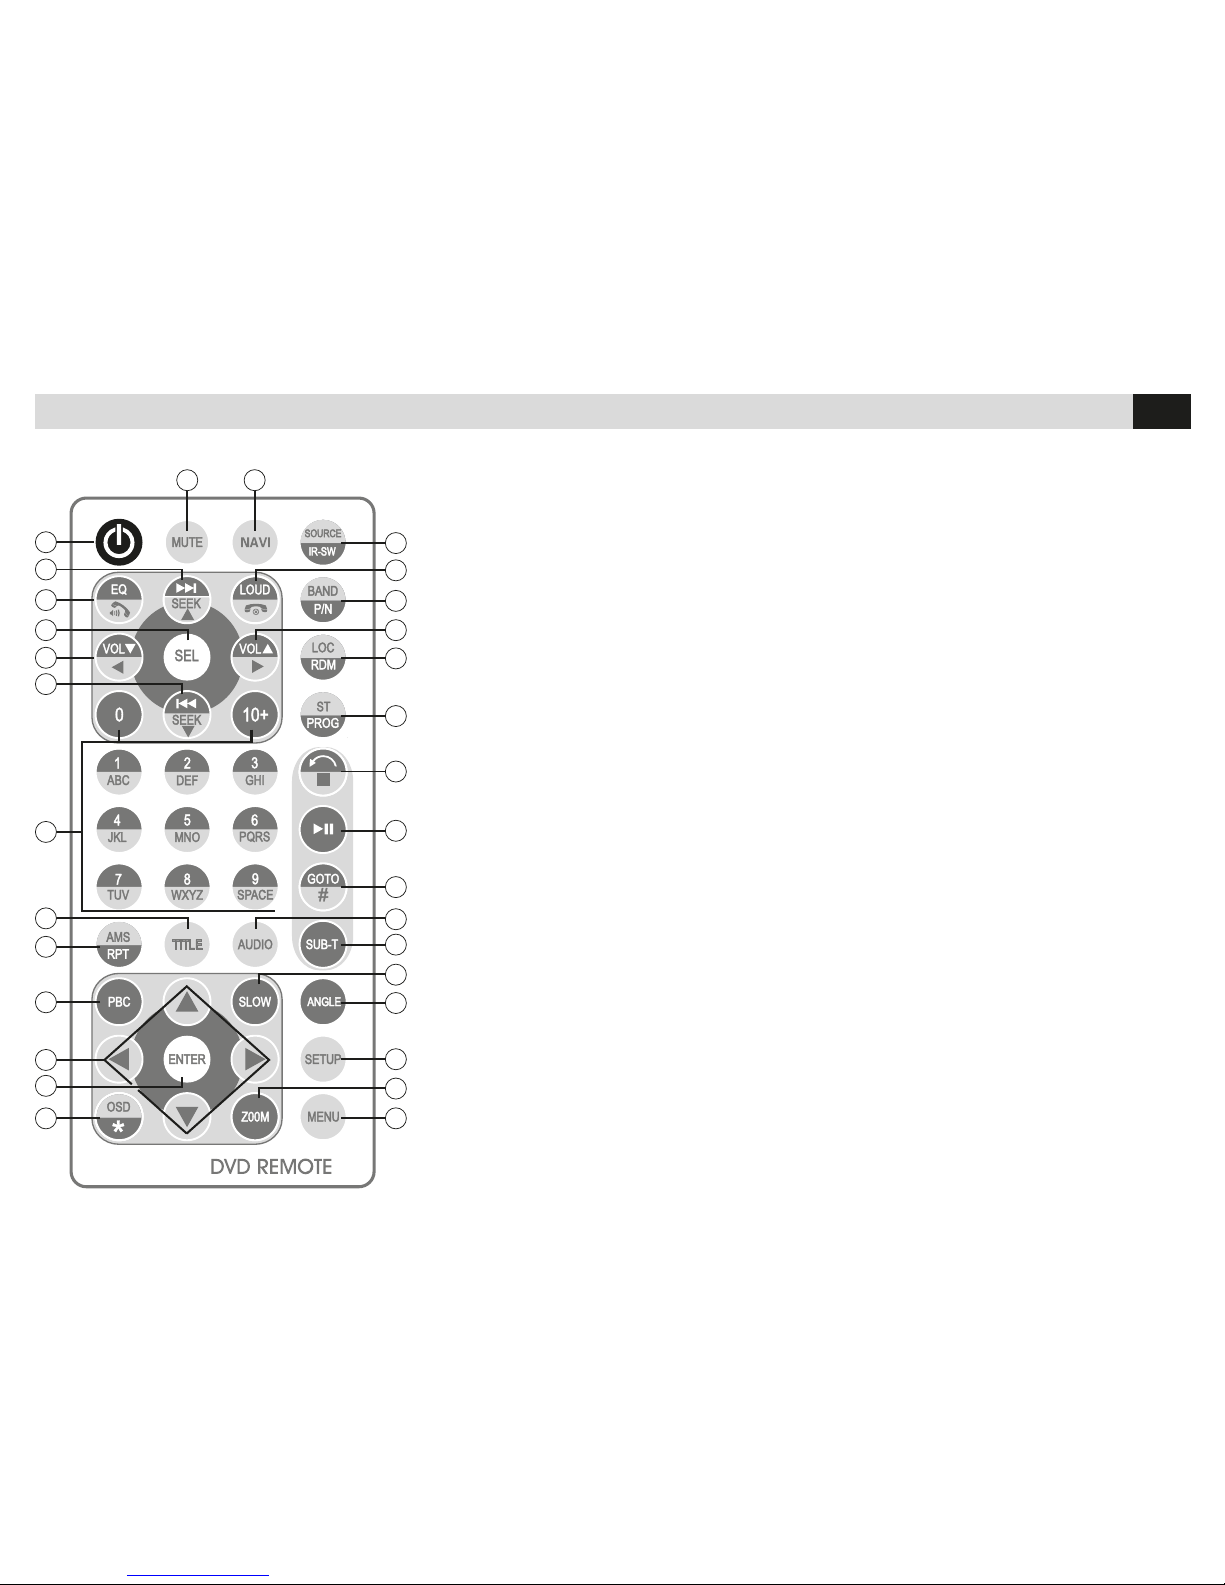
FONCTIONS TÉLÉCOMMANDE • FERNBEDIENUNGS-FUNKTIONEN
1 EIN/AUS.
2-6 Suche Sender / Stück / Datei.
3 Equalizer / Anruf beantworten.
4 Audio-Einstellungen.
5-26 Lautstärke.
7 Nummern-Tasten.
8 DVD-Titel.
9 Radiosender-Einspeicherungsautomatik.
Stück wiederholen.
10 DVD-Titel-Menü.
11 Läufer im DVD-Menü bewegen.
12 ENTER Wahl bestätigen.
13 DVD-Infos ausweisen.
14 Umschalten von Quelle
auf Hauptmenü und umgekehrt.
15 Zoom.
16 DVD-Einstellungen.
17 DVD-Sichtwinkel ändern.
18 Langsame Wiedergabe.
19 DVD-Untertitel-Sprache ändern.
20 DVD-Sprache ändern.
21 Stück-Wiedergabe wählen.
22 Wiedergabe starten/stoppen.
23 Wiedergabe unterbrechen.
24 Radio Stereo/Mono.
Wiedergabe programmieren.
25 Radio Lokal/entfernt.
Unwillkürliche Wiedergabe.
27 Radio-Frequenzband.
28 Loudness / Telefonat beenden-zurückweisen.
29 Quelle wählen.
30 Navigation.
Wiedergabe-Zeit ausweisen.
31 Stummschaltung.
1
3
5
7
2
6
12
9
14
16
17
19
20
21
22
23
24
25
27
29
31 30
15
18
4
8
13
10
26
28
11
ATTENTION : Le code VM283 n’est pas fourni avec la télécommande. / WICHTIG: Art. VM083 kommt ohne Fernbedienung.
1 Allumage/Extinction.
2-6 Recherche stations /traces/fichiers.
3 Egalisateur/Répond appel.
4 Régulation audio.
5 Volume.
7 Clés numériques.
8 Titres DVD.
9 Auto-mémorisation stations radio.
Répétition traces.
10 Menu titres DVD.
11 Déplacement curseur dans le menu DVD.
12 ENTER Confirmation sélection.
13 Visualisation informations DVD.
14 Passage de la source au menu
principal et vice versa.
15 Zoom.
16 Paramètres DVD.
17 Change angle vision DVD.
18 Reproduction à ralenti.
19 Changer langue sous-titres DVD.
20 Changer langue DVD.
21 Sélectionne trace de reproduction.
22 Commence/interrompe reproduction.
23 Interruption reproduction.
24 Radio Stéréo-Mono.
Programmation reproduction.
25 Radio Locale-éloignée.
Reproduction aléatoire.
27 Bande radio.
28 Loudness/Termine l’appel.
29 Sélection source.
30 Navigation.
Visualisation temps de reproduction.
31 Réduit en silence l’audio.
Page 16
16
FR/D
MENU • MENÜ
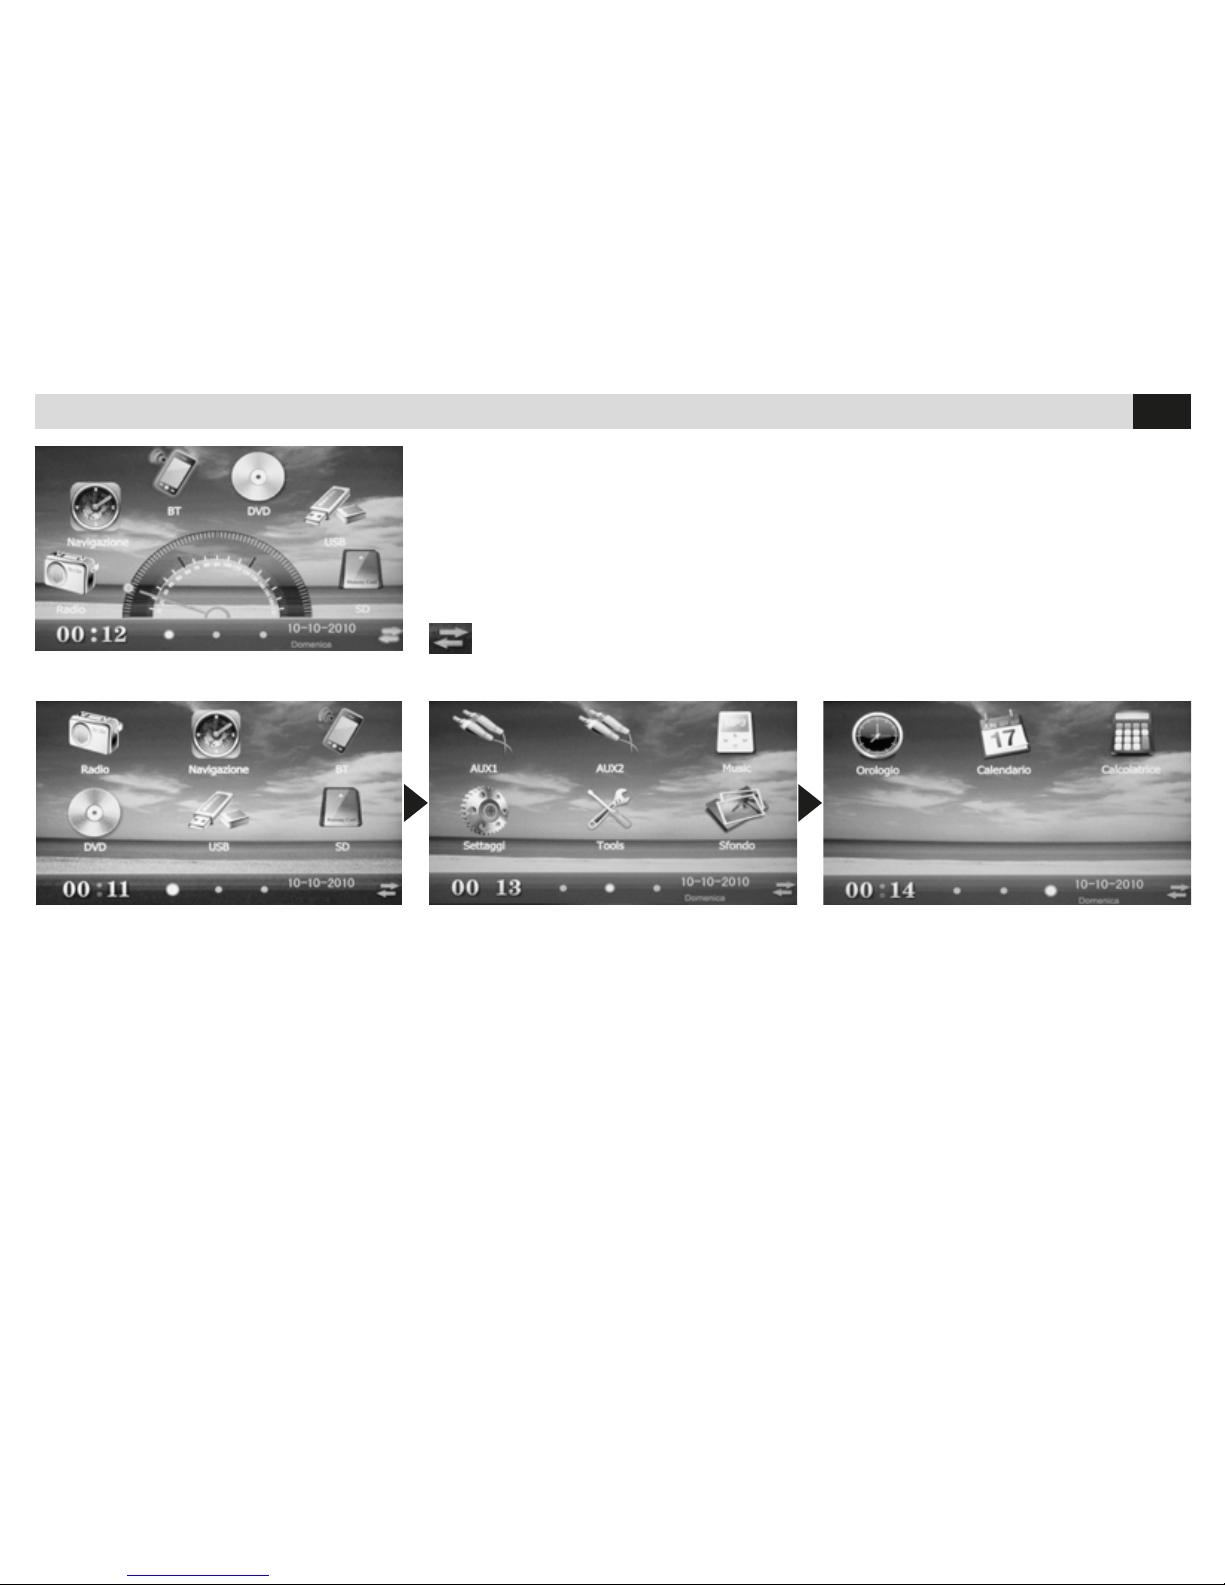
Menu traditionnel. Pour se déplacer d’un panneau à l’autre il faut toucher l’écran avec le doigt ou avec le stylo en dotation.
En touchant les icônes, on sélectionne la source ou la fonction demandée.
Traditionelles Menü. Um von einer Aufzeichnung zur anderen zu gelangen, Aufzeichnung mit dem Finger, oder dem beigelegten Stift, antasten und mitziehen. Durch das Antasten der Ikonen lassen sich Quelle und gewünschte Funktionen wählen.
Das Hauptmenü gibt es in zwei Ausführungen.
Eine Ausführung besteht aus einem Rotations-Schlepp-Menü.
Die andere aus einem traditionellen Menü mit 3 Aufzeichnungen.
Le menu principal est doté de deux versions.
Une de deux versions avec un menu rotatif à entraînement.
L’autre avec un menu traditionnel représenté par deux écrans.
Appuyez pour changer l’interface graphique. / Antasten, um graphische Interface zu ändern.
Page 17
17
FR/D
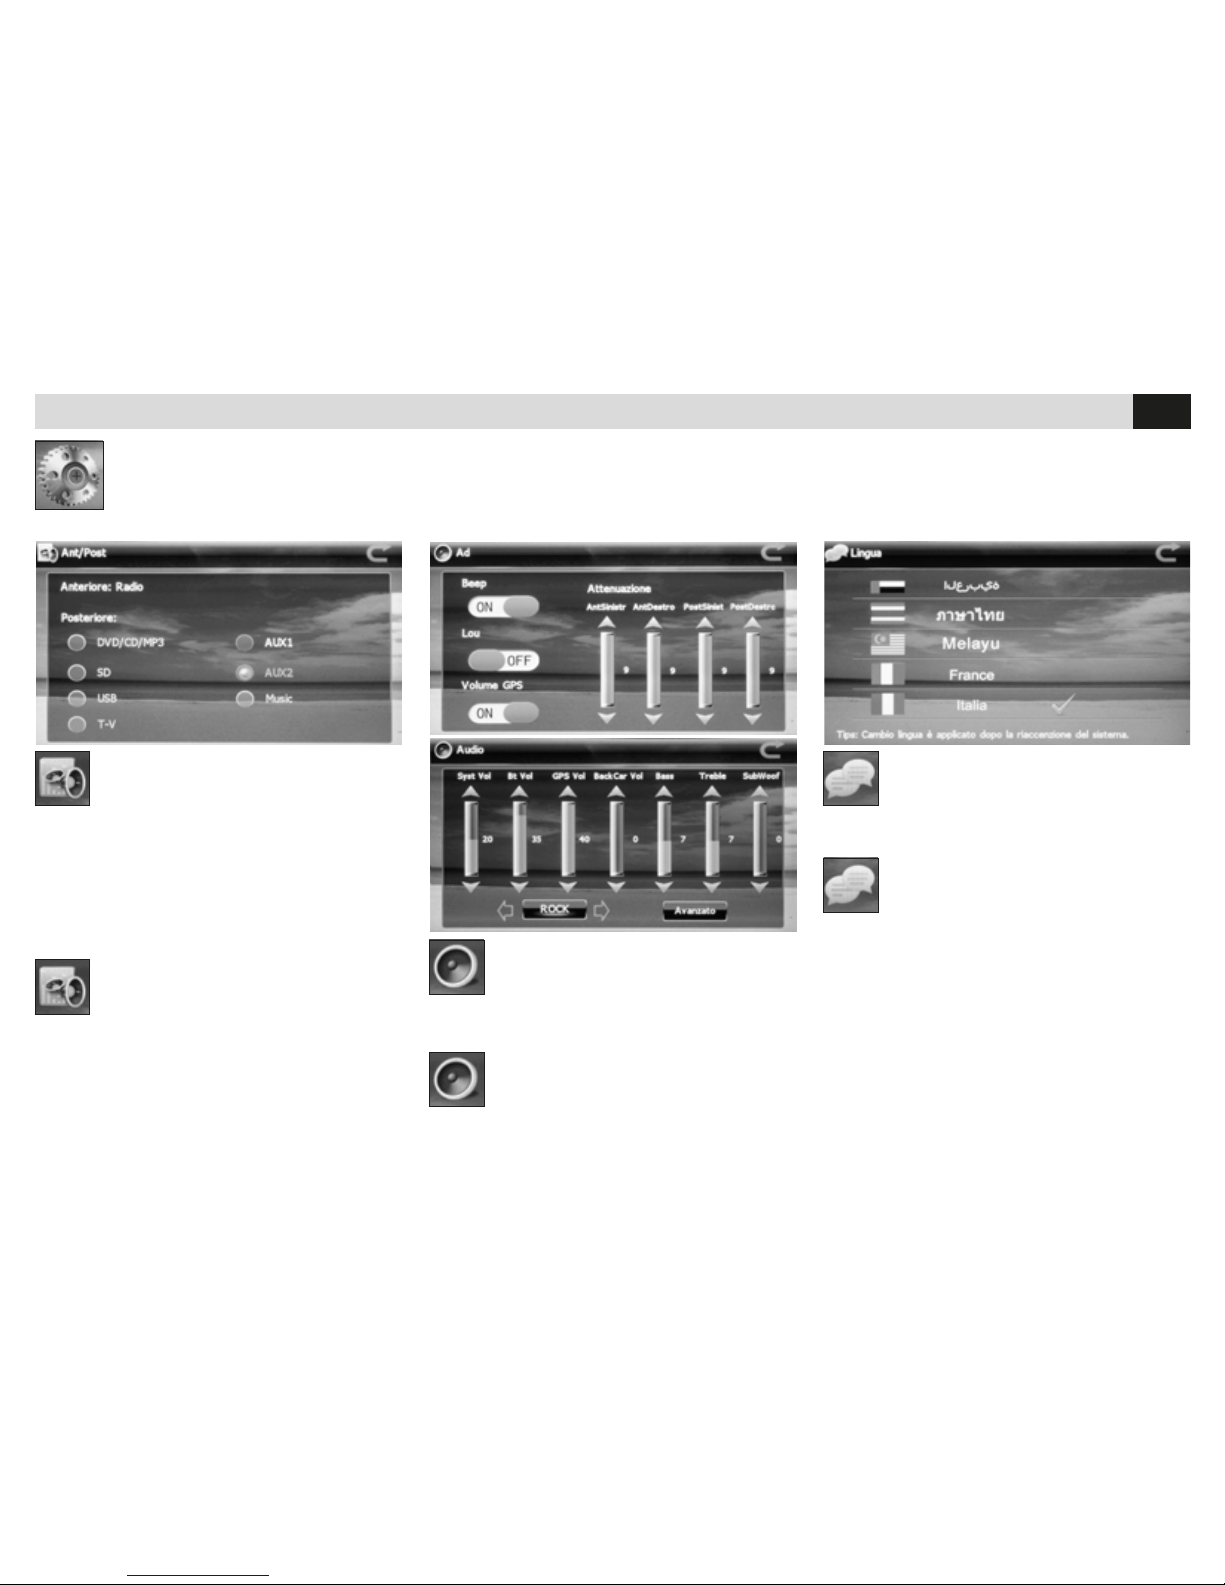
EINSTELLUNGEN
HECK-QUELLE
• Wiedergabe-Quelle für den rückwärtigen Audio/Video-Teil festlegen.
Die Wiedergabe-Quellen am Audio/VideoAusgang Front und Heck dürfen untereinander
verschiedenartig sein. Die Front-Quelle muss, auf
jeden Fall, ein Radio oder ein Navigationsgerät
sein.
AUDIO-EINSTELLUNGEN
• Einstellung der Quellen-Lautstärke
• Equalizer-Modus wählen
• Einstellung Fader, Loudness, Touch-Ton.
REGULATION AUDIO
• Régulation volume des sources
• Sélection modalité égalisateur
• Régulation fader, loudness, son touch.
SPRACHE WÄHLEN
• Menü-Sprache auf dem Bildschirm einstellen.
PARAMETRES LANGUE
• Trace la langue des menus sur l’écran.
PARAMETRES DU SYSTEME • SYSTEM-EINSTELLUNGEN
Réglages : source postérieur, régulation audio, langue, zone radio, luminosité de l’écran, fiche navigation, calibration de l’écran, zone fuseau
horaire, date et horaire, fond, logo initial.
Einstellungen: Heck-Quelle, Audio-Einstellung, Sprache, Radio-Gebiet, Bildschirm-Helligkeit, Navigations-Datei, Bildschirm-Kalibrierung, ZeitZonen, Datum und Uhrzeit, Hintergrund, Start-Logo.
SELECTION
SOURCE POSTERIEUR
• Trace la source de reproduction pour la section
audio/vidéo postérieure.
Il est possible de reproduire une source différente
de celle-ci antérieure dans la sortie audio/vidéo
postérieure.
Page 18
18
FR/D
PARAMETRES DU SYSTEME • SYSTEM-EINSTELLUNGEN
RADIO
• Radio-Gebiet gezielt auf FM-Radio einstellen.
ZONE RADIO
• Sélectionne la zone d’écoute de la radio FM
BILDSCHIRM-HELLIGKEIT (LICHT)
• Helligkeit: stellt die Bildschirm-Helligkeit ein.
(100%-75%-50%-25%)
• Auto-Off: Bildschirm schaltet nach eingegebenen Zeitspanne aus (AUS-15-30-60 Sek.)
LUMINOSITE DE L’ECRAN (LUCE)
• Brillant : la fonction règle la luminosité de
l’écran (100%-75%-50%-25%)
• Auto-off : la fonction éteint l’écran après le
temps qu’on a réglé (fermé-15-30-60 sec.)
NAVIGATIONS-DATEI
• Nach Einlegen der iGO-Navigations-Karten
NV995 (OPTIONAL), die Software-Betriebsdatei
wählen.
FICHE NAVI
• Après avoir inséré la carte de navigation iGo
NV995 (OPTIONAL) la fonction trace le chier
exécutif du software.
Page 19
19
FR/D
PARAMETRES DU SYSTEME • SYSTEM-EINSTELLUNGEN
KALIBRIERUNG
• Für die Kalibrierung des Touch-Screens.
Mit dem beigelegen Stift, das Symbol “+”, im
Zentrum des Bildschirms, antasten.
Die Kalibrierungs-Prozedur nach und nach bis
zum Ende hin abwickeln.
CALIBRATION
• La fonction réalise la calibration du touch
screen.
Utiliser le stylo en dotation et toucher l’écran sur
le symbole “+” au centre du même.
Continuer la séquence jusqu’à la n de la cali-
bration.
ZEIT-ZONEN
• Zutreffende Zeit-Zone einstellen, um die korrekte Uhrzeit ausgewiesen zu bekommen.
ZONE HORAIRE
• Trace le fuseau horaire pour la correcte visualisation de l’horaire.
UHRZEIT
• Einstellung von Datum und Uhrzeit.
HORLOGE
• Régulation date et horaire.
Dopo la calibrazione, cliccare sullo
schermo per uscire, alrtimenti la
calibrazione non verrà salvata.
Page 20
20
FR/D
PARAMETRES DU SYSTEME • SYSTEM-EINSTELLUNGEN
HINTERGRUND
• Menü-Hintergrund ändern.
FOND
• Change le fond des menus
START LOGO
• Charger le chier sur une Micro SD
Card et l’insérer dans le slot de navigation. Après avoir inséré le mot de passe 888888,
il faut charger un fichier d’image, avec une résolution 800x480 pixels, en format BMP.
START-LOGO
• Datei auf eine Mikro-SD-Karte
speichern und in die Navigations-Öffnung
stecken. Dann Passwort 888888 eingeben und
eine Bild-Datei aufladen, mit einer Auflösung von
800x480 Pixel, im BMP-Format.
VERSION
• Software-Version und Hardware-Informationen
werden ausgewiesen.
VERSION
• Visualise la version du software et les informations du hardware.
Page 21
21
FR/D
RADIO
RECHERCHE STATIONS RADIO
• En appuyant sur les touches
/ pour
quelques seconds, sur la télécommande ou sur
l’écran, l’unité recherche automatiquement les
stations. Pour faire une recherche manuelle,
appuyer sur les touches pour peu de temps.
SENDER-SUCHE
• Wenn man die Tasten
/ , auf der Fern-
bedienung oder auf dem Bildschirm, länger als
1 Sek. drückt, geht das Gerät automatisch auf
Sender-Suche.
Für die manuelle Sender-Suche, Tasten nur kurz
drücken.
FONCTION RADIO
AF recherche d’une fréquence alternative avec des
informations de la station, sur l’écran de la station.
TA informations sur le trafic
PTY sélectionne le type de programme musical.
RADIO-FUNKTIONEN
• AF Wahl einer Alternativ-Frequenz, mit SenderInfos auf dem Bildschirm.
• TA Verkehrs-Infos
• PTY Wahl der Art von Musik-Programmen.
FONCTION RADIO
BAND sélectionne les bandes radio 3 FM – 2 AM
PS Balayage des fréquences mémorisées
Pour mémoriser, appuyer directement sur la fréquence,
dans la position désirée. Pour rappeler une station,
appuyer sur l’indication relative.
LOUD Exaltation basses fréquences.
RDS Paramètres avancés RDS.
Sélectionne les stations radio voisines ou éloignées
10 sec. d’écoute pour chaque station mémorisée.
RADIO-FUNKTIONEN
BAND Sucht Radio-Frequenzen zwischen
3 FM - 2 AM.
PS Auflistung der eingespeicherten Frequenzen.
Um die Frequenz einzuspeichern, direkt auf die
gewünschte Frequenz drücken.
Um einen Sender zu holen, auf die betreffende
Bezeichnung drücken.
LOUD Unterstreichung der Tief-Frequenzen.
RDS Fortgeschrittene RDS-Einstellungen.
Wahl der nahen und entfernten Sender.
10-Sekunden-Wiedergabe pro eingespeicher-
ten Sender
Page 22
22
FR/D
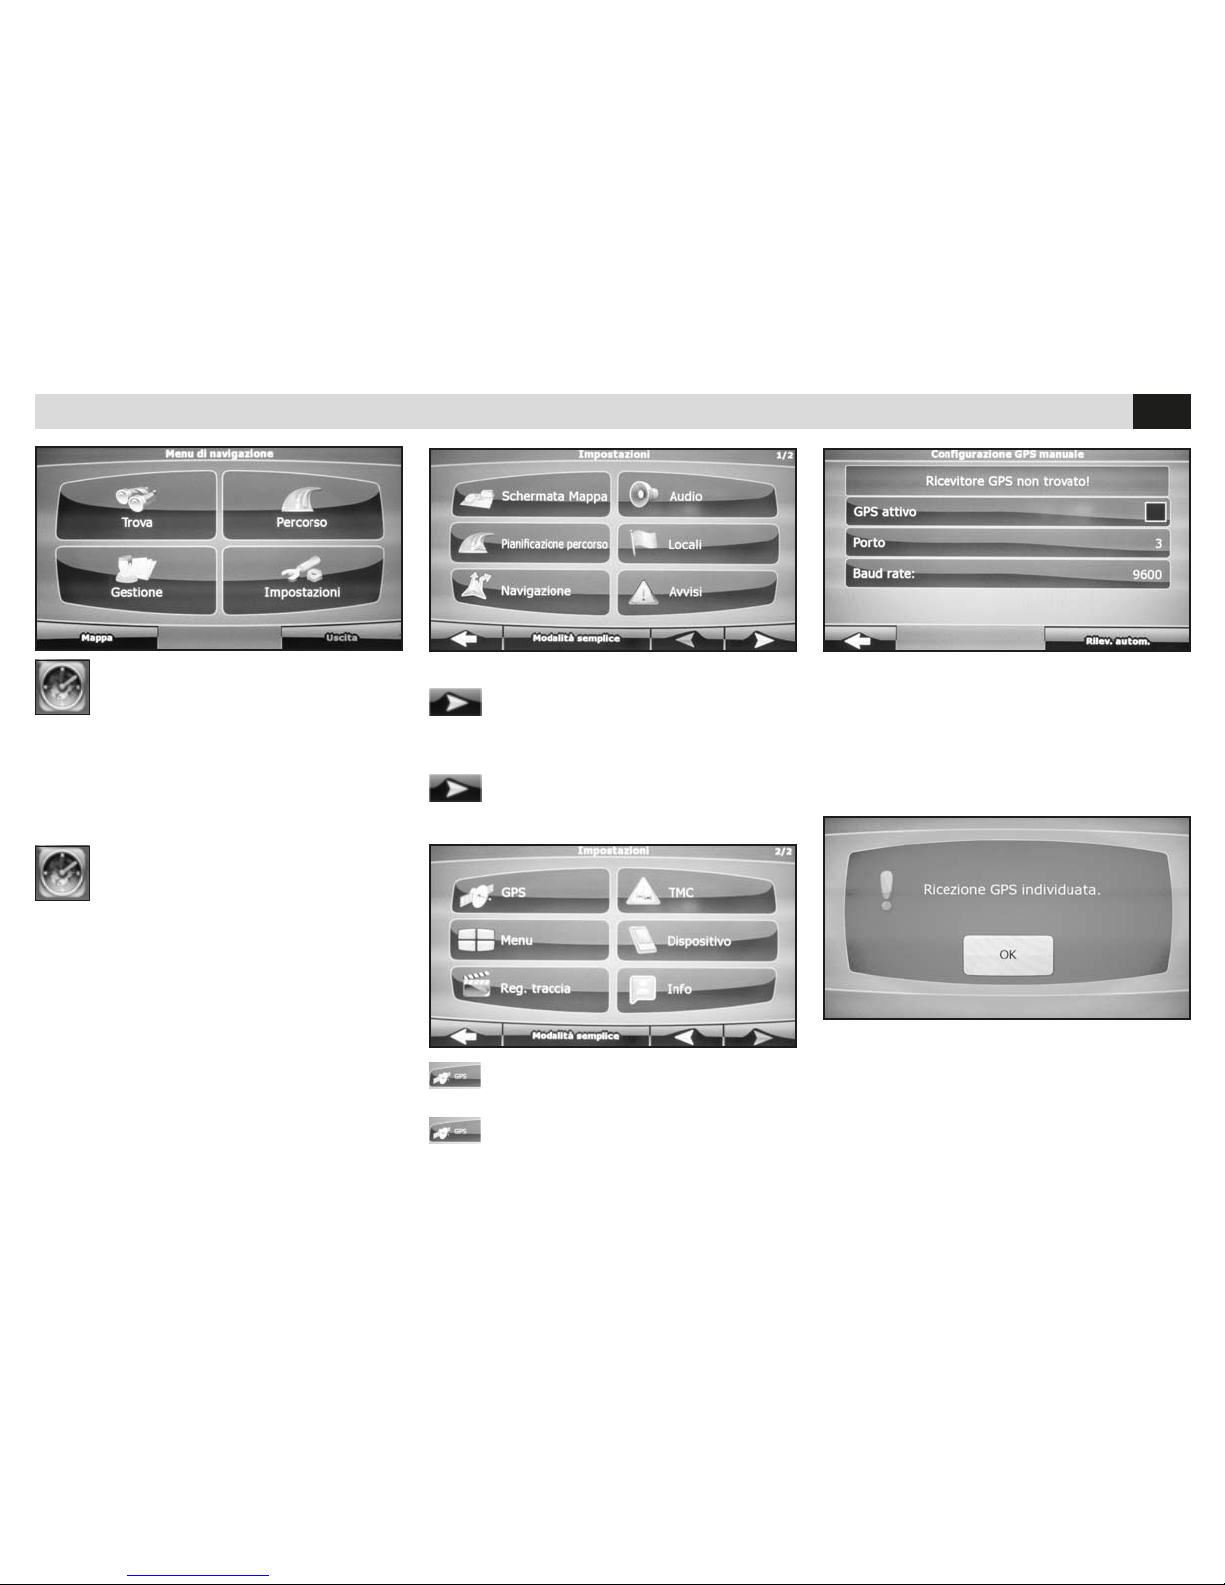
PARAMÈTRE MODULE GPS
• Passer au second écran.
EINSTELLUNG DES GPS-MODULS
• Auf die zweite Seite gehen.
NAVIGATION
Bei der Erst-Aktivierung der iGO-Mappen (Optional), die Betriebs-Datei mobilenavigator.exe
wählen und Einstellungen vornehmen.
• Das Software-Einstellungs-Menü betreten.
NAVIGATION
Quand on active pour la première fois la carte
iGo (optionnel), il faut sélectionner le fichier exécutif mobilenavigator.exe dans les réglages.
• Accéder au menu paramètre du software.
• Appuyer GPS.
• GPS drücken
PARAMÈTRES GPS • GPS-EINSTELLUNGEN
• GPS-AKTIV drücken bzw. abhaken.
Dann auf AUTOMATISCHE ERKENNUNG drücken.
• Appuyer sur le trait de GPS ACTIF,
Et après sur le RELÈVEMENT AUTOMATIQUE.
• Die Ermittlung der Daten abwarten und OK drücken.
• Die Anweisungen zur Navigations-Software sind dem
iGO-Handbuch zu entnehmen.
• Attendre l’acquisition des données et appuyer ok.
• Faire référence au manuel iGo pour les instruc-
tions sur le software de navigation.
Page 23
23
FR/D
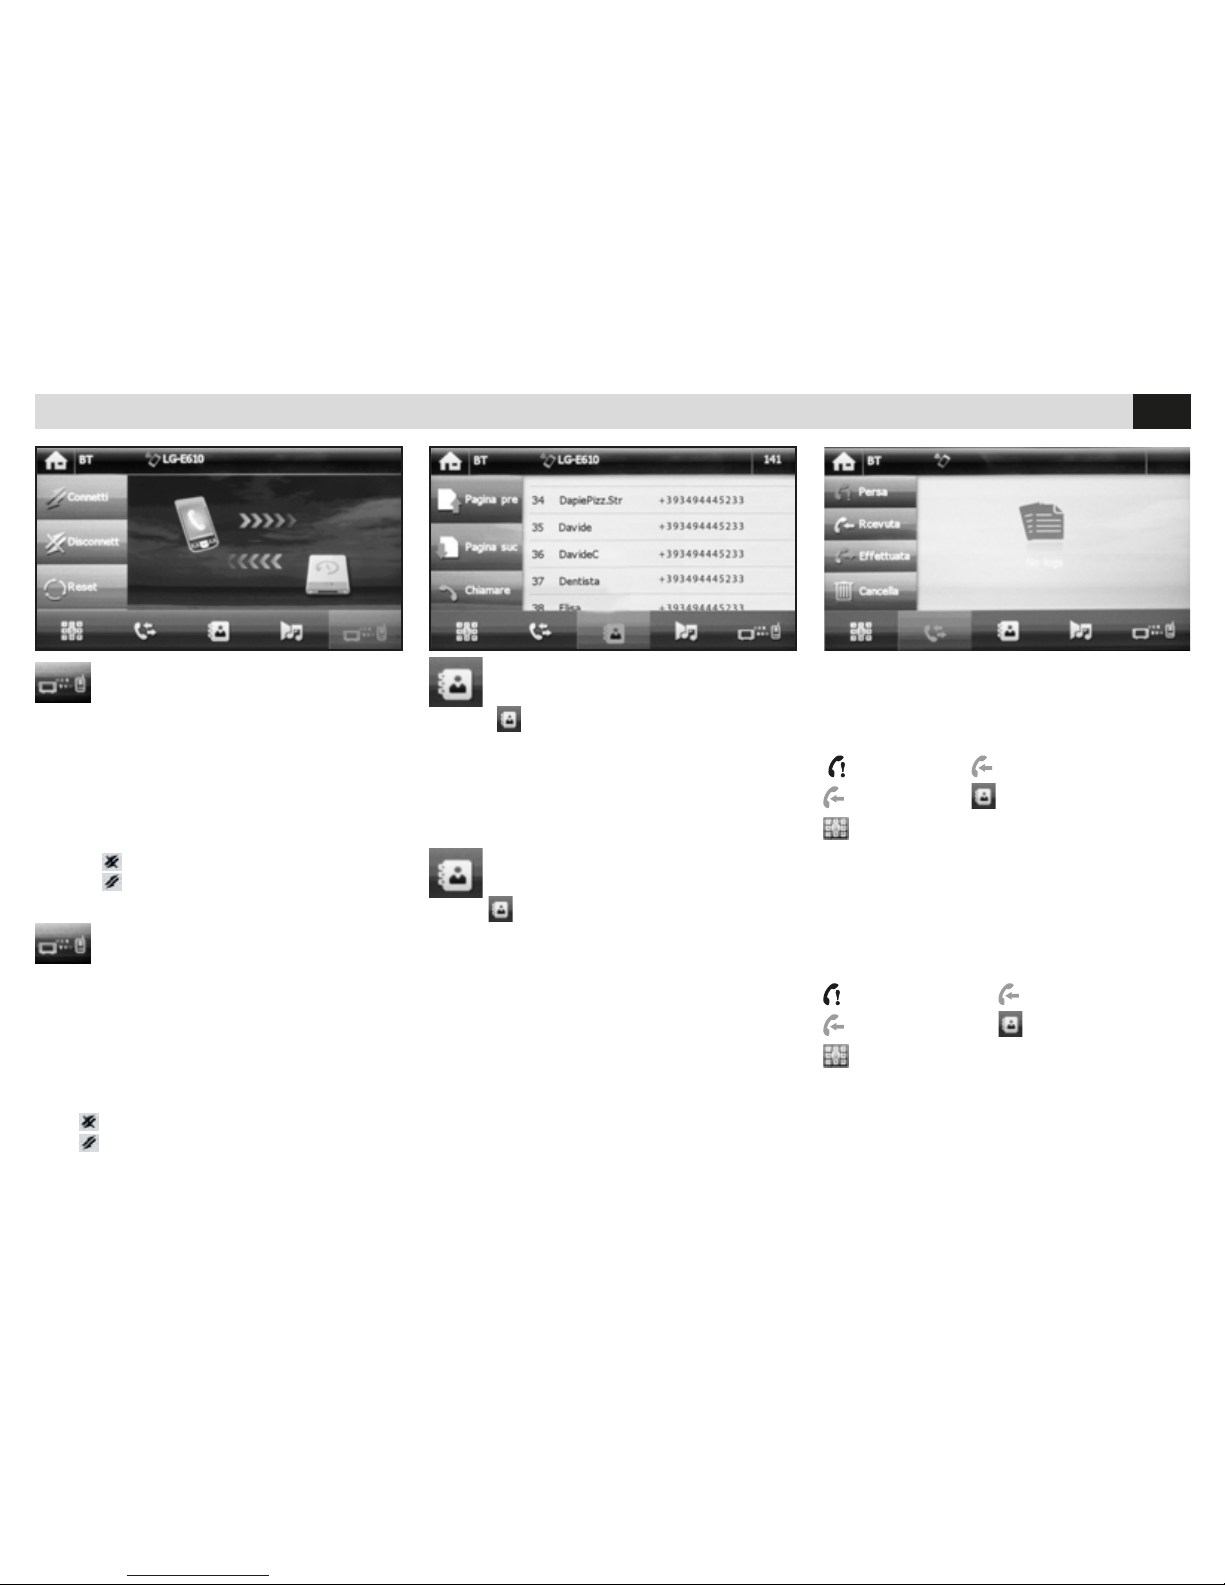
REGLAGES BLUETOOTH • BLUETOOTH-EINSTELLUNGEN
SYNCHRONISATION DU REPERTOIRE
Appuyer
pour accéder aux réglages.
Le répertoire du téléphone sera automatiquement téléchargé dans la mémoire de l’autoradio.
Le temps de l’opération vari en fonction du
nombre des contacts.
ACCOUPLEMENT TELEPHONE
On peut accoupler jusqu’à 8 téléphones.
• Activer la fonction bluetooth sur le téléphone et
rechercher les nouveaux dispositifs.
• Sélectionner VM... dans la liste des dispositifs,
insérer le mot de passe 0000 quand c’est nécessaire. Lorsque le couplage est réussi, le nom du
téléphone apparaît.
Appuyer
pour déconnecter le téléphone
Appuyer
pour le reconnecter.
TELEFON-KOPPELUNG
Es lassen sich bis zu 8 Telefongeräte anschließen.
• Bluetooth-Funktion auf dem Telefon aktivieren
und neue Geräte suchen.
• VM... aus der Geräte-Liste wählen. Auf Verlangen, das Passwort 0000 eingeben.
Nach erfolgreich durchgeführter Koppelung,
erscheint der Name des Telefons.
Taste
drücken, um Telefon zu deaktivieren.
Taste
drücken, um Telefon wieder zu aktivie-
ren.
ÜBERNAHME DES TELEFON-REGISTERS
Taste drücken, um zu den Einstellungen zu
gelangen.
Das Telefon-Register wird somit automatisch
in das Autoradio eingespeichert. Die dazu in
Anspruch genommene Zeit richtet sich nach der
Anzahl der vorhandenen Telefon-Nummern.
APPELER À PARTIR DE L’ÉCRAN
• Sélectionner Bluetooth dans le Menu principal
• Appuyer un des icônes que vous trouvez sur
l’écran pour appeler à partir d’une des listes:
appel perdu; appel reçu;
appel effectué; répertoire téléphonique;
appel à partir du clavier numérique.
TELEFONAT VOM BILDSCHIRM STARTEN
• Bluetooth aus dem Haupt-Menü wählen.
• Eine der Ikonn auf dem Bildschirm antasten,
um Anruf aus der spezifischen Telefon-Liste zu
starten
Verlorene Anrufe Beantwortete Anrufe
Gestartete Anrufe Telefon-Register
Anruf durch Nummern-Tasten starten
Page 24
24
FR/D
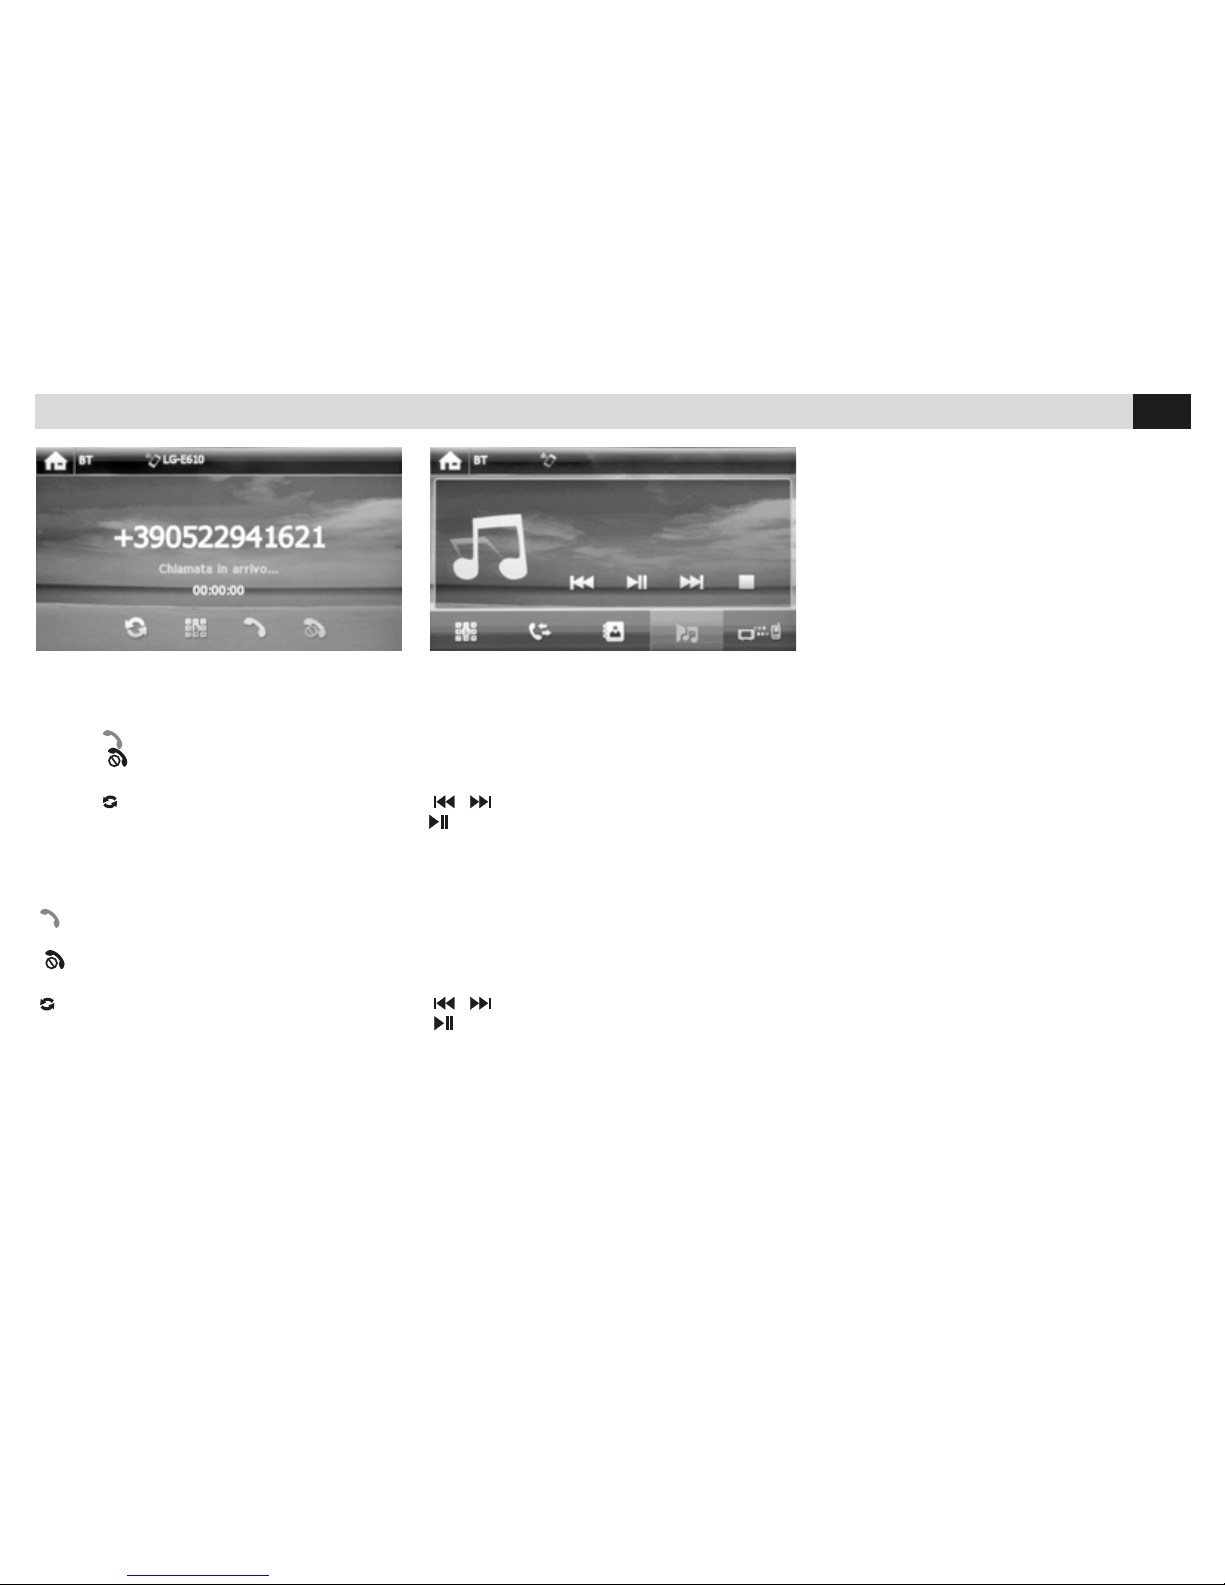
RECEVOIR UN APPEL
Quand un appel est entrant, le VM036 passe
automatiquement en modalité bluetooth.
Appuyer
pour répondre.
Appuyer
pour terminer la conversation ou
refuser l’appel entrant.
Appuyer
pour exclure / activer la mains-libres.
ANRUF IN EMPFANG NEHMEN
Sobald ein Anruf kommt, schaltet das Gerät
VM036 automatisch die Bluetooth-Funktion ein.
Taste drücken, um Gespräch in Empfang zu
nehmen.
Taste drücken, um Gespräch zu beenden
oder um eingehendes Telefonat zurückzuweisen.
Taste drücken, um Freisprech-Funktion zu
aktivieren/deaktivieren.
REPRODUCTION MUSIQUE BLUETOOTH
Si le téléphone branché supporte le profil AD2P,
c’est possible écouter les morceaux.
Si le dispositif supporte AVRCP, les morceaux
pourront être contrôlés directement à partir de
l’écran tactile.
/ Chanson précédente / suivante.
Lance / interrompe la reproduction.
BLUETOOTH-MUSIK-WIEDERGABE
Soweit das gekoppelte Telefon AD2P-kompatibel
ist, läßt sich dadurch Musik hören.
Wenn es AVRCP-kompatibel ist, dann lassen
sich die einzelnen Musikstücke direkt auf dem
touch-Screen bedienen.
/ Stück davor / danach
Wiedergabe Starten / Stoppen
IMPOSTAZIONI BLUETOOTH • BLUETOOTH-SETTINGS
Page 25
25
FR/D
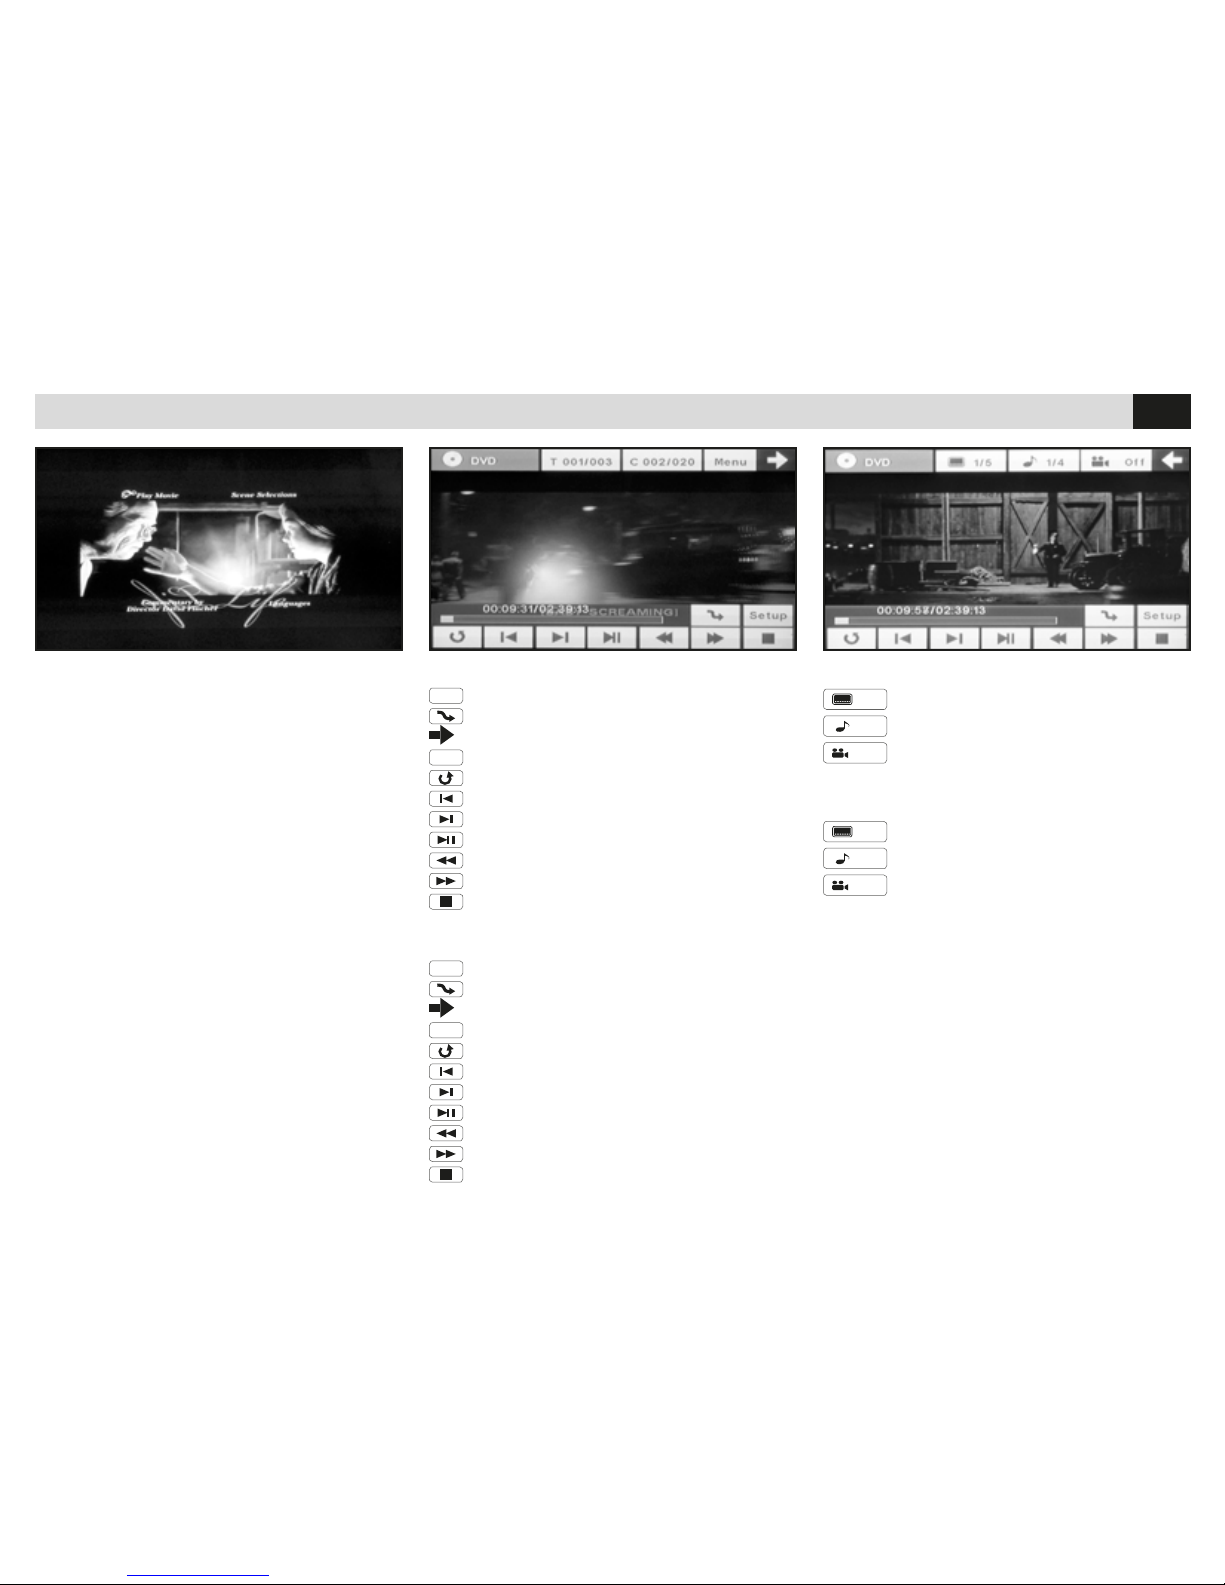
FUNKTIONEN IM DVD-VIDEO-BETRIEB
1/2
DVD-Untertitel
1/2
DVD-Audio
OFF
DVD-Sichtwinkel-Einstellung
DVD VIDEO
REPRODUCTION DVD
•
Insérer le CD
•
Toucher l’écran
FONCTIONS PRÉSENTES EN MODALITÉ DVD VIDEO
Menu
Menu principal DVD
Reproduction aléatoire
Passe au deuxième menu des réglages DVD
Setup
Accès aux réglages DVD/USB/SD
Répétition trace / chapitre / CD
Trace / chapitre précédent
Trace / chapitre successif
Pause / reproduction
Revient rapide
Avance rapide
Interrompt la reproduction
FUNKTIONEN IM DVD-VIDEO-BETRIEB
Menu
DVD-Hauptmenü
Unwillkürliche Wiedergabe
Weiter zum zweiten Menü der DVD-Einstellungen
Setup
Zu den Einstellungen DVD/USB/SD
Wiederholung von Stück/Kapitel/CD
Stück/Kapitel davor
Stück/Kapitel danach
Pause/Wiedergabe
Schnell Rückwärts
Schnell Vorwärts
Wiedergabe stoppen
FONCTIONS PRÉSENTES EN MODALITÉ DVD VIDEO
1/2
Sous-titres DVD
1/2
Audio DVD
OFF
Change l’angle de vision DVD
DVD WIEDERGABE
• CD eingeben
• Touch-screen antasten
Page 26
26
FR/D
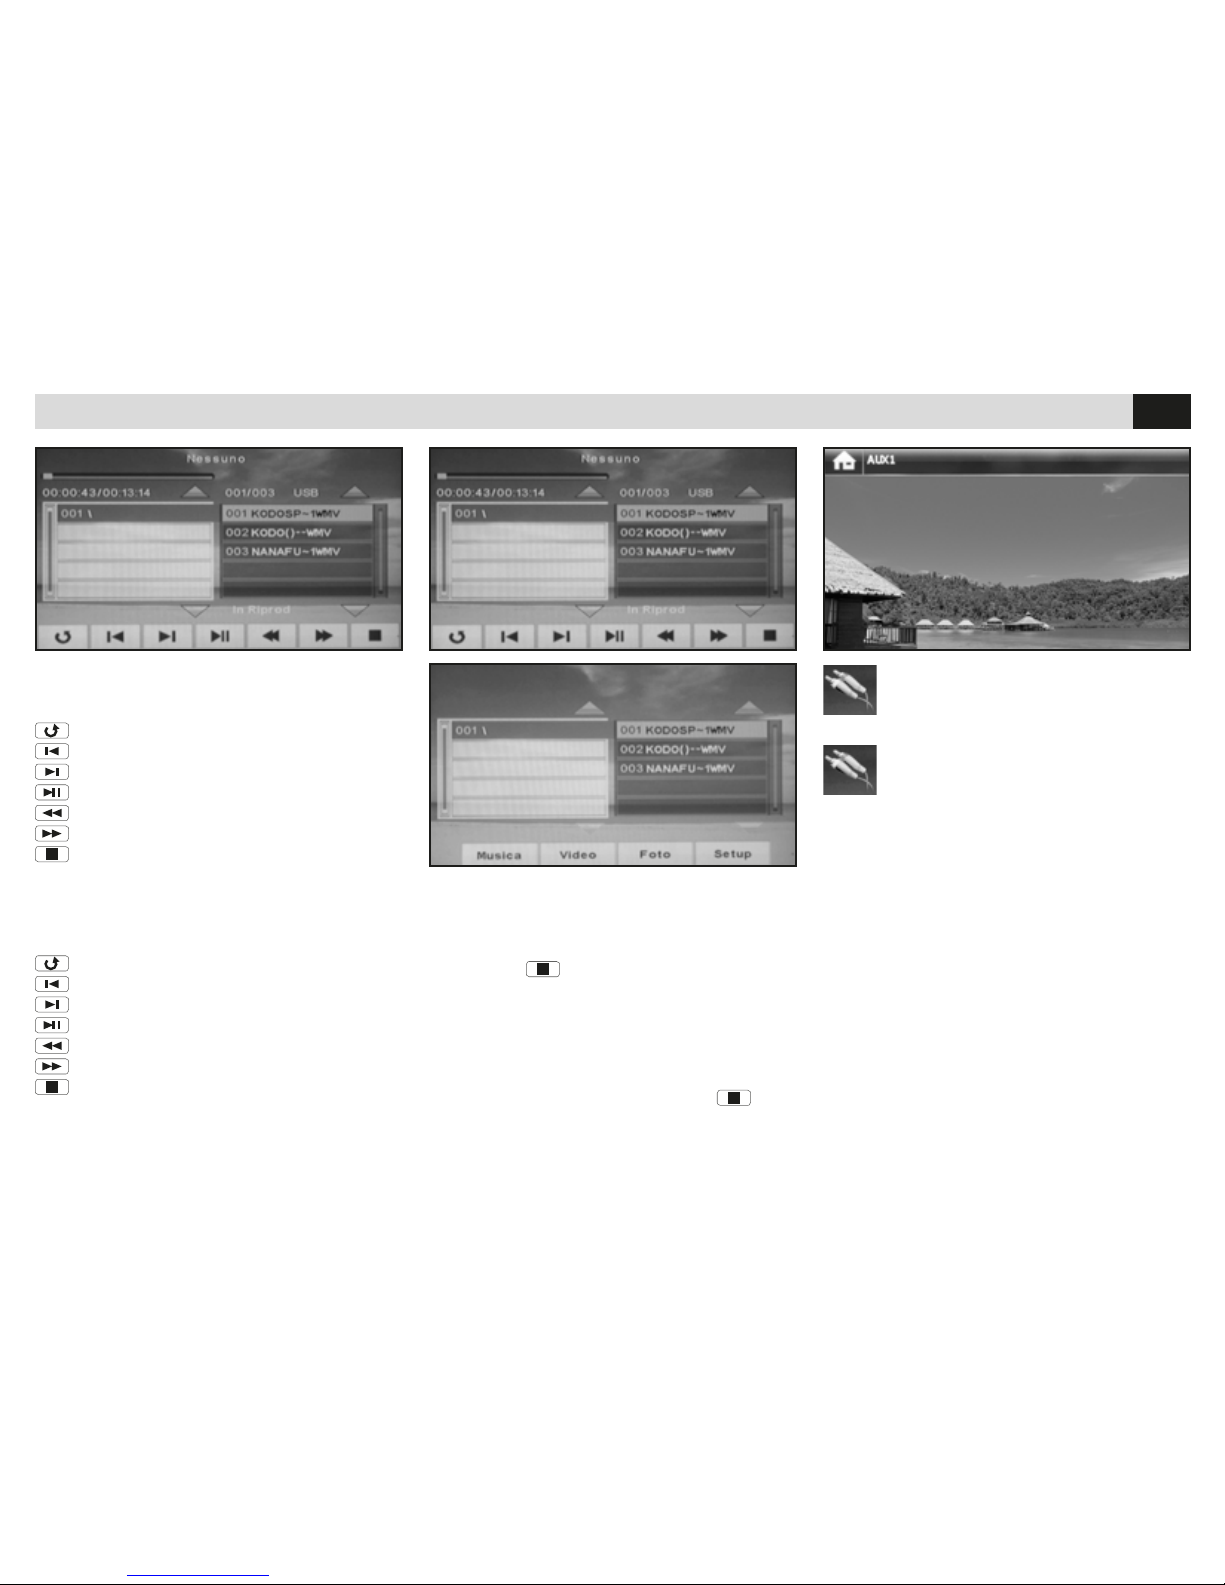
USB-SD CARD • AUX-IN
• USB/SD-Karte eingeben.
• Bildschirm antasten, um Menü auszuweisen.
• A l’insertion d’une USB - Carte SD, la repro-
duction commence par le premier morceau pré-
sent dans le ROOT principal ou dans le premier
dossier. Pour sélectionner une vidéo ou images,
appuyez sur
et ensuite le type de fichier á
reproduire.
Externe Quelle wählen und ausweisen
(DVBT).
Sélectionner pour visualiser une source
externe (DVBT).
• Nach Eingabe von USB-SD, startet die Wiedergabe mit dem ersten Stück, das sich auf der
Haupt-ROOT oder im ersten Ordner befindet.
Um Videos oder Bilder zu wählen, erst
,
dann die gewünschte Datei wählen.
Répétition trace / chapitre / CD
Trace / chapitre précédent
Trace / chapitre successif
Pause / reproduction
Revient rapide
Avance rapide
Interrompt la reproduction
Stück/Kapitel/CD Wiederholen
Stück/Kapitel davor.
Stück/Kapitel danach.
Pause/Wiedergabe
Schnell Rückwärts
Schnell Vorwärts
Wiedergabe stoppen
• Insérer USB/SD card
• Touchez l’écran pour afcher le menu
Page 27
27
FR/D
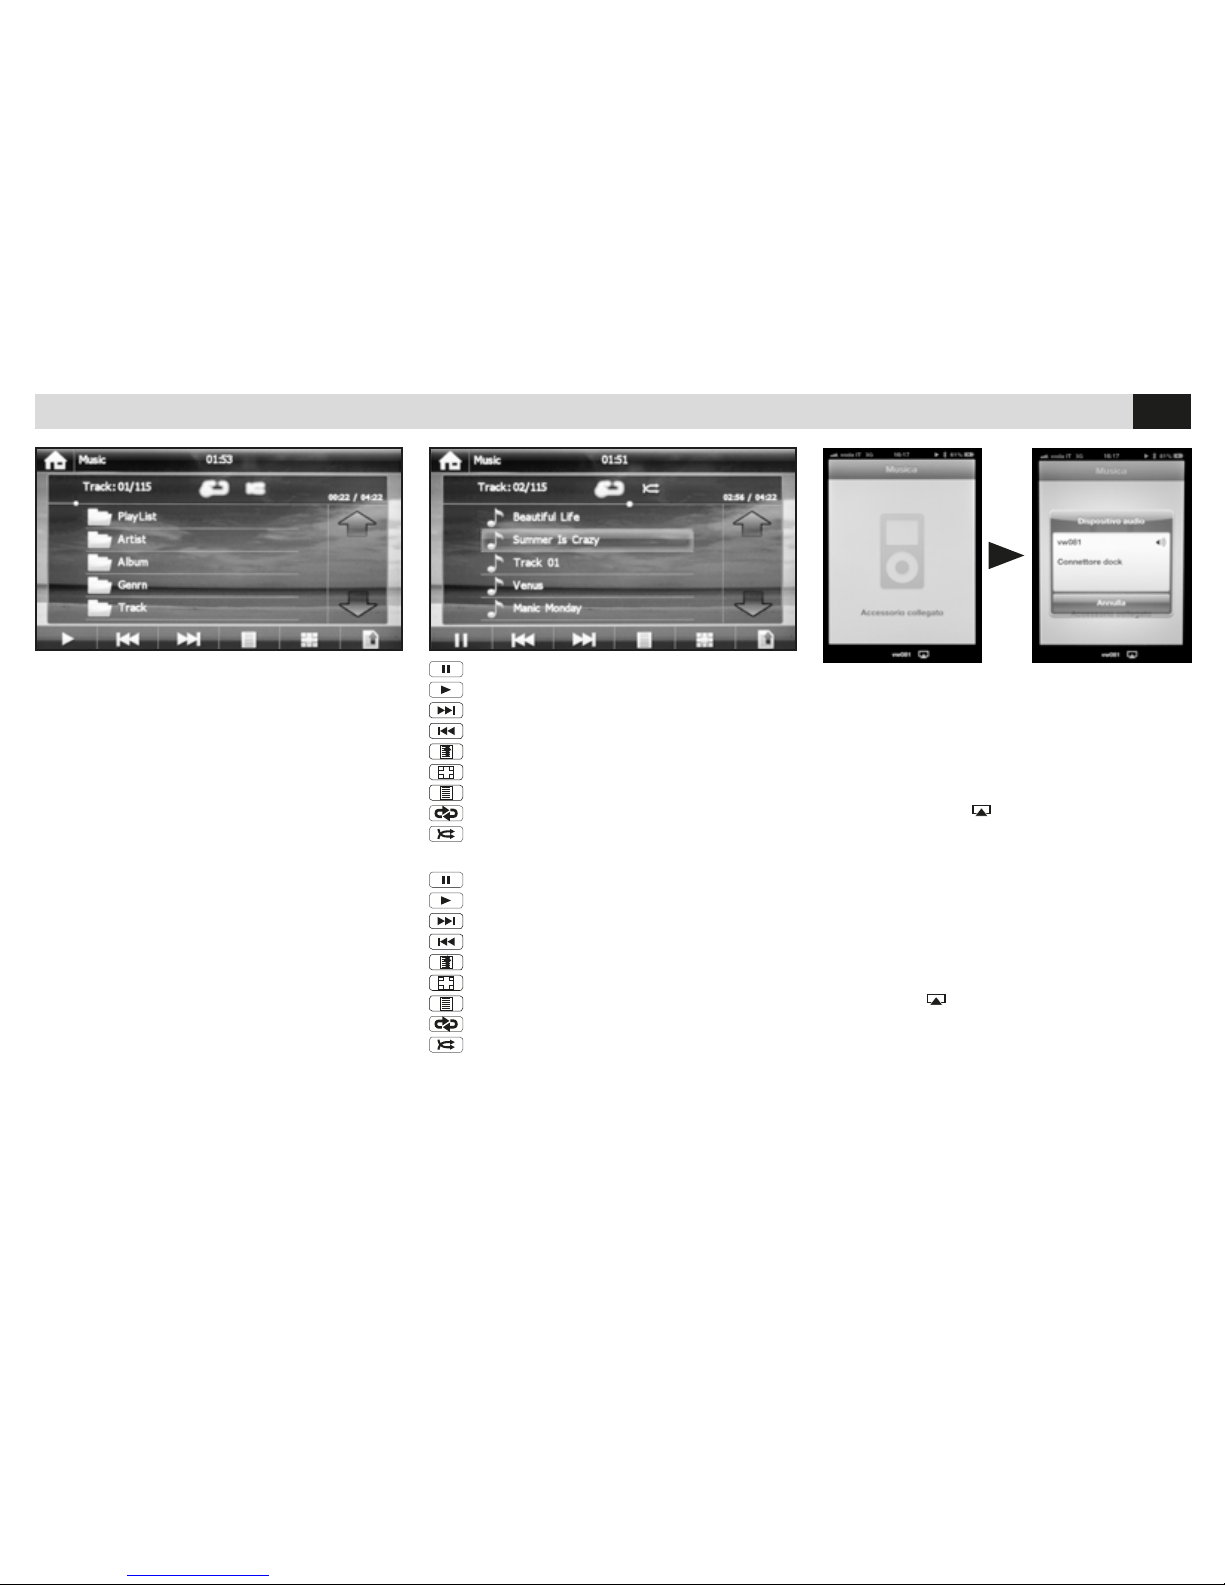
IPOD
Das Gerät ist kompatibel mit iPOD/iPHONE iOS
6.0 bis 10/2012 und ist NUR fuer die MusikWiedergabe gedacht.
Sobald das Gerät angeschlossen wird, erscheint
automatisch das iPOD-Fenster. Gewünschte
Musik wählen
Le produit supporte iPOD/iPHONE i0S 6.0 jusqu’au 10/2012 et reproduit seulement les traces
musicaux.
En branchant le dispositif, il visualise automa-
tiquement l’écran iPOD. Sélectionnez votre
musique.
ATTENTION:
Quand un iPhone est connecté via Bluetooth et
branché à travers un connecteur dock à l’autoradio, il faut sélectionner manuellement, dans
l’application MUSIQUE de l’iPhone, le dispositif
audio « Connecteur Dock » .
Appuyer sur l’icône
Et successivement sélec-
tionner la fonction « Connecteur Dock ».
Pause
Wiedergabe
Stück danach
Stück davor
Haupt-Menü
Sprung zum gewählten Stück
Infos zum Musikstück ausweisen
Wiederhole Stück / Album / Alles
Wahllose Wiedergabe
Pause
Reproduction
Trace successive
Trace précédente
Menu principal
Passer à la trace sélectionnée
Visualise les informations de la trace
Répétition Trace/Album/Tout
Reproduction aléatoire
WICHTIG:
Wenn das iPHONE über Bluetooth gekoppelt
und mittels Dock-Stecker am Autoradio angeschlossen ist, muss man, innerhalb der MUSIKApplikation des iPhones, die Audio-Funktion
“Dock-Stecker” von Hand wählen.
Auf die Ikone
drücken. Dann die Funktion
“Dock-Stecker” wählen.
Page 28
28
E
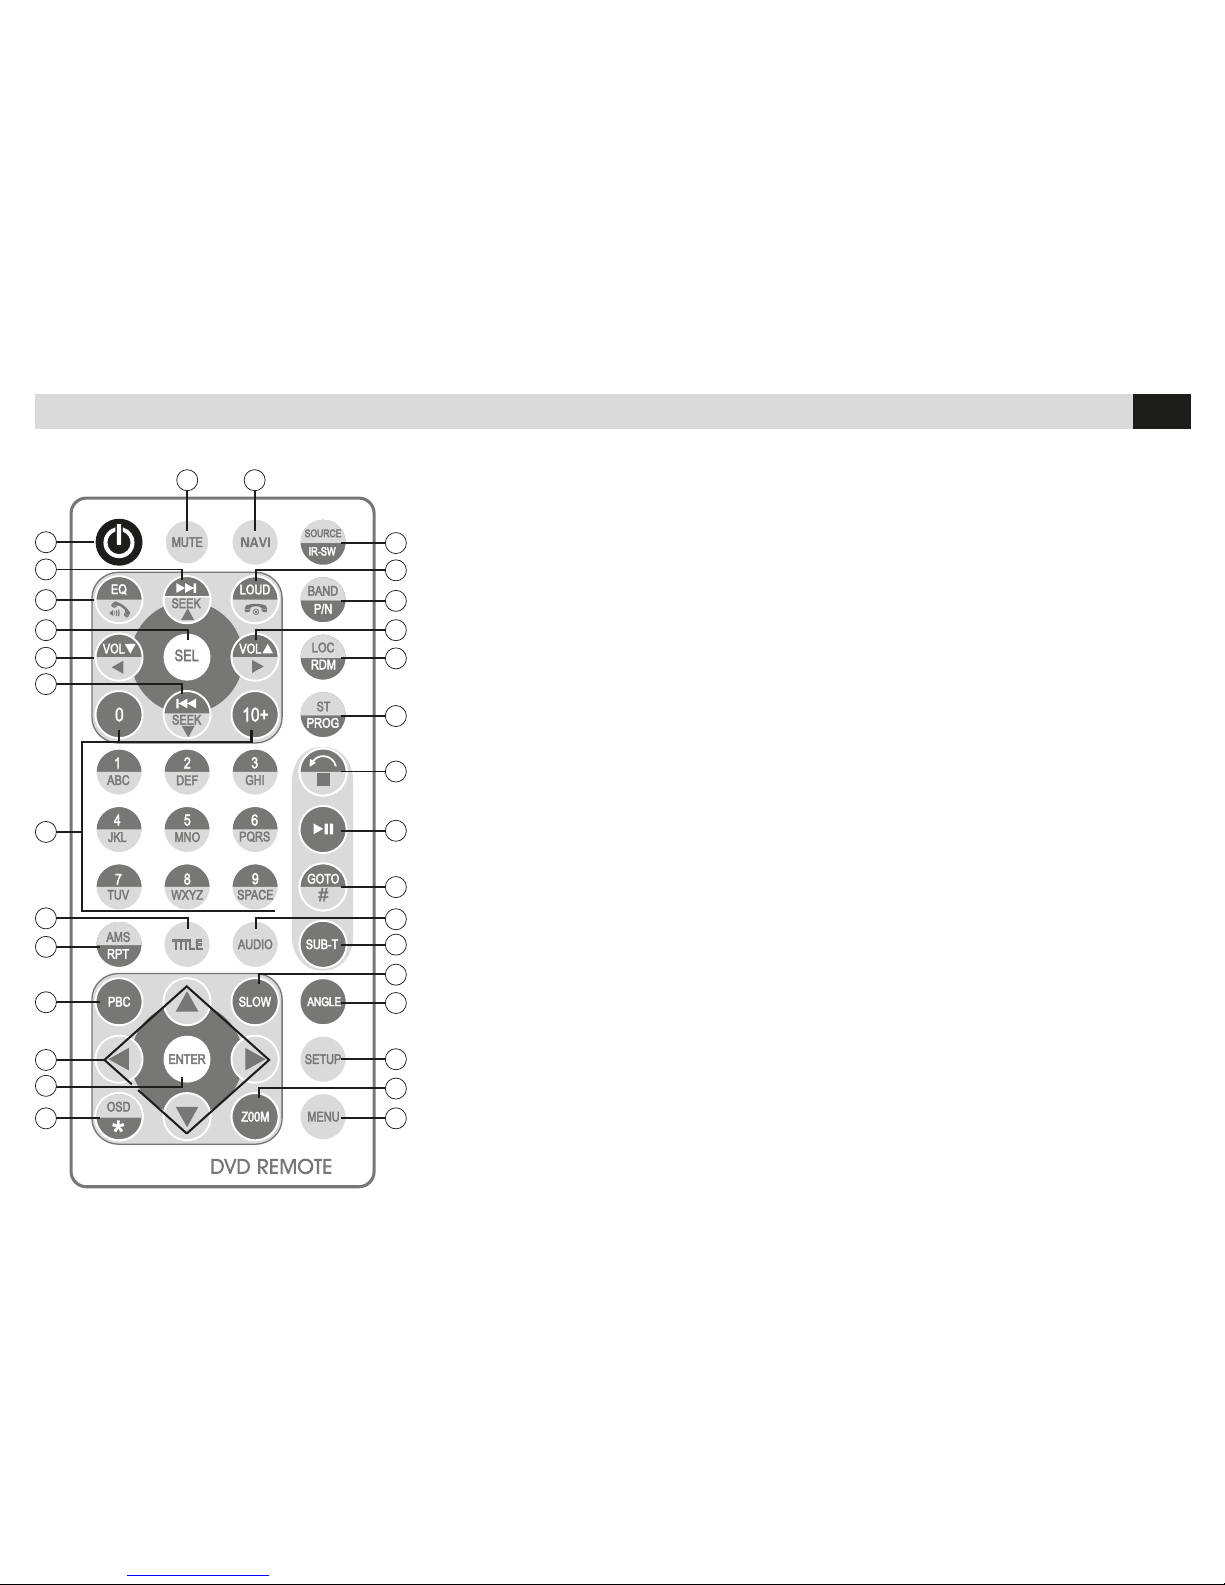
FUNCIONES MANDO A DISTANCIA
1 Encendido/Apagado.
2-6 Búsqueda emisoras / canciones / archivos.
3 Ecualizador / Contesta llamada.
4 Ajustes audio.
5-26 Volumen.
7 Teclado numérico.
8 Títulos DVD.
9 Auto-memorizaciones emisoras de radio.
Repetición canciones.
10 Menú títulos DVD.
11 Desplazamiento cursor en el menú DVD.
12 ENTER Confirma selección.
13 Visualización informaciones DVD.
14 Pasar de fuente a menú principal o al revés.
15 Zoom.
16 Ajustes DVD.
17 Cambio ángulo de visión DVD.
18 Reproducción ralentizada.
19 Cambio idioma subtítulos DVD.
20 Cambio idioma DVD.
21 Selecciona canción de reproducción.
22 Inicia-Interrumpe reproducción.
23 Interrupción reproducción.
24 Radio Stereo-Mono.
Programación reproducción.
25 Radio Local-Distante.
Reproducción aleatoria.
27 Banda radio.
28 Loudness / Termina-rechaza llamada
29 Selección fuente.
30 Navegación.
Visualización tiempo reproducción.
31 Silencia audio.
1
3
5
7
2
6
12
9
14
16
17
19
20
21
22
23
24
25
27
29
31 30
15
18
4
8
13
10
26
28
11
ATENCIÓN: El art. VM083 no se suministra con el mando a distancia.
Page 29
29
E
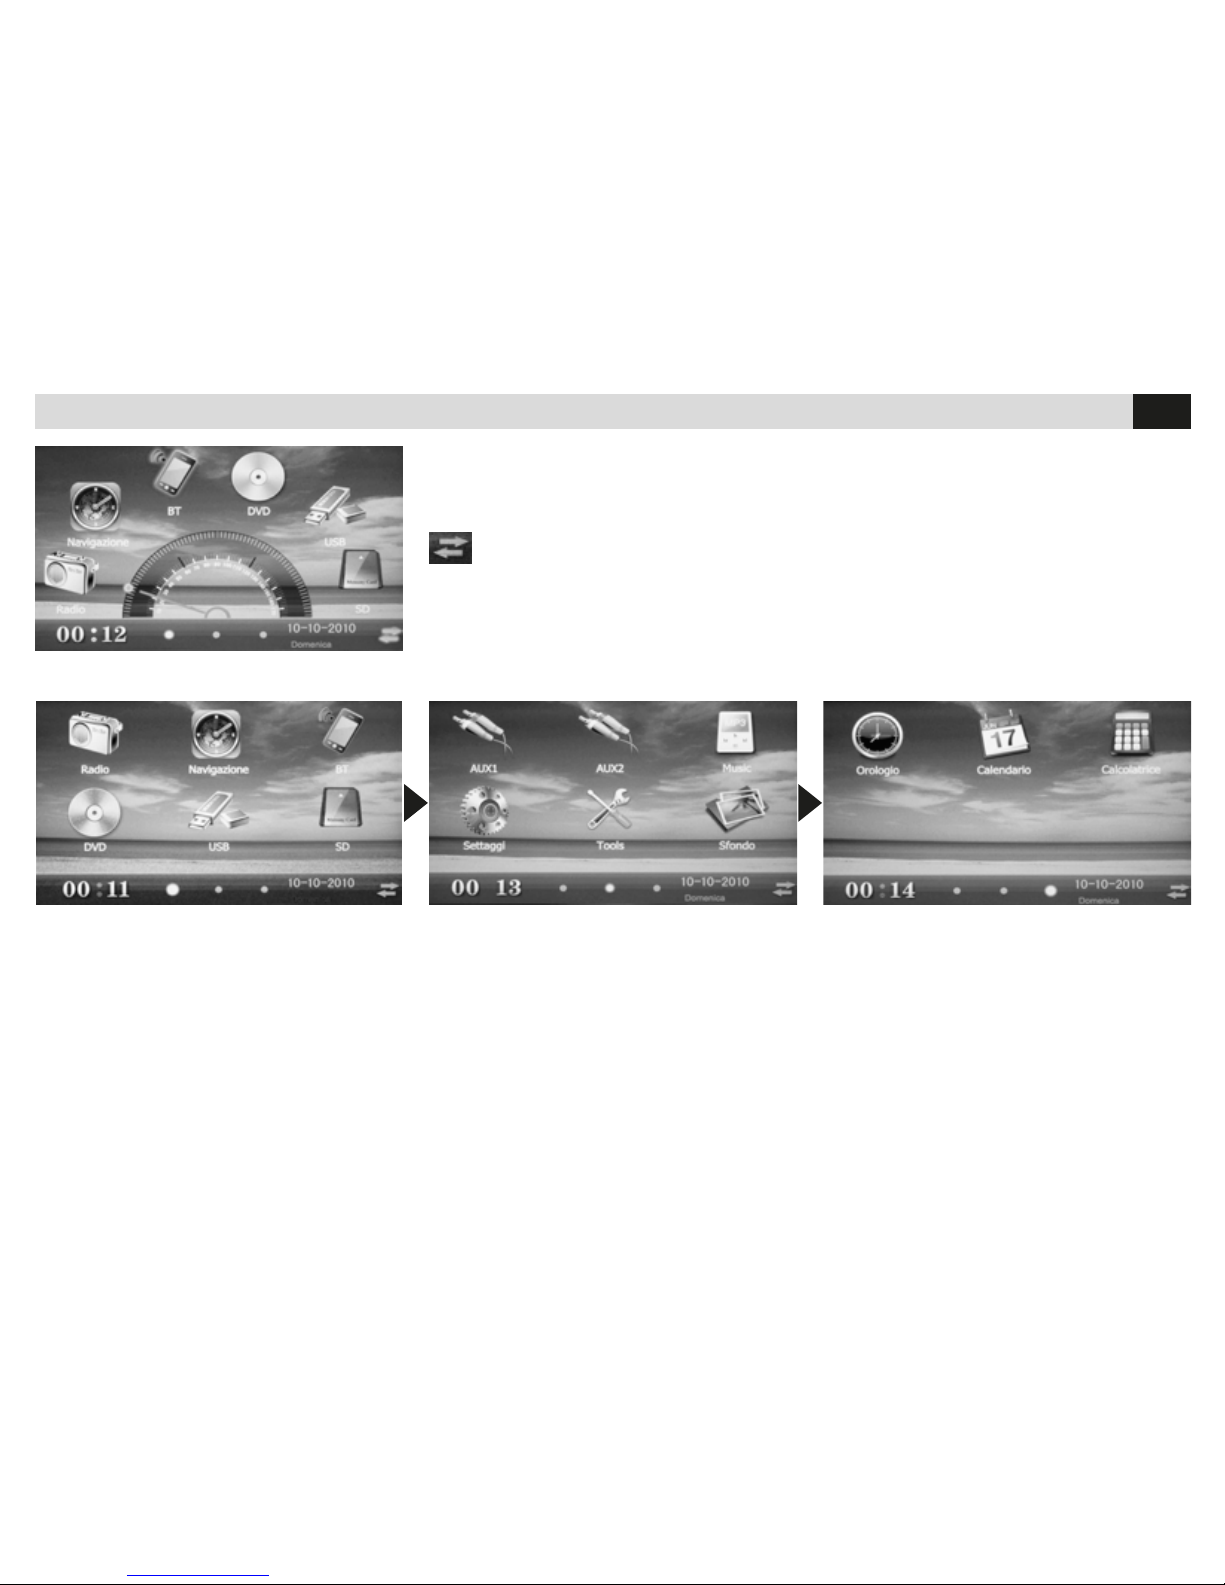
MENU
Menú tradicional. Para desplazarse desde un panel a otro tocar arrastrando la pantalla con un dedo o el lapiz en dotación.
Tocando los iconos se selecciona la fuente o la función deseada.
El menú principal está disponible en 2 versiones.
Una versión con menú giratorio con arrastre.
La otra versión con menú tradicional representado mediante tres ventanas
Tocar para cambiar el interfaz grafico.
Page 30
30
E
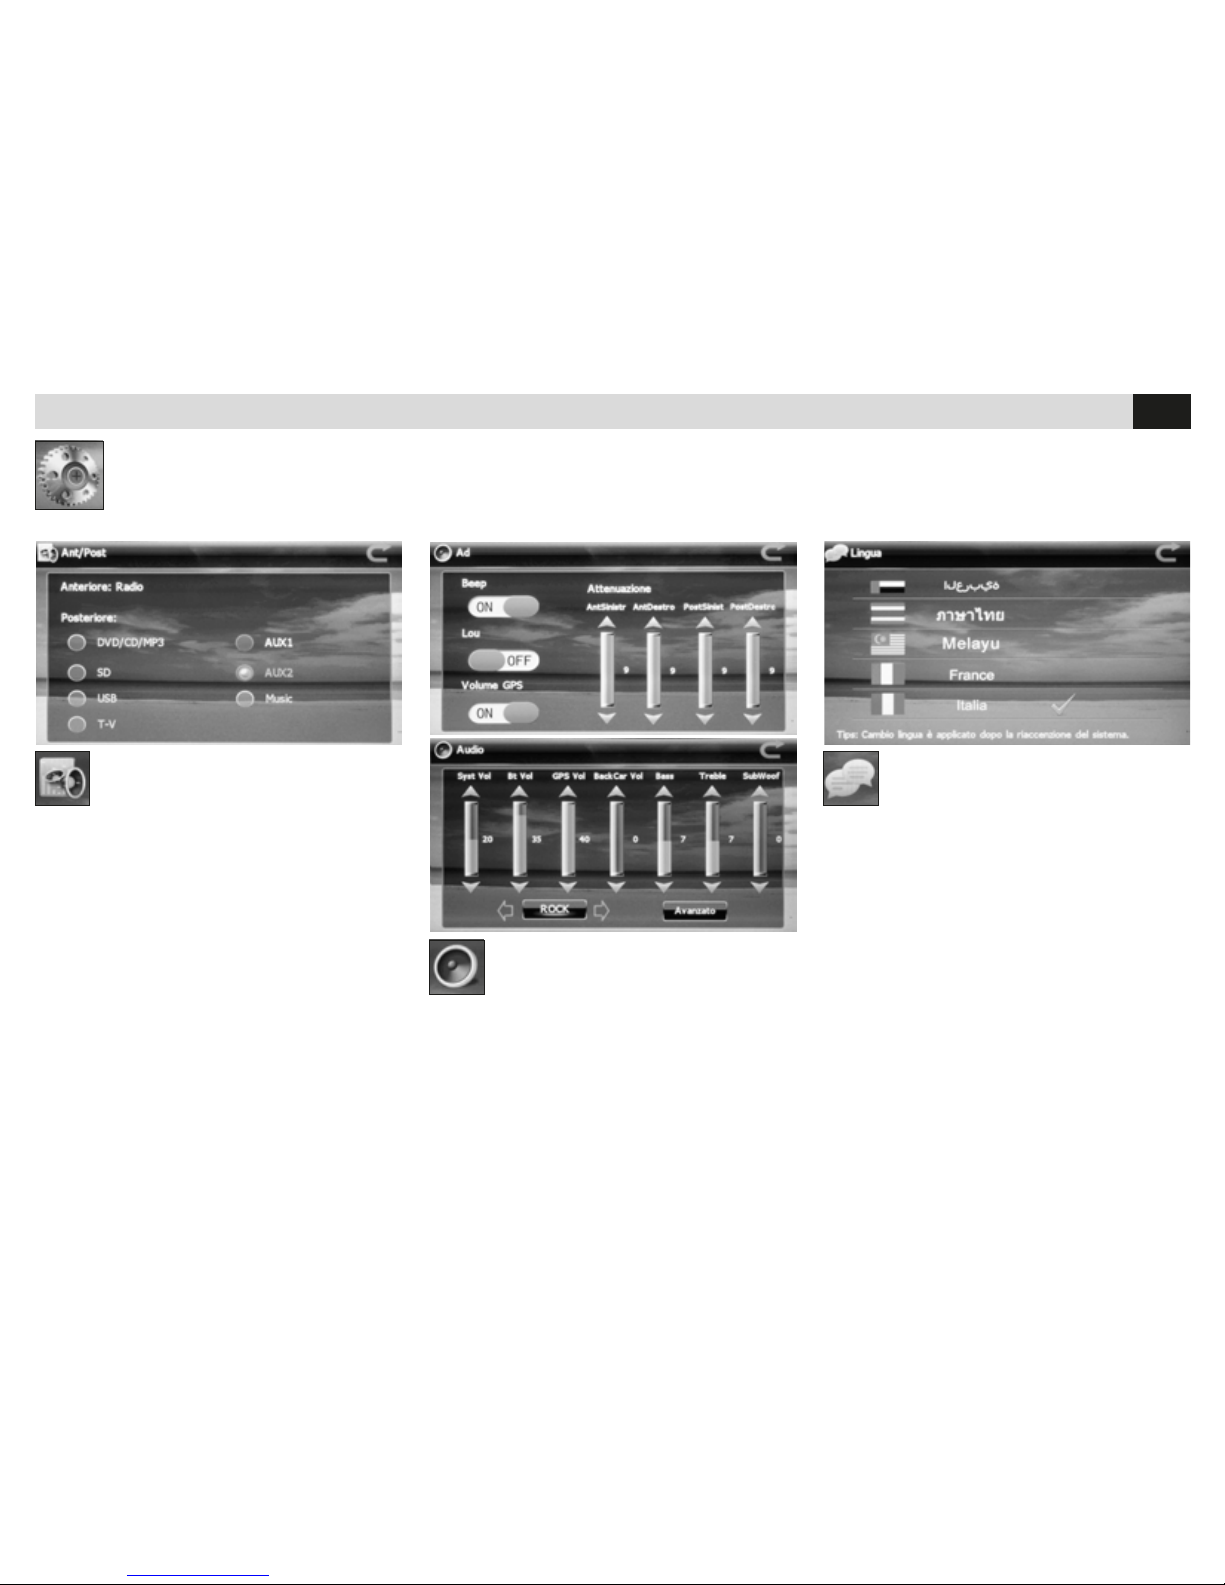
SELECCIÒN
FUENTE TRASERA
• Congura la fuente de reproducción para la
sección audio/video posterior.
Es posible reproducir en la salida audio/video
posterior una fuente diferente de aquella
anterior.
La fuente anterior que se puede reproducir tiene
que ser Radio o Navegación.
AJUSTES AUDIO
• Ajustes volumen de las fuentes.
• Selección modo ecualización.
• Ajustes fader, loudness, sonido pantalla táctil.
CONFIGURACION IDIOMA
• Congura el idioma de los menús en la
pantalla.
AJUSTES DEL SISTEMA
Ajustes: fuente posterior, ajuste audio, idioma, área radio, brillo pantalla, archivo, navegación, calibración pantalla, zona huso horario, fecha y
hora, fondo de pantalla, logotipo inicial.
Page 31
31
E
AJUSTES DEL SISTEMA
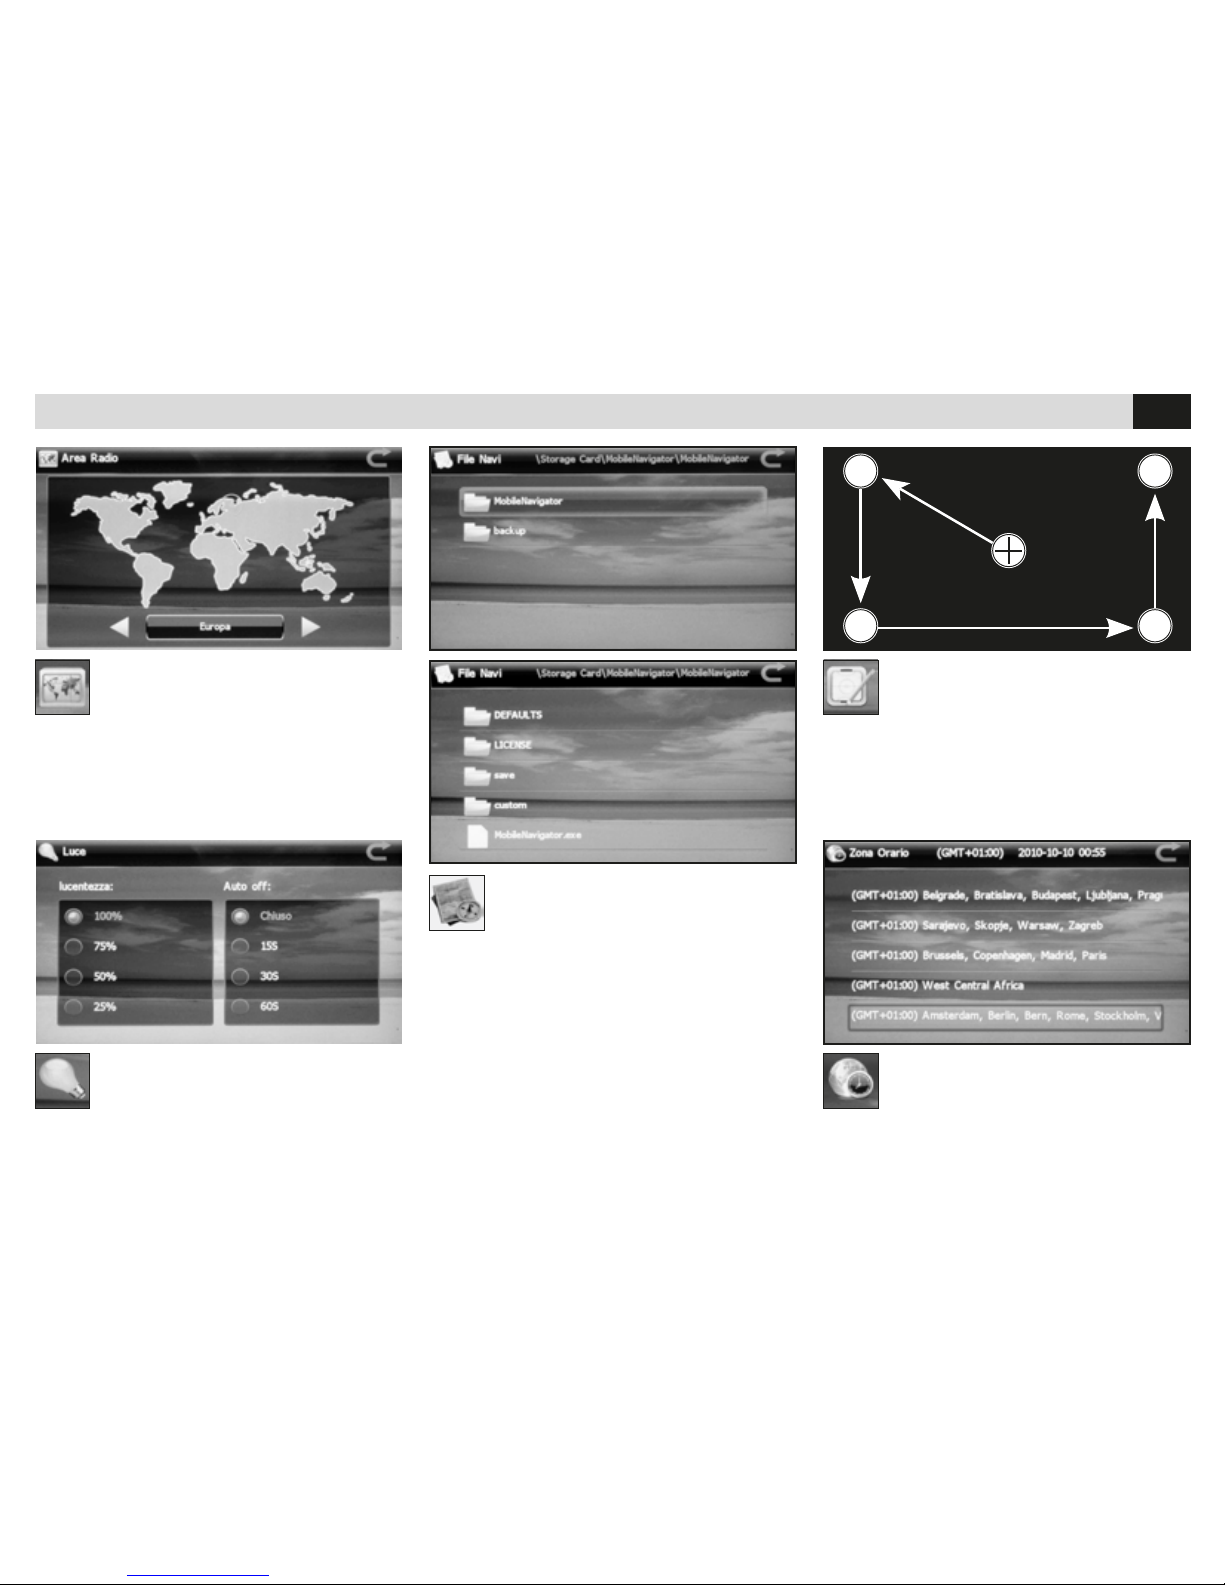
AREA RADIO
• Selecciona la zona de escucha de la radio FM
BRILLO PANTALLA (LUZ)
• Brillo: Ajusta el brillo de la pantalla
(100%-75%-50%-25%)
• Auto-Off: Apaga la pantalla según el tiempo
elegido (cerrado-15-30-60 s.)
ARCHIVOS NAVEGADOR
• Después de introducir la tarjeta con los mapas
de navegación
IGO NV995 (OPCIONAL) congura el archivo del
software para ejecutar.
CALIBRACION
• Efectúa la calibración de la pantalla táctil.
Utilizar el lapiz en dotación y tocar la pantalla en
el simbolo “+” en el centro de la pantalla.
Continuar con la secuencia hasta su completa
calibración.
ZONA HORARIA
• Congura el huso horario para la correcta
visualización de la hora.
Dopo la calibrazione, cliccare sullo
schermo per uscire, alrtimenti la
calibrazione non verrà salvata.
Page 32
32
E
AJUSTES DEL SISTEMA
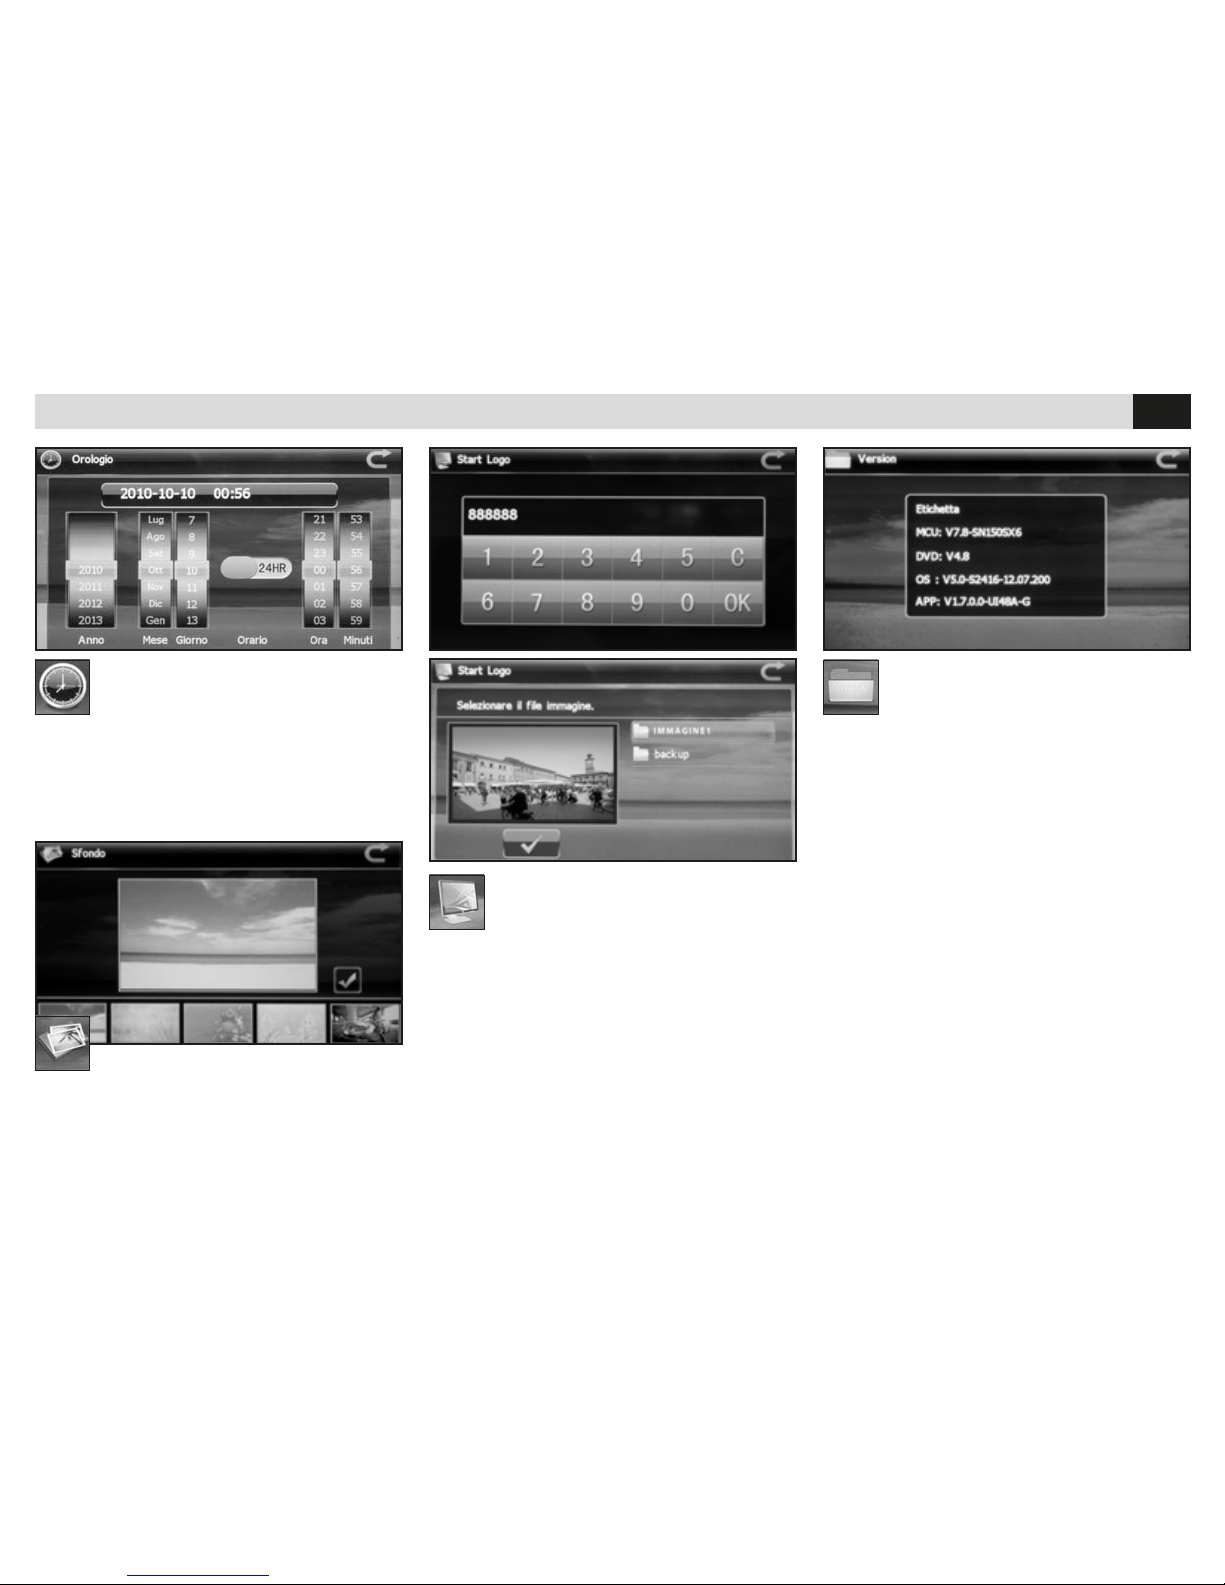
RELOJ
• Conguración fecha y hora.
FONDO DE MENU
• Cambia el fondo de los menús.
LOGOTIPO DE INICIO
• Grabar el archivo en una tarjeta micro SD e
introducirla en la ranura
de navegación. Después de introducir la
contraseña 888888 cargar un archivo de imagen
con resolución 800x480 pixels en formato BMP.
VERSION
• Visualiza la versión del software y las informaciones del hardware.
Page 33
33
E
RADIO
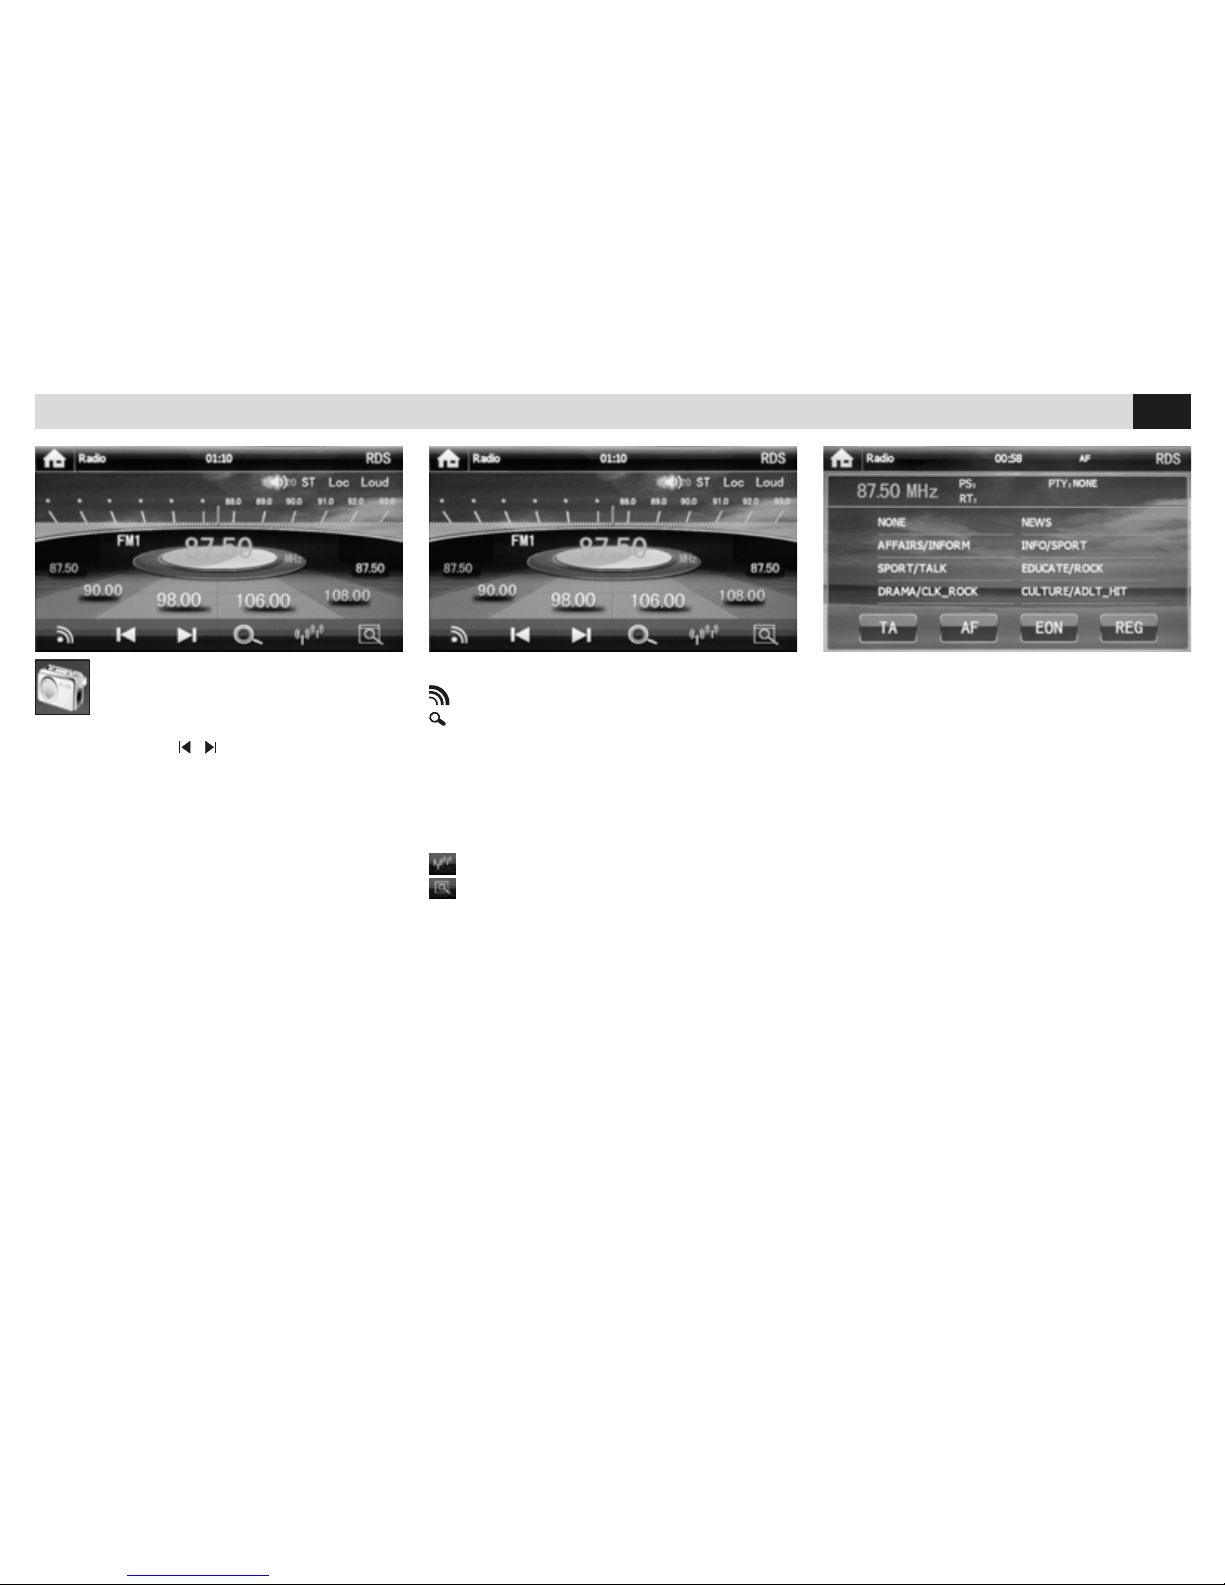
BUSQUEDA EMISORAS
• Teniendo presionado durante más de un
segundo las teclas
/ en el mando a distancia
o en la pantalla, la unidad buscara
automáticamente las emisoras.
Para la búsqueda manual presionar brevemente.
FUNCIONES RADIO
Selecciona Bandas Radio 3 FM - 2 AM.
Escansión de las frecuencias memorizadas.
Para memorizar presionar directamente la frecuencia en la posición deseada.
Para re-llamar una emisora presionar sobre el
nombre correspondiente.
LOUD Exaltación de las bajas frecuencias.
RDS Configuración avanzadas RDS.
Selecciona las emisoras locales y distantes.
10 Segundos de escucha para cada emisora
memorizada.
FUNCIONES AVANZADAS RDS
• AF Búsqueda de una frecuencia alternativa
con información de la emisora en la pantalla.
• TA Informaciones sobre el trafico.
• PTY Selecciona el tipo de programa musical.
Page 34
34
E
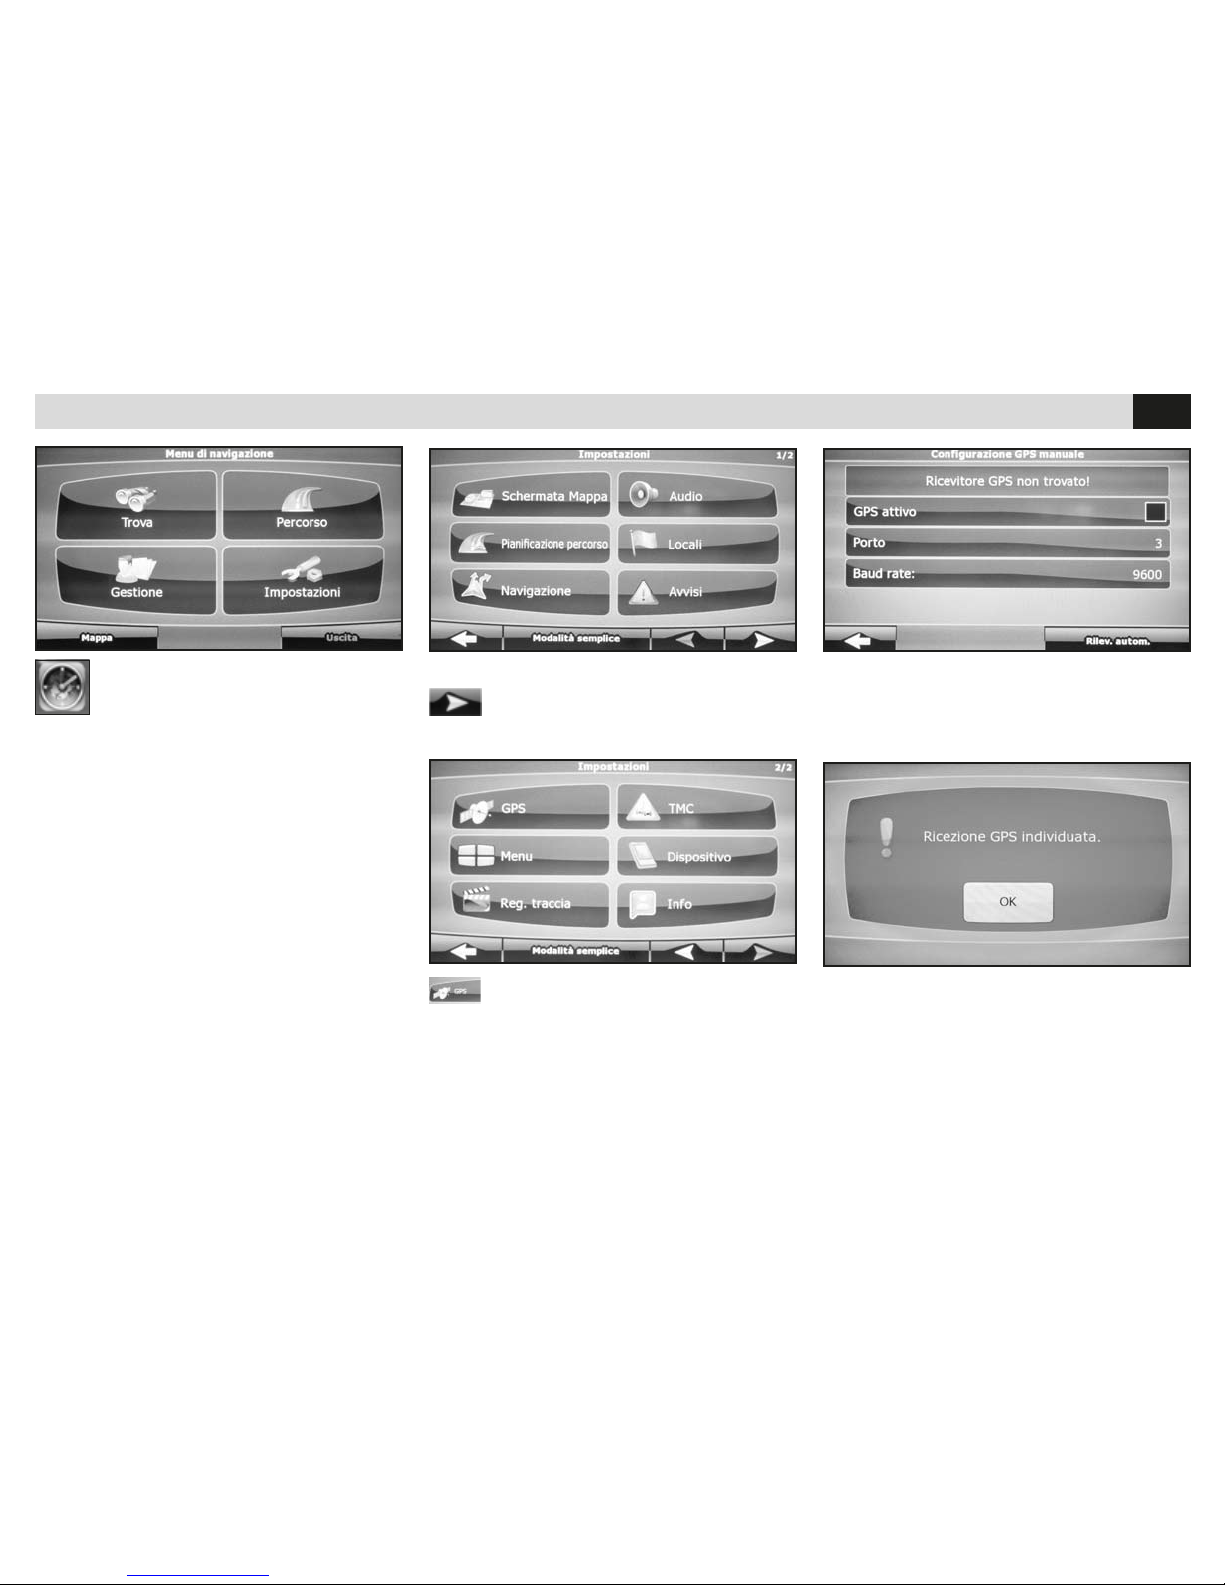
CONFIGURACION MODULO GPS
• Pasa a la segunda ventana
NAVEGACION
En la primera activación de la cartografía iGO
(opcional) seleccionar el archivo ejecutable
mobilenavigator.exe en los ajustes.
• Acceder al menú ajustes del software.
• Presionar GPS
CONFIGURACIONES GPS
• Presionar en la casilla de GPS ACTIVADO
A continuación en DETECCIÓN AUTOMATICA
• Esperar la adquisición de los datos y presionar ok.
• Tomar como punto de referencia el manual
iGO para las instrucciones sobre el software de
navegación.
Page 35
35
E
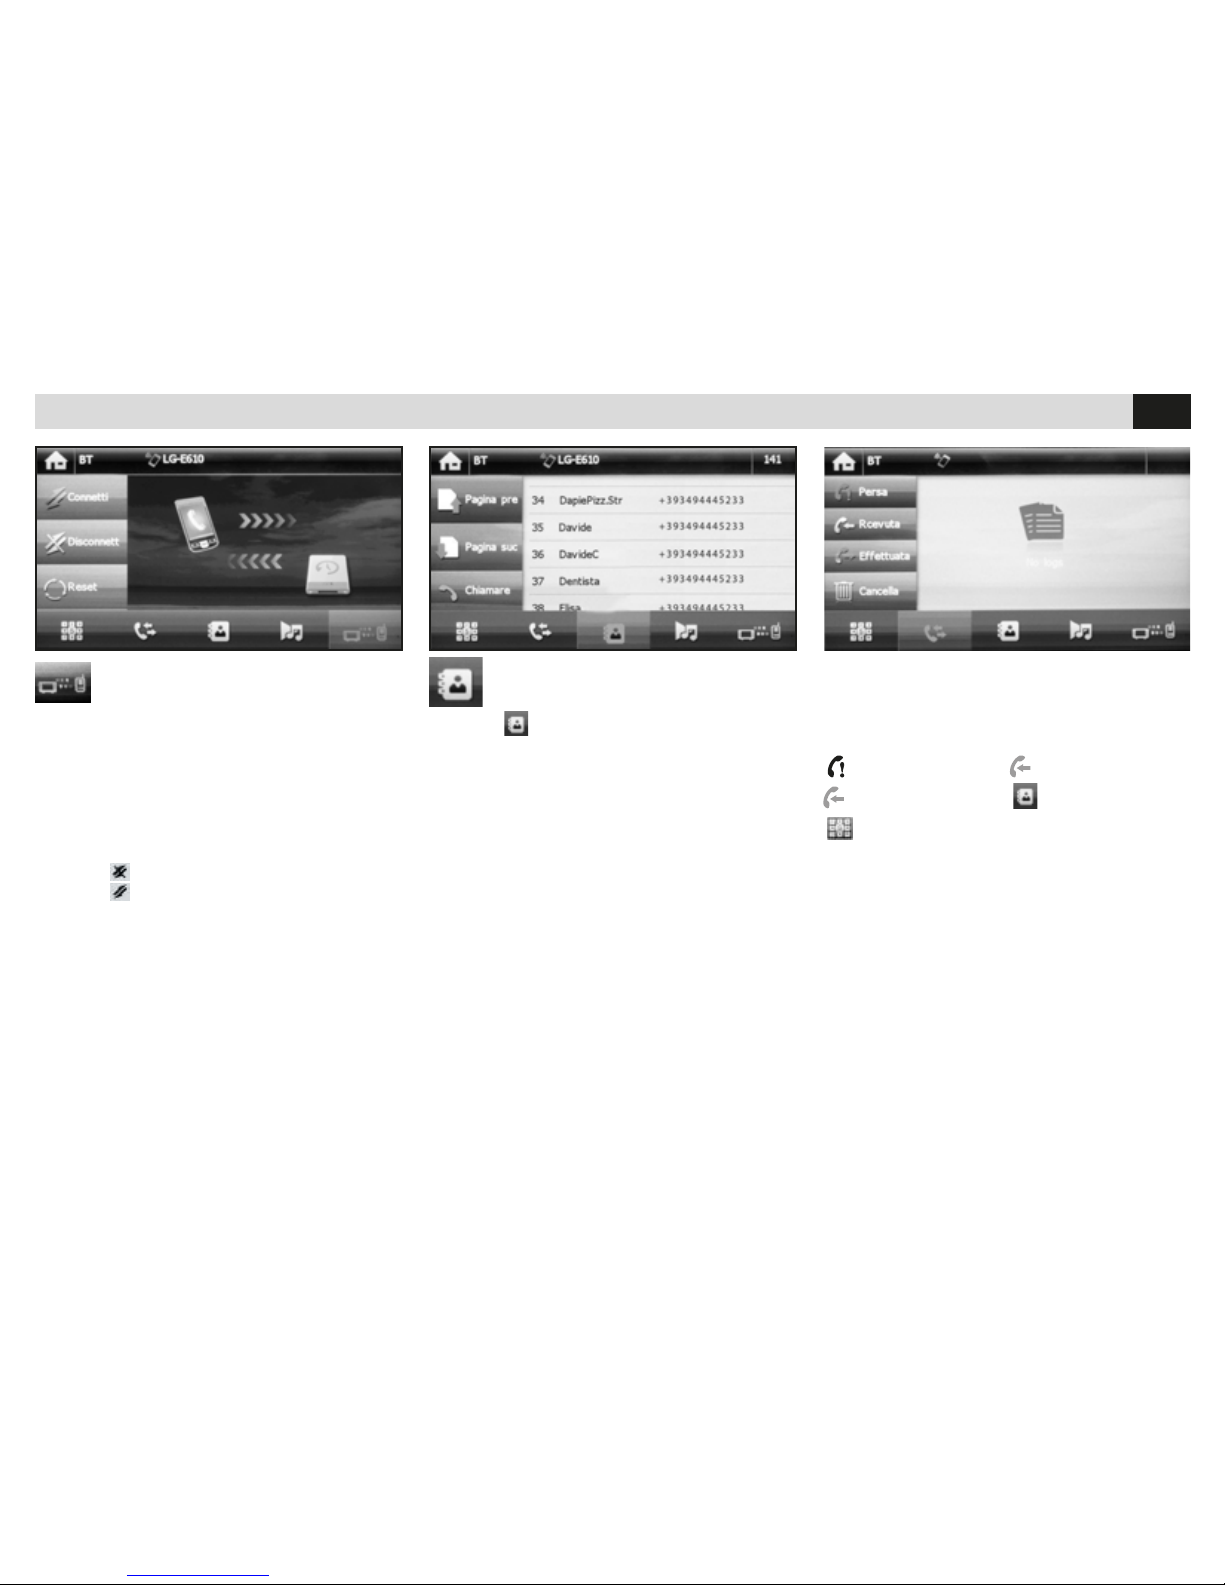
CONFIGURACIONES BLUETOOTH
SINCRONIZACION CONTACTOS
Presionar
para acceder a los ajustes.
Automáticamente los contactos del teléfono
serán descargados en la memoria del autorradio.
El tiempo necesario para esta operación varía en
base al número de contactos.
EMPAREJAMIENTO TELEFONO
Es posible emparejar hasta8 teléfonos.
• Activar la función bluetooth en el teléfono y
buscar nuevos dispositivos.
• Seleccionar VM... en la lista dispositivos,
Introducir la password 0000 cuando se indica.
Una vez emparejado aparecerá el nombre del
teléfono.
Presionar
para desconectar el teléfono.
Presionar
para reconectar.
LLAMAR DESDE LA PANTALLA
• Seleccionar Bluetooth desde el menú principal.
• Presionar uno de los iconos presentes en la
pantalla para llamar desde unos listados.
Llamadas pérdidas llamadas recibidas
Llamadas efectuadas contactos telefónico,
llamadas desde el teclado numérico.
Page 36
36
E
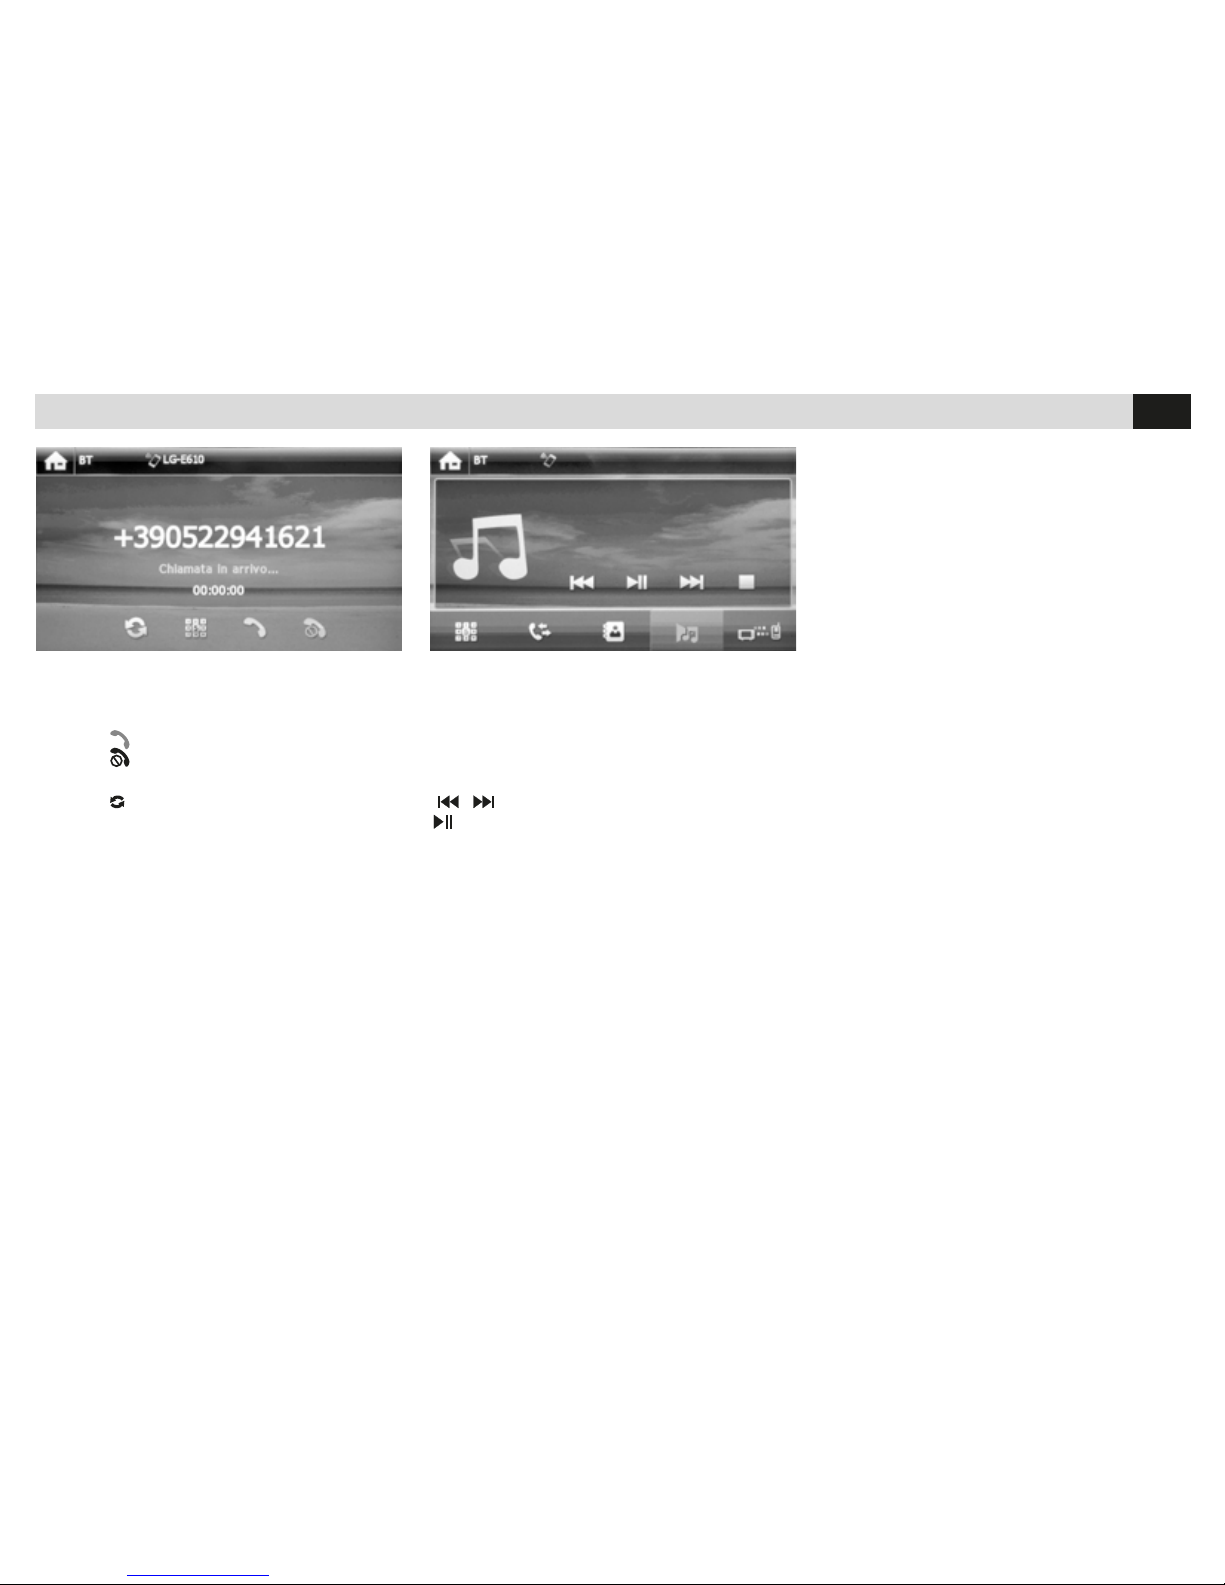
RECIBIR UNA LLAMADA
Cuando hay una llamada, el VM... pasa
automáticamente en modo bluetooth.
Presionar
para contestar.
Presionar
para terminar la conversación o
para rechazar la llamada.
Presionar
para excluir /activar el manos libres.
REPRODUCCION MUSICA BLUETOOTH
Si el teléfono conectado soporta el perfil AD2P
es posible escuchar los temas musicales.
Si el dispositivo soporta AVRCP será posible
controlar los temas musicales directamente
desde la pantalla táctil
/ Pista precedente/siguiente.
Inicia/interrumpe la reproducción.
CONFIGURACIONES BLUETOOTH
Page 37
37
E
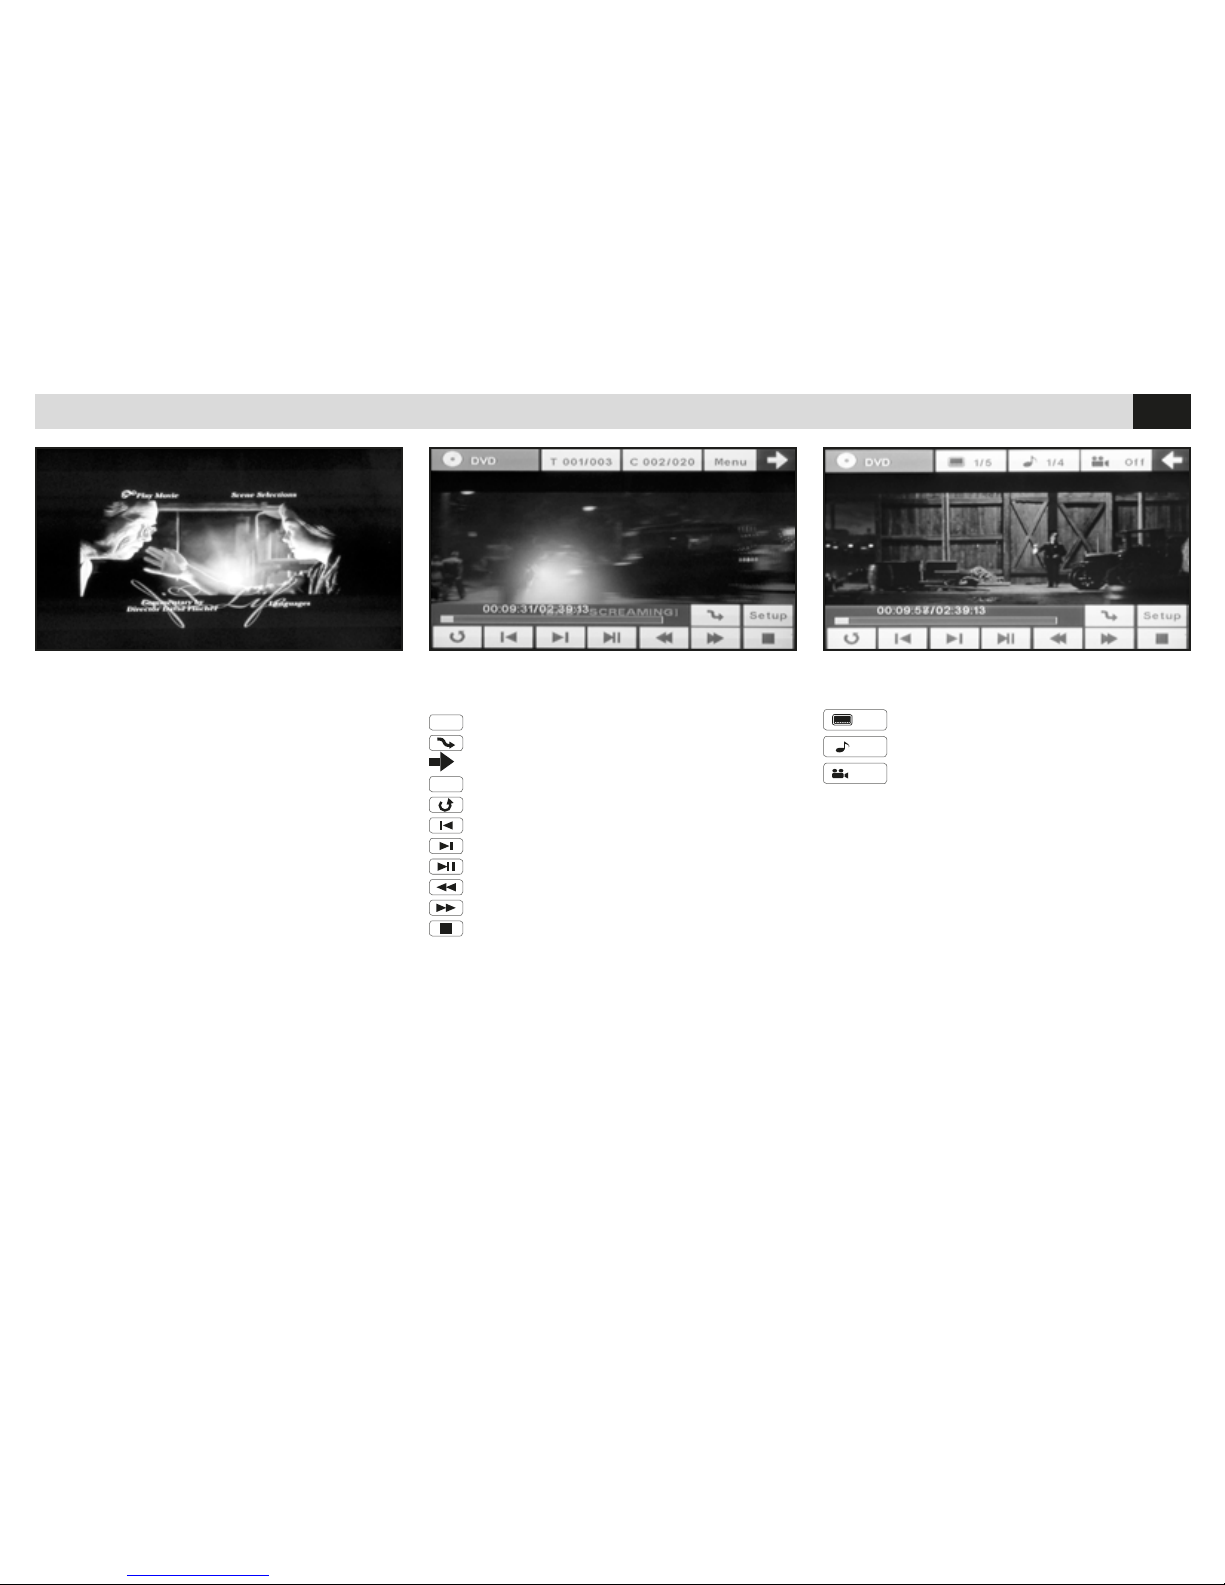
DVD VIDEO
REPRODUCCION DVD
• Introducir USB/SD card
• Tocar la pantalla para visualizar el menú
FUNCIONES PRESENTES
EN MODO DVD VIDEO
Menu
Menú principal DVD
Reproducción aleatoria
Pasa al segundo menú ajustes DVD
Setup
Acceder a la configuración de DVD/USB/SD
Repetición pista/capitulo/disco
Pista/capitulo precedente
Pista/capitulo siguiente
Pausa/reproducción
Atrás rápido
Avance rápido
Interrumpe la reproducción
FUNCIONES PRESENTES
EN MODO DVD VIDEO
Subtítulos DVD
Audio DVD
Cambia ángulo de visión DVD
1/2
1/2
OFF
Page 38
38
E
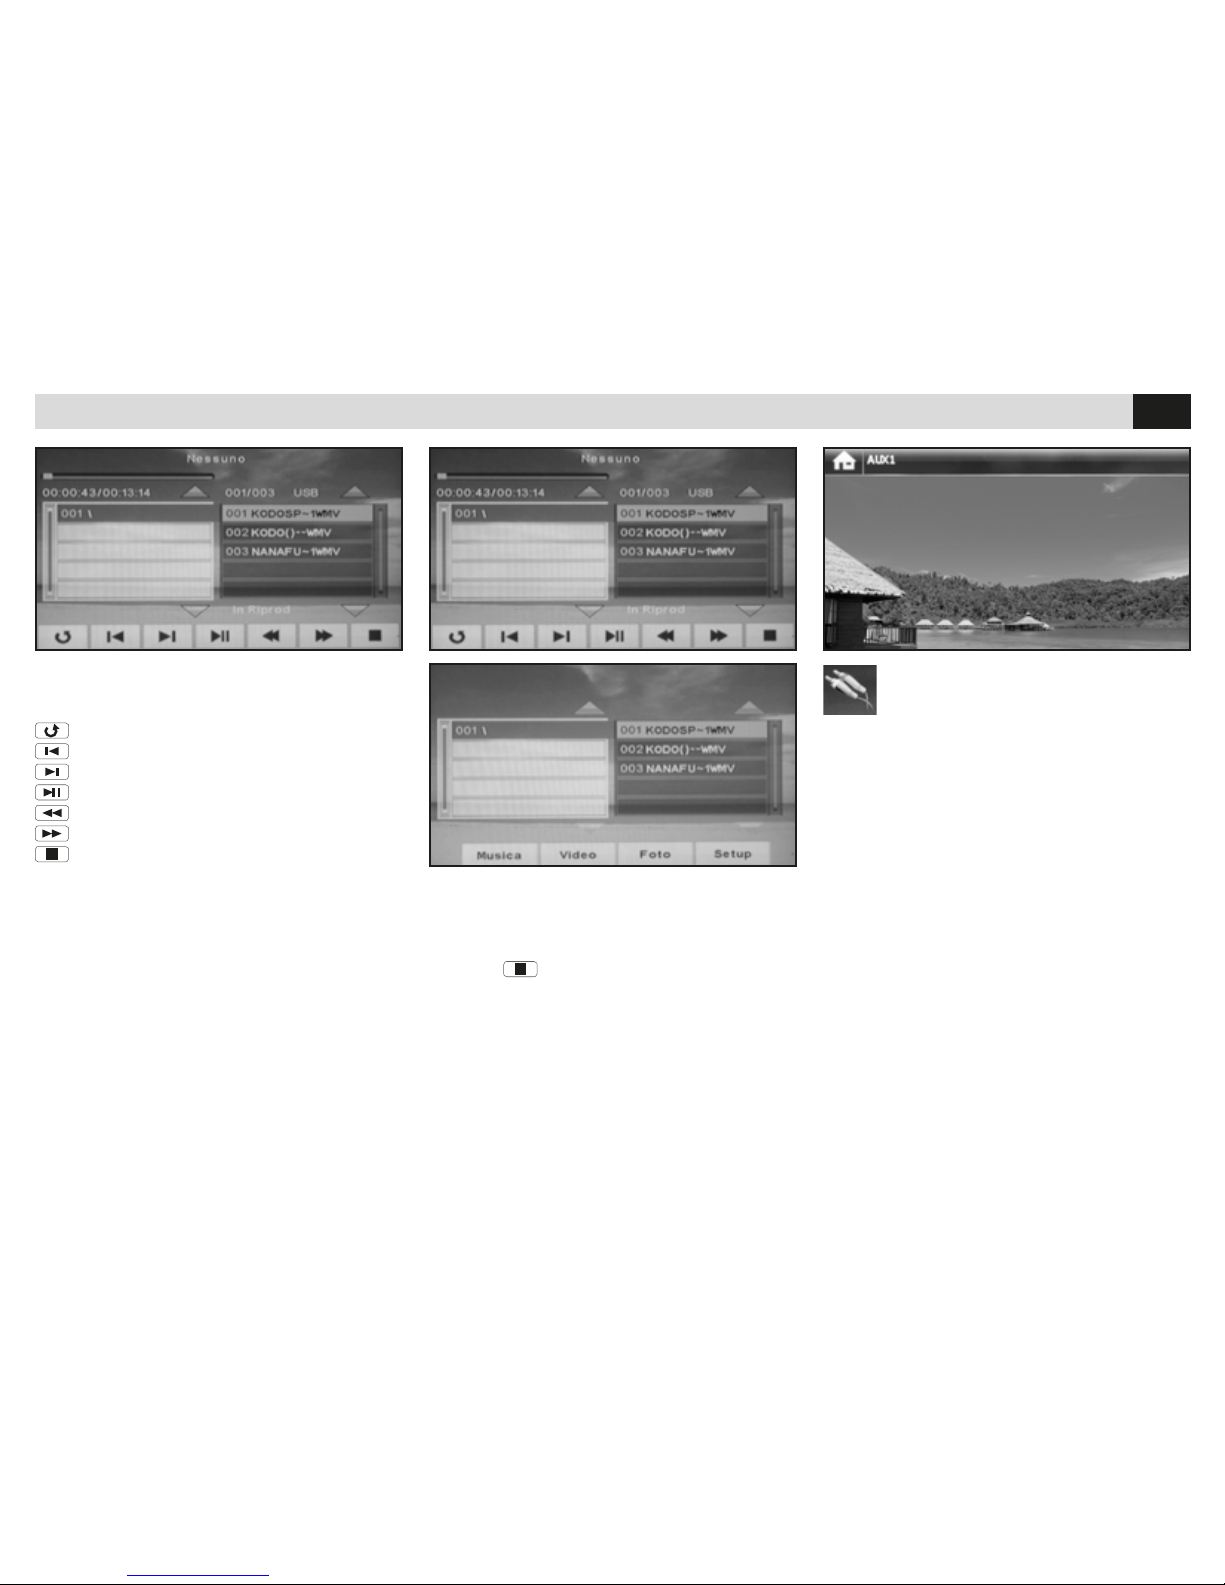
USB-SD CARD • AUX-IN
• Cuando se introduce la USB-SD CARD la
reproducción se inicia con la primera pista
presente en la ROOT principal o en la primera
carpeta. Para seleccionar video o imágenes
presionar
a continuación seleccionar el tipo
de archivo que se desea reproducir.
Seleccionar para visualizar una fuente
exterior (DVBT).
Repetición pista/capitulo/disco
Pista/capitulo precedente
Pista/capitulo sucesivo
Pausa/reproducción
Atrás rápido
Avance rápido
Interrumpe la reproducción
• Introducir una USB / SD Card
• Tocar la pantalla
Page 39
39
E
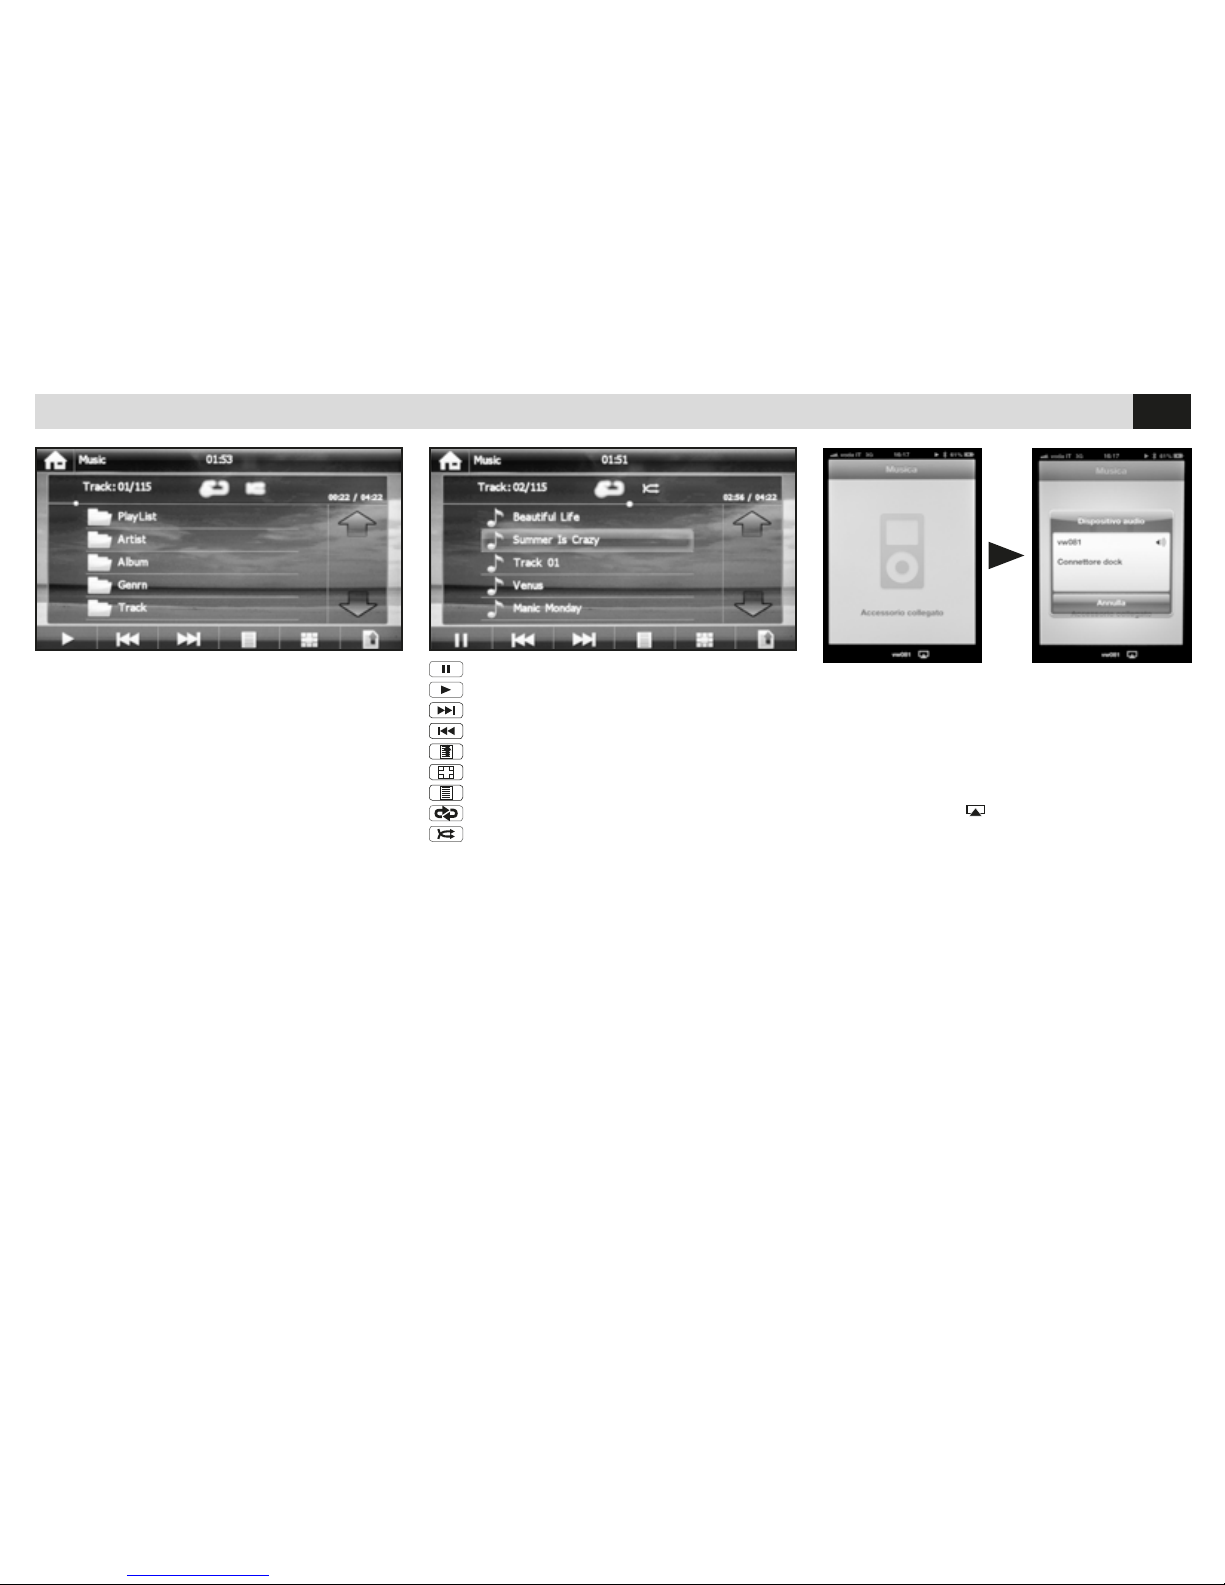
IPOD
El producto es compatible con iPOD/iPHONE
iOS 6.0 hasta el 10/2012 y reproduce solo
fragmentos musicales.
Conectando el dispositivo será visualizada
automáticamente la ventana iPOD seleccionar
la propia música.
ATENCION:
Cuando un iPHONE esta emparejado vía
bluetooth y conectado mediante conector
dock a la autoradio es necesario seleccionar
manualmente la aplicación MUSICA del iPhone
el dispositivo audio “Conector Dock”.
Presionar el icono
y sucesivamente
seleccionar la voz “Conector Dock”.
Pausa
Inicia
Canción siguiente
Canción precedente
Menú principal
Pasa a la canción seleccionada
Visualiza informaciones sobre la canción
Repeticiones canción / Álbum / Todo
Reproducción Aleatoria
Page 40
S.p.A. - Via F.lli Cervi, 167/C • 42124 Reggio Emilia (Italy) • Tel. ++39 0522 941621 • Fax ++39 0522 942452 • www.phonocar.com • e-mail:[email protected]
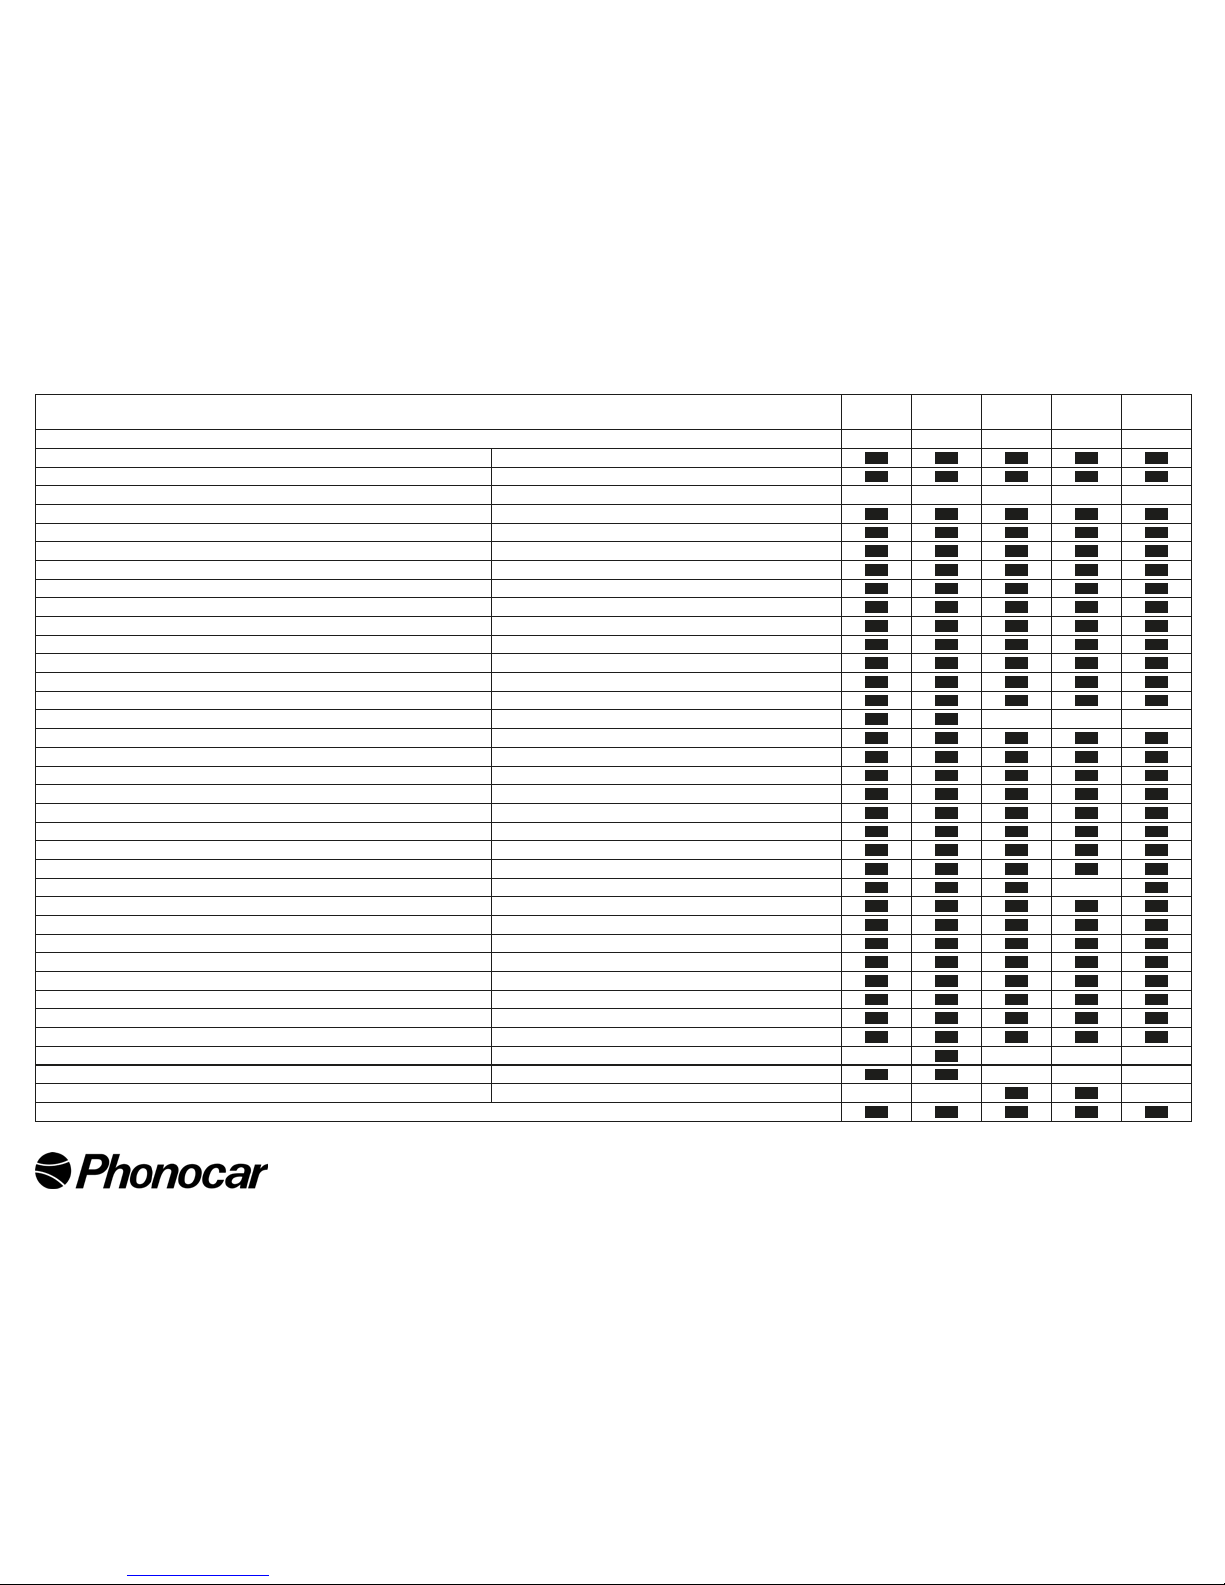
CARATTERISTICHE TECNICHE • TECHNICAL FEATURES
VM081
VM081C
VM082 VM083 VM085
• Monitor TFT/LCD WIDE SCREEN 8” 8” 6,5” 7” 7”
• Touch screen con modalità trascinamento schermata Sliding graphic interface
• Display alta luminosità risoluzione 800x480 High brightness resolution display 800x480
• Navigazione. Mappa opzionale Navigation maps optional NV995 NV995 NV995 NV995 NV995
• Dual zone (musica e video durante la navigazione) Audio and video dual zone navigation
• Sistema colore NTSC/PAL Colour system NTSC/PAL
• Formati di visualizzazione 16:9, 4:3 letter box e 4:3 PAN SCAN Conforming to 16:9, 4:3 letter box and 4:3 PAN SCAN
• Importa immagini per salvaschermo o sfondo Capture images to display as screen saver and background
• Funzioni visibili su schermo (OSD) Functions visible on screen (OSD)
• Menù, Sottotitoli e Audio multilingue su DVD Multiple language menu, subtitle and audio on DVD
• Connessione iPOD e iPHONE-(no al 4S) iPOD e iPHONE connection (up to 4s)
• Streaming audio Bluetooth A2DP Streaming audio bluetooth A2DP
• Sincronizzazione rubrica Phone-Book download
• Chiamate e risposte anche durante la navigazione Bluetooth calling on GPS navigation
• Comandi al volante Steering-wheel commands
• Antenna FAKRA diversity Diversity aerial fakra
• Sintonizzatore Radio / Tuner FM-AM-RDS-EON con regolatore sensibilità FM-AM-RDS-EON tuner with adjustable sensitivity
• 24 Stazioni memorizzabili in FM/AM Memory for 24 FM/AM stations
• Memorizzazione dell’ultima posizione Last position memory function
• Protezione elettronica contro le vibrazioni Electronic shock protection system
• 4 velocità d’avanzamento 4 Speed scan
• 1 ingresso retrocamera 1 Rear camera input
• 1 Porta USB anteriore 32 GB max multimediale 1 Front multimedia USB port 32 GB max
• 1 Porta USB posteriore multimediale 1 Rear multimedia port usb
• 1 Slot SD-Card 8 GB max multimediale 1 Multimedia sd-card slot 8 gb max
• 1 Slot SD-Card per navigazione 1 Micro sd-card slot for navigation
• 4+1 uscite audio preamplicate 4+1 Pre audio output
• 4 Uscite audio amplicate 45 W 4 Audio amplied output 45 w
• 2 uscite video 2 Video output
• 2 ingressi audio 2 Audio input
• 1 ingresso video 1 video input
• Microfono esterno External microphone
• Accessione e spegnimento come autoradio di serie Original car-radio power switching
• Visualizzazione Climatronic e Parking sensors Climatronic and Parking sensors
• Stabilizzatore di tensione Tension stabilizer
• Temporizzatore sottochiave Injection Key timer
• Compatibilità / Compatibility DVD, VCD, CD, MP3, MP4, AVI, DIVX, CD-R/WMA, JPEG
 Loading...