

Page 1
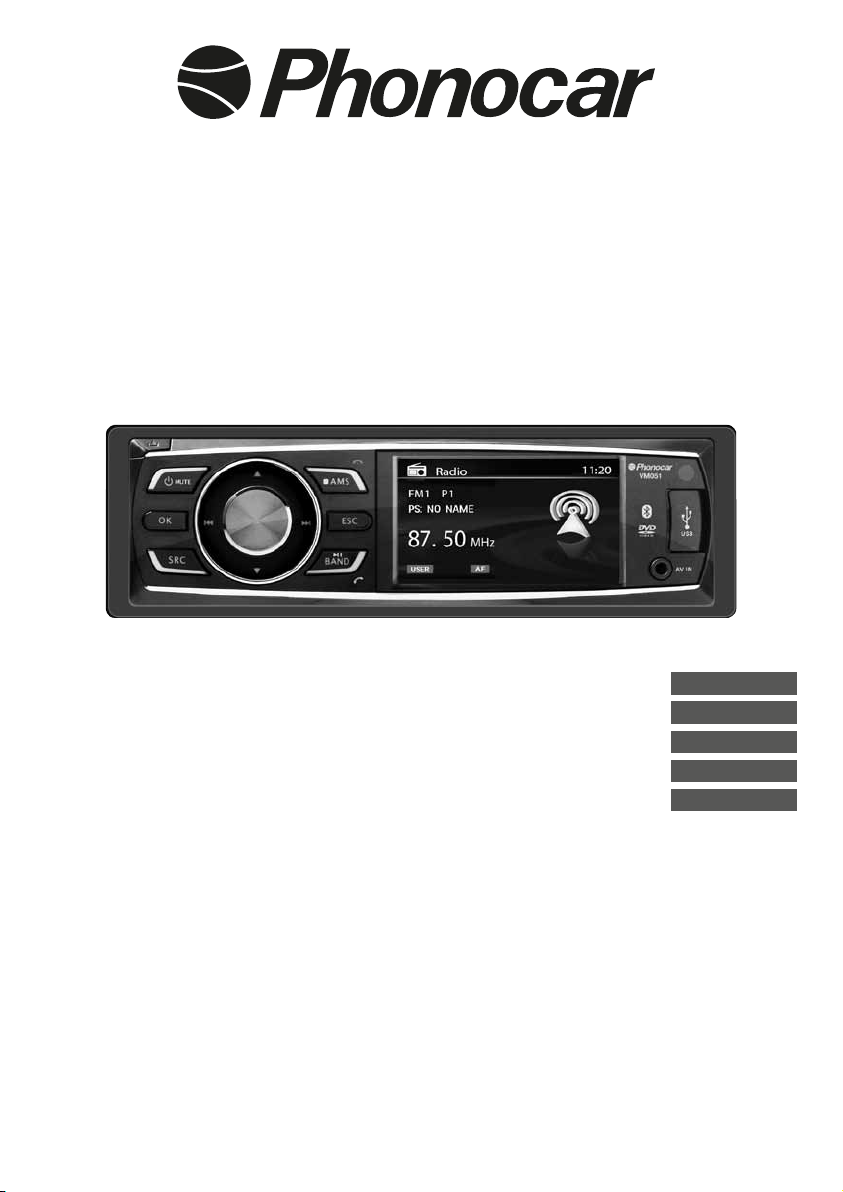
3” TFT LCD MONITOR
CD-MP3-DVD-SD-USB
RECEIVER
ITALIANO
ENGLISH
FRANÇAIS
DEUTSCH
ESPAÑOL
MANUALE ISTRUZIONI
INSTRUCTIONS MANUAL
NOTICE DE MONTAGE ET D’EMPLOI
GEBRAUCHSANWEISUNGEN
MANUAL DE INSTRUCCIONES
VM 051
Page 2
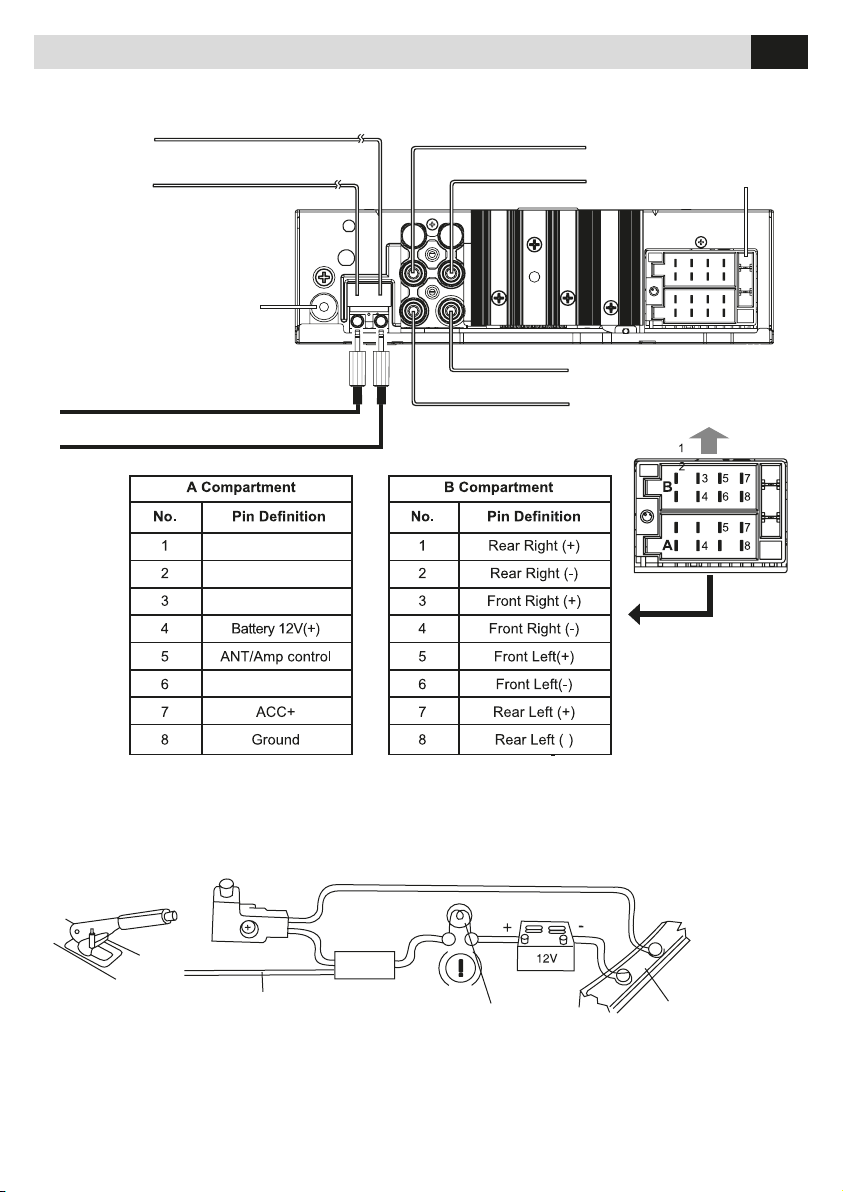
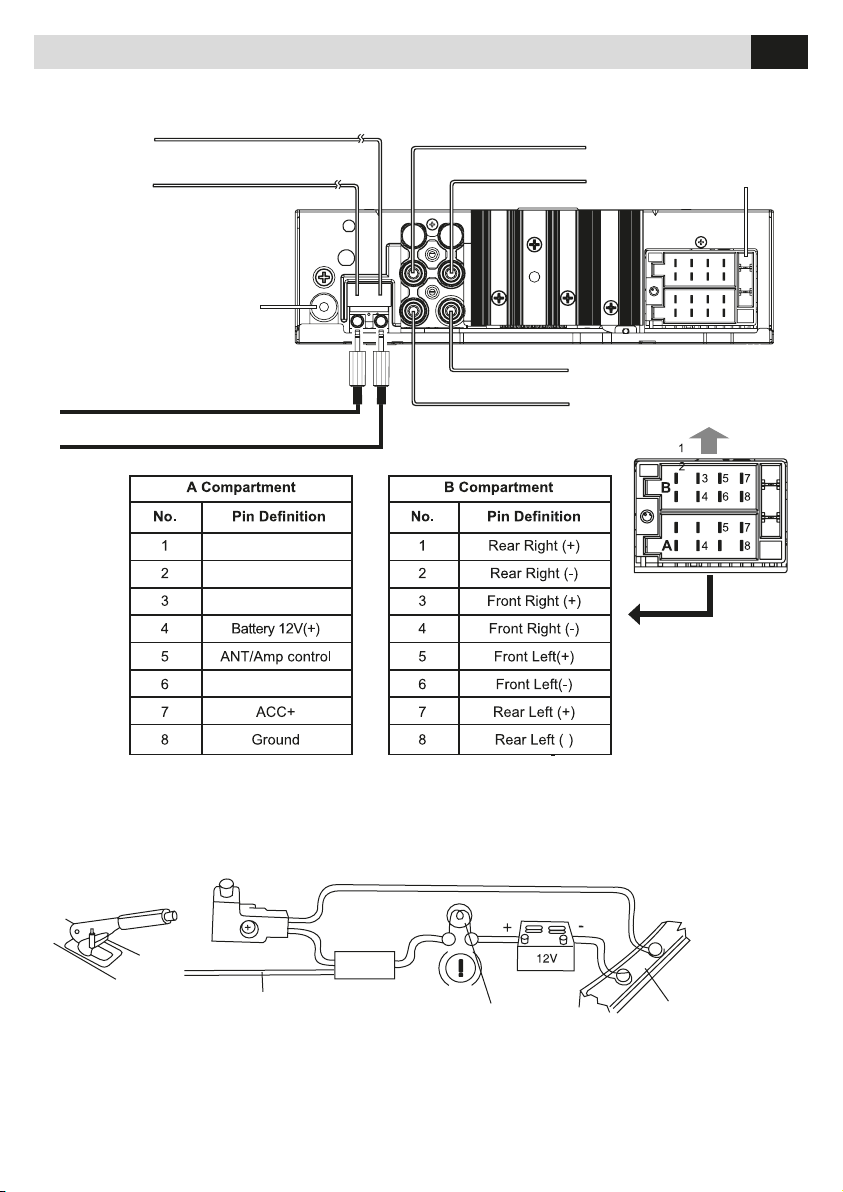
Connessioni • Connections
IT/GB
Parking SW
VERDE-BIANCO / GREEN-WHITE
ROSA / PINK
Reverse
)
ANTENNA RADIO
RADIO ANTENNA
MICROFONO BLUETOOTH/BLUETOOTH MICROPHONE
SWC (COMANDI AL VOLANTE/STEERING WHEEL COMMAND)
USCITA POSTERIORE
REAR LINE-OUT
USCITA VIDEO
VIDEO OUTPUT
INGRESSO RETROCAMERA
CAMERA INPUT
R ROSSO / RED
L BIANCO / WHITE
GIALLO / YELLOW
GIALLO / YELLOW
Fuse
Fusibile
15A
CONNESSIONE CAVI FRENO A MANO / PARKING BRAKE CONNECTIONS
Verde / Green
Interruttore freno a mano
Parking Brake Switch
Cavo freno a mano
Parking brake lead
Spia freno a mano
Brake light
2
Batteria
Battery
Massa
Ground
Page 3
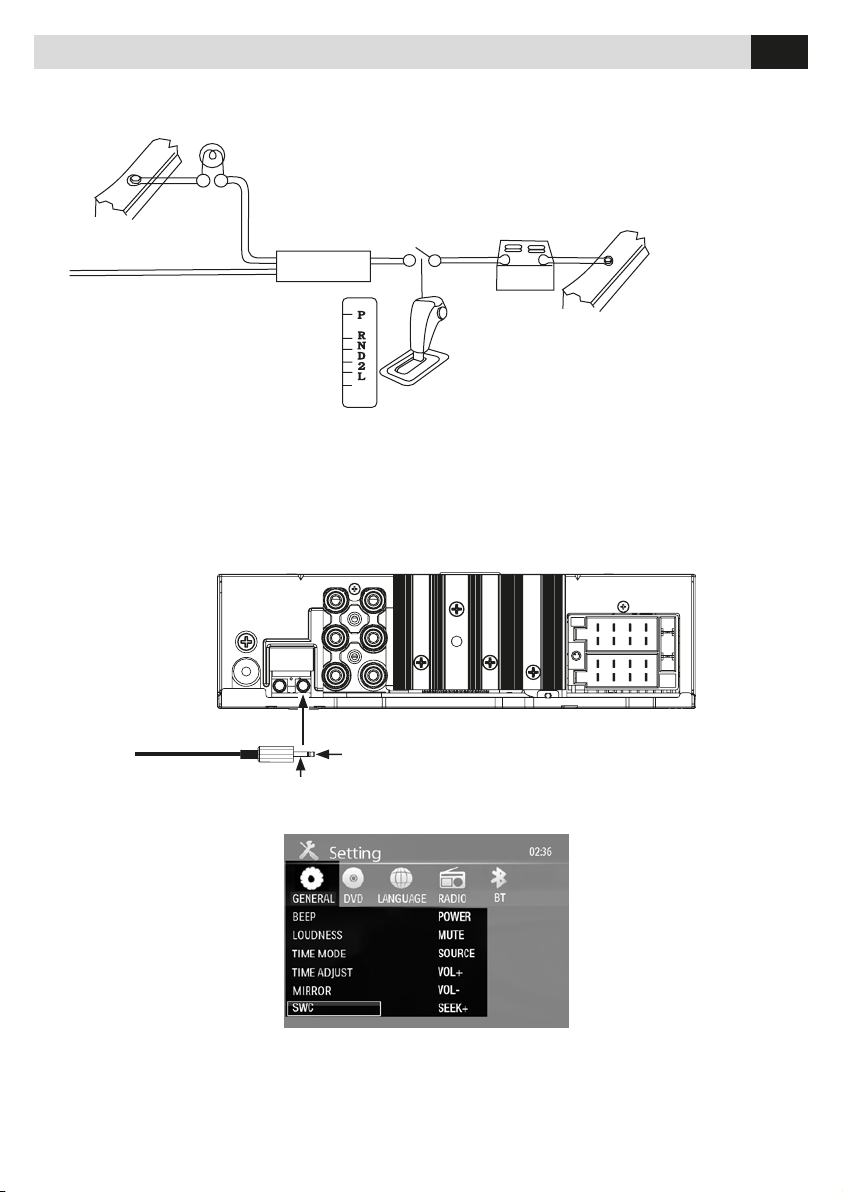
Connessioni • Connections
MASSA / GROUND
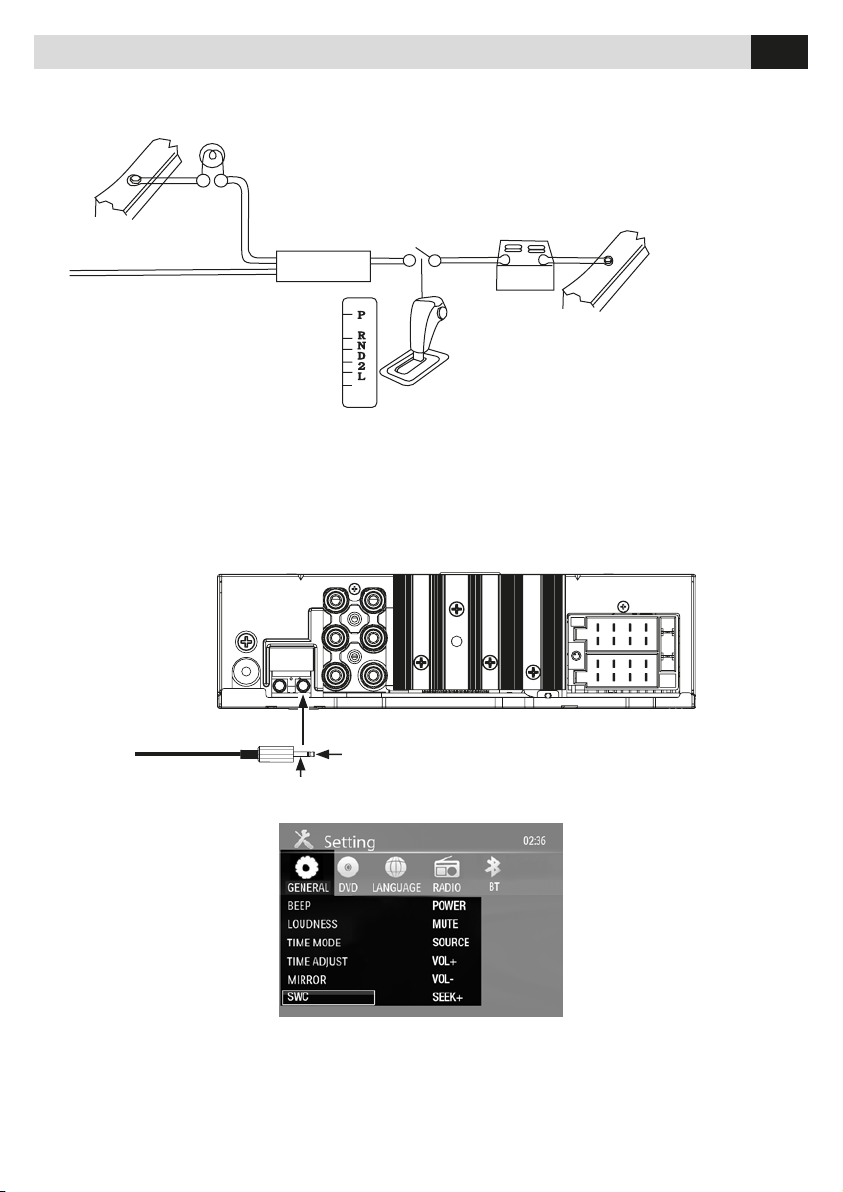
CONNESSIONE CAVI RETROMARCIA / REVERSE DRIVING CABLE CONNECTIONS
IT/GB
Massa
Car frame
Rosa / Pink
Cavo retrocamera
Rear view video camera lead
Luci retromarcia
Reverse driving light
Cambio
Gearbox
CONNESSIONE E MEMORIZZAZIONE COMANDI AL VOLANTE
CONNECTION AND STORING STEERING WHEEL COMANDS
Batteria
Battery
Massa
Car frame
SWC (COMANDI AL VOLANTE
STEERING WHEEL COMMAND)
IT
Selezionando SWC apparirà una
finestra dove si dovrà scegliere
il comando spostandosi con le
frecce. Premere per memorizzare
il comando scelto e attendere che
si illumini l’icona corrispondente,
questa operazione dovrà essere
effettuata per tutti i comandi
disponibili sul volante.
SWC 1
GB
By pressing SWC, a window
will appear showing a number
of available command. Use
the arrow-keys to move to the
requested command. Press to
store the selected command
and wait for it to enlighten the
icon, this operation must be
carried out for all available commands on the steering wheel.
3
Page 4
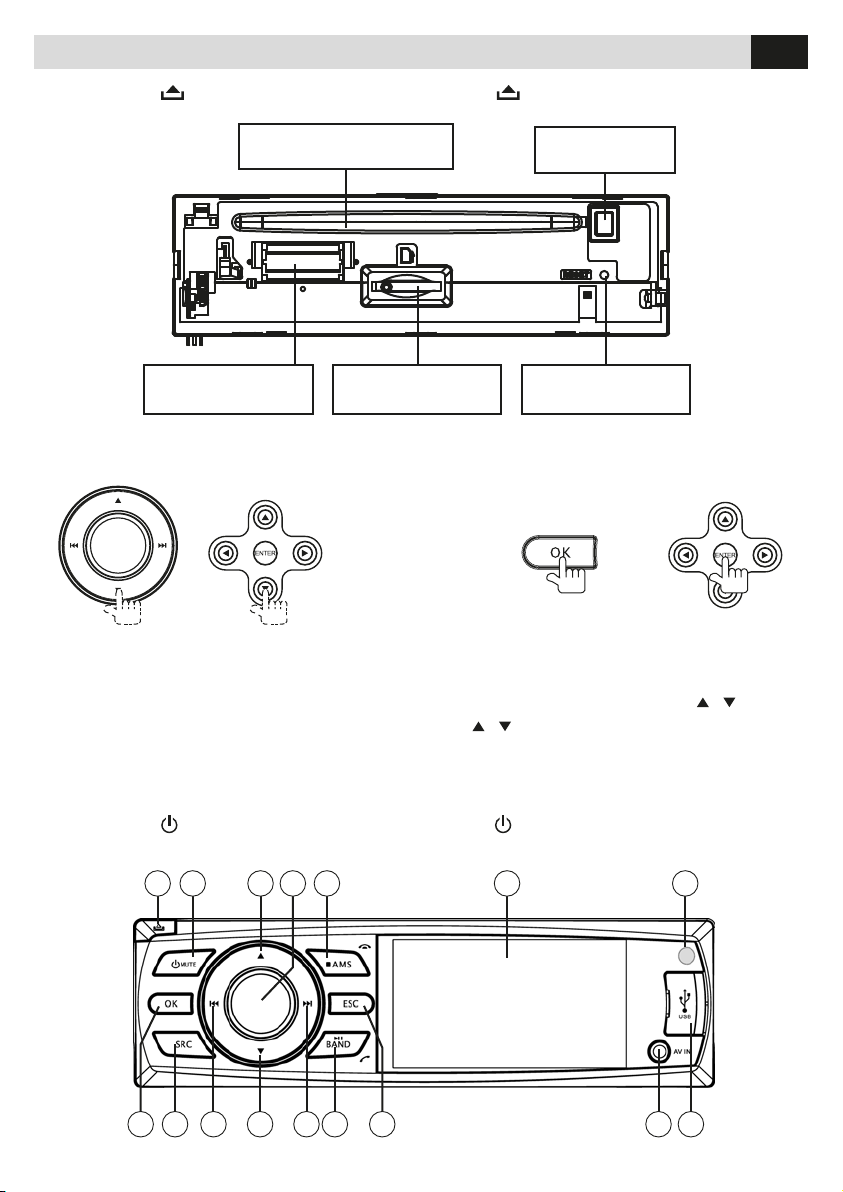
Funzionalità • Features
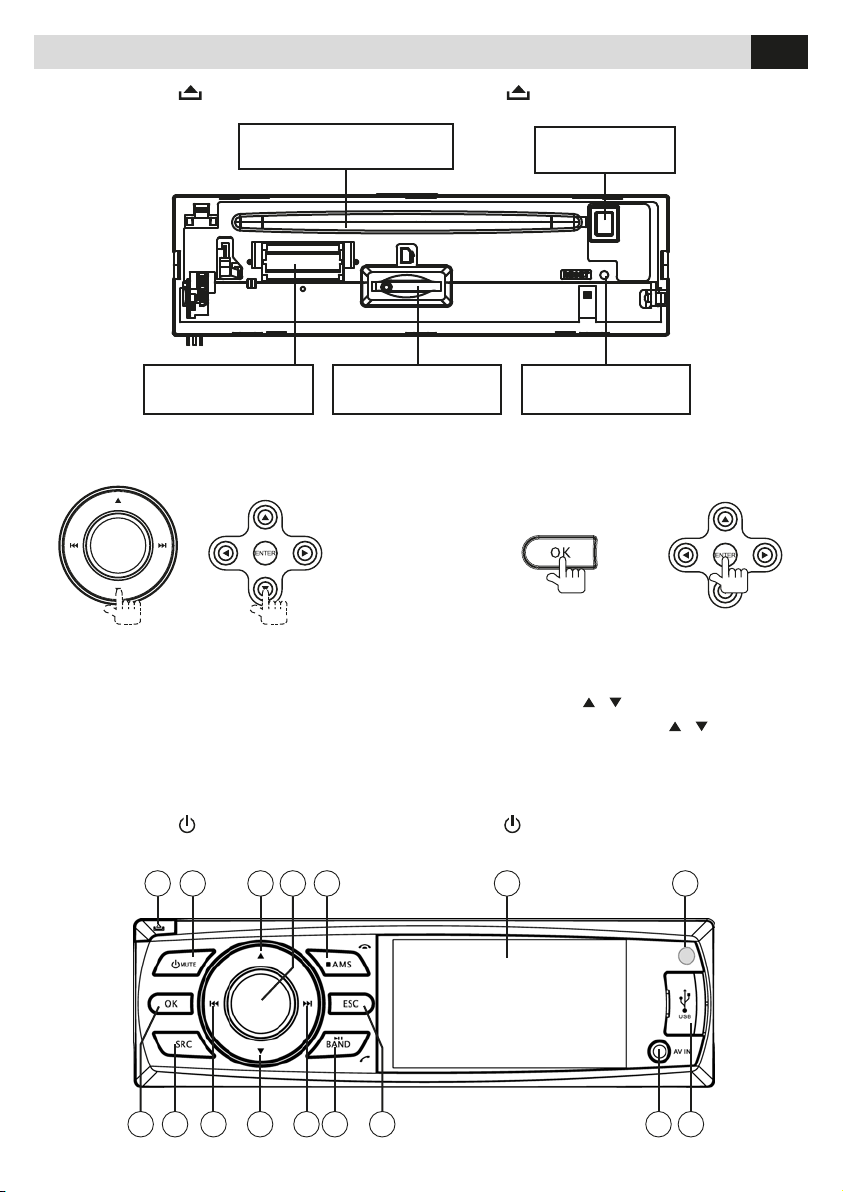
Premere il tasto per aprire il pannello. • Press the button to open the panel.
IT/GB
Feritoia inserimento disco
Slot, insert disc
Contatti pannello
Panel connection
Operazioni frequenti / Some frequent operations:
1) Spostamento cursore / Move cursor 2) Conferma / Confirm
Nota/Note:
In modalità impostazioni (setting), la monopola del volume ha la stessa funzionalità dei tasti
In Setting mode, the VOL knob has the same function as the
Slot SD Card media
Media SD Card Slot
Espulsione disco
Disc Eject
Tasto Reset
Reset button
/ .
/ button to select setting items.
Funzioni su frontalino / Panel controls
Premere il tasto per accendere l’unità. • Press the button to turn on/off the unit.
1
2 3 5 6 74
8 9
10 12 13 15 161411
4
Page 5

Funzionalità • Features
IT/GB
IT
1. Apertura frontalino
2. Accensione/Spegnimento (pressione 3 secondi).
Silenziamento audio (pressione breve).
3. Premere per navigare all’interno delle opzioni in
DVD, CD e MP3/WMA.
Seleziona la stazione precedente in modalità
RADIO.
4. Ruotare la manopola per regolare il volume.
Premere brevemente per selezionare impostazioni
audio/video e ruotare per effettuare le regolazioni.
Premere 3 sec. per entrare nel menù impostazioni.
5. Scansione frequenze radio In modalità RADIO.
Scansione automatica con memorizzazione delle
stazioni radio, in modalità radio, premendo più di 2
secondi.
Stop in modalità CD, MP3/WMA e DVD video.
Termina chiamata in modalità Bluetooth.
6. Display 3” TFT.
7. Sensore IR per telecomando.
8. Conferma operazione.
Interrompe ricerca automatica in modalità RADIO.
9. Premere brevemente per cambiare la sorgente.
Premere 3 sec. per tornare al menù sorgenti,
spostarsi con i tasti e premere OK per confermare.
10. Ricerca automatica stazione precedente (premere
brevemente).
Ricerca manuale stazione precedente (premere più
di 2 secondi).
Traccia/Capitolo precedente (CD, MP3/WMA, DVD)
Riproduzione veloce indietro x2, x4, x8, x20
(premere più di 2 secondi).
Spostamento a sinistra tra le opzioni.
11. Spostamento in basso tra le opzioni (Modalità DVD,
CD, MP3/WMA).
Riproduce la stazione memorizzata successiva
Modalità RADIO).
12. Ricerca automatica stazione successiva (premere
brevemente).
Ricerca manuale stazione successiva (premere più
di 2 secondi).
Traccia/Capitolo successiva (CD, MP3/WMA, DVD)
Riproduzione veloce avanti x2, x4, x8, x20
(premere più di 2 secondi).
Spostamento a destra tra le opzioni.
13. Riproduzione/Pausa (Modalità DVD, CD, MP3/
WMA)
Seleziona banda radio: FM1 - FM2 - FM3 - AM1 -
AM2 (Modalità radio).
Invia/Accetta chiamata bluetooth.
Seleziona programma RDS (Premere più di 2 sec.).
14. Ritorna al menù precedente.
15. Ingresso Audio/Video.
16. Porta USB.
GB
1. Panel open
2. Power on/off (press more than 2 seconds)
Mute
3. Press to navigate up among option items
(in DVD, CD and MP3/WMA modes)
Play the previous preset radio station.
4. Rotate the knob to adjust volume level.
Press to select Audio/video Setting, and rotate the
knob to adjust level.
Press more than 2 seconds to enter Setting menu.
5. Preset scan (press briefly, in Radio mode)
Auto preset (press more than 2 sec., in Radio mode)
Stop (in CD, MP3/WMA, and DVD video mode)
Terminate call (in BT mode)
6. 3” inch TFT display.
7. Remote sensor.
8. Confirm operation.
Stop auto seeking (in Radio mode).
9. Short press to select playing mode.
Long press to return to main source menu use
navigate button to select the desired mode and press
OK button to confirm.
10. Search the previousstation automatically
(press briefly, in Radio mode).
Search the previous station manually, and each
press to seek step by step (press more than 2
seconds, in Radio mode).
Press to search the previous track or chapter (in
CD, MP3/WMA, and DVD video mode).
Fast backward by 2, 4, 8, 20 step (press more than
2 seconds, in CD, MP3/WMA and DVD video mode).
Press to navigate left among option items
11. Press to navigate down among option
items (in DVD, CD and MP3/WMA modes).
Play the next preset radio station (in Radio mode).
12. Search the next station automatically (press briefly,
in Radio mode).
Search the next station manually, and each press to
seek step by step (press more than 2 seconds, in
Radio mode).
Search the next track or chapter (in CD, MP3/WMA,
and DVD video mode).
Fast forward by 2, 4, 8, 20 step (press more than 2
seconds, in CD, MP3/WMA and DVD video mode).
Press to navigate right among option items.
13. Play/Pause (in DVD, CD and MP3/WMA modes).
Band switch: FM1-FM2-FM3-AM1- AM2
Dial/Receive call.
RDS program type (press and hold more than 2 sec.)
14. Cancel source select menu and return to previous.
15. AV in.
16. USB port.
5
Page 6
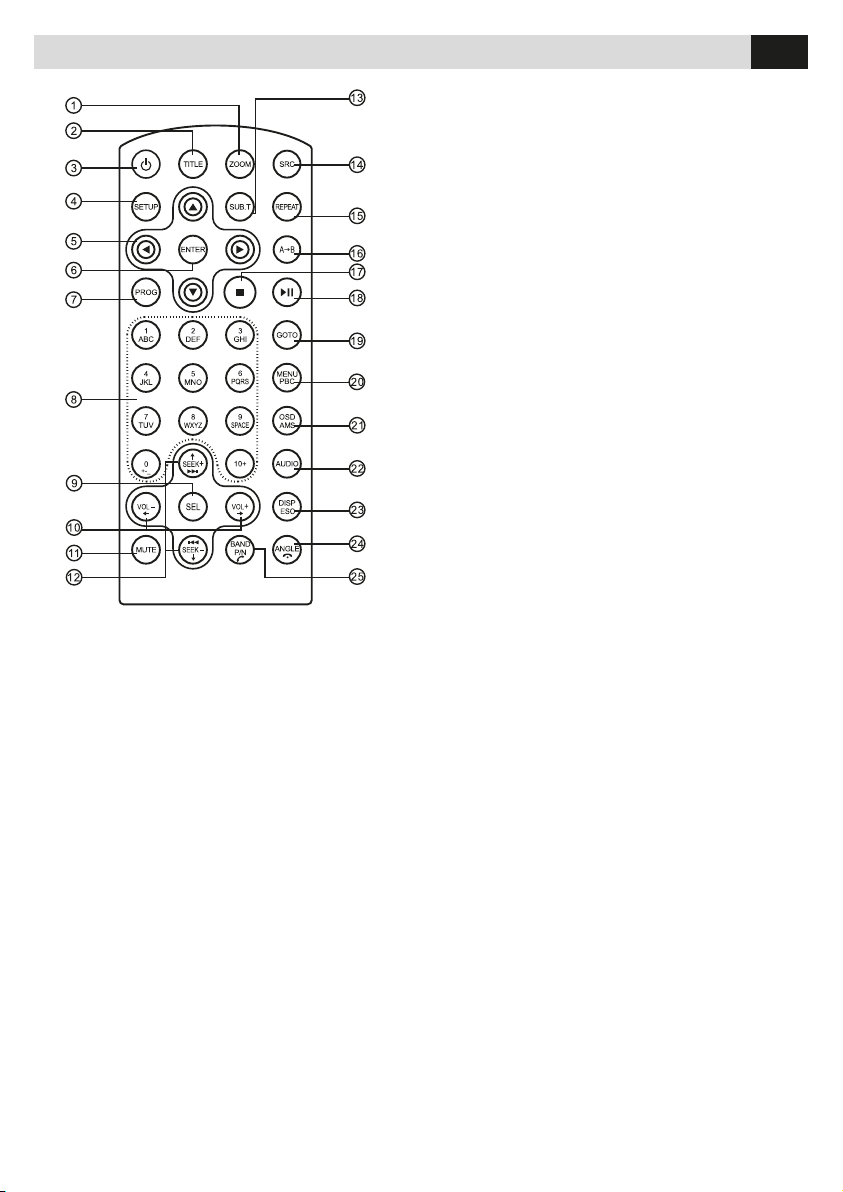
Telecomando • Remote controls
IT
1. Zoom (DVD/VCD)
2. Titoli DVD
3. Accensione/Spegnimento
4. Menù impostazioni
5. Spostamento nei menù
6. Conferma selezione
7. Programma riproduzione
8. Tastierino numerico
9. Seleziona impostazioni Audio/Video
10. Volume
11. Silenziamento audio
12. Sintonizzazione radio
Traccia successiva/precedente
13. Sottotitoli (DVD)
14. Cambio sorgente
15. Ripetizione
16. Ripetizione A-B
17. Stop/Indietro
18. Avvia/Pausa riproduzione
19. Ricerca personalizzata
20. Menù DVD
PBC (per VCD 2.0 o superiore)
21. OSD: Menù su schermo
AMS: Ricerca e memorizza
stazioni automaticamente
22. Lingua audio DVD
IT/GB
Lingua audio VCD - L/R/ST
23. Visualizza orario (Video)
Ritorna al menù precedente
24. Cambia angolo visione DVD
Termina chiamata (in modalità BT)
25. Sistema Video PAL/NTSC/AUTO
Banda radio (in funzionalità Radio)
Invia/Riceve chiamata (in modalità BT)
GB
1. Zoom (DVD/VCD only)
2. Title (DVD only)
3. Power on/off
4. Setup
5. Menu cursor
6. Enter
7. Program
8. Digit area
9. Select Audio/Video Setting, then rotate the
knob to adjust level.
10. Volume
11. Mute
12. Radio tune
Track skip/seek
13. Subtitle (DVD only)
14. Source switch
15. Repeat
16. Repeat A-B
17. Stop/Return
18. Play/Pause
19. Goto search
20. DVD menu
PBC (for VCD 2.0 or up)
21. OSD: On screen display
AMS: Search and store stations automatically
22. DVD audio
VCD audio L/R/ST
23. Display time/clock (Video mode)
Return to previous menu
24. Angle (DVD only)
Terminate call (in BT mode)
25. Video system PAL/NTSC/AUTO
Radio band (in Radio mode)
Dial/Receive call (in BT mode)
6
Page 7
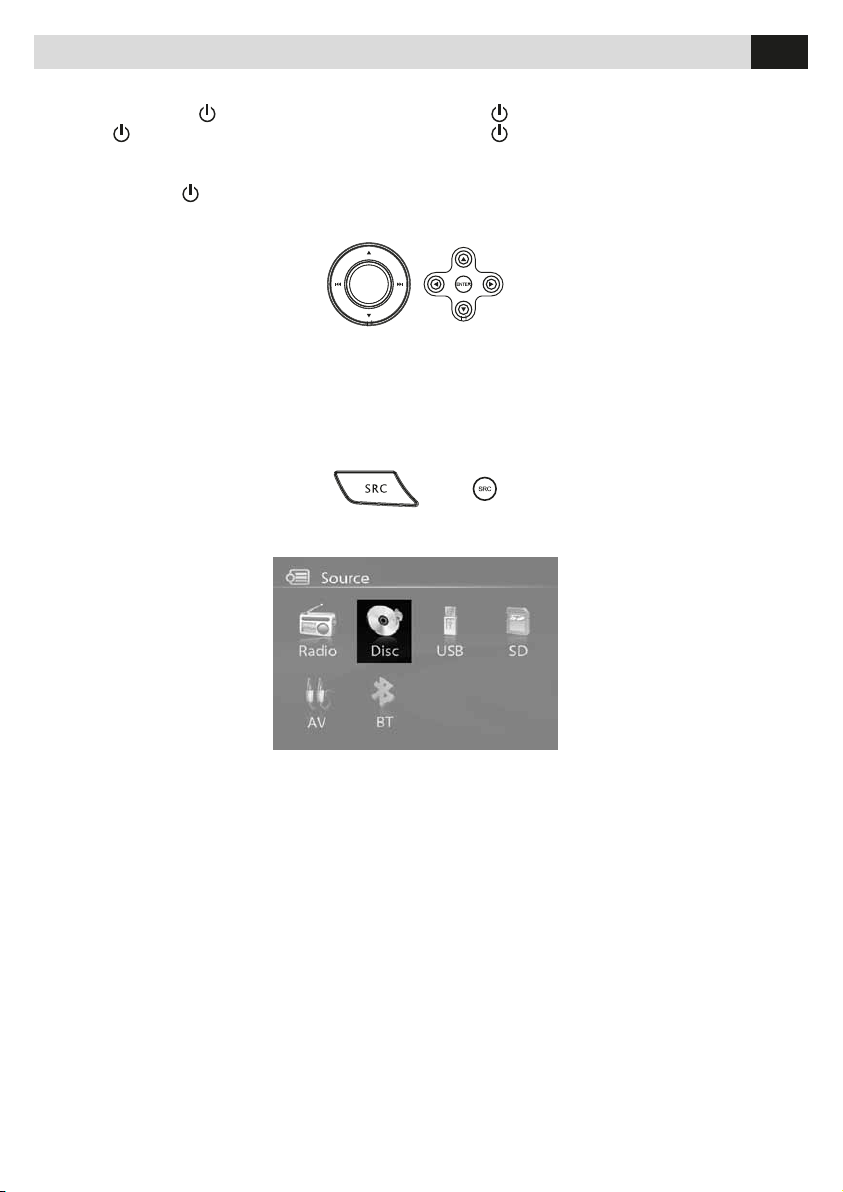
Funzioni di base • Basic Operation
IT ACCENSIONE/SPEGNIMENTO
1. Premere brevemente
2. Premere
per più di 2 secondi per spegnere l’unità.
per accendere l’unità.
GB
TURN ON/OFF THE POWER
1. Press
2. Press
to turn on the unit.
more than 2 seconds to power off.
IT/GB
SILENZIAMENTO AUDIO
Premere brevemente
Note: • Regolando il volume quando l’unità è in silen-
ziamento, l’audio viene ripristinato.
REGOLAZIONE VOLUME
Ruotare la manopola o premere i tasti
VOL+ e VOL- sul telecomando per regolare il volume.
SELEZIONE SORGENTE DA RIPRODURRE
Metodo 1 • Premere brevemente il tasto SRC sul fron-
talino o sul telecomando fino a visualizzzare la sorgente
da riprodurre.
Metodo 2 • Premere per oltre 2 secondi
il tasto SRC sul frontalino o sul telecomando fino alla visualizzazione del menù
sorgenti.
Usare i tasti frecce per muoversi
nel menù e confermare la selezione con il tasto OK.
Note: • Non cambiare sorgente
dopo la conferma della selezione, l’unità impiega qualche
secondo per iniziare la riproduzione, attendere fino alla
visualizzazione sul display della
sorgente.
FRENO A MANO
1. Se il cavo ‘PRK SW’ è collegato al freno a mano, la visualizzazione sullo schermo
dipenderà dallo suo stato.
2. Quando l’auto è in movimento e si riproduce un filmato, sul display compare la scritta “DO NOT WATCH
VIDEO WHILE DRIVING”. Il messaggio avvisa il guidatore che non può guardare il video in movimento,
mentre i passeggeri posteriori possono continuare la
visione se l’unità è collegata ad un monitor da tetto o
poggiatesta.
FASE DI RETROMARCIA
Quando è presente la retrocamera l’unità passa automaticamente alla visualizzazione sul display di quest’ultima all’innesto della retromarcia.
L’unità ritornerà nella visualizzazione normale appena
verrà ripristinata la marcia avanti.
per silenziare l’audio.
MUTE
Press briefly to cut the sound.
Note: • Doing the operation above again or
adjusting volume will release muting.
ADJUST THE VOLUME
Rotate the knob on the panel or press
VOL +/- on the remote control to increase
or decrease the volume.
PLAYING SOURCE SELECTION
Method 1 • Short press the SRC button on the panel
or remote control to cycle through all the available
sources.
Method 2 • In any mode, long press the
SRC button on the panel or remote control
to enter main source menu, then use navigate button to select the desired mode,
and press OK to confirm.
Note: • You should stop
switching when the playing
source you desired has been selected and
wait for some seconds, the unit
will auto enter the playing source
mode you have selected.
PARKING BRAKE
1. If ‘PRK SW’ cable is connected
to hand brake switch, the video
display of the TFT
monitor will be controlled by driving status, system
setup and input video sources.
2. When the car is moving ahead, if the video disc is
played, the screen appears “DO
NOT WATCH VIDEO WHILE DRIVING”. The above
warning screen will prevent the driver watching images. The passengers at the rear seats can watch
normally.
WHEN REVERSE DRIVING
If the rear view video camera is connected, the unit
automatically switches to CAMERA
source during reverse driving. The unit returns to the
original work mode after the reverse
driving is done.
7
Page 8
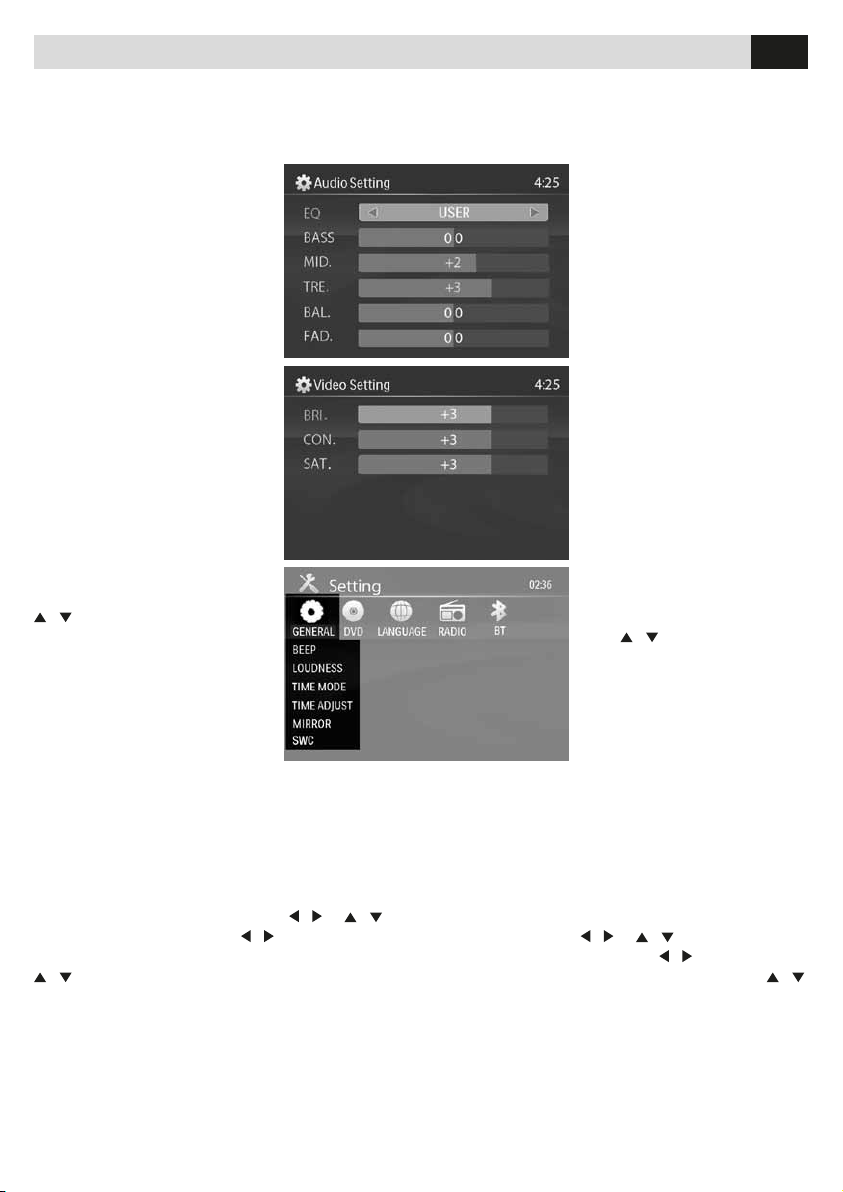
Funzioni della manopola • Rotary knob menu
GB
IT FUNZIONI DELLA MANOPOLA
1. Ruotare la manopola per regolare il volume.
2. Premere brevemente la manopola per entrare nelle
impostazioni audio/video.
3. Premere la manopola per
accedere alle funzioni:
• AUDIO - EQ/Bassi/Medi/Alti
Bilanciamento/Fader, ruotare la
manopola per regolare il livello.
• VIDEO - Luminosità/Contrasto/
Saturazione, ruotare la manopola
per regolare il livello.
• EQ - Ruotare la manopola per
selezionare:
USER/FLAT/POP/ROCK
CLASSIC/JAZZ
Con la funzione equalizzatore
attivata, la regolazione di bassi
o alti fa ricadere la modalità in
USER.
Quando l’equalizzatore non è
attivo l’unità riporta alti e bassi
all’ultima regolazione.
4. Premere la manopola più di 2
secondi per entrare nelle impostazioni di sistema, utilizzare
/ per muoversi nel menù e
selezionare la voce tramite OK.
GENERAL SETTING
BEEP: ON/ OFF - La funzione
BEEP permette di udire un tono
ad ogni accesso al menù.
LOUDNESS: ON/OFF - Durante l’ascolto di musica a basso volume la funzione
loudness permette una esaltazione delle basse e alte
frequenze.
TIME MODE: • 12 HOUR MODE: l’orologio sul di-
splay sarà visualizzato in formato 12 ore, ad esempio
11:18. • 24 HOUR MODE: l’orologio sul display sarà
visualizzato in formato 24 ore, ad esempio 20:32.
TIME ADJUST: Muoversi con i tasti
regolare ore e minuti. Tramite
mento da regolare, impostare il valore con le frecce
/ .
MIRROR: ON/OFF - Questa opzione permette di convertire l’immagine della retrocamera in visione speculare. Ruotare la manopola per selezionare ON o OFF.
SWC (COMANDI AL VOLANTE)
Questa funzione permette di utilizzare i comandi
volante su vetture con protocollo resistivo con la possibilità di memorizzare fino a 6 comandi.
/ or / per
/ si seleziona il seg-
ROTARY KNOB MENU
1. Rotate the knob to adjust volume level.
2. Short press to access the A/V Setting menu.
be heard each time the menu is accessed.
LOUDNESS: ON/OFF - When listening to music at
low volumes, this feature will selectively boost certain
bass and treble frequencies.
TIME MODE: • 12 HOUR MODE: the clock displays
in the type of 12 hours such as 11:18 AM. • 24 HOUR
MODE: the clock displays in the type of 24 hours such
as 20:18.
TIME ADJUST Press
and minute. Each time you press
segment of the clock display then you can press
to put a clock right.
MIRROR: ON/OFF - This option allows for selection of
a mirror image view on a rear-camera. Turn the
rotary encoder to select “On” or “Off”.
SWC (STEERING WHEEL COMMANDS)
The Steering-wheel Commands function are assured
even on car-models fitted with Resistive-protocol, with
memorization-capacity of max. 6 commands.
8
IT/GB
3. Each press the knob to
change the • AUDIO - EQ/
Bass/Middle/Treble/Balance/
Fader, and rotate the knob to
adjust level.
• VIDEO - Bright/Contrast/Saturation, and rotate
the knob to adjust level.
• EQ: Turn the rotary encoder
to select: USER, FLAT, POPULAR, ROCK, CLASSIC, JAZZ.
With the equalizer function activated, if bass or treble is adju-
sted, the EQ Mode will revert
to “USER”. When the equalizer
function is activated, the most
recently selected bass/treble
levels cannot be adjusted.
When the equalizer function is
not active, the unit will return to
the most recently selected bass
and treble levels.
4. Press the knob more than 2
seconds to enter Setting mode,
then
/ and OK key to select
items.
GENERAL SETTING
BEEP: ON/ OFF - The beep
tone feature allows the selection of an audible beep tone to
/ or / key to set hour
/ to select one
/
Page 9

Funzioni della manopola • Rotary knob menu
IT/GB
IMPOSTAZIONI DVD
TV SYSTEM: NTSC/PAL/AUTO
Seleziona il sistema TV nel menù
impostazioni.
TV TYPE: 4:3PS / 4:3LB / 16:9
Imposta il formato di visualizzazione dei filmati.
4:3 Pan Scan - Per monitor 4:3,
gli estremi destro e sinistro sono
tagliati
4:3 Letter Box - Per monitor 4:3,
compariranno due barre nere una in alto ed una in
basso dello schermo.
16:9 - Per monitor 16:9
PASSWORD
1. Premere sul tastierino numerico del telecomando
“0000” e premere ENTER per confermare.
2. Premere la sequenza di quattro numeri desiderata e
premere ENTER per confermare.
3. Memorizzare la password per un eventuale utilizzo
futuro. In caso di smarrimento della password, inserire
0000 per resettarla.
Password : 0000
Selezione grado di sicurezza: 1 KID SAFE • 2 G
3 PG • 4 PG13 • 5 PG-R • 6 R • 7 NC-17 • 8 ADULT
E’ possibile selezionare da 1 a 8 per il livello di sicurezza della visione:
(1) massimo delle limitazioni per la visione.
(8) nessuna limitazione alla visione.
Impostazione predefinita: 8
Nota:
Il livello di sicurezza può essere selezionato soltanto
se la password è sbloccata ed il limite Impostato avrà
effetto solo quando la password è attivata.
DEFAULT: RESTORE - Se viene selezionata questa
voce, il VM051 ritornerà alle impostazioni di fabbrica.
DVD SETTING
TV SYSTEM: NTSC/PAL/AUTO
Select the TV system in the
setting menu.
TV TYPE: 4:3PS / 4:3LB / 16:9
Select TV type to watch wide
screen movies.
4:3 Pan Scan: For 4:3 TV, left
and right edges will be cut.
4:3 Letter Box: For 4:3 TV,
black bars will appear on top
and bottom.
16:9: For 16:9 wide screen TV.
PASSWORD
1. Press number button “ 0000 “ on the remote
control, then press the ENTER button to confirm.
2. Press the desired 4-digit password, and then press
ENTER button to confirm.
3. Record the password and keep it in a safe
place for future reference. If you forget the password,
please enter 0000 to reset a new password.
The password: 0000
RATING: 1 KID SAFE • 2 G • 3 PG • 4 PG13
5 PG-R • 6 R • 7 NC-17 • 8 ADULT
The rating of the disc is from 1 to 8:
(1) with the most limits when playing.
(8) with the least limits when playing.
Original setting: 8
Note:
The rating can be selected only under the password
unlocked status, and the limits can be worked only
under the password locked status.
DEFAULT: RESTORE - If this item is selected, the
VM051 will return to original setting.
9
Page 10
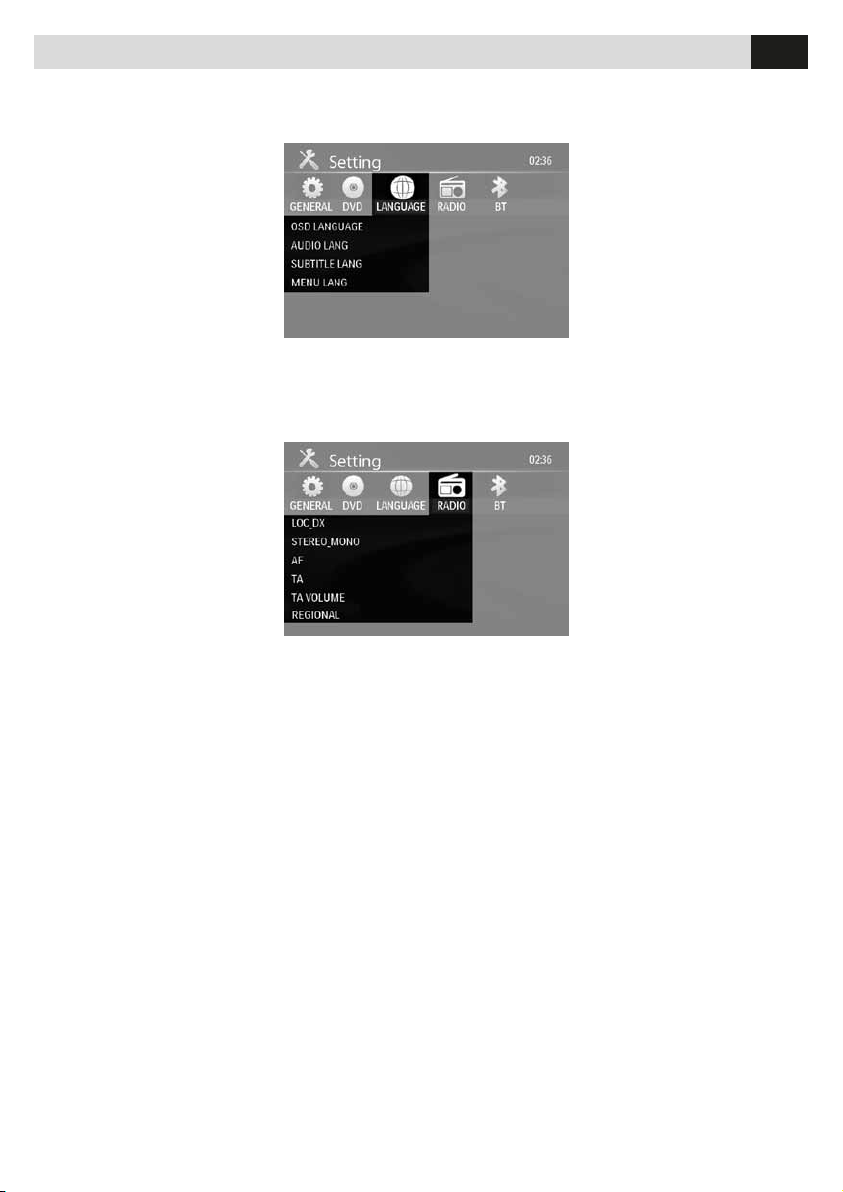
Funzioni della manopola • Rotary knob menu
GB
IT IMPOSTAZIONE LINGUA
OSD LANGUAGE: Seleziona la lingua dei menù di
sistema.
AUDIO LANG: Seleziona la lingua
dei dialoghi nel DVD.
Nota: E’ possibile cambiare la
lingua premendo il tasto AUDIO
sul telecomando.
SUBTITLE LANG: Seleziona la
lingua dei sottotitoli nel DVD.
MENU LANG: Seleziona la lingua
del menù titoli nei DVD.
LANGUAGE SETTING
OSD LANGUAGE: Select language to display system
IT/GB
menu.
AUDIO LANG: Select the language of the dialogues (DVD).
Note: You can change the
language by pressing AUDIO
key of the remote controller.
SUBTITLE LANG: Select the
language of the subtitles (DVD).
MENU LANG: Select language
to display DVD menu.
RADIO SETTING
LOC_DX: LOC/DX: Seleziona la ricezione per stazioni
distanti o locali.
DX: La radio trasmetterà stazioni con segnali deboli e
forti.
LOCAL: La radio trasmetterà solo
stazioni con segnali forti.
STEREO_MONO: STEREO/
MONO
Seleziona FM mono/stereo.
AF: ON/OFF
Attiva/Disattiva la frequenza alternativa (AF)
AF ON: funzione attivata.
AF OFF: funzione disattivata.
Attenzione: L’indicatore AF lampeggerà fino a quando
non si riceve il segnale RDS. Se il segnale RDS non è
disponibile disattivare la funzione AF
TA: ON/OFF
Attiva/Disattiva la ricezione degli annunci sul traffico
(TA). Quando la funzione TA è attiva l’indicatore sul
display lampeggia.
All’arrivo dell’annuncio l’indicatore TA sarà fisso sul
display.
Il VM051 passerà in modalità radio facendo ascoltare
l’avviso di traffico al volume impostato nella funzione
TA volume. Al termine dell’annuncio l’unità ritorna alla
modalità precedente come anche il livello del volume.
Quando la modalità TA è attiva, le funzioni SEEK,
SCAN, AMS saranno operative solo quando il codice
TP è stato ricevuto.
TA VOLUME: 00-34
Regolazione volume dell’annuncio sul traffico
REGIONAL: ON/OFF
REG ON: la funzione AF implementerà il codice regio-
nale (del PI) e solo le stazioni con il codice regionale
corrente saranno sintonizzate automaticamente.
LOC_DX: LOC/DX: Choose radio distant or local.
RADIO SETTING
DX: Stations with strong and weak signals can be
broadcast.
LOCAL: Only station with
strong signal can be
broadcast.
STEREO_MONO: STEREO/
MONO
Choose FM mono/stereo.
AF: ON/OFF
Choose AF (Alternative
Frequency) on or off.
AF ON: function is activated.
AF OFF: function is disabled.
Remark: AF indicator on LCD will flash until RDS
information is received. If RDS service is not available
in your area, turn off the AF mode.
TA: ON/OFF
Choose TA (Traffic Announcements Identification) on
or off. When TA mode is turned on, the TA indicator will
blink. When traffic announcement is received, the TA
indicator will display. The unit will temporarily switch to
the tuner mode (regardless of the current mode) and
begin broadcasting the announcement at TA volume
level. After the traffic announcement is over, it will
return to the previous mode and volume level. When
TA is turned on, SEEK, SCAN, AMS function Rotary
Knob Menu can only be received or saved when traffic
program identification (TP) code is received.
TA VOLUME: 00-34
Choose TA-VOL level.
REGIONAL: ON/OFF
REG ON: AF function will implement the regional code
(of the PI) and only stations in the current region can
be tuned automatically.
REG OFF: AF function will ignore the regional code
10
Page 11
Funzioni della manopola • Rotary knob menu
IT/GB
REG OFF: la funzione AF ignorerà il codice regionale
(del PI) permettendo la sintonizzazione di tutte le stazioni.
CT: ON/OFF
Alcune stazioni trasmettono data e orario all’interno del
codice RDS, ma non è sempre corretto.
Selezionare ON per permettere all’unità di regolare in
base a questo segnale orario e data.
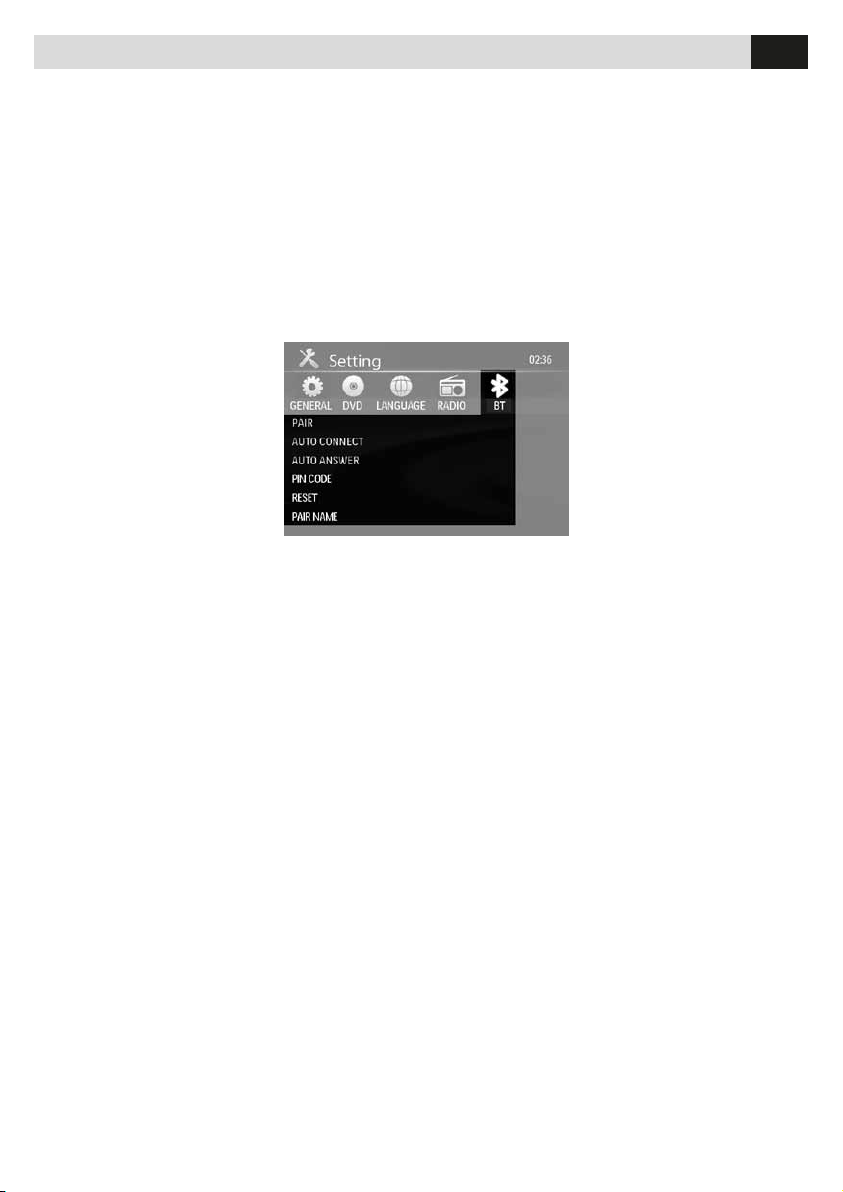
IMPOSTAZIONI BLUETOOTH
PAIR: ON/OFF
Impostare su ON per accoppiare il telefono.
AUTO CONNECT: ON/OFF
Dopo la disconnessione con il
telefono, il bluetooth proverà
a riconnettersi nei 20 secondi
successivi se questa funzione è
impostata su ON
AUTO ANSWER: ON/OFF
Il bluetooth passerà automaticamente alla modalità telefono
all’arrivo di una chiamata e accetterà la conversazione dopo
3/4 squilli quando l’opzione è
impostata su ON
Diversamente la risposta alla chiamata dovrà essere
effettuata manualmente.
PIN CODE
In base alle versioni di VM051 il PIN per l’accoppia-
mento è “0000” oppure “1234”.
E’ possibile modificarlo con questa funzione inserendo
le 4 cifre desiderate tramite il telecomando e confermando con ENTER.
RESET: ON
Effettua il reset del bluetooth e riporta il PIN alle impostazioni di fabbrica “1234”.
PAIR NAME
Mostra il nome che verrà visualizzato sul telefono:
Phonocar.
(of the PI) and stations in the other regions can also be
tuned automatically.
CT: ON/OFF
Some stations broadcast the time and date within the
encoded RDS signal. The clock time is automatically
adjusted when “CT” is set to “ON”.
BT Setting
PAIR: ON/OFF
Set pairing ON/OFF. If select ON, to return to BT main
menu.
AUTO CONNECT: ON/OFF
After disconnecting with your
mobile phone, the built-in
bluetooth will send connection
order automatically in 20s if you
have set the ‘AUTO CONNECT’
to ‘ON’.
AUTO ANSWER: ON/OFF
The built-in bluetooth changes
the work mode to phone mode
automatically and displays the
calling number when one call is
coming in.
The built-in bluetooth will put through the call
automatically if you have set the ‘AUTO ANSWER’
option to ‘ON’, whereas you should put through the
call manually.
PIN CODE
According to the versions of the VM051 PIN for pairing
is “0000” or “1234”. If you want to set a new pin code,
please input the desired 4-digit password by pressing
the number button on the remote conrol, and then
press ENTER button to confirm.
RESET: ON
When RESET ON is selected, the Bluetooth system will
be cleared and return to default setting ,and the pin
code also changed to “1234”.
PAIR NAME
Display the BT device name: Phonocar.
11
Page 12
Modalità radio • Radio mode
IT/GB
IT Premere SRC sul pannello frontale o sul teleco-
mando per passare alla modalità radio.
4
5
6
7
8
SELEZIONARE UNA BANDA RADIO
Premere BAND per selezionare le seguenti bande radio
FM1-FM2-FM3-AM1-AM2.
SELEZIONARE UNA STAZIONE
Premere
oppure per sintonizzare un stazione.
Sintonia radio
- RICERCA AUTOMATICA
Premere
oppure per sintonizzarsi su una sta-
zione successiva o precedente.
- RICERCA MANUALE
Premere e mantenere premuto
entrare in ricerca manuale. Premere nuovamente i tasti
per spostare la frequenza passo passo.
Nota: Durante la ricerca manuale se la pausa tra due
operazioni supera i 5 secondi l’unità ritorna in modalità
ricerca automatica.
MEMORIE STAZIONI
E’ possibile memorizzare 6 stazioni per ogni banda (18
FM - 12 AM).
Memorizzazione
- Auto memorizzazione
1. Selezionare una banda (se necessario).
2. Premere AMS brevemente per effettuare scansione
delle memorie P1-P6 per 5 secondi ognuna.
3. Tenere premuto AMS più di 2 secondi, le 6 stazioni
con segnale più forte saranno automaticamente memorizzate.
- Memorizzazione manuale
1. Selezionare una banda (se necessario) e ricercare
una stazione.
2. Tenere premuto sul telecomando il numero della memoria dove si vuole memorizzare.
3. Il numero verrà visualizzato sul display.
Richiamo di una stazione
1. Selezionare una banda (se necessario).
2. Premere il numero della memoria desiderato.
2
1
3
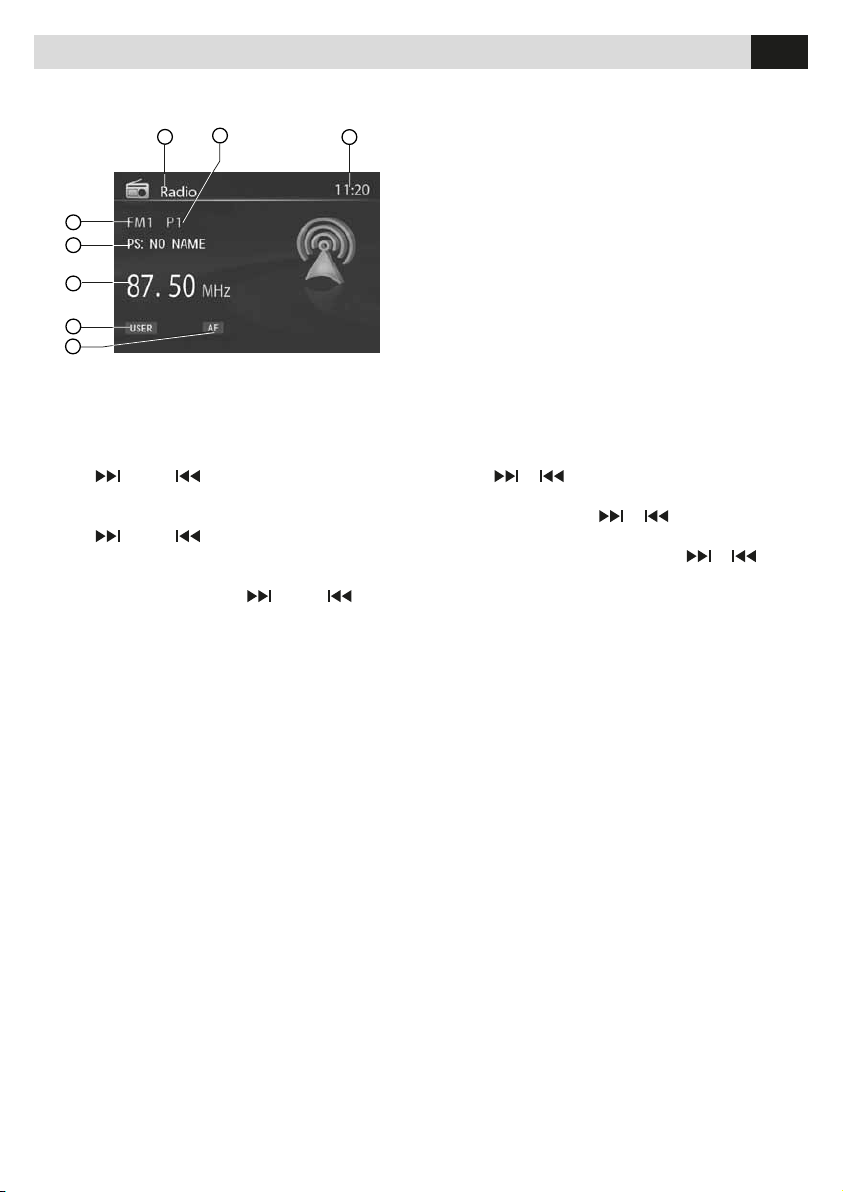
1. Indicatore sorgente / Source Indicator
2. Memoria preselezionata / Current Preset Channels
3. Orario / Time/Clock
4. Banda AM/FM / AM/FM Band
5. Informazioni RDS / RDS Information
6. Frequenza radio / Radio Station Frequency
7. Indicatore EQ / EQ Indicator
8. Indicatore AF / AF Indicator
oppure per
GB Press the SRC button on the front panel or remote
control to switch to the Radio source.
SELECTING A BAND
Press BAND once or more to select FM1 - FM2 - FM3
AM1 - AM2.
SELECTING A STATION
Press the
Tuning
- AUTO SEEK Press the
the next/previous station automatically.
- MANUAL SEEK Press and hold the
buttons to enter manual tuning mode. Press the buttons
again to move the radio frequency number up or
down one step.
Note: During manual seeking, if the pause between
two operating steps is longer than 5 seconds, press the
or buttons, the unit will enter auto seeking.
PRESET MODE
Six numbered preset buttons store and recall stations
for each band. The stored stations (P1-P6) for the
current band can be viewed on the screen.
Storing Stations
- Auto storing
1. Select a band (if needed).
2. Press AMS briefly to scan the preset station P1 - P6
for 5 seconds each.
3. Hold AMS more than 2 seconds, the 6 strongest
available stations will be automatically saved in the
preset button (numbers 1-6).
- Manual Storing
1. Select a band (if needed), then select a station.
2. Press and hold a preset button (numbers 1-6) on the
remote control.
3. The preset number and station is displayed
and highlighted.
Recalling a Station
1. Select a band (if needed).
2. Press a remote control preset button (numbers 1-6)
to select the corresponding stored station.
12
or tuning button to tune a station.
or buttons to seek
or
Page 13
Modalità radio • Radio mode / RDS (Radio Data System)
IT/GB
IT Il servizio RDS varia in base alle aree, le seguenti
informazioni e funzioni saranno disponibili solo dove è
presente questo servizio.
FUNZIONI RDS
AF (Frequenza Alternativa): Quando questa funzione
è attiva ed il segnale della stazione è debole, la radio
ricercherà automaticamente la stessa stazione con il
medesimo PI (identificativo programma radio) su un’al-
tra frequenza dove il segnale è più forte.
PS (Nome Emittente): Il nome dell’emittente viene visualizzato al posto della frequenza radio.
ANNUNCIO INFORMAZIONI SUL TRAFFICO
Alcune stazioni RDS trasmettono informazioni sul
traffico con un codice che ne permette la priorità di
ascolto.
TP: (Programma Identificazione Traffico) Trasmissione
informazioni sul traffico.
TA: (Identificazione Annuncio Traffico) Annuncio sulle
condizioni del traffico.
EON: (Annunci Altre Stazioni) Quando viene ricevuto il
dato EON, l’indicatore si Illumina e le funzioni TA e AF
vengono implementate.
TA: Le informazioni sul traffico possono essere ricevute
dalla stazione corrente o da altre.
AF: La lista delle frequenze alternative sono aggiornate
dall’ EON.
EON abilità la radio all’utilizzo completo delle informazioni RDS. In questo modo la lista delle stazioni AF
viene costantemente aggiornata. Se viene selezionata
una stazione intorno a casa, sarà possibile ricevere
la stessa stazione su una frequenza alternativa con
miglior segnale, oppure un’altra stazione con lo stesso
programma musicale. EON tiene inoltre traccia delle
stazioni con trasmissione TP per
una ricezione più veloce.
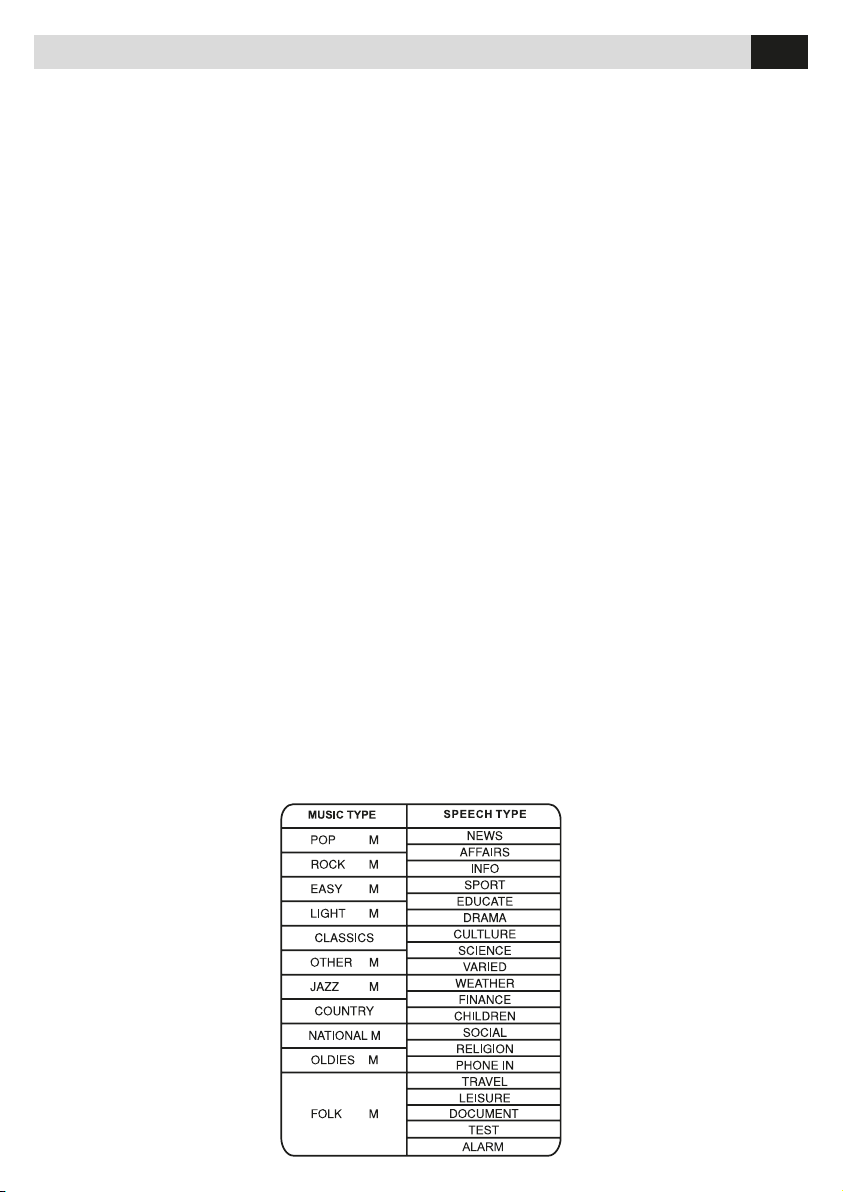
PTY (Tipologia programma
dell’emittente)
RDS invia un codice identificativo
del tipo di programma dell’emittente Esempio: news, rock, info,
sport, ecc.
PTY Mode: Premere BAND più
di 2 secondi per entrare nel menù
del PTY. Verrà visualizzato l’ultimo
PTY, utilizzare le frecce per selezionare il programma desiderato.
L’unità inizierà a ricercare stazioni
con il PTY scelto, se non viene
trovata alcuna stazione verrà visualizzato NO PTY.
GB RDS service availability varies with areas. Please
understand if RDS service is not available in your area,
the following service is not available.
RDS BASICS
AF (Alternative Frequency): When the radio signal
strength is poor, enabling the AF function will allow the
unit to automatically search another station with the
same PI (program identification) as the current station
but with stronger signal strength.
PS (Program Service name): The name of station will be
displayed instead of frequency.
TRAFFIC ANNOUNCEMENTS
Some RDS FM stations periodically provide traffic information.
TP: (Traffic Program Identification) Broadcasting of traffic information.
TA: (Traffic Announcements Identification) Radio announcements on traffic conditions.
EON: (Enhanced Other Networks)
When EON data is received, the EON indicator lights
and the TA and AF functions are enhanced.
TA: Traffic information can be received from the current
station or stations in other network.
AF: The frequency list of preset RDS stations is updated by EON data. EON enables the radio to make fuller
use of RDS information. It constantly updates the AF list
of preset stations, including the one that currently tuned
into. If you preset a station around the area at your
home, you will later be able to receive the same station
at an alternative frequency, or any other station serving
the same program, EON also keeps track of locally available TP stations for quick reception.
PTY Reception (Program Type)
RDS FM stations provide a program type identification signal.
Example: news, rock, info, sport,
etc.
PTY Mode: Press BAND more
than 2 seconds to turn
on the Program Type reception,
the previous PTY type is shown,
then use / to select the desired
program type. The selected PTY
type is shown and searching
starts if no other function is selected for 2 seconds. If there is
no corresponding program type,
NO PTY is shown and the unit will
return to normal mode.
13
Page 14
Modalità Disco/USB/SD card • Disc/USB/SD card mode
IT/GB
IT ACCESSO ALLA MODALITÀ DISCO
Se il disco è già presente all’interno premere il tasto
SRC sul pannello frontale o sul telecomando per passare sulla sorgente DISCO.
Per riprodurre un file da USB/SD card (supporto già
inserito) scegliere sorgente CARD o USB.
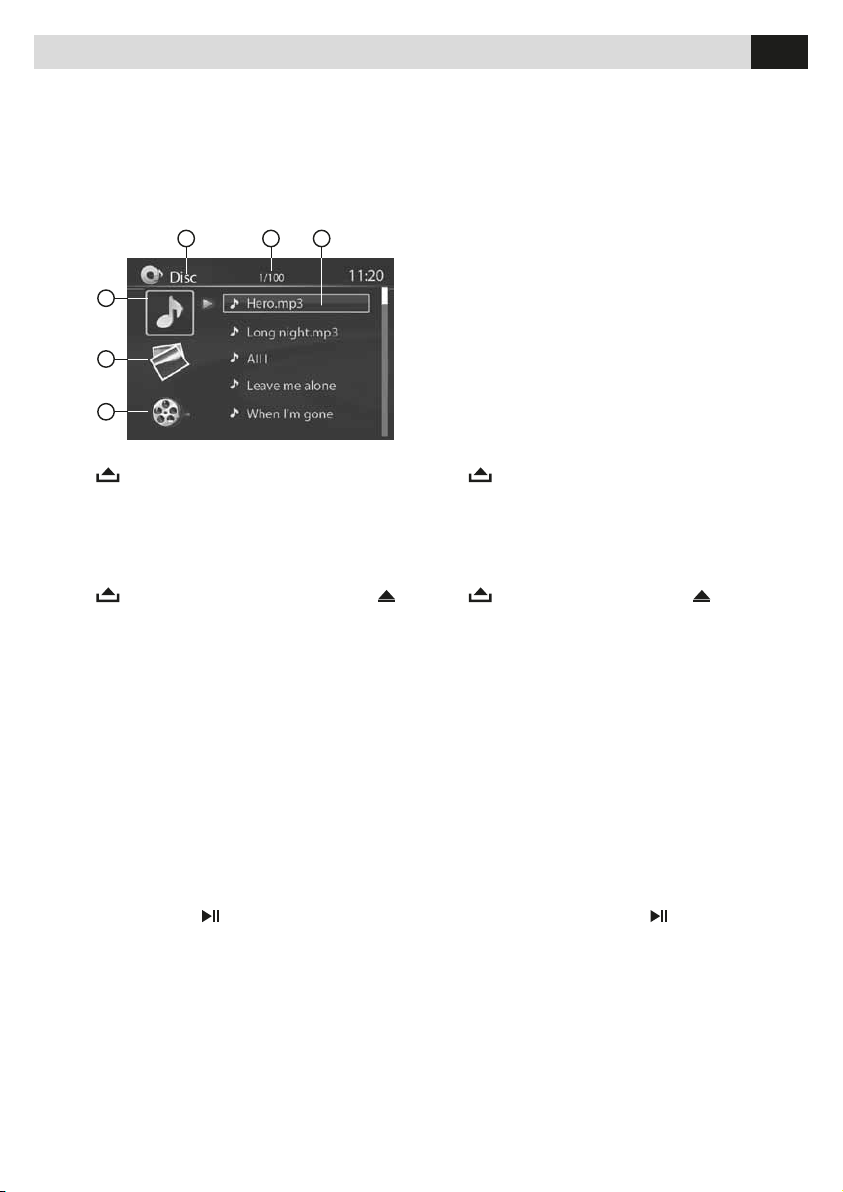
Il display mostrerà la seguente schermata:
1
4
5
6
INSERIMENTO DISCO
Premere
per abbassare il frontalino. Inserire il disco
nella feritoia.
Nota: Fare attenzione a non inserire un disco quando
ne è già presente un altro all’interno.
ESPULSIONE DISCO
Premere
per abbassare il frontalino e premere
per espellere il disco.
Nota: E’ possibile espellere Il disco a unità spenta, non
si accenderà una volta terminata l’espulsione.
2 3
GB ACCESSING DISC MODE
If a disc is already in the disc slot but is not playing,
press the SRC button on the front panel or on the
remote control to switch to the DISC source. To play
files from an SD or USB that is already inserted, choose
the CARD or USB source. The disc playback screen is
indicated below:
1. Indicatore sorgente / Source Indicator
2. Traccia corrente-totali / Current-total Track
3. Nome del file / Name of the song
4. Selezione Musica / Audio Folder
5. Selezione Immagini / Picture Folder
6. Selezione Video / Video Folder
INSERT A DISC
Press
slot.
Note: Please confirm whether there is a disc in
the unit before you insert another one.
Eject the Disc
Press
disc.
Note: You can eject a disc with the unit powered
off. The unit remains off after the disc is ejected.
to flip down the panel. Insert the disc into the
to flip down the panel. Press to eject the
RIPRODUZIONE DISCO
1. Quando il disco è inserito Il display visualizza LOAD.
Per files MP3 o disco con files misti, la lettura potrebbe
impiegare oltre 1 minuto.
2. ERROR viene visualizzato in caso di errore nel cari-
camento.
3. Per VCD/CD, l’icona VCD o CD comparirà sul display.
4. Durante la riproduzione di file MP3/WMA compare la
relativa icona sul display.
5. L’icona DVD compare sul diplay quando è stato
inserito un DVD e successivamente comparirà il menù
titoli. Premere ENTER o
per avviare la riproduzione.
RIPRODUZIONE FILE AUDIO/VIDEO/IMMAGINI
Durante la riproduzioni di files AUDIO/VIDEO/IMMAGINI viene visualizzata la lista Category/Folder/File in
alto sul display che permette di vedere l’elenco dei
titoli, della traccia o il nome della cartella su un disco.
Se viene selezionata la cartella si potrà visualizzare il
suo contenuto.
FILES AUDIO
1. Premere ESC per tornare al menù delle playlist.
DISC PLAYBACK
1. When disc inserted, display shows LOAD. For MP3
or disc with mixed files, reading time may exceed 1
minute.
2. ERROR will be displayed if error found in disc ope-
ration.
3. For VCD/CD, VCD or CD icon will appear on the
display.
4. While MP3/WMA files playback, MP3/WMA icon will
appear on the display.
5. For DVD, DVD icon will appear on the display and
TITLE appears. Press ENTER or
to play.
AUDIO/PICTURE/VIDEO FILE PLAYBACK
When AUDIO/PICTURE/VIDEO file is played, Category/
Folder/File list will be displayed on the screen, and file/
folder name being played will be displayed on top. The
list lets you see the list of track titles or folder names on
a disc. If you select a folder on the list, you can view its
contents.
FOR AUDIO FILES
1. Press ESC to return to playlist menu.
14
Page 15
Modalità Disco/USB/SD card • Disc/USB/SD card mode
IT/GB
2. Utilizzare / per selezionare la cartella AUDIO.
3. Premere OK,
mando per visualizzare tutte le tracce audio disponibili.
4. Muoversi con le frecce
desiderato tramite le frecce
sul frontalino o ENTER sul telecomando per avviare la
riproduzione.
5. Durante la riproduzione premere
e
per riprenderla.
FILES IMMAGINI
1. Premere ESC per tornare al menù delle playlist.
2. Utilizzare
3. Premere OK,
mando per visualizzare tutte le immagini disponibili.
4. Muoversi con le frecce
desiderato tramite le frecce
Premere OK,
mando per avviare la riproduzione.
5. Durante la riproduzione premere
tornare alla lista dei files.
FILES VIDEO
1. Premere ESC per tornare al menù delle playlist.
2. Utilizzare
3. Premere OK,
mando per visualizzare tutte le tracce audio disponibili.
4. Muoversi con le frecce
desiderato tramite le frecce
Premere OK,
mando per avviare la riproduzione.
5. Durante la riproduzione premere
tornare alla lista dei files.
Nota: Durante la selezione delle cartelle, premere ESC
per tornare alla cartella superiore, se ci si trova nella
cartella principale il tasto ESC non potrà essere utilizzato.
sul frontalino o ENTER sul teleco-
/ e posizionarsi sul file
/ . Premere OK,
per interromperla
/ per selezionare la cartella IMMAGINI.
sul frontalino o ENTER sul teleco-
/ e posizionarsi sul file
/ .
sul frontalino o ENTER sul teleco-
per interromperla
/ per selezionare la cartella VIDEO.
sul frontalino o ENTER sul teleco-
/ e posizionarsi sul file
/ .
sul frontalino o ENTER sul teleco-
per interromperla
2. Use / to select AUDIO folders.
3. Press OK,
mote control to display all available audio file folders.
4. Use
sired file, press OK,
the remote control to start play.
5. During the file playing, press
logo, then press
FOR PICTURE FILES
1. Press ESC to return to playlist menu.
2. Use
3. Press OK,
mote control to display all available picture file folders.
4. Use
sired file, press OK,
the remote control to slide show the pictures, and press
PROG to select picture showing style.
5. During the file playing, press
the sub-root.
FOR VIDEO FILES
1. Press ESC to return to playlist menu.
2. Use
3. Press OK,
mote control to display all available video file folders.
4. Use
desired file, press OK,
on the remote control to start play.
5. During the file playing, press to stop and return to the
sub-root.
Note: During the folder selecting, press ESC to the
upper folder (parent folder). If the uppermost folder is
listed, ESC cannot be used.
ENTERING ID3 TAG
This unit supports ID3 tag version 2.0.
on the front panel or ENTER on the re-
/ to enter file list and use / to select de-
on the front panel or ENTER on
will enter power on
to return.
/ to select PICTURE folders.
on the front panel or ENTER on the re-
/ to enter file list and use / to select de-
on the front panel or ENTER on
to stop and return to
/ to select VIDEO folders.
on the front panel or ENTER on the re-
/ to enter file list and use / to select
on the front panel or ENTER
VISUALIZZAZIONE ID3 TAG
L’unità supporta ID3 TAG versione 2.0
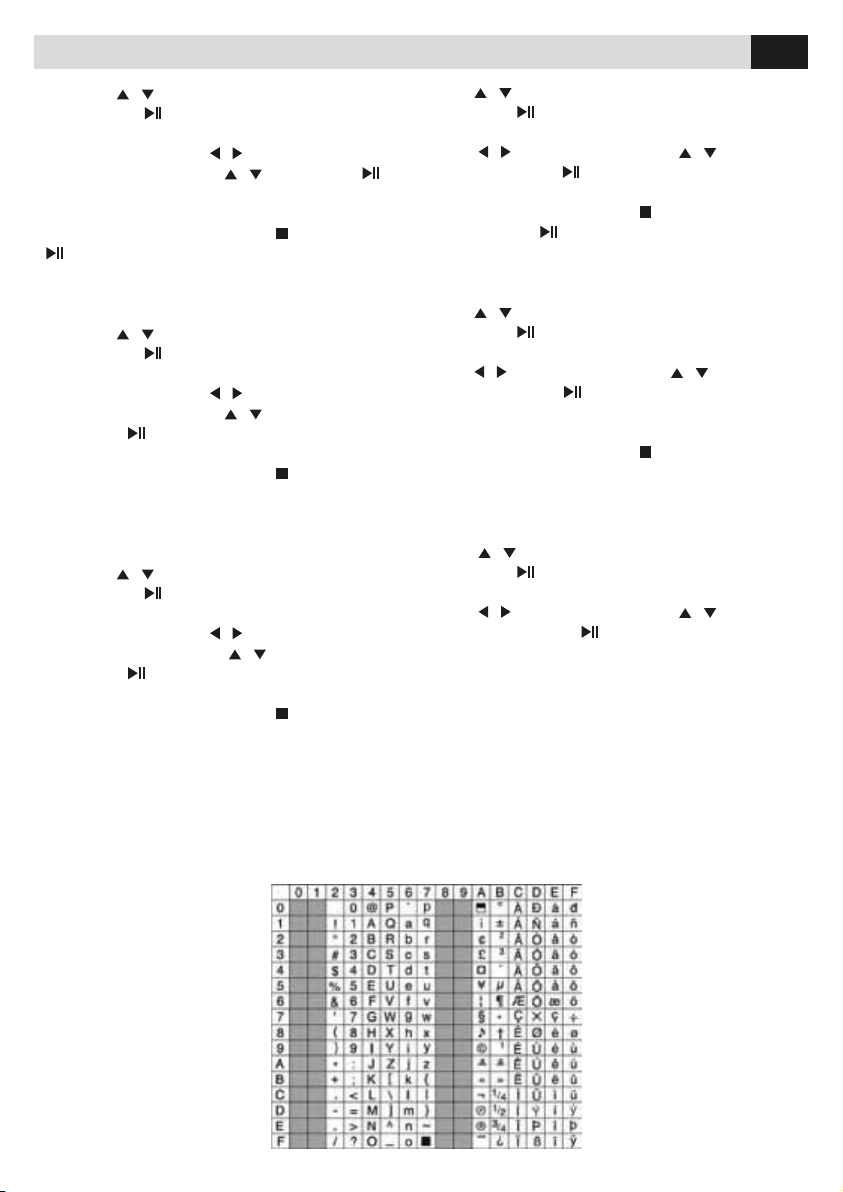
INSERIMENTO FILE E NOME
CARTELLA
Solo i file audio nominati con i
caratteri presenti nella lista sono
visualizzati correttamente. L’utilizzo di ogni altro carattere causerà la visualizzazione errata.
ORDINE DI RIPRODUZIONE
MP3
Quando si seleziona files e
cartelle per la riproduzione, la
ENTERING FILE AND FOLDER NAMES
Names using the code list characters are the only file
names and folder names that
can be entered and displayed.
Using any other character will
cause the file and folder names
to be displayed incorrectly.
A file name entered with characters not on the code list may
not play correctly.
MP3 PLAYING ORDER
When selected for playing, files
and folders (Folder Search, File
Search or Folder Select) are
15
Page 16
Modalità Disco/USB/SD card • Disc/USB/SD card mode
IT/GB
riproduzione avverrà nell’ordine in cui sono stati scritti
sul supporto che potrebbe essere differente da quello
desiderato. E’ possibile impostare
l’ordine di riproduzione assegnando
un numero all’inizio del nome del file/
cartella da 01 a 99.
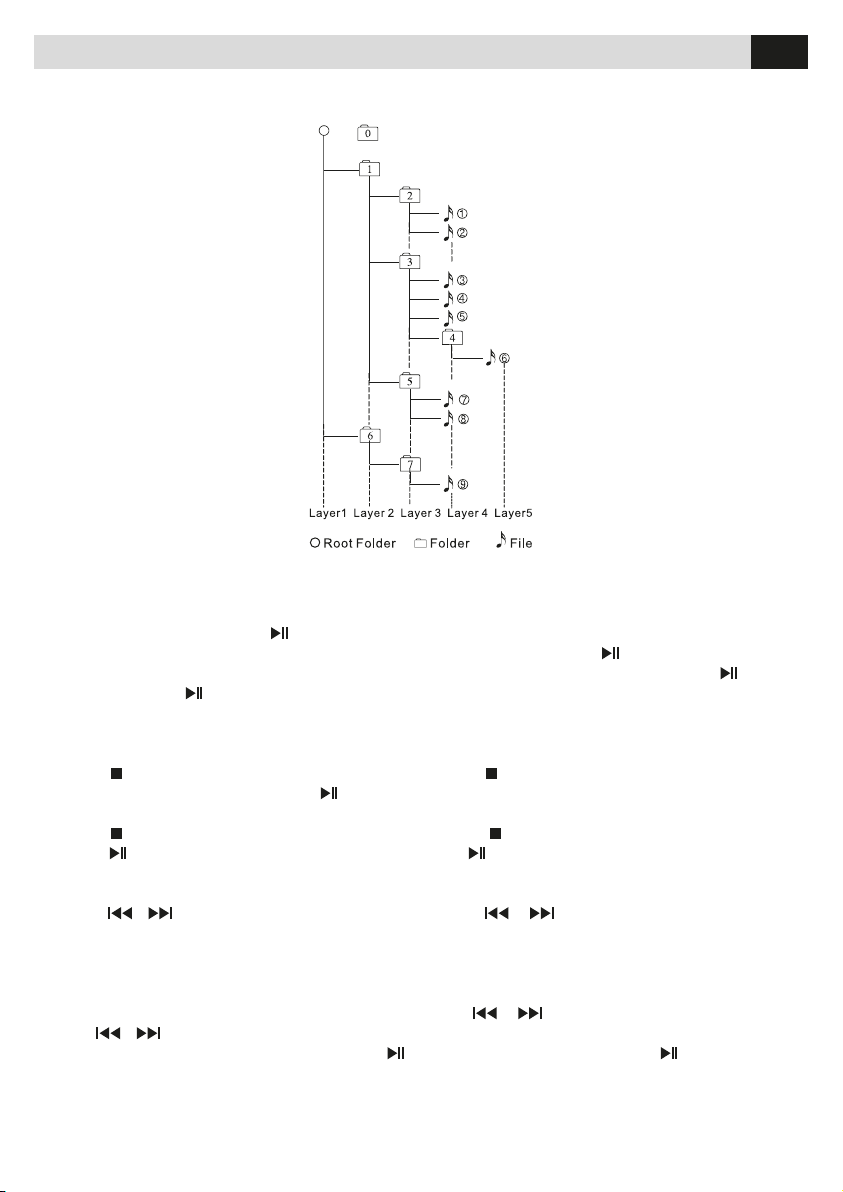
Per esempio un supporto con la
seguente struttura cartelle/files è
soggetto alle funzioni ricerca cartella,
ricerca file o seleziona cartella come
mostrato in figura:
Il lettore riconoscerà solamente 3 livelli
di cartelle e non mostrerà cartelle contenente solo altre cartelle.
Nell’esempio, l’unità mostrerà le cartelle 2,3,5 e 7, ma non la 1 e la 6 poiché non contengono tracce dirette.
PROTEZIONE ELETTRONICA ANTISHOCK
• 10 secondi per CD-DA (CDA)
• >45 secondi per MP3 registrati a
44.1kHz, 128kbps
• >90 secondi per WMA registrati a
44.1kHz, 128kbps
INTERRUZIONE TEMPORANEA RIPRODUZIONE
• Durante la riproduzione premere
la riproduzione.
• La scritta “PAUSE” verrà visualizzata sullo schermo.
Premere nuovamente
per riavviare la riproduzione.
per interrompere
( )
accessed in the order in which they were written to the
media. As a result, the order in which they are expected
• >45 seconds for MP3 recorded at 44.1kHz, 128kbps
• >90 seconds for WMA recorded at 44.1kHz, 128kbps
STOP PLAYBACK TEMPORARILY
• During playback, press
• Display “PAUSE” in the TV screen. Press
continue playback.
to be played may not match the order
in which they are actually played. You
may be able to set the order in which
MP3/WMA files are to be played by
assigning file names beginning with
play sequence numbers such as “01”
to “99”. For example, a medium with
the following folder/ file hierarchy is
subject to Folder Search, File Search
or Folder Select as shown below.The
player will only recognize three folder
levels and does not display folders
containing only other folders. In the
example above, the unit will display
folders 3, 4, 6, and 8, but not 2 and 7
since they do not contain any tracks
directly. Folder 5 is not recognized at
all since it is at the fourth level.
ELECTRONIC SHOCK PROTECTION
• 10 seconds for CD-DA (CDA)
to pause playback.
again to
INTERRUZIONE COMPLETA RIPRODUZIONE
Durante la riproduzione di DVD, VCD, CD, MP3:
1. Premere
zione, la posizione verrà salvata. Premere
dere dalla stessa posizione.
2. Premere
Premendo
SELEZIONE TRACCIA DESIDERATA
• Premere
dente/successiva.
• Utilizzare i tasti 1-9, 0, 10+ sul telecomando per selezionare la traccia desiderata.
AVANTI/INDIETRO VELOCE IN RIPRODUZIONE
Premere
x8, x20 per avviare la riproduzione veloce. Premere
brevemente per riprendere la riproduzione normale.
una volta per interrompere la riprodu-
per ripren-
due volte per cessare la riproduzione.
la riproduzione riprenderà dall’inizio.
o per passare alla traccia prece-
o per 2 secondi e selezionare x2, x4,
STOP PLAYBACK ENTIRELY
During DVD, VCD, CD, MP3 playback:
1. Press
levant location on the disc is saved, press to resume the
playback from the saved disc location.
2. Press
Press
SELECT DESIRED TRACK
• Press
• Use 1-9 and 0, 10+ buttons on the remote control to
select desired track number.
FAST FORWARD/BACKWARD DURING PLAYBACK
Press
more to select X2, X4, X8, X20, to fast backward or forward track during playback. Press
again.
16
key once stopping the playback and the re-
twice to cease the playback.
to start the playback from the beginning.
or to skip to the next /prevoius track.
or for more than 2 seconds once or
briefly to playback
Page 17

Modalità Disco/USB/SD card • Disc/USB/SD card mode
IT/GB
RIPETI
Durante la riproduzione premere RIPETI una o più volte.
• Icona RPT apparirà sul display.
• Per CD/VCD: sul display apparirà RPT ONE ➞ RPT
ALL ➞ RPT OFF.
• Per DVD: sul display apparirà RPT CAPITOLO ➞ RPT
TITOLO ➞ RPT OFF.
• Per disco File: Sul diaply apparirà RPT UNO ➞ RPT
DIR ➞ RPT TUTTI ➞ RPT OFF.
Nota: Se non si seleziona RPT, quando il disco terminerà il sistema si fermerà. Senza altro comando dopo 5
minuti andrà in modalità stand by.
RIPETI A-B
Seleziona il passaggio desiderato per ripetere la riproduzione.
• Premere A ➞ B per selezionare il punto d’inizio. Il
display mostrerà RIPETI A.
• Premere A ➞ B di nuovo per selezionare il termine. Il
display mostra RIPETI A ➞ B e inizia la riproduzione il
passaggio selezionato.
• Premere A ➞ B nuovamente per uscire. Il display
mostrerà A ➞ B CANCEL.
PBC - CONTROLLO PLAYBACK
1.
Se si inserisce un VCD con PCB, la riproduzione ini-
zia dalla prima traccia automaticamente.
2.
Premere PCB per visualizzare il menu, utilizzare
/ o i numeri per la traccia desiderata. Premere
per interrompere. Premere PBC ancora per uscire dal
menu.
GOTO
Premere GOTO sul telecomando, la traccia o il capitolo/titolo DVD e il tempo appariranno nella parte
superiore dello schermo. La riproduzione corrente è
evidenziata, usare
rata. Usare i tasti numerici per selezionare il numero.
Premere ENTER per confermare.
PROGRAM
Premere PROG per entrare nella lista programmazione.
Usare / o / e i tasti numerici per inserire il numero.
Per i dvd o i file disc selezionare titolo o numero del capitolo. Per VCD e CD slezionare numero della traccia
Premere
zionare PLAY premendo ENTER.
Se si vuole cancellare la lista muovere il cursore su
CLEAR e premere ENTER.
Premere nuovamente PROG per uscire dalla modalità.
/ per selezionare quella deside-
per riprodurre, o muovere il cursore e sele-
REPEAT
During playback, press REPEAT once or more.
• RPT icon will appear on the display.
• For VCD/CD: Display appears RPT ONE ➞ RPT ALL
➞ RPT OFF.
• For DVD: Display appears RPT CAPITOLO ➞ RPT
TITOLO ➞ RPT OFF.
• For File disc: Display appears RPT UNO ➞ RPT DIR
➞ RPT TUTTI ➞ RPT OFF.
Note: If you do not select RPT on, when the entire disc
or TITLE playback has finished, the system will stop. If
no other control, after 5 minutes the unit will turn into
standby mode.
REPEAT A B
Select desired passage to repeat playback.
• Press A ➞ B once to select starting point. Display
shows RIPETI A.
• Press A ➞ B again to select ending point. Display
shows RIPETI A ➞ B , and selected passage start to
replay.
• Press A ➞ B once again to exit. Display shows A ➞ B
CANCEL.
PBC - PLAYBACK CONTROL
1. If you insert a VCD with PBC, playback starts from
the beginning of the 1st track automatically.
2. Press PBC to show menu, use
button to select desired track. Press to stop. Press PBC
again to exit menu.
GOTO
Goto desired track/chapter or time point directly.
Press GOTO button on the remote control, track or
DVD Title/Chapter and time display on top of the
screen. Cur rent i tem is highlighted. Use
desired item. Use digit button to select number. Press
ENTER to confirm.
PROGRAM
- Press PROG to enter program list. Use
cursor and digit button to enter number.
For DVD and File disc, select title and chapter number.
For VCD and CD, select track number.
Press
to play, or move the cursor to select “PLAY”
and press ENTER to play.
If you want to delete the list, move the cursor to
“CLEAR”, press ENTER to delete all the list set before.
Press PROG again to exit program play.
/ or digit
/ to select
/ or /
17
Page 18

Modalità Disco/USB/SD card • Disc/USB/SD card mode
IT/GB
SELEZIONE AUDIO DVD
Premere AUDIO per selezionare la lingua audio che si
desidera nel DVD multilingua.
SELEZIONE AUDIO VCD
Premere AUDIO per selezionare il canale audio da
ascoltare, L ➞ R ➞ MIX MONO ➞ STEREO premere
ancora per riselezionare.
SELEZIONE SOTTOTITOLI DVD
Premere SUB.T per selezionare la lingua dei sottotitoli
da mostrare se il DVD è dotato di sottotitoli multilingua.
SELEZIONE TITOLO DVD
Premere TITLE per visualizzare il titolo e la lista capitoli,
usare i cursore o digitare il numero, premere ENTER
per riprodurre.
SELEZIONE ANGOLO DVD
Premere ANGOLO per selezionare i differenti angoli di
visione se il DVD è dotata.
MIRROR IMMAGINE
Quando si visualizza un’immagine, premere
tamente per effettuare il mirror verticale dell’immagine,
e premere ripetutamente
orizzontale.
ZOOM
Premere il tasto ZOOM per ingrandire l’immagine.
X2 ➞ X3 ➞ X4 ➞ X1/2 ➞ X1/3 ➞ X1/4 ➞ OFF premere
ancora per riselezionare.
per effettuare il mirror in
ripetu-
DVD AUDIO SELECT
Press AUDIO to select audio language to listen if the
DVD has multiple audio languages.
VCD AUDIO SELECT
Press AUDIO to select audio channel to listen.
DVD SUBTITLE SELECT
Press SUB.T to select the subtitle language
to show if the DVD has multiple language
subtitles.
DVD TITLE SELECT
Press TITLE to display title or chapter list, use
cursor or digit number to select, press ENTER
to play.
DVD ANGLE SELECT
Press ANGLE to select different angle to view
if the DVD has multiple-angle views.
PICTURE MIRROR
When you view a picture, press
the picture vertically, and press
the picture horizontally.
ZOOM
Press ZOOM button, the picture will be
X2 ➞ X3 ➞ X4 ➞ X1/2 ➞ X1/3 ➞ X1/4 ➞ OFF
zoomed accordingly.
repeatedly to mirror
repeatedly to mirror
18
Page 19
Funzione Bluetooth • Bluetooth mode
IT/GB
IT ACCESSO ALLA MODALITÀ BLUETOOTH
Premere tasto SRC sul pannello o sul telecomando per
entrare in Bluetooth
ACCOPPIAMENTO
Usare la funzione per stabilire una connessione tra
unità e telefono cellulare.
Premere la manopola per 2 secondi per entrare nei
Settaggi, poi usare
poi utilizzare
da OFF in ON.
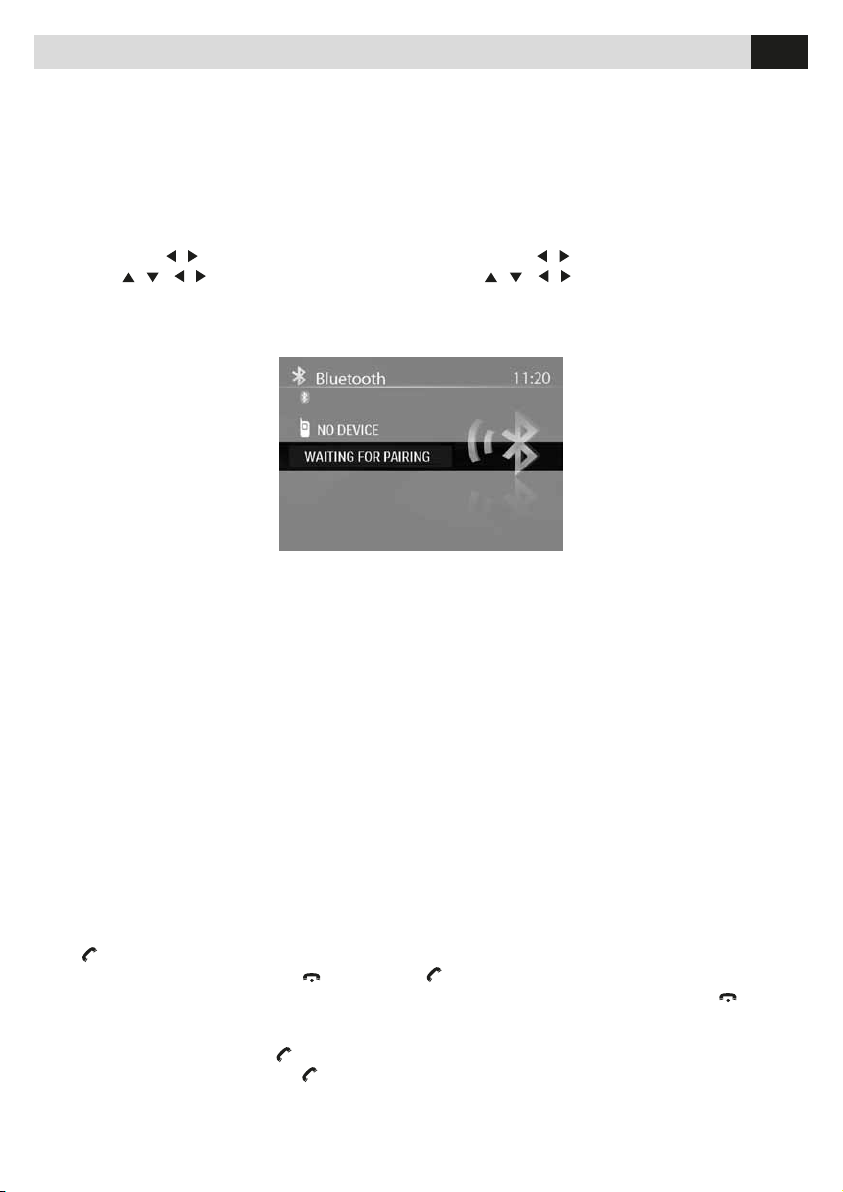
Premere ESC per tornare al menù principale. “IN AT-
TESA DI ACCOPPIAMENTO” apparirà sullo schermo
Attivare la funzione Bluetooth sul
proprio cellulare, mantenersi ad
una distanza massima di 3 mt
dall’unità e iniziare la ricerca di
dispositivi bluetooth.
Quando apparirà il nome
Phonocar è possibile selezionarlo.
A questo punto è richiesto i co-
dice di accesso, inserire 1234 e
l’accoppiamento Bluetooth verrà
effettuato automaticamente.
Alcuni cellulari chiederanno la conferma della connessione.
Nota: La rubrica scaricata non sarà in ordine alfabetico.
Sincronizzazione rubrica non compatibile con
iPhone.
INTERROMPERE ACCOPPIAMENTO
Si può interrompere accoppiamento o disconnettersi
nel seguente modo:
Entrare nel settaggio BT, passare da PAIR ON a OFF,
poi premere ESC per tornare al menù principale. Dopo
aver disconnesso, Nessun Dispositivo apparira sullo
schermo l’icona Bluetooth sparirà.
ATTESA CHIAMATA IN ARRIVO
(Se il cellulare è dotato)
Durante la conversazione o nello streaming audio Bluetooth se abbiamo una chiamata in arrivo sullo schermo
apparirà la scritta “347 3312574 RISPONDI?”. Se si
preme
risponde a quella in arrivo. Se si preme
chiamata in arrivo e si continua con quella corrente.
TRASFERIMENTO VOCE
Durante la conversazione, premere
l’audio dall’unità al cellulare, e premere
per trasferire l’audio dal cellulare all’unità.
Alcuni cellulari trasferiranno l’audio dall’unità a se stessi
quanto si risponde alla chiamata
si interrompe la conversazione in corso e si
/
/ o /
per selezionare i settaggi BT,
per passare l’opzione PAIR
si rifiuta la
per trasferire
nuovamente
GB ACCESSING BLUETOOTH MODE
Press the SRC button on the front panel or remote con-
trol to switch to the Bluetooth source.
PAIRING
Use this function to establish a connection between the
unit and your mobile phone.
Press the knob more than 2 seconds to enter Setting
mode, then use
and use
options to ON.
Press ESC to return to Bluetooth main menu.
“WAITING FOR PAIRING” will appear on the screen.
the Bluetooth pairing will process automatically. Some
mobile phones may instruct you to select connecting or
disconnecting, please select connecting.
Note: The downloaded phonebook will not be in alpha-
betical order.
Phonebook download not available on iPhone.
STOP PAIRING
You can stop pairing or disconnecting in this following
way: Enter BT Setting menu, switch the PAIR: ON/ OFF
options to OFF, then press ESC to return to Bluetooth
main menu. After disconnecting,“NO DEVICE” will
appear on the screen and the Bluetooth icon will disappear.
INCOMING PHONE WAITING
(Only the mobile phone with this function)
In the mode of communication or BT AUDIO (MUSIC
PLAYING), if there is a call coming in, the TFT screen
will appear “347 3312574 ANSWER?”. If you press
key to stop communication you are making, and
receiving the incoming phone. If you press
reject the incoming call, and resume the former communication.
VOICE TRANSFER
During talking, press key to transfer audio from the unit
to your mobile phone, and press key again to transfer
audio from your mobile phone to the unit.
19
/ key to select BT setting item,
/ o / , key to switch the PAIR: ON/OFF
Turn on Bluetooth function of
your mobile phone, keep phone
within 3 meters to the unit and
start to search for Bluetooth
devices. After the name of the
Bluetooth module “Phonocar”
appears on the pairing list on
your mobile phone, you should
select it. At this time, a pairing
code is required. Enter the pairing
code (“1234” by default) and
key on to
Page 20
Funzione Bluetooth • Bluetooth mode
IT/GB
AUDIO BLUETOOTH
(Su cellulari dotati di funzione A2DP o AVRCP)
Dopo aver accoppiato il dispositivo, aprire il player
audio nel menù Bluetooth e settare la modalità trasmit
in Bluetooth. Questa volta, sullo schermo dell’unità
apparirà la scritta Musica in riproduzione. E l’audio
verrà trasferito dal cellulare all’unità. Alcuni cellulari
chiederanno la conferma della connessione. Dopo aver
trovato l’unità sotto il nome “Phonocar” nel cellulare,
connettersi e inserire il codice di accesso che in base
alle versioni è “0000 oppure 1234”. Durante la riprodu-
zione audio si può premere
passare da Play a Pausa e premere
comando o sul pannello.
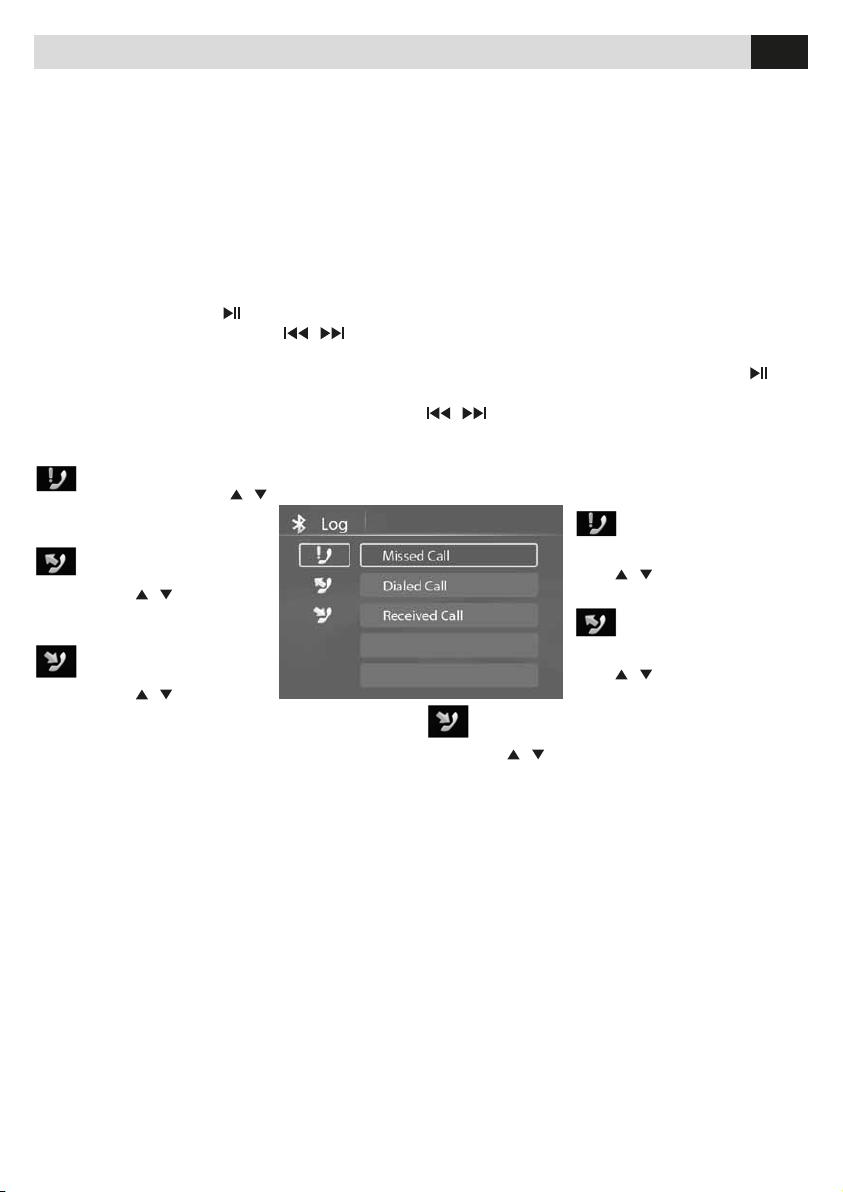
LOG
Dopo l’accoppiamento Bluetooth tenere premuto il
tasto BAND per visualizzare lo storico chiamate.
1.
Chiamate perse.
Fare una chiamata usando la lista chiamate
perse. Premete i tasti
desiderato nella lista.
2.
Chiamate effettuate.
Fare una chiamata usando
la lista chiamate effettuate.
Premete i tasti
numero desiderato nella lista.
3.
Chiamate ricevute.
Fare una chiamata usando
la lista chiamate ricevute.
Premete i tasti
numero desiderato nella lista.
NOTE GENERALI SUL BLUETOOTH
1.
Per cellulari N7X, N9X, Philips, Sony Ericsson, Samsung durante i nostri test, dopo una accoppiamento
risultato effettuato, l’unità risultava ancora in attesa.
A questo punto bisogna cercare il dispositivo
“Phonocar” nella lista dei dispositivi sul cellulare. Nel
menù sottostante, selezionare connessione così nello
schermo dell’unità apparirà OK. Altrimenti nessuna
voce si sentirà nella comunicazione. Alcuni cellulari
come Philips, quando riproducono in A2DP bisogna
entrare nella modalità riproduzione cercare il dispositivo
Phonocar e riconnettersi.
2.
Durante l’accoppiamento, alcuni tipi di cellulari indicano come procedere, per esempio quando si fa una
chiamata con l’unità, ma non si sente nessuna voce, il
motivo è che la voce del cellulare no è stata trasferita
all’unità. I cellulari SAMSUNG possono indicare come
fare per trasferirla.
3.
In base al cellulare se è selezionata la modalità privata quando si fa una chiamata con l’unità potrebbe
/
per cercare il
/
per cercare il
sul telelecomando per
/ sul tele-
/
per cercare il numero
Some mobile phones will transfer audio from the unit to
themselves once the incoming call is answered.
BT AUDIO
(Only the mobile phone with A2DP & AVRCP functions)
After pairing successfully, in the mode of Bluetooth main
menu, open the audio player of your mobile phone and
set the transmit mode to Bluetooth. At this time, the unit
screen will appear “MUSIC PLAYING”, and the audio
will be transferred from the mobile phone to the unit.
Some mobile phones may instruct to connect with the
unit. After found the Bluetooth device name “Phonocar”
on mobile phone, you should select to connect and
according to the versions
or “1234”. When music playback, you can press
the remote control to switch to play/pause, and press the
/ key on the front panel and remote control.
LOG
After pairing Bluetooth, hold BAND key to select dialling
history.
3. Received Call.
Making a phone call using the received call history. Press
the list.
GENERAL NOTES FOR BLUETOOTH
1. For N7X, N9X, PHILIPS, Sony Ericssion,SAMSUNG
mobile phones, during our test, after the mobile phones appear connection successful, the unit still appear
waiting for pairing. At this time you must find the unit’s
Bluetooth module name “Phonocar” on the pairing list
on your mobile phone and select it. In the submenu,
select connecting, then the unit will appear pair OK.
Otherwise, there is no voice coming out when communicating, though the mobile phone has already displayed pair OK. Some mobile phones, such as PHILIPS,
when it playbacks A2DP, you must in its playbacking
mode, find the unit’s “Phonocar” and reconnect (check
your mobile phone whether has the A2DP & AVRCP
functions).
2. When pairing, some types of mobile phone can instruct you how to operate, for example, when you make
20
/ button to search for desired record on
input the pairing code “0000”
1. Missed Call.
Making a phone call using
missed call history.
Press
/ button to search for
desired record on the list.
2. Dialed Cal.
Making a phone call using
the dialled number history.
Press
/ button to search for
desired record on the list.
on
that
Page 21

Funzione Bluetooth • Bluetooth mode
IT/GB
accadere che invece di trasferire la voce il bluetooth si
disconnetta fino a quando la conversazione non termina. Certi cellulari necessitano di effettuare accoppiamento nuovamente.
4.
Il nome dei dispositivo bluetooth deve essere scritto
in numeri e lettere.
5.
Dopo aver effettuato l’accoppiamento, se non c’è
nessun suono verificare che l’audio stereo del Bluetooth sia attivo.
ATTENZIONE!!!
1) La sincronizzazione della rubrica non è compatibile con iPhone.
2) La sincronizzazone della rubrica non sarà
eseguità rispettando l’ordine alfabetico dei nomi.
a phone call with the unit, but no voice comes out, it is
because the mobile phone voice doesn’t be transferred
to the unit. The SAMSUNG mobile phone can instruct
voice should be transferred to Bluetooth device.
3. Depending on the mobile phone, if private mode is
selected, when you make a phone call with the unit,
when received, the voice can be transferred to the mobile phone. But sometime the Bluetooth maybe disconnect till the communication ends, and connects your
mobile phone and the unit automatically. Some mobile
phones maybe require you to perform again the pairing
operation.
4. For mobile phone, the Bluetooth device name must
be pr imary symbols or numbers. Otherwise, some unpredictable issues may occur during the Bluetooth
devices connecting and making phone call.
5. After paired OK, if no sound produced, please check
the Bluetooth stereo audio whether is switched to ON.
WARNING!!!
1) Phonebook download not available on iPhone.
2) The phonebook is not in alphabetical order.
21
Page 22

Caratteristiche tecniche • Specications
GB
IT GENERALI
Alimentazione 12VDC (11V-16V), Test voltage 14.4V,
negative ground
Watt max 45W x 4 channels
Watt rms 20W x 4 channels (4 10%
T.H.D.)
Impedanza altoparlanti 4-8ohm
Voltaggo preamplicatore 2.0V (CD play mode: 1KHz,
0dB, 10K load)
Fusibile 15A
Dimensioni (LxAxP) 178 x 50 x 164mm
Peso 1.38kg
Aux-in 500mV
GENERAL
Power supply 12VDC (11V-16V), Test voltage 14.4V,
negative ground
Maximum power output 45W x 4 channels
Continuous power output 20W x 4 channels (4 10%
T.H.D.)
Suitable speaker impedance 4-8ohm
Pre-Amp output voltage 2.0V (CD play mode: 1KHz,
0dB, 10K load)
Fuse 15A
Dimensions (WxHxD) 178 x 50 x 164mm
Weight 1.38kg
Aux-in level 500mV
IT/GB
3” (16:9) TFT LCD
Risoluzione display (dot) 960(W)×240(H)
Active area (mm) 65.52×36.84
Misura monitor (inch) 2.96 (Diagonal)
Dot pitch (mm) 0.06825 x 0.1535
Contrasto 300
Luminosità 350nits
FM STEREO RADIO
Frequenze: 87.5-108.0MHz (Europe)
87.5-107.9MHz (America)
Sensitivity 8dB μ
Frequency response 30Hz-15KHz
Stereo separation 30dB(1KHz)
Image response ratio 50dB
IF response ratio 70dB
Signal/noise ratio >55dB
AM(MW) RADIO
Frequenze 522-1620KHz (Europe)
530-1710KHz (America)
Sensitivity (S/N=20dB) 30dBμ
DISC PLAYER
Sistema Disc digital audio system
Frequency response 20Hz - 20KHz
Signal/noise ratio >80dB
Total harmonic distortion Less than 0.20% (1KHz)
Channel separation >60dB
Video signal format system NTSC/PAL 60/PAL/AUTO
Video output 1 0.2V
3” INCH (16:9) TFT LCD
Display resolution (dot) 960(W)×240(H)
Active area (mm) 65.52×36.84
Screen size (inch) 2.96 (Diagonal)
Dot pitch (mm) 0.06825 x 0.1535
Contrast ratio 300
Brightness 350nits
FM STEREO RADIO
Frequency range: 87.5-108.0MHz (Europe)
87.5-107.9MHz (America)
Usable sensitivity 8dB μ
Frequency response 30Hz-15KHz
Stereo separation 30dB(1KHz)
Image response ratio 50dB
IF response ratio 70dB
Signal/noise ratio >55dB
AM(MW) RADIO
Frequency range 522-1620KHz (Europe)
530-1710KHz (America)
Usable sensitivity (S/N=20dB) 30dBμ
DISC PLAYER
System Disc digital audio system
Frequency response 20Hz - 20KHz
Signal/noise ratio >80dB
Total harmonic distortion Less than 0.20% (1KHz)
Channel separation >60dB
Video signal format system NTSC/PAL 60/PAL/AUTO
Video output 1 0.2V
COMPONENTS
Staffe di montaggio 1
Viti M5x6 mm 4
Mascherina (50 mm) 1
Portafrontalino 1
Chiavi smontaggio 2
Libretto istruzioni 1
COMPONENTS
Mounting sleeve 1
Machine screws M5x6 mm 4
Mounting bolt (50 mm) 1
Removable face plate case 1
Removal key 2
Operating Instructions 1
22
Page 23

Caratteristiche tecniche • Specications
IT/GB
Perno in gomma 1
Telecomando 1
FILE COMPATIBILI
Audio: MP3(*.mp3), WMA(*.wma)
Video: MP4 (*.avi, DIVX3.11/4.0/5.0/6.0) - MPEG 2
(*.vob) - MPEG 1 (*.dat)
Immagini: JPEG (*.jpg)
MP3 file: ISO 9660 or ISO 9660 + Joliet format Max. 30 caratteri.
Massimo livello di directory: 8.
Massimo numero di album: 99.
Massima lunghezza di ogni traccia: 99 minuti e 59
secondi.
Frequenza di campionamento supportata per dischi
MP3: da 8KHz a 48KHz (44.1KHz preferibilmente).
Bit rates supportati su dischi MP3: 32 - 320kbps
(128 kbps preferibilemente).
DISCHI E FILES NON SUPPORTATI
*.AAC, *.DLF, *.M3U, *.PLS, MP3 PRO files e files
con DRM.
Dischi con sessione aperta.
NOTE MP3/WMA
I files MP3 e WMA (Windows Media Audio) sono file
audio digitali compressi per permettere la memorizzazione di più files. Questa unità può riprodurre MP3/
WMA direttamente da files contenuti in dischi CD-R/
RW,DVD-ROM, DVD+RW, DVD-RW, DVD+R, DVD-R e
DVD-VIDEO, oppure su SD card/USB.
Il VM051 può riprodurre MP3(MPEG1, 2, 2.5 Audio
Layer 3). Tuttavia ci possono essere delle incompatibilità dovuto al formato di compressione o dal programma utilizzato per questa operazione.
Rubber cushion 1
Remote control 1
FILE TYPE SUPPORTED
Audio file: MP3(*.mp3), WMA(*.wma)
Video file: MP4 (*.avi, DIVX3.11/4.0/5.0/6.0) - MPEG 2
(*.vob) - MPEG 1 (*.dat)
Picture file: JPEG (*.jpg)
MP3 file: ISO 9660 or ISO 9660 + Joliet format - Max.
30 characters.
Max. nested directory is 8 levels.
The max. album number is 99.
The max. length of each track is 99 minutes 59 seconds.
Supported sampling frequency for MP3 disc:
8KHz to 48KHz (44.1KHz preferably).
Supported bit-rates of MP3 disc are: 32 - 320
kbps (128 kbps preferably).
DISC AND FILE NOT SUPPORTED
*.AAC, *.DLF, *.M3U, *.PLS, MP3 PRO files and files
with DRM.
Open session discs.
MP3/WMA NOTES
MP3 and WMA (Windows Media Audio) music files are
digital audio files that are compressed to allow more
files to be stored. This unit can play MP3/WMA and
video directly from files contained on a CD-R/RW,
DVD-ROM, DVD+RW, DVD-RW, DVD+R, DVD-R and
DVD-VIDEO, or an SD card or USB Device. Many types
of software are available for converting audio files into
MP3/ WMA formats. Nero or Roxio Easy CD Creator
are recommended. This unit can play MP3 (MPEG1, 2,
2.5 Audio Layer 3). However, the MP3 recording media
and accepted formats are limited.
23
Page 24
Connexions • Kabel-Verbindungen
FR/D
Parking SW
VERT-BLANCHE / GRÜN-WEISS
ROSE / ROSE
Reverse
)
ANTENNE RADIO
RADIO ANTENNE
MICROPHONE BLUETOOTH/BLUETOOTH MIKROFON
SWC (COMMANDES AU VOLANT/LENKRAD-STEUERUNGEN)
SORTIE POSTÉRIEURE
AUSGANG HECK
SORTIE VIDEO
AUSGANG-VIDEO
ENTRÉE CAMÉRA DE RECUL
EINGABE-RÜCKFAHRKAMERA
R ROUGE / ROT
L BLANCHE / WEISS
JAUNE / GELB
JAUNE / GELB
Fuse
15A
FREIN A MAIN CABLE CONNEXION / HANDBREMSSEIL CONNECTION
Vert / Grün
Interrupteur de frein
de stationnement
Schalter Handbremse
Interrupteur de frein
de stationnement
Handbremsseil
Témoin lumineux
de frein à main
Handbremse Warnlicht
24
Batterie
Masse
Grund
Page 25
Connexions • Kabel-Verbindungen
CONNEXION DES CÂBLES REVERSE / REVERSE ANSCHLUSSLEITUNGEN
FR/D
Masse
Grund
Rose / Rose
Cables caméra de recul
Kabel Rückfahr-Kamera
Lumière de marche arrière
Lichter bei Rückwärtsgang
Vitesses
Getriebe
BRANCHEMENTS POUR LES COMMANDES AU VOLANT
ANSCHLÜSSE FÜR LENKRAD-STEUERUNGEN
Batterie
Masse
Grund
(COMMANDES AU VOLANT
LENKRAD-STEUERUNGEN)
FR
En sélectionnant SWC, apparaîtra une fenêtre où choisir la
commande en parcourant avec
les èches. Appuyer pour mémoriser la commande choisie, et
attendre que l’icône correspondante s’illumine.
Cette opération devra être faite
pour toutes les commandes
disponibles sur le volant.
SWC 1
Masse / Grund
D
Wählt man SWC (LenkradSteuerungen), so erscheint ein
Fester mit den diversen SteuerFunktionen. Mit den Pfeiltasten
auf die gewünschte SteuerFunktion gehen und bestätigen,
wonach die betreffende Ikone
aufleuchten wird.
Dies muss für jede einzelne
Lenkrad-Steuerfunktion wiederholt werden.
25
Page 26
Fonctionnalité • Bedienteil
Appuyer la touche pour ouvrir le panneau • Taste drücken , um das Bedienteil zu öffnen.
FR/D
Fente insertion CD
CD-Einwurf
Contacts panneau
Bedienteil-Kontakte
Opérations fréquentes / Oft gewählte Funktionen:
1) Déplacez le curseur / Move cursor 2) Confirmation / Confirm
Note/Wichtig::
En modalité réglages, le boutin du volume a la même fonction des touches
Im Einstell-Modus (setting), übernimmt der Lautstärke-Knopf die Funktionen der Tasten
Slot Carte SD media
SD-Öffnung
Expulsion CD
CD-Auswurf
Touche Reset
Reset-Taste
/ .
/ .
Fonctions sur la façade / Bedienteil-Funktionen
Appuyer la touche pour allumer l’appareil. • Taste drücken , um das Gerät ein-/auszuschalten.
1
2 3 5 6 74
8 9
10 12 13 15 161411
26
Page 27

Fonctionnalité • Bedienteil
FR/D
FR
1. Ouverture façade
2. Allumage/Extinction (faire pression pour 3 secon-
des). Audio mis à zéro (faire brièvement pression).
3. Appuyer pour naviguer dans les options en DVD,
CD et MP3/WMA. Sélection station précédente en
modalité RADIO.
4. Tourner le bouton pour régler le volume.
Appuyer brièvement pour sélectionner les programma-
tions audio/vidéo et tourner pour effectuer les réglages.
Appuyer pour 3 sec. Pour entrer dans le menu des
réglages.
5. Scanning fréquences radio en modalité RADIO.
En modalité radio, appuyer pour plus de 2 secondes
pour le Scanning automatique avec mémorisation
des stations radio.
Stop en modalité CD, MP3/WMA et DVD vidéo.
Termine l’appel en modalité Bluetooth.
6. Afficheur 3” TFT.
7. Senseur IR pour la télécommande.
8. Valide l’opération.
Interrompt la recherche automatique en modalité
RADIO.
9. Appuyer brièvement pour changer la source.
Appuyer pour 3 sec. Pour retourner au menu
sources, parcourir avec les touches et appuyer OK
pour valider.
10. Recherche automatique station précédente
(appuyer brièvement).
Recherche manuelle station précédente (appuyer
pour plus de 2 secondes).
Trace/Chapitre précédent (CD, MP3/WMA, DVD)
Reproduction rapide, revient x2, x4, x8, x20
(Appuyer pour plus de 2 secondes).
Déplacement à gauche dans les options.
11. Déplacement vers le bas dans les options (Modalité
DVD, CD, MP3/WMA). Reproduit la station
mémorisée suivante Modalité RADIO).
12. Recherche automatique station suivante (appuyer
brièvement).
Recherche manuelle station suivante (appuyer pour
plus de 2 secondes.
Trace/Chapitre suivant (CD, MP3/WMA, DVD)
Reproduction rapide avance x2, x4, x8, x20
(appuyer pour plus de 2 secondes).
Déplacement à droite dans les options.
13. Reproduction/Pause (Modalité DVD, CD, MP3/
WMA). Sélection bande radio: FM1 - FM2 - FM3 AM1-AM2 (Modalité radio). Lance/Accepte l’appel
bluetooth. Sélection programme RDS (Appuyer
pour plus de 2 sec.).
14. Retourne au menu précédent.
15. Entrée Audio/Vidéo.
16. Port USB.
D
1. Bedienteil öffnen
2. Einschalten/Ausschalten (3 Sek. drücken).
Audio abschalten - Mute (nur kurz drücken).
3. Drücken, um sich innerhalb der DVD-, CD- und
MP3-Optionen zu bewegen. Vorhergehenden
Sender im RADIO-Modus wählen.
4. Lautstärke-Einstellung durch den Drehknopf
vornehmen. Drehknopf kurz drücken, und
Audio/Video-Einstellungen wählen. Dann drehen,
um die gewünschten Einstellungen durchzuführen.
Um das Einstellungsmenü zu betreten, 3 Sekunden
gedrückt halten.
5. Scrolling der Radio-Frequenzen im RADIO-Modus.
Im Radio-Modus, 3 Sek. gedrückt halten, um
autom. Scrolling, mit Einspeicherung der Radio Sender, zu bewirken.
Stop im CD-, MP3/WMA- und DVD-Video-Modus.
Im Bluetooth-Modus, Gespräch beenden.
6. Display 3” TFT.
7. IR-Sensor für Fernbedienung.
8. Vorgang bestätigen.
Im RADIO-Modus, Unterbrechung der autom
Sendersuche.
9. Kurz drücken, um die Quelle zu ändern.
3 Sek. gedrückt halten, um zum Quellen-Menü
zurückzukehren. Anhand der Tasten, sich
fortbewegen und mit OK-Taste bestätigen.
10.Autom. Suche nach vorhergehendem Sender
(nur kurz drücken). Manuelle Suche nach
vorhergehendem Sender (mindestens 2 Sekunden
drücken).Stück/Kapitel davor (CD, MP3/WMA, DVD)
Schnell-Wiedergabe Rückwärts x2, x4, x8, x20
(Mindestens 2 Sekunden drücken).
Nach links verschieben, innerhalb der Optionen.
11. Nach unten verschieben, innerhalb der Optionen
(DVD-,CD-, MP3/WMA-Modus).
12. Im RADIO-Modus, Wiedergabe des danach
eingespeicherten Senders. Manuelle Suche des
Senders danach (mindestens 2 Sek. drücken).
Stück/Kapitel danach (CD, MP3/WMA, DVD)
Schnell-Wiedergabe vorwärts x2, x4, x8, x20
(mindestens 2 Sekunden drücken).
Nach rechts verschieben, innerhalb der Optionen.
13. Wiedergabe/Pause (DVD-, CD-, MP3/WMA-Modus)
Radio-Band wählen: FM1 - FM2 - FM3 - AM1-AM2
(Radio-Modus). Bluetooth-Gespräch Starten/in
Empfang nehmen. RDS-Programm wählen
(mindestens 2 Sek. drücken).
14. Zurück zum vorhergehenden Menü.
15. Audio/Video-Eingang.
16. USB-Öffnung.
27
Page 28
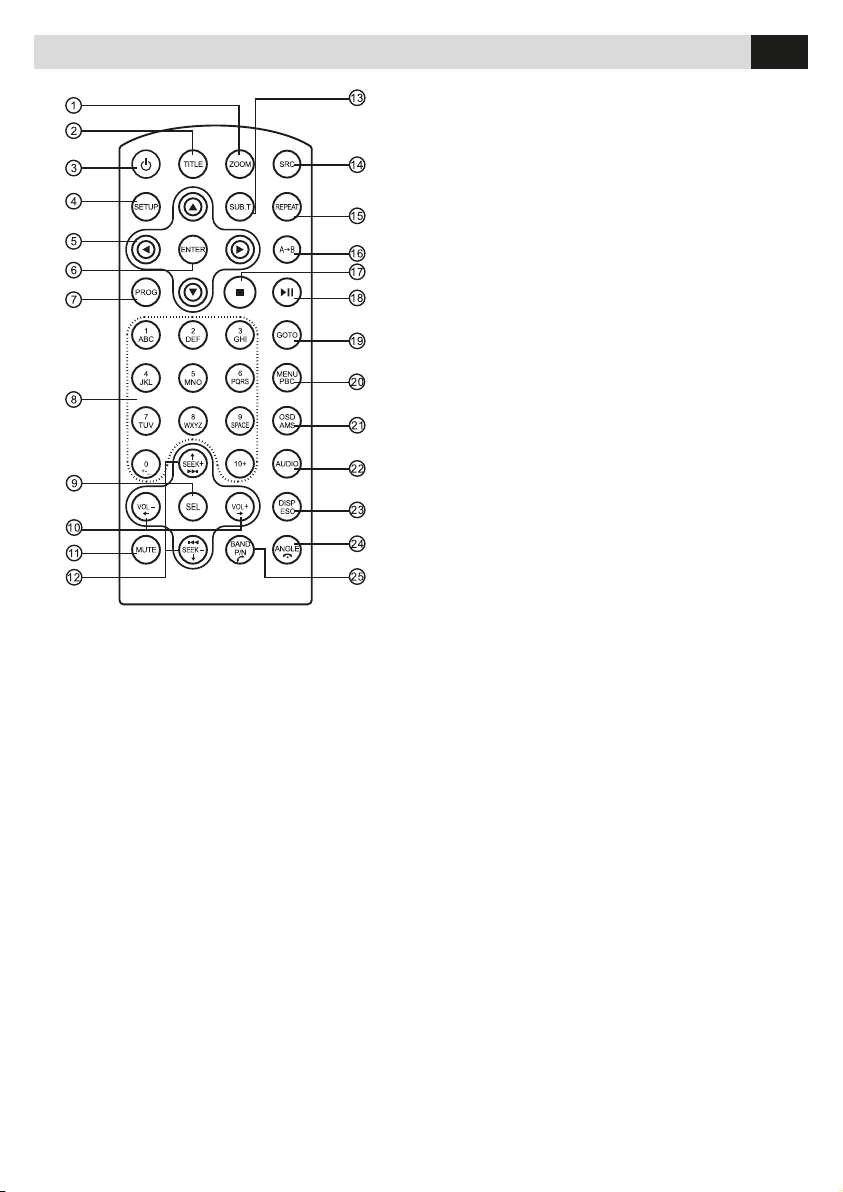
Télécommande • Fernbedienung
FR
1. Zoom (DVD/VCD)
2. Titre DVD
3. Allumage/Extinction
4. Menù réglages
5. Parcourt dans les menus
6. Valide sélection
7. Programme reproduction
8. Clavier numérique
9. Sélection réglages Audio/Vidéo
10. Volume
11. Audio mis à zéro
12. Syntonisation radio
Trace suivante/précédente
13. Sous-titres (DVD)
14. Change source
15. Répétition
16. Répétition A-B
17. Stop/Revient
18. Lance/Pause reproduction
19. Recherche personnalisée
20. Menù DVD
PBC (pour VCD 2.0 ou supérieur)
21. OSD: Menù sur écran
AMS: Recherche et mémorise
Automatiquement les Stations
22. Langue audio DVD
FR/D
Langue audio VCD - L/R/ST
23. Visualise heure (Vidéo)
Retourne au menu précédent
24. Change l’angle de visuel DVD
Termine l’appel (en modalité BT)
25. Système Vidéo PAL/NTSC/AUTO
Bande radio (en fonction Radio)
Lance/Reçoit l’appel (en modalité BT)
D
1. Zoom (DVD/VCD)
2. DVD-Titel
3. Einschalten/Ausschalten
4. Einstellungs-Menü
5. Verschiebungen innerhalb der Menüs
6. Wahl bestätigen
7. Wiedergabe-Programm
8. Nummern-Tastatur
9. Audio/Video-Einstellungen wählen
10. Lautstärke
11. Stummschaltung (Mute)
12. Radio-Sender-Suche - Stück danach/davor
13. Untertitel (DVD)
14. Quelle ändern
15. Wiederholung
16. Wiederholung A-B
17. Stop/Rückwärts
18. Wiedergabe Start/Pause
19. Gezielt suchen
20. DVD-Menü-PBC (für VCD 2.0 aufwärts)
21. OSD: Menü ausweisen
AMS: autom. Suche und Einspeicherung der
Sender
22. Audio-Sprache bei DVD
Audio-Sprache bei VCD - L/R/ST
23. Uhrzeit ausweisen (Video)
Zurück zum Menü davor.
24. DVD-Sichtwinkel ändern
Gespräch beenden (im BT-Modus)
25. Video-System PAL/NTSC/AUTO
Radio-Band (bei Radio-Betrieb)
Gespräch Starten/in Empfang nehmen
(im BT-Modus).
28
Page 29
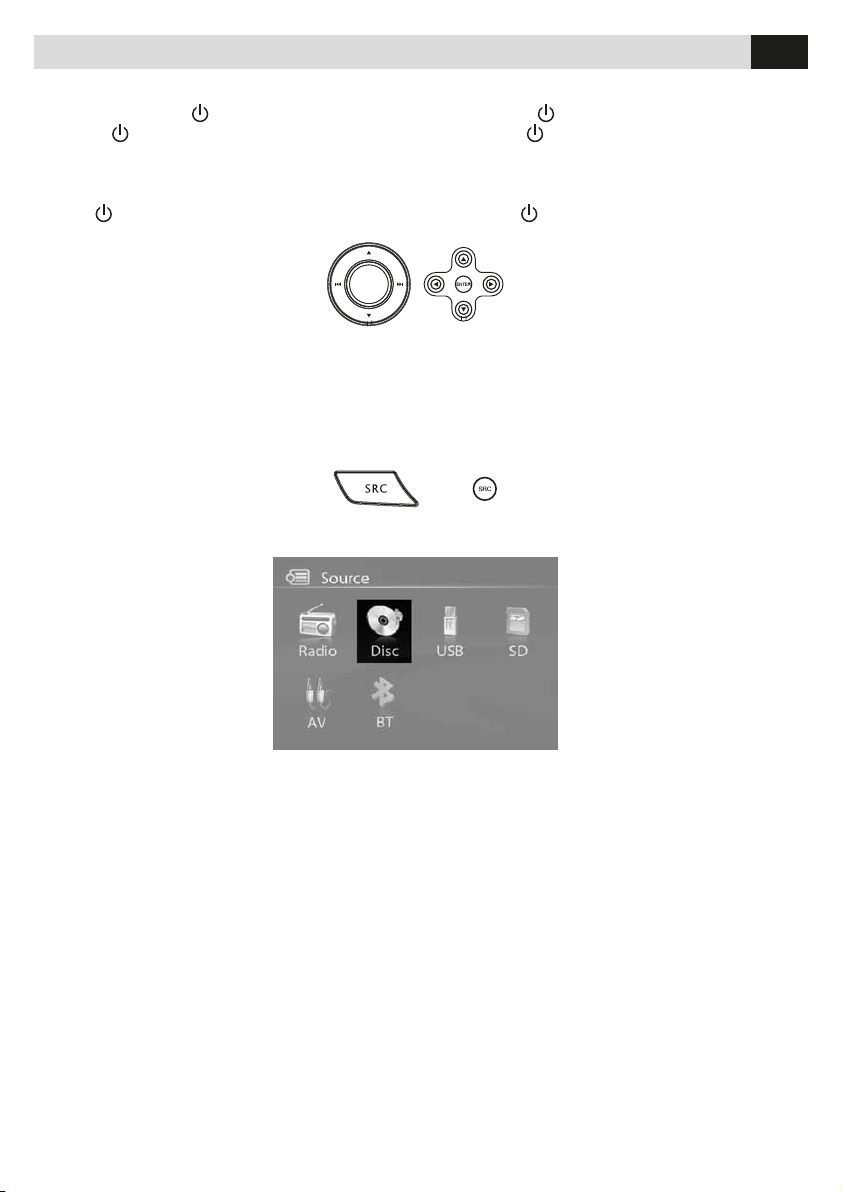
Fonctions de bases • Basis-Funktionen
FR Allumage/Extinction
1. Appuyer brièvement
2. Appuyer
l’appareil.
pour plus de 2 secondes pour éteindre
pour allumer l’appareil.
D
1. Kurz drücken
2. Mindestens
Gerät wieder auszuschalten.
FR/D
EINSCHALTEN/AUSSCHALTEN
, um Gerät einzuschalten.
2 Sekunden gedrückt halten, um
Audio à Zéro
Appuyer
Note: • En réglant le volume de l’appareil
lorsque l’audio est à zéro, celui ci est
restauré.
Réglage VOLUME
Tourner le bouton ou appuyer les touches
VOL+ e VOL- sur la télécommande pour régler le volume.
Sélection Source à reproduire
Méthode 1 • Appuyer brièvement la touche SRC sur la
façade ou sur la télécommande jusqu’à la
visualisation de la source à reproduire.
Méthode 2 • Appuyer pour plus de 2
secondes la touche SRC sur la façade ou
sur la télécommande jusqu’à la visualisation du menu sources.
Utiliser les touches flèches pour se
déplacer dans le menu et valider la
sélection avec la touche OK.
Note: • Ne pas changer la source
après la confirmation de la sé-
lection, l’appareil met quelques
secondes pour commencer la
reproduction, patienter jusqu’à la
visualisation sur l’afficheur de la
source.
Frein de Stationnement
1. Si le câble ‘PRK SW’ est branché au frein de stationnement, la visualisation sur l’écran dépendra de son
état.
2. Lorsque la voiture est en mouvement et une vidéo
est en reproduction, sur l’afficheur apparaît “DO NOT
WATCH VIDEO WHILE DRIVING”. Le message informe le conducteur qu’il ne doit pas visionner avec la
voiture en mouvement; hors, les passagers postérieurs
peuvent continuer la vision si l’appareil est branché à un
écran de toit ou appuie-tête.
brièvement pour mettre l’audio à zéro.
STUMMSCHALTUNG (MUTE)
Kurz drücken
oder die Tasten VOL+ / VOL- auf der Fernbedienung.
WAHL DER WIEDERGABE-QUELLE
Methode 1 • SRC-Taste, auf dem Bedienteil oder der
Fernbedienung, kurz drücken, bis die gewünschte
HAND-BREMSE
1. Wenn das Kabel ‘PRK SW’ an der Hand-Bremse
angeschlossen ist, so verhält sich die Display-Anzeige
den Umständen entsprechend.
2. Wird, während der Fahrt, eine Filmbesichtigung
eingeleitet, so erscheint auf dem Display der Hinweis
“DO NOT WATCH VIDEO WHILE DRIVING”, d.h.
der Fahrer darf, während der Fahrt, KEINE FILME
besichtigen. Die rückwärtigen Passagiere, dagegen,
dürfen ganz normal Filme anschauen, wenn ein
dafür zuständiger Dach- oder Kopfstützen-Monitor
vorhanden ist.
, um Audio abzustellen.
Wichtig: • Ändert man die Lautstärke, noch
während der Stummschaltung, so tritt die
Audio-Wiedergabe von selbst wieder ein.
LAUTSTÄRKE-EINSTELLUNG
Hierzu, entweder Drehknopf verwenden,
Wiedergabe-Quelle ausgewiesen wird.
Methode 2 • SRC-Taste, auf dem
Bedienteil oder der Fernbedienung,
mindestens 2 Sekunden lang drücken, bis
das Quellen-Menü erscheint.
Pfeil-Tasten verwenden, für die
Bewegungen innerhalb des Menüs.
Dann mit OK bestätigen.
Wichtig: • Nach der Wahl-
Bestätigung, keine weiteren
Quellen-Wechsel vornehmen,
sondern abwarten, bis die gewählte
Quelle auf dem Display erscheint.
Die Wiedergabe beginnt erst nach
wenigen Sekunden.
Phase de marche Arrière
À l’insertion de la marche arrière, l’appareil passe
automatiquement en visualisation sur l’afficheur de la
marche arrière.
L’appareil retournera en visualisation normale à peine
restaurée la première marche.
RÜCKWÄRTS-GANG
Bei vorhandener Rückfahr-Kamera, und eingelegtem
Rückwärtsgang, schaltet das Gerät automatisch auf die
Rückfahr-Kamera und weist diese auf dem Display aus.
Die normale Display-Anzeige beginnt wieder von selbst,
sobald der Vorwärtsgang wieder eingelegt wird.
29
Page 30
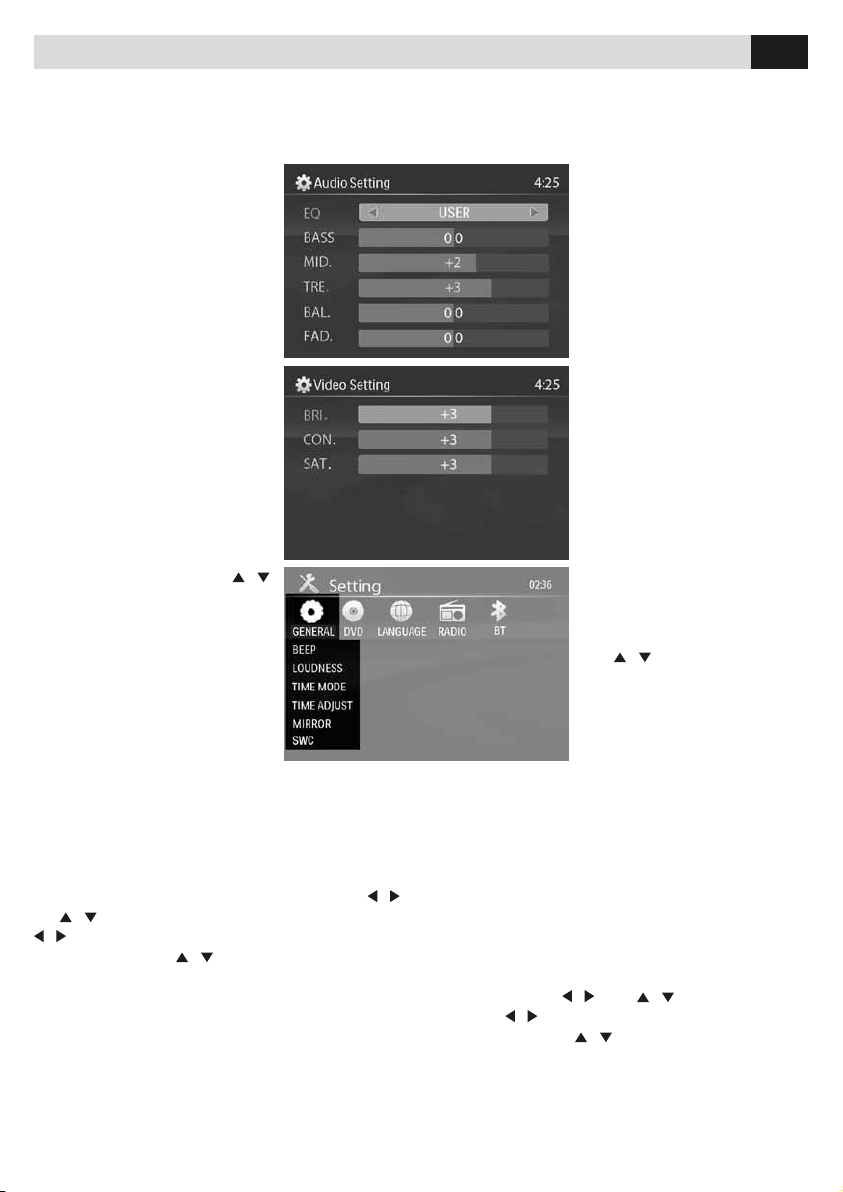
Fonctions du bouton • Drehknopf-Funktionen
D
FR. FONCTIONS DU BOUTON ROND
1. Tourner le bouton pour régler le volume.
2. Appuyer brièvement le bouton pour entrer dans le
menu des réglages audio/vidéo.
3. Appuyer le bouton pour accéder aux fonctions:
• AUDIO - EQ/Basses/Medium
Hautes
Equilibrage/Fader, tourner le
bouton pour régler le niveau.
• VIDEO - Luminosité/Contraste
Saturation, tourner le bouton pour
régler le niveau.
• EQ - Tourner le bouton pour
sélectionner: USER/FLAT/POP/
ROCK/CLASSIC/JAZZ
Avec la fonction égaliseur active, le
réglage des basses ou Hautes fait
chuter la modalité en USER.
Quand l’égaliseur n’est pas activé, l’appareil remet les basses et
Hautes au dernier réglage.
4. Appuyer le bouton pour plus de
2 secondes pour entrer dans les
réglages du système, utiliser
pour parcourir le menu et sélectionner avec OK.
REGLAGES GENERAL
BEEP: ON/ OFF - La fonction
BEEP permet d’avoir un son à l’ac-
cès de chaque menu.
LOUDNESS: ON/OFF – Pendant
l’écoute de la musique à volume
bas. La fonction loudness permet
une exaltation des basses et hautes fréquences.
TIME MODE: • 12 HOUR MODE: la montre sur l’afficheur sera visualisée sous format 12 H, Ex. 11:18.
•24 HOUR MODE: l’heure sur l’afficheur sera visualisé
sous format 24 H, Ex. 20:32.
TIME ADJUST: se déplacer avec les touches
ou
/ pour régler heure et minutes. A travers
/ on sélectionne le segment à régler, régler la va-
leur avec les flèches
MIRROR: ON/OFF – Cette option permet de convertir
l’image de la caméra de recul en vision miroir. Tourner
le bouton pour sélectionner ON ou OFF.
SWC (Commandes au volant)
Cette fonction permet d’utiliser les commandes au volant sur les véhicules avec protocole résistif, et donne la
possibilité de mémoriser jusqu’à 6 commandes
/
/
/ .
VERWENDUNG DES DREH-KNOPFES
1. Drehen, um Lautstärke einzustellen.
2. Kurz drücken, um Audio/Video-Einstellungen zu
des Menüs mit einem akustischen Ton begleitet.
LOUDNESS: ON/OFF - Bei Musik-Wiedergabe
in gedämpfter Lautstärke lassen sich, durch die
Loudness-Funktion, Hoch- und Tief-Frequenzen
besonders hervorheben.
TIME MODE: • 12 HOUR MODE: die Uhrzeit auf dem
Display wird im 12-Stunden-Format ausgewiesen, z.B.
11:18. • 24 HOUR MODE: die Uhrzeit auf dem Display
wird im 24-Stunden-Format ausgewiesen, z.B. 20:32.
TIME ADJUST: Um Stunde und Minuten einzustellen,
sich mit den Tasten
den Tasten
dann, mit den Pfeilen
registrieren.
MIRROR: ON/OFF – Durch diese Option präsentiert
sich die Kamera-Ansicht im Spiegelbild. Knopf drehen.
und ON bzw. OFF wählen.
FR/D
betreten.
3.Drücken, um folgende
Funktionen zu wählen:
•AUDIO - EQ/Bass/Mittel/Hoch
Balance/Fader; Drehknopf
drehen, um Niveau einzustellen.
•VIDEO - Helligkeit/Kontrast
Sättigung; Drehknopf drehen, um
Niveau einzustellen.
•EQ - Drehknopf drehen, und
wählen:
USER/FLAT/POP/ROCK
CLASSIC/JAZZ
Bei aktiviertem Equalizer,
schaltet das Gerät automatisch
auf USER-Mode, sobald man
versucht, Bässe oder Hochtöne
einzustellen. Ist der Equalizer
NICHT aktiviert, so greift das
Gerät auf das zuletzt eingestellte
Niveau der Hoch- und Tieftöne.
4. Drehknopf mindestens 2
Sek. drücken, um die SystemEinstellungen zu betreten. Um
sich im Menü zu bewegen,
Taste
/ verwenden und die
gewünschte Funktion mit OK
bestätigen.
GENERAL SETTING
BEEP: ON/ OFF - Bei aktivierter
BEEP-Funktion, wird das Betreten
/ bzw. / bewegen. Mit
/ den betreffenden Display-Teil wählen,
/ die betreffenden Angaben
30
Page 31
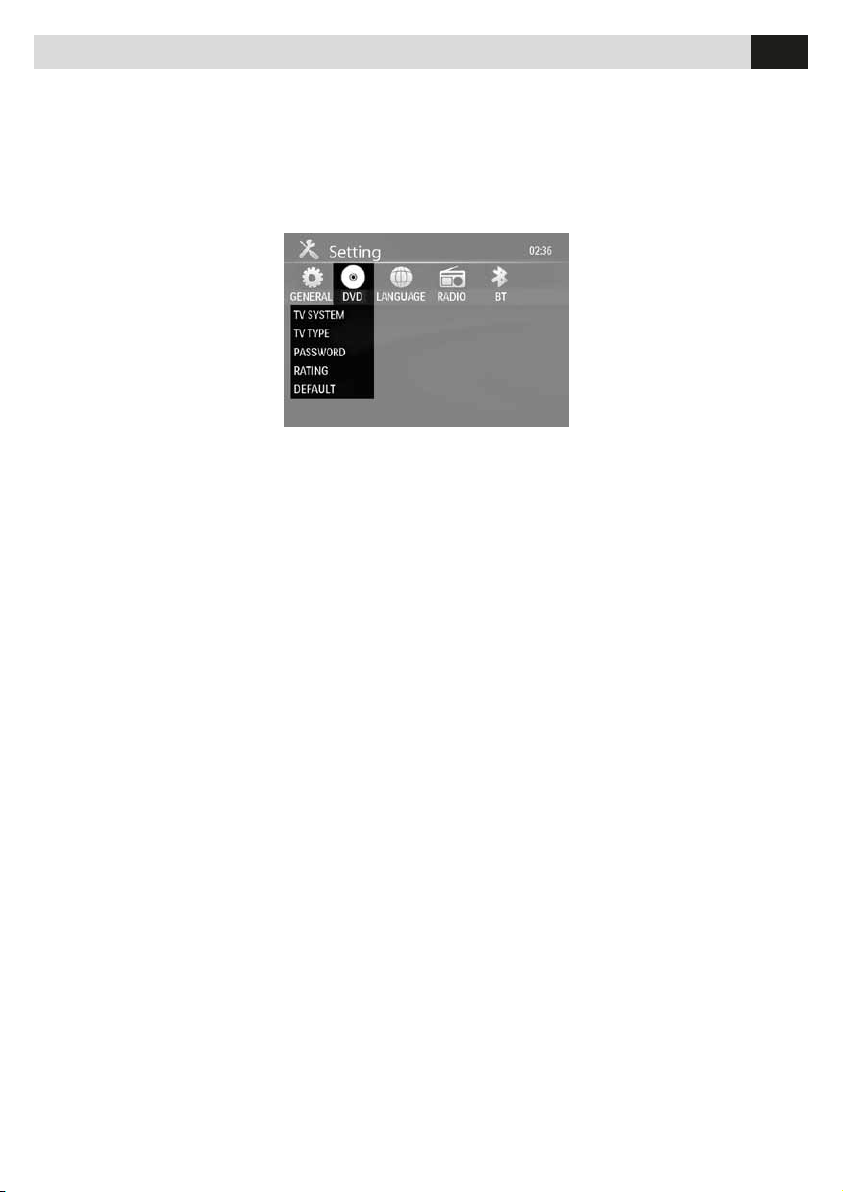
Fonctions du bouton • Drehknopf-Funktionen
FR/D
REGLAGES DVD
TV SYSTEM: NTSC/PAL/AUTO
Sélectionne le système TV dans le menu des réglages.
TV TYPE: 4:3PS / 4:3LB / 16:9
Règles le format de visualisation des films.
4:3 Pan Scan - Pour écran 4:3, les extrêmes droit et
gauche sont coupés
4:3 Letter Box – Pour écran 4:3,
deux barres noires apparaissent,
une en haut et l’autre en bas de
l’écran.
16:9 – Pour écran 16:9
MOT DE PASSE
1. Appuyer sur le clavier numé-
rique de la télécommande “0000”
et appuyer ENTER pour valider.
2. Appuyer la séquence de quatre
chiffres désirée et appuyer ENTER pour valider.
3. Mémoriser le mot de passe pour un usage futur. En
cas de perte du mot de passe, insérer 0000 pour le
restaurer.
Mot de passe: 0000
Sélectionner le niveau de sécurité: 1 KID SAFE •
2 G
3 PG • 4 PG13 • 5 PG-R • 6 R • 7 NC-17 • 8 ADULT
Il est possible sélectionner de 1 à 8 pour le niveau de
sécurité de la vision:
(1) limitations maximales pour la vision.
(8) Aucune limitation pour la vision.
Réglage prédéfini 8
Note:
Le niveau de sécurité peut être choisi seulement si le
mot de passe est débloquer et la limite programmée a
effet uniquement quand le mot de passe est activé.
DEFAULT: RESTORE – si cette fonction est sélection-
née, le VM051 retournera aux réglages d’origine.
SWC (LENKRAD-STEUERUNGEN)
Durch diese Funktion kann man die LenkradSteuerungen auf Resistiv-Protokolle anwenden, mit
Einspeicherung von max. 6 Funktionen.
EINSTELLUNGEN bei DVD
TV SYSTEM: NTSC/PAL/AUTO
Im Einstellungs-Menü, TV-System
wählen.
TV TYPE: 4:3PS / 4:3LB / 16:9
Film-Format einstellen.
4:3 Pan Scan - Für
4:3-Bildschirme: es verschwinden
beide Ränder, links und rechts
4:3 Letter Box - Für
4:3-Bildschirme: es werden zwei
schwarze Balken erscheinen,
oben und unten.
16:9 - Für 16:9-Bildschirme.
PASSWORT
1. Mit den Nummern-Tasten der Fernbedienung
“0000” eingeben und mit ENTER bestätigen.
2. Vier gewünschte Nummern eingeben und mit
ENTER bestätigen.
3. Das festgelegte Passwort vermerken bzw. gut im
Gedächtnis einprägen, um es bei Bedarf kontrollieren
zu können. Falls das Passwort verloren geht, 0000
eintippen und neu festlegen.
Password : 0000
Jugendschutz-Stufe wählen: 1 KID SAFE • 2 G
3 PG • 4 PG13 • 5 PG-R • 6 R • 7 NC-17 • 8 ADULT
Der Jugendschutz für die Filme-Besichtigung bietet 8
Stufen, von 1 bis 8:
(1) maximaler Schutz gegen die Besichtigung.
(8) keinerlei Schutz gegen die Besichtigung.
Vorgegebene Jugendschutz-Stufe: 8
Wichtig:
Die gewünschte Schutz-Stufe lässt sich nur festlegen,
wenn das Passwort freigelegt ist. Die festgelegte
Schutz-Stufe ist nur dann gewährleistet, wenn das
Passwort aktiviert ist.
DEFAULT: RESTORE - Wenn Sie diese Funktion
wählen, dann greift der VM051 auf seine FabrikEinstellungen zurück.
31
Page 32
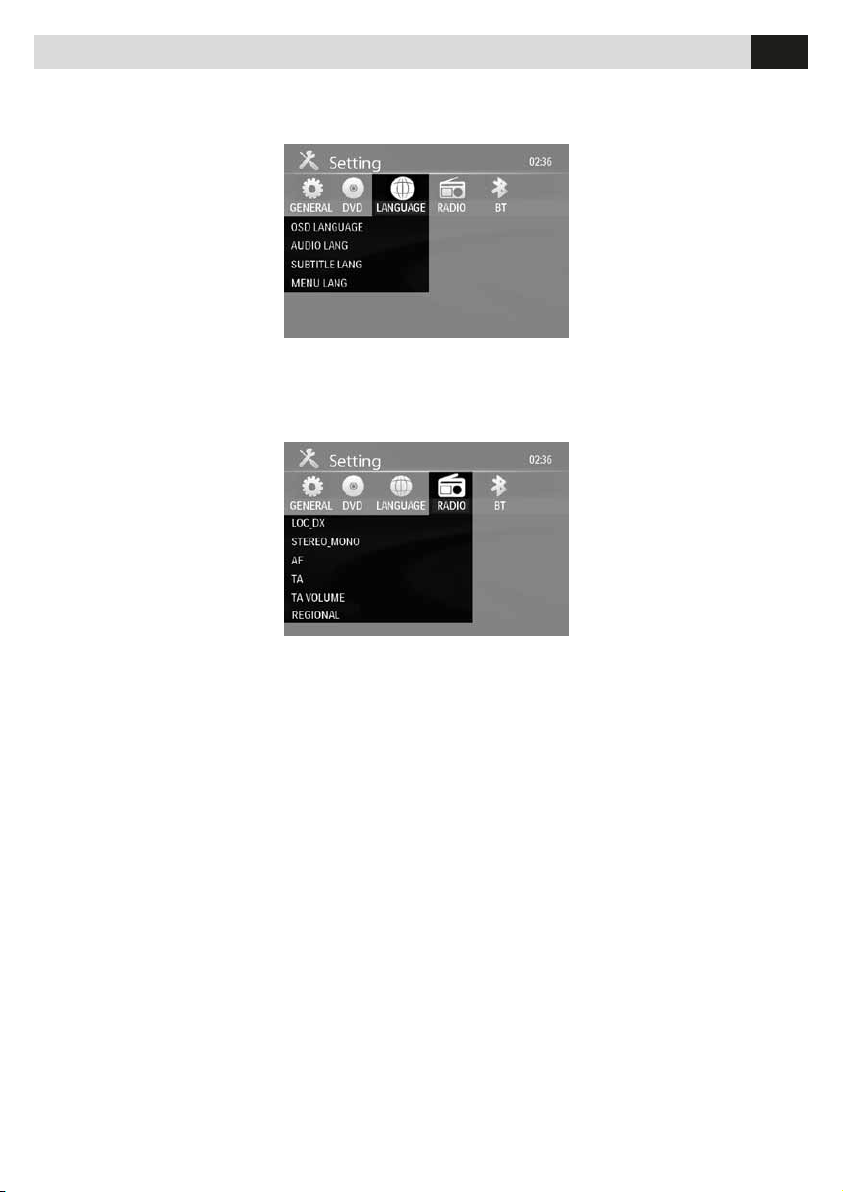
Fonctions du bouton • Drehknopf-Funktionen
D
FR. REGLAGE LANGUE
OSD LANGUAGE: Sélectionne la langue des menus
du système.
AUDIO LANG: Sélectionne la
langue des dialogues des DVD.
Nota: la langue peut être changée en appuyant la touche
AUDIO sur la télécommande.
SUBTITLE LANG: Sélectionne
la langue des sous-titres dans le
DVD.
MENU LANG: Sélectionne la langue du menu titre dans les DVD.
EINSTELLUNG DER SPRACHE
OSD LANGUAGE: Sprache für die System-Menüs
FR/D
wählen.
AUDIO LANG: Sprache für die
Film-Dialoge wählen.
Wichtig: Die Sprache
lässt sich auch anhand der
Fernbedienung ändern: Taste
AUDIO.
SUBTITLE LANG: Sprache der
DVD-Untertitel wählen.
MENU LANG: Sprache für das
DVD-Titelmenü wählen.
RADIO SETTING
LOC_DX: LOC/DX: Sélectionne la réception pour les
stations lointaines ou locales.
DX: La radio transmettra les stations avec signaux faibles et forts.
LOCAL: La radio transmettra
uniquement les stations avec
signaux forts.
STEREO_MONO: STEREO/
MONO
Sélectionne FM mono/stéréo.
AF: ON/OFF
Active/Désactive la fréquence
alternative (AF)
AF ON: fonction activée.
AF OFF: fonction désactivée.
Attention: Le voyant AF clignotera jusqu’à la réception
du signal RDS. Si le signal RDS n’est pas disponible,
désactiver la fonction AF
TA: ON/OFF
Active/Désactive la réception des annonces sur la circulation (TA). Quand la fonction TA est active, le voyant
sur l’afficheur clignote.
Pendant l’annonce, le voyant TA reste fixe sur l’afficheur.
Le VM051 passera en modalité radio en faisant écouter l’info sur la circulation au volume préréglé dans la
fonction TA volume. A la fin de l’annonce, l’appareil
retourne à la modalité précédente, aussi le niveau du
volume.
Quand la modalité TA est active, les fonctions SEEK,
SCAN, AMS sont opératives seulement lorsque le code
TP est reçu.
TA VOLUME: 00-34
Réglage volume de l’annonce sur la circulation
RADIO SETTING
LOC_DX: LOC/DX: die Sender-Entfernung festlegen:
lokal oder entfernt.
DX: Das Radio steht allen
Sendern offen, egal ob das
Signal schwach oder stark ist.
LOCAL: Das Radio nimmt nur
Sender auf, die ein starkes
Signal aufweisen.
STEREO_MONO: STEREO/
MONO
FM Mono/Stereo wählen.
AF: ON/OFF
Aktiviert/Deaktiviert die
Alternativ-Frequenz (AF)
AF ON: aktiviert.
AF OFF: deaktiviert.
Wichtig: Die AF-Leuchte wird so lange blinken, bis
das RDS-Signal vorliegt. Bei Nicht-Empfang des RDSRDS-Signals, AF-Funktion einfach deaktivieren.
TA: ON/OFF
Aktiviert/Deaktiviert den Empfang der VerkehrsHinweise (TA). Wenn die TA-Funktion aktiviert ist, dann
blinkt die dafür zuständige Leuchte auf dem Display.
Bei Ankunft der Verkehrs-Hinweise hört die Leuchte auf
zu blinken und bleibt fix auf dem Display stehen.
Der VM051 schaltet automatisch auf Radio-Empfang
und lässt den Verkehrs-Hinweis hören, in der unter
TA-VOLUME eingestellten Lautstärke. Sobald die
Verkehrs-Durchsage beendet ist, nimmt das Gerät den
vorherigen Modus sowie Lautstärke wieder auf.
Bei aktivierter TA-Funktion, reagieren die Optionen
SEEK, SCAN, AMS erst dann, wenn die TP-CodeNummer eingegangen ist.
TA VOLUME: 00-34
Lautstärke-Einstellung der Verkehrs-Hinweise.
32
Page 33
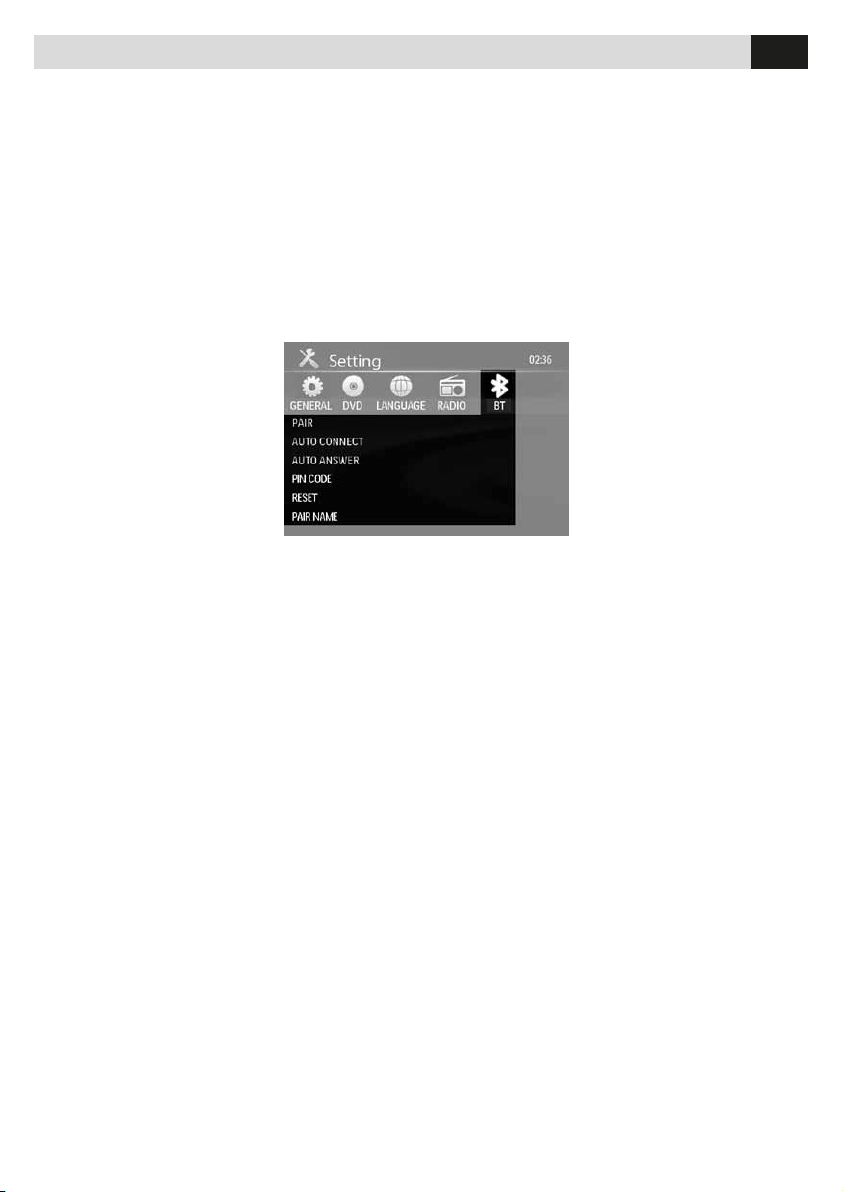
Fonctions du bouton • Drehknopf-Funktionen
FR/D
REGIONAL: ON/OFF
REG ON: la fonction AF augmentera le code régional
(du PI) et seulement les stations avec le code régional
courant seront syntonisées automatiquement.
REG OFF: la fonction AF ignorera le code régional (du
PI) en permettant la syntonisation de toutes les stations.
CT: ON/OFF
Certaines stations transmettent la date et l’heure à l’intérieur du code RDS, mais il n’est pas toujours correct.
Sélectionner ON pour permettre à l’appareil de régler
heure et date en fonction de ce signal.
REGLAGES BLUETOOTH
PAIR: ON/OFF
Régler sur ON pour paramétrer le
téléphone.
AUTO CONNECT: ON/OFF
Après la déconnexion du téléphone, le bluetooth essayera
de se reconnecter dans les 20
secondes suivantes si cette fonction est réglée sur ON
AUTO ANSWER: ON/OFF
Le bluetooth passera automatiquement en modalité
téléphone à l’entrée d’un appel et acceptera la conver-
sation après 3/4 bips lorsque l’option est réglée sur ON
Contrairement, la réponse à l’appel devra être fait manuellement.
CODE PIN
En fonction des versions du VM051 il code pour le paramétrage est“0000” ou “1234”.
Il peut être modifié avec cette fonction en insérant les 4
chiffres désirés moyennant la télécommande et confirmer avec ENTER.
RESET: ON
Effectue le reset du bluetooth et remet le PIN aux réglages d’origine “1234”.
PAIR NAME
Montre le nom qui sera visualisé sur le téléphone: Phonocar.
REGIONAL: ON/OFF
REG ON: die AF-Funktion spricht die Regional-Code-
Nummer an (PI), so dass nur die Sender, die diesem
Regional-Code entsprechen, in die automatiche
Sendersuche kommen.
REG OFF: die AF-Funktion ignoriert die RegionalCode-Nummer (PI), so dass alle Sender bei der
Sendersuche mit einbezogen werden.
CT: ON/OFF
Bei bestimmten Sendern laufen Datum und Uhrzeit
unter dem RDS-Code. Sollte die Uhrzeit nicht genau
stimmen, auf ON gehen, so dass sich das Gerät,
anhand des RDS-Codes, auf
den richtigen Stand bringt.
BLUETOOTH-
EINSTELLUNGEN
PAIR: ON/OFF
Auf ON gehen, um das Telefon
zu koppeln.
AUTO CONNECT: ON/OFF
Sobald der Telefonanschluss
unterbrochen wird, versucht die
Bluetooth-Funktion (wenn auf
ON gestellt), 20 Sekunden lang, den Anschluss wieder
herzustellen.
AUTO ANSWER: ON/OFF
Bei Ankunft eines Anrufs, schaltet die BluetoothFunktion automatisch auf den Telefon-Modus, und
nimmt das Gespräch, nach 3 – 4 Mal Läuten, in
Empfang (wenn auf ON).
Andernfalls, muss man das Gespräch manuell in
Empfang nehmen.
PIN CODE
Je nach Ausführung, lautet der PIN des VM051
entweder“0000” oder “1234”.
Diese beiden PIN-Codes lassen sich, durch die
Fernbedienung, auch abändern: die gewünschten 4
Ziffern eingeben und mit ENTER bestätigen.
RESET: ON
Durch diese Funktion wird Bluetooth neu eingestellt
(Reset) und das PIN erhält wieder die ursprüngliche
Fabrikeinstellung“1234”.
PAIR NAME
Auf dem Telefon erscheint der Name: Phonocar.
33
Page 34
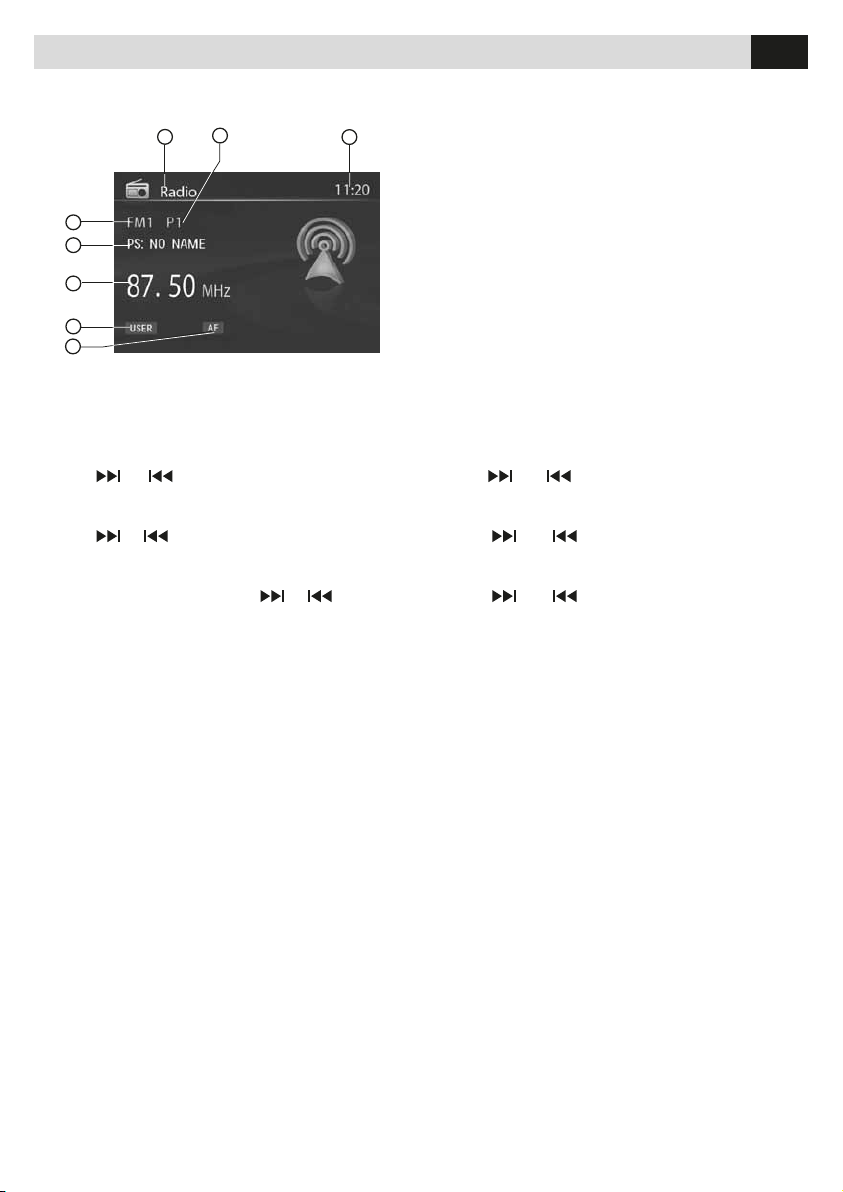
Modalité radio • Radio-Modus
FR/D
FR Appuyer sur SRC sur la façade ou sur la télécom-
mande pour aller à la modalité radio.
4
5
6
7
8
SELECTIONNER UNE BANDE RADIO
Appuyer BAND pour sélectionner les bandes radio suivantes FM1-FM2-FM3-AM1-AM2.
SELECTIONNER UNE STATION
Appuyer
ou pour syntoniser une station.
Syntonisation radio
- RECHERCHE AUTOMATIQUE
Appuyer
ou
suivante ou précédente
- RECHERCHE MANUELLE
Appuyer et maintenir la pression
trer dans la recherche manuelle. Appuyer de nouveau
les touches pour déplacer la fréquence pas à pas.
Note: Pendant la recherche manuelle, si la pause entre
deux opérations dépasse 5 secondes, l’appareil retournera en modalité recherche automatique.
MEMOIRES STATIONS
Pour chaque bande 6 stations peuvent être mémorisées (18 FM - 12 AM).
Mémorisation
- Auto mémorisation
1. Sélectionner une bande (si nécessaire).
2. Appuyer AMS brièvement pour effectuer le scanning
des mémoires P1-P6 pour 5 secondes chacune.
3. Faire pression sur AMS pour plus de 2 secondes, les
6 stations avec des signaux plus élevés seront automatiquement mémorisées.
- Mémorisation manuelle
1. Sélectionner une bande (si nécessaire) et rechercher
une station.
2. Sur la télécommande, faire pression sur le numéro
où la mémoire doit être mémorisée
3. Le numéro sera visualisé sur l’afficheur.
Rappel d’une station
1. Sélectionner une bande (si nécessaire).
2. Appuyer le numéro de la mémoire désiré.
2
1
3
pour se syntoniser sur une station
ou
pour en-
1. Indicateur de source / Quelle Indicator
2. La mémoire de présélection / Der Senderspeicher
3. Heures / Stunden
4. Bande AM / FM / AM / FM-Band
5. Informations RDS / RDS-Informationen
6. Radiofréquence / Funkfrequenz
7. Indicateur EQ / EQ-Anzeige
8. Indicateur AF / AF-Anzeige
D Auf dem Bedienteil oder der Fernbedienung, SRC
drücken, um den RADIO-Modus einzustellen.
RADIO-FREQUENZBAND WÄHLEN
BAND drücken und wählen zwischen: FM1-FM2-FM3-AM1
AM2.
RADIO-SENDER WÄHLEN
Entweder oder drücken, um einen Sender einzustellen.
Sender-Suche
- AUTOMATISCHE SENDER-SUCHE
Entweder
oder davor zu wählen.
- MANUELE SENDERSUCHE
Entweder
Sender-Suche zu betreten. Tasten nochmals drücken, um
die einzelnen Frequenzen nach und nach durchzugehen.
Wichtig: während der manuellen Sendersuche schaltet das
Gerät von selbst wieder auf die automatische Sendersuche,
falls sich, zwischen einer Frequenz-Suche und der anderen,
eine Wartezeit ergibt von mehr als 5 Sekunden.
SENDER-SPEICHER
Pro Frequenzband lassen sich bis zu 6 Sender einspeichern
(d.h. 18 FM - 12 AM).
Einspeicherung
- Automatische Einspeicherung
1. Frequenzband wählen (nach Bedarf).
2. AMS kurz drücken, um die Speicher P1-P6, jeweils 5
Sekunden lang, zu scrollen.
3. AMS mindestens 2 Sekunden drücken, so dass die 6
stärksten Sender automatisch eingespeichert werden.
- Manuelle Einspeicherung
1. Frequenzband wählen (nach Bedarf) und gewünschten
Sender suchen.
2. Auf der Fernbedienung, die erwünschte SpeicherNummer gedrückt halten.
3. Die betreffende Speicher-Nummer erscheint nun auf dem
Display.
Sender abrufen
1. Frequenzband wählen (nach Bedarf).
2. Auf die gewünschte Speicher-Nummer drücken.
34
oder drücken, um einen Sender danach
oder gedrückt halten, um die manuelle
Page 35
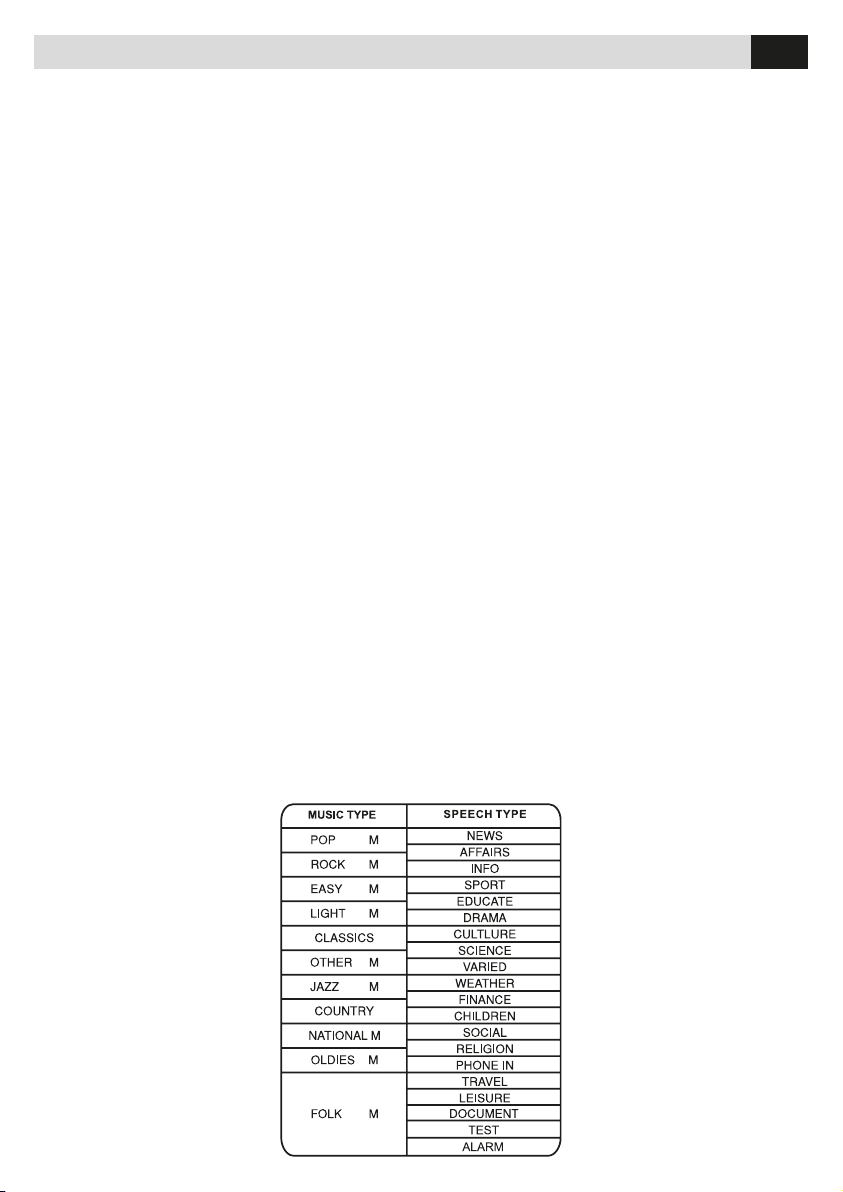
Modalité radio • Radio-Modus / RDS (Radio Data System)
FR
Le service RDS varie en fonction des zones, les
informations et fonctions suivantes seront disponibles
seulement où ce service est présent.
FONCTIONS RDS
AF (Fréquence Alternative): quand cette fonction est
active et le signal de la station est faible, la radio recherchera automatiquement la même station avec le
même PI (identification programme radio) sur une autre
fréquence avec un signal plus fort.
PS (Nom Emetteur): Le nom de l’émetteur est visible à
la place de la fréquence radio.
D Die RDS-Funktion ist, je nach Gebietslage, unterschiedlich
ausgebaut, so dass nachfolgende Infos und Funktionen
nur dann erhältlich sind, wenn die geografische Lage RDS
vorsieht.
RDS-FUNKTIONEN
AF (Alternativ-Frequenz): Wenn die Funktion aktiviert, jedoch
das Sender-Signal zu schwach ist, so schaltet das Gerät
automatisch auf PI (Programm-Identifizierung) und sucht den
Sender auf einer anderen Frequenz, wo das Signal stärker ist.
PS (Sender-Name): anstelle der Radio-Frequenz wird der
Sender-Name ausgewiesen.
FR/D
ANNONCE INFORMATIONS SUR LA CIRCULATION
Certaines stations RDS transmettent des informations
sur la circulation avec un code permettant la priorité de
l’écoute.
TP: (Programme Identification Trafic) Transmission des
informations sur la circulation.
TA: (Identification Annonce Trafic) Annone sur les
conditions de la circulation.
EON: (Annonces Autres Stations) quand la donnée
EON est reçue, le voyant s’illumine et les fonctions TA
et AF sont amplifiées.
TA: Les informations sur la circulation peuvent être reçues à partir de la station courante ou des autres.
AF: La liste des fréquences alternatives sont mises à
jour par l’EON.
EON Active la radio à l’utilisation complète des infor-
mations RDS. De cette façon, la liste des stations AF
est constamment mise à jour. Si une station proche
du domicile est sélectionnée, il sera possible recevoir
la même station sur une fréquence alternative avec un
meilleur signal, ou une autre station avec le même programme musical. EON maintient en outre la trace des
stations avec transmission TP
pour une réception plus rapide.
PTY (Typ. progr. de l’émetteur)
RDS envoie un code d’identifi-
cation du type de programme de
l’émetteur EX.: news, rock, info,
sport, etc.
PTY Mode: Appuyer BAND pour
plus de 2 secondes pour entrer
dans le menu du PTY. Le dernier PTY sera visualisé, utiliser
les flèches pour sélectionner le
programme désiré. L’appareil
commencera à rechercher les
stations avec le PTY choisi, si
aucune station n’est trouvée, NO
PTY sera visualisé.
VERKEHRS-INFORMATIONEN
Bestimmte RDS-Stationen verwenden eine spezifische
code-Nummer, wonach Verkehrsinformationen den Vorrang
bekommen.
TP: (Verkehrs-Programm-Identifizierung) Ausstrahlung von
Verkehrs-Informationen
TA: (Verkehrs-Durchsagen) Durchsagen über die
Verkehrslage.
EON: (Durchsagen anderer Sender) Sobald EON-Infos
vorliegen, schaltet sich die EON-Leuchte ein und die TA- bzw.
AF-Funktionen werden greifbar.
TA: Verkehrsinfos sind auf dem eingeschalteten Programm
erhältlich, aber auch auf anderen Programmen.
AF: Die AF-Liste (Alternativ-Frequenzen) wird durch EON
aktualisiert.
EON Das Radio bekommt Zugang zu allen RDS-Infos. Die
Liste der AF-Sender wird dadurch konstant auf den neuesten
Stand gebracht. Wird ein naheliegender Sender gewählt,
so kann man diesen auch auf einer Alternativ-Frequenz, mit
stärkerem Signal, empfangen. Oder man hört ein bestimmtes
Musik-Programm von einem alternativen Sender. EON merkt
sich im Übrigen auch alle lokalen TP-Sender, und sorgt
dadurch für einen schnellen Empfang.
PTY (Programm-Typ)
RDS Entsendung einer Code-Nummer
für die Programm-Typ-Identifizierung.
Z.B: News, Rock, Infos, Sport, etc.
PTY Mode: BAND mindestens 2
Sekunden drücken, um das PTY-Menü
zu betreten. Ausgewiesen wird das
letzte PTY. Pfeil-Tasten verwenden, um
das gewünschte Programm zu wählen.
Das Gerät startet die Suche nach
Sendern mit dem gewünschten PTY.
Wird kein Sender ausfindig gemacht,
so erscheint der Hinweis NO PTY.
35
Page 36
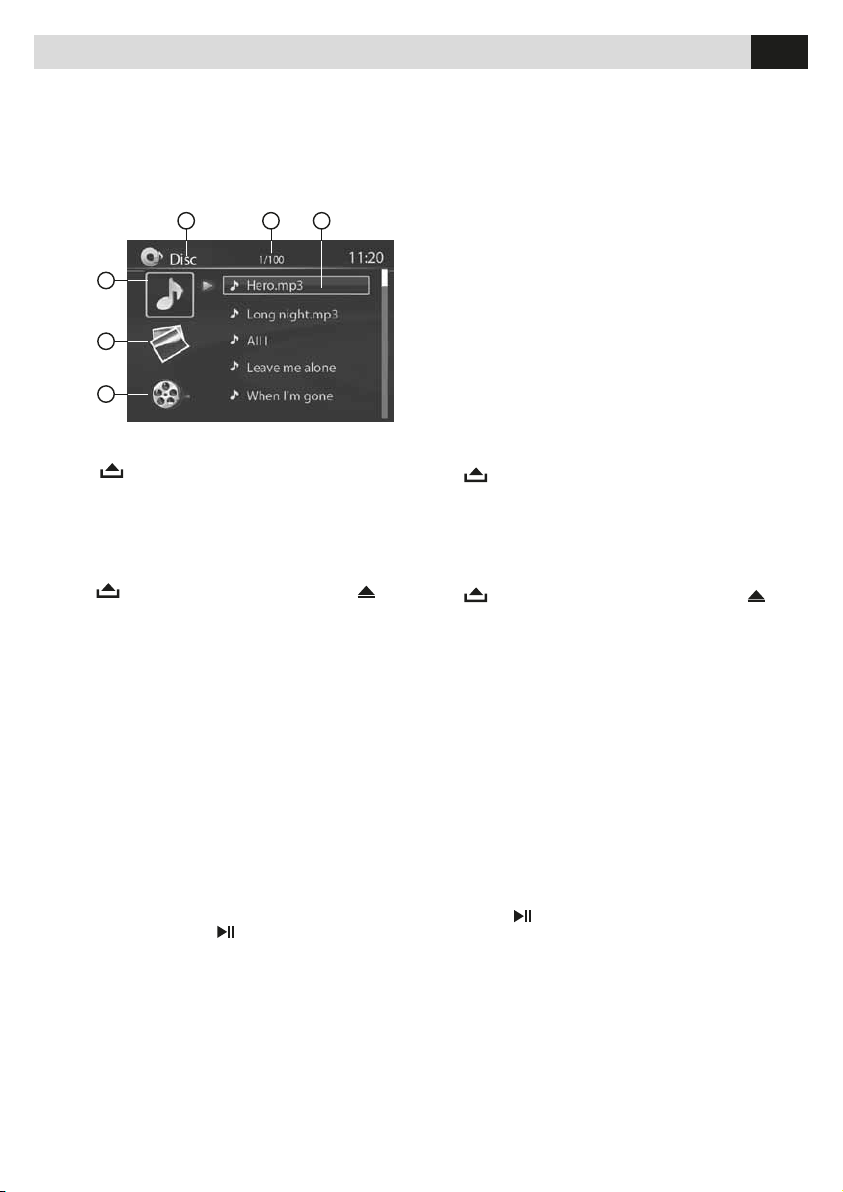
Modalité Disque/USB/Carte SD • Modus CD/USB/SD
FR/D
ACCES A LA MODALITE DISQUE (CD)
Si le disque est déjà à l’intérieur, appuyer la touche
SRC sur la façade ou sur la télécommande pour aller
à la source DISQUE. Pour reproduire un fichier USB/
carte SD (support déjà inséré) choisir la source CARD
o USB. L’afficheur montrera la page-écran suivante:
1
4
5
6
2 3
INSERTION DISQUE
Appuyer
pour baisser la façade. Insérer le disque
dans la fente.
Note: Faire attention à ne pas introduire un disque
lorsque un autre y est déjà présent.
EXPULSION DISQUE
Appuyer
pour baisser la façade et appuyer pour
expulser le disque.
Note: on peut expulser le disque lorsque l’appareil est
éteint, il ne s’allumera pas une fois terminé l’expulsion.
D CD-MODUS BETRETEN
CD eingeben und SRC drücken (auf Bedienteil oder
Fernbedienung), um die CD-Quelle zu wählen.
USB/SD eingeben, und die Quelle USB bzw. SD wählen.
Auf dem Display erscheint folgendes Interface:
1. Indicateur de source / Quelle Indicator
2. Total partiel piste actuelle
Total oder aktuellen Titels
3. Nom du fichier / Dateiname
4. Music Selection / Musik Selection
5. Sélection d’images / Auswählen von Bildern
6. Sélection vidéo / Video Selection
CD-EINWURF
Taste
drücken, um das Bedienteil zu öffnen. CD in die
vorgesehene Öffnung geben.
Wichtig: immer vorher kontrollieren, dass nicht schon eine
CD im Gerät liegt.
CD-AUSWURF
Taste
drücken, um Bedienteil zu öffnen. Taste
drücken, um CD auszuwerfen.
Wichtig: CD lässt sich auch bei ausgeschaltetem Gerät
auswerfen.
REPRODUCTION DISQUE
1. Quand le disque est inséré, l’afficheur visualise
LOAD. Pour les fichiers MP3 ou disque avec fichiers
mixtes, la lecture pourrait mettre plus d’une minute.
2. ERROR est visualisé en cas d’erreur dans le char-
gement.
3. Pour VCD/CD, l’icône VCD ou CD apparaîtra sur
l’afficheur.
4. Pendant la reproduction des fichiers MP3/WMA apparaît l’icône correspondante sur l’afficheur.
5. L’icône DVD apparaît sur l’afficheur quand un DVD
a été inséré et successivement apparaît le menu des
titres. Appuyer ENTER ou
pour lancer la reproduc-
tion.
REPRODUCTION FICHIER AUDIO/VIDEO/IMAGES
Pendant la reproduction des fichiers AUDIO/VIDEO/
IMAGES la liste Category/Folder/File est visualisée en
haut sur l’afficheur qui permet de voir la liste des titres,
de la trace ou le nom du dossier sur un disque.
Si le dossier est sélectionné, le contenu peut être visualisé.
CD-WIEDERGABE
1. Bei eingelegter CD, erscheint der Hinweis LOAD.
MP3-Dateien sowie CDs mit gemischten Datei-Formaten,
benötigen eine Lese-Zeit von mindestens 1 Minute.
2. ERROR wird angezeigt, wenn Lade-Fehler vorliegt.
3. Für VCD/CD: betreffende Ikone erscheint auf dem
Display.
4. Während der Wiedergabe von MP3/WMA-Dateien,
erscheint die entsprechende Ikone auf dem Display.
5. Die DVD-Ikone erscheint, wenn eine DVD eingelegt ist.
Dann folgt das Titel-Menü. Um die Wiedergabe zu starten,
ENTER oder
drücken.
WIEDERGABE VON AUDIO/VIDEO/FOTO-DATEIEN
Während der Wiedergabe von AUDIO/VIDEO/FOTODateien wird, oben auf dem Display, die Liste Kategorie/
Ordner/Datei ausgewiesen, wodurch Musik-Titel, MusikStück oder Ordner auf der CD ersichtlich werden.
Wählt man den Ordner, dann kann auch der betreffende
Inhalt ausgewiesen werden.
AUDIO-DATEIEN
1. ESC drücken, um das Playlist-Menü zurückzuholen.
36
Page 37
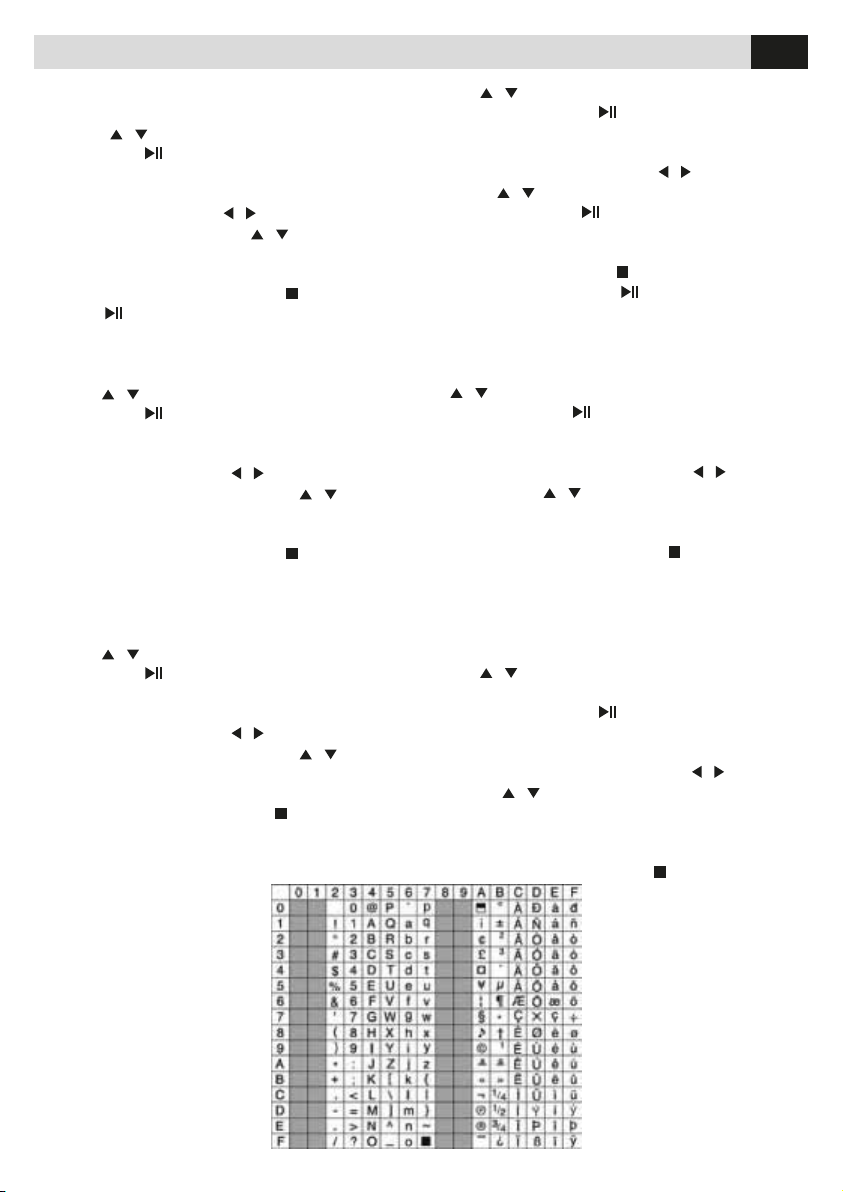
Modalité Disque/USB/Carte SD • Modus CD/USB/SD
2. Taste
/
FICHIERS AUDIO
1. Appuyer ESC pour retourner au menu des playlist.
2. Utiliser
3. Appuyer OK,
télécommande pour visualiser toutes les traces audio
disponibles.
4. Parcourir avec les flèche
fichier désiré grâce aux flèches
la façade ou ENTER sur la télécommande pour lancer
la reproduction.
5. Pendant la reproduction, appuyer
rompre et
/ pour sélectionner le dossier AUDIO.
sur la façade ou ENTER sur la
/ et se positionner sur le
/ . Appuyer OK, sur
pour l’inter-
pour la reprendre.
3. Auf dem Bedienteil, OK
Fernbedienung, ENTER drücken, um alle verfügbare
AUDIO-Dateien zu ersehen.
4. Sich fortbewegen mit den Tasten
Pfeiltasten
Auf dem Bedienteil, OK
Fernbedienung ENTER drücken, um die Wiedergabe zu
starten.
5. Während der Wiedergabe,
Wiedergabe zu unterbrechen.
erneut aufzunehmen.
drücken, um AUDIO-Ordner zu wählen.
/
, auf die gewünschte Datei gehen.
drücken, oder auf der
/
und, mittels
drücken, oder auf der
drücken, um die
Drücken, um Wiedergabe
FR/D
FICHIERS IMAGES
1. Appuyer ESC pour retourner au menu des playlist.
2. Utiliser
3. Appuyer OK,
télécommande pour visualiser toutes les images disponibles.
4. Parcourir avec les flèches
le fichier désiré moyennant les flèches
Appuyer OK, sur la façade ou ENTER sur la télécom-
mande pour commencer la reproduction.
5. Pendant le reproduction, appuyer
rompre et retourner à la liste des fichiers
FICHIERS VIDEO
1. Appuyer ESC pour retourner au menu des playlist.
2. Utiliser
3. Appuyer OK,
télécommande pour visualiser toutes les traces audio
disponibles.
4. Parcourir avec les flèches
le fichier désiré moyennant les flèches
Appuyer OK, sur la façade ou ENTER sur la télécom-
mande pour commencer la reproduction.
5. Durant la reproduction, appuyer
et retourner à la liste des fichiers.
Note: Pendant la sélection des dossiers, appuyer ESC
pour retourner au dossier supérieur, si on est dans le
dossier principal, la touche ESC
ne pourra pas être utilisée.
VISUALISATION ID3 TAG
L’appareil est compatible avec
ID3 TAG version 2.0
INSERTION FICHIER ET NOM
DOSSIER
Uniquement les fichiers audio
ayant les caractères présents
dans la liste sont visualisés
correctement. L’utilisation de
/ pour sélectionner le dossier IMAGES.
sur la façade ou ENTER sur la
/ et se positionner sur
/ .
pour l’inter-
/ pour sélectionner la dossier VIDEO.
sur la façade ou ENTER sur la
/ et se positionner sur
/ .
pour l’interrompre
FOTO-DATEIEN
1. ESC drücken, um das Playlist-Menü zurückzuholen.
2.
/
3. Auf dem Bedienteil,
Fernbedienung ENTER drücken, um alle verfügbaren
Fotos auszuweisen.
4. Sich fortbewegen, mittels Pfeil-Tasten
mittels Pfeiltasten
Auf dem Bedienteil, OK ,drücken, oder auf der
Fernbedienung ENTER drücken, um Wiedergabe zu
starten. 5. Während der Wiedergabe,
Wiedergabe zu unterbrechen und um die Datei-Liste zu
ersehen.
VIDEO-DATEIEN
1. ESC drücken, um auf das Playlist-Menü zurückzukehren.
2. Taste
wählen.
3. Auf dem Bedienteil, OK
Fernbedienung ENTER drücken, um alle erhältlichen
Audio-Dateien auszuweisen.
4. Sich fortbewegen mit den Pfeil-Tasten
den Pfeilen
Auf dem Bedienteil, OK drücken, oder auf der
Fernbedienung ENTER drücken, um die Wiedergabe zu
starten.
5. Während der Wiedergabe, Taste
37
Verwenden, um FOTO-Ordner zu wählen.
OK drücken, oder auf der
/
. Dann
/
auf die gewünschte Datei gehen.
drücken, um
/
verwenden, um den VIDEO-Ordner zu
drücken, oder auf der
/
. Dann mit
/
auf die gewünschte Datei gehen.
Wiedergabe zu stoppen und um
die Datei-Liste zu ersehen.
Nota: Während der Ordner-
Wahl, ESC drücken, um auf
den übergeordneten Ordner
zurückzugehen. Steht man so
wie so auf dem Haupt-Ordner,
dann ist von der ESC-Taste keine
Reaktion zu erwarten.
AUSWEISUNG VON ID3 TAG
Das Gerät ist kompatibel mit ID3
TAG, Ausführung 2.0
drücken, um
Page 38
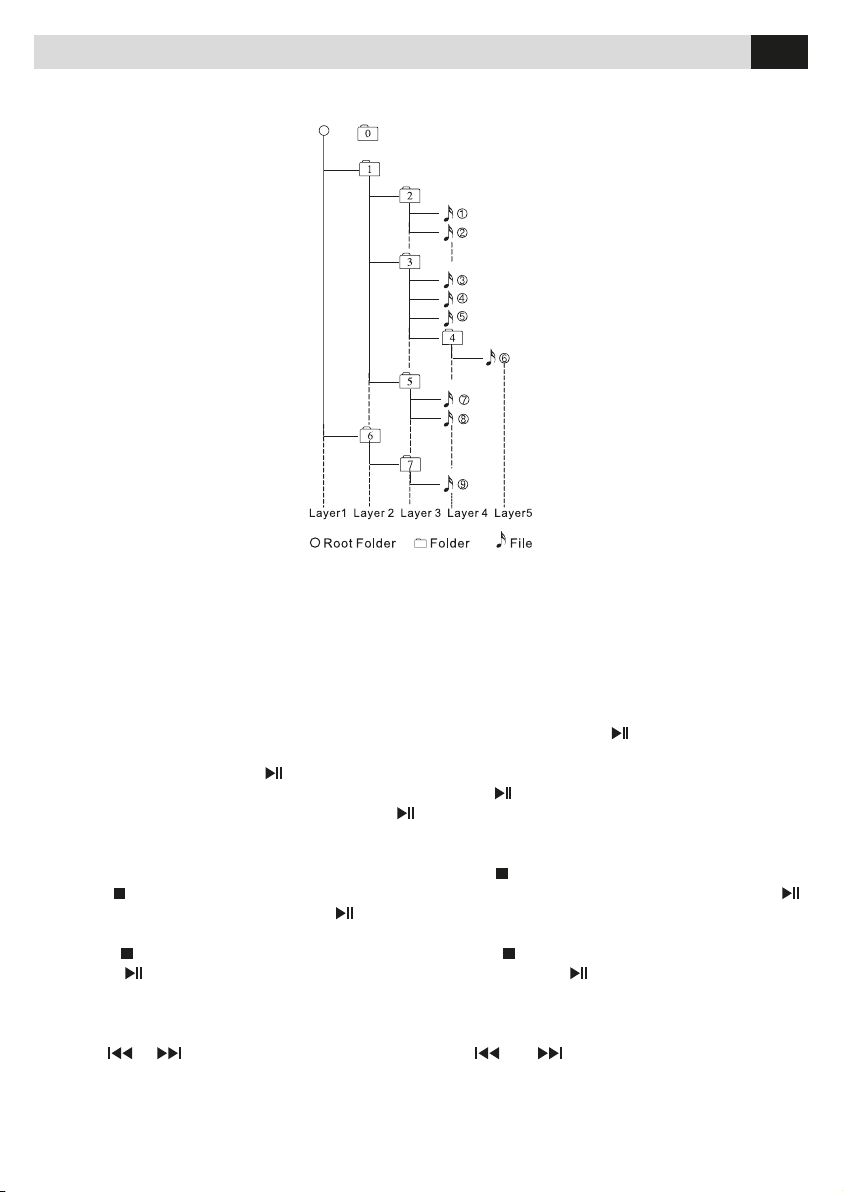
Modalité Disque/USB/Carte SD • Modus CD/USB/SD
FR/D
tout autre caractère sera la cause de mauvaise visualisation.
( )
ORDRE DE REPRODUCTION MP3
Lorsqu’on sélectionne fichiers et
dossiers pour la reproduction, celle ci
se fera selon l’ordre d’écriture sur le
support qui pourrait être différent par
rapport à celui désiré. C’est possible
programmer l’ordre de reproduction
en mettant un chiffre de 01 a 99 au
début du nom du fichier/dossier.
Par exemple, un support avec la
structure dossiers/fichiers est soumis
aux fonctions recherche dossier,
recherche fichier ou sélection dossier
comme indiqué dans la figure:
Le lecteur reconnaîtra uniquement 3
niveaux de dossiers, et ne montrera
pas les dossiers contenant seulement
d’autres dossiers.
Dans l’exemple, l’appareil montrera
les dossiers 2, 3, 5 et 7, mais pas la 1
et la 6 vu qu’elle n’ont pas de traces
directes.
PROTECTION ELECTRONIQUE ANTI-CHOC
• 10 secondes pour CD-DA (CDA)
• >45 secondes pour MP3 Enregistrés à 44.1kHz,
128kbps
• >90 secondes pour WMA enregistrés à 44.1kHz,
128kbps
INTERRUPTION MOMENTANEE REPRODUCTION
• Durant la reproduction appuyer
la reproduction.
• La note “PAUSE” sera visible sur l’écran. Appuyer
de nouveau pour reprendre la reproduction
INTERRUPTION COMPLETE REPRODUCTION
Pendant la reproduction de DVD, VCD, CD, MP3:
1. Appuyer
tion, la position sera sauvegardée. Appuyer
reprendre à partir de la même position.
2. Appuyer
En appuyant
début.
une fois pour interrompre la reproduc-
deux fois pour arrêter la reproduction.
, la reproduction reprendra à partir du
pour interrompre
pour
EINGABE VON DATEI und ORDNER
Es werden nur die AUDIO-Dateien korrekt ausgewiesen,
Musikstücke enthalten.
SCHUTZ-ELEKTRONIK GEGEN ERSCHÜTTERUNGEN
• 10 Sekunden bei CD-DA (CDA)
• >45 Sekunden bei MP3, registriert bei 44.1kHz, 128kbps
• >90 Sekunden bei WMA, registriert bei 44.1kHz, 128kbps
WIEDERGABE VORÜBERGEHEND UNTERBRECHEN
• Während der Wiedergabe,
Wiedergabe zu unterbrechen.
• Auf dem Bildschirm erscheint der Hinweis “PAUSE”.
Nochmals
WIEDERGABE KOMPLETT BEENDEN
Während der Wiedergabe von DVD, VCD, CD, MP3:
1. Ein Mal
Die Abspiel-Position wird dabei vorgemerkt. Nochmals
drücken, um die Wiedergabe, genau von der vorgemerkten
Position aus, wieder aufzunehmen.
2. Zwei mal
beenden. Drückt man
Anfang an.
die lt. Liste benannt wurden. Bei der
Benennung dürfen nur die konkret
zulässigen Buchstaben verwendet
werden, da sonst Fehler bei der
Ausweisung entstehen.
SEQUENZ BEI DER MP3-
WIEDERGABE
Die Wiedergabe von Dateien und
Ordnern erfolgt in der Reihenfolge, in
der diese eingespeichert wurden, also
nicht unbedingt in der gewünschten
Reihenfolge. Es besteht jedoch die
Möglichkeit, die Reihenfolge persönlich
festzulegen, indem man, vor jeder Datei/
jedem Ordner, eine Nummer eingibt, von
01 bis 99.
Anhand des Beispiels ist zu erkennen,
dass das Gerät nur die Ordner 2, 3, 5
und 7 ausweisen wird, NICHT aber die
Ordner 1 und 6, da diese keine direkten
drücken, um die
drücken, um die Wiedergabe wieder zu starten.
drücken, um die Wiedergabe zu unterbrechen.
drücken, um die Wiedergabe komplett zu
, beginnt die Wiedergabe von
SELECTION TRACE DESIDEREE
• Appuyer
précédente/suivante.
• Utiliser les touches 1-9, 0, 10+ sur la télécommande
pour sélectionner la trace désirée.
ou pour aller à la trace
WAHL DES GEWÜNSCHTEN MUSIK-STÜCKS
• Taste
danach zu gehen.
• Auf der Fernbedienung, die Tasten 1-9, 0, 10+ verwenden,
um das gewünschte Stück zu wählen.
38
oder
drücken, um auf das Stück davor/
Page 39

Modalité Disque/USB/Carte SD • Modus CD/USB/SD
FR/D
AVANCE/REVIENT RAPIDE EN REPRODUCTION
Appuyer
x2, x4, x8, x20 pour lancer la reproduction rapide.
Appuyer
tion normale.
REPETE
Pendant la reproduction, appuyer RIPETI (REPETE)
une ou plusieurs fois.
• Icône RPT apparaîtra sur l’afficheur.
• Pour CD/VCD: sur l’afficheur apparaîtra
RPT ONE ➞ RPT ALL ➞ RPT OFF.
• Pour DVD: sur l’afficheur, apparaîtra
RPT KAPITEL ➞ RPT TITEL ➞ RPT OFF.
• Pour disque Fichier: Sur l’afficheur apparaîtra
RPT UNO ➞ RPT DIR ➞ RPT ALL ➞ RPT OFF.
Note: Si RPT n’est pas sélectionné, à la fin du disque,
le système s’arrêtera. Sans aucune commande après 5
minutes il ira en modalité stand by.
REPETE A-B
Sélectionne le passage désiré pour répéter la reproduction.
• Appuyer
L’afficheur montrera REPETE A.
• Appuyer
L’afficheur montre REPETE
reproduction du passage sélectionné.
• Appuyer
montrera
PBC - CONTROLE PLAYBACK
1.
Si un VCD avec PCB est inséré, la reproduction
commence automatiquement à partir de la première
trace.
2. Appuyer
/ ou les chiffres pour la trace désirée. Appuyer
pour interrompre. Appuyer de nouveau PBC pour sortir
du menu.
GOTO
Appuyer GOTO sur la télécommande, la trace ou le
chapitre/titre DVD et le temps apparaîtront dans la partie supérieure de l’écran. La reproduction courante est
marquée, utiliser
rée. Utiliser les touches numériques pour sélectionner
le numéro. Appuyer ENTER pour confirmer.
ou pour 2 secondes et sélectionner
brièvement pour reprendre la reproduc-
A ➞ B
pour sélectionner le point du début.
A ➞ B
de nouveau pour sélectionner la fin.
A ➞ B
et commence la
A ➞ B
de nouveau pour sortir. L’afficheur
A ➞ B
CANCEL.
PCB pour visualiser le menu, utiliser
/ pour sélectionner celle dési-
BEI DER WIEDERGABE, SCHNELL VORWÄRTS/
RÜCKWÄRTS
Taste
oder
x2, x4, x8, x20 wählen, um die Schnell-Wiedergabe zu
starten. Taste
Wiedergabe zurückzukehren.
WIEDERHOLUNG
Während der Wiedergabe, Taste REPEAT ein Mal oder
mehrmals drücken.
• RPT-Ikone erscheint auf dem Display.
• Bei CD/VCD: auf dem Display erscheint
RPT ONE
• Bei DVD: auf dem Display erscheint
RPT KAPITEL
• Bei Datei-CDs: auf dem Display erscheint
RPT UNO
Wichtig: wählt man kein RPT, stoppt das gesamte System,
sobald die CD zu Ende ist. Nach 5 Minuten schaltet das
Gerät, ganz von selbst, auf Stand-by (Ruhestand).
WIEDERHOLE A-B
Den zu wiederholenden Absatz wählen.
• Taste A
wählen. Auf dem Display erscheint WIEDERHOLE (repeat)
A.
• Taste A
wählen. Auf dem Display erscheint WIEDERHOLE (repeat)
A
• Nochmals A
Auf dem Display erscheint A
PBC – WIEDERGABE-KONTROLLE
1. Legt man ein VCD mit PCB ein, so startet die
Wiedergabe automatisch beim ersten Stück.
2. PCB drücken, um das Menü auszuweisen. Taste
Nummer. Drücken, um zu unterbrechen. Nochmals PBC
drücken, um das Menü zu verlassen.
GOTO
Auf der Fernbedienung, GOTO drücken. Auf dem oberen
Teil des Bildschirms erscheint das Musik-Stück, oder
Kapitel/Titel der DVD, sowie die betreffende Dauer. Die
gerade laufende Wiedergabe wird aufgezeigt. Mit der Taste
einstellen. Nummern-Tasten für die Wiedergabe-Nummer
verwenden. Mit ENTER bestätigen.
➞
➞
➞
➞
B. Der gewünschte Absatz wird nun wiederholt.
/
verwenden, oder die gewünschte Stück-
/
kann man nun die gewünschte Wiedergabe
2Sekunden lang drücken. Dann
kurz drücken, um wieder auf die Normal-
RPT ALL ➞ RPT OFF.
➞
RPT TITEL ➞ RPT OFF.
➞
RPT DIR ➞ RPT ALL ➞ RPT OFF.
B drücken, um den Ausgangspunkt zu
B nochmals drücken, um den Endpunkt zu
➞
B drücken, um die Funktion zu verlassen.
➞
B CANCEL.
39
Page 40

Modalité Disque/USB/Carte SD • Modus CD/USB/SD
FR/D
PROGRAMME
Appuyer PROG pour entrer dans la liste de programmation.
Utiliser / ou / et les touches numériques
pour insérer le numéro.
Pour les DVD ou les fichiers DISC, sélectionner le titre
ou le numéro correspondant au chapitre. Pour les VCD
et CD, sélectionner le numéro correspondant à la trace
Appuyer
sélectionner PLAY en appuyant ENTER.
Pour effacer la liste, mettre le curseur sur CLEAR et
valider avec ENTER.
Appuyer de nouveau PROG pour sortir de la modalité.
SELECTION AUDIO DVD
Appuyer AUDIO pour sélectionner la langue audio désirée dans le DVD multi langues.
SELECTION AUDIO VCD
Appuyer AUDIO pour sélectionner le canal audio à
écouter, L
nouveau pour re-sélectionner.
SELECTION SOUS-TITRES DVD
Appuyer SUB.T pour sélectionner la langue des soustitres à montrer si le DVD est incorporé de la fonction
sous-titres multi langues.
SELECTION TITRE DVD
Appuyer TITLE pour visualiser le titre et la liste des
chapitres, utiliser le curseur ou taper le numéro, appuyer ENTER pour reproduire
SELECTION ANGLE DVD
Appuyer ANGLE pour sélectionner les différents
angles de vision si le DVD le permet.
IMAGE MIROIR
Quand on visualise une image, appuyer
pétition pour effectuer le miroir vertical de l’image, et
appuyer
horizontal.
ZOOM
Appuyer la touche ZOOM pour agrandir l’image.
X2
de nouveau pour re-sélectionner.
pour reproduire, ou moyennant le curseur,
➞
R ➞ MIX MONO ➞ STEREO appuyer de
avec ré-
avec répétition pour effectuer le miroir en
➞
X3 ➞ X4 ➞ X1/2 ➞ X1/3 ➞ X1/4 ➞ OFF appuyer
PROGRAMM
PROG drücken, um die Programm-Liste zu betreten. Taste
/ oder / und Nummerntasten verwenden, um die
Wiedergabe-Nummer einzugeben.
Bei DVDs und Datei-CDs, TITEL oder NUMMER des
Kapitels eingeben. Bei VCDs und CDs, Stück-Nummer
wählen.
Taste
auf PLAY verschieben und ENTER drücken.
Will man die Liste löschen, Cursor auf CLEAR verschieben
und ENTER drücken.
Nochmals PROG drücken, um die Funktion zu verlassen.
DVD-AUDIO WÄHLEN
AUDIO drücken, um, innerhalb mehrsprachiger DVDs, die
gewünschte Audio-Sprache festzulegen.
VCD-AUDIO WÄHLEN
AUDIO drücken, um die Audioeinstellungen,
L➞R➞ MIX MONO➞STEREO vorzunehmen.
DVD-UNTERTITEL WÄHLEN
SUB.T drücken, um die Untertitel auszuweisen, wenn die
eingelegte DVD über mehrsprachige Untertitel verfügt.
DVD-TITEL WÄHLEN
TITLE drücken, um Titel und Kapitel-Liste auszuweisen.
Mittels Läufer oder Stück-Nummer wählen und mit ENTER
die Wiedergabe einleiten.
DVD-SICHTWINKEL WÄHLEN
Sichtwinkel (ANGLE) drücken, um die verschiedenen
Sichtwinkel zu wählen, vorausgesetzt die DVD ist damit
ausgestattet.
BILDER IM SPIEGELBILD (MIRROR)
Um ein Bild auszuweisen, mehrmals
vertikale Mirror-Ansicht zu aktivieren. Mehrmals
um die horizontale Mirror-Ansicht zu aktivieren.
ZOOM
Taste ZOOM drücken, um das Bild wie folgt zu vergrößern:
X2 ➞ X3
drücken, um Wiedergabe zu starten. Oder Cursor
drücken, um die
drücken,
➞
X4 ➞ X1/2 ➞ X1/3 ➞ X1/4 ➞ OFF.
40
Page 41
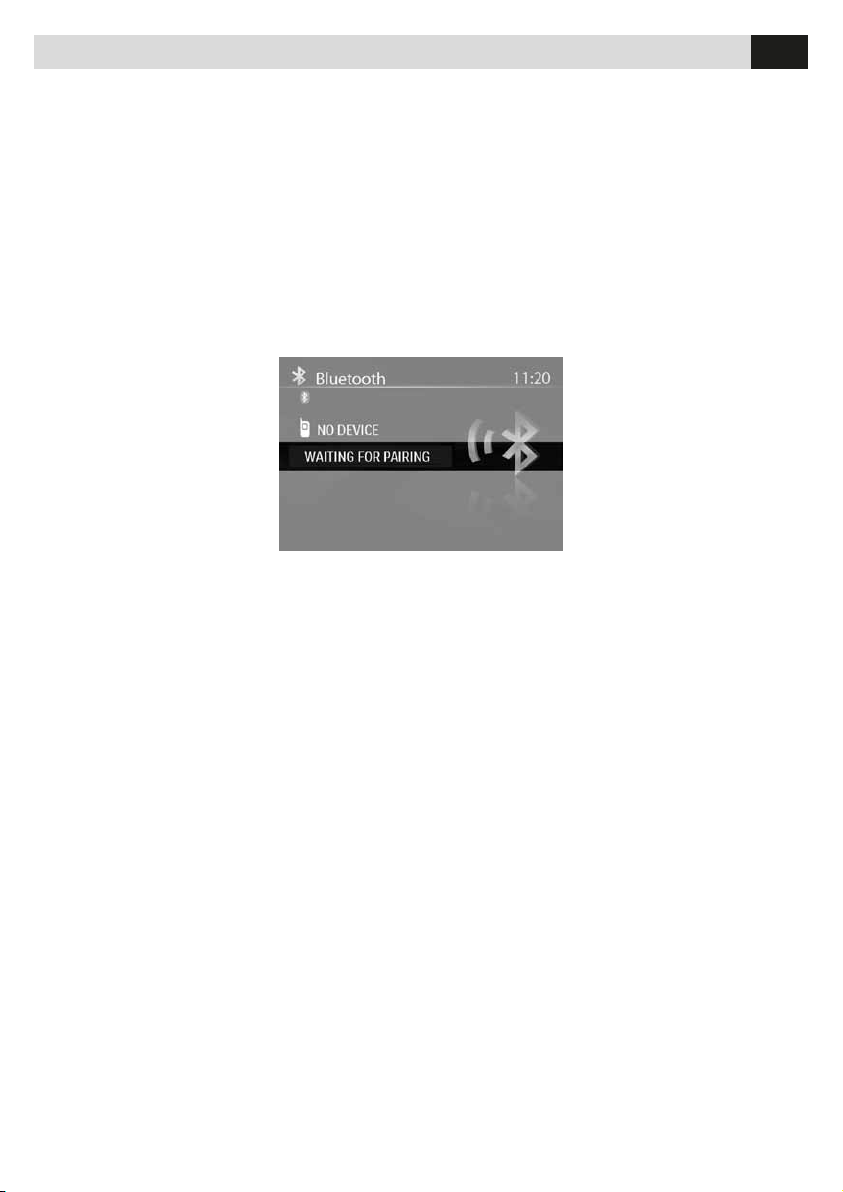
Fonction Bluetooth • Bluetooth-Funktion
FR/D
FR ACCÈS AU MODE BLUETOOTH
Appuyer la touche SRC sur la façade ou sur la télé-
commande pour entrer en Bluetooth
PARAMETRAGE
Utiliser la fonction pour établir une connexion entre
l’appareil et le portable.
Appuyer le bouton pour 2 secondes pour entrer dans
les réglages, ensuite utiliser
réglages BT, et puis utiliser
PAIR de OFF en ON.
Appuyer ESC pour retourner au menu principal. “EN
ATTENTE DE PARAMETRAGE” apparaîtra sur l’écran,
Activer la fonction Bluetooth sur
son portable, être à une distance
maximale de 3 Mt de l’appareil
et commencer la recherche des
dispositifs bluetooth.
Quand le nom de Phonocar apparaît, on peut le sélectionner.
A ce point, le code d’accès est
demandé, insérer 1234 et le
paramétrage Bluetooth sera automatiquement effectué. Certains
portables demanderons la validation de la connexion.
Note: Le répertoire téléchargé ne sera pas en ordre
alphabétique.
Synchronisation répertoire pas compatible avec
iPhone.
INTERROMPRE PARAMETRAGE
On peut interrompre le paramétrage ou se déconnecter
en suivant la procédure ci dessous:
Entrer dans les réglages BT, passer de PAIR ON à
OFF, ensuite appuyer ESC pour retourner au menu
principal. Après avoir déconnecté, aucun dispositif
n’apparaîtra sur l’écran et l’icône Bluetooth disparaîtra.
ATTENTE APPEL ENTRANT
(Si le portable y est intégré)
Pendant la conversation ou dans le streaming audio
Bluetooth, si on reçoit un appel, sur l’écran apparaîtra
“347 3312574 REPONDRE?”. Si on y appuie, on in-
terrompt la conversation en cours et on répond à celle
entrante. Si on appuie [], on refuse l’appel entrant et
continue la conversation courante.
TRANSFERT VOIX
Pendant la conversation, appuyer [] pour transférer
l’audio de l’appareil au portable, et appuyer de nouveau pour transférer l’audio du portable à l’appareil.
Certains portables transférerons l’audio de l’appareil
au portable en réponse d’un appel
/
pour sélectionner les
/ ou /
pour aller à l’option
D BLUETOOTH-FUNKTION BETRETEN
Auf dem Bedienteil oder der Fernbedienung, Taste
SRC drücken, um die Bluetooth-Funktion zu betreten.
KOPPELUNG
Unter dieser Funktion wird die Verbindung hergestellt
zwischen der Einheit und dem Mobil-Telefon.
Knopf 2 Sekunden drücken, um die EinstellungsFunktion zu betreten. Jetzt die Tasten
die BT-Einstellungen zu wählen. Dann die Taste
/
verwenden, um die Funktion PAIR einzuschalten (
von OFF auf ON ).
ESC drücken, um das Haupt-Menü zurückzuholen.
wählen.
An dieser Stelle wird nach der Zugangs-Codenummer
gefragt. Code-Nummer 1234 eingeben. Die BluetoothKoppelung findet somit automatisch statt. Einige MobilTelefone verlangen eine Verbindungs-Bestätigung.
Wichtig: Das heruntergeladene Telefon-Register wird
NICHT in alphabethischer Reihenfolge erscheinen. Die
Synchronisierung des Telefon-Registers ist mit
iPhone NICHT gewährleistet.
KOPPELUNG UNTERBRECHEN
Koppelungs-Vorgang und Bluetooth-Verbindung lassen
sich wie folgt unterbrechen:
BT-Einstellungen betreten; PAIR von ON auf OFF
umstellen; ESC drücken, um das Haupt-Menü
zurückzuholen. Nachdem die Verbindung unterbrochen
worden ist, erscheint auf dem Bildschirm der Hinweis:
„kein Gerät“ und die Bluetooth-Ikone verschwindet.
WARTESTAND FÜR ANKOMMENDE GESPRÄCHE
(wenn Mobil-Telefon diese Funktion bietet)
Wenn, im Laufe eines Gesprächs, oder bei Bluetooth
Audio-Streaming, ein weiteres Gespräch ankommt,
erscheint auf dem Bildschirm der Hinweis “347
3312574 BEANTWORTEN?”. Drückt man , so
unterbricht man das bereits laufende Gespräch und
beantwortet das neue. Drückt man , so weist man das
neue zurück und führt das bereits laufende Gespräch
weiter.
41
Auf dem Display erscheint der
Hinweis: “KOPPELUNG IM
GANGE” .
Auf dem Mobil-Telefon, die
Bluetooth-Funktion aktivieren.
Aus einem Abstand von maximal
3m von der Einheit, mit dem
Mobil-Telefon die Suche nach
Bluetooth-Geräten starten.
Sobald der Name Phonocar
auftaucht, kann man diesen
/
aktivieren, um
/ oder
Page 42
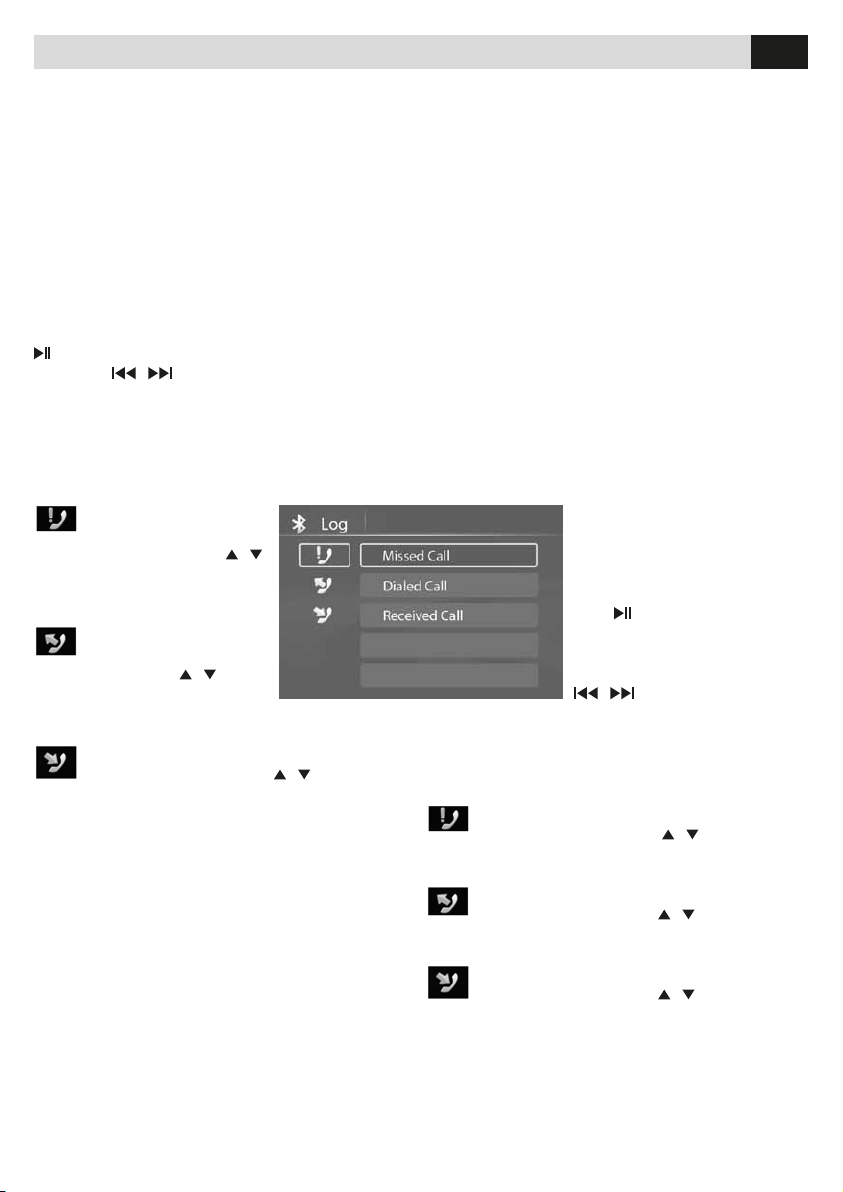
Fonction Bluetooth • Bluetooth-Funktion
FR/D
AUDIO BLUETOOTH
(Sur les portables intégrés de la fonction A2DP ou
AVRCP)
Après avoir paramétré le dispositif, ouvrir le player
audio dans le menu Bluetooth et régler la modalité
transmission en Bluetooth. Cette fois, sur l’écran de
l’appareil apparaîtra Musique en reproduction. Et
l’audio sera transféré du portable à l’appareil. Certains
portables demanderons de valider de la connexion.
Après avoir trouvé l’appareil sous le nom “Phonocar”
dans le portable, se connecter et insérer le code
d’accès: selon les version, il correspond à: “0000 ou
1234”. Durant la reproduction audio, on peut appuyer
sur la télécommande pour passer de Play à Pause
et appuyer
panneau.
LOG
Après le paramétrage Bluetooth, appuyer BAND pour
visualiser l’historique des appels.
1. Appels Manqués
qués. Appuyer les touches
pour rechercher le numéro désiré
dans la liste.
2. Appels émis
Appuyer les touches
rechercher le numéro désiré dans
la liste.
3. Appels reçus
cher le numéro désiré dans la liste.
NOTES GENERALES SUR LE BLUETOOTH
1.
Pour les portables N7X, N9X, Philips, Sony Ericsson,
Samsung durant nos tests, après un paramétrage effectué, l’appareil restait encore en attente.
A ce point il faut rechercher le dispositif “Phonocar”
dans la liste des dispositifs sur le portables. Dans
le menu apparaissant, sélectionner connexion afin
que sur l’écran de l’appareil apparaisse OK. Au cas
contraire, aucune voix ne s’entendra pendant la communication. Certains portables comme Philips, quand
ils reproduisent en A2DP, il faut entrer dans la modalité
reproduction, chercher le dispositif Phonocar et se
reconnecter.
2.
Durant le paramétrage, certains type de portables
indiquent la procédure à suivre, par exemple quand
on émet un appel avec l’appareil, mais on n’écoute
/ sur la télécommande ou sur le
.
Faire un appel en utilisant
la liste des appels man-
/
.
Faire un appel en utilisant
la liste des appels émis.
/
pour
.
Faire un appel en utilisant la liste des appels
reçus. Appuyer les touches
/
pour recher-
AUDIO UMSTELLEN
Während des Gesprächs, Taste drücken, um
die Tonausgabe vom Gerät auf das Mobil-Telefon
umzuleiten. Taste erneut drücken, um die Tonausgabe
Audio vom Mobil-Telefon auf das Gerät zurückzuleiten.
Bestimmte Mobil-Telefone sorgen automatisch, bei der
Beantwortung, für die Audio-Umstellung vom Gerät auf
das Mobil-Telefon.
BLUETOOTH-AUDIO
(bei Mobil-Telefon-Geräten mit A2DP- oder AVRCPFunktion)
Nach erfolgter Koppelung, im Bluetooth-Menü des
Mobil-Telefons, Audio Player aktivieren und auf
TRANSMIT in Bluetooth einstellen. Auf dem Bildschirm
erscheint nun “Musik-Wiedergabe im Gange” und die
Tonausgabe wird vom Mobil-Telefon auf das Gerät
umgeleitet. Bestimmte Mobil-Telefon-Geräte verlangen
nach der Verbindungs-Bestätigung. Sobald das Gerät,
auf dem Mobil-Telefon, unter dem Namen “Phonocar”
auftaucht, Verbindung herstellen und Zugangs-Code-
LOG
Nach der Koppelung, im Bluetooth-Menü – drücken,
um die Gespräche-Liste auszuweisen.
1.
Verpasste Gespräche.
Gespräch aus der Liste der Verpassten
Gespräche starten. Tasten
die gewünschte Rufnummer aus der Liste zu holen.
2. Gestartete Gespräche
Gespräch aus der Liste der gestarteten
Gespräche starten. Tasten
die gewünschte Rufnummer aus der Liste zu holen.
3.
In Empfang genommene Gespräche.
Gespräch aus der Liste der empfangenen
Gespräche starten. Tasten
die gewünschte Rufnummer aus der Liste zu holen.
ALLGEMEINES ÜBER BLUETOOTH
1. Bei unseren Tests auf den Telefon-Modellen
N7X, N9X, Philips, Sony Ericsson, Samsung hat
sich gezeigt, dass die Koppelung zwar erfolgreich
abgeschlossen war, jedoch das Gerät weiterhin im
42
Nummer eingeben, die, je nach
Ausführung, entweder “0000
oder 1234” lautet. Während der
Ton-Wiedergabe kann man,
auf der Fernbedienung, die
Taste
drücken, um von Play
auf Pause zu gehen. Dann,
auf dem Bedienteil oder der
Fernbedienung, die Taste
/ drücken.
/
drücken, um
.
/
drücken, um
/
drücken, um
Page 43

Fonction Bluetooth • Bluetooth-Funktion
FR/D
aucune voix, la raison c’est que la voix du portable n’a
pas été transférée à l’appareil. Les portables SAMSUNG peuvent indiquer la procédure pour la transférer.
3. En fonction du portable, si la modalité privée
est choisie, quand on émet un appel avec l’appareil, il peut arriver qu’au lieu de transférer la voix,
le
bluetooth se déconnecte jusqu’à la fin de l’appel.
Sur certains portables, il est nécessaire re-paramétrer.
4. Le
nom des dispositifs bluetooth doit être écrit en
chiffres et lettres.
5. Après avoir fait le paramétrage,
son, vérifier que l’audio stéréo du Bluetooth soit activé.
s’il n’y a aucun
ATTENTION!!!
1) La synchronisation du répertoire n’est pas compatible avec iPhone.
2) La synchronisation du répertoire sera faite sans
suivre l’orde alphabétique des noms.
Warte-Zustand war.
In solch einem Fall, muss man, auf dem Mobil-Telefon,
“Phonocar” auf der Geräte-Liste suchen. Im darunter
liegenden Menü, Verbindung wählen, so dass OK auf
dem Bildschirm des Geräts erscheint. Andernfalls
wäre keine Stimme zu hören. Bei bestimmten MobilTelefonen, wie z.B. Philips, muss man, bei A2DPWiedergabe, in die Wiedergabe-Funktion gehen, das
Phonocar-Gerät suchen und sich neu verbinden.
2. Während der Koppelung, zeigen bestimmte
Mobil-Telefone genau an, wie vorzugehen ist: z.B.
wenn, durch das Gerät, ein Gespräch gestartet
wird, jedoch keine Stimme zu hören ist,
vergessen, das Audio vom Mobil-Telefon auf das Gerät
umzuleiten. SAMSUNG-Geräte geben, den Umständen
entsprechend, die Anweisungen zur Audio-Umstellung.
3. Je nach Mobil-Telefon, kann es passieren,
dass, über das Gerät, im PRIVAT-Modus, ein
Gespräch gestartet wird, Bluetooth jedoch
abbricht, bis das Gespräch beendet ist,
anstatt die Stimme umzustellen. Bei einigen
Mobil-Telefonen muss die Koppelung erneut
durchgeführt werden.
4. Der Name aller Bluetooth-Geräte muss generell
aus Nummern und Buchstaben bestehen.
5. Sollte, nach der Koppelung, kein Ton
vorhanden ist, kontrollieren, ob Bluetooth AudioStereo aktiviert ist.
wurde
SEHR WICHTIG!!!
1)Die Synchronisierung des Telefon-Registers ist
mit iPhone NICHT gegeben.
2)Die Synchronisierung des Telefon-Registers wird
nicht in namentlicher alphabetischer Reihenfolge
durchgeführt.
43
Page 44

Caractéristiques techniques • Technische Eigenschaften
FR/D
FR GENERALES
Alimentation 12VDC (11V-16V), Test voltage 14.4V,
negative ground
Watt max 45W x 4 channels
Watt rms 20W x 4 channels (4 10%
T.H.D.)
Impédance haut-parleurs 4-8ohm
Voltage préamplificateur 2.0V (CD play mode: 1KHz,
0dB, 10K load)
Fusible 15A
Dimensions (LxAxP) 178 x 50 x 164mm
Poids 1.38kg
Aux-in 500mV
3” (16:9) TFT LCD
Résolution afficheur (dot) 960(W)×240(H)
Active area (mm) 65.52×36.84
Dimension écran (inch) 2.96 (Diagonal)
Dot pitch (mm) 0.06825 x 0.1535
Contraste 300
Luminosité 350nits
FM STEREO RADIO
Fréquence: 87.5-108.0MHz (Europe)
87.5-107.9MHz (Amérique)
Sensitivity 8dB μ
Frequency response 30Hz-15KHz
Stereo separation 30dB(1KHz)
Image response ratio 50dB
IF response ratio 70dB
Signal/noise ratio >55dB
D ALLGEMEIN
Stromversorgung
Minus-Erdung
Watt max 45W x 4 Kanäle
Watt rms 20W x 4 Kanäle (4 10%
T.H.D.)
Lautsprecher-Impedanz 4-8ohm
Vorverstärker-Spannung 2.0V (CD play mode: 1KHz,
0dB, 10K load)
Sicherung 15A
Abmessungen (LxBxT) 178 x 50 x 164mm
1.38kg
Aux-in 500mV
3” (16:9) TFT LCD
Display-Auflösung (dot) 960(W)×240(H)
Activer Raum (mm) 65.52×36.84
Monitor-Abmessung (inch) 2.96 (Diagonal)
Dot pitch (mm) 0.06825 x 0.1535
Kontrast 300
Helligkeit 350nits
FM STEREO RADIO
Frequenzen: 87.5-108.0MHz (Europa)
87.5-107.9MHz (Amerika)
Sensibilität 8dB μ
Frequenz-Gang 30Hz-15KHz
Stereo-Teilung 30dB(1KHz)
Bild-Verhältnis 50dB
IF Frequ.gang-Verhältnis 70dB
Signal/Geräusche-Faktor >55dB
12VDC (11V-16V), Test-Spannung 14.4V,
AM(MW) RADIO
Fréquence 522-1620KHz (Europe)
530-1710KHz (America)
Sensitivity (S/N=20dB) 30dBμ
DISC PLAYER
Système Disc digital audio system
Frequency response 20Hz - 20KHz
Signal/noise ratio >80dB
Total harmonic distortion Less than 0.20% (1KHz)
Channel separation >60dB
Video signal format system NTSC/PAL 60/PAL/AUTO
Video output 1 0.2V
COMPONENTS
Etrier de montage 1
Vis M5x6 mm 4
Support (50 mm) 1
Porte façade 1
Clés pour démonter 2
Manuel d’instructions 1
AM(MW) RADIO
Frequenzen: 522-1620KHz (Europa)
530-1710KHz (Amerika)
Sensibilität (S/N=20dB) 30dBμ
CD-PLAYER
System Disc digital audio system
Frequenz-Gang 20Hz - 20KHz
Signal/Geräusche-Faktor >80dB
Harmonische Verzerrung weniger als 0.20% (1KHz)
Kanal-Teilung >60dB
Video-Signal-System NTSC/PAL 60/PAL/AUTO
Video-Ausgang 1 0.2V
IM LIEFERUMFANG ENTHALTEN
Montage-Bügel 1
Schrauben M5x6 mm 4
Radio-Rahmen (50 mm) 1
Bedienteil-Etui 1
Entriegelungsbügel 2
Bedienungsanleitung 1
44
Page 45

Caractéristiques techniques • Technische Eigenschaften
FR/D
Pivot en caoutchouc 1
Télécommande 1
FICHIERS COMPATIBLES
Audio: MP3(*.mp3), WMA(*.wma)
Vidéo: MP4 (*.avi, DIVX3.11/4.0/5.0/6.0) - MPEG 2
(*.vob) - MPEG 1 (*.dat)
Images: JPEG (*.jpg)
MP3 file: ISO 9660 or ISO 9660 + Joliet format -
Max. 30 caractères.
Niveau maximum de directory: 8.
Nombre Maximum d’album: 99.
Longueur maximale pour chaque trace: 99 minutes
e 59 secondes.
Fréquence d’échantillonnage compatible pour
disques MP3: de 8KHz à 48KHz (44.1KHz préférablement).
Bit rates compatibles sur disques MP3: 32 320kbps (128 kbps préférablement).
DISQUES ET FICHIERS NON COMPATIBLES
*.AAC, *.DLF, *.M3U, *.PLS, MP3 PRO fichiers et
fichiers avec DRM.
Disques avec session ouverte.
NOTE MP3/WMA
Les fichiers MP3 et WMA (Windows Media Audio) sont
des fichiers audio numériques comprimés pour permettre la mémorisation de plusieurs fichiers. Cet appareil peut reproduire MP3/WMA directement des fichiers
contenus dans des disques CD-R/RW,DVD-ROM,
DVD+RW, DVD-RW, DVD+R, DVD-R e DVD-VIDEO, ou
sur Carte SD/USB.
Le VM051 peut reproduire MP3 (MPEG1, 2, 2.5 Audio
Layer 3). Toutefois, des incompatibilités dues au format de compression ou au programme utilisé peuvent
survenir.
Gummi-Zapfen 1
Fernbedienung 1
KOMPATIBLE DATEIEN
Audio: MP3(*.mp3), WMA(*.wma)
Video: MP4 (*.avi, DIVX3.11/4.0/5.0/6.0) - MPEG 2 (*.vob) MPEG 1 (*.dat)
Bilder: JPEG (*.jpg)
MP3-Dateien: ISO 9660 or ISO 9660 + Joliet format - Max.
30 Stellen.
Max. Register-Niveaus: 8.
Max. Album-Anzahl: 99.
Max. Länge pro Stück: 99 Minuten und 59 Sekunden.
Kompatible Muster-Frequenzen bei MP3: von 8KHz bis
48KHz (44.1KHz empfehlenswert).
Kompatible Bit rates supportati bei MP3: 32 - 320kbps
(128 kbps empfehlenswert).
NICHT-KOMPATIBLE CDs und DATEIEN
*.AAC, *.DLF, *.M3U, *.PLS, MP3 PRO-Dateien, sowie
Dateien mit DRM.
CDs mit offener Sektion.
HINWEISE ZU MP3/WMA
MP3- und WMA-Dateien (Windows Media Audio) sind
komprimierte Digital-Audio-Dateien. Es kann folglich
eine größere Anzahl solcher Dateien eingespeichert
werden. Das vorliegende Gerät kann MP3/WMA-Dateien
wiedergeben, entweder direkt aus CD-R/RW,DVD-ROM,
DVD+RW, DVD-RW, DVD+R, DVD-R e DVD-VIDEO, oder
durch SD/USB.
Der VM051 kann MP3-Dateien wiedergeben
(MPEG1, 2, 2.5 Audio Layer 3). Es können trotzdem
Kompatibilitätsprobleme auftauchen, im Bezug auf das
Komprimierungs-Format und das dazu verwendete
Programm.
45
Page 46
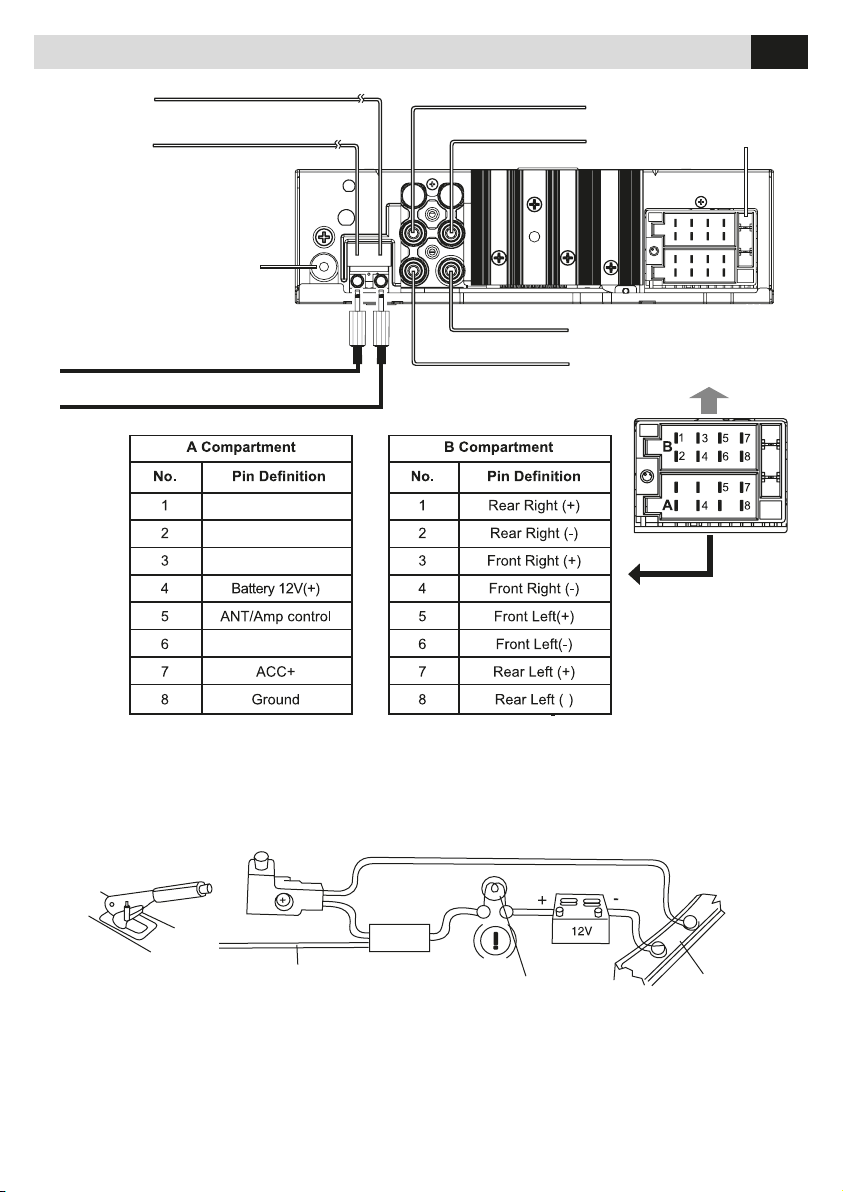
Conexiones
Luces
VERDE-BLANCO
ROSA
RADIO ANTENA
Parking SW
de marcia atrás
E
SALIDA POSTERIOR
)
R ROJO
L BLANCO
Fuse
15A
MICRÓFONO BLUETOOTH
SWC (MANDOS DE VOLANTE)
CONEXIÓN PARA FRENO DE MANO
SALIDA VIDEO
ENTRADA REAR CAMERA
AMARILLO
AMARILLO
Interruptor del freno
de mano
Verde / Green
Cable del freno
de mano
Indicator del freno
de mano
46
Batería
Masa
Page 47
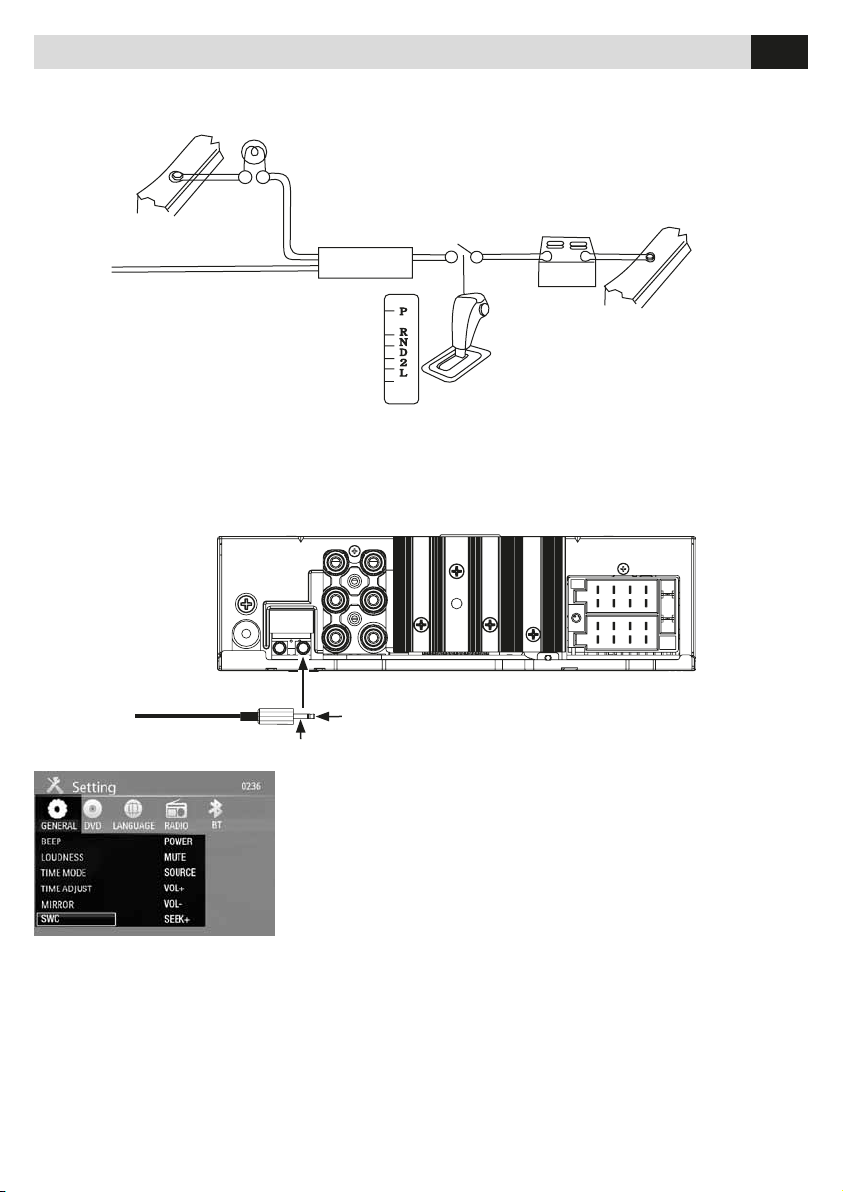
Conexiones
MASSA / GROUND
CONEXIÓN PARA MARCHA ATRÁS
E
Masa
Rosa / Pink
Retro camara
Luces de marcha atrás
CONEXIÓN PARA MANDOS DE VOLANTE
SWC (COMANDI AL VOLANTE
STEERING WHEEL COMMAND)
SWC 1
Cambios
Batería
Masa
Seleccionando SWC aparecerá una ventana en la cual se podrá elegir
la función desplazándose con las flechas. Pulsar para memorizar la
función elegida y esperar que se ilumine el icono correspondiente, esta
operación deberá ser efectuada con todas las funciones disponibles en el
volante
47
Page 48
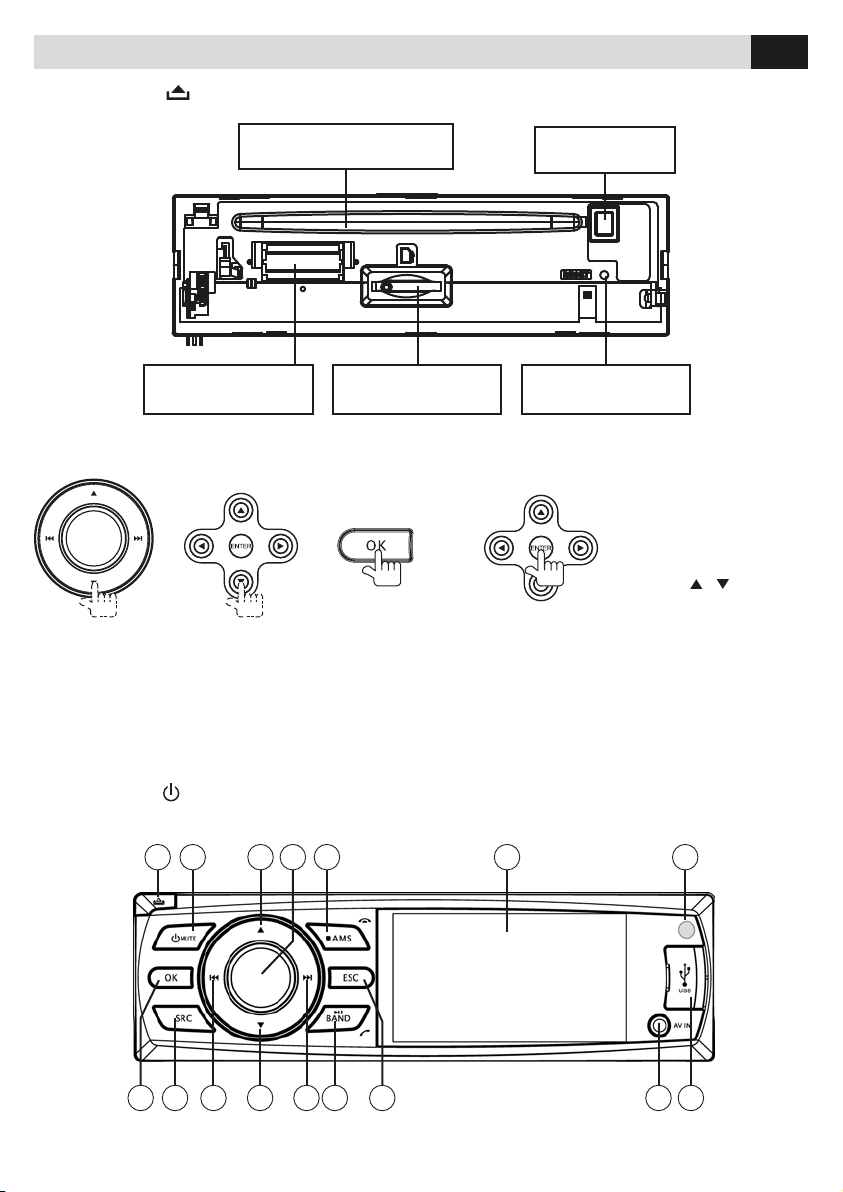
Funciones
Presiona la tecla para abrir el panel.
E
Ranura introducción disco
Contactos panel
Operaciones frecuentes
1) Mueva el cursor 2) Confirmación
Ranura SD Card
media
Expulsión disco
Tecla Reset
Nota:
En modo configuración, el
mando del volumen tiene
la mismas funciones de
las teclas
/ .
Funciones en el frontal
Presionar la tecla para encender el aparato.
1
2 3 5 6 74
8 9
10 12 13 15 161411
48
Page 49
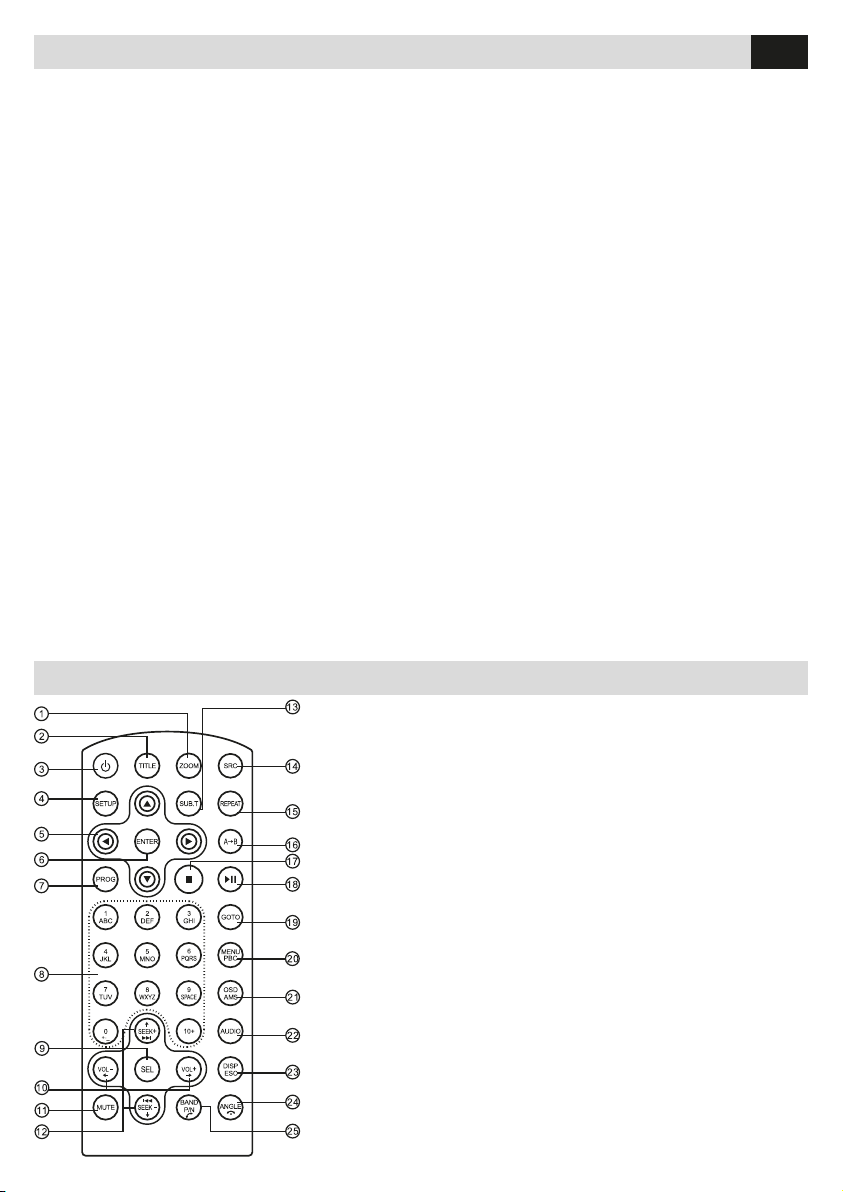
Funciones
1. Abertura panel frontal
2. Encendido/Apagado (presione durante 3 segundos) - Mute audio (presione brevemente).
3. Presionar para navegar en el interior de las opciones en DVD, CD e MP3/WMA - Selecciona la emisora
precedente en modo RADIO.
4. Girar el mando para ajustar el volumen - Presionar brevemente para seleccionar los ajustes
audio/video y girar para efectuar los ajustes - Presionar 3s para entrar en el menú de configuración.
5. Escansión frecuencias de radio En modo RADIO - Escansión automática con memorización de las
emisoras de radio, en modo radio, presionando durante más de 2 segundos - Stop en modo CD,
MP3/WMA y DVD video - Termina llamada en modo bluetooth.
6. Display 3” TFT. • 7. Sensor IR para mando a distancia.
8. Confirma operación - Interrumpe la búsqueda automática en modo RADIO.
9. Presionar brevemente para cambiar de fuente - Presionar durante 3 segundos. Para volver al menú
fuentes, desplazarse con el teclado y presionar OK para confirmar.
10. Búsqueda automática emisora precedente (presionar brevemente) - Búsqueda manual emisora
precedente (pulsar durante más de 2 segundos) - Capitulo precedente (CD, MP3/WMA, DVD)
Reproducción rápida atrás x2, x4, x8, x20 (Pulsar durante más de 2 segundos) - Desplazamiento a
izquierda entre las opciones.
11. Desplazamiento en bajo entre las opciones (Modo DVD, CD, MP3/WMA) - Reproduce la emisora
memorizada siguiente Modo RADIO).
12. Búsqueda automática emisora siguiente (presionar brevemente) - Búsqueda manual emisora
siguiente (presionar durante más de 2 segundos) - Pista/Capitulo siguiente (CD, MP3/WMA, DVD)
Reproducción rápida adelante x2, x4, x8, x20 (presionar durante más de 2 segundos).
Desplazamiento a la derecha entre las opciones.
13. Reproducción/Pausa (Modo DVD, CD, MP3/WMA) - Selecciona banda radio: FM1 - FM2 - FM3 - AM1 AM2 (Modo radio) - Realiza/Acepta llamada bluetooth - Selecciona programa RDS (Presionar durante
más de 2s.).
14. Vuelve al menú precedente.
15. Entrada Audio/Video. • 16. Puerto USB.
E
Mando a distancia
1. Zoom (DVD/VCD) • 2. Títulos DVD
3. Encendido/Apagado • 4. Menú Ajuste
5. Desplazamiento en los menús
6. Conrma selección • 7. Programa reproducción
8. Teclado numérico
9. Selecciona ajustes Audio/Video • 10. Volumen
11. Silenciamento audio
12. Sintonización radio - Pista siguiente/precedente
13. Subtítulos (DVD) • 14. Cambio fuente
15. Repetición • 16. Repetición A-B
17. Stop/Atrás • 18. Inicia/Pausa reproducción
19. Búsqueda personalizada
20. Menú DVD - PBC (para VCD 2.0 o superior)
21. OSD: Menú en pantalla
AMS: Busca y memoriza emisoras automáticamente
22. Idioma audio DVD - Idioma audio VCD - L/R/ST
23. Visualiza horario (Video) - Vuelve al menú precedente
24. Cambia Angulo de visión DVD - Termina llamada (en modo BT)
25. Sistema Video PAL/NTSC/AUTO - Banda radio (en funcion
Audio Radio) - Realiza/llamada (en modo BT)
49
Page 50
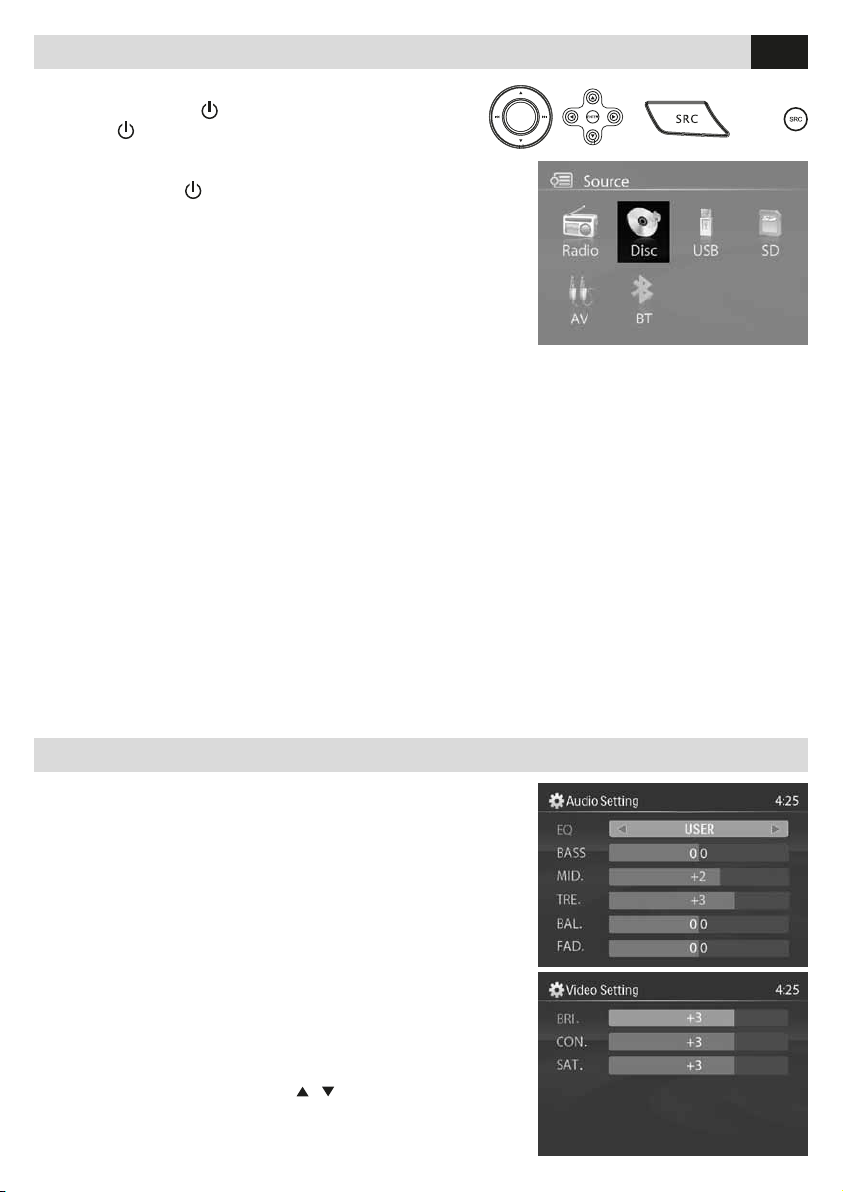
Funciones de base
ENCENDIDO/APAGADO
1. Presionar brevemente
2. Presionar
MUTE AUDIO
Presionar brevemente
volumen
cuando la unidad esta en mute, el audio vuelve a su anterior estado
AJUSTE VOLUMEN
Girar el mando o presionar las teclas VOL+ y VOL- en el mando a
distancia para
ajustar el volumen.
SELECCION FUENTES PARA REPRODUCIR
Método 1
deseada.
Método 2
visualizar el menú de las fuentes, para desplazarse en el menú y confirmar la selección con la tecla OK.
Nota:
reproducción, esperar hasta la visualización en el display de la radio
FRENO DE MANO
1. Si el cable ‘PRK SW’ está conectado al freno de mano, la visualización en la pantalla dependerá de su estado.
2. Cuando el coche esta en movimiento y se reproduce un video, aparecerá en el display “DO NOT WATCH VIDEO
WHILE DRIVING”. El mensaje avisa al conductor que no puede visionar ningún video en movimiento, mientras
que los pasajeros sentados en la parte trasera del coche pueden seguir viendo el video mediante la pantalla de
reposacabezas o de techo.
durante más de 2 segundos para apagar la unidad.
• Presionar brevemente la tecla SRC en el frontal o bien en el mando a distancia hasta visualizar la fuente
• Presionar durante más de 2 segundos la tecla SRC en el frontal o bien en el mando a distancia hasta
• No cambiar la fuente después de conrmar la selección, la unidad necesita algunos segundos para iniciar la
para encender el aparato.
para silenciar el audio. Nota: • ajustando el
E
FASE DE MARCHA ATRAS
Cuando ésta conectada una la retro-cámara a la unidad, en el momento que se procede a efectuar la marcha atrás
se visualizara la parte trasera del coche. La unidad volverá a su estado normal después de efectuar dicha operación.
Funciones del mando
1. Girar el mando para ajustar el volumen.
2. Presionar brevemente el mando para entrar en los ajustes
audio/video.
3. Presionar el mando para acceder a las funciones:
• AUDIO - EQ/Graves/Medios/Agudos/Balance/Fader, girar el
mando para ajustar el nivel.
• VIDEO - Brillo/Contraste/Saturación, girar el mando para ajustar
el nivel.
• EQ - girar el mando para seleccionar: USER/FLAT/POP/ROCK
CLASSIC/JAZZ
Con la función ecualización activada, el ajuste de los graves o de
los agudos hace recaer el modo USER.
Cuando el ecualizador no está activado, la unidad mantiene el nivel
de los graves y agudos del último ajuste.
4. Presionar el mando durante más de 2 segundos para entrar en
la configuración del sistema, utilizar
menú y seleccionar la voz mediante OK.
/ . Para desplazarse en el
50
Page 51
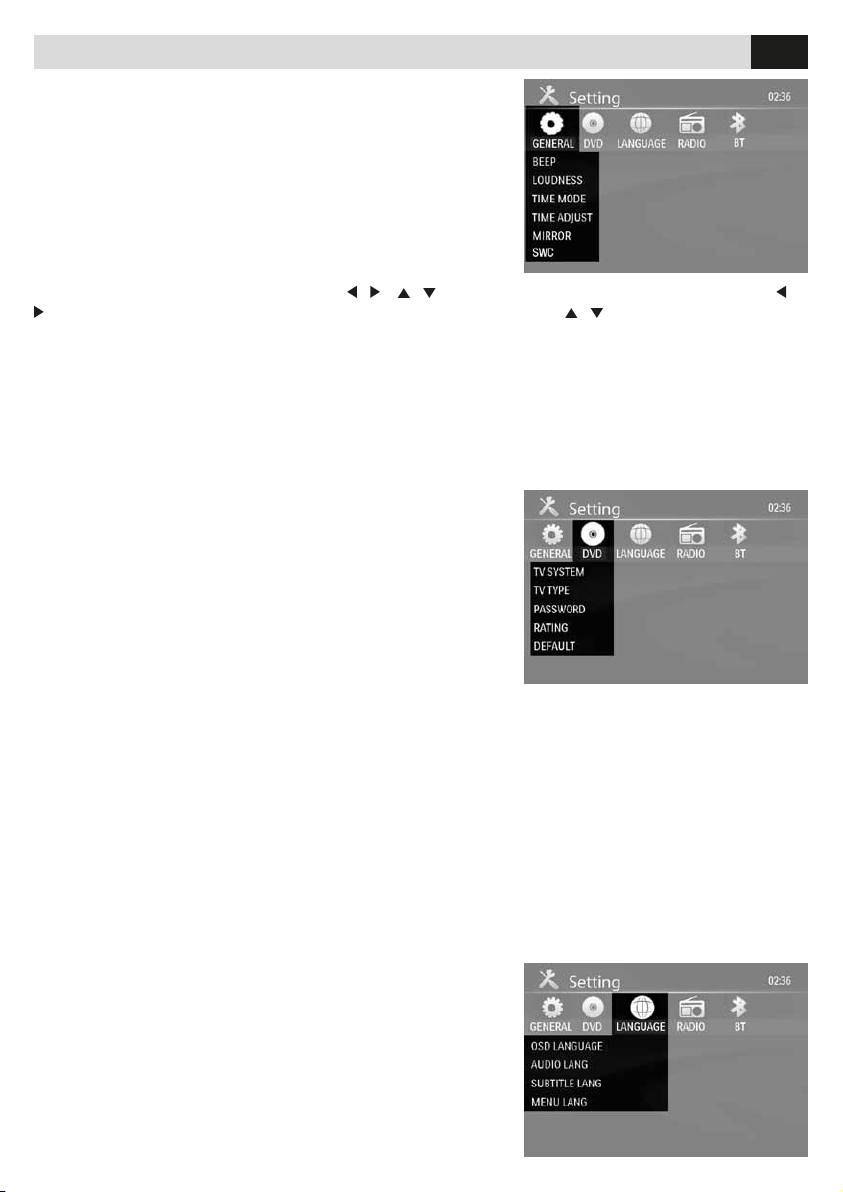
Funciones del mando
GENERAL SETTING
BEEP: ON/ OFF - La función BEEP permite oír un tono en cada
acceso del menú.
LOUDNESS: ON/OFF - Durante la escucha de música con bajo
volumen, la función loudness permite una exaltación de las bajas
y de las altas frecuencias.
TIME MODE: • 12 HOUR MODE: el reloj en el display será
visualizado en formato 12 horas, ejemplo 11:18. • 24 HOUR
MODE: el reloj en el display será visualizado en formato 24 horas,
ejemplo 20:32.
TIME ADJUST: desplazarse con las teclas
se selecciona el segmento para ajustar, Ajustar el valor con las flechas / .
MIRROR: ON/OFF - Esta opción permite de convertir la imagen de la retro-cámara con visión especular.
Girar el mando para seleccionar ON u OFF.
SWC (MANDOS DE VOLANTE)
Esta función permite utilizar los mandos de volante de los coches con protocolo resistivo con esta unidad,
con la posibilidad de memorizar hasta 6 funciones.
CONFIGURACIÓN DVD
TV SYSTEM: NTSC/PAL/AUTO
Selecciona el sistema TV en el menú de ajuste.
TV TYPE: 4:3PS / 4:3LB / 16:9
Configura el formato de visualización de los videos.
4:3 Pan Scan - Para monitor 4:3, los extremos derecho e
izquierdo están recortados
4:3 Letter Box - Para monitor 4:3, aparecerán dos barras negras
en la extremidad inferior y superior de la pantalla.
16:9 - Para monitor 16:9
/ o / para ajustar las horas y los minutos. Mediante /
E
PASSWORD
1. Presionar en el teclado numérico del mando a distancia “0000” y presionar ENTER para confirmar.
2. Presionar la secuencia de cuatro números deseados y presionar ENTER para confirmar.
3. Memorizar la password para una eventual utilización en futuro. En el caso de olvido de la password,
introducir 0000 para resetearla.
Password : 0000
Selección grado de seguridad: 1 KID SAFE • 2 G
3 PG • 4 PG13 • 5 PG-R • 6 R • 7 NC-17 • 8 ADULT
Es posible seleccionar de 1 a 8 el nivel de seguridad de la visión: (1) máximo de las limitaciones de visión.
(8) ninguna limitación de visión.
Configuracion pre-definida: 8
Nota:
El nivel de seguridad puede ser seleccionado solo en el caso de que la password este desbloqueada el
limite definido tendrá efecto solo cuando la password esta activada.
DEFAULT: RESTORE - Si se selecciona esta opción, el VM051
volverá a los ajustes de fábrica.
CONFIGURACION IDIOMA
OSD LANGUAGE: Selecciona el idioma de los menús del
sistema.
AUDIO LANG: Selecciona el idioma de los diálogos para los
DVD.
51
Page 52
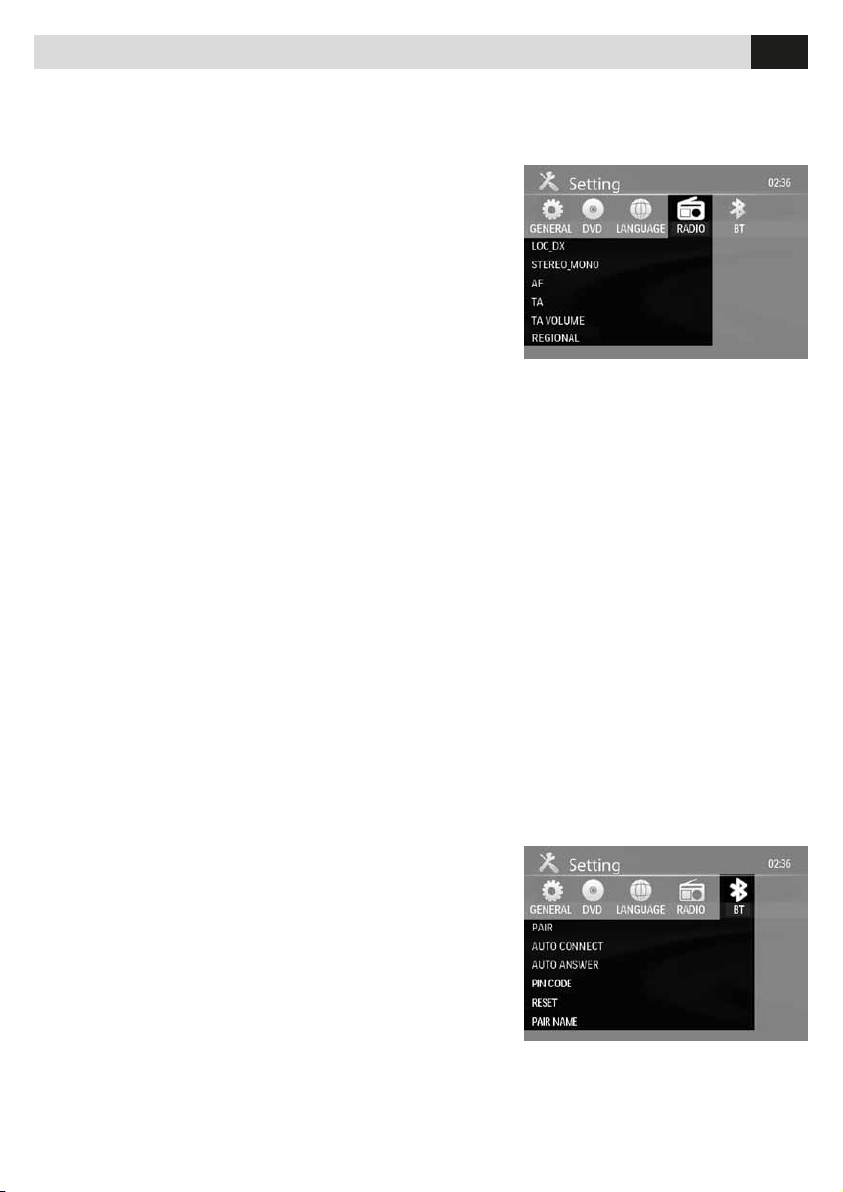
Funciones del mando
Nota: Es posible cambiar el idioma presionando la tecla AUDIO en el mando a distancia.
SUBTITLE LANG: Selecciona el idioma de los subtítulos en los DVD.
MENU LANG: Selecciona el idioma del menú títulos en los DVD.
RADIO SETTING
LOC_DX: LOC/DX: Selecciona la recepción para las emisoras
lejanas o locales.
DX: La radio transmite emisoras con señales débiles o fuertes.
LOCAL: La radio transmite solo emisoras con señales fuertes.
STEREO_MONO: STEREO/MONO
Selecciona FM mono/stereo.
AF: ON/OFF Activa/Desactiva la frecuencia alternativa (AF)
AF ON: función activada.
AF OFF: función desactivada.
Atención: El indicador AF parpadea hasta cuando no se recibe la señal de RDS. Si la señal RDS no está
disponible desactivar la función AF
TA: ON/OFF Activa/Desactiva la recepción de los anuncios sobre el tráfico (TA). Cuando la función TA
esta activa El indicador en el display parpadea. A la llegada de una información el indicador TA será fijo
en el display. El VM051 pasara en modo radio haciendo escuchar el aviso de tráfico con el volumen
anteriormente ajustado en la función TA. Al finalizar el anuncio la unidad vuelve al modo precedente así
como el nivel de volumen.
Cuando el modo TA está activo, las funciones SEEK, SCAN, AMS serán operativas solo cuando el código
TP ha sido recibido.
TA VOLUMEN: 00-34
Ajuste volumen del anuncio de tráfico.
E
REGIONAL: ON/OFF
REG ON: la función AF usará el código regional (del PI) y solo las emisoras con el código regional serán
sintonizadas automáticamente.
REG OFF: la función AF ignorara el código regional (del PI) permitiendo la sintonización de todas las
emisoras.
CT: ON/OFF
Algunas emisoras ofrecen fecha y horario en el interior del código RDS, pero no siempre está correcto.
Seleccionar ON para permitir al unidad de ajustaren base a esta señal el horario y la fecha.
CONFIGURACIÓN BLUETOOTH
PAIR: ON/OFF Ajustar sobre ON para emparejar el teléfono.
AUTO CONNECT: ON/OFF
Después de la desconexión con el teléfono, el bluetooth
intentara´ reconectarse en los siguientes 20 segundos si esta
función está configurada sobre ON
AUTO ANSWER: ON/OFF EL bluetooth pasará
automáticamente al modo teléfono a la llegada de una llama
y aceptara la conversación después de 3/4 tonos cuando la
opción está configurada sobre ON
Diferentemente la respuesta a la llamada se tendrá que efectuar
de forma manual.
PIN CODE En base a las versiones del VM051 el PIN para el
emparejamiento puede ser “0000” o bien “1234”. Es posible modificarlo con esta función introduciendo
los 4 dígitos deseados mediante el mando a distancia y confirmando con ENTER.
RESET: ON Efectúa el Reset del bluetooth así como del PIN, vuelve a los ajustes de fábrica “1234”.
PAIR NAME Muestra el nombre que será visualizado en el teléfono: Phonocar.
52
Page 53
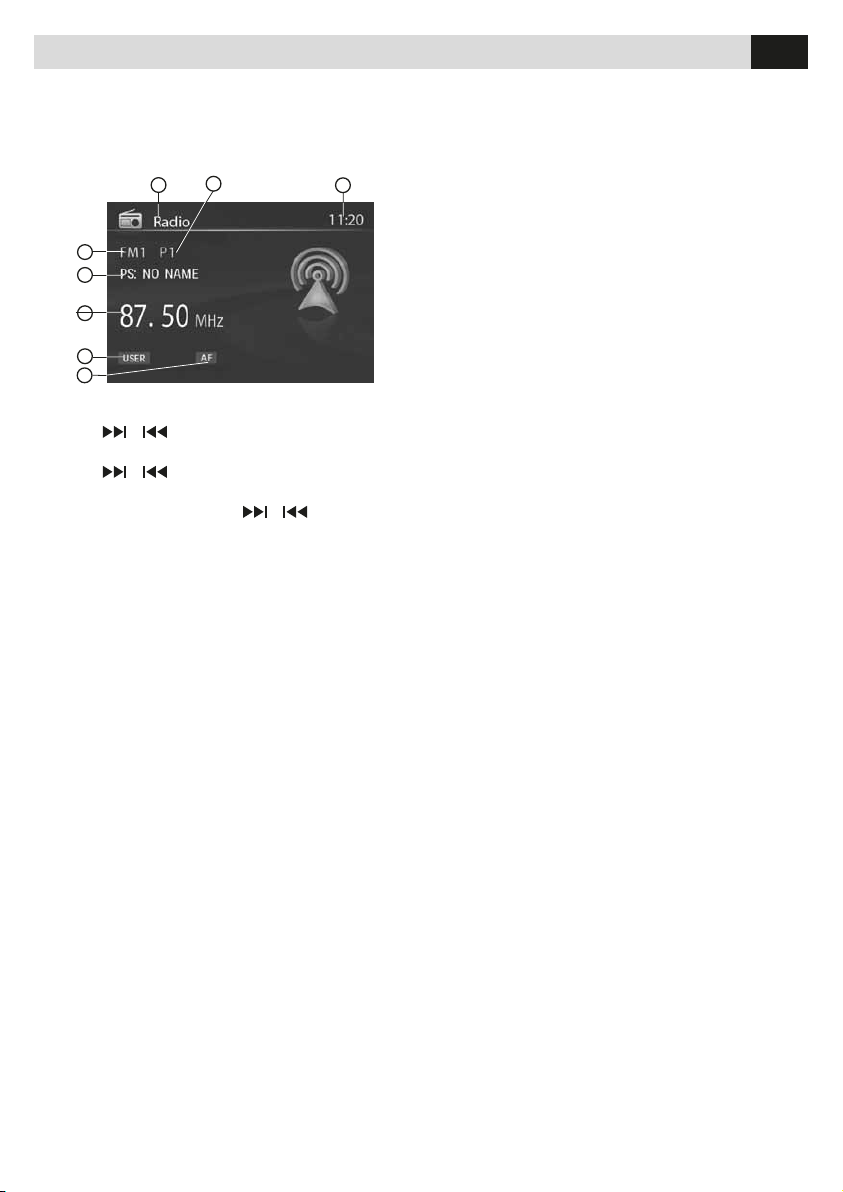
Modo radio
E
Presionar SRC en el panel frontal o bien en el mando a distancia para pasar al modo radio.
SELECCIONAR UNA BANDA RADIO
Presionar BAND para seleccionar las siguientes bandas radio FM1-FM2-FM3-AM1-AM2.
2
1
3
1. Indicador fuente
2. La memorización
4
5
3. Horas
4. AM / FM banda
5. Información RDS
6
6. Frecuencia de radio
7. Indicador EQ
7
8
8. Indicador de AF
SELECCIONAR UNA EMISORA
Presionar
o bien sintonizar una emisora. Sintonia radio
- BUSQUEDA AUTOMATICA
Presionar
o bien sintonizarse en una emisora siguiente o precedente.
- BUSQUEDA MANUAL
Pulsar y mantener presionado
o bien para entrar en la búsqueda manual. Presionar nuevamente las
teclas para desplazar la frecuencia paso a paso.
Nota:
Durante la búsqueda manual si la pausa entre las dos operaciones supera los 5 segundos la unidad vuelve
al modo de búsqueda automática.
MEMORIAS EMISORAS
Es posible memorizar 6 emisoras por cada banda (18 FM - 12 AM).
Memorizacion
- Auto memorizacion
1. Seleccionar una banda (si es necesario).
2. Presionar AMS brevemente para efectuar la escansión de las memorias P1-P6 durante 5segundos cada una.
3. Tener presionado AMS durante más de 2 segundos, las 6 emisoras con la señal más fuerte serán
automáticamente memorizadas.
- Memorización manual
1. Seleccionar una banda (si es necesario) y buscar una emisora.
2. Tener presionada en el mando a distancia el número de la memoria donde se desea memorizar.
3. el número será visualizado en el display.
Re-llamar una emisora
1. Seleccionar una banda (si es necesario).
2. Presionar el número de la memoria deseada.
53
Page 54
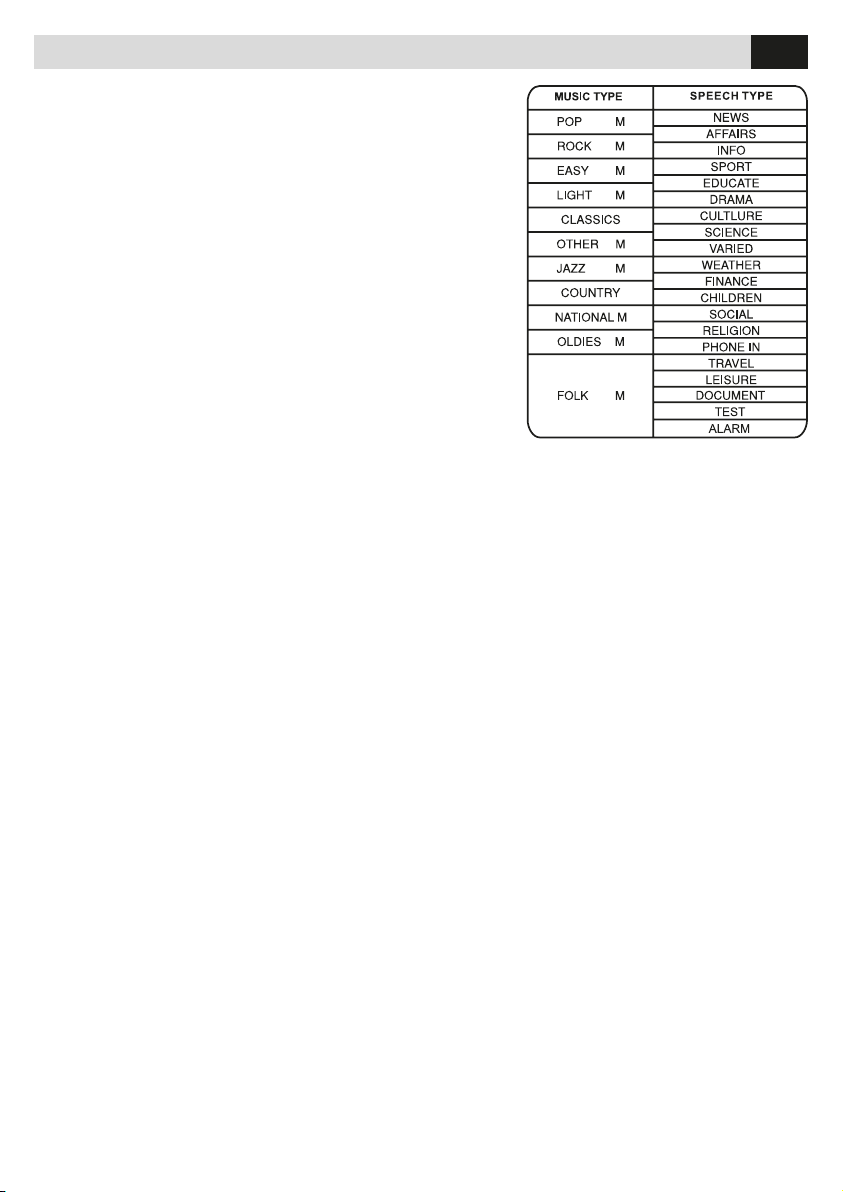
Modo radio RDS (Radio Data System)
El servicio RDS varia en base a las áreas, las siguientes informaciones
y funciones serán disponibles solo donde está presente este
servicio.
FUNCIONES RDS
AF (Frecuencia Alternativa): Cuando esta función está activa y la señal
de la emisora es débil, la radio volverá a buscar la misma emisora
automáticamente la misma emisora con el mismo PI (identificativo
programa radio) en un otra frecuencia donde la señal es más fuerte.
PS (Nombre Emisora): El nombre de la emisora viene visualizado en el
lugar de la frecuencia radio.
ANUNCIOS SOBRE INFORMACIONES DE TRÁFICO
Algunas emisoras RDS trasmiten informaciones del tráfico mediante un
código que permite la prioridad de escucha.
TP: (Programa Identificación Trafico) Transmisión informaciones
sobre el tráfico.
TA: (Identificación Anuncio Trafico) Anuncio sobre las condiciones del
tráfico.
EON
: (Anuncios Otras Emisoras) Cuando viene recibido el dato EON, el indicador se ilumina y las funciones TA y
AF vienen implementadas.
TA: Las informaciones sobre el tráfico pueden ser recibida desde la emisora corriente o de otras.
AF: La lista de las frecuencias alternativas se actualiza mediante el EON.
EON
habilita la radio a la utilización completa de las informaciones RDS. En este modo la lista de las emisoras
AF viene constantemente actualizada. Si viene seleccionada una emisora alrededor de casa, será posible
recibir la misma emisora en una frecuencia alternativa con una mejor señal, o bien otra emisora con el mismo
programa musical. EON tiene además traza de las emisoras con trasmisión TP para una recepción más rápida.
PTY (Tipologia programa de la emisora)
RDS envía un código identificativo del tipo de programa de la emisora Ejemplo: news, rock, info, sport, etc.
PTY Modo: Presionar BAND durante más de 2 segundos para entrar en el menú del PTY. Será visualizado el
último PTY, utilizar las flechas para seleccionar el programa deseado.
La unidad iniciará a buscar emisoras con el PTY elegido, En el caso de no encontrar el tipo de programa
deseado. Será visualizado NO PTY.
E
54
Page 55
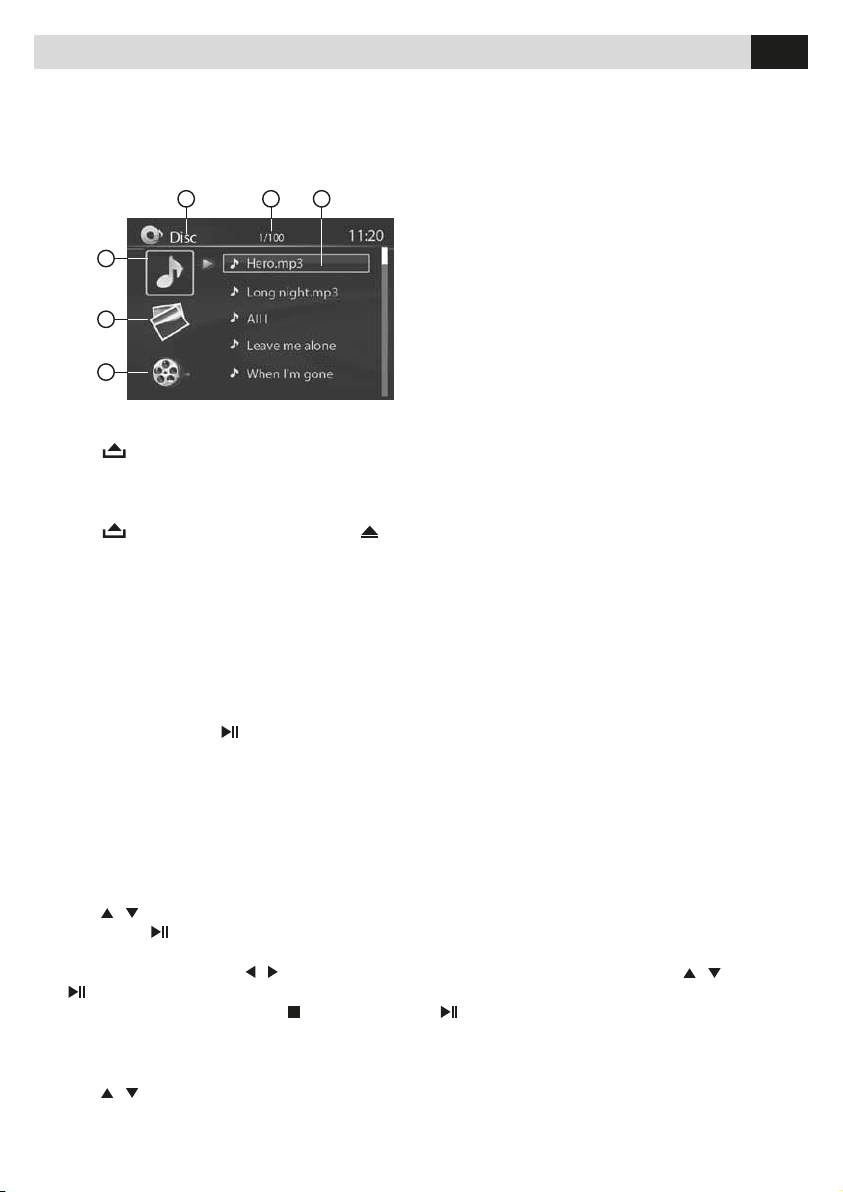
Modo Disco/USB/SD card
E
ES ACCESO AL MODO DISCO
Si el disco ya está presente en el interior, presionar la tecla SRC en el panel frontal o bien en el mando a distancia
para pasar a la función DISCO.
Para reproducir un archivo presente en una USB/SD card (soporte ya introducido) elegir fuente SD/CARD o USB.
El display mostrará la siguiente pantalla:
1
2 3
1. Indicador Fuente
4
2. Total pista actual
3. Nombre de archivo
4. Selección de canciones
5
6
5. Selección de imágenes
6. Selección vídeo
INTRODUCCIÓN DISCO
Presionar
para abatir la caratula. Introducir el disco en la ranura.
Nota: Cuidado a la hora de introducir el disco, percatarse de que no haya ningún disco dentro del aparato
EXPULSION DISCO
Presionar
para abatir la caratula y presionar para expulsar el disco.
Nota: Es posible expulsar el disco con el aparato apagado, no se encenderá una vez terminada la expulsión.
REPRODUCCION DISCO
1. Cuando el disco esta introducido el display visualiza LOAD. Para los archivos MP3 o disco con archivos
variados, la lectura puede necesitar más de 1 minuto.
2. ERROR viene visualizado en caso de error en el momento de la carga del contenido.
3. Para VCD/CD, el icono VCD o CD aparecerá en el display.
4. Durante la reproducción de archivos de MP3/WMA aparece el relativo icono en el display.
5. El icono DVD aparece en el display cuando esta introducido un DVD y sucesivamente aparecerá el menú
títulos. Presionar ENTER o
para iniciar la reproducción.
REPRODUCCIÓN ARCHIVOS AUDIO/VIDEO/IMAGENES
Durante la reproducción de archivos AUDIO/VIDEO/IMAGEN viene visualizada la lista Category/Folder/File en
alto en el display que permite ver el elenco de los títulos, de la canción o el nombre de la carpeta en un disco.
Si viene seleccionada la carpeta se podrá visualizar su contenido.
ARCHIVOS DE AUDIO
1. Presionar ESC para volver al menú de las playlist.
2. Utilizar
3. Presionar OK,
/ para seleccionar la carpeta AUDIO.
en el frontal o ENTER en el mando a distancia para visualizar todas las pistas de audio
disponibles.
4. Desplazarse con las flechas
OK,
en el frontal o ENTER en el mando a distancia para iniciar la reproducción.
5. Durante la reproducción presionar
/ y posicionarse en el archivo deseado mediante las flechas / . Presionar
para interrumpirla o para reiniciar.
ARCHIVOS IMAGENES
1. Presionar ESC para volver al menú de las playlist.
2. Utilizar
/ para seleccionar la carpeta IMAGENES.
55
Page 56
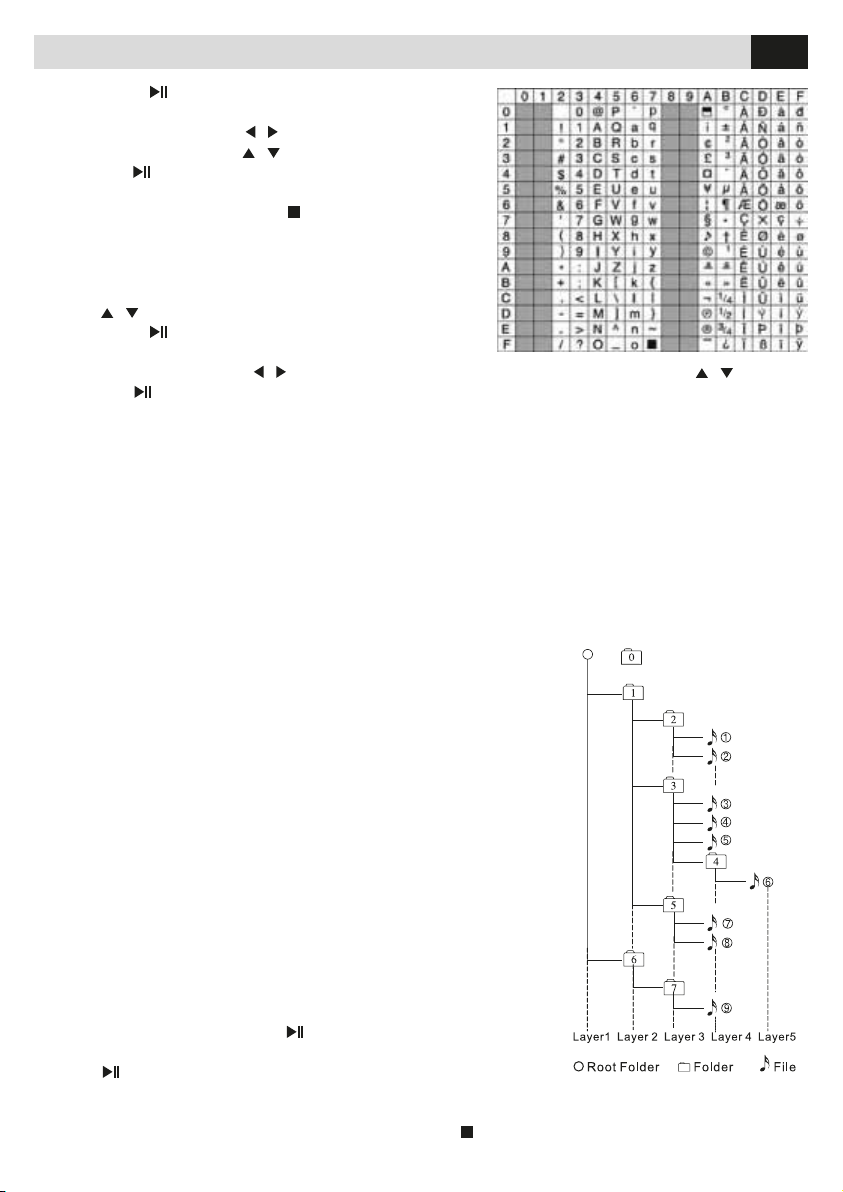
Modo Disco/USB/SD card
3. Presionar OK, en el frontal o ENTER en el mando a
distancia para visualizar todas las imágenes disponibles.
4. Desplazarse con las flechas
deseado mediante las flechas
Presionar OK,
para iniciar la reproducción.
5. Durante la reproducción presionar
la lista de los archivos.
ARCHIVOS VIDEO
1. Presionar ESC para volver al menú de las playlist.
2. Utilizar
3. Presionar OK,
distancia para visualizar las pistas de audio disponibles.
4. Desplazarse con las flechas
Presionar OK,
5. Durante la reproducción presionar para interrumpirla volver a las lista de los archivos.
Nota:
Durante la selección de las carpetas, presionar ESC para volver a la carpeta superior, si ya estamos en la
carpeta principal, la tecla ESC no podrá ser utilizada.
VISUALIZACION ID3 TAG
La unidad es compatible con ID3 TAG versión 2.0
INTRODUCCION ARCHIVO Y NOMBRE CARPETA
Solo los archivos de audio nominados con los caracteres presentes en la lista serán visualizados correctamente.
La utilización de otros caracteres causara la visualización errónea.
ORDEN DE REPRODUCCIÓN
Cuando se seleccionan archivos y carpetas para la reproducción, la
reproducción se realizará con el mismo orden que ha sido escrito en el
soporte, que podría ser diferente de lo deseado. Es posible configurar
el orden de reproducción indicando un número al inicio del nombre del
archivo/carpeta de 01 a 99.
Por ejemplo un soporte con la siguiente estructura carpetas/archivos
está sujeto a las funciones de búsqueda carpeta, búsqueda archivo o
selecciona carpeta como se muestra en la figura:
El lector reconocerá solamente 3 niveles de carpetas y no mostraran
carpetas que solo contengan otras carpetas. En el ejemplo, la unidad
mostrará las carpetas 2, 3,5 y 7, pero no la 1 y la 6 ya que no contienen
pistas directas.
en el frontal o ENTER en el mando a distancia
/ para seleccionar la carpeta VIDEO.
en el frontal o ENTER en el mando a
en el frontal o ENTER en el mando a distancia para iniciar la reproducción.
/ y posicionarse en el archivo
/ .
para interrumpirla volver a
/ y posicionarse en el archivo deseado mediante las flechas / .
( )
E
PROTECCION ELECTRONICA ANTI-SHOCK
• 10 segundos para CD-DA (CDA)
• >45 segundos para MP3 grabados a 44.1kHz, 128kbps
• >90 segundos para el WMA grabados a 44.1kHz, 128kbps
INTERRUPCION TEMPORANEA DE LA REPRODUCCION
• Durante la reproducción presionar
• La indicación “PAUSE” será visualizada en la pantalla.
Presionar
INTERRUPCION COMPLETA DE LA REPRODUCCION
Durante la reproducción de DVD, VCD, CD, MP3: 1. Presionar
nuevamente para reiniciar la reproducción.
para interrumpir la reproducción.
56
una vez para interrumpir la reproducción, la
Page 57

Modo Disco/USB/SD card
posición será guardada. Presionar para reiniciar desde la misma posición.
2. Presionar dos veces para interrumpir la reproducción. Presionando la reproducción empezara desde el inicio.
SELECCION CANCION DESEADA
• Pulsar
• Utilizar las teclas 1-9, 0, 10+ en el mando a distancia para seleccionar la canción deseada.
ADELANTE/ATRAS RAPIDO EN REPRODUCCION
Presionar
Presionar brevemente para volver a la reproducción normal.
REPETIR
Durante la reproducción presionar REPETIR una o más veces.
• El icono RPT aparecerá en el display.
• Para CD/VCD: en el display aparecerá RPT ONE ➞ RPT ALL ➞ RPT OFF.
• Para DVD: en el display aparecerá RPT CAPITOLO ➞ RPT TITOLO ➞ RPT OFF.
• Para Archivos: En el display aparecerá RPT UNO ➞ RPT DIR ➞ RPT TUTTI ➞ RPT OFF.
Nota:
función, después de 5 minutos entrará en stand by.
REPITE A-B
Selecciona el paso deseado para repetir la reproducción.
• Presionar A ➞ B para seleccionar el punto de inicio. El display mostrará REPITE A.
• Presionar A ➞ B de nuevo para seleccionar el final. El display muestra REPITE A fi B e inicia la reproducción
de la pista seleccionada.
• Presionar A ➞ B nuevamente para salir. El display mostrará A ➞ B CANCEL.
o para pasar a la canción precedente/siguiente.
o durante 2 segundos y seleccionar x2, x4, x8, x20 para iniciar la reproducción rápida.
En el caso de no seleccionar RPT, cuando el disco termina el sistema se para. En el caso de no elegir otra
E
PBC - CONTROL PLAYBACK
1. Introduciendo un VCD con PCB, la reproducción inicia automáticamente desde la primera canción.
2. Presionar PCB para visualizar el menú, utilizar
/ o los números para la pista/canción deseada. Presionar para interrumpir. Presionar una vez más PBC
para salir del menú.
GOTO
Presionar GOTO en el mando a distancia, la pista o el capítulo/titulo DVD y el tiempo aparecerá en la parte
superior de la pantalla. La reproducción corriente esta evidenciada, usar / para seleccionar aquella deseada.
Usar el teclado numérico para seleccionar el número. Presionar ENTER para confirmar.
PROGRAMA
Presionar PROG para entrar en la lista de programación. Usar
el número.
Para los dvd o los archivos disc seleccionar título o número del capítulo. Para VCD y CD seleccionar número de
la pista
Presionar
En el caso de querer cancelar la lista desplazar el cursor sobre CLEAR y pulsar ENTER.
Pulsar nuevamente PROG para salir del modo.
SELECCION AUDIO DVD
Presionar AUDIO para seleccionar el idioma de audio que se desea en el DVD multi-idioma.
SELECCION AUDIO VCD
Presionar AUDIO para seleccionar el canal de audio que se desea escuchar, L ➞ R ➞ MIX MONO ➞
STEREO presionar una vez más para volver a seleccionar.
para reproducir, o desplazar el cursor y seleccionar PLAY pulsando ENTER.
/ o / y el teclado numérico para introducir
57
Page 58
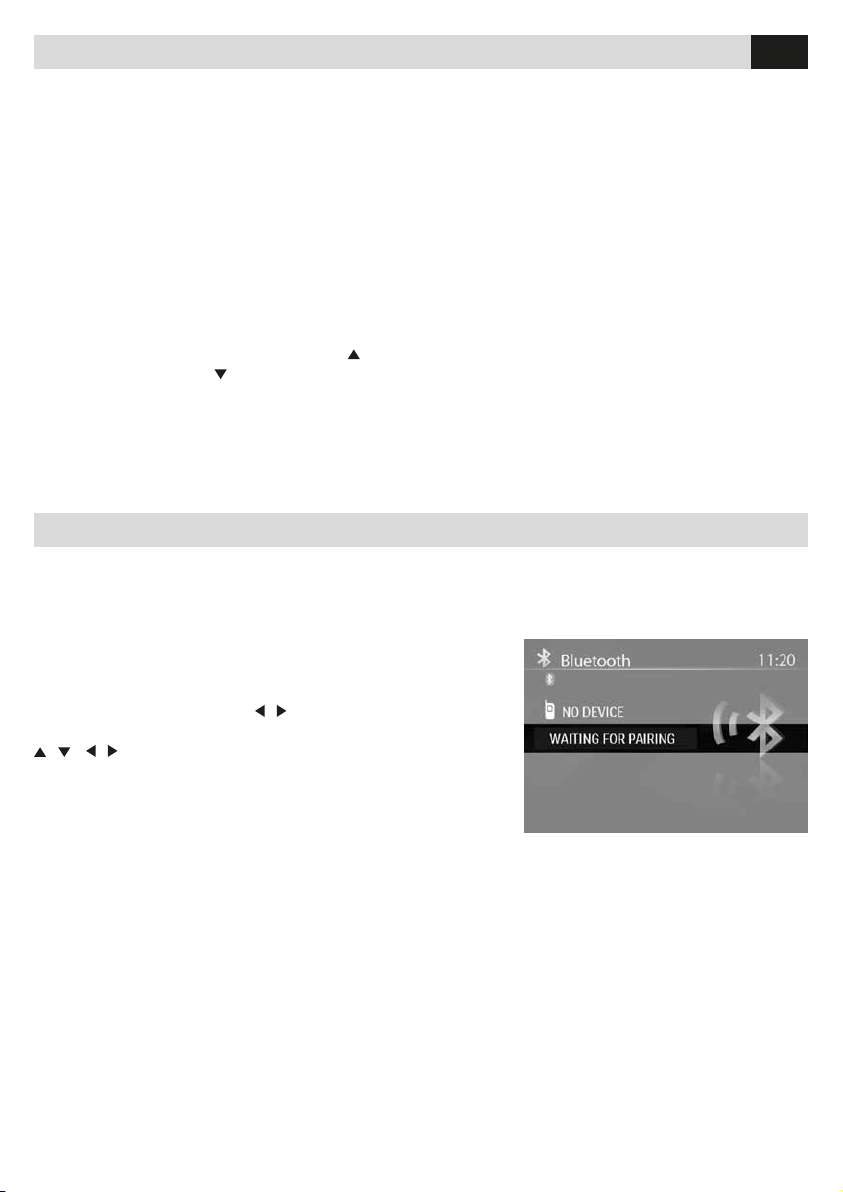
Modo Disco/USB/SD card
SELECCION SUBTITULOS DVD
Presionar SUB.T para seleccionar el idioma de los subtítulos que se desea mostrar si el DVD está dotado
de subtítulos multi idioma.
SELECCION TITULO DVD
Presionar TITLE para visualizar el título y la lista capítulos, usar los cursores o digitar el número, presionar
ENTER para reproducir.
SELECCION ANGULO DVD
Presionar ANGULO para seleccionar los diferentes ángulos de visión. Función disponible a condición de
que el DVD disponga de esta función
MIRROR IMAGEN
Cuando se visualiza una imagen, presionar
presionar repetidamente
ZOOM
Presionar la tecla ZOOM para agrandar la imagen.
X2 ➞ X3 ➞ X4 ➞ X1/2 ➞ X1/3 ➞ X1/4 ➞ OFF presionar una vez más para volver a seleccionar.
para efectuar el mirror en horizontal.
repetidamente para efectuar el mirror vertical de la imagen, y
E
Función Bluetooth
ES ACCESO Al MODO BLUETOOTH
Presionar la tecla SRC en el panel o en el mando a distancia para entrar en Bluetooth
EMPAREJAMIENTO
Usar la función para establecer una conexión entre la unidad y el
teléfono móvil.
Presionar el mando durante 2 segundos para entrar en
Configuración, después usar
BT, a continuación utilizar
/ o /
Presionar ESC para volver al menú principal. Aparecerá en la
pantalla “EN ESPERA DE EMPAREJAMIENTO”
Activar la función Bluetooth en el móvil, mantenerse en un
radio máximo de 3 m desde la unidad e iniciar la búsqueda de
dispositivos bluetooth.
Cuando aparezca el nombre Phonocar es posible seleccionarlo.
A este punto se solicitará el código de acceso, introducir 1234 y el emparejamiento Bluetooth será
efectuado automáticamente. Algunos móviles pedirán la confirmación de la conexión.
Nota: la lista de los Contactos descargados no será en orden alfabético.
Sincronización de los contactos no compatibles con iPhone.
para pasar la opción PAIR de OFF a ON.
/
para seleccionar los ajustes
INTERRUMPIR EMPAREJAMIENTO
Se puede interrumpir el emparejamiento o desconectarse en el siguiente modo:
Entrar en ajuste BT, pasar de PAIR ON a OFF, a continuación presionar ESC para volver al menú
principal. Después de desconectarse, ningún Dispositivo aparecerá en la pantalla y el icono Bluetooth
desaparecerá.
ESPERA LLAMADA ENTRANTE (Si el móvil está dotado de esta función)
Durante la conversación o en el streaming audio Bluetooth si tenemos una llamada entrante en la pantalla
58
Page 59
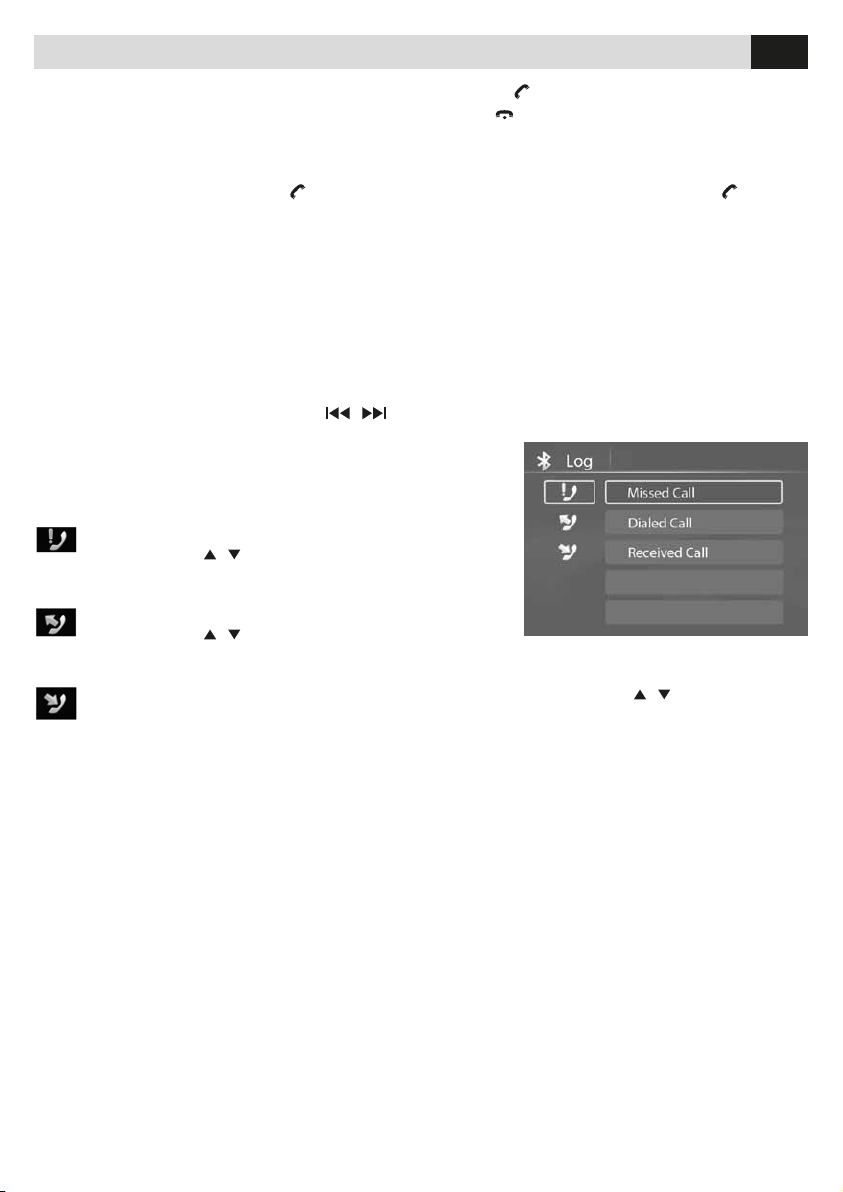
Función Bluetooth
aparecerá indicando “347 3312574 ¿CONTESTAR?”. Si pulsamos se interrumpe la conversación en
curso y se contesta a la llamada entrante. En el caso de pulsar
continúa con la llamada activa.
TRANSFERIR VOZ
Durante la conversación, presionar
nuevamente para transferir el audio desde el móvil al VM051.
Algunos móviles dirigen el audio desde la unidad a si mismo cuando se contesta a una llamada.
AUDIO BLUETOOTH
(Con los móviles dotados de las funciones A2DP o AVRCP) Después de haber emparejado el dispositivo,
abrir el player audio en el menú Bluetooth configurar el modo trasmit en Bluetooth. Esta vez, en la pantalla
del vm051 aparecerá la indicación Música en reproducción. Y el audio será dirigido desde el móvil al
vm051. Algunos moviles pediran la confirma de la conexion . Después de encontrar la unidad con el
nombre “Phonocar” en el móvil, conectarse e introducir el código de acceso que en base a la versión
puede ser “0000 o bien 1234”. Durante la reproducción audio se puede presionar en el mando a distancia
para pasar de Play a Pausa y presionar
LOG
Después de haber emparejado Bluetooth presionar BAND para
visualizar el registro de las llamadas.
1. Llamadas perdidas.
Realizar una llamada usando la lista de llamadas perdidas.
Pulsar las teclas
lista.
2. Llamadas efectuadas.
Realizar una llamada usando la lista llamadas perdidas.
Pulsar las teclas
lista.
3. Llamadas recibidas.
Realizar una llamada usando la lista de llamadas recibidas. Pulsar las teclas
numero deseado en la lista.
/
para buscar el numero deseado en la
/
para buscar el numero deseado en la
para dirigir el audio desde la unidad al móvil, y presionar
/ en el mando a distancia o en el panel frontal de la radio.
se rechaza la llamada entrante y se
/
para buscar el
E
NOTAS GENERALES SOBRE EL BLUETOOTH
1. Para los móviles N7X, N9X, Philips, Sony Ericsson, Samsung durante los test que hemos efectuado,
después que el emparejamiento parecía efectuado, la unidad resultaba todavía en espera.
A este punto hay que buscar el dispositivo “Phonocar” en la lista de los dispositivos en el móvil. En el
menú de abajo, seleccionar conexiones de esta forma en la pantalla de la unidad aparecerá OK. En
caso contrario ninguna voz se oirá en la comunicación. Algunos móviles como Philips, cuando reproducen
en A2DP hay que entrar en el modo reproducción buscar el dispositivo Phonocar y reconectarse.
2. Durante el emparejamiento, algunos teléfonos móviles indican como proceder, por ejemplo cuando se
realiza una llamada con la unidad , pero no se oye ninguna voz , el motivo es que la voz del móvil no ha
sido transferida a la unidad Los móviles SAMSUNG pueden indicar como se hace para transferirla.
3. En base al Móvil si se selecciona el modo privado cuando se realiza una llamada con la unidad
puede pasar que en lugar de transferir la voz el Bluetooth se desconecte hasta que la conversación no
haya finalizado. Algunos móviles necesitan efectuar el acoplamiento nuevamente.
4. El nombre del dispositivo bluetooth tiene que ser indicado en números y letras.
5. Después de haber efectuado el emparejamiento, si no hay ningún sonido verificar que el audio estéreo
del Bluetooth este activo.
ATENCION!!! 1) La sincronización de los Contactos no es compatible con el iPhone.
2) La sincronización de los Contactos no será ejecutada respetando el orden alfabético de los nombres.
59
Page 60
Características técnicas
GENERALES
Alimentación 12VDC (11V-16V), Test voltaje
14.4V, negativo a masa
Watt Max 45W x 4 canales
Watt Rms 20W x 4 canales (4 10% T.H.D.)
Impedancia altavoces 4-8ohm
Voltaje preamplicador 2.0V (CD play mode: 1KHz,
0dB, 10K load)
Fusible 15A
Dimensiones (LxAxP) 178 x 50 x 164mm
Peso 1.38kg
Aux-in 500mV
3” (16:9) TFT LCD
Resolución display (dot) 960(W)×240(H)
Área activa área (mm) 65.52×36.84
Dimensiones monitor (inch) 2.96 (Diagonal)
Dot pitch (mm) 0.06825 x 0.1535
Contraste 300
Brillo 350nits
FM STEREO RADIO
Frecuencias: 87.5-108.0MHz (Europa)
87.5-107.9MHz (América)
Sensibilidad 8dB μ
Frecuencia de respuesta 30Hz-15KHz
Separación Estéreo 30dB(1KHz)
Imágenes respuesta ratio 50dB
IF respuesta ratio 70dB
Señal/ruido >55dB
AM(MW) RADIO
Frecuencias 522-1620KHz (Europa)
530-1710KHz (América)
Sensibilidad (S/N=20dB) 30dBμ
DISC PLAYER
Sistema Disco
Sistema Audio digital
Respuesta de Frecuencia 20Hz - 20KHz
Señal/ Ruido >80dB
Distorsión harmónicas total Meno de 0.20% (1KHz)
E
Separación canal >60dB
Formato Señal Video sistema NTSC/PAL 60/PAL/AUTO
Salida Video 1 0.2V
COMPONENTES
Escuadras de montaje 1
Tornillos M5x6 mm 4
Marco adaptador (50 mm) 1
Custodia caratula 1
Llaves de desmontaje 2
Manual de instrucciones 1
Pernio en goma 1
Mando a distancia 1
ARCHIVOS COMPATIBLES
Audio: MP3(*.mp3), WMA(*.wma)
Video: MP4 (*.avi, DIVX3.11/4.0/5.0/6.0) - MPEG 2 (*.vob) - MPEG
1 (*.dat)
Imágenes: JPEG (*.jpg)
MP3 archivo: ISO 9660 or ISO 9660 + Joliet format - Max. 30
caracteres.
Máximo nivel de directorio: 8.
Máximo numero de álbum: 99.
Máxima longitud de cada canción: 99 minutos y 59 segundos.
Frecuencia de muestreo compatible para discos MP3: de 8KHz a
48KHz (44.1KHz preferiblemente).
Bit rates compatibles con discos MP3: 32 - 320kbps (128 kbps
preferiblemente).
DISCOS Y ARCHIVOS NO COMPATIBLES
*.AAC, *.DLF, *.M3U, *.PLS, MP3 PRO files e files con DRM.
Discos con sesión abierta.
NOTAS MP3/WMA
Los archivos MP3 y WMA (Windows Media Audio) son archivos
de audio digitales comprimidos para permitir la memorización
de más archivos. Esta unidad puede reproducir MP3/WMA
directamente desde archivos contenidos en discos
CD-R/RW,DVD-ROM, DVD+RW, DVD-RW, DVD+R, DVD-R e
DVD-VIDEO, o bien en SD card/USB.
El VM051 puede reproducir MP3(MPEG1, 2, 2.5 Audio Layer 3).
Aun si pueden existir incompatibilidades debido al formato de
compresión o desde el programa utilizado para esta operación.
Il prodotto non deve essere smaltito con i rifiuti
domestici. Si ricorda che le pile/accumulatori devono
essere rimosse dall’apparecchiatura prima che questa sia
conferita come rifiuto. Per rimuovere le pile/ accumulatori
fare riferimento alle specifiche indicazioni del costruttore. L’utente
dovrà, pertanto, conferire gratuitamente l’apparecchiatura e la pila
giunta a fine vita agli idonei centri comunali di raccolta differenziata
dei rifiuti elettrici ed elettronici, oppure riconsegnarle al rivend itore.
L’adeguata raccolta differenziata contribuisce ad evitare possibili
effetti negativi sull’ambiente e sulla salute e favorisce il reimpiego
e/o riciclo dei materiali di cui essi sono composti. Per ulteriori
informazioni consultare il sito www.phonocar.it
This product must NOT be treated as a domestic waste. Please
remember that batteries/chargers must be extracted from the
appliance before throwing the appliance away. How to extract
batteries/chargers: please follow the manufacturer’s specific
instructions. The end-user is requested to carry the appliance and
its related battery, with no cost, to the municipal waste-recyclingspots for electrical and electronic parts, or take them to the related
Retailer shop. Recycling-spots help to avoid negative effects on
the environment & health and promote the re-use and/or recycling
of the various materials. For further information, please read homepage www.phonocar.it
Via F.lli Cervi, 167/C - 42124 Reggio Emilia (Italy) - Tel. ++39 0522 941621 • www.phonocar.com - e-mail:[email protected]
IT Phonocar dichiara che il VM051 è conforme ai requisiti essenziali e a tutte le altre
disposizioni pertinenti stabilite dalla direttiva 1999/5/CE.
GB Phonocar declares that this unit VM051 is in compliance with the essential
requirements and other revelant provisions of Directive 1999/5/EC.
FR Phonocar dèclare que l’appareil VM051 est conforme aux exigences essentielles
et aux autres dispositions pertinentes de la directive 1999/5/EC.
D Phonocar erklärt, dass dieser VM051 in Übereinstimmung ist mit den
grundlegenden Anforderungen und den anderen relevanten Vorschriften der Richtlinie
1999/5/EC.
E Phonocar declara que el VM051 cumple con los requisitos esenciales y
cualesquiera otras disposiciones aplicables o exigibles de la Directiva 1999/5/EC.
EN61000-3-2:2006+A2:2009; EN 61000-3-3:2013 • EN301 489-1
V1.9.2; EN301 489-17 V2.2.1• ETSI EN300 328 V1.8.1 2012-06; EN
62479:2010 • EN 60065:2002+A1:2006+A11:2008+A2:2013+A12:2011
DICHIARAZIONE DI CONFORMITÀ aIle direttive 1999/5/EC R&TTE
DECLARATION OF CONFORMITY to the directives 1999/5/EC R&TTE
E4
10R - 03 2662
 Loading...