


For more information visit www.phonicear.com
UK User guide
Xen Enhanced Cordless Phone

Xen
This cordless DECT telephone is intended for connection to the public switched analogue telephone network
and may be operated in: AT, BE, CH, CZ, DE, DK, ES, FI, FR, GB, GR, HU, IE, IS, IT, LI, LV, LU, MT,
NL, NO, PL, PT, SE
2

Table of contents
Xen Diagram . . . . . . . . . . . . . . . . . . . . . . . . . . . . . . . . . . . . . . . . . . . . . . . . . . . . . . . . . . . . 5
Xen Introduction . . . . . . . . . . . . . . . . . . . . . . . . . . . . . . . . . . . . . . . . . . . . . . . . . . . . . . . . . 6
Xen Setup . . . . . . . . . . . . . . . . . . . . . . . . . . . . . . . . . . . . . . . . . . . . . . . . . . . . . . . . . . . . . . 7
Xen Key Functions . . . . . . . . . . . . . . . . . . . . . . . . . . . . . . . . . . . . . . . . . . . . . . . . . . . . . . . 8
Xen Display Symbols . . . . . . . . . . . . . . . . . . . . . . . . . . . . . . . . . . . . . . . . . . . . . . . . . . . . . 9
Xen Settings . . . . . . . . . . . . . . . . . . . . . . . . . . . . . . . . . . . . . . . . . . . . . . . . . . . . . . . . . . . 10
Setting Language, Vibratior and Flash . . . . . . . . . . . . . . . . . . . . . . . . . . . . . . . . . . . . . . . . . . . . . . . . . . . . 10
Setting Date/Time, Dialling Mode . . . . . . . . . . . . . . . . . . . . . . . . . . . . . . . . . . . . . . . . . . . . . . . . . . . . . . . 11
Xen Normal Operation . . . . . . . . . . . . . . . . . . . . . . . . . . . . . . . . . . . . . . . . . . . . . . . . . . . 12
Make a New Call, Receiving a Call, Adjust Receiver Volume, Boost Receiver Volume,
Mute/Privacy Button . . . . . . . . . . . . . . . . . . . . . . . . . . . . . . . . . . . . . . . . . . . . . . . . . . . . . . . . . . . . . . . . . . 12
Xen Phone Book . . . . . . . . . . . . . . . . . . . . . . . . . . . . . . . . . . . . . . . . . . . . . . . . . . . . . . . . 13
Make a New Entry, Call from Phone Book Memory, Quick Phone Book Search, Delete a Phone
Book Record, Change a Phone Book Record . . . . . . . . . . . . . . . . . . . . . . . . . . . . . . . . . . . . . . . . . . . 13-14
Xen Caller ID Memory . . . . . . . . . . . . . . . . . . . . . . . . . . . . . . . . . . . . . . . . . . . . . . . . . . . 15
Review Caller ID and make a Call, Copy Number from Caller ID Memory and Redial List to Phone
Book, Delete Caller ID Memory, Delete all Records in Caller Memory, Message Waiting Indicator . . . . . . .15
Xen Personalizing Your Phone . . . . . . . . . . . . . . . . . . . . . . . . . . . . . . . . . . . . . . . . . . . . . 16
Setting Key Click, Ringer Volume and Melody, Naming Your Handset . . . . . . . . . . . . . . . . . . . . . . . . . . 16
Xen Advanced Option . . . . . . . . . . . . . . . . . . . . . . . . . . . . . . . . . . . . . . . . . . . . . . . . . . . 17
PIN - Personal Identification Number, Changing Handset PIN, Make and Receive Internal Calls (Intercom),
Make an Internal Call to another Handset, Call Transfer and 3 Parties Conference, Call Transfer or
Conference Setup. . . . . . . . . . . . . . . . . . . . . . . . . . . . . . . . . . . . . . . . . . . . . . . . . . . . . . . . . . . . . . . . . . . . . . . . . 18
Call Barring/Call Block for Specific Telephone . . . . . . . . . . . . . . . . . . . . . . . . . . . . . . . . . . . . . . . . . . . . . . . . . . 19
Emergency/Direct Call/One-Touch Pre-programmed Dialling . . . . . . . . . . . . . . . . . . . . . . . . . . . . . . . . . . . . . . 20
Flash time . . . . . . . . . . . . . . . . . . . . . . . . . . . . . . . . . . . . . . . . . . . . . . . . . . . . . . . . . . . . . . . . . . . . . . . . . . . . . . 21
Multiple Handset and Base Registration . . . . . . . . . . . . . . . . . . . . . . . . . . . . . . . . . . . . . . . . . . . . . . . . . . . . 21-24
Xen Maintenance . . . . . . . . . . . . . . . . . . . . . . . . . . . . . . . . . . . . . . . . . . . . . . . . . . . . . . . 24
Appendix A/B - Xen Desktop Installation & Wall Mounting . . . . . . . . . . . . . . . . . . . . . . 27
Disposal . . . . . . . . . . . . . . . . . . . . . . . . . . . . . . . . . . . . . . . . . . . . . . . . . . . . . . . . . . . . . . 28
Warranty . . . . . . . . . . . . . . . . . . . . . . . . . . . . . . . . . . . . . . . . . . . . . . . . . . . . . . . . . . 29
3

Xen
4

Xen Diagram
Handset
1.
LCD screen
2.
Function keys
3.
Ear piece/Receiver
4.
Mouth piece/Microphone
5.
Flash lens
6.
Battery compartment cover
7.
Handset charger contacts
8.
Silhouette or headset jack socket
9.
Belt clip
Base Unit
10.
Base charger contacts
11.
Page button
12.
Charge/In-use/ringing indicator
13.
Power adaptor connection port
14.
Phone line connection port
15.
Removable cover for wall mounting
5
3
9
1
8
Insert Silhouette or
headset jack
8
2
10
6
4
7
11
12
13
14
15
5

Xen Introduction
Accessories & Content
The following items are included in your phone package:
Phone base unit
•
Handset unit
•
Rechargeable batteries (1.2V 600mAh x 2 pieces)
•
Telephone line cord
•
Power adaptor
•
Instruction for use
•
Wall mounting kit
•
HAC Silhouette ear hook for one ear (only supplied with certain packages)
•
Danger of explosion if the battery is
Replace only with the same or equivalent type.
Instruction for Use
Xen has been specifically designed to deliver maximum performance for both non hearing
CAUTION
!
incorrectly replaced.
!
impaired and hearing impaired users. The phone is based on DECT (Digital Enhanced Cordless
Telecommunication) to provide digital sound quality, user friendly controls and increased
functionality. The phone offers superior performance, increased and controllable speaker
volume and call notification via increased volume, flash and vibration. For complete hearing aid
compatibility a Silhouette is included, which is an ear hook with a built-in teleloop. This allows
the user to benefit from the flexibility of a cordless phone with the "T" function on their hearing
aid.
In addition, a built-in caller ID memory, re-dial, phone book and re-dial list provides greater
convenience to manage phone calls.
According to the DECT system standard (GAP compatible), 5 different handsets (sold
separately) can be registered to a single base unit to perform mini-PABX functions which offers
intercom and call transfer between handsets and base units.
The following user guide describes the installation procedure and the phones features so that
you can quickly start enjoying using Xen.
ATTENTION This phone is protected by PIN (personal identification numbers). Never change
PIN of your handset or base unit unless you are familiar with electronic products and you have
a real need to protect your phone through the use of a PIN. Please refer to the
OPERATION SECTION
for details.
ADVANCED
6
1
2
3
3
4
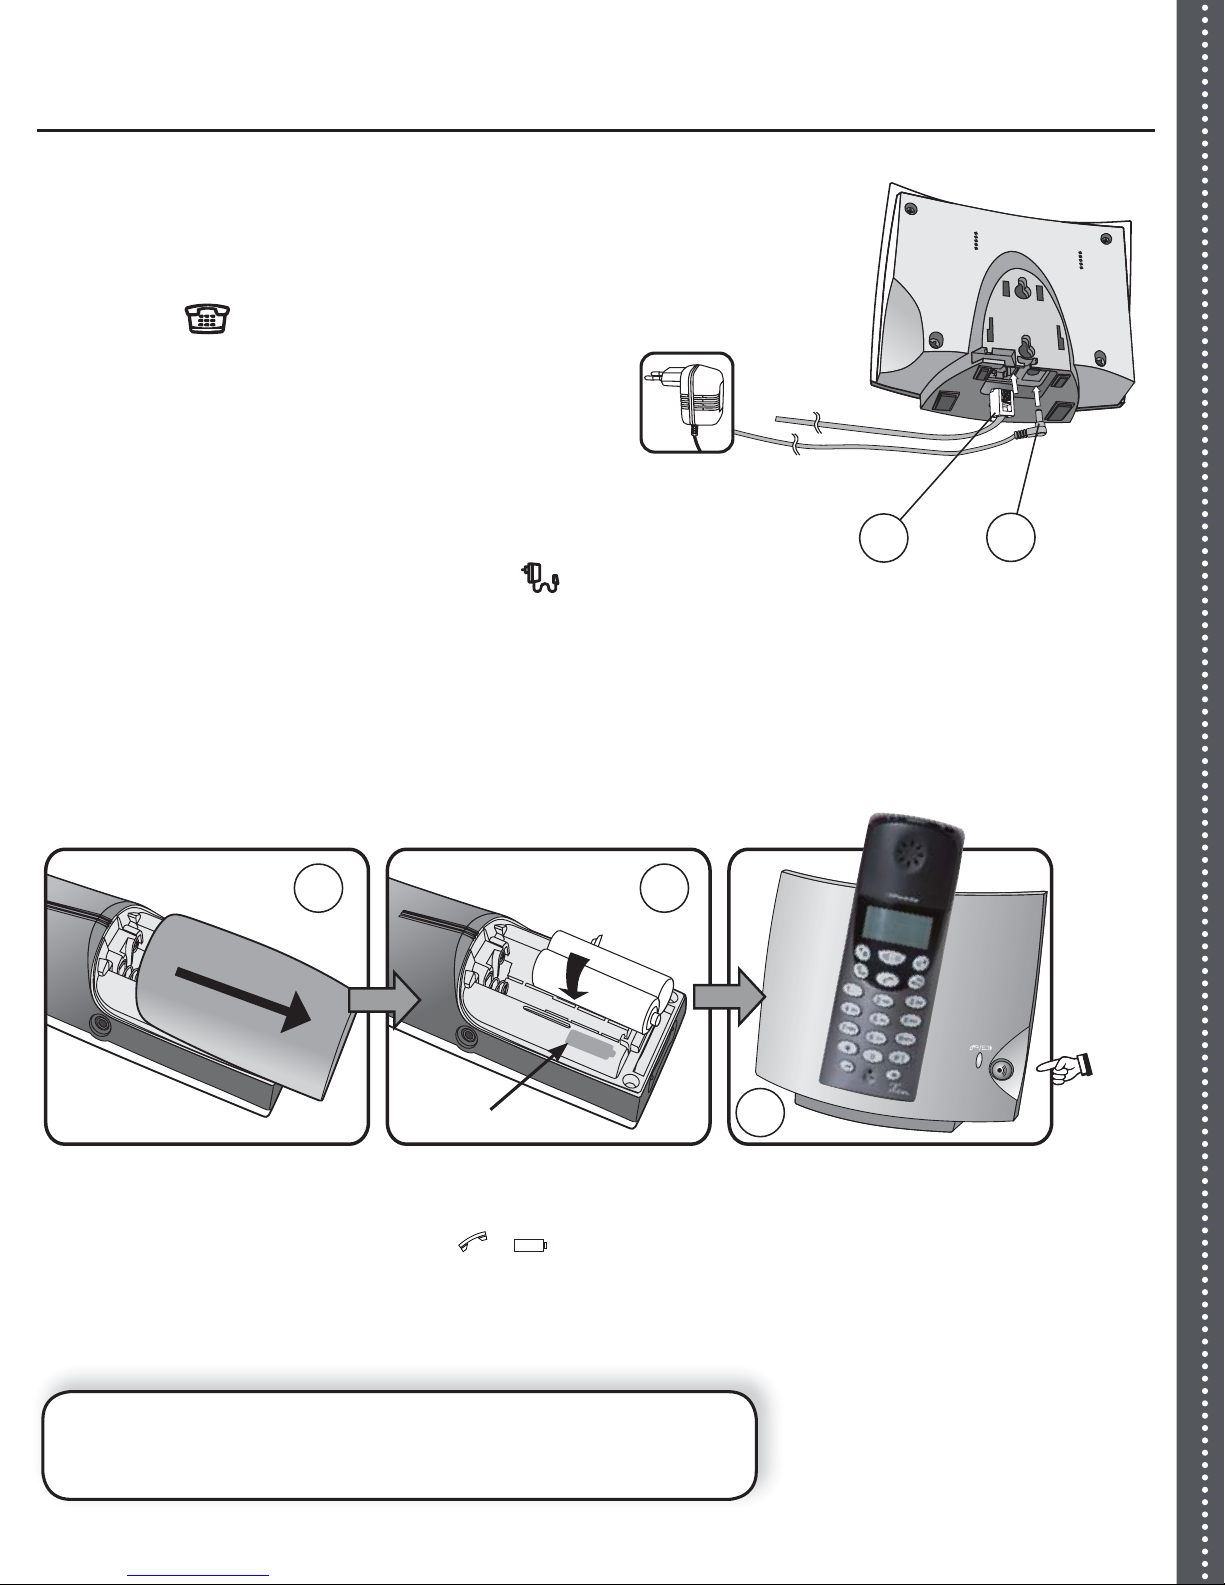
Xen Setup
1.
The connection for the phone line is
located on the underside of the base
station and is marked with the following
symbol
. Connect one end of the
telephone line to this socket on the
base station and the other end to the
telephone outlet socket on the wall.
Connecting base station to power socket.
2.
The connection for power input is located
on the underside of the base station and
is marked with the following symbol . Take the jack pin at the end of the cable on
the power adaptor provided and place it in the power input socket. Take the power
adaptor and connect it to your power socket on the wall.
Install batteries into handset (it is recommended to replace batteries every 2
a. Remove the battery compartment door.
b. Insert the two rechargeable batteries while observing the symbol for
polarity marked on the phone.
nd
year).3.
R
?
X
O
K
1
2
a
b
c
3
d
e
f
4
g
h
j
m
n
7
o
p
q
r
s
t
u
v
9
w
x
y
z
0
P
polarity symbol
Charging handset.
4.
When batteries are charged and installed correctly the base unit illuminates to show
+
charging in progress. (see base uni
t /
NOTE: The LED light on base shows the charge status (steady light) and in-use (flashing). The LED
will also keep flashing when the base is in registration mode (refer to Advance Operation Section).
(Please refer to Appendix A for desktop installation and Appendix B for wall installation).
I MPORTANT NOTICE: To obtain best battery performance, keep the
handset on charged for 15 hours when first installed.
-
)
7

Xen Key Functions
Multiple functions are assigned to each button.
Button In Standby During Conversation In Programming/View Mode
0-9
*
Answer incoming call or make
a call
Enter digit 0-9 Send tone signal of 0-9 Enter digit 0-9 or enter alphabet
Enter
*
To enter # and press and hold
for key lock
View caller ID records Switch on 2 way speaker phone Up arrow when browsing
Enter setup menu or
confirm
Redial list Enter timed pause in phone
End call during conversation When viewing phone book
or caller ID records, press to
make a call
characters
Send tone signal of
Send tone signal of # Enter #
Switch between 2 lines Down arrow when browsing
Enter Intercom menu, and perform
call transfer
*
Enter
*
Confirm an action
book records
Mute Cancel an action
Quick entry to RING SEL menu Adjust receiver volume
Activate phone book. Boost volume and browse phone
book
Send tone signal
Save numbers on display to
phone book
8

Xen Display Symbols
LCD Display:
Name and number of the handset
Message waiting Indicator
Phone book review mode shows when phone book records are being
viewed
Setup Menu mode
Battery capacity indicator
Ringer off
Talk mode
Handset microphone muted
Caller ID (CID) review mode
Main Menu
Pressing the
using
and
Boost mode
Constant antenna symbol shows good radio reception.
Flashing antenna symbol indicates out of range or no power on base unit
button allows you to browse through the function menus in a circular manner
buttons.
Use a combination of menu
phone.
, cancel
& up/down
9
/
buttons to setup your

Xen Settings
Throughout the remaining part of this user guide, a quick Key Map will lead the way through the
steps to make selections required.
For example:
Key Map showing the key sequence for arriving at language setting area.
Key Map:
Above Key Map shows you the following steps:
On the handset, press
1.
2.
3.
4.
5.
Use
Press
Use
Press
/
button to confirm.
/
button to confirm.
button to browse until
button to browse until
button.
is shown on the display.
is shown on the display.
Setting Language
English is the standard factory-programmed display language.
Key Map:
1.
Use
2.
When desired language is shown, press
/
buttons to browse through languages.
confirmation.
Setting Vibrator and Flash ON and OFF
If this function is activated, the handset will vibrate and flash as notification of an incoming call.
Key Map:
1.
Use
When desired setting is shown, press
2.
/
to select ON or OFF.
confirmation.
button to confirm. A long beep will be heard as
button to confirm. A long beep will be heard as
10

Xen Settings
Setting Date/Time
Key Map:
Use the numeric button on the handset to enter DATE/TIME information.
1.
When finished, press
2.
NO TE: Depending on caller ID system and operator date/time information may be recorded
button to confirm. A long beep will be heard as confirmation.
automatically.
Setting Dialling Mode (tone/pulse)
Key Map:
1.
Use
2.
When desired mode is shown, press
/
buttons to browse modes.
button to confirm. A long beep will be heard as
confirmation.
11

Xen Normal Operation
Make a new Call
Enter phone number to be called before or after pressing the
1.
will be dialled automatically.
button. Entered number
To end call press
2.
button.
Receiving a Call
Press the
1.
2.
If you have subscribed to caller ID service with your operator, the caller’s number will be
button to answer call.
shown on the display. If the caller’s number is stored in the phone book the matched name
will be displayed.
To end call press
3.
NO TE: Make sure the symbol on the handset screen is constant indicating a good radio signal. If
the
symbol is flashing, it indicates either the handset is too far away from the base unit, or the
button.
main power connection is not good.
Adjust Receiver Volume
1.
The phone has 5 receiver volume levels. During conversation press
button, then
press 1-5 to select desired volume.
Boost Receiver Volume
During conversation press
1.
2.
Press the
3.
At the end of a call, the phone will automatically return to normal receiver volume mode.
button to exit the boosted receiver volume mode.
Mute/Privacy Button
During a conversation you can mute the microphone on Xen so that your voice cannot be
heard.
1.
During conversation press
2.
To un-mute the microphone Press
button to enter the boosted receiver volume mode.
!
Always make sure to set the volume
controls correctly according to your hearing
By using the telephone with a sound pressure
level that is too high, you may risk impairing
button and the microphone is muted.
Warning
your hearing.
button again and your voice will be heard by the
!
12
caller.

Xen Phone Book
The phone book stores up to 50 numbers (10 characters and 24 digits for each record).
Make a new Entry
Key Map:
1.
Use the alphanumeric buttons (2 to 9) to enter a name. Press the appropriate button
repeatedly until the letter you desire appears. Press
Use the numeric buttons (0-9) to enter phone number. Press
2.
button to confirm.
button to save the record.
A long beep will be heard as confirmation.
NO TE: For PABX purposes a timed pause can be inserted inside telephone.
Make a Call from Phone Book Memory
Key Map:
1.
Use the alphanumeric key pad to enter first letter of a desired name then press
button. The first record starting with the entered letter will be shown on the display.
2.
3.
Use
Press
/
buttons to browses until desired name is shown.
button to make call.
Quick Phone Book Search
Press
1.
2.
Browse using
3.
Press
button.
/
button to make call.
until desired name is shown.
Delete a Phone Book Record
Key Map:
1.
2.
Use the
record.
Press
/
button to delete. You will be asked to confirm permanent deletion. Press
buttons to browse and use the alphanumeric key pad to find desired
button. A long beep will be heard as confirmation.
13

Xen Phone Book
Change a Phone Book Record
Key Map:
Use the
1.
Press
2.
Cursor is positioned at the end of name. Use the
3.
alphanumeric key pad to edit name. press
Cursor will be positioned at the end of number. Use
4.
numeric buttons (0-9) to edit number. Press
heard as confirmation.
button to confirm.
/
buttons to browse until desired name is shown.
button to delete letters and
button to store.
button to delete numbers and
button to save record. A long beep will be
14

Xen Caller ID Memory
If caller ID service is available from service operator and subscribed to, the telephone number
of the caller will be shown.
The phone stores the last 30 caller ID records in caller ID memory. The oldest record
will be replaced by newest record. The
information is missed.
Review Caller ID Records and make Call
Press
1.
2.
Use
3.
Press
NO TE: The caller ID memory also tells the date and time of the call.
Copy Number from Caller ID Memory and Redial List to Phone Book
When desired number is shown in caller ID memory or re-dial list, press
1.
2.
When finished, press
Delete Caller ID Memory
You may delete either a single or all records in the caller ID memory.
1.
Use
2.
Press
confirmation.
button and last caller ID record is shown.
/
buttons to browse records.
button to make call.
button. A long beep will be heard as confirmation.
/
buttons to brows records.
button to delete. You will be asked to confirm. A long beep will be heard as
symbol is displayed if a call with caller ID
button.
Delete all Records in Caller ID Memory
1.
Press
2.
Press and hold
3.
Press
Message Waiting Indicator (MWI)
If voice message service is available from service operator and subscribed to the message
box
Depending on service operator’s service, voice message indicator should turn off
automatically once messages are reviewed. In some situations, press
around 3 seconds in stand-by mode and the indicator will be removed.
symbol may appear.
button to enter caller ID memory.
until "delete all" is shown
to confirm. A long beep will be heard as confirmation.
15
button for

Xen Personalizing Your phone
Xen is built with features to offer personalized settings, such as ringing melody, ringing volume, key
click and key lock.
Naming your Handset
Key Map:
enter a name
The handset name will be shown on the stand by display followed by the handset number.
Setting ringing Volume and Melody
Different ringing melody and volume can be programmed to each handset.
Key Map:
From this menu, you may set the following by using
1.
/ & buttons.
a. External ringing melody and volume
b. Internal ringing melody and volume (in intercom mode - se advanced operations option)
Use
2.
Press button
3.
NO TE: Switch off external ringer by setting ring volume to "0". A symbol will be shown.
/ buttons to browse until the desired melody and volume are heard.
confirm. A long beep will be heard as confirmation.
Setting Key Click ON and OFF
Key Map:
A long beep will be heard as confirmation.
The key pad can be locked to avoid accidental operation. When the key-lock is on, incoming calls
can still be answered via the
1.
Press and hold
Press and hold
2.
to lock key pad. A long beep will be heard as confirmation.
to unlock key pad. A long beep will be heard as confirmation.
When the key pad is locked, the display shows the word "locked".
button.
select ON/OFF
,
to confirm
16

Xen Advanced Option
Attention!!!
Failure to follow the steps correctly may prevent the phone from operating normally.
PIN - Personal Identification Number............................................................18
Changing Handset PIN...............................................................................18
Make and Receive Internal Calls (Intercom)....................................................18
Make an Internal Call to another Handset......................................................18
Call Transfer and 3 Parties Conference..........................................................18
Call Transfer or Conference Setup...............................................................18-19
Call Barring/Call Block for Specific Telephone...............................................19
Emergency/Direct Call/One-Touch Pre-programmed Dialling..............................20
Flash time.................................................................................................21
Multiple Handset and Base Registration.......................................................21-24
17

Xen Advanced Option X
PIN (Personal Identification Number)
The phone is protected by a PIN. The factory default PIN for the handset and base unit are the
same: 0000.
Changing Handset PIN
Key Map:
1.
As a security procedure, enter the old code.
2.
Enter a new code.
3.
Repeat your new code again before confirmation. A long beep will be heard as confirmation.
Attention!!!
You must remember or record your new PIN. The only way to unlock a forgotten PIN is to use
after-sales repair service, which may incur a charge.
Make and receive an Internal Calls (Intercom)
Internal communication (INTERCOM) can be made between handsets – including call transfer
and conference conversation.
Make an Internal Call to Another Handset
You can talk between two handset registered to the same base unit.
Key Map:
To answer an internal call, simply press
Call Transfer and 3 Parties Conference
External calls can be transferred from one handset to another handset. Conference conversations
(or 3 parties conversation) can also be made. Two internal handsets can be used to talk to an
external caller at the same time.
Call transfer or Conference Setup:
1.
Follow the instruction listed above to make an internal call. The external caller will be put on
hold until your internal call has been answered.
enter extension number
button.
18

Xen Advanced Option
2.
When internal call is answered:
a. Press
b. Press and hold down button
button to transfer the external call.
for three seconds and 3 parties conference
starts.
NO TE: If the internal call is not answered, the external call can be retrieved by pressing
button.
Call Barring/Call Block for Specific Telephone
You may select 5 telephone numbers (or leading digits of a type of telephone numbers) to be
barred from each independent handset (BARR list may apply to different handsets if there is
more than one handset registered to the base unit).
Your phone will filter and block any outgoing calls if the dialled number sequence (leading digits)
matches with the BARR number list.
Set BARR number list:
Key Map:
1.
There is an area within the barring section where up to five numbers can be stored.
2.
Enter numbers to be listed, and press
3.
You will be asked which HS (handsets) will be controlled by this BARR list. You may enter
select BARR list
button to confirm.
enter PIN code
HS (handset) number from 1 to 5 respectively. If there are five handsets registered with the
same base, and you just intend to keep three particular handsets under this BARR list, then
you may just enter those three particular handset numbers under this BARR list. Entered
handset number shows above the BARR list. When finished, press
to confirm. A long
beep will be heard as confirmation.
4.
You will enter one BARR list at a time. You have to repeat the above procedures for other
BARR lists.
NO TE: To remove a BARR list, go through the same procedure and clear the BARR number with
button
.
19

Xen Advanced Option
Emergency/Direct Call/One-Touch Pre-programmed Dialling
Your phone is equipped with a special one touch pre-programmed dialling function. It is designed
for the elderly or children at home on their own.
This function allows you to programme your own mobile or office number into the phone. It then
allows your elderly relative or child when alone to press a simple button and the phone dials the
number automatically. This means that the elderly relative or child does not need to be able to dial
or remember the full phone number in an emergency.
Enter a Number into Emergency/Direct Call Memory
Key Map:
enter a telephone number
A long beep will be heard as confirmation.
Turn ON Emergency/Direct Call Mode:
Key Map:
keep holding
button for around 2 seconds
A long beep will be heard as confirmation and will show on the screen indicating that
Emergency/Direct mode is ON.
Turn OFF Emergency/Direct Call Mode:
Press
button twice, and Emergency/Direct mode is turned OFF.
Reverting to Factory default Settings
You can change all of the settings in your phone back to the factory default settings. All
programming and settings you have made to the phone will be erased automatically.
The following memory banks will remain unchanged after resetting to factory default:
•
•
•
Caller ID memory
Last number re-dial list
Base unit and handsets registration
To change all settings back to factory default:
Key Map:
A long beep will be heard as confirmation.
20
enter PIN to continue

Xen Advanced Option
Setting Flash Time (long/short)
Key Map:
1.
Use
2.
When desired option is shown, press
confirmation.
/
buttons to browse option.
button to confirm. A long beep will be heard as
Multiple Handset and Base Registration
According to the DECT system standard (GAP compatible), a base unit can be registered to
work with multiple numbers of handsets, and a handset unit can also be registered to work with
multiple numbers of base units.
Different manufactures of headsets and bases design their products to work with different
numbers of units. Please read the various manufactures user manuals for compatibility and
maximum number of units that can be registered.
In principle, your phone (base unit and handset) work with any makers of digital cordless phones
in the DECT system (GAP compatible). However, it is only advised to register handsets to base
units from the same manufacture to achieve complete functionality.
This phone system works with a maximum of five handsets and four bases from the same
maker. This means that the phone could operate like a mini-PABX system to offer you functions
such as intercom, call transfer and conference call.
Registering of Additional Handsets to a Base Unit
If an additional handset is purchased separately or at a later stage, handset registration (base
subscription) can be done by going through the following procedures.
21

Xen Advanced Option
Preparation for Registration/Subscription Procedures
Make sure the additional handset is installed with charged batteries.
Before you proceed, you should have the following information available:
i. Make sure the handset you intend to register is DECT system and GAP compatible.
ii. Information showing how to bring the handset into registration mode and registration
procedures. Usually, this information can be found in the instruction manual that comes
with the handset.
iii. The PIN code of the base station. PIN code of base unit may be changed by the user. If
you have changed the PIN code yourself, you must have this PIN code available . If you
have not changed the PIN code yourself, the default base PIN code of this DECT phone is
0000.
Registration Procedure
Base unit
Make sure no other handset is in charging mode and LED of the base unit is not ON at this
1.
point.
Bring the base unit into registration mode. Press and hold the Page
2.
button on the base
unit for around 10 seconds until the LED starts to blink, then release the button.
NO TE: The base unit will remain in registration mode for 1 minute. You must complete the rest of the
procedures before the base unit exits the registration mode. If you fail to complete the registration in
time, the indicator on the base unit will stop blinking and you must restart the entire procedures again.
Handset Registration Procedure
If you intend to register an additional handset different from a Xen, you should follow
the instructions that come with the handset you have purchased to finish the registration
procedures.
If you intend to register an additional Xen handset, you should follow the instructions listed below.
Key Map:
1.
You should select the first available base (BASE 1). Use the digit key pad to enter "1".
2.
The handset starts to search for any available base in registration mode within range. When
found, the handset screen may show a long series of numbers. This is the identity number of
the base unit. Press
button to confirm.
and follow instructions on next page
22

Xen Advanced Option
3.
You will be asked to enter the base PIN. If you have not changed the base PIN, default
base PIN is 0000. Press
4.
until the handset completes the registration procedures. A long beep will be heard as
confirmation.
Repeat the above procedures to register another additional handset to the base unit if required.
Please note that the base unit can register up to a maximum of 5 handsets. The base unit will
reject subscription if there are already 5 handsets registered with the base unit. You may remove
any unused handset from the base unit to create room for a new handsets.
How to Remove Connection between Handset and Base Unit
Key Map:
A long beep will be heard as confirmation.
will be shown on the display and the antenna symbol will remain flashing
enter handset number
after base PIN.
enter PIN
How to Subscribe to Additional Base Unit
A single handset can work with more than one base unit. This could be useful if more than
one telephone line and telephone number is connected to your house or office. Then one single
handset can operate different telephone lines by selecting and switching between different base
units.
23
Xen Advanced Option/Maintenance
Usually, a standard product packages will not include more than one base unit. In case you have
another set of DECT phone (GAP compatible) installed in your house or office, you may go through
the following steps to registre the handset of this DECT phone to your other base units.
NO TE: Subscription of a new base unit will automatically replace any previous base unit setting in
the same base number memory bank. If you do not intend to replace and over write any existing
base unit setting, always register a new base unit at a free base number memory bank in your
handset (each handset can work with maximum four base units). If your handset has already been
registered with base one and base two, then when registering a new base, you should proceed to
use base three and complete the registration.
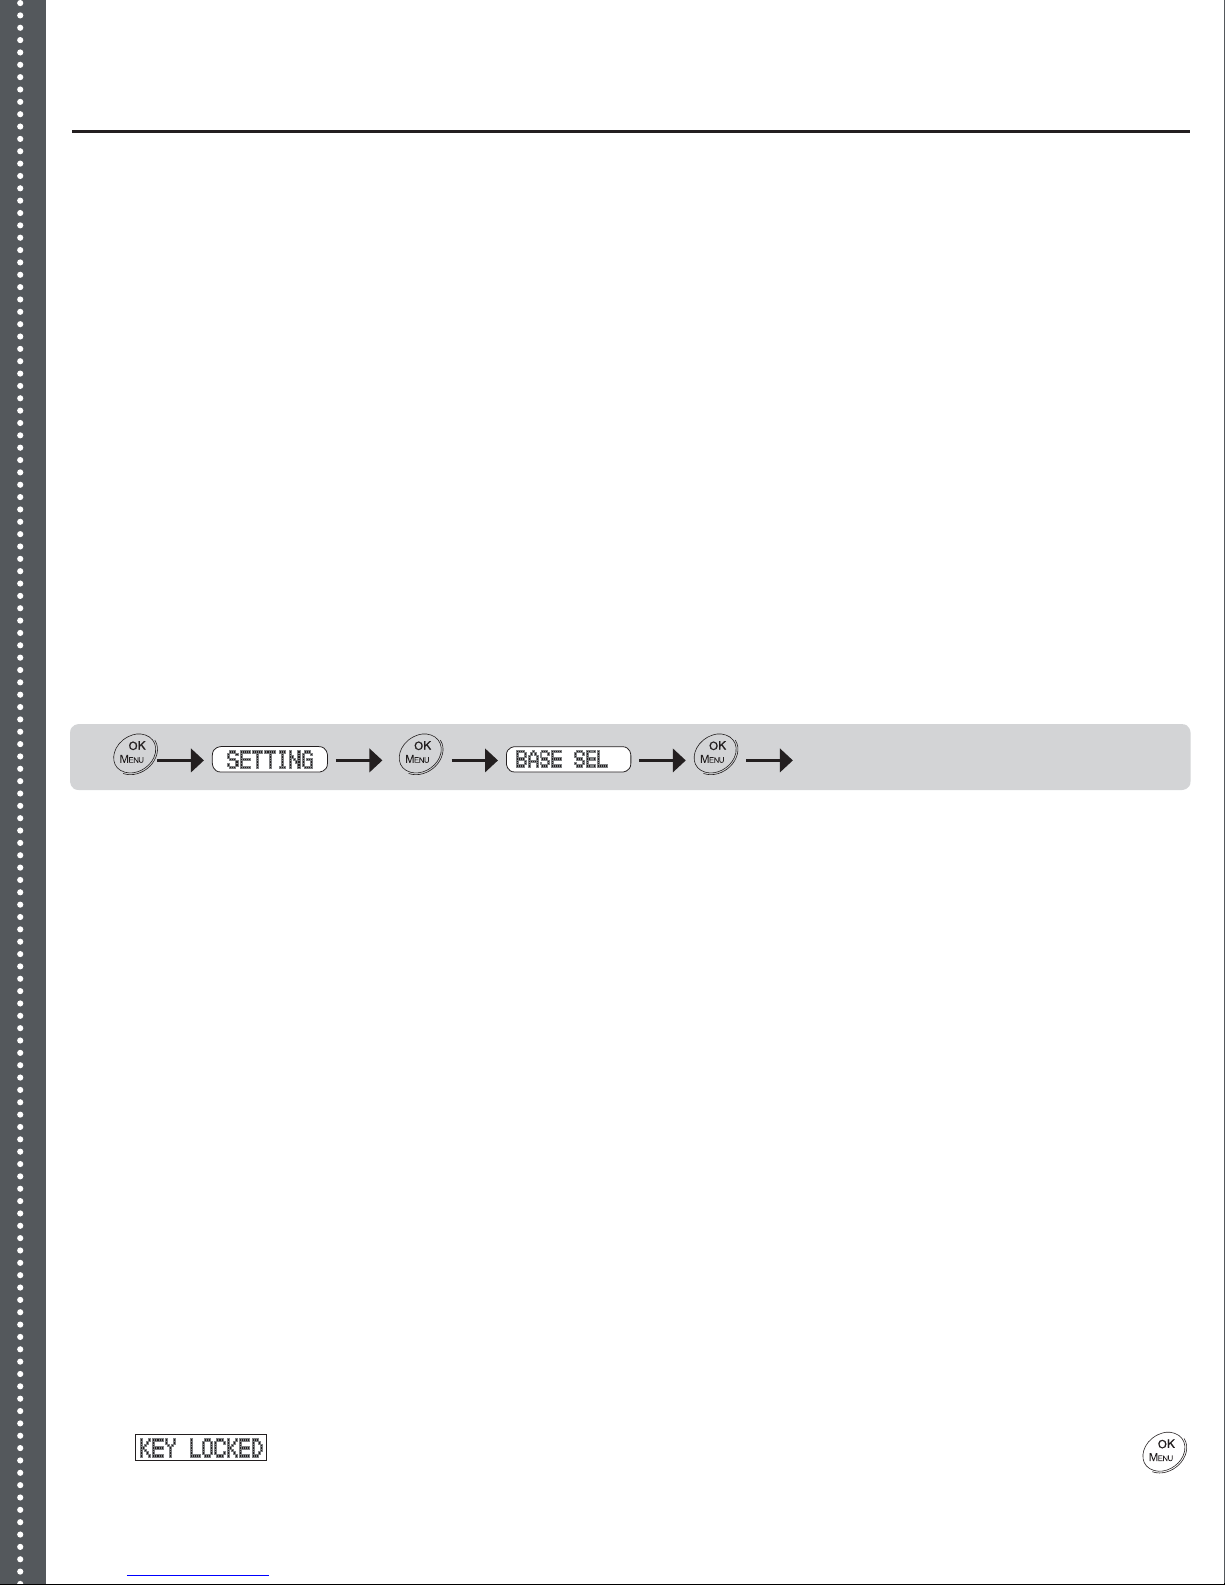
How to Change/Switch Base Unit from the Handset
If the handset is registered to more than one base unit, you may switch among base stations
(switch among different telephone lines).
Key Map:
If you have selected "AUTO" base selection, your handset may switch to any registered base when
a radio signal from the connected base becomes weak or disconnected.
If you have selected "MANUAL" base selection, you will be asked for a base number to complete
the base selection process.
select auto/manual
Maintenance
1.
2.
3.
4.
Do not expose this product to dust, strong sunlight, humidity, high temperature or mechanical
shock.
Do not use corrosive or abrasive cleansers on this product. Keep the unit dust free by wiping
it with a soft, dry cloth.
Do not disassemble this product, it contains no user-serviceable parts.
In case of a thunderstorm, it is advised to disconnect the power adaptor, as product warranty
does not cover damage caused by lightning/serge.
5.
Q1. My phone does not work!
A1. Make sure if you have locked the key pad of your handset. When key pad lock is turned on, a
Only use the adaptor and battery pack that comes with the package.
script will show on the screen. To remove the key pad lock, quickly press the
button twice.
24

Xen Maintenance
A1. Make sure all connections to adaptor and line cord are connected securely to the base and
wall sockets.
A1. Make sure you have inserted batteries into the handset battery compartment, and they are
charged and inserted in the correct way.
A1. If you have connected more than one phone to the same telephone line, make sure all
other telephones connected are put on the hook. Some telephone systems, disconnect all
other telephones when the first phone on the same telephone line is used.
A1. Try to connect another telephone to the telephone socket, if the problem persists, it
appears that there is a problem with your telephone line system, consult your network
provider.
A1. If the person on the other end of the conversation does not hear your voice, make sure
you have not activated the MUTE function. This can be checked by (refer to
page 12).
A1. Check if the antenna symbol
handset is too far away from the base unit and radio signal is too weak. You should get
closer to the base unit and try again.
A1. If your handset rejects to dial a number, check if the number is barred (refer to
Barring
A1. If the handset is without normal battery charging for a prolonged period of time, it may
lock itself when battery level becomes too low. Try to disconnect the batteries and put
them back in again and put the handset on charger for 15 hours to resume.
Q2. My phone does not ring!
A2. Check if the ringing volume is set to "0" (refer to
Your phone will not ring if the ringing volume is set to "0". Change the ringing volume to a
higher setting range.
A2. Make sure your handset is not switched off.
A2. Make sure the line cord is connected securely to base and wall socket.
section page 19).
on the screen is flashing. If it is flashing, it indicates your
Adjust Receiver Volume page 12).
Mute section
Call
A2. Check if you have selected the right base unit via base selection function (if you have
registered more than 1 base unit to your handset).
Q3. The phone book memories do not work as expected!
A3. Make sure you have not entered a telephone number longer than limits mentioned in the
Phone Book section.
A3. If your phone is connected to a PABX system, consult your system provider for information
of timed pause delay required to make an external call.
25

Xen Maintenance
Q4. Caller’s number does not show on my phone!
A4. Make sure your phone line is provided with caller ID function from the phone service provider.
In most countries, caller ID function must be subscribed to. For details, please consult your
phone service provider.
A4. Callers may suppress their caller’s number when making their phone call. Caller’s number
does not necessary display when a call is received. For details, please consult your phone
service provider.
A4. If a call is made from abroad, the caller's number cannot be transmitted.
Q5. My handset does not work after I have registered my handset to a base unit
from a different manufacturer!
A5. According to DECT standard (GAP compatible), a handset can be registered to any DECT
system base unit. However, manufacturer specific functions may not be compatible between
products. Only basic function can be operated if handset and base unit from 2 manufacturers
are registered together.
A5. Check if the other base unit is GAP compatible according to DECT standard. Only GAP
compatible products can be compatible with each other.
26

Xen Desktop Installation & Wall Mounting
Appendix A
Appendix B
ll Mounting
Screw position in actual
Template for wall mounting
35 mm
27

Xen Disposal
Electrical and electronic equipment (EEE) contains materials, components and substances, that
could be dangerous or detrimental to human health and the environment if waste electrical and
electronic equipment (WEEE) is not disposed of correctly.
Products marked with the crossed-out dustbin shown below are electrical and electronic
equipment. The crossed-out dustbin indicates that waste electrical and electronic equipment may
not be disposed of with unsorted household waste and that it must be collected separately.
In developing and manufacturing your Phonic Ear product, we used high-quality materials and
components that can be reused. Thus, when disposing of your waste electrical and electronic
equipment, you must use a collection system designated for this purpose, regardless of whether
you dispose of your waste at your local waste site or it is collected from your home. Please contact
your local authority for further information.
28

Warranty
A Two-year limited warranty is issued to the original consumer of this product by Phonic Ear A/S.
Time period of warranty
This warranty will go into effect upon the date of original purchase of this equipment, and will remain in
effect for two calendar years from that date as long as the instrument remains the property of the original
consumer.
What is covered by this warranty
Any electronic component which, because of workmanship, manufacturing, or design defects, fails to function properly under normal use during the life of this warranty will be replaced or repaired at no charge for
parts or labour when returned to the factory service centre. Transportation in is paid by the customer. If it is
determined that repair is not feasible, the entire unit may be replaced with an equivalent unit upon mutual
agreement of the manufacturer and customer.
What is not covered by this warranty
1 Malfunctions resulting from abuse, neglect, or accident.
2 Peripheral accessories as itemized within the product brochure, when such items are
returned after 30 days from the original purchase.
3 Batteries.
4 Instruments connected, installed, used, or adjusted in a manner contrary to instructions pro-
vided by the manufacturer.
5 Consequential damages and damages resulting from delay or loss of this instrument. The exclu-
sive remedy under this warranty is strictly limited to repair or replacement as herein provided.
6 Products damaged in transit unless investigated by the shipper and returned to the warrantor
with the investigation report.
Phonic Ear A/S reserves the right to make changes in the design or construction of any of its instruments at
any time without incurring any obligation to make any changes whatsoever on units previously
purchased. This warranty is in lieu of all other expressed warranties. All expressed and implied warranties
will terminate upon the expiration of this written warranty. No representative or person is authorized to
represent or assume for us any liability in connection with the sale or use of our products other than as set
forth above.
The above warranty does not affect any legal rights that you might have under applicable national legislation governing sale of consumer goods. Your distributor may have issued a warranty that goes beyond the
clauses of this limited warranty. Please consult your distributor for further information.
What to do if you need service
If you require service under the terms of this warranty, carefully package the instrument to prevent damage
and return it to your distributor (see information on back cover). Please provide your receipt, a detailed
description of the problem, your full name, billing address, and telephone number.
29

Your local representative:
Manufactured by:
921-30-010-00 Rev. A 0207
Connected to life
© 2007 Phonic Ear A/S
Kongebakken 9 • 2765 Smørum • Denmark
Phone: +45 3917 7101 • Fax: +45 3927 7900
E-mail: mail@phonicear.com
 Loading...