

Page 1

© 2004 Phonic Ear Inc. Phonic Ear and the names of Phonic Ear products are trademarks or
registered trademarks of Phonic Ear Inc. in the U.S. and other countries. 9 001 007 022/Rev. A/0404
other resources online at www.phonicear.dk
Your local representative:
international: + 45 3917 7101 • germany (kostenlose Rufnummer): 0800/1844736
u.s.: 800.227.0735, then press 7 • canada: 800.263.8700 • website: www.phonicear.dk
Amplified telephone with telecoil
GB user guide
D Bedienungsanleitung
F instructions
E instrucciones
Page 2

2 3
User guide (English) . . . . . . . . . . . . . . . . . . . . . . . . . . . . . . . . . . . . . . . . . . . . 4
Bedienungsanleitung (Deutsch) . . . . . . . . . . . . . . . . . . . . . . . . . . . . . . . . . . 32
Instructions (Francais) . . . . . . . . . . . . . . . . . . . . . . . . . . . . . . . . . . . . . . . . . 60
Instrucciones (Español). . . . . . . . . . . . . . . . . . . . . . . . . . . . . . . . . . . . . . . . . 88
Table of contents
Page 3

4 5
Introduction . . . . . . . . . . . . . . . . . . . . . . . . . . . . . . . . . . . . . . . . . . . . . . . . . . 5
Main Diagram . . . . . . . . . . . . . . . . . . . . . . . . . . . . . . . . . . . . . . . . . . . . . . . . 6
Installation . . . . . . . . . . . . . . . . . . . . . . . . . . . . . . . . . . . . . . . . . . . . . . . . . . . 8
Function Description . . . . . . . . . . . . . . . . . . . . . . . . . . . . . . . . . . . . . . . . . . . 9
Preparing Your Phone Before Use. . . . . . . . . . . . . . . . . . . . . . . . . . . . . . . . . 12
Normal Operation . . . . . . . . . . . . . . . . . . . . . . . . . . . . . . . . . . . . . . . . . . . . 15
Operation with Headset or FM Device. . . . . . . . . . . . . . . . . . . . . . . . . . . . . 16
Redial Memory. . . . . . . . . . . . . . . . . . . . . . . . . . . . . . . . . . . . . . . . . . . . . . . 17
Speed Dial Memory . . . . . . . . . . . . . . . . . . . . . . . . . . . . . . . . . . . . . . . . . . . 17
Direct Memory. . . . . . . . . . . . . . . . . . . . . . . . . . . . . . . . . . . . . . . . . . . . . . . 19
Phone Book . . . . . . . . . . . . . . . . . . . . . . . . . . . . . . . . . . . . . . . . . . . . . . . . . 20
Operation of Caller ID . . . . . . . . . . . . . . . . . . . . . . . . . . . . . . . . . . . . . . . . . 24
Message Waiting Indication . . . . . . . . . . . . . . . . . . . . . . . . . . . . . . . . . . . . . 25
Troubleshooting . . . . . . . . . . . . . . . . . . . . . . . . . . . . . . . . . . . . . . . . . . . . . . 26
Safety Precautions. . . . . . . . . . . . . . . . . . . . . . . . . . . . . . . . . . . . . . . . . . . . . 28
Warranty. . . . . . . . . . . . . . . . . . . . . . . . . . . . . . . . . . . . . . . . . . . . . . . . . . . . 30
Table of contents Introduction
Thank you for purchasing the RELATION telephone.
RELATION is an HAC telephone, which means it is Hearing Aid Compatible.
It was designed with the hearing-impaired user in mind although it works
well for anyone who wants exceptionally clear sound reception. It integrates multiple relevant hearing functions for better speech understanding
along with a high-quality user-friendly interface, including Caller ID, for
easy operation. Powerful amplification ensures a high sound pressure level
from the handset speaker, while a built-in telecoil eliminates background
noise. R
ELATION meets all the standards and includes all the features expect-
ed from a modern telephone. Various types of assistive listening devices
such as FM transmitters can be connected using the auxiliary connector;
please refer to “Operation With Headset or FM Device”.
Hearing Aid Compatibility
When you set the hearing aid switch to the T-position (Telecoil), the hearing aid’s microphone is switched off and background noise is automatically
excluded. When your hearing aid is in the M-position (microphone), it is
important to hold the handset close to the hearing aid’s microphone (please
note that background noise will NOT be excluded when the hearing aid is
set to the M-position). To avoid feedback, you might need to turn the
handset a little. Some hearing instruments are also equipped with an MTposition, which means that the microphone and the telecoil can be used at
the same time. If you are using ITE hearing instruments you do not have
to worry about feedback, since R
ELATION’s clear sound means you do not
need to press the handset up against your ear.
English
Page 4

6 7
Main Diagram
English
Main Diagram
1. Handset
2. Base unit
3. Key top
4. Hook switch
5. Speaker
6. New call indicator
7. LCD display
8. Speaker phone microphone
9. Handset cord
10. Line cord
11. Battery compartment
12. Jack for handset cord
13. Ringer switch
14. Adaptor socket
15. Jack for line cord
16. Jack for headset or FM Device
Page 5
8
9
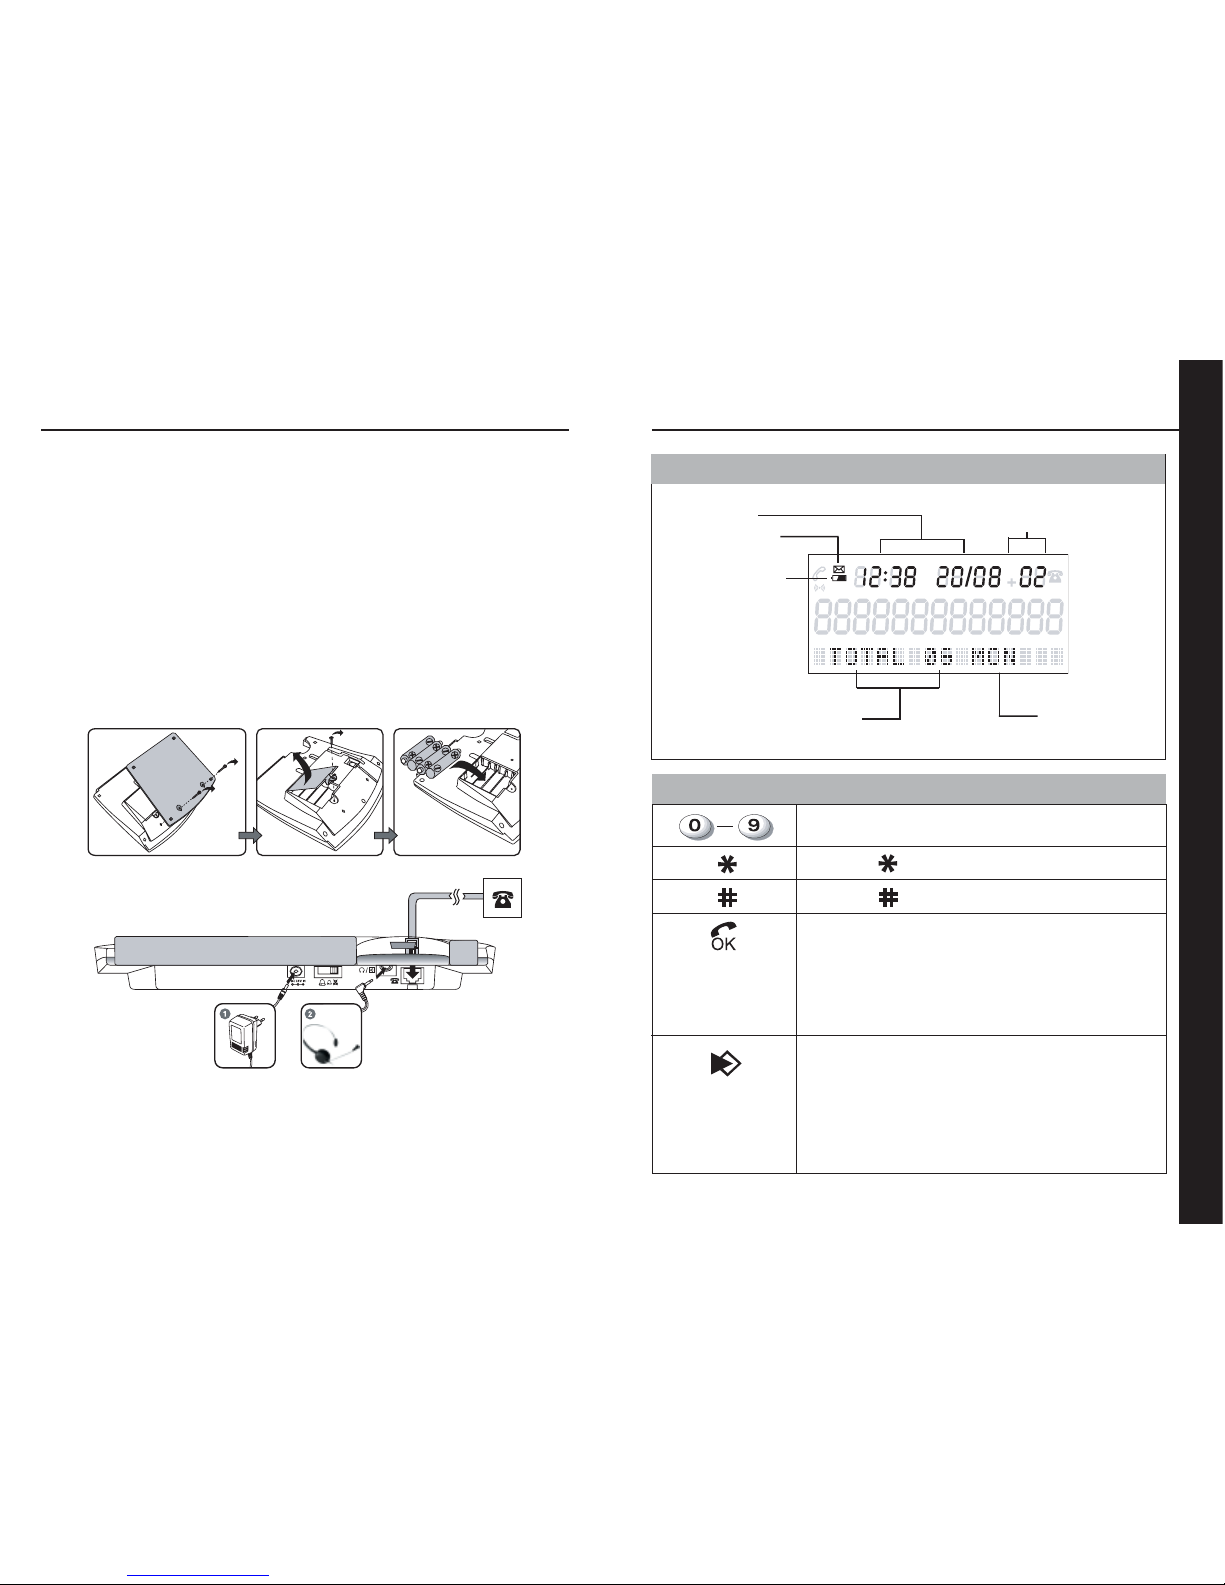
Function Description
N
Date and time
Number showing unchecked
incoming calls
Total number of incoming calls
Day of week
Message indicator
Battery low indicator
Function Buttons Description
((CCAALLLL BBAACCKK))
(
SSTTOORREE))
To enter the digits 0-9
To enter
To enter
To confirm an action.
This button functions as CALL BACK when
browsing the incoming calls. Please refer to
“
RReeddiiaall
MMeemmoorryy
” section for details.
This button functions as STORE when programming
a telephone number into the memory. Please refer
to
“
DDiirreecctt MMeemmoorryy
” & “
SSppeeeedd DDiiaall MMeemmoorryy
”
sections for details.
English
Installation
Refer to the Main Diagram section and:
1. Remove the bottom plate by unscrewing the two screws.
2. Install batteries:
i) Remove the battery compartment door.
ii) Insert 4 fresh AA size batteries while observing the +/- polarity
marks in the battery compartment.
iii) Replace the battery compartment cover securely.
3. Screw the bottom plate back into place.
4. Connect the line cord to the wall outlet for telephone, choosing the
connector which fits your outlet (supplied).
NOTE:
Accessory (purchase separately, not provided with the package).
1. Adaptor 7.5V DC. Plug types vary according to different countries.
2. Headset or FM transmitter.
Information on the Display
Page 6

10 11
Function Description
((PPHHOONNEE BBOOOOKK))
Phone book function has up to 70 memory locations. Please refer to
“
PPhhoonnee BBooookk
” section for
details.
To scroll forward or backward when browsing
selections, and to move the cursor to left/right
when editing a record.
To select the speaker volume from low to high
(ie, Level 1 - Level 8)
To select ringer level (Off/Low/High)
Telephone line jack for line cord plug in.
When a headset (purchased separately) is connected to the headset jack, calls can be made via the
headset.
This connector can also be used to interface with
FM transmitters, cochlear implant processors or
other assistive listening devices. Please refer to
“
OOppeerraattiioonn WWiitthh HHeeaaddsseett oorr FFMM DDeevviiccee
” section for
details.
Function Buttons Description
((MMUUTTEE))
((DDEELLEETTEE))
((SSEETT))
((SSPPEEAAKKEERR))
((RREEDDIIAALL//PP))
This button functions as “MUTE” during conversation.
Press this button once and your voice will not pass
through the microphone. To resume, press the button
again.
To delete an entry or a record in the memory.
To set time and date for the unit.
To switch between 2 lines.
To set your phone to off-hook for on-hook dialling. To
switch back, simply pick up the handset and speak
as normal.
This button functions as
“Last Number Redial” when
you make a call (32 digits maximum). Numbers that
are longer than 32 digits will not be stored in the
redial memory.
This button also functions as
“Pause” when program-
ming a telephone number into the memory bank.
Please refer to
“
SSppeeeedd DDiiaall MMeemmoorryy
” & “
DDiirreecctt
MMeemmoorryy
” sections for details.
Speed Dial Memory (20 digits maximum). Push one
of these keys to make a call to one of the stored
telephone numbers. Please refer to
“
SSppeeeedd DDiiaall
MMeemmoorryy
” section for details.
Function Buttons Description
Function Description
M1, M2, M3
English
Page 7

12
13
2. Time & Date Setting
1. In on-hook mode, press hold and the button until the display
shows “
SET TIME”. Then release all buttons.
2. Use the / buttons to set the right entry.
3. Press the button to confirm and move to the next entry.
4. The setting sequence is “HOUR-MINUTE-MONTH-DAY-YEAR-
WEEKDAY”. The weekday is shown by a number on the lefthand
side of the display which is calculated automatically, where
1=Monday, 2=Tuesday etc. After completing the action, the display
will show “
TOTAL XX” and the day of the week.
5. Press the button to confirm and exit.
NNOOTTEE::
1. a) When you receive the first incoming call, the time and date will
automatically be set if you have FSK Caller ID service.
1. b) To turn off the day of week shown on the display, simply press the
/ button once when the cursor moves to the “WEEKDAY”
entry on the lefthand side of display. Then, “ ___ ” will appear on
the display. After completing the action, the display will show
“
TOTAL CALLS XX”.
3. Date Format Setting
1. In on-hook mode, pressthe button twice and the display will
show “
PHONE BOOK”.
2. Press the / buttons until “
DATE FORMAT” appears on the dis-
play. Then, press the button to enter.
3. Use the / buttons to select the date format between MM-DD
and DD-MM.
4. To confirm, press the button once.
5. Then, press the button once to exit.
Preparing Your Phone Before Use
This telephone contains the following functions:
1. Language Selection
2. Time & Date Setting
3. Date Format Setting
4. Hour Format Setting
5. Flash Time Setting
6. Handset Speaker Volume Setting
1. Language Selection
R
ELATION has multilingual support.
1. In on-hook mode, press and hold
button.
2. While holding , press and hold the
button.
3. While holding and , press the
button until the current language is
shown on the display. Then release all
buttons.
4. Use the / buttons to select the
desired language.
5. Press the button to confirm and exit.
IMPORTANT NOTICE: In order to use
the Caller ID function and the message
waiting functions, you are required to
switch to the language selection corresponding to the country of operation.
Preparing Your Phone Before Use
English
Australia Austral
Czech Republic Czech
Denmark Danish
Finland Finland
France French
Germany Germany
Greece Greek
Hong Kong English 1
Hungary English 1
Ireland English 1
Italy English 1
Malaysia English 1
Netherlands Netherland
Norway Norway
Poland Poland
Singapore English 1
Slovakia Slovak
Spain Spanish
Sweden Sweden
Turkey Turkish
United Kingdom English 1
Country Language Setting
Page 8

14 15
Normal Operation
To make a call
1. Pick up the handset and wait for the dial tone.
2. Enter the desired telephone number using the numeric keys.
3. To end a call, replace the handset onto the cradle of the base
unit or push the hook switch.
On-Hook Dialling
1. In on-hook mode, press the button to set your phone to
off-hook.
2. Enter the phone number to be dialled. Afterwards, the number will
be dialled out accordingly.
3. When the dialled number is answered pick up the handset to start
the call.
Note: The On-Hook Dialling function also works with phone numbers
stored in the Phone Book, Speed Dial Memory, Direct Memory and Redial
List.
Predialling
1. In on-hook mode, enter the phone number to be dialled.
2. Press the button or lift the handset. Afterwards the number will
be dialled out accordingly.
3. When the dialled number is answered pick up the handset to start
the call.
Note: When the dialled number is answered, you may also speak through
the speaker phone mic without lifting the handset.
Preparing Your Phone Before Use
English
4. Hour Format Setting
1. In on-hook mode, press the button twice and “
PHONE BOOK”
will show on the display.
2. Press the / buttons until “
HOUR FORMAT” appears on the dis-
play. Press the button to enter.
3. Use the / buttons to select the hour format between 24 HOUR
and 12 HOUR.
4. Press the button once to confirm.
5. Press the button once to exit.
5. Setting of flash time (Only to be used in connection with
internal switchboard)
1. In on-hook mode, press the button twice and the display
will show “
PHONE BOOK”.
2. Press the / buttons until “
SET FLASH” shows on the display.
Then press the button to enter.
3. Use the / buttons to set the correct flash time
(100/120/300/600ms).
4. Press the button to confirm.
5. Press the button once to exit.
6. Handset Speaker Volume Setting
1. In off-hook mode, (lift the handset), press and hold the
button.
2. While holding the button use the / buttons to select your
desired volume level. Then release all buttons.
3. Press the button to exit.
NOTE: If the volume is changed during an ongoing conversation, the tele-
phone will automatically go back to this programmed volume setting
before the next call.
Page 9

16
17
Redial Memory
The RELATION telephone is equipped with a redial memory function which
allows you to dial a previously called number automatically.
A maximum of 10 previously called numbers can be stored in the phone.
1. In on-hook mode, press the button once.
2. Press the and buttons to select the number you want to dial.
3. Lift the handset or press the button. The number will be dialled
accordingly.
4. To delete a single record, simply pressthe button twice. If you
want to delete all records, press and holdthe button until the
display shows “
ALL DEL”. Pressthe button again to confirm.
Speed Dial Memory
Speed Dial Memory provides you with the easiest way to make a call to a
frequently used number.
To store a number in the Speed Dial Memory
1. In on-hook mode, enter the number you want to store. While
entering the desired number any entry can be deleted by using the
button.
2. Press and hold the desired Speed Dial Memory (M1, M2, M3)
button until the display shows “
SAVE OK”.
To delete a record from the Speed Dial Memory
Numbers in the Speed Dial Memory cannot be erased. However, the user
can “overwrite” an existing old record or store a blank record.
1. In on-hook mode, press the button until the display shows
“”.
2. Press the desired Speed Dial Memory (M1, M2, M3) button once,
and the display will show “
SAVE OK”.
Operation with Headset or FM device
English
The RELATION telephone is equipped with a jack for connection to a headset
or an FM device (both available separately).
Headset
1. Connect the headset to the headset connector jack.
2. Follow the On-Hook Dialling procedures to make and answer calls
by pressing the button.
3. The call is made via the headset’s mouth and ear pieces.
4. The user can switch to handset operation at any time by picking up
the handset.
FM device
The headset jack can also be connected to an FM transmitter or another
assistive listening device equipped with a line or auxiliary input. This allows
you to make a call using your preferred method of communication.
1. Connect the FM transmitter to the headset or FM device jack.
2. Follow the On-Hook Dialling procedures to make and answer
calls by pressing the button.
3. The call is made via the FM transmitter directly to your ear, while the
microphone in the base picks up your voice.
4. You can switch to handset operation at any time by picking up the
handset.
Page 10

18 19
Direct Memory
Besides the Speed Dial Memory, the RELATION telephone is also equipped
with 10 Direct Memory banks.
To store a number in the Direct Memory
1. In on-hook mode, press the button until the display shows
“”.
2. Enter the desired phone number. You may enter or in the
dialling sequence. If your phone is connected to a PABX switching
system, you may enter /P (PAUSE) in the dialling sequence to
insert a timed delay when necessary.
3. Press the button once again, “ ” will appear on the display.
4. Press a numbered button from 0 to 9 to select a memory bank
location. The display will show “
SAVE OK”.
5. Press the button twice to return to standby mode.
Direct Memory cannot be erased in this unit. New blank memory entries
need to be entered in each location to overwrite the old one.
To make a call from the Direct Memory
1. In on-hook mode, press and hold the desired numbered
button from 0 to 9 until the display shows the stored number.
2. Lift the handset or press the button. The number will dial
out automatically.
To review the number in the Direct Memory
1. In on-hook mode, press and hold the desired numbered
button 0 to 9. The display will show the stored number.
NOTE: The maximum number of digits which can be entered is 20. If the
number exceeds 20 digits, the display will show “
TOO LONG” and the extra
digits will not be stored.
Speed Dial Memory
English
To make a call from the Speed Dial Memory
1. Lift the handset and wait for the dial tone.
2. Press the desired Speed Dial Memory (M1, M2, M3) button.
3. The desired phone number will be dialled accordingly.
Alternatively:
1. Press the Speed Dial Memory (M1, M2, M3) button.
2. Then, lift the handset or press the button.
To copy the numbers to the Speed Dial Memory
Numbers in the Caller ID memory (See “Operation of Caller ID”) or
Redial Memory can be copied to the (M1, M2 M3) memory locations. Do as
follows:
1. When a number shows on the display, press and hold the desired
memory location (M1, M2, M3).
2. The display shows “
SAVE OK” thereby confirming that the number
has been stored correctly.
To review the numbers in the Speed Dial Memory
1. In on-hook mode, press one of the buttons (M1, M2, M3).
2. The display will show the stored number accordingly.
NOTE: The maximum number of digits which can be entered is 20. If the
number exceeds 20 digits, the display will show “TOO LONG” and the extra
digits will not be stored.
Page 11

20 21
Key in Display
Character table
Phone Book
In on-hook mode, pressthe button for
about 5 seconds to enter.
Besides the Speed Dial Memory and Direct Memory, you may store phone
numbers in the built-in phone Book.
To make a new entry
Key in Display
N
Then, enter the phone number for the entry
(maximum 20 digits). “TOO LONG” will
appear on the display if more than 20 digits
are entered.
N
English
Phone Book
Enter the name by using the alphanumeric keypad, e.g., “MARTIN SMITH”. Please refer to
the character table below.
If two continuous letters appear in the sequence,
you need to press the button once before you
can go to the next letter.
Press the button to delete the previous
digit.
Press the button once to store the entry.
After that you can go to the next entry of the
Phone Book.
NOTE: If you want to exit the setting mode,
press the button once or leave the phone
for 20 seconds and the system will exit automatically
Press the button again to enter the name
setting.
N
N
Note: = space
Page 12

22 23
3. The number will be copied to the Phone Book and the cursor will
flash to indicate that you can enter or edit the name (by using the
keypad).
4. Press the button to confirm and to enter the next number.
5. Press the button to exit.
To delete a single record from the Phone Book
1. Press the button and use the scroll keys / to find the desired
number.
2. Select a record in the Phone Book which you want to delete.
3. Press the button and the display shows “
DEL ?”.
4. Press the button again to confirm.
To edit a record in the Phone Book
1. Press the button and use the scroll keys / to find the
desired number.
2. Use the scroll keys / to view the whole number if the display is
not showing your full Phone Book memory.
3. Press and hold the button for 5 seconds.
4. The phone enters editing mode and the name can be changed as
described in “To make a new entry”.
To review a record in the Phone Book
1. In on-hook mode, press the button.
2. Then, use the scroll keys / to review the phone Book memory.
To store a number as VIP from the Phone Book
The R
ELATION telephone is equipped with a VIP function. If a number is
marked as a VIP number, there will be a “beep-beep” tone when the VIP
number calls.
1. In on-hook mode, press the button once followed by the
/ buttons to select the number you want to as a VIP number.
2. Press and hold the button until the display shows “VIP”.
A confirmation “beep” tone should be heard to indicate the
selected number has been stored as VIP.
3. To cancel the VIP setting, simply press and hold the buttons
until the “VIP” disappears on the display.
Phone Book
To make a call from the Phone Book
1. In on-hook mode, press the button.
2. Insert the first letter of the name and use the scroll keys /
to find the number.
3. Use the scroll keys / to view the whole number if the display is
not showing your full Phone Book memory.
4. Lift the handset or press the button to dial the number.
To copy the Caller ID numbers and redial memories to the
Phone Book
1. Find the number in the Caller ID memory or the Redial List.
2. Press and hold the button for 5 seconds.
English
Phone Book
Page 13

24 25
Operation of Caller ID
Alternatively:
1. Lift the handset or press the button and wait for a dial tone.
2. Select the desired number by pressing the / buttons until the
desired number is shown in the display.
3. Press the button and the number will be dialled accordingly.
If the selected number in the Caller ID memory shows the text
“
PRIVATE” or “OUT OF AREA”, this particular number cannot be dialled.
To delete a record in the Caller ID memory
1. Select the desired Caller ID number by reviewing the numbers as
described above.
2. When the desired caller’s number is shown on the display.
Press the button and the display will show “
DEL ?”.
3. Press the button again to confirm the deletion and the selected
number will be deleted accordingly.
To delete all records in the Caller ID memory
1. In on-hook mode, press and holdthe button for 6 seconds.
2. The display shows “
ALL DEL ?”.
3. Press the button again to confirm. The display now shows
“
NO CALL”.
4. Press any key to exit this mode.
Message Waiting Indication
Message Waiting Indication is a subscription based voice mail service from
the network operator. The screen will display “
MESSAGE WAITING” for a
few seconds when a recorded message is left. A “ ” icon will display in
the upper left corner and the new call indicator will flash. The icon will not
go out unless you have retrieved your voice mail or deleted the Caller ID
record. For details, please consult your network operator.
Operation of Caller ID
English
Caller ID decoder
When the telephone rings, the Caller ID function shows and records the
caller’s number (if available). The Caller ID function only works if your
phone line is provided with the Caller ID function.
If the caller’s number is already stored in the Phone Book, the the allocated
name will be displayed when the phone receives a call.
If the number cannot be shown or recorded, the display will show the text
“
PRIVATE” (number is suppressed by caller) or “OUT OF AREA”
(call from abroad).
When there are new unanswered calls, the red indicator flashes. The light
will continue to flash until the new calls have been reviewed. This telephone
keeps up to 76 records of numbers in the Caller ID memory. As long as the
records have not been deleted, they will remain in the memory. When the
memory is full, the oldest record will be deleted and replaced by the new
one.
To review records in the Caller ID memory
1. In on-hook mode, browse with the / buttons.
2. Caller’s numbers or matching names and the call time and date will
be shown as you browse through the Caller ID memories. If a call
came repeatedly a “+” icon will show in the upper row of the display.
When the end of the Caller ID list is reached, “
END OF LIST” will be shown
on the display.
To make a call from the Caller ID memory
1. Select the desired Caller ID number by reviewing the numbers as
described above.
2. When the desired caller’s number is shown on the display, push the
button and the displayed number will be dialled accordingly.
Page 14

26
27
Troubleshooting
If the memory buttons do not work as expected
1. Make sure that you do not enter telephone numbers that are longer
than the limits stated in the memory buttons section.
2. If your phone is connected to a PABX system, consult your network operator for information about the timed pause delay required
for making an external call. Make sure that the correct prefix is
stored before each telephone number in the Phone Book memory
to ensure a successful outgoing call.
3. If your phone is disconnected from the telephone line without batteries for more than 60 seconds, the memory is lost. You must
reprogram all memory records.
If caller’s number does not show on the phone
1. Make sure that your phone line is provided with the Caller ID
function from the network operator. In most countries, the Caller
ID function must be paid for and subscribed to separately from
the normal phone function. For details, please consult your network
operator.
2. Callers may suppress their caller’s number when making their phone
call. The text “
PRIVATE” will be shown instead. For details, please
consult your network operator.
3. If a call is made from abroad, caller’s number cannot always be
transmitted. The text “
OUT OF AREA” will be shown instead.
Test and approval
The R
ELATION telephone is approved and CE marked in accordance with
the R&TTE directive.
Troubleshooting
English
If the phone does not work
1. Make sure that the handset cord and line cord are connected secure-
ly to the jacks.
2. Make sure that you have inserted batteries into the battery compart-
ment, and that they are fresh and inserted with correct polarity.
3. Press the hook switch once and wait for the dial tone again.
4. If there is more than one phone connected to the same telephone
outlet you may need to contact your network operator. In some
systems, when the first phone on the same telephone line is used, all
other telephones are electrically disconnected.
5. Try to connect another telephone to the telephone outlet. If the
problem persists, there may be a problem with your telephone line.
In that case you should contact your network operator.
6. If the person you are speaking to does not hear your voice, make
sure that you have not pressed the mute button. To test, press the
mute button once more and your phone should resume to
normal operation.
If the phone does not ring
1. Check if the ringer switch is in the position. Your phone will not
ring if the ringer switch is in the position. Change the position of
the ringer switch to either ( ) or ( ).
2. Make sure the line cord is connected securely to the jack.
3. You may have too many communication devices hooked to a single
line. A communication device can be a phone, modem or a facsimile
(FAX) machine. Contact your network operator for help in calculating the limit of your telephone line.
Page 15

28 29
Safety PrecautionsSafety Precautions
To reduce the risk of fire, electric shock and personal injury, please follow
these basic safety precautions before you use this product.
1. Carefully read the instructions in this manual.
2. Follow all warnings and instructions marked on the unit.
3. When cleaning, unplug the telephone jack and the adaptor jack from
the wall outlet. Use a damp cloth. Do not use liquid or aerosol
cleaners.
4. Do not use this equipment near water (eg, the kitchen sink, bathtub,
washbasin, laundry tub, swimming pool or in a wet basement).
5. Install in a protected location. Ensure that all lines and cords cannot
become snagged underfoot or stepped on. Do not place objects on
the line cord that may cause damage or abrasion.
6. Avoid spilling any liquid on the unit. This may cause internal
shorting, fire or shock and is not covered under your warranty.
7. Do not overload wall outlets and extension cords as this can result in
the risk of fire or electric shock.
8. Never push objects of any kind into this telephone as they can
touch dangerous voltage points or short out parts that could result
in a risk of fire or electric shock.
9. Take the phone to a qualified technician when repair work or
service is required. To reduce the risk of electric shock, do not
disassemble the telephone. Opening or removing covers can
expose you to dangerous voltages or other risks. Incorrect
reassembly can cause electric shock during subsequent use.
10. Avoid using the telephone during an electrical storm. There can
be a slight risk of electric shock from lightning.
11. Do not use the telephone to report a gas leak, if in the vicinity of
the leak.
English
12. Unplug this telephone from the wall outlet and refer to qualified
service personnel under the following conditions:
1. When liquid is spilled into the unit.
2. When the unit is exposed to rain or water.
3. When the unit does not operate normally by following
the operating instructions.
4. When the unit is dropped or the casing is damaged.
5. When the unit exhibits a distinct change in performance.
Page 16

30 31
The above warranty does not affect any legal rights that you might have
under applicable national legislation governing the sale of consumer goods.
Your distributor may have issued a warranty that goes beyond the clauses
of this limited warranty. Please consult your distributor for further information.
What to do if you need service
If you require service under the terms of this warranty, carefully package
the product to prevent damage and return it to your local sales representative (see information on back cover). Please provide your receipt, a detailed
description of the problem, your full name, billing address, and telephone
number.
Warranty
English
Warranty
Phonic Ear offers a one-year limited warranty (two years inside the EU).
This warranty commences on the date of original purchase of this product.
What is covered by this warranty
Any electronic component which, because of workmanship, manufacturing
or design defects, fails to function properly under normal use during the life
of this warranty will be replaced or repaired at no charge for parts or labour
when returned to the factory service centre. Transportation is paid by the
customer. If it is determined that repair is not feasible, the entire unit may
be replaced with an equivalent unit upon mutual agreement of the
manufacturer and customer.
What is not covered by this warranty
1. Malfunctions resulting from abuse, neglect, or accident.
2. Peripheral accessories as itemised within the product brochure, when such
items are returned after 90 days from the original purchase.
3. Alkaline batteries (if applicable).
4. Instruments connected, installed, used, or adjusted in a manner contrary
to instructions provided by the manufacturer.
5. Consequential damages and damages resulting from delay or loss of this
unit. The exclusive remedy under this warranty is strictly limited to repair
or replacement as herein provided.
6. Products damaged in transit unless investigated by the shipper and
returned to the warrantor with the investigation report.
Phonic Ear reserves the right to make changes in the design or construction
of its units at any time without incurring any obligation to make any changes
whatsoever on units previously purchased. No representative or person is
authorised to assume for Phonic Ear any liability in connection with the sale
or use of our products.
 Loading...