

Page 1

user guide
Page 2

contents
introduction . . . . . . . . . . . . . . . . . . . . . . .1
package contents . . . . . . . . . . . . . . . . .2-3
microphone features . . . . . . . . . . . . . .4-6
receiver features . . . . . . . . . . . . . . . . . . .7
about channels . . . . . . . . . . . . . . . . . . . .8
connecting receiver . . . . . . . . . . . . . . . . .9
professional fitting . . . . . . . . . . . . . . . . .10
suggested uses for L
EXIS system . . . . . .11
suggested settings for receiver . . . . . . . .12
suggested settings for microphone . . . .13
ways to use your microphone . . . . .14-16
connecting mic to other devices . . . .17-18
batteries/charging . . . . . . . . . . . . . . .19-22
extending microphone range . . . . . . . . .23
replacing pin locks . . . . . . . . . . . . . . . . . .23
cautions/notices . . . . . . . . . . . . . . . . . . .24
cleaning . . . . . . . . . . . . . . . . . . . . . . . . .24
appendix a: troubleshooting . . . . . . . .25-26
appendix b: warranty . . . . . . . . . . . . . . . .27
disclosure policies . . . . . . . . . . . . . . . . . .28
code of federal regulations . . . . . . . . . . .29
EXIS frequencies . . . . . . . . . . . . . . . . . . .30
L
Page 3

introduction
ongratulations on your decision to take
the next step toward better hearing!
C
Many people with active lifestyles like yours
have chosen Lexis to improve the quality
of their participation in social situations.
Lexis is an addition to your behind-the-ear
hearing instruments. Simply attaching the
small receiver to your hearing instrument
creates the mobility and freedom to participate in situations that might otherwise
be uncomfortable. You’ll notice improved
speech understanding in almost any
Lexis conforms to the guidelines of the Mosaic standard. Mosaic (www.mosaic-consortium.org) helps ensure the interoperability of new
wireless systems for hearing healthcare.
1
environment — even in the presence of
noise or reverberation, or at a distance from
the speaker.
Your Lexis solution is compatible with most
manufacturers’ hearing instruments, so
even if you decide to change your hearing
instrument, your investment is safe in Lexis.
Page 4

1
typical package contents
• Microphone/
transmitter
• Receiver
module(s)
*NOTE: batteries need to be charged for ? hours before they are ready to use in the microphone/transmitter
• Lavalier cord
• Extra color
pin locks
• Microphone charger
• External antenna
• Auxilliary input
cables
• NiMH rechargeable
batteries*
2
Page 5

you will also need:
• Behind-the-ear
hearing aid
(contact manufacturer for
compatibility information)
3
• Audio shoe:
• Must be compatible with your
hearing aid
• Note: Some versions of Lexis
include the audio shoe as a
component of the receiver
Page 6

2
microphone features (top)
On/off/mode switch •
Omni mode
Focus mode
Superfocus mode
•
•
•
• Microphone grille
• Charge jack
• Auxilliary audio input jack
• External
antenna jack
4
Page 7

microphone features (bottom)
• Pocket clip
5
• HI/LO level button
• Battery status & channel display
• Channel button
• Battery chamber & stand
Page 8
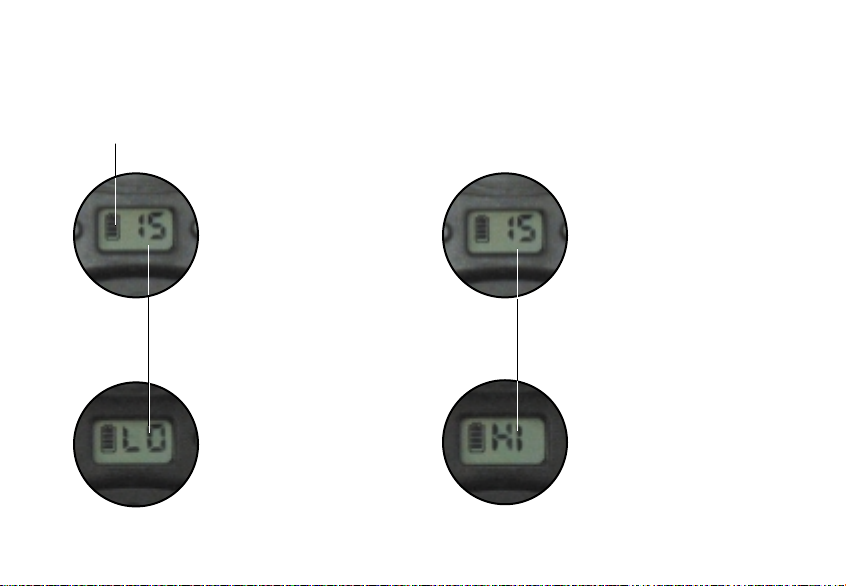
microphone features (display)
• Battery level indicator
• Display only shows
channel number when
in low sensitivity mode
• Display alternates between
channel number and HI when
set to boom mic (high sensitivity)
level. Use Omni mode (See 10)
to use the boom mic; Focus
and Superfocus modes
work normally.
6
Page 9

receiver features
3
• Direct audio input pins
• FM gain control (professional use only)
• Channel label
• Pin orientation lock
(blue pin = right ear; red pin =left ear)
7
• Mode switch
Page 10

about channels
4
Your Lexis system is a radio device, and
like any other radio, it communicates on
specific channels. Your microphone and
receiver must be on the same channel to
work together.
Never operate two microphones on the
same channel — you’ll experience annoying interference.
If you are travelling internationally, be aware
that your channel may not be approved for
use in all countries. Contact your manufacturer for a list of channels approved around
the world.
5
Push
button
to
change
channel
changing channels
If you want to use your microphone
with a receiver on a different channel,
you can change the microphone
channel as shown here.
Microphone
and receiver
channels
must
match!
8
Page 11

6
connecting the receiver
to your hearing aid
7
changing pin
orientation
Audio shoe
required
(see 1)
Important!
Back of Lexis
must face
same direction
as back of
hearing aid
9
Note
large
pin
If pins
don’t
align
with
holes
1 Pull out lock
3 Push
in lock
2 Rotate pins to
align with audio
shoe holes
Page 12

professional fitting
8
Your hearing instrument has unique characteristics. To work properly, your Lexis receiver must
be adjusted to match those characteristics. Only a hearing care professional is qualified to
perform such adjustments. Fitting procedures are available in the Lexis Fitting Guide. Please
visit your hearing care professional for a complete fitting.
Lexis has a unique feature in its variable FM gain control that allows your hearing care professional to change the FM signal relationship to the environmental sounds. This creates the
optimal signal-to-noise ratio, which improves your ability to hear in noise and over distance.
Your hearing instrument has distinctive characteristics, so for it to work properly with your Lexis
receiver it must be correctly adjusted. Only a hearing care professional is qualified to perform
these adjustments; please visit them for a complete fitting. These fitting procedures are
available in the Lexis Fitting Guide.
10
Page 13

11
suggested ways to use your Lexis system
9
The possibilities are limitless, but here are some common uses:
classrooms meetings parties
television car household
Page 14

10
suggested settings for your receiver
These are suggested starting points; with experience, you can quickly
change the settings to suit your preferences.
If distance or
noise level is:
High Lexis only•
Med/Low Lexis + HA•
None HA only•
Use:
12
Page 15

11
suggested settings for your microphone
These are suggested starting points; with experience, you can quickly
change the settings to suit your preferences.
If distance or
noise level is:
High Superfocus•
Medium Focus•
Low Omni•
None Off•
13
NOTE: After turning on your microphone, you may notice a small delay while the system software loads
Use:
SF
F
Page 16

12
ways to use your
microphone
point and listen
As you move from place to place — from
home to school to work to restaurants and
parties — you will find that your listening
environment changes dramatically. You can
use your versatile Lexis microphone to
improve understanding in practically any of
these environments, just by changing its
position. The examples shown here are
only suggestions — with practice, you’re
sure to discover what works best for you.
Point toward
sound source
Avoid covering grille
Ideal for:
• Parties
• Shopping
• Small group
discussions
14
Page 17

on the table
Ideal for:
• Conferences
• Large group discussions
• Restaurants
around a friend
or teacher’s neck
Superfocus mode
recommended.
Ideal for:
• Lectures
• Sports
• Parent/partner
communication
15
NOTE: These user modes may require the external antenna for optimum performance.
Page 18

clipped to a friend or
teacher’s pocket
Superfocus mode
recommended.
Ideal for:
• Lectures
• Sports
• Parent/partner
communication
a friend or teacher
uses a boom mic
(optional accessory)
Provides the
best possible
signal.
Ideal for:
• Lectures
• Sports
• Parent/partner
communication
NOTE: These user modes may require the external antenna for optimum performance.
16
Page 19

connecting a boom mic
NOTE: You can override the boom mic signal by
switching to Focus or Superfocus modes.
connecting to TV,
stereo, & other devices
1 Switch
17
to Omni
mode
3 Push HI/LO
button with
pen to set
to HI level
2 Plug in mic
1 Mic must be at LO
level; if it has previously
been set to HI level for
boom mic use, reset
by switching to Omni
mode and pushing the
HI/LO button
2 Plug in cable
Page 20

notes on connecting to TV,
stereo, & other devices
3 Plug into
TV, VCR,
CD, etc.
• Your microphone must be set to LO
level to connect to TV, stereo, and
other devices
• If your microphone is off, it will automatically turn on when you plug in the auxilliary input cable
• It is recommended that you use the TV
Audio Out jacks (on the back of most
TVs). If you use the Headphone jack, the
TV speaker will turn off
• Switch to Omni mode to mix in environmental sounds (focus modes are muted)
• If no auxilliary signal is present for 5
minutes (e.g., if the TV isn’t on), your
microphone will automatically turn off
• To override the 5-minute timeout, switch
to Superfocus mode, then to Off
18
Page 21

13
batteries
your receiver has no battery
Typical battery life: 8 hours
The unit will
shut down
when battery
voltage is
too low.
During shutdown the
unit power
will cycle on
and off to
give an audio
indication of
low battery
19
Indicator
level drops
as battery
drains
Your Lexis receiver
draws a small
amount of power
from the battery
inside your hearing
aid. It does not
have a battery of
its own. Do not
attempt to open
the receiver case.
Page 22

charging in progress
completed charging
Never recharge alkaline batteries!
3 Plug in
Bars scroll
while
charging
2 Plug in
Never recharge alkaline batteries!
Typical charge time:
Battery
bars flash
when fully
charged
20
Page 23

replacing microphone batteries
Your Lexis microphone uses 2 AAA batteries.
These will eventually need to be replaced —
after about 1 year for rechargeable batteries,
and after about 8 hours of use for Alkaline
batteries. You can replace your batteries with
any of the following:
• Special “short-sleeve” rechargeable batteries
from your dealer.
be recharged inside your microphone.
• Standard rechargeable NiMH batteries.
These will not recharge inside your microphone, but can be removed for charging.
• Standard non-rechargeable Alkaline batteries
(when you don’t have time to charge).
21
Only these batteries can
NOTE: Always dispose of old batteries in approved
battery recycling bins. It may be illegal to dispose in
the trash. If you are not sure of proper disposal
method, please consult your local authority.
Remove tamperresistant screws
(if present)
Screw
may be
hidden
under rubber plug
Page 24

removing batteries replacing batteries
Squeeze and
lift cover
NOTE: The positive and negative ends
of AAA batteries may appear similar.
Use care to orient them properly.
+
–
+
–
22
Page 25

extending microphone
14
• Internal antenna
range is up to
5m/15ft
• To extend range up
to 30m/100ft, add an
external antenna:
For best range, antenna
should point away from mic
NOTE: Actual range may vary depending on
environmental conditions.
23
transmission range
15
replacing pin locks
You can color-code your pin locks to
distinguish right and left receiver modules
1 Pull out lock
completely
2 Push in new lock
Page 26

16
cautions/notices
cleaning
17
• do not use on
aircraft without
permission of
flight crew
• do not operate
two transmitters
on the same
channel (causes
interference)
• do not immerse
Lexis units in water
or other liquids
• some electronic
devices (microwave
ovens, for example)
can interfere with
your Lexis signal
• avoid clothing or
hand noise on
microphone
• supervise small
children to avoid
swallowing or
choking on parts
• Clean gently with a
soft, damp cloth
• Do not use solvents
• Do not immerse
24
Page 27

appendix a: troubleshooting
• Check that receiver and microphone channels
match
• Recharge or replace batteries
no sound at all
• Check the hearing aid in isolation to make sure
it is not malfunctioning
• Check that receiver mode switch is in correct
position
• Check that microphone mode switch is in
correct position
• Check that receiver and microphone channels match
• Recharge or replace batteries
• Adjust FM gain control
no FM reception
• Confirm that the DAI shoe is properly seated,
undamaged, and set properly
• Check that mode switch is in correct position
• Check that the microphone is on
25
weak or distorted sound
• Check for improperly fitting or clogged
earmolds, or excess ear wax
• Recharge or replace batteries
• Adjust FM gain control (consult your hearing
care professional)
static, intermittent sound, or feedback
• Move away from sources of interference
(metal structures, computers, etc.)
• Make sure that no other microphone is broadcasting on the same channel
• Clean and check battery contacts
• Check for improperly fitting or clogged
earmolds, or excess ear wax
• Turn down FM gain control (consult your
hearing care professional)
Page 28

microphone batteries won’t charge
• LCD battery icon will flash if there is a problem
with charging
• Check that batteries are special “short sleeve”
batteries — all other batteries can not
be charged
• Check that charger is plugged into working
wall socket
• Clean charge jack
LCD error codes
• E2 – LCD communication error – contact your
service center for help
• E1 – RF fault – contact your service center for help
Omni mode does not work
• Check the LCD panel – if the panel is flashing
“HI”, then your microphone is set to HI (or
boom mic) level. Switch to Omni mode, and
push the HI/LO biutton to reset the mic to LO
mode. See 10
very noisy sound when plugged into
TV, stereo
• If you experience a noisy signal when connecting the microphone to TV, stereo, etc., check
the LCD panel – if the panel is flashing “HI”,
then your microphone is set o HI (or boom
mic) level. Switch to Omni mode, and push
the HI/LO button to reset the mic to LO
mode. See 10
26
Page 29

appendix b: manufacturer’s warranty
The manufacturer issues a one-year limited warranty to the
original consumer of this product.
This warranty will go into effect upon the date of original
purchase of this equipment, and will remain in effect for
one calendar year from that date.
what is covered by this warranty
Any electronic component which, because of workmanship,
manufacturing, or design defects, fails to function properly
under normal use during the life of this warranty will be
replaced or repaired at no charge for parts or labor when
returned to the point of purchase. Transportation in is paid by
the customer. If it is determined that repair is not feasible, the
entire unit may be replaced with an equivalent unit upon
mutual agreement of the manufacturer and customer.
what is not covered by this warranty
This one-year limited warranty does not apply to:
• Malfunctions resulting from abuse, neglect, or accident
• Peripheral accessories as itemized within the product
brochure, when such items are returned after 90 days
from the original purchase
• Batteries
• Instruments connected, installed, used, or adjusted in a
27
• Consequential damages and damages resulting from
• Products damaged in transit unless investigated by the
The manufacturer reserves the right to make changes in
the design or construction of any of its instruments at any
time without incurring any obligation to make any changes
whatsoever on units previously purchased. This warranty is
in lieu of all other expressed warranties by the manufacturer.
No representative or person is authorized to represent or
assume for the manufacturer any liability in connection
with the sale or use of this product other than as set
forth above.
If your Lexis system requires service under the terms of this
warranty, carefully package the instrument to prevent damage in transit and return it to the point of purchase. Include a
detailed description of the problem, your full name, billing
and shipping address, and telephone number.
manner contrary to the instructions provided by the
manufacturer
delay or loss of this instrument. The exclusive remedy
under this warranty is strictly limited to repair or replacement as herein provided.
shipper and returned to the warrantor with the investigation report.
Page 30

warranty (cont’d)
The above warranty does not affect any legal rights that you
might have under applicable national legislation governing
sale of consumer goods. Your point of purchase may have
issued a warranty that goes beyond the clauses of this l
imited warranty. Please consult your point of purchase for
further information
disclosure policies
This transmitter is authorized by rule under the Low Power
Radio Service (47 C.F.R. Part 95) and must not cause harmful
interference to TV reception or United States Navy SPASUR
installations. You do not need an FCC license to operate this
transmitter. This transmitter may only be used to provide: auditory assistance to persons with disabilities, persons who require
language translation, or persons in educational settings: health
care services to the ill; law enforcement tracking services under
agreement with a law enforcement agency; or automated maritime telecommunications system (AMTS) network control
communications. Two-way voice communications and all other
types of uses not mentioned above are expressly prohibited.
Labeling requirements
This device may not interfere with TV reception or federal government radar, and must accept any interference received,
including interference that may cause undesired operation.
IMPORTANT NOTE: To comply with FCC RF exposure
compliance requirements, only use supplied antenna that is
sold with this transmitter. Use of any other antenna which
has not been approved by the manufacturer will violate
FCC rules and regulation and void the user's authority to
operate this device. This device and its antenna(s) must
not be co-located or operating in conjunction with any
other antenna or transmitter.
28
Page 31

code of federal regulations
C.F.R. 21 Part 801.420
EXIS
FM receivers and FM transmitters, when required, are
L
approved by the Federal Communications Commission in the
U.S. and Industry Canada. Other government approvals
available upon request. (Other international regulations may
also apply.)
Operation is subject to the following two conditions: (1) this
device may not cause harmful interference, and (2) this
device must accept any interference received, including
interference that may cause undesired operation.
Any changes or modifications made to any governmentapproved element of this instrument, without the expressed
approval of the manufacturer in writing, could void the user’s
authority to operate those elements of the system.
If any changes or modifications are made it will be the
responsibility of the party performing the changes or modifications to ensure continued compliance with the FCC regulations and they are required to: (1) File for a new equipment
authorization, or (2) Relabel the product(s) with “This product has been modified by [insert the name, address and
telephone number of the party performing the modification].”
(United States only)
29
Part 95
This transmitter is authorized by rule under the Low
Power Radio Service (47 C.F.R. Part 95) and must not
cause harmful interference to TV reception or United
States Navy SPASUR installations. You do not need an
FCC license to operate this transmitter. This transmitter
may only be used to provide: auditory assistance to persons with disabilities, persons who require language
translation, or persons in educational settings; health
care services to the ill; law enforcement tracking services
under agreement with a law enforcement agency; or
automated maritime telecommunications system
(AMTS) network control communications. Two-way voice
communications and all other types of uses not mentioned above are expressly prohibited.
This device may not interfere with TV reception or federal government radar, and must accept any interference
received, including interference that may cause undesired operation.
Operation is subject to the following two conditions: (1) this
device may not cause interference, and (2) this device must
accept any interference, including interference that may cause
undesired operation of the device.
Page 32

Lexis frequencies (MHz)
Austria 174.12
174.415
174.60
Belgium 181.90
187.50
194.50
Finland 173.99
Germany 173.99
174.075
174.275
174.425
174.60
175.00
175.70
176.00
180.45
187.45
194.45
207.85
208.00
208.10
Greece 173.40
173.99
Ireland From 173.7
To 175.1
Italy 173.99
174.12
174.415
174.77
175.70
176.00
181.21
Luxembourg 173.40
Netherlands 207.85
208.00
208.10
Norway 173.8125
173.9625
Portugal 174.12
174.41
Spain 173.99
174.12
174.415
174.77
175.70
176.00
181.21
Sweden 175.70
187.45
194.45
207.85
UK 173.40
174.12
174.415
174.60
174.77
30
Page 33

Date of purchase:
My hearing care professional:
My serial number:
My channel number:
© 2002 Phonic Ear Inc. ???-????-101/Rev. A/2163 0203
 Loading...