

Page 1
2100, 2500, 3500
®
User Guide
Version 6
Revised 7/2009
Page 2

2
Page 3

Table of Contents
Introduction . . . . . . . . . . . . . . . . . . . . . . . . . . . . . . . . . . . . . . . . . . . . . . . . . . . . . . . . . . . . . . . . . . . . . . . . . . . . . . . . . .5
Installation . . . . . . . . . . . . . . . . . . . . . . . . . . . . . . . . . . . . . . . . . . . . . . . . . . . . . . . . . . . . . . . . . . . . . . . . . . . . . . . . . . .7
Step One: Check System Requirements . . . . . . . . . . . . . . . . . . . . . . . . . . . . . . . . . . . . . . . . . . . . . . . . . . . . . . . .8
Step Two: Install the Software . . . . . . . . . . . . . . . . . . . . . . . . . . . . . . . . . . . . . . . . . . . . . . . . . . . . . . . . . . . . . . . .9
Step Three: Connect the Hardware . . . . . . . . . . . . . . . . . . . . . . . . . . . . . . . . . . . . . . . . . . . . . . . . . . . . . . . . . . .10
Step Four: Install the Hardware Drivers . . . . . . . . . . . . . . . . . . . . . . . . . . . . . . . . . . . . . . . . . . . . . . . . . . . . . . . .12
Step Five: Connect Analog Phone Cable . . . . . . . . . . . . . . . . . . . . . . . . . . . . . . . . . . . . . . . . . . . . . . . . . . . . . . .14
Pre-Configuration Steps . . . . . . . . . . . . . . . . . . . . . . . . . . . . . . . . . . . . . . . . . . . . . . . . . . . . . . . . . . . . . . . . . . . . . .17
Step One: Verify Device Connection . . . . . . . . . . . . . . . . . . . . . . . . . . . . . . . . . . . . . . . . . . . . . . . . . . . . . . . . . .18
Step Two: Disable Power Management . . . . . . . . . . . . . . . . . . . . . . . . . . . . . . . . . . . . . . . . . . . . . . . . . . . . . . . .19
Step Three: Turn Off PC Hibernation . . . . . . . . . . . . . . . . . . . . . . . . . . . . . . . . . . . . . . . . . . . . . . . . . . . . . . . . .20
Step Four: Get a Copy of Your Phone Book . . . . . . . . . . . . . . . . . . . . . . . . . . . . . . . . . . . . . . . . . . . . . . . . . . . . .22
PhoneTree Hardware Functionality (While In Use) . . . . . . . . . . . . . . . . . . . . . . . . . . . . . . . . . . . . . . . . . . . . . .23
One-Time Configurations . . . . . . . . . . . . . . . . . . . . . . . . . . . . . . . . . . . . . . . . . . . . . . . . . . . . . . . . . . . . . . . . . . . . .25
Desktops . . . . . . . . . . . . . . . . . . . . . . . . . . . . . . . . . . . . . . . . . . . . . . . . . . . . . . . . . . . . . . . . . . . . . . . . . . . . . . . . .26
The Admin Desktop . . . . . . . . . . . . . . . . . . . . . . . . . . . . . . . . . . . . . . . . . . . . . . . . . . . . . . . . . . . . . . . . . . . . . . . .27
Step One: Configure Phone Lines . . . . . . . . . . . . . . . . . . . . . . . . . . . . . . . . . . . . . . . . . . . . . . . . . . . . . . . . . . . .28
Step Two: Configure Global Settings . . . . . . . . . . . . . . . . . . . . . . . . . . . . . . . . . . . . . . . . . . . . . . . . . . . . . . . . . .29
Step Three: Configure Dialing Translator . . . . . . . . . . . . . . . . . . . . . . . . . . . . . . . . . . . . . . . . . . . . . . . . . . . . . .30
Step Four: Import Menu Manager . . . . . . . . . . . . . . . . . . . . . . . . . . . . . . . . . . . . . . . . . . . . . . . . . . . . . . . . . . . . .31
Step Five: Configure eMail . . . . . . . . . . . . . . . . . . . . . . . . . . . . . . . . . . . . . . . . . . . . . . . . . . . . . . . . . . . . . . . . . .32
Additional Icons . . . . . . . . . . . . . . . . . . . . . . . . . . . . . . . . . . . . . . . . . . . . . . . . . . . . . . . . . . . . . . . . . . . . . . . . . . .33
Your First Call Job . . . . . . . . . . . . . . . . . . . . . . . . . . . . . . . . . . . . . . . . . . . . . . . . . . . . . . . . . . . . . . . . . . . . . . . . . . .37
Your First Call Job . . . . . . . . . . . . . . . . . . . . . . . . . . . . . . . . . . . . . . . . . . . . . . . . . . . . . . . . . . . . . . . . . . . . . . . . .38
2100 . . . . . . . . . . . . . . . . . . . . . . . . . . . . . . . . . . . . . . . . . . . . . . . . . . . . . . . . . . . . . . . . . . . . . . . . . . . . . . . . . . . . . . . .41
Let’s Begin! . . . . . . . . . . . . . . . . . . . . . . . . . . . . . . . . . . . . . . . . . . . . . . . . . . . . . . . . . . . . . . . . . . . . . . . . . . . . . . .42
Setting Up a Call Job . . . . . . . . . . . . . . . . . . . . . . . . . . . . . . . . . . . . . . . . . . . . . . . . . . . . . . . . . . . . . . . . . . . . . . .43
2500 . . . . . . . . . . . . . . . . . . . . . . . . . . . . . . . . . . . . . . . . . . . . . . . . . . . . . . . . . . . . . . . . . . . . . . . . . . . . . . . . . . . . . . . .51
Let’s Begin! . . . . . . . . . . . . . . . . . . . . . . . . . . . . . . . . . . . . . . . . . . . . . . . . . . . . . . . . . . . . . . . . . . . . . . . . . . . . . . .52
Additional Admin Desktop Features (2500 and up) . . . . . . . . . . . . . . . . . . . . . . . . . . . . . . . . . . . . . . . . . . . . . .53
Setting Up a Call Job . . . . . . . . . . . . . . . . . . . . . . . . . . . . . . . . . . . . . . . . . . . . . . . . . . . . . . . . . . . . . . . . . . . . . . .54
3500 . . . . . . . . . . . . . . . . . . . . . . . . . . . . . . . . . . . . . . . . . . . . . . . . . . . . . . . . . . . . . . . . . . . . . . . . . . . . . . . . . . . . . . .63
Let’s Begin! . . . . . . . . . . . . . . . . . . . . . . . . . . . . . . . . . . . . . . . . . . . . . . . . . . . . . . . . . . . . . . . . . . . . . . . . . . . . . . .64
Additional Admin Desktop Features for 3500 (and S≠) only . . . . . . . . . . . . . . . . . . . . . . . . . . . . . . . . . . . . . .65
Configuring a Flex Field . . . . . . . . . . . . . . . . . . . . . . . . . . . . . . . . . . . . . . . . . . . . . . . . . . . . . . . . . . . . . . . . . . . .66
Setting Up a Call Job . . . . . . . . . . . . . . . . . . . . . . . . . . . . . . . . . . . . . . . . . . . . . . . . . . . . . . . . . . . . . .68-75, 80-81
Creating a Construct
Call Center . . . . . . . . . . . . . . . . . . . . . . . . . . . . . . . . . . . . . . . . . . . . . . . . . . . . . . . . . . . . . . . . . . . . . . . . . . . . . . . . . .83
Call Center . . . . . . . . . . . . . . . . . . . . . . . . . . . . . . . . . . . . . . . . . . . . . . . . . . . . . . . . . . . . . . . . . . . . . . . . . . . . . . .84
atuses
Call St
Reports . . . . . . . . . . . . . . . . . . . . . . . . . . . . . . . . . . . . . . . . . . . . . . . . . . . . . . . . . . . . . . . . . . . . . . . . . . . . . . . . . . . . .
Manual Reports . . . . . . . . . . . . . . . . . . . . . . . . . . . . . . . . . . . . . . . . . . . . . . . . . . . . . . . . . . . . . . . . . . . . . . . . . . .88
AutoReports
Tasks . . . . . . . . . . . . . . . . . . . . . . . . . . . . . . . . . . . . . . . . . . . . . . . . . . . . . . . . . . . . . . . . . . . . . . . . . . . . . . . . . . . . . . .93
Creating a Manual Task . . . . . . . . . . . . . . . . . . . . . . . . . . . . . . . . . . . . . . . . . . . . . . . . . . . . . . . . . . . . . . . . . . . .94
Automating a Task . . . . . . . . . . . . . . . . . . . . . . . . . . . . . . . . . . . . . . . . . . . . . . . . . . . . . . . . . . . . . . . . . . . . . . . .100
ed Message (.vft only) . . . . . . . . . . . . . . . . . . . . . . . . . . . . . . . . . . . . . . . . . . . . . . . . .76-79
. . . . . . . . . . . . . . . . . . . . . . . . . . . . . . . . . . . . . . . . . . . . . . . . . . . . . . . . . . . . . . . . . . . . . . . . . . . . . .
. . . . . . . . . . . . . . . . . . . . . . . . . . . . . . . . . . . . . . . . . . . . . . . . . . . . . . . . . . . . . . . . . . . . . . . . . . . . . .
85
87
90
3
Page 4

Table of Contents, continued
Views . . . . . . . . . . . . . . . . . . . . . . . . . . . . . . . . . . . . . . . . . . . . . . . . . . . . . . . . . . . . . . . . . . . . . . . . . . . . . . . . . . . . . .103
Creating a Custom View . . . . . . . . . . . . . . . . . . . . . . . . . . . . . . . . . . . . . . . . . . . . . . . . . . . . . . . . . . . . . . . . . . .104
Remote Operation . . . . . . . . . . . . . . . . . . . . . . . . . . . . . . . . . . . . . . . . . . . . . . . . . . . . . . . . . . . . . . . . . . . . . . . . . . .107
≠nabling Remote Operation . . . . . . . . . . . . . . . . . . . . . . . . . . . . . . . . . . . . . . . . . . . . . . . . . . . . . . . . . . . . . . . .108
≠nabling a Line as a Call-In Line . . . . . . . . . . . . . . . . . . . . . . . . . . . . . . . . . . . . . . . . . . . . . . . . . . . . . . . . . . . .109
Configuring Remote Options . . . . . . . . . . . . . . . . . . . . . . . . . . . . . . . . . . . . . . . . . . . . . . . . . . . . . . . . . . . . . . . .110
Calling In . . . . . . . . . . . . . . . . . . . . . . . . . . . . . . . . . . . . . . . . . . . . . . . . . . . . . . . . . . . . . . . . . . . . . . . . . . . . . . . . .111
PhoneTree Remote Menu . . . . . . . . . . . . . . . . . . . . . . . . . . . . . . . . . . . . . . . . . . . . . . . . . . . . . . . . . . . . . . . . . . .111
OnDemand . . . . . . . . . . . . . . . . . . . . . . . . . . . . . . . . . . . . . . . . . . . . . . . . . . . . . . . . . . . . . . . . . . . . . . . . . . . . . . . . .113
Setting Up an Account . . . . . . . . . . . . . . . . . . . . . . . . . . . . . . . . . . . . . . . . . . . . . . . . . . . . . . . . . . . . . . . . . . . . .114
Submitting a Call Job: Using ≠asy Call . . . . . . . . . . . . . . . . . . . . . . . . . . . . . . . . . . . . . . . . . . . . . . . . . . . . . . . .121
Submitting a Call Job: Using the Call Wizard . . . . . . . . . . . . . . . . . . . . . . . . . . . . . . . . . . . . . . . . . . . . . . . . . .125
Getting Call Results: Active Jobs . . . . . . . . . . . . . . . . . . . . . . . . . . . . . . . . . . . . . . . . . . . . . . . . . . . . . . . . . . . . .126
Getting Call Results: Merging Results . . . . . . . . . . . . . . . . . . . . . . . . . . . . . . . . . . . . . . . . . . . . . . . . . . . . . . . .127
Getting Call Results: Completed Jobs . . . . . . . . . . . . . . . . . . . . . . . . . . . . . . . . . . . . . . . . . . . . . . . . . . . . . . . . .128
PhoneTree Client (2500 & 3500 Only) . . . . . . . . . . . . . . . . . . . . . . . . . . . . . . . . . . . . . . . . . . . . . . . . . . . . . . . . .131
Initial Setup: Host PC Configurations . . . . . . . . . . . . . . . . . . . . . . . . . . . . . . . . . . . . . . . . . . . . . . . . . . . . . . . .132
Initial Setup: Remote PC Configurations . . . . . . . . . . . . . . . . . . . . . . . . . . . . . . . . . . . . . . . . . . . . . . . . . . . . . .134
Initial Setup: Client Configurations (Remote PC) . . . . . . . . . . . . . . . . . . . . . . . . . . . . . . . . . . . . . . . . . . . . . .136
Initial Setup: Call Options (Remote PC) . . . . . . . . . . . . . . . . . . . . . . . . . . . . . . . . . . . . . . . . . . . . . . . . . . . . . .138
Daily Operation: Starting a Call Job (Remote PC) . . . . . . . . . . . . . . . . . . . . . . . . . . . . . . . . . . . . . . . . . . . . . .144
Daily Operation: Checking Call Status (Remote PC) . . . . . . . . . . . . . . . . . . . . . . . . . . . . . . . . . . . . . . . . . . . .145
Reference: Importing Data (Remote PC) . . . . . . . . . . . . . . . . . . . . . . . . . . . . . . . . . . . . . . . . . . . . . . . . . . . . . .148
Reference: The Call Status Screen (Remote PC) . . . . . . . . . . . . . . . . . . . . . . . . . . . . . . . . . . . . . . . . . . . . . . . .151
Troubleshooting . . . . . . . . . . . . . . . . . . . . . . . . . . . . . . . . . . . . . . . . . . . . . . . . . . . . . . . . . . . . . . . . . . . . . . . . . . . .153
Line Card Not Found . . . . . . . . . . . . . . . . . . . . . . . . . . . . . . . . . . . . . . . . . . . . . . . . . . . . . . . . . . . . . . . . . . . . . .154
Please Connect Telephone Cord . . . . . . . . . . . . . . . . . . . . . . . . . . . . . . . . . . . . . . . . . . . . . . . . . . . . . . . . . . . . .156
Call Remote Won’t Answer . . . . . . . . . . . . . . . . . . . . . . . . . . . . . . . . . . . . . . . . . . . . . . . . . . . . . . . . . . . . . . . . .158
OnDemand . . . . . . . . . . . . . . . . . . . . . . . . . . . . . . . . . . . . . . . . . . . . . . . . . . . . . . . . . . . . . . . . . . . . . . . . . . . . . .160
PhoneTree Client . . . . . . . . . . . . . . . . . . . . . . . . . . . . . . . . . . . . . . . . . . . . . . . . . . . . . . . . . . . . . . . . . . . . . . . . .164
Checking DIP Switches . . . . . . . . . . . . . . . . . . . . . . . . . . . . . . . . . . . . . . . . . . . . . . . . . . . . . . . . . . . . . . . . . . . .166
Appendices . . . . . . . . . . . . . . . . . . . . . . . . . . . . . . . . . . . . . . . . . . . . . . . . . . . . . . . . . . . . . . . . . . . . . . . . . . . . . . . . .169
≠diting an Icon . . . . . . . . . . . . . . . . . . . . . . . . . . . . . . . . . . . . . . . . . . . . . . . . . . . . . . . . . . . . . . . . . . . . . . . . . . .170
Text Messaging . . . . . . . . . . . . . . . . . . . . . . . . . . . . . . . . . . . . . . . . . . . . . . . . . . . . . . . . . . . . . . . . . . . . . . . . . . . .171
Blocking Numbers . . . . . . . . . . . . . . . . . . . . . . . . . . . . . . . . . . . . . . . . . . . . . . . . . . . . . . . . . . . . . . . . . . . . . . . . .172
Activating Line 2 for G2PT Hardware . . . . . . . . . . . . . . . . . . . . . . . . . . . . . . . . . . . . . . . . . . . . . . . . . . . . . . . .173
Backing Up/Restoring Your PhoneTree System . . . . . . . . . . . . . . . . . . . . . . . . . . . . . . . . . . . . . . . . . . . . . . . .174
Warranty Information . . . . . . . . . . . . . . . . . . . . . . . . . . . . . . . . . . . . . . . . . . . . . . . . . . . . . . . . . . . . . . . . . . . . . . .177
Regulatory Information . . . . . . . . . . . . . . . . . . . . . . . . . . . . . . . . . . . . . . . . . . . . . . . . . . . . . . . . . . . . . . . . . . . . . .181
. . . . . . . . . . . . . . . . . . . . . . . . . . . . . . . . . . . . . . . . . . . . . . . . . . . . . . . . . . . . . . . . . . . . . . . . . . . . . . . . . . . . . .
Index
185
4
Page 5

Introduction
5
Page 6

Introduction
Welcome!
Thank you for choosing PhoneTree to deliver your important messages! This guide has been designed to
take you step-by-step through the basic required setup of your PhoneTree system, including the
pre-configuration steps necessary to complete before calls can take place, as well as daily operation and
common questions. For further information on certain features that are not discussed in this guide, you can
search the help files located within the PhoneTree software or visit our website at
We are always improving our product and support materials. For the latest updates for this User Guide,
please visit
www.phonetree.com/customersupport/downloads.htm.
Contacting Us
We’re here to help if you ever have questions. Keep the following contact information handy and let us
know anytime you have a question, comment or concern.
Toll-Free Customer Support . . . . . . . . .866.234.2943
Fax . . . . . . . . . . . . . . . . . . . . . . . . . . . . .800.245.4221
≠-Mail . . . . . . . . . . . . . . . . . . . . . . . . . [email protected]
USPS . . . . . . . . . . . . . . . . . . . . . . . . . . .PhoneTree
2400 Reynolda Rd
Winston-Salem, NC 27106
Notice of Liability
The information in this book is intended to be accurate and useful with the operation of your PhoneTree.
Personal Communication Systems, Inc. shall not have any liability for loss or damage caused by directly or
indirectly using the instructions contained within this book or by the computer software and hardware
products described in it.
www.phonetree.com.
Trademarks
The trademarked names used in this book are used for editorial purposes only and to the benefit of the
trademarked owner with no intention of infringement of the trademark. We further state that PhoneTree,
PhoneTree 2100, PhoneTree 2500, PhoneTree 2500 S≠, PhoneTree 3500, PhoneTree 3500 S≠, PhoneTree
PT-400, PhoneTree G2PT, PhoneTree Client, PhoneTree OnDemand and the PhoneTree logo are all
trademarks of Personal Communication Systems, Inc.
6
Page 7

Installation
7
Page 8
Installation: Check System Requirements
Step One: Check System Requirements
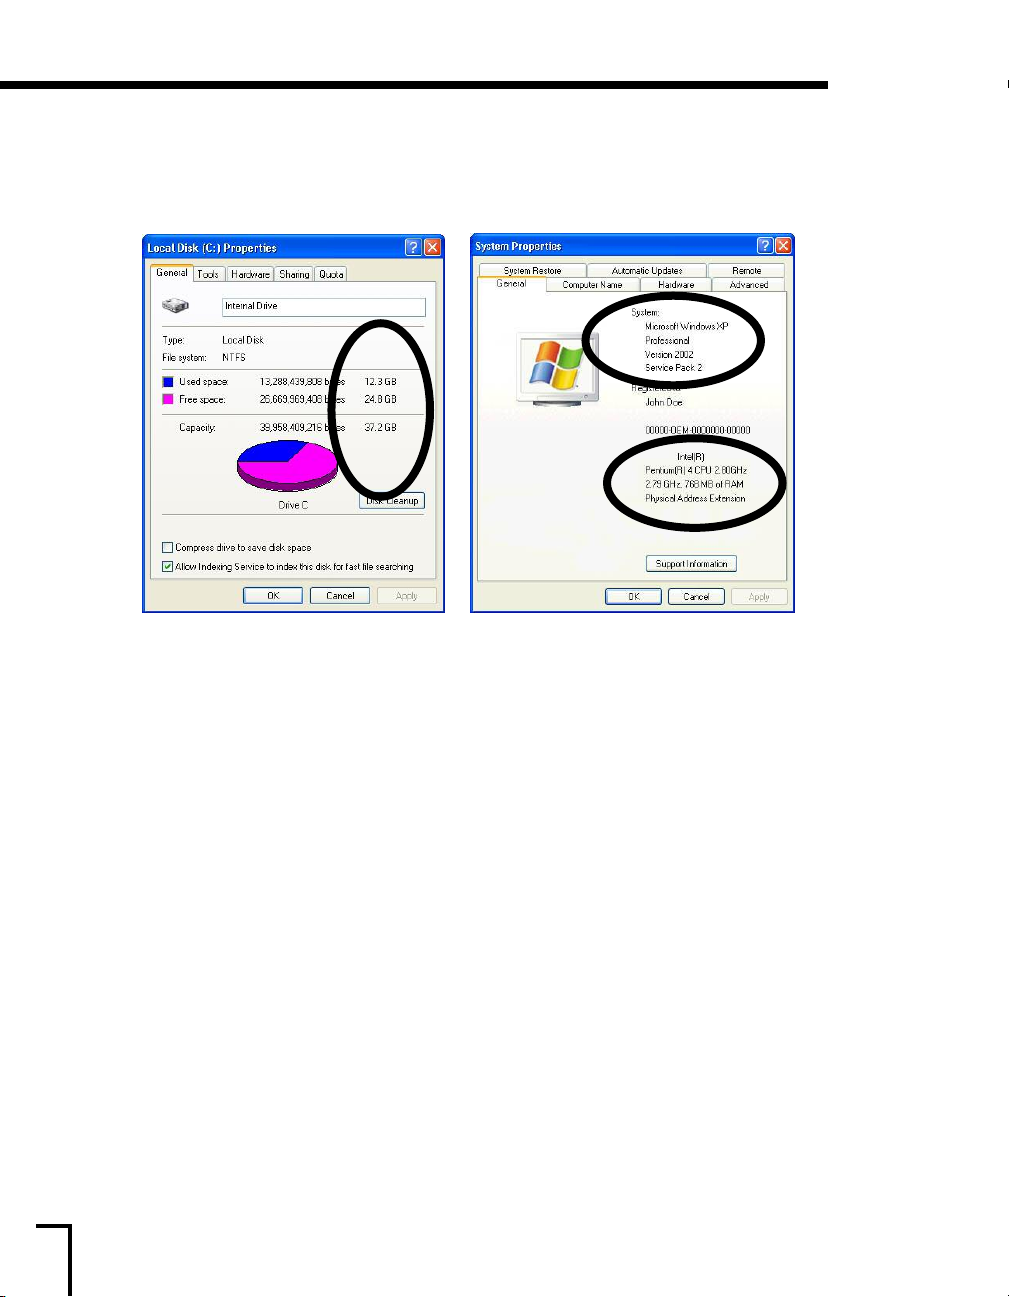
PhoneTree requires a minimum set of requirements from your system in order to work correctly. If
your PC has fewer than these requirements, your PhoneTree system may not complete certain
tasks well or at all.
System Requirements (Minimum)
• Intel Pentium 4 or equivalent processor
• Windows 2000, Windows XP, Windows Server 2003, or Windows Vista
PhoneTree is not compatible with Windows 3.1, Windows 95, Windows 98, Windows M≠,
Windows NT, or Mac OS.
• RAM: 2000 . . . . . . . . . . . 512 MB
XP . . . . . . . . . . . . . 512 MB
Server 2003 . . . . . 512 MB
Vista . . . . . . . . . . . 1 GB
• Hard Drive Space: 1 GB
• CD ROM Drive
• Color Monitor (SVGA) with 1024 x 768 resolution
• One USB port per unit.
Note: If you do not have any available USB ports, you will need to purchase a new host
controller card. There is a max of 12 lines (3 PT-400 units or 6 G2PT units)
controller card
In addition to the abo
• Configured and installed on the client network.
• Able to access the Internet for initial configuration, to receive online training and in case of
any future technic
Note: PhoneTree is designed t
compatibility or problem-free operation with other programs.
(true dual [or quad]). For more information, please contact Customer Support.
ements, the computer hosting PhoneTree must be:
equir
e r
v
al support needs f
w oper
o allo
om PhoneT
r
ation in the background however,
ree Customer Support.
per host
e cannot guar
w
ant
ee
8
Page 9

Installation: Install the Software
Ins
tal
lat
ion
CD
Step Two: Install the Software
Note to Windows Vista users: User Account Control (UAC) must be disabled before you can
install the PhoneTree software. Please see the
that was included with your package or visit
instructions on how to do this.
1. Insert the CD
Insert the PhoneTree Installation CD into your CD-ROM drive. The Installer Menu should
start automatically. Choose
(found on the inside of the software case) when prompted. If it does not start automatically,
click on Start
click OK. The Installer Menu should then launch.
To install
software for limited remote access of your PhoneTree system from a networked PC (see page
131), launch the Installer Menu from that PC.
Choose the Default Settings
2.
Click on Next several times until the installation process starts. In order to assure reliable
operation and ease of service, please DO NOT change the default installation information as it
is presented.
£ Run £ Browse... £ Installer.exe (look for this file on the CD) £ click Open £
Adobe Reader, relaunch the Installer Menu. If you plan to use the PhoneTree Client
Install PhoneTree Software and enter the supplied Serial Key
3. Finish Installation
If asked, choose “Yes, I want to restart my computer now” and click Finish. Do not start the
PhoneTree program at this time.
4. Install Female and Male Voice Text-to-Speech (3500 only)
Repeat t
his proc
ess for
both t
he Female
Installing PhoneTree on Windows Vista insert
www.phonetree.com/customersupport for
ale Voice CDs
and M
.
9
Page 10
Installation: Connect the Hardware
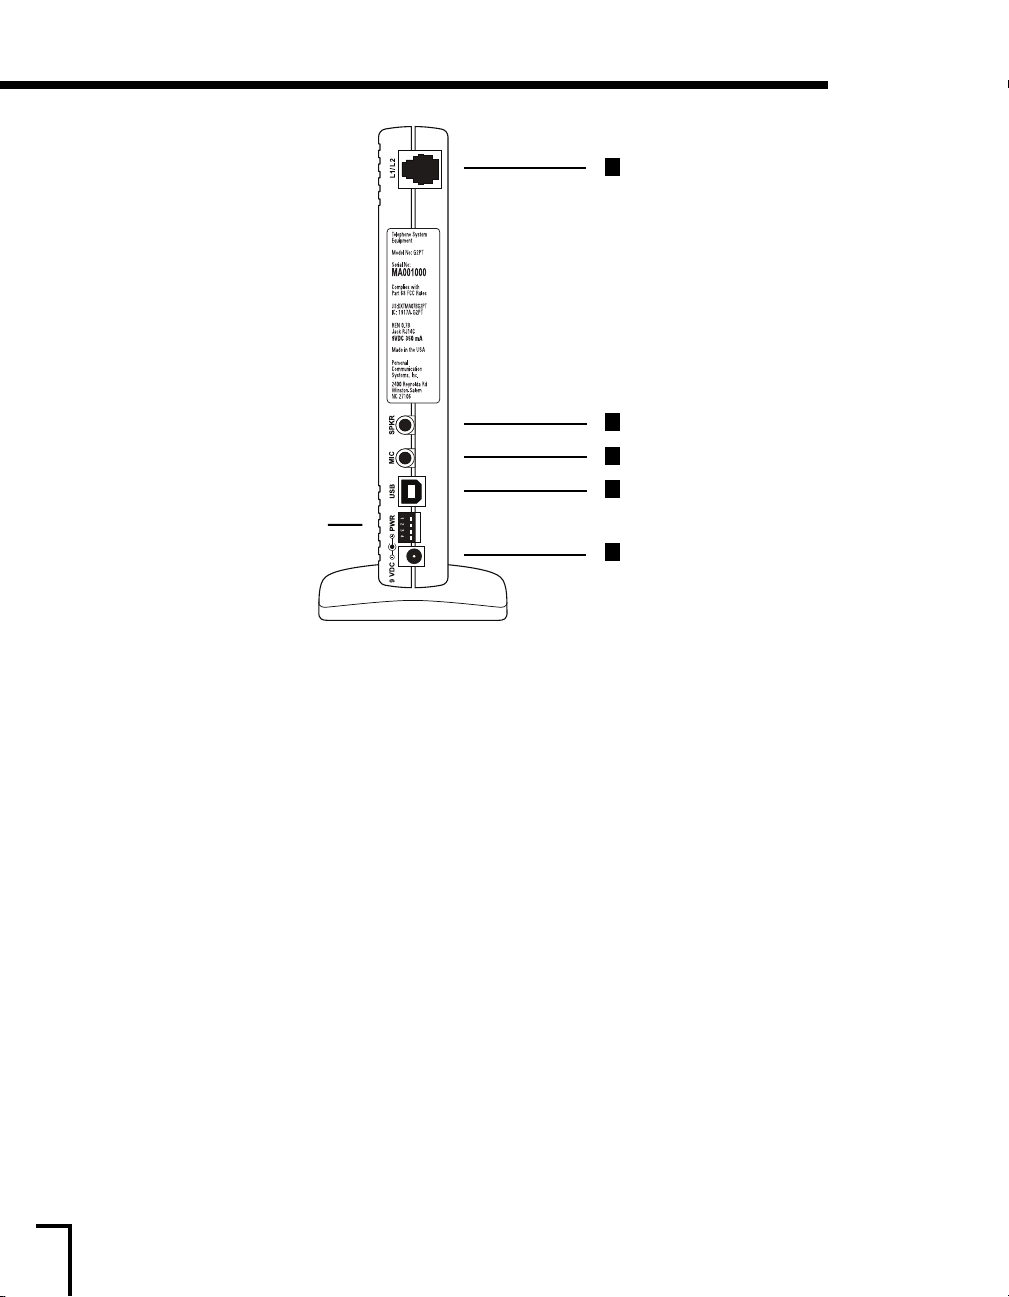
Hardware Model: G2PT
DIP Switches
(See warning below)
a
Phone Line Jack
d
Headphone/Speaker Jack
e
Microphone Jack
USB Cable Jack
b
c
Power Adapter Jack
Step Three: Connect the Hardware
G2PT
1. Connect the phone cable
The G2PT’s single phone jack design (a) has the ability to be configured for 1 or 2 Line capacity.
Please see page 14 for instructions on how to connect to various wall jack configurations.
Connect the USB cable
2.
Using the supplied USB cable, connect the flat end to an available USB port on your PC and the
square end to the PhoneTree’s USB cable jack
hardware box (
if all of your USB ports are in use, see page 8).
3. Connect the power adapter
Connect the supplied power adapter to the PhoneTree’s power adapter jack (c) and then insert it
into a wall power outlet or power strip.
4. Connect the headset micr
Using the supplied headset microphone, connect the Headphone plug, or a set of computer
speakers, into the SPKR jack
located right below the SPKR jack.
microphone or speak
er set, is c
ophone
(d). Next, connect the Microphone plug into the MIC jack (e),
Note: If using more than one unit, make sure that the headset
onnected to the unit that contains lines 1-2.
Caution! (DIP Switches)
The DIP (Dual In-Line Package) Switches are pre-configured from PCS and should only be adjusted
if there is an installation problem as described on page 18.
DIP Switches, please see page 166.
(b). A USB cable is required for each PhoneTree
For information on how to properly set the
10
Page 11
Hardware Model: PT-400
Installation: Connect the Hardware, continued
a
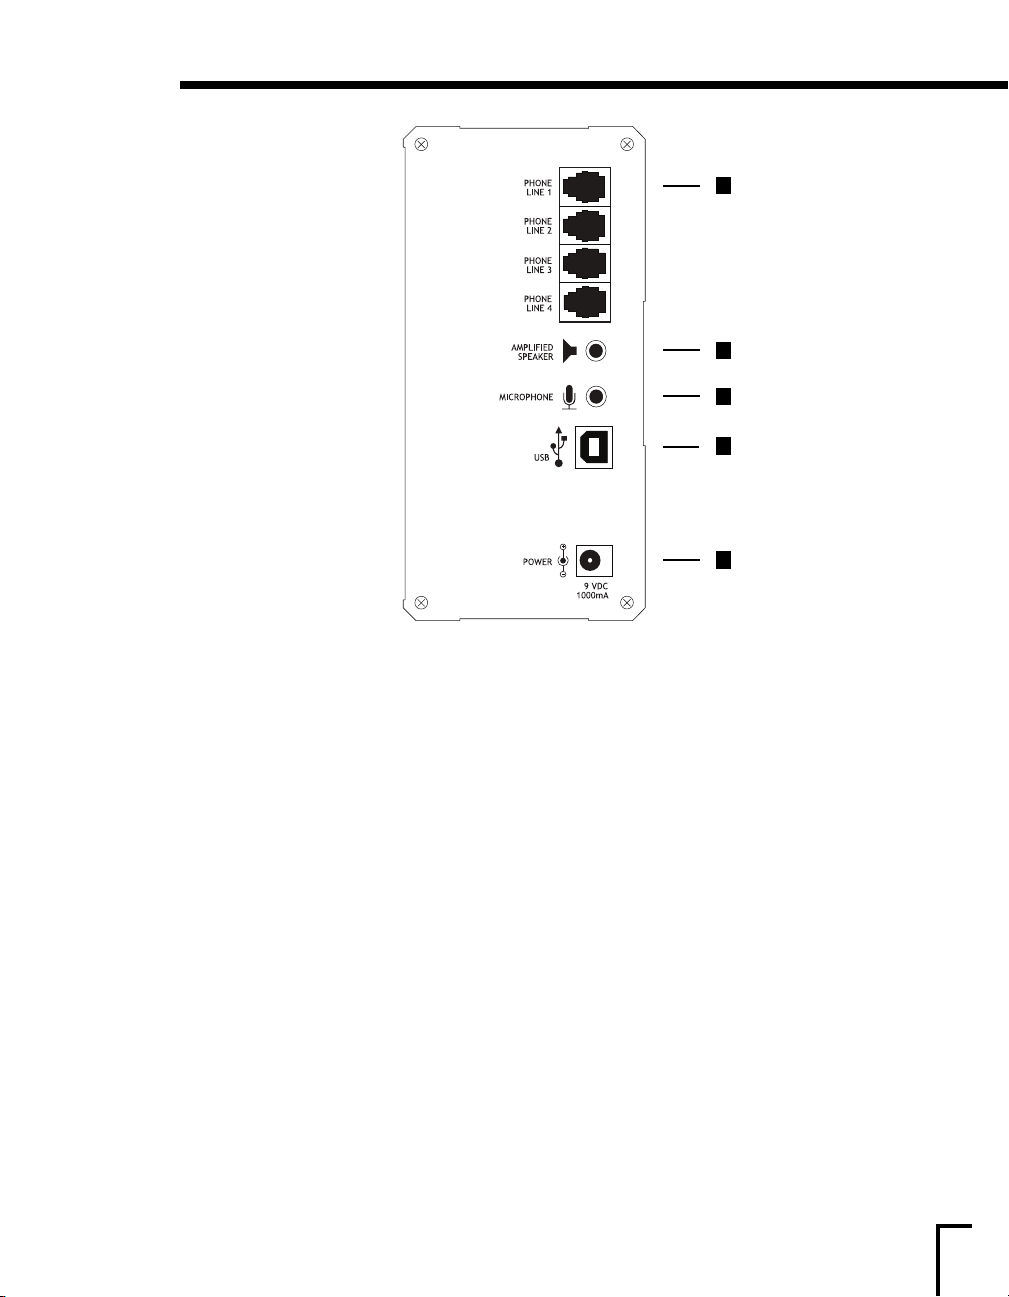
Phone Line Jack
d
Headphone/Speaker Jack
e
Microphone Jack
b
USB Cable Jack
c
Power Adapter Jack
PT-400
1. Connect the phone cable
Connect an analog phone cable to each enabled phone jack. Depending on the number of lines
you ordered for your PhoneTree hardware, all phone jacks on the back of each PT-400 unit
may not be enabled.
2. Connect the USB cable
Using the supplied USB cable, connect the flat end to an available USB port on your PC and the
square end to the PhoneTree’s USB cable jack
hardware box (
if all of your USB ports are in use, see page 8).
3. Connect the power adapter
Connect the supplied power adapter to the PhoneTree’s power adapter jack (c) and then insert it
into a wall power outlet or power strip.
4. Connect the headset microphone
Using the supplied
speakers, into the Speaker jack
jack
(e), located just below the Speaker jack.
Note: If using more than one unit, make sure that the headset microphone or speaker set, is
connected to the unit that contains lines 1-4.
headset microphone, connect the Headphone plug, or a set of computer
(d). Next, connect the Microphone plug into the Microphone
(b). A USB cable is required for each PhoneTree
11
Page 12
Installation: Install the Hardware Drivers
Step Four: Install the Hardware Drivers
After the hardware steps on the previous page are completed, your computer may prompt you for
permission to install the hardware drivers for Windows. Check with your IT personnel to make sure
the Windows user login you plan to run PhoneTree with has the correct permissions associated with
it. If the permissions are not set high enough, Windows will prevent you from moving further with
the installation.
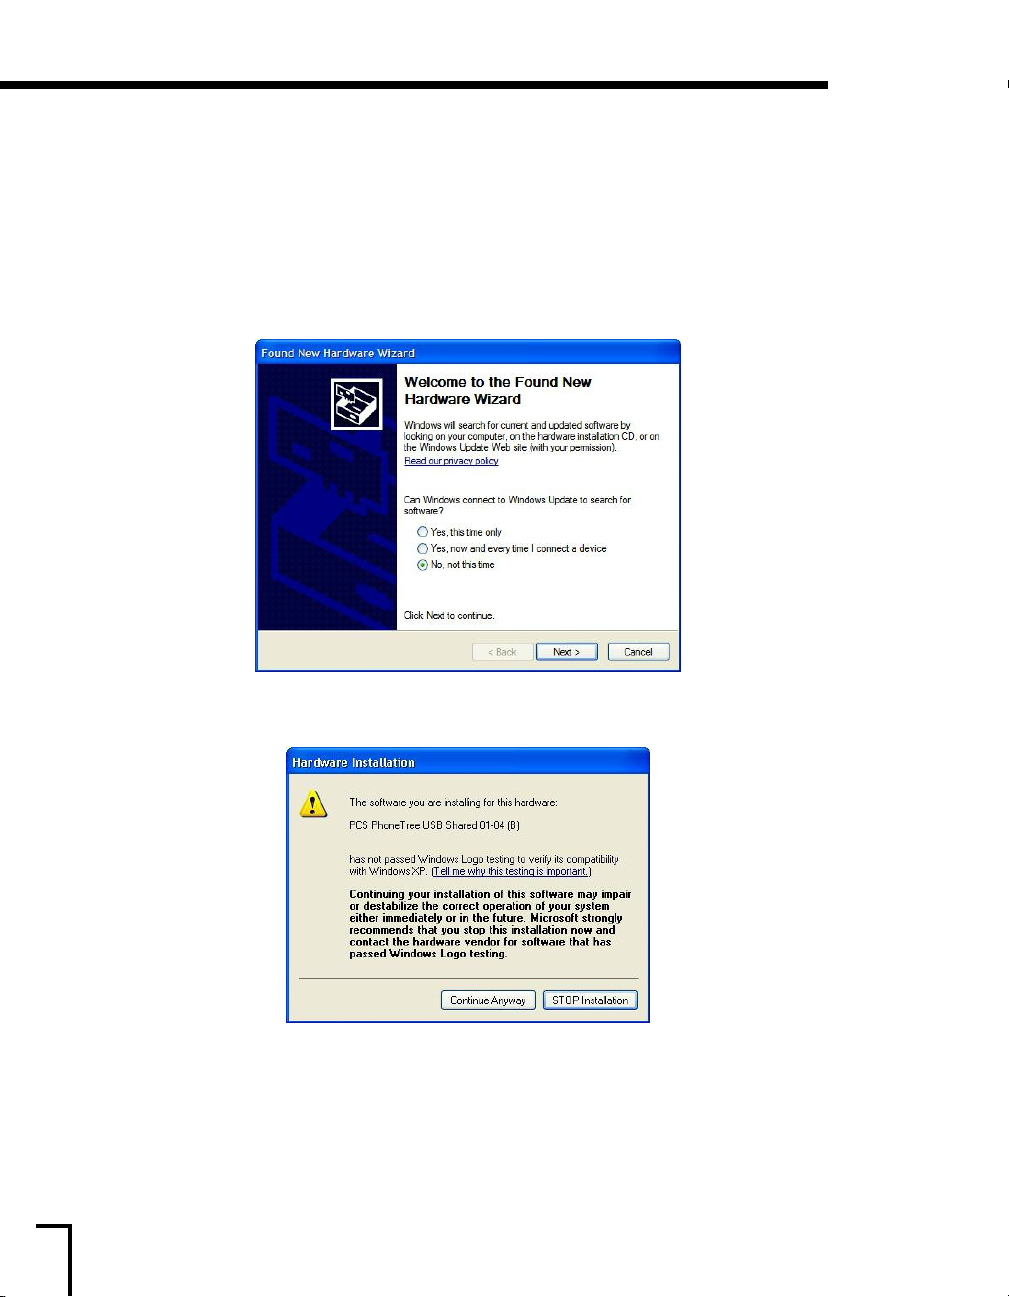
If you are running Windows XP, you will be required to install the drivers manually:
Windows XP (with Service Pack 2)
Choose
(Recommended)
Next, y
is 100% safe to install the PhoneTree drivers on your computer. Click
Windows will prompt you to do this several times until the hardware is fully installed.
Note: If you accidentally pressed STOP Installation, unplug the power adapter from the PhoneTree
box for about 10 seconds and then reinsert it. You should see Windows detect the hardware again and
then just follow the steps listed above.
No, not this time and click Next. Choose Install the software automatically
, then click Next.
ou will be informed that the drivers have not passed Windows Logo testing. Be assured that it
Continue Anyway to proceed.
12
Page 13
Installation: Install the Hardware Drivers, continued
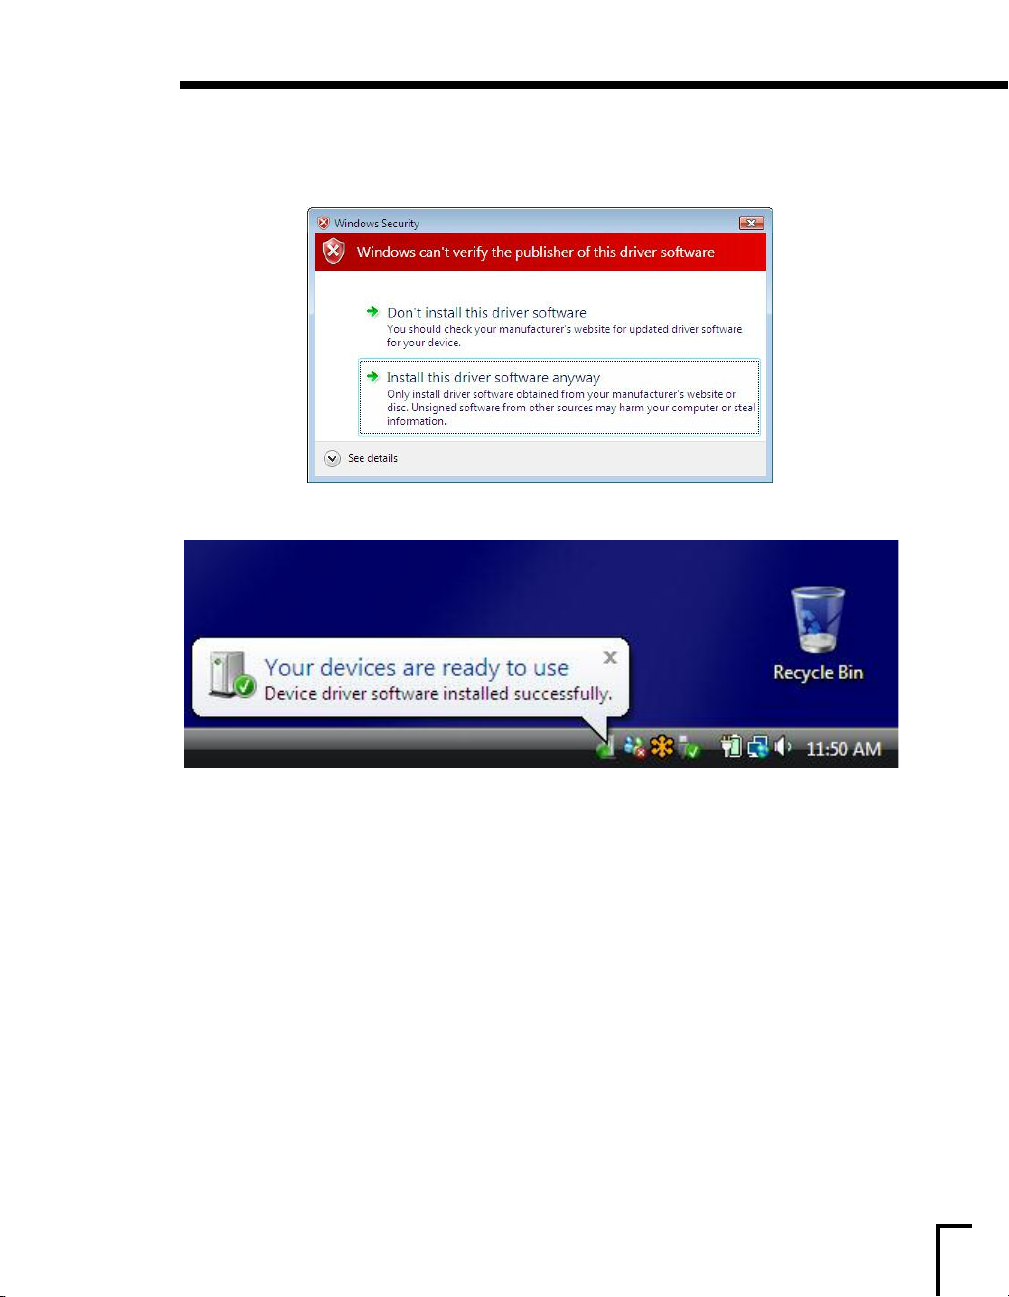
Windows Vista
You may receive the warning screen below. Be assured that it is 100% safe to install PhoneTree on
your PC.
Please click Install this driver software anyway.
It may take a few minutes for Windows to recognize the PhoneTree device drivers. When you see
the above message appear in the lower right corner of the screen, the PhoneTree hardware has
been successfully installed.
13
Page 14
Installation: Connect Analog Phone Cable
Step Five: Connect Analog Phone Cable
G2PT
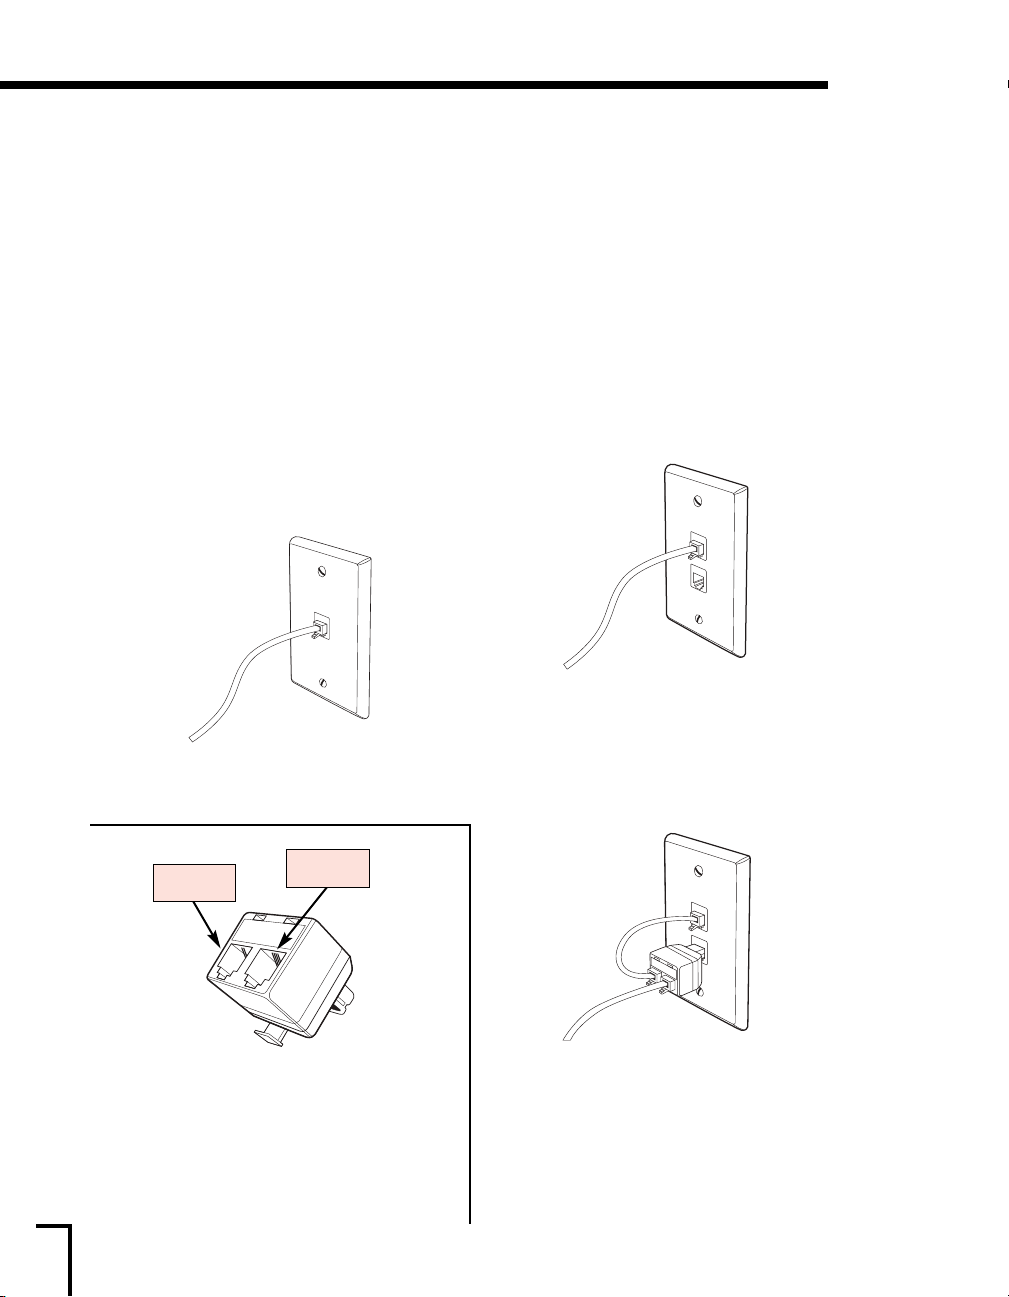
The G2PT’s single phone jack design allows it to be used for either a 1 or 2 line system. The
number of PhoneTree lines you purchased will determine how many PhoneTree hardware units
you have. For example, if you have ordered a 4-line PhoneTree system, you will have two
PhoneTree units: one unit representing lines 1-2 and the other for lines 3-4. By using the supplied
cables and adapter, each PhoneTree unit can be configured to work with most any analog wall jack.
Using the examples below, choose the wall jack configuration that you will use and connect your
analog phone cable(s) as instructed.
Note: These illustrations represent connections for one G2PT PhoneTree hardware unit. If you
have more than one PhoneTree unit, you will need additional wall jacks enabled for each unit.
Single, Analog Wall Jack
(1-Line PhoneTree Unit)
or
Single, 2-Line Analog Wall Jack
(2-Line PhoneTree Unit)
Connect PhoneTree to the wall jack
using the 7-foot phone cable.
2-Wire Jack
4-Wire Jack
Duplex Analog Wall Jack
(1-Line PhoneTree Unit)
Connect PhoneTree to either wall
jack using the 7-foot phone cable.
Duplex Analog Wall Jack
(2-Line PhoneTree Unit)
Duplex Adapter
The Duplex Adapt
PhoneTree G2PT unit) has been specially
wired for exclusive use with the Duplex Analog
Wall Jack (2-Line) configuration.
serve as a standard splitter.
not found in stores and is only sold directly
from PhoneTree (www.phonetree.com/shop).
er (included wit
14
h each
It will not
This adapter is
Connect PhoneTree to the 4-wire jack
on the duplex adapter using the 7-foot
phone cable.
he adapter into either wall jack.
Plug t
Using the 4-inch phone cable, connect
he 2-
t
o t
t
above).
wir
emaining w
he r
e jack on t
he duplex adapt
all jack (see figur
er
e
Page 15

Installation: Connect Analog Phone Cable, continued
PT-400
Unlike the G2PT model, each phone jack located on the back of the PT-400 (see page 11) represents
one phone jack, or line card, inside the PhoneTree unit. The PT-400 does not require special phone
jack configurations. An individual, analog wall jack is required for each phone line board installed
inside the unit. ≠ven though each PT-400 unit has four phone jacks, all may not be enabled.
15
Page 16

Notes
16
Page 17

Pre-Configuration
Steps
17
Page 18
Pre-Configuration Steps: Verify Device Connection
Pre-Configuration
Before starting the PhoneTree software configurations, we recommend that the following steps are
completed. These steps have been designed to help ensure that your PhoneTree operates at its
fullest potential on your PC.
Step One: Verify Device Connection
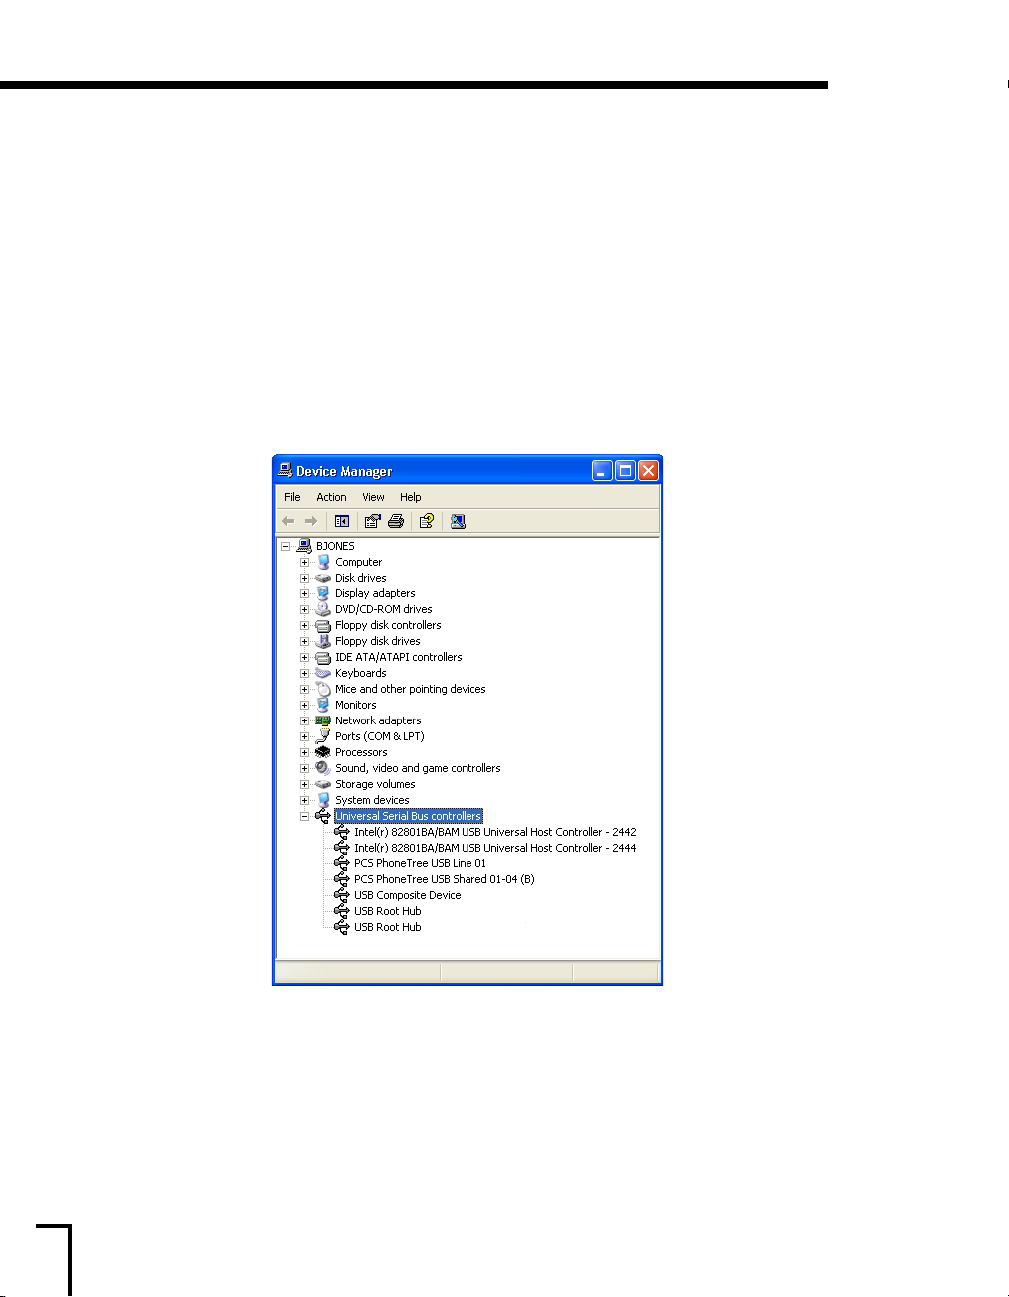
Check to see if your PC recognizes your PhoneTree unit by doing the following:
a. Right-click the My Computer icon on your computer desktop and choose Properties.
b. Click on the Hardware tab and then the Device Manager button. Then scroll down to Universal
Serial Bus controllers.
c. Click on the
+ sign next to its icon.
18
ou should see the following devices (exact descriptions vary) at a minimum:
Y
d.
Host Contr
USB Root Hub
PCS PhoneTree USB Line 01
you have purchased more than 2 lines, follow the instructions in the Troubleshooting:
Checking DIP Switches
Other devices may be present. Leave this window open in order to complete the next step.
oller
(if you do not see the correct number of installed lines AND if
section on page 166).
Page 19
Pre-Configuration Steps: Disable Power Management
Step Two: Disable Power Management
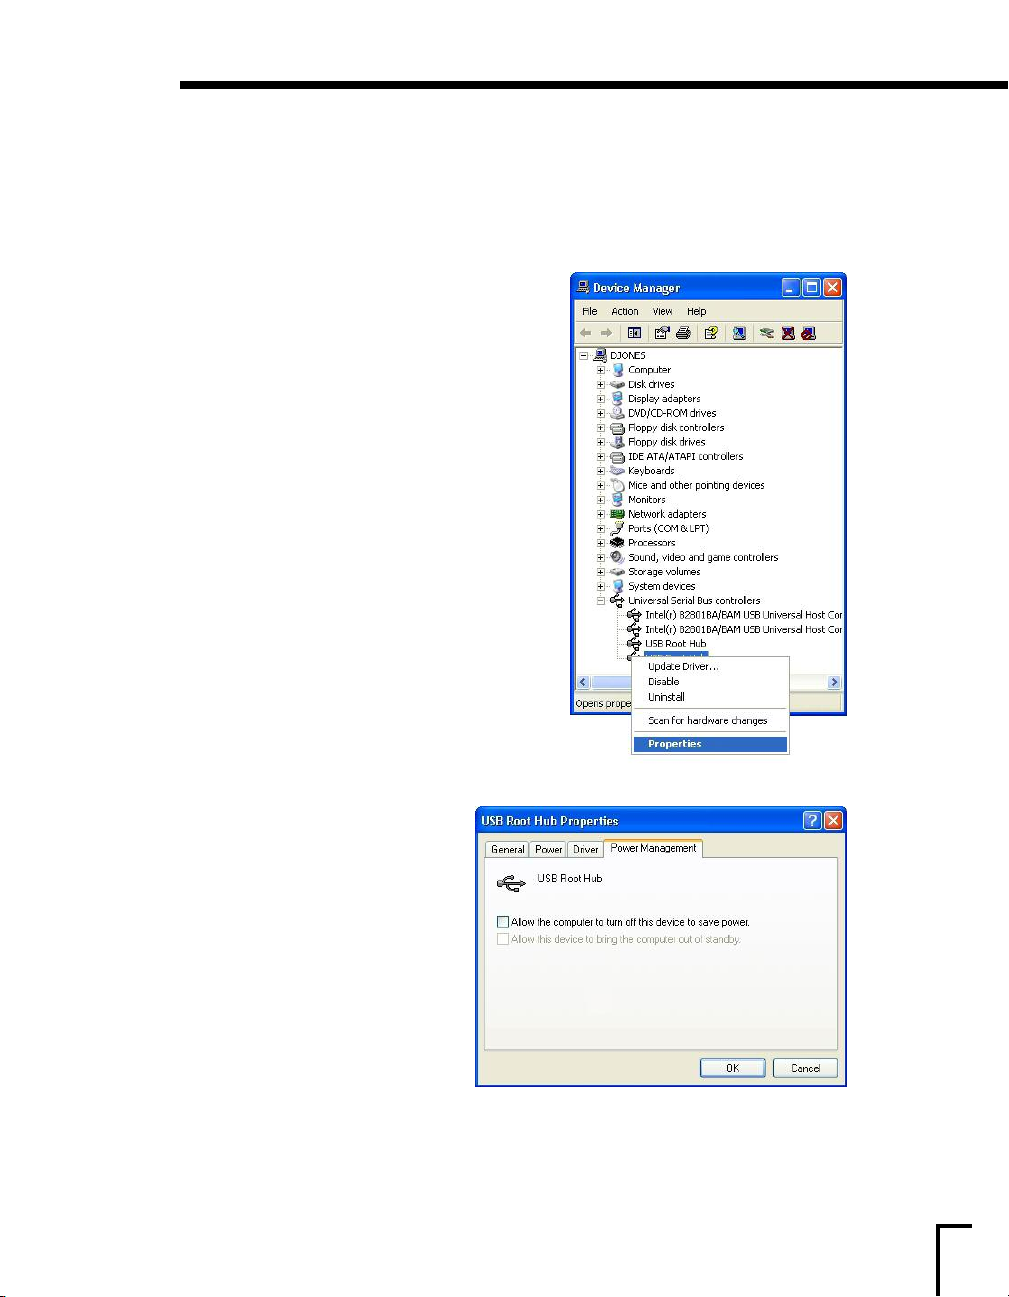
To manage power, Windows will attempt to disable USB functionality when a device is not used. As
the default behavior, this often does not work correctly and may cause Windows to not properly
recognize any USB device (including PhoneTree). Because the default power management setting
often causes problems for PhoneTree and other USB devices and because you already have the
Device Manager open, go ahead and change the setting by completing the following steps:
a. Under the the Universal Serial Bus Controllers
branch, right-click a
Properties (see picture at right).
choose
USB Root Hub, and then
b. Click the
tab.
c.
De-select the “Allow the computer
to turn off this device to save
power” check box (see picture at
right).
d. Repeat Steps a-c for each USB
Root Hub in your Device Manager.
e. Click
Manager.
Power Management
OK, and close the Device
19
Page 20
Pre-Configuration Steps: Turn Off PC Hibernation
Step Three: Turn Off PC
Hibernation
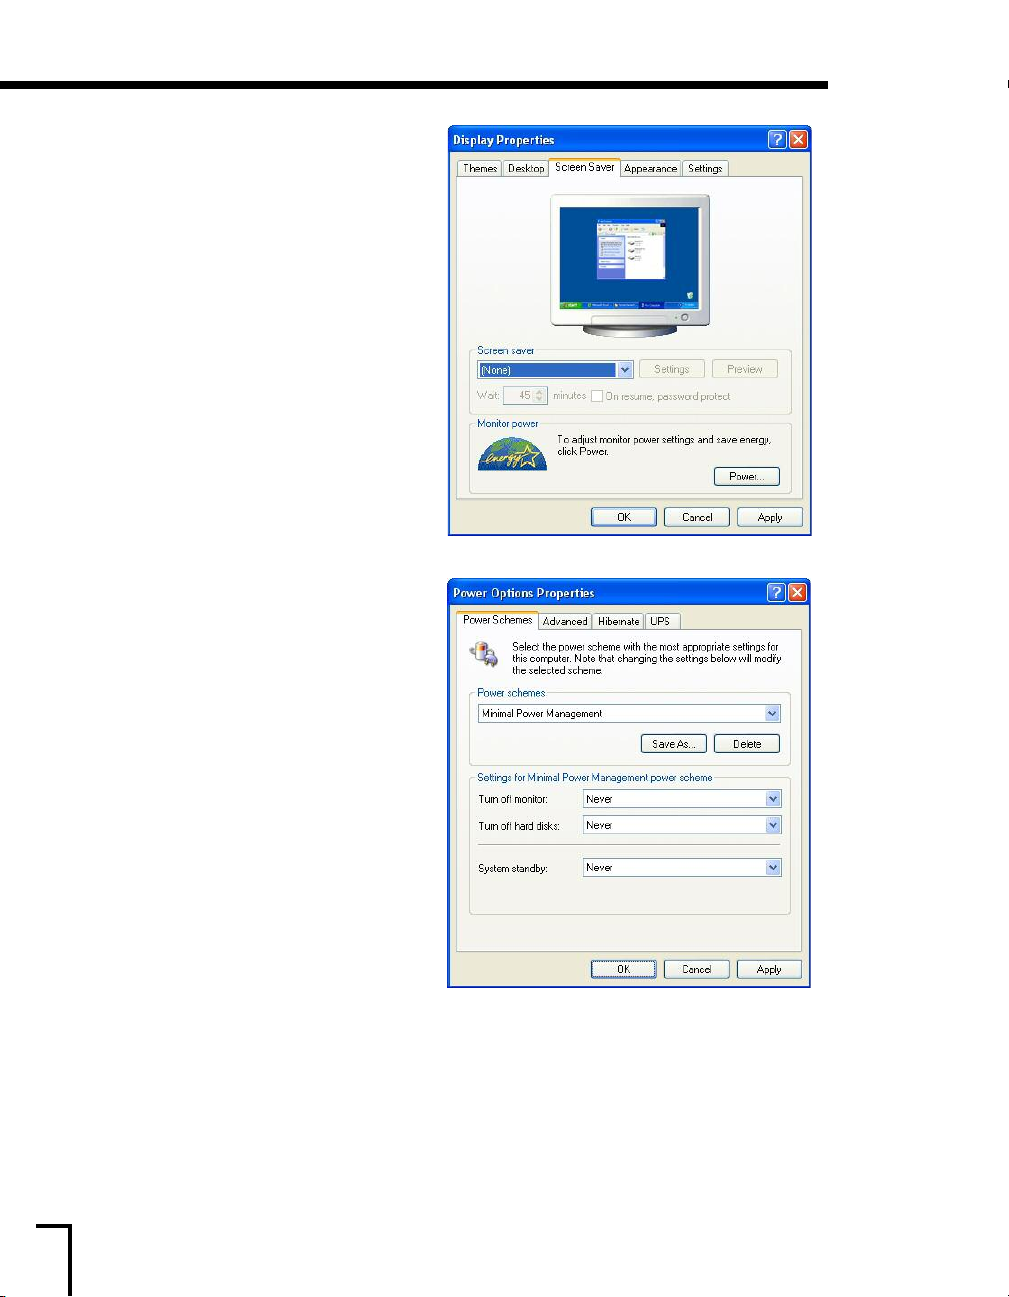
For Windows 2003 & XP:
The Windows hibernation or another power
management function sometimes interferes
with the operation of your PC when left
idle, which can cause problems when using
PhoneTree. To resolve this:
a. Right-click on a blank area of your
desktop and choose
b. Click on the
c. Disable your screen saver by choosing
“
None” from the drop-down, then click
the Power button (see picture at right).
Properties.
Screen Saver tab.
d. Once the
window opens, click on the Power
Schemes
settings for your selected scheme
include the
monitor
System standby (see picture below
right). Now click on the
e. Make sure the
option is NOT selected on this Hibernate
tab. Click
Display Properties screen.
Power Options Properties
tab. Make sure that the
Never setting for Turn off
, Turn off hard disks and
Hibernate tab.
≠nable hibernation
OK, then click OK on the
20
Page 21
Pre-Configuration Steps: Turn Off PC Hibernation, continued
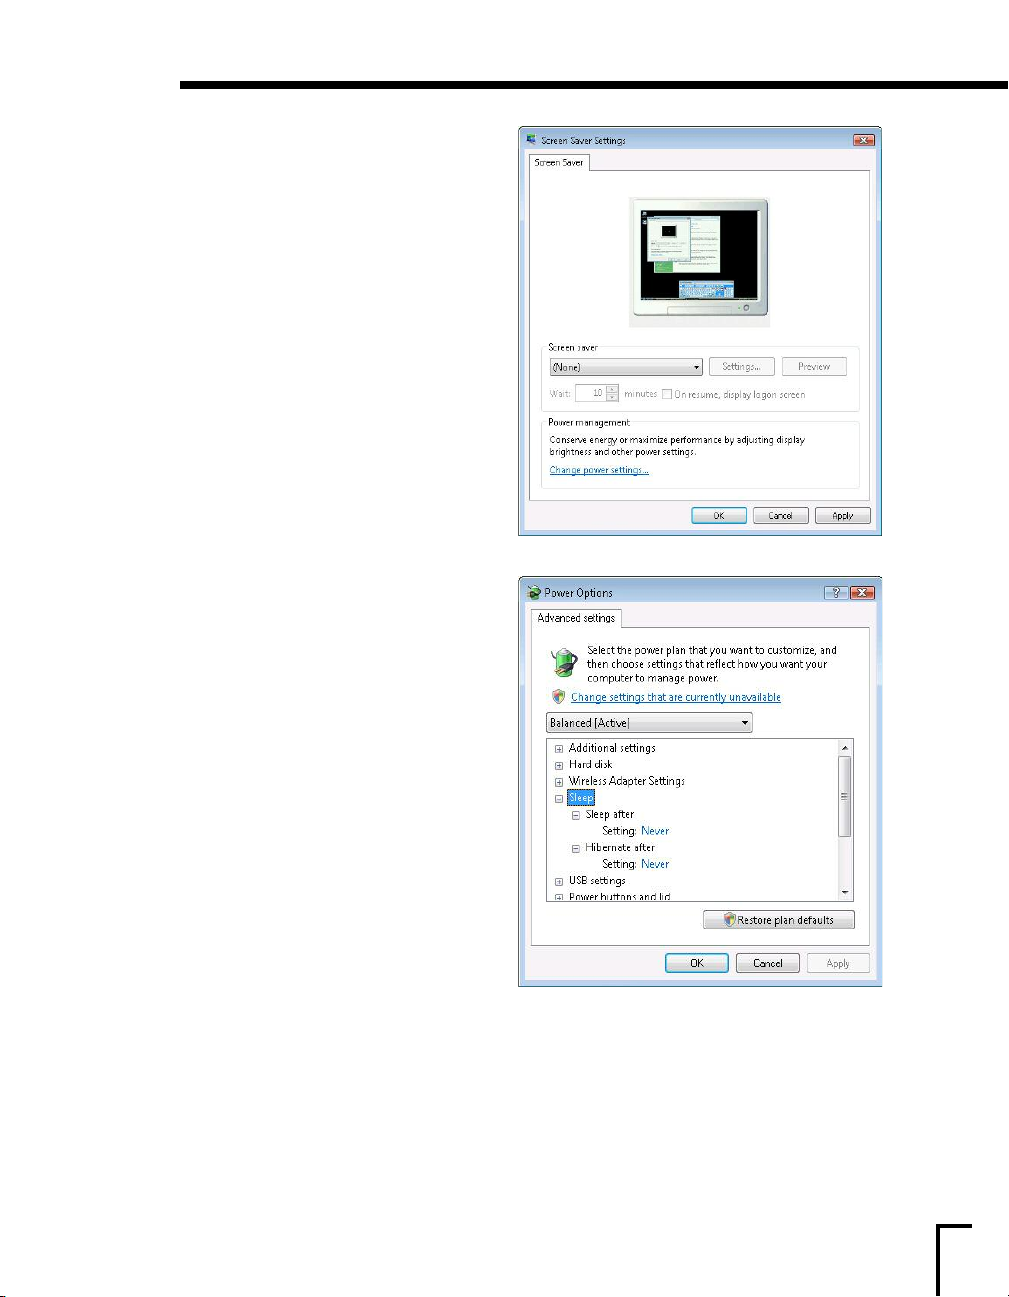
For Windows Vista:
a. Right-click on a blank area of your
desktop and choose
b. Click on the
c. Disable your screen saver by choosing
None from the drop-down, then click on
Change power settings...
d. On the Power Options tab, under
Select a power plan, click Change
plan settings
plan you are using.
e. Once in the
drop-down boxes for
display
to Never. Next, click on Change
advanced power settings
f. From the list of advanced settings, click
the
When finished, click
You will return to the ≠dit Plan Settings tab.
Click
and Put the computer to sleep
+ sign next to the following items:
Hard Disk: set Turn off hard disk
after
to 0 minutes. This will change
the setting to Never.
Sleep: set Sleep after and Hibernate
after
both to 0 minutes.
Display: set Turn off display after to
0 minutes and
Off.
Save changes to exit.
Personalization.
Screen Saver link.
for the current power
≠dit Plan Settings tab, set
Turn off the
.
Adaptive display to
Apply and then OK.
21
Page 22
Pre-Configuration Steps: Get a Copy of Your Phone Book
Step Four: Get a Copy of Your Phone Book
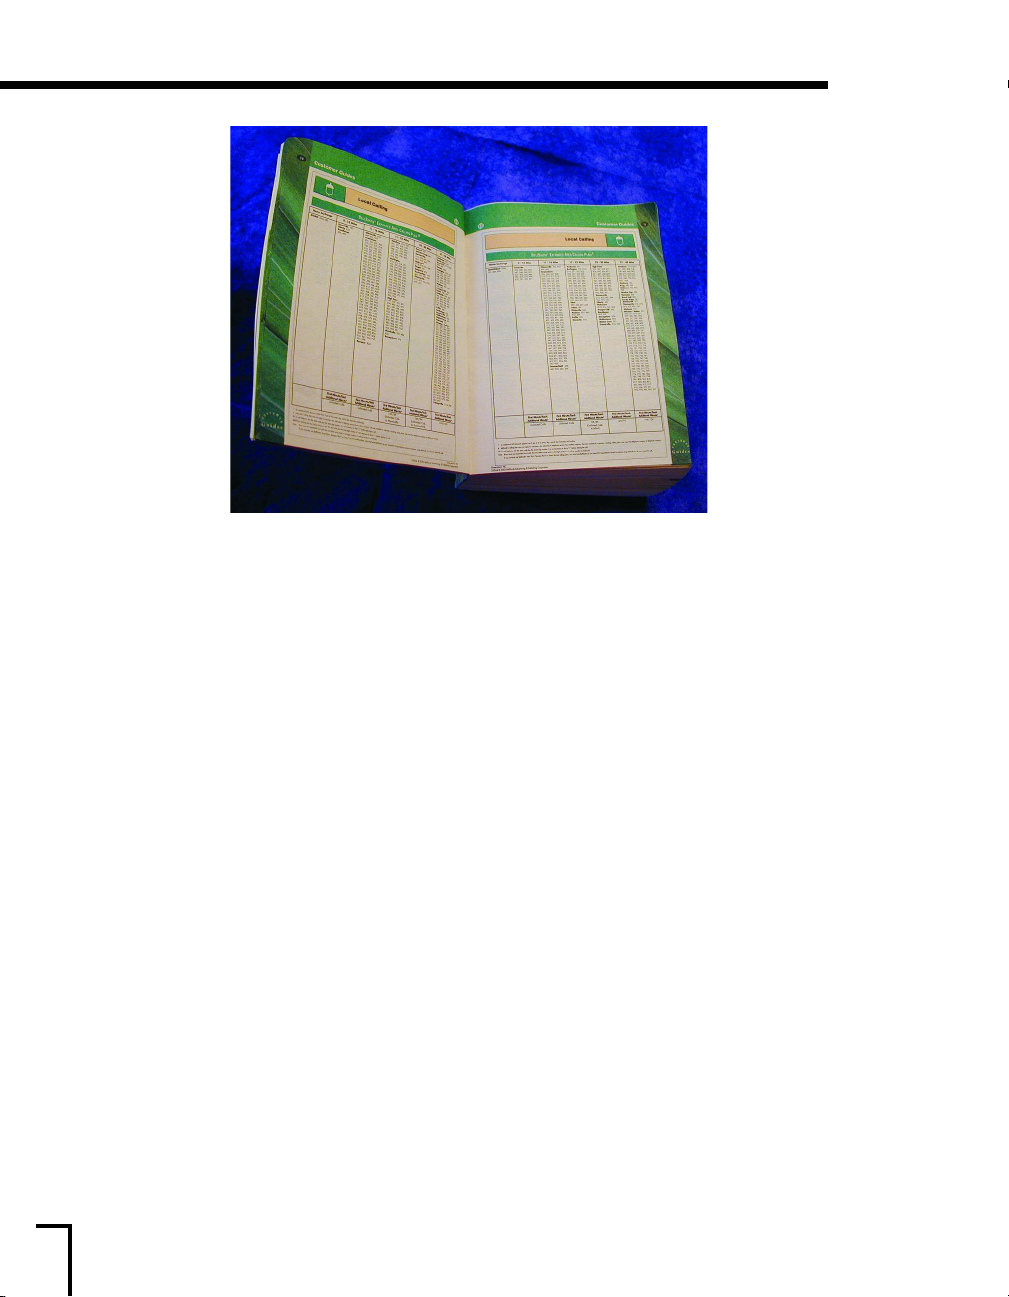
Because the dialing rules are set by independent phone companies, varying from location to location
across the United States, and are continually being updated, you will need to tell PhoneTree how
your numbers must be dialed. This is a one-time setup step that will not need to be repeated unless
the dialing rules change for your location. The easiest way to get the dialing rules for your area is to
get a copy of the phone book issued by your telephone service provider and have it ready when you
complete the configuration steps on page 30. Your phone company may be able to provide a copy of
your phone book if yours has been misplaced.
We have also found the following website helpful in determining local dialing rules, although no
guarantees are made regarding the accuracy of the information:
www.localcallingguide.com.
22
Page 23
Pre-Configuration Steps: Hardware Functionality
PhoneTree Hardware Functionality (While In Use):
G2PT
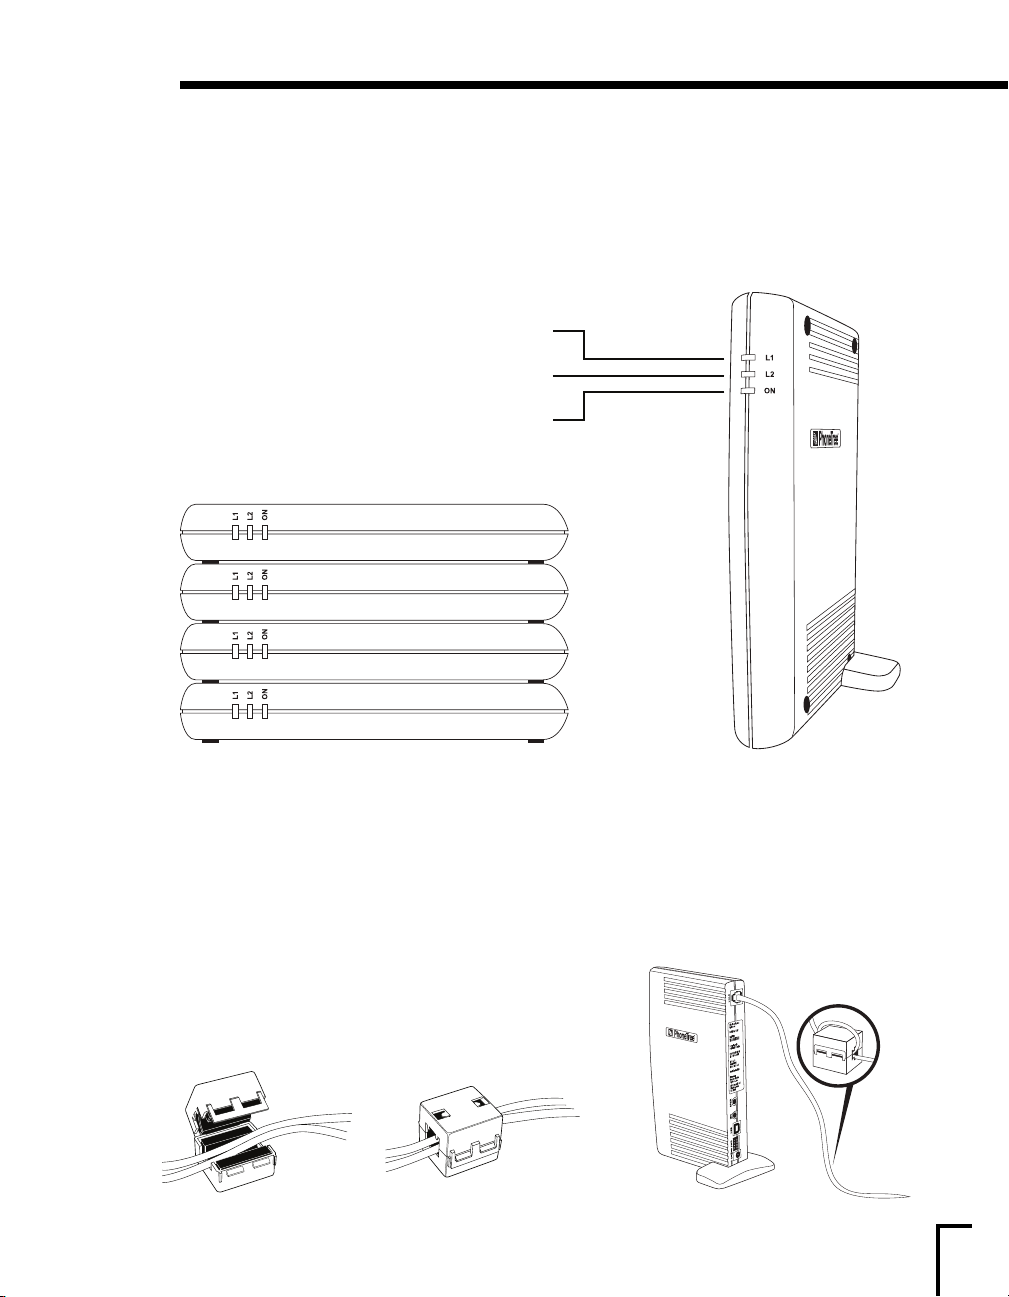
Your PhoneTree unit has been designed to stand upright or, if you have more than one unit, stacked
on its side to save room.
While in operation, your PhoneTree will use the built in L≠Ds to display the activity. Below is a
description for each L≠D and how it functions:
Line 1
Line 2
Power
Stacked PhoneTree Position
(ideal for multiple units)
L1 (Line 1): This yellow light illuminates only while your PhoneTree is making a call on Line 1 and
briefly turns off while switching between calls.
L2 (Line 2): Corresponds to the second phone line (if enabled) and is otherwise the same as Line 1
in color and functionality.
ON (Power): This green light illuminates while your PhoneTree has power, regardless of whether
it is making calls or not.
Standing PhoneTree Position
(ideal for a single unit)
Interference
If your PhoneTree experiences radio interference while
making calls, install a ferrite clip on the phone cable close
to the PhoneTree’s phone jack.
23
Page 24
Pre-Configuration Steps: Hardware Functionality, continued
USB
PT-400
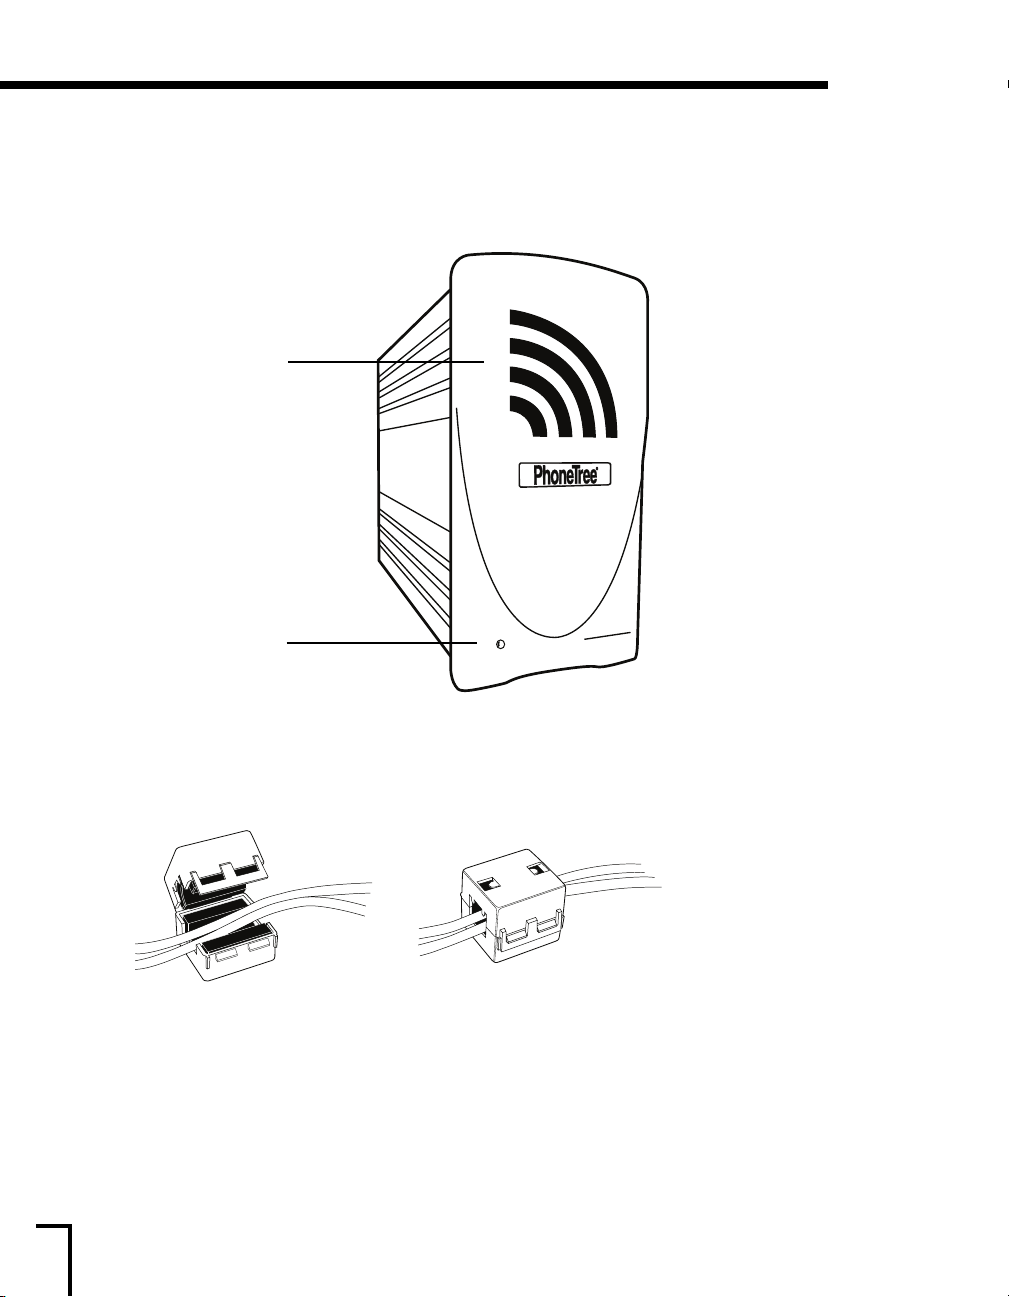
Always make sure the green power light is on to be assured that your PhoneTree system is able to
make calls. The speaker can be used to listen to any call activity for your line of choice or you can
connect the headphones to listen to them privately. For more information about listening to calls
and choosing which line to hear, please see page 84.
Speaker
Power
erence
Interf
If your PhoneTree experiences radio interference while making calls, install a ferrite clip on the
phone cable(s) close to the PhoneTree’s phone jack (see page 23).
24
Page 25

One-Time
Configurations
25
Page 26
One-Time Configurations: Desktops
Desktops
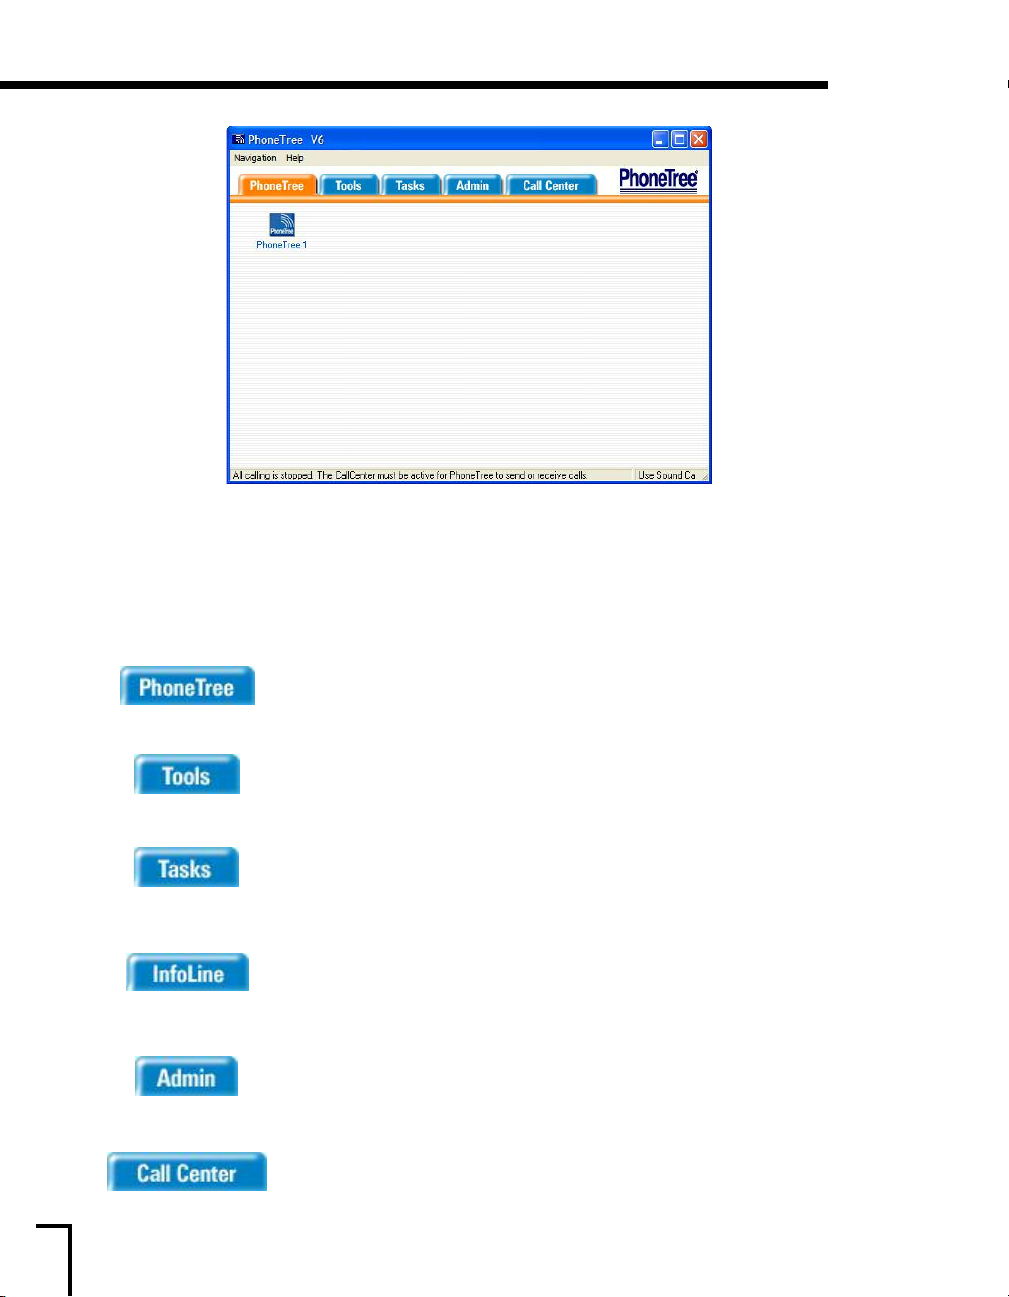
Upon opening the PhoneTree software, you will be presented with the Desktop View. In this view,
you will see that the software is divided into five major sections; each represented by its own tab.
These tabs give access to each Desktop View and are an important part of using and navigating
through the PhoneTree software. Before you start configuring your PhoneTree, please read the
brief description for each tab to help you understand its specific function:
The PhoneTree Desktop stores your call list(s) of names and numbers,
as well as your recorded message(s), unique call job settings and other
important features.
Tools Desktop contains useful utilities that relate to your past and
The
present call jobs such as Call Logs. For more information on the Tools
Desktop, please see the help files within the software.
Tasks Desktop stores any built tasks (macros), manual or
The
automatic, created for your call list(s). For more information on Tasks,
turn to page 93.
The InfoLine Desktop allows you to create up to 999 call-in InfoLines
(for access to assignments, announcements, schedules, directions, etc.).
This feature is only available with the 2500 and 3500 models.
instructions on how to set up and use InfoLines, please see the help
files wit
The
Admin Desktop contains several features that globally control
how PhoneTree makes calls in your area, as well as other settings. The
Admin Desktop will be discussed on the following pages.
The
Call Center Desktop launches the Call Center from which all
actual phone c
he Call Center, turn to page 83.
t
he software.
hin t
alls ar
ed and received. For more information on
e plac
Fo r
26
Page 27
One-Time Configurations: The Admin Desktop
The Admin Desktop
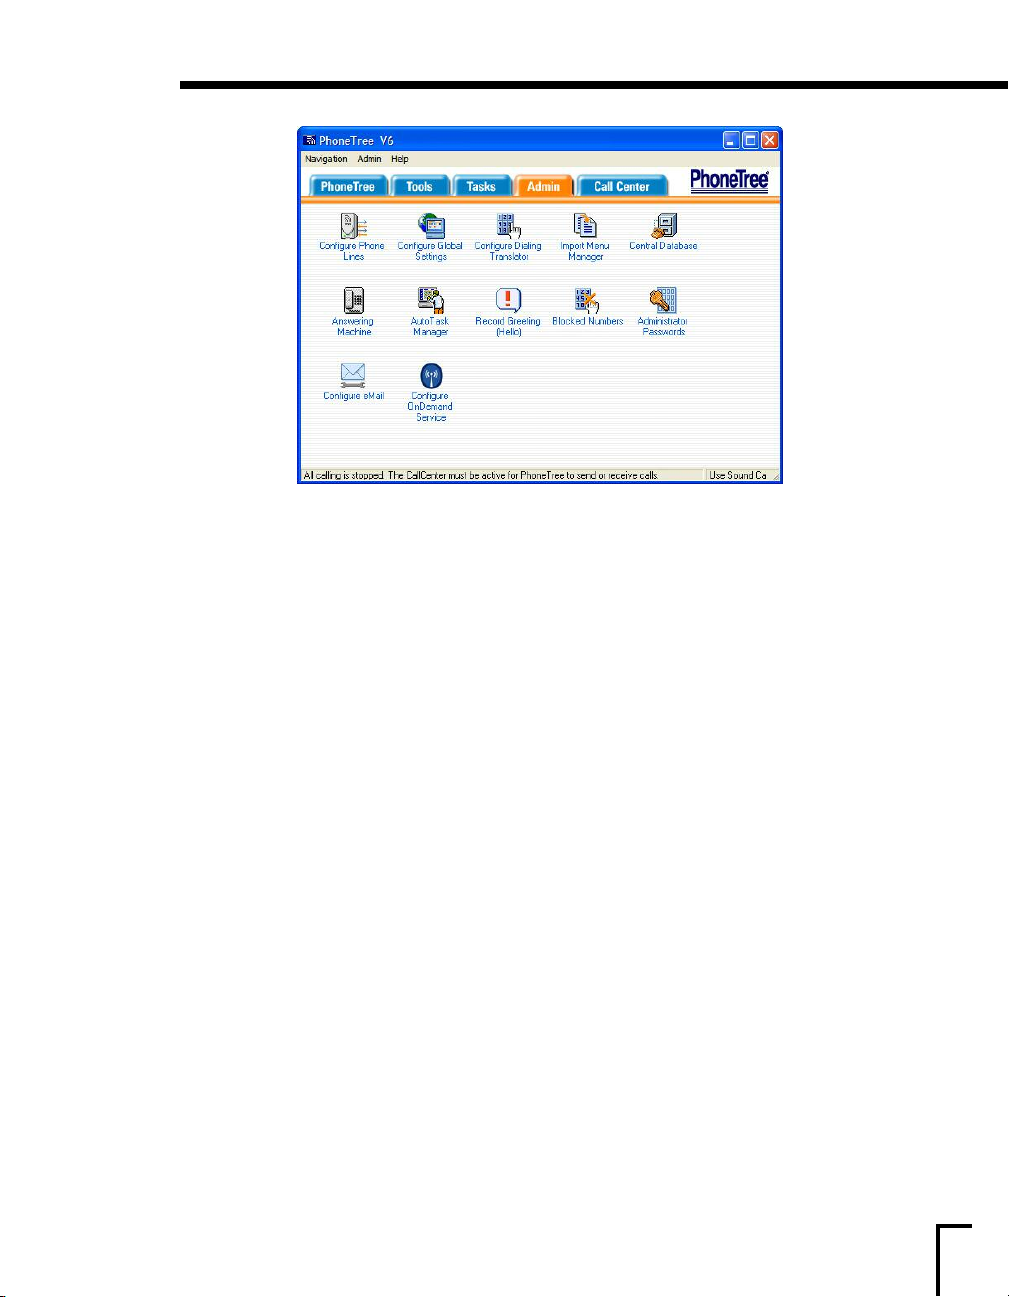
Click on the Admin tab from the Desktop View.
To start the basic configuration of your PhoneTree system, you will first need to access the
Desktop
control how PhoneTree makes calls in your area and from your location. On the following pages,
you will learn how to configure the icons needed for your basic PhoneTree setup.
Note: Some features for each icon will not be discussed in this user guide, but have a complete
description contained within the help files. To access detailed help for any part of the software,
click
. The Admin Desktop contains several icons (varies with model), some of which globally
Help from any screen.
Admin
27
Page 28
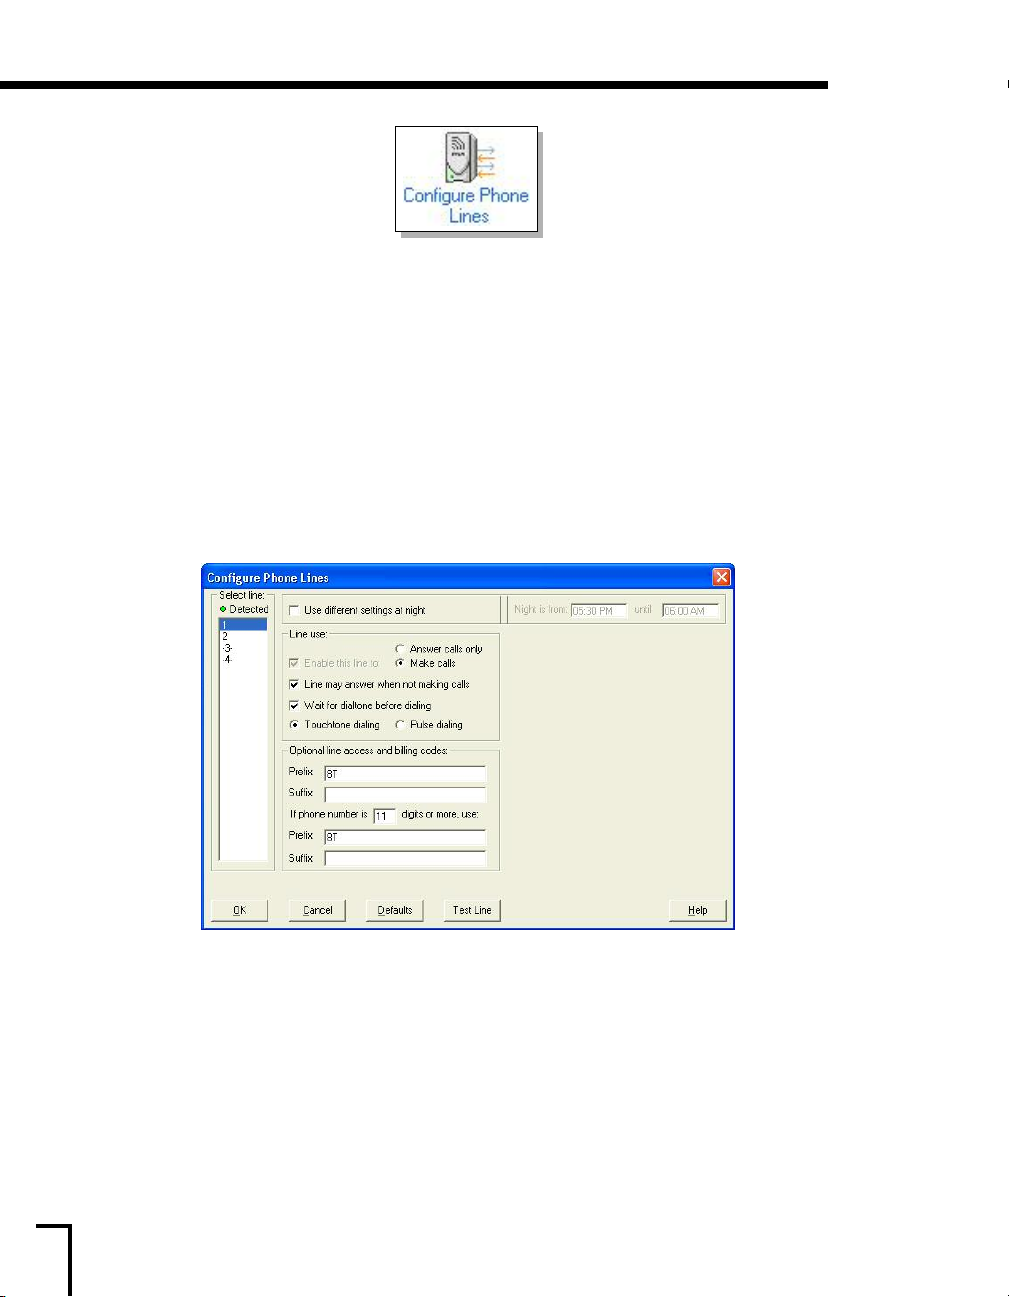
One-Time Configurations: Configure Phone Lines
Step One: Configure Phone Lines
First, click on the Configure Phone Lines icon.
On this screen, you will tell PhoneTree how it needs to access the analog phone line(s) you are
using. Some phone lines, usually with business phone systems, may require a
must be dialed
phone number)
phone line that is not part of a phone system), then you should not have to add a prefix or suffix to
complete a call.
If you are unsure of how your phone line(s) are set up, connect the phone line(s) you intend to use
with PhoneTree, one-by-one, to a standard, non-digital telephone and try making a phone call. You
will know if you need a prefix/suffix if you cannot complete the call by just dialing a phone
number on its own.
numbers to use, please contact your phone system company.
before the phone number) and/or a Suffix (digit(s) that must be dialed after the
to access an available outside line. If you have a direct analog phone line (i.e. a
If you do require a prefix/suffix to access an outside line and are unaware what
Prefix (digit(s) that
To enter a Prefix, type the number in both Prefix boxes followed by a “T” (wait for dial tone).
To enter a Suffix, first type the “T”, followed by the required number(s) in each Suffix box.
If your PhoneTree system is a multi-line setup, you may need to set a prefix and/or suffix for each
o do this, choose the next ascending number in the
line. T
for Line 1, “2” is for Line 2, etc.) and repeat the process for each line that shows a
the word “Detected.”
When you are finished, click
For features not discussed for this icon or for more information, please click Help.
OK.
Select Line c
olumn (for example, “1” is
green dot beside
28
Page 29
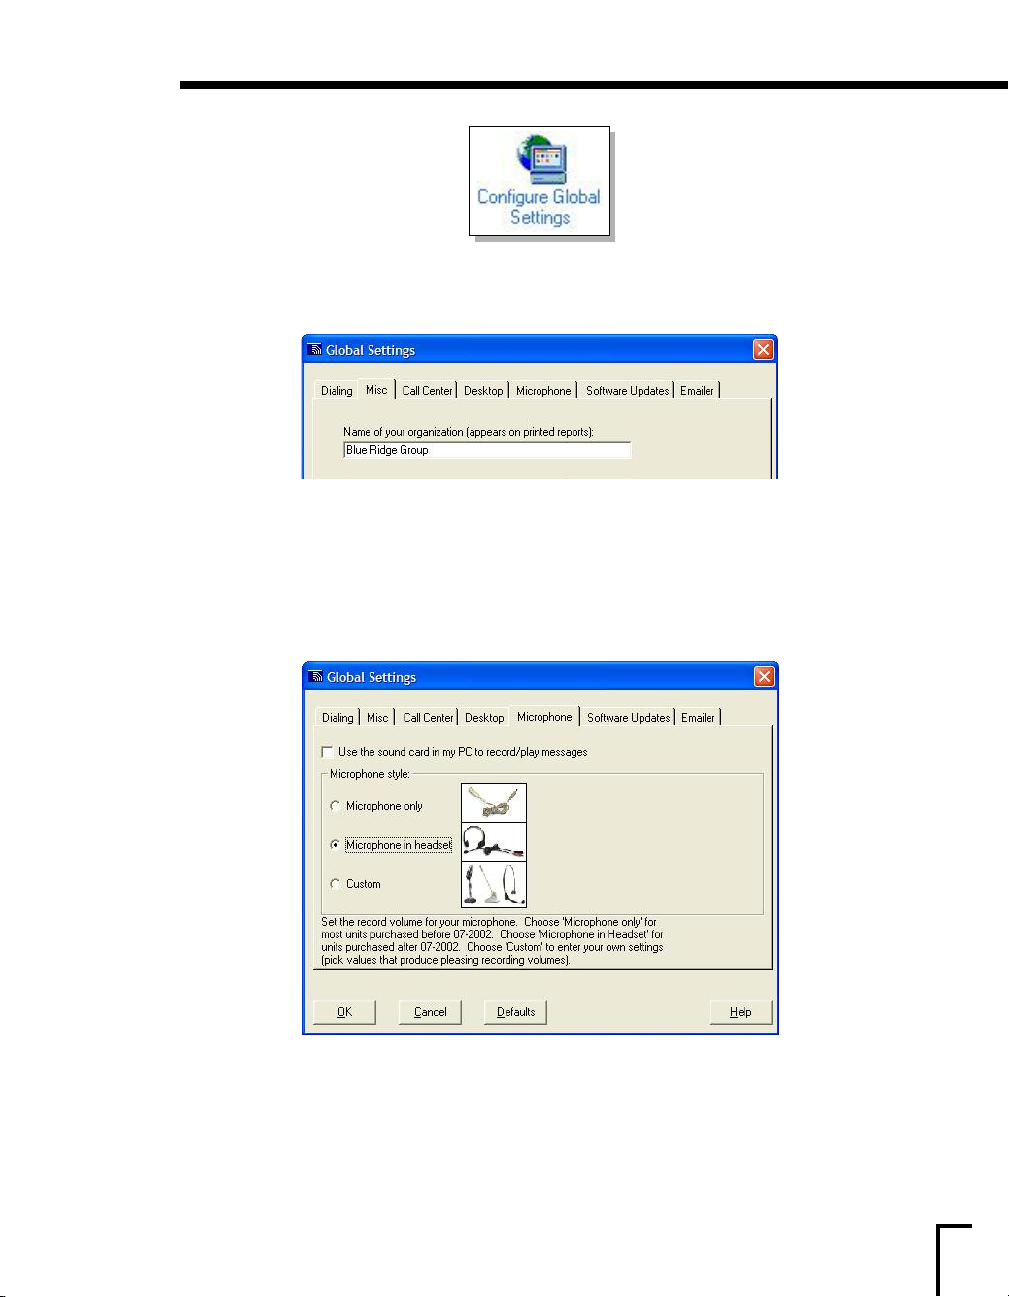
One-Time Configurations: Configure Global Settings
Step Two: Configure Global Settings
Next, click on the Configure Global Settings icon.
Click on the
organization
any call reports generated in PhoneTree).
PhoneTree can automatically print, save as a file or e-mail reports for your call job results (see page
90). ≠nter the time you want your reports to generate in the
at
box (default 1:00 AM). Note: The Call Center must be running during this time. It is
recommended the time set here be after your calls typically end for the day.
Next, click on t
Uncheck Use the sound c
headset.
When finished, click OK.
For features not discussed for this icon or for more information, please click Help.
Misc tab and enter your company’s name in the box labeled “Name of your
” (the name you type here will appear on the top border of the Desktop View as well as
≠nable daily file maintenance to run
M
ophone
icr
d in m
ar
tab.
y PC...
and t
hen set t
he micr
ophone style to
M
icr
ophone in
he
29
Page 30
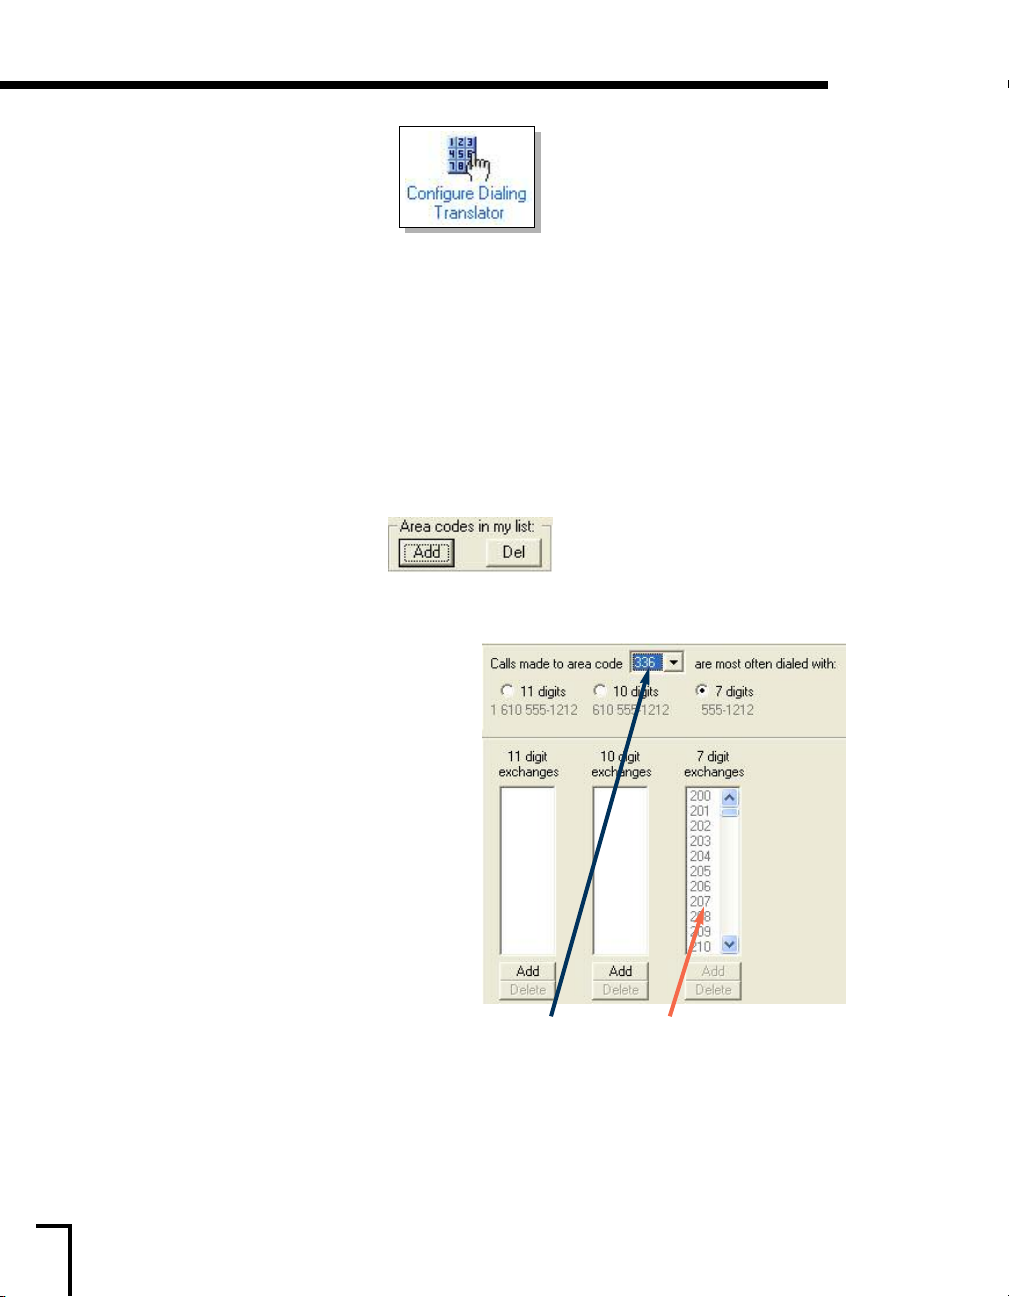
One-Time Configurations: Configure Dialing Translator
Step Three: Configure Dialing Translator
Click on the Configure Dialing Translator icon.
In this section, you will learn how to program the rules set by your phone company for dialing local
phone numbers in your area. You will need your phone book or local dialing information (refer to
page 22) for this step.
First, look in your phone book and find the local calling section for your city/town. Here, you
should find a section labeled “local dialing” that lists all the area codes local to you with their
corresponding exchanges. Since PhoneTree requires only the area codes that are local to you, do
not worry about obtaining any area codes that are
your phone book does not list your local area codes and exchanges, try contacting your phone company
for information or refer to the website link listed on page 22.
To add a local area code, click the Add button under Area codes in my list. On the following screen,
enter the area code and then press
[≠nter] on your keyboard.
only dialed long distance from your city/town.
If
Under each area code, via the area code drop
down box, you will see three columns;
(Long Distance), 10 digit (Metro) and 7 digit
(Local). These columns are used for telling
PhoneTree which exchanges for each area code
that are local and/or long distance. Since the local
dialing information you obtain from your phone
company will list what is local, the concept here
will be to place the list of exchanges under the 11
digit column and extract the local exchanges
from it. If you entered multiple area codes, you
will need to repeat this for each area code.
Remember, the concept here is to, one-by-one,
move the exchange(s) that require a different
dialing method to their appropriate column. For
example, with the button placed on 11 digit, let’s
y exchange number 231 was a local exchange. It
sa
would have to be moved from the long distance
column to the local column.
11 digit
(336) 722- 5008
Area code Exchange Number
ve it to, type in the
olumn y
he c
dd
butt
on beneat
A
To move an exchange, click t
exchange and press
keyboard. Repeat this process for each area code that requires exchanges to be moved.
When finished, click
For features not discussed for this icon or for more information, please click Help.
[≠nter] on your keyboard; repeat as needed. When finished, press [≠sc] on your
he
OK.
h t
ou wish t
o mo
30
Page 31
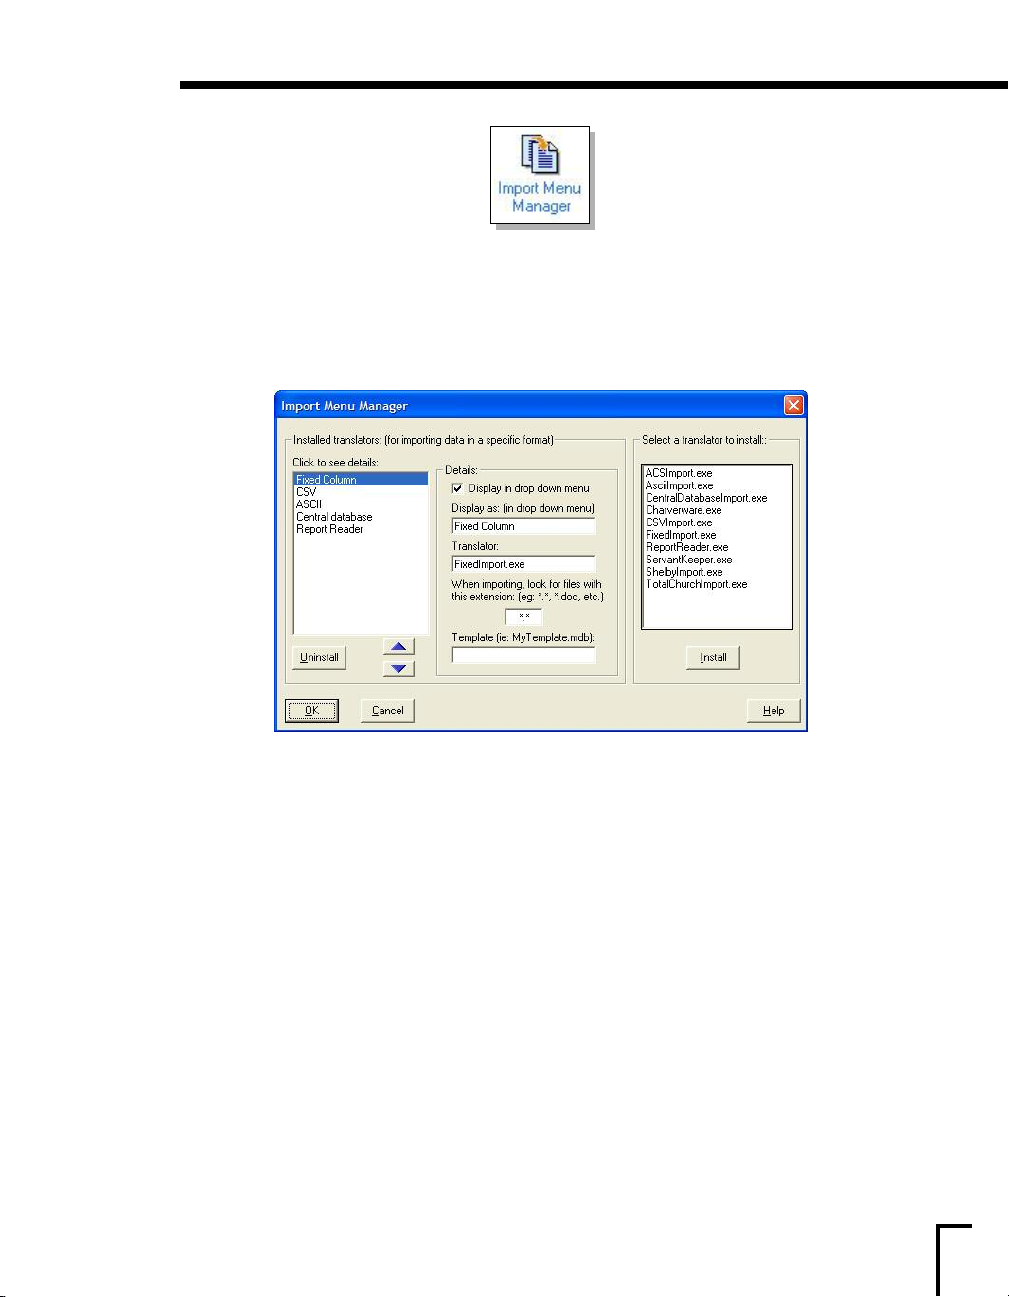
One-Time Configurations: Import Menu Manager
Step Four: Import Menu Manager
Click the Import Menu Manager icon.
If you have a list of names and numbers stored in a file, PhoneTree can import that data using one
of the supplied translators to create your call list. The translators have been named based on the
file format they are designed to work with.
The translators are separated into two different sections:
The left-side box shows the currently installed and ready to use translators which are for the most
commonly used file formats.
The right-side box shows the complete list of available translators including the few already installed
in the left box.
you will need to install the correct translator.
To install a translator, click on your translator of choice in the right-side box and then click the
Install button. This will move a copy of the translator you chose to the left-side box. After the
translator moves, it is automatically named as “
section. Rename the translator to the same name that it was in the right-sided box, without the
“.exe” as shown in the example above.
When finished, click
For features not discussed for this icon or for more information, please click Help.
If you are using a supported membership management or database software package,
New!” in the Display as box under the Details
OK.
31
Page 32
One-Time Configurations: Configure eMail
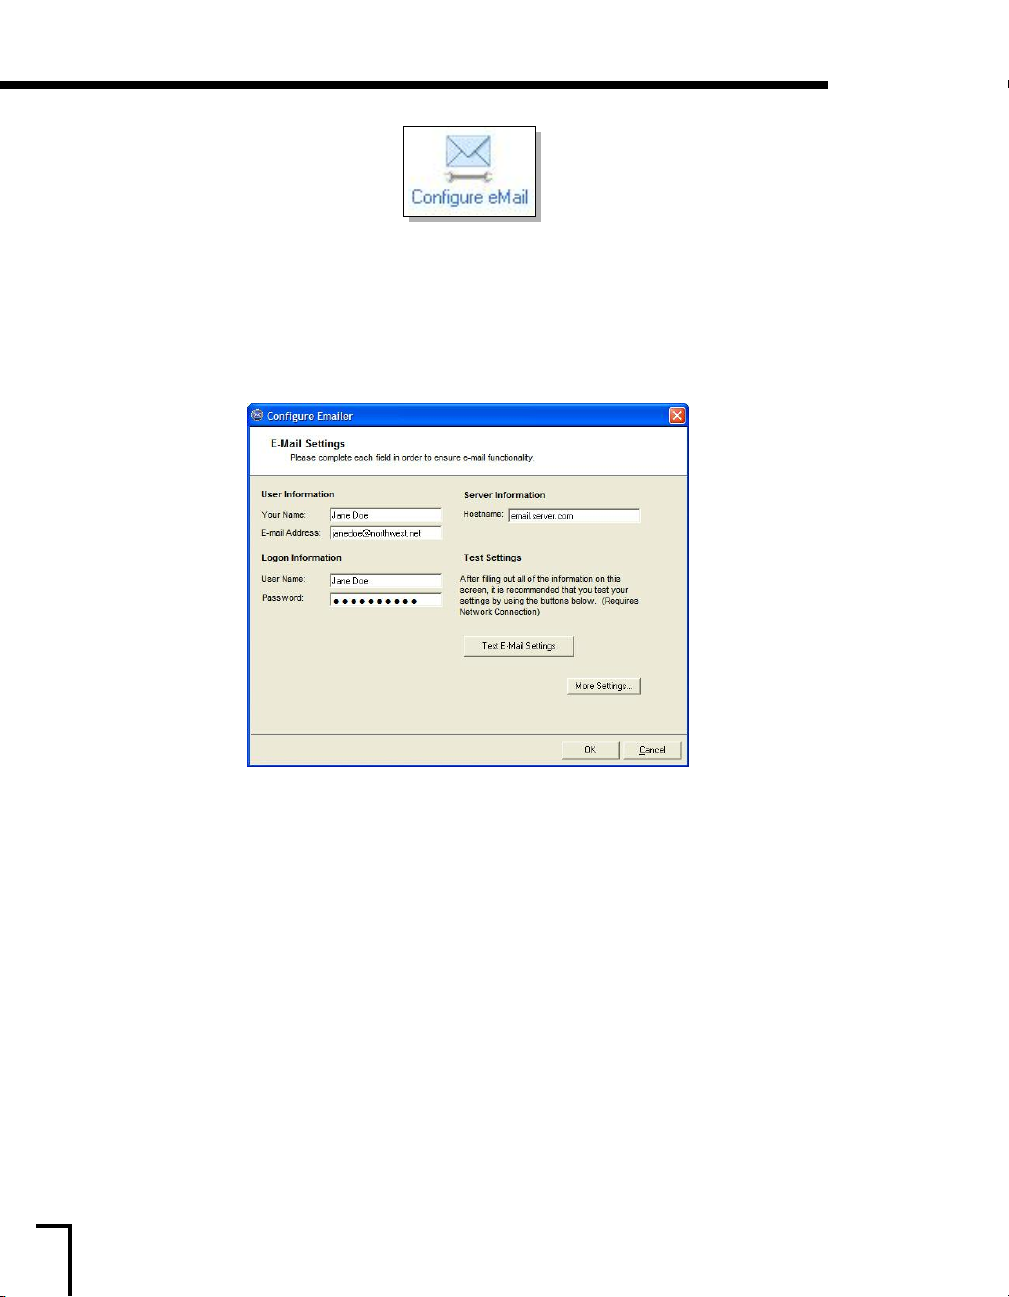
Step Five: Configure eMail
Click on the Configure eMail icon.
PhoneTree can be configured to e-mail your call results as an AutoReport (see page 90) and/or
messages in text form
The settings on this screen must correspond to a valid e-mail account, and you can get most of these
values from the ≠-Mail Accounts area of your e-mail program, such as Outlook or Outlook ≠xpress.
(2500 and 3500 only, including S≠) to e-mail addresses in your call lists.
≠nter the following information:
User Information:
Your Name
e-mails from the PhoneTree system.
≠-mail Address - The e-mail address should be a valid e-mail address which corresponds to
all the other settings on this screen.
Logon Information:
User Name - This should be the exact user name you use to access this e-mail account.
Password -
Server Information:
Hostname
After you have completed each field, click
should receive a “Test Succeeded” message, followed by a “Message Sent” dialog. Check your email
to make sure you received the sample message. If you receive a “Connection Failed” message, it
means that one or mor
on how to troubleshoot this issue. When finished, click
- ≠nter your name here as you would like it to be seen by the people receiving
This should be the exact password you use to access this e-mail account.
our main e-mail program.
ed in y
OK.
er
. If everyt
hing is correct, you
- This should be exact
our settings ar
e of y
ve it ent
ou ha
ly as y
est ≠-Mail Settings
T
e incorrect. Please access the help files for information
32
Page 33
One-Time Configurations: Additional Icons
Additional Icons
These icons refer to additional features you can use to further customize your PhoneTree. Below are
brief descriptions for each of these icons and what they do.
to use and set up each of the icons, please reference the help files accessible via the
located on any screen.
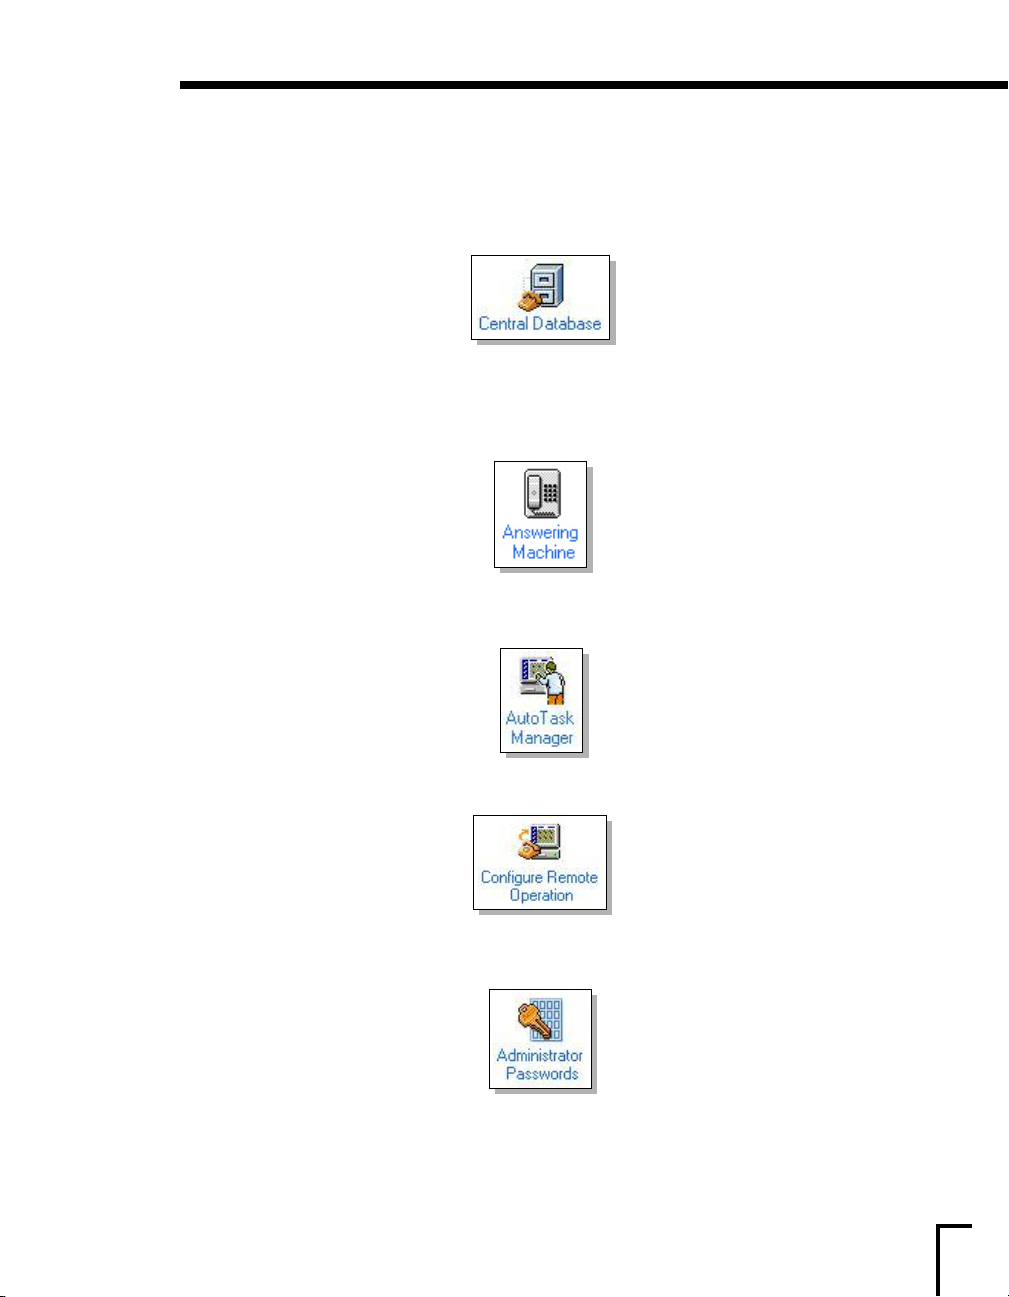
Central Database is used to keep a master list of your contacts that may be used with the
PhoneTree system. Any time you wish to make a change to any of the contacts, you can make the
change here and then set individual PhoneTree icons to automatically sync with the Central
Database, so that changes need only to be made in one place.
Answering Machine allows you to set up your PhoneTree to act as an answering machine while it
is not making any outbound calls.
Note: For a detailed explanation on how
Help button
AutoTask Manager is part of setting up a Task. See page 93 for more information on Tasks.
Remote Operation lets you call in to PhoneTree and access most major functions including
recording your message, selecting whom to call, changing the calling times, and more (see page 107).
Administr
ator P
assw
ords
allo
ws y
ou t
ord-protect the Admin Tab.
o passw
33
Page 34
One-Time Configurations: Additional Icons, continued
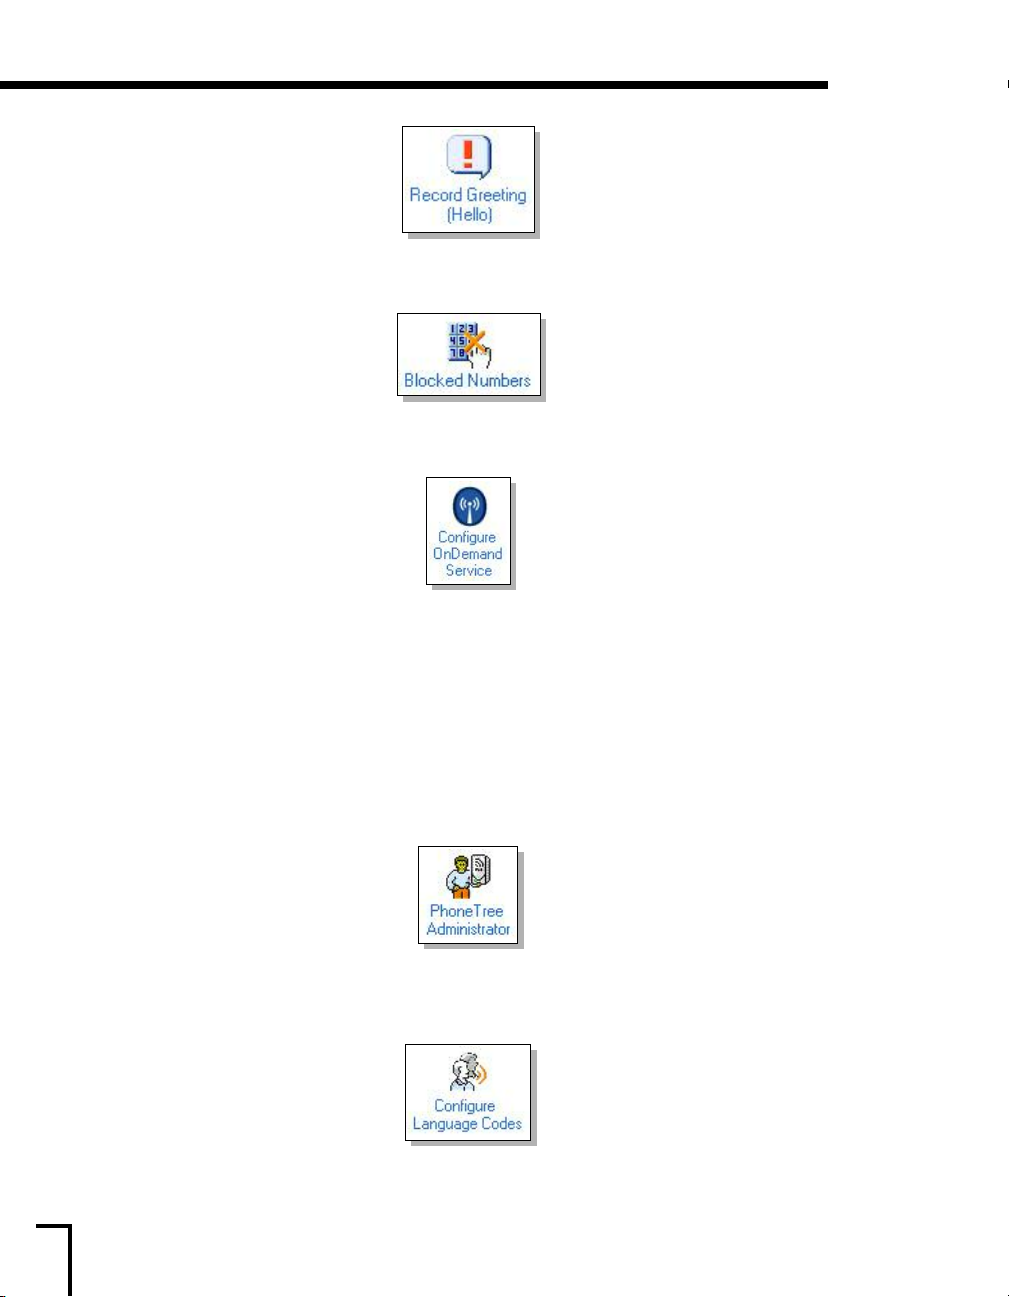
Record Greeting (Hello) allows you to create your own greetings or preview the pre-recorded
greetings shipped with the PhoneTree software.
Blocked Numbers stores any phone number hand-entered into this database or selected from the
List ≠ditor screen (see page 172).
Configure OnDemand Service allows you to set up an OnDemand account for times that you may
need to contact everyone on your call list quickly, for an emergency or other time-sensitive reason
(see page 113).
time limits of 1 minute for calls placed with ≠asyCall and 2 minutes for the Call Wizard.
2500 S≠ and 3500 S≠ Users: If you have a PhoneTree 2500 S≠ or 3500 S≠, it is required that
OnDemand is set up before you can make calls.
Call sessions made with OnDemand carry a per-call charge and have message
PhoneTree 2500 and up:
PhoneTree Administrator allows you to manage all of the PhoneTrees under the PhoneTree tab.
Here, you can rename, password-protect, lock and even change the number of PhoneTrees (up to
256) available.
Configure Language Codes allows you to program up to 99 different languages in your PhoneTree
for multi-lingual capability. You can use this feature with importing a file or by manually building
your call list in PhoneTree.
34
This feature does not work for e-mail messaging.
Page 35
One-Time Configurations: Additional Icons, continued
PhoneTree 3500 (and S≠) only:
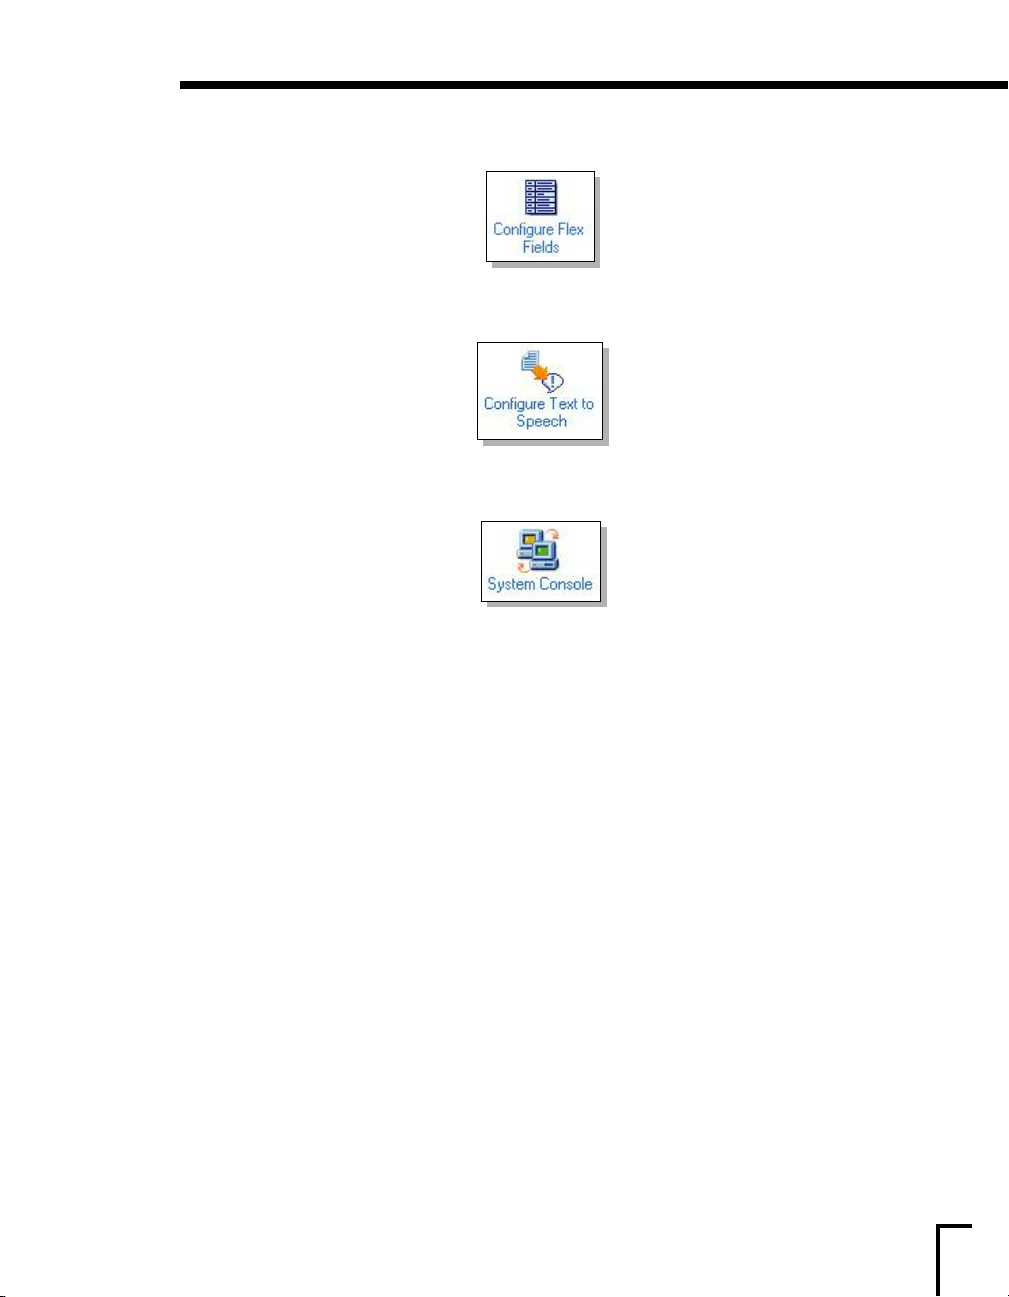
Configure Flex Fields gives you the ability to configure parts of your message to change based on
the data PhoneTree reads from a file.
Configure Text-to-Speech gives you control over which Text-to-Speech engine you wish to use
(basic or advanced), the voice gender and voice quality settings (via the Advanced button).
System Console is an advanced feature that allows control over call options and other settings for
all the PhoneTrees in an expanded view.
information on how to successfully use System Console, please click the
This feature should be used with caution! For more
Help button.
35
Page 36

Notes
36
Page 37

Your First
Call Job
37
Page 38
Your First Call Job
Your First Call Job
In the previous sections, you were shown the necessary steps to prepare your PhoneTree system to
make calls. Next, we suggest that you try making a test call to yourself to be sure your PhoneTree can
complete the call with no difficulty. This section will show you how to manually add yourself to the
call list, record a message and start calling using
have completed this section, turn to the appropriate page number that covers the model of PhoneTree
you have purchased (see page 40) to access additional configurations. There you will find even more
configurations that will help you to customize your PhoneTree to meet your specific needs.
Note: The following screens may vary depending on your PhoneTree model.
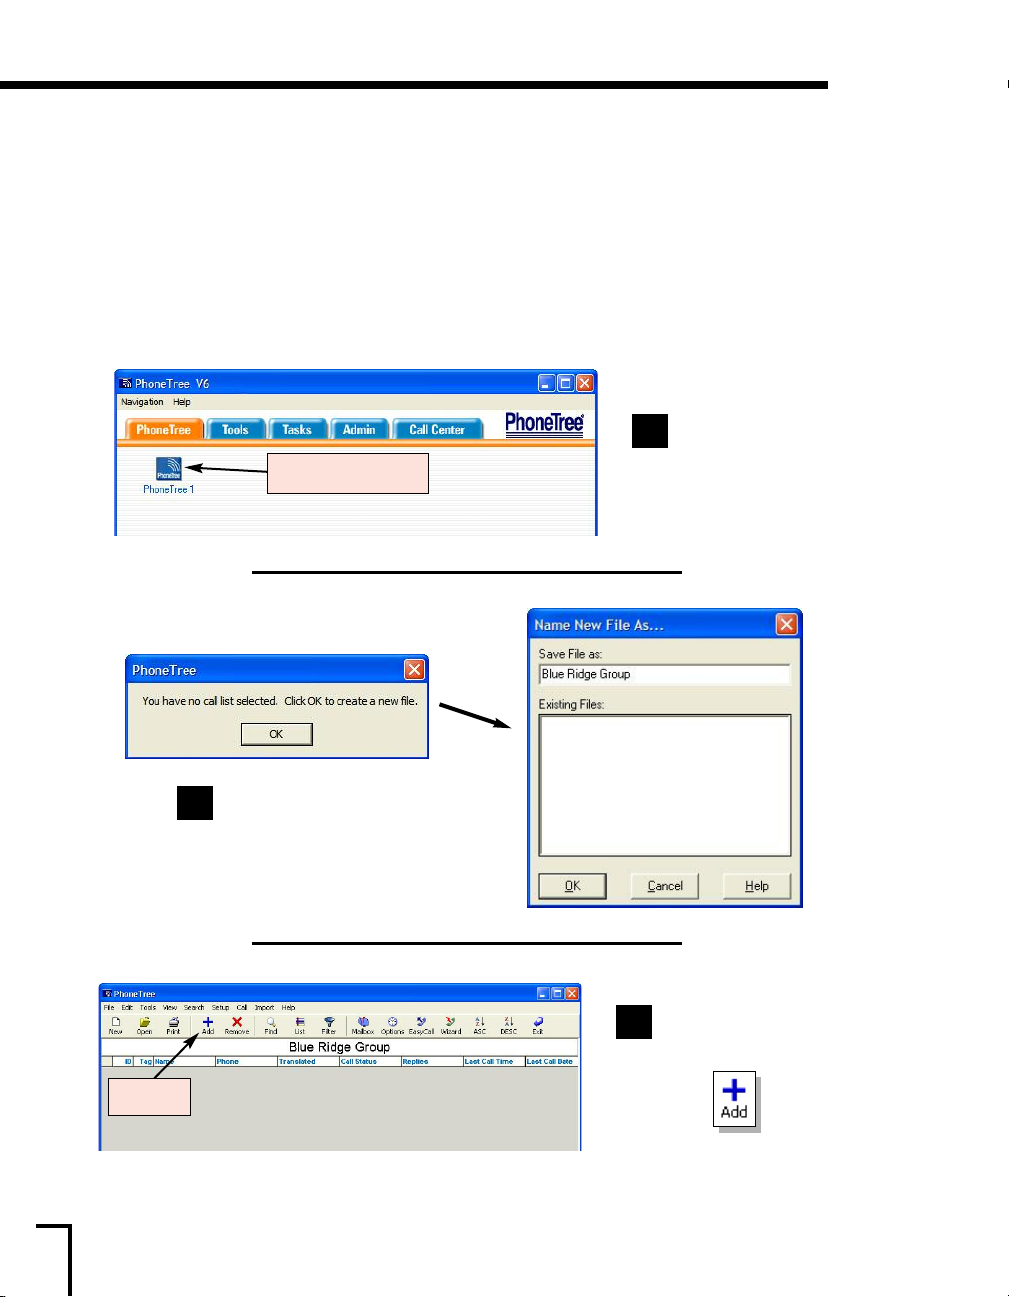
Click the PhoneTree 1 icon.
≠asyCall, one of two ways to launch calls. After you
From the Desktop
1
View, click on the
PhoneTree tab, then,
click on
PhoneTree 1.
38
Click OK for the box that appears.
2
Then, enter a name for this
particular call list and click
Click Add.
OK.
ed
ou are now pr
Y
3
with the
screen. From the top toolbar,
click
Add.
esent
List ≠ditor
Page 39
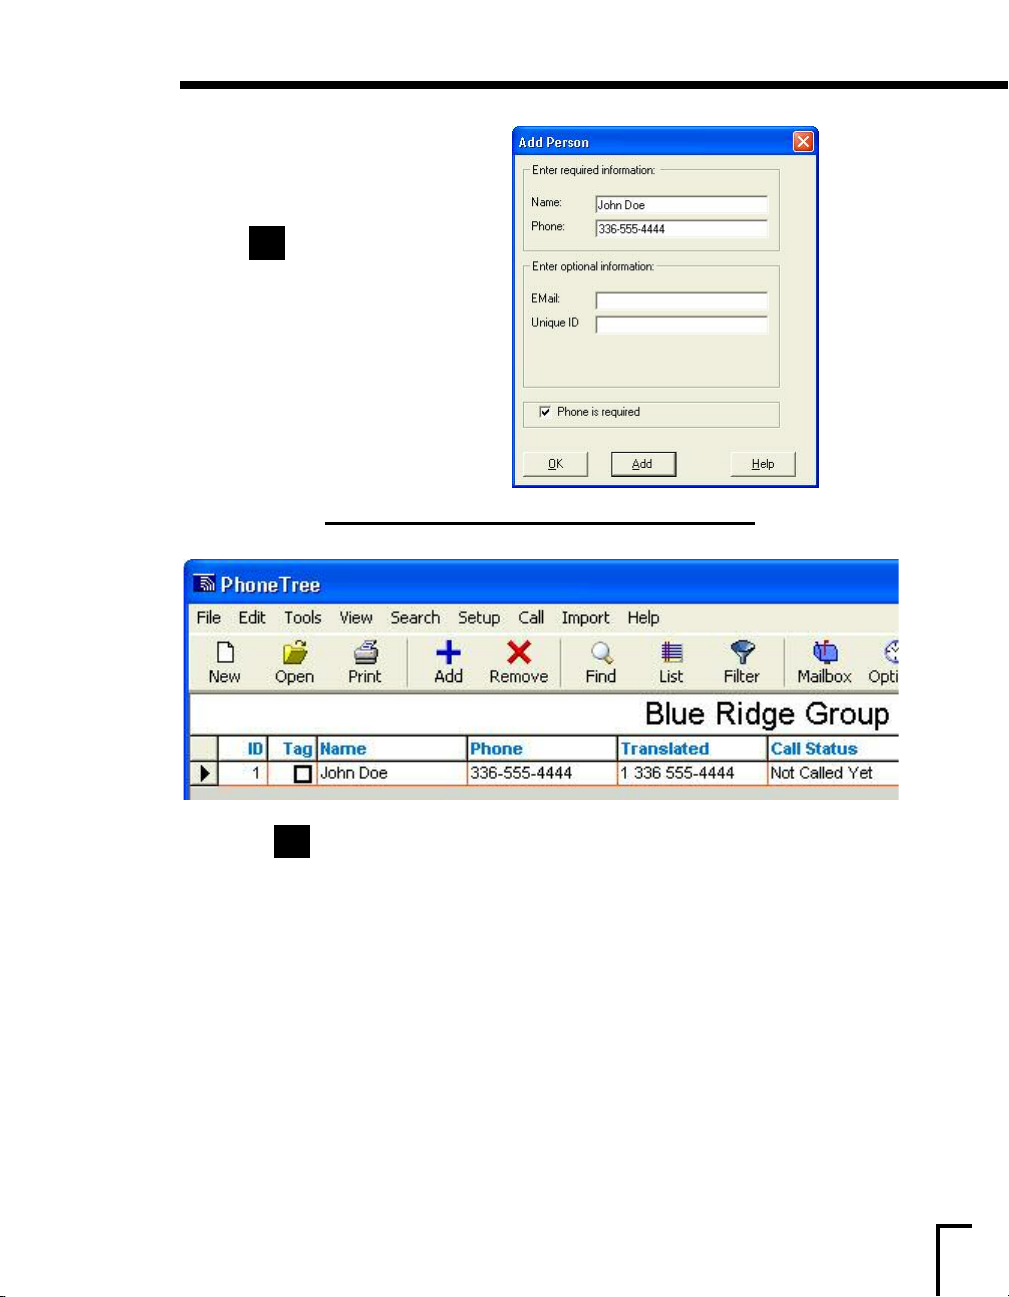
After the Add Person
4
window appears, enter
your name and corresponding
phone number for this test
call job. Repeat for any
additional entries you wish to
make. Click
finished.
OK when
Your First Call Job, continued
You will now see your name and phone number added to the
5
list. You will also see a Translated phone number and a Call
Status displayed. The Translated phone number column shows exactly
how PhoneTree will dial that number by using the rules you set earlier
in the Configure Dialing Translator (see page 30). The Call Status
column shows whether or not an individual has been called and what
PhoneTree encountered during that phone call (i.e. Answered By
Person, Answered by Machine, Busy, etc.).
statuses, see page 85.
For a complete list of call
39
Page 40
Your First Call Job, continued
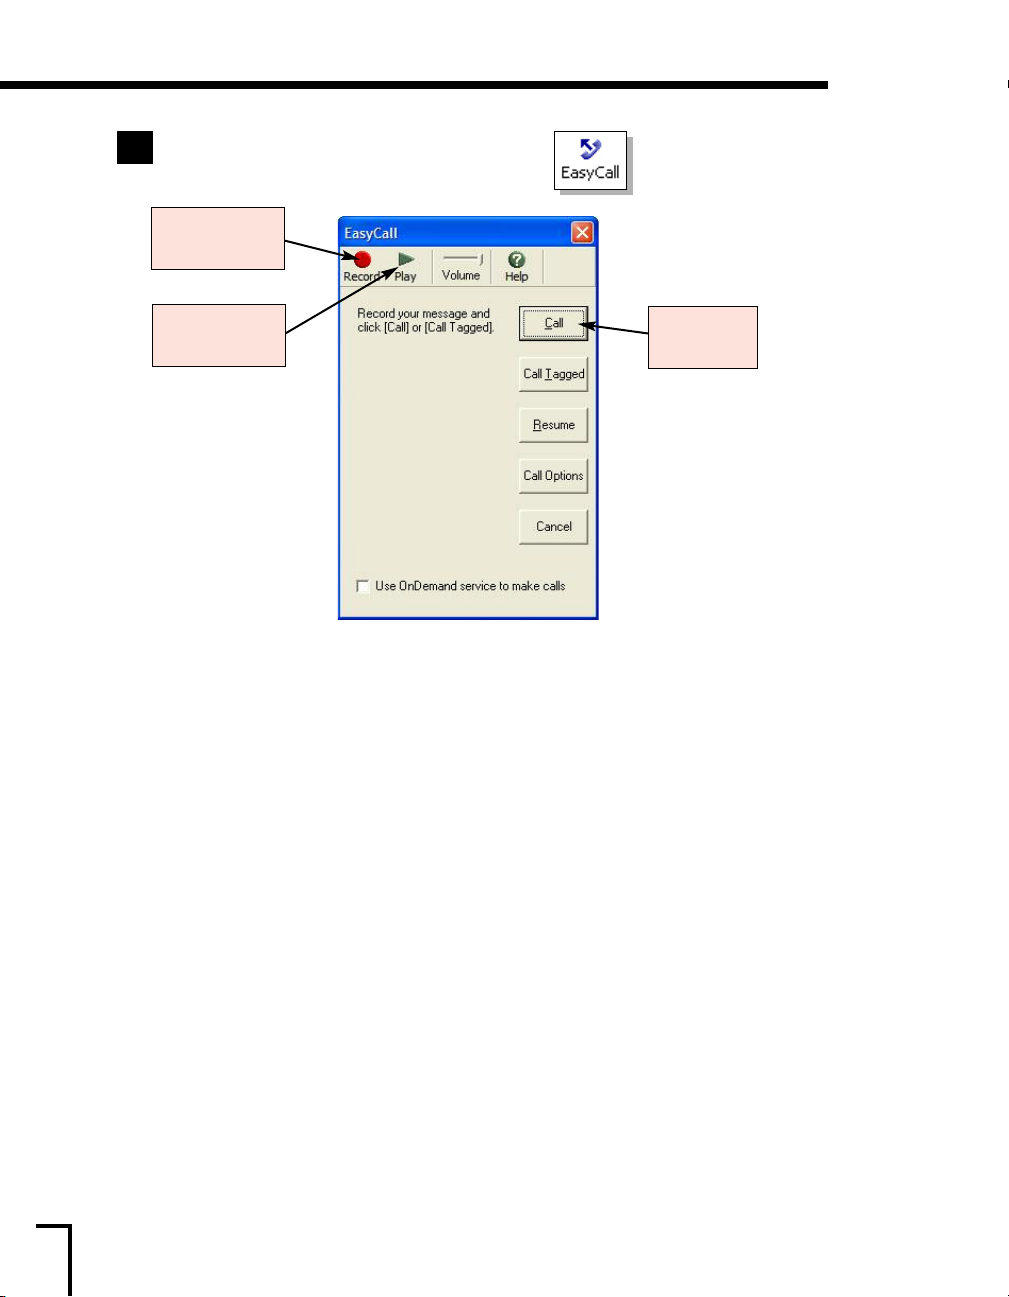
Click on the ≠asyCall icon from the top toolbar.
6
Click Record to record
your message.
Click Play to listen to
your message.
To record your message, click Record and speak into the headset microphone after you hear
the beep. When you are finished, click
To review what was recorded, click
Once you are ready to launch your call list, click
Once
Call is pressed, the PhoneTree will launch the Call Center. Turn to page 83 for more
information on what the Call Center is and how it operates.
If you would like to generate a report showing your call results once your call job is finished or
configure PhoneTree to automatically do this for you, turn to page 87.
Congratulations, you have completed your first call job!
Stop.
Play.
Call.
Click Call to start
your calls.
40
As stated before, ≠asyCall is one of two methods for launching your call job. The other option
is using the Call Wizard – offering a walk-through interface, the option of saving your
message(s) and other call options such as e-mail messaging (2500 model and up). To take
advantage of the Call Wizard and additional configurations for any PhoneTree model, please
refer to the model number listings below and turn to its appropriate section.
use ≠asyCall to make your calls, please click
options such as Night and Machine messages.
PhoneTree 2100 - P
PhoneTree 2500 - P
PhoneTree 3500 - Page 63
age 41
age 51
Help for information on enabling additional call
If you prefer to
Page 41

2100
41
Page 42
2100: Let’s Begin!
2100
Now that your PhoneTree 2100 is configured to work with your phone lines and dialing rules in
your area, you are now ready to set up your message. On the following pages you will be shown,
step-by-step, how to import your call list using a file, configure the call times, record a message and
start making outbound calls using the Call Wizard. If you prefer to use ≠asyCall to make your calls
once you have configured your call times and other options, please see page 40.
Note: Since this section only covers the basic call setup, some options and features are not
discussed thoroughly. For more information regarding any option or feature, please click a
button which will display information on that feature.
In order for PhoneTree to make or receive phone calls, the Call Center must be running
during your preset call times (see page 84).
Let’s Begin!
Help
42
Page 43
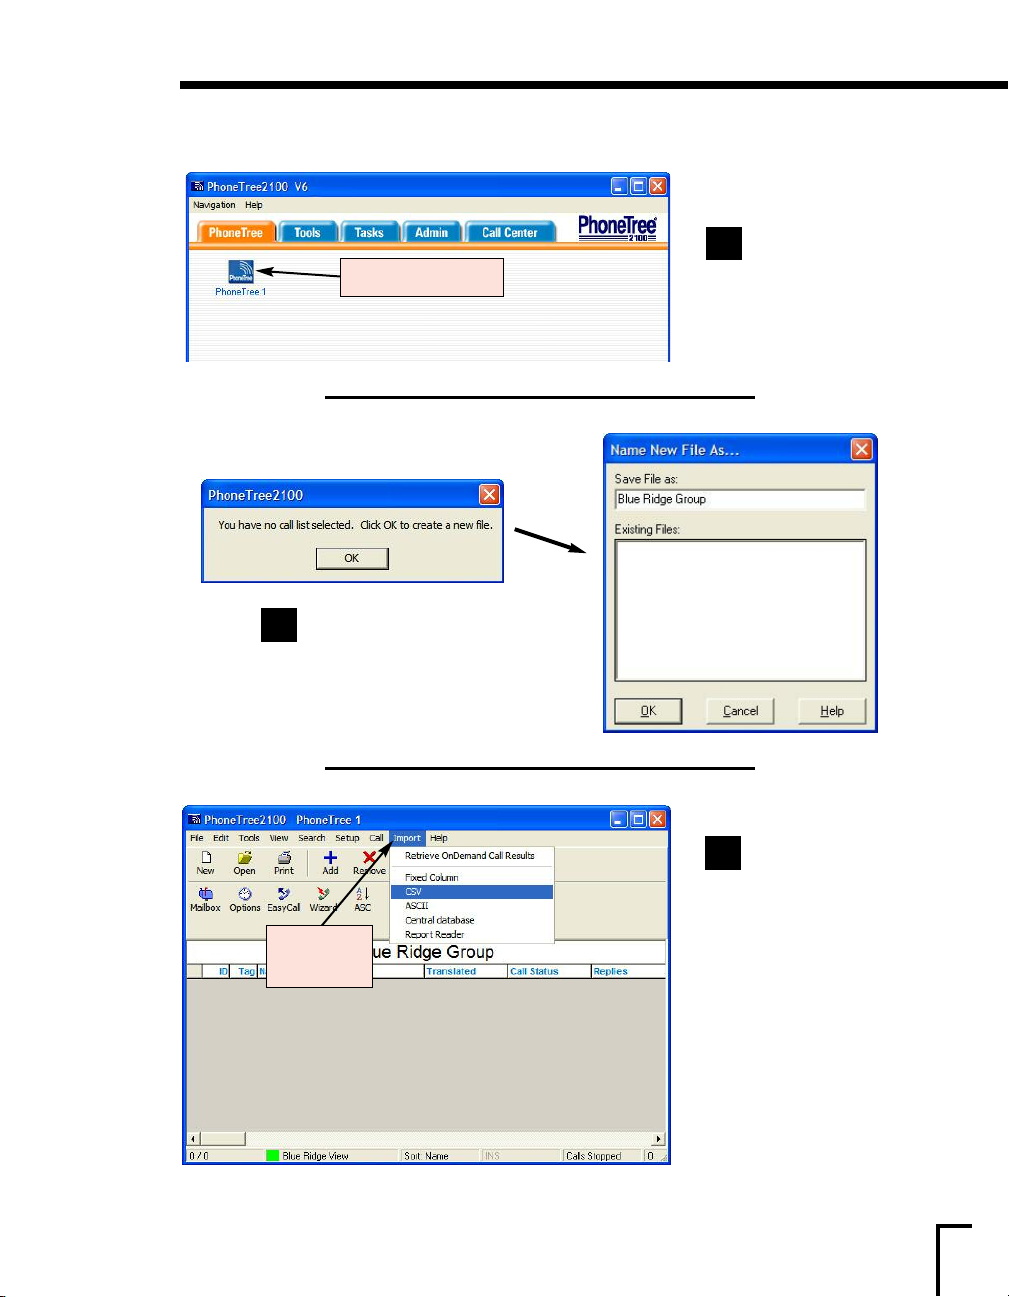
Setting Up a Call Job:
Click the PhoneTree 1 icon.
Click OK for the box that appears.
2
Then, enter a name for this
particular call list and click
OK.
2100: Setting Up a Call Job
From the Desktop
1
View, click on the
PhoneTree tab, then,
click on
PhoneTree 1.
Click Import,
then choose CSV.
Now it is time to
3
import the file
that contains your name
and numbers (or add
them one-by-one as
described on page 38).
For this example, we
will use a CSV file.
our file requires a
y
differ
other than CSV, please
choose that instead.)
Click Import at the top
of the screen and then
choose
ent tr
CSV.
anslat
(If
or
43
Page 44
2100: Setting Up a Call Job, continued
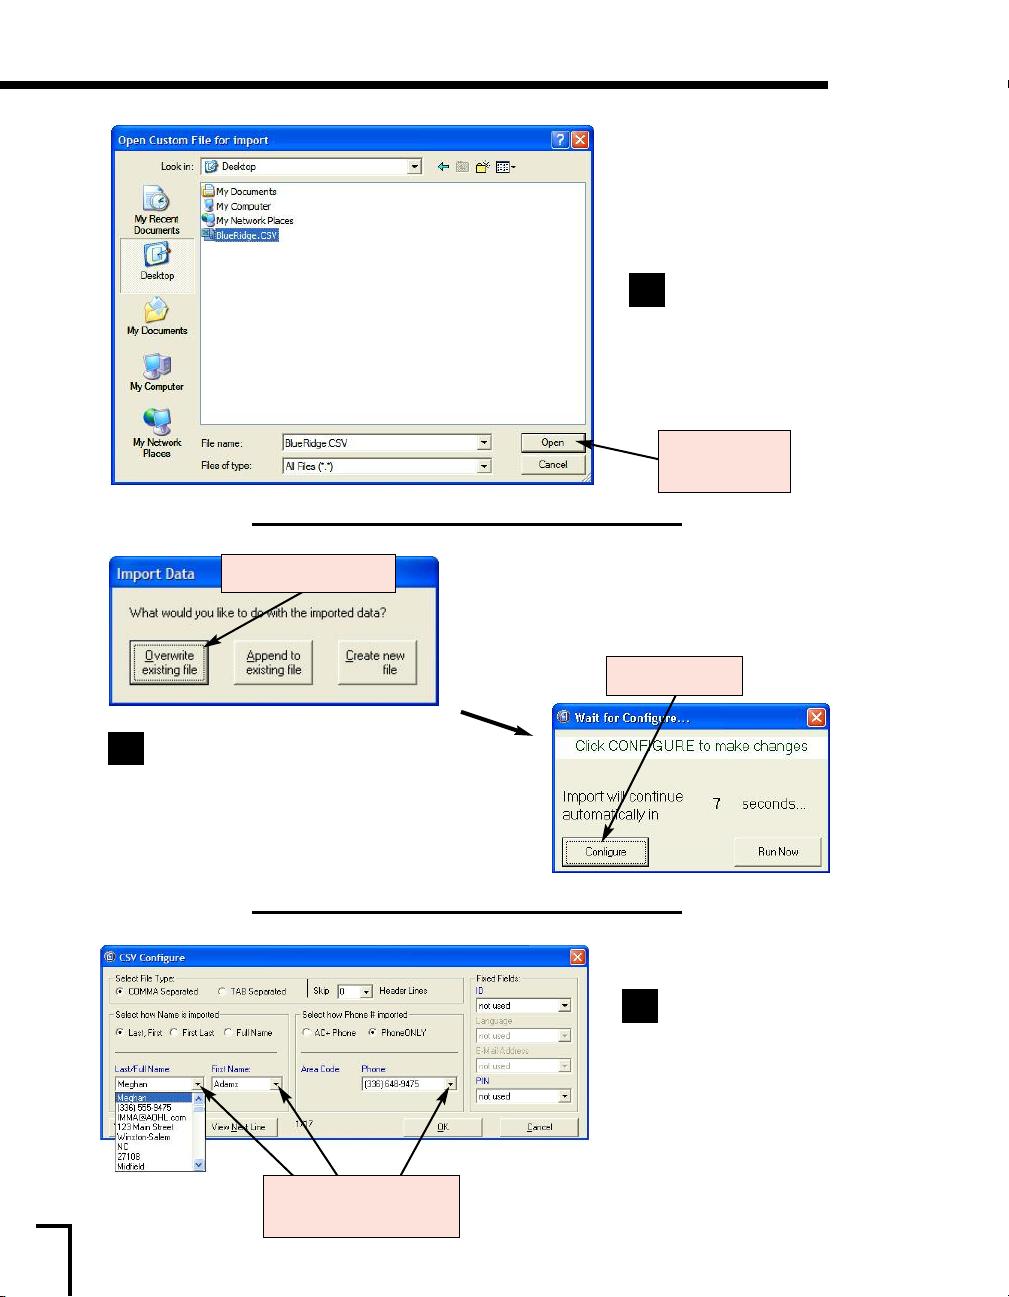
Click Overwrite existing file...
Browse to the file
4
to import. Click
Open.
Locate your file, then
click Open.
44
A window will appear asking you what
5
you would like to do, click
existing file
click
. When the next window appears,
Configure before the timer runs out.
Click the drop-down boxes to set
the data for each field.
Overwrite
...then click Configure.
V translator
CS
The
6
appears. Using the
op down box
dr
Name
, First Name and
Phone, make the choices
appropriate to the data in
your file. Then, click
es f
or
Last
OK.
Page 45
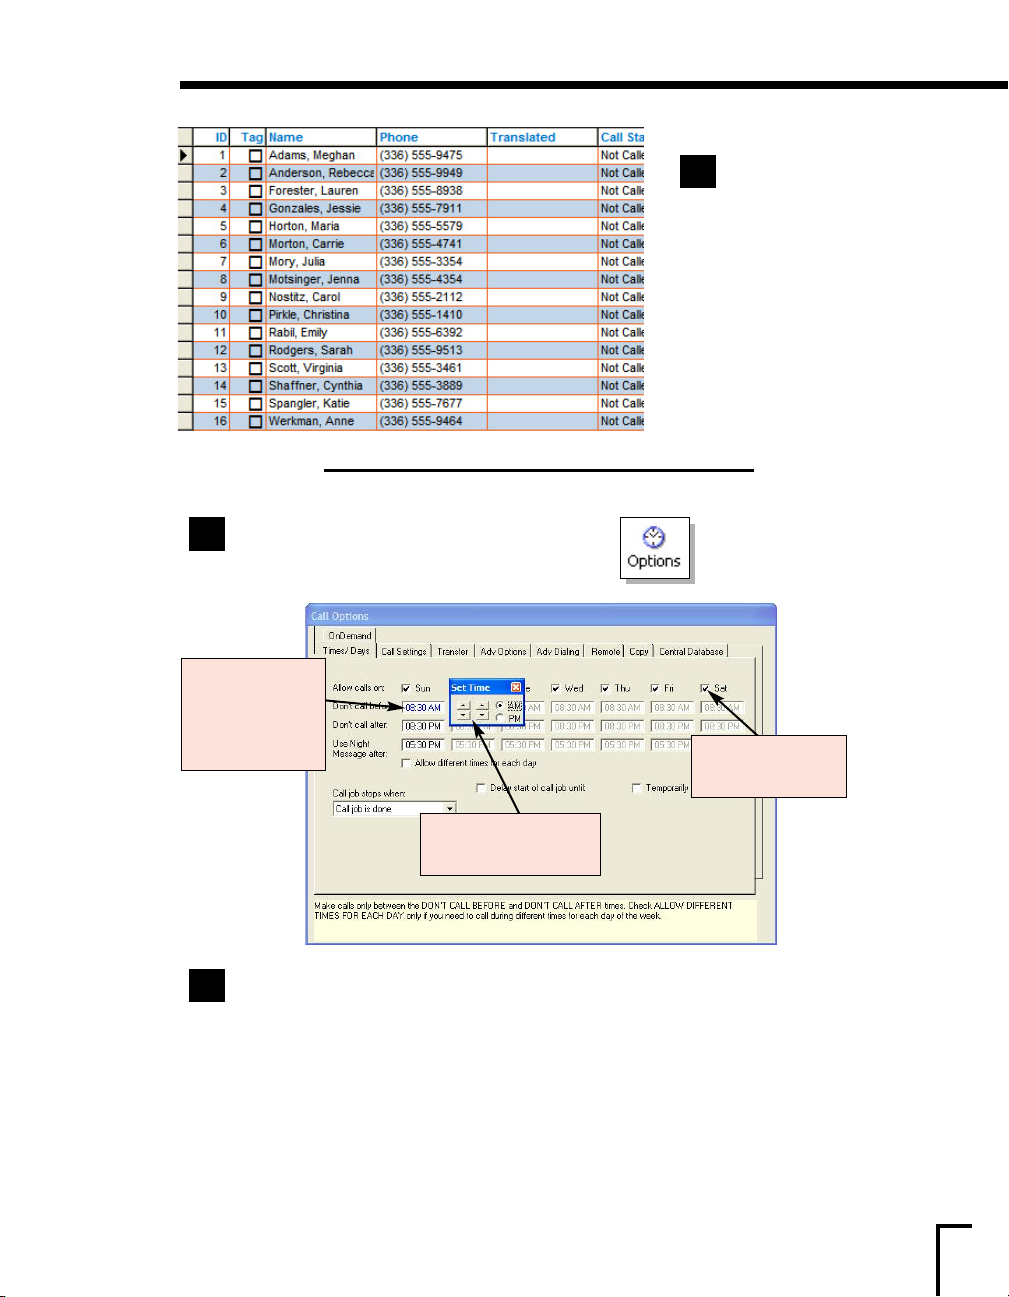
Click on the Options icon from the top toolbar.
8
2100: Setting Up a Call Job, continued
After your data
7
imports, you should
see your call list appear as
shown here. Make sure that
the data looks correct.
If you need to add another
entry to the list after the
file has been imported, click
Add button from the
the
top toolbar. To remove an
entry, click on the name
and then click
Remove.
Click on the Don’t call
before/after times to set
when PhoneTree starts
and stops calling.
Use the up and down arrows to
change the hour and minutes.
The first tab of Call Options, Time/Days, allows you to tell PhoneTree which days of
8a
the week and what time during those days you want to make calls.
e calls on.
o mak
ant t
and Don
all after
t c
’
Sun. A bo
Don
ou do not w
all before
t c
’
Uncheck any day(s) y
o change t
T
eek, click on each of the time fields under
w
arrows to adjust the hours and minutes. If you would like to set different times for each
day, select the
day to set the times.
he
Allow different times for each day box, then individually click on each
Uncheck any day you don’t
want to make calls on.
or all of t
times f
x will then appear. Use the four
he da
ys of the
45
Page 46
2100: Setting Up a Call Job, continued
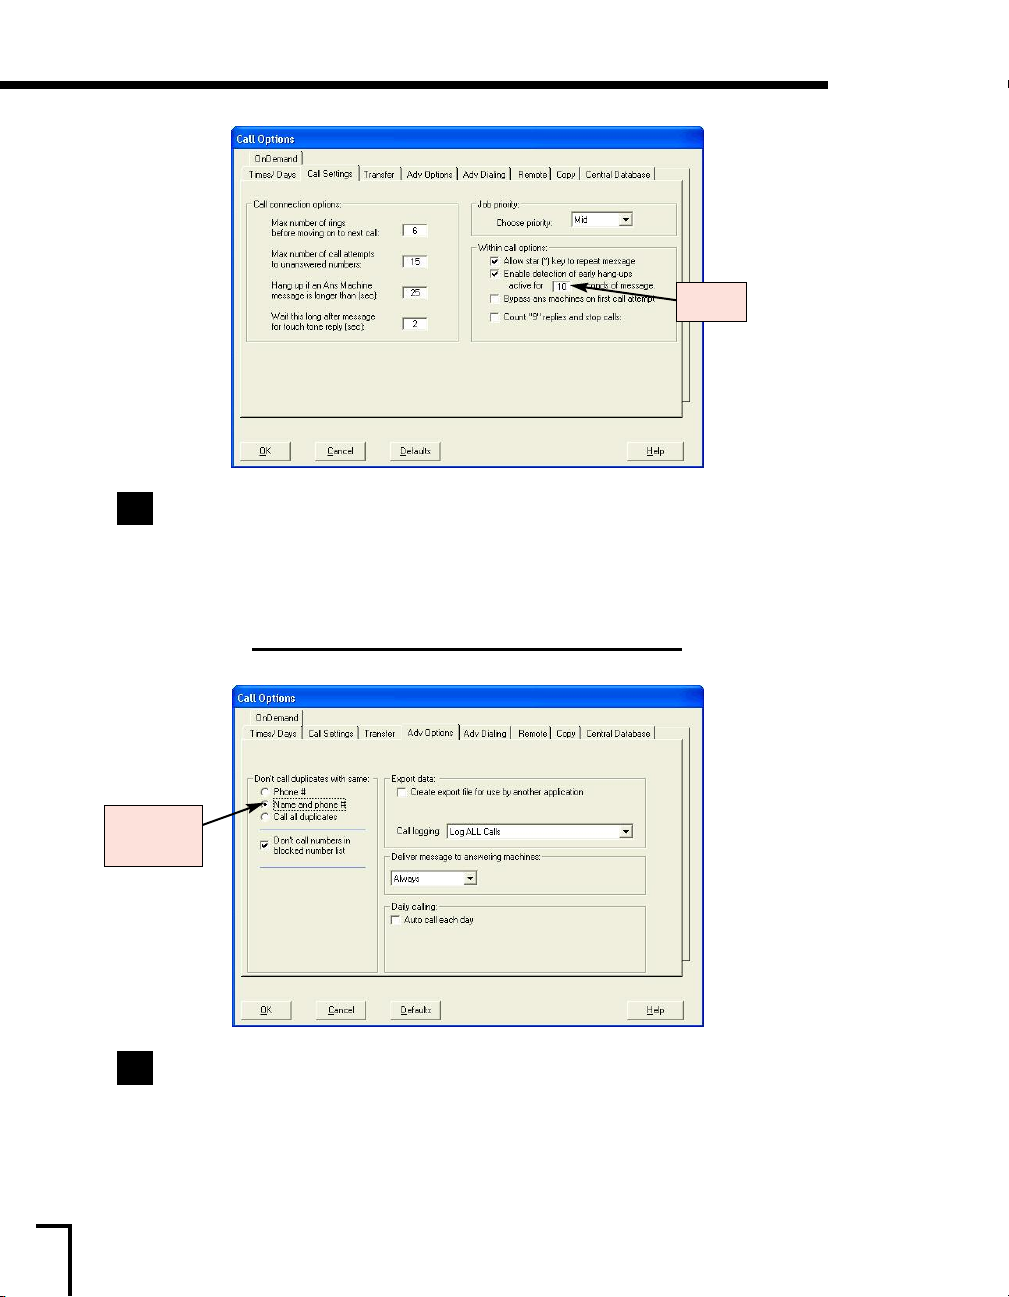
Next, click on the Call Settings tab.
8b
Leave the
The
if star is pressed by announcing it during your message. Uncheck if this is not desired.
Set
Call connection options to their default settings.
Allow star (*) key to repeat message option allows the message to be repeated
≠nable detection of early hang-ups.... to 10 seconds.
Set to 10.
46
Set to Name
and phone #.
Click on the Adv Options tab.
8c
Set the
Don’t call duplicates with same to Name and phone #.
Then, click
OK.
Page 47
2100: Setting Up a Call Job, continued
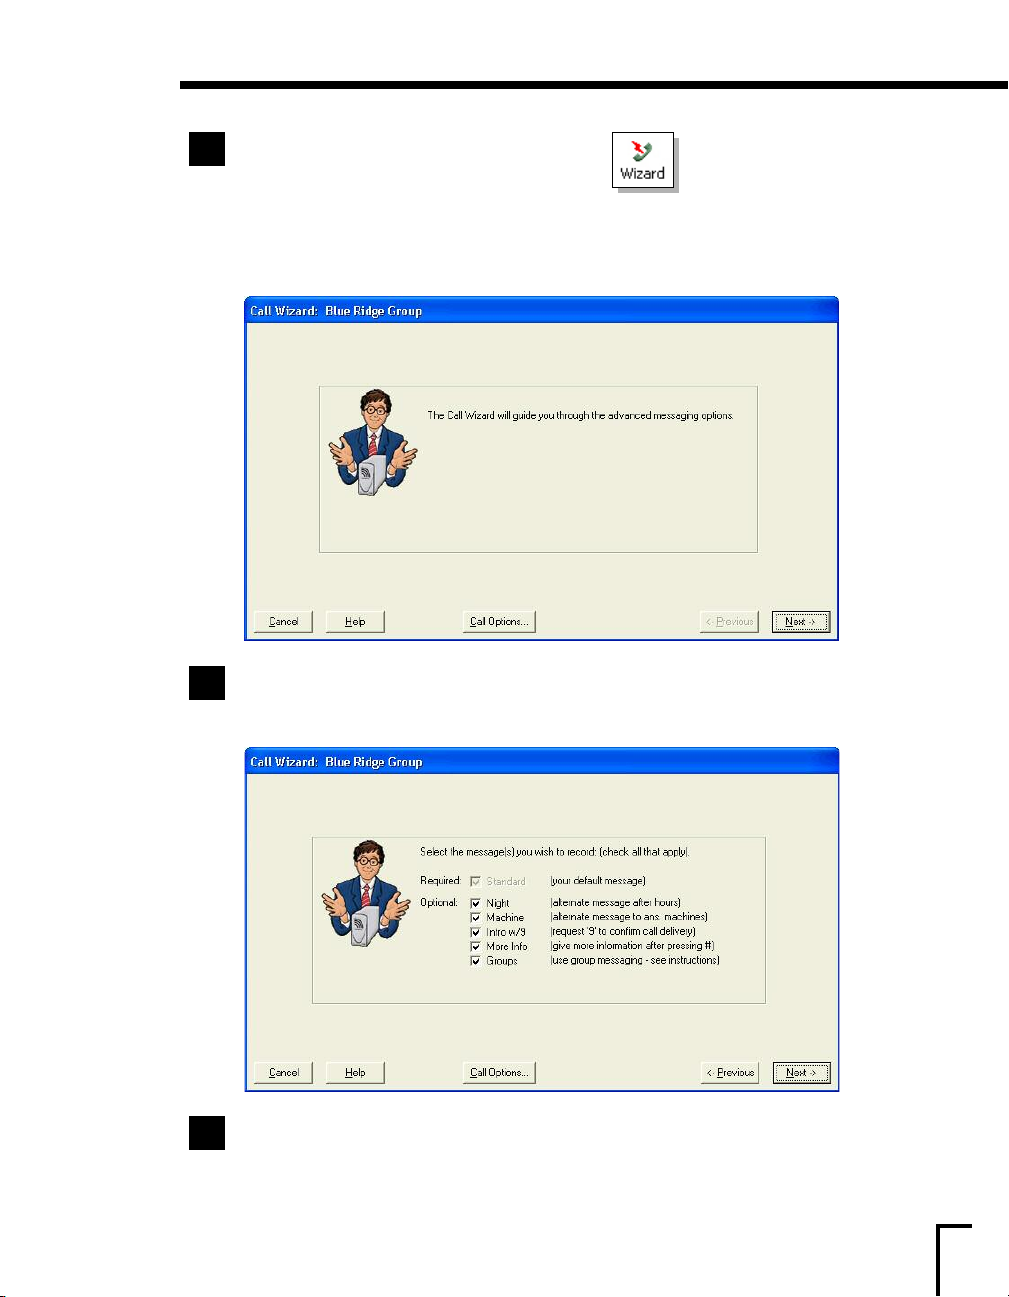
Click on the Wizard icon from the top toolbar.
9
Call Wizard will take you step-by-step through the various call options and how to record
The
your message(s) for your outbound calls. Unlike ≠asyCall, the Call Wizard allows you to save any
messages that you record for later use.
Upon opening the Call Wizard, click Next.
9a
Choose which message option(s) you would like to add in addition to your outgoing
9b
message (
or det
f
ailed inf
ormation on each of these options, click
Help), t
hen, click
Next.
47
Page 48
2100: Setting Up a Call Job, continued
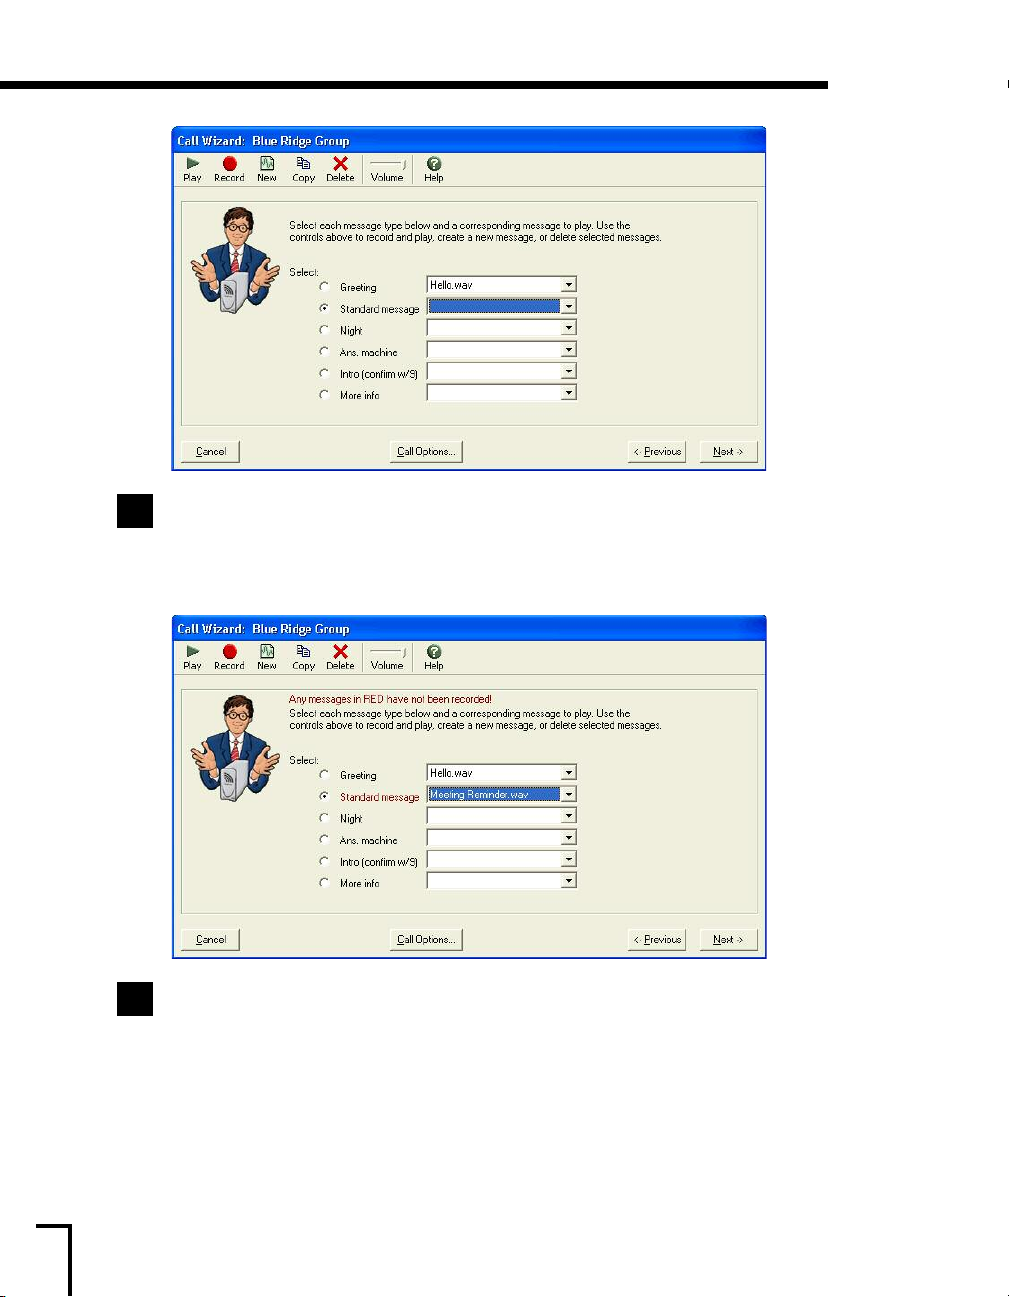
The message options chosen on the previous screen will determine which and how many
9c
of the drop-down boxes [i.e. Night, More Info] appear. Select the
Then, from the top toolbar, click
≠nter a title for the message and then click
New. A box will appear requesting a title for the message.
Standard message box.
OK. Repeat for each additional message option.
48
Next, one-by-one, you will need to record each message option. Click Record from the top
9d
toolbar and speak into the headset microphone after you hear the beep. Click
finished. T
finished, click
eview what was recorded, click
o r
Next.
Play. Repeat f
or each message option. When
Stop when
Page 49
2100: Setting Up a Call Job, continued
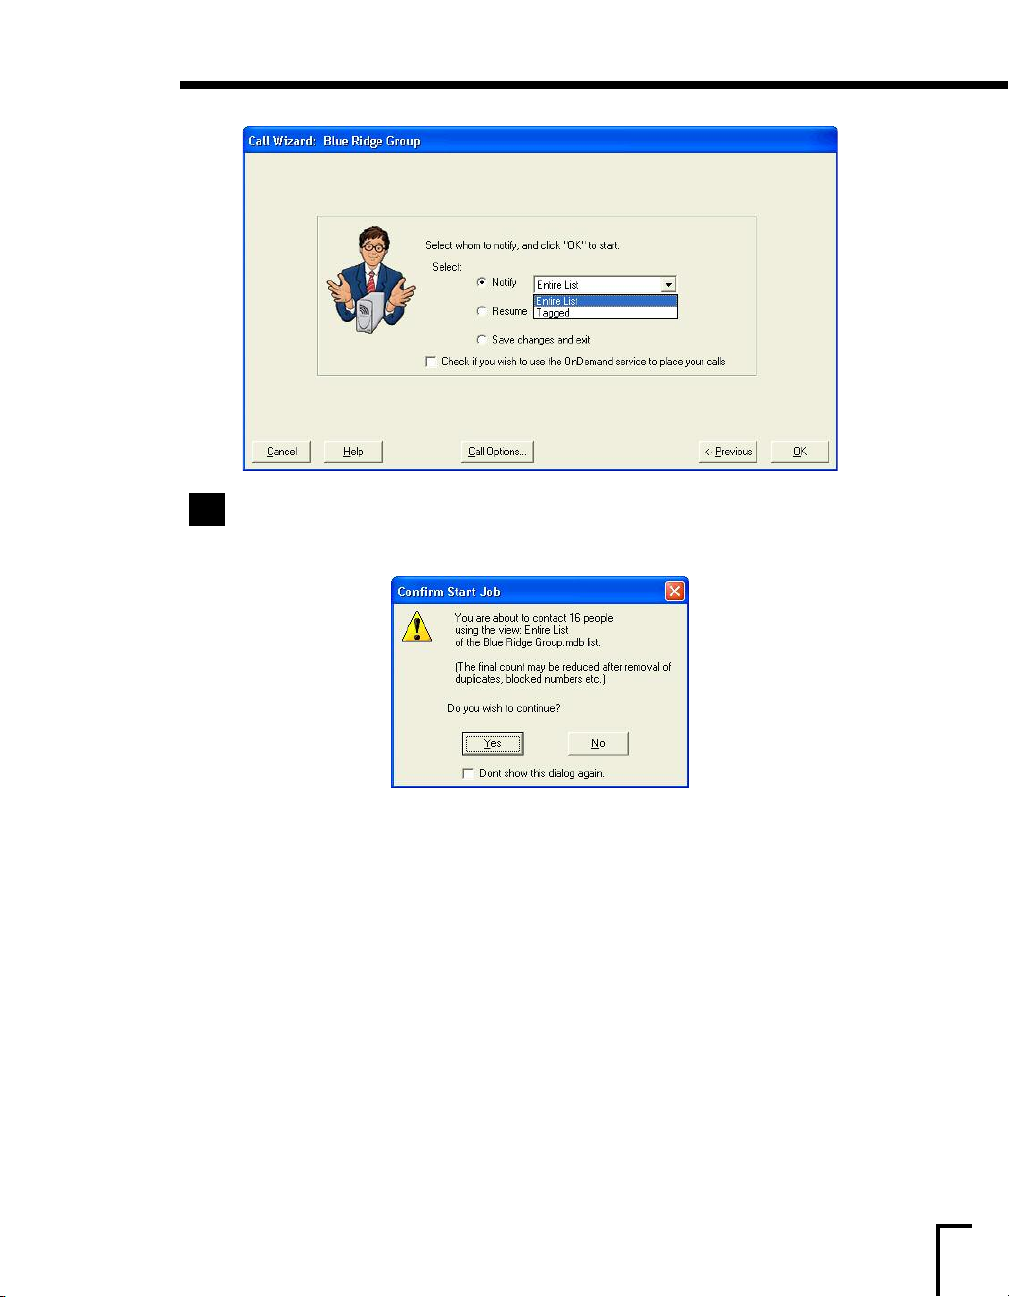
In the Notify drop down box, either choose the ≠ntire List view (all members will be
9e
notified), or any custom view you have set up or
the call list will be called). Then, click
OK to launch your call job.
Tagged (only the members checked on
Once you press OK, the Confirm Start Job window will appear showing how many people
you are about to call and asking if you wish to continue. If you are ready to start your calls,
Yes. If you click No, you will exit the Call Wizard completely.
click
After you click
on what the Call Center is and how it functions.
If you would like to generate a report showing your call results once your calls are finished
or configur
Yes, this will launch the Call Center. Turn to page 83 for more information
e PhoneTree to automatically do this for you, turn to page 87.
49
Page 50

Notes
50
Page 51

2500
51
Page 52
2500: Let’s Begin!
2500
Now that your PhoneTree 2500 is configured to work with your phone lines and dialing rules in your
area, you are now ready to set up your message. On the following pages you will be shown, step-bystep, how to import your call list using a file, configure the call times, record a message, set up e-mail
messaging, set up multi-lingual messaging and start making outbound calls using the Call Wizard. If
you prefer to use ≠asyCall to make your calls once you have configured your call times and other
options, please see page 40 (
the Call Wizard
2500 S≠ users: If you have the 2500 S≠, you will use the same instructions supplied here to record
your message(s) and make your calls. Please make sure you have already set up your OnDemand
account before proceeding (see page 113).
Note: Some options and features are not discussed thoroughly. For more information regarding any
option or feature, please click a
The next page lists the additional Admin icons included with the 2500 and 3500 models.
Please review the information provided for these icons before you begin setting up your calls.
In order for PhoneTree to make or receive phone calls, the Call Center must be running
during your preset call times (see page 84).
).
≠asyCall does not contain all of the call features that are available with
Help button which will display information on that feature.
52
Let’s Begin!
Page 53
2500: Additional Admin Desktop Features (2500 and up)
Additional Admin Desktop Features (2500 and up):
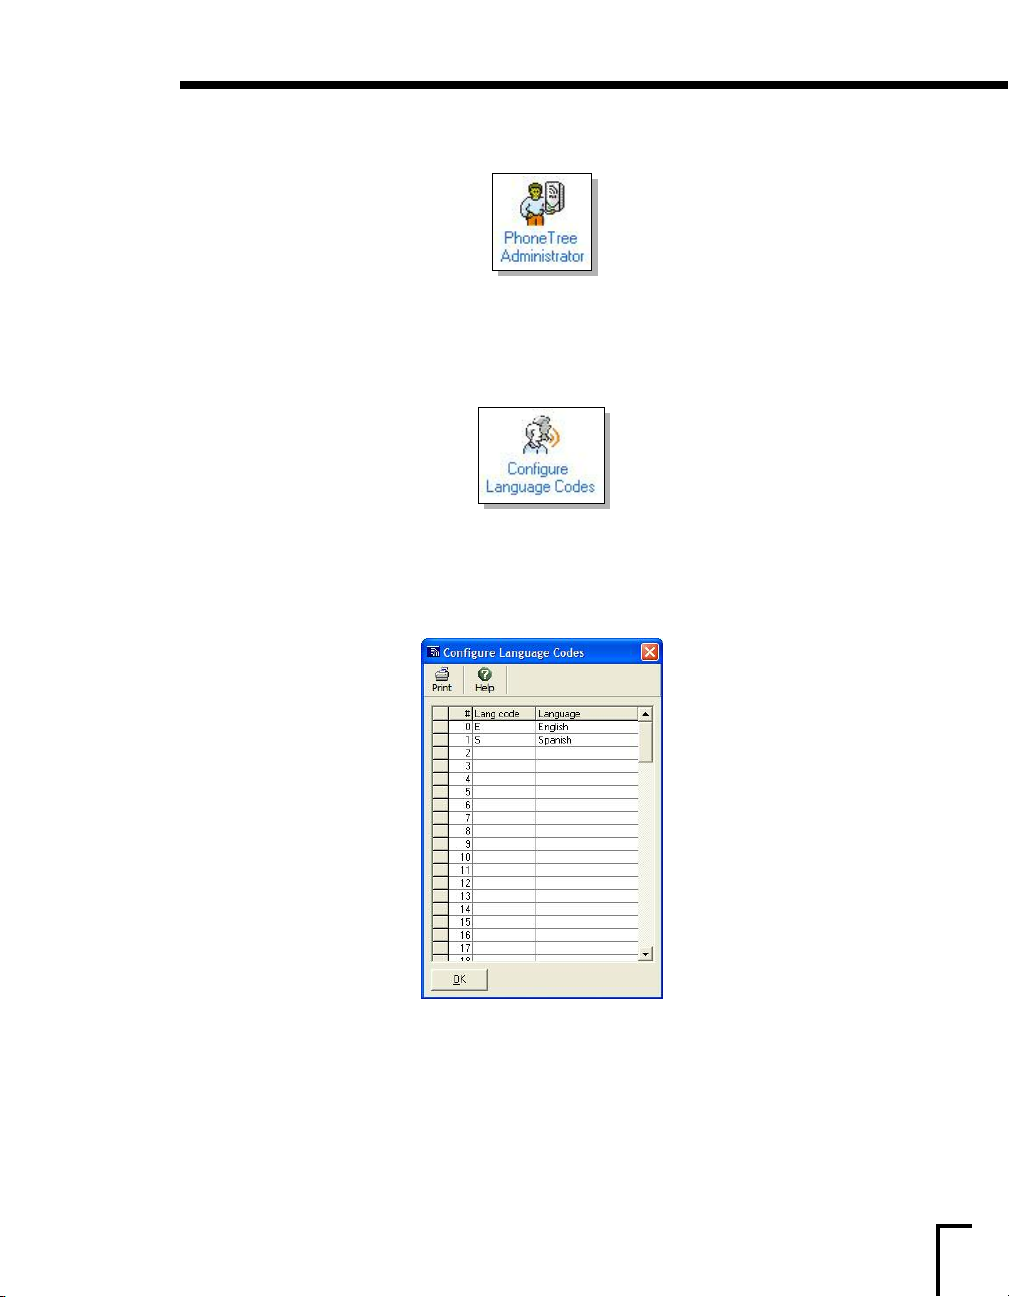
PhoneTree Administrator
The PhoneTree Administrator tool allows you to manage all of the PhoneTrees under the PhoneTree
tab. Here, you can rename, password-protect, lock or change the number of PhoneTrees available.
For more information regarding this icon, please click Help.
Configure Language Codes
Your PhoneTree has the ability to deliver vocal messages in different languages to members in your
call list
(this feature does not work for e-mail messaging). You can use this feature with importing a
file or by manually building your call list in PhoneTree.
≠ach language that will be used with your PhoneTree will need to be entered and assigned a code to
represent it (i.e. “≠” for ≠nglish, “S” for Spanish, etc.) under the
the
Language column, enter the name of the language as shown in the example above.
Note: If you plan on importing a file and ha
sure that the codes entered here match what appears on the file. If you are building your list by
adding members t
from what you have added here. If there is no language assigned to a member, then the default
language, #0, will be used for them.
For features not discussed for this icon or for more information, please click Help.
o t
he call list manually, you can set the language for each member by choosing
ve a field on t
Lang code column. Then, under
hat contains the language code, be
he file t
53
Page 54
2500: Setting Up a Call Job
Setting Up a Call Job:
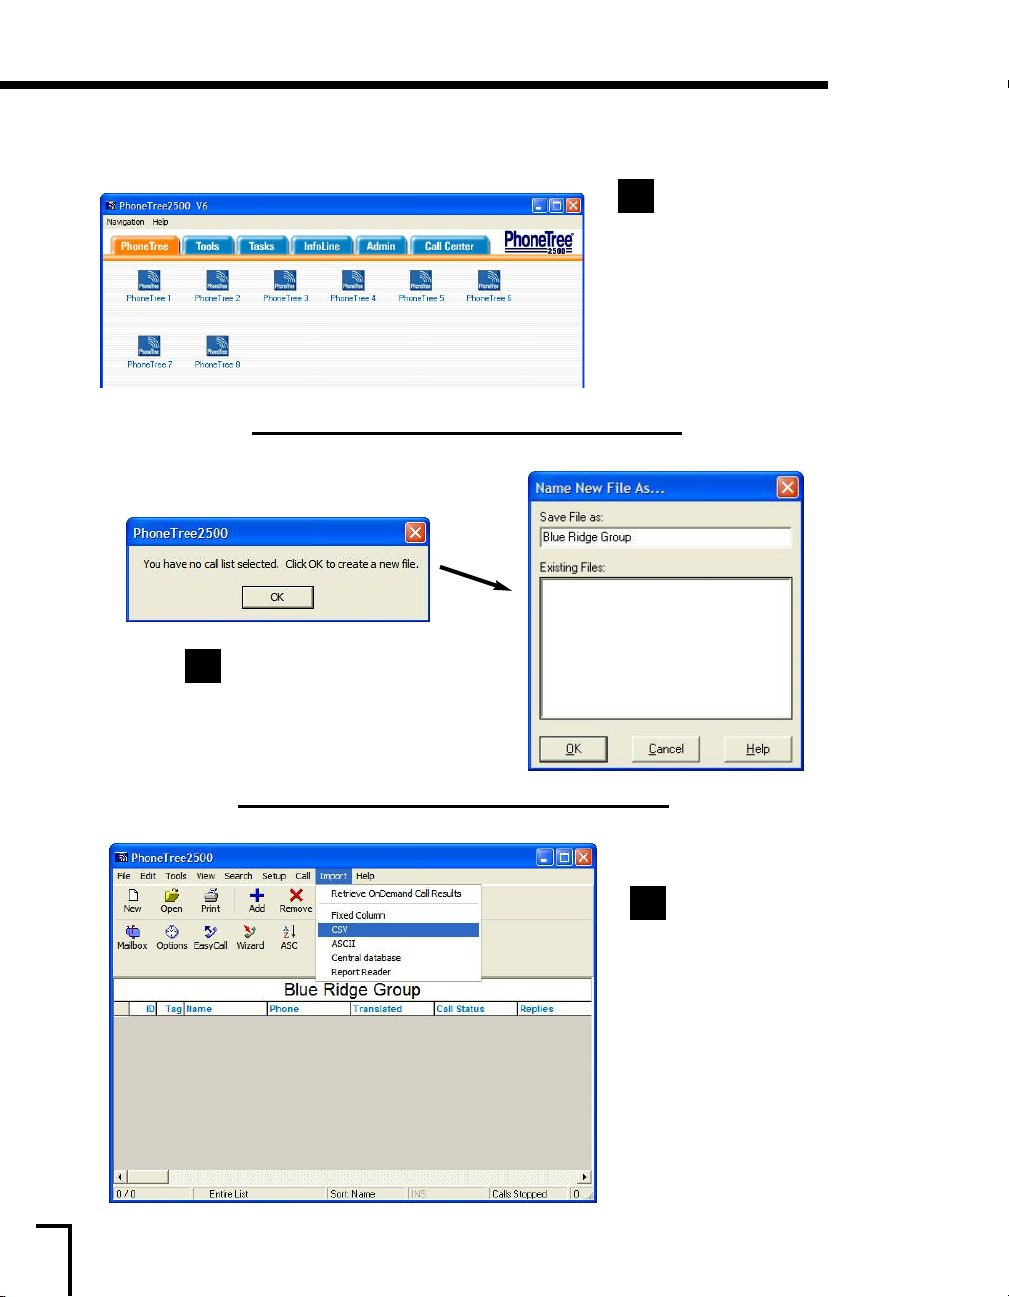
From the Desktop
1
View, click the
PhoneTree tab, then, click
PhoneTree 1. The other
PhoneTree icons can be
used for additional call lists
(up to 256, using the
PhoneTree Administrator).
Repeat this section to set
up another PhoneTree for a
different list and message.
Click OK for the box that appears.
2
Then, enter a name for this
particular call list and click
OK.
Now it is time to
3
import the file that
contains the names and
numbers (or add them
one-by-one as described
on page 38). For this
example, w
CSV file.
equir
r
translator other than
CSV, please choose that
instead.)
the top of the screen and
then choose
e will use a
(If your file
ent
es a diff
er
Click Import at
CSV.
54
Page 55
2500: Setting Up a Call Job, continued
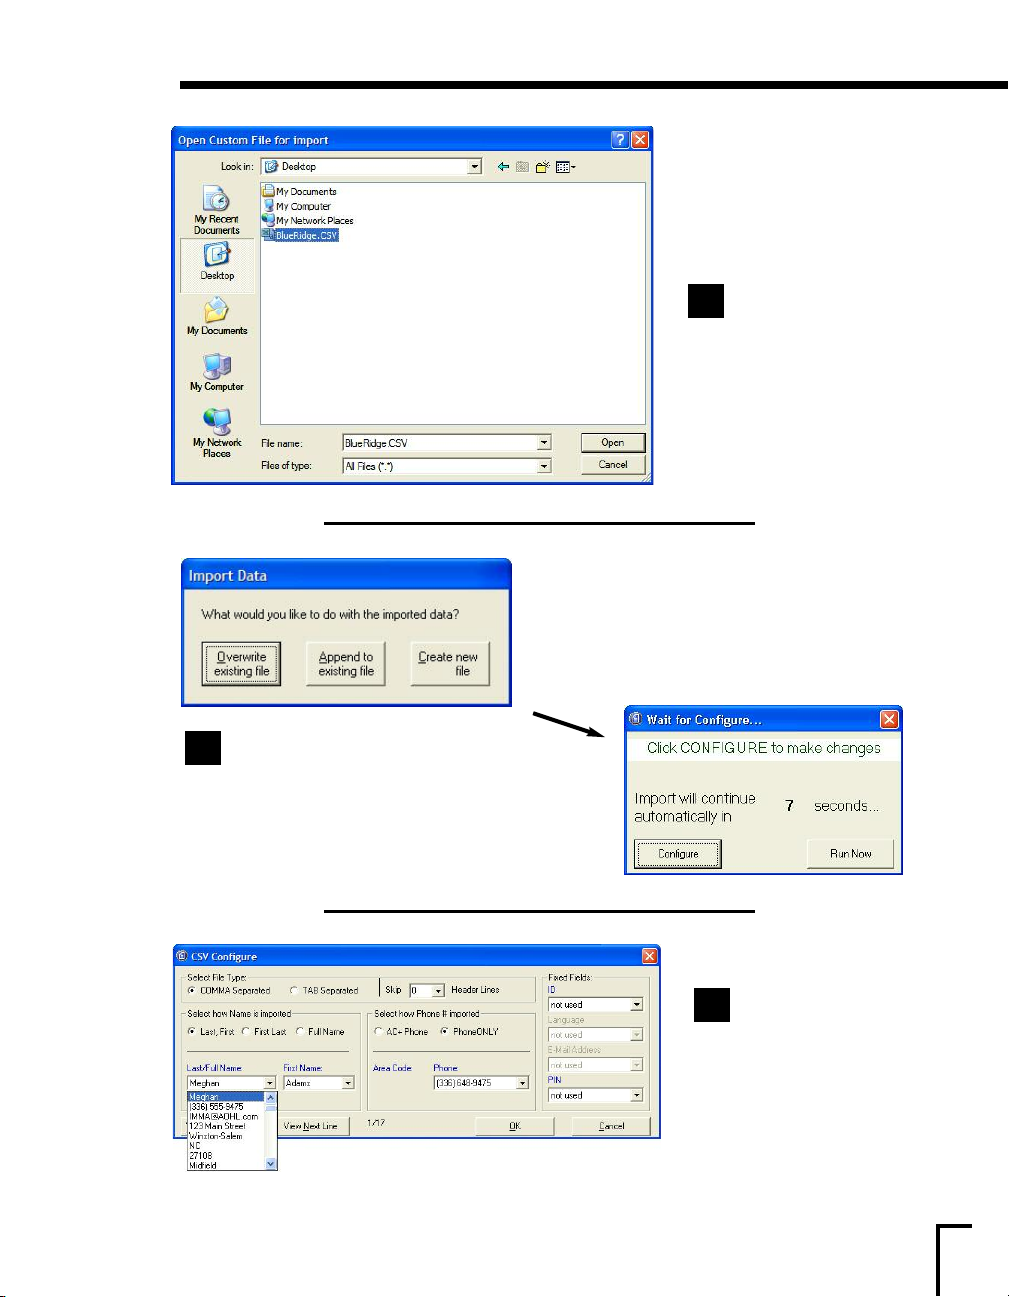
Browse to the file to
4
import. Click
Open.
A window will appear asking you what
5
you would like to do, click
existing file
click
. When the next window appears,
Configure before the timer runs out.
Overwrite
The CSV translator
6
appears. Using t
drop down boxes for
Name
Phone, mak
appropriate to the data in
your file. Then, click
, F
st Name
ir
e t
he
Last
and
he choic
OK.
es
55
Page 56
2500: Setting Up a Call Job, continued
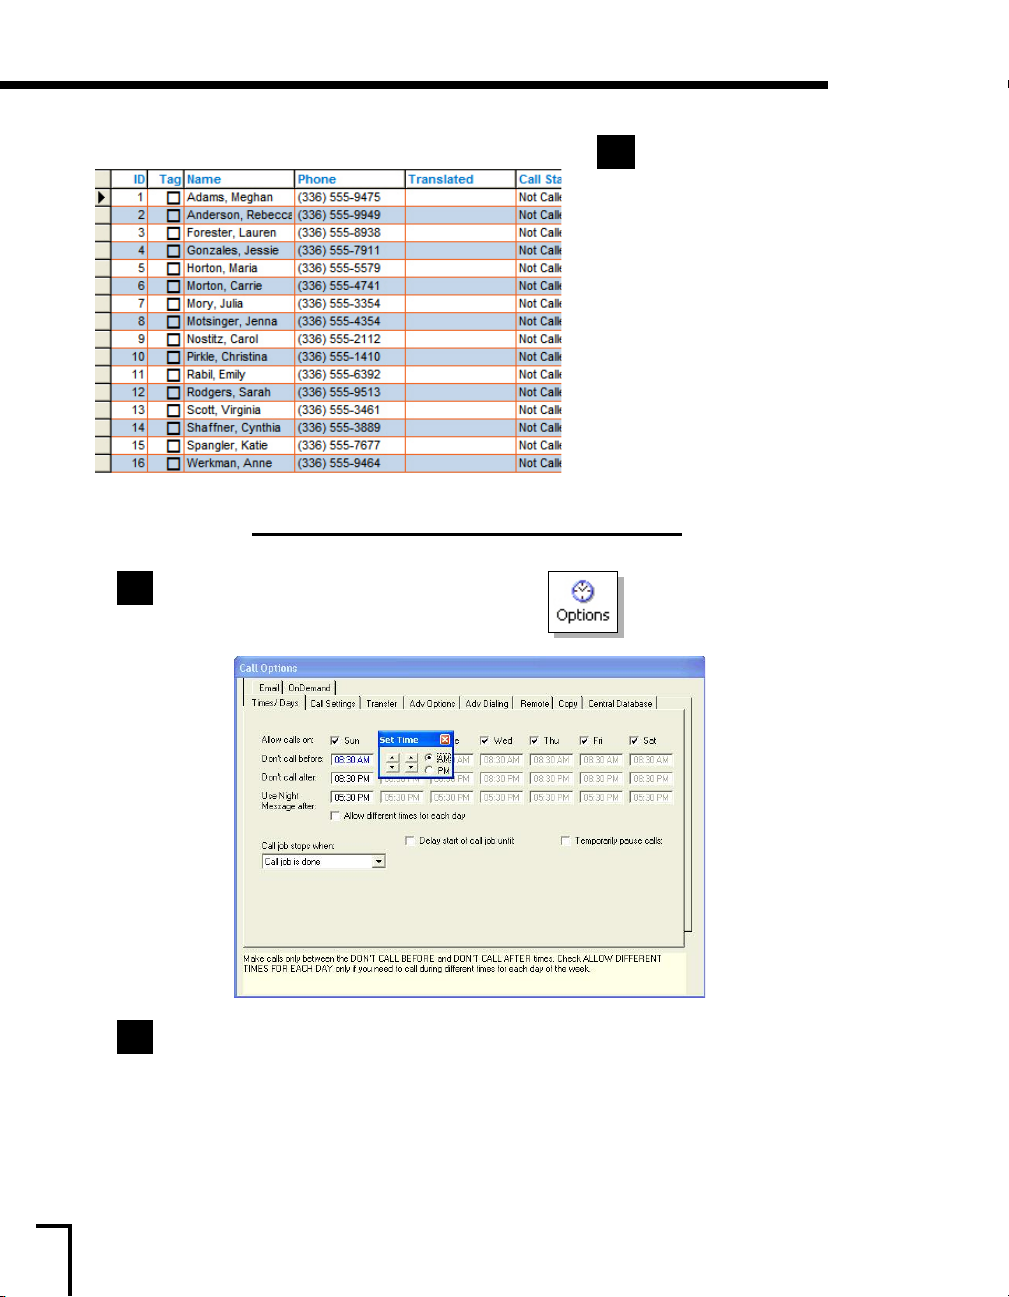
Click on the Options icon from the top toolbar.
8
After your data finishes
7
importing, you should
see your call list appear as
shown here. Make sure all
intended fields were imported.
Some fields are not available
in the ≠ntire List view. To
create a custom view to
include or change which
columns you see here, see
page 103.
If you need to add another
entry to the list after the file
has been imported, click the
Add button from the top
toolbar. To remove an entry,
click on the name and then
Remove.
click
56
The first t
8a
the week and what time during those days you want to make calls.
Uncheck any day(s) you do not want to make calls on.
To change the
week, click on each of the time fields under
arrows to adjust the hours and minutes. If you would like to set different times for
each day, select the
on each day to set the times.
ab of
Call Options, T
Don’t call before and Don’t call after times for all of the days of the
Allow different times for each day box, then individually click
ime/Da
ys
, allo
ou to tell PhoneTree which days of
ws y
Sun. A box will then appear. Use the four
Page 57
2500: Setting Up a Call Job, continued
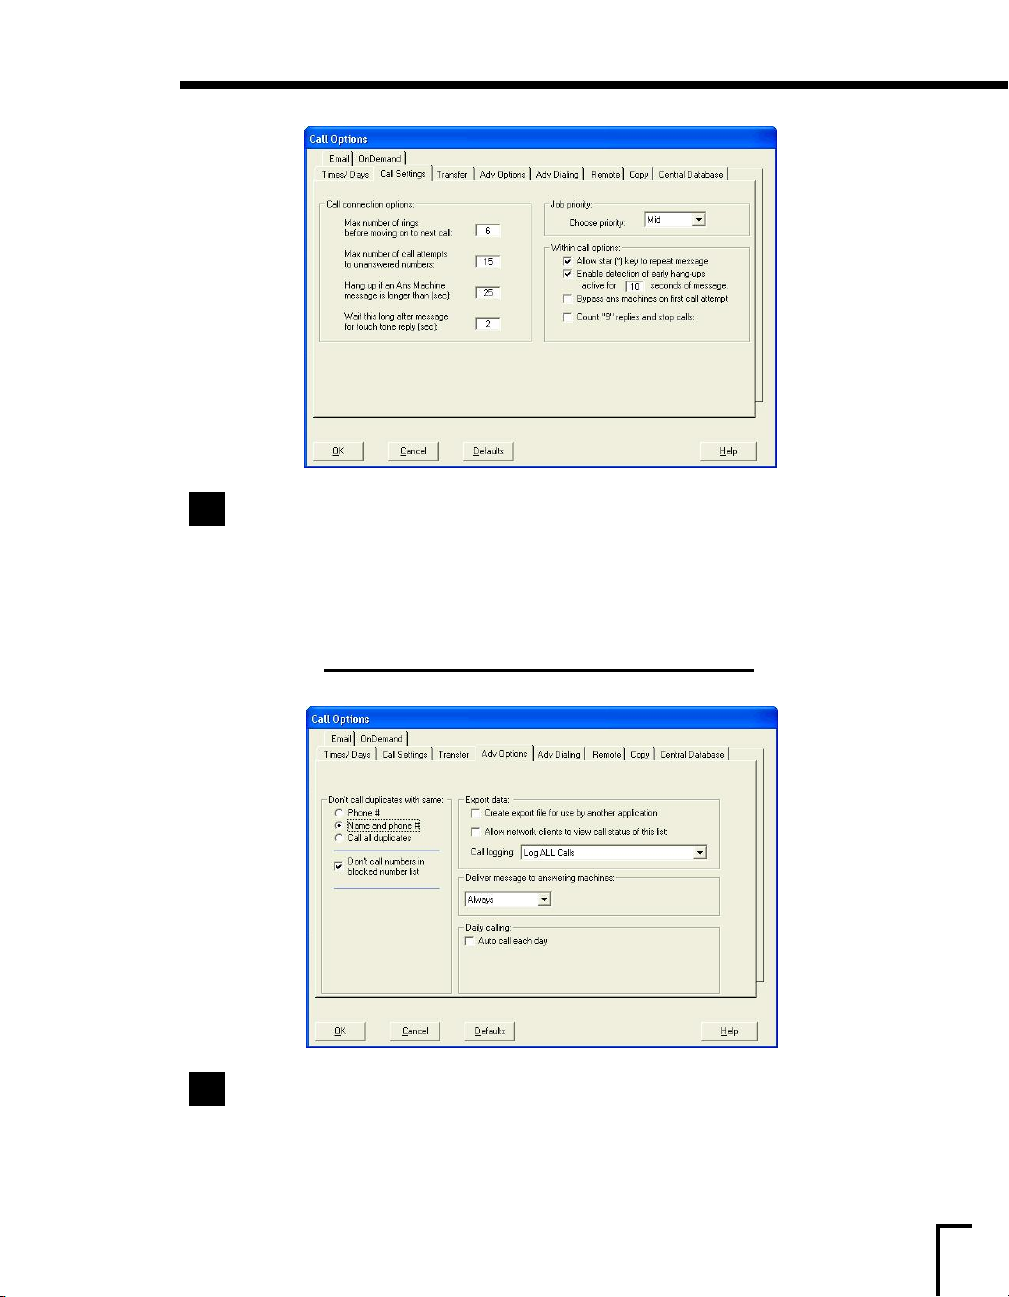
Next, click on the Call Settings tab.
8b
Leave all of the
The
Allow star (*) key to repeat message option allows the message to be repeated
if the star key is pressed by announcing it during your message. Uncheck if this is not
desired.
≠nable detection of early hang-ups.... to 10 seconds.
Set
Call connection options to their default settings.
Click on the Adv Options tab.
8c
he
Set t
Then, click
Don
all duplic
t c
’
OK.
ates
with same
toName and phone#.
57
Page 58
2500: Setting Up a Call Job, continued
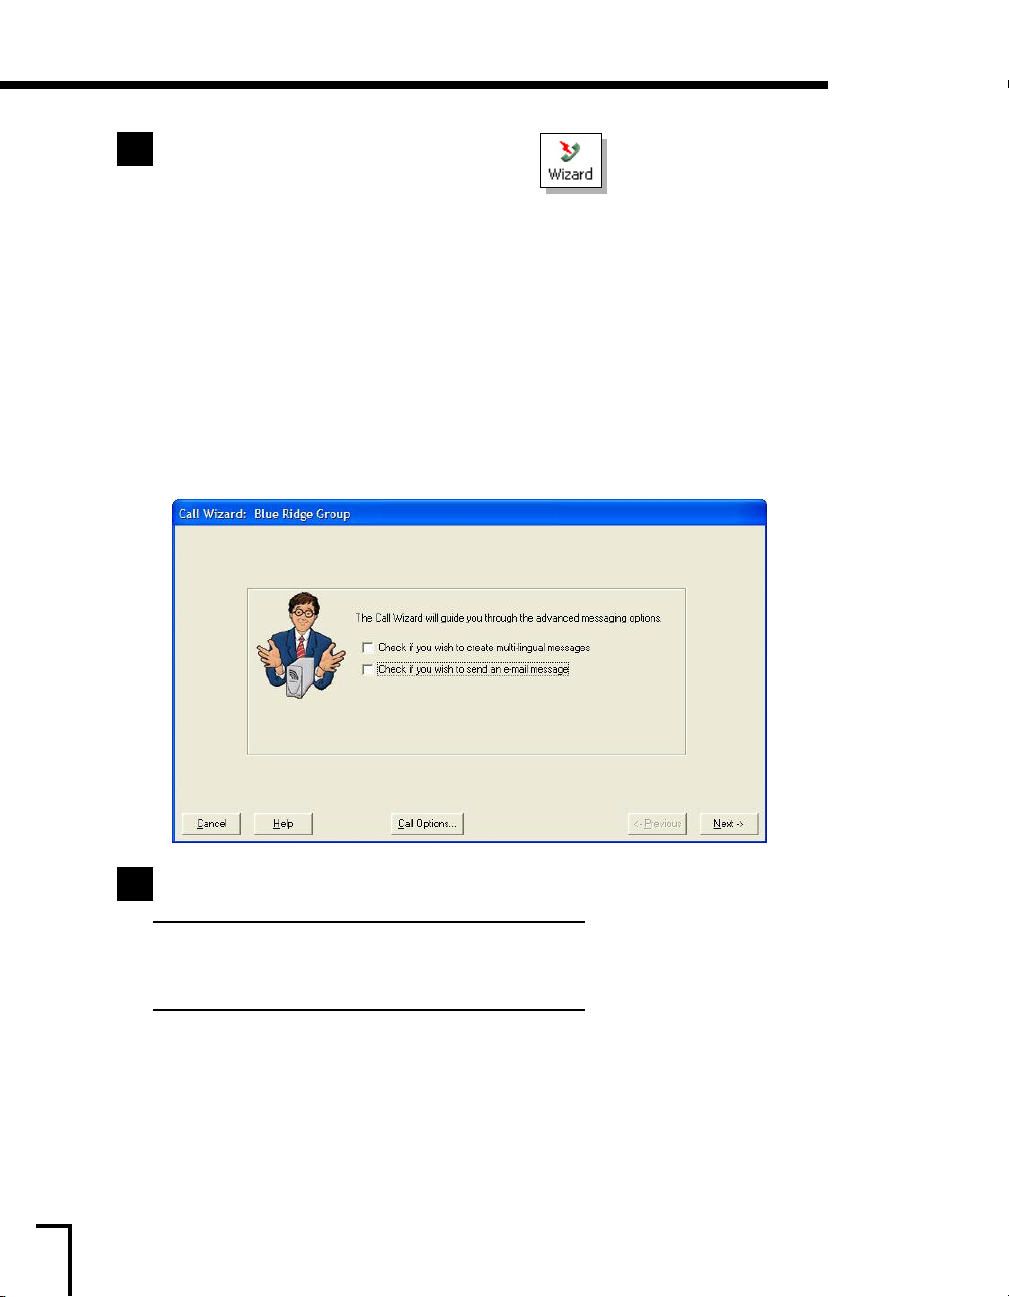
Click on the Wizard icon from the top toolbar.
9
The Call Wizard allows many options for different types of messages (as opposed to using
≠asyCall). Using the Call Wizard, you can create the standard recorded message or, add several
different message options such as a Night Message. You can set up e-mail messages, multi-lingual
messages and even use touch tone responses with your message for surveys or to have someone
respond to certain parts of your message.
This section covers three types of messages you can configure in the Call Wizard: Standard, MultiLingual and ≠-mail. The instructions for each type of message have been separated for each screen
and allow you to set up one type of message or all three at once if you choose.
Lingual message requires the Standard message to be configured at the same time in order for it to
properly work; Standard and ≠-mail alone do not.
At any point during the setup of the Call Wizard you do not understand a specific function or want
more information, click the
Help button.
Note: The Multi-
58
To set up a Standard Message
9a
Upon opening the Call Wizard, click Next.
To set up a Multi-Lingual Message
Upon opening t
messages
hen, click
, t
he Call Wizard, click on
Next.
k if you wish to create multi-lingual
Chec
To set up an ≠-mail Message
Upon opening the Call Wizard, click on Check if you wish to send an e-mail message,
then, click
Next.
Page 59
2500: Setting Up a Call Job, continued
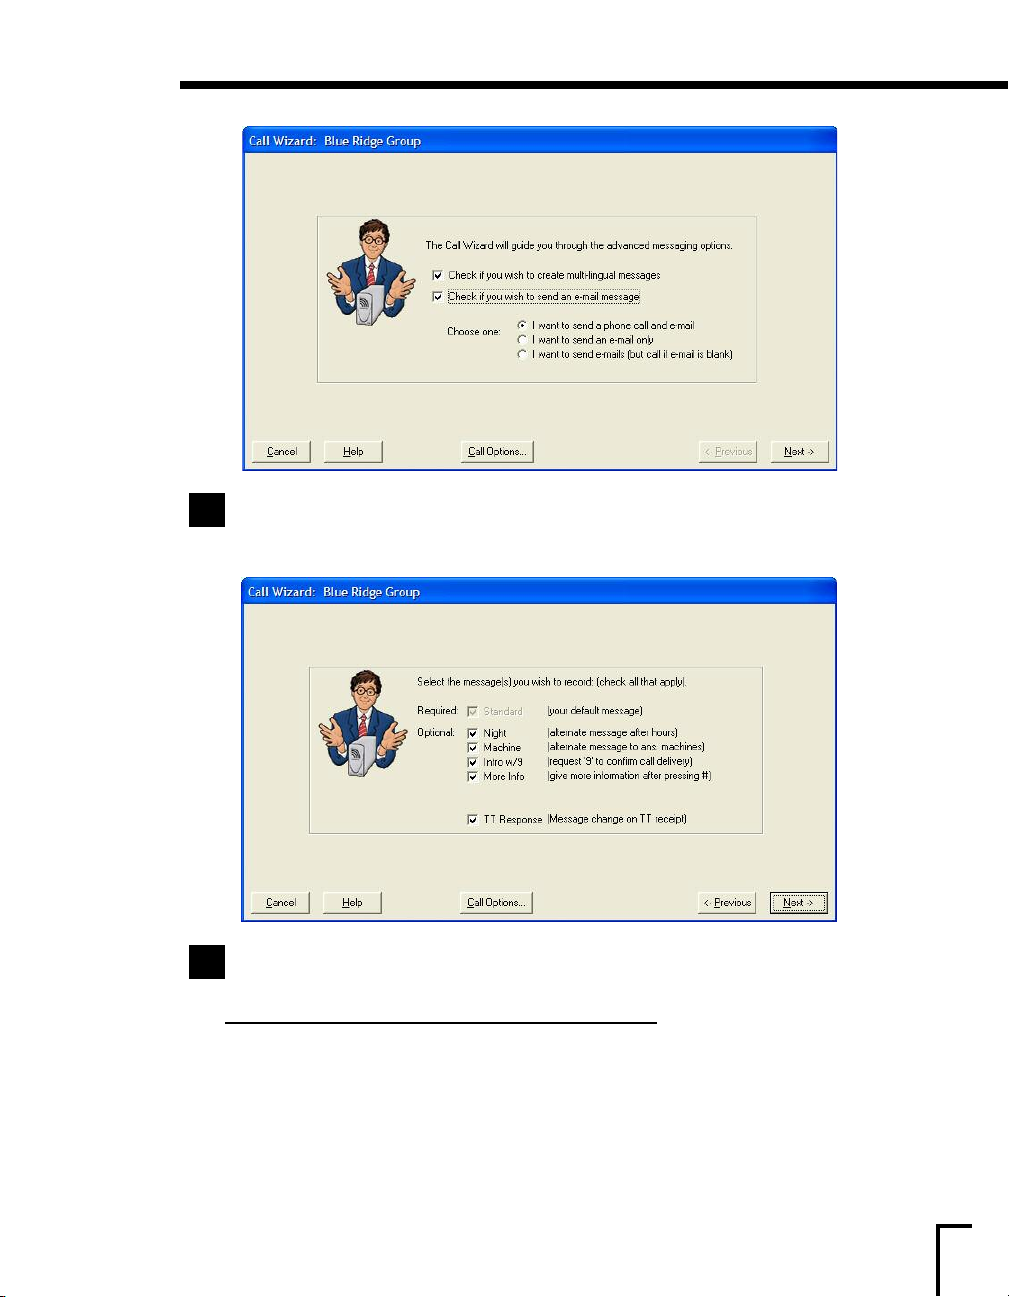
≠-mail Message continued...
9b
Choose from one of the three choices for sending e-mail messages, then, click Next.
Standard Message continued...
9c
Choose which message option(s) you would like to add in addition to your recorded
message (
M
Choose which message option(s) you would like to add in addition to your recorded
message (
for detailed information on each of these options, click Help), then, click Next.
ulti-Lingual Message continued...
for detailed information on each of these options, click Help), then, click Next.
59
Page 60
2500: Setting Up a Call Job, continued
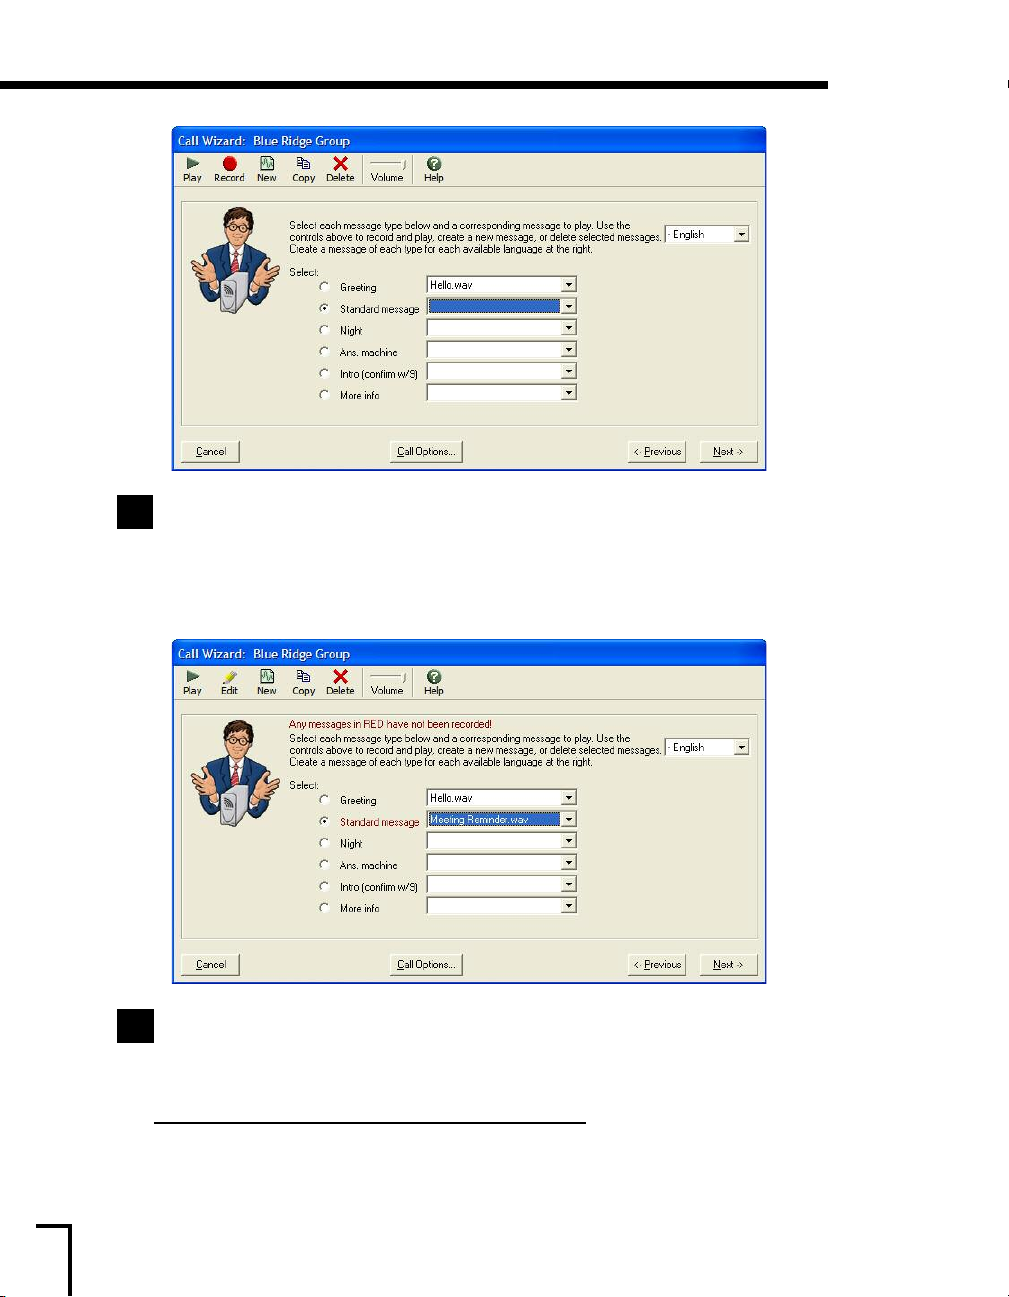
Standard Message continued...
9d
The message options chosen on the previous screen will determine which and how many
drop-down boxes [i.e. Night, More Info] appear. Select the
from the top toolbar, click
a title for the message and then click
New. A box will appear requesting a title for the message. ≠nter
OK. Repeat for each additional message option.
Standard message box. Then,
60
Standard Message continued...
9e
Next, one-by-one, you will need to record each message option. Click Record from the
top toolbar and speak int
when finished. T
When finished, click
o review what was recorded, click
he headset micr
o t
Next.
ophone after you hear the beep. Click
Play. Repeat f
or each message option.
Multi-Lingual Message continued...
First, change the language from ≠nglish to a different language via the drop-down box in
the top right corner. Then, record each message option for that language. Repeat for each
language. When finished, click
Next.
Stop
Page 61
2500: Setting Up a Call Job, continued
Standard Message continued...
9f
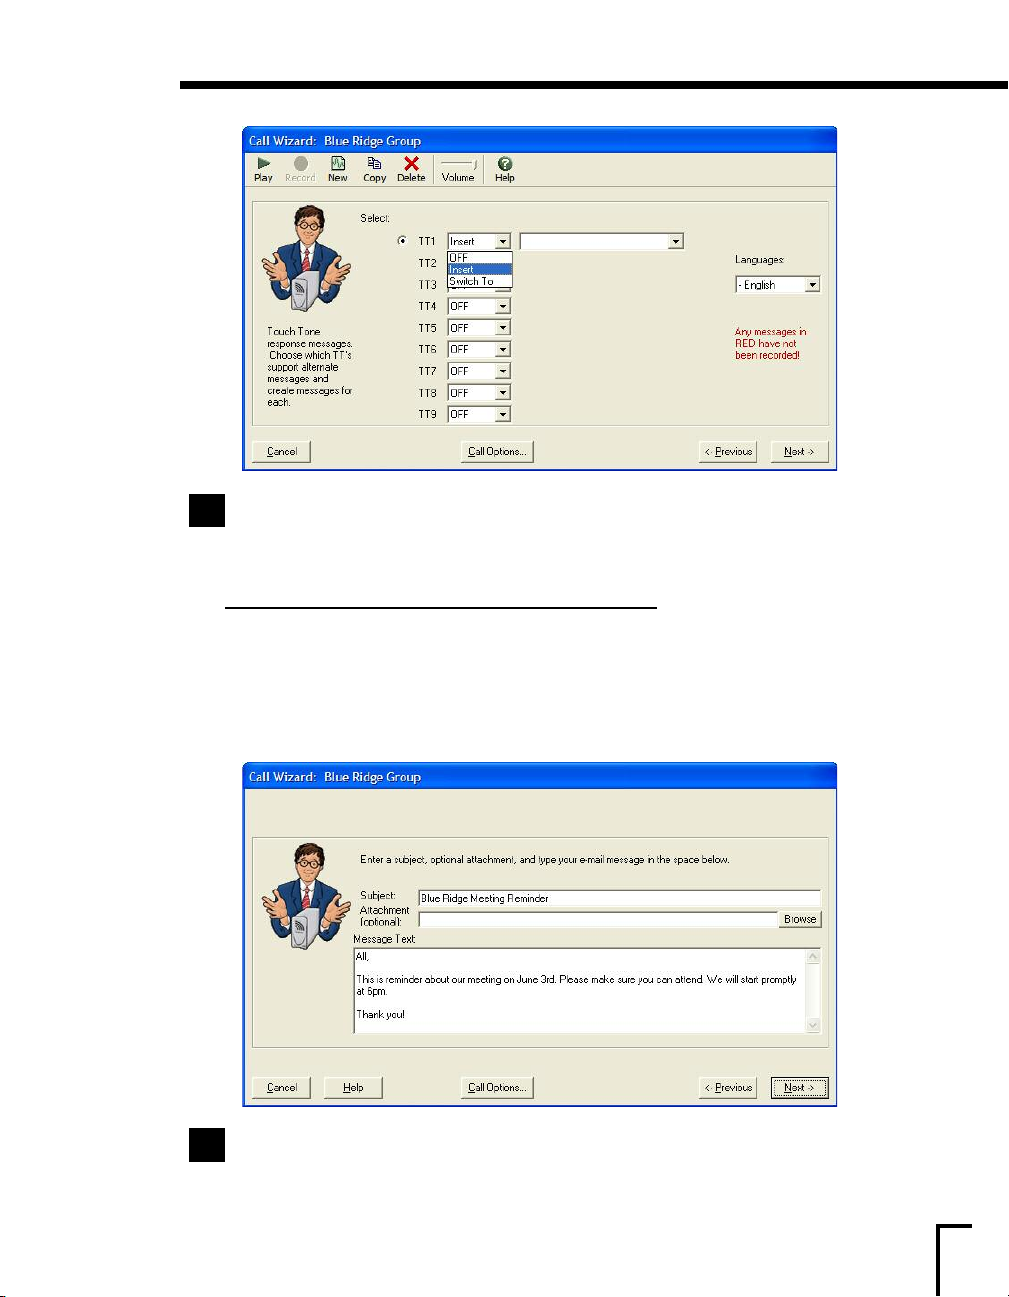
If you chose TT Response as a message option, you will see this screen. The touch tone
reply numbers you choose here should coincide with what you mention in your message
(for detailed information on how to set up a touch tone reply, click the Help button from
the top toolbar)
Multi-Lingual Message continued...
If your multi-lingual messages use the touch tone reply feature too, you will need to record
those as well. First, change the Languages drop-down box from ≠nglish to a different
language, then proceed with recording the touch tone replies as with the ≠nglish message.
When finished, click
. When finished, click Next.
Next.
≠-mail Message continued...
9g
er a subject and message f
≠nt
the
Browse button to locate and include it with the e-mail. When finished, click Next.
or your e-mail here. If you wish to send an attachment, click
61
Page 62
2500: Setting Up a Call Job, continued
All Messages
9h
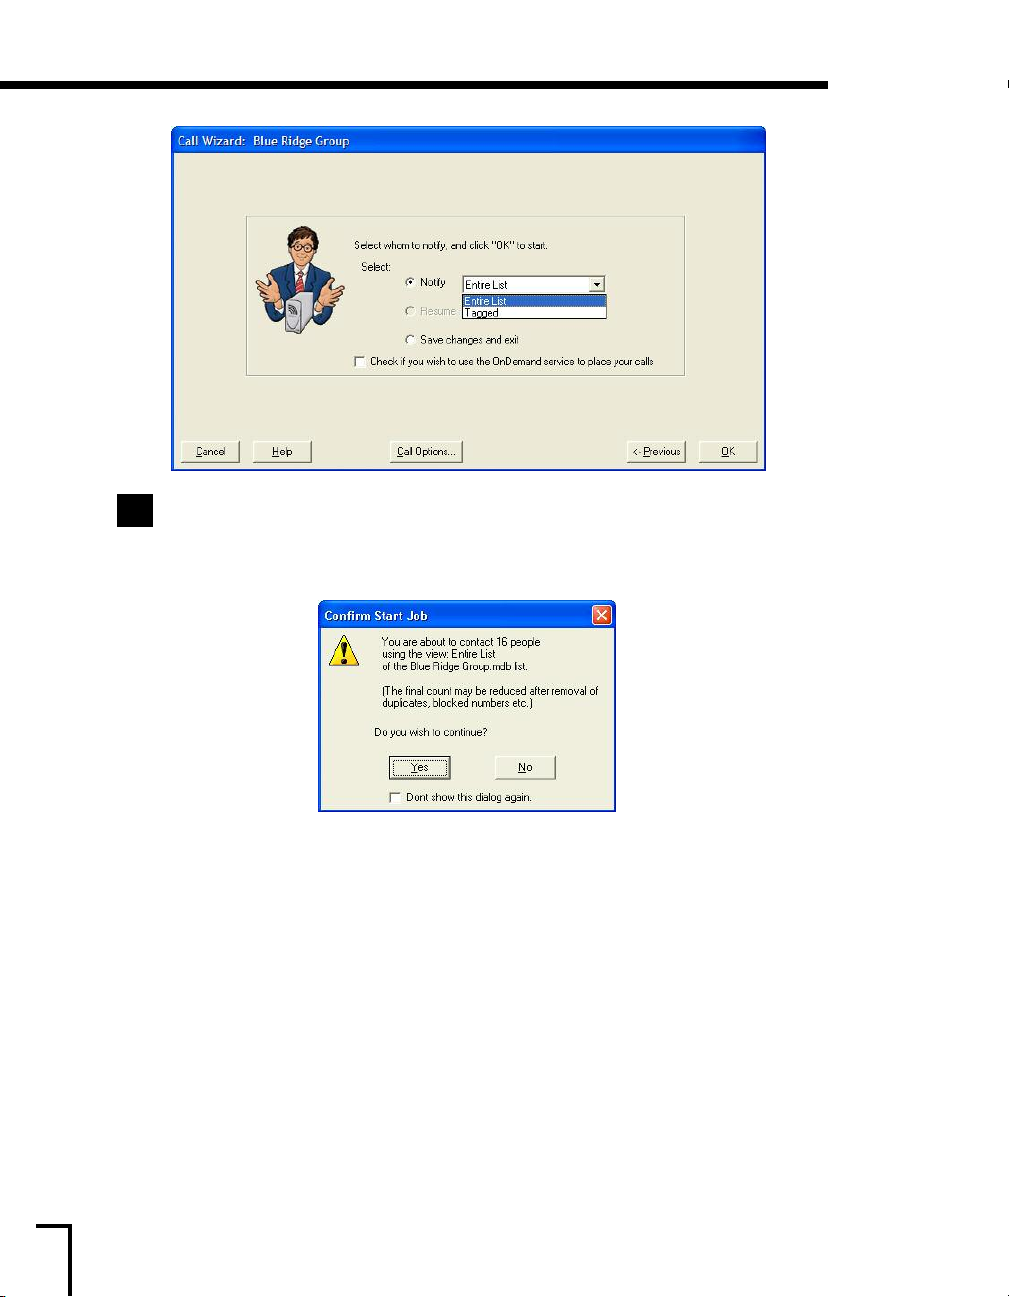
In the Notify drop down box, either choose the ≠ntire List view (all members will be
notified), or any custom view you have set up or
the call list will be called). Then, click
OK to launch your call job.
Tagged (only the members checked on
62
Once you press OK, the Confirm Start Job window will appear showing how many
people you are about to call and asking if you wish to continue. If you are ready to start
your calls, click
After you click
Packager
For information on what the Call Center is and how it functions, see page 83.
For information on how to initiate the OnDemand Packager, see pages 123-124.
If you would like to generate a report showing your call results once your calls are
finished or c
Yes. If you click No, you will exit the Call Wizard completely.
Ye s , this will launch the Call Center for the 2500 or the OnDemand
for the 2500 S≠.
onfigure PhoneTree to automatically do this for you, turn to page 87.
Page 63

3500
63
Page 64
3500: Let’s Begin!
3500
Now that your PhoneTree 3500 is configured to work with your phone lines and dialing rules in your
area, you are now ready to set up your message. On the following pages you will be shown, step-bystep, how to import your call list via a file, configure flex fields, configure the call times, record a
message, set up e-mail messaging, set up multi-lingual messaging and start making outbound calls
using the Call Wizard.
If you do not need these advanced options and prefer to use ≠asyCall to make your calls once you
have configured your call times and other options, please see page 40 (
of the call features that are available with the Call Wizard
3500 S≠ users: If you have the 3500 S≠, you will use the same instructions supplied here to record
your message(s) and make your calls. Please make sure you have already set up your OnDemand
account before proceeding (see page 113).
Note: Some options and features are not discussed thoroughly. For more information regarding any
option or feature, please click a
The next page lists the additional Admin icons included with the 3500 model only. Please
review the information provided for these icons before you begin setting up your calls.
In order for PhoneTree to make or receive phone calls, the Call Center must be running
during your preset call times (see page 84).
Help button which will display information on that feature.
).
≠asyCall does not contain all
64
Let’s Begin!
Page 65
3500: Additional Admin Desktop Features for 3500 (and SE) only
Additional Admin Desktop Features for 3500 (and S≠) only:
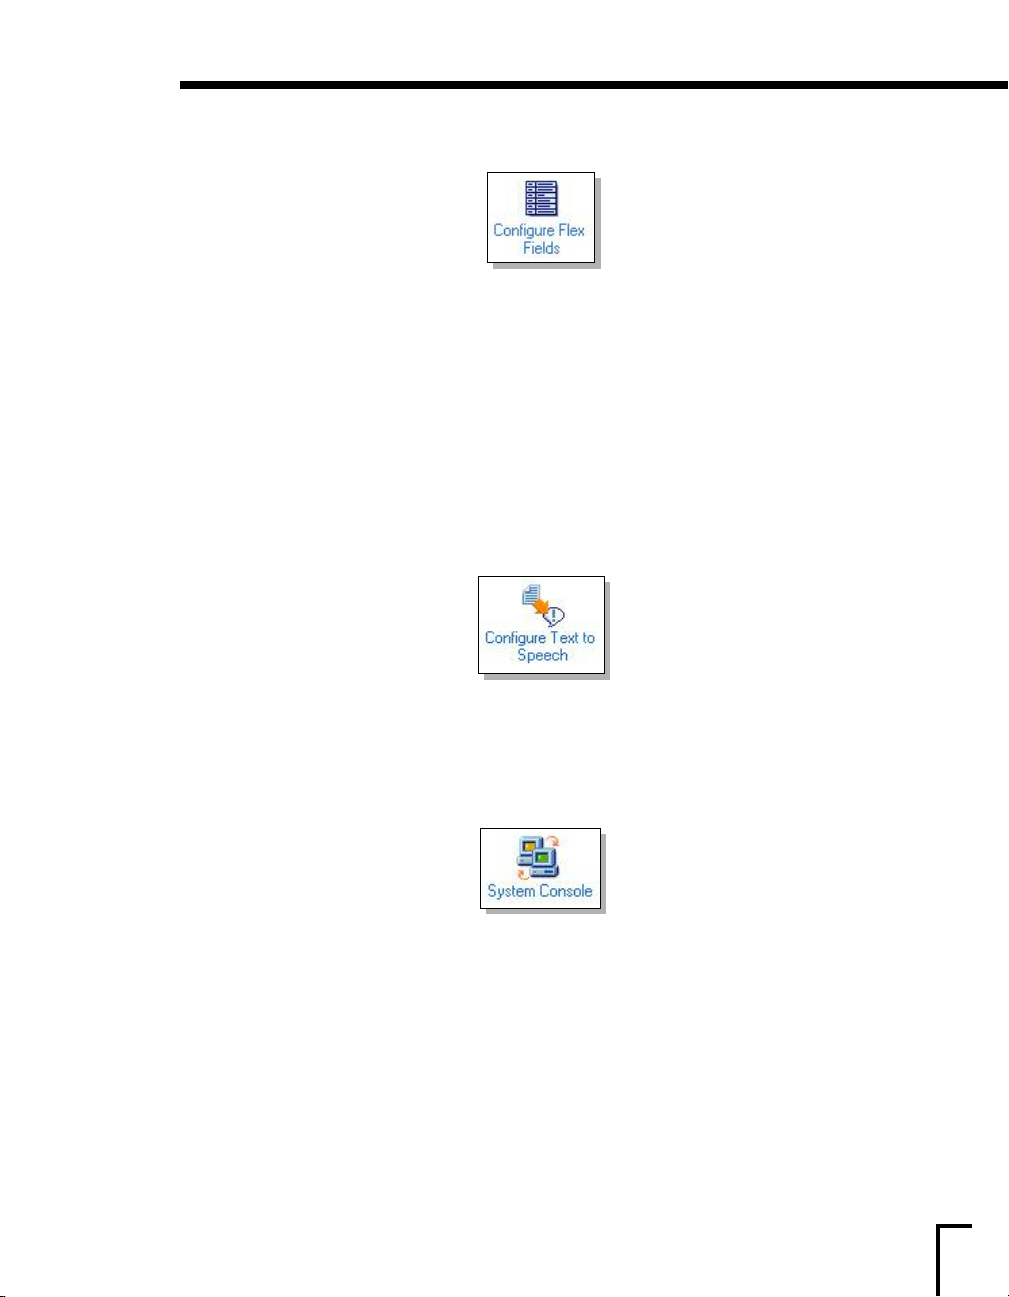
Configure Flex Fields
Flex Fields give you the ability to configure parts of your message to change based on the data
PhoneTree reads from a file. For instance, you could set up a Flex Field called “Location” and within
that Flex Field, have three different locations. In your message, you could insert the “Location” flex
field and depending on the location each member of your call list is listed with, that location would
play back during the message. The field would change based on the location the person was assigned
to either by a manual list build or by reading a file.
It is recommended that you first set up any Flex Fields you plan to use as part of your
message
If you plan on using the Alternate Phone Numbers feature (page 71), which will allow you to try
two additional phone numbers per member (up to three phone numbers), you will need to set up a
flex field for each of those.
before you begin the instructions on the next page.
Configure Text-to-Speech
The Text-to-Speech software included with your PhoneTree system allows you to have any part of
your message spoken by the Text-to-Speech software instead of your voice. Later in the Call Wizard,
you will be shown how to enable this option for your messages.
Text-to-Speech, please click the
Help button.
For more information on how to use
System Console
ed feature that allows control over call options and other settings for all the
This is an adv
PhoneT
Customer Support for supervision or click the
anc
ees in an expanded view
r
.
eature should is f
This f
or adv
Help button.
anced user
s only! Please call
65
Page 66
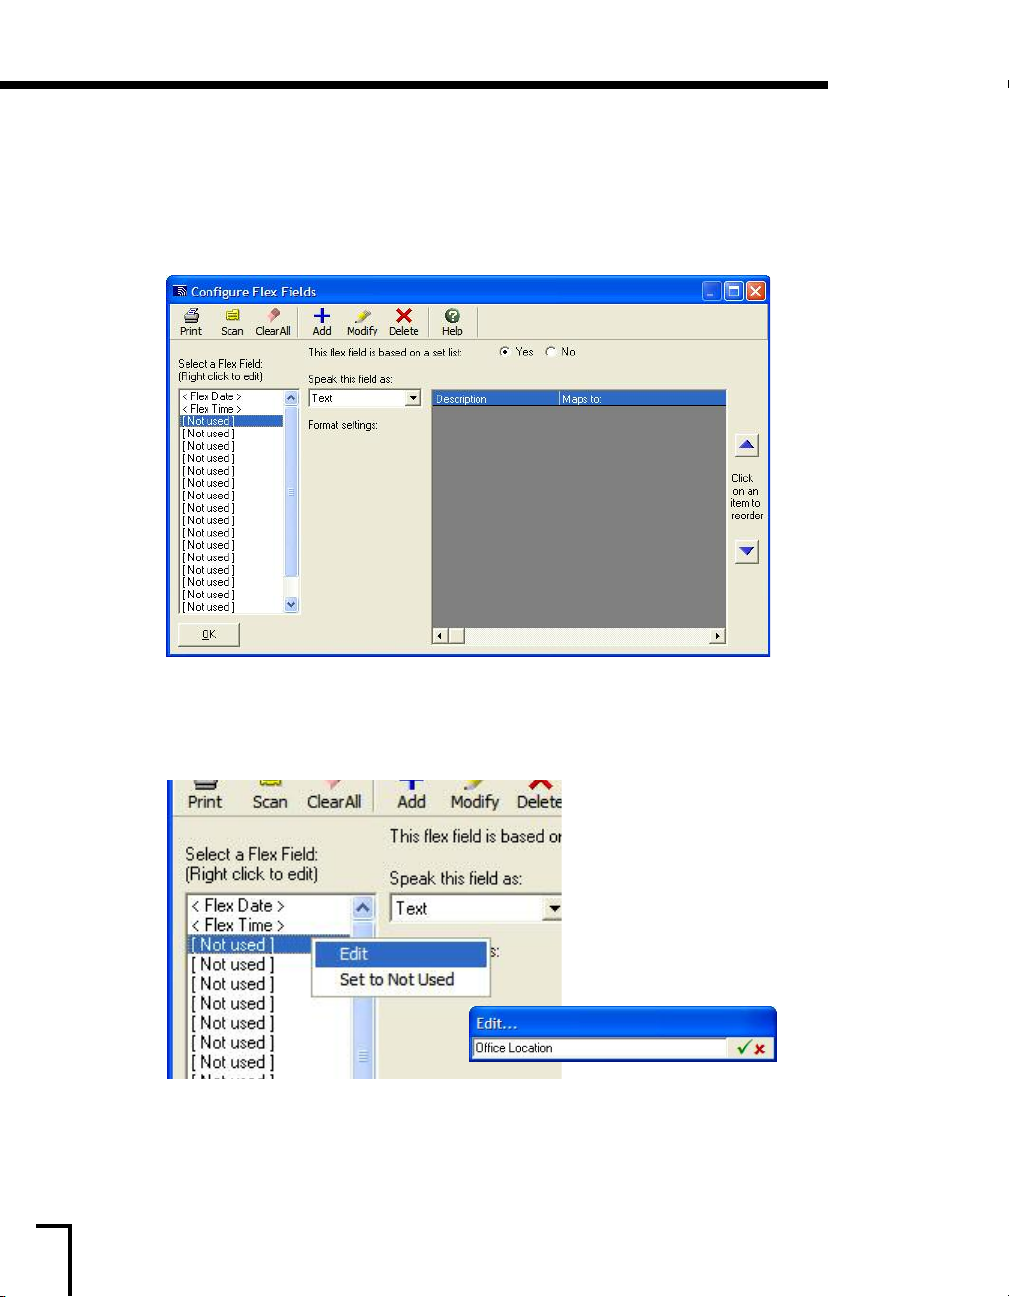
3500: Configuring a Flex Field
Configuring a Flex Field
It is recommended that if you plan on using a flex field with your message that you first configure
it before setting up PhoneTree to make calls. This section will discuss how to edit a flex field by
using an example called “Office Location.” This example will also be used later in the chapter to
illustrate how to use the flex field with your message. If you are not planning on using flex fields
with your message, proceed to page 68.
a) From the
Under the
These flex fields are preconfigured to allow the time and/or date from your file to be announced in
your message if you choose to include them. Skip to the third flex field,
b) Right click on
the
green check mark.
Admin Desktop, click on Configure Flex Fields.
Select a Flex Field column, the first two flex fields listed are Flex Date and Flex Time.
[Not used].
he flex field and t
[Not used] and t
hen choose
≠dit. ≠nt
er a name f
or t
66
hen click
Page 67
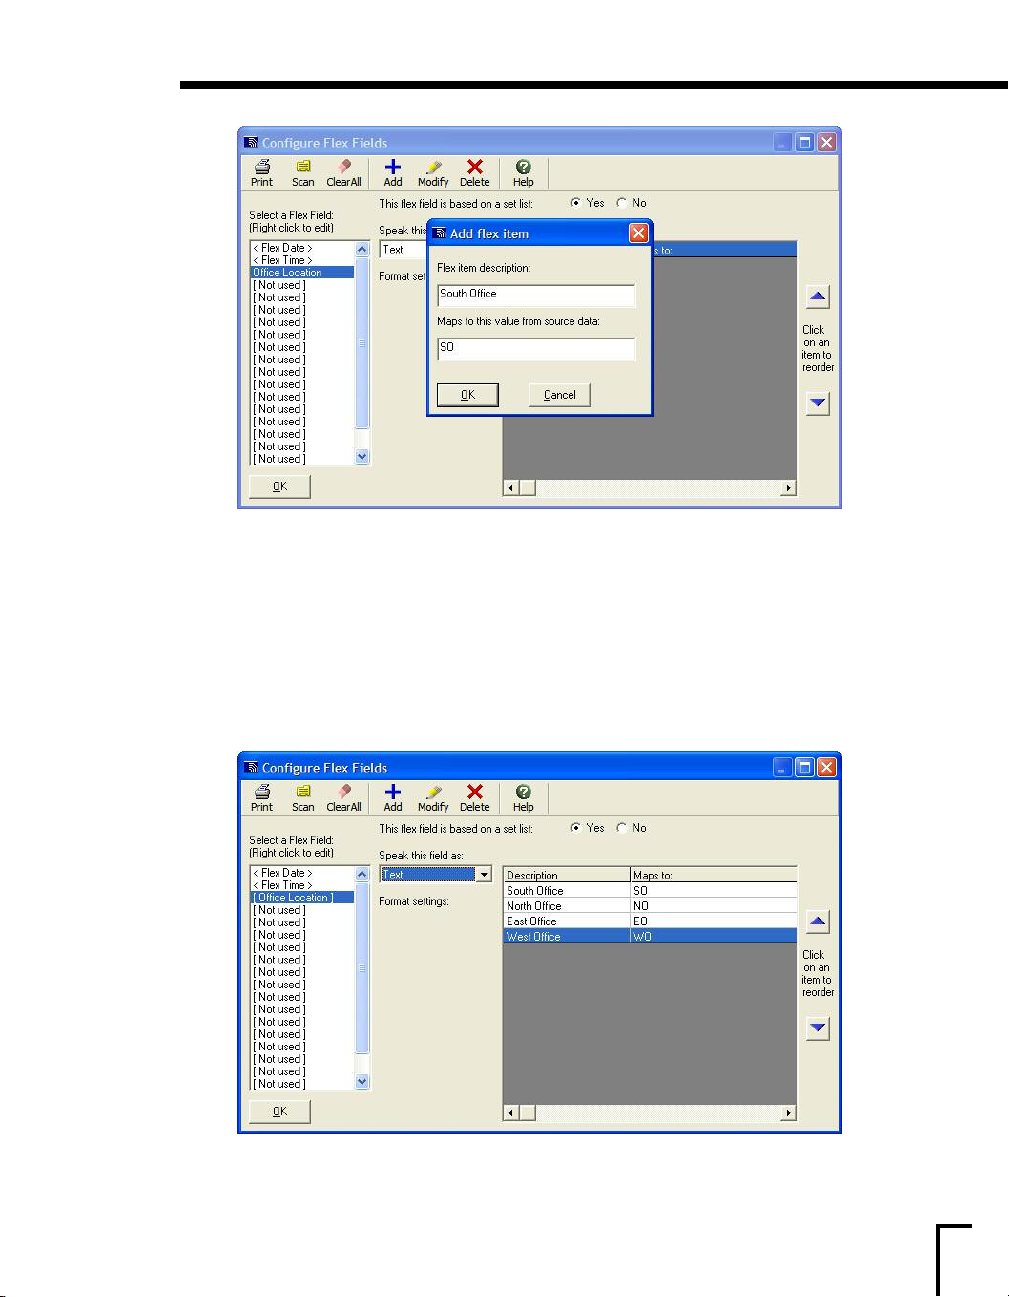
3500: Configuring a Flex Field, continued
c) Once you have created a name for the flex field, you will need to add the items for it. Using our
example, Office Location, we have four locations that will be added: South, North, ≠ast and West
Offices. ≠ach of these locations will be given a name and a value that lets us know how to identify it
on the file that will be imported. For instance, the above example shows
item description
represent how the location appears on the call list and the
looking for from the file we import. Later in this chapter, we will discuss how to set a flex field to
look for the intended data from the file.
To add an item to a flex field, click
description
box and “SO” for the Maps to this value... box. The Flex item description will
Maps to this value... is the data we are
Add from the top toolbar and then enter the Flex item
and Maps to value... Repeat for each item.
South Office in the Flex
In this example, we see how each item appears after being added.
set up Flex Fields, click the
he next page w
Continue t
o t
Help button located within.
ou are ready to set up your PhoneTree to make calls.
hen y
For more information on how to
67
Page 68
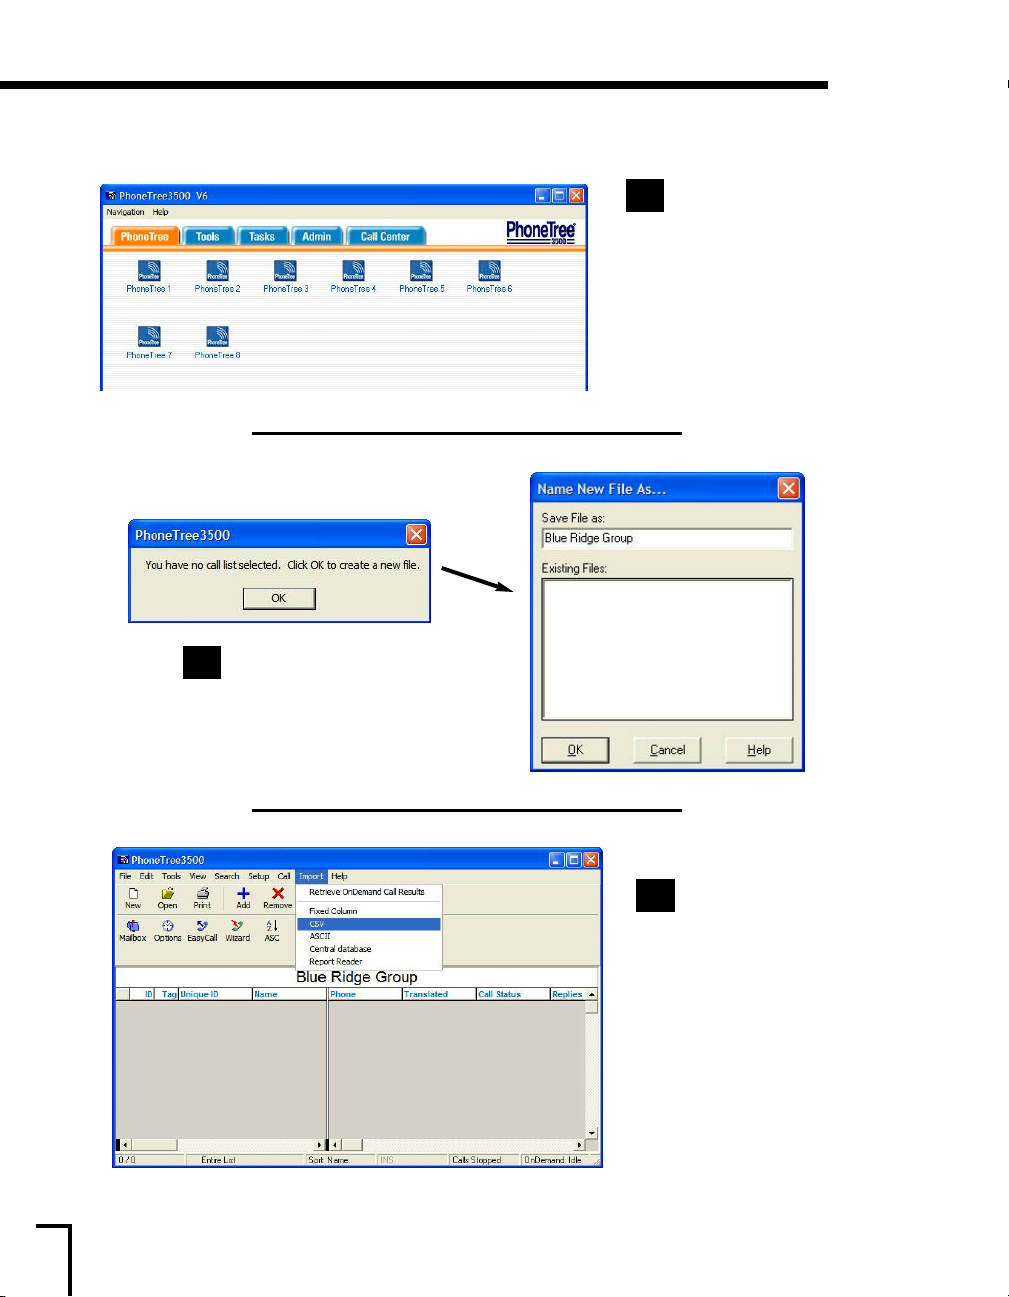
3500: Setting Up a Call Job
Setting Up a Call Job:
From the Desktop
1
View, click the
PhoneTree tab, then, click
PhoneTree 1. The other
PhoneTrees can be used for
additional call lists (up to
256 using the PhoneTree
Administrator). Repeat this
section to set up another
PhoneTree for a different
list and message.
Click OK for the box that appears.
2
Then, enter a name for this
particular call list and click
OK.
Now it is time to
3
import the file
that contains your name
and numbers (or add
them one-by-one as
described on page 38).
(If your file requires a
different translator
other than CS
choose that instead.)
Click Import at the top
he scr
of t
choose
een and t
CSV.
V, please
hen
68
Page 69
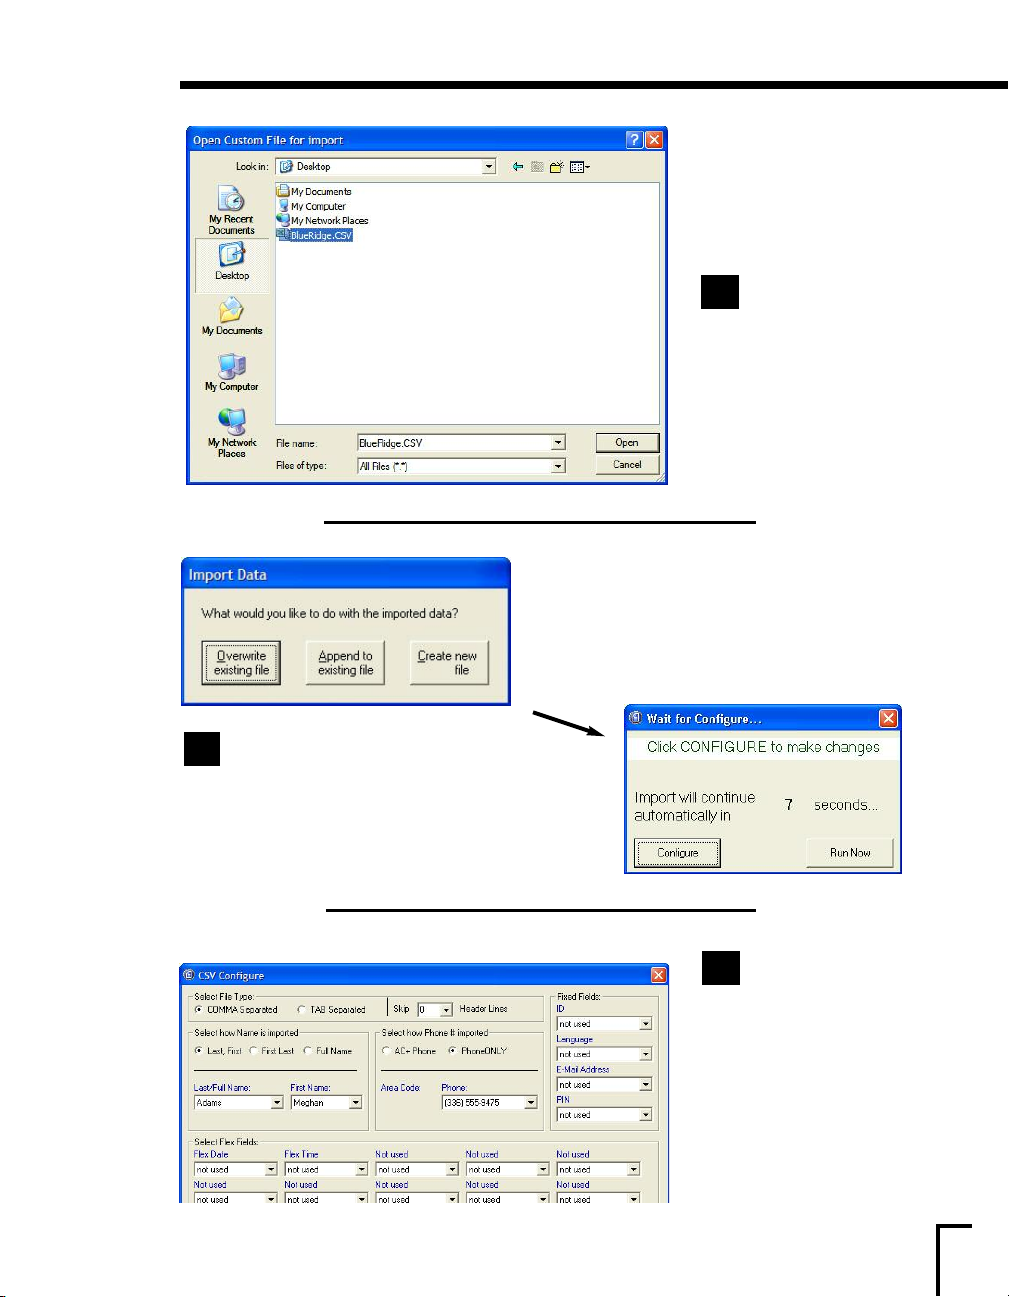
3500: Setting Up a Call Job, continued
Browse to the file
4
to import. Click
Open.
A window will appear asking you what
5
you would like to do, click
existing file
click
. When the next window appears,
Configure before the timer runs out.
Overwrite
The CSV translator
6
appears. Using t
drop down boxes for
Name
, First Name and
Phone, make the choices
appropriate to the data in
your file. Also, if your file
ains e-mail addresses,
ont
c
multi-lingual codes or any
data that will act as a Flex
ield, set t
F
ell. When finished, click
w
OK.
hose fields as
he
Last
69
Page 70
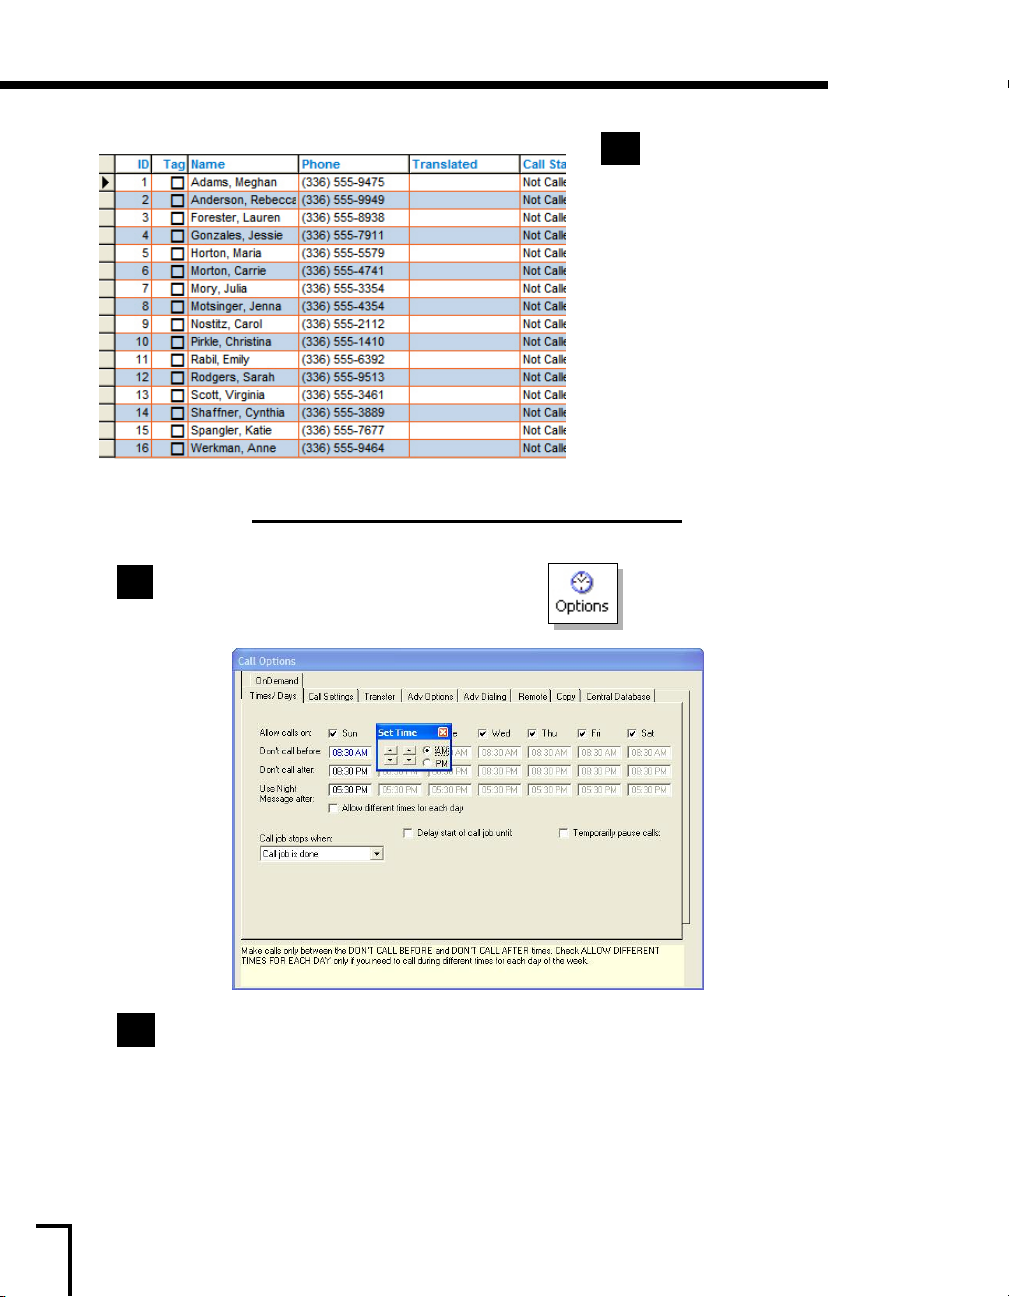
3500: Setting Up a Call Job, continued
Click on the Options icon from the top toolbar.
8
After your data imports,
7
you should see your call
list appear as shown here.
Make sure that the data looks
correct.
available in the ≠ntire List
view. To create a custom
view to include or change
which columns you see here,
see page 103.
If you need to add another
entry to the list after the file
has been imported, click the
Add button from the top
toolbar. To remove an entry,
click on the name and then
click
Some fields are not
Remove.
70
The first tab of Call Options, Time/Days, allows you to tell PhoneTree which days of
8a
the week and what time during those days you want to make calls.
e calls on.
o mak
Uncheck an
To change t
week, click on each of the time fields under
arrows to adjust the hours and minutes. If you would like to set different times for each
day, select the
day to set the times.
y da
all before
t c
’
Don
he
Allow different times for each day box, then individually click on each
ou do not w
y(s) y
ant t
and Don
all after
t c
’
Sun. A box will then appear. Use the four
times f
or all of t
he da
ys of the
Page 71
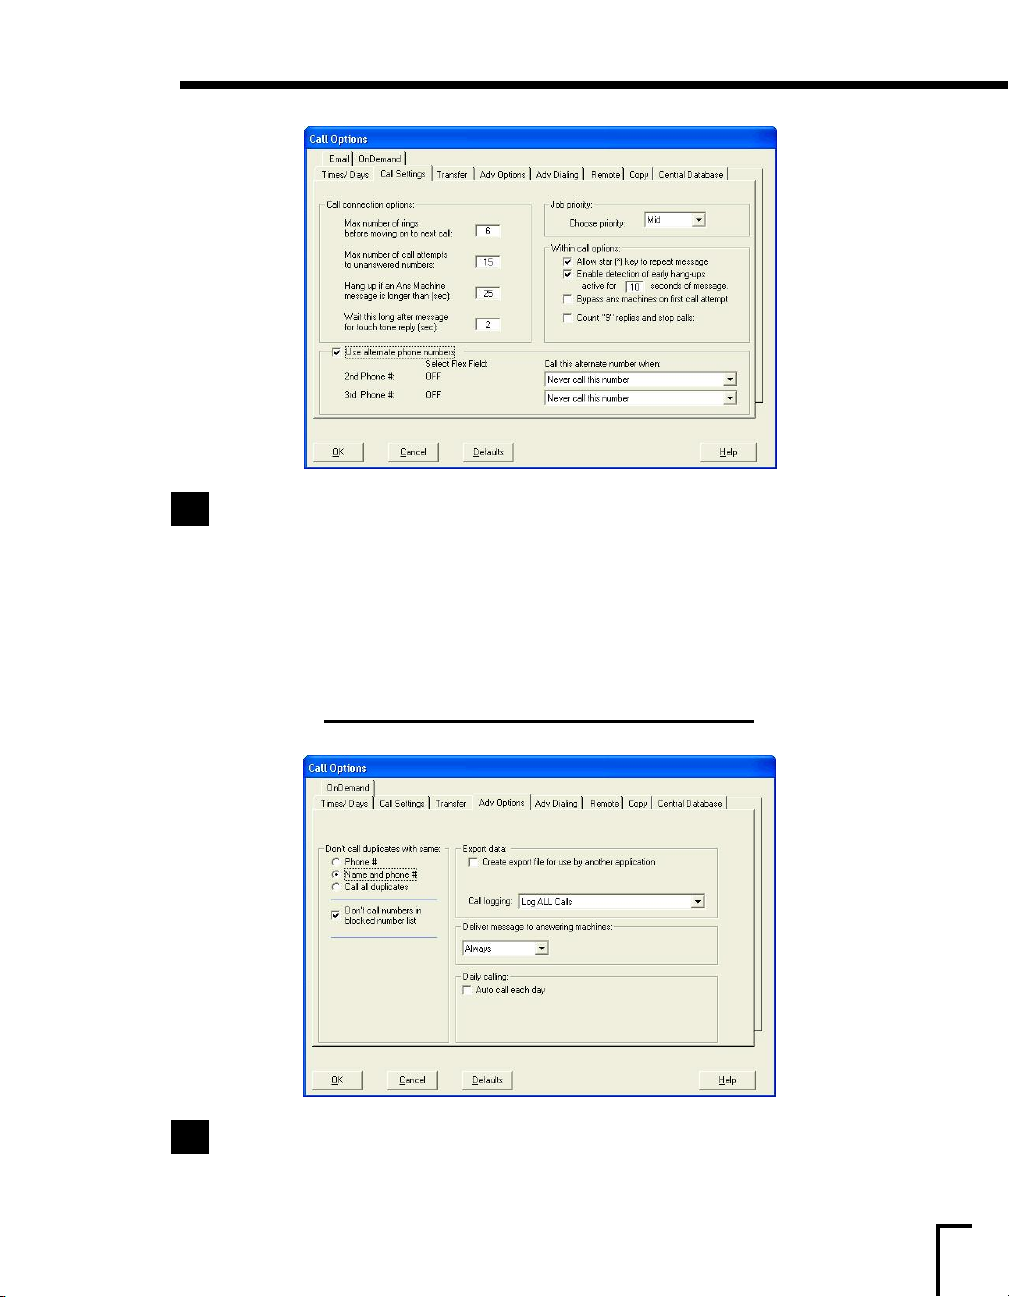
3500: Setting Up a Call Job, continued
8b
Next, click on the Call Settings tab.
Leave all of the
Allow star (*) key to repeat message option allows the message to be repeated if
The
star is pressed by announcing it during your message. Uncheck if this is not desired.
Set
≠nable detection of early hang-ups.... to 10 seconds.
Use alternate phone numbers if you have more than one phone number for
≠nable
each member.
please click
Call connection options to their default settings.
For more information or how to set up the alternate phone number feature,
Help.
8c
he
he Ad
Don
Click on t
Set t
Then, click
v Options
t call duplicates with same
’
OK.
ab.
t
toName and phone#.
71
Page 72
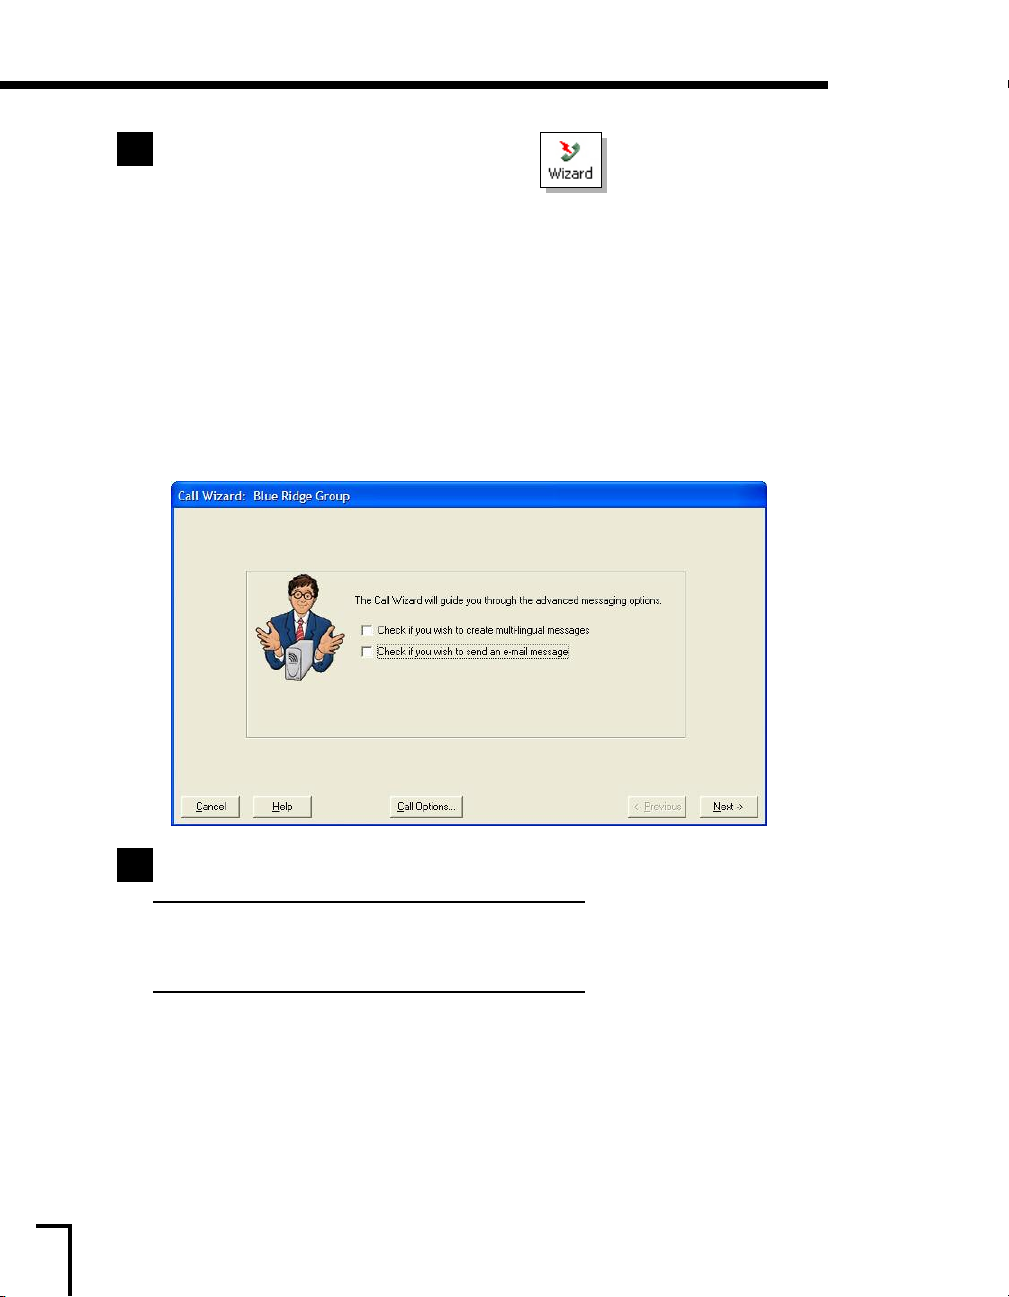
3500: Setting Up a Call Job, continued
Click on the Wizard icon from the top toolbar.
9
The Call Wizard allows many options for different types of messages (as opposed to using ≠asyCall).
Here, you can create the standard recorded message or, add several different message options such as
a Night Message. You can set up an e-mail message, multi-lingual message and even request a touchtone response to your message.
This section covers three types of messages you can configure in the Wizard all at once; Standard,
Multi-Lingual and ≠-mail. The instructions for each type of message have been separated for each
screen. You can set up one type of message or all three at once using these instructions. Multi-Lingual
does require the Standard message to be configured; Standard and ≠-mail alone do not.
At any point during the Wizard you do not understand a specific function or want more information,
click the
Help button.
72
To set up a Standard Message
9a
Upon opening the Call Wizard, click Next.
To set up a Multi-Lingual Message
Upon opening the Call Wizard, click on Check if you wish to create multi-lingual
messages
, then, click Next.
To set up an ≠-mail Message
Upon opening the Call Wizard, click on Check if you wish to send an e-mail message,
then, click
Next.
Page 73
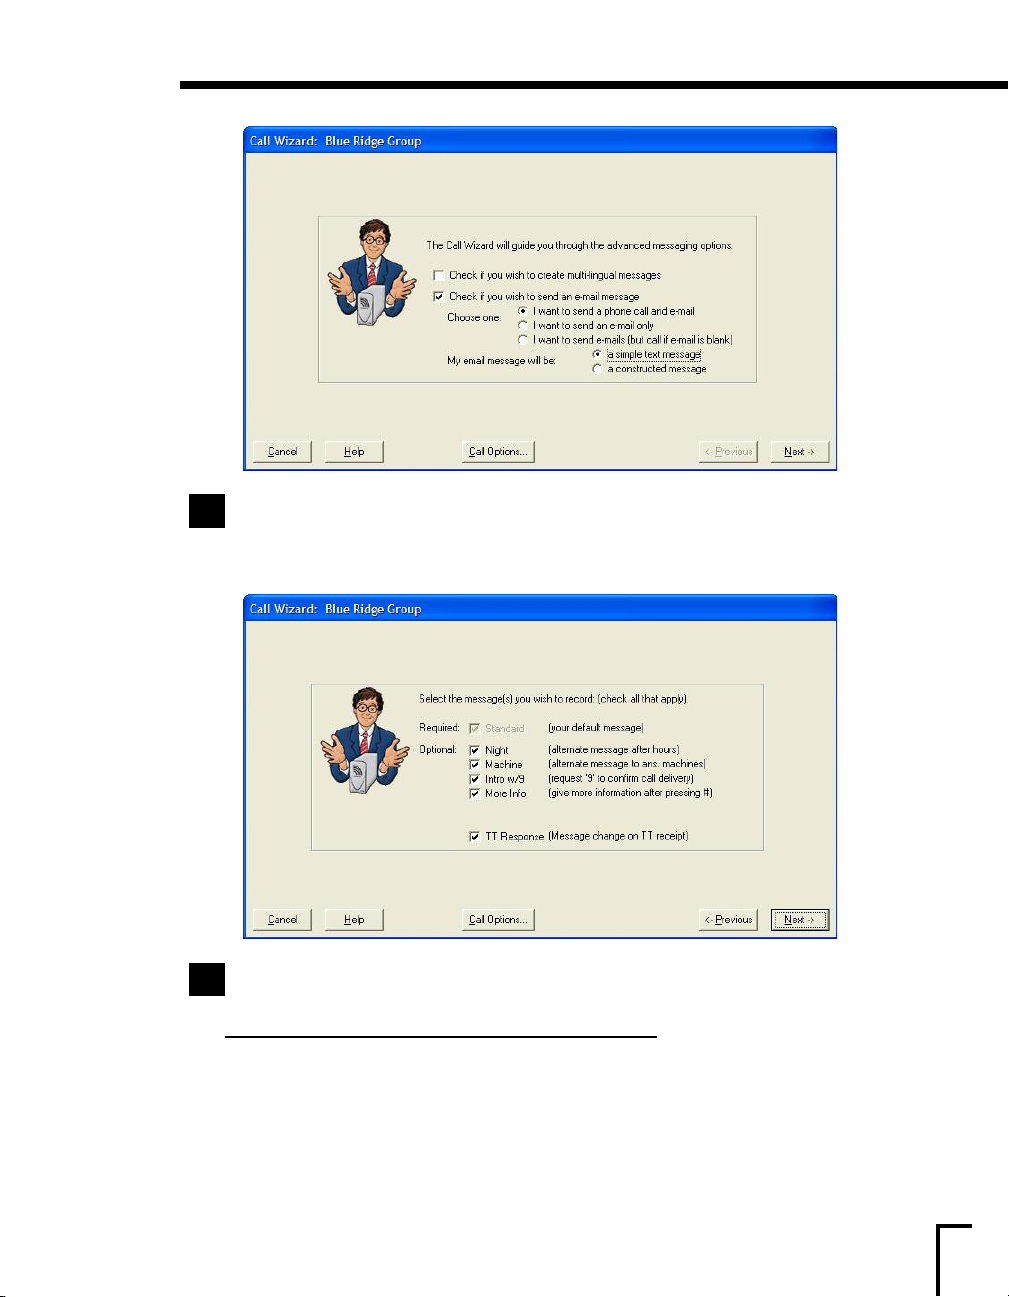
3500: Setting Up a Call Job, continued
≠-mail Message continued...
9b
Choose from one of the three choices for sending e-mail messages, then, choose to send
either a simple text message or a constructed message. Then, click
Next.
Standard Message continued...
9c
Choose which message option(s) you would like to add in addition to your recorded
message (
Multi-Lingual Message continued...
Choose which message option(s) you would like to add in addition to your recorded
message (
for detailed information on each of these options, click Help), then, click Next.
ailed information on each of these options, click
or det
f
Help), t
hen, click
Next.
73
Page 74
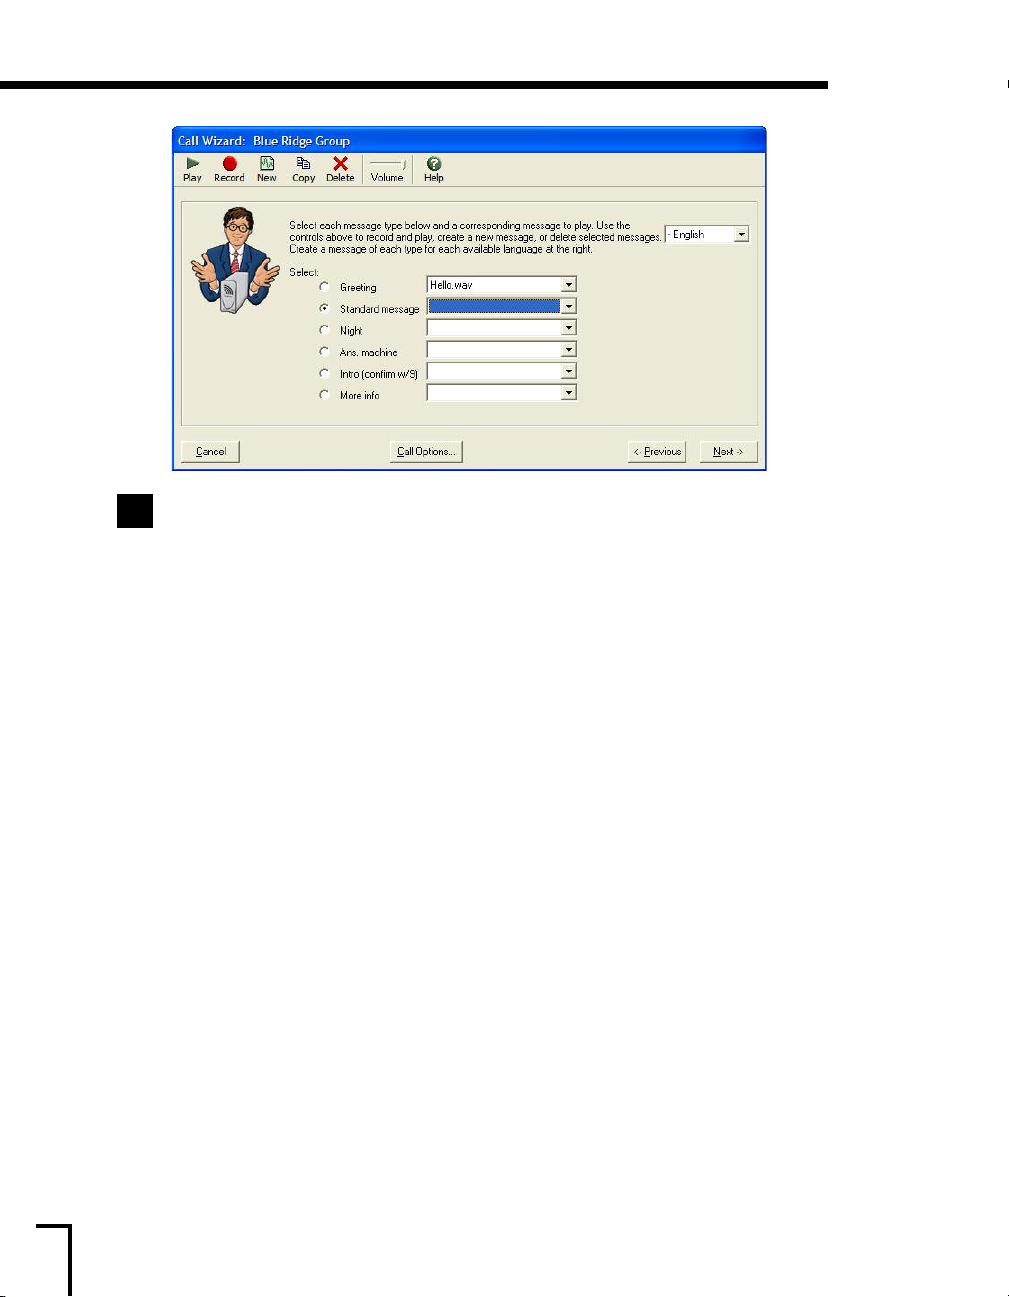
3500: Setting Up a Call Job, continued
Standard Message continued...
9d
The message options chosen on the previous screen will determine which and how many
drop-down boxes [i.e. Night, More Info] appear. Select the
from the top toolbar, click
want and a title for the message:
Single-part (linear) message (.wav) - Choose this type if you do not want to
use Flex Fields in your message.
Individually constructed message (.vft) - Choose this type if you do want to
use Flex Fields in your message.
Next, type in the title you wish the message to be called and then click
any additional message options.
New. A box will appear requesting what type of message you
Standard message box. Then,
OK. Repeat for
74
Page 75
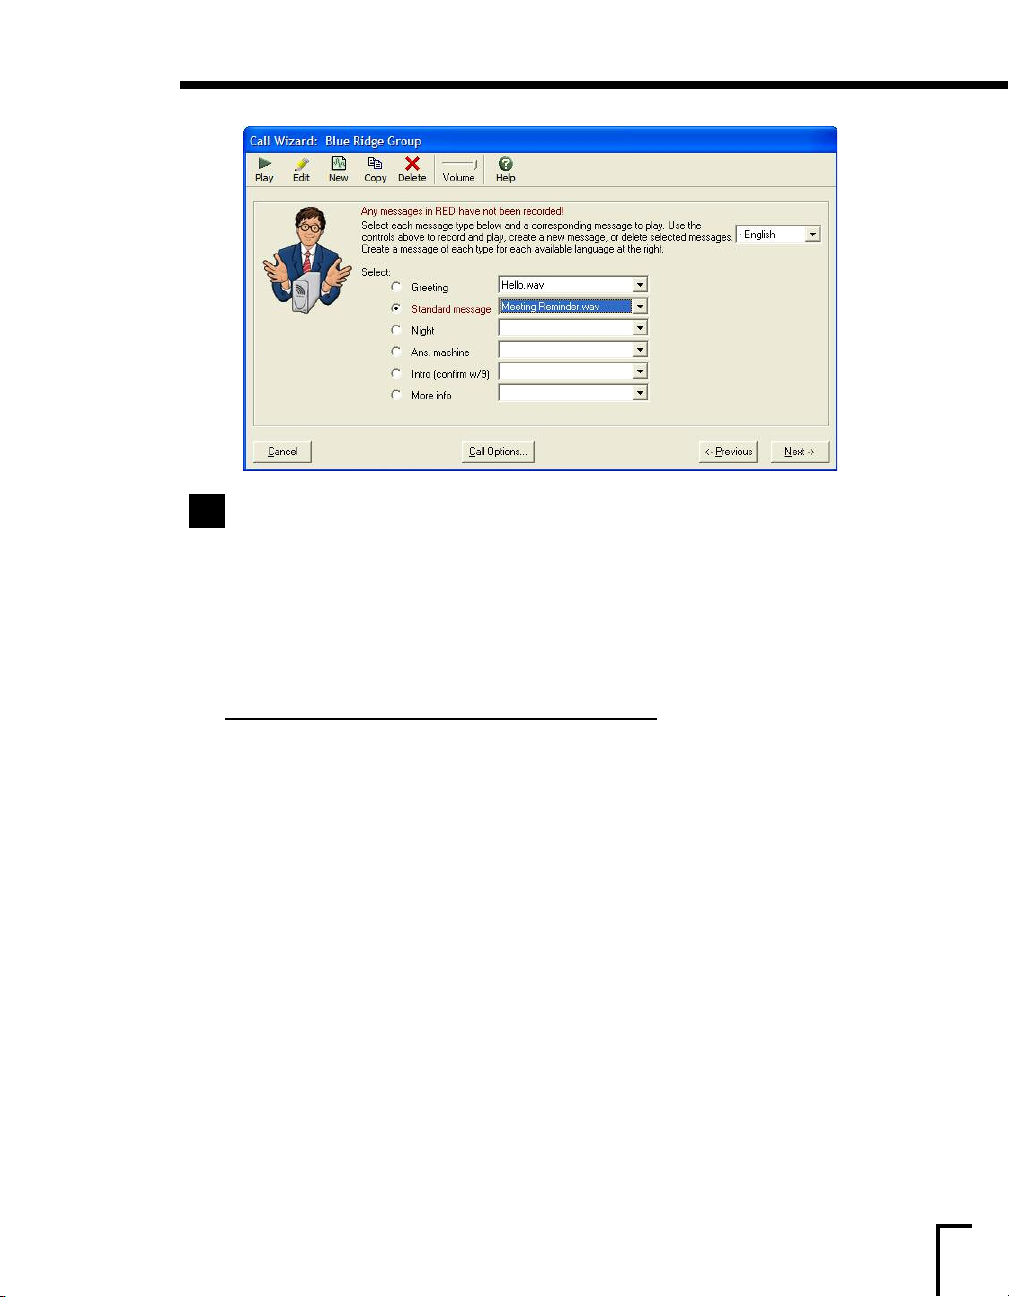
3500: Setting Up a Call Job, continued
Standard Message continued...
9e
If you chose Single-part (linear) message (.wav) as your message type:
To record a message option, click
headset/microphone after you hear the beep. Click
was recorded, click
and proceed to page 80.
If you chose Individually constructed message (.vft) as your message type:
Click the
through setting up a message in the Constructed Message ≠ditor.
≠dit button from the top toolbar. The next proceeding pages will walk you
Play. Repeat for each message option. When finished, click Next
Record from the top toolbar and speak into the
Stop when finished. To review what
Multi-Lingual Message continued...
First, change the language from ≠nglish to a different language via the drop-down box in
the top right corner. Then, depending on what type of message you chose for each message
option, use the instructions listed above for the Standard Message and proceed accordingly.
75
Page 76
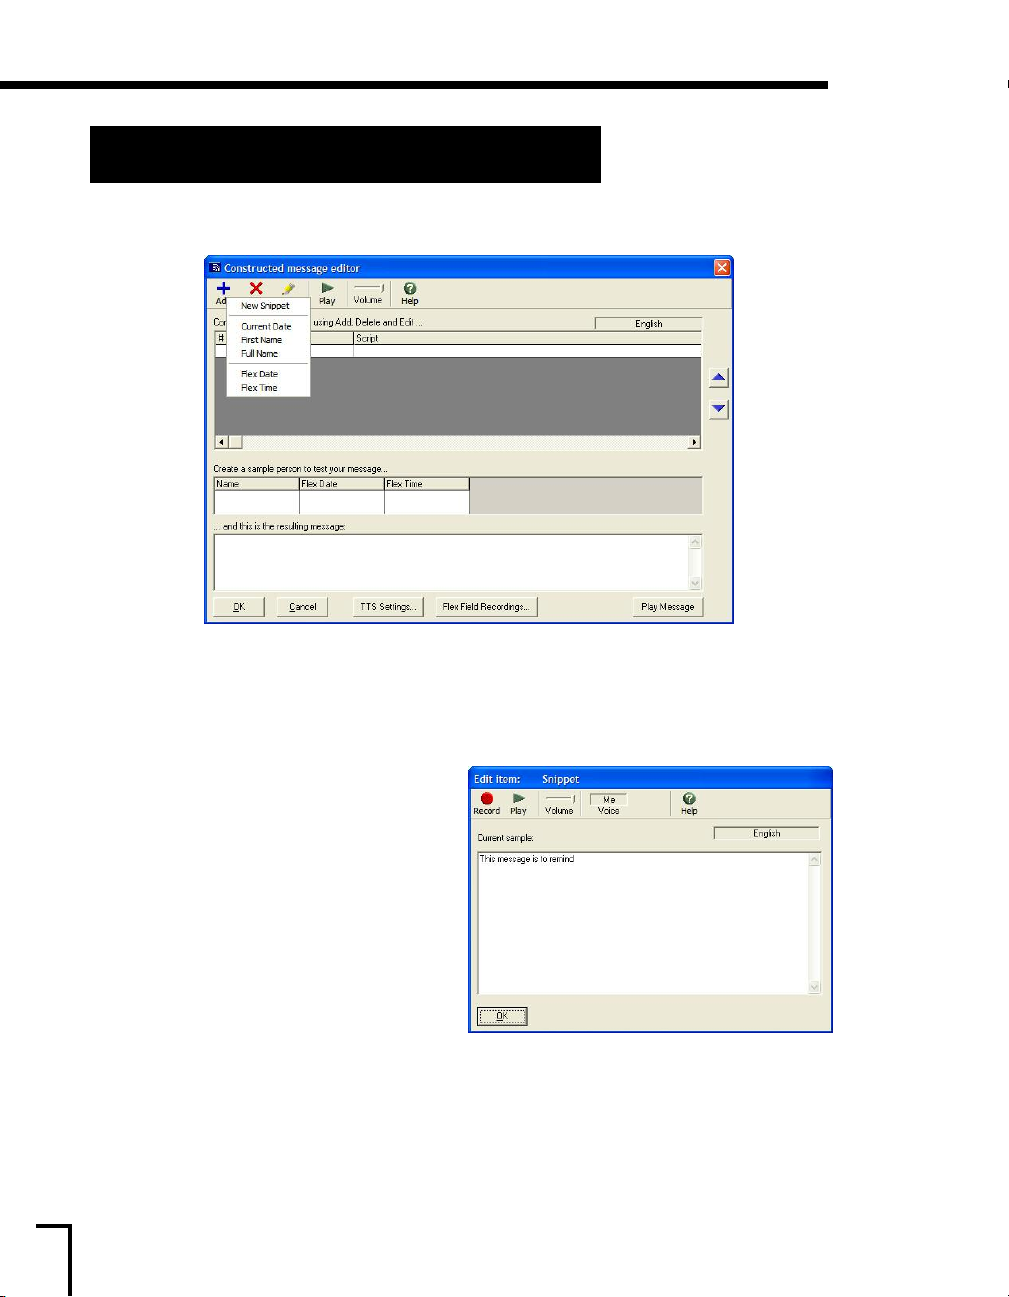
3500: Creating a Constructed Message
Creating a Constructed Message
(Individually Constructed Message (.vft))
Note: If you chose Individually Constructed Message for your message option(s), please
proceed with these instructions.
If you chose Single Part (linear), please see the preceding page.
Upon clicking ≠dit from the previous screen, you are presented with the Constructed Message
≠ditor
. Here, you will assemble your messages in pieces rather than one single recording. This
allows you to insert Flex Fields and other information into your message, so that everyone called by
PhoneTree will hear their own unique and customized message.
To start, click
To help you understand how a constructed
message really works, a sample message will be
used.
For this example, the message that will be
scripted will read as follows when pieced
together: “This message is to remind
office
make sure you can attend, we will start
promptly at 6pm. Thank you.”
In the above sentence, “the north office” is our
flex field and will change based on the location
that each member on the call list is assigned to.
The rest of the sentence, once scripted, will
always stay the same. Remember t
this example just sho
The first snippet should represent what needs to be said up until the flex field part of the message.
For this example, the first snippet will be “This message is to remind.” The same principle applies
for your message. Start your message off with a snippet that stops where you want to insert a flex
field.
To record the snippet, click
When
Add and choose New Snippet and then double click on Unrecorded Snippet.
the north
about our meeting on June 3rd. Please
hat you can have more than just one flex field in your message,
ws one.
Recordf
finished, click OK.
rom the top toolbar. To review what was recorded, click
Play.
76
Page 77
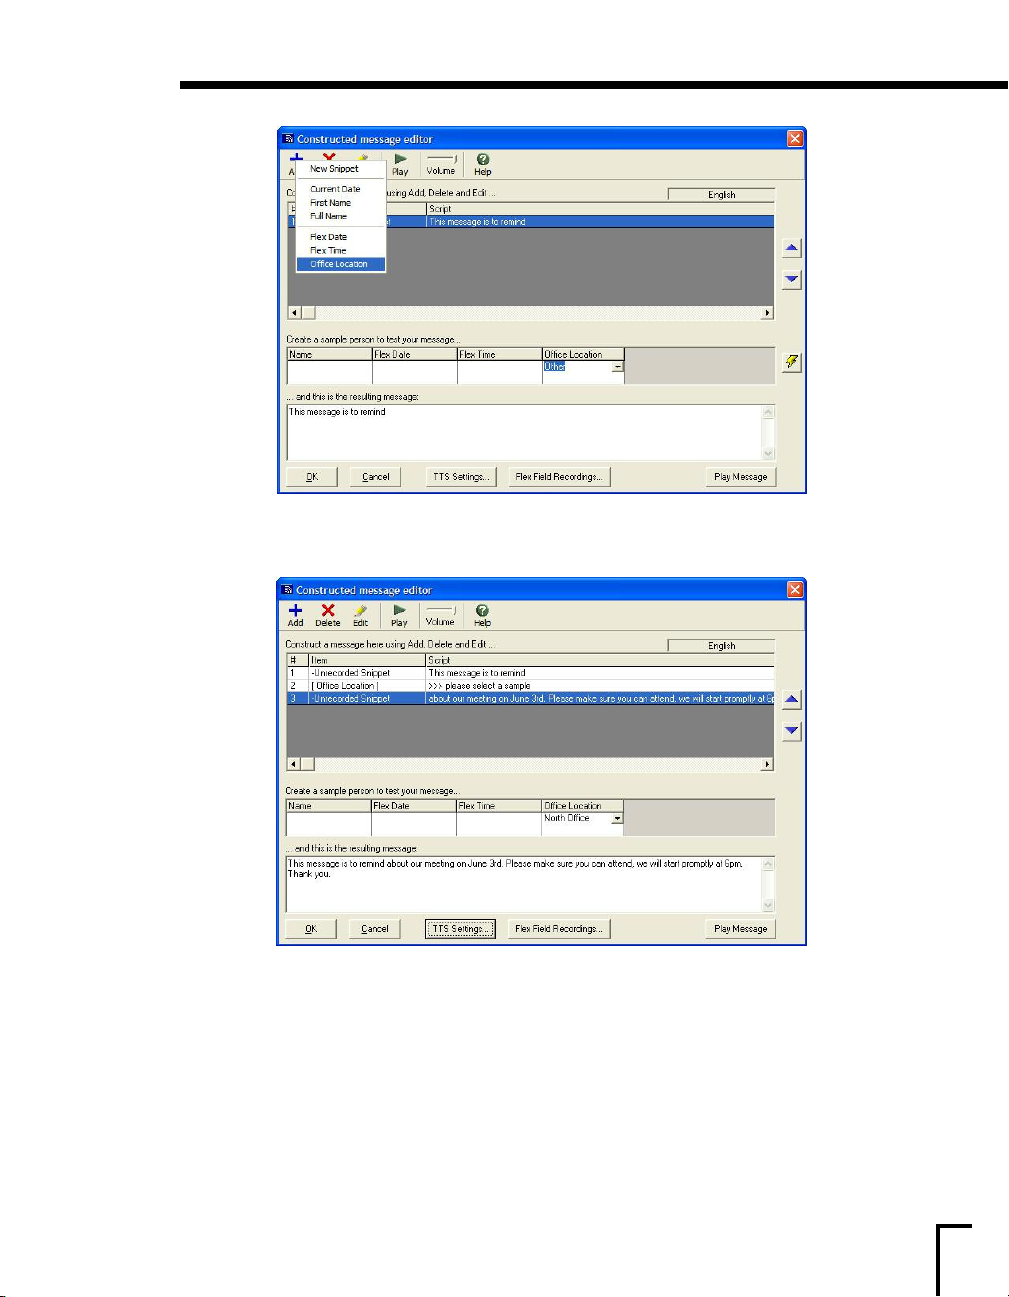
3500: Creating a Constructed Message, continued
Now the flex field can be added to the message. Click Add and insert a flex field that you have
already set up. For our example, this is where the Office Location flex field gets inserted.
Since the flex field has been inserted, we can add another New Snippet to complete the message.
Click Add and choose New Snippet again, then double click on it to insert text. You will need to
ecord the message after you have entered the text and click
r
above screen shot, we have done the same with our example message.
our flex fields. F
It is now time t
Location flex field. Click
o edit y
Flex F
or our example, we will show you how we edit our Office
ield Recordings...
.
hen finished. You can see in the
OK w
77
Page 78
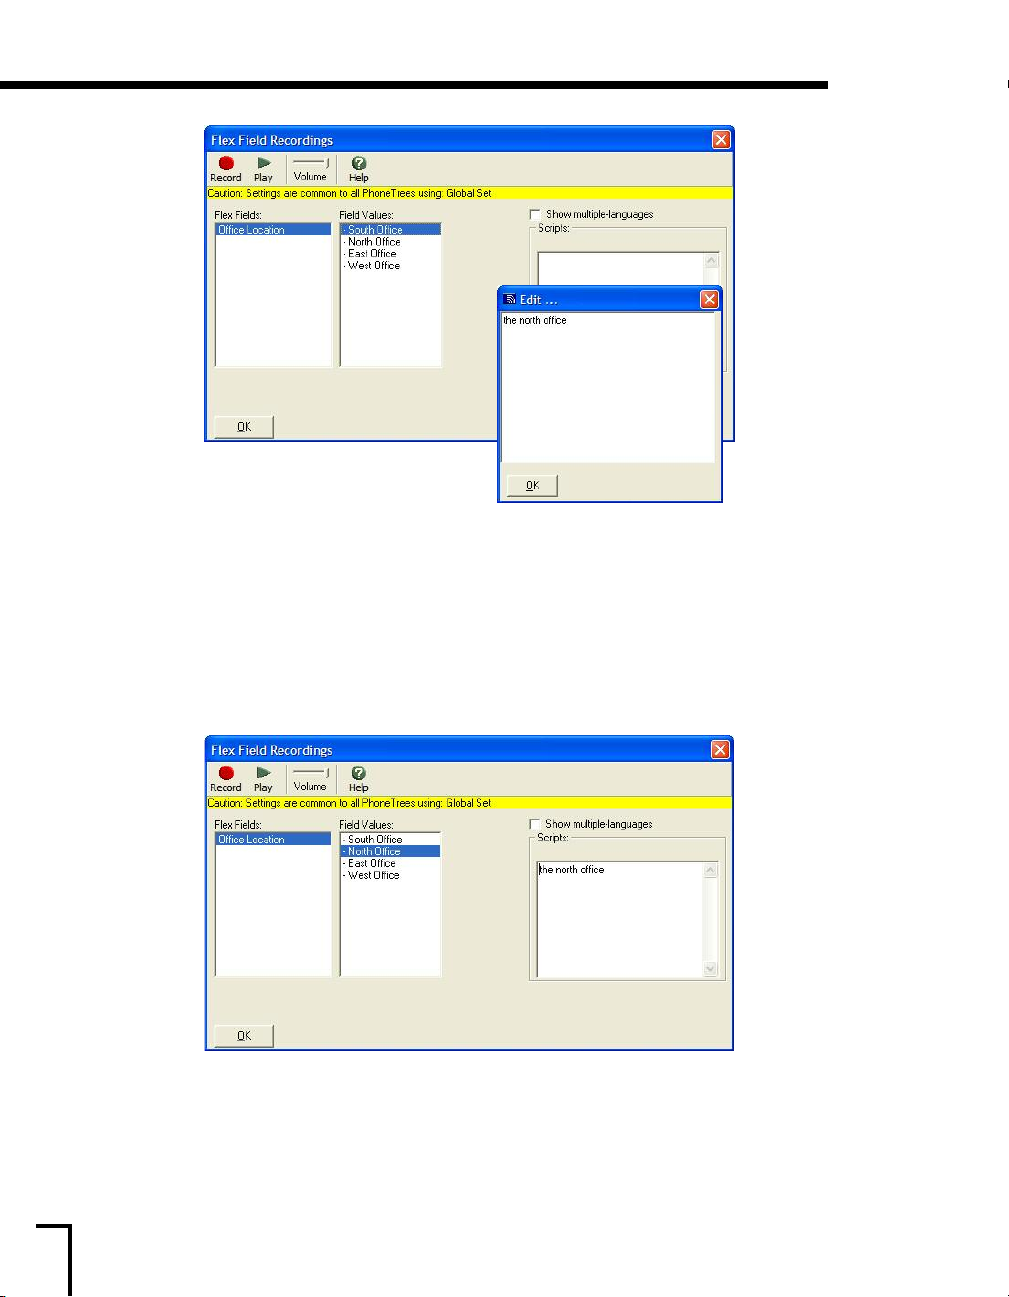
3500: Creating a Constructed Message, continued
To edit a flex field, first click on the name of the flex field and then under the Field Values box
select an entry for that flex field. For our Office Location example, we have four different offices:
South, North, ≠ast and West.
Once you have selected which flex field entry you want to edit, click on the
appears. Type in the text that the flex field should insert in the message, then click
example message, we say “in our North office” for the North Office entry, because this is the section
of the message that the flex field is inserted. The other flex field entries would be scripted the same
way so when a different member on the call list has a location other than the North office, the flex
field within the message changes seamlessly.
Scripts box. An edit box
OK. For our
Once all entries have been scripted, you can record them. First, click on the entry that you want to
record and then click
If you are also setting up a multi-lingual message, check t
repeat the scripting and recording process for each language.
When finished, click
Record from the top toolbar. Press Play to review what was recorded.
he
w multiple-languagesbox and
Sho
OK.
78
Page 79
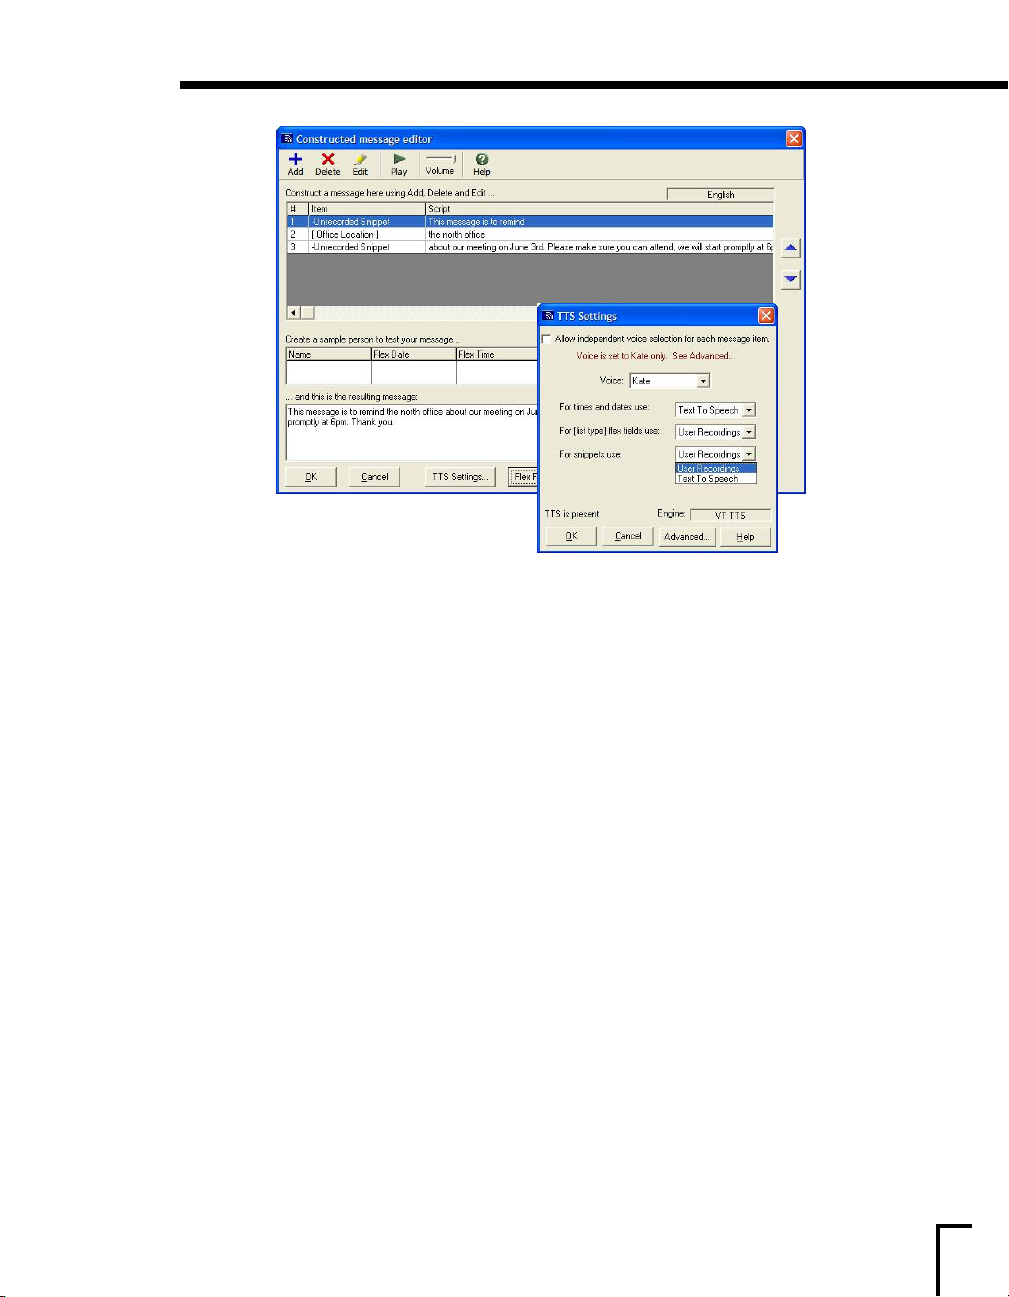
3500: Creating a Constructed Message, continued
This completes our example message. At this point, both snippets and all of the flex field entries
have been recorded.
You do have the choice of using your voice recordings to play back the message or switching to
Text-to-Speech. If you would like to switch to Text-to-Speech, click
Help for more information on how to use this feature.
Click
OK to exit the Constructed Message ≠ditor.
TTS Settings... and then click
Note: If you have selected other message options to be Individually Constructed Messages as well,
you can use these same instructions to create those messages.
79
Page 80
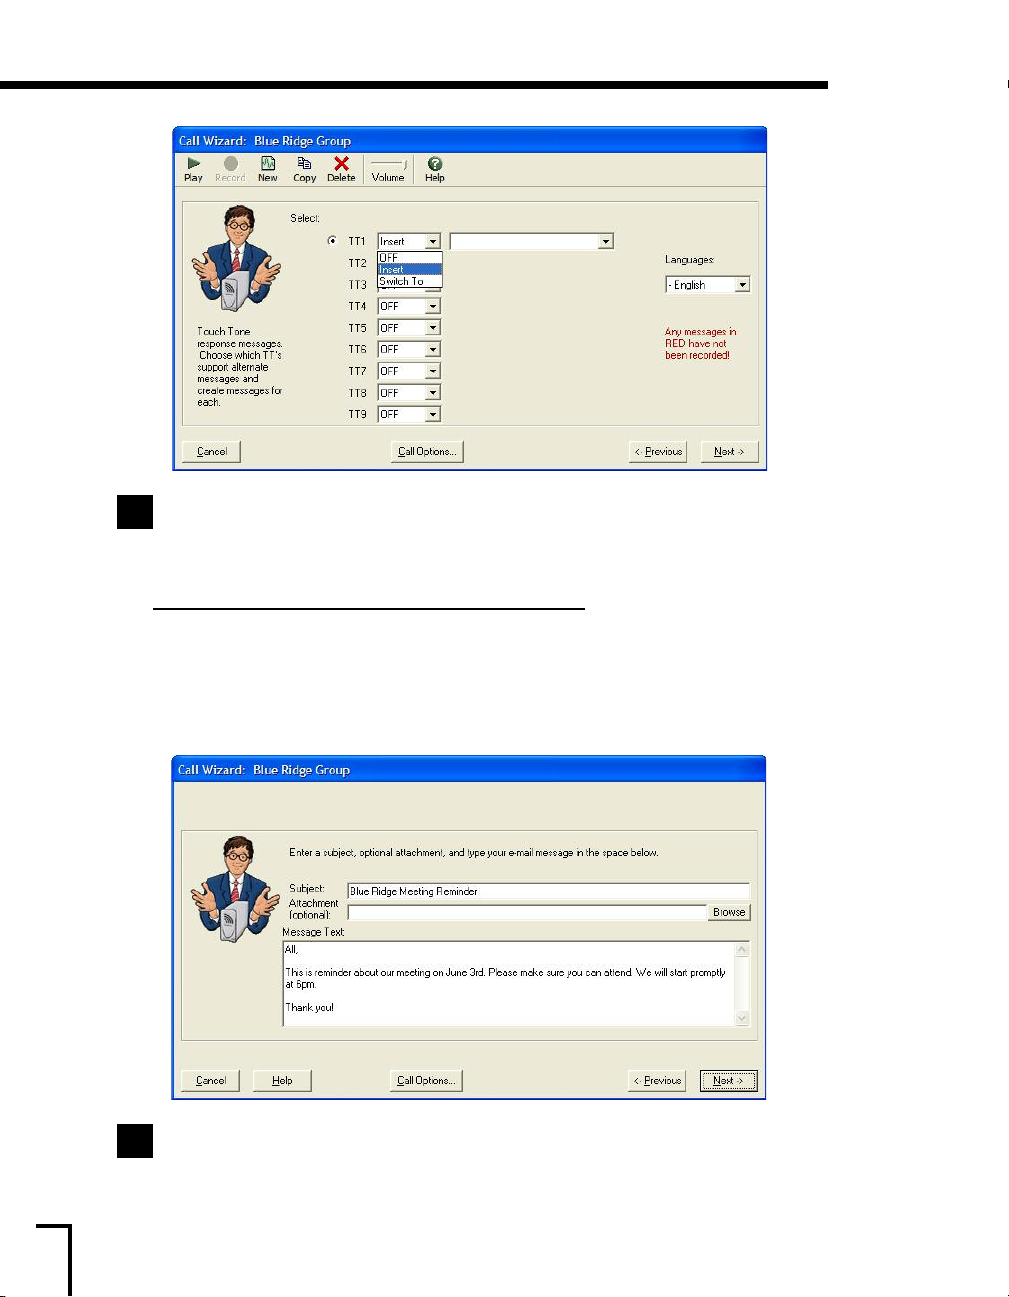
3500: Setting Up a Call Job, continued
Standard Message continued...
9f
If you chose TT Response as a message option, you will see this screen. The touch tone
reply numbers you choose here should coincide with what you mention in your message
detailed inf
toolbar)
Multi-Lingual Message continued...
If your multi-lingual messages use the touch tone reply feature, you will need to record those
as well. First, change the
then proceed with recording the touch tone replies as with the ≠nglish message. When
finished, click
ormation on how to set up a touch tone reply, click the
. When finished, click Next.
Languages drop-down box from ≠nglish to a different language,
Next.
Help button f
(for
rom the top
80
≠-mail Message continued...
9g
≠nter a subject and message for your e-mail here. If you wish to send an attachment, click
the
Browse button to locate and include it with the e-mail. When finished, click Next.
Note: If you chose a constructed message for your email message, please click Help for
instructions on how to use that feature.
Page 81
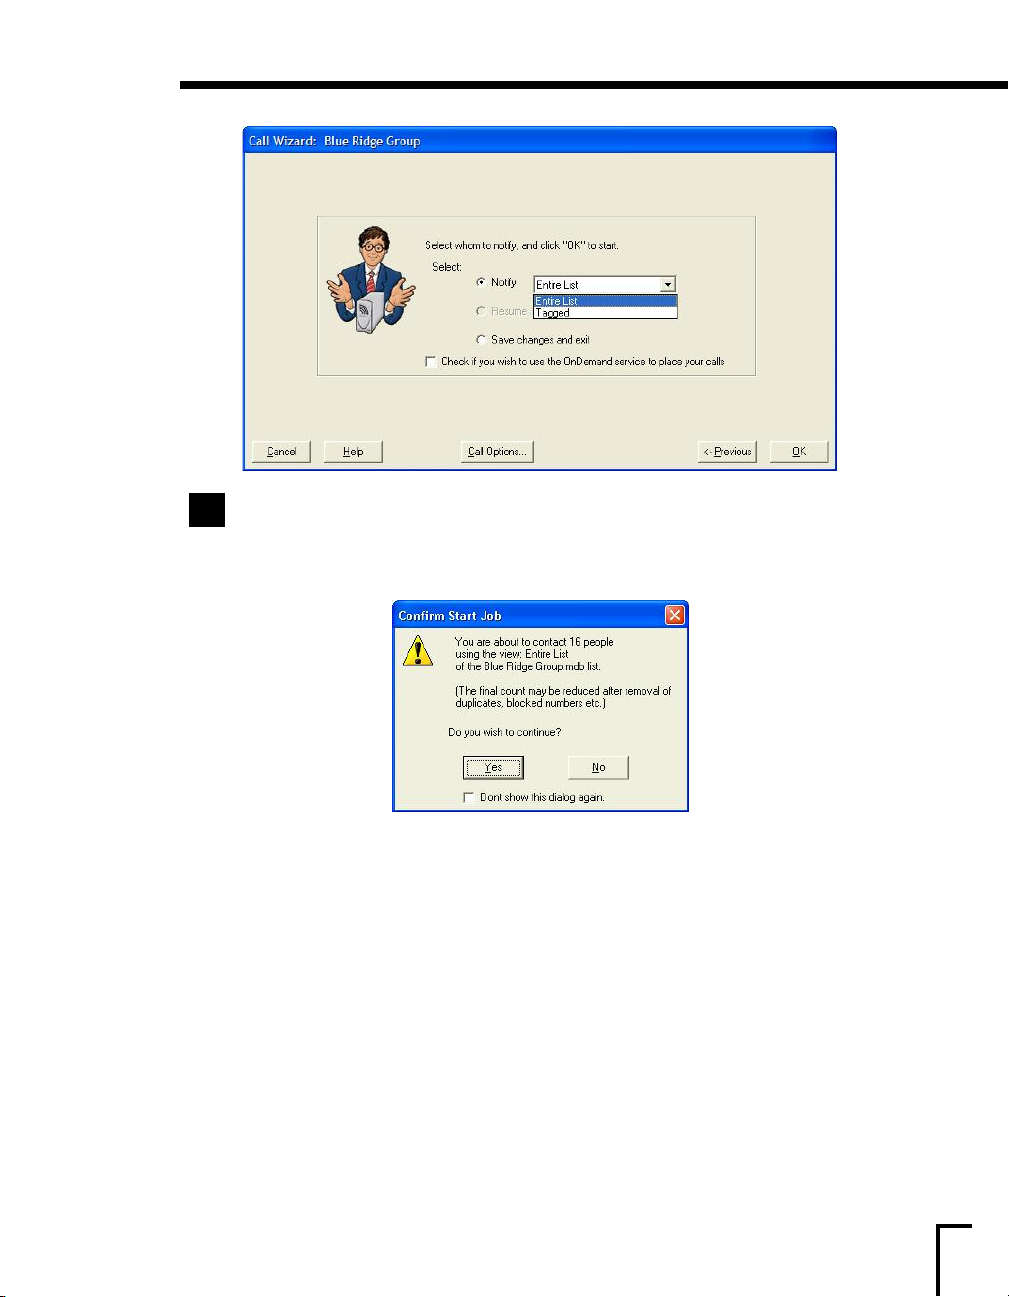
3500: Setting Up a Call Job, continued
All Messages
9h
In the Notify drop down box, either choose the ≠ntire List view (all members will be
notified), or any custom view you have set up or
the call list will be called). Then, click
OK to launch your call job.
Tagged (only the members checked on
Once you press OK, the Confirm Start Job window will appear showing how many
people you are about to call and asking if you wish to continue. If you are ready to start
your calls, click
After you click
Packager
For information on what the Call Center is and how it functions, see page 83.
ormation on how to initiate the OnDemand Packager, see pages 123-124.
or inf
F
ou w
If y
finished or configure PhoneTree to automatically do this for you, turn to page 87.
Yes. If you click No, you will exit the Call Wizard completely.
Ye s , this will launch the Call Center for the 3500 or the OnDemand
for the 3500 S≠.
o generate a report showing your call results once your calls are
e t
ould lik
81
Page 82

Notes
82
Page 83

Call Center
83
Page 84
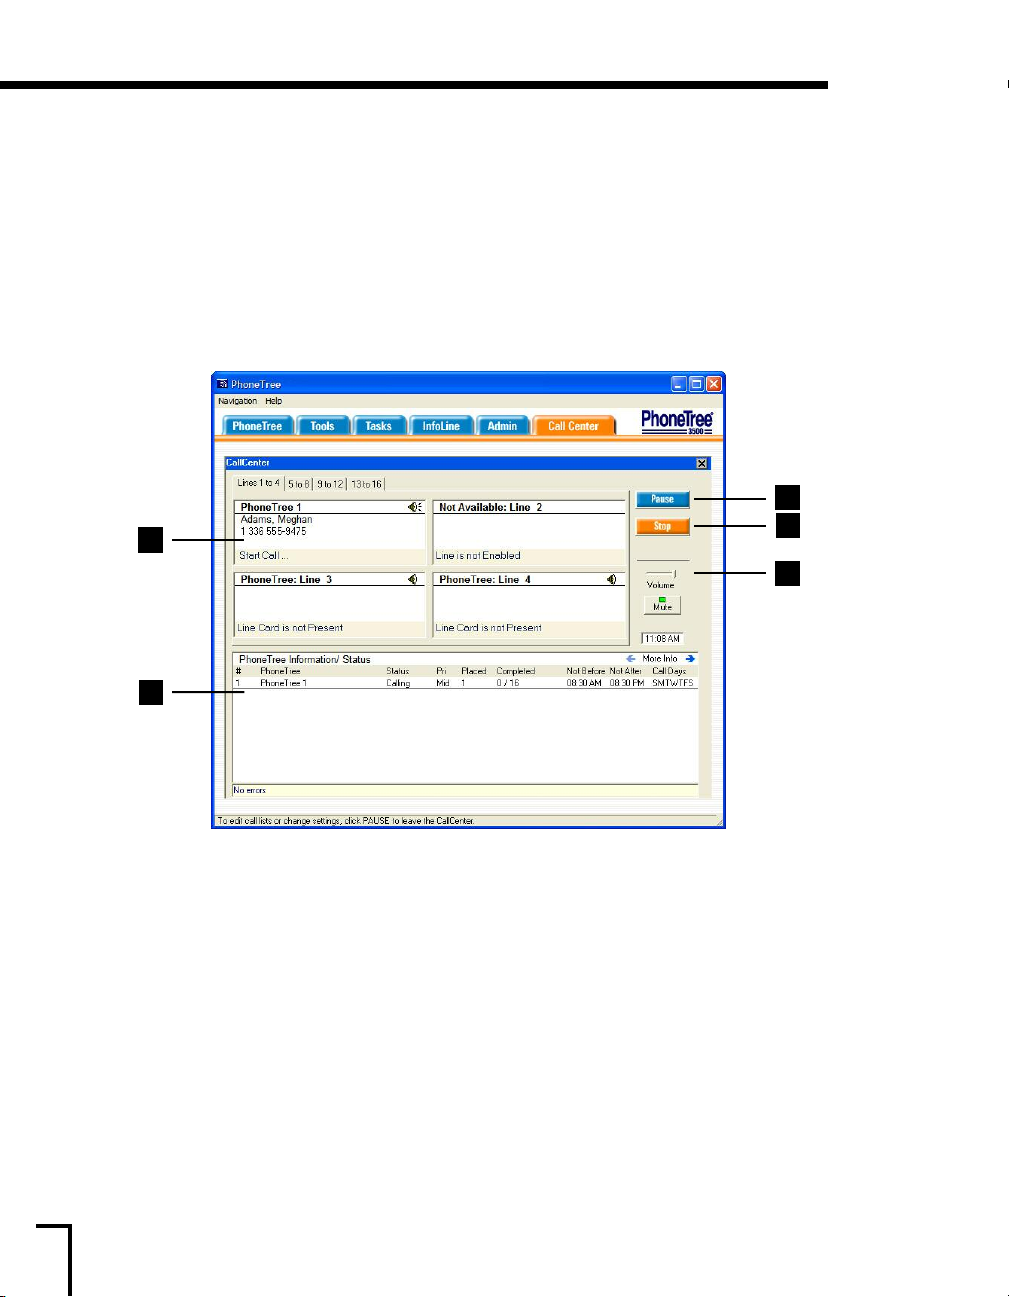
Call Center
Call Center
Once you have initiated your calls from either ≠asyCall or the Call Wizard, the PhoneTree software
will launch the Call Center. The Call Center is where phone calls actually take place. In addition to
making calls, the Call Center is also utilized for features like AutoReports and Auto Tasks.
In order for the Call Center to make or receive phone calls, it must be running during your
preset call times.
don’t close the software!
While the Call Center is operating, you will need to know the functionality of some of its features:
A
This means that you can minimize the Call Center while it is making calls – just
C
D
B
E
The Call Center provides a dynamic call status:
A. Call Status Boxes: ≠ach box shows the status of an installed phone line (four at a time). The
contents of each box change as calls progress. Click the Speaker icon in the top right of any box to
monitor calls for that line.
B. Volume Control Slider: Use to adjust the volume of the speaker while calls are being made.
Click the Mute button if you do not want to hear calls in progress at all.
C. Pause Button: Use to stop calling. In-progress calls are finished before returning to the Main
Menu. You can return here to finish the call job later by clicking the Resume Calls button.
D. Stop Calls Button: Use to stop calling immediately. In-progress calls are interrupted and you
will be taken back to the Main Menu. You can return here to finish the call job later by clicking the
Resume Calls button.
≠. Job Status Window: P
on the More Info Arrows to see additional summary information.
rovides summary information about the calling session in progress. Click
84
Page 85

Call Center: Call Statuses
Call Statuses:
≠very member on a your call list receives a call status. Below is a listing of every call status and its
definition. You can view the call status either by opening the call list under the PhoneTree desktop
or by reviewing your report (see page 87).
Completed Call Statuses (message delivered)
Ans by Person Message was delivered to a person
Ans by Machine Message was delivered to a person’s answering machine
Ans by +Machine Message was delivered to a person’s answering machine after a definite
Ans by Pager Message was delivered to a person’s paging device
Call Transferred Person transferred by pressing “0”
Uncompleted Call Statuses (PhoneTree will re-attempt to deliver message)
Busy Phone was busy on last call to person
Not Called Yet Person has not been called yet
Learned Machine Person’s answering machine is “unique” and was learned
No Answer Person did not answer last call
9 Not Confirmed Did not confirm delivery when asked to dial “9”
beep was detected by PhoneTree
Final Call Statuses (PhoneTree will not re-attempt to deliver message)
Hung Up ≠arly Call was answered but responder hung up before message finished
Busy After Voice Telephone company busy or off-hook service message
Max No Answers Line was busy or not answered for max attempts (up to 15) set by user
Not Accepted Did not confirm delivery (by pressing “9”) after 3 call attempts
[2100: see 8b on page 46, 2500: see 8b on page 57, 3500: see 8b on page 71]
Not Selected Call Statuses
Not Selected Person is not selected for calling
Removed as Dup Person was removed from the call list by checking one of the options
Blocked Number Person is on the master Blocked Number list (see page 172)
on the Advanced tab of the Call Options dialog
[2100: see 8c on page 46, 2500: see 8c on page 57, 3500: see 8c on page 71]
≠rror Call Statuses (please check the phone number)
Call Failed! ≠rror detected during call (check for disconnected/changed number)
OGM Too Long Call was answered by a machine, but its OGM (outgoing message) was
Telco Message Call was answered with a telephone company (Tri-Tone) S.I.T. tone
No Connect
Fax or Modem Call was answered by a FAX machine or modem
too long
(disconnect/change)
No signal det
ected after dialing (phone number is probably not valid)
85
Page 86

Call Center: Call Statuses, continued
In addition to the call statuses, a number may appear to the right of the status, in the Replies
column. This indicates a TouchTone was pressed by the person during the call:
0 Indicates call was transferred to a voice mailbox or other extension on your
1 thru 9 Meaning will vary depending on message. you may request that the person
phone system. See the Transfer tab of the Call Options dialog.
respond to a question with any touch-tone digit (ie, press “5” if you can come to
this Thursday’s meeting, press “3” if you need transportation, etc...)
86
Page 87

Reports
87
Page 88
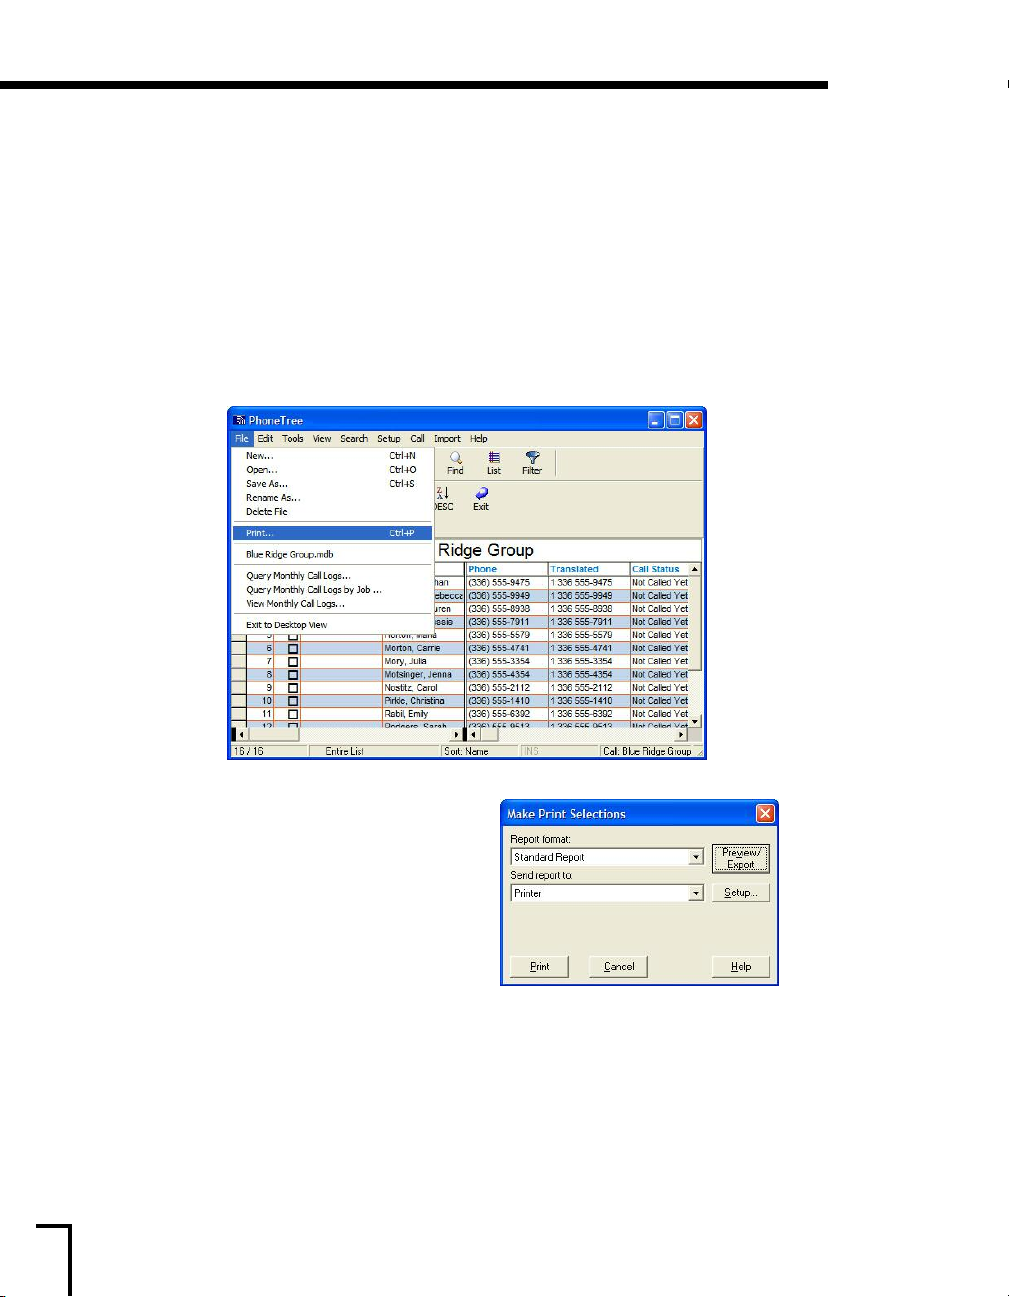
Reports: Manual Reports
Reports
After your call job has completed, you have the option of creating a report showing the results of
those calls. PhoneTree offers an array of reports that show various data regarding your calls. Also,
you have the option of either creating the reports manually or configuring PhoneTree to automatically
do it for you. There are four choices for creating a report:
only) and
Manual Reports:
a) Go to the PhoneTree desktop and click on the PhoneTree icon you wish to generate a report for.
fax (AutoReport only).
print-out, file export, e-mail (AutoReport
b) Click
icon from the toolbar).
c) The
Here, you can use the
box to select which report you would like to use.
To preview the layout of each report, click
Preview/≠xport.
To print a report, select the report you want and
click
correct printer, click
File and choose Print (or click the Print
Make Print Selections window appears.
Report format drop-down
Print. To make sure your report goes to the
Setup to select a printer.
88
Page 89
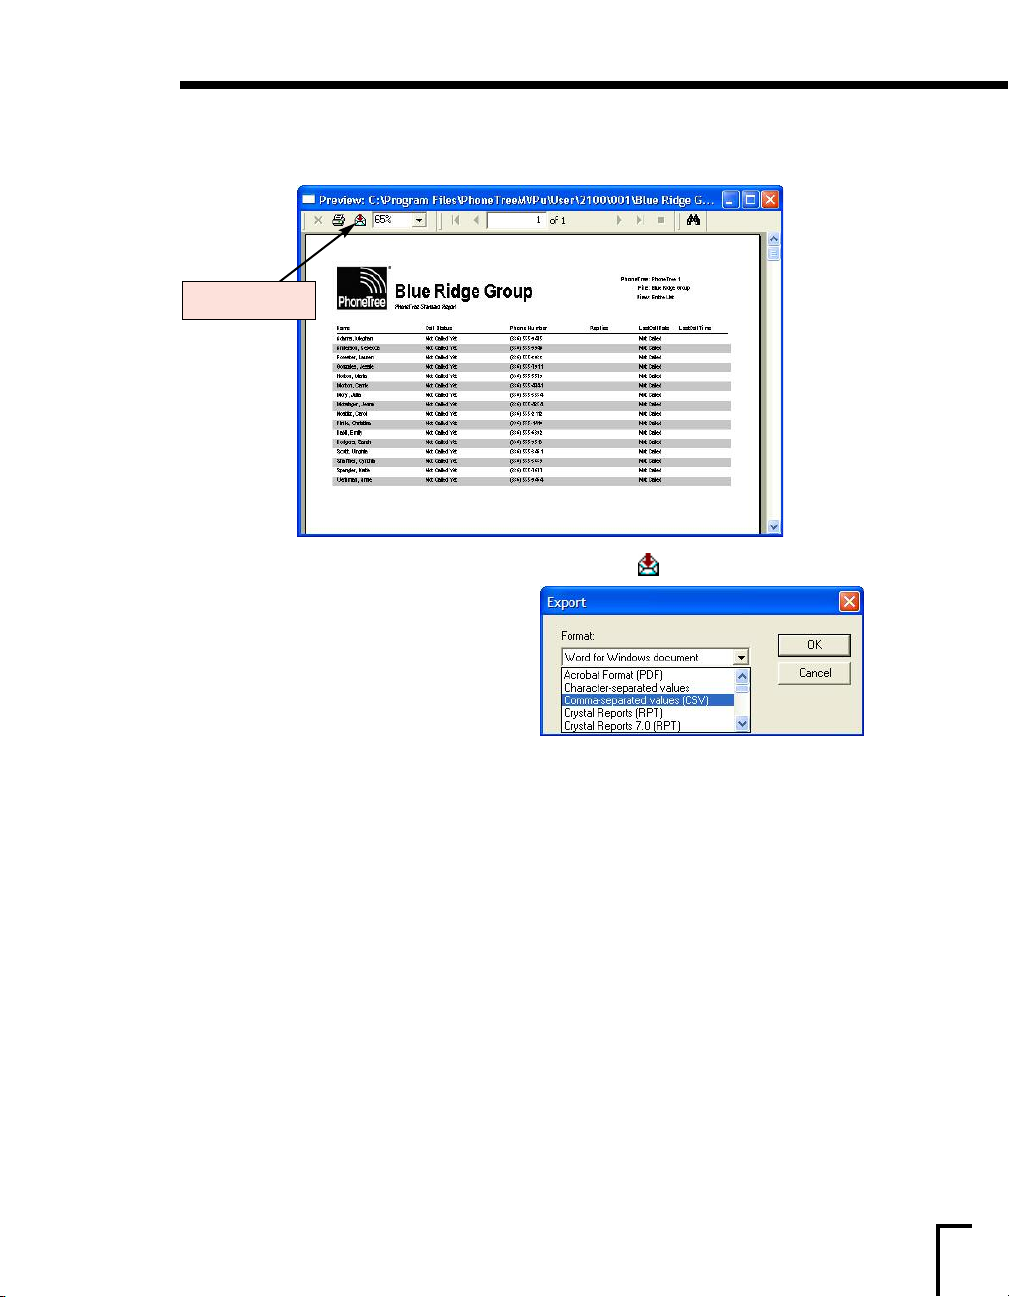
Reports: Manual Reports, continued
To export your report to a file instead of printing it, click Preview/≠xport to open a preview
of the report.
Click the Export icon.
d) At the top of the preview screen, click on the
The
≠xport window appears. From the Format
drop-down box, choose the file format then click
OK. You will be asked where you would like to
save the file. Make sure you choose a location
that is easy to locate such as your Desktop.
≠xport icon (blue envelope with red arrow).
89
Page 90
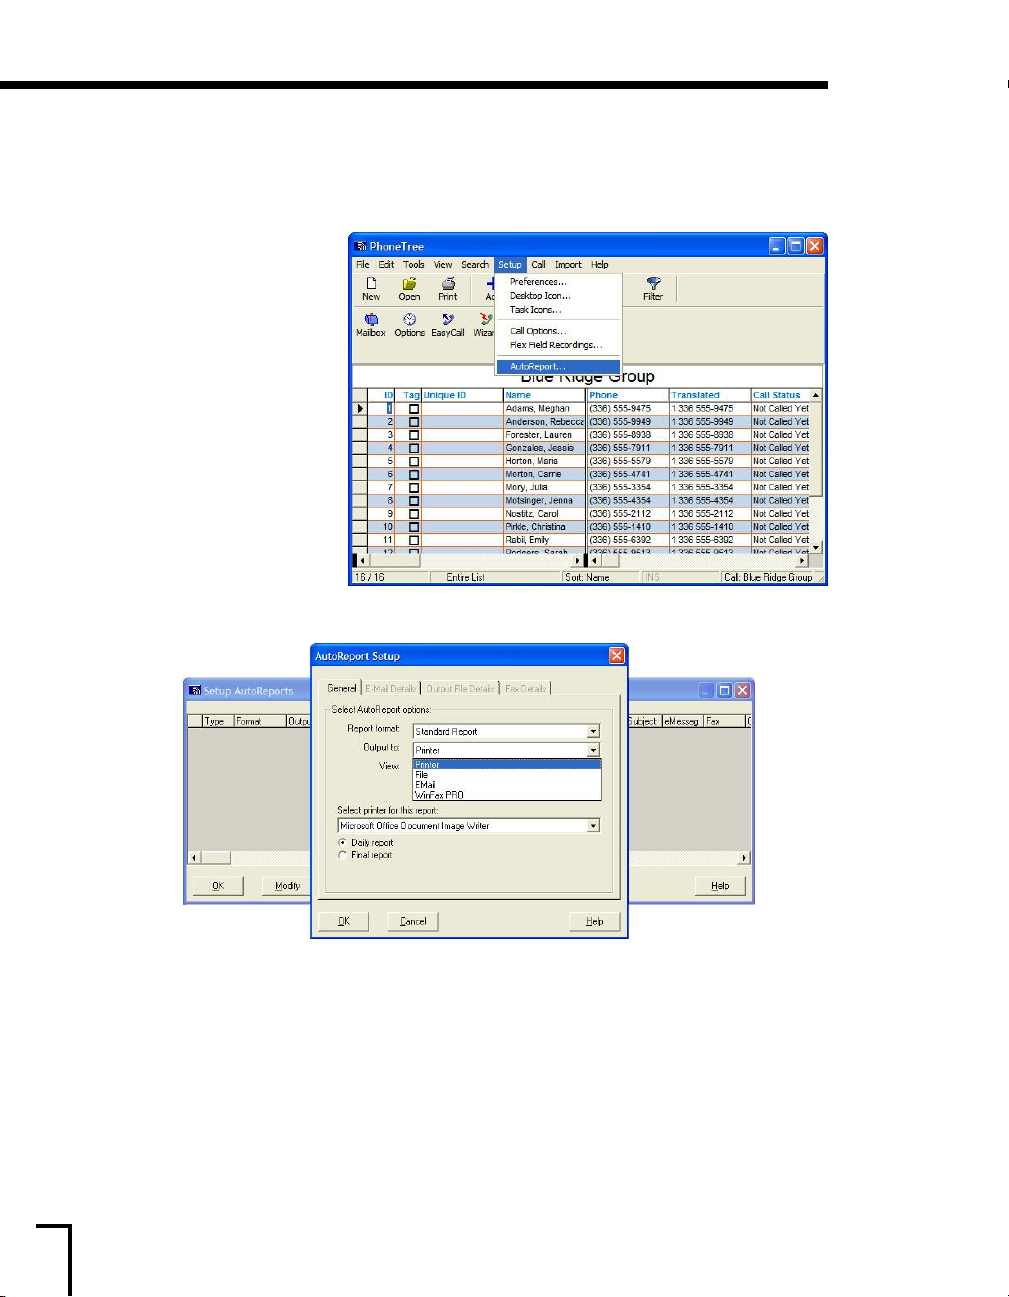
Reports: AutoReports
AutoReports:
AutoReports allow you to generate your call result reports automatically, instead of manually, after
your call job(s) have completed.
a) Go to the PhoneTree desktop and click the PhoneTree icon you wish to generate a report for.
b) Then, click
Autoreport...
The Setup AutoReports window opens. Click Add.
Setup and choose
c) The AutoReport Setup window opens. There are four different types of AutoReports that
PhoneTree can generate: print-out, file export, e-mail and fax
below)
. Also, you can set up more than one AutoReport to run at a time, so if you wanted the
report printed and e-mailed, you would need to set up an AutoReport for each type. Below is a
description for each field for this setup:
es available. (to preview the layout of each report,
emplat
eport t
ent r
er
Report format: List of dif
Manual Reports on page 88).
see
Output: List of different output options for the reports. ≠ach output option varies in setup. Click
Help for more information.
Printer - Sends the call results to a printer of your choice.
File - Generates the call results into one of several file formats to a path designated by you
on your local computer or network.
f
(requires WinFax PRO software – see
90
Page 91

Reports: AutoReports, continued
≠mail - Sends the call results as an attachment from one of several file formats. Requires
you to enter your e-mail server information. See page 32 for more information.
WinFax PRO - Sends the report via fax machine. Requires installation of WinFax PRO
software [not sold or supported by PhoneTree].
View: Choose which view you want to represent the report. This is a useful option when custom
views have been created with special sorting properties. The report will obey any sorting or filtering
rules set for a custom view (see page 103).
The report can be processed automatically, at the time you specify in
under the Misc tab (see page 29), by one of two ways:
Daily Report - This report will generate at the same time regardless if the call job is complete.
Final Report - This report will only generate when the call job is complete or the call times have
expired.
d) After all options have been set, click
OK. Then, click OK to exit the Setup AutoReports window.
Configure Global Settings
91
Page 92

Notes
92
Page 93

Tasks
93
Page 94
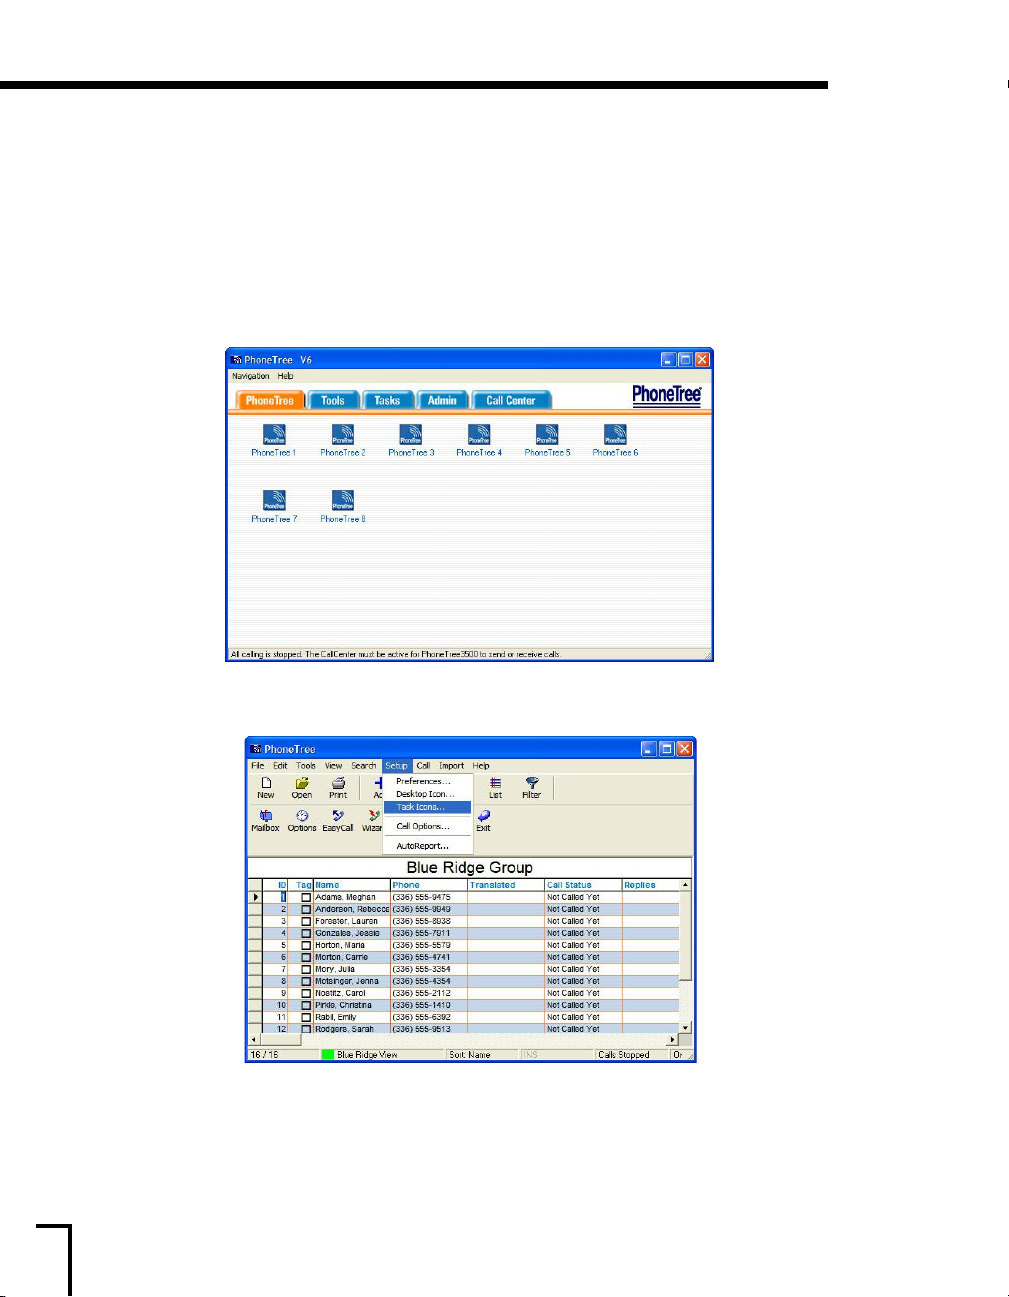
Tasks: Creating a Manual Task
Tasks
Tasks allow you to string together several commands for a single application and complete them all
with a single click on the Tasks Desktop. In addition, you can set an AutoTask to be triggered at a
certain time or by the appearance of the creation file. In this case, you wouldn’t need to click an
icon on the Tasks Desktop to initiate the task – it would start automatically.
Creating a Manual Task:
a) On the PhoneTree desktop, choose the icon for which you would like to create an Task. This
takes you to the List ≠ditor for that icon.
b) From the Setup menu, choose T
94
ask Icons...
Page 95
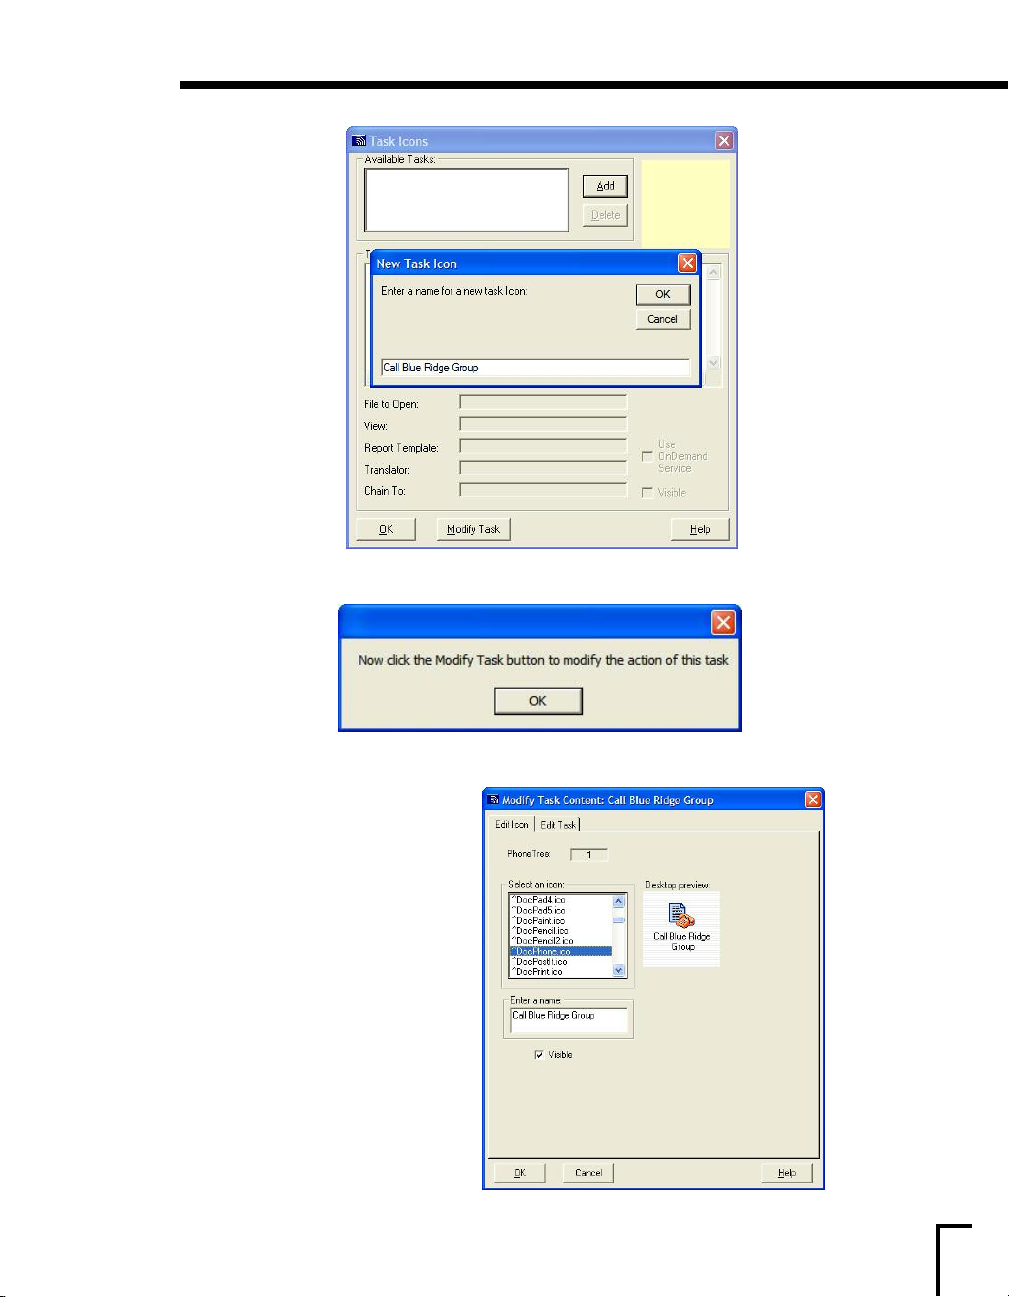
Tasks: Creating a Manual Task, continued
c) Next, click the Add button, then enter a name for your new Task Icon, and click OK.
d) Click OK on this screen. Now click the Modify Task button.
e) Under the ≠dit Icon tab, choose an
available icon from the list on the left,
then type in a name in the
box. Next, click the ≠dit Task tab.
≠nter a name
95
Page 96
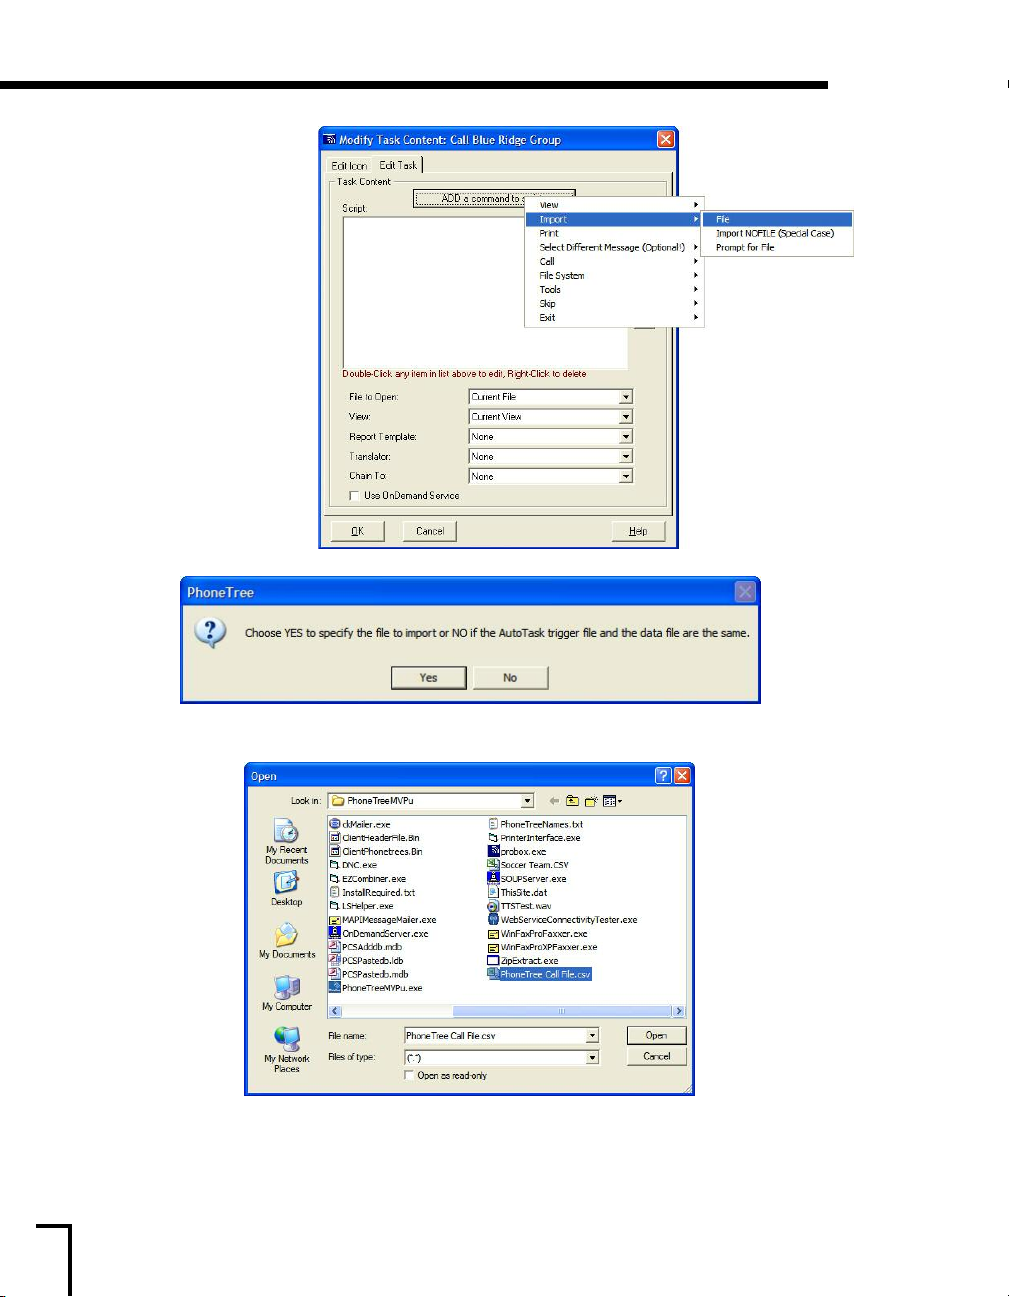
Tasks: Creating a Manual Task, continued
f) Click the ADD a
command to script
Choose
Import, then File.
button.
g) Click the Yes button.
h) Specify the file PhoneTree should look for every time this Task is initiated. When you have
found and selected it, click
Open.
96
Page 97
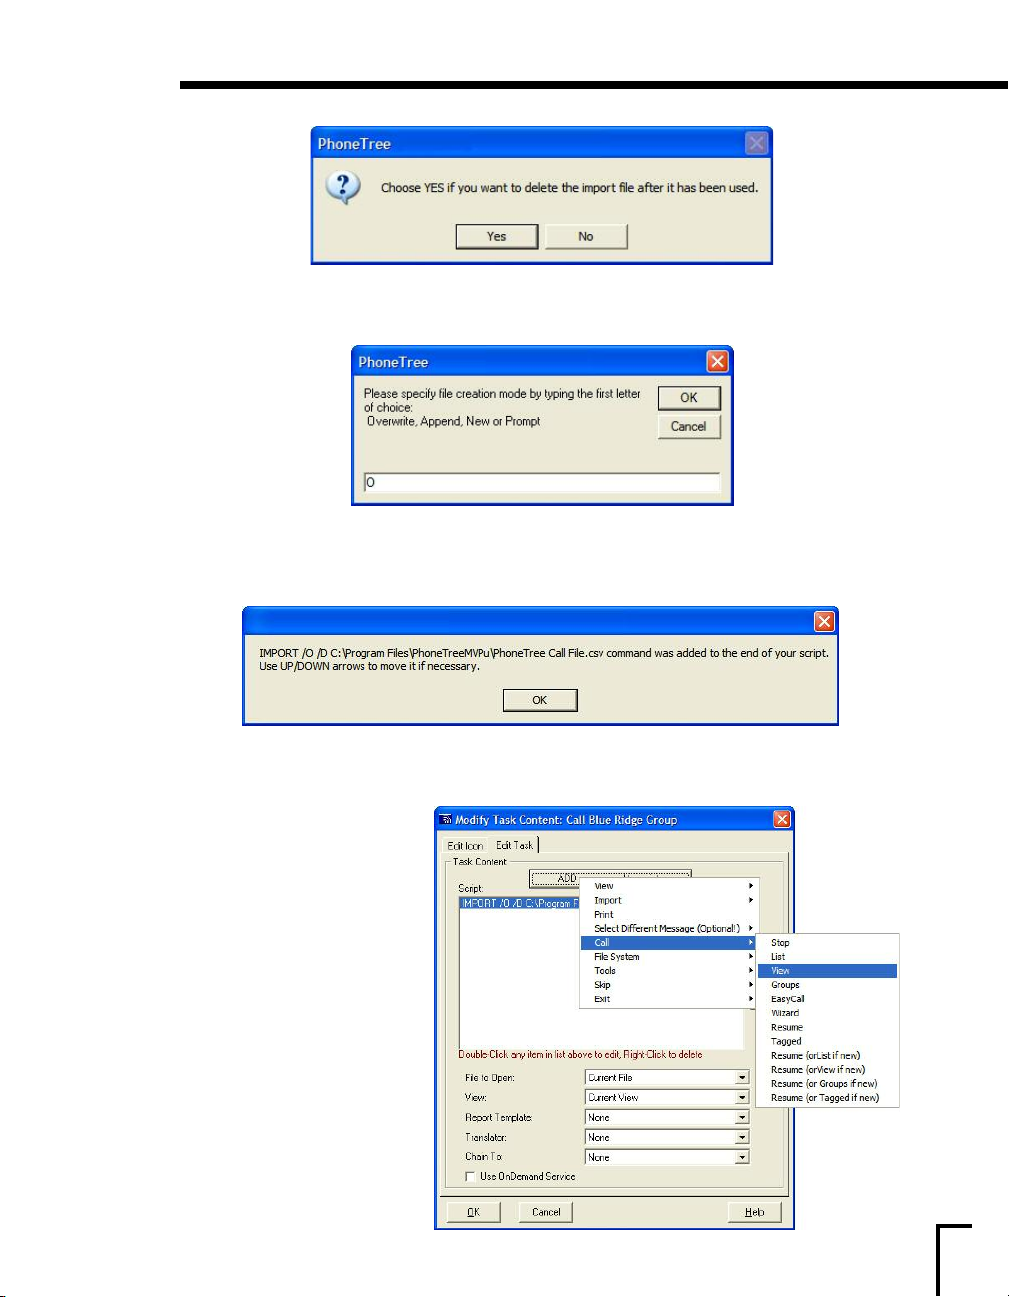
Tasks: Creating a Manual Task, continued
i) Make the appropriate choice on this box (Ye s will delete the import file after use, No will preserve
the file).
j) Choose whether the creation of this file should Overwrite the existing file, Append to the
existing file, create a
of your desired operation. (“
New file or Prompt (ask each time for a choice) by typing in the first letter
O”, “A”, “N” or “P”). “O” is recommended.
k) Click OK. Now your Import command shows up in the Task Content window of the Modify
Task Icon screen.
l) Now click the Add command
to script
choose
button again, and
Call £ View.
97
Page 98
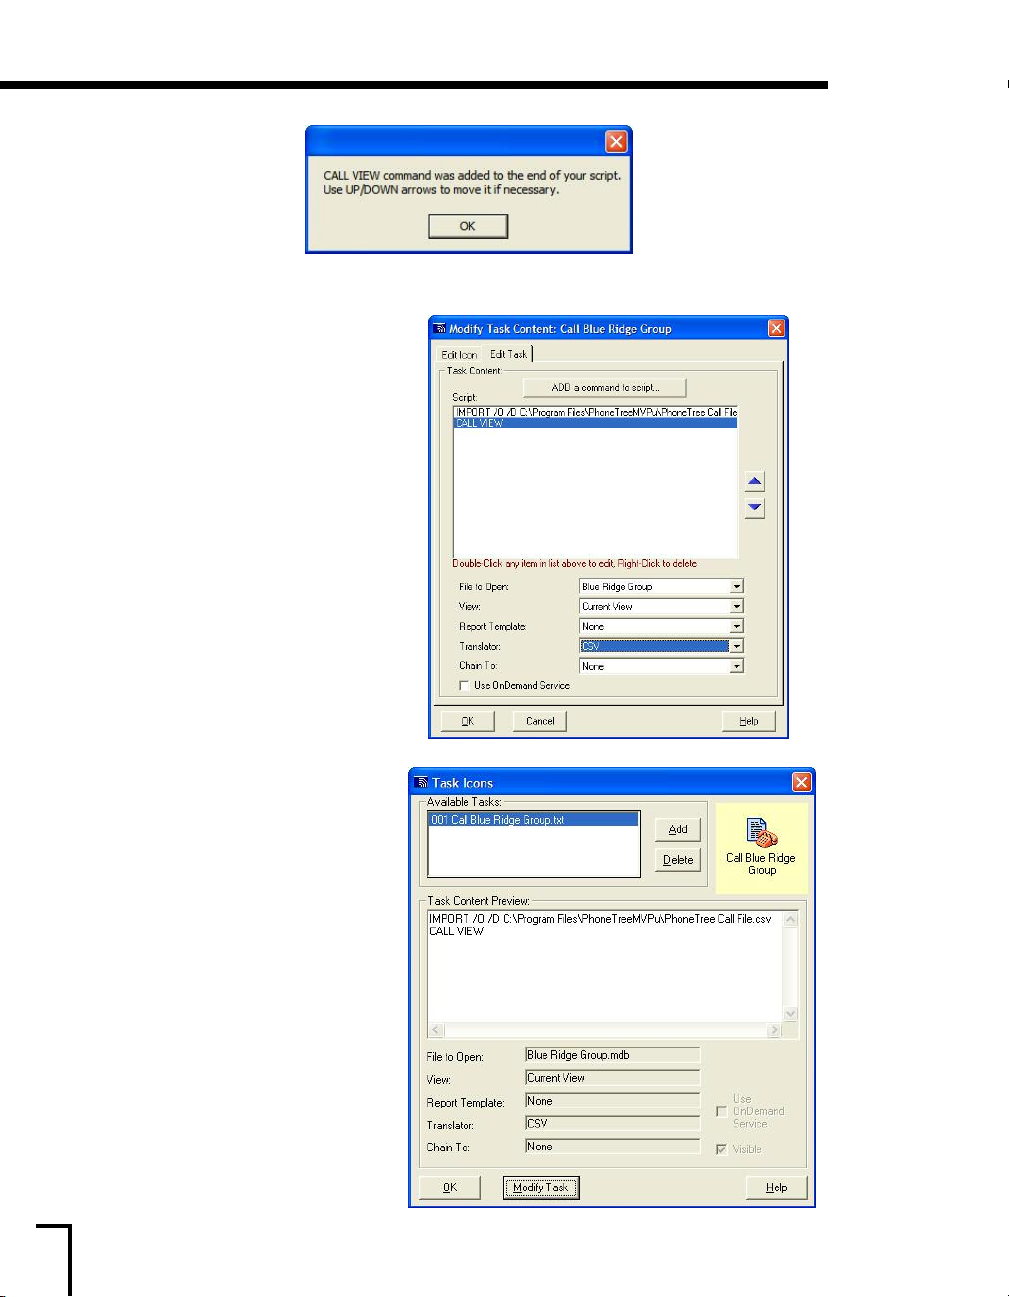
Tasks: Creating a Manual Task, continued
m) Click OK.
n) Make sure your view, whether custom
or ≠ntire List, is selected in the
drop-down menu and CSV (or your other
translator) is selected in the
drop-down menu, then click OK.
ocess for any other
o) Repeat t
Task Icons you would like to create,
then click
his pr
OK.
View:
Translator
98
Page 99
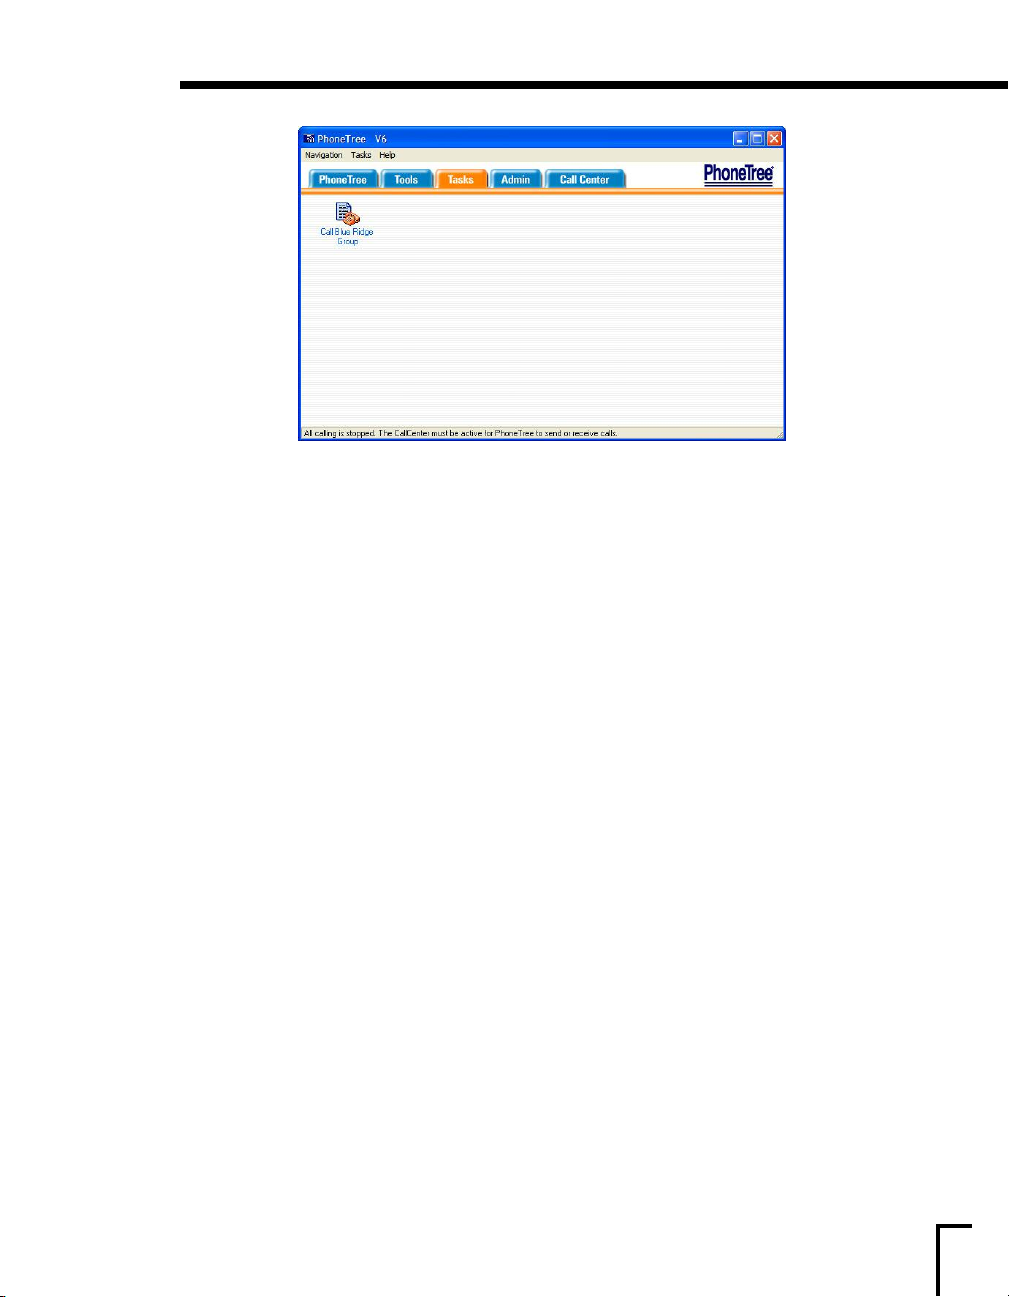
Tasks: Creating a Manual Task, continued
The Task icons you’ve created will now appear on the Task desktop, and when you click an icon,
PhoneTree will execute the commands you selected for that Task.
99
Page 100
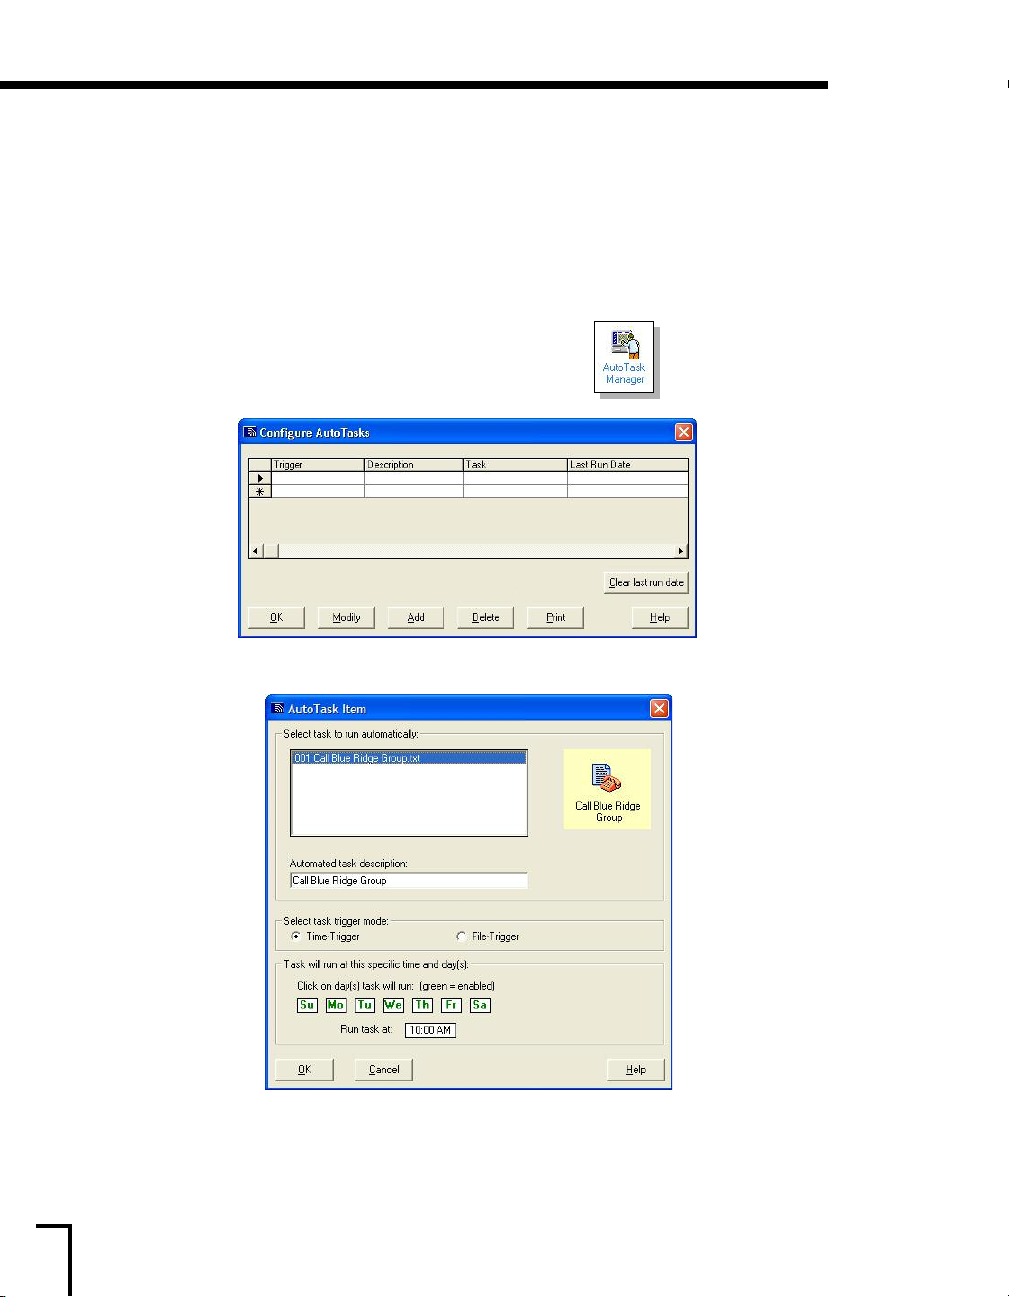
Tasks: Automating a Task
Automating a Task:
Suppose you set up a Task and you need to click the icon every day to initiate the actions associated
with that task. But what if you will be out on vacation for the rest of the week and you still need to
make calls (or print a report, etc.) each day?
PhoneTree allows you to initiate the actions of a Task automatically, based on a trigger you set (like
a certain time of day, or the appearance of a certain file). Once this is set up, the task will run
automatically
how to do this:
a) From the Admin Desktop, click the AutoTask Manager icon.
only if PhoneTree is in the Call Center (like all other automated features). Here’s
b) The Configure AutoTasks dialog appears. Click the Add button.
c) A list of the configured Task icons will appear. Select the one you would like to automate from
the list. Type a description directly in the
will now be displayed in the upper right corner.
Automated Task Description box. The task you selected
100
 Loading...