

Page 1

MicroField
User Manual
Page 2

Page 3

Contents
Introduction ........................................................................................................................................ 1
MicroField Key Features............................................................................................................... 3
Important Notes About Your MicroField.................................................................................... 4
MicroField Channels............................................................................................................... 6
Instructions For First-Time Users.......................................................................................... 7
General Functions......................................................................................................................... 8
Turning the Unit On and Off................................................................................................. 9
Operational Overview - Connections and Controls........................................................... 10
MicroField’s Display ............................................................................................................. 11
Adjusting Volume.................................................................................................................12
Enabling the Automatic Shut-Off Function......................................................................13
Returning to Factory Defaults ............................................................................................ 14
Charging the Batteries.........................................................................................................15
Using the Power Supply.......................................................................................................16
Replacing the Batteries........................................................................................................17
Page 4

Applications:
1. Using MicroField for Rebroadcasting..................................................................................19
Setting Up The Transmit Channel.......................................................................................19
Important Notes ............................................................................................................... 20
Transmitting to a Phonak MicroLink or MicroEar Receiver.......................................... 22
Transmitting to other 216MHz FM Receivers................................................................23
Setting up MicroField For Use With an External 72MHz Transmitter and Receiver..24
Setting up the Receive Channel.......................................................................................... 26
Important Notes ............................................................................................................... 27
Finding a Receive Channel Using Automatic Search.....................................................28
Finding a Receive Channel Using Manual Search.......................................................... 29
Storing a Preset Channel .................................................................................................30
Selecting a Preset Channel For Use ................................................................................ 31
Locking Preset Channels .................................................................................................. 32
Using the Infrared (IR) Receiving Cable .........................................................................33
2. MicroField as a Receiver ......................................................................................................34
Important Notes.................................................................................................................35
Using the Headset Jack .....................................................................................................36
Using the Optional Speaker ..............................................................................................37
Page 5

3. MicroField as a Transmitter.................................................................................................38
Using the Auxiliary Input With a Microphone..................................................................39
Using the Auxiliary Input With Your TV or Other Device.................................................40
Troubleshooting ................................................................................................................................41
Compliance Notice............................................................................................................................47
Appendix ...........................................................................................................................................50
Page 6

This page intentionally blank.
Page 7

1
Introduction
Page 8

2
Welcome to the Phonak World of Wireless Communication!
Thank you for choosing MicroField! MicroField is a high-quality product from Phonak, a world
leader in hearing technology innovation and reliability. MicroField automatically finds audio
transmissions (such as from a teacher’s wireless transmitter, a theater sound system, or other
facilities providing wireless assistive listening) on any of three frequency bands. Once MicroField
finds the transmission, it sends the audio signal to you in one of several ways:
Directly to your hearing aid (when equipped with a Phonak MicroLink or other type
216MHz receiver)
To your personal transmitter and FM receiver
To an earphone or neckloop
To an optional speaker
MicroField has been designed to give you the easiest possible way to receive wireless audio transmissions for personal use and in public facilities.
Introduction
Page 9
3
MicroField Key Features
Receives audio on three frequency bands
72-76MHz
216-217MHz
Multiple Infrared (IR) Channels
Can be used at literally thousands of facilities!
Classrooms, theaters, cinema, places of worship, courtrooms, etc.
Automatic and manual search modes
Quickly recognizes/locates an FM / IR signal in a facility
Seven presets for regularly used transmission channels
Ideal for classroom use, places of worship or your favorite theater
Automatically remembers the last volume setting for each preset plus the last searched
channel
50+ hours of battery life between charges
Easy-to-use LCD display shows battery condition, channel number, preset number, volume
setting and signal strength
Digital design for stable, crystal clear reception
Can be used indoors or outdoors
Page 10
4
Important Notes About Your MicroField
MicroField is a highly versatile product. It can receive various types of audio signals and
uses a variety of methods to convert the signals to a form you can use. The unit can retransmit the signals directly to an FM or external receiver; it can send audio to a headset or
an optional loudspeaker; or it can send audio signals via auxiliary connections to an external transmitter that transmits to an FM receiver.
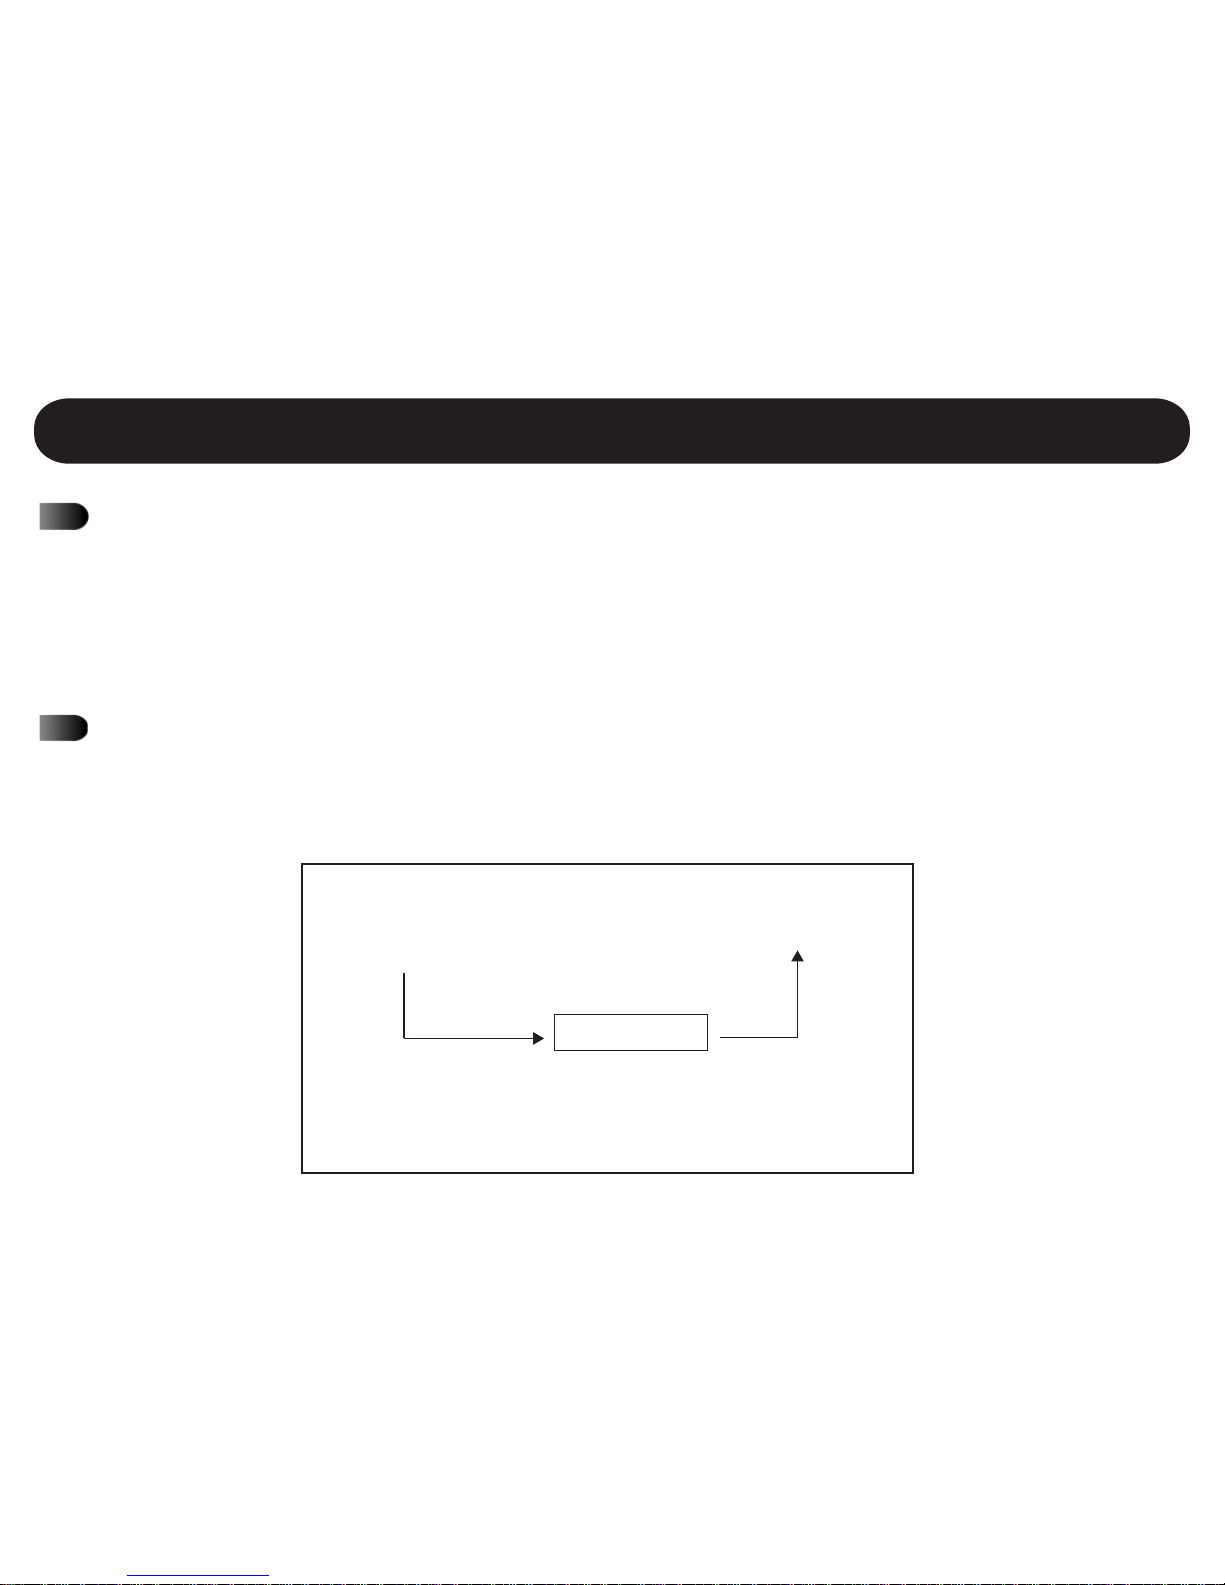
This manual frequently refers to “receive” and “transmit” channels. Please note that “receive” channels are frequencies received by MicroField from a portable, stationary or infrared transmitter in a room. A “transmit” channel is a channel MicroField uses to transmit to
your MicroLink, MicroEar or other FM receiver.
Receive Channel Transmit Channel
Wireless transmissions
on 216 MHz, 72 MHz
or Infrared
MicroLink, MicroEar or
other personal receiver
Source: portable transmitter,
stationary transmitter, infrared
emitter (equipment in room)
MicroField
Page 11
5
When shipped, your MicroField is set to send audio to the headset jack. If you are planning
to use it with a MicroEar, MicroLink or other FM receiver, it must be set up for the way you
will be using it. See page 20 for more information.
Make certain that the batteries are charged overnight before using MicroField. See page 15.
After extensive use of your MicroField, you might want to restore the factory default set-
tings to give you a fresh start on programming the unit. See page 14.
If you are planning to use MicroField in a theater or other location using infrared assistive
listening, the supplied IR receiving cable must be connected to the unit. See page 33.
Important Notes About Your MicroField Cont.
Page 12

6
There are many places you can use your MicroField. These places
include places of worship, schools, cinemas, live theatres, stadiums, courtrooms and government meeting rooms. Many public
facilities provide transmitters that use specific channels to send
the audio from their sound systems to personal receivers or
portable listening devices. Your MicroField is designed to search
out these audio channels and then send them directly to your FM
receiver.
Your MicroField can pick up signals in three frequency bands:
72-76 MHz, 216-217 MHz, and infrared. For all of the possible
receiving channels, see the channel selection guide (Appendix B).
MicroField can also receive infrared signals. Infrared is available
in many cinemas, live theatres and courtrooms. See page 33 for
more information.
MicroField Channels
Important Notes About Your MicroField Cont.
Page 13

7
Instructions For First-Time Users
Unpack your new Phonak MicroField and make sure all components were included in the
shipment:
1. MicroField module (with 4 AA NiMH
rechargable batteries pre-installed)
2. Nylon case
3. Infrared receiving cable
4. Power supply for re-charging and/or powering
the unit
5. Headset (not shown)
If any components are missing, contact Phonak immediately. If any items were damaged in
shipping, retain the packing materials for inspection and contact the shipper. Phonak is not
responsible for damage incurred in shipment.
1
2
4
3
Page 14

8
General Functions
Page 15
9
General Functions
Turning the Unit On and Off
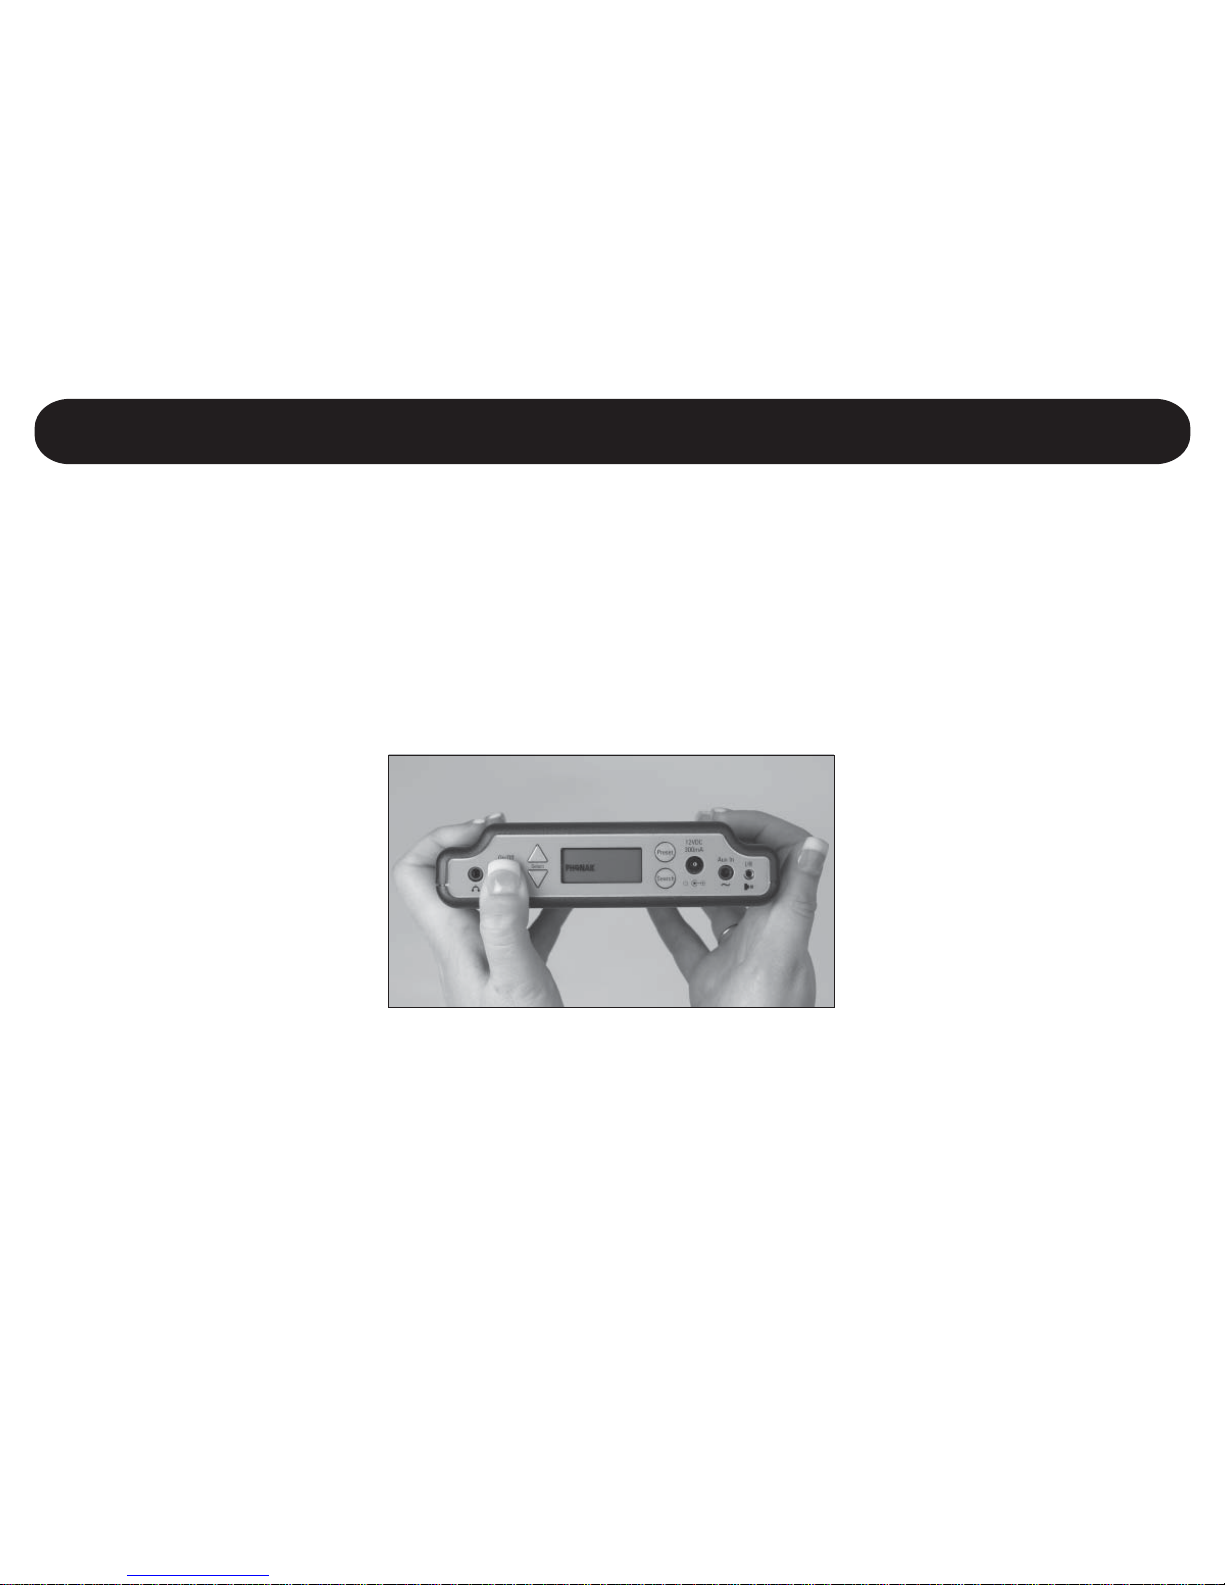
To turn on your MicroField, press and hold the ON button until you see the Phonak logo on the
display, and then release.
To turn the unit off, press and hold the OFF button until the display turns off.
If the I/O symbol is illuminated, your MicroField’s
auto-shutoff feature has been activated. See
page 13 for more information.
Page 16
10
General Functions
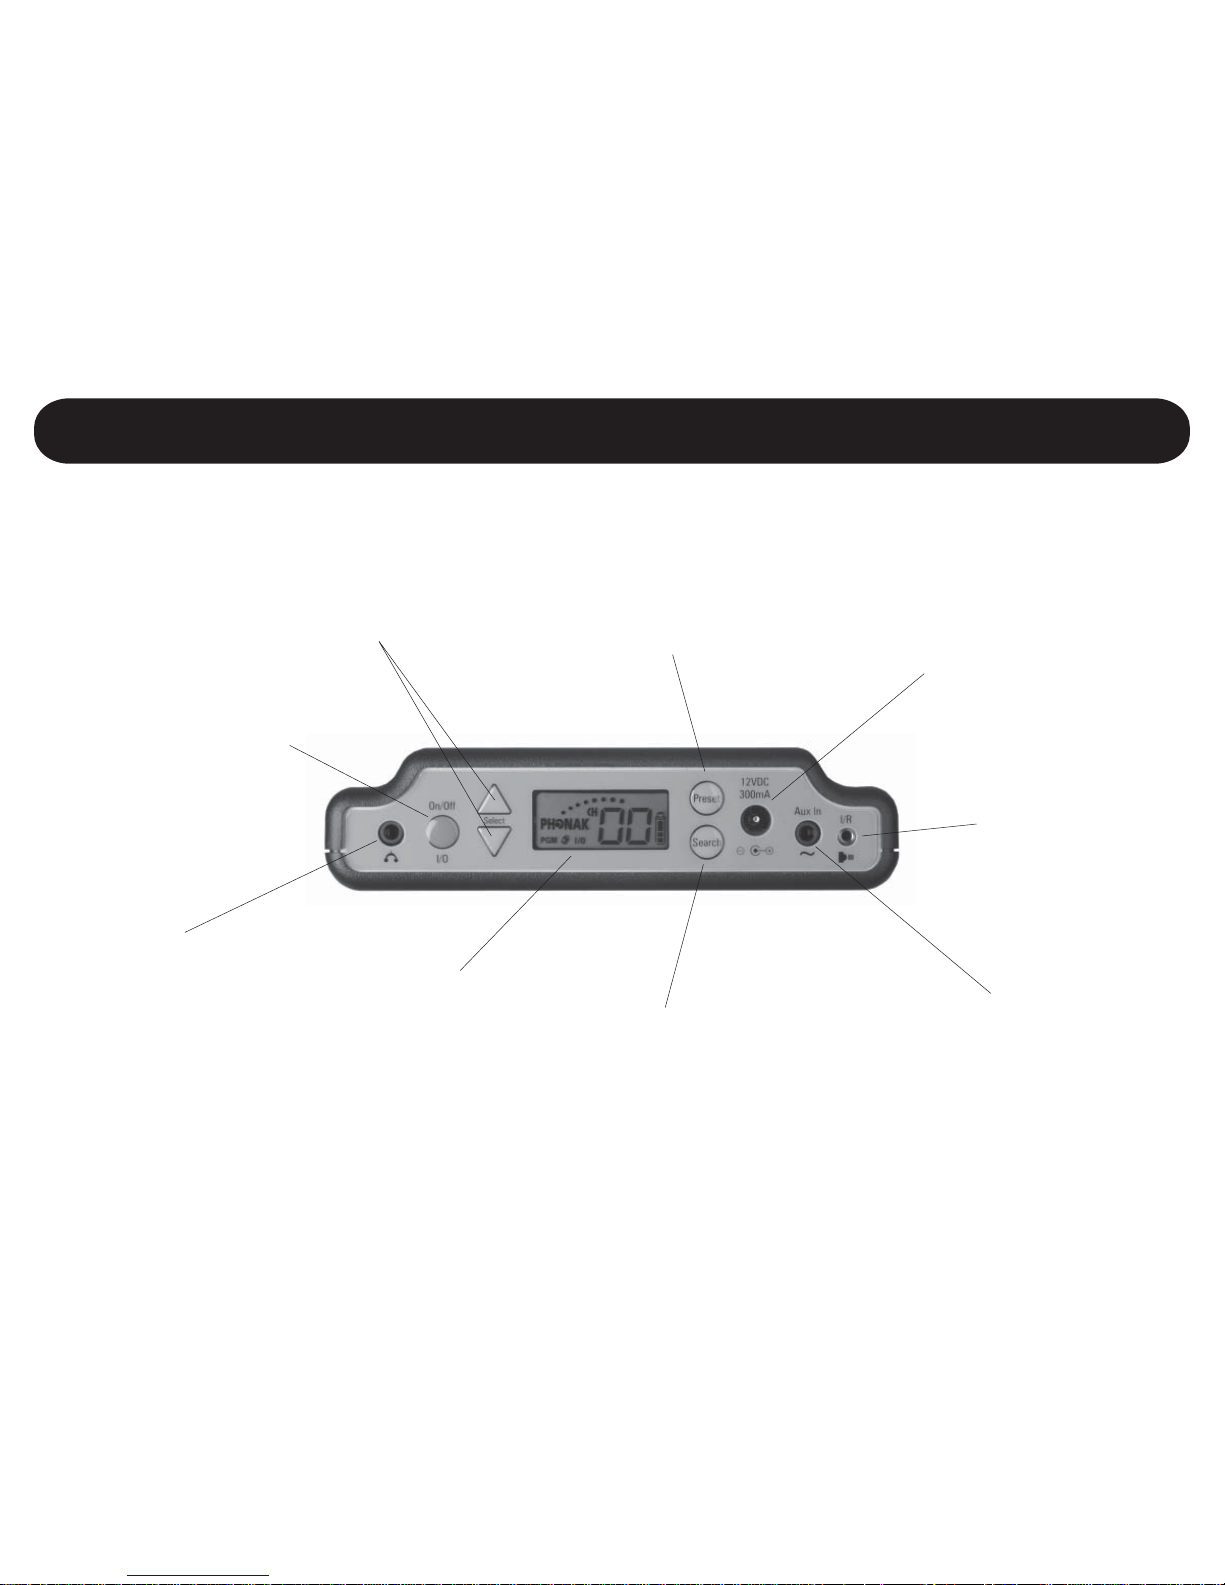
Operational Overview - Connections and Controls
Connect a headset,
neckloop, an optional
speaker, or a cable to your
72MHz transmitter here
Use for controlling volume and
selecting channels
Display indicates
channel, battery
status, program mode,
and preset lock
Use to select and
store presets or to
program the unit
Connect the provided
power supply here to
charge the batteries or
operate the unit
Use to automatically or
manually search for a
channel
Auxiliary devices connect here, such
as an environmental microphone or
a cable to your TV set
An infrared
receiving cable
(supplied)
connects here
Press and hold until
display turns on (or off)
Page 17

11
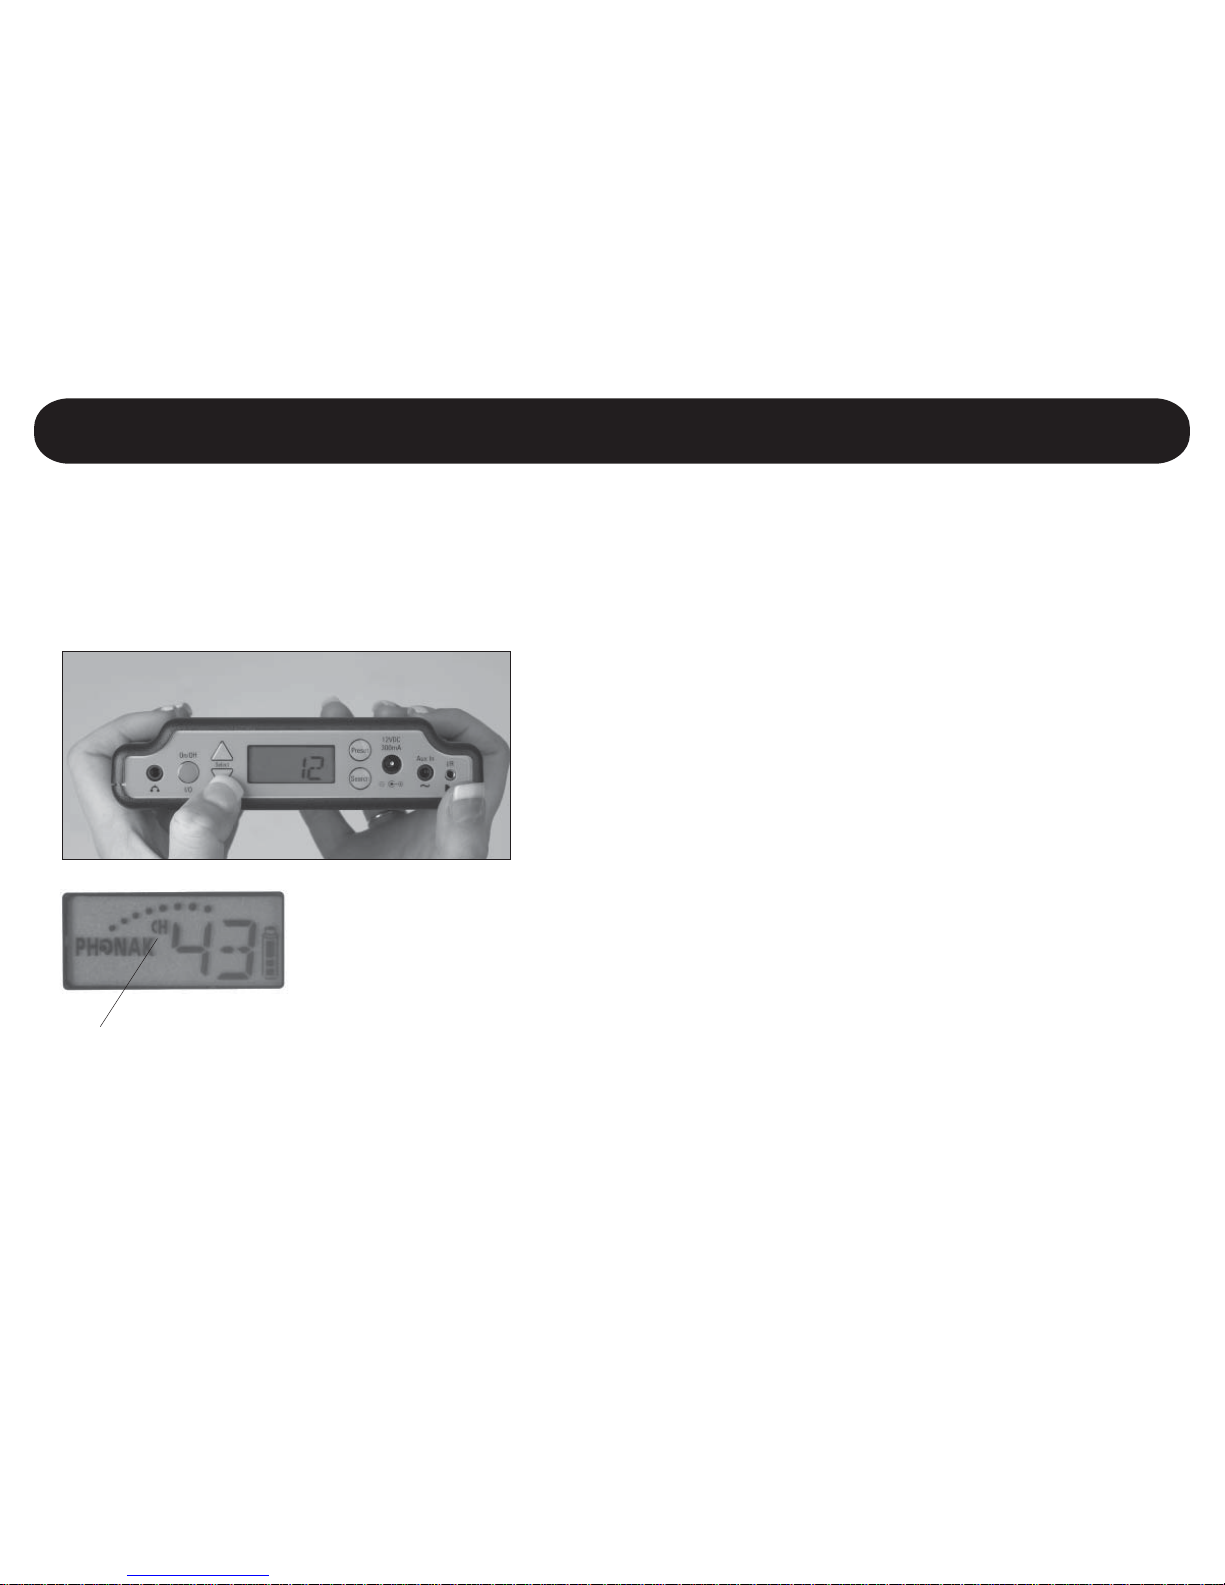
MicroField’s Display
Indicates signal strength of
received audio channel
When illuminated, indicates
unit is in search mode
The battery symbol
indicates approximate
battery life remaining;
when flashing, shutdown
is imminent
When illuminated, indicates
unit is in transmit channel
programming mode
When illuminated,
indicates unit is in
auto shut-off mode
When illuminated,
indicates presets are
locked and new ones
cannot be stored
Indicates either the preset
number, channel number, or
relative volume setting
FULL MID LOW
General Functions
Page 18
12
If CH appears in your MicroField’s display, your unit is
in the search mode. Wait about 7 seconds until CH
goes away, then you can adjust volume.
Adjusting Volume
To increase or decrease the volume, press the UP or DOWN keys.
MicroField’s display will show a number between 0
and 25 indicating the relative volume level. The unit
will also remember volume settings for each preset.
Once you adjust volume to the desired level, the
volume level will automatically return the next time
you select that preset.
When using the manual search function, the UP and
DOWN keys momentarily become channel selection
keys. To change back to volume controls, wait 7
seconds - the CH indicator will go out and you can
again adjust volume.
General Functions
Page 19
13
Enabling the Automatic Shut-Off Function
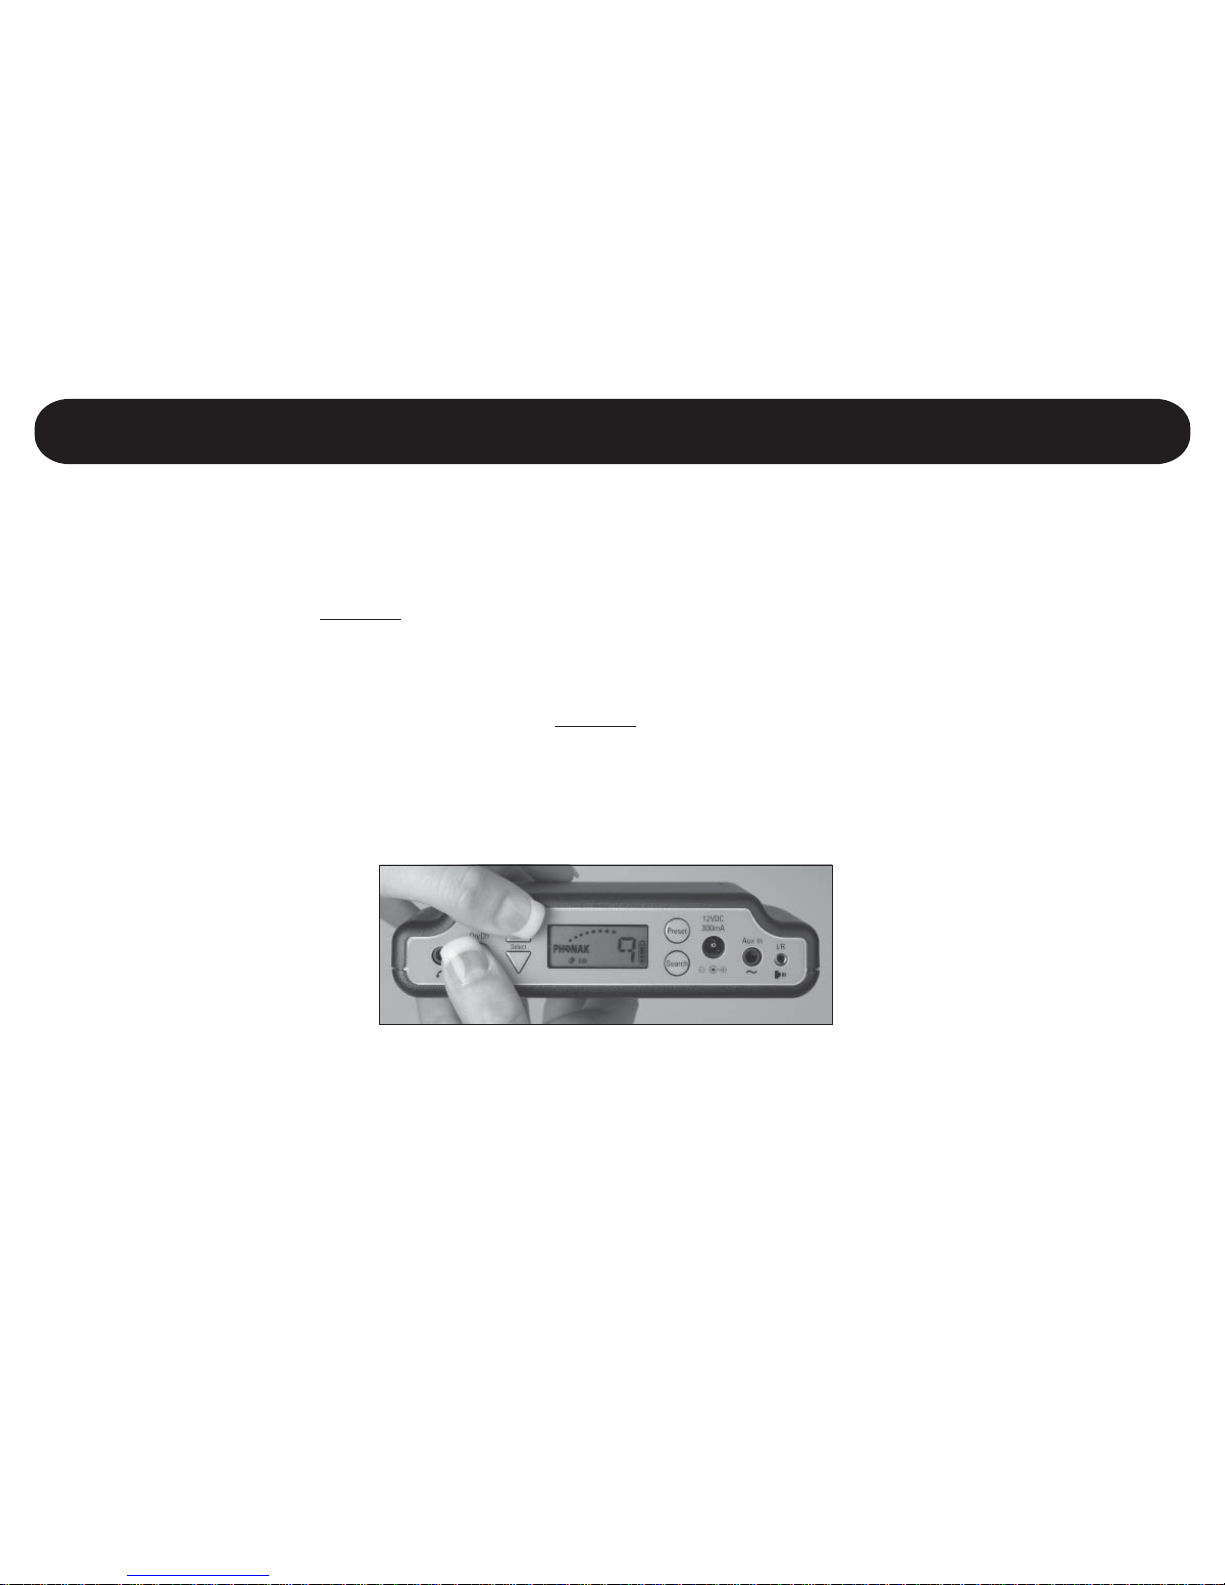
Your MicroField can be set up so that after 30 minutes of no receive signal, it will turn itself off.
To activate this feature, quickly* press and hold the On/Off button and then the UP button. The
I/O symbol will be displayed.
To turn off the automatic shut-off function, quickly* press and hold the On/Off button and then
press the DOWN button. The I/O symbol will be extinguished.
Note: Any time you plug a device into the AUX IN jack, the auto shut-off function is disabled.
The I/O symbol illuminates when the auto
shut-off feature is
activated.
*If you hold the On/Off button down too long, the unit will shut off. Turn it back on and try again.
General Functions
Page 20
14
Returning to Factory Defaults
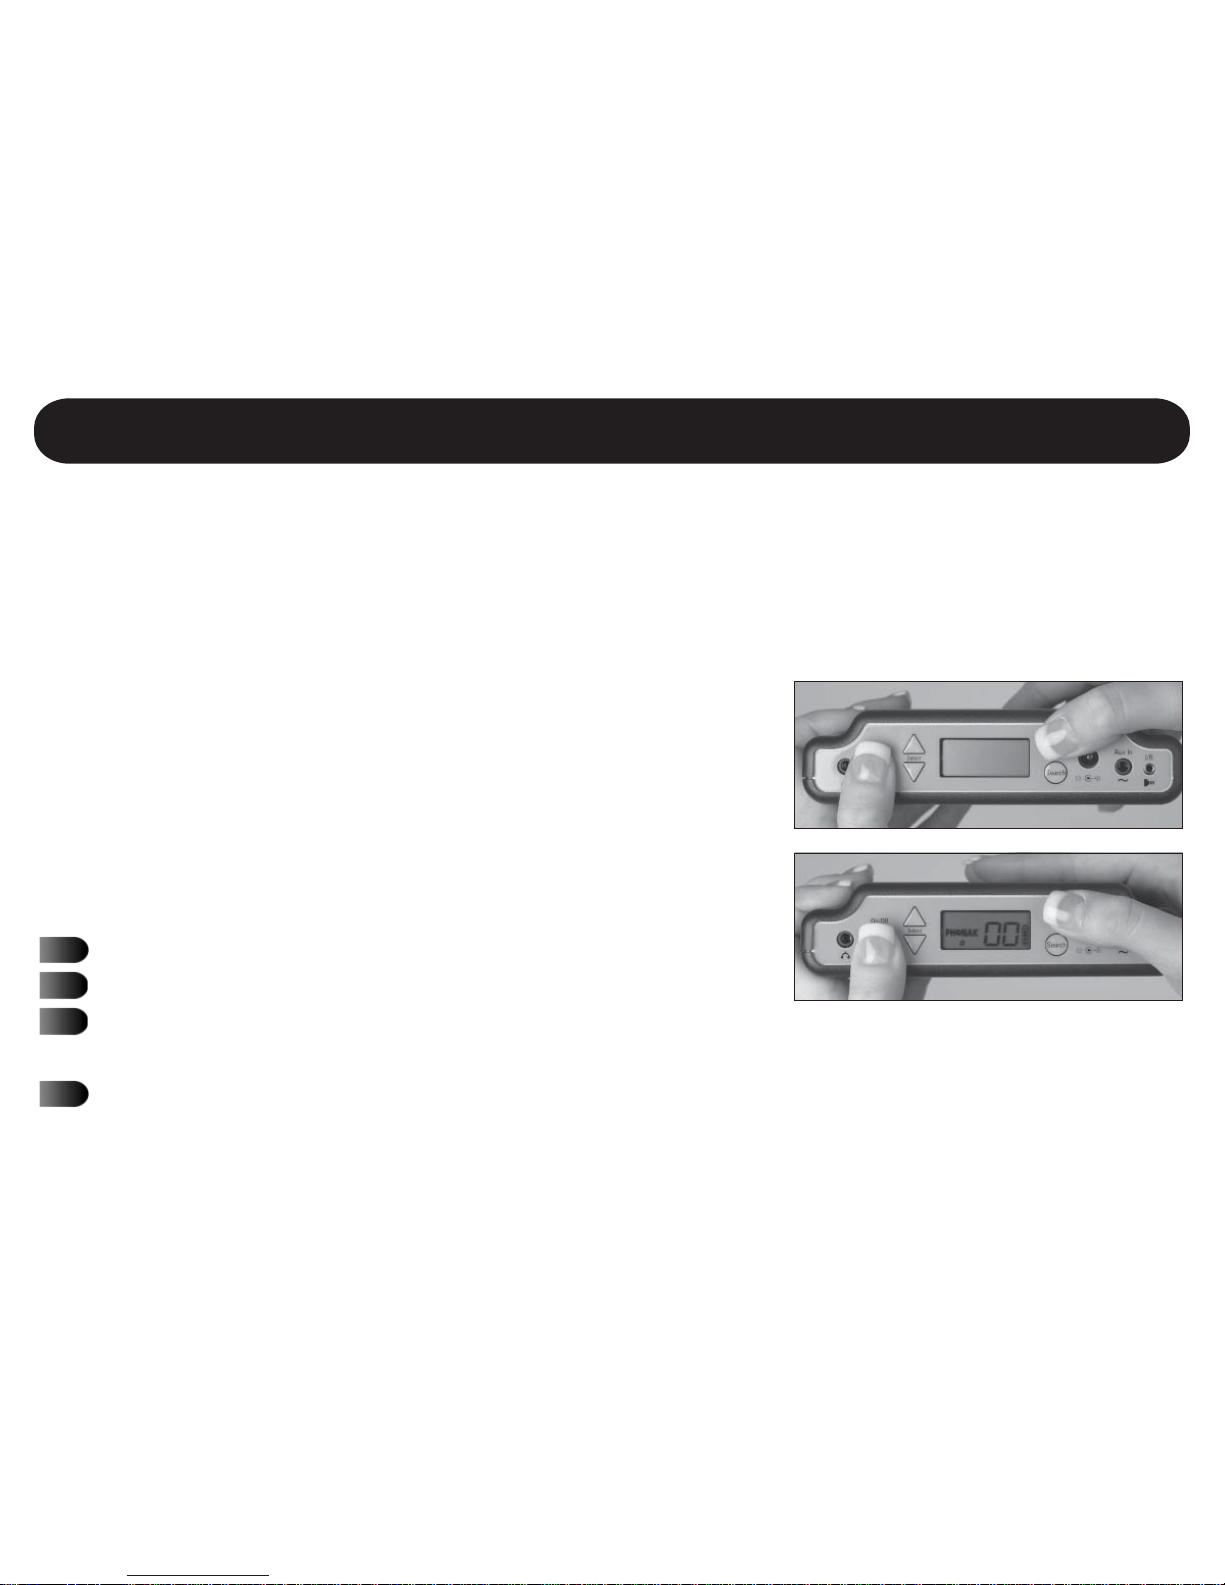
While holding the Preset button, turn the
unit on to restore factory defaults.
This feature restores the factory defaults to your MicroField. This is recommended if someone new
is going to use the unit or if you simply want to start over. When you restore the factory default
settings, the following occurs:
All of the presets are programmed to channel 00 (they are
all cleared).
The transmitting channel is set to channel 00.
The auto shut-off function is turned off.
The preset lock function is turned off.
To restore factory defaults:
Turn the unit off.
Press and hold the Preset button.
While holding the Preset button, press and hold the
On/Off button until you see the Phonak logo.
Release the On/Off button and the Preset button.
00 will be displayed.
General Functions
Page 21
15
General Functions
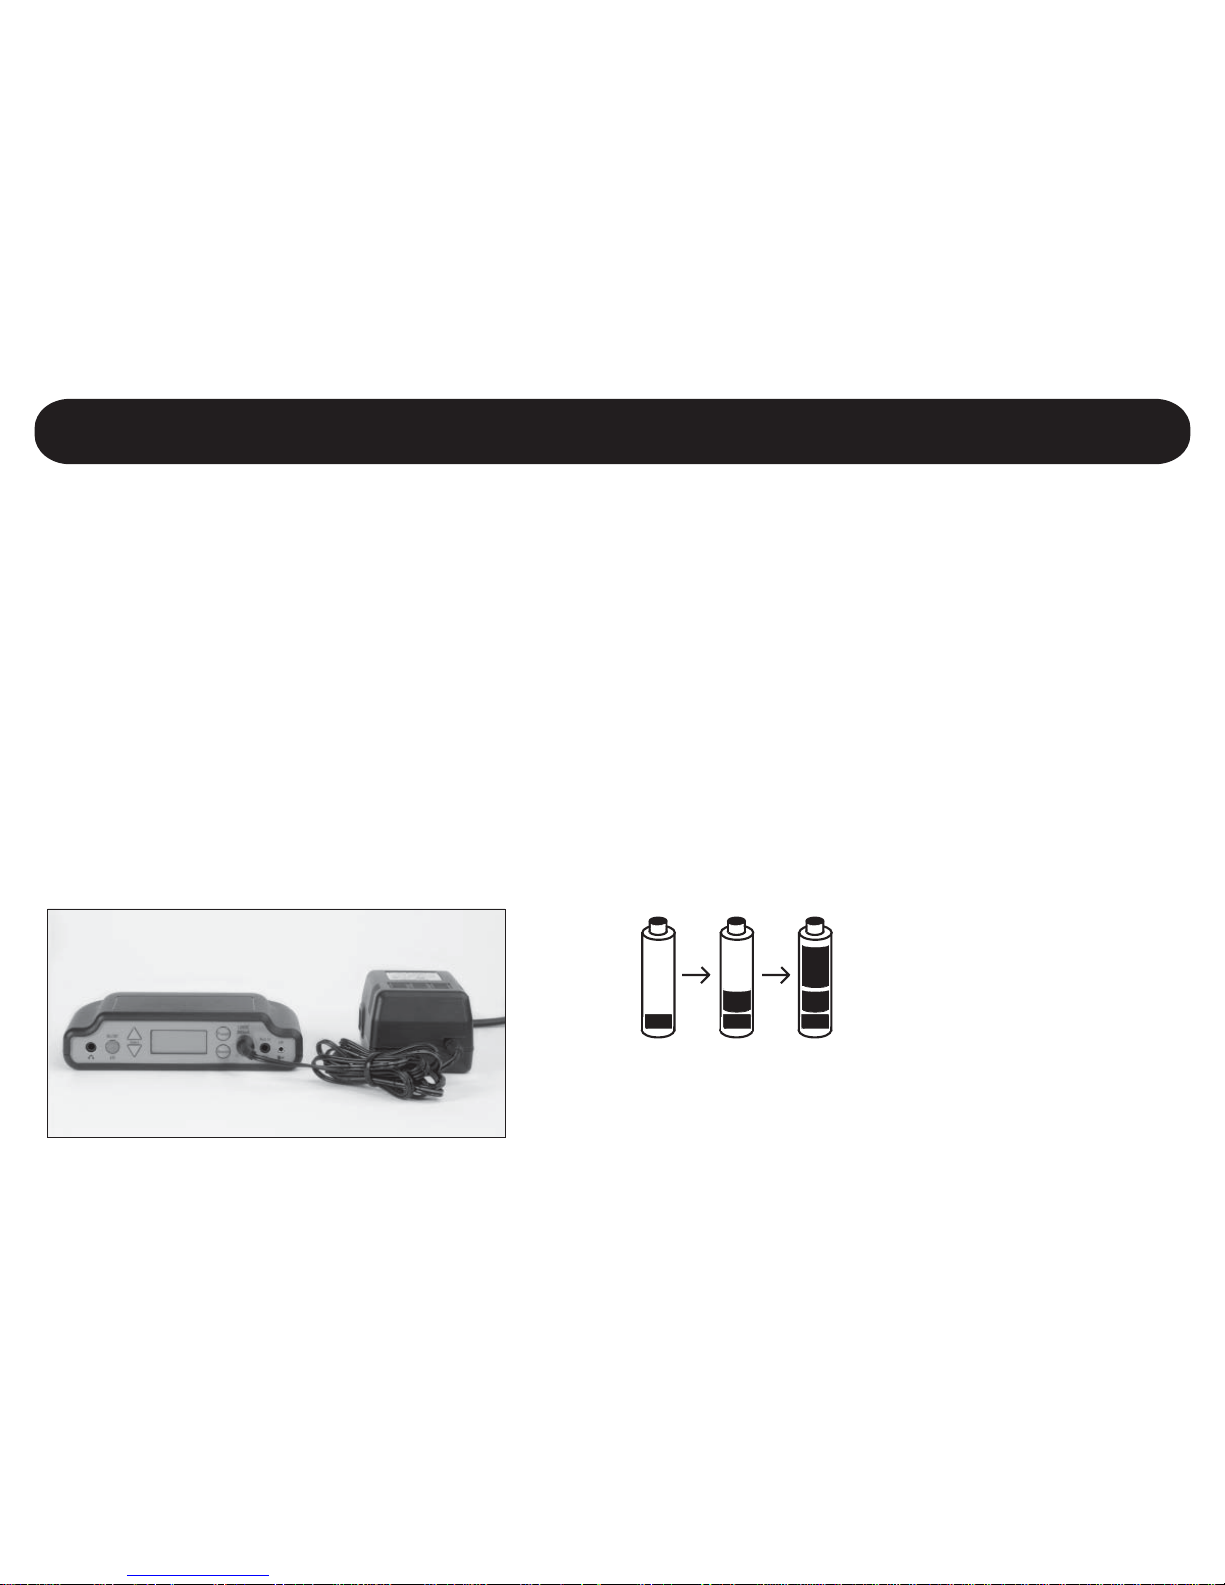
To charge your MicroField’s batteries, connect the power supply to MicroField and then plug it into a
wall outlet. You will notice that the battery symbol flashes while it is charging. It will take 13 hours
to fully charge the batteries. When the batteries are fully charged, the unit will stop charging.
When not in use, it is best to leave your MicroField connected to the power supply to keep the
batteries fully charged (the unit loses charge over time even when off). Leaving the unit connected
to power will not damage the batteries.
You may use your MicroField unit while it is connected to the power supply.
Charging the Batteries
The battery symbol
flashes while charging.
Page 22

16
Using the Power Supply
Your MicroField unit may be operated with batteries or connected to the power supply. To use
your unit with the power supply, simply connect the supply to the front of the MicroField unit and
connect to AC power. Use ONLY the power supply provided with your MicroField unit.
General Functions
Page 23
17
General Functions
You should change the batteries in your MicroField if the unit does not give you a sufficient
amount of time for your needs after being fully charged. MicroField uses four (4) AA NiMH rechargeable batteries. Only replace the batteries with the same type (NiMH) and a capacity of
1600mA or greater. Use good quality batteries.
To replace the batteries:
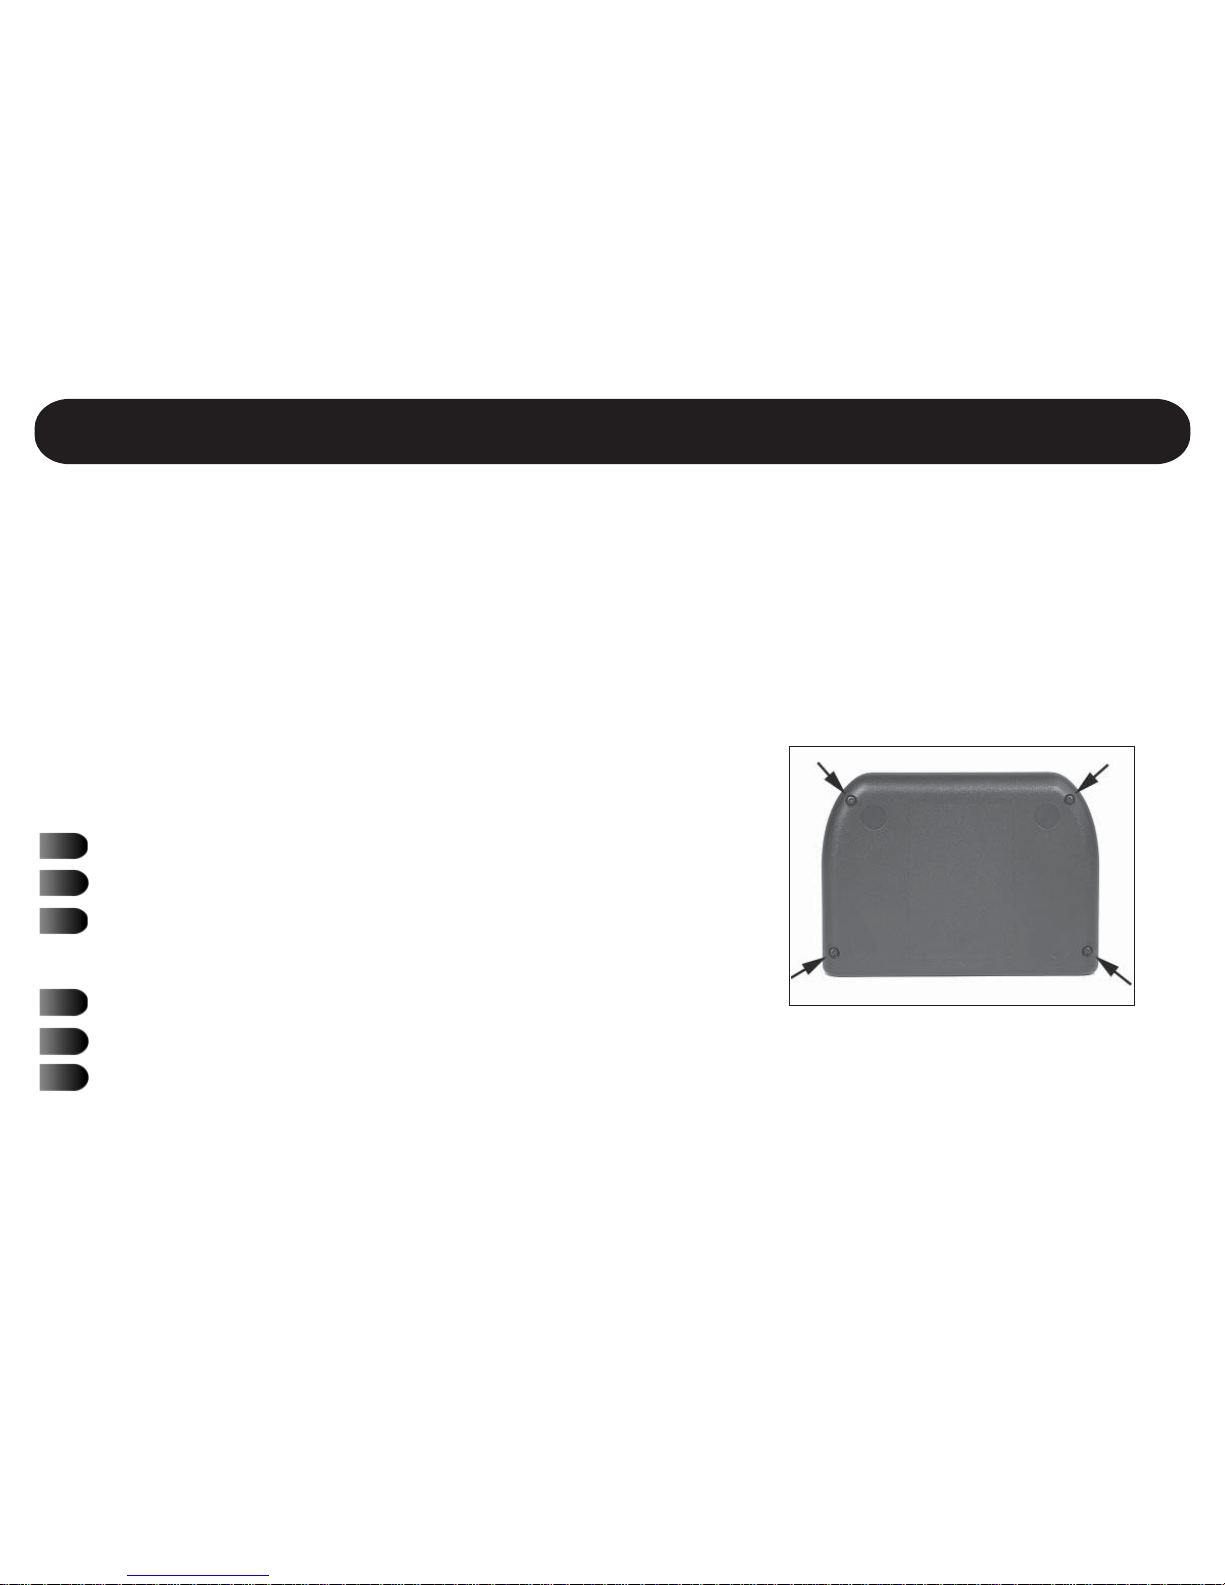
Turn the unit off.
Turn the unit upside down.
Use a Phillips screwdriver to remove the four
screws on the bottom of the unit.
Turn the unit right side up.
Carefully remove the lid.
Remove the old batteries.
Replacing the Batteries
The batteries are accessed by removing four screws
on the bottom of your MicroField
(continued on next page)
Page 24
18
Replace with new NiMH batteries,
observing correct polarity.
Carefully replace the lid. Make sure it is
aligned correctly.
Turn the unit upside down.
Replace the four screws.
Charge the batteries for 13 hours before
first use.
You can expect a new set of NiMH batteries to last between 1 and 3 years before requiring
replacement, depending on the usage.
WARNING: do not use alkaline batteries
in your MicroField. Charging alkaline
batteries may result in physical harm,
destruction of property and/or fire.
Phonak is not responsible for any damage
caused by improper battery use.
General Functions
Battery Replacement Continued
Page 25

19
Using MicroField for Rebroadcasting
Setting Up The Transmit Channel
Page 26
20
Using MicroField for Rebroadcasting - Setting the Transmit Channel
Your MicroField can receive audio signals and rebroadcast them directly to your MicroLink,
MicroEar or other FM receiver. However, when you first get your MicroField, it is set up only to
send audio signals to the headset jack. To use it with your MicroLink/MicroEar or with any other
FM receiver, you will need to go through the setup process outlined in this section. Please refer to
the following pages for more detailed information:
Transmitting to a Phonak MicroLink or MicroEar - Page 22
Transmitting to another brand 216 MHz FM Receiver - Page 23
Setting up MicroField For Use With an External 72 MHz Transmitter and Receiver - Page 24
Important Notes
Page 27
21
Using MicroField for Rebroadcasting - Setting the Transmit Channel
Your MicroField’s transmission range is normally about 5 - 10 feet (1.5 - 3 meters). If a
cable is plugged into the AUX connector, the transmission range is increased to 30 - 40 feet
(9 - 12 meters).
When using MicroField for rebroadcasting, set its volume control at about 15 to ensure the
best audio levels. To change volume, use the controls on your hearing aid or receiver.
If you use your MicroField near a computer, the computer may cause interference which
will result in a noisy audio signal or no signal at all.
Note that the channel sequence is different when setting up the transmit channel than it is
with searching for receive channels. Your MicroField will cycle through the Phonak frequencies (see Appendix B), then through the remaining frequencies.
Other Information
Page 28
22
Using MicroField for Rebroadcasting - Setting the Transmit Channel
IMPORTANT: Before starting this procedure, verify that your Phonak transmitter is turned OFF and
MicroField is not near a computer or other device that generates RF energy. Your MicroField must
be running on batteries rather than the power supply.
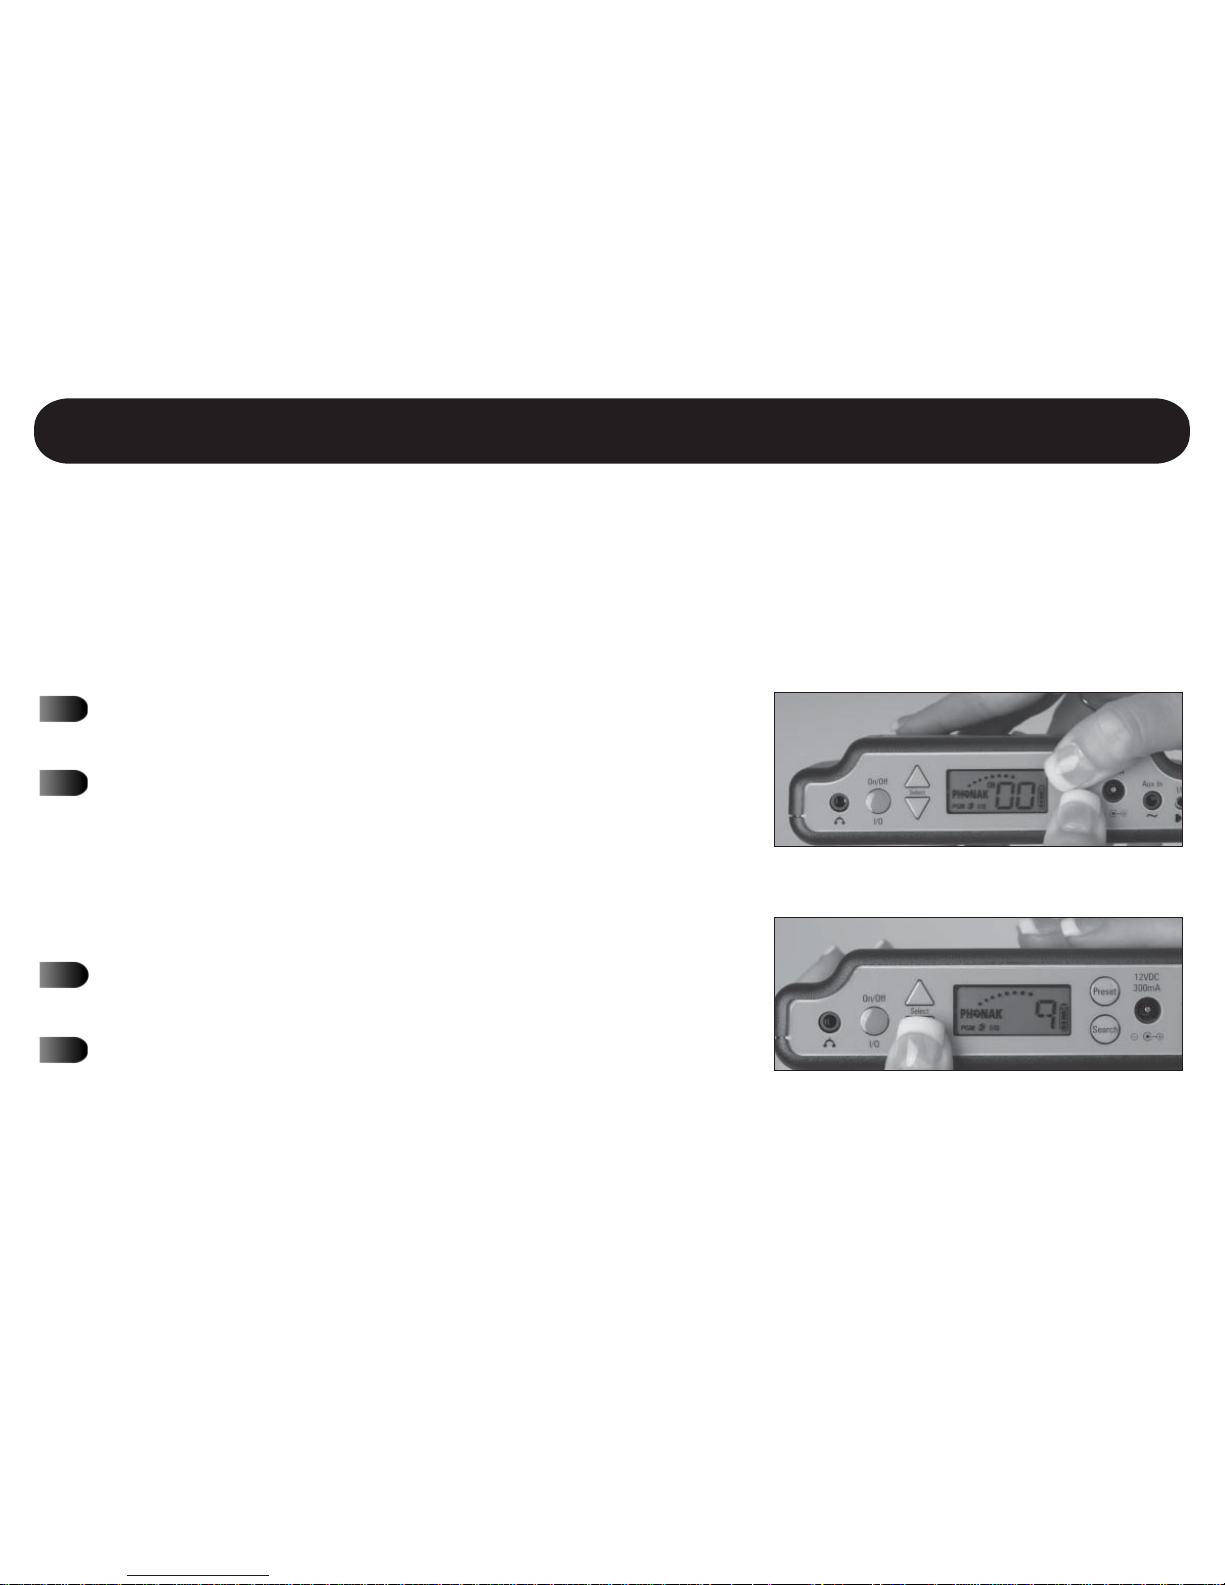
Transmitting to a Phonak MicroLink or MicroEar Receiver
Determine the channel of your MicroLink or MicroEar
(for example, 9).
Press PRESET and SEARCH at the same time on your
MicroField. PGM will appear on the display, indicating
the unit is ready to be programmed with a transmitting
channel. The display will show the current transmit channel. If no channel is programmed, 00 will be displayed.
Press UP until your MicroLink’s channel number appears
in the display.
Press PRESET. The channel will flash; the setting is
stored for immediate use. You will hear a clicking
sound during this process.
Page 29
23
Using MicroField for Rebroadcasting - Setting the Transmit Channel
If using a personal transmitter, turn it off; your MicroField must be running on batteries rather
than the power supply.
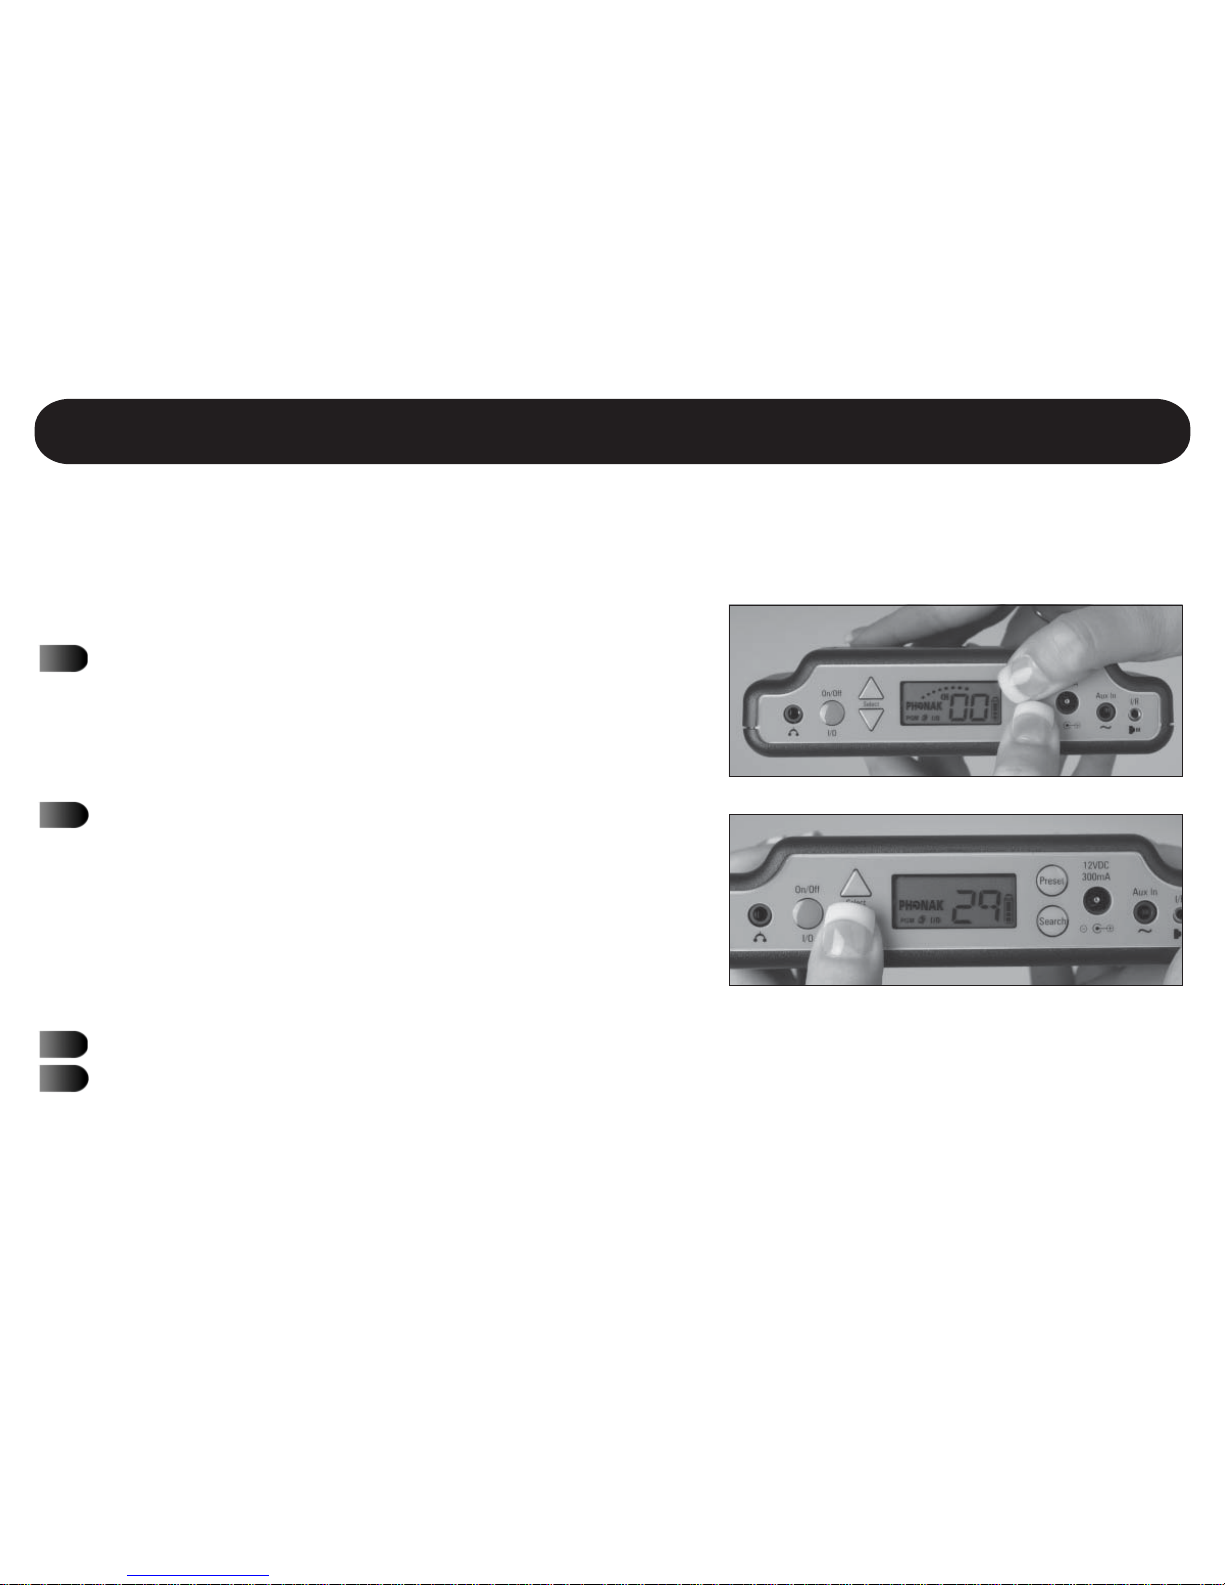
Transmitting to other 216MHz FM Receivers
Find your product in the channel selection tables in
Appendix B, and determine the MicroField channel
number that corresponds with your product. For
example, Phonic Ear #51 = MicroField Channel #29.
Press the PRESET and SEARCH buttons at the same
time on your MicroField. PGM will appear on the
display, indicating it is ready to program a channel
for transmitting. The display will show the current
transmit channel. If no channel is programmed, 00
will be displayed.
Press UP until the desired MicroField channel number appears in the display.
Press PRESET; the channel will flash and the setting is stored for immediate use. MicroField
will now transmit on that 216MHz channel (example: it now broadcasts on channel 29).
Page 30
24
Using MicroField for Rebroadcasting - Setting the Transmit Channel
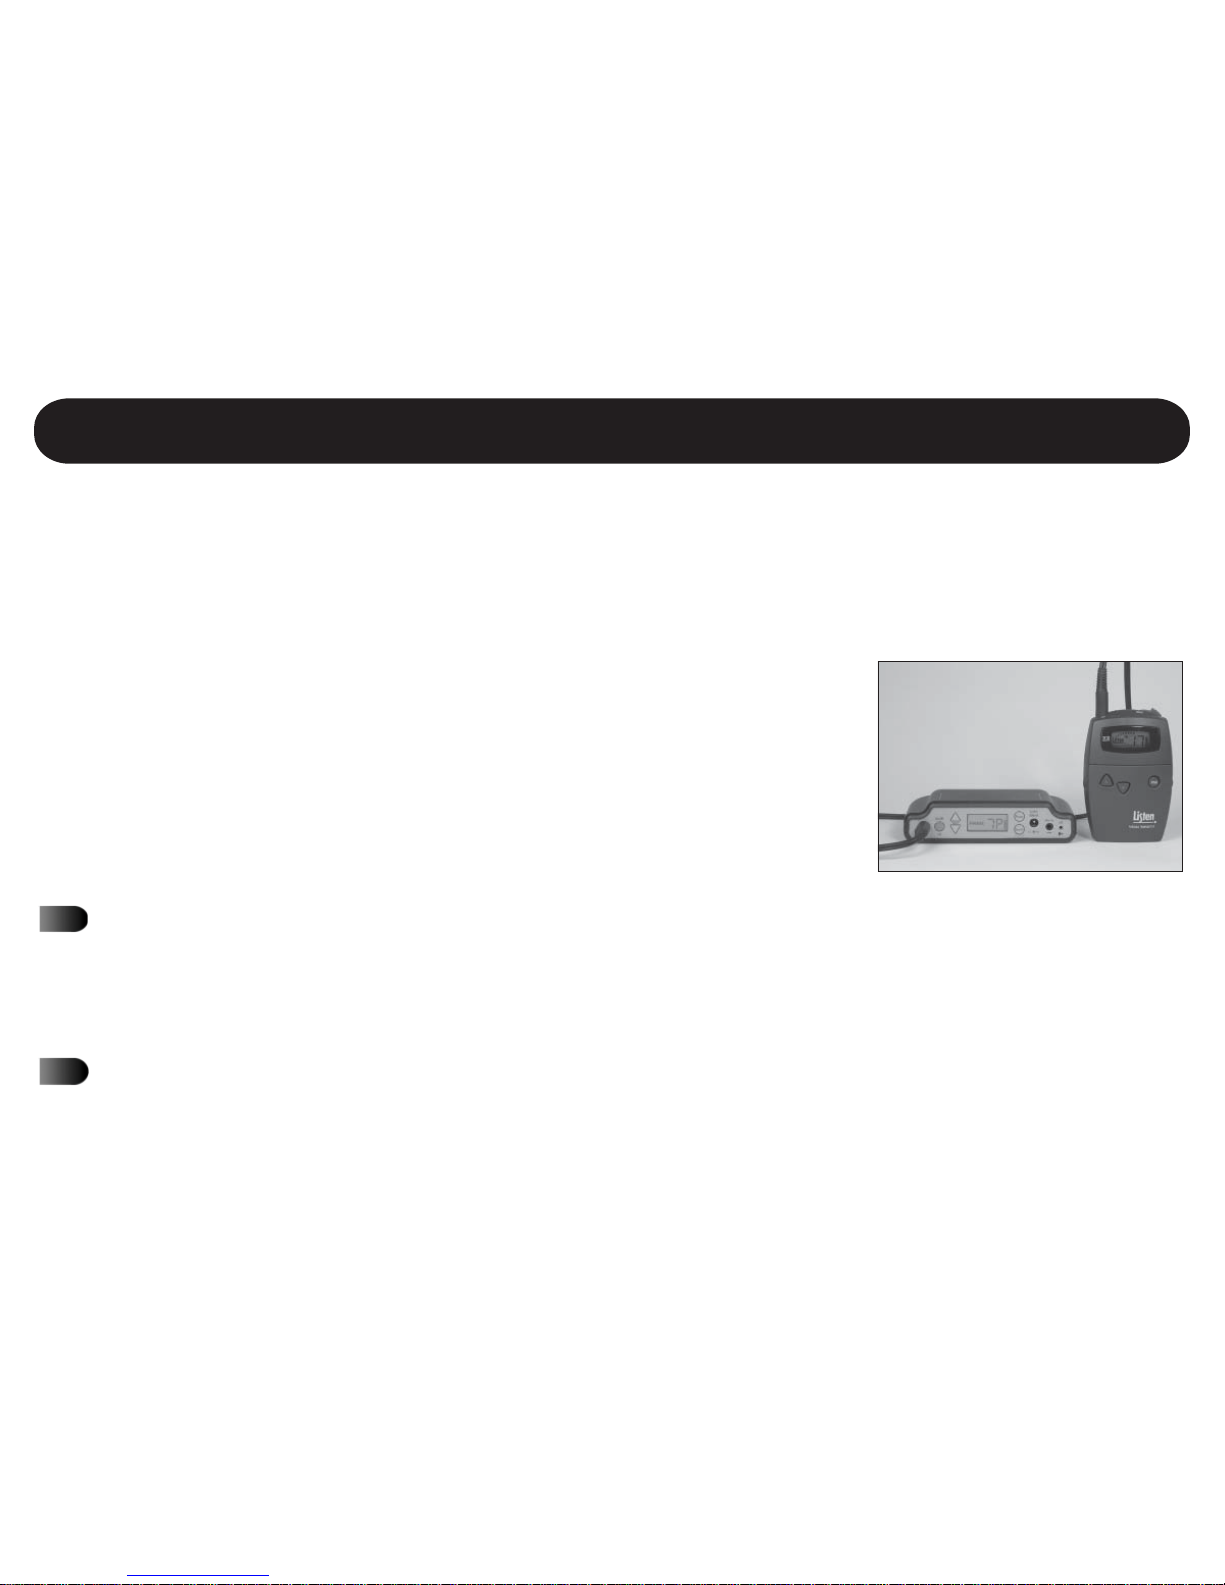
If you are currently using a 72 MHz transmitter to broadcast signals to your FM receiver, you can
set up MicroField to work with your existing transmitter.
Your external 72 MHz transmitter broadcasts on a specific frequency,
which is then picked up by your FM receiver. In order for your transmitter to send the signal from MicroField to the FM receiver, you will
need to connect it to your MicroField using an auxiliary cable from
Phonak. You also must program MicroField so that it will work with
your transmitter.
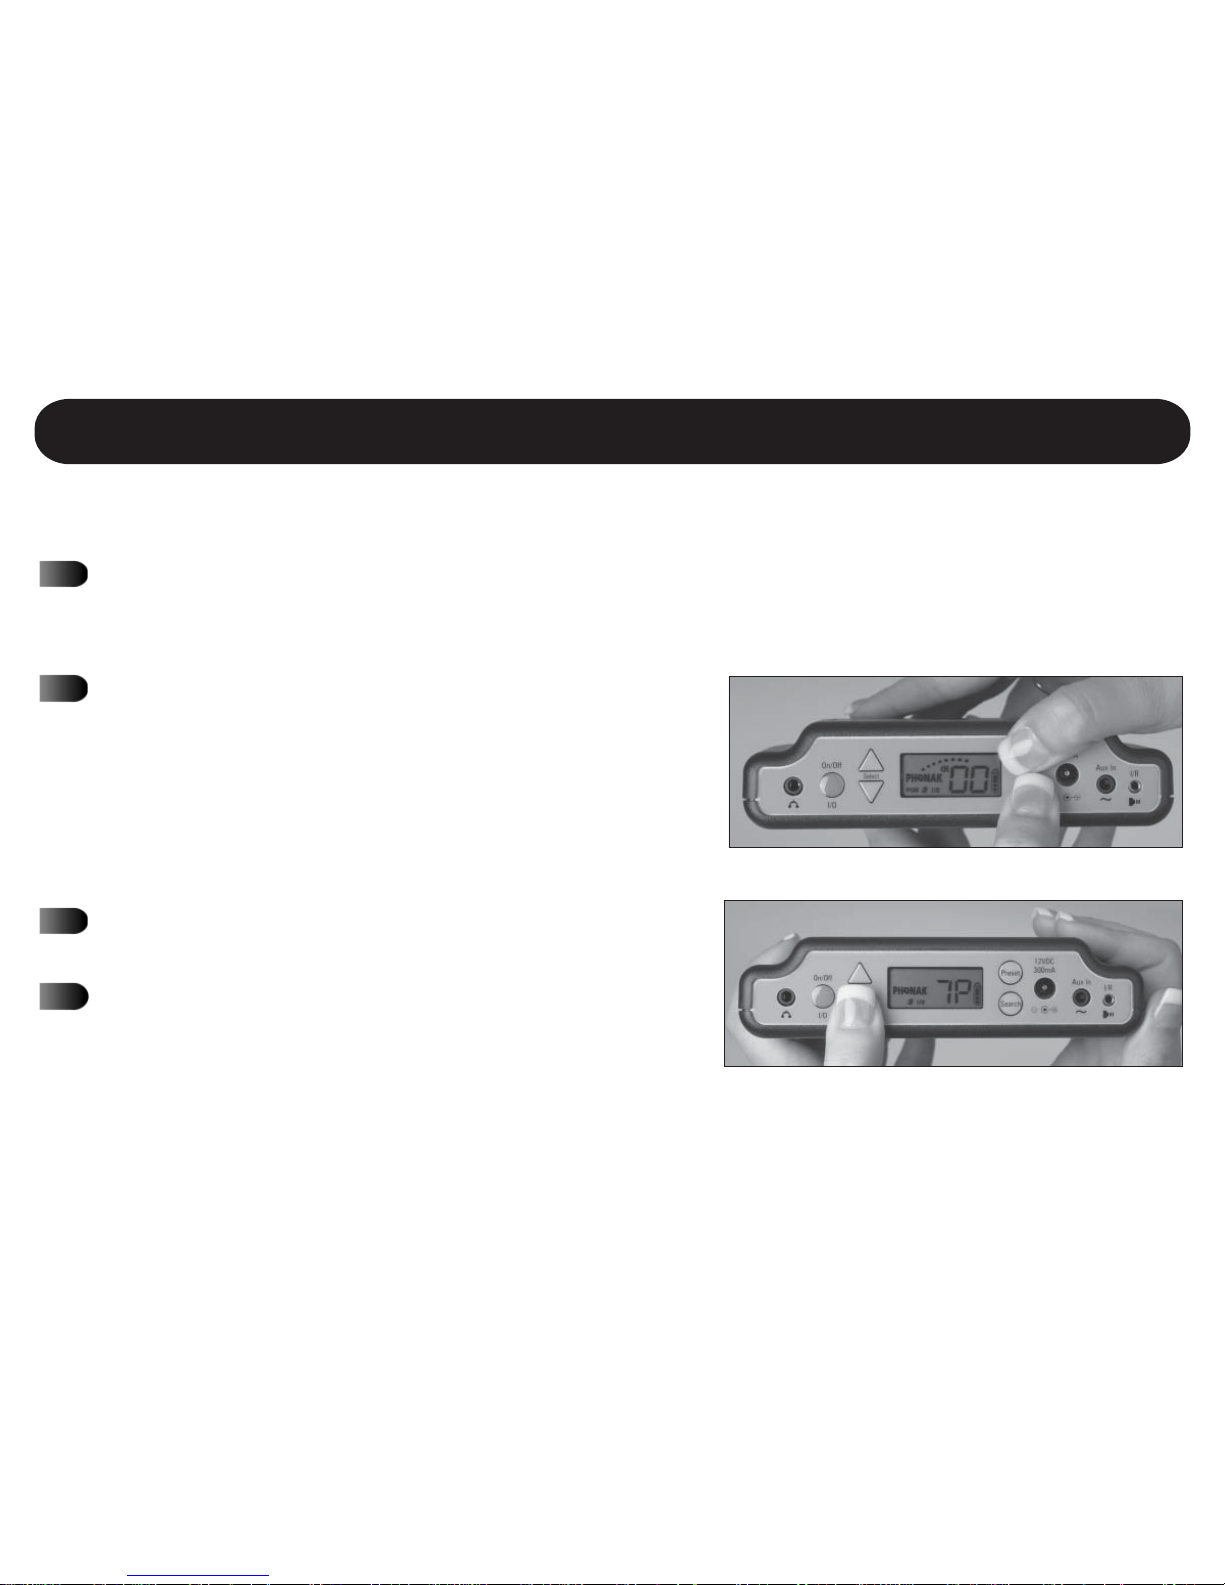
Setting up MicroField For Use With an External 72MHz Transmitter and Receiver
Find your product in the channel selection tables starting on
page A-2, and determine the MicroField channel number
that corresponds with your product. For example, Listen
channel 17 is MicroField channel 7P.
Turn on your 72 MHz transmitter and make sure it is set to
the correct channel.
(continued on next page)
Page 31
25
Connect your transmitter to MicroField using the optional transmitter cable* from Phonak.
Plug in the cable between the headphone jack of your MicroField and the AUX (or mic)
input on your transmitter.
Press the Search and Preset buttons together. The
PGM symbol on the display will appear.
If no transmitting channel is selected, 00 will appear in the channel indicator; if your MicroField
was previously programmed, the transmitting channel number will be displayed.
Press the DOWN button to select the channel number of your transmitter.
Press PRESET. The channel will flash and the setting
is stored for immediate use.
Using MicroField for Rebroadcasting - Setting the Transmit Channel
Setting up MicroField For Use With an External 72MHz Transmitter and Receiver cont.
*The optional cable should be purchased through Phonak.
Page 32

26
Using MicroField For Rebroadcasting
Setting up the Receive Channel
Page 33
27
Important Notes
MicroField will receive audio signals from a minimum of 5 feet (1.5 meters) from the transmitting
antenna to a maximum of approximately 1000 feet (305 meters), depending on the type of transmitter used.
When searching for audio signals, make sure your MicroField unit is not near a computer. Computers cause interference which may prevent your unit from finding a signal. When searching,
MicroField will step through all available channels in the sequence shown in the “MicroField”
column of Appendix B.
Refer to the following pages for specific Receive Channel set-up information:
Finding a Receive Channel Using Automatic Search - page 28
Finding a Receive Channel Using Manual Search - page 29
Storing, Using and Locking Presets - page 30
Using the Infrared Cable - page 33
Page 34

28
Using MicroField for Rebroadcasting - Setting the Receive Channel
To find an audio signal automatically, press the SEARCH
button momentarily. MicroField will search all available
frequencies for valid audio signals. “SE” will flash in the
display, indicating the unit is searching for a valid receive
channel, and the CH indicator will illuminate. When it finds
an audio signal*, it will stop on that channel and display the
channel number. Press the SEARCH button again within 5
seconds if this is not the receive channel you want (if you
wait longer than 5 seconds, the unit will start over when you
press SEARCH). If no receive signals are present, the unit
will continue to search - press UP or DOWN to stop. CH is
displayed when your MicroField is in the search mode. If you
are not successful in finding an audio signal, the facility may
be using infrared. See page 33 for more information.
Finding a Receive Channel Using Automatic Search
When CH is illuminated, your
MicroField is in Search mode.
When SE is flashing, this indicates the unit is
searching for a channel.
*MicroField will not receive channels at or near its programmed transmit channel (see page 22). For example, if MicroField is
programmed to transmit on channel 52, it will not be able to receive on channel 52 or nearby channels. See the Interference
Chart in Appendix A for more information.
Page 35

29
Using MicroField for Rebroadcasting - Setting the Receive Channel
When CH is illuminated, your MicroField
is in Search mode. The CH indication will
go out after 7 seconds of non-use. Press
and hold SEARCH to re-enter the manual
search mode.
Finding a Receive Channel Using Manual Search
To find an audio signal* manually, press and HOLD the Search
button until the CH symbol is shown on the display. Then,
press the UP/DOWN keys repeatedly until you find the desired
channel. Keep in mind that the first channel you find may not
have the clearest signal; you should tune to the exact channel
number of the desired audio signal by using the UP and
DOWN buttons. (See Appendix B for MicroField channel numbers.) After you have selected your channel, do not press any
buttons for 7 seconds; the UP/DOWN keys will revert to volume controls and the CH symbol will be extinguished.
If you are not successful in finding an audio signal, the facility may be using infrared. See page 33 for more information.
Use the UP/DOWN keys to manually
search for the clearest channel.
*MicroField will not receive channels at or near its programmed transmit channel (see page 22). For example, if MicroField is
programmed to transmit on channel 52, it will not be able to receive on channel 52 or nearby channels. See the Interference Chart
in Appendix A for more information.
Page 36
30
Storing a Preset Channel
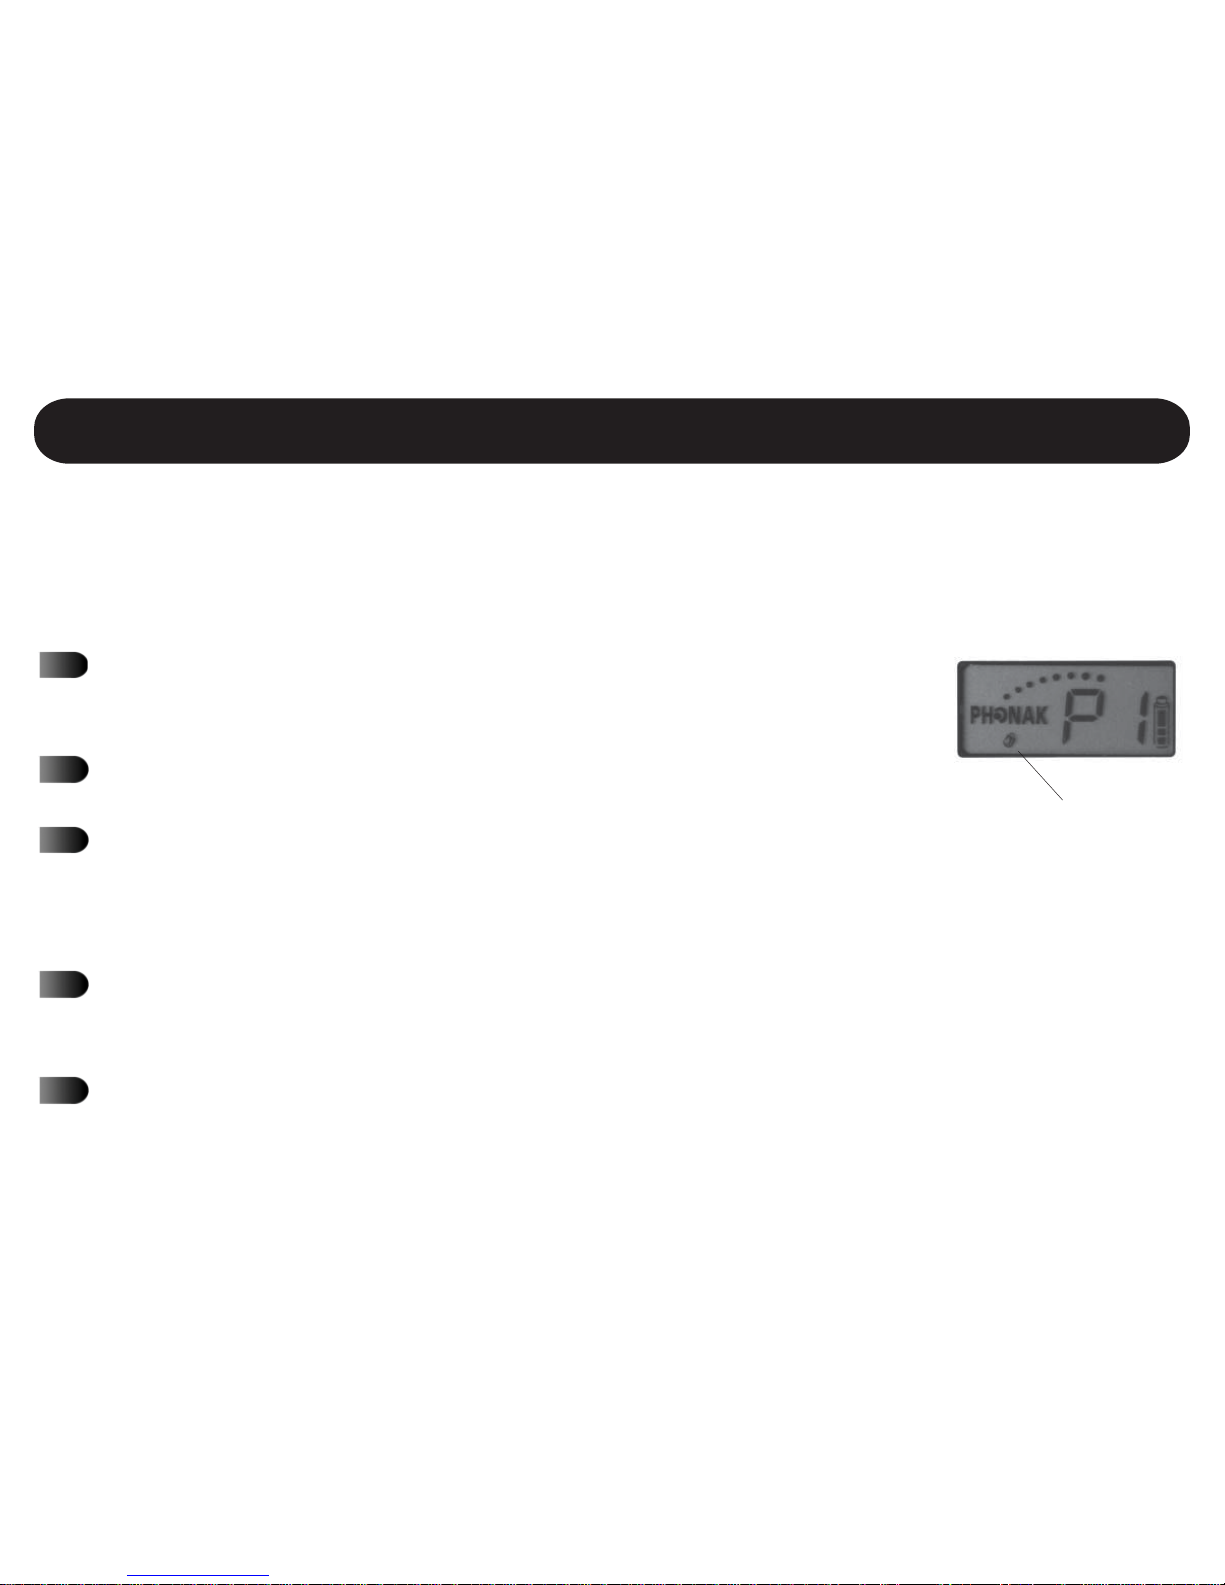
If the padlock symbol is
displayed, the presets are
locked and you cannot
store new presets. You
should consider locking
the presets after storing
them. See page 32 for
more information.
MicroField allows you to store frequently-used channels into presets (P1 through P7). This gives
you the ability to quickly find the channel you use frequently. To store a preset:
Find the receive channel you want to store using the automatic or
manual search function. For example, if you want to store channel 18,
use search until channel 18 is displayed.
Press and hold the Preset button. The display will flash between P1
and the stored channel; the factory default channel is 00.
Momentarily press the Preset button to select the preset number you
want to program. As you step through the presets, the display will
alternately flash with the preset number and the programmed channel.
Press and HOLD the Preset button until the display flashes momentarily. This will program your desired channel (example: channel 18)
into the currently selected preset number.
To keep users from inadvertently selecting a preset*, program 00 into
the preset location by manually searching for channel 00.
*When 00 is programmed into a preset location, that preset is not available.
Using MicroField for Rebroadcasting - Setting the Receive Channel
Page 37
31
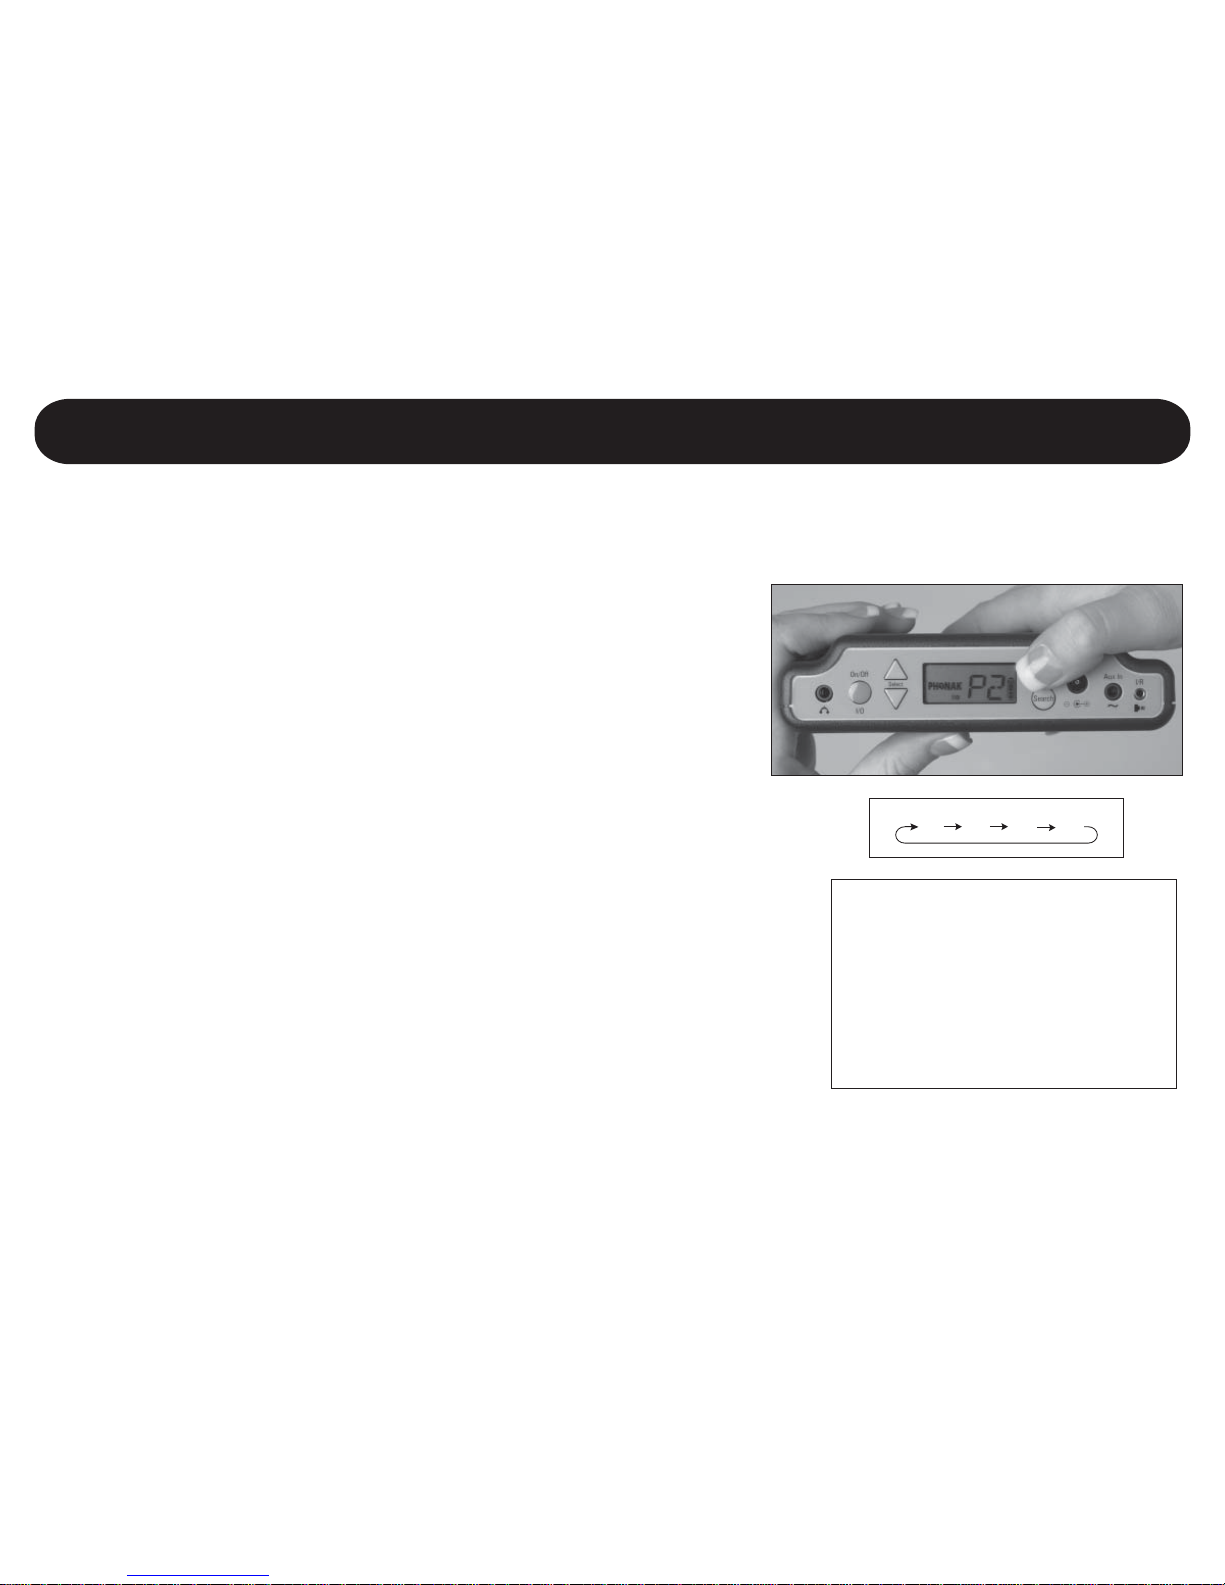
To select a preset, press and release the PRESET button
repeatedly until the desired preset number appears in the
display. There are a total of 7 preset locations available, P1
through P7. In addition to the 7 preset channels, the “last
searched” channel is also displayed. For example: the first
three presets are programmed and the last searched channel
was channel 52. Repeated pressing of the preset button
will result in the following selections: P1, P2, P3, 52, P1, P2,
P3, 52.
If no presets are available, you may program them. See “Storing Presets” on the previous page.
Caution: if you hold the preset button down for more than
two seconds, you will enter the preset programming mode.
You may lock the presets after they have been stored to prevent this - see page 32.
P1 P2
52P3
Selecting a Preset Channel For Use
Note: If channel 00 is
stored in a preset location,
that location will not be
displayed when you step
through the presets.
Using MicroField for Rebroadcasting - Setting the Receive Channel
Page 38
32
Operating Your MicroField
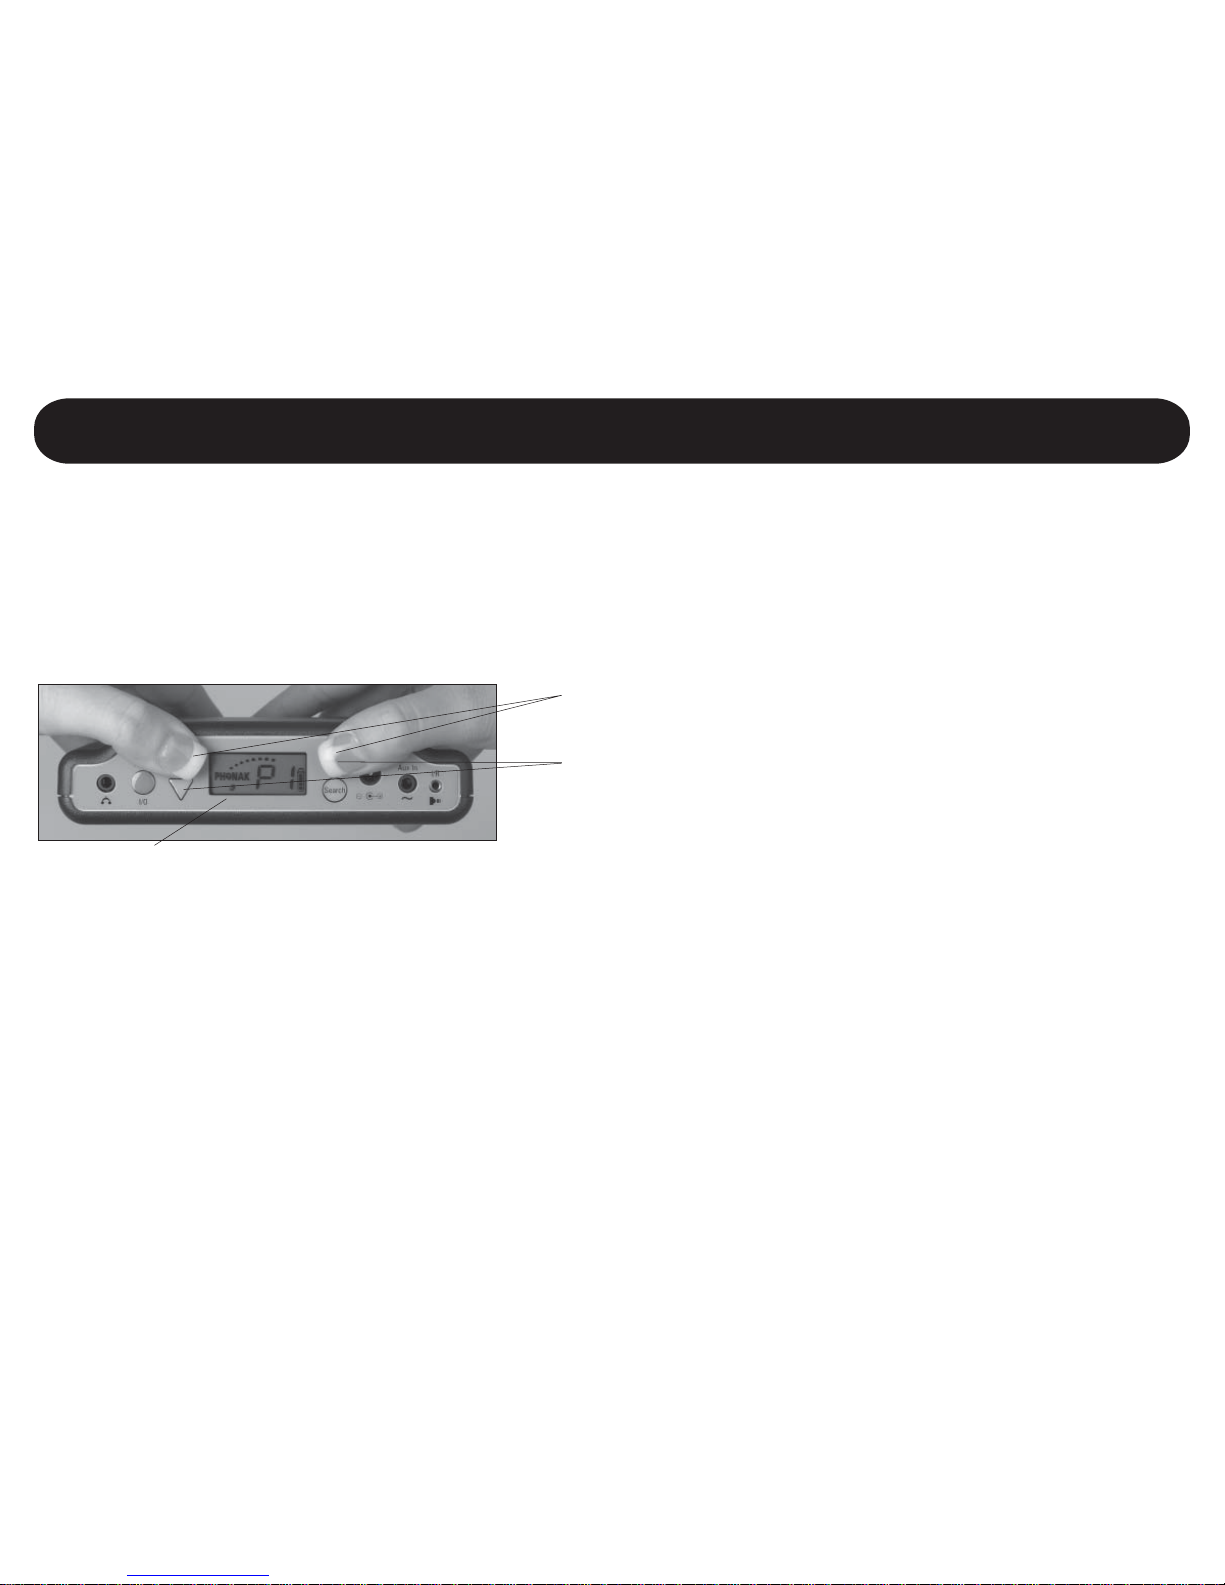
Locking presets will prevent accidental erasure or changing of stored receive channels in the
presets. Press Preset and then the UP button to lock the presets. A padlock will appear in the
display indicating the presets are locked.
To unlock the presets, press the Preset button and then the DOWN button. The padlock will disappear and you will be able to store new channels in the presets. When presets are locked, you
cannot store any new presets. However, you can still find out what is in a preset location by
pressing and holding the Preset button until the display flashes. This will cause MicroField to cycle
between the preset number and the channel that is stored in the preset. Press Preset momentarily
while the display is flashing to view what channels are stored in other presets.
Locking Preset Channels
Press PRESET, then UP to lock preset channels
Press PRESET, then DOWN to unlock preset channels
Padlock symbol indicates the presets are locked and new
presets cannot be stored
Using MicroField for Rebroadcasting - Setting the Receive Channel
Page 39
33
Using the Infrared (IR) Receiving Cable
Many cinemas, live theaters, courtrooms or similar places transmit audio signals to portable receivers
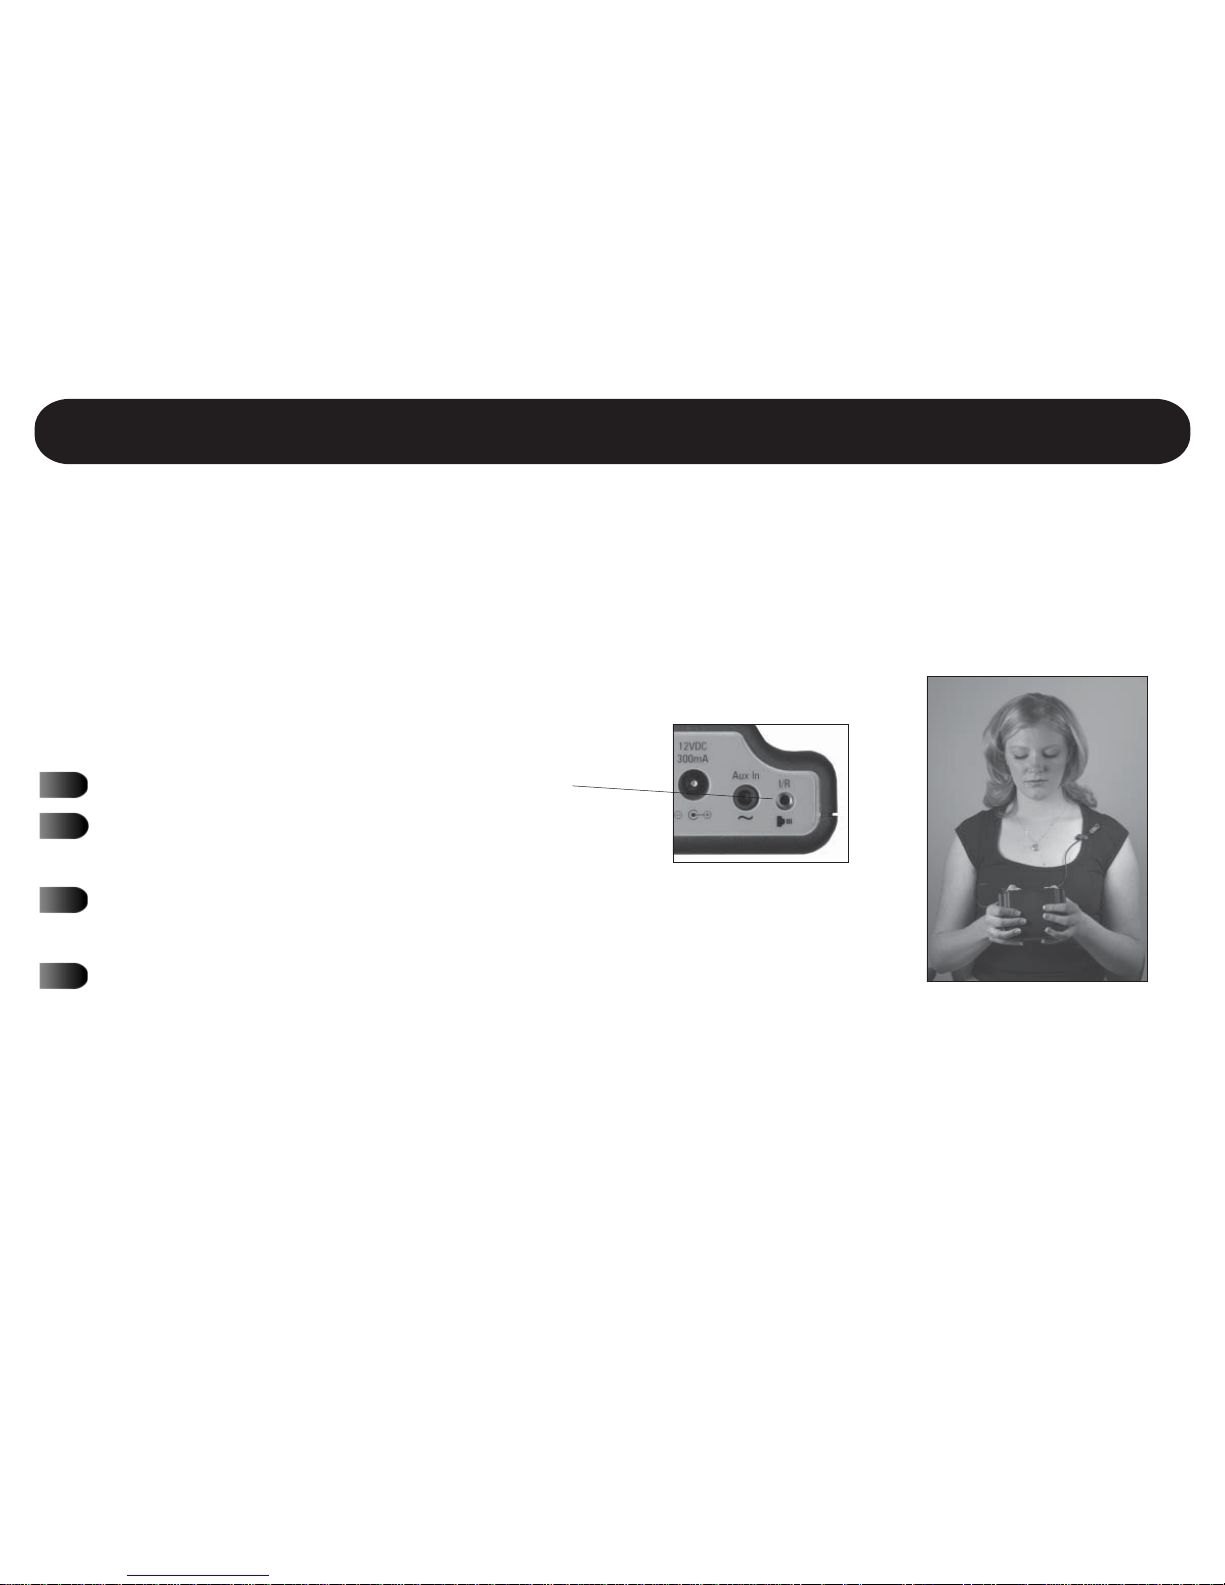
via infrared emitters. To receive these signals, you will need to use the infrared receiving cable with
your MicroField. Be sure to position the IR sensor so that Microfield can pick up the signal. If you
are not certain where the IR emitter is located, try different positions until
you get the strongest signal.
Plug the cable into the jack marked IR.
Attach the IR cable to your clothing,
MicroField’s nylon case, or other location.
Make sure the sensor is pointed toward the IR source (typically near the ceiling).
Use MicroField’s search function to find the IR signal (see
pages 28 and 29 for information on automatic and manual
search functions).
Using MicroField for Rebroadcasting - Setting the Receive Channel
Page 40

34
MicroField as a Receiver
Page 41

35
MicroField as a Receiver
Important Notes
MicroField will receive audio signals from a minimum of 5 feet (1.5 meters) from the transmitting
antenna to a maximum of approximately 1000 feet (305 meters), depending on the type of transmitter used.
When using your MicroField, make sure the unit is not near a computer. Computers cause interference which may disrupt your reception.
Using the Headset Jack - page 36
Using the Optional Speaker - page 37
Page 42

36
Using the Headset Jack
MicroField can be connected to a headset, earphone or neckloop. Securely plug the device into
the headset jack. Stereo or mono mini (3.5 mm) plugs can be used. Adjust the volume to a comfortable listening level using the UP / DOWN buttons.
Headset, Earphone, or Neckloop Use
Connect your headset, earphone or
neckloop to the headset jack when
using MicroField as a receiver.
MicroField as a Receiver
Page 43
37
Using the Optional Speaker
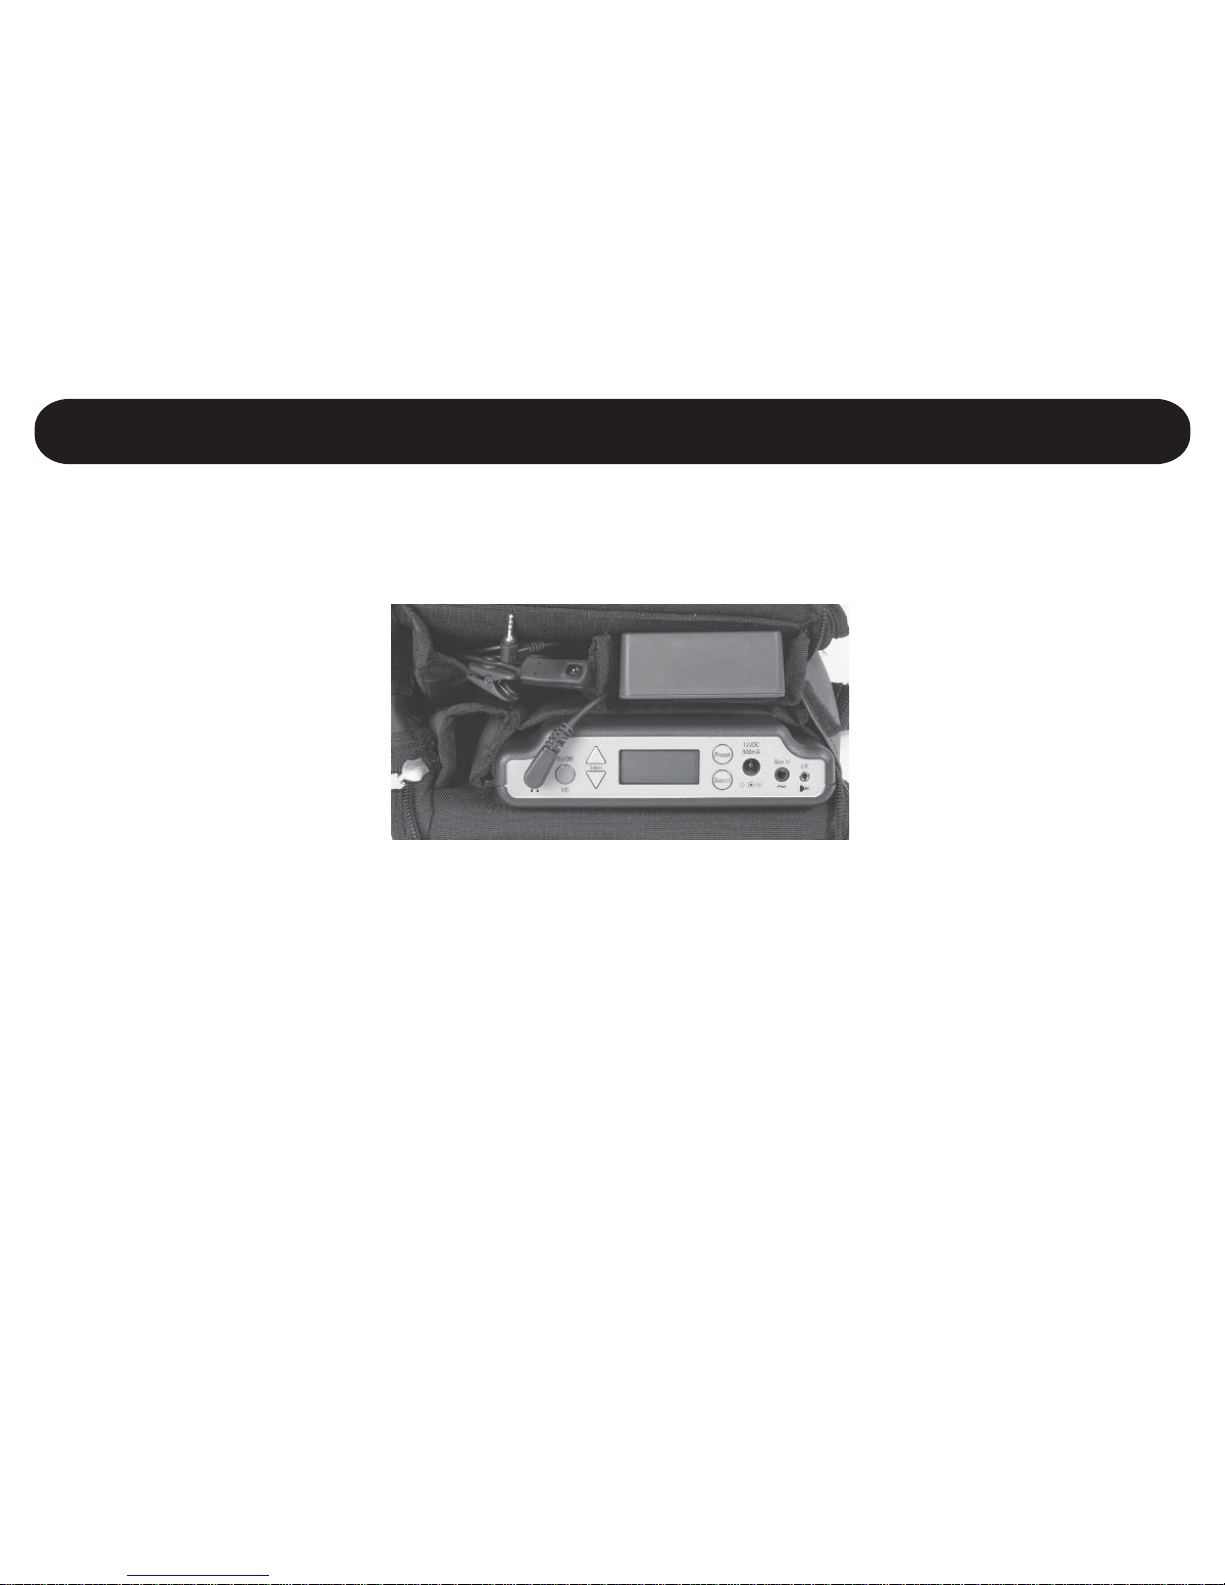
Phonak offers an optional speaker for your MicroField unit which fits in the carrying case. This
allows you to use your MicroField for personal soundfield applications. Plug the speaker cable into
MicroField’s headset jack. Position the speaker in the case so the speaker grid is facing outside.
After locating your receive audio signal (see pages 28-29), adjust volume to a comfortable level
using the UP / DOWN buttons.
MicroField as a Receiver
Page 44

38
Operating Your MicroField
MicroField as a Transmitter
Page 45
39
Using the Auxiliary Input With a Microphone
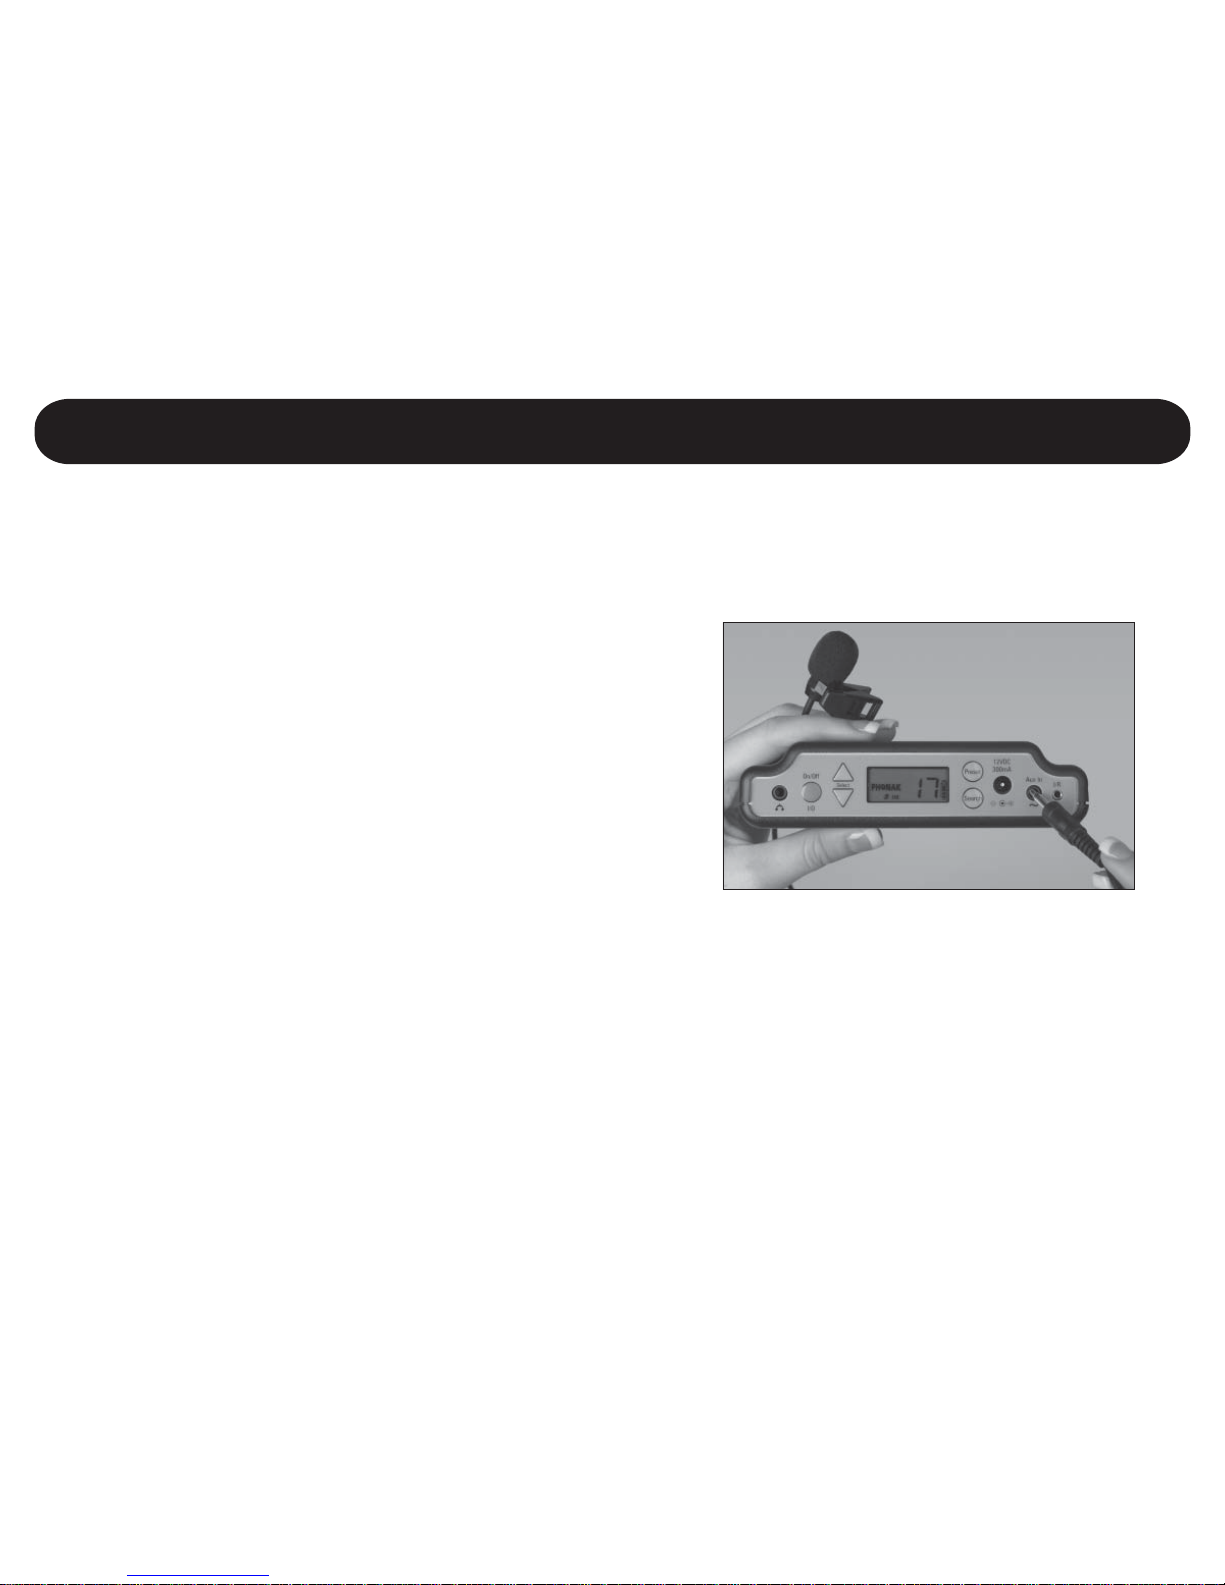
To use the optional microphone, securely plug it into the
AUX IN jack. You should only use a microphone supplied
by Phonak for this purpose.
When you plug a device into the AUX IN jack, two additional functions are triggered in MicroField:
The transmission range of the internal transmitter is
increased.
The auto shut-off function (if enabled) is disabled.
MicroField as a Transmitter
Page 46

40
Replacing the Batteries Cont.
Using the Auxiliary Input With Your TV or Other Device
MicroField can be directly connected to your TV set, DVD, CD
player, computer or other similar devices. This allows you to
listen to this device through your FM receiver via MicroField.
Connect the optional cable* to the AUX IN jack on your
MicroField. Connect the other end to your TV or other device.
When you plug a device into the AUX IN, two additional
functions are triggered in MicroField:
The transmission range of the internal transmitter
is increased.
The auto shut-off function (if enabled) is disabled.
*The optional cable should be purchased through Phonak.
MicroField as a Transmitter
Page 47

41
Troubleshooting
Page 48
42
2
Troubleshooting and FAQ
1
When using MicroField for rebroadcasting, my MicroLink / MicroEar sounds distorted.
Your MicroField’s volume is too high. Set your MicroField’s volume control at 15, then use
the hearing aid to adjust volume.
When I press the Preset button, the display reads 00 and I can’t find any presets.
This is normal. The unit has been set to factory defaults. No channel or preset has been
programmed. You can find a channel using the Search functions - see pages 28 - 29; or
you can program presets - see page 30.
When I repeatedly press the Preset button, not all 7 presets are shown.
This is normal. Only programmed presets (presets with channels other than 00) are shown.
How do I find out what is stored in a preset channel?
Press and hold the Preset button until it flashes. The display will alternately show the
preset number and the channel stored in that preset. Repeatedly press the preset button to
find your desired preset.
Troubleshooting
Page 49

43
When I try to store a preset, the display flashes, but I cannot store the preset.
The presets are probably locked (look for the padlock symbol in the display). To unlock the
presets, see page 32.
The receive channel is shown in the Channel Selection Guide, but I cannot tune to this
channel.
MicroField will not receive channels at or near its programmed transmit channel (see Appendix A for details). For example, if your MicroField is programmed to transmit on channel
52, it will not be able to receive on channel 52 or nearby channels. These channels are
purposefully locked out by MicroField when you program the transmit channel.
Pressing Search causes the unit to search, but it never finds a channel.
There are no FM channels available. Try plugging in the IR receiving cable; the facility may
be using infrared transmission. If you still don’t find any channels, ask someone at the
facility whether they have a transmission available.
Troubleshooting
Page 50

44
At a movie theater, we could not pick up the transmission.
Make sure the IR cable is plugged in all the way. Point the sensor around the room until
you get the signal. Sometimes the signal is behind you.
Tip: before entering the theater, set your MicroField to channel 91. Most theaters use
channel 91 or 92 for infrared transmissions.
The audio signal is distorted.
When searching for a channel, your MicroField may not stop at the clearest channel. Press
the Search button again within 5 seconds to find a clearer receive channel.
The channel indicator and signal strength dots go on and off.
You are getting a weak signal from the transmitter. Try moving to a different location to
receive a stronger signal.
Troubleshooting
Page 51
45
The batteries are not charging.
Make sure you are using the correct power supply and that it is connected to a working
power outlet.
My batteries don’t last very long.
It is time to replace the batteries. See page 17.
My MicroField keeps turning off by itself.
The auto shut-off function may be enabled (the I/O symbol will be illuminated); see page
13. Or the batteries may be dead; try charging the batteries.
The unit is not turning off automatically.
Make sure the auto shut-off feature is enabled (the I/O symbol will be illuminated when it
is enabled). If the auxiliary cable is plugged into the AUX IN jack, the auto shut-off feature is disabled.
Troubleshooting
Page 52

46
I need more transmission range on my MicroField.
To increase the transmission range, plug the auxiliary cable into the AUX IN jack.
How is the AUX IN jack wired?
Tip is the microphone input; Ring is a line input.
The microphone that is connected to the AUX IN does not work or is distorted.
You may be using the wrong type of microphone. Contact Phonak for assistance.
I can’t get the audio from my TV to MicroField.
This requires a special cable from Phonak.
Can I charge my MicroField in my car?
Yes. Use an adapter that provides a tip positive to the power jack.
Troubleshooting
Page 53

47
Compliance Notice
Page 54

48
Phonak MicroField
216 MHz transmission:
The MicroField transmitter is authorized by rule under the Low Power Radio Service (47 C.F.R. Part
95) and must not cause harmful interference to TV reception or United States Navy SPASUR installations. You do not need an FCC license to operate this transmitter. This transmitter may only
be used to provide: auditory assistance to persons with disabilities, persons who require language
translation, or persons in educational settings; health care services to the ill; law enforcement
tracking services under agreement with a law enforcement agency; or automated maritime telecommunications system (AMTS) network control communications. Two-way voice communica-
tions and all other types of uses not mentioned above are expressly prohibited.
Caution: Changes or modifications not expressly approved by the party responsible for compliance
could void the user’s authority to operate Phonak equipment.
Compliance Notices
Compliance Notices
Page 55

49
Compliance Notices
FCC Statement
This equipment has been tested and found to comply with the limits for a class B digital device,
pursuant to part 15 of the FCC Rules. These limits are designed to provide reasonable protection
against harmful interference in a residential installation. This equipment generates, uses and can
radiate radio frequency energy and if not installed and used in accordance with the instructions,
may cause harmful interference to radio communications. However, there is no guarantee that
interference will not occur in a particular installation. If this equipment does cause harmful
interference to radio or television reception, which can be determined by turning the equipment
off and on, the user is encouraged to try to correct the interference by one or more of the
following measures:
Reorient or relocate the receiving antenna.
Increase the separation between the equipment and receiver.
Connect the equipment into an outlet on a circuit different from that to which the receiver is
connected.
Consult the dealer or an experienced radio/TV technician for help.
Page 56

50
Appendix
Page 57
I
0
0
75
100
125
150
275
300
325
400
425
450
475
512
575
550
675
650
662
775
750
812
875
850
950
962
925
25
0
50
75
100
125
250
275
300
375
400
425
450
487
550
525
650
625
637
750
725
787
850
825
925
937
900
75
50
0
25
50
75
200
225
250
325
350
375
400
437
500
475
600
575
587
700
675
737
800
775
875
887
850
100
75
0
0
25
50
175
200
225
300
325
350
375
412
475
450
575
550
562
675
650
712
775
750
850
862
825
175
150
50
25
0
0
100
125
150
225
250
275
300
337
400
375
500
475
487
600
575
637
700
675
775
787
750
200
175
75
50
25
0
75
100
125
200
225
250
275
312
375
350
475
450
462
575
550
612
675
650
750
762
725
275
250
150
125
100
75
0
25
50
125
150
175
200
237
300
275
400
375
387
500
475
537
600
575
675
687
650
300
275
175
150
125
100
0
0
25
100
125
150
175
212
275
250
375
350
362
475
450
512
575
550
650
662
625
375
350
250
225
200
175
50
25
0
25
50
75
100
137
200
175
300
275
287
400
375
437
500
475
575
587
550
400
375
275
250
225
200
75
50
25
0
25
50
75
112
175
150
275
250
262
375
350
412
475
450
550
562
525
425
400
300
275
250
225
100
75
50
0
0
25
50
87
150
125
250
225
237
350
325
387
450
425
525
537
500
500
475
375
350
325
300
175
150
125
50
25
0
0
12
75
50
175
150
162
275
250
312
375
350
450
462
425
525
500
400
375
350
325
200
175
150
75
50
25
0
12
50
25
150
125
137
250
225
287
350
325
425
437
400
563
538
437
412
388
362
237
212
188
112
87
63
38
0
13
13
113
87
100
212
187
250
312
287
388
400
363
575
550
450
425
400
375
250
225
200
125
100
75
50
13
0
0
100
75
87
200
175
237
300
275
375
387
350
600
575
475
450
425
400
275
250
225
150
125
100
75
38
0
0
75
50
62
175
150
212
375
250
350
362
325
675
650
550
525
500
475
350
325
300
225
200
175
150
113
50
75
0
0
12
100
75
137
200
175
275
287
250
700
675
575
550
525
500
375
350
325
250
225
200
175
138
75
100
0
0
12
75
50
112
175
150
250
262
225
713
688
587
562
538
512
387
362
338
262
237
213
188
150
87
112
12
12
0
62
37
100
162
137
238
250
213
775
750
650
625
600
575
450
425
400
325
300
275
250
213
150
175
50
75
63
0
0
37
100
75
175
187
150
800
775
675
650
625
600
475
450
425
350
325
300
275
238
175
200
75
100
88
0
0
12
75
50
150
162
125
813
788
687
662
638
612
487
462
438
362
337
313
288
250
187
212
87
112
100
13
13
0
62
37
138
150
113
875
850
750
725
700
675
550
525
500
425
400
375
350
313
250
275
150
175
163
50
75
13
0
0
75
87
50
900
875
775
750
725
700
575
550
525
450
425
400
375
338
275
300
175
200
188
75
100
38
0
0
50
62
25
950
925
825
800
775
750
625
600
575
500
475
450
425
388
325
350
225
250
238
125
150
88
25
50
0
12
0
963
938
837
812
788
762
637
612
588
512
487
463
438
400
337
362
237
262
250
137
163
100
38
63
12
0
12
975
950
850
825
800
775
650
625
600
525
500
475
450
412
350
375
250
275
263
150
175
113
50
75
0
13
0
N01
N02
N04
N05
N08
N09
N12
N13
N16
N17
N18
N61
N62
N52
N64
N65
N68
N69
N55
N72
N73
N57
N76
N77
N79
N60
N80
216.0125
216.0375
216.0875
216.1125
216.1875
216.2125
216.2875
216.3125
216.3875
216.4125
216.4375
216.5125
216.5375
216.575
216.5875
216.6125
216.6875
216.7125
216.725
216.7875
216.8125
216.825
216.8875
216.9125
216.9625
216.975
216.9875
Receiver
f(MHz)
Transmitter
N01
N02
N04
N05
N08
N09
N12
N13
N16
N17
N18
N61
N62
N52
N64
N65
N68
N69
N55
N72
N73
N57
N76
N77
N79
N60
N80
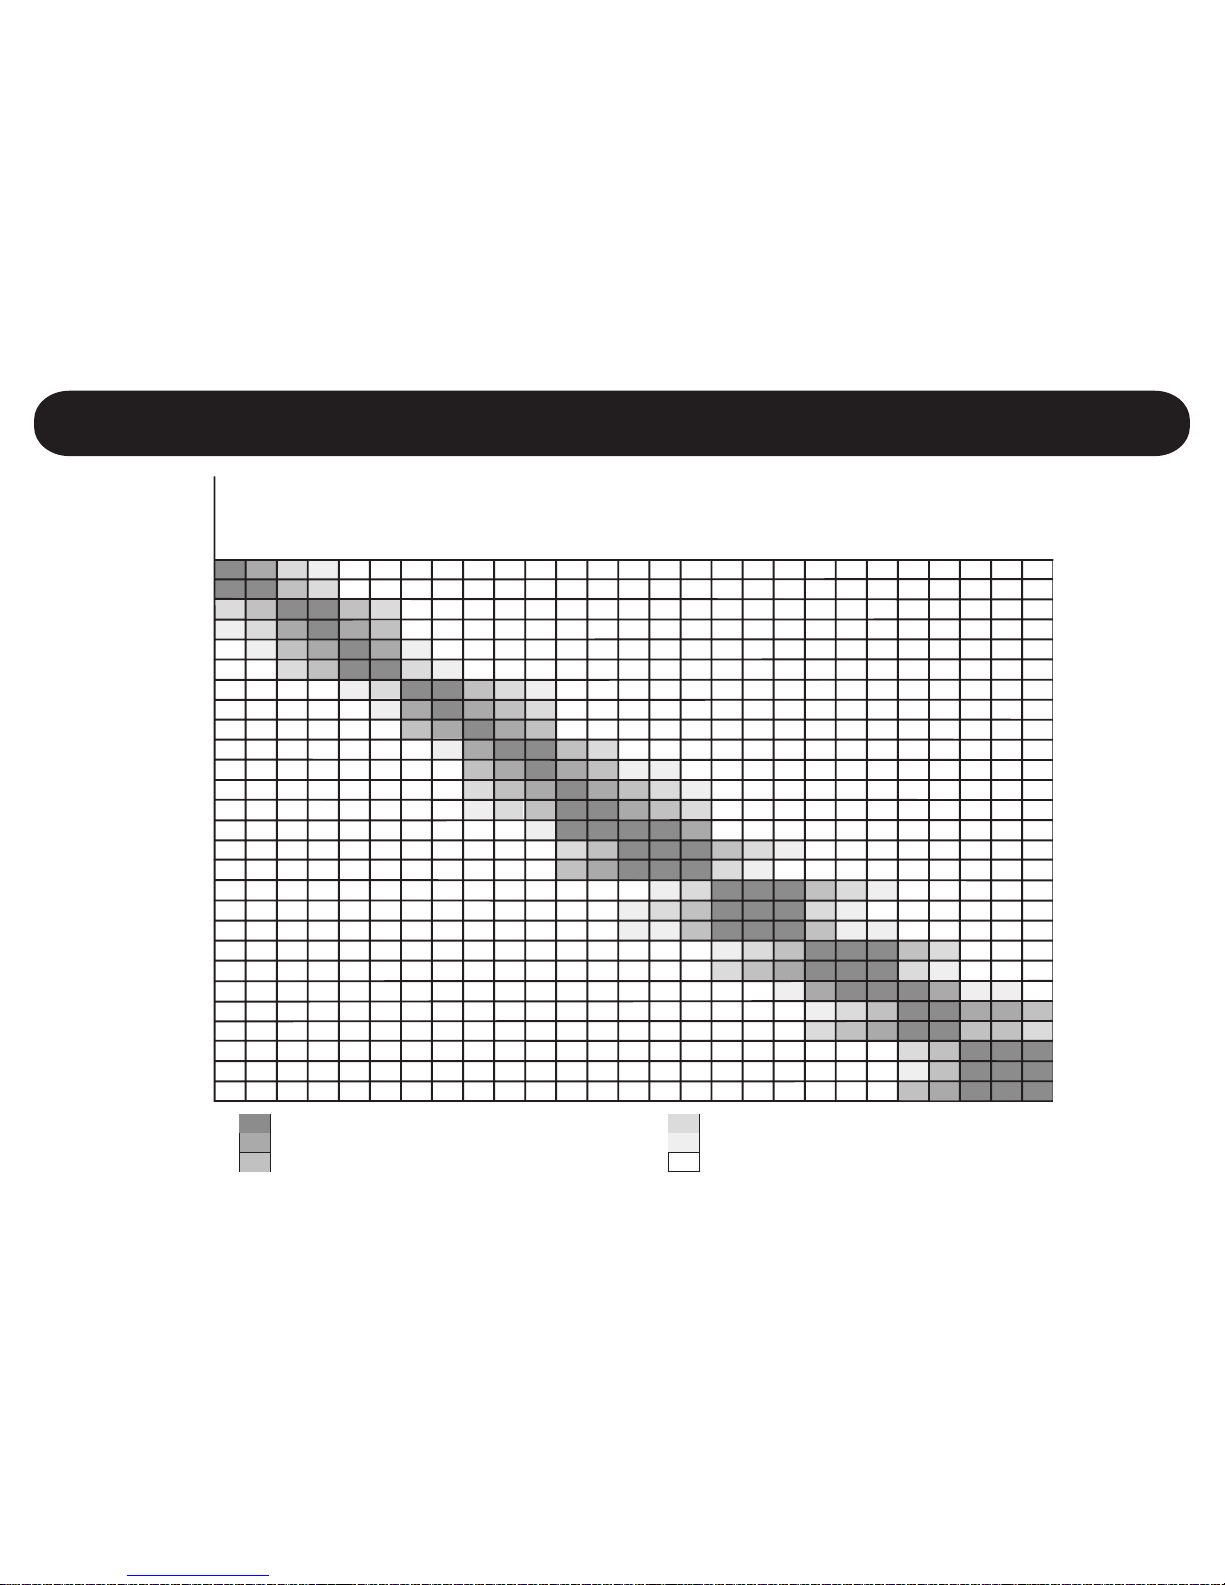
Frequencies used in other rooms
Interference certain
Interference likely, keep max. distance
Reduced range, keep distance as large as possible
Potential interference in neighboring rooms
Potential interference in the same room
No interference
Appendix A: Interference Chart (Standard Phonak Frequencies 216 MHz)
Page 58
II
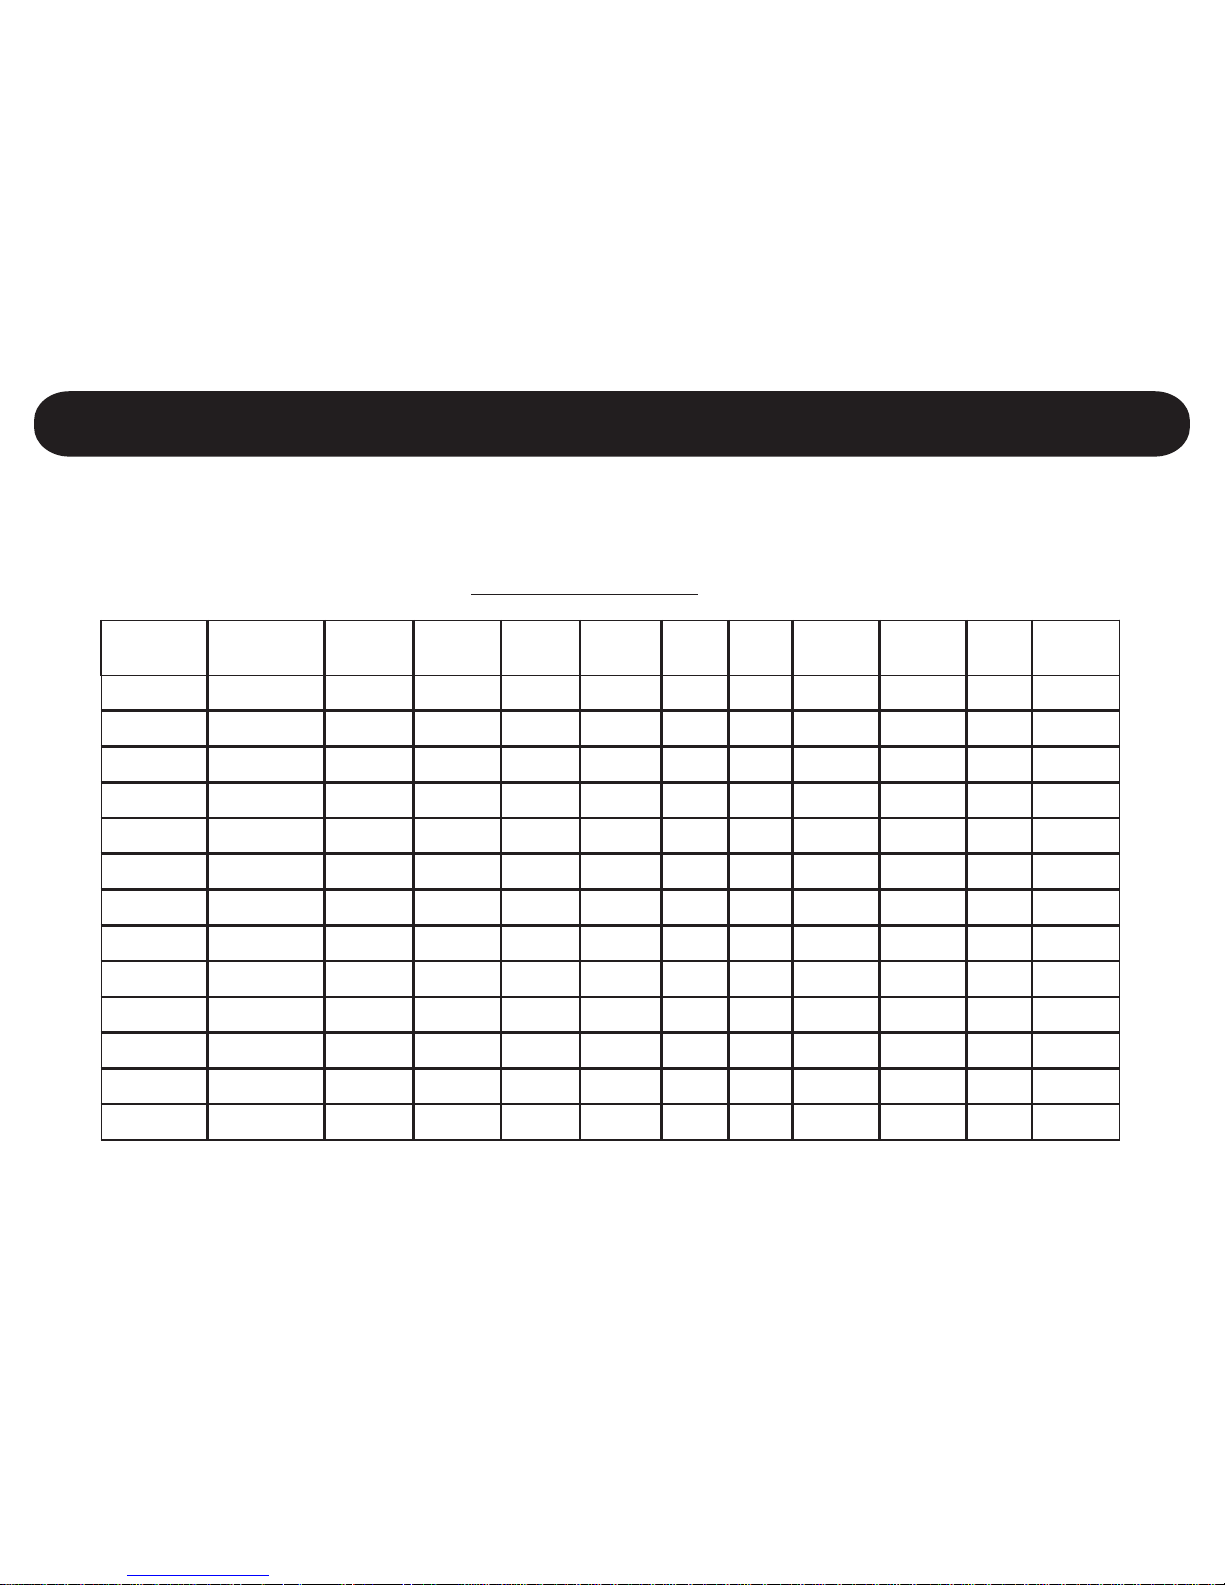
Appendix B: Channel Selection Guide
To use this guide, find the channel number of your product and note the corresponding channel
number in MicroField. You will use the MicroField channel number (first column) for programming
or using your unit.
216 MHz Channels
dleiForciM
lennahC
ycneuqerF
)zHM(
kanohPnetsiL
cinohP
raE
ketmoCxeleTRVAsmailliW
thgiL
deepS
ekarDrentneG
15210.61210NA110C10N
140520.612A2141
25730.61220NA3
125260.612B1
240570.612B2242
45780.61240NB3
55211.61250NC150C
340521.612C234A3
225731.612C3
325261.612D1
440571.612D244B4
85781.61280ND3
95212.61290NE190C90N
(continued on next page)
Page 59

III
dleiForciM
lennahC
ycneuqerF
)zHM(
kanohPnetsiL
cinohP
raE
ketmoCxeleTRVAsmailliW
thgiL
deepS
ekarDrentneG
540522.612E254C5
425732.612E3
525262.612F1
640572.612F264D6
215782.61221NF321C21N
315213.61231NG1
740523.612G274E7
625733.612G3
725263.612H1
840573.612H284F8
615783.61261NH361C
715214.61271NJ1
940524.612J294G9
815734.61281NJ381C81N
165215.61216NK112C
920525.612K215H01
265735.61226NK3
Appendix B: Channel Selection Guide
Page 60
IV
Channel Selection Guide - 216 MHz cont.
dleiForciM
lennahC
ycneuqerF
)zHM(
kanohPnetsiL
cinohP
raE
ketmoCxeleTRVAsmailliW
thgiL
deepS
ekarDrentneG
825265.612L1
250575.61225NL225I11
465785.61246NL342C46N
565216.61256NM152C
350526.612M235J21
185736.612M3
285266.612N1
450576.612N245K31
865786.61286NN3
965217.61296NP192C
550527.61255NP255L41
385737.612P3
485267.612R1
650577.612R26551
275787.61227NR323C27N
375218.61237NS133C
750528.61275NS27561
Appendix B: Channel Selection Guide
Page 61
V
Channel Selection Guide - 216 MHz cont.
dleiForciM
lennahC
ycneuqerF
)zHM(
kanohPnetsiL
cinohP
raE
ketmoCxeleTRVAsmailliW
thgiL
deepS
ekarDrentneG
675738.61267NS3
585268.612T1
850578.612T28571
685788.612T3
775219.61277NU173C77N
950529.612U29581
885739.612U3
975269.61297NV193C
060579.61206NV20691
085789.61208NV304C08N
00ENON
Appendix B: Channel Selection Guide
Page 62
VI
dleiForciM
lennahC
ycneuqerF
)zHM(
kanohPnetsiL
cinohP
raE
ketmoCxeleTRVAsmailliW
thgiL
deepS
ekarDrentneG
A10520.27111111
A20570.27222221
A0001.27AAAAA1.272
A30521.27333341
A40571.27444451
K0002.27K B 2.274
K50522.27555561
K60572.27666671
B0003.27BBBCB3.276
B70523.27777791
B80573.27888802
N0004.27N D 4.278
N90524.27999912
N00574.270101010122
C0005.27CCCEC5.2701
C10525.271111111142
C20575.272121212152
Appendix B: Channel Selection Guide
72 MHz Channels
Page 63

VII
dleiForciM
lennahC
ycneuqerF
)zHM(
kanohPnetsiL
cinohP
raE
ketmoCxeleTRVAsmailliW
thgiL
deepS
ekarDrentneG
O0006.27O F 6.2721
O20526.273131313162
O40576.274141414172
D0007.27DDDGD7.2741
D50527.275151515192
D60577.2761616103
P0008.27P H 8.2761
P70528.277171717113
P80578.278181818123
E0009.27EEEIE9.2781
E90529.279191919143
E00579.270202020253
E30526.473333333363
E40576.474343434373
I0007.47IIIOL 12
I50527.475353535393
I60577.476363636304
Appendix B: Channel Selection Guide
Page 64
VIII
dleiForciM
lennahC
ycneuqerF
)zHM(
kanohPnetsiL
cinohP
raE
ketmoCxeleTRVAsmailliW
thgiL
deepS
ekarDrentneG
I70522.577373737314
I80572.578383838324
J0003.57JJJPJ 42
J90523.579393939344
J00573.570404040454
R0004.57R Q 62
R10524.5712121264
R20574.5722222274
F0005.57FFFJF5.5782
F30525.5732323294
F40575.5742424205
S0006.57S K 6.5703
S50526.5752525215
S60576.5762626225
G0007.57GGGLG7.5723
G70527.5772727245
G80577.5782828255
Appendix B: Channel Selection Guide
Page 65

IX
dleiForciM
lennahC
ycneuqerF
)zHM(
kanohPnetsiL
cinohP
raE
ketmoCxeleTRVAsmailliW
thgiL
deepS
ekarDrentneG
T0008.57T M 8.5743
T90528.5792929265
T00578.5703030375
H0009.57HHNH9.5763
H10529.5713131375
H20579.5723232306
00ENON
Appendix B: Channel Selection Guide
Page 66
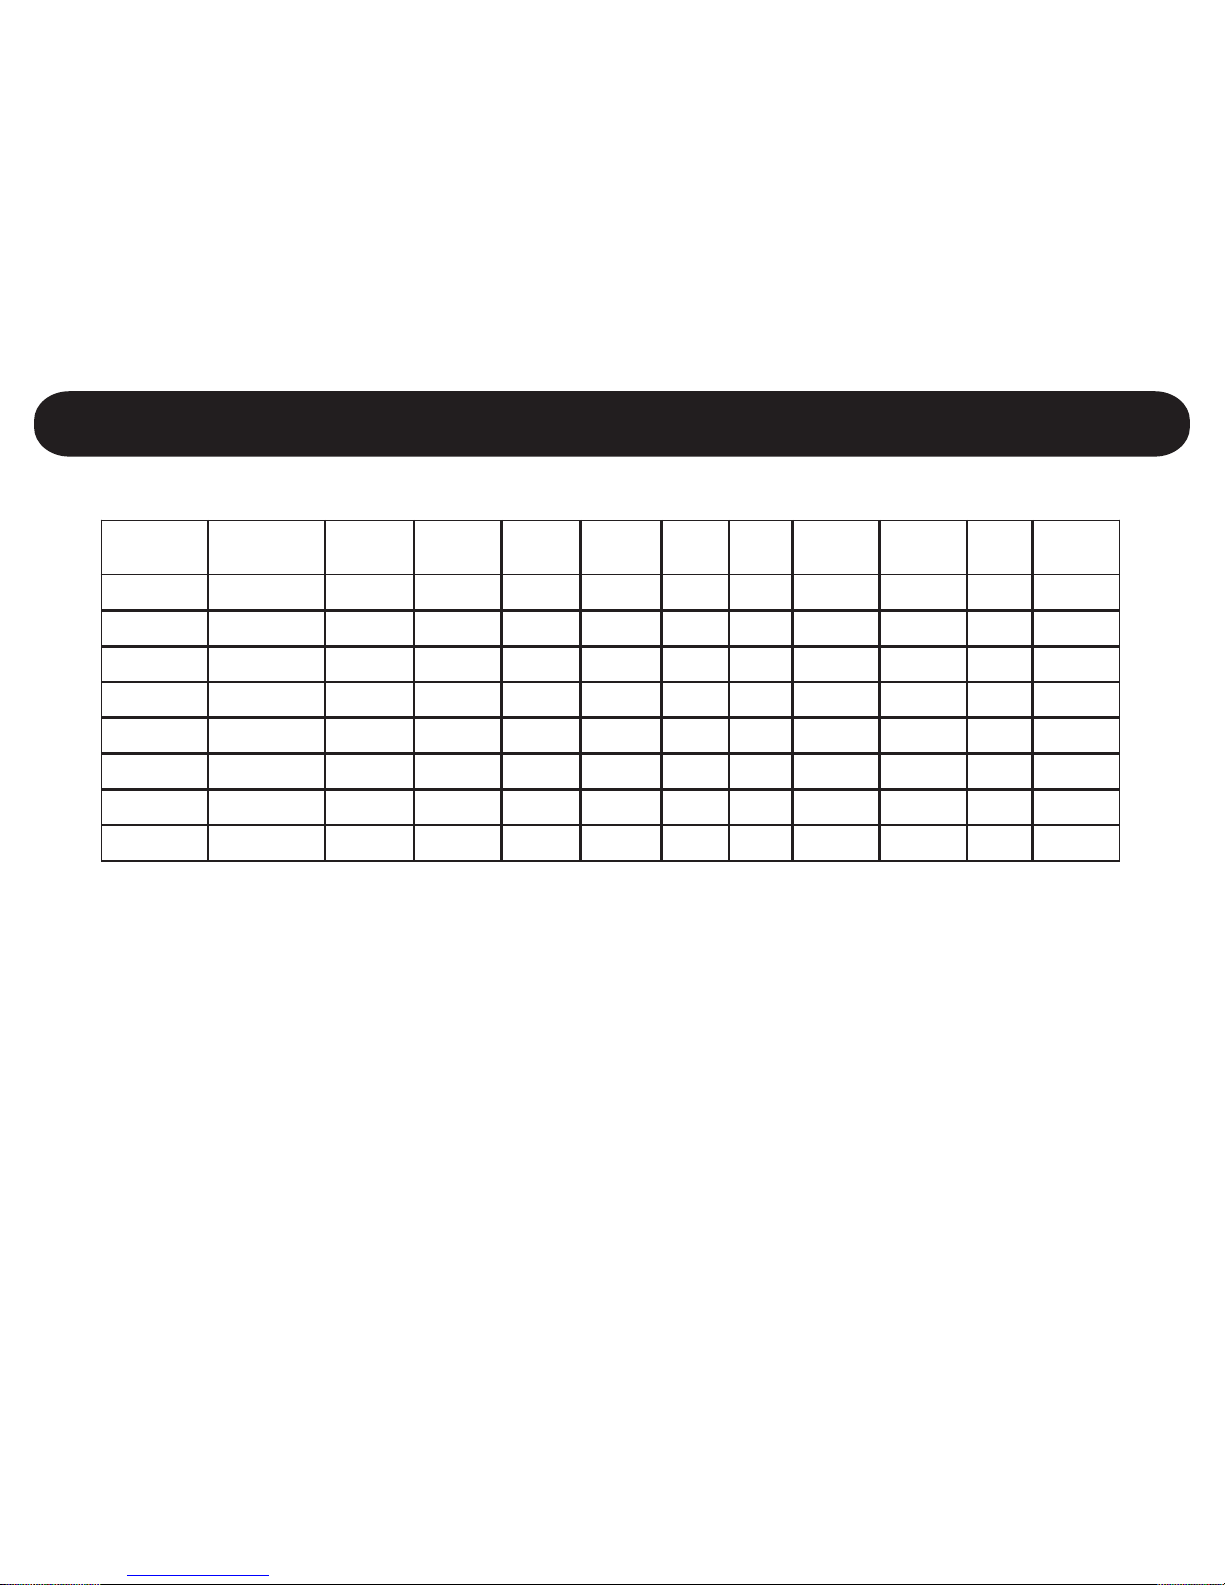
X
Channel Selection Guide - Infrared (IR)
dleiForciM
lennahC
ycneuqerF
)zHM(
19RIzHk59
29RIzHk052
39RIzHM60.2
49RIzHM3.2
59RIzHM65.2
69RIzHM8.2
79RIzHM3.3
89RIzHM8.3
Page 67

XI
Page 68
FM Division Contact Information
Telephone: 1.888.777.7316
Website: www.Phonak-US.com
Address:
4520 Weaver Parkway
Warrenville, IL 60555-3927
Version 031020. Copyright© 2003 Phonak Hearing Systems. All Rights Reserved.
 Loading...