

Page 1
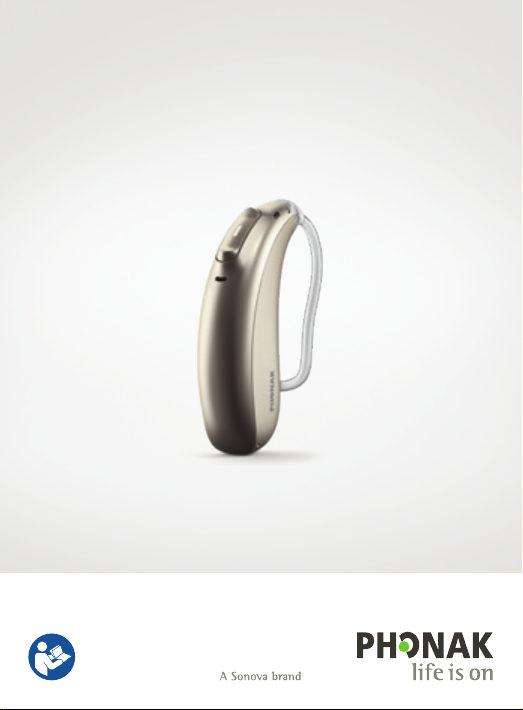
Phonak BoleroTM M
User Guide
Phonak Bolero M-PR
Phonak Bolero M-PR Trial
Page 2
This user guide is valid for:
Hearing aids
Phonak Bolero M90-PR
Phonak Bolero M70-PR
Phonak Bolero M50-PR
Phonak Bolero M30-PR
Phonak Bolero M-PR Trial
Charging accessory
Phonak Charger BTE RIC
2
2019
2019
2019
2019
2019
2019
Page 3
Your hearing aid and charger details
If no box is checked and you do not know the model
of your hearing aid or charging accessory, please ask
your hearing care professional.
The hearing aids described in this user guide contain
a built-in and non-removable rechargeable lithiumion battery.
Please also read safety information regarding
handling rechargeable hearing aids (chapter 23).
Hearing aid models
c Bolero M-PR (M90/M70/M50/M30)
c Bolero M-PR Trial
Charging accessory
c Charger BTE RIC
incl. power supply
Earpieces
c Classic earmold
c Universal eartip
c Dome
c SlimTip
3
Page 4

4
Page 5

Your hearing aids and charger have been developed by
Phonak – the world leader in hearing solutions based in
Zurich, Switzerland.
These premium products are the result of decades of
research and expertise and are designed to keep you
connected to the beauty of sound! We thank you for
making such a great choice and wish you many years of
listening pleasure.
Please read the user guide carefully to make sure that you
understand and get the best out of your hearing aids. For
more information about features and benets, simply
contact your hearing care professional.
Phonak - life is on
www.phonak.com
5
Page 6

Contents
Your hearing aid and charger
1. Quick guide
2. Parts of the hearing aid & charger
Using the charger
3. Preparing the charger
4. Charging the hearing aids
Using the hearing aid
5. Left & right hearing aid markings
6. Putting on the hearing aid
7. Removing the hearing aid
8. Multi-function button with indicator light
9. On/O
10. Connectivity overview
1 1. Initial pairing
12. Phone calls
13. Flight mode
14. Rebooting your hearing aid
8
10
12
13
17
18
20
22
23
24
25
28
32
35
6
Page 7

Further information
15. Join our hearing loss community!
16. Operating conditions
17. Care and maintenance
18. Exchanging the earpiece
19. Service and warranty
20. Compliance information
21. Information and description of symbols
22. Troubleshooting
23. Important safety information
36
37
38
41
44
46
54
58
62
7
Page 8
1. Quick guide
Charging your hearing aid
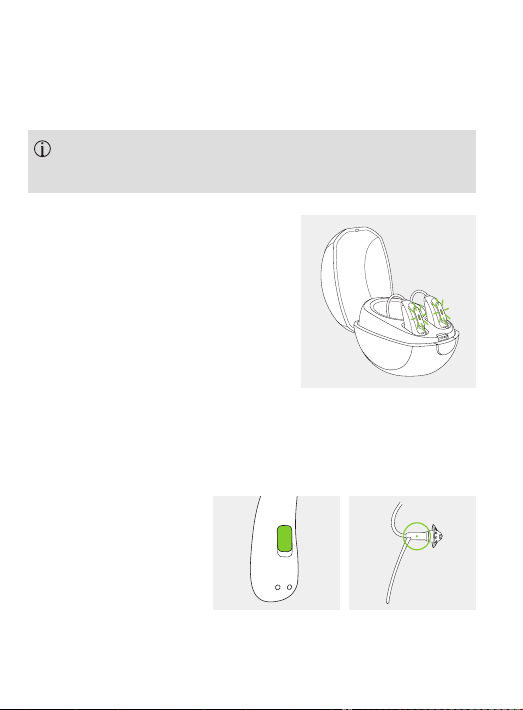
Before using your hearing aid for the rst time, it is
recommended to charge it for 3 hours.
After placing your hearing aid
in the charger, the indicator light
will show the charging state of
the battery until the hearing aid
is fully charged. When fully
charged the indicator light will
be constantly on, i.e. solid
green light.
Left & right hearing aid markings
Blue marking for
left hearing aid.
Red marking for
right hearing aid.
8
Page 9

Multi-function button with indicator light
The button has several functions.
It functions as an on/o switch, a
volume control and/or a program
change depending on the hearing aid
programming. This is indicated in
your individual instructions. If paired
with a Bluetooth® enabled phone,
a short press will accept and a long
press will reject an incoming call.
On/O
Firmly press the lower part of the
button for 3 seconds until the
indicator light turns solid green (On)
or solid red (O).
Enter ight mode
When device is o, press the lower
part of the button for 7 seconds until
the solid orange light appears. Then
release the button.
9
Page 10
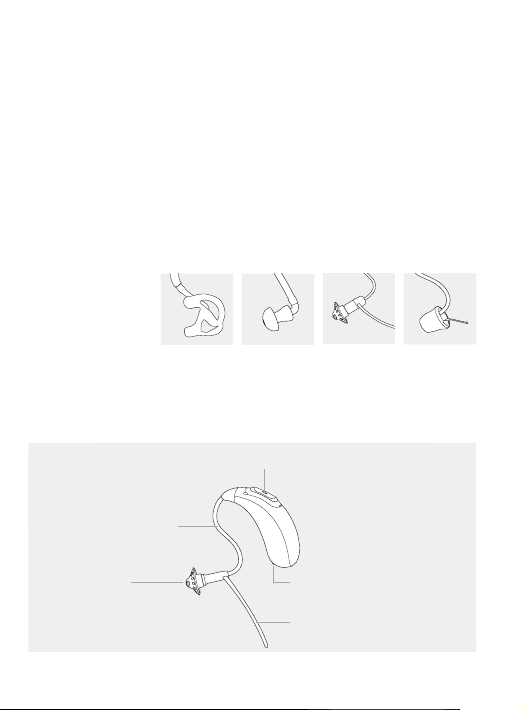
2. Parts of the hearing aid & charger
The following pictures show the hearing aid model and
charger accessory described in this user guide. You can
identify your personal models by:
• checking “Your hearing aid & charger details” on
page 3.
• comparing your hearing aid and charger with the
following models.
Possible
earpieces
Classic
earmold
Universal
eartip
Bolero M-PR / Bolero M-PR Trial
Multi-function button with indicator light
Tube
Earpiece:
Dome (detachable)
10
SlimTip Dome
Charging contacts
Anchor (optional)
Page 11
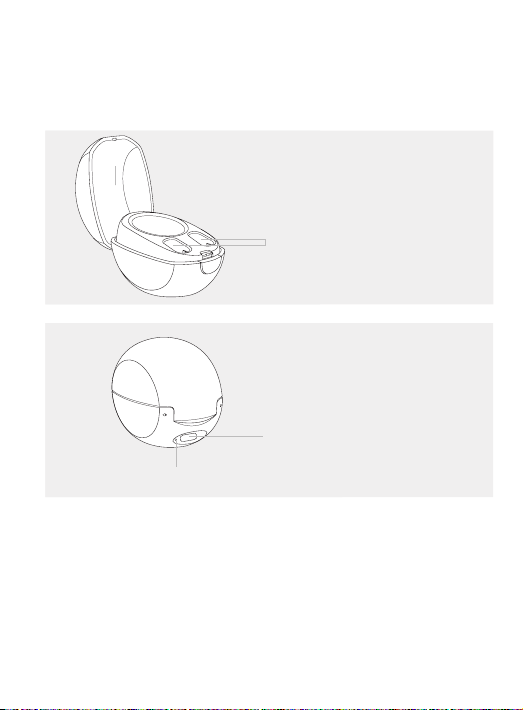
Charger
Indicator light for power
Hearing aid charging slots
with left/right indicators
USB port to external
power supply
11
Page 12
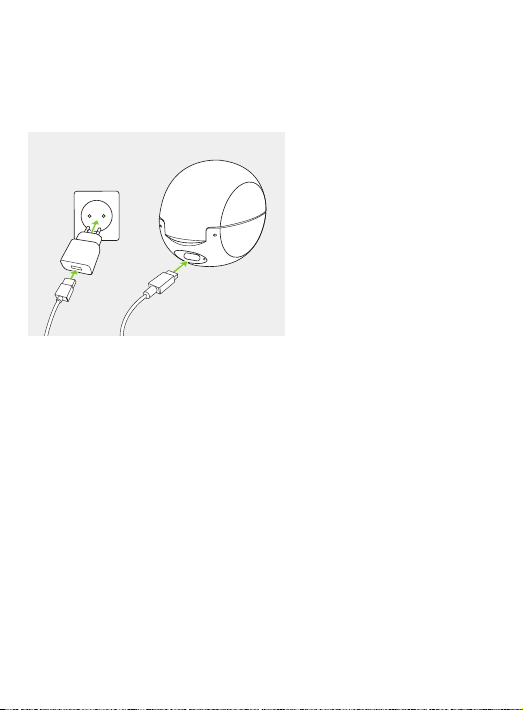
3. Preparing the charger
Connecting the power supply
c
a
d
b
a) Plug the larger end of the charging cable into the
power supply.
b) Plug the smaller end into the USB port on the charger.
c) Plug the power supply into a power outlet.
d) The indicator light is green when the charger
is connected to the power supply.
12
Page 13
4. Charging the hearing aids
Low power: You will hear two beeps when the battery
is low. You will have approximately 60 minutes before
you have to charge the hearing aids (this can vary,
depending on the hearing aid settings).
The hearing aid contains a built-in and non-
removable rechargeable lithium-ion battery.
Before using your hearing aid for the rst time, it is
recommended to charge it for 3 hours.
The hearing aid must be dry before charging, see
chapter 17.
13
Page 14
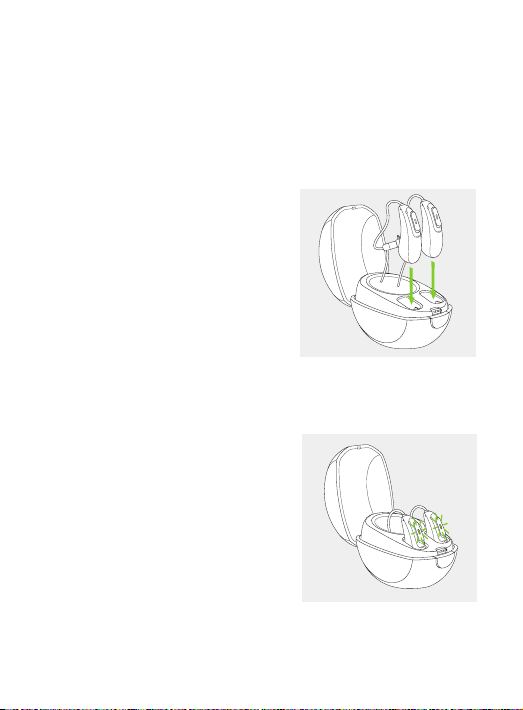
4.1 Using the charger
Please refer to chapter 3 for how to set up the charger.
1.
Insert the hearing aid into the
charging slots. Make sure the left
and right hearing aid markings
match the left (blue), right (red)
indicators next to the charging
slots. The hearing aids will
automatically be muted when
inserted into the charger.
2.
The indicator light will show the
charging state of the battery until
the hearing aid is fully charged.
When fully charged the indicator
light will be solid green.
14
Page 15

The charging process will automatically stop when
the batteries are fully charged, so the hearing aid can
be safely left in the charger. It can take up to 3 hours
to charge the hearing aid. The charger can be closed
while charging.
Charging times
Indicator light Charging state Approx. charging times
0 – 10%
11 – 80%
81 – 99%
100% 3 h
30 min (30%)
60 min (50%)
90 min (80%)
15
Page 16
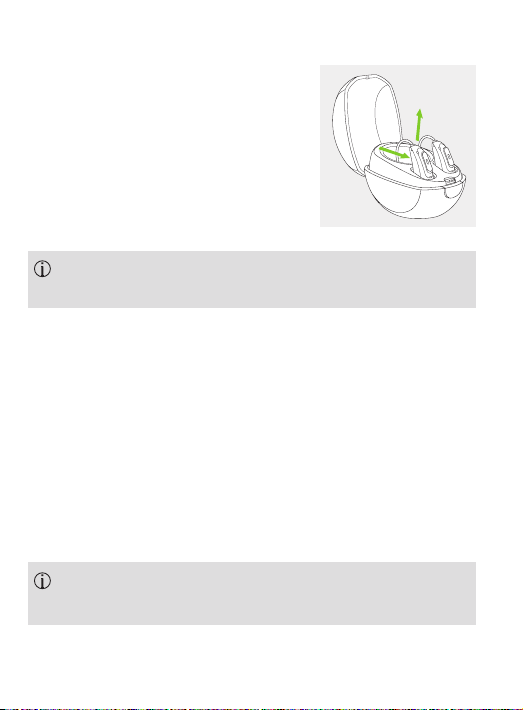
3.
Remove the hearing aid from the
charger by
1
2
1. pulling the hearing aid gently
toward yourself and
2. lifting it out of the charger.
Do not hold the tube to remove the hearing aid from
the charger as this can damage the tube.
When the charger is connected to the power supply,
the hearing aid switches on automatically when removed
from the charger. The indicator light starts blinking.
The solid green light indicates for 3 seconds that the
hearing aid is ready.
If you unplug the charger while the hearing aid is
charging inside, please make sure to turn o the hearing
aid to prevent discharge.
Turn o your hearing aid before inserting it in the
disconnected charger to store it.
16
Page 17

5. Left & right hearing aid markings
There is a red or blue marking on the back of the hearing
aid and on the speaker. This will tell you if it is a left or a
right hearing aid.
Blue marking
for left hearing aid.
Red marking
for right hearing aid.
17
Page 18

6. Putting on the hearing aid
6.1 Putting on the hearing aid with
classic earmold
1.
Take the earmold up to your ear
and place the ear canal part into
your ear canal.
2.
Place the hearing aid behind
your ear.
3.
Insert the upper part of the
earmold into the upper part of
the bowl of your ear.
18
Page 19
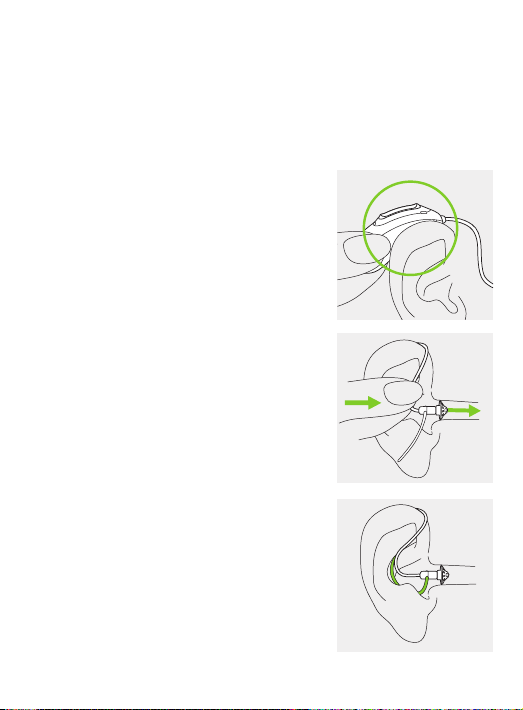
6.2 Putting on the hearing aid with dome,
SlimTip or universal eartip
1.
Place the hearing aid behind
your ear.
2.
Insert the earpiece into your
ear canal.
3.
If there is an anchor attached to
the earpiece, tuck it into the bowl of
your ear to secure your hearing aid.
19
Page 20

7. Removing the hearing aid
7.1 Removing the hearing aid with
classic earmold
1.
Lift the hearing aid above the
upper part of your ear.
2.
Grasp the earmold with your
ngers and gently remove it.
Please try to avoid gripping the tube to remove the
hearing aid.
20
Page 21

7.2 Removing the hearing aid with dome, SlimTip
or universal eartip
1.
Pull on the bend of the tube
and remove the hearing aid
from behind the ear.
21
Page 22
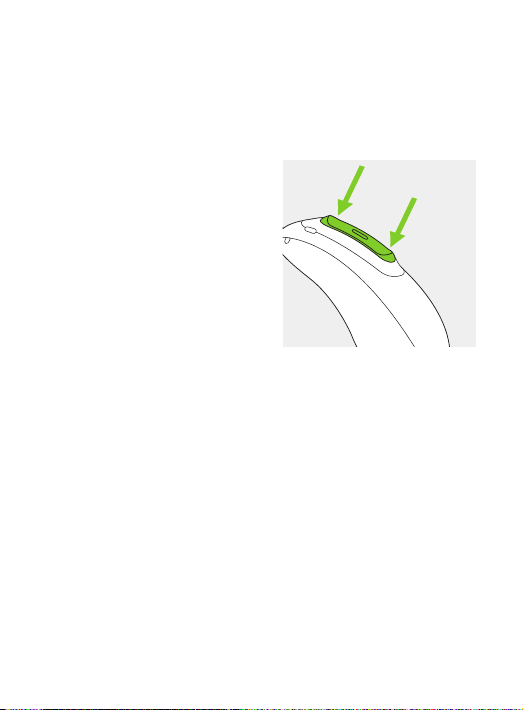
8. Multi-function button with
indicator light
The multi-function button has several functions.
It functions as an on/o
switch, a volume control
and/or a program change
depending on the hearing aid
programming. This is
indicated in your individual
“Hearing aid instructions”.
Please ask your hearing care
professional for a printout.
If the hearing aid is paired with a Bluetooth® enabled
phone, a short press on the upper or the lower part of the
button will accept an incoming call and a long press will
reject an incoming call – refer to chapter 12.
22
Page 23

9. On/O
Switch on hearing aid
The hearing aid is congured to
switch on automatically when
removed from the charger connected
to the power supply. If this function
is not congured or if the charger is
not connected to the power supply,
rmly press and hold the lower part of the button for
3 seconds until the indicator light blinks green. The solid
green light indicates for 3 seconds that the hearing aid
is ready.
Switch o hearing aid
Press and hold the lower part of the button for 3 seconds
until the solid red light indicates the hearing aid is o.
Blinking green Hearing aid is switching on
Solid red for 2 seconds Hearing aid is switching o
When you switch on the hearing aid you might hear a
start-up melody.
23
Page 24
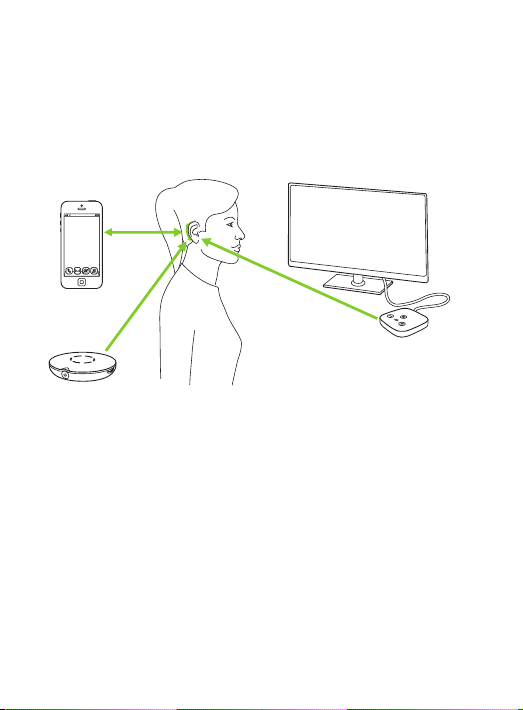
10. Connectivity overview
The illustration below shows the connectivity options
available for your hearing aid.
Cell phone
TV Connector connected to TV*
Roger**
* The TV Connector can be connected to any audio source such as a TV, PC or hi- system.
** Roger wireless microphones can be connected to your hearing aids as well.
24
Page 25
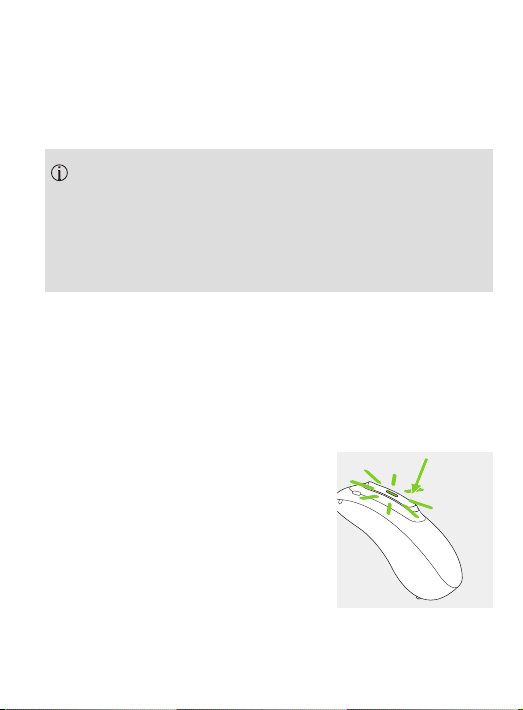
11. Initial pairing
11.1 Initial pairing to a Bluetooth® enabled device
It is only necessary to perform the pairing procedure
once with each device featuring Bluetooth wireless
technology. After the initial pairing, your hearing aid
will connect automatically to the device. This can take
up to 2 minutes.
1.
On your device (e.g. a phone), ensure that Bluetooth
wireless technology is enabled and search for Bluetooth
enabled devices in the connectivity setting menu.
2.
Switch on both hearing aids.
You now have 3 minutes
to pair your hearing aids
with your device.
25
Page 26
3.
Select the hearing aid in the list of Bluetooth enabled
devices. This will pair both hearing aids simultaneously.
A beep conrms successful pairing.
For more information about pairing instructions for
Bluetooth wireless technology, go to:
https://marvel-support.phonak.com
26
Page 27
11.2 Connecting to the device
After your hearing aids have been paired to your device,
they will automatically connect again when switched on.
The connection will be maintained as long as the
device remains ON and within range.
Your hearing aids can be paired to up to two devices.
Your hearing aids can be connected to one device
at a time.
27
Page 28
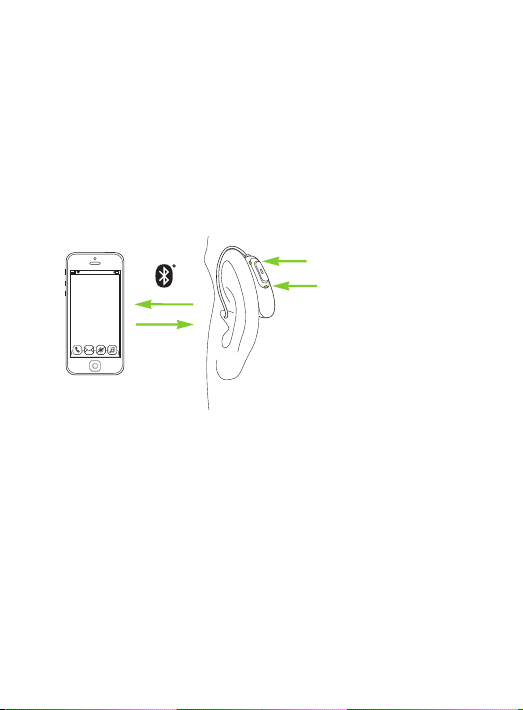
12. Phone calls
Your hearing aids connect directly with Bluetooth®
enabled phones. When paired and connected to your
phone, you will hear the caller’s voice directly in your
hearing aids. Your hearing aids pick up your voice
through their own microphones.
Your voice
Caller’s voice
Bluetooth® is a registered trademark owned by the Bluetooth SIG, Inc.
28
Page 29
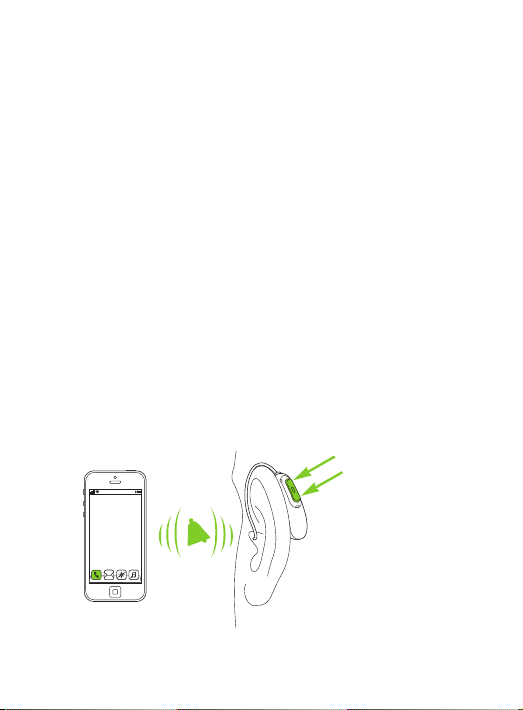
12.1 Making a call
Enter the phone number and press the dial button.
You will hear the ring tone through your hearing aid.
Your hearing aids pick up your voice through their own
microphones.
12.2 Accepting a call
When receiving a call, a calling notication will be heard
in the hearing aids.
The call can be accepted by a short press on the upper or
lower part of the multi-function button on the hearing
aid (less than 2 seconds) or directly on your phone.
short press
< 2 sec
29
Page 30
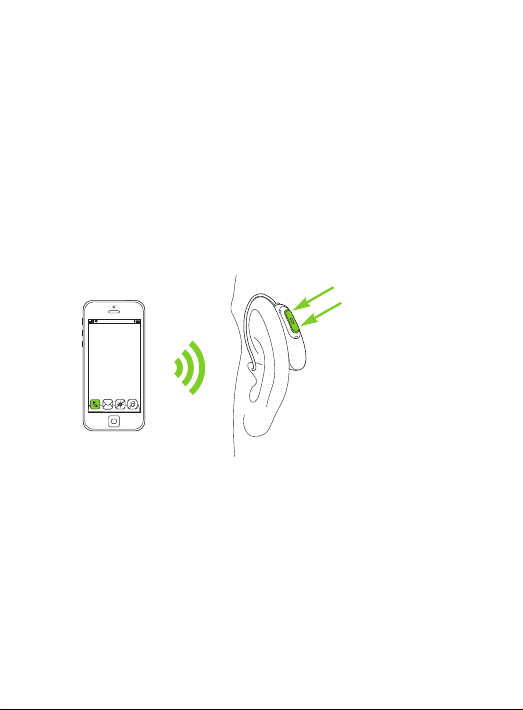
12.3 Ending a call
A call can be ended by a long press on the upper or
lower part of the multi-function button on the hearing
aid (more than 2 seconds) or directly on your phone.
long press
> 2 sec
30
Page 31
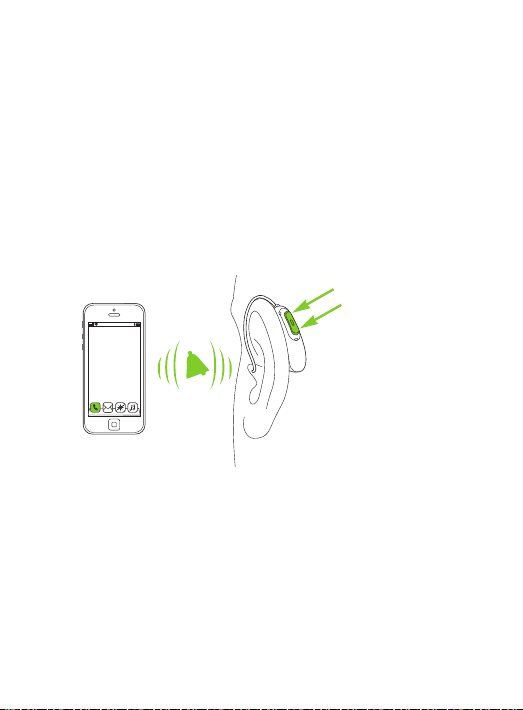
12.4 Rejecting a call
An incoming call can be rejected by a long press on
the upper or lower part of the multi-function button
on the hearing aid (more than 2 seconds) or directly
on your phone.
long press
> 2 sec
31
Page 32

13. Flight mode
Your hearing aids operate between 2.4 GHz–2.48 GHz
frequency range. When ying some operators require all
devices to be switched into ight mode. Entering ight
mode will not disable normal hearing aid functionality,
only the Bluetooth connectivity functions.
13.1 Enter ight mode
To disable the wireless function and enter ight mode in
each hearing aid:
32
Page 33
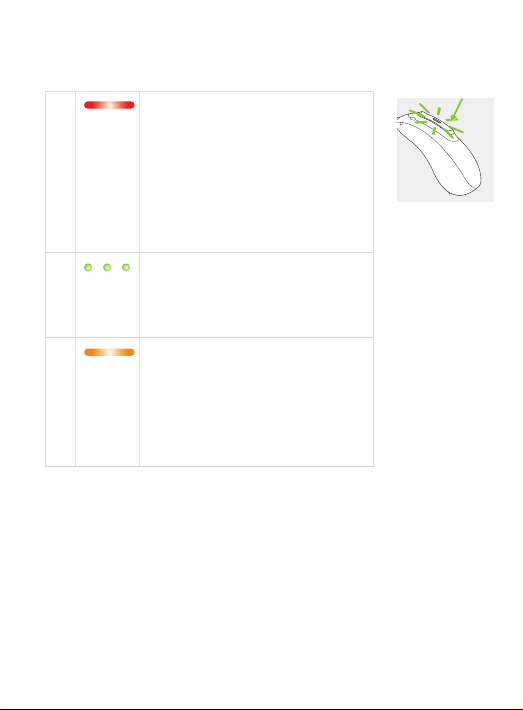
1. If the hearing aid is turned o,
2.
3.
proceed to Step 2.
If the hearing aid is on, turn it o
by pressing and holding the lower
part of the button for 3 seconds,
until the indicator light turns solid
red for 2 seconds, signifying that
the hearing aid is switching o.
Press and hold the lower part of
the button. The green indicator
light blinks when the hearing aid
starts up.
Keep pressing the button for 7
seconds, until the indicator light is
solid orange, then release the
button.
The solid orange light indicates the
hearing aid is in ight mode.
In ight mode, your hearing aid cannot connect directly
to your phone.
33
Page 34
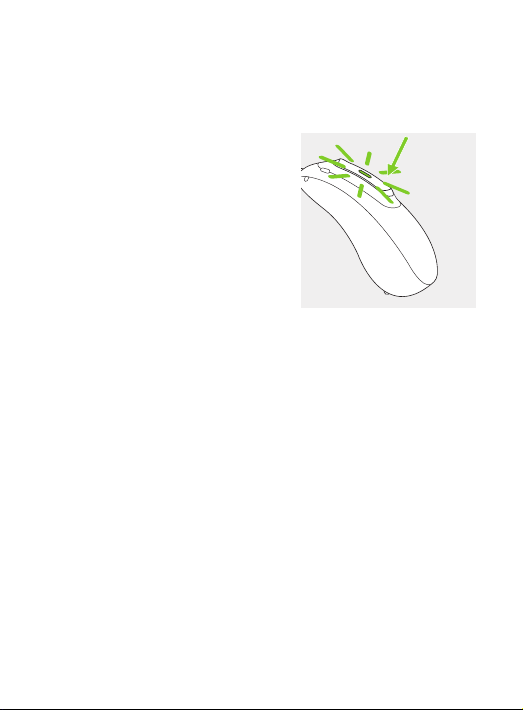
13.2 Exit ight mode
To enable the wireless function
and exit ight mode in each
hearing aid:
Switch the hearing aid o and
then on again - refer to chapter 9.
34
Page 35

14. Rebooting your hearing aid
Use this technique if your hearing aid is in an error state.
This will not remove or delete any program or settings.
1.
Press the lower part of the button for at least
15 seconds. It does not matter if the hearing aid is
switched on or o before you start pressing the button.
There is no light or acoustic notication at the end of the
15 seconds.
2.
Place the hearing aid in the power-connected charger
and wait until the indicator light blinks green. This can
take up to 30 seconds. The hearing aid is now ready to use.
35
Page 36
15. Join our hearing loss
community!
On HearingLikeMe.com you will nd:
• Living with Hearing Loss
A set of interesting articles on how to live with
hearing loss.
• Forum
A forum to meet and engage with a growing number of
people who face the same challenges.
• Blog
A blog to keep up-to-date with the latest news on
anything hearing.
36
Page 37

16. Operating conditions
The product is designed such that it functions without
problems or restrictions if used as intended, unless
otherwise noted in this user guide.
Please ensure to charge the hearing aid within operating
temperature range: +5° to +40° Celsius (41° to 104°
Fahrenheit), atmospheric pressure range: 800 hPa to
1500 hPa and humidity 0% to 85% (non condensing).
Bolero M-PR is classied IP68 (depth of 1 meter for
60 minutes) and designed to be used in all daily life
situations. Therefore you do not have to worry about
exposing the hearing aids to rain shower or sweat.
However, Bolero M-PR is not intended to be used in water
activities that includes chlorinated water, soap, salt water
or other liquids with a chemical content.
37
Page 38

17. Care and maintenance
Diligent and routine care of your hearing aid and charger
contribute to outstanding performance and a long service
life. To ensure a long service life, Sonova AG provides a
minimum of a ve year service period after phase out of
the respective hearing aid.
Please use the following specications as a guideline.
For further information regarding product safety, see
chapter 23.2.
38
Page 39

General information
Before using hair spray or applying cosmetics, you should
remove your hearing aid from your ear, because these
products may damage it.
Your hearing aids are resistant to water, sweat and dust
under the following conditions:
• After exposure to water, sweat or dust, the hearing aid
is cleaned and dried.
• The hearing aid is used and maintained as described in
this user guide.
Always make sure that the hearing aids and charger
are dry and clean.
39
Page 40

Daily
Hearing aid: Inspect the earpiece for earwax and
moisture deposits. Clean the surfaces with a lint-free
cloth. Never use cleaning agents such as household
detergents, soap, etc. for cleaning your hearing aid. It is
not recommended to rinse with water. If you need to
clean your hearing aid intensively, ask your hearing care
professional for advice.
Chargers: Make sure that charger slots are clean.
Never use cleaning agents such as household detergents,
soap, etc. for cleaning your charger.
Weekly
Hearing aid: Clean the earpiece with a soft, damp cloth
or with a special cleaning cloth for hearing aids. For more
in-depth maintenance instructions or for more than basic
cleaning, please see your hearing care professional. Clean
the charging contacts on the hearing aid with a soft,
damp cloth.
Chargers: Remove dust or dirt from the charger slots.
40
Page 41

18. Exchanging the earpiece
If your hearing aid is tted with a SlimTube, you may need
to exchange or clean the earpiece.
Please check the earpiece regularly and exchange or clean
it if it looks dirty or if the hearing aid volume or sound
quality is reduced. If a dome is used, it should be
exchanged every 3 months.
41
Page 42
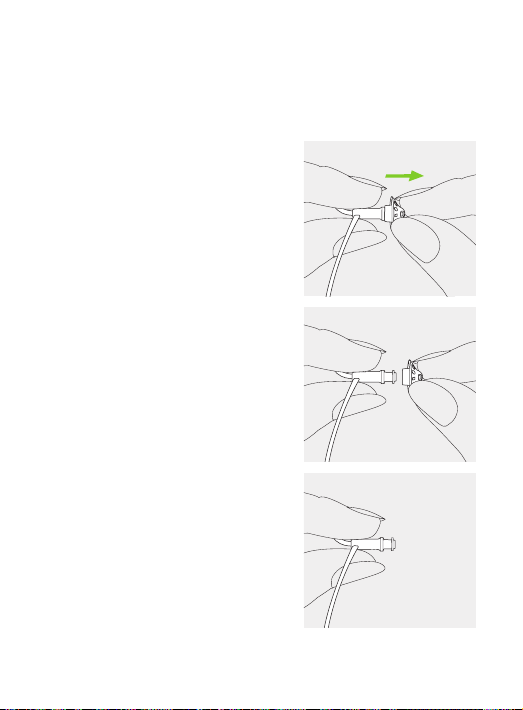
18.1 Removing the earpiece from the SlimTube
1.
Remove the earpiece from the
SlimTube by holding the SlimTube
in one hand and the earpiece in
the other.
2.
Gently pull on the earpiece
to remove.
3.
Clean the SlimTube with a
lint-free cloth.
42
Page 43
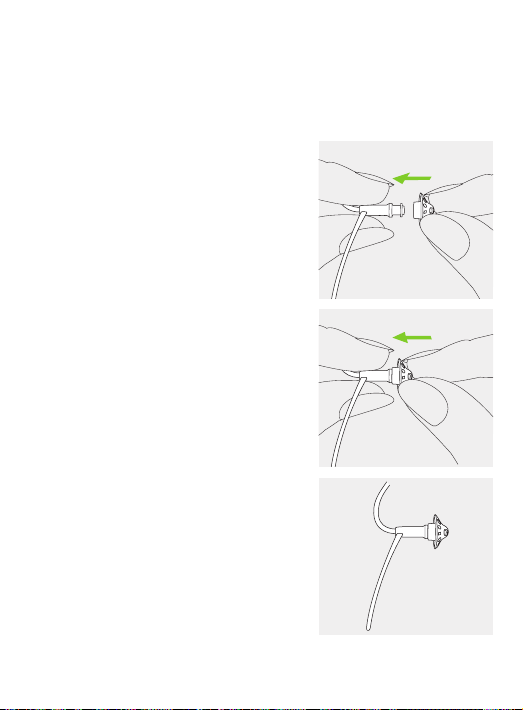
18.2 Attaching the earpiece to the SlimTube
1.
Hold the SlimTube in one hand
and the earpiece in the other.
2.
Slide the earpiece over the
sound outlet.
3.
The SlimTube and the earpiece
should t perfectly together.
43
Page 44

19. Service and warranty
Local warranty
Please ask the hearing care professional where you
purchased your hearing aids and charger about the
terms of the local warranty.
International warranty
Sonova AG oers a one year limited international
warranty, valid from the date of purchase. This
limited warranty covers manufacturing and material
defects in the hearing aid and charger respectively,
but not accessories such as tubes, earpieces, external
receivers. The warranty only comes into force if a
proof of purchase is shown.
The international warranty does not aect any legal
rights that you might have under applicable national
legislation governing sale of consumer goods.
44
Page 45

Warranty limitation
This warranty does not cover damage from improper
handling or care, exposure to chemicals or undue stress.
Damage caused by third parties or non-authorized service
centers renders the warranty null and void. This warranty
does not include any services performed by a hearing care
professional in their office.
Serial numbers
Hearing aid left side:
Hearing aid right side:
Charger BTE RIC:
Date of purchase:
Authorized hearing care professional (stamp/signature):
45
Page 46
20. Compliance information
Europe:
Declaration of Conformity for the hearing aid
Hereby Sonova AG declares that this product meets the
requirements of the Medical Devices Directive 93/42/EEC
as well as the Radio Equipment Directive 2014/53/EU.
The full text of the EU Declaration of Conformity can be
obtained from the manufacturer or the local Phonak
representative whose address can be taken from the list
on www.phonak.com/us/en/certicates
(Phonak worldwide locations).
Australia/New Zealand:
Indicates a device’s compliance with applicable
Radio Spectrum Management’s (RSM) and
Australian Communications and Media Authority
(ACMA) regulatory arrangements for the legal sale
in New Zealand and Australia.
The compliance label R-NZ is for radio products
supplied in the New Zealand market under
conformity level A1.
46
Page 47

The hearing aids listed on page 2 are certied under:
Phonak Bolero M-PR (M90/M70/M50/M30)
Phonak Bolero M-PR Trial
USA FCC ID: KWC-BSR
Canada IC: 2262A-BSR
47
Page 48

Notice 1:
This device complies with Part 15 of the FCC Rules and
with RSS-210 of Industry Canada. Operation is subject to
the following two conditions:
1) this device may not cause harmful interference, and
2) this device must accept any interference received,
including interference that may cause undesired operation.
Notice 2:
Changes or modications made to this device not
expressly approved by Sonova AG may void the FCC
authorization to operate this device.
Notice 3:
This device has been tested and found to comply with
the limits for a Class B digital device, pursuant to Part 15
of the FCC Rules and ICES-003 of Industry Canada.
These limits are designed to provide reasonable protection
against harmful interference in a residential installation.
This device generates, uses and can radiate radio
frequency energy and, if not installed and used in
accordance with the instructions, may cause harmful
interference to radio communications. However, there is
48
Page 49

no guarantee that interference will not occur in a
particular installation. If this device does cause harmful
interference to radio or television reception, which can be
determined by turning the equipment o and on, the user
is encouraged to try to correct the interference by one or
more of the following measures:
• Reorient or relocate the receiving antenna.
• Increase the separation between the device
and receiver.
• Connect the device into an outlet on a circuit
dierent from that to which the receiver is connected.
• Consult the dealer or an experienced radio/TV
technician for help.
49
Page 50
Notice 4:
Japanese Radio Law and Japanese
Telecommunications Business Law Compliance
This device is granted pursuant to the Japanese Radio Law
(電波法) and the Japanese Telecommunications Business
Law (電気通信事業法). This device should not be
modied (otherwise the granted designation number will
become invalid).
005-102109
R
A19-0087005
T
50
Page 51
Radio information of your hearing aid
Antenna type
Operation frequency
Modulation
Radiated power
Resonant loop antenna
2.4 GHz – 2.48 GHz
GFSK, Pi/4 DPSK, GMSK
< 1 mW
Bluetooth®
Range
Bluetooth
Proles supported
~1m
4.2 Dual-Mode
HFP (Hands-free prole), A2DP
51
Page 52
Compliance with emission and immunity standards
Emission standards EN 60601–1-2:2015
IEC 60601–1-2:2014
EN 55011:2009+A1
CISPR11:2009/AMD1:2010
CISPR22:1997
CISPR32:2012
ISO 7637-2:2011
CISPR25:2016
EN 55025:2017
52
Page 53

Immunity standards EN 60601-1-2:2015
IEC 60601-1-2:2014
EN 61000-4-2:2009
IEC 61000-4-2:2008
EN 61000-4-3:2006+A1+A2
IEC 61000-4-3:2006+A1+A2
EN 61000-4-4:2012
IEC 61000-4-4:2012
EN 61000-4-5:2014
IEC 61000-4-5:2014
EN 61000-4-6:2014
IEC 61000-4-6:2013
EN 61000-4-8:2010
IEC 61000-4-8:2009
EN 61000-4-11:2004
IEC 61000-4-11:2004
IEC 60601-1 (§ 4.10.2):2005
ISO 7637-2:2011
53
Page 54
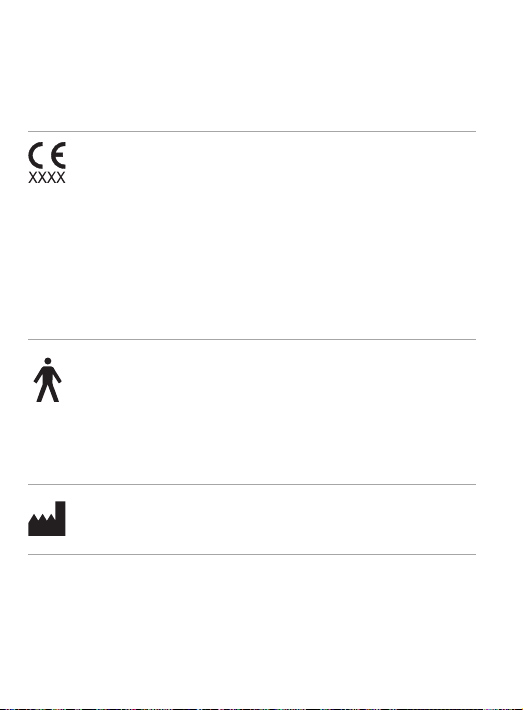
21. Information and description
of symbols
With the CE symbol, Sonova AG conrms that
this product – including accessories – meets the
requirements of the Medical Devices Directive
93/42/EEC as well as the Radio Equipment
Directive 2014/53/EU. The numbers after the
CE symbol correspond to the code of certied
institutions that were consulted under the
above-mentioned directives.
This symbol indicates that the products
described in these user instructions adhere to
the requirements for an applied part of Type B
of EN 60601-1. The surface of the hearing aid
is specied as an applied part of Type B.
Indicates the medical device manufacturer, as
dened in EU Directive 93/42/EEC.
54
Page 55
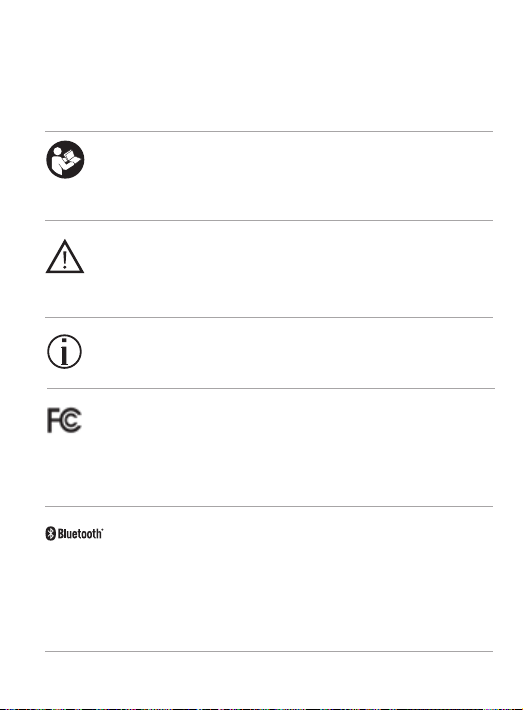
This symbol indicates that it is important for
the user to read and take into account the
relevant information in these user guides.
This symbol indicates that it is important for
the user to pay attention to the relevant warning
notices in these user guides.
Important information for handling and
product safety.
This symbol confers that the electromagnetic
interference from the device is under limits
approved by the US Federal Communications
Commission.
The Bluetooth® word mark and logos are
registered trademarks owned by Bluetooth SIG,
Inc. and any use of such marks by Sonova AG is
under license. Other trademarks and trade
names are those of their respective owners.
55
Page 56
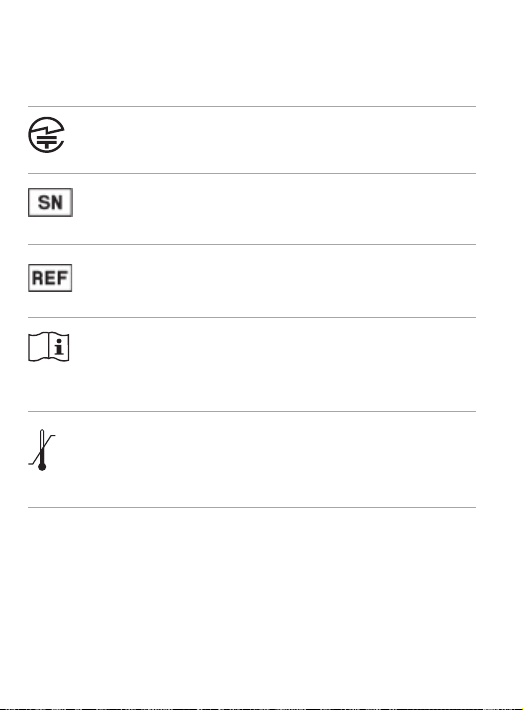
Japanese mark for certied
radio equipment.
Indicates the manufacturer’s serial number so
that a specic medical device can be identied.
Indicates the manufacturer’s catalogue number
so that the medical device can be identied.
This symbol indicates that it is important for
the user to read and take into account the
relevant information in this user guide.
Temperature during transportation
and storage: -20° to +60° Celsius
(-4° to +140° Fahrenheit)
56
Page 57
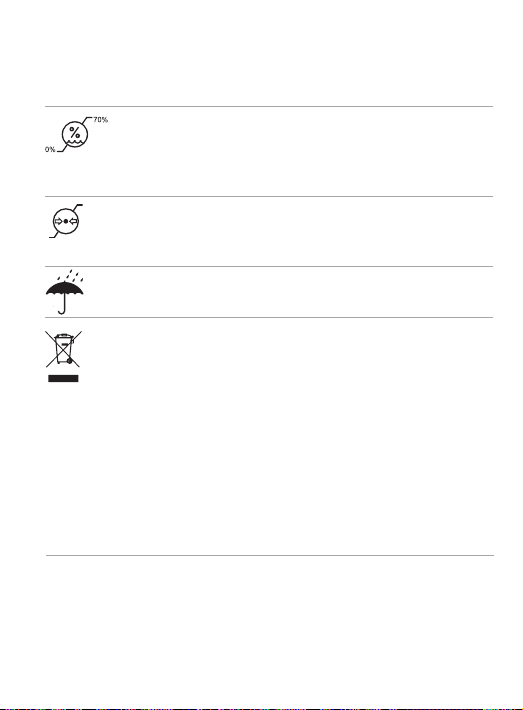
Humidity during storage: 0% to 70%, if not in
use. See instruction in chapter 23.2 regarding
drying the hearing aid after use.
Atmospheric pressure during transportation
and storage: 200 hPa to 1500 hPa
During transportation keep dry.
The symbol with the crossed-out garbage bin
is to make you aware that this hearing aid and
charger may not be thrown away as normal
household waste. Please dispose of old or
unused hearing aids and charger, at waste
disposal sites intended for electronic waste, or
give your hearing aid and charger to your
hearing care professional for disposal. Proper
disposal protects the environment and health.
57
Page 58
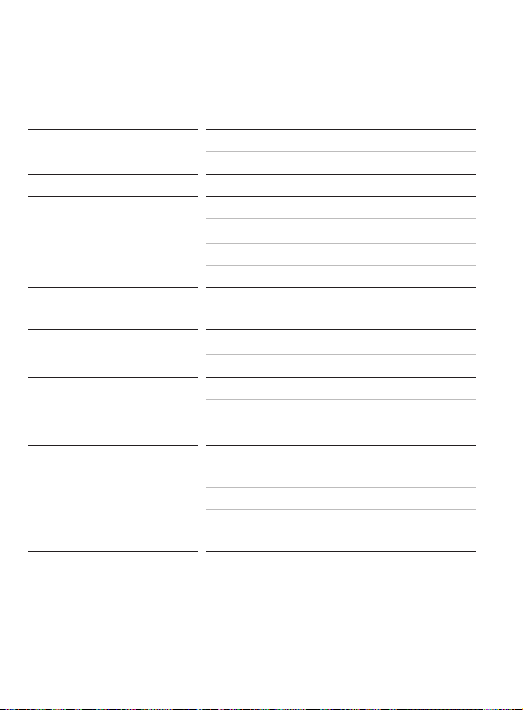
22. Troubleshooting
Problem Causes What to do
Hearing aid whistles Hearing aid not inserted correctly into ear Insert hearing aid correctly (chapter 6)
Cerumen in ear canal Contact your hearing care professional
Hearing aid too loud Volume too loud Decrease volume if volume control available (chapter 8)
Hearing aid not loud
enough or distorted
Hearing aid plays two
beeps
Hearing aid not functioning
(no amplication)
Hearing aid will not
switch on
Indicator light on hearing
aid does not light up when
hearing aid placed in
charging slots
Volume too low Increase volume if volume control available (chapter 8)
Low battery Charge hearing aid (chapter 4)
Earpiece blocked Clean earpiece (chapter 17)
Hearing has changed Contact you hearing care professional
Indication for low battery Charge hearing aid (chapter 4)
Earpiece blocked Clean earpiece (chapter 17)
Hearing aid is switched o Switch on the hearing aid (chapter 9)
Battery fully discharged Charge hearing aid (chapter 4)
Button was inadvertently deactivated by
pressing the button longer than 15 seconds
Hearing aid not inserted correctly
into charger
Charger not connected to power source Connect charger to external power supply
Battery fully discharged Wait three hours after placing hearing aid in charger, regardless of
Please check https://marvel-support.phonak.com for further information.
58
Page 59
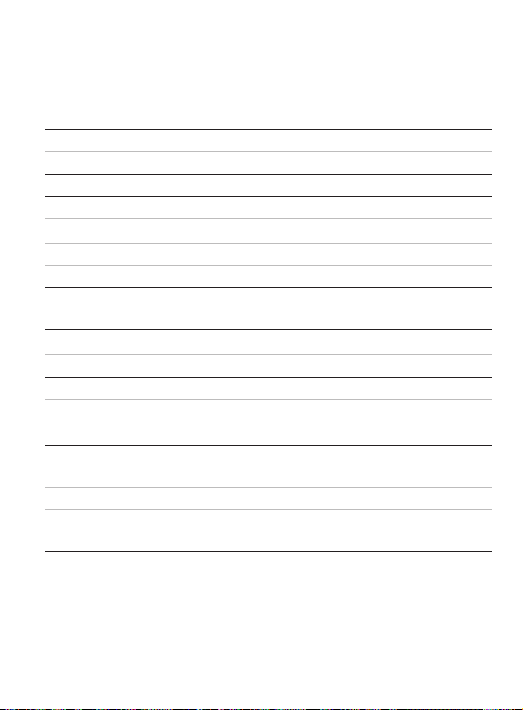
Perform step 2 of the rebooting process (chapter 14)
Insert hearing aid correctly into charger (chapter 4)
LED behavior
59
Page 60
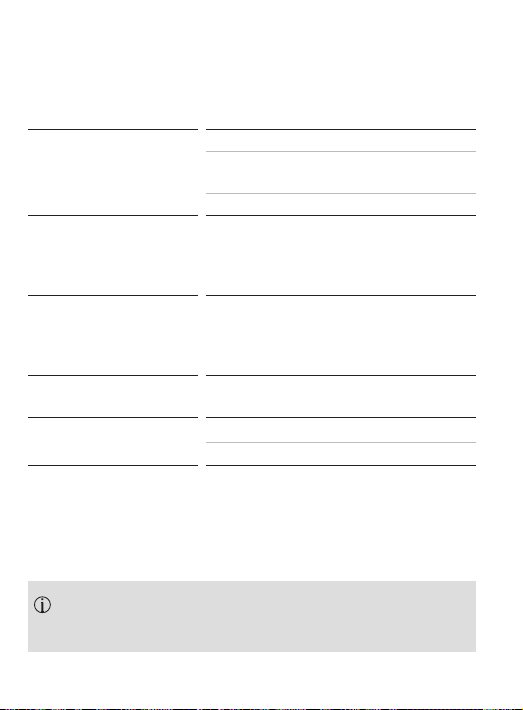
Problem Causes What to do
Indicator light on hearing
aid is solid red while
hearing aid is in the
charger
Indicator light on hearing
aid switches o when the
hearing aid is removed
from charger
Indicator light on hearing
aid remains solid green
after removal from the
charger
Battery does not last the
whole day
Phone call function does
not work
Dirty charging contacts Clean the contacts of the hearing aid and the charger
Hearing aid is out of its operating
temperature range
Faulty battery Contact your hearing care professional
“Auto On” feature is disabled Switch on the hearing aid (chapter 9)
Indicator light on the hearing aid was red
when hearing aid was placed into the
charger
Shortened battery life Contact your hearing care professional. A battery replacement may
Hearing aid is in ight mode Switch hearing aid o and then on again (chapter 13.2)
Hearing aid not paired to the phone Pair it to the phone (chapter 11)
If the problem persists, contact your hearing care
professional for assistance.
60
Page 61
Warm hearing aid up. Operating temperature range is +5° to +40°
Celsius (+41° to +104° Fahrenheit)
Reboot the hearing aid (chapter 14)
be required
61
Page 62

23. Important safety information
Please read the information on the following pages before
using your hearing aid and charger.
A hearing aid will not restore normal hearing and will not
prevent or improve a hearing impairment resulting from
organic conditions. Infrequent use of a hearing aid does not
permit a user to attain full benet from it. The use of a
hearing aid is only part of hearing habilitation and may
need to be supplemented by auditory training and
instruction in lipreading.
Hearing aids are suitable for the home healthcare
environment and due to their portability it may happen that
they are used in professional healthcare facility
environments like physician oces, dental oces etc.
62
Page 63
23.1 Hazard warnings
The rechargeable hearing aids contain lithium-ion batteries
that can be taken onto airplanes as carry-on luggage.
Your hearing aids operate between 2.4 GHz -2.48 GHz frequency
range. When ying please check if ight operator requires
devices to be switched into ight mode, see chapter 13.
The intended use of hearing aids is to amplify and transmit
sound to the ears and hereby compensate for impaired hearing.
The hearing aids (specially programmed for each hearing loss)
must only be used by the intended person. They should not be
used by any other person as they could damage hearing.
Changes or modications to the hearing aid that were not
explicitly approved by Sonova AG are not permitted. Such
changes may damage your ear or the hearing aid.
Do not use the hearing aids and charger in explosive areas
(mines or industrial areas with danger of explosions, oxygen
rich environments or areas where ammable anesthetics are
handled) or where electronic equipment is prohibited.
63
Page 64
If you feel pain in or behind your ear, if it is inamed or if
skin irritation and accelerated accumulations of earwax occur,
please check with your hearing care professional or physician.
In very rare cases, the dome can remain in your ear canal
when removing the hearing tube from the ear. In the unlikely
case that the dome does get stuck in your ear canal, it is
strongly recommended to see a physician for safe removal. To
prevent pushing the dome towards the eardrum, never try to
re-insert the tube into the ear canal.
Hearing programs in the directional microphone mode
reduce background noises. Please be aware that warning
signals or noises coming from behind, e. g. cars, are partially
or entirely suppressed.
This hearing aid is not for children below 36 months. The
usage of this device by children and individuals with cognitive
impairment should be supervised at all times to ensure their
safety. The hearing aid is a small device and contains small
parts. Do not leave children and individuals with cognitive
impairment unsupervised with this hearing aid. If swallowed,
consult a physician or hospital immediately as the hearing aid
or its parts can cause choking!
64
Page 65
Keep the charger out of reach of children, individuals with
cognitive impairment and pets.
Do not cover the whole charger while charging, e.g. with a
cloth etc.
The following is only applicable for persons with
active implantable medical devices (i.e. pacemakers,
debrillators, etc.):
• Keep the wireless hearing aid at least 15 cm (6 inches) away
from the active implant. If you experience any interference, do
not use the wireless hearing aids and contact the
manufacturer of the active implant. Please, note that
interference can also be caused by power lines, electrostatic
discharge, airport metal detectors etc.
• Keep magnets (i.e. EasyPhone magnet, etc.) at least 15 cm
(6 inches) away from the active implant.
• If using a Phonak wireless accessory, consult the chapter
“Important safety information” in your wireless accessory
user guide.
65
Page 66
Use of this equipment adjacent to or stacked with other
equipment should be avoided because it could result in
improper operation. If such use is necessary, this equipment
and the other equipment should be observed to verify that
they are operating normally.
Use of accessories, transducers and cables other than those
specied or provided by the manufacturer of this equipment
could result in increased electromagnetic emissions or
decreased electromagnetic immunity of this equipment and
result in improper operation.
Portable RF communications equipment (including peripherals
such as antenna cables and external antennas) should be used
no closer than 30 cm (12 inches) to any part of the hearing
aids, including cables specied by the manufacturer.
Otherwise, degradation of the performance of this equipment
could result.
The USB port of the charger is to be used for the described
purpose only.
For charger, use only EN60950- and/or EN60601-1 certied
equipment with an output rating of 5 VDC. Min. 500 mA.
66
Page 67
Hearing aids should not be tted with dome/universal eartip
when used by clients with perforated eardrums, inamed ear
canals or otherwise exposed middle ear cavities. In these cases,
we recommend the use of a classic earmold. In the unlikely
case that any part of this product should remain in the ear
canal, it is strongly recommended to see a physician for
safe removal.
Avoid strong physical impacts to the ear when wearing a
hearing aid with customized earpiece. The stability of
customized earpieces is designed for normal use. A strong
physical impact to the ear (e.g. during sports) may cause the
customized earpiece to break. This may lead to perforation of
the ear canal or eardrum.
After mechanical stress or shock to the customized earpiece,
please ensure that it is intact before placing it in the ear.
67
Page 68

23.2 Information on product safety
These hearing aids are water resistant and not waterproof.
They are designed to withstand normal activities and
occasional accidental exposure to extreme conditions. Never
immerse your hearing aid in water! These hearing aids are not
specically designed for extended periods of water submersion
on a continual basis, that is worn in activities such as
swimming or bathing. Always remove your hearing aid
before these activities, as the hearing aid contains sensitive
electronic parts.
Never wash the microphone inputs. Doing so could cause it to
lose its special acoustic features.
Protect your hearing aid and charger from heat (never leave
near a window or in the car). Never use a microwave or other
heating devices to dry your hearing aid or charger (due to risk
of re or explosion). Ask your hearing care professional about
suitable drying methods.
68
Page 69

Do not place the charger close to an induction cooking
surface. Conductive structures inside the charger could absorb
inductive energy resulting in thermal destruction.
The dome should be changed every three months or when
it becomes sti or brittle. This is to prevent the dome from
detaching from the tube spout during insertion into or
removal from the ear.
Do not drop your hearing aid or charger! Dropping onto a hard
surface can damage your hearing aid or charger.
Charger and power supply must be protected against shocks.
If the charger or power supply is damaged after a shock, the
devices must not be used anymore.
Store your hearing aid in the charger if you are not using it
for a long period of time.
69
Page 70

Special medical or dental examination including radiation
described below, may adversely aect the correct functioning
of your hearing aids. Remove and keep them outside the
examination room/area before undergoing:
• Medical or dental examination with X-ray (also CT scan).
• Medical examinations with MRI/NMRI scans, generating
magnetic elds.
Hearing aids don’t need to be removed when passing security
gates (airports etc.). If X-ray is used at all, it will be in very low
doses, and will not aect the hearing aids.
Do not use your hearing aid or your charger in areas where
electronic equipment is prohibited.
The hearing aids have to be dry before charging. Otherwise the
charging reliability cannot be guaranteed.
Only use the charger described in this user guide for charging
your hearing aids, otherwise the devices may be damaged.
70
Page 71

Your hearing aids contain lithium-ion batteries with a Watt
hour rating <20 Wh which have been tested according to
UN 38.3 of the “UN Manual of Tests and Criteria” and should
be shipped in accordance with all the rules and regulations
on the safe shipment of lithium-ion batteries.
71
Page 72
Notes
Page 73

Page 74
74
Page 75

Page 76
Your hearing care professional:
7 613389 288407
Manufacturer:
Sonova AG
Laubisrütistrasse 28
CH-8712 Stäfa
Switzerland
www.phonak.com
029-0787-02/V2.00/2019-06/cu © 2019 Sonova AG All rights reserved
 Loading...