

Phonak Certena micro, Certena micro Petite, Versata micro, Versata micro petite User Manual

www.phonak.com
029-0055-02/V2.00/2009-03/A+W Printed in Switzerland, © Phonak AG, all rights reserved
Certéna micro / Certéna micro Petite
User Guide
0459

2
Contents
Welcome 5
Description 6
Short introduction
Inserting the battery 8
Switching ON/OFF 8
Selecting a hearing program 9
Preparation
Replacing the battery 10
Tamper proof battery compartment (optional) 14
Identifying left and right hearing instruments 16
Inserting your hearing system with
micro tube into your ear 17
Closed domes 19
Inserting your hearing system with
earmold into your ear 21
Fine tuning based on your personal preferences 24
Operation
Switching ON/OFF 25
Hearing programs 26
Synchronized manual control 28
Telecoil (optional) 28
EasyPhone (optional) 29

3
Wireless accessories (optional) 32
myPilot 32
iCom 34
iView 36
Remote control (optional) 37
FM communication (optional) 39
Dynamic FM transmitters 40
Multi-frequency FM receivers 41
MyLink 42
FM Program 43
Maintenance 44
Microphone Protector 44
Micro tube and dome 46
Important points 51
Warning 54
Service and Warranty 55
Phonak distributors worldwide 58

4
This symbol indicates features, options and
accessories which are available for Certéna micro
and not for the Certéna micro Petite version

5
Your new Certéna hearing system uses the mature and
latest advances in digital wireless hearing technology.
Certéna offers you automatic functions providing the
best sound quality, speech understanding and listening
comfort in your daily hearing situations. High-tech
has turned highly sophisticated hearing systems into
convenient devices that are easy to use.
Please read this manual carefully to benefit from
all the features of your new hearing system. Ask your
hearing care professional if you have any questions.
Certéna is a quality product developed by the Swiss
company Phonak, a world leader in hearing technology,
innovation and reliability. With proper care and
usage, your hearing system will support your hearing
and communication needs for many years.
For further information, please visit the Phonak website
www.phonak.com.
Phonak – life is on
Welcome
6
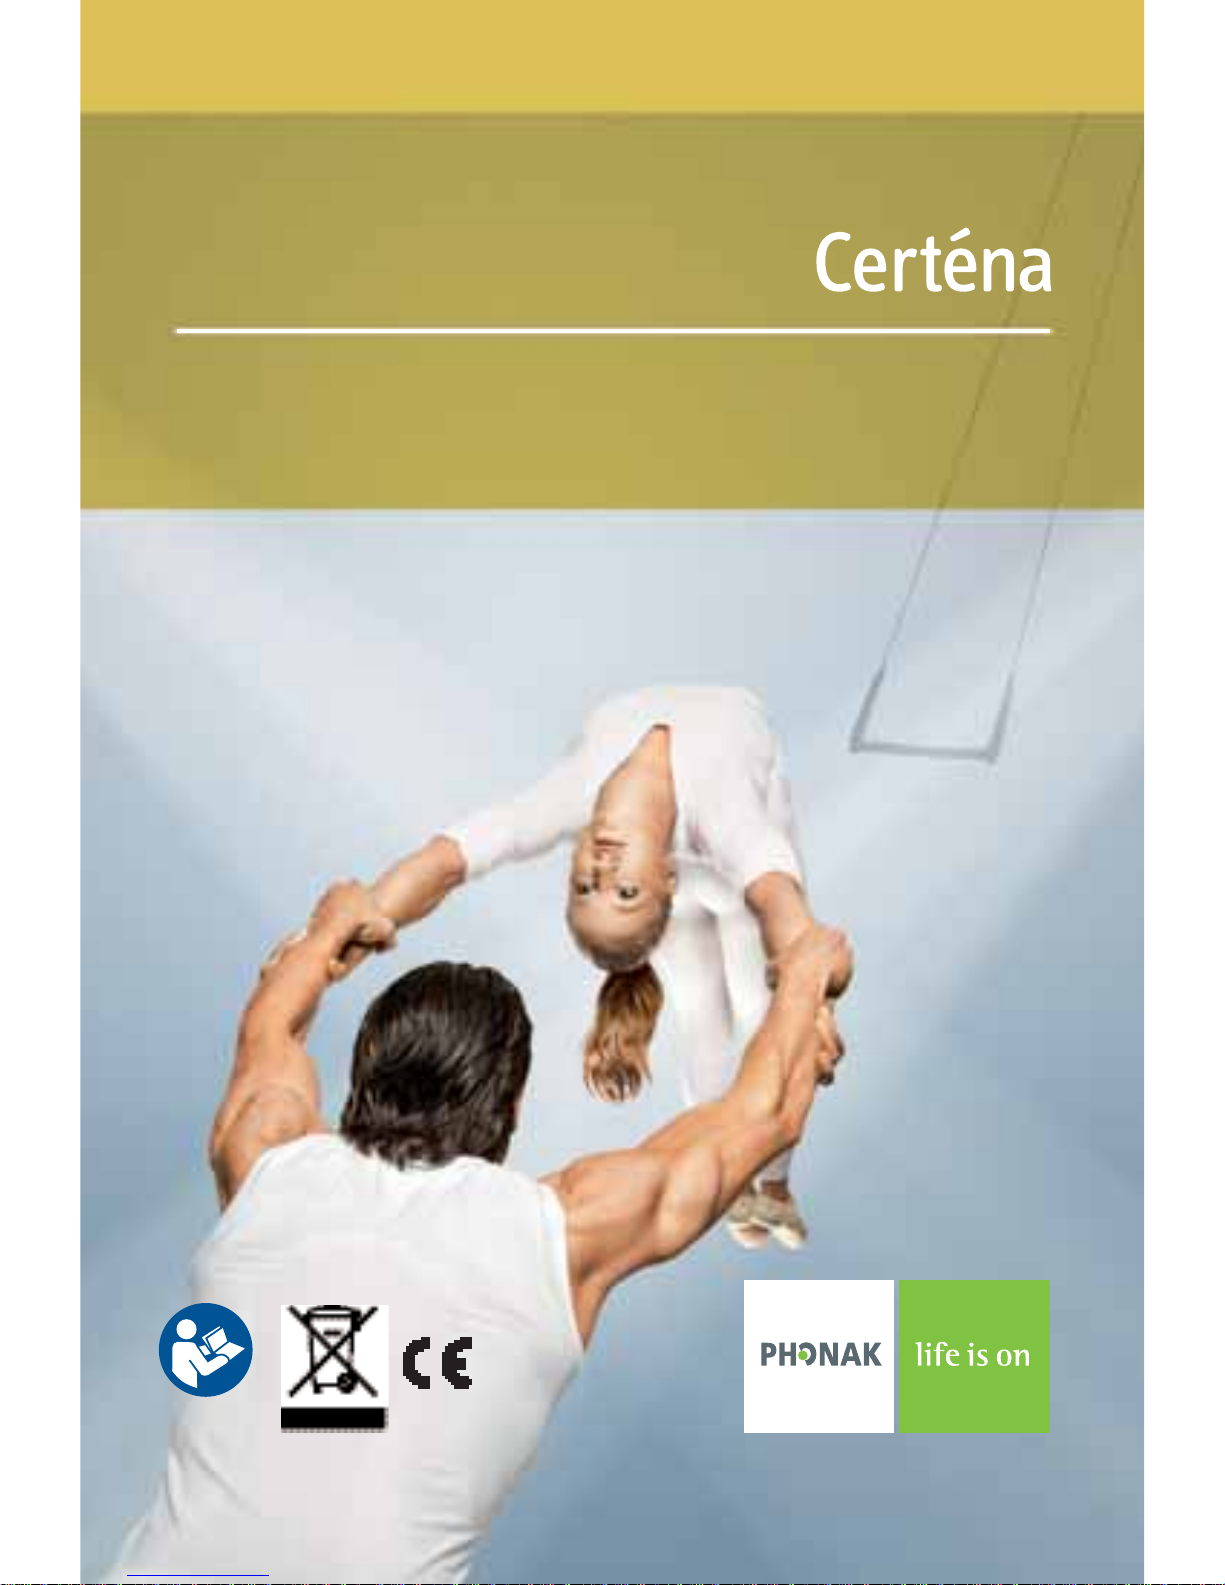
Description
Hearing system with micro tube and dome
햲 Microphone inputs with Microphone Protector
햳 Program switch
햴 Battery compartment with
ON/OFF switch
햵 Micro tube/sound output
햶 Dome
햷 Retention
햵
햶
햲
햴
햳
햷
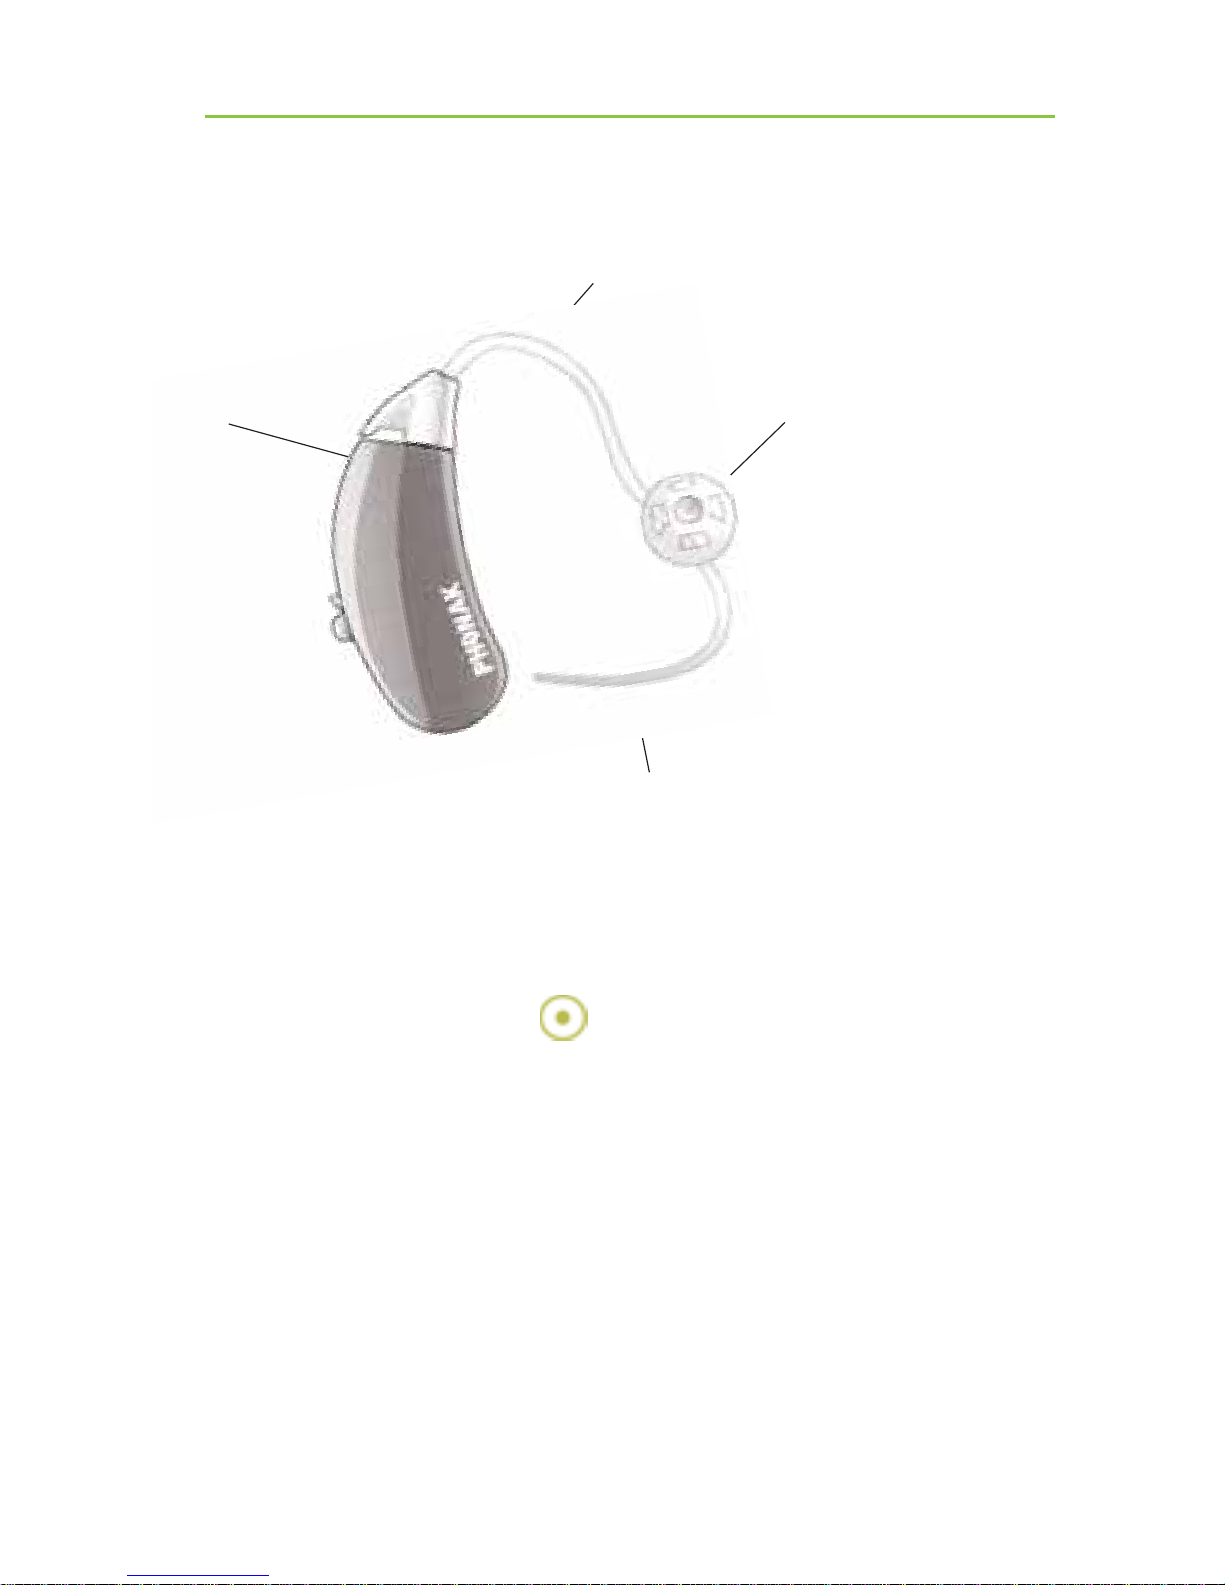
Hearing system
with micro tube
and SlimTip
햲 – 햵 See
micro tube
and dome
햶 Individual SlimTip
햷 Removal handle
Hearing system
with earmold
햲 – 햴 See micro tube
and dome
햵 Hook/
sound output
햶 Individual
earmold
7
햵
햶
햵
햶
햷
햲
햴
햳
햲
햴
햳
8
Short introduction
Inserting the battery
Details see page 10
Switching ON/OFF
Details see page 25
OFF
ON

9
Selecting a hearing program via Toggle
Details see page 26
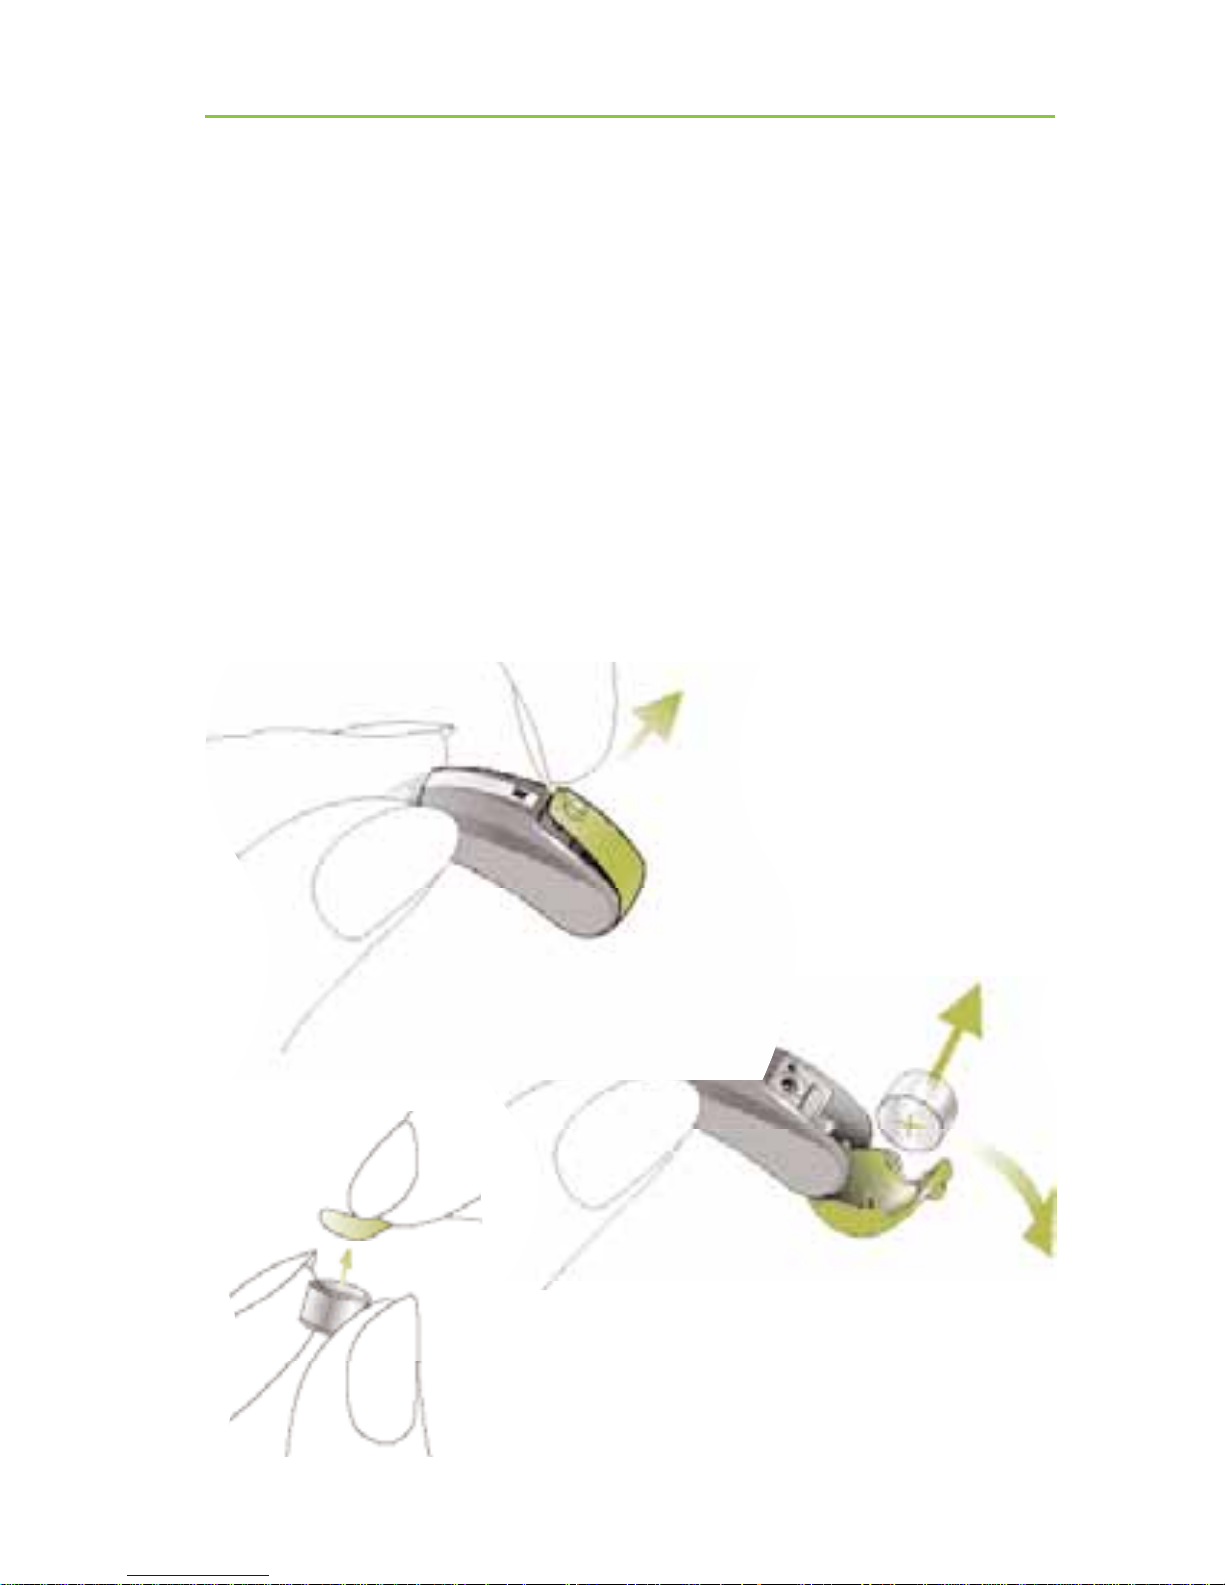
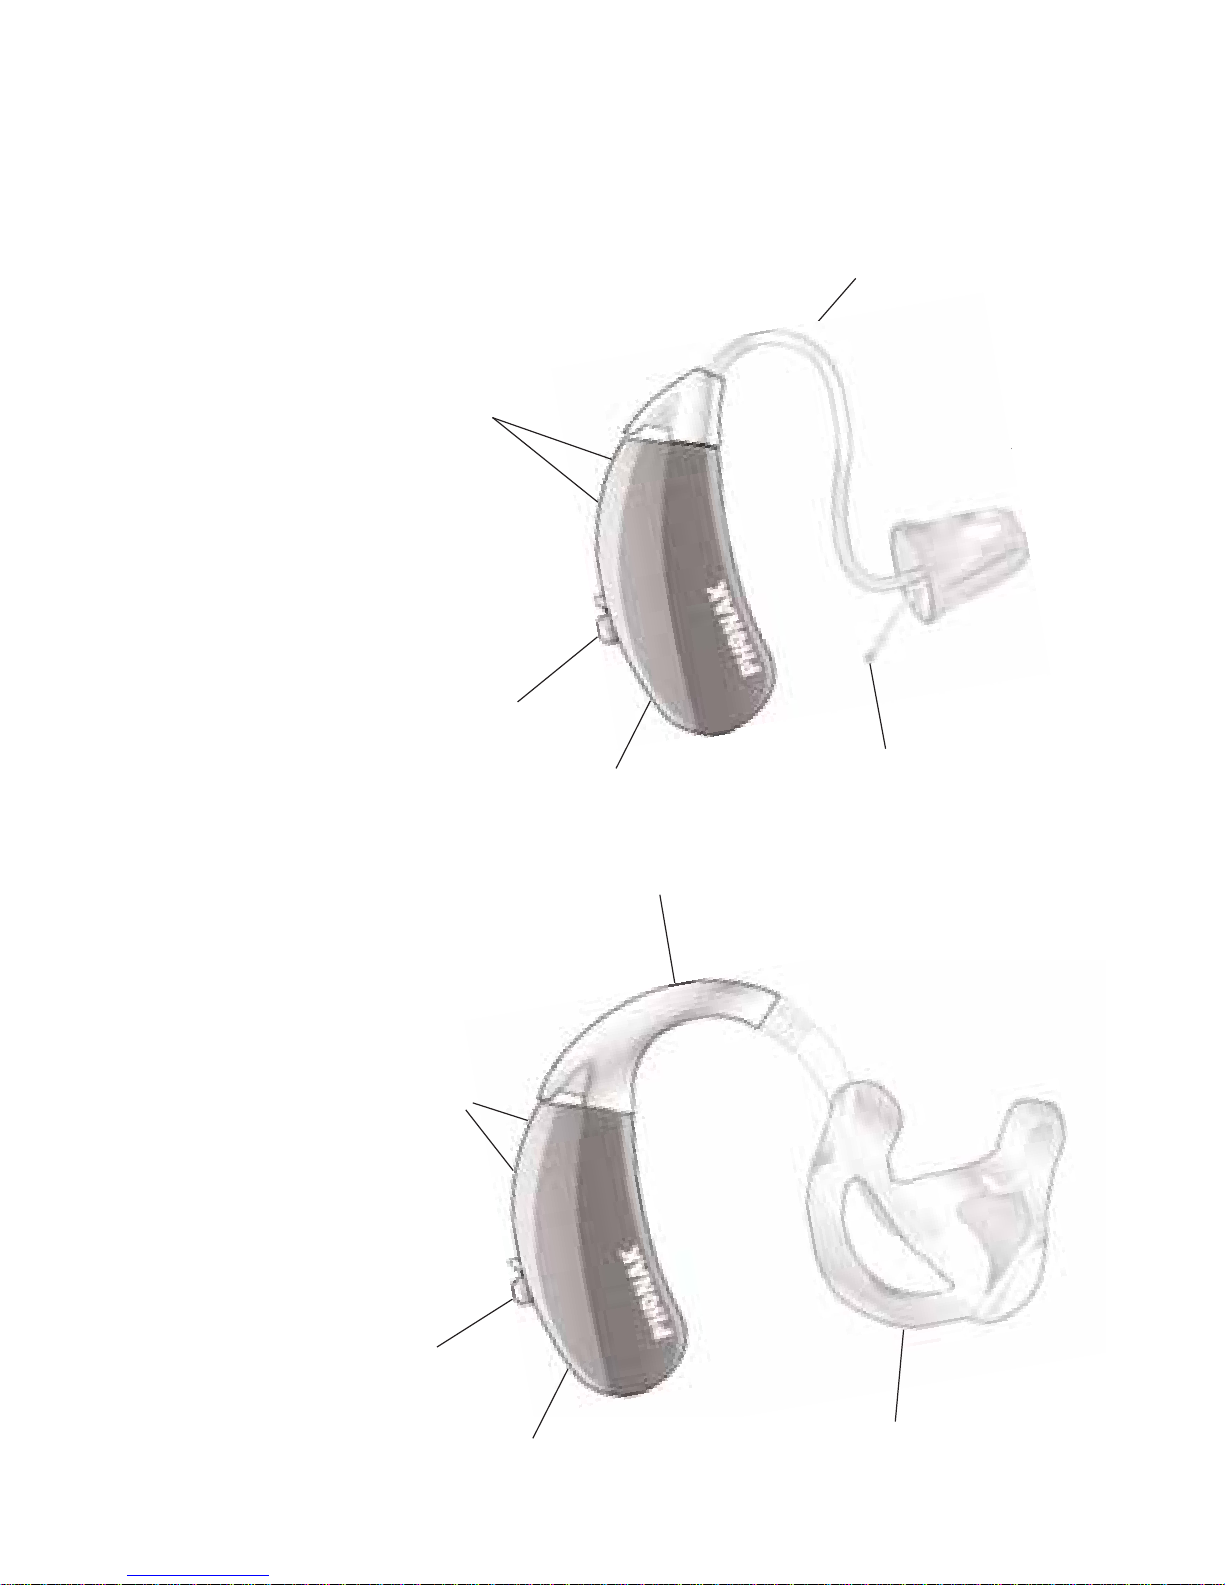
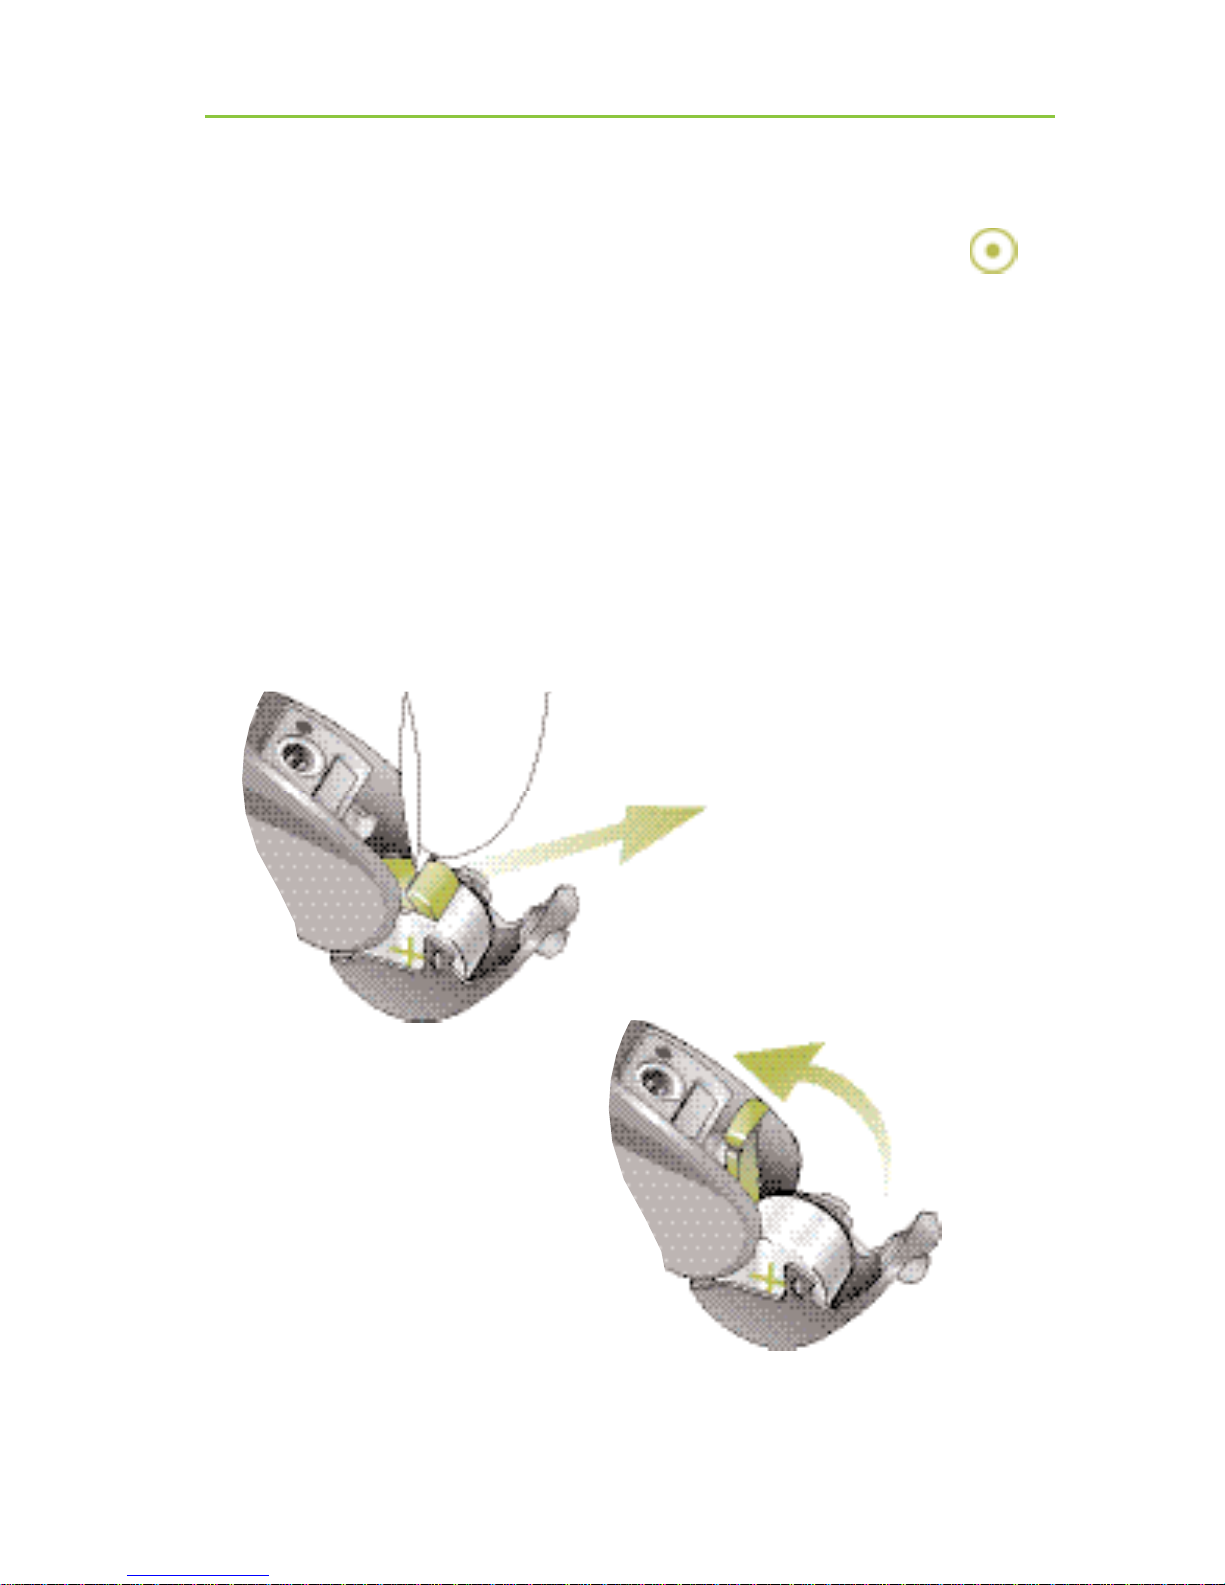
Replacing the battery
Use battery size 13 for your Certéna micro system.
Use battery size 10 or 312 for your Certéna micro
Petite system (see page 12).
Using the nail grip, open the battery compartment
completely and remove the old battery.
Remove the protective foil from
the new battery.
10
Preparation
11
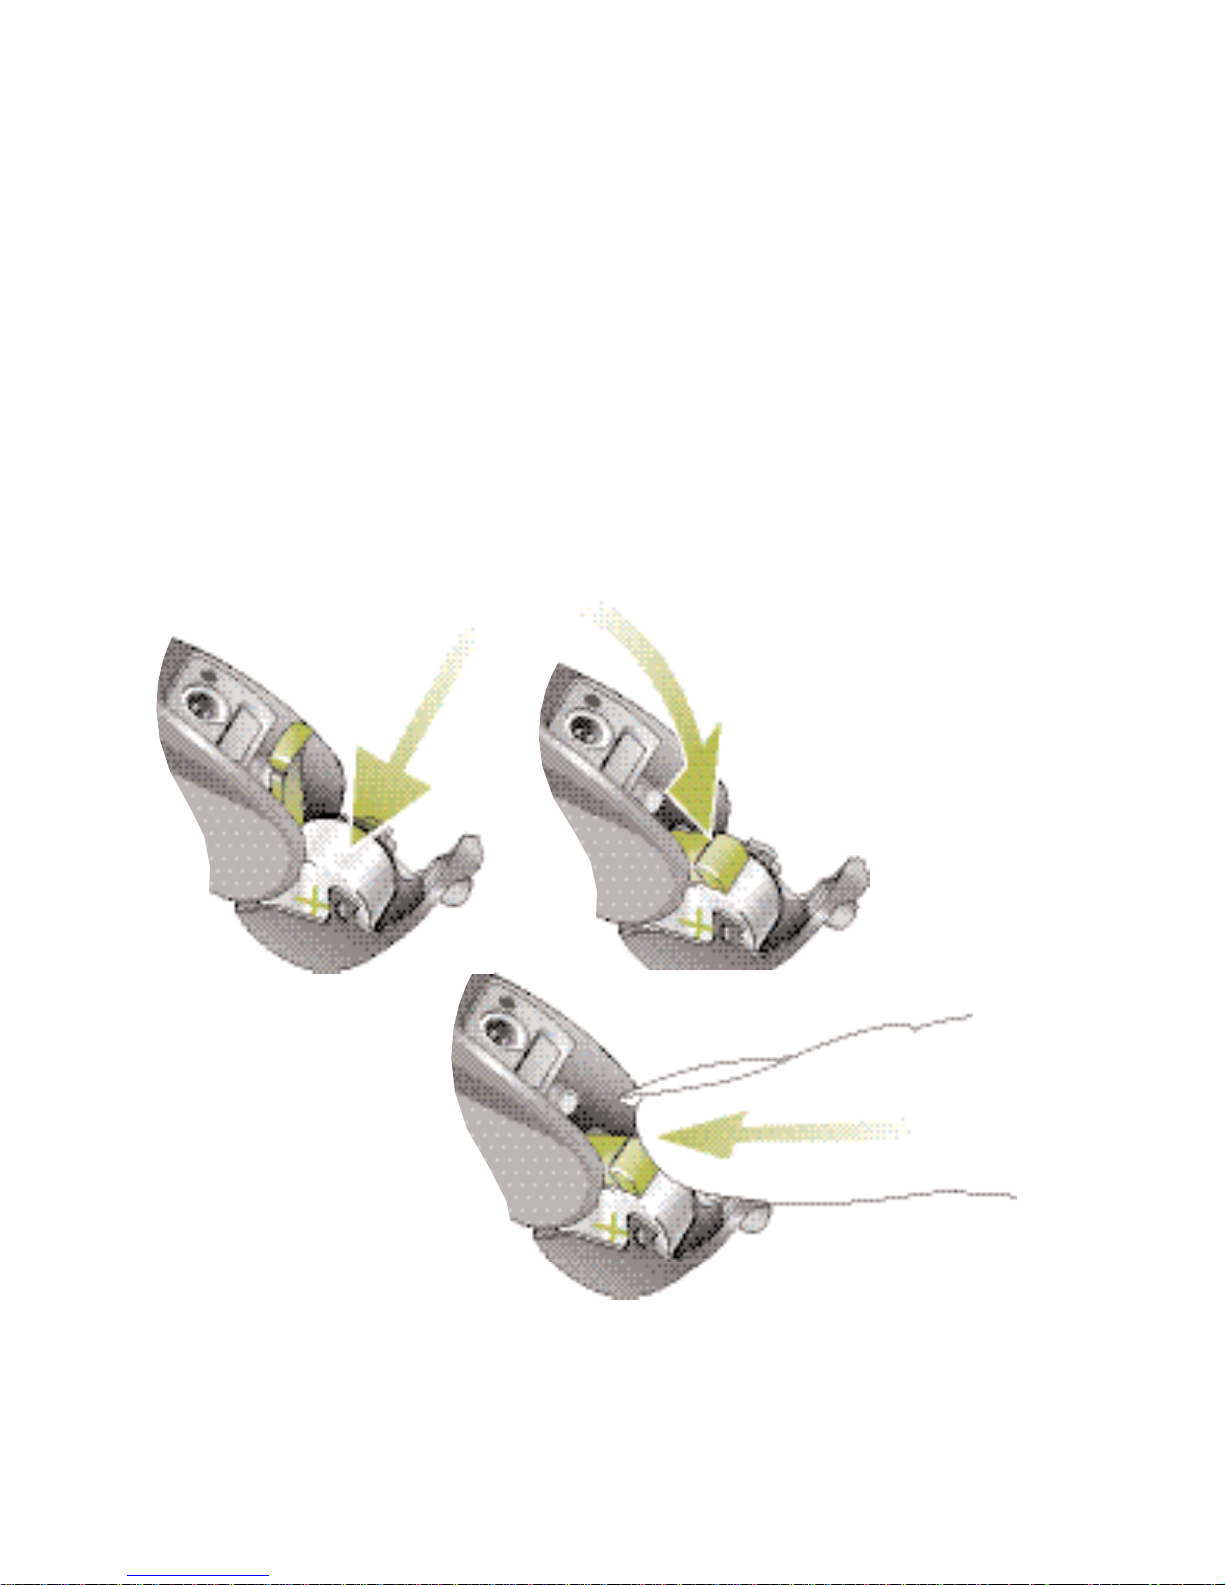
Insert the new battery with the “+” sign (flat side
of the battery) as shown below. The correct
battery orientation can also be seen on the inside
of the battery compartment. Close the battery
compartment.
12
Note:
Your Certéna micro Petite hearing system can be
operated either with size 10 (standard) or size 312
batteries (optional). Your hearing care professional
may modify the devices accordingly. The 312 battery
lasts longer. The 10 battery creates an even smaller
overall instrument size (refer to picture below).
Preparation
312 battery10 battery
13
Handle the battery compartment with care and
do not use excessive force.
If there is any resistance when closing the
compartment, ensure that the battery is
inserted correctly. The compartment may not
close properly if the battery is upside down,
and the instrument will not work.
When your hearing system is not in use, leave
the battery compartment open to allow any
moisture to evaporate.
Low battery warning
An acoustic signal gives you an early warning that
the battery is approaching exhaustion. You have
approximately 30 minutes to replace the battery after
hearing the signal. This reserve may be higher
and the hearing system will repeat the low battery
warning approximately every 30 minutes.
Please note that the battery consumption increases
with regular use of the myPilot command center ,
the iCom communication interface or the remote controls KeyPilot2 and WatchPilot2.
14
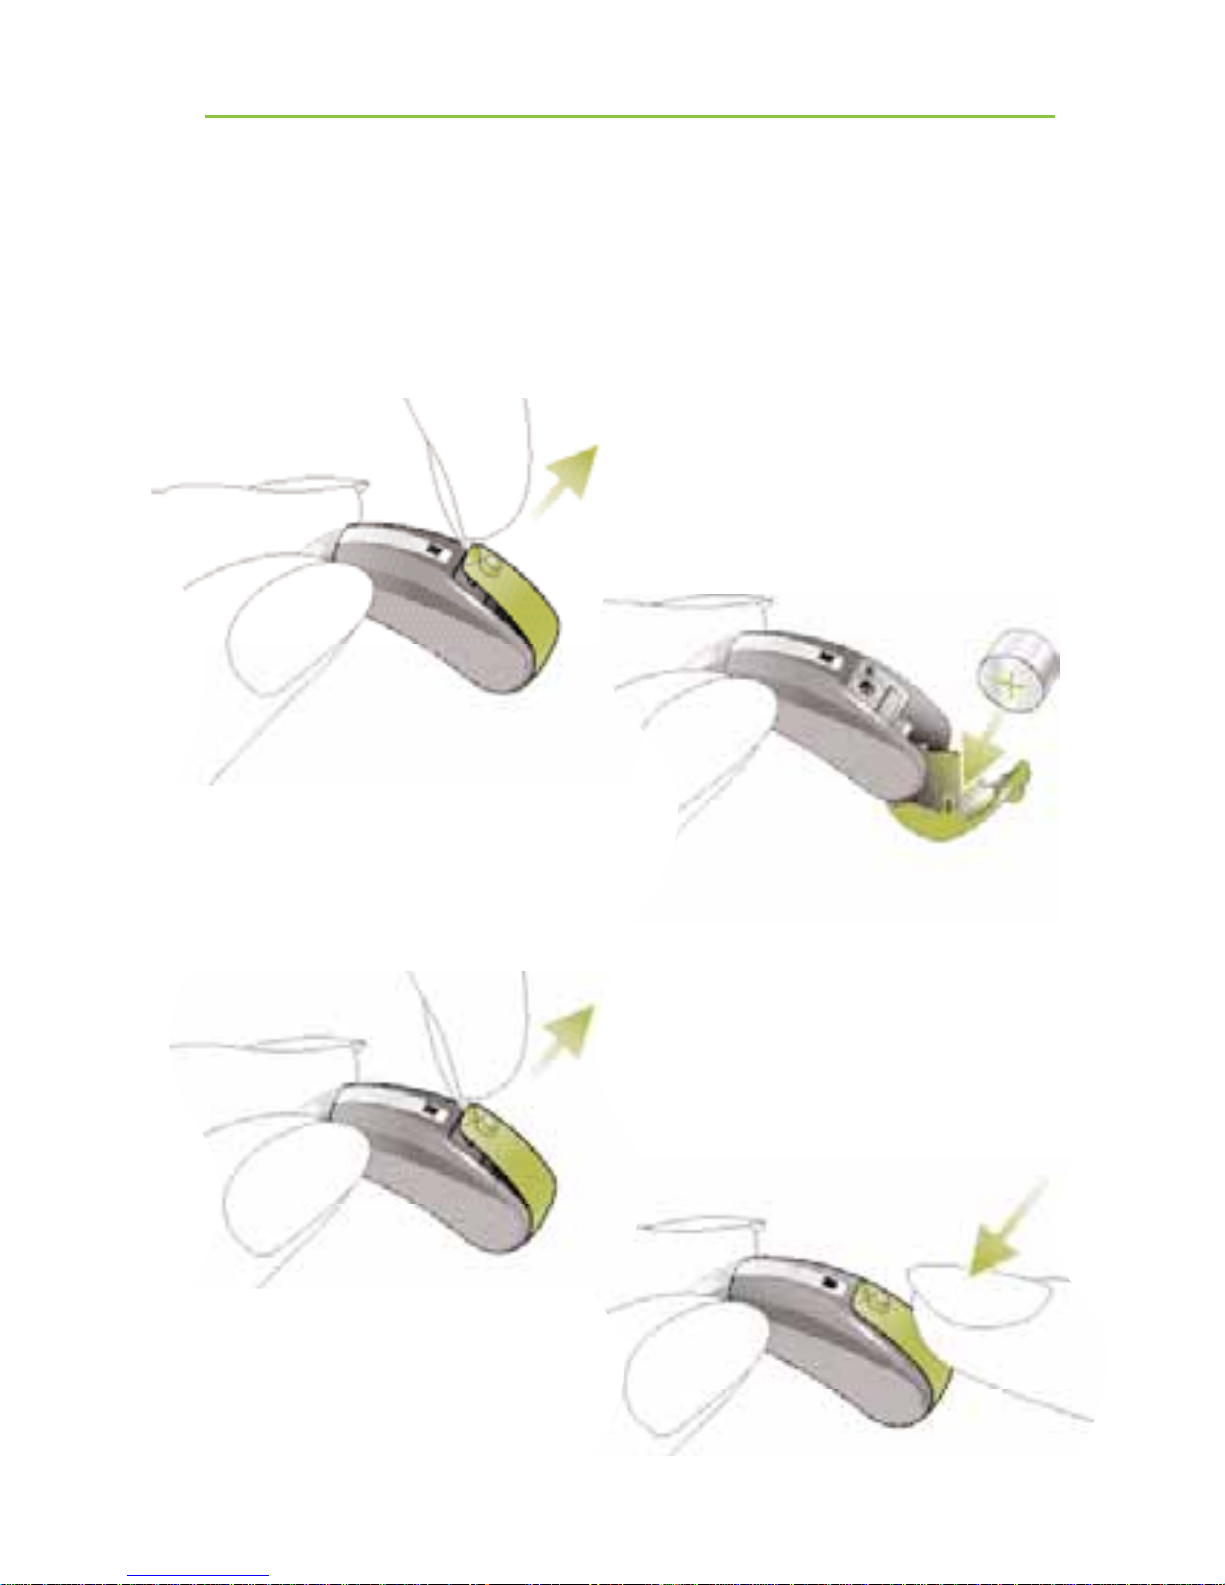
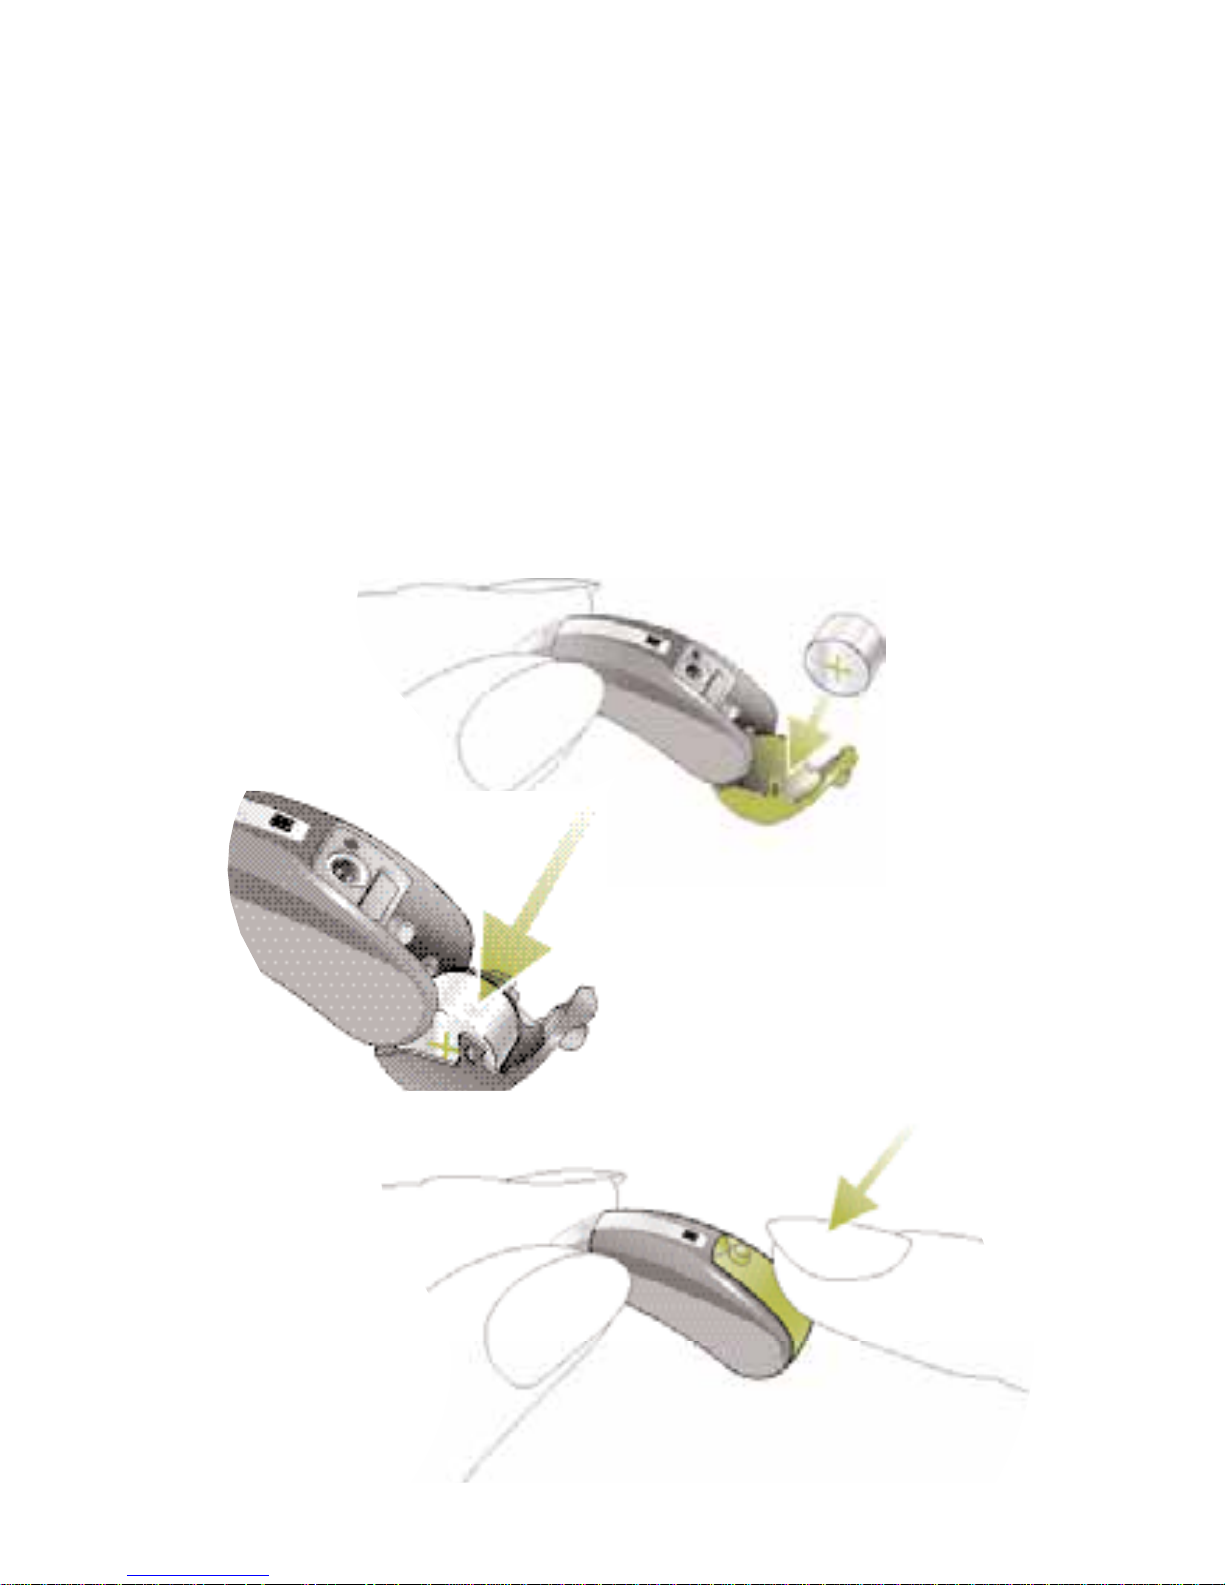
Tamper proof battery compartment (optional)
The battery is locked inside the battery compartment
for safety reasons. The latch can easily be opened with
a fingernail. Place the fingernail in the groove and pull
the latch away from the hearing instrument 햲 and
then push it upwards 햳.
Preparation
햲
햳
“click”
15
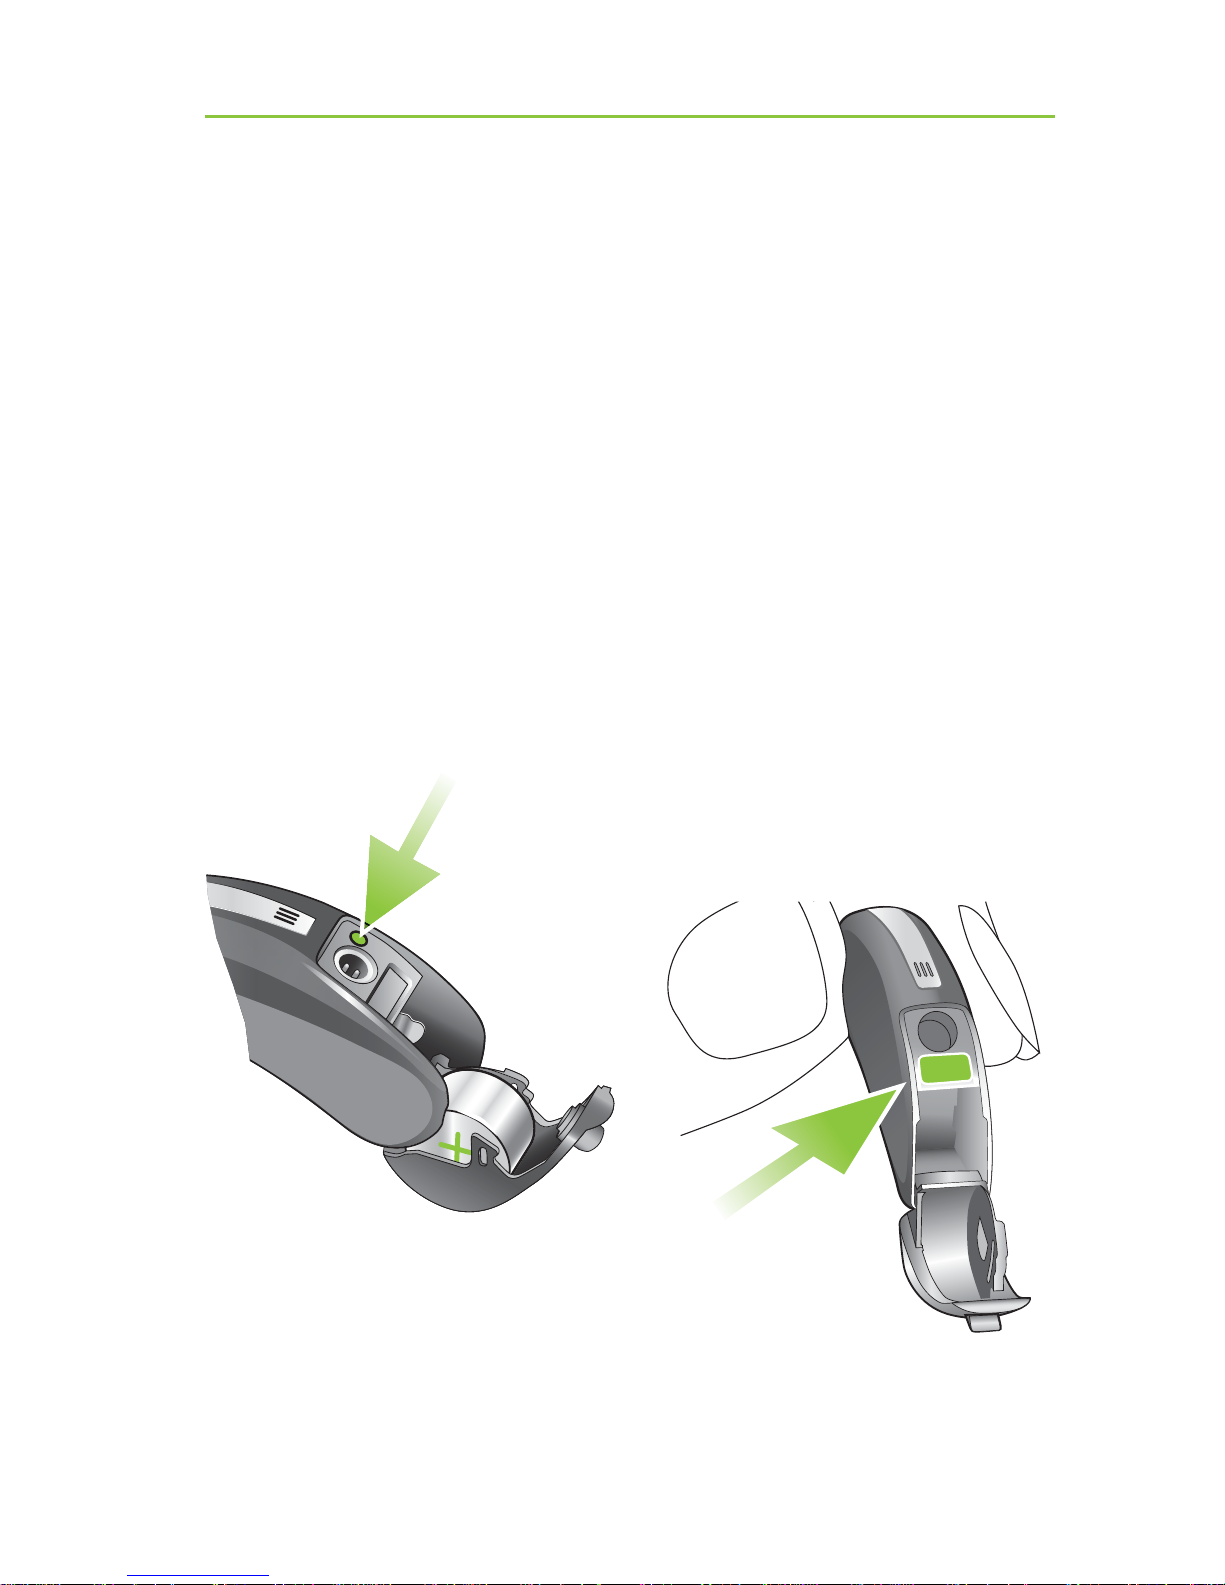
The battery can only be inserted when the latch is open
햴. Move the latch over the inserted battery so that
it lies against it 햵. Lock the battery by pushing the
latch towards the hearing instrument with your finger
until it "clicks" into its final position 햶. Before you
close the battery compartment, check that the latch is
locked in position and the battery can’t be removed.
Warning: The battery latch must be placed back
over the battery and locked before closing the battery
compartment.
햴
햵
햶“click”
16
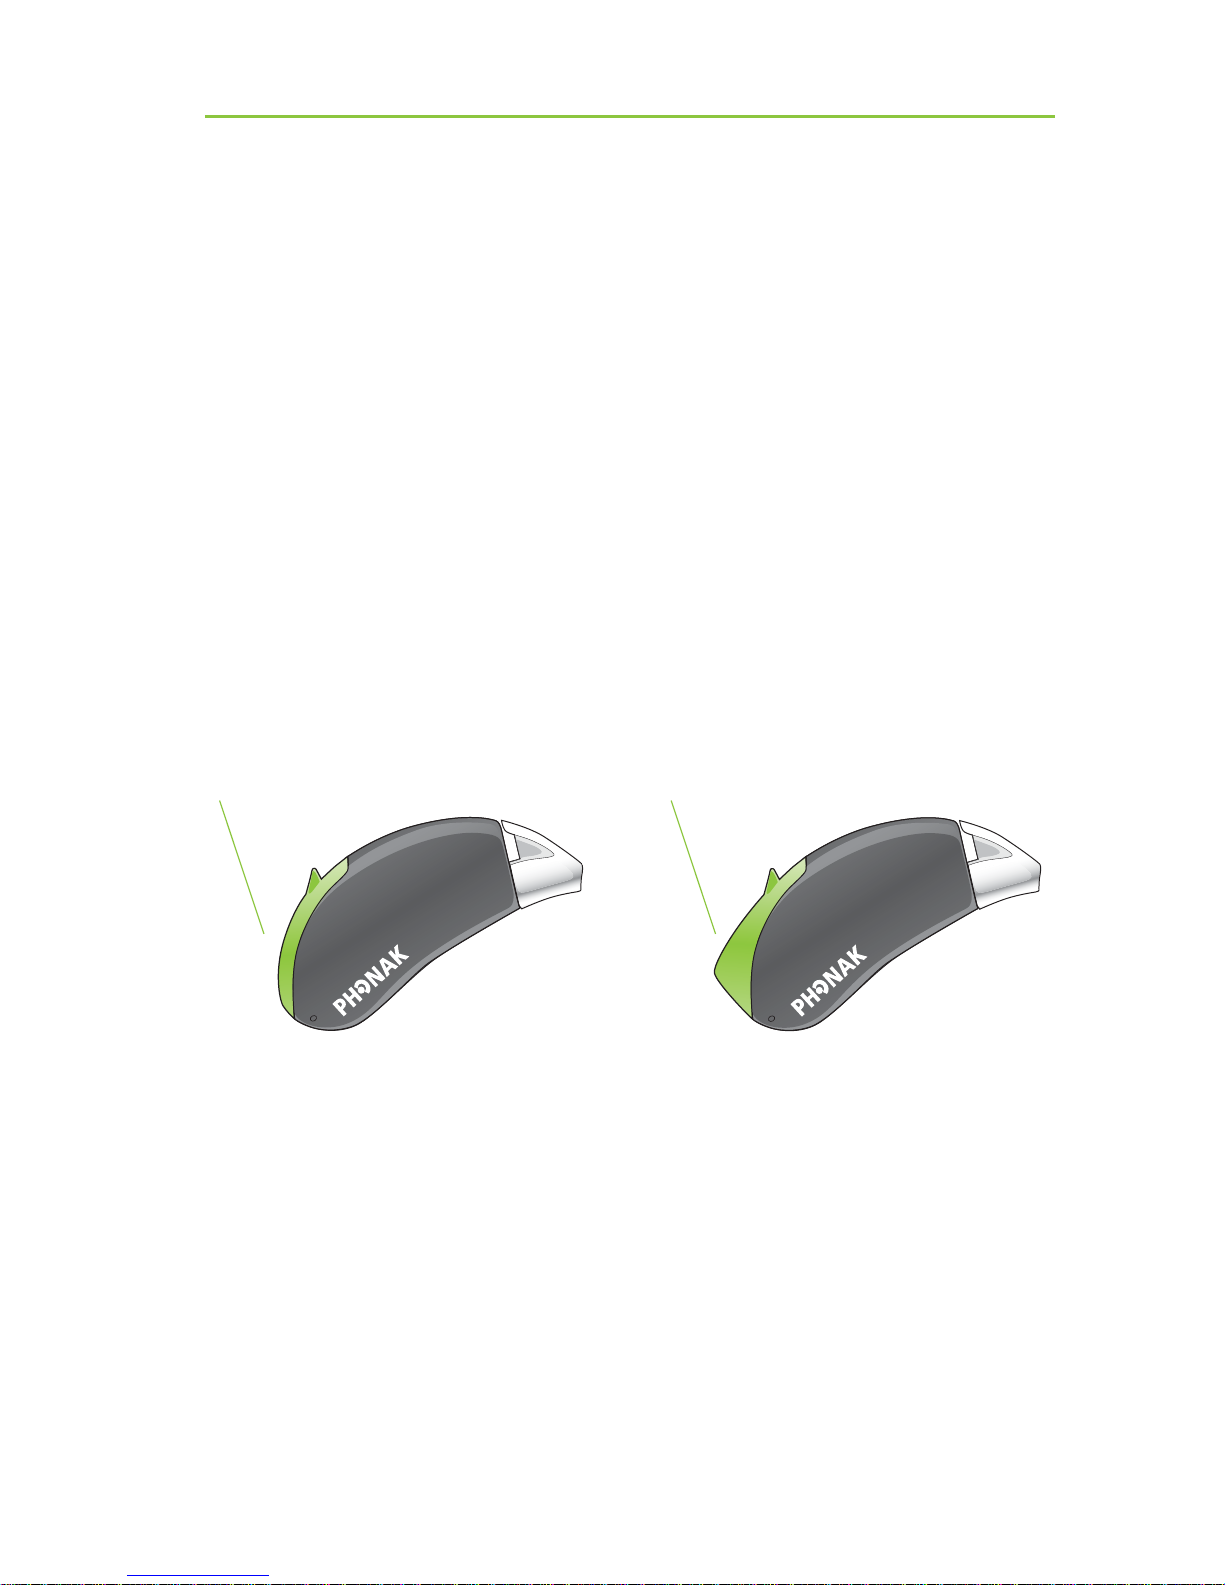
Identifying left and right hearing instruments
It is important to use the correct hearing instrument for
each ear.
Your hearing care professional can mark the hearing
instruments for you. The color code is visible when
the battery compartment is opened. It will identify left
and right hearing instruments as follows:
Certéna micro
Certéna micro Petite
red = right hearing instrument
blue = left hearing instrument
Preparation
17
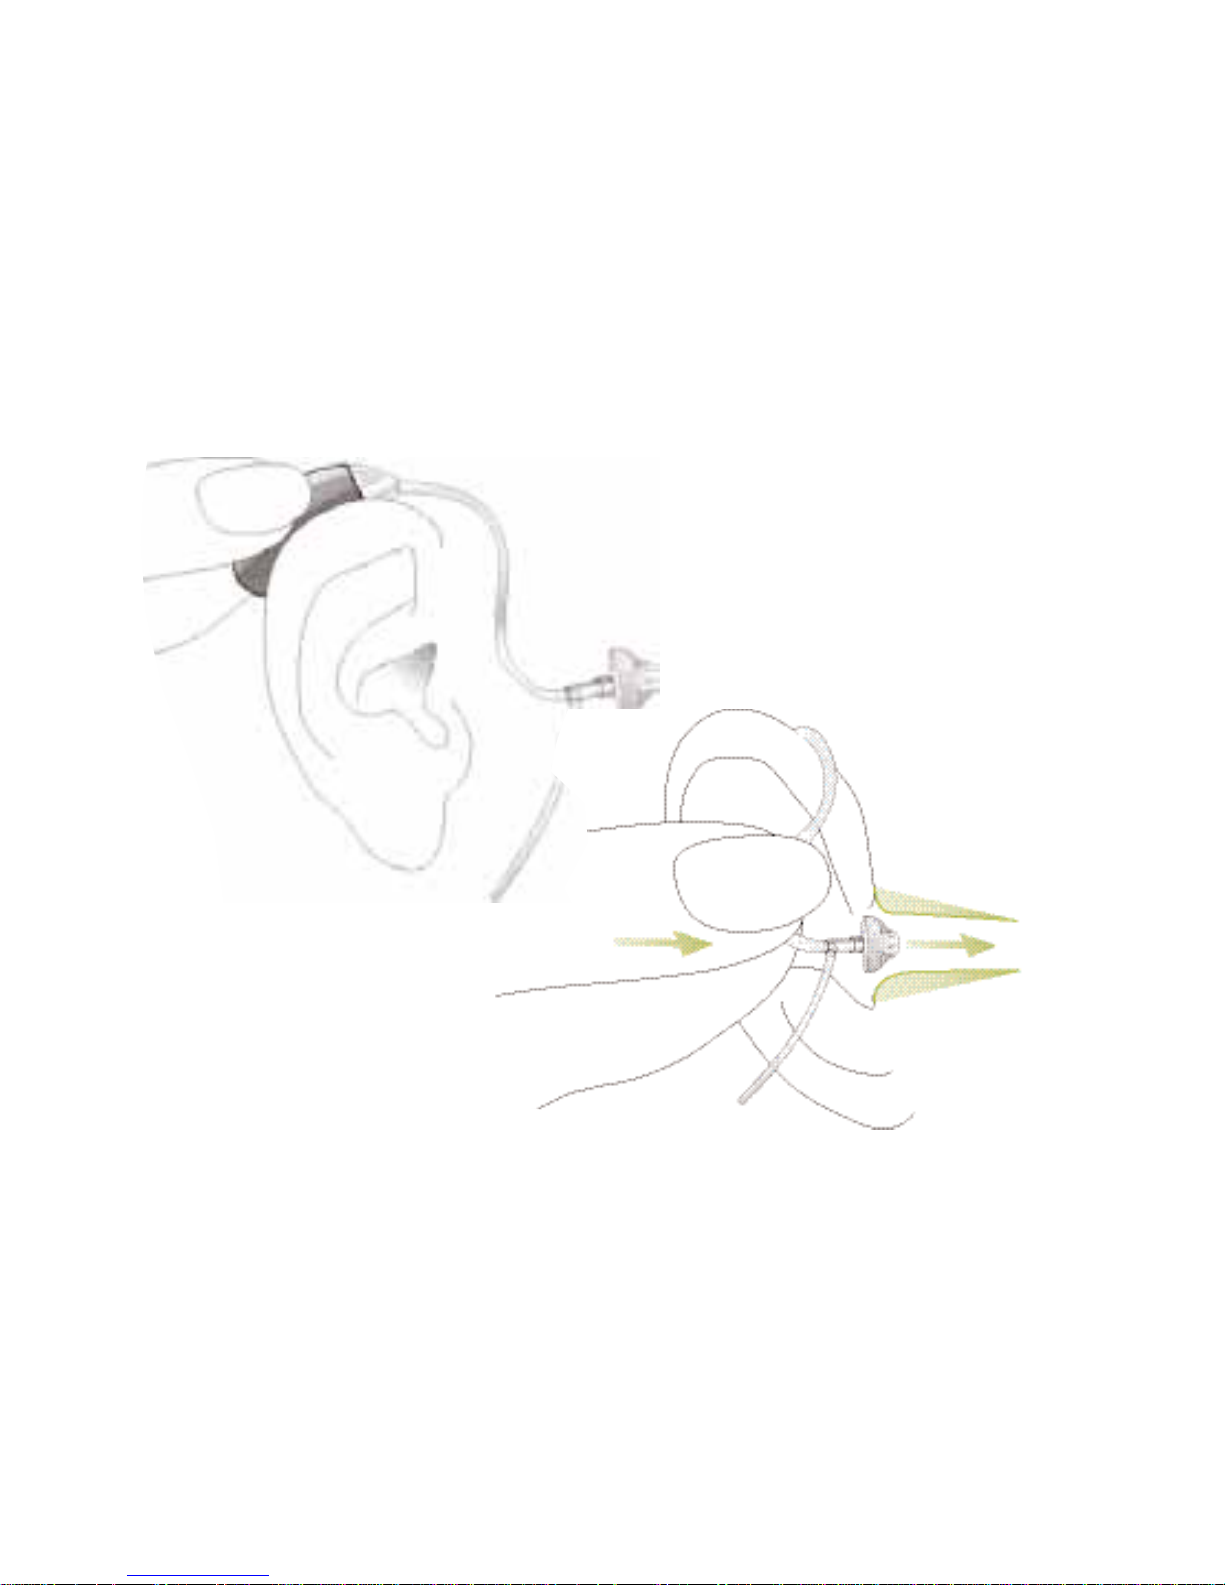
Inserting your hearing system with micro tube
into your ear
Open dome and SlimTip
Place the hearing
instrument over the top
of your ear 햲.
Hold the micro tube where it attaches to the dome
or SlimTip 햳 and gently push the dome or SlimTip into
your ear canal. The dome or SlimTip should be placed
far enough into the ear so that the micro tube lies
flush with your head.
햳
햲
18
Place the retention tail (if available) of the micro tube
into the bowl part of your ear 햴.
To remove your hearing instrument, grasp the micro
tube near the dome and pull it out of your ear gently
but firmly.
In very rare cases, the dome can remain in the
ear canal when removing the micro tube from
the ear. In the unlikely case that any parts remain
in the ear canal, it is strongly recommended to
see a medical specialist for safe removal.
Preparation
햴

19
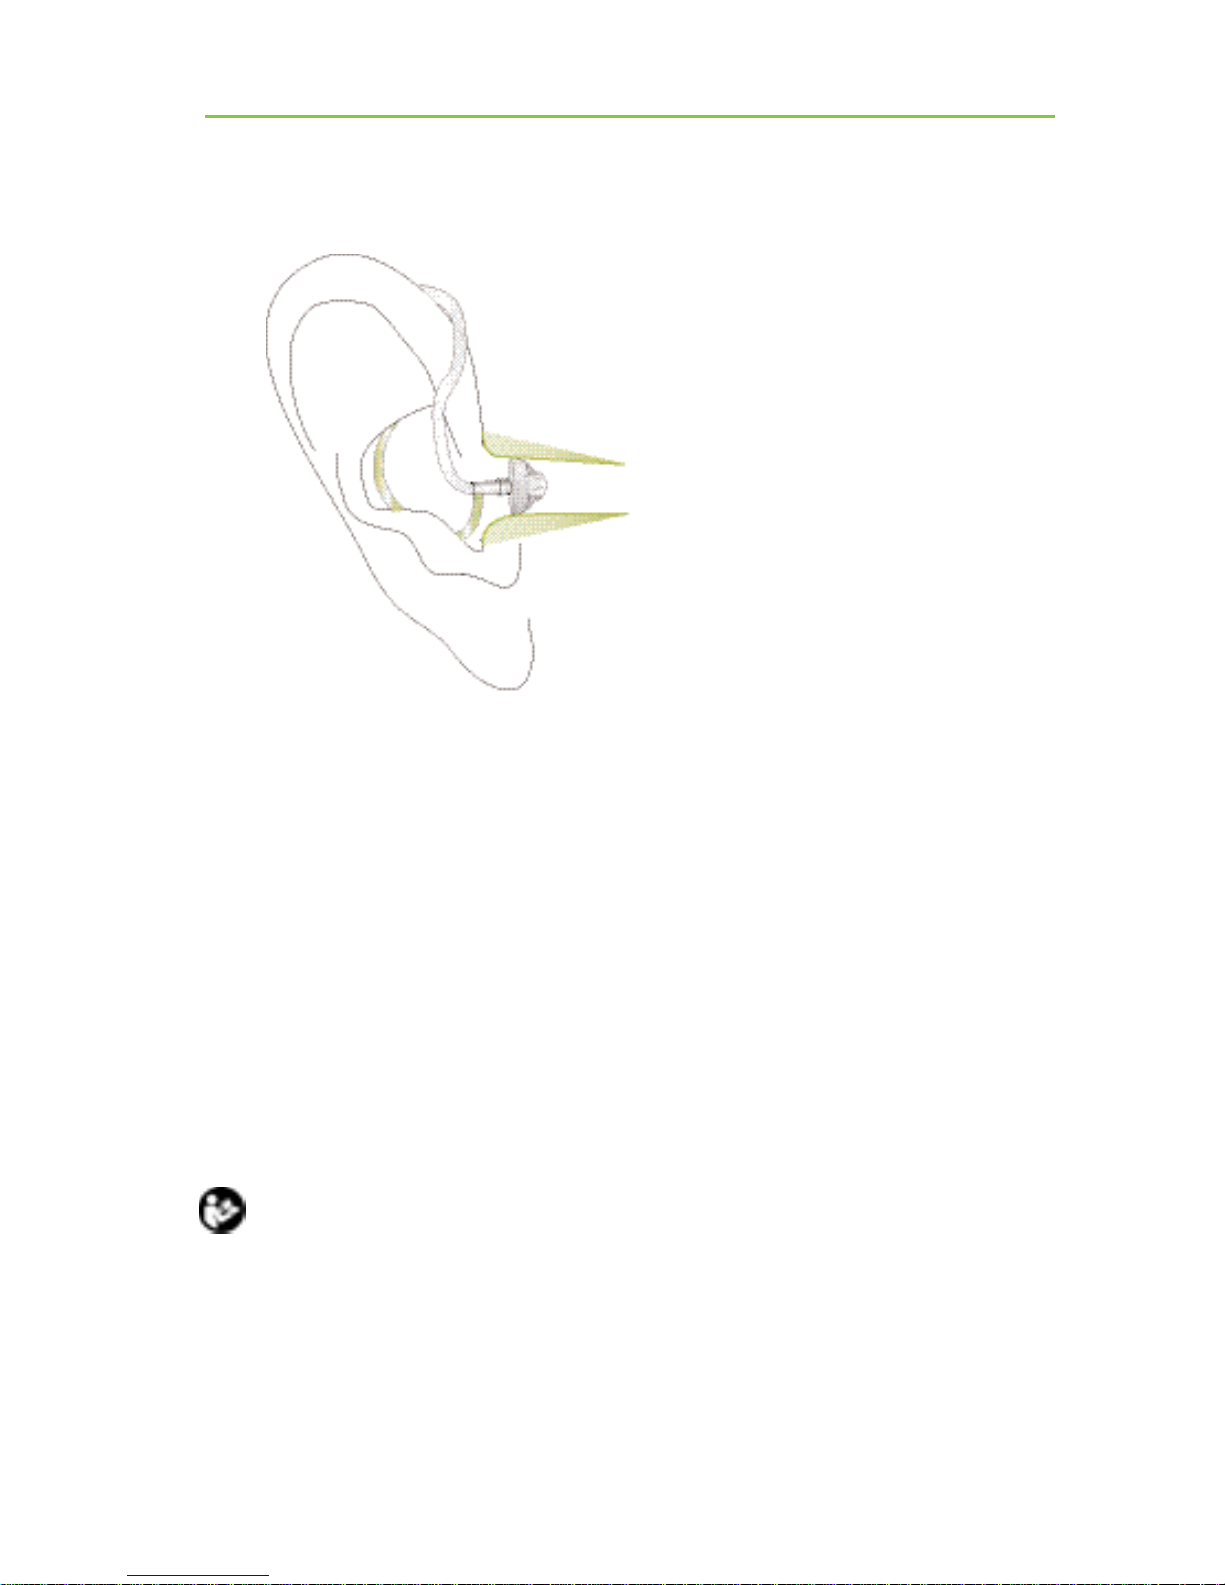
Closed domes
The closed dome has a different design than other domes
(refer to pictures). The closed dome consists of two
fins overlapping each other. Before inserting the closed
dome into the ear canal, it is important to check the
position of these fins. The larger fin must be positioned
over the smaller fin 햵. If the position is incorrect 햶,
you can easily adjust it. With one finger, gently bend
the bigger fin forwards and then back again so that
it overlaps the smaller one 햷. Make also sure that the
slit of the closed dome is in a horizontal position on
the tube unit 햵. Your closed dome is now ready to be
inserted into the ear.
 Loading...