

Page 1

IVT BlueSoleil™
User Manual
Version: 1.4
This document describes how to use IVT BlueSoleil .
Page 2

IVT BlueSoleil™ User Manual
Contents
1 BlueSoleil™ Introduction............................................................................1
1.1Profiles....................................................................................................1
1.2New features in BlueSoleil 1.4.....................................................................2
1.3Features in BlueSoleil 1.2...........................................................................2
2 BlueSoleil™ Basic Operations.....................................................................4
2.1Start BlueSoleil! ......................................................................................4
2.2 Exit BlueSoleil! ........................................................................................4
2.3 BlueSoleil! Main Window...........................................................................5
2.4Service Window.........................................................................................8
2.5What You Need To Do Before Build A Connection.........................................10
2.6Start Or Stop A Bluetooth Service Connection..............................................14
3 Bluetooth Security....................................................................................16
3.1Introduction...........................................................................................16
3.2BlueSoleil Security Configuration...............................................................17
4 Personal Area Networking........................................................................22
4.1Introduction...........................................................................................22
4.2Communication Between Two Computers....................................................23
4.3Access LAN Through PAN-NAP...................................................................29
4.4Access LAN Through IVT BlueSoleil!..........................................................33
4.5Access Internet through IVT BlueSoleil!.....................................................35
4.6PAN Configuration...................................................................................36
5 Dial-Up Networking..................................................................................38
5.1Introduction...........................................................................................38
5.2Connect to a Dial-up Gateway from a Computer...........................................38
5.3Settings for Dial-up Networking Profile (client side) in Windows98/Me.............41
6 Bluetooth Serial Port................................................................................46
6.1Introduction...........................................................................................46
6.2Connect Two Computers...........................................................................46
6.3Use SPP to Print a Document.....................................................................48
6.4Use a cellphone to control a computer........................................................48
6.5SPP Configuration....................................................................................50
7 Bluetooth File Transfer.............................................................................52
7.1Introduction...........................................................................................52
7.2Transfer files to/from a Computer..............................................................52
7.3FTP Configuration....................................................................................55
8 LAN Access...............................................................................................56
8.1Introduction...........................................................................................56
8.2Access a Local Area Network (LAN)............................................................56
8.3Access a LAN via a LAN Access Point..........................................................60
8.4Settings for LAN Access Profile (client side) in Windows98/Me........................61
8.5Usage of LAN Access Profile (server side) in Windows98/Me...........................65
9 Object Push..............................................................................................70
9.1Introduction...........................................................................................70
9.2Transfer Objects from a Computer to a Bluetooth Cellular Phone....................70
Copyright © 2001, IVT Corporation, http://www.ivtcorporation.com
All specifications are preliminary and subject to change without notice.
2
Page 3

IVT BlueSoleil™ User Manual
9.3Transfer Objects from a Bluetooth Cellular Phone to a Computer....................74
9.4Transfer Objects between Two Computers...................................................75
9.5Configure OPP Service..............................................................................76
9.6Using OPP in Microsoft Outlook..................................................................77
10 Synchronization.....................................................................................80
10.1 Introduction.........................................................................................80
10.2 Exchange PIM Data with a Cellular Phone.................................................80
10.3 Set up SYNC Connection between Two Computers.....................................81
10.4 Synchronization Configuration................................................................83
10.5 Using Synchronization in Outlook............................................................84
11 Hardcopy Cable Replacement................................................................87
11.1 Introduction.........................................................................................87
11.2 Print a Document Using a Bluetooth Printer..............................................87
12 Human Interface Device........................................................................89
12.1 Introduction.........................................................................................89
12.2 Connect a Computer to a Bluetooth Mouse...............................................89
12.3 Connect a Computer to a Bluetooth Keyboard...........................................91
13 FAX........................................................................................................94
13.1 Introduction.........................................................................................94
13.2 Connect to a FAX Gateway from a Computer............................................94
13.3 Using FAX software on a bluetooth computer............................................94
14 Headset.................................................................................................96
14.1 Introduction.........................................................................................96
14.2 Create an audio connection between computer and Headset.......................96
14.3 Using Headset Profile in BlueSoleil...........................................................98
15 Advanced Audio Distribution...............................................................100
15.1 Introduction.......................................................................................100
15.2 Play music between computer and AV Headphone wirelessly.....................100
15.3 Play music between two computers wirelessly.........................................103
16 Basic Imaging.....................................................................................107
16.1 Introduction.......................................................................................107
16.2 Push an image from a digital still camera...............................................107
16.3 Control a digital still camera remotely....................................................108
17 Connection Shortcut............................................................................110
17.1 Introduction.......................................................................................110
17.2 How to use Connection Shortcut...........................................................110
18 Bluetooth Glossary..............................................................................113
Copyright © 2001, IVT Corporation, http://www.ivtcorporation.com
All specifications are preliminary and subject to change without notice.
3
Page 4

IVT BlueSoleil™ User Manual
1 BlueSoleil Introduction
BlueSoleil is a Windows-based Bluetooth Wireless software suite from IVT
Corporation. It is fully compliant to the latest Bluetooth SIG specifications.
BlueSoleil incorporates Bluetooth and computer technologies to enable users to
wirelessly access computing devices, form networks, and exchange information.
1.1 Profiles
BlueSoleil V1.4 includes ten Bluetooth profiles. The following table indicates
which of these profiles is available for client and server devices.
Profile Description Client Server
PAN Personal Area Networking
SPP Serial Port
DUN Dial-Up Networking
LAP LAN Access
FTP File Transfer
HID Human Interface Device
HCRP Hardcopy Cable Replacement
OPP Object Push
SYNC Synchronization
AG Audio Gateway
AV Audio Source
Audio Sink
BIP Basic Imaging
BlueSoleil supports more than ten Bluetooth chip-sets and HCI interfaces
including USB, UART, PCMCIA and Compact Flash.
IVT BlueSoleil supports:
Windows 2000/XP
Windows 98SE/Me
This manual describes how to use BlueSoleil :
How to start and exit BlueSoleil .
How to navigate the Main Window and Service Window.
How to use the Bluetooth profiles.
Copyright © 2001, IVT Corporation, http://www.ivtcorporation.com
All specifications are preliminary and subject to change without notice.
1
Page 5

IVT BlueSoleil™ User Manual
1.2 New features in BlueSoleil 1.4
BlueSoleil version 1.4 is ready now with even more exciting new features,
multimedia profiles are added into BlueSoleil.
They include:
Headset
With this feature, users can use Bluetooth Headset to listen to music, to record
sound or to chat with others. Headset increases the user"s mobility.
Audio/Video
With this feature, users can listen to stereo music with any media player
wirelessly between Bluetooth enabled computers or Bluetooth enabled
computer and Bluetooth Stereo headphone.
Basic Image
With this feature, users can push an image from a digital still camera to a
computer, or control a digital still camera remotely from a computer.
1.3 Features in BlueSoleil 1.2
BlueSoleil version 1.2.0 is ready with exciting new features, aiming at making
Bluetooth more easy to use for end user. Less steps is required to setup wireless
connections. User can even do not care what is Bluetooth. Anyway, Bluetooth is
just a kind of connecting method. So, please just have fun from all these new
functions.
They include:
Seamless Integration with Windows
This is an important improvement to make it more easy to use Bluetooth.
Generally, users do not care about what is Bluetooth and how can they connect
to a Bluetooth device. From users' point of view, they just want to print a
document, open a serial port, dial-up to Internet and send a FAX etc. To make
this, BlueSoleil automatically setup Bluetooth connections for users. There is no
need to setup connection before using Bluetooth anymore.
Integration with MS Outlook for Object Push and Synchronization
With this feature, contact cards and email messages can be sent or
synchronized from Outlook directly via Bluetooth. Received cards and other
information items will be imported to Outlook automatically.
Shortcut on Windows Desktop
Windows shortcut is introduced here to let user to be able to setup Bluetooth
connection when they want by just double- clicking them. It makes Bluetooth
connection extremely simple.
Security 2
With this feature, users can manage local Bluetooth services in a flexible way.
Authentication, encryption and authorization can be configured based on every
service. Users can set which remote device can access local services and which
not.
FAX
FAX enable users to send a FAX from PC side via Bluetooth cellular phone or
Bluetooth FAX machine wirelessly.
Network Address Translation, Network Access Point, and DHCP server
in PAN
Copyright © 2001, IVT Corporation, http://www.ivtcorporation.com
All specifications are preliminary and subject to change without notice.
2
Page 6

IVT BlueSoleil™ User Manual
With these functions, users can setup ad-hoc Personal Area Network quickly
and share the Internet accessing among computer.
More Bluetooth Serial Ports
More Bluetooth Serial Ports are supported, with 4 Bluetooth Serial Ports for
out-going connections and 2 Bluetooth Serial Ports for incoming connections.
Mobile HID
With this feature, users can make cellular phones like Ericsson T39 or T68 to
work like a mouse and keyboard. Users can remotely control their PC to show
Power Point etc.
Copyright © 2001, IVT Corporation, http://www.ivtcorporation.com
All specifications are preliminary and subject to change without notice.
3
Page 7
IVT BlueSoleil™ User Manual
2 BlueSoleil™ Basic Operations
2.1 Start BlueSoleil™
After installing BlueSoleil!, there are two ways to start the program:
1. A BlueSoleil! shortcut icon on the Windows desktop.
2. An IVT BlueSoleil program group entry in the Windows" Start | Programs menu.
Double-click the BlueSoleil shortcut icon on the desktop or click the BlueSoleil!
menu item on the Start | Programs | IVT BlueSoleil menu to start the
BlueSoleil! software.
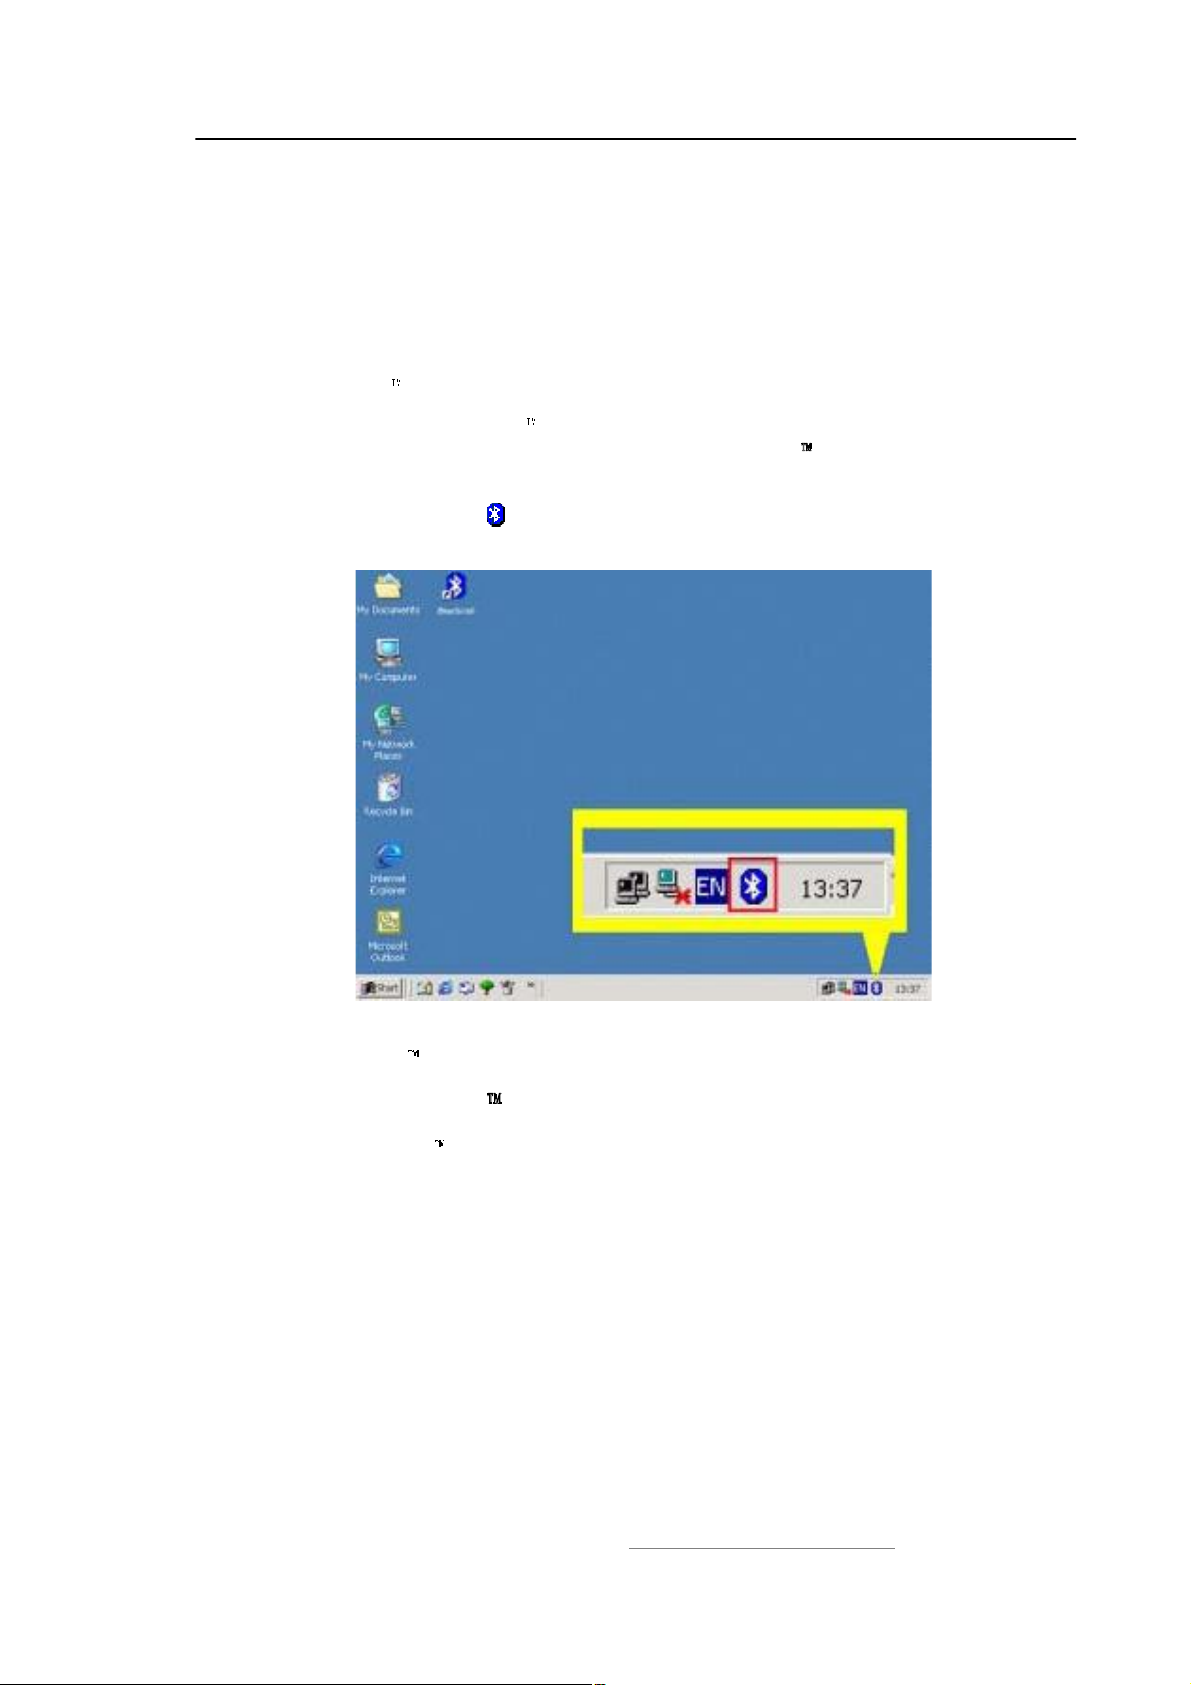
The BlueSoleil! icon will be displayed at the bottom right corner of the
Windows desktop (Figure 2.1).
Figure 2.1: BlueSoleil! icon
The BlueSoleil Main Window pops up as shown in Figure 2.2.
2.2 Exit BlueSoleil
To exit BlueSoleil , right-click the BlueSoleil! icon at the bottom right corner of the
Windows task bar and select Exit on the pop-up menu.
Note: Selecting the Close button at the top right corner of the BlueSoleil! window
only hides the BlueSoleil! window.
Copyright © 2001, IVT Corporation, http://www.ivtcorporation.com
All specifications are preliminary and subject to change without notice.
4
Page 8
IVT BlueSoleil™ User Manual
2.3 BlueSoleil™ Main Window
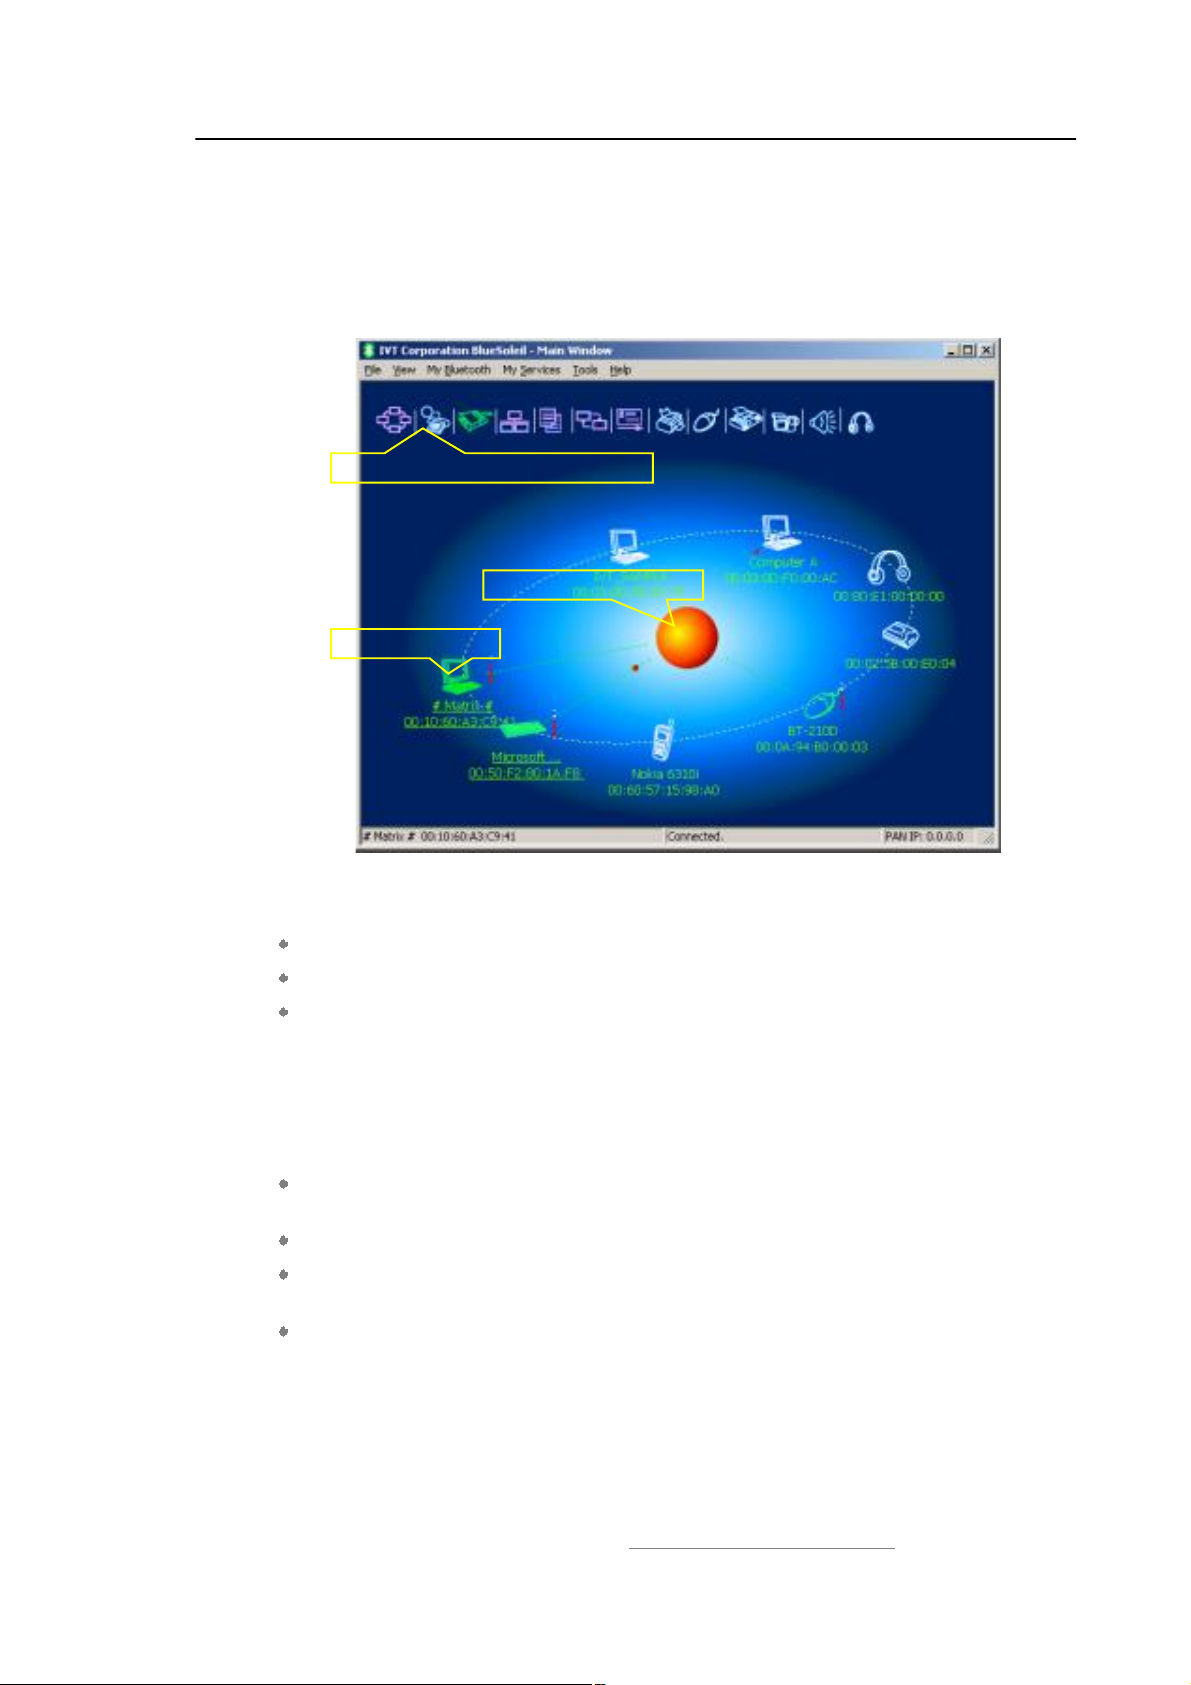
The BlueSoleil! Main Window displays all surrounding Bluetooth devices. From
the BlueSoleil! Main Window users can search for surrounding Bluetooth devices
and can execute connect/ disconnect functions.
Remote Device Serivce Icon
Local Device Icon
Remote Device
Figure 2.2: BlueSoleil! Main Window
The main elements in the BlueSoleil! Main Window are:
My Device Icon
Remote Bluetooth Device Icons
Bluetooth Service Icons
2.3.1 My Device Icon
This icon represents the client computer. It is called the #My Device icon" or #center
ball" in this document.
Functions:
Hover the mouse over the My Device icon to display the client Bluetooth device
name and address.
Double-click to start/ stop searching for surrounding Bluetooth devices.
Drag scrollbar on the right of main window to find other Bluetooth devices if
there are more than seven devices.
Right-click to display the pop-up menu with related operations.
Copyright © 2001, IVT Corporation, http://www.ivtcorporation.com
All specifications are preliminary and subject to change without notice.
5
Page 9
IVT BlueSoleil™ User Manual
2.3.2 Remote Bluetooth Device Icons
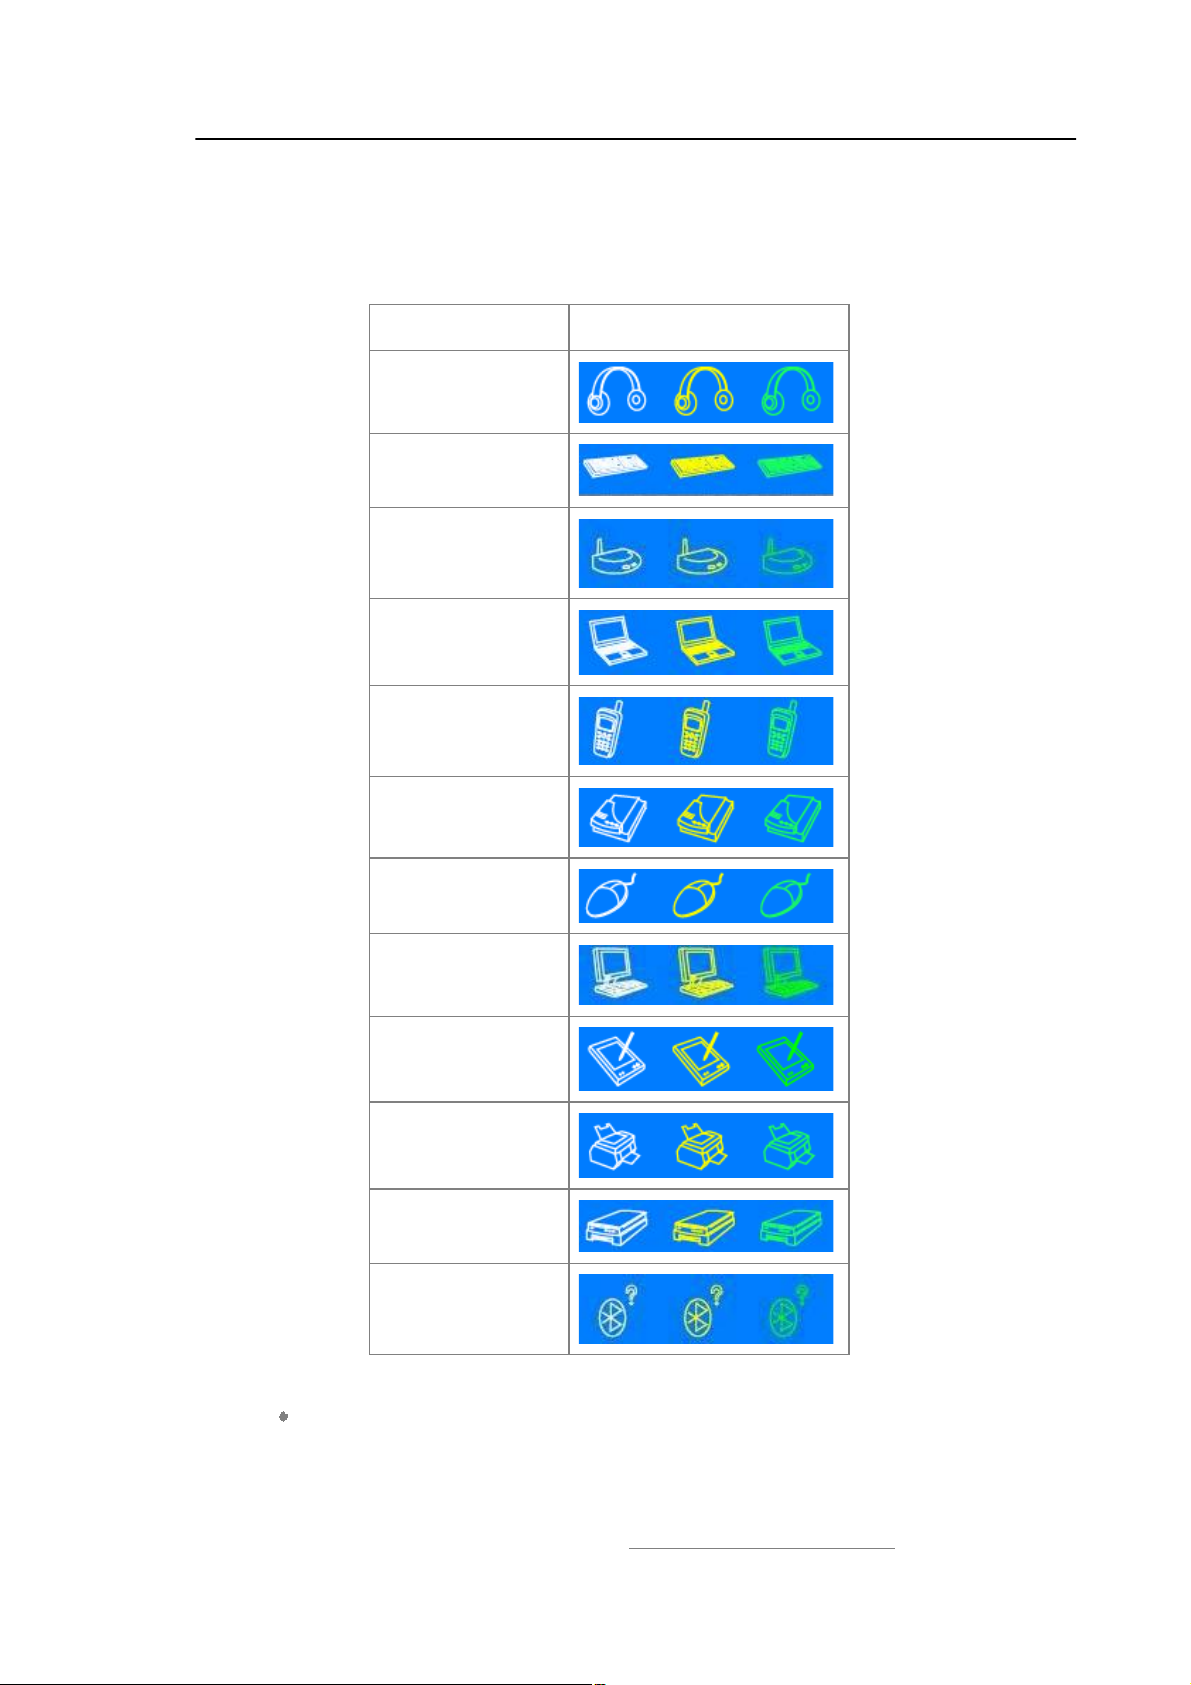
The icons in the table below represent the remote Bluetooth devices.
Device Type Icon
Headset
Keyboard
LAN Access Point
Laptop
Mobile
Modem
Mouse
Personal Computer
PDA
Printer
Scanner
Unknown device
The following colors are used to indicate the status of the remote Bluetooth device:
White (Idle)
This is the normal status of the device.
Copyright © 2001, IVT Corporation, http://www.ivtcorporation.com
All specifications are preliminary and subject to change without notice.
6
Page 10

IVT BlueSoleil™ User Manual
Yellow (Selected)
The device has been selected by the user.
Green (Connected)
The device has been connected.
Functions:
Single-click to select.
Double-click to get the services remote Bluetooth device supports.
Right-click to display the pop-up menu with related operations.
2.3.3 Bluetooth Service Icons
The Bluetooth Service Icons represent the Bluetooth services supported by the
remote device.
Bluetooth Service Icon
Personal Area Networking
Dial-up Networking
Serial Port
LAN Access
File Transfer
Information Synchronization
Object Push
Printer
Fax
Human Interface Device
Copyright © 2001, IVT Corporation, http://www.ivtcorporation.com
All specifications are preliminary and subject to change without notice.
7
Page 11
IVT BlueSoleil™ User Manual
AV Headphone
Basic Image
Headset Audio Gateway
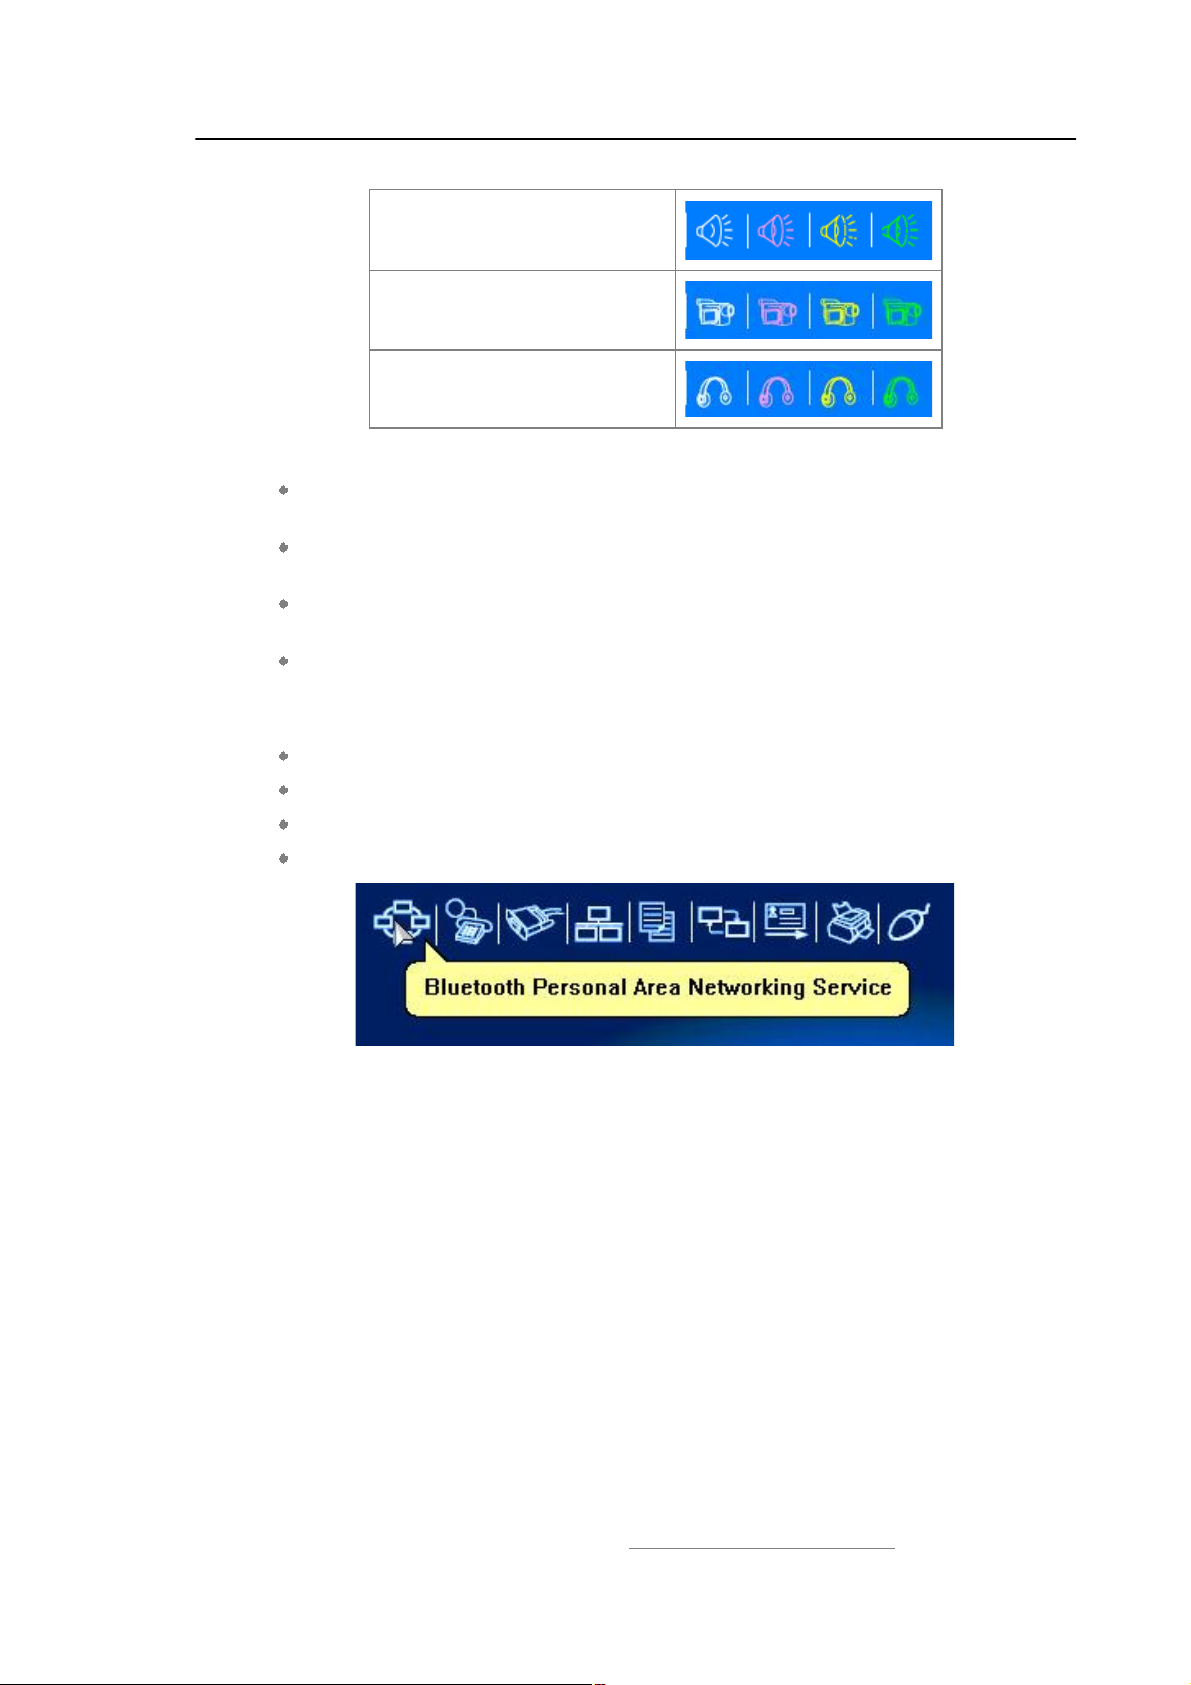
The following colors are used to indicate the status of the Bluetooth service:
White (Idle)
This is the normal status.
Pink (Available)
The Bluetooth service is available for the selected device.
Yellow (Selected)
The service icon has been selected by the user.
Green (Connected)
The service is connected.
Functions:
Hover the mouse over the icon to display the service name.
Single-click to select the service.
Double-click to connect.
Click to display the pop-up menu with related operations.
Figure 2.3: Bluetooth PAN Service Icon
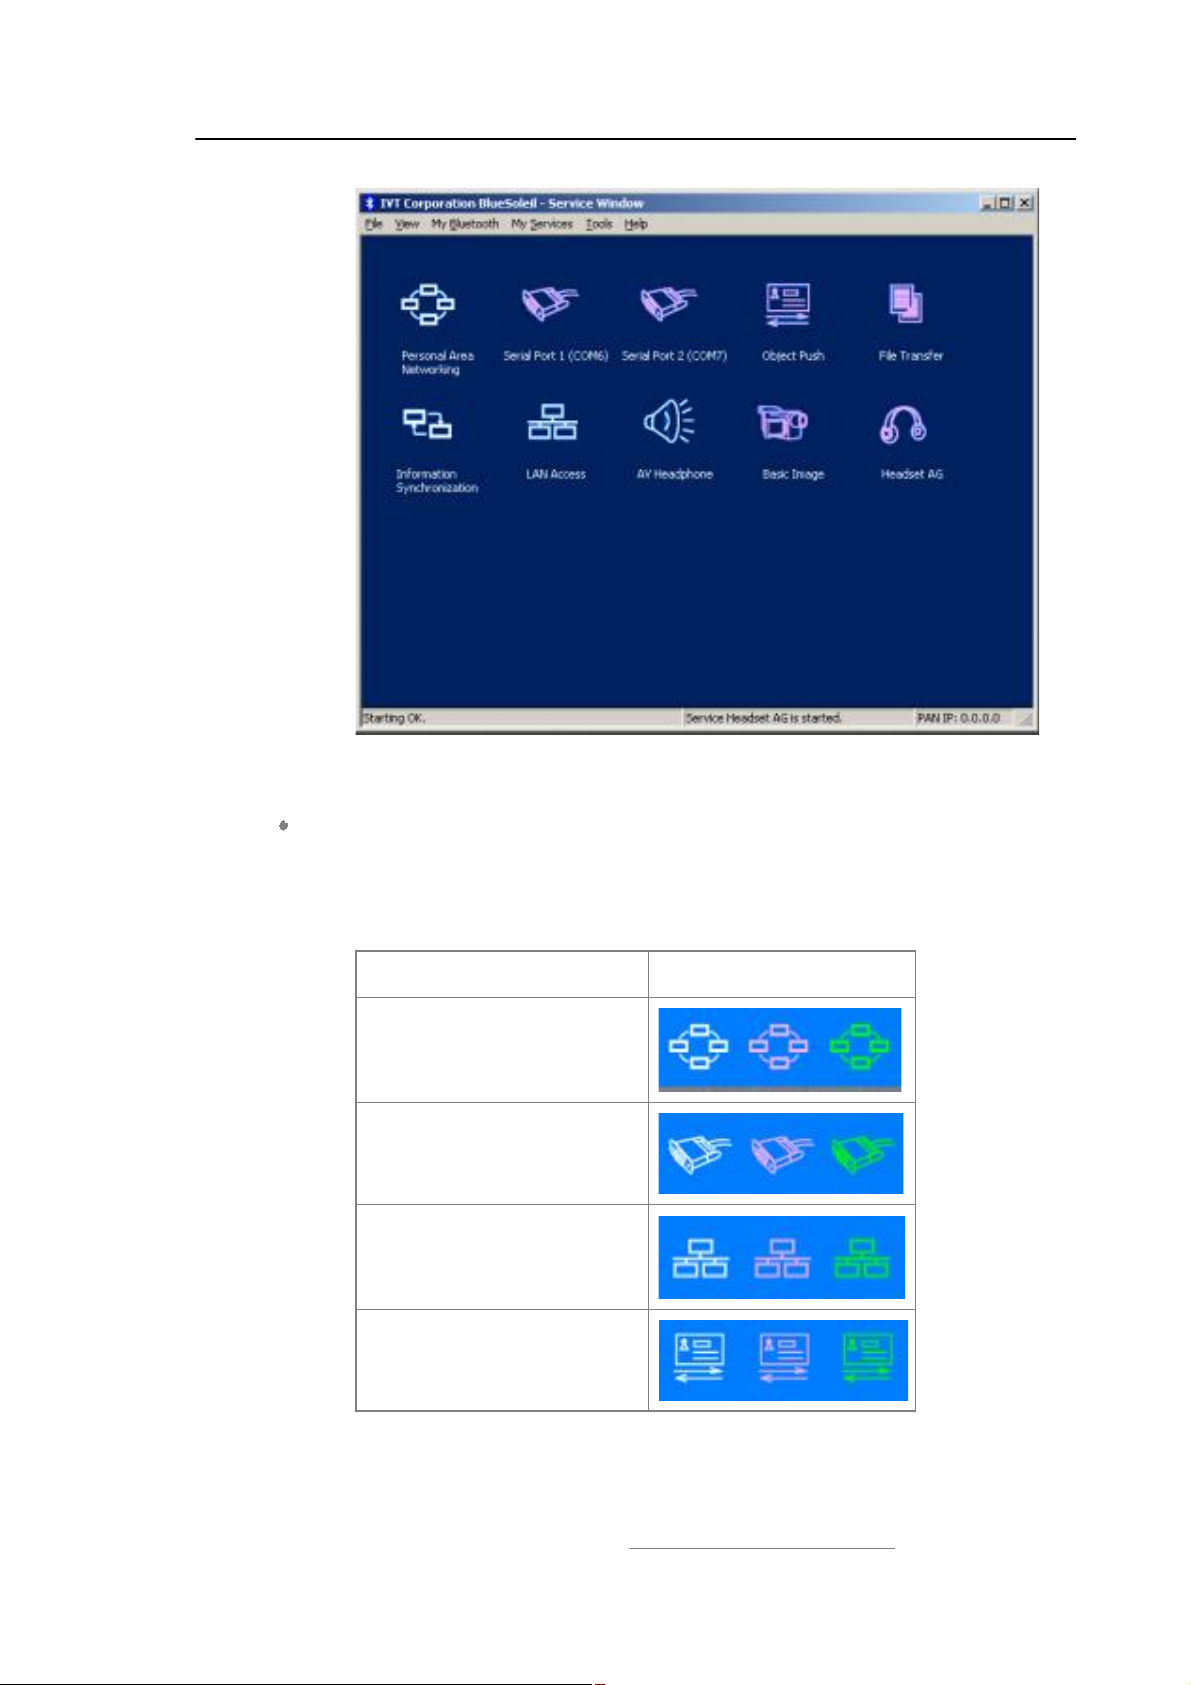
2.4 Service Window
Select menu View | Service Window andthe Service Window appears.
This window displays the Bluetooth services the #my Bluetooth device" provides to
remote Bluetooth devices. These services are called #my Bluetooth services".
Copyright © 2001, IVT Corporation, http://www.ivtcorporation.com
All specifications are preliminary and subject to change without notice.
8
Page 12
IVT BlueSoleil™ User Manual
Figure 2.4: BlueSoleil! Service Window
Main Elements:
My Service Icons
2.4.1 My Service Icons
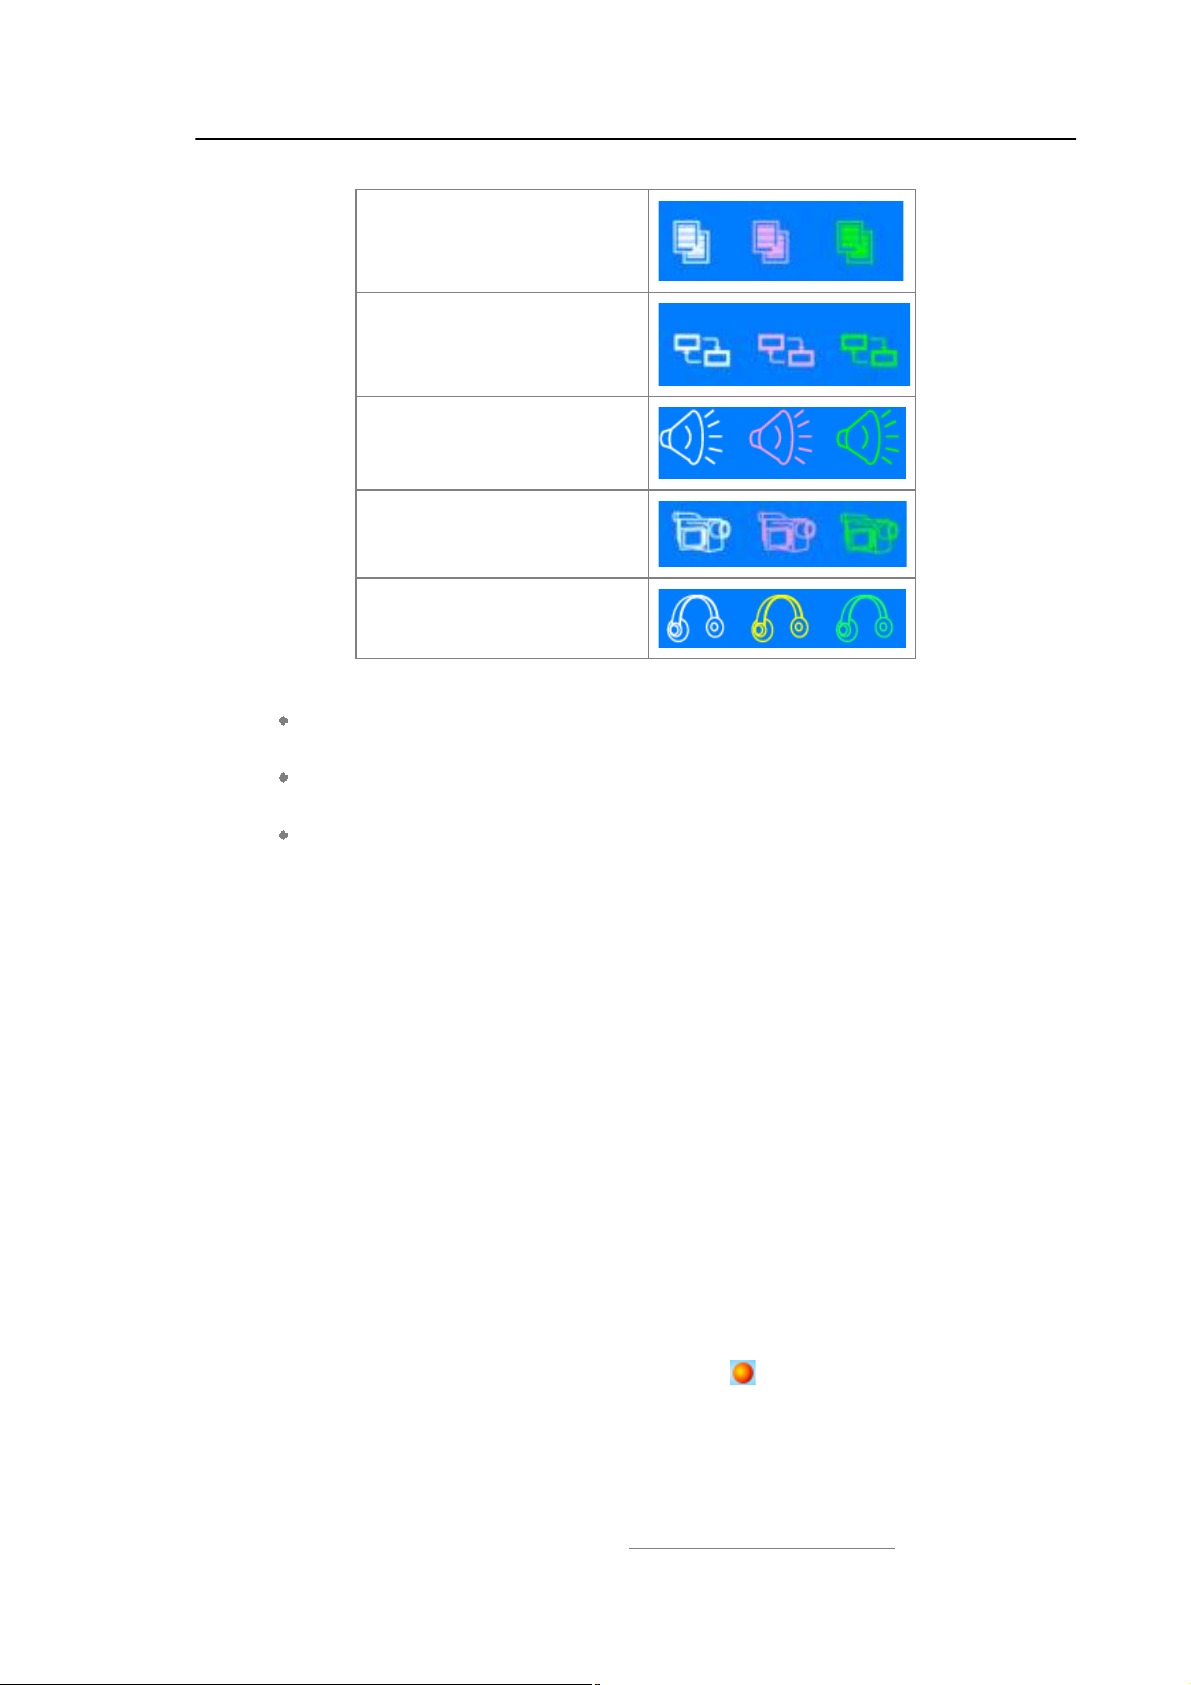
These icons represent #my Bluetooth services".
My Bluetooth Service Icon
Personal Area Networking
Serial Port
LAN Access
Object Push
Copyright © 2001, IVT Corporation, http://www.ivtcorporation.com
All specifications are preliminary and subject to change without notice.
9
Page 13
IVT BlueSoleil™ User Manual
File Transfer
Information Synchronization
AV Headphone
Basic Image
Headset AG
The following colors indicate the status of the Bluetooth service:
White (Idle)
Normal status.
Pink (Started)
My Bluetooth service is started.
Green (Connected)
A remote device has connected to my Bluetooth service.
2.4.2 Start/Stop a Bluetooth Service
Select a service icon in service window, and double-click to start/stop a service or
select right popup menu to send command.
2.4.3 View the Property of a Service
Right-click to display the pop-up menu with related operations in service window.
2.5 What You Need To Do Before Build A Connection
3. Inquiring Bluetooth Devices in the vicinity
4. Pairing your desktop or laptop with the associated device
2.5.1 Inquiring Bluetooth Devices
Method 1: Enquire Device
To start to set up a Bluetooth connection, you have to find the remote device you
want to connect first. You can choose one of the following methods to find the
remote device.
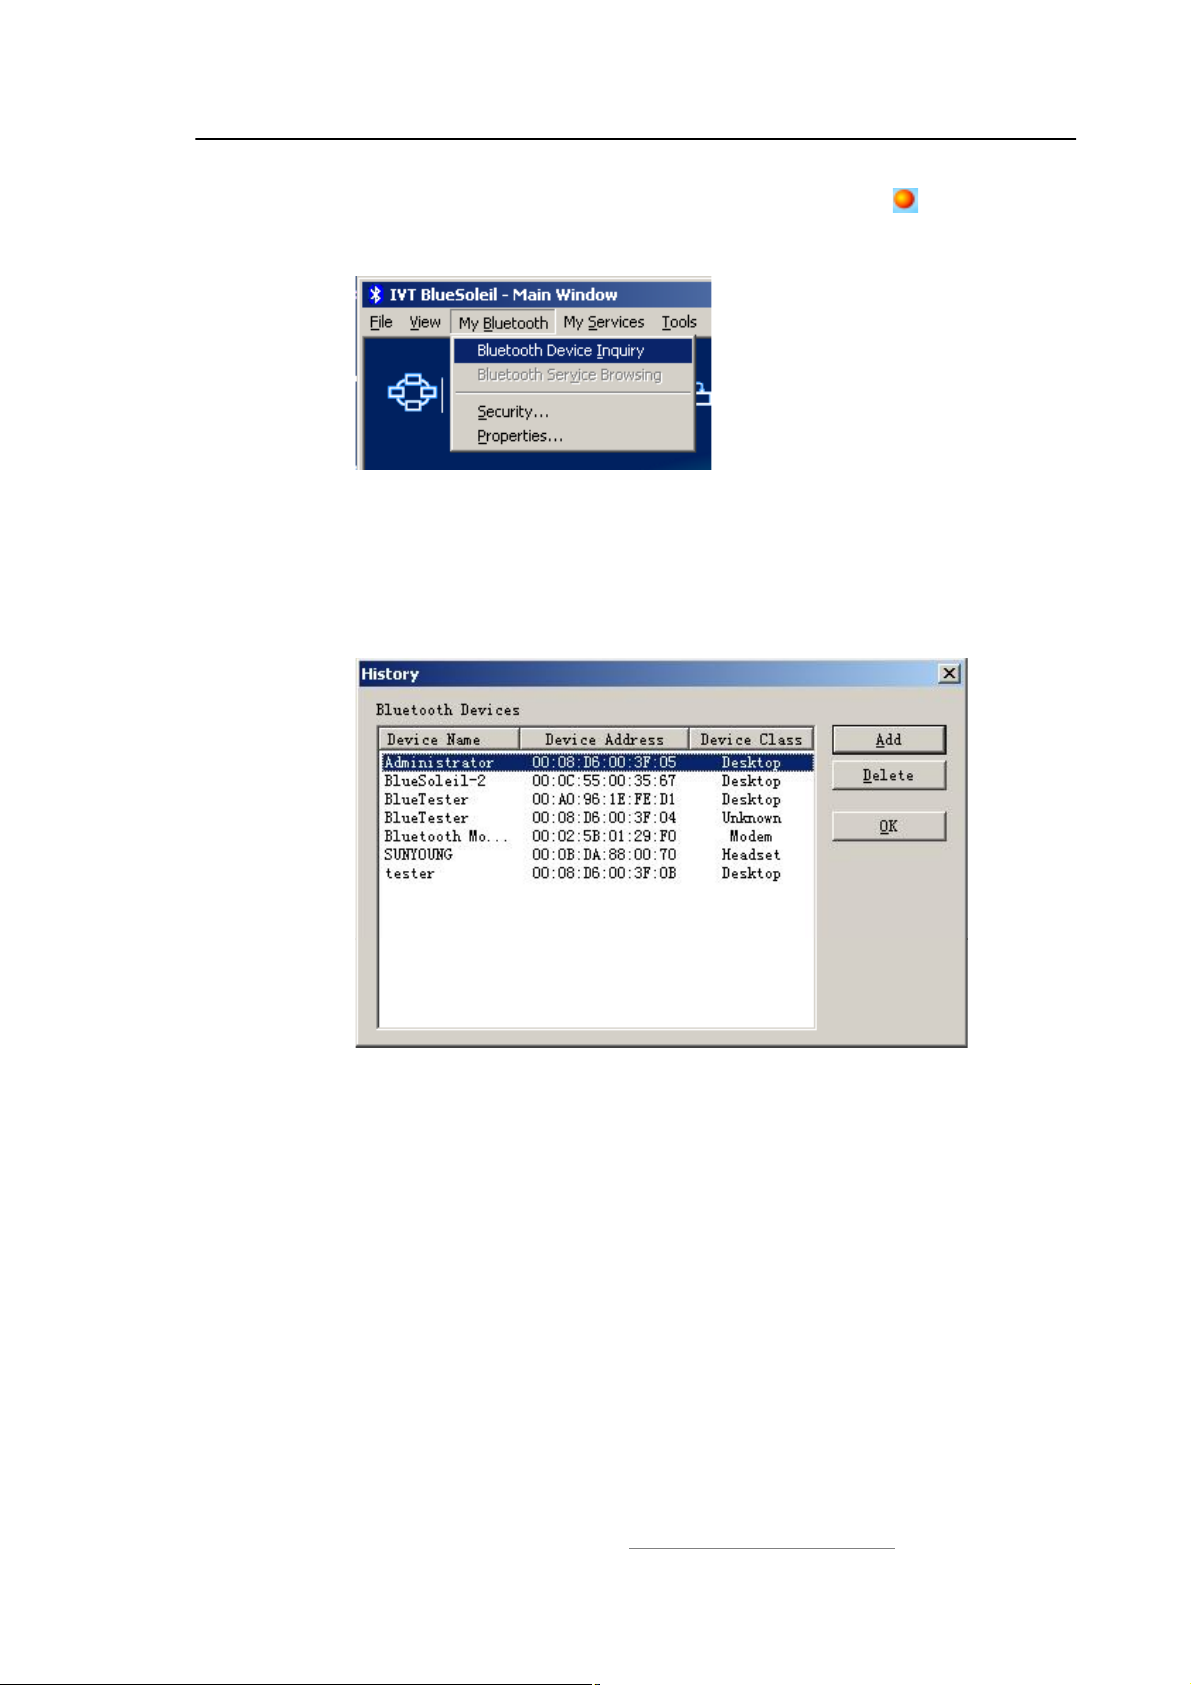
You may double click My Bluetooth Device icon or from MY Bluetooth Menu
-> Bluetooth Device Inquiry (Figure 2.5) to find other Bluetooth devices in
range. Bluetooth devices within the radio range will be added to the orbit. The
inquiry procedure will search up to 7 devices each time. After it finds the devices or
it has been 25 seconds since the beginning of the inquiry, it will continue to refresh
Copyright © 2001, IVT Corporation, http://www.ivtcorporation.com
All specifications are preliminary and subject to change without notice.
10
Page 14
IVT BlueSoleil™ User Manual
the names of the found devices. Double clicking the local device or double
clicking one of the remote devices (to start to search profiles it supports) will stop
the inquiry procedure.
Figure 2.5 Inquiry Menu
Method 2: Add Device from History List
If there are more than 7 devices to find within the radio range, you can add the
device you have used to the orbit from the history device list. Click Tools Menu
and select Add Device from History. The History dialog box will be pop-up
(Figure 2.6).
Figure 2.6 History Dialog
Select the device from the list and click Add, the selected device will be added to
the end of the orbit. The shortcut key to open the History dialog box is Ctrl+H.
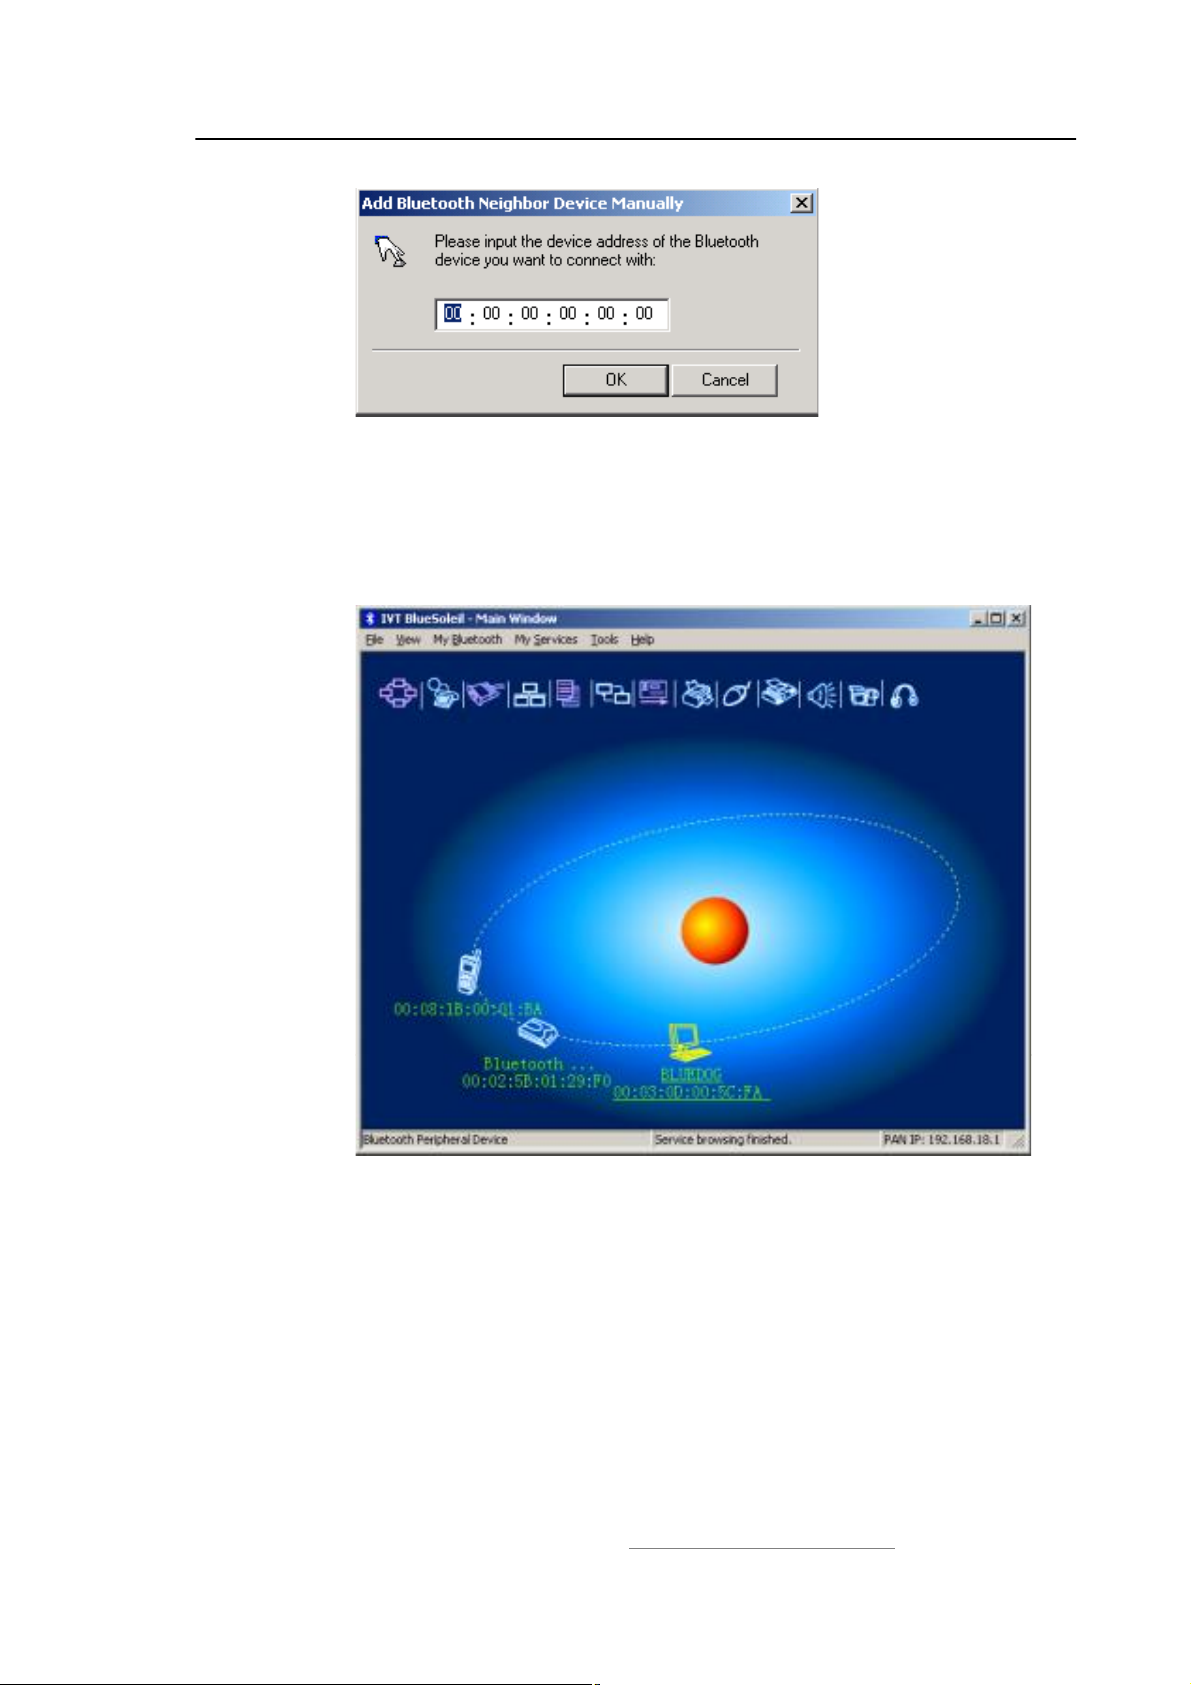
Method 3: Add a New Device by Inputting Device Address
If you are going to connect a device that you have never used, which is not in the
history list and which you cannot find, you can add it directly by inputting its
Bluetooth device address. Click Tools Menu and select Add New Device. The
Add Bluetooth Neighbor Device Manually dialog box pops up.
Copyright © 2001, IVT Corporation, http://www.ivtcorporation.com
All specifications are preliminary and subject to change without notice.
11
Page 15
IVT BlueSoleil™ User Manual
Figure 2.7 Add Bluetooth Neighbour Device Manually dialog
Input the device address and click OK, and then the device will be added to the end
of the orbit. However, the device type will be unknown. The shortcut key to open
Add Bluetooth Neighbor Device Manually dialog box is Ctrl+N.
The remote devices found will be added to the orbit. Refer to the following window
(Figure 2.8).
Figure 2.8 Devices can be add into the main window
2.5.2 Pairing your desktop or laptop with a Bluetooth Device
Bluetooth passkey may be asked if security level of either side of the connection is
set to High and they are not paired devices. You can initiate the pairing from your
own desktop or laptop or accept a request for pairing from the other device. Pairing
allows you to avoid entering access information each time a connection is setup.
Paired devices share a unique Link Key, which they exchange each time they
connect.
Pairing Procedures
Copyright © 2001, IVT Corporation, http://www.ivtcorporation.com
All specifications are preliminary and subject to change without notice.
12
Page 16
IVT BlueSoleil™ User Manual
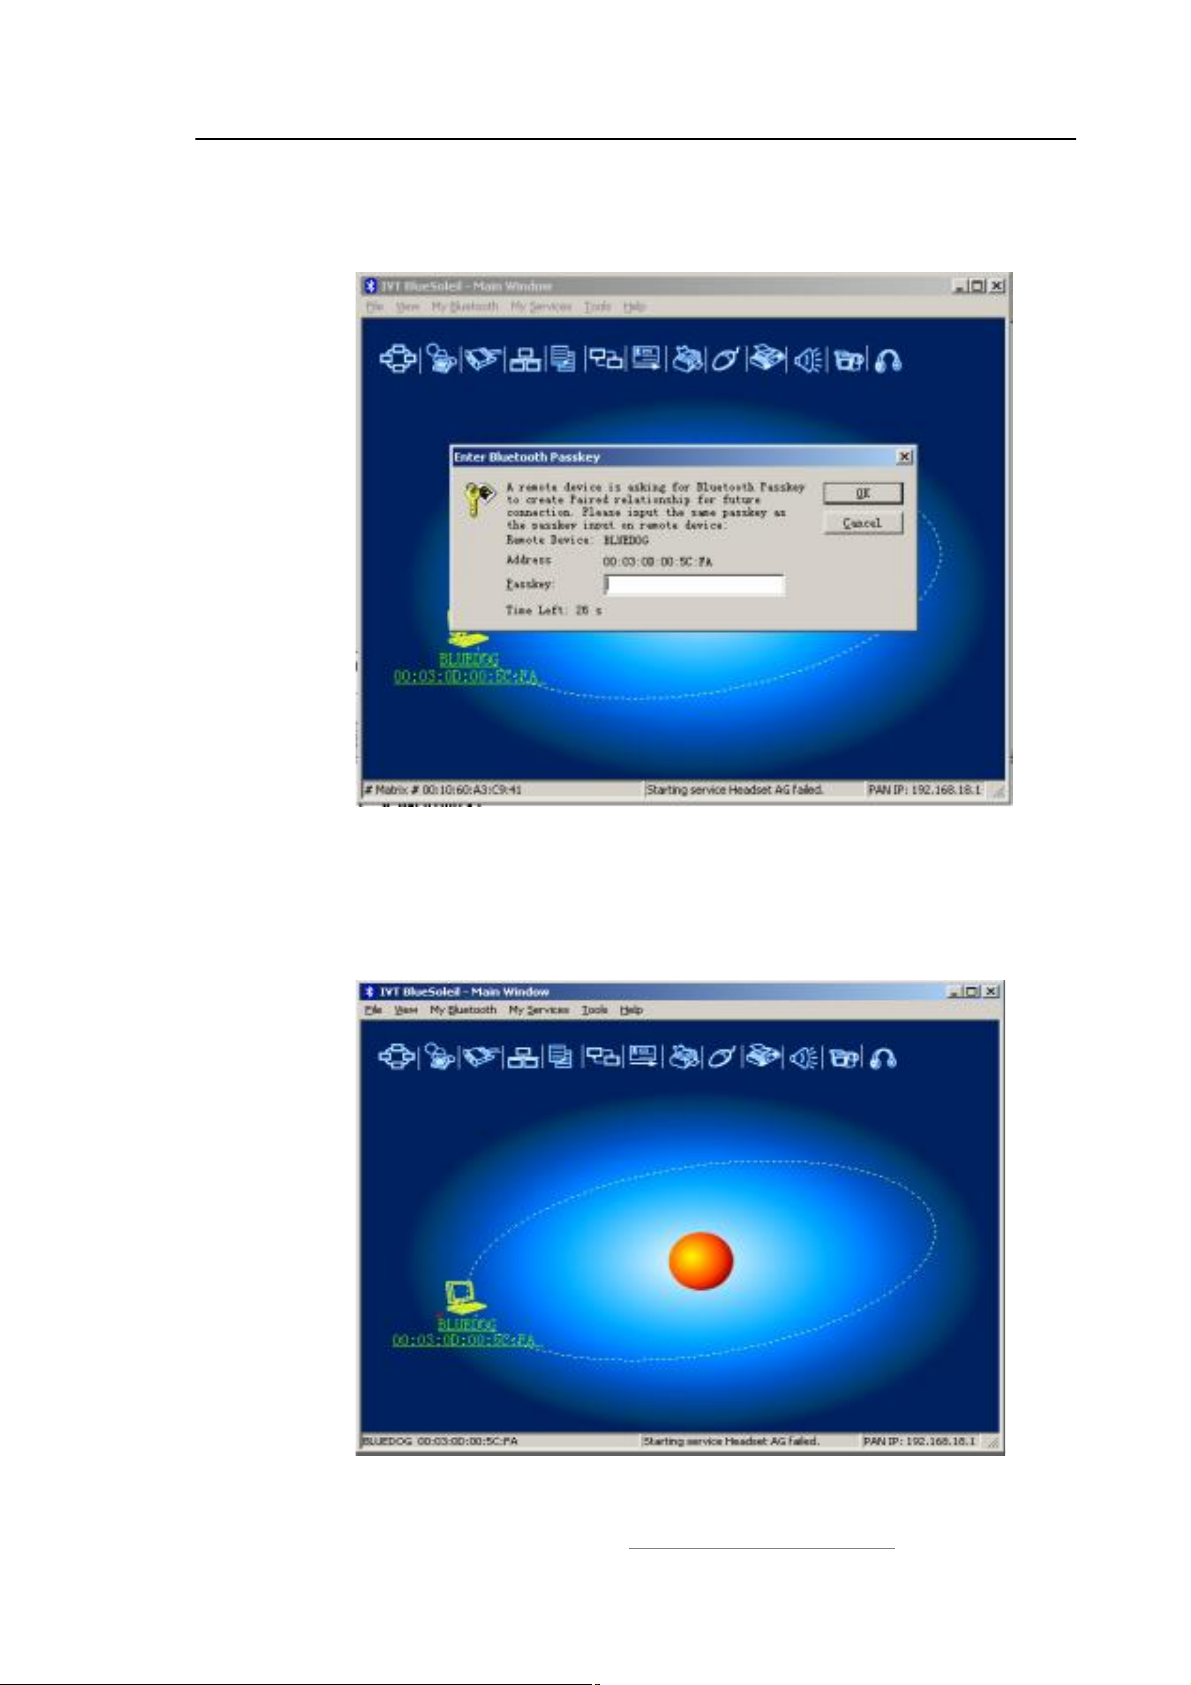
Double click the remote Bluetooth device you want to connect and you will be asked
to enter the Bluetooth Passkey. Please type the Bluetooth Passkey in the Passkey
field (Figure 2.9).
Figure 2.9 Input Passkey
Meanwhile, there will be a Bluetooth Passkey dialog box prompted on the remote
laptop or desktop equipped with the Bluetooth device to ask you to enter passkey.
The Bluetooth passkey should be the same between paired devices. If the pairing
process succeeds, there will be a red check on the paired Bluetooth device icon
(Figure 2.10).
Figure 2.10 Device have been paired
Copyright © 2001, IVT Corporation, http://www.ivtcorporation.com
All specifications are preliminary and subject to change without notice.
13
Page 17
IVT BlueSoleil™ User Manual
2.6 Start Or Stop A Bluetooth Service Connection
After you have finished the pairing process, it means that you have built the
connection between the client side and remote side. You may start to use the
Bluetooth services the associated Bluetooth device provides.
You can refer to 4.2 Communication Between Two Computers as a more
detailed example.
2.6.1 Search Bluetooth Service
You can double click the associated Bluetooth device icon or right-click on the icon
and select Refresh Services to find the service it provides. After service searching
finishes, the services the remote device supports and the corresponding service
icons on the top of the main window will change to be pink color.
2.6.2 Start A Remote Bluetooth Service Connection
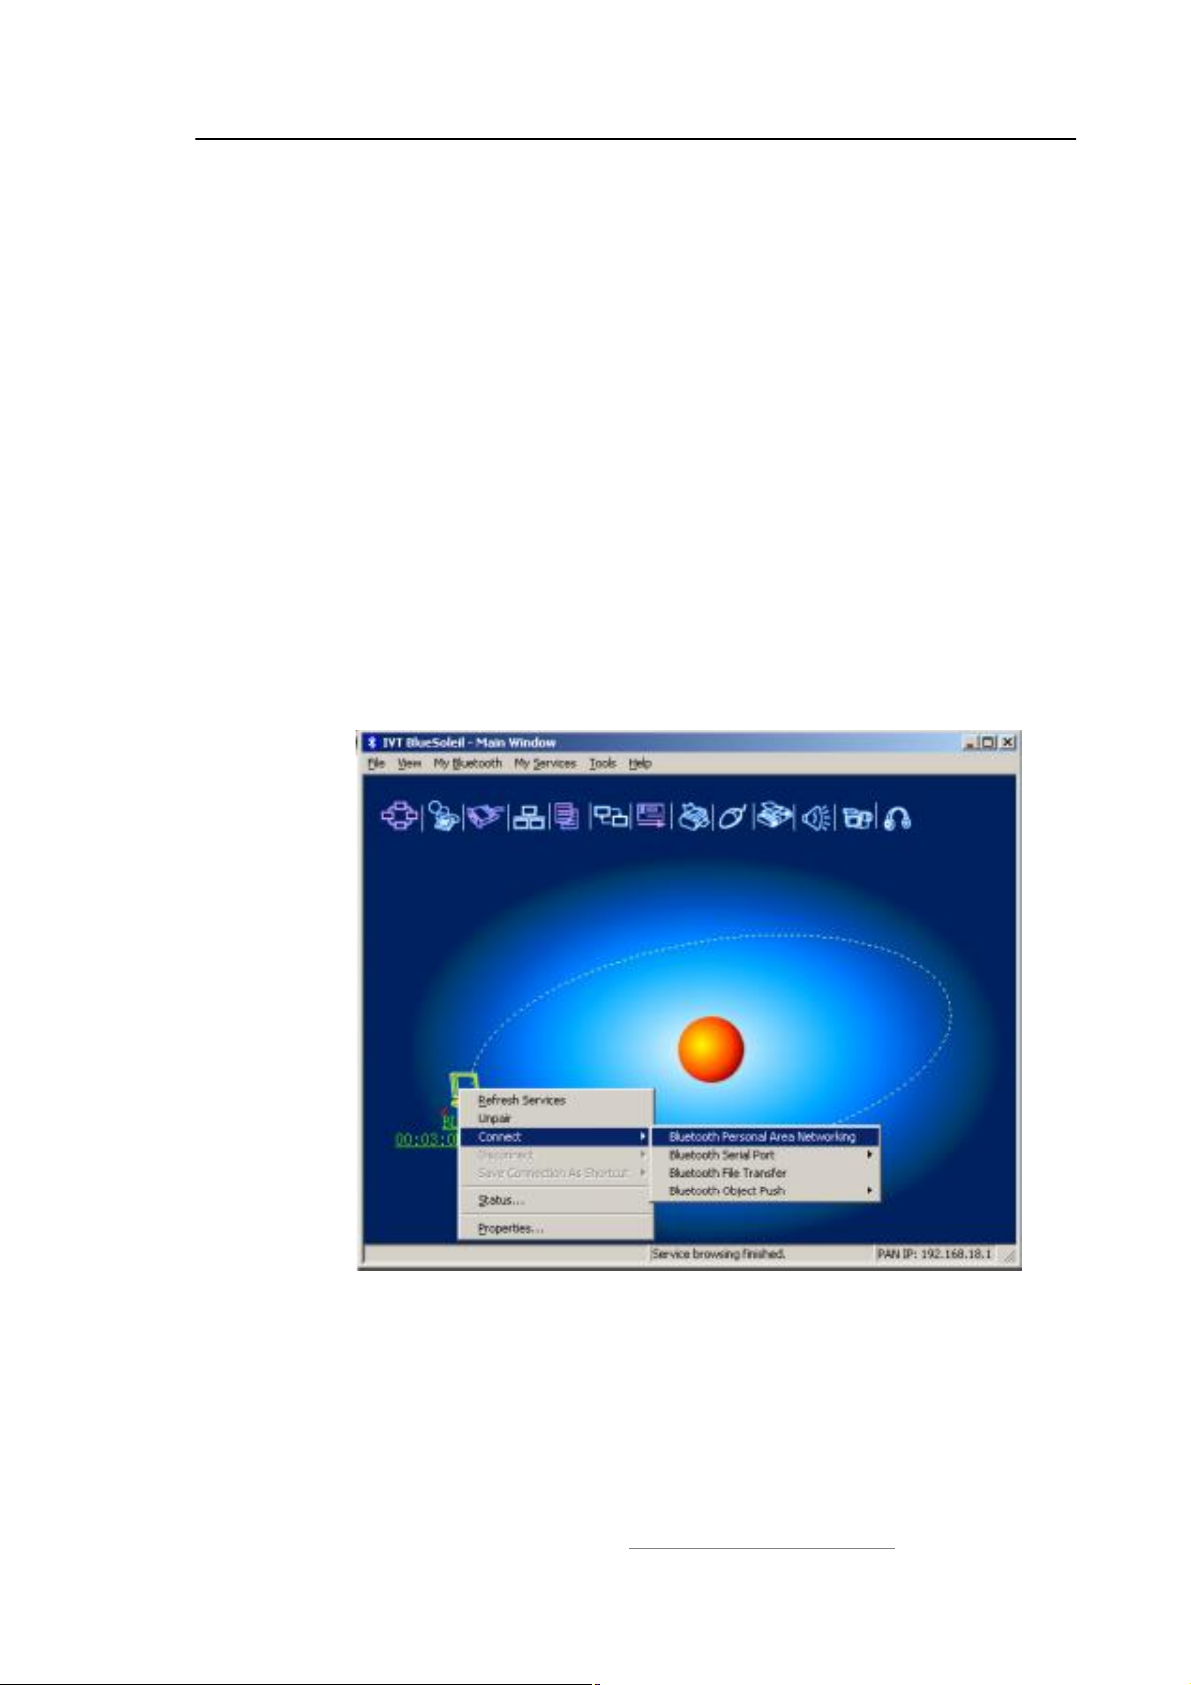
You may right-click on the connected Bluetooth device, select Connect and
highlight the service you want to use (Figure 2.11).
Or
Double click the pink profile icon (the service icon) you want to connect on the top
of the Main Window.
Figure 2.11 Connect to the remote service
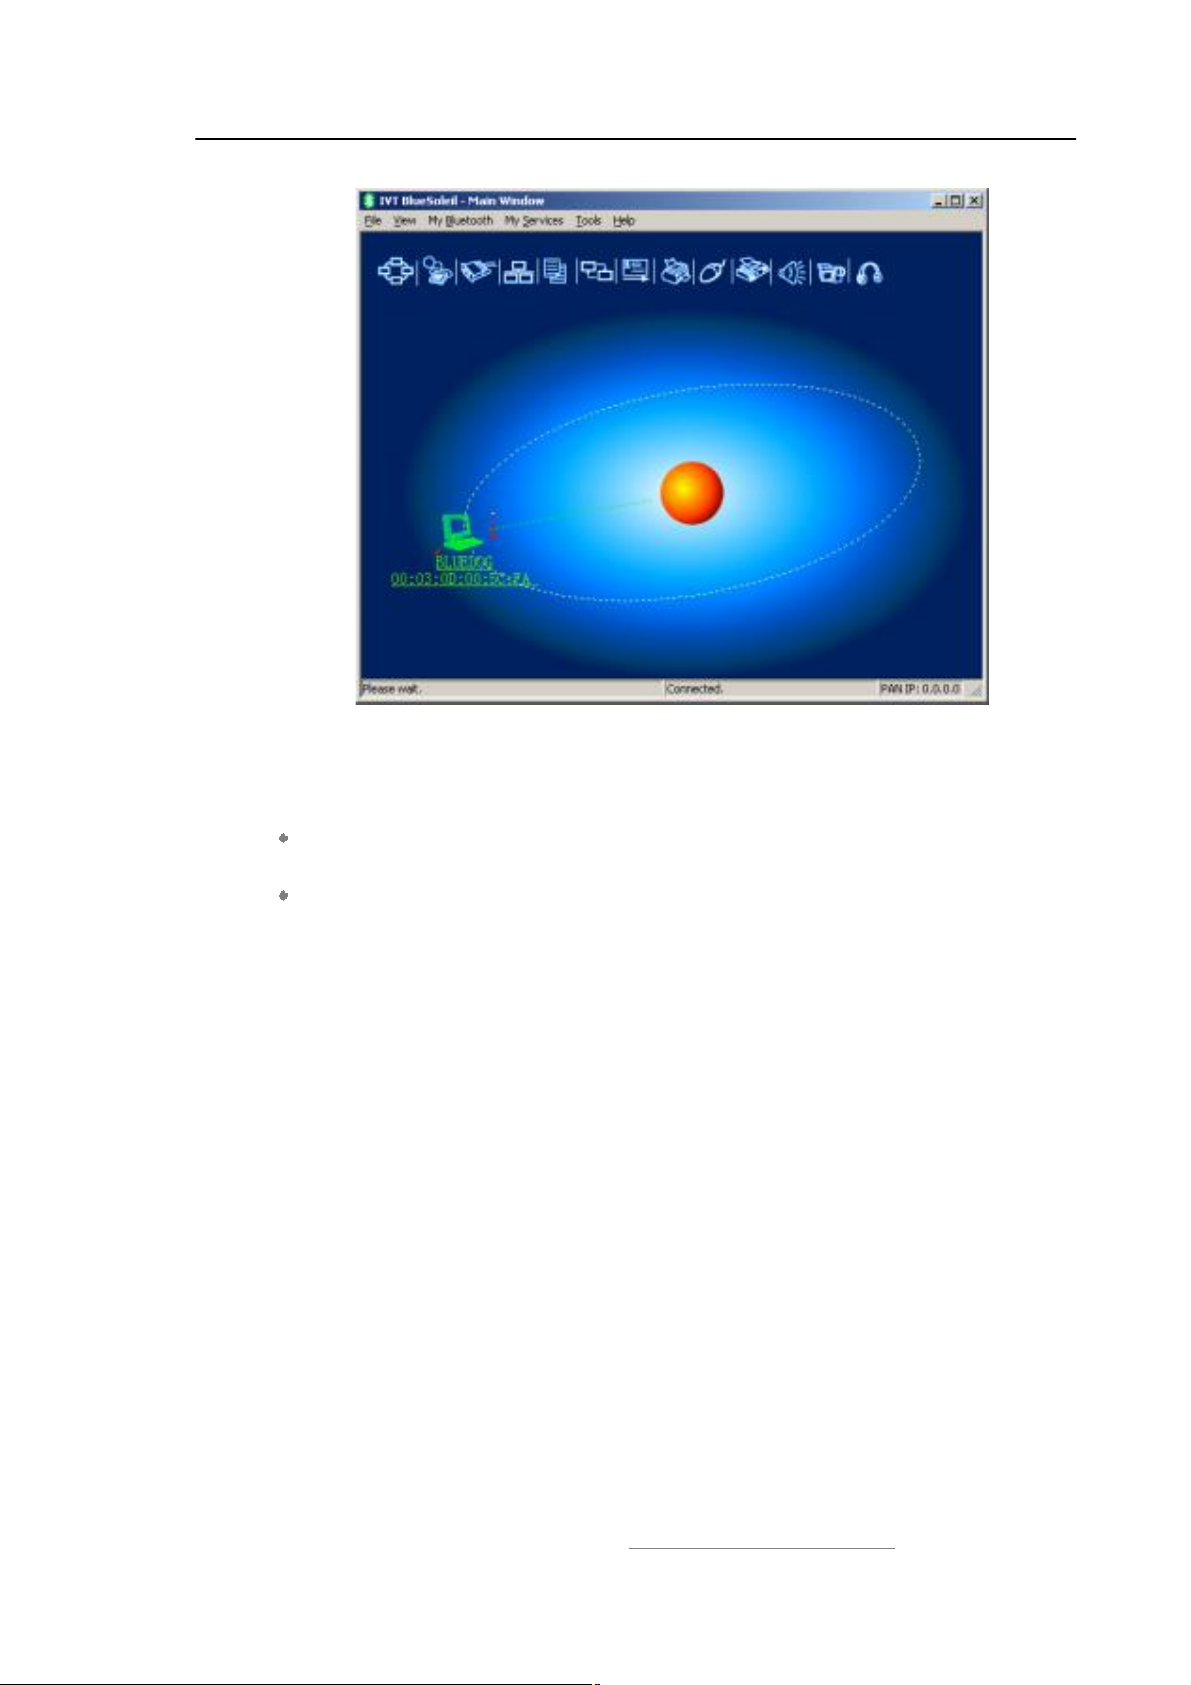
Connection will be setup. After connection is OK, the remote device and the service
icon will turn green.
Copyright © 2001, IVT Corporation, http://www.ivtcorporation.com
All specifications are preliminary and subject to change without notice.
14
Page 18
IVT BlueSoleil™ User Manual
Figure 2.12 The connection has been established
2.6.3 Stop A Bluetooth Service Connection
There are two ways to stop the service:
Select a started service and right click the service. On the popup menu, select
Stop Service. The service icon turns white. The service is stopped.
Select a started service. Select My Services menu and highlight Stop Service.
The service icon turns white. The service is stopped.
Copyright © 2001, IVT Corporation, http://www.ivtcorporation.com
All specifications are preliminary and subject to change without notice.
15
Page 19

IVT BlueSoleil™ User Manual
3 Bluetooth Security
3.1 Introduction
Bluetooth introduces security features to protect users from unauthorized access of
local data and encrypt data in the air. Three levels of security is defined in
Bluetooth:
Low (no security): Local device will not initiate any security procedure.
Medium (service-level enforced security): Local device does not initiate
security procedures before user access local Bluetooth services. This mode
allows different and flexible access policies for Bluetooth applications,
especially running applications with different security requirements in parallel.
High(device level enforced security): Local device initiates security procedures
as long as the remote Bluetooth device set-up link, for example, browsing local
services etc.
Following table shows the security when Bluetooth client device access another
Bluetooth device that provides services.
Server in
Security Low
Client in
Security
Low
Client in
Security
Medium
Client in
Security
High
When security is enforced at device level or a local service requires, an
Authentication procedure is required. Both of Bluetooth client and server side
need enter a Bluetooth passkey to confirm the client user's identity.
No security. Can browse
No security. Can browse
High. Security is
enforced at link
level before setup
connection.
Server in
Security Medium
services.
Accessing service
depends on the
settings of local
services.
services.
Accessing service
depends on the
settings of local
services.
High. Security is
enforced at link
level before setup
connection.
Server in
Security High
High. Security is
enforced at link
level before setup
connection.
High. Security is
enforced at link
level before setup
connection.
High. Security is
enforced at link
level before setup
connection.
To avoid entering Bluetooth passkey every time, two Bluetooth devices can be set
up paring relationship, that is to save the relationship after Authentication. After
Authentication, the Bluetooth link can be encrypted if necessary.
Authorization is used in Security Medium (service-level enforced security), to set
which devices can use the local service and which cannot. The following are some
concept of bluetooth security:
Copyright © 2001, IVT Corporation, http://www.ivtcorporation.com
All specifications are preliminary and subject to change without notice.
16
Page 20

IVT BlueSoleil™ User Manual
Authentication
Authentication is used to verify identity; it requires a passkey or link key from
the remote device. When an Authentication procedure is initiated by either local
device or remote device, a dialog is shown to ask for entering Bluetooth
Passkey. Only when passkeys from both sides are identical, can
authentication succeed.
Authorization
Bluetooth authorization is the procedure to decide whether you are going to
allow some other Bluetooth devices to use Bluetooth services on your Bluetooth
devices. This procedure takes function in Bluetooth security Medium and
applies to Bluetooth services only.
Encryption
When a Bluetooth link is encrypted, data are encrypted into unreadable data
using a secret key or password before they are sent in the air. Data are
decrypted after they reach the remote device using the same key or password
that was used to encrypt it.
Pairing Devices
Pairing allows you to avoid entering access information each time a connection
is setup. Paired devices share a unique Link Key, which they exchange each
time they connect.
3.2 BlueSoleil Security Configuration
The BlueSoleil security configuration involves the policy setting of the local device's
security, it comprises the following items:
General Property Page
Devices Property Page
Services Property Page
Copyright © 2001, IVT Corporation, http://www.ivtcorporation.com
All specifications are preliminary and subject to change without notice.
17
Page 21
IVT BlueSoleil™ User Manual
3.2.1 General Property Page
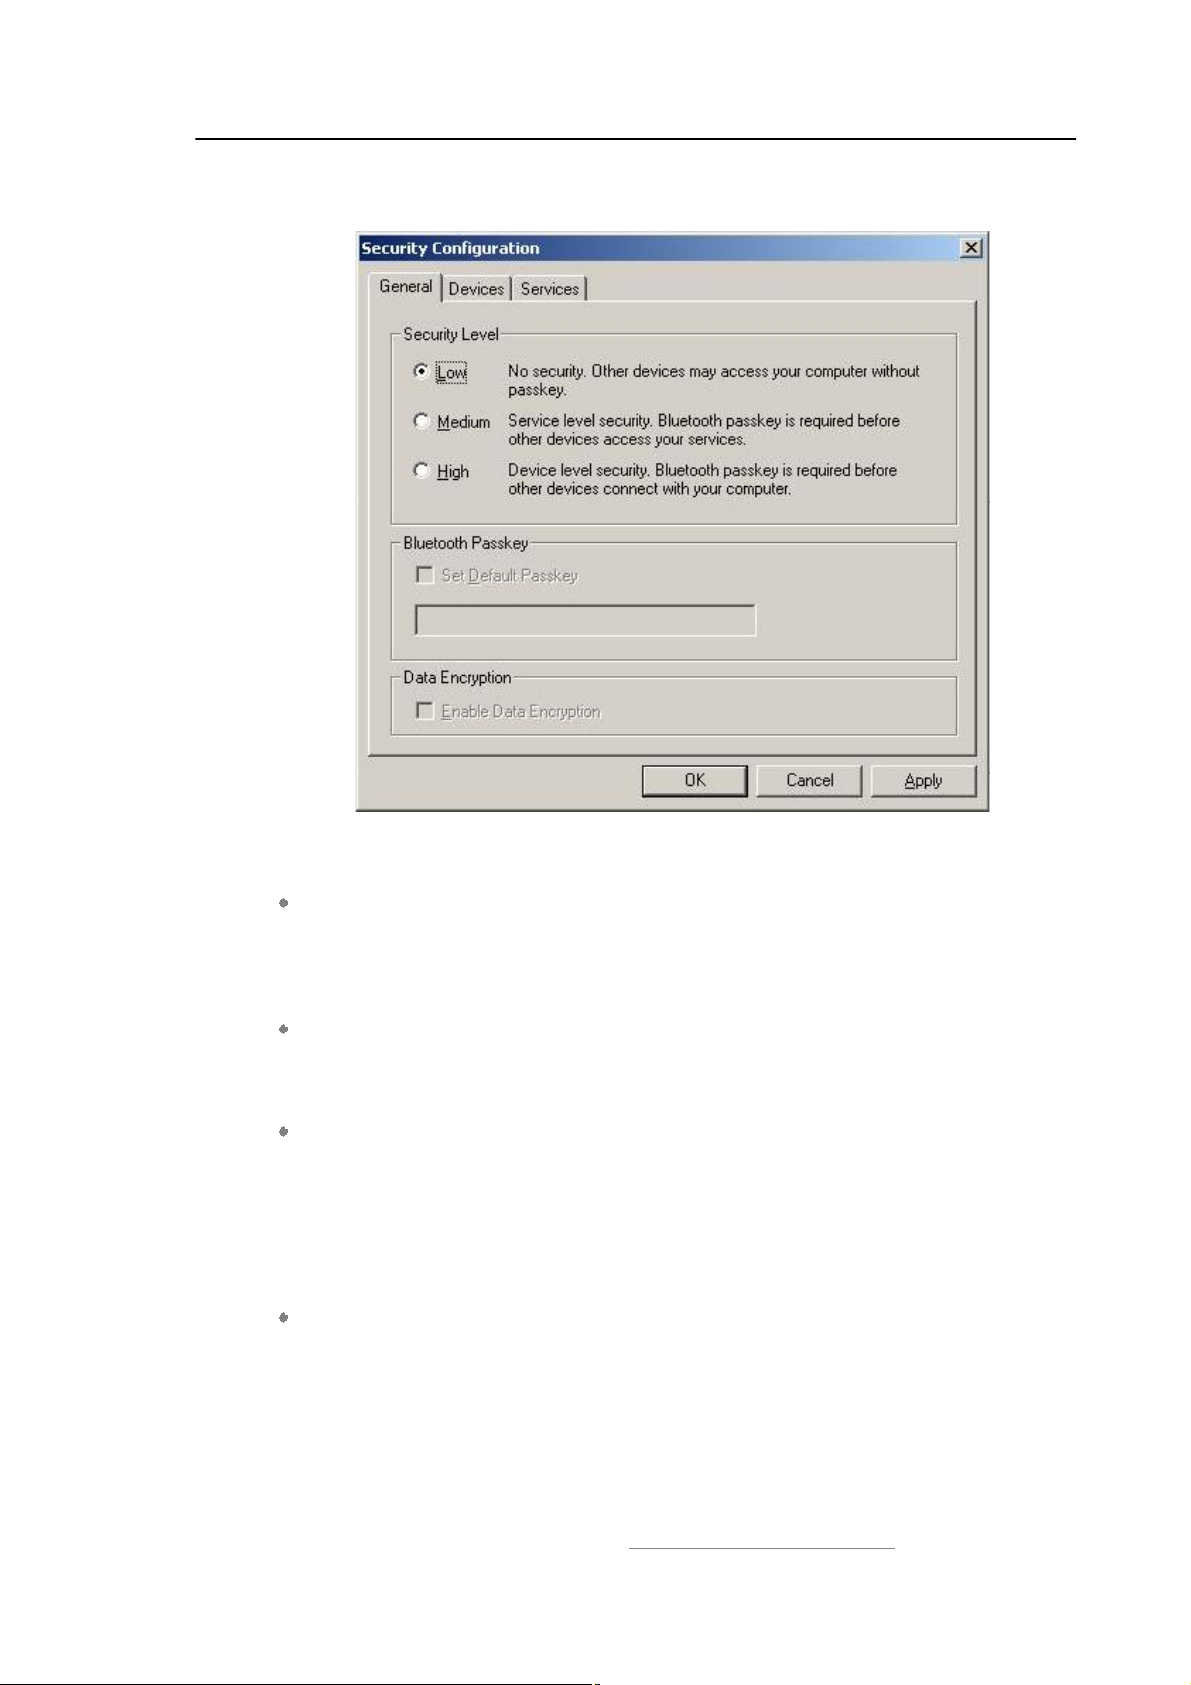
Figure 3.1: Security Configuration Dialog
Security Level
Low
When Low is checked, normally other devices may access your device freely,
which means that they don't need to input the Bluetooth passkey. However, if
the other device set its own security level to High, you are also required to input
the passkey.
Medium
The medium level is service level security. You can assign access right for
specified service to different devices. For more detail, to see Services Property
Page.
High
When other devices connect to your device or your device connects with other
devices, you are required to input a Bluetooth passkey. If your device has been
paired with the other device before connecting, you can connect with the other
device directly. (A link key has been created and stored for the paired
relationship. Link key is used instead of Bluetooth passkey here.)
Bluetooth Passkey
Set Default Passkey
If you check Set Default Passkey, you needn't input passkey manually.
BlueSoleil will use the passkey inputted in the edit box below to connect with
other devices.
Data Encrypt
Copyright © 2001, IVT Corporation, http://www.ivtcorporation.com
All specifications are preliminary and subject to change without notice.
18
Page 22
IVT BlueSoleil™ User Manual
Enable Data Encryption
If the item is checked, the transmitted data will be encrypted into an
unreadable format.
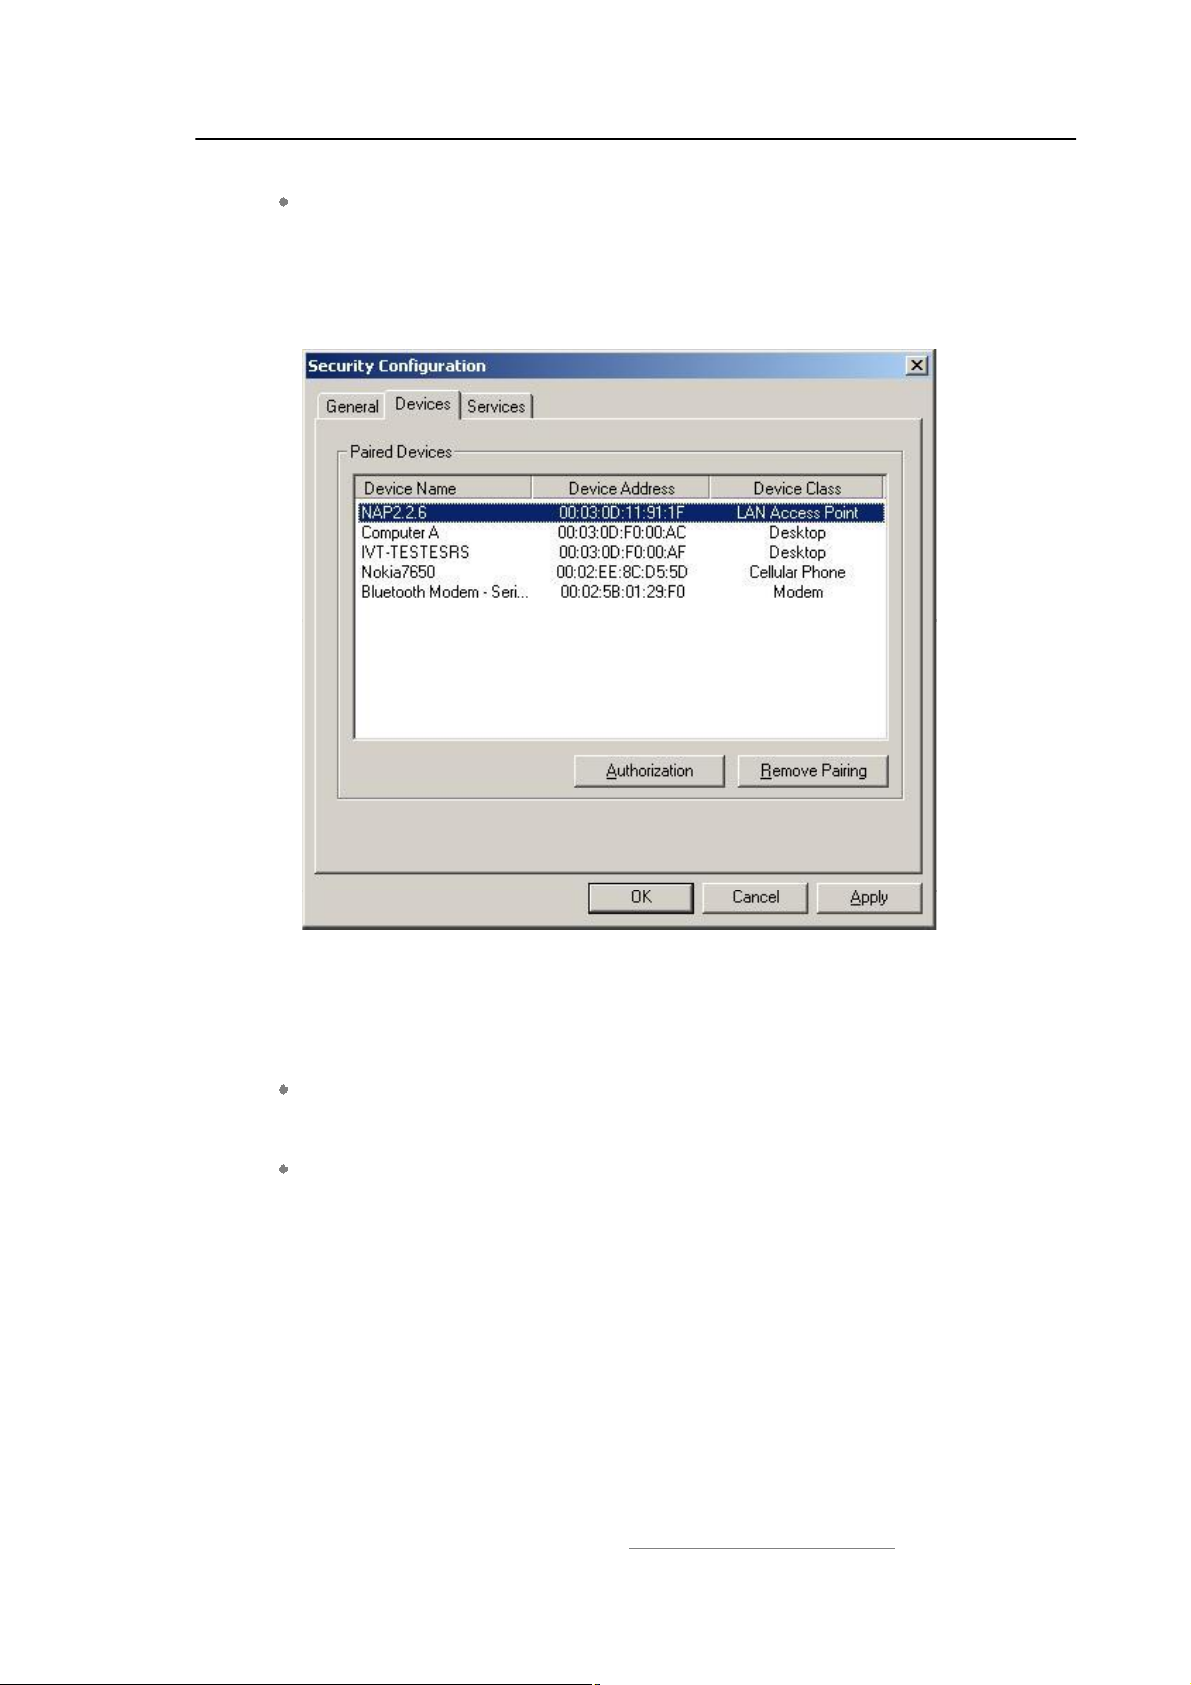
3.2.2 Devices Property Page
Figure 3.2: Devices Property Page
when you establish connection with a paired device, you needn't input a passkey
again. A link key has been created and stored for the paired relationship.
How to pair with another device
Automatically
If a passkey is required before connection, devices will pair automatically the
first time they connect (a passkey must be successfully exchanged).
Manually
In the main window of BlueSoleil, right click a device, select Pair Device from
the popup menu, and then input a same passkey on both side.
How to unpair with another device
Manually
1. Click Remove Pairing button in this page.
2. In the main window of BlueSoleil, right click a paired device, select Unpair from
the popup menu.
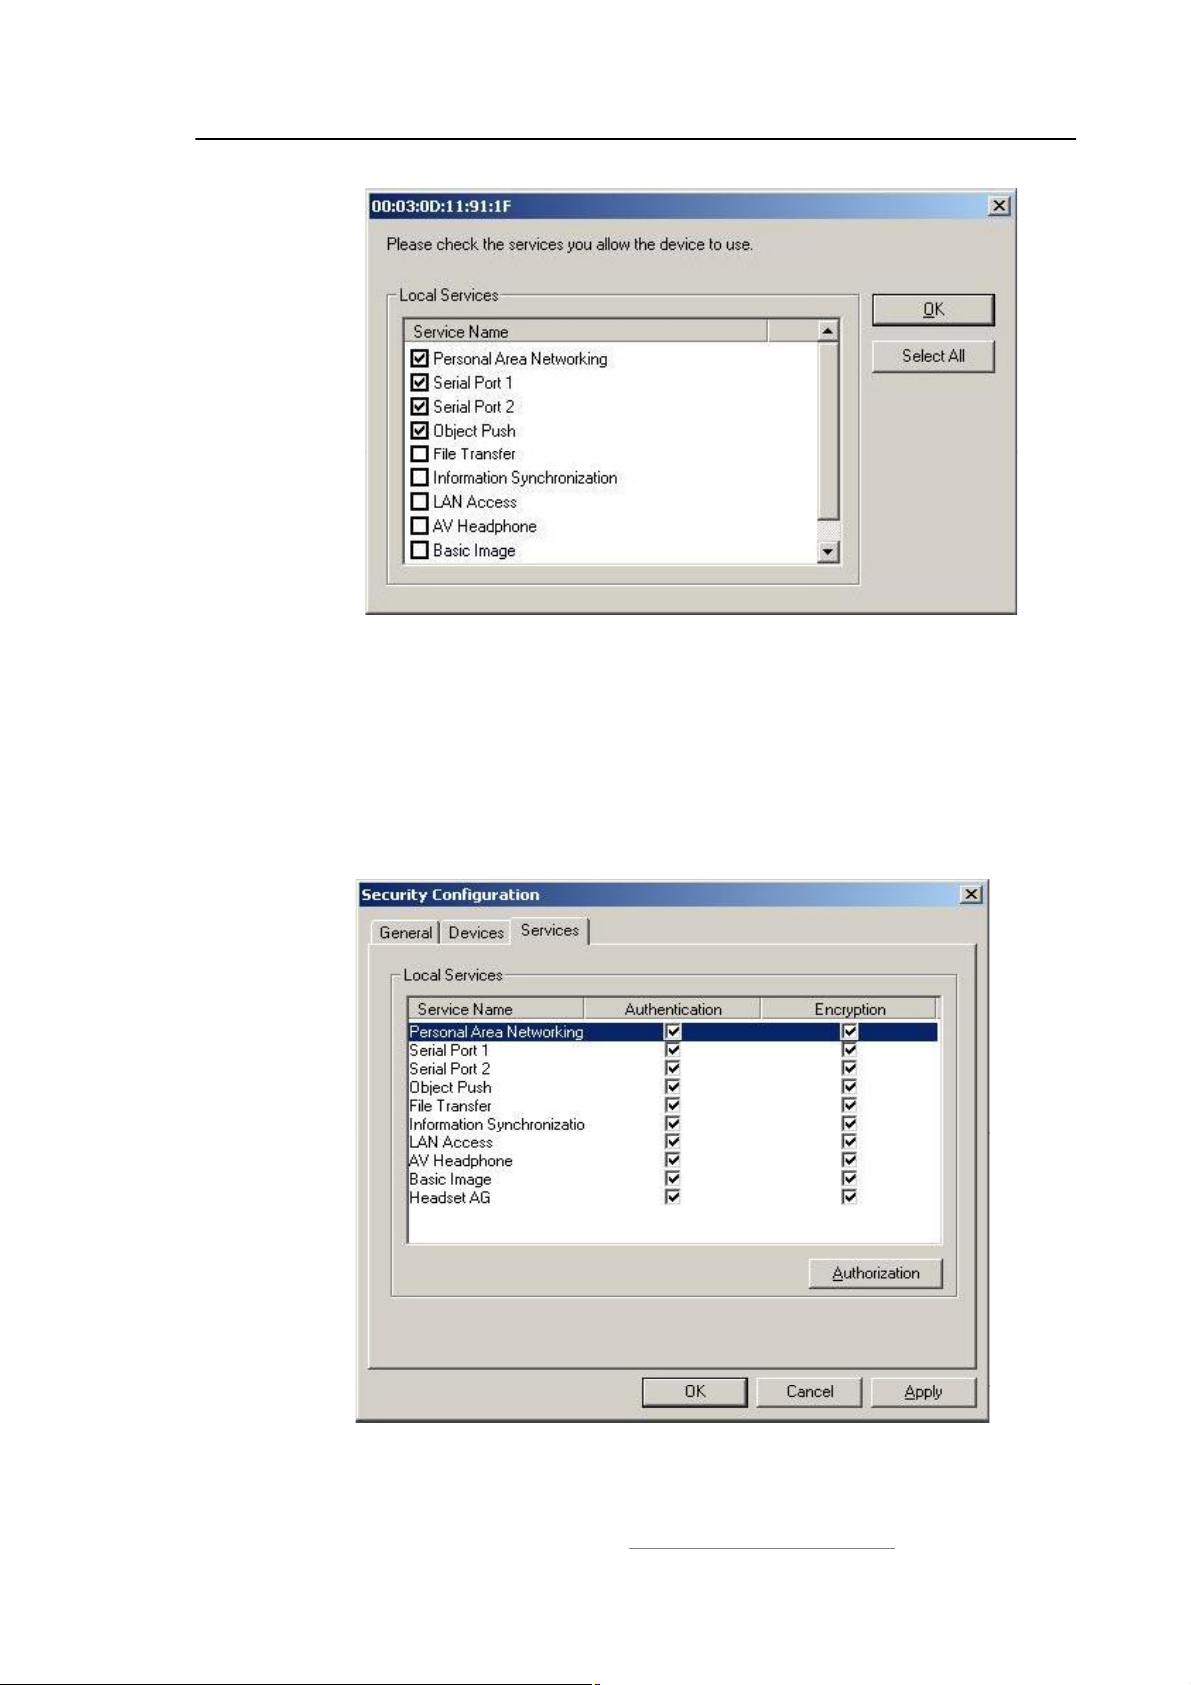
Authorization for paired devices
Only when the Security Level is set as Medium in General Property Page, the
Authorization button is enabled. Select a device in Paired Devices list, then click
Authorization button to show an authorization dialog.
Copyright © 2001, IVT Corporation, http://www.ivtcorporation.com
All specifications are preliminary and subject to change without notice.
19
Page 23
IVT BlueSoleil™ User Manual
Figure 3.3: Authorization Dialog
The services shown in Service Name list are those need Authentication. Configure
in Services Property Page. If a service name is checked, the device will be a trusted
device for the service.
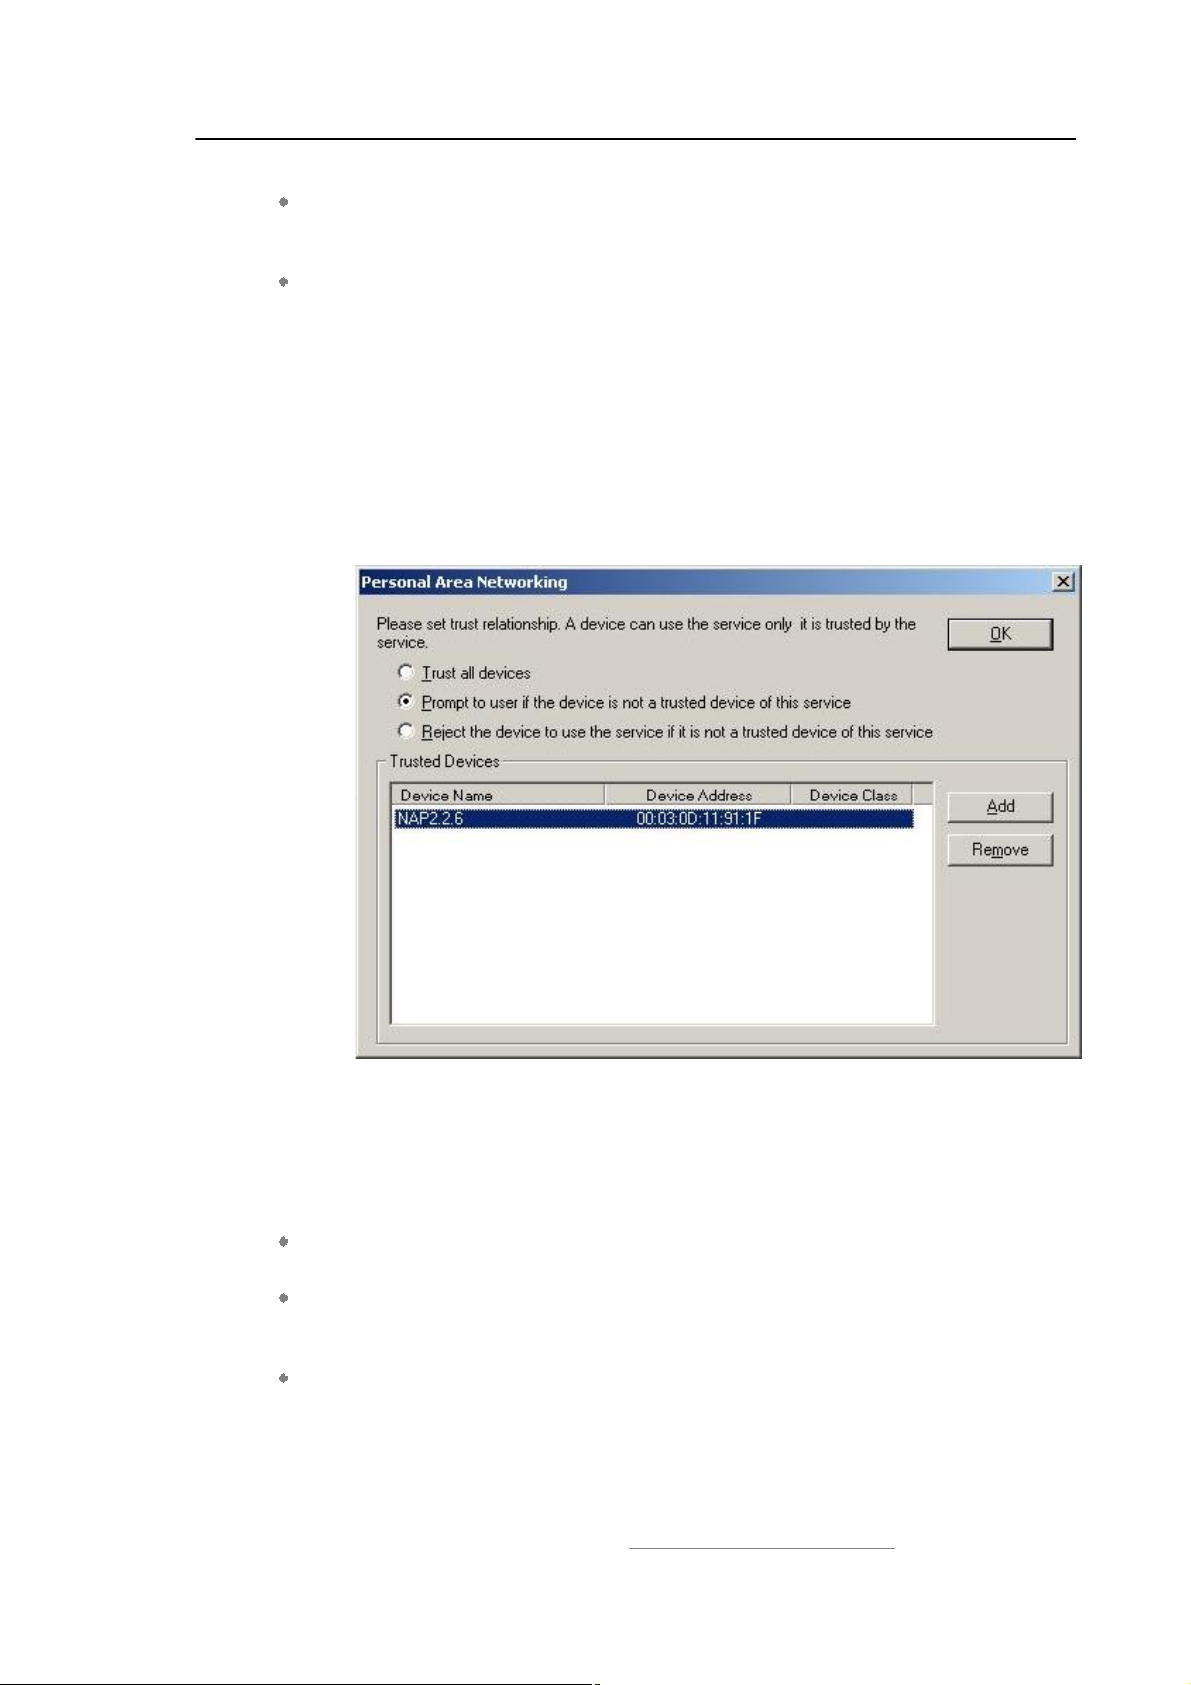
3.2.3 Services Property Page
Only when the Security Level is set as Medium in General Property Page, the
property page is enabled.
Figure 3.4: Services Property Page
Authentication
Copyright © 2001, IVT Corporation, http://www.ivtcorporation.com
All specifications are preliminary and subject to change without notice.
20
Page 24
IVT BlueSoleil™ User Manual
Checked
If you check the Authentication box after a service name, when a not paired
device access the service, a passkey is required.
Not Checked
The security level of the service will be Low. Any device may access the service
freely.
Encryption
If check Encryption after a service name, the transmitted data for the service will
be encrypted into an unreadable format.
Authorization for services
Select a service which need Authentication, then the Authorization button is
enabled. Click Authorization button to show an authorization dialog for the
specified service.
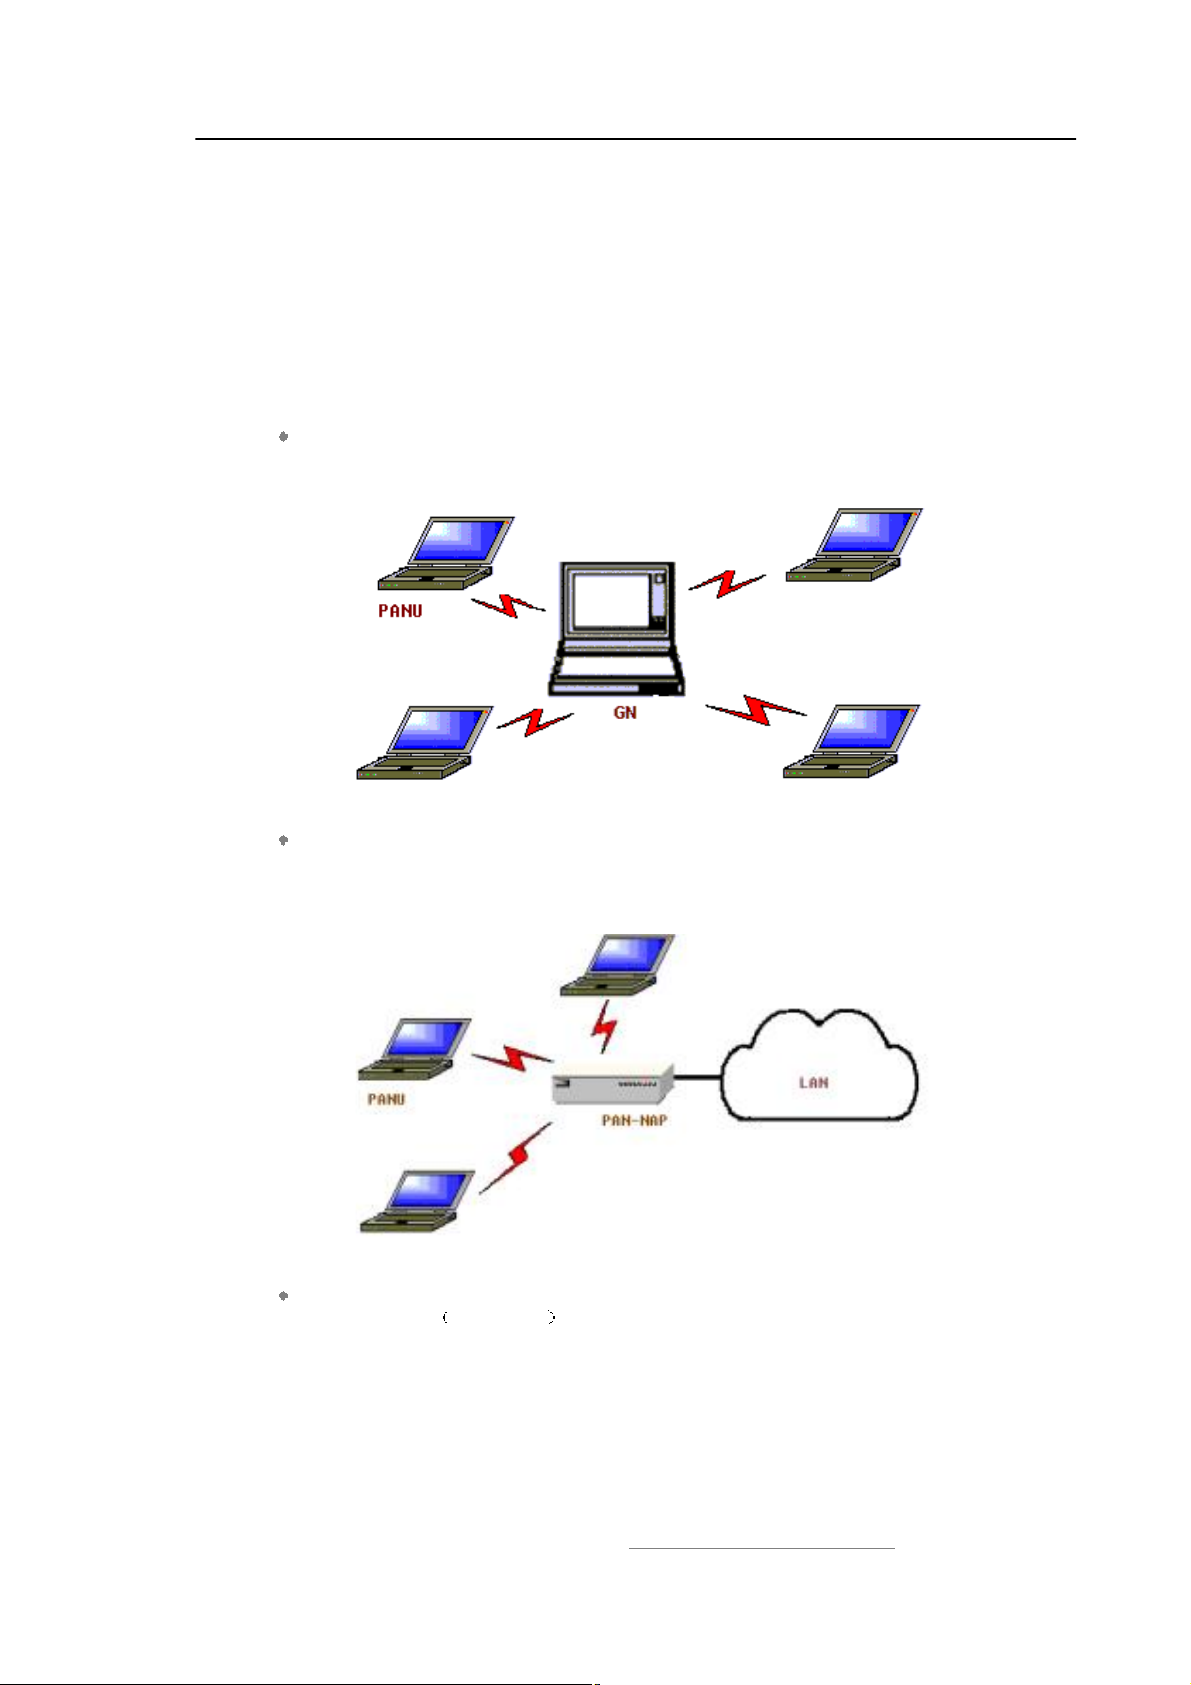
Figure 3.5: Authorization for Services
Trusted Devices
The devices are trusted by the specified service. Click Add button to add devices
into Trusted Devices list. Only a paired and trusted device can use the service
freely.
Trust all devices
Set all devices trusted.
Prompt to user if the device is not a trusted device of this service
If a device attempting to access the service is not a trusted device, a prompt
dialog will popup on the server side to inquire user if accepting the connection.
Reject the device to use the service if it is not a trusted device of this
service
If a device attempting to access the service is not a trusted device, the device
will be rejected to established connection directly.
Copyright © 2001, IVT Corporation, http://www.ivtcorporation.com
All specifications are preliminary and subject to change without notice.
21
Page 25
IVT BlueSoleil™ User Manual
4 Personal Area Networking
4.1 Introduction
The Bluetooth Personal Area Networking (PAN) is a Bluetooth application, which
enables devices to form an ad-hoc network or to access a remote network through
a network access point.
The PAN application can be used in the following scenarios:
Two or more computers (or PDAs) can be connected to form a Group Ad-hoc
Network (GN) and can visit each other using Windows Network Places or any
application based on TCP/IP. (Figure 4.1)
Figure 4.1: Group Ad-hoc Network
Two or more computers (or PDAs) can access a Local Area Network through a
Network Access Point (NAP) bridge. (Figure 4.2) After the computers or PDAs
connect to the PAN-NAP, they become members of the LAN and can
communicate with other computers in the LAN directly.
Figure 4.2: Access LAN through PAN-NAP
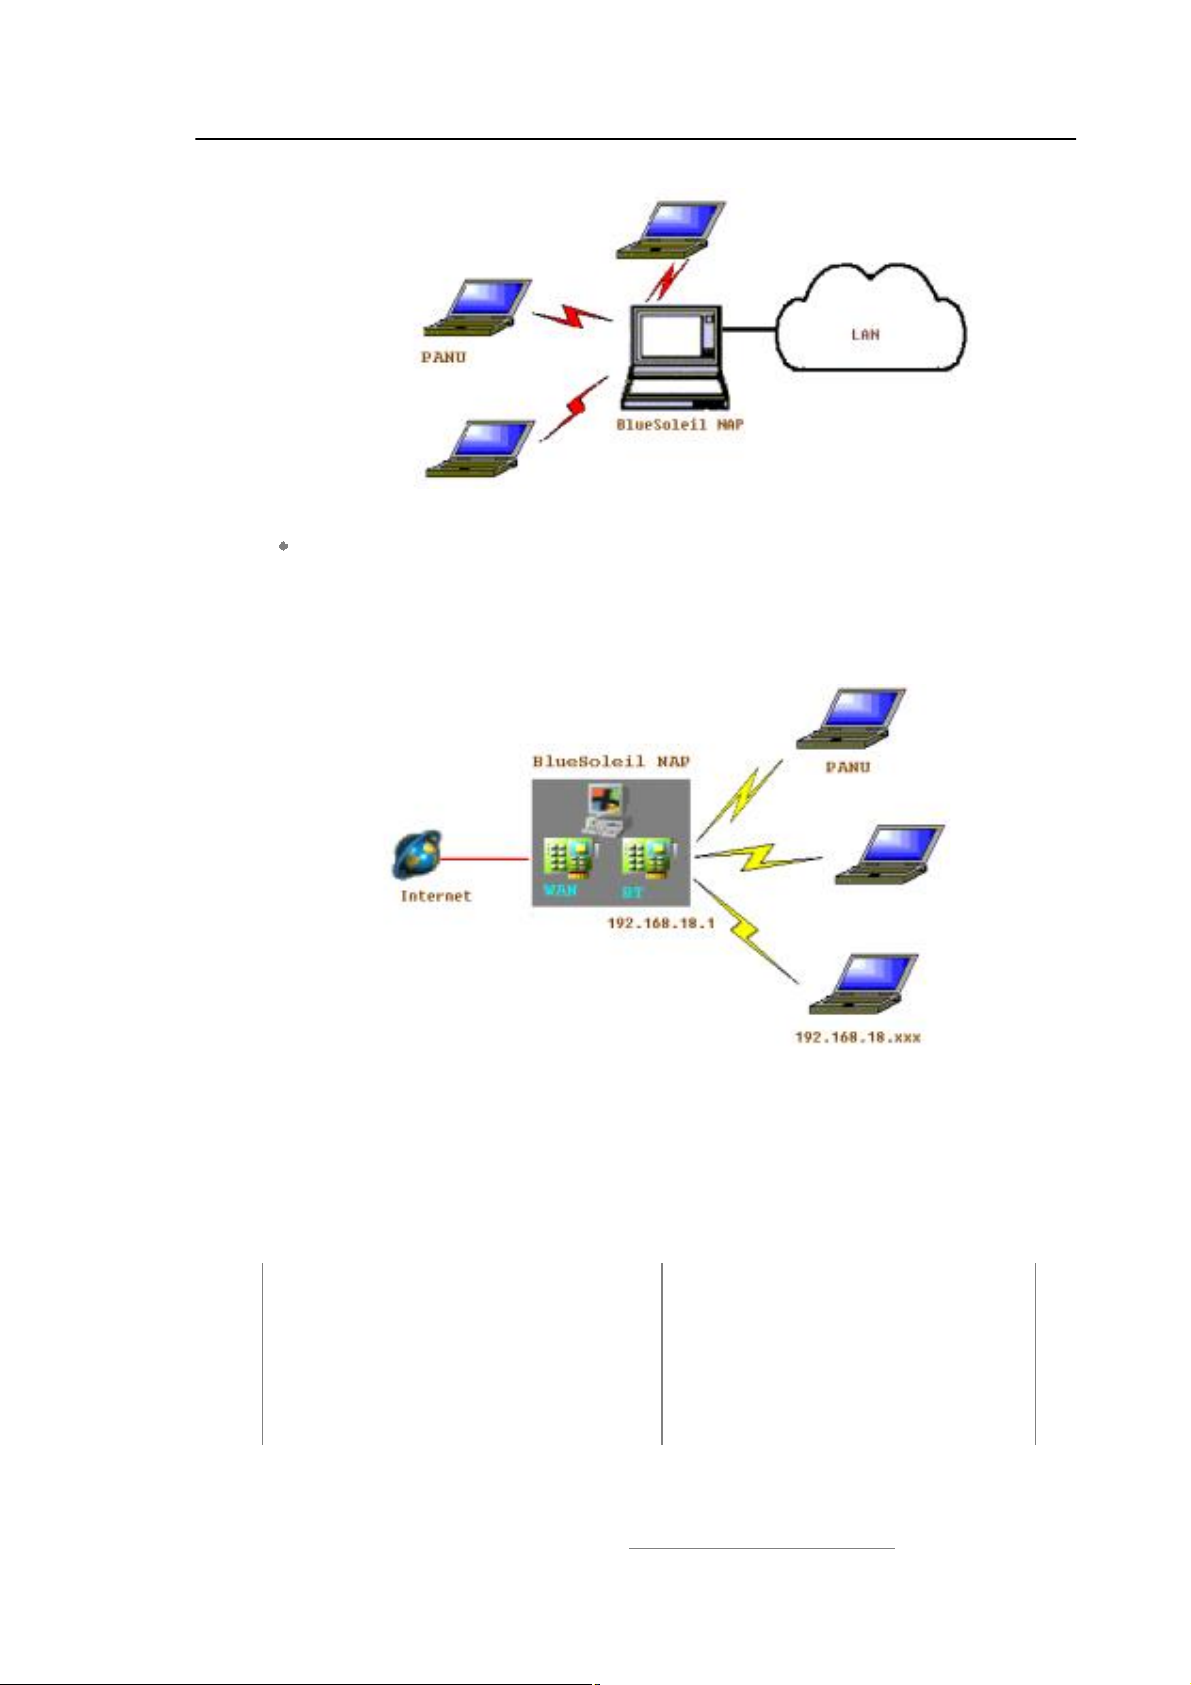
Two or more computers (or PDAs) can access a Local Area Network through
BlueSoleil!. Figure 4.3 After the PANUs connect to the BlueSoleil NAP, they
become members of the LAN and can communicate with other computers in the
LAN directly.
Copyright © 2001, IVT Corporation, http://www.ivtcorporation.com
All specifications are preliminary and subject to change without notice.
22
Page 26
IVT BlueSoleil™ User Manual
Figure 4.3: Access LAN through BlueSoleil NAP
Two or more computers (or PDAs) can access the Internet through BlueSoleil!.
(Figure 4.4) In this scenario, there are two network adapters for the BlueSoleil
NAP: the WAN adapter is connected to the Internet and the BT network adapter
is used for Bluetooth connections from the PANUs. The BlueSoleil NAP acts as a
TCP/IP gateway, and the PANUs can access the Internet through the BlueSoleil
NAP.
Figure 4.4: Access Internet through BlueSoleil NAP
Each of these scenarios is now covered in more detail.
4.2 Communication Between Two Computers
This section outlines the steps involved in connecting two computers, Computer A
and Computer B.
Computer A: Computer B:
Desktop Notebook/ Laptop
A Bluetooth Device A Bluetooth Device
IVT BlueSoleil! IVT BlueSoleil!
Copyright © 2001, IVT Corporation, http://www.ivtcorporation.com
All specifications are preliminary and subject to change without notice.
23
Page 27
IVT BlueSoleil™ User Manual
Step 1: Insert Bluetooth Devices in both computers and start BlueSoleil! in
both computers.
Step 2: Set device name of each computer to anything you want. Here they
are named Computer A and Computer B.
In the BlueSoleil! Main Window of Computer A, click My
Bluetooth | Property…. Enter #Computer A" in the device name
field in the My Bluetooth Device window.
Repeat for Computer B.
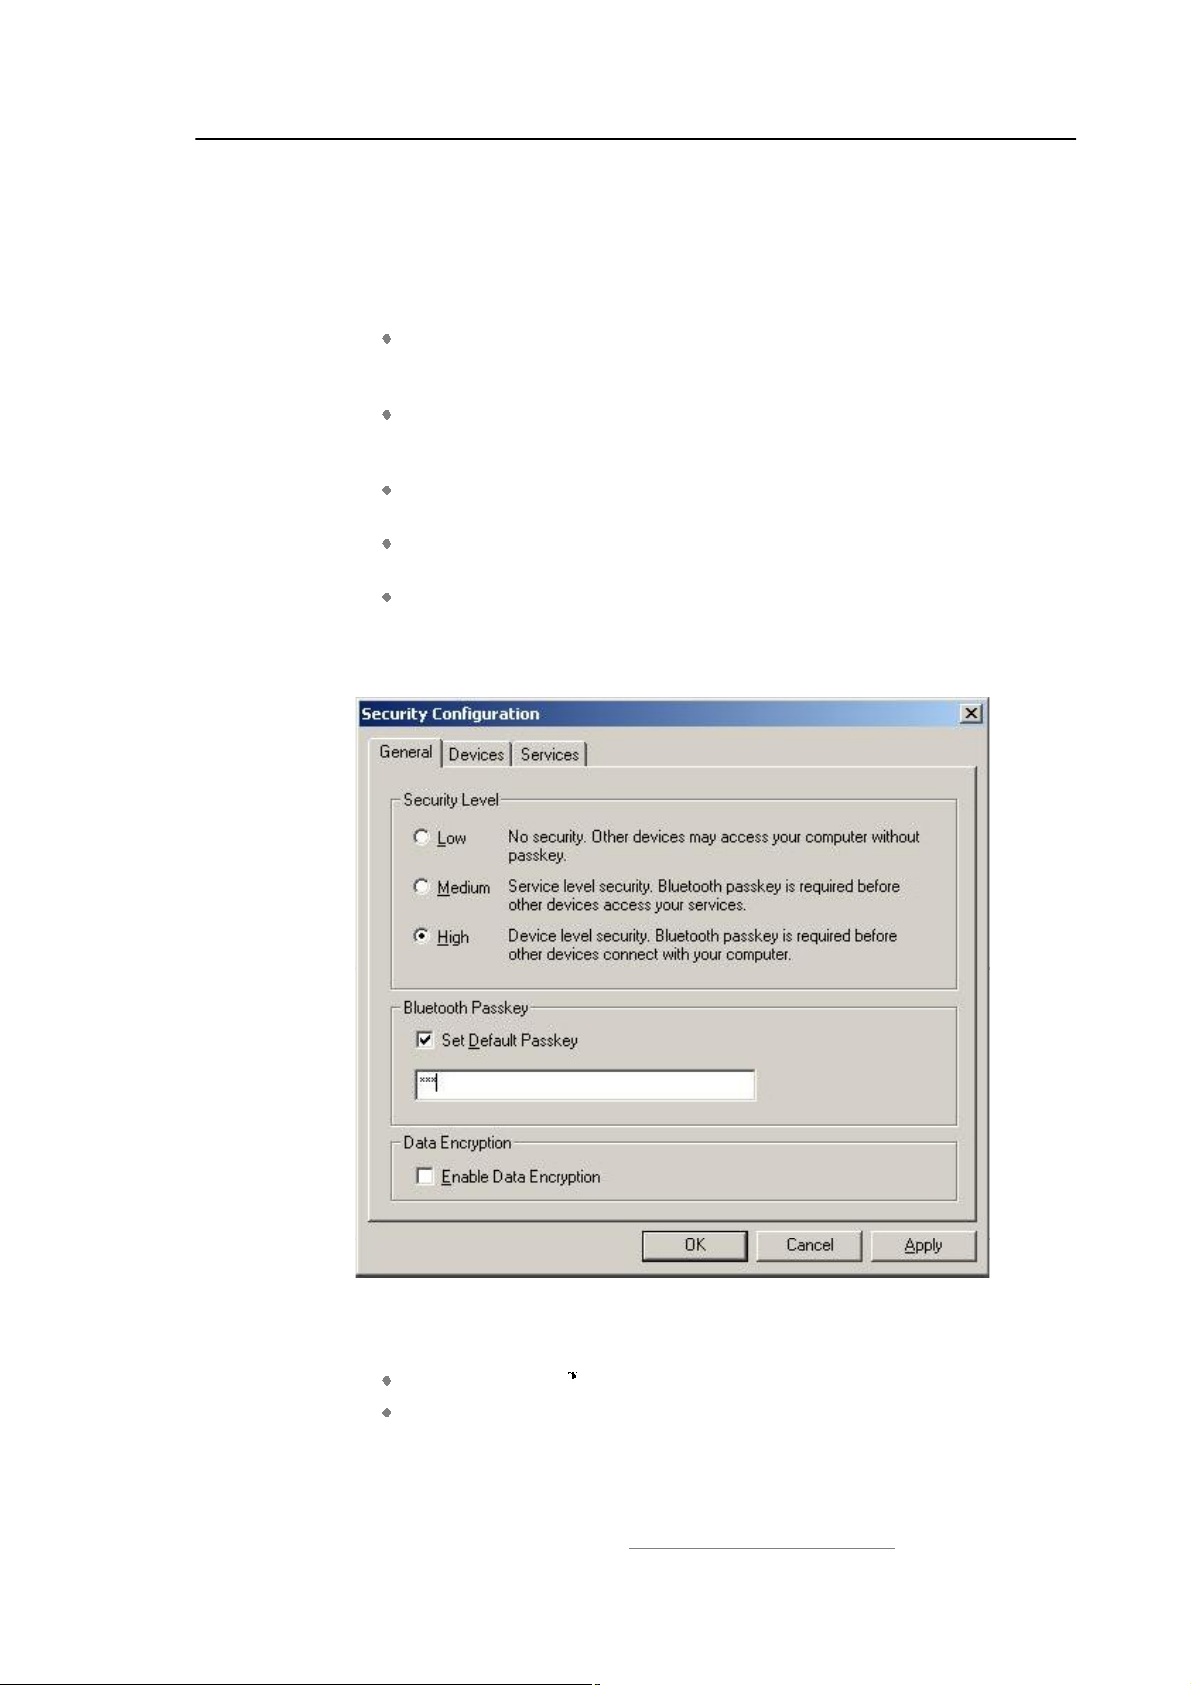
Step 3: Set the Security Level.
Click My Bluetooth| Security, the Security Configuration panel
pops up.
On the Security Configuration panel, select High in Security
Level.
Note: If you check the Fixed Passkey and input a Bluetooth
passkey, this passkey will be used as the default passkey. The
other computer will then have to provide the same passkey during
the connection procedure if it wants to connect to this computer.
Figure 4.5: Security Configuration
Step 4: Start the PAN service on Computer A.
In the BlueSoleil Main Window, click View | Service Window.
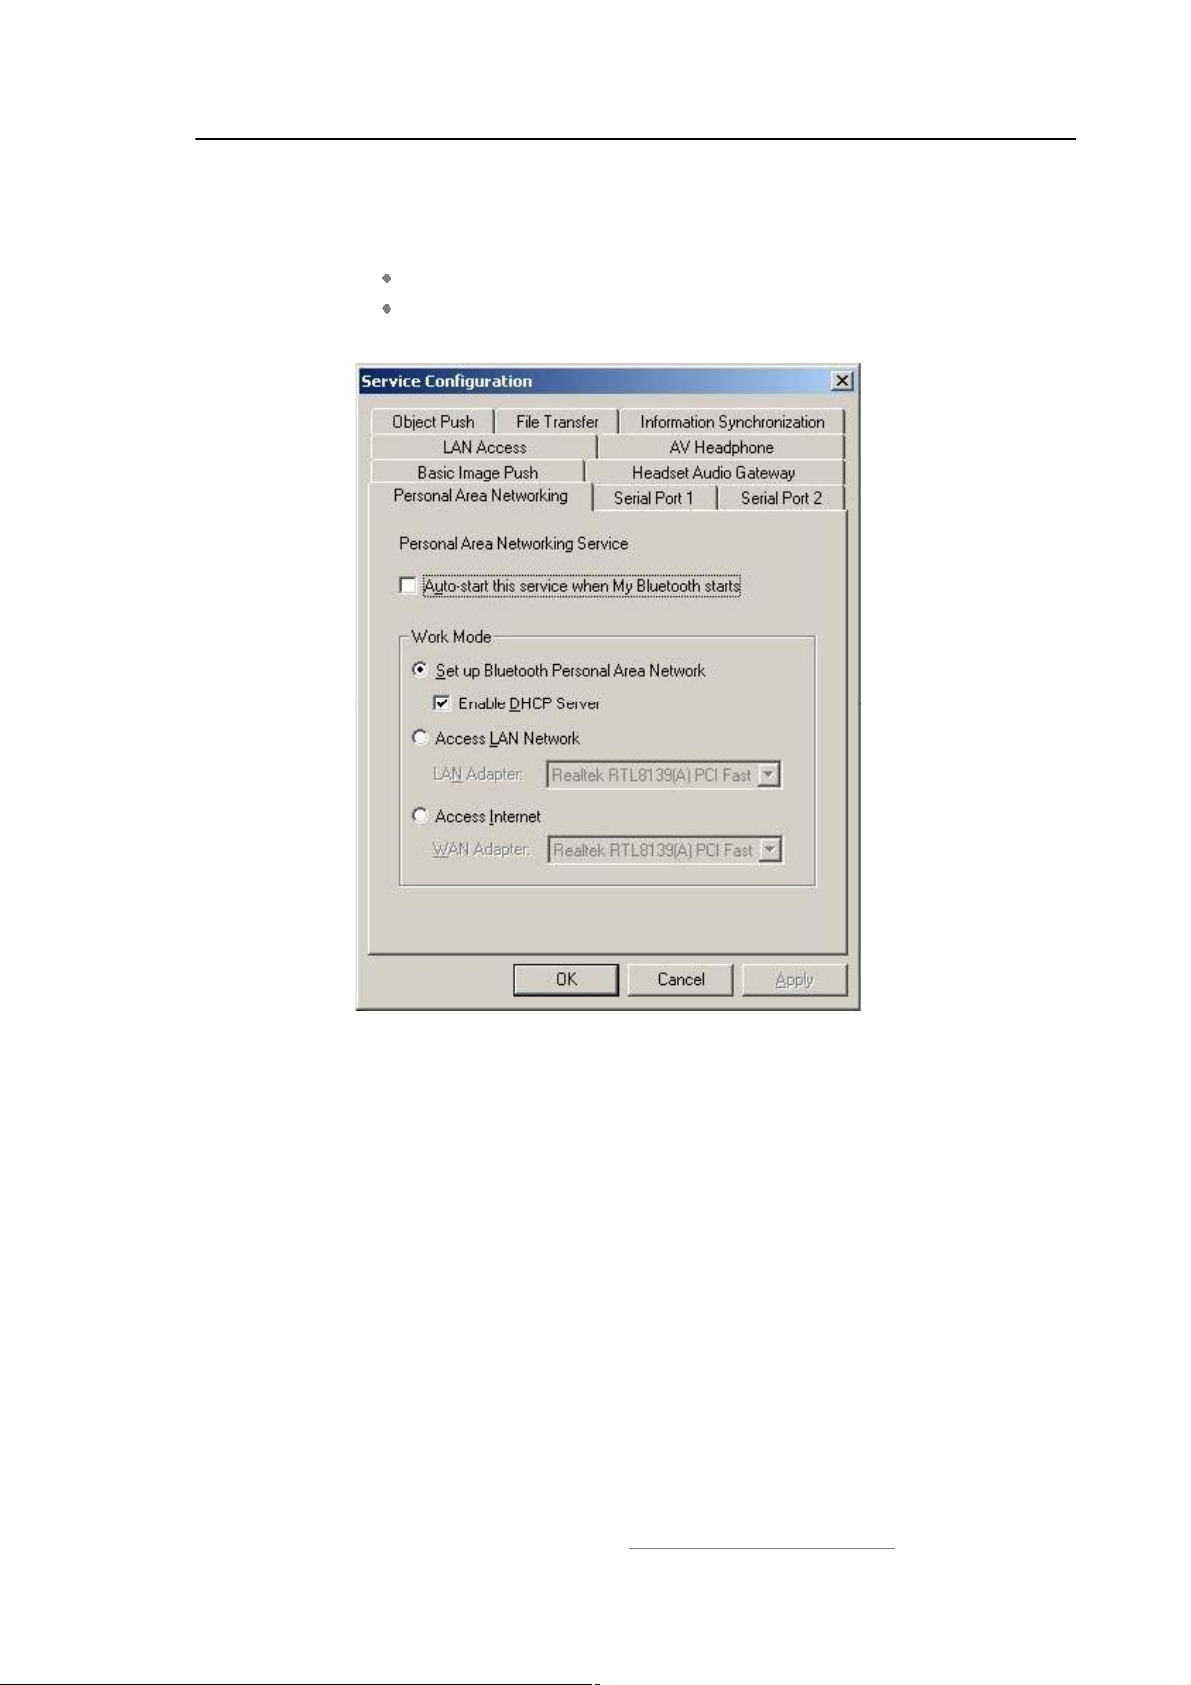
In the Service Window, right-click the Personal Area Networking
icon. Choose Properties to configure my PAN service as Set up
Bluetooth Personal Area Network. (Figure 4.6) If the item of
Enable DHCP Server is checked, a DHCP server will be started
Copyright © 2001, IVT Corporation, http://www.ivtcorporation.com
All specifications are preliminary and subject to change without notice.
24
Page 28
IVT BlueSoleil™ User Manual
on the GN side. (Notes: To use DHCP, the BT Network Adapter on
the client side must be set to obtain an IP address automatically.
The IP address is in the form of 192.168.18.xxx.)
Click Apply or OK button to save the configuration.
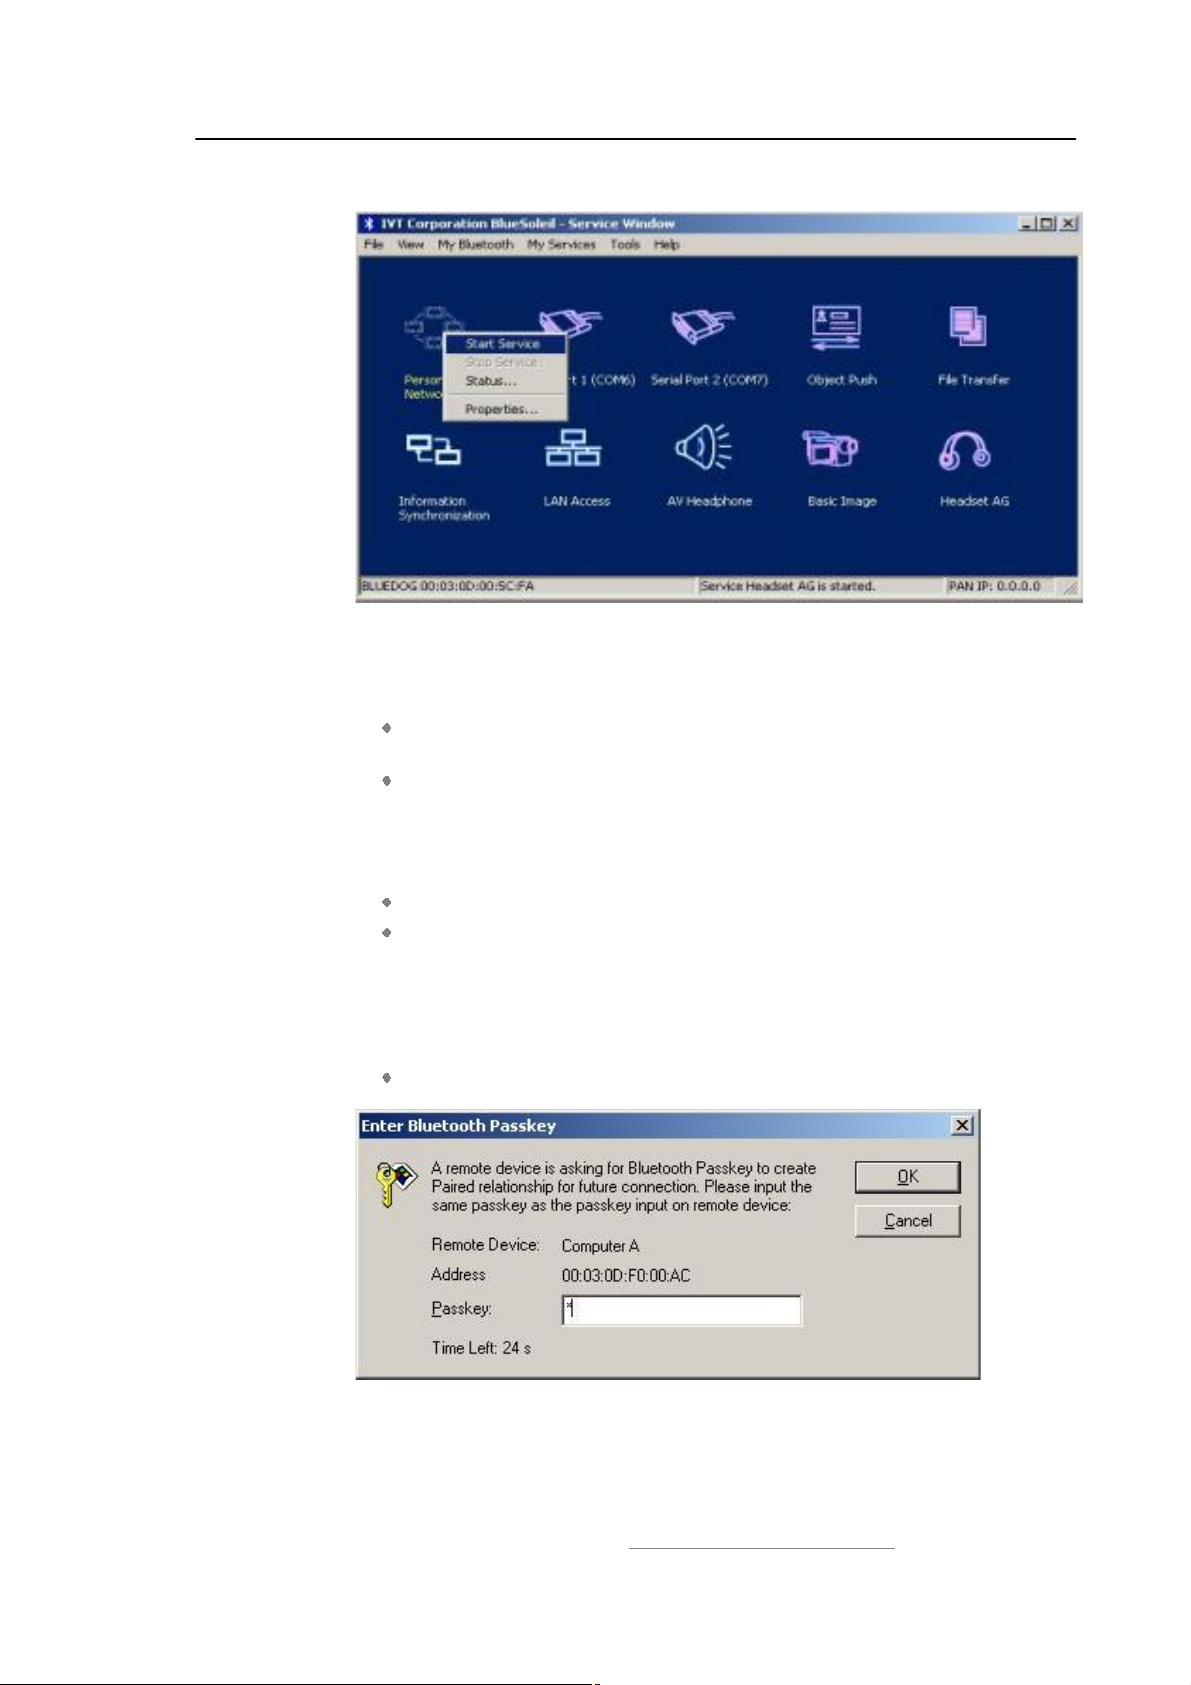
Right-click the Personal Area Networking icon again, then choose
Start Service. (Figure 4.7)
Figure 4.6: Set up Bluetooth Personal Area Network Configuration
Copyright © 2001, IVT Corporation, http://www.ivtcorporation.com
All specifications are preliminary and subject to change without notice.
25
Page 29
IVT BlueSoleil™ User Manual
Figure 4.7: Start PAN Service on Computer A
Step 5: Search for Computer A on Computer B.
Double-click the My Device Icon (center ball). The surrounding
discovered Bluetooth devices appear.
Check to see if Computer A appears. If it does not appear,
double-click the My Device Icon again. Repeat the operation until
you find Computer A.
Step 6: Find the PAN service on Computer A.
Double-click the Computer A device icon on Computer B.
Enter the Bluetooth passkey (if security is set to High on either
side) to start the authenticating process. The Enter Bluetooth
Passkey window pops up on Computer A. Input any characters or
numbers, e.g. $12%. The Enter Bluetooth Passkey window pops
up on Computer B. Input exactly the same characters or numbers
as you input for Computer A, e.g. $12%. (Figure 4.8)
Once authentication is complete, the PAN service is found.
Figure 4.8: Input passkey
Copyright © 2001, IVT Corporation, http://www.ivtcorporation.com
All specifications are preliminary and subject to change without notice.
26
Page 30
IVT BlueSoleil™ User Manual
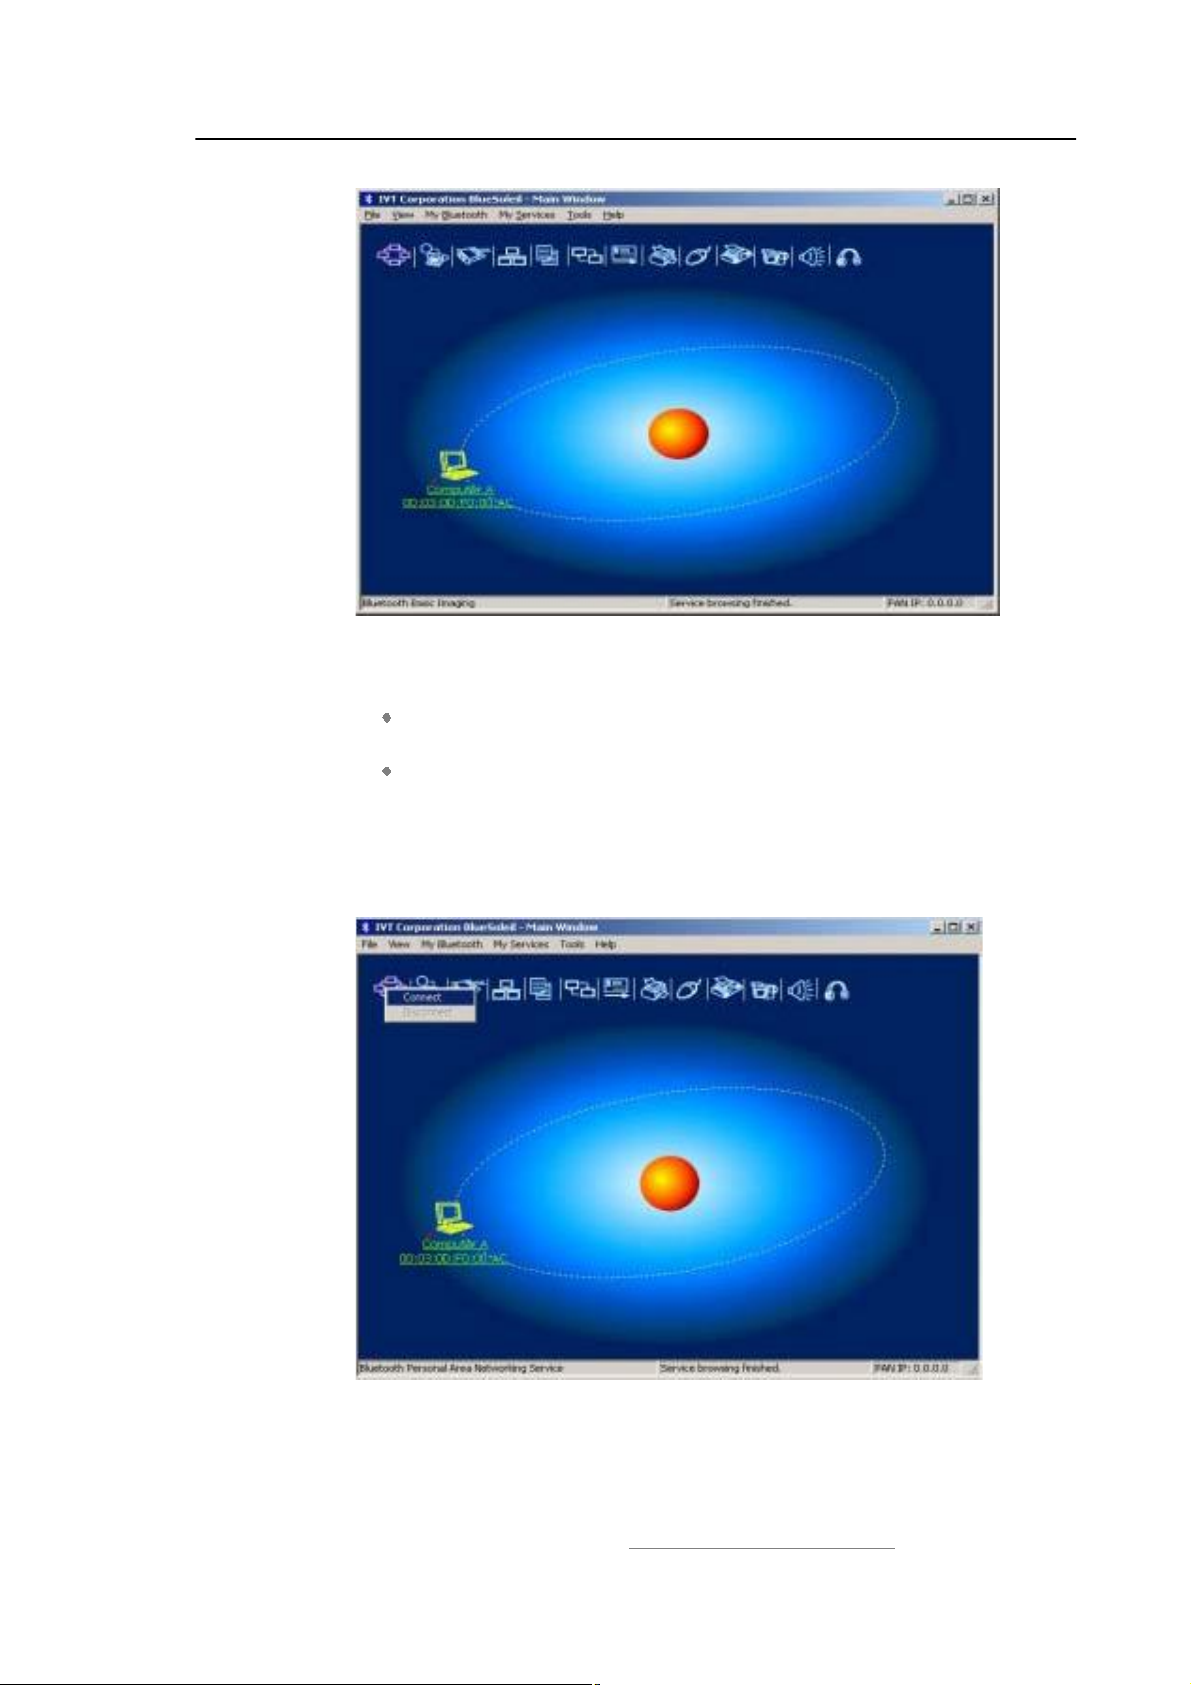
Figure 4.9: PAN service is found
Step 7: Connect to Computer A.
Right-click the PAN service icon; select Connect on the pop-up
menu. (Figure 4.10)
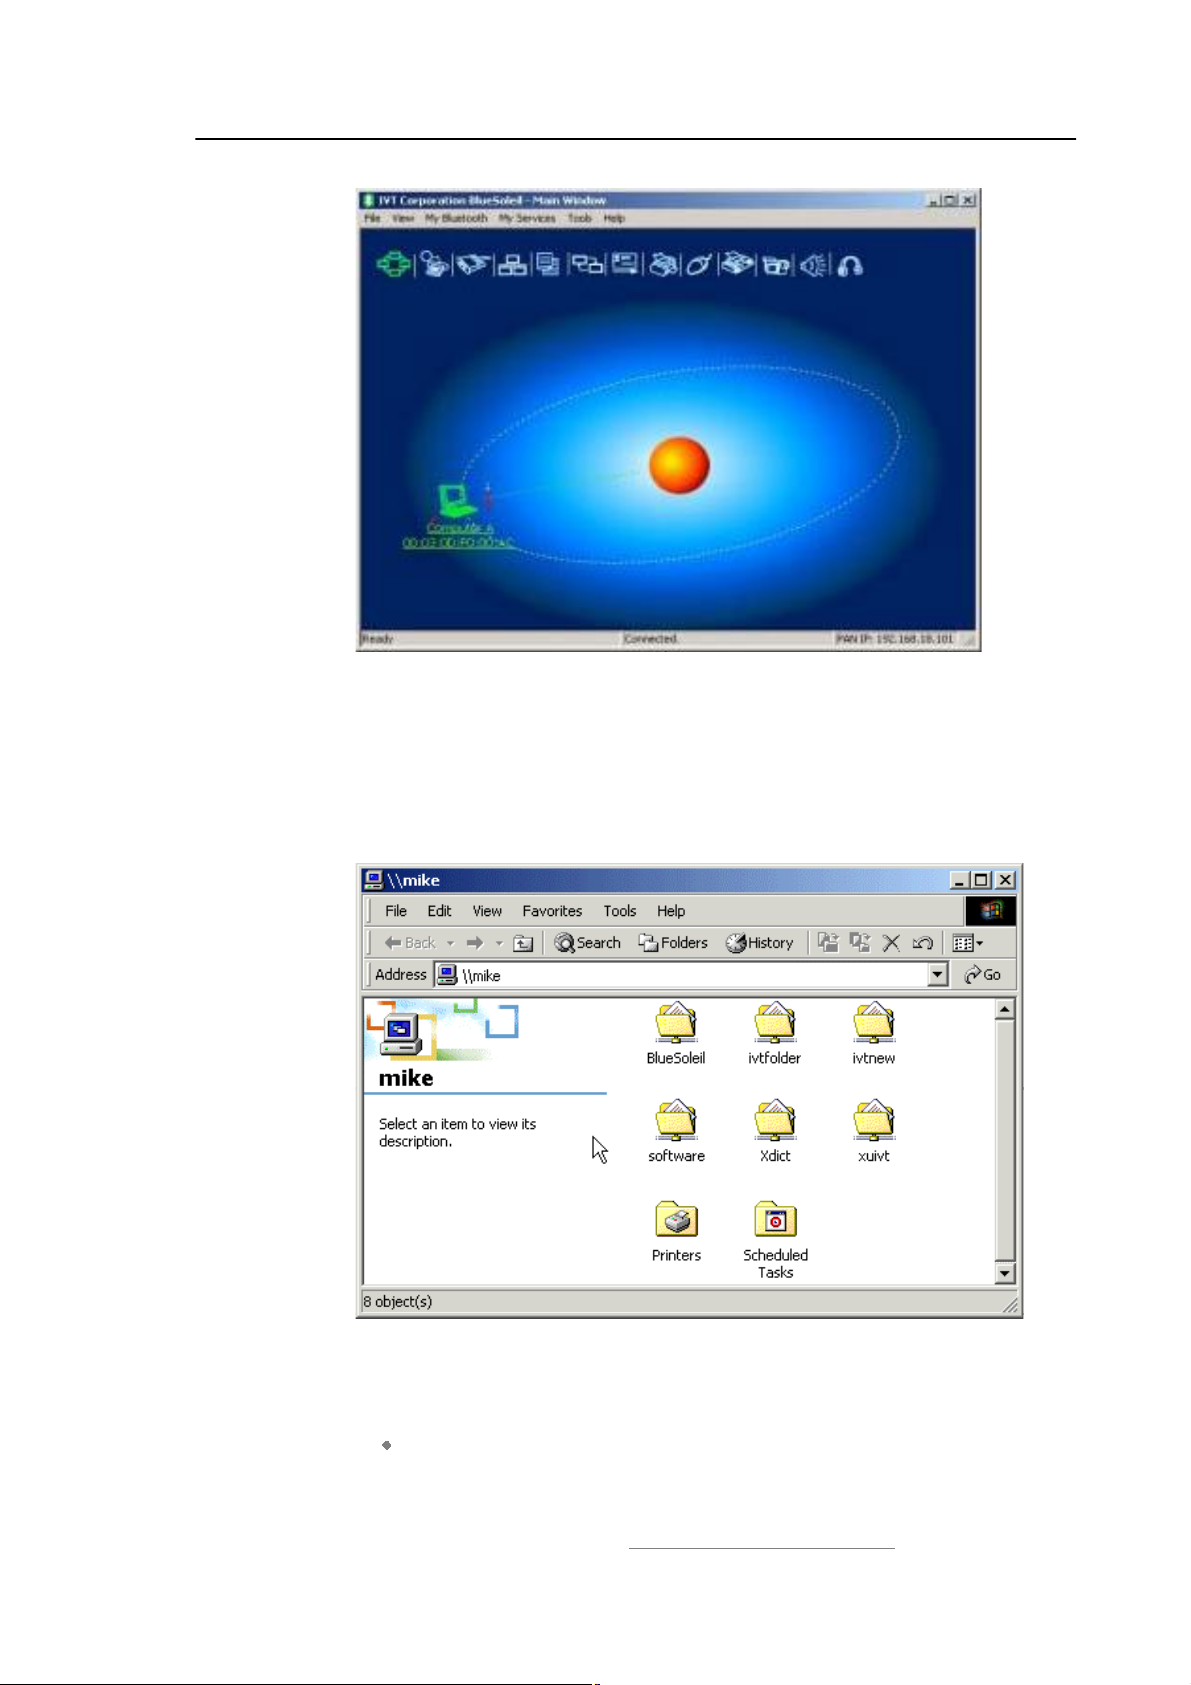
The connection is established successfully ( Figure 4.11).
Wait until the valid IP address is shown on the bottom right status
bar on both Computer A and Computer B. If you enable the DHCP
server on the server side, the IP address appears as
$192.168.18.xxx%. If not, the IP address appears as
$169.254.xxx.xxx%.
Figure 4.10: Connect to PAN Service
Copyright © 2001, IVT Corporation, http://www.ivtcorporation.com
All specifications are preliminary and subject to change without notice.
27
Page 31
IVT BlueSoleil™ User Manual
Figure 4.11: Connection is established successfully.
Step 8: Computer A and Computer B are now connected. On Computer B, go
to Windows | My Network Places to find Computer A and copy
files. Figure 4.12 shows where to input Computer A"s name. In Figure
4.12, Computer A is named #mike".
Figure 4.12: Find Computer A in My Network Places
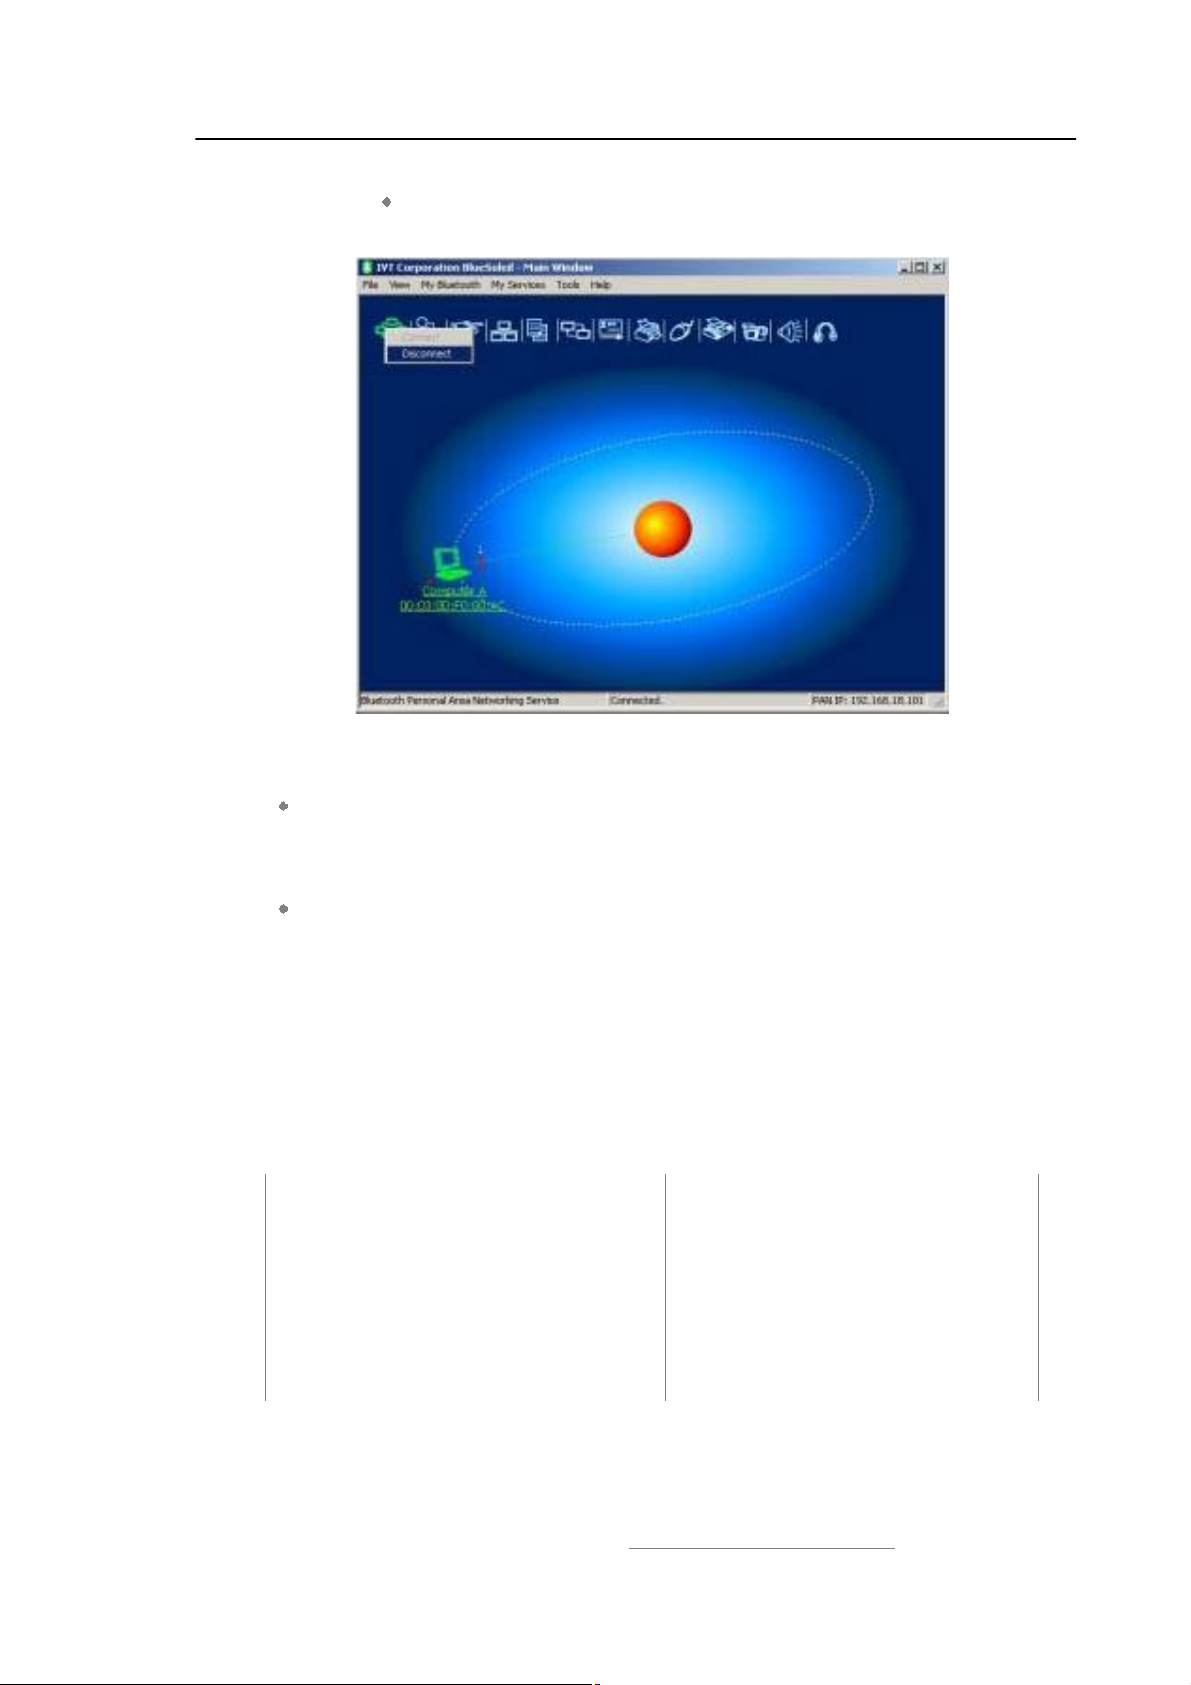
Step 9: To disconnect the PAN connection, disconnect from either Computer A
or from Computer B.
On Computer B, right-click on the PAN service icon and choose
Disconnect. (Figure 4.13)
Copyright © 2001, IVT Corporation, http://www.ivtcorporation.com
All specifications are preliminary and subject to change without notice.
28
Page 32
IVT BlueSoleil™ User Manual
On Computer A, right-click on the PAN service icon in service
window and choose Stop Service.
Figure 4.13: Disconnect the PAN service from Computer B
Advanced Usage:
Computer A is now the center node. Other computers, for example, Computers
C, D and E, can connect to Computer A with BlueSoleil! following the same
steps as those for Computer B. Computer A supports up to 7 connections at the
same time.
Computer A, B, C, D and E can access each other using the Windows Network
Places. This forms a Bluetooth ad-hoc networking environment.
Note: It takes about 1 minute before an IP address can be obtained on the client
side (Computer B) unless you select to enable the DHCP server on the server side
(Computer A).
4.3 Access LAN Through PAN-NAP
This section outlines the steps involved in accessing a Local Area Network (LAN)
through a PAN-NAP.
Computer A: Ethernet PAN-NAP B:
Notebook/Laptop Ethernet PAN-NAP
A Bluetooth Device
Windows 2000
IVT BlueSoleil!
Step 1: Plug the LAN cable into the PAN-NAP (Ethernet PAN-NAP B) and power
Copyright © 2001, IVT Corporation, http://www.ivtcorporation.com
All specifications are preliminary and subject to change without notice.
29
Page 33

IVT BlueSoleil™ User Manual
it on.
Step 2: Insert a Bluetooth Device into the computer.
Step 3: Start BlueSoleil! in the computer.
Step 4: Connect Computer A to Ethernet PAN-NAP B
1. Go to Computer A, double click My Device Icon until you find the
device Ethernet PAN-NAP B.
2. Find the PAN service on Ethernet PAN-NAP B by double clicking the
Ethernet PAN Bridge B device icon. Enter the Bluetooth passkey (if
security is set to High on either side) to start authentication. The
Enter Bluetooth Passkey window pops up on Computer A. Input
the same passkey as the one on the Ethernet PAN-NAP B. (Figure
4.8)
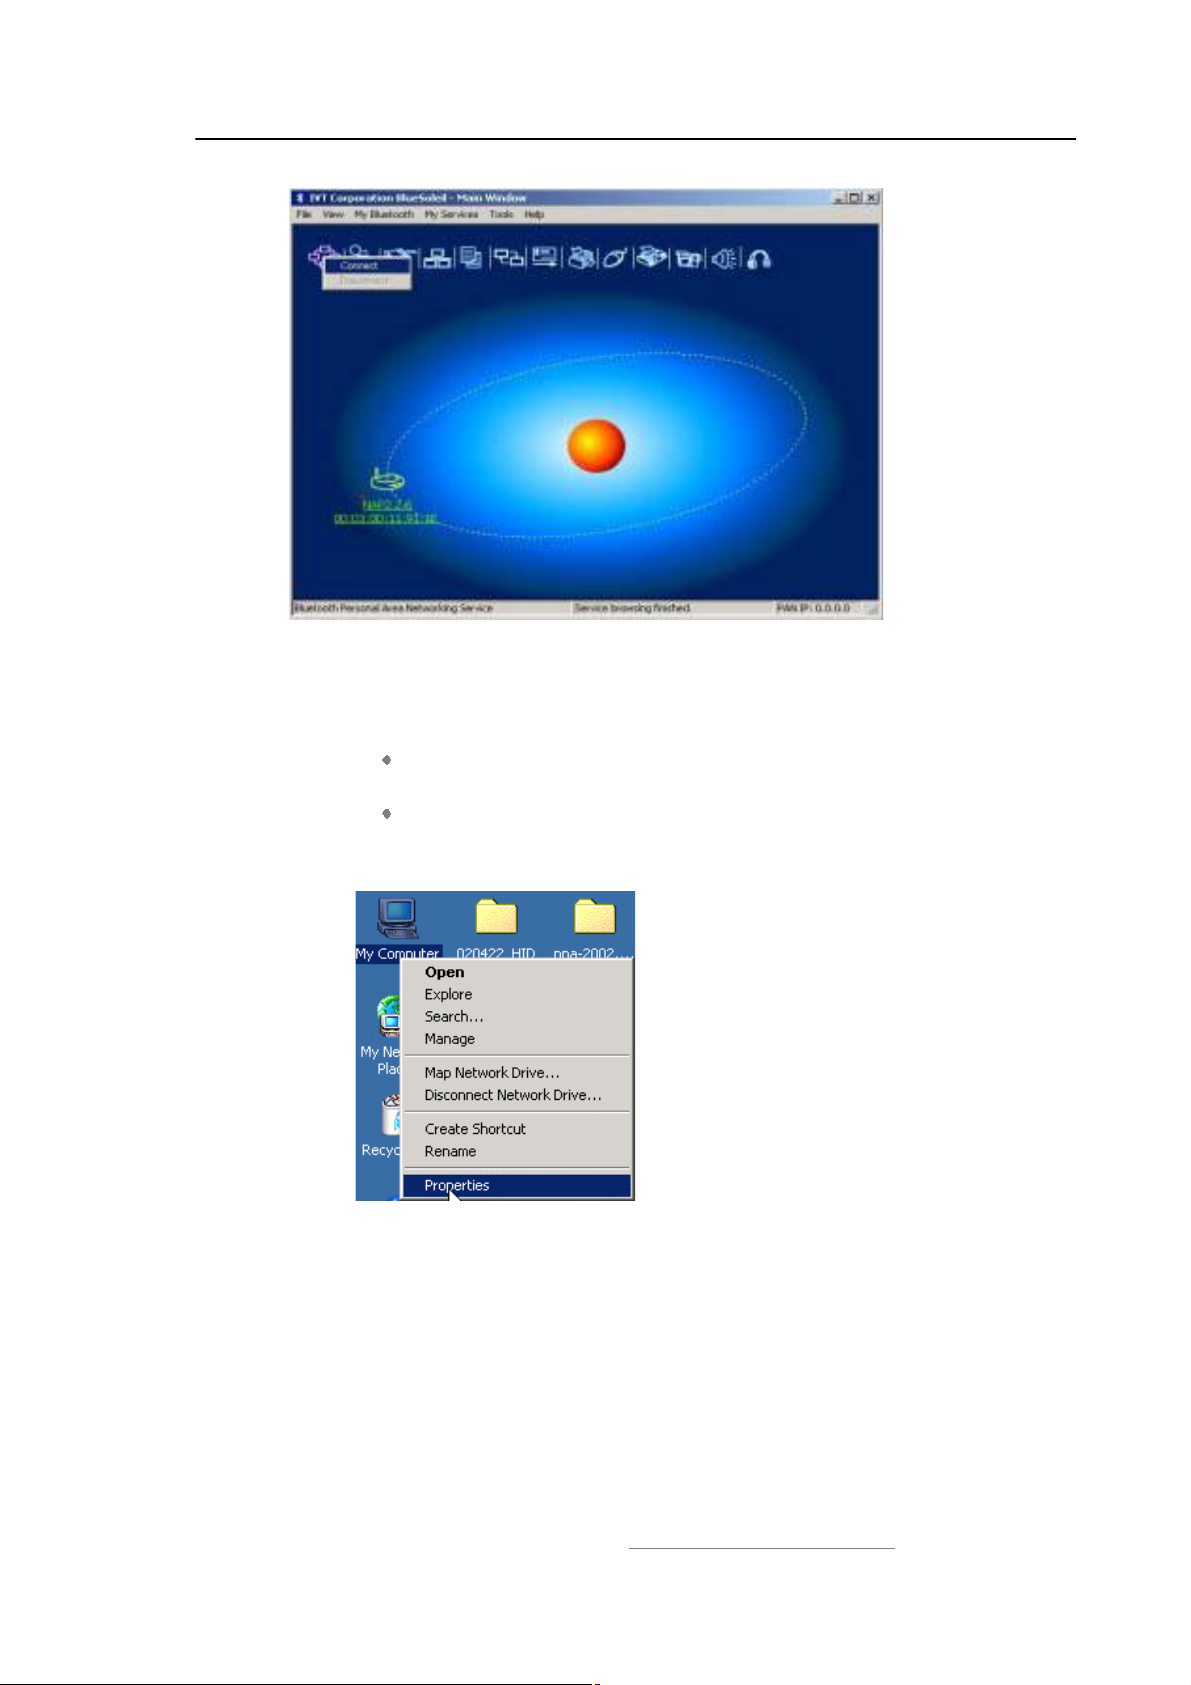
3. Right-click the PAN service icon, and then choose Connect.
(Figure 4.15)
Note: The passkey is provided by the PAN-NAP provider and the
default value is usually "root". It can be modified by the software
associated with the PAN-NAP. For more details please refer to the
user documentation provided by the PAN-NAP provider.
Figure 4.15: Choose Connect
The connection is established successfully (Figure 4.16). Wait
until the valid IP address appears in the bottom right status bar on
Computer A.
Copyright © 2001, IVT Corporation, http://www.ivtcorporation.com
All specifications are preliminary and subject to change without notice.
30
Page 34
IVT BlueSoleil™ User Manual
Figure 4.16: Successful connection to PAN-NAP
Step 5: IP address configuration of the BT Network Adapter on Computer A.
Right-click on My Network Places and select Properties.
(Figure 4.17)
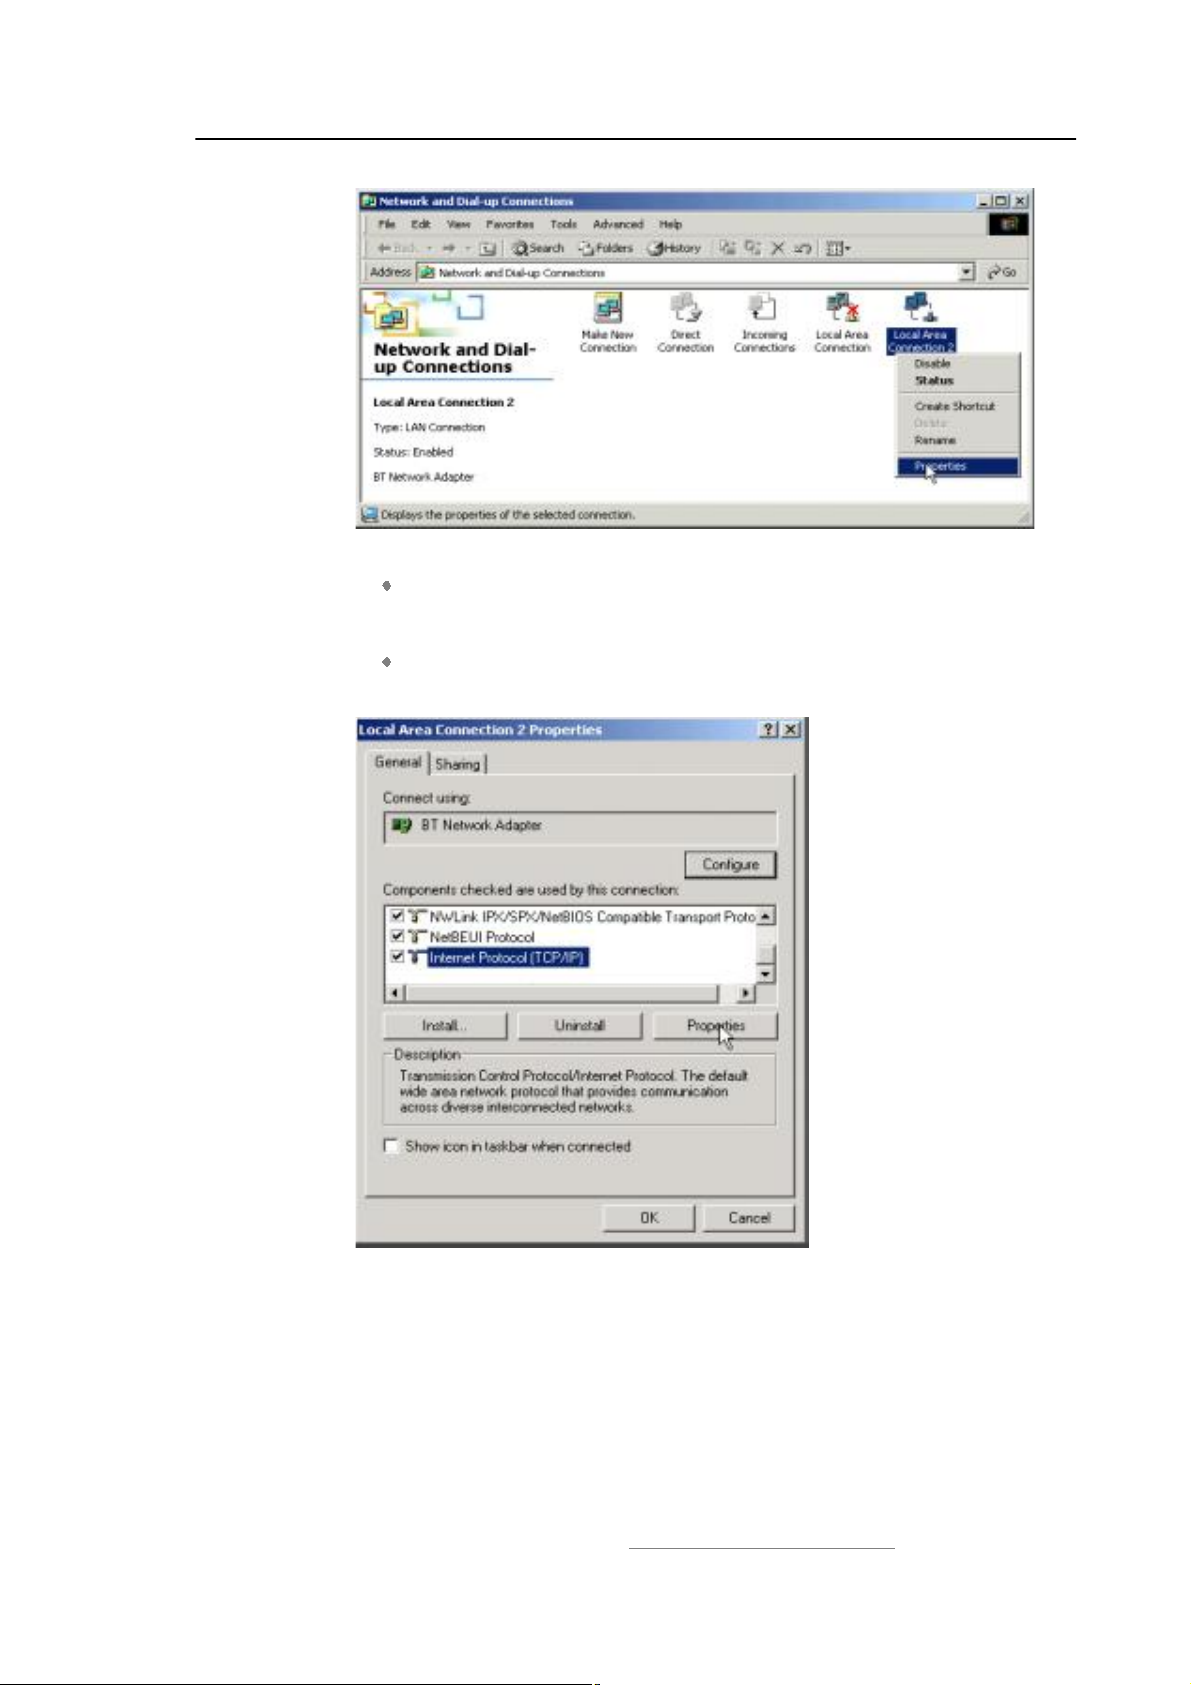
Right-click the Local Access Connection 2 on the Network and
Dial-up Connections window, and select Properties. (Figure
4.18)
Figure 4.17: Right-click on My Network Places
Copyright © 2001, IVT Corporation, http://www.ivtcorporation.com
All specifications are preliminary and subject to change without notice.
31
Page 35
IVT BlueSoleil™ User Manual
Figure 4.18: Network and Dial-up Connections
On the Local Area Connection 2 Properties window, select the
Internet Protocol (TCP/IP) item and click on Properties. (Figure
4.9)
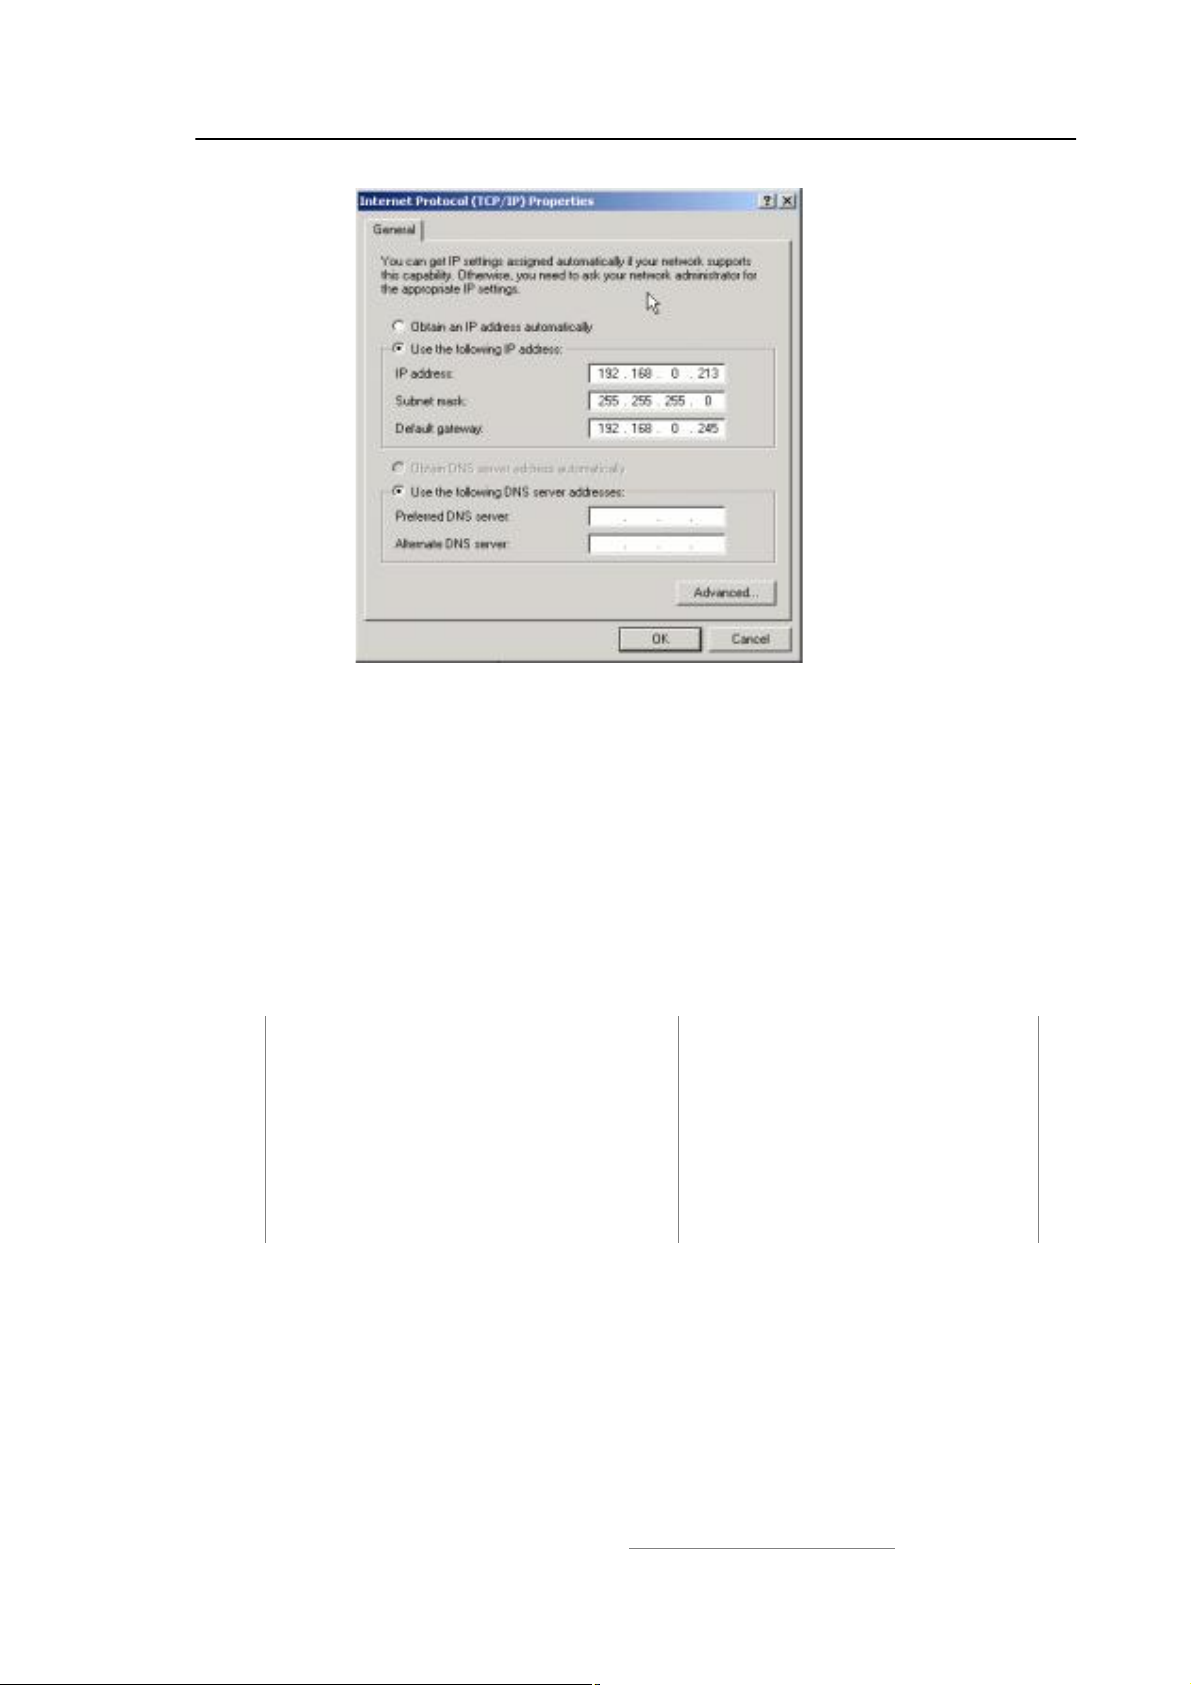
Set the IP address to be in the same subnet as the other
computers in the LAN. (Figure 4.20).
Figure 4.19: Find Internet Protocol (TCP/IP)
Copyright © 2001, IVT Corporation, http://www.ivtcorporation.com
All specifications are preliminary and subject to change without notice.
32
Page 36
IVT BlueSoleil™ User Manual
Figure 4.20: Set the IP address
Note: When Computer A connects to Ethernet PAN-NAP B it accesses the LAN as if
it is attached to the LAN directly. The network properties of Computer A must be
the same as the computers in the LAN, that is, Computer A and the computers in
the LAN must be in the same subnet and have the same subnet mask. For example,
if the computers in the LAN use DHCP for IP addressing, then Computer A needs to
be configured to use DHCP. If the IP address is configured manually on the
computers in the LAN, then Computer A also needs to be configured manually.
4.4 Access LAN Through IVT BlueSoleil™
This section outlines the steps involved in accessing a Local Area Network (LAN)
through IVT BlueSoleil!.
Computer A: Computer B:
Desktop Notebook/Laptop
A Bluetooth Device A Bluetooth Device
IVT BlueSoleil! IVT BlueSoleil!
Network Adapter connecting to the LAN
Copyright © 2001, IVT Corporation, http://www.ivtcorporation.com
All specifications are preliminary and subject to change without notice.
33
Page 37
IVT BlueSoleil™ User Manual
Step 1:
Start IVT BlueSoleil! on both Computer A and Computer B.
Please
refer to $Section 3.2:Communication Between Two Computers%,
and complete Steps 1 to 4.
Step 2: Start the PAN service on Computer A.
In the BlueSoleil Main Window, click View | Service Window.
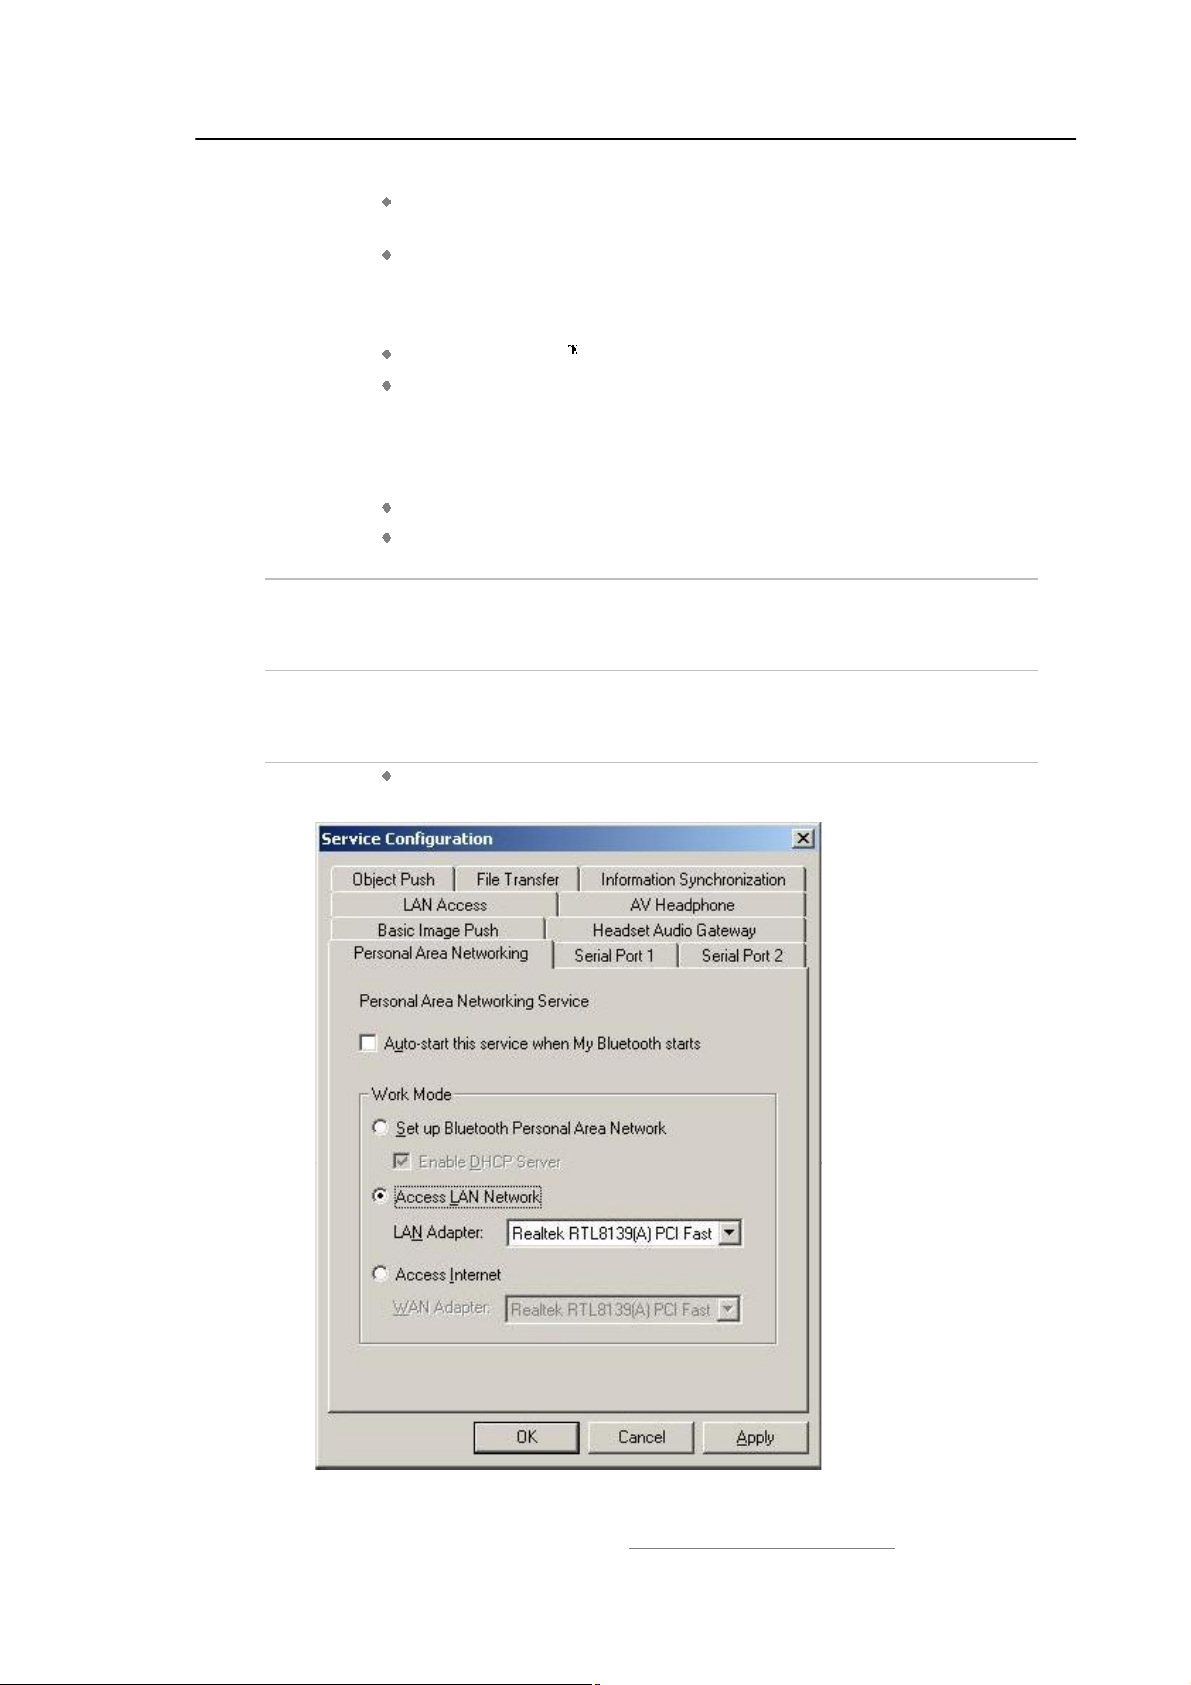
In the Service Window, right-click the Personal Area Networking
icon. Choose Properties to configure my PAN service as Access
LAN Network and select a physical adapter, through which
Computer A connects to a LAN, as the LAN Adapter (Figure
4.21).
Click Apply or OK button to save the configuration.
Right-click the Personal Area Networking icon again, and choose
Start Service.
Step 3: On Computer B, make sure that the BT adapter has the same
configuration with computers in the LAN. (Refer to Step 6 in $Section
3.3: Access LAN Through PAN%.)
Step 4: Setup connection between Computer A and Computer B. Please refer
to $Section 3.2:Communication Between Two Computers%, and
complete Steps 6 to 8.
Step 5:
Computer B can now access the LAN.
Copyright © 2001, IVT Corporation, http://www.ivtcorporation.com
All specifications are preliminary and subject to change without notice.
34
Page 38

IVT BlueSoleil™ User Manual
Figure 4.21: Access Outside LAN Network Configuration
4.5 Access Internet through IVT BlueSoleil™
The following sections outline how to enable Computer B to access the Internet
through Computer A.
Computer A: Computer B:
Desktop Notebook/ Laptop
A Bluetooth Device A Bluetooth Device
Windows 2000 Windows 2000
IVT BlueSoleil! IVT BlueSoleil!
Network Adapter connecting to the
Internet
Step 1:
Step 2: Start the PAN service on Computer A.
Make sure Computer A can access Internet. Start IVT BlueSoleil!
on both Computer A and Computer B. Please refer to $Section
3.2:Communication Between Two Computers%, and complete
Steps 1 to 4.
1. In the BlueSoleil Main Window, click View | Service Window.
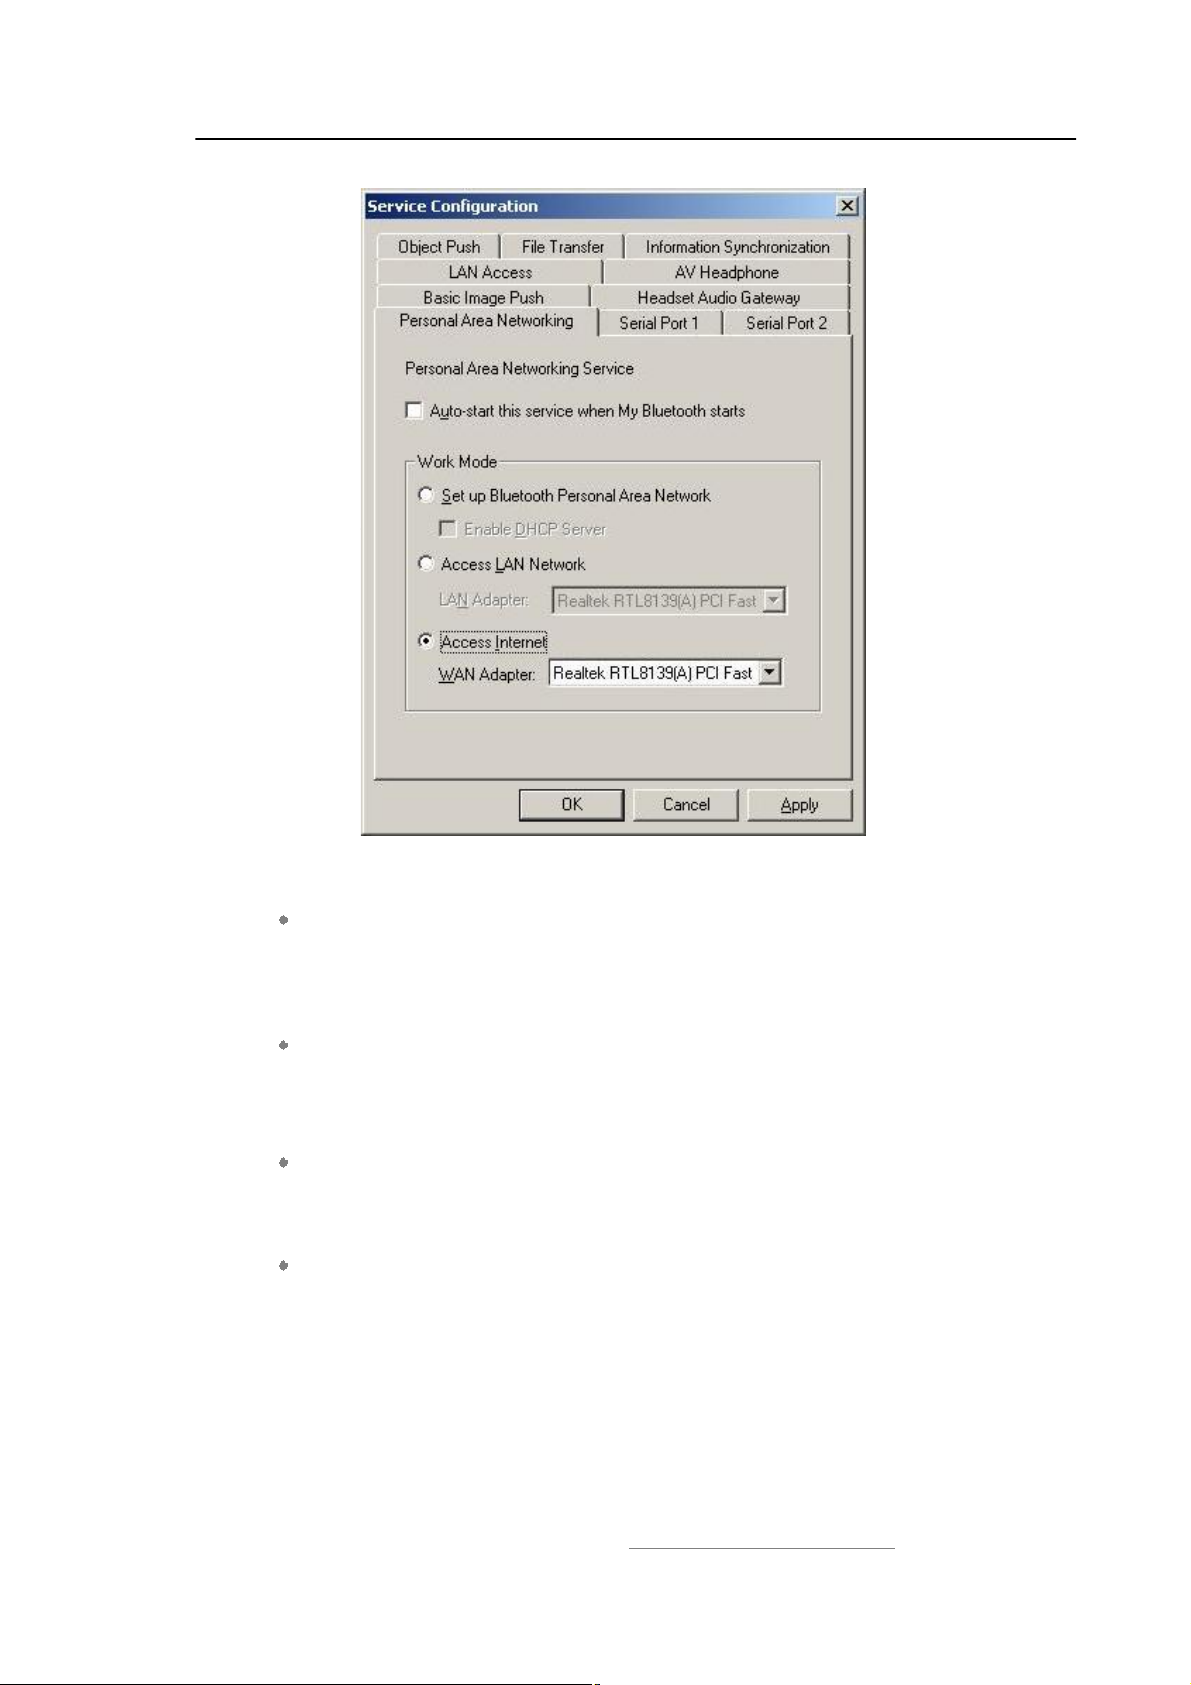
2. In the Service Window, right-click the Personal Area Networking
icon. Choose Properties to configure my PAN service as Access
Internet and select a local physical adapter as the WAN Adapter
(Figure 4.22), through which Computer A can access Internet. It
automatically enables NAT (Network Address Translation, please
refer to Windows Help Topic) function and a DHCP server.
(Notes: The BT Network Adapter on the client side must be set
to obtain an IP address automatically. The IP address is in the
form of 192.168.18.xxx.)
3. Click Apply or OK button to save the configuration.
4. Right-click the Personal Area Networking icon again, and choose
Start Service.
Step 3: Setup connection between Computer A and Computer B. Please refer
to $Section 3.2:Communication Between Two Computers%, and
complete Steps 6 to 8.
Step 4:
Copyright © 2001, IVT Corporation, http://www.ivtcorporation.com
All specifications are preliminary and subject to change without notice.
After Computer B gets an IP address as $192.168.18.xxx%,
Computer B can now access the Internet through Computer A.
35
Page 39
IVT BlueSoleil™ User Manual
Figure 4.22: Access Outside WAN Network Configuration
Advanced Usage:
Computer A is now the center node of the network. Other computers with
BlueSoleil! installed, for example, Computers C, D and E, can connect to
Computer A following the same steps as those for Computer B and access the
Internet through Computer A. Computer A supports up to 7 connections at the
same time.
Computers A, B, C, D and E can access each other using the Windows My
Network Places and form a Bluetooth ad-hoc networking. Computers B, C, D
and E can then access the Internet through Computer A.
Note:
Computer B also can share a dial-up connection of Computer A, in this case,
please set up a dial-up connection for Computer A at first. While working with
a dial-up connection, if the dial-up connection is destroyed for some reason,
please restart the service after the dial-up connection established again.
The Internet Connection Sharing (ICS) of Windows (refer to Windows
Help Topic) can also be used on computer A for computer B to access the
Internet. In this situation, the PAN service configuration must be set as
Bluetooth Group Ad-hoc Network without DHCP Server enabled.
4.6 PAN Configuration
4.6.1 My PAN Service
In the BlueSoleil! Service Window, right-click the Personal Area Networking icon.
On the pop-up menu, select Properties to configure my PAN service.
Copyright © 2001, IVT Corporation, http://www.ivtcorporation.com
All specifications are preliminary and subject to change without notice.
36
Page 40
IVT BlueSoleil™ User Manual
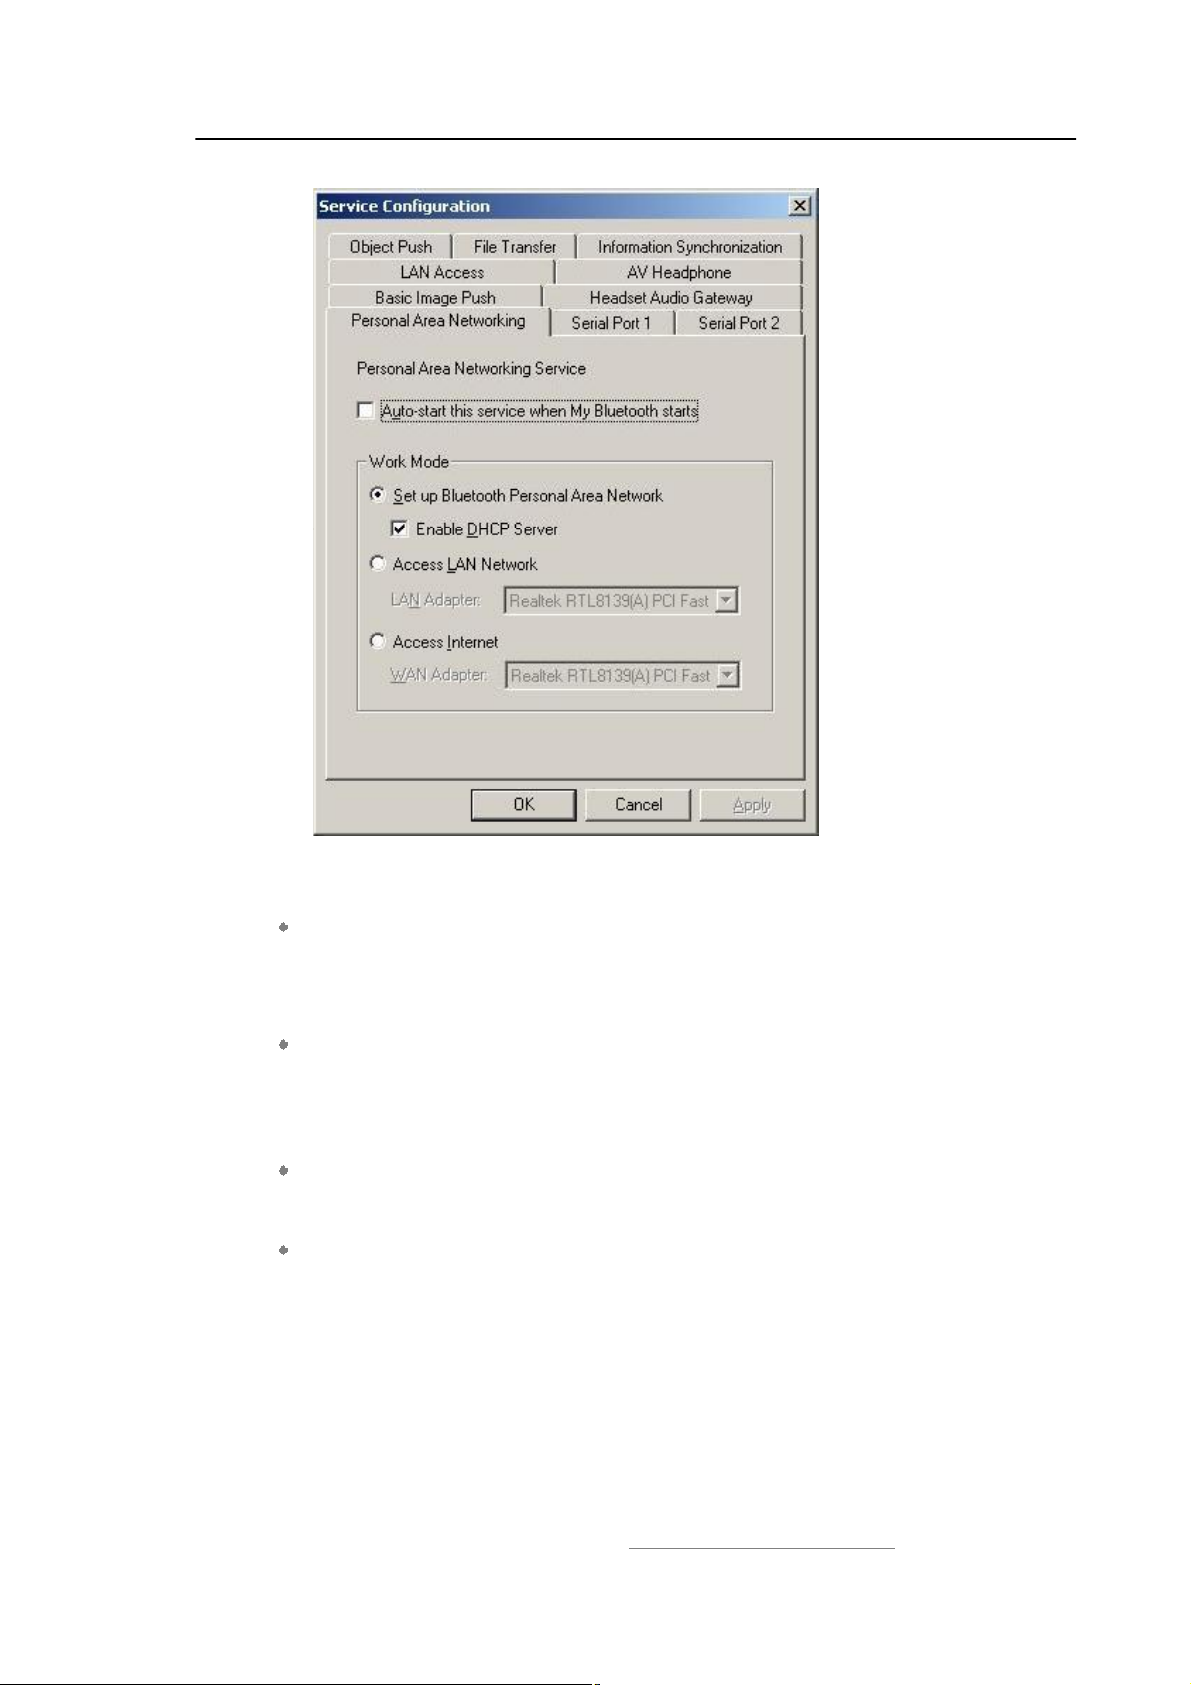
Figure 4.23: Service Configuration
Setting Items:
Auto start this service when my Bluetooth starts
Check this option to automatically start my PAN service the every time
BlueSoleil! is started.
Work Mode
Set up Bluetooth Personal Area Network
Choose this item to run in the GN mode. Check Enable DHCP Server, anda
DHCP server will be started on the server side, so other devices will obtain an IP
address (192.168.18.xxx) from the DHCP server after they connected to the
GN. (Refer to Figure 4.1)
Access LAN Network
Choose this item to run in the NAP mode, and other devices can access outside
LAN network after they connected to the NAP. (Refer to Figure 4.3)
Access Internet
Choose this item to run in the NAP mode, and other devices can access outside
WAN network (e.g. Internet) after they connected to the NAP. (Refer to Figure
4.4)
Copyright © 2001, IVT Corporation, http://www.ivtcorporation.com
All specifications are preliminary and subject to change without notice.
37
Page 41

IVT BlueSoleil™ User Manual
5 Dial-Up Networking
5.1 Introduction
The Bluetooth Dial-up Networking (DUN) service allows a Bluetooth-enabled client
to access the Internet wirelessly through a modem on another Bluetooth device or
a cellular phone. The other Bluetooth device or the cellular phone is called the
gateway (server) as it provides access to the public network.
The DUN profile can be used in the following scenario:
A Bluetooth computer accesses the Internet through a Bluetooth cellular phone
or Bluetooth modem.
5.2 Connect to a Dial-up Gateway from a Computer
This section outlines the steps involved in a computer (client) accessing the
Internet through a Bluetooth cellular phone.
Computer A: Bluetooth Cellular Phone:
Notebook/ Laptop Ericsson T39 cellular phone
A Bluetooth Device
Windows XP
IVT BlueSoleil!
Step 1: Insert the Bluetooth Device in the computer and start BlueSoleil! in
the computer.
Step 2: Set the Ericsson T39 to be discoverable so that Computer A can find
the T39.
1. Press the Menu button on the T39 and scroll until you reach the
Extras menu option, select Extras and scroll until you find
Bluetooth. Select this option and scroll until you see
Discoverable. Press the Yes button to confirm the selection.
2. The T39 will now enable itself to receive connection requests from
other devices.
Step 3: Add Computer A to the paired device list in the T39.
1. Press the Menu button on the T39 and scroll until you reach the
Extras menu option, select Extras and scroll until you find
Bluetooth. Select this option and scroll until you see Discover.
Press the Yes button to confirm the selection.
2. The T39 will now start searching devices. Once the T39 finds
$ComputerA% on the screen, select it by pressing the Yes button.
The Add to paired? message appears on the screen. Press Yes to
confirm you want to initialize pairing.
3. The T39 will ask for the Bluetooth passkey. You can input any
Copyright © 2001, IVT Corporation, http://www.ivtcorporation.com
All specifications are preliminary and subject to change without notice.
38
Page 42
IVT BlueSoleil™ User Manual
number, for example, $1%.
4. On the BlueSoleil side, the Enter Bluetooth Passkey window
pops up requesting the Bluetooth passkey. Input the same
Bluetooth passkey you have input in the T39 and click OK.
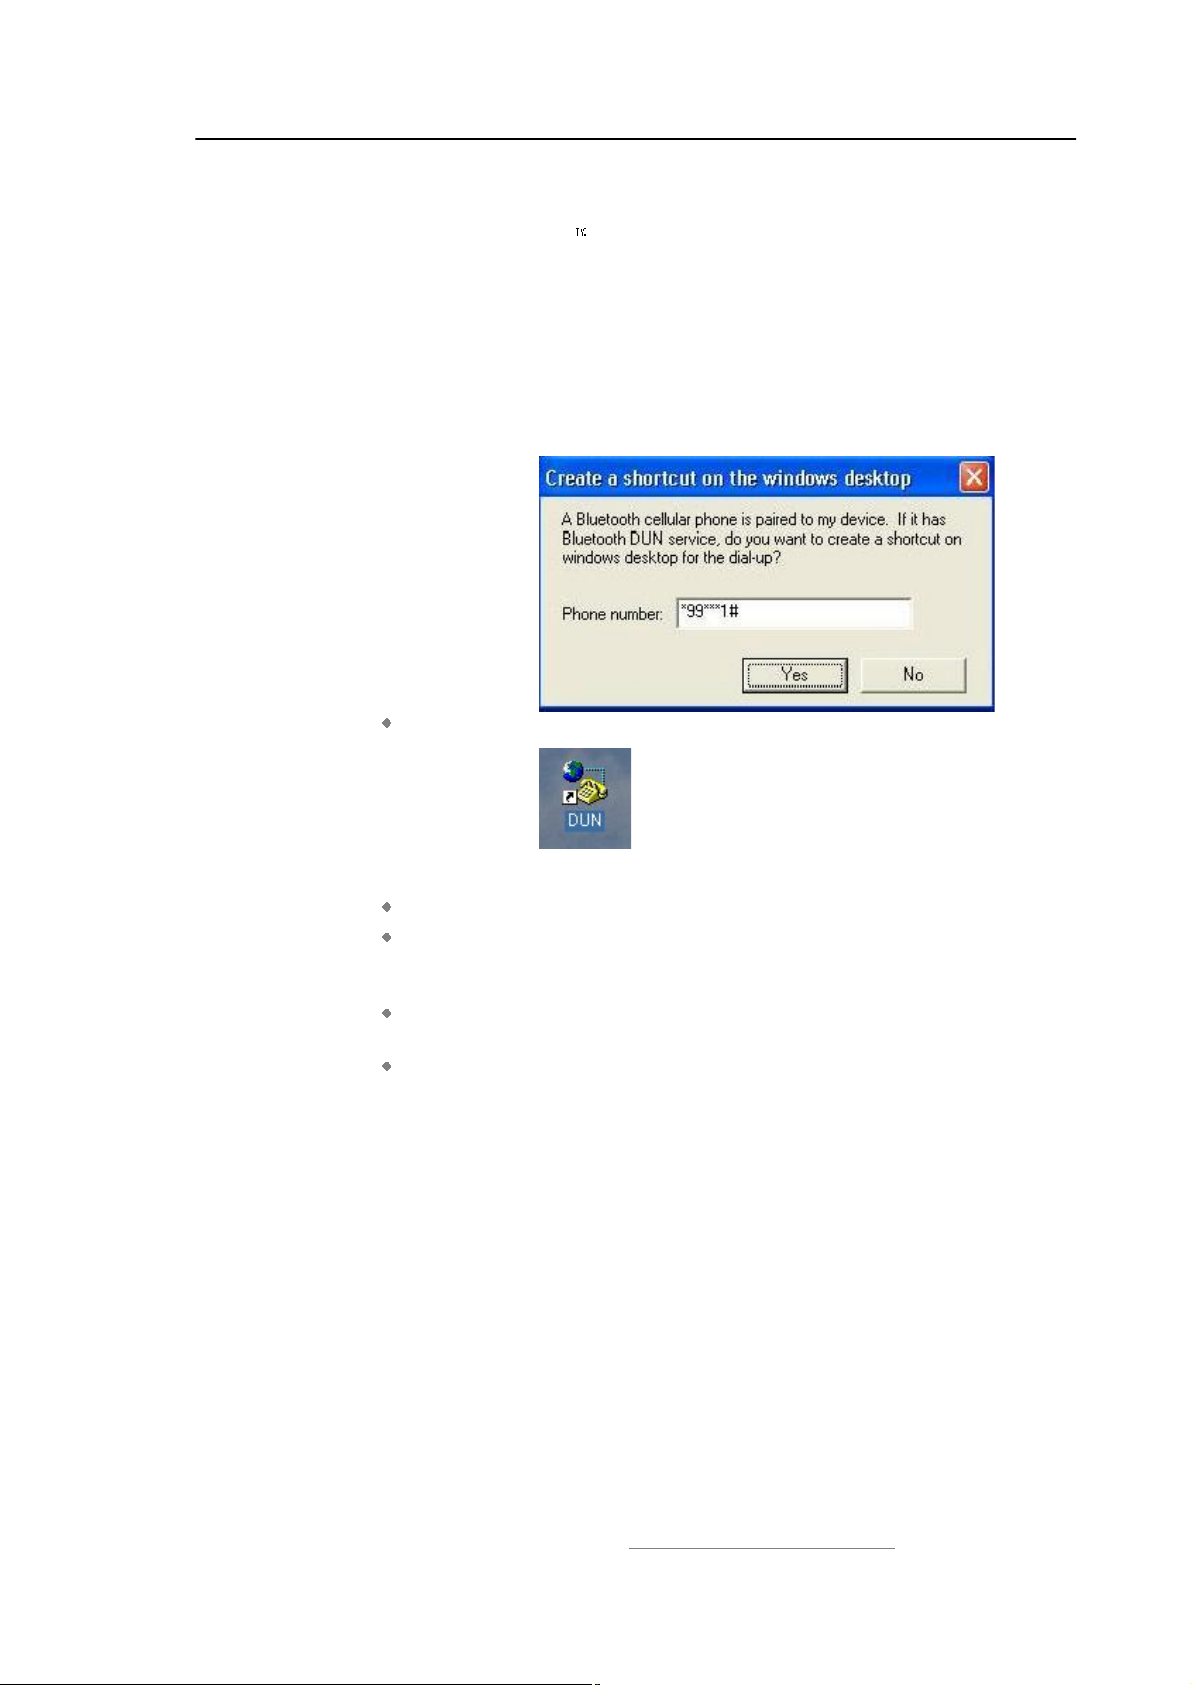
5. Once the pairing process is successfully complete, the T39 device
icon is displayed in the Main Window of Computer A. At the
meanwhile, the following dialog pops up asking you whether
Create a Shortcut on the windows desktop. If you choose
yes, a shortcut icon called DUN will occur on the desktop,
otherwise the icon will not occur.
This is the icon on the desktop:
Step 5: Connect to phone DUN service:
Search for Bluetooth devices in Computer A until you find the T39.
In the Main Window of Computer A, double click the T39 device to
find its DUN service. If found, the DUN service icon in the Main
Window will turn pink.
In the Main Window of Computer A, double click the DUN service
icon to connect to the DUN service on the T39.
Once the two computers are connected, the Bluetooth Dial-up
Networking (DUN) service icon in the Main Window will turn from
pink to green.
Copyright © 2001, IVT Corporation, http://www.ivtcorporation.com
All specifications are preliminary and subject to change without notice.
39
Page 43
IVT BlueSoleil™ User Manual
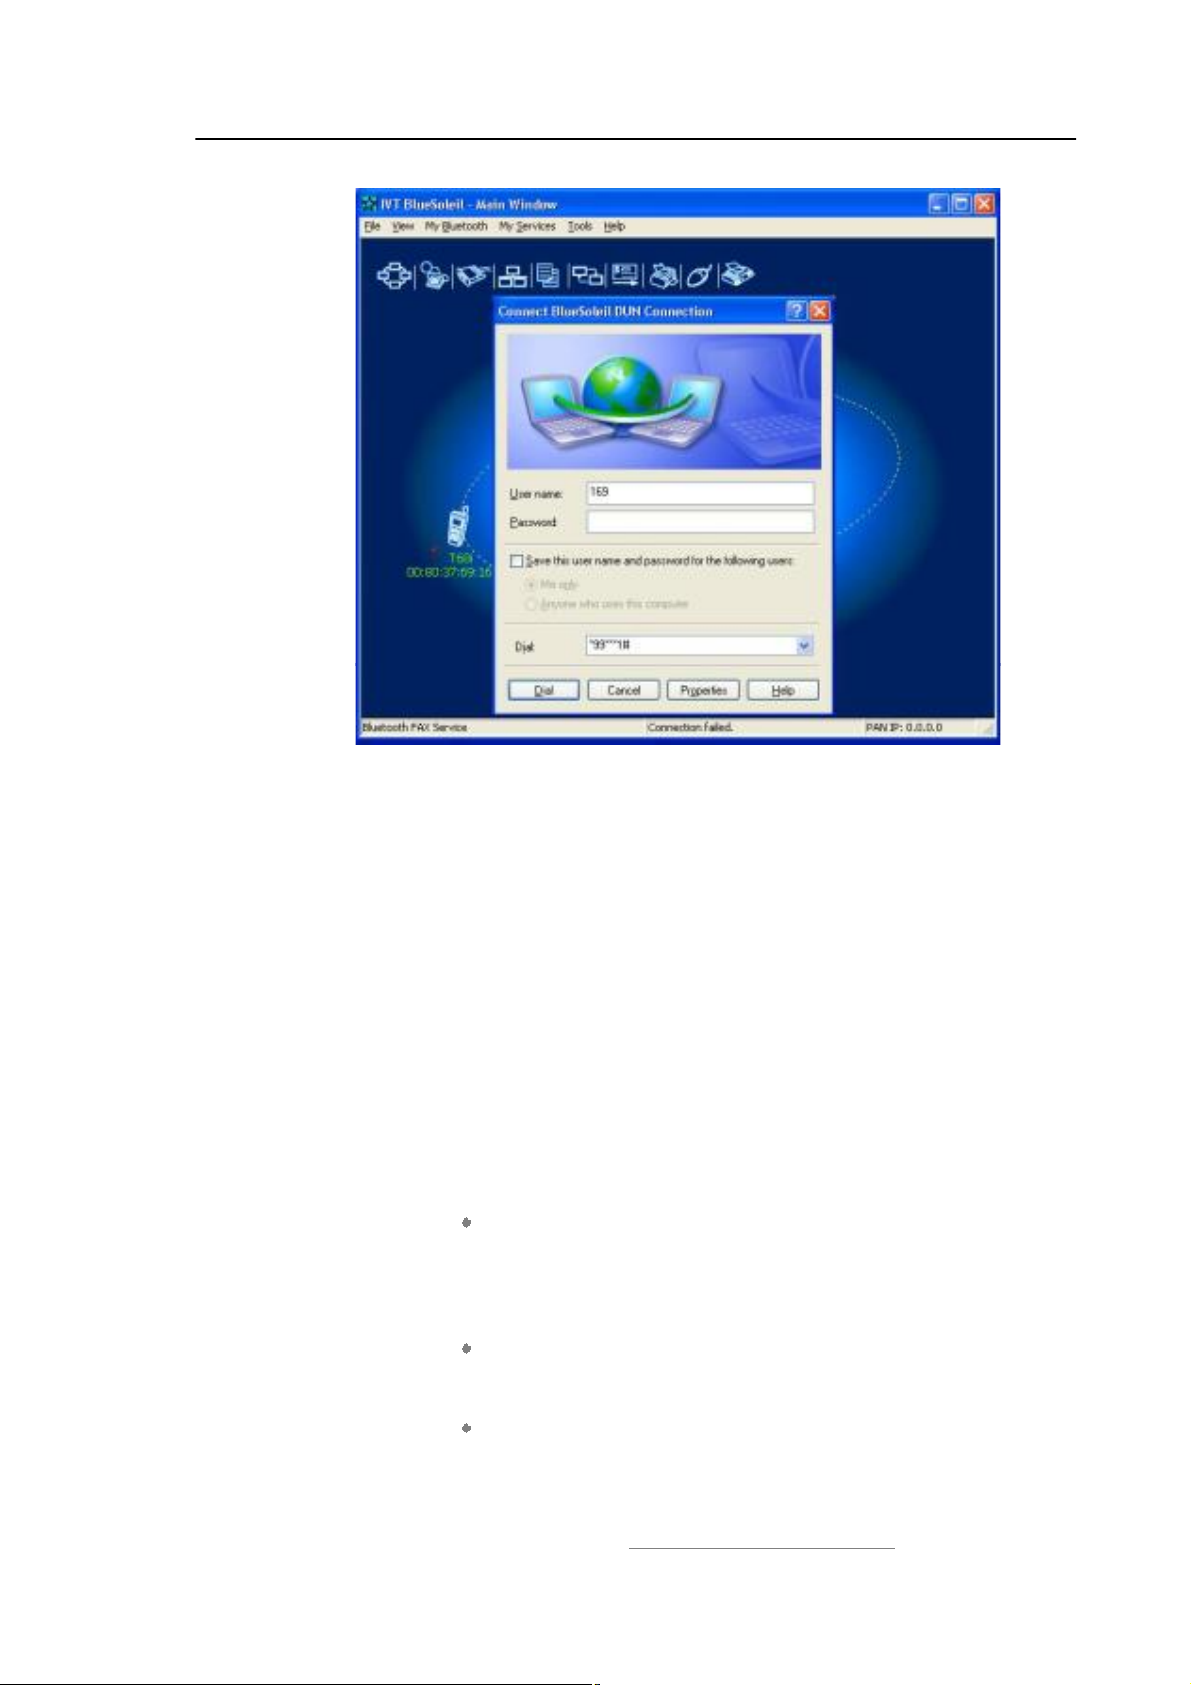
Figure 5.1: Connect BlueSoleil! DUN Connection
Step 6: Dial to Internet
1. The Connect BlueSoleil™ DUN Connection window appears
(Figure 5.1).
2. Input a valid username, password and the Internet Service
Provider"s (ISP"s) phone number, then click the Dial button.
3. If the dial-up is successful, a small icon appears on the bottom
right hand of the Windows taskbar, indicating that the dial up
connection is successfully established.
4. If the dial-up fails, the Bluetooth connection between the two
computers will be disconnected. In this case, to reconnect to the
T39"s DUN service, repeat Steps 5 above.
Step 7: Once the dial-up connection is established, users can browse web
sites or access other Internet services from Computer A.
Step 8: There are three methods to disconnect the dial-up connection:
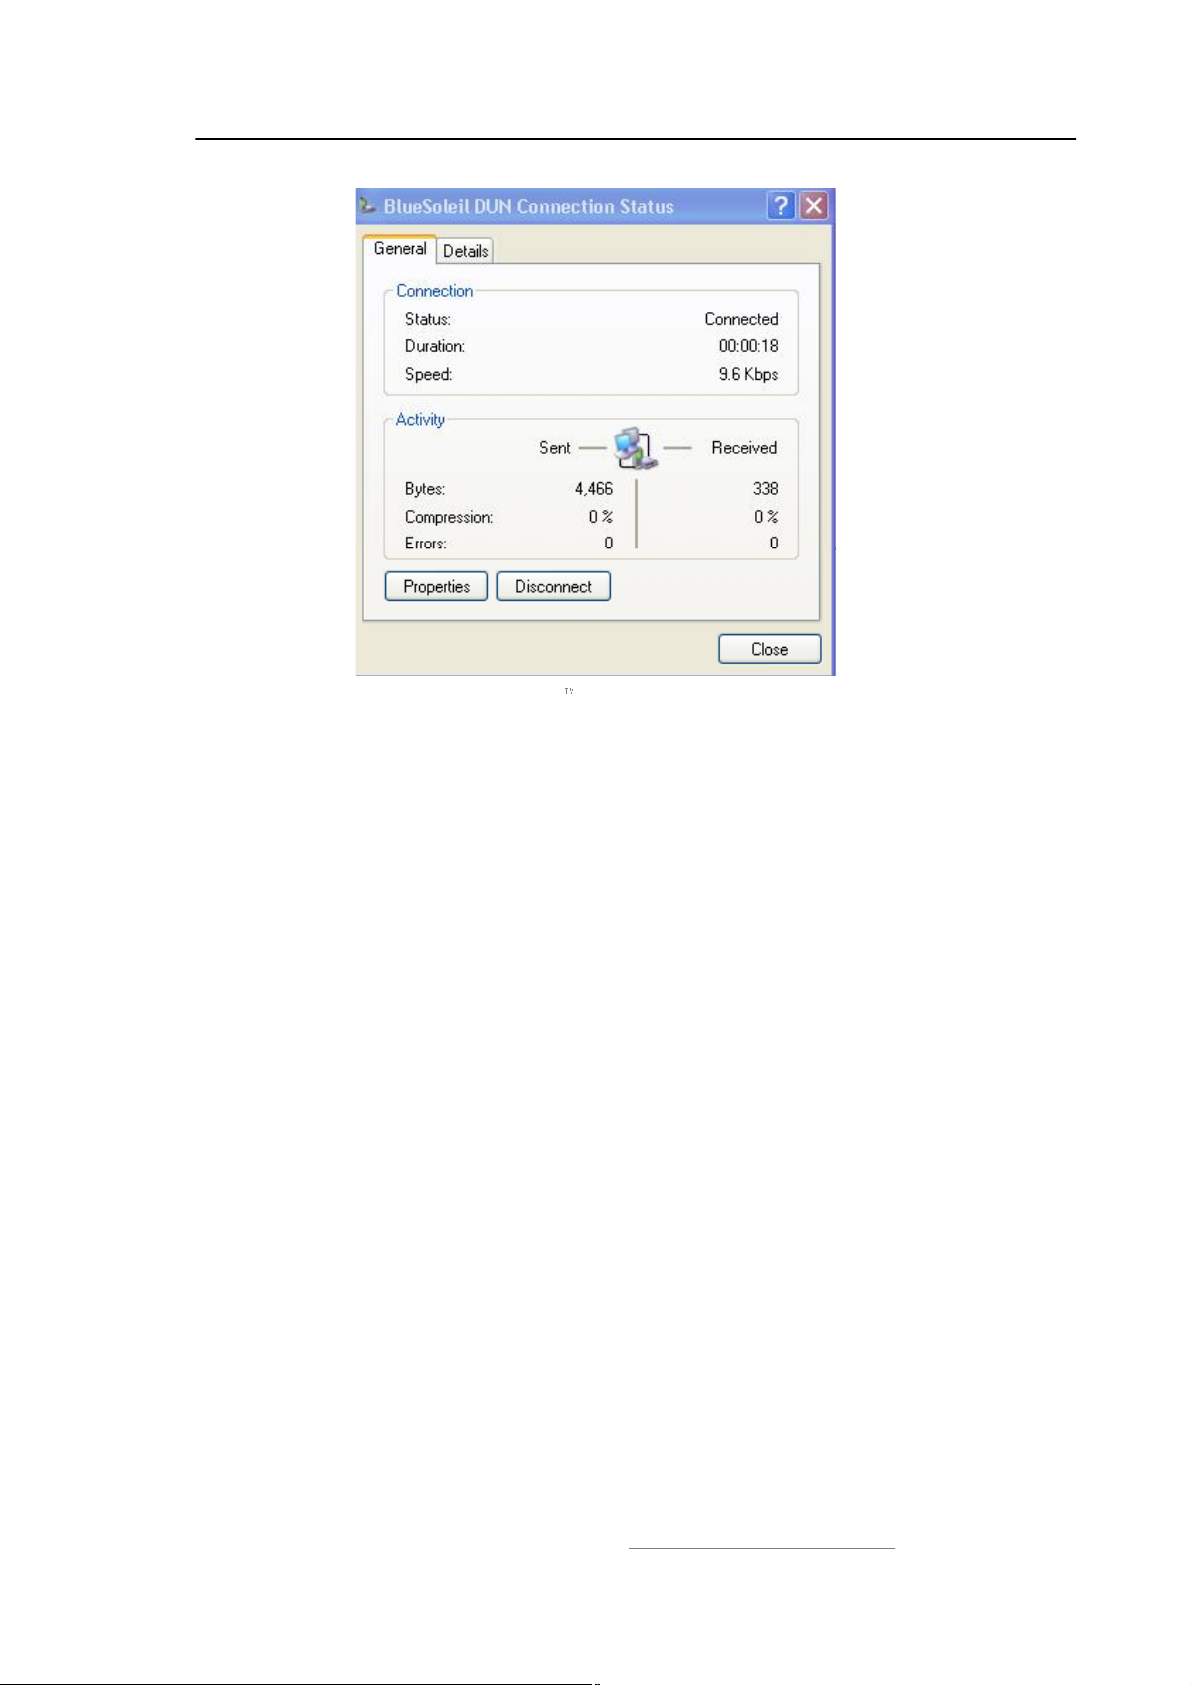
Method 1. Double-click the dial-up connection icon on the
bottom right of the Windows taskbar. The BlueSoleil™
DUN Connection Status window appears. Click the
Disconnect button to disconnect the dial-up connection
(Figure 5.2).
Method 2. Right-click the Bluetooth Dial-up
Networking icon in the Main Window, and then click the
Disconnect menu item on the pop-up menu.
Method 3. Right-click the T39 device in the Main Window
and select Disconnect | Bluetooth Dial-Up
Networking.
Copyright © 2001, IVT Corporation, http://www.ivtcorporation.com
All specifications are preliminary and subject to change without notice.
40
Page 44
IVT BlueSoleil™ User Manual
Figure 5.2: BlueSoleil DUN Connection Status window
5.3 Settings for Dial-up Networking Profile (client side)
in Windows98/Me
Before using the Dial-up Networking (DUN) profile in Windows98/Me, ensure a
Dial-up Adapter is already installed on the client computer.
5.3.1 Check if a Dial-up Adapter is installed
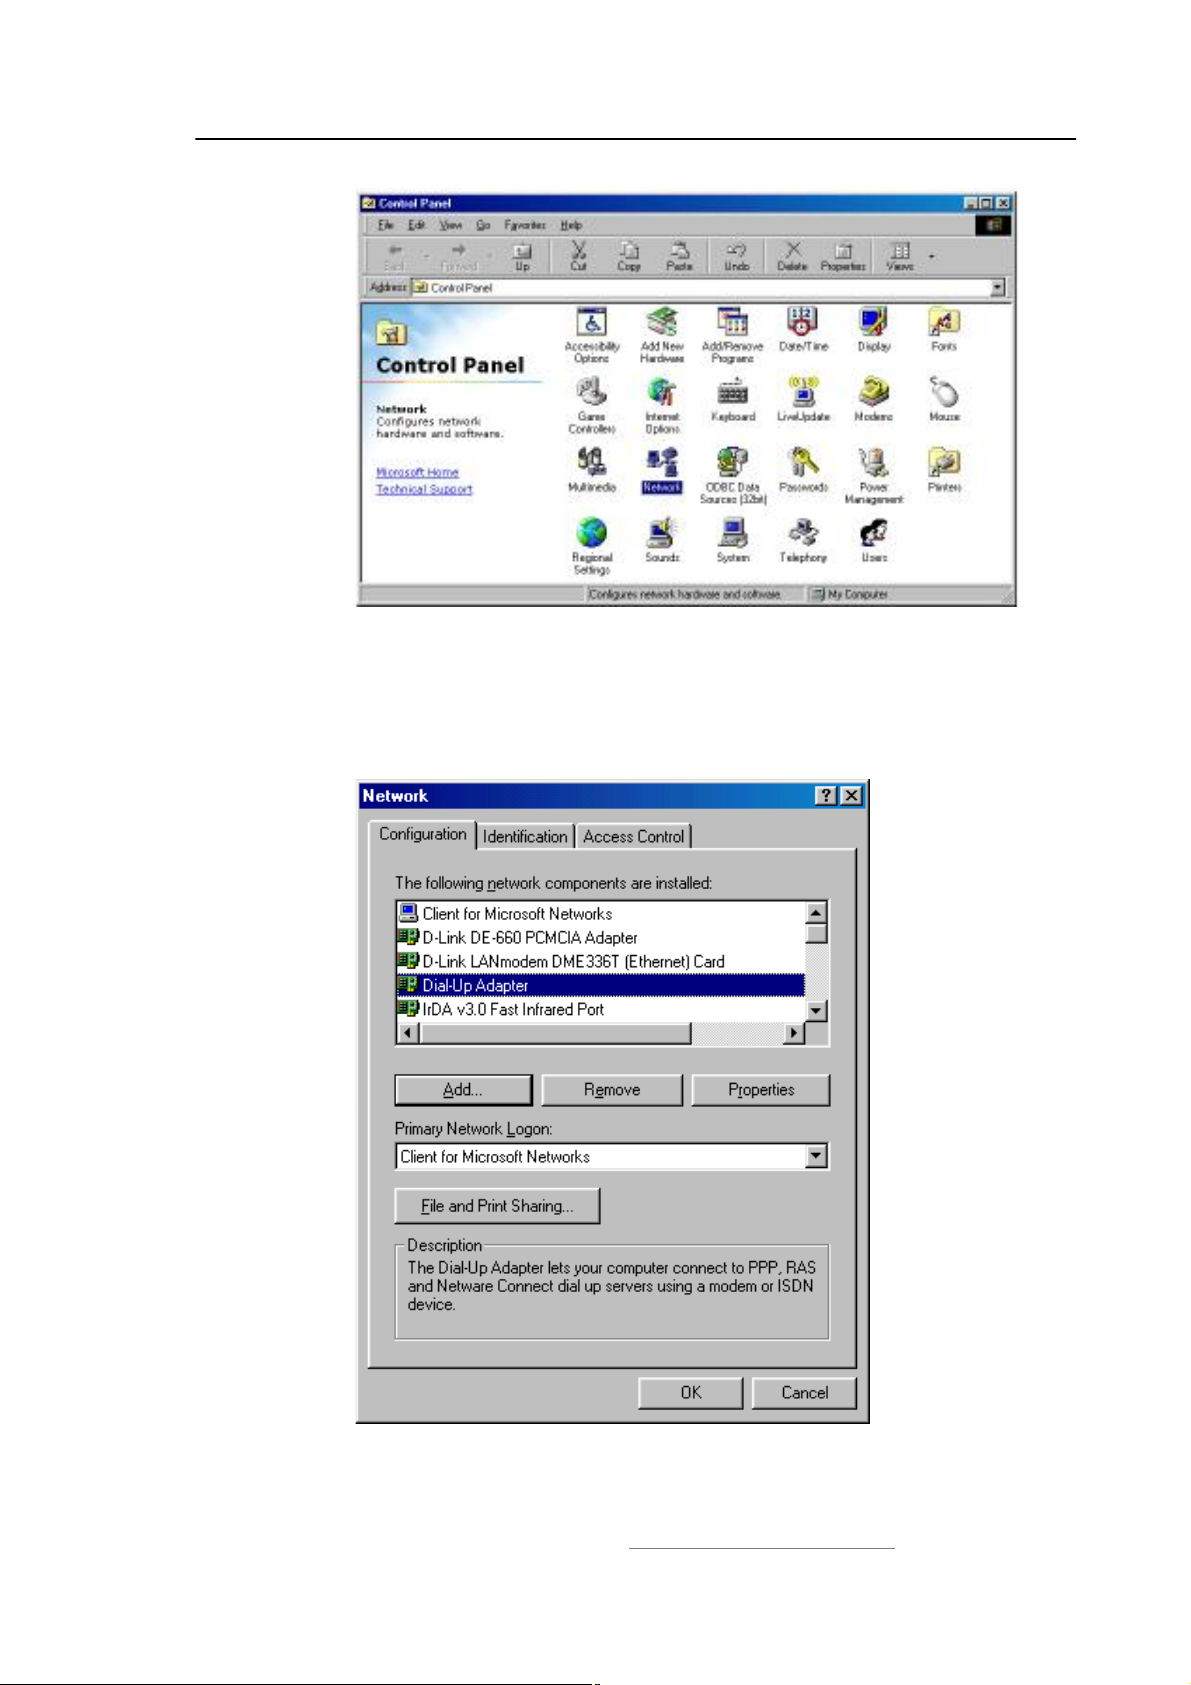
Step 1: Select the Control Panel from the Start |Settings menu.
Step 2: Double-click the Network icon. (Figure 5.3)
Copyright © 2001, IVT Corporation, http://www.ivtcorporation.com
All specifications are preliminary and subject to change without notice.
41
Page 45
IVT BlueSoleil™ User Manual
Figure 5.3: Windows Control Panel
Step 3: Check if a Dial-up Adapter appears in the Network Component list.
(Figure 5.4)
Step 4: If a Dial-up Adapter is not found, then click Add to install one.
Figure 5.4: Install Dial-up Adapter
Copyright © 2001, IVT Corporation, http://www.ivtcorporation.com
All specifications are preliminary and subject to change without notice.
42
Page 46
IVT BlueSoleil™ User Manual
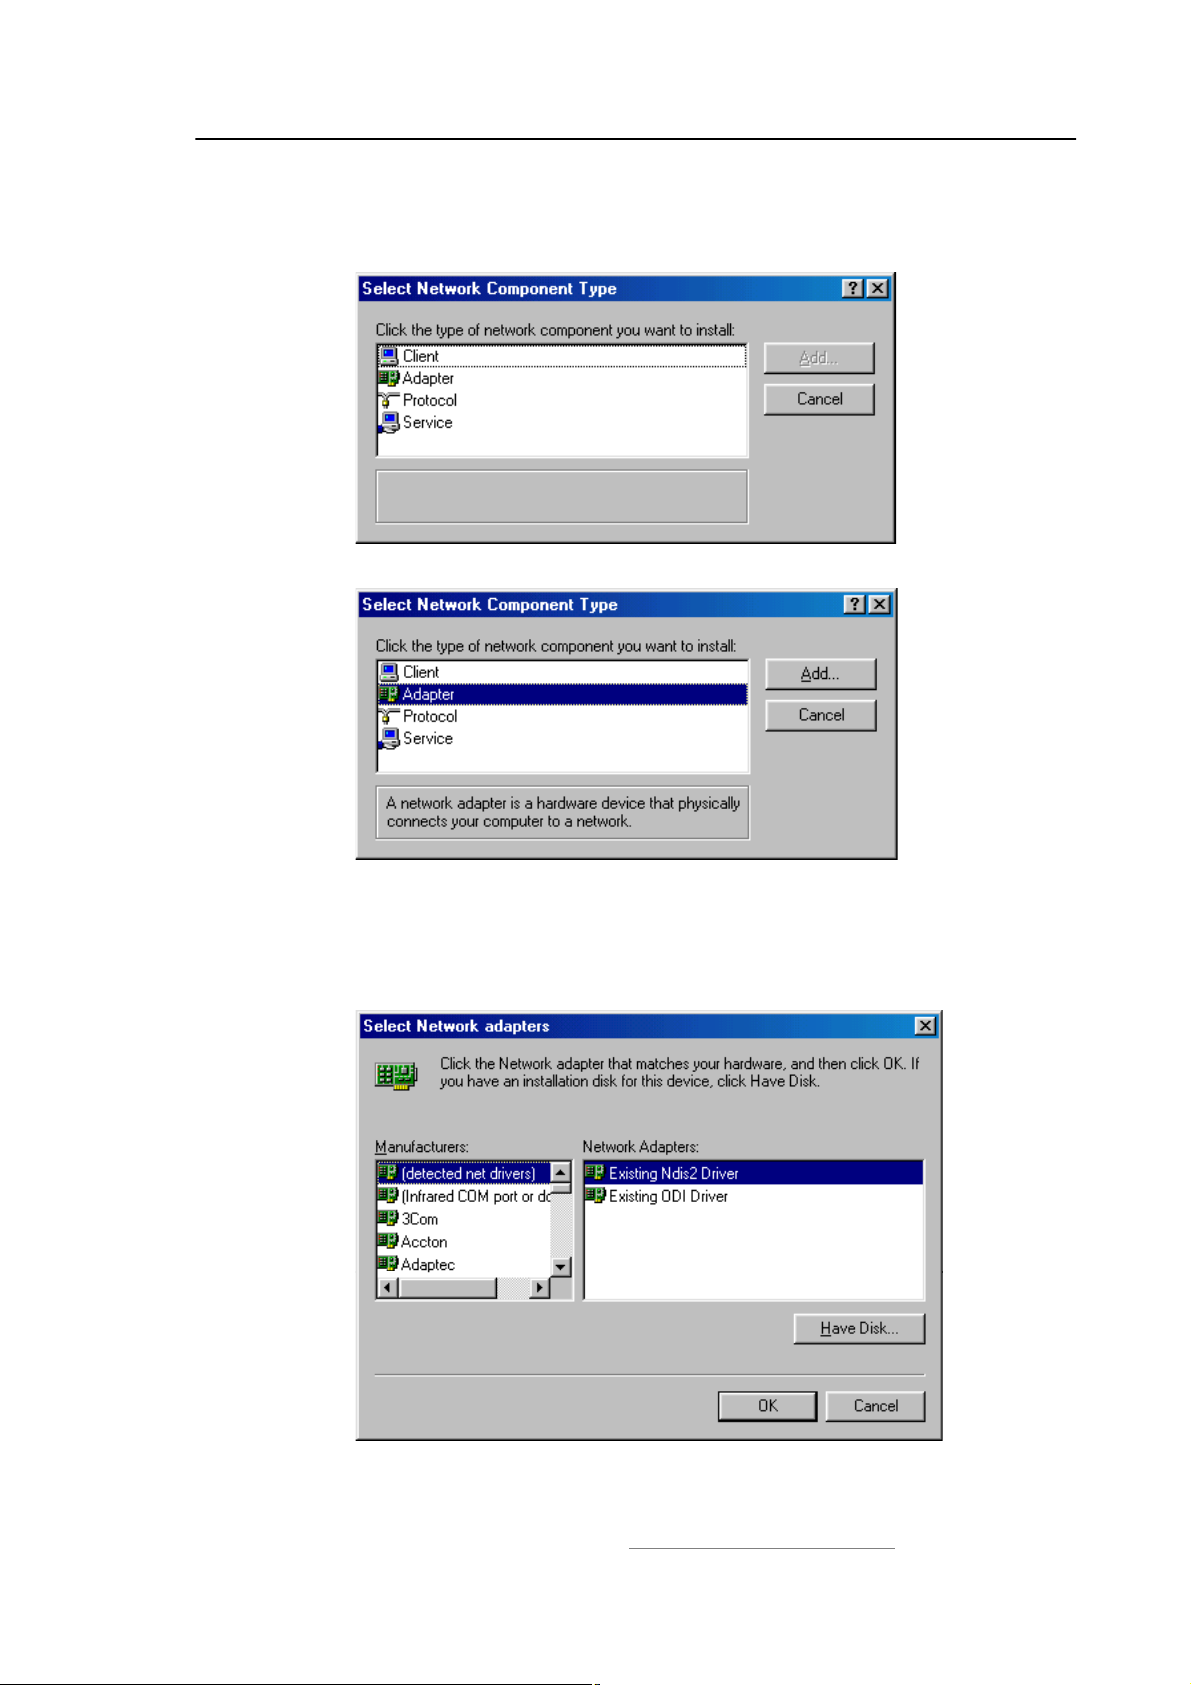
Step 5: Select Adapter from the Network Component list and click Add.
(Figure 5.5 and Figure 5.6)
Figure 5.5: Network Component list
Figure 5.6: Select Adapter as the Network Component Type
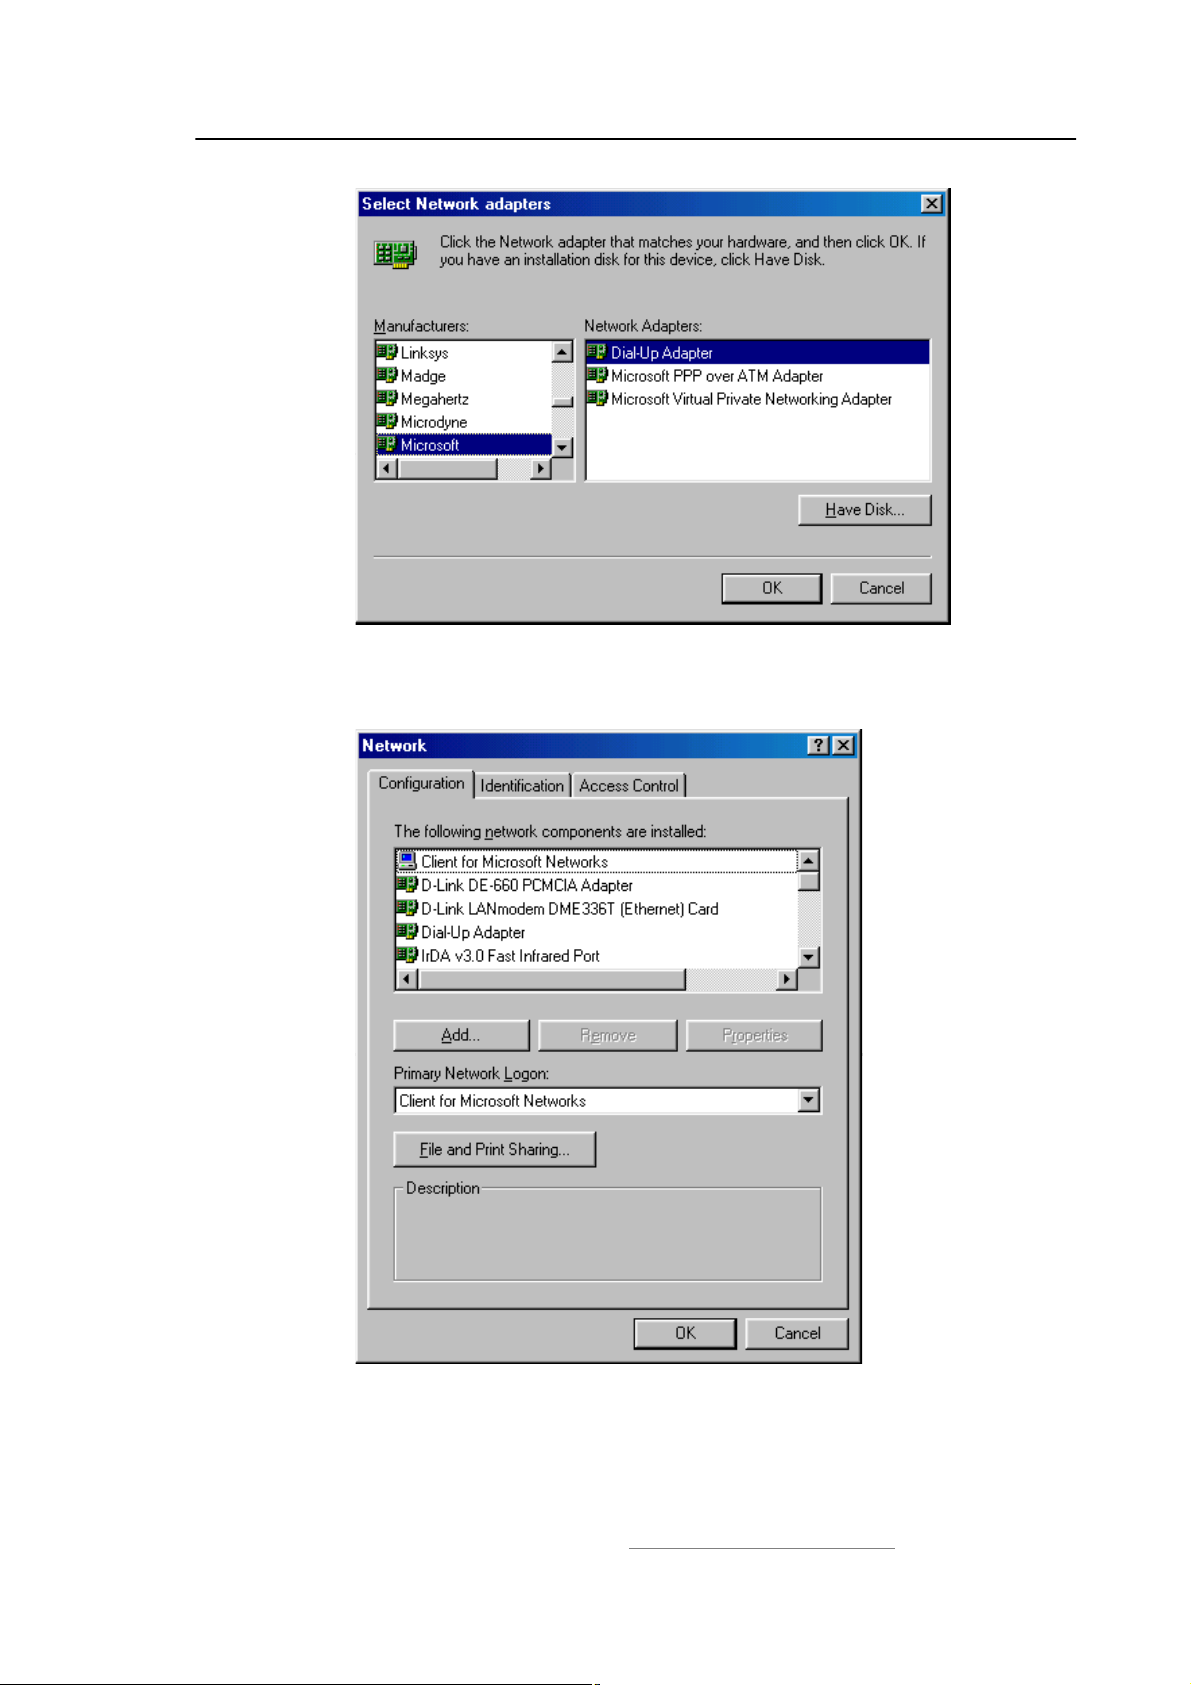
Step 6: Select Microsoft from the Manufacturers list on the left-hand side
and select Dial-up Adapter in the Network Adapter list on the right
hand side. (Figure 5.7 and Figure 5.8)
Figure 5.7: Select Network Adapters (1)
Copyright © 2001, IVT Corporation, http://www.ivtcorporation.com
All specifications are preliminary and subject to change without notice.
43
Page 47
IVT BlueSoleil™ User Manual
Figure 5.8: Select Network Adapters (2)
Step 7: Click OK to return to the Network property sheet. (Figure 5.9)
Figure 5.9: Network property sheet
Step 8: Click OK to close the Network property sheet. A message box pops
up, click Yes to restart the computer. (Figure 5.10).
Copyright © 2001, IVT Corporation, http://www.ivtcorporation.com
All specifications are preliminary and subject to change without notice.
44
Page 48

IVT BlueSoleil™ User Manual
Figure 5.10: Restart computer
Copyright © 2001, IVT Corporation, http://www.ivtcorporation.com
All specifications are preliminary and subject to change without notice.
45
Page 49

IVT BlueSoleil™ User Manual
6 Bluetooth Serial Port
6.1 Introduction
The Bluetooth Serial Port (SPP) provides a virtual serial port via Bluetooth as an
alternative to a hardwired serial cable between a computer and device. Any
program that uses a standard serial port can use the Bluetooth serial port without
any change.
IVT BlueSoleil! provides three Serial Port services, you can connect with three
remote devices and be connected with three remote devices at the same time
through serial ports.
The SPP profile can be used in the following scenarios:
Connecting two computers through a Bluetooth serial port.
Using SPP to print a document.
Using a cellphone to control a computer through a Bluetooth serial port.
Connecting a computer to any other device that supports SPP through a
Bluetooth serial port.
6.2 Connect Two Computers
This section outlines the steps involved in connecting two computers, Computer A
and Computer B using the Bluetooth Serial Port application.
Computer A: Computer B:
Notebook/ Laptop Desktop
A Bluetooth Device A Bluetooth Device
Windows 2000 Windows 2000
IVT BlueSoleil! IVT BlueSoleil!
Step 1: Insert the Bluetooth Devices into each computer.
Step 2: Start BlueSoleil! in each computer.
Step 3:
Step 4: Connect Computer B to Computer A.
Start the SPP service on Computer A.
1. On Computer B double click the #My Device icon" until you find the
device, Computer A.
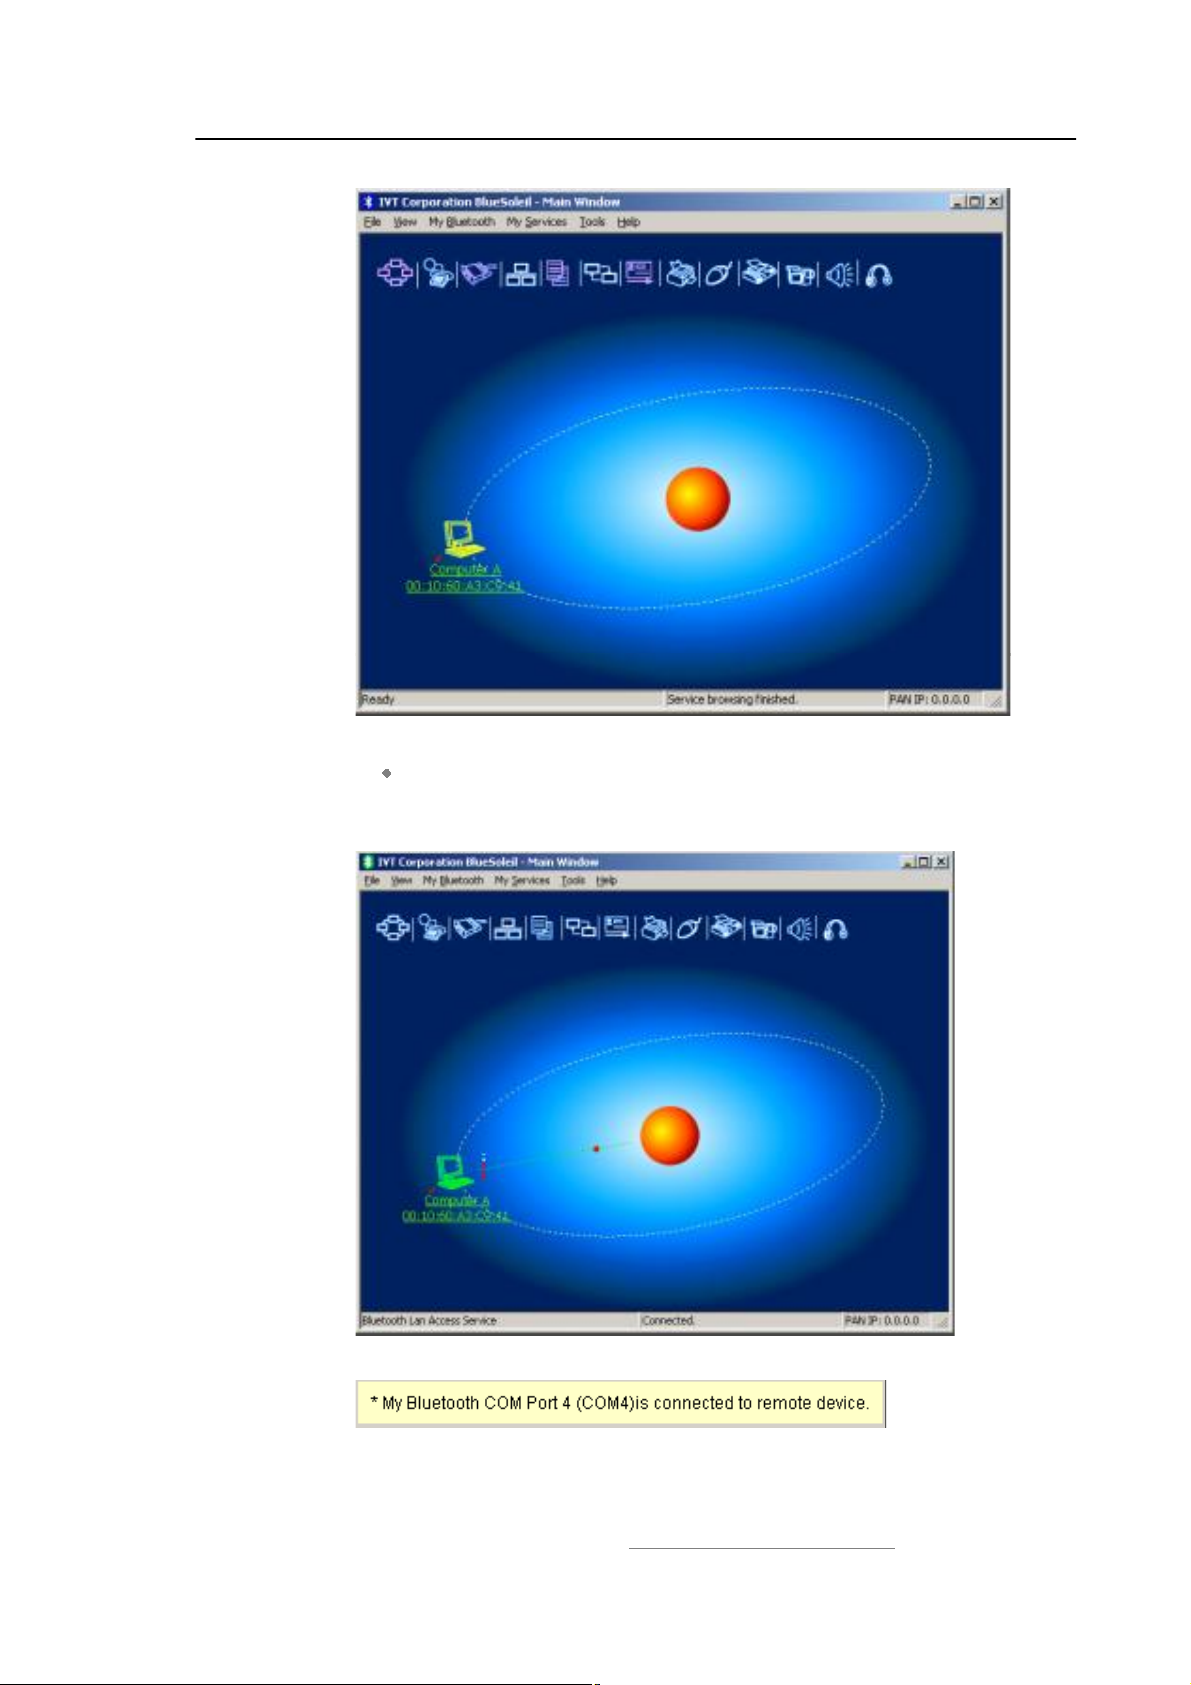
2. Double-click the Computer A device to find its SPP service (Figure
6.1). The Bluetooth Serial Port service icon turns pink.
3. Right-click the Bluetooth Serial Port service icon and select
Connect.
Copyright © 2001, IVT Corporation, http://www.ivtcorporation.com
All specifications are preliminary and subject to change without notice.
46
Page 50
IVT BlueSoleil™ User Manual
Figure 6.1: Double-click the Computer A device icon
The connection is established successfully as shown in Figure 6.2.
And the serial port number is shown on the right bottom status bar
on Computer B. (Figure 6.3)
Figure 6.2: The connection is established successfully
Figure 6.3: The serial port number is shown
Copyright © 2001, IVT Corporation, http://www.ivtcorporation.com
All specifications are preliminary and subject to change without notice.
47
Page 51

IVT BlueSoleil™ User Manual
Note: You can initiate three connections between the two computers through three
serial ports. And at the same time, you can also be connected with three remote
devices if you provide three SPP services.
6.3 Use SPP to Print a Document
This section outlines the steps involved in connecting a computer to a Bluetooth
Printer Adapter using SPP.
Computer A: Bluetooth Printer Adapter B:
Notebook/Laptop Printer
A Bluetooth Device Bluetooth Printer Adapter
Windows 2000
IVT BlueSoleil!
Step 1: Insert the Bluetooth Device into the computer.
Step 2: Start BlueSoleil! in the computer.
Step 3: Connect Computer A to the Bluetooth Printer Adapter B using SPP.
1. Go to Computer A; double click the My Device icon" until you find
the device Bluetooth Printer Adapter B.
2. Double-click the Bluetooth Printer Adapter B device to find it"s SPP
service.
3. Double-click the SPP service icon to start connecting SPP.
Step 4: Change the printer settings to use the connected Bluetooth serial
port.
Step 5:
Print a document.
6.4 Use a cellphone to control a computer
This section outlines the steps involved in connecting a computer to a Bluetooth
Cellphone using SPP.
Computer A: Bluetooth Cellphone B:
Notebook/Laptop Ericsson T39 or T68
A Bluetooth Device
Windows 2000
IVT BlueSoleil!
Copyright © 2001, IVT Corporation, http://www.ivtcorporation.com
All specifications are preliminary and subject to change without notice.
48
Page 52
IVT BlueSoleil™ User Manual
Step 1: Insert the Bluetooth Device into the computer.
Step 2: Start BlueSoleil! in the computer.
Step 3: Connect Computer A to the Bluetooth Cellphone B using SPP.
1. Go to Computer A; double click the My Device icon" until you find
the device Bluetooth Cellphone B.
2. Double-click the Bluetooth Cellphone B device to pair with it. If
pairing is finished successfully, then find it"s SPP service.
3. Double-click the SPP service icon to start connecting SPP.
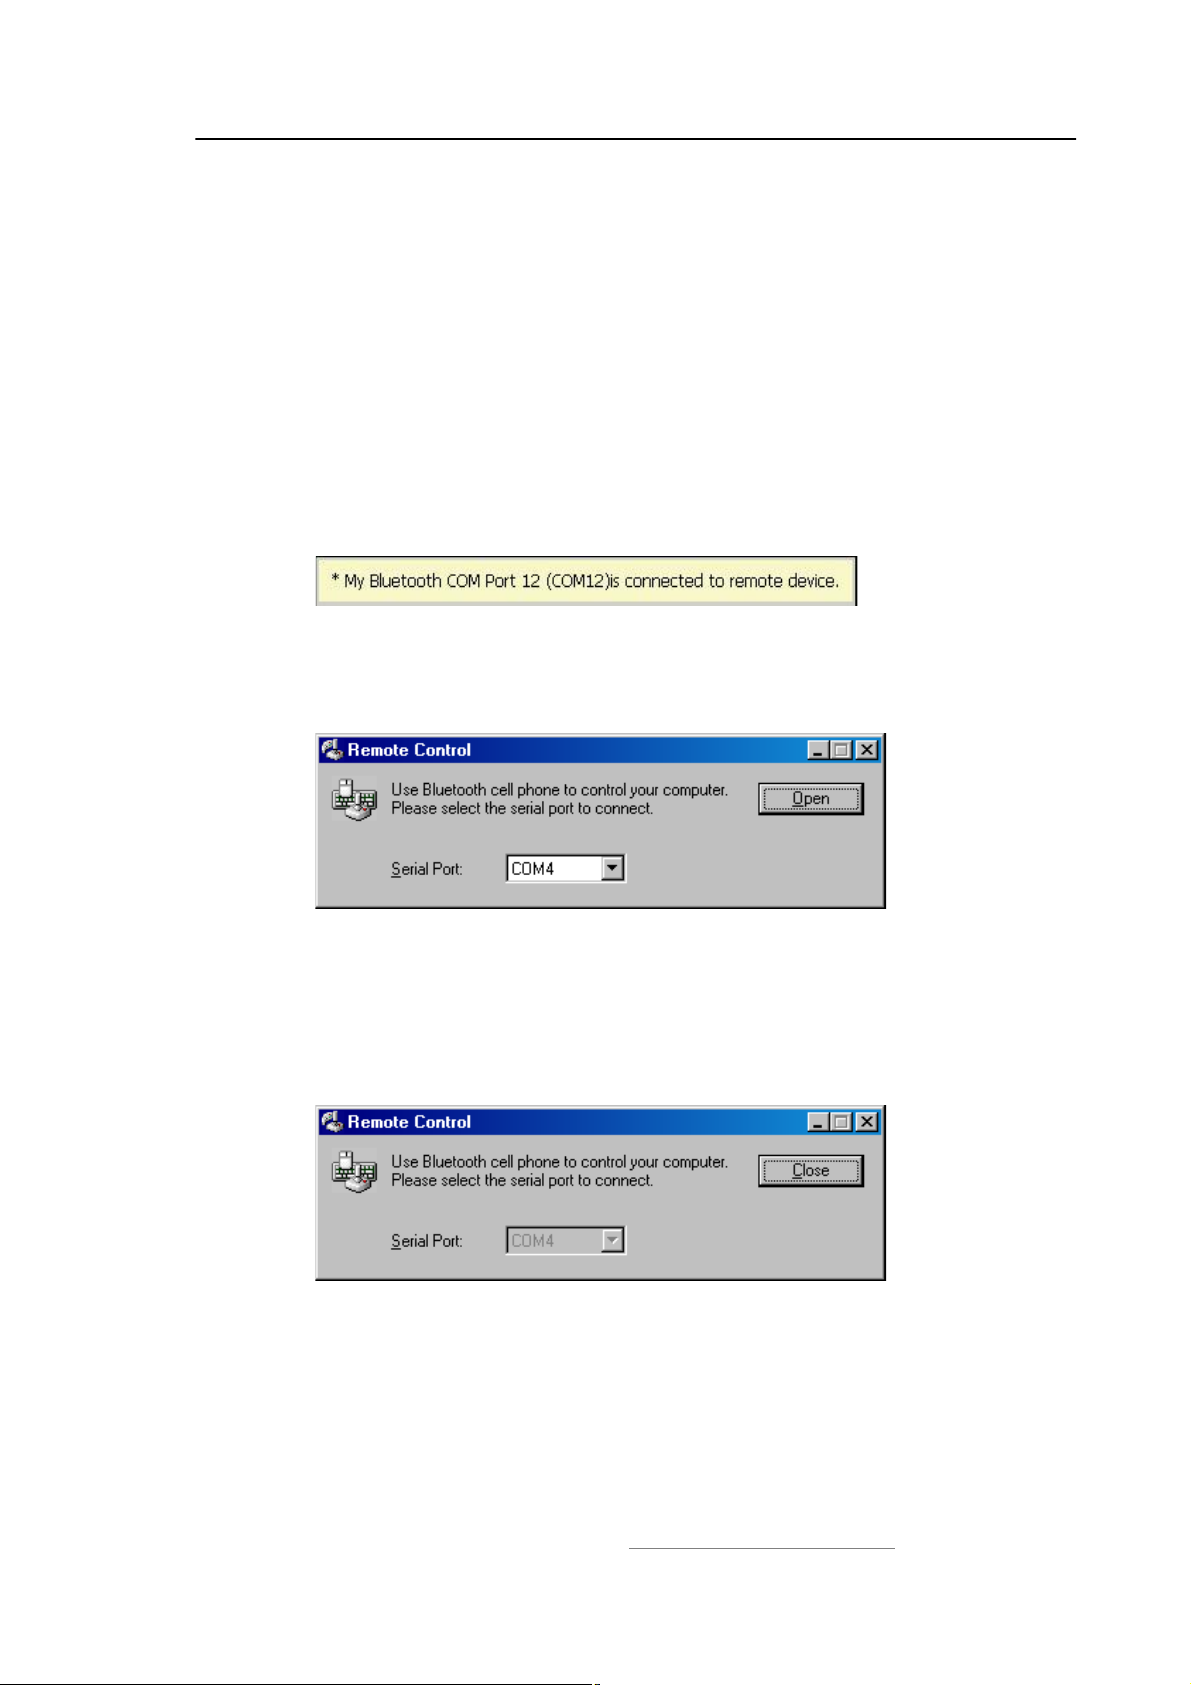
4. The connected serial port number is shown on the right bottom
status bar on Computer A. (Figure 6.4)
Figure 6.4: The serial port number is shown
Step 4: Select Start|Program|IVT Corporation|Control PC to open
Mobile HID program. (Figure 6.5)
Figure 6.5: Mobile HID Program Dialog
Step 7: From the Serial Port list in the $Remote Control% window, select the
serial port number that has been established connection. Then click
Open button to enable Cellphone B controlling computer A. The Open
button becomes to Close button automatically. (Figure 6.6)
Figure 6.6: Click button to start controlling computer
Step 8: A new menu will be added into the accessories menu in Cellphone B.
Enter menus by the path: accessories -> Mobile HID -> Control PC ->
Controlling. When Controlling window is shown, you can control
Computer A by all keys in Cellphone B.
Copyright © 2001, IVT Corporation, http://www.ivtcorporation.com
All specifications are preliminary and subject to change without notice.
49
Page 53

IVT BlueSoleil™ User Manual
Step 9: If you want to disable Cellphone B controlling computer A,click Close
button. The Close button becomes to Open button automatically. Or
press down the No key in Cellphone B to exit Controlling window.
The function of cellphone key map:
Keys in cellphone Function definition
Up,Down,Left,Right
direction key
Key Yes Mouse left button
Press down direction
key (T68)
Key c (T39) Mouse right button
Volume Up Page Up
Volume Down Page Down
Key 1 Home
Key 2 Arrow Up
Key 3 End
Key 4 Arrow Left
Key 5 Arrow Down
Key 6 Arrow Right
mouse move
(no UP,Down in T39)
Mouse right button
Key 7 Start menu
Key 8 Key Enter
Key 9 Key F5
Key 0 Show desktop
Key * Key Ctrl
Key # Key Alt
6.5 SPP Configuration
6.5.1 My SPP Service
In the BlueSoleil! Service Window, right-click the Serial Port 1 or Serial Port 2
icon. On the pop-up menu, select Properties to configure the Serial Port1 and
Serial Port 2.
Copyright © 2001, IVT Corporation, http://www.ivtcorporation.com
All specifications are preliminary and subject to change without notice.
50
Page 54
IVT BlueSoleil™ User Manual
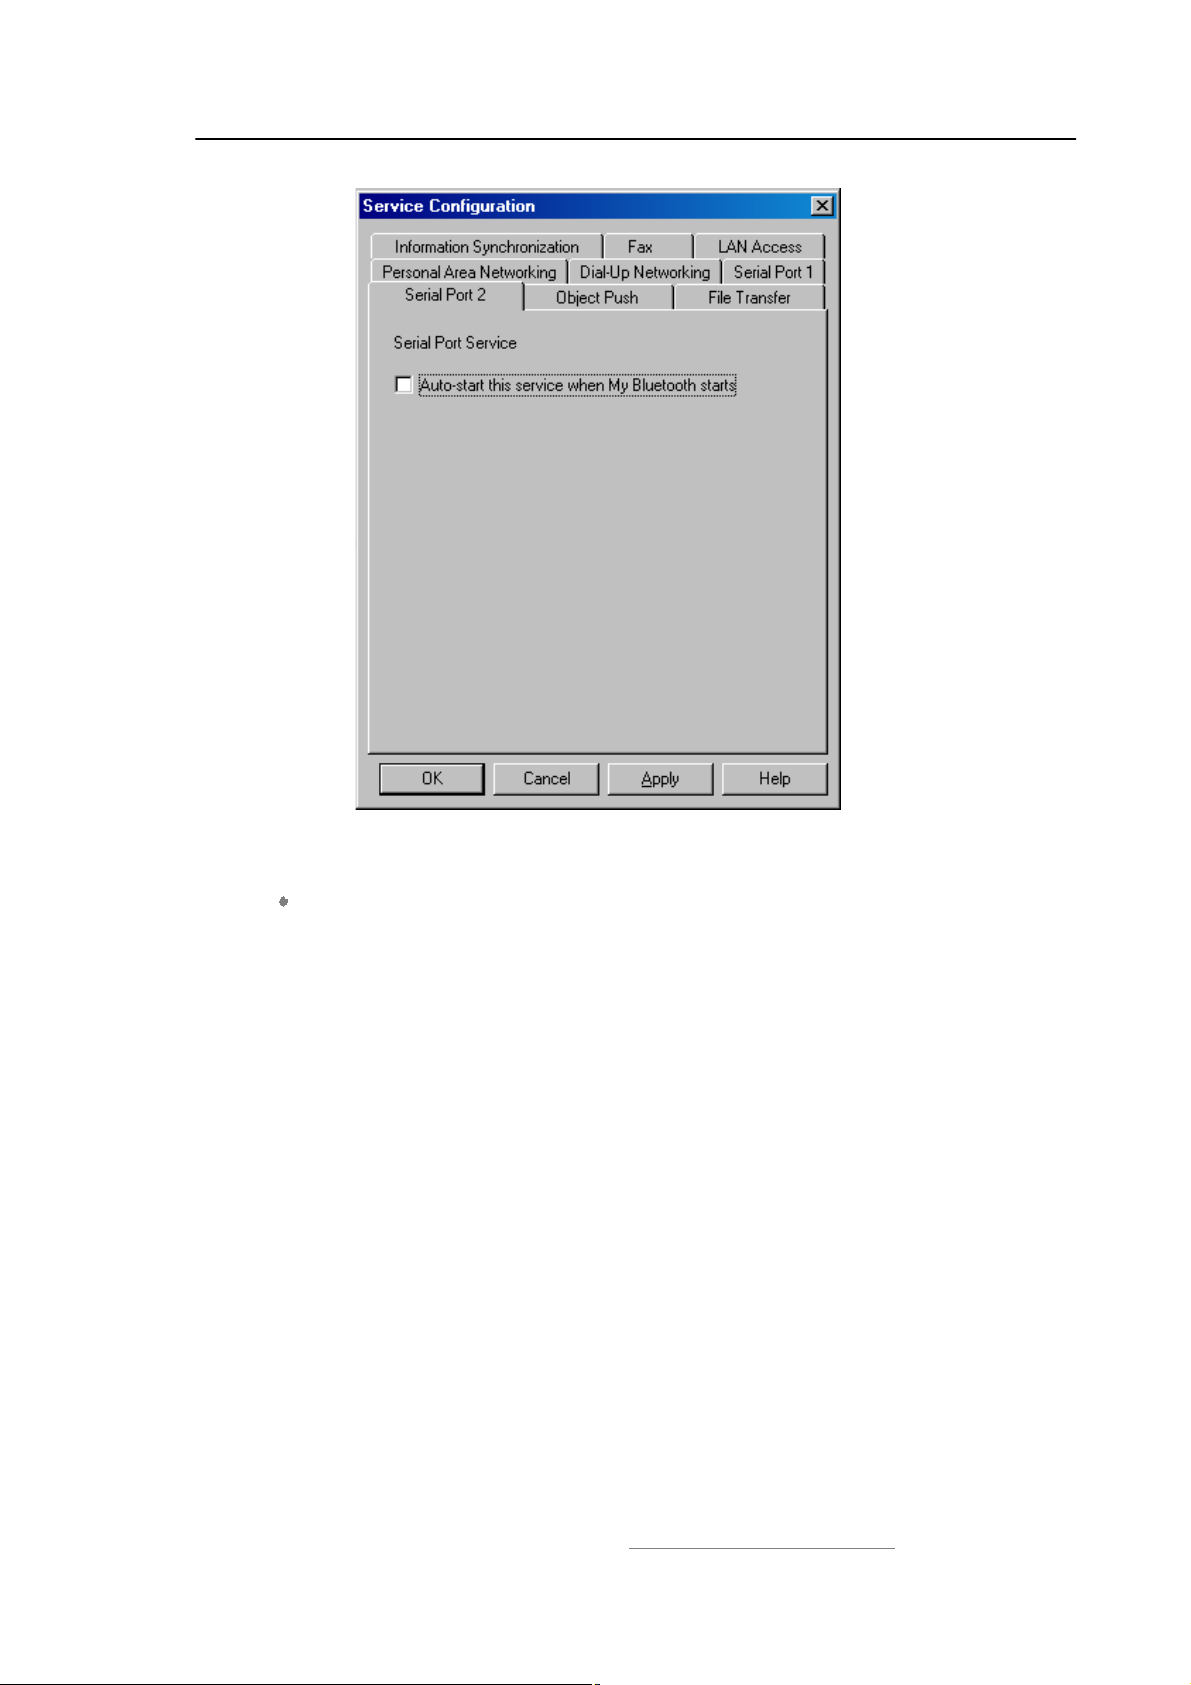
Figure 6.9: SPP Service Configuration.
Setting Items:
Auto start this service when my Bluetooth starts
Check this option to automatically start my Bluetooth SPP service #(1,2) every
time BlueSoleil! is started. (Figure 6.9)
Copyright © 2001, IVT Corporation, http://www.ivtcorporation.com
All specifications are preliminary and subject to change without notice.
51
Page 55

IVT BlueSoleil™ User Manual
7 Bluetooth File Transfer
7.1 Introduction
The File Transfer profile (FTP) supports the file transfer usage model, which offers
the ability to transfer files from one Bluetooth device to the other.
The FTP profile can be used in the following scenarios:
A computer can transfer files to/from another computer.
7.2 Transfer files to/from a Computer
This section outlines the steps in transferring files between Computer A and
Computer B.
Computer A (Server) Computer B (Client)
IVT BlueSoleil! IVT BlueSoleil!
A Bluetooth Device A Bluetooth Device
Note: BlueSoleil! can inter-operate with other Bluetooth devices which support
FTP profile.
Step 1: Insert the Bluetooth Devices into each computer.
Step 2: Start BlueSoleil! in each computer.
Step 3: Make sure File Transfer service is started on Computer A. Refer to
Section 7.3 for service configurations.
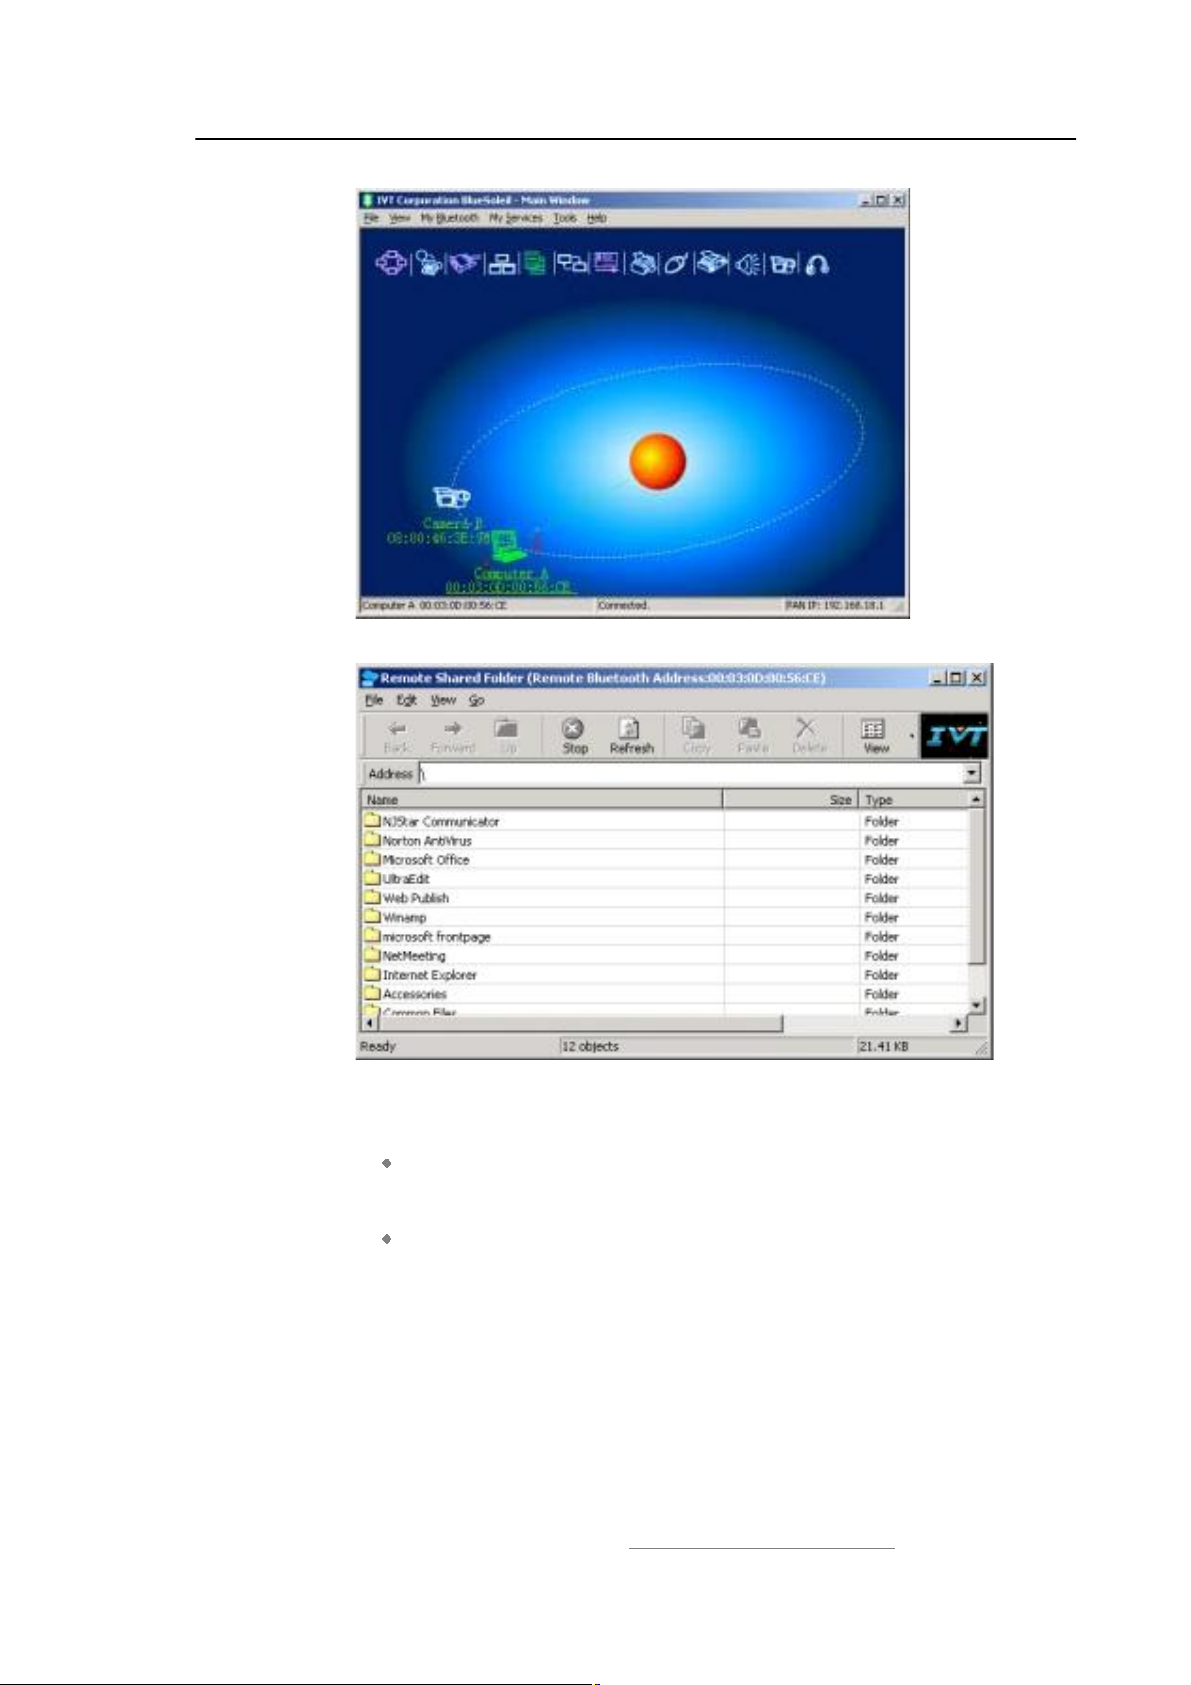
Step 4: Search for Computer A on Computer B, and connect to its FTP service
(Figure 7.1). The remote folder is displayed in a Windows Explorer
style window (Figure 7.2).
Copyright © 2001, IVT Corporation, http://www.ivtcorporation.com
All specifications are preliminary and subject to change without notice.
52
Page 56
IVT BlueSoleil™ User Manual
Figure 7.1: The connection is successfully established
Figure 7.2: The remote folder is displayed
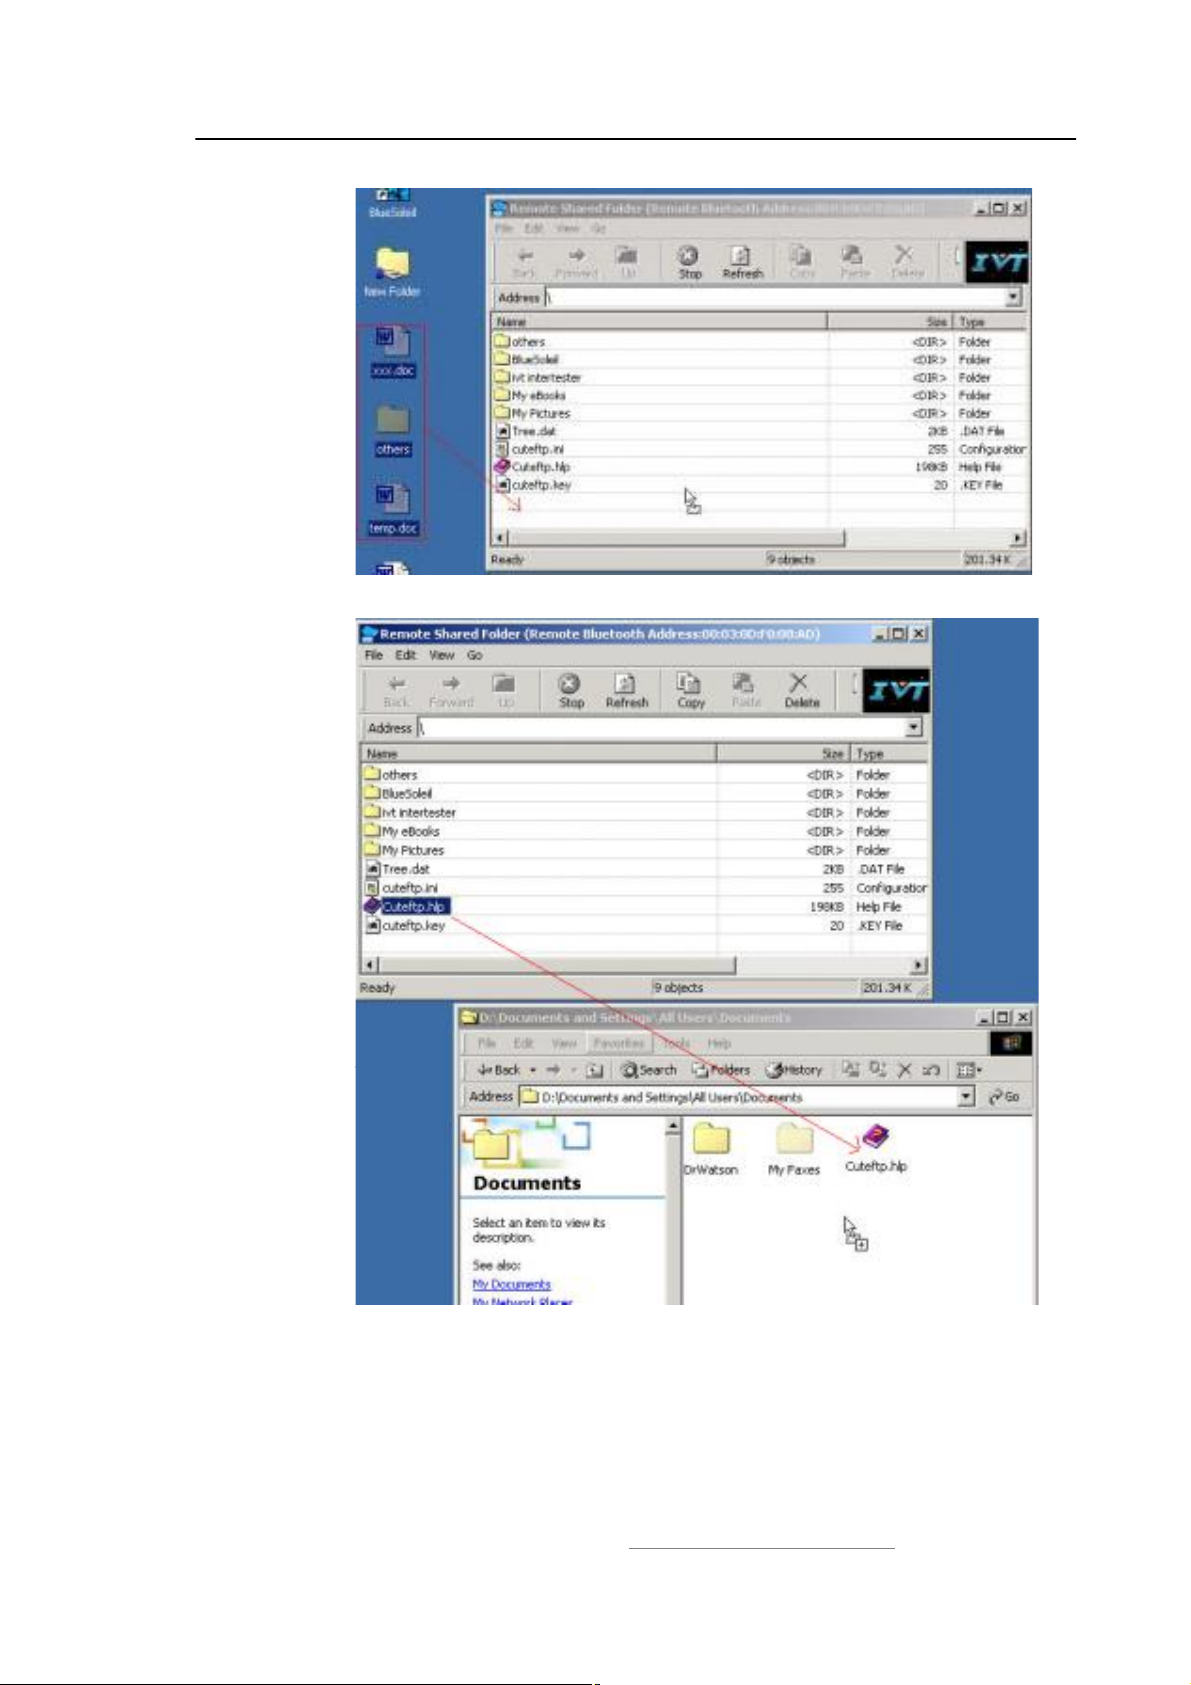
Step 5: Copy files and directories.
From Computer B to Computer A & upload
Select files\ directories on Computer B and drag files into the
Remote Shared Folder. (Figure 7.3)
From Computer A to Computer B & download
Select files\ directories from the Remote Shared Folder and drag
files into the desktop or a folder on Computer B. (Figure 7.4)
Copyright © 2001, IVT Corporation, http://www.ivtcorporation.com
All specifications are preliminary and subject to change without notice.
53
Page 57
IVT BlueSoleil™ User Manual
Figure 7.3: Upload files to Computer A
Figure 7.4: Download files from Computer A
Copyright © 2001, IVT Corporation, http://www.ivtcorporation.com
All specifications are preliminary and subject to change without notice.
54
Page 58
IVT BlueSoleil™ User Manual
7.3 FTP Configuration
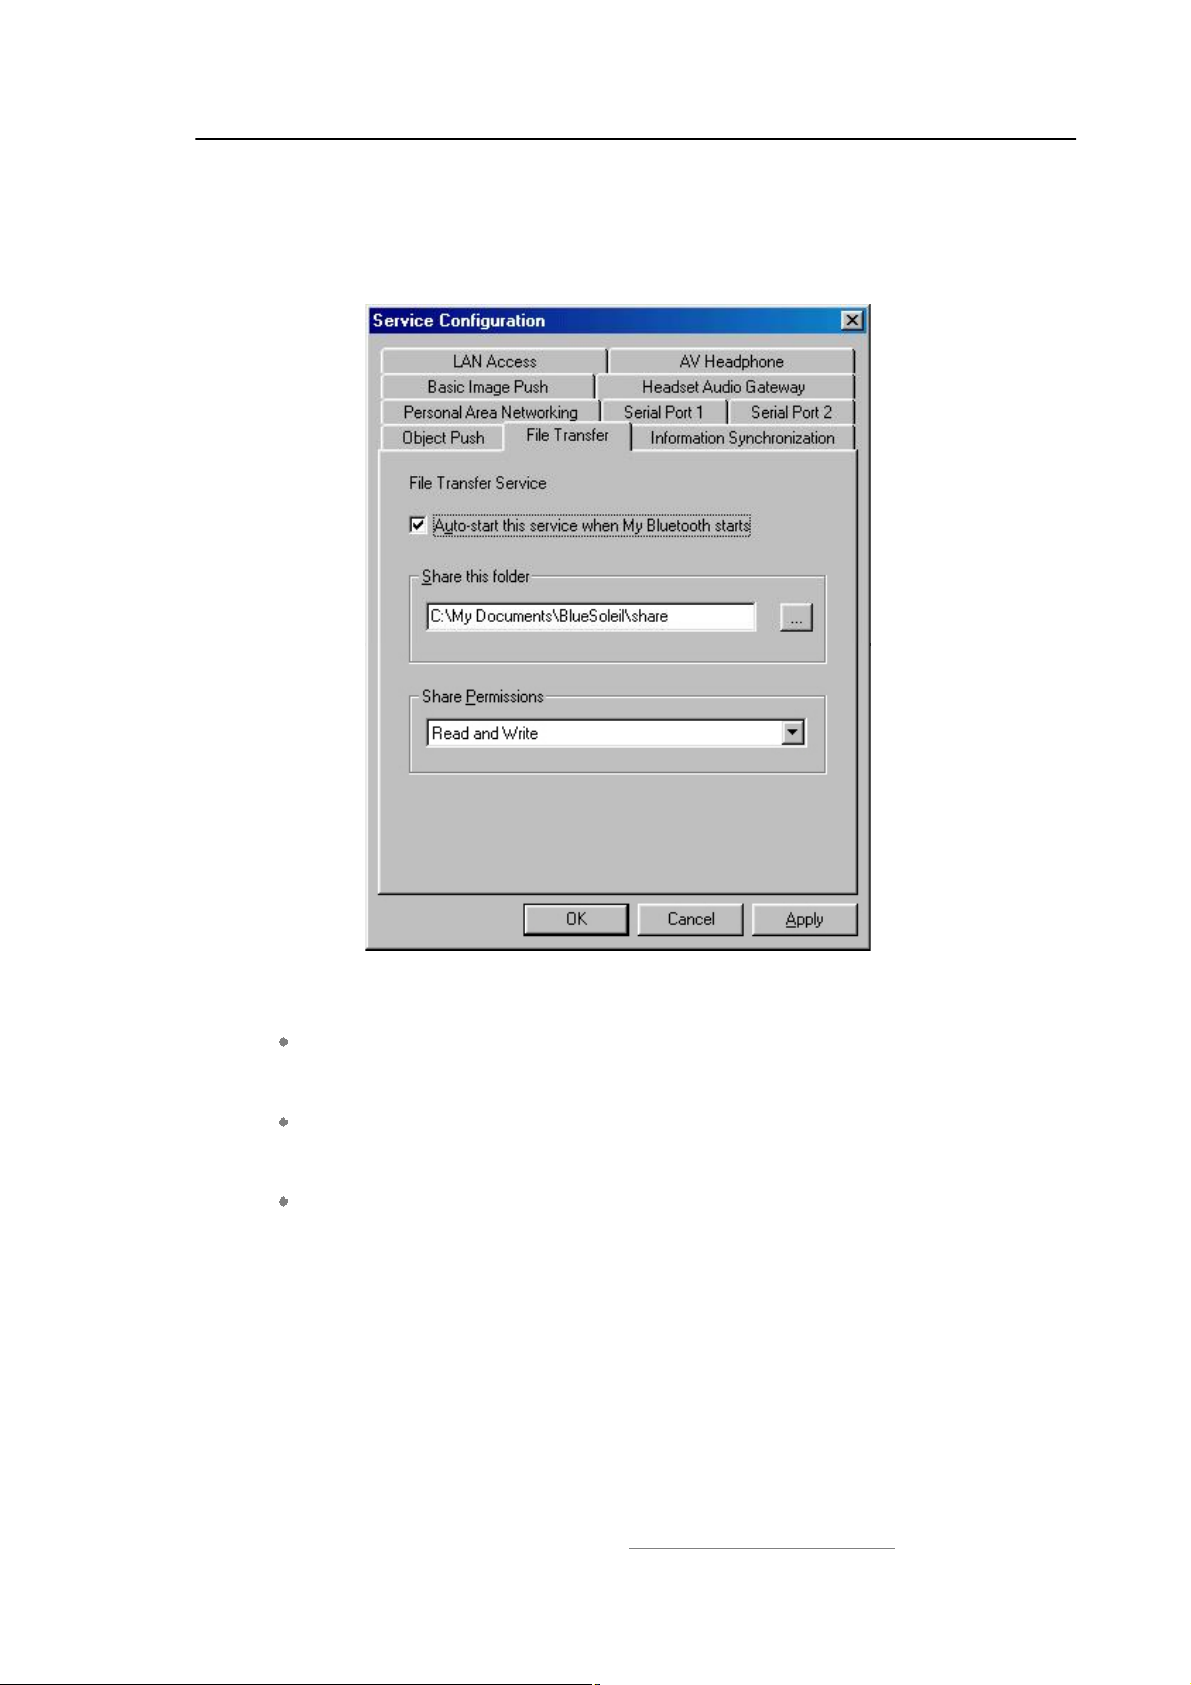
In the BlueSoleil! Service Window, right-click the File Transfer icon. On the pop-up
menu, select Properties to configure the #my FTP service" (Figure 7.5).
Figure 7.5: Configure FTP service
Setting Items:
Auto starts this service when my Bluetooth starts
Check this box to automatically start the File Transfer service every time
BlueSoleil! is started.
Root Directory
This sets the root directory that you want to share with other computers using
Bluetooth.
Access Permissions
This sets the access permission remote computers have to the shared root
directory.
Copyright © 2001, IVT Corporation, http://www.ivtcorporation.com
All specifications are preliminary and subject to change without notice.
55
Page 59

IVT BlueSoleil™ User Manual
8 LAN Access
8.1 Introduction
The Bluetooth LAN Access Profile (LAP) allows Bluetooth-enabled devices to access
the services of a LAN using Point-to-Point Protocol. In this usage model, multiple
data terminals use a LAN access point as a wireless connection to a Local Area
Network (LAN). Once connected, data terminals operate as if they are connected to
the LAN via dial-up networking and can access all the services provided by the LAN.
The LAN application can be used in the following scenarios:
A computer (or PDA) accesses a Local Area Network via a LAP Server.
A computer (or PDA) accesses a Local Area Network via a LAN access point.
Note: Before using the LAN Access Profile in Windows98/Me, ensure that a
Dial-up Adapter and Windows"s component direct cable are already installed on the
computer. (See $Section 8.4: Settings for LAN Access Profile (client side) in
Windows98/Me%). Moreover, every operating system should have an installation of
NetBEUI protocol; otherwise, it cannot use computer name to visit other computer.
8.2 Access a Local Area Network (LAN)
This section outlines the steps involved in connecting to a Local Area Network using
the LAP application.
Computer A: Computer B:
Notebook/ Laptop Desktop
A Bluetooth Device A Bluetooth Device
Windows 2000 Windows 2000
IVT BlueSoleil! IVT BlueSoleil!
Step 1: Insert Bluetooth Devices into both computers.
Step 2: Start BlueSoleil! in both computers.
Step 3:
Step 4: Make incoming connection on Computer A
Start the LAP service on Computer A.
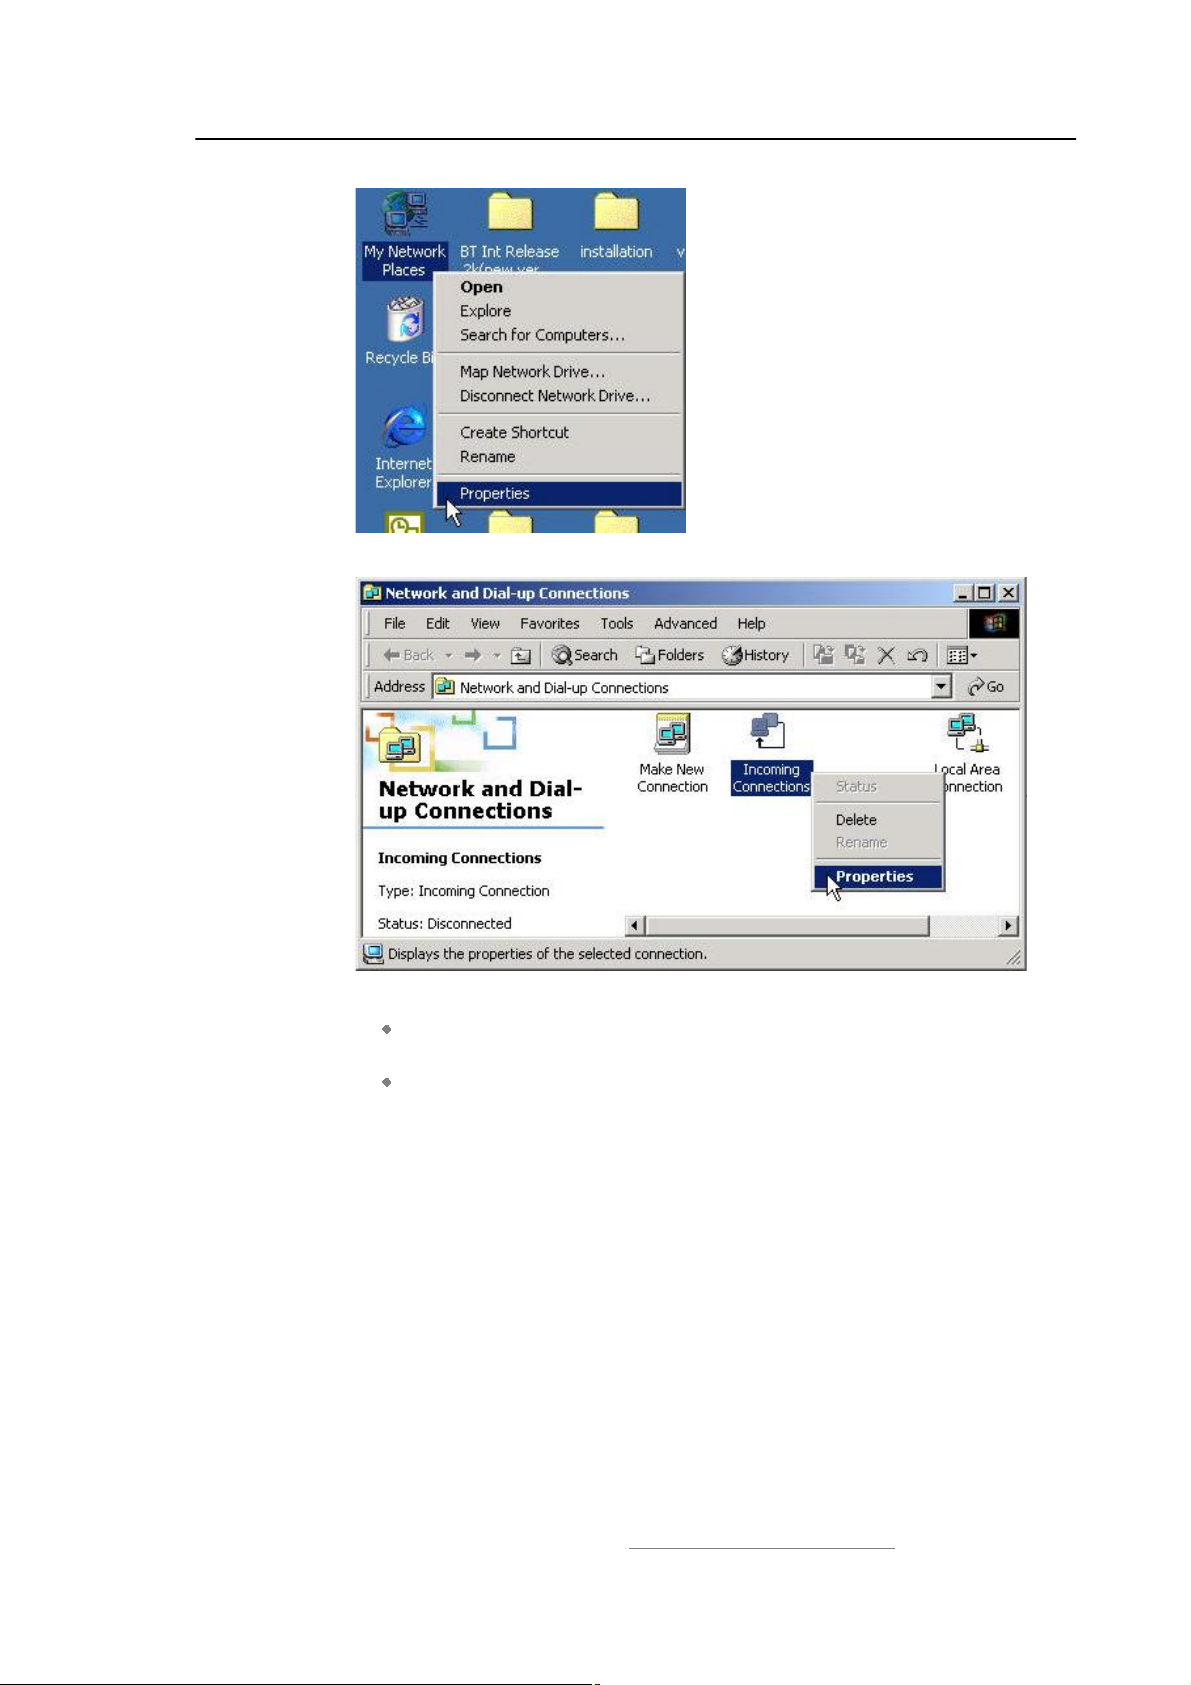
Right-click on My Network Places; select Properties. (Figure
8.1)
On the Network and Dial-up Connections panel, right-click the
Incoming Connection icon, and then select Properties on the
pop up menu. (Figure 8.2)
Copyright © 2001, IVT Corporation, http://www.ivtcorporation.com
All specifications are preliminary and subject to change without notice.
56
Page 60
IVT BlueSoleil™ User Manual
Figure 8.1: Right-click My Network Places
Figure 8.2: Select Properties on the pop up menu
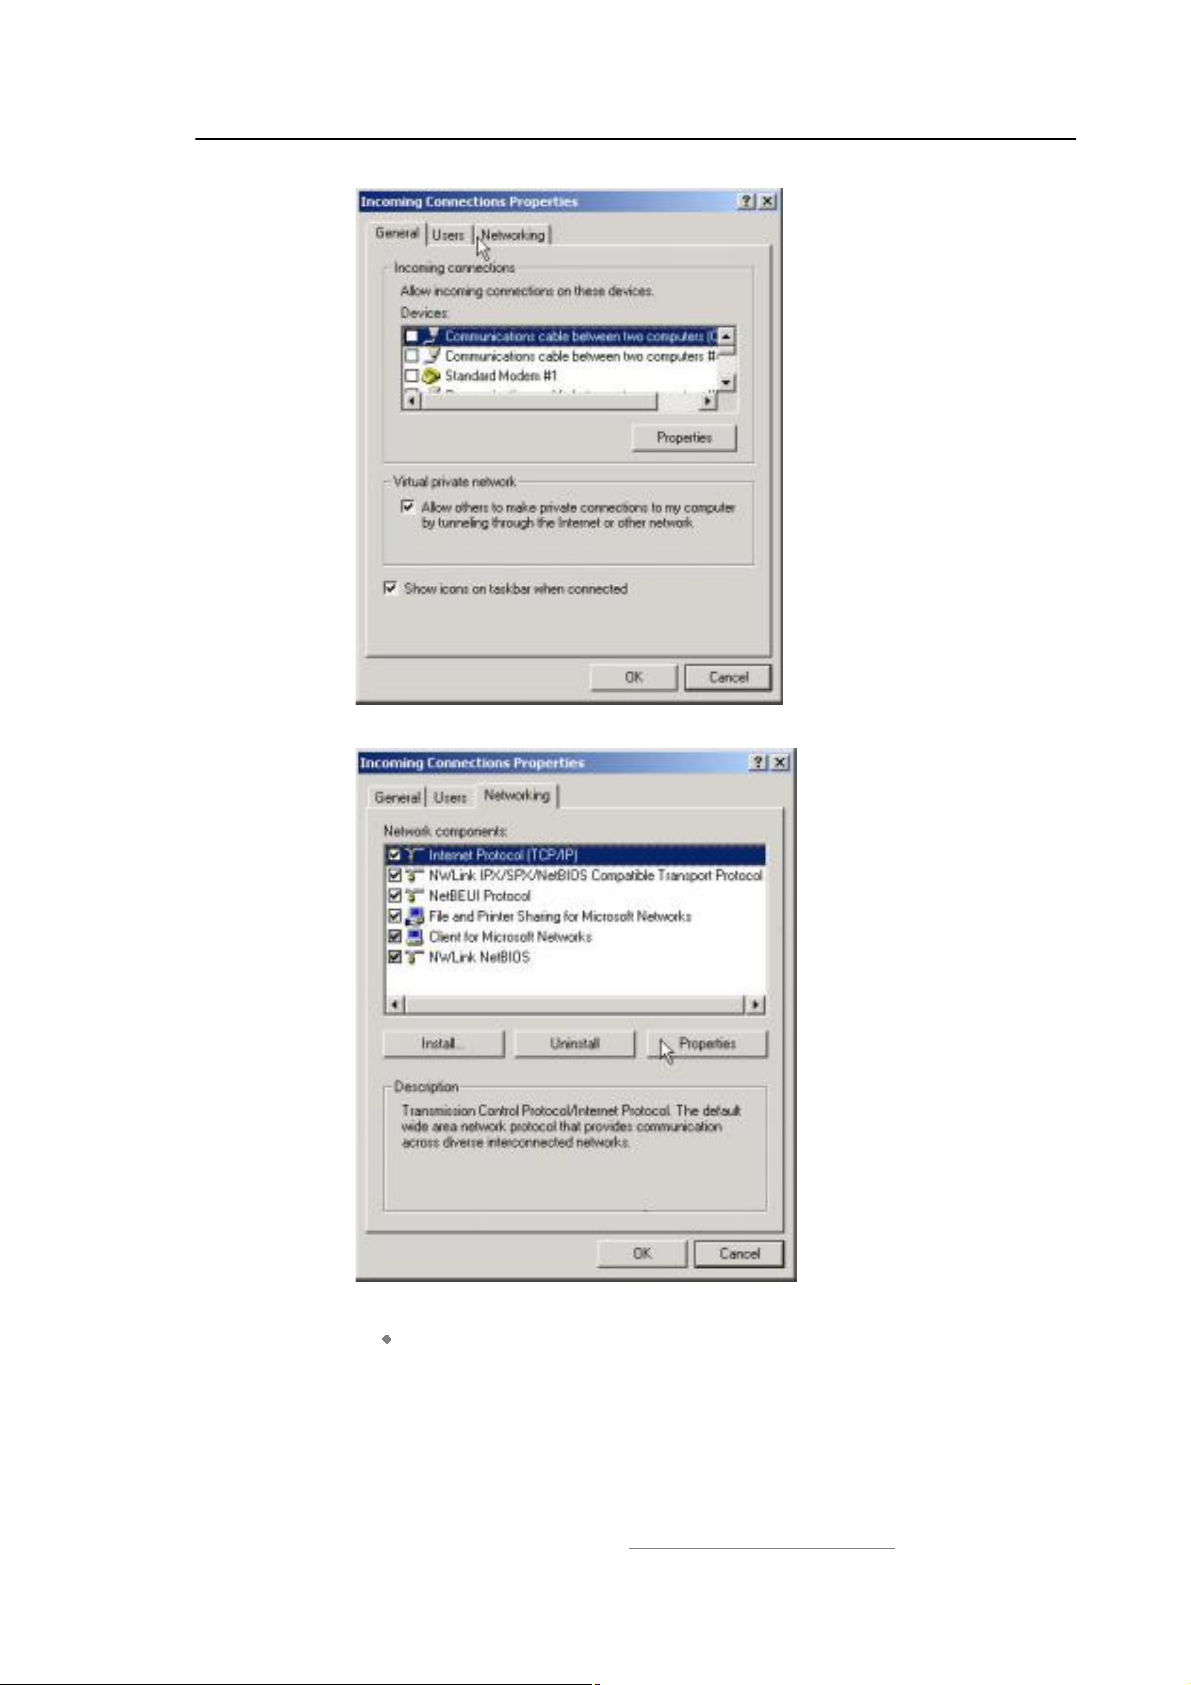
Click Networking on the Incoming Connections Properties
pop-up window. (Figure 8.3)
Choose Internet Protocol (TCP/IP) and click Properties.
(Figure 8.4)
Copyright © 2001, IVT Corporation, http://www.ivtcorporation.com
All specifications are preliminary and subject to change without notice.
57
Page 61
IVT BlueSoleil™ User Manual
Figure 8.3: Incoming Connections Properties
Figure 8.4: Choose Internet Protocol (TCP/IP)
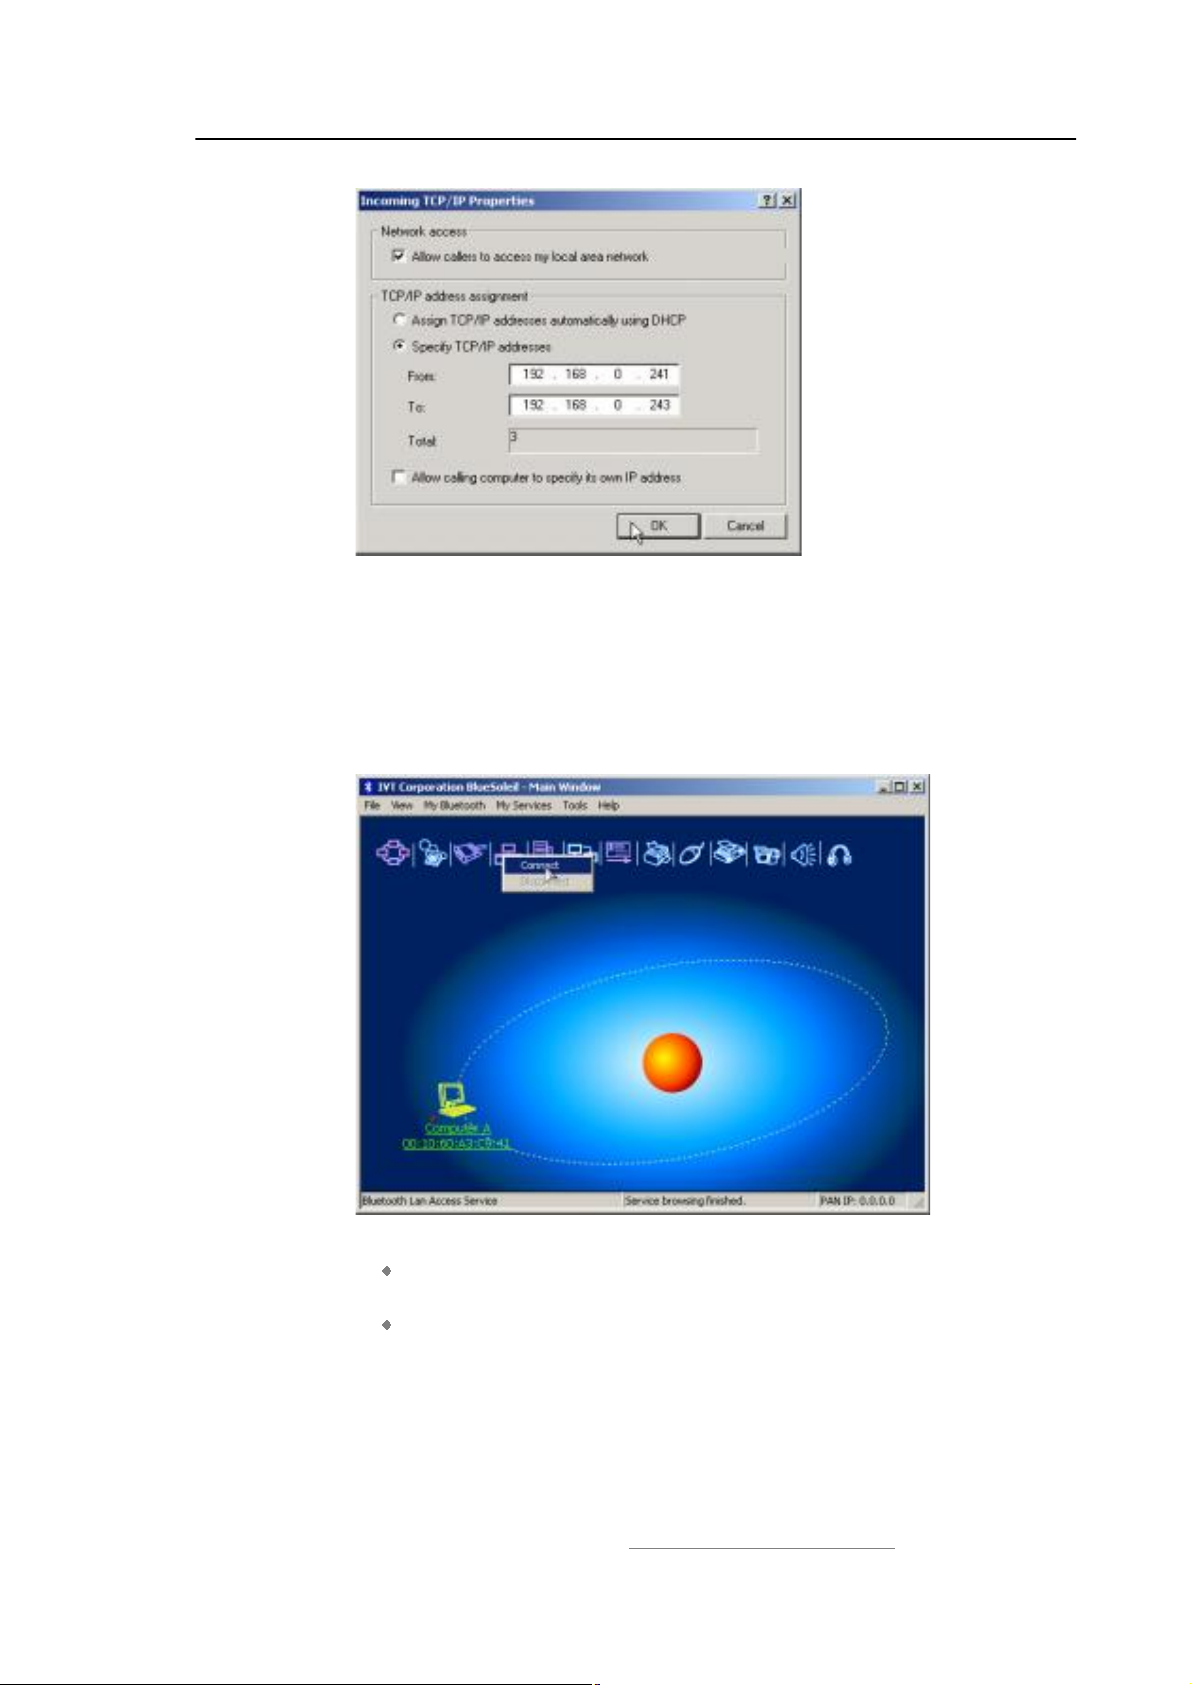
Select Specify TCP/IP addresses, and input the two IP
addresses. The subnet mask of the two IP addresses should be the
same as the subnet of the LAN Computer A belongs to. (Figure
8.5)
Copyright © 2001, IVT Corporation, http://www.ivtcorporation.com
All specifications are preliminary and subject to change without notice.
58
Page 62
IVT BlueSoleil™ User Manual
Figure 8.5: Input the IP addresses
Step 5: Connect to Computer A.
1. Search for Computer A on Computer B.
2. Find the LAP service of Computer A.
3. Right-click the LAP service icon; select Connect on the pop-up
menu. (Figure 8.6)
Figure 8.6: Select Connect
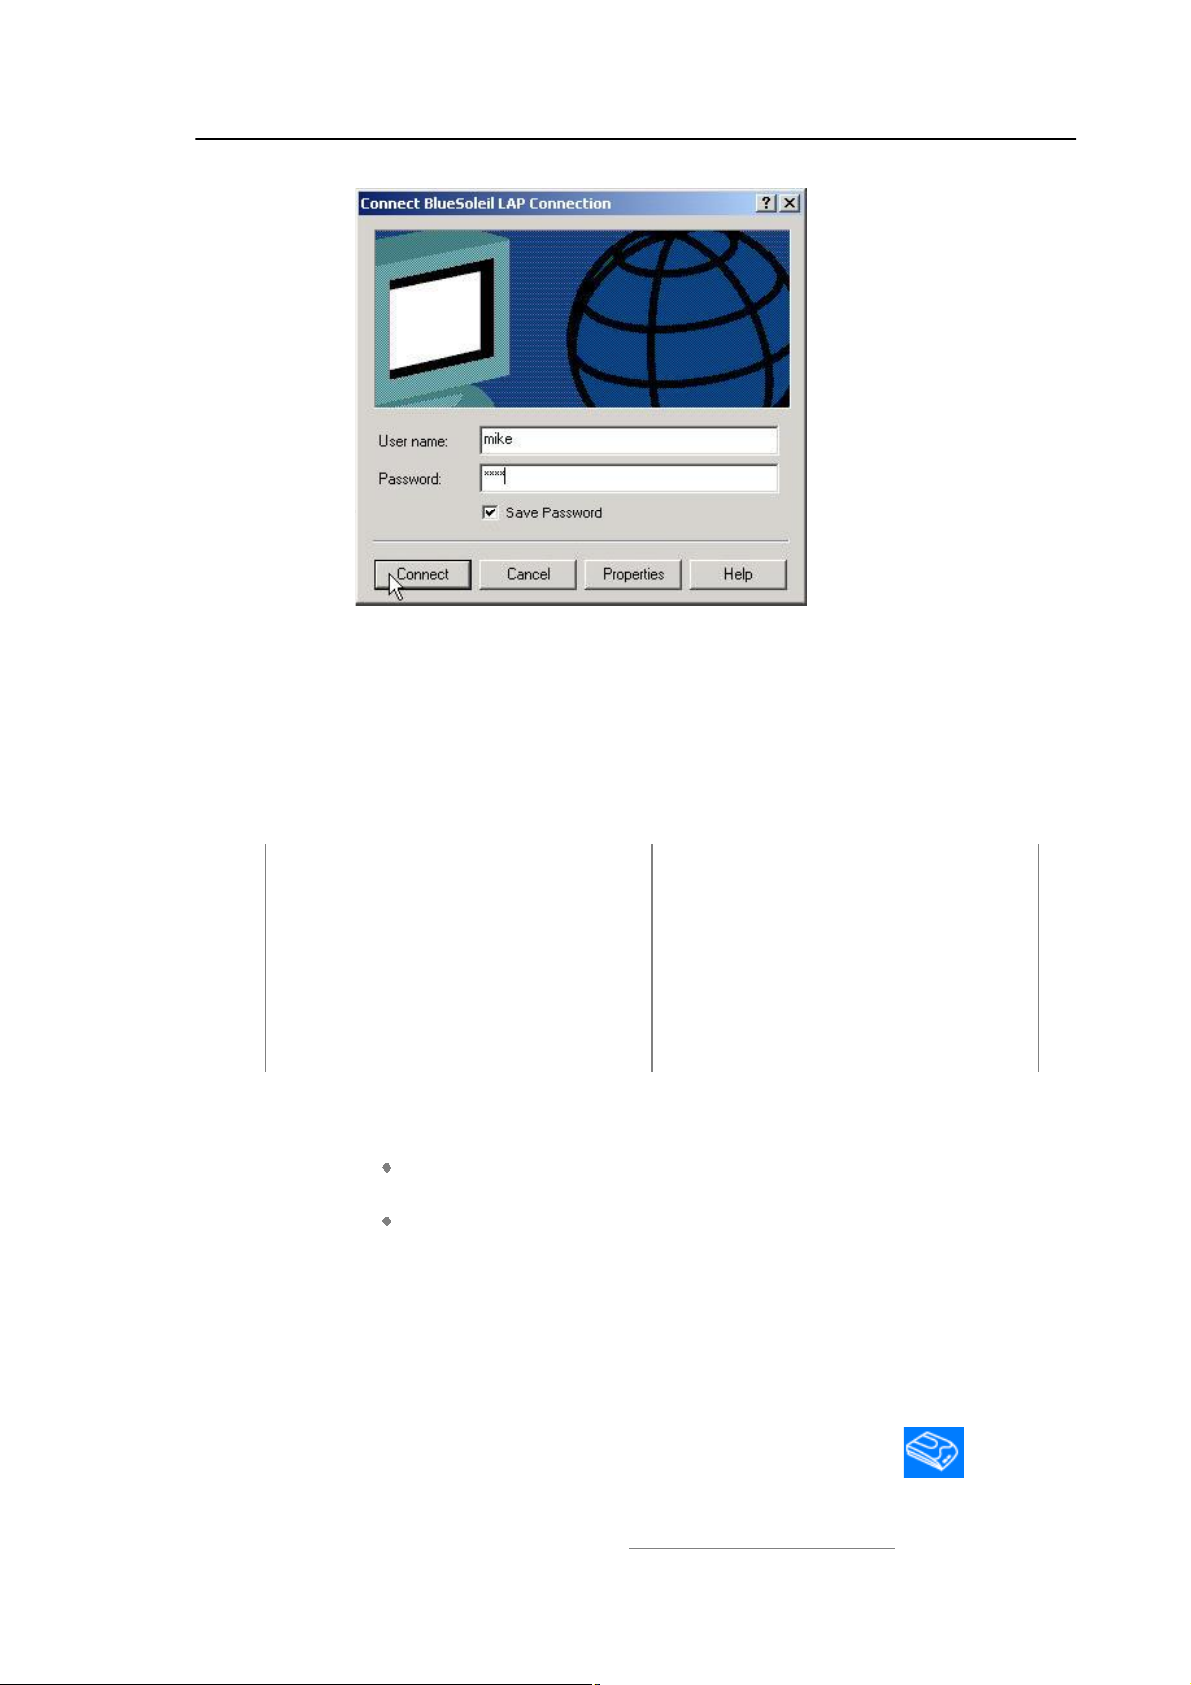
The Connect BlueSoleil™ LAP Connection window pops up.
Input a username and password. (Figure 8.7)
The connection is then established.
Copyright © 2001, IVT Corporation, http://www.ivtcorporation.com
All specifications are preliminary and subject to change without notice.
59
Page 63
IVT BlueSoleil™ User Manual
Figure 8.7: Input Username and Password
Step 6: Computer B can now access the LAN via Computer A.
8.3 Access a LAN via a LAN Access Point
This section outlines the steps involved in accessing a LAN through a LAN access
point.
LAN Access Point A: Computer B
Bluetooth access point Notebook/Laptop
A Bluetooth Device
Windows 2000
IVT BlueSoleil!
Step 1: Connect LAN access point to the Local Area Network.
Set the LAN access point"s name to anything you want. Here it is
named LAN Access Point A.
Set LAN Access Point A"s IP address to be in the same range as the
other computers in the LAN.
Step 2: Insert the Bluetooth Device into the computer.
Step 3: Start BlueSoleil! in the computer.
Step 4:
Copyright © 2001, IVT Corporation, http://www.ivtcorporation.com
All specifications are preliminary and subject to change without notice.
Connect to the LAN Access Point A.
1. Find the LAP service of LAN Access Point A
2. Double-click on the LAN Access Point A device icon on
60
Page 64
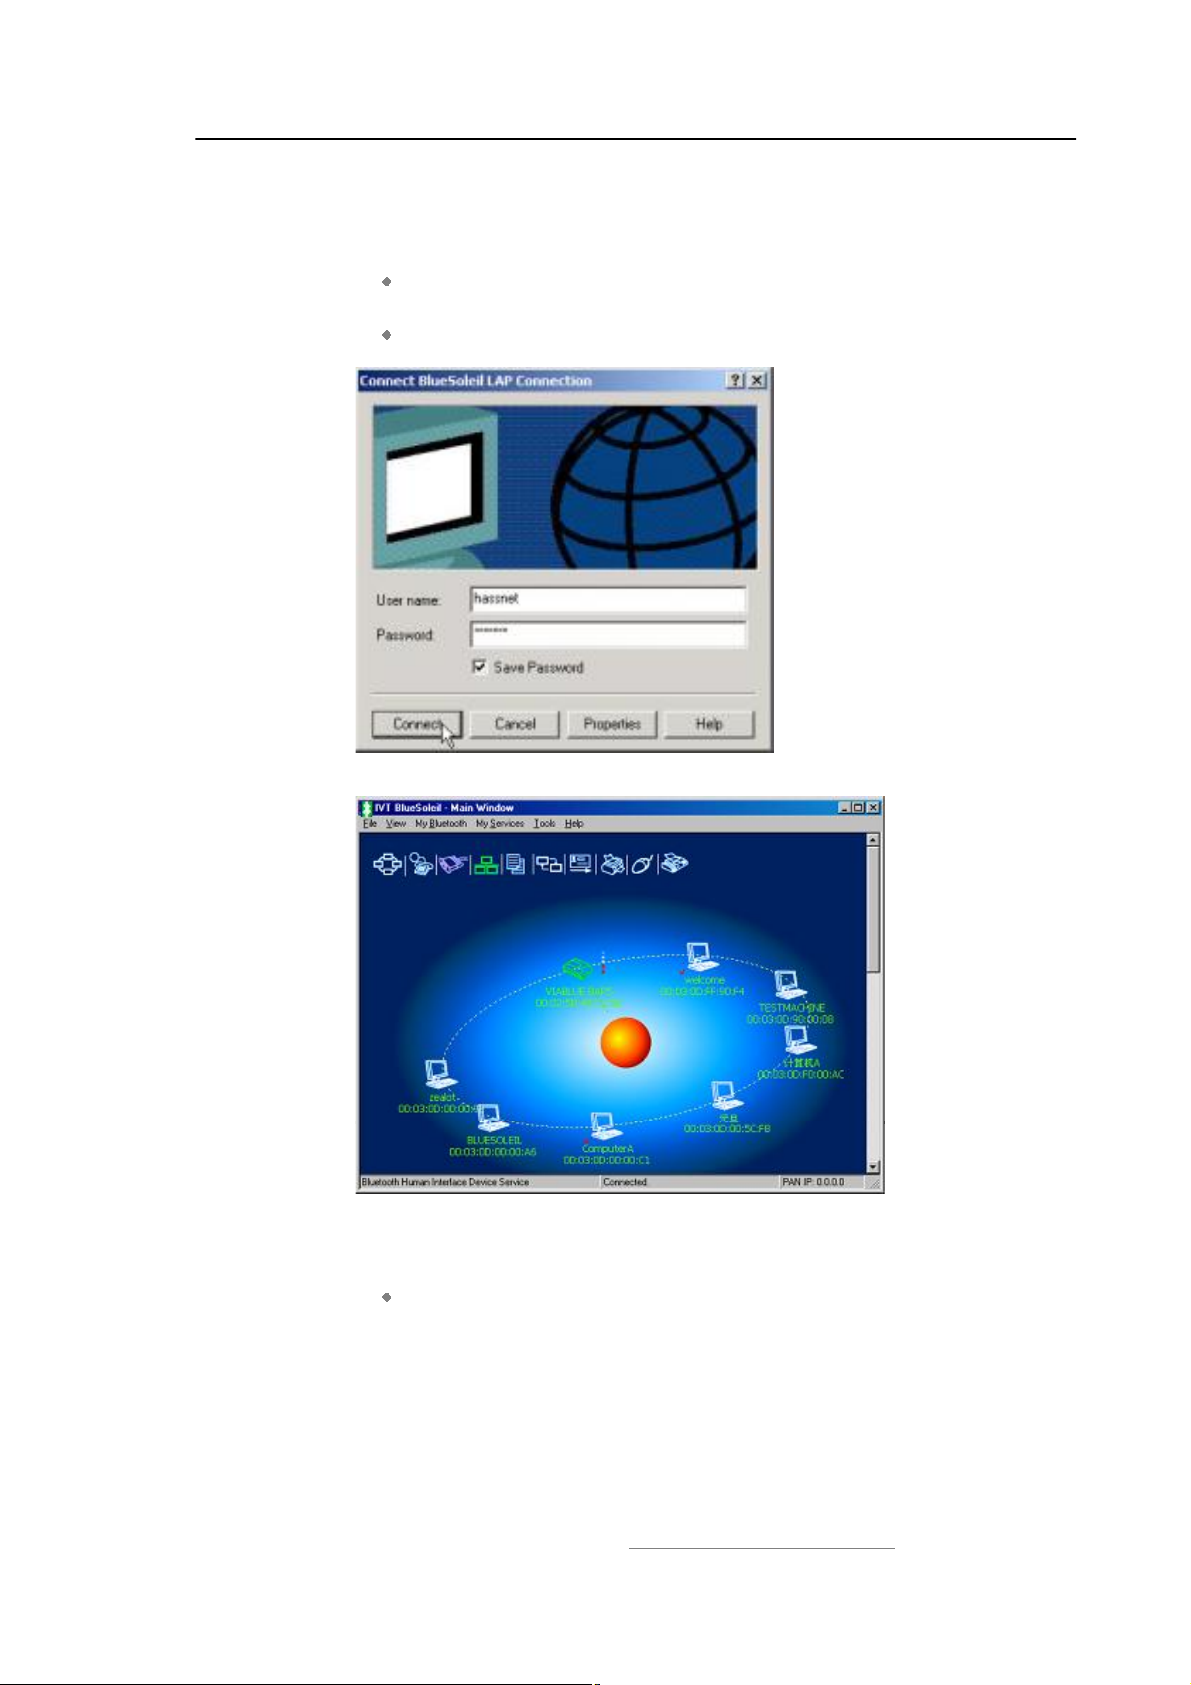
IVT BlueSoleil™ User Manual
Computer B.
3. Right-click the LAP service icon; select Connect on the pop-up
menu.
The Connect BlueSoleil™ LAP Connection window pops up.
Input username and password. (Figure 8.8)
The connection is now established. (Figure 8.9)
Figure 8.8: Input username and password
Figure 8.9: Successful connection to the LAN Access Point
Step 5: Access other computers in the LAN.
Now Computer B can access the LAN via LAN Access Point A.
8.4 Settings for LAN Access Profile (client side) in
Windows98/Me
Before using the LAN Access Profile in Windows98/Me, ensure that a Dial-up
Adapter and Windows"s component direct cable connection are installed on the
client computer.
Copyright © 2001, IVT Corporation, http://www.ivtcorporation.com
All specifications are preliminary and subject to change without notice.
61
Page 65
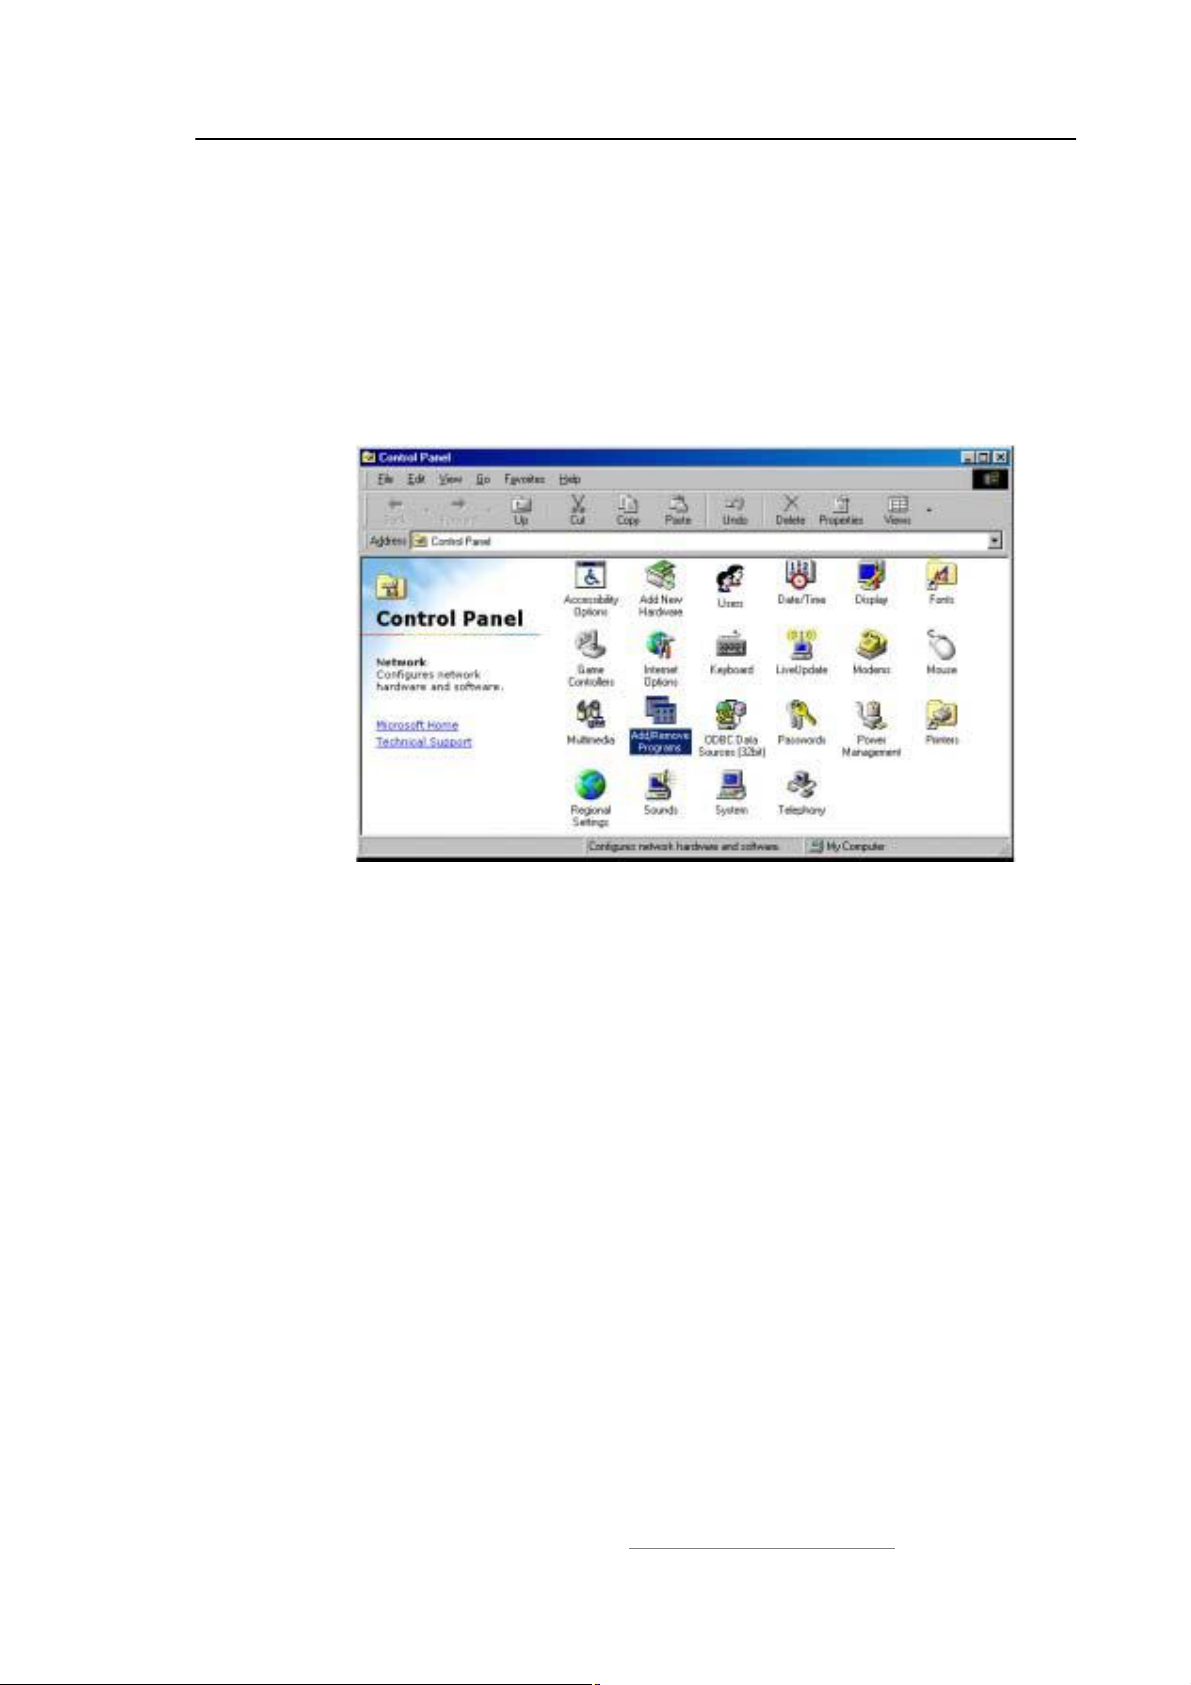
IVT BlueSoleil™ User Manual
See $Section 5.3.1: Check if a Dial-up Adapter is installed%, to check if a Dial up
Adapter is installed in your computer.
8.4.1 Check if a Windows Component Direct Cable Connection is
installed
Step 1: Select Control Panel from the Start | Settings menu,
Step 2: Double-click the Add/Remove Programs icon. (Figure 8.10)
Figure 8.10: Double-click the Add/Remove Programs icon
Step 3: Selectthe Windows Setup tab in the Add/Remove Programs
Properties window. (Figure 8.11)
Copyright © 2001, IVT Corporation, http://www.ivtcorporation.com
All specifications are preliminary and subject to change without notice.
62
Page 66
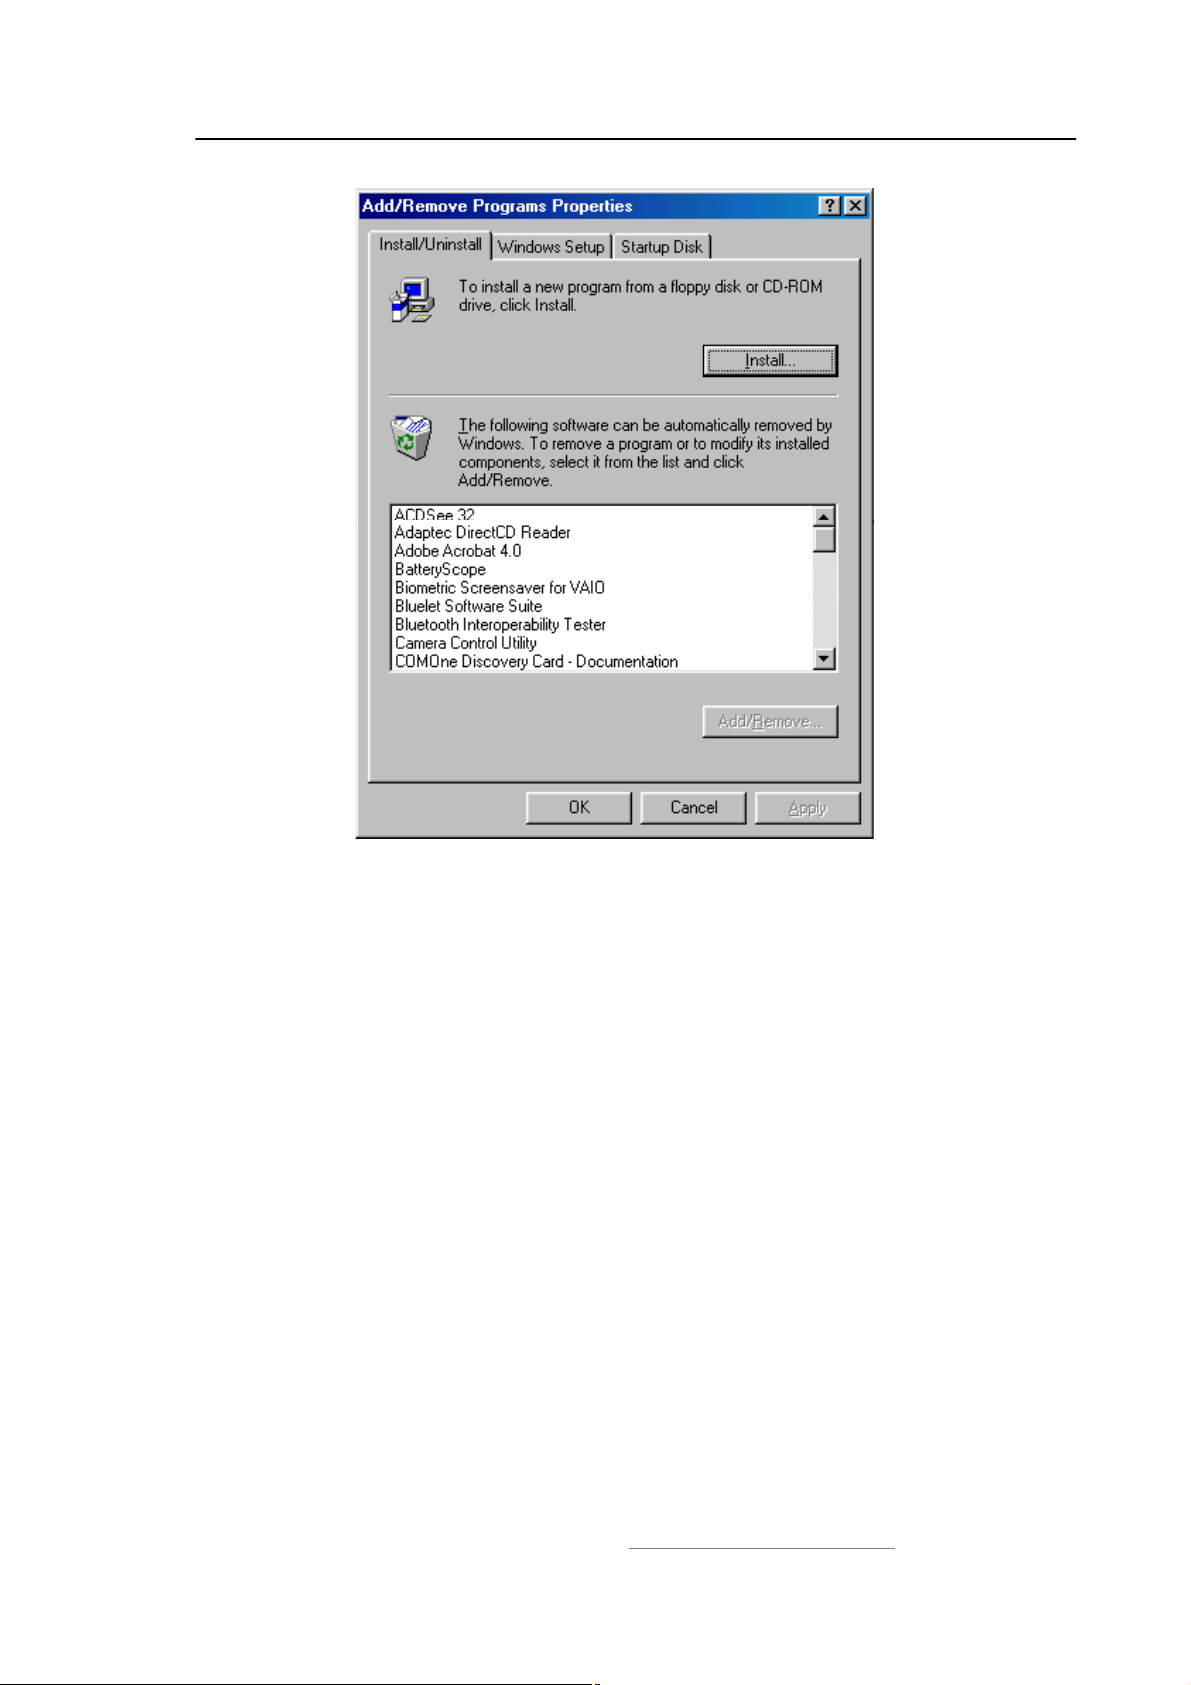
IVT BlueSoleil™ User Manual
Figure 8.11: Select Windows Setup tab
Step 4: Double-click the Communications item in the Windows Setup
component list to check the properties. (Figure 8.12)
Copyright © 2001, IVT Corporation, http://www.ivtcorporation.com
All specifications are preliminary and subject to change without notice.
63
Page 67
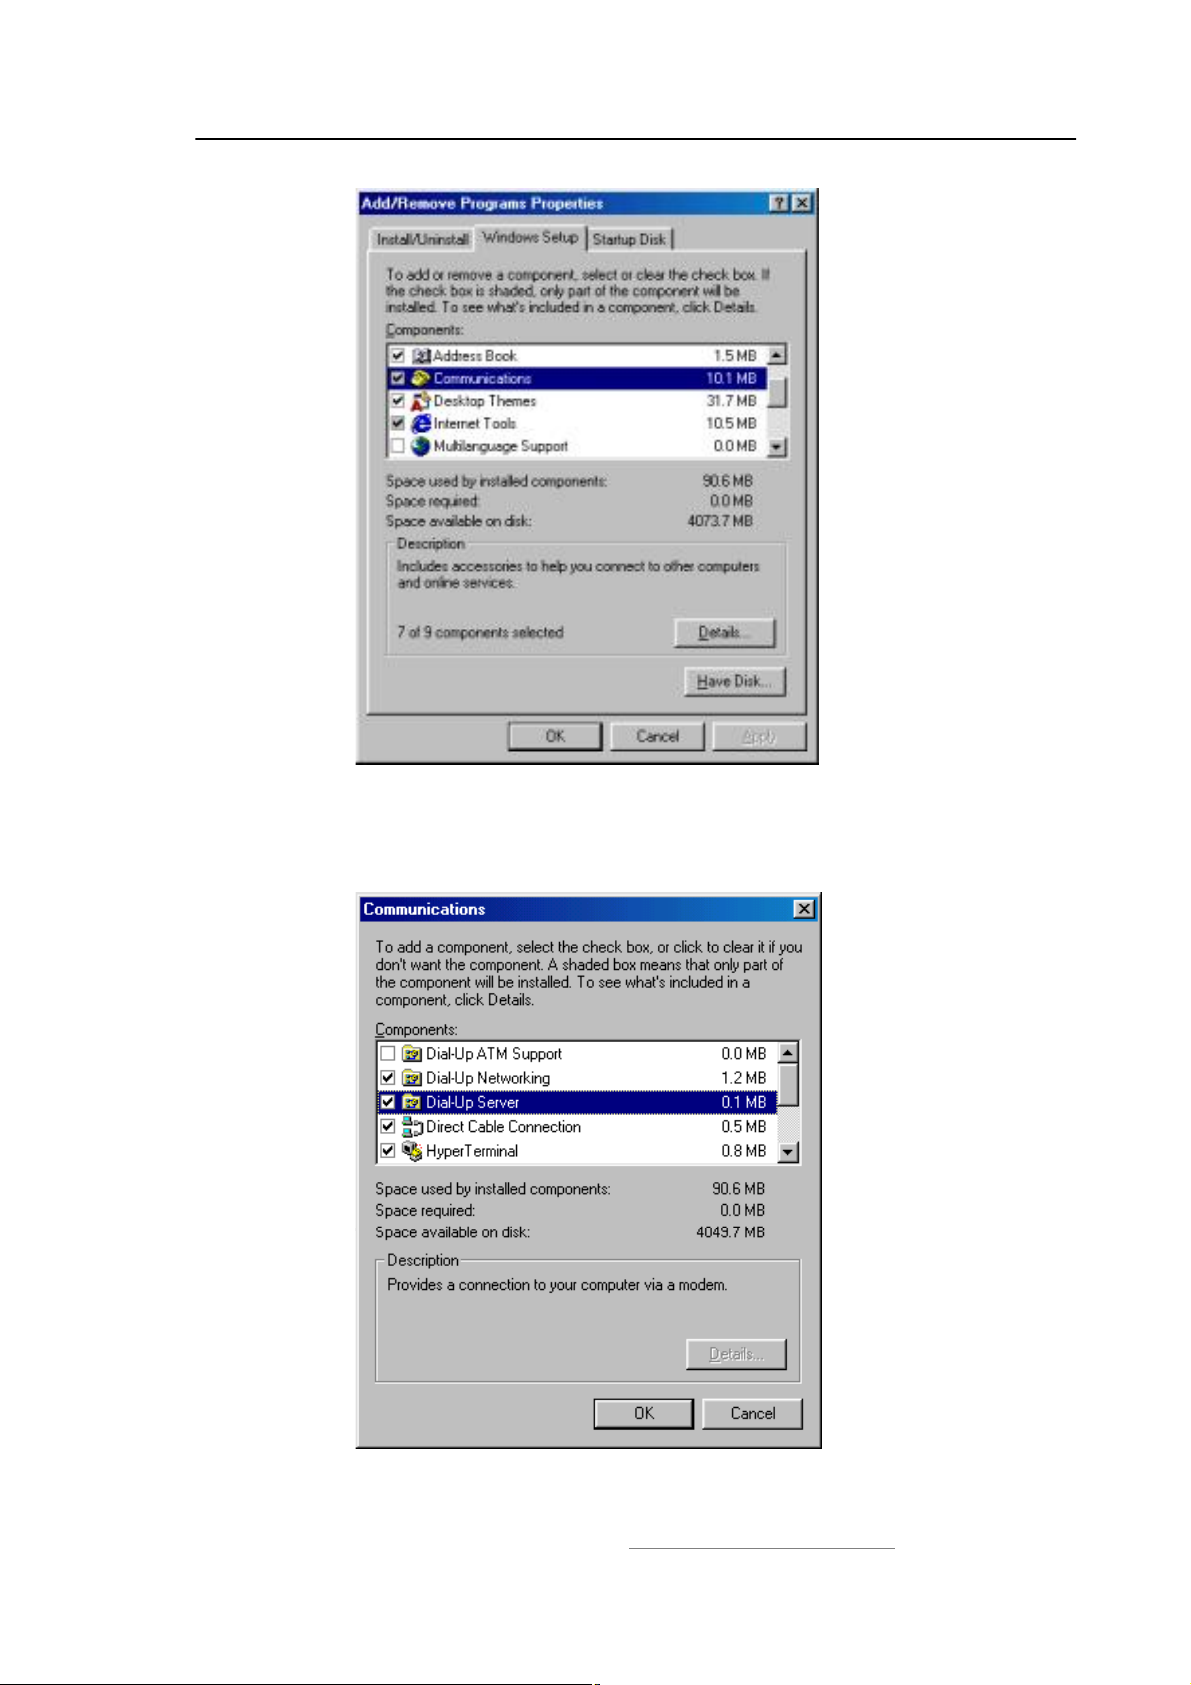
IVT BlueSoleil™ User Manual
Figure 8.12: Double-click Communications item
Step 5: Check if Direct Cable Connection is selected. If not, select it and
click OK to install a Direct Cable Connection. (Figure 8.13)
Figure 8.13: Check if Direct Cable Connection is selected
Copyright © 2001, IVT Corporation, http://www.ivtcorporation.com
All specifications are preliminary and subject to change without notice.
64
Page 68
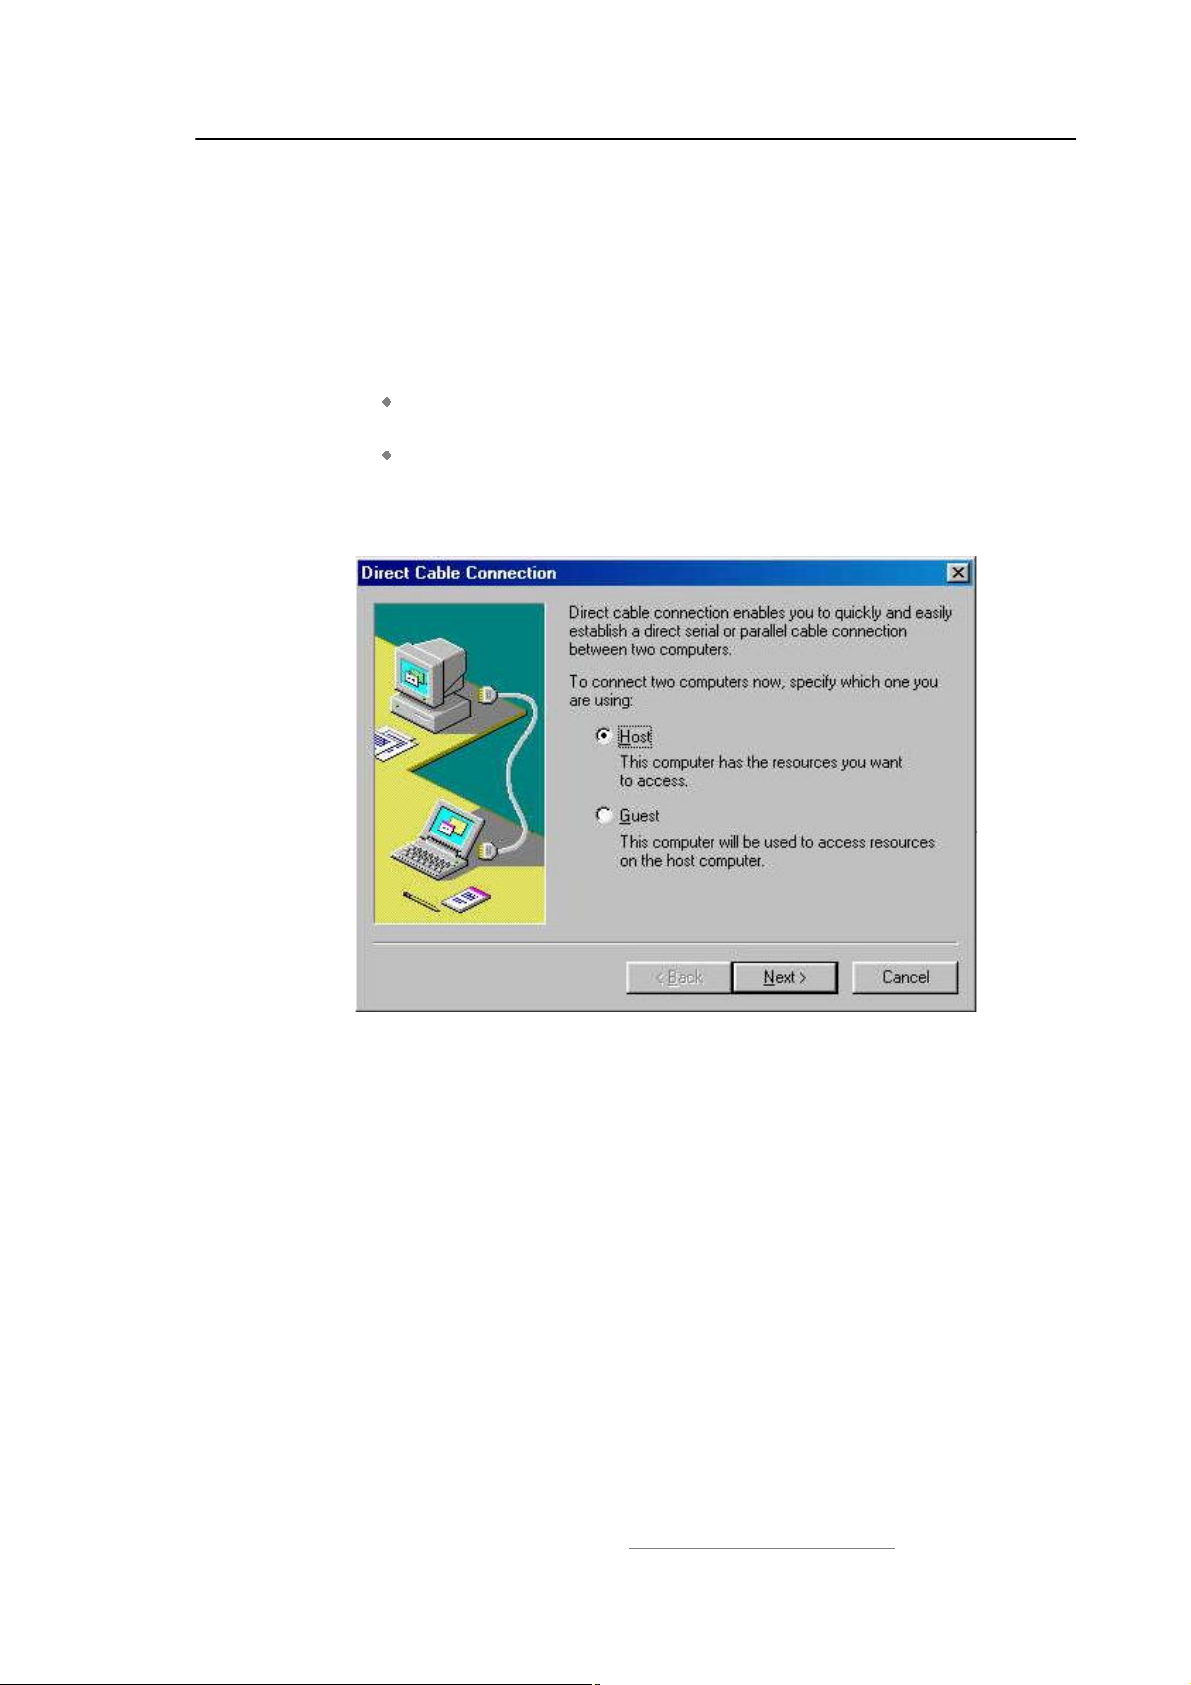
IVT BlueSoleil™ User Manual
8.5 Usage of LAN Access Profile (server side) in
Windows98/Me
8.5.1 Configure a LAP server in Windows 98/ Me
Step 1: Start the LAP service.
See $Section 8.2: Access a Local Area Network (LAN)%, Steps 1 to
5.
If this is the first time the service is started n Windows 98/Me, the
Direct Cable Connection window pops up.
Step 2: Select Host and click the Next button. (Figure 8.14)
Figure 8.14: Direct Cable Connection window
Step 3: Select Bluelet NULL Modem (Server) and click Next. (Figure 8.15)
Copyright © 2001, IVT Corporation, http://www.ivtcorporation.com
All specifications are preliminary and subject to change without notice.
65
Page 69
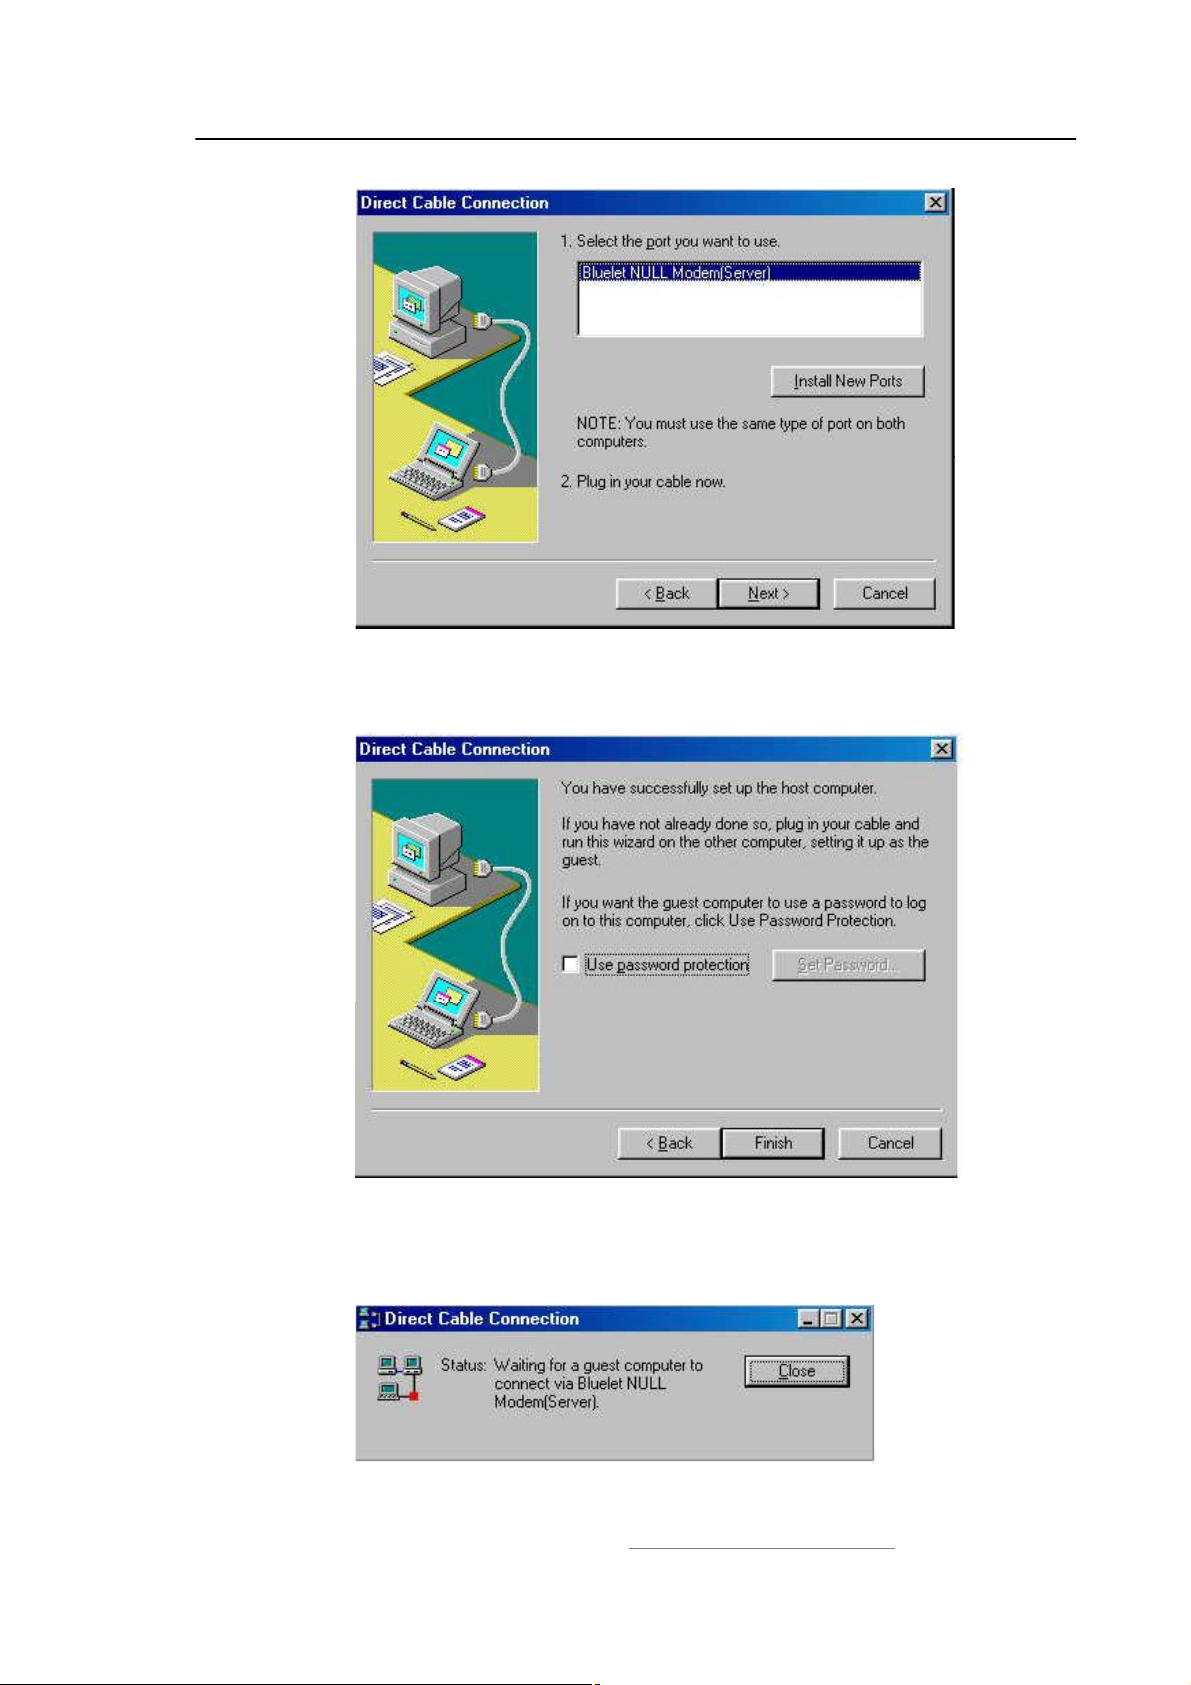
IVT BlueSoleil™ User Manual
Figure 8.15: Select Bluelet NULL Modem (Server)
Step 4: Click the Finish button. (Figure 8.16)
Figure 8.16: Click Finish button.
Step 5: Finally, the Direct Cable Connection window pops up. It is now
possible to connect to the LAP server. No password is required.
Figure 8.17: Connection created
Copyright © 2001, IVT Corporation, http://www.ivtcorporation.com
All specifications are preliminary and subject to change without notice.
66
Page 70
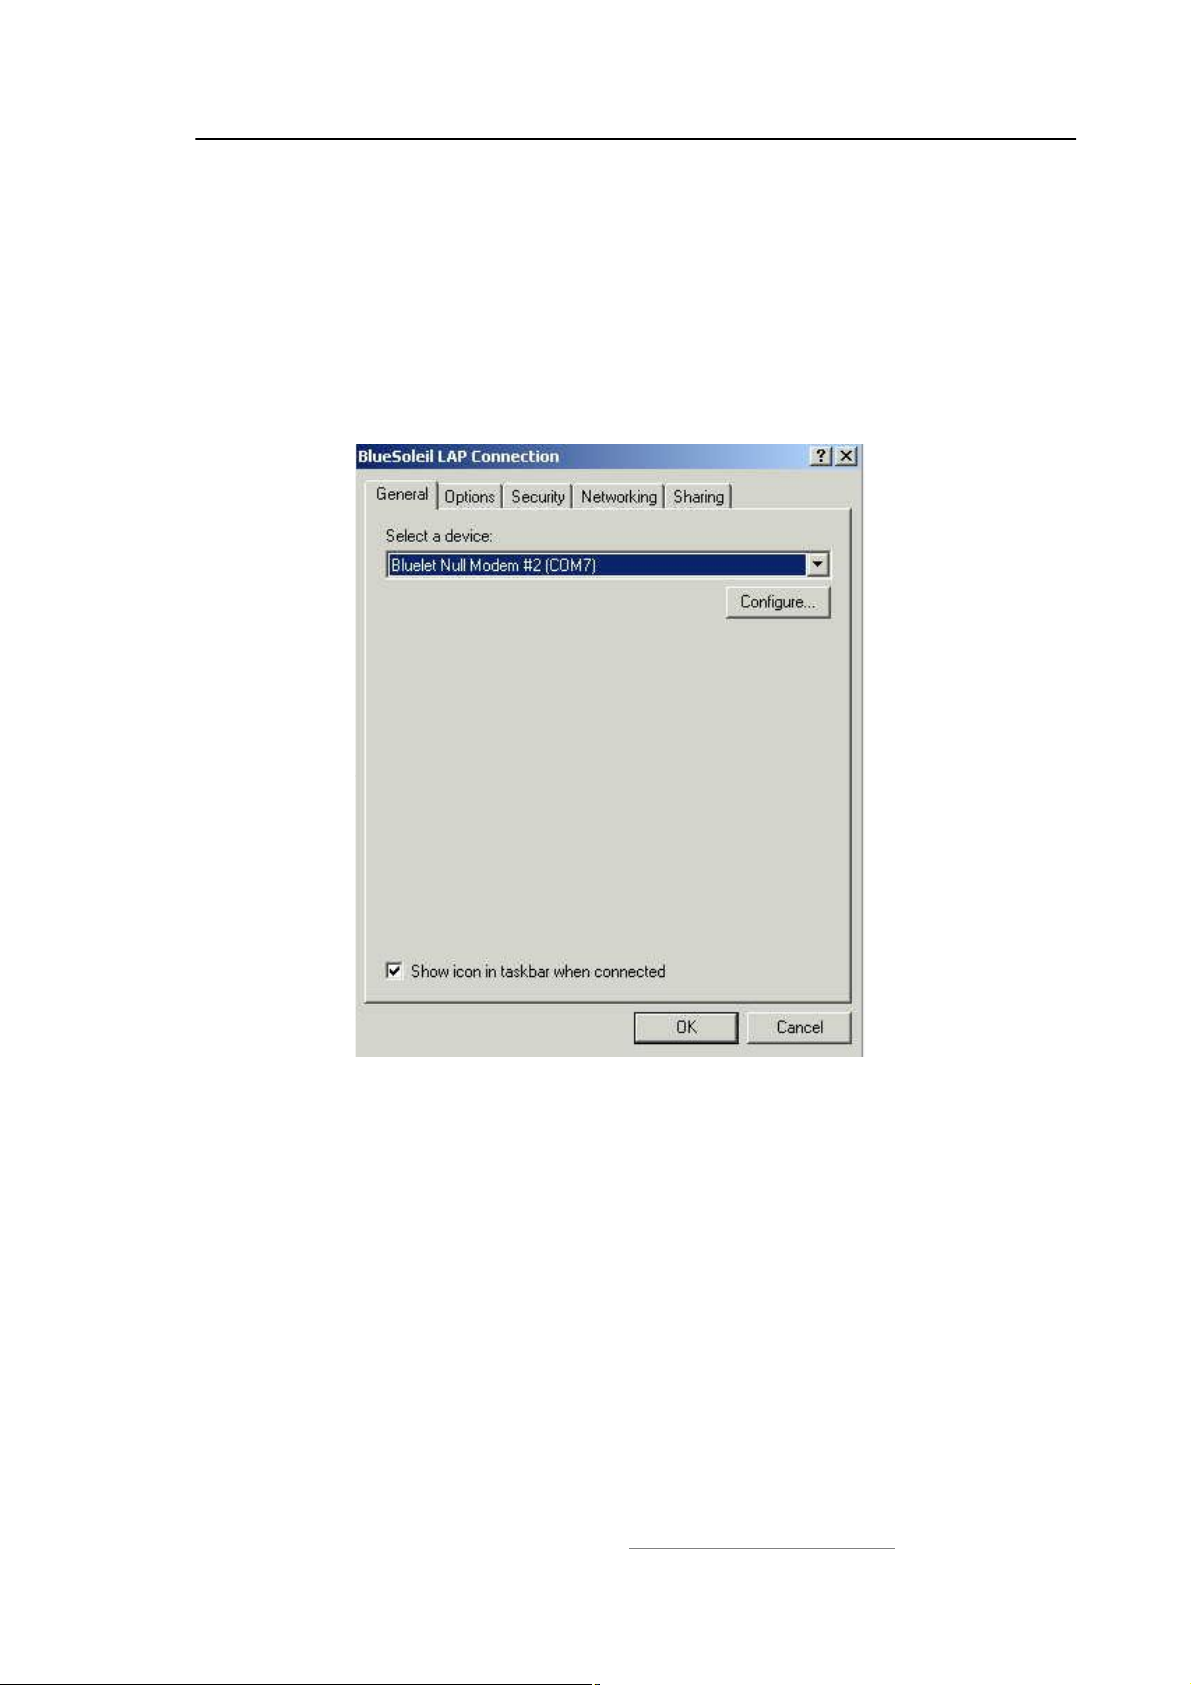
IVT BlueSoleil™ User Manual
Note: The above steps are applicable when configuring the LAP server for the first
time only. The next time the LAP service is started, the Direct Cable Connection
window (Figure 8.17) appears.
8.5.2 Set-up a LAP connection from Windows 2000 to Windows
98/Me
Step 1: In the Connect BlueSoleil LAP Connection window click
Properties and a window as shown in Figure 8.18 pops up.
Figure 8.18: Connect BlueSoleil LAP Connection window
Step 2: Select the Security tab in BlueSoleil LAP Connection window.
Select Advanced (custom settings) and click Settings. (Figure
8.19)
Copyright © 2001, IVT Corporation, http://www.ivtcorporation.com
All specifications are preliminary and subject to change without notice.
67
Page 71
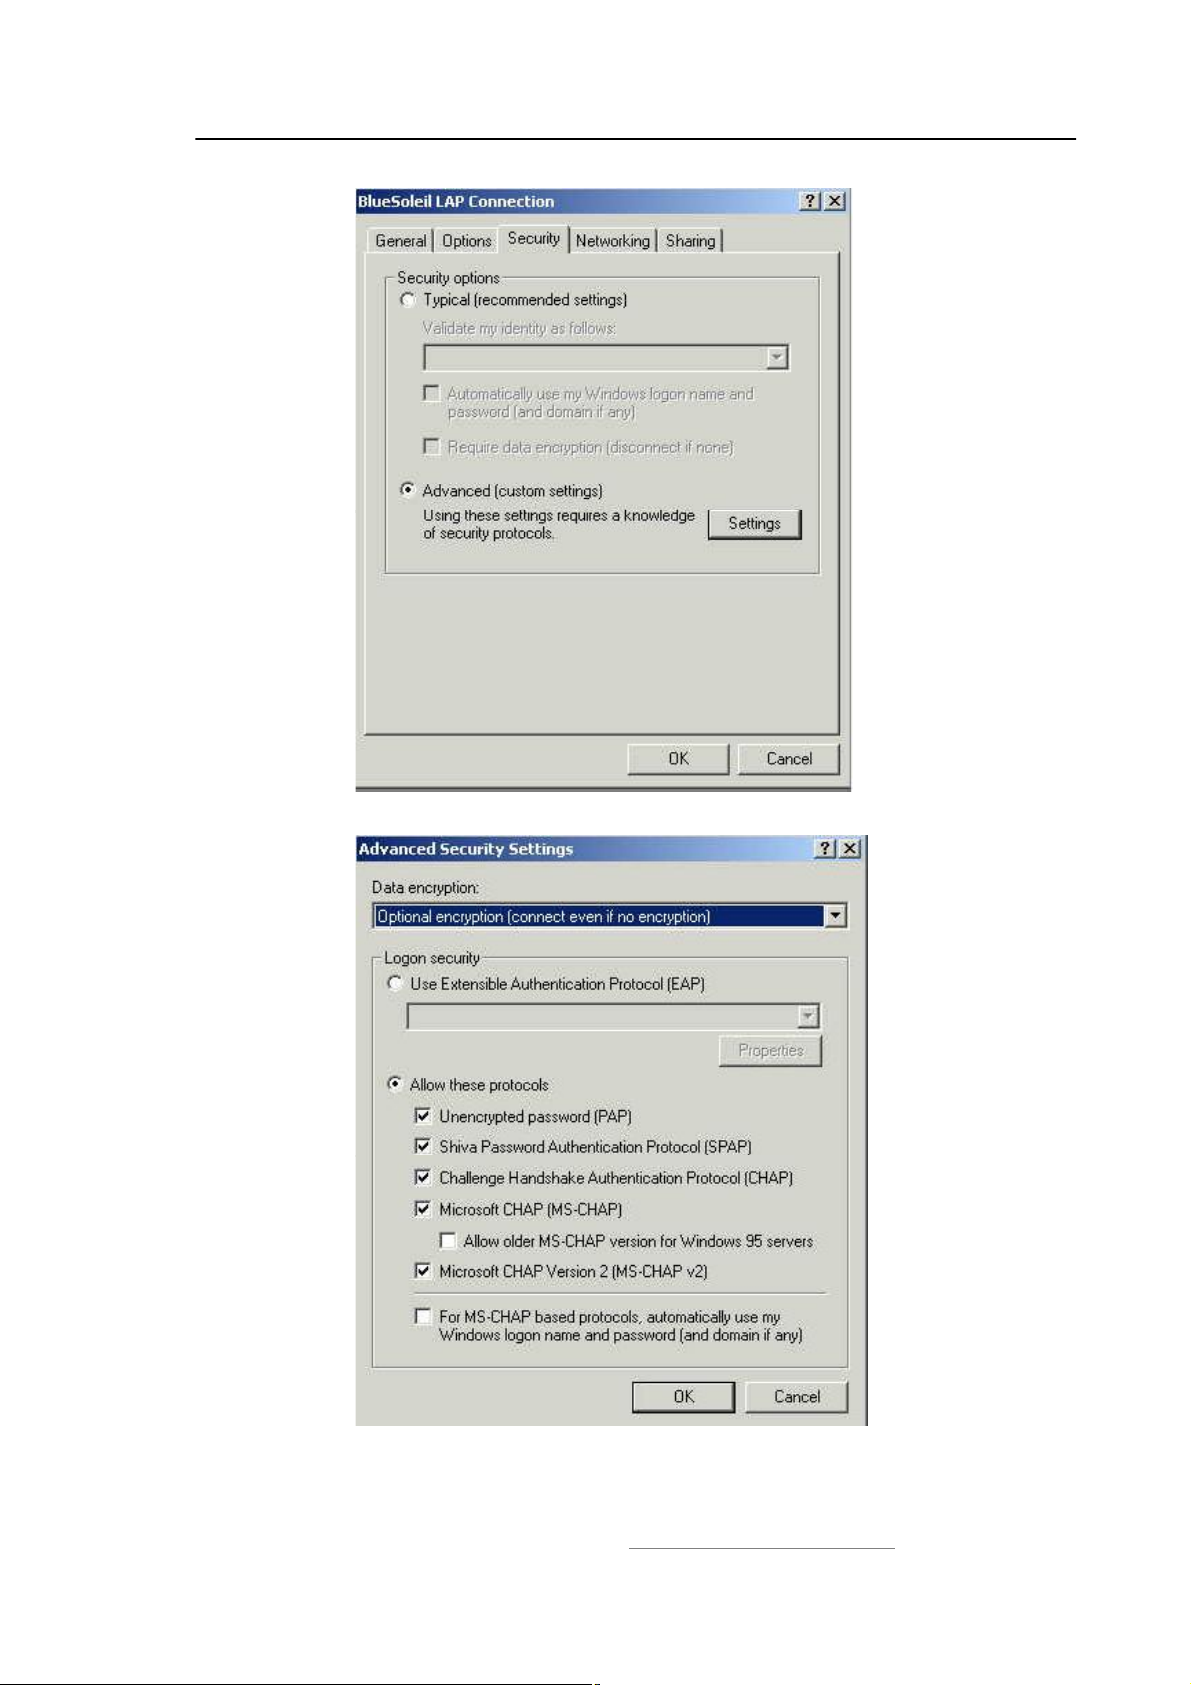
IVT BlueSoleil™ User Manual
Figure 8.19: Select Advanced (custom settings)
Figure 8.20: Advanced Security Settings window
Copyright © 2001, IVT Corporation, http://www.ivtcorporation.com
All specifications are preliminary and subject to change without notice.
68
Page 72
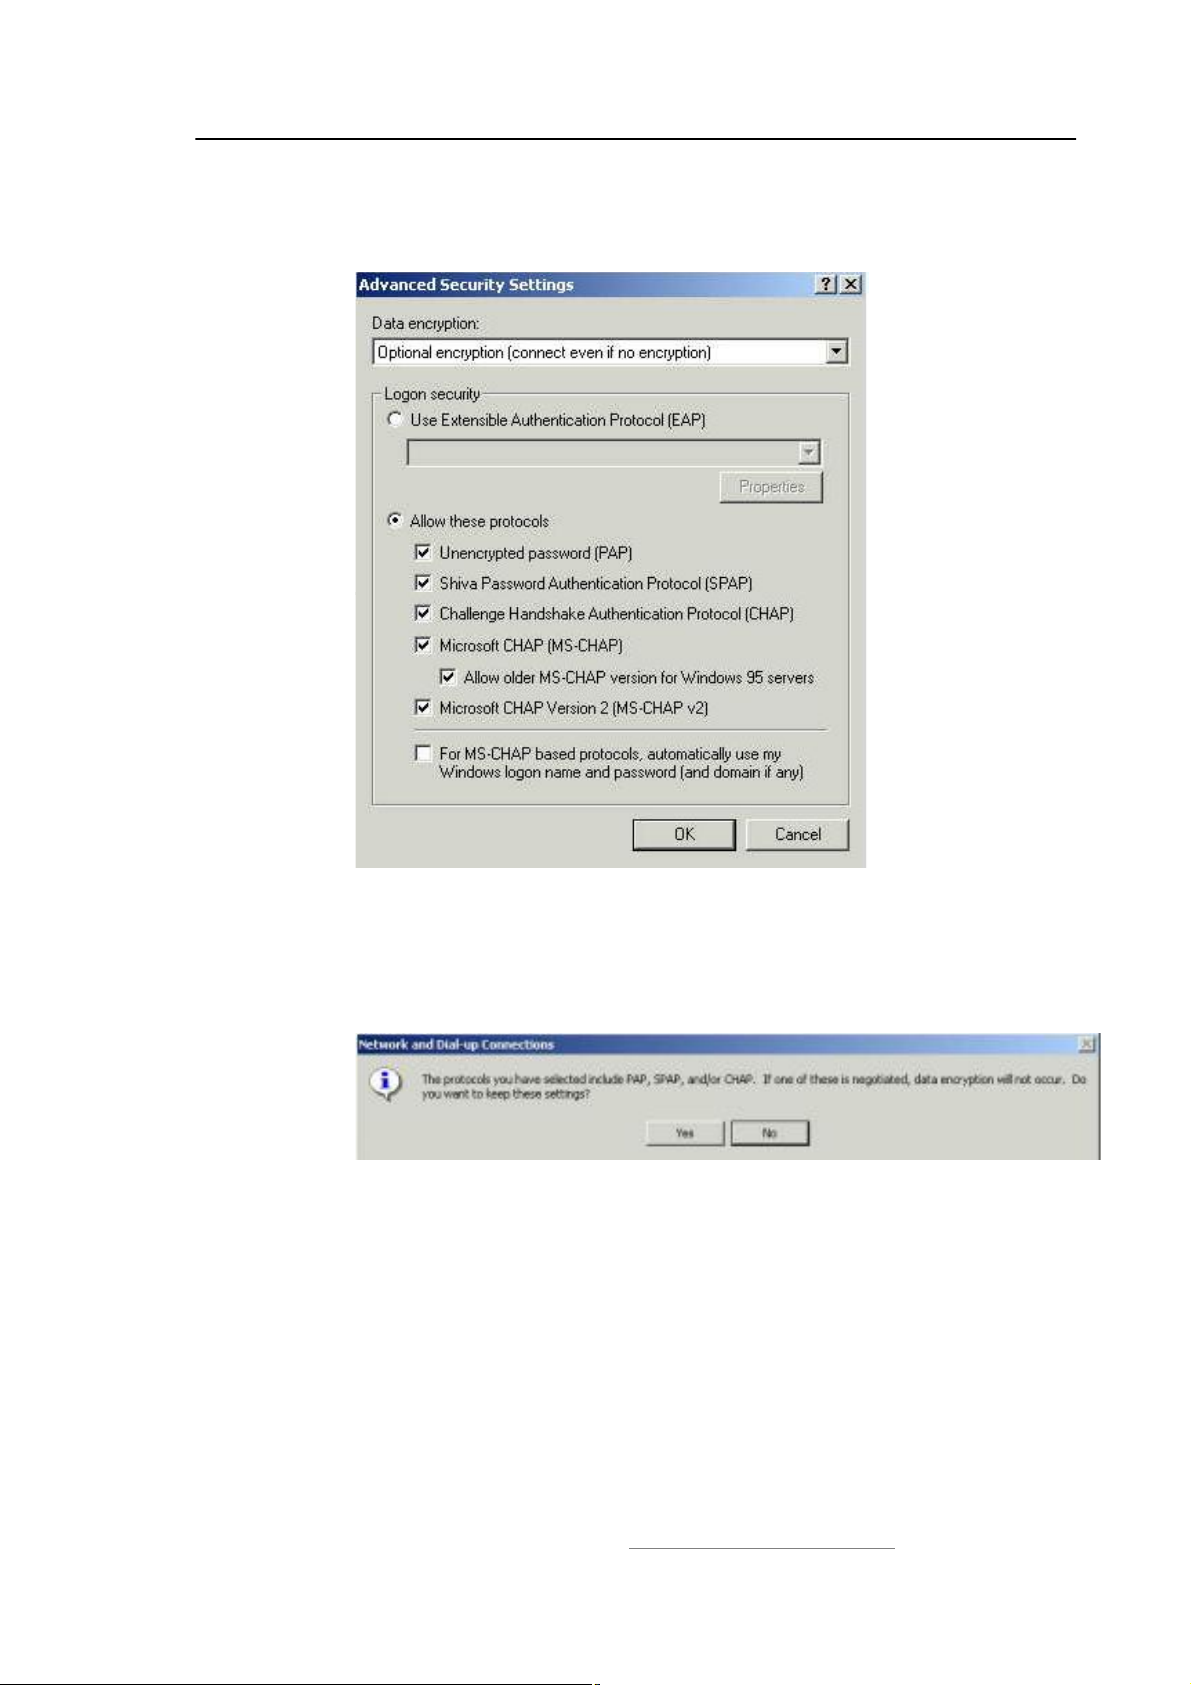
IVT BlueSoleil™ User Manual
Step 3: Select Allow older MS-CHAP version for Windows 95 servers
and click OK. (Figure 8.21)
Figure 8.21: Select Allow older MS-CHAP version for Windows 95 servers
Step 4: Select the Yes button. The LAP client in Windows 2000 is now able to
connect to the LAP server in Windows 98/Me. (Figure 8.22)
Note: The IVT Corporation LAP service does not require a password.
Figure 8.22: Click Yes button
Copyright © 2001, IVT Corporation, http://www.ivtcorporation.com
All specifications are preliminary and subject to change without notice.
69
Page 73

IVT BlueSoleil™ User Manual
9 Object Push
9.1 Introduction
The Bluetooth Object Push profile (OPP) is an application that offers a way to send
and receive Personal Information Management (PIM) data objects from one
Bluetooth-enabled device to or from the other one.
The objects Object Push supports the following four formats:
Business cards (*.vcf)
Calendar entries (*.vcs)
Notes (*.vnt)
Messages (*.vmg)
The OPP profile can be used in the following scenarios:
Connecting a computer to a Bluetooth cellular phone (or PDA), and transferring
objects from the computer to the cellular phone (or PDA).
Connecting a computer to a Bluetooth cellular phone (or PDA), and transferring
objects from the cellular phone (or PDA) to the computer.
Connecting two computers and transferring objects between them.
9.2 Transfer Objects from a Computer to a Bluetooth
Cellular Phone
This section outlines the steps involved in transferring OPP objects from a
Computer to a Bluetooth cellular phone.
Computer A: Bluetooth Cellular Phone:
IVT BlueSoleil! Ericsson T39
A Bluetooth Device
Step 1: Insert the Bluetooth Device into the computer.
Step 2: Start BlueSoleil! in the computer.
Step 3: Configure the business card of Computer A.
1. Open the Service Configuration window and select the Object
Push page. In the BlueSoleil! Main Window, click Tools |
Configuration | My Services (Figure 9.1).
2. Check the boxes, Send Business Card on Request, Accept
Business Card, Accept Calendar Items, Accept Email Messages
and Accept Notes.
3. To set #my business card", click the box Send My Business Card
(*.VCF). This opens the Open File window. Select a VCF file as
your own business card and click the Open button. Click the OK
button on the Service Configuration window. If you do not set a
business card, the program will generate a business card file
Copyright © 2001, IVT Corporation, http://www.ivtcorporation.com
All specifications are preliminary and subject to change without notice.
70
Page 74
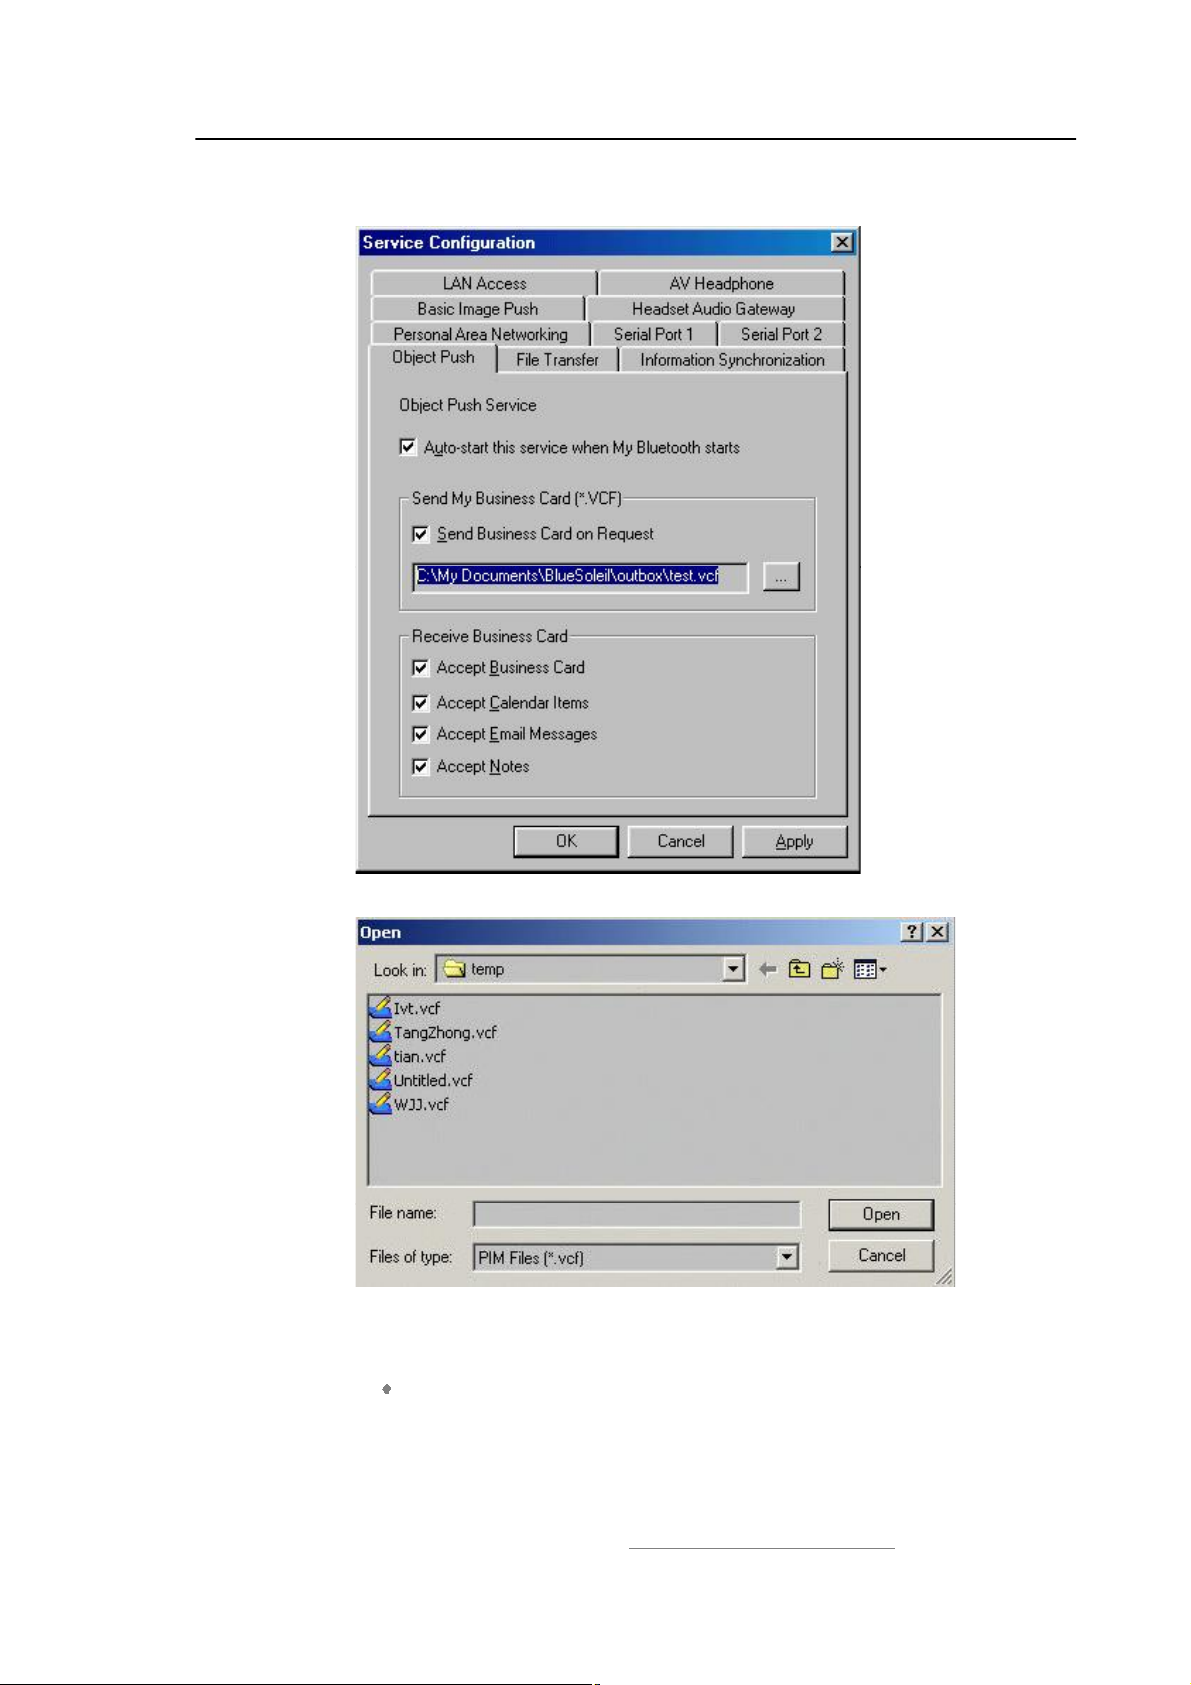
IVT BlueSoleil™ User Manual
automatically using your computer name. (Figure 9.2)
Figure 9.1: Service Configuration
Figure 9.2: Open File
Step 4: To obtain a VCF card file from MS Outlook.
Open MS Outlook, and select the Contacts item in Outlook
Shortcuts. (Figure 9.3)
Copyright © 2001, IVT Corporation, http://www.ivtcorporation.com
All specifications are preliminary and subject to change without notice.
71
Page 75
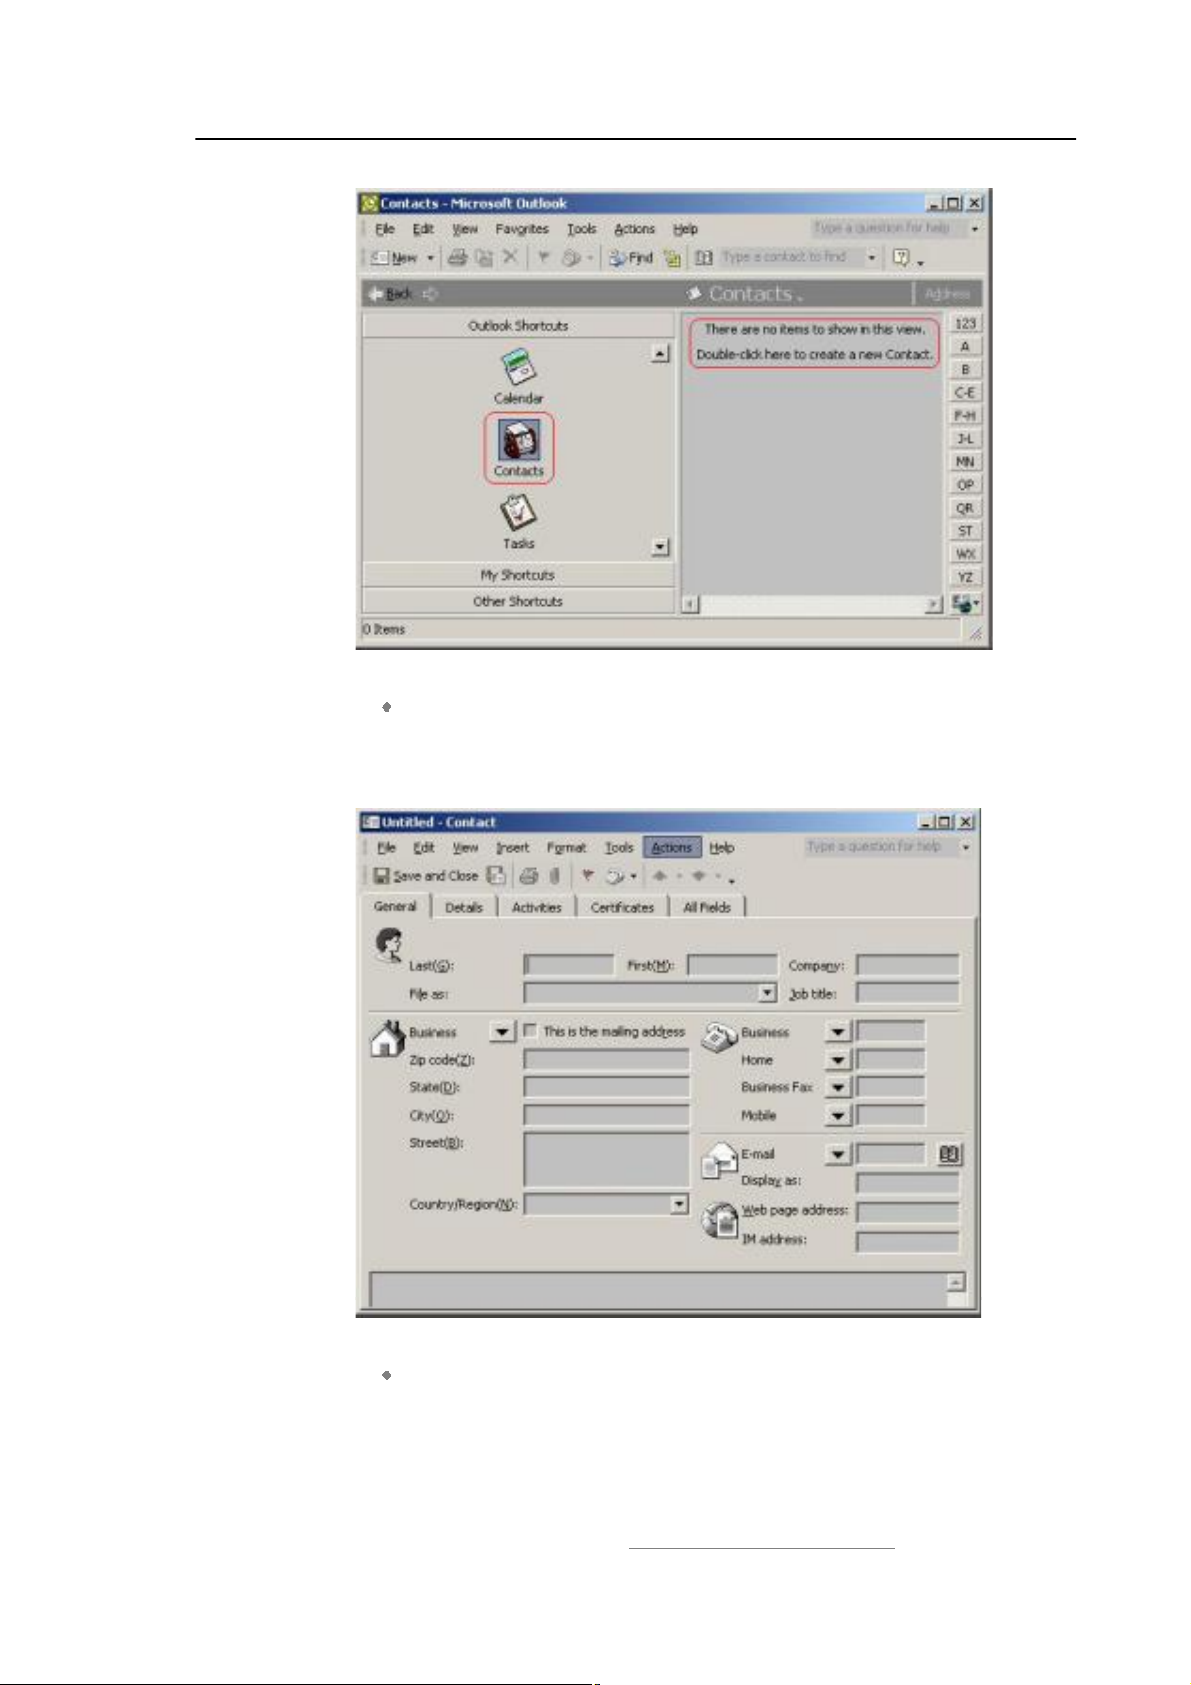
IVT BlueSoleil™ User Manual
Figure 9.3: MS Outlook main window
If there are no contacts entered, the following message appears
on the main window “There are no items to show in this
view. Double-click here to create a new Contact.”
Double-click and a pop-up window appears. (Figure 9.4)
Figure 9.4: Create a new contact
Enter your Contact information. Click File | Save as and a Save
As window pops up. Select the name of the file and the directory
where you want to save the file. Select the vCard Files (*.vcf)
item in the Save as type box. Click the Save button. (Figure 9.5)
Copyright © 2001, IVT Corporation, http://www.ivtcorporation.com
All specifications are preliminary and subject to change without notice.
72
Page 76
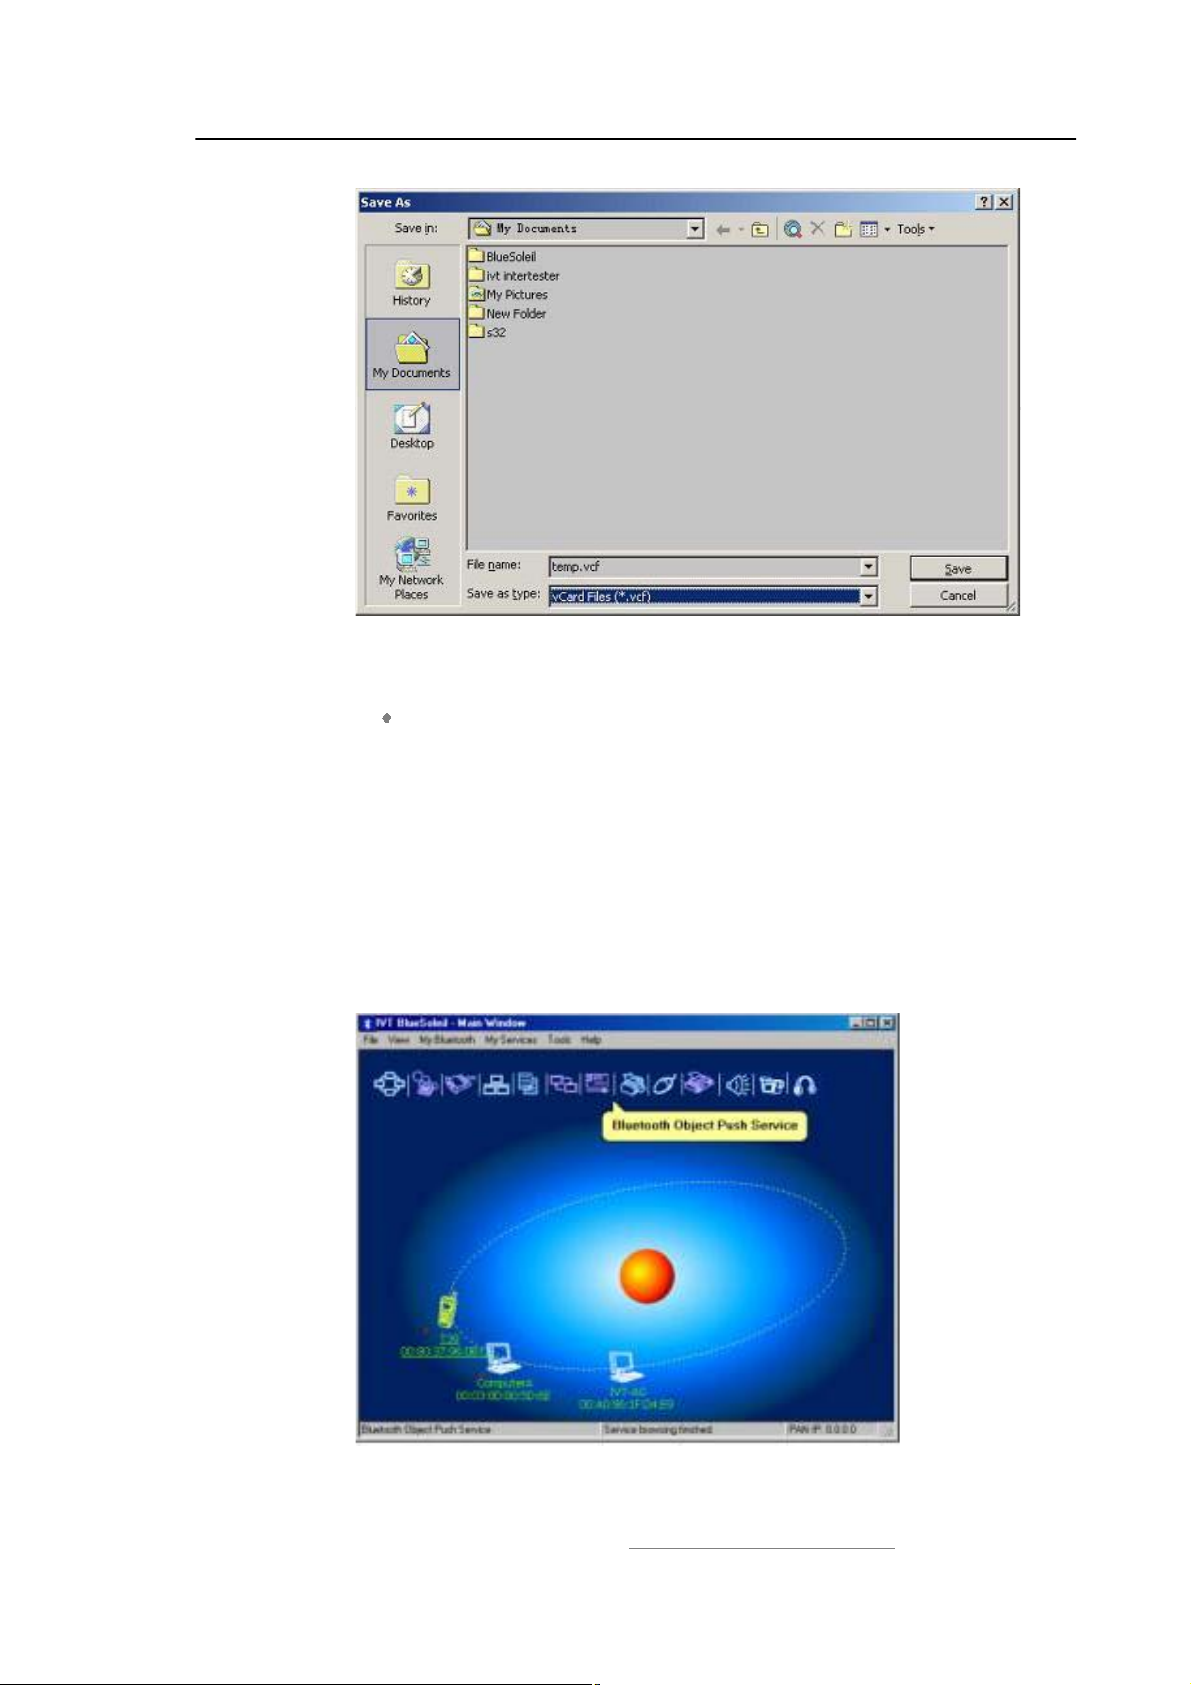
IVT BlueSoleil™ User Manual
Figure 9.5: Save new Contact
Step 5: Set the T39 to be discoverable.
Press the Menu button on the T39 to find the menu list, and then
select the Extras item. Press the Yes key to enter the Extras
menu, and then select the Bluetooth item. Then select the
Discoverable item.
Step 6: Pair with T39
If the pairing succeeds, you will see the services of the T39 include the
OPP service. (Figure 9.6) If you have never created a shortcut DUN,
the following dialog pops up asking you whether Create a Shortcut
on the windows desktop. If you choose yes, a shortcut icon called
DUN will occur on the desktop, otherwise the icon will not occur. For
details, please refer to the related part of DUN.
Figure 9.6: Find the services
Copyright © 2001, IVT Corporation, http://www.ivtcorporation.com
All specifications are preliminary and subject to change without notice.
73
Page 77
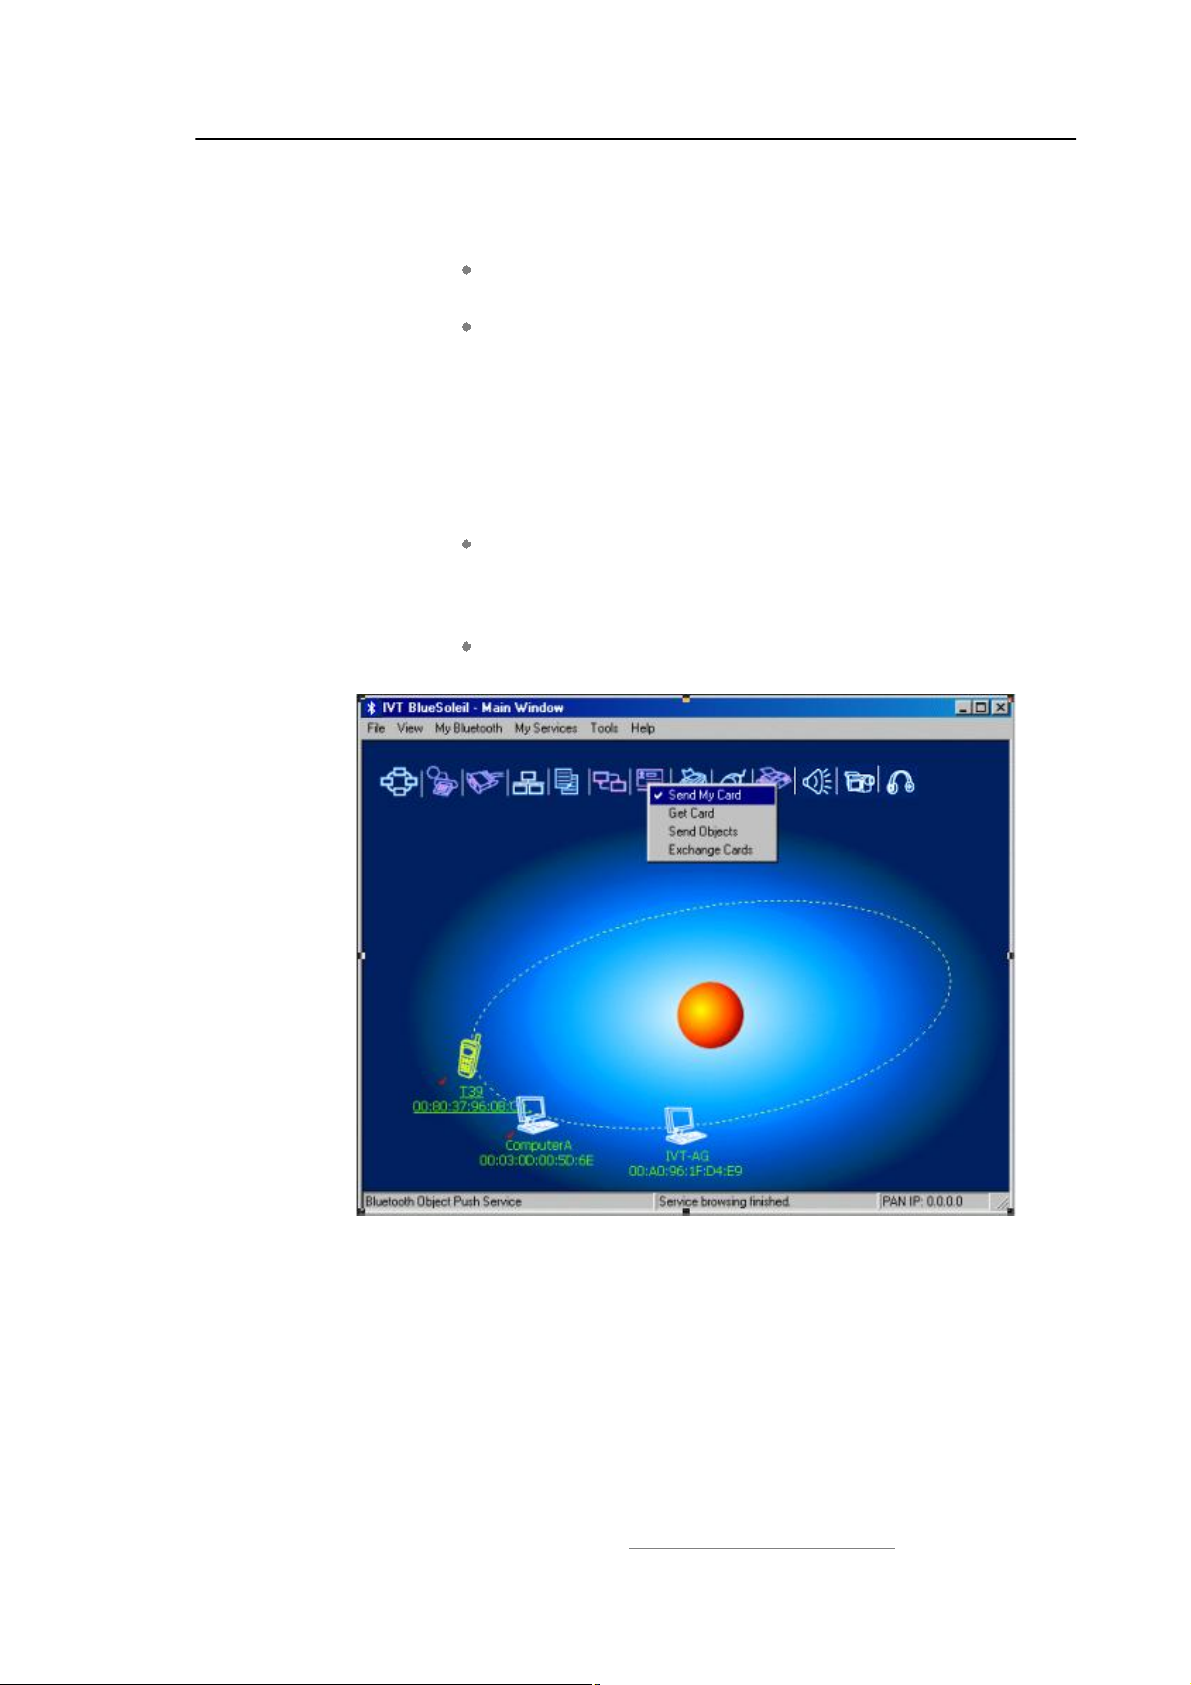
IVT BlueSoleil™ User Manual
Step 7: To send or get objects data, right-click the OPP service icon. There are
four options (Figure 9.7) on the pop-up menu:
Send My Card: Click this menu item, and a business
card from Computer A is sent to the T39.
Get Card: Click this menu item to receive a business card
from the T39. Open the folder inbox to check if you have
received the card.
(Note: Open the My Documents folder on the computer
and find a new folder called BlueSoleil. Open this folder
to find the subfolders inbox and outbox. Inbox is used
to deposit the objects received from other Bluetooth
devices. Outbox is used to deposit the objects you want
to send to other Bluetooth devices.)
Send Objects: Click this menu item to send an object in
Computer A to the T39 (there are four types of object:
*.vcf, *.vcs, *.vmg, *.vnt). Select the objects that you
want to send in the window that pops up and click Open.
Exchange cards: Click this menu item to exchange
business cards between Computer A and the T39.
Figure 9.7: Four types of operation
9.3 Transfer Objects from a Bluetooth Cellular Phone to
a Computer
This section outlines the steps involved in transferring OPP objects from a
Bluetooth cellular phone to a computer.
Copyright © 2001, IVT Corporation, http://www.ivtcorporation.com
All specifications are preliminary and subject to change without notice.
74
Page 78

IVT BlueSoleil™ User Manual
Computer A: Bluetooth Cellular Phone:
IVT BlueSoleil! Ericsson T39
A Bluetooth Device
Step 1: Insert the Bluetooth Device into the computer.
Step 2: Start BlueSoleil! in the computer.
Step 3:
Step 4:
Step 5: Start the OPP operation.
Configure the OPP service attribute of Computer A, and start the
OPP service.I
Discover and pair Computer A on the T39.
Select Menu | Phone book | Business cards on the T39.
To send $my card% from the T39.
From the Business cards menu, select Send my own
and then select Via Bluetooth. The T39 searches the
surrounding Bluetooth devices. To send the business card
from the T39 to Computer A, select #Computer A" on the
T39 screen.
To select an object and send it.
From the Business cards menu, select Send contact
and then select Via Bluetooth. The T39 asks you to
select the object that you want to send. Select an object
and send it as specified above.
To receive a business card.
From the Business cards menu, select Receive and
then select Via Bluetooth. The T39 is now in
discoverable status, and you can send an object to it from
other Bluetooth devices.
To send all business cards.
From the Business cards menu, select Send all and
then select Via Bluetooth. Select the destination device
Computer A. The T39 then sends all its *.vcf files to
Computer A.
9.4 Transfer Objects between Two Computers
This section outlines the steps involved in transferring OPP objects between two
Computers (Computer A and Computer B).
Computer A: Computer B:
IVT BlueSoleil! IVT BlueSoleil!
A Bluetooth Device A Bluetooth Device
Copyright © 2001, IVT Corporation, http://www.ivtcorporation.com
All specifications are preliminary and subject to change without notice.
75
Page 79
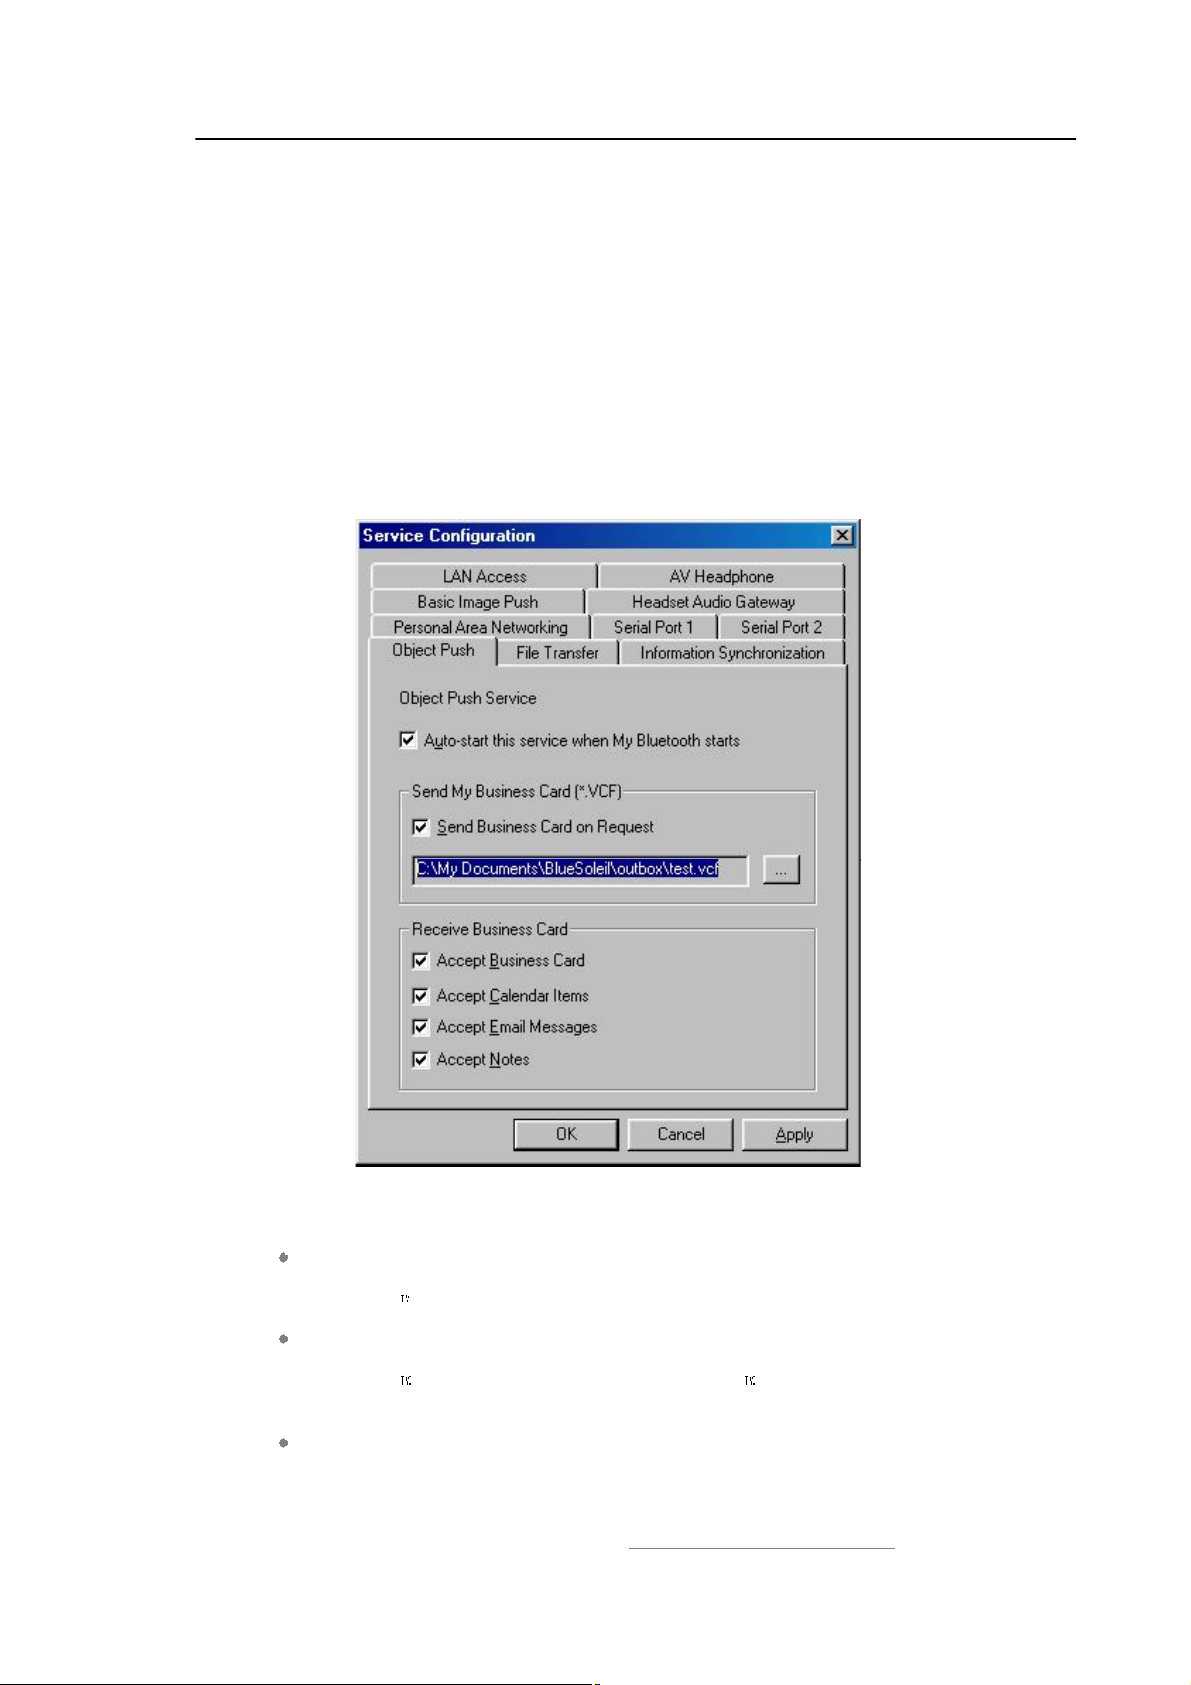
IVT BlueSoleil™ User Manual
Step 1: Insert Bluetooth Devices in both computers.
Step 2: Start BlueSoleil! in both computers.
Step 3: Start the OPP service on Computer B.
Step 4: Perform an OPP operation. (See $Section 9.3: Transfer Objects from a
Bluetooth Cellular Phone to a Computer%, Step 5)
9.5 Configure OPP Service
In the BlueSoleil! Service Window, right-click the Object Push icon. To configure
#my OPP service", select Properties on the pop-up menu.
Figure 9.8: Configure OPP service
Setting Items:
Auto start this service when my Bluetooth starts
Select this item if you want to automatically start the OPP service every time
BlueSoleil starts.
My Business Card (*.vcf)
You must select your own business card (*.vcf file) every time you start
BlueSoleil . If you forget to do this, BlueSoleil creates a *.vcf file using your
computer name and regards this file as your own business card.
Send Business Card on Request
Select this item to allow other users to receive your business card.
Copyright © 2001, IVT Corporation, http://www.ivtcorporation.com
All specifications are preliminary and subject to change without notice.
76
Page 80
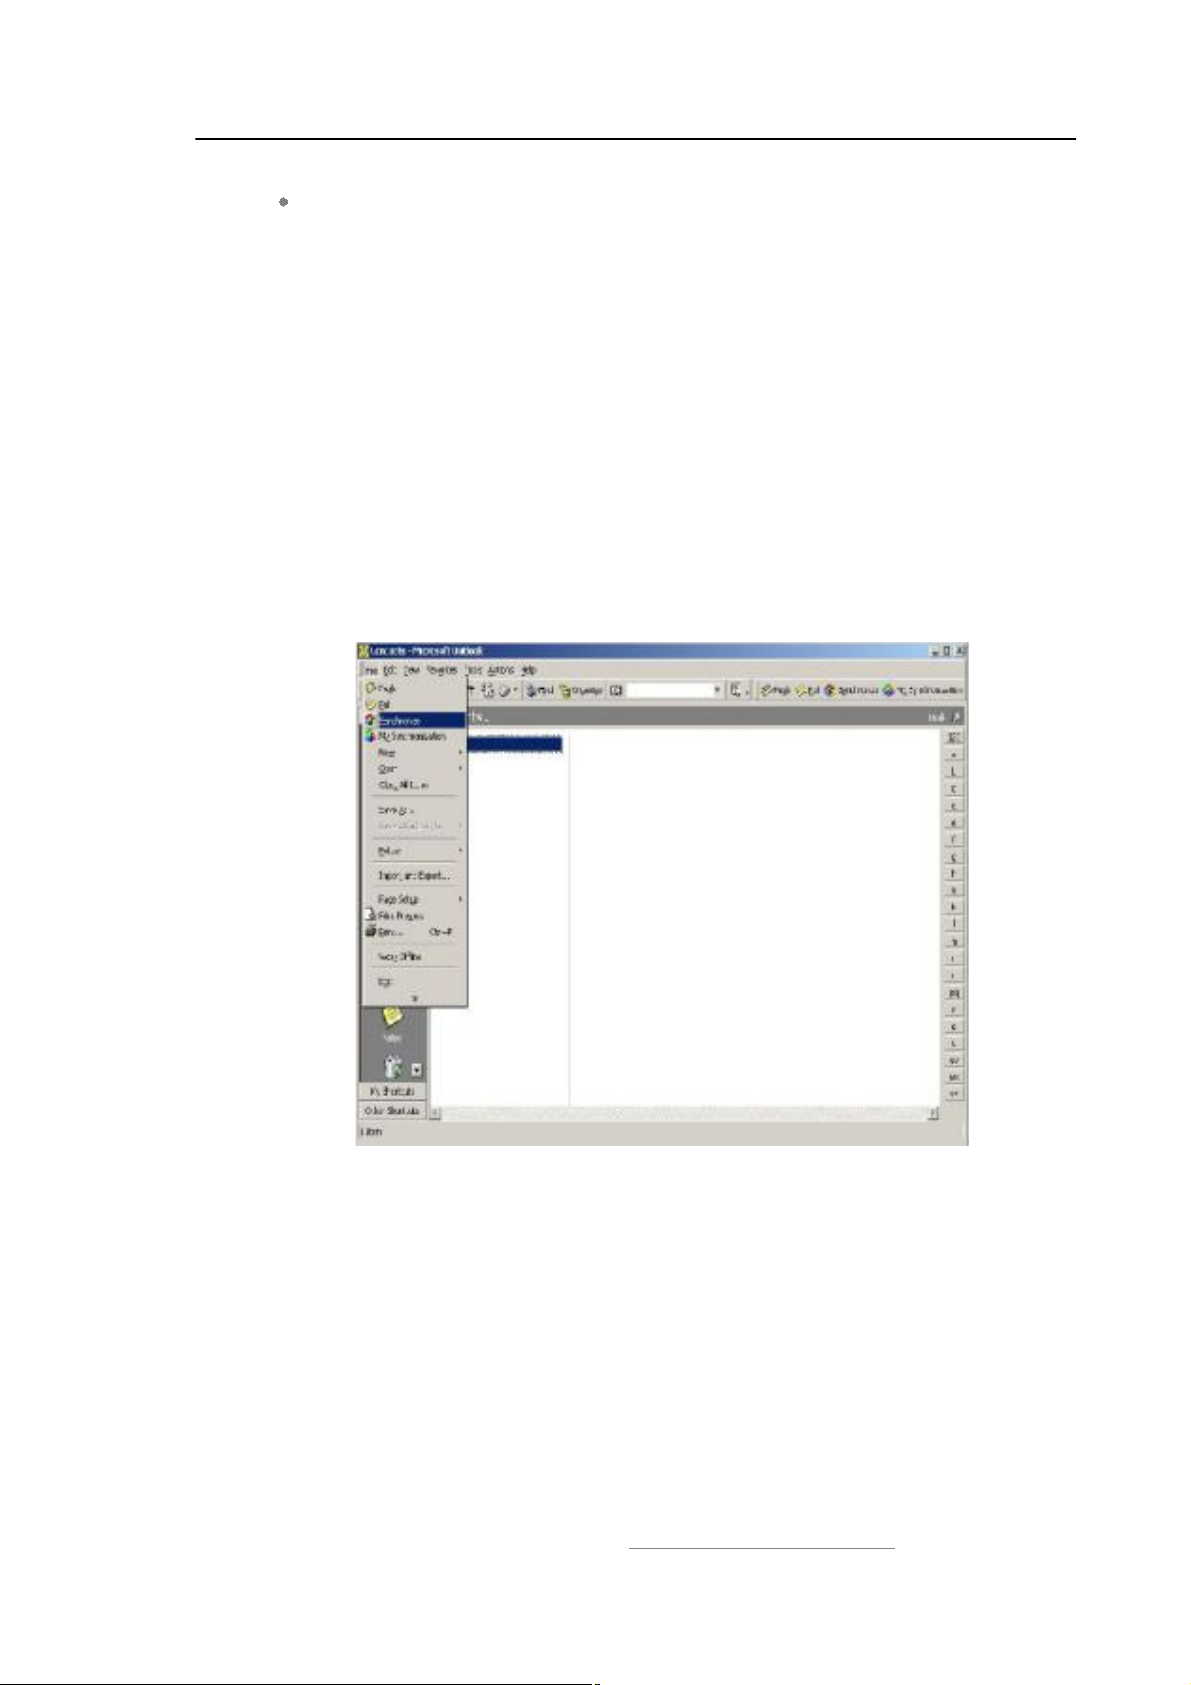
IVT BlueSoleil™ User Manual
Receive Business Card
There are four possible items here. Each item represents one type of object.
You may select the object types that you want to accept.
- Accept Business Card to accept business cards (*.vcf)
- Accept Calendar Items to accept calendar items (*.vcs)
- Accept Email Messages to accept email messages (*.vmg)
- Accept Notes to accept notes (*.vnt)
9.6 Using OPP in Microsoft Outlook
9.6.1 The GUI of Outlook Application with bluetooth plug-in
After correct installation of BlueSoleil, lunch the Outlook application. If the GUI
looks like the following, namely there are four buttons added into the toolbar and
File menu, the OPP is integrated into Outlook successfully.
Notice: both the OPP and Synchronization functionalities are available in Microsoft
Office 2000( or higher version) and , BlueSoleil must start first.
Figure 9.9: OPP and Sync integrated with Outlook
9.6.2 The usage of OPP Push-function
Start the Outlook application and select Contacts from the shortcuts to browse the
Contacts folder. Select the item(s) to be pushed then click the Push button from
the toolbar or File menu. If BlueSoleil is running properly, a dialog will appear with
all discovered bluetooth devices listed.
From the devices list, user can select the target device and then click the Push
button.
Copyright © 2001, IVT Corporation, http://www.ivtcorporation.com
All specifications are preliminary and subject to change without notice.
77
Page 81
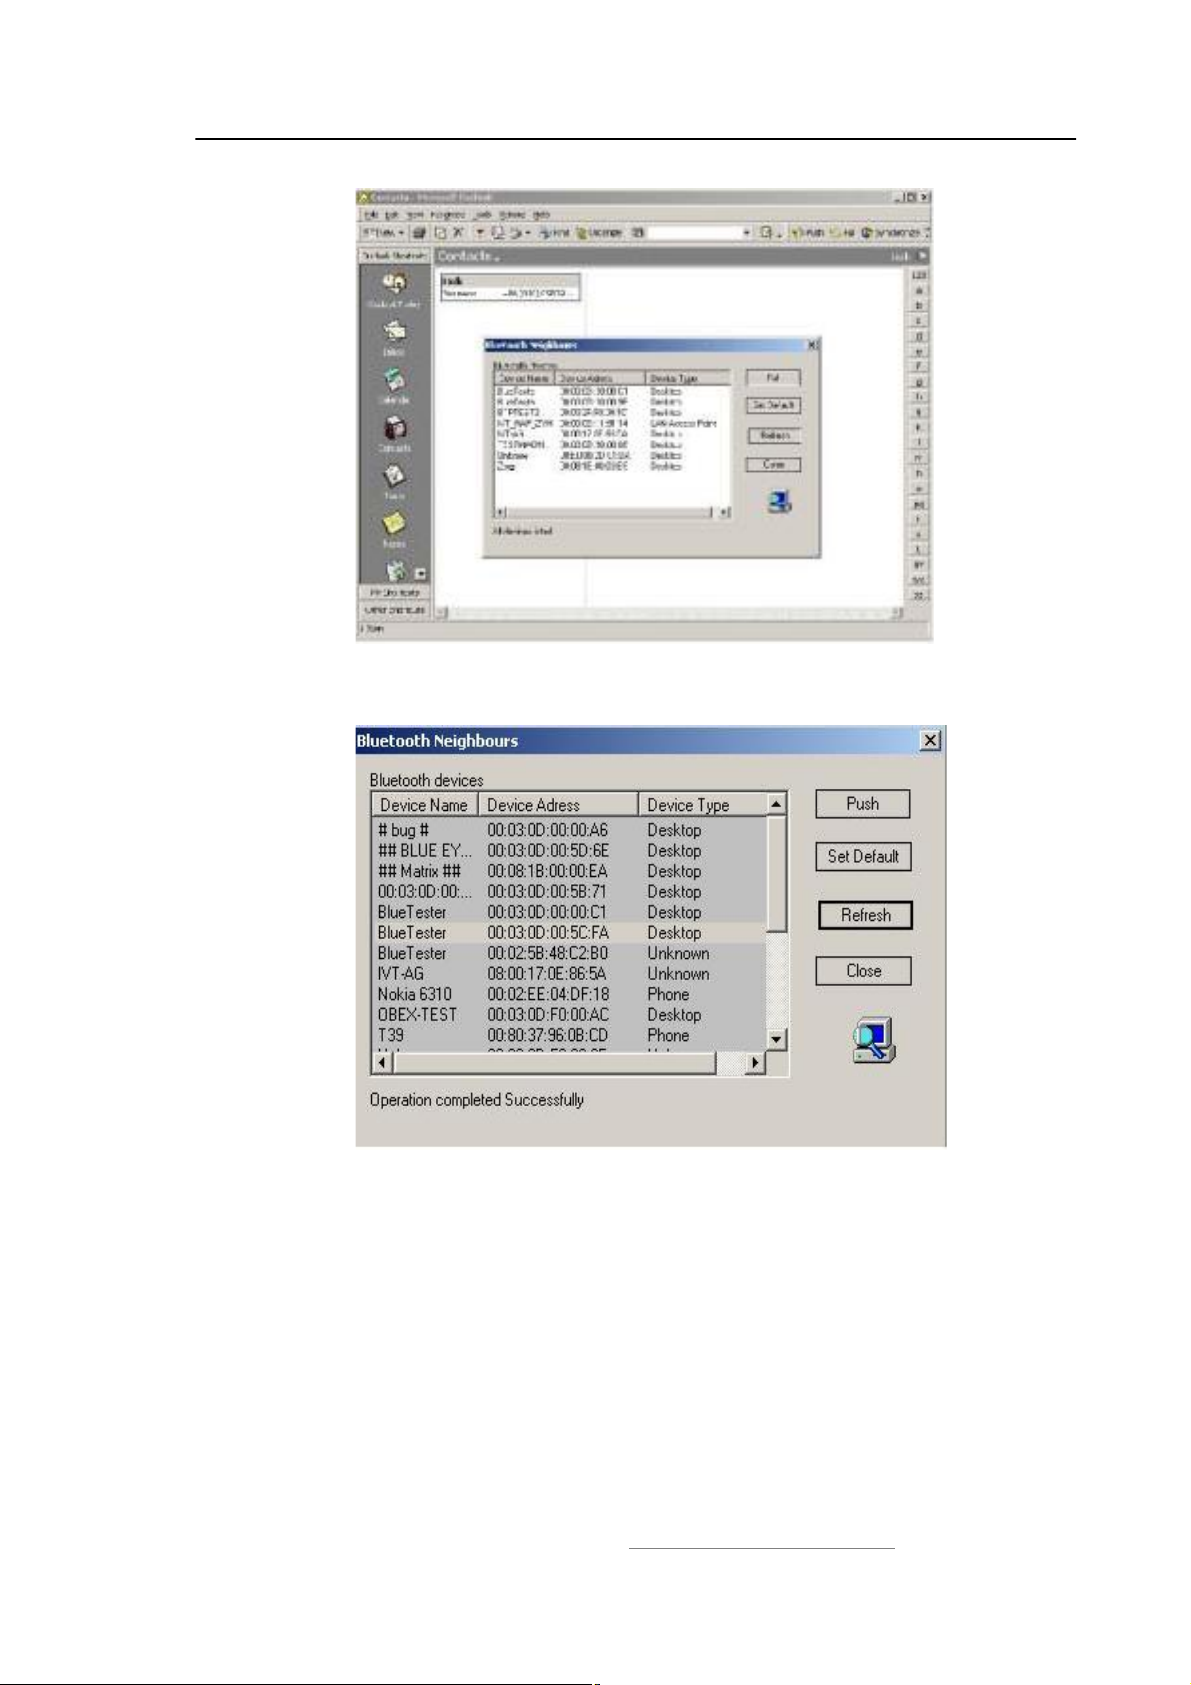
IVT BlueSoleil™ User Manual
Figure 9.10: Select the target device and click Push button
The operation result will be reported on the dialog.
Figure 9.14: Push operation completed Successfully
As to other items, for example, note, message and calendar, the steps are the
same with ones above.
9.6.3 The usage of OPP-Pull function
Click the Pull button from toolbar or File menu then the devices list dialog will
appear. Select the target device from the list and click the Pull button to perform
OPP-Pull function.
Copyright © 2001, IVT Corporation, http://www.ivtcorporation.com
All specifications are preliminary and subject to change without notice.
78
Page 82
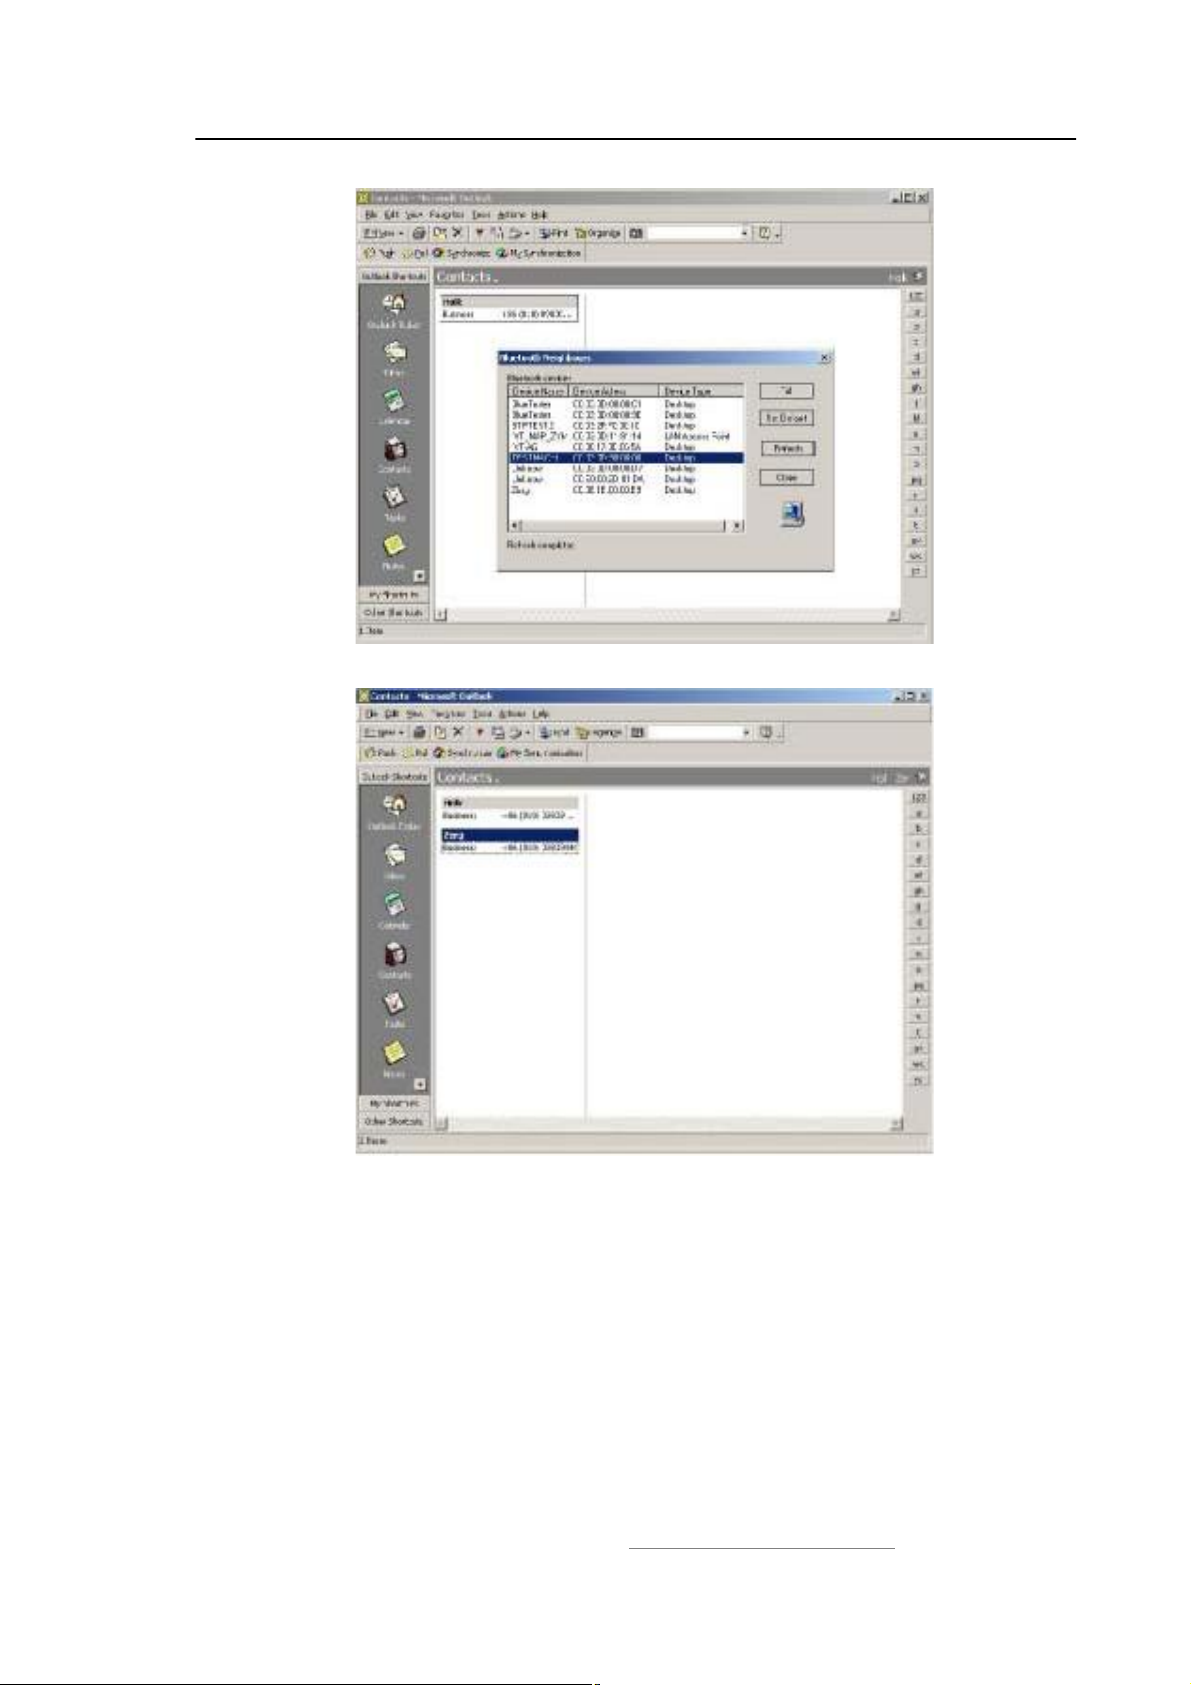
IVT BlueSoleil™ User Manual
Figure 9.15: Before Pull only one card named $holk%
Figure 9.16: The card named $zerg% is pulled in.
If the operation completes successfully the newly pulled card is imported into
Outlook.
Copyright © 2001, IVT Corporation, http://www.ivtcorporation.com
All specifications are preliminary and subject to change without notice.
79
Page 83

IVT BlueSoleil™ User Manual
10 Synchronization
10.1 Introduction
Using Bluetooth Synchronization (SYNC), Bluetooth devices can synchronize
messages, notes, calendars and cards with each other.
The objects Synchronization (SYNC) supports are:
Business cards (*.vcf)
Calendar entries (*.vcs)
Notes (*.vnt)
Messages (*.vmg)
The SYNC application is typically used in the following scenarios:
A computer exchanging PIM (Personal Information Management) data with a
cellular phone or PDA.
Two computers exchanging PIM data with each other.
10.2 Exchange PIM Data with a Cellular Phone
This section outlines the steps involved in connecting a computer to a Bluetooth
cellular phone. The cellular phone works as a server that provides the SYNC
service.
Computer A: Bluetooth Cellular Phone:
IVT BlueSoleil! Ericsson T39
A Bluetooth Device
Step 1: Insert the Bluetooth Device into the computer.
Step 2: Start BlueSoleil! in the computer.
Step 3: Configure the T39.
Set T39 to be discoverable.
Step 4: Start synchronization.
Now use the computer running BlueSoleil! to start the
synchronization. (See $Section 9.3: Transfer Objects from a
Bluetooth Cellular Phone to a Computer%, Step 5).
Copyright © 2001, IVT Corporation, http://www.ivtcorporation.com
All specifications are preliminary and subject to change without notice.
80
Page 84
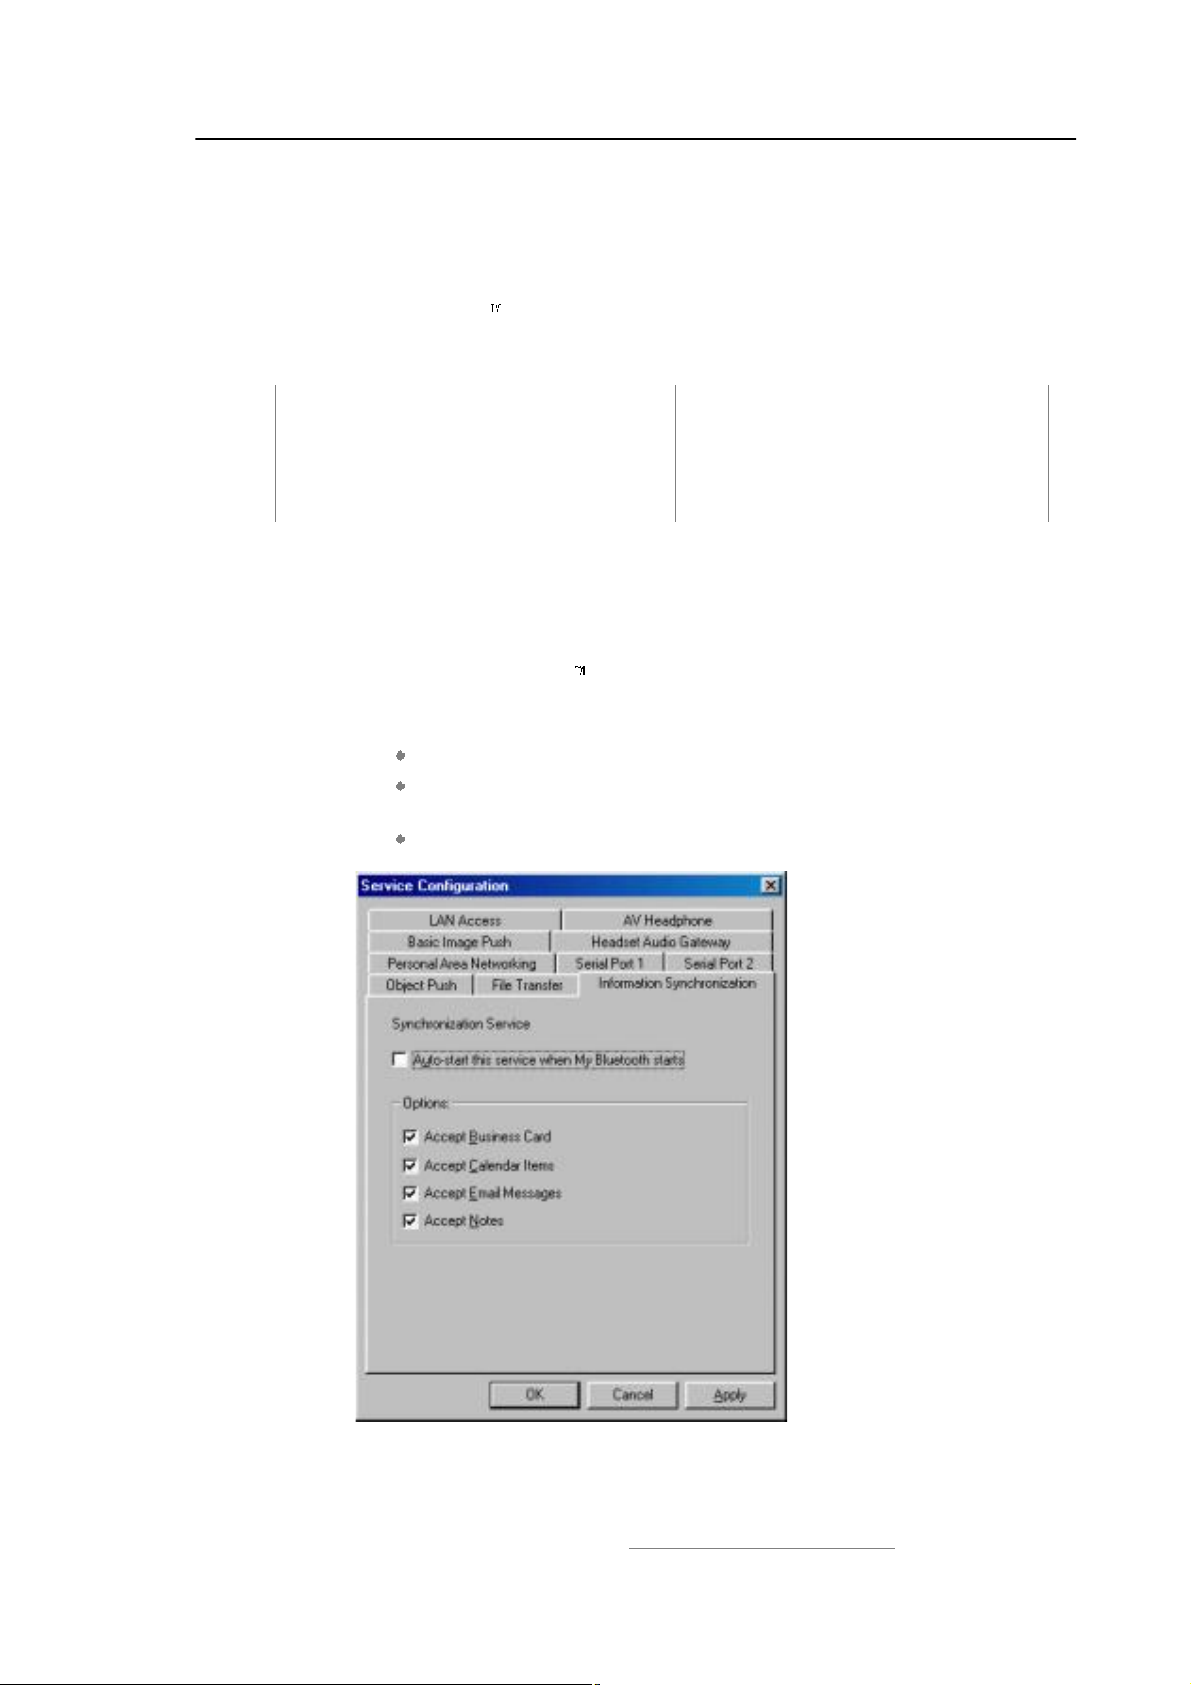
IVT BlueSoleil™ User Manual
10.3 Set up SYNC Connection between Two Computers
This section outlines the steps involved in setting up a SYNC connection between
two computers, Computer A and Computer B. Computer A works as a server that
provides the BlueSoleil SYNC service. Computer B works as a client that uses the
SYNC service provided by Computer A.
Computer A: Computer B:
IVT BlueSoleil! IVT BlueSoleil!
A Bluetooth Device A Bluetooth Device
Step 1: Insert the Bluetooth Devices into each computer.
Step 2: Start BlueSoleil! in each computer.
Step 3:
Start the BlueSoleil SYNC service on Computer A. Before starting
the SYNC Server, it may need to be configured. To configure the
server, follow the steps below:
In the Main Window click View | Service Window
In the Service Window, right-click the Information
Synchronization icon. Select Properties on the pop up menu.
Set the option you require, and then click OK. (Figure 10.1)
Figure 10.1: Service Configuration
Copyright © 2001, IVT Corporation, http://www.ivtcorporation.com
All specifications are preliminary and subject to change without notice.
81
Page 85
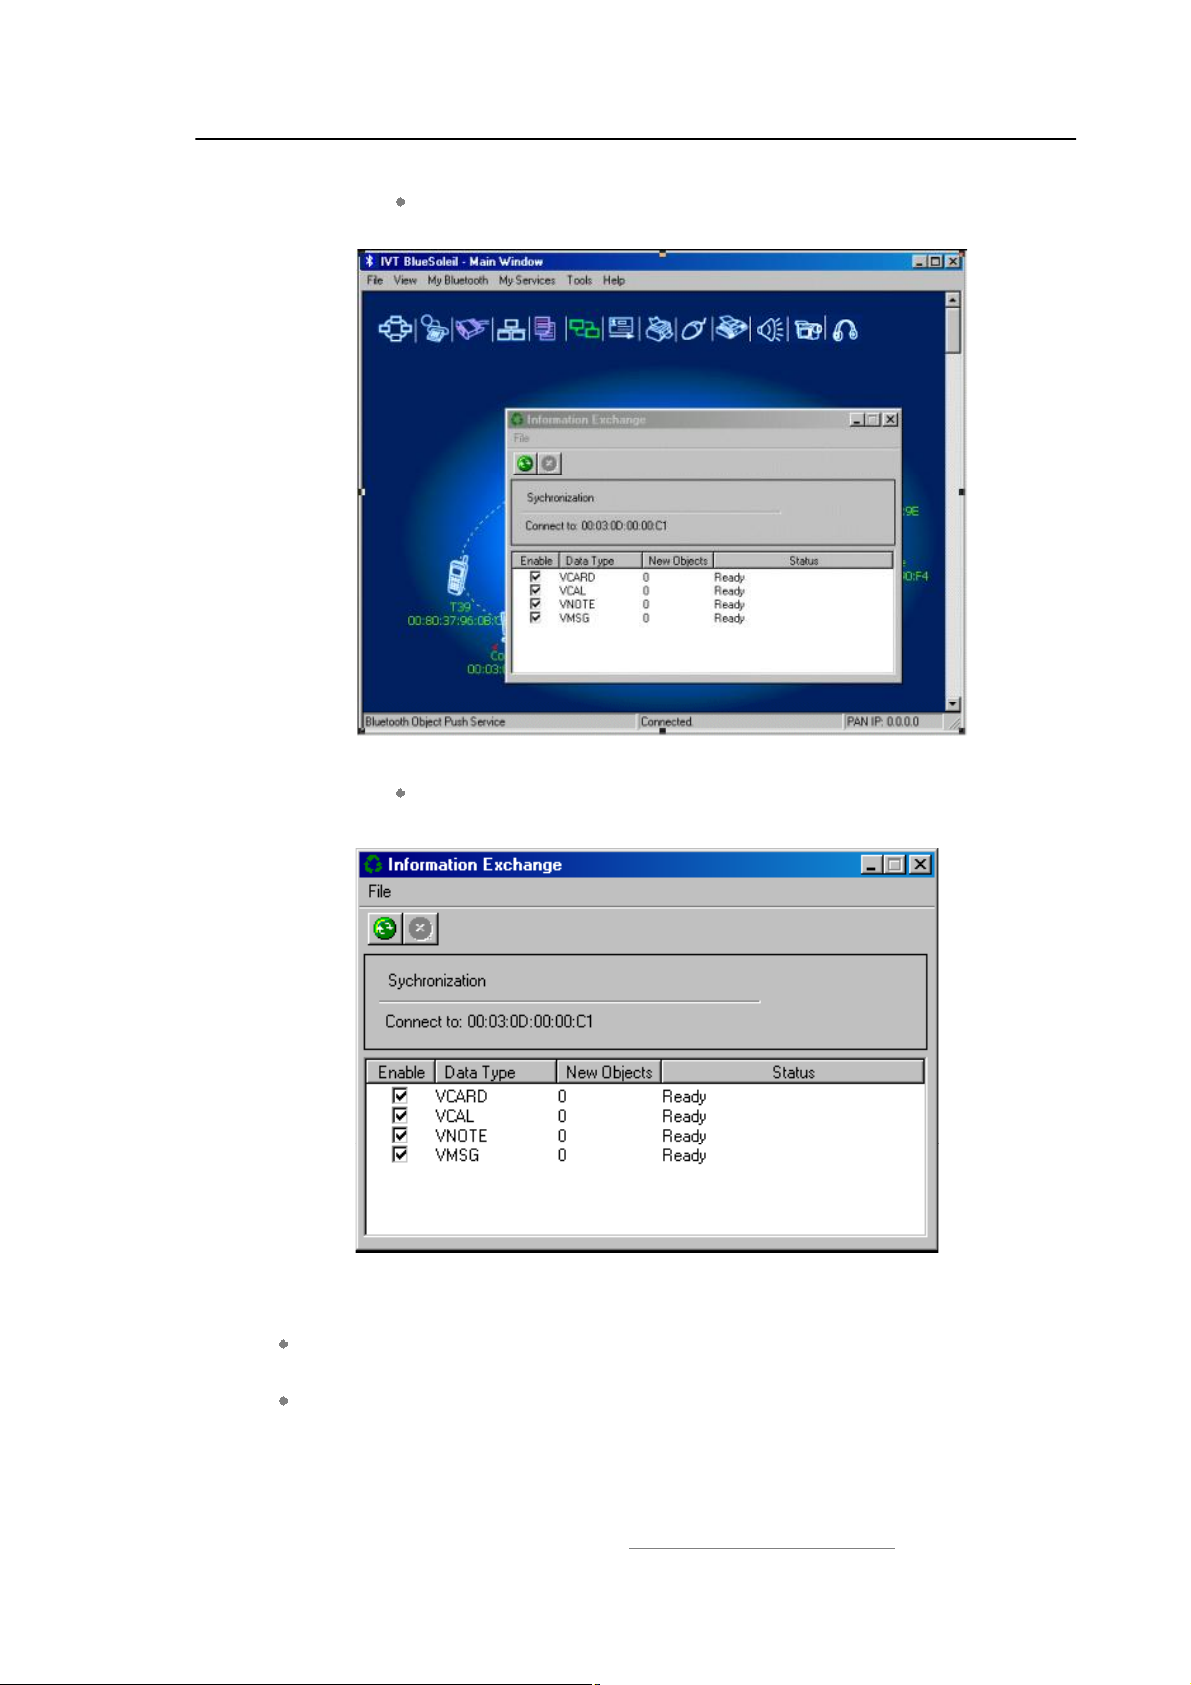
IVT BlueSoleil™ User Manual
Step 4:
Connect to the SYNC service of Computer A. (Figure 10.2)
Figure 10.2: Connection is established successfully
The SYNC clients can now start synchronization. Press the green
button to begin synchronization. (Figure 10.3)
Figure 10.3: Press the green button
Advanced Usage:
Before synchronization select the data type that you want to exchange. Leave
the checkbox unchecked to disable the object type that you do not support.
During synchronization push the red button if you want to stop the
synchronization.
Copyright © 2001, IVT Corporation, http://www.ivtcorporation.com
All specifications are preliminary and subject to change without notice.
82
Page 86
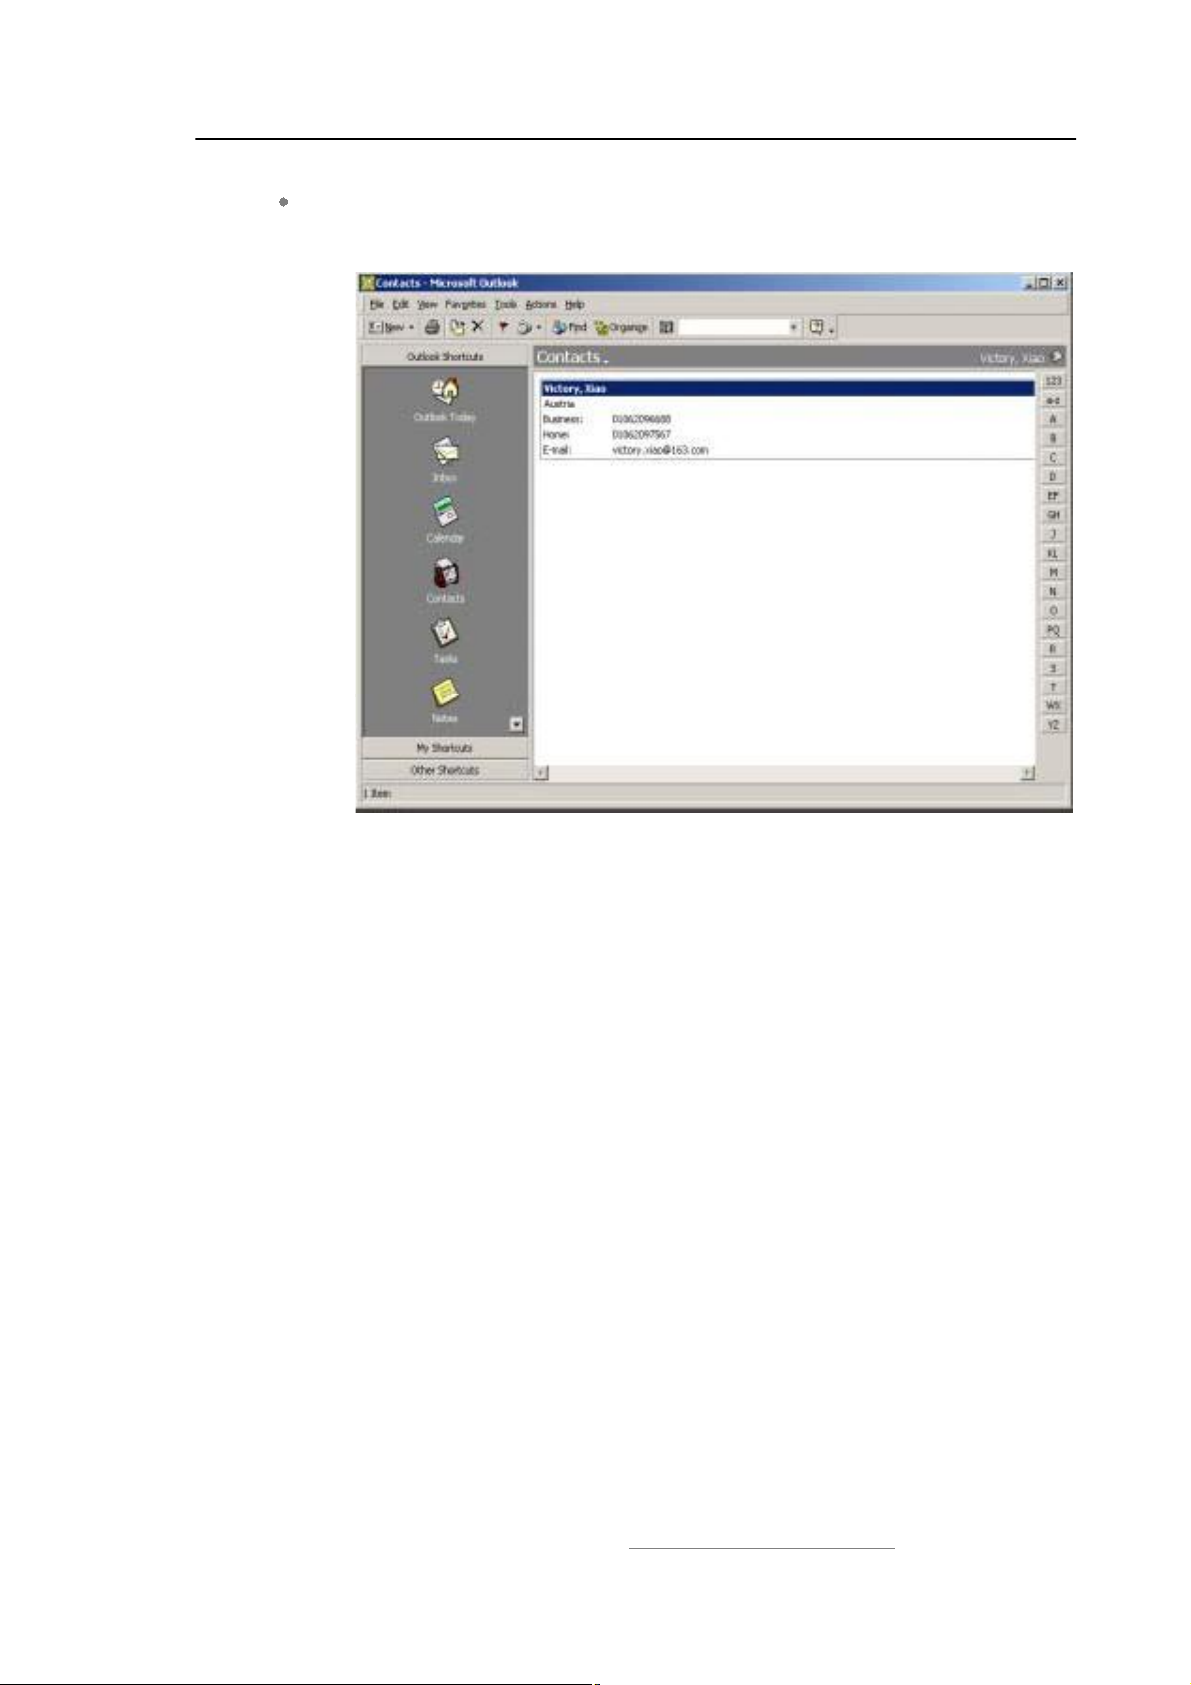
IVT BlueSoleil™ User Manual
Open Microsoft Outlook to check the information data that saved in the folder of
Contacts(VCARD), Calendar(VCAL), Notes(VNOTE) and Inbox(VMSG) after
synchronization. (Figure 10.8)
Figure 10.8: Microsoft Outlook
10.4 Synchronization Configuration
In the BlueSoleil! Service Window, right-click the Information Synchronization
icon. To configure the synchronization service select Properties on the pop-up
menu. (Figure 10.9)
Copyright © 2001, IVT Corporation, http://www.ivtcorporation.com
All specifications are preliminary and subject to change without notice.
83
Page 87
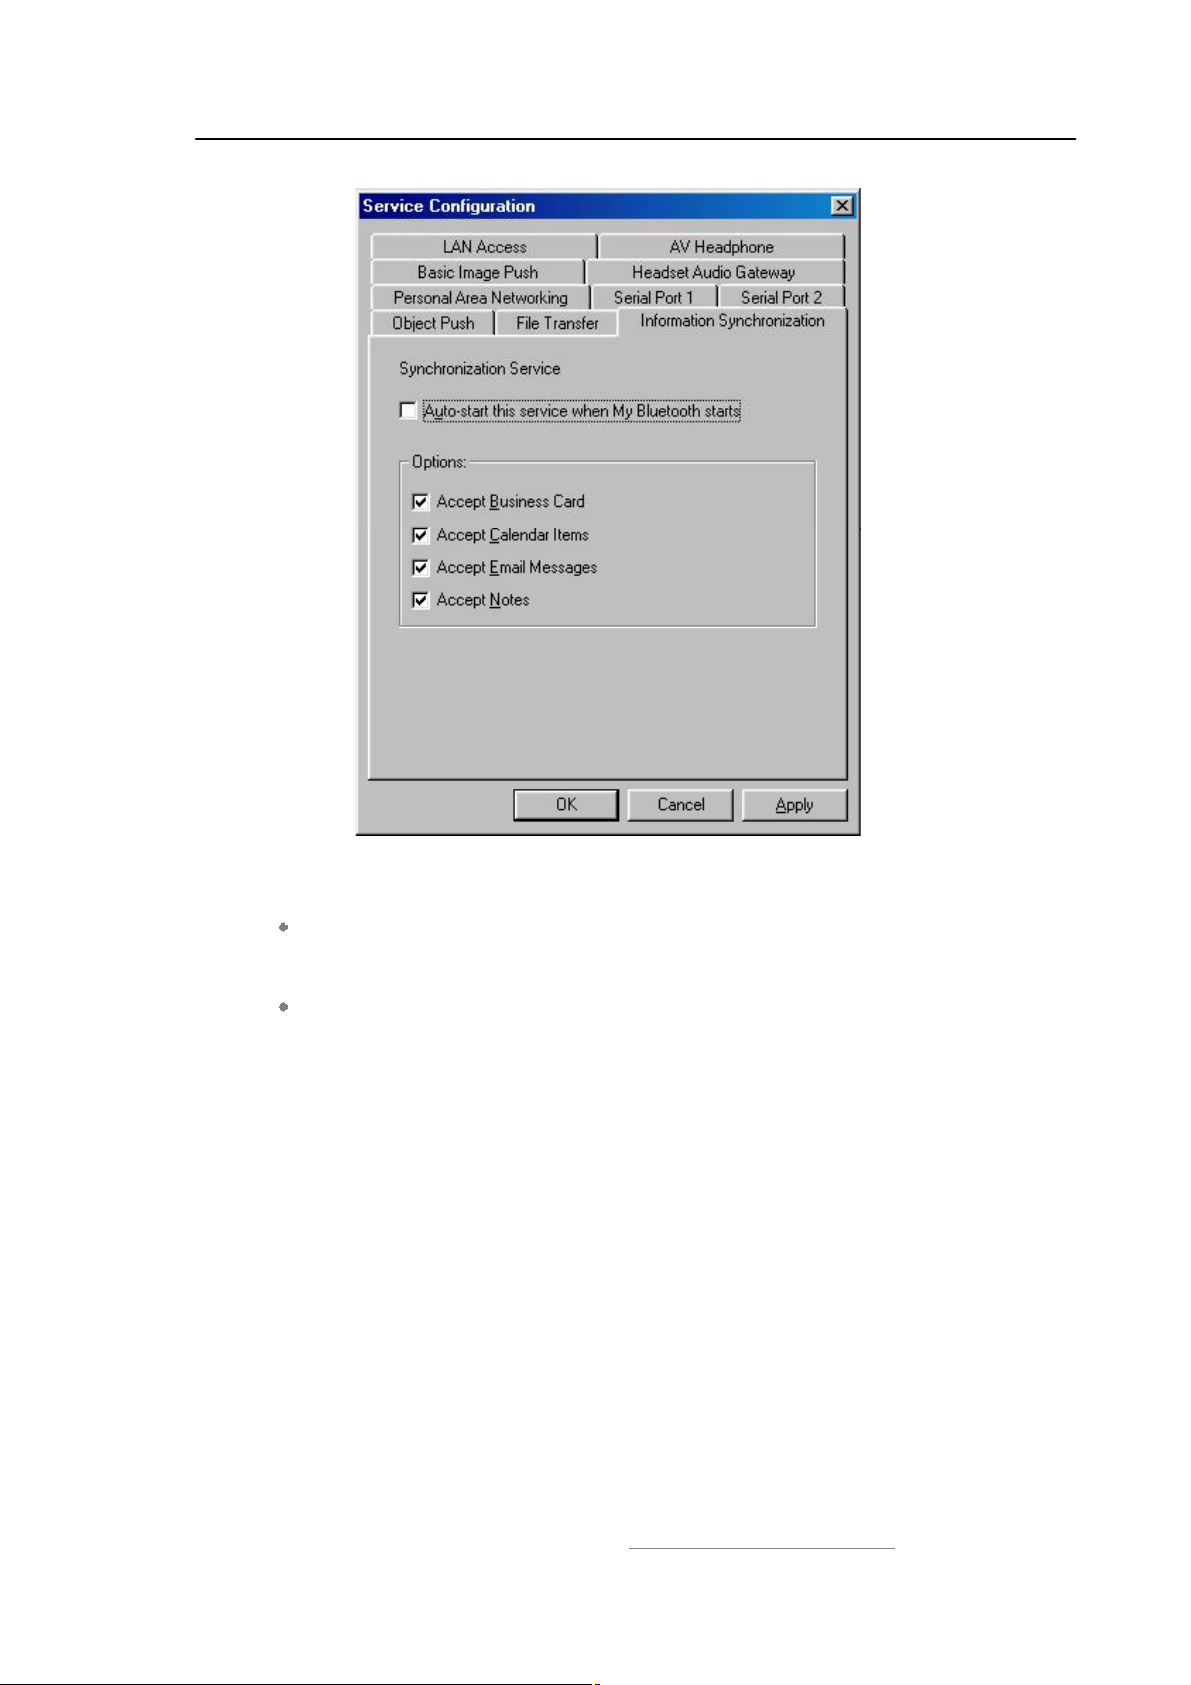
IVT BlueSoleil™ User Manual
Figure 10.9: Service Configuration
Setting Items:
Auto start this service when my Bluetooth starts
Check this item to start my synchronization service automatically every time
BlueSoleil! is started.
Options
This service supports options for vCard, vCalendar, vMessage and vNote data
types. You can select the data type you want to support.
10.5 Using Synchronization in Outlook
After correct installation of BlueSoleil the GUI of Outlook application looks like
figure 9.12.
Notice: This function requires Microsoft Office 2000 or higher version and is
available only when BlueSoleil is running properly.
10.5.1 The usage of synchronization
Click the Synchronization button from the toolbar or File menu, from the devices
list dialog user can select the target device to synchronize with.
Copyright © 2001, IVT Corporation, http://www.ivtcorporation.com
All specifications are preliminary and subject to change without notice.
84
Page 88
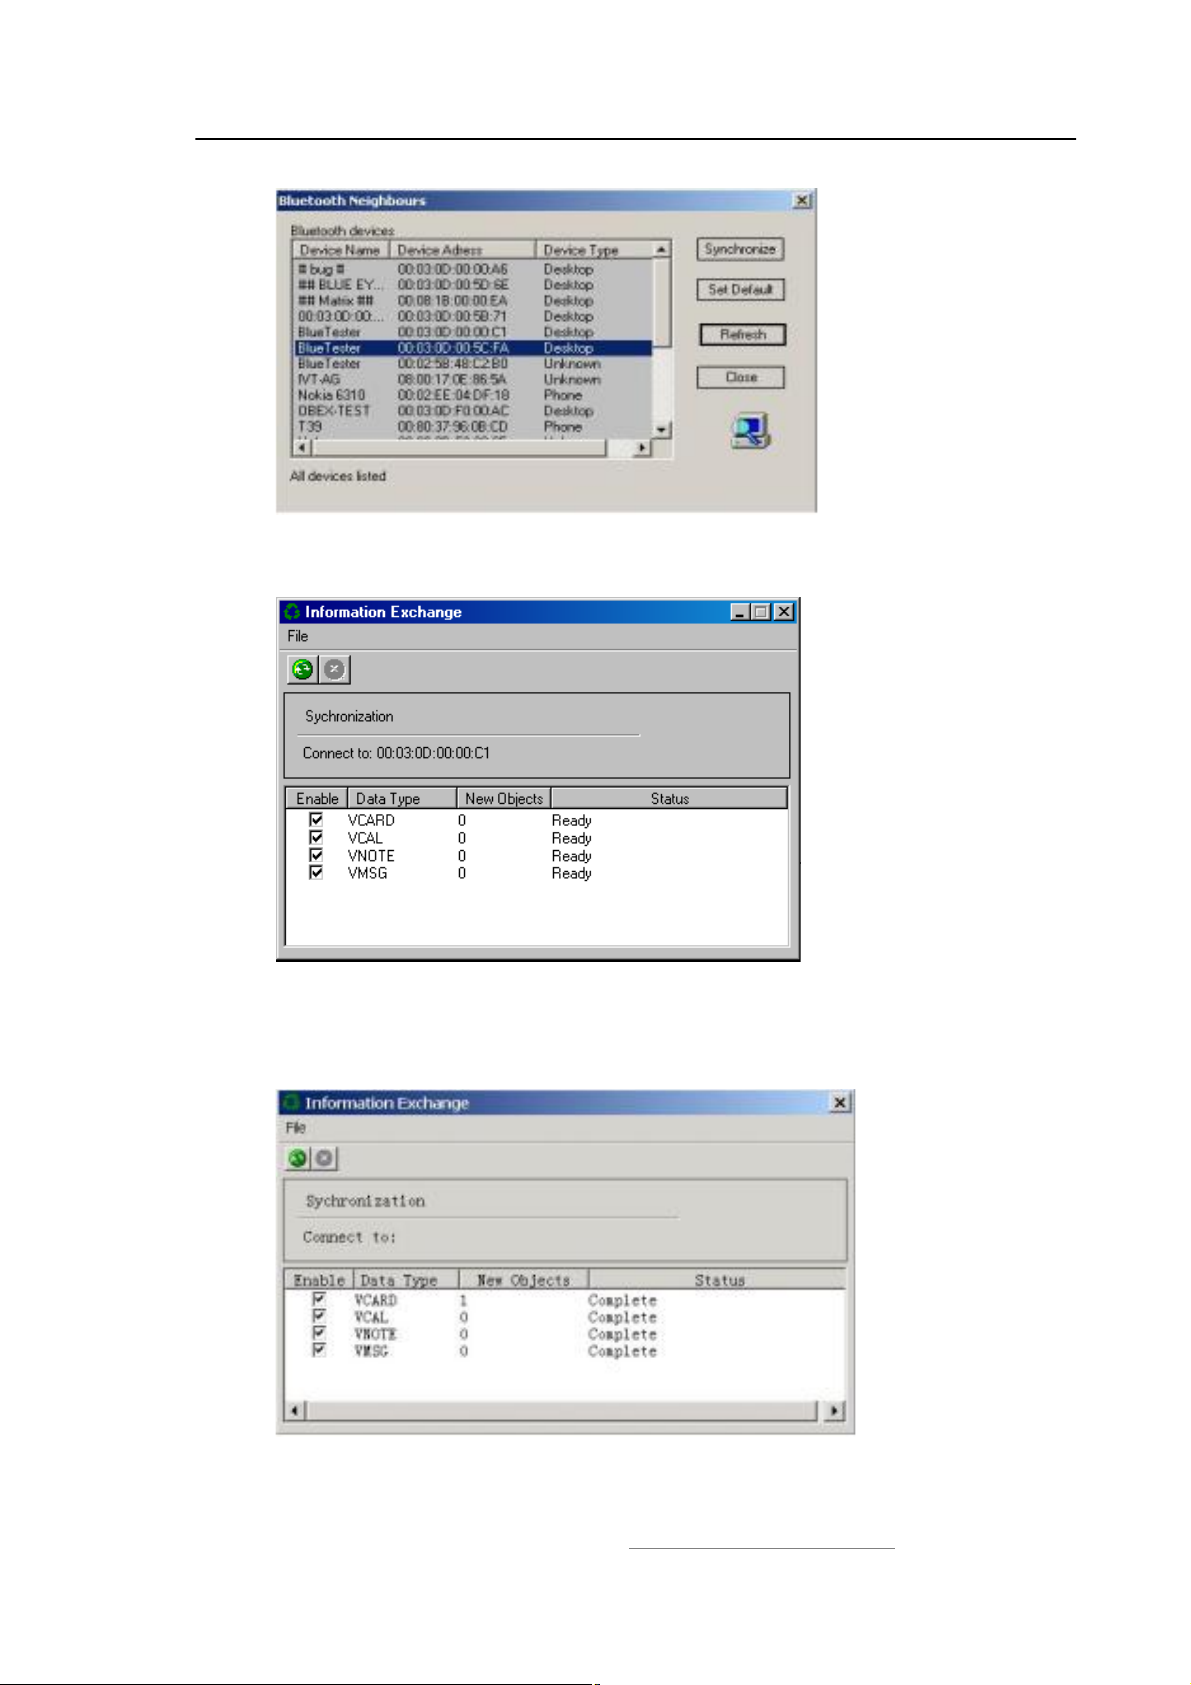
IVT BlueSoleil™ User Manual
Figure 10.10: Select the target device to synchronize with
After selecting the target device, the Sync-dialog appears.
Figure 10.11: Choose the item type to synchronize
Click the Sync button from the toolbar or File menu to start the synchronization
process, during and after the synchronization process the current status will be
displayed to users.
Figure 10.12: The status when operation finished
Copyright © 2001, IVT Corporation, http://www.ivtcorporation.com
All specifications are preliminary and subject to change without notice.
85
Page 89
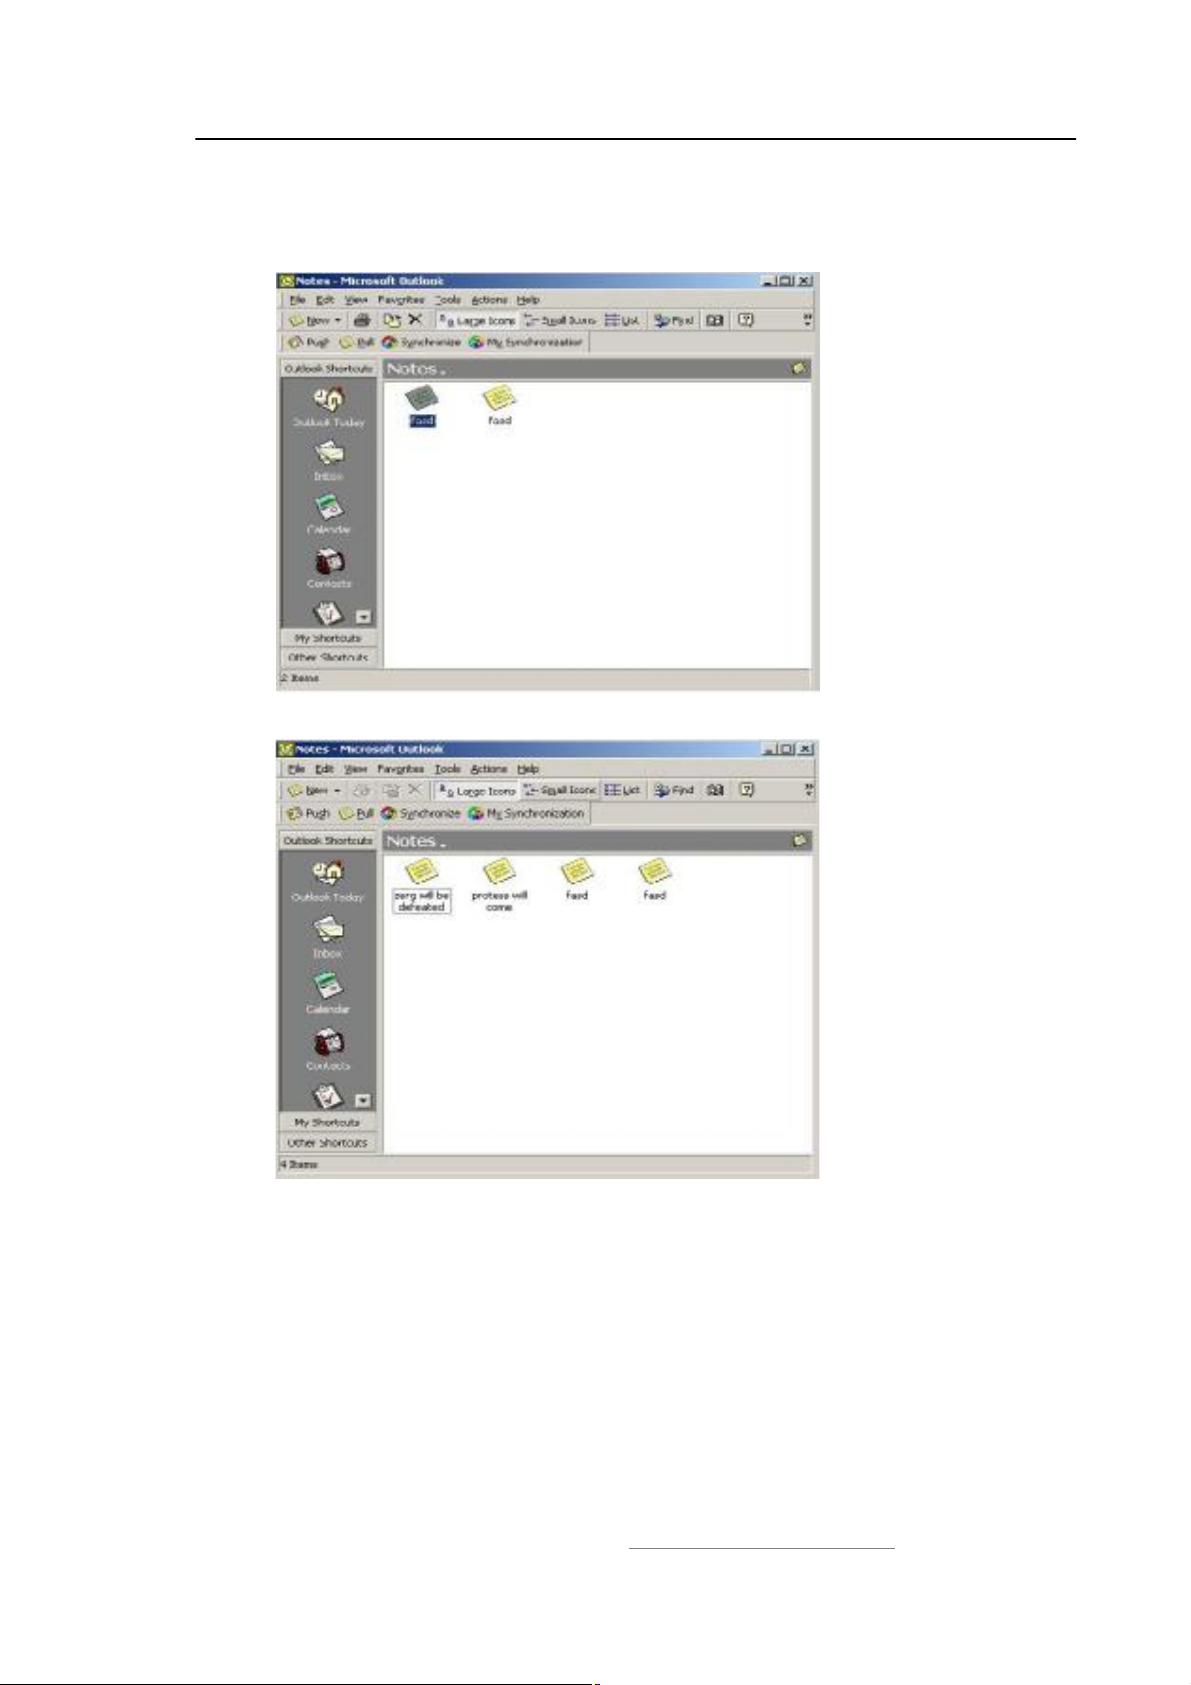
IVT BlueSoleil™ User Manual
Just like the OPP-Pull function, the synchronization"s result will be visible in Outlook
application. The following two diagrams show the Note folder before and after the
synchronization.
Figure 10.13: Before Synchronization
Figure 10.14: After Synchronization
User can set the most often-used device to default device. From the devices list
dialog please choose the right device and then click Set Default button. So when
synchronize next time user can click My Synchronization button to start
synchronization directly avoiding the time-consuming selecting device steps. When
mouse move onto the button the message tip will display current default device
information.
Copyright © 2001, IVT Corporation, http://www.ivtcorporation.com
All specifications are preliminary and subject to change without notice.
86
Page 90

IVT BlueSoleil™ User Manual
11 Hardcopy Cable Replacement
11.1 Introduction
The Bluetooth Hardcopy Cable Replacement profile (HCRP) provides services to
replace the cable between a host and peripheral device with a Bluetooth link. The
most common devices using these services are laptops and desktop computers,
however other devices are not excluded.
The HCRP profile can be used in the following scenario:
Print a document using a Bluetooth Printer.
11.2 Print a Document Using a Bluetooth Printer
This section outlines how to print a document from Computer A (client) using a
Bluetooth Printer (server)
Computer A: Bluetooth Printer B:
Notebook/Laptop Bluetooth Printer
A Bluetooth Device
Windows 2000
IVT BlueSoleil!
Step 1: Insert the Bluetooth Device into the computer.
Step 2: Start BlueSoleil! in the computer.
Step 3: Turn on the Bluetooth printer to provide the HCRP service for
Computer A.
Step 4: Connect the two devices.
1. Search for Bluetooth devices on Computer A
2. Search the HCRP services of Printer B.
3. Double-click the HCRP service icon to connect Computer A and the
Bluetooth printer.
Step 5:
Once the connection is established, please check:
If there is no driver installed for the Bluetooth printer,
then BlueSoleil! displays a message asking the user to
install a driver for the Bluetooth Printer, see the Windows
system icons in the bottom right hand corner of the
Windows desktop. (Figure 11.1) Install the driver for the
printer on Computer A and set its port to COMx.
If there is already a driver installed for the Bluetooth
printer, a message appears indicating that the Bluetooth
printer is ready (Figure 11.2). BlueSoleil! sets the
Bluetooth printer"s port to COMx (e.g. COM3). If there are
Copyright © 2001, IVT Corporation, http://www.ivtcorporation.com
All specifications are preliminary and subject to change without notice.
87
Page 91

IVT BlueSoleil™ User Manual
several drivers for the Bluetooth printer installed on
Computer A, BlueSoleil! automatically sets one of them
as the Bluetooth printer.
Figure 11.1: Bluetooth Printer Driver is not installed
Figure 11.2: Bluetooth Printer Driver is ready
Step 6: Print documents.
Computer A and Bluetooth Printer B are now connected. On
Computer A, open the document that you want to print. Select
File |Print. Then select the Bluetooth printer and print.
Step 7: Disconnect the Bluetooth Printer.
Right-click the HCRP service icon; select Disconnect on the pop
up menu.
Copyright © 2001, IVT Corporation, http://www.ivtcorporation.com
All specifications are preliminary and subject to change without notice.
88
Page 92

IVT BlueSoleil™ User Manual
12 Human Interface Device
12.1 Introduction
A typical Bluetooth Human Interface Devices (HID) is a Bluetooth-enabled mouse,
keyboard or joystick. The HID service allows wireless communication to Bluetooth
HID devices.
The HID profile can be used in the following scenarios:
Connecting a computer to a Bluetooth Mouse.
Connecting a computer to a Bluetooth Keyboard.
12.2 Connect a Computer to a Bluetooth Mouse
This section outlines how to connect a computer (Computer A) to a mouse
(Bluetooth Mouse B).
Computer A: Bluetooth Mouse B:
Desktop Bluetooth wireless mouse
A Bluetooth Device
Windows 2000
IVT BlueSoleil!
Step 1: Insert the Bluetooth Device into the computer.
Step 2: Start BlueSoleil! in the computer and set the security level to low
using the Tools | Configurations | Security menu.
Step 3: Power on the Bluetooth mouse. (Bluetooth Mouse B)
Step 4: Connect to HID service:
1. Search for Bluetooth devices in Computer A until you find
Bluetooth Mouse B.
2. Double-click the Bluetooth Mouse B device icon to find it"s HID
service. If found, the HID service icon turns red. (Figure 12.1)
Copyright © 2001, IVT Corporation, http://www.ivtcorporation.com
All specifications are preliminary and subject to change without notice.
89
Page 93

IVT BlueSoleil™ User Manual
Figure 12.1: Find Bluetooth mouse and its service
Step 5: Double-click the HID service icon to connect to Mouse B. After the
connection is successfully set-up, a dashed line appears between the
center ball and the Mouse B icon. The HID service icon turns green (
).
Step
6:
Install drivers for Bluetooth mouse.
If this is the first time Computer A has connected to a Bluetooth
mouse, wait for a few seconds to allow Windows to install drivers
for a Bluetooth mouse.
You will see two new devices in Computer A: Bluetooth HID
Mouse in #Human Interface Devices" class and HID-compliant
mouse in #Mice and other pointing devices" class. (Figure 12.2)
Step 7: Now the Bluetooth mouse is ready to use. You can use it as a legacy
PS/2 or serial mouse.
Step 8: To disconnect Mouse B.
Right-click the HID service icon in the Main Window and click
Disconnect. Alternatively right-click Mouse B in the Main Window
and select Disconnect | Human Interface Device.
Copyright © 2001, IVT Corporation, http://www.ivtcorporation.com
All specifications are preliminary and subject to change without notice.
90
Page 94
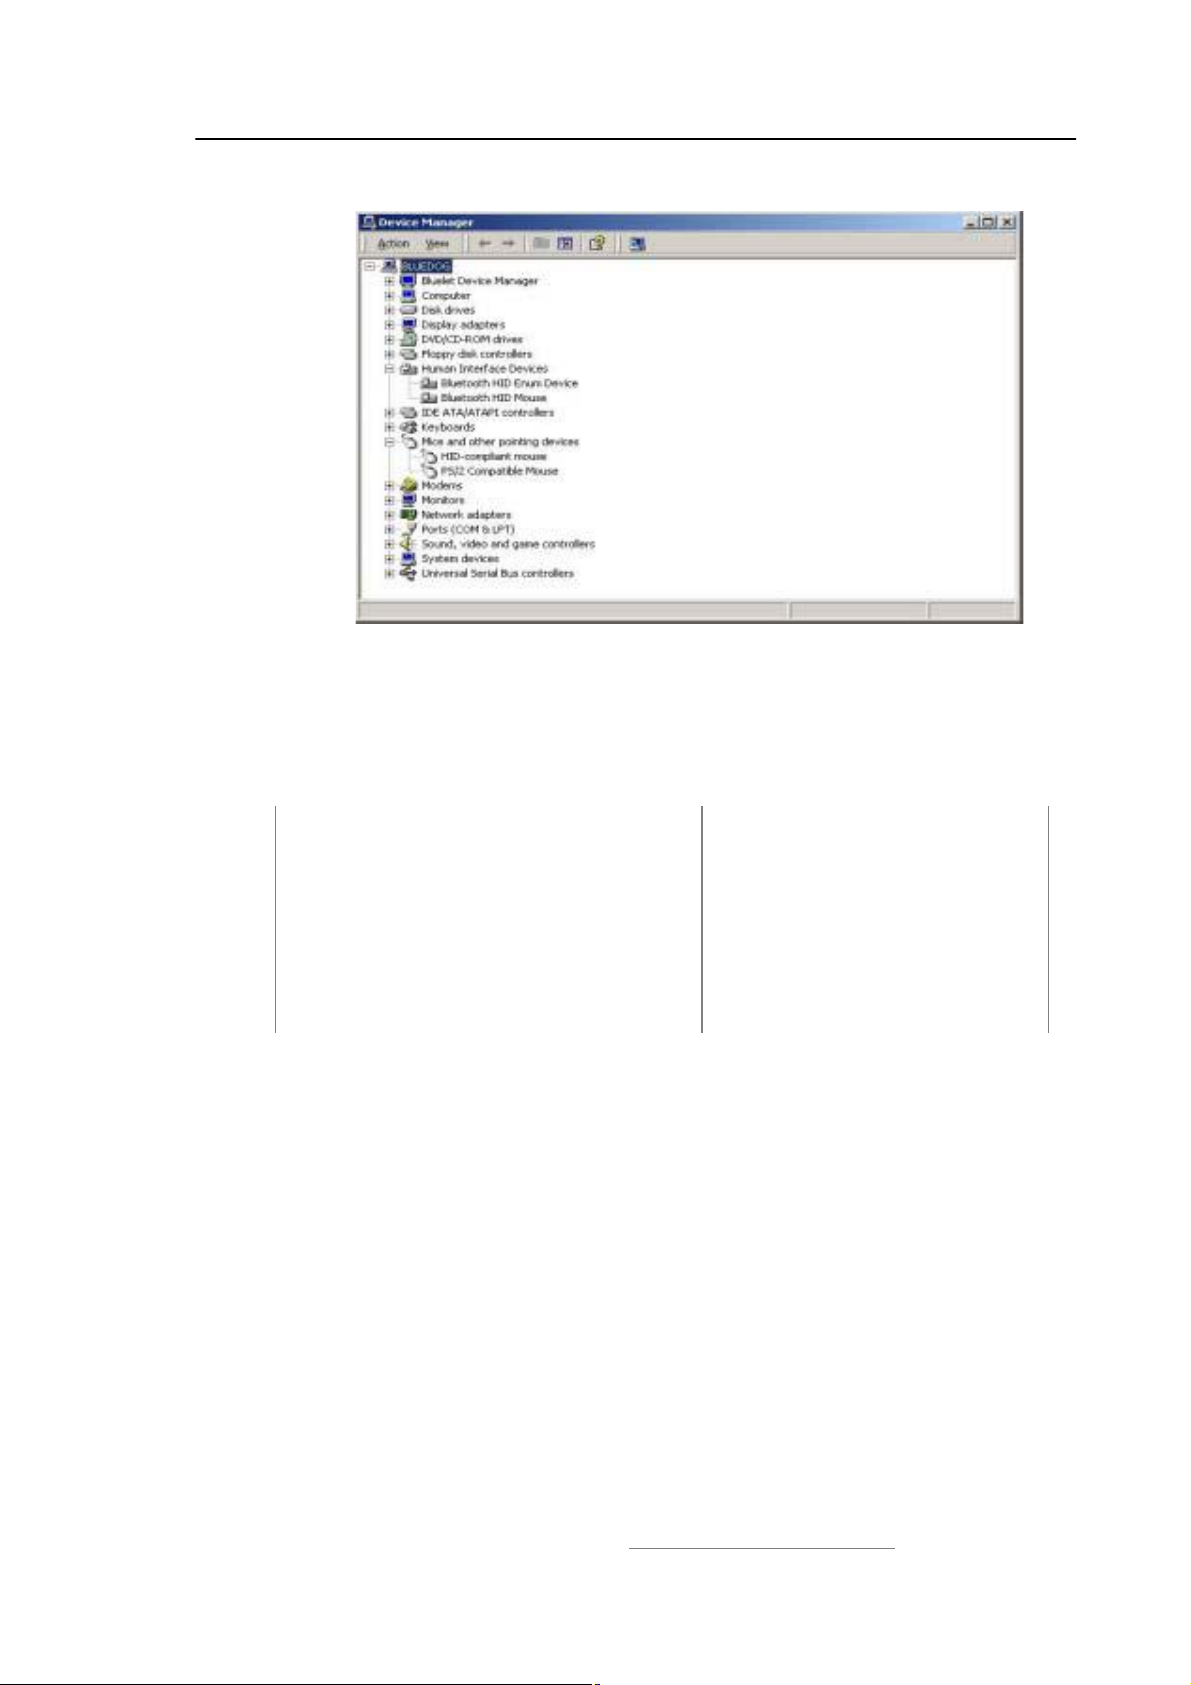
IVT BlueSoleil™ User Manual
Figure 12.2: New HID mouse device in Device Manager
12.3 Connect a Computer to a Bluetooth Keyboard
This section outlines how to connect a computer (Computer A) to a keyboard
(Bluetooth Keyboard B).
Computer A: Bluetooth Keyboard B:
Desktop Bluetooth wireless keyboard
A Bluetooth Device
Windows 2000
IVT BlueSoleil!
Step 1: Insert the Bluetooth Device into the computer.
Step 2: Start BlueSoleil! in the computer and set the security level to low
using the Tools | Configurations | Security menu.
Step 3: Power on the Bluetooth keyboard. (Bluetooth Keyboard B)
Step 4: Connect to Keyboard. (Figure 12.3)
Copyright © 2001, IVT Corporation, http://www.ivtcorporation.com
All specifications are preliminary and subject to change without notice.
91
Page 95
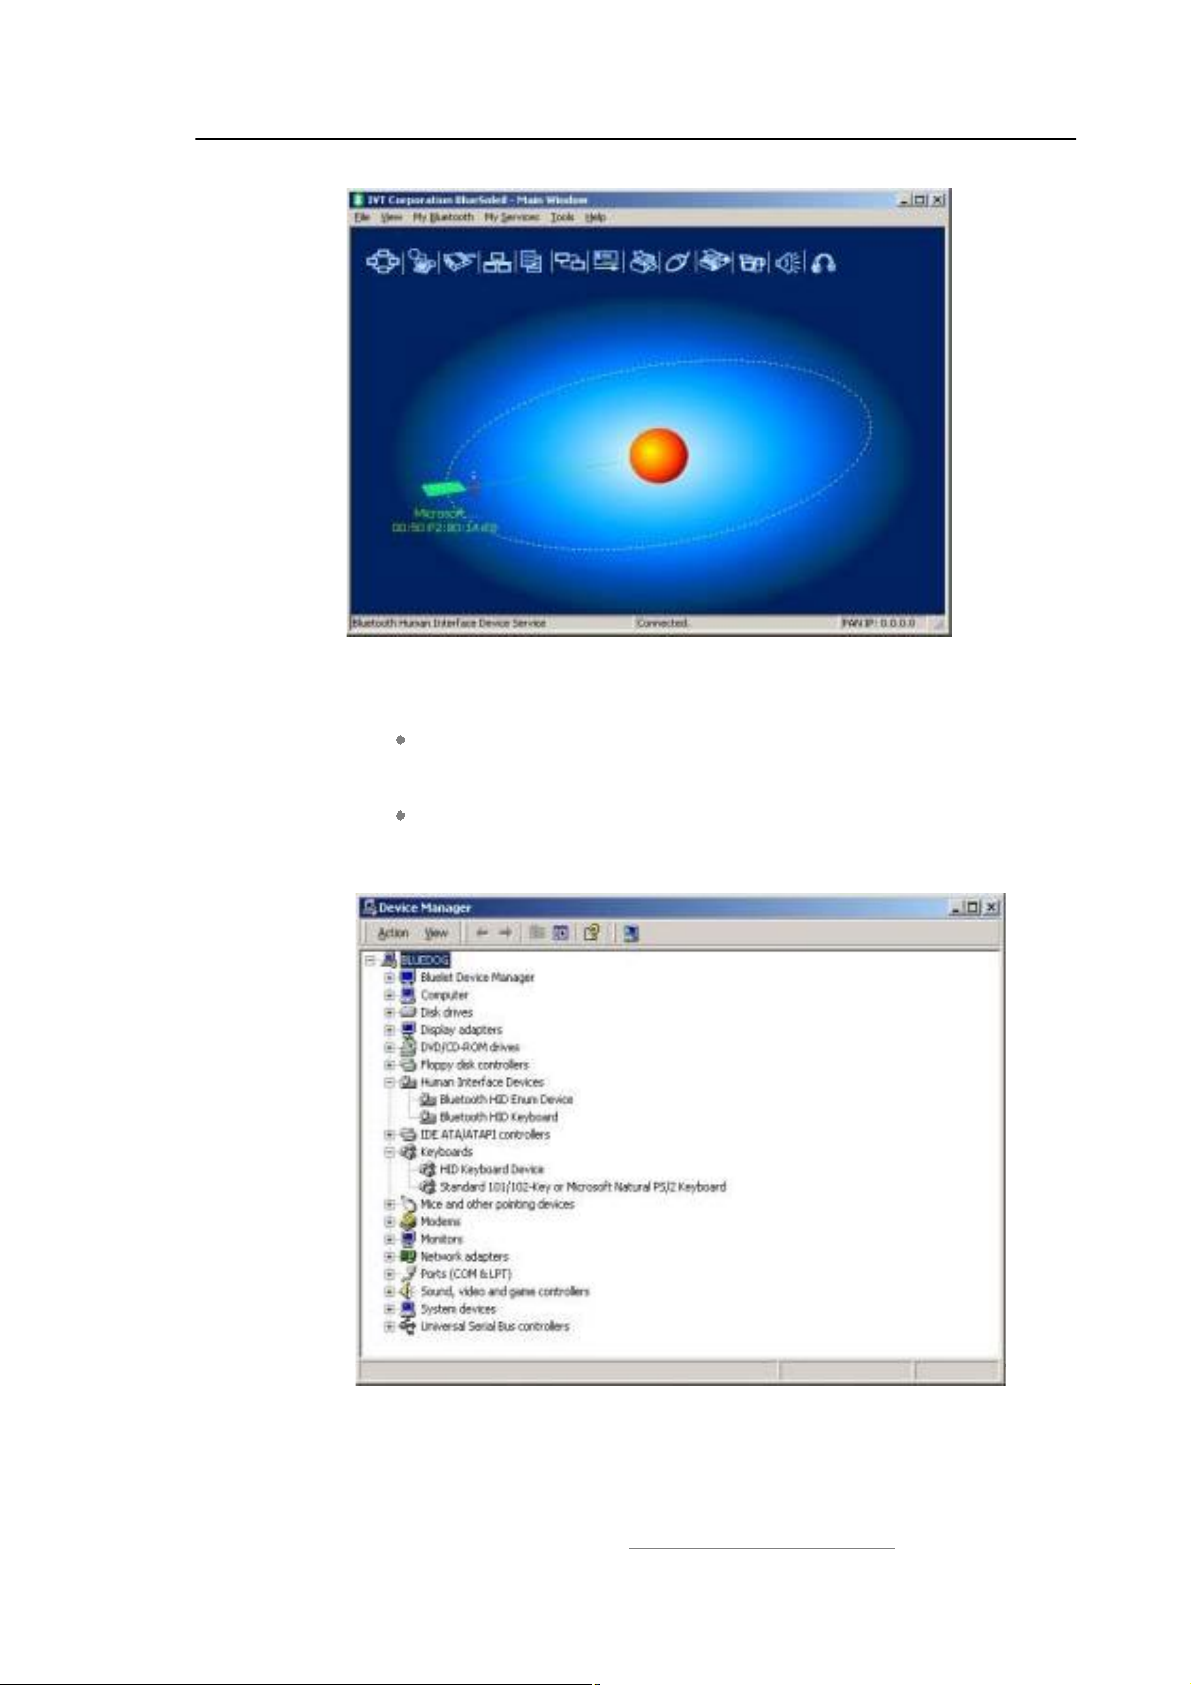
IVT BlueSoleil™ User Manual
Figure 12.3: Connect to Bluetooth keyboard
Step 5: Install drivers for the Bluetooth keyboard.
If this is the first time Computer A has connected to a Bluetooth
keyboard, wait for a few seconds to allow Windows install drivers
for a Bluetooth keyboard.
You will see two new devices in Computer A: Bluetooth HID
Keyboard in #Human Interface Devices" class and HID
Keyboard Device in #Keyboards" class. (Figure 12.4)
Figure 12.4: New HID keyboard device in Device Manager
Step 6: Now the Bluetooth keyboard is ready to use. You can use it as a
Copyright © 2001, IVT Corporation, http://www.ivtcorporation.com
All specifications are preliminary and subject to change without notice.
92
Page 96

IVT BlueSoleil™ User Manual
legacy PS/2 keyboard.
Step 7: To disconnect Keyboard B.
Right-click the HID service icon in the Main Window and click
Disconnect. Alternatively right-click Keyboard B in the Main
Window and select Disconnect | Human Interface Device.
Copyright © 2001, IVT Corporation, http://www.ivtcorporation.com
All specifications are preliminary and subject to change without notice.
93
Page 97

IVT BlueSoleil™ User Manual
13 FAX
13.1 Introduction
The Bluetooth Fax service allows a Bluetooth-enabled client to send fax messages
wirelessly through a fax modem on another Bluetooth device or a cellular phone.
The other Bluetooth device or the cellular phone is called the fax gateway (server)
as it provides the service to send/receive fax messages.
The FAX profile can be used in the following scenario:
A Bluetooth computer sends/receives fax messages through a Bluetooth
cellular phone or Bluetooth fax modem.
13.2 Connect to a FAX Gateway from a Computer
This section outlines the steps involved in a computer (client) sending a fax
message through a Bluetooth cellular phone.
Computer A: Bluetooth Cellular Phone:
Notebook/ Laptop Ericsson T39 cellular phone
A Bluetooth Device
Windows 2000
IVT BlueSoleil!
Step 1: Insert the Bluetooth Device in the computer.
Step 2: Start BlueSoleil! in the computer.
Step 3:
Step 4:
Step 5:
Set the Ericsson T39 to be discoverable so that Computer A can
find the T39.
Add Computer A to the paired device list in the T39.
Connect to the phone FAX service .
13.3 Using FAX software on a bluetooth computer
There are many commercial or free fax software could be found. And they all can
work with IVT BlueSoleil. Since these fax software have their own MMI feature, the
usages will not be listed step by step.
Please check the following setting in FAX software before using it:
The FAX modem must be set to $Bluelet Fax Modem%. This $Bluelet Fax
Modem% device is added to windows modem device list when BlueSoleil is
installed.
Copyright © 2001, IVT Corporation, http://www.ivtcorporation.com
All specifications are preliminary and subject to change without notice.
94
Page 98
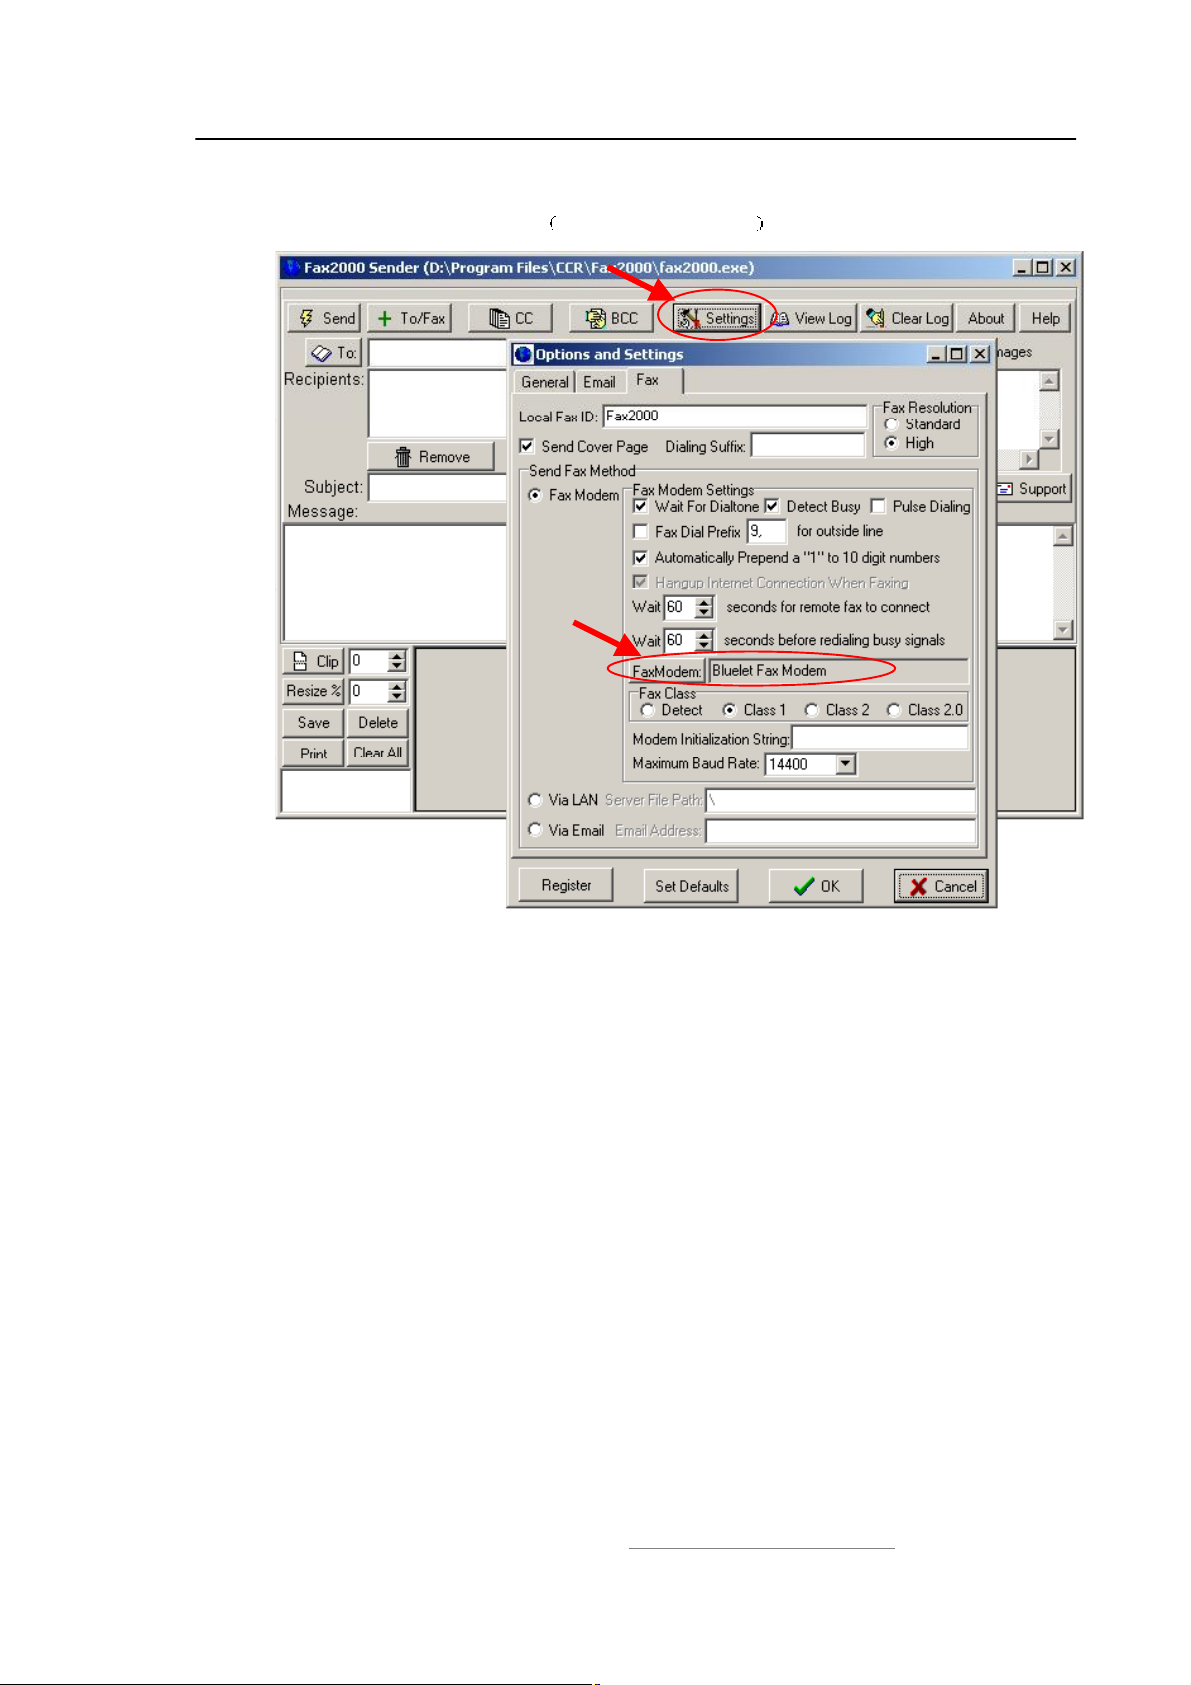
IVT BlueSoleil™ User Manual
And please make sure the bluetooth connection has been set up between the
computer and FAX Gateway refer to Section 12.2 .
Figure 13.1 Settings in Fax2000
Copyright © 2001, IVT Corporation, http://www.ivtcorporation.com
All specifications are preliminary and subject to change without notice.
95
Page 99

IVT BlueSoleil™ User Manual
14 Headset
14.1 Introduction
The Bluetooth Headset Profile defines the procedures implementing audio wireless
transmission on SCO channels. It provides services to replace the cable between an
Audio Gateway and Headset with a Bluetooth link.
Audio Gateway (AG) & This is the device that is the gateway of the audio, both for
input and output. Typical devices acting as Audio Gateways are cellular phones and
personal computer.
Headset (HS) & This is the device acting as the Audio Gateway"s remote audio input
and output mechanism.
Now BlueSoleil acts as Audio Gateway, which can initiate a connection to a headset
and can also provide service for headset to be connected.
The Headset profile in BlueSoleil can be used in the following scenario:
Play music from computer to Headset wirelessly.
Record sound from Headset to computer wirelessly.
Chat with chatting tools using Headset as voice input/output device.
14.2 Create an audio connection between computer and
Headset
This section outlines how to create an audio connection between Computer A and
Headset. Here, the name of the demo headset is EL-235.
Computer A Headset
Notebook/Laptop Bluetooth Headset
A Bluetooth Device supporting SCO
Windows 2000 or Windows XP
IVT BlueSoleil!
Step 1: Insert the Bluetooth Device into computer A.
Step 2: Start BlueSoleil! on computer A.
Step 3: Power on Headset EL-235 to supply headset service and make it
discoverable.
Step 4: Search for Headset device on Computer A.
Double-click the My Device icon until you find the device
Headset EL-235.
Copyright © 2001, IVT Corporation, http://www.ivtcorporation.com
All specifications are preliminary and subject to change without notice.
96
Page 100

IVT BlueSoleil™ User Manual
Step 5: Find the headset service of Headset EL-235 .
Double-click the Headset EL-235 device icon on Computer A.
Enter the Bluetooth passkey (Generally,0000), if necessary, to
start authentication.
Once authentication is complete, the Headset service is found.
Step 6: Connect to Headset EL-235.
After creating pairing relationship between Headset and dongle, we
can establish the audio connection in several ways:
Right-click Headset service icon; select Connect on the pop-up
menu. The headset ring to alert the user. After the user answers
the call, the connection will be established. (Figure 14.2) But, if
user does not answer after 20 rings, the connection will be
released.
Make sure you have started your Headset AG service in Service
Window. You can press answer key on your headset, and then it
will initiate a connection to BlueSoleil.
Figure 14.2: The connection is successfully established
Step 7:
Play music, record sound or chatting, please refer to Chapter
14.3
Step 8: After using Headset, you can disconnect the connection as follows.
If BlueSoleil initiate connection to Headset,
Right-click Headset service icon; select Disconnect on the
pop-up menu.
Or, press answer key on Headset to release this connection.
If BlueSoleil is connected by headset,
Press answer key on Headset to release this connection.
Or, stop Headset AG service in Service Window.
Copyright © 2001, IVT Corporation, http://www.ivtcorporation.com
All specifications are preliminary and subject to change without notice.
97
 Loading...