

Page 1
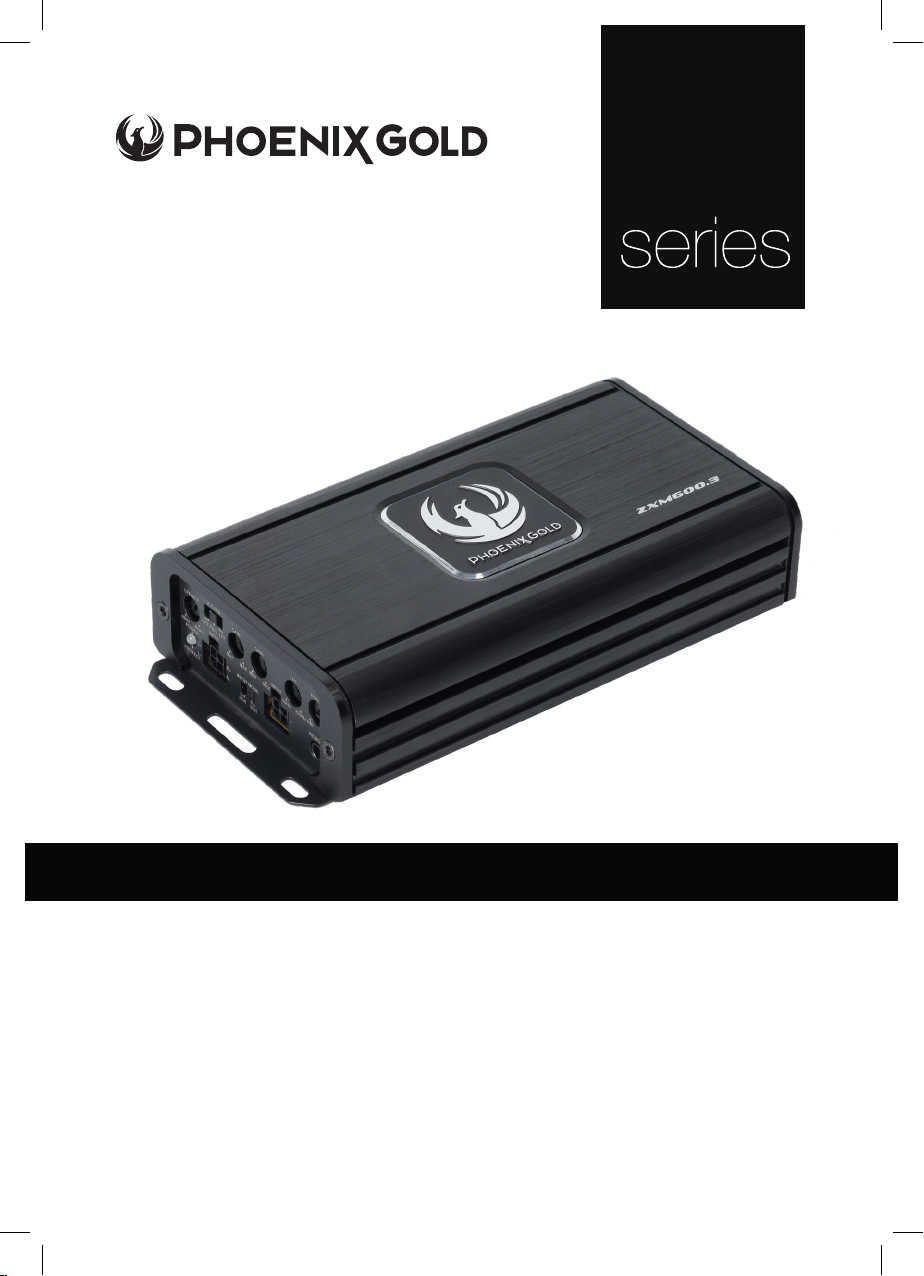
FULL CLASS-D TECHNOLOGY
ZX
MINI AMPLIFIERS
Models: ZXM500.1 - ZXM500.4 - ZXM600.3 - ZXM700.5
SPECIFICATIONS
• Full Class-D technology oers eciency & performance
• Short circuit/thermal and high/low voltage protection
• Excellent signal to noise ratio and FM noise rejection
• Remote gain controller included (except ZXM500.4)
• Built in protection LED light status indicator
• Surface mount component technology
• Ultra small size for easy installation
• Autostart on high-level input
• Full adjustable HP & LP filter
All specifications subject to change without notice.
Page 2
© 2024 Phoenix Gold - www.phoenixgold.com
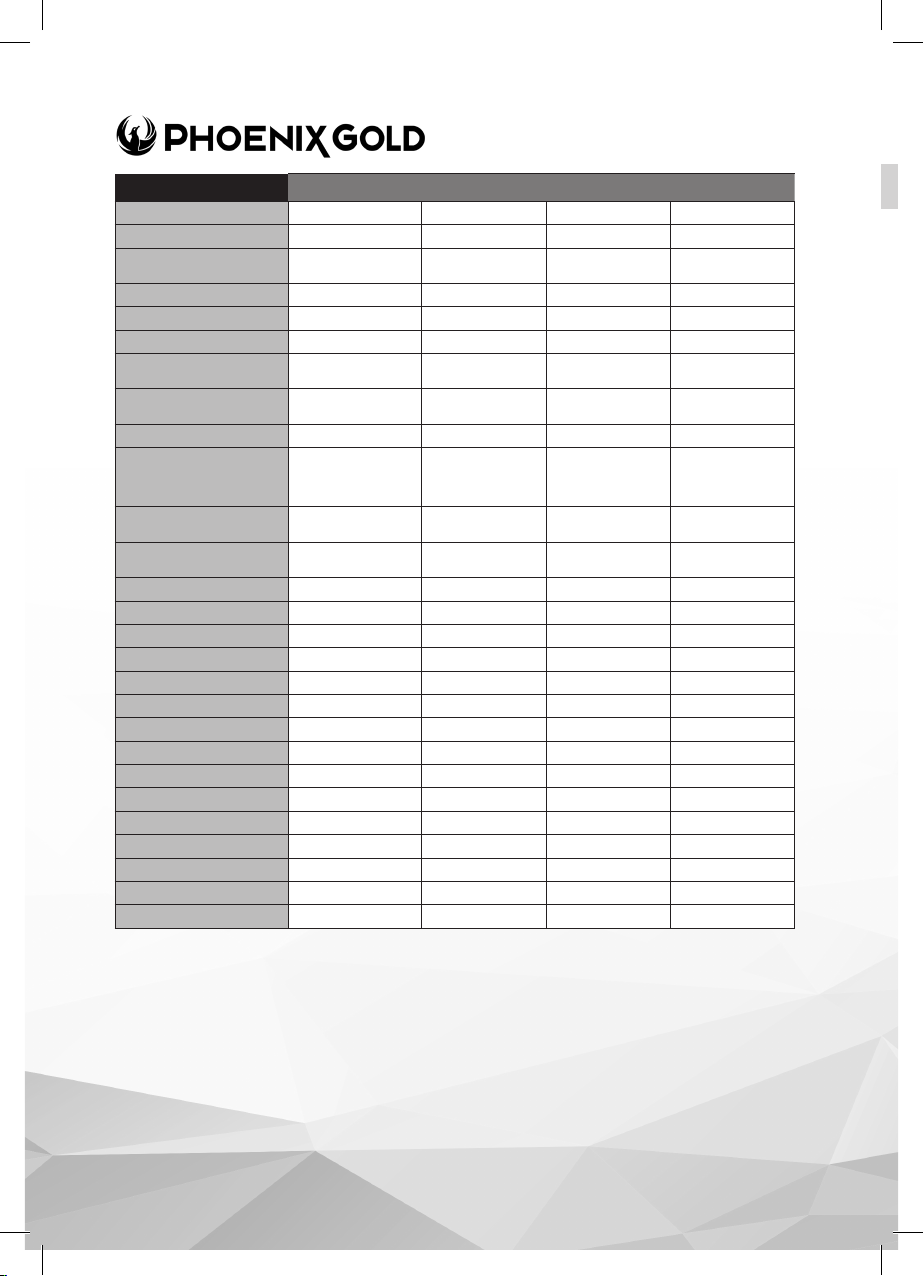
Class:
Channels:
Frequency Response:
Max Power Rating:
RMS Power Rating (1Ω):
RMS Power Rating (2Ω):
RMS Power Rating (4Ω):
Signal to Noise Ratio (SNR) (Full Power):
Total Harmonic Distortion (THD):
Low Pass Filter (LPF):
High Pass Filter (HPF):
Subsonic:
Bass Boost @ 45Hz:
Crosstalk:
Input Sensitivity:
Remote:
High-level Input:
Auto Turn-on:
Input Mode:
Operating Voltage:
Idle Current:
Current Draw (Max):
Total Eciency (4Ω):
Power Terminal:
Speaker Terminal:
Dimensions (LxWxH) (Excluding Feet):
Dimensions (LxWxH) (Including Feet):
ZXM500.1 ZXM500.4 ZXM600.3 ZXM700.5
Class D Class D Class D Class D
1 4 3 5
12Hz – 280Hz 10Hz – 30kHz
L/R: 20Hz – 25kHz
Sub: 10Hz – 250Hz
1000W 1000W 1200W 1400W
1 x 500W N/A N/A N/A
1 x 360W 4 x 125W 2 x 130W + 1 x 350W 4 x 100W + 1 x 350W
1 x 230W
-88dB -90dB
4 x 80W
2 x 250W Bridged
2 x 75W + 1 x 230W 4 x 60W + 1 x 230W
L/R: - 86dB
Sub: -91dB
<1% <1% <1% <1%
40Hz – 250Hz (12dB/Oct)
Sub: 50Hz – 250Hz
(24dB/Oct)
Sub: 50Hz – 250Hz
(24dB/Oct)
40Hz – 400Hz (12dB/
Oct)
F/R: 40Hz – 400Hz
(12dB/Oct)
N/A N/A N/A
L/R: 40Hz – 400Hz
(12dB/Oct)
Sub: 50Hz – 250Hz
(24dB/Oct)
40Hz – 400Hz
(12dB/Oct)
0 – +18dB N/A Sub: 0 – +18dB Sub: 0 – +18dB
N/A -48dB -50dB
0.34V – 7.1V 0.34V – 5.7V 0.36V – 6.8V 0.34V – 8V
Yes (Included) N/A Yes (Included) Yes (Included)
Yes Yes Ye s Yes
Yes Yes Ye s Yes
N/A 2CH / 4CH 2CH / 3CH 4CH / 5CH
7V – 16.5V 7V – 16.5V 8.5V – 16.8V 8.6V – 16.6V
0.51A 0.72A 0.88A 1.24A
46A 46A 56A 70A
92% 90% 88% 85%
10mm² 10mm² 10mm² 10mm²
10mm² 1mm² 1mm² 1mm²
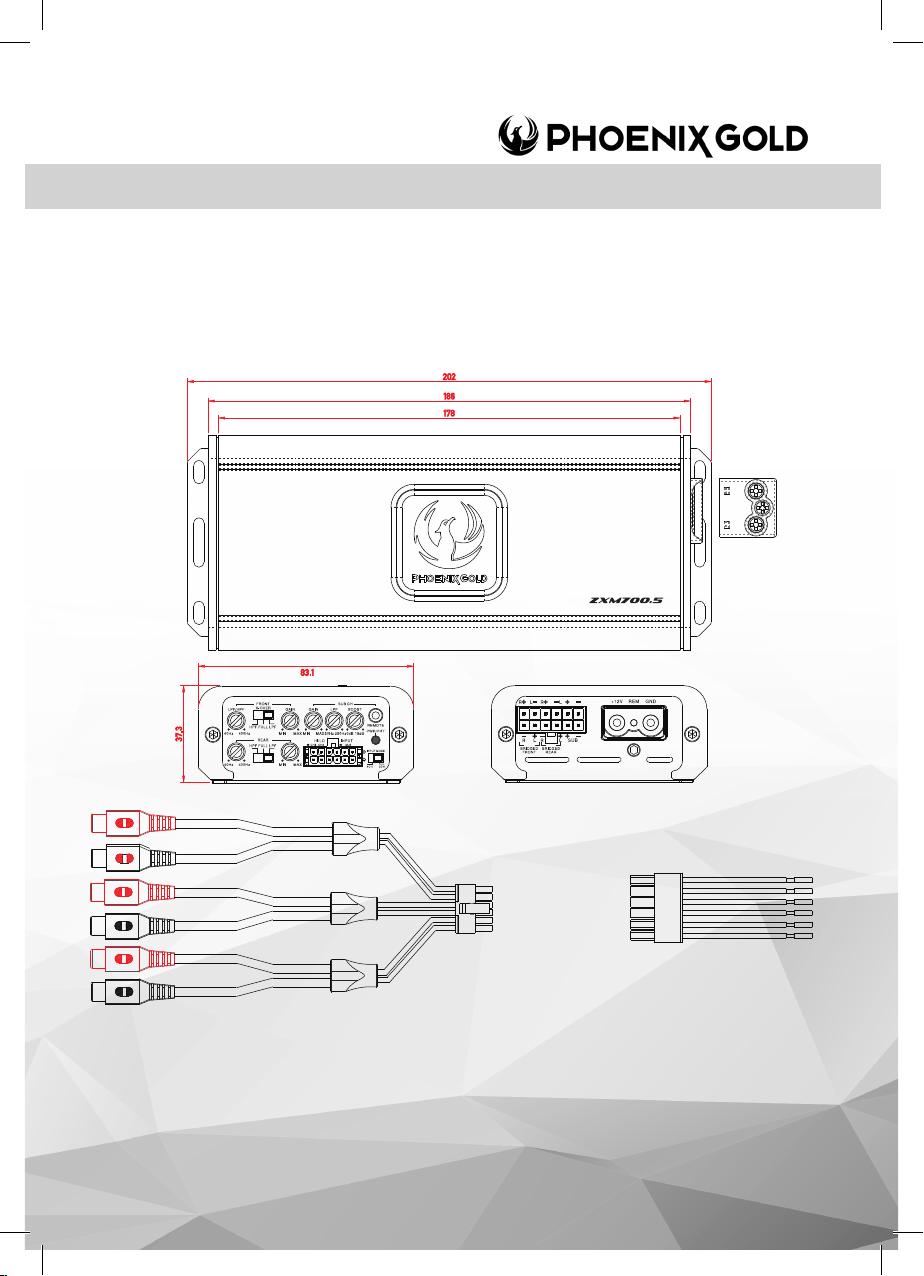
149 x 83.1 x 34.8mm 149 x 83.1 x 34.8mm 149 x 83.1 x 34.8mm 186 x 83.1 x 37.3mm
165 x 83.1 x 34.8mm 165 x 83.1 x 34.8mm 165 x 83.1 x 34.8mm 202 x 83.1 x 37.3mm
F/R: 20Hz – 25kHz
Sub: 10Hz – 260Hz
F/R: -84dB
Sub: -89dB
F/R: 40Hz – 400Hz
(12dB/Oct)
Sub: 50Hz – 250Hz
(24dB/Oct)
40Hz – 400Hz
(12dB/Oct)
Installation
Make sure the enclosure is firmly fixed in your vehicle. Check before drilling or cutting holes. DO NOT work near fuel tanks, fuel lines hydraulic lines or electrical wiring.
Amplifiers are generally mounted in the hatch/trunk area of a car or SUV, and under or behind the seat of most trucks. Select a location that will provide adequate ventilation
for the amplifier. Secure the amplifier with the screws provided. DO NOT mount the amplifier in such a way as to pinch or damage the wires.
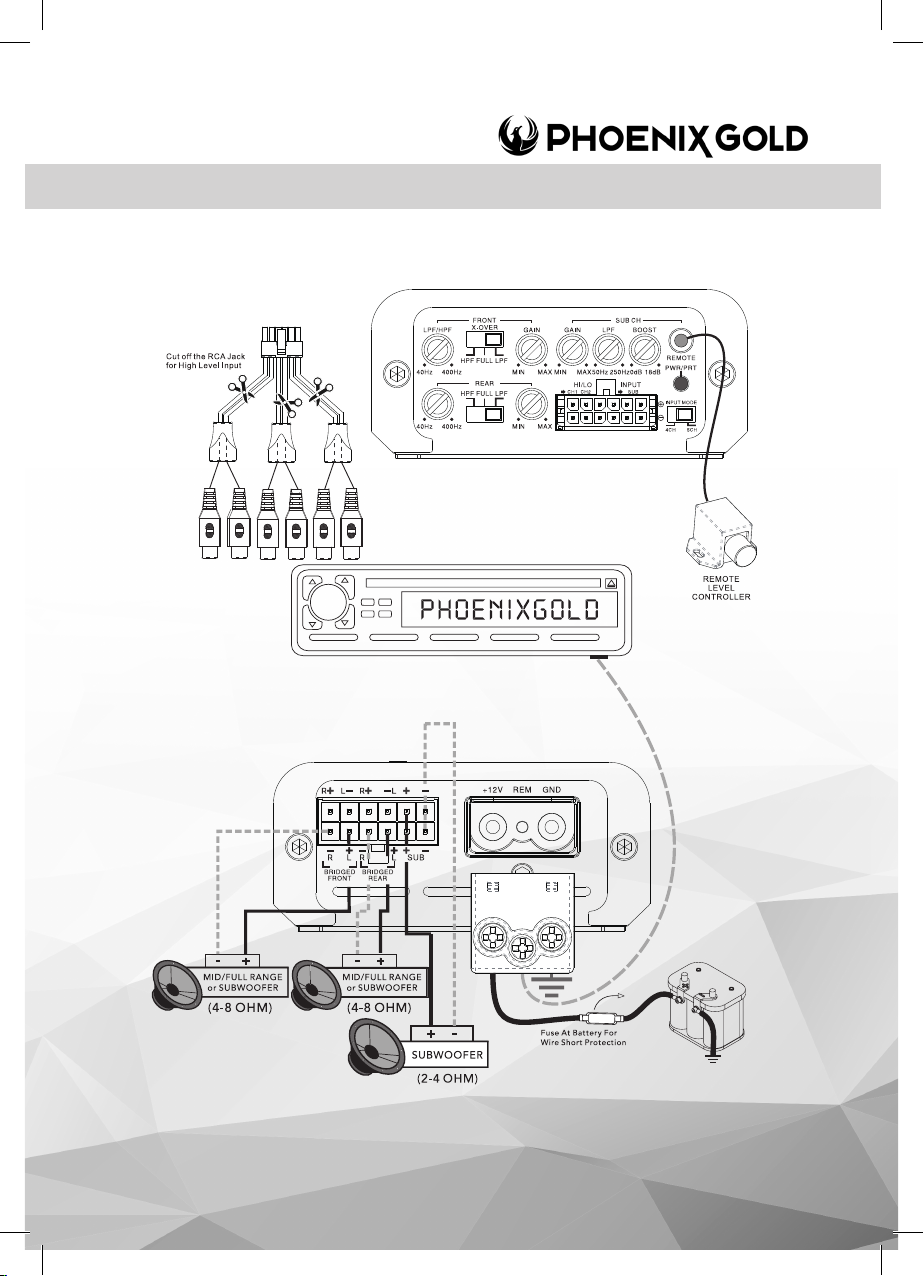
1. Before you start, disconnect the car battery’s negative cable and ensure it is isolated during the installation.
2. Run an appropriate gauge wire from the battery to the amplifier. Ensure that the wire being used is good quality as this cable will carry a very high current.
3. Find the closest clear metal area to the amp for a ground. Sand, grind or scrape all paint and undercoating from the body and screw the ground securely in place.
Test the ground with an ohm meter if desired.
4. Decide where you are ideally going to mount the amp. Once placed, run the speaker wire to the speakers. Make sure the polarity (+ and -) are correctly installed.
5. Connect the power and ground to the amplifier.
6. Connect the power wire to the battery using a fuse capable of the total current load of all amplifiers connected. Locate the fuse as close as possible to the battery.
7. Connect the remote wire from the head unit to the amplifier.
8. Connect the RCA’s to the amplifier.
9. When everything is connected, power on the unit and leave the gain all the way down at first. Start with the head unit volume low and work your way up.
10. Now you can tune the amp. Take your time and make only one adjustment at a time. It may take some time to get the system fully adjusted.
During this time, the amp is drawing current from the battery. You should check the battery voltage from time to time and re-charge it if it gets low.
Page 3
© 2024 Phoenix Gold - www.phoenixgold..com
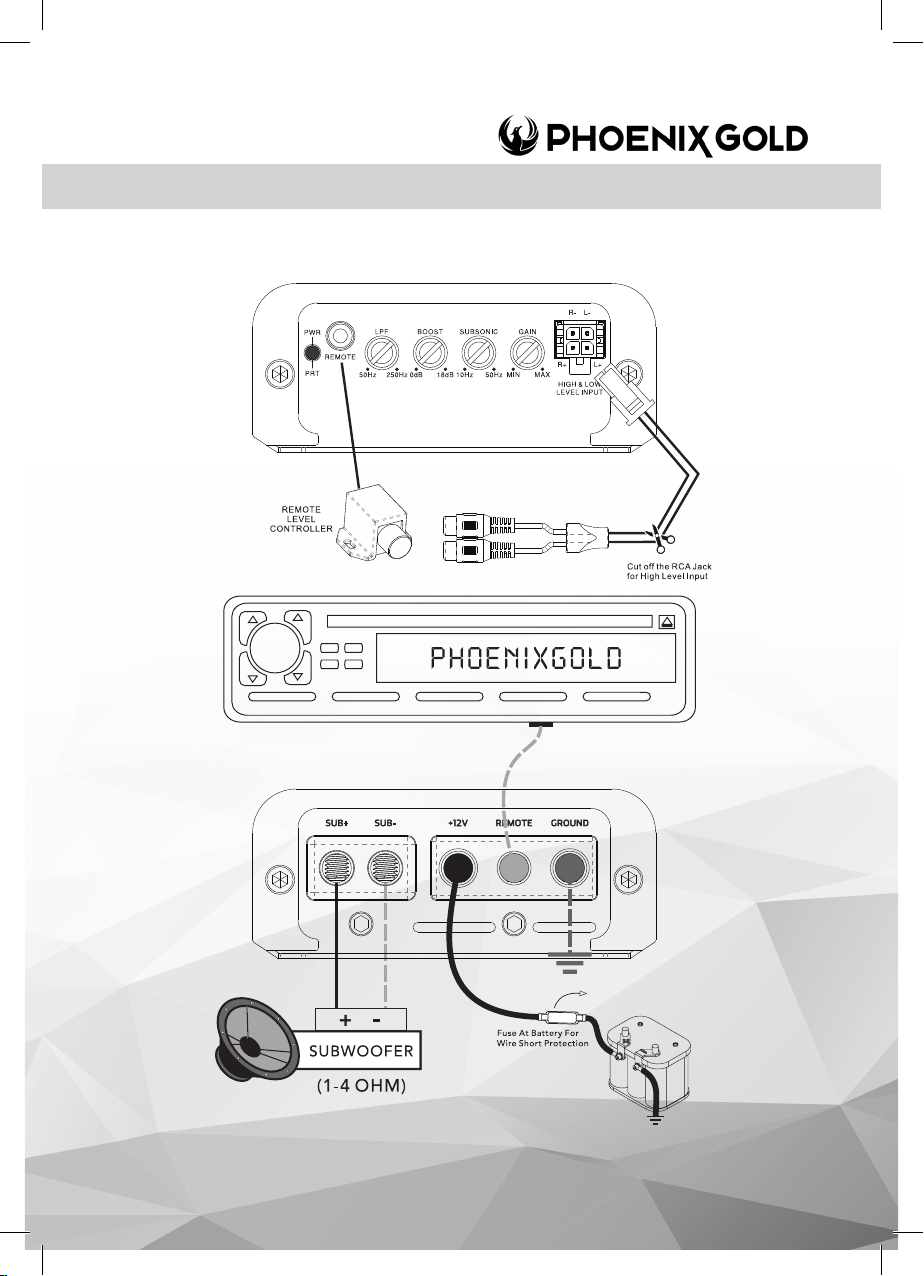
ZXM AMPLIFIERS - Connection Diagrams
ZXM500.1 Install
Page 4
© 2024 Phoenix Gold - www.phoenixgold.com
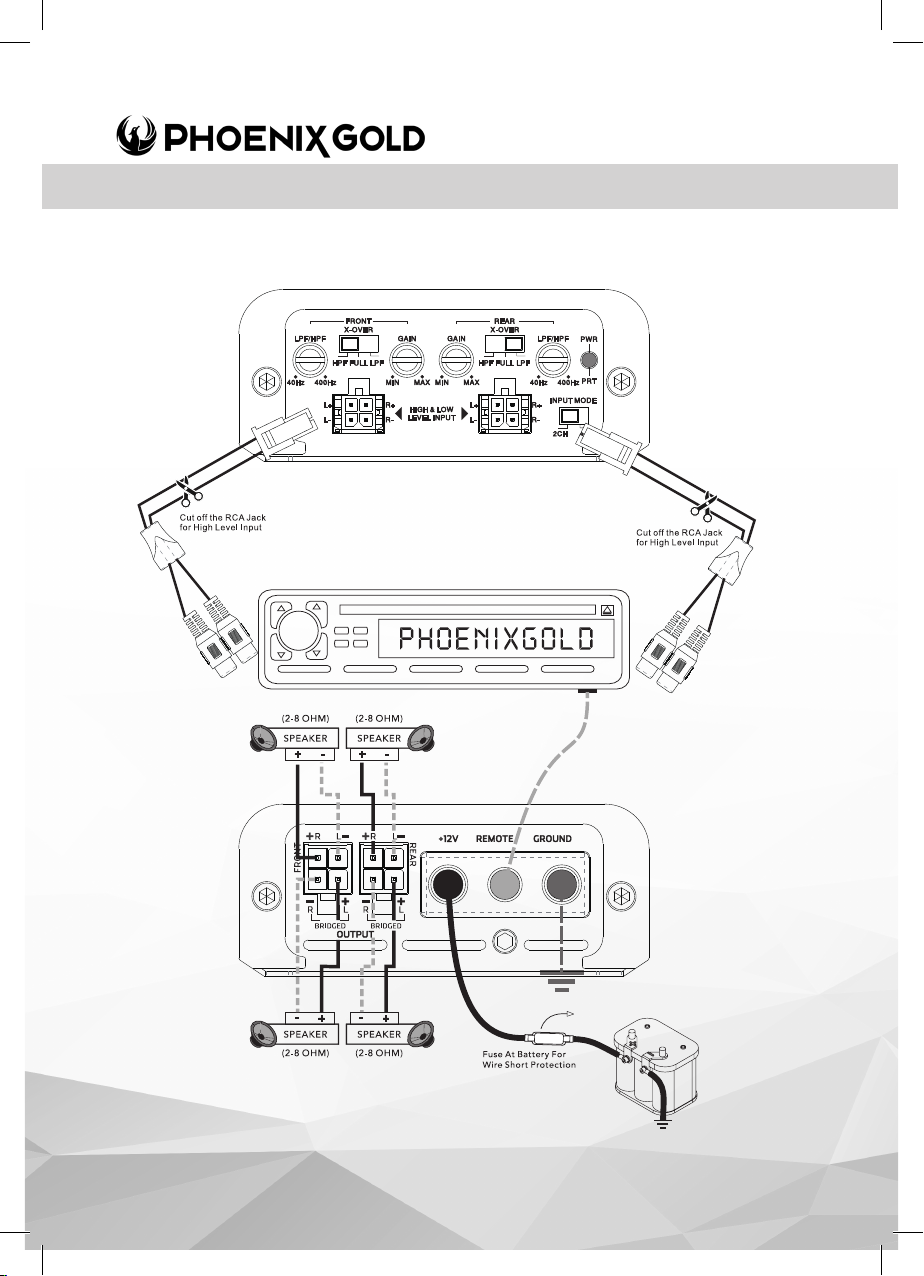
ZXM AMPLIFIERS - Connection Diagrams
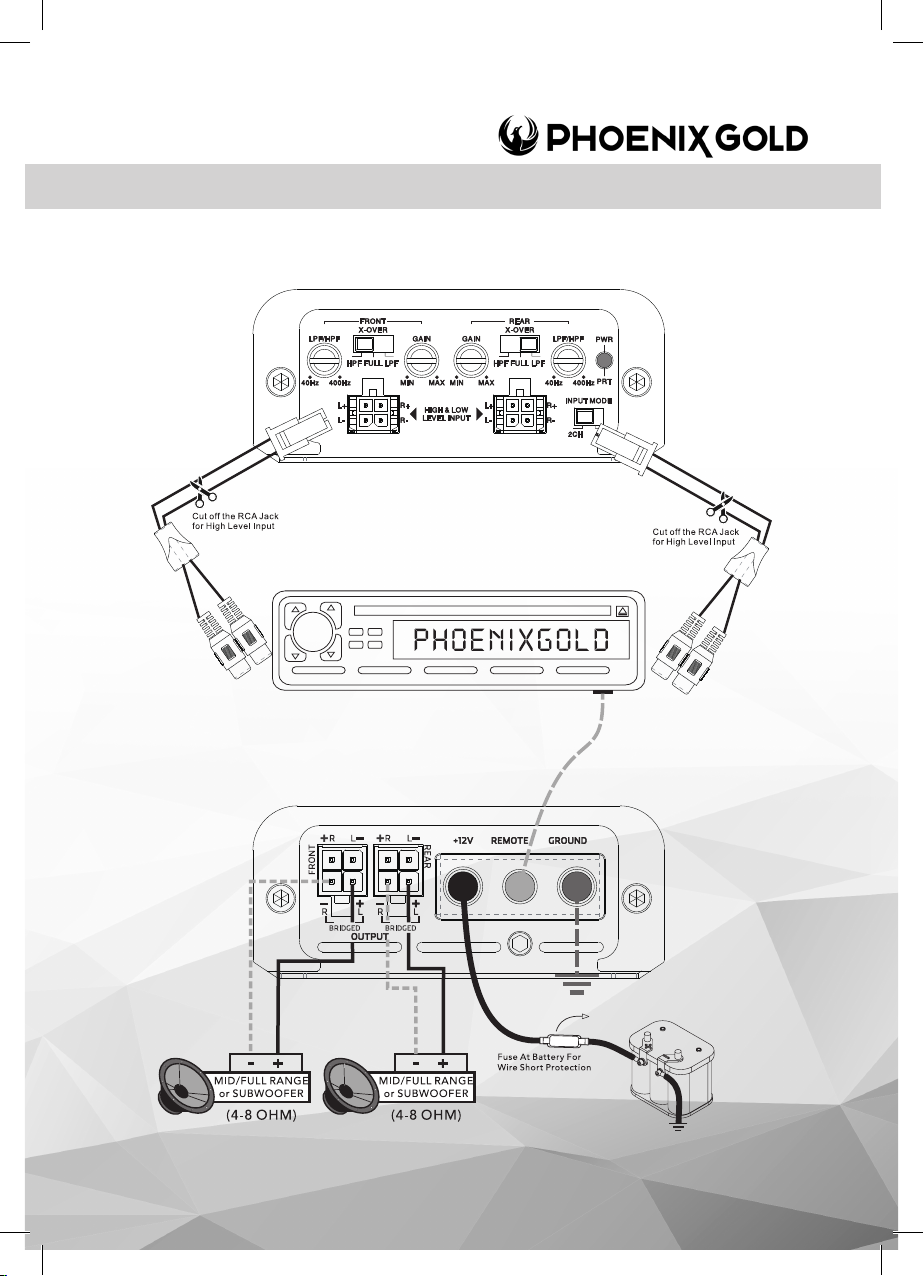
ZXM500.4 Install - NORMAL
Page 5
© 2024 Phoenix Gold - www.phoenixgold..com
ZXM AMPLIFIERS - Connection Diagrams
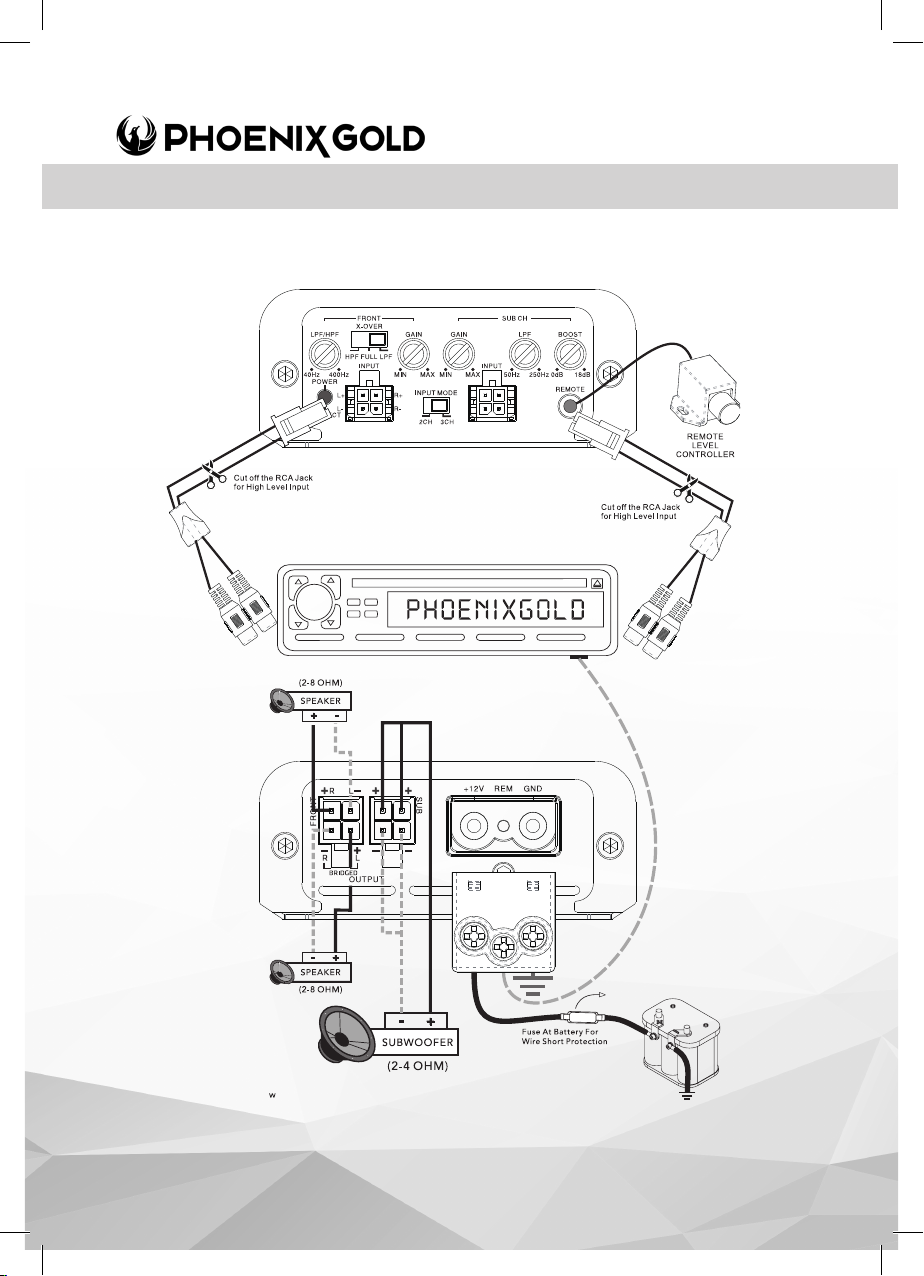
ZXM500.4 Install - BRIDGED
Page 6
© 2024 Phoenix Gold - www.phoenixgold.com
ZXM AMPLIFIERS - Connection Diagrams
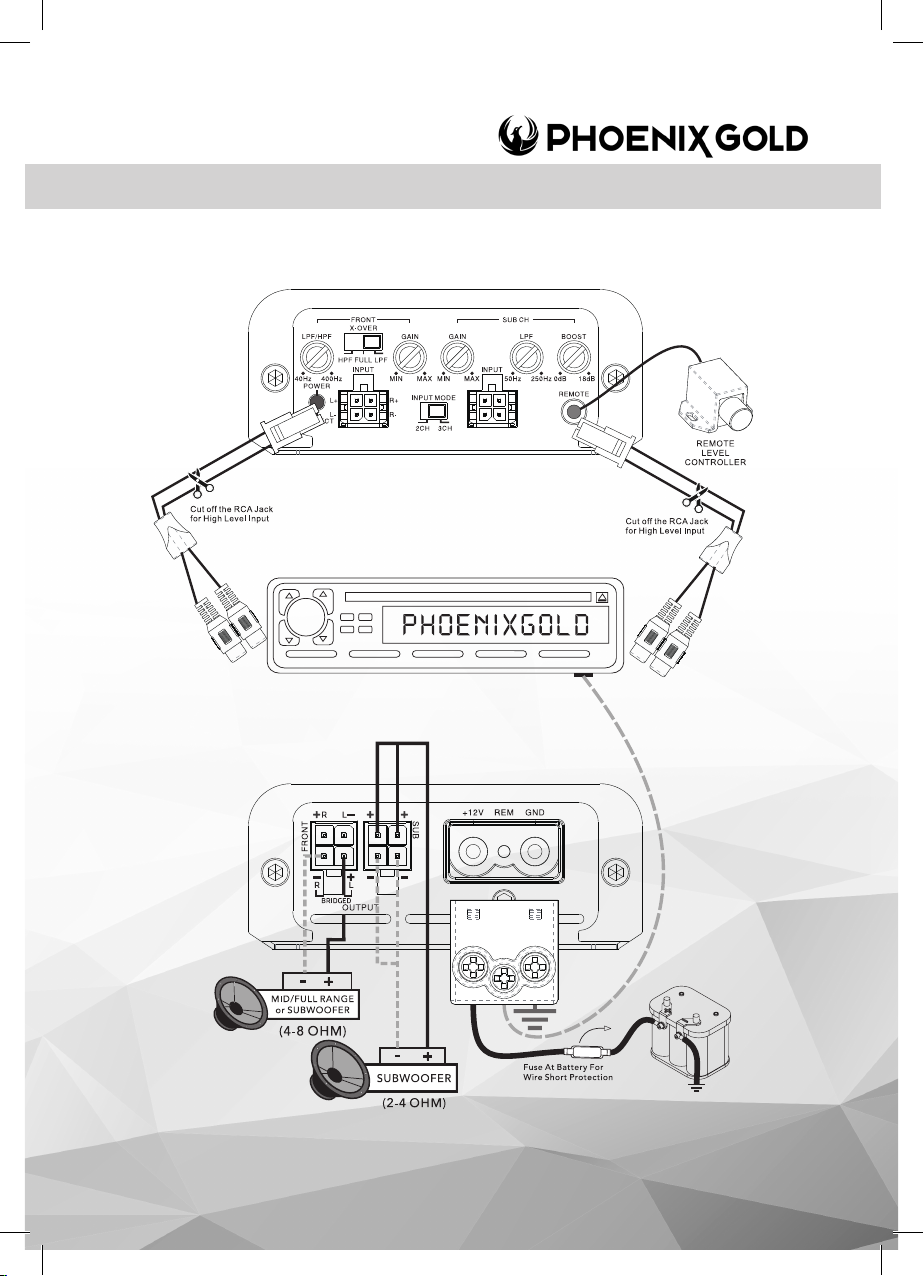
ZXM600.3 Install - NORMAL
Page 7
© 2024 Phoenix Gold - www.phoenixgold..com
ZXM AMPLIFIERS - Connection Diagrams
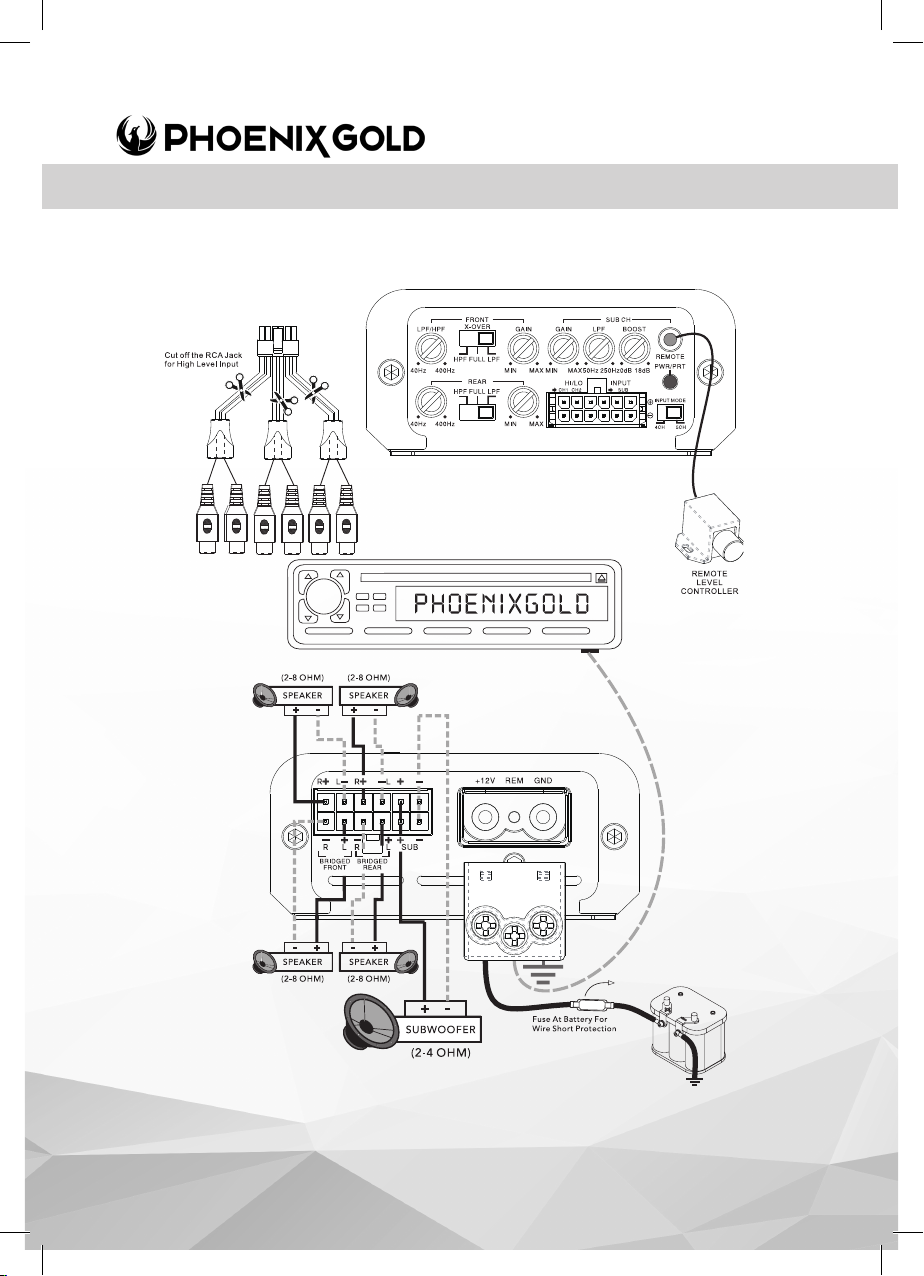
ZXM600.3 Install - BRIDGED
Page 8
© 2024 Phoenix Gold - www.phoenixgold.com
ZXM AMPLIFIERS - Connection Diagrams
ZXM700.5 Install - NORMAL
Page 9
© 2024 Phoenix Gold - www.phoenixgold..com
ZXM AMPLIFIERS - Connection Diagrams
ZXM700.5 Install - BRIDGED
Page 10
© 2024 Phoenix Gold - www.phoenixgold.com
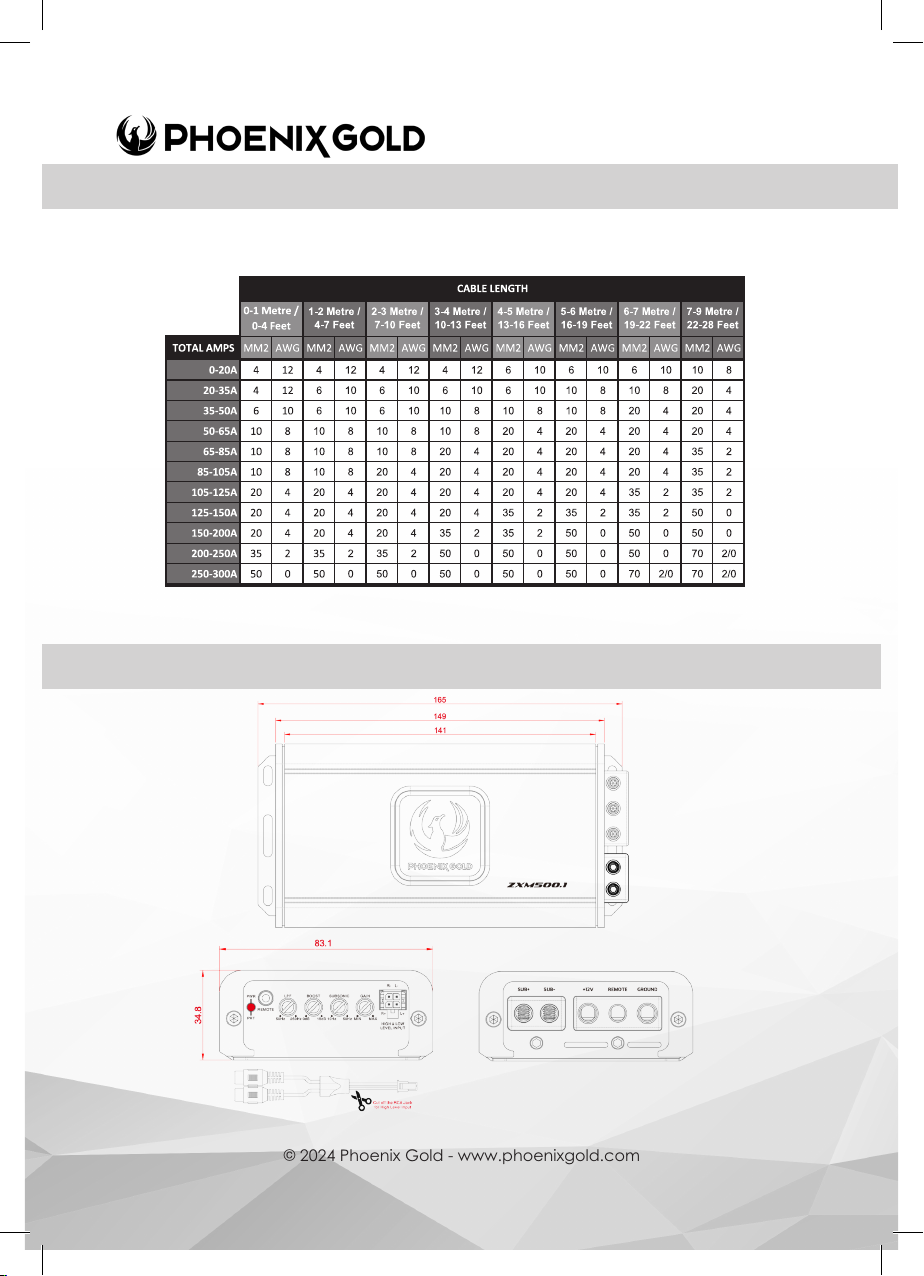
Connection - Cable Information
Ensure the audio system is turned o before making any connections to the amplifier, speakers, or source unit.
Failure to do so could result in permanent damage to the audio system. Ensure the correct gauge cable is used for all
connections; consult the cable calculator diagram below for the correct gauge cable for your installation.
If aluminium wire is used, it is recommended to increase the size of the gauges to compensate.
The calculation of cable gauge size considers the resistance of terminal connections.
ZXM500.1 - Line Diagram
Page 11
© 2024 Phoenix Gold - www.phoenixgold..com
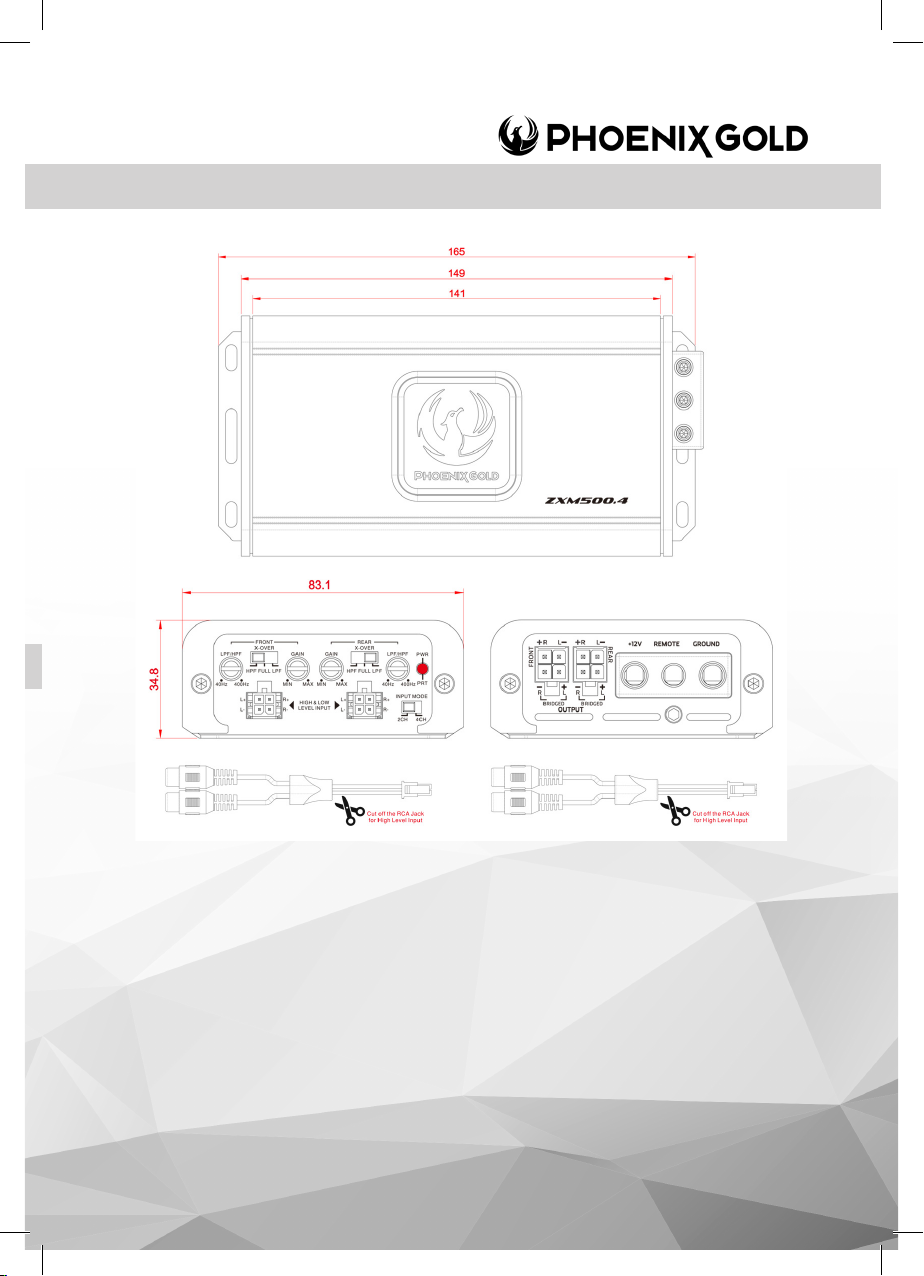
ZXM500.4 - Line Diagram
Page 12
© 2024 Phoenix Gold - www.phoenixgold.com
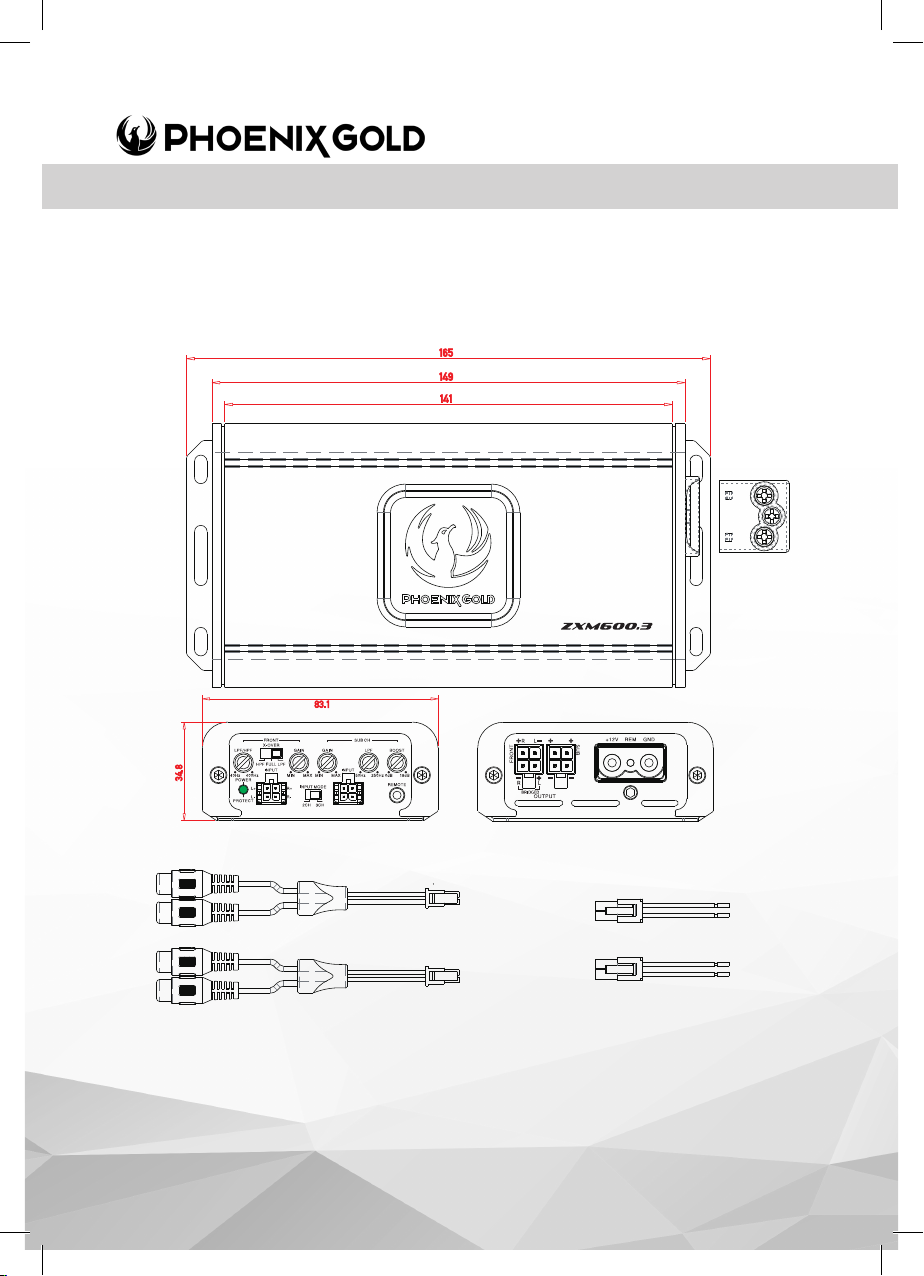
ZXM600.3 - Line Diagram
Page 13
© 2024 Phoenix Gold - www.phoenixgold..com
ZXM700.5 - Line Diagram
Page 14

© 2024 Phoenix Gold - www.phoenixgold.com
Page 15

© 2024 Phoenix Gold - www.phoenixgold..com
Page 16

© 2024 Phoenix Gold - www.phoenixgold.com
Disclaimer
Always ensure the enclosure is securely attached, to avoid movement. PHOENIX GOLD accepts no responsibility for
damage or injury in relation to inappropriate securing of this product.
Phoenix Gold Product Warranty
LIMITED WARRANTY ON AMPLIFIERS
Phoenix Gold warrants this product to be free of defects in materials and workmanship for a period of one (1) years
from the original date of purchase. This warranty is not transferable and applies only to the original purchaser from an
authorized Phoenix Gold dealer. Should service be necessary under this warranty for any reason due to manufacturing
defect or malfunction, Phoenix Gold or it’s Country distributor / reseller will (at its discretion) repair or replace the
defective product with new or re-manufactured product at no charge. Damage caused by the following is not
covered under warranty: accident, misuse, abuse, product modification or neglect, failure to follow installation
instructions, unauthorized repair attempts, misrepresentations by the seller. This warranty does not cover incidental or
consequential damages and does not cover the cost of removing or reinstalling the unit(s). Cosmetic damage due to
accident or normal wear and tear is not covered under warranty.
REV 22/05/24
 Loading...