

Page 1
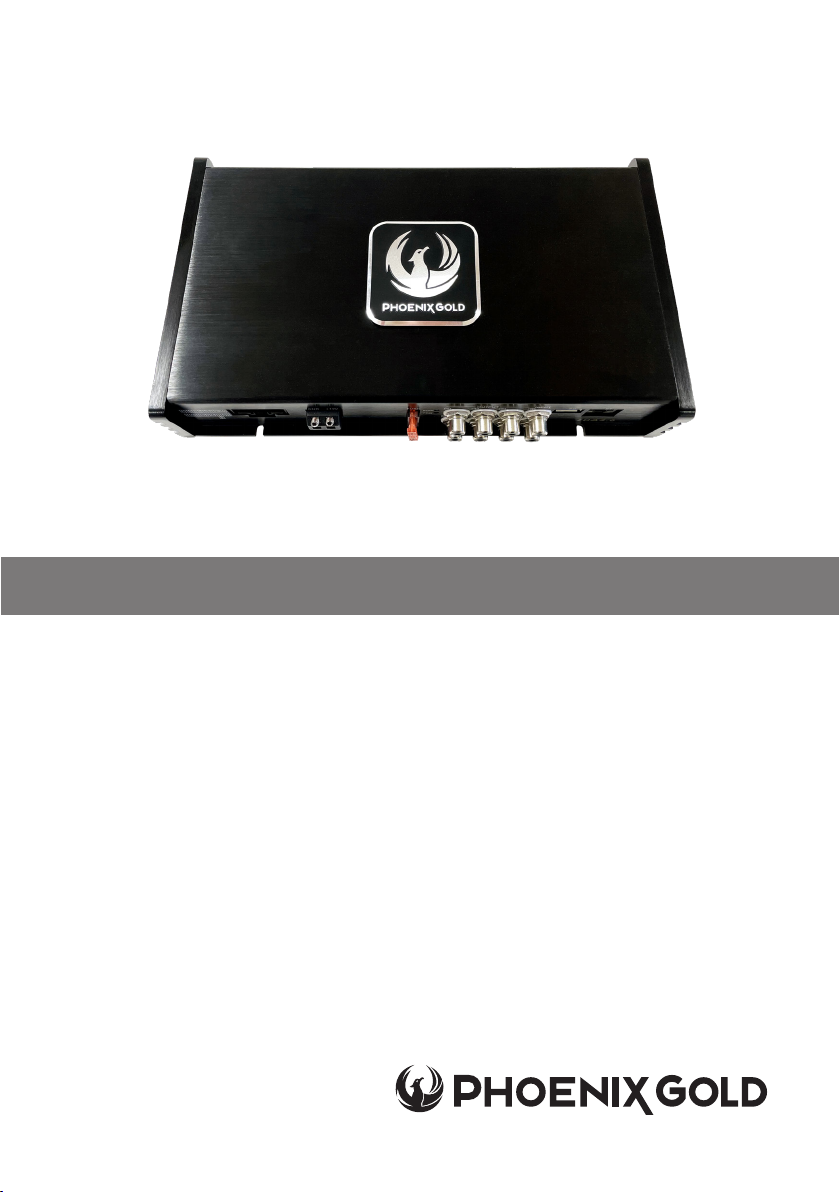
4-Channel DSP Amplier
Model: ZDA4.6
Model: Z110-V2, Z112-V2
KEY FEATURES
• DSP + Amplier
• 800W Max Power, 400W RMS
• 4x60W @ 4Ohm, 4x100W @ 2Ohm
with DSP control
• PC Control software
(and APP control ready iOS and Android)
• BT streaming sold separately
(inludes APP Control)
Page 2
ZDA4.6 Owners Manual
ZDA4.6 - DSP AMPLIFIER
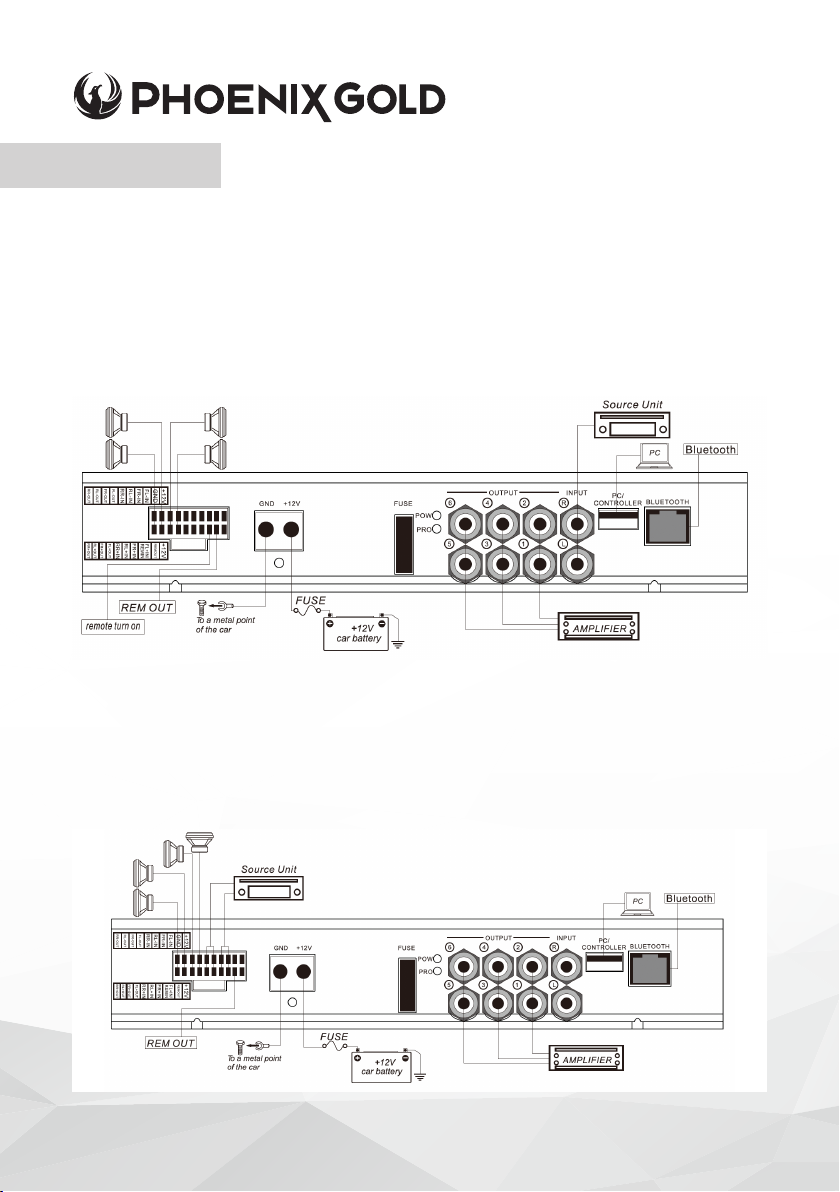
INSTALLATION
WHEN USING AN RCA INPUT:
u First, connect the positive wire (12v) to the vehicle battery (20A fuse is required)
u Next, connect the negative wire to the vehicle chassis to create a GND connection.
u Put the REM from main engine to “FL+” on the ZDA4.6 HI INPUT
u Finally, ensure all other connections are made, plug in PCA out, and ensure the unit
is xed securely in a location free of dirt and dust with enough ventilation for optimum
operation.
WHEN USING A HI INPUT:
u First, connect the positive wire (12v) to the vehicle battery (20A fuse is required)
u Next, connect the negative wire to the vehicle chassis in order to create
a ground connection.
u Finally, ensure all other connections are made, plug in PCA out, and ensure the unit
is xed securely in a location free of dirt and dust with enough ventilation for optimum
operation.
© 2021 Phoenix Gold • www.phoenixgold-eu.com
Page 3
ZDA4.6 Owners Manual
ZDA4.6 - DSP AMPLIFIER
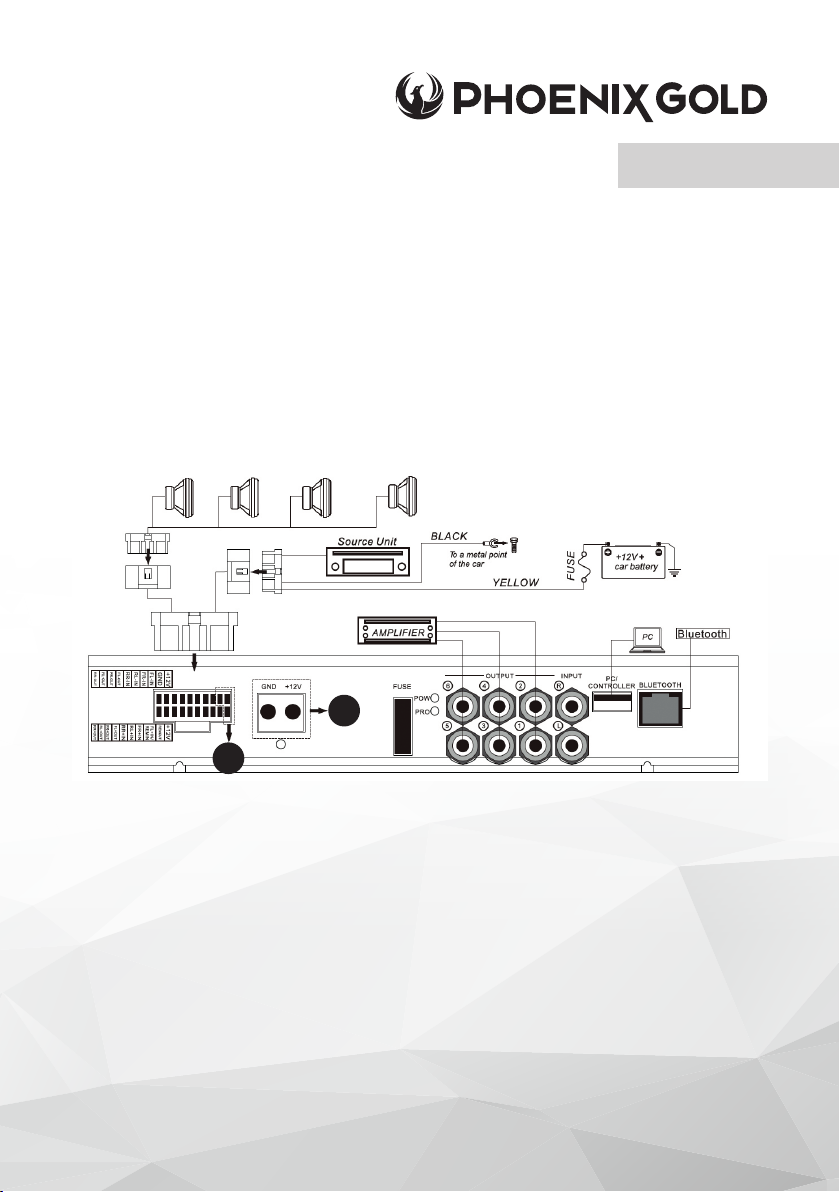
INSTALLATION - CONTINUED
u First, ensure the mounting location is free of dirt and dust and that there is
enough ventilation in order to achieve optimum performance and avoid
overheating when the ZDA4.6 is in use.
u Keep the wire connections as short as possible but with sufcient length in
order to minimise any power losses and provide a higher audio output of
the system.
u Where possible route all power and speaker wiring through any existing
wire channels within the vehicle in order to ensure wiring does not pass
through sharp edged metal.
2
1
The Power Connection Mode shown (1) only applies to a power outlet less
than 40Watts; in other cases, please use power connection mode (2)
© 2021 Phoenix Gold • www.phoenixgold-eu.com
Page 4
ZDA4.6 Owners Manual
ZDA4.6 - DSP AMPLIFIER
SOFTWARE OPERATION INSTRUCTION
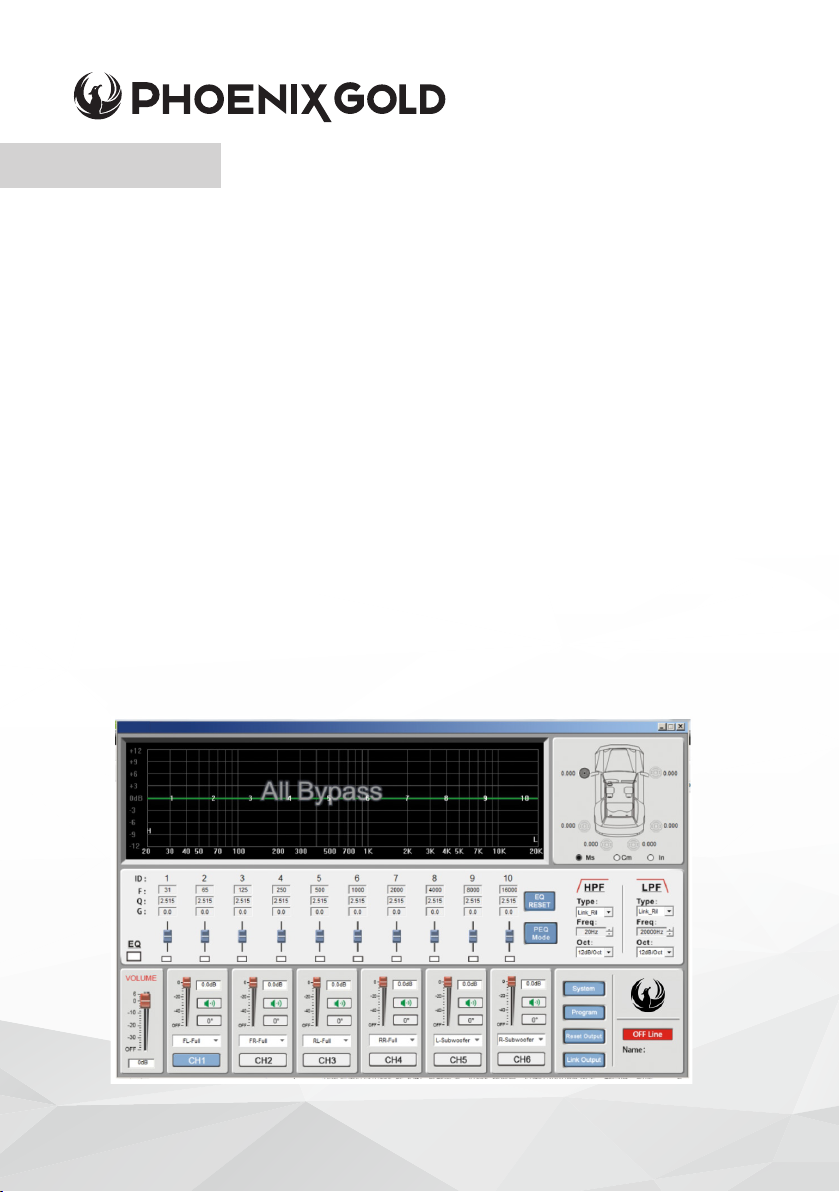
The PC software supplied offers a convenient and user-friendly interface that
allows you to save various settings and parameters from the ZDA4.6, along with
letting you switch or recover settings saved for multiple vehicles.
As well as the software included with the ZDA4.6, it can also be downloaded
here: phoenixgold-eu.com if required.
INSTALLATION
Windows XP/Vista/Windows 7/8/9/10.
The ZDA4.6 software is a standard WIN32 executable le named ZDA4.6.exe.
This software will need to be directly installed on your hard drive in order to
function.
OPERATION
Insert the CD in your computer. Once loaded, locate the ZDA4.6.exe le and
copy into a chosen location. Once copied, double click the .exe.le to open.
This will automatically create a ‘Data File’ in the same location. Once opened
the main interface will look like the image below.
© 2021 Phoenix Gold • www.phoenixgold-eu.com
Page 5
ZDA4.6 Owners Manual
ZDA4.6 - DSP AMPLIFIER
SOFTWARE OPERATION INSTRUCTION
USB INTERFACE CONNECTION
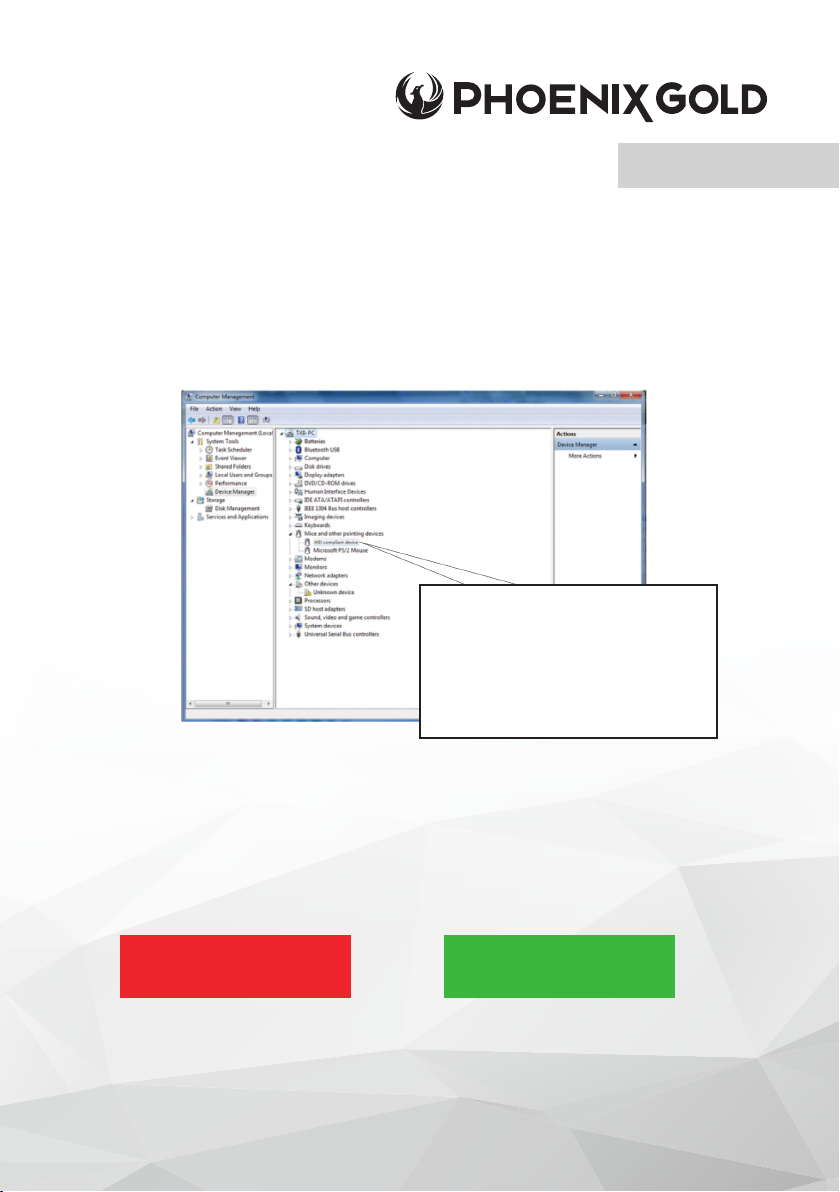
Connect the DSP to your PC via the USB cable supplied. The PC will locate the
device, install and upgrade automatically. After a few seconds you will see a
new device added and called HID-compliant device. See image below:
The device appearing here means
the computer has identied the
machine successfully and can
move on to the next step to get
the software online.
If the DSP software is OFFLINE, the button on the main interface screen will be
RED. Once the DSP is connected, a dialogue box will show a ‘CONNECTING TO
DATA’ message on screen. After a few seconds, the OFFLINE button will change
to ONLINE and become GREEN.
OFFLINE ONLINE
© 2021 Phoenix Gold • www.phoenixgold-eu.com
Page 6
ZDA4.6 - DSP AMPLIFIER
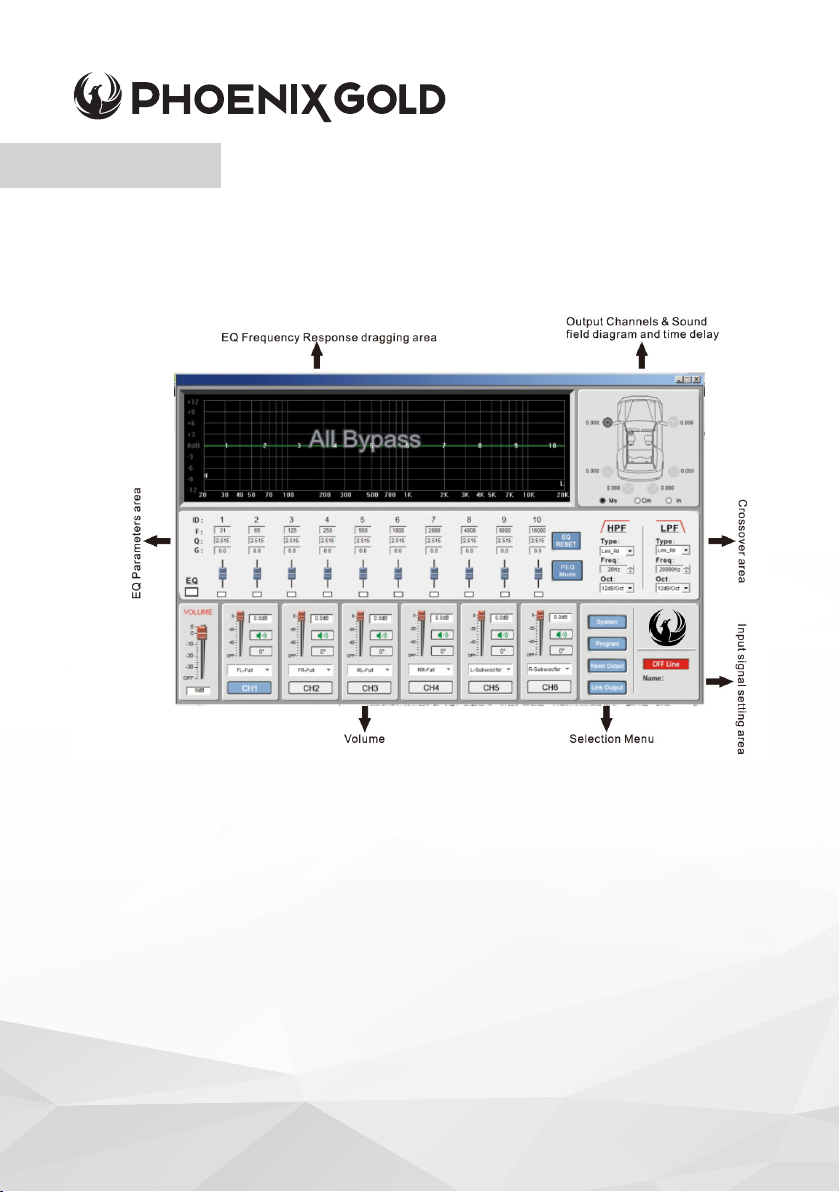
SOFTWARE INTERFACE
ZDA4.6 Owners Manual
© 2021 Phoenix Gold • www.phoenixgold-eu.com
Page 7
ZDA4.6 Owners Manual
ZDA4.6 - DSP AMPLIFIER
EQUALISER FREQUENCY RESPONSE DRAGGING AREA
This area displays the output signal of the 10-BAND EQ parameters and
crossover parameters clearly and you can drag the mouse to set the
parameters. Left-click and drag the mouse in this 1-10 Band EQ display area
to adjust the EQ parameters; Left-click and drag the mouse in the display area
HPF (high pass or low cut) or LPF (low pass or high cut) to adjust the High Pass
(low cut) or Low Pass (high cut) frequency.
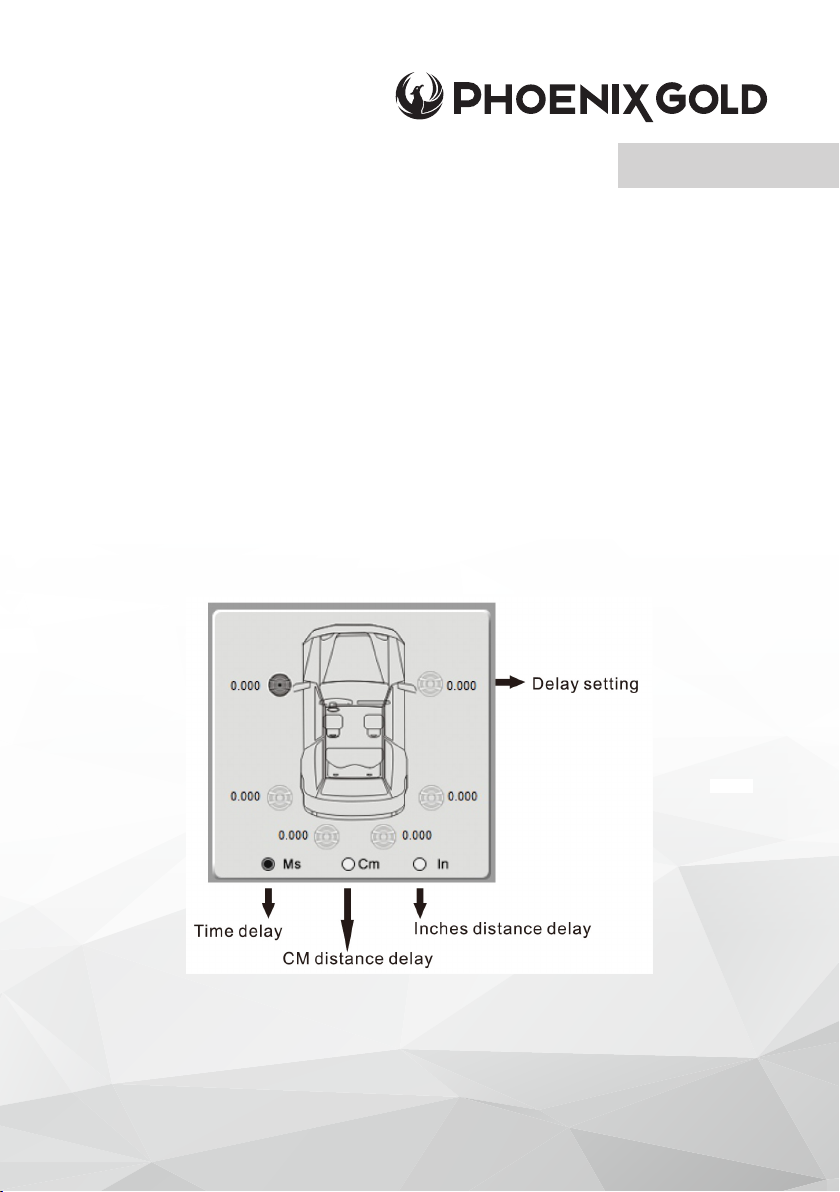
OUTPUT CHANNELS CORRESPONDING TO THE SOUND FILED
AND TIME DELAY
© 2021 Phoenix Gold • www.phoenixgold-eu.com
Page 8
ZDA4.6 Owners Manual
ZDA4.6 - DSP AMPLIFIER
SOFTWARE OPERATION INSTRUCTION
OUTPUT CHANNELS
This area displays the CH1-CH6 output channel settings and you can click the
mouse in the corresponding output channel speaker for setting. When the
current editable channel is in white you can set the parameters accordingly.
TIME DELAY
This area displays the CH1-CH6 output channels time delay and you can left
click the mouse directly in the output channel speaker to nish adjustment.
There are MS/CM/ INCH unit buttons for time delay and distance delay setting.
Click the white letter in the editing area and you can input a number, roll the
mouse or use the keyboard arrow keys to nish the delay setting. The parameters range is listed below:
A MS: 0.000 MS - 20.000 MS
B CM: 0.00 CM - 692.00 CM
C INCH: 0.00 INCH - 272.37 INCH
CROSSOVER AREA
© 2021 Phoenix Gold • www.phoenixgold-eu.com
Page 9
ZDA4.6 Owners Manual
ZDA4.6 - DSP AMPLIFIER
SOFTWARE OPERATION INSTRUCTION
CROSSOVER AREA - CONTINUED
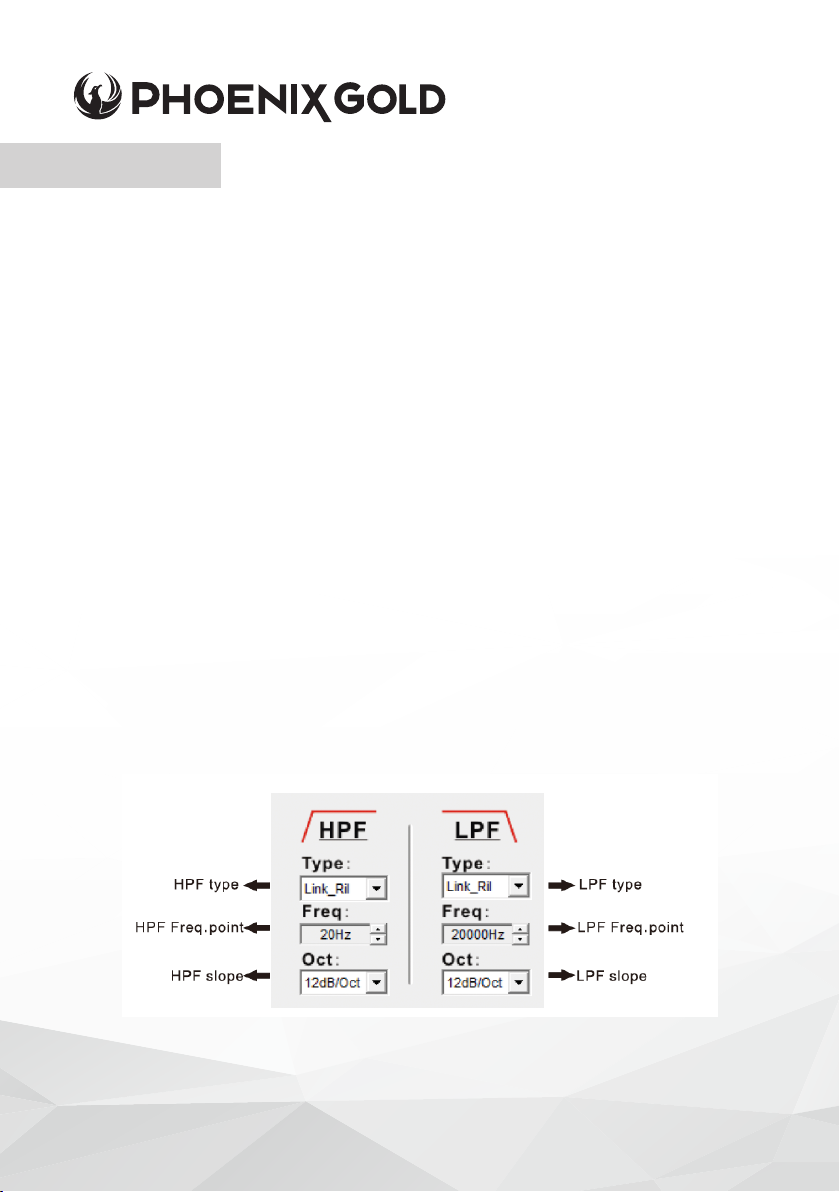
1. TYPE SETTING
Left-click the drop-down button
of the HPF and choose lter type
below:
A Butterworth
B Linkwitz-Riley
C Bessel
2. FREQUENCY SETTING
Input the numbers, roll the mouse or
use the keyboard arrow keys to set the
frequency adjustment range
A HPF Frequency 20HZ-20KHz
B LPF Frequency 20-20KHz
3. SLOPE SETTING
Left-Click the drop-down button of the HPF or LPF slope to choose the lter
slope there are 6dB/oct - 12dB/oct
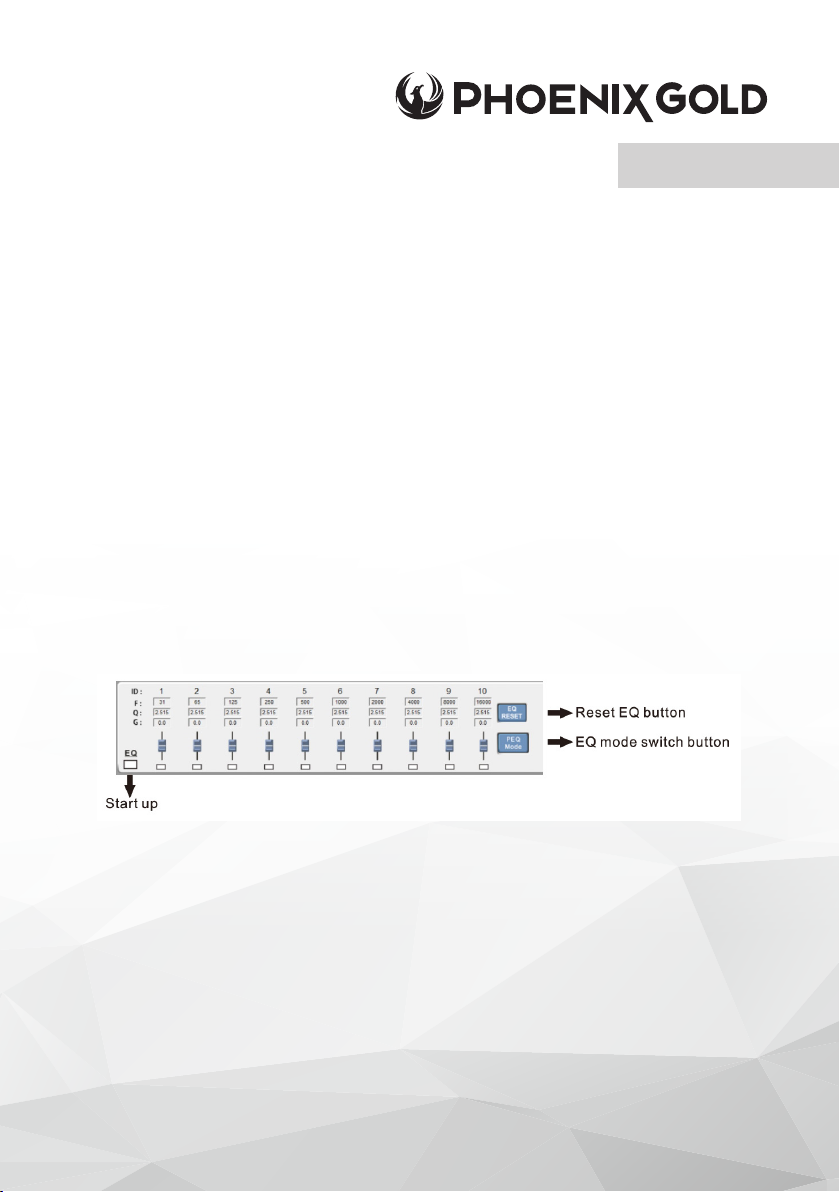
EQ PARAMETERS AREA
1. FREQUENCY
In the parametric equaliser mode, you can adjust the frequency range (20Hz 20000Hz) by inputting numbers, rolling the mouse or using keyboard arrow keys.
In the graphic equaliser mode, the frequency is the 1/3 oct of the default value
assignment and will not show a specic value.
2. Q-VALUE
In the Parametric equaliser mode, you can adjust the Q value range
(0.404-28.82) by inputting the numbers, rolling the mouse or using the keyboard
arrow keys. In the graphic equaliser mode, the frequency is the 1/3 oct of the
default value assignment; and will not show a specic value.
© 2021 Phoenix Gold • www.phoenixgold-eu.com
Page 10

ZDA4.6 Owners Manual
ZDA4.6 - DSP AMPLIFIER
SOFTWARE OPERATION INSTRUCTION
EQ PARAMETERS - CONTINUED
3. GAIN
You can adjust the gain by putting the numbers in directly, using the keyboard
arrows keys. Range (-12dB~+12dB) or push the buttons directly.
4. START BUTTON
There are 10 buttons for the 10-BAND EQ. Each band has 1 button that you can
start this band accordingly.
5. RESET EQ BUTTON
Click this button and a dialogue box will appear. Click YES to reset all the
10-band (frequency, Q volume and gain volume reset to the preset, which is
distributed evenly according to the 1/3 oct)
6. EQ MODE SWITCH BUTTON
This is a switch button for the parametric equaliser mode and the graphic
equaliser mode. Click this button and a dialogue box will appear. Click YES to
switch the EQ mode. The difference between graphic EQ mode and
parametric EQ mode as below:
A. GRAPHIC EQUALISER
Using the constant-Q technology,
set a fader that ensures the lter
frequency band never changes per
each frequency point, no matter the
boost or decay of the frequency.
Using the graphic equaliser structure
is much more simple and straight
forward and is commonly used in the
professional audio studios to get a lot
more ne composition.
© 2021 Phoenix Gold • www.phoenixgold-eu.com
B. PARAMETRIC EQUALISER
For further adjustment in detail for
various parameters including the
frequency band, frequency point,
gain Q-value etc, you can modify
the sound to make it brighter, richer
and more colourful to get the artistic
effect that you wanted.
Page 11
ZDA4.6 Owners Manual
ZDA4.6 - DSP AMPLIFIER
SOFTWARE OPERATION INSTRUCTION
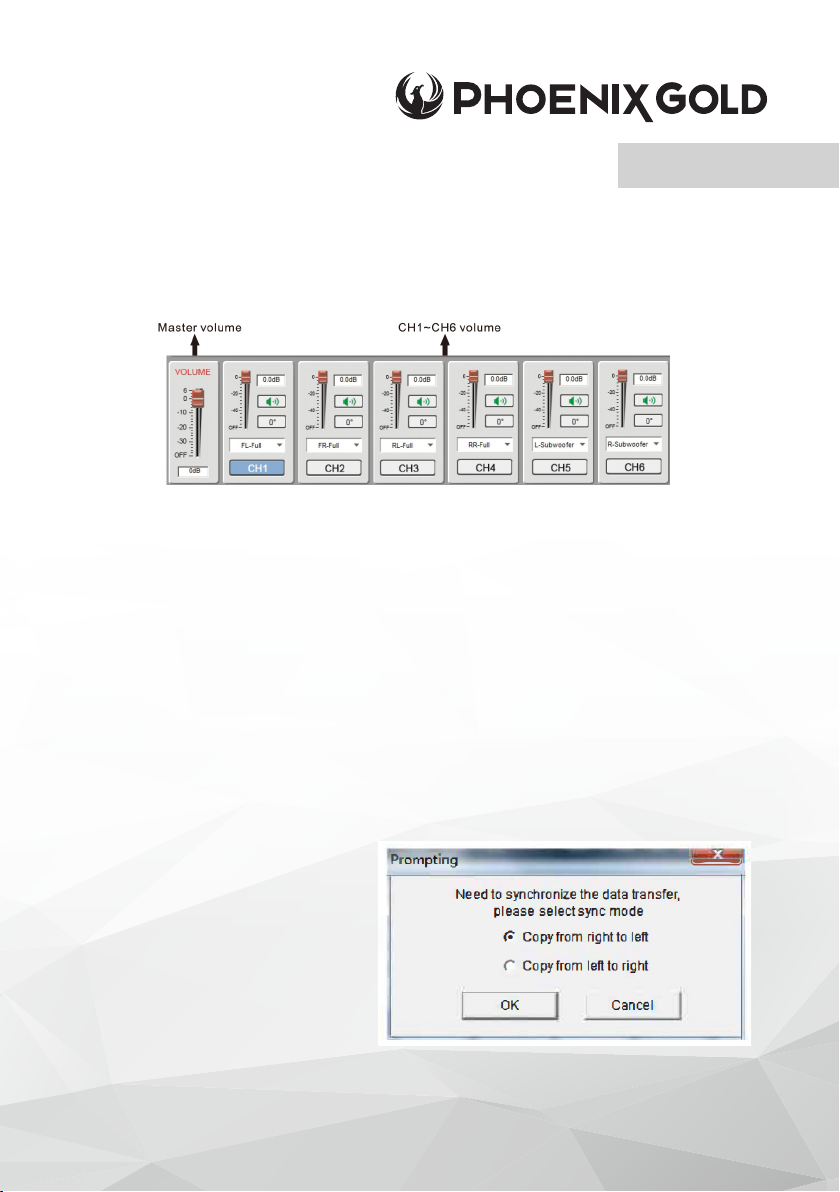
VOLUME ADJUSTMENT AREA
1. MASTER VOLUME ADJUSTING
Below the master volume there is a data frame. Left-click and set the volume
with exact values or drag the volume buttons to set the volume adjustment
range (39.9dB~6dB turn-off)
2. CH1-CH6 OUTPUT CHANNEL VOLUME ADJUSTING
Below the CH1-CH6 channel there is a data frame. Left-click and set the
volume with exact values or drag the volume buttons to set the volume
adjustment range (39.9dB~6dB turn-off)
3. CH1-CH6 OUTPUT CHANNEL MUTE
Left-click the icon under the CH1 - CH6 channel volume and the icon will
change. This enters MUTE state, click again to cancel MUTE.
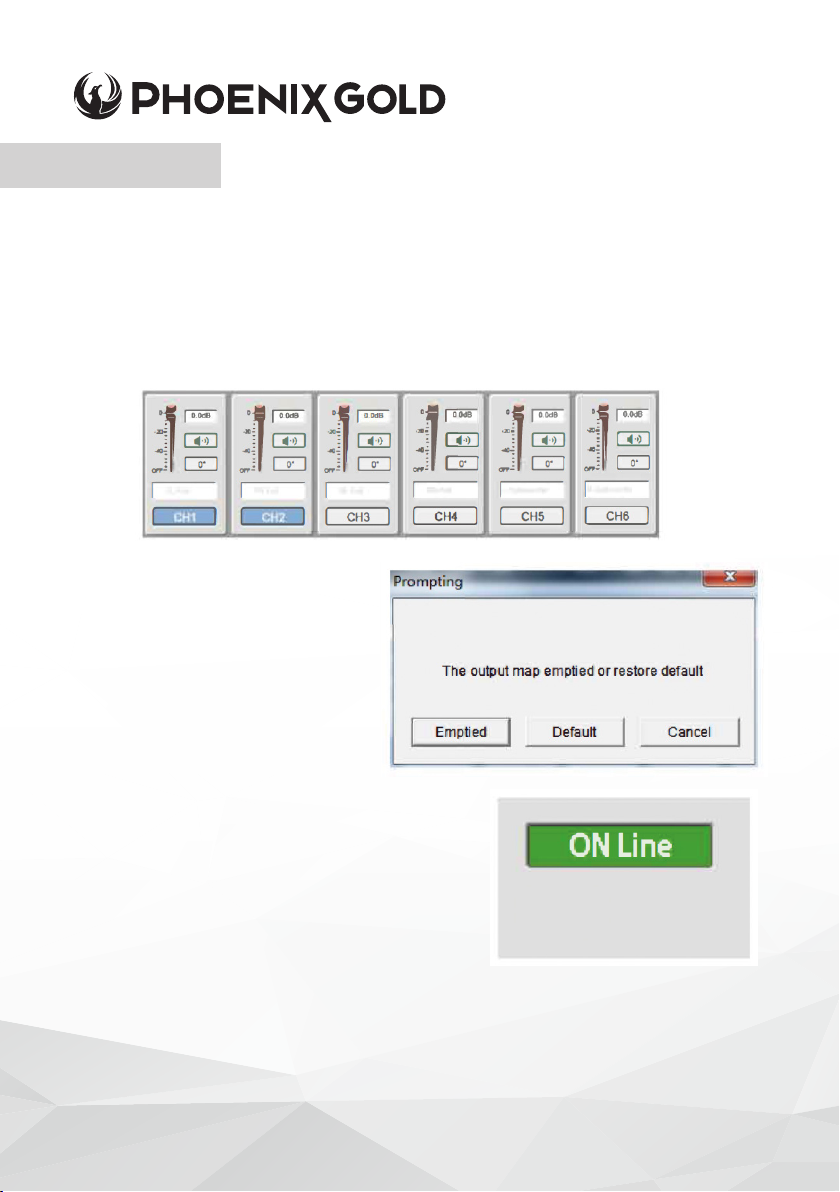
4. OUTPUT
Left click the output link, and the
system as show in the diagram:
© 2021 Phoenix Gold • www.phoenixgold-eu.com
Page 12
ZDA4.6 Owners Manual
ZDA4.6 - DSP AMPLIFIER
SOFTWARE OPERATION INSTRUCTION
VOLUME ADJUSTMENT AREA - CONTINUED
Choose the synchronisation style and click OK to enter into a new LINK mode
(as shown below) Click the “UNLINK” button to exit the LINK mode.
5. RESET OUTPUT
Left-click the “RESET OUTPUT” to
pop-up a dialogue box as below,
and choose “Empty”, “Default”
or “Cancel”.
6. SIGNAL INPUT AREA
Current Signal State.
© 2021 Phoenix Gold • www.phoenixgold-eu.com
Page 13
ZDA4.6 Owners Manual
ZDA4.6 - DSP AMPLIFIER
SOFTWARE OPERATION INSTRUCTION
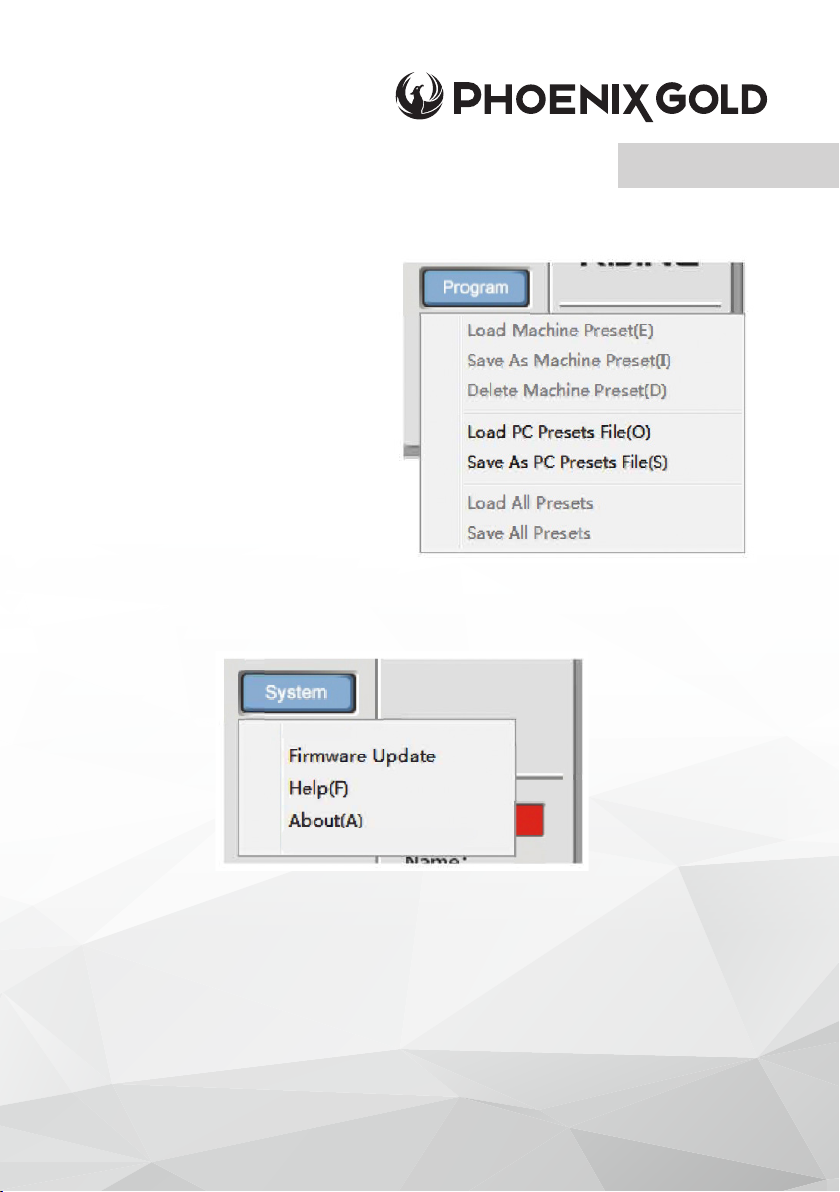
7. OPTION MENU
PROGRAM
Click programs and pop-up a
menu as below, then choose the
option accordingly to nish save,
import or cancel operation
SYSTEM
Left-click the system and show up as below options
1. LANGUAGE SWITCH
2. FIRMWARE UPGRADES - For Software Upgrade
3. HELP - For System Help
4. ABOUT - For Software Version Info
© 2021 Phoenix Gold • www.phoenixgold-eu.com
Page 14
ZDA4.6 Owners Manual
ZDA4.6 - DSP AMPLIFIER
APP SOFTWARE OPERATION INSTRUCTIONS
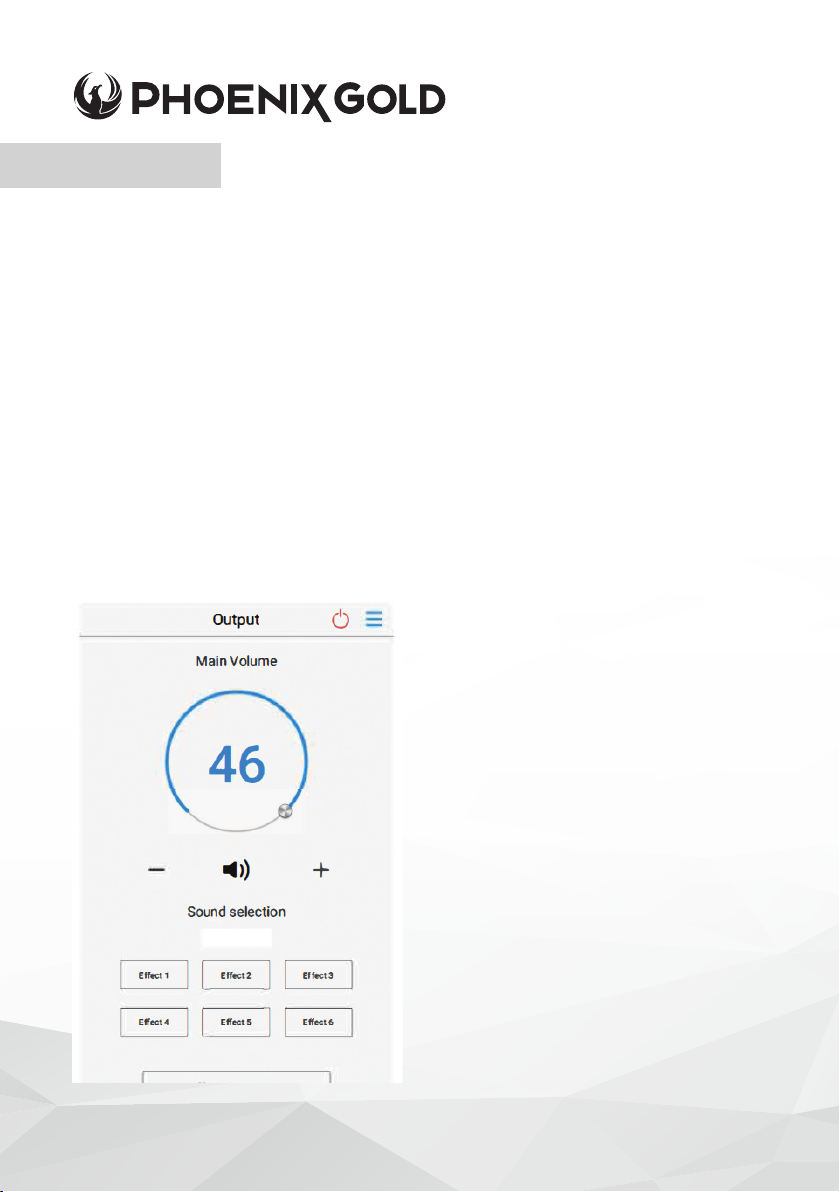
To support Android and iOS operation the system needs Bluetooth to function.
The Bluetooth is optional and can support audio play and adjust the iOS &
Android software.
HOW TO GET APP SOFTWARE
iOS APP software can be downloaded from APP store directly. Android APP
software is recorded on the CD included with the machine in the box. Also you
can download the latest software and more optimal upgrade les from our
company website.
APP SOFTWARE AND INSTALLATION
The iOS and Android APP software installation are similar, and here is the
Android APP software installation as an example:
OPERATION ENVIRONMENT Con-
nect to the Android system. Find the
“ZDA4.6.apk” executable les on the
CD Phoenixgold-eu.com, and copy to
your Android operating system, click
this le and choose install to nish installation in few seconds. Then double-click
to open this APP software and enter
into the software main interface:
© 2021 Phoenix Gold • www.phoenixgold-eu.com
Page 15
ZDA4.6 Owners Manual
ZDA4.6 - DSP AMPLIFIER
APP SOFTWARE OPERATION INSTRUCTIONS
SOFTWARE ONLINE
Before connecting to online, please make sure the Android system Bluetooth
is open, and nd the name “ZDA4.6” in the Bluetooth connection interface,
then click to make a connection. Once you are notied that the connection is
successful, you will not need make connection again.
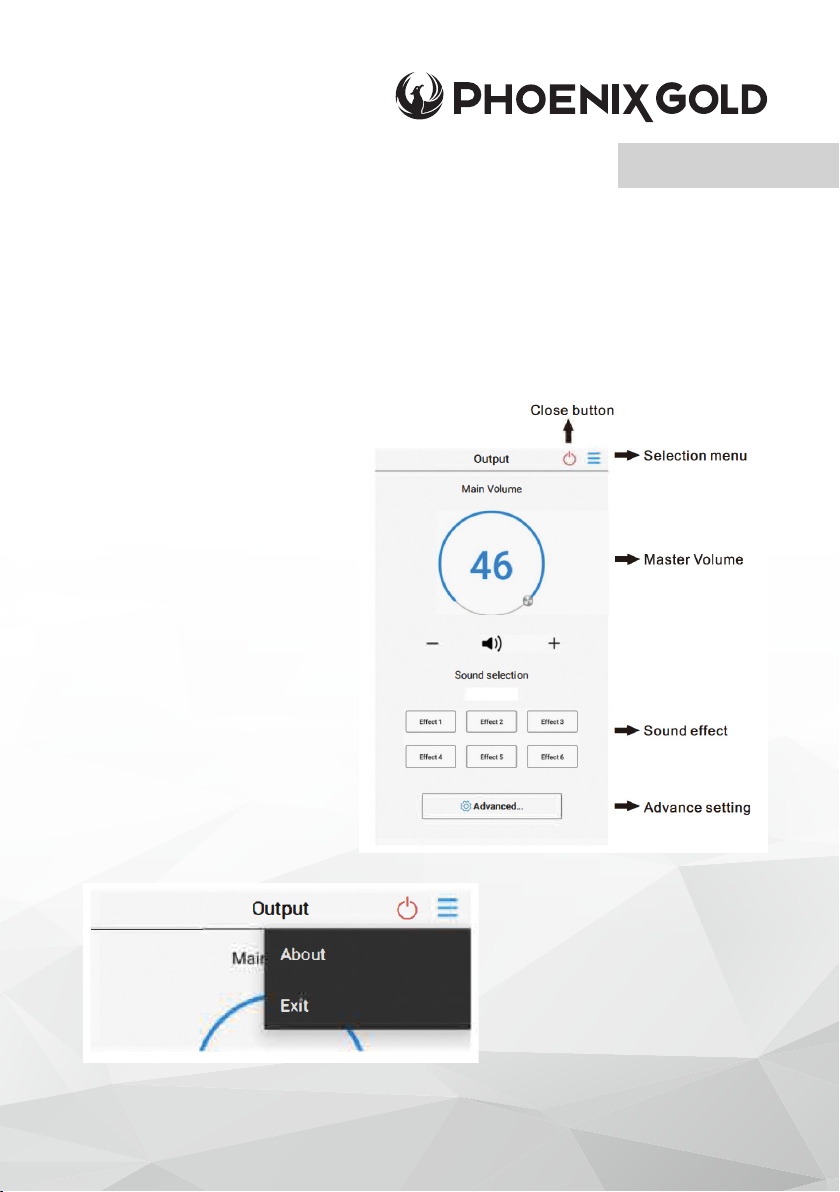
SOFTWARE INTERFACE
CLOSE BUTTON
Click this button to exit
the software.
SELECTION MENU
Click this selection menu
button to enter the drop down
menu opposite.
© 2021 Phoenix Gold • www.phoenixgold-eu.com
Page 16
ZDA4.6 - DSP AMPLIFIER
APP SOFTWARE OPERATION INSTRUCTIONS
ZDA4.6 Owners Manual
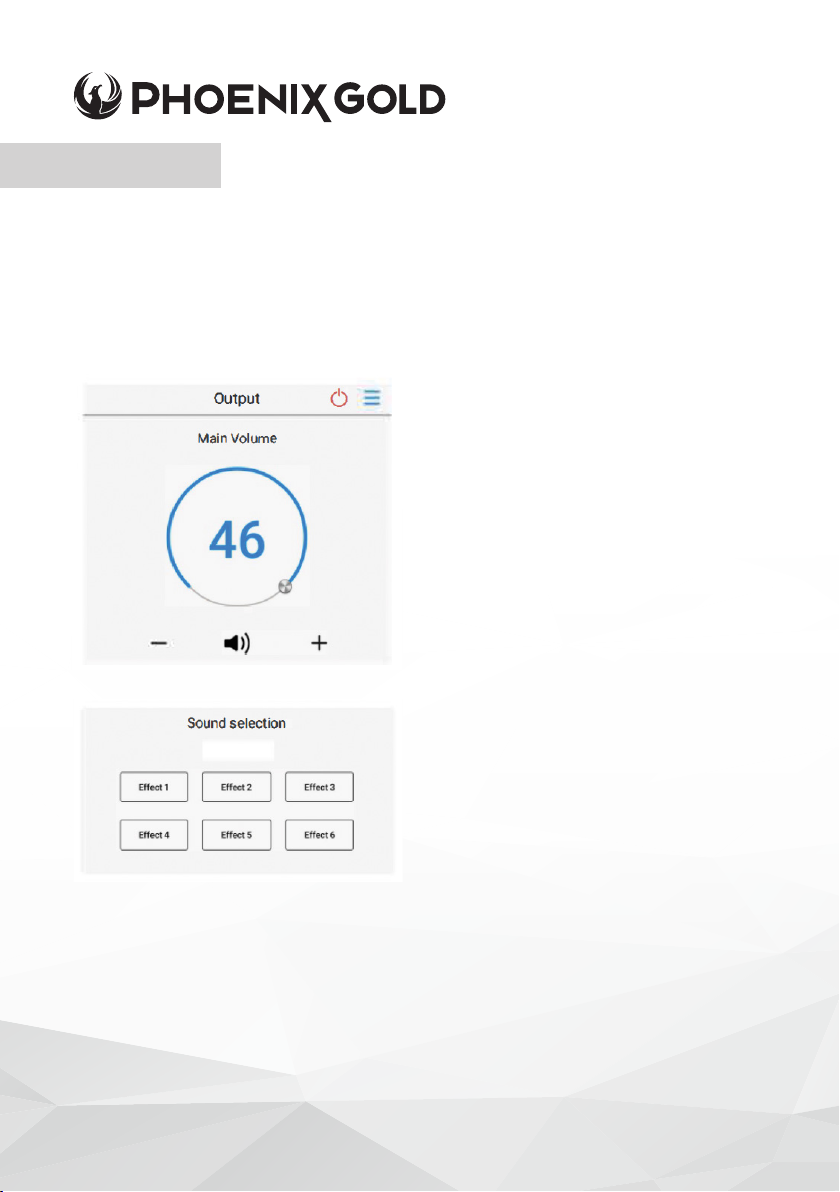
ABOUT
Display software version
EXIT
Click this button to exit software
MASTER VOLUME
You can adjust the master volume
by clicking the”+”/”-” or clockwise
or anti-clockwise for the fader
(adjust range 0dB-46dB)
SOUND EFFECT
You can select any sound effect from
the presets. The sound effect name
will display in the choice box once
selected.
© 2021 Phoenix Gold • www.phoenixgold-eu.com
Page 17
ZDA4.6 Owners Manual
ZDA4.6 - DSP AMPLIFIER
APP SOFTWARE OPERATION INSTRUCTIONS
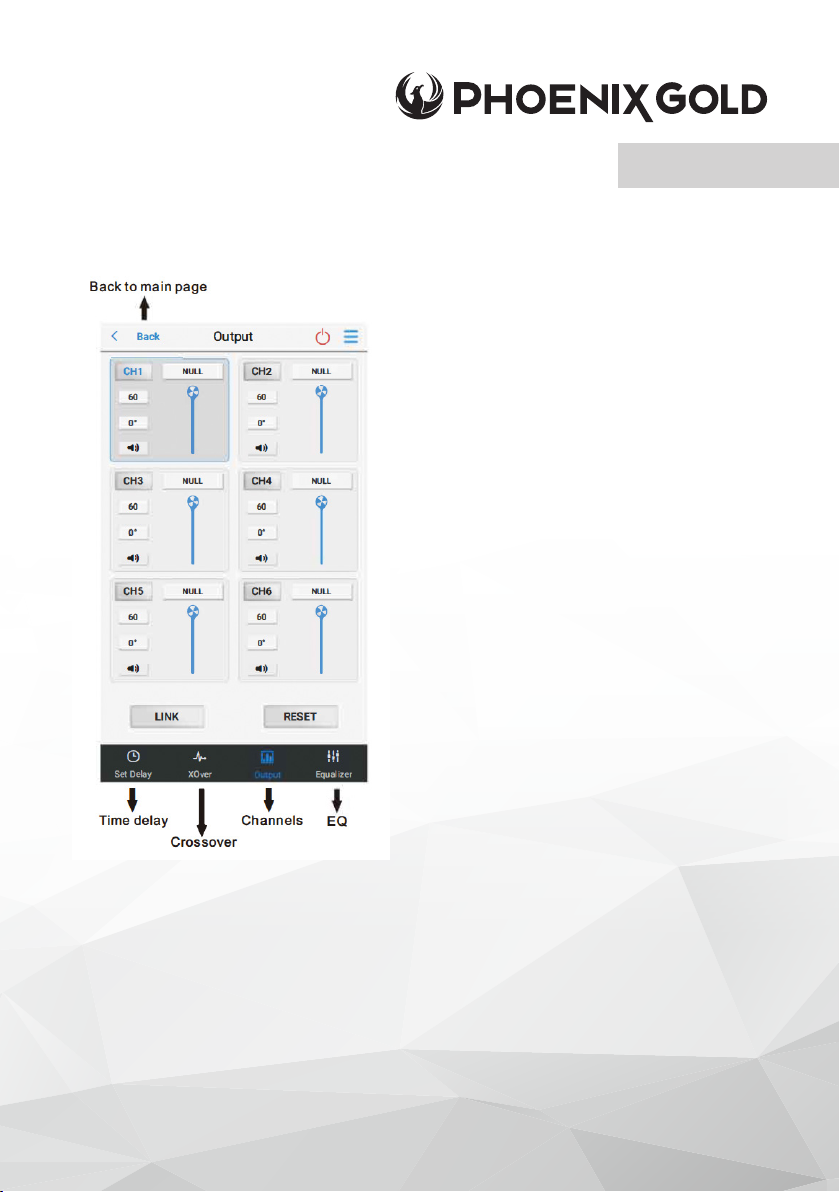
ADVANCED SETTINGS
Click advance settingto enter
BACK TO MAIN PAGE
Click “BACK” to exit
© 2021 Phoenix Gold • www.phoenixgold-eu.com
Page 18
ZDA4.6 - DSP AMPLIFIER
APP SOFTWARE OPERATION INSTRUCTIONS
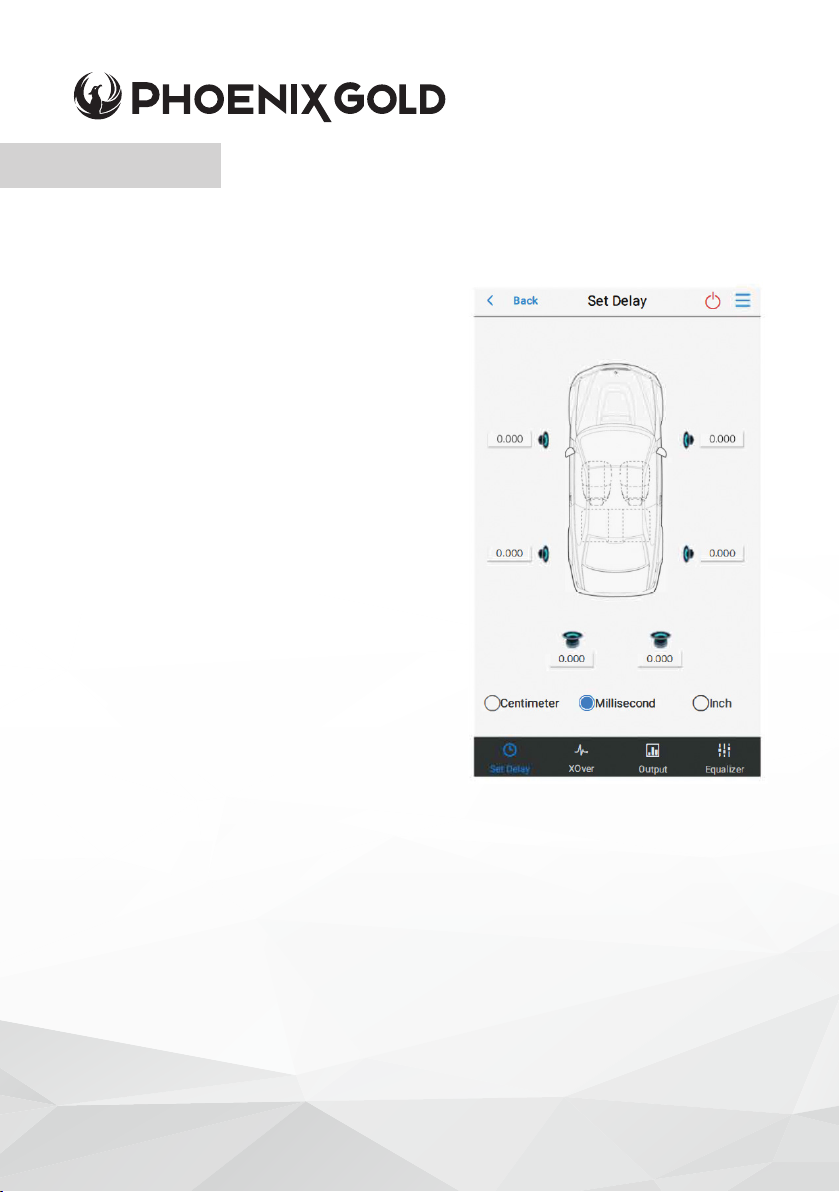
TIME DELAY
You can select any sound effect from the
presets. The sound effect name will display
in the choice box once you selected the
sound effect.
Display CH1 -CH6 output channels time
delay conguration, and you can set up
directly for each speaker in the designated
area. In this area you can click MS, CM
and INCH these 3 unit buttons to set
up time delay and distance.
The parameters as bellow:
A MS 0.00 MS -20.000 MS
B CM 0.00 CM - 692.00 CM
C INCH 0.00 - 272.37 INCHES
ZDA4.6 Owners Manual
© 2021 Phoenix Gold • www.phoenixgold-eu.com
Page 19
ZDA4.6 Owners Manual
ZDA4.6 - DSP AMPLIFIER
APP SOFTWARE OPERATION INSTRUCTIONS
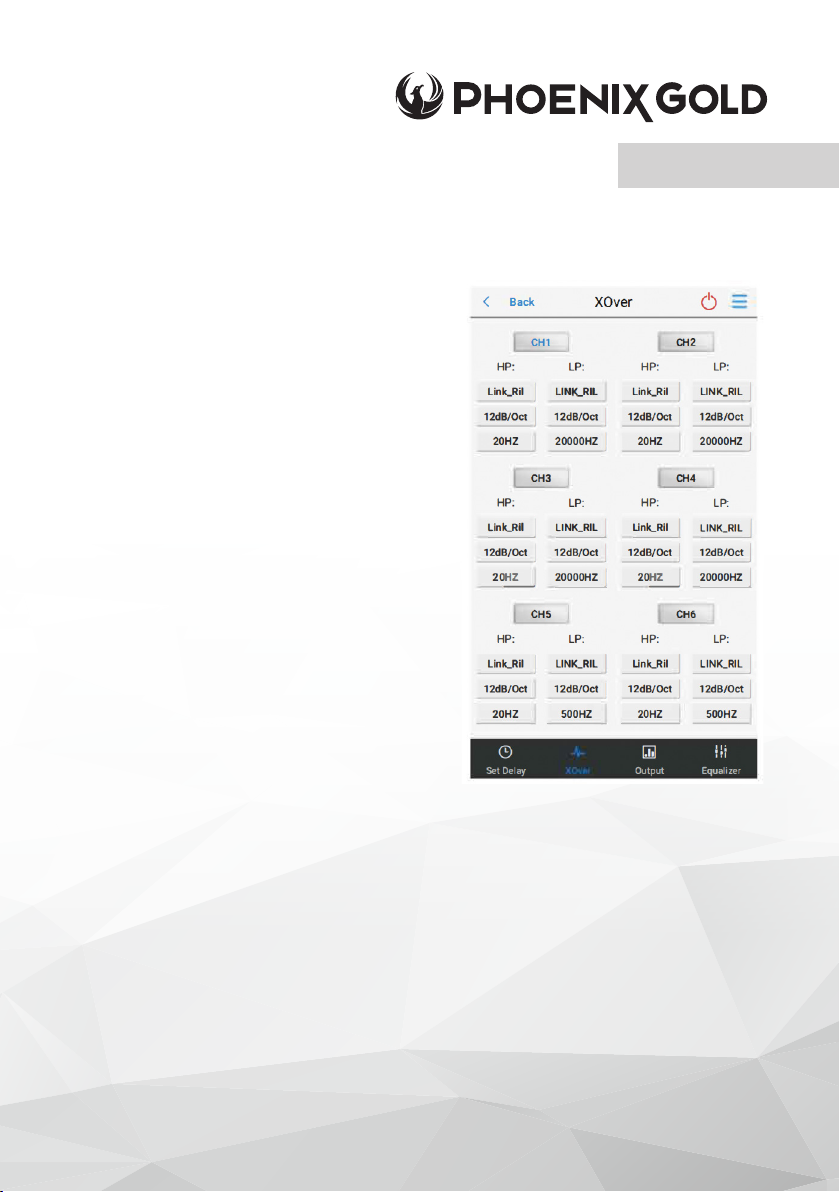
CROSSOVER
Click “Crossover” and enter below
operation interface. You can adjust the
parameters separately according to the
CH1- CH6.
1. TYPE SETTING
Left-click the drop-down button of the HPF
and choose lter type below:
A Butterworth
B Linkwitz-Riley
C Bessel
2. SLOPE SETTING
Left click the drop-down button of the
HFP or LPF slope to choose the lter slope.
There has 6dB/Oct, 12dB/Oct.
3. FREQUENCY SETTING
Click the HPF or LPF lter frequency button, and enter into the “Frequency”
setting page. And you can click”+””-” or push the fader to nish the Frequency
setting. And the range as below:
A HPF Frequency: 20HZ-20KHZ
B LPF Frequency: 20HZ -20KHZ
© 2021 Phoenix Gold • www.phoenixgold-eu.com
Page 20
ZDA4.6 - DSP AMPLIFIER
APP SOFTWARE OPERATION INSTRUCTIONS
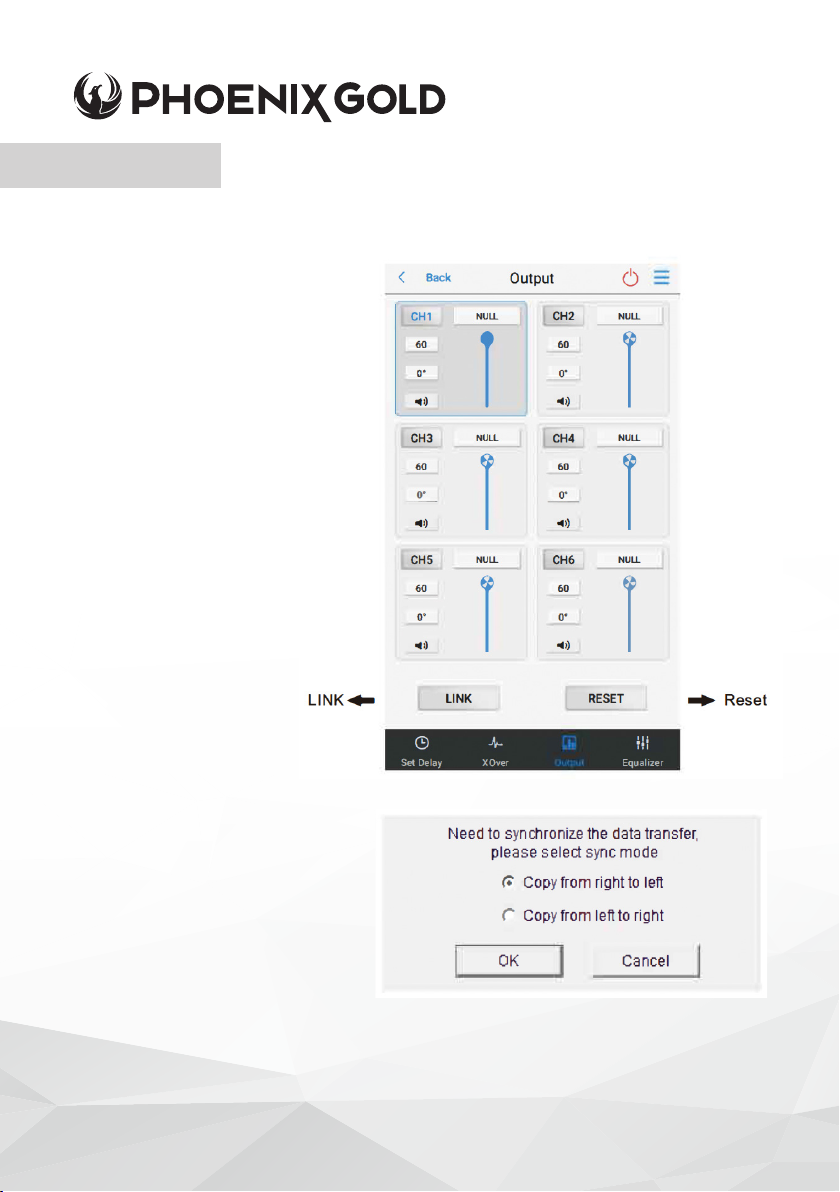
CHANNELS
Click the “Channel” and enter
into as below operation interface
You can adjust Volume, Mute,
positive phase/opposite phase
for CH1 - CH6 output per each
channel separately:
ZDA4.6 Owners Manual
LINK
Click LINK and pop-up as below
tips:
© 2021 Phoenix Gold • www.phoenixgold-eu.com
Page 21
ZDA4.6 Owners Manual
ZDA4.6 - DSP AMPLIFIER
APP SOFTWARE OPERATION INSTRUCTIONS
CHANNELS - CONTINUED
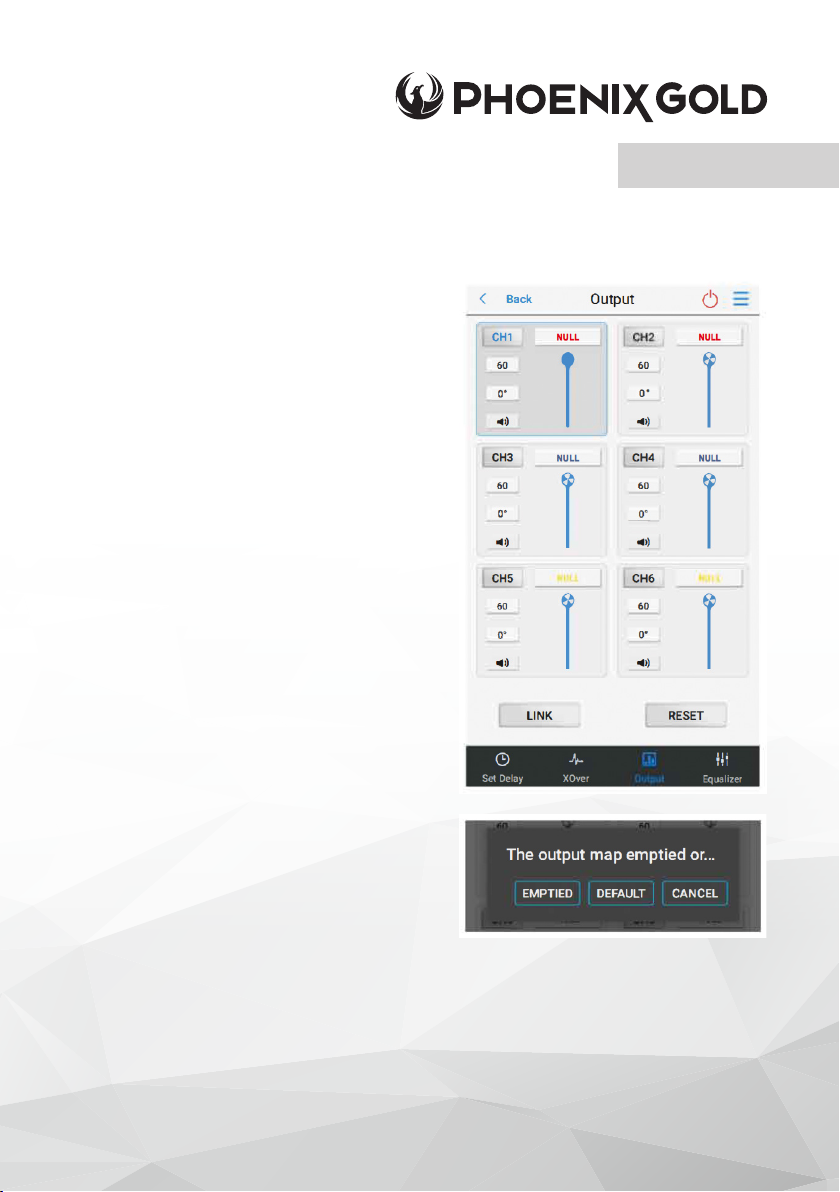
Choose the synchronisation mode and
click “YES” enter into below LINK mode;
Click “Cancel” to exit the LINK mode.
RESET
Click “Reset” and enter into dialogue
box right, and choose EMPTY, DEFAULT
or CANCEL.
© 2021 Phoenix Gold • www.phoenixgold-eu.com
Page 22
ZDA4.6 - DSP AMPLIFIER
APP SOFTWARE OPERATION INSTRUCTIONS
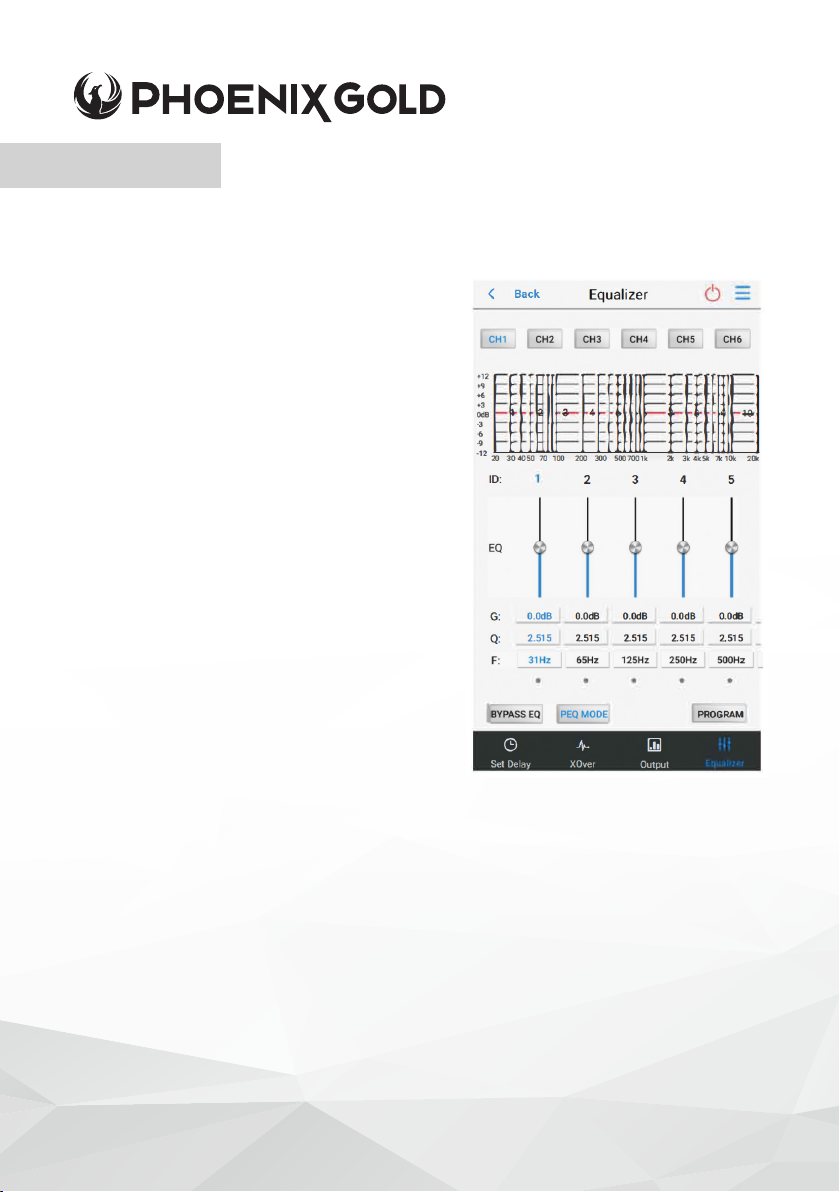
EQ
Click EQ, and enter into control
operation interface
1. GAIN
Input the numbers, roll the mouse or use
the keyboard arrow keys to set the gain
(range: -12dB - 12dB), or push the fader
directly to adjust the gain.
2. Q-VALUE
In the Parametric equaliser mode, you can
adjust the Q value (range: 0.404-28.85) by
inputting the numbers, rolling the mouse
or using the keyboard arrow keys. In the
graphic equaliser mode, the Q value is the
1/3 oct of the default value assignment but
does not show the specic value.
ZDA4.6 Owners Manual
3. FREQUENCY
In the Parametric equaliser mode, you can
adjust the frequency (range: 20Hz-2KHz) by
inputting the numbers, rolling the mouse
or using the keyboard arrow keys. In the
graphic equaliser mode, the frequency is
the 1/3 oct of the default value assignment
but does not show the specic value.
© 2021 Phoenix Gold • www.phoenixgold-eu.com
Page 23
ZDA4.6 Owners Manual
ZDA4.6 - DSP AMPLIFIER
APP SOFTWARE OPERATION INSTRUCTIONS
4. RESET EQ BUTTON
Click this button and pop-up a dialogue box, and click “YES” to reset all the
10-band (Frequency, Q volume and gain volume reset to the preset, which is
distributed evenly according to the 1/3 oct.
5. PARAMETRIC EQUALISER MODE AND GRAPHIC EQUALISER MODE
SWITCH BUTTON
This is a switch button for the parametric equalizer mode and the graphic
equalizer mode. Click this button and enter into the EQ mode accordingly.
The difference between graphic EQ mode and parametric EQ mode as below:
A. GRAPHIC EQUALISER
Using the constant-Q technology,
set a fader that ensures the lter
frequency band never changes per
each frequency point, no matter the
boost or decay of the frequency.
Using the graphic equaliser structure
is much more simple and straight-forward and is commonly used in the
professional audio studios to get a lot
more ne composition.
B. PARAMETRIC EQUALISER
For further adjustment in detail for
various parameters including the
frequency band, frequency point,
gain Q-value etc, you can modify
the sound to make it brighter, richer
and more colourful to get the artistic
effect that you wanted.
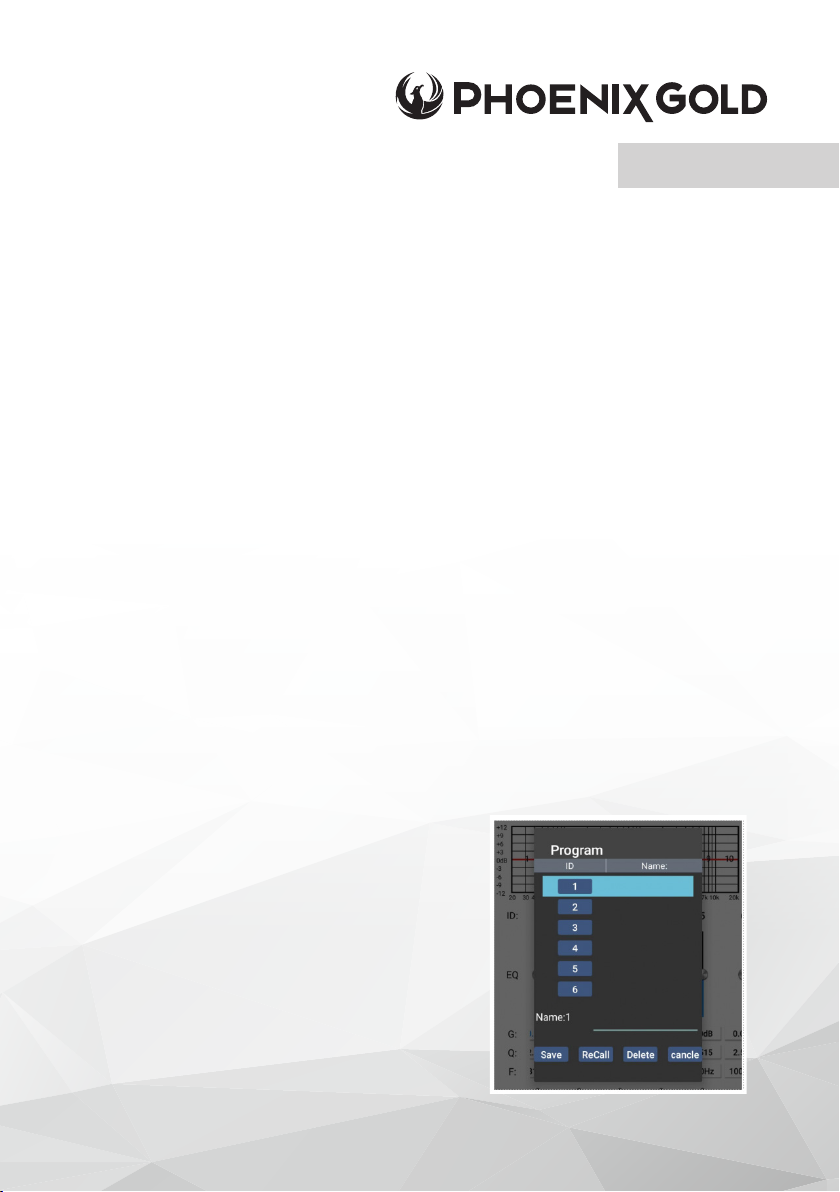
6. PROGRAM
Click Program” button and enter into
interface.
You can save, call or cancel the saved
settings according to the current scene
parameters.
© 2021 Phoenix Gold • www.phoenixgold-eu.com
Page 24
ZDA4.6 Owners Manual
ZDA4.6 - DSP AMPLIFIER
SPECIFICATION
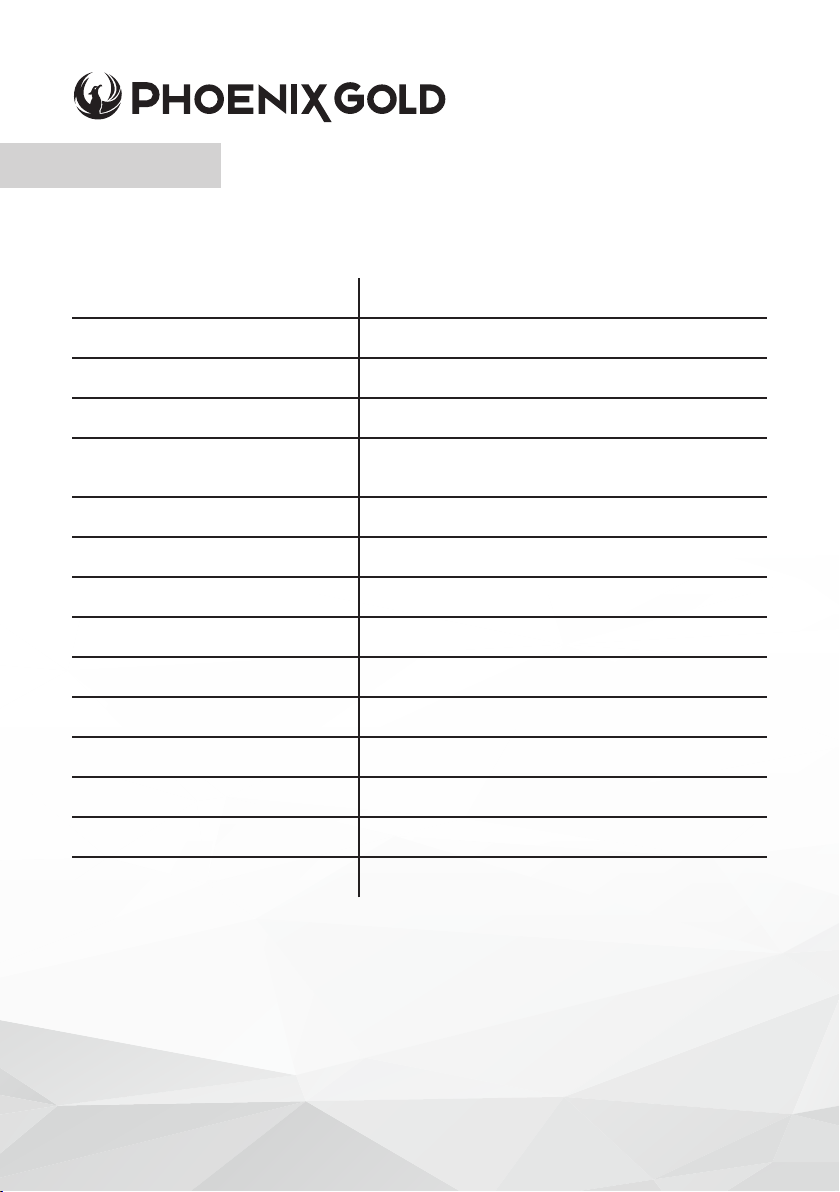
Power Supply 9.8V - 16V
RMS Power Output 60W x 4 @4Ohm, 100W x 4 @2Ohm
MAX Power Output 800W
Input Range 4V
Control Mode
DSP Controller, PC Software,
APP Software
Filter Mode HPF/LPF
HPF 20-20KHz, 1/6 oct step
LPF 20-20KHz, 1/6 oct step
Filter Slope 6dB/oct - 12dB/oct
EQ Band 10-Band per channel
EQ Gain -12dB ~ +12dB
EQ Q-Value 0.404~+28.852
S/N Ratio 102dB
Time Delay 20 MS per channel 0.021ms step
Product Size 266 x 150mm x 45mm
© 2021 Phoenix Gold • www.phoenixgold-eu.com
Page 25

ZDA4.6 Owners Manual
NOTES:
ZDA4.6 - DSP AMPLIFIER
© 2021 Phoenix Gold • www.phoenixgold-eu.com
Page 26

NOTES:
ZDA4.6 Owners Manual
ZDA4.6 - DSP AMPLIFIER
© 2021 Phoenix Gold • www.phoenixgold-eu.com
Page 27

ZDA4.6 Owners Manual
NOTES:
ZDA4.6 - DSP AMPLIFIER
© 2021 Phoenix Gold • www.phoenixgold-eu.com
Page 28

A Brand of AAMP Global.
phoenixgold-eu.com
© Copyright 2021
Phoenix Gold Product Warranty
LIMITED WARRANTY ON AMPLIFIERS
Phoenix Gold warrants this product to be free of defects in materials and workmanship for a period
of one (1) years from the original date of purchase. This warranty is not transferable and applies only
to the original purchaser from an authorized Phoenix Gold dealer in the United States of America
only. Should service be necessary under this warranty for any reason due to manufacturing defect
or malfunction, Phoenix Gold will (at its discretion) repair or replace the defective product with new
or re-manufactured product at no charge. Damage caused by the following is not covered under
warranty: accident, misuse, abuse, product modication or neglect, failure to follow installation
instructions, unauthorized repair attempts, misrepresentations by the seller. This warranty does not
cover incidental or consequential damages and does not cover the cost of removing or reinstalling
the unit(s). Cosmetic damage due to accident or normal wear and tear is not covered under
warranty.
INTERNATIONAL WARRANTIES:
Products purchased outside the United States of America are covered only by that country’s
Authorized Phoenix Gold reseller and not by Phoenix Gold. Consumers needing service or warranty
information for these products must contact that country’s reseller for information.
REV 03/06/21
 Loading...