

Page 1
ZB
ZB8P
8” Slim Active Bass Enclosure
User Manual
Page 2
© 2024 Phoenix Gold - www.phoenixgold.com
ZB8P - 8” SLIM ACTIVE BASS ENCLOSURE
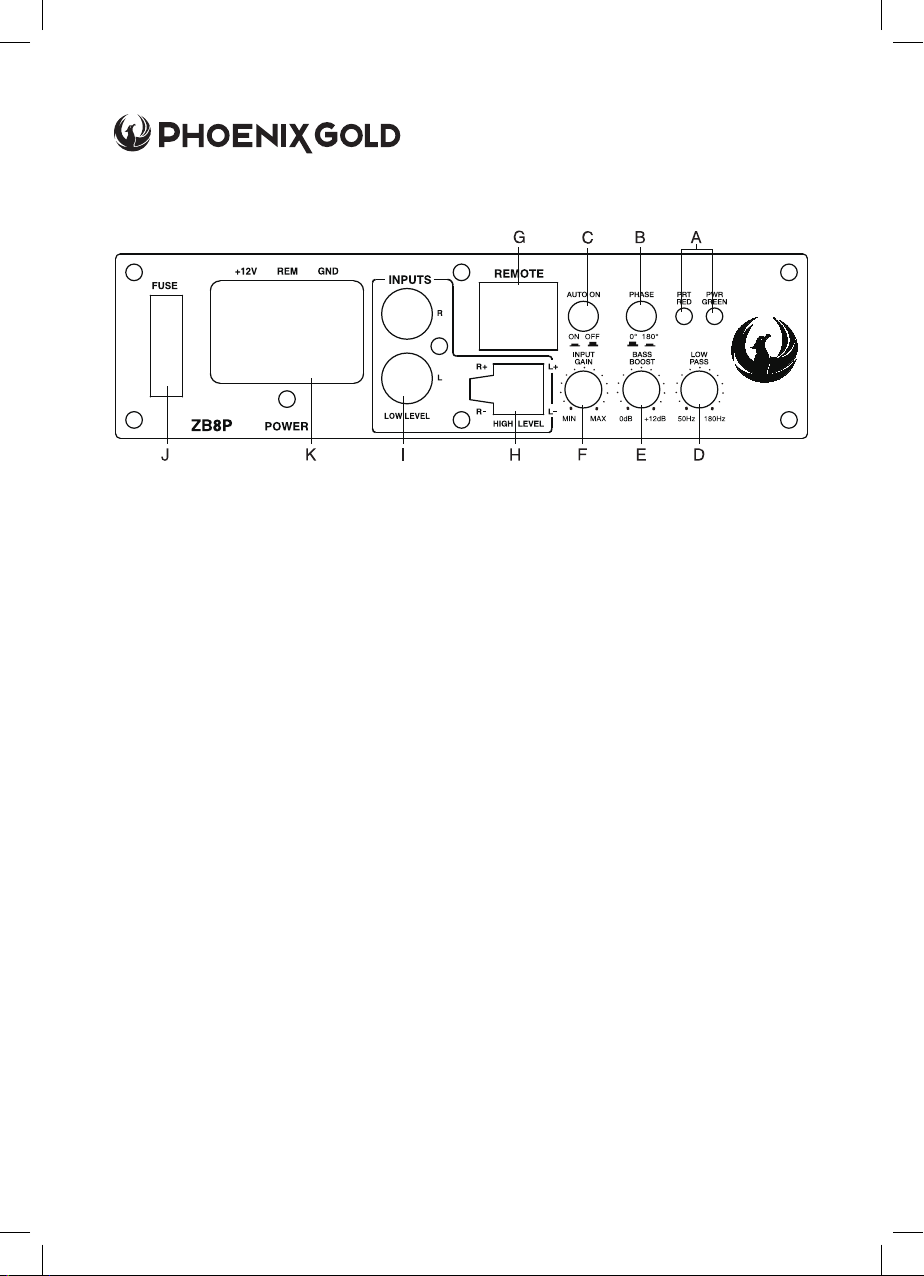
PANEL CONTROLS AND FEATURES
A. POWER STATUS LED
This bi-coloured LED glows green when power is on
and no problems are detected. If one of the
protection circuits come on, the LED will glow RED.
B. PHASE SHIFT
Use this switch to help compensate for time alignment
problems in the system. Such problems usually result
from having the subwoofer at a dierent distance
from the listener than the other speakers in the
system.
C. AUTO POWER ON
The AUTO POWER ON (ON/OFF) is for high level
(speaker level) connections. When the switch is in the
‘ON’ position, the subwoofer will AUTO POWER ON
when there is a signal input. If the amplifier detected
no signal input, the amplifier will auto turn o. If you
prefer to use the remote turn on/o connection, the
switch is in the OFF position.
(NOTE: Please connect the remote terminal to the
remote output of head unit (See Fig 4) when you hear
the unit turn ON/OFF POP noise from the subwoofer).
D. LOW PASS FILTER
This control allows you to define the frequency range
you want the subwoofer amplifier to receive. The
subwoofer will reproduce all sound below the
frequency you set.
Note: The low pass filter frequency can be higher
or lower than the standard. There have +/-20%
tolerance.
E. BASS BOOST
The BASS BOOST feature will increase the sound level
in the bass frequencies.
F. INPUT GAIN CONTROL
After you have installed your system, turn this control
to minimum. Turn the head unit on (and the
subwoofer will turn on via the remote connection).
Turn the head unit volume to about 2/3 full level.
Slowly turn up the subwoofer input gain control until
you hear a small amount of distortion. Then reduce
the level until the distortion is completely gone. Level
the control at this setting.
G. REMOTE LEVEL CONTROL PORT
Attach the included remote level control to control
the volume level of the subwoofer independently.
H. HIGH LEVEL (SPEAKER LEVEL) INPUTS
If your head unit does not have RCA outputs you can
use the speaker outputs for the audio source for the
subwoofer. Use the supplied cable and wire harness
and connect the outputs properly as shown in the
connection diagram in this manual.
I. LOW LEVEL RCA INPUTS
Low level inputs are the recommended way to
introduce the audio signal to the subwoof er if RCA
outputs are present on your head unit or other signal
source (such as a sound processor).
J. FUSE
Do not use a fuse with a dierent value and never
replace the fuse with a wire or coin.
K.POWER INPUT TERMINAL
2
Page 3
© 2024 Phoenix Gold - www.phoenixgold.com
WIRING
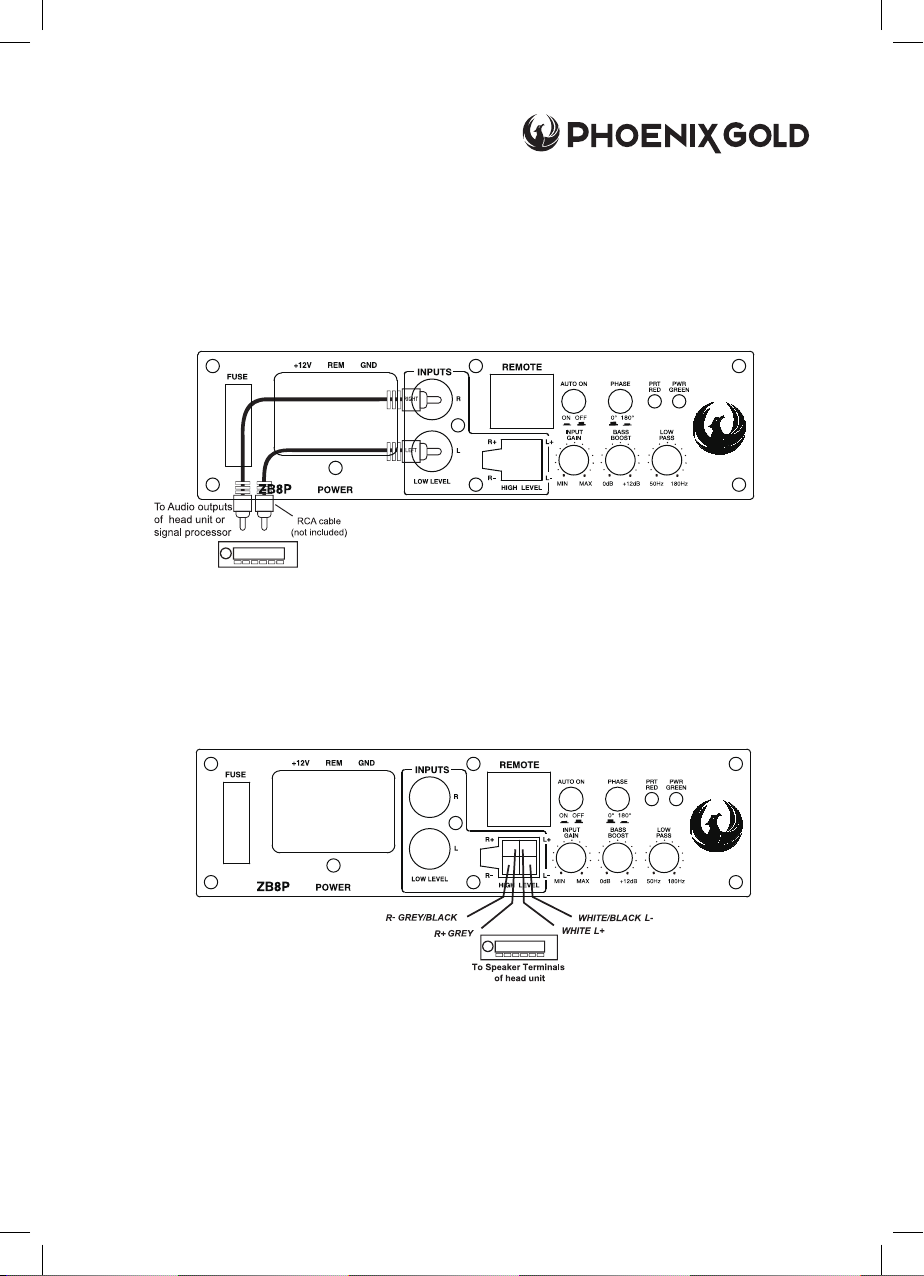
LOW LEVEL INPUT WIRING
Low-level (RCA) input wiring is preferred for best audio performance. Most trunk and under-seat installations will require
a 6-12 feet RCA cable. Always use a high quality cable.
NOTE: Do not connect BOTH the high level and low level inputs from your receiver to your amplifier at the same time!
FIG 1
HIGH LEVEL INPUT WIRING
The high level input(s) should only be used when your receiver lacks RCA outputs. If the RCA outputs are not present,
connect the speaker outputs from the receiver to the high level input connector of the amplifier. Be sure to observe
polarity to avoid audio phase problems.
NOTE: Do not connect BOTH the high level and low level inputs from your receiver to your amplifier at the same time!
FIG 2
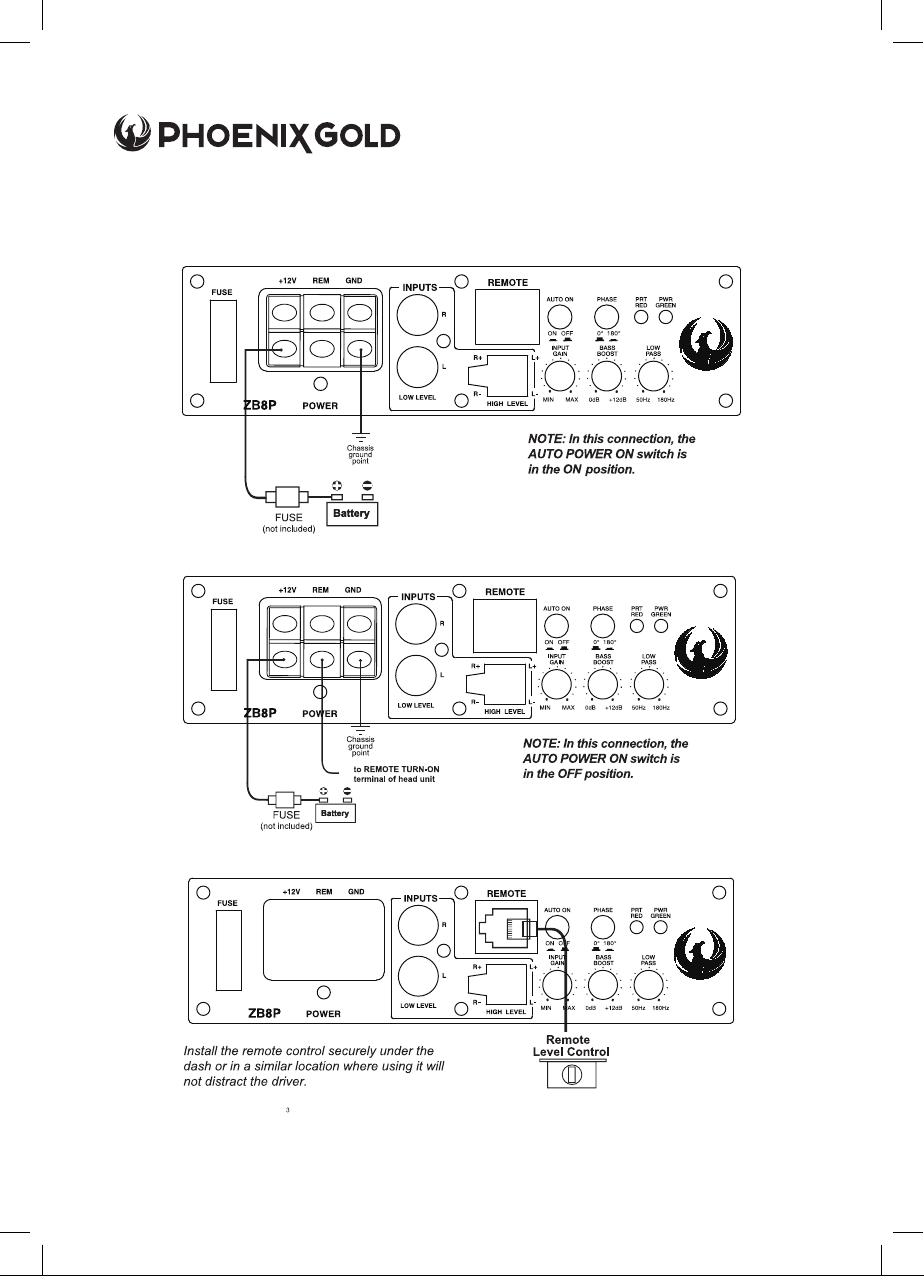
POWER CONNECTIONS
Connect the ground terminal to the closest point on the chassis of the vehicle. Use 8 gauge (or heavier) wire to
connect the ground cable.
Connect the remote terminal to the remote output of head unit using 16 gauge (or heavier) wire.
Connect an empty fuse holder within 16” (40 cm) of the car battery, and run 8 gauge (or heavier) cable from this fuse
to the amplifier location. Then connect the fuse holder to the “BATT+” (+ l 2V) connection on the subwoofer rear panel.
3
Page 4
© 2024 Phoenix Gold - www.phoenixgold.com
ZB8P - 8” SLIM ACTIVE BASS ENCLOSURE
WIRING
FIG 3
FIG 4
FIG 5
4
Page 5
© 2024 Phoenix Gold - www.phoenixgold.com
SPECIFICATION
THD <0.5%
Signal-to-noise ratio >90dB
Frequency response 20Hz -180Hz
Input sensitivity, high level 1.0V
Input sensitivity, low level 300mV
Low Pass Filter 50Hz-180Hz
Bass Boost 0 to+ 12dB
Subsonic Filter 20Hz
Fuse rating 20A
Dimensions(L x W x H) mm 245 x 180 x 72 mm
All specifications subject to change without notice.
5
Page 6

© 2024 Phoenix Gold - www.phoenixgold.com
ZB8P - 8” SLIM ACTIVE BASS ENCLOSURE
TROUBLESHOOTING
SYMPTOM POSSIBLE REMEDY
Check to make sure you have a good ground connection.
Check that the Remote Input (Turn-on) has at least 5V DC.
Products will not power
up
Protection LED comes on
when
amplifier is powered up
No output
Low output
High hiss in the sound.
Squealing noise is
present.
Distorted sound.
Engine noise (static type)
Check that there is battery power on the(+) terminal.
Check that there is at least 12V.
Check all fuse, replace if necessary.
Make sure that the Protection LED is not illuminated. If it is lit shut o the
amplifier briefly, and then repower it.
Turn down the volume control on the head unit to prevent overdriving.
Check that there is good air cirulation around the amp.
Check that all fuses are OK.
Check that unit is properly grounded,
Check that the Remote Input (Turn-on) has at least 5V DC.
Check that the RCA audio cables are plugged into the proper inputs.
Reset the Level Control.
Check the Crossover Control settings.
Disconnect all RCA inputs to the power sub’s control panel. If the hiss
disappears, then plug in the component driving the amplifier and
unplug its inputs. If the hiss disappears at this point, go on until the faulty/
noisy component is found.
It is best to set the amplifie’s input level control as low as possible. The
best subjective signal-to-noise ratio is achieved in this manner. Try to set
the head unit as high as possible (without distortion).
Check for improperly grounded RCA interconnects.
Check that the Input Level Control is set to match the signal level of the
head unit.
This is usually caused by poor quality RCA cables, which can pick up
radiated noise. Use only the best quality cables, and route them away
from power cables.
Engine noise (alternator
whine)
6
Check that the RCA grounds are not shorted to the vehicle chassis.
Check that the head unit is properly grounded.
Page 7

© 2024 Phoenix Gold - www.phoenixgold.com
7
Page 8

Disclaimer
Always ensure the enclosure is securely attached, to avoid movement. PHOENIX GOLD accepts no responsibility for
damage or injury in relation to inappropriate securing of this product.
Phoenix Gold Product Warranty
Phoenix Gold warrants this product to be free of defects in materials and workmanship for a period of one (1) years
from the original date of purchase. This warranty is not transferable and applies only to the original purchaser from an
authorized Phoenix Gold dealer. Should service be necessary under this warranty for any reason due to manufacturing
defect or malfunction, Phoenix Gold or it’s Country distributor / reseller will (at its discretion) repair or replace the
defective product with new or re-manufactured product at no charge. Damage caused by the following is not
covered under warranty: accident, misuse, abuse, product modification or neglect, failure to follow installation
instructions, unauthorized repair attempts, misrepresentations by the seller. This warranty does not cover incidental or
consequential damages and does not cover the cost of removing or reinstalling the unit(s). Cosmetic damage due to
accident or normal wear and tear is not covered under warranty.
94 Vantage Point, Second Ave,
Pensnett Trading Estate,
Kingswinford DY6 7FS
Email: [email protected]
Tel: +44(0)1384 958502
phoenixgold.com
AAMP Nordic AB
Brodalsvägen 1B 433 38 Partille
Sweden
 Loading...