

Page 1
Z8AB / Z10AB / Z12AB
ACTIVE SUBWOOFER ENCLOSURES
Page 2

© 2024 Phoenix Gold - www.phoenixgold.com
SPECIFICATIONS
MODEL NO
MAX Power (Watts) 500 Watts 800 Watts 1000 Watts
RMS Power (Watts) 125 Watts 200 Watts 500 Watts
Amplifier Type Class-AB Class-AB Class-AB
Frequency Response 25-200hz 25-200hz 10Hz - 200Hz
Signal to Noise Ratio >60dB >60dB >60dB
Crossover Slope 6dB per octave 6dB per octave 6dB per octave
Crossover Range 50Hz - 200Hz 50Hz - 200Hz 50Hz - 200Hz
Tuning Bass Reflex Bass Reflex Bass Reflex
Woofer Size 8” / 200mm 10” / 250mm 12” / 300mm
Fuse 15A 15A 15A
Auto Turn-On Yes Yes Yes
Dimensions (mm) 400 x 295 x 280m 476 x 343 x 331mm 560 x 384 x 394mm
Z8AB Z10AB Z12AB
INSTALLATION
Make sure the active enclosure is firmly fixed in your vehicle. Check before drilling or
cutting holes. DO NOT work near fuel tanks, fuel lines hydraulic lines or electrical wiring.
DO NOT mount the active enclosure in such a way as to pinch or damage the wires.
Make sure everything is firmly connected before attaching a +12V wire.
Ensure the +12V wire is fused as close as possible to the battery. Always use a fuse with
the recommended rating.
CONTROL DESCRIPTIONS
LEVEL
This allows the adjustment of the amplifier level of the subwoofer.
Turn clockwise to increase the level. If the sound becomes distorted reduce the level.
LOW PASS FILTER
This allows the adjustment of the highest frequency the active enclosure will produce.
This should be adjusted to blend with your main speakers. Typically, this will be set to
around 100Hz (approximately the central position of the control knob).
BASS REMOTE CONTROL
This control can be mounted in the front of the vehicle to give you control of your
subwoofers output level.
Page 3
© 2024 Phoenix Gold - www.phoenixgold..com
DISCLAIMER
Always ensure the Active Enclosure is securely attached, to avoid movement.
PHOENIX GOLD accepts no responsibility for damage or injury in relation to inappropriate
securing of this product.
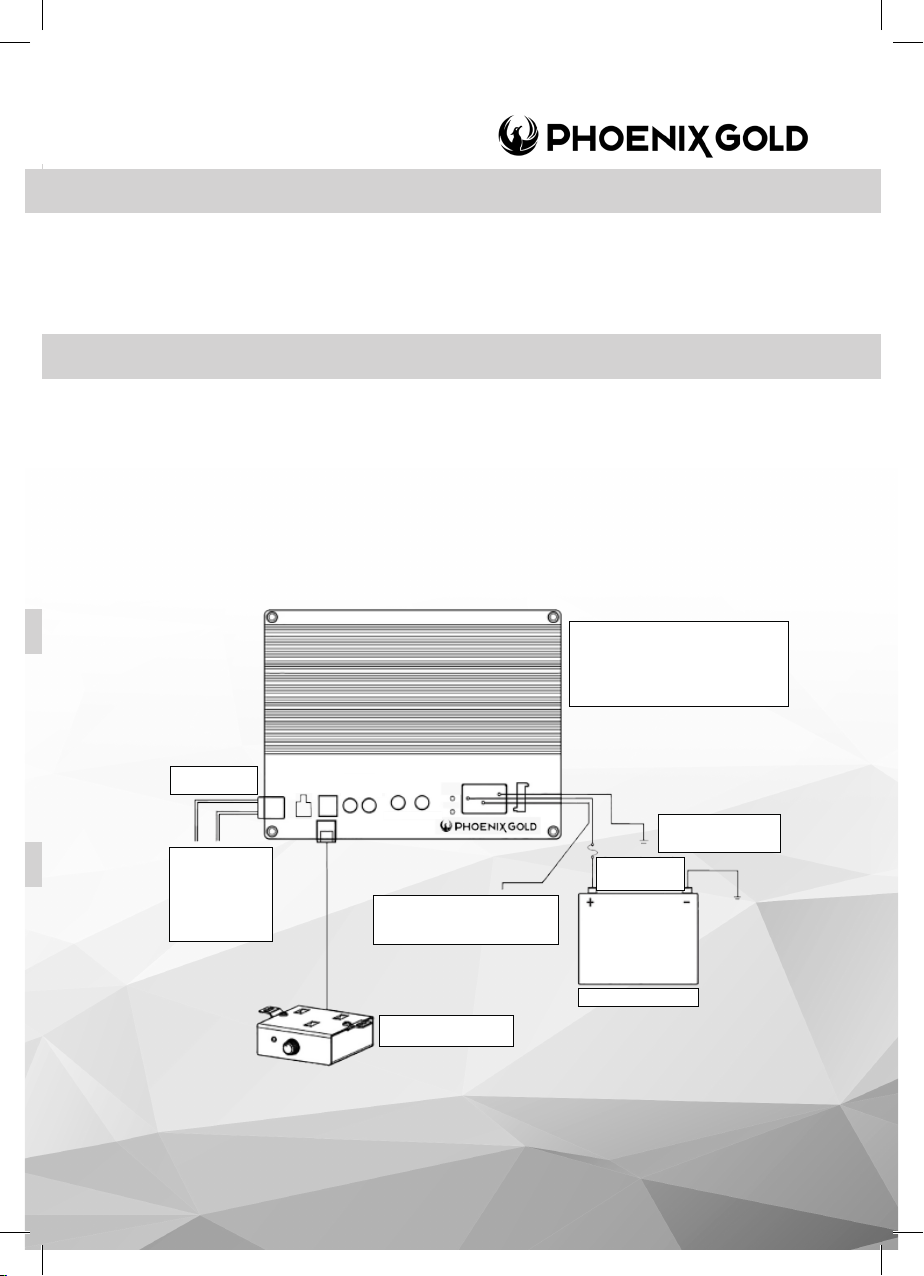
WIRING
u Connect the ground wire to the vehicle first (clean dirt and paint to bare metal)
u Connect the remote on (blue wire)
u Connect the RCA cables if applicable OR
u Connect the speaker level wire into the headunits speaker wires (See note1)
u Connect the remote level controller with the supplied lead
u Please ensure power wire is fused within 12” of battery
u Connect the 12 volt (red wire) to the positive battery terminal.
u Check all connections.
Note 1
Take care to make sure the wires are spliced in the
correct phase.
Positive to Positive , Negative to Negative.
Failure to do this correctly could result in loss of bass.
Speaker Level
Input Plug
Splice into source unit’s
speaker wires
(R+) - Grey / White
(R-) Grey
(L+) Green / White
(L-) Green
LOW INPUT
HIGH
REMOTE
INPUT
GAIN LPF
LEFT RIGHT
MIN MAX 40Hz 200Hz
Connect Blue Wire to source unit’s
accessory lead or switched 12 volt
source (REM)
FUSE
Vehicle Battery
Remote Bass Level
Connect Red wire
to positive (+12v)
battery terminal
Connect Black wire to
chassis ground of the
vehicle (ground)
Page 4

© 2024 Phoenix Gold - www.phoenixgold.com
Disclaimer
Always ensure the bass enclosure is securely attached, to avoid movement. PHOENIX GOLD accepts no responsibility
for damage or injury in relation to inappropriate securing of this product.
Phoenix Gold Product Warranty
LIMITED WARRANTY ON BASS ENCLOSURES
Phoenix Gold warrants this product to be free of defects in materials and workmanship for a period of one (1) years
from the original date of purchase. This warranty is not transferable and applies only to the original purchaser from an
authorized Phoenix Gold dealer. Should service be necessary under this warranty for any reason due to manufacturing
defect or malfunction, Phoenix Gold or it’s Country distributor / reseller will (at its discretion) repair or replace the
defective product with new or re-manufactured product at no charge. Damage caused by the following is not
covered under warranty: accident, misuse, abuse, product modification or neglect, failure to follow installation
instructions, unauthorized repair attempts, misrepresentations by the seller. This warranty does not cover incidental or
consequential damages and does not cover the cost of removing or reinstalling the unit(s). Cosmetic damage due to
accident or normal wear and tear is not covered under warranty.
REV 10/06/24
 Loading...