

Page 1

Converng StatSafe from
Dell to Lonovo Tablet
PHOENIX LTC | 3730 East Southern Avenue, Phoenix, Arizona 85040-3958 PHOENIXLTC.COM
Page 2

WARNING! RISK OF ELECTRIC SHOCK.
PLEASE CONTACT TECHNICAL SUPPORT IF
YOU’RE EXPERIENCING ANY DIFFICULTY
DURING THE TABLET CONVERSION.
855-633-2278 EXT: 2
PHOENIX LTC | 3730 East Southern Avenue, Phoenix, Arizona 85040-3958 PHOENIXLTC.COM
Page 3
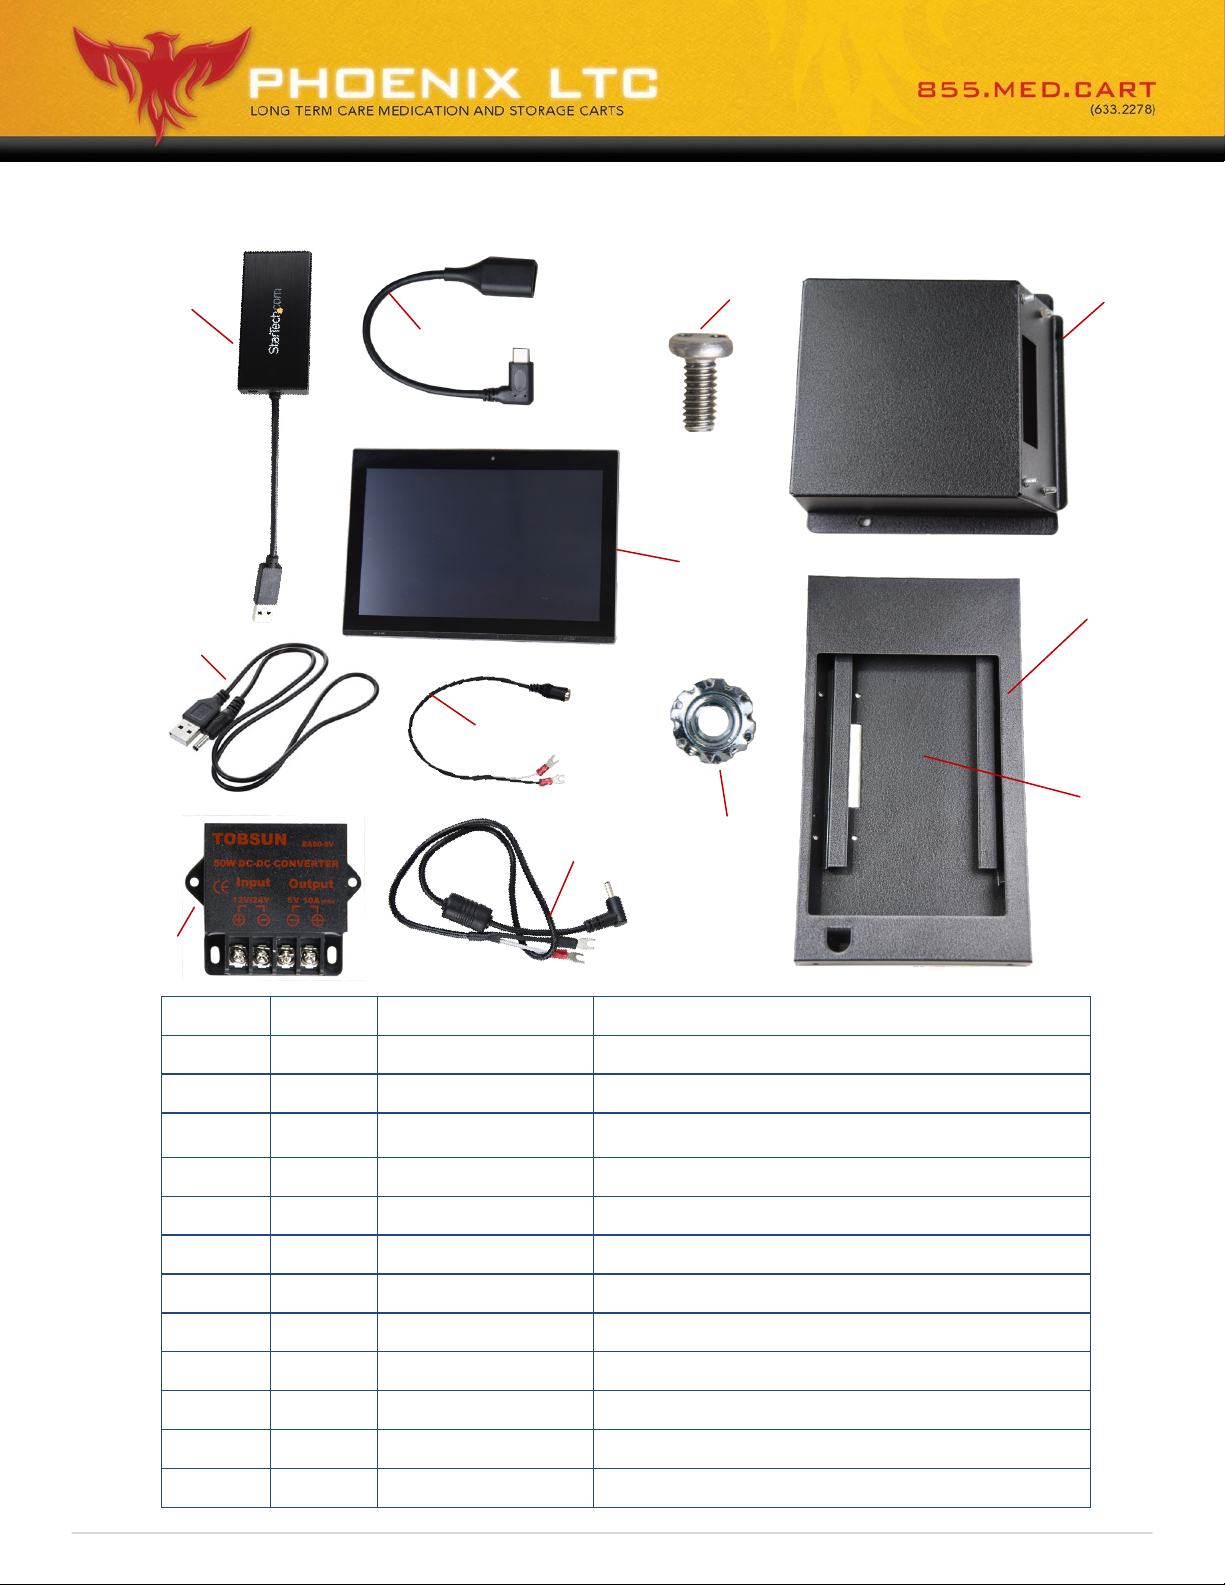
Lonovo Parts and Descripons
1
2
4
6
7
5
9
8
10
11
12
3
Item No. Quanty Part Number Descripon
1 1 32-C-USB-300 CABLE USB 3.0 3 HUB W/ GBE ADAPTER
2 1 32-C-USB-301 CABLE USB POWER SUPPLY FOR 3 HUB
3 1 33-2551 CONVERTER 50W DC-DC 5V-10A
4 1
5 1 39-5110 LENOVO MIIX 320
6 1 39 1092 HARNESS, TERMINAL FEMALE CABLE
7 1 39 1151 HARNESS, TERMINAL MALE CABLE
8 6 41-SPN-8-25 SPANNER MACHINE SCREW 8-31 X 3/8
9 4 42-KEPS-8-10 8-32 KEPS NUT
10 1 T19761A7 BACK COVER
11 1 T19761A3 BEZEL, LENOVA TABLET
12 1 WA-0359A BACK TABLET WELDMENT
PHOENIX LTC | 3730 East Southern Avenue, Phoenix, Arizona 85040-3958 PHOENIXLTC.COM
32-C-USB-90
USB C MALE TO USB FEMALE
Page 4
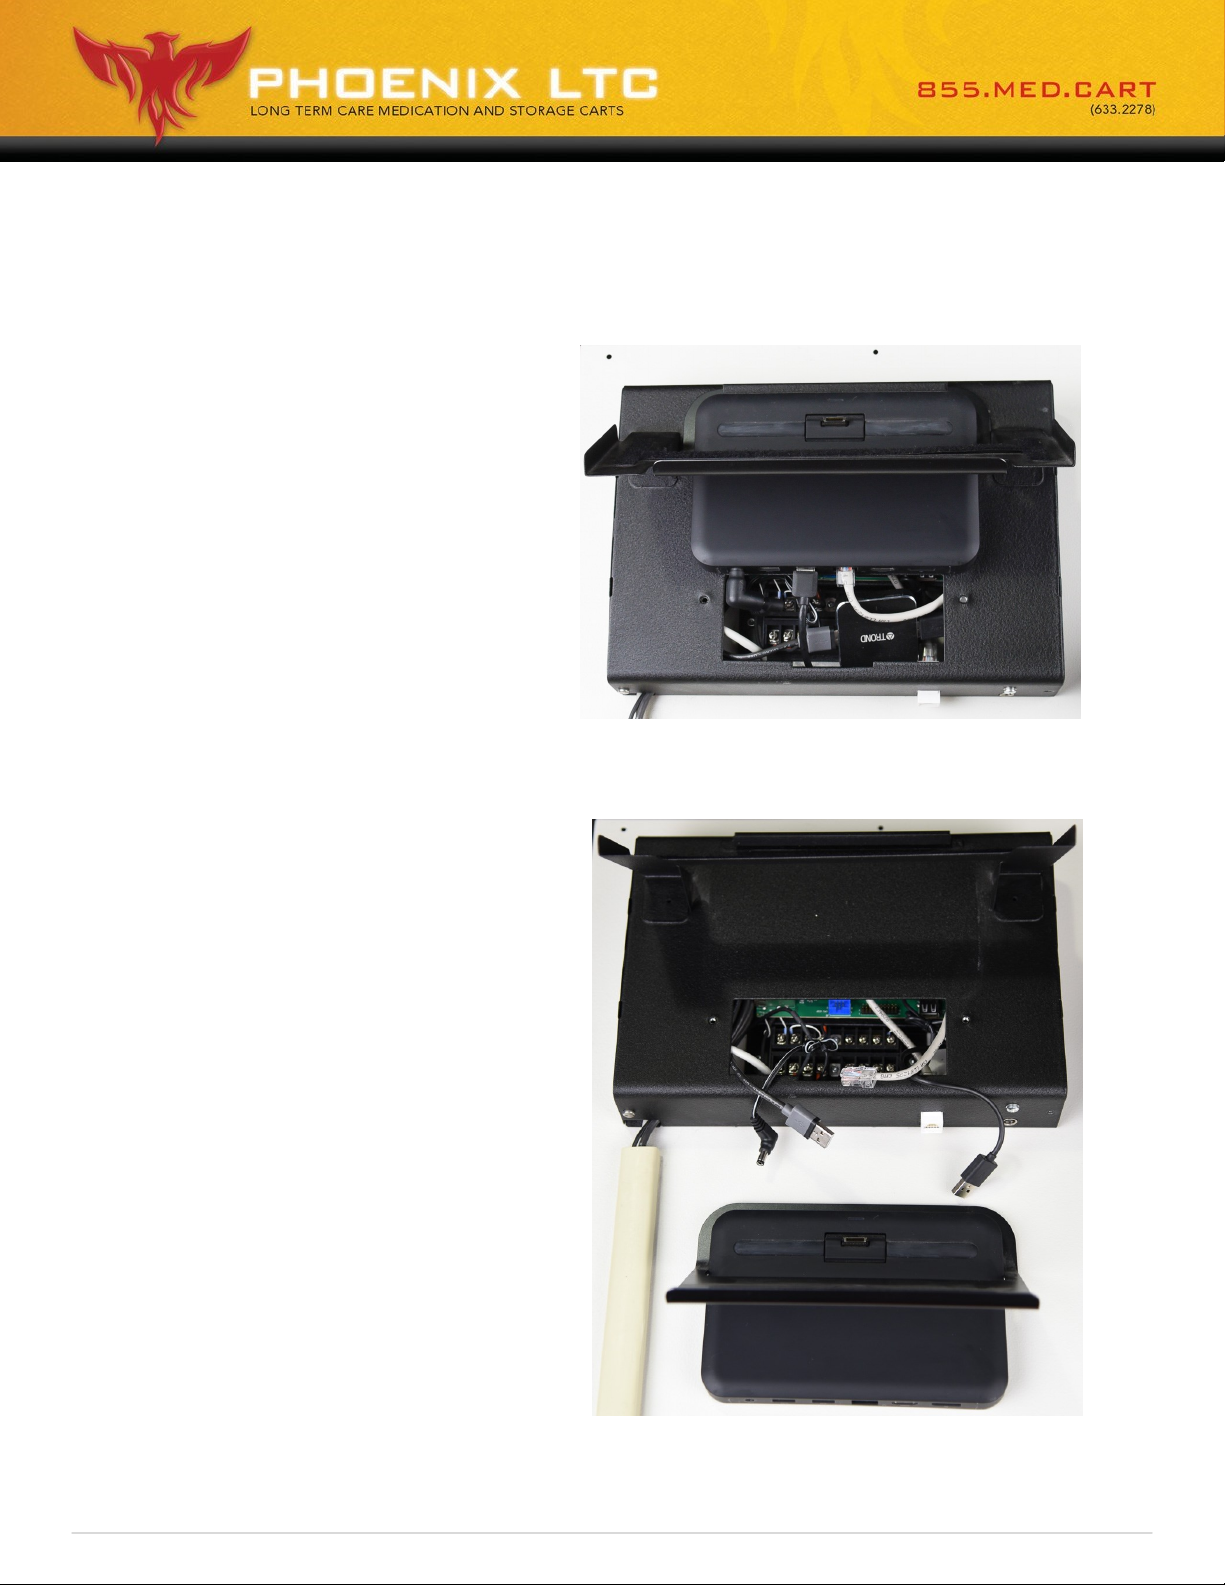
Remove Old Tablet & Docking Staon
1. Using a screw driver, remove the
2 Spanner Screws and the Back
Cover/Clamp Weldment.
2. Remove the old tablet.
3. Remove the cords that are
connected to the Docking
Staon.
4. Once all cords are disconnected,
remove the Docking Staon.
PHOENIX LTC | 3730 East Southern Avenue, Phoenix, Arizona 85040-3958 PHOENIXLTC.COM
Page 5
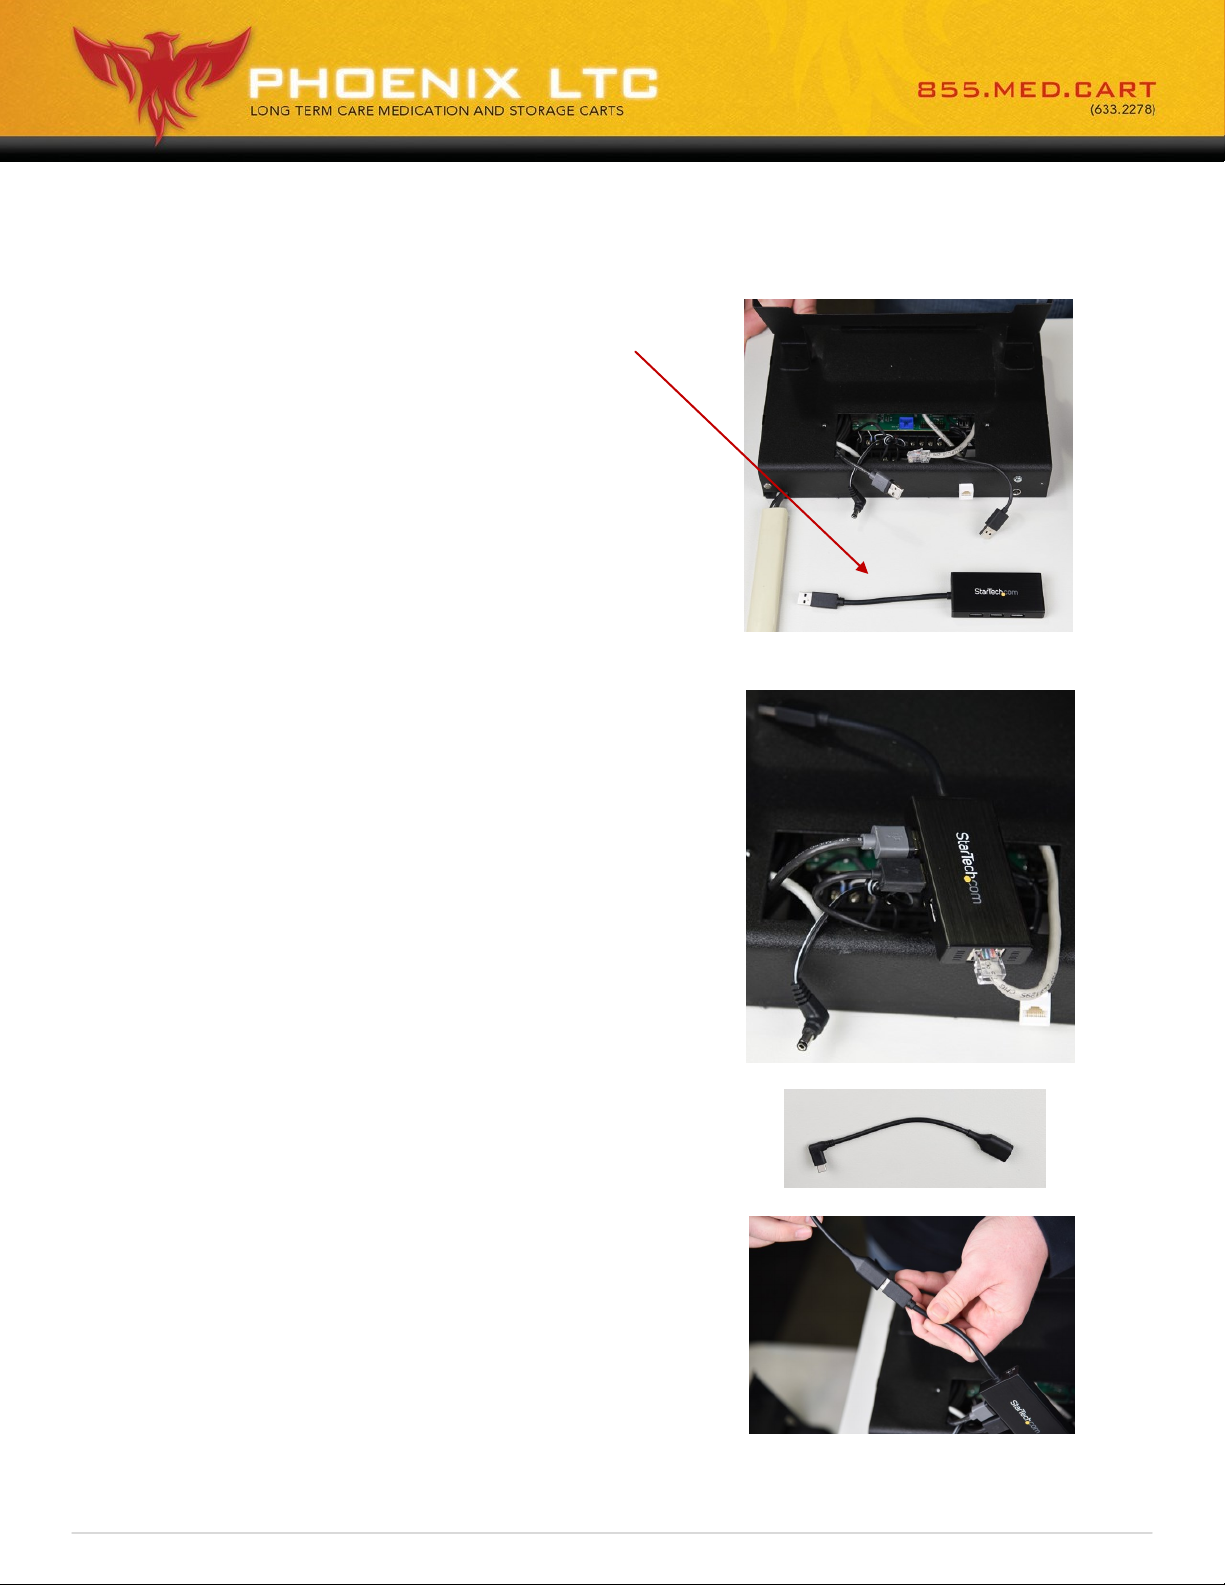
Connect the USB Hub
1. Locate the CABLE USB 3.0 3 HUB W/ GBE
ADAPTER.
2. Aach the 2 USB cords that were
plugged into the docking staon into the
CABLE USB 3.0 3 HUB W/ GBE ADAPTER.
3. Aach the Ethernet Cable into the hub.
4. Locate the USB C MALE TO USB FEMALE
cord.
5. Aach the USB C MALE TO USB FEMALE to
the USB cord that is connected to the
CABLE USB 3.0 3 HUB W/ GBE ADAPTER.
PHOENIX LTC | 3730 East Southern Avenue, Phoenix, Arizona 85040-3958 PHOENIXLTC.COM
Page 6
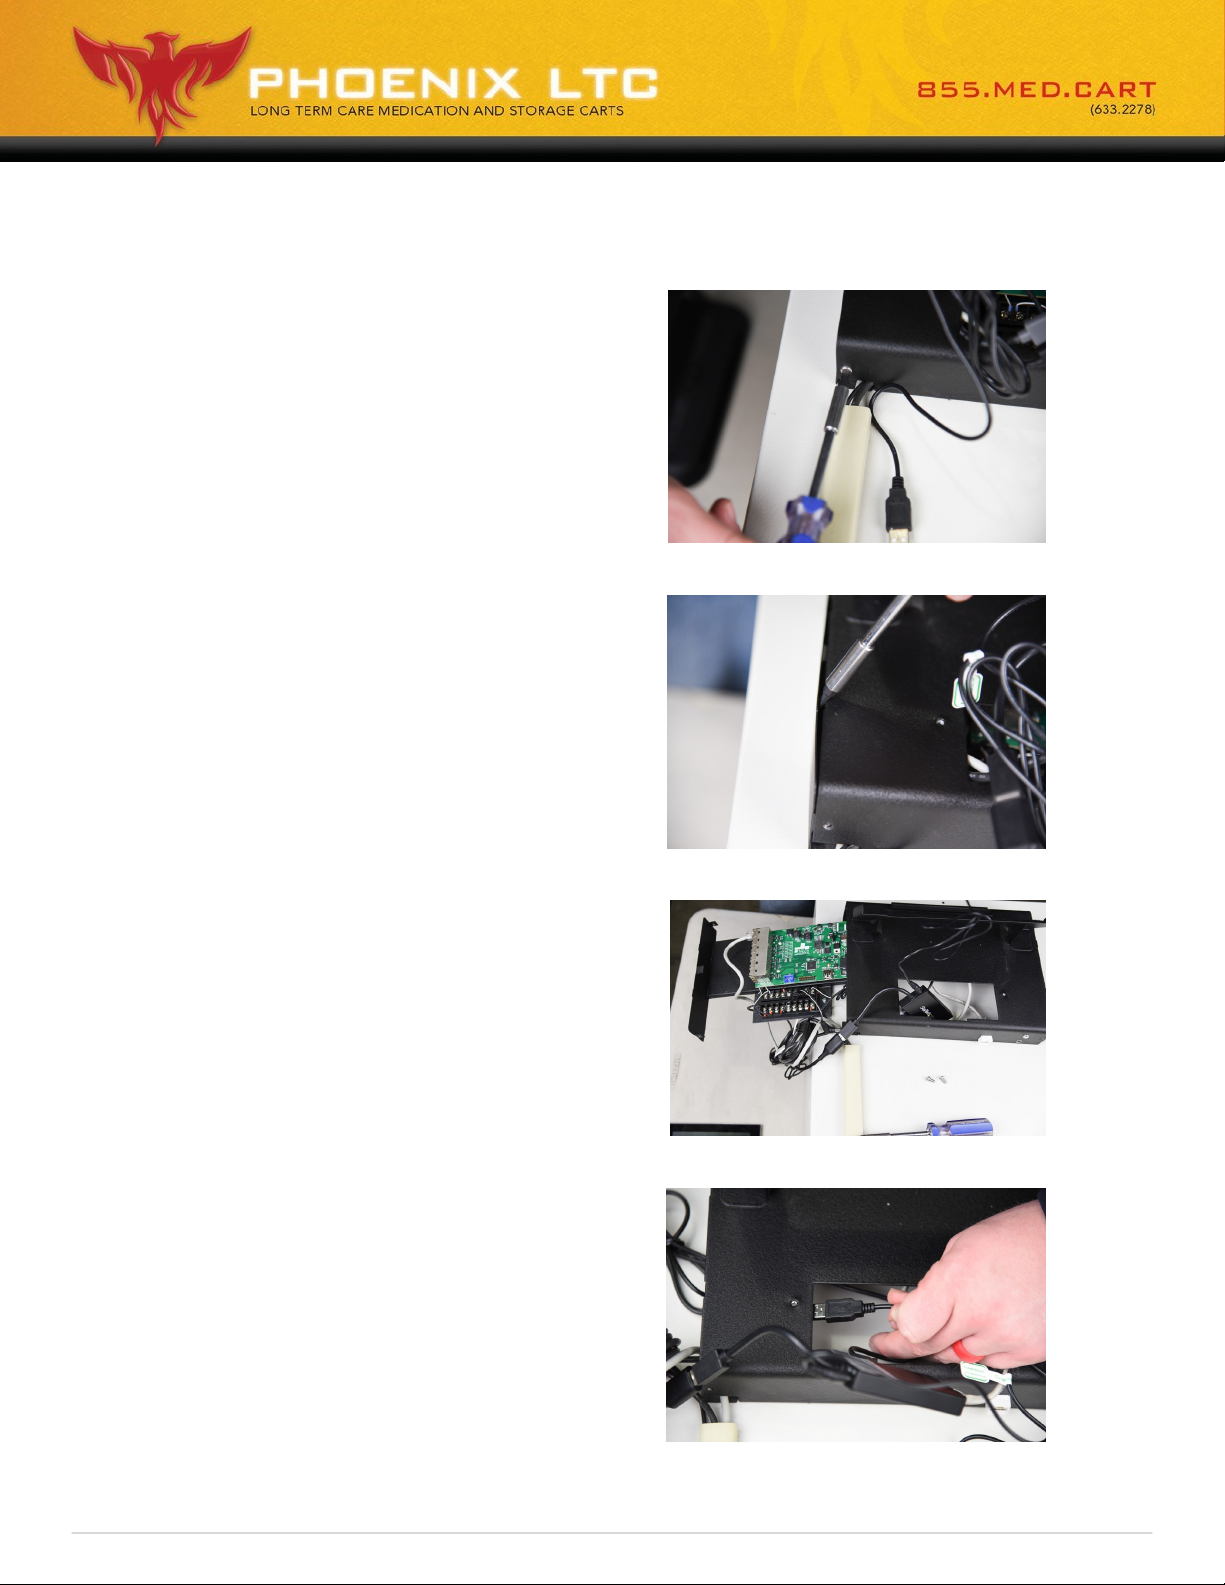
Connect the USB Hub Power Cable to the Circuit Board
1. Using your screwdriver, remove
the front and back Spanner
Screws from the right side of
the kiosk (when facing tablet) .
2. Once screws are removed, pry
open the side panel of the kiosk
and pull unl the circuit board is
exposed.
3. Plug the barrel end of the power
cable into the CABLE USB 3.0 3
HUB W/ GBE ADAPTER.
4. Once connected, take the CABLE
USB POWER SUPPLY and place
through the opening on top of the
kiosk.
PHOENIX LTC | 3730 East Southern Avenue, Phoenix, Arizona 85040-3958 PHOENIXLTC.COM
Page 7
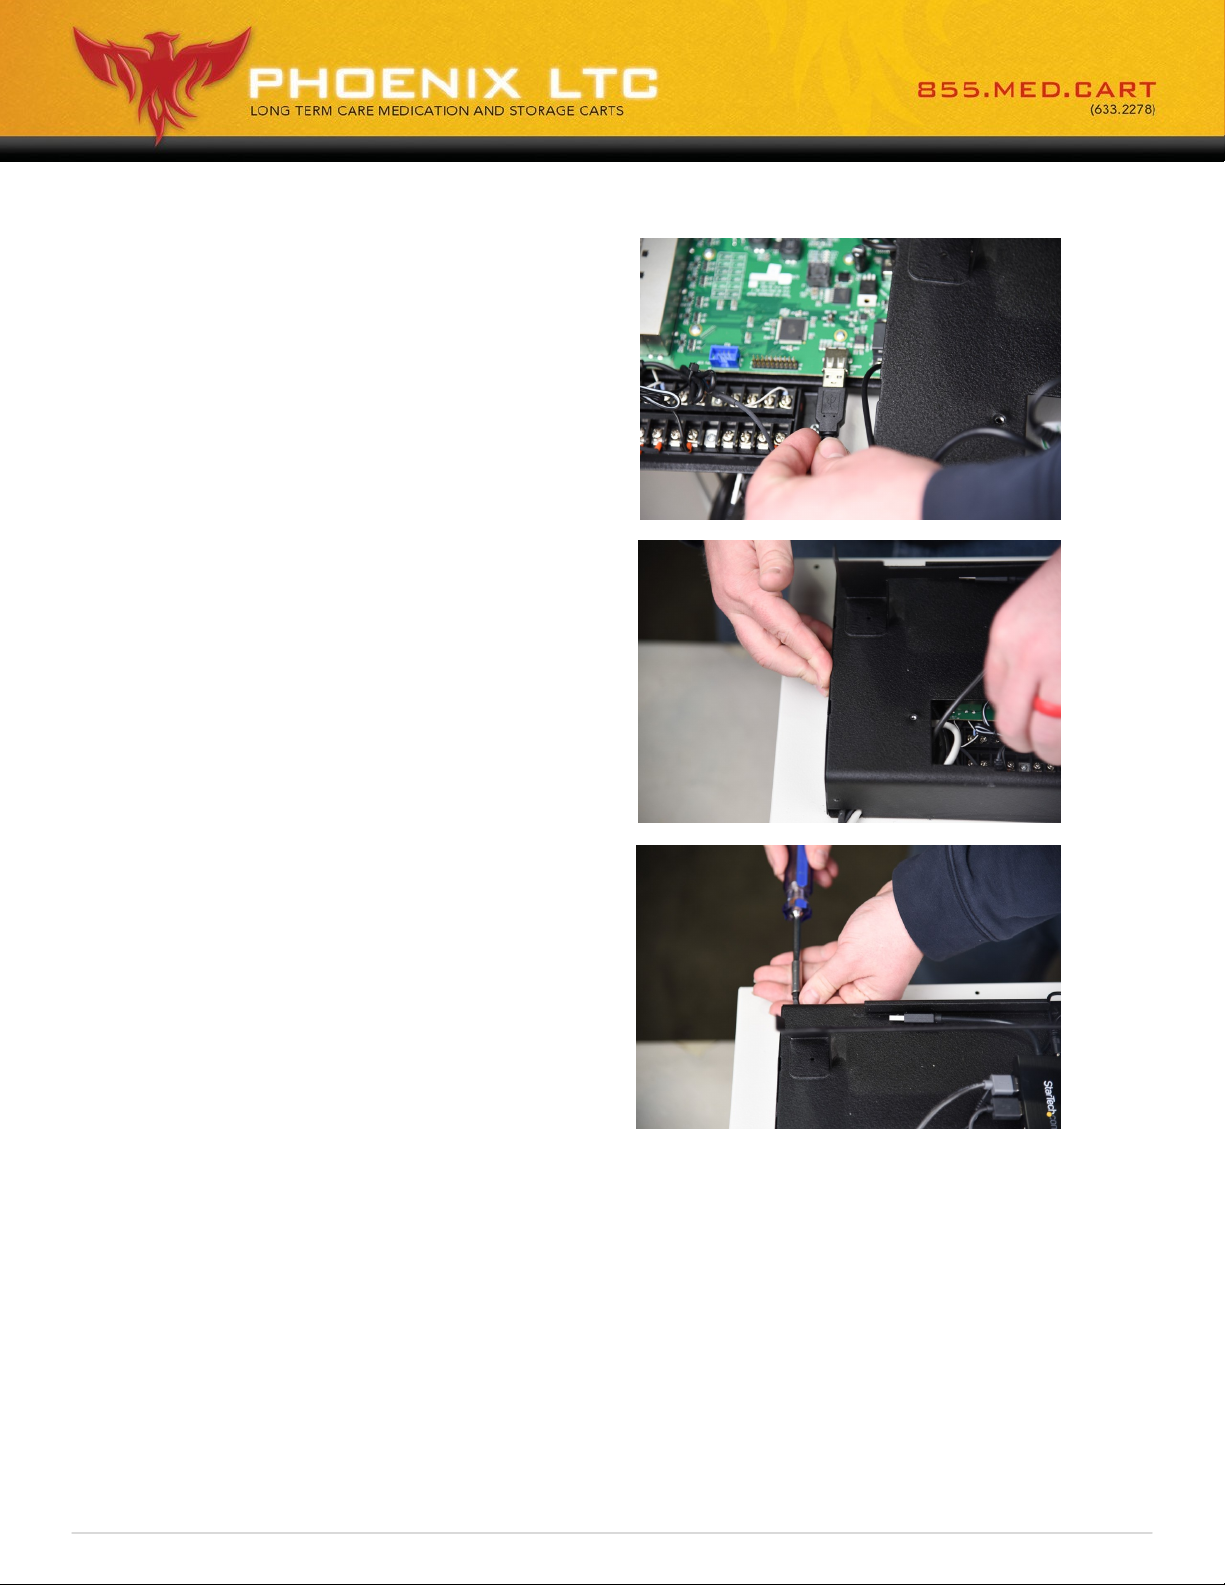
5. Locate the USB port on the circuit
board and plug the CABLE USB POWER
SUPPLY FOR 3 HUB into the port.
6. Once connected, put the circuit board
and all wires back into the kiosk and
press the side panel closed.
7. Re-install your spanner screws into the
front and the back of the kiosk to lock
the side panel back into place.
PHOENIX LTC | 3730 East Southern Avenue, Phoenix, Arizona 85040-3958 PHOENIXLTC.COM
Page 8
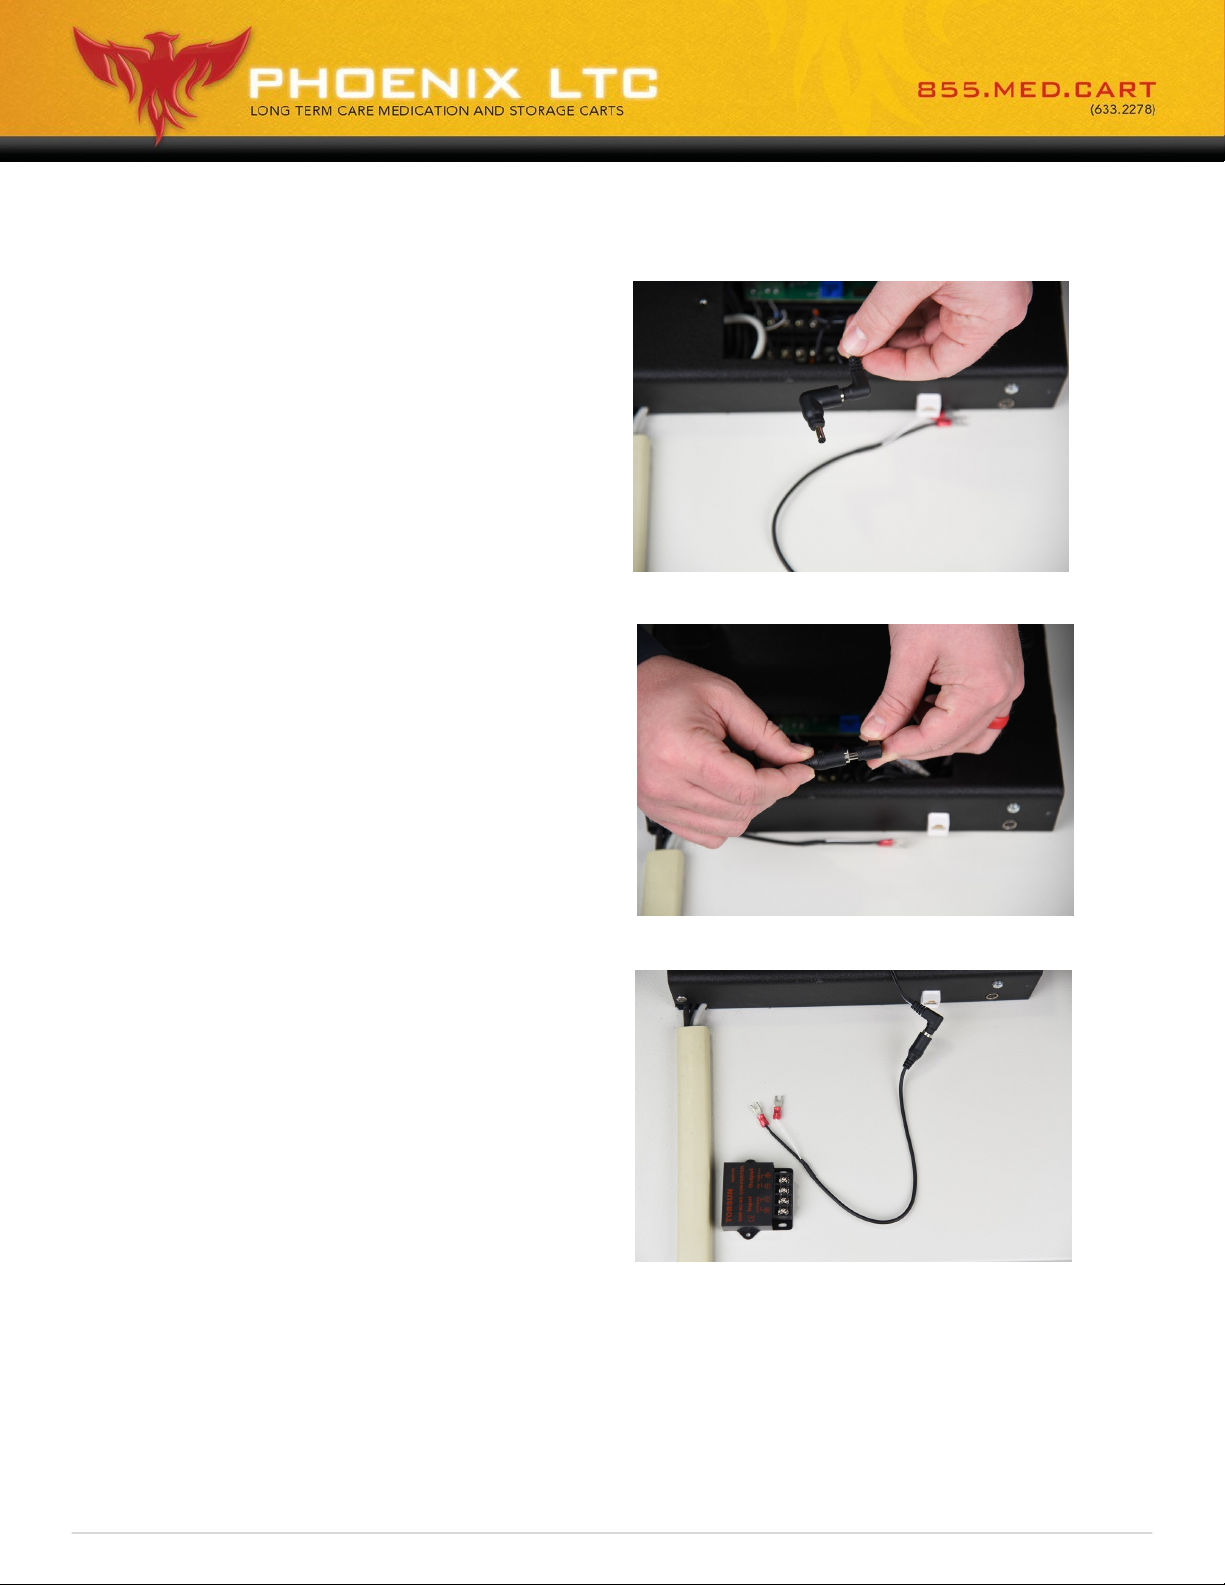
Converng the Power
1. Remove the elbow shaped cord
connector from the Dell
docking staon.
2. Insert the HARNESS, TERMINAL
FEMALE CABLE into the CABLE
USB POWER SUPPLY.
PHOENIX LTC | 3730 East Southern Avenue, Phoenix, Arizona 85040-3958 PHOENIXLTC.COM
Page 9
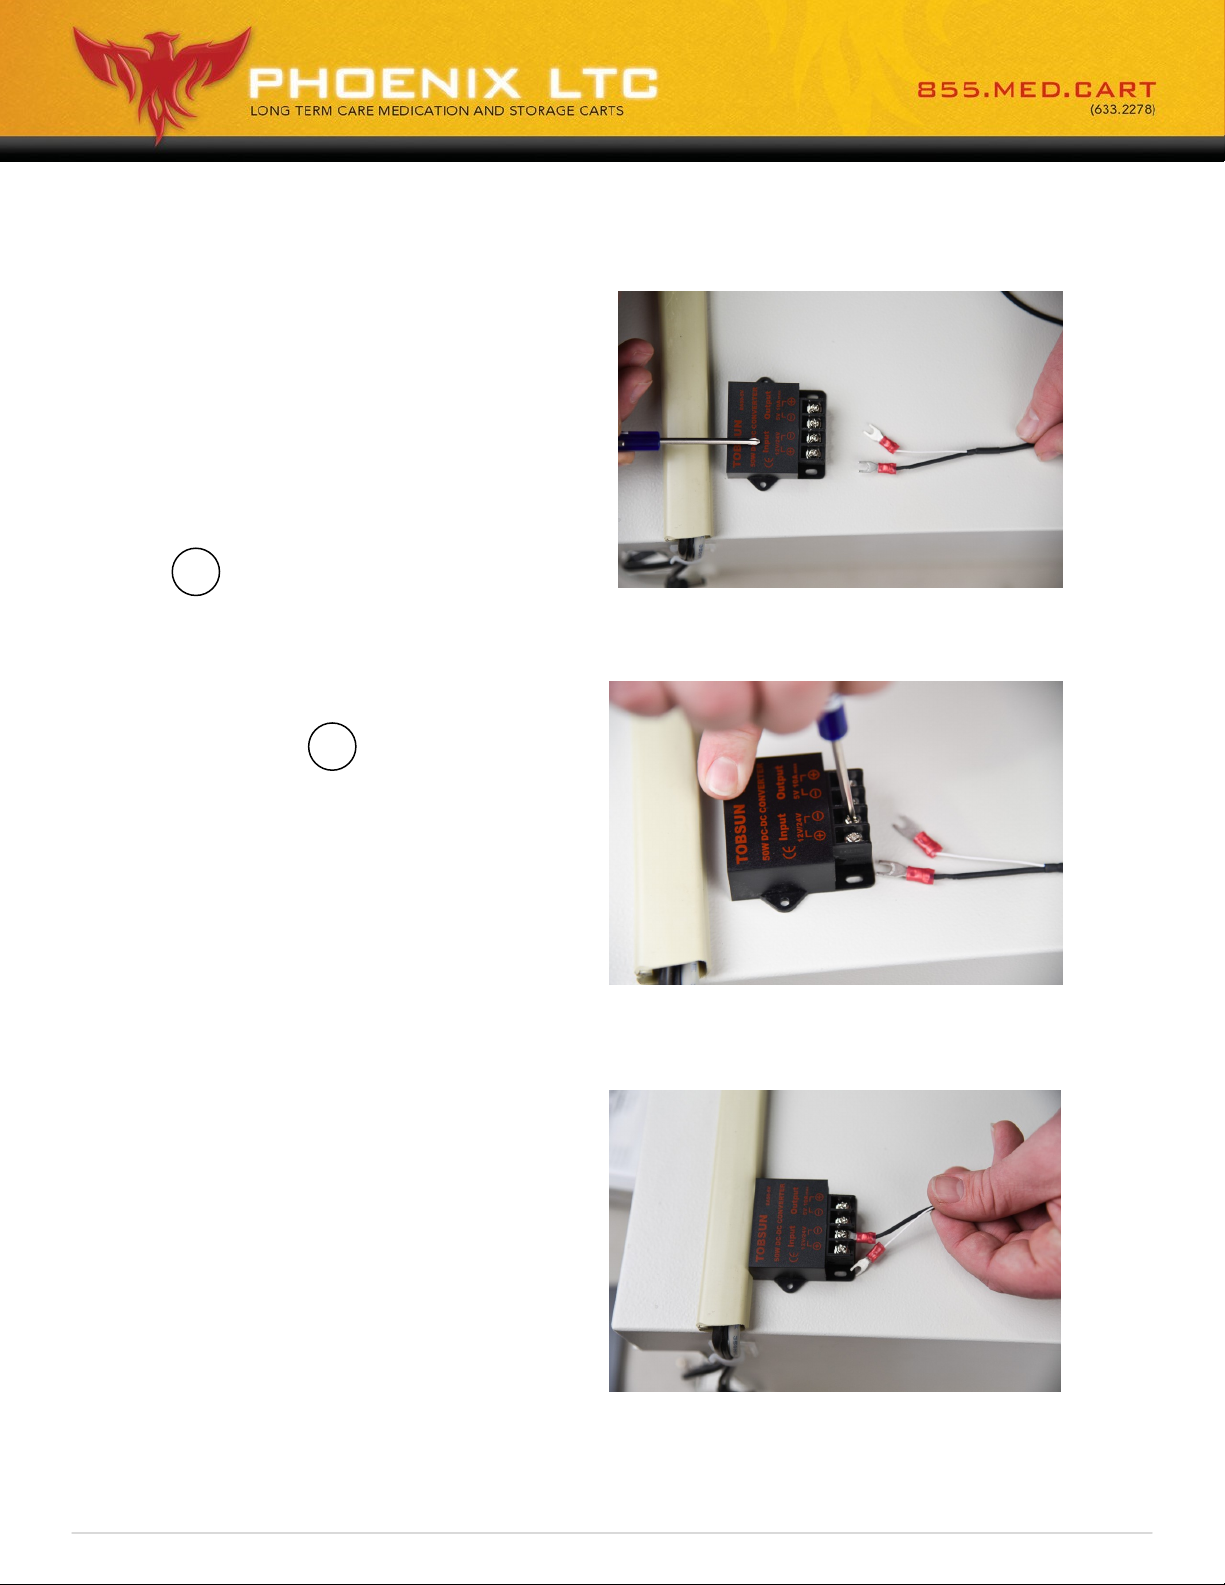
3. Starng on the le side of the
CONVERTER 50W DC-DC
12V/24A, loosen each of the
screws with a screwdriver.
4. Take the white wire and place
the fork terminal underneath the
+ screw on the input side.
5. Next, take the black wire and
place the fork terminal underneath the — screw on the input
side.
6. Once in place, ghten the screws
with your screwdriver.
PHOENIX LTC | 3730 East Southern Avenue, Phoenix, Arizona 85040-3958 PHOENIXLTC.COM
Page 10
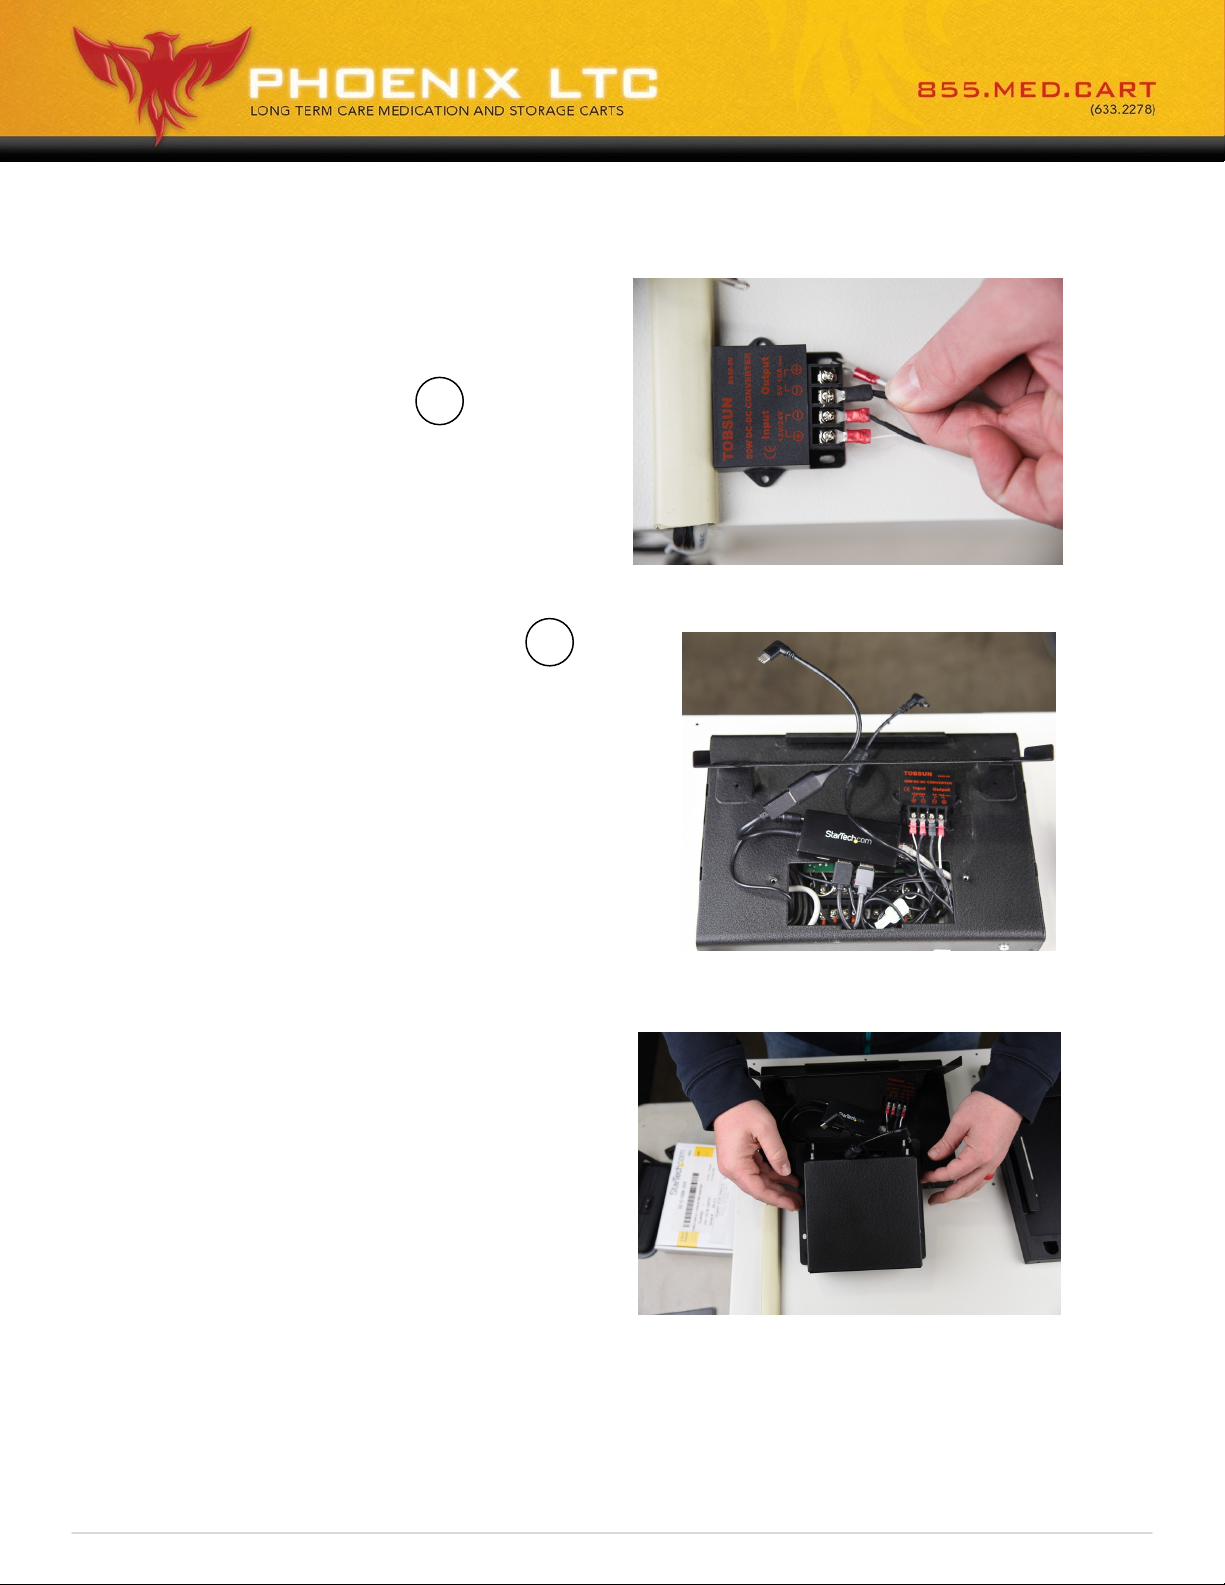
7. Take your HARNESS, TERMINAL
MALE CABLE and starng with
the black wire, place the fork
terminal under the — screw
on the output side. The black
wires should be right next to
each other.
8. Take the white wire and place the
fork terminal underneath the +
screw on the output side.
9. Once in place, ghten the screws
to secure the terminal.
10. Place on top of the kiosk and put
the HARNESS, TERMINAL MALE
CABLE and the USB C MALE TO
USB FEMALE through the
opening in the front of the kiosk.
11. Take the back cover and place it
over all of the exposed wires,
CONVERTER 50W DC-DC 5V-10A
and CABLE USB 3.0 3 HUB W/
GBE ADAPTER.
PHOENIX LTC | 3730 East Southern Avenue, Phoenix, Arizona 85040-3958 PHOENIXLTC.COM
Page 11
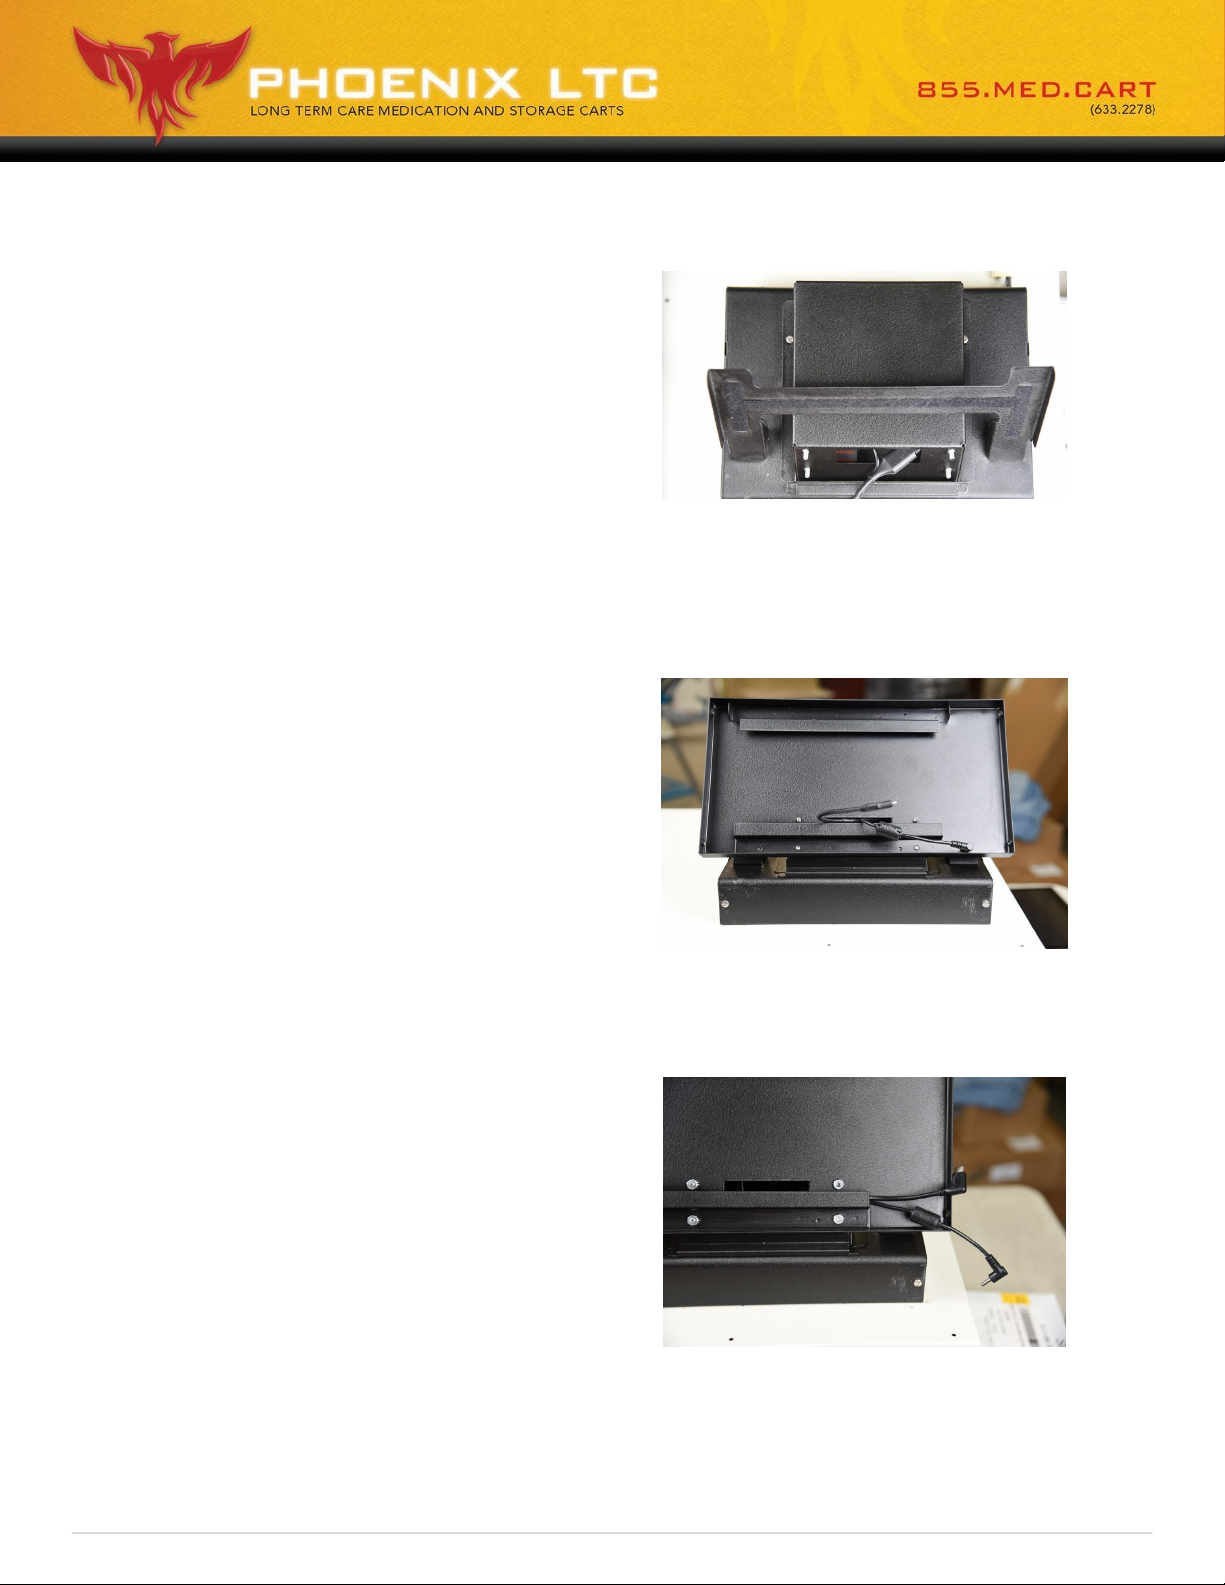
Installing the Lenovo Tablet
1. Locate the pre-drilled holes on
the kiosk and line up with the
pre-drilled holes on the back
cover. Make sure all of the new
cabling is under the cover.
Secure into place with spanner
screws and screwdriver.
2. Mount the back tablet weldment
into place, pull the HARNESS,
TERMINAL MALE CABLE and
CABLE USB 3.0 3 HUB W/ GBE
ADAPTER through the opening on
the back tablet weldment. Secure
with KEPS NUTS.
3. Take the two cables and pull to
the side so they hang o the right
hand side.
PHOENIX LTC | 3730 East Southern Avenue, Phoenix, Arizona 85040-3958 PHOENIXLTC.COM
Page 12
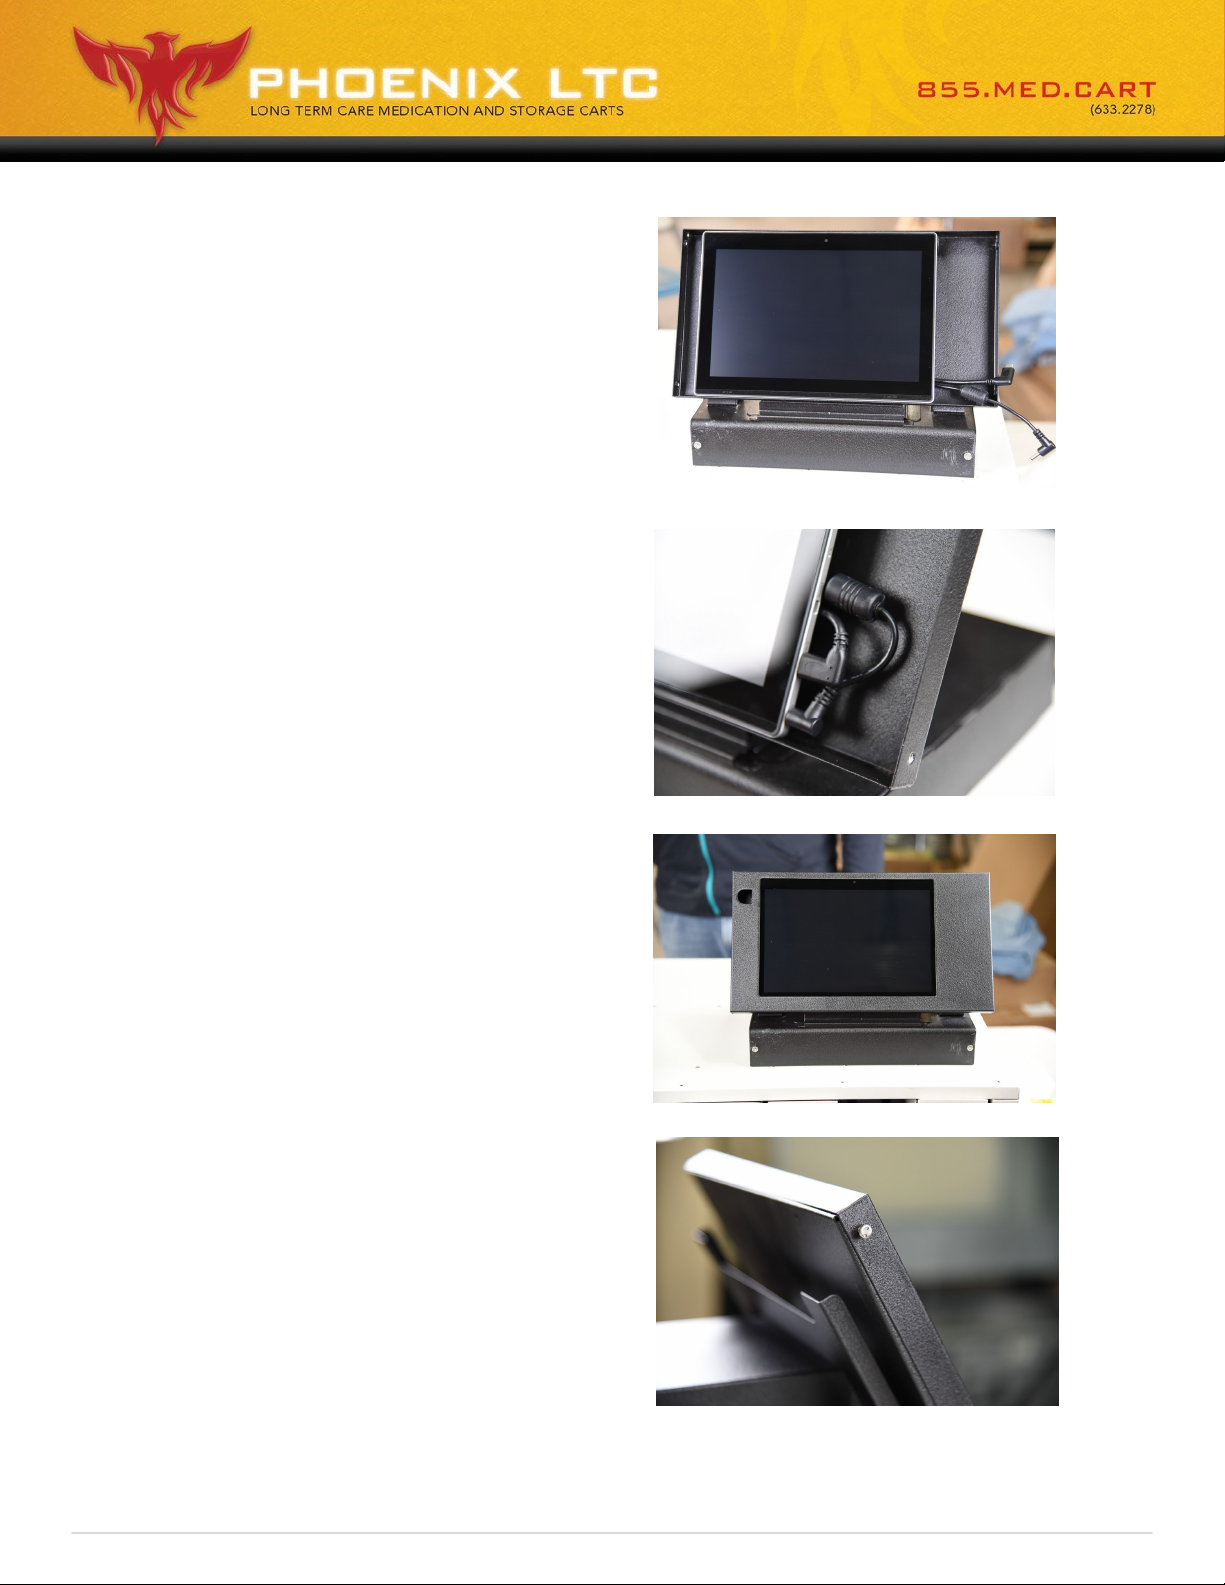
4. Place the Lenovo tablet into the
slots that are welded onto the BACK
TABLET WELDMENT
5. Plug the two cables into their ports
on the Lenovo tablet.
6. Take the FRONT BEZEL and place
onto the BACK TABLET WELDMENT
to enclose the tablet.
7. Secure FRONT BEZEL into place with
spanner screws and screwdriver.
Congratulaons!
Your conversion is complete,
the Lenovo tablet is now
ready for use!
PHOENIX LTC | 3730 East Southern Avenue, Phoenix, Arizona 85040-3958 PHOENIXLTC.COM
 Loading...