

Page 1
INSTRUCTIONS D'UTILISATION INSTRUCCIONES DEL USUARIO
Operating Instructions for
Phoenix SS0720E Series
Mode d'emploi pour
Phoenix série SS0720E
Betriebsanleitung für
Phoenix SS0720E Serie
Istruzioni per l'uso di
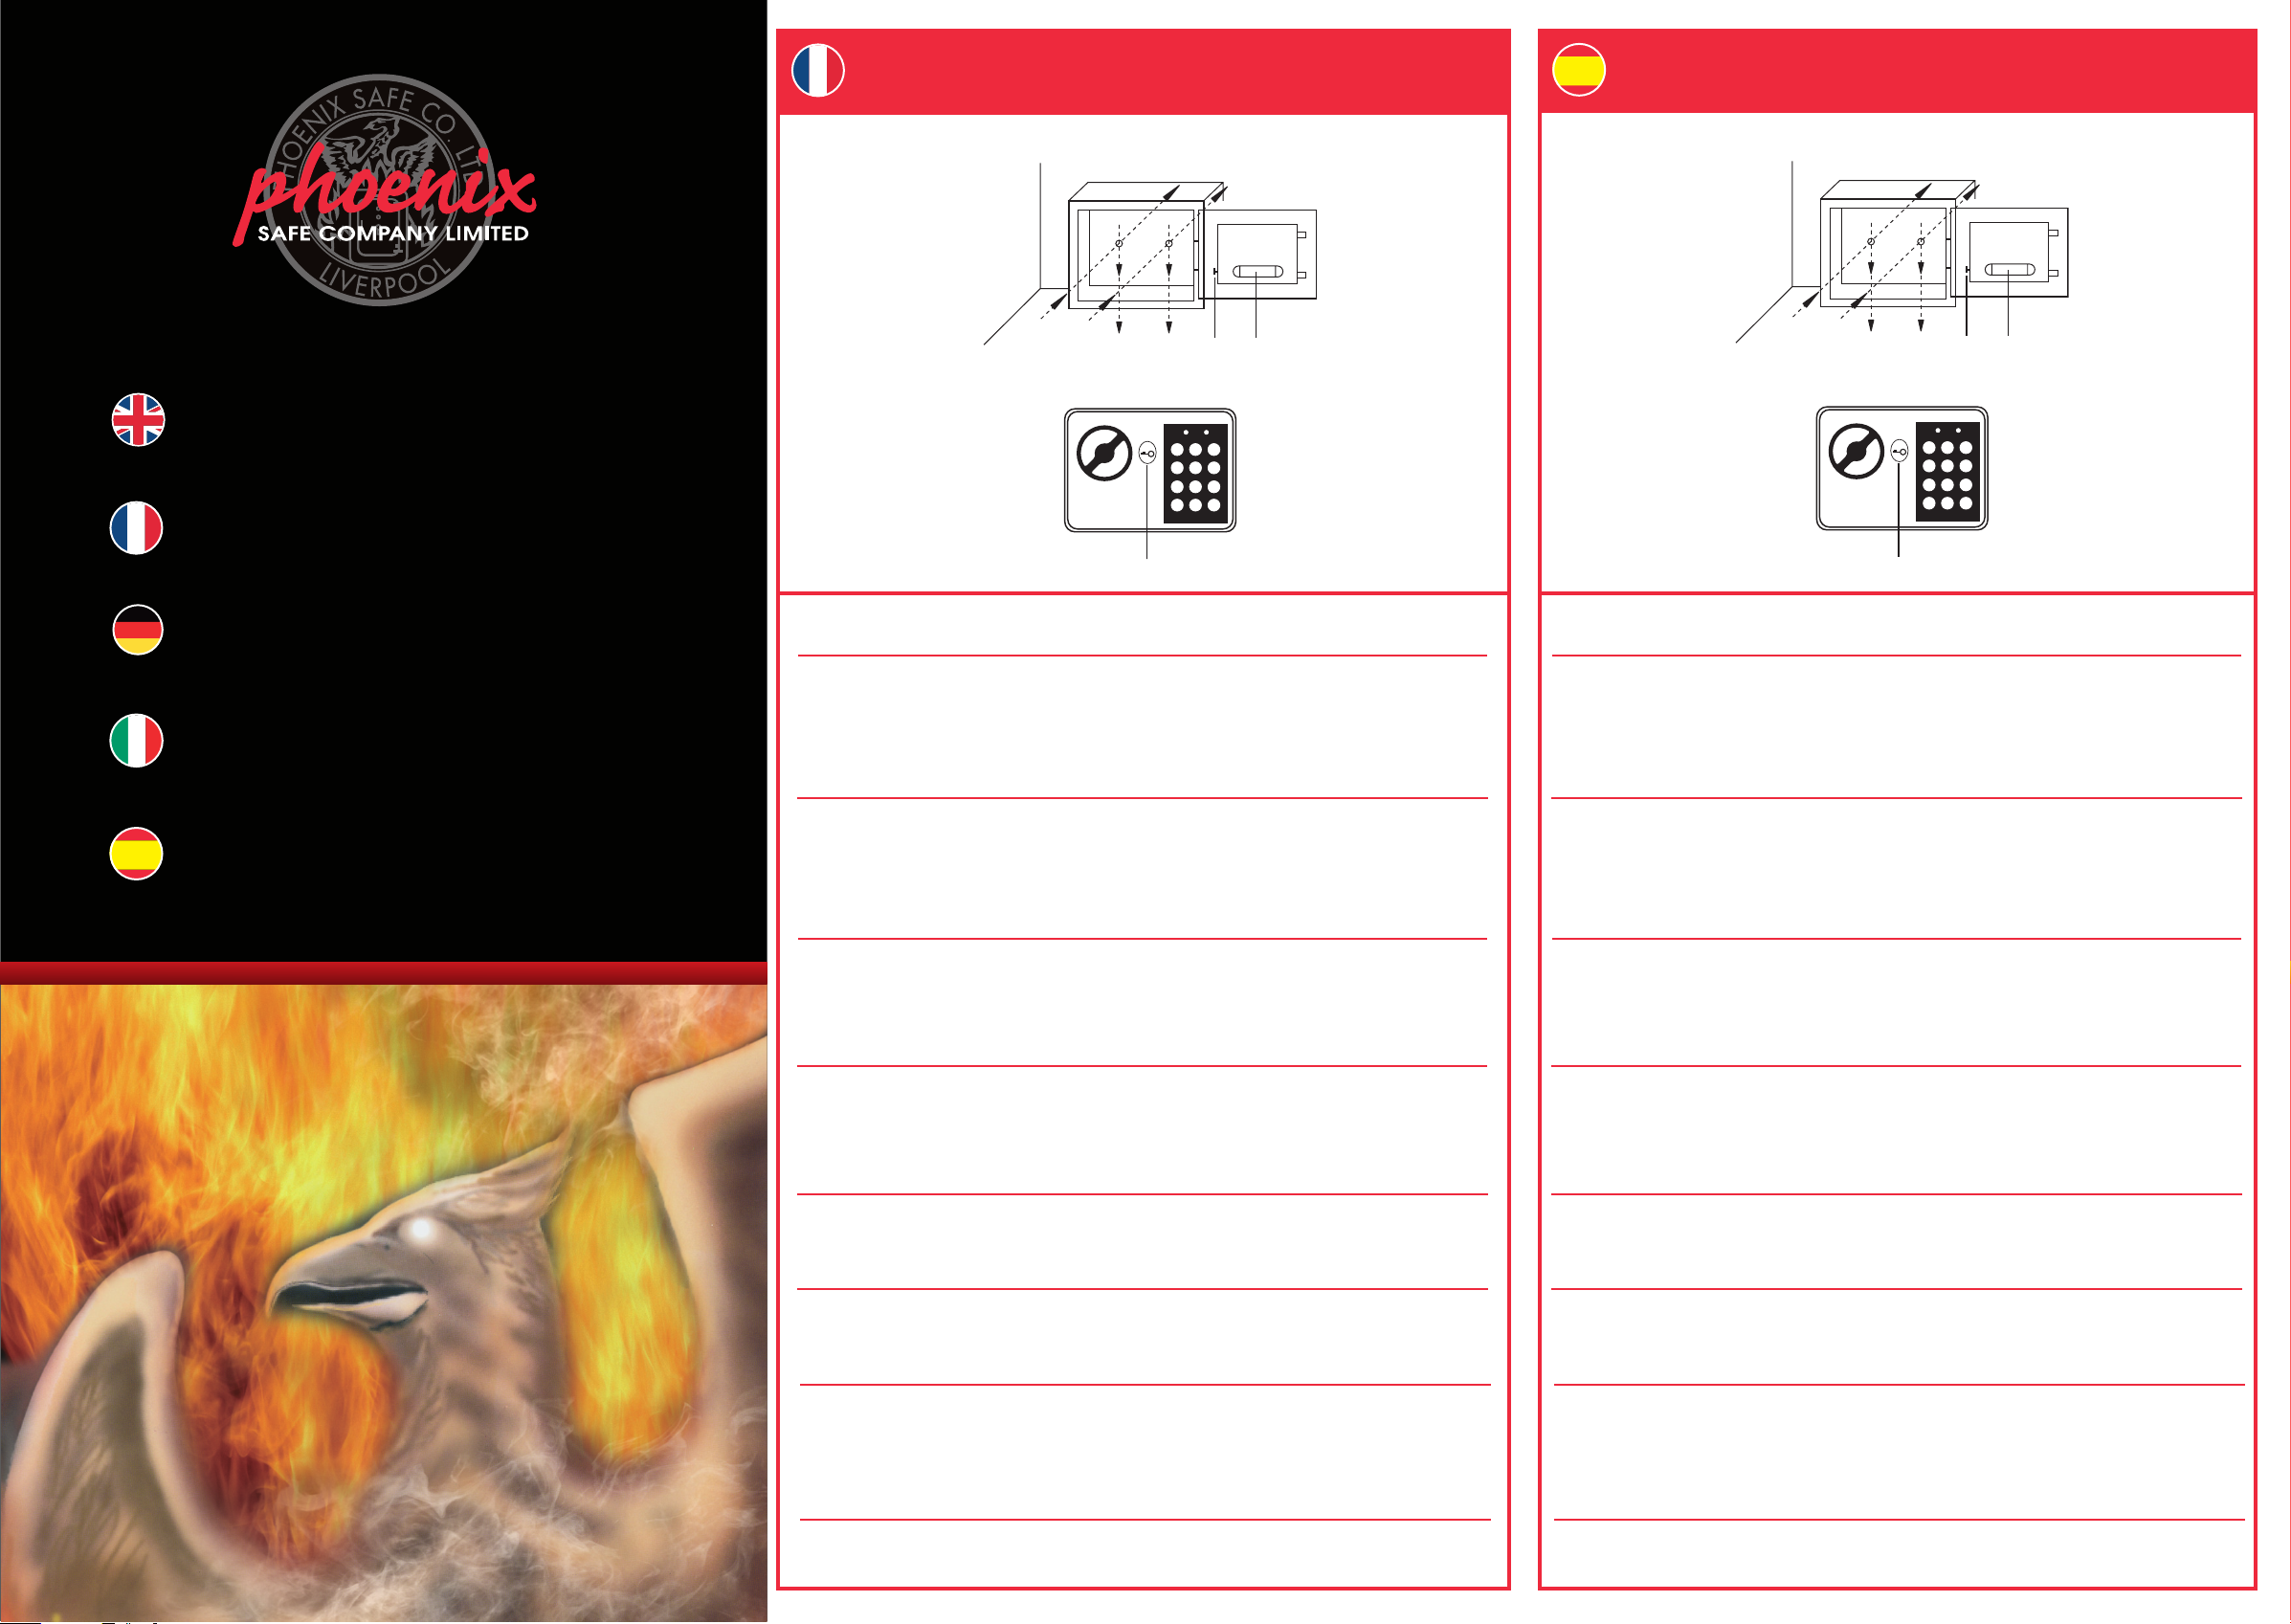
Schéma 1
X Y
Schéma 2
1
2
3
4
5
6
9
7
8
C
0
E
Z
X – Bouton de réinitialisation
Y – Cache serrure
Z – Compartiment des piles
1. PREMIÈRE OUVERTURE
Retirez le cache ovale bleu du pavé avant (Schéma 2-Z), insérez ensuite la clé fournie et tournez-la dans
le sens anti-horaire. Ouvrez la porte en tournant la poignée dans le sens horaire. La porte étant ouverte,
insérez les 4 piles AA fournies (schéma 1-Y).
Diagrama 1
X Y
Diagrama 2
1
2
3
4
5
6
9
7
8
C
0
X – Botón de reposición
Y – Compartimento de Pilas
Z – Cerradura de la llave de emergencia
Z
E
1. PARA ABRIR POR PRIMERA VEZ
Quite la tapa ovalada azul del teclado numérico frontal (Diagrama 2-Z), inserte la llave y gírela en sentido
contrario a la agujas del reloj, abre la puerta girando el pomo en el sentido de giro de las agujas del reloj.
Con la puerta abierta, inserte las 4 pilas (AA) (Diagrama 1-Y).
SS0720E Serie Phoenix
Manual de instrucciones
para SS0720E Phoenix Serie
2. DÉFINITION DU CODE PERSONNEL
La porte étant ouverte, appuyez sur le bouton de réinitialisation rouge (Schéma 1-X) sur l'arrière de la
porte. Saisissez votre code personnel (il est recommandé d'utiliser un code à quatre chiffres) puis
appuyez sur le bouton « E », pour le confirmer. Vous entendrez un bip sonore.
3. DÉFINITION DU CODE MAÎTRE
Il est recommandé de modifier le code maître. Pour ce faire, ouvrez la porte du coffre, appuyez deux fois
sur la touche « 0 », puis appuyez sur le bouton rouge au dos de la porte. Saisissez maintenant le code
maître de votre choix (8 chiffres maximum), puis appuyez sur la touche « E ».
4. ATTENTION
Avant de fermer la porte, vérifiez que les nouveaux codes fonctionnent. Entrez votre code personnel et
appuyez sur le bouton « E ». Le voyant vert s'allume puis un signal sonore retentit. Répétez l'opération
pour votre code maître. Le coffre est maintenant prêt à être utilisé.
5. OUVERTURE DE VOTRE COFFRE
Saisissez votre code utilisateur ou le code maître puis pressez la touche « E ».
6. OUVERTURE MANUELLE
Suivez les instructions données en 1.
2. PARA INTRODUCIR EL CÓDIGO PERSONAL
Con la puerta abierta, pulse el botón rojo de reposición (Diagrama 1-X) colocado en la parte interior de la
puerta. Introduzca su código personal (Se recomienda introducir 4 dígitos), y pulse el botón “E” para
confirmarlo. Se encenderá el testigo verde, seguido por un zumbido.
3. PARA INTRODUCIR EL CÓDIGO MAESTRO
Se recomienda cambiar el código maestro. Para hacer esto, abra la puerta de la caja, pulse el botón “0”
dos veces, a continuación pulse el botón rojo de reposición colocado en el interior de la puerta,
introduzca su código maestro (máximo de 8 dígitos), pulse el botón “E”.
4. AVISO
Antes de cerrar la puerta compruebe que los nuevos códigos estén activados. Introduzca su nuevo código
personal y luego pulse el botón “E” para confirmarlo. El testigo verde se encenderá, seguido por un
zumbido. Haga lo mismo para su código maestro. Ahora la caja está preparada.
5. PARA ABRIR LA CAJA
Introduzca su código de usuario o el código maestro y luego pulse el botón “E”.
6. CANCELACIÓN MANUAL
Sigue las instrucciones en el apartado 1.
7. REMPLACEMENT DES PILES
Lorsque les piles sont déchargées, le voyant rouge s'allume à chaque pression sur les touches du clavier.
Le verrou fonctionne avec 4 piles AA logées dans le compartiment de piles (Schéma 1-Y).
Remplacez-les au plus vite.
8. INSTALLATION
Utilisez les deux boulons de 6 mm afin de boulonner le coffre contre un plancher ou un mur adéquat.
7. PILAS DE REEMPLAZO
Cuando las pilas están agotadas se encenderá el testigo rojo al pulsar las teclas del teclado. La cerradura
utiliza 4 pilas (AA), colocadas en el portapilas (Diagrama 1-Y).
Sustituya estas lo antes posible.
8. INSTALACIÓN
Utiliza dos pernos de 6 mm para fijar la caja al suelo o la pared.
Page 2
ISTRUZIONI
USER INSTRUCTIONS
BEDIENUNGSANLEITUNG
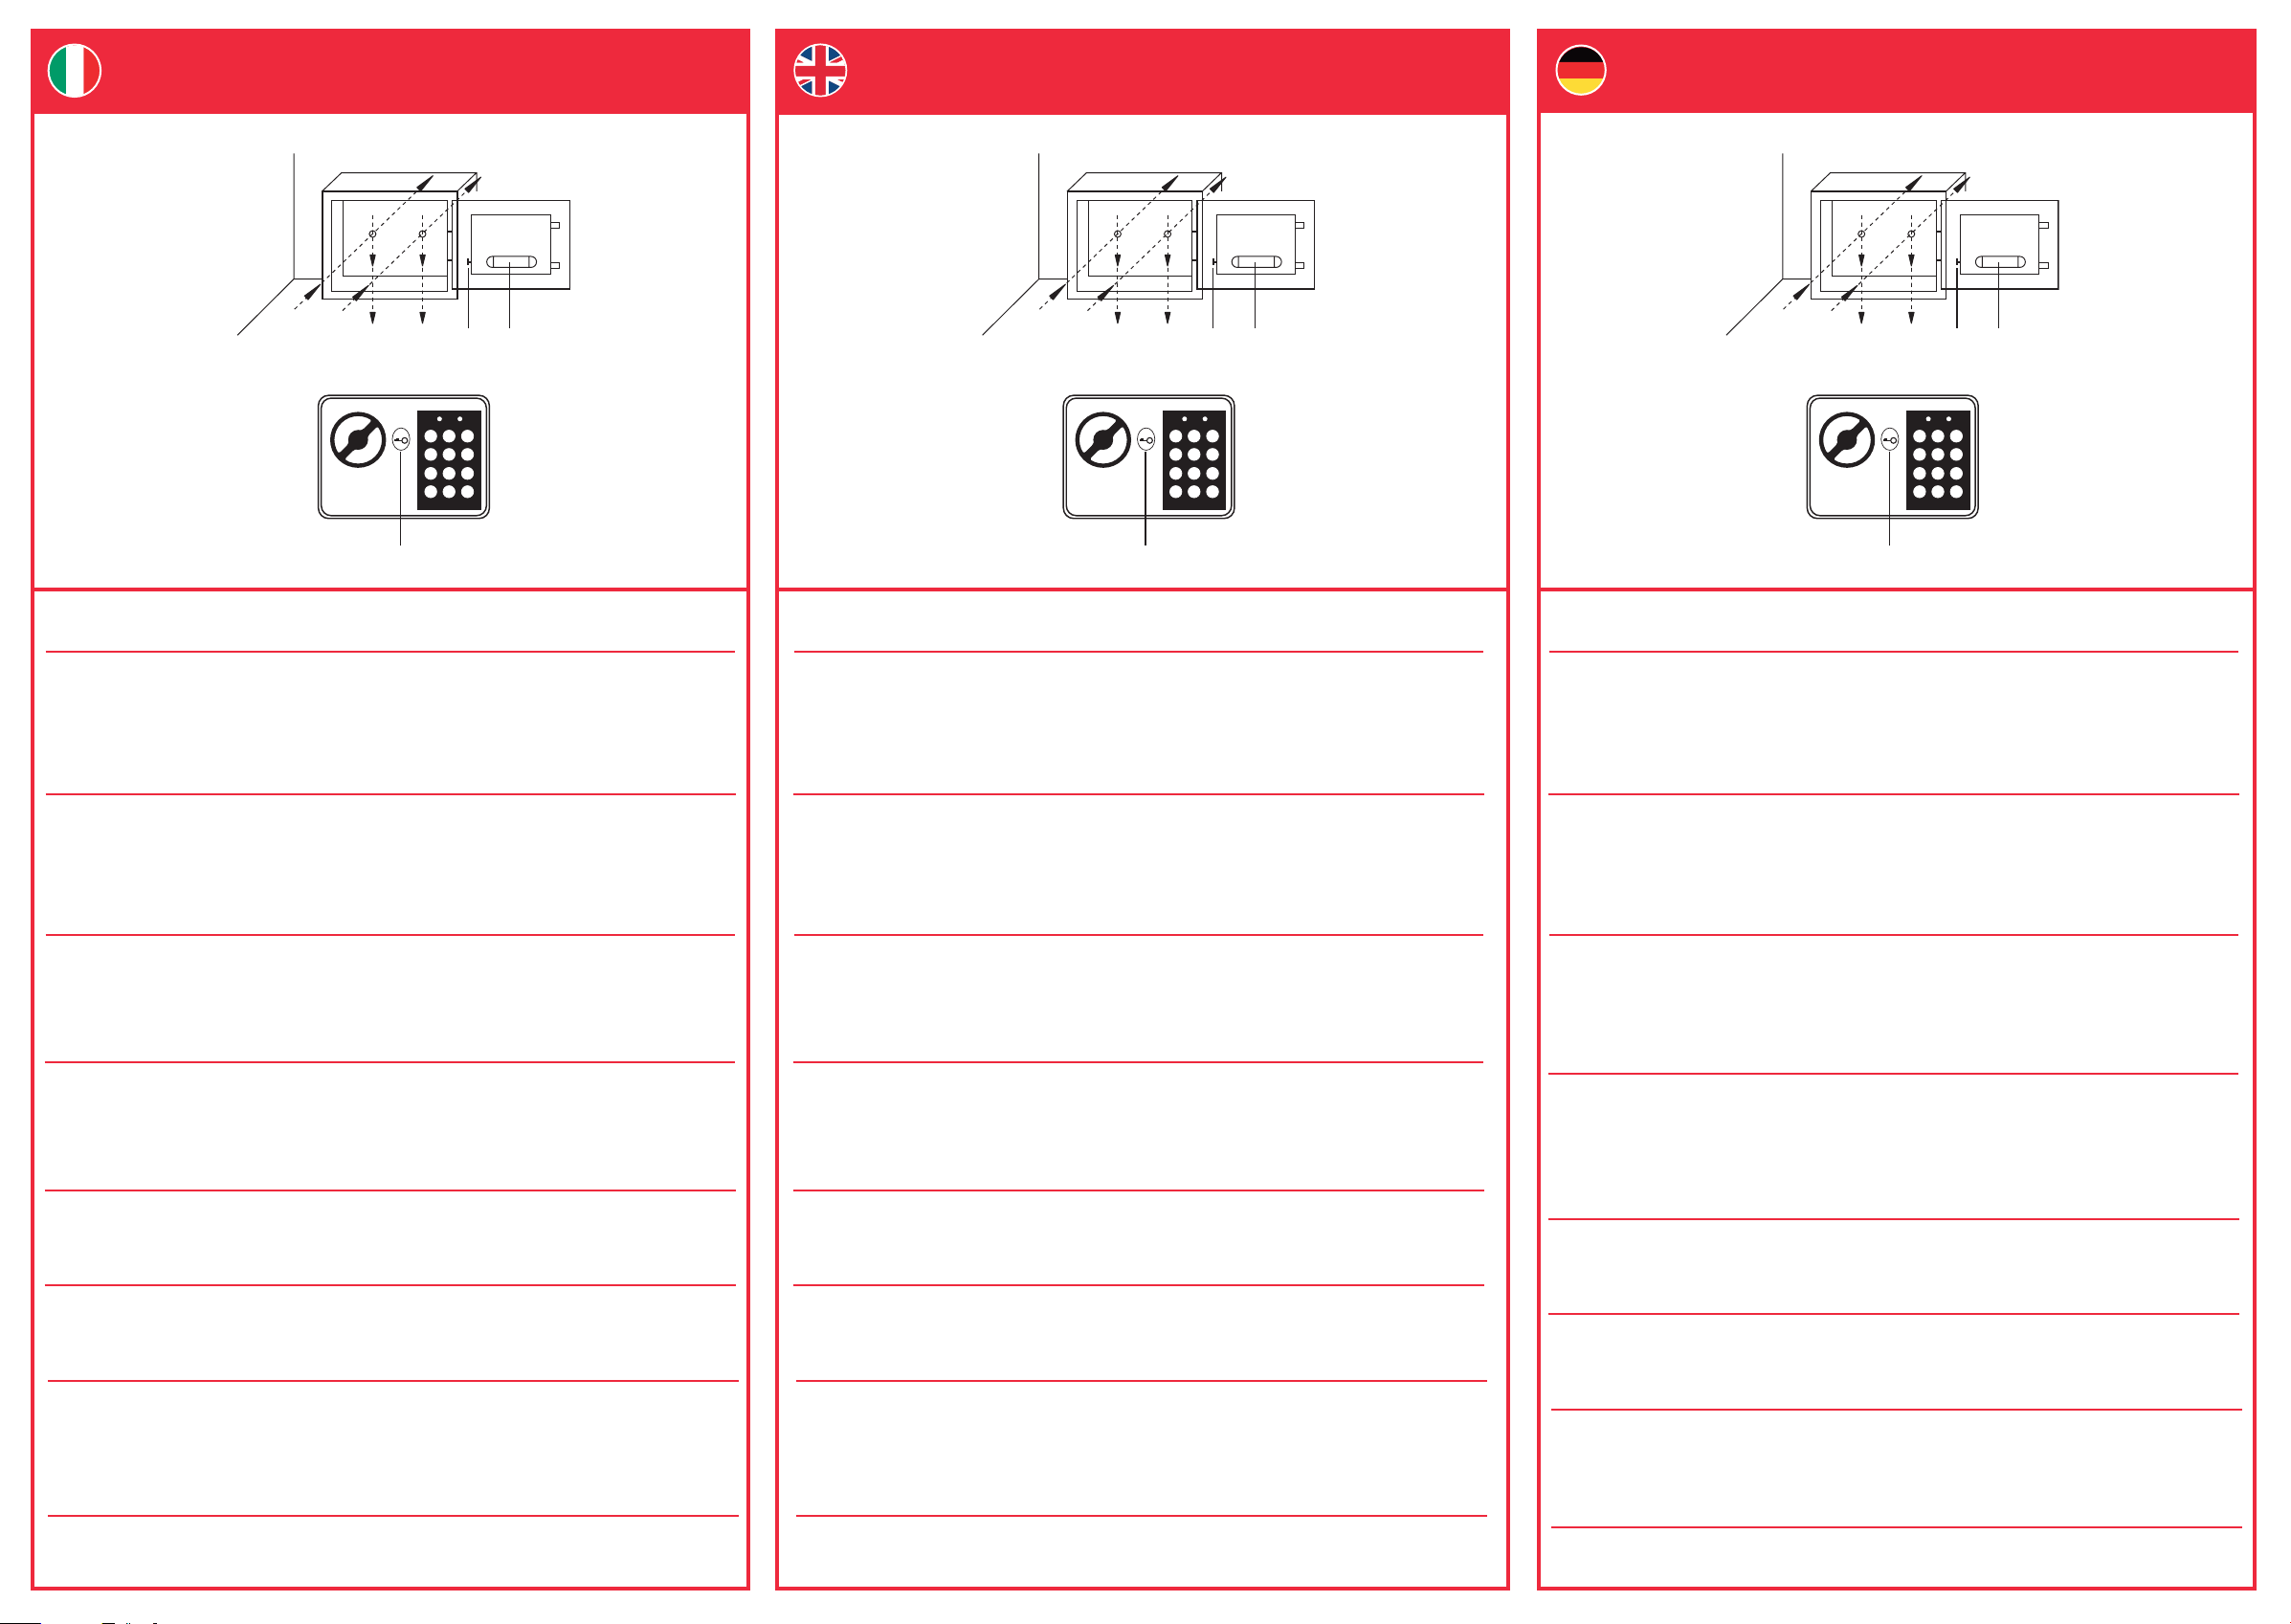
Diagramma 1
X Y
Diagramma 2
1
2
3
4
5
6
9
7
8
C
0
E
Z
X – Pulsante di Reset
Y – Vano batteria
Z – Serratura per chiave
emergenza
1. PRIMA APERTURA
Rimuovere il coperchio ovale dalla tastierina frontale (Diagramma 2 - Z), inserire la chiave fornita e girare
in senso anti-orario, aprire lo sportello girando il pomello in senso orario. Con lo sportello aperto, inserire
le 4 pile AA in dotazione (Diagramma 1-Y).
Diagram 1
X Y
Diagram 2
1
2
3
4
5
6
9
7
8
C
0
E
Z
X – Reset Button
Y – Battery Compartment
Z – Over Key Lock
1. FIRST OPENING
Please remove blue oval cover from front keypad (Diagram 2 - Z), now insert key supplied and turn
anti-clockwise, open the door by turning knob clockwise. With the door in open position insert the 4 x AA
batteries supplied (Diagram 1-Y).
Abbildung 1
X Y
Abbildung 2
1
2
3
4
5
6
9
7
8
C
0
E
Z
X – Reset – Knopf
Y – Batteriefach
Z – Abdeckung Schloss
1. DIE ERSTE ÖFFNUNG
Bitte entfernen Sie die blaue, ovale Abdeckung des Schlüsselschloss (Abbildung 2 – Z), stecken Sie den
mitgelieferten Schlüssel in das Schloss und drehen Sie ihn gegen den Uhrzeigersinn. Öffnen Sie die Tür
indem Sie den Drehknopf im Uhrzeigersinn drehen. Bei geöffneter Tür setzen Sie nun die 4 mitgelieferten
Batterien (AA) in das Batteriefach ein (Abbildung 1 – Y).
2. IMPOSTARE IL CODICE PERSONALE
Con lo sportello aperto, premere il tasto reset rosso (Diagramma 1 –X) all’interno dello sportello. Digitare
il codice personale (Si raccomanda di usare un codice a Quattro cifre) e premere il tasto “E” per
confermare. Si accenderà l’indicatore verde a cui seguirà un “beep”.
3. IMPOSTARE IL CODICE MASTER
Si raccomanda di cambiare il codice master. Per far questo, aprire lo sportello della cassaforte, premere
il tasto “0” due volte, poi premere il tasto reset rosso all’interno dello sportello, ora inserire il codice
master di vostra scelta (8 cifre massimo) e premere il tasto “E”.
4. ATTENZIONE
Prima di chiudere lo sportello controllare che i nuovi codici siano operativi. Digitare il nuovo codice
personale e premere il tasto “E” per confermare. Si accenderà l’indicatore verde a cui seguirà un
“beep”. Ripetere l’operazione per il codice master. La cassaforte è ora pronta per l’uso.
5. APRIRE LA CASSAFORTE
Digitare il codice personale o codice master seguito dal tasto “E”.
6. APERTURA MANUALE
Seguire le istruzioni al punto 1.
2. SETTING PERSONAL CODE
With the door in the open position. Press the red reset button (Diagram 1 –X) on the back of the door.
Enter your personal code (It is recommended to use four numbers) and press button “E” to confirm. You
will hear a bleep tone.
3. SETTING MASTER CODE
It is recommended that you change the master code, to do this open safe door, press button “0” twice,
then press red reset button on inside of door, now enter master code of your choice (max 8 digits), press
button “E”.
4. WARNING
Before closing the door check that the new codes are in operation. Enter your new personal code and
press button “E” to confirm. The green indicator will light followed by a beep tone. Repeat for your master
code. The safe is now ready for use.
5. OPENING YOUR SAFE
Enter your user code or master code followed by button “E”.
6. MANUAL OVERRIDE
Follow instructions in item 1.
2. CODE EINSTELLEN
Die Tür ist geöffnet. Drücken Sie den roten Reset – Knopf (Abbildung 1 - X) an der Türrückseite. Geben
Sie Ihren persönlichen Code ein (wir empfehlen min. 4 Stellen) und drücken Sie die Taste „E“ zur
Bestätigung. Die grüne Kontrolllampe sollte nun leuchten, gefolgt von einem Ton zur Bestätigung der
Eingabe.
3. MASTERCODE EINSTELLEN
Es wird empfohlen, den Mastercode zu ändern. Öffnen Sie die Tür und drücken Sie die Taste „0“
zweimal. Drücken Sie dann den roten Reset – Knopf an der Türrückseite. Geben Sie nun den
gewünschten Mastercode ein (max. 8 Stellen) und drücken Sie die Taste „E“.
4. ACHTUNG:
Bevor Sie die Tür schließen, vergewissern Sie dich, dass die neuen Codes funktionieren. Geben Sie Ihren
persönlichen Code ein und drücken Sie die Taste „E“ zur Bestätigung. Die grüne Kontrolllampe sollte nun
leuchten, gefolgt von einem Ton zur Bestätigung der Eingabe. Wiederholen Sie diesen Test nun ebenfalls
für den Mastercode. Der Tresor ist nun betriebsbereit.
5. TRESOR ÖFFNEN
Geben Sie Ihren persönlichen oder Mastercode ein und drücken Sie die Taste „E“.
6. NOTÖFFNUNG
Folgen Sie den Anweisungen unter Punkt 1.
7. SOSTITUZIONE PILE
Quando le pile si stanno scaricando, l’indicatore rosso si accenderà ogni qualvolta si usa la tastierina. La
serratura richiede 4 pile AA situate nell’apposito alloggiamento (Diagramma 1 –Y).
Sostituire le pile il più presto possibile.
8. INSTALLAZIONE
Fissare la cassaforte ad una superificie adeguata, muro o pavimento, usando i due bulloni in dotazione.
7. REPLACEMENT BATTERIES
When the batteries are low the red indicator light will be illuminated when the keypad buttons are
pressed. The lock uses 4 x AA batteries located in the battery holder (Diagram 1 –Y).
Please replace these as soon as possible.
8. INSTALLATION
Use the two 6mm bolts to bolt the safe to a suitable floor or wall.
7. BATTERIEWECHSEL
Wenn die Batterien fast leer sind, leuchtet die rote Kontrolllampe sobald Sie eine Taste auf dem
Bedienfeld drücken. Das Schloss benötigt 4x AA – Batterien, die sich im Batteriefach befinden (Abbildung
1-Y). Bitte tauschen Sie die Batterien so schnell wie möglich.
8. MONTAGE
Verwenden Sie die beiden 6mm Bolzen zu Bolzen die sichere, einen geeigneten Boden oder Wand.
 Loading...