

Phoenix Power Rower MR900 Owner's Manual

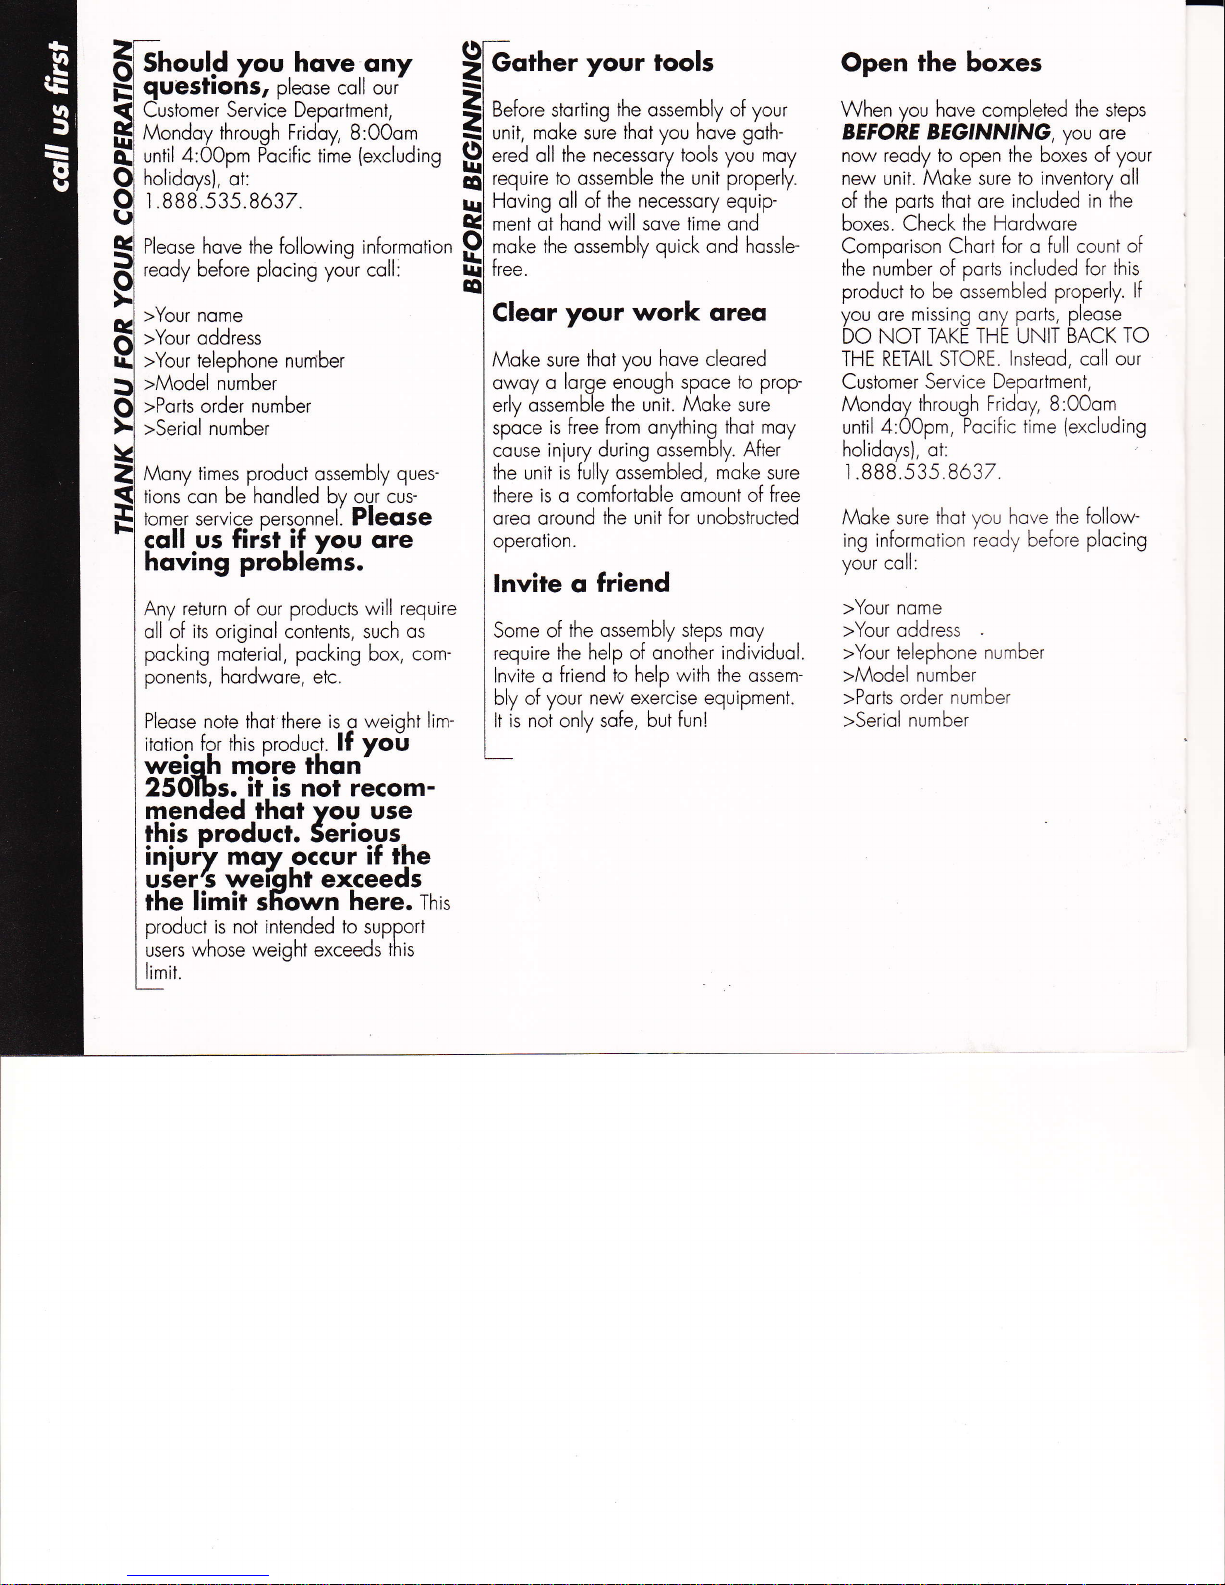
Should
you
hove
ony
$G"rh.r
your
tools
qUeSflOnS,
pleose coll our
=i
Customer
Service Deporiment,
tl
Before
storiing
the
ossembly of your
Mondoy throuoh Fridoy,
8:0Oom
Fl
unit,
moke
sure
lhot
you
hove golh-
until
4:OOpm
ilocific tirine
(excluding
'(ll
ered oll the
necessoly iools
vou
mov
holidoys),'ot:
I
v
Sl
require
to
ossemble
the unit
'ptop",ly.
r 8B8 s3s 863z
ul
il:il..;,;l$
l; ::::';il:::1"
Pleose
hove the following
informotion
9l f"b
the
ossembly
quick ond hossle-
reody before
plocing your
coll:
E1
t*"
>Your
nome
lCleEr
your work
qreq
>Your
oddress
I
>Your telephone number
I
lztoke sure
thot
you
hove cleored
>Model number
I
o*oy
o lorge enough spoce
to prop-
>Poris
order
number
I
erly ossemble
the
unit.
Moke
sure
>Seriol number
I
spi,ce
is free from onything
thot
moy
I
couse
iniury during ossembly.
After
Monv times oroduct ossemblv oues- I
the
unit
is fullv ossembled,
moke
sure
tions'con be'hondled bv our'cus- I
there
is
o comfortoble
omount of free
tomer service oersonnell Pleqse I
oreo oround
ihe
unit
for
unobskucted
coll us firsf if
you
ore r
ooerorion.
hoving
proble'ms.
:lnvite
q
friend
Anv reiurn of our oroducts will reouire I
oll of
its
originol contents, such
os
I
Sot"
of
the ossembly steps
moy
oockino moieriol. oockino box. com- lreouire
the help of onother
individuol.
pon"nti, hordwore, eic.
"
I
lnuite o
friend to
help
with
the
ossem-
I
bly of
your new exercise equipment.
Pleose note
ihot
there is
g
weioht lim-
|
lt is
not only sofe,
but
fun!
itotion
for this
produci.
lf yoil
L
Open the
boxes
When you hove completed the steps
BEFORE BEGTNNTNG
vou
o'e
now reody
to
open the boxes of
your
new
unit. Moke sure
to inventory oll
of
the
ports
thot ore
included in the
boxes. Check the Hordwore
Comporison Chort
for o
full
count
of
the number
of
ports
included for
this
product to be ossembled
properly.
lf
you ore missing ony
ports, pleose
DO
NOT TAKE THE UNIT
BACK TO
THE
RETAIL
STORE.
lnsteod, coll our
Customer Service
Deportment,
Mondoy
through
Fridoy,
8.OOom
until
4:OOpm, Pocific
time
(excluding
holidoys),
ot:
t.BBB 535 863Z
Moke sure
thot you hove the
follow-
ing informotion
reody belore plocing
your coll:
>Your nome
>Your oddress
>Your telephone ni,mber
>Model number
>Ports
order
number
>Seriol number
itotion
fqr this
produci.
lf yoil
weioh mdre thqn
25OIbs. it is not recom-
mended thqt
you
use
rhis
producl.
Seriogs-
tntury mqv occur
if the
vierrs weiqhr exceeds
rhe
limit
sFown
here.
Tr's
product is not intended to
support
users
whose weight
exceeds
this
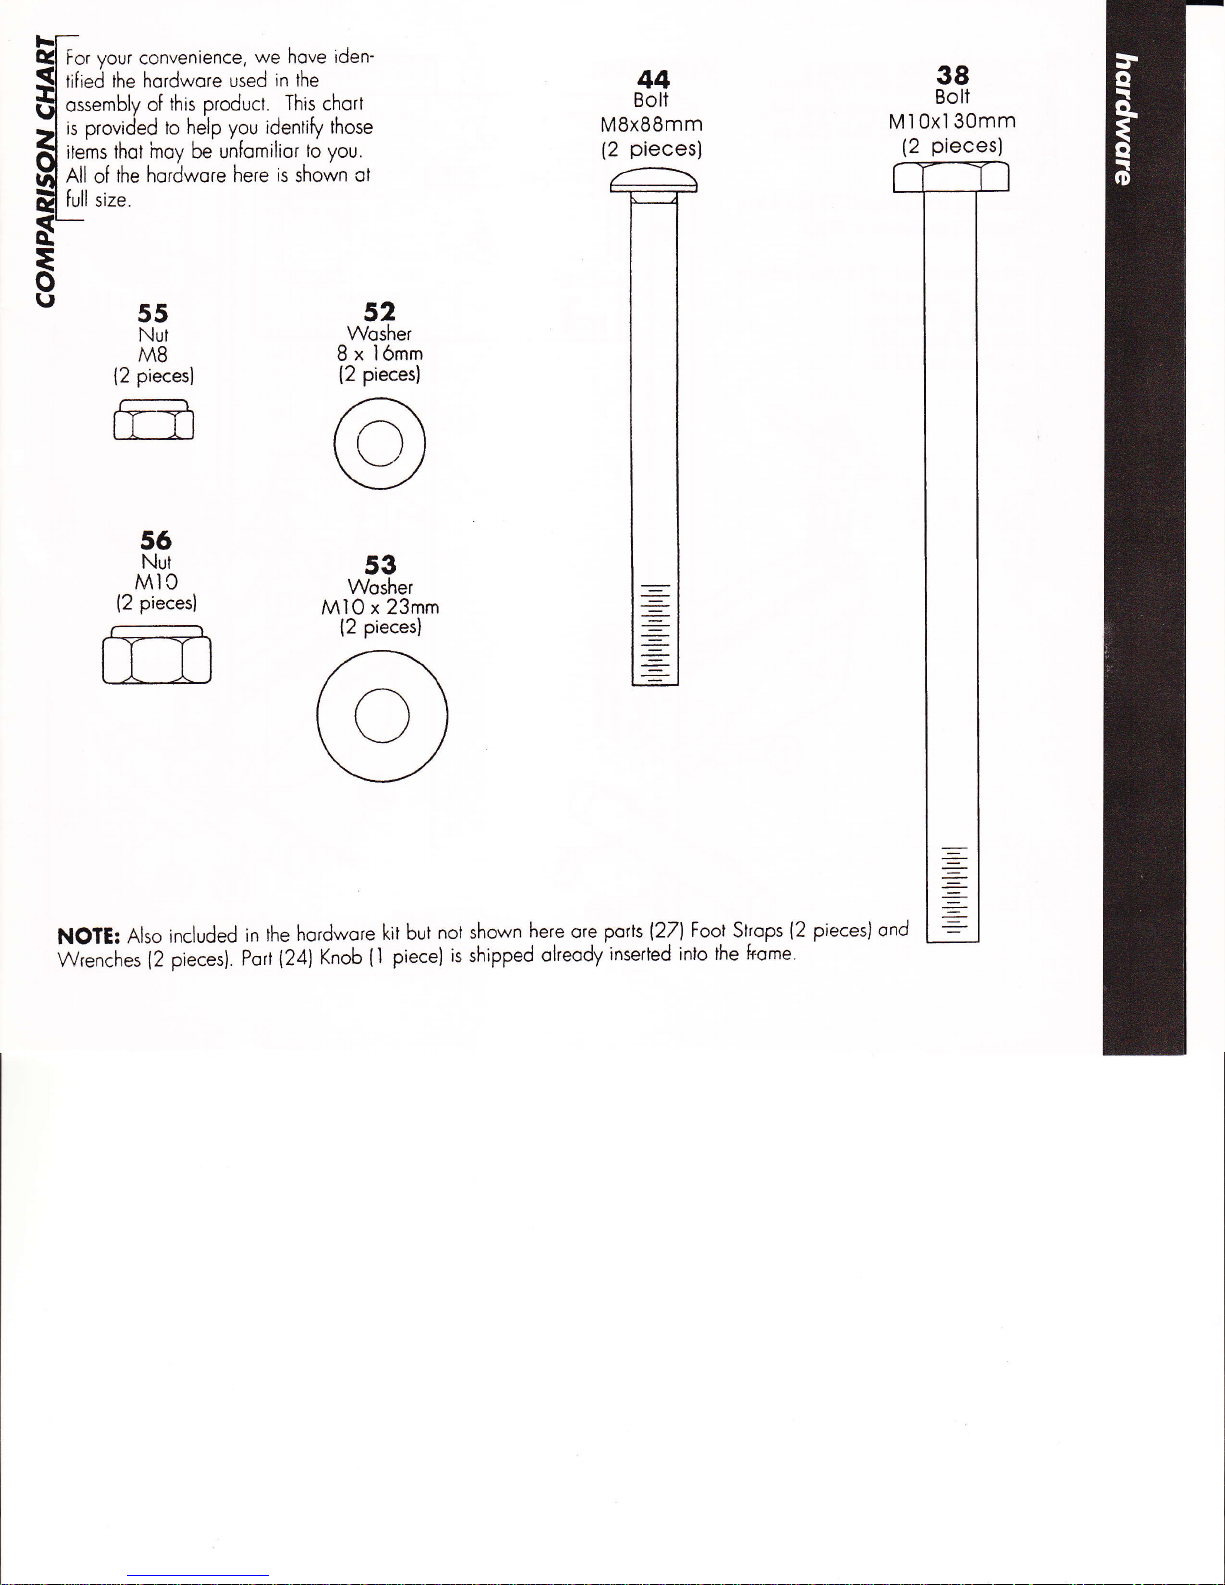
For
your
convenience,
we hove
iden-
tified
the hordwore
used
in
lhe
help you idenlify
those
ilems
lhot
inoy
be
unfomilior
to
you.
All
of
the hordwore here
is
shown
ol
full size.
44
Bolt
MBxSSmm
(2
pieces)
38
Bolt
M10x130mm
(2
pieces)
55
Nut
M8
{2
pieces}
fffi
52
Wosher
8
x l6mm
(2
pieces!
53
Wosher
MI0
x 23mm
(2
pieces)
56
Nut
MIC
(2
pieces|
NOTE:
Also
included
in
the
hordwore
kit but
not shown
here
ore
poils
l27l
Fool
Strops
(2
pieces] ond
Wi"n.nur
[2
pieces]. Poil
124)
Knob
(
I
piece)
is
shipped
olreody
inserbd inlo
the
Frome.

A[och
Stobilizer Bor
{3}
to Moin
Frome
{l l.
Secure
with
Bolts
{44},
Woshers
(52)
ond Nuts
(55los
shown.
lnserl
the
Foot
Strops
(2Zl
into eoch
Pedol
(Zl
os shown
in
FIG
l.
Attoch
he Pedols
{Z)
lo
the
Stobilizer
Bor
(31.
Secure
with
Bolts
{381,
Woshers
153lond
Nuts
(561
os
shown in FIG 2.
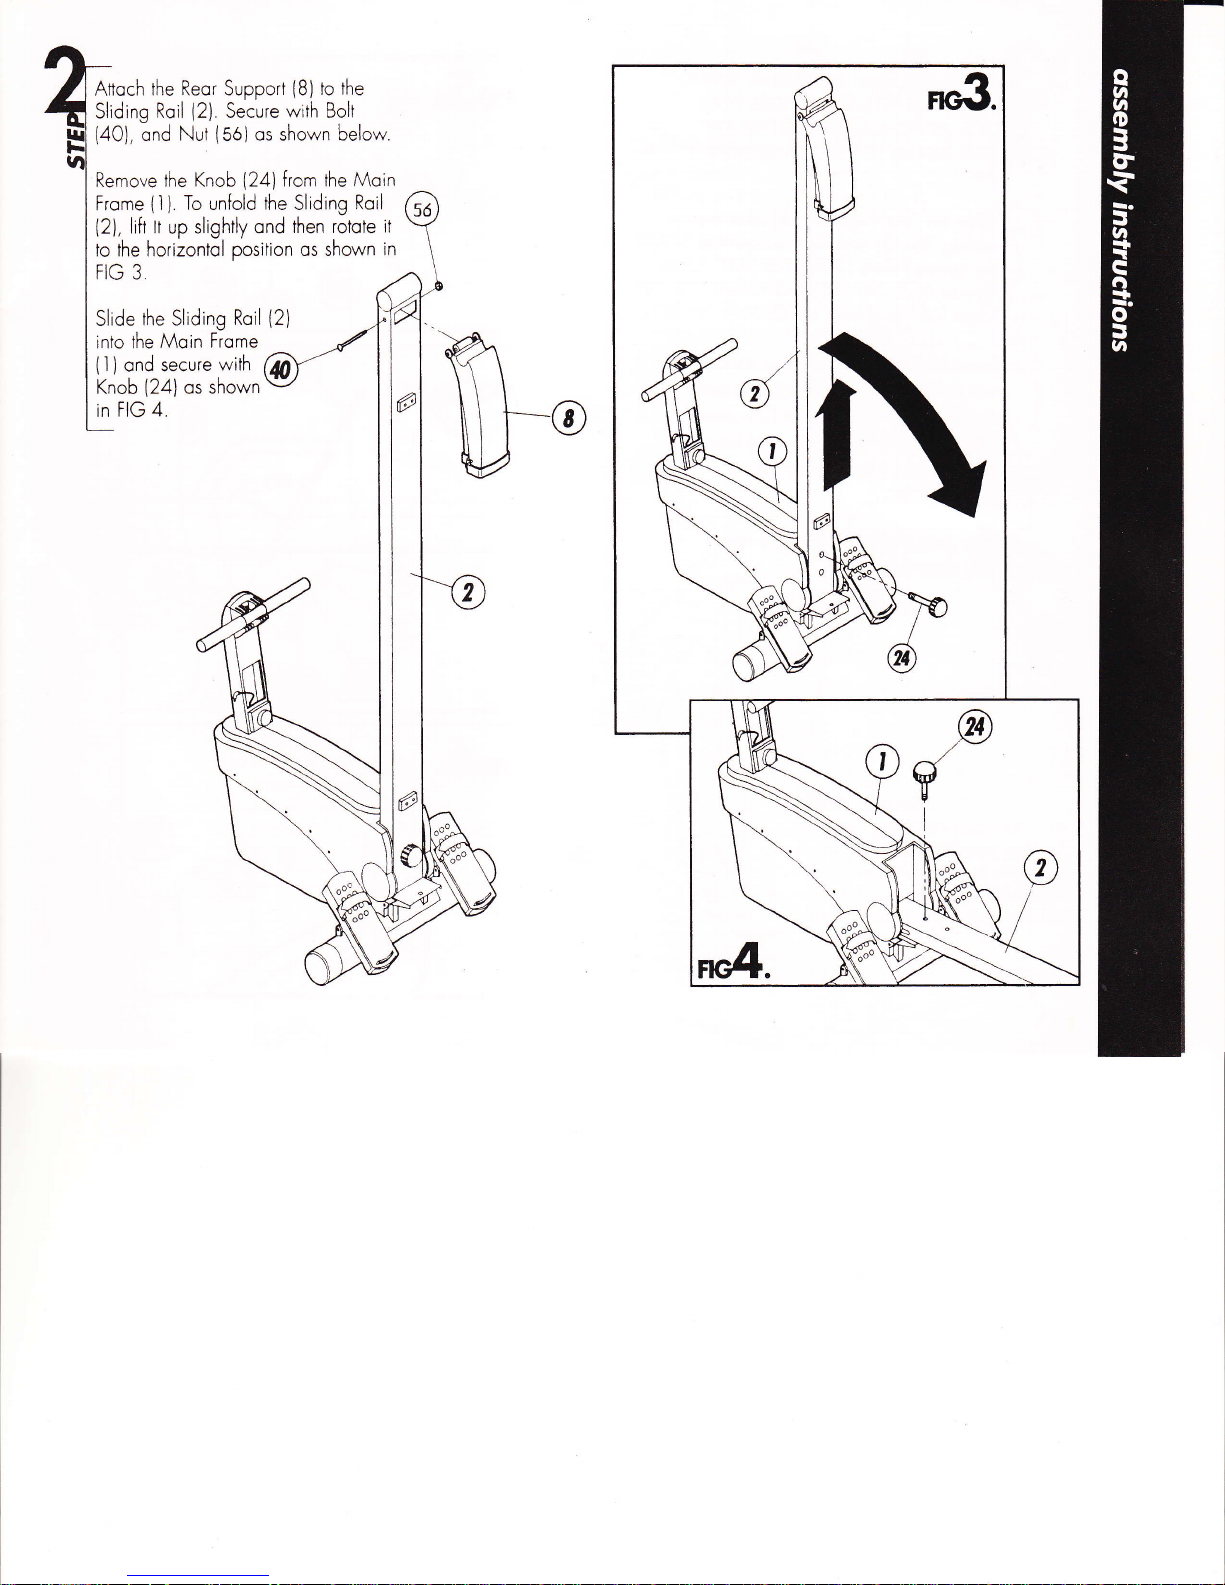
Attoch
the Reor Support
{8)
to the
Slldlng
Roil
(2).
Secure
with
Bolt
{40),
ond Nut
{56)
os
shown
below.
Remove the Knob
'24)fron
lhe Moin
Frome
{1
).
To
unfold
the
Sliding
Roil (}
{2),
lift lr
up slightly
ond
then rotote
it
\
toJhe
horizoniol position os shown
in
\
FIG 3
Slide
the Sliding
Roil
{2)
into the Moin
Frome
(l
)
ond
secure
with
Knob
{24)
os shown
in
FIG 4.
a
W"
tr_
{
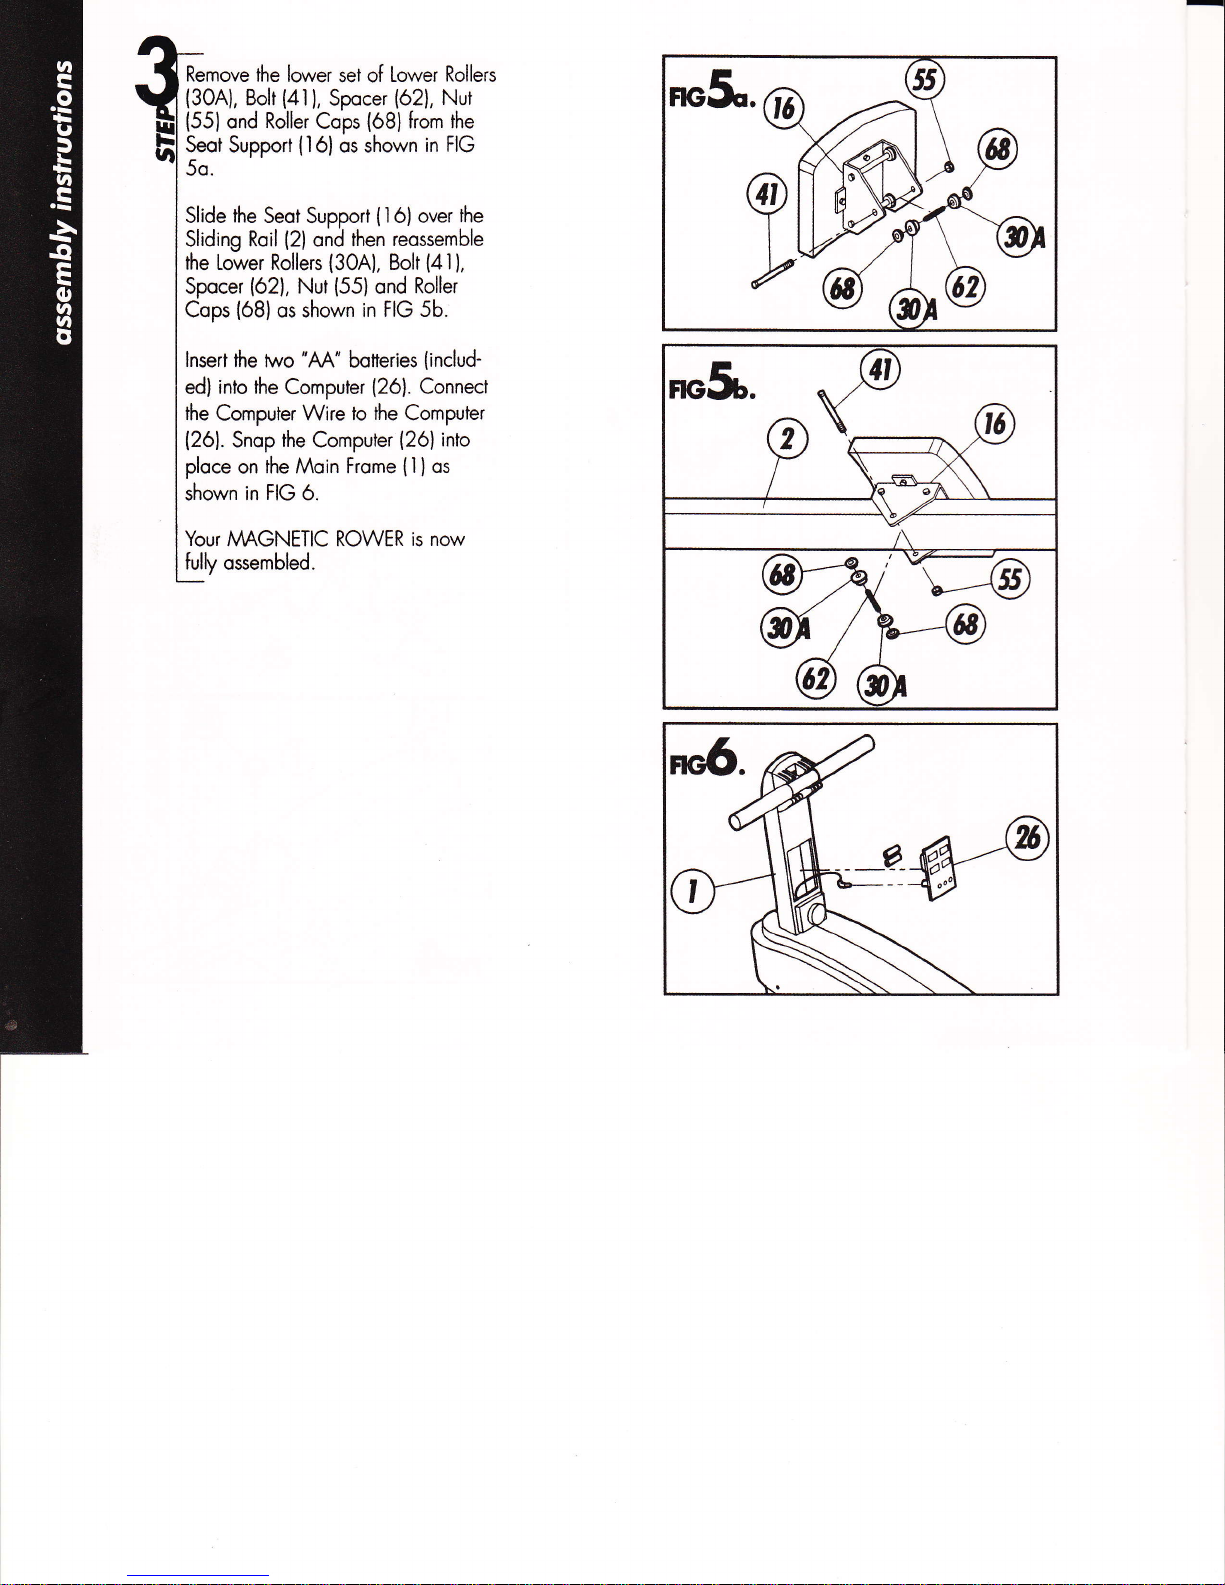
Rurnou" the
lower
set oi
Lower
Rollers
Yll
{gon},
Bolr
(4i),
Spocer
{62},
Nur
tl
(551
ond Roller
Cops
(68l
from the
hl
H:tSuPPort
ll6los
shown
in
FIG
I
I
Slide
the
Seot
Support
{.l6}
over
the
I
Sliding Roil
{2}
ond
then reossemble
I
the
Lower Rollers
(3041,
Bolt
(41),
I
Spocer
(621,
Nut
(55)
ond
Roller
I
Cops
(681
os shown
in FIG 5b.
I
I
lnsert the
two
"M'
botteries
{includ-
I
ed!
into the
Computer
{26}.
Connect
I
the
Computer
Wire
to the
Computer
|
{ZOl.
Snop
the
Compuler
(26}
into
I
ploce
on the Moin Frome
(ll
os
I shown in FIG 6.
I
lYour
MAGNETIC ROWER
is now
[ulV
ossembled.
:,,#A
ALLOW
SLIDING
RAII
TO DROP
INIO AAAIN
FRA'IIE
*qfo
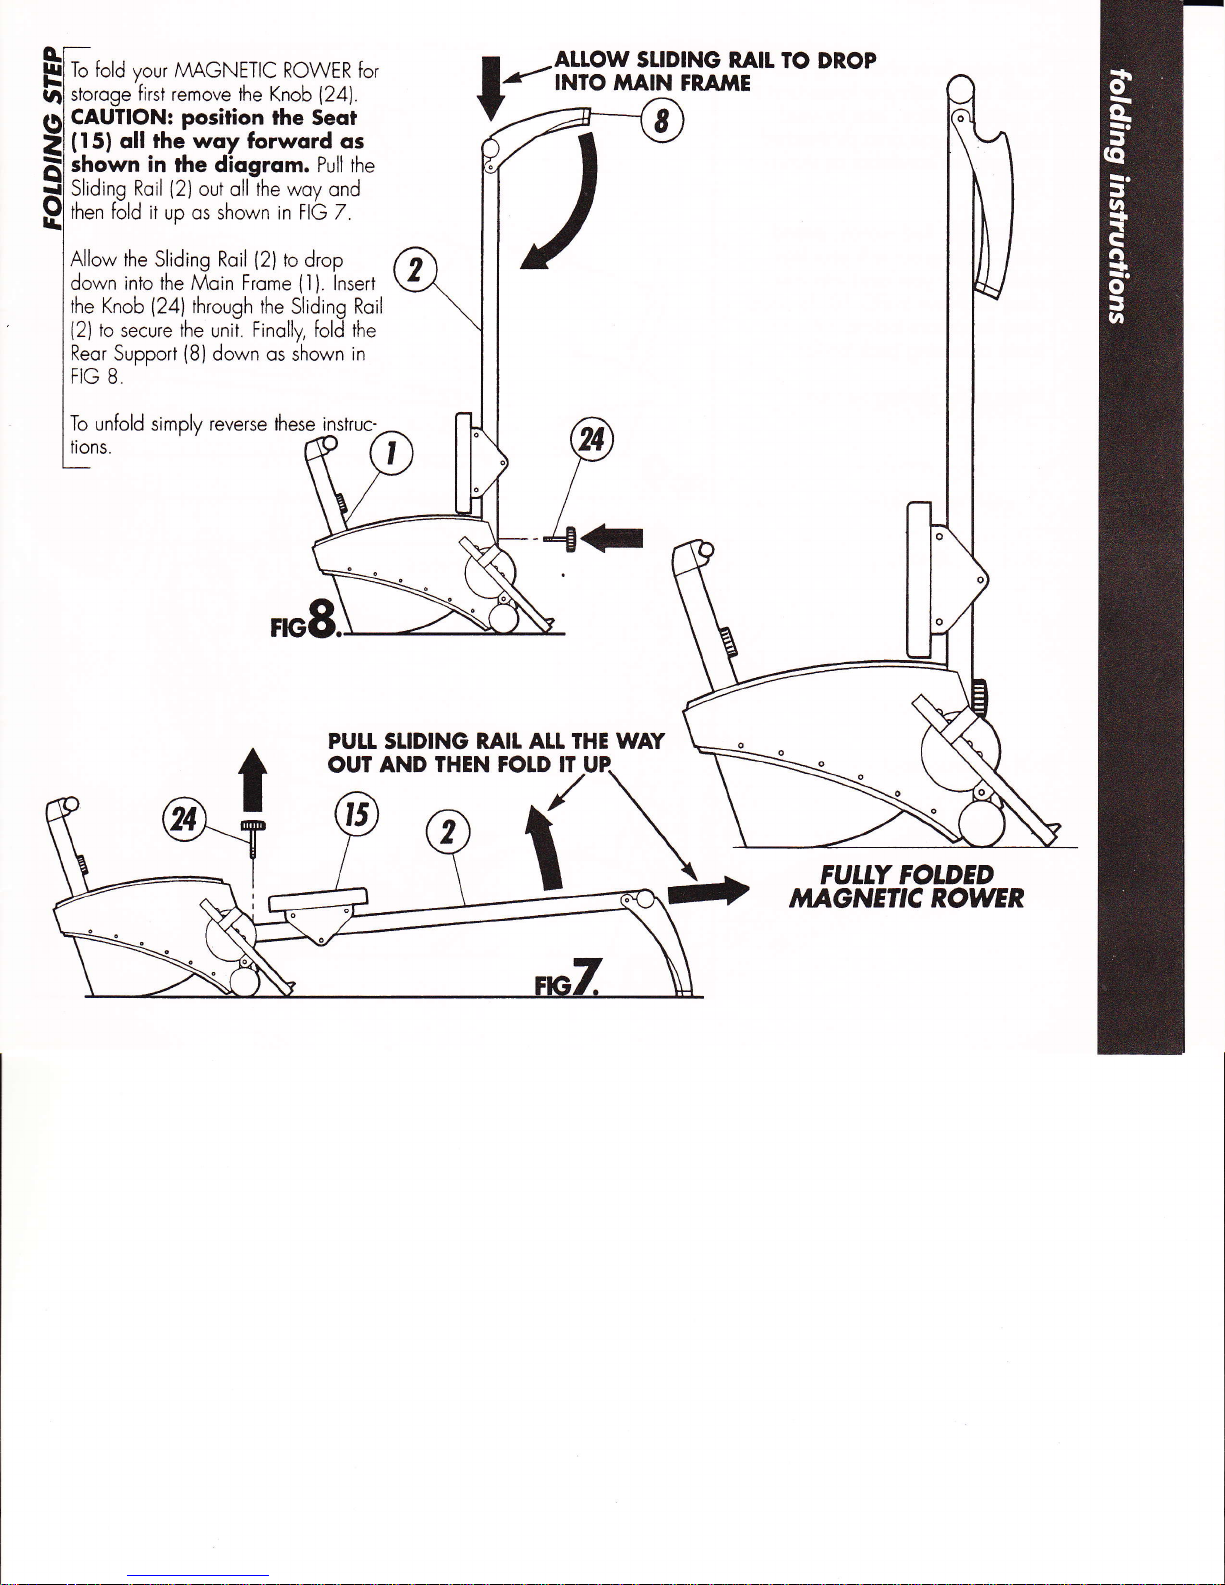
to'O
vour
MAGNETIC
ROWER
for
[lstoroge'first
remove ihe
Knob
(24].
rru
CAUI|ON:
position
the Seat
Xr
(f
5l
oll
rhe woy
forword os
Flshown
in
the diogrom.
Puil
ihe
!lStiaing
Roil
(2)
out oll'ihe woy
ond
f,l
then fold it
up
os shown in FIG 7.
j
lRtto*
rhe Sliding Roil
(2)
to
drop
ldown
into
lhe Moin Frome
(1).
lnsert
Ithe
Knob
(24)
through
the
Sliding
Roil
|
{2)
to
secure
he
unit.
Finolly, fold the
lReor
Support
(8)
down os shown
in
IFIG B
I
I
To unfold simplv reverse fiese inskuc-
[,..' P
(
(h
L
PULL
STIDING
RAII AtI THE WAY
OUT AND THEN FOID IT UP
Z\
\\
FULLY FOLDED
TVIAGNEII'C ROT/YER
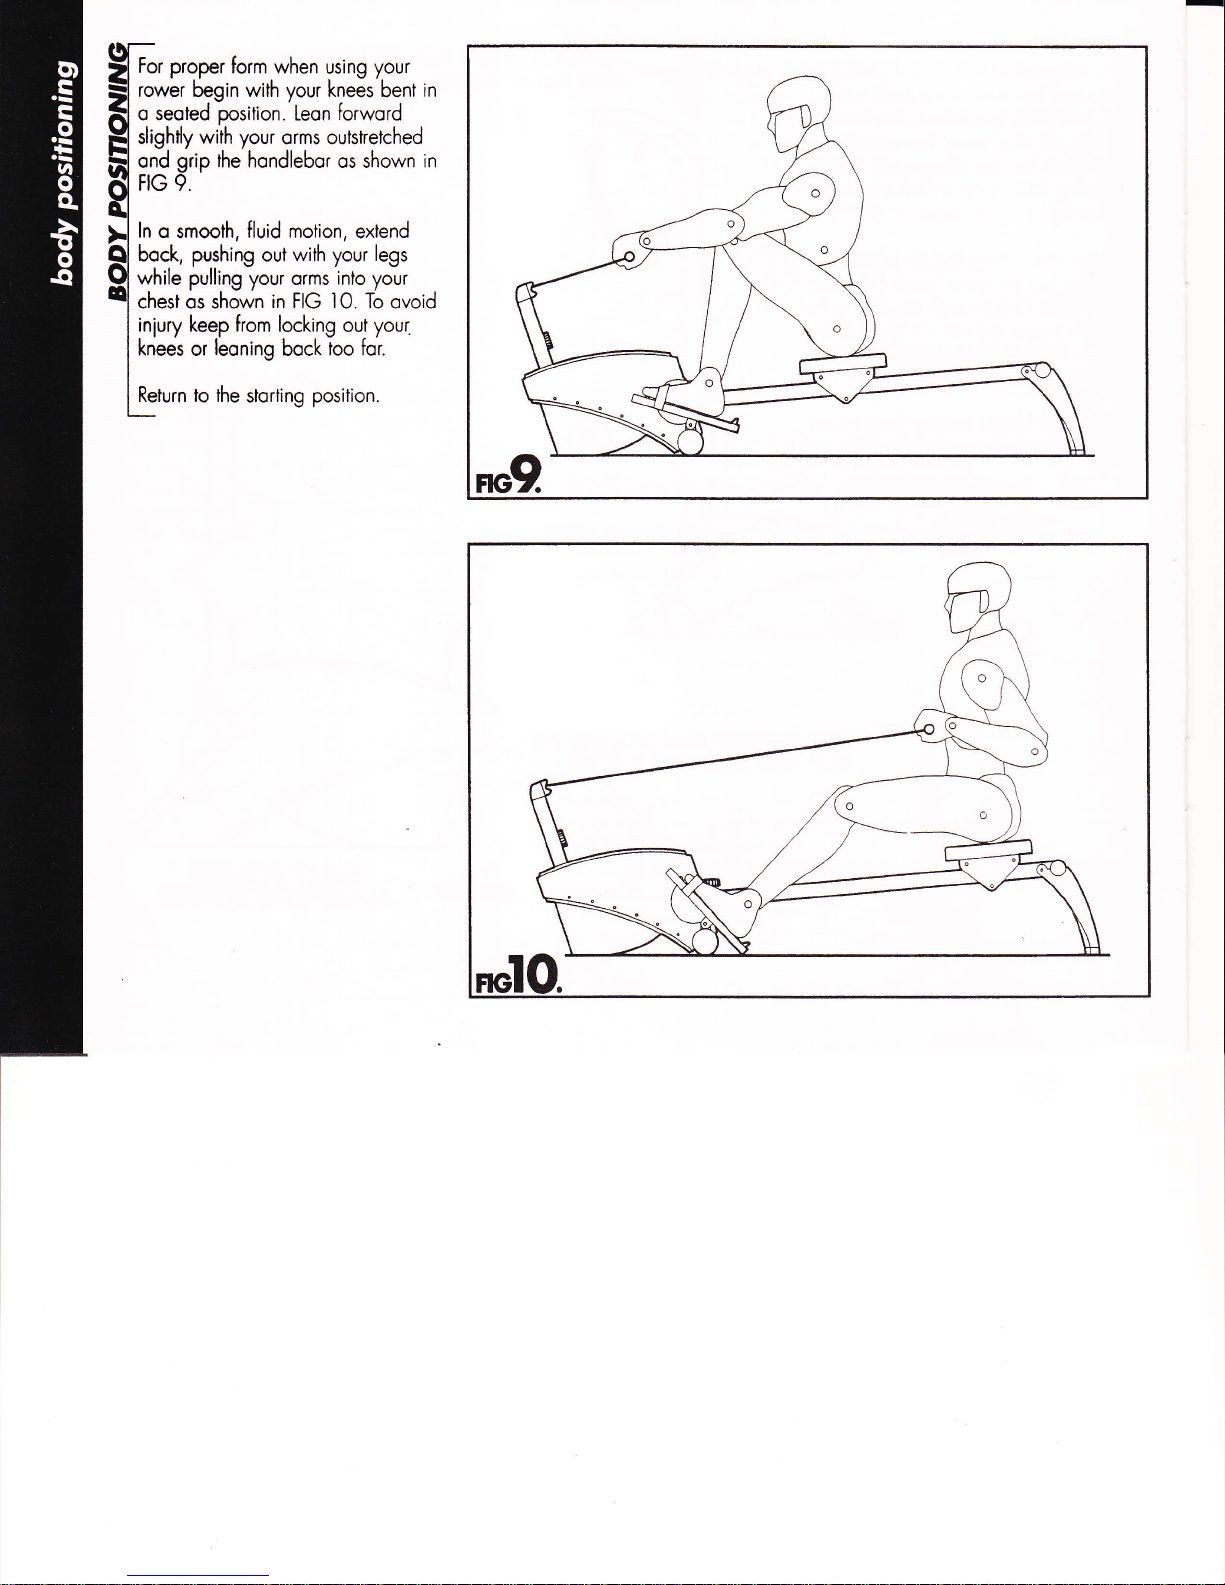
9l-ro, Drooer form when usino vour
$l
ro*!r
degin with your kneJs'bent
in
fl
o seoted
posiiion.
Leon
forword
Htr
sliqhtlv
with
vour
orms outstretched
B
;,3
sriP
the'hondlebor
os shown
in
o.l
;l
tn o
smooh,
fluid motion,
exlend
Ql
bock,
pushing
oui
with
your
legs
Ql
while
pulling"yorr
orms'into yo-ur
Ql
chest or rhrY*n
in FIG lO. To
ovoid
I
inlury keep from locking
out
your.
I
knees
or
leoning
bock
too for.
I
I
Return
to the
storting
position.
FlGg
 Loading...