

Phoenix PFMGBFAB-P, PFMGBFAB-N Owner's Manual

Owner’s Manual
Assembly and Maintenance Instructions
THIS GAS APPLIANCE IS DESIGNED FOR OUTDOOR USE ONLY.
Model: PFMGBFAB-P Propane
PFMGBFAB-N Natural Gas
THESE INSTRUCTIONS SHOULD BE LEFT WITH
THE CUSTOMER. KEEP THESES INSTRUCTIONS
FOR FUTURE REFERENCE.
YOU MUST READ THIS OWNERS MANUAL BEFORE
OPERATING YOUR GAS GRILL.
FOR YOUR SAFETY
If you smell gas:
1. Shut off gas to appliance.
2. Extinguish any open flame.
3. Open Lid.
4. If odor continues, immediately
call your gas supplier or your
fire department.
FOR YOUR SAFETY
1. Do not store or use gasoline or
other flammable vapors and liquids in the vicinity of this or any
other appliance.
2. An LP cylinder not connected
for use shall not be stored in
the vicinity of this or any other
appliance.
FOR YOUR SAFETY
Follow all leak-test procedures
carefully in this manual before using. Do this even if the grill was
dealer assembled. Do not try to
light this appliance without read-
ing the “Lighting” instructions in
this manual.
10/12
Note To Customer:
We recommend that you “break in” your grill by cooking the first two or three times at medium or low
temperature settings. This allows the cast aluminum drip pan to “season/break in’.
Caution: We recommend after each use, you turn the control knobs to HIGH (with the lid closed)
and run the grill for approximately 10 minutes. This will allow the accumulated fats and greases to
cook off, and avoid a possible flare up on the next use. HINT: The fats and greases are cooked off
when no more smoke is flowing from the grill vents.
READ this book first!
Safety
Your new gas grill is a safe, convenient appliance when assembled and used properly. However, as with all
gas-fired products, certain safeguards must be observed. Failure to follow these safeguards may result in
hazardous fire or an explosion causing serious bodily injury or property damage. If you have any questions concerning the assembly or operation of this appliance after reading these instructions thoroughly, consult your dealer, gas appliance serviceman, or your propane gas company.
The SAFETY symbol identifies the most important safety messages in this manual. When you see the
SAFETY symbol, Be Alert to the possibility of personal injury and carefully read the messages that follow.
Installer: This instructions MUST be left with the consumer.
Consumer: Retain these instructions for future use.
SAVE this manual for future reference!
SAFETY
For Your Safety
Never check for gas leaks with a lighted match or open flame.
-This grill is for outdoor use only.
-Never leave a lit grill unattended.
-Do not let children operate or play near your grill.
-This grill is for use with propane gas only.
-Always leave filled cylinders outdoors.
Plan The Location Carefully
This grill is for outdoor use only. The grill is not to be used in a building, garage or any other enclosed area.
Installation of this appliance must be in accordance with all applicable local codes and gas utility requirements. In the absence of local codes, installation must be in accordance with current National Fuel Gas Code,
Z223,I/NFPA54 (Latest Edition) or CAN/CGA-B149.1, Natural Gas Installation Code or Can/CGA-B149.2 Propane Installation Code.
This appliance is for outdoor installation only in a well ventilated space. This grill is not intended to
be installed in or on any recreational vehicle and/or boats.
2

SAFETY
IMPORTANT!
Check for compliance to these safety rules before each use!
-Maintain a minimum clearance of 24 inches
(61 cm) from sides and back of the grill to
any combustible construction.
-Do not use this appliance under overhead
combustible surfaces.
-Always keep the area around the grill clear
from any combustible materials, gasoline,
and other flammable gas and liquids.
-Do not block air to the appliance.
-Do not block ventilation openings.
LP Gas Cylinder
The LP Gas Cylinder which you purchase
separately for use with this grill must meet the
following requirements and be equipped with a
listed Overfilling Protection Device.
All LP gas cylinders used with this appliance
must be approximately 12" (30.5 cm) in diameter and approximately 18" (45.7 cm) in height.
The maximum fuel capacity shall be 20 lbs.
(9.1 kg) of Propane (43.7 lbs. normal water capacity). The propane tank must be provided
with a shut-off valve terminating in a propane
gas tank valve outlet and be provided with an
overfilling protection device.
Please Note: Your Propane Tank accepts a
Type I, also known a “Quick Connect
Valve”
SAFETY
OPD—Overfilling Protection Device
As stated, the cylinder you purchase must be
equipped with an overfilling protection device.
This type of cylinder can be identified by its triangular shaped tank valve and handle (see
page 9 for diagram of tank valve and handle).
Be Certain if you exchange your cylinder, that
the cylinder you receive in exchange has this
new OPD safety device.
The cylinder must be arranged for vapor withdrawal and remain in the upright position. The
cylinders must include a collar to protect the
cylinder valve.
All LP gas cylinders used with this appliance
must be marked in accordance with the specifications for LP gas cylinders of the US Depart-
ment of Transportation (DOT), or the National
Standard of Canada CAN/CSA-B339 Cylinder, Spheres and Tubes For Transportation of
Dangerous Goods, and Commission as Applicable.
Use of LP Cylinder
Refer to the assembly instructions section
and the label on the LP cylinder for guidance on proper installation and disconnection of the LP cylinder.
SAFETY
Use of Cylinder Dust Cap
The cylinder dust cap provided with your tank
must be used whenever the cylinder tank is
not connected to the grill gas system. Install
the dust cap onto the tank valve. Always use
the tank dust cap and be sure the tank valve
is closed when storing or transporting the
tank.
NOTE:
-The tank valve must be closed even when
using the dust cap.
-Always transport, store and use the tank in
an upright position.
-DO NOT take or store the tank in a building,
garage or enclosed area.
-Always keep the tank valve closed when the
grill is not in use.
-When removing the dust cap, do so slowly
and only after checking to ensure that the
tank valve is still closed.
-Read and follow all safety rules in your in struction books and on cylinder tank.
SAFETY
Filling the LP Cylinder
Have the tank filled by a reputable propane
gas dealer. The air must be purged from the
tank by your propane gas dealer before the
first filling. Have your propane gas dealer
check the relief valve after filling to ensure
that it remains free to function, and check for
leaks.
SAFETY Storage
DO NOT store the LP cylinder in direct
sunlight. When the grill is to be stored indoors,
the propane tank MUST be disconnected. The
propane tank must be stored outdoors in a
3

well ventilated space, NOT in a building, garage, or any other enclosed area. It must be out
of reach of children. A dust cap MUST be used
whenever the tank is disconnected from the
grill. When grill is not in use, close propane tank
cylinder valve.
When the propane tank is connected, the grill
must be stored outdoors in a well ventilated
space, not in a building, garage or any other
enclosed area. Always close the propane tank
before disconnecting it from the grill or when
the grill is not in use.
If the grill is going to be stored for winter or for
an extended period of time, we suggest you follow these steps:
-The burner should be cleaned and coated
lightly with cooking oil to prevent from rusting.
-The venturi openings should be covered with
aluminum foil to prevent small insects from
entering the opening during storage and must
be removed before using.
-The grill should be covered if it is left outdoors.
Grill covers are available as an accessory.
-Follow the cleaning procedures.
Hose and Regulator
The pressure regulator and hose assembly supplied with the appliance must be used. This
pressure regulator is preset for an outlet pressure of 11 inches (27.9 cm) water column.
Therefore, this pressure regulator MUST be
used with your Phoenix Grill. Before each use
of the grill inspect the hose for wear, cracking
and examine for any cuts. If any these conditions exist, do not use, purchase a new hose
and regulator. If a replacement is needed, refer
to the parts list for the part number and contact
the dealer where your grill was purchased. Refer to “Connecting the Cylinder to the Grill”
for details of hooking up your regulator to the
LP gas cylinder. Make sure a leak test is performed every time you have your LP gas cylinder refilled, and visibly inspect for excessive
wear and damage on a regular basis. Always
follow the directions for the “Leak Test”.
Natural Gas
Your grill may be converted to natural gas by
replacing the LP Valve with the appropriate
Natural Gas Valve. (Part #HHVLV32-SD). A
conversion should only be made by an authorized
Phoenix Grill dealer or local gas utility in accordance with all applicable codes. CAUTION: Any
additions, changes, or conversions required in
order for the appliance to satisfactorily meet the
application needs must be made by a Phoenix
dealer or local gas utility using factory specified
and approved parts. Always remember to shut
gas off at gas connection when grill is not in
use.
SAFETY
Leak Test
Check for leaks before lighting the grill for the
first time, after storing the grill between seasons
and after refilling the propane cylinder.
Take your grill outdoors into a well ventilated area. Do not use or permit sources of
ignition in the area during this test, this includes smoking. Use only a soap and water
solution to test for leaks.
Leak Test Check List
-Tank valve (all over) including area that
screws into the tank and the welds.
-Regulator fitting
-Hose connections
-Valves
Mandatory Leak Test
1. Have propane tank filled with propane gas
only by a reputable propane gas dealer.
2. Attach regulator fitting to tank valve.
3. Tighten regulator fitting securely.
4. Turn the control knobs to the right, clockwise.
This is the “OFF” position.
5. Make a solution of half liquid detergent and
half water.
6. Turn gas supply “ON” at the tank valve
(counter clockwise).
7. Brush soapy mixture on all connections listed
in the Leak Test Check List.
8. Observe each place for bubbles caused by
leaks.
9. Tighten any leaking connections, if possible.
If leak cannot be stopped, DO NOT USE
THE GRILL. Order new parts from an
authorized Phoenix dealer. Do not use the
grill until after the new parts are installed.
After installing new parts, perform complete
leak test.
10. Turn gas supply “OFF” at the tank valve.
4
Phoenix Grill WARRANTY
10-YEAR WARRANTY ON THE FOLLOWING:
(Against Rust Through)
• Stainless Steel Burner • Stainless Steel Cooking Grid • Cast Aluminum Drip Pan
5-YEAR WARRANTY ON THE FOLLOWING:
(Against Rust Through)
Black Aluminized Steel Grill Top and Bottom (Paint Excluded) • Aluminized Steel
Column and Base Components (Including Fasteners)
1-YEAR WARRANTY ON THE FOLLOWING:
(Against Rust Through)
All other Components including; • Igniter System • Gas Valves • Knobs • Drain Valve
Thermometer • Grease Bucket • Nu-Stone Side Shelves • Hose & Regulator
• Casters • Hood Handle
WHAT IS NOT COVERED:
Surface Corrosion and Discoloration • Transportation and shipping cost • Labor for replace-
ment or repairs • Damage from accident, misuse, alteration, abuse, improper installation or
storage • Removal and reinstallation costs • Finishes on surface that are damaged by improper installation, improper storage, accident, misuse, abuse or alteration • Inoperable due
to improper installation or storage • The costs of a service call to diagnose a problem • All
warranties are non-transferable and apply only to the original purchaser • Warranties are
null and void if grills are put into commercial or community use. This warranty does not imply or assume any responsibility for consequential damages that might result from use, misuse, or improper installation of this cooking appliance. This warranty does not cover claims,
which do not involve defective workmanship or materials, bill of sale, cancelled check, or
payment record should be kept to verify purchase date and establish warranty period.
Your Phoenix Grill is identified by a model number and a serial number located on the left side of the control panel. Always
use both the model and serial numbers when contacting ProFire Grills about your grill. For future reference, take the time
now to record the model and serial numbers below:
MODEL NUMBER: ______________SERIAL NUMBER: ________________DATE PURCHASED:__________________
How to contact us: phone: 1-888-781-4657, fax: 1-800-781-3965, E-mail: info@profiregrills.com or write: Customer
Service, ProFire Grills 5565 North 124th Street, Butler, WI 53007.
MODEL IDENTFICATION
5
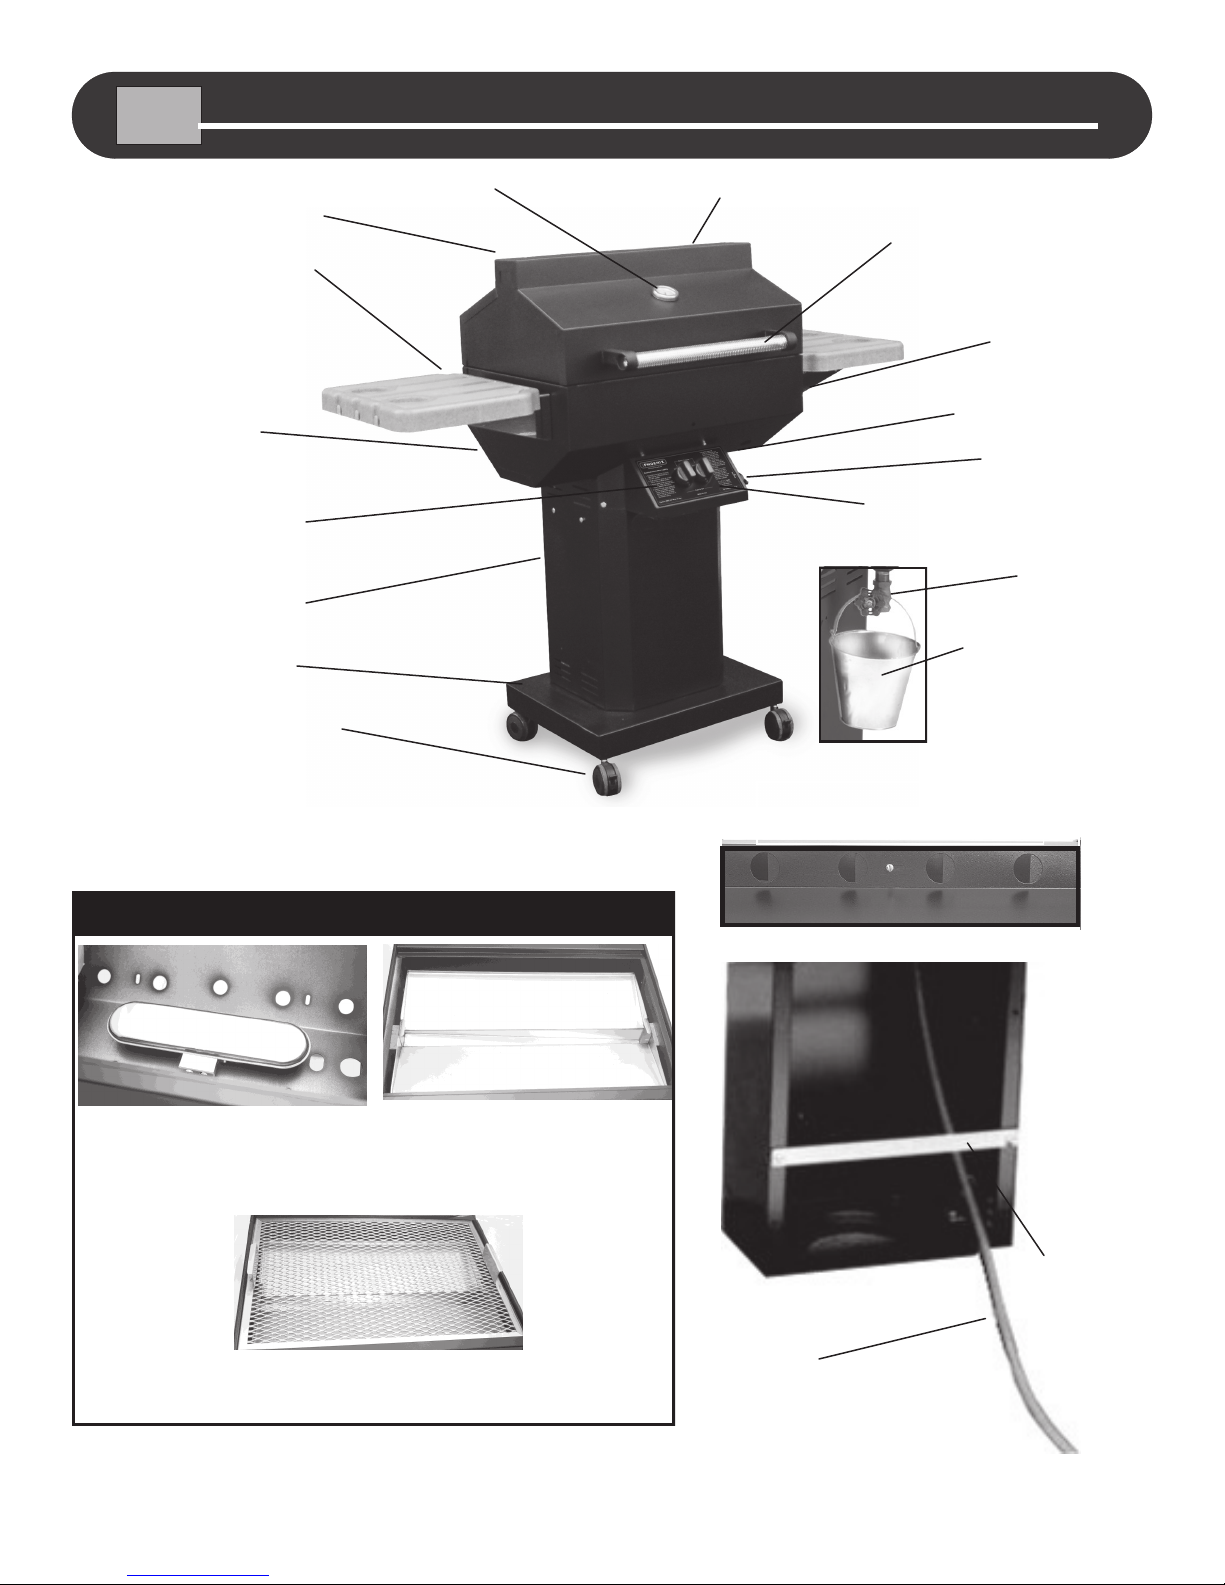
GETTING TO KNOW YOUR PHOENIX GAS GRILL
Vents on
Back of Lid
Side Shelf
Grill
Fire Pit
Control Panel
Column
Base
Locking Casters
Heat Indicator
Grill Lid
Sta-Kool
Swivel Handle
Shelf
Brackets
Match
Hole
Rotary
Igniter
Left and Right Side Burner
Controls
Drip Pan Drain
Valve
Grease/Water
Collector Bucket
Dual Burner and
Gas Collector Box
INSIDE VIEW
Stainless Steel
Cooking Grid
Vents On
Rear Of Lid
Back View of
Column
Cast Aluminum
Drip Pan
Tank
Locking Bar
On Propane
Model
12 Ft. Hose with
Quick Disconnect
Included with
Natural Gas Model
6
 Loading...