

Page 1
Operators Manual
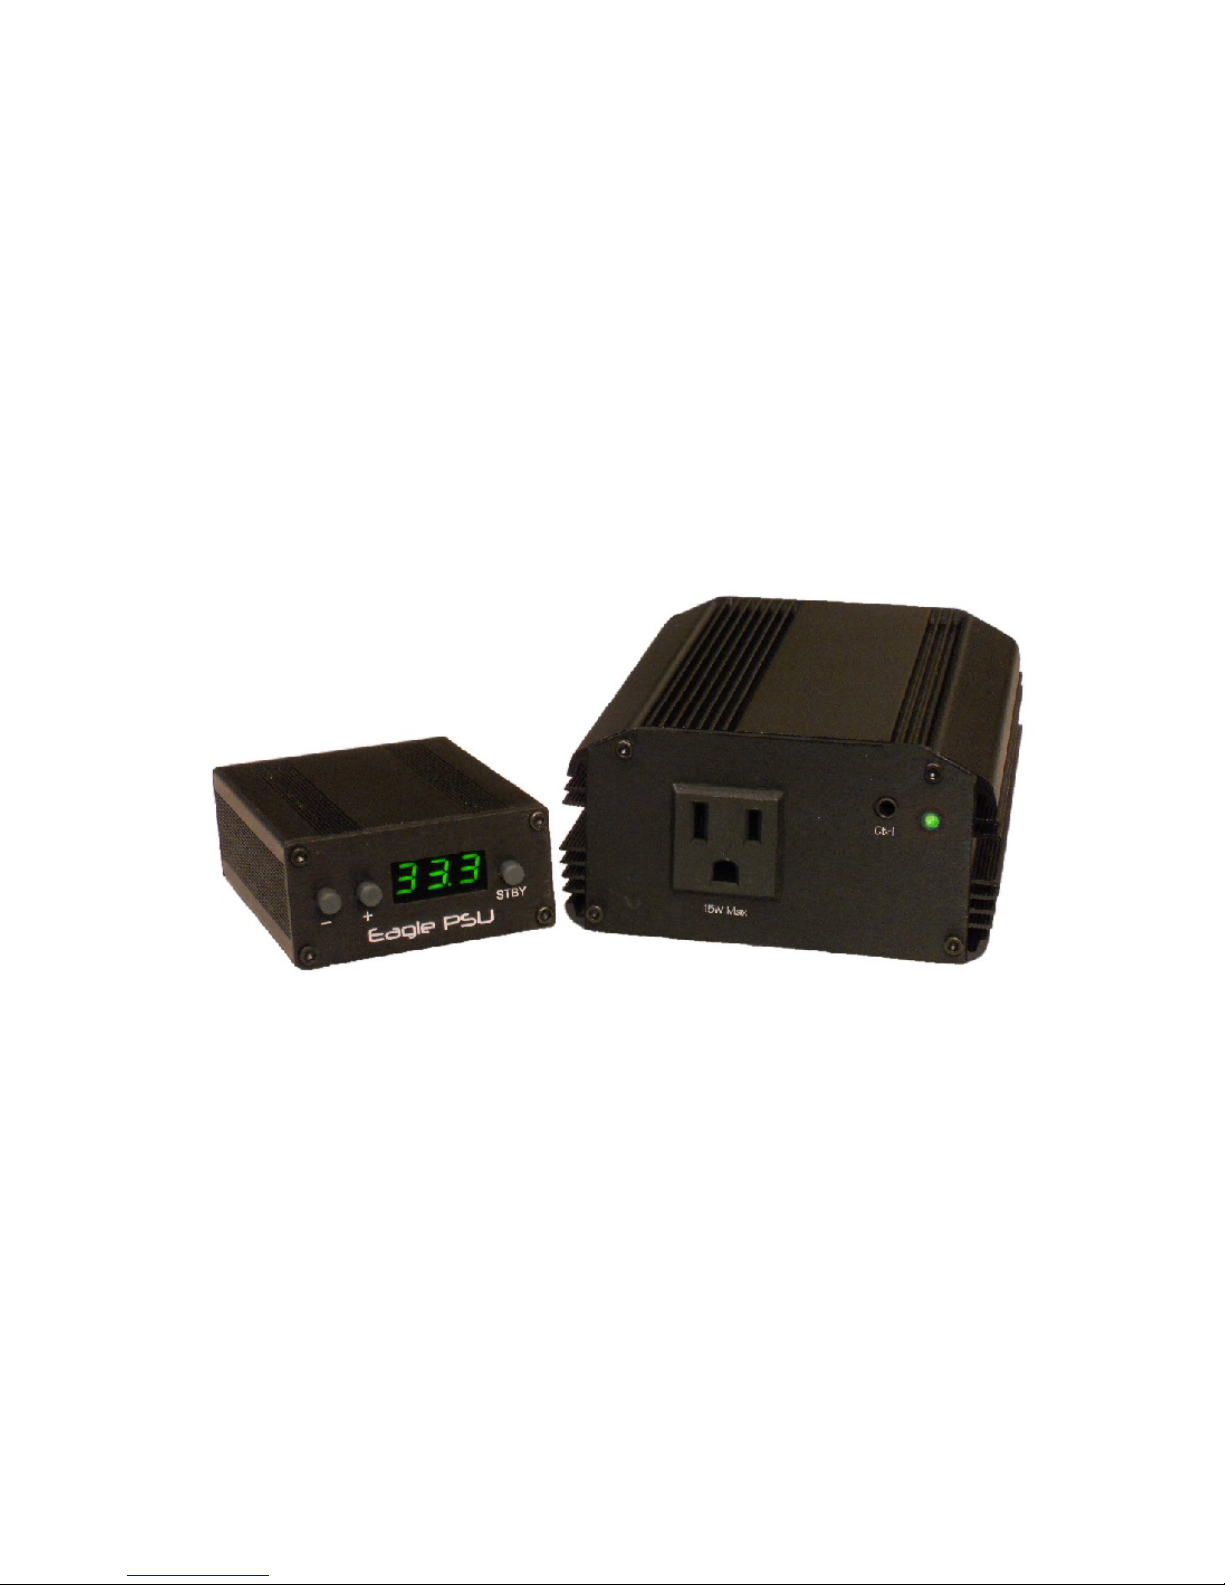
Eagle Digital
Power Supply Unit
Page 2

Specifications
Physical:
Dimensions: Controller: 3.565"L x 2.50"W x 1.1875"H. Amp: 6”L x 4”W x 2”
H
Weight: Controller: 4 oz. Amp: 2 lbs
Case: 1 piece Extruded Aluminium.
Operating Modes:
Standby, Sleep, Normal, Voltage Calibration, Frequency Calibration, Factory Default Programming
Power Requirements:
DC Supply 48VDC 600 mA nominal Normal mode; 20mA Standby; 5mA Sleep
Output:
Voltage: 115/230V RMS nominal, adjustable from 85 to 115VAC and 170 to 230VAC
Frequency: 60Hz Motors: 60.0 Hz (33.3 RPM) and 81.0 Hz (45.0 RPM)
50Hz Motors: 50.0 Hz (33.3 RPM) and 67.5 Hz (45.0 RPM)
Distortion: Less than 0.5%
Speed Adjust: ±1.0 RPM in 0.1 RPM steps Normal Mode
±1.0 RPM in 0.01 RPM steps Calibration Mode
Min Freq Step: 35µHz
Freq Stability: Crystal Controlled ±100PPM
Freq Accuracy: ±0.01%
Options:
RoadRunner Tachometer input; synchronizes output frequency to digital tachometer reading to within
±0.005 RPM with 2.5PPM (±0.00025%) stability. Serial input on 3.5mm jack, 9600N81.
1
Page 3
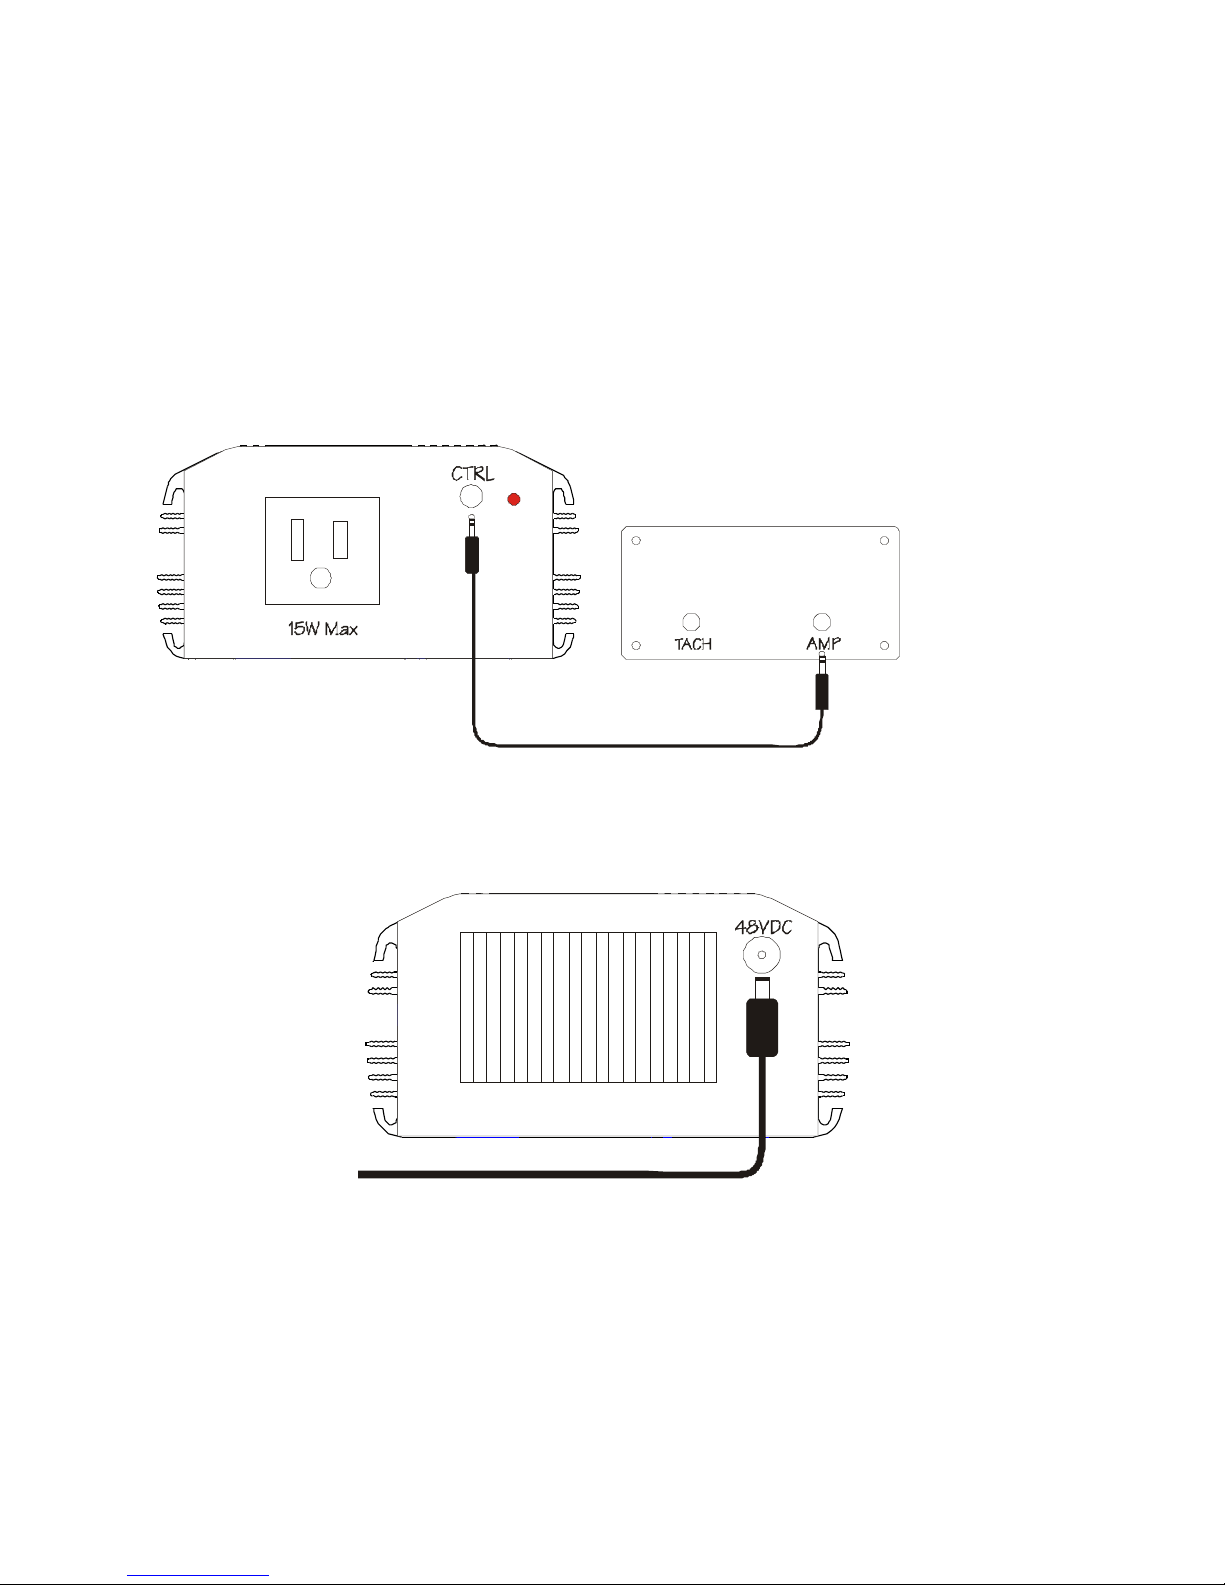
Setup: Connect the 6ft 3.5mm stereo cable between the Eagle control unit and the amplifier as
shown. Plug the cable into the amplifier front panel connector marked “CTRL” and into the
controller rear panel connector marked “AMP”.
Connect the output of the wall adapter to the amplifier by plugging the 2.1mm plug into the
connector on the back of the amplifier marked “48VDC”. Connect the wall adapter’s AC plug to
your house’s mains power wall socket. Connect the turntable motor’s AC plug to the amplifier
output connector marked “15W Max”.
2
Page 4

Operating Modes
Note: The turntable belt MUST be on the SMALL pulley for proper operation.
Standby Mode: The PSU will power up in Standby Mode as indicated by 3 dashes:
The amplifier’s LED will be Red while in Standby Mode.
Sleep Mode: While in Standby Mode, if no activity is detected for 5 min., the PSU will revert to
Sleep Mode and blank the display.
Normal Mode: To Exit Sleep or Standby Mode, press and release the Stby button. The PSU will
revert to the last used speed and output the appropriate AC signal to the motor. The display will
show the currently selected speed or offset:
The amplifier’s LED will be Green when the unit exits Standby Mode.
Soft Start: Whenever the Eagle PSU exits Standby Mode, it starts the platter at ~25RPM and evenly
ramps up the speed to prevent “burn out” on the belt. This greatly extends the belt life and improves
long term speed stability.
To change between 33.3 and 45.0 RPM, press and release the Stby button.
To adjust the turntable speed in 0.1 RPM increments, press and release the Plus or Minus buttons.
To stop the turntable platter and return to Standby Mode, press and hold the Stby button until the
3 dashes are displayed.
3
Page 5

Voltage Output Mode: Voltage Output Mode is used to adjust the output voltage the PSU reverts
to after the platter has reached operating speed. The motor requires much more torque at start up
than it does once the platter is on speed; by reducing the running voltage once the platter is moving,
vibration and noise are greatly reduced. The PSU will always assert the maximum output voltage
when starting, or changing speeds, then revert to the programmed lower voltage after approximately
3 seconds. Voltage Output Mode has separate adjustments for 33.3 and 45 RPM; both can be
selected, displayed and adjusted while in Voltage Output Mode.
Enter Voltage Output Mode from Standby Mode by holding the Minus button; press and release
the Stby button. The display will show:
The display will then indicate the current speed selection (33.3/45.0) and start the turntable motor
rotating. The display will then show the current reduced output voltage for the selected speed; range
is approximately 75%-100% of the maximum output voltage: 85-115V in 1V steps for 120V
supplies and 170-230V in 2V steps for 240V supplies. The following indicates a voltage of 95V
for a 120V supply:
Increase or decrease the output voltage for the selected speed by pressing and releasing the Plus or
Minus buttons until the desired voltage is displayed or measured with a voltmeter. Pressing and
holding the Plus or Minus buttons will automatically increase or decrease the voltage at a rate of
8 times per second.
4
Page 6

To select the other speed output voltage, press and release the Stby button. The display will show
the newly selected speed, then revert to the output voltage for that speed selection. Increase or
decrease the output voltage for the selected speed as above.
When output voltage selections are complete, press and hold the Stby button; the display will show
“SAV” and the voltage outputs will be saved in non-volatile memory. The PSU will then return to
Standby Mode.
Pulley Select Mode: Pulley Select Mode is used to specify which pulley your motor is fitted with
(either 50Hz or 60 Hz operation). As shipped from the factory, the Eagle is set for the small spindle;
extensive testing has shown this to be the most stable option with the least vibration.
Enter Pulley Select Mode by removing the cable between the Eagle controller and the amplfier.
Press and hold the Plus button while re-inserting the cable. The display will show:
Release the Plus button and the display will show the currently selected pulley/spindle combination.
Use the Plus and Minus buttons to toggle between 50Hz Small and 60Hz Small until the desired
combination is displayed. Press and hold the Stby button to save the selection and return to normal
operation.
The 2 selections are displayed as 50Hz Small and 60Hz Small .
5
Page 7

Frequency Calibration Mode: Frequency Calibration Mode is used to fine tune the output
frequency to compensate for belt tension and other variables that may cause the platter to rotate
faster or slower than the indicated speed. Frequency Calibration Mode will adjust the base
frequency in 0.01RPM steps within a range of ±1.0 RPM. Frequency Calibration Mode has
separate adjustments for 33.3 and 45 RPM; both can be selected, displayed and adjusted while in
Calibration Mode.
Enter Frequency Calibration Mode from Standby Mode by holding the PLUS button; press and
release the Stby button. The display will show:
The display will then indicate the current speed selection (33.3/45.0) and start the turntable motor
rotating. The display will then show the current speed offset in 0.01 RPM steps; range is +0.99
to -0.99. The following indicates an offset of -0.15 RPM:
Increase or decrease the base frequency offset for the selected speed by pressing and releasing the
Plus or Minus buttons until the exact turntable speed is indicated by a strobe device or tachometer.
Pressing and holding the Plus or Minus buttons will automatically increase or decrease the speed
at a rate of 8 times per second.
To select the other speed offset, press and release the Stby button. The display will show the newly
selected speed, then revert to the offset for that speed selection. Increase or decrease the base
frequency offset for the selected speed as above.
When frequency calibration is complete, press and hold the Stby button; the display will show
“SAV” and the frequency offsets will be saved in non-volatile memory. The PSU will then return
to Standby Mode.
6
Page 8

Factory Default Mode: To return the PSU operating parameters to the factory defaults, remove the
cable between the Eagle controller and the amplfier. Press and hold the Plus and Minus buttons
while re-inserting the cable. The display will show:
Release both buttons and the display will show " don" to indicate factory default settings have been
restored. Press and hold the Stby button to return to Standby Mode.
Factory Default Programming restores the following:
Current Speed: 33.3 RPM
Base Speed Offset 33.3: 0.00
Base Speed Offset 45.0: 0.00
Output Voltage 33.3: 87% (100V/200V)
Output Voltage 45.0: 87% (100V/200V)
Note: Factory Default Mode does not affect the pulley selection.
7
Page 9

Tachometer Operation: The PSU can be connected directly to the RoadRunner digital turntable
tachometer or RoadRunner Lite Sensor via a 3 wire serial cable in order to synchronize its output
with the direct measurement of the platter speed. Operation is completely automatic with no user
intervention needed. The tachometer outputs the speed reading once per revolution. The PSU
compares this reading to the speed on the display and can make micro-fine adjustments to the output
frequency to lock the turntable speed to within ±0.005 RPM. The adjustment is done slowly and
evenly over the entire next revolution and is inaudible to the listener (in most cases, the adjustment
is <0.0005 RPM per step). The turntable remains on speed independent of the belt tension, bearing
oil viscosity, drag from the needle or any other variables that cause the table to drift over time with
speed.
Note: Whenever the PSU is applying a correction to the speed, the decimal point will blink
on the PSU's LED display.
Tachometer
Eagle PSU
8
 Loading...