

Page 1
DS2500K INSTRUCTIONS ET ENREGISTREMENT
DE LA GARANTIE
DS2500K INSTRUCCIONES DE MANEJO &
REGISTRO DE LA GARANTÍA
DS2500K INSTRUCTIONS &
GUARANTEE REGISTRATION
DS2500K INSTRUCTIONS ET ENREGISTREMENT
DE LA GARANTIE
DS2500K BEDIENUNGSANLEITUNG UND
GARANTIEREGISTRIERUNG
DS2500K ISTRUZIONI & REGISTRAZIONE
GARANZIA
DS2500K INSTRUCCIONES DE MANEJO &
REGISTRO DE LA GARANTÍA
Nous vous remercions pour l’achat d’un coffre Phoenix Safe.
OUVERTURE DU COFFRE
Veuillez insérer l’une des deux clefs fournies dans la serrure puis tourner la dans le sens horaire.
Ensuite, tirez la porte pour l’ouvrir.
Votre coffre est prêt pour être fixé au sol, pour cela veuillez suivre les instructions ci-dessous.
POUR REUSSIR VOTRE INSTALLATION, VOUS AUREZ BESOIN:
• Perceuse à percussion électrique
• Une mèche de 10 mm
• Un gros marteau
• Un mètre
• Une clef plate ajustable (clef à molette)
• Un crayon
• Une petite brosse
NE PAS FAIRE À L’ÉCHELLE DE CE DESSIN
AVEC VOTRE PLATEAU DE BASE, VOUS RECEVREZ:
• 4 chevilles d’ancrage à tête ronde
• 4 Boulons à tête cassable
• Le plateau de fixation au sol
• Cache avant
4 No.
Chevilles d’ancrage
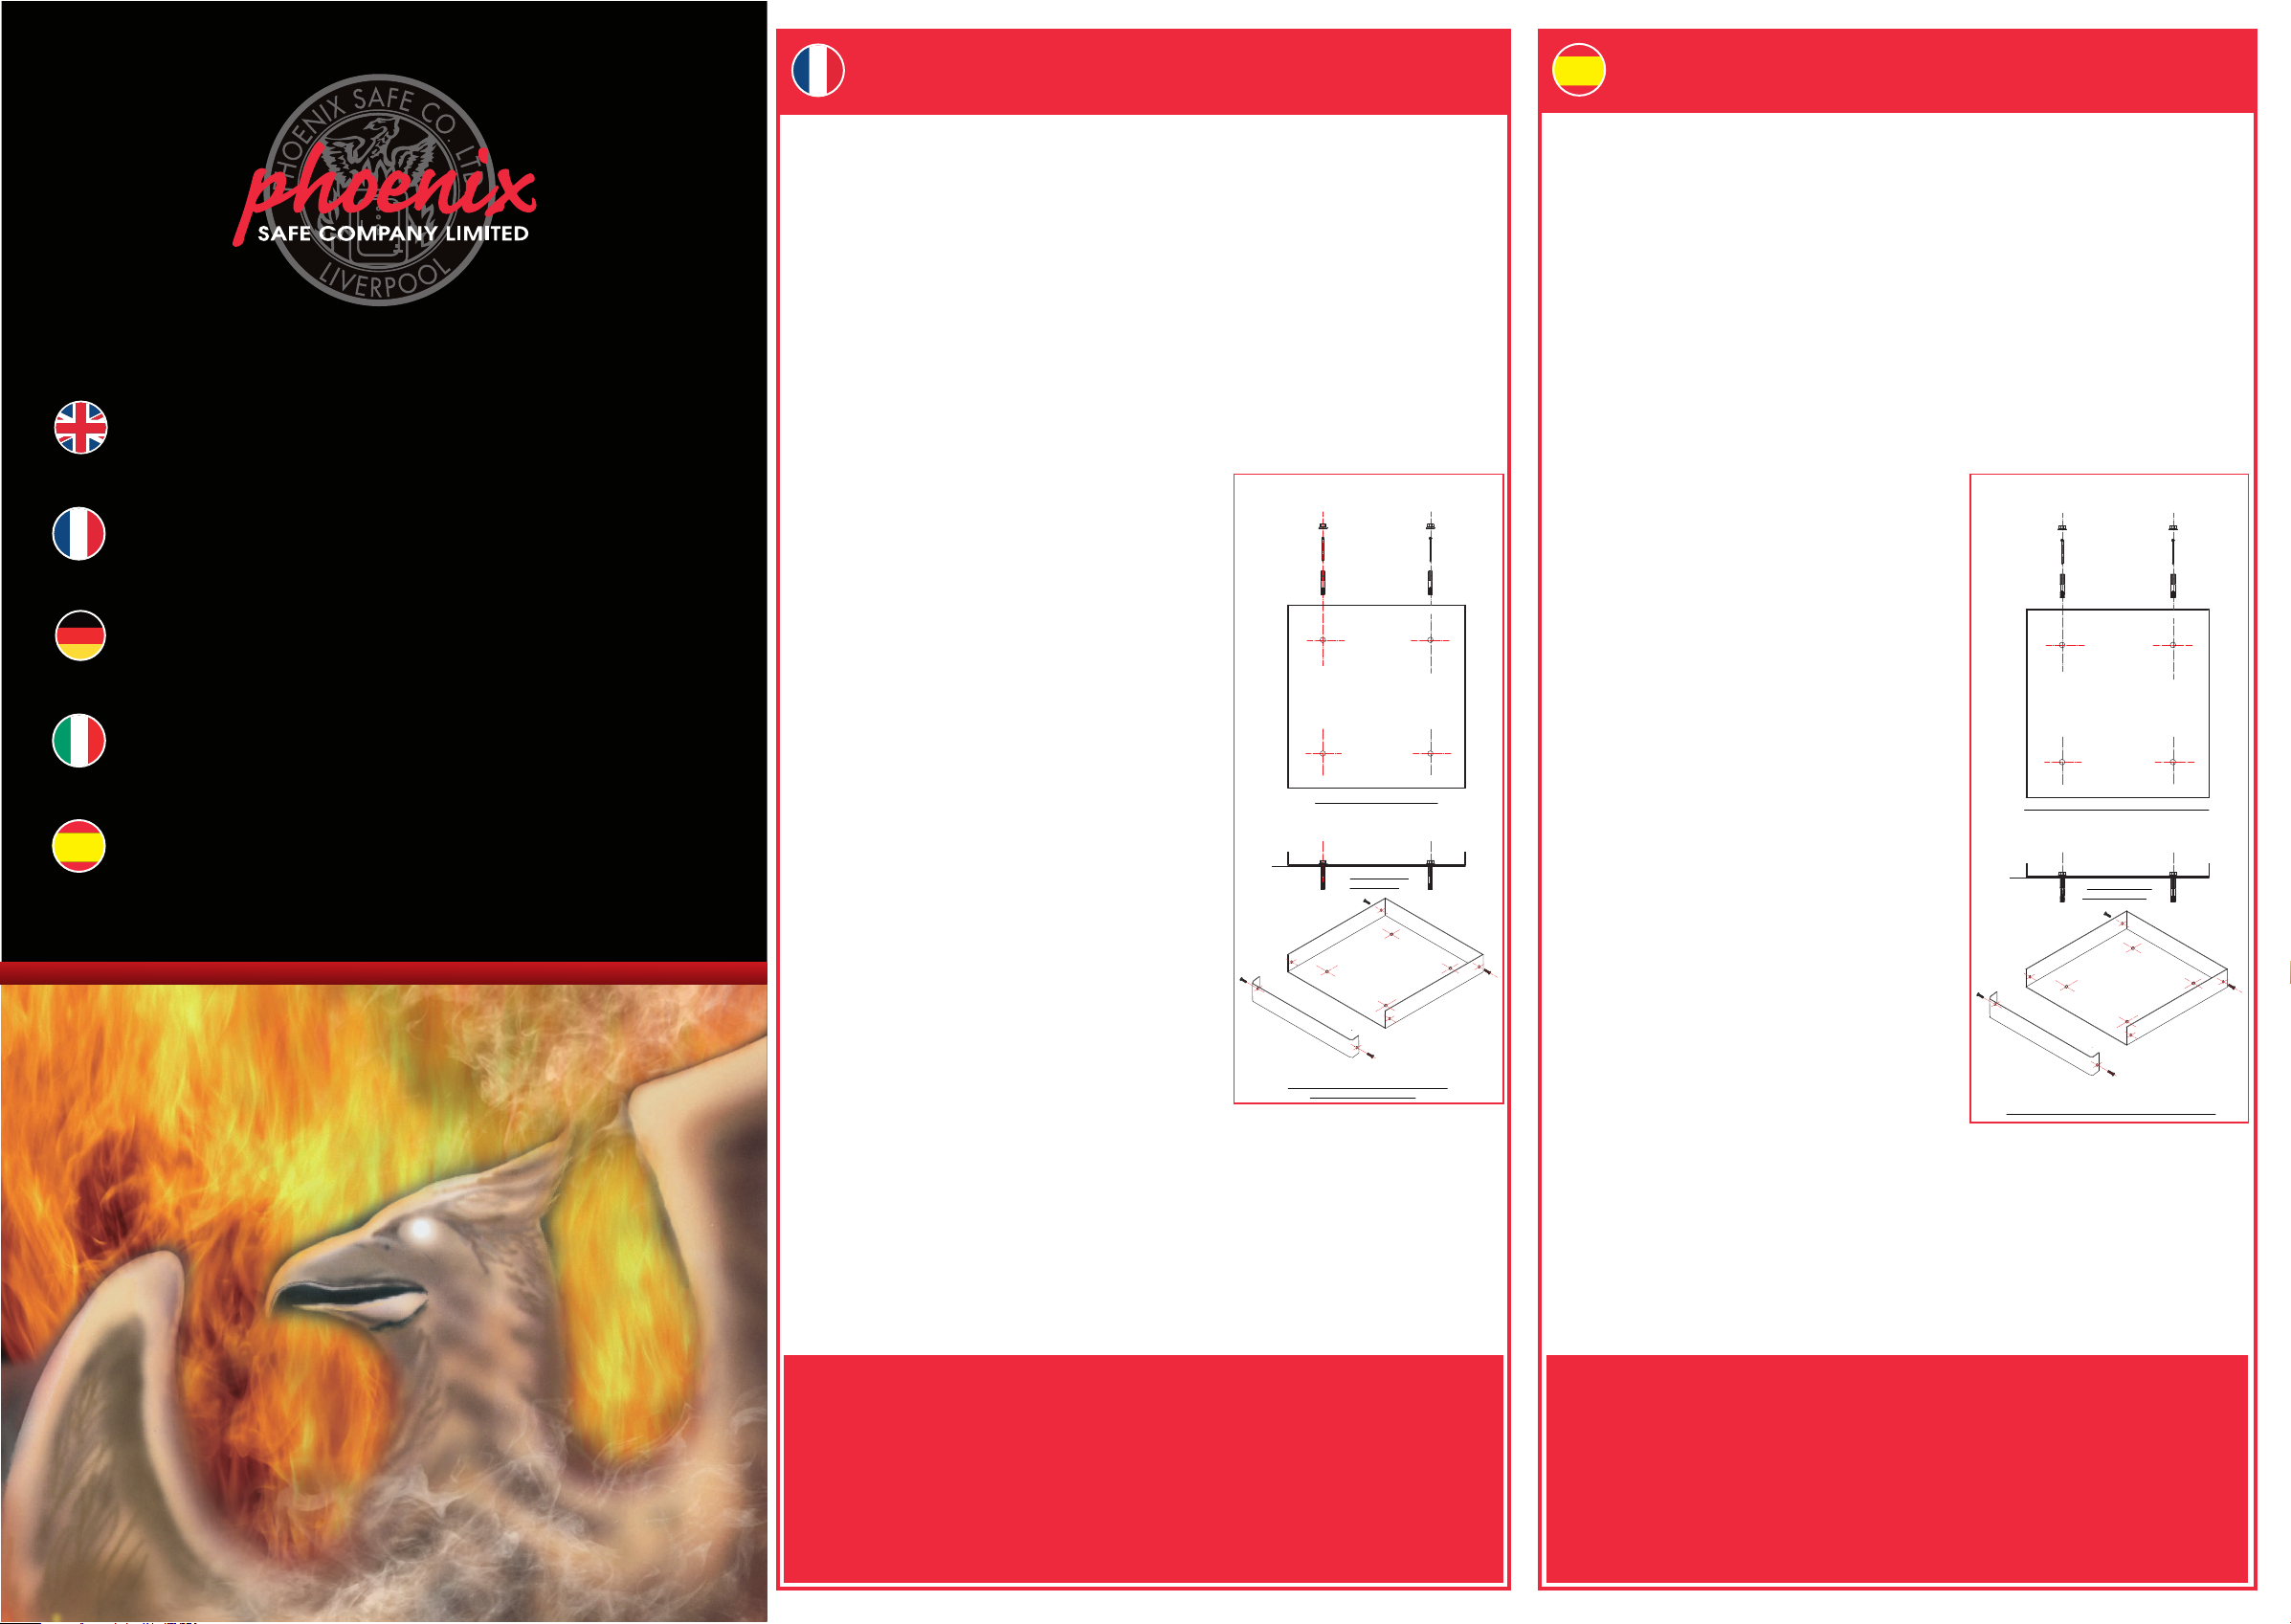
INSTRUCTIONS:
• Décidez d'un emplacement approprié pour votre coffre, en
laissant 25mm d’espace entre les côtés du plateau de fixation
au sol et tous murs voisins. (Le coffre dépassera le plateau
d’approximativement 20mm)
• Placez le plateau au sol dans la position choisie et marquez les
quatre trous pour les boulons
• Enlevez le plateau
• Percez les quatre marques faites pour les boulons à une
profondeur de 60mm
• Nettoyez tous débris autour des trous
• Placez le plateau dans sa position
• Dévissez l’écrou de la cheville d’ancrage jusqu’à ce qu’il soit
aligné avec le haut du boulon de potence
• La petite tête se tiendra au-dessus de l’écrou
d’approximativement 15mm
• Insérez les quatre boulons de fixation à travers les trous du
plateau et dans les trous du béton
• Frappez avec un marteau la petite tête et boulonnez dans le trou
jusqu’à ce que l’écrou soit au même niveau que le sol.
• Serrez l’écrou avec la clef à molette
- PLAN POUR FIXER LE PLATEAU -
FFL
- PLATEAU DE FIXATION & FIXATIONS SUR
- ELÉVATION DE
LA FIXATION -
4 No.
Couvrez les vis avec les têtes cassables
LES CÔTÉS DE LA PLINTHE -
LA VASCHETTA È ORA SALDAMENTE FISSATA
AL PAVIMENTO
• Far scivolare la cassaforte sulla vaschetta allineando i quattro fori per i bulloni dello zoccolo della
cassaforte con quelli praticati nella vaschetta
• Posizionare la copertura frontale allineando i fori della copertura con i due fori frontali della vaschetta e
con i fori filettati dello zoccolo della cassaforte.
• Inserire i quattro bulloni con testa a perdere nei fori ma non stringerli fino a quando tutti e quattro non
saranno in posizione e pronti per essere avvitati. Stringere i bulloni fino a quando le teste si staccano.
La cassaforte è ora fissata al pavimento.
Gracias por adquirir una caja fuerte Phoenix.
PARA ABRIR LA CAJA
Introduzca una de las llaves suministradas en el agujero de la cerradura y gírela en el sentido de las agujas
de un reloj. A continuación tire de la puerta para abrirla.
Su caja fuerte está preparada para su anclaje al suelo. Para realizar esta operación de forma segura, siga
estas instrucciones.
PARA UNA CORRECTA INSTALACIÓN NECESITA:
• Un martillo perforador eléctrico
• Una broca de albañilería de 10 mm
• Un martillo adecuado
• Una cinta métrica
• Una llave de tuercas regulable
• Un lápiz o rotulador
• Un cepillo pequeño
NO TOMAR COMO REFERENCIA A ESCALA ESTE
notas:
DIBUJO
EL KIT DE LA BASE SE COMPONE DE:
• 4 tacos de anclaje para percutir
• 4 pernos de seguridad de cabeza plana
• Base de seguridad para fijar al suelo
• Zócalo frontal
4 TACOS
DE ANCLAJE
INSTRUCCIONES DE ANCLAJE:
• Elegir un lugar apropiado, dejando un hueco de 25 mm entre
los lados de fijación de la base y cualquier pared adyacente.
(La caja sobresaldrá de la base 20mm aproximadamente).
• Colocar la base en el suelo, en la posición elegida y marcar
los cuatro agujeros para los pernos.
• Retirar la base.
• Perforar los cuatro agujeros ya marcados hasta una
profundidad de 60 mm.
• Limpiar el agujero de cualquier resto de hormigón.
• Volver a colocar la base en su posición.
• Aflojar la tuerca del perno de anclaje hasta ponerla en línea
con la parte superior de la espiga del perno.
• La cabeza de percusión quedará aproximadamente 15 mm
por encima de la tuerca.
• Introducir los cuatro pernos de fijación en los agujeros de la
base y de los agujeros del hormigón.
• Golpear con el martillo la cabeza del tornillo y su
correspondiente taco hasta que la tuerca quede a ras de
suelo.
• Apretar la tuerca con la llave regulable.
- PLANO DE ANCLAJE DE FIJACIÓN DE LA BASE -
FFL
- DE ANCLAJE & Y FIJACIÓN DEL ZÓCALO A LA MISMA -
- VISTA FRONTAL
DE LA FIJACIÓN -
PROTECTOR DE
LOS 4 TORNILLOS
UNA VEZ FIJADA LA BASE:
• Deslizar la caja en la base alineando los cuatro agujeros de la caja con los de la base.
• Colocar la placa (zócalo) frontal, alineando los agujeros de la misma con los dos agujeros de la base y los
de la caja.
• Introducir los cuatro pernos en los orificios correspondientes y apretar.
La caja queda así fijada al suelo.
Phoenix Safe Company: Where peace mind is guaranteed
GARANTIE
Pour une meilleure sécurité, nous vous recommandons d’enregistrer votre
garantie en ligne par notre site: www.phoenixsafe.com et en cliquant sur
enregistrement de garantie.
19 RUE DES HALLES, 16510 VERTEUIL SUR CHARENTE,
FRANCE | 00 33 (0) 5 45 89 68 80
GARANTÍA
Para mayor seguridad, le recomendamos que cuando acceda a nuestra página
web www.phoenixsafe.com, haga clic en Registro de garantía e introduzca su
registro de garantía.
AVDA, DE LA INDUSTRIA, 52 POLÍGONO INDUSTRIAL, 28820 COSLADA,
MADRID, ESPAÑA | 0034 (91) 6736411
Page 2
DS2500K ISTRUZIONI & REGISTRAZIONE
DS2500K INSTRUCTIONS &
DS2500K BEDIENUNGSANLEITUNG UND
GARANZIA
Grazie per aver acquistato una Cassaforte Phoenix.
APRIRE LA CASSAFORTE
Inserire nella serratura una delle due chiavi in dotazione e girare in senso orario.
Quindi tirare lo sportello per aprire.
La cassaforte è pronta per essere fissata alla base. Per fissare la cassaforte alla base seguire le istruzioni
sotto indicate.
MATERIALE NECESSARIO PER UNA PERFETTA INSTALLAZIONE:-
• Trapano elettrico a martello
• Punta di trapano da10 mm
• Pesante martello
• Metro
• Chiave regolabile
• Matita o penna
NON SCALARE DA QUESTO SCHIZZO
• Piccolo pennello
No. 4
IL SACCHETTO PER IL FISSAGGIO CONTIENE :-
BULLONI
FISSAGGIO
• 4 shield anchor fixing bolts with striking head
• 4 x security bolts with shearing heads
• The security basefixing tray
• Front cover plate
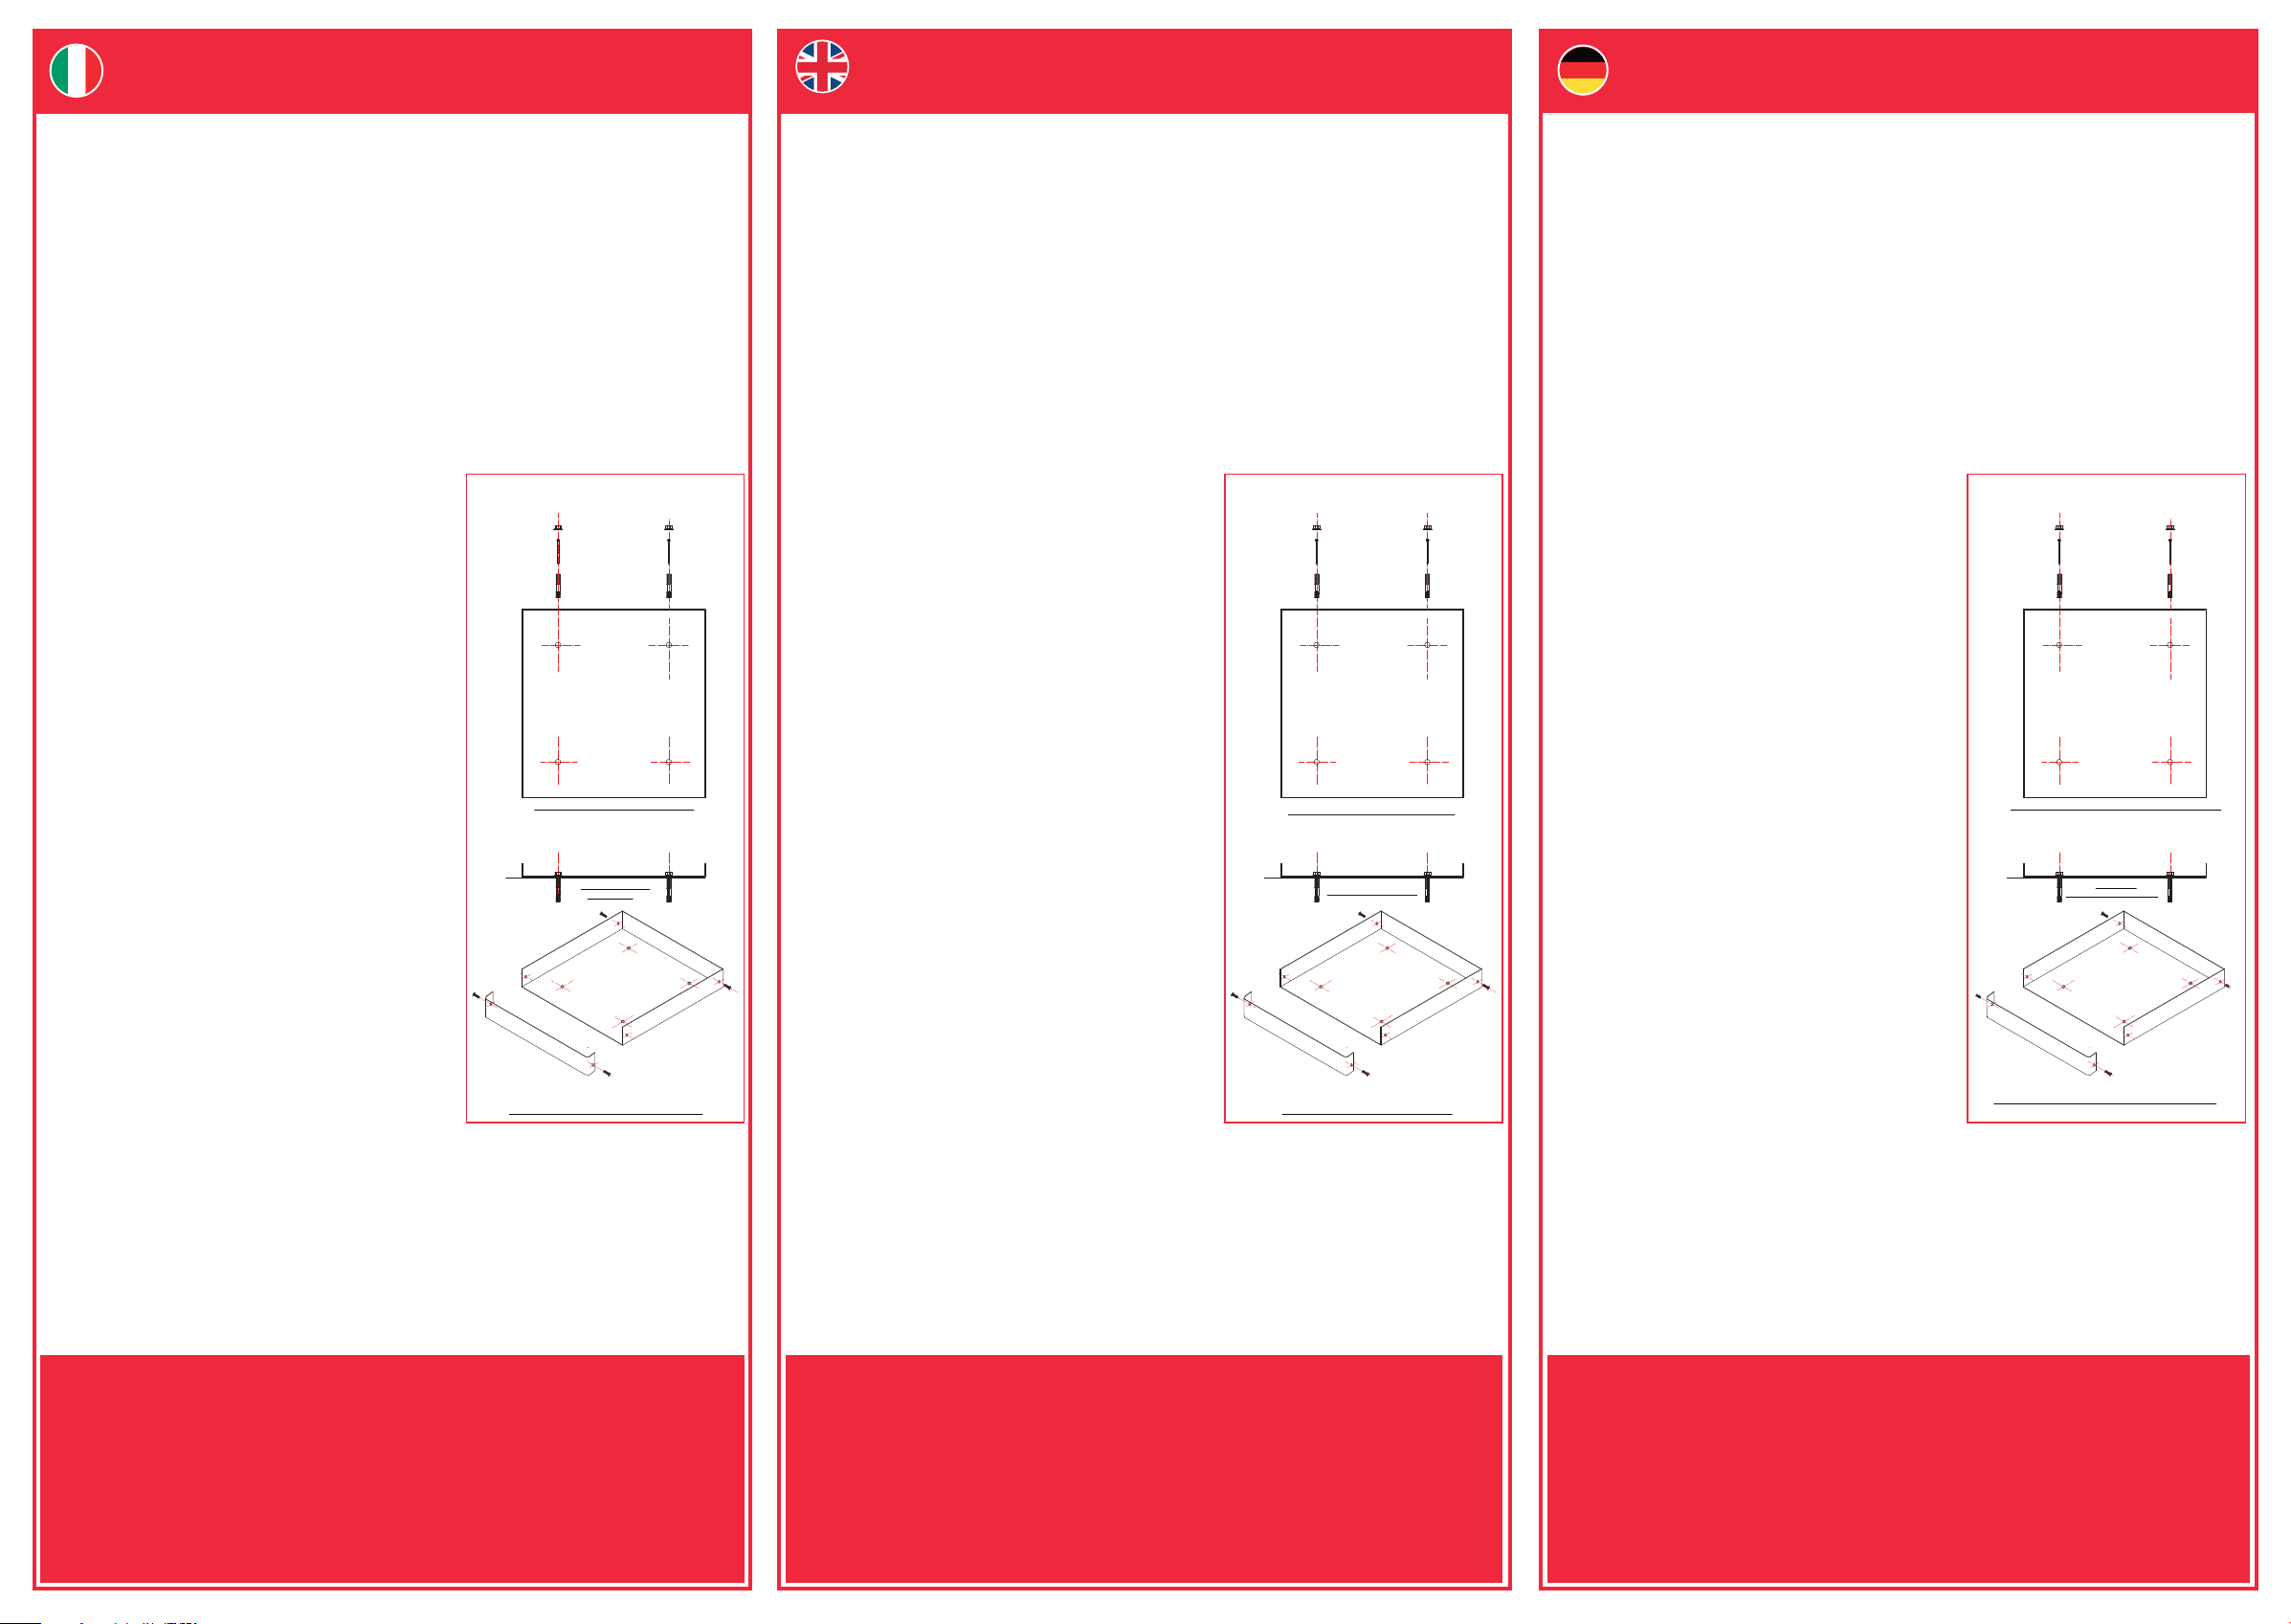
ISTRUZIONI
• Selezionare una posizione adatta per la cassaforte, lasciando
uno spazio di 25mm dai lati della vaschetta di fissaggio al
muro adiacente. (La cassaforte sporgerà dalla vaschetta di
circa 20mm)
- PIANO FISSAGGIO VASCHETTA DI BASE -
• Posizionare la vaschetta sul pavimento nella posizione scelta e
contrassegnare i quattro fori per i bulloni
• Spostare la vaschetta.
• Trapanare i quattro fori nei punti contrassegnati fino a una
profondità di 60mm.
FFL
- PROSPETTO DEL
FISSAGGIO -
• Con il pennello eliminare dal foro qualsiasi deposito di
cemento o sporcizia
• Riposizionare la vaschetta
• Svitare il dado fino a livellarsi con la parte superiore della
barra del bullone
• La testa del bullone uscirà di circa 15 mm dal dado.
• Inserire i quattro bulloni di fissaggio nei fori attraverso la
vaschetta e il cemento.
• Colpire la testa del bullone con il martello fino a quando è a
livello del pavimento.
- VASCHETTA DI FISSAGGIO & BULLONI LATERALI -
No. 4 BULLONI CON TESTA A
PERDERE PER COPERTURA.
• Avvitare il dado con la chiave regolabile.
LA VASCHETTA È ORA SALDAMENTE FISSATA AL PAVIMENTO
• Far scivolare la cassaforte sulla vaschetta allineando i quattro fori per i bulloni dello zoccolo della
cassaforte con quelli praticati nella vaschetta
• Posizionare la copertura frontale allineando i fori della copertura con i due fori frontali della vaschetta e
con i fori filettati dello zoccolo della cassaforte.
• Inserire i quattro bulloni con testa a perdere nei fori ma non stringerli fino a quando tutti e quattro non
saranno in posizione e pronti per essere avvitati. Stringere i bulloni fino a quando le teste si staccano.
La cassaforte è ora fissata al pavimento.
note:
GUARANTEE REGISTRATION
Thank you for purchasing a Phoenix Safe.
OPENING SAFE
Please insert one of the two keys supplied into the key hole and turn clockwise.
Then pull the door to open.
Your safe is ready prepared for base fixing. To base fix your safe, follow the instructions below.
FOR A SUCCESSFUL INSTALLATION, YOU WILL NEED :-
• An electric hammer drill
• A 10 mm masonery drill bit
• A heavy hammer
• A measuring tape
• An adjustable spanner
• A pencil or marker
• Small brush
DO NOT SCALE FROM THIS DRAWING
YOUR BASE TRAY PACK CONSISTS OF :-
• 4 shield anchor fixing bolts with striking head
• 4 x security bolts with shearing heads
• The security basefixing tray
• Front cover plate
4 No.
ANCHORING
BOLTS
INSTRUCTIONS
• Decide on a suitable location for your safe, leaving 25mm gap
between the sides of the basefixing tray and any adjacent wall.
(The safe will overhang the basetray by approximately 20mm)
• Place the tray on the floor in your chosen position and mark the
four bolt holes
• Remove the base tray.
- PLAN OF ANCHORING TRAY BASE FIXING -
• Drill the four holes previously marked to a depth of 60 mm.
• Brush away and cleanout any concrete debris from the hole
• Place the tray back into position.
• Unscrew the anchor bolt nut until it is flush with the top of the
FFL
- ELEVATION OF FIXING -
bolt stem.
• The striking head will stand approximately 15 mm above the
nut.
• Insert the four fixing bolts through the holes in the tray and into
the holes in the concrete.
• Hammer the the striking head and bolt down into the hole until
the nut is level with the floor
• With the adjustable spanner tighten the nut.
THE TRAY IS NOW SECURELY FIXED TO
- ANCHORING TRAY & PLINTH SIDE FIXINGS -
4 No. COVER
SCREWS WITH
SHEERING HEADS.
THE FLOOR
• Slide the safe on to the tray aligning the four threaded bolt holes in the safe leg with the holes in the tray
side
• Postion the front cover plate aligning the holes in the plate with the two front basefixing tray holes and
the threaded bolt holes in the safe leg
• Insert the four shearing head bolts into the bolt holes but do not tighten them up until
engaged and run freely. Tighten the bolts until the heads snap off.
Your safe is now secured to the floor
all four bolts are
notes:
GARANTIEREGISTRIERUNG
Vielen Dank, dass Sie sich für einen Tresor aus dem Hause Phoenix entschieden haben.
ÖFFNEN DES SAFES
Einen der beiden mitgelieferten Schlüssel in das Schlüsselloch stecken und im Uhrzeigersinn drehen.
Dann am Türgriff ziehen um den Tresor zu öffnen.
Ihr Tresor ist bereits für die Bodenmontage vorbereitet. Bitte folgen Sie den unten stehenden
Anleitungen.
FÜR DIE ERFOLREICHE INSTALLATION BENÖTIGEN SIE:
• 1 Schlagbohrmaschine
• 1 Bohrer (Durchmesser 10mm)
• 1 500g Hammer
• 1 Messmittel, z. B. Lineal, Massband......
DAS BEFESTIGUNGSSYSTEM BESTEHT AUS:
• 4 Ankerbolzen mit Schlagkopf
• 4 Abrissschrauben
• 1 Blechwanne
• 1 Blende
ANLEITUNG
• Suchen Sie einen geeigneten Standort für Ihren Safe. Bitte
achten Sie auf den Mindestabstand zwischen der Wanne und
den umliegenden Wänden von 25mm. (Der Safe wird ca.
20 mm überstehen)
• Stellen Sie nun die Wanne auf den Boden und markieren Sie
die 4 Bohrungen auf dem Boden
• Stellen Sie die Wanne wieder auf Seite.
• Bohren Sie die 4 Löcher bis zu einer Tiefe von 60mm.
• Entfernen Sie die Bohrspäne bzw. den Bohrstaub rund um
die Bohrlöcher.
• Stellen Sie die Blechwanne wieder auf den Boden.
• Drehen Sie die Mutter soweit heraus, bis sie bündig mit dem
Gewindezapfen ist.
• Der Schlagkopf sollte jetzt ca. 15mm über der Mutter
herausragen.
• Stecken Sie nun die 4 Ankerbolzen durch die Blechwanne in
den Boden.
• Schlagen Sie jetzt mit dem Hammer solange auf den
Schlagkopf der Ankerbolzen bis dieser bündig auf
dem Gewindezapfen aufliegt. Im Anschluss ziehen Sie die
Mutter mit dem Universalschraubenschlüssel fest.
DIE BLECHWANNE IST NUN SICHER AM BODEN
BEFESTIGT
• Stellen Sie nun den Safe in die Blechwanne und richten ihn
solange aus, bis die 4 Gewindebohrungen in
den Füßen mit den Bohrungen in der Wanne übereinstimmen.
• Positionieren Sie die Blende so, dass die Bohrungen in der Blende mit den Bohrungen in der Blechwanne
und den Gewindebohrungen in den Füßen des Safes übereinstimmen.
• Stecken Sie jetzt die 4 Abrissschrauben durch die Bohrungen. Bitte beachten Sie, dass sich alle
4 Schrauben in allen Bohrungen gleich leicht bewegen lassen müssen. Erst wenn das der Fall ist,
ziehen Sie diese solange fest bis die Köpfe abreißen.
• 1 Universalschraubenschlüssel
• 1 Bleistift
• 1 kleinen Pinsel
DIES IST KEINE MAßSTABSGERECHTE
4 VERANKERUNGSBOLZEN
- DRAUFSICHT BODENBEFESTIGUNGSGRUNDPLATTE -
FFL
VERANKERUNGSZUSTAND -
- SEITENANSICHT BODENBEFESTIGUNGSGRUNDPLATTE (BLENDE + BLECHWANNE)
Ihr Safe ist nun sicher verankert.
- ABBILDUNG
4 ABRISSSCHRAUBEN
FÜR DIE BLENDE
Bemerkungen:
ZEICHNUNG
REGISTRAZIONE DELLA GARANZIA
Per una maggiore sicurezza vi raccomandiamo di inoltrare la vostra
registrazione della garanzia visitando il nostro sito web: www.phoenixsafe.com
e cliccando su registrazione della garanzia.
VIA MONTE ROSA 28, 20049, CONCOREZZO, MILAN, ITALY | 39 039 5965844
GUARANTEE REGISTRATION
Please submit your guarantee registration by visiting our website
www.phoenixsafe.com and clicking on guarantee registration.
For further assistance or information please contact us on 0151 944 6444.
APEX HOUSE, 1 ORRELL MOUNT, LIVERPOOL, L20 6NS,
UNITED KINGDOM | +44 (0)151 944 6444
GARANTIEKARTE
Aus Sicherheitsgründen empfehlen wir Ihnen, Ihre Garantiekarte online auf
unserer Website www.phoenixsafe.com per Mausklick auf der Schaltfläche
„Garantieanmeldung“ auszufüllen.
DEUTSCHLAND GMBH, BAHNSTR. 23, D-42327 WUPPERTAL
0049-202-69519-0
Version 1/PB/JAN 16
 Loading...