

Page 1

Phoenix
DectGem
User’s Guide
Page 2

Overview of your Phoenix DectGem 1
Introduction 1
About the equipment 1
The packaging contents 1
DectGem features 1
Power 1
Personal Identity Numbers 1
Exploring your Phoenix DectGem 2
The display backlight 3
The basestation LEDs 3
Handset acoustic signals 3
Icons that a ppear in the display 3
Installation 4
Where to install the Dect Gem 4
Installing t he basestatio n 4
Preparing the handset 4
Exploring the standby display 4
Making and receiving calls 5
Making an external call 5
Answering an external call 5
Making an inte rnal call 5
Answering an internal call 5
Terminating a call 5
Enhanced telephone features 6
Redial memory 6
Call list 6
Phonebook 7
Notebook facility 7
Handset settings 11
Handset PIN 11
Handset name 11
Language options 11
Ring volume 11
Ring melody 11
Selecting basestations 11
Baby (sitting) mode 12
Baby number 12
Off-hook facility 12
Restoring factory default settings 13
Handset registration 13
Navigating the menus 14
Programming mode search tree - main 14
Programming mode search tree - during a call 14
Programming mode search tree - handset 15
Programming mode search tree - basestation 16
Programming mode search tree - last number
redial 16
Programming mode search tree - Call list 16
General 17
Safety precautions 17
For best performance 17
Cleaning instructions 17
Battery usage 17
Battery replacement 17
Battery disposal 17
Technical specification 17
General operation 8
Call waiting 8
External call transfers 8
Dialling a pause 8
Changing dialling mode temporarily 8
Changing tone duration temporarily 8
Paging 9
Muting the Microphone 9
Adjusting the receiver volume 9
Key beep 9
Locking the handset keypad 9
Switching off the handset 9
Basestation settings 10
Setting the clock 10
Basestation PIN 10
Default dialling mode 10
Defining the dial pause duration 10
Restoring factory default settings 10
Page 3

Overview of your Phoenix DectGem
Introduction
Your Phoenix DectGem has been designed to send o utgoing
calls over your service provider’s network. This service is
fully automatic and is initiated when your DectGem is first
powered up and plugged into the telephone network.
If you have any queri es regarding this servi ce, please contact
your DectGem supplier.
About the equipment
The equipment consists of a bases tat i on and a han dse t. The
basestation is to be plugged into the mains power supply
using the supplied main s power adaptor. The handset is t o be
fitted with the supplied rechargeable b atteries.
Before using your DectGem for the first time, the batteries
must be fully charged in the basestation; this takes approximately 15 hours. Ful l instructions are provided in Preparing
the handset.
The packaging contents
• DectGem basestation
• DectGem handset pre-registered to the basestation
• 2 x AAA Ni MH rechargeable batteries
• AC mains power adaptor
• telephone cable
• an optional country specific telephone plug adaptor
•this User’s Guide
DectGem features
• indoor handset range up to 30 metres
• outdoor handset range up to 300 metres
• up to 7 hours talk time
• up to 70 hours standby time
• basestation supports up to 6 handsets
• handset can be registered with up to 4 basestations
• call duration automatically displayed
• internal and extern al call transfer
• handset paging
• handset can be programmed to dial only one number
• 3 volume levels on the speaker
• 10 ring melodies
• 10 ringer volume levels
• stores the last 10 telephone numbers dialled
• phonebook holds up to 50 entries; on some models the
phonebook holds up to 100 entries
• stores the telephone numbers of the last 30 incoming
calls
Power
Your DectGem needs mains power. Alternative arrangements should be made for access to emergency services in
the event of a power failure.
To make and receive calls, the basestation must always be
powered on and the handset must remain charged.
A power failure does not affect the DectGem settings
(other than the c lock), the pho nebook entri es, the Call l ist or
redial memory.
Personal Identity Numbers
Important functions and settings of your DectGem are
protected by Personal Identity Numbers (PIN).
The factory default setting for the basestation PIN is
The factory default setting for the handset PIN is
You may choose to change these numbers. Instructions are
provided later in this Guide.
You will always be prompted for the basestation PIN when
accessing basestation settings.
In the case of handset s ettings, you will only be pro mpted for
the handset PIN if you have changed it from the factory
default.
Remember your PIN numbers. Many of your DectGem’s
functions will be unavailable if you forget them.
Caution The ring volume on the handset can be changed
or silenced by the user. Please note that there is
no ringer on the basestation. If the ring volume is
silenced, this phone will not ring.
1111.
0000.
recall
R
menu
P
select / confirm
scroll
delete / cancel
phonebook
redial memory/call list
1
Page 4
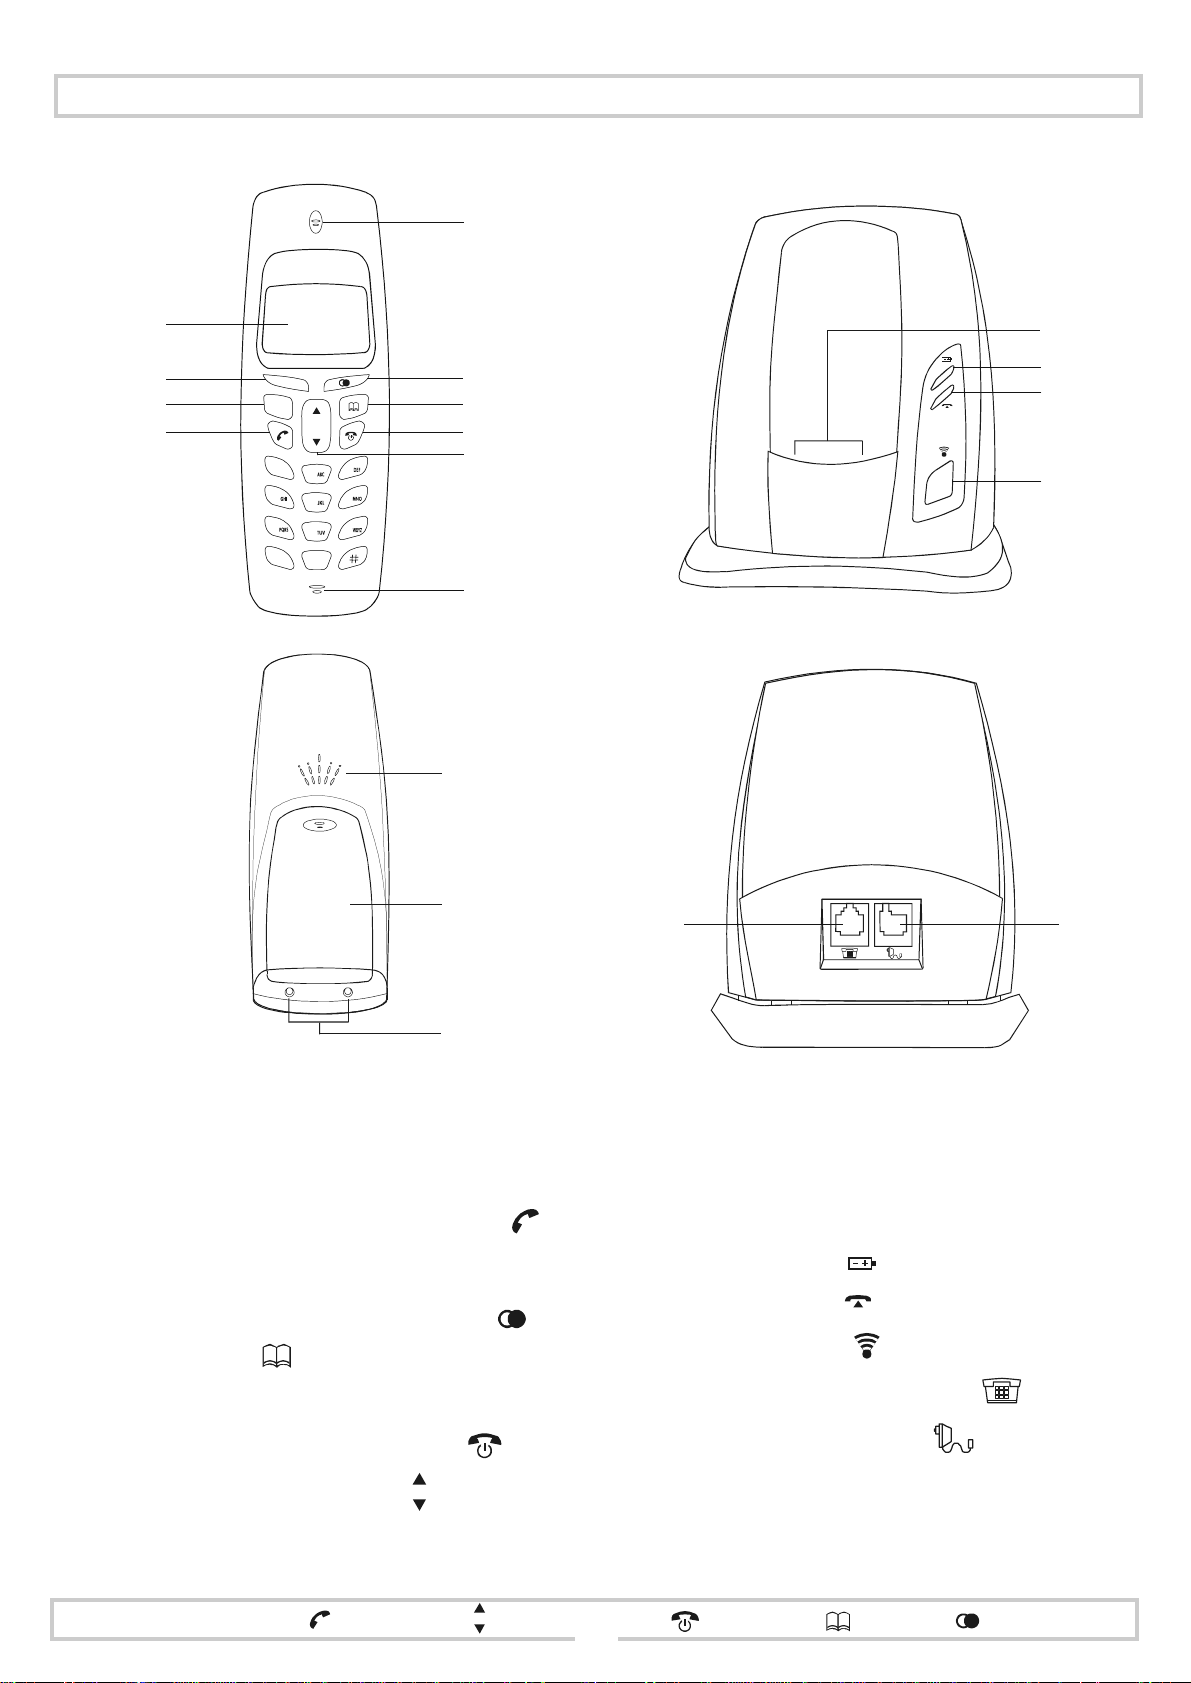
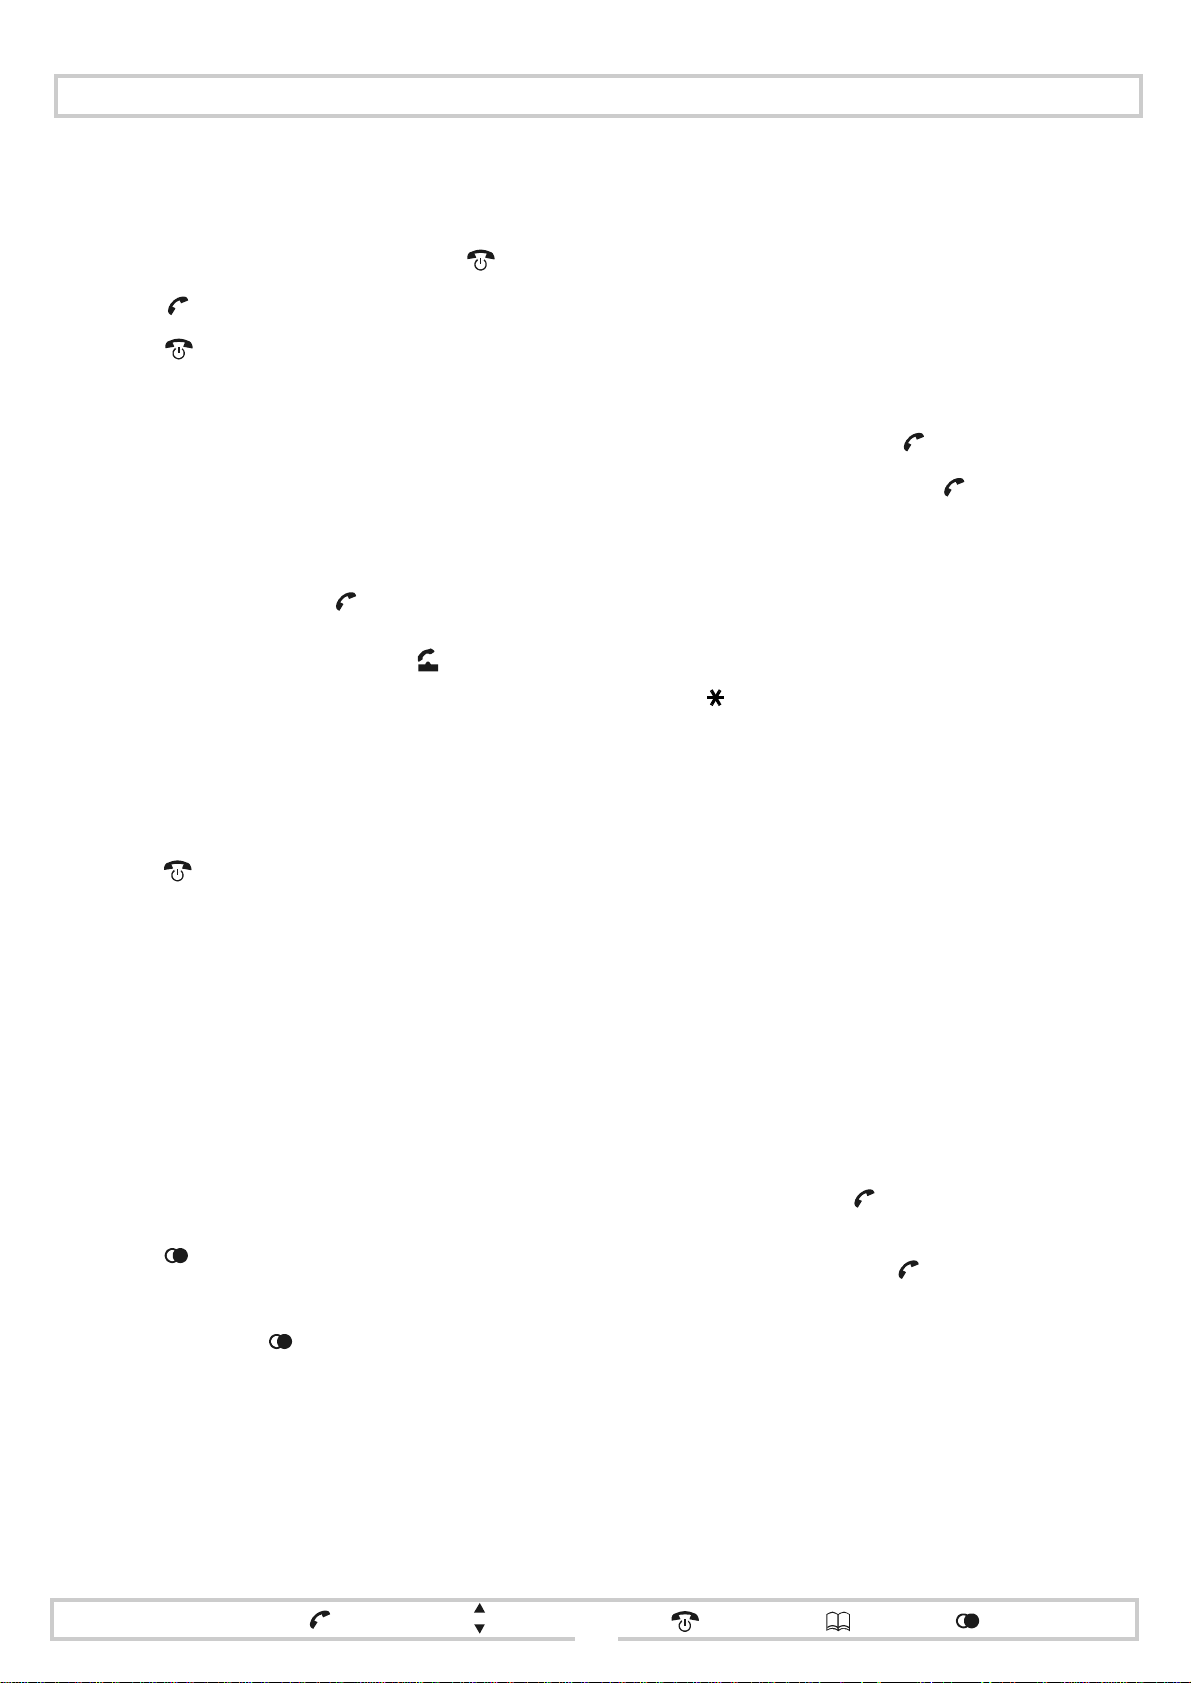
Exploring your Phoenix DectGem
141513161
5
1
2
3
R
P
4
1
4
7
*
3
2
6
5
9
8
0
6
7
8
9
10
11
12
817
13
1 LCD display
2
3
recall
menu
R
P
4 off-hook / select menu option / confirm
(green icon)
5earpiece
6
redial memory / Call list / insert pause
phonebook
7
8 on-hook / delete digit or ch aract er / cancel op erat ion /
go back up menu tree / lock and unlock handset
keypad / switch handset on and off (red icon)
scroll to menu / menu option
9
10 microphone
11 ringer
12 battery compartment
13 charging cradle / charging contacts
14 battery status - glows red
15 call indicator - glows green
paging button
16
telephone network connector
17
mains power connector
18
menu
recall
R
P
select / confirm
scroll
delete / cancel
phonebook
redial memory/call list
2
Page 5
Exploring your Phoenix DectGem
The display backlight
The DectGem handset has a backlit LCD display.
To conserve the battery, th e backlight extinguishes when the
handset is not in use.
The backlight is activa ted when you place the handset on, or
remove it from, the charging cradle (13 ) and when you press
a handset key.
When the battery is low the backlight is disabled.
With fresh batteries, the backlight may not work until the
batteries are fully charged.
The basestation LEDs
The (green) call indicator LED (15) lights up in the following four modes:
1 The LED flashes when you make an outgoing call.
2 The LED flashes to alert you to an incoming call.
3 When you register an additional/replacement hand-
set, the LED starts flashing 4 seconds after you commence the registration process by holding down the
paging button (16). It co ntinues t o flash at 1/2 second
intervals for 90 seconds.
The (red) battery status LED (14) glows steadily while the
batteries are cha r gi ng. Wh en the batt erie s are full y ch ar ged,
the LED glows for 1 second every 5 seconds.
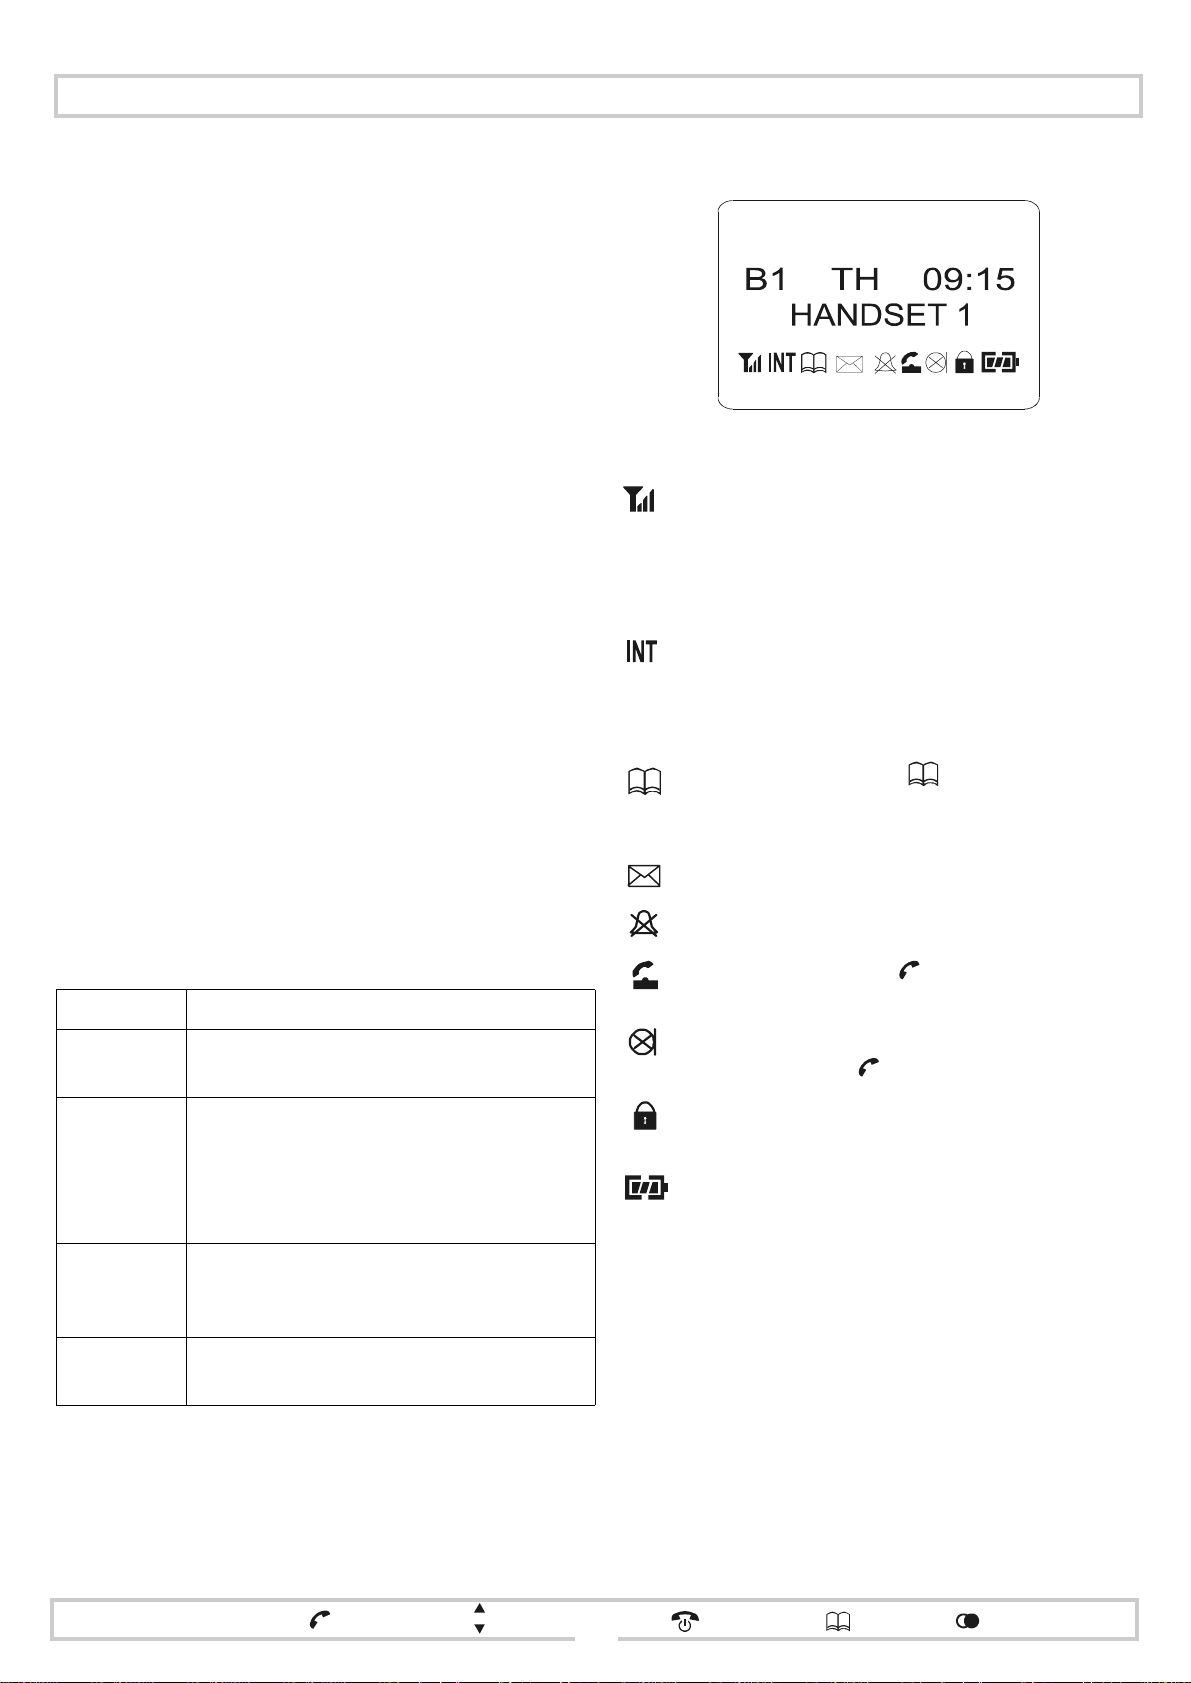
Icons that appear in the display
Note: All icons are shown.
Indicates the strength of the radio signal between
the basestation and the handset. One bar indicates
the weakest signal and three bars indicate the bes t.
A single flashing bar indicates you are out of
range.
Flashes while a call between two handsets registered to the same basestation (an intercom call) is
being set up, and steady when the called handset
answers t he call.
Appears when you press to view the phonebook or when you are making changes to the
phonebook.
Indicates that you have missed a call
Handset acoustic signals
Signal Meaning
1 short beep,
high pitch
1 l o n g b e e p ,
medium pitch
2 short beeps,
medium pitch
1 long beep,
low pitch
Key beep - emitted when a key is pressed. This
beep can be switched off.
• Confirmation of successful programming
operation
• When the handset is placed in the charging cradle
• When the handset is switched off
• Invalid key press
• Emitted every 60 seconds when the batt eries need charging. LOW BATT is displayed.
When the handset returns to standby mode.
Indicates that the ringer has been silenced
Steady when you press to make a call.
Flashes to alert you to an incoming call.
Flashes to indicate that the microphone has been
muted by pressing .
Indicates that the keypad has been l ocked (optiona l
feature on some models only)
Indicates the c harge level held by the battery pa ck.
One bar indicates the lowest charge, and three bars
indicate the highest.
recall
R
menu
P
select / confirm
scroll
delete / cancel
phonebook
redial memory/call list
3
Page 6
Installation
Where to install the DectGem
Please read the safe ty precautions given at the end of this
Guide.
Your DectGem is intended for use indoors.
Note: Although the handset may be taken outside dur ing dry
weather, the basestation must remain indoors at all
times.
Choose a location that is:
• away from other electronic equipment (such as computers, televisions, video recorders)
• away from heat sources (such as radiators, air ducts,
sunlight)
• away from excessive mo isture (suc h as a bat hroom, near
a kitchen sink or by an open window),
• away from extremely low temperatures, dust or shock
Location can affect signal range. In general, the higher the
basestation is lo cated, th e bett er the signal. Fo r best o utdoor
reception, install th e basestation at wind ow height in a room
near the outdoor area.
The indoor range is up to 30m, depending on the construction of the building; for example, use of steel or solid walls
or floors may limit the range. The outdoor range is up to
300m.
Installing the basestation
Connection sockets are located on the back of the basestation. The right-hand socket is for mains power. The lefthand socket is for the telephone connection.
To connect the basestation:
Preparing the handset
Before using your DectGem for the first time, charge the
batteries fully; this takes approximately 15 hours.
Fully charged batteries permit up to 7 hours of continuous
telephoning or up to 70 hours of standby time. Please note
that these times only apply to the supplie d batt eries.
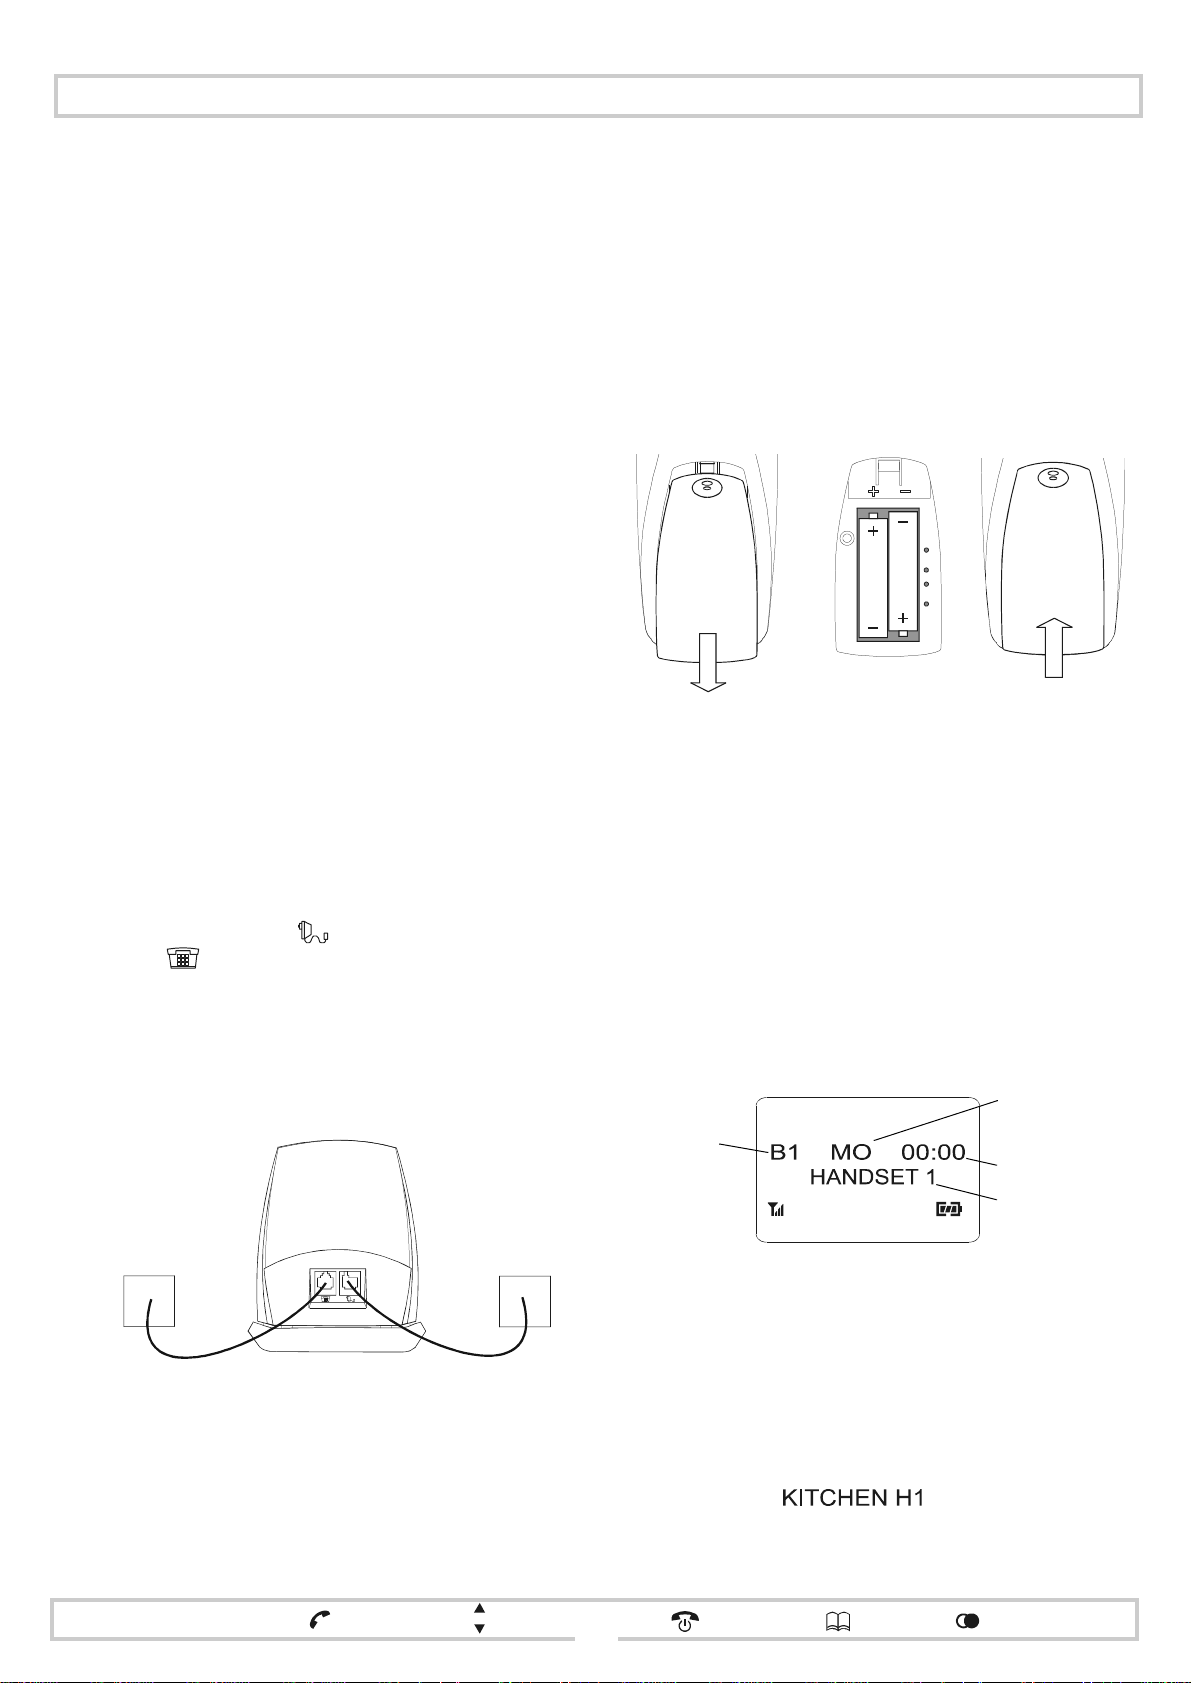
To install the batteries:
1 Open the batt ery
compartment.
To charge the batteries:
1
Place the handset in the charging cradle (13). The
battery status LED (14) glows steadily to confirm
that the batteries are being charged.
2
The batteries are fully charged when the LED
flashes. Your DectGem is now ready for use.
Note: To make and receive calls, the base station must
always be powered on and the handset must remain
charged.
2 Insert the
batteries.
3 Replace the
cover.
1 If supplied, connect the country specific telephone
plug adaptor to one end of the telephone cable.
2 Connect the basestation according to the diagram.
telephone
socket
basestation
mains power
socket
3 If necessary, switch on at the mains.
menu
recall
R
P
select / confirm
scroll
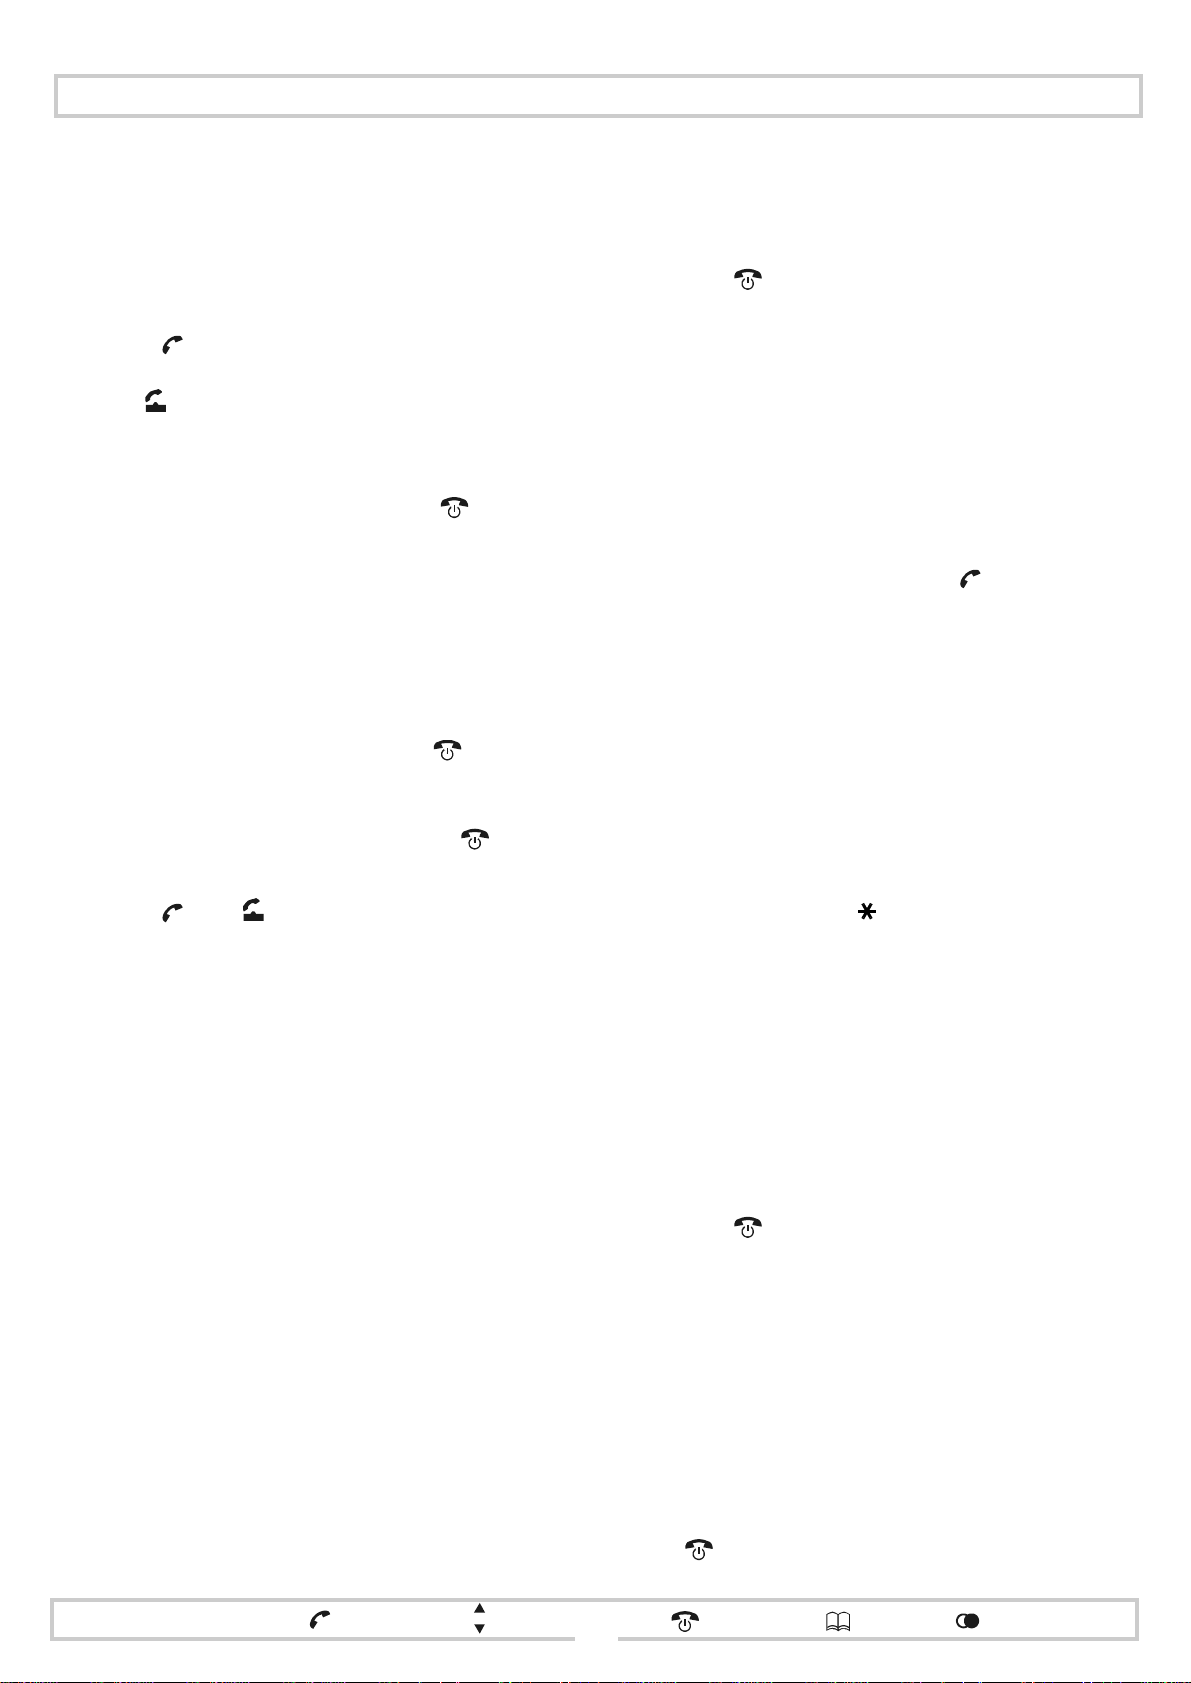
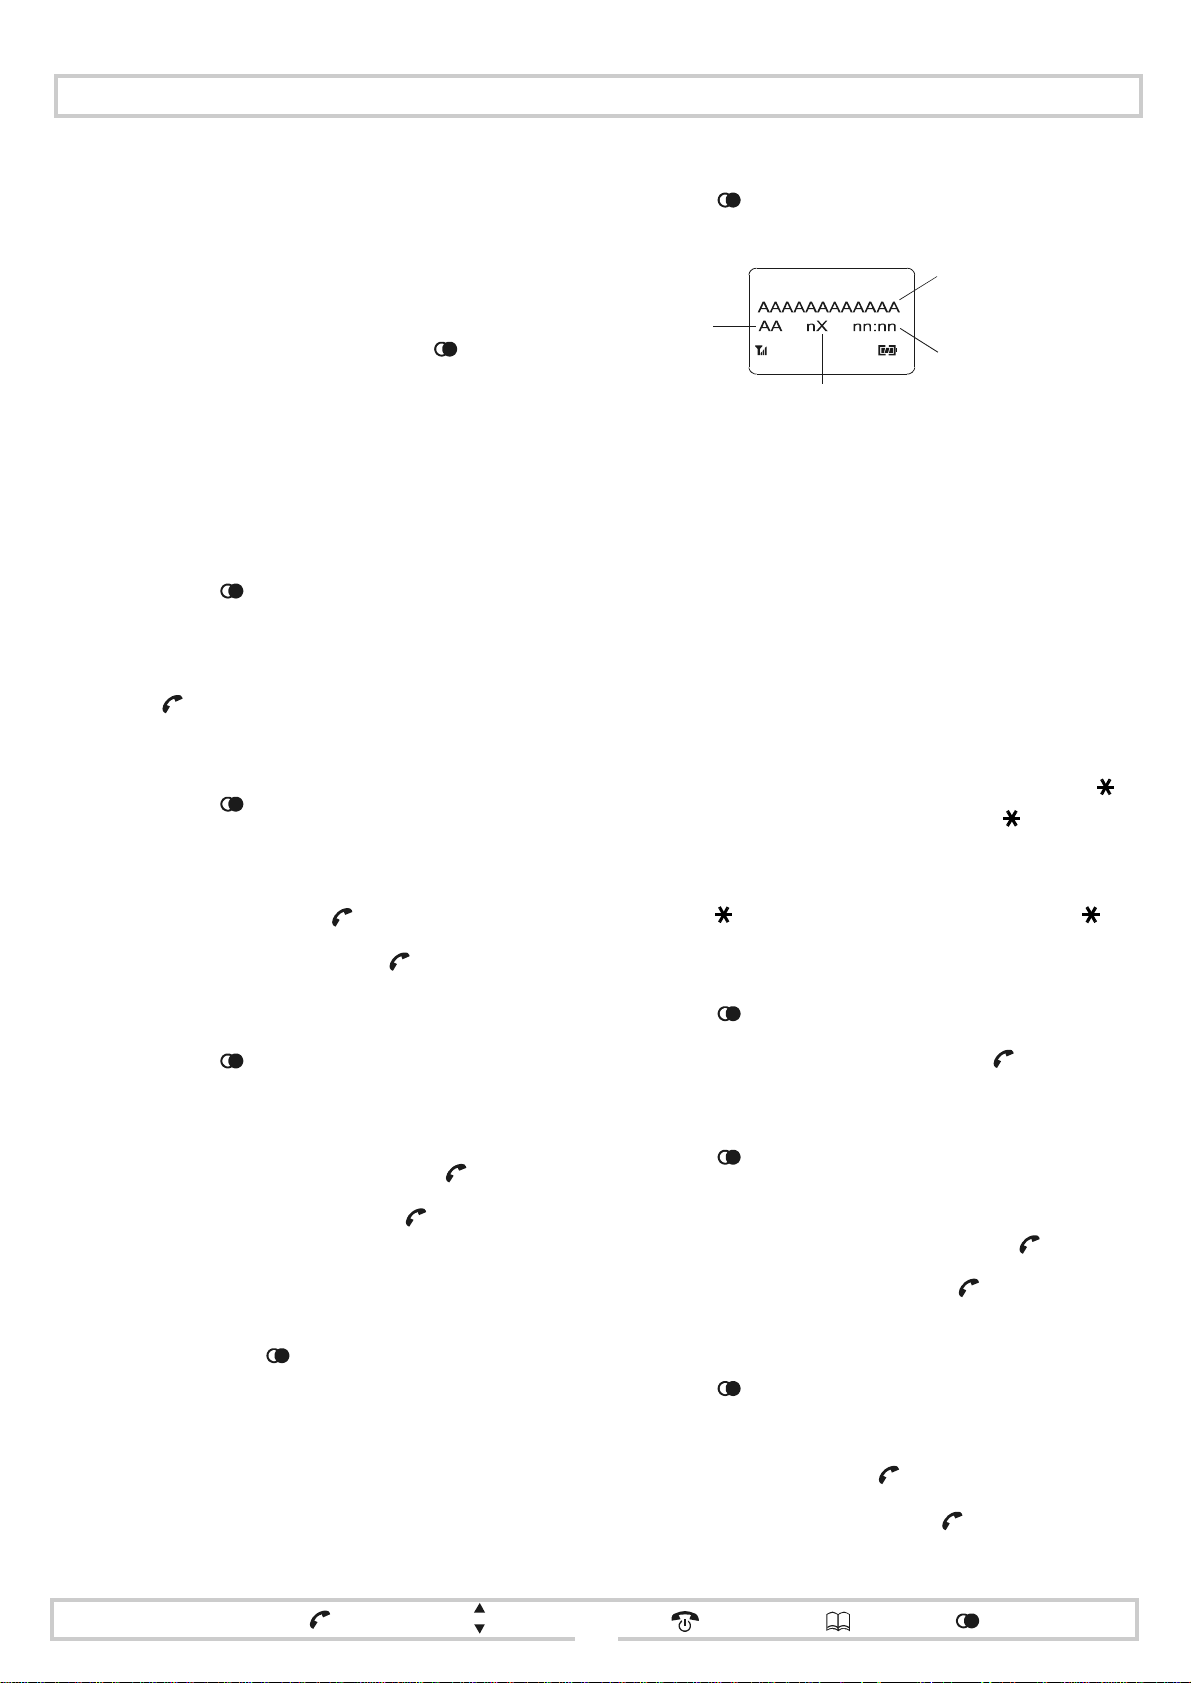
Exploring the standby display
Identity of
basestation to
which handset
is registered
B1 - BASE1
To set the day and time, use the basestation CLOCK
programming facility.
Note: The clock setting will be lost if there is an interruption
to the power supply to the basestation.
If you have sever al handsets you may wish to alloca te names
to each of them (such as KITCHEN) using the handset H/S
NAME programming facility . The standby display will then
show the name foll owed by the handset number, in the f orm:
delete / cancel
phonebook
4
Day of the week
MO - Monday
Time
Handset number
redial memory/call list
Page 7
Making and receiving calls
Making an external call
Note: If your DectGem is co nnected to t he public te lephone
network via a PBX, remember to prefix the teleph one
number with your exchange line access code.
Basic dialling method:
1
Press .
CONNECTING appears in the display along with
the icon. At the same time you will hear the dial
tone.
2
When CONNECTING is replaced by
_ _ _ _
, dial the
number. If you make a mistake, press to return
the handset to the standby state, and start again.
Block dialling method:
This method allows y ou to enter a tel ephone numbe r befo re
obtaining the dial tone. This means you can check and
correct the number before it is dialled.
1 Enter the telephone number.
To delete the last entered digit, press .
T o correct a n error in the middle of t he string, use the
scroll button to move the cursor to the incorrect
digit. This digit will start to flash. Press to delete
the digit, and then dial the correct digit.
2
Press . The icon is displayed. At the same
time CONNECTING appears briefly. This is then
replaced by the entered number.
You will then hear the di al tone followed by the dialling of the digits.
Answering an external call
When an external call co mes in, the ba sestation call indicator LED (15) flashes . All ha ndsets that are swi tched on rin g
and display one of the following:
• the caller’s telephone number
• the caller’s name, if the number is in the phonebook
• CALLING, if the caller’s telephone number has been
withheld (either by the caller or by the telephone network)
Notes: 1 The caller’s details will only be displayed if you
have the caller display feature enabled on your
telephone line.
2 The caller display feature may not work properly
if you are on broadband or cable.
To answer the call:
• if the handset is in the charging cradle, pick up the
handset
• if the handset is not in the cha rging cr adle, pres s any key
other than (which only mutes the ringer)
Note: For additional informati on concer ning the answe ring
of calls, please refer to the instructions on the handset
OFF-HOOK facility.
Making an internal call
Calls between handsets registered to the same ba sestation
can be activated at any time using the intercom facility.
To set up an intercom call:
1Press P. Scroll to INT CALL. Press .
INT appears next to the range icon, and your handset
number in the right of the display.
2 Enter the handset number of the handset you wish to
call. The selected handset number appears in the left
of the display.
While the selecte d h andset is ringing, th e INT icon and
the number of the called handset both flash.
The flashing indicat ors become steady when the call is
answered.
Hint: You can access a short cut to the I N T CALL menu by
pressing and holding for more than 1 second.
Answering an internal call
You will be alert ed to an inte rcom call by a flashing INT icon
and a number flashing in the left of the display; this is the
number of the calling handset.
To answer the intercom call:
• if the han dset is in the c harging cradle, simply remove
the hands et from the charging cradle
• if the handset is not in the cha rging cr adle, pres s any key
other than (which only mutes the ringer)
When you answer the call, t he INT icon and hands et number
stop flashing.
Note: For additional informati on concer ning the answe ring
of calls, please refer to the instructions on the handset
OFF-HOOK facility.
Terminating a call
To terminate a call:
• either replace the handset in the charging cradle, or
•press
recall
R
menu
P
select / confirm
scroll
delete / cancel
phonebook
redial memory/call list
5
Page 8
Enhanced telephone features
o
Redial memory
The handset automatically stores the last 10 telephone
numbers dialled; these are held in the Last Number Redial
(LNR) list.
If a number is in the phonebook, then the associ ated name is
held instead of the number.
The LNR list can be accessed using either or the scroll
button.
Notes: 1 If the LNR list is empty, the fi rst entry in the Call
list is displayed , providing t he Call lis t is not also
empty.
2 If both lists are empty, NO ENTRY is displayed.
To redial any of the last 10 numbers dialled:
1 Press either or the scroll button to access LNR
LIST. The last number/name dialled is displayed.
2 Scroll to the number/name to be redialled.
3
Press to redial.
To view the Call list:
1 Press twice to access CALL LIST. Details of the
most recent call are displayed.
Name or t elephon e
number or UNKNOWN
Day of
last call
Total number
f times called
(see Notes)
Time of
last call
Notes: 1 Information concerning the caller is only
available if the caller dis play feature i s
enabled on your telephone line.
2 If the caller’s telephone number is in the
phonebook then a name is displayed.
Otherwise, only the number is displayed.
3 A caller’s telephone number may not
always be available; some netw orks do not
pass on this information, and callers may
also withhold their numbers. In this case,
UNKNOWN is displayed.
To delete a number from redial memory:
1 Press either or the scroll button to access LNR
LIST. The last number/name dialled is displayed.
2 Scroll to the number/n ame t o be de leted, and press P.
3
Scroll to DEL LNR. Press .
4
Confirm the SURE? query with .
To add a number to the phonebook from redial memory:
1 Press either or the scroll button to access LNR
LIST. The last number/name dialled is displayed.
2 Scroll to the number, and press P.
COPY TO PB is displayed . Select with .
3
Enter the name and confirm with .
4
Call list
The Call list holds info rmation on the last 30 incoming calls.
It is accessed using the button.
Notes: 1 If the Call list is emp ty, the first entry in the LNR
list is displayed, pro viding the LNR list is not als o
empty.
2 If both lists are empty, NO ENTRY is displayed.
2 If a name is displayed, and you wish to check the
number from which the call was made, press or .
To redisplay the full entry, press or .
#
#
3 If only the number is displayed, it may not fit in one
display line. To check the complete number, press
or . To redisplay the full entry, press or .
# #
To dial from the Call list:
1 Press twice to access CALL LIST.
2
Scroll to the required entry and press .
To add a number to the phonebook from the Call list:
1 Press twice to access CALL LIST.
2 Scroll to the required entry and press P.
3
COPY TO PB is displayed. Confirm with .
4
Enter the name and confirm with .
To delete an entry from the Call list:
1 Press twice to access CALL LIST.
2 Scroll to the required entry and press P.
3
Scroll to DEL CID. Press .
4
Confirm the SURE? query with .
menu
recall
R
P
select / confirm
scroll
delete / cancel
phonebook
redial memory/call list
6
Page 9

Enhanced telephone features
Phonebook
The phonebooks on some Phoenix DectGem models allow
you to store up to 50 telephone numbers; on other models
100 numbers can be stored.
A phonebook entry consists o f two components: a name (up
to 10 characters) and a telephone number (up to 24 digits).
The entries are automatically stored in alphabetical order.
To dial a number from the phonebook:
1
Press to access the phon eboo k. The fi rst name is
displayed along with the telephone number.
2
Scroll to the desired name and press to dial.
To jump to the first nam e beginning with a certain
letter, dial that letter; for example, for L dial 555.
To add an entry to the phonebook:
Press P.
1
PHONEBOOK is displayed. Press .
2 ADD appears in the di spl ay a lo ng wi th the number of
free memory locations. Press . ENTER NAME
appears.
3 Using the digit k eys, en ter t he name (up t o 10 c harac-
ters). The name can include letters and numbers.
T o co rrect the entr y use the sc roll bu tton to move the
cursor to the left or right.
To delete a character press briefly.
To insert a space, press .
4
Press to store the name. ENTER NUM appears.
5 Enter the number (up to 24 digits). If necessary, you
can also insert a pause into the number by pressing
. (The dial pause is discussed earlier in this
Guide.)
6 Press to store the number. STORED appears
briefly in the display. ADD ENTRY is then displayed
with the revised number of free memory locations.
To change an entry in the phonebook:
5 Make your corrections using the scroll button to
move the cursor around the entry. To delete a character, press brie fly. To insert a space, press .
To insert a pause, press . To store the change,
press .
6 The telephone number is displayed with a flashing
cursor after the last digit. Make your corrections
using the scroll button to move the cursor aroun d the
entry.
To delete a digit press briefly.
To insert a pause, press .
Press to store the change. STORED is displayed
7
briefly.
To delete an entry from the phonebook:
Press P.
1
PHONEBOOK is displayed. Press .
Scroll to DEL ENTRY. Press . The first name in the
2
phonebook is displayed.
Scroll to the entry to be deleted and press .
3
Confirm the SURE? query with . When the entry
4
is deleted, DELETED is disp layed.
To clear the phonebook:
1Press P.
PHONEBOOK is displayed. Press .
Scroll to DEL ALL. Press . If prompted, enter the
2
handset PIN.
Confirm the SURE? query with . When all entries
3
are deleted , DELETED is displayed.
Notebook facility
The notebook facility allows you to make additions to the
phonebook during a call.
Press P.
1
PHONEBOOK is displayed. Press .
2 Scroll to EDIT ENTRY. Press . The first name in the
phonebook is displayed.
Scroll to the entry to be edited. Press . As you do
3
so, a flashing cursor appears after the name.
4 If you only wish to change the telephone number
stored in the entry, press and go to step 6 in this
procedure. Otherwise, continue with step 5.
recall
R
menu
P
select / confirm
scroll
To add an entry to the phonebook during a call:
Press P to access NOTEBOOK. Press . ENTER
1
NAME is displayed.
Enter the name. Press to confirm. ENTER NUM is
2
displayed.
3
Enter the telephone number. Press to confirm.
4 STORED appears briefly in the display.
delete / cancel
phonebook
7
redial memory/call list
Page 10
General operation
Call waiting
To accept an external call during an intercom call:
1
Terminate the intercom call by pressing .
Press to pick up the external call.
2
Press to terminate the external call
3
External call transfers
To transfer an external call to another handset registered to
the same basestation:
1 During the call press P.
NOTEBOOK is displayed.
2 Scroll to INT CALL. Press . The external call is
now on hold.
INT appears in the display, and the icon begins
to flash. Your handset number appears on the right
of the display.
3 Enter the handset number of the handset to which
you wish to transfer the call. This appears on the
left of the display.
When the selected handset number begins to flash,
press to transfer the external call.
If the transferred call is not answered within 30
seconds, it will come back to your handset;
CALLING will appear flashing on your display.
Note: To cancel the call transfer and return to the external
call, press R.
Changing dialling mode temporarily
If your DectGem operates using pulse dialling, it may be
necessary to switch to DTMF (tone) dialling during a call
(for example, to enable you to access certain telephone
banking services or to dial into an answer-phone).
To change to pulse dialling during a call:
1Press P.
NOTEBOOK is displayed.
Scroll to TEMP DIAL. Press .
2
DTMF FIXED is displayed. Press . Any digits you
3
dial now will be generated as tones.
When you hang up the call , the dial ling mod e retu rns
to pulse.
Should you experience problems accessing the required
service using the DTMF FIXED setting, follow the instructions for Changing tone duration temporarily.
Note: The button can also be used to change the dialling
mode temporarily. This usage is de scrib ed in t he hi nt
following the instructions for setting the Default
dialling mode.
Changing tone duration temporarily
The length of tones generated by DectGem is fixed during
manufacture. In most circumstance s this duratio n is sufficient. If you experience problems accessing your telephone
banking services (for example), you could try varying the
length of the tones during the call.
This facility can be used whether your DectGem operates
using DTMF or pulse dialling.
Dialling a pause
If your DectGem is connected t o the tel eph one ne twor k vi a
a PBX, you may need to ins ert a pause between the e xchange
line access code and the telephone number.
To insert a pause:
1 Press at the appropriate point in the telephone
number. As you do so, a pause is inserted and the
letter P appears in the display.
Each press of the button represents a pause, the
duration of which is preset to 3 or 5 seconds.
Instructions on setting the duration of the pause are
provided later in this Guide.
Note: A pause can also be inserted into a tel ephone numb er
stored in the phonebook.
menu
recall
R
P
select / confirm
scroll
To vary tone duration during a call:
1Press P.
NOTEBOOK is displayed.
Scroll to TEMP. Press .
2
DTMF FIXED is displayed.
Scroll to DTMF VAR. Press .
3
The length of tones will be proportional to the duration of
the key presses you make from now on.
When you terminate the call, the fixed tone length is reinstated.
delete / cancel
phonebook
redial memory/call list
8
Page 11
General operation
Paging
The paging facility allows you to call all handsets simultaneously (enabling you to locate a misplaced handset, for
example).
All handsets that are switched on will ring for 30 seconds,
and INT will appear flashing in each of the displays. Two
paging methods are available.
Method 1 - to call all handsets from the basestation:
Briefly press the paging button (16).
1
2 To end paging, either press the paging button again,
or press and then on any handset.
Method 2 - using a handset to call all other handsets:
Press and hold for more than 1 second. Your
1
handset number appears on the right of the display.
Press again, briefly. The numbers of all handsets
2
registered to the basestation appear on the left of the
display.
3
To end paging, press on your handset.
Muting the Microphone
Key beep
To switch key beep on or off:
1
Press P and scroll to KEY BEEP. Press .
Scroll to BEEP ON. Press . Key presses will be
2
confirmed with beeps.
3
Scroll to BEEP OFF. Press . Thereafter, key
presses will not be confirmed with beeps.
Locking the handset keypad
You can lock the handset keypad to prevent accidental
entries (for example, while carrying the handset in your
pocket). When a call comes i n, the key pad unlocks au tomatically.
Note: This optional feature is only available on some
Phoenix models.
To lock the keypad, press for 1 second. The icon
appears in the display.
To unlock the keypad, press for 1 second. The icon
disappears from the display.
Note: If you press for 2 seconds or longer, the handset is
turned off.
The microphone (10) can be s witched off whil e th e handse t
is off-hook.
To mute the microphone:
Press .
1
MIC MUTED is displayed briefly, after which the icon appears flashing in the display.
To switch on the microphone:
1
Press again. The icon disappears and MIC ON
is then displayed.
Adjusting the receiver volume
To adjust the receiver (speaker) volume during a call:
1 Press the scroll button. The current volume is dis-
played (eg. EAR VOL 2). Press the scroll button
repeatedly to achieve a more comfortable volume.
The new level is stored.
Note: Of the three volume levels, level 1 is softest
and level 3 the loudest.
Switching off the handset
The handset is always on when it is in the charging cradle .
A handset that is turned off does not ring.
To switch the handset on and off:
1
Press for more than 2 seconds. POWER OFF is
displayed before the handset switches off.
2
To turn it on, press again.
Note: There may be a short pause before the handset
re-establishes radio communication with the
basestation; durin g this time NO BASE appears
in the handset display.
recall
R
menu
P
select / confirm
scroll
delete / cancel
phonebook
redial memory/call list
9
Page 12

Basestation settings
Setting the clock
To set the day of the week and the time:
1
Press P and scroll to BASE. Press .
2 PIN _ _ _ _ is displayed. Enter the basestation PIN
(factory d efault 1111).
3
Scroll to CLOCK. Press . A time of 00:00 is
displayed.
Scroll to the required day of the week.
4
5 Use the digit keys to enter time in hours and minutes
in 24 hour clock format; for example, 6:30 in the
evening should be entered as 1830. Confirm with .
Basestation PIN
The default setting of the fo ur-digit basestat ion PIN is 1111.
To change the basestation PIN:
Press P
1
2 PIN _ _ _ _ is displayed. Enter the basestation PIN
(factory d efault 1111).
3
Scroll to NEW PIN. Press .
4 PIN _ _ _ _ is displayed. Enter the new basestation
PIN.
and scroll to BASE. Press .
Hint: If the default dialling mode is pulse, you can tempo-
rarily switch to DTMF diallin g as you t he numbe r by
pressing . For example, if you di al 123 4 56789,
then 1234 will be dialled in pulse mode and 56789
will be dialled in DTMF mode. Once t he call is terminated the DectGem will revert to pulse di alling mode.
Defining the dial pause duration
Some PBX systems require a pause to be inserted between
the exchange line access code and the telephone number.
To set the dial pause to either 3 seconds or 5 seconds:
1Press P and scroll to BASE.
2 PIN _ _ _ _ is displayed. Enter the basestation PIN
(factory default 1111).
Scroll to DIAL PAUSE. Press .
3
4 Scroll to the required setting (3 SEC or 5 SEC) and
press .
Note: A pause can also be ins erte d int o a t elepho ne numbe r
stored in the phonebook.
Restoring factory default settings
To restore factory default settings to the basestation:
1
Press P and scroll to BASE. Press .
5 PIN _ _ _ _ is displayed again for confirmation of the
new PIN. Enter the new PIN again.
Confirm the SURE? query with .
6
Remember your PIN. Many of your DectGem’s functions will be unavailab le if you forget it.
Default dialling mode
To confirm the default dialling to either DTMF (tone) dialling
or pulse dialling:
1
Press P and scroll to BASE. Press .
2 PIN _ _ _ _ is displayed. Enter the basestation PIN
(factory d efault 1111).
3
Scroll to DIAL MODE. Press .
4 Scroll to the desired dialling mode, ie. DTMF or
PULSE. Press .
2 PIN _ _ _ _ is displayed. Enter the basestation PIN
(factory default 1111).
3
Scroll to DEFAULT. Press .
4
When SURE? is displayed, confirm with . All
basestation settings are reset to the factory default
values.
Note: The basestation PIN is reset to the default 1111.
menu
recall
R
P
select / confirm
scroll
delete / cancel
phonebook
redial memory/call list
10
Page 13

Handset settings
Handset PIN
The default setting of the four-digit handset PIN is 0000.
To define your own handset PIN:
Press
1
P and scroll to HANDSET. Pres s .
2 If prompted, enter your handset PIN.
3
RINGER appears. Scroll to HANDSETPIN. Press .
4 Using the digit keys, enter your new handset PIN.
(To restore the default handset PIN, enter 0000.)
Press . STORED is then displayed.
Remember your PIN. Many of your DectGem’s functions will be unavailab le if you forget it.
Handset name
To enter a handset name:
1
2 If prompted, enter your handset PIN.
3
4 The handset number is displayed on the left of the
P and scroll to HANDSET. Press .
Press
Scroll to H/S NAME. Press .
display. Enter the handset name (up to 8 characters)
and confirm with .
5 Use the scroll button to hear the ring melody (see
below) played at each of the available volume settings (range 0 to 9). Press to select the required
volume.
Hint: You can change the setting by pressing the
corresponding keypad button.
Note: Setting the volume to 0 switches off the handset
ringer. When the ringer is off the icon appears in
the display as a reminder. (The base does not have a
ringer.)
Ring melody
To set the ring melody:
1
Press
P and scroll to HANDSET. Press .
2 If prompted, enter your handset PIN.
3
Scroll to RINGER. Press .
4
Scroll to MELODY. Press .
5 Use the scroll button to sample each of the ten melo-
dies (range 0 to 9). Press to select the required
melody.
Hint: You can change the melody by pressing the
corresponding keypad button.
Language options
To change the language:
1
Press
P and scroll to HANDSET. Pres s .
2 If prompted, enter your handset PIN.
3
Scroll to LANGUAGE. Press .
4
Scroll to the required language. Press .
Ring volume
To set the ring volume:
1
2 If prompted, enter your handset PIN.
3
4
P and scroll to HANDSET. Pres s .
Press
Scroll to RINGER. Press .
Scroll to VOLU ME. Press .
Selecting basestati ons
By default, the handset is set up to sea rch for and lock onto
the strongest radio signal from any bas estation to whi ch it is
registered. This means that if you are out of range of your
primary basestation, you will still be able to make calls, as
the handset will pick up the signal from your sec ondary basestation. As you go out of range of the primary basestation
the field range icon wil l flash one bar. When you come int o
range of the secondary basestation, the primary basestation
number will be replaced by the secondary basestation
number.
If the handset is locked to a defined basestation, it will not
search for another ba sestation when it is out of r ange of that
basestation. In this case the handset flashes NO BASE.
To allow the handset to select the best available basestation:
Press P and scroll to HANDSET. Press .
1
2 If prompted, enter your handset PIN.
Scroll to SELECT B/S. Press .
3
Scroll to BEST BASE. Press to enable the handset
4
to search for and lock onto the strongest radio signal.
recall
R
menu
P
select / confirm
scroll
delete / cancel
phonebook
redial memory/call list
11
Page 14

Handset Settings
To lock the handset to a particular basestation:
Press P and scroll to HANDSET. Press .
1
2 If prompted, enter your handset PIN.
Scroll to SELECT B/S. Press .
3
4 Scroll through th e bases tati ons t o which the ha ndset is
registered. Press to lock the handset to the desired
basestation.
Baby (sitting) mode
The handset can be set up to only make calls to a part ic ular
telephone number (Baby Number). Although this mode is
designed to enable your baby-sitter to contact you in an
emergency, it can also be used to prevent unauthorized use
of the phone line.
In Baby mode, whichever key (other th an P) is pressed, the
handset automatically dials the Baby Number.
With the handset in this mode, the standby display shows
BABY CALL.
Warning! In Baby mode, the handset cannot be used to
access the emergency services.
Baby number
To define the Baby Number:
1
Press P and scroll to HANDSET. Press .
2 If prompted, enter your handset PIN.
3
Scroll to BABY NUM. Press .
4
Enter the Baby Number and confirm with .
To change the Baby Number:
Press P and scroll to HANDSET. Press .
1
2 If prompted, enter your handset PIN.
Scroll to BABY NUM. Press .
3
4 To change the number, use the scroll button to move
the cursor and to delete digits. Press to store
the new number.
5If ENTER NUM is displayed, then no number has been
defined. Enter the Baby Number and co nfirm with .
To enable baby mode:
Press P and scroll to HANDSET. Press .
1
2 If prompted, enter your handset PIN.
Scroll to BABY MODE. Press .
3
4
BABY ON is displayed. Confirm with .
5 If the Ba by Number is not already defined, ENTER
NUM is displayed. Enter the telephone number and
confirm wi th .
6 The standby display now shows BABY CALL.
To disable baby mode:
1
Press P and scroll to HANDSET. Press .
2 If prompted, enter your handset PIN.
Off-hook facility
The handset is supplied with the off-hook facility en abled. It
allows you to answer calls by simply removing the handset
from the charging cradle.
To disable/enable the off-hook facility:
Press P and scroll to HANDSET. Press .
1
2 If prompted, enter your handset PIN.
Scroll to OFFHK MODE. Press .
3
4 To disable this facility, scroll to OFFHK OFF and
press .
5 To enable this facility, scroll to OFFHOOK ON and
press .
To answer calls with the off-hook facility disabled:
• remove the handset from the charging cradle and press
any key other than (which only mutes the ringer)
Scroll to BABY MODE. Press .
3
4
BABY OFF is displayed. Press . This returns the
handset to normal operation.
menu
recall
R
P
select / confirm
scroll
12
delete / cancel
phonebook
redial memory/call list
Page 15
Handset settings
Restoring factory default settings
To restore factory default settings to the handset:
Press P and scroll to HANDSET. Press .
1
2 If prompted, enter your handset PIN.
Scroll to SETDEFAULT. Press .
3
4
When SURE? is displayed, confirm with . All
handset settings are reset to the factory default values.
Notes: 1 The handset PIN is reset to the default 0000.
2 The following information is retained: the con-
tents of the phonebook, redial memory and Call
list, and the handset name.
Handset registration
All handsets supplied with the station are pre-registered to
that basestation. Additional/replacement handsets will be
supplied unregistered; NO BASE will flash in the displays.
You will have to register each new handset to at least one
basestation.
7 On completion of registration, DONE appears briefly
in the display to be followed by a string of digits.
These are the free handset numbers; for example, if
you already have on e handset registered wit h t hi s basestation, then the free handset numbers
2 3 4 5 6
are displayed.
Select a number by pressing the corresponding key-
pad button. If you do not select a number, the handset
is registered under the next free number.
The handset returns to standby and the display indicates the number o f the basest ation to whic h th e handset is now registered.
Notes: 1 A handset can be registered to up to 4 base-
stations.
2 Each basestation can have up to 6 handsets
registered to it.
3 Once a handset is registered to a Phoenix Dect-
Gem basestation, it cannot be deleted from that
base.
4 A Phoenix handset cannot be registered to a
basestation from another DECT equipment
supplier.
To register a handset:
1
Hold down the paging button (16) until the call
indicator LED (15) starts flashing rapidly (approxi-
mately 4 seconds); the basestation is now in registration mode.
2
Press
P and scroll to HANDSET. Pres s .
3 If prompted, enter your handset PIN.
Scroll to REGISTER. Press .
4
5 Scroll to the basestat ion to which the handset is to be
registered. Press .
6 Enter your basestation PIN (facto ry defaul t 1111) and
press to confirm the entry. While registration is in
progress, REG_ _ _ _ flashes in the display.
recall
R
menu
P
select / confirm
scroll
13
delete / cancel
phonebook
redial memory/call list
Page 16
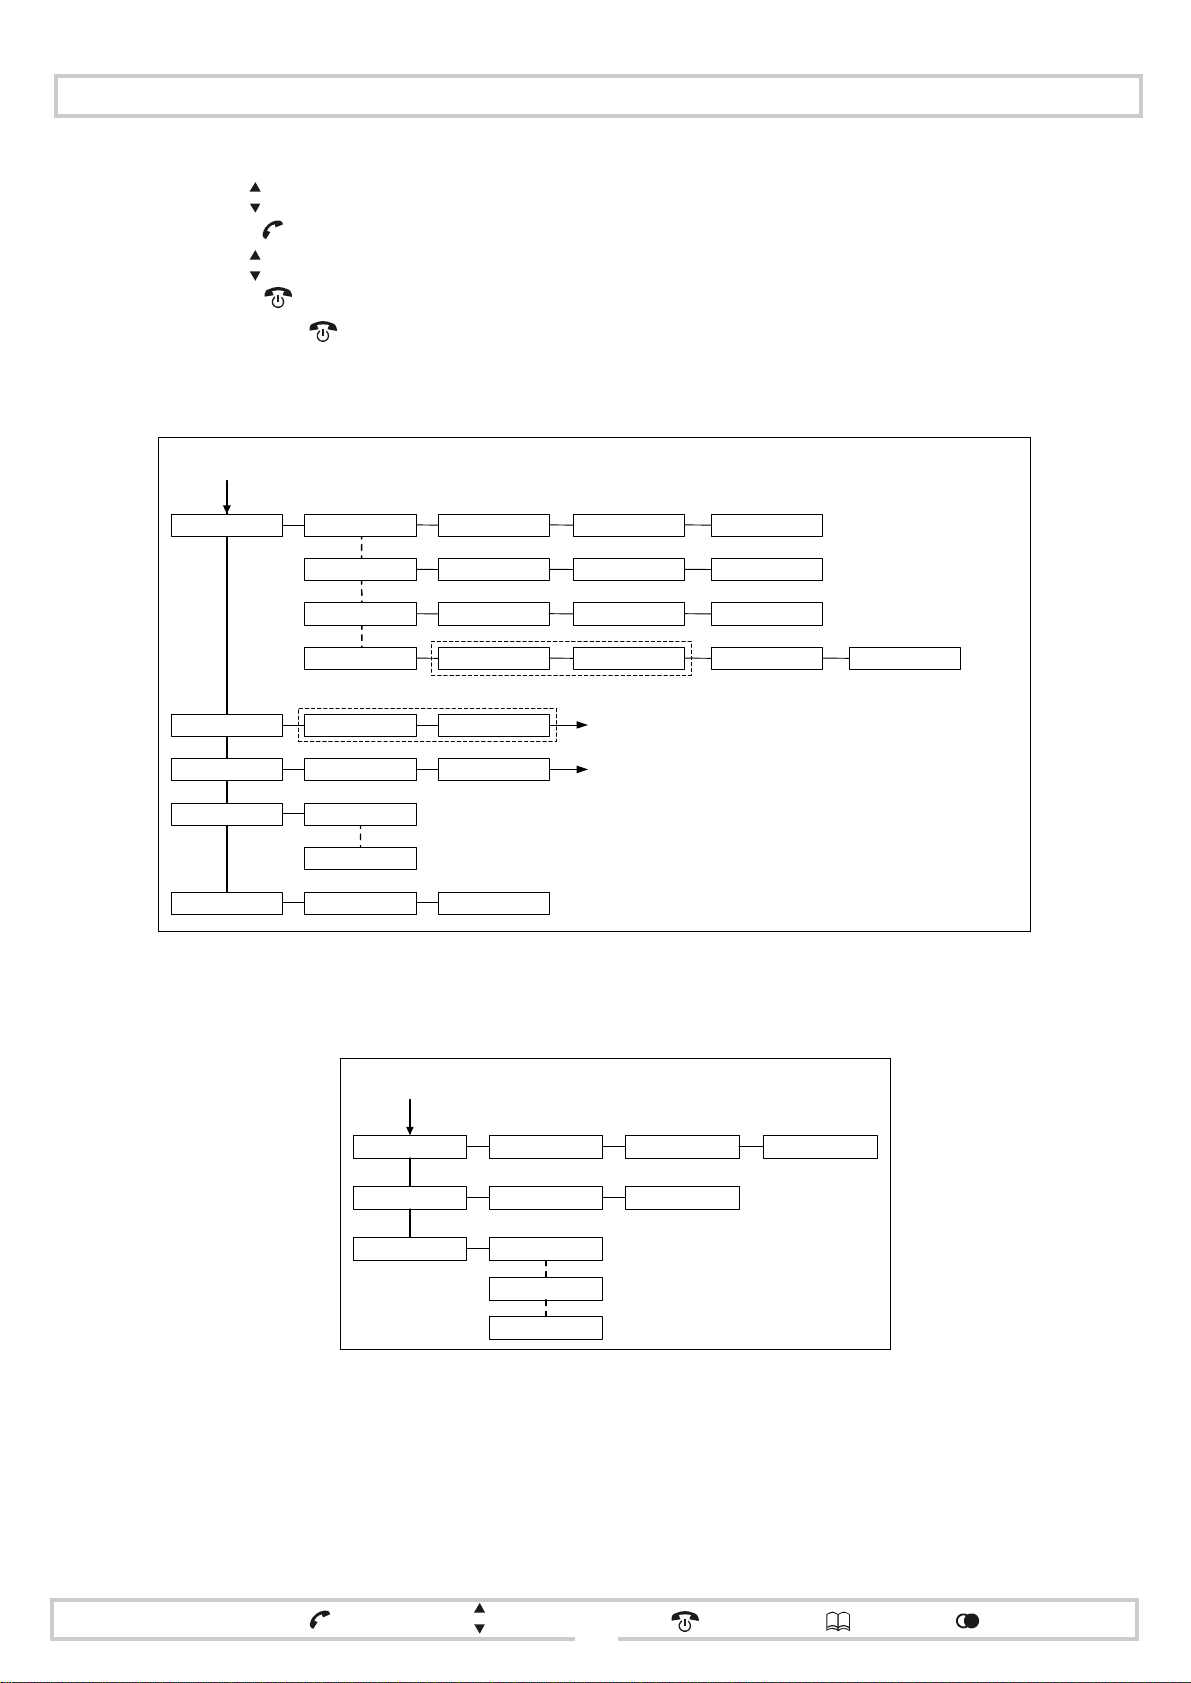
Navigating the menus
Hints: 1 Use to scroll to a menu option.
2 Press to select a menu option/confirm an operation.
3 Use to move the cursor around a data entry.
4 Press to delete digits/characters during data entry.
5 Hold down for at least 2 seconds to cancel an operati on and go back up the programming tree .
Programming mode search tree - main
P
P
H
O
O
N
B
E
O
A
D
D
K
D
E
I
E
T
N
D
E
E
N
L
D
E
L
A
E
2
8
T
R
R
Y
T
L
L
N
T
E
R
M
N
A
A
N
W
D
R
Y
E
A
N
W
D
R
E
H
A
D
N
S
E
T
P
E
N
T
E
N
U
M
R
E
I
N
1
3
5
2
4
6
8
7
S
U
R
E
?
_
_
_
_
S
T
O
D
R
E
S
O
D
T
R
E
D
E
E
L
T
E
D
*
S
U
R
E
?
D
E
E
L
E
T
D
H
A
D
S
N
E
B
S
A
E
Y
E
K
E
B
E
I
N
T
C
A
L
H
A
N
D
T
P
L
S
T
E
P
I
N
P
I
N
_
_
_
_
B
E
E
P
O
N
B
E
E
P
F
F
O
1
_
_
_
_
2
*
_
_
_
_
1
Programming mode search tree - handset
Programming mode search tree - basestation
You will only be asked
*
for the handset PIN if
you have changed it
from the default of 0000
Programming mode search tree - during a call
P
N
N
T
OTE
N
I
M
E
T
B
CAL
P
E
NAM
R
E
O
O
K
L
D
L
A
I
T
F
M
D
T
F
D
E
X
I
M
D
T
F
R
A
V
N
E
N
U
R
M
E
E
1
T
2
1
T
S
O
D
R
E
S
U
L
P
E
menu
recall
R
P
select / confirm
scroll
delete / cancel
phonebook
redial memory/call list
14
Page 17
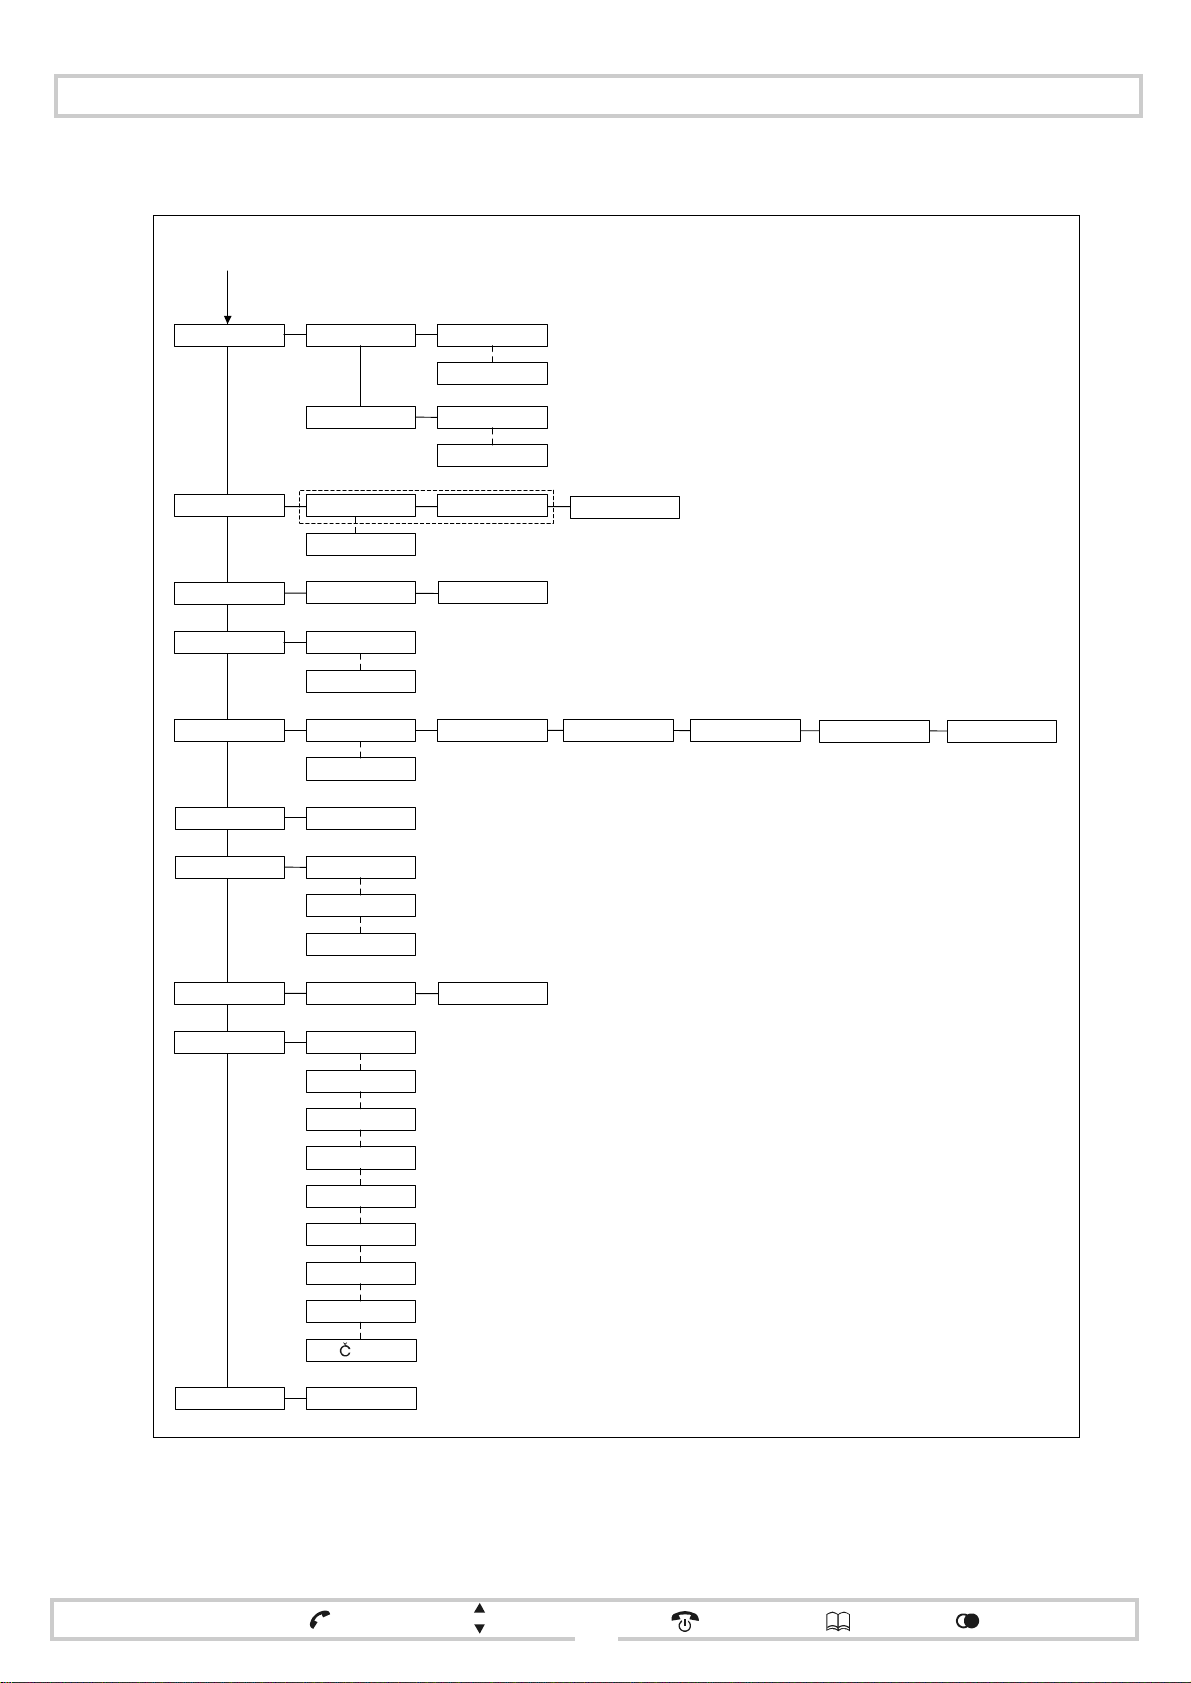
Programming mode search tree - handset
from main programming mode search tree
V
O
U
M
R
N
R
E
G
I
L
E
O
M
E
L
Y
D
M
O
U
L
V
V
M
9
:
E
O
E
0
L
U
M
E
:
O
L
9
D
Y
:
Navigating the menus
M
B
A
B
A
O
F
F
E
R
H
/
S
E
H
A
N
E
D
O
M
B
Y
M
N
U
B
Y
O
M
H
K
D
E
S
T
I
G
E
R
S
N
A
M
E
T
S
C
B
L
/
E
E
T
P
S
D
I
N
A
B
O
Y
N
B
O
A
Y
B
B
F
R
E
N
E
T
U
N
O
F
F
H
K
O
O
F
F
H
O
F
O
K
A
E
B
S
1
A
E
4
B
S
1
T
H
E
C
I
K
E
B
T
A
S
B
S
1
E
B
A
S
B
A
E
4
S
_
_
_
_
E
N
F
M
N
O
F
N
E
L
D
O
Y
:
E
1
B
S
0
E
T
2
3
A
S
T
O
*
U
M
N
R
4
5
6
7
E
-
N
P
I
R
E
D
4
5
2
3
1
6
7
-
-
-
-
-
-
-
-
You will only be asked
*
for the BABY NUM if one
does not already exist
-
R
E
G
-
-
-
2
3
4
5
N
O
E
D
6
A
N
L
E
S
recall
R
P
T
G
D
menu
E
U
A
G
E
F
A
U
L
T
E
N
G
D
E
U
T
L
A
I
T
F
N
A
R
N
E
D
E
R
E
S
A
P
L
P
O
E
E
C
E
S
U
R
select / confirm
L
I
H
S
H
C
S
N
A
I
O
C
A
I
S
A
L
N
D
S
N
L
O
K
S
I
S
T
I
K
S
Y
?
E
scroll
delete / cancel
phonebook
redial memory/call list
15
Page 18

Navigating the menus
Programming mode search tree - basestation
from main programming mode search tree
DIAL MODE
DIAL PAUSE
NEW PIN
CLOCK - MO 00:00
DTMF
PULSE
3 SEC
5 SEC
SURE?DEFAULT
PIN_ _ _ _
- TU 00:00
- WE 00:00
- TH 00:00
- FR HH:MM
- FR 00:00
- FR HH:MM
- SA 00:00
- SU 00:00
PIN_ _ _ _ SURE?
COMPLETED
Programming mode search tree - last number redial
P
L
N
R
I
S
L
T
1
2
3
7
5
6
4
C
O
T
O
P
P
Y
B
E
D
I
L
T
N
R
U
S
R
D
L
E
L
N
R
D
E
L
A
L
L
E
?
S
R
E
U
?
D
E
L
T
E
E
D
D
E
T
E
L
E
D
Programming mode search tree - Call list
P
A
D
A
C
A
L
L
I
S
L
T
M
O
M
2
X
0
2
2
:
4
C
O
T
O
P
Y
P
B
D
E
L
T
E
E
U
S
R
D
E
L
C
I
D
E
?
D
D
E
T
E
L
E
R
S
E
U
D
E
L
A
L
L
menu
recall
R
P
select / confirm
scroll
delete / cancel
?
phonebook
D
redial memory/call list
16
Page 19

General
The DectGem equipment does no t co ntain any user serviceable parts.
Warning! Compliance with the appropriate standards can-
not be guranteed if the user attempts any
unauthorized modifications to the equipment.
Safety precautions
Use only the appr ove d p o wer a dapt or and battery type. Use
of any other adaptor or battery type could make the unit
unsafe or damage the unit.
Do not use your DectGem in potenti ally explosive are as, eg.
paint shops.
Do not use your DectGem to report a gas leak.
Your DectGem is intended for us e i ndoor s. Whi le the hand-
set may be taken outside, the basestation/charging unit
should not be loca ted in an envir onment where it is l ikely to
get wet, such as near a kitchen sink or an open window.
Alternative arrangements should be made to enable you to
contact the emergency services during a power failure.
Batteries can cause pr operty damage, injury or burns if a
conductive material, such as jewellery, keys or beaded
chain, touches exposed terminals. The material may complete an electrical circuit and become quite hot.
To protect against s uch unwant ed curre nt drain, please ex ercise care in handling a charged batteries, particularly when
placing it inside your pocket, purse or other container with
metal objec ts.
Never leave the batteries in extremely high temperatures
(over 60°C), for example behind glass in very hot, direct
sunlight.
For best performance
Avoid using your DectGem in the immediate vicinity of
electrical devices, metallic objects and satellite receivers.
The charging contacts should not come into contact with
metallic or greasy objects.
Do not attempt to charge bat teries from another device in the
DECTGem equipment.
If you do not intend using the DECTGem for a prolonged
period, please remov e the batteries fr om the handset. Failu re
to do so may cause damage through battery leakage.
Battery replacement
When the standby or in-call time reduces markedly, even
though the batteries are fully charged on the basestation/
charging unit, the effective life of the batteries has reached
an end. When this occurs, plea se purchase two AAA NiMh
rechargeable batteries.
Battery disposal
You should dispose of the exhausted batteries for recycling
according to the recycling system of your country. Never
dispose of the batter ies in a fi re as the bat teries will explod e
and may cause injury.
Technical specification
Standard: DECT, GAP
Number of channels: 120 duplex channels
Channel increment: 1728kHz
Bit rate: 1152kbit/s
Duplex protocol: TDMA (time slice procedure)
Voice coding: ADPCM 32kbit/s
Modulation: GFSK
Radio frequency range: 1880MHz to 1900MHz
Average transmitting
capacity:
Power supply
(AC adaptor):
10mW, average output per channel ;
250mW peak
Basestation: 230V, 50Hz, with
Euro plug connector
Handset batteries: 2 NiMh batteries
Permissible ambient
0°C to 40°C
temperature:
Cleaning instructions
Clean the DectGem equipment with a damp cloth . Never use
cleaners containing abrasive, alcohol, spirits or solvents
(eg. turpentine). Thes e a gents may corrode the hous in g and
damage the labels.
Battery usage
Only use AAA NiMH rechargeable batteries.
Never use non-rechargeable batteries.
Do not attempt to charge the batteries in any equipment
other than in the handset.
menu
recall
R
P
select / confirm
scroll
Permissible storage
-20°C to 60°C
temperature:
Handset dimensions: 170 x 55 x 30 mm
Handset weight: 135g including batteries
Base dimensions: 125 x 125 x 56 mm
Total height with hand -
167 mm
set in bases tation
Dialling protocol: DTMF and pulse
CLI: FSK / DTMF (factory set)
delete / cancel
phonebook
17
redial memory/call list
 Loading...