

Page 1
The product has been approved according to the strictest
European. safety standards (ECE R 44/04) and is suitable
for Group I+II+III(9-36KG).
discovery
Group I+II+III (9-36kg)
™
2015
+
9-36 Kg Y
043846
ECE R44/04
SUITABLE FOR
BS01N-B/S
BS01N-BE/SE
BS01N-BC/SC
BS01N-BCE/SCE
Page 2

Contents
Contents 2
Introduction 4
Safety warnings 5 - 7
Know your car seat 8 - 9
1.0 Use in the vehicle 10
1.1 Use in the vehicle 10
1.2 Legal requirements 10
1.3 Important notes 10
2.0 Securing your baby 11 - 13
2.1 Securing the harness 11
2.2 Tightening and loosening the harness 11
2.3 Adjusting the shoulder height 12
2.4 Adjusting the headrest height 13
2.5 Adjusting the buckle position 13
3.0 Installation in the vehicle 14 - 16
3.1 Installation in vehicle for children up to 13kg 14
3.2 Installation in vehicle for children up to 15 - 25kg 15
3.3 Installation in vehicle for children up to 22 - 36kg 16
4.0 Care Instructions 17
4.1 Cleaning 17
4.2Checklist 17
Page 3

3
Page 4
Introduction
The discovery™ complies with requirements applicable in
market of sale
For rights & remedies, refer www.philandteds.com/warranty
Please register your purchase through our online warranty
registration by visiting: www.philandteds.com/register
philandteds.com
Introduction
Dear parents
Thank you very much for purchasing our product.
The function and design of this seat delivers the
highest levels of safety and comfort when your child is
in this child restraint.
In order to achieve the best function, please adjust the
child restraint to be suitable for your child’s stature and
weight before using our product.
Research shows that a high number of car safety seats
are incorrectly installed. Therefore, please take the time
to read through the instruction manual carefully. Our
product offers maximum safety only when it is used in
accordance with the instructions.
Continuous research by our development team, user
tests and consumer reactions ensure that we are kept
fully up to date in the field of child safety. Therefore, if
you have any questions concerning the use of the our
product, please do not hesitate to contact us.
You can see our contact information in the service card.
Page 5

5
Page 6

Safety Warnings
Safety Warnings
• WARNING: PLEASE READ THOROUGHLY
BEFORE COMMENCING INSTALLATION AS
AN INCORRECT INSTALLATION COULD BE
DANGEROUS.
• WARNING: DO NOT USE THIS CHILD SEAT IN
PASSENGER SEATS EQUIPPED WITH AIRBAGS.
• This child seat must only be installed in a forward
facing position in passenger seats.
• Do not use on side facing or rear facing seats .
• Never use this child seat without fastening the
child's harness correctly, and never attempt to use
it without fastening it into the car as described in
these instructions.
• Do not modify the seat in any way.
• In the event of an emergency it is important that
the child can be released quickly, this means that
the buckle is not fully tamper proof and so your
child must be taught never to play with the buckle.
• Do not leave your child unattended in the seat at
any time.
• It is recommended that this car seat should be
changed when it has been subjected to violent
stresses in an accident or has become badly
worn, periodically inspect the harness for wear,
paying particular attention to the attachment points,
stitching and adjusting devices.
• Ensure that no part of the seat is trapped in a door
or folding seat, if your car has a folding rear seat,
ensure that it is correctly latched in the upright
position.
• Car interiors can become very hot when in direct
sunlight, it is therefore recommended that the
child seat is covered when not in use this prevents
components, particularly those attached to the
child seat, becoming hot and burning the child.
• Luggage and other heavy or sharp objects should
be secured in the car, loose objects are liable to
cause injury in the event of an accident.
• The safest seating position for a child car seat is on
the rear seat of a vehicle.
Page 7
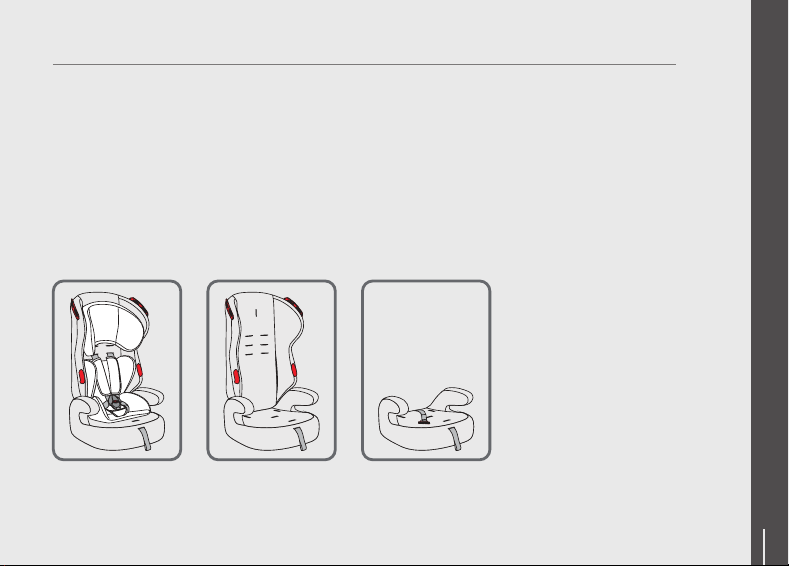
• WARNING: THIS CHILD SEAT MUST ONLY BE
INSTALLED IN A FORWARD FACING POSITION.
THIS SEAT IS CLASSIFIED AS:
• Group I for children weighing from 9kg to
18kg (9months - 4 years approx.)
• Group II for children weighing from 15kg to
25kg (4-6 years approx.)
• Group III for children weighing from 22kg to
36kg (4-11 years approx.)
Safety Warnings
Set up for use by
(9-18kg children
group I)
Set up for use by
(15-25kg children
group II)
Set up for use by
(22-36kg children
group III)
7
7
Page 8
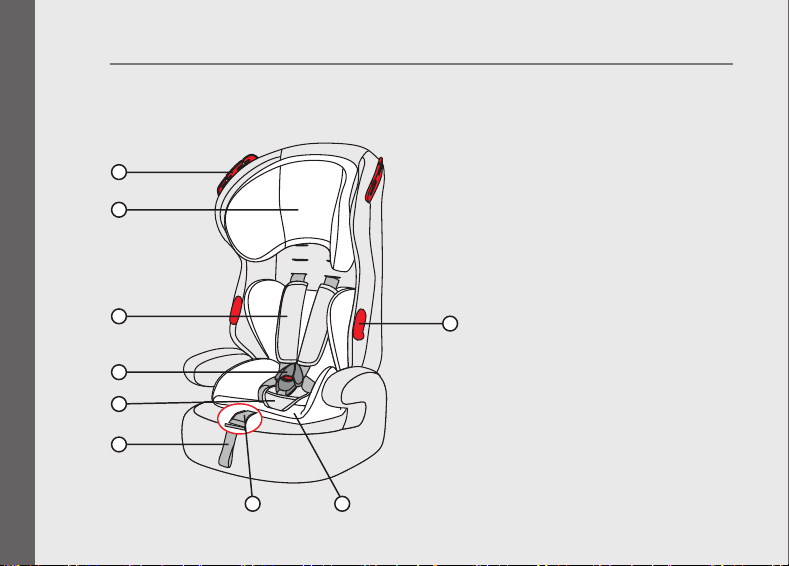
Know your car seat
1
2
3
4
5
6
1. Diagonal belt guide for
group 2 use
2. Head support
3. Shoulder pads
4. Buckle release button
5. Crotch strap
6. harness adjuster
7. harness release button
8. cushion
9
9. diagonal belt guide
for group 1 use
7
8
Page 9
Know your car seat
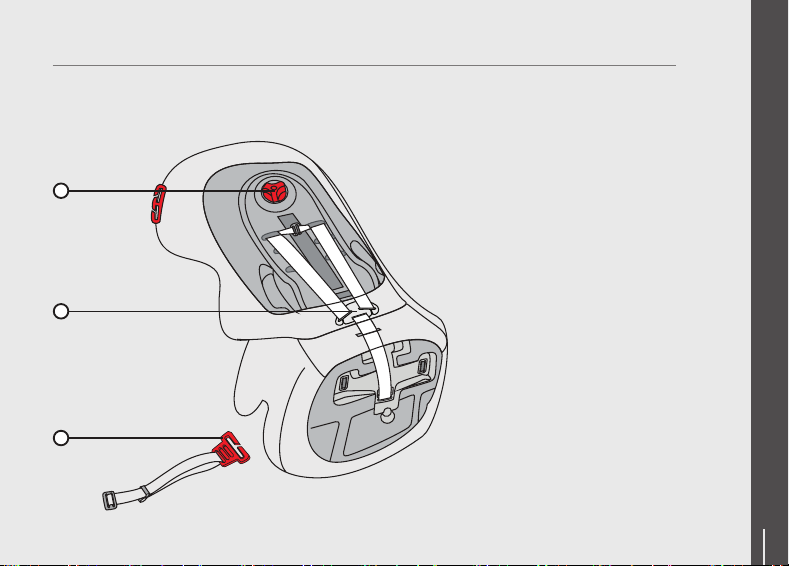
10. Locking device for
head support
10
11. Metal yoke
12. Diagonal belt clip
(for use in group 3 only,
store at the bottom of
the booster)
11
12
9
99
Page 10
Use in the vehicle
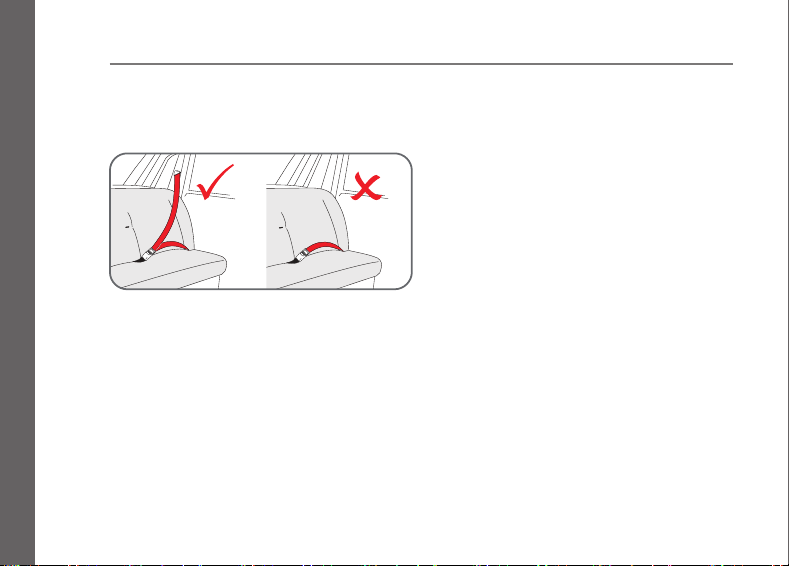
1.1 Use in the vehicle
Your discovery child seat can only be installed forward
facing using a lap and diagonal seat belt.
Do not use this child seat in passenger seat equipped
with airbags.
1.2 Legal requirements
This child seat is approved to ECE R44.04 and is ONLY
suitable for use with a 3 point and diagonal seat belt,
approved to UN/ECE Regulation No.16 or other equivalent safety standards.
1.3 important notes
• In an emergency your child can be released quickly
by pressing the red button on the harness buckle.
• Keep this user guide in a safe place where if can
easily be found.
• When the child seat is not in use. it is recommended
that it is fastened into the car with a seat belt
to avoid being thrown about in the event of an
accident.
• If you travel with passengers using both the front
and rear seats, the lighter occupants should be in
the rear seats and the heavier occupants in the front
of the vehicle. When a child is in the front seat, the
lighter passenger should be behind the child.
• Do not allow the child seat to come into contact
with corrosive substances e.g. battery acid.
Page 11
Securing your baby
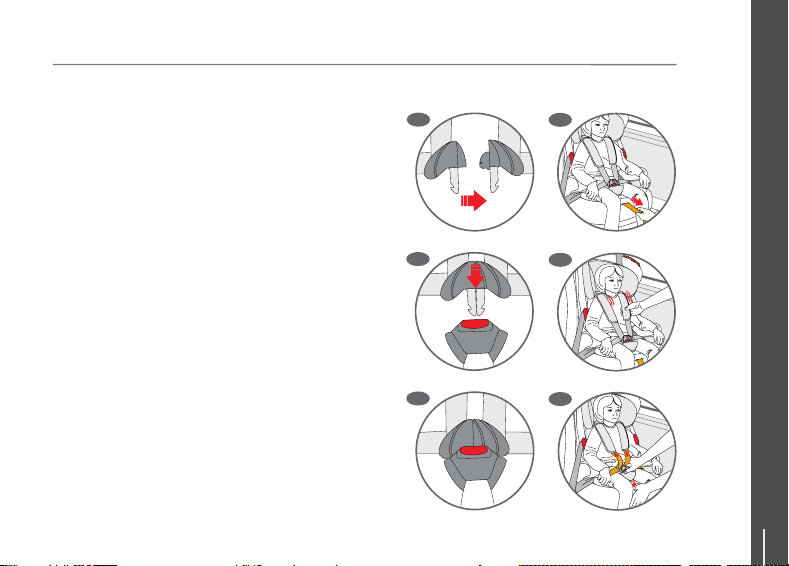
2.1 Securing the harness
• Place the right hand harness connector behind the
left hand one, they should slot together neatly (2-A).
• Push the harness ends into the hole in the
buckle at the top of the crotch strap (2-B).
• You will hear and feel a 'CLICK' when it is
secure, check by attempting to remove the
connectors by pulling the webbing above and
below the buckle, periodically check that your
child has not released the buckle (To release
the harness, press the red button down) (2-C).
2.2 Securing the harness
• Pull gently on the harness adjuster to take up any slack
(2-D). A loose harness is dangerous, so it should be
checked every time the seat is used . It i s recommended
that there is just enough room to insert two fingers
between the shoulder straps and the ch ild's chest (2-E).
• If the harness is too tight, loosen it by first pressing
the tab at the front of the seat, and then pulling both
straps, as shown. Do not pull on the shoulder pads,
as these are fixed in length (2-F)
2-A
D-2
B-2
C-2
E-2
2-F
11
11
Page 12
Securing your baby
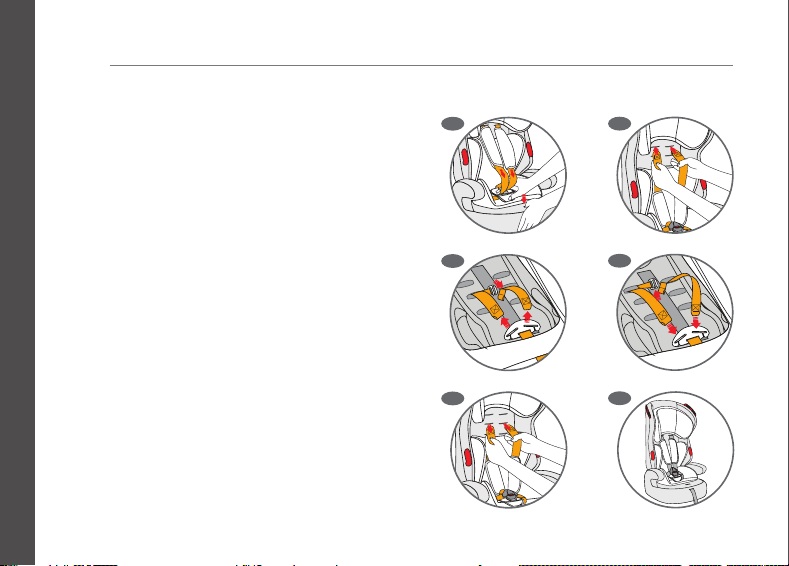
2.3 Adjusting the shoulder height
• The harness has 3 height positions. The straps should
go into the slots nearest to the top of your child's
shoulders. If your child's shoulders are between two
pairs of slots, always use the higher position.
• Loosen the shoulder belts by pressing the release
button and pulling the shoulder belts as far as you
can. NOTE: DO NOT PULL THE BELT PADS (2-G)
• To adjust the shoulder straps of the harness,
remove one of the shoulder straps from the metal
retaining yoke located at the back of the seat.
Leave the other one in place for reference (2-H).
• Pull the shoulder straps through the harness slot in
the shell and cover, then pull through the shoulder
pad (2-I).
• Pull shoulder pad back through harness slot in cover
and shell, and re-locate to desired harness slot (2-J).
• Feed the shoulder strap back through the shoulder
pad, then through the same slot, and re-attach to
metal yoke at rear (2-K).
• Repeat the same procedure for the shoulder strap
and pad on the other side, Make sure there are no
kinks or twists in the straps (2-L).
2-G
2-H
2-J
2-K
2-I
2-L
Page 13
OK
Securing your baby
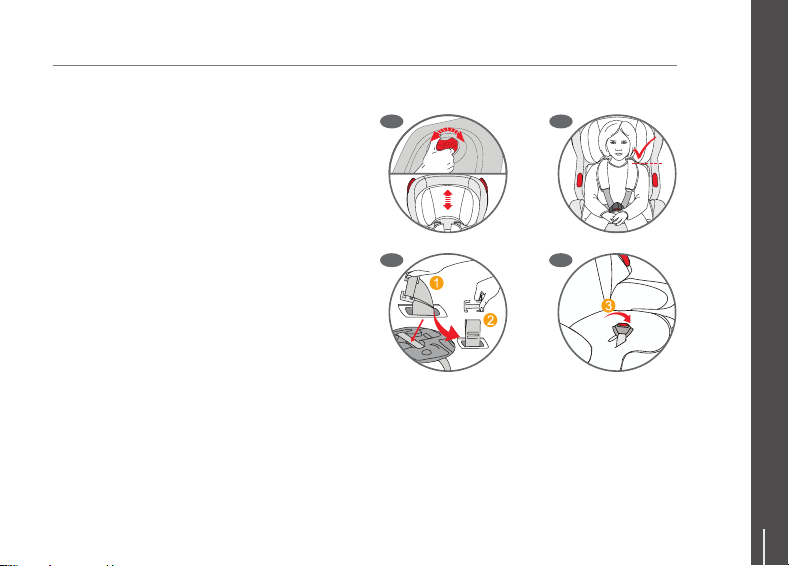
2.4 Adjusting the headrest height
• The adjustable head support is designed to provide
side impact protection for your child (when the seat
is used with the backrest).
• To adjust the height, unscrew the red locking device
located at the top back of shell. Move up or down to
the desired position, then re-tighten the red locking
device, making sure that there is no movement in
the head support (2-M).
• The head support should be positioned just above
your child's shoulders (2-N).
• The head support can be removed to wash the
cover. Please see care & maintenance section.
2.5 Adjusting the buckle position
• You need to move the buckle to outer position if
the inner one is not fitting your child.
• Before moving, please take out metal clip of strap
(2-O); after moving, please remember to put clip
in (2-P).
2-M
2-O
2-N
2-P
13
Page 14
3-A
3-D
Installation in the vehicle
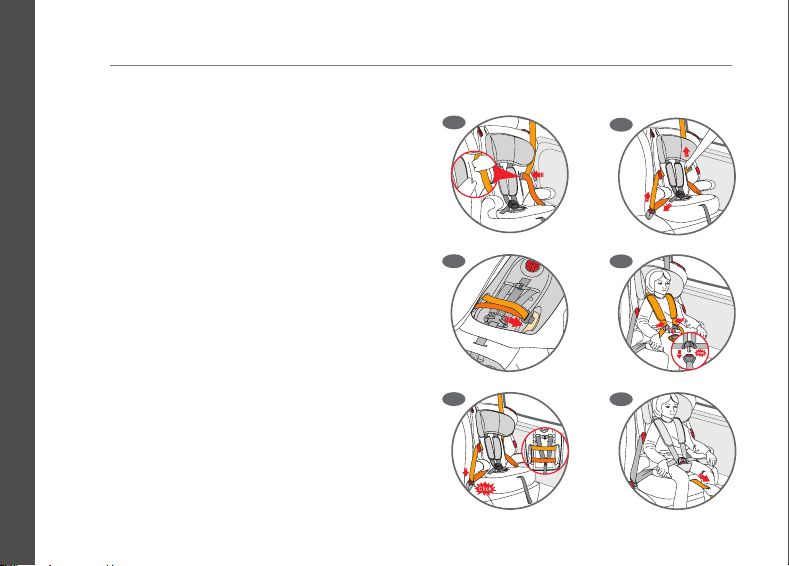
3.1 Installation in vehicle for
children up to 13kg
• Place the child's car seat on a passenger seat with
• Pull the lap and diagonal sections of the car seat until
• Guide the seat belt around the side panel of the car
• Pull the belt around the seat and fasten in the normal way
• Make sure that there are no kinks or twists in the car
• Slide buckle tongue sections together and insert
• Pull gently on the harness adjuster to take up any
a 3 point seat belt. Make sure the child seat is facing
towards the front of the car.
fully extended.
seat making sure that the lap belt is below the arm
rest of the seat base (3-A). Then feed both lap and
diagonal belt into the side slot, around the plastic
back panel (over the harness) and back through the
opposite slot (3-B).
making sure that the lap section is below the arm rest and
the diagonal section goes through the red guide. (3-C)
seat belt. To check that seat is fixed securely, tug the
top of the shoulder straps there should be little or no
forwards movement (3-D).
them in the buckle with an audible “ click” (3-E).
slack (3-F).
3-B
3-C
3-E
3-F
Page 15
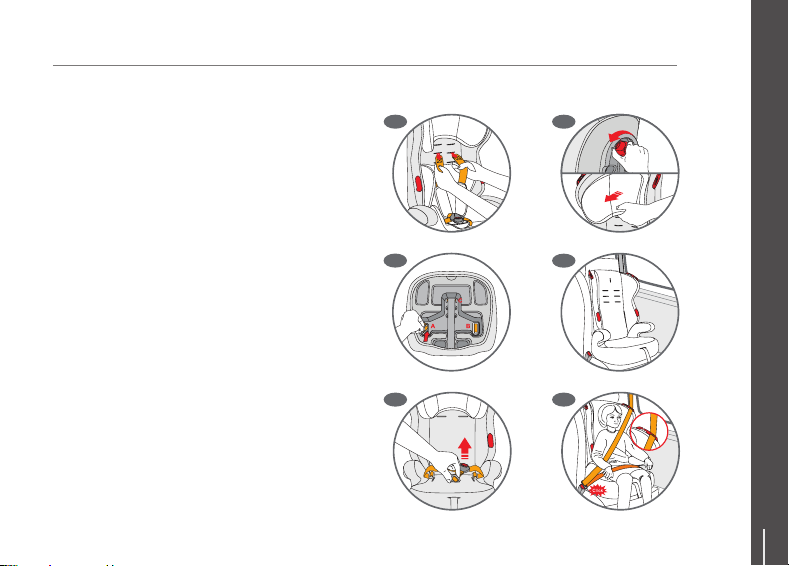
3.2 Installation in vehicle for
3-G
3-J
children up to 15 - 25kg
• Your child will be secured using the vehicle's seat
belt. It will therefore be necessary to remove the
harness fitted to the child seat before use (3-G).
Please see Adjusting the shoulder height 2-G/2-H.
• Remove the crotch strap by twisting and feeding
the metal retaining keeper through the bottom
of the child seat (3-H) and up through the seat’s
upholstery (3-I).
• Remove the head support by turning the red
locking device whilst applying downward pressure
as shown (3-J).
• To fit the child’s car seat, place it on a passenger
seat with a 3 point seat belt. Make sure it is facing
towards the front of the vehicle (3-K).
• Pull the lap and diagonal sections of the car seat
belt across and secure it in the normal way. Make
sure that there are no kinks or twists in the car seat
belt. The lap belt should be routed under both the
arm rests of the child seat and the diagonal belt
routed over the armrest as shown. The diagonal
belt will be kept away from the child's neck by
passing under the head support (3-L).
Installation in the vehicle
H-3
I-3
K-3
L-3
15
Page 16
Installation in the vehicle
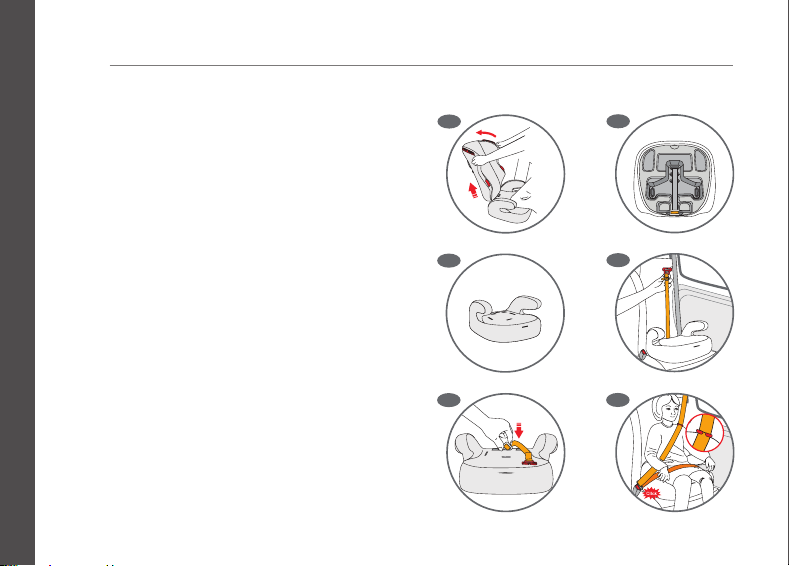
3.3 Installation in vehicle for
children up to 22 - 36kg
• The back section of the seat is removed by pushing
the back of the seat away from the base of the seat
(3-M/3-N).
• Attach the diagonal belt clip, by threading the loose
strap through the slot at the side of the seat base
(3-O/3-P).
• Place the child car seat on the passenger seat with
a 3 point seat belt. Make sure it is facing towards the
front of the car (3-Q).
• Pull the lap and shoulder sections of the vehicle
seat belt across and secure it in the normal way.
The lap belt should be routed under both the arm
rest of the child seat, and the diagonal belt routed
over the armrest as shown.
• The red belt clip can be used to position the
diagonal belt securely on the child’s shoulder, away
from the neck. Pass the strap behind the child’s
back, so the clip rest on the child’s shoulder, then
feed the diagonal belt through the clip. Adjust the
strap length so the clip holds the belt securely on
the shoulder (3-R). WARNING: please ensure that
the red belt clip and webbing do not interfere with
the vehicle seat belt.
3-M
3-N
3-O
3-P
3-Q
3-R
Page 17

Care instructions
4.1 Cleaning
• The harness and plastic parts can be sponged
with a mild detergent and warm water.
• Ensure no soap gets into the buckle or adjusters.
• Do not use chemical cleaners or bleach on the
harness straps.
• Dry thoroughly before use.
4.2 Checklist
• However safe a child car seat is, however well built
it is, your child's safety depends on you. Read this
final checklist once you have fitted your child seat
in you car.
1. Check that you have adjusted the harness to
suit your child. A fitting for winter clothes will be
too loose for a child wearing summer clothes.
2. Check you have installed your child seat
properly using a 3 point lap and diagonal belt.
3. Check that your child seat is secure before
each journey.
• REMEMBER: mis-using your child seat will reduce
the protection and safety you offer your child.
• If you are unsure about the fit of your child seat
please contact the local distributors or contact the
manufacturer for advice.
17
Page 18

Notice
1. This is a Universal child restraint. It is approved
to Regulation No.44,04 series of amendments, for
general use in vehicles and it will t most, but not all,
car seats.
2. A correct t is likely if the vehicle manufacturer has
declared in the vehicle handbook that the vehicle is
capable of accepting a Universal child restraint for
this age group.
3. This child restraint has been classied as
Universal under more stringent conditions than
those which applied to earlier designs which do not
carry this notice.
4. If in doubt, consult either the child restraint
manufacturer or the retailer.
5. Only suitable if the approved vehicles are tted
with 3 point static or retractor safety belts, approved
to UN/ECE Regulation No.16 or other equivalent
standards.
6. Do not use rearward facing in seating positions
where there is an airbag installed.
Page 19

© Phil and Teds Most Excellent Buggy Company Ltd 2012.
We (Phil and Teds Most Excellent Buggy Company Ltd) own the intellectual property rights in our brands, designs and inventions featured in
this publication. These include, without limitation, the phil~teds, adapt~survive!, ~, INLINE trade marks and INLINE DOUBLE BUGGY shape.
We actively pursue people who infringe our intellectual property.
19
Page 20
AUS/NZL
phil&teds
102-112 Daniell Street
Newtown, Wellington 6021
New Zealand
+ 64 4 3800 833
USA/CAN
phil&teds USA Inc
221 Jefferson Street
Fort Collins, CO 80524
USA.
1 800 839 4985
GBR
phil&teds UK
71-73 Victoria St
Windsor, Berkshire
SL4 1EH, United Kingdom
+44 (0) 20-30519264
USA/CAN
EUR
phil&teds Spain
Calle Casas de Campos
N'15, 3' Planta
Malaga 29001, Spain
+34-91-290 14 82
CHN
phil&teds China
No.10 East Chuangyeyuan
Road, Yangzhou
China
0086-514-87634533
Designed in New Zealand. Made in China
Conçu en Nouvelle Zélande. Fabriqué en Chine
Produit conforme aux exigences de sécurité
8223-01
FRA
philandteds.com
 Loading...