

Page 1

SM6080/SM6081/SM7080/SM7081
USER MANUAL
BENUTZERHANDBUCH
MANUAL DEL USUARIO
MODE D’EMPLOI
MANUALE UTENTE
GEBRUIKSAANWIJZING
BENUTZERHANDBUCH
MANUAL DEL USUARIO
MODE D’EMPLOI
MANUALE UTENTE
MANUALE UTENTE
GEBRUIKSAANWIJZING
SAECO.COM/CARE
SM7786, SM7785, SM7686,
SM7685, SM7684, SM7683,
SM7682, SM7680
EN USER MANUAL
DE BENUTZERHANDBUCH
ES MANUAL DEL USUARIO
FR MODE D’EMPLOI
4219.450.1008.1 XELSIS BETTER WEU BKLT SMPL FC A5 FRONTCOVER.indd 1 12-06-19 14:09
IT MANUALE UTENTE
NL GEBRUIKSAANWIJZING
PT MANUAL DO UTILIZADOR
WW W.SAECO.COM/CARE
Page 2
Boekje_2xlinks_ICOON_A5pag.indd 1 04-04-17 15:00
Page 3

1
2
11
1
0
9
8
7
6
5
4
3
2
1
Drink s
Profiles
Clean
Setti ngs
A
A2 A3 A4
B
B1 B2 B3 B4 B5 B6 B7
A1
A5
A6
A7
A7
A8A9
A10
A11
A12
A13
A14
A15
A16
A17
A18A19A20
A28
A29
A30
A31
A21
A23 A25 A27A24 A26
A22
Page 4

5 sec.
1
30 sec.
2
3
AquaClean
Stand-by
time
Water
hardness
4
40 ml
Very
Strong
Strength
ESPRESSO
5
40 ml
Strength
ESPRESSO
Very
Strong
6
2
1
789
10
40 ml
Strength
ESPRESSO
Very
Strong
11
ESPRESSO MACCHIATO
Milk
Strength
40 ml 10 ml
Very
strong
12
13
NEW PROFILENEW PROFILE
14
MARJOLEIN
Add drink
Espresso
MA
15
1
2
1
2
1
1
10
9
8
7
6
5
4
3
2
1
16
171819
20
21
22
23
24
Page 5
25
262728
29
30
31
32
33
press to star t
15 min
DESCALING
34
Page 6

Page 7
English
Contents
Machine overview (Fig. A) ____________________________________________________________________________ 7
Control panel (Fig. B) _________________________________________________________________________________ 8
Introduction __________________________________________________________________________________________ 8
First installation_______________________________________________________________________________________ 8
AquaClean filter ______________________________________________________________________________________ 8
Measuring water hardness ___________________________________________________________________________ 9
Brewing drinks ________________________________________________________________________________________ 10
Personalizing drinks and creating profiles___________________________________________________________ 11
Adjusting machine settings __________________________________________________________________________ 11
Handling the brew group_____________________________________________________________________________ 12
Cleaning and maintenance __________________________________________________________________________ 12
Descaling procedure _________________________________________________________________________________ 15
Warning icons and error codes ______________________________________________________________________ 16
Ordering accessories _________________________________________________________________________________ 17
Troubleshooting ______________________________________________________________________________________ 17
Technical specifications______________________________________________________________________________ 21
Machine overview (Fig. A)
A1 Control panel and touchscreen A12 Drip tray release grip
7
English
A2 Cup holder A13 Mains cord with plug
A3 Lid of bean hopper A14 Grind setting knob
A4 Lid of pre-ground coffee compartment A15 Bean hopper
A5 Internal cappuccinatore A16 Brew group
A6 Adjustable coffee and milk dispensing
spout
A7 Milk tube holder A18 Coffee residues drawer
A8 Main switch A19 Coffee grounds container
A9 Socket for cord A20 Drip tray
A10 Service door A21 Drip tray cover
A11 'Drip tray full' indicator A22 Water tank
A17 Coffee funnel
Accessories
A23 Grease tube A26 Measuring scoop
A24 Cleaning brush A27 Water hardness test strip
A25 AquaClean filter
English
Page 8

8
English
Milk frothing parts
A28 Milk container A30 Metal milk tube
A29 Flexible milk tube A31 Lid of milk container
Control panel (Fig. B)
Refer to figure B for an overview of all buttons and icons of the control panel and touchscreen of the
machine.
Below you find the description. You can swipe the touchscreen and tap to select or confirm your
choices.
B1. On/off button B4. Touchscreen B7. Start/stop button
B2. Personal profiles B5. Cleaning menu
B3. Drinks menu B6. Machine settings
Introduction
Congratulations on your purchase of a Saeco full-automatic coffee machine! To fully benefit from the
support that Saeco offers, please register your product at www.saeco.com/care.
Read the separate safety booklet carefully before you use the machine for the first time and save it for
future reference.
To help you get the best out of your coffee machine, Saeco offers full support in 3 different ways:
1 The separate quick start guide for first installation and first use.
2 This user manual for more detailed information.
3 Online support and movies: scan the QR code on the front page or visit www.saeco.com/care
Note: This machine has been tested with coffee. Although it has been carefully cleaned, there may be
some coffee residues left. We guarantee, however, that the machine is absolutely new.
First installation
To prepare your coffee machine for use, you need to perform a few simple steps such as filling the
water circuit and activating the AquaClean filter. These steps are shown in the separate quick start
guide.
For the best-tasting coffee, you need to brew 5 coffees initially to allow the machine to complete its
self-adjustment.
The machine has been set up to get the best taste out of your coffee beans. Therefore we advise you
not to adjust the grinder settings until you have brewed 100-150 cups (approx. 1 month of usage).
Thoroughly clean the milk container, the milk tubes and the cappuccinatore before first use. We
advise you not to clean the cappuccinatore in the dishwasher, to prevent food particles or detergent
residues from clogging it.
AquaClean filter
The AquaClean filter is designed to reduce limescale deposits in your coffee machine and provide
filtered water to preserve the aroma and flavor of each cup of coffee. If you use a series of 8
Page 9
English
AquaClean filters as indicated by the machine and in this user manual, you don't have to descale your
machine for up to 5000 cups. With each filter you can enjoy up to 625 cups, depending on the
selected coffee varieties and the rinsing and cleaning frequencies.
9
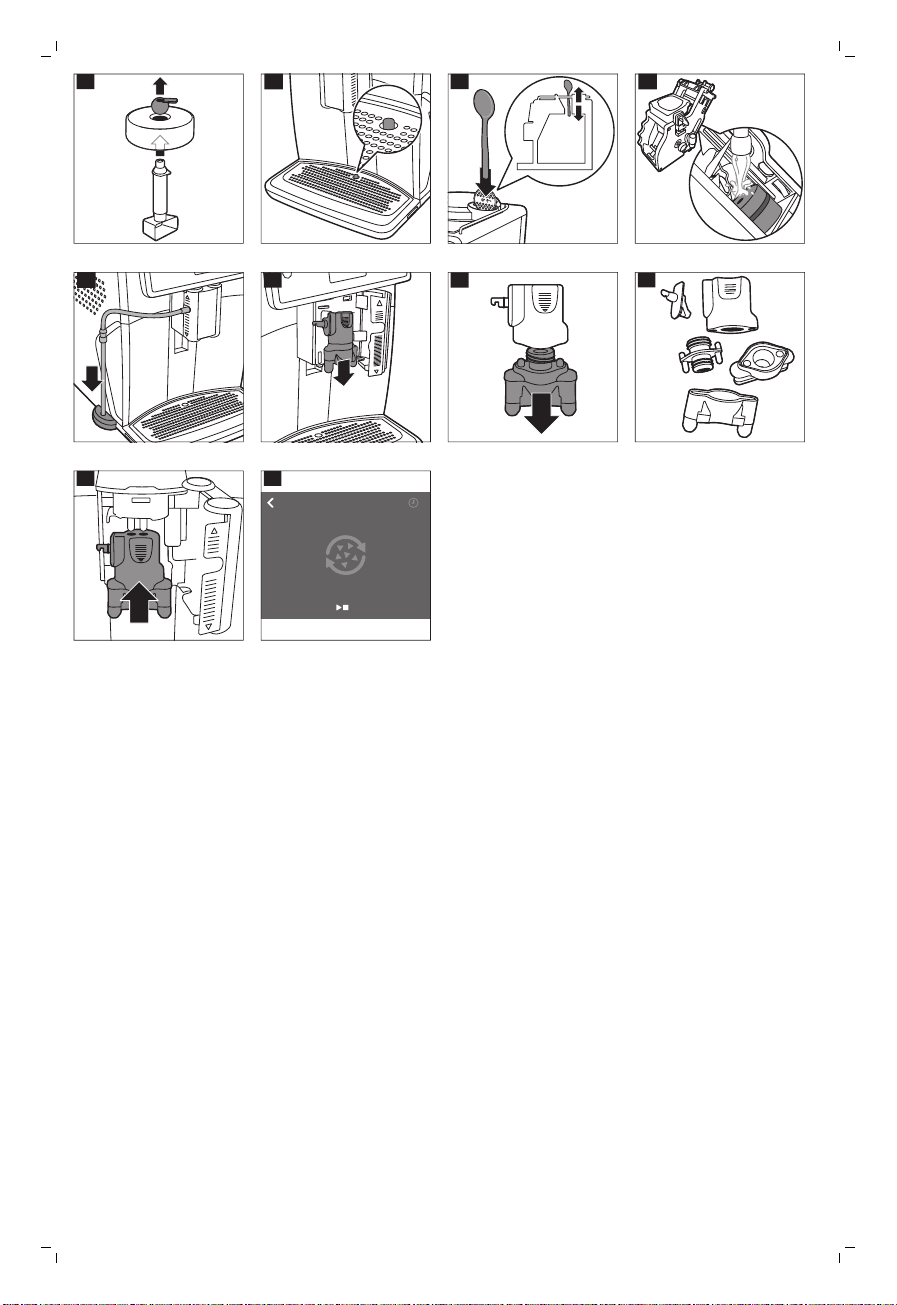
Preparing the AquaClean filter for activation
Before you place the AquaClean filter in the water tank, you need to prepare it for use:
1 Shake the filter for about 5 seconds (Fig. 1).
2 Fully immerse the filter upside down in a jug with cold water for at least 30 seconds. Wait until no
more air bubbles come out (Fig. 2).
3 Push the filter onto the filter connection to the lowest possible point. (Fig. 3)
Activating the AquaClean filter
You need to activate every new AquaClean filter that you use. By activating the AquaClean filter, the
machine monitors the capacity of the AquaClean filter and the number of filters used. There are 3
ways to activate the AquaClean filter.
1. Activating the AquaClean filter during first installation
After switching on for the first time, the machine guides you through the first installation steps such as
filling the water tank, filling the water circuit and activating the AquaClean filter. Simply follow the
instructions on the screen.
2. Activating the AquaClean filter when prompted
Replace the AquaClean filter when the screen shows the message 'Replace AquaClean filter?'. Then
follow the instructions on the screen to activate the filter properly.
Replace the AquaClean filter at least every 3 months, even if the machine has not yet indicated that
replacement is required.
3. Activating the AquaClean filter at any other time
You can start using the AquaClean filter at any time by following the instructions below.
1 Tap the Settings
2 Select 'new' and when the activation screen appears, press the start/stop button.
3 Follow the instructions on the screen.
icon and then select 'AquaClean' (Fig. 4).
English
Note: In some situations the machine will tell you that you need to descale the machine before you
can install and activate a new AquaClean filter. This is because your machine has to be completely
limescale-free before you start to use the AquaClean filter. Follow the instructions on the screen.
Measuring water hardness
During first installation, you have to set the water hardness. Follow the steps on the screen and use
the water hardness test strip supplied. To set the water hardness later, tap the Settings icon and
select 'water hardness'.
1 Immerse the water hardness test strip in tap water for 1 second. Then wait for 1 minute.
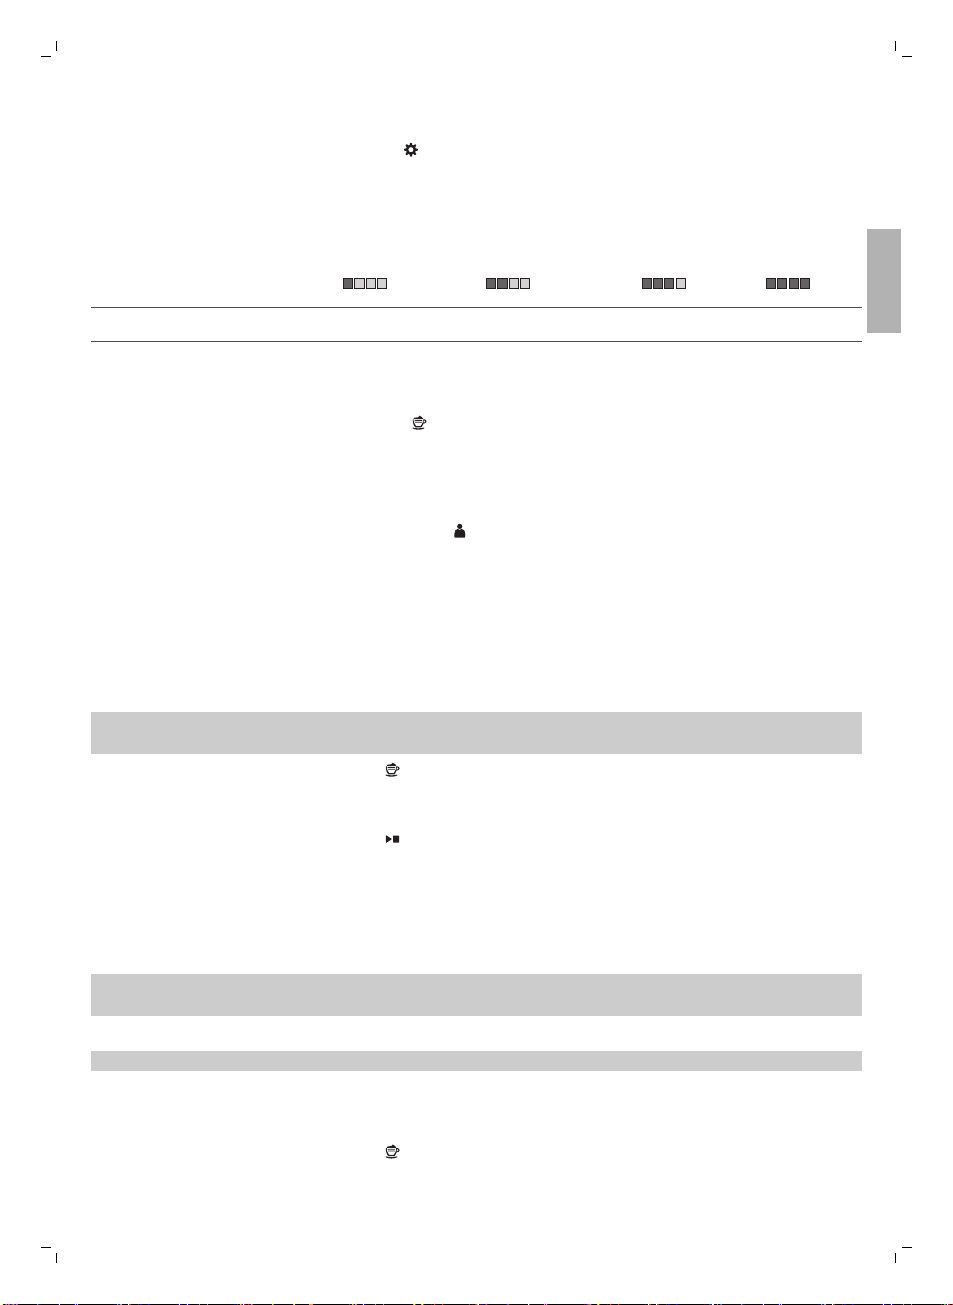
2 Check how many squares have turned red.
3 Select the appropriate water hardness setting and tap the OK icon to confirm.
Number of red squares:
Value to be set 1 2 3 4
Page 10

10
English
Brewing drinks
Tap the Drinks
After selecting a drink you can personalize it by adjusting the settings (see 'Personalizing your drinks').
-
Tap the '2x' icon if you want to brew two cups. The machine automatically carries out two grinding
cycles in sequence of the selected drinks (Fig. 5).
-
Tap the Profiles
-
Slide the dispensing spout up or down to adjust the height to the size of the cup or glass you are
using.
Brewing coffee drinks
1 Fill the water tank with tap water and fill the bean hopper with beans.
Tip: Slide the dispensing spout to the uppermost position for easy access to the water tank.
2 Tap the Drinks icon and select your coffee.
3 You can adjust the settings to your preference by swiping the adjustable bars up and down (Fig. 6).
4 Press the start/stop
Brewing milk-based drinks
1 Fill the water tank with tap water and fill the bean hopper with beans.
Tip: Slide the dispensing spout to the uppermost position for easy access to the water tank.
2 Unscrew the lid of the milk container and fill the milk container with milk (Fig. 7).
Always use milk coming directly from the fridge for optimal results.
3 Place the metal milk tube in the container. Open the door of the internal cappuccinatore (Fig. 8)
and connect the flexible milk tube to the cappuccinatore (Fig. 9). Then close the door of the
internal cappuccinatore again.
4 Tap the Drinks icon and select your coffee.
5 You can adjust the settings to your preference by swiping the adjustable bars up and down (Fig. 6).
6 Press the start/stop button at any time to start brewing the selected drink.
7 Directly after dispensing the milk,the 'Auto Steam Shoot' is performed. The machine forces steam
through the internal milk system to rinse it quickly.
Tip: You can also use a regular milk carton to brew your milk-based drinks. Place the metal milk tube
in directly into the milk carton.
icon to enter the 'Drinks' menu. Scroll through the different pages to find your drink.
icon to brew one of your saved drinks.
button to start brewing the selected drink.
Brewing coffee with pre-ground coffee
1 Open the lid of the pre-ground coffee compartment and pour one measuring scoop of pre-ground
coffee into it (Fig. 10). Then close the lid.
2 After selecting a drink, tap the pre-ground coffee icon (Fig. 11) and then press the start/stop
button.
Note: If you select pre-ground coffee, you cannot adjust the coffee strength and brew more than one
drink at the same time.
Dispensing hot water
1 Tap the Drinks
2 Press the start/stop button to start dispensing hot water.
icon and then select 'Hot water'.
Page 11

English
Personalizing drinks and creating profiles
This machine allows you to adjust the settings of a drink to your own preference and to save the
adjusted drink in a personal profile. There are two ways to create a profile:
1 In the 'Drinks' menu: Select and adjust a drink and then tap the 'save' icon.
2 In the 'Profiles' menu: Create a profile by tapping the 'add profile' icon. Select the newly created
profile, select a drink, adjust it to your preference and then tap the 'save' icon.
Personalizing your drinks
You can adjust the settings to your own preference:
1 Tap the Drinks
2 Select your preferred drink.
3 The screen shows the settings you can adjust to your preference. Tap on the arrow to go to the
next screen for more settings to adjust. Depending on the type of drink, you can adjust strength,
volume of coffee, milk and foam, temperature, the taste and the order of brewing milk-based
drinks.
4 Swipe the bars you want to adjust up or down to your preferred level (Fig. 6).
5 You can save these settings to your profile by tapping the 'saving' icon and following the
instructions on the screen (Fig. 12).
Creating a profile
1 Tap the Profiles
2 Select 'Add profile' (Fig. 13).
3 Enter a name for the new profile and confirm (Fig. 14).
4 Select the newly created profile.
5 Add drinks to the profile by selecting 'Add drink' (Fig. 15).
icon.
icon.
11
English
Adjusting machine settings
You can adjust the grinder settings by using the grind setting knob inside the bean container. There
are 12 different grind settings you can choose from. The lower the setting, the stronger the coffee.
Note: You need to brew 2 to 3 drinks before you can taste the full difference.
Caution: Do not turn the grind setting knob more than one notch at a time to prevent damage to the
grinder.
1 Open the lid of the bean hopper.
2 Press down the grind setting knob and turn it to the left or right (Fig. 16). Turn the grind setting knob
one notch at at time. Each time you have turned the grind setting one notch, brew a coffee drink to
prevent damage to the grinder.
3 Close the lid of the bean hopper.
Adjusting default settings
Use the SETTINGS icon to change the following settings:
-
AquaClean: To check the status of AquaClean and install a new one.
-
Water hardness: to be able to adjust the machine settings to the water in your region, please
measure the water hardness.
-
Stand-by time: this is the time after which the machine goes into stand-by mode.
Page 12

12
English
-
Brightness: to adjust the display contrast
-
Water tank light: to adjust the light in the water tank
-
Language: to select a different language
-
Sound feedback: to activate/deactivate the sound feedback of the display
-
Spout light: to adjust the light in the coffee and milk dispensing spout (specific types only)
-
Factory settings: to reset to the factory settings
Handling the brew group
Go to www.saeco.com/care for detailed video instructions on how to remove, insert and clean the
brew group.
Removing the brew group from the machine
1 Switch off the machine by pressing the main switch on the back of the machine.
2 Open the service door (Fig. 17).
3 Remove the coffee residues drawer (Fig. 18).
4 Press the PUSH button (Fig. 19) and pull at the grip of the brew group to remove it from the
machine (Fig. 20).
Reinserting the brew group
Before you slide the brew group back into the machine, make sure it is in the correct position.
1 Check if the arrow on the yellow cylinder on the side of the brew group is aligned with the black
arrow and N (Fig. 21).
-
If they are not aligned, push down the lever until it is in contact with the base of the brew group
(Fig. 22).
2 Make sure that the yellow locking hook on the other side of the brew group is in the correct
position.
-
To position the hook correctly, push it upwards until it is in uppermost position (Fig. 23).
3 Slide the brew group back into the machine along the guiding rails on the sides until it locks into
position with a click. Do not press the PUSH button.
4 Place back the coffee residues drawer and close the service door.
Cleaning and maintenance
Regular cleaning and maintenance keeps your machine in top condition and ensures good-tasting
coffee for a long time, a steady coffee flow and a perfect milk froth.
Consult the table on when and how to clean all detachable parts of the machine. You can find more
detailed information and video instructions on www.saeco.com/care.
Cleaning table
Part description
Brew group Weekly Remove the brew group and rinse it under the
When to clean How to clean
tap and let it air-dry.
Page 13
Part description When to clean How to clean
Monthly Perform the 'Brew group clean' procedure with
the Philips coffee oil remover tablet. Select 'Brew
group clean' in the cleaning menu and follow the
instructions on the screen. Go to
www.saeco.com/care for detailed video
instructions.
English
13
English
Lubrication of the
brew group
Milk
system/internal
cappuccinatore
Milk container Weekly Disassemble the milk container (Fig. 24) and push
Drip tray Empty the drip tray every
Depending on the type of
usage. Consult the
lubrication table (see
'Lubricating the brew group').
After every day of use Perform the HYGIESTEAM program in the
Weekly Remove and disassemble the internal
Monthly Perform the 'DEEP MILK CLEAN' procedure with
day or as soon as the red
'drip tray full' indicator pops
up through the drip tray (Fig.
26).
Lubricate the brew group with the Philips grease.
Go to www.saeco.com/care for detailed video
instructions.
cleaning menu. Select HYGIESTEAM in the
cleaning menu and follow the instructions on the
screen. Wipe the outside of the metal milk tube
with a damp cloth before placing it into the milk
tube holder.
cappuccinatore (see 'Cleaning the internal
cappuccinatore under the tap'). Rinse all parts
under the tap with some washing-up liquid.
the Philips milk circuit cleaner. Select 'DEEP MILK
CLEAN' in the cleaning menu and follow the
instructions on the screen. Go to
www.saeco.com/care for detailed video
instructions.
the ball out with the measuring scoop (Fig. 25).
Rinse all parts under the tap or in the dishwasher
Remove the drip tray and rinse it under the tap
with some washing-up liquid.
Coffee grounds
container
Water tank Weekly Rinse the water tank under the tap
Coffee funnel Check the coffee funnel
Empty the coffee grounds
container when prompted by
the machine. Clean it weekly.
weekly to see if it is clogged.
Remove the coffee grounds container while the
machine is switched on and rinse it under the tap
with some washing-up liquid.
Unplug the machine and remove the brew group.
Open the lid of the pre-ground coffee
compartment and insert the spoon handle into
the coffee funnel. Move the handle up and down
until the clogged ground coffee falls down (Fig.
27). Go to www.saeco.com.care for detailed
video instructions.
Page 14
14
English
Tip: There is a cleaning calender on the last page of this user manual. Write down the dates on which
you have performed a cleaning action.
Cleaning the brew group
Regular cleaning of the brew group prevents coffee residues from clogging up the internal circuits.
Visit www.saeco.com/care for support videos on how to remove, insert and clean the brew group.
Cleaning the brew group under the tap
1 Open the service door and remove the brew group (see 'Removing the brew group from the
machine').
2 Rinse the brew group thoroughly with water. Carefully clean the upper filter (Fig. 28).
3 Let the brew group air-dry before you place it back. Do not dry the brew group with a cloth to
prevent fibers from collecting inside the brew group.
Cleaning the brew group with the coffee oil remover tablets
Only use Philips coffee oil remover tablets. Tap the Clean
follow the instructions on the screen. Visit www.saeco.com/care for detailed video instructions.
icon and select 'Brew group clean'. Then
Lubricating the brew group
Lubricate the brew group regularly to ensure that the moving parts continue to move smoothly.
1 Apply a thin layer of grease around the shaft in the bottom of the brew group.
2 Apply a thin layer of grease to the rails on both sides.
See the table below for the lubrication frequency. Visit www.saeco.com/care for detailed video
instructions.
Usage frequency
Low 1-5 Every 4 months
Nr of drinks brewed daily Lubrication frequency
Normal 6-10 Every 2 months
Heavy >10 Every month
Cleaning programs for the internal cappuccinatore
The machines has three programs to clean the internal cappuccinatore. The Auto Steam Shoot
cleaning program is automatically performed by the machine after brewing a milk-based drink. You
can select the HYGIESTEAM or DEEP MILK CLEAN program by tapping the Clean icon and scrolling
through the cleaning menu. Then follow the instructions on the screen.
-
Auto Steam Shoot: the machine shoots steam through the internal cappuccinatore to quickly rinse
it.
-
HYGIESTEAM: the machine thoroughly cleans the internal milk system with steam. Place the milk
tube in the milk tube holder (Fig. 29) and follow the instructions on the screen.
-
DEEP MILK CLEAN: Perform the 'DEEP MILK CLEAN' procedure with the Philips milk circuit cleaner
for a thorough cleaning of the internal milk system.
Cleaning the internal cappuccinatore under the tap
1 Open the door of the internal cappuccinatore (Fig. 8).
2 Remove the internal cappuccinatore by pulling it down (Fig. 30).
3 Disassemble the internal cappuccinatore by pulling the bottom part off the top part (Fig. 31).
Page 15

English
4 Disassemble all parts (Fig. 32) and clean them under the tap.
5 Reassemble the internal cappuccinatore.
6 To place back the internal cappuccinatore, put it in upright position and make sure the holes are
aligned with the two tubes on the machine. Then move the internal cappuccinatore upwards until it
locks into place (Fig. 33).
7 Close the door.
Visit www.saeco.com/care for detailed video instructions.
Descaling procedure
Please use Philips descaler only. Under no circumstances should you use a descaler based on sulfuric
acid, hydrochloric acid, sulfamic or acetic acid (vinegar) as this may damage the water circuit in your
machine and not dissolve the limescale properly. Not using the Philips descaler will void your
warranty. Failure to descale the appliance will also void your warranty. You can buy Philips descaling
solution in the online shop at www.saeco.com/care.
1 When the machine asks you to descale it, press the start/stop
without being prompted by the machine, tap the Clean icon and select 'Descale' (Fig. 34).
2 Remove the drip tray and the coffee grounds container, empty them and put them back into place.
3 Remove the water tank and empty it. Then remove the AquaClean filter.
4 Pour the whole bottle of Philips descaler in the water tank and then fill it with water up to the CALC
CLEAN level. Then place it back into the machine.
5 Place a large container (1.5 l) under the coffee dispensing spout.
6 Follow the instructions on the screen to start the descaling procedure. The descaling procedure
lasts approx. 15 minutes and consists of a descaling cycle and a rinsing cycle.
7 Once the descaling cycle is finished, you need to rinse the water tank and water circuit. Follow the
instructions on the screen.
8 Place a new AquaClean filter in the water tank and reactivate the AquaClean filter in the menu.
Tip: Using the AquaClean filter reduces the need for descaling!
button to start. To start descaling
15
English
What to do if the descaling procedure is interrupted
You can exit the descaling procedure by pressing the on/off button on the control panel. If the
descaling procedure is interrupted before it is completely finished, do the following:
1 Empty and rinse the water tank thoroughly.
2 Fill the water tank with fresh water up to the CALC CLEAN level indication and switch the machine
back on. The machine will heat up and perform an automatic rinsing cycle.
3 Before brewing any drinks, perform a manual rinsing cycle. To perform a manual rinsing cycle, first
dispense half a water tank of hot water and then brew 2 cups of pre-ground coffee without adding
ground coffee.
Note: If the descaling procedure was not completed, the machine will require another descaling
procedure as soon as possible.
Page 16
16
English
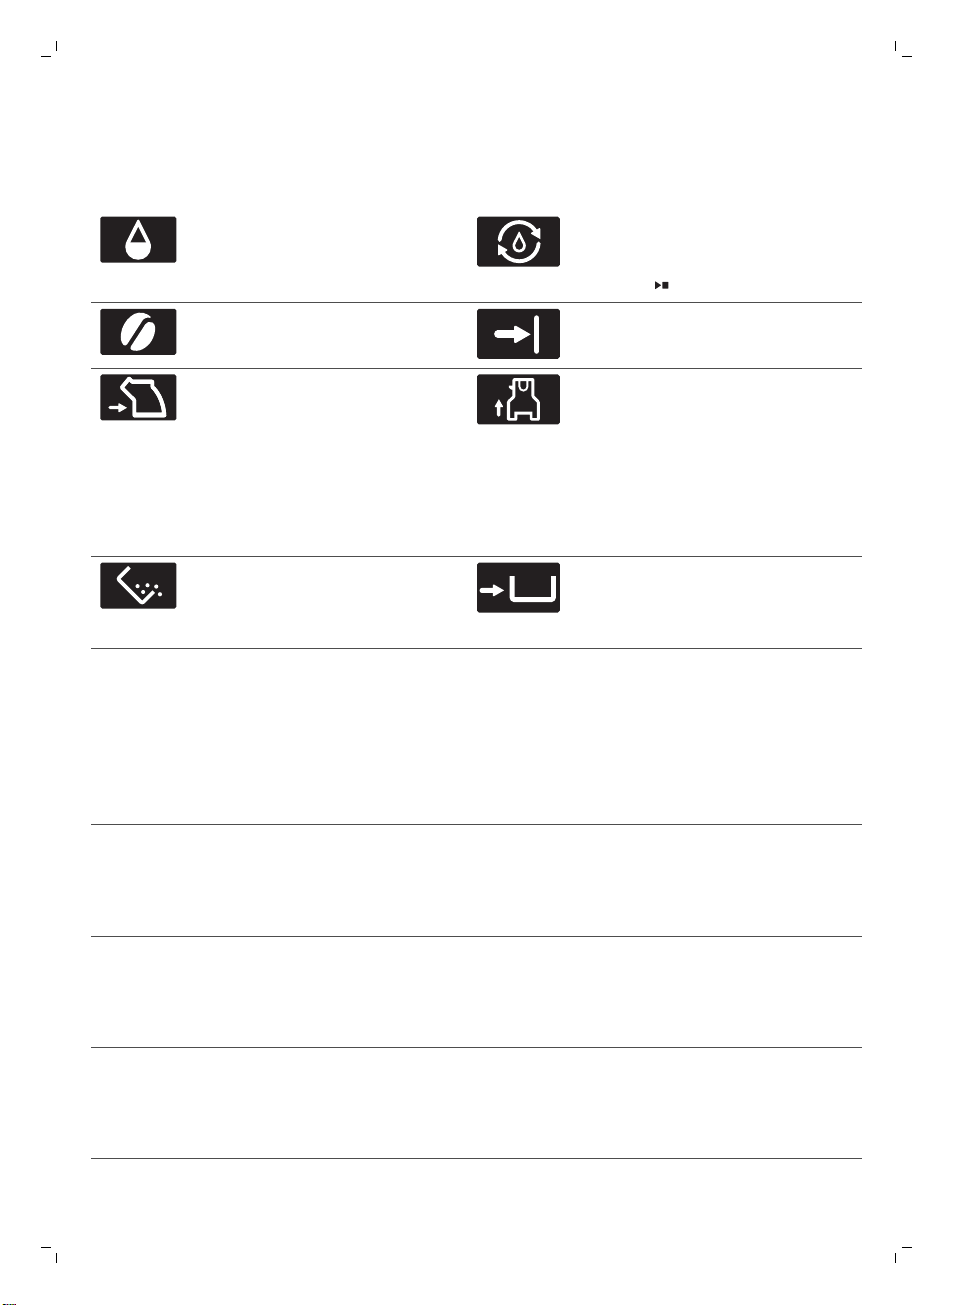
Warning icons and error codes
Meaning of the warning icons
Fill the water tank with fresh water
to the MAX level indication.
The machine needs to fill the water
circuit with water. Make sure there is
water in the water tank and press the
start/stop button to start.
The bean hopper is empty. Put new
coffee beans in the bean hopper.
The brew group is not inserted or is
not inserted correctly. Insert the
brew group and make sure that it
locks into place.
The coffee grounds container is full.
Make sure that the machine is
switched on. Then remove and
empty the coffee ground container.
Close the service door.
The internal cappuccinatore is not
inserted or is not inserted correctly
and/or the spout door is open. Make
sure that the holes in the
cappuccinatore are aligned with the
tubes in the machine before you
push the internal cappuccinatore
upwards into place. Then close the
spout door.
The coffee grounds container is not
in place. Place back the coffee
grounds container.
Meaning of error codes
Below you find a list of the error codes showing problems that you can solve yourself. Video
instructions are available on www.saeco.com/care. If another error code appears, please contact the
Philips Consumer Care Center in your country. For contact details, see the warranty leaflet.
Error
code
01 The coffee funnel is
Problem Possible solution
clogged.
Switch off the machine and unplug it. Remove the brew group.
Then open the lid of the pre-ground coffee compartment and
insert the spoon handle. Move the handle up and down until
the clogged ground coffee falls down (Fig. 27). Visit
www.saeco.com/care for detailed video instructions.
03 The brew group is dirty
or not well-greased.
04 The brew group is not
positioned correctly.
Switch off the machine with the main switch. Rinse the brew
group with fresh water, let it air-dry and then lubricate it.
Consult chapter 'Cleaning the brew group' or visit
www.saeco.com/care for detailed video instructions. Then
switch the machine on again.
Switch off the machine with the main switch. Remove the brew
group and reinsert it. Make sure that the brew group is in the
correct position before you insert it. Consult chapter 'Handling
the brew group or visit www.saeco.com/care for detailed
video instructions. Then switch the machine on again.
Page 17

English
17
Error
Problem Possible solution
code
05 There is air in the water
circuit.
The AquaClean filter
was not prepared
properly before
installation or it is
clogged.
14 The machine is
overheated.
Restart the machine by switching it off and on again with the
main switch. If this works, dispense 2-3 cups of hot water.
Descale the machine if you have not done so for a longer
period of time.
Remove the AquaClean filter and try again to brew a coffee. If
this works, make sure that the AquaClean filter is prepared
properly before you place it back (see 'Preparing the
AquaClean filter for activation'). Put the AquaClean filter back
into the water tank. If this still does not work, the filter might be
clogged and needs to be replaced.
Switch the machine off and switch it back on again after 30
minutes.
Ordering accessories
To clean and descale the machine, only use the Philips maintenance products. These products can be
purchased from your local retailer, from the authorized service centers or online at
www.saeco.com/care. To find a full list of spare parts online, enter the model number of your
machine. You can find the model number on the inside of the service door.
Maintenance products and type numbers:
-
Descaling solution CA6700
-
AquaClean filter CA6903
-
Brew group grease HD5061
-
Coffee oil remover tablets CA6704
-
Milk circuit cleaner CA6705
-
Maintenance kit CA6707
English
Troubleshooting
This chapter summarizes the most common problems you could encounter with the machine. Support
videos and a complete list of frequently asked questions are available on www.saeco.com/care. If you
are unable to solve the problem, contact the Consumer Care Center in your country. For contact
details, see the warranty leaflet.
Problem
The drip tray fills up
quickly.
The machine is in DEMO
mode.
Cause Solution
This is normal. The machine
uses water to rinse the internal
circuit and brew group. Some
water flows through the internal
system directly into the drip
tray.
You pressed the standby
button for more than 8
seconds.
Empty the drip tray every day or as
soon as the red 'drip tray full' indicator
pops up through the drip tray (Fig. 26).
Place a cup under the dispensing spout
to collect rinsing water.
Switch the machine off and then on
again with the main switch on the back
of the machine.
Page 18

18
English
Problem Cause Solution
The 'coffee grounds
container full' icon
remains displayed.
You emptied the coffee
grounds container while the
machine was switched off.
Always empty the coffee grounds
container while the machine is switched
on. If you empty the coffee grounds
container when the machine is switched
off, the coffee cycle counter is not reset.
You placed back the coffee
grounds container too fast.
The 'coffee grounds
container full' icon is
displayed even though
the container is not full.
I cannot remove the
brew group.
You have not removed the
I cannot insert the brew
group.
The machine did not reset the
counter the last time you
emptied the coffee grounds
container.
The brew group is not in the
correct position.
coffee grounds container.
The brew group is not in the
correct position.
Do not place back the coffee grounds
container until the screen prompts you
to put it back.
Always wait approx. 5 seconds when
you place back the coffee grounds
container.In this way the coffee
grounds counter will be reset to zero.
Always empty the coffee grounds
container while the machine is switched
on. If you empty the coffee grounds
container when the machine is switched
off, the coffee grounds counter will not
be reset.
Reset the machine in the following way:
place back the drip tray and the coffee
grounds container. Then close the
service door and switch the machine off
and back on again. Try again to remove
the brew group.
Remove the coffee grounds container
before you remove the brew group.
Reset the machine in the following way:
place back the drip tray and the coffee
grounds container. Leave the brew
group out. Close the service door and
switch the machine on and off. Then put
the brew group in the correct position
and reinsert it into in the machine (see
'Reinserting the brew group').
The coffee is watery. The brew group is dirty or
needs to be lubricated.
The grinder is set to a too
coarse setting.
The coffee settings have been
adjusted.
The machine is performing its
self-adjustment procedure
after a change in grinder
settings or bean types.
Clean and lubricate the brew group.
Set the grinder to a finer (lower) setting.
Select your coffee drink and adjust the
settings to a stronger coffee.
Brew a few cups of coffee.
Page 19
Problem Cause Solution
The coffee is not hot
enough.
The temperature is set too low.
The cups you use are cold. Preheat the cups by rinsing them with
Check the menu settings.
hot water.
Set the temperature to 'high' in the
menu.
English
19
English
You added milk. Whether the milk you add is warm or
Coffee does not come
out or coffee comes out
slowly.
The brew group is dirty. Clean the brew group.
The coffee dispensing spout is
The milk does not froth. The internal cappuccinatore is
The type of milk used is not
The AquaClean filter was not
prepared properly for
installation or it is clogged.
The grinder is set to a too fine
setting.
dirty.
The machine circuit is blocked
by limescale.
dirty or not inserted correctly.
suitable for frothing.
cold, it always decreases the
temperature of the coffee to some
extent.
Remove the AquaClean filter and try to
brew a coffee again. If this works, make
sure the AquaClean filter is prepared
properly before you place it back. Place
back the prepared filter. If this still does
not work, the filter might be clogged
and needs to be replaced.
Set the grinder to a coarser (higher)
setting.
Clean the coffee dispensing spout and
its holes with a needle.
Descale the machine.
Clean the internal cappuccinatore and
make sure that you position and insert it
correctly (see 'Cleaning the internal
cappuccinatore under the tap').
Different types of milk result in different
amounts of froth and different froth
qualities. We have tested the following
milk types which proved to deliver a
good milk froth result: semi-skimmed or
full-fat cow's milk, soy milk and lactosefree milk.
The milk is splashing. The milk you use is not cold
enough.
The flexible milk tube is not
connected properly.
Make sure you use cold milk coming
directly from the fridge.
Open the door of the coffee dispensing
spout (Fig. 8) and check if the flexible
milk tube is fully connected to the
cappuccinatore (Fig. 9). Note that the
cappuccinatore and milk tubes may be
hot. Let the cappuccinatore and the
tubes cool down before you touch
them.
Page 20
20
English
Problem Cause Solution
The cappuccinatore and milk
tubes are not clean.
Remove and disassemble the internal
cappuccinatore (see 'Cleaning the
internal cappuccinatore under the tap').
Rinse all parts under the tap. For a
thorough cleaning, use the Philips milk
circuit cleaner and perform the DEEP
MILK CLEAN procedure via the cleaning
( ) menu. Note that if the parts have
been cleaned in the dishwasher, they
may have become clogged by food
particles or detergent residues. A visual
check that they are not obstructed is
also recommended.
We advise you to perform the
HygieSteam program every day: 1) Press
'Clean' on the control panel. 2) Select
'HygieSteam'. 3) Press the start button
to start the process, then confirm all
steps on the display.
The milk tubes are clogged. Always store the milk container without
The machine seems to
be leaking.
The machine is not placed on a
I cannot activate the
AquaClean filter and the
machine asks for
descaling.
The machine uses water to
rinse the internal circuit and
brew group. Some water flows
through the internal system
directly into the drip tray.
The drip tray is too full and has
overflowed which makes it look
like the machine is leaking.
horizontal surface.
The filter has not been replaced
in time after the AquaClean
filter icon flashed and the
capacity dropped to 0%.
the milk tubes in the refrigerator.
Leftover milk could accumulate within
the milk tubes and block the flow of
milk going through the tubes. Rinse the
milk tubes before storage.
Empty the drip tray every day or as
soon as the 'drip tray full' indicator pops
up through the drip tray cover (Fig. 26).
Place a cup under the dispensing spout
to collect rinsing water.
Empty the drip tray every day or as
soon as the 'drip tray full' indicator pops
up through the drip tray cover (Fig. 26).
Place a cup under the dispensing spout
to collect rinsing water.
Place the machine on a horizontal
surface so that the 'drip tray full'
indicator works properly.
Descale your machine first and then
install the AquaClean filter.
Page 21

Problem Cause Solution
You did not install the
AquaClean filter during first
installation, but after having
brewed approx. 25 coffees
(based on 100ml/3oz cups). The
machine has to be completely
limescale-free before you
install the AquaClean filter.
First descale the machine and then
install a new AquaClean filter. After
descaling, the filter counter is reset to
0/8. Always confirm filter activation in
the machine menu. Also do this after
filter replacement.
English
21
English
The new water filter does
not fit.
The machine is making a
noise.
You are trying to install another
filter than the AquaClean filter.
It is normal that your machine
makes noise during use.
The AquaClean filter was not
prepared properly and air is
now drawn into the machine.
Only the AquaClean filter fits into the
machine.
If the machine starts to make a different
kind of noise, clean the brew group and
lubricate it (see 'Lubricating the brew
group').
Remove the AquaClean filter from the
water tank. Shake the filter for about 5
seconds. Immerse the filter upside
down in a jug with cold water for at
least 30 seconds. Wait until no more air
bubbles come out. Place the prepared
AquaClean filter back into the water
tank. Then dispense 2-3 cups of hot
water.
Technical specifications
The manufacturer reserves the right to improve the technical specifications of the product. All the
preset quantities are approximate.
Description
Size (w x h x d) 283 x 393 x 489 mm
Weight 10.8 - 12.2 kg
Power cord length 1200 mm
Value
Water tank 1.7 litres, removable
Coffee bean hopper capacity 450 g
Coffee grounds container capacity 14 pucks
Milk carafe capacity 600 ml
Adjustable spout height 75-148 mm
Nominal voltage - Power rating - Power supply See data plate on inside of service door
Page 22
22
Deutsch
Inhalt
Geräteüberblick (Abb. A) _____________________________________________________________________________ 22
Bedienfeld (Abb. B)___________________________________________________________________________________ 23
Einführung ___________________________________________________________________________________________ 23
Inbetriebnahme ______________________________________________________________________________________ 23
AquaClean-Filter _____________________________________________________________________________________ 24
Messung der Wasserhärte ___________________________________________________________________________ 24
Brühen von Getränken _______________________________________________________________________________ 25
Getränke personalisieren und Profile anlegen ______________________________________________________ 26
Einstellungen der Kaffeemaschine anpassen _______________________________________________________ 27
Handhabung der Brühgruppe _______________________________________________________________________ 27
Reinigung und Wartung ______________________________________________________________________________ 28
Entkalkungsvorgang__________________________________________________________________________________ 31
Warnsymbole und Fehlercodes______________________________________________________________________ 32
Bestellen von Zubehör _______________________________________________________________________________ 33
Fehlerbehebung______________________________________________________________________________________ 34
Technische Daten ____________________________________________________________________________________ 38
Geräteüberblick (Abb. A)
A1 Bedienfeld und Touchscreen A12 Griff für die Entriegelung der Abtropfschale
A2 Tassenhalter A13 Netzkabel mit Stecker
A3 Deckel des Bohnenbehälters A14 Drehknopf für Mahlgrad
A4 Deckel des Behälters für
vorgemahlenen Kaffee
A5 Interner Cappuccinatore A16 Brühgruppe
A6 Einstellbarer, abnehmbarer Kaffee- und
Milchauslauftrichter
A7 Milchschlauchhalter A18 Kaffeeresteschublade
A8 Hauptschalter A19 Kaffeesatzbehälter
A9 Buchse für Kabel A20 Abtropfschale
A10 Serviceklappe A21 Abdeckung für Abtropfschale
A11 Anzeiger "Abtropfschale voll" A22 Wasserbehälter
A15 Bohnenbehälter
A17 Kaffeetrichter
Zubehör
A23 Schmierfetttube A26 Messlöffel
A24 Reinigungsbürste A27 Teststreifen zum Bestimmen der Wasserhärte
A25 AquaClean-Filter
Deutsch
Page 23

Deutsch
Teile des Milchaufschäumers
A28 Milchbehälter A30 Metallmilchschlauch
A29 Flexibler Milchschlauch A31 Milchbehälterdeckel
Bedienfeld (Abb. B)
Abbildung B gibt einen Überblick über alle Tasten und Symbole auf dem Bedienfeld und dem
Touchscreen der Maschine.
Nachstehend finden Sie die Beschreibung. Sie können über den Touchscreen wischen und die
gewünschten Optionen antippen, um sie auszuwählen oder zu bestätigen.
B1. Ein-/Ausschalter B4. Touchscreen B7. Start-/Stopp-Taste
B2. Persönliche Profile B5. Reinigungsmenü
B3. Getränke-Menü B6. Geräteeinstellungen
Einführung
Herzlichen Glückwunsch zum Kauf eines Saeco Kaffeevollautomaten! Um die Kundenunterstützung
von Saeco optimal zu nutzen, registrieren Sie Ihr Produkt unter www.saeco.com/care.
Lesen Sie die separate Sicherheitsbroschüre vor dem ersten Gebrauch des Gerät aufmerksam durch,
und bewahren Sie sie für eine spätere Verwendung auf.
Um Ihnen zu helfen, die Kaffeemaschine optimal zu nutzen, bietet Saeco einen 3-fachen Support an:
1 Die separate Schnellstart-Anleitung für die Inbetriebnahme und den ersten Gebrauch.
2 Diese Bedienungsanleitung für weitere Informationen.
3 Online-Support und Videos: Scannen Sie den QR-Code auf der Titelseite oder besuchen Sie
www.saeco.com/care
23
Deutsch
Hinweis: Die Maschine wurde mit Kaffee getestet. Zwar wurde die Maschine anschließend sorgfältig
gereinigt, aber es ist möglich, dass noch ein Rest Kaffee in der Maschine ist. Wir garantieren aber, dass
Ihre Maschine absolut neu ist.
Inbetriebnahme
Um Ihre Kaffeemaschine für den Einsatz vorzubereiten, führen Sie ein paar einfache Schritte aus, wie
das Auffüllen des Wasserkreislaufs und die Aktivierung des AquaClean-Filters. Diese Schritte können
Sie einer separaten Schnellstart-Anleitung entnehmen.
Für den besten Kaffeegeschmack sollten Sie zu Beginn 5 Tassen Kaffee zubereiten, damit das Gerät
die automatische Einstellung abschließen kann.
Das Gerät wurde so eingestellt, dass der bestmögliche Geschmack aus Ihren Kaffeebohnen geholt
wird. Daher empfehlen wir Ihnen, die Mahlwerkseinstellungen erst nach 100–150 zubereiteten Tassen
Kaffee zu verändern (ca. 1Monat Nutzung).
Reinigen Sie vor dem ersten Gebrauch den Milchbehälter, die Milchleitungen und den Cappuccinatore
gründlich. Wir empfehlen, den Cappuccinatore nicht in der Spülmaschine zu reinigen, um zu
verhindern, dass sich darin Speisereste oder Reinigungsmittel ansammeln.
Page 24

24
Deutsch
AquaClean-Filter
Der AquaClean-Filter reduziert Kalkablagerungen in Ihrer Kaffeemaschine und bereitet gefiltertes
Wasser, damit Aroma und Geschmack jeder Tasse Kaffee optimal sind. Wenn Sie einen Satz aus acht
AquaClean-Filtern, wie von der Maschine und in der Bedienungsanleitung vorgeschlagen, verwenden,
müssen Sie Ihr Gerät 5.000Tassen lang nicht entkalken. Mit jedem Filter können Sie bis zu 625 Tassen
genießen, je nach gewählter Kaffeevariante und der Spül- und Reinigungshäufigkeit.
Vorbereitung des AquaClean-Filters für die Aktivierung
Bevor Sie den AquaClean-Filter in den Wasserbehälter einsetzen, müssen Sie ihn für den Einsatz
vorbereiten:
1 Schütteln Sie den Filter ca. 5 Sekunden (Abb. 1) lang.
2 Tauchen Sie den Filter mit der Oberseite nach unten mindestens 30Sekunden vollständig in eine
Kanne mit kaltem Wasser. Warten Sie, bis keine Luftblasen mehr austreten (Abb. 2).
3 Schieben Sie den Filter bis ganz nach unten (Abb. 3) in den Filteranschluss.
Aktivierung des AquaClean-Filters
Sie müssen jeden neuen von Ihnen verwendeten AquaClean-Filter aktivieren. Durch die Aktivierung
des AquaClean-Filters kontrolliert die Maschine die Kapazität des AquaClean-Filters und die Anzahl
der benutzen Filter. Es gibt drei Möglichkeiten, wie Sie den AquaClean-Filter aktivieren können.
1. Aktivierung des AquaClean-Filters während der Inbetriebnahme
Nach dem ersten Einschalten führt Sie die Maschine durch die Inbetriebnahmeschritte, wie das
Auffüllen des Wasserbehälters, das Auffüllen des Wasserkreislaufs und die Aktivierung des
AquaClean-Filters. Folgen Sie einfach den Anweisungen auf dem Bildschirm.
2. Aktivierung des AquaClean-Filters bei Aufforderung
Tauschen Sie den AquaClean-Filter aus, wenn auf dem Bildschirm die Meldung "AquaClean-Filter
austauschen?" erscheint. Folgen Sie anschließend den Anweisungen auf dem Bildschirm, um den
Filter korrekt zu aktivieren.
Tauschen Sie den AquaClean-Filter mindestens alle 3 Monate aus, selbst wenn die Maschine noch
nicht anzeigt, dass ein Filteraustausch notwendig ist.
3. Aktivierung des AquaClean-Filters zu einem anderen Zeitpunkt
Sie können den AquaClean-Filter jederzeit verwenden. Befolgen Sie dazu die nachstehenden
Anweisungen.
1 Tippen Sie auf das Symbol "Settings" (Einstellungen)
2 Wählen Sie 'neu' und drücken Sie die Start-/Stopp-Taste , sobald der Bildschirm für die
Filteraktivierung erscheint.
3 Folgen Sie den Anweisungen auf dem Bildschirm.
Hinweis: In einigen Fällen zeigt die Maschine an, dass Sie das Gerät zunächst entkalken müssen, bevor
Sie den AquaClean-Filter installieren und aktivieren können. Das liegt daran, dass Ihre Maschine zum
Einbau des AquaClean-Filters vollkommen kalkfrei sein muss. Folgen Sie den Anweisungen auf dem
Bildschirm.
, und wählen Sie dann "AquaClean" (Abb. 4).
Messung der Wasserhärte
Während der Inbetriebnahme müssen Sie die Wasserhärte einstellen. Folgen Sie den Anweisungen
auf dem Bildschirm und benutzen Sie den mitgelieferten Teststreifen, um den Härtegrad des
Page 25
Deutsch
Leitungswassers zu prüfen. Um die Wasserhärte zu einem späteren Zeitpunkt einzustellen, tippen Sie
auf das Symbol "Settings" (Einstellungen) und wählen Sie "Wasserhärte".
1 Tauchen Sie den Wasserhärte-Teststreifen für 1Sekunde in Leitungswasser. Warten Sie dann eine
Minute.
2 Prüfen Sie, wie viele Quadrate auf dem Teststreifen sich rot verfärbt haben.
3 Wählen Sie die bevorzugte Wasserhärte-Einstellung aus und tippen Sie zur Bestätigung auf das
OK-Symbol.
Anzahl roter Vierecke:
Einstellwert 1 2 3 4
Brühen von Getränken
Tippen Sie das Symbol "Drinks" (Getränke) , um das Menü "Drinks" aufzurufen. Blättern Sie durch die
verschiedenen Seiten, um Ihr Getränk zu finden. Nach der Auswahl eines Getränks können Sie es
durch Anpassung der Einstellungen (siehe 'Ihre Getränke personalisieren') personalisieren.
-
Tippen Sie auf das Symbol "2x", wenn Sie zwei Tassen zubereiten möchten. Die Maschine führt
automatisch zwei Mahlvorgänge für die gewünschten Getränke (Abb. 5) hintereinander aus.
-
Tippen Sie auf das Symbol "Profiles" (Profile) , um eines der von Ihnen gespeicherten Getränke zu
brühen.
-
Schieben Sie den Auslauf nach oben oder unten, um die Höhe auf die Größe der von Ihnen
verwendeten Tasse oder des von Ihnen verwendeten Glases einzustellen.
Brühen von Kaffeegetränken
1 Füllen Sie den Wasserbehälter mit Leitungswasser und den Kaffeebohnenbehälter mit
Kaffeebohnen.
Tipp: Schieben Sie den Auslauf in die höchste Position, um den Zugang zum Wasserbehälter zu
vereinfachen.
2 Tippen Sie auf das Getränkesymbol , und wählen Sie die gewünschte Kaffeevariante.
3 Sie können die Einstellung nach Belieben verändern. Wischen Sie dazu die einstellbaren Balken
nach oben oder unten (Abb. 6).
4 Drücken Sie die Start-/Stopp-Taste , um den Brühvorgang für das ausgewählte Getränk zu
starten.
25
Deutsch
Brühen von Getränken mit Milch
1 Füllen Sie den Wasserbehälter mit Leitungswasser und den Kaffeebohnenbehälter mit
Kaffeebohnen.
Tipp: Schieben Sie den Auslauf in die höchste Position, um den Zugang zum Wasserbehälter zu
vereinfachen.
2 Lösen Sie den Deckel des Milchbehälters, und füllen Sie den Milchbehälter mit Milch (Abb. 7).
Für optimale Ergebnisse verwenden Sie immer die direkt aus dem Kühlschrank kommende Milch.
3 Setzen Sie die Metall-Milchleitung in den Behälter ein. Öffnen Sie die Klappe des internen
Cappuccinatore (Abb. 8), und verbinden Sie den flexiblen Milchschlauch mit dem Cappuccinatore
(Abb. 9). Schließen Sie dann die Klappe des inneren Cappuccinatore wieder.
4 Tippen Sie auf das Getränkesymbol
5 Sie können die Einstellung nach Belieben verändern. Wischen Sie dazu die einstellbaren Balken
nach oben oder unten (Abb. 6).
, und wählen Sie die gewünschte Kaffeevariante.
Page 26

26
Deutsch
6 Sie können jederzeit die Start-/Stopp-Taste drücken, um die Zubereitung des ausgewählten
Getränks zu starten.
7 Direkt nach der Ausgabe eines Getränkes mit Milch wird "Auto Steam Shoot" ausgeführt. Die
Maschine presst Dampf durch das interne Milchsystem, um dieses schnell zu spülen.
Tipp: Sie können auch eine normale Milchtüte verwenden, um das gewünschte Getränk mit Milch zu
brühen. Setzen Sie die metallene Milchleitung direkt in die Milchtüte ein.
Brühen von Kaffee aus vorgemahlenem Kaffee
1 Öffnen Sie den Deckel Kaffeepulverfachs, und schütten Sie einen Messlöffel Kaffeepulver hinein
(Abb. 10). Schließen Sie dann den Deckel.
2 Nach der Auswahl eines Getränks tippen Sie auf das Symbol (Abb. 11)
und drücken anschließend die Start-/Stopp-Taste .
Hinweis: Wenn Sie Kaffeepulver auswählen, können Sie die Kaffeestärke nicht anpassen und nicht
mehr als ein Getränk gleichzeitig zubereiten.
für vorgemahlenen Kaffee
Heißes Wasser bereiten
1 Tippen Sie auf das Symbol für die Getränke
2 Drücken Sie die Start-/Stopp-Taste , um heißes Wasser herauszulassen.
, und wählen Sie dann "Hot Water" (Heißes Wasser).
Getränke personalisieren und Profile anlegen
Diese Maschine ermöglicht Ihnen die Anpassung der Einstellungen für ein Getränk Ihrer Wahl, und das
Speichern des angepassten Getränks in einem persönlichen Profil. Es gibt zwei Möglichkeiten für die
Erstellung eines Profils:
1 Im Menü "Drinks" (Getränke): Wählen Sie ein Getränk und passen Sie es an. Tippen Sie
anschließend auf das Symbol "Speichern" .
2 Im Menü 'Profiles' (Profile): Tippen Sie auf das Symbol "Profil hinzufügen", um ein Profil zu erstellen.
Wählen Sie zuerst das neu erstellte Profil und dann ein Getränk aus, nehmen Sie die gewünschten
Einstellungen vor, und tippen Sie auf das Symbol .
Ihre Getränke personalisieren
Sie können die Getränkeeinstellungen nach Belieben anpassen:
1 Tippen Sie auf das Symbol für Getränke .
2 Wählen Sie das gewünschte Getränk.
3 Der Bildschirm zeigt Einstellungen, die Sie nach Belieben verändern können. Tippen Sie auf den
Pfeil, um zum nächsten Bildschirm mit weiteren Einstellungen zu wechseln. Je nach Art des
Getränks können Sie die Stärke und die Menge von Kaffee, Milch oder Schaum, Temperatur,
Geschmack und Brühreihenfolge von Getränken mit Milch einstellen.
4 Wischen Sie die Balken, die Sie anpassen möchten, bis zum gewünschten Grad (Abb. 6) nach oben
oder unten.
5 Sie können diese Einstellungen in Ihrem Profil speichern. Tippen Sie dazu auf das Symbol "Saving"
(Speichern), und folgen Sie den Anweisungen auf dem Bildschirm (Abb. 12).
Profil erstellen
1 Tippen Sie auf das Symbol für Profile
2 Wählen Sie "Add Profile" (Profil hinzufügen) (Abb. 13).
.
Page 27

Deutsch
3 Geben Sie einen Namen für das neue Profil ein, und bestätigen (Abb. 14) Sie ihn.
4 Wählen Sie das neu erstellte Profil aus.
5 Fügen Sie Getränke zum Profil hinzu. Wählen Sie dazu "Add drink" (Abb. 15) (Getränk hinzufügen).
Einstellungen der Kaffeemaschine anpassen
Sie können die Einstellungen für das Mahlwerk mit Hilfe des Mahlgrad-Drehknopfes innerhalb des
Bohnenbehälters anpassen. Es stehen 12 verschiedene Mahlwerkeinstellungen zur Auswahl. Je
niedriger die Einstellung, desto stärker der Kaffee.
Hinweis: Sie müssen 2 bis 3 Getränke brühen, bevor Sie den vollen Unterschied herausschmecken
können.
Achtung: Drehen Sie den Mahleinstellungs-Drehknopf immer nur jeweils um eine Position, um
Schäden am Mahlwerk zu verhindern.
1 Öffnen Sie den Deckel der Kaffeebohnenbehälters.
2 Drücken Sie den Drehknopf für Mahlgrad nach unten, und drehen Sie ihn nach links oder rechts
(Abb. 16). Drehen Sie den Drehknopf für Mahlgrad jeweils um eine Raststellung. Bereiten Sie nach
jeder Änderung der Mahlgradeinstellung um eine Stufe ein Kaffeegetränk zu, um Schäden am
Mahlwerk zu vermeiden.
3 Schließen Sie den Deckel des Kaffeebohnenbehälters.
Standardeinstellungen anpassen
Verwenden Sie das Symbol EINSTELLUNGEN zur Änderung der folgenden Einstellungen:
-
AquaClean: Ermöglicht die Statusprüfung und den Neueinbau des AquaClean.
-
Wasserhärte: Um das Gerät auf das Wasser in Ihrer Region einzustellen, messen Sie bitte die
Wasserhärte.
-
Timer (Stand-by): Mit dieser Funktion kann die Zeit eingestellt werden, wann die Maschine in den
Standby-Modus wechseln soll.
-
Helligkeit: zum Anpassen des Displaykontrasts
-
Wasserbehälter-Leuchte: zum Anpassen der Lichtintensität im Wasserbehälter
-
Sprache: zum Auswählen einer anderen Sprache
-
Akustische Rückmeldung: zum Aktivieren/Deaktivieren der Tonausgabe des Displays
-
Ausgießerleuchte: zum Anpassen der Helligkeit des Kaffee- und Milchauslaufs an (nur bestimmte
Typen)
-
Werkseinstellungen: zum Wiederherstellen der Werkseinstellungen
27
Deutsch
Handhabung der Brühgruppe
Gehen Sie auf www.saeco.com/care für mehr Video-Anweisungen zum Entfernen, Einsetzen und
Reinigen der Brühgruppe.
Entfernen der Brühgruppe aus der Maschine
1 Schalten Sie die Maschine aus, indem Sie den Hauptschalter an der Rückseite der Maschine
drücken.
2 Öffnen Sie die Serviceklappe (Abb. 17).
3 Entfernen Sie die Kaffeeresteschublade (Abb. 18).
Page 28

28
Deutsch
4 Drücken Sie die PUSH-Taste (Abb. 19), und ziehen Sie am Griff der Brühgruppe, um sie aus der
Maschine (Abb. 20) zu entfernen.
Wiedereinsetzen der Brühgruppe
Bevor Sie die Brühgruppe wieder in die Maschine schieben, stellen Sie sicher, dass sie richtig
positioniert ist.
1 Prüfen Sie, ob der Pfeil am gelben Zylinder auf der Seite der Brühgruppe am schwarzen Pfeil und N
(Abb. 21) ausgerichtet ist.
-
Wenn sie nicht ausgerichtet sind, drücken Sie den Hebel, bis er die Unterseite der Brühgruppe
(Abb. 22) berührt.
2 Stellen Sie sicher, dass sich der gelbe Verriegelungshaken auf der anderen Seite der Brühgruppe in
der richtigen Position befindet.
-
Um den Haken in die richtige Position zu bringen, schieben Sie ihn so weit wie möglich nach
oben (Abb. 23).
3 Schieben Sie die Brühgruppe entlang der Führungsschienen an den Seiten in die Maschine zurück,
bis sie mit einem Klick einrastet. Drücken Sie nicht die PUSH-Taste.
4 Setzen Sie dann die Kaffeeresteschublade wieder in das Gerät ein und schließen Sie die
Serviceklappe.
Reinigung und Wartung
Regelmäßiges Reinigen und Warten halten Ihre Maschine in einwandfreiem Zustand und garantieren
einen langanhaltenden Kaffeegenuss, einen stabilen Kaffeefluss und einen perfekten Milchschaum.
In der folgenden Tabelle finden Sie Informationen dazu, wann und wie alle herausnehmbaren
Bestandteile des Geräts gereinigt werden sollten. Weitere Informationen und Video-Anweisungen
finden Sie auf www.saeco.com/care.
Reinigungstabelle
Bestandteil
Wann wird das Gerät
gereinigt
Brühgruppe Wöchentlich Nehmen Sie die Brühgruppe heraus, spülen Sie
Monatlich Führen Sie den Reinigen Sie die "Reinigung der
Schmierung der
Brühgruppe
Je nach Verwendungsart.
Weitere Informationen
finden Sie in der Tabelle
(siehe 'Schmierung der
Brühgruppe') mit den
Angaben zur Schmierung.
Wie wird das Gerät gereinigt
sie unter fließendem Leitungswasser ab und
lassen Sie sie trocknen.
Brühgruppe" mit den Philips Tabletten zum
Entfernen von Kaffeefett durch. Wählen Sie
"Reinigung der Brühgruppe" im Reinigungsmenü
aus und befolgen Sie die Anweisungen auf dem
Bildschirm. Besuchen Sie www.saeco.com/care
für ausführliche Video-Anweisungen.
Schmieren Sie die Brühgruppe mit dem Philips
Schmierfett ein. Besuchen Sie
www.saeco.com/care für ausführliche VideoAnweisungen.
Page 29

Deutsch
29
Bestandteil Wann wird das Gerät
Wie wird das Gerät gereinigt
gereinigt
Milchsystem/inter
ner
Cappuccinatore
Milchbehälter Wöchentlich Zerlegen Sie den Milchbehälter (Abb. 24), und
Abtropfschale Leeren Sie die Abtropfschale
Nach der täglichen Nutzung Führen Sie das HYGIESTEAM-Programm im
Wöchentlich Entnehmen Sie den internen Cappuccinatore
Monatlich Führen Sie die "DEEP MILK CLEAN"-Reinigung
täglich oder sobald die rote
Anzeige „Abtropfschale voll“
durch die Abtropfschale
(Abb. 26) zu sehen ist.
Reinigungsmenü aus. Wählen Sie HYGIESTEAM
im Reinigungsmenü und befolgen Sie die
Anweisungen auf dem Bildschirm. Wischen Sie
die Außenseite der metallenen Milchleitung mit
einem feuchten Tuch ab, bevor Sie sie in den
Milchleitungshalter einsetzen.
(siehe 'Reinigung des internen Cappuccinatore
unter fließendem Wasser'), und nehmen Sie ihn
auseinander. Spülen Sie alle Teile unter
fließendem Wasser mit etwas Spülmittel aus.
mit dem Philips Milchkreislaufreiniger aus.
Wählen Sie "DEEP MILK CLEAN" im
Reinigungsmenü und befolgen Sie die
Anweisungen auf dem Bildschirm. Besuchen Sie
www.saeco.com/care für ausführliche VideoAnweisungen.
schieben Sie die Kugel mit dem Messlöffel (Abb.
25) heraus. Spülen Sie alle Teile unter fließendem
Wasser ab, oder reinigen Sie sie im
Geschirrspüler.
Nehmen Sie die Abtropfschale heraus, und
spülen Sie sie unter fließendem Wasser mit etwas
Spülmittel ab.
Deutsch
Kaffeesatzbehäl
ter
Wasserbehälter Wöchentlich Spülen Sie den Wasserbehälter unter fließendem
Kaffeetrichter Prüfen Sie wöchentlich, ob
Leeren Sie den
Kaffeesatzbehälter, wenn die
Maschine Sie dazu
auffordert. Reinigen Sie sie
einmal pro Woche.
der Trichter für gemahlenen
Kaffee verstopft ist.
Entfernen Sie den Kaffeesatzbehälter, während
die Maschine eingeschaltet ist, und spülen Sie
ihn dann unter fließendem Wasser mit etwas
Spülmittel ab.
Wasser ab.
Ziehen Sie den Netzstecker aus der Steckdose,
und entfernen Sie die Brühgruppe aus der
Maschine. Öffnen Sie den Deckel des Behälters
für vorgemahlenen Kaffee, und führen Sie den
Löffelstiel in den Kaffeetrichter ein. Bewegen Sie
den Stiel auf und ab, bis der Klumpen aus
gemahlenem Kaffee herausfällt (Abb. 27).
Besuchen Sie www.saeco.com.care für
ausführliche Video-Anweisungen.
Page 30

30
Deutsch
Tipp: Auf der letzten Seite dieser Bedienungsanleitung finden Sie einen Reinigungskalender.
Schreiben Sie die Tage auf, an denen Sie die Reinigung vorgenommen haben.
Brühgruppe reinigen
Eine regelmäßige Reinigung der Brühgruppe beugt eine Verstopfung des internen Kreislaufs durch
Kaffeereste vor. Besuchen Sie www.saeco.com/care für Supportvideos zum Entfernen, Einsetzen und
Reinigen der Brühgruppe.
Brühgruppe unter fließendem Leistungswasser reinigen
1 Öffnen Sie die Serviceklappe, und nehmen Sie die Brühgruppe (siehe 'Entfernen der Brühgruppe
aus der Maschine') heraus.
2 Spülen Sie die Brühgruppe gründlich mit Wasser ab. Reinigen Sie vorsichtig (Abb. 28) den oberen
Filter.
3 Lassen Sie die Brühgruppe an der Luft trocknen, bevor Sie sie zurück in die Maschine einsetzen.
Trocknen Sie die Brühgruppe nicht mit einem Tuch, damit keine Fusseln in die Brühgruppe
gelangen.
Reinigung der Brühgruppe mit den Tabletten zur Entfernung von Kaffeefett
Verwenden Sie nur die Philips Tabletten zum Entfernen von Kaffeefett. Tippen Sie auf das Symbol für
die Reinigung
Anweisungen auf dem Bildschirm. Für ausführliche Video-Anweisungen besuchen Sie
www.saeco.com/care.
, und wählen Sie "Reinigung der Brühgruppe". Folgen Sie anschließend den
Schmierung der Brühgruppe
Schmieren Sie die Brühgruppe regelmäßig, um sicherzustellen, dass die beweglichen Teile sich
weiterhin leicht bewegen können.
1 Geben Sie eine dünne Schicht Fett um den Schaft unten in der Brühgruppe.
2 Geben Sie eine dünne Schicht Fett auf die Schienen auf beiden Seiten.
Die Schmierhäufigkeit entnehmen Sie der untenstehenden Tabelle. Für ausführliche VideoAnweisungen besuchen Sie www.saeco.com/care.
Häufigkeit des
Gebrauchs
Niedrig 1-5 Alle 4 Monate
Anzahl der täglich zubereiteten
Getränke
Schmierhäufigkeit
Normal 6-10 Alle 2 Monate
Häufig >10 Jeden Monat
Reinigungsprogramme für den internen Cappuccinatore
Die Maschine verfügt über drei Reinigungsprogramme für den internen Cappuccinatore. Das
Reinigungsprogramm "Auto Steam Shoot" wird automatisch nach dem Brühen von Getränken mit
Milch ausgeführt. Sie können das Programm "HYGIESTEAM" oder "DEEP MILK CLEAN" auswählen,
indem Sie auf das Reinigungssymbol tippen und durch das Reinigungsmenü blättern. Folgen Sie
anschließend den Anweisungen auf dem Bildschirm.
-
Auto Steam Shoot: Die Maschine leitet Dampf durch den internen Cappuccinatore, um ihn schnell
zu spülen.
Page 31

Deutsch
-
HYGIESTEAM: Die Maschine reinigt das interne Milchsystem gründlich mit Dampf. Setzen Sie die
Milchleitung in den Milchleitungshalter (Abb. 29), und befolgen Sie die Anweisungen auf dem
Bildschirm.
-
DEEP MILK CLEAN (Tiefenreinigung der Milchschläuche): Führen Sie die "DEEP MILK CLEAN"Reinigung mit dem Philips Milchkreislaufreiniger aus, um das interne Milchsystem gründlich zu
reinigen.
31
Reinigung des internen Cappuccinatore unter fließendem Wasser
1 Öffnen Sie die Klappe des internen Cappuccinatore (Abb. 8).
2 Entnehmen Sie den internen Cappuccinatore (Abb. 30), indem Sie ihn herunterdrücken.
3 Nehmen Sie den internen Cappuccinatore auseinander, indem Sie den unteren Teil von dem
oberen Teil (Abb. 31) abziehen.
4 Nehmen Sie alle Teile (Abb. 32) auseinander, und reinigen Sie sie unter fließendem Wasser.
5 Setzen Sie den internen Cappuccinatore wieder zusammen.
6 Um den internen Cappuccinatore wieder einzusetzen, halten Sie ihn senkrecht und vergewissern
Sie sich, dass die Öffnungen bündig an den beiden Rohren der Maschine ausgerichtet sind.
Schieben Sie den internen Cappuccinatore dann nach oben, bis er hörbar einrastet (Abb. 33).
7 Schließen Sie die Klappe des Geräts.
Für ausführliche Video-Anweisungen besuchen Sie www.saeco.com/care.
Entkalkungsvorgang
Verwenden Sie ausschließlich Entkalker von Philips. Unter keinen Umständen dürfen Sie Entkalker auf
Schwefel-, Salz- oder Essigsäurebasis (Essig) verwenden, da dies den Wasserkreislauf der Maschine
beschädigen kann und die Kalkablagerungen nicht ordnungsgemäß auflöst. Wenn Sie einen anderen
Entkalker als den von Philips verwenden, verfällt die Garantie. Auch wenn Sie das Gerät nicht
entkalken, verfällt die Garantie. Die Entkalkungslösung von Philips ist im Online-Shop unter
www.saeco.com/care erhältlich.
1 Wenn die Maschine Sie zum Entkalken auffordert, drücken Sie zum Starten die Start-/Stopp-Taste
. Um den Entkalkungsvorgang zu starten, ohne dass die Maschine Sie dazu auffordert, tippen Sie
auf das Reinigungssymbol , und wählen Sie "Descale" (Entkalken) (Abb. 34).
2 Entfernen Sie die Abtropfschale und den Kaffeesatzbehälter, leeren Sie diese und setzen Sie
beides in die Maschine zurück.
3 Nehmen Sie den Wasserbehälter ab, und entleeren Sie ihn. Entfernen Sie dann den AquaClean-
Filter.
4 Gießen Sie die gesamte Flasche Philips Entkalker in den Wasserbehälter, und füllen Sie ihn dann
bis zur Markierung CALC CLEAN (Entkalken) mit frischem Wasser auf. Setzen Sie ihn wieder in die
Maschine ein.
5 Stellen Sie einen großen Behälter (1,5 l) unter den Kaffeeauslauftrichter.
6 Befolgen Sie die Anweisungen auf dem Bildschirm, um den Entkalkungsvorgang zu starten. Der
Entkalkungsvorgang dauert ungefähr 15Minuten und besteht aus einem Entkalkungszyklus und
einem Spülzyklus.
7 Sobald der Entkalkungsvorgang abgeschlossen ist, spülen Sie den Wasserbehälter und den
Wasserkreislauf mit frischem Wasser ab. Folgen Sie den Anweisungen auf dem Bildschirm.
8 Setzen Sie einen neuen AquaClean-Filter in den Wasserbehälter und aktivieren Sie den
AquaClean-Filter wieder im Menü.
Tipp: Der AquaClean-Filter reduziert den Entkalkungsaufwand!
Deutsch
Page 32

32
Deutsch
Wenn der Entkalkungsvorgang unterbrochen wurde
Sie können den Entkalkungsvorgang abbrechen, indem Sie den Ein-/Ausschalter auf dem Bedienfeld
drücken. Wenn der Entkalkungsvorgang vorzeitig unterbrochen wurde, gehen Sie wie folgt vor:
1 Leeren und spülen Sie den Wasserbehälter gründlich.
2 Füllen Sie den Wasserbehälter bis zur Markierung CALC CLEAN mit frischem Wasser, und schalten
Sie das Gerät wieder ein. Die Maschine heizt auf und führt einen automatischen Spülzyklus durch.
3 Bevor Sie Getränke zubereiten, führen Sie nochmals einen manuellen Spülzyklus durch. Um einen
manuellen Spülzyklus durchzuführen, geben Sie erst einen halben Wassertank heißes Wasser aus
und brühen Sie dann zwei Tassen vorgemahlenen Kaffee, ohne gemahlenen Kaffee hinzuzugeben.
Hinweis: Wenn die Entkalkung nicht beendet wurde, muss ein weiterer Entkalkungsvorgang so bald
wie möglich durchgeführt werden.
Warnsymbole und Fehlercodes
Bedeutung der Warnsymbole
Füllen Sie den Wasserbehälter bis
zur Markierung MAX mit frischem
Wasser.
Die Maschine muss den
Wasserkreislauf mit Wasser füllen.
Vergewissern Sie sich, dass sich
Wasser im Wasserbehälter befindet,
und drücken Sie die Start-/StoppTaste zum Starten.
Der Bohnenbehälter ist leer. Geben
Sie neue Kaffeebohnen in den
Bohnenbehälter.
Die Brühgruppe wurde nicht oder
nicht korrekt eingesetzt. Setzen Sie
die Brühgruppe in die Maschine ein
und vergewissern Sie sich, dass sie
richtig eingerastet ist.
Der Kaffeesatzbehälter ist voll.
Stellen Sie sicher, dass die
Maschine eingeschaltet ist.
eingeschaltet. Entnehmen und
leeren Sie dann den
Kaffeesatzbehälter.
Schließen Sie die Serviceklappe.
Die interne Cappuccinatore ist nicht
oder nicht richtig eingesetzt,
und/oder der Deckel des Ausgießers
ist offen. Vergewissern Sie sich, dass
die Öffnungen des Cappuccinatore
bündig an den Rohren der Maschine
ausgerichtet sind, bevor Sie den
internen Cappuccinatore nach oben
schieben. Schließen Sie dann den
Deckel des Ausgießers.
Der Kaffeesatzbehälter ist nicht
eingesetzt. Setzen Sie den
Kaffeesatzbehälter wieder ein.
Bedeutung der Fehlercodes
Nachstehend finden Sie eine Liste der Fehlercodes für die Probleme, die Sie selbst beheben können.
Ausführliche Video-Anweisungen finden Sie auf www.saeco.com/care. Wenn ein anderer Fehlercode
angezeigt wird, wenden Sie sich an ein Philips Service-Center in Ihrem Land. Kontaktinformationen
können Sie der Garantieschrift entnehmen.
Page 33

FehlercodeProblem Mögliche Lösung
Deutsch
33
01 Der Kaffeetrichter ist
verstopft.
03 Die Brühgruppe ist
schmutzig oder nicht
gut gefettet.
04 Die Brühgruppe ist
nicht richtig positioniert.
05 Es ist Luft im
Wasserkreislauf.
Der AquaClean-Filter
wurde vor der
Installation nicht richtig
vorbereitet oder ist
verstopft.
Schalten Sie die Maschine aus und ziehen Sie den Netzstecker
aus der Steckdose. Entfernen Sie die Brühgruppe. Öffnen Sie
dann den Deckel des Behälters für vorgemahlenen Kaffee, und
führen Sie den Löffelstiel in den Kaffeetrichter ein. Bewegen
Sie den Stiel auf und ab, bis der Klumpen aus gemahlenem
Kaffee herausfällt (Abb. 27). Besuchen Sie
www.saeco.com/care für ausführliche Video-Anweisungen.
Schalten Sie die Maschine mit dem Hauptschalter aus. Spülen
Sie die Brühgruppe mit frischem Wasser aus, lassen Sie sie an
der Luft trocknen, und fetten Sie sie dann ein. Schlagen Sie das
Kapitel "Reinigung der Brühgruppe" nach oder besuchen Sie
www.saeco.com/care für ausführliche Video-Anweisungen.
Schalten Sie das Gerät dann wieder ein.
Schalten Sie die Maschine mit dem Hauptschalter aus.
Nehmen Sie die Brühgruppe heraus, und setzen Sie sie erneut
ein. Stellen Sie sicher, dass die Brühgruppe richtig positioniert
ist, bevor Sie sie einsetzen. Schlagen Sie das Kapitel
"Handhabung der Brühgruppe" nach oder besuchen Sie
www.saeco.com/care für ausführliche Video-Anweisungen.
Schalten Sie das Gerät dann wieder ein.
Starten Sie die Maschine neu, indem Sie sie mit dem
Hauptschalter aus- und wieder einschalten. Wenn dies
funktioniert, lassen Sie zwei bis drei Tassen heißes Wasser
ablaufen. Entkalken Sie die Maschine, wenn Sie dies längere
Zeit nicht gemacht haben.
Entfernen Sie den AquaClean-Filter, und versuchen Sie erneut,
einen Kaffee zu brühen. Wenn dies funktioniert, stellen Sie
sicher, dass der AquaClean-Filter richtig vorbereitet ist, bevor
Sie ihn wieder (siehe 'Vorbereitung des AquaClean-Filters für
die Aktivierung') einsetzen. Setzen Sie den AquaClean-Filter
wieder in den Wasserbehälter ein. Wenn das immer noch nicht
zum gewünschten Ergebnis führt, ist möglicherweise der Filter
verstopft und muss ausgetauscht werden.
Deutsch
14 Die Maschine ist
überhitzt.
Schalten Sie das Gerät aus und nach 30Minuten wieder ein.
Bestellen von Zubehör
Verwenden Sie zum Reinigen und Entkalken der Maschine nur Philips Wartungsprodukte. Sie können
diese Produkte bei Ihrem lokalen Händler, von den autorisierten Kundenzentren oder online unter
www.saeco.com/care erwerben. Um eine vollständige Online-Ersatzteilliste zu finden, geben Sie die
Modellnummer Ihrer Maschine ein. Sie finden die Modellnummer auf der Innenseite der
Serviceklappe.
Wartungsprodukte und Typnummern:
-
Entkalkungslösung CA6700
-
AquaClean-Filter CA6903
-
Fett für Brühgruppe HD5061
Page 34

34
Deutsch
-
Kaffeefettlöser-Tabletten CA6704
-
Reiniger für Milchkreislauf CA6705
-
Wartungskit CA6707
Fehlerbehebung
In diesem Kapitel werden die häufigsten Probleme beschrieben, die beim Gebrauch der Maschine
auftreten können. Supportvideos und eine vollständige Liste häufig gestellter Fragen finden Sie unter
www.saeco.com/care. Sollten Sie das Problem nicht beheben können, wenden Sie sich an ein Philips
Service-Center in Ihrem Land. Kontaktinformationen können Sie der Garantieschrift entnehmen.
Problem
Die Abtropfschale wird
schnell voll.
Ursache Lösung
Das ist normal. Die Maschine
spült den internen Kreislauf
und die Brühgruppe mit
Wasser. Ein Teil des Wassers
fließt durch das interne System
direkt in die Abtropfschale.
Leeren Sie die Abtropfschale täglich
oder sobald die rote Anzeige
"Abtropfschale voll" durch die
Abtropfschale (Abb. 26) zu sehen ist.
Stellen Sie eine Tasse unter den
Heißwasserauslauf, um das Spülwasser
aufzufangen.
Das Gerät befindet sich
im DEMO-Modus.
Das Symbol
"Kaffeesatzbehälter voll"
bleibt im Display stehen.
Das Symbol
"Kaffeesatzbehälter voll"
wird angezeigt, obwohl
der Behälter nicht voll ist.
Ich kann die Brühgruppe
nicht entnehmen.
Sie haben die Standby-Taste
für länger als 8Sekunden
gedrückt.
Sie haben den
Kaffeesatzbehälter bei
ausgeschaltetem Gerät geleert.
Sie haben den
Kaffeesatzbehälter zu schnell
zurückgesetzt.
Das Gerät hat den Zähler bei
der letzten Entleerung des
Kaffeesatzbehälters nicht
zurückgesetzt.
Die Brühgruppe ist nicht in der
richtigen Position.
Schalten Sie das Gerät mit dem
Hauptschalter an der Rückseite des
Geräts aus und wieder ein.
Leeren Sie den Kaffeesatzbehälter
immer bei eingeschaltetem Gerät. Wenn
der Kaffeesatzbehälter bei
ausgeschaltetem Gerät geleert wird,
wird der Kaffeezykluszähler nicht
zurückgesetzt.
Setzen Sie den Kaffeesatzbehälter erst
dann zurück, wenn Sie am Bildschirm
dazu aufgefordert werden.
Warten Sie immer etwa 5Sekunden,
wenn Sie den Kaffeesatzbehälter
wieder einsetzen.Auf diese Weise wird
der Kaffeesatzzähler auf 0
zurückgesetzt.
Leeren Sie den Kaffeesatzbehälter
immer bei eingeschaltetem Gerät. Wenn
der Kaffeesatzbehälter bei
ausgeschaltetem Gerät geleert wird,
wird der Kaffeesatzzähler nicht
zurückgesetzt.
Setzen Sie das Gerät folgendermaßen
zurück: Setzen Sie die Abtropfschale
und den Kaffeesatzbehälter wieder ein.
Schließen Sie dann die Serviceklappe,
und schalten Sie die Maschine ein und
aus. Versuchen Sie erneut, die
Brühgruppe zu entfernen.
Page 35

Problem Ursache Lösung
Sie haben den
Kaffeesatzbehälter nicht
ausgebaut.
Entnehmen Sie den Kaffeesatzbehälter,
bevor Sie die Brühgruppe entfernen.
Deutsch
35
Ich kann die Brühgruppe
nicht einsetzen.
Der Kaffee ist wässrig. Die Brühgruppe ist schmutzig
Die Kaffee-Einstellungen
Die Maschine führt nach einer
Der Kaffee ist nicht heiß
genug.
Die Temperatur ist zu niedrig
Die Brühgruppe ist nicht in der
richtigen Position.
oder muss geölt werden.
Es ist ein zu grober Mahlgrad
eingestellt.
wurden angepasst.
Änderung der
Mahlgradeinstellungen oder
Bohnentypen einen
Selbsteinstellungsvorgang
durch.
Die Tassen sind kalt. Wärmen Sie die Tassen vor, indem Sie
eingestellt. Prüfen Sie die
Einstellungen im Menü.
Setzen Sie das Gerät folgendermaßen
zurück: Setzen Sie die Abtropfschale
und den Kaffeesatzbehälter wieder ein.
Lassen Sie die Brühgruppe ausgebaut.
Schließen Sie die Serviceklappe, und
schalten Sie die Maschine ein und aus.
Bringen Sie die Brühgruppe dann in die
richtige Position, und setzen Sie sie
wieder in die Maschine (siehe
'Wiedereinsetzen der Brühgruppe') ein.
Reinigen und ölen Sie die Brühgruppe.
Stellen Sie einen feineren (niedrigeren)
Mahlgrad ein.
Wählen Sie Ihr Kaffeegetränk aus, und
stellen Sie die Einstellungen auf einen
stärkeren Kaffee ein.
Brühen Sie einige Tassen Kaffee.
sie mit heißem Wasser ausspülen.
Setzen Sie die Temperatur im Menü auf
"high" (hoch).
Deutsch
Sie haben Milch hinzugegeben. Ob warme oder kalte Milch, die Milch
Es kommt kein Kaffee
oder der Kaffee fließt nur
langsam heraus.
Der AquaClean-Filter wurde für
die Installation nicht richtig
vorbereitet oder ist verstopft.
senkt die Temperatur des Kaffees
immer in einem gewissen Maß.
Entfernen Sie den AquaClean-Filter,
und versuchen Sie erneut, einen Kaffee
zu brühen. Wenn dies funktioniert,
stellen Sie sicher, dass der AquaCleanFilter richtig vorbereitet ist, bevor Sie ihn
wieder einsetzen. Setzen Sie den
vorbereiteten Filter wieder ein. Wenn
das immer noch nicht zum
gewünschten Ergebnis führt, ist
möglicherweise der Filter verstopft und
muss ausgetauscht werden.
Page 36

36
Deutsch
Problem Ursache Lösung
Es ist ein zu feiner Mahlgrad
eingestellt.
Die Brühgruppe ist verschmutzt. Reinigen Sie die Brühgruppe.
Stellen Sie einen gröberen (höheren)
Mahlgrad ein.
Der Kaffeeauslauftrichter ist
Die Milch schäumt nicht
auf.
Die verwendete Milchsorte
Die Milch spritzt. Die verwendete Milch ist nicht
verschmutzt.
Der Maschinenkreislauf ist von
Kalk zugesetzt.
Der interne Cappuccinatore ist
verschmutzt oder nicht richtig
eingesetzt.
eignet sich nicht zum
Aufschäumen.
kalt genug.
Die flexible Milchleitung ist
nicht ordnungsgemäß
angeschlossen.
Reinigen Sie den Kaffeeauslauftrichter
und die Öffnungen mit einer Nadel.
Entkalken Sie die Maschine.
Reinigen Sie den internen
Cappuccinatore. Achten Sie dabei
darauf, dass Sie ihn richtig positionieren
und richtig (siehe 'Reinigung des
internen Cappuccinatore unter
fließendem Wasser')einsetzen.
Die Menge und die Qualität des
erzielbaren Milchschaums variieren je
nach der verwendeten Milchsorte. Wir
haben die folgenden Milcharten
getestet, und sie lassen sich gut
aufschäumen: fettarme Milch oder
Vollmilch von der Kuh, Sojamilch und
laktosefreie Milch.
Achten Sie darauf, dass Sie kalte Milch
direkt aus dem Kühlschrank verwenden.
Öffnen Sie die Klappe des
Kaffeeauslauftrichters (Abb. 8), und
überprüfen Sie, ob der flexible
Milchschlauch vollständig mit dem
Cappuccinatore (Abb. 9) verbunden ist.
Beachten Sie, dass der Cappuccinatore
und die Milchleitungen heiß sein
können. Lassen Sie den Cappuccinatore
und die Leitungen abkühlen, bevor Sie
sie berühren.
Page 37

Problem Ursache Lösung
Der Cappuccinatore und die
Milchleitungen sind nicht
sauber.
Entnehmen Sie den internen
Cappuccinatore (siehe 'Reinigung des
internen Cappuccinatore unter
fließendem Wasser'), und nehmen Sie
ihn auseinander. Spülen Sie alle Teile
unter fließendem Wasser ab. Für eine
gründliche Reinigung verwenden Sie
den Philips Milchkreislauf-Reiniger, und
führen Sie das Verfahren DEEP MILK
CLEAN über das Reinigungsmenü ( )
durch. Hinweis: Wenn die Teile in der
Spülmaschine gereinigt wurden, sind sie
möglicherweise durch
Lebensmittelpartikel oder
Spülmittelrückstände verstopft. Eine
Sichtprüfung auf etwaige Verstopfung
wird ebenfalls empfohlen.
Wir empfehlen, das HygieSteamProgramm jeden Tag durchzuführen: 1)
Drücken Sie "Clean" auf dem
Bedienfeld. 2) Wählen Sie "HygieSteam"
aus. 3) Drücken Sie die Start-Taste, um
den Vorgang zu starten, und bestätigen
Sie dann alle Schritte auf dem Display.
Deutsch
37
Deutsch
Die Milchleitungen sind
verstopft.
Die Maschine scheint
undicht zu sein.
Die Maschine steht nicht auf
Die Maschine spült den
internen Kreislauf und die
Brühgruppe mit Wasser. Ein Teil
des Wassers fließt durch das
interne System direkt in die
Abtropfschale.
Die Abtropfschale ist voll und
läuft über, sodass es danach
aussieht, als ob die Maschine
undicht ist.
einer gerade Oberfläche.
Bewahren Sie den Milchbehälter immer
ohne die Milchleitungen im Kühlschrank
auf. Übrig gebliebene Milch kann sich in
den Milchleitungen ansammeln und
den Milchfluss durch die Leitungen
blockieren. Spülen Sie die
Milchleitungen vor der Aufbewahrung
aus.
Leeren Sie die Abtropfschale täglich
oder sobald die rote Anzeige
„Abtropfschale voll“ durch die
Abdeckung (Abb. 26) der Abtropfschale
zu sehen ist. Stellen Sie eine Tasse
unter den Heißwasserauslauf, um das
Spülwasser aufzufangen.
Leeren Sie die Abtropfschale täglich
oder sobald die rote Anzeige
„Abtropfschale voll“ durch die
Abdeckung (Abb. 26) der Abtropfschale
zu sehen ist. Stellen Sie eine Tasse
unter den Heißwasserauslauf, um das
Spülwasser aufzufangen.
Setzen Sie das Gerät auf eine gerade
Oberfläche, damit die Anzeige "Drip tray
full" (Abtropfschale voll) normal
funktioniert.
Page 38

38
Deutsch
Problem Ursache Lösung
Ich kann den
AquaClean-Filter nicht
aktivieren und das Gerät
will entkalkt werden.
Der Filter wurde nicht
rechtzeitig ausgetauscht,
nachdem das AquaCleanFilter-Symbol geblinkt hat und
die Kapazität auf 0% gesunken
ist.
Entkalken Sie das Gerät zuerst, und
bauen Sie dann den AquaClean-Filter
ein.
Sie haben den AquaClean-
Der neue Wasserfilter
passt nicht.
Die Maschine ist laut. Es ist ganz normal, dass Ihre
Filter nicht bei der
Inbetriebnahme des der
Maschine, sondern erst nach
ca. 25Tassen Kaffee (à 100ml)
eingesetzt. Das Gerät muss
vollkommen kalkfrei sein, bevor
Sie den AquaClean-Filter
einbauen.
Sie versuchen gerade einen
Filter zu einzubauen, der kein
AquaClean-Filter ist.
Maschine bei Verwendung
hörbar ist.
Der AquaClean-Filter wurde
nicht korrekt vorbereitet,
sodass jetzt Luft in die
Maschine gesaugt wird.
Entkalken Sie das Gerät zuerst, und
bauen Sie dann den AquaClean-Filter
ein. Nach dem Entkalken ist der
Filterzähler auf0/8 zurückgesetzt.
Bestätigen Sie die Aktivierung des
Filters immer im Gerätemenü. Aktivieren
Sie den Filter auch nach dem
Filterwechsel.
Es passen nur AquaClean-Filter in das
Gerät.
Wenn die Maschine andere Geräusche
von sich gibt, reinigen Sie die
Brühgruppe, und schmieren Sie sie
(siehe 'Schmierung der Brühgruppe').
Nehmen Sie den AquaClean-Filter vom
Wasserbehälter ab. Schütteln Sie den
Filter ca. 5Sekunden lang. Tauchen Sie
den Filter mit der Oberseite nach unten
mindestens 30Sekunden in eine Kanne
mit kaltem Wasser. Warten Sie, bis keine
Luftblasen mehr austreten. Setzen Sie
den vorbereiteten AquaClean-Filter
wieder in den Wasserbehälter ein.
Lassen Sie dann zwei bis drei Tassen
heißes Wasser ablaufen.
Technische Daten
Der Hersteller behält sich das Recht vor, die technischen Eigenschaften des Produkts zu verbessern.
Alle voreingestellten Mengen sind Circa-Mengen.
Beschreibung
Größe (B x H x T) 283 x 393 x 489 mm
Gewicht 10.8–12.2kg
Netzkabellänge 1200mm
Wasserbehälter 1,7 Liter, abnehmbar
Fassungsvermögen des Kaffeebohnenbehälters 450g
Wert
Page 39

Kapazität des Kaffeesatzbehälters 14 Portionen
Fassungsvermögen der Milchkanne 600 ml
Anpassbare Öffnungshöhe 75-148 mm
Deutsch
39
Nennspannung – Nennleistung – Netzanschluss Siehe Datenschild an der Innenseite der
Serviceklappe.
Deutsch
Page 40

40
Español
Contenido
Descripción general del aparato (Fig. A)_____________________________________________________________ 40
Panel de control (Fig. B)______________________________________________________________________________ 41
Introducción _________________________________________________________________________________________ 41
Primera instalación ___________________________________________________________________________________ 41
Filtro AquaClean______________________________________________________________________________________ 42
Medición de la dureza del agua _____________________________________________________________________ 43
Preparación de bebidas______________________________________________________________________________ 43
Personalización de bebidas y creación de perfiles _________________________________________________ 44
Cambio de los ajustes de la máquina _______________________________________________________________ 45
Manejo del grupo de preparación de café __________________________________________________________ 45
Limpieza y mantenimiento___________________________________________________________________________ 46
Procedimiento de descalcificación __________________________________________________________________ 49
Iconos de advertencia y códigos de error ___________________________________________________________ 50
Solicitud de accesorios_______________________________________________________________________________ 51
Resolución de problemas ____________________________________________________________________________ 51
Especificaciones técnicas ____________________________________________________________________________ 56
Descripción general del aparato (Fig. A)
A1 Panel de control y pantalla táctil A12 Empuñadura de liberación de la bandeja de
goteo
A2 Soporte para tazas A13 Cable de alimentación con clavija
A3 Tapa de la tolva de granos A14 Rueda de configuración del molinillo
A4 Tapa del compartimento de café
molido
A5 Espumador de leche interno A16 Grupo de preparación del café
A6 Boquilla dispensadora de leche y café
ajustable
A7 Soporte del tubo de leche A18 Cajón de residuos de café
A8 Interruptor principal A19 Recipiente para posos de café
A9 Toma para el cable A20 Bandeja de goteo
A10 Puerta de mantenimiento A21 Tapa de la bandeja de goteo
A11 Indicador de 'bandeja de goteo llena' A22 Depósito de agua
A15 Tolva de granos
A17 Abertura de café
Accesorios
A23 Tubo de grasa A26 Cuchara de dosificación
A24 Cepillo de limpieza A27 Tira de prueba de dureza del agua
A25 Filtro AquaClean
Español
Page 41

Español
Piezas para espumar leche
A28 Depósito de leche A30 Tubo de leche metálico
A29 Tubo de leche flexible A31 Tapa del depósito de leche
Panel de control (Fig. B)
Consulte la figura B para obtener una visión general de todos los botones e iconos del panel de
control y la pantalla táctil de la máquina.
A continuación encontrará la descripción. Puede deslizar el dedo por la pantalla táctil y tocar la
pantalla para seleccionar o confirmar las opciones.
B1. Botón de
encendido/apagado
B2. Perfiles personales B5. Menú de limpieza
B3. Menú de bebidas B6. Ajustes de la cafetera
B4. Pantalla táctil B7. Botón de inicio/parada
Introducción
Enhorabuena por la adquisición de una cafetera totalmente automática Saeco. Para sacar el mayor
partido a la asistencia que Saeco le ofrece, registre el producto en www.saeco.com/care.
Lea atentamente el librillo de seguridad separado antes de usar la máquina por primera vez y
consérvelo por si necesitara consultarlo en el futuro.
Para obtener el máximo rendimiento de su cafetera, Saeco le ofrece todo el soporte que pueda
necesitar de 3 formas diferentes:
1 La guía de inicio rápido independiente incluye información sobre la primera instalación y el primer
uso.
2 Este manual de usuario para obtener más información
3 Asistencia en línea y vídeos: escanee el código QR de la primera página o visite
www.saeco.com/care
41
Español
Nota: Este aparato se ha probado con café. Aunque se ha limpiado cuidadosamente, es posible que
quede algún residuo de café. Le garantizamos, no obstante, que el aparato es absolutamente nuevo.
Primera instalación
Para preparar la cafetera para el uso tiene que realizar unos cuantos y sencillos pasos, como llenar el
circuito de agua y activar el filtro AquaClean. Estos pasos se muestran en la guía de inicio rápido
separada.
Si quiere obtener el café más delicioso, al principio deberá preparar 5 cafés para permitir que la
máquina complete su ajuste automático.
La máquina está concebida para extraer el mejor sabor de sus granos de café. Por consiguiente, es
recomendable que no realice ajustes en el molinillo hasta que haya preparado entre 100 y 150 tazas
de café (aprox. 1 mes de uso).
Limpie a fondo el recipiente de leche, los tubos de leche y el espumador de leche antes del primer
uso. Le aconsejamos no limpiar el espumador de leche en el lavavajillas, para evitar que las partículas
de alimentos o los residuos de detergente lo obstruyan.
Page 42

42
Español
Filtro AquaClean
El filtro AquaClean se ha diseñado para reducir los depósitos de cal de la cafetera y dispensar agua
filtrada para preservar el aroma y el sabor de cada taza de café. Si utiliza una serie de 8 filtros
AquaClean como señala la cafetera y se indica en este manual del usuario, no tendrá que
descalcificar el aparato hasta las 5000 tazas. Con cada filtro se puede disfrutar de hasta 625 tazas,
dependiendo de la variedad de café elegida y de la frecuencia con que se enjuague y limpie la
cafetera.
Preparación del filtro AquaClean para la activación
Antes de colocar el filtro AquaClean en el depósito de agua es preciso prepararlo:
1 Sacuda el filtro durante unos 5 segundos (Fig. 1).
2 Sumerja completamente el filtro boca abajo en una jarra con agua fría durante al menos
30segundos. Espere a que no salgan (Fig. 2) más burbujas de aire.
3 Empuje el filtro en la conexión hasta el punto (Fig. 3) más bajo posible.
Activación del filtro AquaClean
Es preciso que active cada filtro AquaClean nuevo que utilice. Al activar el filtro AquaClean, la cafetera
controla la capacidad del filtro AquaClean y el número de filtros usados. Existen 3 maneras de activar
el filtro AquaClean.
1. Activación del filtro AquaClean durante la primera instalación
Después de encender la cafetera por primera vez, el aparato le guía a través de los primeros pasos de
instalación, como el llenado del depósito de agua y el circuito de agua y la activación del filtro
AquaClean. Basta con seguir las instrucciones de la pantalla.
2. Activación del filtro AquaClean cuando se solicite
Reemplace el filtro AquaClean cuando el mensaje 'Replace AquaClean filter?' (¿Cambiar filtro
AquaClean?) aparezca en la pantalla. Luego siga las instrucciones de la pantalla para activar el filtro
de forma correcta.
Reemplace el filtro AquaClean como mínimo cada 3 meses, aunque la máquina no haya indicado que
es necesaria la sustitución.
3. Activación del filtro AquaClean en cualquier otro momento
Para empezar a utilizar el filtro AquaClean en cualquier otro momento solo tiene que seguir las
instrucciones incluidas a continuación.
1 Toque el icono de configuración
2 Seleccione 'new' (nuevo) y pulse el botón de inicio/parada cuando aparezca la pantalla de
activación.
3 Siga las instrucciones de la pantalla.
Nota: En algunos casos, la máquina indicará la necesidad de eliminar los depósitos de cal antes de
instalar y activar un filtro AquaClean nuevo. Esto se debe a que la máquina debe estar
completamente libre de depósitos de calcio antes de empezar a usar el filtro AquaClean. Siga las
instrucciones de la pantalla.
y seleccione 'AquaClean' (Fig. 4).
Page 43

Español
Medición de la dureza del agua
Durante la primera instalación tiene que establecer la dureza del agua. Siga los pasos de la pantalla y
utilice la tira de prueba de dureza del agua que se suministra. Para ajustar la dureza del agua más
adelante, toque el icono de configuración
1 Sumerja la tira de prueba de dureza del agua en agua del grifo durante 1 segundo. Espere 1 minuto.
2 Compruebe cuántos cuadrados se han vuelto rojos.
3 Seleccione el ajuste de dureza del agua adecuado y toque el icono OK (Aceptar) para confirmar.
Número de cuadrados rojos:
Valor a ajustar 1 2 3 4
y seleccione 'water hardness' (dureza de agua).
43
Preparación de bebidas
Toque el icono de bebidas para acceder al menú 'Drinks' (Bebidas). Desplácese por las diferentes
página para encontrar la bebida. Tras seleccionar una bebida, puede personalizarla ajustando la
configuración (consulte 'Personalización de bebidas').
-
Toque el icono '2x' para preparar dos tazas. La cafetera realiza automáticamente dos ciclos de
molido consecutivos de las bebidas (Fig. 5) seleccionadas.
-
Toque el icono de perfiles para preparar una de las bebidas almacenadas.
-
Deslice la boquilla dispensadora arriba o abajo para ajustar la altura al tamaño de la taza o del
vaso que esté usando.
Preparación de bebidas con café
1 Llene el depósito de agua con agua del grifo y la tolva de granos, con granos.
Consejo: Deslice la boquilla dosificadora hasta la posición más alta para facilitar el acceso al
depósito de agua.
2 Toque el icono de bebidas y seleccione el café.
3 Puede ajustar la configuración deslizando las barras ajustables arriba y abajo (Fig. 6).
4 Pulse el botón de inicio/parada para empezar a preparar la bebida seleccionada.
Preparación de bebidas con leche
1 Llene el depósito de agua con agua del grifo y la tolva de granos, con granos.
Consejo: Deslice la boquilla dosificadora hasta la posición más alta para facilitar el acceso al
depósito de agua.
2 Desenrosque la tapa del depósito de leche y llénelo de leche (Fig. 7).
Utilice siempre leche recién extraída del frigorífico para obtener resultados óptimos.
3 Coloque el tubo de leche metálico en el recipiente. Abra la puerta del espumador de leche interno
(Fig. 8) y conecte el tubo de leche flexible en el espumador de leche (Fig. 9). A continuación, vuelva
a cerrar la puerta del espumador de leche interno.
4 Toque el icono de bebidas y seleccione el café.
5 Puede ajustar la configuración deslizando las barras ajustables arriba y abajo (Fig. 6).
6 Pulse el botón de inicio/parada
seleccionada.
7 Inmediatamente después de dispensar la leche, se lleva a cabo "Auto Steam Shoot" (Vapor auto).
La cafetera expulsa vapor a través del espumador de leche interno para enjuagarlo rápidamente.
en cualquier momento para empezar a preparar la bebida
Español
Page 44

44
Español
Consejo: Puede utilizar un cartón de leche normal para preparar las bebidas con leche. Coloque el
tubo de leche metálico directamente en el cartón de leche.
Preparación de café con café molido
1 Abra la tapa del compartimento de café premolido y ponga una cuchara de medida rasa de café
en él (Fig. 10). Cierre la tapa.
2 Tras seleccionar una bebida, toque el icono (Fig. 11) de café premolido y pulse el botón de
inicio/parada
Nota: Si selecciona café premolido, no podrá ajustar la intensidad del café y preparar más de una
bebida a la vez.
.
Dispensación de agua caliente
1 Toque el icono de bebidas
2 Pulse el botón de inicio/parada
y seleccione 'Hot water' (Agua caliente).
para empezar a dispensar agua caliente.
Personalización de bebidas y creación de perfiles
Esta cafetera permite ajustar la configuración de una bebida a sus preferencias y guardar la bebida en
un perfil personal. Existen dos formas de crear un perfil:
1 En el menú 'Drinks' (Bebidas): Seleccione y ajuste una bebida y luego tope el icono de guardar .
2 En el menú 'Profiles' (Perfiles): Cree un perfil tocando el icono "Añadir perfil". Seleccione el perfil
recién creado, seleccione una bebida, ajústela según sus preferencias y luego toque el icono de
guardar .
Personalización de bebidas
Puede ajustar la configuración según sus preferencias:
1 Toque el icono de bebidas .
2 Seleccione su bebida preferida.
3 En pantalla se muestra la configuración que puede adecuar a sus preferencias. Toque la flecha
para pasar a la pantalla siguiente y configurar más ajustes. Dependiendo del tipo de bebida, puede
ajustar la intensidad, el volumen de café, la leche y la espuma, la temperatura, el sabor y el orden
en que se preparan las bebidas con leche.
4 Deslice las barras que quiera ajustar arriba o abajo hasta el nivel (Fig. 6) que prefiera.
5 Para guardar la configuración en su perfil, toque el icono 'saving' (almacenamiento) y siga las
instrucciones de la pantalla (Fig. 12).
Creación de un perfil
1 Toque el icono de perfiles .
2 Seleccione 'Add profile' (Fig. 13) (Añadir perfil).
3 Introduzca el nombre del nuevo perfil y confirme (Fig. 14) la operación.
4 Seleccione el perfil recién creado.
5 Para añadir bebidas al perfil, seleccione 'Add drink' (Fig. 15) (Añadir bebida).
Page 45

Español
45
Cambio de los ajustes de la máquina
Puede configurar los ajustes del molinillo usando la rueda de configuración del molinillo situada
dentro del contenedor de granos. Puede elegir entre 12 ajustes diferentes para el molinillo. Cuanto
más baja sea la configuración, más intenso será el café.
Nota: Necesita preparar 2 o 3 bebidas antes de que pueda apreciar la diferencia.
Precaución: Para evitar daños en el molinillo, no gire la rueda de configuración del molinillo más de un
grado cada vez.
1 Abra la tapa de la tolva para granos.
2 Presione hacia abajo la perilla de ajuste y gírela hacia la izquierda o la derecha (Fig. 16). Gire la
perilla de ajuste de la molienda una marca a la vez. Cada vez que haya convertido el ajuste de
molienda una marca, prepare un café para evitar daños en el molinillo.
3 Cierre la tapa de la tolva para granos.
Ajuste de la configuración predeterminada
Utilice el botón SETTINGS (Ajustes) para cambiar la siguiente configuración:
-
AquaClean: Para comprobar el estado de AquaClean e instalar uno nuevo.
-
Dureza del agua: para poder adaptar los ajustes del aparato al agua de su zona, mida la dureza del
agua.
-
Tiempo en modo de espera es el tiempo tras el cual el aparato pasa al modo de espera.
-
Luminosidad: para ajustar el contraste de la pantalla
-
Luz del depósito de agua: para ajustar la luz del depósito de agua
-
Idioma: para seleccionar otro idioma
-
Respuesta sonora: para activar/desactivar la respuesta sonora de la pantalla
-
Luz de la boquilla: para ajustar la luz en la boquilla dispensadora de café y de leche (solo algunos
tipos)
-
Ajustes de fábrica: para restablecer los ajustes de fábrica
Español
Manejo del grupo de preparación de café
Acceda a www.saeco.com/care para consultar el vídeo de instrucciones detalladas sobre cómo
quitar, introducir y limpiar el grupo de preparación de café.
Extracción del grupo de preparación de café de la máquina
1 Pulse el interruptor principal de la parte trasera de la máquina para apagarla.
2 Abra la puerta (Fig. 17) de mantenimiento.
3 Retire el cajón (Fig. 18) de residuos de café.
4 Pulse el botón (Fig. 19) PUSH y tire del asa del grupo de preparación de café para retirarlo de la
máquina (Fig. 20).
Colocación del grupo de preparación de café
Antes de volver a colocar el grupo de preparación del café en la máquina, asegúrese de que se
encuentra en la posición correcta.
1 Compruebe si la flecha del cilindro amarillo del lateral del grupo está alineada con la flecha negra y
la letra N (Fig. 21).
Page 46

46
Español
-
Si no están alineadas, baje la palanca hasta que entre en contacto con la base del grupo (Fig.
22) de preparación de café.
2 Asegúrese de que el gancho de bloqueo amarillo del otro lado del grupo de preparación de café
esté en la posición correcta.
-
Para colocar el gancho correctamente, presiónelo hacia arriba hasta que esté en la posición
(Fig. 23) más alta.
3 Vuelva a colocar el grupo de preparación del café en la máquina a lo largo de los raíles de guía de
los laterales hasta que encaje en su posición y se oiga un clic.No pulse el botón PUSH.
4 Vuelva a colocar el cajón de residuos de café y cierre la puerta de mantenimiento.
Limpieza y mantenimiento
La limpieza y el mantenimiento periódicos contribuyen a mantener la cafetera en condiciones
óptimas y garantizan un café con sabor óptimo durante mucho tiempo, un flujo de café estable y una
espuma de leche perfecta.
Consulte cuándo y cómo limpiar todas las partes desmontables del aparato en la tabla. Puede
obtener información detallada e instrucciones en vídeo en www.saeco.com/care.
Tabla de limpieza
Descripción
parcial
Grupo de
preparación del
café
Cuándo se debe limpiar Cómo se debe limpiar
Semanalmente Quite el conjunto de preparación de café,
enjuáguelo con agua del grifo y deje que se
seque al aire.
Lubricación del
grupo de
preparación
Sistema de
leche/espumador
de leche interno
Cada mes Realice el procedimiento 'Limpieza del grupo de
Dependiendo del tipo de
uso. Consulte la tabla
(consulte 'Lubricación del
grupo de preparación') de
lubricación.
Tras cada uso diario Utilice el programa HYGIESTEAM del menú de
Semanalmente Quite y desmonte el espumador de leche
preparación de café' con la pastilla
desengrasante Philips. Seleccione 'Brew group
clean' (Limpiar grupo de preparación de café) en
el menú de limpieza y siga las instrucciones de la
pantalla. Acceda a www.saeco.com/care para
ver el vídeo de instrucciones detalladas.
Utilice grasa Philips para lubricar el grupo de
preparación de café. Acceda a
www.saeco.com/care para ver el vídeo de
instrucciones detalladas.
limpieza. Seleccione HYGIESTEAM en el menú de
limpieza y siga las instrucciones de la pantalla.
Limpie el exterior del tubo de leche metálico con
un paño húmedo antes de colocarlo en el tubo
de leche.
(consulte 'Limpieza del espumador de leche
interno bajo el grifo') interno. Enjuague todas las
piezas bajo el grifo con un poco de jabón líquido.
Page 47

Español
47
Descripción
Cuándo se debe limpiar Cómo se debe limpiar
parcial
Cada mes Lleve a cabo el procedimiento 'DEEP MILK
Depósito de leche Semanalmente Desmonte el depósito (Fig. 24) de leche y empuje
Bandeja de goteo Vacíe la bandeja de goteo
Recipiente para
posos de café
Depósito de agua Semanalmente Enjuague del depósito de agua bajo el grifo
Abertura de café Compruebe la abertura del
todos los días o en cuanto el
indicador rojo de "bandeja
de goteo llena" sobresalga
de la bandeja de goteo (Fig.
26).
Vacíe el recipiente de posos
de café cuando lo indique la
máquina. Límpielo
semanalmente.
café cada semana para
saber si está obstruida.
CLEAN' (Limpieza profunda de leche) con el
limpiador del circuito de leche de Philips.
Seleccione 'DEEP MILK CLEAN' (Limpieza
profunda de leche) en el menú de limpieza y siga
las instrucciones de la pantalla. Acceda a
www.saeco.com/care para ver el vídeo de
instrucciones detalladas.
la bola hacia fuera con la cuchara (Fig. 25) de
medida. Enjuague todos los componentes con
agua corriente o en el lavavajillas
Quite la bandeja de goteo y enjuáguela con agua
corriente y detergente.
Retire el recipiente de posos de café mientras la
máquina está encendida y enjuáguelo con agua
corriente y jabón.
Desenchufe la máquina y retire el grupo de
preparación de café. Abra la tapa del
compartimento de café molido e introduzca el
mango de una cuchara en la abertura de café.
Mueva el mango arriba y abajo hasta que caiga
(Fig. 27) el café molido que está atascado.
Acceda a www.saeco.com.care para ver el vídeo
de instrucciones detalladas.
Español
Consejo: En la última página de este manual del usuario hay un calendario de limpieza. Anote las
fechas en las que realiza la limpieza.
Limpieza del grupo de preparación
La limpieza periódica del grupo de preparación de café impide que los residuos de café obstruyan los
circuitos internos. Visite www.saeco.com/care para ver los vídeos en los que se explica cómo quitar,
introducir y limpiar el grupo de preparación de café.
Limpieza de la unidad de preparación de café bajo el grifo
1 Abra la puerta de mantenimiento y quite el conjunto (consulte 'Extracción del grupo de
preparación de café de la máquina') de preparación de bebidas.
2 Enjuague bien el grupo de preparación de café con agua. Limpie exhaustivamente el filtro (Fig. 28)
superior.
Page 48

48
Español
3 Deje que el grupo de preparación de café se seque al aire antes de volver a colocarlo. Para evitar
que se introduzcan fibras en el interior, no seque el grupo de preparación del café con un paño.
Limpieza del grupo de preparación de café con pastillas desengrasantes
Utilice pastillas desengrasantes de café Philips exclusivamente. Toque el icono de limpieza
seleccione 'Brew group clean' (Limpiar grupo de preparación de café). A continuación, siga las
instrucciones de la pantalla. Visite www.saeco.com/care para ver el vídeo de instrucciones detalladas.
y
Lubricación del grupo de preparación
Lubrique periódicamente el grupo de preparación de café para asegurarse de que las piezas móviles
se muevan con suavidad.
1 Aplique una fina capa de grasa alrededor del eje de la parte inferior del grupo de preparación del
café.
2 Aplique una fina capa de grasa a los raíles de ambos lados.
Consulte la tabla siguiente para ver la frecuencia de lubricación. Visite www.saeco.com/care para ver
el vídeo de instrucciones detalladas.
Frecuencia de uso
Low (Baja) 1-5 Cada 4 meses
Normal 6-10 Cada 2 meses
Alta >10 Cada mes
Nº de bebidas preparadas al día Frecuencia de engrasado
Programas de limpieza del espumador de leche interno
Las cafeteras tienen tres programas para limpiar el espumador de leche interno. La cafetera ejecuta el
programa de limpieza Auto Steam Shoot (Vapor auto) de forma automática tras preparar una bebida
con leche. Puede tocar el icono de limpieza para seleccionar el programa HYGIESTEAM o DEEP
MILK CLEAN (Limpieza profunda de leche) y desplazarse por el menú de limpieza. A continuación,
siga las instrucciones de la pantalla.
-
Auto Steam Shoot (Vapor auto): La cafetera expulsa vapor a través del espumador de leche interno
para enjuagarlo rápidamente.
-
HYGIESTEAM: la cafetera limpia exhaustivamente el sistema interno de leche con vapor. Coloque
el tubo de leche en el soporte (Fig. 29) correspondiente y siga las instrucciones de la pantalla.
-
DEEP MILK CLEAN (Limpieza profunda de leche): Realice el procedimiento 'DEEP MILK CLEAN'
(Limpieza profunda de leche) con el limpiador del circuito de leche de Philips para limpiar a
conciencia el sistema de leche interno.
Limpieza del espumador de leche interno bajo el grifo
1 Abra la puerta del espumador de leche (Fig. 8) interno.
2 Tire hacia abajo (Fig. 30) del espumador de leche interno para quitarlo.
3 Tire de la parte inferior para separarla de la parte (Fig. 31) superior y desmontar el espumador de
leche interno.
4 Desmonte todas las piezas (Fig. 32) y límpielas bajo el grifo.
5 Vuelva a montar el espumador de leche interno.
6 Para colocar el espumador de leche interno otra vez, póngalo en posición vertical y asegúrese de
que los orificios están alineados con los dos tubos de la cafetera. Mueva el espumador de leche
interno hacia arriba hasta que encaja en su sitio (Fig. 33).
7 Cierre la puerta.
Page 49

Español
Visite www.saeco.com/care para ver el vídeo de instrucciones detalladas.
Procedimiento de descalcificación
Utilice solo descalcificador Philips. No utilice en ningún caso descalcificadores a base de ácido
sulfúrico, ácido clorhídrico, ácido sulfámico o acético (vinagre), ya que pueden dañar el circuito de
agua del aparato y no disolver correctamente la cal. No utilizar el descalcificador de Philips anulará la
garantía. No descalcificar el aparato también anulará la garantía. Puede comprar la solución
descalcificadora de Philips en la tienda en línea www.saeco.com/care.
1 Cuando la cafetera indique que tiene que eliminar los depósitos de cal, pulse el botón de
inicio/parada para comenzar. Para iniciar este procedimiento sin que la cafetera lo indique,
toque el icono de limpieza
2 Retire la bandeja de goteo y el recipiente de posos de café, vacíelos y vuelva a colocarlos en su
lugar.
3 Extraiga el depósito de agua y vacíelo. Luego quite el filtro AquaClean.
4 Vierta todo el contenido de la botella de descalcificador de Philips en el depósito de agua y llénelo
de agua hasta el nivel CALC CLEAN. Después, vuelva a colocarlo en el aparato.
5 Coloque un recipiente grande (1,5 l) debajo de la boquilla dispensadora de café.
6 Para iniciar el procedimiento de descalcificación, siga las instrucciones que aparecen en pantalla.
El proceso de eliminación de los depósitos de cal dura unos 15minutos y consiste en un ciclo de
descalcificación y un ciclo de enjuagado.
7 Cuando el ciclo de eliminación de los depósitos de cal termine, tendrá que enjuagar el depósito de
agua y el circuito de agua. Siga las instrucciones de la pantalla.
8 Coloque un nuevo filtro AquaClean en el depósito de agua y vuelva a activar el filtro AquaClean en
el menú.
Consejo: El uso del filtro AquaClean reduce la necesidad de descalcificación.
y seleccione 'Descale' (Fig. 34) (Descalcificar).
49
Español
Qué hacer si el proceso de descalcificación se interrumpe
Puede salir del procedimiento de descalcificación pulsando el botón de encendido/apagado del
panel de control. Si el proceso de descalcificación se interrumpe antes de que termine, realice lo
siguiente:
1 Vacíe y lave bien el depósito de agua.
2 Llene el depósito con agua hasta la indicación de nivel CALC CLEAN y vuelva a encender el
aparato. El aparato se calentará y realizará un ciclo de enjuagado automático.
3 Antes de preparar ninguna bebida, realice un ciclo de enjuagado manual. Para realizar un ciclo de
enjuagado manual, primero dispense medio tanque de agua caliente y después prepare 2 tazas de
café sin moler ni añadir café molido.
Nota: Si el procedimiento de descalcificación no se completó, el aparato requerirá otro procedimiento
de descalcificación tan pronto como sea posible.
Page 50

50
Español
Iconos de advertencia y códigos de error
Significado de los iconos de advertencia
Llene el depósito de agua con agua
limpia hasta la indicación de nivel
MAX.
La máquina necesita llenar el circuito
de agua con agua. Asegúrese de que
haya agua en el depósito de agua y
presione el botón de arranque/paro.
Botón de arranque.
La tolva de granos de café está
vacía. Ponga granos de café
nuevos en la tolva de granos.
El grupo de preparación de café no
se introduce o no se introduce
correctamente. Introduzca el grupo
de preparación de café y asegúrese
de que encaja en su sitio.
El recipiente de posos de café está
lleno. Asegúrese de que la cafetera
está encendida.. A continuación,
retire y vacíe el recipiente de posos
de café.
Cierre la puerta de mantenimiento.
El espumador de leche interno no
está insertado o no está bien
insertado, o la puerta de la boquilla
está abierta. Asegúrese de que los
orificios del espumador de leche
están alineados con los tubos de la
cafetera antes de empujar el
espumador hacia arriba hasta su
posición. A continuación, cierre la
puerta de la boquilla.
No se ha colocado el recipiente de
posos de café. Vuelva a colocar el
recipiente de posos de café.
Significado de los códigos de error
A continuación, encontrará una lista de los códigos de error que muestran problemas que puede
solucionar sin ayuda. Las instrucciones en vídeo están disponibles en www.saeco.com/care. Si
aparece otro código de error, póngase en contacto con el Centro de Atención al Cliente de su país.
Para información de contacto, consulte el folleto de la garantía.
Código
de error
01 La abertura de café
Problema Posible solución
está obstruida.
Apague la máquina y desenchúfela. Extraiga el grupo de
preparación del café. Luego abra la tapa del compartimento
de café molido e introduzca el mango de una cuchara. Mueva
el mango arriba y abajo hasta que caiga (Fig. 27) el café molido
que está atascado. Visite www.saeco.com/care para ver el
vídeo de instrucciones detalladas.
03 El grupo de
preparación de café
está sucio o no está
bien engrasado.
Apague la máquina mediante el interruptor principal. Enjuague
el grupo de preparación con agua limpia, deje que se seque y
después lubríquelo. Consulte el capítulo 'Limpieza del grupo
de preparación de café' o visite www.saeco.com/care para ver
el vídeo de instrucciones detalladas. Después, encienda la
máquina de nuevo.
Page 51

Español
51
Código
Problema Posible solución
de error
04 El grupo de
preparación de café no
está colocado
correctamente.
05 Hay aire en el circuito
de agua.
El filtro AquaClean no
se preparó de forma
adecuada antes de la
instalación o está
obstruido.
14 La máquina se ha
sobrecalentado.
Apague la máquina mediante el interruptor principal. Quite el
grupo de preparación del café y vuelva a insertarlo. Asegúrese
de que el grupo de preparación del café está en la posición
correcta antes de introducirlo. Consulte el capítulo 'Manejo del
grupo de preparación de café' o visite www.saeco.com/care
para ver el vídeo de instrucciones detalladas. Después,
encienda la máquina de nuevo.
Encienda y apague la máquina mediante el interruptor
principal para reiniciarla. Si funciona, dispense 2 o 3 tazas de
agua caliente. Elimine los depósitos de cal de la máquina si no
lo ha hecho desde hace mucho tiempo.
Retire el filtro AquaClean e intente preparar un café otra vez. Si
funciona, asegúrese de que el filtro AquaClean se ha
preparado de forma adecuada antes de colocarlo otra vez
(consulte 'Preparación del filtro AquaClean para la activación').
Vuelva a colocar el filtro AquaClean en el depósito de agua. Si
no funciona, es posible que el filtro esté obstruido y sea
preciso cambiarlo.
Apague el aparato y enciéndalo de nuevo después de 30
minutos.
Solicitud de accesorios
Para limpiar y descalcificar el aparato, utilice solamente productos de mantenimiento de Philips.
Puede adquirir estos productos en el distribuidor local, en los centros de servicio autorizados o en
línea en www.saeco.com/care. Para encontrar la lista completa de repuestos en línea, introduzca el
número de modelo de la máquina. Puede encontrar el número de modelo en el interior de la puerta
de mantenimiento.
Productos de mantenimiento y números de tipo:
-
Solución descalcificadora CA6700
-
Filtro AquaClean CA6903
-
Grasa para el grupo de preparación de café HD5061
-
Pastillas desengrasantes de café CA6704
-
Limpiador del circuito de leche CA6705
-
Kit de mantenimiento CA6707
Español
Resolución de problemas
Este capítulo resume los problemas más comunes que pueden surgir al usar el aparato. En
www.saeco.com/care están disponibles los vídeos de ayuda y una lista completa de las preguntas
más frecuentes. Si no logra solucionar el problema, póngase en contacto con el Centro de Atención al
Cliente de Philips en su país. Para información de contacto, consulte el folleto de la garantía.
Page 52

52
Español
Problema Causa Solución
La bandeja de goteo se
llena rápidamente.
Esto es normal. El aparato
utiliza agua para enjuagar el
circuito interno y el grupo de
preparación del café. Parte del
agua fluye a través del sistema
interno y directamente hacia la
bandeja de goteo.
Vacíe la bandeja de goteo todos los
días o en cuanto el indicador rojo de
"bandeja de goteo llena" sobresalga de
la bandeja (Fig. 26) de goteo. Coloque
una taza debajo de la boquilla
dispensadora para recoger el agua de
enjuagado.
El equipo está en modo
DEMO (Demostración).
El icono del recipiente
de posos de café lleno
continúa mostrándose.
Se muestra el icono
"recipiente de posos de
café lleno" a pesar de
que no está lleno.
No puedo retirar el grupo
de preparación del café.
Ha pulsado el botón de espera
durante más de 8 segundos.
Ha vaciado el recipiente de
posos de café mientras el
aparato estaba apagado.
Ha vuelto a colocar el
recipiente de posos de café
demasiado rápido.
El contador de la máquina no
se ha puesto a cero la última
vez que se ha vaciado el
recipiente de posos de café.
El grupo de preparación de
café no está en la posición
correcta.
Apague y encienda el aparato con el
interruptor principal de la parte trasera
del aparato.
Vacíe siempre el recipiente de posos de
café con el aparato encendido. Si vacía
el recipiente de posos de café cuando
el aparato está apagado, el contador de
ciclos de café no se restablecerá.
No vuelva a colocar el recipiente de
posos de café hasta que se indique en
pantalla.
Espere siempre unos 5 segundos
cuando vuelva a colocar el recipiente
de posos de café.De esta forma se
reiniciará el contador de posos de café
en cero.
Vacíe siempre el recipiente de posos de
café con el aparato encendido. Si vacía
el recipiente de posos de café cuando
la máquina está apagado, el contador
de posos de café no se pondrá a cero.
Restablezca el aparato de la siguiente
manera: vuelva a colocar la bandeja de
goteo y el recipiente de posos de café.
Luego cierre la puerta de
mantenimiento y apague y encienda el
aparato otra vez. Haga otro intento de
quitar el grupo de preparación de café.
No ha retirado el recipiente de
posos de café.
Retire el recipiente de posos de café
antes de retirar el grupo de preparación
de café.
Page 53

Problema Causa Solución
No puedo insertar el
grupo de preparación de
café.
El grupo de preparación de
café no está en la posición
correcta.
Restablezca el aparato de la siguiente
manera: vuelva a colocar la bandeja de
goteo y el recipiente de posos de café.
Deje fuera el grupo de preparación del
café. Cierre la puerta de servicio y
encienda y apague el aparato. Después,
ponga el grupo de preparación en la
posición correcta y vuelva a introducirlo
en la cafetera (consulte 'Colocación del
grupo de preparación de café').
Español
53
El café está aguado. El grupo de preparación de
Se han configurado los ajustes
La máquina realiza su
El café no está lo
suficientemente caliente.
La temperatura ajustada es
Añadió leche. La leche, tanto si está templada como si
No sale café o sale con
mucha lentitud.
café está sucio o debe
lubricarse.
El molinillo está configurado
con un ajuste demasiado
grueso.
del café.
procedimiento de ajuste
automático después de
cambiar los ajustes del molinillo
o los tipos de grano.
Las tazas que utiliza están frías. Caliente las tazas previamente
demasiado baja. Compruebe
los ajustes del menú.
El filtro AquaClean no se
preparó de forma adecuada
para instalarlo o está obstruido.
Limpie y engrase el grupo de
preparación.
Configure el molinillo con un ajuste más
fino (bajo).
Seleccione su bebida de café y
configure los ajustes para obtener un
café más fuerte.
Prepare varias tazas de café.
enjuagándolas con agua caliente.
Ajuste la temperatura con el valor High
(Alta) en el menú.
está fría, siempre reduce la temperatura
del café hasta cierto punto.
Retire el filtro AquaClean e intente
preparar un café otra vez. Si funciona,
asegúrese de que el filtro AquaClean se
ha preparado de forma adecuada antes
de colocarlo otra vez. Vuelva a poner el
filtro preparado. Si no funciona, es
posible que el filtro esté obstruido y sea
preciso cambiarlo.
Español
El molinillo está configurado
con un ajuste demasiado fino.
El grupo de preparación del
café está sucio.
Configure el molinillo con un ajuste más
grueso (alto).
Limpie el grupo de preparación del café.
Page 54

54
Español
Problema Causa Solución
La boquilla dispensadora de
café está sucia.
Limpie la boquilla dispensadora de café
y sus orificios con una aguja.
El circuito del aparato está
atascado por depósitos de cal.
El aparato no produce
espuma de leche.
El tipo de leche utilizado no es
La leche salpica. La leche que utiliza no está lo
El espumador de leche interno
está sucio o no se ha insertado
correctamente.
adecuado para producir
espuma.
suficientemente fría.
El tubo de leche flexible no
está bien conectado.
El espumador de leche y los
tubos de leche no están
limpios.
Descalcifique el aparato.
Limpie el espumador de leche interno y
asegúrese de colocarlo e introducirlo
correctamente (consulte 'Limpieza del
espumador de leche interno bajo el
grifo').
Los diferentes tipos de leche producen
como resultado cantidades y calidades
diferentes de espuma. Hemos probado
los siguientes tipos de leche que han
demostrado producir espuma de leche
con buenos resultados: leche de vaca
semidesnatada o entera, leche de soja y
leche sin lactosa.
Asegúrese de utilizar leche fría
directamente del frigorífico.
Abra la puerta de la boquilla (Fig. 8)
dispensadora de café y compruebe si el
tubo de leche flexible está
completamente conectado al
espumador de leche (Fig. 9). Tenga en
cuenta que el espumador de leche y los
tubos de leche pueden estar calientes.
Deje que el espumador de leche y los
tubos se enfríen antes de tocarlos.
Quite y desmonte el espumador de
leche (consulte 'Limpieza del
espumador de leche interno bajo el
grifo') interno. Enjuague todas las piezas
con agua del grifo. Para una limpieza a
fondo, utilice el limpiador de circuitos
de leche Philips y realice el
procedimiento DEEP MILK CLEAN
mediante el menú de limpieza ( ).
Tenga en cuenta que, si las piezas se
han limpiado en el lavavajillas, es
posible que se hayan obstruido con
partículas de alimentos o residuos de
detergente. También se recomienda
comprobar visualmente que no estén
obstruidos.
Page 55

Problema Causa Solución
Le aconsejamos que realice el
programa HygieSteam todos los días: 1)
Pulse "Limpiar" en el panel de control.
2) Seleccione 'HygieSteam'. 3) Pulse el
botón de arranque para iniciar el
proceso y, a continuación, confirme
todos los pasos en la pantalla.
Español
55
Los tubos de leche están
obstruidos.
Parece que la máquina
pierde líquido.
La máquina no está colocada
No puedo activar el filtro
AquaClean y la máquina
solicita que se realice
una descalcificación.
El aparato utiliza agua para
enjuagar el circuito interno y el
grupo de preparación del café.
Parte del agua fluye a través
del sistema interno y
directamente hacia la bandeja
de goteo.
La bandeja de goteo está
demasiado llena y ha rebosado,
lo que da la impresión de que
hay una fuga en la máquina.
en una superficie horizontal.
El filtro no se ha reemplazado a
tiempo después que
comenzara a parpadear el
icono del filtro AquaClean y la
capacidad bajara al 0%.
Guarde siempre el recipiente de leche
sin los tubos de leche en el refrigerador.
La leche sobrante podría acumularse
dentro de los tubos de leche y bloquear
el flujo de leche que atraviesa los tubos.
Enjuague los tubos de leche antes de
almacenarlos.
Vacíe la bandeja de goteo todos los
días o en cuanto el indicador de
"bandeja de goteo llena" sobresalga de
la tapa (Fig. 26) de la bandeja de goteo.
Coloque una taza debajo de la boquilla
dispensadora para recoger el agua de
enjuagado.
Vacíe la bandeja de goteo todos los
días o en cuanto el indicador de
"bandeja de goteo llena" sobresalga de
la tapa (Fig. 26) de la bandeja de goteo.
Coloque una taza debajo de la boquilla
dispensadora para recoger el agua de
enjuagado.
Coloque la máquina sobre una
superficie horizontal para que funcione
correctamente el indicador de bandeja
de goteo llena.
Descalcifique primero la máquina e
instale después el filtro AquaClean.
Español
No ha instalado el filtro
El filtro nuevo del agua
no encaja.
AquaClean durante la primera
instalación, sino después de
haber preparado unos 25cafés
(a razón de 100ml por taza). La
máquina debe estar
completamente libre de
depósitos de cal antes de
instalar el filtro AquaClean.
Está intentado instalar un filtro
diferente del filtro AquaClean.
Descalcifique primero la máquina y, a
continuación, instale un nuevo filtro
AquaClean. Después de la
descalcificación, el contador de filtros
se reinicia a 0/8. Confirme siempre la
activación del filtro en el menú de la
máquina. Haga esto también después
de sustituir el filtro.
La máquina solamente admite el filtro
AquaClean.
Page 56

56
Español
Problema Causa Solución
La máquina hace ruido. Es normal que la máquina haga
ruido durante el uso.
Si la máquina empieza a hacer un ruido
diferente, limpie el grupo de
preparación de café y lubríquelo
(consulte 'Lubricación del grupo de
preparación').
El filtro AquaClean no se
preparó correctamente y ahora
el aire penetra en la máquina.
Quite el filtro AquaClean del depósito
de agua. Sacuda el filtro durante unos 5
segundos. Sumerja completamente el
filtro boca abajo en una jarra con agua
fría durante al menos 30segundos.
Espere a que no salgan más burbujas
de aire. Vuelva a colocar el filtro
AquaClean ya preparado en el depósito
de agua. A continuación, dispense 2 o
3tazas de agua caliente.
Especificaciones técnicas
El fabricante se reserva el derecho a mejorar las especificaciones técnicas del producto. Todas las
cantidades predefinidas son aproximadas.
Descripción
Dimensiones (ancho x alto x largo) 283 x 393 x 489 mm
Peso 10.8 - 12.2kg
Longitud del cable de alimentación 1200 mm
Depósito de agua 1,7 litros, desmontable
Capacidad de la tolva de granos de café 450g
Capacidad del recipiente para posos de café 14 discos
Capacidad de la jarra de leche 600ml
Valor
Altura de la boquilla ajustable 75-148 mm
Tensión nominal - Potencia nominal - Fuente de
alimentación
Consulte los datos en la placa del interior de la
puerta de servicio
Page 57

Français
57
Sommaire
Présentation de la machine (Fig. A)__________________________________________________________________ 57
Panneau de commande (Fig. B) _____________________________________________________________________ 58
Introduction __________________________________________________________________________________________ 58
Première installation _________________________________________________________________________________ 58
Filtre AquaClean______________________________________________________________________________________ 59
Mesure de la dureté de l'eau_________________________________________________________________________ 59
Préparation de boissons _____________________________________________________________________________ 60
Personnalisation de boissons et création de profils ________________________________________________ 61
Réglage des paramètres de la machine _____________________________________________________________ 62
Manipulation du groupe de percolation_____________________________________________________________ 62
Nettoyage et entretien _______________________________________________________________________________ 63
Procédure de détartrage_____________________________________________________________________________ 66
Icônes d'alerte et codes d'erreur_____________________________________________________________________ 66
Commande d'accessoires____________________________________________________________________________ 68
Dépannage ___________________________________________________________________________________________ 68
Caractéristiques techniques _________________________________________________________________________ 72
Présentation de la machine (Fig. A)
A1 Panneau de commande et écran tactile A12 Poignée de déverrouillage du plateau
égouttoir
Français
A2 Support de tasse A13 Cordon d'alimentation avec fiche secteur
A3 Couvercle du bac à grains A14 Bouton de réglage de la mouture
A4 Couvercle du compartiment du café
prémoulu
A5 Cappuccinatore interne A16 Groupe de percolation
A6 Buse réglable de distribution du café et
du lait
A7 Support du bec d'admission de lait A18 Tiroir à résidus de café
A8 Commutateur principal A19 Bac à marc de café
A9 Prise pour cordon d'alimentation A20 Plateau égouttoir
A10 Porte d'accès au groupe café A21 Grille du plateau égouttoir
A11 Indicateur «Plateau égouttoir plein» A22 Réservoir d’eau
A15 Réservoir à grains
A17 Entonnoir pour café
Accessoires
A23 Tube de graisse A26 Cuillère de mesure
A24 Brossette de nettoyage A27 Bande de test de la dureté de l’eau
A25 Filtre AquaClean
Français
Page 58

58
Français
Pièces pour mousse de lait
A28 Réservoir de lait A30 Bec d'admission de lait métallique
A29 Bec d'admission de lait souple A31 Couvercle du récipient à lait
Panneau de commande (Fig. B)
Reportez-vous à la figure B pour obtenir un aperçu de tous les boutons et icônes du panneau de
commande et de l'écran tactile de la machine.
La description figure au-dessous. Vous pouvez faire glisser le doigt sur l'écran tactile ou le toucher
pour sélectionner ou valider vos choix.
B1. Bouton marche/arrêt B4. Écran tactile B7. Bouton marche/arrêt
B2. Profils personnels B5. Menu de nettoyage
B3. Menu des boissons B6. Paramètres de la
machine
Introduction
Félicitations pour votre achat d'une machine à café Saeco entièrement automatique! Pour profiter
pleinement de l’assistance Saeco, veuillez enregistrer votre produit à l’adresse www.saeco.com/care.
Lisez attentivement le livret de sécurité distinct avant d’utiliser la machine pour la première fois, et
conservez-le pour un usage ultérieur.
Pour vous aider à utiliser votre machine de manière optimale, Saeco offre une assistance complète de
3manières différentes:
1 Le guide de mise en route séparé pour la première installation et utilisation.
2 Ce mode d'emploi donnant des informations détaillées
3 Assistance et vidéos en ligne: scannez le codeQR sur la première page ou consultez le site
www.saeco.com/care
Remarque: Cette machine a été testée avec du café. Bien qu'elle ait été soigneusement nettoyée, il
se peut que quelques résidus de café subsistent. Nous garantissons néanmoins que la machine est
entièrement neuve.
Première installation
Avant la première utilisation de votre machine à café, vous devez effectuer quelques étapes simples,
comme remplir le circuit d'eau et activer le filtre AquaClean. Ces procédures sont expliquées dans le
guide distinct de mise en route.
Pour un excellent café, vous devez commencer par préparer 5cafés afin de permettre l'auto-réglage
de l'appareil.
L'appareil a été configuré de manière à extraire une saveur optimale de vos grains de café. Nous vous
conseillons donc de ne pas modifier les réglages du moulin avant d'avoir préparé 100 à 150tasses
(environ 1mois d'utilisation).
Nettoyez soigneusement le réservoir de lait, les becs d'admission de lait et le cappuccinatore avant la
première utilisation. Nous vous conseillons de ne pas nettoyer le cappuccinatore au lave-vaisselle,
afin d'éviter que des résidus d'aliments ou de détergent ne le bouchent.
Page 59

Français
59
Filtre AquaClean
Le filtre AquaClean est conçu pour réduire les dépôts de calcaire dans votre machine à café et fournir
une eau filtrée pour préserver l’arôme et le goût de chaque tasse de café. Si vous utilisez une série de
huitfiltres AquaClean tel qu’indiqué par la machine et dans le présent mode d'emploi, il ne sera pas
nécessaire de détartrer votre machine avant d’avoir servi 5000tasses. Chaque filtre permet de servir
jusqu'à 625tasses, en fonction des variétés de café sélectionnées et de la fréquence de rinçage et de
nettoyage.
Préparation du filtre AquaClean avant son activation
Avant de placer le filtre AquaClean dans le réservoir d’eau, vous devez le préparer à l’utilisation:
1 Secouez la cartouche pendant environ 5secondes (Fig. 1).
2 Plongez entièrement le filtre à l’envers dans une verseuse remplie d’eau froide pendant au moins
30secondes. Attendez jusqu’à ce que plus aucune bulle d’air ne sorte (Fig. 2).
3 Poussez le filtre dans le raccordement du filtre au niveau le plus bas (Fig. 3) possible.
Activation du filtre AquaClean
Vous devez activer chaque nouveau filtre AquaClean utilisé. En activant le filtre AquaClean, la
machine surveille la capacité du filtre AquaClean et le nombre de filtres utilisés. Vous pouvez activer le
filtre AquaClean de trois manières différentes.
1. Activation du filtre AquaClean lors de la première installation
Lorsque vous l'allumez pour la première fois, la machine vous guide dans les premières étapes
d'installation, comme le remplissage du réservoir d'eau, le remplissage du circuit d'eau et l'activation
du filtre AquaClean. Il suffit de suivre les instructions à l'écran.
Français
2. Activation du filtre AquaClean au moment demandé
Veuillez remplacer le filtre AquaClean lorsque le message «Replace AquaClean filter?» (Remplacer le
filtre AquaClean?) s'affiche à l'écran. Suivez alors les instructions à l’écran pour activer correctement le
filtre.
Veuillez remplacer le filtre AquaClean au moins tous les 3mois, même si la machine n'indique pas
encore que c'est nécessaire.
3. Activation du filtre AquaClean à tout autre moment
Vous pouvez commencer à utiliser le filtre AquaClean à tout moment en suivant les instructions cidessous.
1 Touchez l'icône Paramètres
2 Sélectionnez «new» (nouveau), puis lorsque l'écran d'activation apparaît, appuyez sur le bouton
marche/arrêt .
3 Suivez les instructions à l’écran.
Remarque: dans certains cas, la machine vous indique que vous devez la détartrer avant d’installer et
d’activer un nouveau filtre AquaClean. Cela est dû au fait qu’il ne doit plus y avoir de calcaire dans la
machine pour pouvoir utiliser le filtre AquaClean. Suivez les instructions à l’écran.
, puis sélectionnez «AquaClean» (Fig. 4).
Mesure de la dureté de l'eau
Lors de la première installation, vous devez régler la dureté de l'eau. Suivez les étapes à l'écran et
utilisez la bandelette de test de dureté d'eau fournie à cet effet. Pour régler la dureté de l’eau
ultérieurement, touchez l'icône Paramètres
et sélectionnez «dureté de l’eau».
Page 60

60
Français
1 Immergez la bandelette de test de dureté de l'eau dans l'eau du robinet pendant 1seconde.
Attendez une minute.
2 Vérifiez combien de carrés sont devenus rouges.
3 Sélectionnez le réglage de dureté de l'eau approprié et touchez sur l'icône OK pour confirmer.
Nombre de carrés rouges:
Valeur à définir 1 2 3 4
Préparation de boissons
Touchez l'icône Boissons pour entrer dans le menu «Boissons». Faites défiler les différentes pages
pour rechercher une boisson. Une fois que vous avez sélectionné une boisson, vous pouvez la
personnaliser en réglant ses paramètres (voir 'Personnalisation de vos boissons').
-
Touchez l'icône «2x» si vous voulez préparer deux tasses. La machine effectue automatiquement
deux cycles de mouture de suite pour les boissons (Fig. 5) sélectionnées.
-
Touchez l'icône Profils pour préparer l'une de vos boissons enregistrées.
-
Faites coulisser la buse de distribution vers le haut ou vers le bas pour adapter la hauteur à la taille
de la tasse ou du verre utilisé.
Préparation de boissons au café
1 Remplissez le réservoir avec de l’eau du robinet et le bac à grains avec des grains de café.
Conseil: Glissez la buse de distribution en position supérieure pour faciliter l’accès au réservoir
d’eau.
2 Touchez l'icône Boissons , puis sélectionnez votre café.
3 Vous pouvez régler les paramètres à votre convenance en faisant glisser les barres réglables vers le
haut ou vers le bas (Fig. 6).
4 Appuyez sur le bouton marche/arrêt pour commencer à préparer la boisson sélectionnée.
Préparation de boissons à base de lait
1 Remplissez le réservoir avec de l’eau du robinet et le bac à grains avec des grains de café.
Conseil: Glissez la buse de distribution en position supérieure pour faciliter l’accès au réservoir
d’eau.
2 Dévissez le couvercle du réservoir de lait et remplissez ce dernier de lait (Fig. 7).
Pour un résultat optimal, utilisez toujours du lait sortant directement du réfrigérateur.
3 Placez le bec d'admission de lait métallique dans le réservoir. Ouvrez la porte du cappuccinatore
interne (Fig. 8) et raccordez le bec d'admission de lait souple au cappuccinatore (Fig. 9). Refermez
ensuite la porte du cappuccinatore interne.
4 Touchez l'icône Boissons , puis sélectionnez votre café.
5 Vous pouvez régler les paramètres à votre convenance en faisant glisser les barres réglables vers le
haut ou vers le bas (Fig. 6).
6 Appuyez sur le bouton marche/arrêt à tout moment pour commencer à préparer la boisson
sélectionnée.
7 Directement après la distribution du lait, l'injection de vapeur automatique («Auto Steam Shoot»)
est effectuée. La machine injecte de la vapeur dans le système de lait interne pour le rincer
rapidement.
Page 61

Français
Conseil: Vous pouvez également utiliser une brique de lait classique pour préparer vos boissons à
base de lait. Insérez le bec d'admission de lait métallique directement dans la brique de lait.
Préparation d’un café avec du café prémoulu
1 Ouvrez le couvercle du compartiment de café prémoulu et versez une mesurette de café prémoulu
dans le compartiment (Fig. 10). Fermez le couvercle.
2 Après avoir sélectionné une boisson, touchez l'icône de café prémoulu (Fig. 11) , puis appuyez sur
le bouton marche/arrêt
Remarque: Si vous sélectionnez du café prémoulu, vous ne pouvez pas régler son intensité ni
préparer plus d’une tasse à la fois.
.
Verser l'eau chaude
1 Touchez l'icône Boissons
2 Appuyez sur le bouton marche/arrêt
, puis sélectionnez «Hot water» (Eau chaude).
pour commencer à verser l’eau chaude.
61
Personnalisation de boissons et création de profils
Cette machine vous permet de régler les paramètres d’une boisson à votre convenance et
d’enregistrer le réglage de la boisson dans un profil personnel. Il existe deux façons de créer un profil:
1 Dans le menu «Boissons»: sélectionnez et réglez une boisson, puis touchez l'icône «Save»
(Enregistrer) .
2 Dans le menu «Profils»: Créez un profil en touchant l'icône «Add profile» (Ajouter un profil).
Sélectionnez le profil nouvellement créé, sélectionnez une boisson, réglez-la selon vos
préférences, puis appuyez sur l'icône «Save» (Enregistrer) .
Personnalisation de vos boissons
Vous pouvez régler les paramètres à votre convenance:
1 Touchez l'icône Boissons .
2 Sélectionnez votre boisson préférée.
3 L’écran indique les paramètres que vous pouvez régler à votre convenance. Tapotez sur la flèche
pour passer à l'écran suivant afin de régler davantage de paramètres. Selon le type de boisson,
vous pouvez régler l'intensité, le volume de café, le lait et la mousse, la température, le goût et
l'ordre de préparation des boissons à base de lait.
4 Faites glisser les barres vers le haut ou vers le bas pour les régler au niveau de votre choix (Fig. 6).
5 Vous pouvez enregistrer ces paramètres dans votre profil en touchant l'icône «Saving»
(Enregistrer) et en suivant les instructions à l'écran (Fig. 12).
Création d'un profil
1 Touchez l'icône Profils .
2 Sélectionnez «Add profile» (Ajouter un profil) (Fig. 13).
3 Saisissez un nom pour le profil et validez (Fig. 14).
4 Sélectionnez le profil nouvellement créé.
5 Ajoutez des boissons au profil en sélectionnant «Add drink» (Ajouter une boisson) (Fig. 15).
Français
Page 62

62
Français
Réglage des paramètres de la machine
Vous pouvez régler les paramètres du moulin à l'aide du bouton de réglage de la mouture dans le
réservoir à grains. Vous pouvez choisir parmi 12paramètres de mouture différents. Plus le réglage est
bas, plus le café est intense.
Remarque: Vous devez préparer2 ou 3boissons avant de sentir toute la différence de goût.
Attention: Ne tournez pas le bouton de réglage de la mouture de plus d'un cran à la fois afin d'éviter
d'endommager le moulin à café.
1 Soulevez le couvercle du bac à grains.
2 Appuyez sur le bouton de réglage de la mouture et tournez-le vers la gauche ou la droite (Fig. 16).
Tournez le bouton de réglage de la mouture d'un cran à la fois. À chaque fois que vous avez réglé
la mouture d'un cran, préparez un café pour éviter d'endommager le moulin.
3 Fermez le couvercle du bac à grains.
Réglage des paramètres par défaut
Utilisez l'icône PARAMÈTRES pour changer les réglages suivants:
-
AquaClean: pour vérifier le statut du filtre AquaClean et en installer un nouveau.
-
Dureté de l'eau: afin de régler les paramètres de la machine en fonction de la dureté locale de
l'eau dans votre région, veuillez mesurer la dureté de l'eau.
-
Durée de veille: durée après laquelle la machine passe en mode veille.
-
Luminosité: pour régler le contraste d'affichage
-
Témoin du réservoir d'eau: pour régler la lumière dans le réservoir d'eau
-
Langues: pour sélectionner une autre langue
-
Signaux sonores: pour activer/désactiver les signaux sonores de l'afficheur
-
Témoin du bec verseur: pour régler la lumière de la buse de distribution de café et de lait (certains
modèles uniquement)
-
Réglages d'usine: pour réinitialiser les paramètres d'usine
Manipulation du groupe de percolation
Visitez www.saeco.com/care pour obtenir des instructions vidéo détaillées sur le retrait, l'insertion et
le nettoyage du groupe de percolation.
Retrait du groupe de percolation de la machine
1 Éteignez la machine en appuyant sur l’interrupteur principal situé à l’arrière.
2 Ouvrez la porte (Fig. 17) d'accès au groupe de percolation.
3 Retirez le tiroir (Fig. 18) à résidus de café.
4 Appuyez sur le bouton PUSH (Fig. 19) et tirez le groupe de percolation pour l’enlever de la machine
(Fig. 20).
Réinsertion du groupe de percolation
Avant de faire glisser le groupe de percolation dans la machine, vérifiez qu’il est dans la bonne
position.
1 Vérifiez que la flèche située sur le cylindre jaune sur le côté du groupe de percolation est alignée
sur la flèche noire et N (Fig. 21).
Page 63

Français
-
Si ce n’est pas le cas, poussez le levier vers le bas jusqu’à ce qu’il touche la base du groupe de
percolation (Fig. 22).
2 Assurez-vous que le crochet de blocage jaune de l’autre côté du groupe de percolation est dans la
bonne position.
-
Pour positionner correctement le crochet, poussez-le vers le haut jusqu'à ce qu'il soit dans la
position (Fig. 23) la plus haute.
3 Replacez le groupe de percolation dans la machine en le faisant glisser le long des rainures
latérales de guidage jusqu’à ce qu’il soit enclenché. N’appuyez pas sur le bouton PUSH.
4 Remettez en place le tiroir des résidus de café, puis fermez la porte d’accès.
Nettoyage et entretien
Un nettoyage et un entretien réguliers optimisent le fonctionnement de votre machine, préservent le
bon goût du café pendant longtemps et assurent un débit du café stable et une parfaite mousse de
lait.
Consultez le tableau indiquant quand et comment nettoyer toutes les parties détachables de la
machine. Vous trouverez plus d'informations détaillées et des instructions vidéo sur
www.saeco.com/care.
Tableau relatif au nettoyage
Description de
la pièce
Groupe de
percolation
Quand nettoyer Comment nettoyer
Toutes les semaines Enlevez le groupe de percolation, rincez-le sous
le robinet et laissez-le sécher.
63
Français
Lubrification du
groupe de
percolation
Système de
distribution de
lait/Cappuccina
tore interne
Tous les mois Effectuez la procédure pour «Nettoyer le groupe
En fonction du type
d’utilisation. Consultez le
tableau de lubrification (voir
'Lubrification du groupe de
percolation').
Après chaque journée
d’utilisation
Toutes les semaines Retirez et démontez le cappuccinatore interne
de percolation» à l’aide d'une tablette de
dégraissage pour café Philips. Sélectionnez
«Brew group clean» (Nettoyer le groupe de
percolation) dans le menu de nettoyage et suivez
les instructions à l’écran. Visitez:
www.saeco.com/care pour des instructions
vidéo détaillées.
Lubrifiez le groupe de percolation à l’aide de la
graisse Philips. Visitez: www.saeco.com/care
pour des instructions vidéo détaillées.
Effectuez le programme HYGIESTEAM dans le
menu de nettoyage. Sélectionnez HYGIESTEAM
dans le menu de nettoyage et suivez les
instructions à l'écran. Essuyez l'extérieur du bec
d'admission de lait métallique à l'aide d'un
chiffon humide avant de le placer dans son
support.
(voir 'Nettoyage du cappuccinatore interne sous
le robinet'). Rincez tous les éléments sous le
robinet avec un peu de liquide vaisselle.
Page 64

64
Français
Description de
Quand nettoyer Comment nettoyer
la pièce
Tous les mois Effectuez la procédure «DEEP MILK CLEAN» à
Réservoir de lait Toutes les semaines Démontez le réservoir (Fig. 24) de lait et faites
Plateau égouttoir Videz le plateau égouttoir
Bac à marc de
café
Réservoir d’eau Toutes les semaines Rincez le réservoir d’eau sous le robinet
Entonnoir pour
café
tous les jours ou dès que le
témoin rouge «Plateau
égouttoir plein» s’allume à
travers le plateau égouttoir
(Fig. 26).
Videz le bac à marc de café
lorsque la machine le
demande. Nettoyez-le une
fois par semaine.
Vérifiez l’entonnoir pour café
toutes les semaines pour
voir s’il est obstrué.
l'aide du nettoyeur de circuit du lait Philips.
Sélectionnez «DEEP MILK CLEAN» dans le menu
de nettoyage et suivez les instructions à l'écran.
Visitez: www.saeco.com/care pour des
instructions vidéo détaillées.
sortir la boule avec la cuillère doseuse (Fig. 25).
Rincez toutes les pièces sous le robinet ou
passez-les au lave-vaisselle.
Retirez le plateau égouttoir et nettoyez-le sous le
robinet avec un peu de liquide vaisselle.
Retirez le bac à marc de café alors que la
machine est allumée et nettoyez-le sous le
robinet avec un peu de liquide vaisselle.
Débranchez la machine et retirez le groupe de
percolation. Ouvrez le couvercle du
compartiment à café prémoulu et insérez le
manche d’une cuillère dans l’entonnoir pour café.
Agitez le manche de haut en bas pour faire
tomber (Fig. 27) le bouchon de café moulu.
Visitez: www.saeco.com.care pour des
instructions vidéo détaillées.
Conseil: vous trouverez un calendrier de nettoyage sur la dernière page de ce mode d’emploi. Notez
les dates auxquelles vous devez procéder à un nettoyage.
Nettoyage du groupe de percolation
Un nettoyage régulier du groupe de percolation empêche les résidus de café d'obstruer les circuits
internes. Visitez www.saeco.com/care pour obtenir des vidéos d'assistance pour le retrait, l'insertion
et le nettoyage du groupe de percolation.
Nettoyage du groupe de percolation sous l'eau
1 Ouvrez la porte d'accès et retirez le groupe de percolation (voir 'Retrait du groupe de percolation
de la machine').
2 Rincez soigneusement le groupe de percolation avec de l’eau. Nettoyez soigneusement le filtre du
haut (Fig. 28).
3 Laissez le groupe de percolation sécher à l’air libre avant de le remettre en place. Évitez de sécher
le groupe de percolation avec un chiffon, afin d’empêcher que des fibres ne tombent dedans.
Page 65

Français
Nettoyage du groupe de percolation à l'aide de tablettes de dégraissage pour café
Utilisez uniquement des tablettes de dégraissage pour café Philips. Touchez l'icône Nettoyer
sélectionnez «Brew group clean» (Nettoyer le groupe de percolation). Suivez ensuite les instructions
à l'écran. Visitez www.saeco.com/care pour obtenir des instructions vidéo détaillées.
, puis
Lubrification du groupe de percolation
Lubrifiez régulièrement le groupe de percolation afin que ses pièces en mouvement puissent
continuer à bouger correctement.
1 Appliquez une fine couche de graisse autour de l’axe dans le fond du groupe de percolation.
2 Appliquez une fine couche de graisse sur les rails des deux côtés.
Reportez-vous au tableau ci-dessous pour connaître la fréquence de lubrification. Visitez
www.saeco.com/care pour obtenir des instructions vidéo détaillées.
Fréquence
d’utilisation
Faible 1-5 Tous les quatremois
Nombre de boissons préparées
par jour
Fréquence de lubrification
65
Normale 6-10 Tous les deuxmois
Élevée >10 Tous les mois
Programmes de nettoyage pour le cappuccinatore interne
La machine propose trois programmes de nettoyage pour le cappuccinatore interne. Le programme
de nettoyage Auto Steam Shoot (Injection de vapeur automatique) se lance automatiquement après
la préparation d'une boisson à base de lait. Vous pouvez sélectionner le programme HYGIESTEAM ou
DEEP MILK CLEAN en touchant l'icône Nettoyer et en faisant défiler le menu de nettoyage. Suivez
ensuite les instructions à l’écran.
-
Auto Steam Shoot: la machine injecte de la vapeur dans le cappuccinatore interne pour le rincer
rapidement.
-
HYGIESTEAM: la machine nettoie le système interne de distribution de lait en profondeur avec de
la vapeur. Placez le bec d'admission de lait dans son support (Fig. 29) et suivez les instructions à
l'écran.
-
DEEP MILK CLEAN: effectuez la procédure «DEEP MILK CLEAN» à l'aide du nettoyeur de circuit
de lait Philips pour un nettoyage en profondeur du système interne de distribution de lait.
Nettoyage du cappuccinatore interne sous le robinet
1 Ouvrez la porte du cappuccinatore interne (Fig. 8).
2 Retirez le cappuccinatore interne en le tirant vers le bas (Fig. 30).
3 Démontez le cappuccinatore interne en tirant la partie inférieure pour la séparer de la partie
supérieure (Fig. 31).
4 Démontez tous les composants (Fig. 32) et nettoyez-les sous le robinet.
5 Remontez le cappuccinatore interne.
6 Pour remettre le cappuccinatore interne en place, mettez-le en position verticale et assurez-vous
que les orifices sont alignés sur les deux tubes de la machine. Déplacez le cappuccinatore interne
vers le haut jusqu'à ce qu'il s'enclenche (Fig. 33).
7 Fermez la porte.
Visitez www.saeco.com/care pour obtenir des instructions vidéo détaillées.
Français
Page 66

66
Français
Procédure de détartrage
N'utilisez que du détartrant Philips. N'utilisez jamais un détartrant à base d'acide sulfurique, d'acide
chlorhydrique, d'acide sulfamique ou d'acide acétique (vinaigre), car cela risque d'endommager le
circuit d'eau de votre machine et de ne pas dissoudre le calcaire correctement. La non-utilisation d'un
détartrant Philips annule votre garantie. Ne pas détartrer l'appareil annule également votre garantie.
Vous pouvez acheter la solution de détartrage Philips dans la boutique en ligne
www.saeco.com/care.
1 Lorsque la machine vous demande de la détartrer, appuyez sur le bouton marche/arrêt
commencer. Pour lancer un détartrage sans y être invité par la machine, touchez l'icône Nettoyer
et sélectionnez «Descale» (Détartrer) (Fig. 34).
2 Retirez le plateau égouttoir et le bac à marc de café, videz-les et replacez-les dans la machine.
3 Enlevez le réservoir d’eau et videz-le. Retirez ensuite le filtre AquaClean.
4 Versez le contenu d’une bouteille complète de solution de détartrage Philips dans le réservoir
d’eau, puis remplissez ce dernier d’eau jusqu’au niveau CALC CLEAN. Puis, replacez-le dans la
machine.
5 Placez un grand récipient (1,5l) sous la buse de distribution de café.
6 Suivez les instructions à l'écran pour lancer la procédure de détartrage. La procédure de détartrage
dure environ 15minutes et consiste en un cycle de détartrage et un cycle de rinçage.
7 Lorsque le cycle de détartrage est terminé, vous devez rincer le réservoir d'eau et le circuit d'eau.
Suivez les instructions à l’écran.
8 Placez un nouveau filtre AquaClean dans le réservoir d’eau et réactivez le filtre AquaClean dans le
menu.
Conseil: L'utilisation du filtre AquaClean réduit le besoin de détartrage!
pour
Que faire si la procédure de détartrage est interrompue
Vous pouvez interrompre la procédure de détartrage en appuyant sur le bouton marche/arrêt du
panneau de commande. Si la procédure de détartrage s'interrompt avant son arrêt complet, procédez
comme suit:
1 Videz le réservoir d'eau et rincez-le soigneusement.
2 Remplissez le réservoir d’eau avec de l’eau fraîche jusqu’à l’indication CALC CLEAN (Détartrage),
puis remettez la machine en marche. La machine chauffera et effectuera un cycle de rinçage
automatique.
3 Avant de préparer une boisson, effectuez un cycle de rinçage manuel. Pour effectuer un cycle de
rinçage manuel, versez d’abord la moitié d’un réservoir d’eau chaude, puis préparez deuxtasses de
café prémoulu sans ajouter de café moulu.
Remarque: si la procédure de détartrage n'est pas allée jusqu'au bout, la machine nécessitera une
nouvelle procédure de détartrage dès que possible.
Icônes d'alerte et codes d'erreur
Signification des icônes d’alerte
Remplissez le réservoir d'eau avec
de l'eau fraîche jusqu'à l'indication
MAX.
La machine doit remplir le circuit
d'eau avec de l'eau. Assurez-vous
qu'il y a de l'eau dans le réservoir
d'eau et appuyez sur le bouton
marche/arrêt pour démarrer.
Page 67

Français
67
Le bac à grains est vide. Placez les
nouveaux grains de café dans le
bac à grains.
Le groupe de percolation n'est pas
inséré ou ne l'est pas correctement.
Insérez le groupe de percolation et
assurez-vous qu'il est correctement
enclenché.
Le bac à marc de café est plein.
Assurez-vous que la machine est
sous tension. Retirez et videz
ensuite le bac à marc de café.
Fermez la porte d’accès au groupe
de percolation.
Le cappuccinatore interne n'est pas
inséré ou n'est pas inséré
correctement et/ou la porte du bec
verseur est ouverte. Assurez-vous
que les orifices du cappuccinatore
sont alignés sur les deux tubes de la
machine avant de pousser le
cappuccinatore interne vers le haut
pour l'enclencher. Fermez ensuite la
porte du bec verseur.
Le bac à marc de café n'est pas en
place. Remettez le bac à marc de
café en place.
Signification des codes d'erreur
Vous trouverez ci-dessous une liste des codes d’erreur montrant les problèmes que vous pouvez
résoudre vous-même. Des instructions vidéo détaillées sont disponibles sur le site
www.saeco.com/care. Si un autre code d’erreur apparaît, veuillez contacter le
ServiceConsommateursPhilips de votre pays. Vous trouverez ses coordonnées dans le dépliant de
garantie.
Code
d’erreur
01 L'entonnoir pour café
Problème Solution possible
est bouché.
Mettez la machine hors tension et débranchez-la. Retirez le
groupe de percolation. Ouvrez le couvercle du compartiment à
café prémoulu et insérez le manche d'une cuillère dedans.
Agitez le manche de haut en bas pour faire tomber (Fig. 27) le
bouchon de café moulu. Visitez le site: www.saeco.com/care
pour des instructions vidéo détaillées.
Français
03 Le groupe de
percolation est sale ou
n’est pas bien graissé.
04 Le groupe de
percolation n’est pas
placé correctement.
05 De l’air est présent
dans le circuit d’eau.
Éteignez la machine au moyen de l’interrupteur principal.
Rincez le groupe de percolation à l’eau claire, laissez-le sécher
à l’air libre, puis lubrifiez-le. Consultez le chapitre «Nettoyage
du groupe de percolation» ou visitez le site
www.saeco.com/care pour des instructions vidéo détaillées.
Puis, rallumez la machine.
Éteignez la machine au moyen de l’interrupteur principal.
Retirez le groupe de percolation, puis réinsérez-le. Assurezvous que le groupe de percolation est dans la bonne position
avant de l’insérer. Consultez le chapitre «Manipulation du
groupe de percolation» ou visitez le site www.saeco.com/care
pour des instructions vidéo détaillées. Puis, rallumez la
machine.
Redémarrez l’appareil en l’éteignant et en l’allumant à
nouveau au moyen de l’interrupteur principal. Si cela
fonctionne, versez deux à troistasses d’eau chaude. Détartrez
la machine si vous ne l’avez pas fait depuis longtemps.
Page 68

68
Français
Code
Problème Solution possible
d’erreur
Le filtre AquaClean n’a
pas été correctement
préparé avant
l’installation ou il est
obstrué.
14 La machine surchauffe. Éteignez la machine et rallumez-la après 30minutes.
Retirez le filtre AquaClean, puis essayez de préparer à
nouveau un café. Si cela fonctionne, assurez-vous que le filtre
AquaClean a été correctement préparé avant de le remettre
en place (voir 'Préparation du filtre AquaClean avant son
activation'). Remettez le filtre AquaClean dans le réservoir
d’eau. Si cela ne fonctionne toujours pas, le filtre est peut-être
bouché et doit être remplacé.
Commande d'accessoires
Veuillez utiliser uniquement les produits de maintenance Philips pour nettoyer et détartrer la
machine. Vous pouvez acheter ces produits chez votre revendeur local, dans les centres de service
agréés ou en ligne sur le site www.saeco.com/care. Pour trouver la liste complète des pièces de
rechange en ligne, entrez le numéro de modèle de votre machine à café. Vous trouverez le numéro de
modèle à l’intérieur de la porte d’accès.
Produits d’entretien et références:
-
Solution de détartrage CA6700
-
Filtre AquaClean CA6903
-
Graisse pour groupe de percolation HD5061
-
Tablettes de dégraissage pour café CA6704
-
Nettoyeur du circuit à lait CA6705
-
Kit d’entretien CA6707
Dépannage
Cette rubrique récapitule les problèmes les plus courants que vous pouvez rencontrer avec la
machine. Des vidéos d’assistance et la liste complète de questions fréquemment posées sont
disponibles sur le site www.saeco.com/care. Si vous n’arrivez pas à résoudre le problème, veuillez
contacter le ServiceConsommateurs de votre pays. Vous trouverez ses coordonnées dans le dépliant
de garantie.
Problème
Le plateau égouttoir se
remplit rapidement.
L’appareil est en mode
DEMO.
Cause Solution
Ce phénomène est normal.
L’appareil utilise l’eau pour
rincer le circuit interne et le
groupe de percolation. De l’eau
coule dans le système interne
directement dans le plateau
égouttoir.
Vous avez appuyé sur le
bouton de veille pendant plus
de huitsecondes.
Videz le plateau égouttoir tous les jours
ou dès que le témoin rouge «Plateau
égouttoir plein» s’allume à travers le
plateau égouttoir (Fig. 26). Placez une
tasse sous la buse de distribution pour
recueillir l’eau de rinçage.
Éteignez la machine, puis rallumez-la au
moyen de l’interrupteur principal situé à
l’arrière.
Page 69

Problème Cause Solution
L’icône indiquant que le
bac à marc de café est
plein s’affiche.
Vous avez vidé le bac à marc de
café alors que l’appareil était
éteint.
Videz toujours le bac à marc de café
lorsque l’appareil est allumé. Si vous
videz le bac à marc de café alors que la
machine est éteinte, le compteur du
cycle du café n’est pas réinitialisé.
Français
69
Vous avez remis en place le bac
à marc de café trop
rapidement.
L’icône «Bac à marc de
café plein» s’affiche
alors que le réservoir
n’est pas plein.
Je ne peux pas retirer le
groupe de percolation.
Vous n’avez pas retiré le bac à
Je ne peux pas insérer le
groupe de percolation.
La machine n’a pas réinitialisé
le compteur la dernière fois que
vous avez vidé le bac à marc de
café.
Le groupe de percolation n’est
pas positionné correctement.
marc de café.
Le groupe de percolation n’est
pas positionné correctement.
Ne remettez pas le bac à marc de café
en place avant que l’écran ne vous
invite à le faire.
Patientez toujours environ 5secondes
lorsque vous replacez le bac à marc de
café.De cette manière, le compteur de
marc de café se réinitialisera à zéro.
Videz toujours le bac à marc de café
lorsque l’appareil est allumé. Si vous
videz le bac à marc de café alors que la
machine est éteinte, le compteur du
cycle du café ne sera pas réinitialisé.
Réinitialisez la machine à café de la
manière suivante: remettez en place le
plateau égouttoir et le bac à marc de
café. Fermez la porte d’accès au groupe
de percolation, puis éteignez et
rallumez la machine. Réessayez de
retirer le groupe de percolation.
Retirez le bac à marc de café avant de
retirer le groupe de percolation.
Réinitialisez la machine à café de la
manière suivante: remettez en place le
plateau égouttoir et le bac à marc de
café. Laissez le groupe de percolation à
l’extérieur. Fermez le portillon destiné à
l’entretien, puis allumez et éteignez la
machine. Puis positionnez correctement
le groupe de percolation et réinsérez-le
dans la machine (voir 'Réinsertion du
groupe de percolation').
Français
Le café est aqueux. Le groupe de percolation est
sale et doit être lubrifié.
Le réglage du moulin est défini
sur une mouture trop grosse.
Les réglages de café ont été
ajustés.
Nettoyez et lubrifiez le groupe de
percolation.
Réglez le moulin sur une mouture plus
fine (numéro inférieur).
Sélectionnez votre café et ajustez les
réglages pour un café plus fort.
Page 70

70
Français
Problème Cause Solution
La machine effectue sa
procédure d'auto-ajustement
après un changement de
réglage du moulin ou de type
de grain.
Préparez quelques tasses de café.
Le café n’est pas assez
chaud.
La température sélectionnée
Vous avez ajouté du lait. Que le lait que vous ajoutez soit froid
Le café ne s’écoule pas
ou s’écoule lentement.
Le groupe de percolation est
La buse de distribution du café
Les tasses que vous utilisez
sont froides.
est trop basse. Consultez les
paramètres du menu.
Le filtre AquaClean n’a pas été
correctement préparé avant
l’installation ou il est obstrué.
Le réglage du moulin est défini
sur une mouture trop fine.
sale.
est sale.
Du calcaire obstrue le circuit de
l’appareil.
Préchauffez les tasses en les rinçant à
l’eau chaude.
Choisissez une température élevée
dans le menu.
ou chaud, il réduira toujours un peu la
température du café.
Retirez le filtre AquaClean, puis essayez
de préparer à nouveau un café. Si cela
fonctionne, assurez-vous que le filtre
AquaClean a été correctement préparé
avant de le remettre en place. Remettez
le filtre préparé en place. Si cela ne
fonctionne toujours pas, le filtre est
peut-être bouché et doit être remplacé.
Réglez le moulin sur une mouture plus
grosse (numéro supérieur).
Nettoyez le groupe de percolation.
Nettoyez la buse de distribution du café
et ses trous avec une aiguille.
Détartrez la machine.
Le lait ne mousse pas. Le cappuccinatore interne est
sale ou n’est pas inséré
correctement.
Le type de lait utilisé ne
convient pas pour produire de
la mousse.
Le lait éclabousse. Le lait utilisé n’est pas assez
froid.
Nettoyez le cappuccinatore interne et
veillez à le positionner et à l'insérer
correctement (voir 'Nettoyage du
cappuccinatore interne sous le
robinet').
Selon le type de lait, la quantité et la
qualité de la mousse seront différentes.
Nous avons testé les types de laits
suivants, qui ont produit une mousse
satisfaisante: du lait de vache demiécrémé ou entier, du lait de soja et du
lait sans lactose.
Utilisez uniquement du lait froid sortant
directement du réfrigérateur.
Page 71

Problème Cause Solution
Le bec d'admission de lait
souple n'est pas correctement
branché.
Ouvrez la porte de la buse (Fig. 8) de
distribution du café et vérifiez que le
bec d'admission de lait souple est
entièrement branché sur le
cappuccinatore (Fig. 9). Notez que les
becs d'admission de lait et le
cappuccinatore peuvent être chauds.
Laissez refroidir les cappuccinatore et
les becs d'admission avant de les
toucher.
Français
71
Le cappuccinatore et les becs
d'admission de lait ne sont pas
propres.
Les becs d'admission de lait
sont obstrués.
Retirez et démontez le cappuccinatore
interne (voir 'Nettoyage du
cappuccinatore interne sous le robinet').
Rincez toutes les pièces sous le robinet.
Pour un nettoyage en profondeur,
utilisez le nettoyeur de circuit du lait
Philipset effectuez la procédure DEEP
MILK CLEAN (NETTOYAGE DE LA
CARAFE À LAIT EN PROFONDEUR) via
le menu de nettoyage (
les pièces ont été nettoyées au lavevaisselle, elles ont peut-être été
obstruées par des résidus d'aliments ou
de détergent. Il est également
recommandé de vérifier visuellement
l'absence d'obstruction.
Nous vous conseillons d'effectuer le
programme HygieSteam tous les jours:
1) Appuyez sur «Clean» (Nettoyage)
sur le panneau de commande. 2)
Sélectionnez «HygieSteam». 3)
Appuyez sur le bouton de démarrage
pour lancer le processus, puis confirmez
toutes les étapes sur l'afficheur.
Rangez toujours le réservoir de lait sans
les becs d'admission de lait au
réfrigérateur. Les résidus de lait peuvent
s'accumuler dans les becs d'admission
de lait et bloquer l'écoulement du lait.
Rincez les becs d'admission de lait
avant de les ranger.
). Notez que si
Français
La machine semble fuir. L’appareil utilise l’eau pour
rincer le circuit interne et le
groupe de percolation. De l’eau
coule dans le système interne
directement dans le plateau
égouttoir.
Videz le plateau égouttoir tous les jours
ou dès que le voyant «Plateau
égouttoir plein» s’allume à travers le
couvercle du plateau égouttoir (Fig. 26).
Placez une tasse sous la buse de
distribution pour recueillir l’eau de
rinçage.
Page 72

72
Français
Problème Cause Solution
Le plateau égouttoir est trop
plein et a débordé, ce qui
donne l’impression que la
machine fuit.
Videz le plateau égouttoir tous les jours
ou dès que le voyant «Plateau
égouttoir plein» s’allume à travers le
couvercle du plateau égouttoir (Fig. 26).
Placez une tasse sous la buse de
distribution pour recueillir l’eau de
rinçage.
La machine n’est pas placée sur
Je ne peux pas activer le
filtre AquaClean et la
machine demande un
détartrage.
Vous n’avez pas installé le filtre
Ce nouveau filtre à eau
ne convient pas.
La machine émet un
bruit.
une surface horizontale.
Le filtre n’a pas été remplacé
quand l’icône du filtre
AquaClean a clignoté, et la
capacité a atteint 0%.
AquaClean pendant la
première installation, mais
après avoir préparé environ
25cafés (en se basant sur des
tasses de 100ml). Il ne doit pas
y avoir de calcaire dans la
machine avant d’installer le
filtre AquaClean.
Vous essayez d’installer un
autre filtre que le filtre
AquaClean.
Il est normal que votre machine
fasse du bruit au cours de
l’utilisation.
Le filtre AquaClean n’a pas été
préparé correctement et l’air
est maintenant aspiré dans la
machine.
Placez la machine sur une surface
horizontale afin que le voyant «Plateau
égouttoir plein» fonctionne
correctement.
Détartrez d’abord votre machine, puis
installez le filtreAquaClean.
Détartrez d’abord la machine, puis
installez un nouveau filtre AquaClean.
Après le détartrage, le compteur du
filtre est réinitialisé à 0/8. Veillez à
toujours confirmer l’activation du filtre
dans le menu de la machine. Faites-le
également après avoir remplacé le filtre.
Seul le filtre AquaClean est adapté à la
machine.
Si la machine se met à produire un son
différent, nettoyez le groupe de
percolation et lubrifiez-le (voir
'Lubrification du groupe de
percolation').
Retirez le filtre AquaClean du réservoir
d’eau. Secouez la cartouche pendant
environ 5secondes. Immergez
entièrement le filtre à l’envers dans une
verseuse remplie d’eau froide pendant
au moins 30secondes. Attendez
jusqu’à ce que plus aucune bulle d’air
ne sorte. Remettez le filtre AquaClean
préparé dans le réservoir d’eau. Versez
ensuite deux à troistasses d’eau
chaude.
Caractéristiques techniques
Le fabricant se réserve le droit d’améliorer les spécifications techniques du produit. Toutes les
quantités prédéfinies sont approximatives.
Page 73

Description Valeur
Dimensions (lxHxP) 283x393x489mm
Poids 10.8 - 12.2kg
Longueur du câble électrique 1200mm
Réservoir d’eau 1,7litre, amovible
Capacité du réservoir à grains de café 450g
Capacité du bac à marc de café 14rondelles
Capacité de la carafe à lait 600ml
Hauteur du bec verseur réglable 75-148 mm
Français
73
Tension nominale - Puissance nominale Alimentation électrique
Se reporter à la plaque à l’intérieur du portillon
d’accès pour l’entretien
Français
Page 74

74
Italiano
Sommario
Panoramica della macchina (Fig. A) _________________________________________________________________ 74
Pannello di controllo (Fig. B) _________________________________________________________________________ 75
Introduzione _________________________________________________________________________________________ 75
Prima installazione ___________________________________________________________________________________ 75
Filtro AquaClean______________________________________________________________________________________ 76
Misurazione della durezza dell'acqua _______________________________________________________________ 76
Preparazione di bevande ____________________________________________________________________________ 77
Personalizzazione di bevande e creazione di profili ________________________________________________ 78
Regolazione delle impostazioni della macchina ____________________________________________________ 79
Gestione del gruppo infusore________________________________________________________________________ 79
Pulizia e manutenzione ______________________________________________________________________________ 80
Procedura di rimozione del calcare__________________________________________________________________ 83
Icone di avvertenza e codici di errore________________________________________________________________ 83
Ordinazione degli accessori__________________________________________________________________________ 85
Risoluzione dei problemi_____________________________________________________________________________ 85
Specifiche tecniche___________________________________________________________________________________ 89
Panoramica della macchina (Fig. A)
A1 Pannello di controllo e touchscreen A12 Maniglia di rilascio del vassoio antigoccia
A2 Portatazza A13 Cavo di alimentazione con spina
A3 Coperchio del contenitore caffè in grani A14 Manopola di selezione della macinatura
A4 Coperchio dello scomparto del caffè
premacinato
A5 Cappuccinatore interno A16 Gruppo infusore
A6 Beccuccio di erogazione regolabile di
latte e caffè
A7 Supporto del tubo del latte A18 Cassetto residui di caffè
A8 Interruttore principale A19 Recipiente fondi di caffè
A9 Presa per filo A20 Vassoio antigoccia
A10 Sportello di manutenzione A21 Coperchio vassoio antigoccia
A11 Indicatore "'drip tray full" A22 Serbatoio dell'acqua
A15 Contenitore caffè in grani
A17 Imbuto del caffè
Accessori
A23 Tubetto del lubrificante A26 Misurino
A24 Spazzolina per la pulizia A27 Tester della durezza dell'acqua
A25 Filtro AquaClean
Italiano
Page 75

Italiano
Parti per la produzione della schiuma di latte
A28 Contenitore del latte A30 Tubo del latte di metallo
A29 Tubo del latte flessibile A31 Coperchio del contenitore del latte
Pannello di controllo (Fig. B)
Fate riferimento alla figura B per una panoramica di tutti i pulsanti e le icone del pannello di controllo
e del touchscreen della macchina.
Di seguito sono riportate le descrizioni. Potete sfiorare il touchscreen e toccare per selezionare o
confermare le vostre scelte.
B1. Pulsante on/off B4. Touchscreen B7. Pulsante di avvio/arresto
B2. Profili personali B5. Menu di pulizia
75
B3. Menu delle bevande B6. Impostazioni della
macchina
Introduzione
Congratulazioni per l'acquisto della macchina per caffè superautomatica Saeco! Per trarre il massimo
vantaggio dall'assistenza fornita da Saeco, registrate il vostro prodotto sul sito www.saeco.com/care.
Prima di utilizzare la macchina per la prima volta, leggete attentamente l'opuscolo sulla sicurezza
fornito a parte e conservatelo per eventuali riferimenti futuri.
Per consentirvi di ottenere il meglio dalla vostra macchina per caffè, Saeco offre un supporto
completo in 3 modi diversi:
1 La guida rapida separata per la prima installazione e il primo utilizzo.
2 Il presente manuale dell'utente per informazioni più dettagliate.
3 Assistenza e video in linea: eseguite la scansione del codice QR nella prima pagina oppure andate
al sito www.saeco.com/care
Nota: Questa macchina è stata testata con caffè. Benché accuratamente pulita, potrebbe presentare
residui di tale sostanza. In ogni caso garantiamo che la macchina è assolutamente nuova.
Prima installazione
Per predisporre la macchina per il caffè per l'utilizzo, dovete eseguire alcuni semplici passaggi, ad
esempio riempire il circuito dell'acqua e attivare il filtro AquaClean. Questi passaggi sono descritti
nella guida rapida separata.
Per ottenere un caffè più gustoso, è necessario preparare inizialmente 5 tazze di caffè per consentire
l'autoregolazione della macchina.
La macchina è stata impostata per ottenere il miglior gusto dai chicchi di caffè. Vi consigliamo
pertanto di non modificare le impostazioni del macinacaffè finché non avete preparato 100-150 tazze
(circa 1 mese di utilizzo).
Pulite accuratamente il recipiente del latte, i tubi del latte e il cappuccinatore prima del primo utilizzo.
Si consiglia di non pulire il cappuccinatore in lavastoviglie, per evitare che venga ostruito da particelle
di cibo o residui di detergente.
Italiano
Page 76

76
Italiano
Filtro AquaClean
Il filtro AquaClean è progettato per ridurre i depositi di calcare all'interno della macchina da caffè e
fornire acqua filtrata per conservare l'aroma e il gusto di ogni tazza di caffè. Se utilizzate la serie di 8
filtri AquaClean, come indicato dalla macchina e nel presente manuale dell'utente, non dovrete
eseguire la pulizia anticalcare della macchina prima di aver preparato 5.000 tazze. Ogni filtro consente
di preparare fino 625 tazze, a seconda della varietà di caffè selezionata e della frequenza di risciacquo
e pulizia.
Preparazione del filtro AquaClean per l'attivazione
Prima di posizionare il filtro AquaClean nel serbatoio dell'acqua, occorre prepararlo per l'utilizzo:
1 Scuotete il filtro per circa 5 secondi (fig. 1).
2 Immergete completamente il filtro capovolto in una caraffa con acqua fredda per almeno 30
secondi. Attendete fino a quando non escono (fig. 2) più bolle d'aria.
3 Spingere il filtro sopra il punto di aggancio del filtro il più in basso (fig. 3) possibile.
Attivazione del filtro AquaClean
Ogni nuovo filtro AquaClean utilizzato deve essere attivato. Con l'attivazione del filtro AquaClean, la
macchina monitorerà la capacità del filtro AquaClean e il numero di filtri utilizzati. Ci sono 3 modi per
attivare il filtro AquaClean.
1. Attivazione del filtro AquaClean durante la prima installazione
Dopo la prima accensione, la macchina fornisce le indicazioni per eseguire i primi passaggi di
installazione, ad esempio riempire il serbatoio e il circuito dell'acqua e attivare il filtro AquaClean.
Basta seguire le istruzioni visualizzate.
2. Attivazione del filtro AquaClean quando richiesto
Sostituite il filtro AquaClean quando sullo schermo viene visualizzato il messaggio "Replace
AquaClean filter?" (Sostituire il filtro AquaClean?). Seguire quindi le istruzioni visualizzate sullo schermo
per attivare il filtro correttamente.
Sostituite il filtro AquaClean almeno ogni 3 mesi, anche se la macchina non ha ancora indicato la
necessità di sostituirlo.
3. Attivazione del filtro AquaClean in qualunque altro momento
È possibile iniziare a riutilizzare il filtro AquaClean in qualunque momento seguendo le istruzioni
riportate di seguito.
1 Toccate l'icona Impostazioni
2 Quando viene visualizzata la schermata di attivazione, selezionate "new" (nuovo) e premete il
pulsante di avvio/arresto .
3 Seguite le istruzioni visualizzate.
Nota: in alcune situazioni la macchina indicherà che è necessario rimuovere il calcare prima di poter
installare e attivare un nuovo filtro AquaClean. Ciò perché la macchina deve essere del tutto priva di
calcare prima di iniziare a utilizzare il filtro AquaClean. Seguite le istruzioni visualizzate.
e selezionate "AquaClean" (fig. 4).
Misurazione della durezza dell'acqua
Durante la prima installazione, dovete specificare la durezza dell'acqua. Seguendo i passaggi
visualizzati sullo schermo, utilizzate l'apposita striscia fornita per misurare la durezza dell'acqua. Per
Page 77

Italiano
specificare la durezza dell'acqua in un secondo momento, toccate l'icona Impostazioni e
selezionate "water hardness" (durezza dell'acqua).
1 Immergete la striscia per misurare la durezza dell'acqua sotto l'acqua corrente per 1 secondo.
Attendete quindi 1 minuto.
2 Verificate quanti quadrati sono diventati rossi.
3 Selezionate l'impostazione di durezza dell'acqua appropriata e toccate l'icona OK per confermare.
Numero di quadratini rossi:
Valore da impostare 1 2 3 4
77
Preparazione di bevande
Toccate l'icona Drinks (Bevande) per accedere al menu "Drinks" (Bevande). Scorrete le diverse
pagine per trovare la bevanda desiderata. Dopo aver selezionato una bevanda potete personalizzarla
regolando le impostazioni (vedere 'Personalizzazione delle bevande').
-
Toccate l'icona "2x" se desiderate preparare due tazze. La macchina esegue automaticamente due
cicli di macinatura di seguito della bevanda (fig. 5) selezionata.
-
Toccate l'icona Profili (Profiles) per preparare una delle bevande salvate.
-
Fate scorrere il beccuccio di erogazione verso l'alto o verso il basso per regolare l'altezza in base al
formato della tazza o del bicchiere che state usando.
Preparazione di bevande al caffè
1 Riempire il serbatoio dell'acqua con acqua corrente e riempire il contenitore del caffè in grani.
Suggerimento: Fate scorrere il beccuccio di erogazione nella posizione più in alto per accedere
facilmente al serbatoio dell'acqua.
2 Toccate l'icona Drinks (Bevande) e selezionate il caffè.
3 Potete modificare le impostazioni in base alle vostre preferenze facendo scorrere le barre regolabili
in alto e in basso (fig. 6).
4 Premete il pulsante di avvio/arresto per iniziare la preparazione della bevanda selezionata.
Italiano
Preparazione di bevande a base di latte
1 Riempire il serbatoio dell'acqua con acqua corrente e riempire il contenitore del caffè in grani.
Suggerimento: Fate scorrere il beccuccio di erogazione nella posizione più in alto per accedere
facilmente al serbatoio dell'acqua.
2 Svitate il coperchio del contenitore del latte e riempite quest'ultimo con latte (fig. 7).
Per ottenere risultati ottimali, usare sempre latte proveniente direttamente dal frigorifero.
3 Posizionate il tubo del latte in metallo nel recipiente. Aprite lo sportello del cappuccinatore interno
(fig. 8) e collegate il tubo del latte flessibile al cappuccinatore (fig. 9). Quindi chiudete lo sportello
del cappuccinatore interno.
4 Toccate l'icona Drinks (Bevande) e selezionate il caffè.
5 Potete modificare le impostazioni in base alle vostre preferenze facendo scorrere le barre regolabili
in alto e in basso (fig. 6).
6 Premete il pulsante di avvio/arresto
bevanda selezionata.
7 Subito dopo l'erogazione del latte, viene eseguito il programma "Auto Steam Shoot" (Getto vapore
automatico). La macchina immette vapore attraverso il sistema interno del latte per pulirlo
velocemente.
in qualsiasi momento per iniziare la preparazione della
Page 78

78
Italiano
Suggerimento: Potete anche utilizzare un cartone di latte abituale per preparare le bevande a base di
latte. Posizionate il tubo del latte in metallo direttamente nel cartone del latte.
Preparazione del caffè con caffè pre-macinato
1 Aprite il coperchio dello scomparto del caffè pre-macinato e versate al suo interno (fig. 10) un
misurino di caffè pre-macinato. Quindi chiudete il coperchio.
2 Dopo avere selezionato una bevanda, toccate l'icona (fig. 11) del caffè pre-macinato e premete il
pulsante di avvio/arresto
Nota: se si seleziona caffè pre-macinato, non è possibile regolare l'intensità del caffè e preparare più
di una bevanda alla volta.
.
Erogazione di acqua calda
1 Toccate l'icona Drinks (Bevande)
2 Premete il pulsantedi avvio/arresto
e selezionate "Hot water" (Acqua calda).
per avviare l'erogazione di acqua calda.
Personalizzazione di bevande e creazione di profili
Questa macchina consente di modificare le impostazioni di una bevanda in base alle proprie
preferenze e di salvare la bevanda modificata in un profilo personale. Sono disponibili due modi per
creare un profilo:
1 Nel menu "Drinks" (Bevande): selezionate e regolate una bevanda, quindi toccate l'icona di
salvataggio .
2 Nel menu "Profiles" (Profili): create un profilo toccando l'icona "Aggiungi profilo". Selezionate il
profilo appena creato, selezionate una bevanda, regolatela in base alle preferenze, quindi toccate
l'icona di salvataggio .
Personalizzazione delle bevande
È possibile modificare le impostazioni in base alle proprie preferenze:
1 Toccate l'icona Drinks .
2 Selezionate la vostra bevanda preferita.
3 Nella schermata sono mostrate le impostazioni che è possibile regolare in base alle proprie
preferenze. Toccate la freccia per andare alla schermata successiva e regolare altre impostazioni. A
seconda del tipo di bevanda, potete regolare l'intensità, il volume di caffè, il latte e la schiuma, la
temperatura, il gusto e l'ordine di preparazione delle bevande a base di latte.
4 Fate scorrere le barre in alto o in basso fino a raggiungere il livello (fig. 6) preferito.
5 Potete salvare queste impostazioni sul vostro profilo toccando l'icona di salvataggio e seguendo le
istruzioni sullo schermo (fig. 12).
Creazione di un profilo
1 Toccate l'icona Profiles (Profili) .
2 Selezionate "Add profile" (Aggiungi profilo) (fig. 13).
3 Immettete un nome per il nuovo profilo e confermate (fig. 14).
4 Selezionate il profilo appena creato.
5 Aggiungete bevande al profilo selezionando "Add drink" (Aggiungi bevanda) (fig. 15).
Page 79

Italiano
79
Regolazione delle impostazioni della macchina
Potete regolare le impostazioni di macinatura utilizzando la manopola di selezione della macinatura
nel contenitore di caffè in grani. È possibile scegliere tra 12 diverse impostazioni di macinatura. Più
bassa è l'impostazione, più forte sarà il caffè.
Nota: Dovete preparare 2 o 3 bevande prima di poter assaporare a pieno la differenza.
Attenzione: non ruotate la manopola di selezione della macinatura più di un livello alla volta per
evitare di danneggiare il macinacaffè.
1 Aprite il coperchio del contenitore del caffè in grani.
2 Premete la manopola di selezione della macinatura e ruotatela verso sinistra o verso destra (fig. 16).
Ruotate la manopola di selezione della macinatura di un livello alla volta. Ogni volta che si ruota la
manopola di selezione della macinatura di un livello, è consigliabile preparare una bevanda al caffè
per evitare di danneggiare il macinacaffè.
3 Chiudete il coperchio del contenitore del caffè in grani.
Regolazione delle impostazioni predefinite
Utilizzate l'icona IMPOSTAZIONI per modificare le seguenti impostazioni:
-
AquaClean: per verificare lo stato del filtro AquaClean e installarne uno nuovo.
-
Durezza dell'acqua: per poter regolare le impostazioni della macchina secondo l'acqua della vostra
zona, misurate la durezza dell'acqua.
-
Tempo di stand-by: si tratta del periodo di tempo trascorso il quale la macchina entra in modalità
stand-by.
-
Luminosità: per regolare il contrasto del display
-
Luce del serbatoio dell'acqua: per regolare la luce nel serbatoio dell'acqua
-
Lingua: per selezionare una lingua diversa
-
Feedback sonoro: per attivare/disattivare il feedback sonoro del display
-
Luce del beccuccio: per regolare la luce nel beccuccio di erogazione di caffè e latte (solo per
modelli specifici)
-
Impostazioni di fabbrica: per ripristinare le impostazioni di fabbrica
Italiano
Gestione del gruppo infusore
Per istruzioni video dettagliate su come rimuovere, inserire e pulire il gruppo infusore, andate al sito
www.saeco.com/care.
Rimozione del gruppo infusore dalla macchina
1 Spegnete la macchina premendo l'interruttore principale sulla parte posteriore della macchina
stessa.
2 Aprite lo sportello (fig. 17) di manutenzione.
3 Rimuovete il cassetto (fig. 18) dei residui di caffè.
4 Premete il pulsante (fig. 19) PUSH e tirate l'impugnatura del gruppo infusore per rimuoverlo dalla
macchina (fig. 20).
Reinserimento del gruppo infusore
Prima di far scorrere il gruppo infusore nuovamente nella macchina, assicurarsi che sia nella posizione
corretta.
Page 80

80
Italiano
1 Controllare se la freccia sul cilindro giallo sul lato del gruppo infusore è allineata con la freccia nera
ed N (fig. 21).
-
Se non sono allineati, spingere la leva in basso finché non tocca la base del gruppo (fig. 22)
infusore.
2 Assicurarsi che il gancio di bloccaggio di colore giallo sull'altro lato del gruppo infusore sia nella
posizione corretta.
-
Per posizionare il gancio correttamente, spingetelo verso l'alto fino alla posizione (fig. 23) più
alta raggiungibile.
3 Fate scorrere nuovamente il gruppo infusore nella macchina lungo le guide sui lati finché non si
blocca in posizione con un clic. Non premere il pulsante PUSH (spingi).
4 Riposizionate il cassetto dei residui di caffè e chiudete lo sportello di manutenzione.
Pulizia e manutenzione
Una pulizia e una manutenzione regolari mantengono la macchina in condizioni ottimali e
garantiscono un caffè di ottimo gusto per un lungo periodo di tempo, un flusso costante di caffè e una
schiuma di latte eccellente.
Consultate la tabella riportata di seguito per sapere quando e come pulire tutte le parti rimovibili della
macchina. Informazioni e istruzioni video più dettagliate sono disponibili all'indirizzo
www.saeco.com/care.
Tabella di pulizia
Descrizione
parte
Gruppo infusore Settimanalmente Rimuovete il gruppo infusore, sciacquatelo sotto
Quando pulire Come pulire
l'acqua corrente e lasciatelo asciugare all'aria.
Lubrificazione del
gruppo infusore
Sistema del
latte/Cappuccina
tore interno
Mensilmente Seguite la procedura "Brew group clean" (Pulizia
In base al tipo di utilizzo.
Consultare la tabella (vedere
'Lubrificazione del gruppo
infusore') di lubrificazione.
Dopo ogni giorno di utilizzo Eseguite il programma HYGIESTEAM nel menu di
Settimanalmente Rimuovete e smontate il cappuccinatore (vedere
gruppo infusore) con pastiglie per la rimozione
dei residui grassi Philips. Selezionare "Brew group
clean" (Pulizia gruppo infusore) nel menu di
pulizia e seguire le istruzioni visualizzate. Andare
al sito www.saeco.com/care per istruzioni video
dettagliate.
Lubrificare il gruppo infusore con lubrificante
Philips. Andare al sito www.saeco.com/care per
istruzioni video dettagliate.
pulizia. Selezionate HYGIESTEAM nel menu di
pulizia e seguite le istruzioni visualizzate. Pulite
con un panno umido la superficie esterna del
tubo del latte in metallo prima di posizionarlo
nell'apposito supporto.
'Pulizia del cappuccinatore interno sotto l'acqua
corrente') interno. Sciacquate tutte le parti sotto
l'acqua corrente con del detergente per piatti.
Page 81

Italiano
81
Descrizione
Quando pulire Come pulire
parte
Mensilmente Seguite la procedura "DEEP MILK CLEAN"
Contenitore del
latte
Vassoio antigoccia Svuotate il vassoio
Recipiente fondi
di caffè
Serbatoio
dell'acqua
Imbuto del caffè Controllare l'imbuto di
Settimanalmente Smontate il recipiente (fig. 24) del latte e
antigoccia quotidianamente
o non appena l'indicatore di
"vassoio antigoccia pieno"
rosso compare attraverso il
vassoio antigoccia (fig. 26).
Svuotate il recipiente dei
fondi di caffè quando
richiesto dalla macchina.
Pulirlo settimanalmente.
Settimanalmente Sciacquare il serbatoio dell'acqua sotto l'acqua
riempimento del caffè con
una frequenza settimanale
per verificare che non sia
ostruito.
(PULIZIA PROF. LATTE) utilizzando un detergente
per il circuito del latte. Selezionate "DEEP MILK
CLEAN" (PULIZIA PROF. LATTE) nel menu di
pulizia e seguite le istruzioni visualizzate. Andare
al sito www.saeco.com/care per istruzioni video
dettagliate.
rimuovete la palla con il misurino (fig. 25).
Sciacquate tutte le parti sotto l'acqua corrente o
in lavastoviglie.
Rimuovere il vassoio antigoccia e sciacquarlo
sotto l'acqua corrente con un detergente per
piatti.
Rimuovere il recipiente dei fondi di caffè mentre
la macchina è accesa e risciacquarlo sotto
l'acqua corrente con un detergente per piatti.
Italiano
corrente
Scollegare la macchina e rimuovere il gruppo
infusore. Aprire il coperchio dello scomparto del
caffè pre-macinato e inserire il manico del
cucchiaio nell'imbuto di riempimento del caffè.
Spostare l'impugnatura in alto e in basso finché il
caffè macinato ostruito non cade giù (fig. 27).
Andare al sito www.saeco.com.care per istruzioni
video dettagliate.
Suggerimento: Nell'ultima pagina del presente manuale dell'utente è presente un calendario delle
pulizie. Scrivere le date in cui è stata eseguita un'azione di pulizia.
Pulizia del gruppo infusore
La pulizia regolare del gruppo infusore impedisce l'ostruzione dei residui di caffè nei circuiti interni.
Andate al sito www.saeco.com/care per i video di supporto su come rimuovere, inserire e pulire il
gruppo infusore.
Pulizia del gruppo infusore sotto l'acqua corrente
1 Aprire lo sportello di manutenzione e rimuovere il gruppo (vedere 'Rimozione del gruppo infusore
dalla macchina') infusore.
2 Sciacquare a fondo il gruppo infusore con acqua. Pulire accuratamente il filtro (fig. 28) superiore.
3 Lasciare asciugare all'aria il gruppo infusore prima di reinserirlo. Non asciugare il gruppo infusore
con un panno per evitare l'accumulo di fibre al suo interno.
Page 82

82
Italiano
Pulizia del gruppo infusore con la pastiglia per la rimozione dei residui grassi del caffè
Utilizzate solo pastiglie per la rimozione dei residui grassi Philips. Toccate l'icona Clean (Pulisci)
selezionate "Brew group clean" (Pulizia gruppo infusore). Seguite quindi le istruzioni visualizzate. Per
istruzioni video dettagliate, andate al sito www.saeco.com/care.
e
Lubrificazione del gruppo infusore
Lubrificare regolarmente il gruppo infusore per garantire che le parti in movimento scorrano bene.
1 Applicare uno strato sottile di lubrificante intorno al perno di inserimento nella parte inferiore del
gruppo infusore.
2 Applicare uno strato sottile di lubrificante alle guide, su entrambi i lati.
Consultare la tabella seguente per la frequenza di lubrificazione. Per istruzioni video dettagliate,
andare al sito www.saeco.com/care.
Frequenza di utilizzo
Numero di bevande preparate
Frequenza di lubrificazione
quotidianamente
Bassa 1-5 Ogni 4 mesi
Normale 6-10 Ogni 2 mesi
Elevata >10 Ogni mese
Programmi di pulizia per il cappuccinatore interno
La macchina ha tre programmi per pulire il cappuccinatore interno. Il programma di pulizia Auto
Steam Shoot (Getto vapore automatico) viene eseguito automaticamente dalla macchina dopo aver
preparato una bevanda a base di latte. Potete selezionare il programma HYGIESTEAM o DEEP MILK
CLEAN (PULIZIA PROF. LATTE) toccando l'icona Clean (Pulisci) e scorrendo il menu di pulizia.
Seguire quindi le istruzioni visualizzate.
-
Getto vapore automatico: la macchina emette getti di vapore attraverso il cappuccinatore interno
per pulirlo velocemente.
-
HYGIESTEAM: la macchina pulisce accuratamente il sistema interno del latte con il vapore.
Posizionate il tubo del latte nell'apposito supporto (fig. 29) e seguite le istruzioni visualizzate.
-
DEEP MILK CLEAN (pulizia profonda latte): Per pulire profondamente il sistema interno del latte,
seguite la procedura "DEEP MILK CLEAN" (PULIZIA PROF. LATTE) con la soluzione per il circuito del
latte.
Pulizia del cappuccinatore interno sotto l'acqua corrente
1 Aprite lo sportello del cappuccinatore (fig. 8) interno.
2 Rimuovete il cappuccinatore interno tirandolo in basso (fig. 30).
3 Smontate il cappuccinatore interno tirando la parte inferiore dalla parte (fig. 31) superiore.
4 Smontate tutte le parti (fig. 32) e pulitele sotto l'acqua corrente.
5 Rimontate il cappuccinatore interno.
6 Per riposizionare il cappuccinatore interno, ponetelo in posizione verticale e assicuratevi che i fori
siano allineati ai due tubi sulla macchina. Spostate quindi il cappuccinatore interno verso l'alto
finché non si blocca in posizione (fig. 33).
7 Chiudete lo sportello.
Per istruzioni video dettagliate, andate al sito www.saeco.com/care.
Page 83

Italiano
83
Procedura di rimozione del calcare
Utilizzate solo soluzioni anticalcare Philips. In nessun caso utilizzate una soluzione anticalcare basata
su acido solforico, cloridrico, sulfamidico e acetico (aceto) in quanto potrebbe danneggiare il circuito
dell'acqua nella macchina e non dissolve correttamente il calcare. Se non si utilizza la soluzione
anticalcare Philips, la garanzia verrà invalidata. Anche la mancata decalcificazione della macchina
invaliderà la garanzia. Potete acquistare la soluzione anticalcare Philips nell'Online Shop all'indirizzo
www.saeco.com/care.
1 Quando la macchina chiede di eseguire la pulizia anticalcare, premere il pulsante di avvio/arresto
per iniziare. Per avviare la pulizia anticalcare senza che venga chiesto dalla macchina, toccate
l'icona Clean (Pulisci)
2 Rimuovete il vassoio antigoccia e il recipiente dei fondi di caffè, svuotateli e inseriteli nuovamente
nella macchina.
3 Rimuovete il serbatoio dell'acqua e svuotatelo. Rimuovete quindi il filtro AquaClean.
4 Versate l'intera bottiglia di soluzione anticalcare Philips nel serbatoio dell'acqua e quindi riempitelo
di acqua fino a raggiungere il livello di CALC CLEAN. Quindi reinserirlo nella macchina.
5 Posizionate un recipiente grande (1,5 l) sotto il beccuccio di erogazione del caffè.
6 Seguite le istruzioni visualizzate sullo schermo per avviare la procedura di rimozione del calcare. La
procedura di rimozione del calcare dura circa 15 minuti e consiste di un ciclo di pulizia anticalcare e
di un ciclo di risciacquo.
7 Una volta che il ciclo di rimozione del calcare è completato, dovete sciacquare il serbatoio e il
circuito dell'acqua. Seguite le istruzioni visualizzate.
8 Posizionate un nuovo filtro AquaClean nel serbatoio d'acqua e riattivate il filtro AquaClean nel
menu.
Consiglio: con il filtro AquaClean si riduce la frequenza della pulizia anticalcare.
e selezionate "Descale" (Pulizia anticalc.) (fig. 34).
Italiano
Cosa fare in caso di interruzione della procedura di rimozione del calcare
Potete uscire dalla procedura di rimozione del calcare premendo il pulsante on/off sul pannello di
controllo. Nel caso la procedura di rimozione del calcare si interrompa prima che sia completata,
effettuare quanto segue:
1 Svuotate il serbatoio dell'acqua e lavatelo accuratamente.
2 Riempite il serbatoio dell'acqua con acqua fresca fino all'indicazione del livello CALC CLEAN e
riaccendete la macchina. La macchina si riscalderà ed eseguirà un ciclo di risciacquo automatico
3 Prima di preparare qualsiasi bevanda, eseguite un ciclo di risciacquo manuale. Per eseguire un
ciclo di risciacquo manuale, innanzitutto erogate mezzo serbatoio di acqua calda, quindi preparate
2 tazze di caffè pre-macinato senza aggiungere caffè macinato.
Nota: se la procedura non è stata portata a termine, non appena possibile sarà necessario eseguire
un'altra procedura di rimozione del calcare.
Icone di avvertenza e codici di errore
Significato delle icone di attenzione
Riempite il serbatoio di acqua
fresca fino all'indicazione del livello
MAX.
La macchina deve riempire il circuito
dell'acqua con acqua. Controllate
che vi sia acqua nel serbatoio e
premete il pulsante di avvio/arresto
per iniziare.
Page 84

84
Italiano
Il contenitore del caffè in grani è
vuoto. Inserite chicchi di caffè nel
contenitore del caffè in grani.
Il gruppo infusore non è inserito o
non lo è correttamente. Inserite il
gruppo infusore e assicuratevi che
sia bloccato in posizione.
Il recipiente dei fondi di caffè è
pieno. Assicuratevi che la macchina
sia accesa. Rimuovete e svuotate il
recipiente dei fondi di caffè.
Chiudete lo sportello di
manutenzione.
Il cappuccinatore interno non è
inserito o non è inserito
correttamente e/o lo sportello del
beccuccio è aperto. Assicuratevi che
i fori nel cappuccinatore siano
allineati con i tubi nella macchina
prima di spingere il cappuccinatore
interno verso l'alto in posizione.
Quindi chiudete lo sportello del
beccuccio.
Il recipiente dei fondi di caffè non è
posizionato correttamente.
Rimettete il recipiente dei fondi di
caffè al suo posto.
Significato dei codici di errore
Di seguito sono elencati i codici di errore indicanti i problemi che potete risolvere da soli. Istruzioni
video sono disponibili all'indirizzo www.saeco.com/care. Se viene visualizzato un altro codice di
errore, contattate il Centro Assistenza Clienti Philips del vostro paese. Per dettagli sui contatti, vedete
l'opuscolo della garanzia.
Codice
di errore
01 L'imbuto per il caffè è
Problema Possibile soluzione
ostruito.
Spegnete la macchina e staccate la spina. Rimuovete il gruppo
infusore. Aprite quindi il coperchio dello scomparto del caffè
pre-macinato e inserite il manico del cucchiaio. Spostare
l'impugnatura in alto e in basso finché il caffè macinato
ostruito non cade giù (fig. 27). Andate al sito
www.saeco.com/care per istruzioni video dettagliate.
03 Il gruppo infusore è
sporco o non è ben
lubrificato.
04 Il gruppo infusore non è
posizionato
correttamente.
05 È presente aria nel
circuito dell'acqua.
Spegnete la macchina con l'interruttore principale. Sciacquate
il gruppo infusore sotto l'acqua corrente, lasciatelo asciugare e
poi lubrificatelo. Consultate il capitolo "Pulizia del gruppo
infusore" o andate al sito www.saeco.com/care per istruzioni
video dettagliate. Accendete e spegnete di nuovo la macchina.
Spegnete la macchina con l'interruttore principale. Rimuovete
il gruppo infusore e reinseritelo. Assicuratevi che il gruppo
infusore sia nella posizione corretta prima di inserirlo.
Consultate il capitolo "Gestione del gruppo infusore" o andate
al sito www.saeco.com/care per istruzioni video dettagliate.
Accendete e spegnete di nuovo la macchina.
Riavviate la macchina accendendola e spegnendola di nuovo
con l'interruttore principale. Se il problema è risolto, erogate
2-3 tazze di acqua calda. Rimuovete il calcare dalla macchina
se non lo avete fatto da lungo tempo.
Page 85

Italiano
85
Codice
Problema Possibile soluzione
di errore
Il filtro AquaClean non
è stato preparato
correttamente prima
dell'installazione o è
ostruito.
14 La macchina è
surriscaldata.
Rimuovete il filtro AquaClean e provate di nuovo a preparare
un caffè. Se il problema è risolto, assicuratevi che il filtro
AquaClean sia stato preparato correttamente prima di
riposizionarlo (vedere 'Preparazione del filtro AquaClean per
l'attivazione'). Reinserite il filtro AquaClean nel serbatoio
dell'acqua. Se il problema persiste, il filtro potrebbe essere
ostruito e deve essere sostituito.
Spegnete la macchina e riaccendetela dopo 30 minuti.
Ordinazione degli accessori
Per pulire e rimuovere il calcare dalla macchina, usate solo i prodotti per la manutenzione Philips.
Potete acquistare questi prodotti dal vostro rivenditore locale, presso i centri assistenza autorizzati
oppure online all'indirizzo www.saeco.com/care. Per trovare l'elenco completo delle parti di ricambio
online, inserite il numero di modello della macchina. Il numero di modello è riportato all'interno dello
sportello di manutenzione.
Prodotti per la manutenzione e numeri dei tipi:
-
Soluzione anticalcare CA6700
-
Filtro AquaClean CA6903
-
Lubrificante gruppo infusore HD5061
-
Pastiglie per la rimozione dei residui grassi del caffè CA6704
-
Prodotto per la pulizia del circuito latte CA6705
-
Kit di manutenzione CA6707
Italiano
Risoluzione dei problemi
Questo capitolo riassume i problemi più comuni che potreste riscontrare con la macchina. I video di
supporto e un elenco competo di domande frequenti sono disponibili all'indirizzo
www.saeco.com/care. Se il problema persiste, contattate il Centro Assistenza Clienti del vostro paese.
Per dettagli sui contatti, vedete l'opuscolo della garanzia.
Problema
Il vassoio antigoccia si
riempie velocemente.
La macchina è in
modalità DEMO.
Causa Soluzione
Si tratta di un fenomeno del
tutto normale. La macchina
utilizza acqua per sciacquare il
circuito interno e il gruppo
infusore. Una parte dell'acqua
fluisce attraverso il sistema
interno direttamente nel
vassoio antigoccia.
Il pulsante Standby è stato
premuto per più di 8 secondi.
Svuotare il vassoio antigoccia
quotidianamente o non appena
l'indicatore di "vassoio antigoccia pieno"
rosso compare attraverso il vassoio
antigoccia (fig. 26). Posizionare una
tazza sotto l'erogatore per raccogliere
l'acqua di risciacquo.
Spegnere e riaccendere la macchina
con l'interruttore principale sulla parte
posteriore della macchina stessa.
Page 86

86
Italiano
Problema Causa Soluzione
Il display visualizza
costantemente l'icona
"recipiente dei fondi di
caffè pieno".
Il recipiente dei fondi di caffè è
stato svuotato a macchina
spenta.
Svuotare sempre il recipiente dei fondi
di caffè a macchina accesa. Se il
recipiente dei fondi di caffè viene
svuotato a macchina spenta, il
contatore dei cicli di caffè non si azzera.
Il recipiente dei fondi di caffè è
stato riposizionato troppo
rapidamente.
Viene visualizzata l'icona
indicante che il
recipiente dei fondi di
caffè è pieno benché
non lo sia.
Impossibile rimuovere il
gruppo infusore.
Il recipiente dei fondi di caffè
Impossibile inserire il
gruppo infusore.
La macchina non ha azzerato il
contatore l'ultima volta che è
stato svuotato il recipiente dei
fondi di caffè.
Il gruppo infusore non è nella
posizione corretta.
non è stato rimosso.
Il gruppo infusore non è nella
posizione corretta.
Non riposizionare il recipiente dei fondi
di caffè prima che sullo schermo venga
visualizzato il messaggio che indica di
farlo.
Attendete sempre circa 5 secondi
quando riposizionate il recipiente dei
fondi di caffè.In questo modo il
contatore dei fondi di caffè verrà
azzerato.
Svuotare sempre il recipiente dei fondi
di caffè a macchina accesa. Se il
recipiente dei fondi di caffè viene
svuotato a macchina spenta, il
contatore dei fondi di caffè non si
azzera.
Per reimpostare la macchina:
riposizionare il vassoio antigoccia e il
recipiente dei fondi di caffè. Chiudere lo
sportello di manutenzione, quindi
spegnere e riaccendere la macchina.
Provare di nuovo a rimuovere il gruppo
infusore.
Rimuovere il recipiente dei fondi di
caffè prima di rimuovere il gruppo
infusore.
Per reimpostare la macchina:
riposizionare il vassoio antigoccia e il
recipiente dei fondi di caffè. Non
inserire il gruppo infusore. Chiudere lo
sportello di manutenzione e accendere
e spegnere la macchina. Posizionare
quindi il gruppo infusore nella posizione
corretta prima di reinserirlo nella
macchina (vedere 'Reinserimento del
gruppo infusore').
Il caffè è acquoso. Il gruppo infusore è sporco o
deve essere lubrificato.
Il macinacaffè è impostato su
una macinatura grossolana.
Le impostazioni del caffè sono
state regolate.
Pulire e lubrificare il gruppo infusore.
Impostare il macinacaffè su
un'impostazione più fine (più bassa).
Selezionare una bevanda al caffè e
regolare le impostazioni per ottenere un
caffè più forte.
Page 87

Problema Causa Soluzione
La macchina sta effettuando la
procedura di autoregolazione
dopo la modifica delle
impostazioni di macinatura o
del tipo di grani.
Preparare alcune tazze di caffè.
Italiano
87
Il caffè non è abbastanza
caldo.
La temperatura impostata è
È stato aggiunto latte. L'aggiunta di latte, caldo o freddo,
Il caffè non viene
erogato o viene erogato
lentamente.
Il gruppo infusore è sporco. Pulire il gruppo infusore.
Il beccuccio di erogazione del
Le tazze utilizzate sono fredde. Preriscaldare le tazze passandole sotto
troppo bassa. Verificare le
impostazioni del menu.
Il filtro AquaClean non è stato
preparato correttamente per
l'installazione o è ostruito.
Il macinacaffè è impostato su
una macinatura troppo fine.
caffè è sporco.
Il circuito della macchina è
bloccato dal calcare.
l'acqua calda.
Impostare la temperatura del menu su
"high".
abbassa sempre in una certa misura la
temperatura del caffè.
Rimuovere il filtro AquaClean e
riprovare a preparare un caffè. Se il
problema è risolto, assicurarsi che il
filtro AquaClean sia stato preparato
correttamente prima di riposizionarlo.
Reinserire il filtro preparato. Se il
problema persiste, il filtro potrebbe
essere ostruito e deve essere sostituito.
Impostare il macinacaffè su
un'impostazione più grossolana (più
elevata).
Pulire il beccuccio di erogazione del
caffè e i relativi fori con un ago.
Eseguire la pulizia anticalcare.
Italiano
Il latte non fa schiuma. Il cappuccinatore interno è
sporco o non è inserito
correttamente.
Il tipo di latte utilizzato non è
adatto a produrre schiuma.
Il latte provoca schizzi. Il latte utilizzato non è
abbastanza freddo.
Pulire il cappuccinatore interno e
verificare che sia posizionato e inserito
correttamente (vedere 'Pulizia del
cappuccinatore interno sotto l'acqua
corrente').
Secondo il tipo di latte, la quantità e la
qualità di schiuma prodotte sono
diverse. Abbiamo testato i seguenti tipi
di latte ottenendo risultati soddisfacenti
in termini di schiuma prodotta: latte
vaccino parzialmente scremato o intero,
latte di soia e latte senza lattosio.
Usare latte freddo direttamente dal
frigorifero.
Page 88

88
Italiano
Problema Causa Soluzione
Il tubo flessibile del latte non è
collegato correttamente.
Aprire lo sportello del beccuccio (fig. 8)
di erogazione del caffè e verificare che il
tubo flessibile del latte sia collegato
correttamente al cappuccinatore (fig. 9).
Prestare attenzione poiché il
cappuccinatore e i tubi del latte
potrebbero essere caldi. Lasciare
raffreddare il cappuccinatore e i tubi
prima di toccarli.
Il cappuccinatore e i tubi del
latte non sono puliti.
I tubi del latte sono ostruiti. Conservare sempre il recipiente del
Rimuovete e smontate il
cappuccinatore (vedere 'Pulizia del
cappuccinatore interno sotto l'acqua
corrente') interno. Sciacquare tutte le
parti sotto l'acqua corrente. Per una
pulizia accurata, utilizzare il prodotto
Philips per la pulizia del circuito del latte
ed eseguire la procedura DEEP MILK
CLEAN (pulizia profonda latte) tramite il
menu di pulizia ( ). Si noti che se le
parti sono state pulite in lavastoviglie,
potrebbero essere ostruite da particelle
di cibo o residui di detergente. Si
raccomanda di controllare visivamente
le parti per verificare che non siano
ostruite.
È consigliabile eseguire il programma
HygieSteam ogni giorno: 1) Premere
"Pulizia" sul pannello di controllo. 2)
Selezionare "HygieSteam". 3) Premere il
pulsante di avvio per avviare il processo,
quindi confermare tutti i passaggi sul
display.
latte senza i tubi del latte nel frigorifero.
Il latte avanzato potrebbe accumularsi
all'interno dei tubi del latte e bloccare il
flusso del latte che passa attraverso i
tubi. Sciacquare i tubi del latte prima di
riporli.
La macchina sembra
perdere acqua.
La macchina utilizza acqua per
sciacquare il circuito interno e il
gruppo infusore. Una parte
dell'acqua fluisce attraverso il
sistema interno direttamente
nel vassoio antigoccia.
Svuotate il vassoio antigoccia
quotidianamente o non appena
l'indicatore di "vassoio antigoccia pieno"
compare attraverso il coperchio (fig. 26)
del vassoio antigoccia. Posizionare una
tazza sotto l'erogatore per raccogliere
l'acqua di risciacquo.
Page 89

Problema Causa Soluzione
Il vassoio antigoccia è troppo
pieno e ha traboccato. La
macchina sembra perdere
acqua.
Svuotate il vassoio antigoccia
quotidianamente o non appena
l'indicatore di "vassoio antigoccia pieno"
compare attraverso il coperchio (fig. 26)
del vassoio antigoccia. Posizionare una
tazza sotto l'erogatore per raccogliere
l'acqua di risciacquo.
Italiano
89
La macchina non è stata
Impossibile attivare il
filtro AquaClean e la
macchina chiede di
eseguire la pulizia
anticalcare.
Il filtro AquaClean è stato
Il nuovo filtro dell'acqua
non si inserisce.
La macchina produce un
rumore.
collocata su una superficie
orizzontale.
Il filtro non è stato sostituito in
tempo utile dopo che l'icona
del filtro AquaClean ha iniziato
a lampeggiare e la capacità è
scesa allo 0%.
installato dopo avere preparato
circa 25 tazze di caffè (da 100
ml) e non durante l'installazione
iniziale. Prima di installare il
filtro AquaClean la macchina
deve essere del tutto priva di
calcare.
Si sta tentando di installare un
filtro diverso dal filtro
AquaClean.
È normale che la macchina
produca un rumore durante
l'utilizzo.
Il filtro AquaClean non è stato
preparato in modo adeguato e
viene aspirata dell'aria nella
macchina.
Posizionare la macchina su una
superficie orizzontale in modo che
l'indicatore "vassoio antigoccia pieno"
funzioni correttamente.
Eseguire la pulizia anticalcare, quindi
installare il filtro AquaClean.
Eseguire la pulizia anticalcare, quindi
installare un nuovo filtro AquaClean.
Dopo la pulizia anticalcare, il contatore
dei filtri si reimposta su 0/8. Confermare
sempre l'attivazione del filtro nel menu
della macchina. Effettuare questa
operazione anche dopo la sostituzione
del filtro.
Solo il filtro AquaClean si inserisce nella
macchina.
Se inizia a produrre un tipo di rumore
diverso, pulire il gruppo infusore e
lubrificarlo (vedere 'Lubrificazione del
gruppo infusore').
Rimuovete il filtro AquaClean dal
serbatoio dell'acqua. Scuotete il filtro
per circa 5 secondi. Immergete il filtro
capovolto in una caraffa con acqua
fredda per almeno 30 secondi.
Attendete fino a quando non escono
più bolle d'aria. Riposizionate il filtro
AquaClean preparato nel serbatoio
dell'acqua. Quindi erogate 2-3 tazze di
acqua calda.
Italiano
Specifiche tecniche
Il produttore si riserva il diritto di migliorare le specifiche tecniche del prodotto. Tutte le quantità
preimpostate sono approssimative.
Descrizione
Valore
Page 90

90
Italiano
Dimensioni (L x A x P) 283 x 393 x 489 mm
Peso 10.8 - 12.2 kg
Lunghezza cavo di alimentazione 1.200 mm
Serbatoio dell'acqua 1,7 litri, rimovibile
Capacità contenitore caffè in grani 450 g
Capacità recipiente fondi di caffè 14 fondi
Capacità caraffa del latte 600 ml
Altezza regolabile del beccuccio 75-148 mm
Tensione nominale - Potenza nominale Alimentazione elettrica
Fare riferimento alla piastra dei dati all'interno
dello sportello di servizio
Page 91

Nederlands
91
Inhoud
Apparaatoverzicht (afb. A) ___________________________________________________________________________ 91
Bedieningspaneel (afb. B)____________________________________________________________________________ 92
Introductie ___________________________________________________________________________________________ 92
Eerste installatie______________________________________________________________________________________ 92
AquaClean-filter______________________________________________________________________________________ 93
De waterhardheid meten ____________________________________________________________________________ 93
Dranken bereiden ____________________________________________________________________________________ 94
Dranken aan uw voorkeur aanpassen en profielen maken _________________________________________ 95
Apparaatinstellingen aanpassen ____________________________________________________________________ 96
De zetgroep __________________________________________________________________________________________ 96
Schoonmaken en onderhoud________________________________________________________________________ 97
Ontkalkingsprocedure________________________________________________________________________________ 100
Waarschuwingspictogrammen en foutcodes _______________________________________________________ 100
Accessoires bestellen ________________________________________________________________________________ 102
Problemen oplossen _________________________________________________________________________________ 102
Technische gegevens ________________________________________________________________________________ 106
Apparaatoverzicht (afb. A)
A1 Bedieningspaneel en aanraakscherm A12 Ontgrendeling voor lekbak
A2 Kophouder A13 Netsnoer met stekker
A3 Deksel van bonenreservoir A14 Maalgraadknop
A4 Deksel van compartiment voor
voorgemalen koffie
A5 Ingebouwde cappuccinatore A16 Zetgroep
A6 Instelbare koffie- en melkuitloop A17 Koffietrechter
A7 Melkslanghouder A18 Lade voor koffieresten
A8 Hoofdschakelaar A19 Koffiedikbak
A9 Aansluiting voor netsnoer A20 Lekbak
A10 Servicedeur A21 Rooster lekbak
A11 Indicator 'lekbak vol' A22 Waterreservoir
A15 Bonenreservoir
Accessoires
A23 Tube smeermiddel A26 Maatschep
A24 Reinigingsborsteltje A27 Teststrip voor waterhardheid
A25 AquaClean-filter
Nederlands
Nederlands
Page 92

92
Nederlands
Melkopschuimonderdelen
A28 Melkreservoir A30 Metalen melkpijpje
A29 Flexibele melkslang A31 Deksel van het melkreservoir
Bedieningspaneel (afb. B)
Raadpleeg afbeelding B voor een overzicht van alle knoppen en pictogrammen van het
bedieningspaneel en het aanraakscherm van het apparaat.
Hieronder vindt u de beschrijving. U kunt het aanraakscherm bedienen door met uw vinger over het
scherm te vegen, en uw keuze selecteren of bevestigen door erop te tikken.
B1. Aan/uit-knop B4. Aanraakscherm B7. Start-/stopknop
B2. Persoonlijke profielen B5. Menu Reinigen
B3. Menu Dranken B6. Apparaatinstellingen
Introductie
Gefeliciteerd met de aanschaf van dit volledig automatische Saeco-koffiezetapparaat. Registreer uw
product op www.saeco.com/care om optimaal gebruik te kunnen maken van de door Saeco geboden
ondersteuning.
Lees het aparte boekje met veiligheidsinformatie zorgvuldig door voordat u het apparaat in gebruik
neemt. Bewaar het boekje om het indien nodig later te kunnen raadplegen.
Saeco biedt uitgebreide ondersteuning op 3 verschillende manieren, zodat u optimaal gebruik kunt
maken van uw koffiezetapparaat:
1 Een aparte snelstartgids voor de eerste installatie en het eerste gebruik.
2 Deze gebruiksaanwijzing biedt gedetailleerde informatie.
3 Online ondersteuning en video's: scan de QR-code op de voorpagina of ga naar
www.saeco.com/care.
Opmerking: Dit apparaat is getest met koffie. Hoewel het apparaat zorgvuldig is schoongemaakt,
kunnen er wat koffieresten zijn achtergebleven. We garanderen dat het apparaat helemaal nieuw is.
Eerste installatie
Voordat u het koffiezetapparaat in gebruik kunt nemen, moet u enkele eenvoudige stappen uitvoeren,
zoals het watersysteem vullen en het AquaClean-filter activeren. Deze stappen worden weergegeven
in de afzonderlijke snelstartgids.
Na de eerste vijf koppen koffie is het apparaat helemaal goed ingesteld en is de smaak van de koffie
optimaal.
Het apparaat is speciaal ingesteld om de beste smaak uit uw koffiebonen te halen. We raden u
daarom aan om de instellingen van de molen, indien nodig, pas na 100-150 koppen koffie (circa 1
maand gebruik) aan te passen.
Maak het melkreservoir, de melkbuis en -slang, en de cappuccinatore vóór het eerste gebruik grondig
schoon. We raden u af om de cappuccinatore in de vaatwasmachine te reinigen, aangezien de
cappuccinatore verstopt kan raken met etensresten of resten afwasmiddel.
Page 93

Nederlands
93
AquaClean-filter
Het AquaClean-filter is speciaal ontworpen om kalkaanslag in het koffiezetapparaat te verminderen
en om het water te filteren, zodat het aroma en de smaak behouden blijven. Als u een reeks van 8
AquaClean-filters gebruikt zoals aangegeven door het apparaat en in deze gebruiksaanwijzing, hoeft
u het apparaat tot maximaal 5000 koppen koffie niet te ontkalken. Elk filter gaat maximaal 625
koppen mee, afhankelijk van de geselecteerde koffiesoorten en de frequentie waarmee het apparaat
wordt gespoeld en gereinigd.
Het AquaClean-filter voorbereiden voor activatie
Voordat u het AquaClean-filter in het waterreservoir plaatst, moet u het filter klaarmaken voor gebruik:
1 Schud het filter ongeveer 5 seconden (Fig. 1).
2 Dompel het filter gedurende ten minste 30 seconden ondersteboven onder in een bak met koud
water. Wacht totdat er geen luchtbellen meer uitkomen (Fig. 2).
3 Duw het filter op de filtervoet, zo ver mogelijk naar beneden. (Fig. 3)
Het AquaClean-filter activeren
Elk nieuw AquaClean-filter dat u installeert, moet vóór gebruik worden geactiveerd. Wanneer u het
AquaClean-filter activeert, controleert het apparaat de capaciteit van het AquaClean-filter en het
aantal reeds gebruikte filters. Er zijn drie manieren om het AquaClean-filter te activeren.
1. Het AquaClean-filter activeren tijdens de eerste installatie
Wanneer u het apparaat voor het eerst inschakelt, wordt u door de eerste stappen voor installatie
geleid, zoals het vullen van het waterreservoir en de waterleidingen, en het activeren van het
AquaClean-filter. U hoeft alleen de instructies op het scherm te volgen.
2. Het AquaClean-filter activeren als dat wordt gevraagd
Vervang het AquaClean-filter wanneer op het scherm het bericht 'AquaClean-filter vervangen?'
verschijnt. Volg dan de instructies op het scherm om het filter op de juiste manier te activeren.
Vervang het AquaClean-filter ten minste om de 3 maanden, zelfs als de machine nog niet aangeeft
dat het filter moet worden vervangen.
3. Het AquaClean-filter op een ander moment activeren
U kunt het AquaClean-filter op elk moment in gebruik nemen door de onderstaande instructies te
volgen.
1 Tik op het pictogram Instellingen
2 Selecteer 'nieuw' en druk op de start/stop-knop wanneer het activatiescherm verschijnt.
3 Volg de instructies op het scherm.
Opmerking: In bepaalde situaties verschijnt de melding dat het apparaat eerst moet worden ontkalkt
voordat u een nieuw AquaClean-filter kunt installeren en activeren. Het apparaat moet namelijk
volledig kalkvrij zijn voordat u het AquaClean-filter in gebruik neemt. Volg de instructies op het
scherm.
en selecteer 'AquaClean' (Fig. 4).
De waterhardheid meten
Tijdens de eerste installatie moet de waterhardheid worden ingesteld. Volg de stappen op het scherm
en gebruik het meegeleverde teststrookje om de waterhardheid te meten. Als u de waterhardheid
later wilt instellen, tikt u op het pictogram Instellingen
en selecteert u 'waterhardheid'.
Nederlands
Page 94

94
Nederlands
1 Houd het teststrookje voor het meten van de waterhardheid gedurende 1 seconde in kraanwater.
Wacht vervolgens 1 minuut.
2 Controleer hoeveel vakjes rood zijn geworden.
3 Selecteerde juiste instelling voor de waterhardheid en tik op OK om te bevestigen.
Aantal rode vakjes:
In te stellen waarde 1 2 3 4
Dranken bereiden
Tik op het pictogram Dranken om het menu 'Dranken' te openen. Blader door de verschillende
pagina's naar de gewenste drank. Nadat u een drank hebt geselecteerd, kunt u deze naar wens
aanpassen via de instellingen (zie 'Dranken aan uw voorkeur aanpassen').
-
Tik op het pictogram '2x' om twee koppen te zetten. Het apparaat voert automatisch twee
maalcycli na elkaar uit voor de geselecteerde drank (Fig. 5).
-
Tik op het pictogram Profielen om een van uw opgeslagen dranken te bereiden.
-
Schuif de uitloop naar boven of beneden, afhankelijk van de hoogte van de kop of het glas.
Koffie zetten
1 Vul het waterreservoir met kraanwater en vul het bonenreservoir met koffiebonen.
Tip: Schuif de koffie-uitloop naar de bovenste positie zodat u gemakkelijk bij het waterreservoir
kunt.
2 Tik op het pictogram 'Dranken' en selecteer de gewenste koffie.
3 U kunt de instellingen aan uw eigen voorkeur aanpassen door de instelbare balken naar boven of
beneden (Fig. 6) te vegen.
4 Druk op de start/stop-knop om de geselecteerde drank te bereiden.
Koffie met melk zetten
1 Vul het waterreservoir met kraanwater en vul het bonenreservoir met koffiebonen.
Tip: Schuif de koffie-uitloop naar de bovenste positie zodat u gemakkelijk bij het waterreservoir
kunt.
2 Draai het deksel van het melkreservoir en vul het reservoir met melk (Fig. 7).
Voor het beste resultaat raden we u aan altijd melk te gebruiken die rechtstreeks uit de koelkast
komt.
3 Plaats de metalen melkbuis in het melkreservoir. Open de deur van de ingebouwde
cappuccinatore (Fig. 8) en sluit de flexibele melkslang aan op de cappuccinatore (Fig. 9). Sluit de
deur van de ingebouwde cappuccinatore.
4 Tik op het pictogram 'Dranken' en selecteer de gewenste koffie.
5 U kunt de instellingen aan uw eigen voorkeur aanpassen door de instelbare balken naar boven of
beneden (Fig. 6) te vegen.
6 Druk op elk gewenst moment op de start/stop-knop om de geselecteerde drank te bereiden.
7 Meteen nadat de melk is afgegeven, wordt de functie 'Automatische stoomstoot' uitgevoerd. Het
apparaat blaast stoom door het interne melksysteem om dit snel te reinigen.
Tip: U kunt ook een gewoon pak melk gebruiken om koffie met melk te zetten. Plaats de metalen
melkbuis rechtstreeks in het pak melk.
Page 95

Nederlands
Koffie zetten met voorgemalen koffie
1 Open het deksel van het compartiment voor gemalen koffie en doe één maatschep voorgemalen
koffie in het compartiment (Fig. 10). Sluit het deksel.
2 Nadat u een drank hebt geselecteerd, tikt u op het pictogram (Fig. 11) voor voorgemalen koffie
Druk vervolgens op de start/stop-knop
Opmerking: Als u voorgemalen koffie selecteert, kunt u de koffiesterkte niet aanpassen en kunt u niet
meer dan één kop tegelijk zetten.
.
.
Heet water tappen
1 Tik op het pictogram Dranken en selecteer 'Heet water'.
2 Druk op de start/stop-knop om heet water te tappen.
Dranken aan uw voorkeur aanpassen en profielen maken
Bij dit apparaat kunt u de instellingen van een drank aan uw eigen voorkeur aanpassen en de
aangepaste drank in een persoonlijk profiel opslaan. Er zijn twee manieren om een profiel te maken:
1 In het menu 'Dranken': Selecteer een drank, pas de instellingen aan en tik op het pictogram
'Opslaan' .
2 In het menu 'Profielen': Maak een profiel door op het pictogram 'Profiel toevoegen' te tikken.
Selecteer het nieuwe profiel, selecteer een drank, pas de drank aan uw voorkeuren aan en tik op
het pictogram 'Opslaan' .
95
Dranken aan uw voorkeur aanpassen
U kunt de instellingen aan uw eigen voorkeur aanpassen:
1 Tik op het pictogram Dranken .
2 Selecteer de door u gewenste drank.
3 Op het scherm verschijnen de instellingen die u aan uw voorkeur kunt aanpassen. Tik op de pijl om
naar het volgende scherm te gaan om meer instellingen aan te passen. Afhankelijk van het type
drank kunt u het volgende aanpassen: de sterkte, de hoeveelheid koffie, melk en schuim, de
temperatuur, de smaak en de volgorde waarin koffie met melk wordt gezet.
4 Veeg de instelbare balken naar boven of beneden, tot het door u gewenste niveau (Fig. 6).
5 U kunt deze instellingen opslaan in uw profiel door op het pictogram Opslaan te tikken en de
instructies op het scherm (Fig. 12) te volgen.
Een profiel maken
1 Tik op het pictogram Profielen .
2 Selecteer 'Profiel toevoegen' (Fig. 13).
3 Geef een naam op voor het nieuwe profiel en bevestig (Fig. 14).
4 Selecteer het nieuwe profiel dat u hebt gemaakt.
5 Voeg dranken toe aan het profiel door 'Drank toevoegen' (Fig. 15) te selecteren.
Nederlands
Page 96

96
Nederlands
Apparaatinstellingen aanpassen
U kunt de maalgraad aanpassen met de maalgraadknop in het bonenreservoir. Er zijn 12 verschillende
maalgraadstanden waaruit u kunt kiezen. Hoe lager de stand, hoe sterker de koffie.
Opmerking: U proeft het verschil pas echt na 2 of 3 koppen koffie.
Let op: Draai de maalgraadknop niet meer dan één stapje per keer om zo schade aan de molen te
voorkomen.
1 Open het deksel van het bonenreservoir.
2 Druk de maalgraadknop in en draai deze naar links of naar rechts (Fig. 16). Draai de maalgraadknop
één stapje per keer. Zet elke keer nadat u de maalgraadknop één stapje hebt gedraaid een kop
koffie om schade aan de molen te voorkomen.
3 Sluit het deksel van het bonenreservoir.
Standaardinstellingen aanpassen
Gebruik het pictogram INSTELLINGEN om de volgende instellingen te wijzigen:
-
AquaClean: hiermee kunt u de status van het AquaClean-filter controleren en een nieuw filter
installeren.
-
Waterhardheid: meet de waterhardheid om het apparaat in te stellen op de waterhardheid in uw
regio.
-
Stand-bytijd: dit is de tijd waarna het apparaat overschakelt naar de stand-bymodus.
-
Helderheid: hiermee kunt u het contrast van het display aanpassen.
-
Licht waterreservoir: hiermee kunt u het licht in het waterreservoir aanpassen.
-
Taal: hiermee kunt een andere taal kiezen.
-
Geluiden display: hiermee kunt u de geluiden van het display inschakelen/uitschakelen.
-
Licht koffie-uitloop: hiermee kunt u het licht in de koffie- en melkuitloop aanpassen (alleen
bepaalde modelnummers).
-
Fabrieksinstellingen: hiermee kunt u het apparaat terugzetten op de fabrieksinstellingen.
De zetgroep
Op www.saeco.com/care vindt u uitgebreide videoinstructies voor het verwijderen, plaatsen en
reinigen van de zetgroep.
De zetgroep uit het apparaat verwijderen
1 Schakel het apparaat uit met de hoofdschakelaar aan de achterzijde van het apparaat.
2 Open de servicedeur (Fig. 17).
3 Verwijder de lade voor koffieresten (Fig. 18).
4 Druk op de PUSH-knop (Fig. 19) en trek aan de handgreep van de zetgroep om deze uit het
apparaat (Fig. 20) te halen.
De zetgroep terugplaatsen
Zorg ervoor dat u de zetgroep in de juiste stand vasthoudt, voordat u deze weer in het apparaat
schuift.
1 Controleer of de pijl op de gele cirkel aan de zijkant van de zetgroep zich recht tegenover de
zwarte pijl en N bevindt (Fig. 21).
Page 97

Nederlands
-
Als dat niet het geval is, duwt u de hendel omlaag totdat deze de onderkant van de zetgroep
raakt (Fig. 22).
2 Controleer of de gele vergrendelhaak aan de andere kant van de zetgroep in de juiste stand staat.
-
Duw de haak omhoog naar de bovenste stand (Fig. 23) om deze in de juiste positie te zetten.
3 Schuif de zetgroep over de geleiderails aan de zijkanten terug in het apparaat totdat de zetgroep
vastklikt. Druk niet op de PUSH-knop.
4 Plaats de lade voor koffieresten terug in het apparaat en sluit de servicedeur.
97
Schoonmaken en onderhoud
Houd uw apparaat in topconditie door het regelmatig te reinigen en onderhouden. Zo kunt u
gedurende lange tijd genieten van heerlijke koffie, een constante koffiestroom en perfect melkschuim.
In de onderstaande tabel ziet u hoe en wanneer de afneembare onderdelen van het apparaat
moeten worden gereinigd. Ga voor uitgebreidere informatie en videoinstructies naar
www.saeco.com/care.
Schoonmaaktabel
Beschrijving van
de onderdelen
Zetgroep Wekelijks Verwijder de zetgroep en spoel deze af onder de
Wanneer reinigen Hoe reinigen
kraan. Laat de zetgroep aan de lucht drogen.
Smering van de
zetgroep
Melksysteem/inge
bouwde
cappuccinatore
Maandelijks Voer de procedure 'Zetgroep reinigen' uit met
Afhankelijk van de mate van
gebruik. Raadpleeg de tabel
(zie 'De zetgroep invetten')
voor het smeren van de
zetgroep.
Elke dag dat deze wordt
gebruikt
Wekelijks Verwijder de ingebouwde cappuccinatore (zie 'De
een koffieolieverwijderingstablet van Philips.
Selecteer 'Zetgroep reinigen' in het
reinigingsmenu en volg de instructies op het
scherm. Ga naar www.saeco.com/care voor
uitgebreide video-instructies.
Smeer de zetgroep met smeermiddel van Philips.
Ga naar www.saeco.com/care voor uitgebreide
video-instructies.
Voer het HYGIESTEAM-programma in het
reinigingsmenu uit. Selecteer HYGIESTEAM in het
reinigingsmenu en volg de instructies op het
scherm. Veeg de buitenkant van de metalen
melkbuis schoon met een vochtige doek voordat
u deze in de melkbuishouder plaatst.
ingebouwde cappuccinatore reinigen onder de
kraan') en haal deze uit elkaar. Spoel alle
onderdelen schoon onder de kraan met een
beetje afwasmiddel.
Nederlands
Page 98

98
Nederlands
Beschrijving van
Wanneer reinigen Hoe reinigen
de onderdelen
Maandelijks Voer de procedure GRONDIGE REINIG. MELK uit
Melkreservoir Wekelijks Haal het melkreservoir (Fig. 24) uit elkaar en duw
Lekbak Leeg de lekbak elke dag of
zodra de rode indicator voor
een volle lekbak boven het
deksel van de lekbak (Fig. 26)
uitkomt.
Koffiedikbak Leeg de koffiedikbak
wanneer het apparaat dat
aangeeft. Maak de bak elke
week schoon.
Waterreservoir Wekelijks Spoel het waterreservoir af onder de kraan.
Koffietrechter Controleer de trechter elke
week op verstopping.
met de Philips-reiniger voor het
melkdoorloopsysteem. Selecteer GRONDIGE
REINIG. MELK in het reinigingsmenu en volg de
instructies op het scherm. Ga naar
www.saeco.com/care voor uitgebreide videoinstructies.
de bal uit het deksel met behulp van de
maatschep (Fig. 25). Reinig alle onderdelen onder
de kraan of in de vaatwasmachine.
Haal de lekbak uit het apparaat en spoel deze af
onder de kraan met een beetje afwasmiddel.
Verwijder de koffiedikbak terwijl het apparaat is
ingeschakeld en spoel de bak af onder de kraan
met een beetje afwasmiddel.
Haal de stekker van het apparaat uit het
stopcontact en verwijder de zetgroep. Open het
deksel van het compartiment voor gemalen
koffie en steek de steel van een lepel in de
koffietrechter. Beweeg de steel van de lepel op
en neer totdat de aangekoekte gemalen koffie
naar beneden valt (Fig. 27). Ga naar
www.saeco.com/care voor uitgebreide videoinstructies.
Tip: Op de laatste pagina van deze gebruiksaanwijzing vindt u een reinigingskalender. Noteer de
datums waarop u een reinigingsactie hebt uitgevoerd.
De zetgroep schoonmaken
Als u de zetgroep regelmatig schoonmaakt, voorkomt u dat het interne systeem verstopt raakt met
koffieresten. Op www.saeco.com/care vindt u ondersteuningsvideo's over het verwijderen, plaatsen
en reinigen van de zetgroep.
De zetgroep schoonmaken onder de kraan
1 Open de servicedeur en verwijder de zetgroep (zie 'De zetgroep uit het apparaat verwijderen').
2 Spoel de zetgroep grondig af met water. Maak het bovenste filter (Fig. 28) voorzichtig schoon.
3 Laat de zetgroep aan de lucht drogen voordat u deze terugplaatst. Droog de zetgroep niet met een
doek om te voorkomen dat zich vezels ophopen in de zetgroep.
Page 99

Nederlands
De zetgroep reinigen met de koffieolieverwijderingstabletten
Gebruik voor de reiniging alleen koffieolieverwijderingstabletten van Philips. Tik op het pictogram
Reinigen
www.saeco.com/care voor uitgebreide videoinstructies.
en selecteer 'Reiniging zetgroep'. Volg dan de instructies op het scherm. Ga naar
De zetgroep invetten
Als u de zetgroep regelmatig smeert, blijven de bewegende onderdelen soepel bewegen.
1 Breng een dunne laag smeermiddel aan op de as onder in de zetgroep.
2 Breng een dunne laag smeermiddel aan op de geleiders aan beide zijden.
Raadpleeg de onderstaande tabel voor de aanbevolen smeerfrequentie. Ga naar
www.saeco.com/care voor uitgebreide videoinstructies.
Gebruiksfrequentie
Laag 1-5 Elke 4 maanden
Normaal 6-10 Elke 2 maanden
Hoog > 10 Eenmaal per maand
Aantal bereide dranken per dag Smeerfrequentie
Reinigingsprogramma's voor de ingebouwde cappuccinatore
Het apparaat heeft drie programma's voor reiniging van de ingebouwde cappuccinatore. Het
reinigingsprogramma 'Autom. stoomstoot' wordt automatisch uitgevoerd nadat het apparaat een
drank met melk heeft bereid. U kunt het programma HYGIESTEAM of DEEP MILK CLEAN selecteren
door op het pictogram Reinigen te tikken en door het reinigingsmenu te bladeren. Volg dan de
instructies op het scherm.
-
Autom. stoomstoot: Het apparaat geeft stoom af via de ingebouwde cappuccinatore om deze snel
te reinigen.
-
HYGIESTEAM: Het apparaat reinigt het interne melksysteem grondig met stoom. Plaats de
melkbuis in de daartoe bestemde houder (Fig. 29) en volg de instructies op het scherm.
-
GRONDIGE REINIGING MELKKAN: Voer de procedure 'GRONDIGE REINIG. MELK' uit met de Philips
melksysteemreiniger voor een grondige reiniging van het interne melksysteem.
99
Nederlands
De ingebouwde cappuccinatore reinigen onder de kraan
1 Open de deur van de ingebouwde cappuccinatore (Fig. 8).
2 Verwijder de ingebouwde cappuccinatore door deze omlaag (Fig. 30) te trekken.
3 Haal de ingebouwde cappuccinatore uit elkaar door de onderkant van de bovenkant (Fig. 31) te
trekken.
4 Haal alle onderdelen (Fig. 32) uit elkaar en spoel ze schoon onder de kraan.
5 Zet de ingebouwde cappuccinatore weer in elkaar.
6 Houd de ingebouwde cappuccinatore rechtop en zorg dat de gaten zich precies bij de twee buisjes
op het apparaat bevinden wanneer u de cappuccinatore terugplaatst. Duw de ingebouwde
cappuccinatore vervolgens omhoog totdat deze vastzit (Fig. 33).
7 Sluit de deur.
Ga naar www.saeco.com/care voor uitgebreide videoinstructies.
Page 100

100
Nederlands
Ontkalkingsprocedure
Gebruik alleen de ontkalker voor de Philips. Gebruik in geen geval een ontkalker op basis van
zwavelzuur, zoutzuur, sulfaminezuur of azijnzuur (azijn) omdat deze het waterdoorloopsysteem van
het apparaat kunnen beschadigen en kalkaanslag niet goed oplossen. Uw garantie vervalt als u niet
de ontkalker van Philips gebruikt. Als u het apparaat niet ontkalkt, vervalt tevens uw garantie. U kunt
de Philips-ontkalkingsoplossing kopen in de onlineshop op www.saeco.com/care.
1 Wanneer het apparaat aangeeft dat het ontkalkt moet worden, drukt u op de start/stop-knop
om de ontkalkingsprocedure te starten. Als u het apparaat wilt ontkalken zonder dat daarom wordt
gevraagd, tikt u op het pictogram Reinigen en selecteert u 'Ontkalken' (Fig. 34).
2 Haal de lekbak en de koffiedikbak uit het apparaat, maak ze leeg en plaats ze weer terug in het
apparaat.
3 Haal het waterreservoir uit het apparaat en leeg het. Verwijder vervolgens het AquaClean-filter.
4 Giet de hele fles Philips-ontkalker leeg in het waterreservoir en vul het reservoir met water tot aan
het CALC CLEAN-niveau. Plaats het reservoir vervolgens terug in het apparaat.
5 Plaats een grote kom (1,5 l) onder de koffie-uitloop.
6 Volg de instructies op het scherm om de ontkalkingsprocedure te starten. De ontkalkingsprocedure
duurt circa 15 minuten en bestaat uit een ontkalkingscyclus en een spoelcyclus.
7 Wanneer de ontkalkingscyclus is voltooid, moeten het waterreservoir en het watersysteem goed
worden gespoeld. Volg de instructies op het scherm.
8 Plaats een nieuw AquaClean-filter in het waterreservoir en activeer opnieuw het AquaClean-filter
in het menu.
Tip: Als u een AquaClean-filter gebruikt, hoeft u de machine minder vaak te ontkalken!
Wat u moet doen als de ontkalkingsprocedure wordt onderbroken
Beëindig de ontkalkingsprocedure door op de aan/uit-knop op het bedieningspaneel te drukken. Ga
als volgt te werk als de ontkalkingsprocedure wordt onderbroken voordat deze is voltooid:
1 Giet het waterreservoir leeg en spoel het grondig af.
2 Vul het waterreservoir tot aan de CALC CLEAN-aanduiding met vers water en schakel het apparaat
weer in. Het apparaat warmt op en voert een automatische spoelcyclus uit.
3 Voer een handmatige spoelcyclus uit voordat u koffiezet. Als u een handmatige spoelcyclus wilt
uitvoeren, tapt u eerst een half reservoir heet water en zet u vervolgens 2 koppen voorgemalen
koffie zonder gemalen koffie toe te voegen.
Opmerking: Als de ontkalkingsprocedure niet volledig is uitgevoerd, moet de ontkalkingsprocedure zo
snel mogelijk opnieuw worden uitgevoerd.
Waarschuwingspictogrammen en foutcodes
Betekenis van de waarschuwingspictogrammen
Vul het waterreservoir tot aan de
MAX-aanduiding met vers water.
Het bonenreservoir is leeg. Vul het
bonenreservoir met koffiebonen.
Het apparaat moet het
doorloopsysteem vullen met water.
Zorg dat er water in het
waterreservoir zit en druk op de
start/stop-knop
Sluit de servicedeur.
om te starten.
 Loading...