

Page 1
Register your product and get support at
www.philips.com/welcome
Type HD8930
INSTRUCTIONS
READ THESE INSTRUCTIONS CAREFULLY BEFORE USING THE MACHINE.
CHECK ON WWW.PHILIPS.COM/SUPPORT TO DOWNLOAD THE LATEST USER MANUAL
EnglishDeutschFrançaisEspañol
中文
中文
한국어
한국어
繁體中文
繁體中文
Page 2
DE
Herzlich Willkommen in der Welt von Philips Saeco! Registrieren Sie sich auf der Internetseite
WWW.PHILIPS.COM/WELCOME und erhalten Sie Hinweise und Aktualisierungen zur Wartung. In
diesem Heft werden die Hinweise für den korrekten Betrieb der Maschine in Kurzform dargestellt. In der
Verpackung der Maschine be ndet sich eine CD, die das gesamte Handbuch in der gewünschten Sprache
enthält. Legen Sie die CD in das Lesegerät Ihres PC ein und Sie werden bei der Suche des gewünschten Dokuments geführt. Darüber hinaus können Sie die neueste Version des Bedienungshandbuchs auf
der Internetseite www.philips.com/support herunterladen. Nehmen Sie dabei auf die Modellnummer Bezug, die auf der ersten Seite angegeben wird.
EN
Welcome to Philips Saeco! Register on WWW.PHILIPS.COM/WELCOME and you will receive tips and
updates on how to take care of your machine. This booklet contains quick instructions on how to oper-
ate your machine properly. The machine package includes a CD with the entire manual in your language.
Put the CD in your PC’s CD drive and you will be guided to the desired document. You may also go to
www.philips.com/support to download the latest version of the user manual (refer to the type
number listed on the cover page).
Page 3
ES
¡Bienvenido al mundo Philips Saeco! Regístrese en la página WWW.PHILIPS.COM/WELCOME para
recibir consejos y actualizaciones relativos al mantenimiento. En este manual encontrará las instrucciones resumidas para el correcto funcionamiento de la máquina. En el embalaje de la máquina se incluye
un CD con el manual completo en el idioma deseado. Introduzca el CD en el reproductor de su PC; se le guiará durante la búsqueda del documento deseado. Además, puede descargar la última versión del ma-
nual de uso de la página www.philips.com/support (utilice el número de modelo indicado en la
primera página).
FR
Bienvenue dans le monde Philips Saeco ! Enregistrez-vous sur le site WWW.PHILIPS.COM/WELCOME
et retrouvez les conseils et les mises à jour concernant l’entretien de votre appareil. Ce mode d’emploi
fournit de brèves instructions pour le bon fonctionnement de la machine. L’emballage de la machine
contient un CD avec le manuel complet dans la langue souhaitée. Insérez le CD dans le lecteur de votre PC et
laissez-vous guider à la recherche du document souhaité. De plus, vous pouvez télécharger la dernière
version du manuel d’utilisateur depuis le site www.philips.com/support (reportez-vous au numéro de modèle indiqué à la première page).
EnglishDeutschFrançaisEspañol
Page 4
4
Safety instructions www.philips.com/support
EN - Safety instructions
Read the user manual carefully before using the appliance and save it for
future reference.
Never allow water to come into contact with any of the electrical parts
of the machine: Danger of short circuit! Steam and hot water may cause
burning! Never direct the hot water jet towards body parts: Danger of
burning!
Intended Use
The co ee machine is intended for domestic use only. Do not make any
technical changes or use the machine for unauthorised purposes since
this would create serious hazards! The appliance is not to be used by
persons (including children) with reduced physical, mental or sensory
abilities or with scarce experience and/or expertise, unless they are supervised by a person responsible for their safety, or they are instructed by
this person on how to properly use the machine.
Power Supply - Power Cord
Only connect the co ee machine to a suitable socket. The socket to which
the machine is connected must be:
- Compatible with the type of plug installed on the machine.
- Sized to comply with the data on the tag attached to the appliance.
- Connected to an e cient earthing system.
Never use the co ee machine if the power cord is defective or damaged.
If the power cord is damaged, it must be replaced by the manufacturer or
by its authorised service centre.
Do not pass the power cord around corners, over sharp edges or over hot
objects and keep it away from oil.
Do not use the power cord to carry or pull the co ee machine.
Do not pull out the plug by the power cord or touch it with wet hands. Do
not let the power cord hang freely from tables or shelves.
For the Safety of Others
Prevent children from playing with the machine. Children are not aware
of the risks related to electrical household appliances. Do not leave the
machine packaging materials within the reach of children.
Danger of Burns
Never direct the jet of hot steam and/or hot water towards yourself or
others: Danger of burning!
Machine Location - Suitable Location for Operation
and Maintenance
For best use, it is recommended to:
• Choose a safe, level surface, where there will be no danger of overturning the appliance or being injured.
• Choose a location that is su ciently well-lit, clean and near an easily reachable socket.
• Provide for a minimum distance from the sides of the machine as
shown in the illustration.
• While switching on or o the machine, we suggest placing an empty glass under the dispensing spout.
Do not keep the machine at temperatures below 0°C. Frost may damage
the machine. Do not use the co ee machine outdoors.
In order to prevent its housing from melting or being damaged, do not
place the machine on very hot surfaces and close to open ames.
Cleaning and Storing the Machine
Keep the machine at its best, clean and store it properly.
Since the machine uses natural ingredients to brew beverages (co ee
beans, water, milk, etc.), some residues of ground co ee or condensed
water could be present on its supporting surface. For this reason we recommend to periodically clean both the visible parts of the machine and
the area beneath it.
Before storing the machine we strongly recommend to clean it:
- Water left in the tank and/or in the water circuit for several days
should not be consumed. If the machine is going to remain inactive for a long time, dispense water as described in the “Hot Water
Dispensing” section.
- Turn o the power button and clean the machine. Finally, remove
the plug from the socket. Wait for the machine to cool down.
Never immerse the machine in water! Store it in a dry place, out of the
reach of children. Keep it protected from dust and dirt.
It is strictly forbidden to tamper with the internal parts of the machine.
Malfunction
In case of failure, problems or a suspected fault resulting from the falling
of the machine, immediately remove the plug from the socket. Never attempt to operate a faulty machine.
For further information on troubleshooting and service, please refer to
the “Troubleshooting” and “Service” chapters of the usermanual.
Fire Safety Precautions
In case of re, use carbon dioxide (CO2) extinguishers. Do not use water or
dry powder extinguishers.
Preliminary Operations
NEVER remove the drip tray when the machine is on. Wait for a couple of
minutes after turning on/o , as the machine will be carrying out a rinse/
self-cleaning cycle (see section “Rinse/Self-Cleaning Cycle”).
Fill the tank only with fresh, non-sparkling water. Hot water or any other
liquid may damage the tank and/or the machine. Do not operate the machine without water. Make sure there is enough water in the tank.
Only co ee beans must be put into the co ee bean hopper. If ground coffee, instant co ee or any other object is put in the co ee bean hopper, it
may damage the machine.
Adjustable Ceramic Co ee Grinders
Warning! The grinder adjustment knob, which is placed inside the co ee
bean hopper, must be turned with the Co ee grinder adjustment key only
when the co ee grinder is working. Do not put any material other than
co ee beans into the hopper. Do not pour ground and/or instant co ee
into the co ee bean hopper.
Page 5
5
www.philips.com/support Safety instructions
Warning: The co ee grinder contains moving parts that may be dangerous. Therefore, do not insert ngers and/or other objects. In case of
malfunction, turn o the appliance by pressing the ON/OFF button and
remove the plug from the socket before carrying out any type of operation inside the co ee bean hopper. Do not pour co ee beans when the
co ee grinder is working.
Co ee Brewing using Pre-Ground Co ee
Warning: Add only pre-ground co ee to the compartment. Other substances and objects may cause severe damages to the machine. Such
damages will not be covered by warranty.
Thermos
Warning! Use the thermos for preparing beverages and drinking water for
cleaning. Never use the container with liquids other than those indicated.
Hot Water Dispensing
Warning! At the beginning, short spurts of hot water may come out: Risk
of burning. The device may reach high temperatures: Do not touch it with
bare hands.
General Cleaning
Do not immerse the machine in water.
Do not wash any of its parts in the dishwasher.
Do not use sharp objects or harsh chemical products (solvents) for cleaning.
Use a soft, dampened cloth to clean the machine.
Do not dry the machine and/or its parts using a microwave and/or standard oven.
Brew Group Cleaning with Co ee Oil Remover
Warning: The Co ee Oil Remover is to be used for cleaning only and does
not have a descaling function. For descaling use the Saeco descaling solution and follow the procedure described in the “Descaling” chapter.
Brew Group Lubrication
Please bear in mind that failure to lubricate the brew group every month
may prevent your appliance from working properly. Repair is not covered
by warranty.
Descaling
Not doing this will ultimately make your appliance stop working properly,
and in this case repair is not covered under your warranty.
Warning! Never drink the descaling solution or any products dispensed
until the cycle has been carried out to the end. Never use vinegar as a
descaling solution.
Warning! Remove the “Intenza” lter before adding the descaling solution.
Disposal
- The packing materials can be recycled.
- Appliance: Unplug the appliance and cut the power cord.
- Deliver the appliance and power cord to a service center or public
waste disposal facility.
In compliance with art.13 of the Italian Legislative Decree dated 25 July
2005, no. 151 “Implementation of the directives 2005/95/EC, 2002/96/EC
and 2003/108/EC on the restriction of the use pf certain hazardous substances in electrical and electronic equipment, as well as waste disposal”.
This product complies with eu directive 2002/96/EC.
The symbol
on the product or on its packaging indicates that
this product may not be treated as household waste. Instead it shall be
handed over to the applicable collection point for the recycling of electrical and electronic equipment.
By ensuring this product is disposed of correctly, you will help prevent
potential negative consequences for the environment and human health,
which could otherwise be caused by inappropriate waste handling of this
product. For more detailed information about recycling of this product,
please contact your local city o ce, your household waste disposal service or the shop where you purchased the product.
EnglishDeutschFrançaisEspañol
Page 6
6
Safety instructions www.philips.com/support
DE - Sicherheitsvorschriften
Das vorliegende Handbuch ist sorgfältig zu lesen, bevor das Gerät verwendet wird, und sollte zum späteren Nachschlagen gri bereit aufbewahrt
werden.
Die unter Strom stehenden Teile dürfen keinesfalls mit Wasser in Berührung
kommen: Kurzschlussgefahr! Der Dampf und das heiße Wasser können Verbrennungen verursachen! Den Heißwasserstrahl keinesfalls auf Körperteile
richten: Verbrühungsgefahr!
Sachgemäßer Gebrauch
Die Ka eemaschine ist ausschließlich für den Gebrauch im Haushalt bestimmt. Alle technischen Änderungen und jeder unsachgemäße Gebrauch
sind verboten, da sie ernstzunehmende Risiken bergen! Die Maschine ist
nicht dazu bestimmt, von Personen (einschließlich Kindern) mit eingeschränkten körperlichen oder geistigen Fähigkeiten oder einer Beeinträchtigung der Sinnesorgane und/oder von Personen ohne ausreichende Erfahrung oder Kompetenz verwendet zu werden, es sei denn, sie werden von
einer Person überwacht, die für ihre Sicherheit verantwortlich ist oder sie
werden im Gebrauch der Maschine geschult.
Stromversorgung - Netzkabel
Die Ka eemaschine darf nur an eine geeignete Steckdose angeschlossen
werden. Die für den Anschluss der Maschine vorgesehene Steckdose muss
folgende Anforderungen erfüllen:
- mit dem Stecker der Maschine kompatibel sein;
- entsprechend den Angaben auf dem Typenschild des Geräts ausgelegt
sein;
- an eine leistungsfähige Erdungsanlage angeschlossen sein.
Die Ka eemaschine darf keinesfalls mit defektem oder beschädigtem Netzkabel betrieben werden. Bei Schäden am Netzkabel muss dieses vom Hersteller oder von einer autorisierten Kundendienststelle ausgetauscht werden. Das Netzkabel darf nicht in Ecken, über scharfe Kanten oder auf sehr
heißen Gegenständen verlegt werden. Es sollte vor Öl geschützt werden.
Die Ka eemaschine darf nicht am Kabel getragen oder gezogen werden.
Der Stecker darf nicht durch Ziehen am Kabel herausgezogen werden. Er
sollte nicht mit nassen Händen berührt werden. Das freie Herabhängen des
Netzkabels von Tischen oder Regalen sollte vermieden werden.
Schutz anderer Personen
Kinder beaufsichtigen, damit sie nicht mit dem Gerät spielen. Kinder können die Gefahrensituationen, die durch Haushaltsgeräte entstehen können,
nicht abschätzen. Die für die Verpackung der Maschine benutzten Materialien sollten nicht in Reichweite von Kindern aufbewahrt werden.
Verbrühungsgefahr
Den Heißwasser- und/oder Dampfstrahl keinesfalls auf sich und/oder andere Personen richten: Verbrühungsgefahr!
Standort - Raumbedarf für den Betrieb und die Wartung
Für einen optimalen Betrieb wird folgendes empfohlen:
• Einen Standort mit sicherer und ebener Au age äche auswählen, an
dem nicht die Gefahr des Umkippens des Geräts oder der Verletzung von
Personen besteht.
• Der Raum sollte ausreichend beleuchtet und hygienisch unbedenklich
sein und die Steckdose muss leicht zugänglich sein.
• Gemäß der Angaben in der Abbildung einen Mindestabstand von den
Maschinenwänden berücksichtigen.
• Es wird empfohlen, während der Ein- und Ausschaltphasen der Maschine ein leeres Glas unter den Auslauf zu stellen.
Die Maschine keinen Temperaturen unter 0°C aussetzen. Es besteht die Gefahr, dass sie durch gefrierendes Wasser beschädigt wird. Die Ka eemaschine darf nicht im Freien betrieben werden.
Die Maschine nicht auf heißen Flächen oder in der Nähe von o enem Feuer aufstellen, da das Gehäuse schmelzen oder auf andere Art beschädigt
werden könnte.
Reinigung und Aufbewahrung der Maschine
Die Maschine stets sauber halten und in geeigneter Weise aufbewahren. Da
die Maschine natürliche Zutaten für die Zubereitung von Getränken (Ka ee,
Wasser, Milch, usw.) benutzt, können sich einige Rückstände von gemahlenem Ka ee oder kondensiertem Wasser auf ihrer Au age äche absetzen.
Aus diesem Grund wird empfohlen, regelmäßig sowohl die sichtbaren Teile
der Maschine als auch den Bereich darunter zu reinigen.
Bevor die Maschine eingelagert wird, sollte diese in jedem Falle gereinigt
werden:
- Für mehrere Tage im Tank und/oder im Wassersystem verbliebenes Wasser darf nicht mehr für Lebensmittelzwecke verwendet werden. Wird
die Maschine längere Zeit nicht benutzt, so muss das Wasser gemäß der
Beschreibung im Abschnitt “Heißwasserausgabe” ausgegeben werden.
- Die Maschine mit dem Hauptschalter ausschalten und reinigen. Anschließend den Stecker von der Steckdose abziehen. Abwarten, bis die
Maschine abgekühlt ist.
Die Maschine keinesfalls in Wasser tauchen! An einem trockenen Ort
außerhalb der Reichweite von Kindern aufbewahren. Vor Staub und
Schmutz schützen.
Die Änderung von und der Eingri auf interne Teile der Maschine ist strengstens verboten.
Betriebsstörungen
Die Maschine bei Störungen, Problemen oder dem Verdacht auf Defekte
nach einem Sturz nicht verwenden und unverzüglich den Netzstecker ziehen. Eine defekte Maschine keinesfalls in Betrieb setzen.
Für weitere Informationen zum Kundendienst und zur Lösung von Problemen ist auf die Kapitel “Problemlösung” und “Kundendienst” Bezug zu
nehmen.
Brandschutz
Im Fall eines Brands einen Kohlensäurelöscher (CO2) verwenden. Keinesfalls
sind Wasser- oder Pulverlöscher einzusetzen.
Vorbereitende Arbeiten
Die Abtropfschale KEINESFALLS bei eingeschalteter Maschine abnehmen.
Nach der Ein- und/oder Ausschaltung einige Minuten abwarten, da die Maschine einen Spülzyklus/eine Selbstreinigung ausführt (siehe Abschnitt “Spülzyklus/Selbstreinigung”).
In den Tank darf ausschließlich frisches Trinkwasser ohne Kohlensäure eingefüllt werden. Heißes Wasser und/oder andere Flüssigkeiten können den Tank
und/oder die Maschine beschädigen. Die Maschine darf nicht ohne Wasser in
Betrieb gesetzt werden. Sicherstellen, dass im Tank eine ausreichende Menge
Wasser vorhanden ist.
In den Behälter dürfen ausschließlich Ka eebohnen eingefüllt werden. Gemahlener Ka ee, Instantka ee oder andere Gegenstände können Schäden an
der Maschine verursachen, wenn sie in den Ka eebehälter eingefüllt werden.
Page 7
7
www.philips.com/support Safety instructions
Einstellbares Mahlwerk aus Keramik
Achtung! Der Drehknopf für die Mahlgradeinstellung, der sich im Ka eebehälter be ndet, darf nur dann mit dem Schlüssel für die Einstellung des Mahlwerks gedreht werden, wenn sich das Mahlwerk in Betrieb be ndet. Anderes
Material als Ka eebohnen darf keinesfalls eingefüllt werden. Keinen gemahlenen Ka ee und/oder Instantka ee in den Ka eebohnenbehälter einfüllen.
Achtung: Das Mahlwerk enthält bewegliche Teile, die potentiell gefährlich
sein können. Die Einführung der Finger und/oder anderer Gegenstände in den
Innenbereich ist daher verboten. Im Falle von Betriebsstörungen das Gerät
ausschalten, indem die Taste ON/OFF gedrückt und der Stecker von der Steckdose abgezogen wird, bevor jede Art von Eingri en im Ka eebohnenbehälter
vorgenommen wird. Während sich das Mahlwerk in Betrieb be ndet, sollten
keine Ka eebohnen eingefüllt werden.
Ka eeausgabe mit vorgemahlenem Ka ee
Achtung: Ausschließlich vorgemahlenen Ka ee in das Fach füllen. Die Einfüllung anderer Substanzen und/oder Gegenstände kann zu schweren Schäden
an der Maschine führen, die nicht durch die Garantie gedeckt sind.
Thermobehälter
Achtung! Für die Zubereitung der Getränke und für das Trinkwasser für die
Reinigung wird der Thermobehälter benutzt. Der Behälter darf keinesfalls für
andere Flüssigkeiten als die genannten benutzt werden.
Einschub/Herausnahme Milchkara e
Die Kara e darf nicht stärker, als durch den Einschub vorgegeben, geneigt
werden.
Heißwasserausgabe
Achtung! Zu Beginn der Ausgabe kann heißes Wasser herausspritzen: Verbrennungsgefahr. Die Vorrichtung kann hohe Temperaturen erreichen: nicht direkt
mit den Händen berühren.
Allgemeine Reinigung
Die Maschine keinesfalls in Wasser tauchen. Ihre Teile sollten nicht in der
Spülmaschine gereinigt werden. Für die Reinigung dürfen keine spitzen Gegenstände oder chemisch aggressive Produkte (Lösungsmittel) verwendet
werden. Für die Reinigung der Maschine sollte ein weiches, leicht mit Wasser
getränktes Tuch verwendet werden. Die Maschine und/oder deren Bestandteile nicht unter Verwendung einer Mikrowelle oder eines herkömmlichen
Backofens trocknen.
Reinigung Brühgruppe mit “Ka eefettlöser-Tabletten”
Achtung: Die “Ka eefettlöser-Tabletten” dürfen ausschließlich für die Reinigung verwendet werden, für die Entkalkung sind sie wirkungslos. Für die Entkalkung sollte der Entkalker Saeco verwendet werden. Dabei ist der im Kapitel
“Entkalkung” beschriebene Vorgang auszuführen.
Schmierung Brühgruppe
Wir weisen darauf hin, dass die unzureichende monatliche Schmierung der
Brühgruppe zu Betriebsstörungen der Maschine führen kann. Die Reparatur
wird nicht durch die Garantie gedeckt.
Entkalkung
Wird dieser Arbeitsvorgang nicht ausgeführt, funktioniert das Gerät nicht
mehr störungsfrei. In diesem Falle wird die Reparatur nicht durch die Garantie
gedeckt.
Achtung! Die Entkalkerlösung und die bis zum Abschluss des Zyklus ausgegebenen Produkte dürfen keinesfalls getrunken werden. Keinesfalls darf Essig
als Entkalker verwendet werden.
Achtung! Bevor der Entkalker eingefüllt wird, muss der Wasser lter “Intenza”
herausgenommen werden.
Entsorgung
Dieses Produkt entspricht der EU-Richtlinie 2002/96/EG.
Das Symbol
auf dem Produkt oder seiner Verpackung weist darauf hin, dass das Produkt nicht als normaler Haushaltsabfall zu behandeln
ist, sondern an einem Sammelpunkt für das Recycling von elektrischen und
elektronischen Geräten abgegeben werden muss.
Durch Ihren Beitrag zum korrekten Entsorgen dieses Produkts schützen Sie
die Umwelt und die Gesundheit Ihrer Mitmenschen.
Umwelt und Gesundheit werden durch falsches Entsorgen gefährdet.
Weitere Informationen über das Recycling dieses Produkts erhalten Sie von
Ihrer Gemeinde, der Müllabfuhr oder dem Geschäft, in dem Sie das Produkt
gekauft haben.
FR - Consignes de sécurité
Avant d’utiliser l’appareil, lire attentivement ce mode d’emploi et le garder
pour toute référence à venir.
Ne jamais mettre les parties sous tension au contact de l’eau : danger de courtcircuit ! La vapeur et l’eau chaude peuvent provoquer des brûlures ! Ne jamais
diriger le jet d’eau chaude vers des parties du corps : danger de brûlures !
Utilisation prévue
Cette machine à café est destinée uniquement à un usage domestique.
Toute modi cation technique ainsi que toute utilisation illicite sont interdites puisqu’elles compor tent des risques sérieux ! L’appareil ne doit pas être
utilisé par des personnes (y compris les enfants) ayant de faibles capacités
physiques, mentales ou sensorielles, sans expérience et/ou aux compétences insu santes, à moins qu’elles ne soient sous la supervision d’une
personne responsable de leur sécurité ou formées par cette personne en ce
qui concerne l’utilisation de l’appareil.
Alimentation du secteur - Câble d’alimentation
Ne brancher la machine à café que sur une prise de courant appropriée. La
prise pour le branchement de la machine doit être :
- conforme au type de che dont la machine est équipée ;
- dimensionnée pour respecter les spéci cations indiquées sur la plaquette des données de l’appareil ;
- reliée à un équipement de mise à la terre e cace.
Ne jamais utiliser la machine à café si le câble d’alimentation est défectueux
ou abîmé. Si le câble d’alimentation est abîmé, il doit être remplacé par le
fabricant ou par son centre d’assistance agrée. Ne pas faire passer le câble
d’alimentation sur des arêtes vives ou sur des objets très chauds. Le protéger
contre l’huile. Ne pas transporter ou tirer la machine à café par son câble.
Ne pas retirer la che en la tirant par le câble. Ne pas la toucher, les mains
mouillées. Éviter que le câble d’alimentation ne pende librement des tables
ou des étagères.
Protection des autres personnes
Garder les enfants sous supervision, pour qu’ils ne jouent pas avec l’appareil.
Les enfants ne se rendent pas compte des risques liés aux électroménagers.
EnglishDeutschFrançaisEspañol
Page 8
8
Safety instructions www.philips.com/support
Les matériaux utilisés pour l’emballage de la machine doivent être gardés
hors de la portée des enfants.
Danger de brûlures
Éviter d’orienter le jet d’eau chaude ou de vapeur vers soi et/ou vers d’autres
personnes : danger de brûlures !
Position - Espace pour l’utilisation et l’entretien
Pour une utilisation optimale, il est recommandé de :
• choisir une surface d‘appui sûre et bien nivelée pour éviter tout risque de
renversement de l‘appareil ou de blessures ;
• choisir un endroit assez bien éclairé, propre et pourvu d’une prise de
courant facilement accessible ;
• prévoir une distance minimum des parois de la machine comme le montre la gure ;
• pendant la mise en marche et l‘arrêt de la machine, il est recommandé
de placer un verre vide sous la buse de distribution du café.
Éviter de garder la machine à des températures inférieures à 0°C : le gel
pourrait l’endommager. Ne pas utiliser la machine à café en plein air.
Ne pas poser la machine sur des surfaces très chaudes ou à proximité d’une
amme nue : le châssis pourrait fondre ou s’abîmer.
Nettoyage et conservation de la machine
Garder la machine propre, en bon état et la ranger convenablement. La
machine utilise des ingrédients naturels pour préparer les boissons (café,
eau, lait, etc.) : il est donc possible que des résidus de café moulu ou d’eau
condensée soient présents sur la surface d’appui. Voilà pourquoi il est recommandé de nettoyer périodiquement les parties visibles de la machine
et la zone en dessous.
Avant de ranger la machine, il est vivement recommandé de la nettoyer :
- l’eau restée dans le réservoir et/ou dans le circuit de l‘eau pendant
plusieurs jours ne doit pas être utilisée pour un usage alimentaire. Si
la machine doit rester inactive pendant longtemps, distribuer de l‘eau
comme indiqué à la section « Distribution d‘eau chaude » ;
- mettre la machine hors tension par l’interrupteur général et la nettoyer.
Débrancher en n la che de la prise murale. Attendre jusqu‘à ce que la
machine ait refroidi.
Ne jamais plonger la machine dans l’eau ! Ranger la machine dans un lieu
sec et hors de la portée des enfants. La garder à l’abri de la poussière et
des saletés.
Il est strictement interdit d’altérer les parties internes de la machine.
Mauvais fonctionnements
En cas de pannes, de problèmes ou de défauts présumés à la suite d’une
chute, débrancher immédiatement la che de la prise. Ne jamais mettre en
marche une machine défectueuse.
Pour plus d’informations sur le service d’assistance aux clients et la résolution des problèmes, prière de consulter les sections « Dépannage » et
« Service Clients ».
En cas d’incendie
En cas d’incendie, utiliser des extincteurs au dioxyde de carbone (CO2). N’utiliser ni d’eau ni d’extincteurs à poudre.
Opérations préliminaires
Ne JAMAIS extraire le bac d’égouttement lorsque la machine est en marche. Attendre quelques minutes après la mise en marche et/ou l’arrêt puisque la machine e ectue un cycle de rinçage/auto-nettoyage (voir section
« Cycle de rinçage/auto-nettoyage »).
Ne remplir le réservoir qu’avec de l’eau fraîche non pétillante. L’eau chaude
et/ou d’autres liquides peuvent abîmer le réservoir et/ou la machine. Ne pas
mettre en marche la machine sans eau. S’assurer que le réservoir est su samment plein.
Ne verser que du café en grains dans le réservoir. Le café moulu, soluble ou
autres objets, si insérés dans le réservoir à café, peuvent endommager la machine.
Moulin à café réglable en céramique
Attention ! Tourner le bouton de réglage mouture situé à l’intérieur du réservoir à café seulement par la Clé de réglage du moulin à café et lorsque le
moulin à café est en marche. Il est interdit d’introduire des substances autres
que du café en grains dans le réservoir. Ne pas introduire de café moulu et/ou
soluble dans le réservoir à café en grains.
Attention : le moulin à café contient des parties en mouvement qui peuvent
être dangereuses ; il est donc interdit d’y mettre les doigts et/ou autres objets. En cas de mauvais fonctionnement, arrêter l’appareil en appuyant sur
la touche ON/OFF et débrancher la che de la prise avant d’e ectuer toute
intervention dans le réservoir à café en grains. Ne pas verser de café en grains
lorsque le moulin à café est en marche.
Distribution de café avec du café prémoulu
Attention : verser uniquement du café prémoulu dans le compartiment. L’introduction d’autres substances ou objets peut provoquer de graves dommages
à la machine qui ne sont pas couverts par la garantie.
Thermos
Attention ! Utiliser le Thermos pour la préparation des boissons et l’eau potable pour son nettoyage. Ne jamais utiliser le récipient avec des liquides autres
que ceux indiqués.
Introduction/enlèvement de la carafe à lait
Il est interdit de forcer la carafe au-delà de son inclinaison naturelle.
Distribution d’eau chaude
Attention ! Il peut y avoir quelques éclaboussures d’eau chaude au début : danger de brûlures. Le dispositif peut atteindre des températures élevées : éviter
tout contact direct avec les mains.
Nettoyage général
Ne pas plonger la machine dans l’eau. Ne laver aucun composant de la machine au lave-vaisselle. Ne pas utiliser d’objets pointus ou de produits chimiques
agressifs (solvants) pour le nettoyage. Pour le nettoyage de la machine, utiliser un chi on doux, légèrement imbibé d’eau. Ne pas faire sécher la machine
et/ou ses composants dans un four à micro-ondes et/ou traditionnel.
Nettoyage du Groupe de distribution à l’aide des « Tablettes de
dégraissage »
Attention : les « Tablettes de dégraissage » ne sont à utiliser que pour le nettoyage. Elles n’ont aucune fonction détartrante. Pour le détartrage, utiliser
le détartrant Saeco et suivre la procédure décrite à la section « Détartrage ».
Lubri cation du Groupe de distribution
Nous tenons à souligner que si la lubri cation du groupe de distribution n’est
pas e ectuée tous les mois, ceci pourrait compromettre le bon fonctionnement de l’appareil. La réparation n’est pas couverte par la garantie.
Détartrage
Si cette opération n’est pas e ectuée, l’appareil pourrait cesser de fonctionner
Page 9
9
www.philips.com/support Safety instructions
régulièrement. En pareil cas, la réparation n’est pas couverte par la garantie.
Attention ! Ne pas boire la solution détartrante et les produits distribués
jusqu’à la conclusion du cycle. Ne jamais utiliser de vinaigre pour détartrer
la machine.
Attention ! Retirer le ltre « Intenza » avant d’introduire le détartrant.
Élimination
L’ appareil est conçu et fabriqué pour faciliter sa valorisation, son
recyclage ou sa réutilisation conformément à la directive européenne 2002/96/CEE relative aux appareils électriques et électroniques
usagés (waste electrical and electronic equipment - WEEE).
Le logo
ci-contre apposé sur l’appareil indique que ce produit ne
peut pas être éliminé avec les déchets ménagers non triés.
Lorsque vous aurez décidé de vous en séparer dé nitivement, il convient de
faire procéder à la collecte sélective de cet appareil en vous conformant au
mode de reprise mis en place dans votre commune (collecte ponctuelle des
encombrants, déchèterie), ou en faisant appel au service de reprise proposé
par votre distributeur, ou bien, en le con ant à des organisations caritatives
et des associations à but non lucratif.
En vous assurant que ce produit est éliminé correctement, vous favorisez
la prévention des conséquences négatives pour l’environnement et la santé
humaine.
ES - Normas de seguridad
Antes de utilizar la máquina, leer atentamente el presente manual y conservarlo para posibles referencias en el futuro.
No dejar nunca que las partes bajo tensión entren en contacto con agua: ¡riesgo de cortocircuito! ¡El vapor y el agua caliente pueden causar quemaduras!
No dirigir nunca el chorro de agua caliente hacia partes del cuerpo: ¡riesgo
de quemaduras!
Uso previsto
Esta máquina de café ha sido diseñada exclusivamente para uso doméstico.
¡Se prohíbe realizar cualquier modi cación técnica así como el uso ilícito de
la máquina debido al serio riesgo que ello conlleva! Este aparato no está
destinado a ser utilizado por personas (niños incluidos) con capacidades físicas, mentales o sensoriales reducidas o que no dispongan de una su ciente experiencia y/o competencias, a menos que lo utilicen bajo la supervisión
de una persona responsable de su seguridad o que sean instruidas por dicho
responsable en cómo usarlo.
Alimentación de corriente - Cable de alimentación
Conectar la máquina de café sólo a una toma de corriente adecuada. La
toma a la que se conectará la máquina debe:
- ser adecuada para el tipo de enchufe instalado en la máquina;
- respetar las especi caciones de dimensionamiento indicadas en la placa
de datos del aparato;
- estar conectada a una e ciente instalación de puesta a tierra.
No usar nunca la máquina de café si el cable de alimentación está defectuoso o dañado. Si el cable de alimentación está dañado, solicitar al fabricante o
a un centro de asistencia autorizado la sustitución del mismo. Procurar que
el cable de alimentación no pase por esquinas o cantos agudos ni por encima de objetos muy calientes. Protegerlo del aceite. No transportar ni tirar
de la máquina de café sosteniéndola por el cable. No desenchufar la máqui-
na tirando del cable ni tocar el enchufe con las manos mojadas. Procurar
que el cable de alimentación no cuelgue libremente de mesas o estanterías.
Protección de terceras personas
Mantener la máquina fuera del alcance de los niños para evitar que jueguen
con ella. Los niños no se dan cuenta de los peligros relacionados con el uso
indebido de un electrodoméstico. No dejar al alcance de los niños los materiales usados para embalar la máquina.
Riesgo de quemaduras
No dirigir contra uno mismo ni contra terceras personas el chorro de vapor
y/o de agua caliente: ¡riesgo de quemaduras!
Colocación - Espacio para el uso y el mantenimiento
Para un uso óptimo se aconseja:
• elegir una super cie de apoyo segura, bien nivelada, donde nadie pueda volcar el aparato o resultar herido;
• elegir un ambiente su cientemente iluminado e higiénico, y en el que la
toma de corriente sea de fácil acceso;
• dejar una distancia mínima entre la máquina y la pared, tal como muestra la gura;
• durante las fases de encendido y apagado de la máquina, se aconseja
colocar un vaso vacío bajo la salida de café.
No someter la máquina a temperaturas inferiores a 0°C, ya que el frío podría
dañarla. No usar la máquina de café al aire libre.
No apoyar la máquina sobre super cies muy calientes ni colocarla cerca de
llamas abiertas a n de evitar que su carrocería se derrita o resulte dañada.
Limpieza y conservación de la máquina
Mantener la máquina en el mejor estado posible, limpia y conservándola
adecuadamente. La máquina utiliza ingredientes naturales para la preparación de las bebidas (café, agua, leche, etc.), por lo que podrían quedar posos
de café molido o agua condensada en su super cie de apoyo. Por esta razón,
se aconseja limpiar periódicamente tanto las partes visibles de la máquina
como la zona subyacente.
Es altamente aconsejable limpiar la máquina antes de guardarla:
- no utilizar para uso alimentario el agua que haya permanecido en el depósito y/o en el circuito de agua durante varios días. Cuando no vaya a
utilizarse la máquina durante un largo período, suministrar agua según
lo descrito en el apartado “Suministro de agua caliente”;
- apagar la máquina mediante el interruptor general y limpiarla. Por último, desconectar el enchufe de la toma. Esperar a que la máquina se
haya enfriado.
¡Nunca sumergir la máquina en agua! Mantener en lugar seco, fuera del alcance de los niños. Proteger del polvo y de la suciedad. Queda terminantemente prohibido manipular las partes internas de la máquina.
Mal funcionamiento
En caso de averías, problemas o funcionamiento sospechoso tras una caída,
desconectar inmediatamente la máquina de la toma de corriente. No poner
nunca en funcionamiento la máquina si está averiada.
Para más información sobre el servicio clientes y la resolución de problemas,
consultar los capítulos “Resolución de problemas” y “Servicio clientes”.
Antiincendio
En caso de incendio usar extintores de anhídrido carbónico (CO2). No usar
agua ni extintores de polvo.
Operaciones preliminares
EnglishDeutschFrançaisEspañol
Page 10

10
Safety instructions www.philips.com/support
No extraer NUNCA la bandeja de goteo con la máquina encendida. Esperar
un par de minutos tras el encendido y/o el apagado, ya que la máquina realiza un ciclo de enjuague/autolimpieza (véase el apartado “Ciclo de enjuague/
autolimpieza”).
Introducir siempre en el depósito sólo agua fresca sin gas. El agua caliente y/u
otros líquidos pueden dañar el depósito y/o la máquina. No poner en funcionamiento la máquina sin agua. Asegurarse de que haya su ciente agua en
el depósito.
Introducir siempre en el contenedor sólo café en grano. La máquina podría resultar dañada si se introduce en el contenedor de café cualquier otro producto,
como café molido o soluble.
Molinillo de café regulable de cerámica
¡Atención! El mando de regulación del grado de molido, ubicado en el interior
del contenedor de café, debe girarse mediante la Llave de regulación del molinillo de café sólo con el molinillo de café en funcionamiento. No introducir
ningún producto en el contenedor que no sea café en grano. No introducir café
molido y/o soluble en el contenedor de café en grano.
Atención: el molinillo de café contiene componentes móviles potencialmente
peligrosos, por lo que se prohíbe introducir los dedos y/u otros objetos en su
interior. En caso de mal funcionamiento, apagar la máquina pulsando el botón
ON/OFF y desconectar el enchufe de la toma antes de realizar cualquier tipo de
intervención en el interior del contenedor de café en grano. No echar café en
grano con el molinillo de café en funcionamiento.
Suministro de café con café premolido
¡Atención! Utilizar el termo únicamente para la preparación de bebidas y con
agua potable para la limpieza. No utilizar nunca el contenedor con líquidos
distintos a los indicados.
Termo
¡Atención! Utilizar el contenedor únicamente con leche (para la preparación
de las bebidas) y con agua potable (para su limpieza). No utilizar nunca el
contenedor para tratar líquidos distintos de los citados.
Introducción/extracción de la jarra de leche
No forzar nunca la jarra más allá de su inclinación natural.
Suministro de agua caliente
¡Atención! Al inicio del suministro pueden producirse pequeñas salpicaduras
de agua caliente: riesgo de quemaduras. El dispositivo puede alcanzar temperaturas elevadas: evitar el contacto directo con las manos.
Limpieza general
No sumergir la máquina en agua. No lavar ninguno de sus componentes en el
lavavajillas. No utilizar objetos puntiagudos o productos químicos agresivos
(solventes) para la limpieza. Para la limpieza de la máquina, usar un paño suave humedecido con agua. No secar la máquina ni sus componentes usando un
horno de microondas y/o un horno convencional.
Limpieza del grupo de café con las “Pastillas desengrasantes”
Atención: las “Pastillas desengrasantes” deben utilizarse exclusivamente para
la limpieza y no tienen ninguna función descalci cante. Para la descalci cación, utilizar el producto descalci cante Saeco y seguir el procedimiento descrito en el capítulo “Descalci cación”.
Lubricación del grupo de café
Recordamos que la falta de lubricación mensual del grupo de café puede afec-
tar al correcto funcionamiento del aparato. La reparación no estará cubierta
por la garantía.
Descalci cación
La omisión de esta operación puede hacer que la máquina deje de funcionar
correctamente, en cuyo caso la reparación no estará cubierta por la garantía.
¡Atención! No beber la solución descalci cante ni los productos suministrados
hasta que el ciclo se haya completado. No utilizar bajo ningún concepto vinagre como producto descalci cante.
¡Atención! Quitar el ltro “Intenza” antes de añadir el producto descalci cante.
Eliminación del aparato
Este producto cumple con la Directiva EU 2002/96/EC.
El símbolo
en el producto o en su embalaje indica que este producto no se puede tratar como desperdicios normales del hogar.
Este producto se debe entregar al punto de recogida de equipos eléctricos y
electrónicos para reciclaje.
Al asegurarse de que este producto se deseche correctamente, usted ayudará a evitar posibles consecuencias negativas para el medio ambiente y la
salud pública, lo cual podría ocurrir si este producto no se manipula de forma adecuada. Para obtener información más detallada sobre el reciclaje de
este producto, póngase en contacto con la administración de su ciudad, con
su servicio de desechos del hogar o con la tienda donde compró el producto.
Page 11
11
www.philips.com/support Safety instructions
EnglishDeutschFrançaisEspañol
Page 12
12
Instructions www.philips.com/support
H2O
MAX
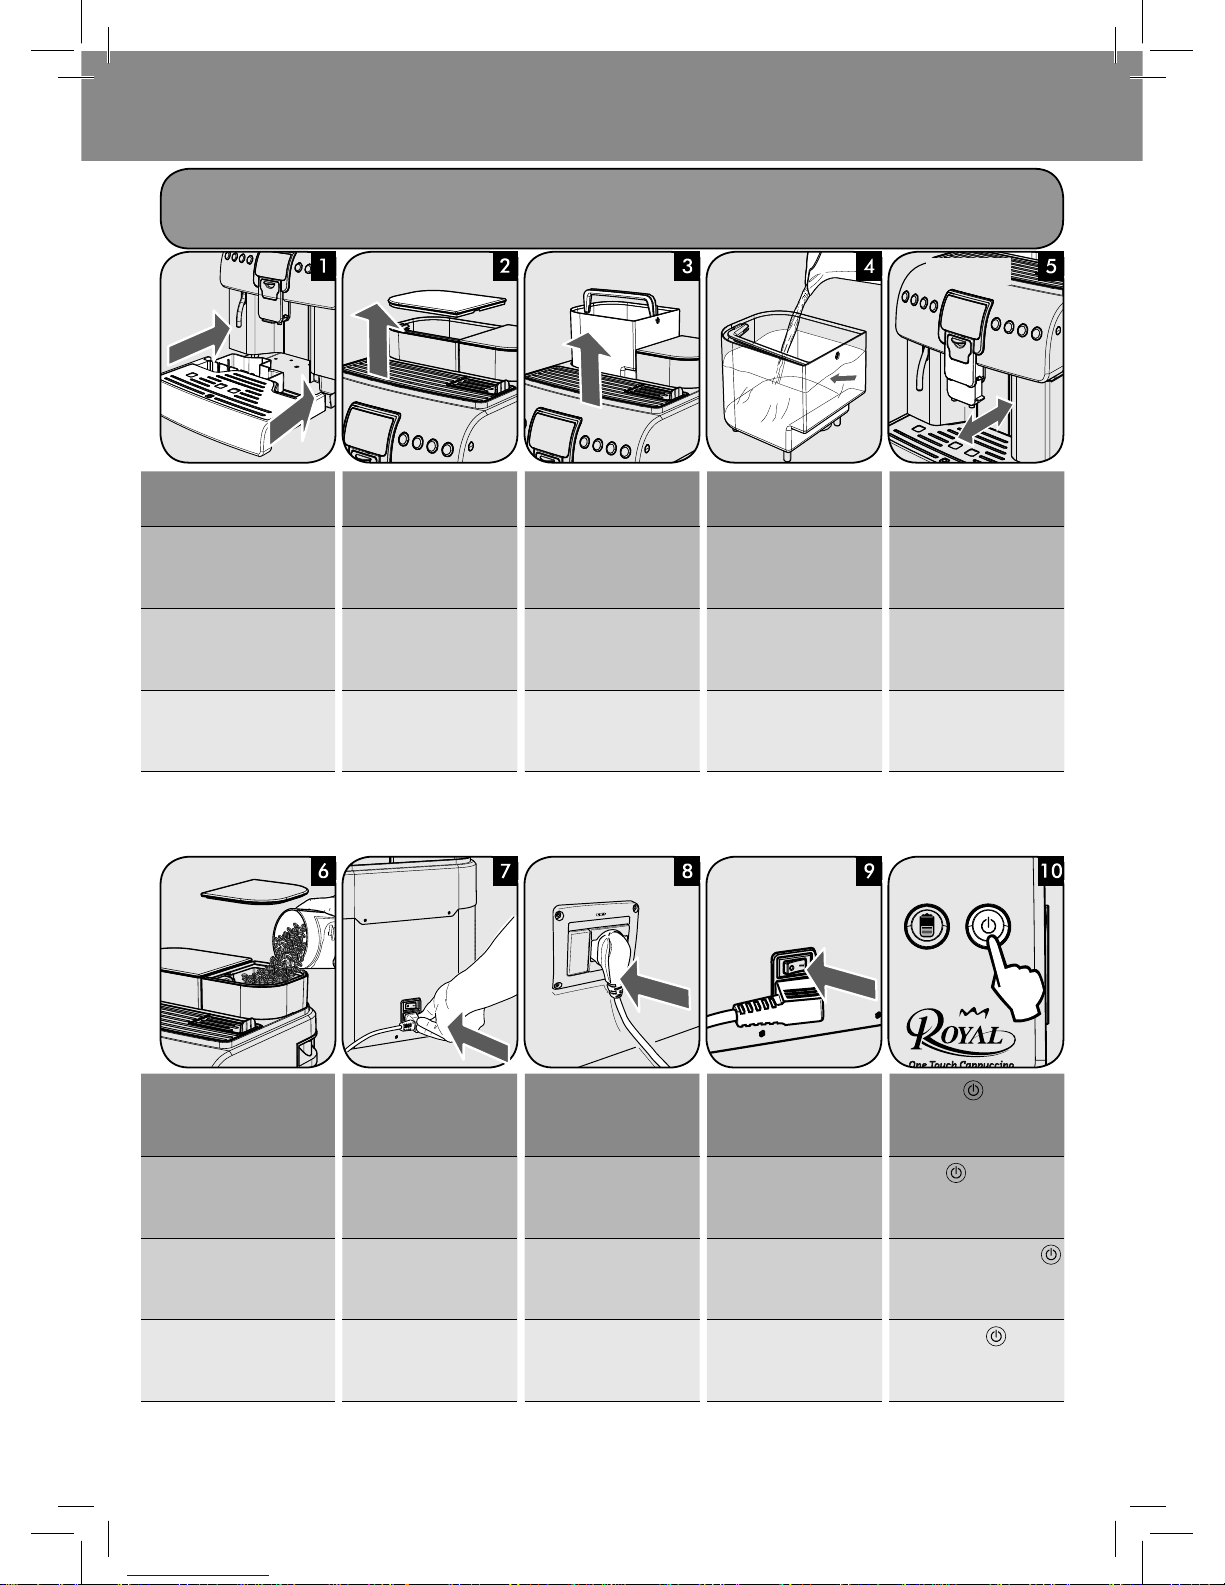
EN
Fully insert the drip tray. Remove the lid from the wa-
ter tank.
Remove the water tank by
only using the handle.
Fill it with fresh drinking
water.
Make sure the dispensing
spout is in correct position.
DE
Die Abtropfschale bis zum
Anschlag einsetzen.
Den Deckel vom Wassertank
abnehmen.
Den Wassertank ausschließlich am Gri entnehmen.
Mit frischem Trinkwasser
au üllen.
Sicherstellen, dass der Auslauf korrekt positioniert
wurde.
FR
Insérer le bac d’égouttement jusqu’à la butée.
Retirer le couvercle du réservoir à eau.
Retirer le réservoir à eau
en utilisant uniquement la
poignée.
Le remplir d’eau fraîche
potable.
S’assurer que la buse de distribution est correctement
positionnée.
ES
Introducir la bandeja de goteo hasta el tope.
Quitar la tapa del depósito
de agua.
Extraer el depósito de agua
utilizando sólo la empuñadura.
Llenarlo con agua fresca potable.
Comprobar que la salida de
café esté correctamente posicionada.
EN
Fill the co ee bean hopper. Insert the mains in the ma-
chine.
Insert the mainsplug in the
wall socket
Switch the power button
to “I”.
1
st
time go to step 11.
Press the
button to
switch on the machine.
DE
Den Ka eebohnenbehälter
au üllen.
Den Stecker in die Maschine
einstecken.
Den Stecker in die Wandsteckdose einstecken.
Den Hauptschalter auf „I“
stellen. Beim ersten Mal
weiter mit Punkt 11.
Die Taste
drücken, um die
Maschine einzuschalten.
FR
Remplir le réservoir à café
en grains.
Insérer la che dans la
machine.
Brancher la prise de courant
sur la prise murale.
Mettre l’interrupteur principal sur « I ». En cas de 1
ère
fois passer au point 11.
Appuyer sur la touche
pour allumer la machine.
ES
Llenar el contenedor de café
en grano.
Introducir la clavija en la
máquina.
Conectar el enchufe a la
toma de corriente de pared.
Poner el interruptor principal
en “I”.
La 1
a
vez, ir al punto 11.
Pulsar el botón
para en-
cender la máquina.
FIRST INSTALLATION
ERSTE INSTALLATION - PREMIÈRE INSTALLATION - PRIMERA INSTALACIÓN
CLICK!
Page 13

13
www.philips.com/support Instructions
HEATING UP…
RINSING
ESC
STOP RINSING
EN
Press to select the language, then press to memorize!
Only for the st installation.
The machine is heating up. Place a container under the
dispensing spout.
The machine performs a
rinse cycle.
DE
Die Taste drücken, um die Sprache anzuwählen, dann für
die Speicherung
drücken!
Nur bei der ersten Installation.
Die Maschine be ndet sich in
der Aufheizphase.
Einen Behälter unter den
Auslauf stellen.
Die Maschine führt einen
Spülzyklus aus.
FR
Appuyer sur pour choisir la langue, puis sur pour
la mémoriser !
Uniquement lors de la première installation.
La machine est en phase de
chau age.
Placer un récipient sous la
buse de distribution.
La machine e ectue un
cycle de rinçage.
ES
Pulsar para seleccionar el idioma y luego pulsar para
memorizarlo.
Sólo en la primera instalación.
La máquina está en fase de
calentamiento.
Colocar un recipiente bajo la
salida de café.
La máquina realiza un ciclo
de enjuague.
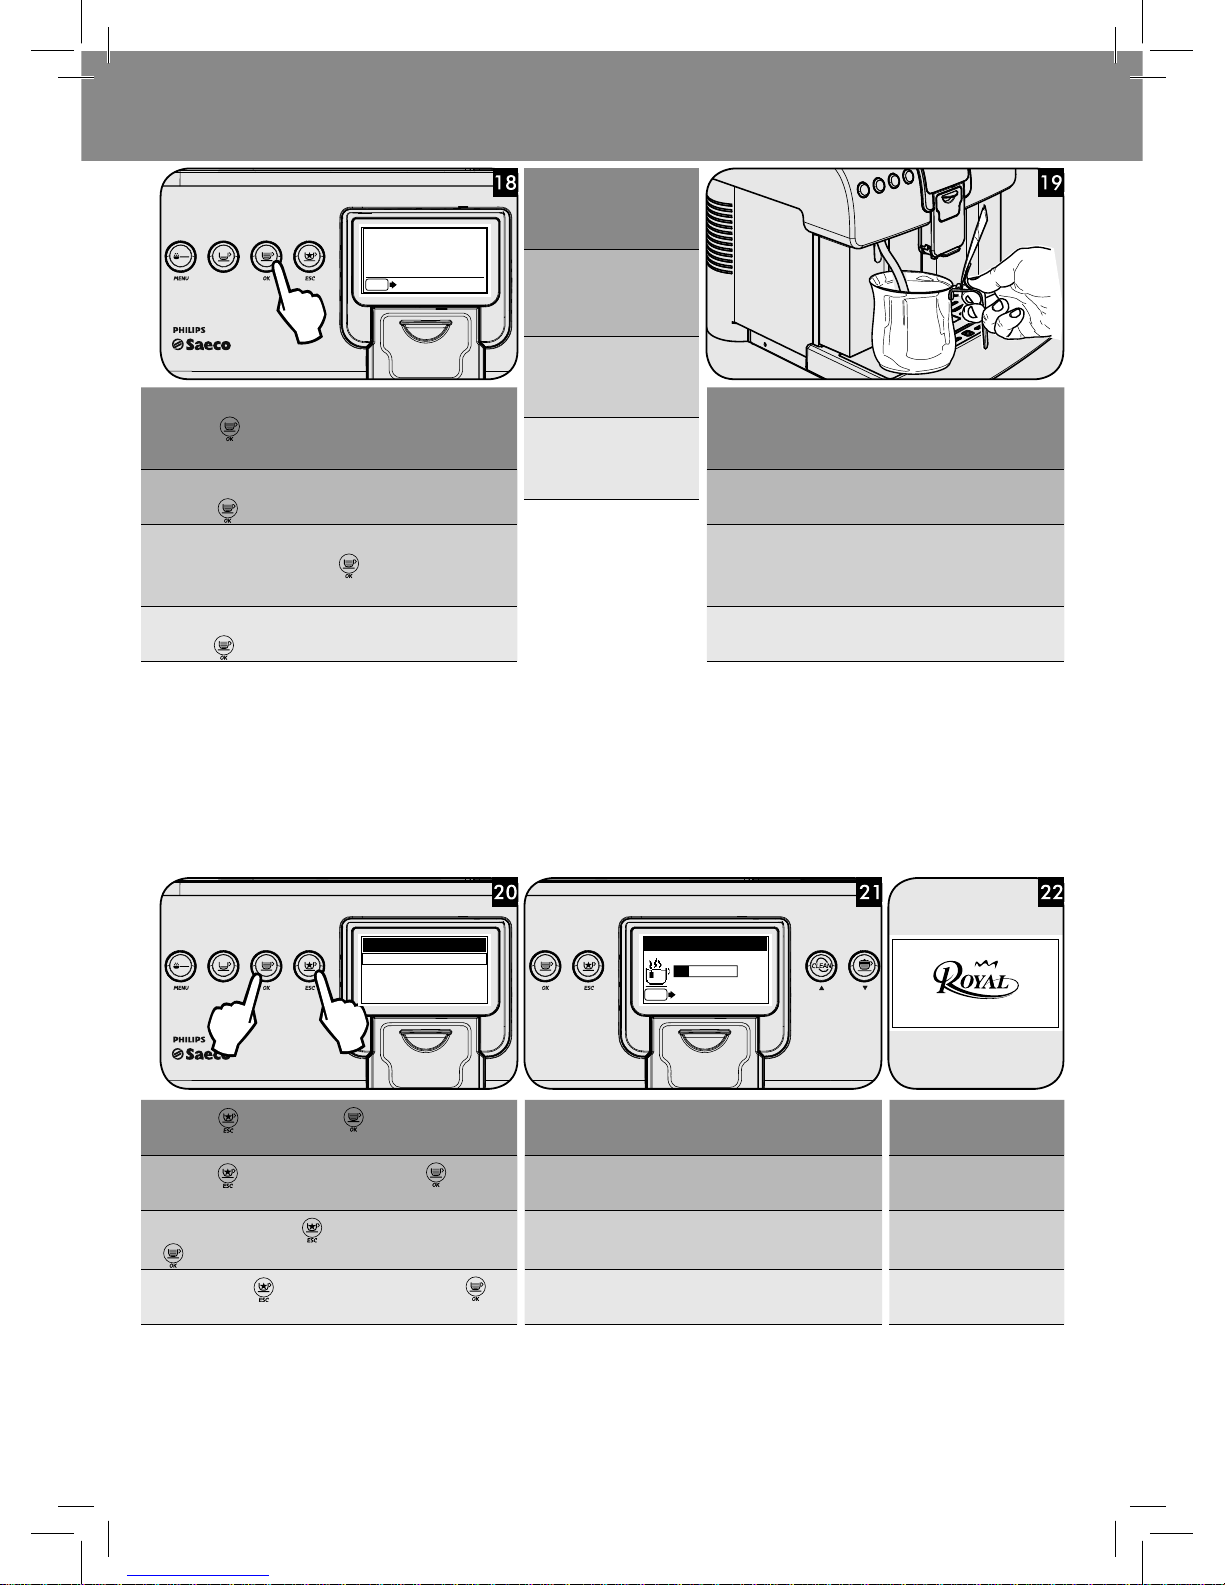
EN
Then, the machine is ready
for use. Remove the cup.
Place a large container under
the dispensing spout.
Select the pre-ground co ee brewing function by pressing
the
button once. Then press the button.
DE
In diesem Falle ist die Maschine nun betriebsbereit.
Die Tasse entnehmen.
Einen großen Behälter unter
den Auslauf stellen.
Die Funktion für die Ausgabe von vorgemahlenem Ka ee
anwählen, indem die Taste
ein Mal gedrückt wird. Nach-
folgend die Taste
drücken.
FR
Maintenant la machine est
prête à l’emploi. Retirer la
tasse.
Placer un récipient su samment grand sous la
buse de distribution.
Sélectionner la fonction de distribution du café prémoulu
en appuyant une fois sur la touche
. Appuyer ensuite
sur la touche
.
ES
La máquina ya está lista
para ser utilizada. Retirar
la taza.
Colocar un recipiente grande
bajo la salida de café.
Seleccionar la función de suministro de café premolido pulsando una vez el botón
. A continuación, pulsar el botón
.
OK ESC
MENU OK ESC
LANGUAGE
ITALIANO
ENGLISH
DEUTSCH
FRANÇAIS
1
1
2
2
MANUAL RINSE CYCLE
MANUELLER SPÜLZYKLUS
CYCLE DE RINÇAGE MANUEL
CICLO DE ENJUAGUE
MANUAL
EnglishDeutschFrançaisEspañol
Page 14
14
Instructions www.philips.com/support
MENU OK ESC
MEMO
ESC
ESC
INSERT
GROUND COFFEE
AND PRESS OK
MENU OK ESC
OK ESC
SPECIAL BEVERAGES
HOT WATER
LONG COFFEE
HOT MILK
AMERICAN COFFEE
HOT WATER
ESC
STOP HOT WATER
1
2
EN
Note: Do not add pre-ground co ee into the compartment.
Press the
button. Wait until the dispensing procedure is
complete.
Place a large container under the hot water wand.
DE
Hinweis: Keinen vorgemahlenen Ka ee in das Fach einfüllen.
Die Taste
drücken. Das Ende der Ausgabe abwarten.
Einen großen Behälter unter die Heißwasserdüse stellen.
FR
Remarque : ne pas ajouter de café prémoulu dans le logement. Appuyer sur la touche
. Attendre la n de la dis-
tribution.
Placer un récipient su samment grand sous la buse d’eau
chaude.
ES
Nota: no añadir café premolido en el compartimento. Pulsar
el botón
. Esperar a que termine el suministro.
Colocar un recipiente grande bajo el tubo de agua caliente.
EN
Press the button. Then the button.
When the hot water dispensing procedure is complete, empty the container.
Then, the machine is ready
for use.
DE
Die Taste drücken. Nachfolgend die Taste drücken.
Nach Abschluss der Ausgabe des heißen Wassers den Behälter leeren.
In diesem Falle ist die Maschine nun betriebsbereit.
FR
Appuyer sur la touche . Appuyer ensuite sur la touche
.
Une fois la distribution d’eau chaude terminée, vider le
récipient.
Maintenant la machine est
prête à l’emploi.
ES
Pulsar el botón . A continuación, pulsar el botón .
Una vez nalizado el suministro de agua caliente, vaciar el
recipiente.
La máquina ya está lista
para ser utilizada.
Repeat the operations from
step 16 to step 18 for 3 times,
then continue with step 19.
Die Vorgänge von Punkt 16
bis Punkt 18 insgesamt 3
Mal wiederholen. Danach zu
Punkt 19 übergehen.
Répéter 3 fois les opérations
du point 16 au point 18,
passer ensuite au point 19.
Repetir 3 veces las operaciones del punto 16 al punto 18;
después pasar al punto 19.
Page 15
15
www.philips.com/support Instructions
ENU OK ESC
ENU OK ESC
MEMO
MEMO
ESC
STOP COFFEE
ESC
MEMO
ESC
STOP COFFE
ENU OK ESC
OK
FIRST ESPRESSO
ERSTER ESPRESSO - PREMIER CAFÉ EXPRESSO - PRIMER CAFÉ EXPRÉS
MY ESPRESSO
MEIN ESPRESSO - MON CAFÉ EXPRESSO - MI CAFÉ EXPRÉS
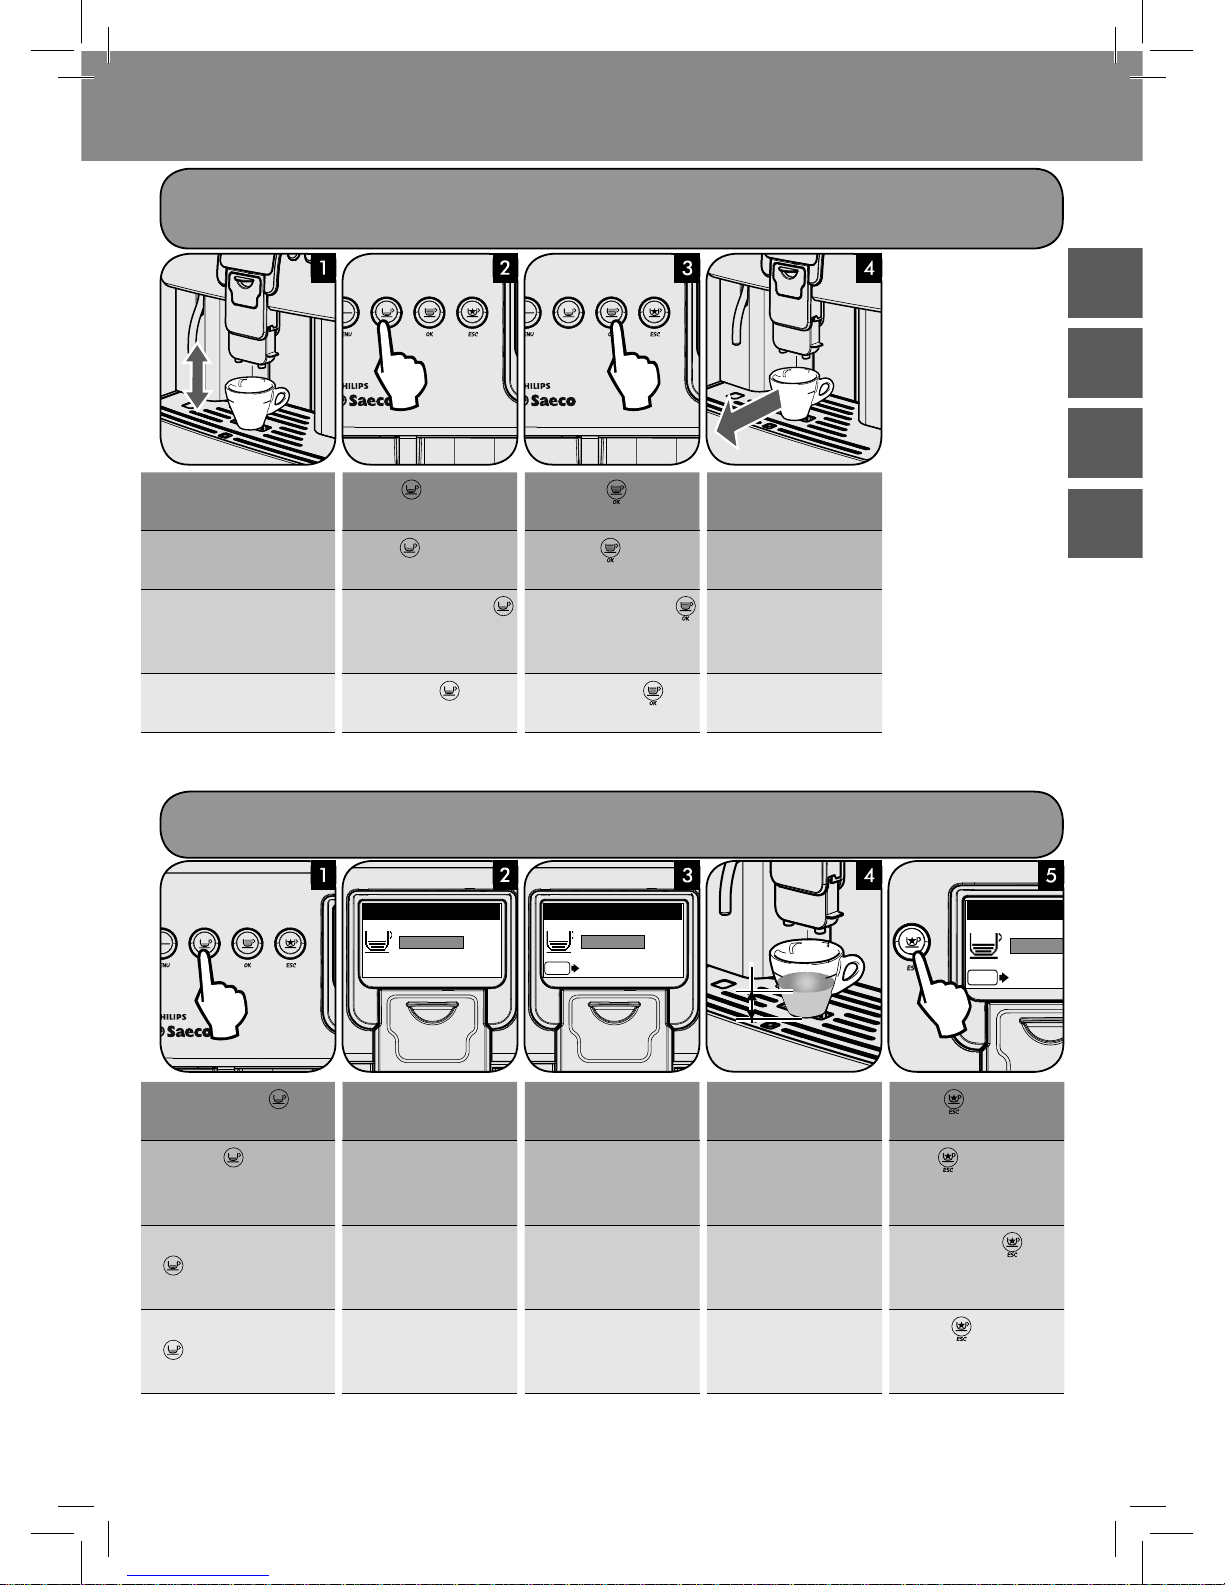
EN
Adjust the dispensing spout.
Press the
button to brew
espresso or..
...press the
button to
brew co ee.
At the end of the process, remove the cup.
DE
Den Auslauf einstellen.
Die Taste
für die Ausgabe
eines Espresso oder ...
... die Taste
für die Aus-
gabe eines Ka ees drücken.
Zum Abschluss des Vorgangs
die Tasse entnehmen.
FR
Régler la buse de distribution.
Appuyer sur la touche
pour distribuer un café expresso ou...
...appuyer sur la touche
pour distribuer un café.
À la n de la préparation,
retirer la tasse.
ES
Ajustar la salida de café.
Pulsar el botón
para su-
ministrar un café exprés o...
... pulsar el botón
para
suministrar un café.
Cuando el procedimiento termine, retirar la taza.
EN
Press and hold the button
until “MEMO” is displayed
The machine is programming.
The machine starts brewing. Wait until the desired quan-
tity is reached...
.... press
to stop.
Stored!
DE
Die Taste gedrückt halten, bis die Angabe „MEMO“
angezeigt wird.
Die Maschine be ndet sich in
der Programmierphase.
Die Maschine beginnt mit
der Ausgabe.
Abwarten, bis die gewünschte Menge erreicht
wird ...
.... und
drücken, um den
Vorgang zu beenden.
Gespeichert!
FR
Garder appuyée la touche
jusqu’à l’a chage du
message « MEMO ».
La machine est en phase de
programmation.
La machine commence à
distribuer la boisson.
Attendre que la quantité
désirée ait été distribuée...
... appuyer sur
pour
arrêter l’opération.
Mémorisé !
ES
Mantener pulsado el botón
hasta que se visualice
“MEMO”.
La máquina entra en fase de
programación.
La máquina comienza el suministro.
Esperar a que se alcance la
cantidad deseada...
... pulsar
para terminar
la operación.
¡Memorizado!
EnglishDeutschFrançaisEspañol
Page 16
16
Instructions www.philips.com/support
FIRST CAPPUCCINO
ERSTER CAPPUCCINO - PREMIER CAPPUCCINO - PRIMER CAPUCHINO
CAPPUCCINO
ESC
STOP COFFEE
CAPPUCCINO
ESC
STOP MILK
EN
Remove the cover from the
front side.
Insert the Cappuccinatore
into its seat until it locks into
place.
Insert the clean hose directly
in the milk container.
Place the cup under the dispensing spout.
Press the
button.
DE
Den Deckel vom vorderen Teil
abnehmen.
Den Cappuccinatore bis zum
Anschlag in seine Aufnahme
einstecken.
Den sauberen Schlauch direkt in den Milchbehälter
einstecken.
Eine Tasse unter den Ka eeauslauf stellen.
Die Taste
drücken.
FR
Enlever le couvercle placé
sur la partie avant.
Introduire le Cappuccinatore dans son logement
jusqu’à la butée.
Insérer le tuyau propre
directement dans le réservoir à lait.
Positionner une tasse sous
la buse de distribution.
Appuyer sur la touche
.
ES
Quitar la tapa ubicada de la
parte frontal.
Introducir el Cappuccinatore
en su alojamiento hasta el
tope.
Introducir el tubo limpio directamente en el contenedor
de la leche.
Colocar una taza bajo la salida de café.
Pulsar el botón
.
EN
The machine dispenses
frothed milk.
The machine brews co ee. At the end of the preparation
remove the cup.
DE
Die Maschine gibt die geschäumte Milch aus.
Die Maschine gibt den Kaffee aus.
Zum Abschluss der Zubereitung die Tasse entnehmen.
FR
La machine distribue le lait
émulsionné.
La machine distribue le
café.
À la n de la préparation,
retirer la tasse.
ES
La máquina suministra la leche montada.
La máquina suministra el
café.
Cuando la preparación esté
lista, retirar la taza.
Page 17
17
www.philips.com/support Instructions
ESC
STOP COFFEE
LATTE MACCHIATO
LATTE MACCHIATO
ESC
STOP MILK
FIRST LATTE MACCHIATO
ERSTE LATTE MACCHIATO - PREMIER LAIT NOISETTE - PRIMERA LECHE MANCHADA
EN
Remove the cover from the
front side.
Insert the Cappuccinatore
into its seat until it locks into
place.
Insert the clean hose directly
in the milk container.
Place the cup under the dispensing spout.
Press the
button.
DE
Den Deckel vom vorderen Teil
abnehmen.
Den Cappuccinatore bis zum
Anschlag in seine Aufnahme
einstecken.
Den sauberen Schlauch direkt in den Milchbehälter
einstecken.
Eine Tasse unter den Ka eeauslauf stellen.
Die Taste
drücken.
FR
Enlever le couvercle placé
sur la partie avant.
Introduire le Cappuccinatore dans son logement
jusqu’à la butée.
Insérer le tuyau propre
directement dans le réservoir à lait.
Positionner une tasse sous
la buse de distribution.
Appuyer sur la touche
.
ES
Quitar la tapa ubicada de la
parte frontal.
Introducir el Cappuccinatore
en su alojamiento hasta el
tope.
Introducir el tubo limpio directamente en el contenedor
de la leche.
Colocar una taza bajo la salida de café.
Pulsar el botón
.
EN
The machine dispenses
frothed milk.
The machine brews co ee. At the end of the preparation
remove the cup.
DE
Die Maschine gibt die geschäumte Milch aus.
Die Maschine gibt den Kaffee aus.
Zum Abschluss der Zubereitung die Tasse entnehmen.
FR
La machine distribue le lait
émulsionné.
La machine distribue le
café.
À la n de la préparation,
retirer la tasse.
ES
La máquina suministra la leche montada.
La máquina suministra el
café.
Cuando la preparación esté
lista, retirar la taza.
EnglishDeutschFrançaisEspañol
Page 18
18
Instructions www.philips.com/support
“SPECIAL” Beverages
Getränke “SPECIAL” - Boissons « SPECIAL » - Bebidas “SPECIAL”
ESC
ESC
SPECIAL BEVERAGES
HOT WATER
LONG COFFEE
HOT MILK
AMERICAN COFFEE
SPECIAL BEVERAGES
HOT WATER
LONG COFFEE
HOT MILK
AMERICAN COFFEE
12
3
ENU OK ESC
SPECIAL BEVERAGES
HOT WATER
LONG COFFEE
HOT MILK
AMERICAN COFFEE
SPECIAL BEVERAGES
HOT WATER
LONG COFFEE
HOT MILK
AMERICAN COFFEE
SPECIAL BEVERAGES
HOT WATER
LONG COFFEE
HOT MILK
AMERICAN COFFEE
EN
Press the button.
The display shows the page for “special” beverages.
Place a container under the
hot water wand.
Select the desired beverage by pressing the
or but-
ton.
DE
Die Taste drücken.
Die Seite der Getränke „Special“ wird angezeigt.
Einen Behälter unter die
Heißwasserdüse stellen.
Das gewünschte Getränk anwählen, indem die Taste
oder gedrückt wird.
FR
Appuyer sur la touche .
La page des boissons « special » s’a che.
Placer un récipient sous la
buse d’eau chaude.
Sélectionner la boisson souhaitée en appuyant sur les
touches ou .
ES
Pulsar el botón .
Se muestra la página de las bebidas “special”.
Colocar un recipiente bajo el
tubo de agua caliente.
Seleccionar la bebida que se desea pulsando los botones
o .
EN
Press the button to start
the preparation.
in the special beverages, you
can also nd long co ee...
... hot milk... ... American co ee.
DE
Die Taste drücken, um
die Zubereitung zu beginnen.
Die Getränke Special umfassen den großen Ka ee ...
... die heiße Milch ... ... und den amerikanischen
Ka ee.
FR
Appuyer sur la touche
pour commencer la préparation.
Les boissons « special »
comprennent café allongé...
...lait chaud... ...et café américain.
ES
Pulsar el botón para iniciar la preparación.
Las bebidas especiales incluyen café largo...
... leche caliente... ... y café americano.
Page 19
19
www.philips.com/support Instructions
H2O
DESCALING - 30 min.
ENTKALKUNG - DÉTARTRAGE - DESCALCIFICACIÓN
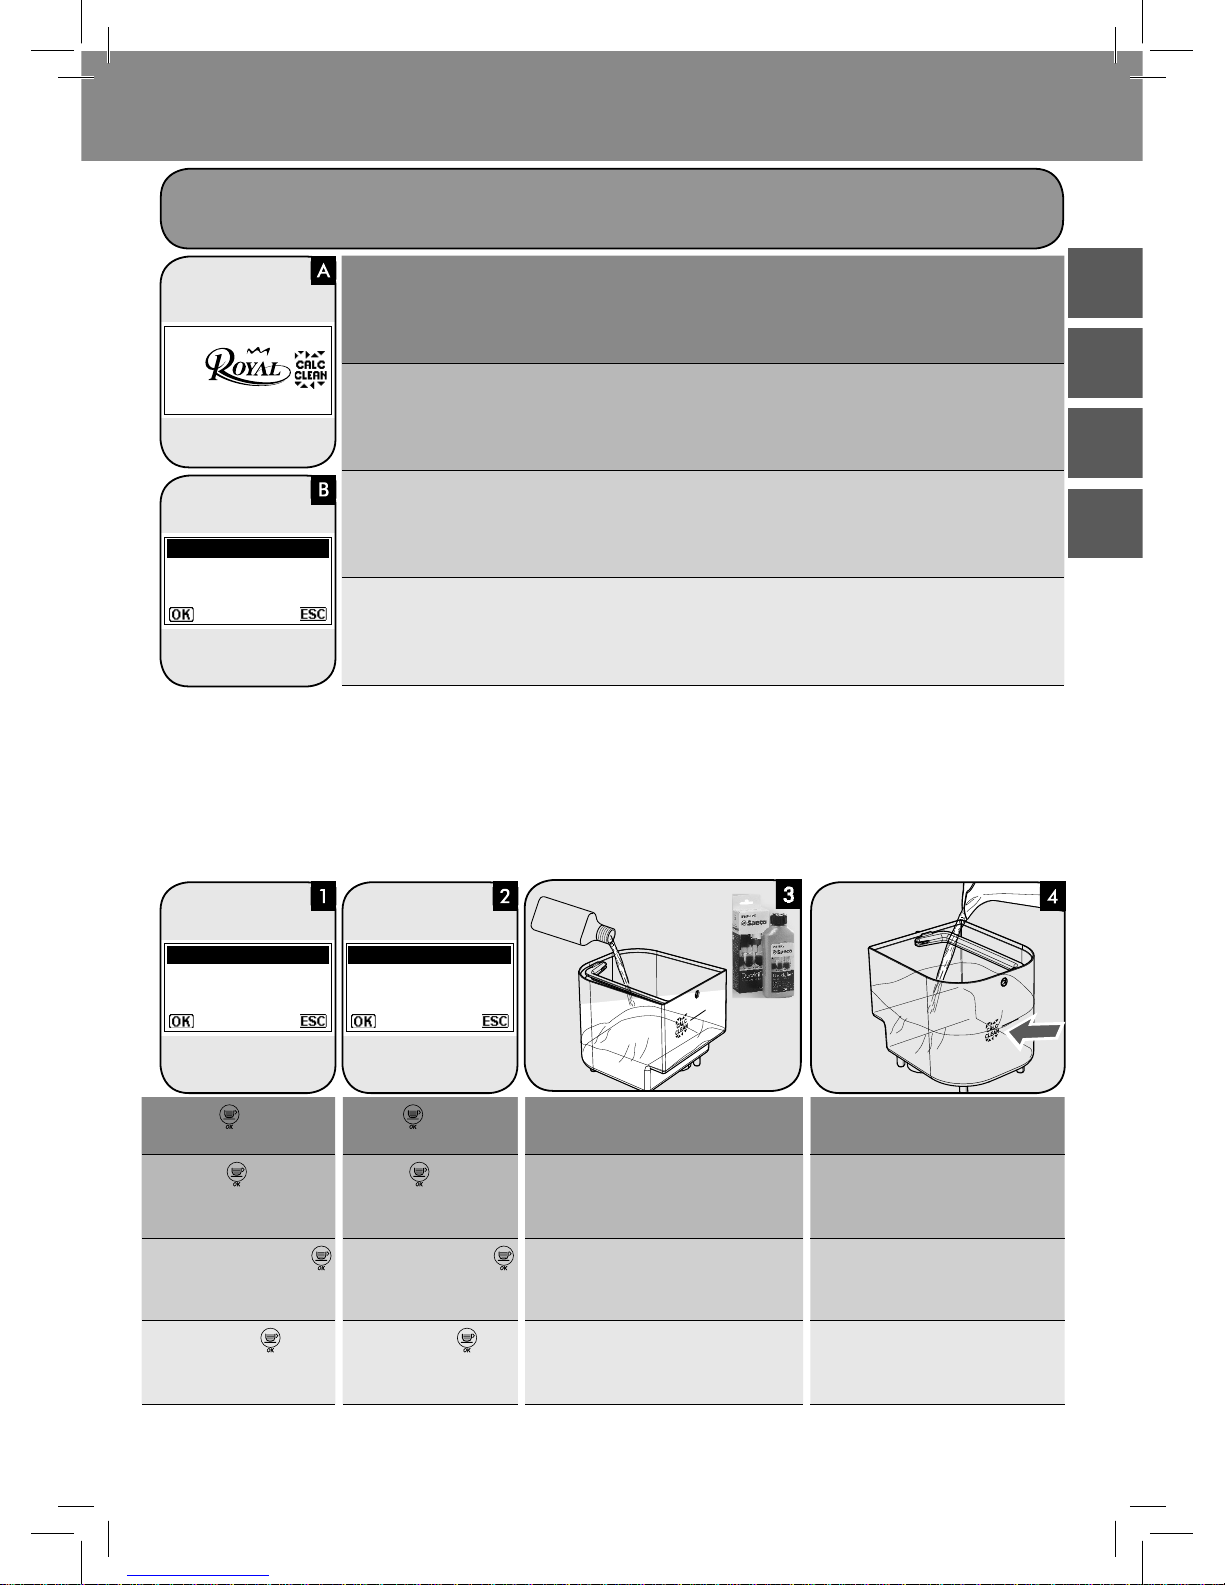
EN
(A) is displayed when the machine needs a descaling cycle. At the following start-up (B) will be displayed, which provides
quick access to the descaling cycle.
Not doing this will ultimately make your appliance stop working properly. In this case repair is not covered under your
warranty.’
DE
Das Display (A) wird angezeigt, wenn die Maschine einen Entkalkungszyklus erfordert. Bei der nächsten Einschaltung
wird das Display (B) angezeigt, mit dem der Entkalkungszyklus schnell gestartet werden kann.
Wird dieser Vorgang nicht ausgeführt, so treten Betriebsstörungen auf Ihrem Gerät auf. In diesem Fall wird die Reparatur
nicht durch die Garantie gedeckt!
FR
Le message (A) apparaît quand la machine nécessite un cycle de détartrage. Lors du démarrage suivant apparaitra le
message (B) qui permet d’accéder rapidement au cycle de détartrage.
Si cette opération n’est pas e ectuée, votre appareil cesse de fonctionner correctement. En pareil cas, la réparation
n’est pas couverte par la garantie !
ES
La pantalla (A) aparece cuando la máquina requiere un ciclo de descalci cación. Al volver a encender la máquina, se
mostrará la pantalla (B), que permite acceder rápidamente al ciclo de descalci cación.
Si esta operación no se lleva a cabo, la máquina dejará de funcionar correctamente. En ese caso, ¡la reparación no estará
cubierta por la garantía!
DESCALING
NEEDED.
DESCALE?
DESCALING
DESCALING
NEEDED.
DESCALE?
DESCALING
START DESCALING?
DESCALING
EN
Press the button to enter
the descaling menu.
Press the button to start
the DESCALING cycle.
Pour the descaling solution. Fill with fresh water up to the level indi-
cated by the icon.
DE
Die Taste drücken, um
das Menü der Entkalkung zu
ö nen.
Die Taste drücken, um
den Zyklus der ENTKALKUNG
zu starten.
Die Entkalkerlösung einfüllen. Frisches Wasser bis zur Füllstandanzeige
einfüllen.
FR
Appuyer sur la touche
pour accéder au menu de
détartrage.
Appuyer sur la touche
pour démarrer le cycle de
DÉTARTRAGE.
Verser la solution détartrante. Remplir avec de l’eau fraîche jusqu’au
niveau indiqué par le symbole.
ES
Pulsar el botón para acceder al menú de descalci cación.
Pulsar el botón
para
iniciar el ciclo de DESCALCIFICACIÓN.
Verter la solución descalci cante. Rellenar con agua fresca hasta el nivel in-
dicado por el símbolo.
EnglishDeutschFrançaisEspañol
Page 20
20
Instructions www.philips.com/support
EMPTY DRIP TRAY
DESCALING
INSERT THE
CAPPUCCINATORE WITH
ALL THE COMPONENTS
DESCALING
FILL TANK WITH
DESCALING SOLUTION
DESCALING
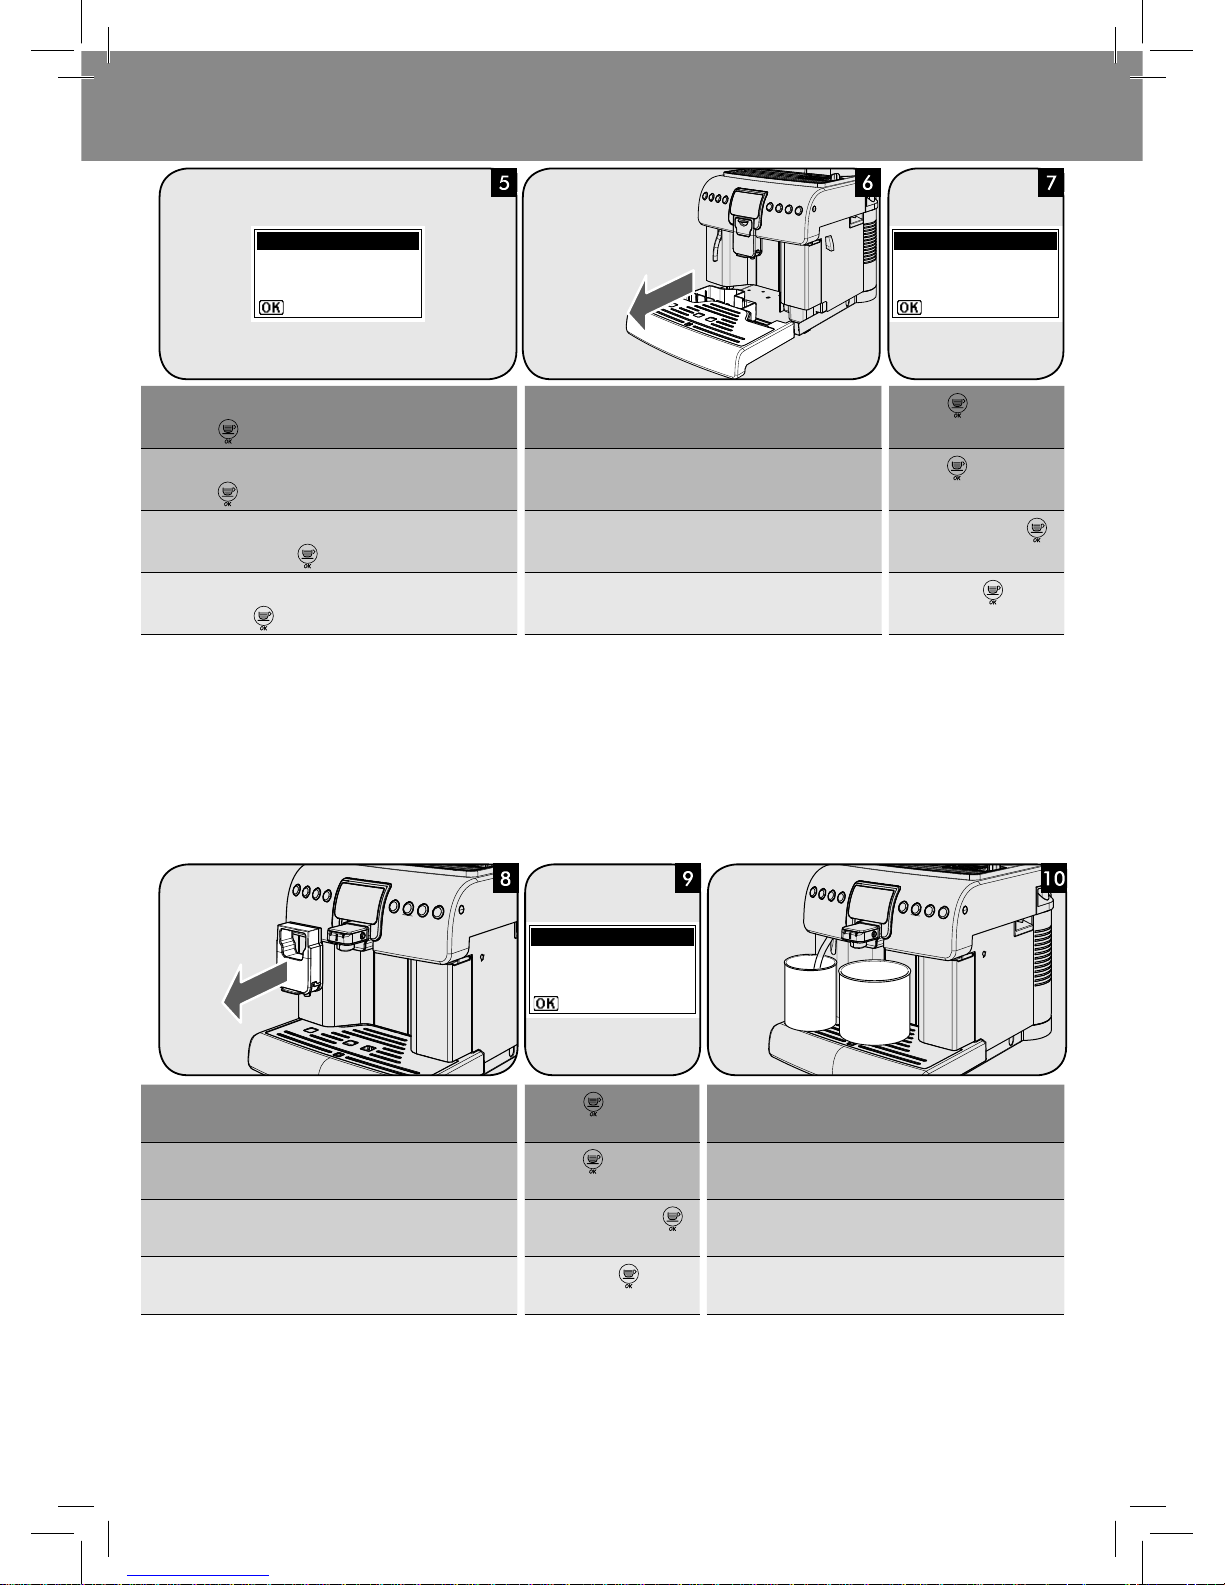
EN
Place the tank back in the machine.
Press the
button.
Empty the drip tray and place it back into the machine.
Press the
button.
DE
Den Tank wieder in die Maschine einsetzen.
Die Taste
drücken.
Die Abtropfschale leeren und wieder in die Maschine einsetzen.
Die Taste
drücken.
FR
Repositionner le réservoir dans la machine.
Appuyer sur la touche
.
Vider le bac d’égouttement et le réinsérer dans la machine.
Appuyer sur la touche
.
ES
Volver a colocar el depósito en la máquina.
Pulsar el botón
.
Vaciar la bandeja de goteo y volver a introducirla en la máquina.
Pulsar el botón
.
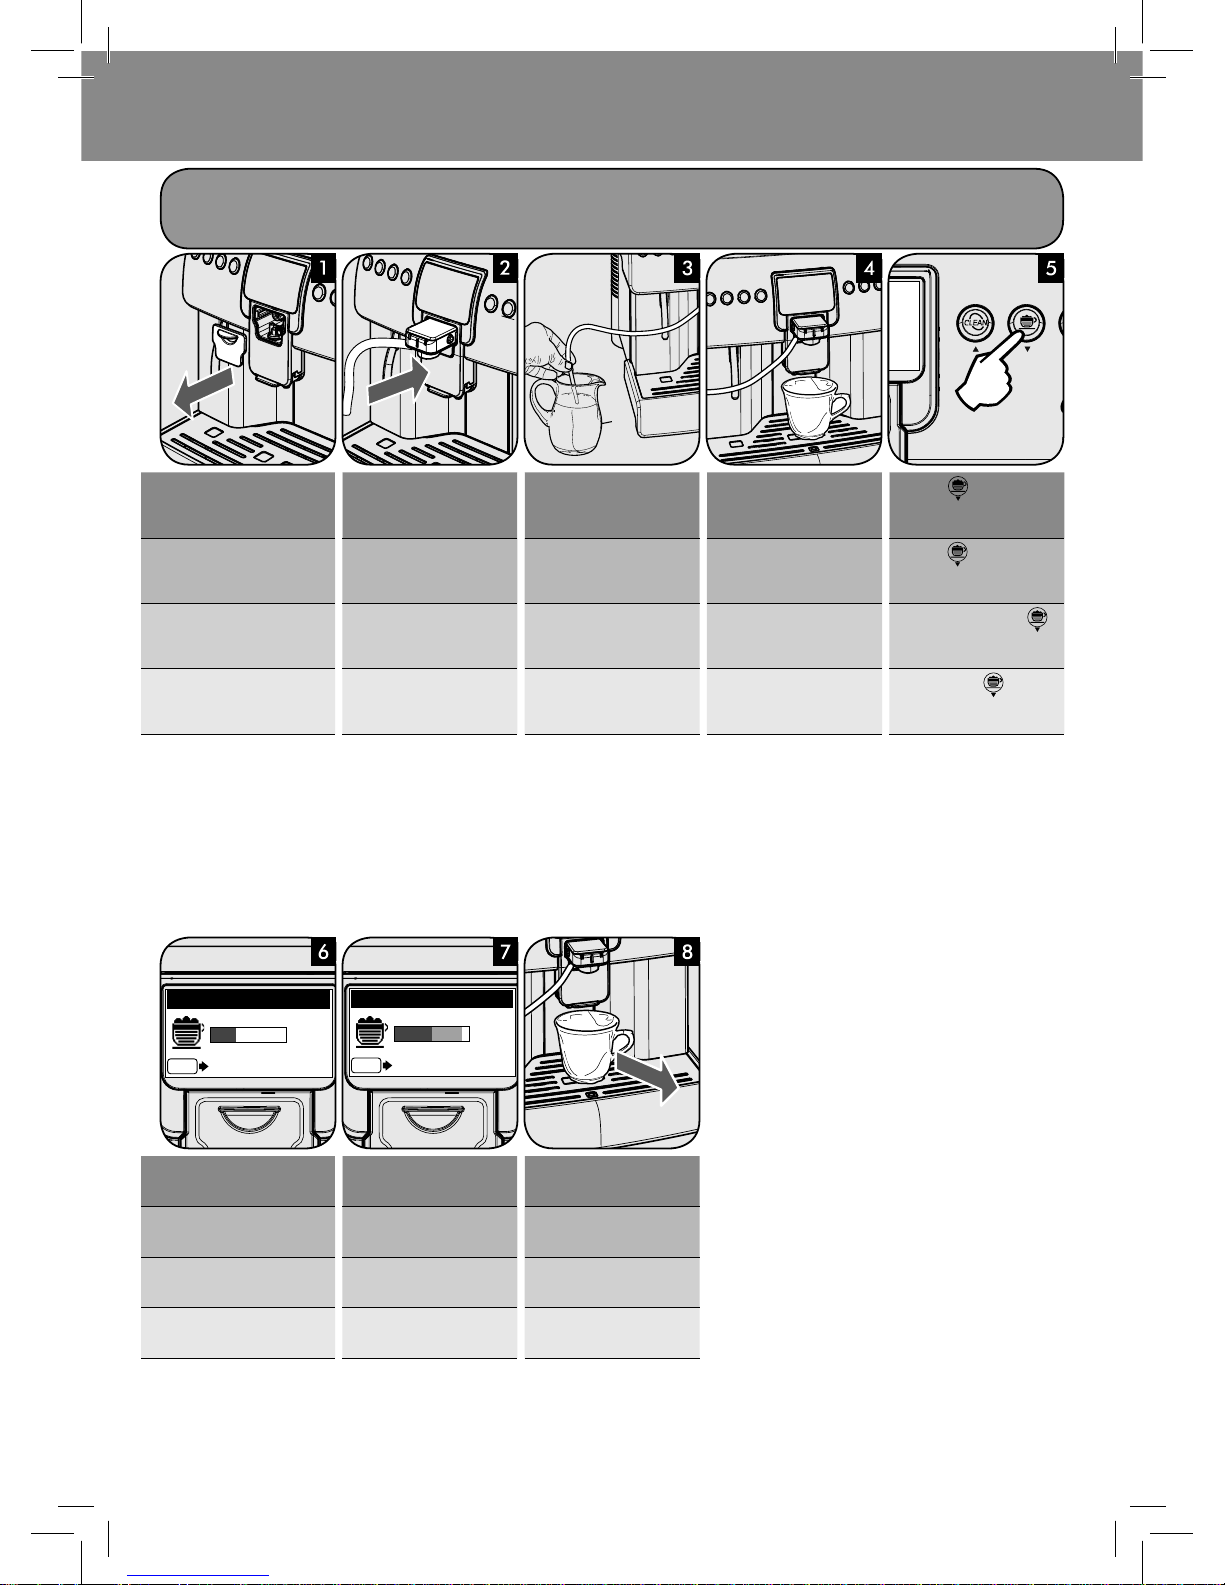
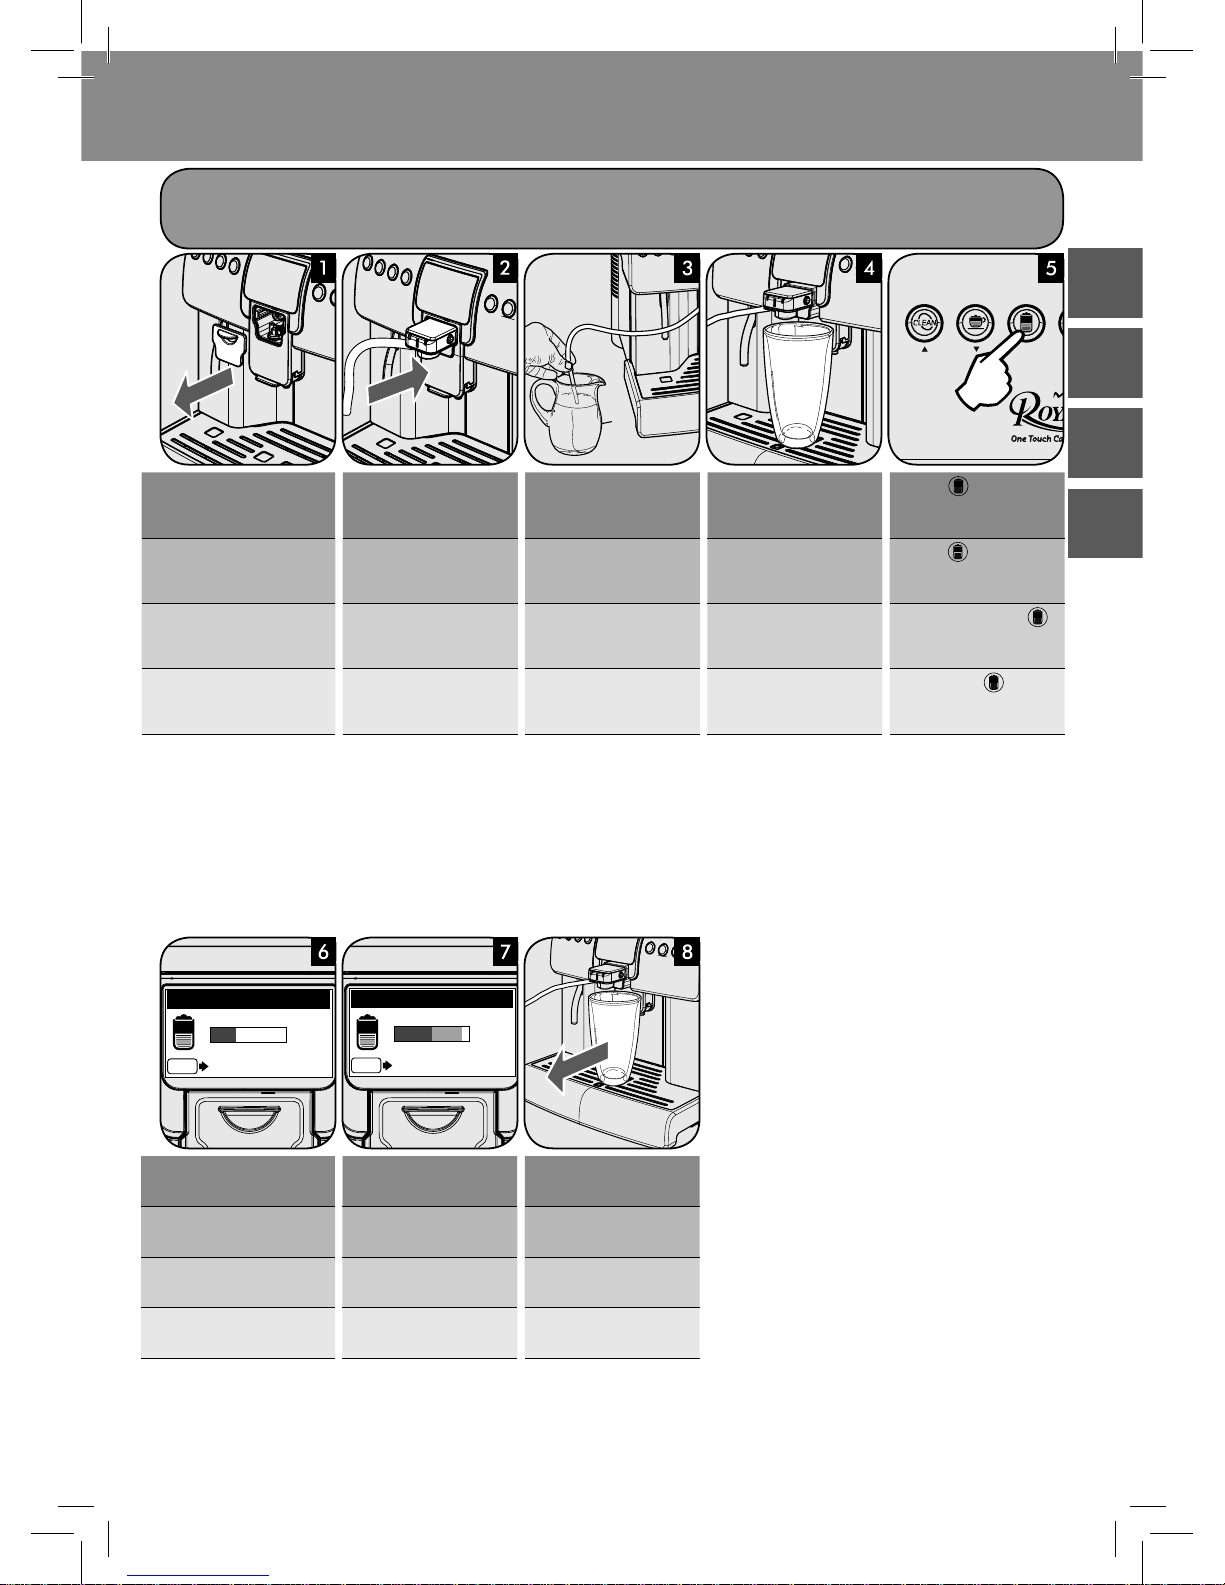
EN
Remove the dispensing spout and insert the Cappuccinatore.
Press the
button.
Place a container under the hot water/steam wand and another container (1.5 l) under the Cappuccinatore.
DE
Den Auslauf herausnehmen und den Cappuccinatore einsetzen.
Die Taste
drücken.
Einen Behälter unter die Dampf-/Heißwasserdüse und einen
weiteren Behälter (1,5 l) unter den Cappuccinatore stellen.
FR
Retirer la buse de distribution et insérer le Cappuccinatore.
Appuyer sur la touche
.
Placer un récipient sous le buse de vapeur/eau chaude et
un autre récipient (1,5 l) sous le Cappuccinatore.
ES
Extraer la salida de café e introducir el Cappuccinatore.
Pulsar el botón
.
Colocar un recipiente bajo el tubo de vapor/agua caliente y
otro recipiente (1,5 l) bajo el Cappuccinatore.
Page 21

21
www.philips.com/support Instructions
Repeat the operations described from step 6 to step 11,
then continue with step 15.
Die von Punkt 6 bis Punkt
11 beschriebenen Vorgänge
wiederholen. Dann Punkt 15
ausführen.
Répéter les opérations décrites du point 6 au point
11. Passer ensuite au point
15.
Repetir las operaciones descritas del punto 6 al punto
11. Luego, pasar al punto 15.
STEP 1/2
DESCALING
PAUS E
RINSE TANK &
FILL WITH FRESH WATER
DESCALING
REFILL
WATER TANK
STEP 2/2
DESCALING
PAUS E
PLACE A CONTAINER
UNDER MILK AND HOT
WATER SPOUTS
DESCALING
H2O
MAX
EN
Press the button.
The machine starts the descaling cycle.
The machine has concluded
the descaling solution.
Rinse and ll with fresh water up to the MAX level.
DE
Die Taste drücken.
Die Maschine beginnt den
Entkalkungszyklus.
Die Maschine hat die Entkalkerlösung verbraucht.
Ausspülen und bis zum
Füllstand MAX mit frischem
Wasser füllen.
FR
Appuyer sur la touche .
La machine démarre le cycle
de détartrage.
La machine a ni la solution
détartrante.
Rincer et remplir avec de
l’eau fraîche jusqu’au niveau
MAX.
ES
Pulsar el botón .
La máquina inicia el ciclo de
descalci cación.
La máquina ha terminado la
solución descalci cante.
Enjuagar y llenar con agua
fresca hasta el nivel MAX.
EN
The machine starts the rinse
cycle.
The rinsing cycle is nished.
Fill the water tank.
The machine is ready for use. Empty the containers and
the drip tray.
Remove and rinse the Cappuccinatore and Brew Group.
DE
Die Maschine beginnt den
Spülzyklus.
Der Spülzyklus ist abgeschlossen. Den Wassertank
füllen.
Die Maschine ist betriebsbereit.
Die Behälter und die Abtropfschale leeren.
Den Cappuccinatore und die
Brühgruppe herausnehmen
und spülen.
FR
La machine démarre le cycle
de rinçage.
Le cycle de rinçage est terminé. Remplir le réservoir
à eau.
La machine est prête à
l’emploi.
Vider les récipients et le bac
d’égouttement.
Retirer et rincer le Cappuccinatore et le Groupe de distribution.
ES
La máquina inicia el ciclo de
enjuague.
El ciclo de enjuague ha terminado. Llenar el depósito
de agua.
La máquina está lista para
ser utilizada.
Vaciar los recipientes y la
bandeja de goteo.
Extraer y enjuagar el Cappuccinatore y el grupo de
café.
EnglishDeutschFrançaisEspañol
Page 22

22
Instructions www.philips.com/support
MonthlyWeekly
REPLACE MILK CONTAINER
WITH ANOTHER ONE WITH
FRESH WATER
CAPPUCCINATORE CLEAN
CAPPUCCINATORE CLEANING
REINIGUNG DES CAPPUCCINATORE - NETTOYAGE DU CAPPUCCINATORE
LIMPIEZA DEL CAPPUCCINATORE
Daily
EN
Fill a container with fresh
water.
Insert the clean hose in the
container.
Place the container (1 l ) under the dispensing spout.
Press the
button. Press the button to con-
rm. The machine starts the
washing cycle.
DE
Einen Behälter mit frischem
Wasser füllen.
Den sauberen Schlauch in
den Behälter einstecken.
Den Behälter (1 l) unter den
Auslauf stellen.
Die Taste
drücken. Zur Bestätigung die Taste
drücken. Die Maschine startet
den Reinigungszyklus.
FR
Remplir un récipient avec de
l’eau fraîche.
Insérer le tuyau propre dans
le récipient.
Positionner le récipient (1 l)
sous la buse de distribution.
Appuyer sur la touche
. Appuyer sur la touche
pour con rmer. La machine
démarre le cycle de lavage.
ES
Llenar un recipiente con
agua fresca.
Introducir el tubo limpio en
el recipiente.
Colocar el recipiente (1 l)
bajo la salida de café.
Pulsar el botón
. Pulsar el botón para con-
rmar. La máquina inicia el
ciclo de lavado.
EN
Wash all components with
lukewarm water.
Pour the powder and ll the container with
fresh water.
Make sure the Cappuccinatore is correctly
placed.
DE
Alle Teile mit lauwarmem
Wasser reinigen.
Das Pulver einfüllen und den Behälter mit
frischem Wasser füllen.
Sicherstellen, dass der Cappuccinatore korrekt positioniert wurde.
FR
Laver tous les composants à
l’eau tiède.
Verser la poudre et remplir le récipient
d’eau fraîche.
S’assurer que le Cappuccinatore est correctement positionné.
ES
Lavar todos los componentes
con agua tibia.
Verter el polvo y llenar el recipiente con agua
fresca.
Comprobar que el Cappuccinatore esté correctamente posicionado.
Page 23

23
www.philips.com/support Instructions
MENU OK ESC
MENU
BEVERAGE MENU
MACHINE MENU
MACHINE MENU
DISPLAY MENU
WATER MENU
MAINTENANCE
FACTORY SETTINGS
MAINTENANCE
BREW GROUP CLEAN
DESCALING
CAPPUCCINATORE CLEANING
WASH THE
CAPPUCCINATORE?
CAPPUCCINATORE CLEANING
REFILL
WATER TANK
CAPPUCCINATORE CLEANING
POUR DETERGENT
IN A CONTAINER
WITH 1/2 L WATER
CAPPUCCINATORE CLEANING
EN
Press and hold the button for 5 seconds
Press the button to select the “MACHINE MENU” ; press
the
button to enter the menu.
Press the
button to select “MAINTENANCE”. Press to
enter the menu.
DE
Die Taste für 5 Sekunden
gedrückt halten.
Die Taste
drücken, um die Option „MASCHINENMENÜ“
anzuwählen. Die Taste
drücken, um das Menü zu ö nen.
Die Taste
drücken, um „WARTUNG“ anzuwählen. Die Ta-
ste
drücken, um das Menü zu ö nen.
FR
Garder la touche enfoncée pendant 5 secondes.
Appuyer sur la touche pour sélectionner la fonction
« MENU MACHINE ». Appuyer sur la touche
pour accé-
der au menu.
Appuyer sur la touche pour sélectionner « ENTRETIEN ».
Appuyer sur
pour accéder au menu.
ES
Mantener pulsado el botón
durante 5 segundos.
Pulsar el botón para seleccionar la opción “MENÚ MÁQUINA”. Pulsar el botón
para acceder al menú.
Pulsar el botón
para seleccionar “MANTENIMIENTO”. Pul-
sar
para acceder al menú.
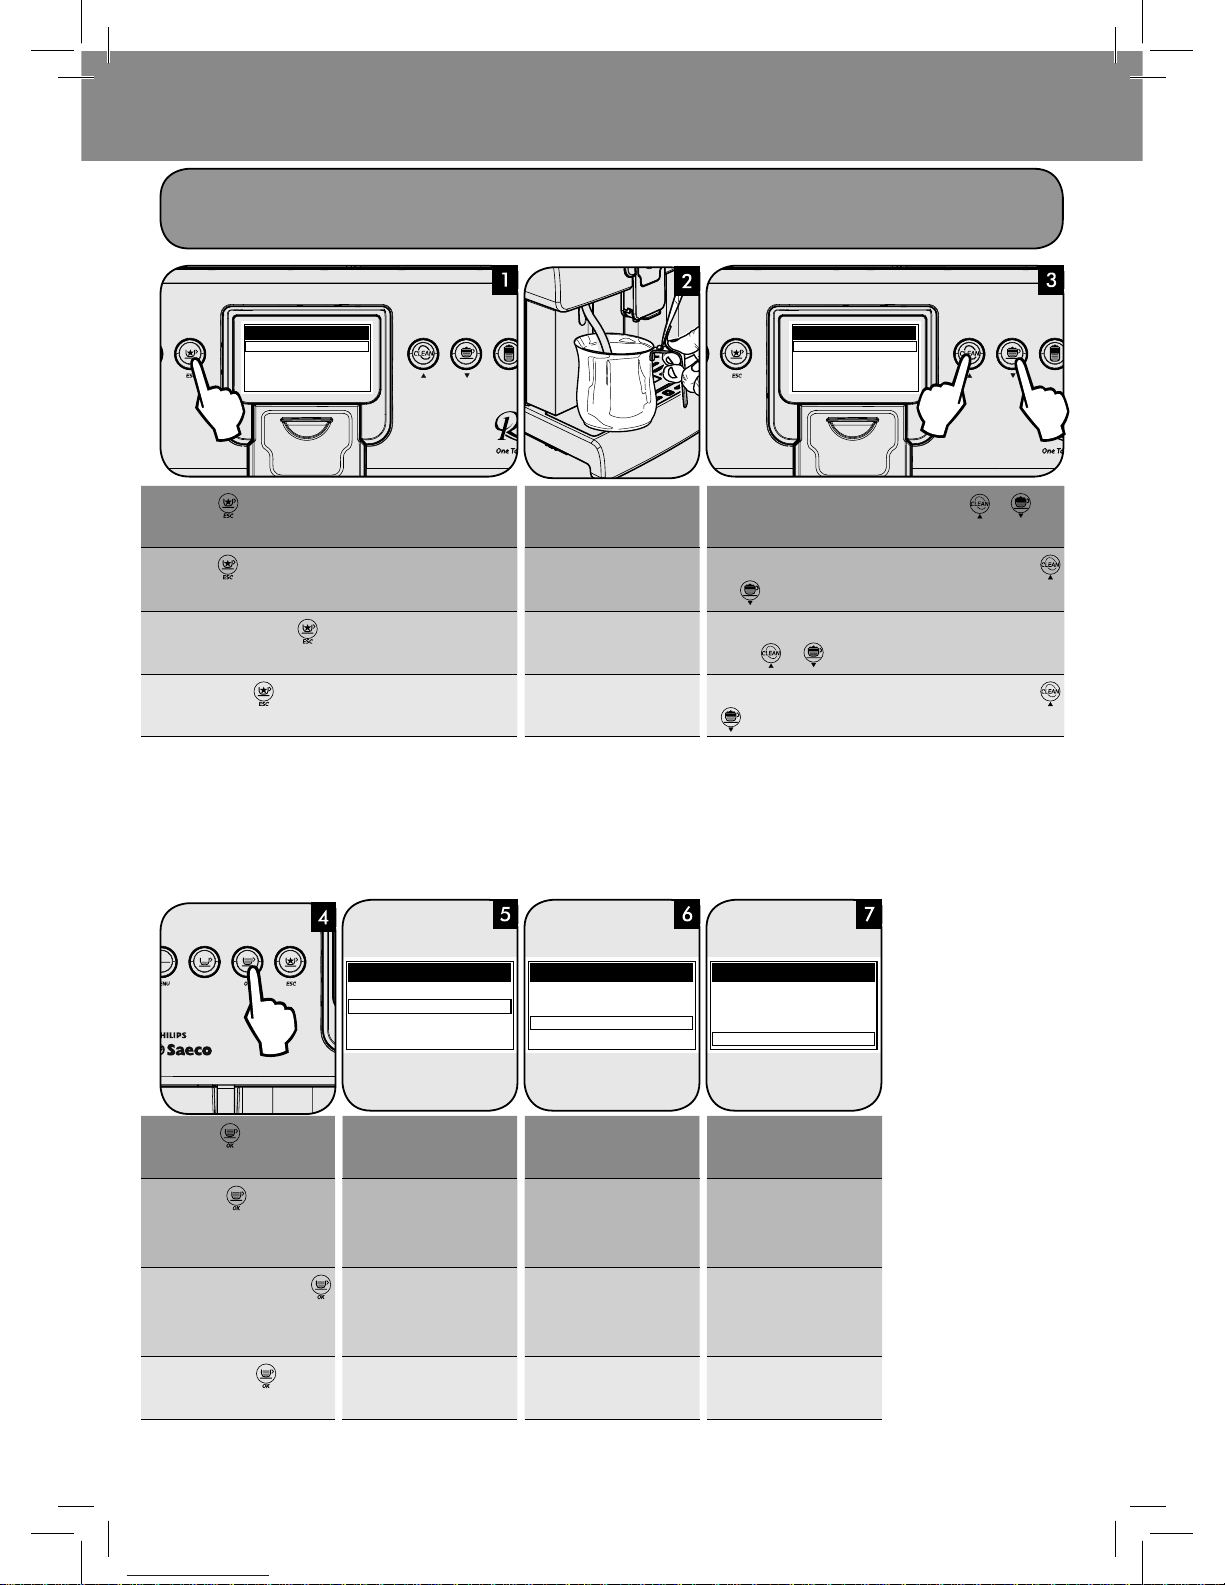
EN
Press the to select the CAPPUCCINATORE CLEANING option
and press
to enter the cycle.
Press the button to start
the cleaning cycle.
Fill the water tank and press
the button to con rm.
Make sure that the solution
is ready.
DE
Die Taste drücken, um die Option „REINIGUNG CAPPUCCINATORE“ anzuwählen und
drücken, um den Zyklus zu
ö nen.
Die Taste
drücken, um
den Reinigungszyklus zu
starten.
Den Wassertank füllen und
zur Bestätigung die Taste
drücken.
Sicherstellen, dass die Lösung bereit ist.
FR
Appuyer sur pour choisir la fonction « NETTOYAGE
CAPPUCCINATORE », puis sur
pour accéder au cycle.
Appuyer sur la touche
pour démarrer le cycle de
nettoyage.
Remplir le réservoir à eau et
appuyer sur la touche
pour con rmer.
Véri er que la solution est
prête.
ES
Pulsar para seleccionar la opción “LIMPIEZA CAPPUCCINATORE” y pulsar
para acceder al ciclo.
Pulsar el botón
para ini-
ciar el ciclo de limpieza.
Llenar el depósito de agua
y pulsar el botón para
con rmar.
Comprobar que la solución
esté lista.
EnglishDeutschFrançaisEspañol
Page 24

24
Instructions www.philips.com/support
PUT CAPPUCCINATORE
HOSE IN THE
CONTAINER
CAPPUCCINATORE CLEANING
PLACE A CONTAINER
UNDER THE
DISPENSING SPOUT
CAPPUCCINATORE CLEANING
CAPPUCCINATORE CLEANING
REFILL
WATER TANK
CAPPUCCINATORE CLEANING
INSERT CAPPUCCINATORE
HOSE IN A CONTAINER
WITH 1/2 L WATER
CAPPUCCINATORE CLEANING
EN
Insert the clean hose directly in the container.
Press the
button to con rm.
Place an empty container (1l) under the dispensing spout
and press to con rm.
DE
Den sauberen Schlauch direkt in den Behälter einstecken.
Zur Bestätigung die Taste
drücken.
Einen leeren Behälter (1 l) unter den Auslauf stellen und zur
Bestätigung drücken.
FR
Insérer le tuyau propre directement dans le récipient.
Appuyer sur la touche
pour con rmer.
Placer un récipient vide (1 l) sous la buse de distribution et
appuyer sur pour con rmer.
ES
Introducir el tubo limpio directamente en el recipiente.
Pulsar el botón
para con rmar.
Colocar un recipiente vacío (1 l) bajo la salida de café y pulsar
para con rmar.
EN
The machine performs a wash cycle of the Cappuccinatore. Fill the water tank and press
the
button to con rm.
Rinse the container and ll it with 1/2 l of fresh water and
insert back the Cappuccinatore hose in it.
DE
Die Maschine führt einen Reinigungszyklus des Cappuccinatore aus.
Den Wassertank füllen und
zur Bestätigung die Taste
drücken.
Den Behälter ausspülen und mit 1/2 Liter frischem Wasser
füllen, dann den Schlauch des Cappuccinatore wieder einstecken.
FR
La machine e ectue un cycle de lavage du Cappuccinatore. Remplir le réservoir à eau et
appuyer sur la touche
pour con rmer.
Rincer le récipient et le remplir de 1/2 litre d’eau fraîche,
puis y réinsérer le tuyau du Cappuccinatore.
ES
La máquina realiza un ciclo de lavado del Cappuccinatore. Llenar el depósito de agua
y pulsar el botón
para
con rmar.
Enjuagar el recipiente, llenarlo con 1/2 litro de agua fresca y
volver a introducir en él el tubo del Cappuccinatore.
Page 25

25
www.philips.com/support Instructions
PLACE A CONTAINER
UNDER THE
DISPENSING SPOUT
CAPPUCCINATORE CLEANING
CAPPUCCINATORE CLEANING
EN
Empty the container and place it back under the dispensing
spout. Press
.
The machine performs a rinse cycle of the Cappuccinatore.
Wait until the cycle stops automatically.
Remove the Cappuccinatore
by pressing the side buttons
and wash it.
DE
Den Behälter leeren und erneut unter den Auslauf stellen.
Die Taste
drücken.
Die Maschine führt einen Spülzyklus des Cappuccinatore
aus. Abwarten, bis der Zyklus automatisch beendet wird.
Den Cappuccinatore entfernen, indem die seitlichen
Tasten gedrückt werden, und
dann reinigen.
FR
Vider le récipient et le replacer sous la buse de distribution.
Appuyer sur
.
La machine e ectue un cycle de rinçage du Cappuccinatore. Attendre que le cycle se termine automatiquement.
Retirer le Cappuccinatore
en appuyant sur les touches
latérales puis le laver.
ES
Vaciar el recipiente y volver a colocarlo bajo la salida de café.
Pulsar
.
La máquina realiza un ciclo de enjuague del Cappuccinatore.
Esperar a que el ciclo termine automáticamente.
Quitar el Cappuccinatore
pulsando los botones laterales y lavarlo.
EnglishDeutschFrançaisEspañol
Page 26

26
Instructions www.philips.com/support
BREW GROUP CLEANING
REINIGUNG BRÜHGRUPPE - NETTOYAGE DU GROUPE DE DISTRIBUTION
LIMPIEZA DEL GRUPO DE CAFÉ
1
2
EN
Remove the drip tray.
Remove the co ee grounds
drawer.
Open the service door:
1) Rotate the lever clockwise by 90°.
2) Pull the door towards you.
Remove the brew group: Pull
it by the handle and press
the «PRESS» button.
DE
Die Abtropfschale herausnehmen.
Den Ka eesatzbehälter herausnehmen.
Die Servicetür ö nen:
1) Den Hebel im Uhrzeigersinn um 90° drehen;
2) Die Tür nach außen ziehen.
Die Brühgruppe herausnehmen: am Gri ziehen und die
Taste «PRESS» drücken.
FR
Retirer le bac d’égouttement.
Retirer le tiroir à marc. Ouvrir la porte de service :
1) tourner le levier de 90° dans le sens des aiguilles d’une montre ;
2) tirer la porte de service vers soi.
Retirer le groupe de distribution : tirer la poignée et appuyer sur la touche « PRESS ».
ES
Extraer la bandeja de goteo. Extraer el cajón de recogida
de posos.
Abrir la puerta de servicio:
1) girar la palanca 90° en el sentido indicado;
2) tirar de la puerta hacia uno mismo.
Extraer el grupo de café: tirar
de la empuñadura y pulsar el
botón «PRESS».
EN
Carry out maintenance to the
Brew Group.
Check the alignment. PRESS and then insert the
Brew Group.
Close the service door. Place back the co ee grounds drawer
and the drip tray.
DE
Die Wartung der Brühgruppe
ausführen.
Die Ausrichtung überprüfen. DRÜCKEN, dann die Brüh-
gruppe einsetzen.
Die Servicetür schließen. Den Ka eesatzbehälter und die Abtropfschale wieder einsetzen.
FR
Procéder à l’entretien du
Groupe de distribution.
Véri er l’alignement. APPUYER puis insérer le
Groupe de distribution.
Fermer la porte de service. Repositionner le tiroir à marc et
le bac d’égouttement.
ES
Realizar el mantenimiento
del grupo de café.
Comprobar la alineación. PULSAR y luego introducir el
grupo de café.
Cerrar la puerta de servicio. Volver a colocar el cajón de recogida de posos y la bandeja de goteo.
Page 27

27
www.philips.com/support Instructions
MENU FOR CUSTOMIZATION AND MAINTENANCE
MENÜ FÜR DIE PERSÖNLICHE EINSTELLUNG UND DIE WARTUNG
MENU POUR LA PERSONNALISATION ET L’ENTRETIEN
MENÚ DE PERSONALIZACIÓN Y MANTENIMIENTO
Press and hold the button for 5 seconds
Die Taste
für 5 Sekunden gedrückt halten.
Garder la touche
enfoncée pendant 5 secondes.
Mantener pulsado el botón
durante 5 segundos.
When you enter the programming mode, the buttons have a di erent function:
button = (con rms a selection or a change you have made)
button = (scrolls up the menu)
button = (scrolls down the menu)
button = (con rms when you exit a selection)
Nach der Ö nung des Programmiermodus übernehmen die Tasten andere Funktionen:
Taste
= (Bestätigung einer Anwahl oder einer vorgenommenen Änderung)
Taste
= (Über iegen des Menüs nach oben)
Taste
= (Über iegen des Menüs nach unten)
Taste
= (Bestätigung des Verlassens einer angewählten Option)
Les touches ont des fonctions di érentes en modalité de programmation :
touche
= (con rme une sélection ou une modi cation e ectuée)
touche
= (déroule le menu vers le haut)
touche
= (déroule le menu vers le bas)
touche
= (con rme la sortie d’une fonction sélectionnée)
Al entrar en el modo de programación, los botones asumen funciones diferentes:
botón
= (con rmar una selección o una modi cación efectuada)
botón
= (desplazar el menú hacia arriba)
botón
= (desplazar el menú hacia abajo)
botón
= (con rmar la salida de una opción seleccionada)
MENU OK ESC
MENU
BEVERAGE MENU
MACHINE MENU
1
EnglishDeutschFrançaisEspañol
Page 28

28
Instructions www.philips.com/support
BEVERAGE MENU
GETRÄNKEMENÜ - MENU BOISSON - MENÚ BEBIDA
BEVERAGE MENU
ESPRESSO
COFFEE
CAPPUCCINO
LATTE MACCHIATO
CAPPUCCINO
PREBREWING
COFFEE TEMPERATURE
COFFEE LENGTH
MILK QUANTITY
COFFEE LENGTH
PREBREWING
COFFEE TEMPERATURE
MENU OK ESC
MENU
BEVERAGE MENU
MACHINE MENU
1
EN
Press and hold the button for 5 seconds. Press the
button to select the “BEVERAGE MENU”.
Press the
button to select the “CAPPUC-
CINO” and the
button to enter the menu.
Press the
button to select the “PREBREW-
ING” and the
button to enter the menu.
DE
Die Taste für 5 Sekunden gedrückt halten. Die Taste
drücken, um die Option „GETRÄNKEMENÜ“ anzuwählen.
Die Taste
drücken und die Option “CAP-
PUCCINO” anwählen. Die Taste
drücken,
um das Menü zu ö nen.
Die Taste
drücken und die Option “VOR-
BRÜHUNG” anwählen. Die Taste
drücken,
um das Menü zu ö nen.
FR
Garder la touche enfoncée pendant 5 secondes.
Appuyer sur la touche
pour sélectionner la fonction
« MENU BOISSON ».
Appuyer sur la touche
pour sélectionner la fonction « CAPPUCCINO » et sur la
touche
pour accéder au menu.
Appuyer sur la touche
pour sélectionner
la fonction « PRÉINFUSION » et sur la touche
pour accéder au menu.
ES
Mantener pulsado el botón durante 5 segundos. Pulsar
el botón
para seleccionar la opción “MENÚ BEBIDA”.
Pulsar el botón
para seleccionar la op-
ción “CAPPUCCINO” y el botón
para ac-
ceder al menú.
Pulsar el botón
para seleccionar la opción
“PREINFUSIÓN” y el botón
para acceder
al menú.
EN
This function allows you to adjust the prebrewing. Co ee
is slighty dampened before the brewing to bring out its full
aroma.
This section allows you to program the temperature for coffee brewing.
This section allows programming of the amount of co ee to be
brewed for each selected beverage.
DE
Mit dieser Funktion kann die Vorbrühung eingestellt werden.
Vor der Ausgabe wird der Ka ee leicht angefeuchtet, damit er
sein volles Aroma entfalten kann.
In diesem Bereich kann die
Ausgabetemperatur des Kaffees programmiert werden.
In diesem Bereich kann die Ka eemenge, die für jedes angewählte Getränk ausgegeben wird, programmiert werden.
FR
Cette fonction permet de programmer la préinfusion. Avant la
distribution le café est légèrement humidi é pour libérer tout
son arôme.
Cette section permet de programmer la température de
distribution du café.
Cette section permet de programmer la quantité de café qu’il
faut distribuer pour chaque boisson sélectionnée.
ES
Esta función permite ajustar la preinfusión. Antes del suministro, el café es ligeramente humedecido para que libere todo su
aroma.
Esta sección permite programar la temperatura de suministro del café.
Esta sección permite programar la cantidad de café que se suministrará para cada bebida seleccionada.
Page 29

29
www.philips.com/support Instructions
DEFAULT
MILK QUANTITY
WATER QUANTITY
MACHINE MENU
MASCHINENMENÜ - MENU MACHINE - MENÚ MÁQUINA
MENU
BEVERAGE MENU
MACHINE MENU
MENU OK ESC
MENU
BEVERAGE MENU
MACHINE MENU
1
EN
This section allows you to program the amount of milk for each
selected beverage.
This section allows programming of the amount of water
to be dispensed.
For each beverage it is possible to reset the original standard values assigned by the manufacturer.
DE
In diesem Bereich kann die Milchmenge für jedes angewählte
Getränk programmiert werden.
In diesem Bereich kann die
auszugebende Wassermenge
programmiert werden.
Für jedes Getränk können die vom Hersteller vorgenommenen
ursprünglichen Standard-Einstellungen wiederhergestellt
werden.
FR
Cette section permet de programmer la quantité de lait pour
chaque boisson sélectionnée.
Cette section permet de programmer la quantité d’eau
qu’il faut distribuer.
Pour chaque boisson il est possible de mettre à zéro les valeurs
standard prédé nies par le fabricant.
ES
Esta sección permite programar la cantidad de leche para cada
bebida seleccionada.
Esta sección permite programar la cantidad de agua que
se suministrará.
Es posible restablecer los valores estándares de fábrica de cada
bebida.
EN
Press and hold the button for 5 seconds. Press the button to scroll down and the button to
enter the MACHINE MENU.
DE
Die Taste für 5 Sekunden gedrückt halten. Die Taste drücken, um nach unten zu scrollen, und die
Taste
drücken, um das MASCHINENMENÜ zu ö nen.
FR
Garder la touche enfoncée pendant 5 secondes. Appuyer sur la touche pour dérouler vers le bas et sur la
touche
pour accéder au MENU MACHINE.
ES
Mantener pulsado el botón durante 5 segundos. Pulsar el botón para desplazar hacia abajo y el botón
para acceder al MENÚ MÁQUINA.
EnglishDeutschFrançaisEspañol
Page 30

30
Instructions www.philips.com/support
MACHINE MENU
GENERAL MENU
DISPLAY MENU
WATER MENU
MAINTENANCE
DISPLAY MENU
GENERAL MENU
WATER MENU
MAINTENANCE
EN
Select the options. You can manage and maintain your machine.
This menu allows you to change the machine operating settings
This menu allows you to
change the display settings.
DE
Die Optionen anwählen. Die Maschine kann gesteuert und
die Wartung der Maschine kann ausgeführt werden.
In diesem Menü können die Betriebsparameter der Maschine
geändert werden.
In diesem Menü können die
Anzeigeparameter der Maschine geändert werden.
FR
Sélectionner les fonctions. Il est possible de gérer la machine et d’en e ectuer l’entretien.
Ce menu permet de modi er les réglages de fonctionnement de la machine.
Ce menu permet de modi er les réglages de l’a chage.
ES
Seleccionar las opciones. Es posible gestionar la máquina y
efectuar su mantenimiento.
Este menú permite modi car los parámetros operativos de
la máquina.
Este menú permite modi car
los parámetros de visualización.
EN
This menu allows you to set water hardness and manage the
water lter.
This menu allows you to perform maintenance operations.
DE
In diesem Menü können die Wasserhärte eingestellt und der
Wasser lter verwaltet werden.
In diesem Menü können die Wartungsvorgänge ausgeführt
werden.
FR
Ce menu permet de régler la dureté de l’eau et de gérer
le ltre à eau.
Ce menu permet de procéder aux opérations d’entretien.
ES
Este menú permite con gurar la dureza del agua y gestionar
el ltro de agua.
Este menú permite efectuar las operaciones de mantenimiento.
Page 31

31
www.philips.com/support Instructions
Warning
Achtung - Attention - Atención
INSERT DRIP TRAY
INSERT
CAPPUCCINATORE
INSERT COFFEE
GROUNDS DRAWER
INSERT VALVE INTO
CAPPUCCINATORE
CLOSE
HOPPER DOOR
ADD COFFEE
REFILL
WATER TANK
CLOSE
SIDE DOOR
INSERT BREW GROUP
EN
Close the service door. Insert the drip tray. Insert the co ee grounds
drawer.
Close the co ee beans hopper lid.
Remove the tank and ll it
with fresh drinking water.
DE
Die Servicetür schließen. Die Abtropfschale einsetzen. Den Ka eesatzbehälter ein-
setzen.
Den Deckel des Ka eebohnenbehälters schließen.
Den Tank herausnehmen und
mit frischem Trinkwasser
füllen.
FR
Fermer la porte de service. Insérer le bac d’égouttement. Insérer le tiroir à marc. Fermer le couvercle du réser-
voir à café en grains.
Retirer le réservoir et le remplir d’eau fraîche potable.
ES
Cerrar la puerta de servicio. Introducir la bandeja de
goteo.
Introducir el cajón de recogida de posos.
Cerrar la tapa del contenedor
de café en grano.
Extraer el depósito y llenarlo
con agua fresca potable.
EN
Insert the Brew Group into its
seat.
Insert the Cappuccinatore. Insert the valve into the Cappuccinatore. For more details, refer
to the user manual.
Fill the co ee bean hopper
with co ee beans.
DE
Die Brühgruppe in ihre Aufnahme einsetzen.
Den Cappuccinatore einsetzen.
Das Ventil in den Cappuccinatore einsetzen. Für weitere Details
ist auf die Bedienungsanleitung Bezug zu nehmen.
Den Behälter mit Ka eebohnen au üllen.
FR
Insérer le Groupe de distribution dans son logement.
Insérer le Cappuccinatore. Insérer la soupape dans le Cappuccinatore. Pour plus de détails
se référer au manuel d’instructions.
Remplir le réservoir avec le
café en grains.
ES
Introducir el grupo de café en
su alojamiento.
Introducir el Cappuccinatore. Introducir la válvula en el Cappuccinatore. Para más detalles,
consultar el manual de instrucciones.
Llenar el contenedor con café
en grano.
EnglishDeutschFrançaisEspañol
Page 32

32
Instructions www.philips.com/support
EMPTY COFFEE
GROUNDS DRAWER
RESTART TO SOLVE
DESCALING
NEEDED.
DESCALE?
DESCALING
EN
The machine needs to be descaled. Go to the Maintenance menu
to select and start the cycle.
Replace the “Intenza” water
lter with a new one.
After a few cycles, you will
need to empty the co e
grounds drawer.
Remove and empty the co ee
grounds drawer with the machine turned on.
DE
Die Maschine muss entkalkt werden. Das Menü Wartung ö nen, um den Zyklus anzuwählen und zu starten.
Den Wasser lter „Intenza“
durch einen neuen Filter ersetzen.
Nach einigen Zyklen muss der
Ka eesatzbehälter geleert
werden.
Bei eingeschalteter Maschine
den Ka eesatzbehälter herausnehmen und entleeren.
FR
La machine doit être détartrée. Aller au menu Entretien pour
sélectionner et démarrer le cycle.
Remplacer le ltre à eau
« Intenza » par un nouveau
ltre.
Après plusieurs cycles il sera
nécessaire de vider le tiroir
à marc.
Lorsque la machine est allumée, retirer et vider le tiroir
à marc.
ES
La máquina debe ser descalci cada. Ir al menú Mantenimiento
para seleccionar e iniciar el ciclo.
Sustituir el ltro de agua “Intenza” por uno nuevo.
Tras algunos ciclos será necesario vaciar el cajón de recogida de posos.
Con la máquina encendida,
extraer y vaciar el cajón de recogida de posos.
EN
Turn o the machine, wait 30 seconds and turn it on. If the problem persists, contact the service center. Take note of the code (E
xx) shown in the display.
If this page is displayed after starting the machine, this means that the descaling cycle is needed.
Press the button to enter the descaling menu and refer to the relevant section.
DE
Die Maschine aus- und nach 30 Sekunden erneut einschalten.
Sollte das Problem bestehen bleiben, ist der Kundendienst zu
benachrichtigen. Den angezeigten Code (E xx) aufschreiben.
Erst nachdem die Maschine gestartet wurde, wird diese Seite angezeigt: Dies bedeutet, dass ein
Entkalkungszyklus ausgeführt werden muss.
Die Taste drücken, um das Menü der Entkalkung zu ö nen und auf den entsprechenden
Abschnitt Bezug zu nehmen.
FR
Éteindre la machine et la remettre en marche au bout de 30
secondes. Si le problème persiste, contacter le service d’assistance. Noter le code (E xx) a ché.
Si cette page apparaît après avoir mis en marche la machine, cela signi e qu’un cycle de détartrage est nécessaire. Appuyer sur la touche pour accéder au menu du détartrage et consulter la section correspondante.
ES
Apagar la máquina y volver a encenderla tras 30 segundos. Si el
problema persiste, contactar con el servicio de asistencia. Anotar
el código (E xx) visualizado.
Si se muestra esta página tras haber encendido la máquina, signi ca que es necesario efectuar un
ciclo de descalci cación. Pulsar el botón para acceder al menú de descalci cación y consultar
la sección correspondiente.
Page 33

33
go to www.shop.philips.com/service to buy accessories Accessories
EN
Milk circuit cleaner
product number: CA6705
DE
Reiniger Milchsystem
Produktnr.: CA6705
FR
Système de nettoyage du circuit du
lait n° produit : CA6705
ES
Limpiador del circuito de leche
n.° del producto: CA6705
EN
Maintenance kit
product number: CA6706
DE
Wartungsset
Produktnr.: CA6706
FR
Kit d’entretien
n° produit : CA6706
ES
Kit de mantenimiento
n.° del producto: CA6706
EN
INTENZA+ water lter
product number: CA6702
DE
Wasser lter INTENZA+
Produktnr.: CA6702
FR
Filtre à eau INTENZA+
n° produit : CA6702
ES
Filtro de agua INTENZA+
n.° del producto: CA6702
EN
Decalci er
product number: CA6700
DE
Entkalker
Produktnr.: CA6700
FR
Détartrant
n° produit : CA6700
ES
Producto descalci cante
n.° del producto: CA6700
EN
Co ee oil remover
product number: CA6704
DE
Ka eefettlöser-Tabletten
Produktnr.: CA6704
FR
Tablettes de dégraissage
n° produit : CA6704
ES
Pastillas desengrasantes
n.° del producto: CA6704
EN
Visit Philips onlineshop to check
availability and purchasing opportunities in your country.
DE
Besuchen Sie den Online-Shop
Philips für die Verfügbarkeit und die
Kaufmöglichkeiten in Ihrem Land.
FR
Visitez le magasin en ligne Philips pour
véri er la disponibilité et les opportunités d’achat dans votre Pays.
ES
Visite la tienda en línea de Philips
para comprobar la disponibilidad y
las ofertas de compra en su país.
Accessories
Zubehör -Accessoires - Accesorios
EnglishDeutschFrançaisEspañol
Page 34

KOR
필립스 세코에 오신 것을 환영합니다!!
WWW.PHILIPS.COM/WELCOME
WWW.PHILIPS.COM/WELCOME 에 등록하면 커
피 머신을 관리하는 방법에 대한 팁과 업데이트를 받으실 수 있습니다. 이 설명서에는 커
피 머신을 올바로 작동하는 방법에 대한 간단한 사용법이 들어 있습니다. 커피 머신 패키지에는
사용자의 언어로 된 사용 설명서 전체가 들어 있는 CD가 제공됩니다. CD를 PC의 CD 드라이브
에 넣고 원하는 문서의 안내를 따르십시오.
www.philips.com/support에서도 사용 설명서의 최
www.philips.com/support에서도 사용 설명서의 최
신 버전을 다운로드할 수 있습니다(표지에 기재된 타입 번호 참조).
신 버전을 다운로드할 수 있습니다(표지에 기재된 타입 번호 참조).
TWN
感謝購入 Philips Saeco!在
WWW.PHILIPS.COM/WELCOME
WWW.PHILIPS.COM/WELCOME 上注冊後,您將收到有關如何
保養咖啡機的技巧貼士和最新訊息。本手册中包括有关如何正确操作咖啡机的简明说明。
咖啡機包裝中附帶的光碟中有使用您所在國語言編寫的完整使用手冊。將光碟放入您電腦的光
碟機中,然後按照顯示屏上的指引即可找到所需的文檔。
您也可以通過 www.philips.com/support
您也可以通過 www.philips.com/support
下載最新版本的使用手冊(參見封面上列出的型號)。
下載最新版本的使用手冊(參見封面上列出的型號)。
CHN
感谢您购买 Philips Saeco 产品!在
WWW.PHILIPS.COM/WELCOME
WWW.PHILIPS.COM/WELCOME 上注册后,您将收到
有关如何保养咖啡机的技巧提示和最新信息。本手册中包括有关如何正确操作咖啡机的
简明说明。咖啡机包装中附带的光盘中有使用您所在国语言编写的完整使用手册。将光盘放
入您电脑的光盘驱动器中,然后按照电脑屏幕上的指引即可找到所需的文档。
您也可以通过
您也可以通过
www.philips.com/support 下载最新版本的使用手册(参见封面上列出的型号)。
www.philips.com/support 下载最新版本的使用手册(参见封面上列出的型号)。
Page 35

35
www.philips.com/support Safety instructions
CHN - 安全说明
CHN - 安全说明
请在使用本咖啡机前仔细阅读本手册,并妥善保
管,以备日后查阅。
切勿让咖啡机的任何电子部件接触到水:有短路危
险!蒸汽和热水可能造成烫伤!切勿将热水出口朝向
身体任一部位:有烫伤危险!
设计用途
设计用途
本咖啡机仅限家庭使用。禁止对咖啡机做任何技术
改造或用于非授权用途,以防造成严重后果!身
体、精神、感官存在缺陷或经验不足者(包括儿
童),除非由负责其安全的人监督,或接受该人指
导,否则均不可使用本机。
电源 - 电源线
电源 - 电源线
只可将咖啡机接在合适的插座中。连接咖啡机的插
座必须:
- 与咖啡机插头相匹配;
- 与咖啡机铭牌上标注的参数相符;
- 连接有效的接地系统。
若电源线有缺陷或已损坏,切勿使用本机。若电源
线损坏,必须由制造商或授权服务中心进行更换。
请勿将电源线绕过拐角、置于锋利边沿或高温物体
上方,并应远离油烟。
请勿用电源线牵引或拖拽咖啡机。
拔插头时请勿拖拽电源线或用潮湿的手触碰插头。
请勿让电源线从桌面或架子上随意垂悬。
为了他人安全
为了他人安全
禁止儿童玩弄咖啡机。儿童并不了解家庭电器的风
险。请勿将产品包装材料放在儿童可以接触的范围
内。
烫伤危险
烫伤危险
切勿将蒸汽和/或热水出口朝向自己或他人:有烫伤
危险!
咖啡机位置 - 操作和维护的适当位置
咖啡机位置 - 操作和维护的适当位置
最佳使用建议:
• 选择安全、平稳的表面,以免咖啡机翻倒或导致
人员受伤;
• 选择照明充足、干净且靠近插座的位置;
• 根据图示,在咖啡机两边留出最短距离;
• 建议开关机时,在咖啡流出口下放置一个空杯。
请勿将本机放在低于 0°C 的环境中;冰冻可能会损
坏本机。请勿在室外使用咖啡机。
为防止外壳熔化或损坏,请勿把咖啡机放在高温表
面上或靠近明火。
咖啡机的清洁与存放
咖啡机的清洁与存放
请妥善清洁并存放咖啡机,以保证最佳状态。
由于咖啡机使用天然材料(咖啡豆、水、牛奶等)
冲泡饮品,若支撑面上出现咖啡残渣或冷凝水,属
于正常现象。为此,建议您定期清洁咖啡机可见部
件及其下方区域。
强烈建议您在存放咖啡机之前,先将机器清理干
净,包括:
- 不要再使用水箱和/或水回路中残留几天的水。若
咖啡机将长时间闲置,请按照“排出热水”章节
中的说明将水完全排出。
- 关闭电源按钮,清洁机器。最后,从电源插座中
拔出插头。等待咖啡机冷却。
切勿将咖啡机浸泡在水中!将其存放在干燥且儿童
无法触及的地方。远离尘垢。
严禁私自改造咖啡机内部零部件。
运行故障
运行故障
若咖啡机因跌落而导致失灵、问题或疑似故障,请
立即拔下插头。切勿操作有故障的咖啡机。
更多故障排查以及服务的信息,请参阅本手册“故
障排查”和“服务”等章节。
防火注意事项
防火注意事项
着火时请使用二氧化碳 (CO2) 灭火器。请勿使用水
或干粉灭火器。
初步操作
初步操作
切勿在咖啡机处于开机状态时取出滴水盘。开机/关机
后等待数分钟,咖啡机将执行冲洗/自动清洁程式(参
见“冲洗/自动清洁程式”章节)。
仅可向水箱内注入干净、无碳酸添加的饮用水。热水
或其他液体可能会损坏水箱和/或咖啡机。请勿在水箱
无水时操作咖啡机。确保水箱中有足够的水。
咖啡豆槽中只可放入咖啡豆。放入预磨咖啡粉、速溶
咖啡粉或其他材料可能损坏咖啡机。
可调节陶瓷研磨器:
可调节陶瓷研磨器:
警告!研磨器调节栓位于咖啡豆槽内,只有在研磨器
启用时,方可使用咖啡研磨器调节匙旋转。请勿在豆
槽中放入咖啡豆之外的其他材料。请勿将预磨咖啡和/
或速溶咖啡放入咖啡豆槽。
警告:咖啡研磨器含有可能导致危险的移动部件。因
此,请勿将手指和/或其他物体放入咖啡研磨器内。咖
啡机故障时,在对咖啡豆槽的内部部件进行任何操作
前,请按下 ON/OFF (开/关)按钮关机并拔掉插头。
请勿在研磨器工作时倒入咖啡豆。
使用预磨咖啡粉冲煮咖啡
使用预磨咖啡粉冲煮咖啡
警告:仅可将预磨咖啡粉放入粉格。其它物质和物体
可能严重损坏咖啡机。此类损坏不在质保范围内。
保温壶
保温壶
警告!使用保温壶冲煮饮品,使用饮用水清洁。切勿
使用装有本说明书指示之外的其他液体的容器。
排出热水
排出热水
警告!起初,可能会有少许热水喷溅:有烫伤危险。
装置温度可能较高:请勿用手直接接触。
一般清洁
一般清洁
请勿将咖啡机浸泡在水中。
中文
中文
한국어
한국어
繁體中文
繁體中文
Page 36

36
Safety instructions www.philips.com/support
请勿用洗碗机清洗任何部件。
请勿使用尖锐物品或带腐蚀性的化学产品(溶剂)清
洁咖啡机。
用柔软、潮湿的布清洁咖啡机即可。
请勿在微波炉和/或标准烤箱中烘干本机和/或其零部
件。
使用“咖啡油去除剂”清洁咖啡冲泡器
使用“咖啡油去除剂”清洁咖啡冲泡器
警告:“咖啡油去除剂”仅用于清洁,不具备除垢功
能。如需除垢,请使用 Saeco 除垢剂并按照“除垢”
章节的说明执行。
咖啡冲泡器润滑
咖啡冲泡器润滑
请记住,没有按照说明每月润滑咖啡冲泡器可能导致
您的咖啡机无法正常工作。此类维修不在质保范围
内。
除垢
除垢
若不按指示操作,可最终导致您的咖啡机停止正常工
作,此种情况下的维修不在质保范围内。
警告!除垢剂绝不可饮用,除垢程式执行过程中排出
的所有液体均不可饮用。切勿将醋用作除垢剂。
警告!加入除垢剂之前,取出“Intenza”滤水器。
处置
处置
- 包装材料可回收利用。
- 电器:拔下电源并切断电源线。
- 将电器及电源线送往服务中心或公共废弃物处理
中心。
本产品符合欧洲指令 2002/96/EC。
本产品或或其包装上的
标志说明不可将本产
品视同家庭垃圾处理。用户必须将本产品送到专门
的电气和电子设备回收点。
若您能正确处置废弃产品,便可防止错误处置本品
对环境和人类健康可能造成的负面影响。关于本产
品回收的详细信息,请与当地城市规划办公室、家
庭废弃物服务中心或购买本产品的商店联系。
KOR - 안전지침
KOR - 안전지침
커피 머신을 사용하기 전에 사용 설명서를 주의해
서 읽고 나중에 참조할 수 있도록 잘 보관하십시오.
커피 머신의 전기 부품이 물에 닿게 해서는 안 됩니다.
커피 머신의 전기 부품이 물에 닿게 해서는 안 됩니다.
감전 위험이 있으며 뜨거운 물이나 스팀에 화상을 입
감전 위험이 있으며 뜨거운 물이나 스팀에 화상을 입
을 수 있습니다. 뜨거운 물을 인체 방향으로 분사하지
을 수 있습니다. 뜨거운 물을 인체 방향으로 분사하지
마십시오. 화상의 위험이 있습니다.
마십시오. 화상의 위험이 있습니다.
용도
용도
이 커피 머신은 가정용입니다. 커피 머신을 기술적
으로 변경하거나 공인되지 않은 용도로 사용하지 마
십시오. 심각한 부상을 입을 수 있습니다. 커피 머신
은 신체적, 정신적 또는 감각적 능력이 떨어지거나
경험 또는 전문 지식이 부족한 사람(어린이 포함)이
사용해서는 안 되며, 이들이 사용할 때는 안전 책임
자의 감독을 받거나 안전 책임자에게 올바른 커피
머신 사용 방법에 대한 지시를 받아야 합니다.
전원 공급장치 - 전원 코드
전원 공급장치 - 전원 코드
커피 머신은 적합한 콘센트에만 연결해야 합니다.
커피 머신을 연결하는 콘센트는 다음 요건을 충족
해야 합니다.
- 기기에 설치된 플러그 유형과 호환 가능해야 합니
다.
- 기기에 부착된 태그에 기재된 데이터에 해당하는
적합한 크기여야 합니다.
- 효율적인 접지 시스템에 연결되어야 합니다.
전원 코드에 결함이 있으면 커피 머신을 사용하지
마십시오. 손상된 전원 코드는 제조업체나 필립스
공식 서비스 센터에서 교체를 받아야 합니다.
전원 코드가 구석 주변, 날카로운 가장자리 또는 뜨
거운 물체 위를 지나지 않도록 하며, 오일에 닿지 않
도록 하십시오.
전원 코드를 잡고 커피 머신을 이동하거나 잡아당
기지 마십시오.
전원 코드를 잡아당겨 플러그를 뽑거나 전원 코드
를 젖은 손으로 만지지 마십시오. 전원 코드가 테
이블이나 선반에 아무렇게나 걸려 있지 않도록 하
십시오.
타인의 안전을 위해
타인의 안전을 위해
어린이가 커피 머신을 다루지 않도록 하십시오. 어
린이는 가전제품과 관련된 위험을 인지하지 못하기
때문입니다. 커피 머신 포장재는 어린이의 손에 닿
지 않는 곳에 보관하십시오.
화상의 위험
화상의 위험
사람에게 스팀 및/또는 뜨거운 물을 직접 분사해서
는 안 됩니다. 화상의 위험이 있습니다.
커피 머신 위치 - 작동 및 유지관리에 적
커피 머신 위치 - 작동 및 유지관리에 적
합한 장소
합한 장소
커피 머신을 가장 효율적으로 사용하려면 다음을 따
르는 것이 좋습니다.
• 커피 머신이 뒤집히거나 사람이 부상을 입을 염려
가 없는 안전하고 평평한 표면을 선택합니다.
• 충분하고 효율적인 조명이 가능하고, 위생적이며
콘센트가 쉽게 닿을 수 있는 위치를 선택합니다.
• 그림과 같이 커피 머신의 측면으로부터 최소 거리
를 유지하십시오.
• 커피 머신 전원을 켜거나 끄는 동안에는 음료 추
출구 아래에 빈 컵을 놓아 두는 것이 좋습니다.
커피 머신을 온도가 0°C 이하인 장소에 두지 마십시
오. 성에로 인해 커피 머신이 손상될 수 있습니다. 커
피 머신을 실외에서 사용하지 마십시오.
커피 머신 외장이 녹거나 손상되지 않도록 하려면
커피 머신을 매우 뜨거운 표면에 놓지 말고 화기에
노출되지 않도록 하십시오.
Page 37

37
www.philips.com/support Safety instructions
커피 머신 세척 및 보관
커피 머신 세척 및 보관
적절히 세척하고 보관하여 커피 머신을 최적의 상태
로 유지하십시오.
커피 머신은 음료를 추출하는 데 천연 성분(커피 원
두, 물, 우유 등)을 사용하므로 지지면에 커피 찌꺼
기 또는 응축수의 일부 잔류물이 생기는 것이 정상
입니다. 따라서 커피 머신의 눈에 보이는 부품과 부
품 밑면을 정기적으로 세척하는 것이 좋습니다.
커피 머신을 보관하기 전에 먼저 세척하는 것이 좋
습니다.
- 며칠 동안 탱크 및/또는 물 통로에 있었던 물은 사
용하지 마십시오. 커피 머신을 오랫동안 사용하지
않는 경우 “뜨거운 물 공급” 섹션의 설명에 따라 물
을 추출합니다.
- 전원 버튼을 끄고 커피 머신을 세척하십시오. 그런
다음, 머신 뒷면의 전원 코드 커넥터에서 플러그를
뽑습니다. 커피 머신이 냉각될 때까지 기다리십시
오.
커피 머신을 절대 물에 담그지 마십시오. 건조하고
어린이의 손이 닿지 않는 곳에 보관하십시오. 먼지
나 오물로부터 보호하십시오.
커피 머신의 내부 부품을 개조하는 것은 엄격히 금
지됩니다.
오작동
오작동
커피 머신을 떨어뜨려 고장 또는 문제가 발생하거나
결함이 의심되는 경우에는 즉시 콘센트에서 플러그
를 뽑으십시오. 절대 고장난 커피 머신을 작동해서
는 안 됩니다.
문제해결 및 서비스에 대한 자세한 내용은 사용 설
명서의 ”문제해결” 및 ”서비스” 장을 참조하십시오.
화재 안전 주의사항
화재 안전 주의사항
화재 발생 시, 이산화탄소(CO2) 소화기를 사용하십
시오. 물 또는 건식 분말 소화기를 사용하지 마십
시오.
예비 작동
예비 작동
커피 머신이 켜진 상태에서는 물받이를 제거하지 마
커피 머신이 켜진 상태에서는 물받이를 제거하지 마
십시오. 커피 머신이 헹굼/자동 세척 과정을 실행하기
십시오. 커피 머신이 헹굼/자동 세척 과정을 실행하기
때문에 전원을 켜거나 끈 다음 몇 분을 기다리십시오
때문에 전원을 켜거나 끈 다음 몇 분을 기다리십시오
(”헹굼/자동 세척 과정” 섹션 참조).
(”헹굼/자동 세척 과정” 섹션 참조).
탱크에는 탄산수가 아닌 깨끗한 물만 채워야 합니다.
탱크에는 탄산수가 아닌 깨끗한 물만 채워야 합니다.
뜨거운 물 또는 기타 액체는 탱크 및/또는 커피 머신
뜨거운 물 또는 기타 액체는 탱크 및/또는 커피 머신
에 손상을 줄 수 있습니다. 물 없이 커피 머신을 작동
에 손상을 줄 수 있습니다. 물 없이 커피 머신을 작동
하지 마십시오. 먼저 탱크에 물을 충분히 채우십시오.
하지 마십시오. 먼저 탱크에 물을 충분히 채우십시오.
원두 투입구에는 커피 원두만 넣어야 합니다. 분쇄 커
원두 투입구에는 커피 원두만 넣어야 합니다. 분쇄 커
피, 인스턴트 커피 또는 기타 물질을 원두 투입구에 넣
피, 인스턴트 커피 또는 기타 물질을 원두 투입구에 넣
으면 커피 머신이 손상될 수 있습니다.
으면 커피 머신이 손상될 수 있습니다.
조정 가능한 세라믹 커피 분쇄기
조정 가능한 세라믹 커피 분쇄기
경고! 원두 투입구 내에 있는 분쇄 조절기 손잡이는
경고! 원두 투입구 내에 있는 분쇄 조절기 손잡이는
분쇄기가 작동 중일 경우에만 분쇄 조절기 키를 사용
분쇄기가 작동 중일 경우에만 분쇄 조절기 키를 사용
하여 돌려야 합니다. 원두 투입구에 커피 원두 이외의
하여 돌려야 합니다. 원두 투입구에 커피 원두 이외의
물질을 넣지 마십시오. 원두 투입구에 인스턴트 커피
물질을 넣지 마십시오. 원두 투입구에 인스턴트 커피
및/또는 분쇄 커피를 붓지 마십시오.
및/또는 분쇄 커피를 붓지 마십시오.
경고: 분쇄기에는 움직이는 부품이 포함되어 있어 위
경고: 분쇄기에는 움직이는 부품이 포함되어 있어 위
험할 수 있습니다. 그러므로 손가락 및/또는 다른 물
험할 수 있습니다. 그러므로 손가락 및/또는 다른 물
질을 넣어서는 안 됩니다. 오작동이 발생하는 경우 원
질을 넣어서는 안 됩니다. 오작동이 발생하는 경우 원
두 투입구 내에서 작업을 수행하기 전에 ON/OFF 버
두 투입구 내에서 작업을 수행하기 전에 ON/OFF 버
튼을 눌러 커피 머신 전원을 끄고 콘센트에서 플러그
튼을 눌러 커피 머신 전원을 끄고 콘센트에서 플러그
를 뽑으십시오. 분쇄기가 작동 중일 때에는 커피 원두
를 뽑으십시오. 분쇄기가 작동 중일 때에는 커피 원두
를 붓지 마십시오.
를 붓지 마십시오.
분쇄 커피를 사용한 커피 추출
분쇄 커피를 사용한 커피 추출
경고: 분쇄 커피 투입구에는 분쇄 커피만 넣어야 합
경고: 분쇄 커피 투입구에는 분쇄 커피만 넣어야 합
니다. 다른 물질을 넣으면 커피 머신이 심각하게 손
니다. 다른 물질을 넣으면 커피 머신이 심각하게 손
상될 수 있습니다. 이러한 손상에는 보증이 적용되지
상될 수 있습니다. 이러한 손상에는 보증이 적용되지
않습니다.
않습니다.
보온 용기
보온 용기
경고! 보온 용기는 음료를 준비하고 세척에 사용할 식
경고! 보온 용기는 음료를 준비하고 세척에 사용할 식
수를 담는 데 사용합니다. 상기 지시된 종류 이외의 액
수를 담는 데 사용합니다. 상기 지시된 종류 이외의 액
체를 우유통에 담지 마십시오.
체를 우유통에 담지 마십시오.
우유통 삽입/제거
우유통 삽입/제거
우유통을 억지로 기울이지 마십시오.
우유통을 억지로 기울이지 마십시오.
뜨거운 물 추출
뜨거운 물 추출
경고! 시작 시 뜨거운 물이 짧게 분출될 수 있습니다.
경고! 시작 시 뜨거운 물이 짧게 분출될 수 있습니다.
화상의 위험이 있습니다. 기기가 높은 온도에 도달했
화상의 위험이 있습니다. 기기가 높은 온도에 도달했
을 수 있으므로 맨손으로 만지지 마십시오.
을 수 있으므로 맨손으로 만지지 마십시오.
일반 세척
일반 세척
커피 머신을 물에 담그지 마십시오.
커피 머신을 물에 담그지 마십시오.
식기 세척기를 사용하여 커피 머신 부품을 세척하지
식기 세척기를 사용하여 커피 머신 부품을 세척하지
마십시오.
마십시오.
세척할 때 예리한 물체나 강한 화학제품(용제)을 사
세척할 때 예리한 물체나 강한 화학제품(용제)을 사
용하지 마십시오.
용하지 마십시오.
부드러운 젖은 천으로 커피 머신을 세척합니다.
부드러운 젖은 천으로 커피 머신을 세척합니다.
전자레인지 또는 일반 오븐을 사용하여 커피 머신 또
전자레인지 또는 일반 오븐을 사용하여 커피 머신 또
는 부품을 건조시키지 마십시오.
는 부품을 건조시키지 마십시오.
“커피 오일 리무버”를 사용한 추출 그룹 세척
“커피 오일 리무버”를 사용한 추출 그룹 세척
경고: ”커피 오일 리무버”는 세척용으로만 사용해야
경고: ”커피 오일 리무버”는 세척용으로만 사용해야
하며, 스케일 제거 기능이 없습니다. 스케일을 제거하
하며, 스케일 제거 기능이 없습니다. 스케일을 제거하
려면 Saeco 스케일 제거 용액을 사용하여 “스케일 제
려면 Saeco 스케일 제거 용액을 사용하여 “스케일 제
거” 장에 설명된 절차를 따르십시오.
거” 장에 설명된 절차를 따르십시오.
추출 그룹 윤활유
추출 그룹 윤활유
추출 그룹에 윤활유를 매월 발라주지 않으면 기기가
추출 그룹에 윤활유를 매월 발라주지 않으면 기기가
올바르게 작동하지 않는 경우가 생길 수 있음을 유념
올바르게 작동하지 않는 경우가 생길 수 있음을 유념
하십시오. 이런 경우의 수리에는 보증이 적용되지 않
하십시오. 이런 경우의 수리에는 보증이 적용되지 않
습니다.
습니다.
스케일 제거
스케일 제거
이 절차를 수행하지 않으면 커피 머신이 제대로 작동
이 절차를 수행하지 않으면 커피 머신이 제대로 작동
하지 않게 되며, 이런 경우의 수리에는 보증이 적용되
하지 않게 되며, 이런 경우의 수리에는 보증이 적용되
지 않습니다.
지 않습니다.
경고! 과정이 끝까지 수행될 때까지 스케일 제거 용액
경고! 과정이 끝까지 수행될 때까지 스케일 제거 용액
이나 공급된 음료를 마시지 마십시오. 또한 식초를 스
이나 공급된 음료를 마시지 마십시오. 또한 식초를 스
케일 제거 용액으로 사용하지 마십시오.
케일 제거 용액으로 사용하지 마십시오.
경고! 스케일 제거 용액을 넣기 전에 ”Intenza” 필터
경고! 스케일 제거 용액을 넣기 전에 ”Intenza” 필터
를 제거하십시오.
를 제거하십시오.
中文
中文
한국어
한국어
繁體中文
繁體中文
Page 38

38
Safety instructions www.philips.com/support
커피 머신 처리
커피 머신 처리
- 포장재는 재활용할 수 있습니다.
- 커피 머신: 커피 머신의 플러그를 뽑고 전원 코드
를 자르십시오.
- 커피 머신과 전원 코드를 필립스 공식 서비스 센
터로 보내거나 일반 폐기물 처리 시설에서 처리하
십시오.
본 제품은 EU Directive 2002/96/EC를 준수합니다.
제품 또는 포장의
기호는 본 제품을 가정용
쓰레기로 처리할 수 없음을 나타냅니다. 이 제품은
해당 전기 전자 장비 재활용 수거처로 보내야 합니
다.
본 제품을 올바르게 폐기 처리함으로써 부적절한 처
리로 인해 발생할 수 있는 환경과 인체 건강에 대한
잠재적인 피해를 방지할 수 있습니다. 본 제품의 재
활용에 대한 자세한 내용은 해당 지역 관공서, 가
정용 쓰레기 처리업체 또는 제품 구입처에 문의하
십시오.
TWN - 安全說明
TWN - 安全說明
使用電器之前請仔細閱讀本使用手冊,並妥善保存
供未來參考。
切勿讓機器的任何電子零件碰觸到水:有短路危
險!蒸汽和熱水可能造成灼傷!切勿將熱水噴嘴朝
向身體部位:有灼傷危險!
預定用途
預定用途
本咖啡機僅限家庭使用。未經授權禁止改動咖啡機
或用於非設計用途,否則可能導致嚴重後果!身
體、精神、感官存在缺陷或經驗不足者(包括兒
童),除非由負責其安全的人監督,或接受該人指
導,否則均不可使用本機。
電源 - 電源線
電源 - 電源線
只可將咖啡機接在合適的插座中。連接機器的插座
必須為:
- 與機器配置的插頭類型相符;
- 尺寸要與機器標示的資料相符;
- 連接於有效的接地系統。
若電源線損壞,切勿使用本咖啡機。若電源線損
壞,必須由製造商或授權服務中心進行更換。
勿將電源線繞過轉角、鋒利邊緣或置於高溫物體上
方,且要遠離汽油。
不要用電源線牽引或拖拽咖啡機。
不要拉扯電源線拔出插頭,或者用潮濕的手觸碰插
頭。不要讓電源線從檯面或架面上自由懸掛。
為了他人安全
為了他人安全
不要讓孩子將咖啡機當作玩具。兒童並不瞭解家電
的危險。不要將產品包裝材料放在兒童可以取得的
地方。
灼傷危險
灼傷危險
切勿將蒸汽及/或熱水噴嘴朝向自己或他人:有灼傷
危險!
咖啡機位置 - 操作和保養的適當位置
咖啡機位置 - 操作和保養的適當位置
為達最佳效能,請遵照下列建議:
• 選擇安全、平穩的表面,不會有翻倒或受傷的危
險;
• 選擇照明充足、乾淨且靠近插座的位置;
• 機器兩側至少要預留如圖所示之距離;
• 在開啟或關閉機器時,建議在咖啡龍頭下方放置
空杯子。
不要將咖啡機放在低於 0°C 的環境中。結冰可能會損
壞機器。不要在室外使用咖啡機。
為防止其外殼熔化或損壞,不要把咖啡機放在非常
熱的表面或靠近明火。
機器的清潔與儲存方法
機器的清潔與儲存方法
將機器妥善清潔及保管,使其維持在最佳狀態。
由於咖啡機使用天然食材沖煮飲品(咖啡豆、水、
鮮奶等),因此其表面上必定會出現預磨咖啡粉殘
餘物或冷凝水。因此,建議您定期清潔咖啡機看得
見的部分,以及咖啡機下方區域。
建議您在機器收藏不用之前,務必要清潔乾淨:
- 留在水箱及/或水線迴路長達數天的水,不得用
來製作飲品。若機器將長時間不使用,請依「釋
出熱水」章節中所述的方式將水排出。
- 關閉電源開關並清潔機器。最後,從插座中拔出
插頭。等待咖啡機冷卻。
切勿將咖啡機浸泡在水中!將其存放在乾燥且兒童
無法取得的地方。防止灰塵與浮土。
嚴禁擅自改造機器內部零件。
故障
故障
若機器因掉落而導致故障,發生問題或錯誤時,請
立即拔下插頭。不要操作有故障的咖啡機。
有關故障排除及服務的詳細資訊,請參閱「故障排
除」及「服務」章節。
防火安全注意事項
防火安全注意事項
發生火災時,請使用二氧化碳 (CO2) 滅火器。不要使
用水或乾粉滅火器。
初步操作
初步操作
咖啡機在開機狀態時,切勿取出滴水盤。開啟或關
閉後請等待數分鐘,因機器將執行沖洗/自動清潔程
序(請參閱「沖洗/自動清潔程序」章節)。
僅向水箱注入乾淨的無汽泡水。熱水或其他液體均
可能損壞水箱及/或機器。無水時不要操作機器。確
保水箱中有足夠的水。
咖啡豆槽中只可放入咖啡豆。若在咖啡豆槽放入預
磨咖啡粉、即溶咖啡或其他東西,可能損壞機器。
Page 39

39
www.philips.com/support Safety instructions
可調式陶製咖啡研磨器:
可調式陶製咖啡研磨器:
警告!研磨器調整旋鈕在咖啡豆槽內,只有在咖啡
研磨器運作時,才能與咖啡研磨器調整鍵同時轉
動。不要在咖啡豆槽中放入咖啡豆以外的物品。不
要將預磨咖啡粉及/或即溶咖啡放入咖啡豆槽。
警告:咖啡研磨器包含活動零件,可能導致危險。因
此,不要放入手指及/或其他物品。若遇故障情況,
在咖啡豆槽內執行任何操作之前,請按 ON/OFF(
開/關)按鈕以關閉機器,並拔掉插頭。咖啡研磨器
運作時,不可放入咖啡豆。
使用預磨咖啡粉沖煮咖啡
使用預磨咖啡粉沖煮咖啡
警告:僅能在粉格中放入預磨咖啡粉。其他物品將
對機器產生嚴重損害。此項損壞不列入保固範圍
內。
保溫瓶
保溫瓶
警告!使用保溫瓶製作飲品,使用飲用水清潔。 切
勿使用裝有本說明書指示以外液體的容器。
插入/取下鮮奶壺
插入/取下鮮奶壺
不可將鮮奶壺過度傾斜。
釋出熱水
釋出熱水
警告!最初可能會流出少量熱水:有灼傷危險。裝
置可能會燙:不要用手直接接觸。
一般清潔
一般清潔
不要將機器浸泡在水中。
不要用洗碗機清洗任何零件。
清潔時不要使用尖銳物品或化學產品(溶劑)。
請使用沾濕的軟布清潔機器。
不要用微波爐及/或標準烤箱烘乾機器及/或其零件。
以「咖啡油脂清潔器」清潔沖煮系統
以「咖啡油脂清潔器」清潔沖煮系統
警告:「咖啡油脂清潔器」僅用於清潔,不具有除
鈣功能。若要除鈣請使用 Saeco 除鈣劑,並依照「除
鈣」章節所述步驟進行。
沖煮系統潤滑
沖煮系統潤滑
請記住,沒有按照說明每月潤滑沖煮系統可能導致
機器無法正常工作。此類維修不列入保固範圍內。
除鈣
除鈣
若不清潔,您的機器將無法正常運作,而此類維修
不列入保固範圍內。
警告!切勿飲用除鈣劑,或是此程序完成之前所釋
出的任何飲品。切勿將醋用作除鈣劑。
警告!加入除鈣劑之前,取出「Intenza」濾水器。
處置
處置
- 包裝材料可回收。
- 咖啡機:拔出咖啡機電源插頭並切斷電源線。
- 將咖啡機及電源線送往服務中心或公共廢棄物處
置中心。
本產品符合歐洲指令 2002/96/EC。
本產品及其包裝上的標誌
顯示不能以家庭垃
圾處理。用戶必須將本產品送到專門的電子和電器
設備回收點。
若您能確保正確處置廢棄產品,便可幫助預防錯誤
處置本產品對環境和人類健康可能造成的負面影
響。關於產品回收的詳細資訊,請與當地城市規劃
辦公室、家庭廢棄物服務中心或購買本產品的商店
聯絡。
中文
中文
한국어
한국어
繁體中文
繁體中文
Page 40

40
Instructions www.philips.com/support
H2O
MAX
CHN
将滴水盘完全插
入。
打开水箱盖。 仅使用手柄取出水
箱。
向水箱内注入干净
的饮用水。
确保咖啡流出口的
位置正确。
KOR
물받이를 완전히
끼웁니다.
물 탱크에서 커버
를 제거합니다.
핸들만 사용하여
물 탱크를 빼냅니
다.
물 탱크에 깨끗한
식수를 채웁니다.
음료 추출구가 올
바른 위치에 있는
지 확인하십시오.
TWN
將滴水盤插到底。 取下水箱的蓋子。 握住手柄,取出水
箱。
向水箱中注入乾淨
的飲用水。
確認咖啡龍頭位置
正確。
CHN
将咖啡豆倒入咖啡
豆槽。
将电源线与咖啡机
连接。
将电源插头插入电
源插口
将电源按钮按下
到“I”位置。
首次使用请前往第
首次使用请前往第
11 步
11 步
按下
按钮打开
咖啡机。
KOR
원두 투입구를 채
웁니다.
커피 머신에 메인
라인을 연결합니
다.
메인 라인의 플러
그를 벽 콘센트에
꽂습니다.
전원 버튼을 ”I”로
전환합니다.
최초 사용 시 11단
최초 사용 시 11단
계로
계로
버튼을 눌러 커
피 머신을 켭니다.
TWN
將咖啡豆倒入咖啡
豆槽。
將電源線連接至咖
啡機。
將電源插頭插入電
源插座。
將電源開關壓到 I
位置。
首次使用請跳至步
首次使用請跳至步
驟 11
驟 11
按下
鈕開啟咖
啡機電源。
初次安装
初次安装 -
최초 설치
최초 설치 -
首次安裝
首次安裝
CLICK!
Page 41

41
www.philips.com/support Instructions
HEATING UP…
RINSING
ESC
STOP RINSING
CHN
按 选择语言,或按 记住选择!
仅针对初次安装。
仅针对初次安装。
咖啡机正在预热。 在咖啡龙头下放置
一个器皿。
咖啡机将执行冲洗
程式。
KOR
를 눌러 언어를 선택한 다음 를 눌
러 저장합니다!
최초 설치 시에만 해당합니다.
최초 설치 시에만 해당합니다.
기기를 가열하는
중입니다.
음료 추출구 아래
에 용기를 놓습니
다.
커피 머신에서 헹
굼 과정을 완료합
니다.
TWN
按下 鈕選擇語言,再按下 儲存設
定!
僅適用於首次安裝。
僅適用於首次安裝。
機器加熱中。 將一個器皿放在咖
啡龍頭下方。
咖啡機執行沖洗程
式。
CHN
现在,咖啡机准备
就绪。取出杯子。
将一个大号器皿放
在咖啡流出口下。
按一次 按钮,选择预磨咖啡粉冲泡功
能。然后按
按钮。
KOR
이제 커피 머신을
사용할 준비가 되
었습니다. 컵을 치
웁니다.
음료 추출구 아래
에 큰 용기를 놓습
니다.
버튼을 한 번 눌러 분쇄 커피 추출 기
능을 선택합니다. 그런 다음
버튼을
누릅니다.
TWN
咖啡機已就緒,請
移開杯子。
將一個大器皿放在
咖啡龍頭下方。
按下
鈕一次,選擇預磨咖啡粉沖煮
功能,再按下
鈕。
OK ESC
MENU OK ESC
LANGUAGE
ITALIANO
ENGLISH
DEUTSCH
FRANÇAIS
1
1
2
2
手动冲洗程式
수동 헹굼 과정
手動沖洗程式
中文
中文
한국어
한국어
繁體中文
繁體中文
Page 42

42
Instructions www.philips.com/support
MENU OK ESC
MEMO
ESC
ESC
INSERT
GROUND COFFEE
AND PRESS OK
MENU OK ESC
OK ESC
SPECIAL BEVERAGES
HOT WATER
LONG COFFEE
HOT MILK
AMERICAN COFFEE
HOT WATER
ESC
STOP HOT WATER
1
2
CHN
说明:请勿在粉格中加入预磨咖啡粉。
按
按钮。等待排水完毕
在热水冲煮管下放置一个大号容器。
KOR
참고: 원두 투입구나 분쇄 커피 투입구
에 분쇄 커피를 넣지 마십시오.
버튼
을 누릅니다. 추출 절차가 완료될 때까지
기다리십시오.
뜨거운 물 봉 밑에 큰 용기를 놓습니다.
TWN
請注意:請勿在粉格中加入預磨咖啡
粉。按下
鈕。等待沖煮完成
在熱水沖煮管下方放置一個大器皿。
CHN
按
按钮。然后按 按钮。
当热水排出完毕后,清空容器。 现在,咖啡机准备
就绪。
KOR
버튼을 누릅니다. 그런 다음 버튼
을 누릅니다.
뜨거운 물 추출 절차가 완료될 때까지 기
다렸다가 용기를 비웁니다.
이제 커피 머신을
사용할 준비가 되
었습니다.
TWN
按下
鈕,再按下 鈕。
熱水釋出程式完成後,請清空容器。 咖啡機已就緒,
将步骤 16 到 18
重复三次,再进行
步骤 19。
16~18단계를 세
번 반복한 다음 19
단계를 계속 진행
합니다.
重複步驟 16 至步
驟 18 的操作三
次,然後進行步驟
19。
Page 43

43
www.philips.com/support Instructions
中文
中文
한국어
한국어
繁體中文
繁體中文
ENU OK ESC
ENU OK ESC
MEMO
MEMO
ESC
STOP COFFEE
ESC
MEMO
ESC
STOP COFFE
ENU OK ESC
OK
第一杯意式浓缩咖啡
第一杯意式浓缩咖啡 -
최초의 에스프레소
최초의 에스프레소 -
第一杯義式濃縮咖啡
第一杯義式濃縮咖啡
我的意式浓缩咖啡
我的意式浓缩咖啡 -
내 에스프레소
내 에스프레소 -
我的義大利濃縮咖啡
我的義大利濃縮咖啡
CHN
调整咖啡流出口。
按下
按钮,冲
煮意式浓缩咖啡,
或者..
...按
按钮冲煮
咖啡。
此过程完成后,取
出杯子。
KOR
음료 추출구를 조
정합니다.
버튼을 눌러 에
스프레소를 추출하
거나...
...
버튼을 눌러
커피를 추출합니
다.
프로세스가 끝나면
컵을 꺼냅니다.
TWN
調整咖啡龍頭。
按下
鈕沖煮義
式濃縮咖啡,或是
按下
鈕沖煮咖
啡。
沖煮結束後取出杯
子。
CHN
按住
按钮,直到
显示“MEMO”时松
开。
咖啡机开始编程。 咖啡机开始冲煮。 等到咖啡量达到所
需时...
....按
停止冲
煮。
设置已保存!
KOR
”MEMO”가 표시
될 때까지
버튼
을 길게 눌렀다 놓
습니다.
커피 머신이 프로
그래밍 중입니다.
음료 추출 과정이
시작됩니다.
원하는 양에 도달
할 때까지 기다리
다가...
....
버튼을 눌러
정지하십시오.
저장되었습니다!
TWN
按住
鈕,直到
顯示「MEMO」(
記憶)
咖啡機設定中。 咖啡機開始沖煮。 盛裝到需要的量
後,
按下
鈕停止咖
啡沖出。
設定已儲存!
Page 44

44
Instructions www.philips.com/support
第一杯卡布奇诺
第一杯卡布奇诺 -
최초의 카푸치노
최초의 카푸치노 -
第一杯卡布奇諾
第一杯卡布奇諾
CAPPUCCINO
ESC
STOP COFFEE
CAPPUCCINO
ESC
STOP MILK
CHN
从前部移开盖子。 将 Cappuccinato-
re(自动奶泡器)
安到底座上,锁定
到位。
将干净的管子直接
插入牛奶容器中。
将咖啡杯放在咖啡
流出口下方。
按
按钮。
KOR
앞쪽에서 커버를
제거합니다.
Cappuccinatore가
제 위치에 잠길 때
까지 시트에 삽입
합니다.
깨끗한 호스를 직
접 우유통에 끼웁
니다.
컵을 추출구 아래
에 놓습니다.
버튼을 누릅니
다.
TWN
打開前端的蓋子。 將 Cappuccinatore
插入底座固定。
將乾淨的連接管直
接放入裝牛奶的器
皿內。
將杯子放置在咖啡
龍頭下方。
按下
鈕,
CHN
咖啡机排出奶泡。 咖啡机冲煮咖啡。 准备过程完成后,
取出杯子。
KOR
거품을 낸 우유가
추출됩니다.
커피가 추출됩니다.준비가 끝나면 컵
을 꺼냅니다.
TWN
咖啡機器開始沖出
奶泡。
咖啡機沖煮咖啡
中。
沖煮完成後,取回
杯子。
Page 45

45
www.philips.com/support Instructions
ESC
STOP COFFEE
LATTE MACCHIATO
LATTE MACCHIATO
ESC
STOP MILK
第一杯拿铁玛奇朵
第一杯拿铁玛奇朵 -
최초의 라떼 마끼아또
최초의 라떼 마끼아또 -
第一杯拿鐵瑪奇朵
第一杯拿鐵瑪奇朵
CHN
从前部移开盖子。 将 Cappuccinato-
re(自动奶泡器)
安到底座上,锁定
到位。
将干净的管子直接
插入牛奶容器中。
将咖啡杯放在咖啡
流出口下方。
按
按钮。
KOR
앞쪽에서 커버를
제거합니다.
Cappuccinatore가
제 위치에 잠길 때
까지 시트에 삽입
합니다.
깨끗한 호스를 직
접 우유통에 끼웁
니다.
컵을 추출구 아래
에 놓습니다.
버튼을 누릅니
다.
TWN
打開前端的蓋子。 將 Cappuccinatore
插入底座固定。
將乾淨的連接管直
接放入裝牛奶的器
皿內。
將杯子放置在咖啡
龍頭下方。
按下
鈕,
CHN
咖啡机排出奶泡。 咖啡机冲煮咖啡。 准备过程完成后,
取出杯子。
KOR
거품을 낸 우유가
추출됩니다.
커피가 추출됩니다.준비가 끝나면 컵
을 꺼냅니다.
TWN
咖啡機器開始沖出
奶泡。
咖啡機沖煮咖啡
中。
沖煮完成後,取回
杯子。
中文
中文
한국어
한국어
繁體中文
繁體中文
Page 46

46
Instructions www.philips.com/support
“SPECIAL”饮品
“SPECIAL”饮品 -
특별 음료
특별 음료 -
「特調」品
「特調」品
ESC
ESC
SPECIAL BEVERAGES
HOT WATER
LONG COFFEE
HOT MILK
AMERICAN COFFEE
SPECIAL BEVERAGES
HOT WATER
LONG COFFEE
HOT MILK
AMERICAN COFFEE
12
3
ENU OK ESC
SPECIAL BEVERAGES
HOT WATER
LONG COFFEE
HOT MILK
AMERICAN COFFEE
SPECIAL BEVERAGES
HOT WATER
LONG COFFEE
HOT MILK
AMERICAN COFFEE
SPECIAL BEVERAGES
HOT WATER
LONG COFFEE
HOT MILK
AMERICAN COFFEE
CHN
按
按钮。显示屏上出现“special”
饮品页面。
在热水冲泡管下放
置一个容器。
按下
或
按钮,选择您想要的饮品。
KOR
버튼을 누릅니다. 제어판에 ”SPE-
CIAL” 음료 페이지가 표시됩니다.
뜨거운 물 봉 밑에
용기를 놓고
또는
버튼을 눌러 원하는 음료를
선택합니다.
TWN
按下
鈕,螢幕顯示「special」(特
調)飲品頁面。
在熱水沖煮管下方
放置一個器皿。
按下
或
鈕,選擇所需的飲品。
CHN
按下
按钮,开始
准备。
在特别饮品中,您
还可以找到意式淡
咖啡...
...热牛奶... ...美式咖啡。
KOR
버튼을 눌러 준
비를 시작합니다.
SPECIAL 음료에서
롱 커피...
... 뜨거운 우유... ... 아메리카노 커
피를 만들 수 있습
니다.
TWN
按下
鈕開始沖
煮。
特調飲品也包含義
式淡咖啡、
熱鮮奶 和美式咖啡。
Page 47

47
www.philips.com/support Instructions
H2O
除垢 - 30 分钟
除垢 - 30 分钟 -
스케일 제거 - 30분
스케일 제거 - 30분 -
除鈣 - 30 分鐘
除鈣 - 30 分鐘
CHN
咖啡机需要执行除垢程式时会显示 (A)。之后启动咖啡机时会显示 (B),方便您
快速访问除垢程式。
如一直不进行除垢,将最终导致您的咖啡机无法正常工作。由此涉及的维修不在
质保范围内。
KOR
스케일 제거 과정이 필요하면 (A)가 표시됩니다. 다음 시작 시에 (B)가 표시되어
스케일 제거 과정을 쉽게 시작할 수 있습니다.
스케일을 제거하지 않으면 커피 머신이 정상적인 작동을 멈추게 됩니다. 이 경우
수리 시 보증을 받지 못합니다.
TWN
咖啡機需要執行除鈣程式時,會顯示 (A)。啟動後續程式後則會顯示 (B),出
現除鈣程式的捷徑。
若不除鈣,您的機器將最終無法正常運作。此類維修不列入保固範圍內。
DESCALING
NEEDED.
DESCALE?
DESCALING
DESCALING
NEEDED.
DESCALE?
DESCALING
START DESCALING?
DESCALING
CHN
按下
按钮,进入
除垢菜单。
按下
按钮,启动
除垢程式。
倒入除垢剂。 注入清水,直到图标所示的
水位线。
KOR
버튼을 눌러 스
케일 제거 메뉴로
진입합니다.
버튼을 눌러 스
케일 제거 과정을
시작합니다.
스케일 제거 용액을 붓습니다. 아이콘으로 표시된 선까지
깨끗한 물을 채웁니다.
TWN
按下
鈕進入除
鈣選單。
按下
鈕開始除
鈣程式。
倒入除鈣劑。 加入乾淨的水到圖示的
量。
中文
中文
한국어
한국어
繁體中文
繁體中文
Page 48

48
Instructions www.philips.com/support
EMPTY DRIP TRAY
DESCALING
INSERT THE
CAPPUCCINATORE WITH
ALL THE COMPONENTS
DESCALING
FILL TANK WITH
DESCALING SOLUTION
DESCALING
CHN
将水箱放回咖啡机。按
按钮。
清空滴水盘并放回咖啡机中。
按
按钮。
KOR
그런 다음 탱크를 다시 커피 머신에 끼웁
니다.
버튼을 누릅니다.
물받이를 비우고 머신에 다시 넣습니다.
버튼을 누릅니
다.
TWN
將水箱放回咖啡機。按下
鈕,
倒乾滴水盤後放回咖啡機。
按下
鈕,
CHN
取下咖啡流出口,并插入 Cappuccinatore(自动奶泡器)。
按
按钮。
在热水/蒸汽冲泡管下放置一个容器,并
在 Cappuccinatore(自动奶泡器)下放
置另一个容器(1.5 升)。
KOR
추출구를 꺼내고 Cappuccinatore를 끼
웁니다.
버튼을 누릅니
다.
용기를 뜨거운 물/증기 봉 아래에 놓고
다른 용기(1.5L)를 Cappuccinatore 아
래에 놓습니다.
TWN
取下咖啡龍頭,裝入 Cappuccinatore。
按下
鈕,
請在熱水/蒸汽沖煮管下放置一個器
皿,Cappuccinatore 下方也放置一個
(1.5 公升)。
Page 49

49
www.philips.com/support Instructions
重复步骤 6 到 11
,再进行步骤 15。
6~11단계를 반복
한 다음 15단계를
계속 진행합니다.
重複步驟 6 至步
驟 11,再進行步
驟 15。
STEP 1/2
DESCALING
PAUS E
RINSE TANK &
FILL WITH FRESH WATER
DESCALING
REFILL
WATER TANK
STEP 2/2
DESCALING
PAUS E
PLACE A CONTAINER
UNDER MILK AND HOT
WATER SPOUTS
DESCALING
H2O
MAX
CHN
按
按钮。
咖啡机开始执行除
垢程式。
此时咖啡机已完成
除垢过程。
冲洗并注入清水至
MAX(最大)水位
线。
KOR
버튼을 누릅니
다.
머신이 스케일 제
거 과정을 시작합
니다.
머신이 스케일 제
거 용액을 다 사용
했습니다.
헹구고 MAX 선까
지 깨끗한 물을 채
웁니다.
TWN
按下
鈕,
咖啡機開始執行除
鈣程式。
咖啡機已完成除鈣
程式。
沖洗後,將乾淨的
水加到 MAX(最
大)刻度線。
CHN
咖啡机开始执行冲
洗程式。
冲洗程式已完成。
向水箱注水。
咖啡机准备就绪。 清空容器和滴水
盘。
取下 Cappuccinatore(自动奶泡
器)和咖啡冲泡
器,进行冲洗。
KOR
커피 머신이 헹굼
과정을 시작합니
다.
헹굼 과정이 종료
됩니다. 물탱크에
물을 채우십시오.
커피 머신을 사용
할 준비가 되었습
니다.
용기와 물받이를
비우십시오.
Cappuccinatore와
추출 그룹을 꺼내
서 헹구십시오.
TWN
咖啡機開始執行沖
洗程式。
沖洗程式已完成,
請加水到水箱中。
咖啡機已準備就
緒。
倒乾器皿和滴水盤
的水。
取下並沖洗 Cappuccinatore 和沖煮
系統。
中文
中文
한국어
한국어
繁體中文
繁體中文
Page 50

50
Instructions www.philips.com/support
MonthlyWeekly
MAX
REPLACE MILK CONTAINER
WITH ANOTHER ONE WITH
FRESH WATER
CAPPUCCINATORE CLEAN
CAPPUCCINATORE(自动奶泡器)清洗
CAPPUCCINATORE(自动奶泡器)清洗-
CAPPUCCINATORE 세척
CAPPUCCINATORE 세척 -
清潔 CAPPUCCINATORE
清潔 CAPPUCCINATORE
Daily
CHN
取一个容器,注入
清水。
将干净的管子插入
该容器。
将容器(1 升)放
在咖啡流出口下
方。
按
按钮。
按
按钮确认。咖
啡机开始执行冲洗
程式。
KOR
용기에 깨끗한 물
을 채웁니다.
깨끗한 호스를 용
기에 끼웁니다.
음료 추출구 아래
에 용기(1L)를 놓습
니다.
버튼을 누릅니
다.
버튼을 눌러 확
인합니다. 커피 머
신이 세척 과정을
시작합니다.
TWN
在器皿中裝入乾淨
的水。
將乾淨的連接管放
入器皿中。
將器皿(1 公升)
放在咖啡龍頭下
方。
按下
鈕,
按下
鈕確認。
咖啡機啟動沖洗程
式。
CHN
用温水冲洗各零部
件。
将清洁粉倒入容器然后装满
清水。
确保 Cappuccinatore(自动
奶泡器)的位置正确。
KOR
모든 구성부품을
미지근한 물로 세
척합니다.
파우더를 붓고 용기를 깨끗한
물로 채웁니다.
Cappuccinatore가 올바른 위
치에 있는지 확인하십시오.
TWN
以溫水洗淨所有組
件。
將清潔粉末倒入器皿並裝入
乾淨的水。
確認 Cappuccinatore 裝置正
確。
Page 51

51
www.philips.com/support Instructions
MENU OK ESC
MENU
BEVERAGE MENU
MACHINE MENU
MACHINE MENU
DISPLAY MENU
WATER MENU
MAINTENANCE
FACTORY SETTINGS
MAINTENANCE
BREW GROUP CLEAN
DESCALING
CAPPUCCINATORE CLEANING
WASH THE
CAPPUCCINATORE?
CAPPUCCINATORE CLEANING
REFILL
WATER TANK
CAPPUCCINATORE CLEANING
POUR DETERGENT
IN A CONTAINER
WITH 1/2 L WATER
CAPPUCCINATORE CLEANING
CHN
按住
按钮 5 秒
钟
按
按钮选择“MACHINE MENU”;按
按钮进入该菜单。
按
按钮选择“MAINTENANCE”。按
进入该菜单。
KOR
버튼을 5초 동안
길게 누릅니다.
버튼을 눌러 “MACHINE MENU” 옵
션을 선택하고
버튼을 눌러 메뉴에
진입합니다.
버튼을 눌러 ”MAINTENANCE”를 선
택합니다.
버튼을 눌러 메뉴에 진입합
니다.
TWN
按住
鈕 5 秒
種。
按下
鈕選擇「MACHINE MENU」,
按下
鈕進入選單。
按下
鈕選擇「MAINTENANCE」,
按下
鈕進入選單。
CHN
按
按钮选择“CAPPUCCINATORE CLEA-
NING”选项,然后按
进入该程式。
按
按钮,启动清
洗程式。
向水箱内注满水,
并按
按钮确认。
确保溶液已备好。
KOR
버튼을 눌러 CAPPUCCINATORE
CLEANING 옵션을 선택하고
버튼을
눌러 세척 과정에 들어갑니다.
버튼을 눌러 세
척 과정을 시작합
니다.
물 탱크를 채우고
버튼을 눌러 확
인합니다.
용액이 준비된 상
태인지 확인합니
다.
TWN
按下
鈕選擇「CAPPUCCINATORE
CLEANING」,再按下
鈕進入程
式。
按下
鈕開始清
潔程式。
裝水到水箱,再按
下
鈕確認。
確認已倒入清潔
劑。
中文
中文
한국어
한국어
繁體中文
繁體中文
Page 52

52
Instructions www.philips.com/support
PUT CAPPUCCINATORE
HOSE IN THE
CONTAINER
CAPPUCCINATORE CLEANING
PLACE A CONTAINER
UNDER THE
DISPENSING SPOUT
CAPPUCCINATORE CLEANING
CAPPUCCINATORE CLEANING
REFILL
WATER TANK
CAPPUCCINATORE CLEANING
INSERT CAPPUCCINATORE
HOSE IN A CONTAINER
WITH 1/2 L WATER
CAPPUCCINATORE CLEANING
CHN
将干净的管子直接插入该容器。按
按
钮确认。
在咖啡流出口下放置一个空容器(1
升),然后按
确认。
KOR
깨끗한 호스를 직접 용기에 끼웁니다.
버튼을 눌러 확인합니다.
빈 용기(1L)를 음료 추출구 아래에 놓고
버튼을 눌러 확인합니다.
TWN
將乾淨的連接管直接放入器皿內。按
下
鈕確認。
在咖啡龍頭下方放置空的器皿(1 公
升),再按下
鈕確認。
CHN
咖啡机执行 Cappuccinatore(自动奶泡
器)的冲洗程式。
向水箱内注满水,
并按
按钮确认。
冲洗容器并注入 1/2 升清水,然后将
Cappuccinatore(自动奶泡器)软管再
次插入其中。
KOR
커피 머신에서 Cappuccinatore의 세척
과정을 실행합니다.
물 탱크를 채우고
버튼을 눌러 확
인합니다.
용기를 헹구고 깨끗한 물을 1/2L 정도
채운 다음 Cappuccinatore 호스를 다시
끼워 넣습니다.
TWN
咖啡機將執行 Cappuccinatore 清洗程
式。
裝水到水箱,再按
下
鈕確認。
沖洗器皿並裝入 0.5 公升的乾淨水,並
放入 Cappuccinatore 連接管。
Page 53

53
www.philips.com/support Instructions
PLACE A CONTAINER
UNDER THE
DISPENSING SPOUT
CAPPUCCINATORE CLEANING
CAPPUCCINATORE CLEANING
CHN
倒空容器,再将它放回到咖啡流出口
下。按
按钮。
咖啡机执行 Cappuccinatore(自动奶
泡器)的冲洗程式。等待该程式自动完
成。
按 Cappuccinatore(自动奶泡器)
两侧将它取下,再
清洗。
KOR
용기를 비우고 음료 추출구 아래에 다시
놓습니다.
를 누릅니다.
커피 머신에서 Cappuccinatore의 헹굼
과정을 실행합니다. 과정이 자동으로 중
지될 때까지 기다리십시오.
측면 버튼을 눌러
Cappuccinatore를
꺼낸 다음 세척합
니다.
TWN
將器皿的水倒乾,並放回咖啡龍頭下
方。按下
鈕。
咖啡機執行 Cappuccinatore 的沖洗程
式。請等待該程式自動停止為止。
按下側邊鈕,取出
Cappuccinatore 並
清洗。
中文
中文
한국어
한국어
繁體中文
繁體中文
Page 54

54
Instructions www.philips.com/support
咖啡冲泡器清洁
咖啡冲泡器清洁 -
추출 그룹 세척
추출 그룹 세척 -
清潔沖煮系統
清潔沖煮系統
1
2
CHN
取下滴水盘。 取下咖啡粉槽。 打开服务门:
1) 将加载杆顺时针旋转 90°;
2) 将门拉向身体一侧。
取下咖啡冲泡器:
拉动手柄,并
按“PRESS”按钮。
KOR
물받이를 분리합
니다.
커피 찌꺼기통을
제거하고
서비스 도어를 엽니다.
1) 레버를 시계 방향으로 90° 돌립니다.
2) 도어를 앞쪽으로 당깁니다.
추출 그룹을 분리
합니다. 핸들을 사
용해 그룹을 당기
면서 «PRESS» 버
튼을 누릅니다.
TWN
取出滴水盤。 取出咖啡渣槽。 打開服務門:
1) 以順時鐘方向旋轉拉桿 90°,
2) 將服務門往自己的方向拉開。
取下沖煮系統:握
住把手往上拉,並
按 「PRESS」鈕。
CHN
对咖啡冲泡器进行
维护。
检查其定位状况。 按 PRESS(按压)
,再插入咖啡冲泡
器。
关闭服务门。放回咖啡粉槽和滴水盘。
KOR
추출 그룹을 정비
합니다.
정렬 상태를 점검
합니다.
추출 그룹을 눌러
끼웁니다.
서비스 도어를 닫습니다. 커피 찌꺼기통
과 물받이를 다시 넣습니다.
TWN
保養沖煮系統。 檢查定位對齊狀
況。
下壓後裝入沖煮系
統。
關上服務門。裝回咖啡渣槽和滴水
盤。
Page 55

55
www.philips.com/support Instructions
用于自定义设置和维护的菜单
用于自定义设置和维护的菜单
사용자 지정 및 정비 메뉴
사용자 지정 및 정비 메뉴
客制化設定和保養選單
客制化設定和保養選單
按住
按钮 5 秒钟
버튼을 5초 동안 길게 누릅니다.
按住
鈕 5 秒種。
进入编程模式后,各个按钮的功能会相应改变:
按钮 = (确认所作的选择或更改)
按钮 = (向上滚动菜单)
按钮 = (向下滚动菜单)
按钮 = (确认退出选择)
프로그래밍 모드에 진입하면 다음 버튼의 기능이 달라집니다.
버튼 = (선택하거나 변경한 사항 확인)
버튼 = (메뉴를 위로 스크롤)
버튼 = (메뉴를 아래로 스크롤)
버튼 = (선택 종료 확인)
當您進入設定模式時,按鈕將有不同的功能:
按鈕 = (確認選項和變更)
按鈕 = (往上捲動選單)
按鈕 = (往下捲動選單)
按鈕 = (確認以離開選項)
MENU OK ESC
MENU
BEVERAGE MENU
MACHINE MENU
1
中文
中文
한국어
한국어
繁體中文
繁體中文
Page 56

56
Instructions www.philips.com/support
饮品菜单
饮品菜单 -
BEVERAGE MENU
BEVERAGE MENU -
飲品選單
飲品選單
BEVERAGE MENU
ESPRESSO
COFFEE
CAPPUCCINO
LATTE MACCHIATO
CAPPUCCINO
PREBREWING
COFFEE TEMPERATURE
COFFEE LENGTH
MILK QUANTITY
COFFEE LENGTH
PREBREWING
COFFEE TEMPERATURE
MENU OK ESC
MENU
BEVERAGE MENU
MACHINE MENU
1
CHN
按住
按钮 5 秒钟。按 按钮选
择“BEVERAGE MENU”。
按
按钮,选择“CAPPUC-
CINO”,再按
按钮进入该
菜单。
按 按钮,选择“PREBREWING”
,再按
按钮进入该菜单。
KOR
버튼을 5초 동안 길게 누릅니다.
버튼을 눌러 ”BEVERAGE MENU”를 선
택합니다.
버튼을 눌러 ”CAPPUC-
CINO”를 선택하고
버튼을
눌러 메뉴에 진입합니다.
버튼을 눌러 ”PREBRE-
WING”을 선택하고
버튼
을 눌러 메뉴에 진입합니다.
TWN
按住
鈕 5 秒種。按下 鈕選擇
「BEVERAGE MENU」(飲品選單)
。
按下
鈕選擇「CAPPUC-
CINO」,按下
鈕進入選
單。
按下
鈕選擇「PREBRE-
WING」,按下
鈕進入選
單。
CHN
此功能可用于调整预煮设置。咖啡先稍
稍浸湿,而后再冲煮到浓郁香醇。
该功能用于设定咖
啡的冲泡温度。
该功能用于设定每一种饮品的咖啡冲煮
量。
KOR
이 기능으로 사전 추출량을 조정할 수 있
습니다. 커피 아로마를 완전하게 추출하
기 전에는 커피향이 많이 나지 않습니다.
이 섹션에서는 커
피 추출 온도를 프
로그래밍할 수 있
습니다.
이 섹션에서는 선택한 각 음료의 커피
추출 분량을 프로그래밍할 수 있습니다.
TWN
此功能可調整預煮選項。沖煮前稍微
弄溼咖啡粉,可完全帶出咖啡的香
味。
此選單用於對咖啡
沖煮溫度進行程式
化設計。
此選單用於對每一種所要沖煮的選取
飲品的咖啡量進行設定。
Page 57

57
www.philips.com/support Instructions
DEFAULT
MILK QUANTITY
WATER QUANTITY
咖啡机菜单
咖啡机菜单 -
MACHINE MENU
MACHINE MENU -
咖啡機選單
咖啡機選單
MENU
BEVERAGE MENU
MACHINE MENU
MENU OK ESC
MENU
BEVERAGE MENU
MACHINE MENU
1
CHN
该功能用于设定每一种饮品所需的牛奶
量。
该功能用于设定热
水排出量。
每一种饮品都可以恢复制造商设定的原
始标准参数。
KOR
이 섹션에서는 선택한 각 음료의 우유 분
량을 프로그래밍할 수 있습니다.
이 섹션에서는 물
추출 분량을 프로
그래밍할 수 있습
니다.
각 음료에 대해 제조업체가 지정한 원래
표준 값으로 재설정할 수 있습니다.
TWN
此選單用於對所選取飲品的鮮奶用量
進行設定。
此選單可設定出水
量。
對於每種飲品而言,都可重設為製造
商所指定的原始標準值。
CHN
按住
按钮 5 秒钟。 按
按钮向下滚动,再按
按钮进
入“MACHINE MENU”。
KOR
버튼을 5초 동안 길게 누릅니다.
버튼을 눌러 아래로 스크롤하고
버
튼을 눌러 MACHINE MENU에 진입합니
다.
TWN
按住
鈕 5 秒種。
按下
鈕以向下捲動選單,按下
鈕
可進入 MACHINE MENU。
中文
中文
한국어
한국어
繁體中文
繁體中文
Page 58

58
Instructions www.philips.com/support
MACHINE MENU
GENERAL MENU
DISPLAY MENU
WATER MENU
MAINTENANCE
DISPLAY MENU
GENERAL MENU
WATER MENU
MAINTENANCE
CHN
选择选项。您可以管理和维护咖啡机 此菜单可用于更改咖啡机操作设置 此菜单可用于更改
显示设置
KOR
옵션을 선택합니다. 커피 머신을 관리 및
유지보수할 수 있습니다.
이 메뉴에서 머신 작동 설정을 변경할 수
있습니다.
이 메뉴에서 디스
플레이 설정을 변
경할 수 있습니다.
TWN
選取選項。可管理並保養咖啡機。 此選單可變更咖啡機運作設定。 此選單可變更顯示
設定。
CHN
此菜单可用于设置水束带和管理滤水器 此菜单可用于执行维护操作。
KOR
이 메뉴에서 물을 설정하고 정수 필터를
관리할 수 있습니다.
이 메뉴에서 유지보수 작업을 수행할 수
있습니다.
TWN
此選單可設定水質硬度並管理濾水
器。
此選單可執行保養程式。
Page 59

59
www.philips.com/support Instructions
Warning
警告
警告 -
경고
경고 -
警告
警告
INSERT DRIP TRAY
INSERT
CAPPUCCINATORE
INSERT COFFEE
GROUNDS DRAWER
INSERT VALVE INTO
CAPPUCCINATORE
CLOSE
HOPPER DOOR
ADD COFFEE
REFILL
WATER TANK
CLOSE
SIDE DOOR
INSERT BREW GROUP
CHN
关闭服务门。 插入滴水盘。 插入咖啡粉槽。 合上咖啡豆槽盖。 取下水箱,注入干
净的饮用水。
KOR
서비스 도어를 닫습
니다.
물받이를 삽입합니다.커피 찌꺼기통을 끼
웁니다.
원두 투입구 커버를
닫습니다.
탱크를 제거하고 깨
끗한 식수로 채웁니
다.
TWN
關上服務門。 放入滴水盤。 插入咖啡渣槽。 打開咖啡豆槽蓋。 取下水箱,並注入乾
淨的飲用水。
CHN
将咖啡冲泡器安到
底座上。
插入 Cappuccinatore(自动奶泡
器)。
将阀门插入 Cappuccinatore(自动奶
泡器)。如需详细信息,请参阅用户手
册。
将咖啡豆倒入咖啡
豆槽。
KOR
추출 그룹을 시트에
장착합니다.
Cappuccinatore를
끼웁니다.
Cappuccinatore에 밸브를 끼웁니다. 자
세한 내용은 사용 설명서를 참조하십시
오.
원두 투입구에 커피
원두를 채웁니다.
TWN
將沖煮系統插入底座。裝入 Cappuccinato-
re。
裝入 Cappuccinatore 的閥門。詳細資訊請參
閱使用手冊。
將咖啡豆倒入咖啡豆
槽。
中文
中文
한국어
한국어
繁體中文
繁體中文
Page 60

60
Instructions www.philips.com/support
EMPTY COFFEE
GROUNDS DRAWER
RESTART TO SOLVE
DESCALING
NEEDED.
DESCALE?
DESCALING
CHN
咖啡机需要除垢。前往维护菜单,再选
择并启动相关程式。
更换新
的“Intenza”滤水
器。
在运行几个程式
后,您将需要清空
咖啡粉槽。
在咖啡机打开时,
取出并清空咖啡粉
槽。
KOR
스케일을 제거해야 합니다. 유지보수 메
뉴로 가서 과정을 선택하여 시작합니다.
”Intenza” 정수 필
터를 새 것으로 교
체합니다.
과정을 몇 회 수행
한 뒤에 커피 찌꺼
기통을 비워야 합
니다.
커피 머신을 켠 상
태로 커피 찌꺼기
통을 꺼내어 비웁
니다.
TWN
咖啡機需要除鈣。進入保養選單,選擇以
開始保養程式。
更換新的「Intenza」
濾水器。
執行幾次程式後,須
將咖啡渣槽清潔乾
淨。
開啟咖啡機時,應將
咖啡渣槽清潔乾淨。
CHN
关闭咖啡机,等待 30 秒后再打开。如
果问题依旧,请与服务中心联系。请留
意显示屏中显示的代码 (E xx)。
咖啡机开机后显示此页面,表示需要执行除垢程式。
按
按钮进入除垢菜单。请参阅相关章节。
KOR
머신을 끄고 30초 동안 기다렸다가 켭니
다. 문제가 지속되면 서비스 센터에 문의
하십시오. 디스플레이에 표시된 코드(E
xx)를 기록해 두십시오.
커피 머신을 시작한 후 이 페이지가 표시되면 스케일 제거 과정
이 필요하다는 의미입니다.
버튼을 눌러 스케일 제거 메뉴를 시작하고 관련 섹션을 참
조하십시오.
TWN
關閉咖啡機,等待 30 秒之後再重新啟動。
若出現相同問題,請聯繫服務中心。請記
錄畫面上顯示的錯誤代碼(E xx)。
若咖啡機啟動後出現此頁面,表示需要進行除鈣程式。
按下 按鈕以進入除鈣選單,請參閱相關章節。
Page 61

61
www.philips.com/support Instructions
CHN
牛奶回路清洁剂量
产品编码:CA6705
KOR
우유 통로 클리너
제품 번호 CA6705
TWN
牛奶回路清潔劑
產品編碼:CA6705
CHN
维护套件
产品编码:CA6706
KOR
정비 키트
제품 번호 CA6706
TWN
保養套件
產品編碼:CA6706
CHN
“INTENZA+”滤水器
产品编码:CA6702
KOR
INTENZA+ 정수 필터
제품 번호 CA6702
TWN
INTENZA+ 濾水器
產品編碼:CA6702
CHN
除垢剂
产品编码:CA6700
KOR
석회질 제거제
제품 번호 CA6700
TWN
除鈣劑
產品編碼:CA6700
CHN
咖啡油去除剂
产品编码:CA6704
KOR
커피 오일 리무버
제품 번호 CA6704
TWN
咖啡油脂清潔器
產品編碼:CA6704
CHN
请访问 Philips 在线商店
查看各产品的供货情况和
您所在国家的购买信息。
KOR
해당 국가에서의 구입 가
능 여부는 필립스 온라인
샵에서 확인하십시오.
TWN
請訪問 Philips 線上商店查
看各產品的供貨情況和您
所在國家的銷售情況。
附件
附件 -
부속품
부속품 -
附件
附件
中文
中文
한국어
한국어
繁體中文
繁體中文
Page 62

Page 63

Page 64

Rev.01 del 30-08-12
The manufacturer reserves the right to change the features of the product without prior notice.
Der Hersteller behält sich das Recht vor, Änderungen am Produkt ohne Vorankündigung vorzunehmen.
Le producteur se réserve le droit d‘apporter des modifi cations au produit sans aucun préavis.
El fabricante se reserva el derecho a realizar modifi caciones en el producto sin previo aviso.
制造商有权对本产品做出任何更改,恕不另行通知。
필립스 세코에게는 사전 통지 없이 제품 기능을 변경할 권리가 있습니다.
製造商有權對本產品做出任何更改,恕不另行通知。
 Loading...