

Page 1
Register your product and get support at
www.saeco.com/welcome
HD8906
Page 2

Page 3

English 5
Čeština 30
Deutsch 55
Español 81
Français 108
Magyar 135
Italiano 160
Nederlands 186
Polski 211
Português 236
Slovensky 261
Page 4

ESPRES SO
CAPPUC CINO
ESPRES SO LU NGO
MILK F ROTH
CARAFE QUI CK C LEAN
MENU
A
R
O
M
A
S
T
R
E
N
G
T
H
S
P
E
C
I
A
L
D
R
I
N
K
S
1
2
29
30
4
13
14
15
16
28 27
17 18
21
22
20
19
23 24
26
25
3
8
9
6
5
10
11
7
12
1
Page 5

English
Contents
Introduction 5
Important 6
Warning 6
Caution 6
Electromagnetic fields (EMF) 7
Machine overview (Fig. 1) 7
The display 8
First installation 8
Manual rinsing cycle 11
AquaClean filter 11
AquaClean filter installation 11
Replacing the AquaClean filter 12
Using the machine 13
Brewing coffee with beans 13
Adjusting the coffee quantity 13
Adjusting the grind setting 13
Cappuccino, baby cappuccino and milk froth 13
Brewing special drinks 14
Cleaning and maintenance 14
Weekly cleaning of the brew group 14
Lubrication 16
Milk carafe quick clean 17
Daily cleaning of the milk carafe 17
Weekly cleaning of the milk carafe 18
Monthly full milk carafe cleaning with milk circuit cleaner 19
Descaling 20
Descaling procedure 21
Interruption of the descaling cycle 22
Warning icons and error codes 22
Meaning of error codes 24
Ordering accessories Saeco 24
Guarantee and support 25
Recycling 25
Troubleshooting 25
5
Introduction
Congratulations on buying this Intelia/Intelia Deluxe full automatic espresso
machine! The machine is suitable for preparing espresso coffee using whole
coffee beans. You can use the milk carafe to prepare perfect cappuccino in
a quick and easy way.To fully benefit from the support that Saeco offers,
please register your product at www.saeco.com/welcome. This user manual
applies to all Intelia/Intelia Deluxe models with milk carafe.
English
Page 6

6
English
Important
Warning
-
Connect the machine to a wall socket with a voltage matching the
technical specifications of the machine.
-
Connect the machine to an earthed wall socket.
-
Do not let the power cord hang over the edge of a table or counter, or
touch hot surfaces.
-
Never immerse the machine, mains plug or power cord in water (danger
of electrical shock).
-
Do not pour liquids on the power cord connector.
-
Never direct the hot water jet towards body parts: danger of burns.
-
Do not touch hot surfaces. Use handles and knobs.
-
Switch off the machine with the main switch located on the back and
remove the mains plug from the socket:
-
If a malfunction occurs.
-
If the machine will not be used for a long time.
-
Before cleaning the machine.
-
Pull on the plug, not on the power cord.
-
Do not touch the mains plug with wet hands.
-
Do not use the machine if the mains plug, the power cord or the machine
itself is damaged.
-
Do not make any modifications to the machine or its power cord.
-
Only have repairs carried out by a service center authorized by Philips to
avoid a hazard.
-
The machine should not be used by children younger than 8 years old.
-
This machine can be used by children aged from 8 years and above and
by persons with reduced physical, sensory or mental capabilities or lack
of experience and knowledge if they have been given supervision or
instruction concerning use of the machine in a safe way and if they
understand the hazards involved.
-
Cleaning and user maintenance shall not be made by children unless
they are older than 8 and supervised.
-
Keep the machine and its cord out of the reach of children aged less than
8 years.
-
Children should be supervised to ensure that they do not play with the
machine.
-
Never insert fingers or other objects in the coffee grinder.
Caution
-
This machine is intended for normal household use only. It is not
intended for use in environments such as staff kitchens of shops, offices,
farms or other work environments.
-
Always put the machine on a flat and stable surface. Keep it in upright
position, also during transport.
-
Do not place the machine on a hotplate or directly next to a hot oven,
heater or similar source of heat.
Page 7

-
Only put roasted coffee beans in the bean hopper. If ground coffee,
instant coffee, raw coffee beans or any other substance is put in the
coffee bean hopper, it may cause damage to the machine.
-
Let the machine cool down before inserting or removing any parts. The
heating surfaces may retain residual heat after use.
-
Never fill the water tank with warm, hot or sparkling water, as this may
cause damage to the water tank and the machine.
-
Never use souring pads, abrasive cleaning agents or aggressive liquids
such as petrol or acetone to clean the machine. Simply use a soft cloth
dampened with water.
-
Descale your machine regularly. The machine indicates when descaling is
needed. Not doing this will make your appliance stop working properly.
In this case repair is not covered under your guarantee.
-
Do not keep the machine at temperatures below 0°C.Water left in the
heating system may freeze and cause damage.
-
Do not leave water in the water tank when the machine is not used over
a long period of time. The water can be contaminated. Use fresh water
every time you use the machine.
Electromagnetic fields (EMF)
This Philips appliance complies with all applicable standards and
regulations regarding exposure to electromagnetic fields.
Machine overview (Fig. 1)
1 Lid of the bean hopper
2 Coffee bean hopper
3 Socket for cord
4 Water tank
5 Pre-ground coffee compartment
6 Grinder adjustment knob
7 Control panel
8 Coffee grounds container
9 Coffee dispensing spout
10 Drip tray
11 Drip tray cover
12 Drip tray full indicator
13 ESPRESSO button
14 ESPRESSO LUNGO button
15 AROMA STRENGTH button
16 CARAFE QUICK CLEAN button
17 Standby button
18 MENU button
19 SPECIAL DRINKS button
20 MILK FROTH button
21 CAPPUCCINO button
22 Cord
23 Cleaning brush (for specific types only)
24 Grease (for specific types only)
25 Pre-ground coffee measuring spoon
26 Water hardness tester
27 Coffee residues drawer
English
7
Page 8

ESP RESS O
A
R
O
M
A
S
T
R
E
N
G
T
H
CA PPU CC IN O
S
P
E
C
I
A
L
D
R
I
N
K
S
8
English
The display
28 Brew group
29 Milk carafe
30 Hot water dispensing spout
Use these buttons to navigate through the menus:
-
ESPRESSO button = ESC button: press this button to return to the main
menu. The ESC button takes you back one level. You may have to press
the ESC button several times to get back to the main menu.
-
AROMA STRENGTH button = OK button: press this button to select,
confirm or stop a function.
-
CAPPUCCINO button = UP button: press this button to scroll up through
the display menu.
First installation
-
SPECIAL DRINKS button = DOWN button: press this button to scroll down
through the display menu.
This machine has been tested with coffee. Although it has been carefully
cleaned, there may be some coffee residues left. We guarantee, however,
that the machine is absolutely new.
Like with most full-automatic machines, you first need to brew some coffees
to enable the machine to complete its self-adjustment and get the best
tasting coffee.
1 Remove all packaging material from the machine.
2 Place the machine on a table or worktop away from the tap, the sink and
heat sources.
Note: Leave at least 15 cm of free space above, behind and on both sides
of the machine.
3 Slide the drip tray with drip tray cover into the machine.
4 Remove the water tank.
5 Fill the water tank with fresh water to the MAX level indication.
Page 9

AQUA
CLEA N
AQUA CLE AN
FILTE R?
AQUA
CLEA N
INS TALL
FILTE R
English
6 Open the lid of the bean hopper. Fill the bean hopper with coffee beans
and close the lid.
7 Insert mains plug into a wall socket (1) and insert the small plug into the
socket located on the back of the machine (2).
8 Place a container under the hot water and coffee dispensing spouts.
Check if the hot water dispensing spout is installed correctly.
9 Press the standby button to switch on the machine.
10 Press the OK button to start the automatic circuit priming cycle.
11 The machine heats up and the display shows the temperature icon.
-
The machine starts rinsing water through the coffee dispensing spout.
The display shows the rinsing icon and a progress bar.
12 The display shows the following icon to indicate you have to install the
AquaClean filter.
If you want to install the AquaClean filter afterwards, press the ESC
button and continue with the manual rinsing cycle. For installation, see
chapter ‘AquaClean filter’.
9
13 Press the OK button. The display shows the following icon.
14 Remove the AquaClean filter from its packaging. Shake the filter for about
5 seconds.
Page 10

AQ U A
CLEA N
0/8
ON
OFF
AQUA
CLEA N
10 0%
10
English
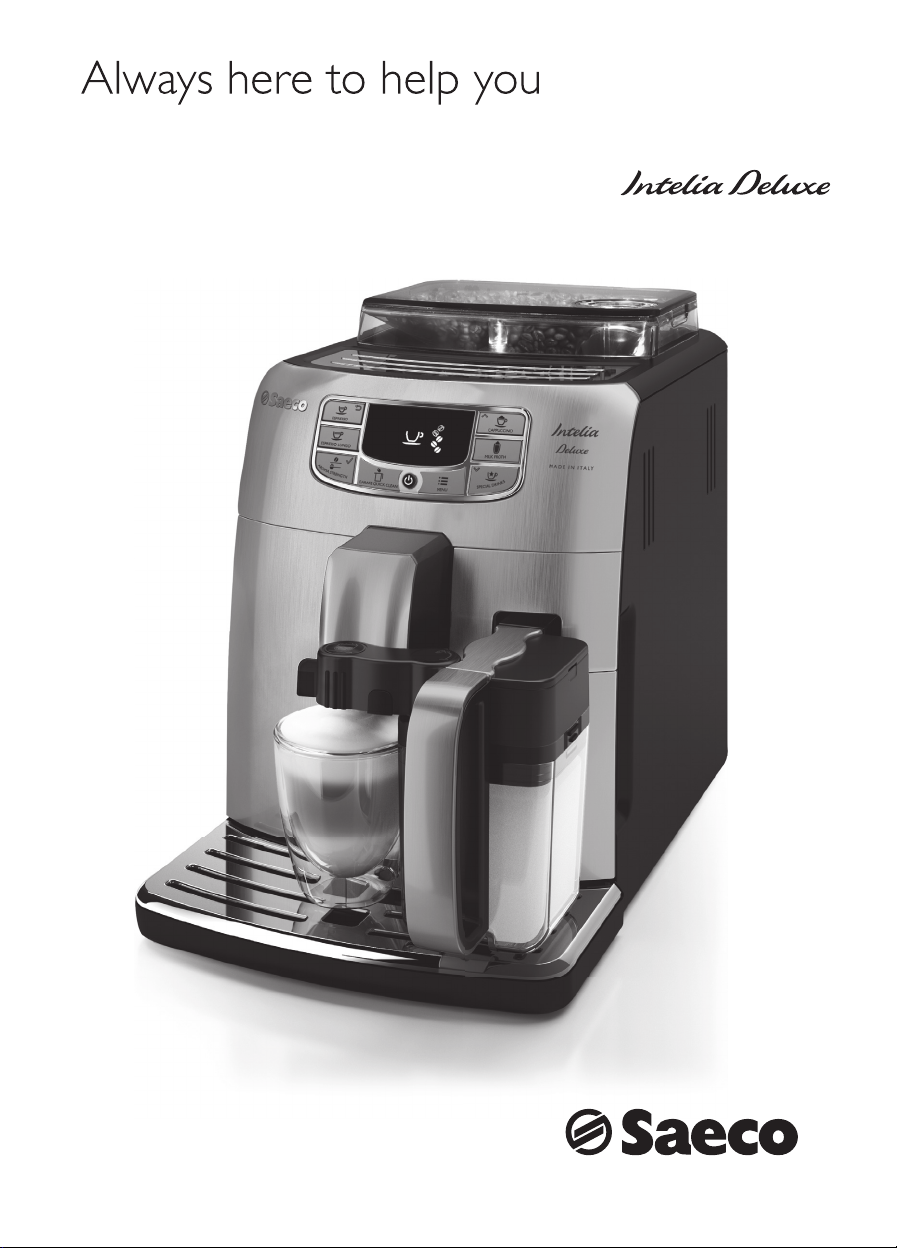
15 Immerse the AquaClean filter upside down in a jug with cold water and
wait until no more air bubbles come out.
16 Remove the water tank from the machine, empty it and insert the filter
vertically onto the filter connection.
17 Fill the water tank with fresh water to the MAX level indication.
18 Press the OK button.
19 Select ON on the display and confirm the activation by pressing the OK
button
When activation is finished, the display shows a tick to confirm activation.
20The display shows the filter ready icon to indicate the AquaClean filter
has been installed correctly.
21 To rinse the filter, press the SPECIAL DRINKS button and select the HOT
WATER option and press the OK button twice. Water flows out from the
hot water dispensing spout. Discard this water.
It can take a while until water comes out of the hot water dispensing
spout. The filter needs to be fully filled and rinsed with water.
The machine is ready for use.
After installing the AquaClean filter, you do not have to perform the manual
rinsing cycle.
Page 11

Manual rinsing cycle
1 Place a container under the coffee dispensing spout.
2 Press the AROMA STRENGTH button and select the pre-ground coffee
brewing function.
Do not add pre-ground coffee in the pre-ground coffee compartment.
3 Press the ESPRESSO or ESPRESSO LUNGO button.
-
4 Wait until the machine stops dispensing water and empty the container.
5 Repeat steps 1-3 twice.
6 Press the SPECIAL DRINKS button. Place a container under the hot water
dispensing spout.
7 Press the UP/DOWN buttons to scroll through the options of the display.
Press the OK button to select ‘hot water’.
8 Press the OK button to start hot water dispensing.
-
Dispense water until the display shows the no water icon.
9 Fill the water tank with fresh water up to the MAX level and remove the
container.
The machine is ready for use.
AquaClean filter
The AquaClean filter is designed to reduce limescale deposits in your coffee
machine and provide filtered water to preserve the aroma and flavor of each
cup of coffee. If you use a series of 8 Aquaclean filters as indicated in this
user manual, you don't have to descale your machine for 5000 cups (with a
capacity of 100 ml).
The machine starts dispensing hot water.
English
11
AquaClean filter installation
Your machine has to be completely limescale-free before you start to use
the AquaClean filter. If you did not activate the filter upon first use and
brewed more than 50 cups (with 100 ml capacity), you need to descale the
machine before you activate the filter.
1 Remove the AquaClean filter from its packaging. Shake the filter for about
5 seconds.
2 Immerse the AquaClean filter upside down in a jug with cold water and
wait until no more air bubbles come out.
3 Remove the water tank from the machine.
Page 12
AQ U A
CLEA N
0/8
ON
OFF
12
English
4 Insert the AquaClean filter vertically onto the filter connection. Push the
AquaClean filter to the lowest possible point. Make sure that the filter fits
tightly and the seal is in the right position, to guarantee the best
performance.
5 Fill the water tank with fresh water and slide it back into the machine.
6 Press the MENU button and scroll to the AquaClean filter option. Then
press the OK button to select the AquaClean filter option.
If you are installing the filter at first time use, follow the steps in chapter
‘First installation’.
7 Select ON on the display and confirm the activation by pressing the OK
button.
Note: The display shows a tick icon to confirm the activation.
8 To rinse the filter, press the SPECIAL DRINKS button, select the HOT
WATER option and press the OK button twice. Water flows out from the
hot water dispensing spout. Discard this water.
Note: It can take a while until water comes out of the hot water
dispensing spout. The filter needs to be fully filled and rinsed with water.
9 Use the sticker attached to the plastic packaging of the AquaClean filter
to write down the date of the next filter replacement (after 3 months).
Place the sticker on the water tank.
The filter and machine are now ready for use.
Replacing the AquaClean filter
Replace the filter every 3 months or at machine request.
Display icon AquaClean filter
10% + icon flashes The performance of this filter is decreasing. It is
0% + icon flashes Remove the old filter immediately and place the new
0% and icon disappears from display You first need to descale the machine before you can
After 8 filter replacements you need to descale the machine chapter
‘Descaling’, section ‘Descaling procedure’.
What to do
recommended to remove the old filter and place the
new filter as described in section 'AquaClean filter
installation’ to retain proper filter performance.
filter as described in section ‘AquaClean filter
installation’. When you activate a new filter, the display
shows the word NEW. Press the OK button to confirm
the activation.
place and activate a new filter.
Page 13

Using the machine
Brewing coffee with beans
1 Adjust the coffee dispensing spout to suit the size of your cup.
2 Press the AROMA STRENGTH button to select the desired coffee
strength from 1-5 beans.
3 Press the ESPRESSO button to brew an espresso or press the ESPRESSO
LUNGO button to brew a coffee.
Adjusting the coffee quantity
1 Press and hold the ESPRESSO button or ESPRESSO LUNGO button until
the display shows the word MEMO.
2 When the cup contains the desired amount of coffee, press the OK
button to save the selected quantity.
Adjusting the grind setting
Note: You can only adjust the grinder settings when the machine is grinding
coffee beans.
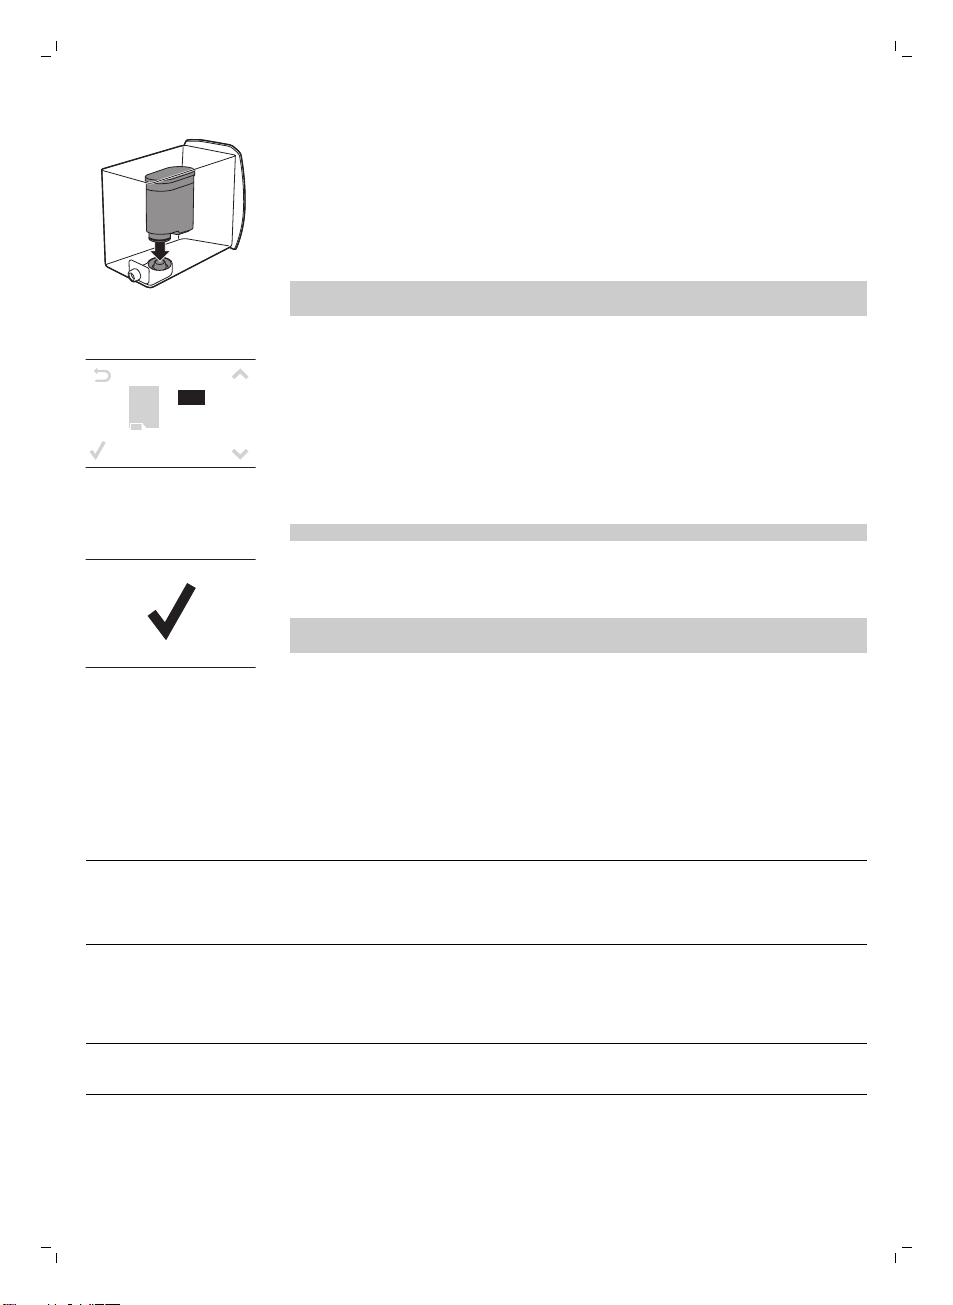
1 Open the lid of the bean hopper.
2 Place a cup under the coffee dispensing spout.
3 Press the ESPRESSO button.
4 While the machine grinds the coffee, place the end of the measuring
spoon handle on the grinder adjustment knob in the coffee bean hopper.
Use the spoon to press and turn the knob to the left or to the right one
notch a time.
5 There are 10 different grinding degree settings you can choose from. The
smaller the dot, the stronger the coffee.
-
Coarse grind: lighter taste, for dark roasted coffee blends.
-
Fine grind: bolder taste, for light roasted coffee blends.
6 Brew 2-3 coffees to taste the difference.
English
13
Cappuccino, baby cappuccino and milk froth
Note: You can adjust the cappuccino and milk froth quantity.
1 Remove the hot water dispensing spout.
2 Remove the milk carafe lid.
3 Fill the milk carafe with milk between the MIN and MAX level indications.
4 Place back the milk carafe lid.
Page 14
14
English
5 Turn the dispensing spout on the milk carafe to ‘I’.
6 Insert the milk carafe into the machine. Make sure the carafe is inserted
properly.
7 Place a cup under the coffee and milk dispensing spouts.
8 Choose your milk-based beverage.
-
Press the CAPPUCCINO button to brew a cappuccino.
-
Press the LATTE MACCHIATO button to brew a latte macchiato.
-
Press the SPECIAL DRINKS button and select baby cappuccino to brew a
baby cappuccino.
The machine first dispenses a preset quantity of frothed milk into the cup or
glass and then dispenses a preset quantity of coffee.
Brewing special drinks
In the special drinks menu you can select hot water and baby cappuccino.
1 Press the SPECIAL DRINKS button to enter the menu. The display shows
the options for special drinks.
2 Press the UP/DOWN buttons to scroll through the options on the menu.
3 Press the OK button to confirm the desired beverage.
4 When you select HOT WATER, insert the hot water dispensing spout into
the machine and lock it into place. When you select cappuccino, milk
froth or baby cappuccino, insert the milk carafe into the machine.
Cleaning and maintenance
Weekly cleaning of the brew group
Clean the brew group once per week.
1 Remove the coffee grounds container and open the service door.
2 Remove the coffee residues drawer.
Page 15
1
2
English
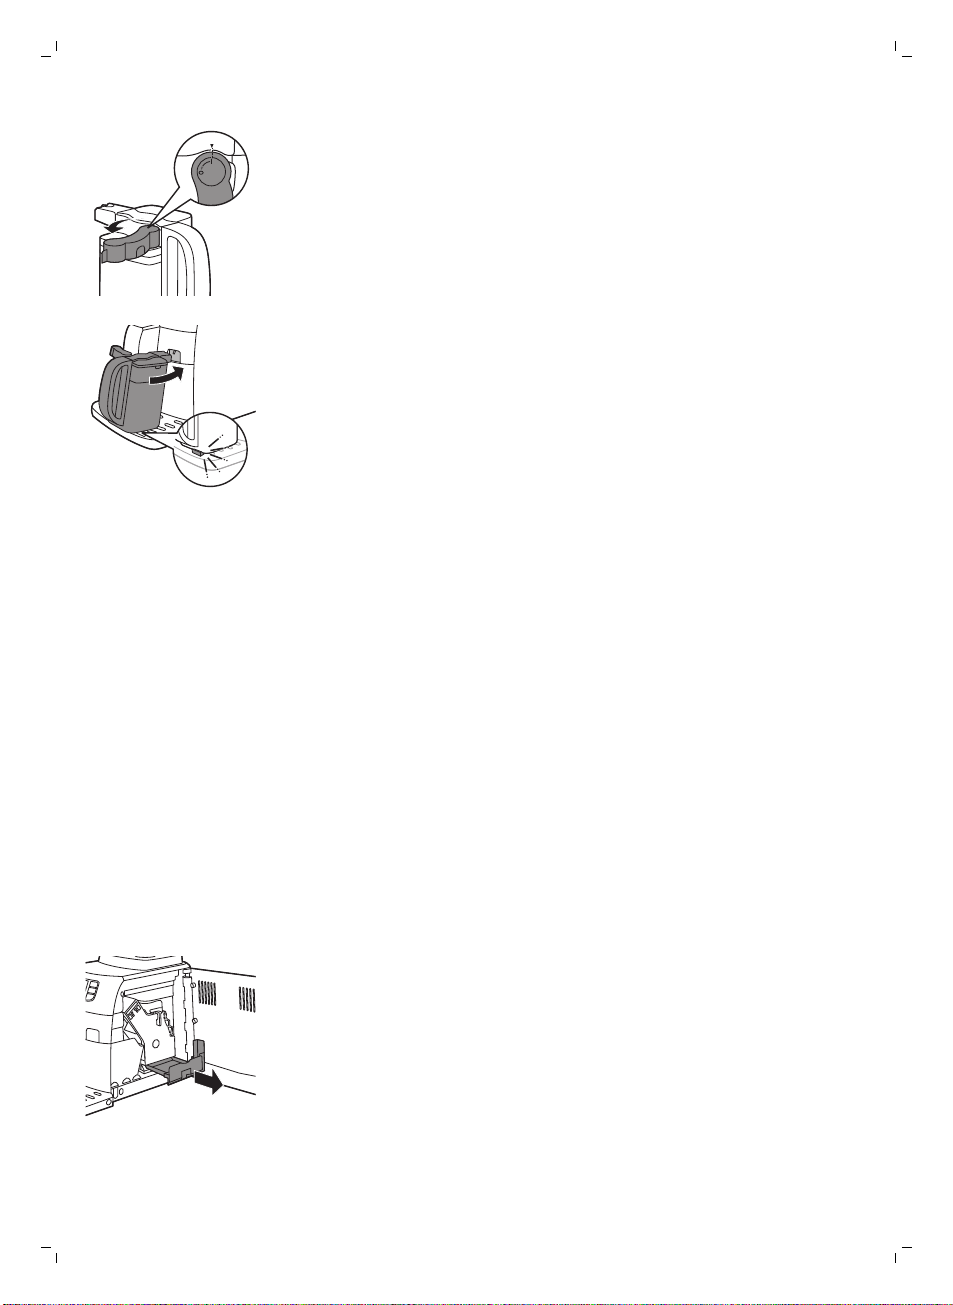
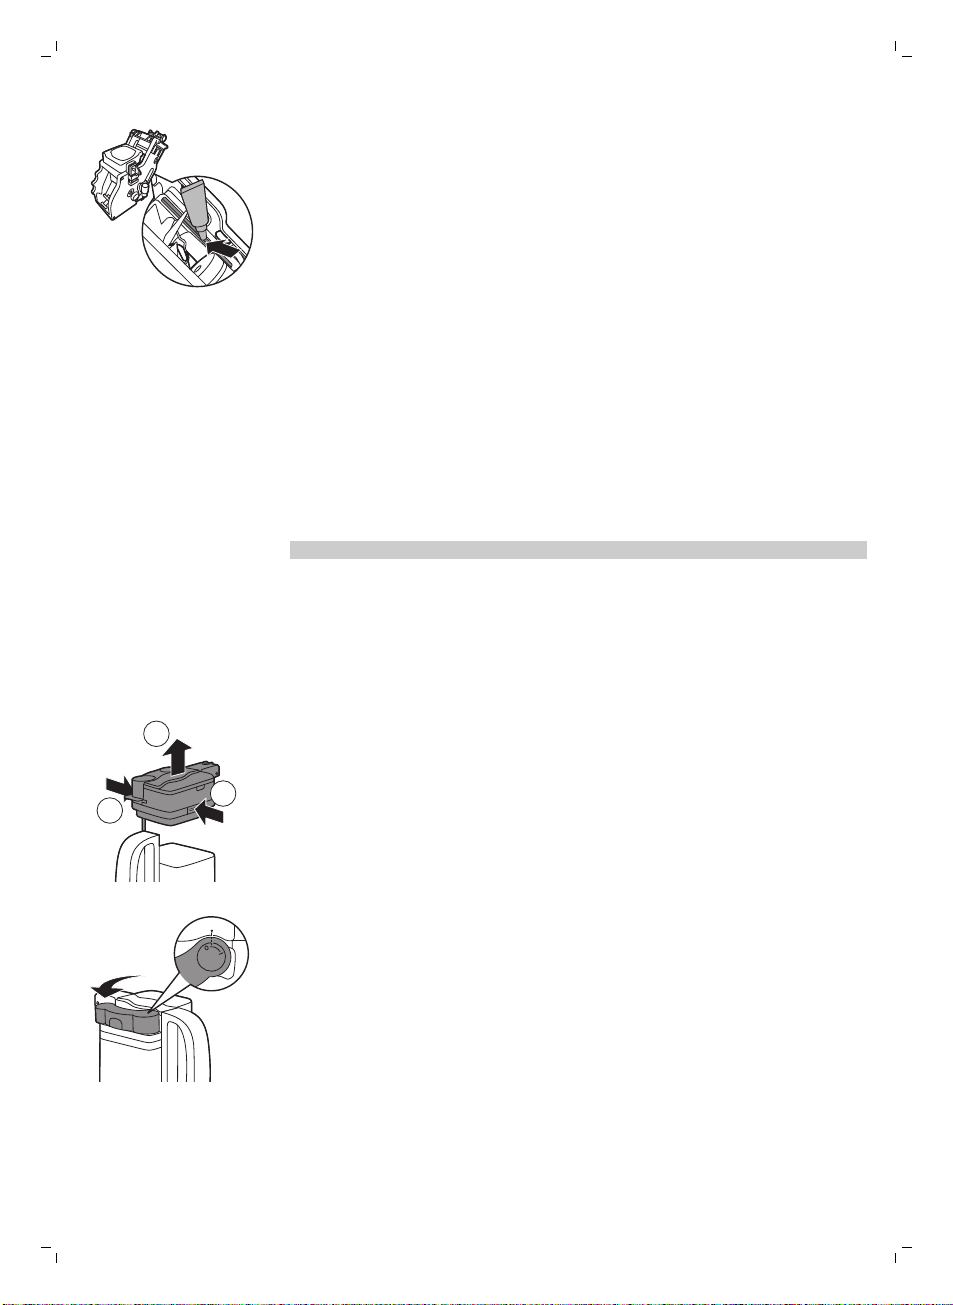
3 To remove the brew group, press the lever and pull the brew group out of
the machine.
4 Rinse the brew group with fresh water and let it air dry.
5 To place the brew group back, make sure that the lever is in contact with
the base of the brewing unit.
Note: If it is not in contact with the base, push it down.
6 Make sure the locking hook of the brew group is in the correct position.
To position the hook correctly, push it upwards until it is in uppermost
position.
15
Page 16

16
English
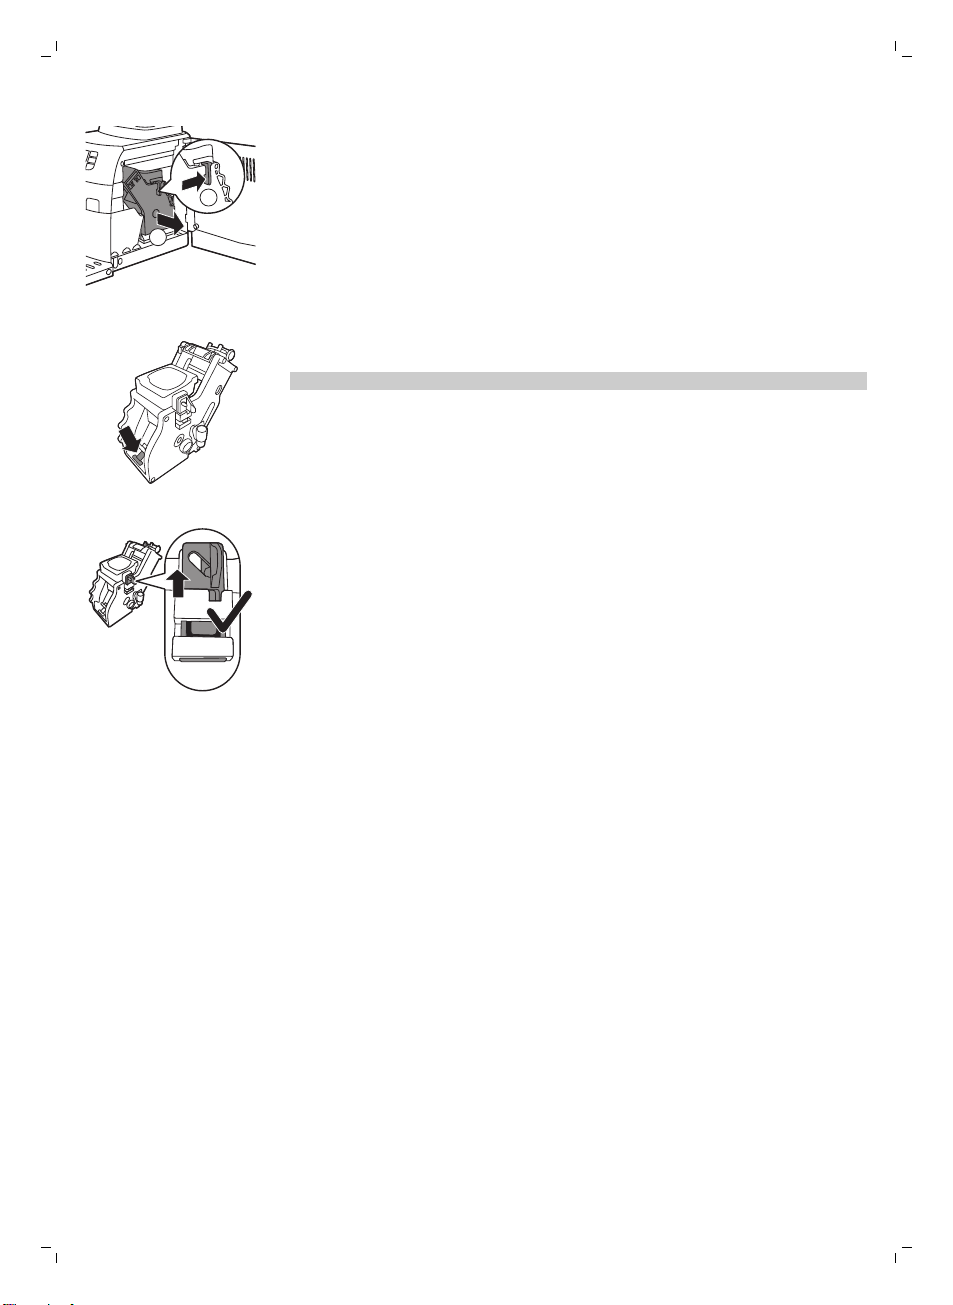
7 The hook is not correctly positioned if it is still in bottommost position.
8 Slide the brew group back into the machine along the guiding rails on the
sides until it clicks into position. Then place the coffee residues drawer
back in the machine.
Monthly cleaning of the brew group with the degreasing tablet
-
Perform this cleaning cycle after the machine has brewed 500 cups of
coffee or once a month.
-
Use a degreasing tablet for this cleaning cycle.
Caution: Only use degreasing tablets for cleaning. They do not have a
descaling function.
1 Place a container under the coffee dispensing spout.
2 Press the AROMA STRENGTH button and select GROUND COFFEE.
3 Put a degreasing tablet in the pre-ground coffee compartment.
4 Press the OK button. The machine dispenses water from the coffee
dispensing spout.
5 When the progress bar has reached the middle, set the power button to
OFF.
6 Let the degreasing solution work for approximately 15 minutes.
7 Set the power button to ON.
8 Press the standby button.
9 Wait until the machine performs an automatic rinsing cycle.
10 Perform the 'Weekly cleaning of the brew group' procedure.
11 Remove the drip tray with the coffee grounds container. Empty the drip
tray and the coffee grounds container and place them back in the
machine.
12 Press the AROMA STRENGTH button and select GROUND COFFEE.
13 Press the OK button. The machine dispenses water from the coffee
dispensing spout.
14 Repeat steps 12 and 13 twice. Discard the dispensed water.
15 To clean the drip tray, put a degreasing tablet in the drip tray and fill the
drip tray up to two-thirds of its capacity with hot water. Let the
degreasing tablet take effect for about 30 minutes. Then empty the drip
tray and rinse it thoroughly.
Lubrication
Lubricate the brew group after approximately 500 cups of coffee or once a
month.
1 Apply some lubricant around the shaft in the bottom of the brewing unit.
Page 17
2 Apply lubricant to the rails on both sides, as shown in the illustration.
1
1
2
3 Slide the brew group back into the machine along the guiding rails on the
sides until it clicks into position. Then place the coffee residues drawer
back in the machine.
Milk carafe quick clean
Between brewing milk varieties you can rinse the spout with hot water to
make sure every milk recipe is optimal.
1 Place a cup or container under the spout to collect the water.
2 Turn the milk dispensing spout to the ‘I’ position.
3 Press the CARAFE QUICK CLEAN button.
-
The display reminds you have to insert the milk carafe, press the OK
button to confirm.
Note: Press the ESC button if you want to interrupt the milk carafe clean.
1 The machine starts rinsing water through the coffee dispensing spout.
The display shows the rinsing icon and a progress bar.
Daily cleaning of the milk carafe
It is important to clean the milk carafe every day or after you have used it, as
this preserves hygiene and ensures perfect milk froth consistency.
1 Press the release buttons to remove the lid.
English
17
2 Turn the milk dispensing spout up to the reference mark (indicated by a
dot).
Page 18

18
English
3 Lift the milk carafe dispenser to remove it from the lid and wash it with
lukewarm water. Remove all milk residues.
4 Put the milk dispensing spout back onto the milk carafe lid. To insert it,
align the dot on the spout with the indication on the lid.
Weekly cleaning of the milk carafe
1 Press the release buttons to remove the lid.
2 Rinse the lid and the milk carafe with fresh water. Remove all milk
residues.
3 Place the lid back onto the milk carafe and make sure it locks into place.
4 Remove the top of the lid and fill the milk carafe with fresh water up to
the MAX level.
5 Place the top of the lid back onto the milk carafe.
6 Insert the milk carafe into the machine. Place a container under the milk
dispensing spout.
7 Press the MILK FROTH button to select hot milk.
8 The display shows the icon to indicate that the machine is dispensing
water.
9 When the machine stops dispensing, remove and empty the milk carafe.
The display will ask you to perform a quick clean cycle, you do not need
to perform this cycle during the weekly cleaning of the milk carafe.
10 Press the release buttons to remove the lid of the milk carafe.
11 Turn the milk dispensing spout to the dot indicated on the lid.
12 Lift the milk dispensing spout off the lid.
13 Remove the ring from the milk carafe dispensing spout.
14 Press the button indicated with the arrow to unlock the cover of the milk
dispensing spout.
Page 19

English
15 To remove the cover, press the sides of the dispensing spout lightly and
pull the cover downwards off the dispensing spout.
16 Pull the milk frothing unit upwards.
17 Pull the fitting outwards from the milk frothing device.
19
18 Remove the suction tube.
19 Pull the fitting outwards and separate it from the remaining part.
20Clean all parts with lukewarm water.
21 Reassemble all parts following in reverse order.
Monthly full milk carafe cleaning with milk circuit cleaner
Only use SAECO milk circuit cleaner CA6705 for this cleaning cycle.
Page 20

START
CALC
CLEAN
20
English
Descaling
Note: Before you start the procedure, make sure that the water tank is filled
up to the MAX level.
1 Press the MENU button to enter the menu and scroll through the menu to
the full carafe clean function. Press the OK button.
-
The display shows the operations that you need to perform before you
can start the cleaning cycle.
2 Pour the contents of the milk circuit cleaner sachet in the milk carafe.
Then fill the milk carafe with water up to the maximum level.
3 Insert the milk carafe into the machine and place a container under the
milk froth dispensing spout.
4 Press the OK button to start dispensing the cleaning solution.
-
The machine dispenses the cleaning solution through the milk dispensing
spout.
-
When the machine stops dispensing, the display shows the following
icon.
5 Remove the container and the milk carafe from the machine.
6 Rinse the milk carafe thoroughly and fill it with fresh water up to the MAX
level indication.
7 Insert the milk carafe into the machine.
8 Place the container under the milk froth dispensing spout.
9 Press the OK button to restart the carafe rinsing cycle.
10 When the machine stops dispensing water, the cycle is finished.
You have to descale the machine when the display shows the CALC CLEAN
icon or after 8 AquaClean filter replacements.
If you do not descale when the display shows the CALC CLEAN icon or after
8 AquaClean filter replacements, the machine may stop working properly. In
this case, repairs are not covered by the guarantee).
Never drink the water with descaling mixture that you pour into
the water tank or any water with residues that comes out of the
machine during the descaling procedure.
The descaling procedure lasts approximately 30 minutes.
Only use Saeco descaling solution to descale the machine. Saeco descaling
solution is designed to ensure optimal performance of the machine. The use
of other products may damage the machine and leave residues in the water.
You can buy Saeco descaling solution in the online shop at
www.shop.philips.com/service.
Page 21

Descaling procedure
CA LC
CLE AN
You can pause the descaling or rinsing cycle by pressing the ESC button.
The display will show the following icon. To continue the descaling or rinsing
cycle, press the OK button.
1 Remove and empty the drip tray. Slide the drip tray back into the
machine.
Remove the AquaClean water filter from the water tank (if present).
2 Fill the milk carafe with fresh water up to the MIN level. Insert the milk
carafe into the machine. Turn the dispensing spout of the milk carafe to
the ‘I’ position.
3 Press the OK button.
-
The display shows the following icon to remind you have to place the
milk carafe in the machine.
4 The display shows the following icon to indicate that the machine enters
the descaling cycle. If you want to exit the descaling cycle, press the ESC
button.
5 Pour the entire bottle of Saeco descaling solution (250ml) into the water
tank.
6 Add water to the descaling solution in the water tank up to the CALC
CLEAN indication.
7 Place a large container (1.5 l) under the coffee and milk dispensing
spouts.
8 Press the OK button to start the descaling cycle.
-
The machine dispenses the entire descaling solution at regular intervals
through the coffee and milk dispensing spouts (this takes approximately
25 minutes).
9 Let the machine dispense the descaling solution until the water tank is
empty. Remove and empty the container and the milk carafe.
10 Remove and empty the drip tray. Slide the drip tray back into the
machine.
11 Rinse the water tank and fill it with fresh water up to the CALC CLEAN
indication. Slide the water tank back into the machine.
12 Filll the milk carafe with fresh water up to the MIN level and place it back
into the machine. Place the container back under both spouts.
13 Press the OK button to start the rinsing cycle (this takes approximately 4
minutes).
English
21
Page 22

CALC
CLEAN
22
English
-
The display shows the following icon to indicate that the rinsing cycle is
finished.
14 Rinse the water tank and fill it with fresh water up to the MAX level. Slide
the water tank back into the machine.
15 Press the OK button to end the descaling cycle.
16 Place a container under the coffee and milk dispensing spouts.
17 The display shows the following icon to indicate that the machine is
heating up.
-
The machine performs an automatic rinsing cycle.
18 Remove and clean the milk carafe see chapter ‘Cleaning and
maintenance’, section ‘Weekly cleaning of the milk carafe’. Insert the
water dispensing spout into the machine.
19 Remove and empty the drip tray. Slide the drip tray back into the
machine.
20Remove and rinse the brew group see chapter ‘Cleaning and
maintenance’, section ‘Clean the brew group’.
The machine is now ready for use.
Interruption of the descaling cycle
Once the descaling cycle has started, you must complete it till the very end
without turning off the machine. In case you get stuck during the cycle or in
case of power failure or accidental disconnection of the power cord, you
can exit by pressing the standby button. If this occurs, empty and rinse
carefully the water tank, then fill it up to the CALC CLEAN level. Follow the
instructions in chapter ‘First installation’, section ‘Manual rinsing cycle’
before brewing any beverage. If the cycle was not completed, the machine
will require another descaling cycle to be performed at your earliest
convenience.
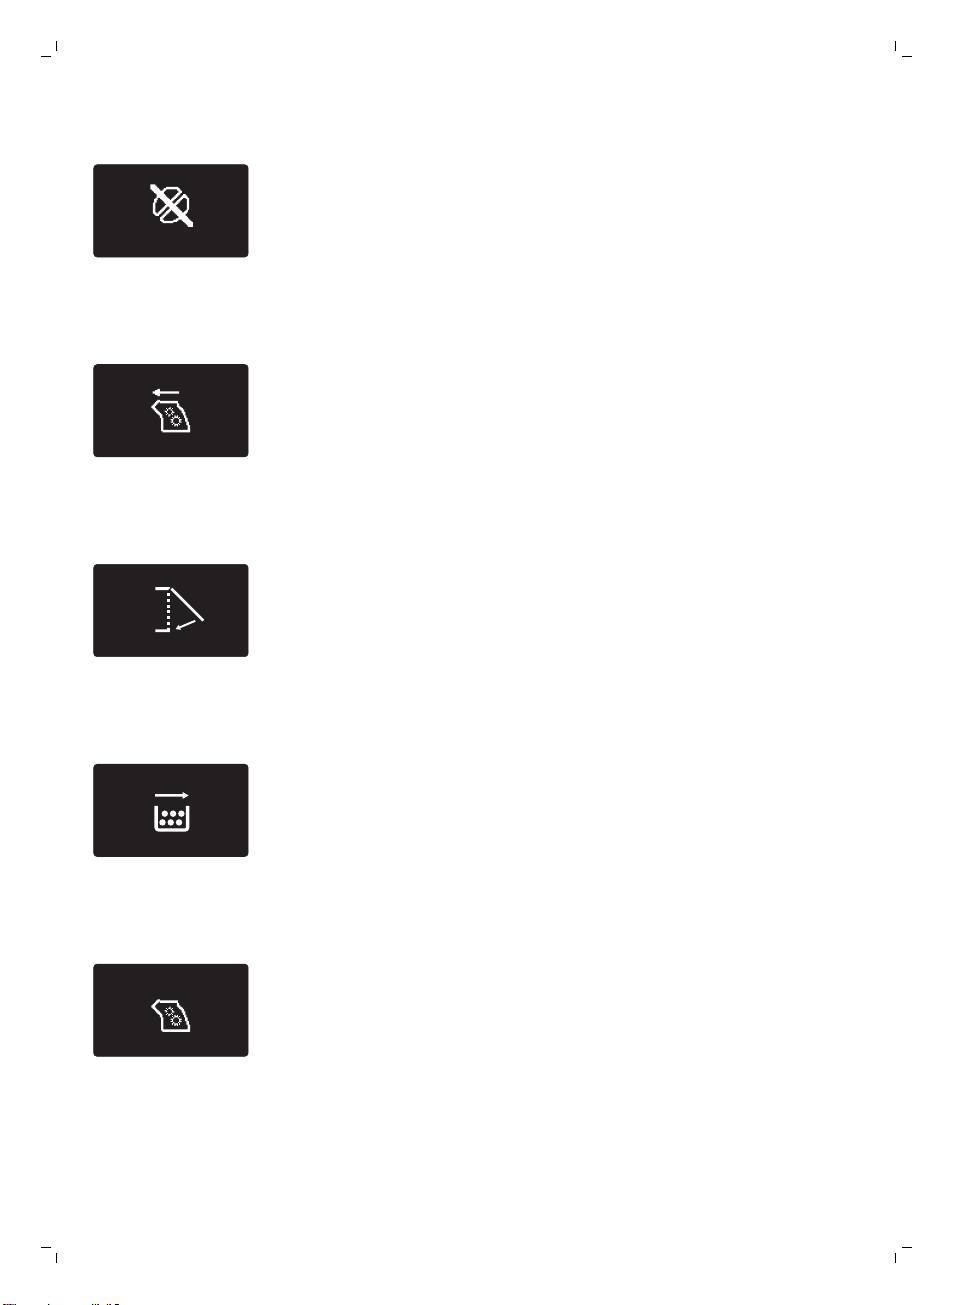
Warning icons and error codes
Warning signals are displayed in red. Below you find a list of the
warnings that may appear on the display and their meaning.
-
Fill the water tank with fresh water to the MAX level indication.
Page 23
English
-
The bean hopper is empty. Put new coffee beans in the bean hopper.
-
The brew group is not in the machine. Insert the group.
-
Close the service door.
23
-
Remove the coffee grounds container and empty it.
-
There is too much powder in the brew group. Clean the brew group.
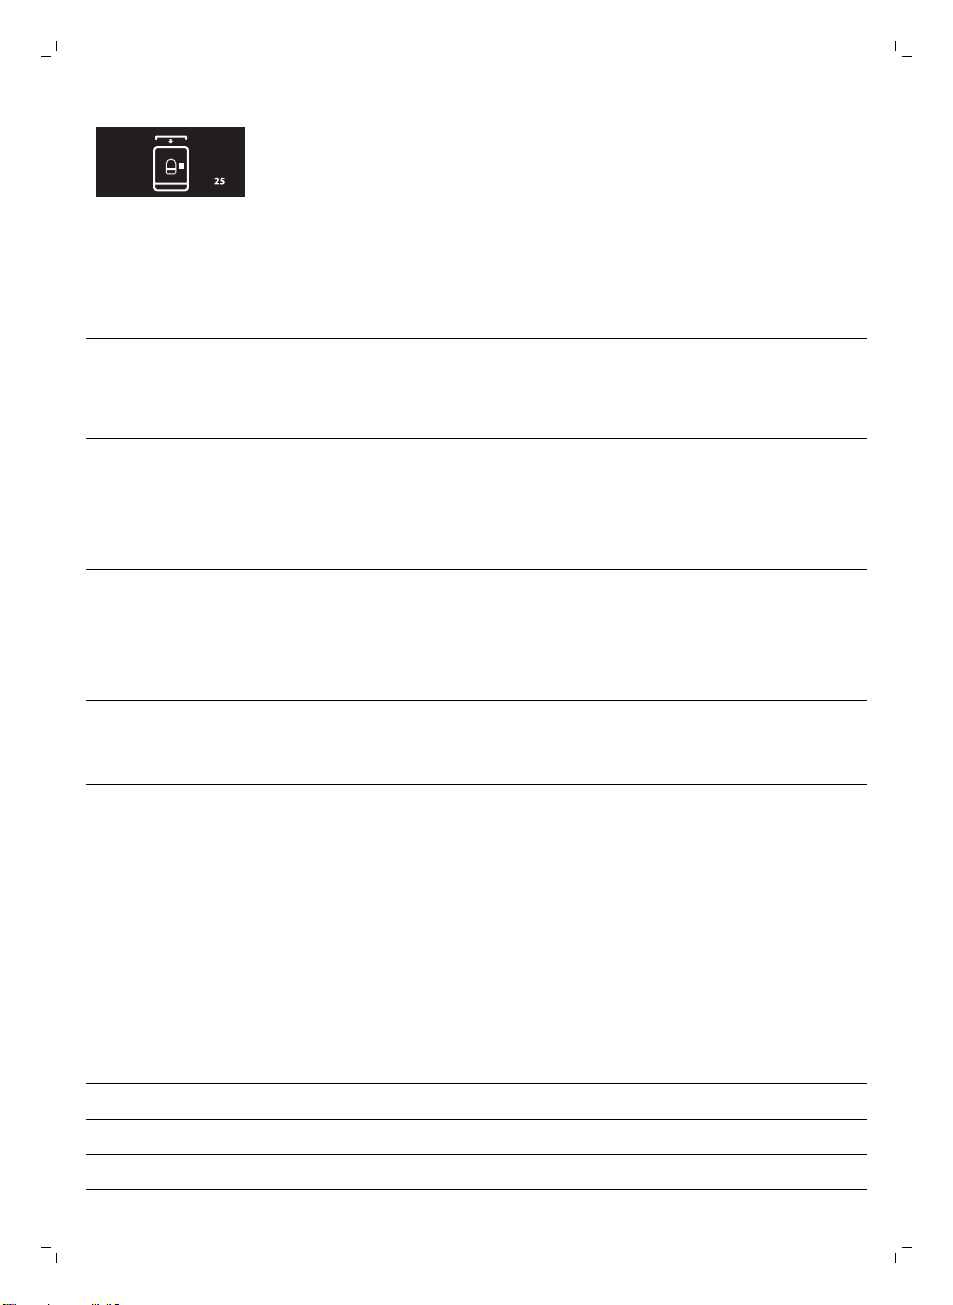
-
If an error code is triggered, check the section 'Meaning of error codes' to
see what the code on the display means and what you can do. The
machine cannot be used when this icon is on the display.
Page 24
24
English
-
You forgot to place the lid on the pre-ground coffee compartment. If you
do not place it back within 30 seconds the display will return to the main
menu and the brewing cycle will be stopped.
Meaning of error codes
Error code
1 Coffee grinder blocked Coffee exit duct
Problem Cause Possible solution
clogged
Clean the coffee exit
duct thoroughly with
the handle of the
multifunctional tool or a
spoon handle.
3 - 4 The brew group cannot
be removed.
5 Water circuit problem There is air in the water
Other error codes Switch the machine off
If the above solutions do not help to remove the error code icon from the
display and bring the machine back to normal working order, contact the
Philips Saeco hotline. Contact details can be found in the warranty booklet
or on www.saeco.com/support.
The brew group is not
positioned correctly.
circuit.
Close the maintenance
door. Switch the
machine off and back
on again. Wait for the
‘machine ready’ icon on
the display and then
remove the brew group.
Remove and place back
the water tank a couple
of times. Make sure you
insert it into the
machine properly.
Check if the water tank
compartment is clean.
and switch it back on
again after 30 seconds.
Try this 2 or 3 times.
Ordering accessories Saeco
To clean and descale the machine, only use the Saeco maintenance
products. These products can be purchased in the Philips online shop (if
available in your country) at www.shop.philips.com/service, from your local
reseller or from the authorized service centers.
Ordering maintenance products:
Typenumber
CA6700 Descaling solution
Product
CA6903 AquaClean filter
HD5061 Brew group grease
Page 25
CA6704 Degreasing tablets
CA6705 Milk circuit cleaner
Guarantee and support
If you need information or support, please visit www.saeco.com/support or
read the separate guarantee leaflet.
If you need information or support, please contact the Philips Saeco hotline
in your country. Contacts are included in the warranty booklet supplied
separately or visit www.saeco.com/support.
Recycling
-
This symbol means that this product shall not be disposed of with normal
household waste (2012/19/EU).
-
Follow your country's rules for the separate collection of electrical and
electronic products. Correct disposal helps prevent negative
consequences for the environment and human health.
English
25
Troubleshooting
Problem Cause Solution
The machine does not
switch on
The machine is in DEMO
mode.
The drip tray is quickly
filled.
Place a cup under the dispensing
The coffee grounds
container full icon remains
displayed.
The machine is disconnected. Check if the power supply cord is
The standby button has been
pressed for more than 8 seconds.
This is normal. The machine uses
water to rinse the internal circuit and
brew group. Some water flows
through the internal system directly
into the drip tray.
The coffee grounds container was
emptied while the machine was
switched off.
inserted correctly
Switch the machine off and then
on again using the main switch on.
Empty the drip tray when the 'drip
tray full' full indicator pops up
through the drip tray cover.
spout to collect rinsing water.
Always empty the coffee grounds
container while the machine is ON.
If the coffee grounds container is
emptied while the machine is
switched off, the coffee cycle
counter is not reset. In that case,
the 'empty coffee grounds
container' message will stay on the
display even though the container
is not full.
Page 26

26
English
The coffee grounds container was
The brew group cannot be
removed.
The coffee grounds container is not
The brew group cannot be
inserted.
Reset the machine by switching it
The machine is still in the descaling
placed back too fast.
The brew group is not positioned
correctly.
removed.
The brew group is not in the correct
position.
procedure.
Do not place back the coffee
grounds container until the screen
message prompts you to put it
back
Close the maintenance door.
Switch the machine off and back
on again. Wait for the machine
ready screen to appear and then
remove the brew group
Remove the coffee grounds
container before removing the
brew group
The brew group was not put in rest
position before it was placed back.
Make sure that the lever is in
contact with the base of the brew
group and that the hook of the
brew group is in the correct
position.
on and off. Place the drip tray and
the coffee grounds container back.
Leave the brew group out. Close
the maintenance door and switch
the machine on and off. Then try
to reinsert the brew group.
You cannot remove the brew
group when the descaling process
is active. First complete the
descaling process and then
remove the brew group.
The coffee has too little
crema or is watery.
The coffee blend is not the correct
The machine is performing its self-
The brew group is dirty. Clean the brew group.
Coffee is leaking from the
coffee dispensing spout
The coffee is not hot
enough.
The temperature is set too low.
You added milk. Whether the milk you add is warm
The grinder is set to a coarse setting. Adjust the grinder to a finer setting.
one.
adjustment.
The coffee dispensing spout is
clogged.
The cups you use are cold. Preheat the cups by rinsing them
Check the menu settings.
Change the coffee blend.
Brew a few cups of coffee.
Clean the coffee dispensing spout
and its holes using a pipe cleaner.
with hot water.
Set the temperature to high in the
menu.
or cold, it will always decrease the
temperature of the coffee to some
extent.
Page 27

English
27
The machine grinds the
coffee beans, but coffee
does not come out.
The brew group is dirty. Clean the brew group.
The coffee dispensing spout is dirty. Clean the coffee dispensing spout
The coffee exit duct is blocked. Clean the coffee exit duct with the
The coffee comes out
slowly.
The brew group is dirty. Clean the brew group.
The coffee exit duct is blocked. Clean the coffee exit duct with the
The machine circuit is blocked by
The milk does not froth. The milk carafe is dirty or not
The milk froth dispensing spout has
The grind is set too fine. Adjust the grinder to a coarser
The grind is ground too finely. Change the coffee blend or adjust
limescale.
inserted correctly.
not been opened fully.
setting.
and its holes with a pipe cleaner.
handle of the multifunctional tool
or a spoon handle.
the grinder.
handle of the multifunctional tool
or a spoon handle.
Descale the machine.
Clean the carafe and make sure
that you position and insert it
correctly.
Check that the milk froth
dispensing spout has been set in
the correct position.
The milk carafe is incompletely
The type of milk used is not suitable
There is water under the
machine.
The machine is not placed on a
assembled.
for frothing.
The drip tray is too full and
overflowed.
horizontal surface.
Check that all the components
have been assembled correctly.
We have tested the following milk
types which proved to deliver a
good milk froth result: semiskimmed or full-fat cow's milk, soy
milk and lactose-free milk. Other
types of milk have not been tested
and may result in a small amount
of milk froth.
Empty the drip tray when the drip
tray full indicator pops up through
the drip tray. Always empty the
drip tray before you start descaling
the machine.
Place the machine on a horizontal
surface so that the drip tray full
indicator works properly.
Page 28

28
English
The AquaClean filter
cannot be activated as the
tick does not appear on
the display.
The filter cannot be
activated and the
machine asks for
descaling.
The AquaClean filter is
installed, but the
descaling message
appears.
A filter has just been activated. You have to dispense at least 10
You have already replaced 8
AquaClean filters. After 8 filter
replacements you need to descale
the machine.
The filter has not been replaced in
time after the AquaClean water filter
signal started flashing.
The filter has not been installed
during first installation but after
having brewed approx.50 coffees
(based on 100ml cups). The machine
has to be completely limescale-free
before installing the AquaClean filter.
The AquaClean filter was not
correctly activated during first
installation.
After 8 filter replacements, you need
to descale the machine.
cups (100of 100ml each before
you can activate a new filter. Be
careful as you activate a new filter,
the filter counter will increase
automatically.You have to
dispense at least 10 cups (100of
100ml each before you can
activate a new filter. Be careful as
you activate a new filter, the filter
counter will increase
automatically.
Descale your machine first and
install the filter.
Descale your machine first and
install the filter.
First descale the machine and
then install a new AquaClean filter.
After descaling, the filter counter is
reset to 0/8. Always confirm filter
activation in the machine menu,
also after filter replacement.
Follow the instructions on the
display until you receive
confirmation that the filter has
been activated.
First descale the machine and
then install a new AquaClean filter.
This will reset the filter counter to
0/8. Always confirm filter
activation in the machine menu,
also after filter replacement.
The descaling message
appears before 8 filters
were replaced.
The filter does not fit. You need to remove air from the
You did not activate the AquaClean
filter correctly during first installation
You placed the AquaClean filter after
having used the machine for a while.
You did not activate the replacement
filter in the machine menu.
You did not replace the filter when
the filter symbol started flashing.
filter.
There is still water in the water tank. Empty the water tank before you
You try to install another filter than
the AquaClean filter.
First descale the machine and
then install a new AquaClean filter.
Always activate the filter in the
machine menu.
Let air bubbles come out of the
filter.
install the filter.
Only the AquaClean filter will fit.
Page 29

English
Note: If you are unable to solve the problem with the information in this
table, contact the Philips/ Saeco hotline.
29
Page 30

30
Čeština
Obsah
Úvod 30
Důležité 31
Varování 31
Upozornění 31
Elektromagnetická pole (EMP) 32
Přehled přístroje (obr. 1) 32
Displej 33
První instalace 33
Manuální vyplachovací cyklus 36
Filtr AquaClean 36
Vložení filtru AquaClean 36
Výměna filtru AquaClean 37
Používání přístroje 38
Vaření kávy z kávových zrn 38
Nastavení množství kávy 38
Úprava nastavení mlýnku 38
Cappuccino, malé cappuccino a mléčná pěna 38
Vaření speciálních nápojů 39
Čištění a údržba 39
Týdenní čištění varné sestavy 39
Mazání 41
Rychlé čištění karafy na mléko 42
Denní čištění karafy na mléko 42
Týdenní čištění karafy na mléko 43
Měsíční čištění celé karafy na mléko pomocí čisticího prostředku pro čištění mléčného
obvodu
Odstraňování vodního kamene 45
Proces odstranění vodního kamene 46
Přerušení cyklu odstraňování vodního kamene 47
Varovné ikony a chybové kódy 48
Význam chybových kódů 49
Objednávání příslušenství značky Saeco 50
Záruka a podpora 50
Recyklace 50
Řešení problémů 50
45
Úvod
Gratulujeme vám ke koupi plně automatického espresovače Intelia / Intelia
Deluxe. Přístroj je vhodný k přípravě kávy espresso z celých kávových zrn.
Karafu na mléko můžete použít k přípravě dokonalé kávy cappuccino.
Chcete-li plně využívat výhod, které nabízí společnost Saeco, zaregistrujte
Čeština
Page 31

Důležité
Varování
Čeština
výrobek na adrese www.saeco.com/welcome. Tato uživatelská příručka se
vztahuje na všechny modely Intelia / Intelia Deluxe s karafou na mléko.
-
Připojte přístroj do síťové zásuvky s napětím odpovídajícím technické
specifikaci přístroje.
-
Přístroj připojujte do řádně uzemněných zásuvek.
-
Nenechávejte napájecí kabel viset přes hranu stolu nebo pultu ani se
dotýkat horkých povrchů.
-
Nikdy neponořujte přístroj, elektrickou zástrčku ani síťový kabel do vody
(nebezpečí úrazu elektrickým proudem).
-
Vyvarujte se polití konektoru napájecího kabelu.
-
Nikdy nesměřujte proud horké vody na části těla: nebezpečí popálení.
-
Nedotýkejte se horkých předmětů. Používejte rukojeti a knoflíky.
-
Položte žehličku zpět na žehlicí plochu, vypněte ji a vytáhněte síťovou
zástrčku ze zásuvky ve zdi:
-
Pokud dojde k závadě.
-
Pokud nebudete přístroj dlouhou dobu používat.
-
Před čištěním přístroje.
-
Tahejte za konektor, nikoli za napájecí kabel.
-
Nedotýkejte se síťové zástrčky mokrýma rukama.
-
Pokud byste zjistili závadu na zástrčce, napájecím kabelu nebo na
přístroji, dále jej nepoužívejte..
-
Neprovádějte žádné úpravy přístroje ani jeho napájecího kabelu.
-
Opravy vždy svěřte servisnímu středisku autorizovanému společností
Philips, vyhnete se tak nebezpečí..
-
Přístroj by neměly používat děti mladší 8 let věku.
-
Děti od 8 let věku a osoby s omezenými fyzickými, smyslovými nebo
duševními schopnostmi nebo nedostatkem zkušeností a znalostí mohou
tento přístroj používat v případě, že jsou pod dohledem nebo byly
poučeny o bezpečném používání přístroje a že chápou rizika, která
mohou hrozit.
-
Děti starší 8 let nesmí provádět čištění a uživatelskou údržbu, pokud jsou
bez dozoru.
-
Přístroj a jeho kabel udržujte mimo dosah dětí mladších 8 let.
-
Dohlédněte na to, aby si s přístrojem nehrály děti.
-
Do mlýnku na kávu nikdy nestrkejte prsty ani jiné předměty.
31
Upozornění
-
Tento přístroj je určen výhradně do běžné domácnosti. Není určen
k použití v prostředí, jako jsou kuchyně pro zaměstnance v rámci
obchodů, kanceláří, farem či jiných pracovišť.
-
Přístroj vždy umístěte na rovnou stabilní podložku. Udržujte jej ve
vzpřímené poloze, a to i při přemisťování..
Page 32

32
Čeština
-
Nepokládejte přístroj na plotýnku ani přímo vedle horké trouby, topení
nebo podobného zdroje tepla.
-
Násypku na kávová zrna plňte výhradně praženou kávou. Pokud byste
do násypky na kávová zrna vsypali mletou kávu, instantní kávu,
nepražená kávová zrna nebo jakoukoli jinou hmotu, mohl by se přístroj
poškodit.
-
Před vložením nebo vyjmutím jakékoli součásti nechte přístroj
vychladnout. Topné plochy mohou po použití zůstat zahřáté.
-
Nikdy neplňte nádržku na vodu teplou, horkou ani perlivou vodou,
protože může dojít k poškození nádržky i přístroje.
-
K čištění přístroje nikdy nepoužívejte kovové žínky, abrazivní čisticí
prostředky ani agresivní čisticí prostředky, jako je například benzín nebo
aceton. Použijte pouze měkký hadřík navlhčený ve vodě.
-
Pravidelně z přístroje odstraňujte vodní kámen. Přístroj signalizuje, pokud
je třeba odstranit vodní kámen. Pokud tak neučiníte, přístroj přestane
správně fungovat. V takovém případě jeho oprava není kryta zárukou.
-
Nevystavujte přístroj teplotám nižším než 0°C. Zbylá voda v zahřívacím
systému může zmrznout a způsobit poškození.
-
Neponechávejte vodu v nádržce na vodu, pokud přístroj delší dobu
nepoužíváte. Voda se může kontaminovat. Při každém použití přístroje
vždy použijte čerstvou vodu.
Elektromagnetická pole (EMP)
Tento přístroj Philips odpovídá všem platným normám a předpisům
týkajícím se elektromagnetických polí.
Přehled přístroje (obr. 1)
1 Víko násypky na kávová zrna
2 Násypka na kávová zrna
3 Zásuvka pro kabel
4 Nádržka na vodu
5 Přihrádka na mletou kávu
6 Tlačítko pro nastavení mlýnku
7 Ovládací panel
8 Nádoba na mletou kávu
9 Hubice dávkovače kávy
10 Tácek na odkapávání
11 Kryt tácku na odkapávání
12 Indikátor plného tácku na odkapávání
13 Tlačítko ESPRESSO
14 Tlačítko ESPRESSO LUNGO
15 Tlačítko AROMA STRENGTH (síla aromatu)
16 Tlačítko CARAFE QUICK CLEAN (rychlé čištění karafy)
17 Tlačítko pohotovost
18 Tlačítko MENU (Nabídka)
19 Tlačítko SPECIAL DRINKS (speciální nápoje)
20 Tlačítko MILK FROTH
21 Tlačítko CAPPUCCINO
22 Kabel
23 Čisticí kartáč (pouze u některých typů)
24 Tuk (pouze u některých typů)
Page 33

Displej
ESP RE SS O
A
R
O
M
A
S
T
R
E
N
G
T
H
CA PPU CC IN O
S
P
E
C
I
A
L
D
R
I
N
K
S
Čeština
25 Odměrka na mletou kávu
26 Prostředek k testování tvrdosti vody
27 Zásuvka na zbytky kávy
28 Varná sestava
29 Karafa na mléko
30 Dávkovací hubice horké vody
K procházení nabídkou používejte tato tlačítka:
-
Tlačítko ESPRESSO = Tlačítko ESC: stisknutím tohoto tlačítka se vrátíte do
hlavní nabídky. Tlačítkem ESC se dostanete o krok zpět. Abyste se dostali
zpět do hlavní nabídky, může být třeba stisknout tlačítko ESC několikrát.
-
Tlačítko AROMA STRENGTH (síla aromatu) = Tlačítko OK: stisknutím
tohoto tlačítka vyberete, potvrdíte nebo ukončíte funkci.
-
Tlačítko CAPPUCCINO = Tlačítko UP (nahoru): stisknutím tohoto tlačítka
procházíte zobrazenou nabídkou nahoru.
33
První instalace
-
Tlačítko SPECIAL DRINKS (speciální nápoje) = Tlačítko DOWN (dolů):
stisknutím tohoto tlačítka procházíte zobrazenou nabídkou dolů.
Tento přístroj byl zkoušen s použitím kávy. I když byl pečlivě vyčištěn, mohly
v něm zůstat zbytky kávy. Zaručujeme však, že přístroj je zcela nový.
Jako u většiny plně automatických přístrojů je nejprve třeba připravit několik
káv a umožnit tak přístroji dokončení vlastních nastavení k přípravě té
nejchutnější kávy.
1 Z přístroje odstraňte veškerý obalový materiál.
2 Přístroj umístěte na stůl anebo na pracovní desku, mimo dosah
vodovodního kohoutku, dřezu a zdrojů tepla.
Poznámka: Nad přístrojem, za ním a po obou jeho stranách ponechejte
alespoň 15 cm volného prostoru.
3 Do přístroje vložte odkapávací misku s krytem.
4 Sejměte nádržku na vodu.
Page 34

AQUA
CLEA N
AQUA CLE AN
FILTE R?
AQUA
CLEA N
INS TALL
FILTE R
34
Čeština
5 Nádržku na vodu naplňte pitnou vodou až po ukazatel hladiny MAX.
6 Otevřete víko násypky na kávová zrna. Naplňte násypku na kávová zrna
kávovými zrny a zavřete víko.
7 Zapojte zástrčku napájení do síťové zásuvky (1) a zasuňte malou zástrčku
do konektoru umístěného na zadní straně přístroje (2).
8 Pod dávkovací hubici horké vody a kávy postavte vhodnou nádobu.
Zkontrolujte, zda je hubice dávkovače horké vody vložena správně.
9 Stisknutím tlačítka pohotovost přístroj zapněte.
10 Stisknutím tlačítka OK spusťte automatický cyklus přípravy vody.
11 Přístroj se zahřeje a na displeji se zobrazí ikona teploty.
-
Stroj začne čistit hubici dávkovače kávy proudem horké vody. Na displeji
se zobrazí ikona čištění a indikátor průběhu.
12 Na displeji se zobrazí následující ikona signalizující, že je třeba vložit filtr
AquaClean.
Pokud chcete filtr AquaClean vložit později, stiskněte tlačítko ESC
a pokračujte manuálním vyplachovacím cyklem. Pokyny k vložení jsou
uvedeny v kapitole Filtr AquaClean.
13 Stiskněte tlačítko OK. Na displeji se zobrazí následující ikona.
14 Vyjměte filtr AquaClean z obalu. Poté filtrem zhruba 5 sekund třepejte.
Page 35

AQ U A
CLEA N
0/8
ON
OFF
AQUA
CLEA N
10 0%
Čeština
35
15 Ponořte filtr AquaClean vzhůru nohama do konvice se studenou vodou a
vyčkejte, dokud se nepřestanou uvolňovat vzduchové bublinky.
16 Vyjměte z přístroje nádržku na vodu, vyprázdněte ji a do přípojky pro filtr
vložte svisle filtr.
17 Nádržku na vodu naplňte pitnou vodou až po ukazatel hladiny MAX.
18 Stiskněte tlačítko OK.
19 Vyberte na displeji položku ON (Zapnout) a aktivaci potvrďte stisknutím
tlačítka OK.
Po dokončení aktivace se na displeji zobrazí symbol zaškrtnutí potvrzující
aktivaci.
20Na displeji se zobrazí ikona Filtr připraven. To signalizuje, že filtr
AquaClean byl správně vložen.
21 Filtr propláchněte: Stiskněte tlačítko SPECIAL DRINKS (speciální nápoje),
zvolte možnost HOT WATER (horká voda) a dvakrát stiskněte tlačítko OK.
Z dávkovací hubice horké vody vytéká voda. Tuto vodu vylijte.
Může chvíli trvat, než z dávkovací hubice horké vody vyteče voda. Filtr je
třeba zcela naplnit a propláchnout vodou.
Přístroj je připraven k použití.
Po vložení filtru AquaClean není třeba provádět manuální vyplachovací
cyklus.
Page 36

36
Čeština
Manuální vyplachovací cyklus
1 Pod hubici dávkovače kávy umístěte vhodnou nádobu.
2 Stiskněte tlačítko AROMA STRENGTH (Síla aromatu) a vyberte funkci
přípravy pre-ground coffee (mletá káva).
Do přihrádky na mletou kávu nevkládejte kávu.
3 Stiskněte tlačítko ESPRESSO nebo ESPRESSO LUNGO.
-
Přístroj začne dávkovat horkou vodu.
4 Vyčkejte, dokud přístroj nepřestane vypouštět vodu, a potom nádobu
vylijte.
5 Kroky 1 až 3 dvakrát opakujte.
6 Stiskněte tlačítko SPECIAL DRINKS (speciální nápoje). Pod dávkovací
hubici horké vody postavte vhodnou nádobu.
7 Pomocí tlačítek UP/DOWN (nahoru/dolů) procházejte možnostmi
zobrazenými na displeji. Stisknutím tlačítka OK zvolte možnost „hot
water“ (horká voda).
8 Stisknutím tlačítka OK spusťte vypouštění horké vody.
-
Nechte přístroj dávkovat vodu, dokud se na displeji nezobrazí ikona
signalizující nepřítomnost vody.
9 Nádržku na vodu naplňte pitnou vodou až po ukazatel hladiny MAX a
nádobu odeberte.
Přístroj je připraven k použití.
Filtr AquaClean
Konstrukce filtru AquaClean omezuje usazování vodního kamene
v espresovači a zajišťuje filtrovanou vodu, která uchová stále stejné aroma a
chuť každého šálku kávy. Pokud používáte sadu 8 filtrů AquaClean, jak je
uvedeno v tomto návodu k použití, není třeba z přístroje odstraňovat vodní
kámen po 5000 šálků (o objemu 100 ml).
Vložení filtru AquaClean
Přístroj musí být před zahájením používání filtru AquaClean zcela zbaven
vodního kamene. Pokud jste při prvním použití filtr neaktivovali a připravili
více než 50 šálků (o objemu 100 ml), je třeba před aktivací filtru zbavit
přístroj vodního kamene.
1 Vyjměte filtr AquaClean z obalu. Poté filtrem zhruba 5 sekund třepejte.
2 Ponořte filtr AquaClean vzhůru nohama do konvice se studenou vodou a
vyčkejte, dokud se nepřestanou uvolňovat vzduchové bublinky.
3 Vyjměte nádržku na vodu z přístroje.
Page 37

AQ U A
CLEA N
0/8
ON
OFF
Čeština
37
4 Filtr AquaClean vložte svisle na připojení filtru. Zatlačte filtr AquaClean do
nejnižší možné polohy. Aby byl zajištěn co nejlepší výkon, filtr musí lehce
zapadnout na místo a těsnění musí být ve správné poloze.
5 Naplňte nádržku na vodu čerstvou vodou a vložte ji zpět do přístroje.
6 Stiskněte tlačítko MENU a posuňte se dolů na možnost AquaClean filter.
Poté stisknutím tlačítka OK potvrďte výběr filtru AquaClean.
Pokud instalujete filtr při prvním použití, řiďte se postupem uvedeným
v kapitole První instalace.
7 Vyberte na displeji položku ON a aktivaci potvrďte stisknutím tlačítka OK.
Poznámka: Na displeji se zobrazí ikona zatržítka potvrzující aktivaci.
8 Filtr propláchněte: Stiskněte tlačítko SPECIAL DRINKS (speciální nápoje),
zvolte možnost HOT WATER (horká voda) a dvakrát stiskněte tlačítko OK.
Z dávkovací hubice horké vody vytéká voda. Tuto vodu vylijte.
Poznámka: Může chvíli trvat, než z dávkovací hubice horké vody vyteče
voda. Filtr je třeba zcela naplnit a propláchnout vodou.
9 Na nálepku přiloženou k plastovému obalu filtru AquaClean si
poznamenejte datum příští výměny filtru (po 3 měsících). Nálepku
umístěte na nádržku na vodu.
Filtr a přístroj jsou nyní připraveny k použití.
Výměna filtru AquaClean
Filtr vyměňujte každé 3 měsíce nebo když k tomu vyzve přístroj.
Ikona filtru AquaClean
Bliká text 10% a ikona Účinnost tohoto filtru klesá. Pro dosažení optimální
Bliká text 0% a ikona Ihned vyjměte starý filtr a vložte do přístroje nový filtr
Text 0% a ikona z displeje zmizí Před vložením a aktivací nového filtru je nutné
Po osmé výměně filtru je třeba z přístroje odstranit vodní kámen podle
kapitoly „Odstraňování vodního kamene“ v části „Proces odstranění vodního
kamene“.
Co dělat
funkce filtru doporučujeme vyjmout starý filtr a vložit
do přístroje nový filtr podle pokynů v části „Vložení
filtru AquaClean“.
podle pokynů v části „Vložení filtru AquaClean“. Po
aktivaci nového filtru se na displeji zobrazí text NEW
(nový). Potvrďte aktivaci stisknutím tlačítka OK.
z přístroje odstranit vodní kámen.
Page 38

38
Čeština
Používání přístroje
Vaření kávy z kávových zrn
1 Nastavte hubici dávkovače kávy podle velikosti šálku.
2 Požadovanou sílu kávy vyberete stisknutím tlačítka AROMA STRENGTH
(síla aromatu) v rozmezí 1 až 5 zrn.
3 Stiskněte tlačítko ESPRESSO, pokud chcete připravit espresso, nebo
tlačítko ESPRESSO LUNGO, pokud chcete připravit kávu.
Nastavení množství kávy
1 Stiskněte tlačítko ESPRESSO nebo ESPRESSO LUNGO a podržte je,
dokud se nezobrazí text MEMO.
2 Jakmile šálek obsahuje požadované množství kávy, uložte zvolené
množství stisknutím tlačítka OK.
Úprava nastavení mlýnku
Poznámka: Nastavení mlýnku můžete upravit ve chvíli, kdy přístroj mele
kávová zrna.
1 Otevřete víko násypky na kávová zrna.
2 Umístěte šálek pod hubici dávkovače kávy.
3 Stiskněte tlačítko ESPRESSO.
4 Zatímco přístroj mele kávu, položte konec rukojeti odměrky na tlačítko
pro seřízení mlýnku v násypce na kávová zrna. Pomocí odměrky stiskněte
tlačítko a otočte jím doleva nebo doprava, vždy pouze o jeden stupeň.
5 Můžete si vybrat z 10 stupňů hrubosti mletí. Čím je bod menší, tím je káva
silnější.
-
Hrubé mletí: jemnější chuť, pro silně pražené směsi kávy.
-
Jemné mletí: výraznější chuť, pro slabě pražené směsi kávy.
6 Uvařte 2–3 kávy, abyste ochutnali rozdíl.
Cappuccino, malé cappuccino a mléčná pěna
Poznámka: Můžete nastavit množství cappuccina a mléčné pěny.
1 Vyjměte dávkovací hubici horké vody.
2 Sejměte víko karafy na mléko.
3 Do karafy na mléko nalijte mléko tak, aby se jeho hladina nacházela mezi
ukazateli hladiny MIN a MAX.
4 Umístěte zpátky víko karafy na mléko.
Page 39

5 Otočte hubici na karafě na mléko do polohy „I“.
6 Vložte do přístroje karafu na mléko. Ujistěte se, že je karafa vložena
správně.
7 Umístěte šálek pod hubici dávkovače kávy a mléka.
8 Vyberte si nápoj obsahující mléko.
-
Stisknutím tlačítka CAPPUCCINO připravte kávu cappuccino.
-
Stisknutím tlačítka LATTE MACCHIATO připravte kávu latte macchiato.
-
Pokud chcete připravit cappuccino, stiskněte tlačítko SPECIAL DRINKS
(speciální nápoje) a vyberte malé cappuccino.
Stroj nejprve do šálku nebo sklenice nalije předem nastavený objem
napěněného mléka a potom předem nastavený objem kávy.
Vaření speciálních nápojů
V nabídce speciálních nápojů můžete vybrat horkou vodu a malé
cappuccino.
1 Stisknutím tlačítka SPECIAL DRINKS (speciální nápoje) přejděte do
nabídky. Na displeji se zobrazí možnosti speciálních nápojů.
2 Pomocí tlačítek UP/DOWN (nahoru/dolů) procházejte možnostmi
nabídky.
3 Stisknutím tlačítka OK potvrďte požadovaný nápoj.
4 Pokud jste vybrali možnost HOT WATER (horká voda), vložte do přístroje
dávkovací hubici horké vody a zajistěte ji. Pokud jste zvolili cappuccino,
mléčnou pěnu nebo baby cappuccino, vložte do přístroje karafu na
mléko.
Čeština
39
Čištění a údržba
Týdenní čištění varné sestavy
Varnou sestavu čistěte jednou týdně.
1 Vyjměte nádobu na namletou kávu a otevřete dvířka pro údržbu.
Page 40

1
2
40
Čeština
2 Vyjměte zásuvku na zbytky kávy.
3 Stiskněte páčku a vyjměte varnou sestavu z přístroje.
4 Opláchněte varnou sestavu čistou vodou a nechte ji oschnout.
5 Než varnou sestavu vložíte zpátky, ujistěte se, že páčka je v kontaktu se
základnou varné jednotky.
Poznámka: Pokud není v kontaktu se základnou, zatlačte ji dolů.
6 Zkontrolujte, zda je pojistný háček varné sestavy ve správné poloze.
Háček nastavíte správně tak, že jej zatlačíte vzhůru, do nejzazší horní
polohy.
Page 41

Čeština
7 Háček není správně umístěn, pokud se stále nachází v dolní poloze.
8 Nasuňte varnou sestavu po vodicích kolejnicích zpět do přístroje, až
zacvakne do příslušné polohy. Poté vložte zásuvku na zbytky kávy zpět
do přístroje.
41
Měsíční čištění varné sestavy pomocí odmašťovací tablety
-
Tento cyklus čištění proveďte po přípravě 500 šálků kávy v přístroji nebo
jednou měsíčně.
-
Při tomto cyklu čištění použijte odmašťovací tabletu.
Upozornění: Odmašťovací tablety používejte pouze k čištění. Neumožňují
odstranit vodní kámen.
1 Pod hubici dávkovače kávy umístěte vhodnou nádobu.
2 Stiskněte tlačítko AROMA STRENGTH a vyberte položku GROUND
COFFEE.
3 Odmašťovací tabletu vložte do přihrádky na mletou kávu.
4 Stiskněte tlačítko OK. Stroj začne z hubice dávkovače kávy vypouštět
vodu.
5 Když indikátor průběhu dosáhne poloviny, přepněte vypínač do polohy
OFF (vypnuto).
6 Nechte odmašťovací roztok působit přibližně 15 minut.
7 Přepněte vypínač do polohy ON (zapnuto).
8 Stiskněte tlačítko pohotovost.
9 Vyčkejte, dokud přístroj neprovede automatický cyklus vyplachování.
10 Proveďte proces Týdenní čištění varné sestavy.
11 Vyjměte tácek na odkapávání s nádobou na namletou kávu. Vyprázdněte
tácek na odkapávání a nádobu na namletou kávu a vraťte je zpět do
přístroje.
12 Stiskněte tlačítko AROMA STRENGTH a vyberte položku GROUND
COFFEE.
13 Stiskněte tlačítko OK. Stroj začne z hubice dávkovače kávy vypouštět
vodu.
14 Kroky 12 a 13 dvakrát opakujte. Vypuštěnou vodu vylijte.
15 Chcete-li očistit tácek na odkapávání, vložte odmašťovací tabletu do
tácku na odkapávání a tácek naplňte do dvou třetin jeho objemu horkou
vodou. Nechte odmašťovací tabletu působit přibližně 30 minut. Potom
tácek na odkapávání vyprázdněte a pečlivě omyjte.
Mazání
Varnou sestavu namažte po přípravě přibližně 500 šálků kávy v přístroji
nebo jednou měsíčně.
Page 42

1
1
2
42
Čeština
1 Aplikujte trochu lubrikantu kolem hřídele ve dně varné jednotky.
2 Aplikujte trochu lubrikantu na kolejnice po obou stranách, viz obrázek.
3 Nasuňte varnou sestavu po vodicích kolejnicích zpět do přístroje, až
zacvakne do příslušné polohy. Poté vložte zásuvku na zbytky kávy zpět
do přístroje.
Rychlé čištění karafy na mléko
Mezi přípravou mléčných nápojů můžete hubici propláchnout horkou vodu,
aby každá příprava mléčného nápoje proběhla optimálně.
1 Pod dávkovací hubici postavte šálek nebo nádobku na sběr vody.
2 Otočte hubici dávkovače mléka do polohy „I“.
3 Stiskněte tlačítko CARAFE QUICK CLEAN (rychlé čištění karafy).
-
Na displeji se zobrazí výzva, abyste vložili karafu na mléko; potvrďte
stisknutím tlačítka OK.
Poznámka: Pokud chcete čistění karafy na mléko přerušit, stiskněte
tlačítko ESC.
1 Stroj začne čistit hubici dávkovače kávy proudem horké vody. Na displeji
se zobrazí ikona čištění a indikátor průběhu.
Denní čištění karafy na mléko
Je důležité čistit karafu na mléko každý den nebo po každém použití, abyste
zajistili náležitou hygienu a zaručili dokonalou konzistenci napěněného
mléka.
1 Stiskněte uvolňovací tlačítka a sejměte víko.
Page 43

2 Otočte hubici na karafě na mléko na referenční značku (označená
tečkou).
3 Nadzvednutím dávkovače karafy na mléko ho vyjměte z víka a
opláchněte vlažnou vodou. Odstraňte všechny zbytky mléka.
4 Umístěte hubici dávkovače mléka zpět do víka karafy na mléko. Při
vložení zarovnejte tečku na hubici s označením na víku.
Týdenní čištění karafy na mléko
1 Stiskněte uvolňovací tlačítka a sejměte víko.
2 Vypláchněte víko a karafu na mléko čistou vodou. Odstraňte všechny
zbytky mléka.
3 Nasaďte víko zpět na karafu na mléko a ujistěte se, že zaklapne na své
místo.
4 Sejměte horní část víka a naplňte karafu na mléko čistou vodou po
ukazatel hladiny MAX.
5 Vložte horní část víka zpět na karafu na mléko.
6 Vložte do přístroje karafu na mléko. Umístěte nádobu pod hubici pro
dávkování mléka.
7 Stisknutím tlačítka MILK FROTH (Mléčná pěna) zvolte horké mléko.
8 Na displeji se zobrazí ikona signalizující, že přístroj vypouští vodu.
9 Až přístroj přestane vypouštět vodu, vyjměte a vyprázdněte karafu na
mléko.
Na displeji se zobrazí výzva k provedení postupu rychlého čištění. Tento
proces nutné není vykonat během týdenního čištění karafy na mléko.
10 Stiskněte uvolňovací tlačítka a sejměte víko karafy na mléko.
11 Otočte hubici dávkovače mléka do polohy na víku označené tečkou.
12 Vysuňte hubici dávkovače mléka z víka.
13 Sejměte kroužek z hubice na karafě na mléko.
Čeština
43
Page 44

44
Čeština
14 Stisknutím tlačítka označeného šipkou odemkněte kryt hubice dávkovače
mléka.
15 Kryt odstraníte jemným stisknutím stran hubice dávkovače a vytáhnete
kryt směrem dolů.
16 Vytáhněte pěnítko na mléko směrem nahoru.
17 Vytáhněte spojku ze zařízení pro napěnění mléka.
18 Vyjměte sací hadičku.
Page 45

19 Vytáhněte spojku směrem ven a oddělte ji od zbývající části.
20Všechny části opláchněte vlažnou vodou.
21 Všechny součásti znovu sestavte v opačném pořadí.
Měsíční čištění celé karafy na mléko pomocí čisticího prostředku pro čištění mléčného obvodu
Při tomto cyklu čištění použijte pouze čisticí prostředek pro čištění
mléčného obvodu SAECO CA6705.
Poznámka: Než zahájíte tento postup, ujistěte se, že je nádržka na vodu
naplněna až po značku MAX.
1 Stisknutím tlačítka MENU (nabídka) otevřete nabídku a přejděte k funkci
úplného čištění karafy. Stiskněte tlačítko OK.
-
Na displeji se zobrazí kroky, které je nutné provést před zahájením
procesu čištění.
2 Obsah sáčku s čističem mléčného obvodu nalijte do karafy na mléko.
Potom karafu na mléku naplňte vodou po ukazatel maximální hladiny.
3 Vložte karafu na mléko do přístroje a pod hubici dávkovače mléčné pěny
postavte vhodnou nádobu.
4 Stisknutím tlačítka OK spusťte vypouštění čisticího roztoku.
-
Z hubice pro dávkování mléka začne vytékat čisticí roztok.
-
Až přístroj přestane vypouštět, na displeji se zobrazí následující ikona.
5 Vyjměte nádobu a karafu na mléko z přístroje.
6 Karafu na mléko důkladně očistěte a naplňte ji čistou vodou po ukazatel
hladiny MAX.
7 Vložte do přístroje karafu na mléko.
8 Umístěte vhodnou nádobu pod otevřenou hubici dávkovače mléčné
pěny.
9 Cyklus vypláchnutí karafy můžete restartovat stisknutím tlačítka OK.
10 Cyklus je dokončen, když přístroj přestane vypouštět vodu.
Čeština
45
Odstraňování vodního kamene
Pokud se na displeji zobrazí ikona CALC CLEAN (odstranění vodního
kamene), resp. po osmé výměně filtru AquaClean je nutné z přístroje
odstranit vodní kámen.
Page 46

START
CALC
CLEAN
CA LC
CLE AN
46
Čeština
Pokud se na displeji zobrazí ikona CALC CLEAN (Odstranění vodního
kamene) nebo pokud provedete osmou výměnu filtru AquaClean a
neodstraníte vodní kámen, přístroj může přestat správně fungovat.
V takovém případě jeho opravy nejsou kryté zárukou.
Nikdy nepijte vodu se směsí pro odstranění vodního kamene,
kterou jste nalili do nádržky na vodu, ani jakoukoli vodu se zbytky
směsi, která během odstraňování vodního kamene z přístroje
vyteče.
Proces odstranění vodního kamene trvá přibližně 30 minut.
K odstranění vodního kamene z přístroje používejte pouze roztok
společnosti Saeco. Roztok k odstranění vodního kamene společnosti Saeco
je navržen tak, aby zajistil optimální výkon přístroje. Použití jiných výrobků
může přístroj poškodit a zanechat ve vodě rezidua. Roztok k odstranění
vodního kamene společnosti Saeco můžete zakoupit v online obchodu na
webu www.shop.philips.com/service.
Proces odstranění vodního kamene
Cyklus odstranění vodního kamene nebo vypláchnutí můžete pozastavit
stisknutím tlačítka ESC. Na displeji se zobrazí následující ikona. Pozastavený
cyklus můžete opět spustit stisknutím tlačítka OK.
1 Vyjměte a vylijte odkapávací misku. Vložte odkapávací misku zpět do
přístroje.
Z nádržky na vodu vyjměte filtr AquaClean (je-li součástí přístroje).
2 Karafu na mléku naplňte čerstvou vodou po ukazatel hladiny MIN. Vložte
do přístroje karafu na mléko. Otočte hubici na karafě na mléko do polohy
„I“.
3 Stiskněte tlačítko OK.
-
Na displeji se zobrazí následující ikona signalizující, že do přístroje je
třeba vložit karafu na mléko.
4 Na displeji se zobrazí následující ikona signalizující, že přístroj zahajuje
cyklus odstraňování vodního kamene. Chcete-li cyklus odstraňování
vodního kamene ukončit, stiskněte tlačítko ESC.
5 Nalijte do nádržky na vodu celou láhev roztoku pro odstranění vodního
kamene Saeco (250 ml).
6 Do roztoku pro odstranění vodního kamene v nádržce na vodu přilijte
vodu až po značku CALC CLEAN.
Page 47

CALC
CLEAN
Čeština
7 Pod hubici dávkovače kávy a mléka umístěte velkou nádobu (1,5 l).
8 Stisknutím tlačítka OK spusťte cyklus odstraňování vodního kamene.
-
Dávkováním v pravidelných intervalech přístroj postupně vypustí z hubic
dávkovače kávy a mléka veškerou tekutinu pro odstraňování vodního
kamene (cyklus trvá cca 25 minut).
9 Nechte přístroj vypouštět roztok k odstranění vodního kamene, dokud
není nádržka na vodu prázdná. Vyjměte a vyprázdněte nádobu a karafu
na mléko.
10 Vyjměte a vylijte odkapávací misku. Vložte odkapávací misku zpět do
přístroje.
11 Nádržku na vodu vypláchněte a naplňte čerstvou vodou až po ukazatel
hladiny CALC CLEAN. Nádržku na vodu zasuňte zpět do přístroje.
12 Naplňte karafu na mléko čerstvou vodou až po ukazatel hladiny MIN
a vložte ji zpět do přístroje. Umístěte nádobu zpátky pod obě hubice.
13 Stisknutím tlačítka OK spusťte vyplachovací cyklus (trvá cca 4 minuty).
-
Na displeji se zobrazí následující ikona signalizující, že vyplachovací
cyklus skončil.
14 Nádržku na vodu vypláchněte a naplňte čerstvou vodou až po ukazatel
hladiny MAX. Nádržku na vodu zasuňte zpět do přístroje.
15 Stisknutím tlačítka OK ukončete cyklus odstraňování vodního kamene.
16 Umístěte nádobu pod hubici dávkovače kávy a mléka.
17 Na displeji se zobrazí následující ikona signalizující, že přístroj se zahřívá.
-
Přístroj provede automatický vyplachovací cyklus.
18 Vyjměte a vyčistěte karafu na mléko (viz kapitolu „Čištění a údržba“, část
„Týdenní čištění karafy na mléko“). Vložte dávkovací hubici horké vody
do přístroje.
19 Vyjměte a vylijte odkapávací misku. Vložte odkapávací misku zpět do
přístroje.
20Vyjměte a vypláchněte varnou sestavu (viz kapitolu „Čištění a údržba“,
část „Čištění varné sestavy“).
Nyní je přístroj připraven k použití.
47
Přerušení cyklu odstraňování vodního kamene
Proces odstranění vodního kamene je nutno po spuštění dokončit a
nevypínat přístroj. Pokud se přístroj v průběhu cyklu zablokuje nebo pokud
dojde k výpadku elektřiny, lze proces odstranění vodního kamene ukončit
stisknutím tlačítka pohotovostního režimu. V takovém případě vyprázdněte
nádržku na vodu, pečlivě ji vypláchněte a naplňte ji až po ukazatel hladiny
CALC CLEAN. Před přípravou jakéhokoli nápoje postupujte podle pokynů
v kapitole „První instalace“ v části „Manuální vyplachovací cyklus“. Pokud
nebyl proces dokončen, přístroj si při nejbližší vhodné příležitosti vyžádá
nové odstranění vodního kamene.
Page 48

48
Čeština
Varovné ikony a chybové kódy
Varovné signály jsou zobrazeny červeně. Níže je uveden seznam
upozornění, která se mohou zobrazit na displeji, a jejich význam.
-
Nádržku na vodu naplňte pitnou vodou až po ukazatel hladiny MAX.
-
Násypka na kávová zrna je prázdná. Násypku na kávová zrna naplňte
novými kávovými zrny.
-
V přístroji není vložena varná sestava. Vložte sestavu.
-
Zavřete obslužná dvířka.
-
Vyjměte z přístroje nádobu na mletou kávu a vyprázdněte ji.
Page 49

-
Ve varné sestavě je příliš mnoho prášku. Vyčistěte varnou sestavu.
-
Je-li spuštěn kód chyby, nahlédněte do části Význam chybových kódů a
zjistěte význam příslušného kódu a opatření, která můžete provést.
Pokud je na displeji zobrazena tato ikona, přístroj nelze použít.
-
Zapomněli jste nasadit víko na přihrádku na mletou kávu. Pokud do
30 sekund víko nevložíte zpátky, displej se vrátí do hlavní nabídky a
cyklus přípravy nápoje se přeruší.
Význam chybových kódů
Chybový kód
1 Mlýnek na kávu je
Problém Příčina Možná řešení
zablokovaný
Trubice výstupu kávy je
ucpaná
Čeština
Důkladně vyčistěte
trubici výstupu kávy
rukojetí multifunkčního
nástroje nebo rukojetí
lžičky.
49
3 - 4 Varnou sestavu nelze
vyjmout.
5 Problém s obvodem
vody
Ostatní chybové kódy Přístroj vypněte a po
Pokud předchozí řešení nepomohlo odstranit ikonu s kódem chyby
z displeje a vrátit přístroj zpět do běžného provozního stavu, kontaktujte
linku péče o zákazníky společnosti Philips Saeco. Kontaktní údaje naleznete
v záruční brožuře, případně na webu www.saeco.com/support.
Varná sestava není
umístěna správně.
Obvod vody je
zavzdušněn.
Zavřete dvířka pro
údržbu. Vypněte přístroj
a znovu jej zapněte.
Vyčkejte, dokud se na
displeji nezobrazí ikona
Machine ready (přístroj
připraven), a potom
vyjměte varnou sestavu.
Nádržku na vodu
několikrát vyjměte a
vložte zpět. Přesvědčte
se, že jste ji do přístroje
vložili správně.
Zkontrolujte, zda je
přihrádka nádržky na
vodu čistá.
30 sekundách jej znovu
zapněte. Tento postup
2–3krát opakujte.
Page 50

50
Čeština
Objednávání příslušenství značky Saeco
K čištění přístroje a odstranění vodního kamene používejte pouze výrobky
údržby společnosti Saeco. Tyto výrobky lze zakoupit v online obchodě
společnosti Philips (je-li ve vaší zemi k dispozici) na webu
www.shop.philips.com/service, od místního prodejce nebo v autorizovaných
servisních střediscích.
Objednání výrobků pro údržbu:
Typové číslo
CA6700 Roztok pro odstranění vodního kamene
CA6903 Filtr AquaClean
HD5061 Mazivo varné sestavy
CA6704 Odmašťovací tablety
CA6705 Čistič obvodu mléka
Výrobek
Záruka a podpora
Více informací nebo podporu naleznete na adrese www.saeco.com/support
nebo na samostatném záručním listu.
Pokud potřebujete další informace nebo podporu, kontaktujte linku péče
o zákazníky ve vaší zemi. Kontakty jsou uvedeny v záruční brožuře
dodávané samostatně, případně na webu www.saeco.com/support.
Recyklace
-
Tento symbol znamená, že výrobek nelze likvidovat s běžným
komunálním odpadem (2012/19/EU).
-
Dodržujte předpisy vaší země týkající se sběru tříděného odpadu
elektrických a elektronických výrobků. Správnou likvidací pomůžete
zabránit negativním dopadům na životní prostředí a lidské zdraví.
Řešení problémů
Problém
Přístroj se nezapne. Přístroj je odpojen. Zkontrolujte, zda je síťová šňůra
Přístroj je spuštěn
v režimu DEMO (Ukázka).
Příčina Řešení
správně připojena.
Tlačítko pohotovostního režimu bylo
stisknuto déle než 8 sekund.
Přístroj vypněte a znovu zapněte
pomocí hlavního vypínače.
Page 51

Čeština
51
Odkapávací miska se
rychle zaplní.
Pod dávkovací hubici postavte
Zůstává zobrazena ikona
plné nádoby na namletou
kávu.
Nádobu na namletou kávu jste vložili
Varnou sestavu nelze
vyjmout.
Nádoba na namletou kávu není
To je normální jev. Přístroj používá
vodu k vypláchnutí vnitřního obvodu
a varné sestavy. Část vody proudí
vnitřní soustavou přímo do
odkapávací misky.
Nádobu na namletou kávu byla
vyprázdněna, když byl přístroj
vypnutý.
zpět příliš brzy.
Varná sestava není umístěna
správně.
vyjmuta.
Odkapávací misku vyprázdněte,
když se nad krytem misky objeví
ukazatel naplnění misky.
šálek na sběr čisticí vody.
Nádobu na namletou kávu
zásadně vyprazdňujte, když je
přístroj zapnutý. Pokud nádobu na
namletou kávu vyprázdníte
v době, kdy je přístroj vypnutý,
nedojde k vynulování počítadla
cyklů kávy. V takovém případě
zůstane na displeji zobrazena
zpráva Empty coffee grounds
container, i když tato nádoba není
plná.
Nádobu na namletou kávu
nevkládejte zpět, dokud vás
k tomu nevyzve zpráva na displeji.
Zavřete dvířka pro údržbu.
Vypněte přístroj a znovu jej
zapněte. Vyčkejte, dokud se
nezobrazí obrazovka Machine
ready, a potom vyjměte varnou
sestavu.
Nádobu na namletou kávu
vyjměte před vyjmutím varné
sestavy.
Varnou sestavu nelze
vložit.
Resetujte přístroj vypnutím
Přístroj stále provádí proces
Káva obsahuje příliš málo
smetany nebo je vodnatá.
Směs kávy není vhodná. Zkuste jinou směs kávy.
Varná sestava není ve správné
poloze.
odstranění vodního kamene.
Mlýnek je nastaven na hrubé mletí. Nastavte mlýnek na jemnější mletí.
Varná sestava nebyla při umístění
do přístroje zasunuta do koncové
polohy. Zkontrolujte, že zda je
páčka v kontaktu se základnou
varné sestavy a že háček varné
sestavy je ve správné poloze.
a opětovným zapnutím. Vložte
odkapávací misku a nádobu na
namletou kávu zpět. Varnou
sestavu nechte vyndanou. Zavřete
dvířka pro údržbu a potom přístroj
zapněte a vypněte. Poté zkuste
znovu vložit varnou sestavu.
Během procesu odstranění
vodního kamene nelze varnou
sestavu vyjmout. Nejprve
dokončete odstranění vodního
kamene a až potom vyjměte
varnou sestavu.
Page 52

52
Čeština
Přístroj provádí vlastní automatické
Varná sestava je znečištěná. Vyčistěte varnou sestavu.
Z hubice dávkovače kávy
uniká káva.
Káva není dostatečně
teplá.
Nastavená teplota je příliš nízká.
Přidali jste mléko. Bez ohledu na teplotu přidaného
Přístroj mele kávová zrna,
ale nevytéká z něj žádná
káva.
Varná sestava je znečištěná. Vyčistěte varnou sestavu.
Hubice dávkovače kávy je
Trubice výstupu kávy je ucpaná. Vyčistěte trubici výstupu kávy
nastavení.
Hubice dávkovače kávy je ucpaná. Vyčistěte hubici dávkovače kávy
Použili jste studené šálky. Šálky předehřejte vypláchnutím
Zkontrolujte nastavení nabídky.
Mlýnek je nastavený na příliš jemné
mletí.
znečištěná.
Připravte několik šálků kávy.
i její otvory pomocí kulatého
kartáče.
horkou vodou.
Nastavte v nabídce vyšší teplotu
kávy.
mléka vždy dojde k určitému
snížení teploty kávy.
Nastavte mlýnek na hrubší mletí.
Vyčistěte hubici dávkovače kávy
i její otvory pomocí kulatého
kartáčku.
rukojetí multifunkčního nástroje
nebo rukojetí lžičky.
Káva vytéká příliš pomalu. Káva je namletá příliš jemně. Zkuste jinou směs kávy nebo
Varná sestava je znečištěná. Vyčistěte varnou sestavu.
Trubice výstupu kávy je ucpaná. Vyčistěte trubici výstupu kávy
Obvod přístroje je ucpán vodním
kamenem.
Mléko se nenapění. Karafa na mléko je znečištěna nebo
není vložena správně.
Hubice dávkovače mléčné pěny
nebyla zcela otevřena.
Karafa na mléko není zcela
sestavena.
změňte nastavení mlýnku.
rukojetí multifunkčního nástroje
nebo rukojetí lžičky.
Odstraňte vodní kámen.
Vyčistěte karafu a zkontrolujte, zda
je umístěna a vložena správně.
Zkontrolujte, zda je hubice
dávkovače mléčné pěny
nastavena do správné polohy.
Zkontrolujte, zda byly všechny
součásti sestaveny správně.
Page 53

Čeština
53
Použitý druh mléka není vhodný
Pod přístrojem se objevila
voda.
Přístroj není umístěn ve vodorovné
Filtr AquaClean nelze
aktivovat, protože na
displeji se nezobrazí
symbol zaškrtnutí.
Filtr nelze aktivovat
a přístroj žádá
o odstranění vodního
kamene.
k napěňování.
Odkapávací miska je přeplněná
a přetekla.
poloze.
Filtr byl právě aktivován. Filtr lze aktivovat až po přípravě
Již jste použili 8 filtrů AquaClean. Po
výměně 8. filtru je třeba z přístroje
odstranit vodní kámen.
Vyzkoušeli jsme následující druhy
mléka, které produkují vhodnou
mléčnou pěnu. částečně
odstředěné nebo plnotučné
kravské mléko, sójové mléko nebo
mléko bez laktózy. Další druhy
mléka nebyly vyzkoušeny a
mohou vyprodukovat menší
množství mléčné pěny.
Odkapávací misku vyprázdněte,
když se nad krytem misky objeví
ukazatel naplnění misky.
Odkapávací misku vyprázdněte
vždy před odstraňováním vodního
kamene.
Umístěte přístroj na vodorovný
povrch, aby ukazatel naplnění
odkapávací misky pracoval
správně.
nejméně 10 šálků (o objemu
100 ml). Při aktivaci nového filtru
postupujte opatrně, počítadlo filtru
se zvýší automaticky. Nový filtr
můžete aktivovat až po přípravě
minimálně 10 šálků (s objemem po
100 ml). Při aktivaci nového filtru
dbejte opatrnosti, počítadlo filtru
bude přičítat automaticky.
Nejprve z přístroje odstraňte vodní
kámen a potom vložte filtr.
Filtr AquaClean je vložen,
ale je zobrazena zpráva
o odstranění vodního
kamene.
Filtr nebyl vyměněn včas poté, kdy
začal blikat signál vodního filtru
AquaClean.
Filtr nebyl vložen během první
instalace, ale až po přípravě cca
50 šálků kávy (o objemu 100 ml).
Přístroj nebyl před vložením filtru
AquaClean zcela zbaven vodního
kamene.
Filtr AquaClean nebyl při první
instalaci aktivován správně.
Po výměně 8. filtru je třeba z přístroje
odstranit vodní kámen.
Nejprve z přístroje odstraňte vodní
kámen a potom vložte filtr.
Nejprve z přístroje odstraňte vodní
kámen a potom vložte nový filtr
AquaClean. Po odstranění vodního
kamene se počítadlo filtrů vynuluje
na hodnotu 0 z 8. Vždy potvrďte
aktivaci filtru v nabídce přístroje, a
to i po výměně filtru.
Postupujte podle pokynů na
displeji, dokud se nezobrazí
potvrzení, že filtr byl aktivován.
Nejprve z přístroje odstraňte vodní
kámen a potom vložte nový filtr
AquaClean. Tím se počítadlo filtrů
vynuluje na hodnotu 0 z 8. Vždy
potvrďte aktivaci filtru v nabídce
přístroje, a to i po výměně filtru.
Page 54

54
Čeština
Zpráva o odstranění
vodního kamene se
zobrazí před použitím
8 filtrů.
Filtr je příliš velký. Filtr je třeba odvzdušnit. Nechte z filtru uniknout všechny
Filtr AquaClean nebyl při první
instalaci správně aktivován.
Filtr AquaClean jste do přístroje
vložili až po určité době používání
přístroje.
Neprovedli jste aktivaci filtru
v nabídce přístroje.
Nevyměnili jste filtr, když na displeji
začal blikat symbol filtru.
V nádržce na vodu je stále voda. Před vložením filtru vyprázdněte
Pokusili jste se vložit jiný filtr než
AquaClean.
Poznámka: Pokud by se vám nepodaří problém vyřešit podle informací
v této tabulce, kontaktujte linku péče o zákazníky společnosti Philips Saeco.
Nejprve z přístroje odstraňte vodní
kámen a potom vložte nový filtr
AquaClean. Filtr aktivujte vždy
v nabídce přístroje.
vzduchové bublinky.
nádržku na vodu.
Vhodné jsou výhradně filtry
AquaClean.
Page 55

Deutsch
55
Inhalt
Einführung 55
Wichtig 56
Warnhinweis 56
Achtung 57
Elektromagnetische Felder 57
Übersicht über das Gerät (Abb. 1) 57
Das Display 58
Inbetriebnahme 58
Manueller Spülzyklus 61
AquaClean-Filter 61
Installation des AquaClean-Filters 61
AquaClean-Filter austauschen 62
Verwenden des Geräts 63
Kaffee aus Kaffeebohnen zubereiten 63
Einstellen der Kaffeemenge 63
Mahlgrad einstellen 63
Cappuccino, Baby-Cappuccino und Milchschaum 64
Brühen von Spezialgetränken 64
Reinigung und Pflege 65
Wöchentliche Reinigung der Brühgruppe 65
Schmierung 66
Schnellreinigung der Milchkanne 67
Tägliche Reinigung der Milchkanne 67
Wöchentliche Reinigung der Milchkanne 68
Monatlicher vollständiger Milchkannen-Reinigungszyklus mit Milchkreislauf-Reiniger 70
Entkalken 71
Entkalkungsvorgang 71
Unterbrechung des Entkalkungsvorgangs 72
Warnsymbole und Fehlercodes 73
Bedeutung der Fehlercodes 74
Saeco-Zubehör bestellen 75
Garantie und Support 75
Recycling 76
Fehlerbehebung 76
Einführung
Herzlichen Glückwunsch zum Kauf dieses Espresso-Vollautomaten
Intelia/Intelia Deluxe. Das Gerät ist geeignet zur Zubereitung von
Espressokaffee unter Verwendung von ganzen Kaffeebohnen. Mithilfe der
Milchkanne lässt sich ein perfekter Cappuccino schnell und einfach
zubereiten. Um die Unterstützung von Saeco optimal nutzen zu können,
registrieren Sie Ihr Produkt unter www.saeco.com/welcome. Diese
Deutsch
Page 56

56
Deutsch
Wichtig
Warnhinweis
Gebrauchsanleitung gilt für alle Intelia/Intelia Deluxe Modelle mit
Milchkanne.
-
Die Maschine benötigt eine Netzsteckdose mit Netzanschlusswerten, die
mit den Angaben auf der Maschine übereinstimmen.
-
Die Netzsteckdose muss schutzgeerdet sein.
-
Lassen Sie das Netzkabel nicht über die Kante des Tischs oder der
Arbeitsfläche hängen oder heiße Flächen berühren.
-
Tauchen Sie die Maschine, den Netzstecker oder das Netzkabel nie in
Wasser (Stromschlaggefahr).
-
Schütten Sie keine Flüssigkeiten über den Netzstecker.
-
Richten Sie die Heißwasserdüse nie auf Teile des Körpers:
Verbrühungsgefahr.
-
Berühren Sie keine heißen Oberflächen. Fassen Sie die Maschine an den
Griffen und Knöpfen an.
-
Schalten Sie die Maschine mit dem Hauptschalter an der Rückseite aus,
und trennen Sie den Netzstecker von der Steckdose:
-
Wenn eine Störung auftritt
-
Wenn die Maschine längere Zeit nicht in Gebrauch sein wird
-
Zum Reinigen der Maschine
-
Ziehen Sie am Stecker, nicht am Kabel.
-
Berühren Sie den Netzstecker nicht mit nassen Händen.
-
Verwenden Sie die Maschine nicht, wenn der Netzstecker, das Netzkabel
oder die Maschine selbst defekt oder beschädigt ist..
-
Nehmen Sie an der Maschine und an dem Netzkabel keine
Veränderungen vor.
-
Lassen Sie Reparaturen ausschließlich von einem PhilipsVertragskundendienst durchführen, um Gefahren zu vermeiden. .
-
Die Maschine soll nicht von Kindern unter 8 Jahren bedient werden.
-
Dieses Gerät kann von Kindern ab 8 Jahren und Personen mit
eingeschränkten physischen, sensorischen oder geistigen Fähigkeiten
oder ohne Erfahrung und besondere Kenntnisse verwendet werden,
wenn sie beim Gebrauch des Geräts beaufsichtigt werden oder in den
sicheren Gebrauch des Geräts unterwiesen wurden und die verbundenen
Gefahren verstanden haben.
-
Reinigung und Pflege dürfen nicht von Kindern durchgeführt werden,
außer sie sind älter als 8 Jahre und werden beaufsichtigt.
-
Sorgen Sie dafür, dass Kinder unter 8 Jahren keinen Zugang zu der
Maschine und zum Kabel der Maschine haben.
-
Achten Sie darauf, dass Kinder nicht mit der Maschine spielen.
-
Stecken Sie nie die Finger oder andere Gegenstände in das Mahlwerk.
Page 57

Achtung
Deutsch
-
Diese Maschine ist nur für den normalen Hausgebrauch bestimmt. Sie ist
nicht für den Gebrauch in Personalküchen, Büros, landwirtschaftlichen
Betrieben oder anderen gewerblichen Umgebungen vorgesehen.
-
Stellen Sie die Maschine auf eine ebene und stabile Fläche. Halten Sie
die Maschine aufrecht, auch beim Transport..
-
Stellen Sie die Maschine nicht auf eine Warmhalteplatte, direkt neben
einen heißen Ofen, eine Heizung oder eine ähnliche Wärmequelle.
-
Befüllen Sie den Bohnenbehälter nur mit gerösteten Kaffeebohnen.
Gemahlener Kaffee, Instantkaffee, rohe Kaffeebohnen oder irgendetwas
anderes im Kaffeebohnenbehälter kann zu Schäden an der Maschine
führen.
-
Lassen Sie die Maschine abkühlen, bevor Sie Teile anbauen oder
entfernen. Die Heizflächen können nach dem Gebrauch noch heiß sein.
-
Füllen Sie den Wasserbehälter nie mit warmem, heißem oder
Mineralwasser, da dies zu Schäden am Wasserbehälter und an der
Maschine führen kann.
-
Reinigen Sie die Maschine nie mit einem Scheuerschwamm oder
Scheuermittel oder mit aggressiven Flüssigkeiten wie Benzin oder
Azeton. Verwenden Sie einfach ein weiches, mit Wasser angefeuchtetes
Tuch.
-
Entkalken Sie Ihre Maschine regelmäßig. Die Maschine zeigt an, wenn sie
entkalkt werden muss. Wenn Sie dies ignorieren, funktioniert das Gerät
nicht mehr richtig. In dem Fall ist auch die Reparatur von der
Gewährleistung ausgeschlossen.
-
Setzen Sie die Maschine nicht Temperaturen unter 0 °C aus. Wasser im
Heizsystem kann einfrieren und Schäden verursachen.
-
Lassen Sie kein Wasser im Wasserbehälter, wenn das Gerät längere Zeit
nicht in Gebrauch ist. Das Wasser kann verderben. Verwenden Sie bei
jedem Gebrauch des Geräts frisches Wasser.
57
Elektromagnetische Felder
Dieses Philips Gerät erfüllt sämtliche Normen und Regelungen bezüglich der
Exposition in elektromagnetischen Feldern.
Übersicht über das Gerät (Abb. 1)
1 Deckel des Kaffeebohnenbehälters
2 Kaffeebohnenbehälter
3 Buchse für Kabel
4 Wasserbehälter
5 Behälter für vorgemahlenen Kaffee
6 Mahlgradregler
7 Bedienfeld
8 Kaffeesatzbehälter
9 Kaffeeauslauftrichter
10 Abtropfschale
11 Abdeckung für Abtropfschale
12 Abtropfschale voll-Anzeige
13 ESPRESSO-Taste
Page 58

ESP RE SS O
A
R
O
M
A
S
T
R
E
N
G
T
H
CA PPU CC IN O
S
P
E
C
I
A
L
D
R
I
N
K
S
58
Deutsch
Das Display
14 ESPRESSO LUNGO-Taste
15 AROMA STRENGTH-Taste (Aromastärke)
16 Taste CARAFE QUICK CLEAN (Schnellreinigung Milchkanne)
17 Standby-Taste
18 MENU-Taste (Menütaste)
19 SPECIAL DRINKS-Taste (Spezialgetränke)
20 MILK FROTH-Taste (Milchschaum)
21 CAPPUCCINO-Taste
22 Netzkabel
23 Reinigungsbürste (nur für bestimmte Gerätetypen)
24 Fett (nur für bestimmte Gerätetypen)
25 Messlöffel für vorgemahlenen Kaffee
26 Wasserhärtetester
27 Kaffeeresteschublade
28 Brühgruppe
29 Milchkanne
30 Heißwasserauslauftrichter
Mit diesen Tasten navigieren Sie durch die Menüs:
-
ESPRESSO-Taste = ESC-Taste: Drücken Sie diese Taste, um zum
Hauptmenü zurückzukehren. Über die ESC-Taste gelangen Sie eine Stufe
zurück. Sie müssen die ESC-Taste mehrere Male drücken, um zum
Hauptmenü zurückzukehren.
Inbetriebnahme
-
AROMA STRENGTH-Taste (Aromastärke) = OK-Taste (Bestätigungstaste):
Drücken Sie diese Taste, um eine Funktion zu bestätigen oder zu
beenden.
-
CAPPUCCINO-Taste = Pfeiltaste nach oben: Drücken Sie diese Taste, um
im Displaymenü nach oben zu gehen.
-
SPECIAL DRINKS-Taste (Spezialgetränke) = Pfeiltaste nach unten:
Drücken Sie diese Taste, um im Displaymenü nach unten zu gehen.
Die Maschine wurde mit Kaffee getestet. Zwar wurde die Maschine
anschließend sorgfältig gereinigt, aber es ist möglich, dass noch ein Rest
Page 59

AQUA
CLEA N
AQUA CLE AN
FILTE R?
Deutsch
59
Kaffee in der Maschine ist. Wir garantieren aber, dass Ihre Maschine absolut
neu ist.
Wie bei den meisten Vollautomaten müssen Sie erst einige Tassen Kaffee
zubereiten, damit sich die Maschine einstellen kann und Sie den perfekten
Kaffeegenuss erhalten.
1 Entfernen Sie das Verpackungsmaterial von der Maschine.
2 Wählen Sie als Aufstellungsort für die Maschine einen Platz auf einem
Tisch oder einer Arbeitsfläche ohne Wasserhahn, Spülbecken oder
Wärmequellen in der Nähe.
Hinweis: Lassen Sie über, hinter und auf beiden Seiten der Maschine
mindestens 15 cm Abstand.
3 Schieben Sie die Tropfschale mit dem Tropfschalendeckel in das Gerät.
4 Nehmen Sie den Wassertank vom Gerät.
5 Füllen Sie den Wasserbehälter bis zur Markierung MAX mit frischem
Wasser.
6 Öffnen Sie den Deckel der Kaffeebohnenbehälters. Füllen Sie den
Bohnenbehälter mit Kaffeebohnen, und schließen Sie den Deckel.
7 Stecken Sie den Netzstecker in die Netzsteckdose (1) und den kleinen
Stecker in die Buchse an der Rückseite der Maschine (2).
8 Stellen Sie einen Behälter unter den Heißwasser- und Kaffeeauslauf.
Prüfen Sie, ob der Heißwasserauslauf richtig angebaut ist.
9 Drücken Sie zum Einschalten der Maschine die Standby-Taste.
10 Drücken Sie die OK-Taste, um die automatische Kreislaufvorbereitung zu
starten.
11 Die Maschine heizt auf und das Display zeigt das Temperatursymbol an.
-
Die Maschine beginnt Wasser durch den Kaffeeauslauftrichter zu spülen.
Im Display sehen Sie das Spülsymbol und einen Fortschrittsbalken.
12 Das Display zeigt das folgende Symbol an, um Sie auf den Einbau des
AquaClean-Filters hinzuweisen.
Hinweis: Wenn Sie den AquaClean-Filter nachträglich einbauen
möchten, drücken Sie die ESC-Taste und fahren mit dem manuellen
Spülzyklus fort. Informationen zur Installation finden Sie im Kapitel
„AquaClean-Filter“.
Page 60

AQUA
CLEA N
INS TALL
FILTE R
AQ U A
CLEA N
0/8
ON
OFF
60
Deutsch
13 Drücken Sie die OK-Taste. Das Display zeigt das folgende Symbol an.
14 Nehmen Sie den AquaClean-Filter aus der Verpackung. Schütteln Sie
den Filter ca. 5 Sekunden.
15 Setzen Sie den AquaClean-Filter kopfüber in einen Behälter mit kaltem
Wasser, und warten Sie, bis keine Luftblasen mehr austreten.
16 Nehmen Sie den Wassertank aus dem Gerät, entleeren Sie ihn und
setzen Sie den Filter senkrecht auf den Filteranschluss.
17 Füllen Sie den Wasserbehälter bis zur Markierung MAX mit frischem
Wasser.
18 Drücken Sie die OK-Taste.
19 Wählen Sie EIN auf dem Display, bestätigen Sie die Aktivierung durch
Drücken der OK-Taste.
Nachdem die Aktivierung beendet ist, wird die Aktivierung im Display mit
einem Häkchen bestätigt.
Page 61

AQUA
CLEA N
10 0%
20Das Display zeigt das Symbol „Filter bereit“ an, wenn der AquaClean-
Filter korrekt installiert wurde.
21 Um den Filter zu spülen, drücken Sie die SPECIAL DRINKS-Taste
(Spezialgetränke), wählen Sie die Option HOT WATER (Heißwasser) aus
und drücken zur Bestätigung die OK-Taste zwei Mal. Aus dem
Heißwasserauslauf fließt Wasser. Schütten Sie dieses Wasser weg.
Es kann eine Weile dauern, bis das Wasser aus dem Heißwasserauslauf
läuft. Der Filter muss vollständig gefüllt und mit Wasser gespült sein.
Das Gerät ist einsatzbereit.
Nach der Installation des AquaClean-Filters müssen Sie den manuellen
Spülzyklus nicht ausführen.
Manueller Spülzyklus
1 Stellen Sie einen Behälter unter den Kaffeeauslauftrichter.
2 Drücken Sie die AROMASTÄRKE-Taste, und wählen Sie die Brühfunktion
für vorgemahlenen Kaffee. aus
Geben Sie keinen vorgemahlenen Kaffee in den Behälter für
vorgemahlenen Kaffee.
3 Drücken Sie die ESPRESSO- oder ESPRESSO LUNGO-Taste.
-
Die Maschine beginnt heißes Wasser auszugeben.
4 Warten Sie, bis kein Wasser mehr läuft, und leeren Sie den Behälter.
5 Wiederholen Sie die Schritte 1-3 zwei Mal.
6 Drücken Sie die SPECIAL DRINKS-Taste (Spezialgetränke). Stellen Sie
einen Behälter unter den Heißwasserauslauf.
7 Drücken Sie die Pfeiltasten nach oben/unten, um durch die Optionen des
Displaymenüs zu scrollen. Drücken Sie die OK-Taste, um „Heißwasser“
auszuwählen.
8 Drücken Sie die OK-Taste, um heißes Wasser herauszulassen.
-
Lassen Sie Wasser laufen, bis das Symbol „Kein Wasser“ gezeigt wird.
9 Füllen Sie den Wassertank bis zur Markierung MAX mit frischem Wasser
und entfernen Sie den Behälter.
Das Gerät ist einsatzbereit.
Deutsch
61
AquaClean-Filter
Der AquaClean-Filter reduziert Kalkablagerungen in Ihrer Kaffeemaschine
und bereitet gefiltertes Wasser, damit Aroma und Geschmack jeder Tasse
Kaffee optimal sind. Wenn Sie einen Satz aus 8 AquaClean-Filtern wie in
dieser Bedienungsanleitung vorgeschlagen verwenden, brauchen Sie Ihr
Gerät 5000 Tassen (à 100 ml) lang nicht zu entkalken.
Installation des AquaClean-Filters
Ihre Maschine muss zum Einbau des AquaClean-Filters vollkommen kalkfrei
sein. Falls Sie den Filter nicht beim ersten Gebrauch aktiviert haben und
mehr als 50 Tassen (mit 100 ml Kapazität) gebrüht haben, müssen Sie die
Maschine entkalken, bevor Sie den Filter aktivieren.
Page 62

AQ U A
CLEA N
0/8
ON
OFF
62
Deutsch
1 Nehmen Sie den AquaClean-Filter aus der Verpackung. Schütteln Sie
den Filter ca. 5 Sekunden.
2 Setzen Sie den AquaClean-Filter kopfüber in einen Behälter mit kaltem
Wasser, und warten Sie, bis keine Luftblasen mehr austreten.
3 Nehmen Sie den Wasserbehälter vom Gerät ab.
4 Führen Sie den AquaClean-Filter senkrecht auf den Filteranschluss.
Schieben Sie den AquaClean-Filter ganz nach unten. Kontrollieren Sie,
dass der Filter dicht ansitzt und die Dichtung richtig sitzt, damit beste
Ergebnisse erzielt werden.
5 Füllen Sie den Wassertank mit frischem Wasser und setzen Sie ihn wieder
ein.
6 Drücken Sie die MENU-Taste und scrollen Sie zur Option AquaClean-
Filter. Drücken Sie dann die OK-Taste, um die Option AquaClean-Filter
auszuwählen.
Wenn Sie den Filter gleich zu Anfang bei der Inbetriebnahme des Geräts
einbauen, folgen Sie den Schritten im Kapitel „Inbetriebnahme“.
7 Wählen Sie ON (Ein) auf dem Display aus und bestätigen Sie die
Aktivierung durch Drücken der OK-Taste.
Hinweis: Die Aktivierung wird im Display mit einem Häkchen bestätigt.
8 Um den Filter zu spülen, drücken Sie die SPECIAL DRINKS-Taste
(Spezialgetränke), wählen die Option HOT WATER (Heißwasser) aus und
drücken zur Bestätigung die OK-Taste zwei Mal. Aus dem
Heißwasserauslauf fließt Wasser. Schütten Sie dieses Wasser weg.
Hinweis: Es kann eine Weile dauern, bis das Wasser aus dem
Heißwasserauslauf läuft. Der Filter muss vollständig gefüllt und mit
Wasser gespült sein.
9 Verwenden Sie den auf der Kunststoffverpackung des AquaClean-Filters
aufgebrachten Aufkleber, um das Datum des nächsten Filterwechsels
(nach 3 Monaten) zu notieren. Bringen Sie den Aufkleber am Wassertank
an.
Der Filter und das Gerät sind nun betriebsbereit.
AquaClean-Filter austauschen
Ersetzen Sie den Filter alle 3 Monate oder nach Aufforderung durch das
Gerät.
Page 63

Deutsch
Anzeigesymbol AquaClean-Filter Das müssen Sie tun
10 % + Symbol blinkt Die Leistung dieses Filters wird schwächer. Es wird
empfohlen, den alten Filter zu entfernen und den
neuen Filter wie im Abschnitt „Installation AquaCleanFilter“ beschrieben einzusetzen. So wird die
bestmögliche Filterleistung erhalten.
63
0 % + Symbol blinkt Entfernen Sie den alten Filter sofort und setzen Sie
0 % und Symbol verschwinden aus dem
Display
Nachdem der Filter 8-mal gewechselt wurde, müssen Sie das Gerät
entkalken. Siehe dazu Kapitel „Entkalken“, Abschnitt „Entkalkungsvorgang“.
den neuen Filter ein, wie im Abschnitt „Installation
AquaClean-Filter“ beschrieben. Beim Aktivieren eines
neuen Filters wird im Display das Wort NEU angezeigt.
Bestätigen Sie die Aktivierung mit der OK-Taste.
Sie müssen das Gerät zuerst entkalken, bevor Sie einen
neuen Filter einsetzen und aktivieren können.
Verwenden des Geräts
Kaffee aus Kaffeebohnen zubereiten
1 Stellen Sie den Kaffeeauslauftrichter auf die Größe Ihrer Tasse ein.
2 Drücken Sie die Taste AROMA STRENGTH (Aromastärke), um die
gewünschte Kaffeestärke von 1 bis 5 Bohnen auszuwählen.
3 Drücken Sie die ESPRESSO-Taste, um einen Espresso zu brühen, oder
die ESPRESSO LUNGO-Taste, um einen Kaffee zu brühen.
Einstellen der Kaffeemenge
1 Halten Sie die ESPRESSO-Taste oder die ESPRESSO LUNGO-Taste
gedrückt, bis das Display das Wort MEMO anzeigt.
2 Wenn sich die gewünschte Menge Kaffee in der Tasse befindet, drücken
Sie die OK-Taste, um die ausgewählte Menge zu speichern.
Mahlgrad einstellen
Hinweis: Den Mahlgrad können Sie nur einstellen, während das Gerät
Kaffeebohnen mahlt.
1 Öffnen Sie den Deckel der Kaffeebohnenbehälters.
2 Stellen Sie eine Tasse unter den Kaffeeauslauftrichter.
3 Drücken Sie die ESPRESSO-Taste.
4 Während das Gerät den Kaffee mahlt, setzen Sie das Ende des
Messlöffelgriffs auf den Einstellregler des Mahlgrades im
Kaffeebohnenbehälter. Mit dem Löffel drücken und drehen Sie den
Regler jeweils um eine Stufe nach links oder rechts.
5 Es stehen 10 verschiedene Mahleinstellungen zur Auswahl. Je kleiner der
Punkt, desto stärker der Kaffee.
-
Grobe Mahlung: leichterer Geschmack, für dunkelgeröstete
Kaffeemischungen
Page 64

64
Deutsch
-
Feine Mahlung: stärkerer Geschmack, für leichtgeröstete
Kaffeemischungen.
6 Brühen Sie 2-3 Tassen Kaffee, um den Unterschied zu schmecken.
Cappuccino, Baby-Cappuccino und Milchschaum
Hinweis: Sie können die Menge an Cappuccino und Milchschaum einstellen.
1 Entfernen Sie den Heißwasserauslauf.
2 Nehmen Sie den Deckel der Milchkanne ab.
3 Füllen Sie die Milchkanne so, dass die Milch zwischen MIN und MAX an
der Kanne steht.
4 Setzen Sie den Deckel der Milchkanne wieder auf.
5 Stellen Sie den Auslauf an der Milchkanne auf die Position „I“.
6 Setzen Sie die Milchkanne in das Gerät. Vergewissern Sie sich, dass die
Milchkanne richtig eingesetzt ist.
7 Stellen Sie eine Tasse unter die Kaffee- und Milchauslauftrichter.
8 Wählen Sie ein Getränk mit Milch.
-
Drücken Sie die CAPPUCCINO-Taste, um einen Cappuccino zu brühen.
-
Drücken Sie die LATTE MACCHIATO-Taste, um eine Latte Macchiato zu
brühen.
-
Zum Brühen eines Baby-Cappuccinos drücken Sie die SPECIAL DRINKSTaste (Spezialgetränke) und wählen Sie „Baby-Cappuccino“.
Die Maschine gibt zuerst eine voreingestellte Menge aufgeschäumte Milch
in die Tasse oder das Glas und danach eine voreingestellte Menge Kaffee.
Brühen von Spezialgetränken
Im Spezialgetränkemenü können Sie Heißwasser und Baby-Cappuccino
auswählen.
1 Drücken Sie die SPECIAL DRINKS-Taste (Spezialgetränke), um das Menü
aufzurufen. Im Display werden die Optionen für Spezialgetränke
angezeigt.
2 Drücken Sie die Pfeiltasten nach oben/unten, um durch die Optionen des
Menüs zu scrollen.
3 Drücken Sie die OK-Taste, um das gewünschte Getränk zu bestätigen.
Page 65

4 Wenn Sie HOT WATER (Heißwasser) auswählen, setzen Sie den
1
2
Heißwasserauslauf in das Gerät ein und verriegeln Sie ihn. Wenn Sie
Cappuccino, Milchschaum oder Baby-Cappuccino auswählen, stellen Sie
die Milchkanne in das Gerät.
Reinigung und Pflege
Wöchentliche Reinigung der Brühgruppe
Reinigen Sie die Brühgruppe einmal pro Woche.
1 Entfernen Sie den Kaffeesatzbehälter und öffnen Sie die Serviceklappe.
2 Entfernen Sie die Kaffeereste-Schublade.
3 Um die Brühgruppe zu entfernen, drücken Sie den Hebel und ziehen Sie
die Brühgruppe aus dem Gerät.
4 Spülen Sie die Brühgruppe mit frischem Wasser aus und lassen Sie sie an
der Luft trocknen.
Deutsch
65
5 Um die Brühgruppe wieder einzusetzen, achten Sie darauf, dass der
Hebel die Unterseite der Brühgruppe berührt.
Hinweis: Falls er die Brühgruppe nicht berührt, drücken Sie ihn nach
unten.
6 Stellen Sie sicher, dass der Verriegelungshaken der Brühgruppe in der
richtigen Position ist. Um den Haken in die richtige Position zu bringen,
schieben Sie ihn so weit wie möglich nach oben.
Page 66

66
Deutsch
7 Der Haken ist nicht richtig positioniert, wenn er noch in der untersten
Position ist.
8 Schieben Sie die Brühgruppe entlang der Führungsschienen an den
Seiten wieder in das Gerät, bis sie hörbar einrastet. Setzen Sie dann die
Kaffeeresteschublade wieder in das Gerät ein.
Monatliche Reinigung der Brühgruppe mit der
Entfettungstablette
-
Führen Sie diesen Reinigungszyklus aus, nachdem das Gerät 500 Tassen
gebrüht hat, oder einmal pro Monat.
-
Verwenden Sie für diesen Reinigungszyklus eine Entfettungstablette..
Achtung: Verwenden Sie zur Reinigung nur die Entfettungstabletten.
Diese haben keine entkalkende Funktion.
1 Stellen Sie einen Behälter unter den Kaffeeauslauftrichter.
2 Drücken Sie die AROMA STRENGTH-Taste (Aromastärke) und wählen Sie
GROUND COFFEE (Mahlkaffee) aus.
3 Geben Sie eine Entfettungstablette in den Behälter für vorgemahlenen
Kaffee.
4 Drücken Sie die OK-Taste. Das Gerät spült Wasser durch den
Kaffeeauslauftrichter.
5 Wenn der Fortschrittsbalken in der Mitte angekommen ist, schalten Sie
den Netzschalter auf „OFF“ (Aus).
6 Lassen Sie den fettlösenden Reiniger ca. 15 Minuten einwirken.
7 Stellen Sie den Netzschalter auf „ON“ (Ein).
8 Drücken Sie die Standby-Taste.
9 Warten Sie, bis das Gerät einen automatischen Spülzyklus durchführt.
10 Führen Sie die „Monatliche Reinigung der Brühgruppe“ durch.
11 Entnehmen Sie die Tropfschale und den Kaffeesatzbehälter. Leeren Sie
die Tropfschale und den Kaffeesatzbehälter und setzen Sie beides
wieder in das Gerät ein.
12 Drücken Sie die AROMA STRENGTH-Taste (Aromastärke) und wählen Sie
GROUND COFFEE (Mahlkaffee) aus.
13 Drücken Sie die OK-Taste. Das Gerät spült Wasser durch den
Kaffeeauslauftrichter.
14 Wiederholen Sie die Schritte 12 und 13 zwei Mal. Schütten Sie das
abgegebene Wasser weg.
15 Zum Reinigen der Tropfschale geben Sie eine Entfettungstablette in die
Tropfschale und füllen die Tropfschale zu zwei Dritteln mit heißem
Wasser. Lassen Sie die Entfettungstablette ca. 30 Minuten einwirken.
Danach leeren und spülen Sie die Tropfschale gründlich.
Schmierung
Schmieren Sie die Brühgruppe nach ungefähr 500 Tassen oder einmal im
Monat.
Page 67

1 Tragen Sie etwas Schmiermittel rund um den Schaft an der Unterseite der
1
1
2
Brühgruppe auf.
2 Tragen Sie wie in der Abbildung dargestellt etwas Schmiermittel auf den
beidseitigen Schienen auf.
3 Schieben Sie die Brühgruppe entlang der Führungsschienen an den
Seiten wieder in das Gerät, bis sie hörbar einrastet. Setzen Sie dann die
Kaffeeresteschublade wieder in das Gerät ein.
Schnellreinigung der Milchkanne
Zwischen der Zubereitung von Milchspezialitäten können Sie den Auslauf
mit Heißwasser spülen und dadurch sichergehen, dass jedes Milchrezept
optimal zubereitet wird.
1 Stellen Sie eine Tasse oder einen Behälter unter den Auslauf, um das
Wasser aufzufangen.
2 Stellen Sie den Milchauslauf auf die Position „I“.
3 Drücken Sie die Taste CARAFE QUICK CLEAN (Schnellreinigung
Milchkanne).
-
Das Display erinnert Sie daran, dass Sie die Milchkanne einsetzen und
dann die OK-Taste drücken müssen.
Hinweis: Wenn Sie die Reinigung der Milchkanne unterbrechen möchten,
drücken Sie die ESC-Taste.
1 Die Maschine beginnt Wasser durch den Kaffeeauslauftrichter zu spülen.
Im Display sehen Sie das Spülsymbol und einen Fortschrittsbalken.
Deutsch
67
Tägliche Reinigung der Milchkanne
Um die Hygiene sowie perfekt aufgeschäumte Milch zu gewährleisten, muss
die Milchkanne jeden Tag oder nach Verwendung gereinigt werden.
1 Drücken Sie die Entriegelungstasten, um den Deckel abzunehmen.
Page 68

68
Deutsch
2 Stellen Sie den Milchauslauf auf die Referenzmarkierung (angegeben
durch einen Punkt).
3 Heben Sie den Milchkannenauslauf an, um ihn vom Deckel abzunehmen,
und waschen Sie ihn mit lauwarmem Wasser. Entfernen Sie sämtliche
Milchrückstände.
4 Setzen Sie den Milchauslauf wieder auf den Deckel der Milchkanne. Um
ihn einzusetzen, richten Sie den Punkt am Auslauf an der Markierung am
Deckel aus.
Wöchentliche Reinigung der Milchkanne
1 Drücken Sie die Entriegelungstasten, um den Deckel abzunehmen.
2 Reinigen Sie den Deckel und die Milchkanne mit frischem Wasser.
Entfernen Sie sämtliche Milchrückstände.
3 Setzen Sie den Deckel wieder auf die Milchkanne und achten Sie darauf,
dass er einrastet.
4 Entfernen Sie das Oberteil des Deckels und füllen Sie die Milchkanne bis
zur Markierung MAX mit frischem Wasser.
5 Setzen Sie das Oberteil des Deckels zurück auf die Milchkanne.
6 Setzen Sie die Milchkanne in das Gerät. Stellen Sie einen Behälter unter
den Milchauslauftrichter.
7 Drücken Sie die MILK FROTH-Taste (Milchschaum), um „Heiße Milch“
auszuwählen.
8 Das folgende Symbol in der Anzeige zeigt an, dass das Gerät Wasser
durchlaufen lässt.
9 Wenn kein Wasser mehr läuft, entfernen und leeren Sie die Milchkanne.
Das Display fordert Sie auf, einen Schnellreinigungszyklus auszuführen.
Für die wöchentliche Reinigung der Milchkanne muss dieser aber nicht
ausgeführt werden.
10 Drücken Sie die Entriegelungstasten, um den Deckel der Milchkanne
abzunehmen.
11 Drehen Sie den Milchauslauf auf den Punkt, der am Deckel erkennbar ist.
12 Heben Sie den Milchauslauf vom Deckel ab.
Page 69

Deutsch
13 Entfernen Sie den Ring vom Auslauftrichter der Milchkanne.
14 Drücken Sie die mit Pfeil markierte Taste, um die Abdeckung des
Milchauslaufs zu entriegeln.
15 Um die Abdeckung zu entfernen, drücken Sie leicht auf die Seiten des
Auslauftrichters und ziehen Sie die Abdeckung nach unten vom
Auslauftrichter ab.
69
16 Ziehen Sie die Milch-Aufschäumeinheit nach oben.
17 Ziehen Sie die Fassung aus dem Milch-Aufschäumgerät heraus.
Page 70

70
Deutsch
18 Entfernen Sie das Saugrohr.
19 Ziehen Sie die Fassung heraus und trennen Sie sie von dem übrigen Teil.
20Reinigen Sie alle Teile mit lauwarmem Wasser.
21 Setzen Sie alle Teile in umgekehrter Reihenfolge wieder zusammen.
Monatlicher vollständiger Milchkannen-Reinigungszyklus mit Milchkreislauf-Reiniger
Verwenden Sie für diesen Reinigungszyklus nur SAECO-MilchkreislaufReiniger CA6705.
Hinweis: Bevor Sie den Vorgang starten, achten Sie darauf, dass der
Wassertank bis zur Markierung MAX mit Wasser gefüllt ist.
1 Drücken Sie die Taste MENU, um das Menü zu öffnen. Scrollen Sie durch
das Menü bis zur Funktion für vollständige Milchkannen-Reinigung.
Drücken Sie die OK-Taste.
-
Im Display wird angezeigt, was Sie vor Beginn des Reinigungsvorgangs
alles erledigen müssen.
2 Geben Sie den Inhalt des Milchkreislauf-Reinigungsbeutels in die
Milchkanne. Füllen Sie die Milchkanne dann bis zur obersten Markierung
mit Wasser.
3 Stellen Sie die Milchkanne in die Maschine, und stellen Sie einen
Behälter unter den Milchschaumauslauf.
4 Drücken Sie die OK-Taste, um die Reinigungslösung durch den Kreislauf
zu spülen.
-
Das Gerät spült die Reinigungslösung durch den Milchauslauftrichter.
-
Sobald der Spülvorgang beendet ist, zeigt das Display folgendes Symbol
an.
5 Nehmen Sie den Behälter und die Milchkanne aus dem Gerät heraus.
6 Spülen Sie die Milchkanne gründlich, und füllen Sie die Kanne bis zur
Markierung MAX mit frischem Wasser.
7 Setzen Sie die Milchkanne in die Maschine.
8 Stellen Sie den Behälter unter den Milchschaumauslauf.
9 Um den Spülzyklus der Milchkanne neu zu starten, drücken Sie die OK-
Taste.
Page 71

10 Wenn kein Wasser mehr läuft, ist der Zyklus beendet.
START
CALC
CLEAN
CA LC
CLE AN
Entkalken
Wenn das Display das Symbol CALC CLEAN anzeigt oder der AquaCleanFilter 8 Mal ausgewechselt wurde, muss das Gerät entkalkt werden.
Wenn Sie das Gerät bei Anzeige des Symbols CALC CLEAN oder nach
8-maligem Auswechseln des AquaClean-Filters nicht entkalken, funktioniert
es unter Umständen nicht mehr richtig. Reparaturen, die hierauf
zurückzuführen sind, fallen nicht unter die Garantie.
Trinken Sie niemals das Wasser mit dem Entkalker, das Sie in den
Wasserbehälter gießen, oder Wasser mit Rückständen, das
während des Entkalkungsvorgangs aus dem Gerät kommt.
Der Entkalkungsvorgang dauert ungefähr 30 Minuten.
Verwenden Sie zum Entkalken des Geräts nur Saeco-Entkalkungslösung.
Saeco-Entkalkungslösung gewährleistet die optimale Funktion des Geräts.
Der Gebrauch von anderen Produkten kann zu Geräteschäden führen und
Rückstände im Wasser hinterlassen. Saeco-Entkalkungslösung erhalten Sie
im Online-Shop unter www.shop.philips.com/service.
Entkalkungsvorgang
Sie können den Entkalkungs- oder Spülzyklus anhalten, indem Sie die ESCTaste drücken. Das Display zeigt dann das folgende Symbol an. Um den
Entkalkungs- oder Spülzyklus fortzusetzen, drücken Sie die OK-Taste.
1 Entnehmen und leeren Sie die Tropfschale. Schieben Sie die Tropfschale
wieder in das Gerät ein.
Entfernen Sie den AquaClean-Filter aus dem Wasserbehälter (wenn
vorhanden).
2 Füllen Sie die Milchkanne bis zur Markierung MIN mit frischem Wasser.
Setzen Sie die Milchkanne in das Gerät. Stellen Sie den Auslauf der
Milchkanne auf die Position „I“.
3 Drücken Sie die OK-Taste.
-
Das Display zeigt das folgende Symbol an, um Sie auf das Einsetzen der
Milchkanne in das Gerät hinzuweisen.
Deutsch
71
4 Das Display zeigt das folgende Symbol an, um anzuzeigen, dass das
Gerät den Entkalkungsvorgang startet. Wenn Sie den
Entkalkungsvorgang abbrechen möchten, drücken Sie die ESC-Taste.
5 Gießen Sie die gesamte Flasche Saeco Entkalkungslösung (250 ml) in
den Wasserbehälter.
6 Füllen Sie die Entkalkungslösung im Wasserbehälter bis zur Markierung
CALC CLEAN mit Wasser auf.
Page 72

CALC
CLEAN
72
Deutsch
7 Stellen Sie einen großen Behälter (1,5 l) unter die Auslauftrichter für
Kaffee und Milch.
8 Drücken Sie die OK-Taste, um den Entkalkungszyklus zu starten.
-
Das Gerät spült die gesamte Entkalkungslösung in regelmäßigen
Intervallen durch die Kaffee- und Milchauslauftrichter (dies dauert etwa
25 Minuten).
9 Lassen Sie die Entkalkungslösung durch das Gerät laufen, bis der
Wasserbehälter leer ist. Nehmen Sie den Behälter und die Milchkanne
aus dem Gerät heraus und leeren Sie sie.
10 Entnehmen und leeren Sie die Tropfschale. Schieben Sie die Tropfschale
wieder in das Gerät ein.
11 Spülen Sie den Wassertank und füllen Sie ihn bis zur Markierung CALC
CLEAN mit frischem Wasser. Setzen Sie den Wasserbehälter wieder in
das Gerät ein.
12 Füllen Sie die Milchkanne erneut bis zur Markierung MIN mit frischem
Wasser und setzen Sie sie wieder in das Gerät ein. Stellen Sie den
Behälter zurück unter beide Ausläufe.
13 Drücken Sie die OK-Taste, um den Spülzyklus zu starten (dies dauert
etwa 4 Minuten).
-
Das folgende Symbol in der Anzeige zeigt an, dass der Spülzyklus
beendet ist.
14 Spülen Sie den Wasserbehälter und füllen Sie ihn bis zur Markierung MAX
mit frischem Wasser. Setzen Sie den Wasserbehälter wieder in das Gerät
ein.
15 Drücken Sie die OK-Taste, um den Entkalkungszyklus zu beenden.
16 Stellen Sie einen Behälter unter die Kaffee- und Milchauslauftrichter.
17 Das folgende Symbol in der Anzeige zeigt an, dass sich das Gerät
aufheizt.
-
Das Gerät führt einen automatischen Spülzyklus durch.
18 Entfernen und spülen Sie die Milchkanne (siehe Kapitel „Reinigung und
Pflege“, Abschnitt „Wöchentliches Reinigen der Milchkanne“). Setzen Sie
den Wasserauslauf in das Gerät ein.
19 Entnehmen und leeren Sie die Tropfschale. Schieben Sie die Tropfschale
wieder in das Gerät ein.
20Entfernen und spülen Sie die Brühgruppe (siehe Kapitel „Reinigung und
Pflege“, Abschnitt „Reinigen der Brühgruppe“).
Das Gerät ist nun einsatzbereit.
Unterbrechung des Entkalkungsvorgangs
Der gestartete Entkalkungsvorgang muss bis ganz zum Schluss
durchlaufen – das Gerät darf währenddessen nicht ausgeschaltet werden.
Wenn das Gerät während dieses Zyklus stehenbleibt, der Strom ausfällt
oder das Stromkabel versehentlich ausgesteckt wird, können Sie den
Entkalkungsvorgang abbrechen, indem Sie die Standby-Taste drücken. In
diesem Fall leeren und spülen Sie den Wassertank gründlich und füllen Sie
ihn dann bis zur Markierung CALC CLEAN mit frischem Wasser. Bevor Sie
Getränke zubereiten, führen Sie nochmals einen manuellen Spülzyklus wie
Page 73

im Kapitel „Inbetriebnahme“, Abschnitt „Manueller Spülzyklus“ beschrieben
durch. Wenn der Vorgang nicht beendet wurde, muss ein weiterer
Entkalkungsvorgang so bald wie möglich durchgeführt werden.
Warnsymbole und Fehlercodes
Warnsignale erscheinen in Rot. Unten finden Sie eine Liste der
Warnungen, die im Display stehen können, sowie die Bedeutung.
-
Füllen Sie den Wasserbehälter bis zur Markierung MAX mit frischem
Wasser.
-
Der Bohnenbehälter ist leer. Geben Sie neue Kaffeebohnen in den
Bohnenbehälter.
Deutsch
73
-
Die Brühgruppe ist nicht in das Gerät eingesetzt. Setzen Sie die Einheit
ein.
-
Schließen Sie die Serviceklappe.
Page 74

74
Deutsch
-
Entnehmen Sie den Kaffeesatzbehälter und leeren Sie den Behälter.
-
Es ist zu viel Pulver in der Brühgruppe. Reinigen Sie die Brühgruppe.
-
Wenn ein Fehlercode ausgelöst wird, sehen Sie im Abschnitt „Bedeutung
der Fehlercodes“ nach, was der Code im Display bedeutet und was Sie
tun können. Das Gerät ist nicht einsetzbar, wenn dieses Symbol im
Display steht.
-
Sie haben vergessen, den Deckel auf den Behälter für vorgemahlenen
Kaffee zu setzen. Wenn Sie ihn nicht innerhalb von 30 Sekunden
aufsetzen, kehrt das Display zum Hauptmenü zurück und der
Brühvorgang wird gestoppt.
Bedeutung der Fehlercodes
Fehlercode
1 Mahlwerk blockiert Kaffeeauswurfschacht
3 - 4 Die Brühgruppe lässt
Problem Ursache Mögliche Lösung
verstopft
sich nicht entnehmen.
Die Brühgruppe ist nicht
richtig positioniert.
Reinigen Sie den
Kaffeeauswurfschacht
gründlich mit dem Griff
des
Multifunktionswerk
zeugs oder einem
Löffelgriff.
Schließen Sie die
Serviceklappe. Schalten
Sie das Gerät aus und
wieder ein. Warten Sie,
bis der Bildschirm das
Symbol „Gerät bereit“
angezeigt wird, und
entnehmen Sie die
Brühgruppe dann.
Page 75

Deutsch
75
5 Problem im
Wasserkreislauf
Andere Fehlercodes Schalten Sie das Gerät
Wenn die obigen Lösungen nicht helfen, das Gerät in den normalen
Betriebszustand zurückzuholen, und der Fehlercode im Display bleibt,
wenden Sie sich an die Philips Saeco-Hotline. Kontaktdetails finden Sie im
Garantieheft oder auf www.saeco.com/support.
Es ist Luft im
Wasserkreislauf.
Den Wasserbehälter
mehrmals entfernen
und wieder einsetzen.
Vergewissern Sie sich,
dass Sie ihn
ordnungsgemäß in die
Maschine einfügen.
Überprüfen Sie, ob der
Wasserbehälterbereich
sauber ist.
aus und nach
30 Sekunden wieder
ein. Versuchen Sie dies
2 oder 3 Mal.
Saeco-Zubehör bestellen
Verwenden Sie zum Reinigen und Entkalken des Geräts nur SaecoWartungsprodukte. Diese Produkte sind im Philips-Onlineshop (soweit in
Ihrem Land verfügbar) unter www.shop.philips.com/service, im Einzelhandel
oder von autorisierten Servicecentern erhältlich.
Wartungsprodukte bestellen:
Typnummer
CA6700 Entkalkungslösung
Produkt
CA6903 AquaClean-Filter
HD5061 Fett für Brühgruppe
CA6704 Entfettungstabletten
CA6705 Reiniger für Milchkreislauf
Garantie und Support
Weitere Informationen und Unterstützung finden Sie auf
www.saeco.com/support oder in dem separaten Garantieheft.
Wenn Sie Hilfe oder Informationen benötigen, wenden Sie sich bitte an die
Philips Saeco-Hotline in Ihrem Land. Die Anschriften und Rufnummern
finden Sie in dem getrennt beiliegenden Garantieheft oder auf
www.saeco.com/support.
Page 76

76
Deutsch
Recycling
-
Dieses Symbol bedeutet, dass das Produkt nicht mit dem normalen
Hausmüll entsorgt werden kann (2012/19/EU).
-
Beachten Sie die örtlichen Vorschriften zur getrennten Entsorgung von
elektrischen und elektronischen Produkten. Die ordnungsgemäße
Entsorgung dient dem Schutz von Umwelt und Gesundheit.
Fehlerbehebung
Problem
Das Gerät schaltet sich
nicht ein.
Ursache Die Lösung
Das Gerät ist nicht angeschlossen. Prüfen Sie, ob das Netzkabel
richtig eingesteckt ist
Das Gerät befindet sich im
DEMO-Modus.
Die Tropfschale wird
schnell voll.
Stellen Sie eine Tasse unter den
Das Symbol
„Kaffeesatzbehälter voll“
bleibt im Display.
Der Kaffeesatzbehälter wurde zu
Die Brühgruppe lässt sich
nicht entnehmen.
Die Standby-Taste wurde länger als
8 Sekunden gedrückt.
Das ist normal. Das Gerät spült den
internen Kreislauf und die
Brühgruppe mit Wasser. Ein Teil des
Wassers fließt durch das interne
System direkt in die Tropfschale.
Der Kaffeesatzbehälter wurde bei
ausgeschaltetem Gerät geleert.
schnell zurückgesetzt.
Die Brühgruppe ist nicht richtig
positioniert.
Das Gerät mit dem Hauptschalter
aus- und wieder einschalten.
Leeren Sie die Tropfschale, wenn
die Anzeige „Tropfschale voll“
durch die Abdeckung der
Tropfschale zu sehen ist.
Heißwasserauslauf, um das
Spülwasser aufzufangen.
Leeren Sie den Kaffeesatzbehälter
immer bei eingeschaltetem Gerät.
Wenn der Kaffeesatzbehälter bei
ausgeschaltetem Gerät geleert
wird, wird der Kaffeezykluszähler
nicht zurückgesetzt. In dem Fall
bleibt die Meldung „Empty coffee
grounds container“
(Kaffeesatzbehälter leeren) im
Display stehen, auch wenn der
Behälter nicht voll ist.
Setzen Sie den Kaffeesatzbehälter
erst zurück, wenn das Display Sie
dazu auffordert
Schließen Sie die Serviceklappe.
Schalten Sie das Gerät aus und
wieder ein. Warten Sie, bis der
Bildschirm „Machine ready“ (Gerät
bereit) angezeigt wird, und
entnehmen Sie die Brühgruppe
dann
Der Kaffeesatzbehälter ist nicht
ausgebaut.
Entnehmen Sie den
Kaffeesatzbehälter, bevor Sie die
Brühgruppe ausbauen
Page 77

Deutsch
77
Die Brühgruppe lässt sich
nicht einsetzen.
Initialisieren Sie das Gerät, indem
Das Gerät befindet sich noch im
Der Kaffee hat zu wenig
Crema oder ist wässrig.
Die Kaffeemischung stimmt nicht. Ändern Sie die Kaffeemischung.
Das Gerät führt die Selbsteinstellung
Die Brühgruppe ist nicht in der
richtigen Position.
Entkalkungsvorgang.
Es ist ein grober Mahlgrad
eingestellt.
durch.
Die Brühgruppe wurde vor dem
Zurückbauen nicht in die
Ausgangsposition gebracht.
Achten Sie darauf, dass der Hebel
die Unterseite der Brühgruppe
berührt und dass der Haken der
Brühgruppe in der richtigen
Position ist.
Sie es ein- und ausschalten.
Setzen Sie die Tropfschale und
den Kaffeesatzbehälter wieder ein.
Lassen Sie die Brühgruppe
ausgebaut. Schließen Sie die
Serviceklappe und schalten Sie
das Gerät ein und aus. Versuchen
Sie danach, die Brühgruppe
einzubauen.
Während des laufenden
Entkalkungsprozesses kann die
Brühgruppe nicht entnommen
werden. Lassen Sie den
Entkalkungsprozess zuerst zu
Ende laufen und entnehmen Sie
dann die Brühgruppe.
Stellen Sie einen feineren
Mahlgrad ein.
Brühen Sie einige Tassen Kaffee.
Die Brühgruppe ist verschmutzt. Reinigen Sie die Brühgruppe.
Kaffee tropft aus dem
Kaffeeauslauftrichter
Der Kaffee ist nicht heiß
genug.
Die Temperatur ist zu niedrig
Sie haben Milch hinzugefügt. Ob warme oder kalte Milch, die
Das Gerät mahlt
Kaffeebohnen, aber es
kommt kein Kaffee.
Die Brühgruppe ist verschmutzt. Reinigen Sie die Brühgruppe.
Der Kaffeeauslauftrichter ist
verstopft.
Die Tassen sind kalt. Wärmen Sie die Tassen vor, indem
eingestellt. Prüfen Sie die
Einstellungen im Menü.
Der Mahlgrad ist zu fein eingestellt. Stellen Sie einen gröberen
Reinigen Sie den
Kaffeeauslauftrichter und seine
Öffnungen mit Pfeifenreiniger.
Sie sie mit heißem Wasser
ausspülen.
Setzen Sie die Temperatur im
Menü höher.
Milch senkt die Temperatur des
Kaffees immer in einem gewissen
Maß.
Mahlgrad ein.
Page 78

78
Deutsch
Der Kaffeeauslauftrichter ist
Der Kaffeeauswurfschacht ist
Der Kaffee läuft langsam
aus dem Gerät.
Die Brühgruppe ist verschmutzt. Reinigen Sie die Brühgruppe.
Der Kaffeeauswurfschacht ist
Der Gerätekreislauf ist von Kalk
Die Milch schäumt nicht
auf.
Der Milchschaumauslauf wurde nicht
Die Milchkanne ist unvollständig
Die verwendete Milchart eignet sich
verschmutzt.
blockiert.
Der Kaffee ist zu fein gemahlen. Ändern Sie die Kaffeemischung
blockiert.
zugesetzt.
Die Milchkanne ist verschmutzt oder
nicht richtig eingesetzt.
ganz geöffnet.
zusammengesetzt.
nicht zum Aufschäumen.
Reinigen Sie den
Kaffeeauslauftrichter und die
Öffnungen mit Pfeifenreiniger.
Reinigen Sie den
Kaffeeauswurfschacht mit dem
Griff des Multifunktionswerkzeugs
oder einem Löffelgriff.
oder stellen Sie das Mahlwerk ein.
Reinigen Sie den
Kaffeeauswurfschacht mit dem
Griff des Multifunktionswerkzeugs
oder einem Löffelgriff.
Entkalken Sie das Gerät.
Reinigen Sie die Kanne und achten
Sie darauf, dass sie beim Einsetzen
richtig positioniert ist.
Prüfen Sie, ob der
Milchschaumauslauf in der
richtigen Position steht.
Kontrollieren Sie, dass alle Teile
richtig zusammengebaut sind.
Wir haben die folgenden
Milcharten getestet und sie lassen
sich gut aufschäumen: fettarme
Milch oder Vollmilch von der Kuh,
Sojamilch und laktosefreie Milch.
Andere Milcharten wurden nicht
getestet und ergeben eventuell
weniger Schaum.
Es ist Wasser unter dem
Gerät.
Das Gerät steht nicht auf einer
Die Tropfschale ist voll und läuft
über.
geraden Oberfläche.
Leeren Sie die Tropfschale, wenn
durch die Tropfschale der Anzeiger
erscheint, dass die Tropfschale voll
ist. Leeren Sie die Tropfschale
immer, bevor Sie das Gerät
entkalken.
Setzen Sie das Gerät auf eine
gerade Fläche, damit der Anzeiger
der vollen Tropfschale normal
funktioniert.
Page 79

Deutsch
79
Der AquaClean-Filter lässt
sich nicht aktivieren, das
Häkchen im Display wird
nicht angezeigt.
Der Filter lässt sich nicht
aktivieren und das Gerät
will entkalkt werden.
Es wurde kürzlich ein Filter aktiviert. Sie müssen mindestens 10 Tassen
Sie haben bereits 8 AquaClean-Filter
ersetzt. Nach 8 Filterwechseln
müssen Sie das Gerät entkalken.
Der Filter wurde nicht rechtzeitig
ausgetauscht, nachdem das
AquaClean-Wasserfilter-Signal zu
blinken begonnen hatte.
Der Filter wurde nicht bei der
Inbetriebnahme des Geräts, sondern
erst nach ca. 50 Tassen Kaffee (à
100 ml) eingebaut. Das Gerät muss
zum Einbau des AquaClean-Filters
vollkommen kalkfrei sein.
Der AquaClean-Filter wurde bei der
Inbetriebnahme des Geräts nicht
richtig aktiviert.
(à 100 ml) entnehmen, bevor Sie
einen neuen Filter aktivieren
können. Geben Sie beim Aktivieren
eines neuen Filters acht, da der
Filterzähler automatisch
angehoben wird. Sie müssen
mindestens 10 Tassen (à 100 ml)
entnehmen, bevor Sie einen
neuen Filter aktivieren können.
Gehen Sie beim Aktivieren eines
neuen Filters vorsichtig vor, da der
Filterzähler automatisch hochzählt.
Entkalken Sie das Gerät zuerst und
bauen Sie dann den Filter ein.
Entkalken Sie das Gerät zuerst und
bauen Sie dann den Filter ein.
Entkalken Sie das Gerät zuerst und
bauen Sie dann den AquaCleanFilter ein. Nach dem Entkalken ist
der Filterzähler auf 0/8
zurückgesetzt. Kontrollieren Sie die
Filteraktivierung immer im
Gerätemenü, auch nach dem
Filterwechsel.
Folgen Sie den Anweisungen auf
dem Display, bis Sie die
Bestätigung erhalten, dass der
Filter aktiviert wurde.
Der AquaClean-Filter ist
eingebaut, aber die
Entkalkungsmeldung wird
angezeigt.
Die Entkalkungsmeldung
wird angezeigt, bevor
8 Filter gewechselt
wurden.
Der Filter passt nicht. Sie müssen die Luft aus dem Filter
Nach 8 Filterwechseln müssen Sie
das Gerät entkalken.
Sie haben den AquaClean-Filter bei
der Inbetriebnahme des Geräts nicht
richtig aktiviert.
Sie haben den AquaClean-Filter
eingebaut, nachdem das Gerät
schon eine Weile in Gebrauch war.
Sie haben den Austauschfilter nicht
im Gerätemenü aktiviert.
Sie haben den Filter nicht
ausgetauscht, als das Filtersymbol zu
blinken begann.
drängen.
Entkalken Sie das Gerät zuerst und
bauen Sie dann den AquaCleanFilter ein. Dadurch wird der
Filterzähler auf 0/8 zurückgesetzt.
Kontrollieren Sie die
Filteraktivierung immer im
Gerätemenü, auch nach dem
Filterwechsel.
Entkalken Sie das Gerät zuerst und
bauen Sie dann den AquaCleanFilter ein. Aktivieren Sie den Filter
immer im Gerätemenü.
Warten Sie, bis keine Luftblasen
mehr aus dem Filter treten.
Page 80

80
Deutsch
Es ist noch Wasser im
Wasserbehälter.
Sie versuchen einen Filter zu
installieren, der kein AquaCleanFilter ist.
Hinweis: Wenn Sie das Problem mit den Informationen in dieser Tabelle
nicht beheben können, wenden Sie sich an die Philips/Saeco-Hotline.
Leeren Sie den Wasserbehälter
zum Einbau des Filters.
Es passen nur AquaClean-Filter.
Page 81

Español
81
Contenido
Introducción 81
Importante 82
Advertencia 82
Precaución 83
Campos electromagnéticos (CEM) 83
Descripción general del aparato (Fig. 1) 83
La pantalla 84
Primera instalación 85
Ciclo de enjuagado manual 87
Filtro AquaClean 88
Instalación del filtro AquaClean 88
Sustitución del filtro AquaClean 89
Uso del aparato 89
Preparación de café con granos de café 89
Selección de la cantidad de café 89
Selección del ajuste de molido 90
Cappuccino, baby cappuccino y milk froth 90
Preparar bebidas especiales 91
Limpieza y mantenimiento 91
Limpieza semanal del grupo de preparación del café 91
Lubricación 93
Limpieza rápida de la jarra de leche 94
Limpieza diaria de la jarra de leche 94
Limpieza semanal de la jarra de leche 95
Realice una limpieza completa de la jarra de leche mensualmente con el limpiador del
circuito de leche.
Eliminación de los depósitos de cal 98
Procedimiento de descalcificación 98
Interrupción del ciclo de eliminación de los depósitos de cal 100
Iconos de advertencia y códigos de error 100
Significado de los códigos de error 101
Pedido de accesorios Saeco 102
Garantía y asistencia 103
Reciclaje 103
Resolución de problemas 103
97
Introducción
Enhorabuena por la compra de la cafetera espresso totalmente automática
Intelia/Intelia Deluxe. Esta cafetera permite preparar café expreso con los
granos enteros del café. Puede utilizar la jarra de leche para preparar un
cappuccino perfecto de manera rápida y sencilla. Para sacar el mayor
partido de la asistencia que Saeco le ofrece, registre su producto en
Español
Page 82

82
Español
Importante
Advertencia
www.saeco.com/welcome. Este manual de usuario se aplica a todos los
modelos Intelia/Intelia Deluxe con jarra de leche.
-
Conecte el aparato a una toma eléctrica cuyo voltaje coincida con las
especificaciones técnicas de la máquina.
-
Conecte el aparato a un enchufe de pared con toma de tierra.
-
No deje que el cable de alimentación cuelgue por el borde de una mesa
o encimera ni que entre en contacto con superficies calientes.
-
No sumerja en agua el aparato, el enchufe ni el cable de red (hay peligro
de descarga eléctrica).
-
No vierta líquidos en el conector del cable de alimentación.
-
No dirija nunca el chorro de agua caliente hacia ninguna parte del
cuerpo: peligro de quemaduras.
-
No toque las superficies calientes. Utilice las asas y los botones.
-
Apague el aparato con el interruptor principal situado en la parte
posterior y desenchúfelo de la toma de corriente:
-
Si se produce una avería.
-
Si el aparato no se va a usar durante mucho tiempo.
-
Antes del limpiar el aparato.
-
Tire de la clavija, no del cable de alimentación.
-
No toque la clavija de alimentación con las manos húmedas.
-
No utilice el aparato si la clavija, el cable de alimentación o el propio
aparato están dañados.
-
No haga ninguna modificación en el aparato ni en el cable de
alimentación.
-
Repare el aparato solamente en un centro de servicio autorizado por
Philips para evitar riesgos.
-
El aparato no debe ser utilizado por niños menores de 8 años de edad.
-
Este aparato puede ser usado por niños a partir de 8 años y por
personas cuya capacidad física, psíquica o sensorial esté reducida o no
tengan los conocimientos y la experiencia necesarios, si cuentan con
supervisión o formación sobre el uso seguro del aparato y siempre que
conozcan los riesgos que conlleva su uso.
-
Los niños no deben limpiar el aparato ni realizar tareas de
mantenimiento a menos que sean mayores de 8 años y cuenten con
supervisión.
-
Mantenga la cafetera y el cable fuera del alcance de los niños menores
de 8 años.
-
Asegúrese de que los niños no jueguen con este aparato.
-
No introduzca los dedos ni otros objetos en el molinillo de café.
Page 83

Precaución
Español
-
Este aparato está diseñado únicamente para un uso doméstico normal.
No se ha diseñado para usarlo en entornos como cocinas para
empleados de tiendas, oficinas, granjas u otros entornos laborales.
-
Coloque siempre el aparato sobre una superficie plana y estable.
Manténgalo en posición vertical, incluso durante el transporte..
-
No coloque el aparato sobre una placa caliente, justo al lado de un
horno caliente, un calefactor u otra fuente de calor similar.
-
Ponga solamente granos de café tostados en la tolva de granos. Si pone
café molido, café instantáneo, granos de café crudos o cualquier otra
sustancia en la tolva de granos de café, puede provocar daños en el
aparato.
-
Deje que el aparato se enfríe antes de insertar o retirar cualquier pieza.
Las superficies calentadoras pueden retener calor residual después del
uso.
-
No llene nunca el depósito de agua con agua templada, caliente o con
gas, ya que esto puede provocar daños en el depósito de agua y en la
cafetera.
-
No utilice estropajos, agentes abrasivos ni líquidos agresivos, como
gasolina o acetona, para limpiar el aparato. Utilice simplemente un paño
suave humedecido con agua.
-
Elimine los depósitos de cal del aparato periódicamente. El aparato
indica cuándo es necesaria la descalcificación. Si no se realiza, el aparato
dejará de funcionar correctamente. En este caso, la garantía no cubre la
reparación.
-
No guarde la cafetera a temperaturas inferiores a 0 °C. El agua que
queda en el sistema de calentamiento podría congelarse y provocar
daños.
-
No deje agua en el depósito de agua cuando no utilice el aparato
durante un largo período de tiempo. El agua puede contaminarse. Utilice
agua limpia cada vez que utilice el aparato.
83
Campos electromagnéticos (CEM)
Este aparato de Philips cumple los estándares y las normativas aplicables
sobre exposición a campos electromagnéticos.
Descripción general del aparato (Fig. 1)
1 Tapa de la tolva de granos
2 Tolva de granos de café
3 Toma para el cable
4 Depósito de agua
5 Compartimento de café molido
6 Botón de ajuste de molido
7 Panel de control
8 Recipiente para posos de café
9 Boquilla dispensadora de café
10 Bandeja de goteo
11 Tapa de la bandeja de goteo
12 Indicador de bandeja de goteo llena
Page 84

ESP RE SS O
A
R
O
M
A
S
T
R
E
N
G
T
H
CA PPU CC IN O
S
P
E
C
I
A
L
D
R
I
N
K
S
84
Español
La pantalla
13 Botón EXPRESO
14 Botón EXPRESO LARGO
15 Botón AROMA STRENGTH (Intensidad del aroma)
16 Botón CARAFE QUICK CLEAN (Limpieza rápida de la jarra)
17 Botón de modo de espera
18 Botón MENU (Menú)
19 Botón SPECIAL DRINKS (Bebidas especiales)
20 Botón MILK FROTH
21 Botón CAPPUCCINO
22 Cable
23 Cepillo de limpieza (solo para modelos específicos)
24 Grasa (solo para modelos específicos)
25 Cacito dosificador de café molido
26 Probador de dureza del agua
27 Cajón de residuos de café
28 Grupo de preparación del café
29 Jarra de leche
30 Boquilla dispensadora de agua caliente
Utilice estos botones para desplazarse por los menús:
-
Botón EXPRESO = Botón ESC (Escape): pulse este botón para volver al
menú principal. El botón ESC (Escape) retrocede un nivel. Puede que
tenga que pulsar el botón ESC varias veces para volver al menú principal.
-
Botón AROMA STRENGTH (Intensidad del aroma) = Botón OK (Aceptar):
pulse este botón para seleccionar, confirmar o detener una función.
-
Botón CAPPUCCINO = Botón UP (Arriba): pulse este botón para
desplazarse hacia arriba por el menú de la pantalla.
-
Botón SPECIAL DRINKS (Bebidas especiales) = Botón DOWN (Abajo):
pulse este botón para desplazarse hacia abajo por el menú de la
pantalla.
Page 85

Primera instalación
Este aparato se ha probado con café. Aunque se ha limpiado
cuidadosamente, es posible que quede algún residuo de café. Le
garantizamos, no obstante, que el aparato es absolutamente nuevo.
Como ocurre con la mayoría de aparatos completamente automáticos,
deberá preparar algunos cafés para que la máquina complete su ajuste
automático y obtener el café más delicioso.
1 Retire todo el material de embalaje del aparato.
2 Colóquelo en una mesa o encimera que esté alejada del grifo, el
fregadero y fuentes de calor.
Nota: Deje un espacio libre de al menos 15 cm por encima, por detrás y a
ambos lados del aparato.
3 Deslice la bandeja de goteo y su tapa en el aparato.
4 Quite el depósito de agua.
5 Llene el depósito de agua con agua limpia hasta la indicación de nivel
MAX.
6 Abra la tapa de la tolva para granos. Llene la tolva de granos de café y
cierre la tapa.
7 Inserte la clavija para la red en una toma de corriente (1) e inserte la
clavija pequeña en la toma que se encuentra en la parte posterior del
aparato (2).
8 Coloque un recipiente debajo de las boquillas dispensadoras de agua
caliente y café.
Compruebe que la boquilla dispensadora de agua caliente se haya
instalado correctamente.
9 Pulse el botón de espera para encender el aparato.
10 Pulse el botón OK (Aceptar) para iniciar el ciclo de cebado del circuito
automático.
11 El aparato se calienta y en la pantalla se muestra el icono de
temperatura.
Español
85
-
El aparato empieza a limpiar con agua la boquilla dispensadora de café.
La pantalla muestra el icono de lavado y una barra de progreso.
Page 86

AQUA
CLEA N
AQUA CLE AN
FILTE R?
AQUA
CLEA N
INS TALL
FILTE R
AQ U A
CLEA N
0/8
ON
OFF
86
Español
12 La pantalla muestra el siguiente icono para indicar que debe instalar el
filtro AquaClean.
Si desea instalar el filtro AquaClean más tarde, pulse el botón ESC
(Escape) y continúe con el ciclo de enjuagado manual. Para la
instalación, consulte el capítulo "Filtro AquaClean".
13 Pulse el botón OK (Aceptar). En la pantalla aparece el siguiente icono.
14 Retire el filtro AquaClean del embalaje. Sacuda el filtro durante unos
5 segundos.
15 Sumerja el filtro AquaClean boca abajo en una jarra de agua fría y espere
hasta que no salgan más burbujas de aire.
16 Extraiga el depósito de agua del aparato, vacíelo e inserte el filtro
verticalmente en la ranura.
17 Llene el depósito de agua con agua limpia hasta la indicación de nivel
MAX.
18 Pulse el botón OK (Aceptar).
19 Seleccione ON (Encendido) en la pantalla y confirme la activación
pulsando el botón OK (Aceptar)
Page 87

Cuando finaliza la activación, la pantalla muestra una marca para
AQUA
CLEA N
10 0%
confirmarla.
20La pantalla muestra el icono de filtro preparado para indicar que se ha
instalado el filtro AquaClean correctamente.
21 Para enjuagar el filtro, pulse el botón SPECIAL DRINKS (Bebidas
especiales), seleccione la opción HOT WATER (Agua caliente) y pulse el
botón OK (Aceptar) dos veces. Saldrá agua por la boquilla de agua
caliente. Deseche esta agua.
Puede que el agua tarde en salir de la boquilla dispensadora de agua
caliente. El filtro debe estar completamente lleno y haberse enjuagado
con agua.
El aparato está listo para su uso.
Después de instalar el filtro AquaClean, no tiene que llevar a cabo el ciclo
de enjuagado manual.
Ciclo de enjuagado manual
1 Coloque un recipiente debajo de la boquilla dispensadora de café.
2 Pulse el botón AROMA STRENGTH (Intensidad del aroma) y seleccione
la función de preparación con café molido.
No añada café molido al compartimento de café molido.
3 Pulse el botón ESPRESSO (Expreso) o ESPRESSO LUNGO (Expreso
largo).
-
El aparato empieza a dispensar agua caliente.
4 Espere hasta que el aparato deje de dispensar agua y vacíe el recipiente.
5 Repita los pasos 1, 2 y 3 dos veces.
6 Pulse el botón SPECIAL DRINKS (Bebidas especiales). Coloque un
recipiente debajo de la boquilla dispensadora de agua caliente.
7 Pulse los botones UP/DOWN (Arriba/Abajo) para desplazarse por las
opciones de la pantalla. Pulse el botón OK (Aceptar) para seleccionar
agua caliente.
8 Pulse el botón OK (Aceptar) para empezar a dispensar agua caliente.
-
Dispense agua caliente hasta que se muestre en la pantalla el icono "sin
agua".
9 Llene el depósito de agua con agua limpia hasta el nivel MAX (Máximo) y
retire el recipiente.
El aparato está listo para su uso.
Español
87
Page 88

AQ U A
CLEA N
0/8
ON
OFF
88
Español
Filtro AquaClean
El filtro AquaClean se ha diseñado para reducir los depósitos de cal de la
cafetera y dispensar agua filtrada para preservar el aroma y el sabor de
cada taza de café. Si utiliza una serie de 8 filtros AquaClean como se indica
en este manual del usuario no tendrá que descalcificar el aparato cada
5000 tazas (con una capacidad de 100 ml).
Instalación del filtro AquaClean
El aparato desde estar completamente libre de depósitos de calcio antes de
empezar a usar el filtro AquaClean. Si no activó el filtro tras el primer uso y
preparó más de 50 tazas (con una capacidad de 100 ml), tiene que eliminar
los depósitos de cal del aparato antes de activar el filtro.
1 Retire el filtro AquaClean del embalaje. Sacuda el filtro durante unos
5 segundos.
2 Sumerja el filtro AquaClean boca abajo en una jarra de agua fría y espere
hasta que no salgan más burbujas de aire.
3 Quite el depósito de agua del aparato.
4 Inserte el filtro AquaClean en posición vertical en la conexión del filtro.
Empuje el filtro AquaClean hasta el punto más bajo posible. Asegúrese
de fijar bien el filtro y de colocar el sellado en la posición correcta para
garantizar un rendimiento óptimo.
5 Llene el depósito con agua y colóquelo de nuevo en la cafetera.
6 Pulse el botón MENU (Menú) y desplácese hasta la opción filtro
AquaClean. Luego, pulse el botón OK (Aceptar) y seleccione la opción
filtro AquaClean.
Si es la primera vez que instala el filtro, siga los pasos descritos en el
capítulo "Primera instalación".
7 Seleccione ON (Encendido) en la pantalla y confirme la activación
pulsando el botón OK (Aceptar).
Page 89

Español
Nota: La pantalla muestra una marca para confirmar la activación.
8 Para enjuagar el filtro, pulse el botón SPECIAL DRINKS (Bebidas
especiales), seleccione la opción AGUA CALIENTE y pulse el botón OK
(Aceptar) dos veces. Saldrá agua por la boquilla de agua caliente.
Deseche esta agua.
Nota: Puede que el agua tarde en salir de la boquilla dispensadora de
agua caliente. El filtro debe estar completamente lleno y haberse
enjuagado con agua.
9 Utilice la pegatina adjunta al embalaje de plástico del filtro AquaClean
para anotar la fecha de la siguiente sustitución del filtro (después de tres
meses). Coloque la pegatina en el depósito de agua.
El filtro y el aparato ya están listos para usar.
Sustitución del filtro AquaClean
Sustituya el filtro cada tres meses o cuando sea necesario.
Icono de la pantalla del filtro
AquaClean
10 % + el icono parpadea El rendimiento del filtro está disminuyendo. Se
Qué hacer
recomienda extraer el filtro antiguo y sustituirlo por
uno nuevo, como se describe en la sección
"Instalación del filtro AquaClean", para preservar un
rendimiento del filtro adecuado.
89
0 % + el icono parpadea Extraiga el filtro antiguo inmediatamente y coloque el
0 % y el icono desaparece de la pantalla Debe descalcificar primero el aparato antes de colocar
Tras 8 sustituciones del filtro, deberá descalcificar el aparato. Capítulo
"Descalcificación", sección "Procedimiento de descalcificación".
filtro nuevo como se describe en la sección
"Instalación del filtro AquaClean". Cuando active un
filtro nuevo, en la pantalla aparecerá la palabra NEW
(Nuevo). Pulse el botón OK (Aceptar) para confirmar la
activación.
y activar el filtro nuevo.
Uso del aparato
Preparación de café con granos de café
1 Ajuste la boquilla dispensadora de café para que se adapte al tamaño de
la taza.
2 Pulse el botón AROMA STRENGTH (Intensidad del aroma) para
seleccionar la intensidad de café deseada, de 1 a 5 granos.
3 Pulse el botón ESPRESSO (Expreso) para preparar un expreso o pulse el
botón ESPRESSO LUNGO (Expreso largo) para preparar un café.
Selección de la cantidad de café
1 Mantenga pulsado el botón ESPRESSO (Expreso) o ESPRESSO LUNGO
(Expreso largo) hasta que en la pantalla se muestre la palabra MEMO.
Page 90

90
Español
2 Cuando la taza contenga la cantidad de café deseada, pulse el botón OK
(Aceptar) para guardar la cantidad seleccionada.
Selección del ajuste de molido
Nota: Solamente podrá establecer los ajustes del molinillo cuando el
aparato esté moliendo granos de café.
1 Abra la tapa de la tolva para granos.
2 Coloque una taza debajo de la boquilla dispensadora de café.
3 Pulse el botón ESPRESSO.
4 Cuando el aparato esté moliendo el café, coloque el extremo del mango
del cacito dosificador en el botón de ajuste del molinillo en la tolva de
granos de café. Use el cacito para pulsar y girar el temporizador a la
izquierda o a la derecha, una marca cada vez.
5 Puede elegir entre 10 ajustes diferentes para el grado de molido. Cuanto
más pequeño sea el punto, más intenso será el café.
-
Molido grueso: sabor ligero, para mezclas de café más tostado.
-
Molido fino: sabor intenso, para mezclas de café poco tostado.
6 Prepare 2 o 3 cafés para notar la diferencia.
Cappuccino, baby cappuccino y milk froth
Nota: Puede ajustar la cantidad de cappuccino y de espuma de leche.
1 Retire la boquilla dispensadora de agua caliente.
2 Retire la tapa de la jarra de leche.
3 Llene la jarra de leche con leche fresca entre las indicaciones de nivel
MIN y MÁX.
4 Vuelva a colocar la tapa de la jarra de leche.
5 Coloque la boquilla dispensadora en la jarra de leche en la posición "I".
Page 91

6 Inserte la jarra de leche en el aparato. Asegúrese de que la jarra está
introducida correctamente.
7 Coloque una taza debajo de las boquillas dispensadoras de café y leche.
8 Elija la bebida con leche.
-
Pulse el botón CAPPUCCINO para preparar un cappuccino.
-
Pulse el botón LATTE MACCHIATO para preparar un latte macchiato.
-
Pulse el botón SPECIAL DRINKS (Bebidas especiales) y seleccione baby
cappuccino para preparar un baby cappuccino.
El aparato dispensa primero una cantidad predefinida de leche con espuma
en la taza o en el vaso y, a continuación, dispensa una cantidad predefinida
de café.
Preparar bebidas especiales
En el menú de bebidas especiales, puede seleccionar agua caliente y baby
cappuccino.
1 Pulse el botón SPECIAL DRINKS (Bebidas especiales) para entrar en el
menú. En la pantalla aparecen las opciones de bebidas especiales.
2 Pulse los botones UP/DOWN (Arriba/Abajo) para desplazarse por las
opciones del menú.
3 Pulse el botón OK (Aceptar) para confirmar la intensidad de la bebida
deseada.
4 Cuando seleccione AGUA CALIENTE, inserte la boquilla dispensadora de
agua caliente en el aparato y fíjela en su sitio. Cuando seleccione
cappuccino, milk froth o baby cappuccino, inserte la jarra de leche en el
aparato.
Español
91
Limpieza y mantenimiento
Limpieza semanal del grupo de preparación del café
Limpie el grupo de preparación del café una vez a la semana.
1 Retire el recipiente de posos de café y abra la puerta de mantenimiento.
2 Retire el cajón de residuos de café.
Page 92

1
2
92
Español
3 Para retirar el grupo de preparación del café, presione la palanca y
extraiga el grupo de preparación del aparato.
4 Enjuague el grupo de preparación con agua limpia y deje que se seque.
5 Para volver a colocar el grupo de preparación, asegúrese de que la
palanca esté en contacto con la base del grupo de preparación del café.
Nota: Si no está en contacto con la base, presiónela hacia abajo.
6 Asegúrese de que el gancho de bloqueo del grupo de preparación del
café esté en la posición correcta. Para colocar el gancho correctamente,
presiónelo hacia arriba hasta que esté en su posición más alta.
Page 93

Español
7 El gancho no está colocado correctamente si continúa en la posición
inferior.
8 Deslice el grupo de preparación del café en el aparato a lo largo de las
ranuras de guía de los laterales hasta que encaje en su posición. A
continuación vuelva a colocar el cajón de residuos de café en el aparato.
93
Limpieza mensual del grupo de preparación del café con la
pastilla desengrasante
-
Realice este ciclo de limpieza cuando el aparato haya preparado 500
tazas de café o una vez al mes.
-
Utilice una pastilla desengrasante para este ciclo de limpieza.
Precaución: Para la limpieza, utilice solamente pastillas desengrasantes.
No tienen una función descalcificadora.
1 Coloque un recipiente debajo de la boquilla dispensadora de café.
2 Pulse el botón AROMA STRENGTH y seleccione GROUND COFFEE.
3 Ponga una pastilla desengrasante en el compartimento de café molido.
4 Pulse el botón OK (Aceptar). El aparato dispensa agua desde la boquilla
dispensadora de café.
5 Cuando la barra de progreso llegue a la mitad, ajuste el interruptor en
OFF.
6 Deje que la solución desengrasante actúe durante aproximadamente 15
minutos.
7 Coloque el interruptor en ON.
8 Pulse el botón de espera.
9 Espere hasta que el aparato realice un ciclo de enjuagado automático.
10 Realice el procedimiento "Limpieza semanal del grupo de preparación
del café"
11 Retire la bandeja de goteo con el recipiente de posos de café. Vacíe la
bandeja de goteo y el recipiente de posos de café y vuelva a colocarlos
en el aparato.
12 Pulse el botón AROMA STRENGTH y seleccione GROUND COFFEE.
13 Pulse el botón OK (Aceptar). El aparato dispensa agua desde la boquilla
dispensadora de café.
14 Repita los pasos 12 y 13 dos veces. Deseche el agua dispensada.
15 Para limpiar la bandeja de goteo, coloque una pastilla desengrasante en
ella y llénela con agua caliente hasta dos tercios de su capacidad. Deje
que la pastilla desengrasante actúe durante unos 30 minutos. A
continuación, vacíe la bandeja de goteo y enjuáguela a fondo.
Lubricación
Lubrique el grupo de preparación del café después de preparar
aproximadamente 500 tazas de café o una vez al mes.
Page 94

1
1
2
94
Español
1 Aplique lubricante alrededor del eje en la parte inferior de la unidad de
preparación del café.
2 Aplique lubricante a los raíles de ambos lados, como se muestra en la
ilustración.
3 Deslice el grupo de preparación del café en el aparato a lo largo de las
ranuras de guía de los laterales hasta que encaje en su posición. A
continuación vuelva a colocar el cajón de residuos de café en el aparato.
Limpieza rápida de la jarra de leche
Entre la preparación de las variedades de leche, puede enjuagar la boquilla
con agua caliente para asegurarse de que cada receta de leche resulte
óptima.
1 Coloque una taza o un recipiente debajo de la boquilla para recoger el
agua.
2 Coloque la boquilla dispensadora de leche en la posición "I".
3 Pulse el botón CARAFE QUICK CLEAN (Limpieza rápida de la jarra).
-
La pantalla le recuerda que tiene que insertar la jarra de leche, pulse
el botón OK (Aceptar) para confirmar.
Nota: Pulse el botón ESC (Escape) si quiere interrumpir la limpieza de la
jarra de leche.
1 El aparato empieza a limpiar con agua la boquilla dispensadora de café.
La pantalla muestra el icono de lavado y una barra de progreso.
Limpieza diaria de la jarra de leche
Es importante limpiar la jarra de leche cada día o después de cada uso, ya
que asegura que la higiene sea correcta y garantiza que se obtenga espuma
de leche perfecta.
1 Pulse los botones de apertura para retirar la tapa.
Page 95

2 Coloque la boquilla dispensadora de leche en la marca de referencia
(indicada con un punto).
3 Levante el dispensador de la jarra de leche para retirarlo de la tapa y
lávelo con agua tibia. Limpie todos los restos de leche.
4 Vuelva a colocar la boquilla dispensadora de leche en la tapa de la jarra
de leche. Para insertarla, alinee el punto de la boquilla con la marca en la
tapa.
Limpieza semanal de la jarra de leche
1 Pulse los botones de apertura para retirar la tapa.
2 Enjuague la tapa y la jarra de leche con agua limpia. Limpie todos los
restos de leche.
3 Vuelva a colocar la tapa en la jarra de leche y asegúrese de que esté
bien fijada.
4 Retire la parte superior de la tapa y llene la jarra de leche con agua
limpia hasta la indicación de nivel MAX (Máximo).
5 Vuelva a colocar la parte superior de la tapa en la jarra de leche.
6 Inserte la jarra de leche en el aparato. Coloque un recipiente debajo de la
boquilla dispensadora de leche.
7 Pulse el botón MILK FROTH (Espuma de leche) para seleccionar leche
caliente.
8 En la pantalla se mostrará un icono que indica que el aparato está
dispensando agua.
9 Cuando el aparato deje de dispensar agua, retire y vacíe la jarra de leche.
En la pantalla se le preguntará si quiere realizar un ciclo de limpieza
rápida; no es necesario realizarlo durante la limpieza semanal de la jarra
de leche.
10 Pulse los botones de apertura para retirar la tapa de la jarra de leche.
11 Coloque la boquilla dispensadora de leche en el punto indicado sobre la
tapa.
12 Retire la boquilla dispensadora de leche de la tapa.
Español
95
Page 96

96
Español
13 Retire el anillo de la boquilla dispensadora de leche.
14 Pulse el botón con una flecha para desbloquear la tapa de la boquilla
dispensadora de leche.
15 Para retirar la cubierta, presione ligeramente ambos lados de la boquilla
dispensadora y tire de la cubierta hacia abajo para sacarla de la boquilla
dispensadora.
16 Quite la unidad de espuma de leche tirando de ella hacia arriba.
17 Tire del adaptador hacia fuera del dispositivo de espuma de leche.
Page 97

18 Retire el tubo de succión.
19 Tire del adaptador hacia fuera y sepárelo de la pieza restante.
20Limpie todas las partes con agua tibia.
21 Vuelva a unir todas las piezas en el orden inverso.
Realice una limpieza completa de la jarra de leche mensualmente con el limpiador del circuito de leche.
Utilice solamente el limpiador del circuito de leche SAECO CA6705 para
este ciclo de limpieza.
Nota: Antes de iniciar el procedimiento, asegúrese de que el depósito de
agua esté lleno hasta el nivel MAX (Máximo).
1 Pulse el botón MENU (Menú) para abrir el menú y desplácese hasta la
función de limpieza de la jarra completa. Pulse el botón OK (Aceptar).
-
En la pantalla aparecen las operaciones que debe realizar antes de
iniciar el ciclo de limpieza.
2 Vierta el contenido de la bolsa de limpiador del circuito de leche en la
jarra de leche. A continuación, llene de agua la jarra de leche hasta el
máximo nivel.
3 Inserte la jarra de leche en el aparato y coloque un recipiente bajo la
boquilla dispensadora de espuma de leche.
4 Pulse el botón OK (Aceptar) para empezar a dispensar la solución de
limpieza.
-
El aparato dispensa la solución de limpieza a través de la boquilla
dispensadora de leche.
-
Cuando el aparato ya no dispense más, en la pantalla se mostrará el
siguiente icono.
5 Retire el depósito y la jarra de leche del aparato.
6 Enjuague a fondo la jarra de leche y llénela de agua limpia hasta la
indicación de nivel MAX (Máximo).
7 Inserte la jarra de leche en el aparato.
8 Coloque el recipiente bajo la boquilla dispensadora de espuma de leche.
9 Pulse el botón OK (Aceptar) para reiniciar el ciclo de enjuagado de la
jarra.
Español
97
Page 98

START
CALC
CLEAN
CA LC
CLE AN
98
Español
10 Cuando el aparato deje de dispensar agua, el ciclo habrá finalizado.
Eliminación de los depósitos de cal
Debe eliminar los depósitos de cal del aparato cuando en la pantalla se
muestre el icono CALC CLEAN o tras haber sustituido el filtro AquaClean 8
veces.
Si no elimina los depósitos de cal del aparato cuando en la pantalla se
muestre el icono CALC CLEAN o tras haber sustituido el filtro AquaClean 8
veces, el aparato dejará de funcionar correctamente. En ese caso, las
reparaciones no estarán cubiertas por la garantía).
No beba nunca el agua con la mezcla descalcificante que se
vierta en el depósito ni ningún otro residuo que proceda del
aparato durante el proceso de eliminación de los depósitos de
cal.
El procedimiento de descalcificación dura aproximadamente 30 minutos.
Utilice solamente la solución descalcificadora de Saeco para descalcificar el
aparato. La solución descalcificadora de Saeco se ha diseñado para
garantizar el rendimiento óptimo del aparato. El uso de otros productos
puede provocar daños en el aparto y dejar residuos en el agua. Puede
comprar solución descalcificadora de Saeco en la tienda en línea
www.shop.philips.com/service.
Procedimiento de descalcificación
Puede hacer una pausa en el ciclo de descalcificación o de enjuagado
pulsando el botón ESC (Escape). En la pantalla aparecerá el siguiente icono.
Para que continúe el ciclo de descalcificación o de enjuagado, pulse el
botón OK (Aceptar).
1 Retire y vacíe la bandeja de goteo. Vuelva a colocar la bandeja de goteo
en la cafetera.
Retire el filtro de agua AquaClean del depósito de agua (si está puesto).
2 Llene de agua limpia la jarra de leche hasta la indicación de nivel MIN
(Mínimo). Inserte la jarra de leche en el aparato. Coloque la boquilla
dispensadora de la jarra de leche en la posición "I".
3 Pulse el botón OK (Aceptar).
-
La pantalla muestra el siguiente icono para recordarle que debe colocar
la jarra de leche en el aparato.
Page 99

CALC
CLEAN
Español
4 En la pantalla se mostrará el siguiente icono para indicar que el aparato
inicia el ciclo de descalcificación. Si quiere salir del ciclo de
descalcificación, pulse el botón ESC (Escape).
5 Vierta todo el contenido de la botella de solución descalcificante de
Saeco (250 ml) en el depósito de agua.
6 Añada agua a la solución descalcificante en el depósito de agua hasta la
indicación CALC CLEAN.
7 Coloque un recipiente grande (1,5 l) debajo de las boquillas
dispensadoras de leche y café.
8 Pulse el botón OK (Aceptar) para iniciar el ciclo de descalcificación.
-
El aparato dispensa la solución de descalcificación completa en
intervalos regulares a través de las boquillas dispensadoras de leche y
café (durante aproximadamente 25 minutos).
9 Deje que el aparato dispense solución descalcificadora hasta que se
vacíe el depósito de agua. Retire y vacíe el depósito y la jarra de leche.
10 Retire y vacíe la bandeja de goteo. Vuelva a colocar la bandeja de goteo
en la cafetera.
11 Enjuague el depósito de agua y llénelo con agua limpia hasta la
indicación CALC CLEAN. Vuelva a colocar el depósito de agua en la
cafetera.
12 Llene la jarra de leche con agua limpia hasta el nivel MIN (Mínimo) y
colóquela de nuevo en el aparato. Coloque el recipiente debajo de las
boquillas dispensadoras.
13 Pulse el botón OK (Aceptar) para iniciar el ciclo de enjuagado (dura
aproximadamente 4 minutos).
-
En la pantalla se mostrará el siguiente icono para indicar que el ciclo de
enjuagado ha finalizado.
14 Enjuague el depósito y llénelo con agua hasta el nivel MAX (Máximo).
Vuelva a colocar el depósito de agua en la cafetera.
15 Pulse el botón OK (Aceptar) para finalizar el ciclo de descalcificación.
16 Coloque un recipiente debajo de las boquillas dispensadoras de café y
leche.
99
17 En la pantalla se mostrará el siguiente icono para indicar que el aparato
se está calentando.
-
El aparato realiza un ciclo de enjuagado automático.
18 Retirar y limpiar la jarra de leche, consulte el capítulo "Limpieza y
mantenimiento", sección "Limpieza semanal de la jarra de leche". Inserte
la boquilla dispensadora de agua en el aparato.
19 Retire y vacíe la bandeja de goteo. Vuelva a colocar la bandeja de goteo
en la cafetera.
20Limpiar y enjuagar el grupo de preparación, consulte el capítulo
"Limpieza y mantenimiento", sección "Limpieza del grupo de
preparación".
El aparato estará entonces listo para usar.
Page 100

Español
Interrupción del ciclo de eliminación de los depósitos de cal
Una vez iniciado el ciclo de descalcificación, deberá completarlo hasta el
final sin apagar el aparato. Si se atasca durante el ciclo, si hay un corte en el
suministro de energía o si se desconecta el cable de alimentación
accidentalmente, puede salir pulsando el botón de espera. Si esto ocurre,
vacíe y enjuague el depósito de agua y llénelo de nuevo hasta la indicación
de nivel CALC CLEAN. Siga las instrucciones del capítulo "Primera
instalación", sección "Ciclo de enjuagado manual", antes de preparar
ninguna bebida. Si el ciclo no se completó, el aparato requerirá otro ciclo de
descalcificación tan pronto como sea posible.
Iconos de advertencia y códigos de error
Las señales de advertencia se muestran en rojo. A continuación encontrará
una lista de las advertencias que pueden aparecer en la pantalla y sus
significados.
-
Llene el depósito de agua con agua limpia hasta la indicación de nivel
MAX.
-
La tolva de granos de café está vacía. Ponga granos de café nuevos en la
tolva de granos.
-
El grupo de preparación de café no está en el aparato. Inserte el grupo.
 Loading...