

Page 1
eW Flex Compact
Flexible strands of high-intensity LED nodes with solid white light
Page 2
eW Flex Compact
Flexible strands of high-intensity LED nodes with solid white light
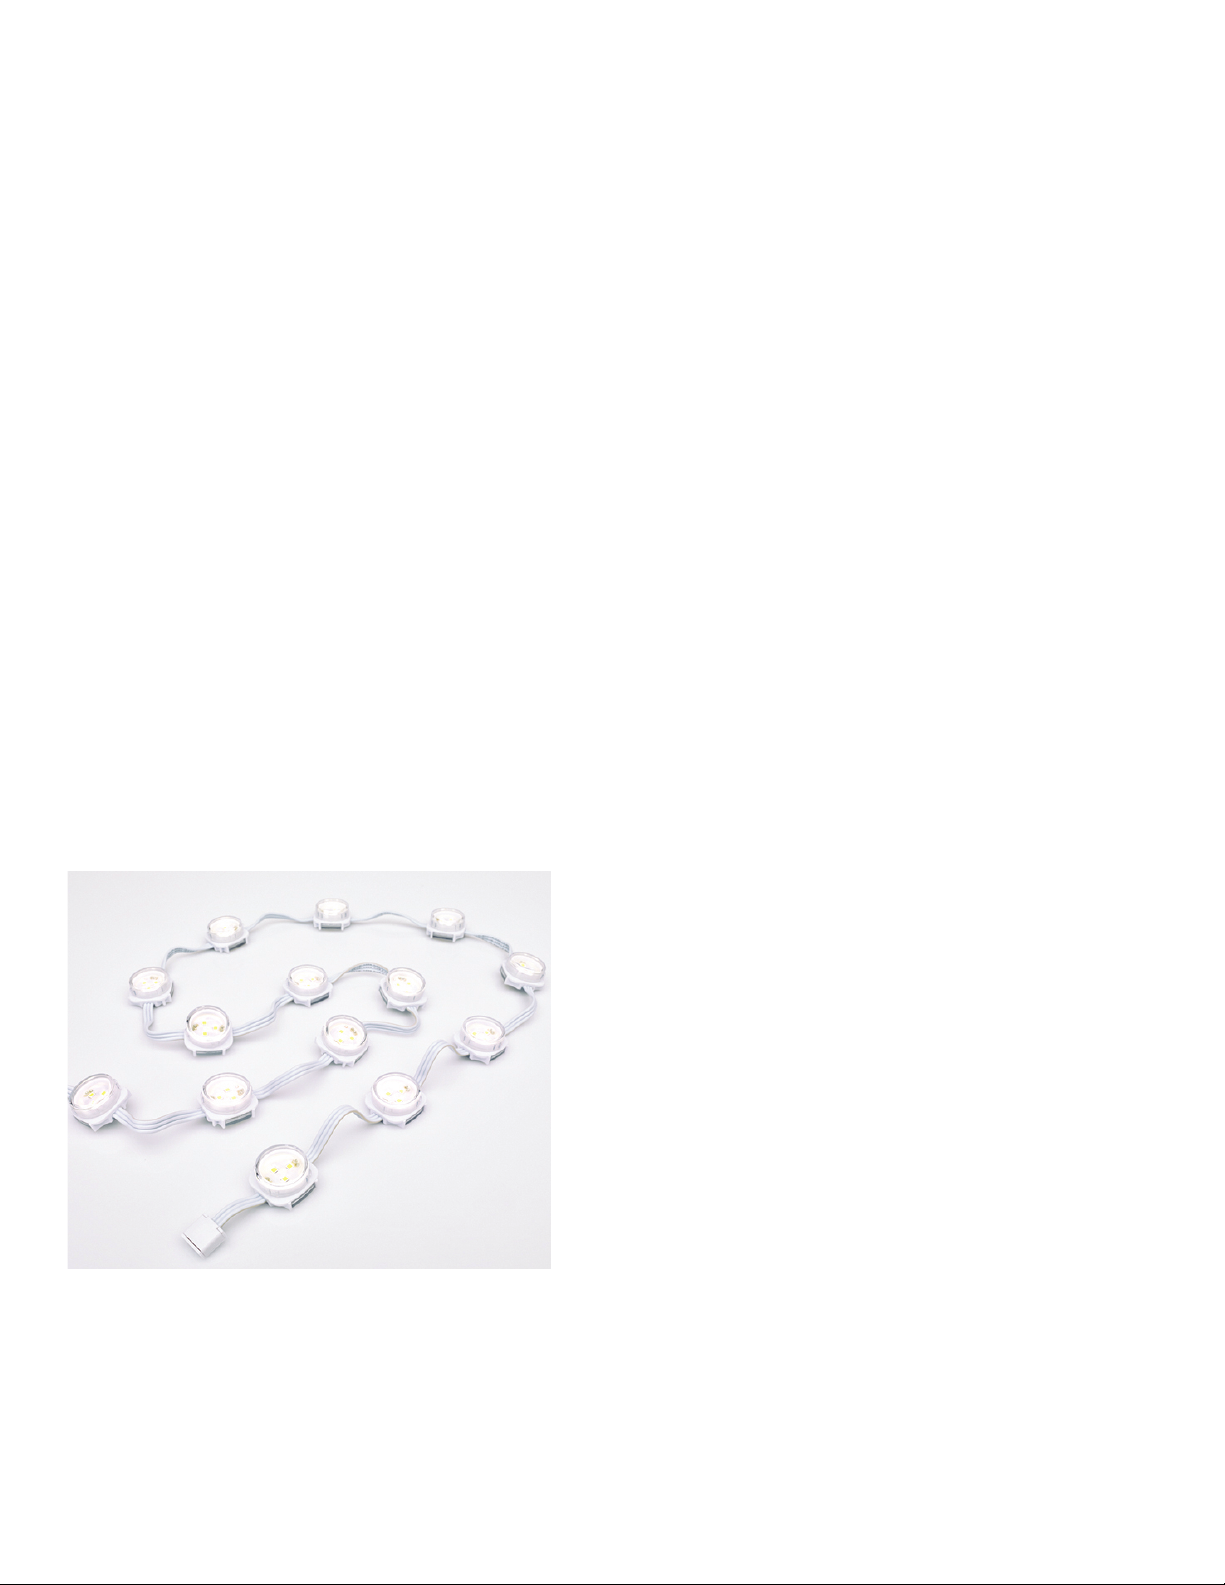
eW Flex Compact is a versatile strand of 50 individually controllable LED nodes. The flexible form factor allows dynamic points of white light
to be installed across nearly any interior or exterior surface, including walls, ceilings, floors, three-dimensional sculptures, and set pieces. eW Flex
Compact can also light tight alcove spaces and signage, and in certain cases, can even display video.
• Daylight visible — At full brightness, each node
produces light output of up to 31.5 candela and
47679 nit s.
• Adaptable mounting — Strands can be mounted
directly to a surface, like traditional string lights.
Detachable leader cables in multiple lengths allow
you to install strings at the appropriate distance
from power/data supplies. Optional mounting
tracks ensure straight linear runs, while snapon spacers hide cabling and mounting hardware.
Single node mounts can be positioned individually
as anchor points for installations with uneven
node spacing or complex geometries.
• Outdoor rated — Fully sealed for maximum
xture life and IP66-rated for outdoor
applications.
• Supports cost-effective video displays — Flexible
form factor, offering maximum lighting control at
50 W per strand, accommodates unique lighting
installations, including two- and three-dimensional
video displays. White nodes enable classic black and
white video or reverse (shadow) video.
• Multiple lens options — Standard clear at and
translucent dome lenses. Optional translucent at,
clear dome, semi-frosted at, and semi-frosted
dome lenses are available.
• Standard and custom lengths and node
spacing — eW Flex Compact strands are available
with standard on-center node spacing of 102 mm
(4 in) or 305 mm (12 in) along a three-wire, 18
AWG cable. For information about custom orders,
see the eW Flex Compact Ordering Sheet at
www.philipscolorkinetics.com/ls/essentialwhite/
ewflexcompact/
• Custom Leader Cables — Custom Leader Cable
lengths are available in addition to standard cables
of 7.6 m (25 ft), 15.2 m (50 ft), and 30.5 m (100 ft).
• Industry-leading controls — eW Flex Compact
works seamlessly with the complete Philips line of
controllers, including Video System Manager Pro,
Light System Manager, and iPlayer 3, as well as
third-party DMX controllers.
Superior Light
Output
eW Flex Compact strands
consist of 50 individually
controllable, high-intensity
LED nodes. Each node
produces solid white
light output of up to 31.5
candela.
eW Flex Compact Product Guide2
Page 3
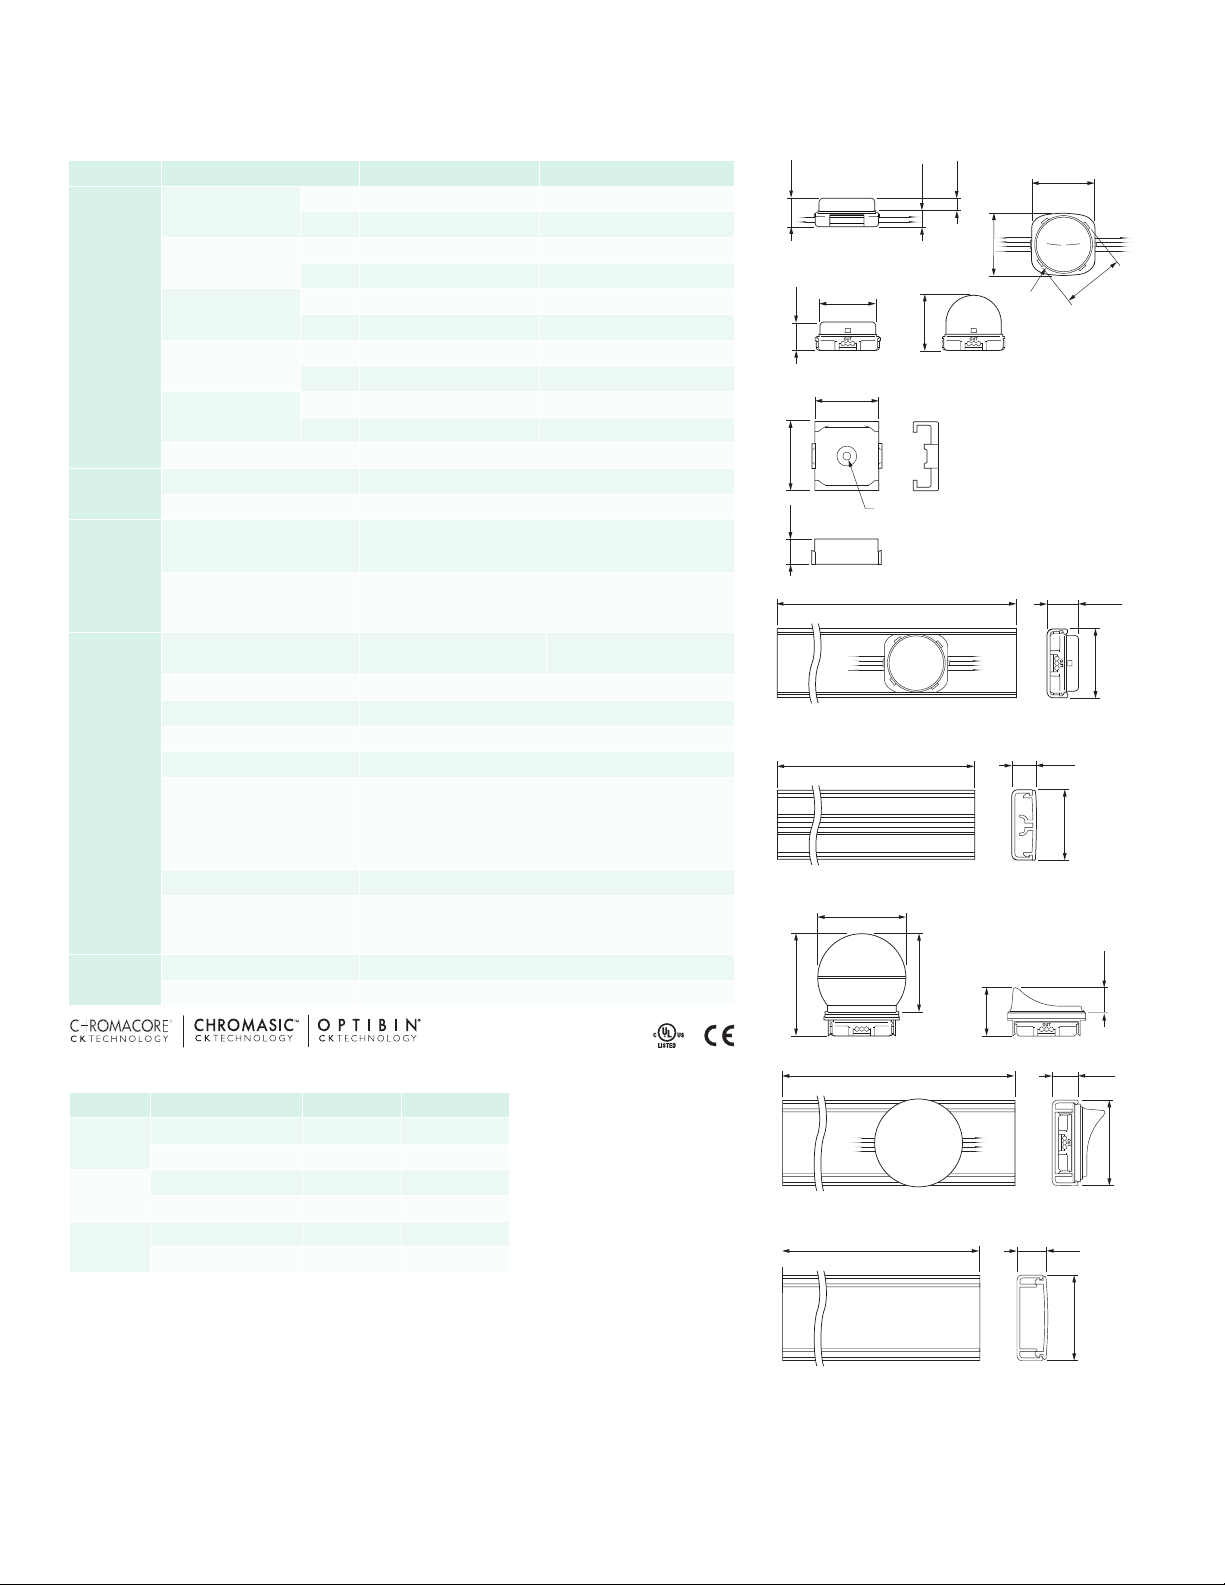
Specications
35 mm
34 mm (1.4 in
Dome Lens
25 mm
(1 in)
Flat Lens
Ø 29 mm
(1.1 in)
17 mm
(.67 in)
17 mm
7 mm
(.27 in)
10 mm
(.4 in)
17 mm
(.67 in)
32 mm
Ø 29 mm
(1.1 in)
32 mm
(1.25 in)
31 mm
(1.2 in)
31 mm
(1.2 in)
Clear Flat Lens Translucent Dome Accessory Single-Node Mount
Ø 29 mm
(1.1 in)
32 mm
(1.25 in)
31 mm
(1.2 in)
31 mm
(1.2 in)
Spacer shown in place on Track
48 mm (1.9 in
Screw mount
through hole
35 mm
(1.4 in)
13 mm
(.5 in)
35 mm
(1.4 in)
12 mm
(.48 in)
Spacer shown in place on Track
34 mm (1.4 in)
20 mm
(.77 in)
34 mm (1.6 in)
70 mm or 273 mm
(2.75 in or 10.75 in)
(.06 in ±)
Node shown in place on Track
1.2 m (48 in)
Dome Lens
25 mm
(1 in)
Dome Lens
25 mm
(1 in)
Flat Lens
Ø 29 mm
(1.1 in)
17 mm
(.67 in)
Flat Lens
Ø 29 mm
(1.1 in)
17 mm
(.67 in)
7 mm
(.27 in)
10 mm
(.4 in)
17 mm
(.67 in)
7 mm
(.27 in)
10 mm
(.4 in)
17 mm
(.67 in)
Ø 29 mm
(1.1 in)
32 mm
(1.25 in)
31 mm
(1.2 in)
31 mm
(1.2 in)
Ø 29 mm
(1.1 in)
32 mm
(1.25 in)
31 mm
(1.2 in)
31 mm
(1.2 in)
Clear Flat Lens Translucent Dome Accessory Single-Node Mount
Ø 29 mm
(1.1 in)
32 mm
(1.25 in)
31 mm
(1.2 in)
31 mm
(1.2 in)
Due to continuous improvements and innovations , specifications may change without notice.
Item Specication Clear Flat Lens Translucent Dome Lens
2700 K 80.9 35.0
4000 K 86.9 39.6
2700 K 29.8 7.1
4000 K 31.5 8.0
2700 K 45127 cd/m
4000 K 47679 cd/m
2700 K 82 85
4000 K 84 86
2700 K 110° 200°
4000 K 110° 200°
PDS-60ca 24V (Pre-programmed or DMX/Ethernet)
sPDS-60ca 24V (DMX/Ethernet)
sPDS-480ca 24V (Ethernet)
Philips full range of controllers, including Video System
Manager Pro, Light System Manager, and iPlayer 3, or third-
Lumens Per Node
Candela Per Node
Output
Electrical
Control
Luminance
CRI
Viewing Angle
LED Channels White
Input Voltage 24 VDC via sPDS-480ca, sPDS-60ca, and PDS-60ca
Power Consumption 1 W max. per node at full output, steady state
Interface
Control System
party controllers
Node Dimensions
Height x Width x Depth
Weight 2.2 lbs (1 kg) 50-node strand, 4 in on-center node spacing
Housing White or black polycarbonate
31 x 32 x 17 mm
(1.2 x 1.25 x .67 in)
Lens Clear or translucent plastic
Physical
Fixture Connections Integrated watertight 3-pin connector
Temperature Ranges
-30° – 50° C (-22° – 122° F) Operating
≥ 0° C (≥ 32° F) Handling
-20° – 50° C (-4° – 122° F) Startup
-30° – 85° C (-22° – 185° F) Storage
PDS-60ca 24V: 1 strand
sPDS-60ca 24V: 1 strand
sPDS-480ca 24V: 8 strands
Certication
and Safety
Humidity 0 – 95%, non-condensing
Maximum Fixtures Per
Power/Data Supply
Certication UL/cUL, FCC Class A, CE
Environment Dry/Damp/Wet Location, IP66
Lumen Maintenance
Threshold* Ambient Temperature Reported† Calculated†
L
90
L
80
L
70
* Lx x= xx% lumen maintenance (when light output drops below x x% of
initial output). All values are given at B50, or the median value where
50% of the LED population is better than the reported or calculated
lumen maintenance measurement.
† Lumen maintenance gures are based on lifetime prediction graphs
supplied by LED source manufacturers. Whenever possible, gures
use measurements that comply with IES LM-80- 08 testing procedures.
In accordance with TM-21-11, reported values represent the
interpolated value based on six times the LM-80- 80 total test duration
(in hours). Calculated values represent time durations that exceed six
times the total test duration.
@ 25° C 50,600 hours >100,000 hours
@ 50° C 50,600 hours >100,000 hours
@ 25° C 50,600 hours >100,000 hours
@ 50° C 50,600 hours >100,000 hours
@ 25° C 50,600 hours >100,000 hours
@ 50° C 50,600 hours >100,000 hours
Ø 29 mm
(1.1 in)
(1.25 in)
31 mm
(1.2 in)
20 mm
(.77 in)
(.67 in)
Ø 29 mm
2
2
10660 cd/m
12106 cd/m
2
2
17 mm
(.67 in)
(1.4 in)
(.5 in)
13 mm
(1.1 in)
Flat Lens
35 mm
(1.4 in)
Screw mount
through hole
1.2 m (48 in)
25 mm
(.4 in)
10 mm
(1 in)
7 mm
(.27 in)
31 mm
Dome Lens
(1.2 in)
31 x 32 x 25 mm
(1.2 x 1.25 x 1 in)
16 mm
(.64 in)
)
(.6 in)
.15 mm
15 mm
(.6 in)
)
34 mm (1.6 in)
48 mm (1.9 in)
Node shown in place on Track
70 mm or 273 mm
(2.75 in or 10.75 in)
(.06 in ±)
52 mm
65 mm
(2.05 in)
(2.6 in)
1.2 m (48 in)
55 mm, 81 mm, 259 mm, 462 mm
(2.2 in, 3.2 in, 10.2 in, 18.2 in)
(.5 mm ±)
53 mm
(2.08 in)
29 mm
(1.1 in)
12 mm
(.48 in)
Spacer shown in place on Track
eW Flex Compact Product Guide 3
Page 4

Fixtures and Power/Data Supplies
eW Flex Compact is part of a complete system which includes fixtures and:
• One or more power/data supplies.
Included in the box
eW Flex Compact strand (50 nodes)
Extra termination cap
Installation Instructions
• One Leader Cable to attach each strand of eW Flex Compact to a power/data
supply port.
• Optional mounting tracks, spacers, or single-node mounts.
• Any Philips controller, including Video System Manager, Light System Manager, and
iPlayer 3, or any third-party controller.
Fixtures, 4 inch on-center node spacing
Item Type Item Number Philips 12NC
White 500-000012-00 912400130619
Black 500-000012-01 912400130620
White 500-000012-02 912400130621
Black 500-000012-03 912400130622
White 500-000012-08 912400130627
Black 500-000012-09 912400130628
White 500-000012-10 912400130629
Black 500-000012-11 912400130630
White 500-000012-16 912400130635
Black 500-000012-17 912400130636
White 500-000012-18 912400130637
Black 500-000012-19 912400130638
White 500-000012-24 912400130643
Black 500-000012-25 912400130644
White 500-000012-26 912400130645
Black 500-000012-27 912400130646
White 500-000012-48 912400133735
Black 500-000012-49 912400133736
White 500-000012-50 912400133737
Black 500-000012-51 912400133738
White 500-000012-32 912400130651
Black 500-000012-33 912400130652
White 500-000012-34 912400130653
Black 500-000012-35 912400130654
White 500-000012-40 912400130659
Black 500-000012-41 912400130660
White 500-000012-42 912400130661
Black 500-000012-43 912400130662
Use Item Number when ordering in North America.
eW Flex Compact
50 nodes
Clear Flat Lens
2700 K
Translucent
Dome Lens
Clear Flat Lens
3000 K
Translucent
Dome Lens
Clear Flat Lens
3500 K
Translucent
Dome Lens
Clear Flat Lens
4000 K
Translucent
Dome Lens
Clear Flat Lens
5000 K
Translucent
Dome Lens
Clear Flat Lens
5700 K
Translucent
Dome Lens
Clear Flat Lens
6500 K
Translucent
Dome Lens
Custom Configurations
In addition to the standard configurations discussed in this product
guide, custom configurations are also available. See the eW Flex
Compact Ordering Information sheet at www.philipscolorkinetics.
com/ls/ew/flexcompact/ for more information.
Component Available Non-Standard Options
Node Spacing
Strand Length 5 – 60 nodes
Node/Cable Color Clear
Lens Clear flat, translucent flat
51 mm (2 in) – 610 mm (24 in)
on-center
eW Flex Compact Product Guide4
Page 5

Fixtures, 12 inch on-center node spacing
Item Type Item Number Philips 12NC
White 500-000012-04 912400130623
Black 500-000012-05 912400130624
White 500-000012-06 912400130625
Black 500-000012-07 912400130626
White 500-000012-12 912400130631
Black 500-000012-13 912400130632
White 500-000012-14 912400130633
Black 500-000012-15 912400130634
White 500-000012-20 912400130639
Black 500-000012-21 912400130640
White 500-000012-22 912400130641
Black 500-000012-23 912400130642
White 500-000012-28 912400130647
Black 500-000012-29 912400130648
White 500-000012-30 912400130649
Black 500-000012-31 912400130650
White 500-000012-52 912400133739
Black 500-000012-53 912400133740
White 500-000012-54 912400133741
Black 500-000012-55 912400133742
White 500-000012-36 912400130655
Black 500-000012-37 912400130656
White 500-000012-38 912400130657
Black 500-000012-39 912400130658
White 500-000012-44 912400130663
Black 500-000012-45 912400130664
White 500-000012-46 912400130665
Black 500-000012-47 912400130666
eW Flex Compact
50 nodes
Clear Flat Lens
2700 K
Translucent
Dome Lens
Clear Flat Lens
3000 K
Translucent
Dome Lens
Clear Flat Lens
3500 K
Translucent
Dome Lens
Clear Flat Lens
4000 K
Translucent
Dome Lens
Clear Flat Lens
5000 K
Translucent
Dome Lens
Clear Flat Lens
5700 K
Translucent
Dome Lens
Clear Flat Lens
6500 K
Translucent
Dome Lens
Use Item Number when ordering in North America.
eW Flex Compact Product Guide 5
Page 6

Power/Data Supplies
Item Type Item Number Philips 12NC
PDS-60ca 24V Power/
Data Supply
sPDS-60ca 24V Power/
Data Supply
sPDS-480ca 24V Power/
Data Supply
Item Type Color Item Number Philips 12NC
Leader Cable
Mounting Track 1.2 m (1 4 ft.) track
Spacers
Single-Node
Mounts
Pre-programmed 109-000016-00 910503700095
DMX/Ethernet 109-000016-04 912400133526
DMX/Ethernet
Ethernet 109-000026-01 912400133528
7.6 m (25 ft) Black 108-000045-00 910503700696
15.2 m (50 ft) Black 108-000045-01 910503700697
30.5 m (100 ft) Black 108-000045-02 910503700698
50 102 mm (4 in)
spacers
50 305 mm (12 in)
spacers
50 mounts
109-000021-04 (NA Cord)
109-000021-05 (EU/UK Cord)
White 101-000057-00 910503700044
Black 101-000057-01 910503700045
White 101-000059-00 910503700048
Black 101-000061-02 910503700052
White 101-000059-01 910503700049
Black 101-000061-01 910503700053
White 101-000058-00 910503700046
Black 101-000058-01 910503700047
912400133527
912400133636
Accessories
Item Type Color Item Number Philips 12NC
White 999-007997-00 910503702308
Black 999-007997-01 910503702309
White 999-007997-04 910503702312
Black 999-007997-05 910503702313
White 999-007997-02 910503702310
Black 999-007997-03 910503702311
Black 120-000179-00 912400130036
White 101-000057-03 910503704266
Black 101-000057-04 910503704267
White 101-000075-00 910503704272
Black 101-000075-02 910503704274
White 101-000075-01 910503704273
Black 101-000075-03 910503704275
Marquee Lens
Kits
Qty 50
Glare Shield
Kits
Qty 50
Accessory
Mounting Track
Qty 1
Accessory
Spacers
Qty 50
Clear
Semi-Frosted
Translucent
(1.2 m) 4 ft
102 mm (4 in)
305 mm (12 in)
eW Flex Compact Product Guide6
Page 7

E Clean lenses with water and mild detergent
using a soft cleaning cloth. Wipe lenses dry.
Do not use paper towels, abrasive cleaning
products, or window cleaners. Abrasive cleaning
products will scratch lenses, and window
cleaners will soften and mar the polycarbonate.
Do not use cleaning solutions that contain
ammonia, sodium hydroxide, or isopropyl alcohol,
which can scratch, pit, haze, yellow, or crack
lenses.
E Refer to the eW Flex Compact Installation
Instructions for specific warning and caution
statements.
Installation
eW Flex Compact can be used in a wide range of two-dimensional and threedimensional configurations, including portable video screens and permanent buildingcovering displays. eW Flex Compact installations are not constrained by fixture size,
shape, or architectural space.
Because of their potential complexity, eW Flex Compact installations require up-front
planning for configuring, positioning, and mounting the fixture strands. Planning includes
understanding how to position strands in relation to power/data supplies and the
number of strands each power/data supply can support. Planning for video displays
involves additional considerations, such as how to space eW Flex Compact nodes to
achieve the desired pixel pitch, minimum and maximum viewing distances, sampling, and
display resolution.
All installations involve three main steps:
1. Create a lighting design plan and layout grid
2. Mount xture strands
3. Test xture strands
Owner/User Responsibilities
It is the responsibility of the contractor, installer, purchaser, owner, and user to
install, maintain, and operate strands of eW Flex Compact in such a manner as to
comply with all applicable codes, state and local laws, ordinances, and regulations.
Consult with the appropriate electrical inspector to ensure compliance.
Installing in Damp or Wet Locations
When installing in damp or wet locations, seal all fixture connections, power/data
supplies, and junction boxes with electronics-grade RTV silicone sealant so that water
or moisture cannot enter or accumulate in wiring compartments, cables, or other
electrical parts. Use suitable outdoor-rated junction boxes when installing in wet
or damp locations. Additionally, use gaskets, clamps, and other parts required for
installation to comply with all applicable local and national codes.
DMX or Ethernet Control?
eW Flex Compact installations can be controlled via either DMX or Ethernet. DMX is
appropriate for relatively simple installations, or for installations where all lights operate
in unison — for example, for accent, perimeter, or cove lighting applications.
Each node in a strand of eW Flex Compact is identified by a light number. A light
number corresponds to three sequential DMX addresses. A DMX universe consists of
512 addresses, so the maximum number of light numbers available in a DMX universe is
170 (170 x 3 = 510).
Because Ethernet is not subject to the DMX addressing limitations, it is the preferred
environment for dynamic light shows and video displays, both of which require
numerous unique light numbers. In an Ethernet environment, each power/data supply
effectively acts as its own universe.
DMX installations require the use of a PDS-60ca 24V or sPDS-60ca 24V
supply, while the sPDS-480ca 24V power/data supply is Ethernet only.
power/data
eW Flex Compact Product Guide 7
Page 8

Considerations for Video Displays
In addition to the planning required for all eW Flex Compact installations, planning
for video displays involves special considerations such as pixel pitch, minimum and
maximum viewing distances, sampling, and display resolution.
Determining Pixel Pitch and Viewing Distances for Video Displays
When using eW Flex Compact strands to display video, each node acts as a pixel in
the display. Images on an LED video display appear to be sharper to the human eye
as the distance from the display increases. Likewise, images appear less visible as the
distance decreases. The spacing between pixels, known as the pixel pitch, determines the
minimum and maximum viewing distances for discernible video output. Pixel pitch is
measured center-to-center. For an eW Flex Compact strand, you determine pixel pitch
by measuring from the center of one node to the center of the next.
Designing a layout with overlapping strands is a common technique for increasing pixel
pitch. For example, to create a dense line of nodes, place multiple runs close to each
other vertically, with a slight horizontal offset between the nodes. Philips offers eW Flex
Compact with both 102 mm (4 in) and 305 mm (12 in) spacing between nodes. Using
strands with made-to-order node spacing is another method for adjusting pixel pitch.
The following calculations and examples are general guidelines for determining
minimum and maximum viewing distances, based on video displays using grids of evenly
spaced pixels:
• To determine minimum viewing distance, multiply pixel pitch by 100 distance units.
For example, if the pixel pitch is 76 mm (3 in), the minimum viewing distance is
7.6 m (25 ft).
Measure from the center of one
node to the center of an adjacent
node to determine pixel pitch
• To determine the maximum viewing distance for discernible video, multiply the
screen height by 20 distance units. For example, if the screen height is 20 m (65.6 ft),
then the maximum viewing distance for recognizable video is 400 m (1312.3 ft).
• LED screens are visible beyond the maximum viewing distance for discernible video.
To determine the maximum viewing distance that still creates visual impact, multiply
the screen height by 50 distance units. For example, a screen 20 m (65.6 ft) high will
continue to create visual impact at 1000 m (3280.8 ft).
Working with Video Display Resolutions
The resolution of an LED video display equals the total number of vertical and
horizontal pixels — the greater the pixel count, the greater the resolution.
• The resolution of VSE digital video is 1024 x 768
• The resolution of PAL video is 704 x 576
• The resolution of NTSC video is 704 x 480
eW Flex Compact Product Guide8
Page 9

E For designs where the acceptable
Terminator
level of discernible video may be more
or less demanding, or for help with your
specific installation, contact Philips Color
Kinetics Application Engineering Services for
assistance.
Reproducing a video signal with 1:1 pixel mapping on an LED display requires a
substantial pixel count. For example, true NTSC video output requires 337,920 pixels,
PAL output requires 405,504 pixels, and digital video output requires 786,432 pixels.
However, you can use a controller such as Philips Video System Manager Pro to reduce
the required pixel count for any video format by sampling and distributing pixels from
the source video to match your installation.
For example, if you retain the horizontal resolution of a digital video source (1024 lines
wide), but sample every tenth line of pixels vertically (76 lines high instead of 768 lines),
you can retain the correct aspect ratio while exponentially reducing the pixel count.
From a distance, even with only 76 lines of vertical output, the human eye can still
discern video images because the horizontal resolution is dense.
An installation using 1024 x 76 nodes would have a pixel count of 77,824 yet still
display high-quality digital video output. This method is especially effective when creating
an installation that covers a building which, by necessity, already has spacing between
lines of video due to windows and other architectural features.
Create a Lighting Design Plan
and Layout Grid
Even for relatively simple installations, it’s good practice to create a lighting design plan.
For complex installations displaying light shows with dynamic effects, and especially
for Ethernet-based video displays, such a plan is essential. A lighting design plan is
typically an architectural diagram or other diagram that shows the physical layout
of the installation, including the appropriate positioning and spacing of all fixtures,
power/data supplies, power sources, controllers, cables, and other required hardware.
For DMX installations, the plan should record the DMX base number and node
count for each eW Flex Compact strand. For Ethernet installations, the plan should
record the IP address of each power/data supply and the number of nodes per
power/data supply port.
E Refer to the Installation Instructions
or Specification Sheet of your power/data
supply for guidelines on configuring and
positioning the power/data supply in relation
to a controller or Ethernet switch.
Power / Data Supply eW Flex CompactLeader Cable
Keep the following considerations in mind when creating a lighting design plan and
layout grid:
• Determine the appropriate location of each power/data supply in relation to the
xtures, and of the xtures in relation to each other. You connect a strand of eW
Flex Compact xtures to an available power/data supply port using a Leader Cable
of 7.6 m (25 ft), 15.2 m (50 ft), or 30.5 m (100 ft).
• eW Flex Compact Leader Cables can be shortened, and strands can be cut to any
node length. An extra termination cap is included for sealing the cut end of the
strand.
Do not trim the Leader Cable between the power/data supply connector and the
PCA transmitter junction box. Do not trim strands between the connector and
the rst node.
1423 50
C Do not trim
eW Flex Compact Product Guide 9
Page 10

• On an architectural diagram or other diagram that shows the physical layout of
1 in
1 in
(25 mm)
the installation, identify the locations of all switches, controllers, power supplies,
and xtures.
• Nodes in each strand are sequentially addressed beginning with the node closest
to the Leader Cable. Orientation of the power/data supply is therefore especially
critical when using dynamic effects.
• In Ethernet environments, each power/data supply is identied with a unique IP
address. We recommend recording the IP address of each power/data supply
on a layout grid. For complex installations with many power/data supplies, we
recommend assigning meaningful IP addresses to each power/data supply, so their
locations are easy to identify.
Start the Installation
1. Install all power/data supplies, including any interfaces with controllers. Power/data
supplies send power and control signals to xtures over the Leader Cable.
2. Verify that all additional supporting equipment (switches, controllers) is in place.
3. Ensure that all additional parts (for example, optional single node mounts, spacers,
mounting track, and mounting hardware) and tools are available.
Cut and Seal eW Flex Compact Strands
(Optional)
You can cut eW Flex Compact strands to any desired node length. We recommend
cutting and sealing the strands before mounting them.
1. Using a wire cutter, cut the cable to the desired length, leaving at least 25 mm (1 in)
of cable after the last node. Ensure the cut is clean and there are no frayed wires
touching other wires.
(25 mm)
2. Apply a liberal amount of electronics-grade RTV silicone sealant to the cable ends
and to the opening of the rubber seal boot included with the extra termination cap.
Insert the boot onto the cable.
3. Sit the sealed cable boot into the base of the provided termination cap.
4. Firmly press the termination cap onto the base until the top snaps into place. If using
pliers, be careful not to crack the housing.
E Never cut a strand between the three-
pin connector and the first node.
E Never reuse a termination cap.
RTV Silicone
eW Flex Compact Product Guide10
Page 11

E Optional Marquee Lens and Glare
Shield Kits use their own mounting tracks
and spacers. Refer to “Mount eW Flex
Compact Strands with Accesories” for
details.
E You cannot use single-node mounts
with marquee lenses or glare shields.
Mount the Fixtures
You can mount eW Flex Compact strands directly to a mounting surface, or you can
mount them using eW Flex Compact mounting accessories (available separately):
• Optional mounting tracks ensure straight runs in linear applications. Spacers snap
to the mounting tracks for a clean, nished look that hides cables and mounting
hardware between nodes.
• Single node mounts can be positioned individually to provide anchor points for
nodes in installations with uneven node spacing or complex geometries.
Make sure the power is OFF before mounting and connecting eW Flex Compact
fixtures.
1. Using a pencil or chalk line, mark a center-line path for the nodes to follow.
Do not twist or loop cable
Do not overstretch cable
Do not pull cable away from node
2. (Optional) To install mounting track, cut the track to the desired length with a
saw or snips. Using athead screws suitable for the mounting surface, drive screws
through the plastic track into the attaching surface. Recommended maximum
spacing between screws is 406 mm (16 in). Snap optional spacers into the track to
hide mounting hardware and wires.
3. (Optional) Ensure that the spacing between single node mounts is sufcient to
accommodate cable length between nodes and to allow for cable bending as
necessary.
Using double-sided tape on the base of the mounts, adhere the mounts to the
attaching surface. Reinforce installation with #6 athead screws suitable for the
mounting surface.
4. If using mounting track or single node mounts, push the xture nodes into the
mounts.
5. If mounting directly to a mounting surface, install eW Flex Compact strands using
a suitable mounting method. For example, you can mount strands to a pipe or
cable using plastic cable ties.
Use caution when handling cable
in sub-freezing temperatures
C
≤ 0ºC
Mounting track and spacers
Single-node mounts
eW Flex Compact Product Guide 11
Page 12

Mount eW Flex Compact Strands
with Accessories
Marquee lenses and glare shields clip onto eW Flex Compact strands with flat lenses.
Available with clear, semi-frosted, or translucent finshes, marquee lenses create the
appearance of bulbs on a traditional theatre marquee. Glare shields block unwanted
spill light, and can shield the light sources from being directly visible in certain
mounting situations.
You can mount strands with marquee lenses and glare shields directly to a mounting
surface, in front of a substrate, or using optional Accessory Mounting Tracks and
Accessory Spacers. Mounting tracks ensure straight runs in linear applications. If
using strands with standard 4-in or 12-in on-center spacing, you can snap spacers to
the mounting tracks for a clean, nished look that hides cables and mounting hardware
between nodes.
Mounting eW Flex Compact Strands with Accessories Directly
to a Mounting Surface
1. Using a pencil or chalk line, mark a center-line path for the nodes to follow.
2. Clip a lens or glare shield holder over each eW Flex Compact node.
3. Do one of the following:
• Screw a marquee lens onto the lens holder. Hand tighten to approximately 10 to
15 in-lbs (1.1 to 1.7 Nm).
• Align the tabs on the glare shield with the slots in the glare shield holder, and
snap the glare shield onto the glare shield holder.
(Optional)
E You cannot use eW Flex Compact
accessories on strands with with dome
lenses, or with standard mounting tracks or
single node mounts.You can install either
a marquee lens or glare shield on a node,
but not both.
4. Fasten assembled eW Flex Compact strands to the mounting surface using a
suitable mounting method, For example, you can mount strands to a pipe or cable
using plastic cable ties.
2.125 in Diameter
(54 mm)
Marquee Lens Kit
2.125 in Diameter
(54 mm)
Glare Shield Kit
eW Flex Compact Product Guide12
Page 13

Mounting eW Flex Compact Strands with Accessories in Front of
a Substrate
1. Prepare the substrate by cutting openings of the appropriate diameter in the
required locations.
To accommodate the threads on the marquee lens holder or the ridges on
the glare shield holder, the recommended substrate thickness is 1.6 mm
(.0625 in), and the maximum thickness is 3.2 mm (.125 in). We recommend
using a 1 3/8 in diameter hole saw to cut openings in the substrate. Openings
should be a minimum of 35.6 mm (1.4 in) in diameter, and a maximum of
38 mm (1.5 in) in diameter.
2. Peel the backing from a lens or glare shield holder to expose the adhesive
surface.
3. Insert the lens or glare shield holder through an opening in the substrate, and
temporarily afx the lens holder by pressing the adhesive surface to the back
of the substrate. Make sure that the holder is oriented in the direction of the
eW Flex Compact strand.
1.0 mm (.039 in) min
3.2 mm (.125 in) max
35.6 mm (1.4 in diameter) min
38 mm (1.5 in diameter) max
1⅜ in diameter hole saw recommended
eW Flex Compact Product Guide 13
Page 14

4. Do one of the following:
• Screw a marquee lens onto the lens holder. Hand tighten to approximately 10
to 1.1 to 1.7 Nm (15 in-lbs).
• Align the tabs on the glare shield with the slots in the glare shield holder, and
snap the glare shield onto the glare shield holder.
5. Repeat steps 2 – 4 for each opening.
6. Once all accessories are installed on the substrate, mount eW Flex Compact
strands by inserting one node into the back of each lens or glare shield holder.
Press until the nodes snap rmly into the lens or glare shield holders.
eW Flex Compact Product Guide14
Page 15

Mounting Marquee Lenses and Glare Shields to Accessory Mounting
Track
1. Clip a lens or glare shield holder to each node.
2. Do one of the following:
• Screw a marquee lens onto the lens holder. Hand tighten to approximately
1.1 to 1.7 Nm (10 to 15 in-lbs).
• Align the tabs on the glare shield with the slots in the glare shield holder, and
snap the glare shield onto the glare shield holder.
3. Cut the Accessory Mounting Track to the desired length with a saw or snips.
Using athead screws suitable for the mounting surface, drive screws through
the plastic track into the attaching surface. Recommended maximum spacing
between screws is 406 mm (16 in).
4. Snap the assembled eW Flex Compact nodes into the mounting track.
5. If using strands with standard 4-in or 12-in on-center spacing, you can snap
optional Accessory Spacers into the track to hide mounting hardware and
wires.
eW Flex Compact Product Guide 15
Page 16

3.69 in
Make Power and Data Connections
eW Flex Compact fixtures are designed to work with 24 VDC power/data supplies
from Philips Color Kinetics. Power/data supplies send power and data to eW Flex
Compact strands over a Leader Cable. Each sPDS-480ca 24V can power up to 8 fixture
strands in Ethernet installation, while each PDS-60ca 24V or sPDS-60ca 24V can power
1 strand in either Ethernet or DMX installations.
PDS-60ca 24V is an IP66-rated power/data supply, suitable for use in damp and wet
locations. Although sPDS-480ca 24V is rated for use in dry locations only, you can
install it in a watertight enclosure for outdoor applications.
Make sure the power is OFF before connecting eW Flex Compact fixture strands.
Connecting eW Flex Compact Leader Cables
Connect a Leader Cable to the three-pin connector on the end of each eW Flex
Compact strand by turning the fixture strand’s grommet clockwise. In wet or damp
environments, tighten the grommet on the male connector sufficiently to ensure a
watertight seal. Use caution when handling the Leader Cable or eW Flex Compact
strand in sub-freezing temperatures, as the wiring can become brittle and break.
Maximum strands per power/data supply
PDS-60ca 24V 1
sPDS-60ca 24V 1
sPDS-480ca 24V 8
Leader Cable connector dimensions
94 mm
1.1 in
28 mm
Connecting to the sPDS-60ca 24V or sPDS-480ca 24V Power/Data Supply
• Connect a Leader Cable to an available power port on the back of the power/data
supply housing.
sPDS-60ca 24V
.25 in
6 mm
E If using conduit, remove the transmitter
PCA junction box cover from the Leader
Cable, as described here, before pulling the
cable through the conduit, then replace the
junction box cover.
sPDS-480ca 24V
eW Flex Compact Product Guide16
Page 17

Connecting to the PDS-60ca 24V Power/ Data Supply
.98 in
25 mm
.63 in
16 mm
5
1
2
4
6
5
3
RTV Silicone
The PDS-60ca 24V is an IP66-rated power/data supply, suitable for use in damp
and wet locations. The following procedure describes how to connect and seal a
PDS-60ca 24V power/data supply for outdoor applications.
1. Remove the power/data supply cover.
2. Remove the cover of the transmitter PCA junction box on the Leader Cable
by expanding the four tabs on the side and sliding the cover from the base.
3. Connect line, common, ground, and data to the provided terminal block,
then replace the cover of the transmitter PCA junction box.
Transmitter PCA junction box dimensions
3.06 in
77.8 mm
E You can download the QuickPlay Pro
software and the Addressing and Configuration
Guide from www.philipscolorkinetics.com/
support addressing/
+
Data
Data
–
Red
Blue
Blue
Stripe
Black
4. Connect the Leader Cable connector to an available port inside the power/
data supply housing.
5. Secure the power/data supply cover. If installing in a wet or damp location,
seal the power/data supply with electronics-grade RTV silicone sealant.
3
Red
Blue
Blue/
White
Black
Red
Blue
Blue/
White
Black
6
4
2
1
PDS-60ca 24V
PDS-60ca 24V
6. Repeat steps 1 – 5 for each power/data supply in the installation.
eW Flex Compact Product Guide 17
Page 18

Address and Congure the Fixtures
Make sure the power is ON before addressing and configuring fixtures.
Power/data supplies and controllers work together to stream data to the eW Flex
Compact strands in your installation.
• Each individual eW Flex Compact node is assigned three sequential DMX addresses.
A DMX universe consists of 512 addresses, so the maximum number of eW Flex
Compact nodes that can be individually addressed in a DMX universe is 170 (170 x
3 = 510).
When using a PDS-60ca 24V power/data supply with DMX control, you program the
power/data supply rather than addressing the eW Flex Compact strings directly. Use
SmartJack Pro (or iPlayer 3) with QuickPlay Pro addressing software to set a base
DMX address for the power/data supply, and to specify the node quantity of each
attached eW Flex Compact strand.
For lighting designs where nodes work in unison, all nodes should be set to
the same DMX addresses. For dynamic light show designs that show different
brightness levels on different nodes simultaneously, you must assign unique
DMX addresses to each node. Starting with its base DMX address, PDS-60ca
automatically assigns addresses to each eW Flex Compact node in sequence, from
the rst node on output port 1 through the last node on output port 2.
Because you are limited to 170 uniquely addressed nodes per DMX universe (less
than four strands of 50 nodes each), Ethernet is the preferred environment for
video displays and dynamic lighting effects.
• Each Ethernet-based power/data supply comes pre-programmed with a unique
IP address, so the power/data supply effectively functions as its own universe.
When creating a light map with a controller or media server, such as Light
System Manager or Video System Manager Pro, each eW Flex Compact node
automatically receives a unique identifier.
You can discover all power/data supplies by IP address using QuickPlay Pro,
Light System Manager, or Video System Manager Pro. For large installations, and
especially for video displays, we recommend giving power/data supplies meaningful
IP addresses to streamline installation, mapping, testing, and troubleshooting.
When readdressing power/data supplies, you will need the layout grid you created
when you recorded each power/data supply’s IP address during installation
planning.
For complete details on addressing and configuring fixtures, controllers, and
power/data supplies, refer to the Addressing and Configuration Guide or the User
Guide, or Specification Sheet for your controller or power/data supply.
Copyright © 2016 Philips Solid-State Lighting Solutions, Inc. All rights reserved.
Chromacore, Chromasic, CK, the CK logo, Color Kinetics, the Color Kinetics
logo, ColorBlast, ColorBlaze, ColorBurst, ColorGraze, ColorPlay, ColorReach, iW
Reach, eW Reach, DIMand, EssentialWhite, eW, iColor, iColor Cove, IntelliWhite,
iW, iPlayer, Optibin, and Powercore are either registered trademarks or
trademarks of Philips Solid-State Lighting Solutions, Inc. in the United States and/or
other countries. All other brand or product names are trademarks or registered
trademarks of their respective owners. Due to continuous improvements and
innovations, specifications may change without notice.
DAS-000142-00 R05 04 APR 2016
Philips Color Kinetics
3 Burlington Woods Drive
Burlington, Massachusetts 01803 USA
Tel 888.385.5742
Tel 617.423.9999
Fax 617.423.9998
www.philipscolorkinetics.com
 Loading...