

Page 1
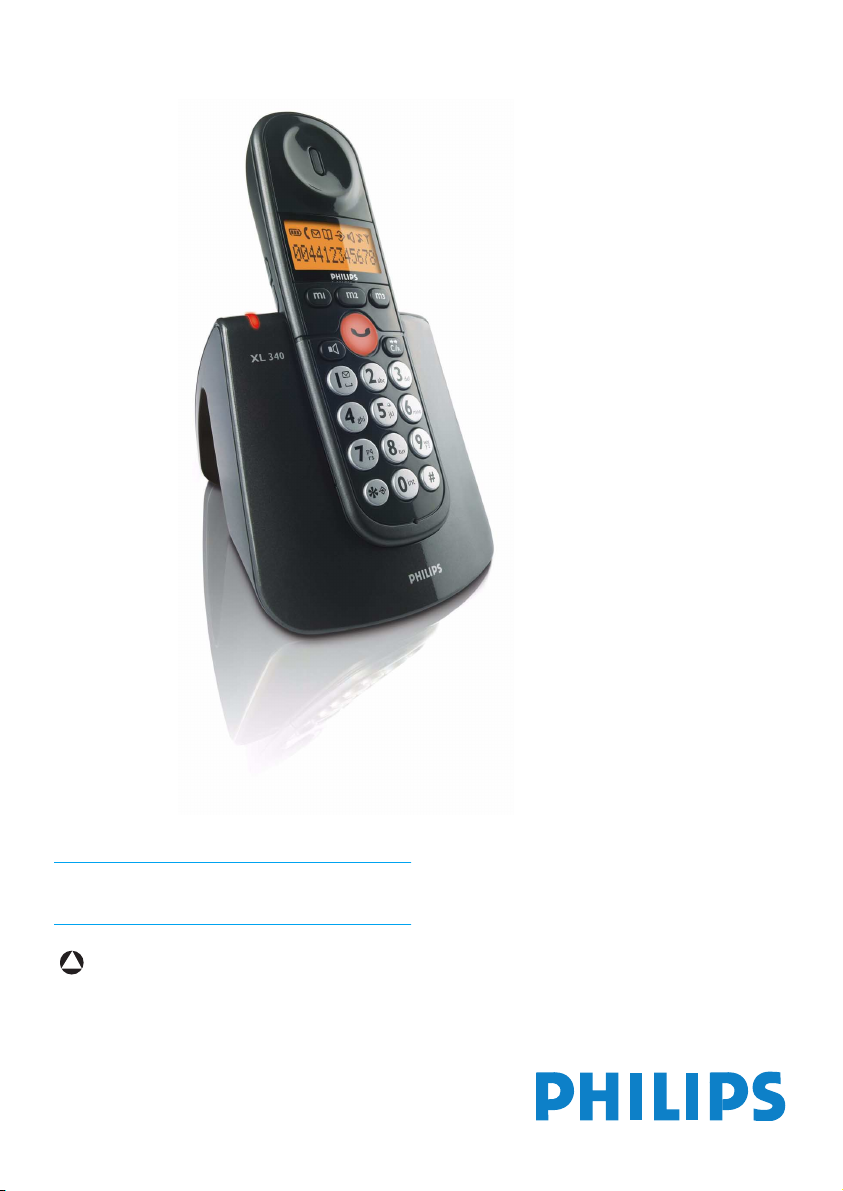
XL340
www.philips.com/support
EN Telephone
!
Warning
Use only rechargeable batteries.
Charge each handset for 24 hours before use.
Page 2

Welcome mode
Note
Welcome mode is not available for some
countries.
Before using your XL340, you need to configure
it according to the country of use. When you
switch on the phone for the first time, your
phone displays a welcome message in different
languages.
After a few seconds, your phone displays the
countries available for selection. You can
configure the country now.
1
View the countries available for selection.
2
Press the country number on the keypad to
make a selection. For example, UK, PRESS 1.
• After making a selection, your phone's power
turns off for a few seconds to update the
setti ngs.
!
Warning
If the handset is currently lost link, your phone
will show a failed message. It will only update the
display language. Your phone will display the
welcome message again when you replace the
handset's batteries.
When your phone finishes updating the settings,
it will turn back on automatically.
Your phone is now ready to be used.
Page 3

Table of contents
1 Important information 3
1.1 For your safety 3
1.2 Power requirements 3
1.3 Telephone connection 3
1.4 Need help? 3
1.5 Safety information 3
1.6 Conformity 3
1.7 Safety precautions 3
1.8 Environmental care 4
1.9 Recycling & disposal 4
2 Your phone 5
2.1 What’s in the box 5
2.2 Overview of the phone 6
3.5 Using GAP standard compliance 9
3.6 Standby mode 9
3.7 Verify the signal 9
4 Using your phone 10
4.1 Call 10
4.2 Answer a call 10
4.3 Loudspeaker phone 10
4.4 Adjust the audio volume 10
4.5 End a call 10
4.6 Make a second call 11
4.7 Answer a second call 11
4.8 Conference call 11
4.9 Use intercom 11
2.3 Overview of the base 7
2.4 Display icons 7
3 Getting started 8
3.1 Connect the base 8
3.2 Connect the charger 8
3.3 Insert the batteries in the handset 8
3.4 Charge batteries 8
Table of contents
4.10 Text or number entry 11
5 Use more of your phone 13
5.1 Phonebook memory 13
5.2 Personalizing your phone 13
5.3 Advanced features 14
6 Default settings 18
1
Page 4

Table of contents
7 Quick reference table for
phone menus 19
8 Technical data 20
9 Frequently asked questions 21
10 Index 22
2
Table of contents
Page 5
1Important information
1.1 For your safety
Before installing your XL340, carefully read the
following information.
1.2 Power requirements
• The product requires an electrical supply of
220-240 volts, alternating monophased power,
excluding IT installations defined in standards
EN 60950. In case of power failure, the
communication can be lost.
!
Warning
The electrical network is classified as dangerous
according to criteria in the standard EN 60950.
The only way to power down this product is by
unplugging the power supply from the electrical
outlet. Ensure the electrical outlet is located
close to the apparatus and is always easily
accessible.
• Always use the cables provided with the
product.
• Handsfree activation could suddenly increase
the volume in the earpiece to a very high level :
make sure the handset is not too close to your
ear.
1.3 Telephone connection
• Always use the line cable provided with the
product otherwise you may not have a dialing
tone.
• If you have a broadband DSL Internet
connection, make sure you have one DSL filter
plugged directly on each line socket used in the
house and check the modem and the phone are
plugged in the correct filter slot (one specific
for each).
1.4 Need help?
For more information on Troubleshooting and
FAQ's :
• Online help : www.philips.com/support
• Troubleshooting : see page 21
1.5 Safety information
• Do not expose the phone to excessive heat
caused by heating equipment or direct sunlight.
• Do not drop your phone or allow objects to
fall on your phone.
• Do not use any cleaning agents containing
alcohol, ammonia, benzene, or abrasives as
these may harm the set.
• Active mobile phones in the vicinity may cause
interference.
• Do not use the product in places where there
are explosive hazards.
• Do not let small metal objects come into
contact with the product. This can deteriorate
audio quality and damage the product.
!
Warning
This equipment is not designed to make
emergency calls when the power fails. An
alternative has to be made available to allow
emergency calls.
1.6 Conformity
Hereby, Philips declares that the XL340 is in
compliance with the essential requirements and
other relevant provisions of Directive 1999/5/EC.
This product can only be connected to the
analogue telephone networks of the countries
mentioned on the packaging.
The Declaration of conformity is available on
www.p4c.philips.com.
1.7 Safety precautions
• Do not allow the handset to come into contact
with water.
• Do not open the handset or the base station.
You could be exposed to high voltages.
Important information
3
Page 6

• Do not allow the charging contacts or the
batteries to come into contact with conductive
materials.
• Never use any battery type other than the one
supplied : risk of explosion.
!
Warning
Metallic objects may be retained if placed near or
on the handset receiver.
1.8 Environmental care
Please remember to observe the local regulations
regarding the disposal of your packaging
materials, exhausted batteries and old phone and,
where possible, promote their recycling.
1.9 Recycling & disposal
Disposal instructions for old products :
The purpose of the WEEE directive (Waste
Electrical and Electronic Equipment; 2002/96/EC)
is to ensure that products are recycled using best
available treatment, recovery and recycling
techniques to ensure human health and high
environmental protection.
Your product is designed and manufactured with
high quality materials and components, which can
be recycled and reused.
Use one of the following disposal options :
• Dispose of the complete product (including its
cables, plugs and accessories) in the designated
WEEE collection facilities.
• If you purchase a replacement product, hand
your complete old product back to the retailer.
The shop should accept it as required by the
WEEE directive.
Disposal instructions for batteries :
Batteries should not be disposed of with
general household waste.
Packaging information :
Philips has marked the packaging with standard
symbols designed to promote the recycling and
appropriate disposal of your eventual waste.
A financial contribution has been paid to
the associated national recovery &
recycling system.
The labeled packaging material is
recyclable.
Do not dispose of your old product in your
general household waste bin.
Inform yourself about the local separate
collection system for electrical and electronic
products marked by this symbol.
4
Important information
Page 7
2 Your phone
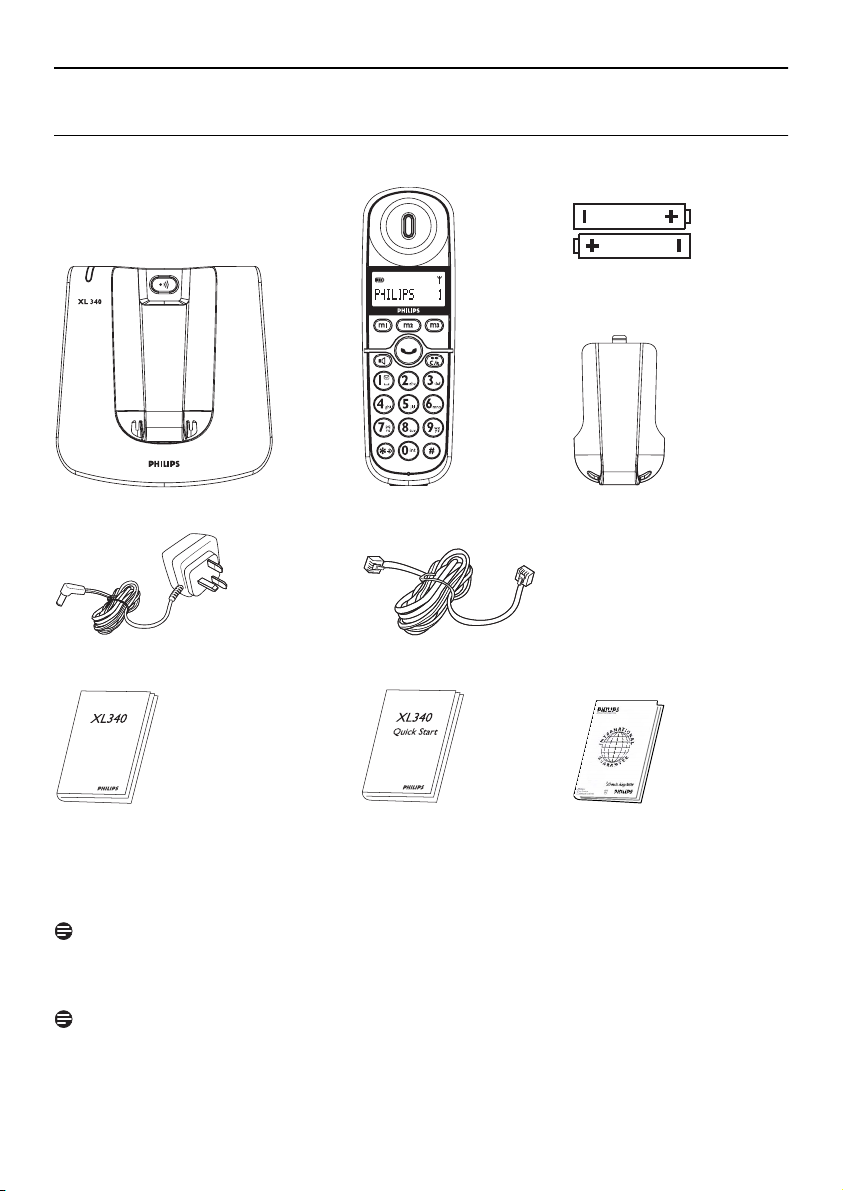
2.1 What’s in the box
2 rechargeable batteries
Base unit
Power adaptor for base Line cord*
User manu al
Make sure you have all these items in the box. For missing item(s), contact your dealer.
In multi-handset packs, you will find additional handsets, chargers, power supplies, and batteries.
Note
*You may find in the box the line adaptor delivered separately from the line cord. In this case, please
plug first this line adapter onto the line cord before connecting it to the line socket.
Note
Handset Battery door
Quick start guide Guarantee
This telephone system meets FCC standards for Hearing Aid Compatibility.
Your phone
5
Page 8
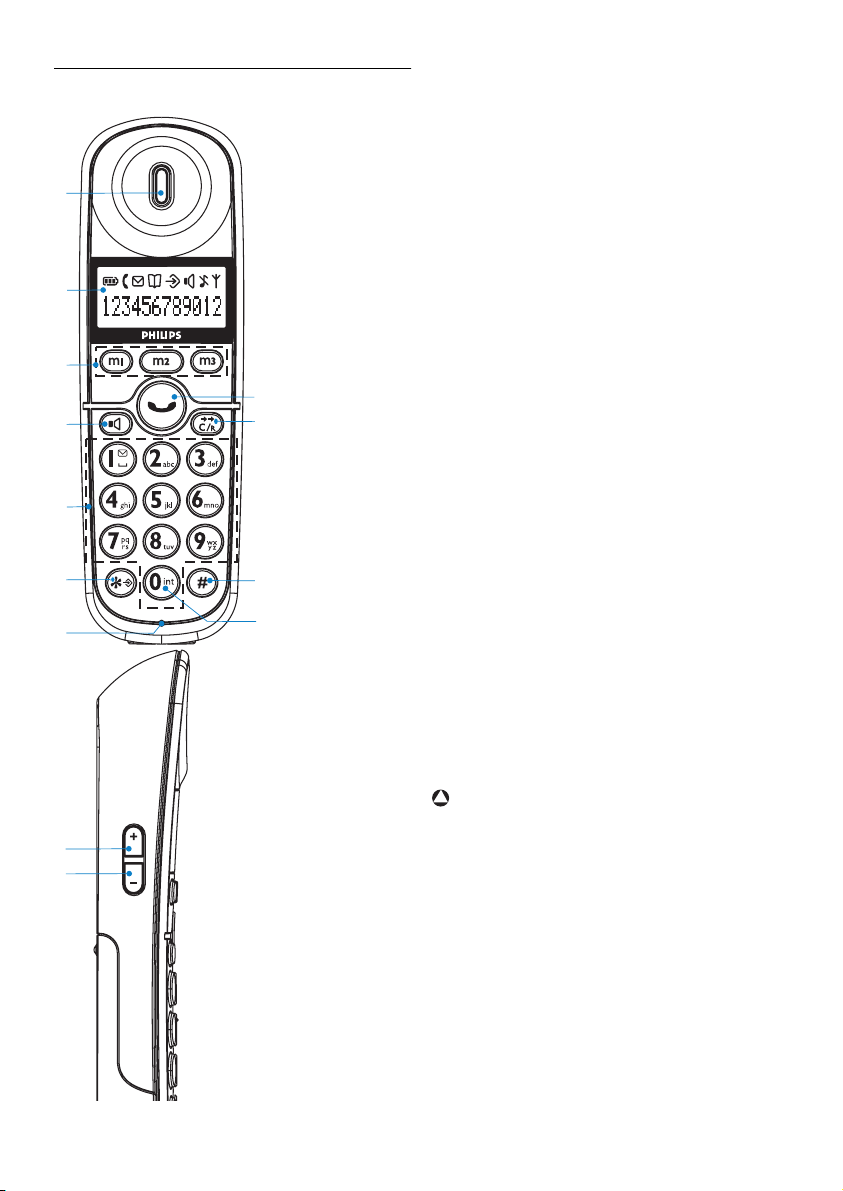
2.2 Overview of the phone
A
B
C
D
E
G
H
K
F
I
J
AEarpiece
BDisplay
C Direct memory keys
Use to access direct memories.
DTalk key
Use to take the line and answer a call.
In viewing memory, use to dial out the
number.
Use to end a call.
E Speaker key
Use to turn on or off the speaker.
Use to change the ringing melody.
F Redial, Cancel & Recall key
Use to cancel an operation.
Use to redial the last dialed number.
Use to send out a flash.
G Digit keys
Use to d ial digits and enter characters.
Use to access extra memories.
H Insert star & Program key
Use to insert * (star).
Use to enter program mode.
I Insert # & Pause key
Use to insert #.
Use to insert pause (P) when dialing.
J Intercom Key
Use to make intercom call.
KMicrophone
LVolume up Key
Use to increase ringer and audio volume.
MVolume down Key
Use to decrease ringer and audio volume.
!
Warning
Handsfree activation could suddenly increase the
L
M
6
volume in the loudspeaker to a very high level.
Make sure the handset is not too close to your
ear.
Your phone
Page 9
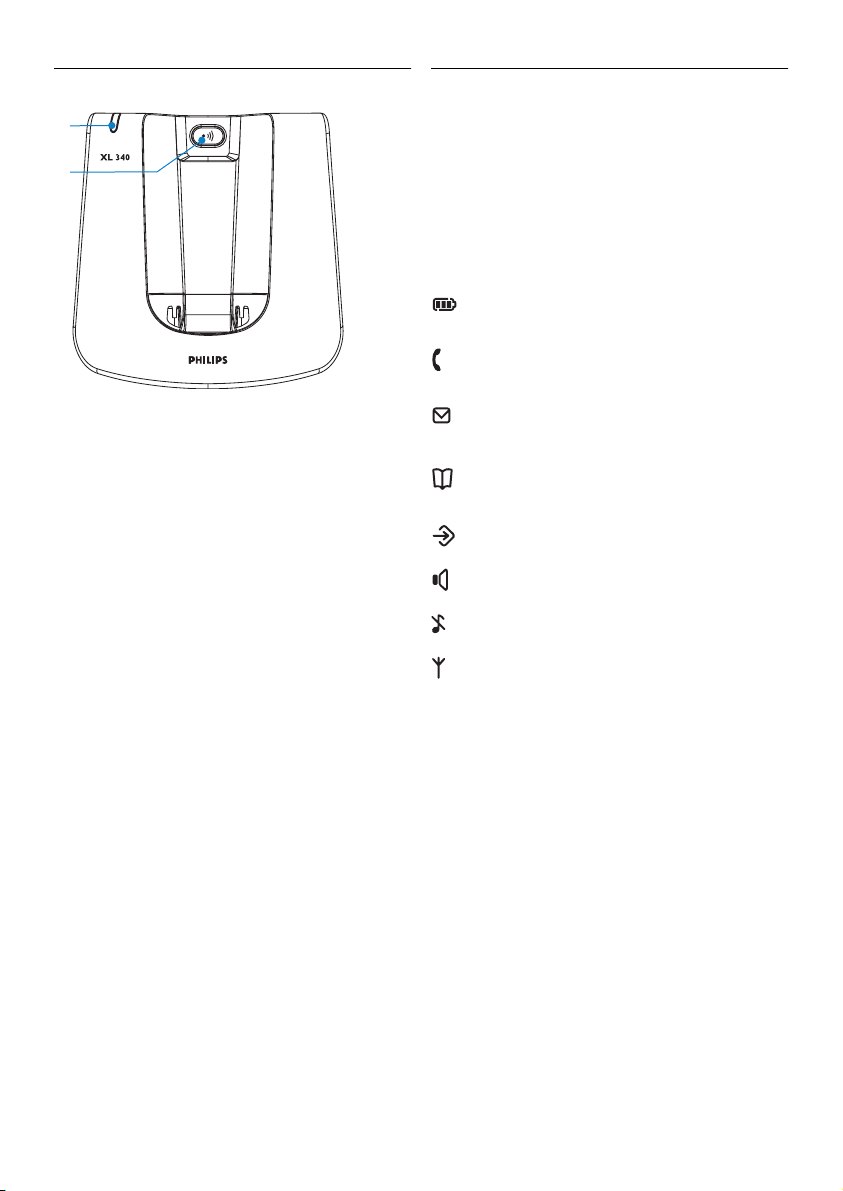
2.3 Overview of the base
A
B
ALED
Steadily on when line is in use.
Blinking when receiving incoming call.
Blinking when having new message in mailbox.
B Page key
Use to locate handset(s).
Use to register handset(s).
2.4 Display icons
When being used for the first time, it is
sometimes necessary to wait until the batteries
are sufficiently charged before the icons appear
on the display.
The display gives information about the operation
of your telephone. The following icons can be
shown in the headline of the display.
Displays the current battery level. It scrolls
during charging.
The phone is in use. It blinks during ringing.
There is a new voice mail in your network
mailbox (subscription needed).
Phonebook memory is being reviewed or
edited.
The phone is in program mode.
Loudspeaker is turned on.
The ringer is turned off.
The handset is linked to the base.
Your phone
7
Page 10

3 Getting started
3.1 Connect the base
Place the base station close enough to the
telephone and the mains power sockets so that
the cables will reach.
1
Connect the telephone line cord to the
phone socket on the bottom of base unit and
the wall phone sockets.
2
Connect output plug of power adapter to the
power socket on the bottom of base unit.
Connect the power adapter to the wall mains
supply.
!
Warning
The electrical network is classified as dangerous
according to criteria in the standard EN 60950.
The only way to power down this product is by
unplugging the power supply from the electrical
outlet. Ensure the electrical outlet is located
close to the apparatus and is always easily
accessible.
2
Connect the charger adaptor to the wall
mains supply.
3.3 Insert the batteries in the handset
1
Place the two rechargeable batteries
(included) into the battery compartment.
!
Warning
Verify the batteries polarity when inserting the
batteries. Incorrect polarity may damage the
product.
2
Slide the battery door firmly into place.
!
Warning
RISK OF EXPLOSION IF BATTERY IS
REPLACED BY AN INCORRECT TYPE. USE
RECOMMENDED TYPE SUPPLIED WITH THIS
PRODUCT. NEVER USE NON-RECHARGEABLE BATTERIES.
3.4 Charge batteries
!
Warning
The base station must always be plugged into the
mains when charging or when in use.
3.2 Connect the charger
If you have bought a multi-pack product, each
extra handset comes with a charger and a charger
adaptor.
1
Connect the output plug of the charger
adaptor to the bottom of the charger.
8
Note
If the batteries are completely exhausted, the
product will not be able to power-on
immediately. Handset may get warm during initial
charge. This is normal.
Getting started
Page 11

Place handset on the base unit or the charger and
let the batteries continuously charge for 24 hours
before using.
• The battery icon appears on the screen
when charging has started.
Note
The warranty does not apply to the batteries and
any other components which have a limited
lifetime or are exposed to wear.
3.4.1 Low battery warning
An empty battery icon indicates the
batteries need recharging.
Place the handset on the base unit or the charger
to recharge the batteries.
Note
Handset will go into sleep mode after reaching
a very low battery voltage level.
Note
A low battery alert (during off hook) will also
inform you that the handset has to be recharged.
If it happens during a call, the call may end shortly
after the alert.
3.4.2 Battery life and range
Optimal battery life is reached after 3 cycles of
complete charging and discharging. Optimal range
is reached when there is no other electrical
appliances working within the range area.
Battery life in talking mode : Up to 12 hours
Battery life in standby mode : Up to 150 hours
Indoor range : Up to 50 meters
Outdoor range : Up to 300 meters
3.5 Using GAP standard compliance
The GAP standard guarantees that all DECT™
GAP handsets and base stations comply with
a minimum operating standard irrespective of
their makes. XL340 handset and base station are
GAP compliant, which means they guarantee the
minimum functions : register a handset, take the
line, make a call and receive a call. The advanced
features may not be available if you use them with
other makes.
To register and use XL340 handset with a GAP
compliant base station from different make, first
follow the procedure described in the
manufacturer's instructions, then follow the
procedure described in this manual for
subscribing a handset.
To register a handset from different make to
XL340 base station, place the base station into
registration mode, then follow the procedure
described in the handset's manufacturer's
instructions.
3.6 Standby mode
Your phone is in standby mode when it is idle.
The standby screen displays the handset name,
handset number, battery icon, and the signal icon.
3.7 Verify the signal
The signal icon displays the link status
between your handset and the base unit.
is steadily on : Your handset and base unit are
linked.
is flashing : Your handset and base unit have
lost link.
Getting started
9
Page 12

4Using your phone
4.1 Call
!
Warning
This telephone is not designed for making
emergency telephone calls when the power fails.
Alternative arrangements should be made for
access to emergency services.
4.1.1 Make a call
1
Press and wait for the dial tone.
2
Dial the number you want to call.
• The number appears on display and is dialed.
4.1.2 Call timer
The call timer shows the duration of your current
call on display. It is shown in minutes and seconds
(MM:SS) in the first hour. After that, it will be
shown in hours and minutes (HH:MM).
4.1.3 Preparatory dialing (Pre-Dial)
With pre-dial, you can see and edit the number
you are calling before dialing it.
1
Enter the number you want to call.
• The number appears on display.
2
Press .
Note
You can enter up to 24 digits. Pr ess to delete
an incorrect digit.
4.1.5 Call from phonebook memory
Press
while viewing a memory.
• The phonebook memory appears on display
and is dialed.
Note
If the number is longer than 12 digits, only the last
12 digits are shown on display.
For more details on the phonebook memory
function, see “Phonebook memory”, page 13.
4.2 Answer a call
When you receive a call, the phone will ring and
will flash on the display.
Press
to answer the call.
Note
If the ringer is turned off, the phone will not ring
for the incoming call.
4.2.1 Answer a call in handsfree mode
The handsfree feature enables you to talk to the
caller without holding onto the phone. It also
allows others in the room to join in the
conversation.
When you receive a call, the phone will ring and
will flash on the display.
Press
to answer the call.
4.3 Loudspeaker phone
During a call, press
to turn on and off the
loudspeaker.
• appears on the hand set di splay when
loudspeaker is on.
4.1.4 Redial the last number
With redialing, you can redial the last number
dialed.
1
Press .
2
Press .
• The last dialed number appea rs on display and
is dialed.
10
4.4 Adjust the audio volume
During a call,
1
press to increase the audio volume,
2
press to decrease the audio volume.
4.5 End a call
Press during a call to end it.
Using your phone
Page 13

4.6 Make a second call
1
Press during a call.
• R appears and yo u will hear a dial tone.
2
Enter the number you want to call.
3
After the second call is answered, you can
press to toggle between these 2 calls.
4.7 Answer a second call
During a call, if another call comes in, the handset
will sound a short beep periodically to notify you.
You can answer it without ending the current call.
1
Press when the second call comes in.
• R appears on display, the current call wi ll be
put on hold, and you a re talking with the
second caller.
2
Press subsequently to toggle between
these 2 calls.
4.8 Conference call
4.8.1 Join a conversation
During a call, another handset can join the
conversation by pressing .
• A short beep (alert tone) will apply to the
original hands et to notify the conference call is
initi ated.
4.8.2 Exit from Conference call
During a conference call, press to exit from
the conference call.
• The other handset is still connected to the
external caller.
4.9 Use intercom
You can call someone in the house by using the
intercom function.
1
Press and hold .
2
If there are only 2 handsets registered to the
base station, the intercom will be made
automatically. Otherwise, enter the handset
number you want to make the intercom call
to.
3
Press to answer the intercom when the
phone is ringing.
4.10 Text or number entry
You can enter texts and numbers for the
phonebook memories and other features.
1
Press corresponding key as many times as
necessary to reach the desired character.
2
Press to delete a character.
Press and hold to delete all entered
characters.
3
Press to switch between uppercase and
lowercase.
• The characters entered thereafter will be in the
alternat e case.
Example to write "Peter"
1
Press once : P
2
Press once : P
3
Press twice : Pe
4
Press once : Pet
5
Press twice : Pete
6
Press three times : Pete r
Upper case input table
Keys Assigned characters
1 [space] 1 , . ! ? : ; ' "
2 A B C 2 À Á Â Ä Æ Ç
3 D E F 3 È É Ê Ë Œ
4 G H I 4 Ì Í Î Ï
5 J K L 5 [ ]
6 M N O 6 Ñ Ò Ó Ö Ø ΩΩΩΩ
Θ Λ Ξ
7P Q R S 7 ∆∆∆∆
ΣΣΣΣ
8 T U V 8 Ù Ú Û Ü
9 W X Y Z 9 Ý Ÿ
00 $ € @ _ ( ) < > ~
* * # + - / = & %
Using your phone
11
Page 14

Lower case input table
Keys Assigned characters
1 [space] 1 , . ! ? : ; ' "
2 a b c 2 À Á Â Ä Æ Ç
3 d e f 3 È É Ê Ë Œ
4 g h i 4 Ì Í Î Ï
5 j k l 5 [ ]
6 m n o 6 Ñ Ò Ó Ö Ø ΩΩΩΩ
Θ Λ Ξ
7 p q r s 7 ∆∆∆∆
8 t u v 8 Ù Ú Û Ü
9 w x y z 9 Ý Ÿ
00 $ € @ _ ( ) < > ~
* * # + - / = & %
ΣΣΣΣ
12
Using your phone
Page 15

5 Use more of your phone
5.1 Phonebook memory
Your phone has 12 phonebook memories
providing you with the convenience for making
calls. Each memory can store a name up to
12 characters and a number up to 24 digits.
Memory type Associated key
Direct access memories
Extra memories Digit keys 1 ~ 9
5.1.1 Save phonebook memory
In standby mode :
1
Enter the number.
Press and hold to insert a pause.
•It is shown as P.
2
Press and hold digit keys (1 to 9)
OR
2
Direct Memory ( ).
• The number is saved. You will hear
a confirmation tone and see NAME?.
3
Enter the name.
4
Press and hold the same memory key to save
the name.
Note
Existing phonebook memory can be replaced by
entering a number and a name at the same
memory location. The new entry will overwrite
the existing one without warning information
shown.
5.1.2 View phonebook memory
You can view these memories when the handset
is in standby mode.
Press Direct Memory
OR
press and hold digit keys (1 to 9).
• The name and number will be shown.
5.1.3 Delete all memories
You can delete all memories by using the RESET
function. See page 15 for more information.
5.2 Persona lizing your phone
5.2.1 Give your phone a name
You can give your phone a different name. If you
have more than one handset, you can give each
handset its own name. The handset name can be
up to 10 characters long. It can be composed of
A-Z, 0-9 and space.
In standby mode :
1
Press and hold until you see MENU?.
2
Enter 40.
3
Press and hold .
• The current handset name is shown.
4
Edit the name.
5
Press and hold to confirm.
5.2.2 Select display language
You phone supports many languages.
In standby mode :
1
Press and hold until you see MENU?.
2
Enter the language index number (see below).
3
Press and hold to confirm.
Language Name Index Number
English 10
Dutch 11
French 12
German 13
Italian 14
Russian 15
Spanish 16
Turkish 17
Danish 18
Swedish 19
Norwegian 20
Greek 21
Use more of your phone
13
Page 16

Language Name Index Number
Polish 22
Portuguese 23
Finnish 24
Hebrew 25
5.2.3 Turn the backlight on / off
The LCD and the key can be lit when the
phone is being used.
In standby mode :
1
Press and hold until you see MENU ?.
2
Enter 44.
3
Press and hold to confirm.
• The new setting is shown.
5.2.4 Auto Pick-up
Auto Pick-up gives you the convenience of
answering a call by picking up the handset from
the cradle or charger. You don't need to press
.
In standby mode :
1
Press and hold until you see MENU ?.
2
Enter 42.
3
Press and hold to confirm.
• The new setting is shown.
5.2.5 Auto Hang-up
Auto Hang-up gives you the convenience of
ending a call by putting the handset onto the
charging cradle. You don't need to press .
In standby mode :
1
Press and hold until you see MENU ?.
2
Enter 43.
3
Press and hold to confirm.
• The new setting is shown.
In standby mode :
1
Press and hold until you see MENU?.
2
Enter 45.
3
Press and hold to confirm.
• The new setting is shown.
5.2.7 Select ringing melody
In standby mode :
1
Press and hold until you see the current
melody name.
2
Select the desired melody by pressing digit
keys 0 to 9.
3
Press to confirm.
5.2.8 Change the ringing volume
In standby mode :
1
Press and hold until you see the current
melody name.
2
Press and to increase or decrease the
volume level.
3
Press to confirm.
Note
If ringing volume level is set to OFF,
appears.
5.2.9 Turn the key tone on / off
Key tones are tones your handset makes each
time you press a key on the handset.
In standby mode :
1
Press and hold until you see MENU?.
2
Enter 41.
3
Press and hold to confirm.
• The new setting is shown.
5.3 Advanced features
5.2.6 Auto Dialing
Auto Dialing gives you the convenience of making
a call from phonebook memories associated to
key 1 or 2 by pressing and holding the key 1 or 2
during standby. You don't need to press .
14
5.3.1 Register a handset
If you have inadvertently unregistered your
handset, you can register it again. Additional
handsets must be registered to the base before
use.
Use more of your phone
Page 17

In standby mode :
1
Press and hold until you see MENU ?.
2
Enter 51. Press and hold until you see
BASE?.
3
Select the base using the digit keys (1, 2, 3 or
4). Press and hold to confirm.
4
If you see PIN?, enter the system PIN
(default 0000). Press and hold until you
see SEARCHING....
5
Press and hold on the base unit for
3seconds.
• The base will turn on the LED for 30 seconds.
• If registration is su ccessful, handset will show
REGISTERED.
Note
If registration was not successful, the handset will
show FAILED. Repeat the above procedures
and try again.
5.3.2 Select a base
If your handse t is register ed to more than 1 base,
you can select which base the handset will use.
You can choose a fixed base or you can allow the
handset to automatically search for a nearby
available base (AUTO base selection).
In standby mode :
1
Press and hold until you see MENU ?.
2
Enter the base index number (see below).
3
Press and hold to confirm.
• If s uccessful, handset will show the selected
base. Otherwise, handset will show FAILED.
Base selection Index Number
BASE 1 64
BASE 2 65
BASE 3 66
BASE 4 67
AUTO 68
5.3.3 Un-register a handset
A handset can un-register another handset
registered to the same base station. It cannot unregister itself.
In standby mode :
1
Press and hold until you see MENU?.
2
Enter 52. Press and hold until you see
HANDSET?.
3
Enter the number of the handset you want to
unregister. Press and hold to confirm.
4
If you see PIN?, enter the system PIN
(default 0000).
5
Press and hold to confirm.
• If un-registration is successful, your handset will
show DELETED.
5.3.4 Change the system PIN
A PIN (Personal Identification Number) is
required to register and un-register a handset.
The factory preset PIN is 0000. You can change it
to a unique one of your own. PIN can be up to
8 digits long.
In standby mode :
1
Press and hold until you see MENU?.
2
Enter 50. Press and hold until you see
PIN?.
3
Enter the system PIN. Press and hold
until you see NEW PIN?.
4
Enter the new PIN. Press and hold until
you see REPEAT PIN?.
5
Enter the new PIN again for verification.
Press and hold to confirm.
• If PIN is changed successfully, handset will
show SAVED.
Note
The default product PIN code is preset to 0000.
If you change this PIN code, keep the PIN details
in a safe place where you have easy access to
them. Do not lose the PIN code.
5.3.5 Reset your phone
You can reset your phone to factory settings. To
find out what settings are being reset, see
page 18.
In standby mode :
1
Press and hold until you see MENU?.
2
Enter 01 if you want to delete all the
memories.
Use more of your phone
15
Page 18

OR
2
Enter 02 if you want to keep the memories
unchanged.
3
Press and hold until you see
PROCESSING....
5.3.6 Select flash duration
This option is helpful when using operator
services. The default value of flash duration that is
preset in your XL340 should be the best suited
for your country network and therefore you
should not need to change it.
In standby mode :
1
Press and hold until you see MENU ?.
2
Enter the flash duration index number (see
below).
3
Press and hold until you see the new
setting is displayed.
Flash duration Index Number
FLASH 1 71
FLASH 2 72
FLASH 3 73
FLASH 4 74
FLASH 5 75
FLASH 6 76
FLASH 7 77
5.3.7 Select pause duration
This option is helpful when using operator
services. The default value of pause duration that
is preset in your XL340 should be the best suited
for your country network and therefore you
should not need to change it.
In standby mode :
1
Press and hold until you see MENU ?.
2
Enter the pause duration index number (see
next).
3
Press and hold until you see the new
setting is displayed.
Pause duration Index Number
PAUSE 1 78
PAUSE 2 79
5.3.8 Select dial mode (country dependent)
The default value of dial mode that is preset in
your XL340 should be the best suited for your
country network and therefore you should not
need to change it.
In standby mode :
1
Press and hold until you see MENU?.
2
Enter 60.
3
Press and hold to confirm.
• The new setting is shown.
5.3.9 Temporary tone dialing in pulse dial mode
If the dialing mode is set to pulse, you can press
and hold to set temporary tone dialing.
• d will be displayed on the screen. All the
following digits w ill be dialed as tones until you
hang up.
5.3.10 Set prefix insertion
The prefix insertion feature checks and formats
your outgoing call number before it is dialed. If
the first few digits of the number match with the
digits you set as DETECT, they will be replaced
by the digits you set as PREFIX.
For example, you set DETECT as 604 and
PREFIX as 967. When you are making a call to
6045551212, the actually dialed number will be
9675551212. The number shown is still
6045551212.
In standby mode :
1
Press and hold until you see MENU?.
2
Enter 62. Press and hold .
3
Edit the DETECT digits
OR
3
enter a new one if you see DETECT? (such
as 604 in the above example).
4
Press and hold to confirm.
16
Use more of your phone
Page 19

5
Edit the PREFI X digits
OR
5
enter a new one if you see PRE FIX? (such as
967 in the above example).
6
Press and hold to confirm.
Note
If the dialed number starts with #, * or P, the
PREFIX will not be added.
Note
Press and hold to insert a pause in PREFIX.
5.3.11 Message waiting indication
If you have subscribed to the voice mail service
from your local service provider, will be on
when you have a new message in your mailbox.
The LED on base station will blink.
After you've listened to all the new messages,
will turn off. The LED on base station will
stop blinking.
Note
You may also see VOICEMAIL shown on the
display if you have new message in your mailbox,
but it will disappear after you make an outgoing
call.
5.3.12 Paging handset
You can use this feature to locate the handsets.
In standby mode, press on the base.
• All handsets registered to the base will produce
the paging tone for 30 seconds and the screen
displays PAGING....
Note
You can stop the paging by pressing any key on
each handset or pressing on the base again.
Use more of your phone
17
Page 20

6 Default settings
These are the factory pre-programmed settings of your phone.
Funct ions Settings after Re set
Display Language Country dependent
Handset Name PHILIPS
Auto Pick-up Off
Auto Hang-up On
Backlight On
Dial Mode* Tone
Key Tone On
Flash Duration* Flash 1
Pause Duration Pause 1
Prefix [Empty]
Melody Selection RING 1
Ring Volume 3 blocks
Receiver Volume 3 blocks
Speaker volume 3 blocks
Message Waiting Indication Off
PIN Code 0000
Base selection AUTO
Auto Dialing Off
Last dialed number [Empty]
Phonebook memories** [Empty]
*Country dependent features
**These memories will remain unchanged for Reset 02
18
Default sett ings
Page 21

7 Quick reference table for phone menus
The table below lists the menus of your phone.
Reminder : Press and hold until you see MENU? to enter the menu index number.
Press to exit from any menu instantly.
Index Number Men u
01 Full Reset
02 Partial Reset
10 - 25 Language
40 Handset Name
41 Key Tone
42 Auto Pick-up
43 Auto Hang-up
44 Backlight
45 Auto Dialing
50 PIN Code
51 Registration
52 Un-registration
60 Dial Mode
62 Prefix Insertion
64 - 68 Base Selection
71 - 77 Flash Duration
78 - 79 Pause Duration
Qu ick ref ere nc e table fo r pho ne menus
19
Page 22

8 Technical data
General telephone features
• Caller name & number identification
• 12 phonebook memories with direct access
• Conference call and voicemails
• Intercom
• Base selection
Battery
• 2 x AAA NiMH 750mAh batteries
Weight and dimensions
• Handset : 160 grams
180x32x56mm (HxDxW)
• Base : 150 grams
94x128x117mm (HxDxW)
Temperature ra nge
• Operation : 0°C to +46°C
• Storage : -25°C to +70°C
Relative humidity
• Operation : Up to 95% at 40°C
• Storage : Up to 95% at 40°C
20
Technical data
Page 23

9 Frequently asked questions
In this chapter you will find the most frequently
asked questions and answers about your phone.
Set up
No dial tone
• Check the phone and power connections.
• The handset may be out of range. Move closer
to the base station.
• The battery capacity may be low. Charge
battery.
“Range/Signal” icon is flashing
• Move closer to the base station.
• If the handset displays UNREGISTERED,
register the handset, see page 14.
The handset does not switch on
• Charge the battery : Put the handset on base /
charger. The battery icon is animated while
charging. After a few moments the phone will
switch on.
The handset does not charge
• Check base / charger connections.
• The battery may be defective. Purchase new
battery from your dealer.
• Check that the batteries are inserted correctly.
• Make sure the handset is placed properly on
the base / charger. The battery icon is
animating while charging.
Communication is lost during a call
• Charge the battery.
• Move closer to the base station.
• Too many phones may be sharing the same
phone line. Disconnect some of the phones.
No parking tone from the handset
• Check the power connections of the base /
charger.
• The handset may not be placed properly. Try
again.
• Charging contacts may be dirty. Clean contacts
with a damp cloth.
Product behaviour
Bad audio quality (crackles, echo, etc.) during a call
• The handset may be nearly out of range. Move
closer.
• The phone may be interfered by nearby
electrical appliance. Move the base unit to
a different location.
• The phone may be at a location with thick
walls. Move the base unit to a different
location.
Caller ID does not display
• Caller ID service may not be activated. Check
with your service provider.
• The caller's information may be withheld or is
unavailable.
• Let the phone ring at least once before
answering it.
Second call service does not work
• Second call service may not be activated. The
second call service may not be available from
your telephone operator, check availability of
the service with your telephone service
provider.
• Check that the flash selection is correct. See
page 16.
Sou nd
Handset does not ring
• Check that the handset melody volume is
turned on. See page 14.
Frequently asked questions
Tip
If the above solutions do not help, remove the
power from both the base station and the
handset. Wait for 15 minutes and try again.
21
Page 24

10 Index
A
Advanced features 14
Answer a call 10
Answer a second call 11
Audio volume, adjust 10
Auto Dialing 14
Auto Hang-up 14
Auto Pick-up 14
B
Backlight on / off 14
Base, overview 7
Batteries 8, 20
Battery door 8
Battery life and range 9
C
Call 10
Call from phonebook memory 10
Call timer 10
Caller ID 21
Character set table 11
Charge batteries 8
Charger 8
Conference call 11
Conformity 3
Connect the base 8
Connect the charger 8
Connection 3
D
Default settings 18
Delete all phonebook memories 13
Dial mode, change 16
Dimensions 20
Display 6
Display icons 7
Display language, select 13
E
Earpiece 6
End a call 10
Environmental care 4
Example text entry 11
Exit from Conference call 11
F
Flash duration, select 16
Frequently asked questions 21
FG
GAP standard 9
Getting started 8
H
Handsfree mode 10
Help 3
I
Insert the batteries 8
Intercom 11
K
Key tone on / off 14
Keys, phone 6
L
LED, base 7
Line adaptor 5
Line cord, connect 8
Loudspeaker phone 10
Low battery warning 9
Lower case input table 12
M
Make a call 10
Message waiting indication 17
Multi-handset packs 5
N
Name, handset 13
Number entry 11
22
Index
Page 25

P
Page key 7
Paging handset 17
Pause duration, select 16
Personalizing 13
Phone, overview 6
Phonebook memory 13
PIN 15
Power adapter, connect 8
Power requirements 3
Pre-Dial 10
Prefix set 16
Q
Quick reference table for phone menus 19
R
Range 9
Recycling & disposal 4
Redial last number 10
Register a handset 14
Relative humidity 20
Reset phone 15
Ringer OFF 14
Ringing melody, select 14
Ringing volume, change 14
UV
View phonebook memory 13
Voicemail 17
UW
Warranty 9
Weight 20
Welcome mode 2
What’s in the box 5
S
Safety 3
Save phonebook memory 13
Second call 11
Select a base 15
Signal icon 9
Standby mode 9
System PIN, change 15
T
Technical data 20
Temperature range 20
Temporary tone dialing 16
Text or number entry 11
Troubleshooting 21
U
Un-register a handset 15
Upper case input table 11
Index
23
Page 26

24
Page 27

Page 28

© 2007 Koninklijke Philips Electronics N.V.
All rights rese rved.
Reproduction in whole or in part is prohibited without
the writt en consent of the copyright owner.
Document order number : 3111 285 32832
Printed in PRC
 Loading...