

Page 1

Page 2

Contents
Important Information........................................ 1
Safety considerations ...................................... 1
SAR ..................................................................... 4
European Union – RTTE ................................. 4
Care and Maintenance ....................................... 5
Getting Started ................................................... 6
Inserting and removing the SIM....................... 6
Attaching and removing the battery................. 6
Charging the battery ........................................ 7
Operation of battery level indicator.................. 7
Low battery power warning.............................. 7
Keys & Displays ................................................. 8
Keys................................................................. 9
Shortcuts ....................................................... 10
Illumination light............................................. 10
Display........................................................... 11
How to Use This Phone ................................... 12
Selecting a menu option ................................ 12
Symbols used in this manual ......................... 13
Phone Basics and Managing Calls................. 14
Switching phone ON/OFF..............................14
Displaying menu ............................................ 14
Making calls................................................... 14
Answering calls.............................................. 15
Ending/rejecting calls..................................... 15
Vodafone Mail................................................ 16
Activating Quiet mode ................................... 16
In-call options ................................................ 17
Call log........................................................... 20
Explore the Menus ........................................... 22
Settings Menu Structure ................................. 23
Settings............................................................. 24
Profile setting................................................. 24
Editing profile................................................. 24
Tone setting................................................... 26
Vibration alert setting ..................................... 27
Display setting ............................................... 28
Language setting........................................... 29
Data connections setting ............................... 29
Network setting .............................................. 29
Call settings ................................................... 31
Security settings ............................................ 34
Time and date setting .................................... 36
Any key answer setting.................................. 36
Keyguard setting............................................ 37
Camera .............................................................. 38
Text Entry (Edit) ............................................... 40
Shift mode...................................................... 40
Input mode..................................................... 41
Text input ....................................................... 41
Messages Menu Structure ..............................42
Messages.......................................................... 43
MMS (Multimedia Messaging Service) .......... 43
MMS postcard................................................ 49
SMS (Short Message Service) ...................... 51
Live! Studio .................................................... 54
Vodafone Mail................................................55
Vodafone Messenger..................................... 55
Cell Broadcast ...............................................56
Memory status ............................................... 56
Contacts Menu Structure ................................ 57
Contacts............................................................ 58
Browsing Contacts......................................... 58
Storing ........................................................... 59
Call log........................................................... 61
Speed dial...................................................... 62
Grouping Contacts entries............................. 63
My numbers ................................................... 64
Group settings ............................................... 65
Memory status ............................................... 65
Copy from SIM............................................... 65
Service numbers............................................ 65
Vodafone live! Menu Structure ....................... 66
Vodafone live! .................................................. 67
Viewing Vodafone live! ..................................67
Browser options ............................................. 69
Browser options (Bookmarks)........................ 69
Browser options (Enter address) ................... 70
Browser options (Save image)....................... 70
Browser options (Set as bookmark)...............70
Browser options (Service Inbox)....................70
Browser options (Reload page)..................... 71
Browser options (Advanced).......................... 71
Browser options (Settings)............................. 72
Fun & Games Menu Structure......................... 73
Fun & Games .................................................... 74
Games & more............................................... 74
Download more.............................................. 74
Settings.......................................................... 74
Applications Menu Structure .......................... 75
X401EN1WW1b
i
Page 3

Contents
Applications ......................................................76
STK (SIM Tool Kit) .........................................76
Alarm ..............................................................76
Sound recorder...............................................77
Calculator .......................................................77
Infrared ...........................................................78
Calendar ............................................................80
My Stuff Menu Structure ..................................81
My Stuff..............................................................82
Pictures (My Stuff > Pictures).........................82
Sounds (My Stuff > Sounds) ..........................83
Shortcuts ........................................................84
Text templates................................................84
Memory status ................................................85
Personal WAP/MMS Settings...........................86
Troubleshooting ...............................................88
Important error messages ..............................89
Glossary of Terms ............................................90
Specifications ...................................................91
Accessories.......................................................92
Licensing ...........................................................93
Index ..................................................................94
EU Warranty ......................................................96
ii
Page 4
Important Information
Thank you for purchasing this Panasonic digital cellular phone. This phone is designed to operate on GSM
networks – GSM900 and GSM1800. It also supports GPRS for packet data connections. Please ensure the
battery is fully charged before use.
We, Panasonic Mobile Communications Development of Europe Ltd., declare that the EB-X400 conforms with
the essential and other relevant requirements of the directive 1999/5/EC.
A declaration of conformity to this effect can be found at http://www.panasonicmobile.com
Safety considerations
The following information should be read and understood as it provides details which will enable you to operate
your phone in a manner which is both safe to you and your environment, and conforms to legal requirements
regarding the use of cellular phones.
This equipment should only be charged with approved charging equipment to ensure optimum
performance and avoid damage to your phone. Other usage will invalidate any approval given to
this apparatus and may be dangerous. Ensure the voltage rating of the Fast Travel Charger is
Power
Battery
Aircraft
compatible with the area of use when travelling abroad. A Fast Travel Charger (EB-CAX70xx*)
is supplied with the Main Kit. Other recommended equipment for charging – Car Charger
(EB-CDX70).
Note* xx identifies the Charger region, e.g. EU, UK.
Use of another battery pack than that recommended by the manufacturer may result in a safety
hazard.
Switch off your cellular phone when in an aircraft. Ensure that the setting of the Alarm function
will not contravene regulations whereby it may automatically power on when in an aircraft or
medical facility etc. The use of cellular phones in an aircraft may be dangerous to the operation
of the aircraft, disrupt the cellular network and may be illegal. Failure to observe this instruction
may lead to the suspension or denial of cellular phone services to the offender, or legal action or
both.
Disposing of
the Battery
Do Not Use
Driving
Do not incinerate or dispose of the battery as ordinary rubbish. The battery must be disposed of
in accordance with local regulations and may be recycled.
It is advised not to use the equipment at a refuelling point. Users are reminded to observe
restrictions on the use of radio equipment in fuel depots, chemical plants or where blasting
operations are in progress. Never expose the battery to extreme temperatures (in excess of
60°C).
It is imperative that the driver exercises proper control of the vehicle at all times. Do not hold a
phone while you are driving; find a safe place to stop first. Do not speak into a handsfree
microphone if it will take your mind off the road. Always acquaint yourself thoroughly with
restrictions concerning the use of cellular phones within the area where you are driving and
observe them at all times.
1
Page 5
Important Information
Care must be taken when using the phone in close proximity to personal medical devices, such
as pacemakers and hearing aids.
Electronic
Devices
For most efficient use, hold the phone as you would any normal phone. To avoid deterioration of
signal quality or antenna performance, do not touch or “cup” the antenna area while the phone is
switched on. (See “SAR Statement”.) Unauthorised modifications or attachments may damage
Efficient Use
Heating
Equipment
Backup
Copies &
Security
the phone and violate applicable regulations. The use of an unapproved modification or
attachment may result in the invalidation of your guarantee – this does not affect your statutory
rights.
If you use a feature which keeps the key backlight on continuously for a long time, such as the
camera, a game or the browser, battery life will become extremely short. To maintain longer
battery life, set
page 74.
Do not leave the camera facing direct sunlight to avoid impairing camera performance.
When your handset, the accompanying battery or charging accessories are wet, do not put those
in any type of heating equipment, such as a microwave oven, a high pressure container, or a drier
or similar. It may cause the battery, handset and/or charging equipment to leak, heat up, expand,
explode and/or catch fire. Moreover, the product or accessories may emit smoke and their
electrical circuits may become damaged and cause the products to malfunction. Panasonic is not
responsible for any and all damages, whether direct or indirect, howsoever caused by any
misuse.
It is recommended that you create a copy or backup, as appropriate, of any important information
and data which you store in your phone’s memory. In order to avoid accidental loss of data,
please follow all instructions relating to the care and maintenance of your phone and its battery.
Panasonic accepts no liability for any and all losses howsoever arising from any loss of data,
including but not limited to direct and indirect losses (to include, but not limited to consequential
loss, anticipated savings, loss of revenue).
Your phone has the capability of storing and communicating personal information. It is
recommended that you take care to ensure that any personal or financial information is stored
separately from your phone. Panasonic accepts no liability for any and all losses howsoever
arising from any loss of data, including but not
limited to consequential loss, anticipated savings, loss of revenue).
not
the Key backlight to off. See “Setting Key backlight” on page 28 and “Settings” on
limited to direct and indirect losses (to include, but
Downloading
2
Your phone has the capability of downloading and storing information and data from external
sources. It is your responsibility to ensure that in doing this you are not infringing any copyright
laws or other applicable legislation. Panasonic accepts no liability for any and all losses
howsoever arising from any loss of data or any such infringement of copyright or intellectual
property rights, including but not limited to direct and indirect losses (to include, but not limited to
consequential loss, anticipated savings, loss or revenues).
Page 6

Camera
Important Information
You are advised to take appropriate care over the use of the internal camera. It is your
responsibility to ensure that you have permission to take photographs of people and objects and
that you do not infringe any personal or third party rights when using the camera. You must
comply with any applicable international or national law or other special restrictions governing
camera use in specific applications and environments. This includes not using the camera in
places where the use of photographic and video equipment may be prohibited. Panasonic
accepts no liability for any and all losses howsoever arising from any infringement of copyright or
intellectual property rights, including but not limited to direct and indirect losses.
Do not use this phone without the battery cover attached.
The colour liquid crystal display (LCD) uses high-precision production technology, and in certain
circumstances pixels may appear brighter or darker. This is due to characteristics of the LCD and
is not a manufacturing defect.
The display layouts and screenshots within this document are for illustrative purposes and may
differ from the actual displays on your phone. Panasonic reserves the right to change the
information in this document without prior notice.
This Panasonic mobile phone is designed, manufactured and tested to ensure that it complies
with the specifications covering RF exposure guidelines applicable at the time of manufacture, in
accordance with EU, USA FCC and Australian ACA regulations; or as specifically stated in the
separate declaration leaflet enclosed with this product.
This phone should only be used with Panasonic approved accessories to ensure optimum
performance and avoid damage to your phone. Panasonic is not responsible for damage caused
by using non-Panasonic approved accessories.
This phone must be used in compliance with any applicable international or national law or any
special restrictions governing its use in specified applications and
but is not limited to use in hospitals, aircraft, whilst driving and any other restricted uses.
Please refer to our website for latest information/standards and compliance in your country/
region of use.
http://www.panasonicmobile.com
environments. This includes
3
Page 7

SAR
European Union – RTTE
THIS PANASONIC PHONE (MODEL EB-X400) MEETS THE EU REQUIREMENTS FOR EXPOSURE TO
RADIO WAVES.
Your mobile phone is a radio transmitter and receiver. It is designed and manufactured not to exceed the limits
for exposure to radio frequency (RF) energy recommended by The Council of the European Union. These limits
are part of comprehensive guidelines and establish permitted levels of RF energy for the general population. The
guidelines were developed by independent scientific organisations through periodic and thorough evaluation of
scientific studies. The limits include a substantial safety margin designed to assure the safety of all persons,
regardless of age and health.
The exposure standard for mobile phones employs a unit of measurement known as the Specific Absorption Rate
or SAR. The SAR limit recommended by The Council of the European Union is 2.0 W/kg*. Tests for SAR have
been conducted using standard operating positions with the phone transmitting at its highest certified power level
in all tested frequency bands. Although the SAR is determined at the highest certified power level, the actual SAR
level of the phone while operating can be well below the maximum value. This is because the phone is designed
to operate at multiple power levels so as to use only the power required to reach the network. In general, the
closer you are to a base station antenna, the lower the power output.
Before a phone model is available for sale to the public, compliance with the European R&TTE directive must be
shown. This directive includes as one essential requirement the protection of the health and the safety for the
user and any other person. The SAR value for this model phone, when tested for use at the ear, for compliance
against the standard was 0.555** W/kg. While there may be differences between the SAR levels of various
phones and at various positions, they all meet the EU requirements for RF exposure.
*The SAR limit for mobile phones used by the public is 2.0 Watts/kilogram (W/kg) averaged over ten grams of
tissue. The limit incorporates a substantial margin of safety to give additional protection for the public and to
account for any variations in measurements. SAR values may vary depending on national reporting requirements
and the network band.
**Right side of Head (Test Position: Cheek) Measurement results for GSM900.
For SAR information in other regions please look under product information at
http://www.panasonicmobile.com/health.html
4
Page 8
Care and Maintenance
Pressing any of the keys may produce a loud tone. Avoid holding the phone close to the ear
while pressing the keys.
Extreme temperatures may have a temporary effect on the operation of your phone. This is
normal and does not indicate a fault.
The display quality may deteriorate if the phone is used in environments over 40°C for a long
time.
Do not modify or disassemble the equipment. There are no user serviceable parts inside.
Do not subject the equipment to excessive vibration or shocks.
Do not drop the battery.
Avoid contact with liquids. If the equipment becomes wet, immediately remove the battery
and contact your dealer.
Do not leave the equipment in direct sunlight or a humid, dusty or hot area.
Never throw a battery into a fire. It may explode.
Keep metallic items that may accidentally touch the terminals away from the equipment/
battery.
Batteries can cause property damage, injury or burns if terminals are touched with a
conductive material (i.e. metal jewellery, keys, etc.).
Always charge the battery in a well ventilated area, not in direct sunlight, between +5°C and
+35°C. It is not possible to recharge the battery if it is outside this temperature range.
When disposing of any packing materials or old equipment, check with your local authorities
for information on recycling.
5
Page 9
Getting Started
A
Some services described in this manual are network dependent or may only be available on a subscription basis.
Some functions are SIM dependent. For more information contact Vodafone.
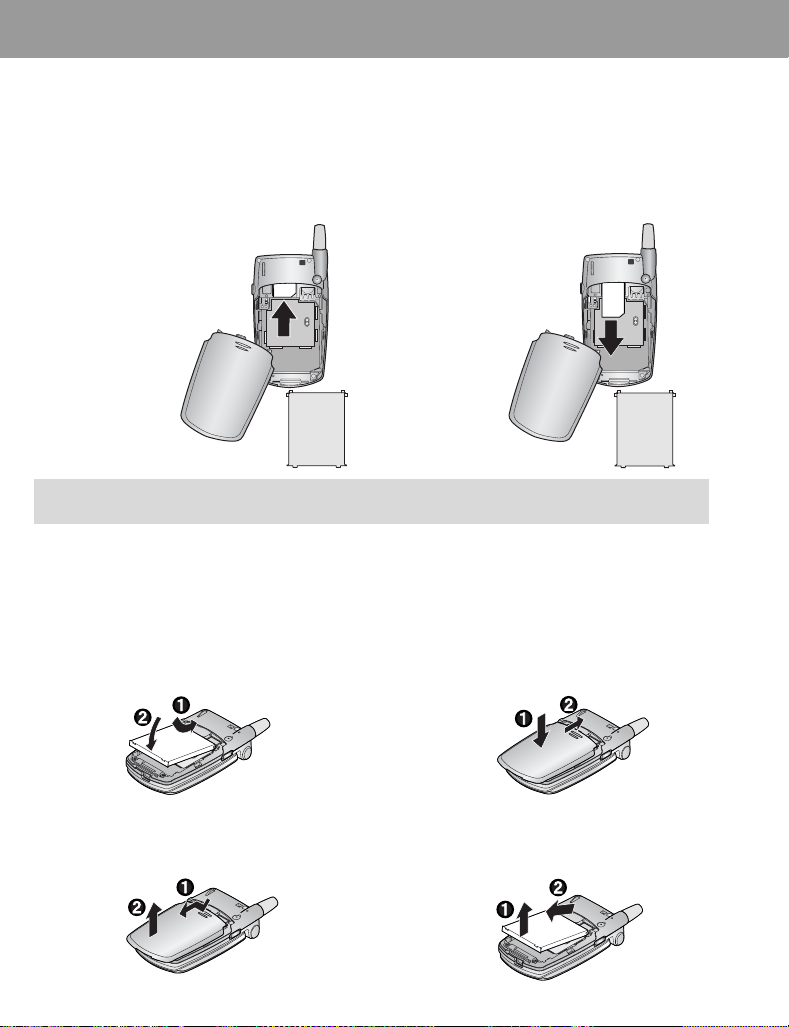
Inserting and removing the SIM
The SIM is inserted into the back of the phone.
(See “Attaching and removing the battery” below to remove or attach the battery.)
Inserting the SIM
Slide your SIM card (with the
gold contacts facing
downwards) into its holder,
making sure that the cutout
corner is aligned.
NOTE If you are upgrading your phone and your previous phone did not support new services, such as
MMS (Multi Media Messaging), you may need to insert a new SIM. Contact Vodafone.
SIM
Attaching and removing the battery
Before removing the battery, ensure that the phone is switched off and the charger is disconnected from the
phone.
Removing the SIM
Slide out the SIM.
SIM
ttaching the battery
1 Insert the battery, ensuring the 3 gold contacts
align with the 3 gold pins in the phone.
2 Replace cover on the phone and slide upwards
to the top of the phone.
Removing the battery
1 Press top part of the cover and remove. 2 Lift the battery out.
6
Page 10
Getting Started
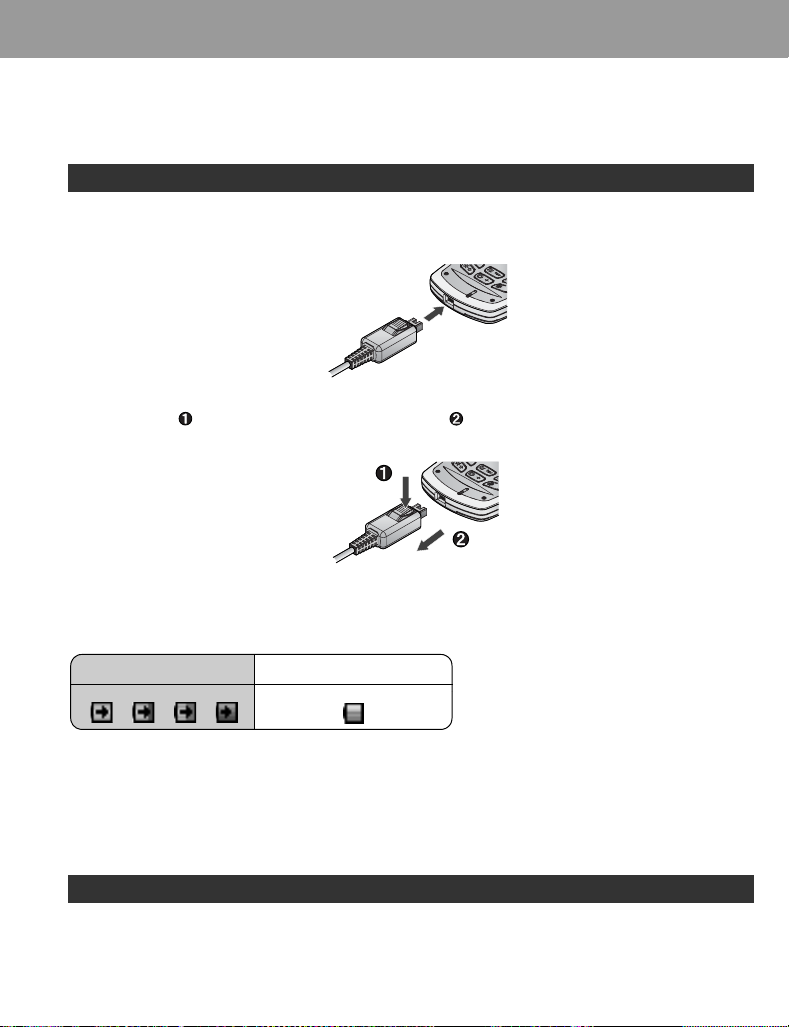
Charging the battery
Connecting and disconnecting the Fast Travel Charger
The battery must be attached in the phone before the charger is connected.
Do not force the connector as this may damage the phone and/or the charger.
Connect the charger to the mains power supply. When the phone is charging, the charging indicator will light and
a scrolling icon will appear in the main display.
When charging is complete switch off the mains power supply and disconnect the charger by pressing the button
on the connector
and remove from the base of the phone .
Operation of battery level indicator
While charging Charging complete
Charging Indicator will go out when charging is completed.
Low battery power warning
When the battery power is low, a warning tone will sound and a Battery low! message will be displayed. Charge
the battery, or the phone will be switched off in 2 minutes. (See “Charging the battery” above.) Calls can be made
and received while the phone is charging.
Some settings may be lost if the battery is removed or remains discharged for more than 1.5 hours.
7
Page 11
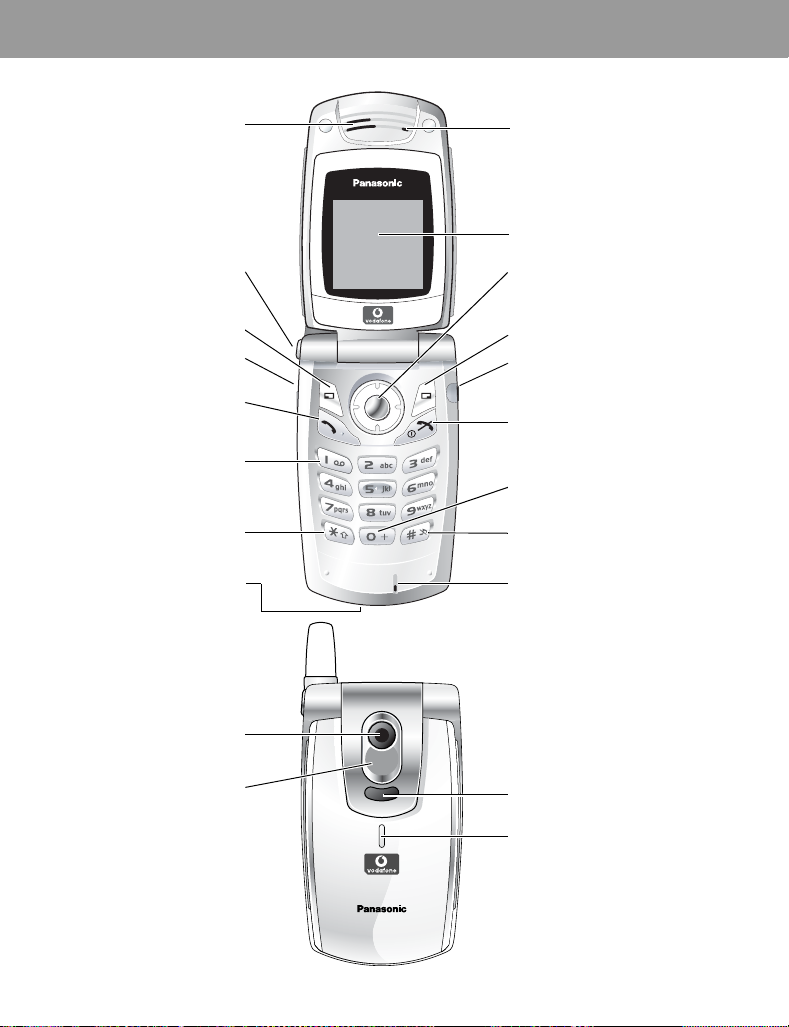
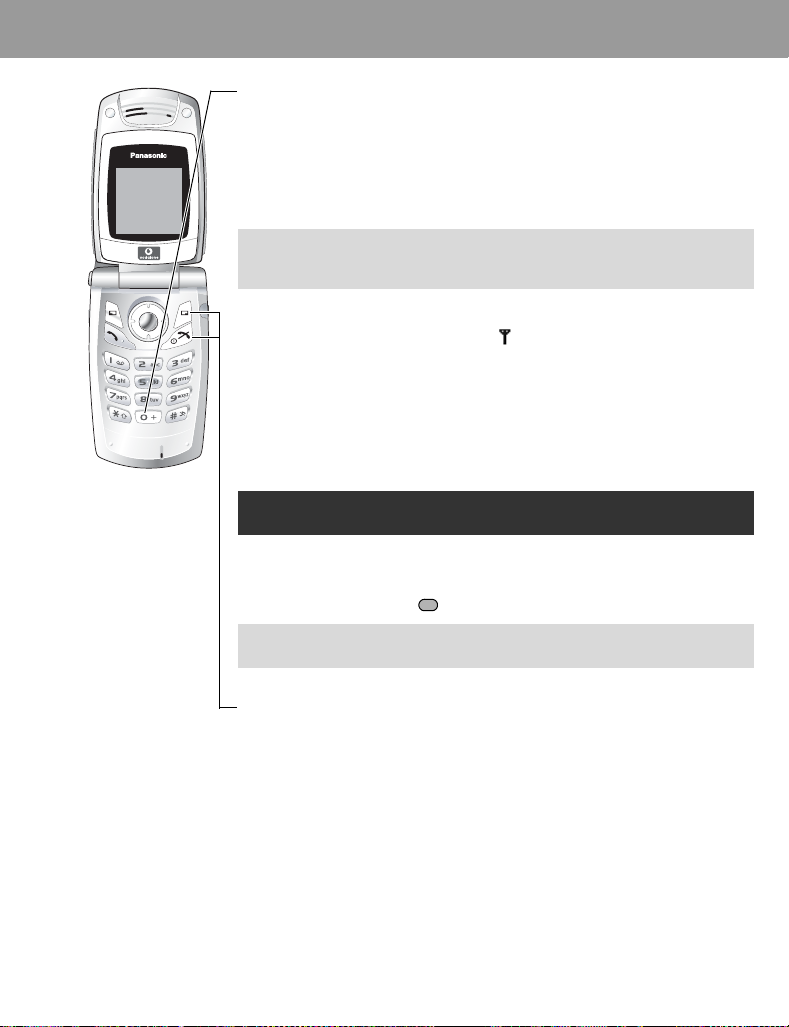
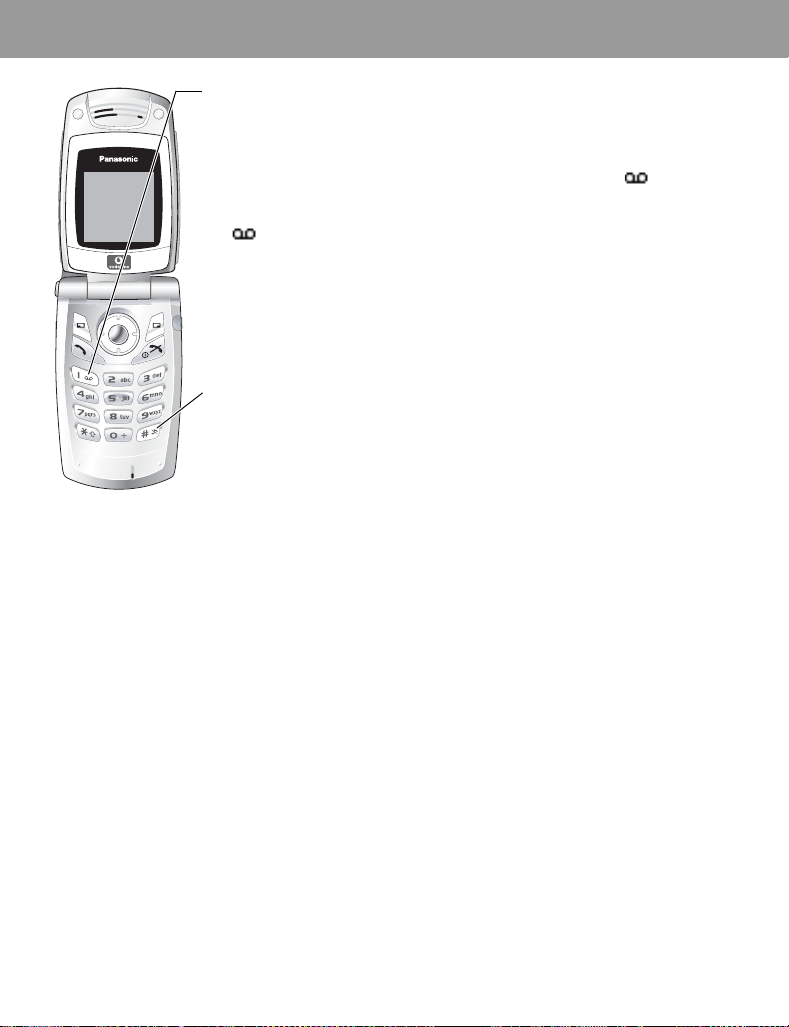
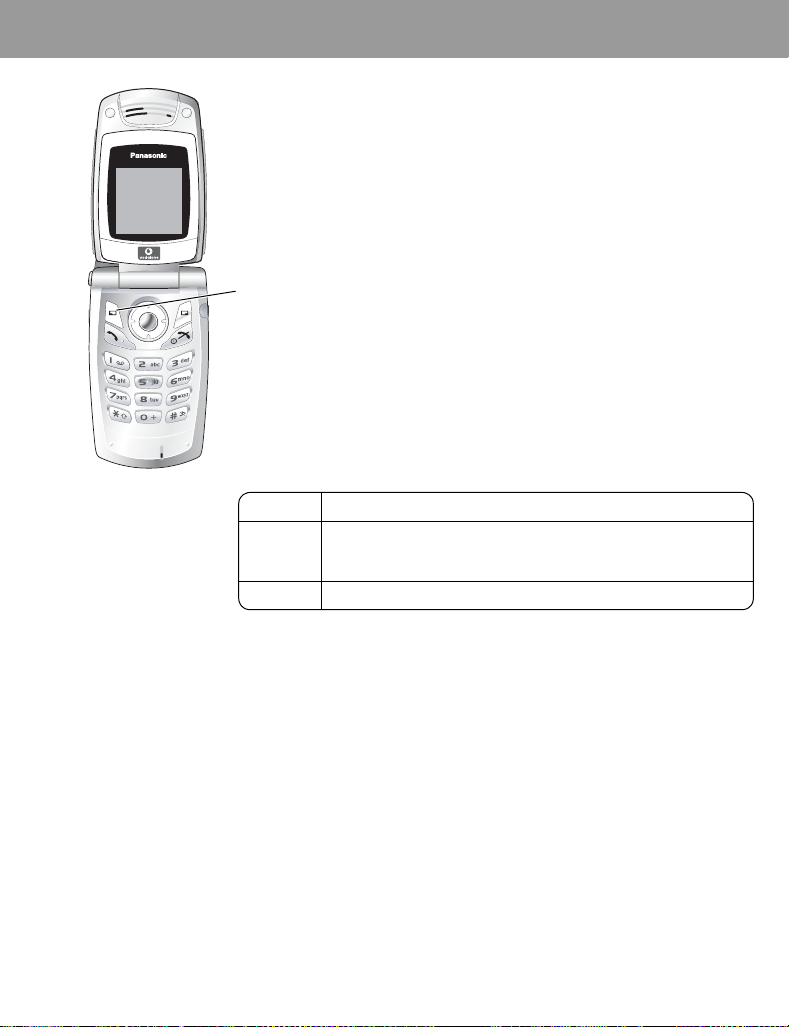
Keys & Displays
Speaker
One Push Auto Open
Press to open the handset
Multi Function key
Camera/Shutter/Alert mute
To answer a call or to
make an outgoing call
1 key/Vodafone mail key
Press and hold to call
Charging Connector
button
Left Soft key
Send key
Vodafone mail
Asterisk key
Earpiece (Receiver)
Main Display
Navigation key
Select/scroll/move/
Alert mute/Keyguard
Right Soft key
Personal Handsfree
Connector
Power/End key
Press and hold to switch your
phone on/off
International Dialling
Prefix key
Pause key/
Quiet Mode key
Microphone
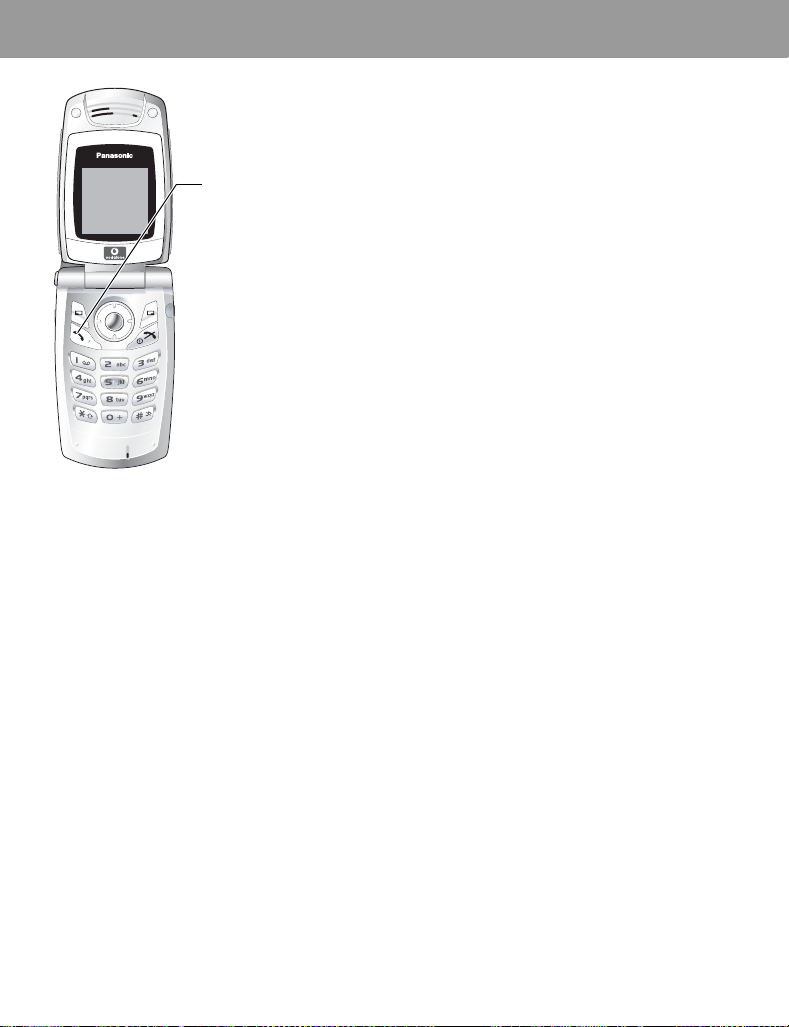
Self-Portrait Mirror
when taking a self-portrait
8
Camera Lens
Watch yourself
Infrared Port
Illumination Light/
Charging Indicator
Lights red during charging
Page 12
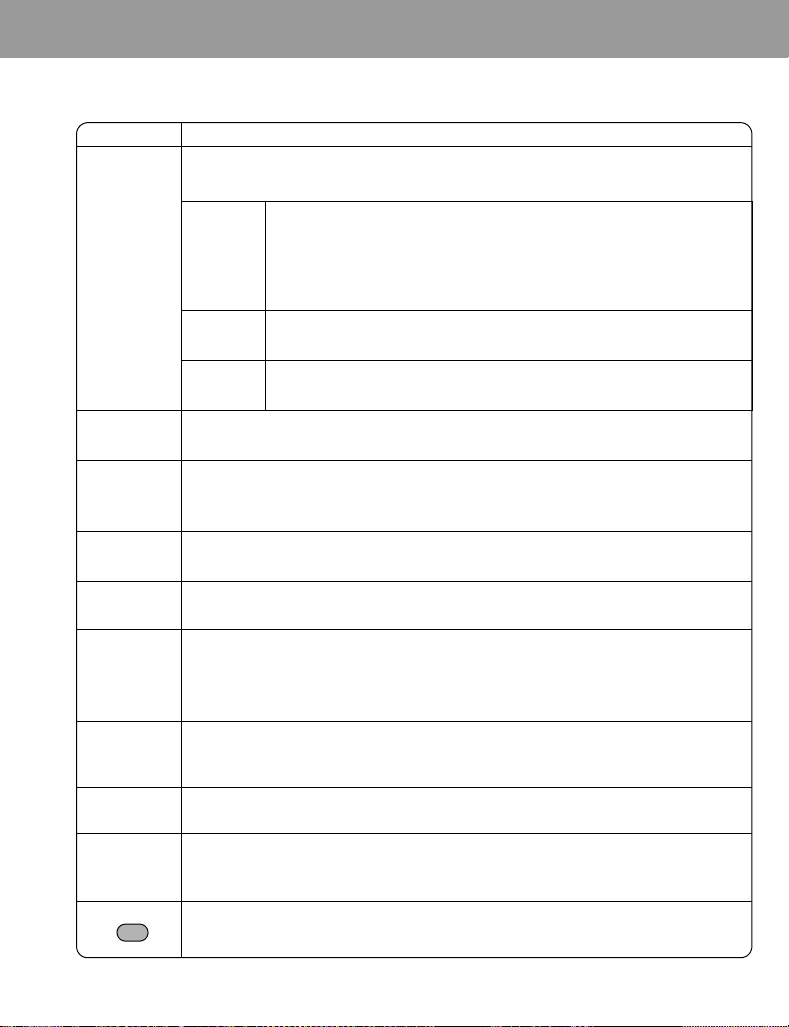
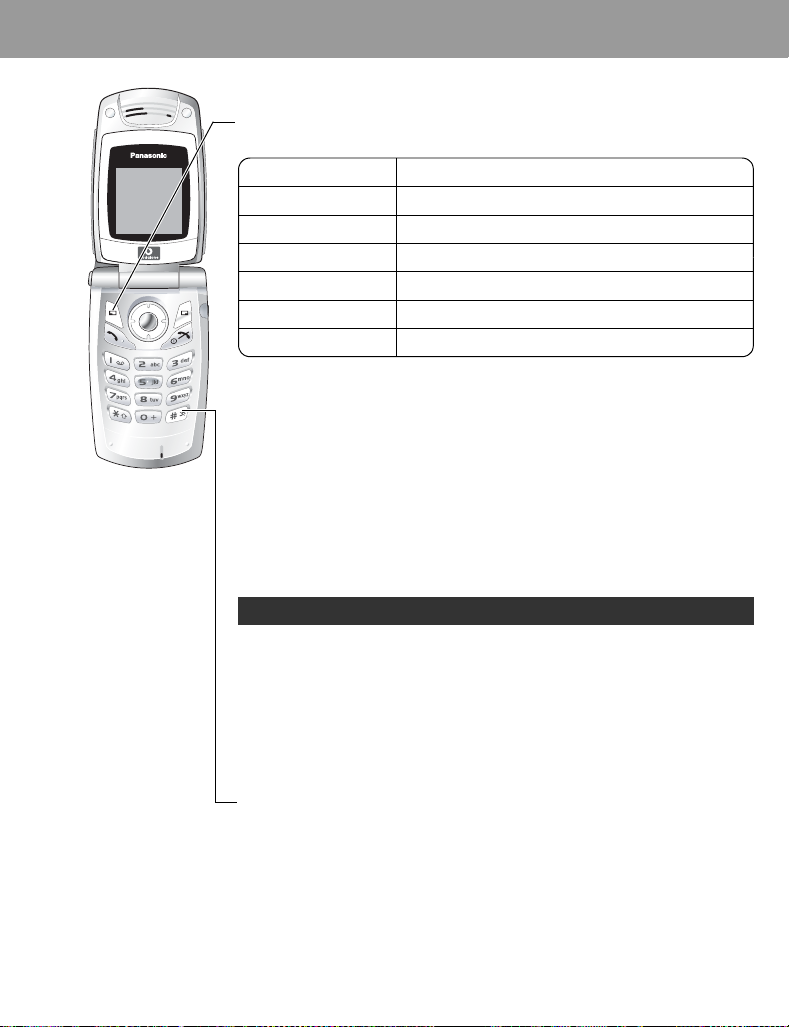
Keys
Key Function
Navigation key: Select and save settings, and scroll/move through menus, text and
Contacts. Also serves as shutter button for the camera and to control movements while
playing games.
Select key: Press centre to select option or to save.
Keyguard key: From Idle mode, press and hold to lock the keypad, or press
0
<
to unlock the keypad.
Alert Mute key: Turns ring tone off and stops vibration when receiving a call
(Alert mute).
Keys & Displays
A
@
C
D
$
to
,
#
"
!
4
2
Left Soft key: Perform function displayed in lower left corner of the display. From Idle
mode, press to open Messages menu.
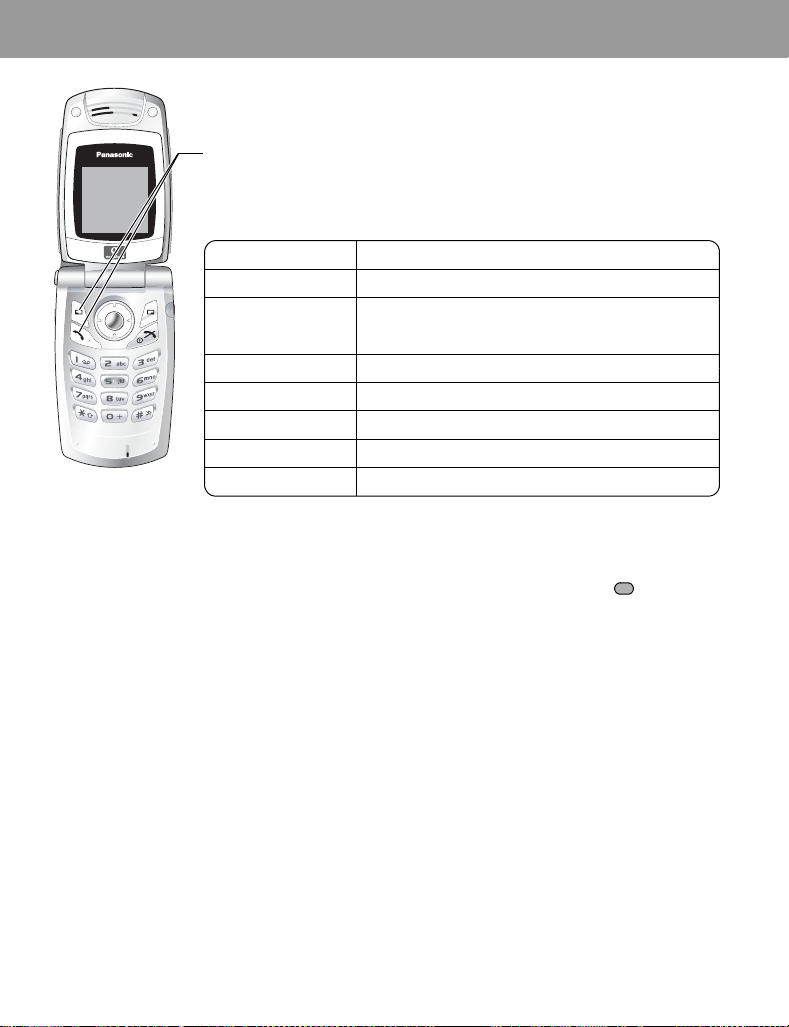
Right Soft key: Perform function displayed in lower right corner of the display. Mainly
used to cancel and return to previous menu level or to delete text/number entries. Press
and hold to delete all characters in text entry mode. From Idle mode, press to open
Vodafone live!
Send key: Make a call, recall recently dialled phone numbers or answer a call.
Power/End key: Press and hold to switch phone on/off. When the phone is on, press
briefly to end a call. During key operation, press to return to Idle mode.
1 key/Vodafone mail key: Press and hold $ to retrieve Vodafone mail messages.
1-9 Number keys: Enter numbers. Press and hold a single key (2-9) for Speed dial. In
text entry mode, enter text, numbers and characters.
0 Number key: Enter number. In text entry mode, enter number and characters.
International Dialling Prefix key: Press and hold
dialling prefix) while entering a phone number.
Asterisk key: During text entry mode, press to switch between upper case and lower case
letters. Changes Input mode (Hold).
Pause key: Press and hold to enter a pause (P) while entering a phone number.
In text entry mode, press to enter a space. Press and hold to enter a line feed.
Quiet Mode key: From Idle mode, press and hold to turn Quiet profile on/off.
Multi Function key (located on the left side of the phone): Press to enter camera
mode, then press again to take a picture.
Turns ring tone off and stops vibration when receiving a call (Alert mute).
Scroll key: Press top or bottom edge to move screen cursor up or down.
Move key: Press left or right edge to move screen cursor left or right.
# to enter + (the international
9
Page 13
Keys & Displays
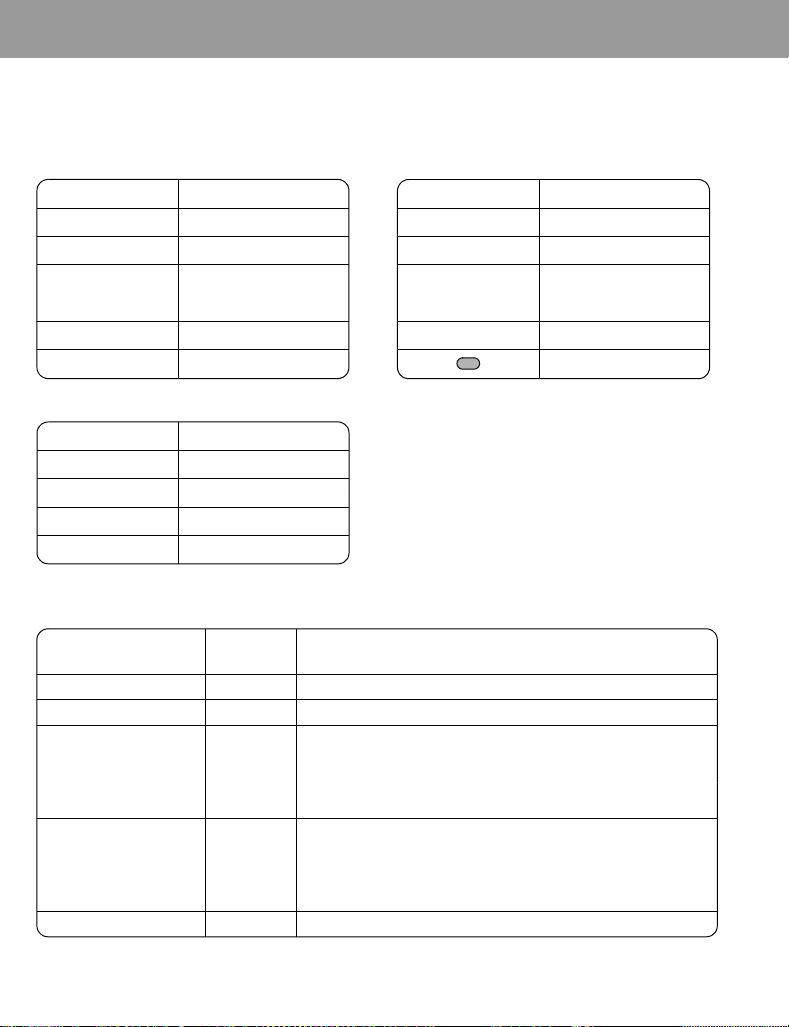
Shortcuts
When you are familiar with the menu system, you can use the keypad to access features instead of navigating
through the display menus.
Short press (from Idle mode)
Key Function
A Messages
@ Vodafone live!
<
1 Shortcuts
5 Contacts
Menu/Alert mute/
Keyguard off
Key Function
7 Inbox (MMS)
3 Calendar
$ - #
"!
C Dialled numbers
Call dial field
Camera/Alert mute
Long press (from Idle mode)
Key Function
< Keyguard on
$ Vodafone mail
% - , Speed dial
! Quiet mode on/off
Illumination light
Function
Incoming call Blue if call is missed (Red) or switched over to voice call (Blue)
Call in progress Blue if call ended
Missed call notification Red
Message notification
(SMS or MMS or WAP
Push)
Alarm notification Purple after alarm is ended (30 seconds) or any key is pressed
Luminous
colour
Green
Light goes out
Mobile phone status: Closed
LED goes out when phone is opened or the Multi Function key is
pressed.
Mobile phone status: Open
LED goes out by pressing any key or if phone is closed.
Mobile phone status: Closed
LED goes out when phone is opened or the Multi Function key is
pressed.
Mobile phone status: Open
LED goes out by pressing any key or if phone is closed.
10
Page 14
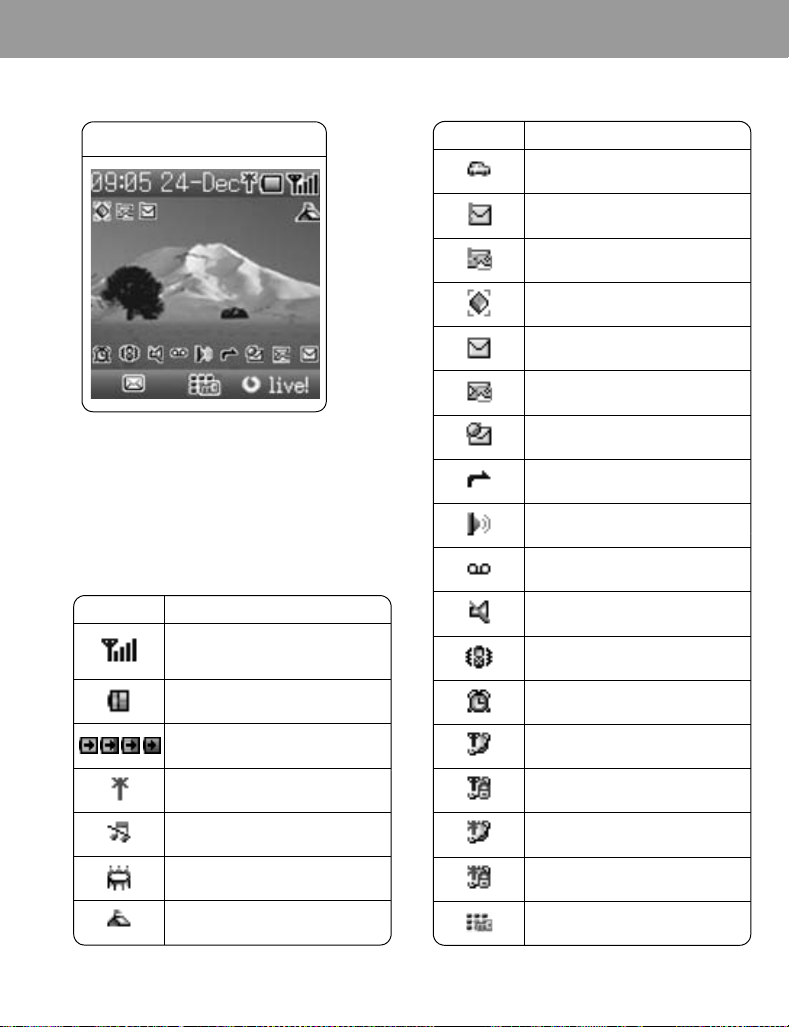
Display
Keys & Displays
Main display
With some operations, the display automatically
clears after 2.5 seconds or after pressing any key.
Status icons
Different icons are shown, depending on the features
you are using and the options you have selected.
Icons appear on the main display as shown in the
following table.
Icon Meaning
Signal strength
The more bars visible, the stronger
the signal.
Battery charge level
Icon Meaning
Car profile is active
SMS message storage area is full
MMS message storage area is full
Java™ (Suspended)
Unread SMS message
Unread MMS message
Unread WAP push message
Call diverts is on
Infrared is active
New Vodafone mail message
received
Incoming volume 0
Vibration alert is on
Alarm is set
Battery is charging
GPRS is active
Quiet profile is active
Meeting profile is active
Outdoor profile is active
On-line browsing during CSD
(Non-Secure)
On-line browsing during CSD
(Secure)
On-line browsing during GPRS
(Non-Secure)
On-line browsing during GPRS
(Secure)
Keyguard is on
11
Page 15
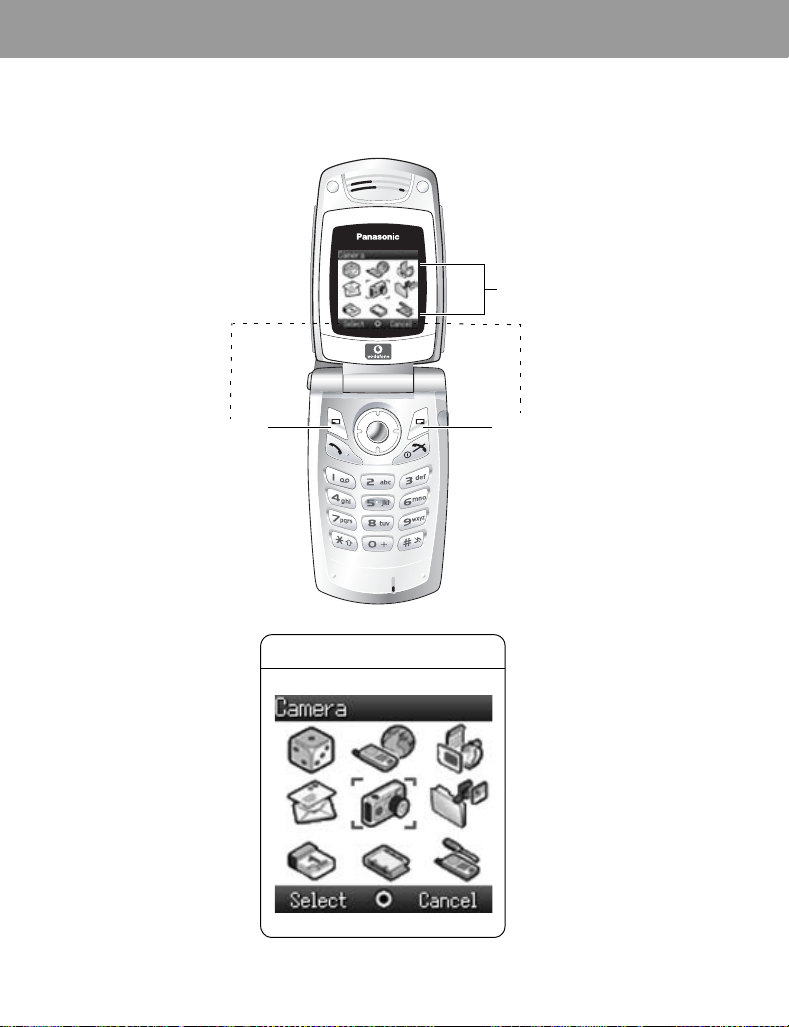
How to Use This Phone
Selecting a menu option
From Idle mode, press the centre of the Navigation key < to open the main menu display. The main menu
display has 9
options.
Main menu
12
Press to perform
function displayed in
the lower left corner.
Main menu screen
Press to Cancel/Exit
or to perform
function displayed
in lower right corner.
Page 16
How to Use This Phone
Symbols used in this manual
The table below shows the symbols used throughout these instructions and the corresponding meanings in the
column on the right.
Symbol Meaning
< Press centre of the Navigation key to select option or to save
1537 Direction in which you can move on the display screen with the Navigation key
Shows possibility of moving in any direction (up, down, left and right) on the display
0
screen with the Navigation key
4 Shows possibility of moving up and down on the display screen with the Navigation key
2 Shows possibility of moving left and right on the display screen with the Navigation key
A Press Left Soft key
@ Press Right Soft key
<A Press centre of Navigation key or Left Soft key
$ - # Press Number keys
" Press Asterisk key
! Press Pause key / Quiet Mode key
C Press Send key
D Press Power / End key
E Indicates that a function is SIM dependent
F Indicates that a function is network dependent
Press Multi Function key
13
Page 17
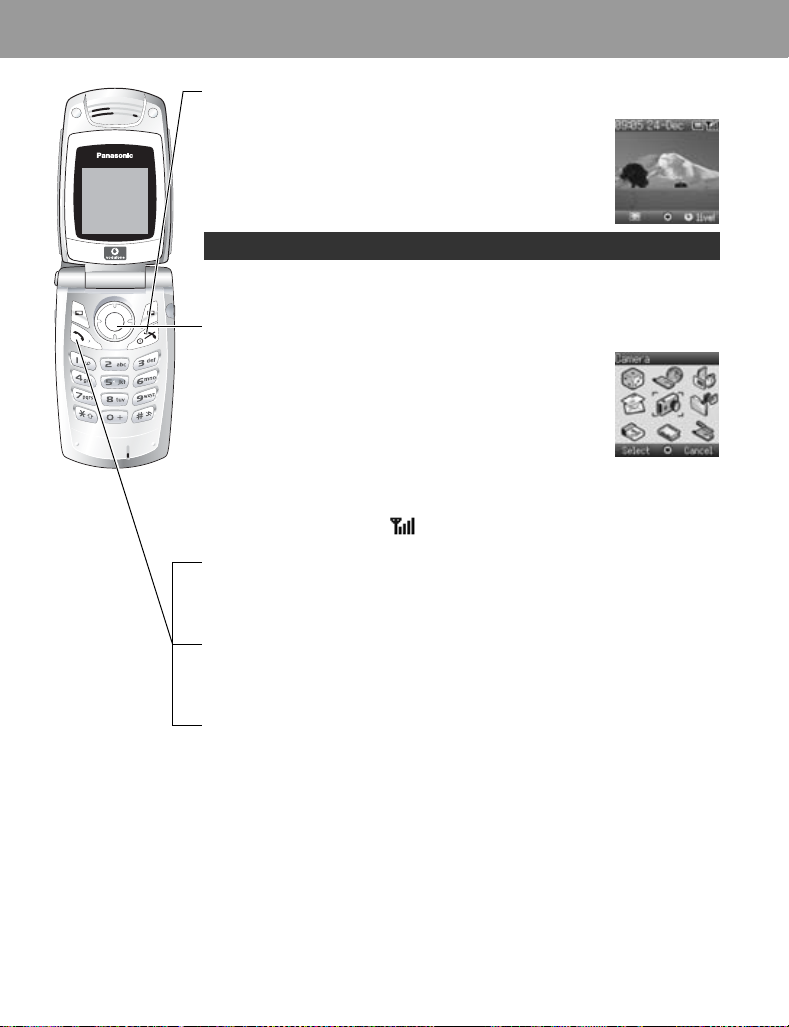
Phone Basics and Managing Calls
Switching phone ON/OFF
Press and hold D for 3 seconds to switch phone on
• When the phone is switched on, a greeting may be displayed
and the phone enters Idle mode.
Press and hold D again to switch phone off
When switching the phone off, use only D to avoid damaging the phone.
Displaying menu
1 To access the menu, press < in Idle mode
2 The menu will be displayed
(The menu may vary depending on your SIM.)
Making calls
• To make a call, start in Idle mode.
• Ensure network name and appear on the display.
Standard dialling
1 Enter phone number (# - ,, ", !)
2 C / <
14
Contacts dialling
1 5 Contacts (see “Shortcuts” on page 10)
2 4 required contact C
Recent number dialling (Calls made or received)
1 C
2 2 Dialled numbers, Answered calls or Missed calls
3 4 required contact C
Page 18
Phone Basics and Managing Calls
International dialling
The international code for the destination country/region should be entered, followed
by the area code and phone number.
1 Press and hold #
2 Enter country/region code
3 Enter area code and phone number C / <
NOTE Many countries/regions include an initial “0” in the area code. This
should, in most cases, be omitted when dialling international numbers. If
you have difficulties making international calls, contact Vodafone.
Emergency call
To make an emergency call the antenna ( ) must be present.
If SIM is inserted enter emergency number C / <
If SIM is not inserted,
1 A
2 4 SOS
3 < / A
Making emergency calls without a SIM is country or network operator
dependent.
Answering calls
Press any key except D / / < / @ (Any key answer)
NOTE Any key answer can be disabled. (See “Any key answer setting” on page
36.) In this case, calls can only be answered by pressing C or A.
Ending/rejecting calls
D / @ or fold the phone during an incoming call to reject the call or end a call in
progress.
15
Page 19
Phone Basics and Managing Calls
Vodafone Mail
You need to subscribe to the voice mail service through Vodafone before you can
retrieve voice mail messages. To check if voice mail access has been configured,
press and hold
1 When a new voice mail message is received, an alert sounds and appears in
lower part of the display or you receive an SMS notification (depending on the
local service)
• remains on the display until you have listened to all your voice messages.
2 Press and hold $ to automatically dial your Vodafone mail number
• If the number is not valid, contact Vodafone.
3 Follow the recorded instructions for your voice mail
4 D when finished
$. See “Vodafone Mail” on page 55 on how to programme.
Activating Quiet mode
1 To quickly set the phone to your preset Quiet mode settings, press and hold !
• To change Quiet mode settings, see “Editing profile” on page 24.
2 To disable, press and hold ! again
16
Page 20
Phone Basics and Managing Calls
In-call options
During a call: A for options
4 required option < / A
Option Explanation
Hold Call
From contacts Access the Contacts list
Create SMS Access Create SMS
Inbox(SMS) Access Inbox(SMS)
Calendar Access Calendar
Handsfree / Handheld Switch to Desktop Handsfree or Handheld
Put a call on hold. To resume,
Earpiece volume
During a call: 4 / 2 to adjust earpiece volume
Desktop Handsfree
Desktop Handsfree allows you to have a conversation without holding the phone to
your ear.
Swapping between Handsfree and Handheld calls:
During a Handheld call:
A, 4 Handsfree < / A
During a Handsfree call:
A, 4 Handheld < / A
Do not hold the phone to your ear in Handsfree mode.
A, 4 Resume < / A
DTMF tones
DTMF tones can be sent during a conversation. These are often used to access
voice mail, paging and computerised home banking. For example, you may need to
input a number to remotely access voice mail messages. A phone number may be
stored in Contacts together with a DTMF tone sequence, allowing the number to be
dialled upon recall and the DTMF tone sequence to be sent automatically.
Send DTMF tones during a call:
Press digits (# - ,, !, ")
Pause dial:
Using pauses allows you to send DTMF tones automatically.
1 Enter phone number
2 Press and hold ! until a P is displayed at the end of the phone number entered
3 Enter the DTMF digits after the pause, e.g. enter the number to access Vodafone
mail messages
4 C / <
When the call is connected the DTMF tone sequence will be sent after 3 seconds.
17
Page 21
Phone Basics and Managing Calls
Incoming call while on a call
During a call, you may receive another call. To enable this, Call waiting must be on.
(See “Call waiting” on page
Accept a second call:
C / A (The second call is active, the current call is put on hold)
When two calls are connected, the following options are available by pressing A.
4 required option < / A
Option Explanation
Swap Switch between two connected calls
Merge
From contacts Access the Contacts list
Create SMS Access Create SMS
Inbox(SMS) Access Inbox(SMS)
Calendar Access Calendar
Handsfree / Handheld Switch to Desktop Handsfree or Handheld
Reject a second call:
@ to reject the incoming call and to resume the call in progress.
End current call and receive second call:
D to end the call in progress, then press any key except D / / < / @ to
answer the incoming call.
Making a second call
During a call:
Enter second phone number and C / <
or
A for options and select required contact from the Contacts list and C
• The first call is put on hold.
32.)
Enable multi-party conversation when two calls are
connected (one active, one on hold). All three parties can
then talk to each other
18
Page 22
Phone Basics and Managing Calls
Multi-party call
A multi-party call has 3 or more people in conversation at the same time. (F)
1 Establish a multi-party call by merging two calls
2 Continue to add people to the multi-party call (up to 5 connections in total) by
calling others or by accepting incoming calls
When making a call or accepting an incoming call, the multi-party call is placed on
hold. The callers already in the multi-party call can continue to talk with each other
while on hold. Each additional connection can then be merged into the multi-party call
A, 4 Merge < / A.
by
Multi-party call options
You can select an individual from the multi-party call and split the conversation,
allowing you to talk privately without the participation of the rest of the parties in the
multi-party call.
1 During a multi-party call, A
2 4 Option < / A
3 4 desired caller in the multi-party list
4 desired option A
5 4 required option < / A
Option Explanation
Split
Ok Close the options list
Split the selected caller from the multi-party call so you can talk
privately. The remaining multi-party callers are placed on hold and
can still talk with each other. To rejoin the call,
A, 4 Merge < / A
To end the call’s connection, @ (End)
6 D to end the multi-party call and all connections
19
Page 23
Phone Basics and Managing Calls
Call log
Recently dialled phone numbers, answered calls and missed calls are stored in the
Call log. The numbers in the Call log list can be used to call, send messages or add
to Contacts. You can also delete the numbers from the list.
Viewing Call log
1 C
2 2 Dialled numbers, Answered calls or Missed calls
3 4 required phone number <
Dialling from Call log
1 C
2 2 Dialled numbers, Answered calls or Missed calls
3 4 required phone number <
4 A
5 4 Call < / A
Sending messages
1 C
2 2 Dialled numbers, Answered calls or Missed calls
3 4 required phone number <
4 A
5 4 Send message < / A
6 4 MMS or SMS < / A
7 Enter a message
For details on creating a message, see “Creating a new MMS” on page 43 or
“Creating a text message” on page 51.
20
Page 24

Phone Basics and Managing Calls
Saving a phone number from Call log into the Contacts list
1 C
2 2 Dialled numbers, Answered calls or Missed calls
3 4 required phone number <
4 A
5 4 Add to contacts < / A
6 4 Phone or SIM < / A
7 4 required icon <
8 Enter as appropriate <
(If required, repeat steps 7 and 8)
9 A
Options in Call log
In each Call log list, the following options are available by pressing A.
4 required option < / A
Option Explanation
Call Call selected number
Send message Send MMS/SMS message to selected number
Add to contacts Store number to Contacts
Delete Delete selected log
Delete all
Delete all logs in the list
(This option is available in the Call log list.)
21
Page 25
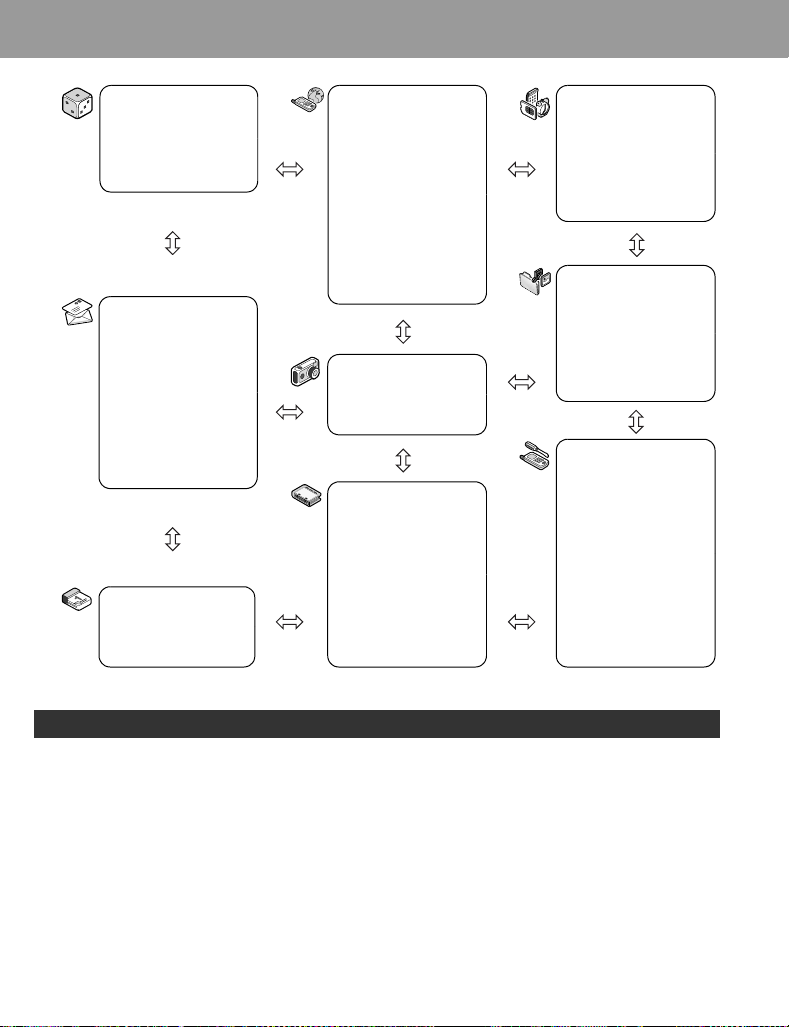
Explore the Menus
Fun & Games
Games & more
Download more
Settings
Messages
Create new
Inbox
Archive
Live! Studio
Vodafone Mail
Vodafone Messenger
Cell Broadcast
Settings
Memory status
Calendar
Vodafone live!
Vodafone live!
Games
Ringtones
Pictures
Search
Find & Seek
News
Sport
Travel
Finance
Camera
Contacts
Contacts list
Add contact
Call log
Speed Dial list
View groups
Advanced
(Service numbers)
Applications
(SIM Tool Kit)
Alarm
Sound recorder
Calculator
Infrared
My Stuff
Pictures
Sounds
Shortcuts
Text templates
Memory status
Settings
Profiles
Sound
Vibration alert
Display
Language
Data connections
GSM network
Calls
Security
Time and date
Any key answer
Keyguard
SIM Tool Kit and Service numbers are SIM dependent (E).
22
Page 26
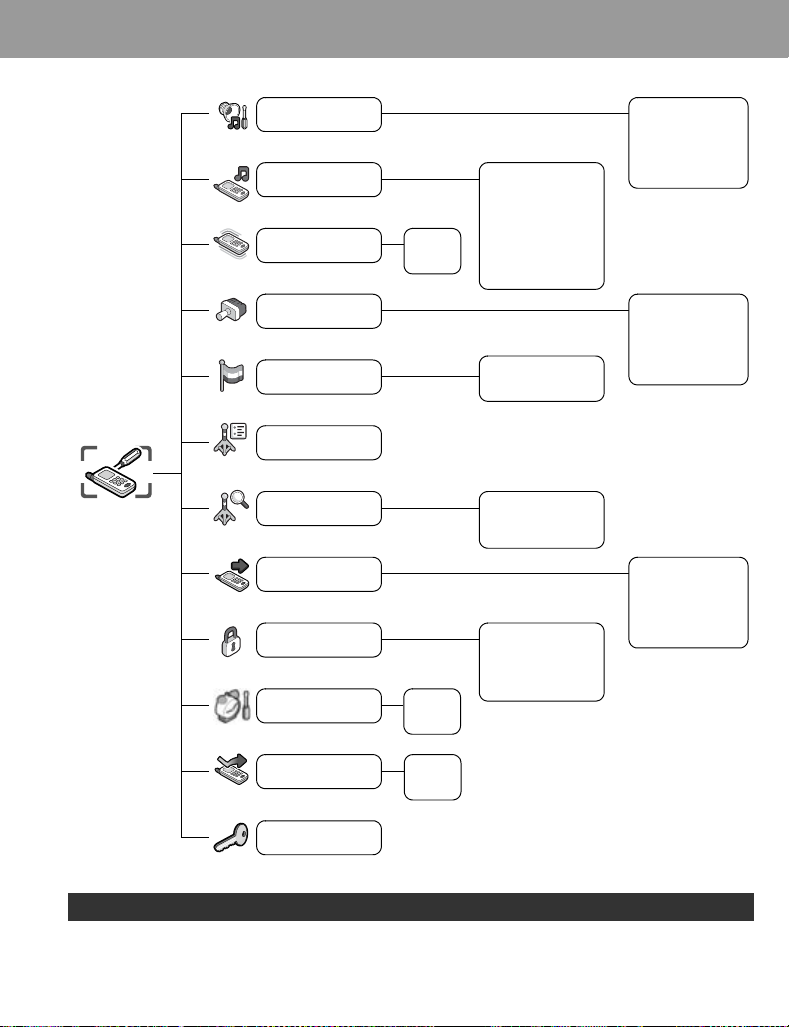
Settings Menu Structure
Settings
Profiles
Sound
Vibration alert
Display
Language
Data connections
GSM network
Calls
Security
Time and date
On
Off
Time
Date
Incoming tone
Incoming volume
Message tone
Message volume
Key tone
Key volume
Warning tone
Display language
Input language
New search
Select network
Search mode
PIN entry
Change PIN2
Fixed dial
Call barring
Normal
Quiet
Meeting
Outdoor
Car
Wallpaper
Colour theme
Brightness
Backlight time
Key backlight
Call diverts
Call waiting
Send my number
Call duration
(Service charge)
Any key answer
Keyguard
Service charge is SIM dependent (E).
On
Off
23
Page 27
Settings
Settings
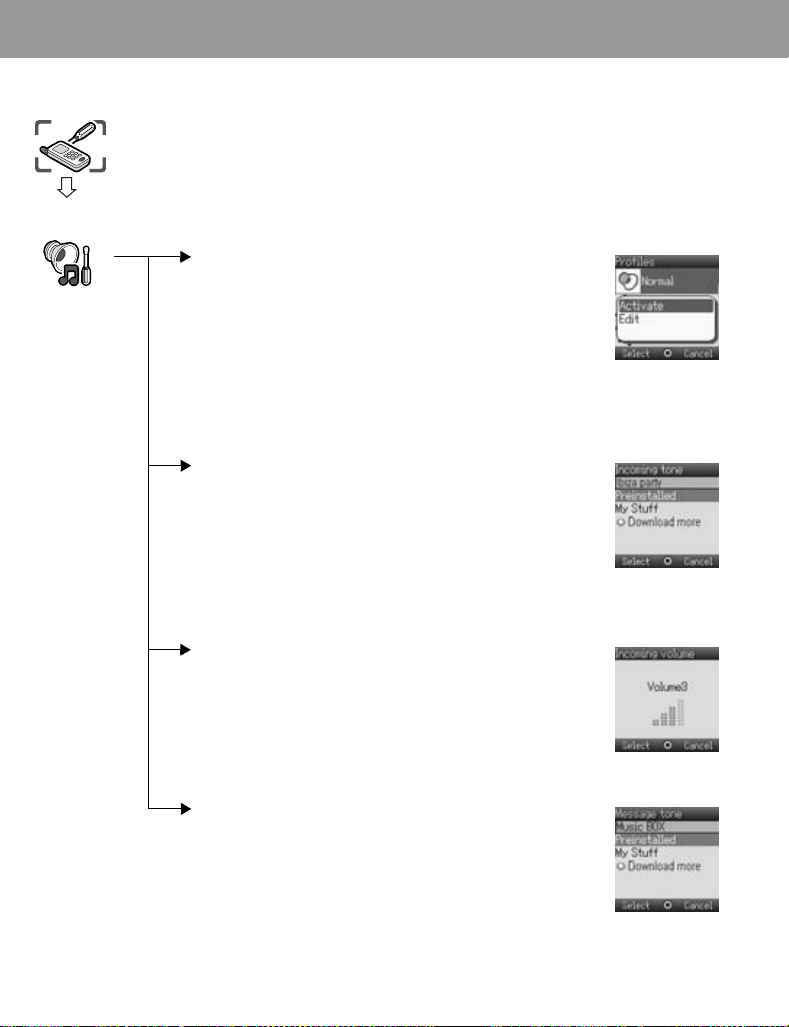
Profiles
Profile setting
You can switch between five profiles in your phone, each with a distinct combination
of ring tone, ring volume, etc.
Profiles are set up for use in different environments – for instance you might want to
create a Quiet profile, a Meeting profile with a ring tone appropriate for formal
occasions and an Outdoor profile for noisy environments.
Within each profile, distinct melodies can be set as incoming call and message alerts.
Activating a profile
From Profiles menu
1 4 required profile A
2 4 Activate < / A
or
1 4 required profile <
Editing profile
Incoming tone
From Profiles menu
1 4 required profile A
2 4 Edit < / A
3 4 Incoming tone < / A
4 4 Preinstalled, My Stuff or Download more < / A
5 4 required data < / A
Incoming volume
From Profiles menu
1 4 required profile A
2 4 Edit < / A
3 4 Incoming volume < / A
4 4 / 2 adjust the volume level (0 - 4) < / A
24
Message tone
From Profiles menu
1 4 required profile A
2 4 Edit < / A
3 4 Message tone < / A
4 4 Preinstalled, My Stuff or Download more < / A
5 4 required data < / A
Page 28

Settings
Settings
Profiles
Message volume
From Profiles menu
1 4 required profile A
2 4 Edit < / A
3 4 Message volume < / A
4 4 / 2 adjust the volume level (0 - 4) < / A
Key tone
From Profiles menu
1 4 required profile A
2 4 Edit < / A
3 4 Key tone < / A
4 4 required tone type < / A
Key volume
From Profiles menu
1 4 required profile A
2 4 Edit < / A
3 4 Key volume < / A
4 4 / 2 adjust the volume level (0 - 4) < / A
Warning tone
From Profiles menu
1 4 required profile A
2 4 Edit < / A
3 4 Warning tone < / A
4 4 On or Off < / A
Vibration alert
From Profiles menu
1 4 required profile A
2 4 Edit < / A
3 4 Vibration alert < / A
4 4 On or Off < / A
25
Page 29
Settings
Settings
Sound
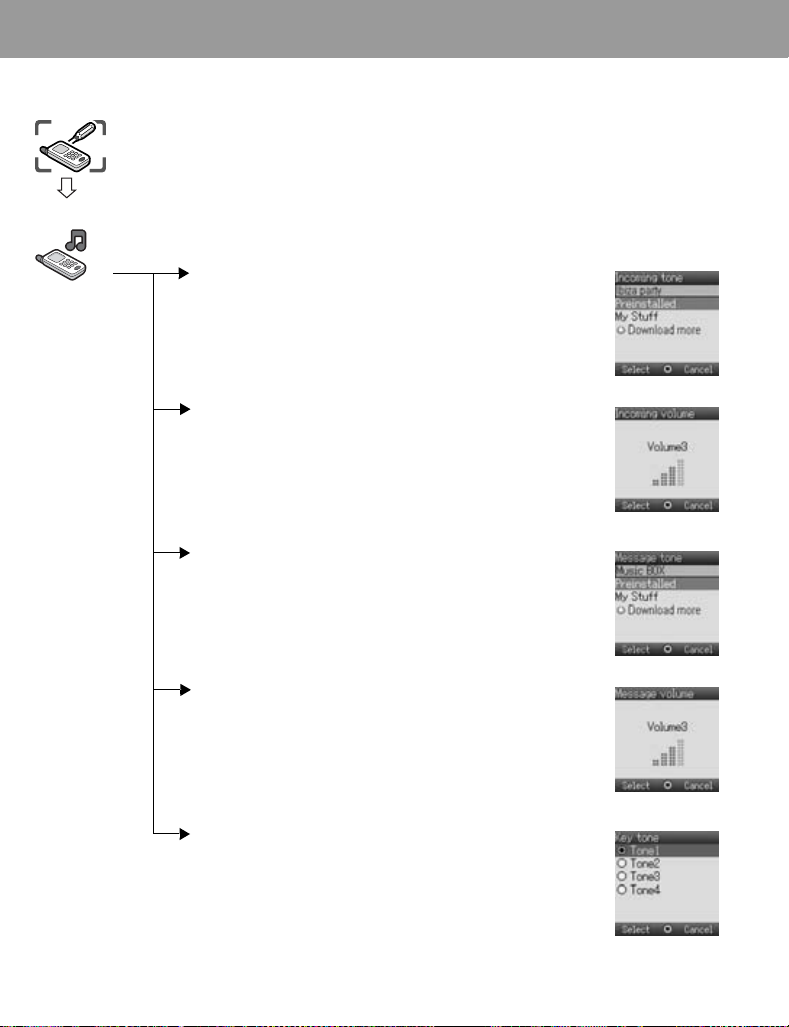
Tone setting
You can set ring tone, ring volume, etc.
The ring tone can be changed to one of the tones from Preinstalled, My Stuff or
Download more. Incoming tone and Message tone can have different ring tones and
volume assigned.
Ring volume increases in steps to the level you selected. Keep in mind that the
speaker located next to the receiver may sound too loud when the phone is held to
your ear.
Changing Incoming tone
From Sound menu
1 4 Incoming tone < / A
2 4 Preinstalled, My Stuff or Download more < / A
3 4 required data < / A
Setting Incoming volume
From Sound menu
1 4 Incoming volume < / A
2 4 / 2 adjust the volume level (0 - 4) < / A
Changing Message tone
From Sound menu
1 4 Message tone < / A
2 4 Preinstalled, My Stuff or Download more < / A
3 4 required data < / A
Setting Message volume
From Sound menu
1 4 Message volume < / A
2 4 / 2 adjust the volume level (0 - 4) < / A
26
Setting Key tone
From Sound menu
1 4 Key tone < / A
2 4 required tone < / A
Page 30
Settings
Settings
Sound
Vibration
alert
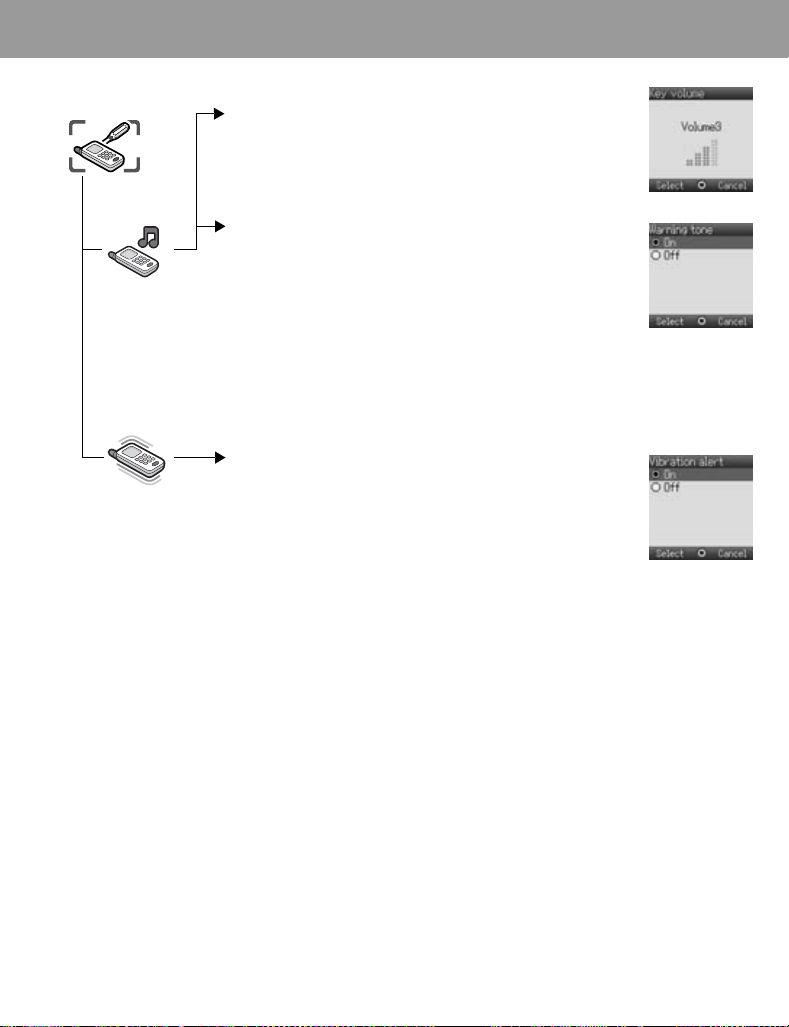
Setting Key volume
From Sound menu
1 4 Key volume < / A
2 4 / 2 adjust the volume level (0 - 4) < / A
Setting Warning tone
From Sound menu
1 4 Warning tone < / A
2 4 On or Off < / A
Vibration alert setting
Vibration alert can be set to indicate an incoming call and a received message.
From Vibration alert menu
4 On or Off < / A
27
Page 31

Settings
Settings
Display
Display colour,
Brightness,
Wallpaper,
Backlight time and
Key backlight can
be changed.
Display setting
Setting Wallpaper
From Display menu
1 4 Wallpaper < / A
2 4 Preinstalled, My Stuff or Download more < / A
3 4 required data
4 To view and save, press < then < / A to save
or
To save without viewing, press A
Setting Display Colour theme
From Display menu
1 4 Colour theme < / A
2 4 required colour < / A
Setting Display Brightness
From Display menu
1 4 Brightness < / A
2 4 adjust the brightness level (1 - 5) < / A
Setting Backlight time
From Display menu
1 4 Backlight time < / A
2 4 required time < / A
The backlight goes out, then display is turned off in 1 minute.
28
Setting Key backlight
From Display menu
1 4 Key backlight < / A
2 4 On or Off < / A
Page 32

Settings
Settings
Language
Data
connections
GSM
network
National
regulations may
not permit
roaming in your
home region.
Language setting
You can change the language used for display messages and/or text entry.
From Language menu
1 4 Display language or Input language < / A
2 4 required language < / A
Data connections setting
GPRS settings and CSD settings are stored in the Data connections menu.
Data can be sent/received using GPRS or CSD technology.
Network setting
Changing to a new network
The New search function is used to manually select a network that is available in your
current location.
From GSM network menu
1 4 New search < / A
2 4 required network < / A
Select network
View available networks.
From GSM network menu
1 4 Select network < / A
2 4 required network A
3 4 required option (see page 30) < / A
NOTE MCC (Mobile Country Code) / MNC (Mobile
Network Code) will appear on the display.
29
Page 33

Settings
Settings
GSM
network
National
regulations may
not permit
roaming in your
home region.
When the Search mode is set to Automatic the phone will automatically reselect a
new network in order to maintain optimum network availability. The network list is
used when the Search mode is set to Automatic. The location numbers in the
preferred network list show the search priority.
You can amend the list as follows:
Option Explanation
Add Store a new network at the end of the list
Insert
Edit Overwrite the old network with a new one
Delete Delete the network you have selected
Store a new network in the currently displayed location and
move other networks down
Search mode
You can set your phone to automatically or manually search for the other networks
when roaming.
From GSM network menu
1 4 Search mode < / A
2 4 Automatic or Manual < / A
When the Search mode is set to Manual the phone will only use
a selected network.
If coverage is lost another network should be manually selected.
30
Page 34

Settings
Settings
Calls
Call settings
Call diverts
Voice, fax, and data calls can be diverted to different numbers in different situations.
For example, you may want to divert voice calls to voice mail when the phone is
switched off.
To register a number to divert at first time:
From Calls menu
1 4 Call diverts < / A
2 4 Divert voice, Divert fax or Divert data < / A
3 4 the circumstances to initiate the divert A (Options)
4 4 On < / A
5 4 Direct input or From contacts < / A
6 When you select Direct input, enter phone number to divert
<
(
If you select A
or
When you select From contacts, 4 required contact from the Contacts list A
Request of Call diverts will be sent to network.
Entered phone number will be registered in the network. From next time, incoming
calls will be diverted to the registered number.
• To cancel the registered phone number, 4 Off on step 4.
• To cancel all the registered phone number, 4 Cancel all on step 2.
• To confirm the status of Call diverts, 4 Status on step 4.
• To confirm all the status of Call diverts, 4 Status all on step 2.
after entering phone number,4 Ok
< / A)
31
Page 35

Settings
Settings
Calls
To change the registered number to divert:
From Calls menu
1 4 Call diverts < / A
2 4 Divert voice, Divert fax or Divert data < / A
3 4 the circumstances to initiate the divert A (Options)
4 4 On < / A
5 4 Direct input or From contacts < / A
6 When you select Direct input, enter phone number to divert <
(If you select A after entering phone number, 4 Ok < / A)
or
When you select From contacts, 4 required contact from the Contacts list A
Request of Call diverts will be sent to network.
NOTE When a divert situation is enabled the divert icon ( ) is displayed.
Call diverts settings
Settings Explanation
All calls Divert all incoming calls
When busy Divert incoming calls when a call is in progress
When no reply
When unreachable Divert incoming calls when phone is disconnected
This function is network dependent (F).
Divert incoming calls if call is not answered
(This setting is available only when Divert voice is
selected.)
32
Call waiting
If Call waiting is switched on a second call can be received.
From Calls menu
1 4 Call waiting < / A
2 The current status, “Call waiting deactivated” or “Call
waiting activated”, is displayed
To accept the current status, <
(If you select A, 4 Ok < / A)
or
To change the setting, A Activate or Deactivate < / A
This function is network dependent (F).
Page 36

Settings
Settings
Calls
Send my number
You can set whether or not to show your phone number to another phone (Caller ID).
From Calls menu
1 4 Send my number < / A
2 4 Network set, On or Off < / A
Call duration
Displays the duration of incoming or outgoing calls.
From Calls menu
1 4 Call duration < / A
2 4 Incoming or Outgoing < / A
To reset counter, < x 2 / A x 2
Service charge
You can check the charges for your calls.
From Calls menu
4 Service charge < / A
The following can be set.
4 required option < / A
Option Explanation
Cost left Show how much cost is left
Call meter Show the total costs of calls made
Price/unit
Max cost Set the maximum cost of calls made
Show the cost that the service provider charges for one unit of call
time
NOTE The duration of one unit may vary during day, peak and off-peak times.
Call charges can be calculated accordingly. However, the call charge
information may not give an accurate reflection of the actual tariffs
charged by Vodafone.
This function is SIM (E) and network (F) dependent.
33
Page 37

Settings
Settings
Security
If PIN is entered
incorrectly 3 times
the phone will be
locked, and you
will need to enter
the PUK code. If
PIN2 is entered
incorrectly 3 times
SIM will be
locked, and you
will need to enter
PUK2 code. If the
PUK code is
entered
incorrectly
10 times, the
phone will cease
to operate
permanently.
All information
stored in the SIM
will be lost and the
SIM will need to
be replaced.
Contact Vodafone
for more
information.
Security settings
The PIN protects your SIM against unauthorised use. If you enable the PIN, every
time the phone is switched on, you will be prompted to enter the PIN code.
The PIN2 controls security for the Fixed dial store.
PIN entry (Enabling/Disabling PIN entry)
From Security menu
1 4 PIN entry < / A
2 4 Enable/disable < / A
3 4 Enable or Disable < / A
4 Enter the PIN code (4 - 8 digits) < / A
Change PIN
From Security menu
1 4 PIN entry < / A
2 4 Change PIN < / A
3 Enter the current code < / A
4 Enter the new code < / A
5 To verify the new code < / A
You can change the PIN when PIN entry is set to Enable.
Change PIN2
From Security menu
1 4 Change PIN2 < / A
2 Enter the current code < / A
3 Enter the new code < / A
4 To verify the new code < / A
This is SIM (E), service provider and network (F) dependent.
34
Page 38

Settings
Settings
Security
Fixed dial
Fixed dial is a part of Contacts, but with added security.
When Fixed dial is enabled:
¾
Only numbers that are in the Fixed dial store may be dialled.
¾
Any manually dialled phone numbers must match a number already in the Fixed
dial store.
If you store, edit or delete a phone number, you have to enter your PIN2 code.
From Security menu
1 4 Fixed dial < / A
2 4 Enable or Disable < / A
3 Enter the PIN2 code (4 - 8 digits) < / A
This is SIM (E), service provider and network (F) dependent.
Call barring
Call barring restricts certain outgoing and/or incoming calls using a password
supplied by Vodafone. When updating/checking the status of Call barring, the phone
must be registered on a network.
Varying call restrictions can be used for voice calls.
From Security menu
1 4 Call barring < / A
2 4 required setting from the table shown below A
(When you select <, enter password (4 digits) < / A)
3 4 On, Off or Status < / A
4 When you select On or Off, enter password (4 digits) < / A
You can skip steps 3 and 4 if you enter your password in step 2.
Call barring settings
Settings Explanation
Bar outgoing calls Outgoing calls are barred
Bar foreign calls International outgoing calls are barred
Bar foreign calls except
Home
Bar incoming calls Incoming calls are barred
Bar incoming if abroad Roaming is barred if abroad
Cancel all Cancel all call bar settings
Status all Call bar status is displayed
Password Change call bar password
International outgoing calls except home are barred
35
Page 39

Settings
Settings
Time
and date
Time and date
can be shown on
the top of the
display when in
Idle mode.
Any key
answer
Time and date setting
From Time and date menu
1 4 Time < / A
2 # - , to enter the time using 24 hour clock < / A
3 4 Date < / A
4 # - , to enter the date < / A
Some settings may be lost if the battery is removed or remains discharged for
more than 1.5 hours.
Any key answer setting
Calls can be answered by pressing any key except D / / < / @.
When any key answer is set to off, calls can only be answered by pressing C or A.
From Any key answer menu
4On or Off < / A
36
Page 40

Settings
Settings
Keyguard
Keyguard setting
Keyguard stops the keys from performing their normal function if accidentally
pressed. When Keyguard is enabled, “ ” appears on the display. When a call is
received, Keyguard is temporarily disabled and you can answer the call.
Setting Keyguard
From Keyguard menu
1 “Would you like to lock Keypad?” < / A
or
From Idle display
1 Press and hold <
2 “Would you like to lock Keypad?” < / A
Emergency calls can still be made with the Keyguard enabled but there will be
no indication that you are dialling a number.
Disabling Keyguard
When “ ” appears on the display
1 <
2 “Would you like to unlock?” < / A
37
Page 41

Camera
Camera
You can take
pictures with the
built-in camera,
send them in an
MMS (multimedia
message) or MMS
postcard or by
infrared and use
them as Wallpaper.
You can also attach
a picture to a
contact in your
Contacts list.
Taking a picture
The camera range is 35 cm - .
The minimum illumination required is 5 lux.
From Camera menu
< or to capture the image
To store the image in My Stuff: (After capturing the image)
A
or
(Available only when the phone is open)
The picture will be saved in My Stuff / Pictures / Stored pictures.
To return to camera operation without storing the image:
(After capturing the image)
@
NOTE If you press < after capturing image, the picture can be attached to
MMS message or MMS postcard. See “Sending a message” on page
or “Creating a MMS postcard” on page 49.
Adjusting the brightness level
While view finder is active, you can adjust the brightness.
3 to increase the brightness
7 to decrease the brightness
Picture brightness indicators:
Brighter
Normal
Darker
45
38
Options in view finder
The following options are available by pressing A.
4 required option < / A
Option Explanation
Twilight mode Improve picture taken in low light conditions (On, Off)
Anti flicker Reduce flickering in view finder (mode 1: 50 Hz, mode 2: 60 Hz)
Image size
Send as Select MMS or Postcard to be attached to
Change image size
(640 x 480 pixels, 352 x 288 pixels, 160 x 120 pixels)
Page 42

Camera
Camera
Saving and using pictures
Once a picture has been taken it will be saved in My Stuff. To use a saved picture as
your personal wallpaper or for Contacts, see “Setting Wallpaper” on page
“Storing a number in your phone” on page 60.
NOTE When My Stuff is full, pictures can be saved if you make space by
deleting files (pictures, sounds and text templates). Press
unwanted files.
28 and
A to delete
Incoming calls during camera operation
If an incoming call etc, is received during camera operation, the phone will exit the
camera mode and switch to the incoming call etc.
The captured image will not be saved.
Self-portrait
You can take your self-portrait. Look at yourself in Self-Portrait Mirror and press <
to take a picture.
or
You can also activate the camera mode and take a picture by pressing with
your phone closed.
Viewing pictures
Pictures taken by the camera are created as JPEG image files. JPEG is standardised
image compression format. JPEG image files can be viewed with most general
image viewers and editors as well as with an Internet browser.
NOTE Do not leave the phone with the camera facing direct sunlight to avoid
impairing camera performance.
If the camera is left in the preview mode or a captured picture is
displayed the phone will automatically return to Idle mode or the main
menu in 3 minutes. If left in preview mode, but with the options menu
displayed, the phone will remain in this state and will not return to Idle
mode.
39
Page 43

Text Entry (Edit)
You can use alphanumeric characters to enter details into Contacts, to create text, email messages, etc.
Text mode
®
Key
# Alternatives
. , - ? ! ’ @ : ; / 1
$
/ (Hold) Character list
% A B C 2 (a b c 2) A B C 2 Γ Á Ä Å Æ Ç (a b c 2 α β γ á ä å æ à
& D E F 3 (d e f 3) D E F 3 ∆ É (d e f 3 δ ε ζ é è
' G H I 4 (g h i 4) G H I 4 Θ Í (g h i 4 η θ ι ì í
( J K L 5 (j k l 5) J K L 5 Λ (j k l 5 κ λ µ
) M N O 6 (m n o 6) M N O 6 Ξ Ñ Ó Ö Ø (m n o 6 ν ξ ó ñ ö ø ò
* P Q R S 7 (p q r s 7) P Q R S 7 Π Σ (p q r s 7 π ρ σ ß
+ T U V 8 (t u v 8) T U V 8 Φ Ú Ü (t u v 8 τ υ φ ú ü ù
, W X Y Z 9 (w x y z 9) W X Y Z 9 Ψ Ω (w x y z 9
" Shift / (Hold) Input mode Shift / (Hold) Input mode
! Space / (Hold) Line feed Space * # / (Hold) Line feed
@ Delete text / (Hold) Delete all characters
T9
(T9 , T9 or T9)
(Input language:
English)
*
. @ / - _
+ 0 0/ (Hold)+
.,?1!”-:; @ / * ( ) # + _ = [ ] { } ’ ¡ ¿ & % \ ^ ~ | < > ¢
§ Space ↵ / (Hold) Character list
£ $ ¥ ¤
Multi-tap
(Input mode indicator:
Abc, ABC or abc)
)
χ ψ ω
)
)
)
)
)
Numeric
(Input mode
indicator:
1
)
2
3
4
5
)
6
7
8
9
* / (Hold)
mode
# / (Hold) Line
feed
0-9)
Input
Displayed characters in the T9® mode vary depending on the selected input language.
Shift mode
Shift mode change
The Shift mode changes by pressing (within 1 sec) ".
Multi-tap Tegic
Abc -> ABC -> abc T9 -> T9 -> T9
If Input mode is changed, Shift mode is initialised.
Auto capital change
Auto capital affects Abc and T9 .
If Input mode is changed to Abc or T9 , the first character is input as upper case and subsequent letters as lower
case. (Input mode indicator changes to abc or T9.)
If these characters [. (Period) or ! or ?] are input, the next character is input as upper case.
(Input mode indicator changes to Abc or T9 .)
40
Page 44

Text Entry (Edit)
Input mode
Input mode change
Input mode changes by pressing and holding (over 1 sec) ".
Input mode
Multi-tap -> Numerals -> T9 (Selected tegic language)
(Abc -> 0-9 -> T9 )
The phone keeps the selected input mode.
Text input
®
T9
Using this mode of text input dramatically reduces the number of key presses required:
Press a key once for any letter you require on that key. The desired letter may not be displayed. Continue
pressing other keys until the end of a word is reached, then check that the word has been typed correctly before
continuing on to the next word. If the combination of letters typed has produced a word which is not the one you
require, press
Example of text input in T9 mode
To type a new message, follow these steps:
1 At the beginning of a new message press and hold @(Clear) to delete previous text, if necessary.
2Press "(Shift) to change letter case, if necessary
3Press %%((
Note that the displayed words change as you type, always type to the end of the word before editing.
T9® languages can be selected from T9 Input, in options A 4 Input language < / A
If the word you require is not in the internal dictionary, it should be entered using the Multi-tap (Abc) mode.
T9 user’s dictionary
Words that you entered are all saved in the user’s dictionary so that they are suggested next time.
Other text modes
Select text mode (displayed in top right corner on screen)
Multi-tap mode (Abc, ABC or abc):
Each time a key is pressed in quick succession, the next character available on that key is displayed. Releasing
the key or pressing another key enters the character displayed. The cursor moves to the next position.
In T9 (T9 ) or Multi-tap (Abc) mode, the first entered letter in a sentence is in upper case.
#, 1 or 5 repeatedly until the correct word is displayed. Continue to the next word.
.
.
“Call” is displayed.
41
Page 45

Messages Menu Structure
Messages
Create new
Inbox
Archive
Live! Studio
Vodafone Mail
Vodafone Messenger
Cell Broadcast
Settings
Memory status
MMS
MMS postcard
SMS
MMS
SMS
MMS
SMS
Call vodafone mail
See Vodafone Mail
Set mailbox number
On/Off
Read messages
Options
MMS
MMS postcard
SMS
MMS
SMS
42
Page 46

Messages
Messages
Create new
This phone has
various
messaging
features including
SMS and MMS.
MMS (Multimedia Messaging Service)
Your phone is designed to be compatible with certain Multimedia Messaging
Services (MMS). You can send pictures and music with text messages. The recipient
can play it as a slide show.
MMS messages can be sent to another mobile phone with MMS capability or to an
email address.
When you receive an MMS message, a notice will inform you that you have received
a message. (See page
An MMS profile may already have been set when you purchased your phone. To
change the settings, see page
with the Left Soft key (A).
Creating a new MMS
From Create new menu
1 4 MMS < / A
When creating a message, the following menu is available.
Menu item Explanation
Add picture
Add text Create text and add to MMS message
Add sound
2 After selecting a picture or sound or entering text, press A for the following
options
4 required option < / A
Option Explanation
Edit text Edit the text when selecting added text
Listen Listen to the sound when selecting added sound
Send
Remove picture/
text/sound
Preview slide Preview MMS as a slide
46.)
48. You can directly access Messages from Idle mode
Select a picture stored in Stored pictures / Download more
/ Take new picture and insert it into the MMS message
Select sound stored in Stored sounds / Download more /
Record new sound and add to MMS message
Send MMS after entering the subject and recipient number or
address
Remove from the MMS
43
Page 47

Messages
Messages
Create new
Creating a slide
In order to send an MMS with more than one picture, text or sound, you need to add
new slides to the MMS.
From Create new menu
1 4 MMS < / A
2 4 Add picture, Add text or Add sound < / A, then select a picture or
sound, or enter a text
3 4 Slides <
Slide option
While Slides is highlighted, the following options are available by pressing A.
4 required option < / A
Option Explanation
Add new Add slide
Send
Slide duration Specifies duration of slide
Remove slide Remove slide from the MMS
Preview slide Preview MMS as a slide
Send MMS after entering the subject and recipient number
or address
44
Page 48

Messages
Messages
Create new
Sending a message
When a message is completed, press A
1 4 Send < / A
2 4 Add subject <
3 Enter subject <
4 4 Add recipient <
5 4 From contact list, Enter number or Enter address < / A
6 When you select From contact list, 4 required contact A
or
When you select
or
When you select
7 4 Send <
Before sending a message, the following options are available by pressing A.
4 required option < / A
Option Explanation
Add subject /
Add recipient
Edit Edit the subject or the recipient
Remove address Remove address
Edit slide Transit to “Slide” screen where you can edit slide
Send Send MMS
Preview MMS Preview MMS message
Save Save MMS message to Drafts box
Create options Set send options
Enter number
Enter address
Add subject to MMS message / Add recipient to MMS
message
, enter number
, enter address
< / A
<
Creating options
Before sending a message, you can set send options.
When a message is completed, press A
1 4 Send < / A
2 A for the options
3 4 Create options < / A
4 4 required option < / A
Option Explanation
Request read Ask if the other party read the message
Request delivery Check if your message has been delivered to the other party
Duration for which your message is stored at the message
Validity period
Priority Set the priority to normal, low or high
Delivery time Specifies delivery time of a message to be sent
centre.
Delivery attempts will be repeated until the message has
been delivered or Validity period expires.
45
Page 49

Messages
Messages
Inbox
Receiving messages
When you receive an MMS message, the message icon ( ) is displayed along
with a tone, illumination, and/or vibration.
From Inbox menu
1 4 MMS < / A
2 4 required notification <
The following options are available by pressing A.
4 required option < / A
Option Explanation
Receive Receive new message
Reject Delete message from the server and delete notification
Call Call sender’s number
Delete all Delete all MMS messages in Inbox
Properties Show message details (such as message size and date)
Reading a received message
From Inbox menu
1 4 MMS < / A
2 4 required message <
When viewing the list, the following options are available by pressing A.
4 required option < / A
Option Explanation
Reply Create reply message
Reply to all
Forward Forward MMS message
To Live! Studio Move MMS message to Live! Studio
Call Make a call to the sender
Contact Store sender’s phone number or email address in Contacts
Delete Delete MMS message
Delete all Delete all MMS messages in Inbox
Properties Display message properties
Create reply message to the sender and all recipients of the
message
46
Page 50

Messages
Messages
Archive
Viewing message lists
The following messages are stored in Archive.
¾
Outbox: When a message has been sent it is stored in the Outbox.
¾
Unsent: Undelivered messages are stored in Unsent.
¾
Drafts: Use to create a message draft.
MMS Drafts: Messages that are saved in the MMS mode are saved in Drafts.
If the transmission of an MMS message fails, the message is stored in Unsent
together with other saved messages.
From Archive menu
1 4 MMS < / A
2 4 required list < / A
In each list, the following options are available by pressing A.
4 required option < / A
Outbox
Option Explanation
Edit Edit MMS messages
Forward Forward MMS messages
Move to Album Move MMS messages to Media Album
Delete Delete MMS messages
Delete all Delete all MMS messages in Outbox
Properties Display message properties
Unsent, Drafts
Option Explanation
Edit Edit MMS messages
Send Send MMS messages
Move to Album Move MMS messages to Media Album
Delete Delete MMS messages
Delete all Delete all MMS messages in Unsent or Drafts
Properties Display message properties
47
Page 51

Messages
Messages
Settings
Setting the MMS message server / profile
MMS message server and profile setting must be done before you can send or
receive an MMS message. Please check with your operator if additional settings are
required. You can select one of five server URLs on the phone.
From Settings menu (Message server)
1 4 MMS < / A
2 4 Advanced < / A
3 4 Message server < / A
4 4 required message server <
5 Enter URL < if you need
From Settings menu (Profile)
1 4 MMS < / A
2 4 Advanced < / A
3 4 Profile < / A
4 4 select profile < / A
NOTE Before selecting MMS message server, you may have to set the profile
if it is empty. To set server profile, see page 72, Vodafone live! - Options
- Settings - WAP profiles.
Modifying previously entered settings can cause failure of the server
setting.
Setting options
The following settings are available.
From Settings menu
4 MMS < / A
Option Explanation
Set Request read (ask if the other party read the message) / Send
Reports
Priority Set the priority to Low, Normal or High
Validity
period
Auto
download
Player
mode
Advanced
read (inform the other party that you have read the message when
asked) /Request delivery (ask if the other party received the
message) /Send delivery (inform the other party that you have
received the message when asked)
Duration that your message is stored at the message centre.
Delivery attempts will be repeated until the message has been
delivered or Validity period (1day, 7days or Maximum) expires
After receiving a message notification, the message will be sent to
you automatically (Always on). Message set to be delivered
automatically in home area (On when home). Message will be sent
to you manually (Never).(This option is available only in Idle mode.)
Auto mode enables MMS slides to be displayed according to their
duration. Manual mode enables MMS slides to be displayed by
pressing 7 / 3
Set Message server, Profile, Fetch on server and Anonymous
reject, and also view Information of MMS software
48
Page 52

Messages
Messages
Create new
MMS postcard
MMS postcard is a service from Vodafone that lets you send an MMS as an actual
postcard.
Simply take a picture using your built-in camera, add a message, and enter a name
and address. Vodafone will have it printed on a postcard, and delivered by mail.
¾
This is only available in countries where the Vodafone MMS postcard service is
active. More information for these services may be obtained from Vodafone.
Creating a MMS postcard
From Create new menu
1 4 MMS postcard < / A
2 4 Add picture or Add text < / A, then select a picture or enter a text
3 A
4 4 Send < / A
5 Enter address by selecting each content or press A for the following options
4 required option < / A
Option Explanation
Name Enter the name
Additional Info Enter the additional information
No./Street Enter the No./Street
Postcode Enter the Postcode
Country/City Enter the Country/City
Country Enter the Country
Edit Edit the name or address
From contacts Select the name from contact
Address list Select the address from address list
Last address Select the last address
Edit postcard Edit the postcard
Save address Save the address to address list
Send Send the postcard
Sending a postcard
When you have created your postcard, press A
4 Send <
You can view a sent MMS postcard in the MMS Outbox.
Undelivered MMS postcards are stored in Unsent box. You can try again later.
(See “Viewing message lists” on page 47.)
49
Page 53

Messages
Messages
Settings
Creating a new address list
From Settings menu
1 4 MMS postcard < / A
2 Address list < / A
3 A
4 4 Add new address < / A
5 4 required content <
6 Enter as appropriate <
(If required, repeat steps 5 and 6)
7 A
8 4 Save < / A
Viewing address list
From Settings menu
1 4 MMS postcard < / A
2 Address list < / A
When viewing names, the following options are available by pressing A.
4 required option < / A
Option Explanation
Add new
address
Edit Edit the address
Delete Delete the address
Delete all Delete all addresses in address list
3 4 required name <
Add new address to address list
50
Page 54

Messages
Messages
Create new
SMS (Short Message Service)
You can receive, display, edit and/or send text messages on Vodafone networks or
any network that has a roaming agreement. (Dependent on the recipient’s phone
parameters.)
The message centre number should be preprogrammed on the Vodafone SIM,
changing this number (see page 54) may cause failure of a text message.
Creating a text message
From Create new menu
1 4 SMS < / A
2 Create text message – max. 459 characters, see “Text Entry”
on page 40
When creating text, the following options are available by
pressing A.
4 required option < / A
Option Explanation
Send Send text as SMS messages
Send to many Send text to more than one recipient
Templates Access to text templates in My Stuff
Save Save message in Unsent
Copy Copy text
Cut Cut text
Paste Paste text
Input language Select input language
Exit Return to Create new menu
Sending a message
When you have created your message, press A
1 4 Send < / A
2 Enter the destination phone number <
If you want to select from Contacts
1 4 Send < / A
2 <
3 4 required contact A
4 <
Before sending a message, the following options are available by pressing A.
4 required option < / A
Option Explanation
Send Send text as SMS messages
From contacts Select the destination phone number from Contacts
Save Save message in Unsent
Exit Return to “Create SMS” screen
51
Page 55

Messages
Messages
Inbox
Receiving messages
When you receive an SMS message, the message icon ( ) is displayed along
with a tone, illumination, and/or vibration.
Reading a received message
From Inbox menu
1 4 SMS < / A
2 4 required message <
When viewing messages, the following options are available by pressing A.
4 required option < / A
Option Explanation
Reply Create reply message to sender
Forward Forward SMS message
Call Call sender’s number
Add to
contacts
Use detail
Delete Delete SMS message
Delete all
By pressing <, detail information of SMS will be shown.
Store sender’s number to Contacts
Call or send messages to a phone number, email address or
URL address in the message
(This option is available only when viewing messages.)
Delete all SMS messages
(This option is available in the message list.)
52
Page 56

Messages
Messages
Archive
Viewing message lists
These message lists are stored in Archive.
¾
Outbox: When a message has been sent, it is stored in the Outbox.
¾
Unsent: If the transmission of an SMS message fails, the message is stored in
Unsent together with other saved messages. Messages that are edited
and saved in the SMS mode are saved in Unsent.
¾
Draft: Use to create a message draft.
SMS Draft: The last message you edit in the SMS mode is saved in the Draft.
From Archive menu
1 4 SMS < / A
2 4 required list < / A
In each list, the following options are available by pressing A.
4 required option < / A
Outbox, Unsent
Option Explanation
Send Send text as SMS messages
Call Call receiver’s number messages
Call or send messages to a phone number, email address or
Use detail
Delete Delete SMS message
Delete all
Draft
Option Explanation
Send Send text as SMS messages
Send to many Send text to more than one recipient
Templates Access to text templates in My Stuff
Save Save message in Unsent
Copy Copy text
Cut Cut text
Paste Paste text
Input language Select input language
Exit Return to Archive menu
URL address in the message
(This option is available only when viewing messages.)
Delete all SMS messages
(This option is available in the message list.)
53
Page 57

Messages
Messages
Settings
Setting the message centre number
The message centre number should be preprogrammed on the Vodafone SIM,
changing this number may cause failure of a text message.
From Settings menu
1 4 SMS < / A
2 4 Message centre < / A
3 Enter message centre number in international dial format (see
“International dialling” on page 15) <
When the message centre number has been pre-installed, please do not
change the number.
Setting options
From Settings menu
1 4 SMS < / A
2 4 required option < / A
Option Explanation
Message centre Edit message centre number
Message type Select required message type
Validity period Select maximum or choose a time limit for sent messages
Delivery report Request a delivery report on the status of a sent message
Store sent SMS Store messages to Sent SMS
54
Live! Studio
Live! Studio
Live! Studio is a personal folder on Vodafone’s server where you can store pictures
etc. To upload your pictures etc. to your personal folder, see pages
Pictures can be shown to your friends.
¾
More information on this service may be obtained by contacting Vodafone.
82 - 83.
Page 58

Messages
Messages
Vodafone Mail
Vodafone Messenger
Vodafone Mail
Vodafone Mail is an innovative service that lets you stay up-to-date with all of your
messages.
You must subscribe to voice mail through Vodafone before you can retrieve voice
mail or email messages.
¾
More information on Vodafone Mail Messages and Internet mail services may
be obtained by contacting Vodafone.
Listening to Vodafone Mail messages
From Vodafone Mail menu
4 Call vodafone mail < / A
Stored mailbox number is dialled and you can listen to voice messages.
Connecting to internet mail
From Vodafone Mail menu
4 See Vodafone Mail < / A
Your phone is connected to the Internet via a WAP connection to retrieve email
messages.
Setting the Vodafone mailbox number
From Vodafone Mail menu
1 4 Set mailbox number < / A
2 Enter the Vodafone mailbox number (when necessary) < / A x 2
Vodafone Messenger
Vodafone Messenger lets you enjoy the fun of instant messaging wherever you are.
It’s the fun way to chat on-line.
¾
More information on this service may be obtained by contacting Vodafone.
It allows you to
read sent and
received
messages with
another party on
one screen.
Viewing Vodafone Messenger
From Vodafone Messenger menu
4 Follow the screen contents
55
Page 59

Messages
Messages
Cell Broadcast
Memory status
Cell Broadcast
You can receive messages on specified topics, such as traffic and weather
information.
Setting Cell Broadcast On/Off
From Cell Broadcast menu
1 4 On/Off < / A
2 4 On or Off < / A
Reading a received message
From Cell Broadcast menu
1 4 Read messages < / A
2 4 required message <
Options
You can add, edit and delete topics and languages.
From Cell Broadcast menu
1 4 Options < / A
2 4 Topic or Language < / A
3 4 required topic or language A
4 4 Add, Edit or Delete < / A
Memory status
You can see MMS/SMS memory status.
Viewing MMS/SMS memory status
From Memory status menu
4 MMS or SMS < / A
The current percentage of MMS saved in Phone are displayed.
or
The current percentage of SMS saved in SIM and in Phone are displayed.
56
Page 60

Contacts list
Contacts Menu Structure
Add contact
Call log
Contacts
Speed Dial list
View groups
Advanced
(Service numbers)
Service numbers is SIM dependent (E).
Phone
SIM
Dialled numbers
Answered calls
Missed calls
My numbers
Group settings
Memory status
Copy from SIM
57
Page 61

Contacts
Contacts
Contacts
list
Browsing Contacts
You can search Contacts by name.
When browsing by name, pressing a letter key will take you to the first entry starting
with that letter.
From Contacts list menu
4 required contact <
Options in Contacts
From Contacts list menu
1 4 required contact A
2 4 required option < / A
Option Explanation
Call Call contact
Send
message
Edit Edit contact
Add contact Add contact to Contacts list
Copy to SIM/
phone
Speed dial Add to Speed Dial list
Delete Delete contact
Search Search contact by entering characters (max. 18 characters)
Send by
infrared
Send MMS/SMS to the selected contact from Contacts list
Copy contact to SIM or Phone
Send contact to another device by infrared
58
Page 62

Contacts
Contacts
Phone numbers
can be stored in
your SIM or in
your phone.
Add
contact
Storing
Storing a number in SIM
In the SIM, you can store: name, phone number.
The length of name and number and the total amount of data are dependent on your
SIM.
From Add contact menu
1 4 SIM < / A
2 4 name icon ( ) <
3 Enter the name <
4 4 mobile icon ( ) <
5 Enter the phone number < / A
6 A
Options in SIM Contacts
When the name is being entered, the following options are available by pressing A.
4 required option < / A
Option Explanation
Copy Copy letters into buffer
Cut Cut and store letters into buffer
Paste Paste letters from buffer
Input language Select input language
Exit Return to Add contact
59
Page 63

Contacts
Contacts
Add
contact
Storing a number in your phone
In the phone, you can store: name, phone no. 1, phone no. 2, email address, picture
and group.
From Add contact menu
1 4 Phone < / A
2 4 name icon ( ) <
3 Enter the name <
4 4 mobile icon ( ) <
5 Enter the phone number < / A
6 4 telephone icon ( ) <
7 Enter the phone number < / A
8 4 email icon ( ) <
9 Enter email address <
104 picture icon ( ) <
110 required picture from My Stuff ( ) or preinstalled pictures < / A
124 group icon ( ) <
134 required group < / A
14 A
NOTE If a picture image for a contact is selected from My Stuff, the image will
appear on the screen when the contact calls you. Preinstalled pictures
are not applicable in this function.
Options in Phone Contacts
When the name and email address are being entered, the same options as SIM
Contacts are available by pressing
A. (See page 59.)
60
Page 64

Contacts
Contacts
Call log
Call log
Recently dialled phone numbers, answered calls and missed calls are stored in the
Call log. The numbers in the Call log list can be used to call, send messages or add
to Contacts. You can also delete the numbers from the list.
Viewing Call log
From Call log menu
1 2 Dialled numbers, Answered calls or Missed calls
2 4 required phone number <
Dialling from Call log
From Call log menu
1 2 Dialled numbers, Answered calls or Missed calls
2 4 required phone number <
3 < / C to call
Sending messages
From Call log menu
1 2 Dialled numbers, Answered calls or Missed calls
2 4 required phone number <
3 A
4 4 Send message < / A
5 4 MMS or SMS < / A
6 Enter a message
For details on creating a message, see “Creating a new MMS” on page 43 or
“Creating a text message” on page 51.
Saving a phone number from Call log into the Contacts list
From Call log menu
1 2 Dialled numbers, Answered calls or Missed calls
2 4 required phone number <
3 A
4 4 Add to contacts < / A
5 4 Phone or SIM < / A
6 4 required icon <
7 Enter as appropriate <
(If required, repeat steps 6 and 7)
8 A
61
Page 65

Contacts
Contacts
Call log
Speed
Dial list
Options in Call log
In each Call log list, the following options are available by pressing A.
4 required option < / A
Option Explanation
Call Call selected number
Send message Send MMS/SMS message to selected number
Add to contacts Store number to Contacts
Delete Delete selected log
Delete all
Delete all logs in the list
(This option is available in the Call log list.)
Speed dial
Phone numbers from the Speed dial of Contacts can be dialled quickly.
In Idle mode, press and hold a number key (2 - 9).
Setting Speed dial
From Speed Dial list menu
1 4 required list <
2 Enter phone number < / A
You can also select a phone number from Contacts by pressing
A in step 1.
Viewing stored numbers
In Idle mode, press and hold a number key (2 - 9).
Making a call by using Speed dial
From Idle display
1 Press and hold a number key (2 - 9)
2 4 required list A / C
62
Page 66

Contacts
Contacts
View
groups
Grouping Contacts entries
The ability to group Contacts entries together is an extra function of Phone Contacts.
Groups are used to collect together types of Contacts entries, e.g. business and
personal. Each
within.
You can attach a particular sound to the groups to identify them. (See “Group
settings” on page
Viewing groups
From View groups menu
4 required group < / A
The following options are available by pressing A.
4 required option < / A
Option Explanation
Call Call contact
Send message Send MMS/SMS to the selected contact
Edit Edit contact
Add contact Create contact in Phone Contacts or SIM Contacts
Copy to SIM Copy contact to SIM
Speed dial Add to Speed Dial list
Delete Delete contact
Search Search contact by entering characters (max. 18 characters)
Send by infrared Send contact to another device by infrared
group can be suitably titled for quick access to the entries contained
65.)
63
Page 67

Contacts
C
Advanced
ontacts
My numbers
My numbers is a contact where you can store your own numbers.
Adding numbers
From Advanced menu
1 4 My numbers < / A
2 4 Mobile profile or SIM profile < / A
3 When My number is empty, press < / A then go to step 5
When My number is already stored in SIM profile, press A
4 4 Create < / A
5 4 name icon ( ) <
6 Enter the name <
7 4 mobile icon ( ) <
8 Enter the phone number < / A
9 A
NOTE If you select Mobile profile, you can also select information such as
additional number, email address and picture.
Viewing stored numbers
From Advanced menu
1 4 My numbers < / A
2 4 Mobile profile or SIM profile < / A
Options in My numbers
When viewing My numbers, the following options are available by pressing A.
4 required option < / A
Mobile profile (View Display)
Option Explanation
Edit Transit to Edit profile
Delete Delete profile
Send by infrared Send profile by infrared
64
SIM profile (View Display and List Display)
Option Explanation
Edit Transit to Edit profile
Create Transit to Create profile
Delete Delete profile
Send by infrared Send profile by infrared
Page 68

Contacts
Contacts
Advanced
Group settings
You can change the group name and attach a sound to the group.
Changing group names
From Advanced menu
1 4 Group settings < / A
2 4 required group <
3 Press and hold @ to clear the current name
4 Enter new group name <
Attaching a sound to a group
From Advanced menu
1 4 Group settings < / A
2 4 required group A
3 Sound type < / A
4 4 Preinstalled, My Stuff or Download more < / A
5 4 required sound type < / A
Selecting <Default> in step 4, you can also select a default sound.
Memory status
Memory status shows how many locations are available in the Contacts.
From Advanced menu
4 Memory status < / A
Copy from SIM
You can copy SIM Contacts to Phone Contacts.
From Advanced menu
4 Copy from SIM < x 2 / A x 2
Service numbers
Service numbers
When SIM containing SDN (Service Dialling Number) is inserted in your phone, you
can call a service number by selecting from the list.
SDN enables you to access special services provided by your network operator, such
as customer support, emergency services, etc.
65
Page 69

Vodafone live! Menu Structure
Vodafone live!
Games
Ringtones
Pictures
Vodafone
live!
Search
Find & Seek
News
Sport
66
Travel
Finance
Page 70

Vodafone live!
Vodafone
live!
Vodafone live! is an
online service which
provides Internet
connection and
email, and is easily
used through the
display of the GSM
phone (X400).
Viewing Vodafone live!
The following sites and services of interest are in Vodafone live!
¾
More information on these services may be obtained by contacting Vodafone.
You can directly access the Vodafone live! web site from Idle mode with the Right
Soft key (@).
Display of Vodafone web site
Idle mode display
67
Page 71

Vodafone live!
Vodafone
live!
From Vodafone live! menu
4 required list <
In each list, options are available by pressing A. (See page 69.)
Contents of Vodafone live!
New
Download
Chat
Sport
Getting & Around
Video & Audio
Search
Contents menu may differ from the actual web site menu.
Messages
Games
News
Erotic
My Vodafone
68
Page 72

Vodafone live!
Vodafone
live!
Browser options
From Vodafone live! menu
1 A (Options)
2 4 select from below options < / A
Option Explanation
Select Select item
Bookmarks Go to bookmark list
Enter
address
Save image
Set as
bookmark
Service
Inbox
Reload page Reload this page
Advanced
Settings
Exit browser Terminate the browser
Go to URL entry
The image in contents is saved in “My
Stuff”
The displayed URL will be saved in
Bookmarks
Open Service Inbox
Go to homepage, clear the cache,
view URL or view WAP information
Edit profiles/Push access or view
security information
Browser options (Bookmarks)
From Vodafone live! menu or contents
1 A (Options)
2 4 Bookmarks < / A
3 4 required bookmarks
4 < to load the URL
or
A to select options
From Vodafone live!
menu
A
Go to page
Add bookmark
Edit
Delete
Home
Clear cache
View address
WAP information
WAP profiles
Push access
Security
From contents
A
Options:
Go to page.................. Jump to the URL page
Add bookmark ................... Add to bookmarks
Edit .......................................... Edit bookmark
Delete .................................. Delete bookmark
69
Page 73

Vodafone live!
Vodafone
live!
Browser options (Enter address)
Your can jump to the required content by entering the URL.
From Vodafone live! menu or contents
1 A (Options)
2 4 Enter address < / A
3 Enter URL <
Browser options (Save image)
Displayed images can be saved in “My Stuff”.
From contents
1 A (Options)
2 4 Save image < / A
3 4 to see whole image
4 < / A to save
Browser options (Set as bookmark)
Favourite URLs can be saved in bookmarks.
From contents
1 A (Options)
2 4 Set as bookmark < / A
3 Enter title < to save
Browser options (Service Inbox)
View WAP push message and go to URL.
From contents
1 A (Options)
2 4 Service Inbox < / A
3 < to load the URL
or
A to select options
70
Options:
When text and URL are delivered from Vodafone, the following
options are available.
Go to page......................................... Jump to the URL page
View message ................................................ View message
Delete .......................................................... Delete message
When only URL is delivered from Vodafone, the following
options are available.
Go to page......................................... Jump to the URL page
Delete .......................................................... Delete message
Page 74

Vodafone live!
Vodafone
live!
Browser options (Reload page)
Current page can be reloaded.
From contents
1 A (Options)
2 4 Reload page < / A to reload this page
Browser options (Advanced)
From Vodafone live! menu or contents
1 A (Options)
2 4 Advanced < / A
Browser options (Advanced - Home)
Phone jumps to the set-up homepage.
From Advanced menu
1 4 Home
2 < / A to jump to homepage
Browser options (Advanced - Clear cache)
Cache is cleared.
From Advanced menu
1 4 Clear cache < / A
2 < / A to clear the cache
Browser options (Advanced - View address)
View URL of the contents.
From Advanced menu
4 View address < / A
Browser options (Advanced - WAP information)
View WAP information.
From Advanced menu
4 WAP information < / A
NOTE View address is available only from contents.
71
Page 75

Vodafone live!
Vodafone
live!
Browser options (Settings)
From Vodafone live! menu or contents
1 A (Options)
2 4 Settings < / A
Browser options (Settings - WAP profiles)
Set up WAP browser.
From Settings menu
1 4 WAP profiles < / A
2 4 required profile
3 < to activate
or
A to select options
Browser options (Settings - Push access)
Set up Push access to receive WAP messages.
From Settings menu
1 4 Push access < / A
2 4 Service Indication, Service Loading or Other messages
< / A
3 4 On or Off < / A
Browser options (Settings - Security)
View security information.
From Settings menu
1 4 Security < / A
2 4 Certificates, Current certificate or Session info < / A
72
Page 76

Fun & Games
Fun & Games Menu Structure
Games & more
Download more
Settings
73
Page 77

Fun & Games
Fun &
Games
Games & more
Download more
Settings
Games & more
Start Java™ applications.
From Games & more menu
4 Java™ application you want to play <
The following options are available by pressing A.
4 required option < / A
Option Explanation
Properties
Update Update Java™ application
Delete Delete Java™ application
Your phone supports J2ME™ Java™ applications. Other types of Java™
applications cannot be installed.
Indicate application name, API, version, network, vendor,
description and store size
Download more
The downloaded Java™ applications will be stored in Games & more.
From Download more menu
1 4 required list <
4 Java™ application you want to download <
2 For options A
Settings
Java™ applications settings, such as volume and backlight etc, can be changed.
Settings Explanation
Sound volume Volume setting for Java™ applications
Backlight ON/OFF setting of Backlight in Java™ applications
Vibration ON/OFF setting of Vibration in Java™ applications
Online service Settings for online Java™ application connections
Memory status Display of Memory status
Reset
Information Display of copyright information
Deletion of downloaded Java™ file and reset records of
preinstalled Java™ application
74
If “Online service” is selected more options are displayed as follows.
Ask ........... When a Java™ application with HTTP access is activated the
Yes ........... Always allow online connections.
No............. Never allow online connections.
phone must ask user’s permission to access network.
Page 78

Applications
Applications Menu Structure
(SIM Tool Kit)
Alarm
Sound recorder
Calculator
Infrared
SIM Tool Kit is SIM dependent (E). The menu name will be changed.
On
Off
75
Page 79

Applications
Applications
SIM
Tool Kit
Alarm
When the set time is
reached, the alarm
will sound and the
display will light with
an alarm message.
STK (SIM Tool Kit)
This function is SIM dependent (E). This menu name will be changed.
Alarm
Setting the alarm
From Alarm menu
1 4alarm icon ( ) <, 4 On < / A
2 4clock icon ( ) <, enter the required time (24 hour
clock) < / A
3 4alarm repetition icon ( ) <, 4 Once, Everyday,
Weekdays or Weekend < / A
sound set-up icon ( ) <, 4
4 4
< / A, 4
select required ring type.)
5 4volume icon ( ) <, 0 adjust the volume < / A
6 A
to save the settings
When the alarm has been set, an alarm icon ( ) will be displayed when the phone
is in Idle mode.
The alarm is activated based on the current clock.
required ring type
Muting the alarm
To stop the alarm:
1 Press any key or @
2 < / A
To disable the alarm:
From Alarm menu
1 4alarm icon ( ) <
2 4 Off < / A
3 A
to save the setting
Preinstalled, My Stuff
< / A
(When you select
or Download more
My Stuff, A () to
76
Adjusting the alarm time
From Alarm menu
1 4clock icon ( ) <
2 Enter the required time < / A
3 A
to save the setting
If you want to change other settings, see “Setting the alarm”.
Page 80

Applications
Applications
Alarm
Sound recorder
Snooze Function
Snooze Function lets the alarm repeat 5 times if you do not press < / A after
stopping the alarm or press
To stop Snooze Function:
Press < / A when “Would you like to stop snooze?” appears in the display.
If you press
“End of alarm” is displayed.
NOTE The alarm goes off at the time you set even if the phone is off.
@ / D, the alarm will repeat 5 more times at 5 minutes intervals until
D to stop the alarm.
Sound recorder
You can record sounds or your voice in My Stuff. The recorded sound files can be
attached to
Recording new sound
From Sound recorder menu
1 < / A to start recording
2 < / A to stop recording (The max. recording time is 15
3 A
4 4 Save < / A
To play a sound:
< after step 2
To adjust the volume, 2
To stop playback, < / A / @
MMS messages.
seconds)
If you select Send MMS, you can access the MMS menu.
NOTE When you finish recording and finding that My Stuff is full, the recorded
sound can be saved if you make space by deleting files (pictures, sounds
and text templates). Press
A to delete unwanted files.
Calculator
Calculator
You can use the 4-function calculator (addition, subtraction, multiplication and
division) to make simple arithmetic operations.
From Calculator menu
1 Enter a number (max. 10 digits) and it will be displayed
If a decimal point is required, press A
2 To select arithmetic operation
(1 to multiply, 3 to add, 5 to divide, 7 to subtract)
3 Enter a number (max. 10 digits) and it will be displayed
4 < to calculate
77
Page 81

Applications
Applications
Infrared
If you try to send
data that cannot
be forwarded or
saved, an error
message will be
displayed.
Infrared
By using the infrared connection with another X400 or with other devices with an
infrared port, you can transfer data between the devices.
Preparing for infrared connection
¾
Place the X400 and another device with an infrared port within the effective
infrared connection range of each other.
¾
There must be no obstruction between the two communicating devices.
¾
The infrared ports of both devices must point at each other.
¾
If you use a PC, you need to set up an infrared connection on the PC.
(Example: Start > Settings > Control Panel > Infrared > Options tab > Enable
Infrared Communication)
Sending data
The types of data you can send are: Contacts, Pictures and Sounds in My Stuff.
Ensure that the infrared ports of your X400 and the second phone or device are
pointing at each other with no obstructions in between.
Some downloaded files may be protected under copyright laws. These files
should not be sent.
Setting infrared
You need to activate infrared before receiving data.
From Infrared menu
4 On or Off < / A
NOTE When infrared is set to on, “ ” appears on the display. If infrared is
unused for 10 minutes or the phone is once switched off, it is
automatically set to off and “
Sending pictures and sounds
From Idle display
1 <
2 0 My Stuff < / A
3 4 Pictures or Sounds < / A
4 4 required item < / A
5 4 select data to send A
6 4 Send by infrared < / A
” disappears.
78
Page 82

Applications
Applications
Infrared
Sending Contacts
From Idle display
1 <
2 0 Contacts < / A
3 4 Contacts list < / A
4 4 select contact to send A
5 4 Send by infrared < / A
Receiving data via infrared port
You need to activate infrared before receiving data.
Data received message is displayed then sent data is displayed.
< / A to save the data
or
@ to cancel
79
Page 83

Calendar
Calendar
Viewing calendar
From Calendar menu
0 will display recent and future calendars
The following options are available by pressing A.
4 required option < / A
Option Explanation
Go to date Jump to the required date
Week starts on Select which day the week starts on
80
Page 84

My Stuff Menu Structure
My Stuff
Pictures
Sounds
Shortcuts
Text templates
Memory status
Stored pictures
Download more
Take new picture
Stored sounds
Download more
Record new sound
Create MMS
Inbox(MMS)
Create SMS
Inbox(SMS)
Profiles
Alarm
81
Page 85

My Stuff
My Stuff
The data saved in
the X400 is
located in My
Stuff. There are
four pre-defined
folders (Pictures,
Sounds,
Shortcuts, Text
templates). The
maximum
capacity of the
Data Folders is
approx. 1 MB.
Pictures
Pictures (My Stuff > Pictures)
Pictures taken by the camera or images downloaded from the Internet can be
managed.
Viewing picture / image
From Pictures menu
1 4 Stored pictures < / A
2 4 required picture / image <
Downloading picture / image file
From Pictures menu
1 4 Download more < / A
2 The picture / image file download site will be displayed
Taking a picture
From Pictures menu
1 4 Take new picture < / A
2 The phone switches to the camera mode (see page 38)
Picture options
When the picture is selected, the following options are available by pressing A.
4 required option < / A
Option Explanation
Send MMS Attach pictures to MMS messages (see “MMS”)
Send postcard Attach pictures to MMS postcard (see “MMS postcard”)
Send by infrared Send pictures to another device by infrared
To Live! Studio Move pictures to Live! Studio
As wallpaper Use pictures as Wallpaper
Add to contacts Add pictures to contact
Send as Select MMS or Postcard to be attached to
Rename Rename picture files
Delete Delete picture files
Properties Show file name, size, date and forward lock status
82
Page 86

My Stuff
My Stuff
Sounds
Sounds (My Stuff > Sounds)
Downloaded sounds and Recorded sounds are stored in Stored sounds.
Checking sounds
From Sounds menu
1 4 Stored sounds < / A
2 4 required sound <
Downloading sounds
From Sounds menu
1 4 Download more < / A
2 The sound file download site is displayed
Recording new sound
From Sounds menu
1 4 Record new sound < / A
2 The phone switches to Sound recorder mode (see page 77)
Options in sound file (Stored sounds)
When a sound is selected, the following options are available by
pressing A.
4 required option < / A
Option Explanation
Send MMS Attach sound files to MMS messages (see “MMS”)
Send by infrared Send sound files to another device by infrared
To Live! Studio Move sound files to Live! Studio
Set alert tone
Rename Rename sound files
Delete Delete sound files
Properties Show file name, size, date and forward lock status
Set sound files to Incoming tone, Message tone and Group
tone (AMR files cannot be set to alert tones.)
83
Page 87

My Stuff
My Stuff
Shortcuts
Text templates
Shortcuts
You can create shortcuts you want to use in My Stuff.
Viewing shortcuts
From Shortcuts menu
4 required content <
The following options are available by pressing A.
4 required option < / A
Option Explanation
Edit Overwrite the present shortcut with a new one
Move Move shortcut to another place in the list
Add Store new shortcut
Delete Delete shortcut
Access to shortcuts:
From Idle display
1 1
2 4 required shortcut <
Text templates
You can use templates stored in the phone when creating a text message.
You can also save frequently used text as templates.
Editing the Text templates
From Text templates menu
4 required template <
(The display will turn to editing display)
The following options are available by pressing A.
4 required option < / A
84
Option Explanation
New Add words to new template
Send message Send template to MMS or SMS
Edit Edit template
Delete Delete template
Properties Show size and date
Page 88

My Stuff
My Stuff
Memory status
Memory status
You can see how much data is stored in the individual folders in My Stuff.
The memory in “My Stuff” is separate from the MMS storage and Java™
storage.
85
Page 89

Personal WAP/MMS Settings
Use the table below to record your GSM/GPRS WAP/MMS settings.
Item
Profile name
Homepage
Gateway
Port
(Non secure / Secure)
Data connections
CSD
Profile name
Account
Password
Call type
Phone number
No.1 No.2 No.3 No.4 No.5
Provisioning information setting
Idle timer
GPRS
Profile name
Account
Password
Apn name
Auth type
Normal / Secured / None
(PAP) (CHAP)
Message server
86
Page 90

Personal WAP/MMS Settings
Item
Profile name
Homepage
Gateway
Port
(Non secure / Secure)
Data connections
CSD
Profile name
Account
Password
Call type
Phone number
Idle timer
GPRS
Provisioning information setting
No.6 No.7 No.8 No.9 No.10
Profile name
Account
Password
Apn name
Auth type
Normal / Secured / None
(PAP) (CHAP)
Message server
87
Page 91

Troubleshooting
Should any problem persist, contact your dealer.
Problem Cause Remedy
Phone will not switch on. Check that the battery is fully charged and
Extremely short battery life
for a new battery.
Short battery life for an old
battery.
The charging indicator does
not light, the battery level
indicator does not appear
and the phone cannot be
switched on when charging.
Battery fails to charge. The battery is not attached to
Calls cannot be made. Keyguard is on. Disable Keyguard.
Calls cannot be made from
Fixed dial store.
Calls cannot be received. The phone is not switched
Emergency calls cannot be
made.
The network you are using
and the condition of the
battery can affect battery life.
The battery has worn out. Replace with a new fully charged battery.
The battery is not attached to
the phone or, when the
battery has been deeply
discharged, the phone will
take a short time until the
indicator lights.
the phone.
Battery was attached to the
phone after the Fast Travel
Charger was connected.
Outgoing calls are barred. Disable outgoing call barring or barred
The phone is not registered
on a network.
on.
Incoming calls are barred. Disable incoming call barring.
The phone is not registered
on a network.
You are not in a GSM
coverage area.
correctly connected to the phone.
Leave the phone charging the battery for a
few minutes before the indicator lights and
you attempt to switch the phone on.
Ensure the battery is fitted to the phone prior
to commencing charging.
dialling.
Move to a coverage area and operate your
phone after it has registered with a network.
Check whether your SIM supports Fixed
dial. Check if Fixed dial is switched on.
Check whether the phone number is stored
in Fixed dial.
Switch the phone on.
Move to a coverage area and operate your
phone after it has registered with a network.
Check that the antenna symbol ( ) is
displayed – move to a coverage area and
operate your phone when the antenna
symbol is displayed.
88
Page 92

Important error messages
These are some of the most important error messages which may be displayed:
Failed! Roaming in the selected area is not allowed.
Roaming with the selected network is not allowed.
The network has detected an authentication failure because your SIM is not
registered with that network – contact Vodafone.
SIM blocked!
Insert SIM
Invalid SIM
Function unavailable!
PIN2 invalidated!
Storage full Message
rejected!
or
SIM message storage full
Message rejected!
Too many characters!
This message may not be
stored
Verification failure!
Auto redial list full!
The SIM is blocked because the PIN unblocking key (PUK) has been entered
incorrectly ten times – contact Vodafone.
The phone has detected a problem with the SIM – switch the phone off and then
back on; if the message is still displayed contact Vodafone.
The SIM has failed one or more of the SIM personalisation checks – contact
Vodafone.
The selected feature is either not supported by the SIM or is not available with
the current subscription – contact Vodafone.
The PIN2 is blocked permanently because the wrong PUK2 has been entered
ten times, services controlled by PIN2 cannot be used – contact Vodafone.
A message has been received but the message store is full – to receive
messages, delete some of the currently stored messages.
The edited or newly created contact number is too long for the SIM.
The message area is full. Your messages cannot be stored until some of the
currently stored messages are deleted.
On changing the PIN/PIN2, verification of the new code is incorrect – retry
changing the PIN/PIN2 with correct verification.
Redial list of unsuccessfully dialled numbers is full – switch the phone off and
then on again.
Troubleshooting
89
Page 93

Glossary of Terms
Apn Access Point Name. Directs the user to the gateway or the required service.
CHAP
Copy
CSD
Cut
DTMF Tones Dual Tone Multi-Frequency tones allow you to communicate with computerised phone
GPRS
GSM
MMS
Network
Operator
PAP
Password
PIN
PIN2
PUK/PUK2
Registration
Roaming The ability to use your phone on networks other than your home network.
Service
Provider
SIM
SMS
URL
WAP
Challenge Handshake Authentication Protocol. A security feature in the GPRS network.
Copies selected text from a short text message without removing it from the original message.
Circuit Switched Data. A communication method used to transmit data over telephone
connections.
Permanently removes selected text from a short text message.
systems, voice mailboxes, etc.
General Packet Radio Service. A GSM transmission technique that transmits and receives
data in packets rather than setting up a continuous channel. It makes very efficient use of
available radio spectrum and users pay only for volume of data sent and received.
Global System for Mobile communications. The name given to the advanced digital technology
that your phone uses.
Multimedia Messaging Service. An advanced mail system used for cellular phones. This
service allows sending/receiving text messages and attaching pictures, animation and sound
to the same.
The organisation responsible for operating a GSM network.
Password Authentication Protocol. A security feature in the GPRS network.
Used for the control of GPRS/CSD settings in Data connections and the control of Call barring.
Supplied by Vodafone.
Personal Identification Number used for SIM security. Supplied by Vodafone. If the PIN is
entered incorrectly 3 times, the PIN will be blocked.
Personal Identification Number used for the control of Fixed dial store and Call charge
metering. Supplied by Vodafone. If the PIN2 is entered incorrectly 3 times, the PIN2 will be
blocked.
PIN/PIN2 Unblocking Key. Used to unblock the PIN/PIN2 code. Supplied by Vodafone. If the
PUK/PUK2 is entered incorrectly 10 times, the PUK/PUK2 will be blocked.
The act of logging on to a GSM network. This is usually performed automatically by your phone.
The organisation responsible for providing access to the GSM network.
Subscriber Identity Module. A small smart-card which stores unique subscriber and userentered information such as Contacts entries and short messages. Supplied by Vodafone.
Short Message Service. A basic mail system used for cellular phones. This service allows
sending/receiving of short text messages.
Uniform Resource Locator. The URL is an alphanumeric address that points to homepages
and other Internet locations.
Wireless Application Protocol. The communication standard which enables you to download
resources from the Internet to your phone.
90
Page 94

Specifications
Bands Supported ............................. GSM900 Class 4
GSM1800 Class 1
Talk Time ......................................... 1.5 hrs. - 4.5 hrs.
Standby Time................................... 70 hrs. - 210 hrs.
NOTE Talk and Standby times depend on network conditions, SIM usage and battery condition.
Temperature Range
Charging ...................................... +5 ºC – +35 ºC
Storage ........................................ -20 ºC – +60 ºC
Volume............................................. Approx. 64 cc
Weight.............................................. Approx. 84 g
Dimensions
Height .......................................... 84 mm
Width ........................................... 47 mm
Depth ........................................... 17.5 mm
Supply Voltage................................. 3.7 V (600 mAh Li-ion)
Antenna............................................ External
Charge Time .................................... Up to 120 min.
NOTE Charging time depends on usage and battery condition.
SIM Type.......................................... 3 V only or 3 V / 5 V
Contacts Size................................... 300 entries + SIM
Sound Recorder............................... Each max. record size
Games (Pre-Installed Games) ......... 1
Ring Tones....................................... Preset: 10 (Varies depending on My Stuff)
Alarm................................................ 1
Graphics Formats Supported........... GIF87a, GIF89a, JPEG, WBMP, PNG
Memory Storage
My Stuff ....................................... 1 MB
MMS ............................................ 700 KB
Fun & Games .............................. 500 KB
Camera Range................................. 35 cm -
(90 min. - 270 min.)
15 seconds (Varies depending on My Stuff)
When switching the phone off, use only D to avoid damaging the phone.
91
Page 95

Accessories
Li-Ion Battery (EB-BSX400)
Double your talk time by having a spare battery.
Personal Handsfree (EB-EMD87)
Talk and move while keeping your hands free by using this accessory. Just place the
earpiece in your ear and the adaptor in the bottom of the handset – and talk.
NOTE Even if the Personal Handsfree is connected to the phone, alerts, e.g.
incoming tone and message tone, sound through the speaker.
Car Charger (EB-CDX70)
Top up your battery in your vehicle by attaching this accessory to your phone and to
the cigarette lighter socket.
Fast Travel Charger (EB-CAX70UK)
Carry a lightweight portable charger wherever you go to ensure you always have
power to talk.
Fast Travel Charger (EB-CAX70EU)
How to identify a genuine Panasonic accessory
Panasonic produces some of the most advanced mobile phones available. So, as you’d expect from this class
leader, the range of accessories are second to none.
Most genuine Panasonic accessories will have a label showing an “EB-XXXXX” model number.
92
Page 96

Licensing
CP8 Patent
© Panasonic Mobile Communications Co., Ltd. 2004
Information in this document is subject to change without notice. No part of these
instructions may be reproduced or transmitted in any form or by any means without
obtaining express permission from Panasonic Mobile Communications Co., Ltd.
TM
Java
JavaTM and all Java-based trademarks and logos are trademarks or registered
trademarks of Sun Microsystems, Inc. in the U.S. and other countries.
JbedTMME
Jbed (JavaTM VM) is the registered trademark of esmertec, Inc.
T9® Text Input
T9® is a trademark of Tegic Communications Inc.T9®
Text Input is licensed under one or more of the following: U.S. Pat. Nos. 5,818,437,
5,953,541, 5,187,480, 5,945,928 and 6,011,554; Canadian Pat. No. 1,331,057; United
Kingdom Pat. No. 2238414B; Hong Kong Standard Pat. No. HK0940329;
Republic of Singapore Pat. No. 51383; Euro. Pat. No. 0 842
463 (96927260.8) DE/DK, FI, FR, IT, NL, PT, ES, SE, GB; and additional patents are
pending worldwide.
Teleca Application
WAP: Browser RA 2.1
MMS: MMS RA 1.3
JAM (under KVM Statement): JAM RA 1.2
V-enabler
V-enabler (VSCL) is the trademark of eValley, Inc.
TM
93
Page 97

Index
A
Add contact ................................................59
Advanced ...................................................64
Alarm ..........................................................76
Alert mute .....................................................9
Any key answer ....................................15, 36
Applications ................................................76
Archive
MMS .........................................................47
SMS .........................................................53
B
Backlight time .............................................28
Battery
Attaching ....................................................6
Battery level indicator .................................7
Charging .....................................................7
Low battery power warning ........................7
Removing ...................................................6
Brightness ..................................................28
Browser options
Advanced - Clear cache ...........................71
Advanced - Home ....................................71
Advanced - View address ........................71
Advanced - WAP information ...................71
Bookmarks ...............................................69
Enter address ...........................................70
Reload page .............................................71
Save image ..............................................70
Service Inbox ...........................................70
Set as bookmark ......................................70
Settings - Push access .............................72
Settings - Security ....................................72
Settings - WAP profiles ............................72
C
Calculator ...................................................77
Calendar .....................................................80
Call
Answering calls ........................................15
Ending/rejecting calls ...............................15
Making a second call ................................18
Making calls .............................................14
Call barring .................................................35
Call diverts ..................................................31
Call duration ...............................................33
Call log .................................................20, 61
Call waiting .................................................32
Calls (Settings) ...........................................31
Camera .......................................................38
Cell Broadcast ............................................56
Change PIN ................................................34
Change PIN2 ..............................................34
Colour theme ..............................................28
Contacts
Contacts dialling ...................................... 14
Contacts list ............................................. 58
Copy from SIM ........................................... 65
Create new
MMS ........................................................ 43
MMS postcard ......................................... 49
SMS ......................................................... 51
D
Data connections ....................................... 29
Desktop Handsfree .................................... 17
Display
Display (Settings) .................................... 28
Main display ............................................ 11
Status icons ............................................. 11
Display language ....................................... 29
Download more ......................................... 74
DTMF tones ............................................... 17
E
Earpiece volume ........................................ 17
Emergency call .......................................... 15
Error messages ......................................... 89
F
Fast Travel Charger ..................................... 7
Fixed dial ................................................... 35
Fun & Games ............................................ 74
G
Games & more .......................................... 74
Group settings ........................................... 65
GSM network ............................................. 29
I
Icons .......................................................... 11
Illumination light ......................................... 10
Inbox
MMS ........................................................ 46
SMS ......................................................... 52
In-call options ............................................ 17
Incoming call while on a call ...................... 18
Incoming tone ...................................... 24, 26
Incoming volume ................................. 24, 26
Infrared ...................................................... 78
Input language ........................................... 29
Input mode ................................................. 41
International dialling ................................... 15
K
Key backlight ............................................. 28
Key tone .............................................. 25, 26
Key volume .......................................... 25, 27
Keyguard ................................................... 37
Keys ......................................................... 8, 9
L
Language ................................................... 29
Live! Studio ................................................ 54
94
Page 98

Index
M
Memory status
Contacts .................................................. 65
Messages ................................................ 56
My Stuff ................................................... 85
Menu
Displaying menu ......................................14
Main menu ............................................... 12
Menu option ............................................. 12
Message tone ......................................24, 26
Message volume .................................. 25, 26
Messages .................................................. 43
MMS (Multimedia Messaging Service) ...... 43
MMS postcard ............................................ 49
Multi-party call ............................................ 19
My numbers ............................................... 64
My Stuff ...................................................... 82
N
Network setting .......................................... 29
New search ................................................ 29
P
Pause dial .................................................. 17
Phone ON/OFF .......................................... 14
Pictures (My Stuff) ..................................... 82
PIN entry .................................................... 34
Profiles ....................................................... 24
Q
Quiet mode ................................................ 16
R
Recent number dialling .............................. 14
S
Safety considerations .................................. 1
SAR ............................................................. 4
SDN (Service Dialling Number) ................. 65
Search mode .............................................30
Security ...................................................... 34
Select network ........................................... 29
Self-portrait ................................................ 39
Send my number ....................................... 33
Service charge ........................................... 33
Service numbers ........................................ 65
Settings (Fun & Games) ............................ 74
Settings (Messages)
MMS ........................................................ 48
MMS postcard ......................................... 50
SMS ......................................................... 54
Settings (Others) ........................................ 24
Shift mode ..................................................40
Shortcuts
Keypad ....................................................10
My Stuff ................................................... 84
SIM
Inserting ..................................................... 6
Removing .................................................. 6
SIM Tool Kit ............................................. 76
Slide ........................................................... 44
SMS (Short Message Service) .................. 51
Snooze Function ........................................ 77
Sound (Settings) ........................................ 26
Sound recorder .......................................... 77
Sounds (My Stuff) ...................................... 83
Speed dial .................................................. 62
Speed Dial list ............................................ 62
Standard dialling ........................................ 14
STK (SIM Tool Kit) ..................................... 76
T
®
............................................................ 41
T9
Text entry ................................................... 40
Text input ...................................................41
Text templates ........................................... 84
Time and date ............................................ 36
Tone setting ............................................... 26
V
Vibration alert ....................................... 25, 27
View groups ............................................... 63
Vodafone live! ............................................ 67
Vodafone Mail ...................................... 16, 55
Vodafone Messenger ................................. 55
W
Wallpaper ................................................... 28
Warning tone ....................................... 25, 27
95
Page 99

EU Warranty
EU/EEA – Wide guarantee is applicable in the EU/EEA and Switzerland.
Panasonic GSM European Service Guarantee Conditions
Dear Customer,
Thank you for buying this Panasonic digital cellular telephone. The Panasonic GSM European Service
Guarantee only applies while travelling in countries other than where the product was purchased. Your local
guarantee is applicable in all other cases. If your Panasonic GSM telephone requires service while abroad,
please contact the local service company shown on this document.
The Guarantee
The applicable period of the European wide guarantee for GSM is generally 12 months for the main body and 3
months for the rechargeable battery. With respect to a product used in a country other than a country of purchase,
notwithstanding what is stated in the conditions below, the customer will benefit, in that country of use, from these
guarantee periods of, respectively, 12 and 3 months, if these conditions are more favourable to him than the local
guarantee conditions applicable in such country of use.
Conditions of Guarantee
When requesting guarantee service the purchaser should present the warranty card together with proof of
purchase, to an authorised service centre.
The guarantee covers breakdowns due to manufacturing or design faults; it does not apply to other events such
as accidental damage, however caused, wear and tear, negligence, adjustment, modification or repair not
authorised by us.
Your sole and exclusive remedy under this guarantee against us is the repair, or at our option the replacement,
of the product, or any defective part or parts. No other remedy, including, but not limited to, incidental or
consequential damage or loss of whatsoever nature shall be available to the purchaser.
This is in addition to and does not in any way affect any statutory or other rights of consumer purchasers. This
guarantee applies in countries shown on this document at the authorised service centres detailed for that country.
UK
Service Centres in England
Tel. +44 8705 159159
IRL
Service Centres in Ireland
Tel. +353 1 2898333
96
D
In Deutschland können Sie auch unseren
Abholservice in Anspruch nehmen, um Ihr defektes
Panasonic Gerät reparieren zu lassen.
Informationen hierzu finden Sie auf unserer Internet
homepage www.panasonic.de, unter Service,
Reparatur-Services.
Hotline Tel. 0180 5015142 (12 Cent pro Minute)
Mo. bis Fr. von 8.00 - 20.00 und
Sa. von 12.00 - 17.00
Spezialisiert auf Vodafone Geräte:
Panasonic Service Center
B&W Service GmbH
Kieler Straße 41
24768 Rendsburg
Tel.: +49 (0) 4331 / 14 11-0
Page 100

EU Warranty
A
Service-Fentren in Österreich
Fa. Frisch
Lokalbahnweg 12
A-4060 Leonding
Tel. +43 (0)732 676 961
FR
A-NOVO Beauvais
16 Rue Joseph Cugnot
ZI Bracheux
60000 Beauvais
Tél. : 03.44.89.79.00
Fax : 03.44.05.16.96
A-NOVO Brive
15 Rue Daniel de Cosnac
BP 561
19107 Brive Cedex
Tél. : 05.55.18.38.81
Fax : 05.55.18.39.06
CETELEC
FI de la Delorme
5 Avenue Paul héroult
13015 MARSEILLE
Tél. : 04 96 15 77 77
Fax : 04 91 03 20 20
CORDON Electronique
BP 460
FI Taden
22107 DINAN CEDEX
Tél. : 08.92.69.27.92
Fax : 02.96.85.82.21
S.B.E.
F.I. de la Liane
BP 9
62360 SAINT LEONARD
Tél. : 03.21.10.10.21
Fax : 03.21.80.20.10
NL
Service-centra in Nederlands
Panasonic-Centre Nederland
(Servicom bv)
P.O Box 16280
2500 BG
Den-Haag
Nederland
Tel. +31 703314314
Zonweg 60
2516 BM
Den-Haag
Nederland
Tel. +31 703314314
I
Per I Centri Assisitenza in Italia
Servizio Clienti
Tel. +39 02/ 67072556
E
Panasonic España, S.A.
Servicio de Atención a Usuarios:
Tel: 902 15 30 60
DK
For nærmeste servicecenter ring Panasonic Danmark
Tel. +45 43 20 08 50
97
 Loading...