

Page 1

Table of Contents
FCC Compliancy 2
What Does the iPronto Box Contain? 3
About the iPronto Documentation 4
About the iPronto 5
Installing the Wireless LAN Adapter 8
Installing and Recharging the Battery 10
Installing 10
Recharging 13
Getting the iPronto Up and Running 14
Setting up Your iPronto 15
Setting up Your Network 20
Using the iPronto 27
The Touch Screen 27
The Status Display 27
The iPronto’s External Controls 28
The Ports 29
Navigating the iPronto 30
The Keyboard 33
The Remote Control 35
How Does the iPronto RC Work? 36
Learning IR Codes 38
Using iProntoEdit 41
The Browser 43
Setting the Home Page 44
Entering a URL 45
The Electronic Program Guide 46
Registration 49
Troubleshooting 54
Index 58
1
Page 2

FCC Compliancy
This equipment has been tested and found to comply with the limits for a Class B digital device, pursuant to part 15 of
the FCC rule. These limits are designed to provide reasonable protection against harmful interference in residential
installations. This equipment generates, uses, and can radiate radio frequency energy and, if not installed and used in
accordance with the instructions, may cause harmful interference to radio communications. However, there is no
guarantee that interference will not occur in a particular installation. If the equipment does cause harmful interference
to radio or television reception, which can be determined by turning the equipment off and on, the user is encouraged
to try to correct the interference by one or more of the following measures:
■ Reorient or relocate the receiving antenna.
■ Increase the separation between the equipment and receiver.
■ Connect the equipment into an outlet on a different circuit from the receiver.
■ Consult the dealer or an experienced radio/TV technician for help.
2
iPronto User Guide
Page 3

What Does the iPronto Box Contain?
The iPronto box contains the following items:
iPronto iPronto User Guide
Wireless LAN Adapter
Warranty
AC power adapter
with cable
Battery
3
Page 4

About the iPronto Documentation
The iPronto documentation consists of two parts:
■ This iPronto User Guide. This guide is meant to help you set up and start using the iPronto.
■ The iPronto Online Help. The iPronto Online Help contains complete information on how to use the
iPronto remote control and its extra features. You can find the iPronto Online Help on
http://www
.pronto.philips.com/products/ipronto/help/
4
iPronto User Guide
Page 5

About the iPronto
Wirelessly connected to the Internet, the iPronto is a must-have for your home entertainment experience. With its
dashboard you can easily access all iPronto’s applications. The dashboard offers access to three basic applications:
the remote control, the Electronic Program Guide and the Browser, however, you can add new applications to the
dashboard.
With iPronto’s universal remote control you can operate almost all your devices, as long as they understand
IR (infrared) signals. And because of its intuitive interface, iPronto is easy to use for everybody.
But iPronto is not only a remote control: it also has an Electronic Program Guide. Without any effort you always
have an up-to-date and customizable Program Guide for your favorite channels. What makes this Electronic Program
Guide so unique is its direct interaction with the iPronto’s remote control. No more wading through pages of program
guides.
Get the information you want fast and start watching your programs immediately by tapping one single button. You are
watching TV and would like to see sports shows? Using the EPG, you only need one button press to surf through the
channels that are broadcasting sports at this particular moment.
The iPronto is also provided with easy Internet browsing functionality. With the browser application it is now
possible to connect to the Internet while you sit back and relax in front of your TV.
5
Page 6
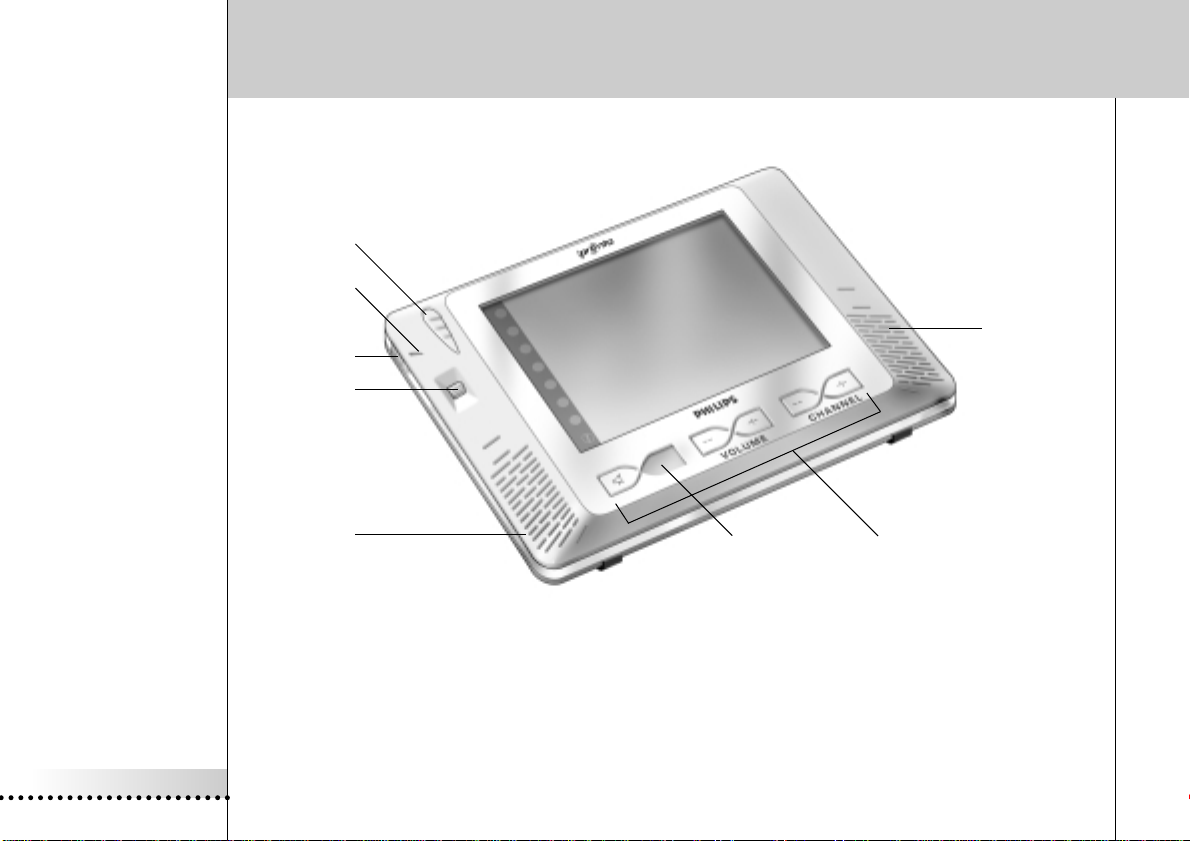
About the iPronto
The iPronto consists of several parts:
stylus
microphone
power button
scroll wheel
speaker
6
iPronto User Guide
speaker
status display
RC buttons
Page 7

About the iPronto
IR learning eye
and sending eye
stand
cover of the
wireless LAN
adapter
reset button cover of the battery pack
This User Guide is meant to help you set up and start using your iPronto. For detailed information on using the various
iPronto applications please refer to the iPronto Online Help. If you follow the flow of the chapters in this guide, you will
have your iPronto up and running in no time. You find information about:
■ Installing the Wireless LAN Adapter on page 8;
■ Installing and Recharging the Battery on page 10;
■ Getting the iPronto Up and Running on page 14;
■ Using the iPronto on page 27;
■ Using the iPronto’s basic applications: The Remote Control on page 35, The Browser on page 43 and
The Electronic Program Guide on page 46;
■ Troubleshooting on page 54.
7
Page 8

Installing the Wireless LAN Adapter
In a wireless network, the Wireless Access Point (WAP) is the last point that is connected to your network with wires.
To communicate with your iPronto, the WAP sends out RF (radio frequency) signals, which spread in all directions. The
iPronto’s Wireless LAN Adapter (also called PCMCIA card) receives these RF signals and sends RF signals back to the
WAP.
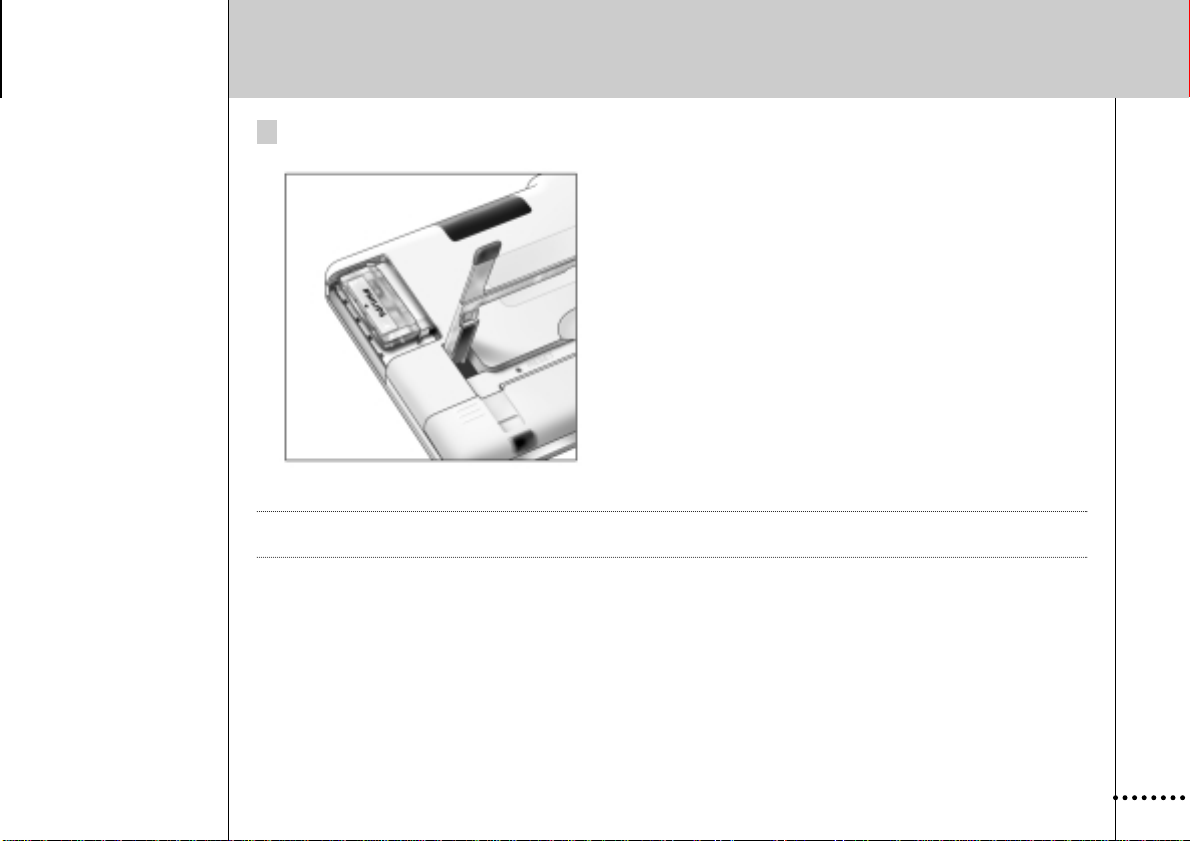
The first thing you do when you take your iPronto out of the box, is installing this Wireless LAN Adapter. In the
following illustrations you see how the installation works:
1 Open the Wireless LAN Adapter cover by pushing in the grips and sliding off the cover in the direction
indicated below (figure 1).
2 Insert the Wireless LAN Adapter in the socket, as indicated below (figure 2).
8
iPronto User Guide
Figure 1 Figure 2
Page 9
Installing the Wireless LAN Adapter
3 Put the Wireless LAN Adapter in the correct position and close the cover.
Note Do not install any other adapter. Do not remove the Wireless LAN Adapter when the iPronto is activated. After the Wireless
LAN Adapter is installed, there is no need to remove it. It can permanently be left inside the iPronto.
9
Page 10
Installing and Recharging the Battery
Installing
After installing the Wireless LAN Adapter, you install the battery. The battery is precharged, but it is advisable to
charge the battery for three hours when you start using the iPronto. See Recharging on page 13.
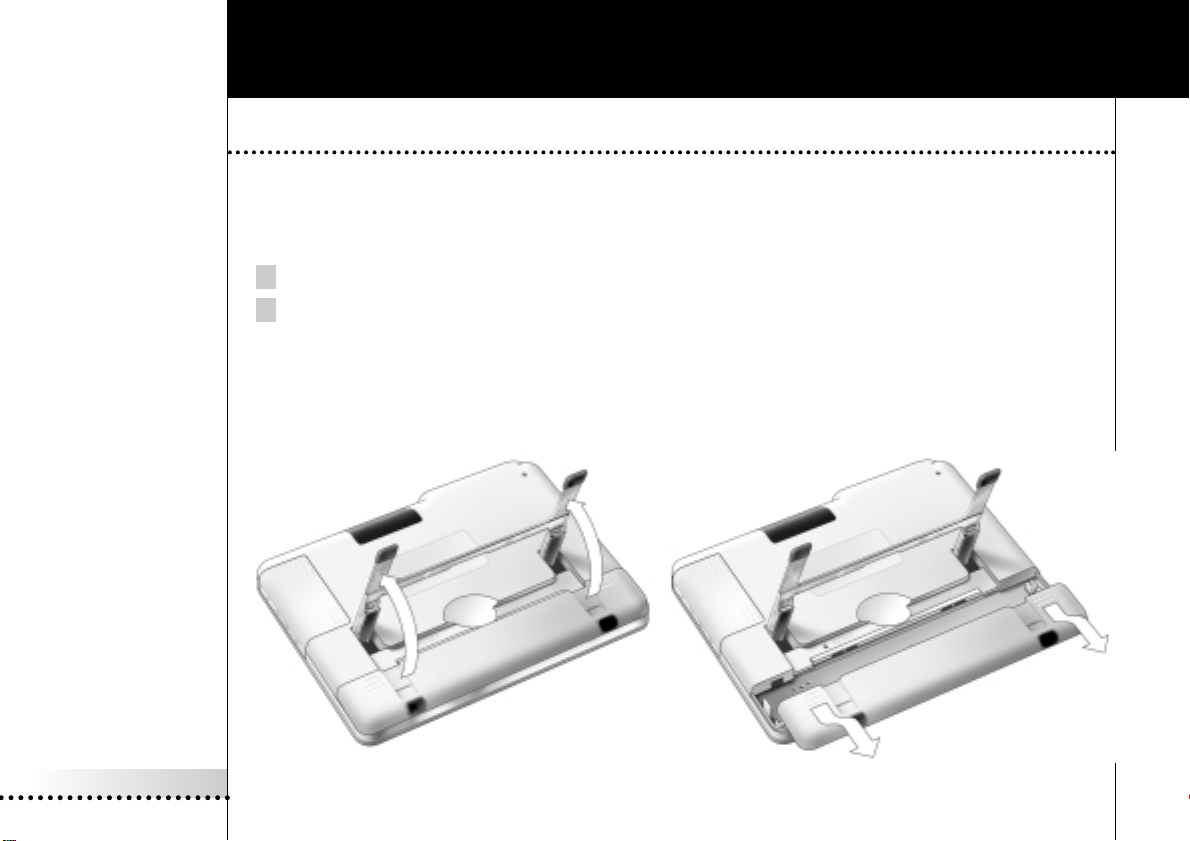
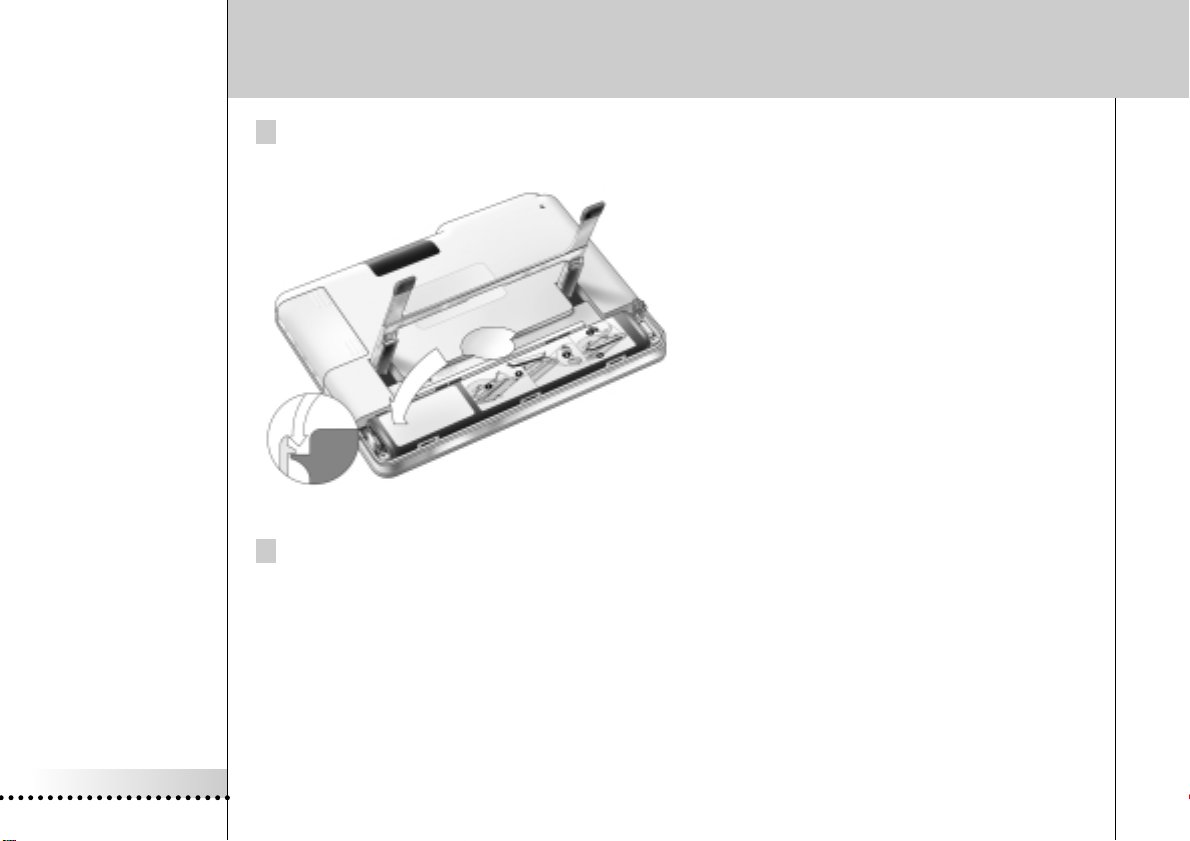
Insert the battery as follows:
1 Lift the stand (figure 1).
2 Open the battery cover by pushing the grips and sliding off the cover in the direction indicated below
(figure 2).
iPronto User Guide
10
Figure 1 Figure 2
Page 11
Installing and Recharging the Battery
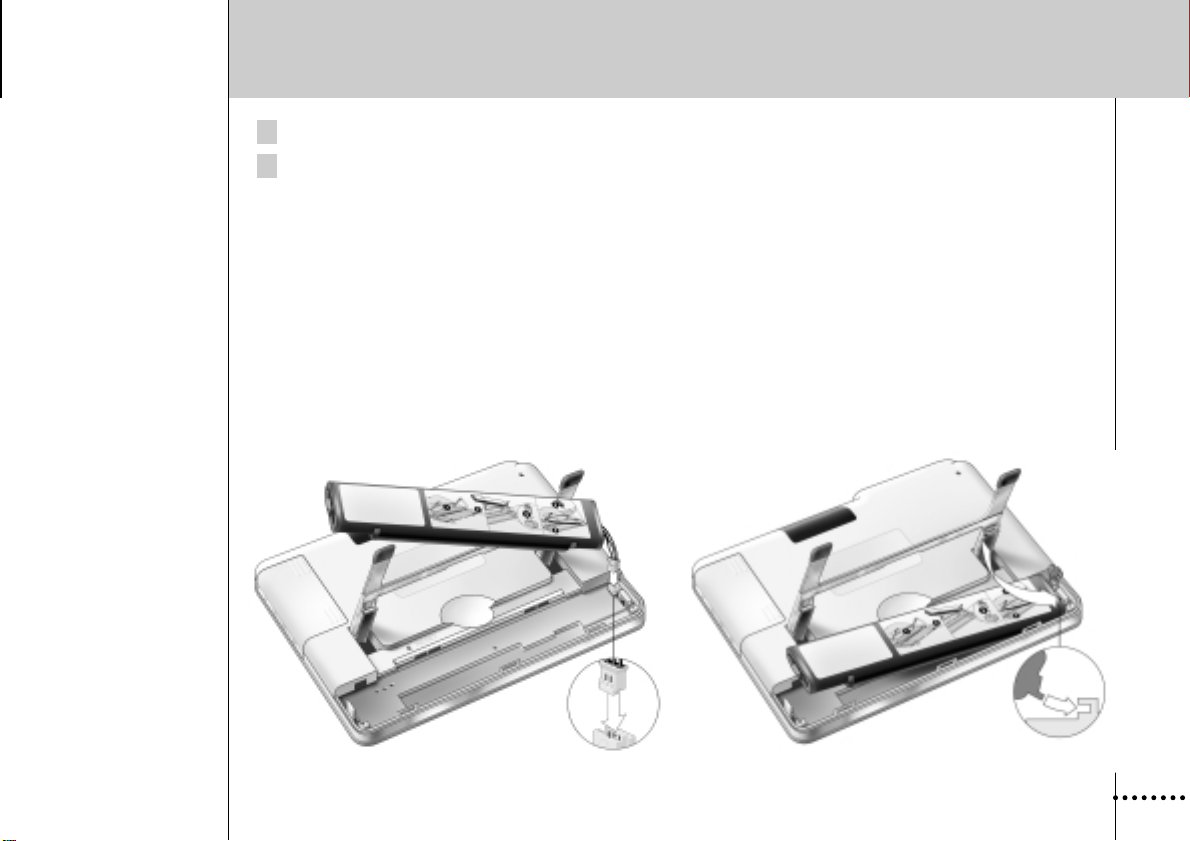
3 Attach the battery connector to the provided socket (figure 3).
4 Put the right-hand side of the battery under the provided hook (figure 4).
Figure 3 Figure 4
11
Page 12
Installing and Recharging the Battery
5 Push the left side of the battery down into its place.
6 Close the battery cover.
iPronto User Guide
12
Page 13

Installing and Recharging the Battery
Recharging
The iPronto is provided with a power adapter to recharge the battery. When the battery is low, it takes about two hours
to recharge. After three hours, recharging is automatically stopped. On first usage, it is advisable to recharge the
battery for the full three hours. The iPronto can be used when it is recharging.
In order to keep the battery in the best condition, it is best to recharge it frequently. It is advised to recharge before the
battery is empty, otherwise you might lose some of your settings. In normal use, recharge every 2 days. When you use
the iPronto very frequently, recharge every day. In this illustration you see how to plug in the power adapter:
The first time you put the battery in the iPronto, the iPronto
will start up automatically and guide you to the System
Settings. This may take 1 to 2 minutes. Continue with the
next chapter, Getting the iPronto Up and Running, to adjust
the settings.
13
Page 14
Getting the iPronto Up and Running
This chapter is divided in two parts. In the first part, Setting up your iPronto, you read how to define the general
settings. In the second part, Setting up your Network, you read how to set up your wireless network and internet
connection.
The first time you activate your iPronto, it will lead you through some initial screens and messages. After these
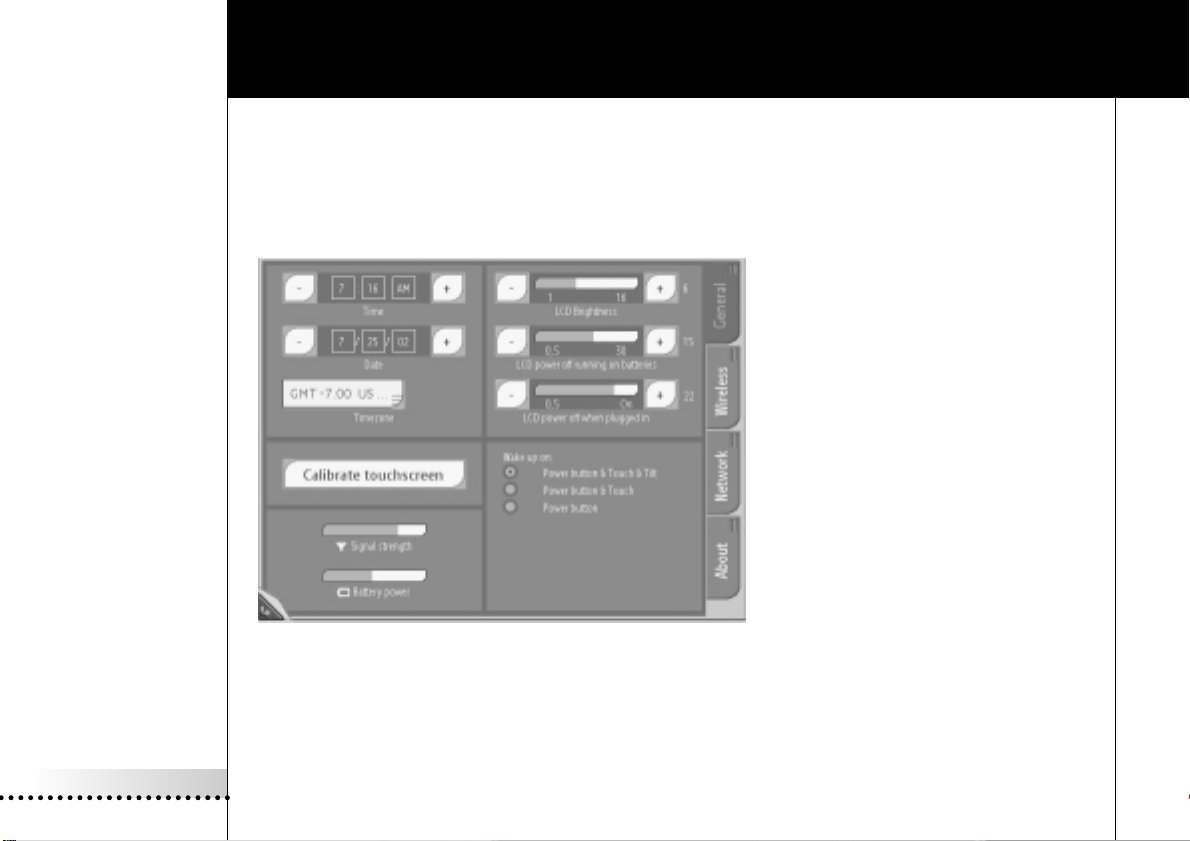
messages the System Settings will automatically appear on the screen. The settings are divided into four tabs:
System Settings
iPronto User Guide
14
Page 15

Getting the iPronto Up and Running
■ General: On this tab you adjust general settings and you can check your battery status and network signal
strength. See Setting up Your iPronto on page 15.
■ Wireless: On this tab you set the wireless network settings. You need to set these settings so the iPronto can be
connected to your network and to the Internet. See Wireless Network Settings on page 21.
■ Network: On this tab you set your Internet connection settings. See Internet Settings on page 23.
■ About: On this tab you read information about licence terms and agreements. A button for downloading new
software from the Internet is also located on this tab. If you tap the button, the iPronto will check if updates of your
software are available. When there are updates available, you can download them from the Internet immediately.
Note While adjusting the System Settings, it is useful to operate the touch screen with the stylus. See The Touch Screen on
page 27 for more information.
Setting up Your iPronto
After installing the Wireless LAN Adapter and the battery, you need to calibrate your touch screen and define the
settings on your iPronto, such as time and date, brightness, time out and so on. These settings are necessary to make
your iPronto function properly.
The first time you activate your iPronto, the System Settings will automatically appear on the screen. To access the
System Settings later, follow this procedure:
1 Press and hold the scroll wheel for 5 seconds.
The page turns to its flipside.
2 To exit the System Settings, press and hold the scroll wheel for 5 seconds.
The page turns to its normal view.
15
Page 16

Getting the iPronto Up and Running
Calibrating the Touch Screen
On first use, you need to calibrate the touch screen of your iPronto. By calibrating, you improve the accuracy of the
touch screen.
1 Select the General tab in the System Settings.
2 Tap the Calibrate touchscreen button.
The Calibration screen appears.
3 Follow the instructions that the iPronto provides.
When calibration has succeeded, you hear a success beep.
Adjusting the Time
1 Select the General tab in the System Settings.
2 In the Time section, select the Hours box.
The selection appears with a highlighted border.
3 Use the + and – buttons to change the hour.
4 In the Time section, select the Minutes box.
The selection appears with a highlighted border.
5 Use the + and – buttons to change the minutes.
6 In the Time section, select the AM/PM box.
The selection appears with a highlighted border.
7 Use the + and – buttons to change AM or PM.
iPronto User Guide
16
Page 17

Getting the iPronto Up and Running
Adjusting the Date
1 Select the General tab in the System Settings.
2 In the Date section, select the Days box.
The selection appears with a highlighted border.
3 Use the + and – buttons to change the day.
4 In the Date section, select the Months box.
The selection appears with a highlighted border.
5 Use the + and – buttons to change the month.
6 In the Date section, select the Years box.
The selection appears with a highlighted border.
7 Use the + and – buttons to change the year.
Adjusting the Timezone
You need to set the timezone to enable your Electronic Program Guide to display the correct data at the right time.
1 Select the General tab in the System Settings.
2 Select the Timezone dropdown list.
A list of all timezones appears.
3 Select your timezone from the dropdown list.
17
Page 18

Getting the iPronto Up and Running
Adjusting the Brightness
You can set the brightness of the touch screen in 16 intervals.
1 Select the General tab in the System Settings.
2 In the LCD Brightness section, use the + and – buttons to set the brightness.
Adjusting the Power off Time Out
Time Out when iPronto is running on the battery
1 Select the General tab in the System Settings.
2 In the LCD power off when running on batteries section, use the + and – buttons to set the LCD time out.
You can choose a time out between 30 seconds and 15 minutes.
Time Out when iPronto is plugged into the power adapter
1 Select the General tab in the System Settings.
2 In the LCD power off when plugged in section, use the + and – buttons to set the LCD time out.
You can choose a time out between 30 seconds and 15 minutes, or you can choose to always leave the display on.
iPronto User Guide
18
Page 19

Getting the iPronto Up and Running
Adjusting the Wake up Conditions
You can wake up a sleeping iPronto in several ways.
1 Select the General tab in the System Settings.
2 In the Wake up on section, select:
■ Power Button & Touch & Tilt to wake up the iPronto when the Power Button is pressed, when the screen is
tapped or when the iPronto is tilted.
■ Power Button & Touch to wake up the iPronto when the Power Button is pressed or when the screen is
tapped.
■ Power Button to wake up the iPronto only when the Power Button is pressed.
19
Page 20

Getting the iPronto Up and Running
Setting up Your Network
After adjusting the settings in the General tab, you have to set your wireless network settings and Internet settings in
the Wireless and Network tabs. These settings depend on the kind of configuration you have in your home. You can
find an overview of different kinds of configurations in the iPronto Online Help at
http://www
In the illustration below you see an example of a configuration.
.pronto.philips.com/products/ipronto/help/.
Example of a Configuration
iPronto User Guide
20
Page 21

Getting the iPronto Up and Running
Wireless Network Settings
After setting the general settings, you need to set the wireless network settings. This is needed so your iPronto can
connect to your home network and to the Internet, and to communicate with iProntoEdit. The Wireless Access Point
(WAP) sends out RF (radio frequency) signals to the iPronto’s Wireless LAN Adapter. The iPronto must use the same
wireless settings as the WAP.
How to set up your WAP on the iPronto, depends on the configuration you have in your home:
■ Your iPronto is connected to a network with a PC: You can read and modify information about your WAP settings
on your PC.
■ Your iPronto is connected to a network without a PC: You can read information about the WAP settings in your
WAP manual.
Wireless tab of the System Settings
21
Page 22

Getting the iPronto Up and Running
Follow these steps to set your wireless network settings.
1 Press and hold the scroll wheel for 5 seconds to display the System Settings.
2 Select the Wireless tab in the System Settings.
3 To change the default name of the Service Set Identifier, enter the new name in the Service Set
Identifier text box.
To obtain information on this, consult your WAP manual or the WAP configuration on your PC.
4 If encryption is enabled in your wireless network, select the correct encryption in the Wireless Network
Encryption section:
■ none;
■ 64 bit;
■ 128 bit.
To obtain information on this, consult your WAP manual or the WAP configuration on your PC.
5 If encryption is enabled in your wireless network, enter your Encryption pass phrase in the Encryption
pass phrase text box.
The Encryption key text box is automatically filled in.
iPronto User Guide
22
Page 23

Getting the iPronto Up and Running
Internet Settings
Network tab of the System Settings
The Internet settings determine how your iPronto will connect to the Internet.
Note You can find information about your Internet settings on your PC. If you do not have a PC, you can obtain Internet settings
information from your Internet Service Provider.
You can set the Internet settings as follows:
1 Press and hold the scroll wheel for 5 seconds to display the System Settings.
2 Select the Network tab in the System Settings.
3 To change the default name of the iPronto, enter the name in the iPronto host name text box.
The host name will be visible when you are using iProntoEdit. Make the iPronto host name as meaningful as
possible. You can use a maximum of 64 characters.
23
Page 24

Getting the iPronto Up and Running
After entering the iPronto host name, you determine the type of IP address you use. An IP address is a number that
identifies you on the Internet. You have two options:
■ Use DHCP (Dynamic Host Configuration Protocol). Your iPronto’s IP address will be assigned by the DHCP server.
■ Use a fixed IP address. You have only one IP address that is always assigned to your iPronto and that never
changes.
If you use DHCP
1 In the Network Configuration section, select Use DHCP.
The IP address, Subnet mask, Default gateway, Local domain name, DNS1 and DNS2 text boxes are automatically
filled in. You can manually modify the DNS1 and DNS2 text boxes.
Selecting DHCP
If you wish to use a fixed IP address
Note When you have a fixed IP address, you can find the information you need to adjust the Internet settings (IP address, Subnet
mask, Default gateway, Local domain name and DNS) in your home network configuration.
1 In the Network Configuration section, select Fixed IP.
iPronto User Guide
24
Selecting Fixed IP
Page 25

Getting the iPronto Up and Running
2 In the IP address text box, enter the IP address you wish to use.
3 In the Subnet mask text box, enter your Subnet mask.
4 In the Default gateway text box, enter your Default gateway.
5 In the Local domain name text box, enter your Local domain name.
6 In the DNS1 and DNS2 text boxes, enter the DNS servers you wish to use.
Proxy
When, in addition, you use a proxy server in your home network or at the Internet Service Provider, you have to adjust
the Proxy settings.
1 Select the Use HTTP Proxy checkbox.
The Proxy Address and Proxy Port text boxes and the Use Password Authentication section are activated.
2 In the Proxy Address text box, enter the IP address of the Proxy server.
3 In the Proxy Port text box, enter the Proxy port.
4 If your Proxy uses password authentication, select the Use Password Authentication checkbox.
The Username and Password text boxes are activated.
1 In the Username text box, enter your username.
2 In the Password text box, enter your password.
25
Page 26

Getting the iPronto Up and Running
Testing the Network Connection
After setting the network settings, you can test whether the iPronto is able to communicate with your network and with
the Internet:
1 Press layout button 8 (at the bottom) in the touchstrip.
If all settings are correct, the home page of the iPronto site page appears.
2 If the iPronto site does not appear, recheck the settings in this chapter or go to Troubleshooting on
page 54.
After setting the wireless network settings and Internet settings, the iPronto is ready for use. In the next chapter,
Using the iPronto, you learn the basics: using the touch screen, what the buttons are for, how you navigate on the
iPronto and so on.
iPronto User Guide
26
Page 27

Using the iPronto
Once you have adjusted the general settings and network settings, you can start using the iPronto. In this chapter you
read how to operate the touch screen, what the hard buttons are for and how you can use the iPronto’s applications
and functions.
The Touch Screen
The iPronto has a touch screen. You can operate the touch screen in two ways. One way is to use the plastic-tipped
stylus. It is specially designed for use on a touch screen. The stylus is very useful if you want to tap a small area on the
touch screen, because it is very precise.
Warning Never use an actual pen, pencil or other sharp object. These objects can damage the touch screen.
You can also operate the touch screen with your fingers. Fingers are less precise than the stylus, but you may find it
more comfortable to use your fingers on the touch screen.
The Status Display
Below the touch screen, the iPronto has a small screen. This second
screen is always on, even when the iPronto has been switched off.
It displays the time and battery status.
The status display also displays an RF icon and an IR icon.
Whenever the iPronto is communicating over your home network,
the RF icon is on. The IR icon gives you feedback when you are
using the iPronto’s remote control: every time you tap a button on
the touch screen or press a hard button that sends an IR code to
your device, the IR icon flashes.
RF icon clock
IR icon
battery
status
27
Page 28

Using the iPronto
The iPronto’s External Controls
The Power Button
The iPronto’s Power button (located on the left side of the iPronto) is used to switch iPronto on when it is sleeping.
In the System Settings you can decide on other options for waking up the iPronto. See Adjusting the Wake up
Conditions on page 19.
You can also use the Power button to switch the iPronto off at any time.
The RC buttons
The iPronto has five buttons on the front panel. They always operate the iPronto’s remote control (RC): When you are
working with the iPronto’s Electronic Program Guide or browser, these buttons will still have RC functions. By default,
the RC buttons have the following functions:
You can change these default functions with
the iPronto’s “learning” tool. This means that
the iPronto will learn an IR (infrared) code
from the conventional RC of your device, for
instance your TV. See Learning IR on page 38.
channel up
and channel
volume up
and volume
mute
iPronto User Guide
28
down
down
Page 29

Using the iPronto
The Scroll Wheel
The iPronto’s scroll wheel is located on the left side of the touch screen. By scrolling the wheel you can adjust the
volume of the iPronto (success beeps and so on) in 20 intervals.
By pressing and holding the scroll wheel for 5 seconds, you can enter the System Settings to adjust settings such as
time, date, network, and so on.
The Ports
MMC/SD port
headphone
USB
power adapter
connector
29
Page 30

Using the iPronto
Navigating the iPronto
Views, Layouts and Touchstrip
The iPronto offers you the possibility to view an application page in XL view or in M view.
The XL view is a full screen view (figure 1).
The M view is 1/4 of a full screen view. The M view allows you to combine multiple applications in one page (figure 2).
Figure 1: XL View Figure 2: 4 M Views
iPronto User Guide
30
Page 31

Using the iPronto
You can toggle between XL and M views by tapping the View Control button.
View Control Button
The iPronto’s principle of multiple views creates various ways of organizing the screen. The iPronto has 8 predefined
ways of organizing the screen, called “layouts”. In a layout, the screen is composed of one or more applications.
A layout has one XL view or four M views for different applications in various combinations. You can switch between
these layouts with the touchstrip.
Touchstrip
31
Page 32

Using the iPronto
When you tap one of the 8 buttons in the touchstrip, the corresponding layout appears:
■ Layout 1 is a full screen remote control;
■ Layout 2 is a full screen EPG;
■ Layouts 3-7 are M views with combined applications;
■ Layout 8 is a full screen browser that connects to the iPronto site. On this site you can find all kinds of useful
information concerning the iPronto:
■ You can learn about new software for your iPronto;
■ You can register for the iPronto EPG application and modify your lineup;
■ You can find iPronto Online Help;
■ You can read the latest news;
■ …
Flipside and Settings
On the iPronto, every application has a flipside. On this flipside you can read application information and modify
settings.
The System Settings are general and applicable to every application and every view. Application Settings are specific
for one application in one layout. For example: the Home Page of a Browser which can differ in different layouts.
For more information on System Settings, go to Getting the iPronto Up and Running on page 14.
Accessing the Application Flipside
1 To access the Application Flipside, tap and hold the View Control button in the lower right corner of the
application page for 5 seconds.
The application turns to its flipside.
2 To return to the normal view, tap the View Control button in the lower left corner of the XL view.
iPronto User Guide
32
Page 33

Using the iPronto
The Keyboard
The iPronto is provided with an on-screen keyboard. You need this keyboard to enter text in text boxes, for example to
enter a URL.
When you tap a text box, the on-screen keyboard automatically appears. A greyed out text box indicates that there is
no on-screen keyboard available.
The on-screen keyboard has its own text box, which displays the same text as the application’s text box. Depending on
the text box that you tap, the keyboard’s text box consists of either 1 or 3 lines. When a one-line text box appears, you
can only enter one line of text. When a three-line text box appears, you can enter multiple lines of text. If your text
consists of more than three lines, a scroll bar appears.
Working with the Keyboard
1 Tap the text box in which you want to enter text.
The on-screen keyboard appears.
On-screen Keyboard
33
Page 34

Using the iPronto
2 To enter text, tap the buttons with characters, numbers, punctuation and the space bar.
3 To enter one character in upper case, tap the Shift button.
The character you enter right after tapping Shift will appear in upper case.
4 To enter multiple characters in upper case, tap the Capitals button.
All the characters you enter after tapping Capitals will appear in upper case, until you tap the Capitals button
again.
5 To enter a symbol, tap the Special button.
The symbols appear on the buttons and you can tap the symbol you need. After tapping a symbol, the normal
characters reappear on the buttons.
6 To position the cursor in the keyboard’s text box, tap the place where you want to position the cursor.
-or-
Use the keyboard’s arrow keys to move up, down, left or right.
7 Tap Done.
The keyboard closes and the text appears in the text box.
-or-
Tap Cancel.
The keyboard closes and the text does not appear in the text box.
iPronto User Guide
34
Page 35

The Remote Control
The iPronto remote control (RC) is a universal RC. This means that it can be used for virtually any audio and video
device, such as a TV, VCR, DVD, CD and so on. As long as your device understands IR codes, the iPronto RC can control
it. This way, the iPronto RC replaces the individual RCs that accompany your devices.
You access the iPronto RC via the touchstrip: Layout 1 is a RC in XL view. See Views, Layouts and Touchstrip on page
30 for more information.
iPronto remote control
35
Page 36

The Remote Control
How Does the iPronto RC Work?
The core element of the iPronto RC is its “configuration file”. This iPronto Configuration File or ICF determines what the
interface on the iPronto RC looks like and how the iPronto RC behaves.
The ICF stores several predefined devices. These devices represent your conventional remote controls. Each device
consists of one or more pages with buttons on them.
You can access the devices from the Device tab or from the Device Overview. When you tap a device in the Device tab
or in the Device Overview, you immediately jump to the first page of that device.
Device tab
iPronto User Guide
36
Page 37

The Remote Control
The pages of a device can be accessed via the Page tab. When you tap the Page in the Page tab, you immediately
jump to that page.
Page tab
The devices and pages of the iPronto RC have an M view and an XL view. In both views you can tap buttons to
manipulate your equipment. To learn IR codes for buttons, however, you need to set the page in XL view. See
Learning IR Codes on page 38 for more information on “learning”.
37
Page 38

The Remote Control
Learning IR Codes
The iPronto RC sends out infrared (IR) signals to your devices, which will execute an action, for example “TV On” or
“VCR Start Recording”.
For every action the iPronto sends out a specific IR signal, called an “IR code”.
The iPronto RC contains a huge database that contains numerous IR codes for all
kinds of devices.
The iPronto RC is set up by default to operate Philips and compatible
devices. If you have other brands, the iPronto has to “learn” the
specific IR codes for your device from the conventional RC that
accompanies the device. This means that you press the button on the
conventional RC and point it at the iPronto’s learning eye:
distance: 4-8 inches
iPronto User Guide
38
Page 39

The Remote Control
The iPronto RC will learn the IR code from the conventional RC. You can learn all soft buttons and hard buttons on the
iPronto.
Note The function of the hard buttons is always device-independent. This means that a hard button always executes the same
action, no matter what device is active.
Follow these steps to “learn” an IR code for a soft button or for a hard button.
1 To learn a button, open the page that contains the button you want to learn.
Make sure the page is in XL view.
2 Tap the Tools tab on the left side of the XL view.
The tab opens with the options Use and Learn.
Tools tab
39
Page 40

The Remote Control
3 Tap the Learn tool.
The label Learn appears on the iPronto icon. The Device and Page tabs are disabled.
4 For learning a soft button, select the soft button you want to learn in the XL view.
The button is highlighted.
-or-
For learning a hard button, press the hard button you want to learn on the iPronto.
5 Press and hold the button on the conventional RC.
The conventional RC sends out an IR code.
If learning succeeds, the iPronto RC beeps and OK appears on the screen.
If learning does not succeed, the iPronto beeps and Failed appears on the screen.
Note When learning fails, try the following:
■ Make sure you aim the IR sender of the conventional remote control to the iPronto’s learning eye;
■ Make sure the distance between the iPronto and the conventional remote control is between 4 and 8 inches
(10 and 20 centimeters);
■ Make sure the batteries of the iPronto or of the conventional RC are not low;
■ Avoid learning under bright fluorescent light or direct sunlight: it might affect the IR signals.
iPronto User Guide
40
Page 41

The Remote Control
Using iProntoEdit
When you buy an iPronto, it is supplied with a default ICF. However, you can also personalize the functions and the
look of the iPronto. You can do this with iProntoEdit. iProntoEdit is the visual editor for creating and configuring ICFs
on your computer. You can download the latest version of iProntoEdit and the accompanying manual from the Pronto
site at http://www
.pronto.philips.com/products/ipronto
With iProntoEdit, you can fully define the iPronto user interface, for example:
■ You can perform basic actions, such as:
■ Deleting and adding devices;
■ Deleting and adding pages;
■ Deleting and adding buttons or panels;
■ Previewing the ICF with the iPronto Emulator.
■ You can easily position elements on a page with simple tools, such as:
■ Setting a Grid and Border;
■ Centering elements;
■ Setting the Z-order of elements.
■ You can design pages with buttons and bitmaps, for example:
■ Adding bitmaps to a button for its pressed and released state;
■ Importing an entire gallery with your own buttons or bitmaps;
■ Changing the color of elements;
■ You can configure elements, such as:
■ Labeling buttons, pages and devices.
■ Adding a complete action list (also called “macros”) to a button, with an IR command, links, delays, beeps and
jumps.
■ Adding IR codes from iProntoEdit’s universal database.
.
41
Page 42

The Remote Control
To modify the ICF with iProntoEdit, you have to be able to transfer the ICF from the iPronto to your PC and vice versa.
This is called “uploading” and “downloading” respectively. You can upload and download the ICF via your home
network.
Uploading and Downloading
Note To upload and download an ICF, iPronto and your PC have to be connected to the same network.
Uploading or downloading is easy: open iProntoEdit on your PC and click the Upload button to upload the ICF into
iProntoEdit, or click the Download button to download the ICF to the iPronto.
iPronto User Guide
42
Page 43

The Browser
You use the iPronto browser to access the Internet. The iPronto browser functions the same way as a regular PC
browser: it has Back, Forward, Home, Reload and Stop buttons, you can enter URLs, see the downloading progress and
scroll with the scroll bar.
iPronto Browser
You can view the iPronto browser in M view and in XL view. In both views you can navigate the Internet and view web
pages. However, you can only enter URLs in iPronto’s XL view.
43
Page 44

The Browser
Setting the Home Page
In the Browser Settings, you can set the Home Page for every individual browser in every layout. When you press the
Home button, this page is always displayed.
1 Open the browser that you want to configure in XL view.
You can toggle between M and XL views with the View Control button.
2 Tap and hold the View Control button for 5 seconds to display the Application Settings.
The flipside of the browser appears.
Browser flipside
3 In the Home Page URL text box, enter the URL of the Home Page with the on-screen keyboard.
See The Keyboard on page 33 for more information.
-or-
To set the currently active web page as Home Page, tap the Set Current button.
iPronto User Guide
44
Page 45

The Browser
Entering a URL
The URL that you are visiting is displayed in the bar at the top of the browser. To be able to enter a new URL in the bar,
you need to view the web page in XL view.
You can enter a URL with the iPronto’s on-screen keyboard.
1 Tap the text box on the touch screen.
The on-screen keyboard appears.
2 Enter the URL with the on-screen keyboard.
The URL appears in the keyboard’s text box.
3 Tap the Done button to close the keyboard.
See The Keyboard on page 33 for more information.
45
Page 46

The Electronic Program Guide
One of the iPronto’s key applications is the Electronic Program Guide. An Electronic Program Guide (EPG) is the
electronic equivalent of a printed television program guide. But the iPronto’s EPG is not a regular EPG: It is unique
because of its direct interaction with the iPronto’s remote control. While browsing through the Electronic Program
Guide, you can immediately switch your TV to the channel.
Note Before you can use the iPronto EPG, you have to register online. See Registration on page 49 for more information.
filter settings
program overview
detailed information
iPronto User Guide
46
Page 47

The Electronic Program Guide
■ In the filter settings you can select the genre, date and time to obtain information about programs in the future.
You can choose a day and the time of the day (morning, afternoon, evening and night) from dropdown lists or you
can set the exact time with the + and – buttons.
If you tap the button, the EPG data will automatically display the programs currently playing of the
genre(s) you have selected.
■ In the program overview the list of programs that meet your selection criteria, which you defined in the upper
part of the screen, appears.
■ The detailed information for the selected program is displayed in the left part of the screen: subject, actors, start
and end time, and so on.
For example, tap the Movies button and select Wednesday Evening, 8:00 PM in the filter settings. A list of movies that
are playing at that time on Wednesday will appear in the program overview. When you select one of the movies in the
list, a detailed description will appear in the left part of the EPG.
The EPG has two power features:
The Watch Feature
When you select a program in the program overview, you can immediately surf to this program with the button.
This Watch button only appears when you select a program that is currently playing on TV.
The SmartSurfer
When you are displaying a list of programs that are currently playing in the program overview, the buttons
appear. With these SmartSurf buttons you can easily surf through the programs in the list. For example: if you want to
watch sports but not soaps or home shopping, then tap “sports” and flip through only what you want to see: football,
soccer, baseball, tennis, car racing. With the SmartSurf buttons your TV will simply surf through the sports shows that
are on TV and it will skip channels that do not broadcast sports shows, even during commercial breaks.
47
Page 48

The Electronic Program Guide
Note The Watch Feature and SmartSurf only function if you apply correct settings in EPG and in RC. You have to set the channel
selection mechanism in the EPG settings. The channel selection mechanism determines how the TV switches channels.
A TV can use, for example, a 10+ button, or an Enter button to switch channels.
1 Tap and hold the View Control button to display the EPG settings.
The EPG page turns to its flipside.
2 Select your type of channel mechanism.
3 Check whether the Watch Device is functioning correctly on the iPronto RC. The ipronto EPG reuses
the RC’s IR codes. If the Watch Device in the ICF of the RC does not function properly, you should
“learn” the correct IR code for the relevant button.
See Learning IR Codes on page 38.
iPronto User Guide
48
Page 49

The Electronic Program Guide
Registration
Before you can use the EPG, you have to register on line. After the registration you can personalize your lineup so
only information on the channels that you find interesting appears in the EPG. After registering and personalizing,
you receive an activation code, which you enter in the EPG settings. Once you have activated your registration, the
iPronto EPG is ready for use.
Registering
1 Use an iPronto browser or your PC browser to navigate to the EPG welcome page at
http://www
The EPG welcome page appears.
.pronto.philips.com/products/ipronto/epg/.
EPG Welcome Page
49
Page 50

The Electronic Program Guide
2 In the New User section, tap Register here to subscribe to the Philips EPG Internet Service.
The Legal Notice page appears.
3 Read the legal notice and tap the Accept button.
The Identification page appears.
4 In the Username text box, enter a user name.
You can make up your own user name.
5 In the Password text box, enter a password.
You can make up your own password. Write down your username and password here for further reference:
Username: ....................................................................
Password: .....................................................................
6 In the Confirm password text box, reenter the password.
7 In the Email address text box, enter your email address (optional).
The email address will be used in case you forget your password.
Note Only if you enter an email address will you be able to recover your password. In the Forgot your password? section of
the EPG welcome page, you can read how to recover your password.
If you do not enter an email address, you will have to register again when you forget your password.
8 To have your browser remember the username, select the Remember me checkbox.
9 Click the Subscribe button.
The Congratulations page appears.
After the registration, you can personalize the information that will be sent to you.
iPronto User Guide
50
Page 51

The Electronic Program Guide
Personalizing
1 Tap the Go to personalization page! button.
The My personal EPG lineups page appears.
2 Tap the Add a lineup button.
The Personalization Wizard – step 1 page appears.
3 In the Zip code text box, enter your zip code.
4 Tap the Next button.
The Personalization Wizard – step 2 page appears.
5 Select your network type.
6 Tap the Next button.
The Personalization Wizard – step 3 page appears.
7 Select your provider.
8 Tap the Next button.
The Personalization Wizard – step 4 page appears.
9 Deselect the TV stations that you do not receive, or that you do not find interesting.
You can obtain information from your cable provider.
10 Tap the Finish button.
The My Personal EPG lineups page appears.
11 In the Activate subscription section, tap the Get activation code button.
The Waiting for Activation page appears.
51
Page 52

The Electronic Program Guide
EPG Waiting for Activation Page
12 In the Your activation code is box, your Activation Code appears.
Write down your activation code here:
.................. ................... ...............
After the registration you enter the activation code in the EPG settings on your iPronto:
iPronto User Guide
52
Page 53

The Electronic Program Guide
Activating
1 Open the EPG application in layout 2 on your iPronto.
The EPG appears in XL view.
2 Tap and hold the View Control button for 5 seconds to display the EPG settings.
The flipside of the EPG appears.
3 In the Activation code text box, enter your activation code.
4 Tap the Activate button.
The first EPG download starts.
Note The first EPG data download may take about 30 minutes. After the initial download, the EPG will be fully functional and
new data will be downloaded automatically every day.
53
Page 54

Troubleshooting
The soft buttons on my touch screen do not respond properly
It might happen that the buttons on your touch screen do not respond properly, for example when you have to tap to the
left of the button instead of on the button. In this case, you should recalibrate the touch screen. Calibrating enables the
iPronto to place the icons on the touch screen in line with their functions. See Calibrating the Touch Screen on page 16.
My iPronto switches off automatically
The iPronto has a power off time out function to save power. You can change the power off time out in the System
Settings. See Adjusting the Power off Time Out on page 18.
Devices do not respond to the commands I send
■ Make sure to point the iPronto’s sending eye towards the device.
■ Make sure there is no obstruction between the iPronto and the device.
■ Check the battery status in the status display or in the General tab of the System Settings.
■ Check if your device understands Philips IR codes. You can find this information in your device’s manual. If your
device does not understand Philips IR codes, you can learn the IR code from the conventional remote control.
See Learning IR Codes on page 38.
My iPronto does not respond
When your iPronto does not respond, try the following:
1 The iPronto may be sleeping. Press the Power button to wake it up.
2 The battery may be low. Check the battery status on the status display. Recharge the battery if
necessary.
See Installing and Recharging the Battery on page 10.
3 If steps 1 and 2 have no result, use the Reset button. The Reset button is located at the back of the
iPronto, as indicated in the illustration:
iPronto User Guide
54
Page 55

Troubleshooting
Press the Reset button with a pointed object, such as an unfolded paperclip. The iPronto will reboot.
Some settings may be lost, such as date and time settings.
4 If resetting does not help, contact your dealer.
I have activated the EPG application on my iPronto, but it still does not work
■ When you register on line for the iPronto EPG, you obtain an activation code. You should enter this activation code
in the EPG settings within a certain amount of days after registering on line. See Flipside and Settings on page 32.
If you do not activate within this period of time, you will have to get a new activation code from the registration
site.
■ When your EPG does not work, something might be wrong with your time, date or timezone settings.
See Setting up Your iPronto on page 15.
55
Page 56

Troubleshooting
The Watch Feature and the SmartSurfer of my EPG application do not work
■ The Watch Feature and SmartSurf buttons only appear on your screen when “Now” information is displayed.
■ Because the Watch Feature and SmartSurfer automatically surf between channels on your TV, you have to “tell”
them how to surf channels. There are several ways to surf, for example with a 10+ button, an Enter button, and so
on. In the EPG settings, you determine the way that your TV changes channels.
See The SmartSurfer on page 47.
■ The Watch Feature and SmartSurf buttons will only function if the channel selection mechanism on your iPronto RC
functions properly. Test whether the channel selection mechanism functions correctly in the Watch Device of the
ICF of the RC. If necessary, “learn” the IR code for the button (10+, Enter,...).
See Learning IR Codes on page 38.
My browser does not work
1 Check the network settings in the System Settings.
See Getting the iPronto Up and Running on page 14. You can find more information about network settings in the
Internet Settings on your PC. If you do not have a PC, you can obtain network information from your Internet Service
Provider.
2 Check the RF icon in the status display.
If the RF icon is off, something is wrong with your wireless network.
1 Check the settings on the Wireless tab.
See Wireless Network Settings on page 21. If you have a PC, you can find more information about the wireless
settings there. If you do not have a PC, you can find more information in the manual of your Wireless Access
Point.
2 Check the network signal strength in the General tab of the System Settings.
See Getting the iPronto Up and Running on page 14.
3 Check whether the Wireless Access Point functions correctly by testing it with another device in
iPronto User Guide
56
your network, for example your PC.
Page 57

Troubleshooting
4 Check the settings of your Wireless Access Point.
If you have a PC, you can find more information about the Wireless Access Point there. If you do not have a PC,
you can find more information in the manual of your Wireless Access Point.
5 Check whether your Wireless LAN Adapter is installed correctly. The Wireless LAN Adapter has a
green led. If this led is not on, something is wrong with your Wireless LAN Adapter.
See Installing the Wireless LAN Adapter on page 8.
The iPronto browser does not display web pages the same way as the browser on my PC
Most web pages are optimized for viewing with a Netscape or Internet Explorer browser. That is why pages may look
different on the iPronto browser.
The iPronto browser has some limitations compared to a regular browser.
■ The iPronto browser supports images of the .gif, .jpg and .png types.
■ The iPronto browser does not support popup windows.
■ MIME is not supported. This means that you cannot download graphics, audio and video files.
■ You cannot make a list of favorites or bookmarks.
■ Cookies are only remembered if there is enough memory available.
■ The iPronto browser uses a different type of JavaScript than a regular browser. There is a limit on the amount of
memory that can be used for JavaScript. This means that large-size pages may not be downloaded.
■ The iPronto browser’s cache memory is limited to 1 MB.
■ Applets are not supported by the iPronto browser.
57
Page 58

Index
A
About tab, 15
activation code, 49, 55
adapter
power, 10
Wireless LAN, 8
application
browser, 43
EPG, 46
remote control, 35
Application Settings, 32
B
battery
install, 10
recharge, 10
brightness, 18
browser, 43, 57
Home Page, 44
URL, 45
button, 36, 38
C
calibration, 16, 54
channel selection mechanism, 48,
56
configuration, 20
D
date, 17
device, 36
Device Overview, 36
Device tab, 36
download, 41
E
Electronic Program Guide. See
EPG
EPG, 46
activation, 53
detailed program information,
47
filter settings, 47
personalization, 51
program overview, 47
registration, 49
SmartSurf, 47, 56
Watch Feature, 47
F
FCC compliancy, 2
flipside, 32
G
general settings
brightness, 18
calibration, 16
date, 17
time, 16
time out, 18
timezone, 17
wake up, 19
H
hard button, 28, 38
headphone, 29
help
iPronto Online Help, 4
iPronto User Guide, 4
Home Page, 44
host name, 23
I
infrared. See IR
installing
battery, 10
iProntoEdit, 41
Wireless LAN Adapter, 8
Internet, 43, 57
Internet Service Provider, 23
iPronto User Guide
58
Page 59

Index
Internet settings
IP, 23
Proxy, 23
IP, 15, 23
DHCP, 24
fixed, 24
IP address. See IP
iPronto
box, 3
parts, 5
set up, 14
using, 27
iProntoEdit, 41
IR
code, 38
icon, 5
learn, 38
IR icon, 27
IR learning eye, 5
IR sending eye, 5
ISP, 23
K
keyboard, 33
L
layout, 30
LCD, 18
brightness, 18
time out, 18
learn, 38
M
M view, 30
microphone, 5
MMC/SD, 29
N
navigate, 43, 57
network settings
IP, 23
proxy, 23
O
on-screen keyboard. See keyboard
P
page, 36
Page tab, 36
PC, 21, 23
PCMCIA, 8
pen. See stylus
personalize, 41, 51
port, 29
power adapter, 10, 13
power button, 5, 28
Proxy, 15, 23
R
RC. See remote control
RC button, 28
recharge, 13
registration, 49
remote control, 35
iProntoEdit, 41
learn IR, 38
reset, 5, 54
RF icon, 5, 27
RF signal, 8
S
scroll wheel, 5, 29
set up
iPronto, 15
network, 20
settings
Application Settings, 32
System Settings, 14, 32
SmartSurf, 47, 56
soft button, 38
speaker, 5
status display, 5, 27
stylus, 5
surf, 43, 57
59
Page 60

Index
System Settings, 32
About, 15
General, 15
Network, 20
Wireless, 21
T
time, 16
time out, 54
adapter, 18
battery, 18
timezone, 17
toggle, 30
Tools tab, 38
touch screen, 27
touchstrip, 30
troubleshooting, 54
U
universal, 35
upload, 41
URL, 44, 45
USB, 29
V
View Control button, 30
W
wake up, 19
WAP, 8, 21
Watch Feature, 56
Wireless Access Point, 8, 21
Wireless LAN Adapter, 8, 57
wireless settings, 21
X
XL view, 30
iPronto User Guide
60
3104 205 3278.1
 Loading...