

Page 1
Quick Install Guide 4
Guide d’installation rapide 6
Guía de instalación rápida 8
Schnellinstallationsanleitung 10
Korte installatiehandleiding 12
Guida rapida all’installazione 14
Manual de utilização rápido 16
Snabb bruksanvisning 18
Philips SPC 200NC PC Camera
Full PDF product
manual on CD
QIG_SPC200NC.qxd 04-01-2005 12:55 Pagina 1
Page 2

Additional information available at our website:
www.philips.com/pcstuff
Specifications subject to change without notice.
All dimensions shown are approximate.
QIG_SPC200NC.qxd 04-01-2005 12:55 Pagina 2
Page 3
2
5
3
6
1
4
12
QIG_SPC200NC.qxd 04-01-2005 12:55 Pagina 3
7
Page 4
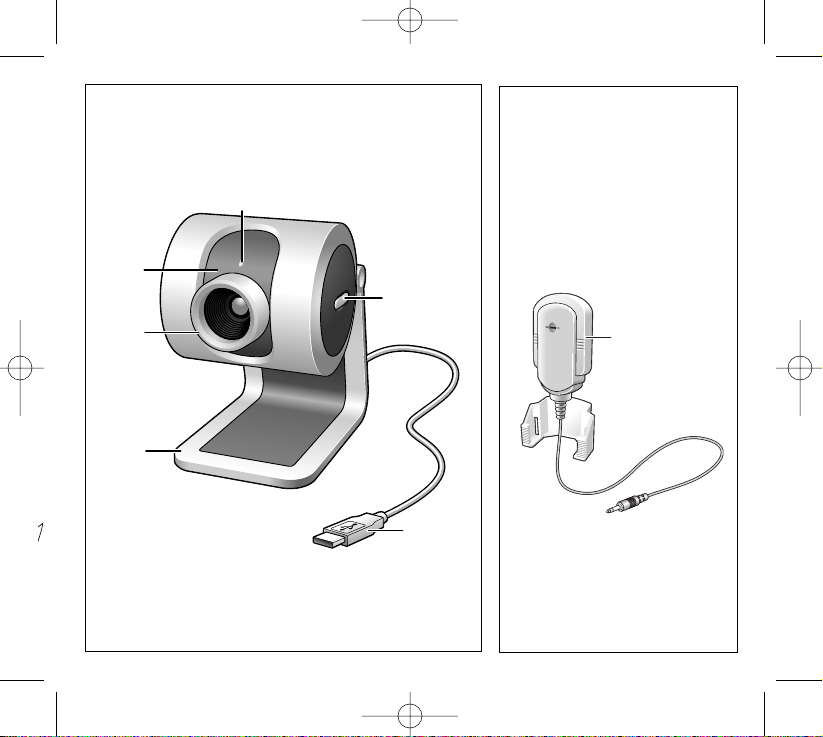
GB Quick Install Guide - Functional overview
1 Rotating lens
For manually changing the vertical angle of the camera.
2 Focus ring
For adjusting the focus of the image manually.
3 Desktop stand
For stable desktop placement of the SPC 200NC PC Camera.
4 USB cable
For connecting the camera to the USB port of the PC.
The camera will derive its power from the PC when a USB connection is made.
5 Snapshot button
Enables you to take photos without using your mouse.
6 Power LED
Lights up blue when the camera is in use.
7 Microphone
For adding voice and sound when video chatting and video recording.
4
QIG_SPC200NC.qxd 04-01-2005 12:55 Pagina 4
Page 5

GB Quick Install Guide - Installing the camera software
1 Insert the installation CD-ROM supplied into the PC’s CD-ROM-/DVD
drive.
> The ‘Language Selection’ screen will appear automatically.
2 Select your language.
Note! If the the ‘Language Selection’ screen does not appear automatically, open
Windows Explorer and double-click the ‘Autorun.exe’ icon in the CD-ROM
directory.
> The software installation screen will now appear.
3 Select at least the ‘SPC 200NC PC Camera driver’.
4 Follow the instructions on the screen to complete the installation.
5 Restart your computer when you have finished installing all of the above
software.
Where to go for information and support?
Please visit our website: www.philips.com for the latest product information.
Go to: www.philips.com/pcstuff for the latest version of drivers and for
troubleshooting tips.The helpline phone numbers can be found in the electronic
manual, chapter ‘8. Helpline’.
5
QIG_SPC200NC.qxd 04-01-2005 12:55 Pagina 5
Page 6

F Guide d’installation rapide - Présentation des fonctionnalités
1 Objectif rotatif
Il vous permet de modifier l’angle vertical de la caméra manuellement.
2 Bague de mise au point
Elle vous permet de régler la mise au point de l’image manuellement.
3 Pied
Pour un placement stable de la caméra pour PC SPC 200NC sur le bureau.
4 Câble USB
Il vous permet de brancher la caméra au port USB du PC.
La caméra est alimentée par le PC lorsque le câble USB est branché.
5 Bouton de prise d’instantanés
Il vous permet de prendre des photos sans utiliser votre souris.
6 Témoin d’alimentation
Il devient bleu lorsque la caméra fonctionne.
7 Micro
Il vous permet d’ajouter des voix et des sons dans le cadre d’applications de
vidéobavardage et d’enregistrement vidéo.
6
QIG_SPC200NC.qxd 04-01-2005 12:55 Pagina 6
Page 7

F Guide d’installation rapide - Installation du logiciel de la caméra
1 Insérez le CD-ROM d’installation dans le lecteur de CD-ROM/DVD du PC
> L’écran de sélection de la langue apparaît automatiquement.
2 Sélectionnez votre langue.
Remarque : Si l’écran de sélection de la langue n’apparaît pas automatiquement,
ouvrez l’Explorateur Windows et double-cliquez sur l’icône du fichier
‘Autorun.exe’ dans le répertoire du CD-ROM.
> L’écran d’installation du logiciel apparaît.
3 Sélectionnez au moins les options ‘SPC 200NC PC Camera driver’
(pilote SPC 200NC PC Camera).
4 Suivez les instructions à l’écran pour terminer l’installation.
5 Redémarrez votre ordinateur une fois que vous avez fini d’installer les
logiciels ci-dessus.
Où trouver des informations complémentaire et de l’assistance?
Visitez notre site web: www.philips.com pour obtenir les informations les plus
récentes sur nos produits. Pour obtenir les dernières versions des pilotes ou
trouver des conceils de dépannage, visitez le site web: www.philips.com/pcstuff. Les
numéros de téléphone du service d’assistance sont mentionnés dans le manuel
électronique, au chapitre ‘8. Assistance téléphonique’.
7
QIG_SPC200NC.qxd 04-01-2005 12:55 Pagina 7
Page 8

8
E Guía de instalación rápida - Visión general del funcionamiento
1 Objetivo giratorio
Permite cambiar manualmente el ángulo vertical de la cámara.
2 Anillo de enfoque
Permite regular el enfoque de la imagen manualmente.
3 Soporte de sobremesa
Para la colocación estable de la cámara de PC SPC 200NC sobre la mesa.
4 Cable USB
Permite la conexión de la cámara al puer to USB del PC.
La cámara se alimentará del PC cuando se establezca la conexión USB.
5 Botón de captura
Permite hacer fotos sin necesidad de utilizar el ratón.
6 LED de alimentación
Se iluminará en azul cuando se esté utilizando la cámara.
7 Micrófono
Permite añadir voz y sonido a las conversaciones de voz y videoconferencias.
QIG_SPC200NC.qxd 04-01-2005 12:55 Pagina 8
Page 9

9
E Guía de instalación rápida - Instalación del software de la cámara
1 Inserte el CD-ROM de instalación suministrado en la unidad de CD-ROM-/
DVD del PC.
> Aparecerá automáticamente la pantalla de selección de idioma.
2 Seleccione un idioma.
Nota: Si la pantalla de selección de idioma no aparece automáticamente, abra el
Explorador de Windows y haga doble clic en el icono ‘Autorun.exe’ del directorio
del CD-ROM.
> A continuación, aparecerá la pantalla de instalación del software.
3 Seleccione al menos SPC 200NC PC Camera
4 Siga las instrucciones en pantalla para completar la instalación.
5 Reinicie el ordenador cuando haya terminado de instalar todo el software
anterior.
Dónde encontrar más información y soporte?
Por favor visite nuestro sitio Web: www.philips.com para consultar la última
información publicada del producto.Vaya a: www.philips.com/pcstuff donde encontrará
la última información publicada sobre controladores (drivers) y sugerencias de
solución de problemas. Los números telefónicos de atención al cliente los puede
encontrar en el manual electrónico, capítulo ‘8. Línea de ayuda’.
QIG_SPC200NC.qxd 04-01-2005 12:55 Pagina 9
Page 10

10
D Schnellinstallationsanleitung - Übersicht über die Funktionen
1 Schwenkbares Objektiv
Zum manuellen Ändern des vertikalen Kamerawinkels.
2 Fokussierring
Zum manuellen Einstellen des Bildfokus.
3 Standfuß
Zur stabilen Desktop-Aufstellung der SPC 200NC PC-Kamera.
4 USB USB-Kabel
Um die Kamera am USB-Port des PC anzuschließen.
Wenn die USB-Verbindung hergestellt ist, wird die Kamera vom PC mit Strom
versorgt.
5 Schnappschusstaste
Ermöglicht es, Fotos ohne Benutzung der Maus zu machen.
6 Betriebs-LED
Leuchtet blau, wenn die Kamera in Betrieb ist.
7 Mikrofon
Ergänzt Video-Chatting und Videoaufnahmen durch Sprache und Ton.
QIG_SPC200NC.qxd 04-01-2005 12:55 Pagina 10
Page 11

11
D Schnellinstallationsanleitung - Installieren der Kamera-Software
1 Legen Sie die mitgelieferte Installations-CD-ROM in das CD-ROM-/DVD-
Laufwerk des PCs ein.
> Auf dem Bildschirm wird automatisch die Anzeige zur Sprachauswahl
angezeigt.
2 Wählen Sie Ihre Sprache.
Hinweis! Wenn die Anzeige zur Sprachauswahl nicht automatisch erscheint, öffnen Sie
den Windows Explorer und doppelklicken Sie auf das Symbol ‘Autorun.exe’
im CD-ROM-Verzeichnis.
> Jetzt erscheint die Anzeige zur Software-Installation.
3 Wählen Sie mindestens ‘SPC 200NC PC Camera’.
4 Befolgen Sie die angezeigten Anweisungen, um die Installation abzuschließen.
5 Starten Sie Ihren Computer neu, wenn Sie die obige Software vollständig
installiert haben.
Wo finden Sie Informationen und Unterstützung?
Besuchen Sie unsere Website: www.philips.com. Dort finden Sie die neuesten
Produktinformationen. Gehen Sie zu: www.philips.com/pcstuff, um die neuesten
versionen der treiber und Tipps für die Fehlerbehebungen zu erhalten.
Die Telefonnummer des Helpdesks finden Sie in der elektronischen
Betriebsanleitung, im Kapitel ‘8. Helpline’.
QIG_SPC200NC.qxd 04-01-2005 12:55 Pagina 11
Page 12

12
NL Korte installatiehandleiding - Onderdelen van de camera
1 Instelbare lens
Om handmatig de verticale hoek van de lens te wijzigen.
2 Focusring
Om het beeld handmatig scherp te stellen.
3 Bureauhouder
Voor een stabiele bureauopstelling van de SPC 200NC pc-camera.
4 USB-kabel
Om de camera te verbinden met de USB-poort van de pc.
Als de USB-verbinding gemaakt is dan wordt de camera gevoed door de pc.
5 Foto-toets
Om foto’s te maken zonder uw muis te gebruiken.
6 Voedingsindicator
Brandt blauw als de camera in gebruik is.
7 Microfoon
Om een stem en geluid toe te voegen aan video-chatten en video-opnames.
QIG_SPC200NC.qxd 04-01-2005 12:55 Pagina 12
Page 13

13
NL Korte installatiehandleiding - Camerasoftware installeren
1 Leg deze installatie-CD-ROM in het CD-ROM-/DVD-station van uw
computer.
> Het scherm voor de taalkeuze verschijnt automatisch.
2 Selecteer uw taal.
Let op! Als het scherm voor de taalkeuze niet automatisch verschijnt, ga dan naar de
Windows Verkenner en dubbelklik in de map van het CD-ROM-station op het
programma ‘Autorun.exe’.
> Het scherm voor het installeren van de software verschijnt.
3 Selecteer minimaal ‘SPC 200NC PC Camera’.
4 Volg de instructies op het scherm om het installeren af te ronden.
5 Start uw computer opnieuw op als u alle software hebt geïnstalleerd.
Wilt u aanvullende informatie en ondersteuning?
Bezoek onze website: www.philips.com voor de meest actuele informatie over uw
product. En op: www.philips.com/pcstuff vindt u de nieuwste versies van de
stuurprogramma’s en tips voor het verhelpen van storingen. De telefoonnummers
van de helpdesk staan in het hoofdstuk ‘8. Helplijn’ van de elektronische
handleiding.
QIG_SPC200NC.qxd 04-01-2005 12:55 Pagina 13
Page 14

14
I Guida rapida all’installazione - Panoramica sulle funzioni
1 Inclinazione dell’obbiettivo
Per cambiare manualmente l’angolo verticale della camera.
2 Ghiera della messa a fuoco
Per regolare manualmente il fuoco dell’immagine.
3 Supporto da tavolo
Per una solida posizione della fotocamera per PC SPC 200NC sulla scrivania.
4 Cavo USB
Per collegare la camera alla porta USB del PC.
Quando la camera è collegata alla porta USB, verrà alimentata dal PC.
5 Tasto Istantanea
Per scattare una foto senza utilizzare il mouse.
6 LED di alimentazione
Si illumina in blu quando la camera è in uso.
7 Microfono
Per catturare la voce ed il sonoro durante la chat video o la registrazione video.
QIG_SPC200NC.qxd 04-01-2005 12:55 Pagina 14
Page 15

15
I Guida rapida all’installazione - Installare il software della telecamera
1 Inserite il CD d’installazione fornito nell’unità CD/DVD-ROM del PC.
> Lo schermo per la selezione della lingua, comparirà automaticamente.
2 Selezionate la lingua.
Nota! Se lo schermo per la selezione della lingua non compare automaticamente,
aprite Esplora risorse e fate doppio clic sull’icona ‘Autorun.exe’ nella cartella del
CD-ROM.
> Comparirà lo schermo per l’installazione del software.
3 Selezionate almeno ‘Strumenti SPC 200NC PC Camera’ (driver).
4 Seguite le istruzioni che compaiono sullo schermo per completare
l’installazione.
5 Riavviate il computer al termine dell’installazione di tutto il software.
Per ulteriori informazioni e assistenza?
Si invita a visitare il nostro sito web: www.philips.com per quanto concerne le ultime
informazioni sui prodotti.Visitando il sito: www.philips.com/pcstuff si potranno avere
le ultimissime versioni dei driver e utili consigli per l’individuazione die guasti. Per
quanto riguarda i numeri di telefono del centro assistena si possono reperire nel
manuale elettronico, capitolo ‘8. Helpline’.
QIG_SPC200NC.qxd 04-01-2005 12:55 Pagina 15
Page 16

P Manual de utilização rápido - Panorâmica das funções
1 Objectiva rotativa
Para regular manualmente o ângulo vertical da câmara.
2 Anel de focagem
Para regular manualmente a focagem da imagem.
3 Base de secretária
Para um posicionamento estável da câmara de PC SPC 200NC na secretária.
4 Cabo USB
Para ligar a câmara à porta USB do PC.
A câmara receberá a alimentação do PC quando for estabelecida a ligação por USB.
5 Botão de fotografia instantânea
Permite-lhe tirar fotografias sem utilizar o rato.
6 LED de alimentação
Fica azul quando a câmara está a ser utilizada.
7 Microfone
Para adicionar voz e som em conversas com vídeo e gravação de vídeo.
16
QIG_SPC200NC.qxd 04-01-2005 12:55 Pagina 16
Page 17

17
P Manual de utilização rápido - Instalar o software da máquina fotográfica
1 Introduza o CD-ROM de instalação fornecido na unidade de CD-ROM-/
DVD do PC.
> Aparece automaticamente o ecrã ‘Language Selection’.
2 Seleccione o seu idioma.
Nota! Se o ecrã ‘Language Selection’ não aparecer automaticamente, abra o
Explorador do Windows e clique duas vezes no ícone ‘Autorun.exe’ no directório
do CD-ROM.
> Aparece agora o ecrã de instalação do software.
3 Seleccione pelo menos ‘SPC 200NC PC Camera’.
4 Siga as instruções no ecrã até completar a instalação.
5 Reinicialize o computador depois de terminar a instalação de todo o
software acima referido.
Onde obter informações e suporte?
Visite o nosso web site em: www.philips.com para obter informações sobre os
productos mais recentes.Visite: www.philips.com/pcstuff para obter informações
sobre as últimas versões de unidades e conselhos para resolução de problemas.
Os números de telefone da helpdesk podem ser encontrados no manual
electrónico, no capítulo ‘8. Serviço de assistência’.
QIG_SPC200NC.qxd 04-01-2005 12:55 Pagina 17
Page 18

S Snabb bruksanvisning - Funktionsöversikt
1 Vridbart objektiv
För manuell inställning av kamerans vinkel i vertikalled.
2 Fokuseringsring
För manuell fokusering.
3 Bordsställ
För stabil placering av SPC 200NC PC-kamera på ett skrivbordet.
4 USB-kabel
För att ansluta kameran till datorns USB-port.
Kameran strömförsörjs från datorn när USB-kabeln är ansluten.
5 Stillbildsknap
För att ta bilder utan hjälp av musen.
6 Nätspänningsindikator
Blå när kameran används.
7 Mikrofon
För att lägga till ljud vid videochatt och videoinspelning.
18
QIG_SPC200NC.qxd 04-01-2005 12:55 Pagina 18
Page 19

S Snabb bruksanvisning - Installera kameraprogrammet
1 Sätt i CD-ROM-skivan med installationsprogrammet i datorns CD-ROM-/
DVD-enhet.
> Skärmbilden för språkval visas automatiskt.
2 Välj språk.
Obs! Om skärmen för språkval inte visas automatiskt, öppnar du Utforskaren och
dubbelklickar på ikonen Autorun.exe i CD-ROM-katalogen.
> Skärmbilden för programinstallation visas.
3 Markera minst ‘SPC 200NC PC Camera’.
4 Följ anvisningarna på skärmen för att slutföra installationen.
5 Starta om datorn när du installerat alla program som nämns ovan.
Vart vänder jag mig för information och support?
Vart vänder jag mig för information och support?
Besök vår webbplats www.philips.com för färsk produktinformation.
Gå till www.philips.com/pcstuff foör de senaste versionerna av drivrutiner och för
felsökningstips.Telefonnumren till vår helpline hittar du i vår elektroniska handbok i
kapitlet ‘8. Hjälplinje’.
19
QIG_SPC200NC.qxd 04-01-2005 12:55 Pagina 19
Page 20

QIG_SPC200NC.qxd 04-01-2005 12:55 Pagina 20
Page 21

QIG_SPC200NC.qxd 04-01-2005 12:55 Pagina 21
Page 22

©2004 Koninklijke Philips Electronics N.V.
All rights reserved. Reproduction, copying, usage, modifying, hiring, renting, public
performance, transmission and/or broadcasting in whole or part is prohibited without
the written consent of Philips Electronics N.V.
9082 100 04691
for
Philips SPC 200NC PC Camera
QIG_SPC200NC.qxd 04-01-2005 12:55 Pagina 22
 Loading...