

Page 1

Register your product and get support at
www.philips.com/welcome
WACS7500
WAS7500
EN User manual 1
Contact information 94
Page 2

_
Philips Consumer Lifestyle
HK-0948-WACS7500-FR 2007
........................................................ ...........................................................................
(Report No. / Numéro du Rapport) (Year in which the CE mark is affixed / Année au cours
de laquelle le marquage CE a été apposé)
EC DECLARATION OF CONFORMITY
(DECLARATION DE CONFORMITE CE)
We / Nous, PHILIPS CONSUMER LIFESTYLE B.V.
TUSSENDIEPEN 4, 9206 AD DRACHTEN, THE NETHERLANDS
Declare under our responsibility that the electrical product(s):
(Déclarons sous notre propre responsabilité que le(s) produit(s) électrique(s):)
Philips........................................................... ....................WACS7500/12 ...................
(brand name, nom de la marque) (Type version or model, référence ou modèle)
Wireless Music Center & Station
..............................................................................................
product description, description du produit)
(
To which this declaration relates is in conformity with the following harmonized standards:
(Auquel cette déclaration se rapporte, est conforme aux normes harmonisées suivantes)
(title, number and date of issue of the standard / titre, numéro et date de parution de la norme)
EN50371 : 2002 EN62301 : 2005
EN55020 : 2007 EN55013 : 2001 + A1:2003 + A2:2006
EN55022 : 2006 EN66024 : 1998 + A1:2001 + A2:2003
EN301489-1 V1.7.1. : 2007 EN301489-17 V1.3.2. : 2008
EN300328 V1.7.1 :2006 EN60065 : 2002 + A1: 2006
Following the provisions of :
(Conformément aux exigences essentielles et autres dispositions pertinentes de:)
1999/5/EC (R&TTE Directive)
2004/108/EC (EMC Directive)
2005/32/EC (EuP) – EC/1275/2008
And are produced under a quality scheme at least in conformity with ISO 9001 or CENELEC
Permanent Documents
(Et sont fabriqués conformément à une qualité au moins conforme à la norme ISO 9001 ou aux Documents Permanents CENELEC)
The Notified Body .............. Electros uisse............. performed .................CB Scheme..............
(L’Organisme Notifié) (Name and number/ nom et numéro) (a effectué) (description of intervention /
CH-3861, M1, M2, M3.
And issued the certificate, .................................................................
(et a délivré le certificat) (certificate number / numéro du certificat)
Remarks:
(Remarques:)
Frank Dethier
Leuven, November 26, 2009
........................................................... ............................................................................................
(place,date / lieu, date)
(signature, name and function / signature, nom et fonction)
(Name / Nom de l’entreprise)
(address / adresse)
Development Manager, Innovation Lab Leven
description de l’intervention)
_
_
Philips Consumer Lifystyle AMB 544-9056
Page 3

EN Wireless Music Center + Station 1
Page 4

Important notes for users in the U.K.
Mains plug
This apparatus is fitted with an approved 13- Amp
plug.To change a fuse in this type of plug, proceed as
follows:
1 Remove fuse cover and fuse.
2
Fix the new fuse which should be a BS1362 5Amp, A.S.T.A. or BSI approved type.
3 Refit the fuse cover.
If the fitted plug is not suitable for your socket
outlets, it should be cut off and an appropriate
plug should be fitted in its place.
If the mains plug contains a fuse, it should have
a value of 5 Amp. If a plug without a fuse is
used, the fuse at the distribution board should
not be greater than 5 Amp.
Note:The severed plug must be disposed, so as to
avoid a possible shock hazard due to it being
inserted into another 13-Amp socket.
How to connect a plug
The wires in the mains lead are colored using the following codes: blue = neutral (N), brown = live (L).
• As these colors may not correspond with the
color markings identifying the terminals in your
plug, proceed as follows:
– Connect the blue wire to the terminal
marked N or colored black.
– Connect the brown wire to the terminal
marked L or colored red.
– Do not connect either wire to the earth
terminal in the plug, marked E (or e) or colored green (or green and yellow).
Before replacing the plug cover, make sure that the
cord grip is clamped over the sheath of the lead and
not simply over the two wires.
Copyright in the U.K.
Recording and playback of any materials may require
consent. See Copyright Act 1956 and The
Performerb’s Protection Acts 1958 to 1972.
Norge
Typeskilt finnes på apparatens bakside.
Observer: Nettbryteren er sekundert
innkoplet. Den innebygde netdelen er derfor ikke frakoplet nettet så lenge apparatet er tilsluttet nettkontakten.
For å redusere faren for brann eller elektrisk
støt, skal apparatet ikke utsettes for regn eller
fuktighet.
CLASS 1
LASER PRODUCT
Page 5

Table of contents
1
ENGLISH
Table of contents
1 Important 3
1.1 Safety 3
1.2 GPL Package written offer 4
1.3 LGPL Library written offer 4
1.4 Environmental information 4
1.5 Disposal of your old product 5
1.6 Maintenance 5
1.7 Hearing Safety 6
1.8 Register your product 7
2 Your Wireless Music Center &
Station 8
2.1 What’s in the box 8
2.2 Overview Wireless Music Center &
Station 10
2.2.1 Controls on Center and Station 10
2.3 Overview remote controls 12
2.3.1 2-way remote control 12
2.3.2 1-way remote control 14
2.4 Overview display 16
3 Installation 17
3.1 Install Center and Station 17
3.2 Connect AC power 18
3.3 Set up Wi-Fi connection between Center
and Station 18
3.4 Rear connections 18
3.4.1 Connect antennas 19
3.4.2 Connect a por table (USB) device 19
3.4.3 Connect your iPod (optional) 20
3.4.4 Connect additional appliances 21
3.4.5 Connect an additional device with
external speakers 21
4 Prepare 22
4.1 Set the clock 22
4.1.1 View the clock 24
4.2 Remote control 25
4.2.1 Remote control battery installation 25
4.2.2 Remote control, 2-way 27
4.3 Navigation controls 28
4.4 Alphanumeric keys 28
5 Basic functions 29
5.1 Power modes and functions 29
5.2 Eco Standby (power-saving mode) 31
5.3 Auto-Standby 31
5.4 Volume control 31
5.5 MUTE 32
5.6 Sound control 32
5.6.1 Smar t equalizer 32
5.6.2 Equalizer 32
5.6.3 DBB (Dynamic Bass Boost) 33
5.6.4 Incredible surround 33
5.7 Display adjustment 33
5.8 Selecting languages 34
5.9 Sleep 34
5.10 Alarm 35
5.10.1 Set alarm / alarm time / repeat mode 35
6 HD (Hard Disk) 36
6.1 Play HD Music 36
6.2 Search 36
6.2.1 Search by keywords 36
6.2.2 Select track of same ar tist 37
6.2.3 Select track of same genre 37
6.2.4 Find track in current album (during
playback) 38
6.2.5 Find passage in current track (during
playback) 38
6.3 Play modes REPEAT, SHUFFLE 38
6.4 Build music library on Center 39
6.4.1 Rip music from CDs 39
6.4.2 Impor t from your PC 41
6.4.3 Record from radio or external source 42
6.5 Create a playlist 42
6.6 Delete a playlist, album or track 43
6.7 View track information 43
6.8 Backup to PC 44
6.9 Move music playback between Center
and Station 44
6.9.1 MUSIC FOLLOWS ME 44
6.9.2 MUSIC BROADCAST 45
6.10 View system information 46
6.11 Edit track information 47
Page 6

7 CD (Center only) 48
7.1 Supported discs 48
7.2 Play discs 49
7.2.1 Search by keywords 50
7.2.2 Find track in current album (during
playback) 51
7.2.3 Find passage in current track (during
playback) 51
7.3 Play modes REPEAT, SHUFFLE 51
8 FM radio 52
8.1 Tune radio stations 52
8.2 Store preset radio stations 52
8.2.1 Autostore: Automatic preset program 53
8.2.2 Manual store: Manual preset program 53
8.2.3 Listen to preset station 53
8.3 RDS 54
8.4 NEWS 54
8.5 Internet radio* 55
8.5.1 First time use 55
8.5.2 Regular use 56
8.5.3 Add internet radio stations and bookmark
your favorites 57
9 UPnP 58
9.1 UPnP (Universal Plug and Play) 58
9.1.1 About UPnP* 58
9.1.2 About UPnP* enabled devices 58
9.2 Connect to the UPnP device 59
9.3 UPnP playback 59
9.3.1 Play music from UPnP device 59
9.3.2 Play music from Center 60
10 External sources 61
10.1 Play or record to USB mass storage
device 61
10.1.1 About USB device 61
10.1.2 Play music from USB device 62
10.1.3 Transfer music to USB device 63
10.2 Play your iPod music 65
10.3 Play external sources 65
11 Network settings 66
11.1 Add Stations to Wi-Fi network of Center
66
11.1.1 Delete a Station 67
11.2 Connect to Wi-Fi (wireless) enabled
home network 68
11.2.1 Network settings on Center 68
11.2.2 Set network on Station 69
11.3 Connect to wired home network 70
11.3.1 Set network on Center 70
11.3.2 Set network on Station 71
11.4 Connect to two different home
networks 72
11.5 View connection status 72
11.5.1 View Station status in Wi-Fi network of
Center 72
11.5.2 Viewing the connection with home
network 73
11.6 Connect to Internet 73
12 Connect to your PC 75
13 Gracenote® CD Information 78
13.1 Gracenote® music recognition database
78
13.1.1 Update Gracenote® music recognition
database 78
13.2 Gracenote® Internet Queries 78
13.2.1 Look up CD track information 79
14 Firmware Upgrade 80
14.1 Upgrade firmware 80
14.2 Restore previous firmware 81
14.3 Re-establish Wi-Fi network of Center
and Stations 81
15 Reset 82
16 Technical data 83
16.1 Center 83
16.2 Station 84
17 Frequently asked questions 85
18 Appendix 91
18.1 How to mount Station to a wall 91
18.1.1 What’s in the supplied mounting kit 91
18.1.2 What else you’ll need 91
18.1.3 Preparation 91
18.1.4 Mounting Station 92
Table of contents
2
* Internet radio requires broadband Internet access and a wireless router.
Page 7

Important
3
ENGLISH
1 Important
1.1 Safety
• Do not open the product or remove the cover.The interior does not contain any userserviceable parts.
• Do not place objects filled with liquid, such as vases, on the product.
• Do not stick objects into the openings of the product.
• Do not drop objects such as paperclips into the openings.
• Do not expose the product to splashing or dripping water.
• Do not expose the product to rain or high humidity.The product is for indoor use only.
• Do not place sources of naked flames, such as burning candles, on the product.
• Position the product in a location with adequate ventilation.Allow at least 10 cm (4 inches)
clearance at the rear and the top of the product and 5 cm (2 inches) on each side.
• Do not cover the ventilation openings with items such as newspapers, tablecloths, curtains, etc.
• Do not oil or lubricate the mechanical parts of the product.
• Visible and invisible laser radiation! Do not look at the laser beam.
•
The set does not contain any user-serviceable parts.
• Place the set on a level, firm and sturdy surface.
• Keep the system, batteries and discs in a cool dry place.
• Do not exposure the product to humidity, rain, or heat sources like radiators, amplifiers, or
direct sunlight.
• Modification of the product can result in hazardous EMC radiation or other unsafe operations.
This product complies with the radio interference requirements of the European Community.
Philips Electronics, BG Entertainment Solutions, hereby declare that this product WACS7500 is in
compliance with the essential requirements and other relevant provisions of the Directive
1999/5/EC.
The making of unauthorized duplicates of copy-protected materials, including computer programs,
files, broadcasts and sound recordings, may be an infringement of copyrights and constitutes as
criminal offence.This equipment should not be used for such purposes.
Note
The use of controls or adjustments or performance of procedures other than described in the user
manual may result in hazardous radiation exposure or unsafe operation.
Caution! To avoid the risk of injuries or damages, follow these safety instructions:
Warning! To avoid the risk fire, electric shock, injuries or damages, follow these safety
instructions:
Page 8

1.2 GPL Package written offer
This product contains Linux 2.4.27-vrsl that is made available under the GNU GPL license version
2 (hereafter called ‘the Program’).
Philips Electronics Hong Kong Ltd. hereby offers to deliver or make available, upon request, for a
charge no more than the cost of physically performing source distribution, a complete machinereadable copy of the corresponding source code of the Program on a medium customarily used for
software interchange. Please contact: Head of Development BLC Audio PDCC Development 5/F.,
Philips Electronics Building 5 Science Park East Avenue Hong Kong Science Park Shatin Hong Kong
This offer is valid for a period of three years after the date of purchase of this product.
1.3 LGPL Library written offer
This product contains Linux 2.4.27-vrsl that is made available under the GNU LGPL license version
2.1 (hereafter called ‘the Library’).
Philips Electronics Hong Kong Ltd. hereby offers to deliver or make available, upon request, for a
charge no more than the cost of physically performing source distribution, a complete machinereadable copy of the corresponding source code of the Library on a medium customarily used for
software interchange. Please contact: Head of Development BLC Audio PDCC Development 5/F.,
Philips Electronics Building 5 Science Park East Avenue Hong Kong Science Park Shatin Hong Kong
This offer is valid for a period of three years after the date of purchase of this product.
1.4 Environmental information
All redundant packaging material has been omitted.We made the packaging easily separable into
three mono materials: cardboard (box), polystyrene foam (buffer) and polyethylene (bags, protective
foam sheet).
The product consists of materials that can be recycled if disassembled by a specialized company.
Please observe local regulations regarding the disposal of packaging materials, exhausted batteries
and old equipment.
Important
4
Page 9

1.5 Disposal of your old product
Your product is designed and manufactured with high quality materials and components,
which can be recycled and reused.
In order to preserve, protect and improve the quality of the environment, protect human
health, and utilize natural resources prudently and rationally, you should return the
unserviceable product either to the place where you purchased it, or to a relevant facility in
accordance with the local statutory regulations.
The crossed-out wheeled bin indicates that the product must not be disposed of in the household
refuse.The symbol is used in conjunction either with a solid bar or the date of manufacture /
launch.
Please act according to your local rules and do not dispose of your old products with your normal
household waste.The correct disposal of your old product will help prevent potential negative
consequences for the environment and human health.
1.6 Maintenance
Clean the set
• Use a soft cloth slightly moistened with a mild detergent solution.
• Do not use any solutions that contain alcohol, spirits, ammonia or abrasives, as these can harm
the product.
Clean your discs
• When a disc becomes dirty, clean it with a cleaning cloth. Wipe the disc from the center out.
• Do not use solvents such as benzene, thinner, or antistatic spray intended for analog records.
Care for the HD (Hard Disk )
The HD is a delicate piece of equipment that is prone to damage due to its long recording capacity
and high speed operation.
• Do not move the unit while it is switched on.
• Do not remove the AC power plug from the power outlet during operation.
• Do not use the unit in excessively hot or humid places as this may cause condensation to form
inside the unit.
If the HD fails, playback and recording will not be possible. In this case, is will be necessary to
replace the HD unit.
Note
The HD is not recommended for permanent storage of recorded contents. Before creating your
music library, create a back up of the music on your PC. If necessary, you can later restore your
system with these backup files.
Important
5
ENGLISH
Page 10

1.7 Hearing Safety
Listen at a moderate volume.
• Using headphones at a high volume can impair your hearing.This product can produce
sounds in decibel ranges that may cause hearing loss for a normal person, even for
exposure less than a minute.The higher decibel ranges are offered for those that may have
already experienced some hearing loss.
• Sound can be deceiving. Over time your hearing ‘comfort level’ adapts to higher volumes of
sound. So after prolonged listening, what sounds ‘normal’ can actually be loud and harmful to
your hearing.To guard against this, set your volume to a safe level before your hearing adapts and
leave it there.
To establish a safe volume level:
• Set your volume control at a low setting.
• Slowly increase the sound until you can hear it comfortably and clearly, without distortion.
Listen for reasonable periods of time:
• Prolonged exposure to sound, even at normally ‘safe’ levels, can also cause hearing loss.
• Be sure to use your equipment reasonably and take appropriate breaks.
Be sure to observe the following guidelines when using your headphones.
• Listen at reasonable volumes for reasonable periods of time.
• Be careful not to adjust the volume as your hearing adapts.
• Do not turn up the volume so high that you can’t hear what’s around you.
• You should use caution or temporarily discontinue use in potentially hazardous situations.
• Do not use headphones while operating a motorized vehicle, cycling, skateboarding, etc.; it may
create a traffic hazard and is illegal in many areas.
Important (for models supplied with headphones):
Philips guarantees compliance with the maximum sound power of its audio players as determined
by relevant regulatory bodies only with the original model of provided headphones. In case this one
needs replacement, we recommend that you contact your retailer to order a model identical to
that of the original, provided by Philips.
Important
6
Page 11

1.8 Register your product
To fully benefit from the support that Philips offers, register your product at
www.philips.com/welcome.
As it is possible for you to upgrade your product, we recommend that you also register your
product on www.club.philips.com so that we can inform you as soon as new and free upgrades
are available.
Products from Philips have been designed and manufactured to the highest quality standards. If your
product does not work correctly, perhaps the connection and configuration must be revised.
To enhance your home entertainment experience, our support website (www.philips.com/support)
offers you the information you need to enjoy your product as well as new additions to our range
of products.
Please visit www.philips.com/support and enter the product name (WACS7500) to view:
• FAQ (Frequently Asked Questions)
• Latest user manuals and PC software manuals
• Firmware upgrade files for WACS7500 online
• Interactive troubleshooting
If you register your product at www.club.philips.com, we will be able to inform you as soon as
new and free upgrades are available.
Enjoy your Wireless Music Center & Station!
Important
7
ENGLISH
Page 12

Your wireless music centre and station
8
2 Your Wireless Music Center & Station
Congratulations on your purchase and welcome to Philips!
With the Wireless Music Center & Station you can:
• Stream music from your PC
• Dock your iPod
• Plug & play from USB devices
• Enjoy HD playback
You can store up to 15000 songs in the 80GB Hard Disk of the Center and you can connect
up to 5 Stations to Center .
All stored music can be wirelessly streamed from to the connected Stations using Wi-Fi*.Your
CD player and PC are no longer bound by wires.
* Wi-Fi is used to describe wireless LAN enabled products that are based on the IEEE 802.11 standards.
The presence of the Wi-Fi logo indicates that a product has been certified for interoperability.
2.1 What’s in the box
WAC7500 Wireless Music Center, 1x
WAS7500 Wireless Music Station, 1x
Page 13

Your wireless music centre and station
9
ENGLISH
Remote control, 2-way, incl. 4x
AAA batteries
Remote control, 1-way, incl. 2x
AAA batteries
Power cable, 2x
FM wire antenna, 2x
PC Suite CD, 1x Mounting kit, 1x (for Station)
Supplied accessories
Page 14
Your wireless music centre and station
10
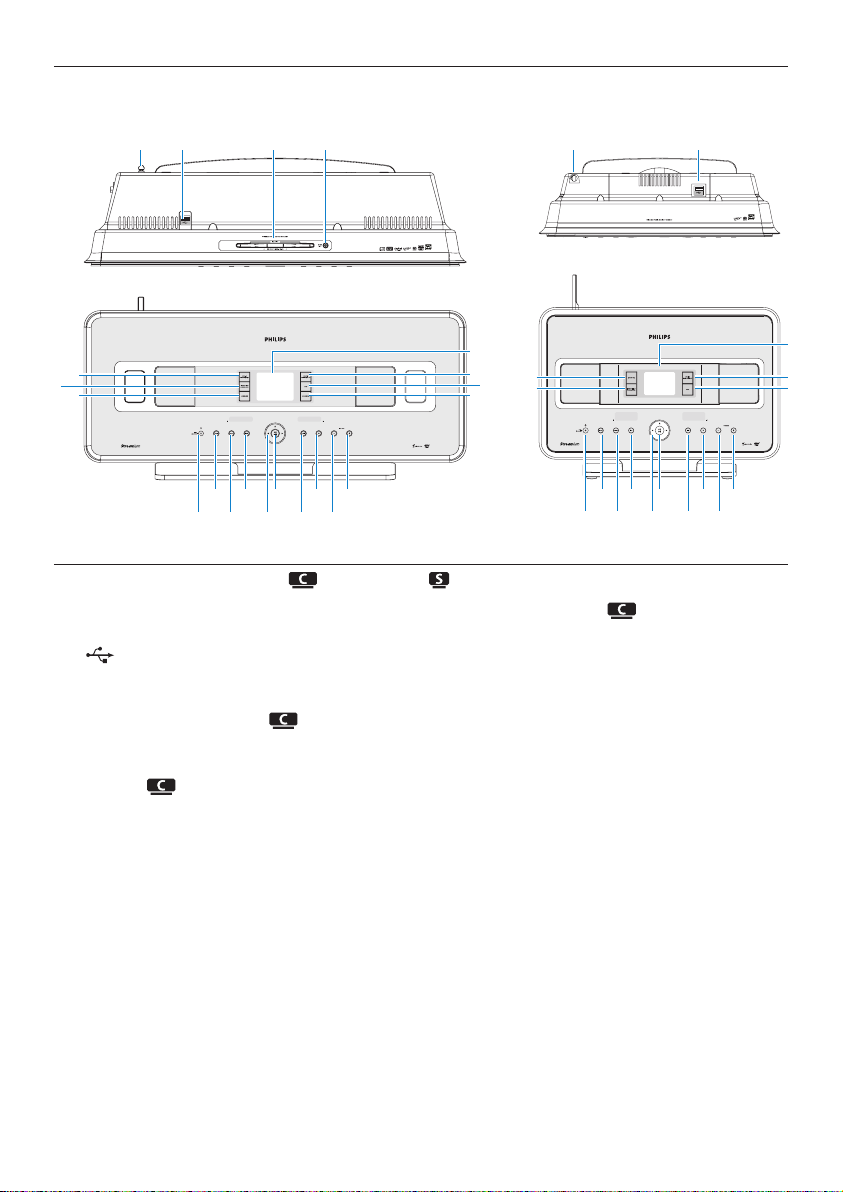
2.2.1 Controls on Center and Station
1 Antenna
2
USB jack
3 Disc slot (loader) (only )
Insert discs with graphics facing you
4 / (only )
Ejects a disk from the CD slot
5 LCD
Display shows the status of the set
6 MUSIC FOLLOWS ME
HD: moves music playback between Center
and Station
7 DBB (Dynamic Bass Boost)
Toggles the bass enhancement between on
(DBB1, DBB2, DBB3) and off
8 SMART EQ (only )
HD: toggles between sound settings for the
current Genre on or off
9 VOLUME +
Adjusts the volume level up
10 VOLUME -
Adjusts the volume level down
11 9
Stops playback or recording
12 )K
Press to skip to next track / press & hold
to fast forward
13 OK / 2;
Confirms selection
Starts or pauses playback
2.2 Overview Wireless Music Center & Station
2143
6
5
7
8
21
20
19
9
10
11
12
13
14
15
16
17
18
21
6
7
21
20
9
10
11
12
13
14
15
16
17
18
5
Page 15

Your wireless music centre and station
11
ENGLISH
14 1 / 2 / 3 / 4
Navigation controls (left, right up, down)
allow you to scroll through the option lists
1
HD/CD/USB/UPnP: returns to previous
option lists
3 / 4
HD/CD/USB/UPnP: skips/searches
tracks/passage back/forward (in playback
screen)
Fast scroll through options/alphanumeric
lists
Radio: tunes to stations
2
Confirms selection
Radio: enters the list of present stations
15 J(
Press to skip to previous track / press &
hold to rewind
16 MENU
Enters or exits setup menu
17 HOME
Selects
HD Music ,
CD ,
Radio ,
UPnP (Universal Plug & Play) ,
Portable (USB Universal Serial Bus) or,
AUX (separately connected device)
18 y ON / STANDBY / ECO STANDBY
Press briefly to toggle between modes
Standby and ON.
Press & hold to toggle power modes
between ON and Eco Standby (powersaving mode).
Green indicator light = the set is
switched ON.
Red indicator light = the set is switched
to Standby or Eco Standby.
19 0 RECORD (only )
CD/Radio/AUX: starts to record to the
HARD DISK (HD)
20 INCR.SURR.
Selects Incredible Surround sound effect
21 MUSIC BROADCAST (only )
HD: broadcasts music from Center to
Station
SMART EQ (only )
HD: toggles between sound settings for the
current Genre on or off
Note
The illumination of one corner of the casing is a
design element.
Page 16

2.3 Overview remote controls
2.3.1 2-way remote control
1 y
Press briefly to switch the set to ON or
Standby
Press & hold to switch the set to Eco Standby
(power-saving mode)
2 HOME
Selects
HD Music ,
1
2
3
4
5
6
7
8
9
11
13
15
17
10
14
16
31
30
29
28
27
26
25
24
23
22
21
18
19
20
12
Important!
The following features require the use of the 1-way remote control:
• Internet radio registration
• Network configuration
• Editing track information
Your wireless music centre and station
12
CD ,
Radio ,
UPnP (Universal Plug & Play) ,
Portable (USB Universal Serial Bus) , or
AUX (separately connected device)
In Standby mode: switches the set ON
and selects
HD Music ,
CD ,
Radio ,
UPnP ,
Portable ,or
AUX
3 HD
Selects HD (Hard Disk) source
In Standby mode: switches the set ON
and selects HD (Hard Disk) source
4 1 / 2 / 3 / 4
Navigation controls (left, right, up, down)
allow you to scroll through the option lists
1
HD/CD/USB/UPnP: returns to previous
option lists
Text input: moves the cursor backwards
3 / 4
HD/CD/USB/UPnP: skips/searches
tracks/passage back/forward (in playback
screen)
Scrolls fast through options list
Radio: tunes to stations
2
Confirms selection
Radio: enters the list of preset stations
Text entry: confirms input and moves the
cursor forward
Page 17

5 OK, 2/;
Confirms selection
starts playing
6 VOL +, -
Adjusts the volume level up or down
7 MENU
Enters or exits the setup menu
8 MUTE
Deactivates the sound temporarily
9 9
Stops playback or recording
10 )K
Press to skip to previous track / press &
hold to fast forward
11 SHUFFLE (3 def)
Selects random playback
12 REPEAT (2 abc)
Selects continuous playback
13 INCR.SURR. (6 mno)
Selects Incredible Surround sound effect
14 DBB (Dynamic Bass Boost) (5 jkl)
Toggles the bass enhancement between on
(DBB1, DBB2, DBB3) and off
15 RDS/NEWS (9 wxyz)
Radio: selects RDS information
HD/CD/UPnP/AUX/USB: toggles
between NEWS function on and off
16 SAME GENRE (8 tuv)
HD: plays all the tracks of the current
Genre
17 SEARCH ()
Searches by leading keywords
18 MARK/UNMARK (0 ) (only )
Selects or deselects tracks you want to
record (press & hold to select/deselect ALL
tracks)
19 MUSIC FOLLOWS ME
HD: moves music playback between Center
and Station
20 MUSIC BROADCAST (only )
HD: broadcasts music from Center to Station
21 Spare
22 DIM
Toggles display brightness between dim and
normal
23 VIEW
Toggles between playback screen and
pr
evious options list
24 SAME ARTIST (
7 pqrs)
HD: plays all the tracks of the current artist
HD: enables wireless range extender (refer
to extender’s manual for details)
25 SMART EQ (4 ghi)
HD: toggles between sound settings for the
current Genre on or off
26 SLEEP (1 .,?!’@-_:;/)
Adjusts, displays or switches off the sleep
timer
27 J(
Press to skip to previous track / press &
hold to rewind
CLEAR
Text entry: deletes the input before the
cursor
28 REC 0 (only )
CD/Radio/AUX: starts to record to the HD
29 SCROLL 3, 4
Scrolls the display screen up or down
30 CD/MP3-CD (only )
Selects CD source
In Standby mode: switches the set ON
and selects CD source
31 REFRESH
Synchronizes the displays of the set and the
remote control
Your wireless music centre and station
13
ENGLISH
Page 18

Your wireless music centre and station
14
2.3.2 1-way remote control
1 y
Press briefly to switch the set to ON or
Standby
Press & hold to switch the set to Eco
Standby (power-saving mode)
2 FM TUNER
Selects FM radio
3 HOME
Selects
HD Music ,
CD ,
Radio ,
UPnP (Universal Plug & Play) ,
Portable (USB Universal Serial Bus) , or
AUX (separately connected device)
In Standby mode: switches the set ON
and selects HD Music ,
CD ,
Radio ,
UPnP ,
Portable ,or
AUX
1
2
3
4
6
7
8
9
10
12
14
16
18
11
15
17
31
30
29
27
26
25
24
23
22
21
28
19
20
5
13
4 SEARCH ()
Searches by keywords
5 VIEW
Toggles between playback screen and
previous options list
6 MENU
Enters or exits the setup menu
7 1 / 2 / 3 / 4
Navigation controls (left, right, up, down)
allow you to scroll through the option lists
1
HD/CD/USB/UPnP: returns to previous
option lists
Text input: moves the cursor backwards
3 / 4
HD/CD/USB/UPnP: skips/searches
tracks/passage back/forward (in playback
screen)
Scrolls fast through options list
Radio: tunes to stations
2
Confirms selection
Radio: enters the list of preset stations
Text entry: confirms input and moves the
cursor forward
8 OK, 2/;
Confirms selection
Starts playing
9 )K
Fast forwards or skips to next track
10 9
Stops playback or recording
11 VOL +, -
Adjusts the volume level up or down
Page 19

Your wireless music centre and station
15
ENGLISH
12 MUTE
Deactivates the sound temporarily
13 SHUFFLE (3 def)
Selects random playback
14 REPEAT (2 abc)
Selects continuous playback
15 INCR.SURR. (6 mno)
Selects Incredible Surround sound effect
16 DBB (Dynamic Bass Boost) (5 jkl)
Toggles the bass enhancement between on
(DBB1, DBB2, DBB3) and off
17 RDS/NEWS (9 wxyz)
Radio: selects RDS information
HD/CD/UPnP/AUX/USB: toggles
between NEWS function on and off
18 SAME GENRE (8 tuv)
HD: plays all the tracks of the current
Genre
19 MUSIC FOLLOWS ME
HD: moves music playback between Center
and Station
20 (0 )
21 MUSIC BROADCAST (only )
HD: broadcasts music from Center to
Station
22 SAME ARTIST (7 pqrs)
HD: plays all the tracks of the current artist
HD: enables wireless range extender (refer
to extender’s manual for details)
23 SMART EQ (4 ghi)
HD: toggles between sound settings for the
current Genre on or off
24 SLEEP (1 .,?!’@-_:;/)
Adjusts, displays or switches off the sleep
timer
25 SCROLL 3, 4
Scrolls the display screen up or down
26 J(
Rewinds or skips to previous track
CLEAR
T
ext entry
: deletes the input before the
cursor
27 REC 0 (only )
CD/Radio/AUX: starts to record to the
HD
28 MARK/UNMARK (0 V) (only )
Selects or deselects tracks you want to
record (press & hold to select/deselect ALL
tracks).
29 AUX
Selects AUX (separately connected device)
30 CD/MP3-CD (only )
Selects CD source
In Standby mode: switches the set ON
and selects CD source
31 HD
Selects HD (Hard Disk) source
In Standby mode: switches the set ON
and selects HD (Hard Disk) source
Page 20

Your wireless music centre and station
16
2.4 Overview display
Icons of the LCD:
Icon Description Icon Description
Client connected Repeat all
Client not connected Repeat 1
Music Shuffle
Radio Alarm
UPnP Music broadcast
Aux mode Music follows me
CD mode Mute
HD mode RDS
Radio mode Sleep
Record (rip) mode Smart EQ
Transfer mode Wi-Fi connected
USB mode Wi-Fi and Ethernet connected
Page 21

Installation
17
ENGLISH
3 Installation
3.1 Install Center ( ) and Station ( )
Note
Before you decide where and how to install the set, test the Wi-Fi connection and rear cable
connections to find a suitable location.
You can install in two ways, free standing (using the supplied stands) or wall mounted (without
the stands). Use the free standing. For the we have enclosed a wall mounting kit.
(free standing)
(wall mounted)
To learn more about wall mounting, see 18 Appendix on How to mount Station to a wall.
Page 22

Installation
18
3.2 Connect AC power
Ensure that all rear connections are established before you power up the set.
Connect the AC power cord to the mains outlet.The set is now powered up (switched on).
When in Standby or Eco Standby mode, and still consume some power.
To disconnect the system from the power supply completely, remove the power plug from the
mains outlet.
For users in the U.K., please follow the instructions on page iii.
3.3 Set up Wi-Fi connection between Center ( ) and Station ( )
Note
• Always press & hold y to switch the set to Eco standby (power-saving mode) before removing its
power plug.
• Always power up the first, and then power up the .
• Never block from by thick walls or more than one wall.
• Avoid installation near large metal objects.
The Wi-Fi connection starts automatically when you power up both and .
The first time you set up a Wi-Fi connection place and side by side on a level and sturdy
surface.
1 Using the supplied power cables, connect first and then to the power supply.
> and are ready for use.
Tip
For better Wi-Fi reception, rotate the Wi-Fi antenna or adjust the location of and .
3.4 Rear connections
Note
• Never connect or disconnect power cables when the mains supply is switched on.
• Install and within easy reach of suitable AC power outlets.
Important! Always press & hold y to switch the set to power-saving mode before removing its
power plug.
Page 23

Installation
19
ENGLISH
3.4.1 Connect antennas
1 Extend wire antenna.
2 Connect wire antenna to FM antenna jack:
3 Optional:To improve FM reception you can install an extension line (sold separately) between
the wire antenna and the antenna jack.
4 Unwind the antenna extension line completely.
5 Move it in different directions to find the optimal reception (if possible, keep it away from the
TV, VCR or other radiation sources).
6 For best results elevate or ceiling-mount the antenna.
3.4.2 Connect a portable (USB) device
On or , you can play back music from a portable device.
You can also transfer music from the library on to the portable device.
1 Insert the USB plug of the portable device into the socket on or .
For portable devices with USB cable:
1 Insert one end of the USB cable (not supplied) into the socket on or .
2 Insert the other end of the USB cable into the USB output terminal of the portable device.
Page 24

Installation
20
To play back music from the portable device:
1 Press HOME.
2 Select PORTABLE .
3 Select USB.
> Your portable device is displayed.
4 Use 3 or 4 and 2 to select your music.
For more details and instructions on how to record music to the portable device: See 10 External
sources.
Tip
• and only support portable (USB) devices that adhere to the following standards:
- USB MSC (Type ‘0’)
- USB MTP
- File system in FAT12 / FAT16 / FAT32
- Operations based on simple folder type navigation (also known as a normal FAT file system),
and not based on proprietary track database.
• The following USB devices will not be supported by or :
Products with database UI (Artists,Albums and Genre based navigation) as these products
normally store music files in a specific hidden folder and use embedded proprietary track
database that and are unable to read properly.
3.4.3 Connect your iPod (optional)
You can connect your iPod (not supplied) to or using Philips docking cradle and data/audio
cable (Philips docking cradle for iPod, model DC1050 sold separately). Now you can enjoy the
music library in your iPod via the sophisticated speaker system of the set.You can even charge your
iPod at the same time.
To play back music from your iPod:
1 Press HOME and select Portable (iPod) .
Your iPod is displayed.
Page 25
Installation
21
ENGLISH
2 Use 3 or 4 and 2 on the remote control (or use the navigation control of your iPod) to select
the music in your iPod menu system.
(See also 10 External sources).
3.4.4 Connect additional appliances
It is possible to play audio output from an external source, e.g.TV, VCR, Laser Disc player, DVD
player on or .You can also record the audio output to the music library in the HD of .
On the additional appliance
Connect one end of the audio cable (not supplied) to the AUDIO OUT terminals on the additional
appliance.
On or
Connect the other end of the audio cables to the AUX IN terminals on or .
To play back audio output from the additional appliance:
1 On or , press HOME and select AUX .
Your additional appliance (external source) is displayed.
2 On your additional appliance, use the controls as you normally would.
(See also 10 External sources).
To record audio output to the library (HD) of , see section HD: Building music library on
Center.
Tip
• If the connected device has only one single audio out terminal, connect it to the AUX IN left
terminal. (Alternatively, you can use a ‘single to double’ cinch cable, but the sound output is still
mono).
• Always refer to the user manual of your other equipment for complete connection.
3.4.5 Connect an additional device with external speakers
To enjoy the good sound quality of the product’s speakers with an additional device, e.g. a mini HiFi system, use red/white audio cables (not supplied) to connect to the external device.
On
1 Connect the red plug of the red/white audio cable (not supplied) to the red socket LINE
OUT R and the white plug to the white socket LINE OUT L.
On the additional device
2 Connect the other end of the audio cable to the AUX IN terminals.
3 Select AUX mode on the connected additional device.
Page 26
Prepare
22
4 Prepare
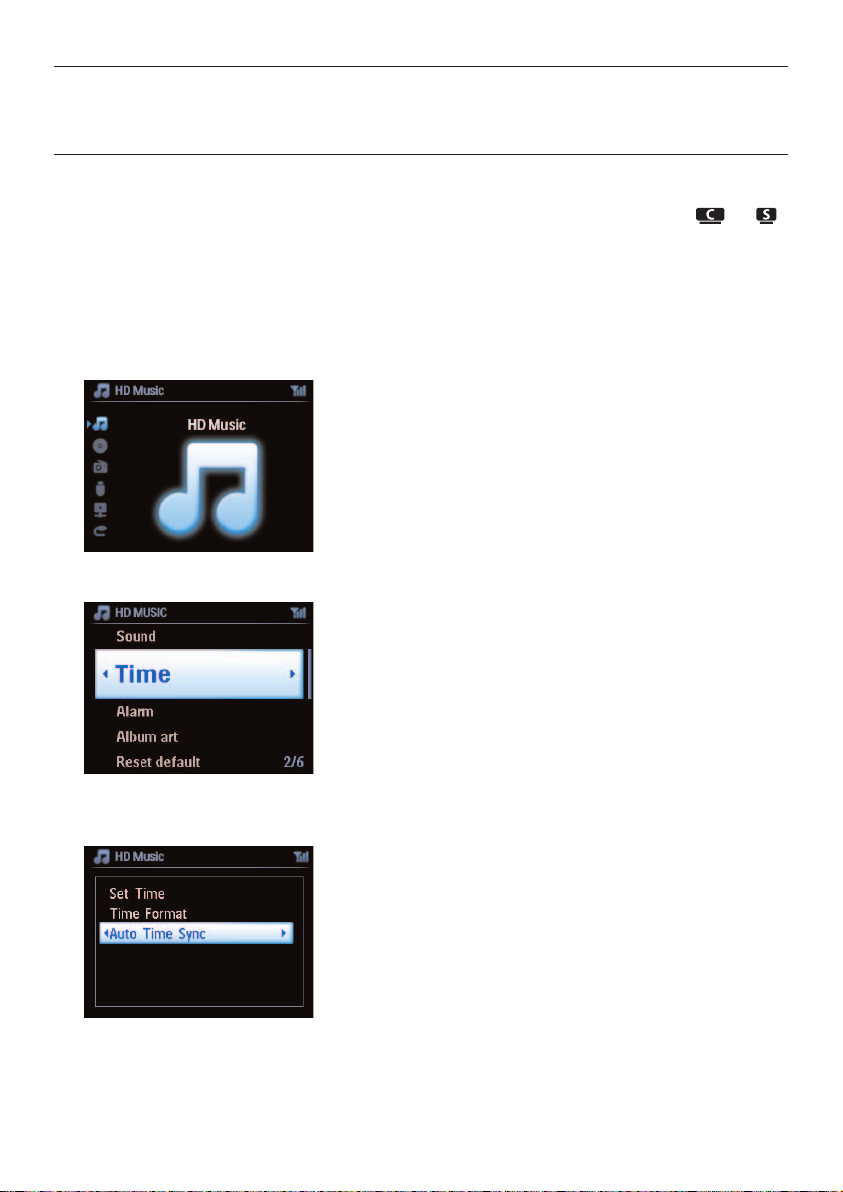
4.1 Set the clock
The time can be displayed in 24-hour or 12-hour format.You can set up your clock on or .
There are two methods to set the clock, RDS automatic time synchronization and manual time setup.
RDS auto time sync:
If you have preset RDS radio stations, you can synchronize the clock with one of the RDS stations.
1 Press MENU to enter the menu screen.
2 Use 3 or 4 and 2 to select Settings followed by Time.
3 Use 3 or 4 and 2 to select Auto Time Sync.
Page 27
Prepare
23
ENGLISH
4 Use 3 or 4 and 2 to select the RDS radio station you wish to synchronize the clock with.
> The screen shows a confirmation screen:
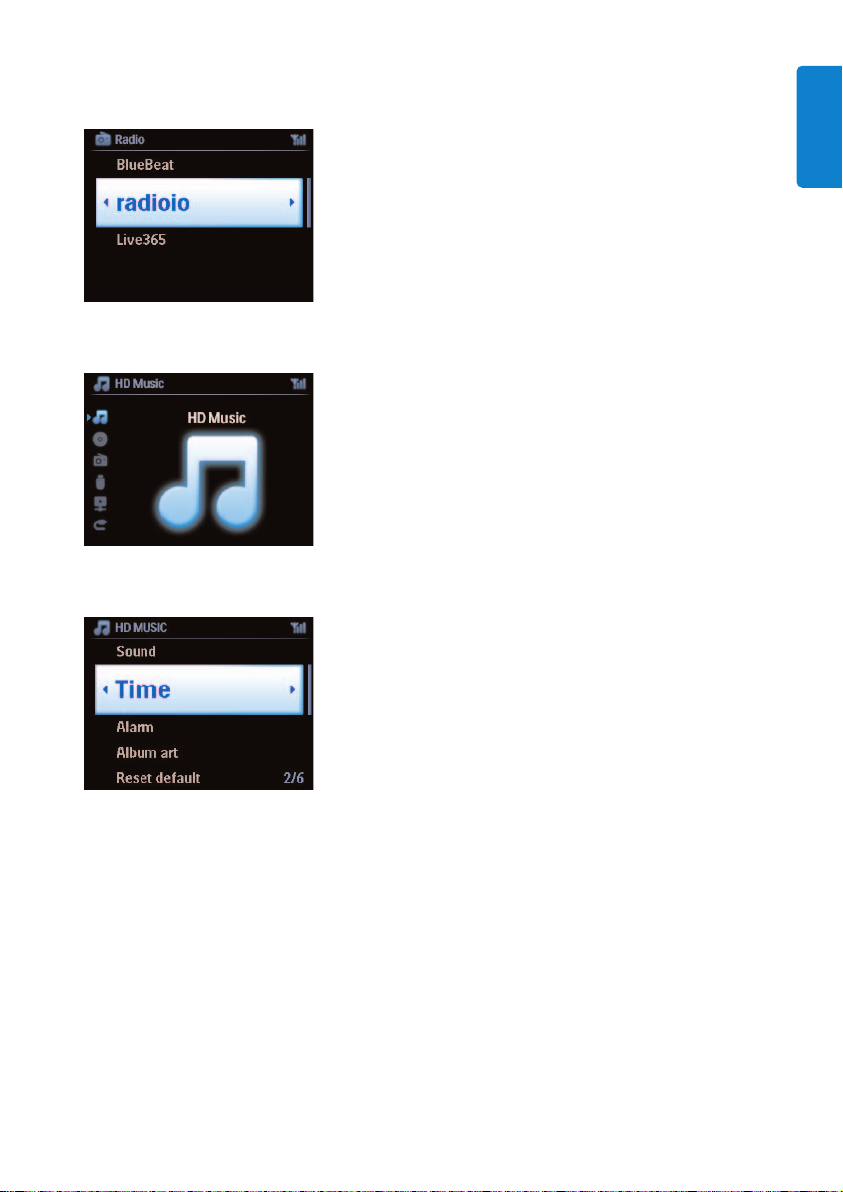
Manual time set:
1 Press MENU to enter the menu screen.
2 Use 3 or 4 and 2 to select Settings followed by Time.
3 Use 3, 4, or the numeric keypad (0-9), and 2 to select Set Time.
> The display shows current clock setting (00:00 by default)
Page 28

Prepare
24
4 Use 3, 4, or the numeric keypad (0-9) repeatedly to set the hours followed by the minutes.
5 Confirm with OK.
Tip
• Change to 12-hour or 24-hour format:
1 In the Time menu, select Time Format.
2 Use 3 or 4 and 2 to select your option.
• If you disconnect the power supply (pull the mains plug), the clock will be reset (settings will not
be saved).
4.1.1 View the clock
1 Press & hold VIEW button for about 5 seconds.
The clock will appear briefly in the display.
Tip
• In Standby mode, you can briefly press VIEW to turn on the LCD backlights and view clock
more clearly.
• If you disconnect the power supply (pull the mains plug), the clock will be reset (settings will not
be saved).
Page 29

Prepare
25
ENGLISH
4.2 Remote control
The set is supplied with a 2-way remote control and a 1-way remote control.You can use these to
control functions on or .
Note
Use the 1-way remote control for Station management, Network configuration, and to Edit track
information.The 2-way remote control cannot be used for these tasks.
4.2.1 Remote control battery installation
Caution!
To avoid the risk of explosion:
• Do not puncture, cut, or manipulate batteries in any way and do not throw them into the fire.
• Do not short-circuit the battery terminals.
To avoid burn injuries:
• Wear protective gloves when you handle leaking batteries.
To avoid leakage of corrosive battery fluid and damage to the product:
• Always replace all batteries at the same time
• Do not mix old and new batteries or batteries of different types.
• Replace batteries immediately if they are exhausted.
• Always remove the batteries, if the remote control will not be used for a longer period of
time.
To avoid batteries being accidentally swallowed:
• Always keep them out of reach of children and pets. (Consult a physician immediately, if a
battery has been swallowed!)
Important!
• Always point the remote control directly towards the IR sensor on or you wish to
operate.
• First, select the source you wish to control by pressing one of the source select keys on the
remote control (for example CD/MP3-CD, HD, FM TUNER, AUX).
• Then select the desired function (for example 2/; / J( / )K ).
Page 30
Prepare
26
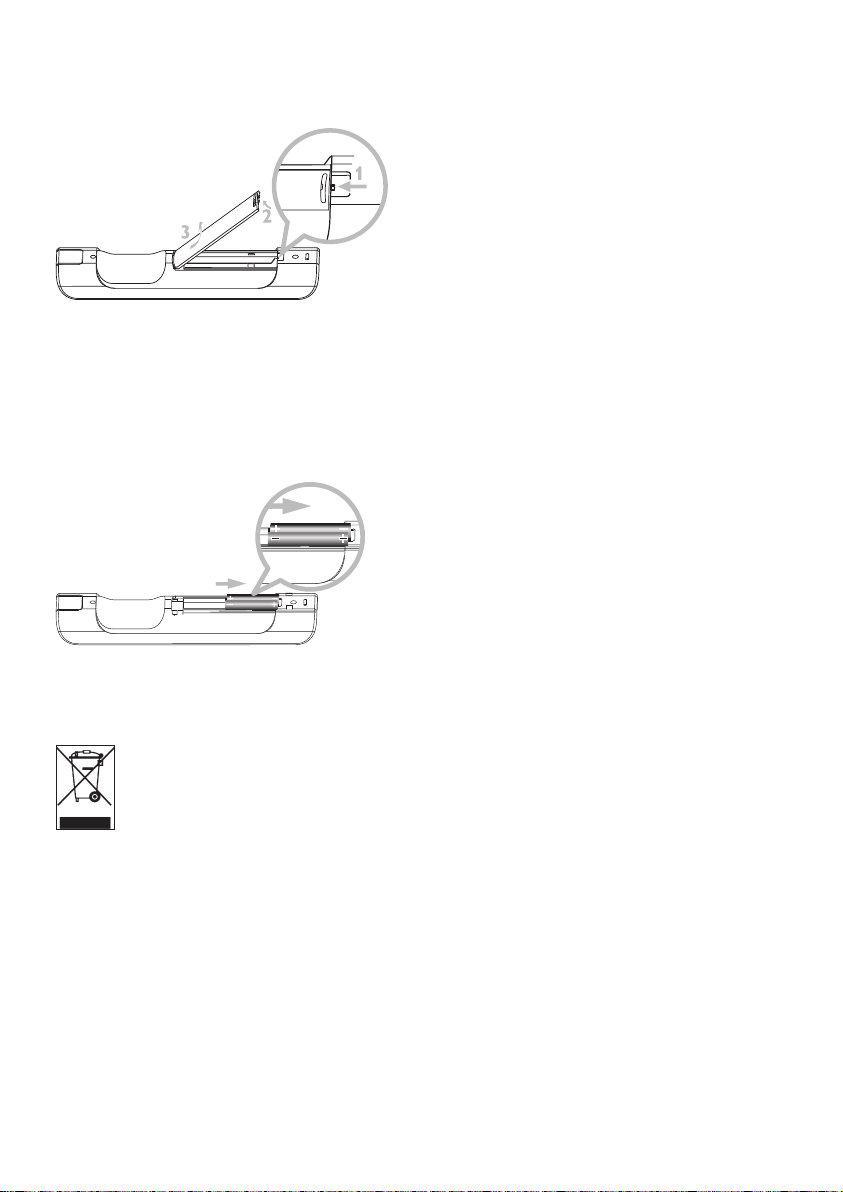
Installing batteries:
Open battery compartment.
Install into
• 2-way remote control: 4 batteries type LR03 or AAA.
• 1-way remote control: 2 batteries type LR03 or AAA.
Observe correct polarity (refer to ‘+’ / ‘-’ symbols inside the battery compartment).
Close battery compartment.
IMPORTANT BATTERY INFORMATION!
Batteries containing hazardous substances are marked with the crossed-out wheeled bin.
The symbol indicates that it is prohibited to dispose of the product with the domestic
refuse.The chemical symbols for the respective hazardous substances are Cd = Cadmium,
Hg = Mercury, Pb = Lead.
You - as the user - are legally obliged to dispose of all batteries in accordance with your local
regulations or to return them to the shop where you purchased the batteries.
Thus, you fulfill your legal obligations and contribute to environmental protection!
Page 31

Prepare
27
ENGLISH
4.2.2 Remote control, 2-way
You can choose to use the 2-way remote control to operate either or . Depending on the
level of interference, you can also select your preferred operational mode: Enhanced Mode or
Normal Mode.
Center (default): to operate
Station: to operate
Enhanced Mode (default):This mode offers a better range (distance and angle). Use this mode if
there is no interference from a plasma TV nearby.
Normal Mode: Choose this mode if there is interference from a plasma TV nearby that is
distorting the display of the 2-way remote control.
1 Press & hold REFRESH until the Select Device screen appears in the display of the 2-way
remote control.
2 Use 3 or 4 to highlight and 2 to select Center or Station.
3 Use 3 or 4 to highlight and 2 to select Normal Mode or Enhanced Mode.
4 Confirm with OK.
Tip
• Avoid placing or near a plasma TV. The interference may distort the display on your 2way remote control.
• The status of or is synchronized into the display of the 2-way remote control, so it is
easier to operate the remote control.
• To synchronize the remote control display after activating the y button on the set, press
REFRESH on the remote control of Center.
Important! To save battery power, if no buttons are pressed for approx. 15 seconds, the 2-way
remote control enters idle mode. Press any button to reengage the control.
Page 32

4.3 Navigation controls
1 Use the navigation controls 1 / 2 / 3 / 4 when navigating through options.
2 Highlight options with 3 / 4.
3 Enter submenus with 2.
4 Confirm selections with OK or 2.
4.4 Alphanumeric keys
1 Use the alphanumeric keys to enter letters or numbers.
2 When the text box appears, press the alphanumeric keys repeatedly until the desired
letter/number appears.
3 Use 1 / 2 to move the cursor back / forward.
4 Press J( to delete the entry before the cursor.
5 Press OK to close the text box and move to the next option list.
Note
You will enter the previous / next option list if the cursor reaches the beginning or the end of the
text box.
Prepare
28
Page 33

Basic functions
29
ENGLISH
5 Basic functions
5.1 Power modes and functions
When you plug the product into your mains supply, it powers up and is in power mode ON.The y
button allows you to change the power mode.A colored light in the button indicates the current
power mode:
Center ( ) / Station ( ):
ON
1 When the set is ON (green button light), press y:
/ switches to Standby mode.
The button light changes from green to red.
: The screen dims.
The display shows connected (or last connected)
: The screen dims.
The display shows the connected (or screen will remain blank if no is found )
Status STANDBY ECO STANDBY
Characteristics fast boot slow boot
Display dimmed off
Remote control on standby off
Streaming on standby off
Status Button indicator light
ON green
Standby red
Eco Standby
(power-saving mode)
red
Page 34

Basic functions
30
During Standby the display shows the time (or display shows —:— if you have not set the clock).
To switch the / back ON again,
a press y.
/ switches ON and remembers the last source selected:
The button light changes from red to green.
OR
b press one of the source buttons on the remote control, CD/MP3-CD (only ), HD,
FM TUNER, AUX, or HOME.
2 To select functions, press HOME once or more times (CD/MP3-CD (only ), HD,or
HOME on remote control).
Tip
• CD/MP3-CD source is only available on .
• FM TUNER and AUX source buttons are only available on the 1-way remote control.
Page 35

Basic functions
31
ENGLISH
5.2 Eco Standby (power-saving mode)
In the power-saving mode Eco Standby, the display and Wi-Fi connections of the product are turned
off.The HD (Hard Disk) of also becomes inactive. When is switched to Eco Standby, you
cannot stream music between and or import music from the PC to . During Eco
Standby the remote controls are inactive.
1 With the set switched ON, press & hold y:
/ changes to Eco Standby.
The button lights up red.
The display is switched off.
2 To switch the / ON, press y on the set. (The remote controls are still inactive.)
/ switches to the last source selected.
Tip
• In the power-saving mode Eco Standby, the settings for networking, sound, display, language and
CD recording, as well as the tuner presets, and the volume level (maximum: moderate level) will
be retained in the memory of the set.
• To protect the HD, always switch to Eco Standby before removing its power plug from the
mains outlet.
• Remember that the remote controls are inactive during Eco Standby.
5.3 Auto-Standby
If at the end of playback / recording (ripping) the set remains in the stop mode for longer than 20
minutes, the set will automatically switch to Standby mode in order to save power.
5.4 Volume control
1 Check that playback has started.
2 Adjust the volume with VOL +/- buttons.
> Display shows a horizontal bar indicating the volume level.
Page 36

Basic functions
32
5.5 MUTE
During playback, you can deactivate the sound without switching off the set.
1 To deactivate the sound, press MUTE.
> appears.
Playback continues without sound.
2 To reactivate the sound, press MUTE again or adjust the volume with VOL +.
> The icon disappears.
5.6 Sound control
5.6.1 Smart equalizer
This function enables you to play music of the current genre with the matching sound settings.
1 During playback, press SMART EQUALIZER
> appears if Smart Equalizer is activated.
2 To deactivate the Smart Equalizer, press SMART EQUALIZER
> disappears.
5.6.2 Equalizer
Equalizer enables you to select predefined sound settings.
Set Equalizer:
1 Press MENU to enter the menu screen.
2 Use 3 or 4 and 2 to select Equalizer.
3 Use 3 or 4 and 2 to select Rock, Pop (default), Jazz, Neutral, Techno, Classical,
Treble/Bass.
4 Confirm with OK.
Set Treble or Bass:
1 Press MENU to enter the menu screen.
2 Use 3 or 4 and 2 to select Settings, followed by Treble or Bass.
3 Navigate 1 / 2 / 3 / 4 to highlight your option:
Treble (+3 to -3), Bass (+3 to -3)
Page 37

Basic functions
33
ENGLISH
5.6.3 DBB (Dynamic Bass Boost)
Press DBB (Dynamic Bass Boost) once or more times to change the bass settings. Select your
option: DBB OFF (default), DBB 1, DBB 2, or DBB 3.
Tip
Some discs might be recorded in high modulation, which causes a distortion at high volume. If this
occurs, switch off DBB or reduce the volume.
5.6.4 Incredible surround
Press INCR. SURROUND (INCR. SURR. on the 1-way remote control) once or more times to
toggle the surround sound effect On and Off.
Display shows: IS ON or IS OFF.
5.7 Display adjustment
With the controls on or (or on the 1-way remote control) you can adjust the backlight
and contrast settings of the display.
1 Press MENU to enter the menu screen
2 Use 3 or 4 and 2 to select Settings, followed by Display.
3 Press 3 / 4 and 2 to select Backlight or Contrast:
Backlight
1 Press 3 or 4 and 2 to select On or Off.
Contrast:
1 Press 3 or 4 to increase or reduce the contrast.
Note
You can also toggle the Backlight On and Off by pressing DIM on the 1-way remote control.
Page 38

Basic functions
34
5.8 Selecting languages
1 Press MENU to enter the menu screen.
2 Use 3 or 4 and 2 to select Settings, followed by Language.
3 Use 3 or 4 and 2 to choose English, Français, Español, Nederlands, Italiano or
Deutsch.
5.9 Sleep
You can preset a certain period of time after which or will switch to Standby mode.
1 On the remote control, press SLEEP repeatedly to select the desired time period (in
minutes):
> Display shows in sequence: Sleep 15, 30, 45, 60, 90, 120, OFF.
2 Select the desired time period.
> Display shows the selected option briefly and returns to its previous status. appears when a time is
selected.
3 To view the countdown time to Standby mode, briefly press SLEEP again.
When the selected sleep time expires, or automatically switches to Standby mode.
4 To deactivate the sleep timer before the sleep time expires, press SLEEP repeatedly until
SLEEP OFF is selected.
> The icon disappears.
Page 39

5.10 Alarm
5.10.1 Set alarm / alarm time / repeat mode
1 Press MENU to enter the menu screen.
2 Use 3 or 4 and 2 to select Settings.
3 Use 3 or 4 and 2 to select Alarm, followed by Alarm On or Off.
> The Alarm Time screen appears.
4 In the Alarm Time screen, use 3 or 4 and 2 to enter the hours and minutes.
5 Confirm the alarm time with OK or 2.
6 Use 3 or 4 and 2 to select repeat mode Once or Daily.
> The screen briefly shows Alarm On and appears in the display.
Important! The clock must be set correctly before the alarm is set.
Basic functions
35
ENGLISH
Page 40

6 HD (Hard Disk)
6.1 Play HD Music
Music is centrally stored in the 80GB HD (Hard Disk) on the .All the stored music can be
streamed and played on via Wi-Fi.
1 Check that or is switched ON or in Standby mode (see 5 Basic functions).
2 Press HOME and select HD Music (or press HD on remote control).
> Display shows HD Music and the categories of your music library: Playlists, Artists, Albums,
Genres, All tracks.
Playlists: customizable collection of your favorite tracks sorted by playlist name in
alphanumeric order.
Artists: collection of albums sorted by artist name in alphanumeric order.
Albums: collection of albums sorted by album name in alphanumeric order.
Genres: collection of albums sorted by music style (only if album information available).
All tracks:All tracks sorted by track name in alphanumerical order.
3 Use 3 or 4 and 2 to select your option.
6.2 Search
6.2.1 Search by keywords
The keyword should be the first letter or word in the title of the track you wish to search for: By
entering a keyword, you can quickly find all the items beginning with the keyword you entered
(note that this feature is case sensitive).
1 Navigate 1 / 2 / 3 / 4 to enter desired option list of tracks, albums or playlists.
2 On remote control, press SEARCH
> Display: text box appears
Hard Disk
36
Page 41

3 Use alphanumeric keys to enter keyword (maximum 8 characters) (see 4.4 Prepare:
Alphanumeric keys)
4 Press OK to start searching
> Display: Searching…
Searching starts from the beginning of current option list.
The matched items appear at the top of the list.
The option list automatically shows the closest match in the alphabet if no match is found.
Display: Searching… disappears.
5 Press STOP 9 to stop searching.
Tip
Searching will also stop when:
• you select another source
• you switch off the set
6.2.2 Select track of same artist
1 During playback, press SAME ARTIST
> Playback of found tracks by the current artist continues after current track.
6.2.3 Select track of same genre
1 During playback, press SAME GENRE
> Playback of found tracks of same genre as current track continues after current track.
Tip
Not all tracks have an automatic genre tag, so you may have to manually assign a genre for your
tracks when loading them to the HD of .
Hard Disk
37
ENGLISH
Page 42

6.2.4 Find track in current album (during playback)
In playback screen, navigate with 3 / 4 to select track in current album during playback.
6.2.5 Find passage in current track (during playback)
1 In playback screen, press & hold 3 / 4 or J( / )K
> Track gets scanned at high speed.
2 When you found the passage you want, release 3 / 4 or J( / )K
> Normal play resumes.
6.3 Play modes REPEAT, SHUFFLE
plays the current track continuously
repeats all the tracks (under current selection of playlist, artist, genre, album, or All
tracks)
repeats all the tracks (under current selection of playlist, artist, genre, album, or All
tracks) in random order
plays tracks (under current selection of playlist, artist, genre, album, or All tracks) in
random order
1 During playback press REPEAT or / and SHUFFLE once or more times to select desired
play mode.The play mode icons appear in the display.
2 To return to normal playback, press REPEAT or / and SHUFFLE repeatedly until the various
mode icons disappear from the display.
Note
If is active, it will be deactivated when pressing SHUFFLE.To activate / press first
SHUFFLE, then REPEAT 1.
Hard Disk
38
Page 43

6.4 Build music library on Center ( )
You can build a music library in the HD of by ripping from CDs, importing from PC and
recording from external sources.
6.4.1 Rip music from CDs
With the , you can rip audio CD tracks from your CDs and store them as MP3 files in the HD
of .The Gracenote MusicID® enables your set to look up CD information (including album,
artist, genre, track information) from its database. It allows the recorded CD tracks to be properly
categorized (for example, under artist, albums, genres or all tracks) and also to be merged with the
existing tracks in the HD. To update your Gracenote® Media Database, see the section 12
Connect to your PC in this manual.
Important!
Ripped files are first stored in a temporary memory:
Do not switch the Center to standby - wait until Center has fully processed the files and
automatically switches to standby.While the Center is processing the files, you can continue to
listen to your music.
Important!
• Recording is permitted only if there is no infringement of copyrights or any other rights of
third parties.
• For CDs encoded with copyright protection technologies used by some record companies,
recording will be restricted.
• The making of unauthorized duplicates of copy-protected material, including computer
programs, files, broadcasts and sound recordings, may be an infringement of copyrights and
constitute a criminal offence.This equipment should not be used for such purposes.
Hard Disk
39
ENGLISH
Page 44

Rip from a CD at high speed:
(Audio CD, MP3/WMA CD)
1 Insert CD with printed side facing you:
For MP3/WMA CD, press 2 on a highlighted file folder to enter the track list.
Hard Disk
40
Music recognition technology and related data are provided by Gracenote®. Gracenote is the
industry standard in music recognition technology and related content delivery. For more
information, please visit www.gracenote.com.
CD and music-related data from Gracenote, Inc., copyright © 2000-2007 Gracenote. Gracenote
Software, copyright © 2000-2007 Gracenote.This product and service may practice one or more
of the following U.S. Patents: #5,987,525; #6,061,680; #6,154,773, #6,161,132, #6,230,192,
#6,230,207, #6,240,459, #6,304,523, #6,330,593, #7,167,857, and other patents issued or pending.
Gracenote and CDDB are registered trademarks of Gracenote.The Gracenote logo and logotype,
and the ‘Powered by Gracenote’ logo are trademarks of Gracenote.
Gracenote® is a registered trademark of Gracenote, Inc.The Gracenote logo and logotype, and
the ‘Powered by Gracenote’ logo are trademarks of Gracenote.
Note
When ripping CDs without active internet connection, the album art will not be shown.The local
copy of the Gracenote® database does not contain album art.
Page 45

Hard Disk
41
ENGLISH
2 In the track list screen, press RECORD 0 (remote control REC).
> List of tracks with check boxes appears:
3 Press MARK/UNMARK to select/deselect tracks (hold MARK/UNMARK to select/deselect
all tracks).
4 Press RECORD 0 (REC) to start ripping.
> Display shows CD-Rip and the current track name.
(A default album name, e.g. Album_001 is assigned if the CD track information cannot be found in
the Gracenote® database.)
> Center returns to CD mode when ripping is complete.
5 To rip another CD repeat steps 1 to 4 again.
6 To stop ripping, press STOP 9.
6.4.2 Import from your PC
The Wireless Audio Device Manager (WADM) in the supplied PC installer helps you organize music
files on your PC and import them into . For details, see the section 12 Connect to your PC
in this manual.
Page 46

Hard Disk
42
6.4.3 Record from radio or external source
A maximum recording time of 3-hours can be made from the radio or an external source.
1
a In Radio mode, tune the desired radio station (see 8.1 FM radio:Tuning radio stations).
or
b In AUX mode, start playback from the external source.
2 Press RECORD
> The recoding starts.
3 Press STOP 9 to stop recording.
The recording will be saved as a file under RADIO or AUX in Albums.A file name is assigned, e.g.
Radio_01, or Aux_01.
6.5 Create a playlist
A playlist is a custom collection of your favorite music.You can create up to 99 playlists in the HD
of .
1 In HD Music mode, press MENU to enter the menu screen.
2 Use 3 or 4 and 2 to select Create Playlist
> A new playlist is created (a default album name, e.g. Playlist_001, is assigned).
Display shows: Playlist created.To add tracks, select Add to Playlist.
1 Navigate with 1 / 2 / 3 / 4 to highlight the desired Track or All tracks.
2 Select Add to Playlist.
3 Press MENU to enter the menu screen.
4 Use 3 or 4 and 2 to display the selection of playlists.
5 Use 3 or 4 and 2 to select the desired playlist.
> Display shows all added tracks in playlist.
6 Repeat steps to select and store all desired tracks.
Page 47

6.6 Delete a playlist, album or track
This feature works only on .
1 Navigate with 1 / 2 / 3 / 4 to enter a category (Playlist, Artists, Albums, Genres, All tracks).
2 If necessary, press 3 or 4 and 2 once or more times to highlight the playlist album or track
you wish to delete.
3 Press MENU to enter the menu screen.
4 Use 3 or 4 and 2 to select Delete Playlist, Delete Album or Delete Track
5 Press 2 to select Ye s .
6.7 View track information
Note
The feature View track information is only available in mode HD Music.
1 Use the VIEW button on the remote control to toggle the display between the HD playback
screen and the track list screen.
Hard Disk
43
ENGLISH
Page 48

To view more track information:
1 In HD playback screen, press 2 to display the full view album art screen.
2 In full view album art screen, press 1 to return to the HD playback screen
6.8 Backup to PC
The Wireless Audio Device Manager (WADM) in the supplied PC Suite CD allows you to
backup contents on the HD to your PC.The backup files on your PC can be subsequently restored
to if the files on the HD are lost or corrupted. For details, see the section 12 Connect to
your PC in this manual.
6.9 Move music playback between Center ( ) and Station ( )
You can connect up to 5 Stations to Center via Wi-Fi, so your music playback can be
moved between Center and Stations .You and your family will be able to enjoy and share
music with ease wherever you are in your home.
6.9.1 MUSIC FOLLOWS ME
As you move around at home, let the music move with you between and or between
and .
On the source unit ( ) where music is playing:
1 Press MUSIC FOLLOWS ME to stop playback from that unit and activate the function.
> The icon appears on the displays of Center and Station.
On the destination unit ( or ) where you want to listen:
2 Press MUSIC FOLLOWS ME to activate the playback.
> The icon disappears from the displays of and , and the music will start to play.
Simultaneously, the music (audio output) of the source unit is stopped.
Any selected play modes (e.g. ) will be retained on the destination unit (see 6.3 Play
modes REPEAT, SHUFFLE).
Hard Disk
44
Page 49

Hard Disk
45
ENGLISH
3 To stop MUSIC FOLLOWS ME, press STOP 9 on the destination unit.
Tip
• MUSIC FOLLOWS ME will be automatically deactivated if you do not activate MUSIC
FOLLOWS ME on the destination unit within 5 minutes
• To deactivate MUSIC FOLLOWS ME, press MUSIC FOLLOWS ME again.
• After activating MUSIC FOLLOWS ME on the destination unit you can select other tracks or
source for playback.
6.9.2 MUSIC BROADCAST
MUSIC BROADCAST allows you to broadcast music from Center ( ) to Stations ( ).
On Stations ( )
1 Check that is switched on or in standby mode (see 5 Basic functions).
On Center ( )
2 In HD source, play back the music that you wish to broadcast to Stations ( ).
3 Press MUSIC BROADCAST to activate the function.
> The icon appears on Center ( ) and Stations ( ).
A countdown of 5 seconds starts.
On and :
The selected music starts to play simultaneously after about 5 seconds.
4 To stop MUSIC BROADCAST, press STOP 9 on .
Tip
• To exit MUSIC BROADCAST on , press STOP 9 on . To broadcast music to again,
press STOP 9 on , and then start playback again and activate MUSIC BROADCAST on
again.
• MUSIC BROADCAST will also stop when:
- is switched to Standby mode or Eco Standby mode
- the selected album or list (Playlist, Artist, Genre,…) has reached the end
Page 50

Hard Disk
46
6.10 View system information
1 Press MENU to enter the menu screen.
2 Use 3 or 4 and 2 to enter Information menu.
The display shows: System, Wireless and Wired.
a Use 3 or 4 and 2 to select System.
> Name of or and firmware version (on also: free hard disk space) is shown on the
display:
b Use 3 or 4 and 2 to select Wireless.
> List of available information items (e.g. SSID,Wireless Mode,WEP Key, MAC Address, Subnet mask,
IP Address, and IP Mode) is shown on the display:
c Use 3 or 4 and 2 to select Wired.
> List of available information (e.g. Subnet mask, IP Address, and IP mode) are shown on the display:
Page 51

6.11 Edit track information
Note
Use the 1-way remote control to Edit track information.The 2-way remote control cannot be
used for this task.
You can edit track title, album name, etc. on :
1 Press HOME to select HD.
2 Use 3 or 4 and 2 to select the track to be edited.
3 Press MENU.
> ‘Edit’ is shown on the LCD display
4 Use 3 or 4 and 2 to select Edit.
> Now you can start editing track information by following the sequence:
Edit track title > Edit Artist name > Edit Album name > Edit Genre name
5 Press the following keys on remote control to edit track information:
When you completed your editing, the LCD shows ‘Updating...’ followed by ‘Update success’ (or
‘System busy, please edit later’ if the update was not successful).
Tip
• If no key is pressed for 60 seconds, the edit screen will disappear without saving anything.
• You can enter an editing string of max. 21characters.
• You can also edit album/playlist names. (All tracks in that album/playlist will bear the new
album/playlist name.)
• You can also use 3 or 4 on or remote control to enter text:
3
Press briefly to skip to previous character, Press & hold to fast
scroll through the character list
4
Press briefly to skip to next character, Press & hold to fast scroll
through the character list.
Alphanumeric keys Insert text into the current position.
1
Move highlight to previous editing position. In leftmost position:
press to move to previous screen.
2
Move highlight to next editing position.
J(
Press briefly to delete highlighted text, Press & hold to delete all
text.
OK Confirms text and enters next screen.
Hard Disk
47
ENGLISH
Page 52

CD
48
7 CD (Center only)
7.1 Supported discs
You can play the following discs on the system:
• Pre-recorded audio CDs (CDDA)
• Finalized audio CD-Rs and CD-RWs (12cm CD / 8cm CD, 185 MB / 200 MB)
• MP3WMA-CDs (CD-R/CD-RWs with MP3/WMA files)
• AAC-CDs (MPEG4 AAC LC raw format, .m4a/.m4b files)
About MP3/ WMA
The music compression technology MP3 (MPEG1 Audio Layer 3) and WMA (Windows Media
Audio) significantly reduces the digital data of an audio CD, while maintaining the sound quality.
Windows Media Audio® is a registered trademark of Microsoft Corporation.
Supported formats:
• Disc format ISO9660, Joliet, UDF (created on Adaptec Direct CD v5.0 and Nero Burning ROM
UDF v5.5) and multi-session CDs
• MP3 bit rate (data rate): 32-320 Kbps and variable bit rate.
• 8-cm and 12-cm CD-R/CD-RW up to 730MB
• Directory nesting up to a maximum of 8 levels
• Directory nesting up to a maximum of 8 levels
• MP3 VBR,WMA VBR
• AAC (MPEG4 AAC LC raw format, .m4a/.m4b files)
The system does not play or support the following:
• Empty albums that do not contain any MP3/WMA files and hence will not be displayed.
• Unsupported formats are skipped (e.g. files with .doc extension are ignored).
• DRM protected WMA files
• WAV, PCM audio files
• WMA files in lossless format
Tip
• Make sure that MP3 files end on extension .mp3,WMA files end on extension .wma, and AAC
files end on extension .m4a or .m4b.
• To burn/convert DRM protected WMA files use Windows Media Player 10 (or later.Visit www.
microsoft.com for details about Windows Media Player and WM DRM (Windows Media Digital
Rights Management).
Important! This system is designed for regular discs.Therefore, do not use any accessories
such as disc stabilizer rings or disc treatment sheets, etc.
Page 53

7.2 Play discs
1 Insert CD into CD loader slot on with printed (label) side facing you.
> Display shows: Reading CD.
Audio CD: list of tracks appears (Track information may not appear, if it is not found in the
HD database and if there is no Internet connection to update the missing information from the
Gracenote® service site.)
MP3/WMA CD: list of albums appears.
Display shows:
2 Press the navigation controls 3 or 4 and 2 to select your option.
3 Press 2; to start playback
• On a highlighted album, to start playback of album.
• On All tracks, to start playback of all tracks on disc.
4
a To temporarily pause playback, press 2; .
b To resume playback, press button again.
5 To stop playback, press STOP 9.
6 To remove disc, press EJECT on Center.
Others MP3/WMA/AAC files that are not sorted into albums (folders)
located in the root directory of the disc.
CDDA CDDA files on an enhanced CD or a mixed mode CD.
All tracks All supported files in any albums (folders) on the disc.
CD
49
ENGLISH
Page 54

7.2.1 Search by keywords
The keyword should be the first letter or word of the album title, artist name, track title, genre
name, or playlist name you wish to search for: By entering a keyword, you can quickly find the item
that most closely matches to your search criteria.The search cursor will stop at the closest
alphabetical match in the list.
Note
The keyword search is supported in modes HD Music and USB only.
1 Navigate 1 / 2 / 3 / 4 to enter desired option list of albums, artists, tracks, genres or playlists.
2 On remote control, press SEARCH
Display: text box appears
3 Use alphanumeric keys to enter keyword (maximum 8 characters) (see 4.4 Prepare:
Alphanumeric keys)
4 Press OK to start searching
> Display: Searching…
Searching starts from the beginning of current option list.
The matched items appear at the top of the list.
The option list automatically shows the closest match in the alphabet if no match is found.
Display: Searching… disappears.
Tip
The search will also stop when:
• you select another source
• you switch off the set
CD
50
Page 55

7.2.2 Find track in current album (during playback)
In playback screen, press 3 / 4 (or J( / )K ) to select previous or next track in current album
during playback.
7.2.3 Find passage in current track (during playback)
1 In playback screen, press & hold 3 / 4 (or J( / )K ) to scan currently playing track at high
speed.
2 When you found the passage you want, release 3 / 4 (or J( / )K ) to resume normal playback.
7.3 Play modes REPEAT, SHUFFLE
plays the current track continuously
repeats all the tracks (under current artist, genre, or album)
repeats all the tracks (under current artist, genre, or album) in random order
plays tracks (under current artist, genre, or album) in random order
1 During playback press REPEAT or / and SHUFFLE once or more times to select play mode.
2 To return to normal playback, press REPEAT or / and SHUFFLE repeatedly until the various
modes are no longer displayed.
CD
51
ENGLISH
Page 56

8 FM radio
8.1 Tune radio stations
1 Connect the supplied FM wire antenna to and (see 3 Installation).
2 Ensure that the set is switched on or in Standby mode (see 5 Basic functions).
3 Press HOME once or more times to select Radio.
> Playback screen appears.
Display: Radio, radio station frequency and preset number (if programmed).
4 Press & hold 3 or 4 until frequency in display starts running.
> The radio automatically tunes to a station of sufficient reception.
Display during automatic tuning: Searching…
When you are receiving an RDS station, is shown.
5 Repeat tuning process until you find the desired radio station.
6 To tune to a weak station, press 3 or 4 briefly and repeatedly until you have established
optimum reception.
8.2 Store preset radio stations
You can store up to 60 radio stations in the preset memory.
FM radio
52
Page 57

8.2.1 Autostore: Automatic preset program
Autostore automatically starts programming radio stations into the preset memory, beginning with
Preset 1.Available stations are programmed in the order of their radio frequency, RDS stations are
followed by FM stations.A maximum of 10 RDS stations will be stored (Preset 01 to Preset 10).
1 Press MENU to enter the menu screen.
2 Use 3 or 4 and 2 to select autostore radio.
> Display: Autostore, please wait… Press ‘Stop’ to exit.
When all stations are stored, the first preset station automatically starts playing.
8.2.2 Manual store: Manual preset program
1 In FM radio mode, use 3 or 4 to select / tune your desired radio station.
2 Press MENU to enter the menu screen.
3 Use 3 or 4 and 2 to select Save to Preset.
4 Use 3 or 4 and 2 to select the desired preset number (PR01, PR02,…PR60).
> Current radio station is stored under selected preset number.
8.2.3 Listen to preset station
1 In FM radio mode, press 2 to access the list of preset stations.
2 Use 3 or 4 and 2 to select the preset station.
FM radio
53
ENGLISH
Page 58

8.3 RDS
RDS (Radio Data System) is a service that allows FM stations to send additional information along
with the FM radio signal.
Tune to RDS radio station (see 8.2.1 Autostore: Automatic preset program)
Display shows (if available):
• Name of radio station
• Radio frequency
• Program type (e.g. News, Pop, Music)
• RDS radio text
8.4 NEWS
You can activate radio NEWS while listening to another source on WACS7500.The set will tune
to a RDS radio station stored in the preset memory under one of the 10 first numbers.
1 During playback (any source except radio) press RDS/NEWS on remote control.
Icon appears and NEWS ON is briefly displayed.
(If no RDS station is found or no news transmission is detected during the scan, the icon
disappears and NEWS OFF is briefly displayed.)
Playback continues while the set scans the first 10 preset stations.
When a news transmission is detected, the set will switch to the RDS station broadcasting the
news transmission and the icon starts flashing.
After the news transmission is over, the set will stay tuned to the news station.
2 To deactivate NEWS, press RDS/NEWS again.
> Icon disappears and NEWS OFF is briefly displayed.
Tip
Ensure that you have stored RDS stations in the first 10 preset locations (see 8.2.1 Autostore:
Automatic preset program).
FM radio
54
Page 59

8.5 Internet radio*
You can also listen to all the most popular Internet Radio stations by connecting through the
Philips web service, where automated links to active stations are maintained and updated at
regular intervals.
The Internet Radio feature requires registration with Philips.The registration process only has to
be completed once, when you are using the Internet Radio for the first time.You can register
more than one user. Each user will have to register separately, following these instructions:
8.5.1 First time use
For first time use of the Internet radio you must register with Philips.
To register you need a valid email address.
Note
If you enter an email address that is already registered with Philips, the display asks for your
password. Enter your password and enjoy Internet radio!
Internet radio registration process:
On or
1 Press HOME one or more times to select Radio.
2 From the radio menu, select Internet Radio.
> Internet connection starts:
The Internet Radio registration help screen appears:
3 Enter any valid email address.
> Display shows confirmation that the automated email dispatch has been initiated:
Important!
Ensure you are connected to the Internet when you use the Internet Radio feature. See 11.
Network Settings for information on how to get your system connected to the home network
and the Internet.
Use the 1-way remote control for the registration process.
FM radio
55
ENGLISH
* Internet radio requires broadband Internet access and a wireless router.
Page 60

On your PC:
1 Check the inbox of the email address you entered and look for a message from
‘ConsumerCare@Philips.com‘ with the subject: Your Streamium Registration….
2 Read and follow the instructions given in the email to complete your registration process on
the Philips website.
On or
Display returns to Radio menu.
Note
• Press HOME to exit any time.Your email address will be remembered.
• Other persons can register individually to enjoy Internet radio with their own settings.
8.5.2 Regular use
Regular users can access the Internet radio directly through the Radio menu screen.
8.5.2.1 Radio services
On or
1 Press HOME one or more times to select Radio.
2 From the Radio menu, select Internet Radio.
3 Use 3 or 4 and 2 to select User.
4 Use 3 or 4 and 2 to select Services.
5 Use 3 or 4 and 2 to make your selection from the Service List (RadioIO, or Live365).
6 Use 3 or 4 and 2 to select the desired station.
FM radio
56
Page 61

8.5.3 Add internet radio stations and bookmark your favorites
On or
In Internet radio mode press 2 to bookmark the current radio station as a favorite.
OR
On your PC
1 Log in with your registered email address at www.philips.com/welcome.
2 Select Streamium Management on the left hand side of the window.
3 Choose radio stations from the list.
4 Mark them as favorites.
The marked stations will appear as My Media and Favorite Stations the next time you
connect.
8.5.3.1 My Media
On or
1 Press HOME one or more times to select Radio.
2 From the radio menu, select Internet Radio.
If multiple users are registered:
a Use 3 or 4 and 2 to select
3 Use 3 or 4 and 2 to select My Media.
4 Use 3 or 4 and 2 to make your selection from the My Media List of Stations.
8.5.3.2 Favorite stations
On or
1 Press HOME one or more times to select Radio.
2 From the radio menu, select Internet Radio.
If multiple users are registered:
a Use 3 or 4 and 2 to select
3 Use 3 or 4 and 2 to select Favorite Stations.
4 Use 3 or 4 and 2 to make your selection from the List of Favorite Stations.
FM radio
57
ENGLISH
Page 62

9 UPnP
Note
Ensure you are connected to your home network when you use the UPnP feature. See
11 Network Settings for information on how to get your system connected to the home
network and the Internet.
9.1 UPnP (Universal Plug and Play)
UPnP is a standard which connects multiple devices (wirelessly or wired) with each other and
enables them to work seamlessly. If you are familiar with UPnP enabled devices,WACS7500 brings
you additional benefits to enrich your wireless music streaming experience. If you are not familiar
with UPnP-enabled devices, please visit www.upnp.org for details.
9.1.1 About UPnP*
In addition to the music library of , an UPnP-enabled device can also serve as a music library.
The music collection on the UPnP enabled device can be played on or , wirelessly or
through an Ethernet cable (not supplied).
You can also play the music library of on the UPnP enabled device, thus expanding your home
music network.
* Universal Plug and Play (UPnP™) builds on standard networking technologies and provides
standardized protocols for a wide variety of home and small business devices. It allows easy
interoperability of all the devices supporting the networking technologies.
9.1.2 About UPnP* enabled devices
The UPnP device can be a PC or other device running UPnP software.
1 To use the UPnP device with or , connect or to the UPnP network of the
device (see 9.2 Connect to UPnP device).
2 To play the music library of your UPnP device on or , check that UPnP server software
is properly installed and enabled on the device (e.g.Windows Media Player supplied PC Suite
CD, Windows Media Player 11 or Philips Multimedia Manager). For more help refer to Windows
Media Player.
3 To play the music library of on the UPnP device, check with the user manual of your UPnP
device to make sure it is able to receive music from other UPnP enabled devices.
Universal Plug and Play
58
Page 63

9.2 Connect to the UPnP device
When connecting to the network of the UPnP device, you have the following options:
• Connect wirelessly or through an Ethernet cable (not supplied).
• Connect or , only, or only.
For more information on the connection, see 11.2 Network settings: Connect to Wi-Fi
enabled or wired home network.
Tip
Connecting other UPnP clients to Philips Wireless Music Center may take longer than connecting a
Philips Wireless Music Station to Center.
9.3 UPnP playback
Note
• You can only stream unprotected music files in MP3,WMA, or AAC (.m4a) format when
WACS7500 is in UPnP mode.
• You cannot stream video or picture contents.
During UPnP playback, some playback features in the Wi-Fi network on Center will be unavailable,
including Music Broadcast, Music Follows Me, Same Artist, Same Genre, Creating / Deleting Playlist,
and Recording.
9.3.1 Play music from UPnP device
Tip
If you cannot find the UPnP server on the network, refresh the UPnP mode of Center by changing
the mode (press HOME key).
1 Check that the UPnP device is switched on.
2 Consult the user manual of the Windows Firewall on your UPnP enabled PC, to ensure that
'UPnP Framework' is allowed in the 'Exceptions' list of the Windows Firewall.
3 Check that or is connected to the network of the UPnP device (see 11.5 Network
settings:View connection status).
Universal Plug and Play
59
ENGLISH
Page 64

or :
4 Press HOME on remote control to select UPnP mode.
> The display on the set shows a list of connected UPnP devices (up to 4 UPnP devices).
(Server not found appears if there is no UPnP device found in the network.)
5 Use 3 or 4 and 2 to select your desired UPnP device.
> The music library of the UPnP device appears on or as well as on the UPnP device.
On or :
6 Play the music library of the UPnP device in the same way as you play Hard Disk (HD) (see 6
HD).
9.3.2 Play music from Center ( )
1 Check that is switched on or already in standby mode.
2 Check that the UPnP device is connected to (see 11.5 Network settings :View
connection status)
> The music library of appears on the UPnP enabled device as it does on
3 Use the function keys on the UPnP device to play the music library of .
Universal Plug and Play
60
Page 65

10 External sources
10.1 Play or record to USB mass storage device
You can playback music from a USB device on or . You can also transfer the music library of
to a USB mass storage device, so that you can carry your favorite music with you wherever
you go.
10.1.1 About USB device
Note
• In some USB flash (or memory) devices, the stored contents is recorded using copyright
protection technology. Such protected contents cannot be played on any other devices (such as
/ ).
• MTP (Media Transfer Protocol) USB devices are not supported.
• Protected (DRM) WMA files cannot be played due to copyright issues.
Compatible USB mass storage devices:
The following devices can be used on or :
• USB flash devices (USB 2.0 or USB1.1)
• USB flash memory devices (USB 2.0 or USB1.1)
Supported formats:
• USB or memory file format FAT12, FAT16, FAT32 (sector size: 512 - 65,536 bytes)
• MP3 bit rate (data rate): 32-320 Kbps and variable bit rate
• WMA v9 or earlier versions
• Directory nesting up to a maximum of 8 levels
• Number of albums/folders: maximum 99
• Number of tracks/titles: maximum 999
• File name in Unicode UTF8 (maximum length: 256 bytes)
• MP3 VBR,WMA VBR, AAC VBR format
or will not play or support the following:
• Empty albums that do not contain any MP3/WMA files and hence will not be displayed.
• Unsupported formats are skipped (e.g. files with .doc extension are ignored).
• WAV, PCM audio files
• DRM protected WMA files
• WMA files in Lossless
How to transfer music files from your PC to a USB mass storage device
You can easily transfer your favorite music from your PC to a USB mass storage device by drag &
drop.
You can use the music management software of your flash device for the music transfer.
External sources
61
ENGLISH
Page 66

How to organize your MP3/WMA files on a USB mass storage device
or browses MP3/WMA files in the same way as reads the HD.
Organize your MP3/WMA files in different folders or sub-folders as needed.
Tip
• Make sure that MP3 files end on extension .mp3 and WMA files end on extension .wma.
• For DRM protected WMA files, use Windows Media Player 10 (or later) for CD burning /
conversion.Visit www.microsoft.com for details about Windows Media Player and WM DRM
(Windows Media Digital Rights Management)
10.1.2 Play music from USB device
1 Check that USB device is properly connected to or (see 3.4.2 Installation:
Connect a portable (USB mass storage) device)
2 Press HOME once or more times to select USB.
> The screen shows ‘USB direct’.
No USB Device Present appears if the USB device is not supported by or .
File system not supported appears if unsupported file formats are used on the USB device.
Empty Folder appears if no supported audio format file is found on the USB device.
3 Play audio files on the USB as you do with the albums/tracks on a HD (see 6 HD).
Tip
Due to compatibility reasons, the album/track information may differ from what is displayed
through the music management software of the flash device.
External sources
62
Page 67

10.1.3 Transfer music to USB device
1 Check that the USB device is properly connected to .
2 On , press HOME and use 3 or 4 and 2 as necessary to select HD.
> If it is in HD playing mode, press STOP to stop playing.
3 Use 3 or 4 and 2 to select an option (Playlists, Artists, etc…) and enter the corresponding
list of tracks.
4 In the track list screen, press RECORD (REC on remote control)
> The list of tracks appears.
5 Press MARK/UNMARK to select or deselect the tracks to be recorded.
> To select/deselect all tracks, Press & hold MARK/UNMARK.
External sources
63
ENGLISH
Important!
• There is no support for transfer of music to MTP devices.
• Recording is permitted only if there is no infringement of copyrights or any other rights of
third parties.
• For CDs encoded with copyright protection technologies used by some record companies,
recording will be restricted.
• Making unauthorized duplicates of copy-protected material, including computer programs, files,
broadcasts and sound recordings, may be an infringement of copyrights and constitute a
criminal offence.This equipment should not be used for such purposes.
• Transfer to USB device is only supported by .
• DRM protected files might not play if they are transferred to the USB device.
Page 68

6 Press RECORD to start recording.
> Display shows: Transferring...
The number of tracks transferred / to be transferred appears.
Selected tracks are transferred to the USB device.
Tip
• Press 1 to stop selecting tracks and return to the list of tracks. To continue, repeat steps 3 to 5.
• Recording will also stop when:
- the USB device is unplugged and the display shows: Connection interrupt, Cancel transfer...
- the USB device has more than 99 folders and 999 titles and the display shows: Device is full,
Cancel transferring...
Find the transferred tracks on your USB device
All the transferred tracks are saved in the USB device under the folder structure
Music\Genre\Artist\Album, and are named as XX-trackname.mp3.
Play the transferred tracks on another music player
You can play the transferred tracks on music players supporting USB playback. On different players,
the files/folders may be browsed in different ways.
External sources
64
Page 69

10.2 Play your iPod music
You can enjoy the music library on your iPod player through the speaker system of the WACS7500.
This feature requires a Dock.The designated Philips Docking Cradle, Model DC1050 is sold
separately.
1 Check that or is switched on or in standby mode.
2 Connect your Dock to or :
a Connect the 9-pin docking cable to the DOCK IN of or .
b Connect the audio cable to the AUX IN* on or (red & white plugs must match
color coding of AUX IN).
3 Insert your iPod into the Dock.
4 Press HOME to enter the main menu and use the navigation controls 3 or 4 and 2 to select
Portable 2 iPod.
5 The iPod can now be controlled via the remote control of the or .
Tip
All features except for the volume can still be controlled on the iPod itself too.
10.3 Play external sources
You can play files from external sources on or by connecting the audio output (e.g.TV,
VCR, Laser Disc player, DVD player).You can also record up to 3 hours of audio output to the
music library in the HD of .
1 Check that the external device is properly connected (see 3.4.4 Installation: Connect
additional appliances).
2 Ensure that or is switched on or in standby mode (see 5 Basic functions).
On or :
3 Press HOME once or more times to select AUX .
On external source:
4 Turn down the volume to avoid noise distortion.
Press 2; to start playback.
5 To adjust sound and volume, use the sound controls on WACS7500 or on your external
source.
External sources
65
ENGLISH
Page 70

11 Network settings
Note
Use the 1-way remote control for Station management and Network configuration.The 2-way
remote control cannot be used for these tasks.
You can add and/or to your existing home network. Set your network according to your
needs as follows:
11.1 Add Stations to Wi-Fi network of Center ( )
You can connect up to five to . When adding a to the Wi-Fi network of , you can
play the music library of on , or move music playback between and (see 6 HD).
On :
1 Check that is in HD source.
2 Press MENU to enter the menu screen.
3 Use 3 or 4 and 2 to enter Station Management (Mgnt) menu.
4 Use 3 or 4 and 2 to select Add New Station.
> You will enter Installation Mode. Search for the new station starts.
Playback stops on the previously associated if you are playing the HD source.
Tip
If five are already connected, the option Add New Station is not available. In this case, please
delete another first and then add the new .
On :
1 To enter Installation Mode
• On a new Station that is still unassociated with the Center:
a Power up new Station.
b Select language.
> Station enters automatic installation mode.
Network settings
66
Type What you want Go to
Simple network settings Add another to Section 11.1
Connect to your PC for configuration management Section 12
Connect to internet for Gracenote® internet service Section 13
Advanced network
settings
Connect to Wi-Fi home network Section 11.2
Connect to wired home network Section 11.3
Expert network setting Connect to two different networks Section 11.4
Page 71

• On a Station that was already paired with another Center:
a Press MENU
b Select Installation mode
> Station enters automatic installation mode.
2 Disconnect the power plug of and then connect it to the power supply again.
> Display: Connecting to Center
3 On remote control, press MENU to enter Installation Mode.
> The following messages are shown in succession:
Center found
Connecting to Center...
On :
4 Press STOP 9 when all the are found.
> HD screen appears once is connected to .
11.1.1 Delete a Station ( )
1 Check that is in HD source.
2 Press MENU to enter the menu screen.
3 Use 3 or 4 and 2 to enter Station Management (Mgnt) menu.
4 Press 3 or 4 and 2 to select Delete Station.
> The list of connected will be displayed on .
5 Use 3 or 4 and 2 to select you wish to delete.
6 Press 3 or 4 and 2 to select YES.
Network settings
67
ENGLISH
Page 72

11.2 Connect to Wi-Fi (wireless) enabled home network
The Wi-Fi enable network is a Wi-Fi infrastructure network or a Wi-Fi enable home network with
a router.
1 To connect or to a Wi-Fi enabled home network, start the Add Network procedure
on or respectively.
2 For music playback within the home network, see 9.3 UPnP Playback.
11.2.1 Network settings on Center ( )
Note
For WEP(Wired Equivalent Privacy) / WPA (Wi-Fi Protected Access) key setting to secure your
network, always refer to the user manual of the Router.WPA is the newest and strongest
encryption method. If this is not available (generally for older devices) choose WEP.
On , search for networks:
1 Press MENU to enter the menu screen.
2 Use 3 or 4 and 2 to enter Settings followed by Network, then Wireless.
> Display: Searching for Networks…
List of networks appears. (Network Not Found appears if no network is found.)
3 Select the Wi-Fi network where your desired UPnP device is located.
4 Press 2 to continue.
5
6 In screen Set IP Mode, select Automatic
If you already know the WEP/WPA
key for the Wi-Fi network:
Use the 1-way remote control
to enter the WEP or WPA key.
Press OK to
confirm.
If there is no WEP/WPA key for the
Wi-Fi network:
Press OK to skip.
Important! Connections that include a Wi-Fi router require that the router is switched on at
all times.
Network settings
68
Page 73

7 As prompted, select Ye s to apply the settings.
is connected to the Wi-Fi home network.
might be disconnected from the Wi-Fi network of .
Tip
• To add to the network of , follow the steps under user manual section 3.1 Installation:
Install Center and Station .
• If you change the WEP/WPA key after you have added the WACS7500 into your home network,
the connection between the WACS7500 and your home network will be lost. In this case, please
restart WACS7500 and in order to refresh the IP update.
Applicable if you already have a wireless network (hub/switch/router).
11.2.2 Set network on Station ( )
1 Press MENU to enter the menu screen.
2 Use 3 or 4 and 2 to enter Settings followed by Network, then Wireless.
3 Press 2 to continue.
> Display: Searching for Networks…
List of networks appears. (Network Not Found appears if no network is found.)
4 Select the Wi-Fi network where your desired UPnP device is located.
5 Press 2 to continue.
Wireless
Router
www
Network settings
69
ENGLISH
Page 74

Network settings
70
6
7 Select Automatic.
8 As prompted, select YES to apply the settings.
is connected to the Wi-Fi home network.
will be disconnected from the Wi-Fi network of .
11.3 Connect to wired home network
The wired home network can be a single PC, a PC network, another or .
and can both access the wired and wireless home network at the same time. Using an
Ethernet cable (not supplied), you can connect or a separately to a wired network while
maintaining its Wi-Fi connection (e.g. the Wi-Fi connection between and on or more , or
the Wi-Fi connection with a home network). In this way, you can opt to play the music library of
the wired network only on or a single (UPnP playback).
At the same time, you can still enjoy all the music playback features on the Wi-Fi network.
11.3.1 Set network on Center ( )
1 Check that the network device is switched on.
2 Connect an Ethernet cable (not supplied) to Ethernet ports on network device and .
3 Press MENU to enter the menu screen.
4 Use 3 or 4 and 2 to enter Settings followed by Network, then Wired.
5 Press 2 to continue.
If you already know the WEP/WPA
key for the Wi-Fi network:
Use the 1-way remote control
to enter the WEP or WPA key.
Press OK to
confirm.
If there is no WEP/WPA key for the
Wi-Fi network:
Press OK to skip.
Page 75

Network settings
71
ENGLISH
6 In Set IP Mode screen: If you are using a DHCP* enabled network device, select Automatic.
* DHCP stands for Dynamic Host Configuration Protocol. It is a protocol for assigning dynamic IP
addresses to devices on a network.
11.3.2 Set network on Station ( )
If there is no DHCP:
1 Select Static and assign an IP address and subnet mask as prompted, using the alphanumeric
keys (see 4.4 Prepare: Alphanumeric keys).
2 As prompted, select YES to apply the settings.
>
is connected to the external wired network.
On the display, the icon changes to .
Applicable if you already have a wired home network (hub/switch/router).
Tip
You can connect or directly to your PC using an Ethernet cable (not supplied) and the
Wireless Audio Device Manager (WADM) in the supplied PC Suite CD. For details, see section
12 Connect to your PC.
Wired
Router
www
Page 76

11.4 Connect to two different home networks
WACS7500 can be added into two different home networks via wired and wireless network ports.
Note that the IP addresses of the two different network ports cannot be in one subnet:WACS7500
has no router function and cannot determine which port to use.
Note
Once is added to the Wi-Fi network, all Wi-Fi ad-hoc connections with the WAC7500 will be
shut down.
Applicable if you have two home networks.
Once a is added to the Wi-Fi (wireless) home network, the Wi-Fi wireless connection of this
particular to the will be shut down. However may still maintain its Wi-Fi ad-hoc
connection with one or more other .
WACS7500 cannot shadow the IP of a network device that is not activated. Please be careful of the
IP address settings to avoid IP address conflict between the wired and Wi-Fi ports.
11.5 View connection status
11.5.1 View Station ( ) status in Wi-Fi network of Center ( )
1 Check that is in HD source.
2 Press MENU to enter the menu screen.
3 Use 3 or 4 and 2 to enter Station Management (Mgnt) menu.
4 Use 3 or 4 and 2 to select Station Status.
> A list of connected or previously connected is displayed on the .
5 Press 2 to view the connection information.
Network settings
72
Page 77

11.5.2 Viewing the connection with home network
1 Check that or is in HD source.
2 Press MENU to enter the menu screen.
3 Use 3 or 4 and 2 to enter Information menu.
> The display shows: System, Wireless and Wired.
4 Use 3 or 4 and 2 to select Wireless or Wired.
• Wi-Fi: information about the Wi-Fi settings.
• Ethernet: information about the Ethernet settings.
11.6 Connect to Internet
Check that you have connected to an Access Point or Router with Internet access or connect
to an ADSL modem with internet access directly.
Set DNS and Gateway
If you are using a DHCP* enabled Access Point, Router or ADSL modem, the DNS and
Gateway can be obtained automatically, so you need only to set to Automatic
(DHCP):
1 Press MENU.
2 Use 3 or 4 and 2 to select Settings followed by Network.
3 Select Wired or Wireless.
4 Use 3 or 4 and 2 to select Automatic (DHCP).
* DHCP stands for Dynamic Host Configuration Protocol. It is a protocol for assigning dynamic IP
addresses to devices on a network.
Network settings
73
ENGLISH
Important! Make sure that no dial-up, user name or password is required for the Internet
access.
Page 78

The following steps show how to get DNS and Gateway settings of the current
network from the PC connected to the same network:
1 On your PC, click Start > Run
2 Type cmd and click OK
3 Type ipconfig/all
4 Write down the DNS and Gateway of the current connection.
On
1 Press MENU to enter the menu screen.
2 Use 3 or 4 and 2 to enter Settings followed by Network, then Wired.
3 Press 2 to continue.
Set DNS
1 Enter the DNS server you wrote down.
2 Press OK to confirm.
3 Press OK to skip Set DNS2.
Tip
If necessary, follow Steps 1 and 2 above to set a secondary DNS server in Set DNS2.
Set Gateway
1 Enter the Gateway you wrote down.
2 Press OK to confirm.
Set proxy
1 If you are using a proxy server to visit websites, enable Proxy and proceed with the proxy
setting as prompted, then press OK to confirm Otherwise, press OK to skip.
2 Choose to apply the settings as prompted.
> Settings will change.
Connection to station could be lost appears.
Network settings
74
Page 79

12 Connect to your PC
Minimum PC requirements:
• Windows 2000 SP4 (or above) / XP SP2 / Vista
• Pentium III 500MHz processor or higher
• 256MB RAM
• CD-ROM drive
• Ethernet adapter, enabled (for wired connection) - or
• Wireless network adapter 802.11 b/g (for wireless connection)
• 500MB free hard disk space
Install WADM (Philips Wireless Audio Device Manager, see 17 FAQ)
1 Insert the PC Suite CD into the PC.
2 Follow the instructions on the PC to install WADM.
3 When the security alert message (Microsoft Windows Firewall) pops up, press Unblock to
allow the WADM application to run on the PC.
> The Microsoft Windows Firewall is still effective and only allows the WADM to run.
Tip
You can also consult the user manual of the Microsoft Windows Firewall and manually add the
WADM application to your list of programs that are safe to run.
4 Select language and accept license terms.
5 On the Welcome screen, click Next.
> The installation process starts automatically.
6 When installation is completed, click Quit.
Connect Center to PC (Wired connection)
Use an Ethernet cable (not supplied) to connect the WAC7500 to your PC. (Make sure that the
Ethernet port on your PC is enabled to establish WADM connection).
Wired
Router
www
Connect to your PC
75
ENGLISH
Page 80

Connect to your PC
76
Launch WADM
1 Double click WADM.
2 If your Center appears, continue with step 6.
3 If your Center is not found, select Connection Wizard.
4 In Connection Wizard screen, select Express Mode.
5 Click Next and follow the instructions.
6 Select your Center from the list and click Connect now.
Connect Center to PC (Wireless connection)
Enable your wireless Access Point or Wireless Router.
Configure Network from Center: Select Menu > Settings > Network > Wireless (select
desired Network) > (enter encryption key) > Automatic > Apply Settings > Ye s
Wireless
Router
www
Page 81

Launch for Windows XP or Vista:
1 Double click WADM.
2 A list of discovered Centers appears.
3 If your Center appears, continue with step 6.
4 If your Center is not found, select Connection Wizard.
5 In Connection Wizard screen, select Express Mode.
6 Click Next and follow the instructions.
7 Select your Center from the list and click Connect now.
Tip
• If the IP configuration of Center is not in the default range (Subnet mask: 255.255.0.0; IP address:
172.31.x.x), select Connection Wizard > Express Mode. Enter the current IP configuration of
Center as prompted. Press MENU and select Information > Wired to check IP configuration.
• When WADM is running, Internet access of your PC may be disabled. Close WADM to restore
access.
Connect to your PC
77
ENGLISH
Page 82

13 Gracenote® CD Information
The Gracenote® music recognition service provides the set with CD track information (including
album, artist, genre, track information) from its built-in database. It allows the recorded CD tracks
to be properly categorized (for example, under Artists, Albums, Genres or All tracks) and be
merged with the existing tracks in the hard disk.
13.1 Gracenote® music recognition database
A 800 MB CD database (contains 800,000 most popular CDs) is embedded in every for quick
look-up on track information.An update file that contains newly released CDs is available quarterly
on www.club.philips.com for download.
13.1.1 Update Gracenote® music recognition database
Use your PC to register your product on www.club.philips.com and go to ‘Show Upgrades &
Support’ page to download Gracenote® Music recognition database update. Note that the updates
are posted quarterly and new updates are independent from old updates, i.e. a new update can be
installed, even without the previous update.
After storing the file on your PC, you can either burn a CD with the update file using your favorite
CD burning software and drop the CD into for automatic update, or you can use the
Gracenote® update option of WADM if you have connected your PC to .
13.2 Gracenote® Internet Queries
If the CD track information of your new CD disc cannot be displayed on the WACS7500, the
quickest and surest solution is to ensure you have followed the steps in 11.6 Connect to
Internet and follow 13.2.1 Look up track information.
Gracenote® CD Information
78
Page 83

13.2.1 Look up CD track information
When an internet connection present (see 11.6 Connect to Internet), insert the CD of which
you require the information (insert disc into loader slot of with graphics facing you).
Searching start immediately.The system will search the local Gracenote® CD database first. If the
CD track information cannot be found, the online search will start.The search results are shown on
the display of .
Tip
If the internet query failed due to a disruption in the internet connection, the error message ‘Check
the internet setup for CD Database on-line’ will appear.
Check if your internet connection is correct (see 11.6 Connect to Internet).
Gracenote® CD Information
79
ENGLISH
Page 84

14 Firmware Upgrade
14.1 Upgrade firmware
The supplied PC Installer CD Wireless Audio Device Manager (WADM) helps you get the upgrades
for WACS7500 Center and Station.
1 Register your Philips Wireless Music Center with www.club.philips.com.
2 Download the firmware upgrade files and store them on your PC.
3 Place and side by side on a level and sturdy surface.
4 Connect and to power supply.
> HD screen appears on .
HD screen appears on when the is connected to .
5 Connect to your PC via an Ethernet cable (not supplied).
6 Install and launch WADM (see section 12 Connect to your PC).
7 Click to enter the Firmware upgrade submenu.
8 As prompted, click Browse and indicate the location where you kept the firmware upgrade
files on PC.
9 Click Apply to start upgrading firmware.
On Philips Wireless Music Center ( ):
The display shows ‘Updating firmware, please wait...’.
will reboot itself during the installation process.
When returns to HD screen, the installation is completed…
On Philips Wireless Music Station ( ):
Installation starts automatically
When returns to HD screen, the installation is completed.
Firmware upgrade
80
Important!
On Philips Wireless Music / :
• Never interrupt the firmware upgrading before its completion.
• Never operate other functions before finishing the installation.
Page 85

14.2 Restore previous firmware
After the firmware of is upgraded, you can restore it to its previous version as desired.
On
1 Press MENU to enter the menu screen.
2 Use 3 or 4 and 2 to enter Settings followed by Firmware, then Restore firmware.
3 Press 2 to select Ye s .
After upgrading or restoring the firmware of , you need to reestablish the Wi-Fi connection
between and .
14.3 Re-establish Wi-Fi network of Center ( ) and Stations ( )
On :
1 Press MENU to enter the menu screen.
2 Use 3 or 4 and 2 to enter Station Mgnt menu.
3 Use 3 or 4 and 2 to select Add New Station.
> Searching for Stations starts.
On :
1 Disconnect the power plug of and then connect them to the power supply again.
> Connecting to Center appears.
2 Press MENU on the remote control to enter the selection screen of Installation Mode and
Select Server.
3 Use 3 or 4 and 2 to enter Installation Mode.
> Stations start to connect to .
4 Press STOP 9 on when all are found.
Reset
81
ENGLISH
Page 86

15 Reset
You can restore or to the default settings (including network settings).
When to reset or :
• Reset or to reestablish Wi-Fi connection between and .
• Reset or to change the way or connects to a Wi-Fi enabled / wired home
network.
1 Check that the set is switched on (see 5 Basic functions).
2 Press MENU to enter the menu screen.
3 Use 3 or 4 and 2 to enter Settings followed by Restore settings.
4 Press 2 to select Ye s .
> The set is rebooted.
Language selection screen appears.
5 Select your desired language: English, Français, Español, Nederlands, Italiano or Deutsch.
> The set enters Installation Mode.
The search for or starts.
The Wi-Fi connection is being reestablished.
If the is reset and are not reset:
1 On the , disconnect the power plug and connect them to the power supply again.
2 Connecting to Center appears.
3 On the remote control, press MENU to enter menu screen.
4 Use 3 or 4 and 2 to enter Installation Mode.
5 start to connect to .
If a is reset and is not reset:
1 On , select HD mode.
2 Press MENU to enter the menu screen.
3 Use 3 or 4 and 2 to enter Station Management (Mgnt) menu.
4 Use 3 or 4 and 2 to select Add New Station.
> Searching for Stations starts.
If and are reset:
1 Select language and then enter Installation Mode.
2 Press STOP 9 on when
all are
found.
Tip
• Restoring to default settings does not delete any stored music tracks.
• After restoration to default settings, the network mode will return to ad-hoc mode.
Reset
82
Page 87

16 Technical data
16.1 Center
Technical data
83
ENGLISH
Specifications and external appearance are subject to change without notice.
General
AC Power 230V ±10%
Dimensions (w x h x d)616x272x172mm
Weight (Net) approx. 8.8kg
Power consumption
Active <45W
Standby < 22W
Eco Power Standby < 1W
Amplifier
Output power 2x20+40W(RMS)
Frequency response 60-20,000Hz, - 3dB
Signal-to-noise ratio 72 dBA (IEC)
Speakers
T
weeter
Power 20W RMS / 30 W
music
Frequency response 5 KHz - 20 KHz
Sensitivity 76 dB / m / W
Impedance 6 Ω (Ohms)
Dimensions (w x h) 72 x 42 mm
Midrange
Power 20W RMS / 30 W
music
Frequency response 130 Hz - 5 KHz
Sensitivity 76 dB / m / W
Impedance 6 Ω (Ohms)
Dimensions (w x h) 75 x 75 mm
Subwoofer
Power 50W RMS / 75 W
music
Frequency response 75Hz - 500 Hz
Sensitivity 83dB / m / W
Impedance 12 Ω (Ohms)
Dimensions (Ø) 125mm
Headphones
Impedance 16-150 Ω (Ohms)
Input sensitivity
AUX IN 500mV
Wireless
Wireless standard 802.11g, backwards
compatible to 802.11b
Wireless security WEP (64 or 128
bit),WPA/WPA2 (8-63
characters)
Frequency range 2412-2462MHz (CH1-
CH11)
Wired (LAN / Ethernet)
Wired standard 802.3 / 802.3u
Speed 10 / 100MBit/s
Mode half / full duplex
Crossover detection (Auto MDIX)
Ye s
Tuner
FM wave range 87.5-108MHz
Number of presets 60
FM antenna/cable COAX / Dipole-antenna
(75W IEC-connector)
HD player
Frequency range 60-20,000Hz, -3dB
Signal-to-noise ratio 72dBA (IEC)
MPEG 1 Layer 3 (MP3-CD)
MPEG AUDIO
MP3-CD bit rate 32-320kbps,VBR
WMA bit rate up to 160kbps
Sampling frequencies 32, 44.1, 48kHz
HD storage capacity 80GB*
Recording quality 128, or 160, or 192, or
256, or 320kbps
Recording speed 1x, 4x
CDDB (CD recognition database)
internal Gracenote® /
online access enabled
* Actual formatted capacity will be less
USB player
USB 12Mb/s,V1.1
(support MP3,WMA and
M4A files)
USB class MSC, MTP
Number of tracks/titles maximum 9999
Page 88

General
AC Power 230V ±10%
Dimensions (w x h x d)
387x272x128mm
Weight (Net) approx. 3.6kg
Power consumption
Active <25W
Standby < 20W
Eco Power Standby < 1W
Amplifier
Output power 2x7.5+15W(RMS)
Frequency response 60-20,000Hz, - 3dB
Signal-to-noise ratio 72 dBA (IEC)
Speakers
Full range
Power 10W RMS / 15W music
Frequency response 150Hz - 20 KHz
Sensitivity 75 dB / m / W
Impedance 4 Ω (Ohms)
Dimensions (w x h) 75 x 75 mm
W
oofer
Power 10W RMS / 15W music
Frequency response 120Hz - 400Hz
Sensitivity 77dB / m / W
Impedance 14 Ω (Ohms)
Dimensions (Ø) 64mm
Impedance 12 Ω (Ohms)
Headphones
Impedance 16-150 Ω (Ohms)
Input sensitivity
AUX IN 500mV
Wireless
Wireless standard 802.11g, backwards
compatible to 802.11b
Wireless security WEP (64 or 128
bit),WPA/WPA2 (8-63
characters)
Frequency range 2412-2462MHz (CH1-
CH11)
Wired (LAN / Ethernet)
Wired standard 802.3 / 802.3u
Speed 10 / 100MBit/s
Mode half / full duplex
Crossover detection (Auto MDIX)
Ye s
Tuner
FM wave range 87.5-108MHz
Number of presets 60
FM antenna/cable COAX / Dipole-antenna
(75W IEC-connector)
HD player
Frequency range 60-20,000Hz, -3dB
Signal-to-noise ratio 72dBA (IEC)
MPEG 1 Layer 3 (MP3-CD)
MPEG AUDIO
MP3-CD bit rate 32-320kbps,VBR
WMA bit rate up to 160kbps
Sampling frequencies 32, 44.1, 48kHz
USB player
USB 12Mb/s,V1.1
(support MP3,WMA and
M4A files)
USB class MSC, MTP
Number of tracks/titles maximum 9999
Specifications and external appearance
are subject to change without notice.
Technical data
84
16.2 Station
Page 89

17 Frequently asked questions
Attention!
• Never try to repair the system yourself as this will invalidate the warranty. Do not open the
system as there is a risk of electric shock.
• If a fault occurs, first check the points listed below before taking the system for repair. If you
are unable to resolve a problem by following these hints, consult your dealer or Philips for
help.
Frequently asked questions
85
ENGLISH
Problem Solution
During the first-time setup, the
display on shows ‘Searching for
Center’.
• Check that you have placed and side by
side on a level and sturdy surface.
• Check that you have connected to the power
supply.
• When adding a new , check that is in
Installation mode (see 11.1 Network settings:
Add Stations to Wi-Fi network of Center ).
• Turn off any nearby wireless access points if you
encounter difficulty connecting and .
Page 90

Frequently asked questions
86
Problem Solution
I get interference on my wireless
(Wi-Fi) link between and .
The WACS7500 operates in the 2.4GHz
radio frequency spectrum. Many other
household/IT devices also operate in this
frequency spectrum, for example:
microwave ovens, Dect phones, bluetooth
devices like bluetooth headphones,
computer mouses, wireless routers,
cordless phones,Wi-Fi compatible
printers, PDAs.These devices can
interfere with the Wi-Fi link between
and , resulting in interference such as
pause during playback, slow response to
my operation, etc.The severity of
interference varies depending on the
extent of radiation from the device and
the strength of Wi-Fi signals in that
position.
• If you are playing the set, stop playback and take the
appropriate measures as follows:
• Keep or at least 3 meters away from such
devices.
• Use the WEP/WPA key when connecting and
to an existing wireless PC network.To set
WEP/WPA key, connect / to your PC using
Philips Wireless Audio Device Manager (WADM) in
the supplied PC Suite CD. In the WADM device
configuration, enter the Wireless Network submenu,
and in Device Wireless Authentication Type, select
WEP or WPA.
• Change operating channel of and when
connecting them to an existing wireless PC network.
To change channels, connect / to your PC
using Philips Wireless Audio Device Manager
(WADM) in the supplied PC Suite CD. In the
WADM Device configuration, enter the SSID of your
Wireless Network, and select ad-hoc mode. See the
section
12 Connect to your PC and the WADM
help file.
• If possible, change the operating channels of the
other Wi-Fi devices in your home.
• Turn the devices in different directions to minimize
interference.
Stations react when you operate the
remote control of .
• The remote control for is powerful enough to
operate several within a certain distance or
angle. Check that you have placed in different
rooms or place them at different angles.
• Use the remote control for or the controls on
the set.
‘x’ flashes on the synchronous
display of the remote control of .
Signal error. Check that you have pointed the remote
control towards the IR sensor of the set you wish to
operate.
Page 91

Frequently asked questions
87
ENGLISH
Problem Solution
Nothing appears on the synchronous
display of the 2-way remote control
of even after the set is switched
on.
You have switched on the set with the y button on
the set and not the y button on the 2-way remote
control. Press REFRESH on center’s 2-way remote
control to synchronize its display.
The remote control does not
function properly.
• Reduce the distance between the remote control
and the set.
• Insert the batteries with correct polarity (+/- as
indicated inside the compartment).
• Replace the batteries.
• Point the remote control directly towards the IR
sensor.
The screen of is stuck in a menu
or shows no response for a long
period of time (2-5 minutes).
Please first try to press y to go to power-saving mode.
If the problem persists, restart the power (disconnect
and reconnect the mains plug) to reset .
‘No Disc’ / ‘Cannot read CD’ is
displayed.
• Insert a suitable disc.
• Check if the disc is inserted with the graphics side
(label) facing you.
• Wait for the moisture condensation on the lens to
clear.
• Replace or clean the disc, see 1.5 Maintenance.
• Use a finalized CD-RW or CD-R.
Sound cannot be heard or is of poor
quality.
• Adjust the volume.
• Disconnect the headphones.
• Switch off MUTE.
The disc skips tracks. • Replace or clean disc.
• Switch off SHUFFLE.
Sound skips during MP3/WMA
playback.
• The MP3/WMA file may be made at a compression
level exceeding 320kbps. Use a lower compression
level to rip audio CD tracks.
• Replace or clean disc.
Page 92

Frequently asked questions
88
Problem Solution
Some files on the USB device are
not displayed.
• Check if the number of folders exceeds 99 or the
number of titles exceeds 999.
• Only completely recorded MP3/WMA files can be
found and played by WACS7500. Check if the file has
been recorded completely.
• DRM-protected WMA files cannot be played on
WACS7500.
Radio reception is poor. • If the signal is too weak, adjust the antenna or
connect an external antenna for better reception.
• Increase the distance between the set and your TV
or VCR.
There is interference on the radio
reception whenever the or is
near my PC. (Such interference
happens to most built-in tuner
products.)
• Install the supplied FM wire antenna for better
reception.
• Keep or at least 1 meter away from your
PC.
How do I mount to the wall? Use the supplied wall mounting kit for Station. It is
recommended that you consult qualified personnel to
mount the bracket safely to your wall before you
install Station. For details, refer to Appendix: How to
mount Station ( ) to a wall.
Some WADM functions cannot be
used.
Your anti-virus software might affect the running of the
WADM.Turn off your anti-virus software temporarily.
I edited ID3 tags in WADM, but the
screen does not show the updated
ID3 tags.What shall I do?
• Go to File > Refresh Content to refresh the
WADM.
• Restart WADM.
Backup function no longer works. The previously backed up file was deleted in Windows
Explorer. Do not delete the file this way. If you want to
delete the backup file, please use WADM to manage. If
the backup file is accidentally deleted, please find the
file named YOURMAC.inx by using your Explorer
search tool and then delete it. Only after that you can
do backups again.
Page 93

Frequently asked questions
89
ENGLISH
Problem Solution
I have problems installing WADM or
launching WADM after installation.
• Please make sure your Operating System is either
Windows 2000 with Service Pack 4 and above, or
Windows XP.
• Please check if your PC has a virus.
• Please make sure your PC has the Microsoft
Windows Media Player installed.
Wireless upgrade of failed. Upgrade via Ethernet cable (not supplied) following
steps below:
1 Connect to your PC via an Ethernet cable (not
supplied) and power on the Station.
2 Download the firmware upgrade file specified for
.
3 Launch WADM and click Firmware upgrade.
4 Follow the on-screen information to complete the
remaining steps.
Page 94

Frequently asked questions
90
Problem Solution
I have done all the steps described in
Connect to PC guide to connect my
WACS7500 to my home wireless
network, but and are still
not connected to each other.
• On , go to Menu > Information > Wireless
> Status. Check that has been changed from
ad-hoc to infrastructure mode.Also check that the
SSID, WEP key, or WPA key matches the setup of
your wireless home network. Do the same on .
• Try to change the SSID on your router to a more
unique name if it is too generic, as your neighbors
might be using a router with the same SSID.
• WACS7500 supports wireless and wired connection
at the same time.There is a chance that your
wireless IP address and wired IP address are on the
same subnet and this will confuse WACS7500.
Suggest to change the DHCP range of your wireless
router so that the wireless IP received by
WACS7500 is on a different subnet from its wired
IP.
• You may have forgotten to set up the wireless
network settings on . If you have not done so,
follow the section 12 Connect to PC on how to
set up to join the network.
• Try to change the channel of your home network
settings on the router.
• On your router, we suggest that you use WPA key
instead of WEP key. When you use WEP as your
encryption key, set all 4 keys to be the same.
• Make sure that the Turbo mode of your wireless
router is switched off (if your router is has this
function).
I see the message ‘Check the
internet setup for CD Database online’ even though I am sure that the
WACS7500 is connected to my
home wireless network with
internet connection.
• Go to Menu > Network > Internet to check if
your DNS server is correctly set up. Also make sure
that you have set up the proxy server if your home
wireless network needs a proxy server for internet
connection.
• There is a chance that you are already successfully
connected to Gracenote® online, but your CD is
not in their database.
Page 95

18 Appendix
18.1 How to mount Station ( ) to a wall
Mount and use free standing.
18.1.1 What’s in the supplied mounting kit
1 x mounting bracket for
2 x screws
18.1.2 What else you’ll need
• Suitable screws and wall anchors for each of the holes in the provided mounting bracket.
• Electric drill
• Screwdriver
Appendix
91
ENGLISH
Important!
• The wall mounting instructions are intended for qualified installation personnel only!
• Request for qualified installation personnel to carry out the wall mounting which includes
drilling the holes, fixing the bracket, and mounting to the bracket.
Page 96

18.1.3 Preparation
Try the necessary rear connections and the Wi-Fi connections between AND in order to
find a suitable location for installation/mounting (see 3 Installation).
18.1.4 Mounting Station
You can mount Station to the wall using the provided bracket.
1 Align the bracket in the chosen location on a wall. Use a pencil to mark the drilling positions.
2 Drill the holes as marked.
3 Fix the bracket to the wall using suitable screws (not provided) and wall anchors (not provided)
for all the holes provided in the wall mounting bracket.
4 Use a screwdriver and fasten the supplied screws to as shown.
5 Hook / mount in place as shown.
Important!
To avoid the risk of injury and damage to property as well as to the product:
• Check for supply lines (gas, water, electricity, etc.) before drilling holes.
• Assess the type of screws necessary to bear Station.
• Choose the right drill and bit for the type of wall to drill the holes.
• Take all other precautions to be observed when carrying out this type of mounting/installation
job.
Appendix
92
Page 97

End-User License Agreement
USE OF THIS PRODUCT IMPLIES ACCEPTANCE OF THE TERMS BELOW
Gracenote® MusicID® Terms of Use
This device contains software from Gracenote, Inc. of Emeryville, California (‘Gracenote’).The
software from Gracenote (the ‘Gracenote Software’) enables this application to carry out online disc
identification and obtain music related information, including name, artist, track, and title information
(‘Gracenote Data’) from online servers (‘Gracenote Servers’) and to perform other functions.You
may use Gracenote Data only by means of the intended end user functions of this device.
You agree that you will use Gracenote Data, the Gracenote Software, and Gracenote Servers for
your own personal non commercial use only.You agree not to assign, copy, transfer, or transmit the
Gracenote Software or any Gracenote Data to any third party.YOU AGREE NOT TO USE OR
EXPLOIT GRACENOTE DATA,THE GRACENOTE SOFTWARE, OR GRACENOTE SERVERS,
EXCEPT AS EXPRESSLY PERMITTED HEREIN.
You agree that your non exclusive license to use the Gracenote Data, the Gracenote Software, and
Gracenote Servers will terminate if you violate these restrictions. If your license terminates, you
agree to cease any and all use of the Gracenote Data, the Gracenote Software, and Gracenote
Servers. Gracenote reserves all rights in Gracenote Data, the Gracenote Software, and the
Gracenote Servers, including all ownership rights. Under no circumstances will Gracenote become
liable for any payment to you for any information that you provide.You agree that Gracenote, Inc.
may enforce its rights under this Agreement against you directly in its own name.
The Gracenote MusicID Service uses a unique identifier to track queries for statistical purposes.
The purpose of a randomly assigned numeric identifier is to allow the Gracenote MusicID service
to count queries without knowing anything about who you are. For more information, see the web
page for the Gracenote Privacy Policy for the Gracenote MusicID Service.
The Gracenote Software and each item of Gracenote Data are licensed to you ‘AS IS’. Gracenote
makes no representations or warranties, express or implied, regarding the accuracy of any
Gracenote Data from in the Gracenote Servers. Gracenote reserves the right to delete data from
the Gracenote Servers or to change data categories for any cause that Gracenote deems sufficient.
No warranty is made that the Gracenote Software or Gracenote Servers are error-free or that
functioning of Gracenote Software or Gracenote Servers will be uninterrupted. Gracenote is not
obligated to provide you with new enhanced or additional data types or categories that Gracenote
may provide in the future and is free to discontinue its online services at any time.
GRACENOTE DISCLAIMS ALL WARRANTIES EXPRESS OR IMPLIED, INCLUDING, BUT NOT
LIMITED TO, IMPLIED WARRANTIES OF MERCHANTABILITY, FITNESS FOR A PARTICULAR
PURPOSE,TITLE,AND NON-INFRINGEMENT. GRACENOTE DOES NOT WARRANT THE
RESULTS THAT WILL BE OBTAINED BY YOUR USE OF THE GRACENOTE SOFTWARE OR ANY
GRACENOTE SERVER. IN NO CASE WILL GRACENOTE BE LIABLE FOR ANY
CONSEQUENTIAL OR INCIDENTAL DAMAGES OR FOR ANY LOST PROFITS OR LOST
REVENUES.
© Gracenote 2006 Version 2.2
Page 98

Contact
information
Argentina (54-11) 4544-2047
Australia 1300 363 391
Austria 0810 000 205
Belgium 78250145
Belarus 882000110068
Brazil 0800 701 02 03 (all
except Sao Paulo)(11)
2121-0203 (Sao Paulo
only)
Bulgaria 8001154 424
Canada 1-888-744-5477
Chile 600 744 5477
(600-PHILIPS)
China 4008 800 008
Colombia 01 800 700 7445
Croatia 800222778
Czech Republic 800142840
Denmark 35258759
Estonia 8000100288
Finland 92 3113415
France 805025510
Germany 8000007520
Greece 800312 21280
Hong Kong 852-2619 9663
Hungary 680018189
India 186 0 -180-1111
Ireland 16011777
Israel 9600900-09
Italy 800088774
Japan 0570-07-6666
Korea 080-600-6600
Latvia 80002794
Luxembourg 4066615644
Malaysia 1800 880 180
Mexico 01 800 504 6200
Netherlands 8000230076
New Zealand 0800 658 224
Norway 22708111
Pakistan 051 580 902-3
Peru 0800 00100
Philippines (63 2) 667 9000
Poland 8003111318
Portugal 800780903
Romania 800894910
Russia Federation (495)961-1111 (local
rate)8-800-200-0880
(mobile phone - free)
Singapore 65 6882 3999
Slovakia 800004537
South Africa (011) 471-5194
Spain 900800655
Sweden 857929100
Switzerland 844800544
Taiwan 0800 231 099
Thailand 66 2 652 8652
Turkey 0800 261 3302
Ukraine 8-800-500-69-70
United Kingdom 80 03316015
United States 1-888-744-5477
Uruguay (598-2) 619 6666
Venezuela 0800 100 4888
94 EN
Page 99

GPL Package / LGPL Library written offers
This product contains
Linux Kernel (linux-2.4.27-vrs1)
Linux kernel drivers developed by NXP Semiconductors
ethtool
lsof
modutils
procps
smartmontools
libstdc++
libgcc
busybox
wireless_tools
made available under the GNU GPL license version 2 (hereafter called the
Program and the GNU LGPL license version 2.1 (hereafter called the
Library.
Philips Electronics Hong Kong Ltd. Hereby offers to deliver or make
available, upon request, for a charge no more than the cost of
physically performing source distribution, a complete machine-readable
copy of the corresponding source code of the Program or Library on a
medium customary used for software interchange. Please contact: Head of
Development BLC Audio PDCC Development 5/F., Philips Electronics
Building, 5 Science Part East Avenue, Hong Kong Science Park, Shatin,
Hong Kong.
This offer is valid for a period of three years after the date of
purchase of this product.
Copyright (C) 1989, 1991 Free Software Foundation, Inc.,
51 Franklin Street, Fifth Floor, Boston, MA 02110-1301 USA
Everyone is permitted to copy and distribute verbatim copies
of this license document, but changing it is not allowed.
The licenses for most software are designed to take away your
freedom to share and change it. By contrast, the GNU General Public
License is intended to guarantee your freedom to share and change free
software--to make sure the software is free for all its users. This
General Public License applies to most of the Free Software
Foundation's software and to any other program whose authors commit to
using it. (Some other Free Software Foundation software is covered by
the GNU Lesser General Public License instead.) You can apply it to
your programs, too.
When we speak of free software, we are referring to freedom, not
price. Our General Public Licenses are designed to make sure that you
have the freedom to distribute copies of free software (and charge for
this service if you wish), that you receive source code or can get it
if you want it, that you can change the software or use pieces of it
in new free programs; and that you know you can do these things.
To protect your rights, we need to make restrictions that forbid
anyone to deny you these rights or to ask you to surrender the rights.
These restrictions translate to certain responsibilities for you if you
distribute copies of the software, or if you modify it.
GNU GENERAL PUBLIC LICENSE
Version 2, June 1991
Preamble
Page 100

For example, if you distribute copies of such a program, whether
gratis or for a fee, you must give the recipients all the rights that
you have. You must make sure that they, too, receive or can get the
source code. And you must show them these terms so they know their
rights.
We protect your rights with two steps: (1) copyright the software, and
(2) offer you this license which gives you legal permission to copy,
distribute and/or modify the software.
Also, for each author's protection and ours, we want to make certain
that everyone understands that there is no warranty for this free
software. If the software is modified by someone else and passed on, we
want its recipients to know that what they have is not the original, so
that any problems introduced by others will not reflect on the original
authors' reputations.
Finally, any free program is threatened constantly by software
patents. We wish to avoid the danger that redistributors of a free
program will individually obtain patent licenses, in effect making the
program proprietary. To prevent this, we have made it clear that any
patent must be licensed for everyone's free use or not licensed at all.
The precise terms and conditions for copying, distribution and
modification follow.
TERMS AND CONDITIONS FOR COPYING, DISTRIBUTION AND MODIFICATION
0. This License applies to any program or other work which contains
a notice placed by the copyright holder saying it may be distributed
under the terms of this General Public License. The "Program", below,
refers to any such program or work, and a "work based on the Program"
means either the Program or any derivative work under copyright law:
that is to say, a work containing the Program or a portion of it,
either verbatim or with modifications and/or translated into another
language. (Hereinafter, translation is included without limitation in
the term "modification".) Each licensee is addressed as "you".
Activities other than copying, distribution and modification are not
covered by this License; they are outside its scope. The act of
running the Program is not restricted, and the output from the Program
is covered only if its contents constitute a work based on the
Program (independent of having been made by running the Program).
Whether that is true depends on what the Program does.
1. You may copy and distribute verbatim copies of the Program's
source code as you receive it, in any medium, provided that you
conspicuously and appropriately publish on each copy an appropriate
copyright notice and disclaimer of warranty; keep intact all the
notices that refer to this License and to the absence of any warranty;
and give any other recipients of the Program a copy of this License
along with the Program.
You may charge a fee for the physical act of transferring a copy, and
you may at your option offer warranty protection in exchange for a fee.
2. You may modify your copy or copies of the Program or any portion
of it, thus forming a work based on the Program, and copy and
distribute such modifications or work under the terms of Section 1
above, provided that you also meet all of these conditions:
a) You must cause the modified files to carry prominent notices
stating that you changed the files and the date of any change.
GNU GENERAL PUBLIC LICENSE
 Loading...