

Page 1
Wireless Music
Center + Station
THANK YOU FOR CHOOSING PHILIPS!
NEED HELP FAST?
Read your Quick-Use guide and/or owner's manual first for quick tips
that make using your Philips product more enjoyable. If you have read
your instructions and still need assistance,
you may access our online help at
or call
1-888-PHILIPS(744-5477)
product, (and model/serial number).
User manual
Manuel d'utilisation
Manual del usuario
WA
www.usasupport.philips.com
while with your
CS5
WACS5_Eng/37 8/3/2005, 15:121
Page 2
2
WACS5_Eng/37 8/3/2005, 15:122
Page 3

1 2 3 4 5
STOP•MENU
# @
WACS5_Eng/37 8/3/2005, 15:123
! 0 9 8 7 6
Page 4
1
2
3
4
5
6
4
WACS5_Eng/37 8/3/2005, 15:124
Page 5
Visit our World Wide Web Site at http://www.usasupport.philips.com
Congratulations on your purchase,
and welcome to the “family!”
Dear PHILIPS product owner:
Thank you for your confidence in PHILIPS. You’ve selected one of
the best-built, best-backed products available today. We’ll do everything in our power to keep you happy with your purchase for many
years to come.
As a member of the PHILIPS “family,” you’re entitled to protection
by one of the most comprehensive warranties and outstanding service networks in the industry. What’s more, your purchase guarantees you’ll receive all the information and special offers for which
you qualify, plus easy access to accessories from our convenient
home shopping network.
Most importantly, you can count on our uncompromising commitment to your total satisfaction.
All of this is our way of saying welcome - and thanks for investing in
a PHILIPS product.
P.S. To get the most from your PHILIPS purchase, be
sure to complete and return your Product Registration
Card at once.
WACS5_Eng/37 8/3/2005, 15:125
Page 6
IMPORTANT SAFETY INSTRUCTIONS
Clean only with a piece of dry cloth.
6
WACS5_Eng/37 8/3/2005, 15:126
materials
Class II equipment symbol
This symbol indicates that the unit has
a double insulation system
Page 7

The set complies with the FCC-Rules,
Part 15 and with RSS-210 of Industry
Canada.
Operation is subject
to the following two conditions:
1. this device may not cause harmful
interference, and
2. this device must accept any interference
received, including interference that may
cause undesired operation.
This equipment has been tested and found to
comply with the limits for a Class B digital
device, pursuant to Part 15 of the FCC Rules.
Philips
WACS5
These limits are designed to provide reasonable
protection against harmful interference in a
residential installation. This equipment generates,
uses, and can radiate radio frequency energy
and, if not installed and used in accordance with
the instructions, may cause harmful interference
to radio communications. However, there is no
guarantee that interference will not occur in a
particular installation. If this equipment does
cause harmful interference to radio or television
reception, which can be determined by turning
the equipment off and on, the user is
encouraged to try to correct the interference
by one or more of the following measures:
IMPORTANT NOTE:
FCC Radiation Exposure Statement:
This equipment complies with FCC radiation
exposure limits set forth for an uncontrolled
environment. This equipment should be installed
and operated with minimum distance 20cm
between the radiator and your body. This
transmitter must not be co-located or operating
in conjunction with any other antenna or
transmitter.
– Reorient or relocate the receiving antenna.
– Increase the separation between the
equipment and the receiver.
– Connect the equipment into an outlet on a
circuit different from that to which the
receiver is connected.
– Consult the dealer or an experienced radio/
TV technician for help.
WACS5_Eng/37 8/3/2005, 15:127
Page 8
LGPL Library written offer
This product contains Linux 2.4.27-vrsl, that is made available under the GNU LGPL license version 2.1
(hereafter called "the Library").
Philips Electronics Hong Kong Ltd. hereby offers to deliver or make available, upon request, for a charge
no more than the cost of physically performing source distribution, a complete machine-readable
copy of the corresponding source code of the Library on a medium customarily used for software
interchange.
Please contact:
Mr. Bin Li
BLC Audio PDCC Development
5/F., Philips Electronics Building
5 Science Park East Avenue
Hong Kong Science Park
Shatin Hong Kong
This offer is valid for a period of three years after the date of purchase of this product.
GPL Package written offer
This product contains Linux 2.4.27-vrsl, that is made available under the GNU GPL license version 2
(hereafter called "the Program").
Philips Electronics Hong Kong Ltd. hereby offers to deliver or make available, upon request, for a charge
no more than the cost of physically performing source distribution, a complete machine-readable
copy of the corresponding source code of the Program on a medium customarily used for
software interchange.
Please contact:
Mr. Bin Li
BLC Audio PDCC Development
5/F., Philips Electronics Building
5 Science Park East Avenue
Hong Kong Science Park
Shatin Hong Kong
This offer is valid for a period of three years after the date of purchase of this product.
8
WACS5_Eng/37 8/3/2005, 15:128
Page 9
Index
English ------------------------------------------------ 8
Français -------------------------------------------- xx
Español --------------------------------------------- xx
English
Français
Español
Canada
English: (Canadian ICES-003)
This digital apparatus does not exceed the Class
B limits for radio noise emissions from digital
apparatus as set out in the Radio Interference
Regulations of the Canadian Department of
Communications.
Français: (La norme NMB-003 du Canada)
Cet appareil numérique n'émet pas de bruits
radioélectriques dépassant les limites applicables
aux appareils numériques de Classe B prescrites
dans le Règlement sur le Brouillage
Radioélectrique édicté par le Ministère des
Communications du Canada.
WACS5_Eng/37 8/3/2005, 15:129
9
Page 10
Contents
English
General Information
About WACS5 ................................................... 11
Supplied accessories .......................................... 11
Philips on-line support ...................................... 12
Environmental information .............................. 13
Maintenance ........................................................ 13
Safety information .............................................. 13
Controls
Controls on the Center ................................... 14
Controls on the Station .................................... 15
Center’s 2-way remote control ................ 16-17
Station’s remote control ............................. 17-18
Installation
Placing Center and Station ............................... 20
Inserting stand into Station
Setting up Wi-Fi connection
between Center and Station ..................... 20-21
Rear connections ......................................... 21-22
Using AC power ................................................. 23
Connecting to an additional appliance with
powerful speakers
Connecting to your PC
Connecting an additional appliance
HD
Playing Harddisk(HD)........................................ 27
Selecting and searching ............................... 27-28
Selecting a different album or track
Finding a passage within a track during playback
Selecting tracks of a particular artist
Selecting tracks of a particular genre
Different play modes: REPEAT, SHUFFLE ...... 28
Creating Playlist: custom collection of your
favorite music ...................................................... 29
Deleting a playlist, album or track .................. 29
Building music library on Center .............. 30-31
Ripping CDs
Importing from PC
Recording from Radio or External source
Display track information ................................. 32
Moving between Center and Station ....... 32-33
MUSIC FOLLOWS ME
MUSIC BROADCAST
Station mangagement ........................................ 34
Adding a station
Deleting a station
Viewing station status
Information about your WACS5 ..................... 34
Firmware ........................................................ 34-35
Upgrading firmware
Restoring previous firmware
Re-establishing Wi-Fi connection
Preparation
Using the remote control ................................ 24
Putting batteries in place
Using Center’s remote control
Using the navigation controls .......................... 24
Basic Functions
Switching to standby/on and
selecting functions .............................................. 25
Switch to Eco power/ on.................................. 25
Auto-standby ....................................................... 25
Adjusting the brightness of blue indicator ... 25
Display adjustment ............................................. 26
Selecting languages ............................................. 26
CD (on center only)
Discs for playback .............................................. 36
Playing discs ................................................... 36-37
Selecting and searching ..................................... 37
Selecting a different album/track
Finding a passage within a track during playback
Different play modes: REPEAT, SHUFFLE ...... 38
Display track information ................................. 38
AUX/UPnP/SLEEP
AUX (Listening to an external source, on
Center only) ........................................................ 39
UPnP (on Station only) ............................... 39-40
SLEEP .................................................................... 40
Reset
Reset ..................................................................... 41
Specifications ........................................... 42
Tr oubleshooting .............................. 43-44
WACS5_Eng/37 8/3/2005, 15:1210
Page 11
General Information
About WACS5
WACS5 are excellent addition to your home
audio system.
WACS5 comprise a WAC5 Center and a
WAS5 Station. Up to 5 Stations (WAS5 or
WAS700) can be connected to a WA C5
Center.
On WAC5’s 80GB* hard disk, you can centrally
store up to 1,500 audio CDs. All the stored
music can be wirelessly streamed, via Wi-Fi**,
from Center to connected Stations.
With this compact wireless music system, you
can fully utilize the sophisticated sound input and
speakers in your existing HiFi audio system.
WAC5 provides multiple choices of sound
output to maintain high quality sound.
No need to be bound to your CD player or PC
etc., or be troubled by the wiring. You can easily
listen to your favourite music around your home.
* Available storage capacity is based on 4 minutes per
song, 10 songs per CD on average, 128 kbps MP3
encoding and given the fact that operational software is
part of the product's memor y.
CAUTION
Use of controls or adjustments or
performance of procedures other than
herein may result in hazardous radiation
exposure or other unsafe operation.
CAUTION
Changes or modifications not expressly
approved by Philips could void FCC
authorization to operate this equipment.
English
Actual free space is X GB or less, due to the buffer
partition for MP3 compression, firmware, music CD
database and demo tracks stored.
** Wi-Fi, or IEEE802.11 b/g, is the international leading
industry standard for wireless broadband networking. It
transfers digital data with wider range and bandwidth.
WACS5_Eng/37 8/3/2005, 15:1211
Supplied accessories
– Center’s remote control and
4 x AAA batteries
– Station’s remote control with
1 x CR2025 battery
– Station’s stand
– DC 9V adaptor
–2 x Audio cables (for Center and Station)
–1 x Ethernet cable
– PC installer CD
Page 12

General Information
English
Philips on-line support
Philips products have been designed and manufactured to the highest quality
standards. If your Philips Connected Planet product is not working correctly, we
recommend you check your User Manual to verify that your product is properly
connected and configured.
The web site for Connected Planet support: www.philips.com/support offers
you all information you need to optimally enjoy your product, and about new
additions to this exciting range, to make your home entertainment experience even
more enjoyable.
Please visit: www.philips.com/support and enter your product name
(WACS5) to view:
● FAQ (Frequently Asked Questions)
● Latest user manuals and PC software manuals
● Firmware upgrade files for WACS5
● Latest PC software downloads
● Interactive troubleshooting
Since it is possible for you to upgrade your product, we recommend that you
register your product on www.philips.com/register so we can inform you as
soon as new free upgrades become available.
Enjoy your WACS5!
The model number is on the rear of the set.
WACS5_Eng/37 8/3/2005, 15:1212
Page 13

General Information
Environmental information
All unnecessary packaging has been omitted.
We have tried to make the packaging easy to
separate into three materials: cardboard (box),
polystyrene foam (buffer) and polyethylene (bags,
protective foam sheet).
Your system consists of materials which can be
recycled and reused if disassembled by a
specialized company. Please observe the local
regulations regarding the disposal of packaging
materials, exhausted batteries and old
equipment.
Disposal of your old product
Your product is designed and
manufactured with high quality materials
and components, which can be recycled
and reused.
When this crossed-out
wheeled bin symbol is
attached to a product it
means the product is
covered by the European
Directive 2002/96/EC
Please inform yourself about the local
separate collection system for electrical
and electronic products.
Please act according to your local rules
and do not dispose of your old products
with your normal household waste. The
correct disposal of your old product will
help prevent potential negative
consequences for the environment and
human health.
Maintenance
Cleaning the Set
● Use a soft cloth slightly moistened with a mild
detergent solution. Do not use a solution
containing alcohol, spirits, ammonia or abrasives.
Cleaning Discs
● When a disc becomes dirty,
clean it with a cleaning cloth.
Wipe the disc from the center
out.
● Do not use solvents such as
benzene, thinner, commercially
available cleaners, or antistatic spray intended for
analog records.
Safety information
● Place the set on a flat, hard and stable surface.
● Do not expose the system, batteries or discs to
excessive moisture, rain, sand or heat sources
caused by heating equipment or direct sunlight.
● Place the sets in a location with adequate
ventilation to prevent internal heat build-up in
your system. Allow at least 10 cm (4 inches)
clearance from the rear and the top of the unit
and 5 cm (2 inches) from each side.
● The ventilation should not be impeded by
covering the ventilation openings with items,
such as newspapers table-cloths, curtains, etc.
● The apparatus shall not be exposed to dripping
or splashing.
● No objects filled with liquids, such as vases, shall
be placed on the apparatus.
● No naked flame sources, such as lighted candles,
should be placed on the apparatus.
● The mechanical parts of the set contain self-
lubricating bearings and must not be oiled or
lubricated.
English
WACS5_Eng/37 8/3/2005, 15:1213
Page 14

English
Controls on the Center (Top and
front panels)
1
STANDBY-ON/ ECO POWER
– press briefly to switch Center on or
to standby mode;
– press and hold to switch Center to
Eco Power mode or on
– Green indicator: flashes during CD ripping /
MP3 conversion
2 Display
– shows status of Center
3 RECORD
– CD/AUX: starts the recording to hard disk
4 1 / 2 / 3 / 4
–navigation controls (left, right, up, down) to scroll
through the option list
1
– HD/CD: returns to previous option lists
3 / 4
– HD/CD: skips/searches tracks/passage
backward/forward (in playback screen);
fast scrolls the option list
2 / OK
– confirms selection
OK
– HD/CD: starts or pauses playback
– CD: selects or deselects tracks to be recorded
on hard disk
5 STOP • MENU
– stops playback or recording;
– enters or exits setup menu
6 MUSIC FOLLOWS ME
– HD: moves music playback between Center and
Station
7 IR
– sensor for the infrared remote control
Helpful hints: Always point the remote control
towards this sensor.
8 MUSIC BROADCAST
– HD: broadcast music from Center to Station
9 EJECT
– ejects a disc from the slot loader
0 CD slot loader
Controls (illustrations on page 3)
! Blue indicator
– lights up when the set is working or ready for
working
@ SOURCE
– selects sound source HD, CD or AUX
– In standby mode: switches Center on and selects
sound source HD, CD or AUX
# Wi-Fi antenna
WACS5_Eng/37 8/3/2005, 15:1214
Page 15
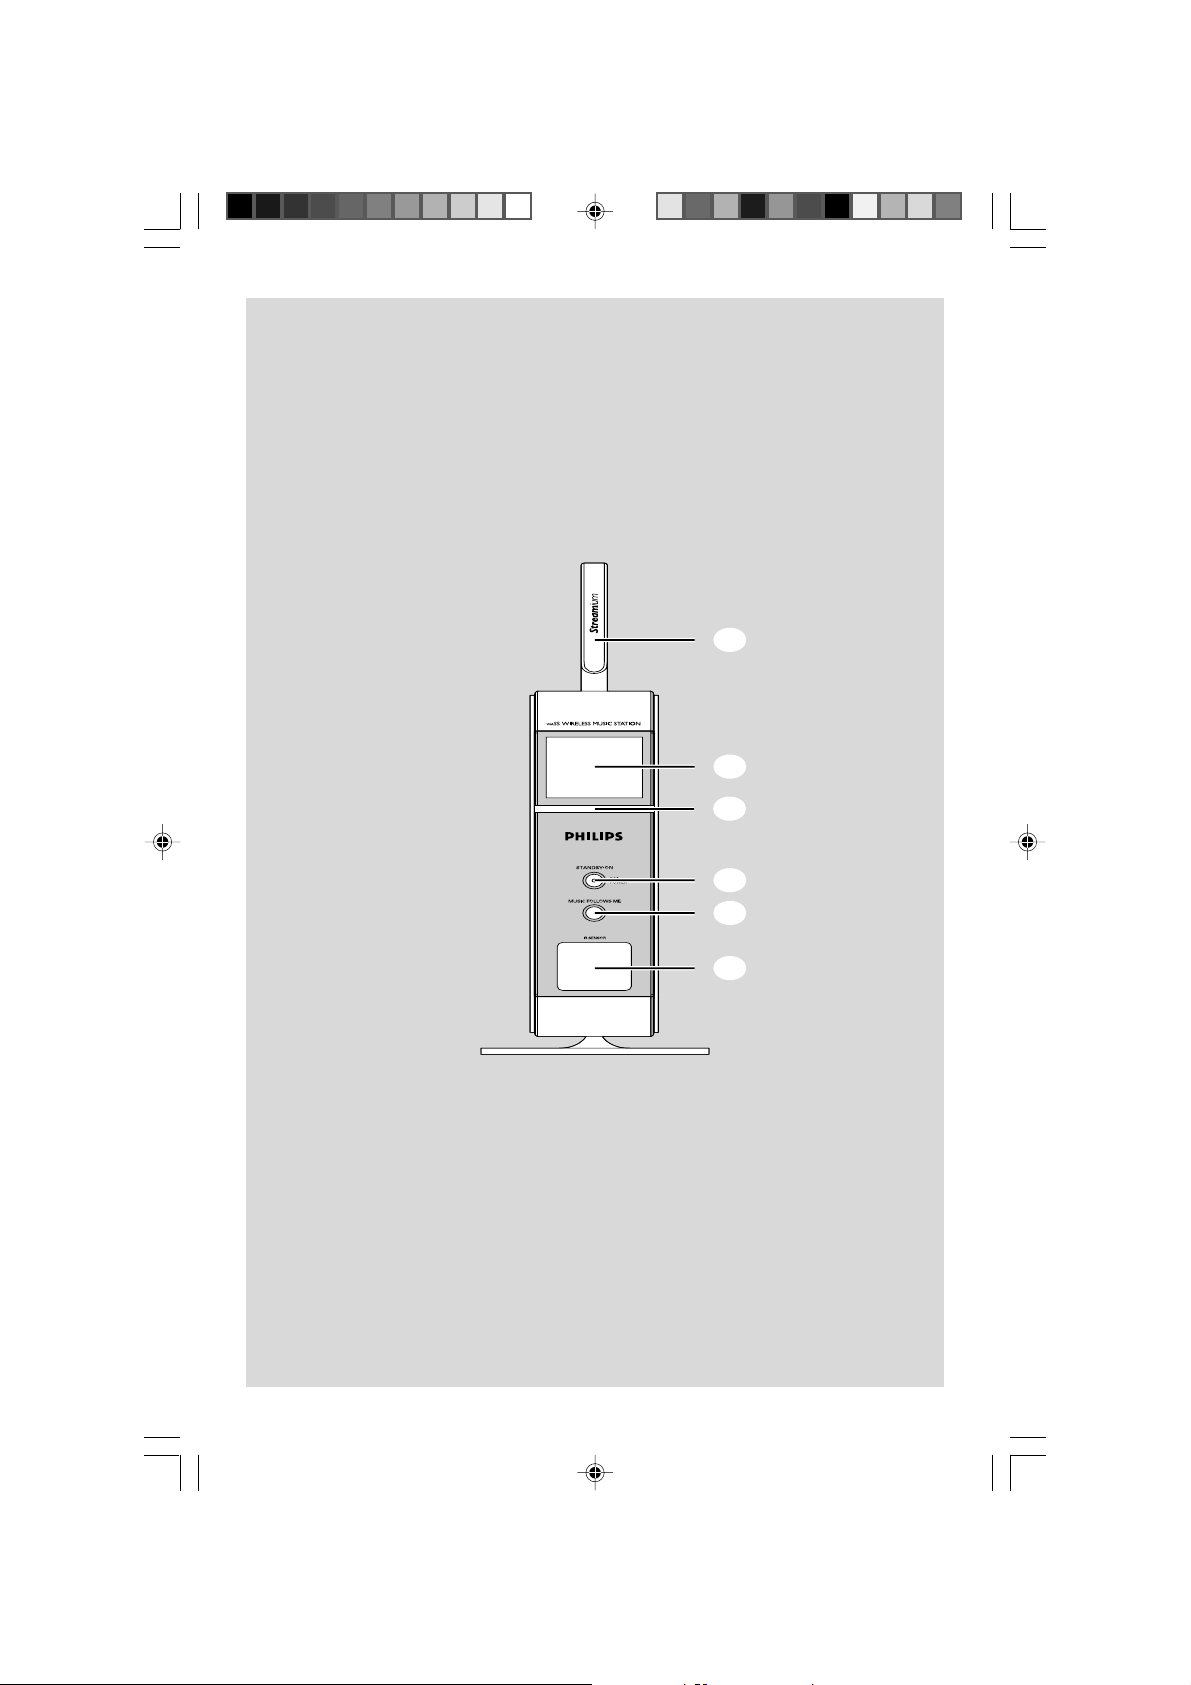
Controls on the Station ( front
panel)
1 Wi-Fi antenna
2 Display
– shows status of Station
3 Blue indicator
– lights up when the set is working or ready for
working
4 STANDBY-ON/ ECO POWER
– press briefly to switch Center on or
to standby mode ;
– press and hold to switch Center to
Eco Power mode or on
5 MUSIC FOLLOWS ME
– HD: moves music playback between Center and
Station or between Station and Station
6 IR
– sensor for the infrared remote control
Helpful hints: Always point the remote control
towards this sensor.
Controls (illustrations on page 4)
English
WACS5_Eng/37 8/3/2005, 15:1215
Page 16
English
SMART EQ
Center’s 2-way remote control
¡
)
(
5
*
&
^
%
$
SMART EQ
SAME ARTIST
IMPORTANT!
This remote control can be also used for
some other Philips’ wireless music systems
(e.g. WAC700, WAS700), which provide
features different from WAC5/WAS5. So,
some of the functional keys are exclusively
used for those systems.
1
2
3
4
5
6
7
8
9
0
!
@
#
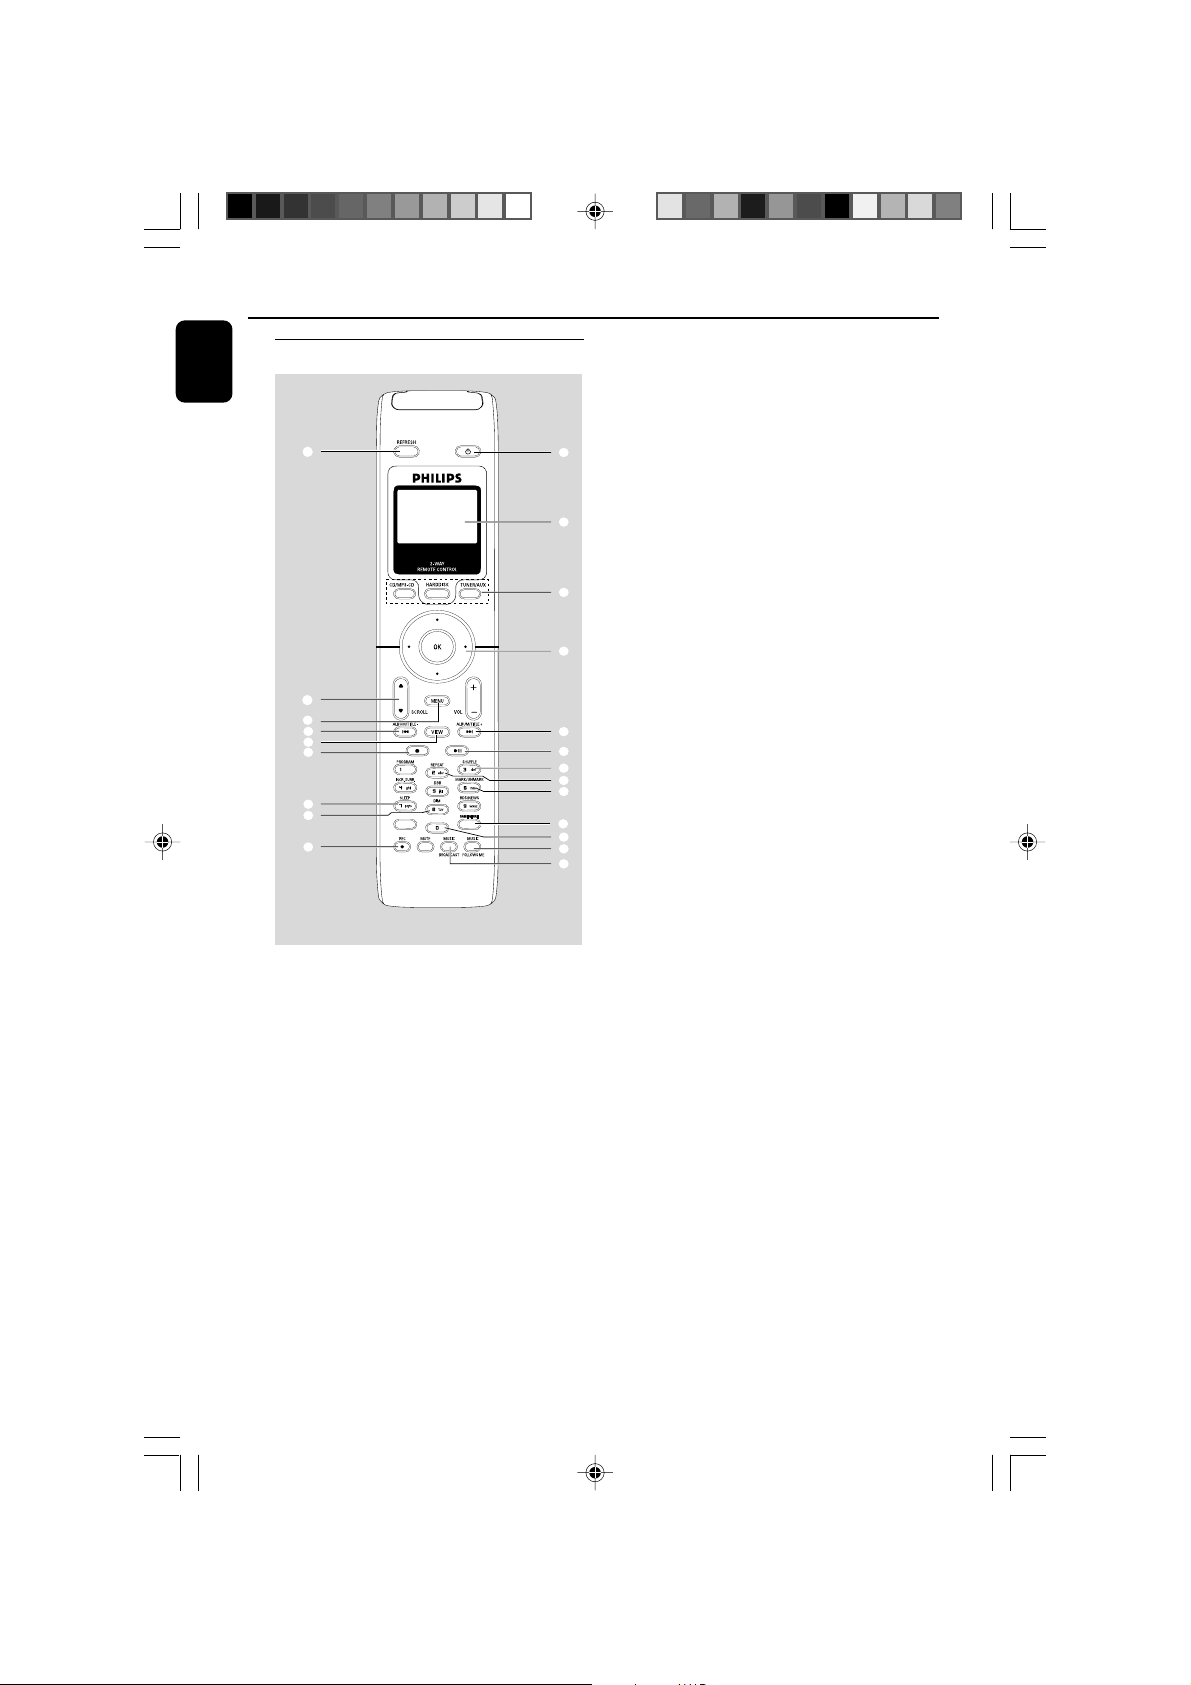
Controls
1 y
– press briefly to switch the set to standby mode
– press and hold to switch the set to Eco Power
mode or on
2 Synchro display
– synchronous display of the set’s status
3 Source buttons
CD/MP3-CD
– selects CD source
– In standby mode: switches the set on and selects
CD source.
HARDDISK
– selects HD source
– In standby mode: switches the set on and selects
HD source
TUNER/AUX
– selects the audio input from an additional
connected appliance
– In standby mode: switches the set on and selects
the audio input from an additional connected
appliance
4 1 / 2 / 3 / 4
–navigation controls (left, right, up, down) to scroll
through the option list
1
– HD/CD: returns to previous option lists
3 / 4
– HD/CD: skips/searches tracks/passage backward/
forward (in playback screen); fast scrolls the
option list
2 / OK
– confirms selection
5 4 / ¢
– HD/CD: skips/searches tracks/passage
backward/forward (in playback screen)
6 ÉÅ
– HD/CD: starts or pauses playback
7 SHUFFLE
– selects random playback
8 REPEAT
– selects continuous playback
9 MARK/UNMARK
– CD: selects or deselects tracks to be recorded
on hard disk
WACS5_Eng/37 8/3/2005, 15:1216
Page 17
Controls
Same Artist Same Genre
Smart EQ
$
#
@
!
9
0
1
4
7
6
5
2
3
8
0 SAME GENRE
– HD: plays all the tracks of current Genre
! SAME ARTIST
– HD: plays all the tracks of current Artist
@ MUSIC FOLLOWS ME
– HD: moves music playback between Center and
Station or between Station and Station
# MUSIC BROADCAST
– HD: broadcasts music from Center to Station
$ REC
– CD/AUX: starts the recording to hard disk
% DIM
– changes the brightness of display illumination
^ SLEEP
– ajusts/displays/switches off sleep timer
& Ç
– stops playback or recording
* VIEW
– toggles playback screen and previous option list
( MENU
– enters or exits setup menu
) 3 / 4 SCROLL
– scroll the display screen upward or downward
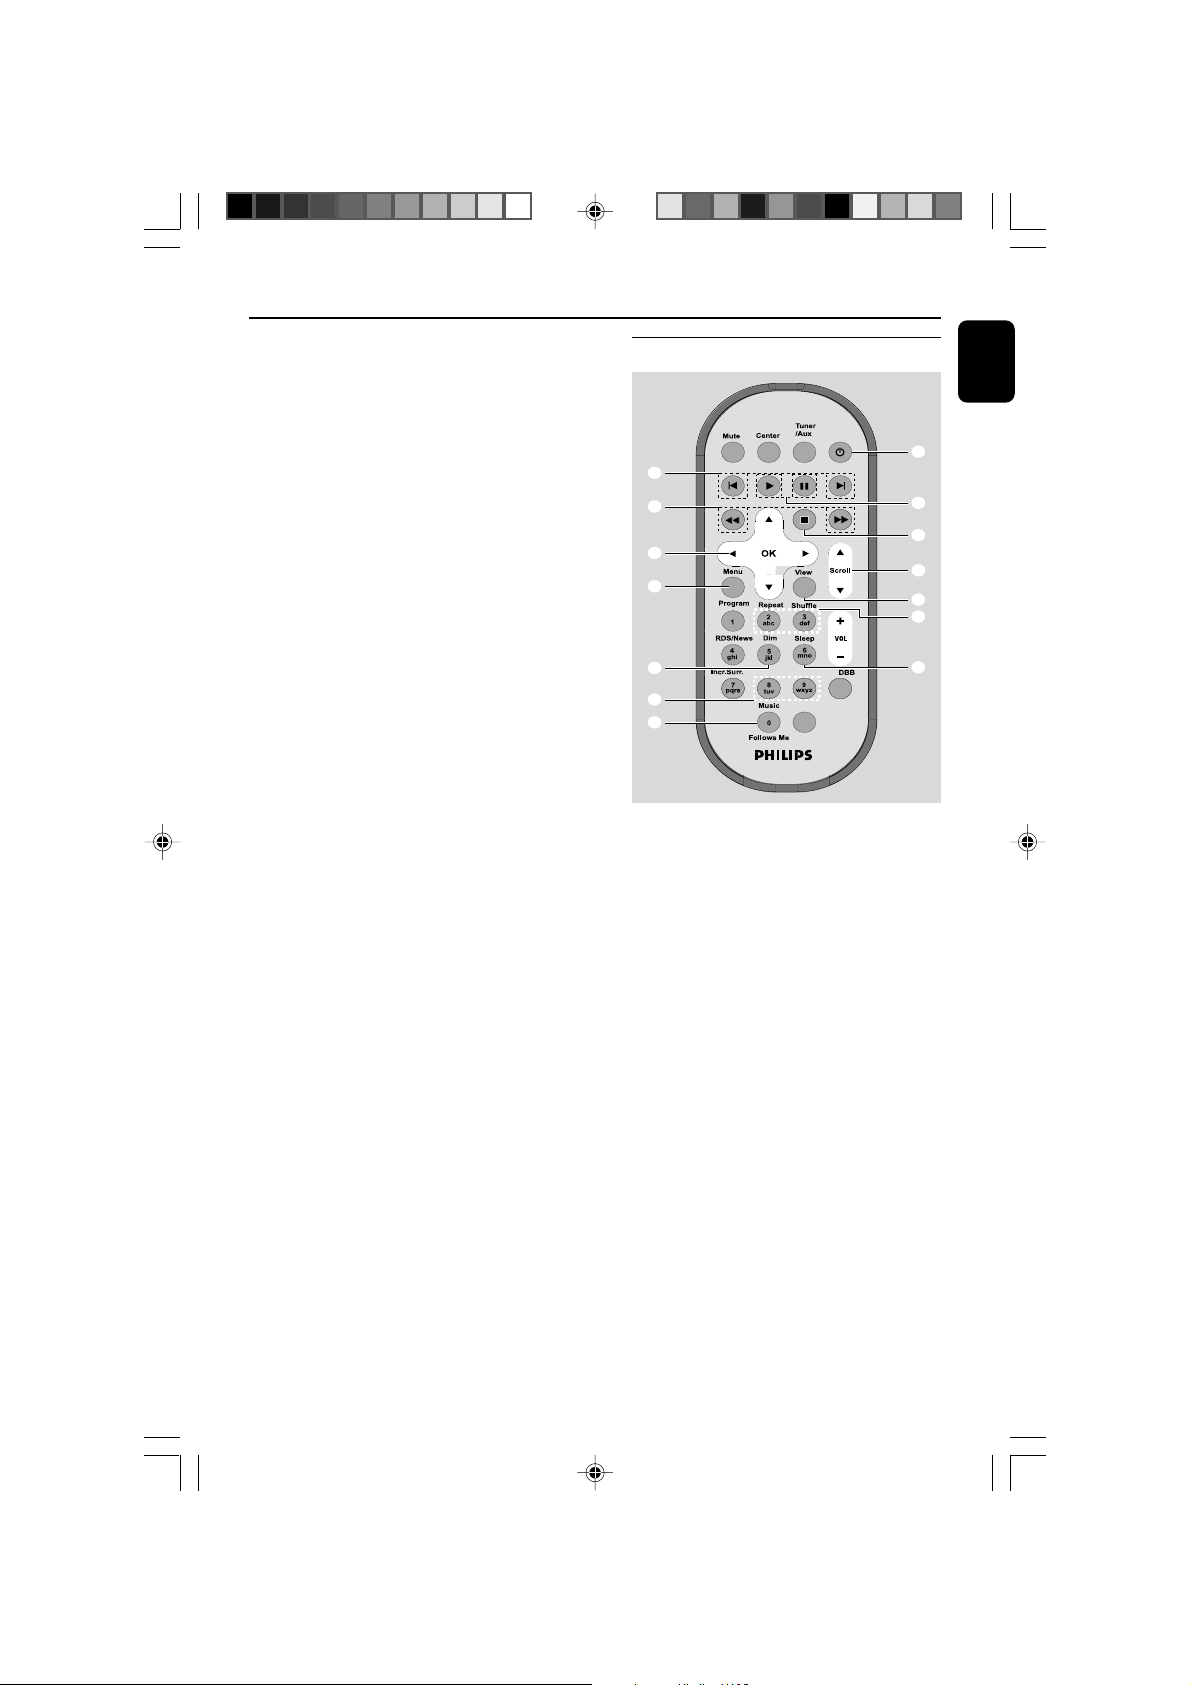
Station’s remote control
English
1 y
– press briefly to switch the set to standby mode
– press and hold to switch the set to Eco Power
mode or on
2 2
– HD/CD: starts playback
Å
– HD/CD: pauses playback
¡ REFRESH
– sychronize remote control’s display
with the set’s display
3 Ç
– stops playback or recording
4 3 / 4 Scroll
– scroll the display screen upward or downward
5 View
– toggles playback display and previous option list
6 Repeat
– selects continuous playback
Shuffle
– selects random playback
7 Sleep
– ajusts/displays/switches off sleep timer
WACS5_Eng/37 8/3/2005, 15:1217
Page 18
English
8 Music Follows Me
– HD: moves music playback between Center and
Station or between Station and Station
9 Same Artist
– HD: plays all the tracks of current Artist
Same Genre
– HD: plays all the tracks of current Genre
0 Dim
– changes the brightness of display illumination
! Menu
– enters or exits setup menu
@ 1 / 2 / 3 / 4
–navigation controls (left, right, up, down) to scroll
through the option list
1
– HD/CD: returns to previous option lists
3 / 4
– HD/CD: skips/searches tracks/passage
backward/forward (in playback screen); fast
scrolls the option list
2 / OK
– confirms selection
# à / á
– HD/CD: searches track passage backward/
forward (in playback screen)
$ O, P
– HD/CD: skips tracks backward/forward (in
playback screen)
Controls
WACS5_Eng/37 8/3/2005, 15:1218
Page 19
Installation
OPTICAL OUT
DIGITAL OUT
English
AC power cord
Center
LINE OUT
DC
WACS5_Eng/37 8/3/2005, 15:1219
Station
Page 20
English
Placing Center and Station
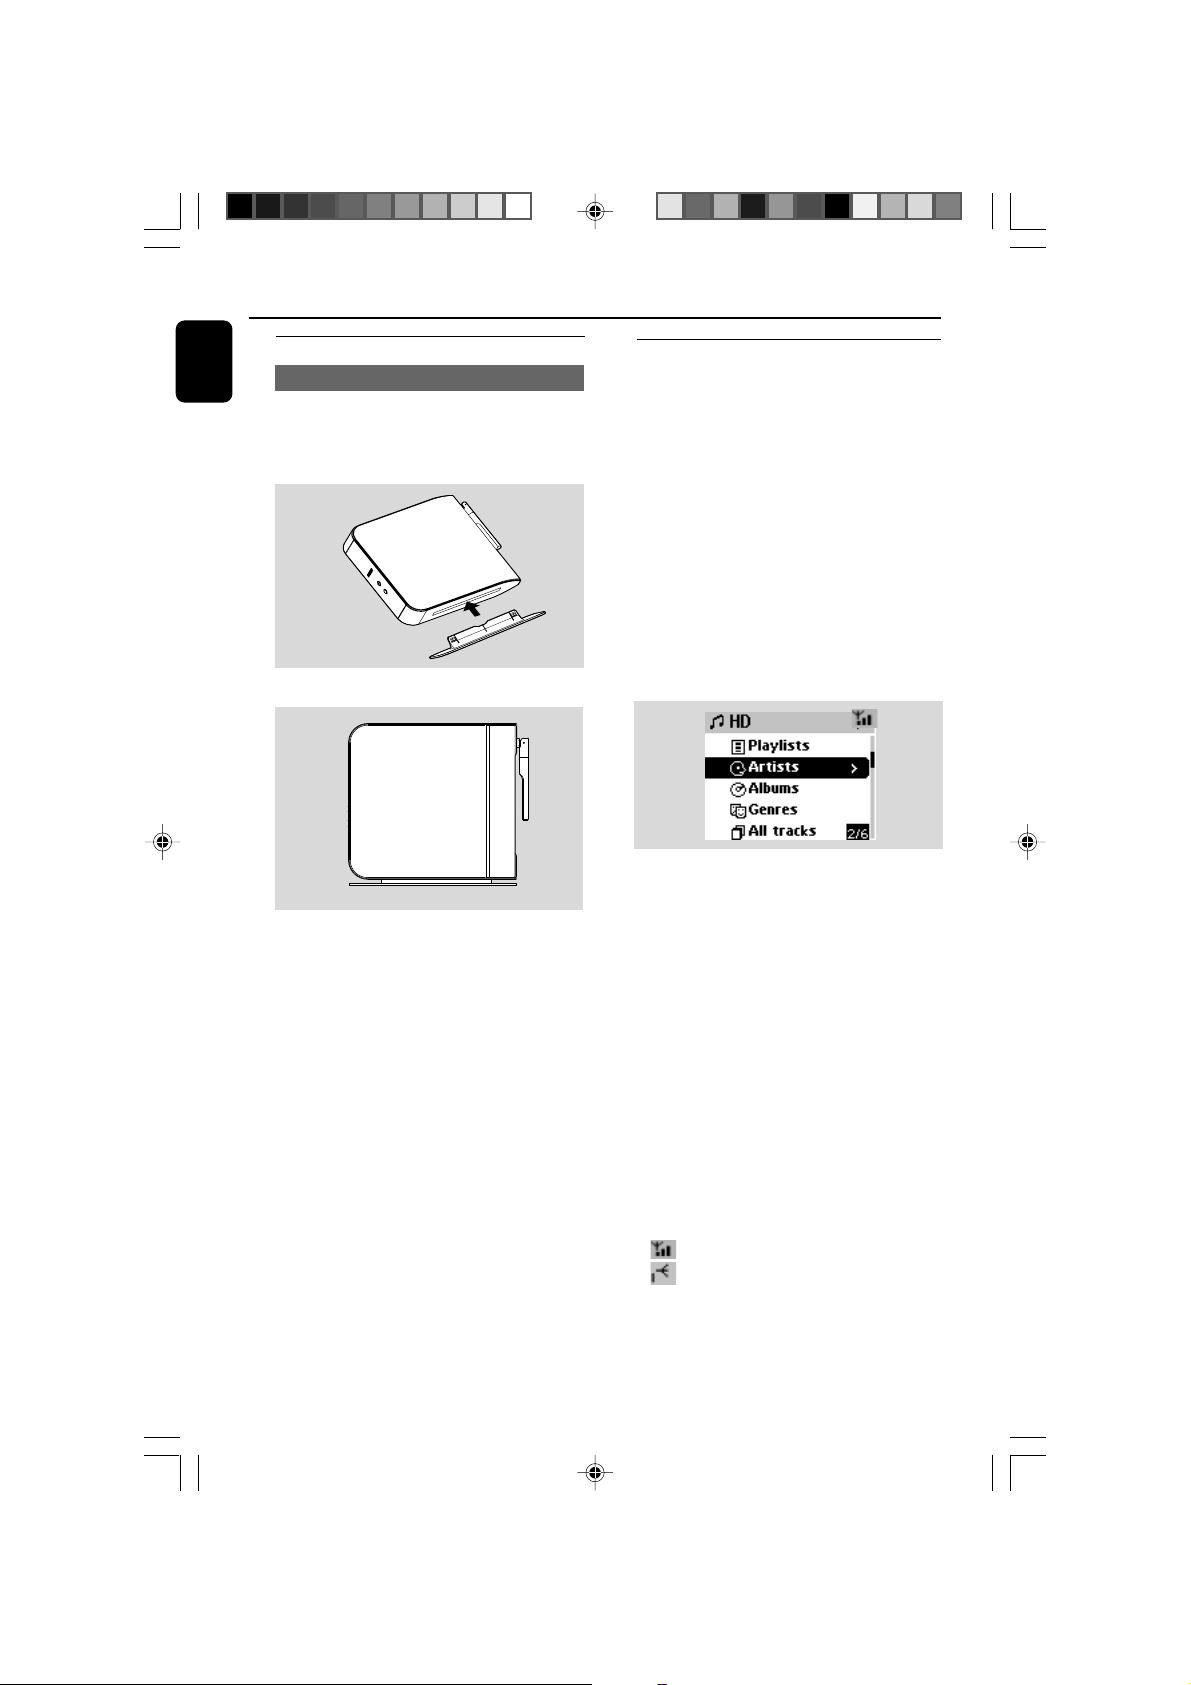
Mounting stand onto Station
WAS5 Station is equipped with a stand. Once
inserted, the stand is undetachable.
1 Align the supplied stand to the jack at Station’s
bottom
2 Insert the stand into the jack firmly
IMPORTANT!
Ta ke the following steps to optimize the
Wi-Fi connection between Center and
Station.
–Keep your Center and Station away
from the source of interference
(microwave ovens, DECT phones,
bluetooth devices, cordless phones,
other Wi-Fi products, etc.)
–Avoid placing your Center or Station
close to the plasma TV. It may result in
improper display on your Center’s 2-way
remote control.
–Keep Stations adequately apart or in
different angles (e.g. in different rooms
blocked by one wall). Within a distance
and angle (e.g. in the same room), your
Center’s remote control is powerful
enough to simultaneously operate
several Stations, which may also result in
improper display on the 2-way remote
control.
Installation
Setting up Wi-Fi connection
between Center and Station
Wi-Fi connection starts automatically when
you power up WAC5 Center and WAS5
Station
1 The first time you set up Wi-Fi connection,
place Center and Station side by side on a flat
and firm surface
2 First, connect the Center to power supply,
and then, connect the Station to power supply
Center/Station:
➜ The screen lights up. Auto installation/
connection starts.
➜ You will enter HD (Harddisk) mode when
the installation/connection is finished.
3 Relocate Center and Station as desired: plug
and stream
● Simply unplug your Center or Station and
power them up in other rooms.
➜ You will be able to move the harddisk music
between Center and Station.
Helpful hints:
– Make sure you have powered up Center before
powering up Station.
IMPORTANT!
– Turn the Wi-Fi antenna for best reception.
– Avoid thick walls. Your Center and Station should
never be blocked by 2 or more walls.
– Avoid placing the sets close to large metal
objects.
– Adjust the location of your Center and Station
according to the reception status of Wi-Fi signals.
– indicates maximum reception
– indicates minmum reception
– WACS5 do not support range expander devices
WACS5_Eng/37 8/3/2005, 15:1220
Page 21
If there is interference from neighborhood,
LINE OUT
DC
OPTICAL OUT
DIGITAL OUT
such as the pause during playback, the sets’
slow response to your operation
– Use the WEP* key when connecting your Center
and Station to an existing wireless PC network. See
the manual Connect to your PC.
– Change the operating channel of your Center
and Station when connecting them to an existing
wireless PC network. To learn about how to change
channels, see the manual Connect to your PC.
– If possible, change the operating channels of the
other Wi-Fi devices at your home.
–Turn the above devices in different directions to
minimize interference.
* stands for Wired Equivalent Privacy. It is a
security protocol for wireless local area
network
Rear connections
Warning:
Never make or change connections with
the mains supply switched on.
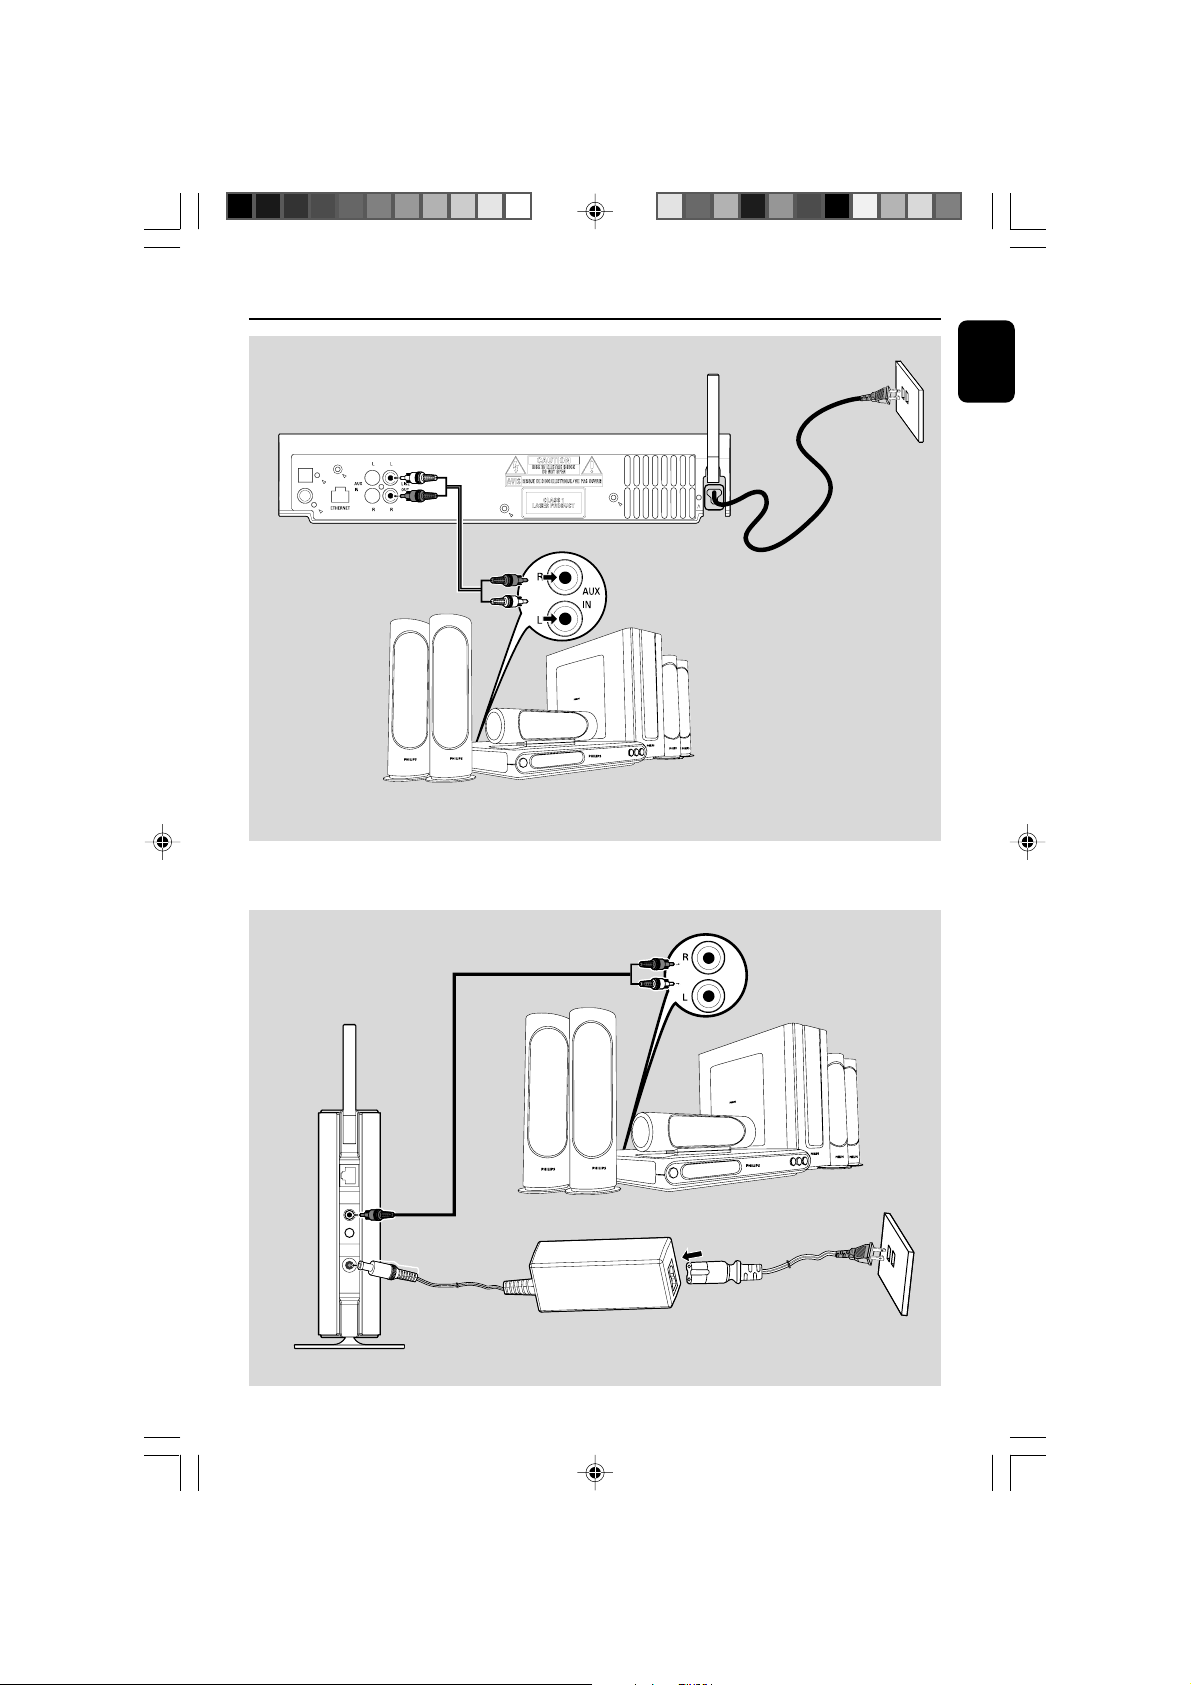
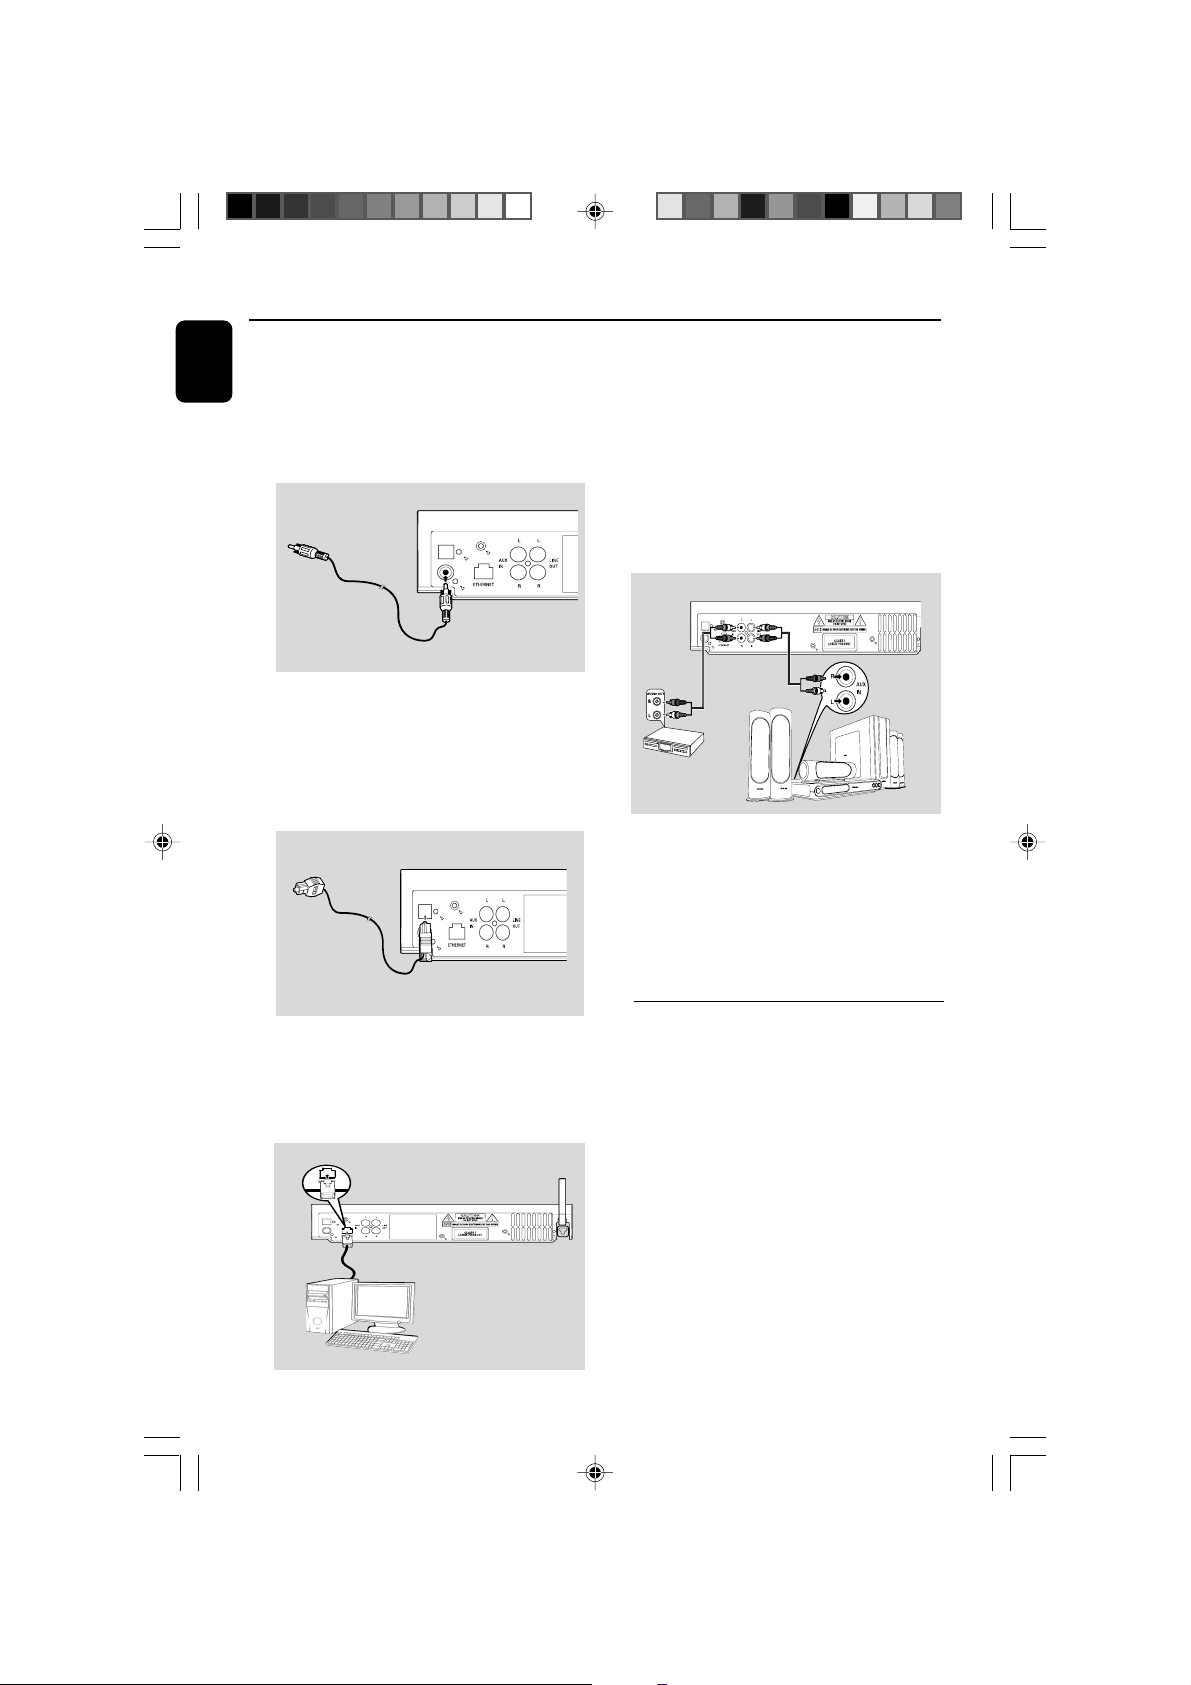
A Connecting to an additional appliance
with powerful speakers
IMPORTANT!
WACS5 need to work with both external
amplifier and external speakers.
LINE OUT:
On Center:
1 Inser t the red plug of the red/white audio cables
(supplied) to the red socket LINE OUT R and
the white plug to the white socket LINE OUT
L.
2 Connect the other end of the audio cables to
the AUX IN (or AUDIO IN)terminals of the
additional appliance, red plug to the red socket
AUX IN R and white plug to the white socket
AUX IN L.
On Station:
3 Inser t the one-plug end of the audio cable
(supplied) to LINE OUT.
4 Connect the two-plug end of the audio cables to
the AUX IN (or AUDIO IN) terminals of the
additional appliance, red plug to the to the red
socket AUX IN R and white plug to the white
socket AUX IN L.
English
With this compact wireless music system, you
can fully utilize the sophisticated sound input and
speakers in your existing HiFi audio system.
Using audio cables, connect one (one set) of
WACS5’s sound output terminals: LINE OUT,
DIGITAL OUT or OPTICAL OUT to the
corresponding input terminals in the connected
device. For better sound output, use DIGITAL
OUT or OPTICAL OUT if it is available on
the connected device.
Helpful hints:
– DIGITAL OUT and OPTICAL OUT are
available on WAC5 only.
WACS5_Eng/37 8/3/2005, 15:1221
Page 22
Installation
OPTICAL OUT
DIGITAL OUT
English
DIGITAL OUT:
1 Inser t the plug of digital audio cables (not
supplied) to the DIGITAL OUT socket
2 Connect the other end of the audio cables to the
DIGITAL IN terminal of the additional
appliance.
OPTICAL OUT
DIGITAL OUT
OPTICAL OUT:
1 Inser t the plug of optical audio cables (not
supplied) to the OPTICAL OUT socket
2 Connect the other end of the audio cables to
the OPTICAL IN terminal of the additional
appliance.
OPTICAL OUT
DIGITAL OUT
B Connecting to your PC
● Connect the supplied Ethernet cable to
Center’s ETHERNET and your computer’s
Ethernet port. For details, see the manual
Connect to your PC.
C Connecting an additional appliance
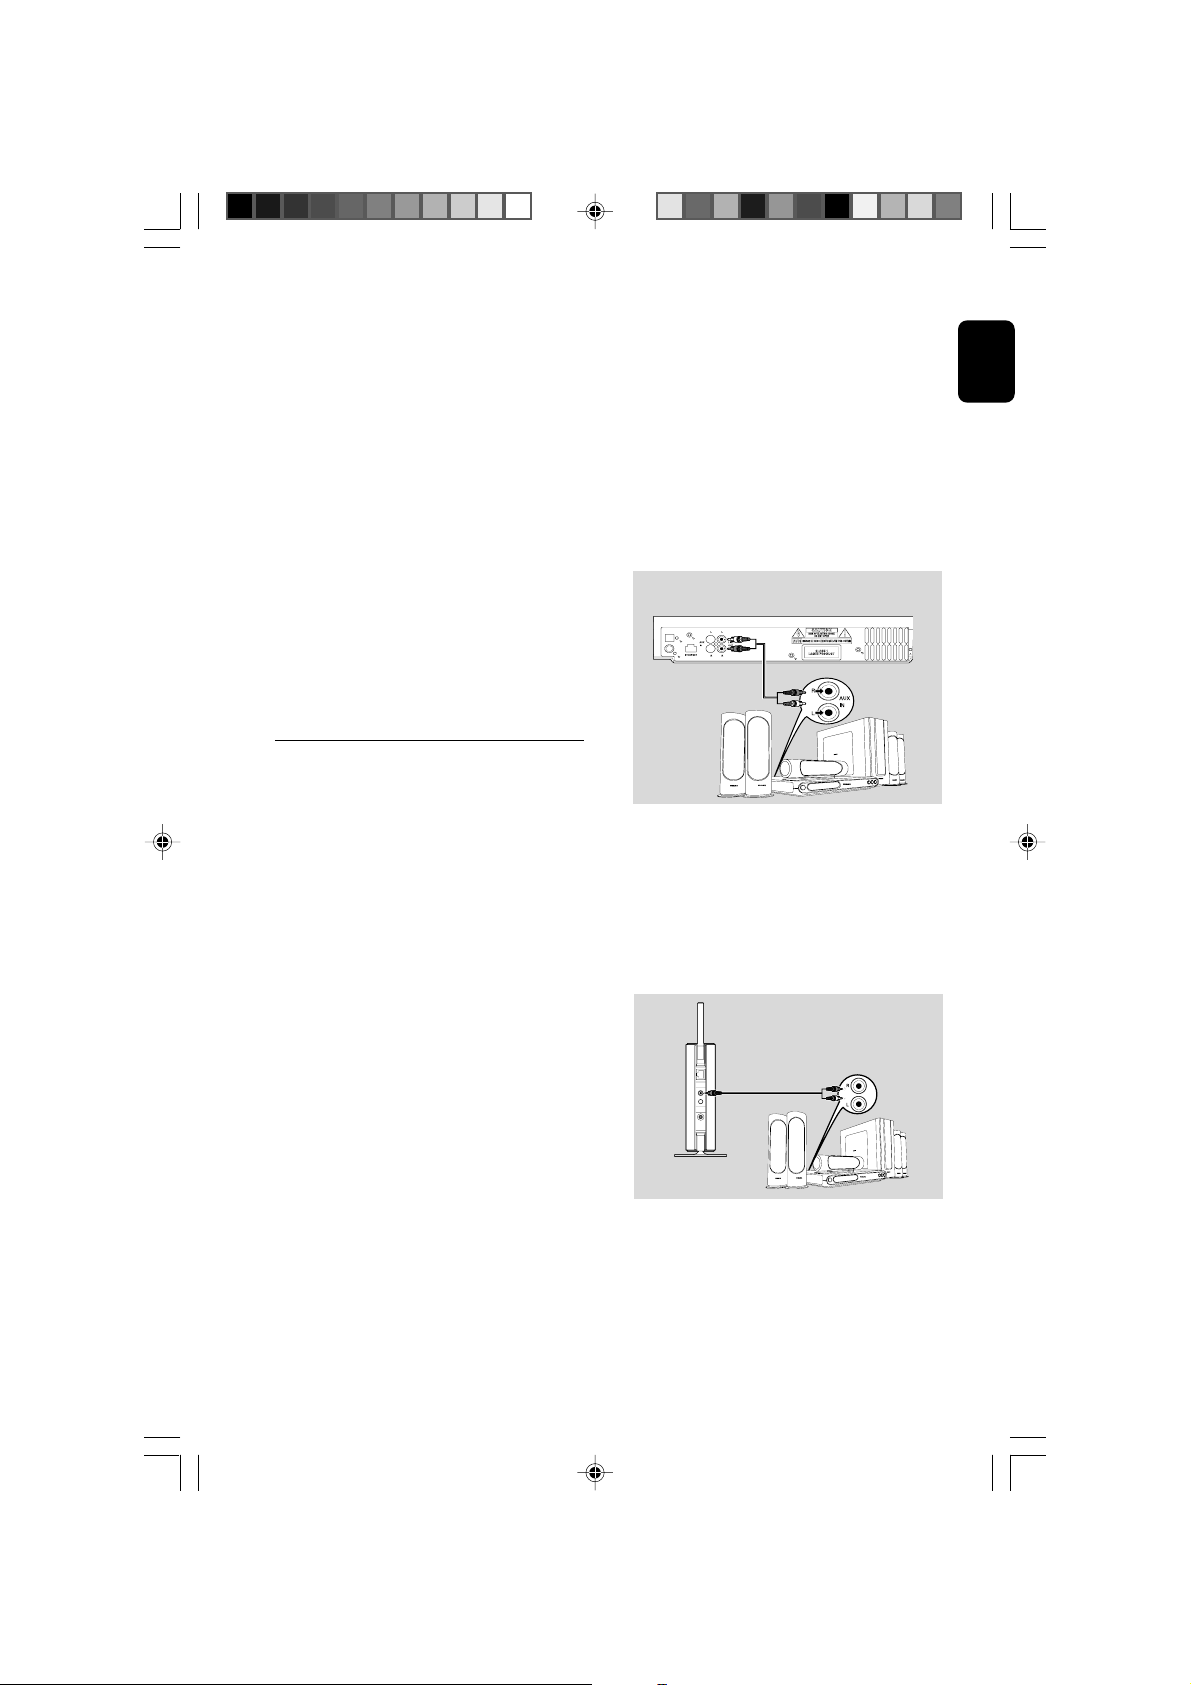
It is possible to use an additional appliance, e.g.
TV, VCR, Laser Disc player, DVD player or CD
recorder, with the WAC5Center .
1 Inser t the red plug of the red/white audio cables
(not supplied) to the red socket AUX IN R and
the white plug to the white socket AUX IN L.
2 Connect the other end of the audio cables to
the AUDIO OUT terminals of the additional
appliance.
Center
Center
Helpful hints:
– If the connected device has only a single audio
out terminal, connect it to the AUX IN left terminal.
Alternatively, you can use a “single to double” cinch
cable, but the output sound still remain mono.
– Always refer to the owner’s manual of other
equipment for complete connection.
Center
Using AC power
1 Make sure all the connections have been made
before switching on the power supply.
2 Connect the AC power cord to the wall socket.
This switches on the power supply.
When Center or Station is switched to standby,
it is still consuming some power. To disconnect
OPTICAL OUT
DIGITAL OUT
the system from the power supply
completely, remove the power plug from
the wall socket.
Center
The type plate is located on the rear of the
set.
WACS5_Eng/37 8/3/2005, 15:1222
Page 23
Preparation
C
R
2
0
2
5
L
I
T
H
I
U
M
2
➠
3
1
Using the remote control
WACS5 are equipped with two remote
controls, one for Center and the other for
Station. By using either of the remote controls,
you can operate both Center and Station.
IMPORTANT!
– Always point the remote control directly
towards IR area on the Center or Station
you wish to operate.
– Some functional keys on Center’s remote
control are exclusively used for Center (for
example, CD/MP3-CD, MARK/UNMARK,
MUSIC BROADCAST etc.)
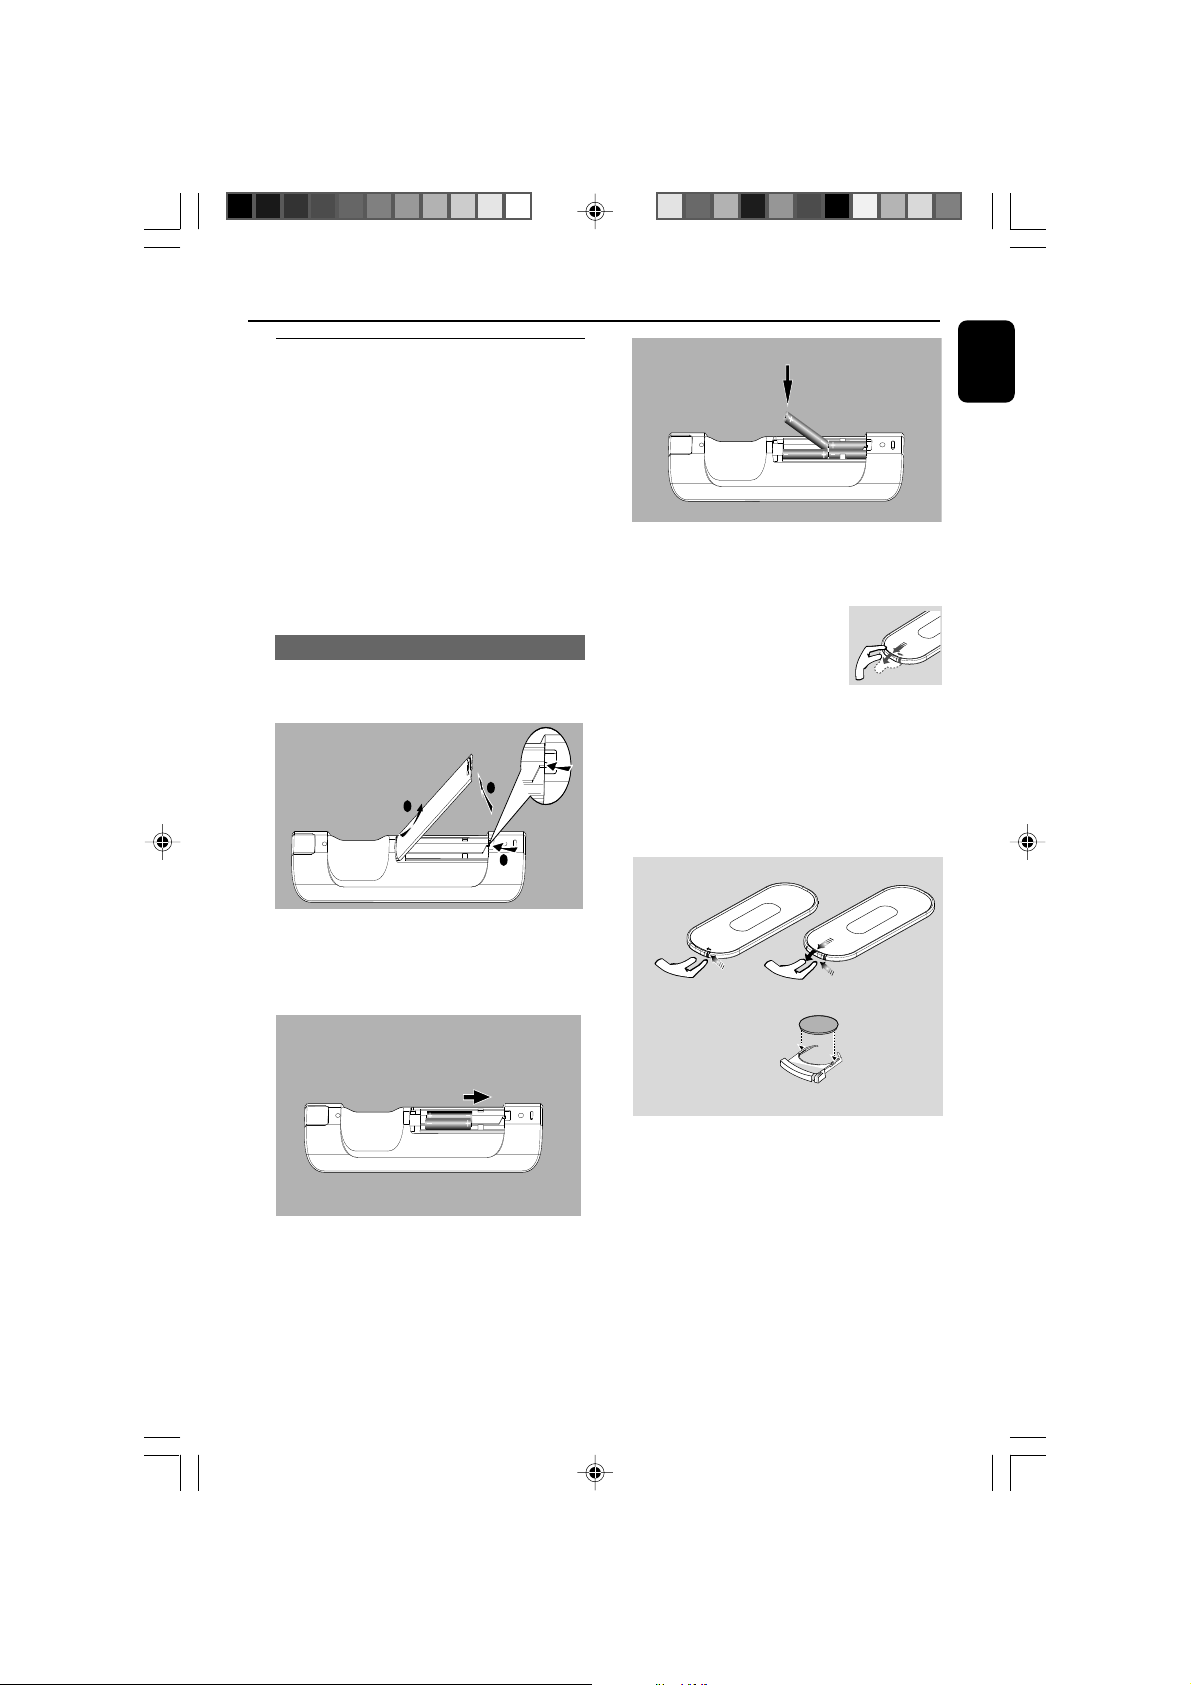
Putting batteries in place
Center’s remote control:
1 Open the batter y compartment .
2
3
1
English
3 Put back the compar tment door.
Station’s remote control:
● Remove the protective plastic tab
before using the Station’s remote
control.
To replace the batteries
1 Press and hold 1 as indicated.
2 Simultaneously, pull the battery tray at 4.
3 Remove the old battery and put a new CR2025
battery in place.
4 Put back the batter y tray.
2 Inser t 4 batteries type R03 or AAA into the
remote control with the correct polarity as
indicated by the "+" and "-" symbols inside
the battery compartment.
WACS5_Eng/37 8/3/2005, 15:1223
CAUTION!
– Remove batteries if they are
exhausted or will not be used for a long
time.
– Do not use old and new or different
types of batteries in combination.
– Batteries contain chemical substances,
so they should be disposed of properly.
Page 24
English
Using Center’s remote control
Battery usage: As a remote control with
synchronous display, Center’s remote control
consumes more power than normal remote
controls. When its batteries are low or empty, the
icon appears on the remote control’s display.
Replace the batteries with new alkaline batteries.
Preparation
Using the display on the Center’s remote
control
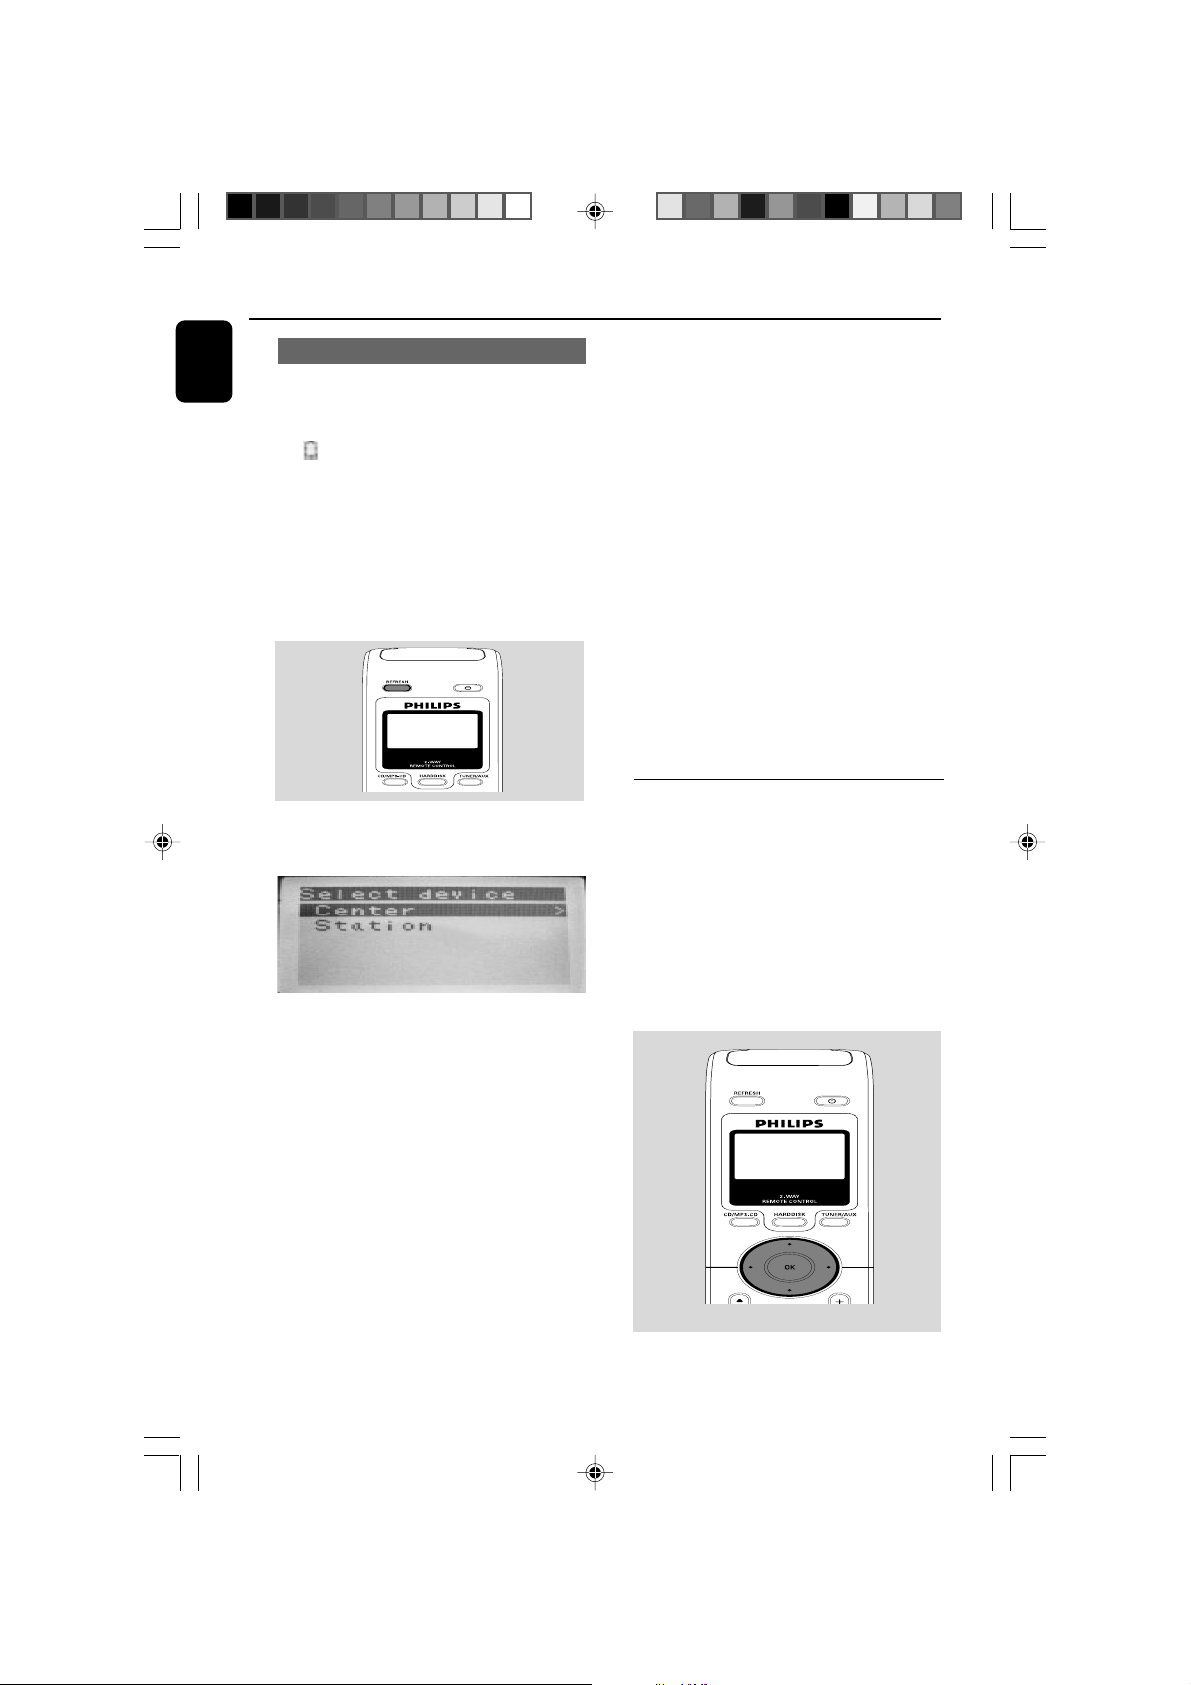
You can synchronize the status of your Center or
Station onto the display of Center’s 2-way
remote control. With the synchronized display,
your operation of remote control becomes
quicker and easier.
By default, Center’s remote control works with
Center only. To operate Station using
Center’s remote control,
1 Press and hold REFRESH until the selection
screen appears on the display of Center’s
remote control.
2 Press the navigation controls 3 or 4 and 2
to select Station
On Center’s remote control:
➜ Display shows current status of Station
after Station is connected
➜ You can use Center’s remote control to
operate Station now
Helpful hints:
– To operate Center using the remote control
again, repeat the above steps 1-2 to select Center.
– Center’s remote control will return to its
default setting (works with Center only)
when you insert new batteries into it.
Note:
–Avoid placing your Center or Station close to the
plasma TV. It may resuit in improper display on
your Center’s remote control. Always keep WACS5
far enough from the plasma TV or turn off your
plasma TV.
– If you switch on your Center or Station using the
STANDBY-ON/ ECO POWER button on the
set, press REFRESH on Center’s remote control
to synchronize the remote control’s display.
– The display supports 6 European languages:
English, French, Spanish, Dutch, Italian and German
Using the navigation controls
When selecting options on the set’s screen, you
often need to use the navigation controls 1 / 2
/ 3 / 4.
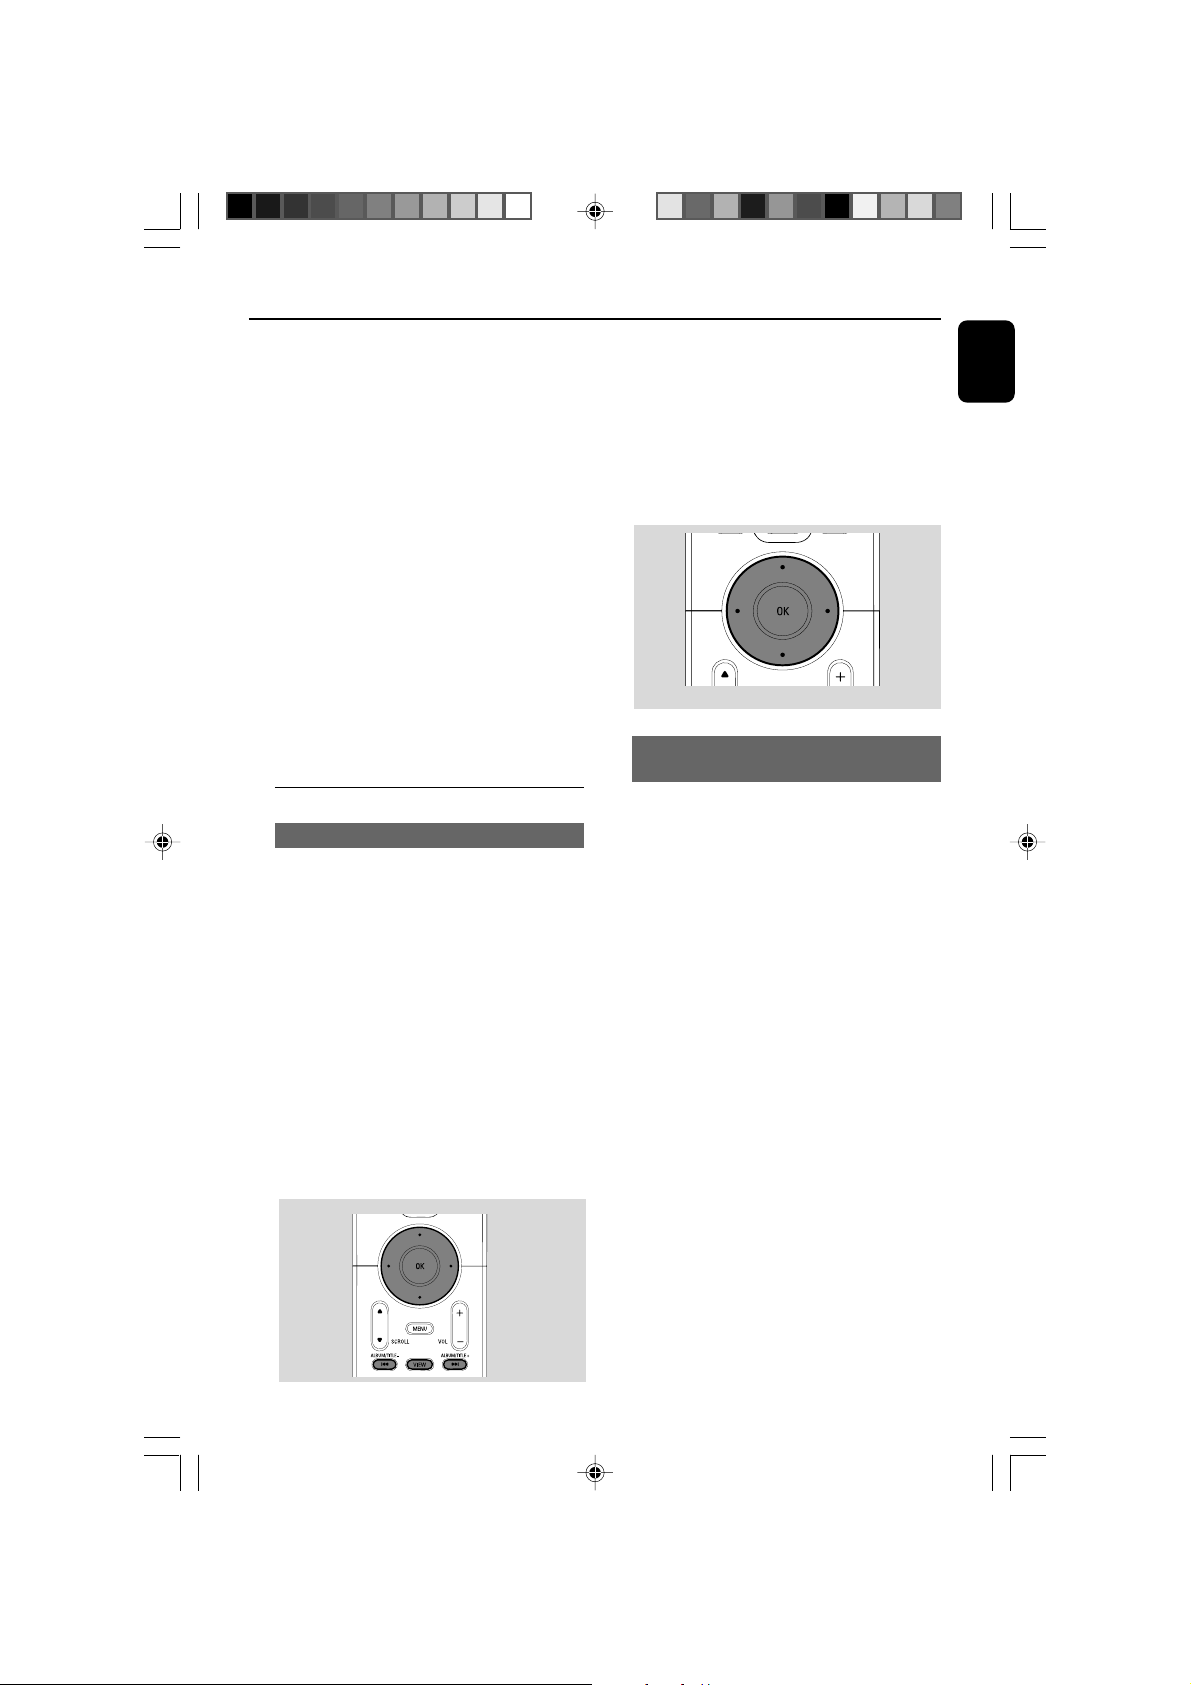
1 Press 3 / 4 to highlight an option.
2 Enter its submenu by pressing 2.
3 Press 1 to return to the previous option list
screen.
4 Press OK or 2 to confirm
WACS5_Eng/37 8/3/2005, 15:1224
Page 25
Basic functions
SMART EQ
Switching to standby/on and
selecting functions
1 When the set is on, press STANDBY-ON/
ECO POWER to switch it to standby (or y
on the remote control)
➜ Display shows GoodBye. Then,
Center: ➜ The screen dims out. Display shows
Station Status screen and the number of stations
found.
Station: ➜ The PHILIPS screen dims out.
2 To switch on, press STANDBY-ON/ ECO
POWER on the set
➜ The set switches to the last source selected.
● You can also switch on Center by pressing the
source button on Center’s remote control
(e.g. HARDDISK, CD/MP3-CD, AUX).
3 To select Center’s function, press SOURCE
once or more on the set (or HARDDISK, CD/
MP3-CD, AUX on Center’s remote control)
Helpful hints:
– CD/MP3-CD and AUX source is only
available on Center.
Switching to Eco power/ on
In the power-saving Eco power mode, the set’s
display and Wi-Fi connection are turned off. The
Center’s harddisk also stops working. When you
switch Center to Eco power, it is impossible to
move music between Center and Station or
import music from PC to Center.
1 When the set is on, press and hold STANDBY-
ON/ ECO POWER to switch it to Eco
power (or y on the remote control).
➜ The display is switched off.
➜ The blue indicator is off.
2 To switch on, press and hold STANDBY-ON/
ECO POWER (or y on the remote control)
or press and hold SOURCE on the set
➜ The set switches to the last source selected.
Helpful hints:
– In the standby/Eco power mode, the settings of
networking, sound, display, language and CD
recording will be retained in the set’s memory.
Auto-standby
● When the set has reached the end of playback/
recording and remains in the stop position for
more than 5 minutes, the set will switch to
standby automatically to save power.
English
WACS5_Eng/37 8/3/2005, 15:1225
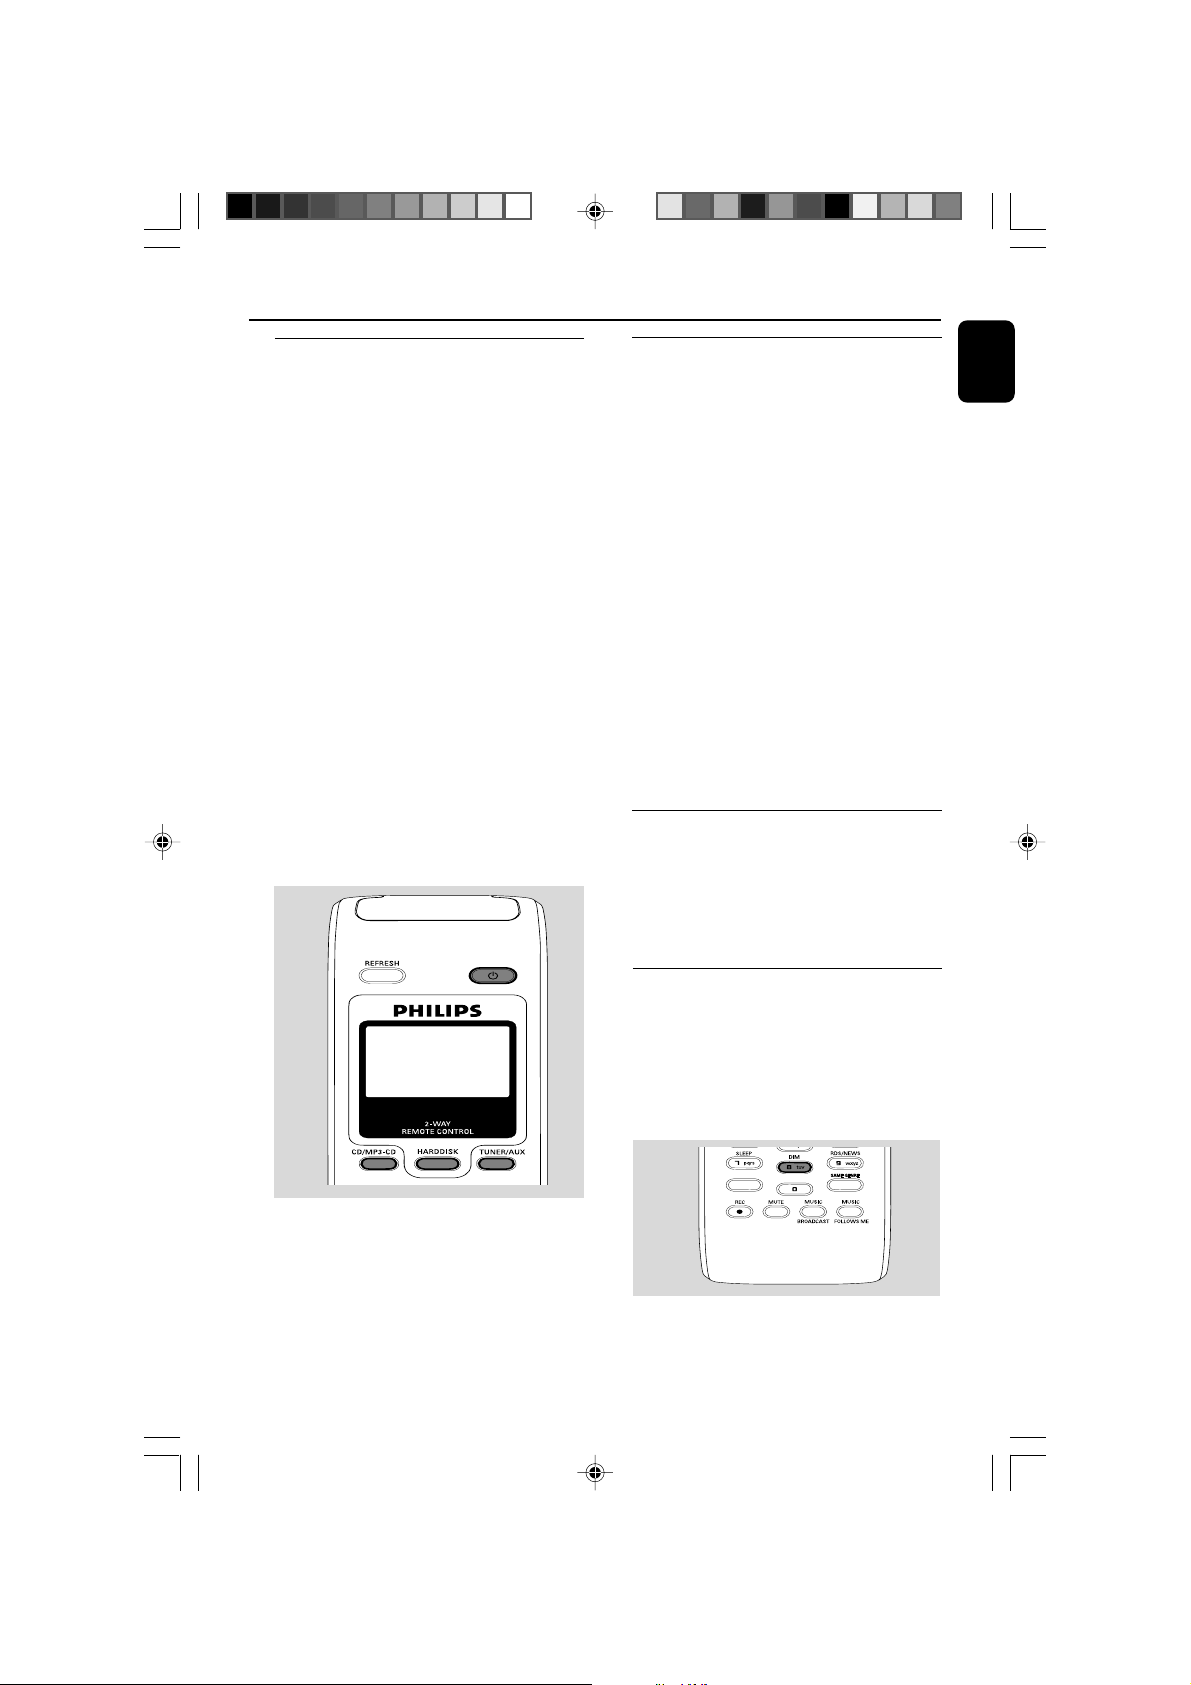
Adjusting the brightness of blue
indicator
The blue indicator lights up when the set is
working or ready for working.
● On the remote control, press and hold DIM to
turn the brightness up or down.
SMART EQ
SAME ARTIST
Page 26
English
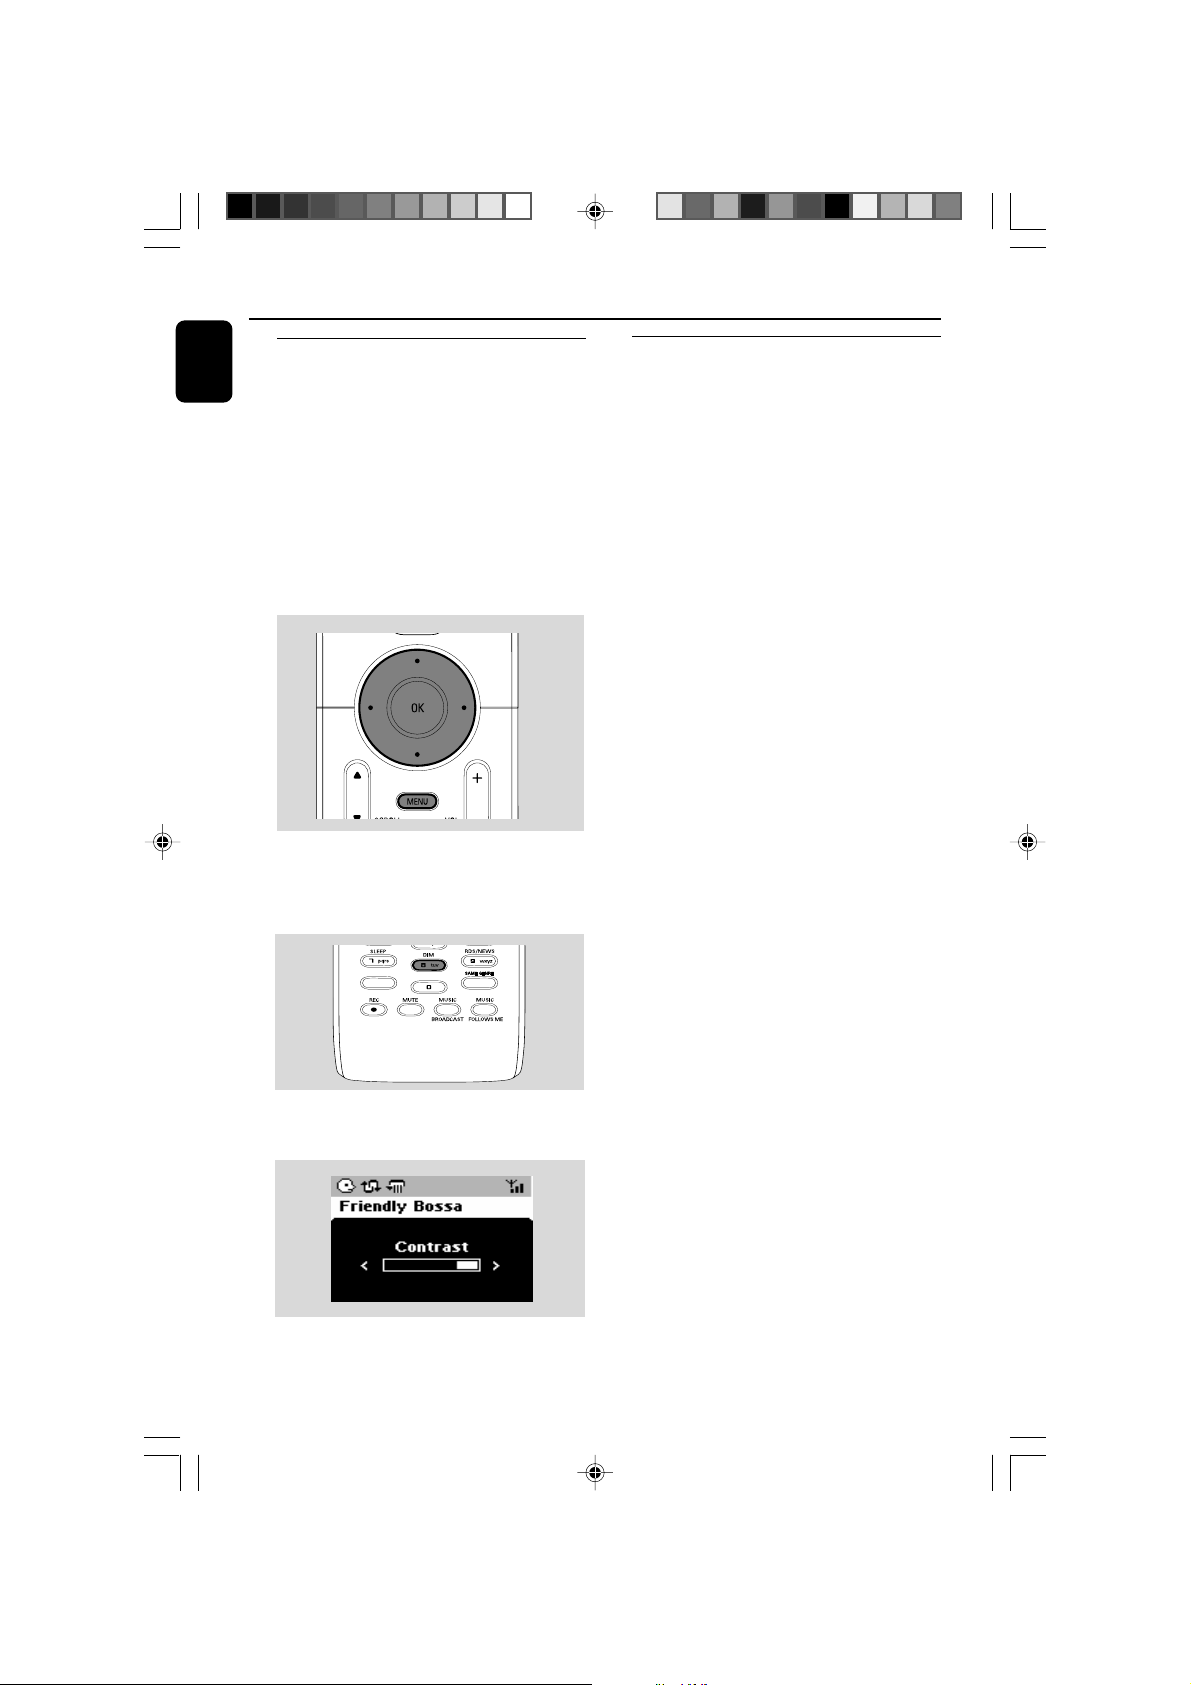
SMART EQ
Display adjustment
You can adjust the display’s backlight and
contrast settings
1 On the remote control, press MENU to enter
the MENU screen (or on Center, press and
hold STOP • MENU)
2 Use the navigation controls 3 or 4 and 2
to select Settings
3 Press 3 or 4 and 2 to select Display
4 Press 1 / 2 / 3 / 4 to select your
options:
Backlight:
Press 3 or 4 and 2 to select on or off ;
● You can also turn the backlight on or off by
pressing DIM on the remote control
Basic functions
Selecting languages
1 On the remote control, press MENU to enter
the MENU screen (or on Center, press and
hold STOP • MENU)
2 Use the navigation controls 3 or 4 and 2
to select Settings
3 Use the navigation controls 3 or 4 and 2
to select Language
4 Press 3 or 4 and 2 to select:
English, French, Spanish, Dutch, Italian
and German
SMART EQ
SAME ARTIST
Contrast:
Press 3 / 4 to reduce or enlarge the contrast
WACS5_Eng/37 8/3/2005, 15:1226
Page 27
HD
Playing Harddisk (HD)
On WAC5 Center is located a 80GB
hard disk, where music is centrally stored.
Via Wi-Fi, all the stored music can be
streamed and played on Station.
1 Check the Center or Station is switched on or
to standby
For Station: also check the Center is switched
on or to standby
➜ The blue indicator lights up
(See Basic functions, Switching to
standby/on and selecting functions,
Switching to Eco power/ on)
2 On Center: Press SOURCE once or more to
select HD (on Center’s remote control, press
HARDDISK)
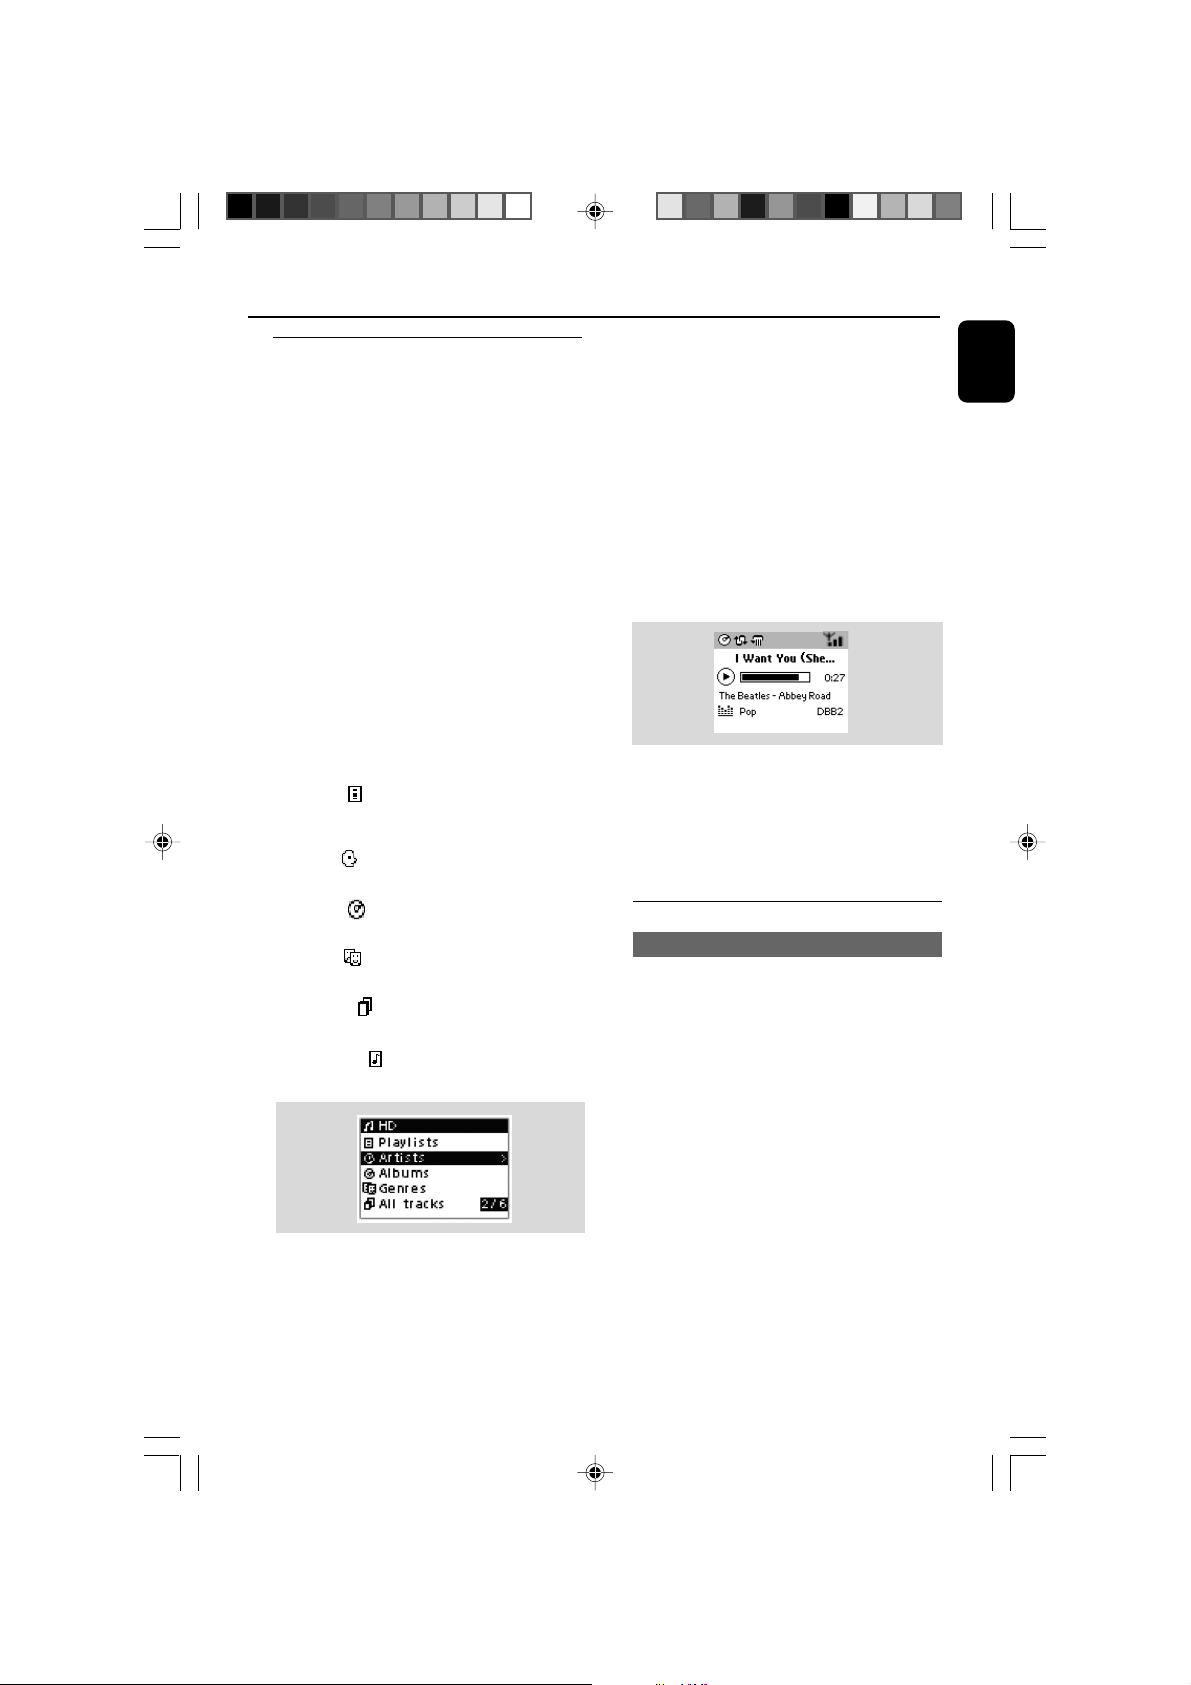
➜ Display shows HD and the categories of your
music library: Playlists, Artists, Albums,
Genres, All tracks, Raw tracks
➜ Demo tracks are stored in Playlists
Playlists( ): custom collection of your
favorite tracks sorted by the playlists’ name in
alphanumeric order
Artists ( ): collection of albums sorted by
the artists’ name in alphanumeric order
Albums ( ): albums sorted by the albums’
name in alphanumeric order
Genres ( ): artists’ album collection sorted
by music style
All tracks ( ): tracks sorted by the tracks’
name in alphanumeric order
Raw tracks ( ): tracks to be compressed
(MP3 conversion)
3 Press the navigation controls 3 or 4 and 2
to select your option
4 Press 2 (or OK) to start playback, if necessary.
● Press OK on a highlighted artist, genre or album
to start playback from the beginning of the item
(orÉÅ on Center’s remote control; the Play
keyÉ on Station’s remote control).
➜ The playback screen shows:
on the top: your HD option (e.g. Playlist, Artist)
in the middle: current track name, elapsed
playing time and some track information
at the bottom: equalizer setting and, if DBB is
activated, DBB setting.
5 To pause playback, press OK (orÉÅ on
Center’s remote control; Å on the Station’s
remote control). To resume playback, press the
button again.
6 To stop playback, press STOPÇ.
Selecting and searching
Selecting a different album or track
1 If necessary, repeatedly press 1 to enter
previous option lists
2 Repeatedly press the navigation controls 3 or
4 and 2 to select the desired album or track.
3 Press VIEW to return to the playback screen, if
necessary.
English
WACS5_Eng/37 8/3/2005, 15:1227
Page 28
English
SAME ARTIST
SMART EQ
To select a different track in current
album during playback
● In the playback screen, briefly and repeatedly
press the navigation controls 3 or 4 to select
previous or next tracks (or 4 or ¢ on
Center’s remote control; O, P on Station’s
remote control)
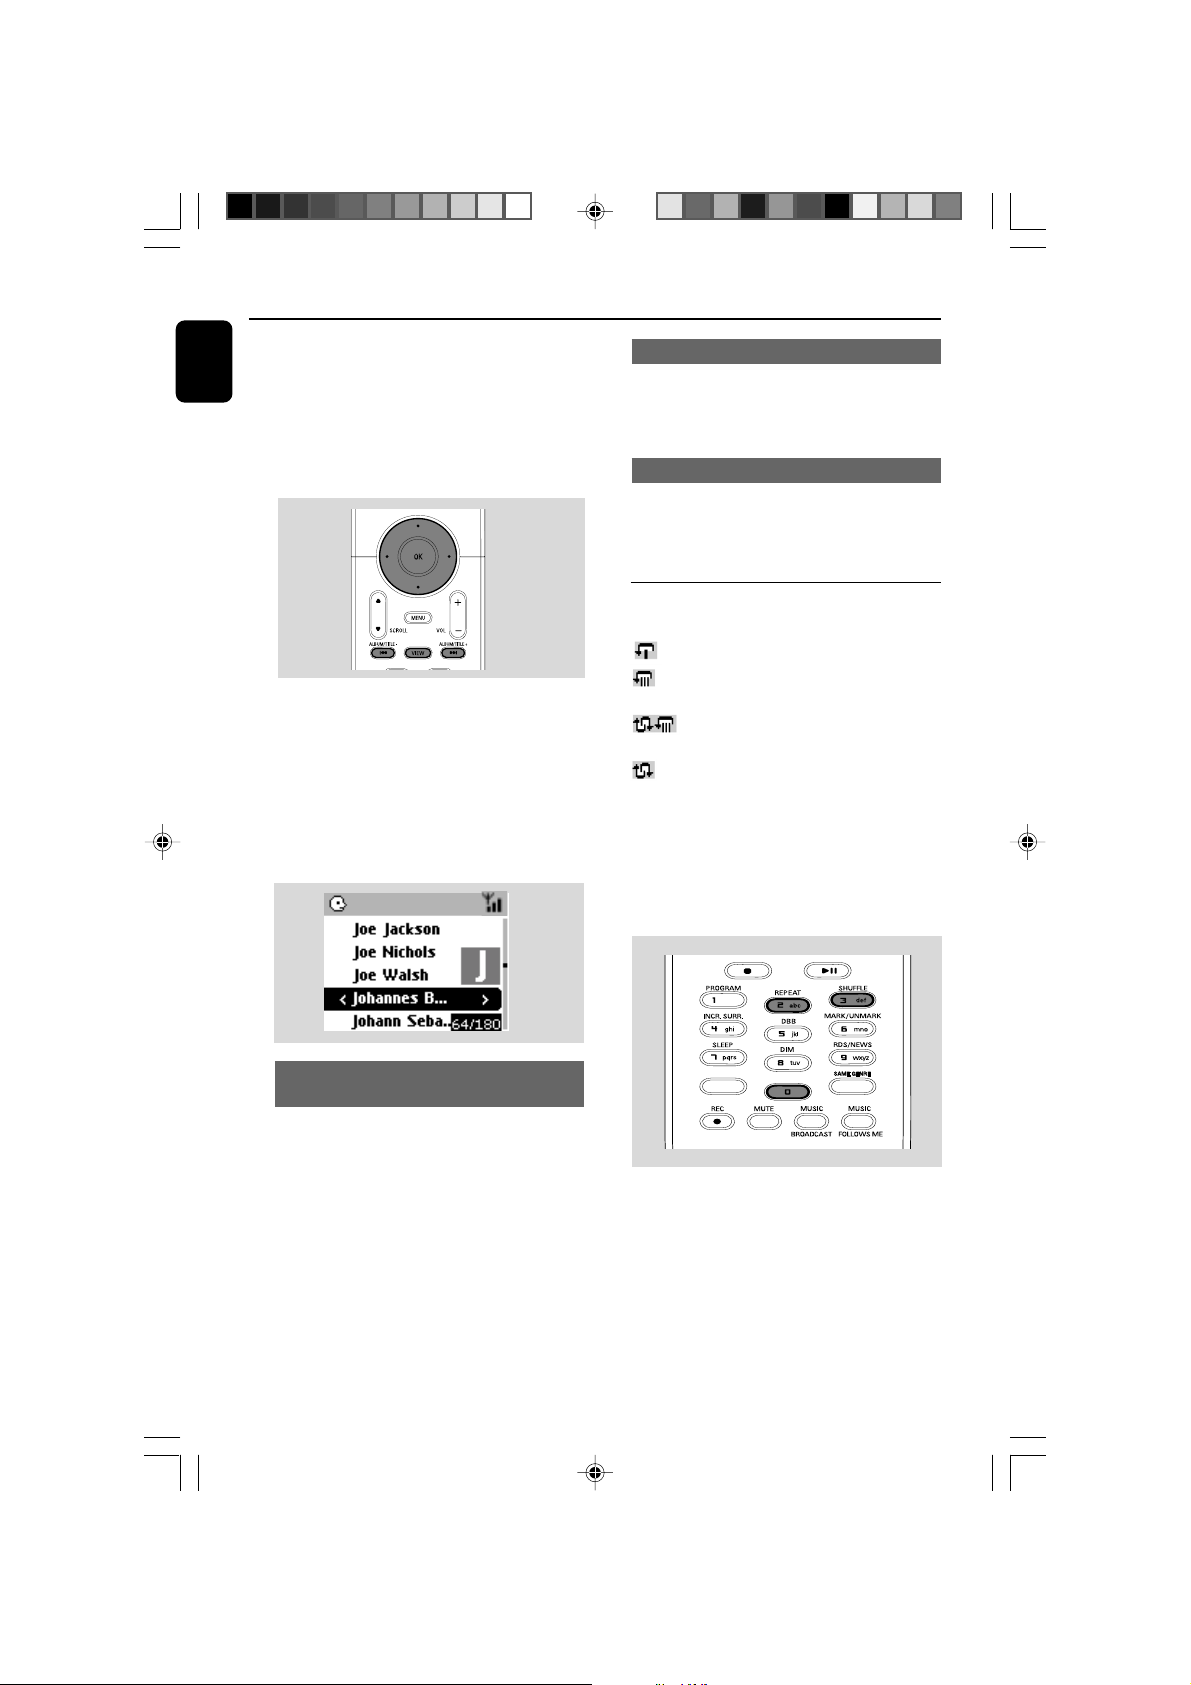
Using the fast skip 3 or 4
Use this function to find an option (e.g. an album
or a track) in a long option list.
● Press and hold the navigation controls 3 or 4
in the long option list.
➜ You will skip the options faster and faster
➜ At the high speed skip, the initial letter of
current options appears for easy identification
HD
Selecting tracks of a particular artist
● During playback, press SAME ARTIST
➜ Playback of current ar tist’s tracks continues
after current track.
Selecting tracks of a particular genre
● During playback, press SAME GENRE
➜ Playback of current genre’s tracks continues
after current track.
Different play modes: REPEAT,
SHUFFLE
– plays the current track continuously
– repeats all the tracks (under current ar tist,
genre or album )
– repeats all the tracks (under current
artist, genre or album) in random order
– tracks (under current ar tist, genre or
album) are played in random order
1 During playback, press once or more REPEAT
or/ and SHUFFLE to select play modes.
2 To return to normal playback, press REPEAT or
SHUFFLE repeatedly until the various modes
are no longer displayed.
Finding a passage within a track
during playback
1 In the playback screen, press and hold the
navigation controls 3 or 4 (or 4 or ¢
on Center’s remote control; à / á on
Station’s remote control)
➜ The HD plays at a high speed.
2 When you recognize the passage you want,
release 3 or 4 (or 4 or ¢ on Center’s
remote control; à / á on Station’s remote
control)
➜ Normal playback resumes.
WACS5_Eng/37 8/3/2005, 15:1228
SMART EQ
SAME ARTIST
Page 29
HD
Creating Playlist: custom
collection of your favorite music
On Center’s hard disk., you can create up to 99
playlists consisting of your favorite tracks in the
desired sequence.
Helpful hints:
– You can also create your playlists on your
computer via Philips Digital Media Manager
(DMM). For details, see DMM’s help file. Refer to
the manual Connect to your PC to learn how to
install DMM software.
1 Use the navigation controls 1 / 2 / 3 / 4 to
highlight the desired track/album (see Selecting
and searching)
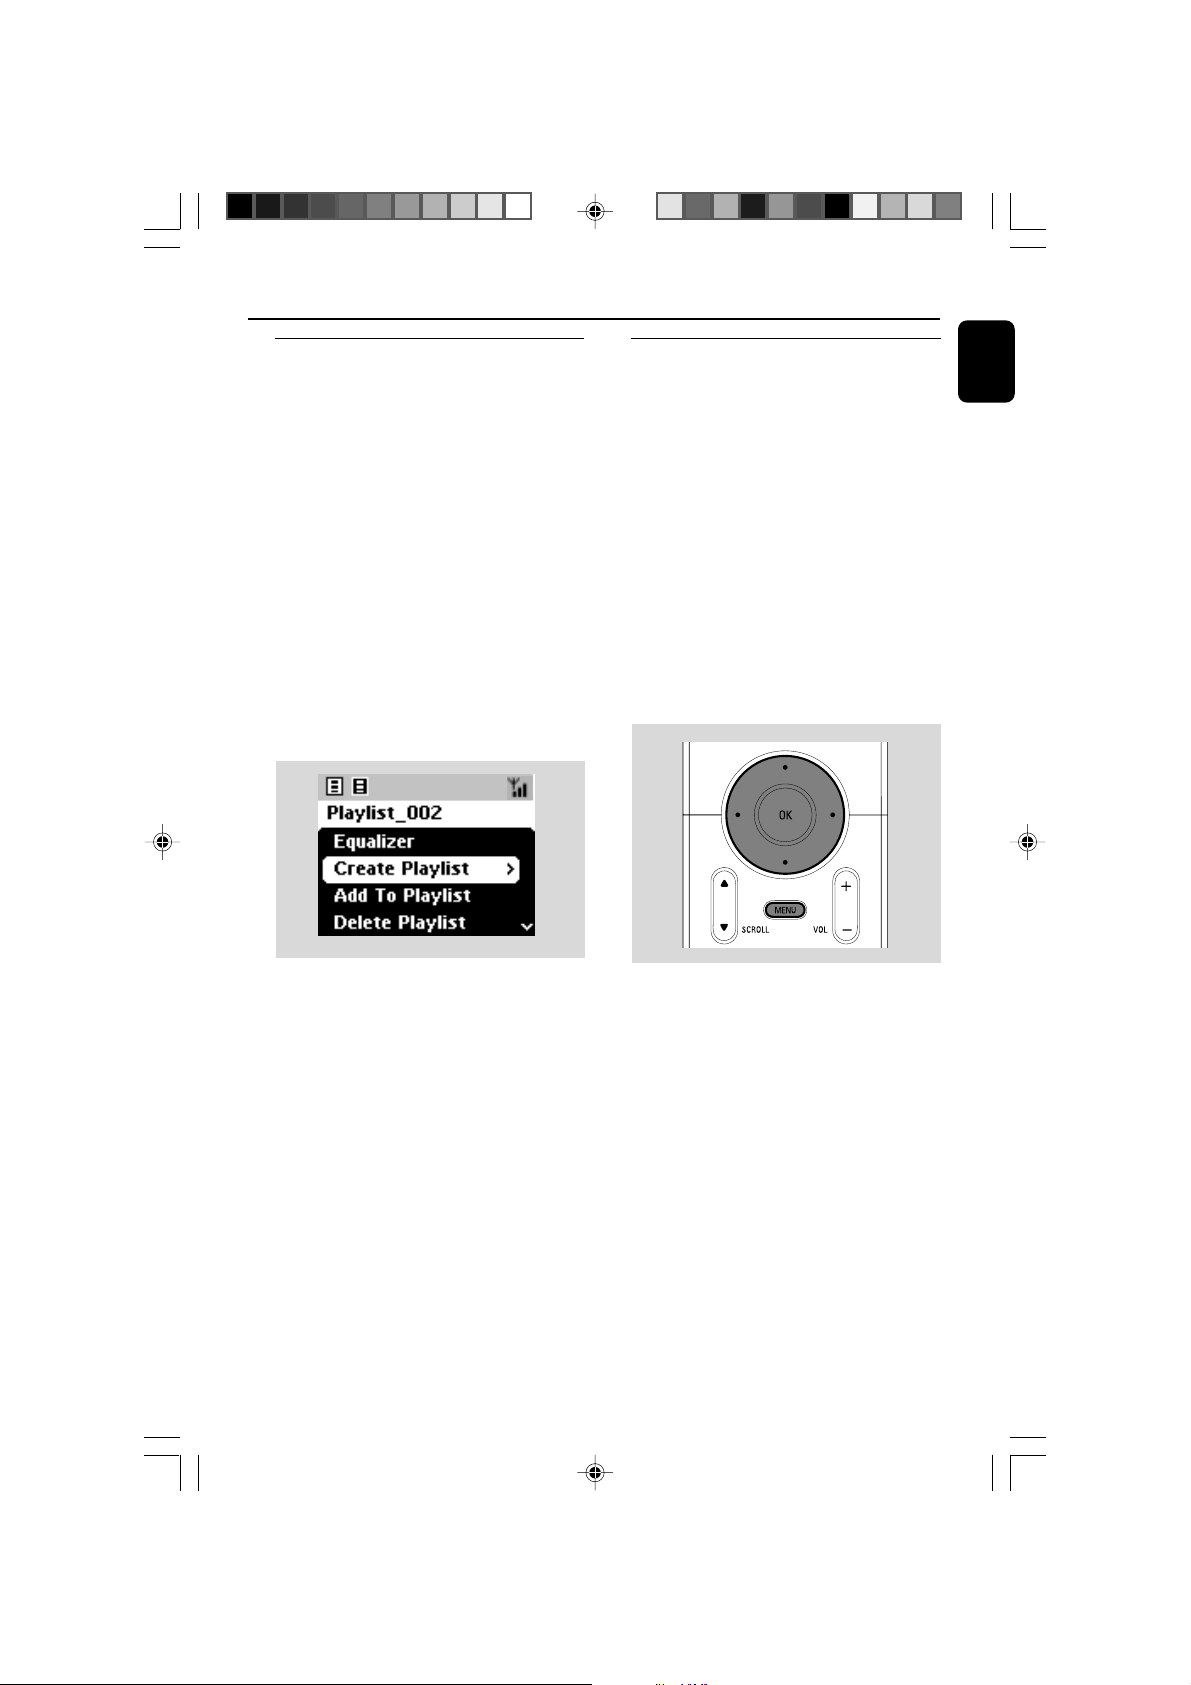
2 Press MENU to enter the MENU screen
3 Use the navigation controls 3 or 4 and 2
to select Create Playlist
Deleting a playlist, album or
track
1 Use the navigation controls 3 or 4 and 2 to
enter a category (Playlist, Artists, Albums, Genres,
All tracks, Raw tracks
● If necessary, press 3 or 4 and 2 once or
more to enter the album/track list
2 Press 3 or 4 to highlight a selected playlist,
album or track
3 To select Delete Playlist, Delete Album or
Delete Track
a. Press MENU to enter the MENU screen
b. In the MENU screen, use the navigation
controls 3 or 4 and 2 to select.
4 Press 3 or 4 and 2 to select Ye s
English
➜ A new playlist is created. Display shows:
Playlist created. To add tracks, select
“ Add to Playlist”.
4 To select Add to Playlist,
a. Press MENU to enter the MENU screen
b. In the MENU screen, use the navigation
controls 3 or 4 and 2 to select
➜ A list of playlists appears
5 Use the navigation controls 3 or 4 and 2
to select the desired playlist
➜ Display shows: Track(s) added to playlist
6 Repeat steps 1, 4 , 5 to select and store all
desired tracks in this way.
WACS5_Eng/37 8/3/2005, 15:1229
Page 30
English
P
r
i
n
t
e
d
S
i
d
e
C
D
(
R
W)
Building music library on Center
By ripping CDs, Importing from PC and
Recording from external source you can
build your music library on Center’s hard disk.
IMPORTANT!
– Recording is permissible if copyright
or other rights of third parties are not
infringed upon.
–For CDs encoded with copyright
protection technologies by some record
companies, recording is restricted.
Ripping CDs
With WAC 5 Center, you can rip audio CD
tracks from your pre-recorded CDs and store
them as MP3 files in the Center’s hard disk.
The Gracenote® music recognition service
enables your set to look up from its built-in
database the CD track information (including
album, artist, genre, track information). It allows
the ripped CD tracks to be properly categorized
(for example, under Artists, Albums, Genres
or All tracks) and also merged with the
existing tracks in the harddisk. To update your
Gracenote® music recognition service database,
see the manual Connect to your PC
Music recognition technology
and related data are provided
by Gracenote
the industry standard in music
recognition technology and
related content delivery. For
more information, visit www.
gracenote.com.
CD and music-related data from Gracenote, Inc.,
C
copyright
2000-2005 Gracenote. Gracenote CDDB
Client Software, copyright 2000-2005 Gracenote. This
product and service may practice one or more of the
following U.S. Patents: #5,987,525; #6,061,680;
#6,154,773, #6,161,132, #6,230,192, #6,230,207,
#6,240,459, #6,330,593, and other patents issued or
pending. Services supplied and/or device manufactured
under license for following Open Globe, Inc. United
States Patent 6,304,523.
Gracenote and CDDB are registered trademarks of
Gracenote. The Gracenote logo and logotype, and the
“Powered by Gracenote” logo are trademarks of
Gracenote.
®
. Gracenote is
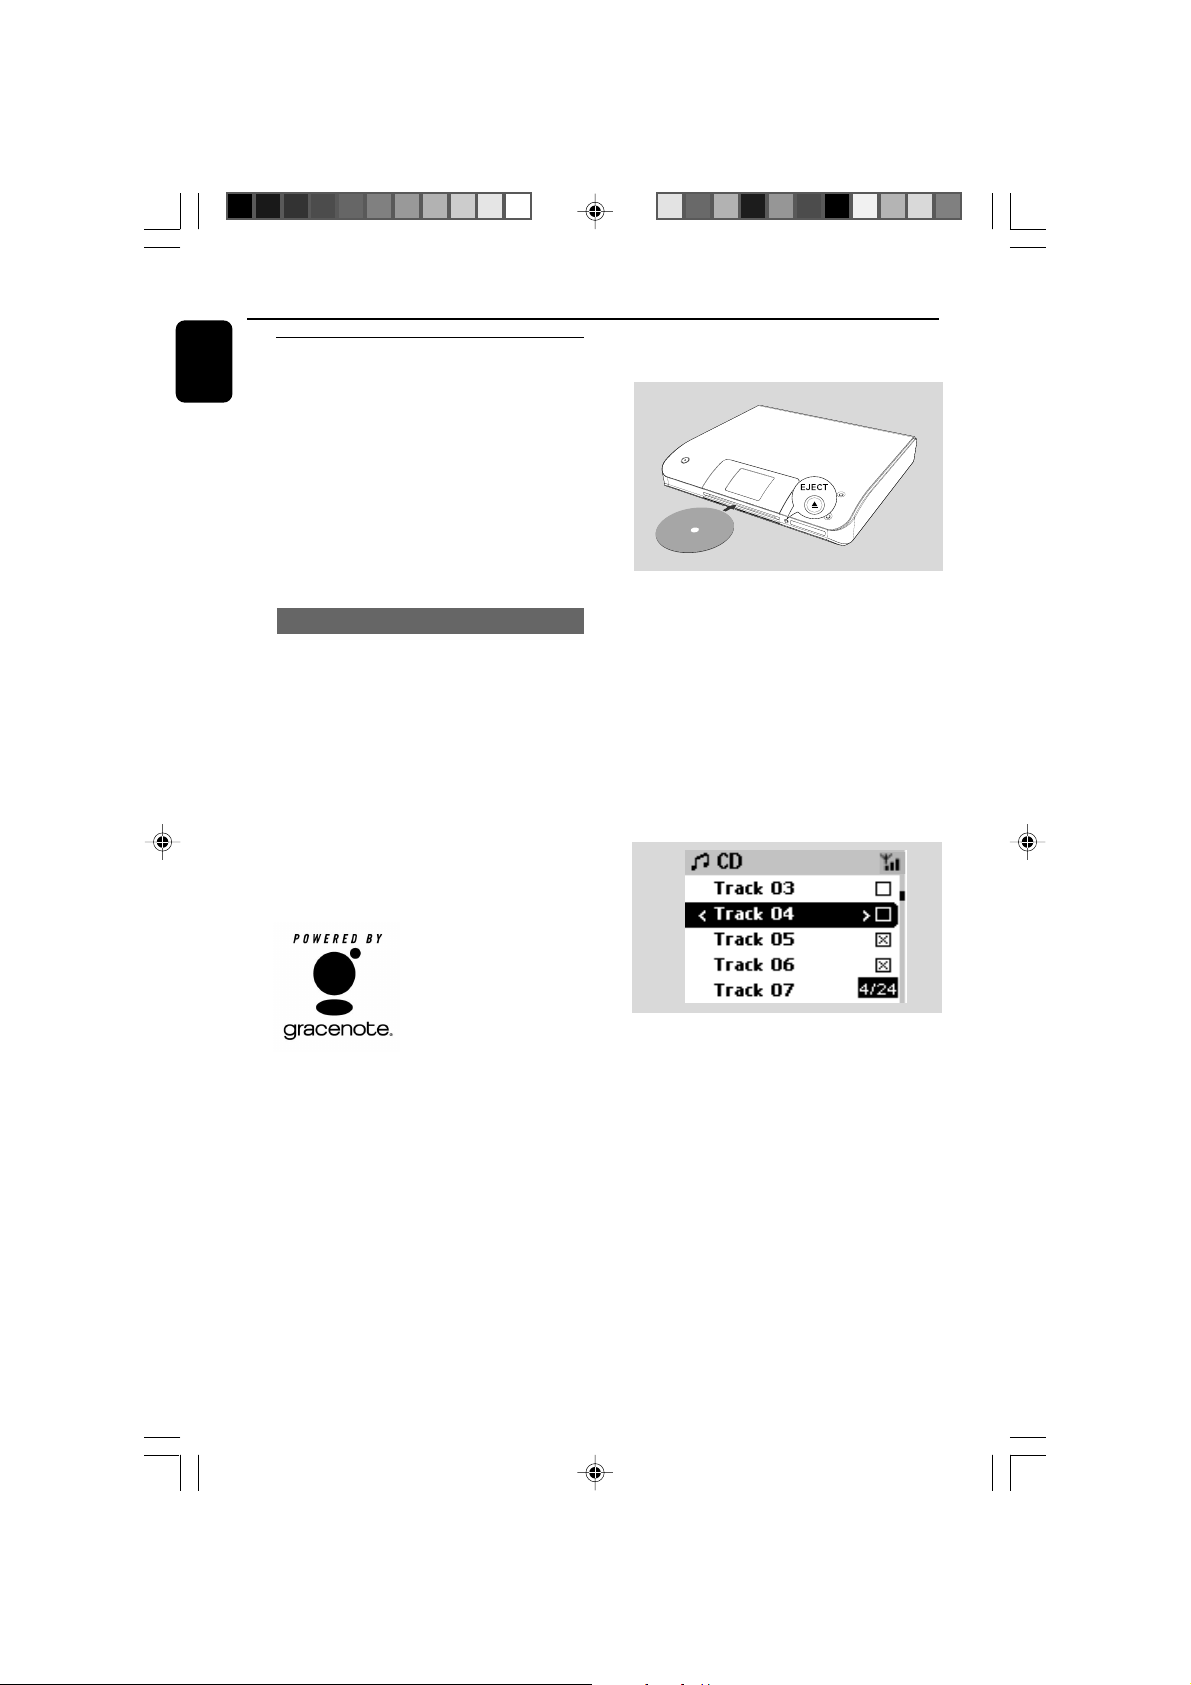
1 Inser t a CD into Center’s CD loader, with the
printed side facing up
➜ Display shows: Reading CD.
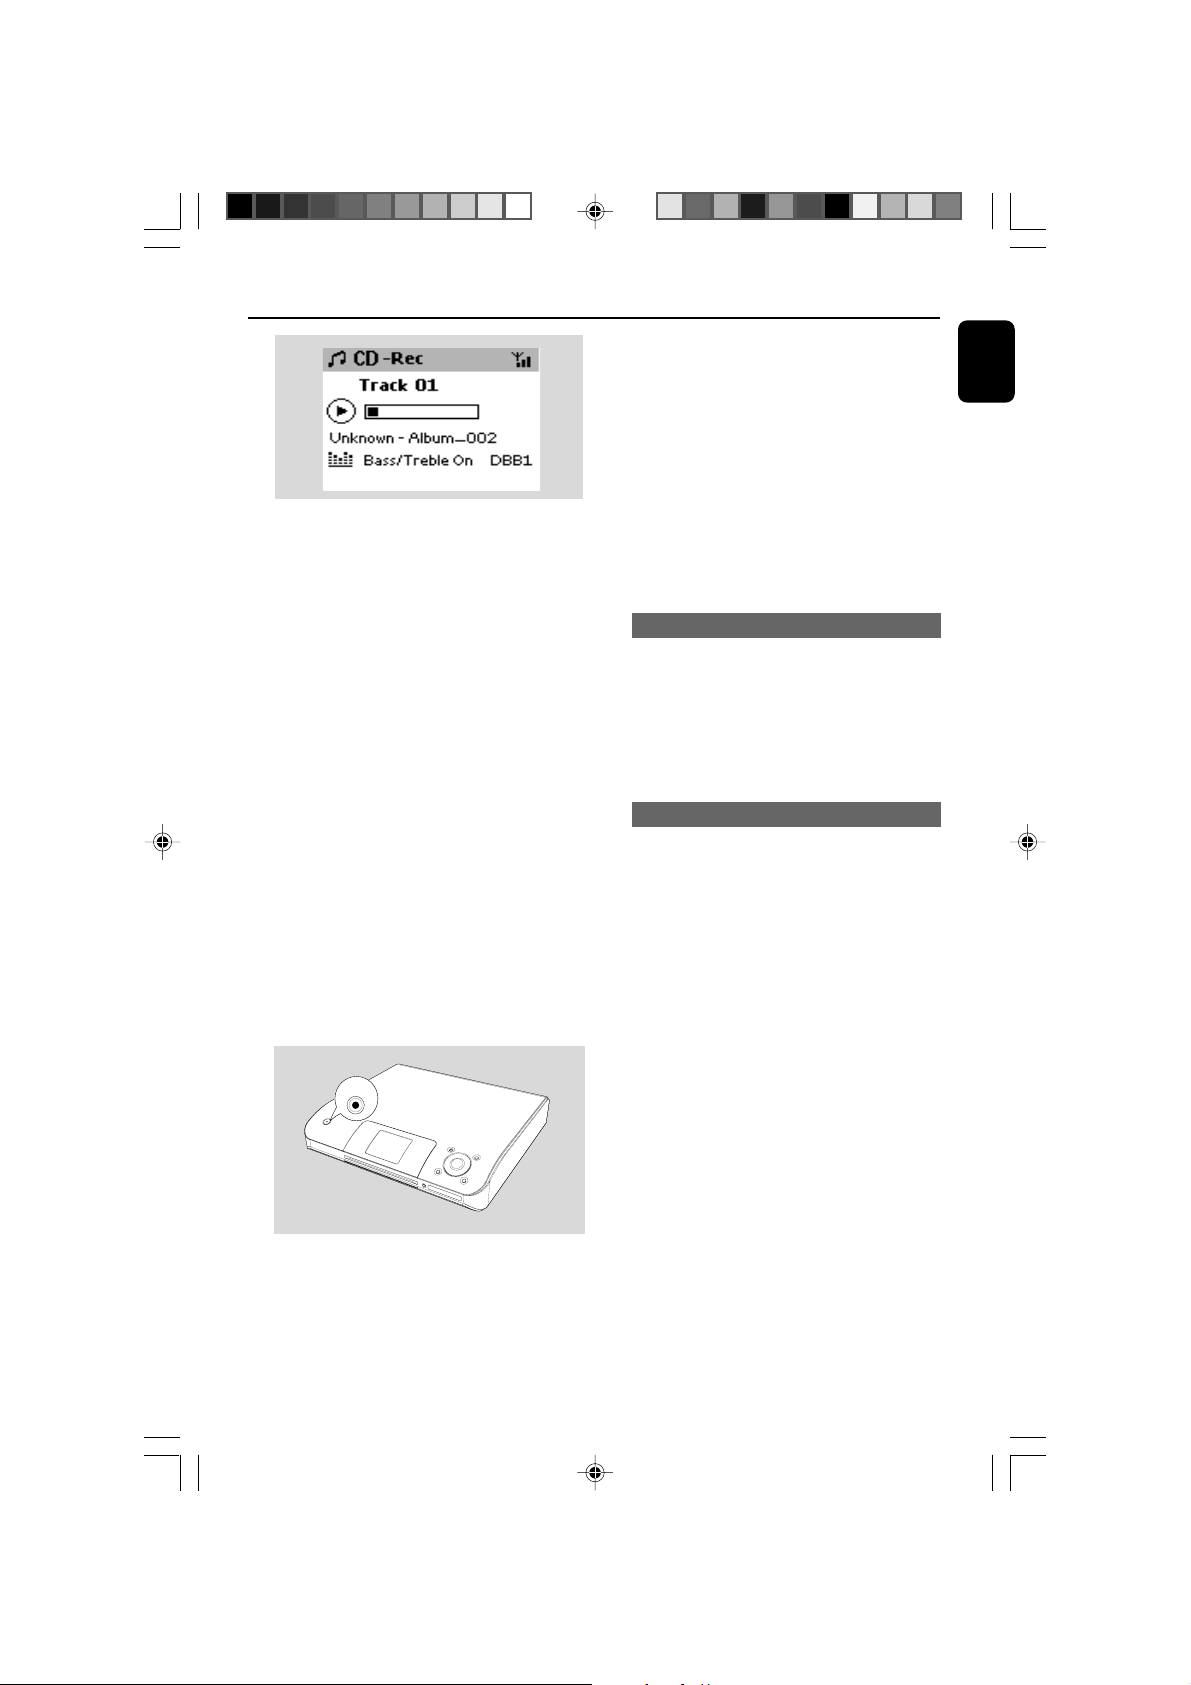
➜ List of tracks appears
● MP3/WMA: To enter the track list, press 2 on a
highlighted file folder
2 In the screen of track list, press RECORD
➜ List of track checkboxes appears
3 Press OK to select or deselect the tracks to be
recorded (or MARK•UNMARK on the
remote control)
● To select/deselect all tracks, press and hold OK
MARK• UNMARK on the remote control)
4 To select Rec speed (1x, 4x) and Rec quality,
a. Press MENU.
b. Use the navigation controls 3 or 4 and 2 to
enter Settings menu
®
c. In Settings menu, use the navigation
controls 3 or 4 and 2 to select.
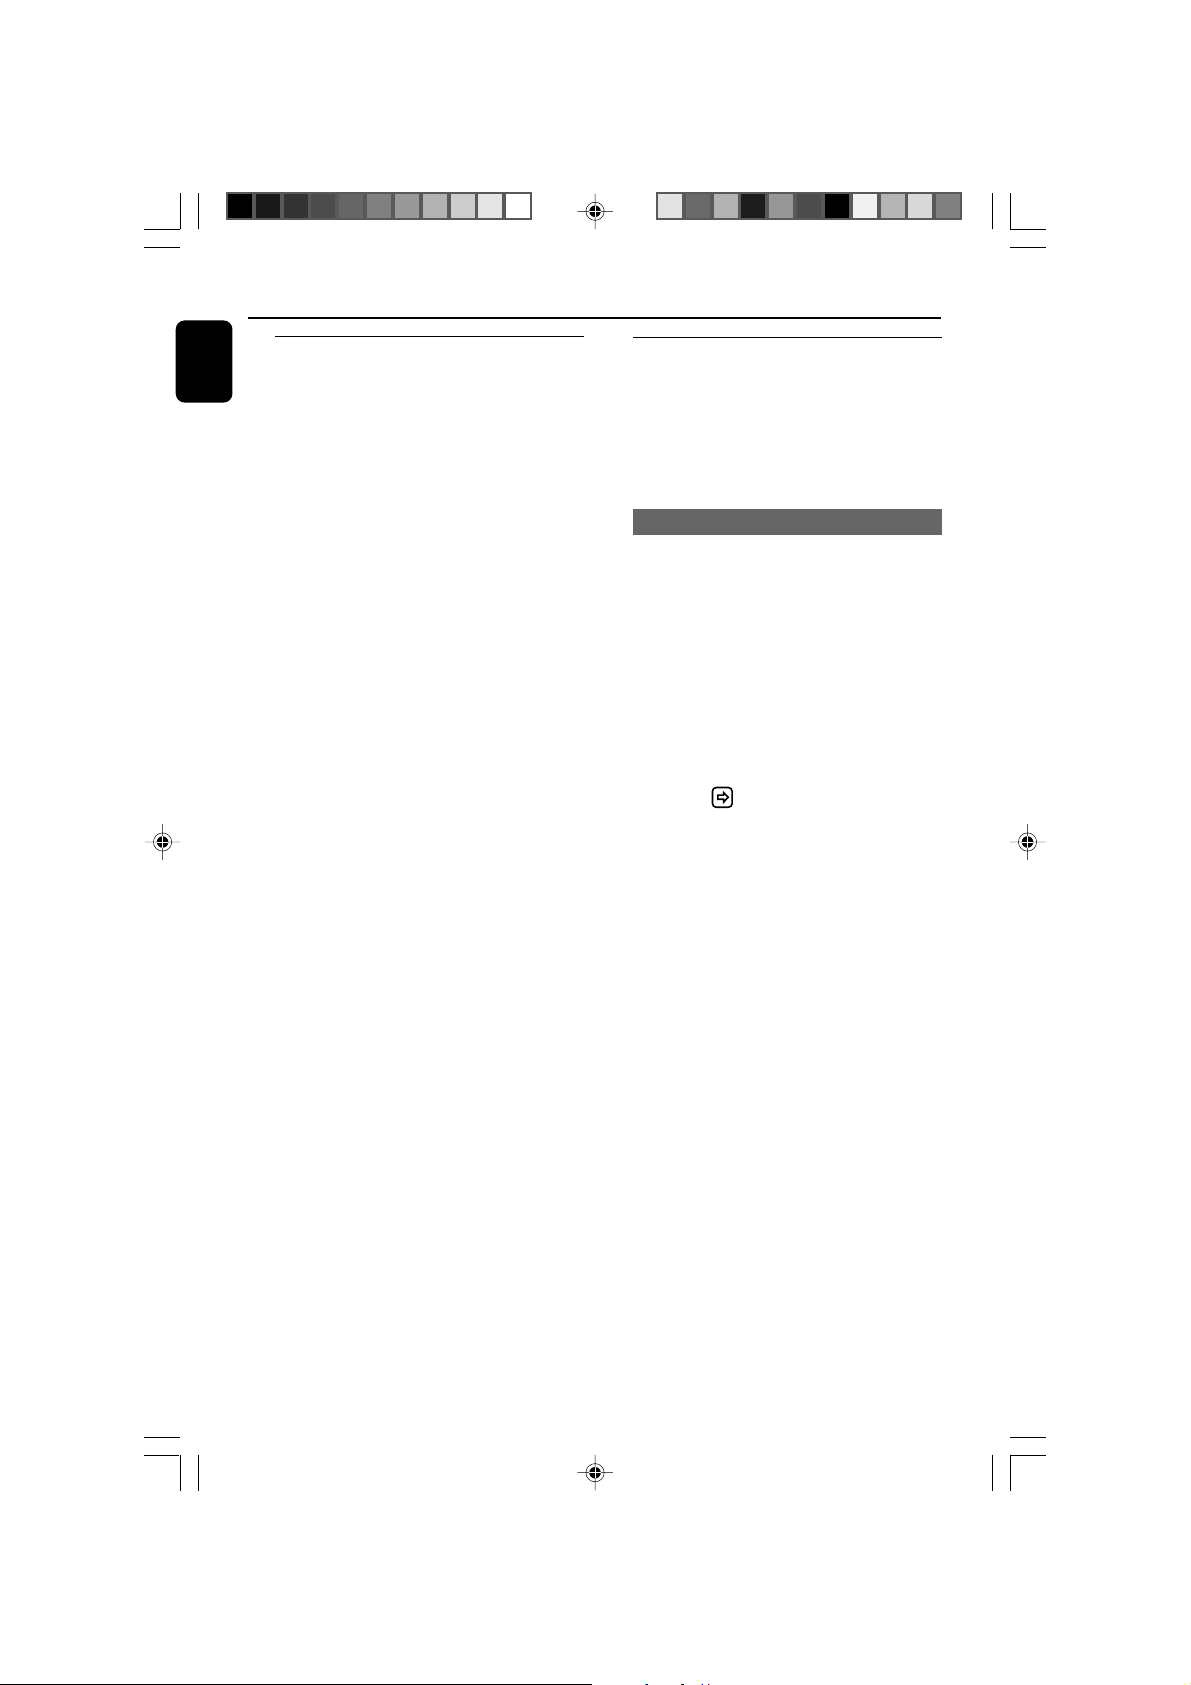
5 To star t recording, press RECORD
➜ Display shows CD-Rec and the album
name of the track being recorded.
(a default album name, e.g. Album_001, is
assigned if the CD track information cannot be
found in Center’s built-in Gracenote® music
recognition service database)
➜ Center will return to HD mode when ripping
is finished
HD
WACS5_Eng/37 8/3/2005, 15:1230
Page 31
HD
6 To rip another CD, repeat the step 1 above
(Up to 8 CDs can be ripped consecutively)
7 To stop recording, press STOP/Ç
To rip an audio CD track during playback
1 Use the navigation controls 3 or 4 and 2 to
select a track.
2 Press RECORD.
➜ You will record and play the selected track.
from the beginning.
3 CD-Rec appears. Display shows the album
name of the track being recorded.
Helpful hints:
– To switch off the sound output temporarily,
press MUTE.
Important!
– During the CD ripping/ MP3 conversion, the
ACTIVE indicator lights up green.
– While the ACTIVE indicator lights up green,
do not switch Center to ECO POWER (power saving mode) or remove its power plug.
STANDBY-ON
To find your ripped tracks
After MP3 conversion is completed (the
ACTIVE indicator is off), you can find and
playback the ripped tracks in Albums.
1 Select HD source
2 In Albums, use the navigation controls 3 or 4
and 2 to enter the album of recorded tracks.
– Only the completely ripped track can be
found on Center’s harddisk.
–You will find the ripped CD tracks under
Raw tracks if they are to be compressed (MP3
conversion).
Importing from PC
The supplied PC Installer CD contains Digital
Media Manager (DMM) software. It will help
you organize the music files on your PC and
import them to WAC700 Center. For details,
see DMM’s help file. Refer to the manual
Connect to your PC to learn how to install
DMM software.
Recording from external source
A maximum of 3-hour recording can be made
from the radio or external source.
1 In Radio mode, tune to the desired radio
station (See Tuner, Tuning to radio stations)
or In AUX mode, start playback from the
external source (see AUX)
2 Press RECORD.
➜ Recording starts
3 To stop recording, press STOP/Ç.
➜ The recording is saved as a file under RADIO
or AUX in Albums. A file name is given, e.g.
Radio_xx, or Aux_xx (where xx denotes a
number)
English
WACS5_Eng/37 8/3/2005, 15:1231
To find your recording
1 Select HD source
2 In Albums, use the navigation controls 3 or 4
and 2 to enter AUX
Page 32
English
Display track information
1 During playback, press VIEW once or more to
enter the playback screen
➜ The display shows:
on the top: HD
in the middle: current track name, elapsed
playing time and some track
information
at the bottom: equalizer setting and, if DBB is
activated, DBB setting.
2 Press 2
➜ The display shows track information (e.g.
track name, file type, file size, bit rate of mp3/
wma files)
3 Press VIEW once or more to return to the
playback screen.
HD
Moving in your WiFi network of
Center and Stations
Up to 5 Stations can be to connected to WAC5
Center. Via Wi-Fi, music can move between
Center and Stations. Even in different places of
your house, you and your family will enjoy and
share music with ease.
MUSIC FOLLOWS ME
As you move around at home, let music move
around you, between Center and Station or
between Station and Station.
On the first unit (Center or Station), where
music will leave:
1 During HD playback, select the album or playlist
you wish to play on the second unit (see
Selecting and searching, Selecting a
different album or track)
2 Press MUSIC FOLLOWS ME to activate
➜ The icon appears. Playback continues
● To star t playback from the beginning on the
second unit, first pressÉÅ on the Center’s
remote control (or Å on the Station’s remote
control, and then, press MUSIC FOLLOWS
ME
3 To deactivate MUSIC FOLLOWS ME, press
MUSIC FOLLOWS ME again or other
functional keys (e.g. SLEEP, RDS/NEWS
or 1 / 2 / 3 / 4)
● MUSIC FOLLOWS ME will be automatically
deactivated if you do not activate MUSIC
FOLLOWS ME on the second unit within 5
minute
WACS5_Eng/37 8/3/2005, 15:1232
On the second unit (Center or Station),
where music will continue
4 Check you have selected HD, CD or AUX
source on the second unit or have switched the
unit to standby mode (see Basic functions,
Switch on/to standby and selecting
functions)
● Check the blue indicator lights up
Page 33
HD
5 Press MUSIC FOLLOWS ME within 5
minutes after MUSIC FOLLOWS ME is
activated on the first unit
➜ Selected music stops on the first unit and
continues on the second unit. The icon
disappears.
➜ Selected play modes (e.g. , )are
retained on the second unit (see Different
play modes: REPEAT, SHUFFLE)
6 To stop MUSIC FOLLOWS ME, press
STOP/Çon the second unit.
SMART EQ
Helpful hints:
After MUSIC FOLLOWS ME is activated on
the second unit, on the first unit:
– make sure the first unit is switched on or to
standby mode
– you can select other tracks or source for
playback
SAME ARTIST
MUSIC BROADCAST
MUSIC BROADCAST allows you to
broadcast music from Center to Station(s).
On Station(s)
1 Check you have switched the Station(s) on or to
standby mode (see Basic functions, Switch
on/to standby and selecting functions)
2 Check the blue indicator lights up
On Center
3 During HD playback, select the album or playlist
you wish to broadcast to Station(s)
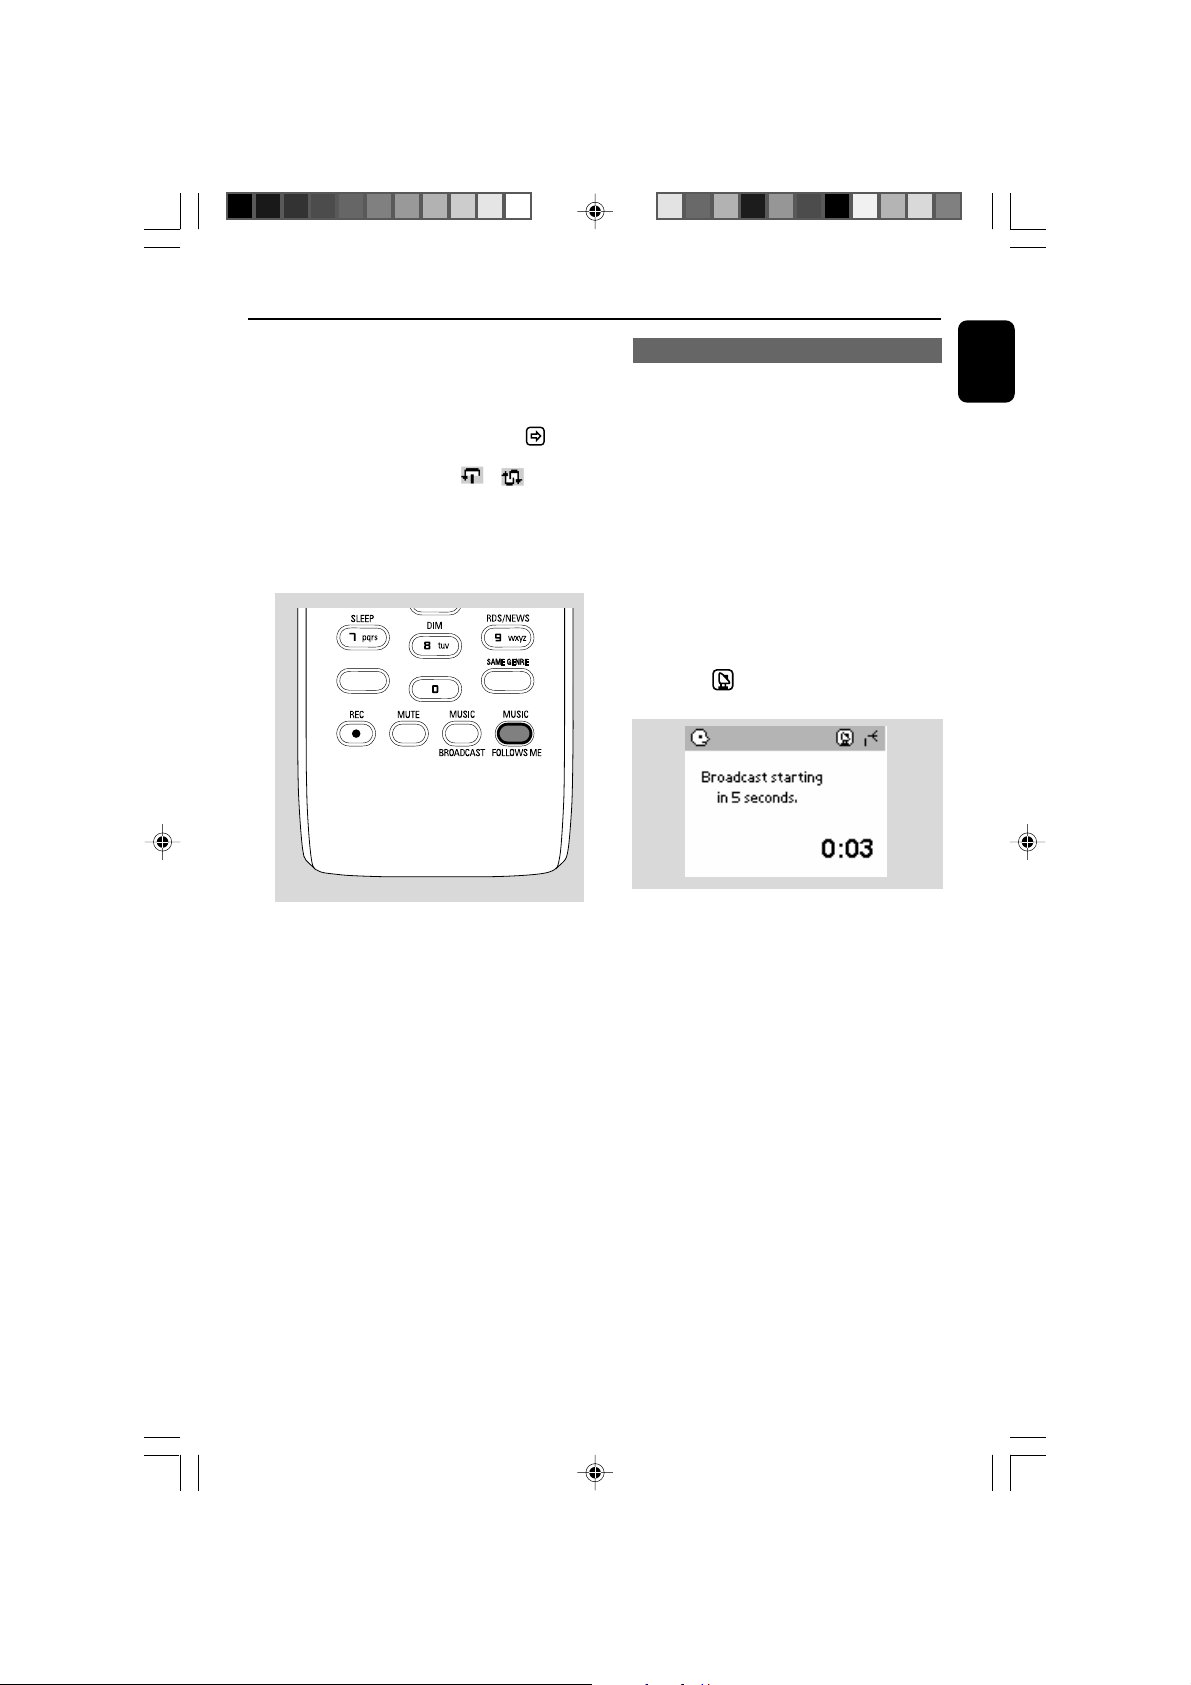
4 Press MUSIC BROADCAST to activate
➜ The icon appears on Center and
Station(s). 5-second countdown starts.
➜ On Center and Station(s): Selected
music plays simultaneously several seconds after
the 5-second countdown.
5 For a station to exit MUSIC BROADCAST,
press STOP/Ç on the Station
● To broadcast music to the station again, you have
to stop MUSIC BROADCAST on Center
and then, activate MUSIC BROADCAST
again on Center.
6 To stop MUSIC BROADCAST, press STOP/
Ç on the Center.
English
WACS5_Eng/37 8/3/2005, 15:1233
Helpful hints: MUSIC BROADCAST will
also stop when:
– you switched Center to Standby or Eco power;
– the selected album or playlist has reached
the end.
Page 34
HD
English
Station management
Adding a station
You can add a station to an existing Wi-Fi
network of Center and Station. Up to 5 stations
can be connected to a WAC Center.
1 Switch on WAC5 Center and select HD source
2 To select Add New Station on Center
a. Press MENU (on Center, press and hold
STOP)
b. Use the navigation controls 3 or 4 and 2 to
enter Station Mgnt menu
c. In Station Mgnt menu, use the
navigation controls 3 or 4 and 2 to select
➜ You will enter the Installation Mode.
Searching for the new station starts.
➜ Playback stops on the previously associated
Station if you are playing the HD source
3 Connect the new station to power supply
➜ On the Center ‘s display shows the number
of stations found
4 Press STOP/Ç on the Center when all the
stations are found
Helpful hints:
–To change your setting of Wi-Fi connection, see
the manual Connect to your PC.
Deleting a station
1 Switch on WAC5 Center and select HD source
2 To select Delete Station on Center
a. Press MENU.
b. Use the navigation controls 3 or 4 and 2 to
enter Station Mgnt menu
c. In Station Mgnt menu, use the navigation
controls 3 or 4 and 2 to select
➜ On the Center ‘s display shows the list of
connected stations
3 Press 3 or 4 and 2 to select the station you
wish to delete
4 Press 3 or 4 and 2 to select Ye s
Viewing station status
1 Switch on WAC5 Center and select HD source
2 To select Station Status on Center
a. Press MENU.
b. Use the navigation controls 3 or 4 and 2 to
enter Station Mgnt menu
c. In Station Mgnt menu, use the
navigation controls 3 or 4 and 2 to select
➜ On the Center ‘s display shows the list of
stations connected or ever connected
3 Press 2 to view the connection information
Information about your WACS5
1 Switch on WAC5 Center (or WAS5 Station) and
select HD source.
2 To select Information on Center or Station
a. Press MENU.
b. Use the navigation controls 3 or 4 and 2 to
enter Information menu
➜ The display shows: the name of Center or
Station, firmware version and free harddisk space
(for Center only)
Firmware
Upgrading firmware
The supplied PC Installer CD contains Digital
Media Manager (DMM) software. It will help
you get the upgrades for WAC5 Center. For
details, see DMM’s help file. Refer to the manual
Connect to your PC to learn how to install
DMM software.
Restoring previous firmware
After the Center’s firmware is upgraded, you can
restore it to its previous version as desired.
1 In Center’s HD mode, press MENU.
2 Use the navigation controls 3 or 4 and 2 to
enter Restore firmware menu.
3 Press 3 or 4 and 2 to select No or Ye s .
WACS5_Eng/37 8/3/2005, 15:1234
Page 35
Re-establishing Wi-Fi connection
After upgrading or restoring the Center’s
firmware, you need to re-establish the Wi-Fi
connection between Center and Stations.
On the WAS5 Stations,
● Enter Installation Mode by:
a. Remove the Station’s power plug and then,
connect it to the power supply again.
➜ “Connecting to Center” appears
b. Press MENU or STOP to enter the
selection screen of Installation Mode and
Select Server
c. Use the navigation controls 3 or 4 and 2 to
select Installation Mode
On Center,
● Select HD mode and then, enter Installation
Mode by:
a. Press MENU.
b. Use the navigation controls 3 or 4 and 2 to
enter Station Mgnt menu
c. In Station Mgnt menu, use the
navigation controls 3 or 4 and 2 to select
Add New Station
➜ Searching for Stations starts.
HD
English
On Center,
● Press STOPÇto exit Installation
Mode when Center has found all the stations.
WACS5_Eng/37 8/3/2005, 15:1235
Page 36
English
P
r
i
n
t
e
d
S
i
d
e
C
D
(
R
W)
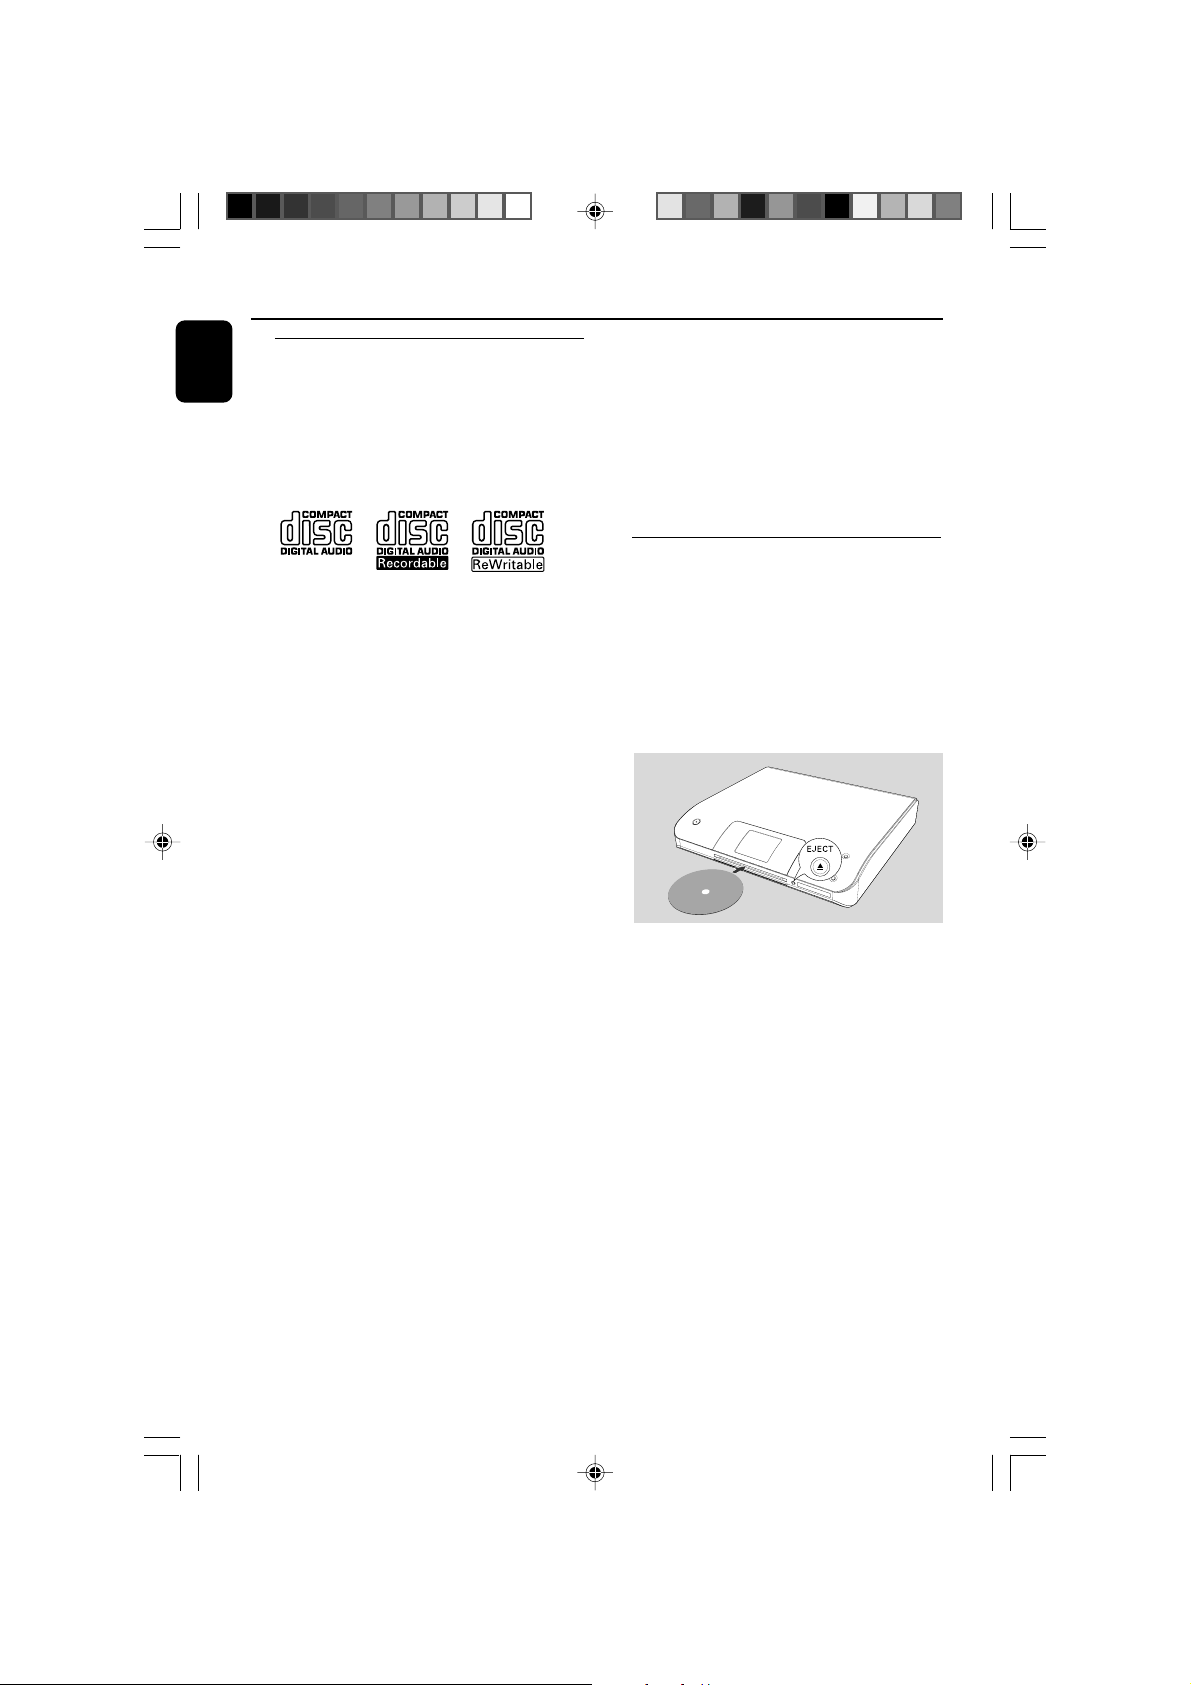
CD
Discs for playback
With this system, you can play
– all pre-recorded audio CDs (CDDA)
– all finalized audio CD-Rs and CD-RWs
(12cm CD and 8cm 185 or 200 MB CD)
– MP3WMA-CDs (CD-Rs/CD-RWs with MP3/
WMA files)
IMPORTANT!
– This system is designed for regular
discs. Therefore, do not use any
accessories such as disc stabilizer rings or
disc treatment sheets, etc.
About MP3/ WMA
The music compression technology MP3
(MPEG1 Audio Layer 3) and WMA (Windows
Media Audio) significantly reduces the digital data
of an audio CD while maintaining CD quality
sound.
Windows Media Audio® is a registered
trademark of Microsoft Corporation.
IMPORTANT!
– Make sure that the file names of MP3
files end with .mp3.
–For DRM protected WMA files, use
Windows Media Player 10 (or later) for
CD burning/conversion. Visit www.
microsoft.com for details about Windows
Media Player and WM DRM (Windows
Media Digital Rights Management).
Playing discs
1 Check the Center is switched on or to standby
(See Basic functions, Switching on/to
standby and selecting functions,
Switching to Eco power/ on)
2 Insert a CD/CD-R(W) into Center’s CD slot
load, with the printed side facing up.
● Make sure you have removed other disc from
the loader.
Supported formats:
– Disc format ISO9660, Joliet, UDF (created on
Adaptec Direct CD v5.0 and Nero Burning
ROM UDF v5.5) and multi-session CDs
– MP3 bit rate (data rate): 32-320 Kbps and
variable bit rate.
– 12-cm 650Mb and 700Mb CD-R/ CD-RWs
– Directory nesting up to a maximum of 8
levels
– WMA v7 or earlier (max. 192Kbps cbr)
The system will not play or support the
following:
•Empty albums: an empty album is an album
that does not contain MP3/WMA files, and will
not be shown in the display.
• Non-suppor ted file formats are skipped. This
means that e.g.: Word documents .doc or MP3
files with extension .dlf are ignored and will not
be played.
• DRM protected WMA files
• WMA files in Lossless or VBR format
WACS5_Eng/37 8/3/2005, 15:1236
➜ Reading CD is displayed as the player scans
the contents of a disc.
➜ Audio CD: the list of tracks appears (track
information appears if it is available after the
lookup of Gracenote Music Recognition Service
database)
➜ MP3/WMA: the list of albums appears
Helpful hints:
–“Others” is shown as an album, if you have not
organized your MP3/WMA files into any albums on
your disc.
–“CDDA” is an album for audio CD tracks if the
disc contains both CD Audio tracks and MP3/WMA
files.
–“All tracks” is shown as an album for MP3/
WMA CD
Page 37
CD
3 Press once or more the navigation controls 3
or 4 and 2 to select a track
4 Press 2 (or OK) to start playback, if necessary.
● MP3/WMA: Press OK on a highlighted album
to start playback of the album (orÉÅ on
Center’s remote control; the Play keyÉ on
Station’s remote control)
● MP3/WMA: Press OK on the highlighted
album All tracks to start playback of all the
tracks on the disc (orÉÅ on Center’s remote
control; the Play keyÉ on Station’s remote
control)
5 To pause playback, press OK.(orÉÅ on
Center’s remote control; Å on the Station’s
remote control). To resume playback, press the
button again.
6 To stop playback, press STOPÇ.
7 To remove the disc, press EJECT on Center
Selecting and searching
Selecting a different album/track
1 If necessary, repeatedly press 1 to enter
previous option lists
2 Repeatedly press the navigation controls 3 or
4 and 2 to select the desired album or track.
3 Press VIEW to return to the playback screen, if
necessary.
Using the fast skip 3 or 4
Use this function to find an option (e.g. an album
or a track) in a long option list.
● Press and hold the navigation controls 3 or 4
in the long option list.
➜ You will skip the options faster and faster
➜ At the high speed skip, the initial letter of
current options appears for easy identification.
Finding a passage within a track
during playback
1 In the playback screen, press and hold the
navigation controls 3 or 4 (or 4 or ¢
on Center’s remote control; à / á on
Station’s remote control)
➜ The CD plays at a high speed.
2 When you recognize the passage you want,
release 4 or ¢ (or à / á on Station’s
remote control)
➜ Normal playback resumes.
English
To select a different track (in current
album) during playback
● In the playback screen, briefly and repeatedly
press the navigation controls 3 or 4 to select
previous or next tracks (or 4 or ¢ on
Center’s remote control; O, P on Station’s
remote control)
WACS5_Eng/37 8/3/2005, 15:1237
Page 38
CD
SMART EQ
English
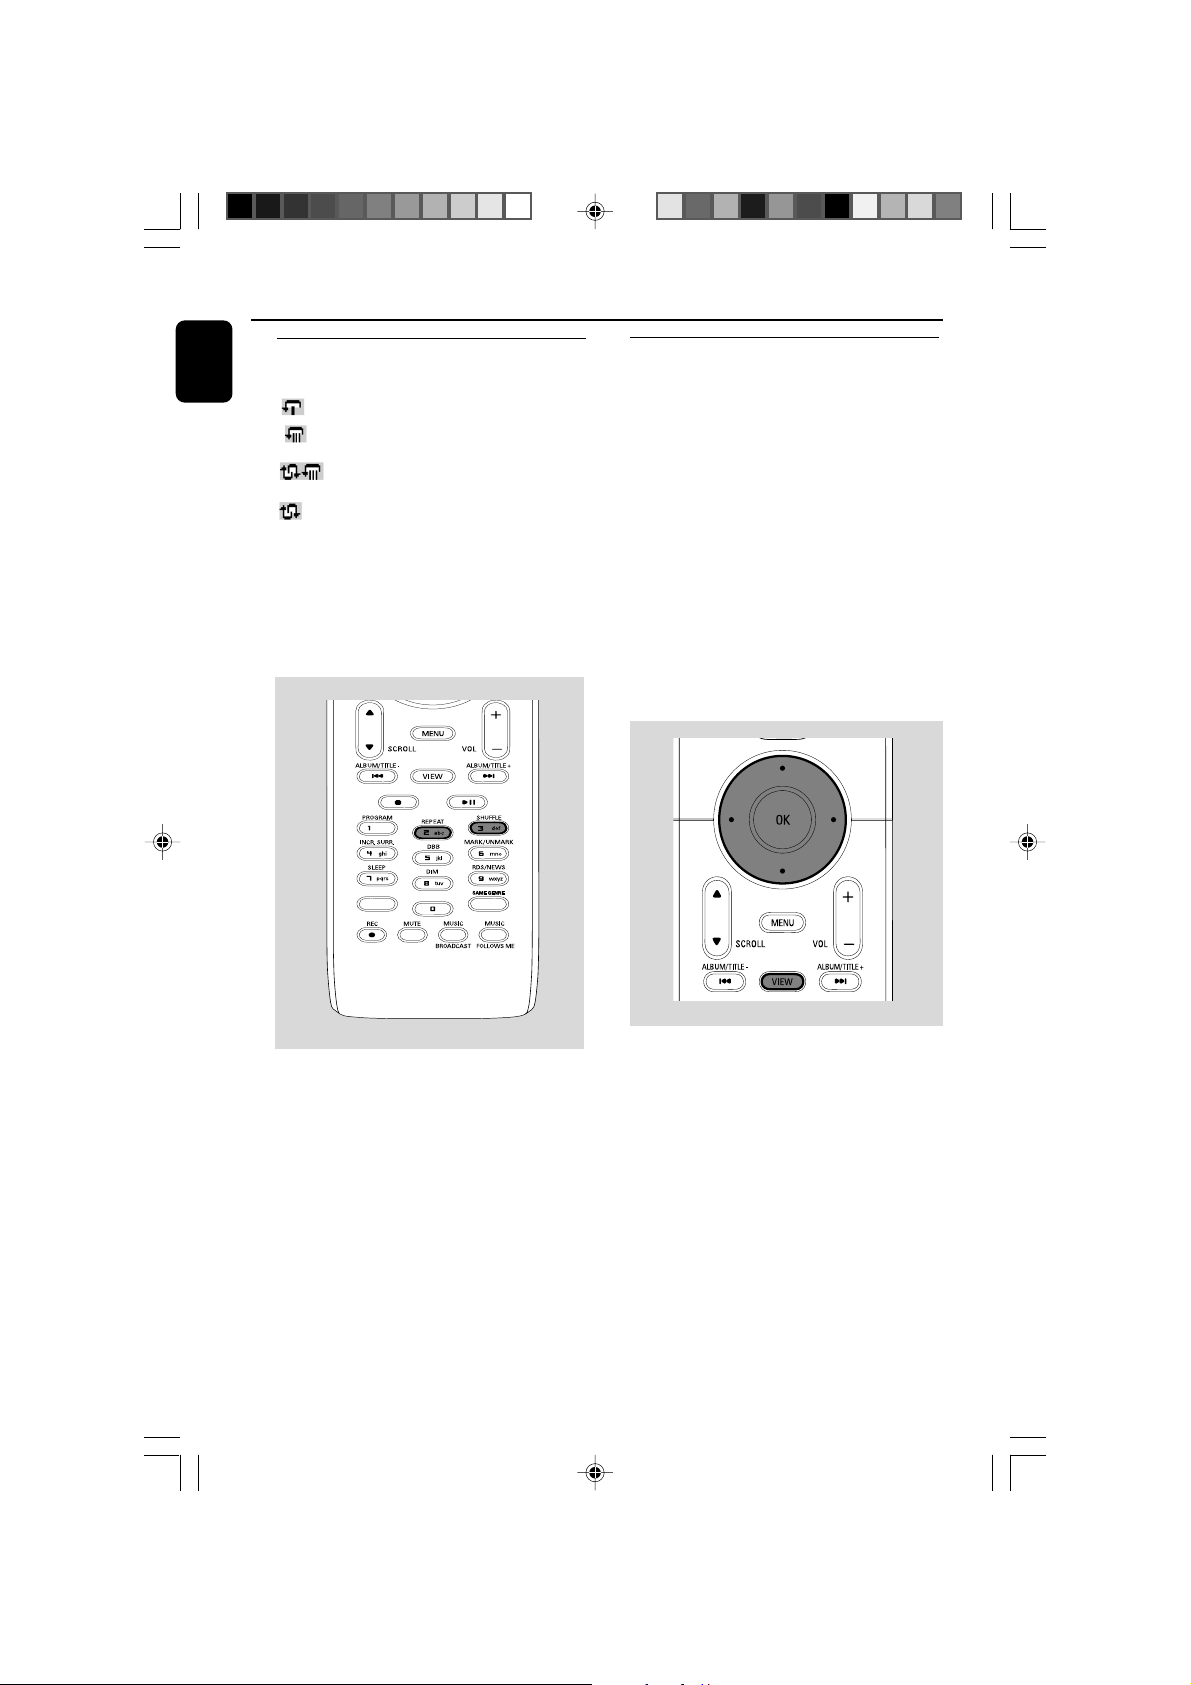
Different play modes: REPEAT,
SHUFFLE
– plays the current track continuously
– repeats all the tracks (under current
album )
– repeats all the tracks (under current
album) in random order
– tracks (under current album) are played
in random order
1 During playback, press once or more REPEAT
or/ and SHUFFLE to select play modes.
2 To return to normal playback, press REPEAT or
SHUFFLE repeatedly until the various modes
are no longer displayed.
Display track information
1 During playback, press VIEW once or more to
enter the playback screen
➜ The display shows:
on the top: CD
in the middle: current track name, elapsed
playing time and some track
information
at the bottom: equalizer setting and, if DBB is
activated, DBB setting.
2 Press 2
➜ The display shows track information (e.g.
track name, file type, file size, bit rate of mp3/
wma files)
3 Press VIEW once or more to return to the
playback screen.
SMART EQ
SAME ARTIST
WACS5_Eng/37 8/3/2005, 15:1338
Page 39
AUX/ UPnP/SLEEP
AUX (Listening to an external
source, on Center only)
You can listen to the sound of the connected
external device through your WAC5 Center.
1 Check the external device has been properly
connected (See Installation, Connecting an
additional appliance)
2 Check the WAC5 Center has been properly
connected to an additional appliance with
powerful speakers (See Installation,
Connecting an additional appliance)
3 Check the WAC5 Center is switched on or to
standby (See Basic functions, Switching on/
to standby and selecting functions,
Switching to Eco power/ on)
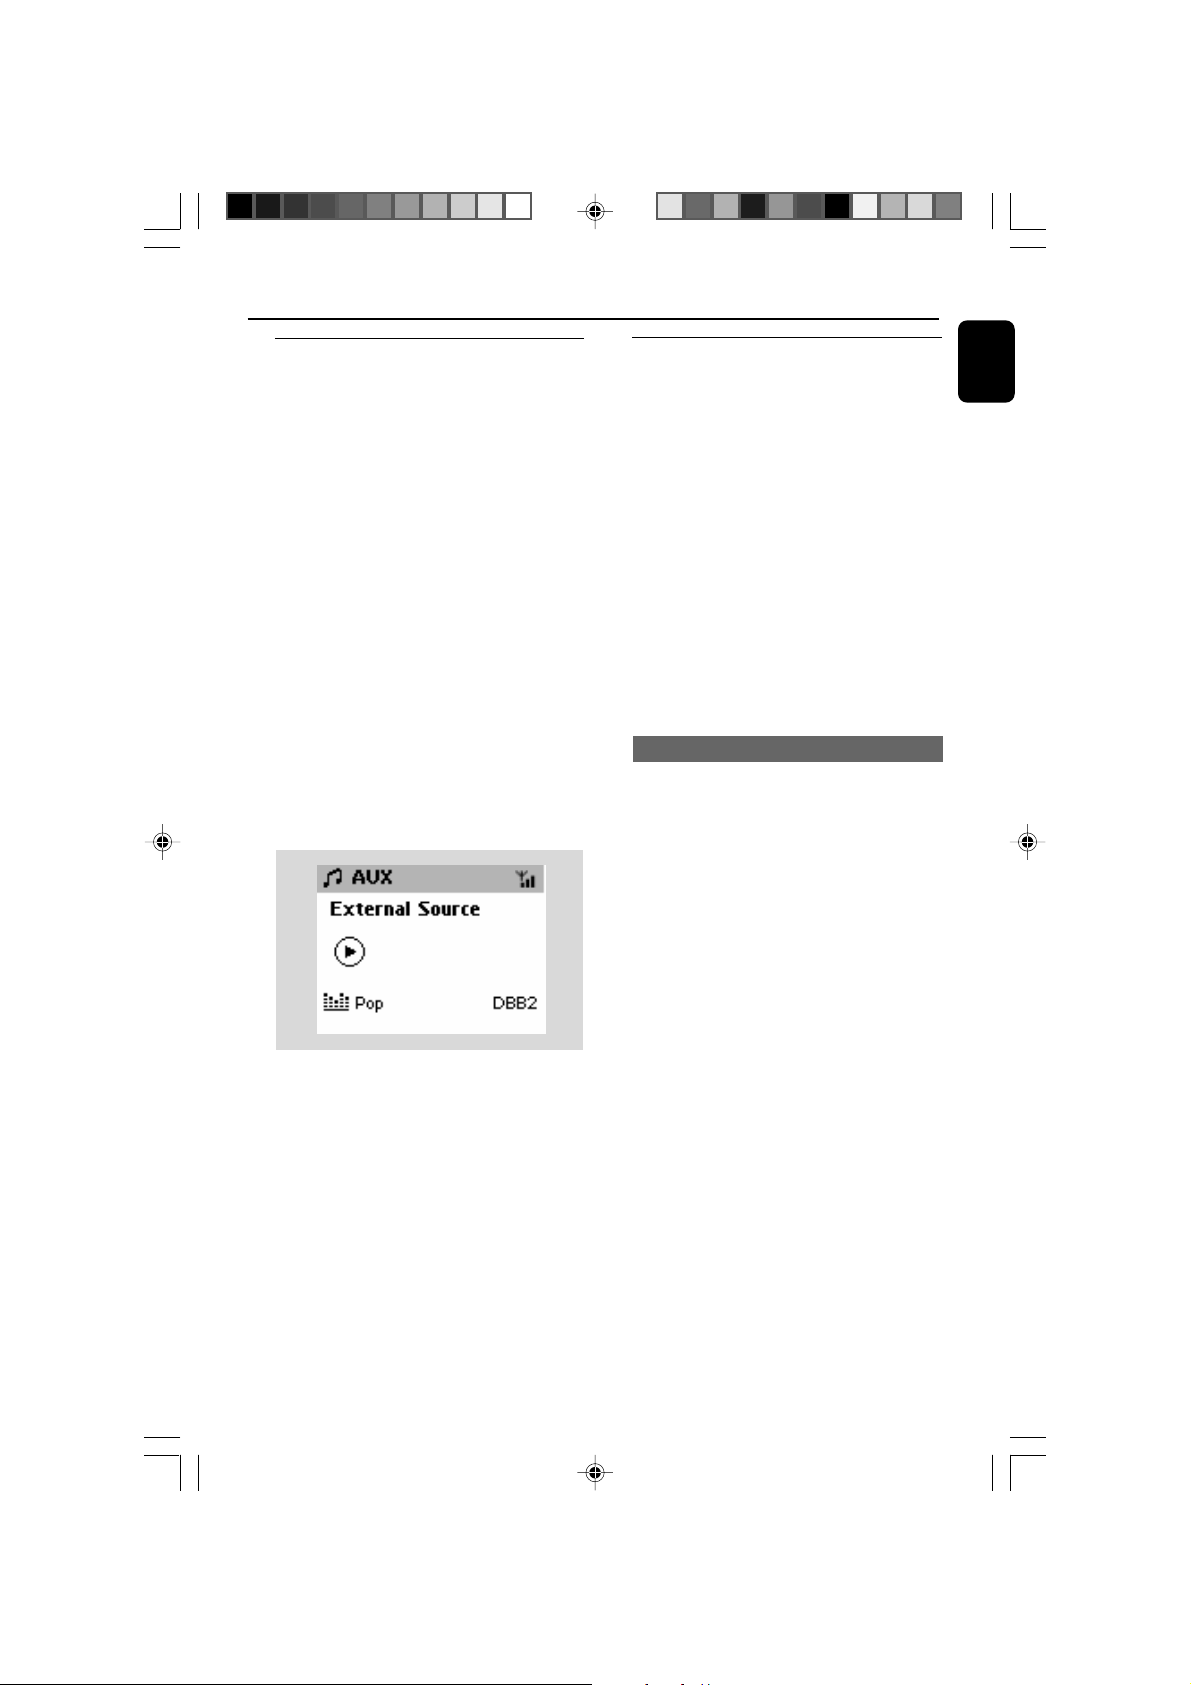
4 Press SOURCE once or more to select AUX
(on the remote control, press TUNER/AUX
once or more)
5 Press the PLAY key on the connected device to
start playback.
6 To adjust the sound and volume, use the sound
controls on your external device.
UPnP (on Station only)
After connecting your WAS5 to an existing
network, you can set up a UPnP* server in the
network. Play from your WAS5 stations the
music collection either on the Center or on the
UPnP server.
* Univeral Plug and Play (UPnPTM) builds on
standard networking technologies and provides
standardized protocols for a wide variety of
home and small business devices. It allows easy
interoperability of all the devices supporting the
the networking technologies.
Requirements for the UPnP server:
● The UPnP device has been connected to the
same network as WAS5.
● UPnP server software is installed (e.g. Philips
Media Manager, Musicmatch® ) and the UPnP
server function is enabled.
To connect a UPnP server
If the WAS5 Station is now connected to
Center,
1 Check the Center is switched on or to standby
mode
2 Check your UPnP-enabled PC is switched on
3 Switch on the Station
4 To select Select Server on Station
a. On the remote control, press MENU.
b. Use the navigation controls 3 or 4 and 2 to
select
➜ On the Station ‘s display shows the list of
servers connected
➜ Server not found appears if there is no
UPnP server in the network
5 Use the navigation controls 3 or 4 and 2 to
select your desired server
➜ On the Station ‘s display shows PC’s music as
it does on PC
If the WAS5 Station has ever been
connected to Center, but is now
disconnected from Center
1 Connect WAS5 to the power supply
➜ Display shows: “Connecting to Center...”
2 To connect to a UPnP server, press MENU or
STOP on the remote control
➜ Display shows the selection screen of
Installation Mode or Select Server
English
WACS5_Eng/37 8/3/2005, 15:1339
Page 40
English
SAME ARTIST
SMART EQ
3 Use the navigation controls 3 or 4 and 2 to
select Select Server
➜ On the Station ‘s display shows the list of
servers connected
➜ Server not found appears if there is no
UPnP server in the network
If the WAS5 Station has never connected to
Center or server,
1 Check your UPnP-enabled PC is switched on
2 Connect WAS5 to the power supply
➜ On the Station ‘s display shows music stored
on PC
AUX/ UPnP/SLEEP
SLEEP
You can set a cer tain period of time after which
the Center or Station will switch to standby.
To play music on a UPnP server
1 Check the WAS5 Station is switched on or
standby mode
2 Check the WAS5 Station is connected to a
UPnP server
➜ On the Station ‘s display shows PC’s music as
it does on PC
Helpful hints:
– On WAS5’s UPnP mode, MUSIC FOLLOWS
ME and MUSIC BROADCAST are disabled.
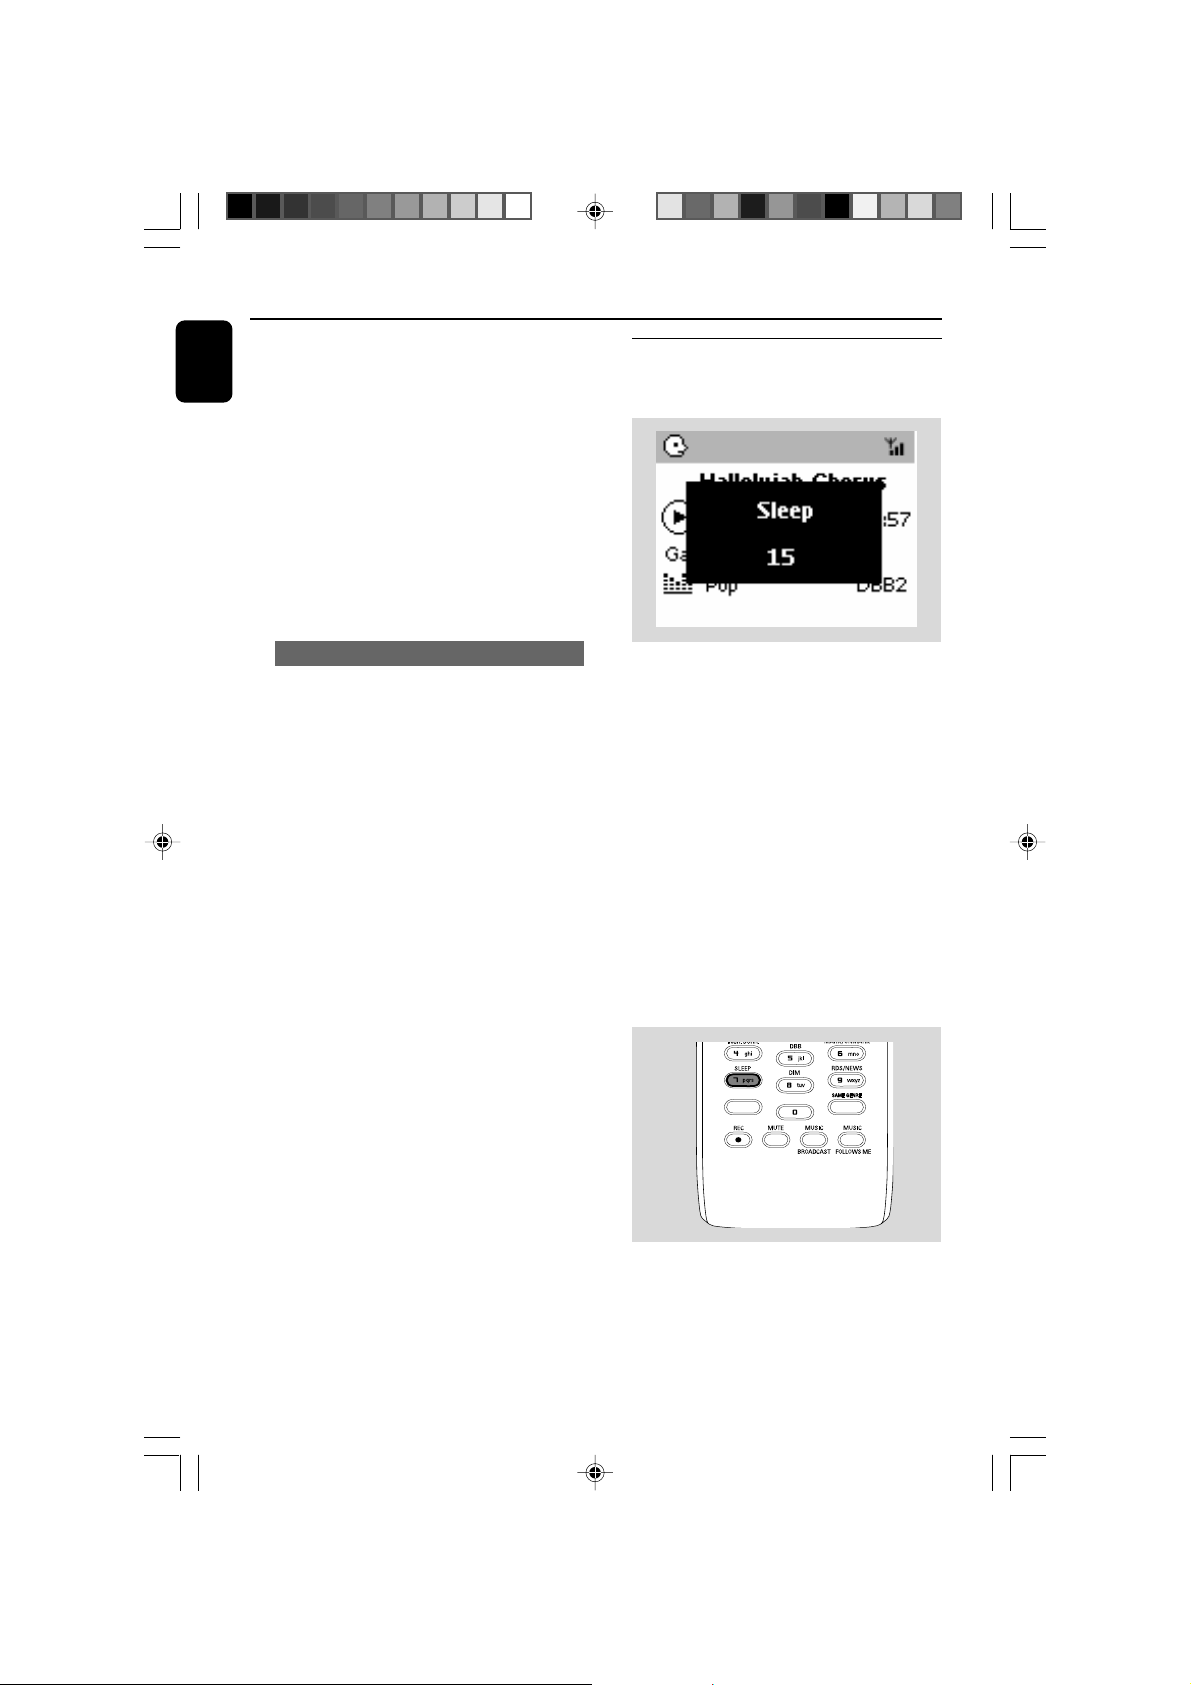
1 On the remote control, press SLEEP
repeatedly to select the desired time period
options (in minutes):
➜ Display shows in sequence: Sleep 15, 30,
45, 60, 90, 120, Off
➜ Display shows the selected option briefly and
returns to its previous status. The icon Z
appears.
Z
2 To view the time countdown to the standby
mode, press SLEEP again.
To deactivate the sleep timer, press
SLEEP until Sleep Off is displayed.
or
Press STANDBY-ON/ ECO POWER to
switch the set to standby (or y on the remote
control)
WACS5_Eng/37 8/3/2005, 15:1340
Page 41
Reset
Reset
If desired, you can restore your Center or Station
to their default setting (including the network
setting).
1 Check the set is switched on (See Basic
functions, Switching on/to standby and
selecting functions, Switching to Eco
power/ on)
2 On the remote control, press MENU to enter
the MENU screen (or on Center, press and
hold STOP • MENU)
3 Use the navigation controls 3 or 4 and 2
to enter Settings
4 Use the navigation controls 3 or 4 and 2
to enter Restore settings
5 Press 3 or 4 and 2 to select Ye s
➜ The set is rebooted. Language selection
screen appears.
6 Select your desired language: English, French,
Spanish, Dutch, Italian and German
➜ The set enters Installation Mode.
➜ The search for Center or Stations starts. The
Wi-Fi connection is being re-established.
If the Center is reset and Stations are
not reset:
● On the Stations, enter Installation Mode by:
a. Remove the Station’s power plug and then,
connect it to the power supply again.
➜ “Connecting to Center” appears
b. Press MENU or STOP to enter the selection
screen of Installation Mode and Select
Server
c. Use the navigation controls 3 or 4 and 2 to
select Installation Mode
If both Center and Stations are reset:
● Do as you did in the first-time Wi-Fi connection
(see Installation, Set up Wi-Fi connection
between Center and Station)
7 On Center, press STOPÇto exit Installation
Mode when all the Stations are found
Helpful hints:
–To change your network settings, you need to
reset your WAC5 Center (see Connect your PC,
Custom Installation).
English
If a Station is reset and the Center is not:
● On the Center, select HD mode and then, enter
Installation Mode by:
a. Press MENU.
b. Use the navigation controls 3 or 4 and 2 to
enter Station Mgnt menu
c. In Station Mgnt menu, use the
navigation controls 3 or 4 and 2 to select
Add New Station
➜ Searching for Stations star ts.
WACS5_Eng/37 8/3/2005, 15:1341
Page 42
English
Specifications
WACS5_Eng/37 8/3/2005, 15:1342
Page 43
Troubleshooting
WARNING
Under no circumstances should you try to repair the system yourself, as this will
invalidate the warranty. Do not open the system as there is a risk of electric shock.
If a fault occurs, first check the points listed below before taking the system for repair. If
you are unable to remedy a problem by following these hints, consult your dealer or
Philips for help.
English
Problem
Wi-Fi connection:
During the first-time setup, Station’s
display shows “Searching for Center”.
I get interference on my wireless (WiFi)
link between center and station.
The WACS 5 operate in the 2.4GHz radio
frequency spectrum. Many other household/IT
devices also operate in the frequency spectrum,
for example: microwave ovens, Dect phones,
bluetooth devices like bluetooth headphones,
computer mouse, wireless routers, cordless
phones, WiFi compatible printers, PDAs.
These devices can interfere with the WiFi link
between Center and Station, resulting in such
interference as the pause during playback , the
set’s slow response to your operation. The
severity of interference varies depending on the
extent of radiation from the device and the
strength of Wi-Fi signals in the position.
Solution
✔ Check you have placed the Center and Station
side by side on a flat and firm surface
✔ Check you have connected the Center to power
supply
✔ When adding a new station, check your center is
in Installation mode (See HD, Station
management)
If you are playing the set, stop playback and take
the appropriate measures as follows:
✔ Keep the Center or Station at least 3 meters
away from such devices.
✔ Use the WEP key when connecting your
Center and Station to an existing wireless PC
network. See the manual Connect to
your PC.
✔ Change the operating channel of your Center
and Station when connecting them to an existing
wireless PC network. To learn about how to
change channels, see the manual Connect to
your PC.
✔ If possible, change the operating channels of
the other Wi-Fi devices at your home.
✔ Tu rn the devices in different directions to
minimize interference.
Remote control:
When I am using the Center’s 2-way
remote control, it starts to show
"connecting ....connecting" on the display
endlessly.
When you read this message on the 2-way
remote control, there could be the following
interference on your remote control:
1) interference signals from the Plasma TV screen
(if this device is turned on);
2) conflicting IR signals from a nearby WAS5
Station
WACS5_Eng/37 8/3/2005, 15:1343
✔ Check your plasma TV is turned off
✔ Check you have placed two IR operated devices
( Station) in separate rooms wherever possible.
Page 44
English
Stations react when you operate
Center’s remote control
Tr oubleshooting
✔ Center’s remote control is powerful enough to
operate several Stations within certain distance
or angle. Check you have placed the Stations in
different rooms or place Stations in different
angles
✔ Use Station’s remote control or the controls on
the set.
x flashes on the sychro display of Center’s
remote control
After the set is switched on, nothing
appears on the sychro display of Center’s
remote control
The remote control does not function
properly.
CD
“No Disc”/ “Cannot read CD” is
displayed
Sound cannot be heard or is of poor
quality.
✔ Signal error. Check you have pointed the remote
control toward the IR area of the set you wish
to operate
✔ You switched on the set by using the control on
the set instead of center’s remote control.
Press REFRESH on center’s remote control to
synchronize its display.
✔ Remove the protective plastic tab before using
the Station’s remote control.
✔ Reduce the distance between the remote
control and the set.
✔ Inser t the batteries with their polarities
(+/– signs) aligned as indicated.
✔ Replace the batteries.
✔ Point the remote control directly towards the IR
sensor.
✔ Inser t a suitable disc.
✔ Check if the disc is inser ted with graphics facing
front
✔ Wait until the moisture condensation at the lens
has cleared.
✔ Replace or clean the disc, see “Maintenance”.
✔ Use a finalized CD-RW or CD-R.
✔ Adjust the volume.
✔ Disconnect the headphones.
✔ Switch off MUTE.
The disc skips tracks
Sound skips during MP3/WMA playback
WACS5_Eng/37 8/3/2005, 15:1344
✔ Replace or clean disc
✔ Switch off SHUFFLE
✔ MP3 file made at compression level exceeding
320kbps. Use a lower compression level to rip
audio CD tracks.
✔ Replace or clean disc.
Page 45
PHILIPS LIMITED WARRANTY
One (1) Year Labor and Parts Repair (Facility)
PHILIPS CONSUMER ELECTRONICS warrants this
product against defect in material or workmanship, subject to
any conditions set forth as follows:
PROOF OF PURCHASE:
You must have proof of the date of purchase to receive warranted repair on the product.A sales receipt or other document showing the product and the date that you purchased the
product as well as the authorized retailer included, is considered such proof.
COVERAGE:
(If this product is determined to be defective)
LABOR: For a period of one (1) year from the date of purchase,
Philips will repair or replace the product, at its option, at no
charge, or pay the labor charges to the Philips authorized repair
facility (see warranty service phone numbers in next column).
After the period of one (1) year, Philips will no longer be
responsible for charges incurred.
PARTS: For a period of one (1) year from the date of purchase,
Philips will supply, at no charge, new or rebuilt replacement
parts in exchange for defective parts. Philips authorized repair
facility will provide removal and installation of the part under
the specified labor warranty.
EXCLUDED FROM WARRANTY COVERAGE
Your warranty does not cover:
• Labor charges for installation or setup of the product, adjustment of customer controls on the product, and installation
or repair of antenna systems outside of the product.
•Product repair and/or part replacement because of improper
installation, connections to improper voltage supply, abuse,
neglect, misuse, accident, unauthorized repair or other cause
not within the control of Philips.
•A product that requires modification or adaptation to enable
it to operate in any country other than the country for
which it was designed, manufactured, approved and/or authorized, or repair of products damaged by these modifications.
• Damage occurring to product during shipping when improperly packaged or cost associated with packaging.
•Product lost in shipment and no signature verification of
receipt can be provided.
•A product used for commercial or institutional purposes
(including but not limited to rental purposes).
•Products sold AS IS or RENEWED.
SHIP-IN WARRANTY
For Ship-In warranty repair, ship the product to a Philips authorized service facility for repair in its original carton and packing
material. If you do not have the original carton or packing material, have your product professionally packed for shipping. Ship
product via a traceable carrier.When it is necessary for you to
ship the product to Philips for repair, you will pay the shipping
cost for shipment to Philips. Philips will pay the shipping costs
when returning the product to you.
TO OBTAIN WARRANTY SERVICE IN THE U.S.A.,
PUERTO RICO, OR U.S.VIRGIN ISLANDS…
Contact Philips Customer Care Center at:
1-888-PHILIPS (1-888-744-5477)
TO OBTAIN WARRANTY SERVICE IN CANADA…
1-800-661-6162 (French Speaking)
1-888-PHILIPS (1-888-744-5477) (English or Spanish
Speaking)
REPAIR OR REPLACEMENT AS PROVIDED UNDER THIS
WARRANTY IS THE EXCLUSIVE REMEDY FOR THE CONSUMER. PHILIPS SHALL NOT BE LIABLE FOR ANY INCIDENTAL OR CONSEQUENTIAL DAMAGES FOR BREACH OF
ANY EXPRESS OR IMPLIED WARRANTY ON THIS PRODUCT. EXCEPT TO THE EXTENT PROHIBITED BY APPLICABLE
LAW, ANY IMPLIED WARRANTY OF MERCHANTABILITY OR
FITNESS FOR A PARTICULAR PURPOSE ON THIS PRODUCT
IS LIMITED IN DURATION TO THE DURATION OF THIS
WARRANTY.
Some states do not allow the exclusions or limitation of incidental or consequential damages, or allow limitations on how
long an implied warranty lasts, so the above limitations or exclusions may not apply to you. In addition, if you enter into a service contract agreement with the PHILIPS partnership within
ninety (90) days of the date of sale, the limitation on how long
an implied warranty lasts does not apply.
English
This warranty gives you specific legal rights. You may have other rights which vary from state/province to state/province.
WACS5_Eng/37 8/3/2005, 15:1345
Philips, P.O. Box 671539, Marietta, GA. 30006-0026
(Warranty: 4835 710 27100)
Page 46
English
End-User License Agreement USE OF THIS PRODUCT IMPLIES ACCEPTANCE OF
This product contains technology and data from Gracenote of Emeryville, California (“Gracenote”). The
technology from Gracenote (the “Gracenote Embedded Software”) enables this product to do disc
identification and obtain music-related information, including name, artist, track, and title information
(“Gracenote Data”), which is included on the Gracenote Database (the “Gracenote Database”).
You agree that you will use Gracenote Data, the Gracenote Database, and Embedded Software for your
own personal non-commercial use only. You agree that you will access Gracenote Data only by means of
the standard end user functions and features of this product. You agree not to assign, copy, transfer or
transmit the Embedded Software or any Gracenote Data to any third party. YOU AGREE NOT TO USE
OR EXPLOIT GRACENOTE DATA, THE GRACENOTE DATABASE, OR GRACENOTE COMPONENT,
EXCEPT AS EXPRESSLY PERMITTED HEREIN.
You agree that your non-exclusive license to use the Gracenote Data, the Gracenote Database, and
Embedded Software will terminate if you violate these restrictions. If your license terminates, you agree to
cease any and all use of the Gracenote Data, the Gracenote Database, and Gracenote Embedded
Software. Gracenote reserves all rights in the Gracenote Data, Gracenote Database, and Gracenote
Embedded Software, including all ownership rights. You agree that Gracenote may enforce its rights under
this Agreement against you directly in its own name.
The Embedded Software and each item of Gracenote Data are licensed to you “AS IS.” Gracenote makes
no representations or warranties, express or implied, regarding the accuracy of any Gracenote Data.
Gracenote reserves the right to delete data or to change data categories in any Data updates and for any
cause that Gracenote deems sufficient. No warranty is made that the Embedded Software is error-free or
that functioning of the Embedded Software will be uninterrupted. Gracenote is not obligated to provide
you with any new enhanced or additional data types or categories that Gracenote may choose to provide
in the future.
THE TERMS BELOW.
GRACENOTE DISCLAIMS ALL WARRANTIES EXPRESS OR IMPLIED, INCLUDING, BUT NOT
LIMITED TO, IMPLIED WARRANTIES OF MERCHANTABILITY, FITNESS FOR A PARTICULAR
PURPOSE, TITLE, AND NON-INFRINGEMENT. GRACENOTE DOES NOT WARRANT THE RESULTS
THAT WILL BE OBTAINED BY YOUR USE OF THE GRACENOTE COMPONENT OR ANY
GRACENOTE SERVER. IN NO CASE WILL GRACENOTE BE LIABLE FOR ANY CONSEQUENTIAL
OR INCIDENTAL DAMAGES OR FOR ANY LOST PROFITS OR LOST REVENUES.
WACS5_Eng/37 8/3/2005, 15:1346
Rev 2.1
 Loading...