

Page 1
Wireless Music Center
WAC 5
User manual
Manuel d'utilisation
Manual del usuario
Benutzerhandbuch
Page 2
Important notes for users in the
U.K.
Mains plug
This apparatus is fitted with an approved 13
Amp plug. To change a fuse in this type of plug
proceed as follows:
1 Remove fuse cover and fuse.
2 Fix new fuse which should be a BS1362 5 Amp,
A.S.T.A. or BSI approved type.
3 Refit the fuse cover.
If the fitted plug is not suitable for your socket
outlets, it should be cut off and an appropriate
plug fitted in its place.
If the mains plug contains a fuse, this should
have a value of 5 Amp. If a plug without a fuse
is used, the fuse at the distribution board
should not be greater than 5 Amp.
Note: The severed plug must be disposed of to
avoid a possible shock hazard should it be
inserted into a 13 Amp socket elsewhere.
How to connect a plug
The wires in the mains lead are coloured with
the following code: blue = neutral (N),
brown = live (L).
¶ As these colours may not correspond with the
colour markings identifying the terminals in
your plug, proceed as follows:0
– Connect the blue wire to the terminal
marked N or coloured black.
– Connect the brown wire to the terminal
marked L or coloured red.
– Do not connect either wire to the earth
terminal in the plug, marked E (or e) or
coloured green (or green and yellow).
Before replacing the plug cover, make certain
that the cord grip is clamped over the sheath
of the lead - not simply over the two wires.
Norge
Typeskilt finnes på apparatens underside.
Observer: Nettbryteren er sekundert
innkoplet. Den innebygde netdelen er
derfor ikke frakoplet nettet så lenge
apparatet er tilsluttet nettkontakten.
For å redusere faren for brann eller elektrisk
støt, skal apparatet ikke utsettes for regn eller
fuktighet.
Copyright in the U.K.
Recording and playback of material may
require consent. See Copyright Act 1956 and
The Performer’s Protection Acts 1958 to 1972.
2
Page 3
Wireless Music Center WAC5
1 2 3 4 5
STOP•MENU
# @
!
0 9 8 7 6
3
Page 4
4
Page 5

Index
LGPL Library written offer
This product contains Linux 2.4.27-vrsl, that is
made available under the GNU LGPL license
ver sion 2.1 (hereafter called "the Library").
Philips Electronics Hong Kong Ltd. hereby offers to
deliver or make available, upon request, for a
charge no more than the cost of physically
performing source distribution, a complete
machine-readable copy of the corresponding
source code of the Library on a medium
customarily used for software interchange.
Please contact:
Mr. Bin Li
BLC Audio PDCC Development
5/F., Philips Electronics Building
5 Science Park East Avenue
Hong Kong Science Park
Shatin Hong Kong
This offer is valid for a period of three years after
the date of purchase of this product.
GPL Package written offer
This product contains Linux 2.4.27-vrsl, that is
made available under the GNU GPL license
ver sion 2 (hereafter called "the Program").
English ------------------------------------------------ 6
Français -------------------------------------------- 38
Español --------------------------------------------- 70
Deutsch ------------------------------------------- 103
English
English
Français
Français
EspañolDeutsch
EspañolDeutsch
Philips Electronics Hong Kong Ltd. hereby offers to
deliver or make available, upon request, for a
charge no more than the cost of physically
performing source distribution, a complete
machine-readable copy of the corresponding
source code of the Program on a medium
customarily used for software interchange.
Please contact:
Mr. Bin Li
BLC Audio PDCC Development
5/F., Philips Electronics Building
5 Science Park East Avenue
Hong Kong Science Park
Shatin Hong Kong
This offer is valid for a period of three years after
the date of purchase of this product.
5
Page 6

Contents
English
General Information
About Wireless Music Center WAC5 ............ 7
Supplied accessories ............................................ 7
Philips on-line support ........................................ 8
Environmental information ................................ 9
Maintenance .......................................................... 9
Safety information ................................................ 9
Controls
Controls on the Center ................................... 10
Center’s 2-way remote control ................ 11-12
Installation
Placing Center and Station ............................... 14
Setting up Wi-Fi connection
between Center and Station ........................... 14
Rear connections ......................................... 15-16
Using AC power ................................................. 16
Preparation
Using the remote control .......................... 17-18
Using the navigation controls .......................... 18
Basic Functions
Switching to standby/on and
selecting functions .............................................. 19
Switching to power-saving mode .................... 19
Auto-standby ....................................................... 19
Switching the blue indicator on/off ................ 20
Display adjustment ............................................. 20
Selecting languages ............................................. 20
Connecting to an audio system
Connecting to your PC
Connecting an additional appliance
Preparation
Using Center’s remote control
HD
Playing Harddisk(HD)........................................ 21
Selecting and searching ............................... 21-22
Selecting a different album or track
Fast search during playback
Selecting tracks of a particular artist
Selecting tracks of a particular genre
Different play modes: REPEAT, SHUFFLE...... 22
Creating Playlist: custom collection of your
favorite music ...................................................... 23
Deleting a playlist, album or track .................. 23
Building music library on Center .............. 24-25
Ripping CDs
Importing MP3/WMA tracks from PC
Recording from External source
Display track information ................................. 26
Moving in your WiFi network of Center and
Stations ........................................................... 26-27
MUSIC FOLLOWS ME
MUSIC BROADCAST
Station mangagement ........................................ 28
Adding a station
Deleting a station
Viewing station status
Information about your WAC5 ....................... 28
Firmware ........................................................ 28-29
Upgrading firmware
Restoring previous firmware
Re-establishing Wi-Fi connection
CD
Discs for playback .............................................. 30
Playing discs ................................................... 30-31
Selecting and searching ..................................... 31
Selecting a different album/track
Finding a passage within a track during playback
Different play modes: REPEAT, SHUFFLE...... 32
Display track information ................................. 32
AUX/UPnP/SLEEP
AUX (Listening to an external source) ......... 33
SLEEP .................................................................... 33
Reset
Reset ..................................................................... 34
Specifications ........................................... 35
Tr oubleshooting .............................. 36-37
6
Page 7

General Information
About Wireless Music Center
WAC5
On WAC5’s 80GB* hard disk, you can centrally
store up to 1,500 audio CDs. All the stored
music can be wirelessly streamed, via Wi-Fi**,
from Center to connected Stations.
WAC5 can be easily connected to your existing
home audio systems, such as the audio/video
receiver, home theatre system, mini/micro
system, or multimedia speaker boxes (with builtin amplifier) and audio amplifiers.
No need to be bound to your CD player or PC
etc., or be troubled by the wiring. Now, you will
have the freedom to enjoy and share your
favorite music around your home.
* Available storage capacity is based on 4 minutes per
song, 10 songs per CD on average, 128 kbps MP3
encoding and given the fact that operational software is
part of the product's memory.
Actual free space is 69GB or less, due to the buffer
partition for MP3 compression, firmware, music CD
database and demo tracks stored.
** Wi-Fi, or IEEE802.11 b/g, is the international leading
industry standard for wireless broadband networking. It
transfers digital data with wider range and bandwidth.
Supplied accessories
– Center’s remote control and
4 x AAA batteries
–1 x Audio cables
–1 x Ethernet cable
– PC installer CD
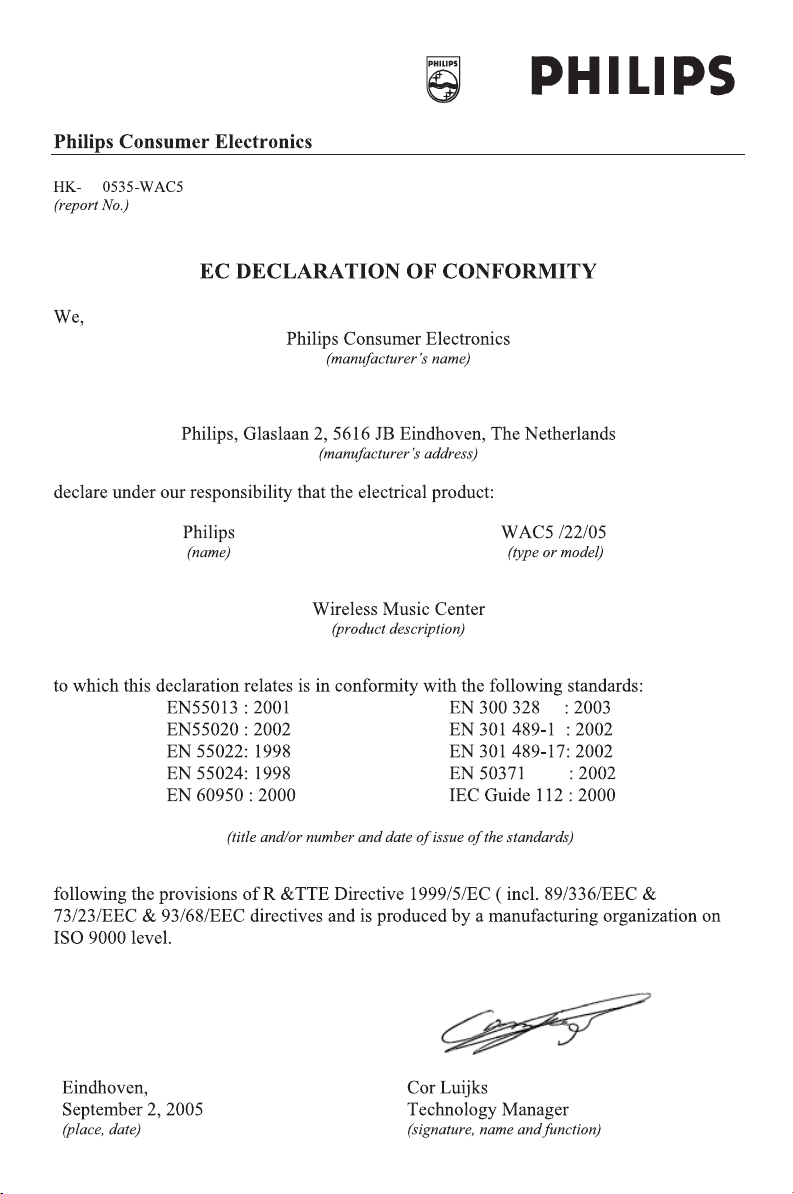
This set complies with the radio interference
requirements of the European Community.
Hereby Philips Consumer Electronics,
BG Home Entertainment Networks ,
declares that this product WAC5 is in
compliance with the essential requirements
and other relevant provisions of Directive
1999/5/EC.
English
CAUTION
Use of controls or adjustments or
performance of procedures other than
herein may result in hazardous radiation
exposure or other unsafe operation.
The making of unauthorized copies of
copy-protected material, including
computer programs, files, broadcasts and
sound recordings, may be an infringement
of copyrights and constitute a criminal
offence. This equipment should not be used
for such purposes.
7
Page 8

General Information
English
Philips on-line support
Philips products have been designed and manufactured to the highest quality
standards. If your Philips WAC5 is not working correctly, we recommend you
check your User Manual to verify that your product is properly connected and
configured.
The web site for WAC5 support: www.philips.com/support offers you all
information you need to optimally enjoy your product, and about new additions
to this exciting range, to make your home entertainment experience even more
enjoyable.
Please visit: www.philips.com/support and enter your product name
(WAC 5) to view:
● FAQ (Frequently Asked Questions)
● Latest user manuals and PC software manuals
● Firmware upgrade files for WAC 5
● Latest PC software downloads
● Interactive troubleshooting
Since it is possible for you to upgrade your product, we recommend that you
register your product on www.philips.com/register so we can inform you as
soon as new free upgrades become available.
Enjoy your WAC5 !
The model number is on the rear of the set.
8
Page 9
General Information
Environmental information
All unnecessary packaging has been omitted.
We have tried to make the packaging easy to
separate into three materials: cardboard (box),
polystyrene foam (buffer) and polyethylene (bags,
protective foam sheet).
Your system consists of materials which can be
recycled and reused if disassembled by a
specialized company. Please observe the local
regulations regarding the disposal of packaging
materials, exhausted batteries and old
equipment.
Disposal of your old product
Your product is designed and
manufactured with high quality materials
and components, which can be recycled
and reused.
When this crossed-out
wheeled bin symbol is
attached to a product it
means the product is
covered by the European
Directive 2002/96/EC
Please inform yourself about the local
separate collection system for electrical
and electronic products.
Please act according to your local rules
and do not dispose of your old products
with your normal household waste. The
correct disposal of your old product will
help prevent potential negative
consequences for the environment and
human health.
Maintenance
Cleaning the Set
● Use a soft cloth slightly moistened with a mild
detergent solution. Do not use a solution
containing alcohol, spirits, ammonia or abrasives.
Cleaning Discs
● When a disc becomes dir ty,
clean it with a cleaning cloth.
Wipe the disc from the center
out.
● Do not use solvents such as
benzene, thinner, commercially
available cleaners, or antistatic spray intended for
analog records.
Protecting the hard disk
● Keep your WAC5 Center from violent vibration,
which may result in the damage to the hard disk.
Safety information
● Place the set on a flat, hard and stable surface.
● Do not expose the system, batteries or discs to
excessive moisture, rain, sand or heat sources
caused by heating equipment or direct sunlight.
● Place the sets in a location with adequate
ventilation to prevent internal heat build-up in
your system. Allow at least 10 cm (4 inches)
clearance from the rear and the top of the unit
and 5 cm (2 inches) from each side.
● The ventilation should not be impeded by
covering the ventilation openings with items,
such as newspapers table-cloths, curtains, etc.
● The apparatus shall not be exposed to dripping
or splashing.
● No objects filled with liquids, such as vases, shall
be placed on the apparatus.
● No naked flame sources, such as lighted candles,
should be placed on the apparatus.
● The mechanical par ts of the set contain self-
lubricating bearings and must not be oiled or
lubricated.
English
9
Page 10

Controls (illustrations on page 3)
English
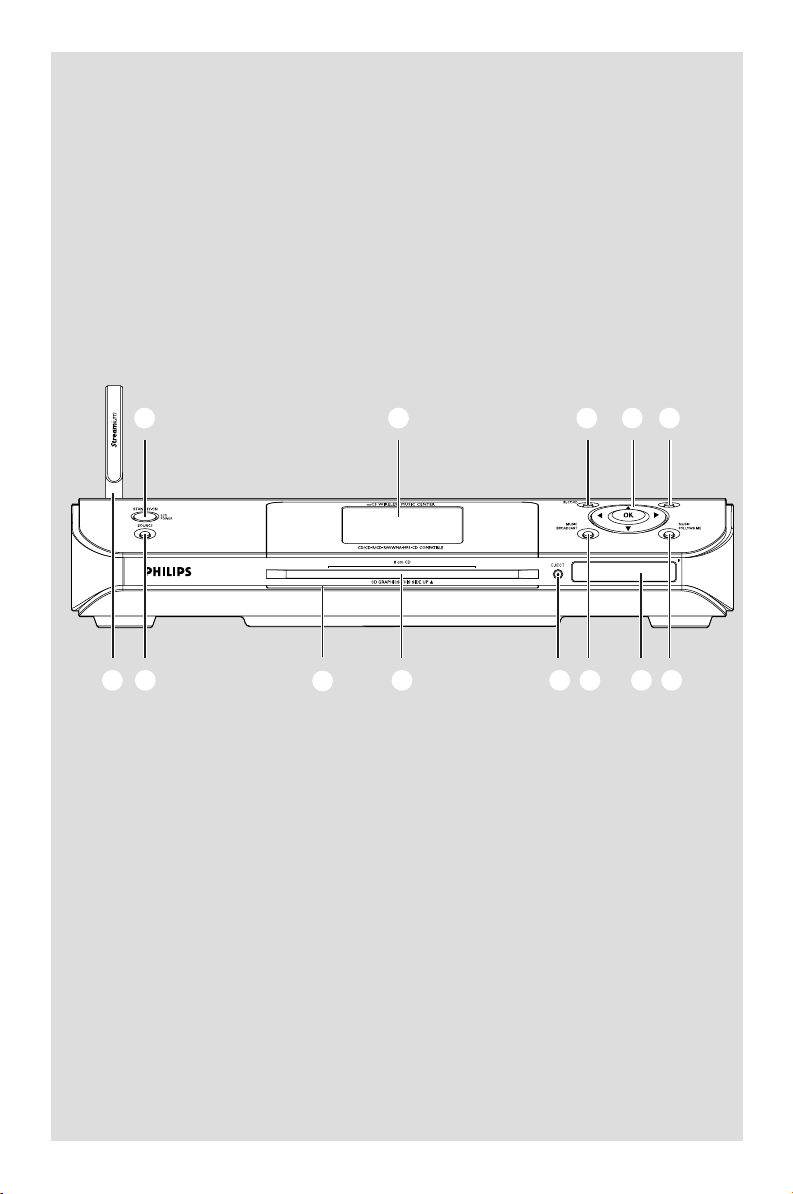
Controls on the Center (Top and
front panels)
1
STANDBY-ON/ ECO POWER
– press briefly to switch Center on or
to standby mode;
– press and hold to switch Center to
power-saving mode or on
– Green indicator: lights up green when the set
is on; flashes during CD ripping /MP3 conversion
(when the set is on)
– Red indicator: lights up red when the set is
switched to Standby mode or power-saving
mode
2 Display
– shows status of Center
3 RECORD
– CD/AUX: starts the recording to hard disk
4 1 / 2 / 3 / 4
–navigation controls (left, right, up, down) to scroll
through the option list
1
– HD/CD: returns to previous option lists
3 / 4
– HD/CD: skips/searches tracks/passage
backward/forward (in playback screen);
fast scrolls the option list
2 / OK
– confirms selection
OK
– HD/CD: starts or pauses playback
– CD: selects or deselects tracks to be recorded
on hard disk
5 STOP • MENU
– stops playback or recording;
– press and hold to enter or exit setup menu
6 MUSIC FOLLOWS ME
– HD: moves music playback between Center and
Station
7 IR
– sensor for the infrared remote control
Helpful hints: Always point the remote control
towards this sensor.
8 MUSIC BROADCAST
– HD: broadcast music from Center to Station
9 EJECT
– ejects a disc from the CD slot loader
0 CD slot loader
! Blue indicator
– lights up when the set is on
@ SOURCE
– selects sound source HD, CD or AUX
– In standby mode: switches Center on and selects
sound source HD, CD or AUX
# Wi-Fi antenna
10
Page 11
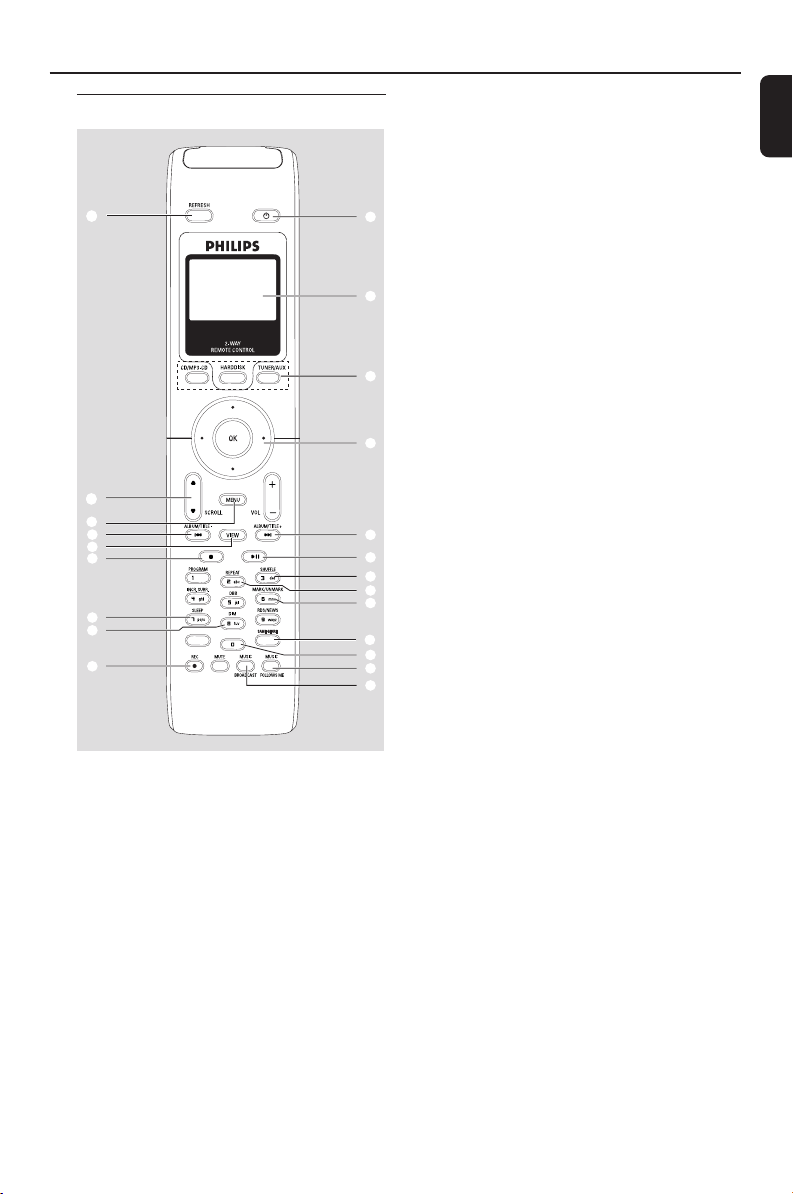
Controls
Center’s 2-way remote control
¡
)
(
5
*
&
^
%
$
IMPORTANT!
– This remote control can be also used for
some other Philips’ wireless music systems,
which provide sound and tuner features
unavailable in WAC5. Such sound/tuner
buttons will not work with WAC5.
– To operate Station using Center’s remote
control, see Preparation: Using Center’s
remote control.
SMART EQ
SAME ARTIST
1 y
– press briefly to switch the set to standby mode
– press and hold to switch the set to Eco Power
mode or on
2 Synchro display
– synchronous display of the set’s status
1
3 Source buttons
CD/MP3-CD
– selects CD source
2
– In standby mode: switches the set on and selects
CD source.
3
HARDDISK
– selects HD source
– In standby mode: switches the set on and selects
HD source
4
TUNER/AUX
– selects the audio input from an additional
connected appliance
– In standby mode: switches the set on and selects
5
6
7
8
9
the audio input from an additional connected
appliance
4 1 / 2 / 3 / 4
–navigation controls (left, right, up, down) to scroll
through the option list
0
!
@
#
1
– HD/CD: returns to previous option lists
3 / 4
– HD/CD: skips/searches tracks/passage backward/
forward (in playback screen); fast scrolls the
option list
2 / OK
– confirms selection
5 4 / ¢
– HD/CD: skips/searches tracks/passage
backward/forward (in playback screen)
6 ÉÅ
– HD/CD: starts or pauses playback
7 SHUFFLE
– selects random playback
8 REPEAT
– selects continuous playback
9 MARK/UNMARK
– CD: selects or deselects tracks to be recorded
on hard disk
English
11
Page 12

Controls
English
0 SAME GENRE
– HD: plays all the tracks of current Genre
! SAME ARTIST
– HD: plays all the tracks of current Artist
@ MUSIC FOLLOWS ME
– HD: moves music playback between Center and
Station or between Station and Station
# MUSIC BROADCAST
– HD: broadcasts music from Center to Station
$ REC
– CD/AUX: starts the recording to hard disk
% DIM
– changes the brightness of display illumination
– press and hold to turn the blue indicator on or
off
^ SLEEP
– ajusts/displays/switches off sleep timer
& Ç
– stops playback or recording
* VIEW
– toggles playback screen and previous option list
( MENU
– enters or exits setup menu
) 3 / 4 SCROLL
– scroll the display screen upward or downward
¡ REFRESH
– sychronize remote control’s display
with the set’s display
12
Page 13

OPTICAL OUT
DIGITAL OUT
Installation
English
AC power cord
(for illustration only)
13
Page 14

Installation
English
Placing Center and Station
IMPORTANT!
– Install your Center and Station near
the AC outlet and where the AC power
plug can be reached easily.
Ta ke the following steps to optimize the
Wi-Fi connection between Center and
Station:
–Keep your Center and Station away
from the source of interference (wireless
routers, microwave ovens, DECT phones,
bluetooth devices, cordless phones,
other Wi-Fi products, etc.)
–Avoid placing your Center or Station
close to the plasma TV. It may result in
improper display on your Center’s 2-way
remote control.
–Keep Stations adequately apart or in
different angles (e.g. in different rooms
blocked by one wall). Within a distance
and angle (e.g. in the same room), your
Center’s remote control is powerful
enough to simultaneously operate
several Stations, which may also result in
improper display on the 2-way remote
control.
Setting up Wi-Fi connection
between Center and Station
Up to 5 stations can be connected to a WAC5
Center.
On Center
1 Connect the Center to power supply
2 Switch on WAC5 Center and select HD source
3 To select Add New Station on Center
a. Press and hold STOP • MENU to enter the
MENU screen (or on remote control, press
MENU)
b. Use the navigation controls 3 or 4 and 2 to
enter Station Mgnt menu
c. In Station Mgnt menu, use the navigation
controls 3 or 4 and 2 to select
➜ You will enter the Installation Mode.
Searching for the station starts
➜ Playback stops on the previously associated
Station if you are playing the HD source
On Station
4 Connect the station to power supply
5 To select Installation Mode,
a. On the remote Control, press MENU
b. use the navigation controls 3 or 4 and 2 to
select
On Center
6 Press STOP/Ç on the Center when all your
stations are found
IMPORTANT!
– Avoid thick walls. Your Center and Station should
never be blocked by 2 or more walls.
– Avoid placing the sets close to large metal
objects.
– For better Wi-Fi reception, turn the Wi-Fi
antenna, or adjust the location of your Center and
Station.
– indicates maximum reception
– indicates no reception
If there is interference in the neighborhood,
the set may pause during playback or
respond slowly to your operation. In such
cases
– Use the WEP* key when connecting your Center
and Station to an existing wireless PC network. See
the manual Connect to your PC: Option 2.
– Change the operating channel of your Center
and Station when connecting them to an existing
wireless PC network. To learn about how to change
channels, see the Owner’s manual of your router
and the manual Connect to your PC: Option
2.
– If possible, change the operating channels of the
other Wi-Fi devices at your home.
–Turn the above devices in different directions to
minimize interference.
* stands for Wired Equivalent Privacy. It is a
security protocol for wireless local area
network
14
Page 15

Installation
OPTICAL OUT
DIGITAL OUT
OPTICAL OUT
DIGITAL OUT
Rear connections
Warning:
Never make or change connections with
the mains supply switched on.
A Connecting to an audio system
You can easily connect your WAC5 to your
existing home audio systems, such as the audio/
video receiver, home theatre system, mini/micro
system, or multimedia speaker boxes (with builtin amplifier) and audio amplifiers.
Using audio cables, connect one (one set) of
WAC5’s sound output terminals: LINE OUT,
DIGITAL OUT or OPTICAL OUT to the
corresponding input terminals in the connected
device. For better sound output, use DIGITAL
OUT or OPTICAL OUT if it is available on
the connected device.
LINE OUT:
1 Connect Center to an audio system:
a. Insert the red plug of the red/white audio
cables (supplied) to the red socket LINE
OUT R and the white plug to the white
socket LINE OUT L
b. Connect the other end of the audio cables to
the AUX IN (or AUDIO IN) terminals of
the additional appliance, red plug to the red
socket AUX IN R and white plug to the
white socket AUX IN L
DIGITAL OUT:
1 Insert the plug of digital audio cables (not
supplied) to the DIGITAL OUT socket
2 Connect the other end of the audio cables to
the DIGITAL IN terminal of an additional
appliance
3 Select the Digital Input mode (such as DI) in the
connected audio system.
Helpful hints:
– Always refer to the owner’s manual of other
equipment for details.
OPTICAL OUT:
1 Insert the plug of optical audio cables (not
supplied) to the OPTICAL OUT socket
2 Connect the other end of the audio cables to
the OPTICAL IN terminal of the additional
appliance.
English
OPTICAL OUT
DIGITAL OUT
(for illustration only)
2 Select AUX mode in the connected audio
system
3 Select the optical input mode in the connected
audio system.
Helpful hints:
– Always refer to the owner’s manual of other
equipment for details.
15
Page 16

Installation
English
B Connecting to your PC
● Connect the supplied Ethernet cable to
Center’s ETHERNET and your computer’s
Ethernet port. For details, see the manual
Connect to your PC
OPTICAL OUT
DIGITAL OUT
C Connecting an additional appliance
It is possible to use an additional appliance, e.g.
TV, VCR, Laser Disc player or DVD player with
the WAC5 Center. On WAC5 Center, you can
playback or record music from an external
source.
1 Insert the red plug of the red/white audio cables
(not supplied) to the red socket AUX IN R
and the white plug to the white socket AUX
IN L
2 Connect the other end of the audio cables to
the AUDIO OUT terminals of the additional
appliance
Helpful hints:
– For more information about recording/playback
from the external source, see HD: Recording
from external source and AUX.
– For better sound output, use the LINE OUT
terminals on the external device.
– If the connected device has only a single audio
out terminal, connect it to the AUX IN left terminal.
Alternatively, you can use a “single to double” cinch
cable, but the output sound still remain mono.
– Always refer to the owner’s manual of other
equipment for complete connection.
Using AC power
1 Make sure all the connections have been made
before switching on the power supply
2 Connect the AC power cord to the wall socket.
This switches on the power supply
When Center is switched to standby, it is still
consuming some power. To disconnect the
system from the power supply completely,
remove the power plug from the wall
socket.
The type plate is located on the rear of the
set.
For users in the U.K.: please follow the
instructions on page 2.
OPTICAL OUT
DIGITAL OUT
3 Select AUX mode in Center.
16
Page 17

Preparation
Using the remote control
IMPORTANT!
–Always point the remote control
directly towards IR area on the Center or
Station you wish to operate.
– Some functional keys on Center’s
remote control are exclusively used for
Center (for example, CD/MP3-CD,
MARK/UNMARK, MUSIC BROADCAST
etc.)
Preparation
Center’s remote control:
1 Open the battery compartment.
2
1
3
2 Insert 4 batteries type R03 or AAA into the
remote control with the correct polarity as
indicated by the "+" and "-" symbols inside
the battery compartment
CAUTION!
– Remove batteries if they are
exhausted or will not be used for a long
time.
– Do not use old and new or different
types of batteries in combination.
– Batteries contain chemical substances,
so they should be disposed of properly.
Using Center’s remote control
Battery usage: As a remote control with
synchronous display, Center’s remote control
consumes more power than normal remote
controls. When its batteries are low or empty, the
icon appears on the remote control’s display.
Replace the batteries with new alkaline batteries.
By default, Center’s remote control works with
Center only. To operate Station using
Center’s remote control
1 Press and hold REFRESH until the selection
screen appears on the display of Center’s
remote control.
English
3 Put back the compartment door
2 Press the navigation controls 3 or 4 and 2
to select Station
On Center’s remote control:
➜ Display shows current status of Station
after Station is connected
➜ You can use Center’s remote control to
operate Station now.
17
Page 18

Preparation
English
Helpful hints:
– To operate Center using the remote control
again, repeat the above steps 1-2 to select Center.
– Center’s remote control will return to its
default setting (works with Center only)
when you insert new batteries into it.
Using the display on the Center’s remote
control
You can synchronize the local display of your
Center or Station onto the display of Center’s 2way remote control. With the synchronized
display, your operation of remote control
becomes quicker and easier.
Note:
–Avoid placing your Center or Station close to the
plasma TV. It may interfere with the Center’s
remote control and cause improper display on your
Center’s remote control. In this case, turn off your
plasma TV or use Station’s remote control.
– If you switch on your Center or Station using the
STANDBY-ON/ ECO POWER button on the
set, press REFRESH on Center’s remote control
to synchronize the remote control’s display.
– The display suppor ts 6 European languages:
English, French, Spanish, Dutch, Italian and German.
Using the navigation controls
When selecting options on the set’s screen, you
often need to use the navigation controls 1 / 2
/ 3 / 4.
1 Press 3 / 4 to highlight an option
2 Enter its submenu by pressing 2
3 Press 1 to return to the previous option list
screen
4 Press OK or 2 to confirm
18
Page 19

Basic functions
ECO
POWER
Switching to standby/on and
selecting functions
1 When the set is on, press STANDBY-ON/
ECO POWER to switch it to standby (or y
on the remote control)
➜ Display shows GoodBye
➜ The Red indicator lights up
➜ The screen dims out. Display shows Station
Status screen and the number of stations found
2 To switch on, press STANDBY-ON/ ECO
POWER on the set
➜ The set switches to the last source selected
➜ The Green indicator lights up
● You can also switch on the set by pressing the
source button on Center’s remote control
(e.g. HARDDISK, CD/MP3-CD, AUX)
3 To select Center’s function, press SOURCE
once or more on the set (or HARDDISK, CD/
MP3-CD, AUX on the remote control)
Switching to power-saving mode
In the power-saving Eco power mode, the set’s
display and Wi-Fi connection are turned off. The
Center’s harddisk also stops working. When you
switch Center to Eco power, it is impossible to
move music between Center and Station or
import music from PC to Center.
1 When the set is on, press and hold STANDBY-
ON/ ECO POWER to switch it to Eco
power (or y on the remote control).
➜ The display is switched off
➜ The Red indicator lights up
2 To switch on, press and hold STANDBY-ON/
ECO POWER (or y on the remote control)
or press and hold SOURCE on the set
➜ The set switches to the last source selected
Helpful hints:
– In the standby/Eco power mode, the settings of
networking, display and language will be retained in
the set’s memory.
– To protect the hard disk, always switch Center to
standby/ECO POWER before removing its power
plug from the wall outlet.
English
STANDBY-ON
Auto-standby
● When the set has reached the end of playback/
recording and remains in the stop position for
more than 5 minutes, the set will switch to
standby automatically to save power.
19
Page 20

Basic functions
SMART EQ
SMART EQ
English
Switching the blue indicator on/
off
The blue indicator lights up when the set is
switched on.
● On the remote control, press and hold DIM to
turn the brightness on or off.
SMART EQ
SAME ARTIST
Display adjustment
You can adjust the display’s backlight and
contrast settings.
1 Press and hold STOP • MENU to enter the
MENU screen (or on remote control, press
MENU).
2 Use the navigation controls 3 or 4 and 2
to select Settings.
3 Press 3 or 4 and 2 to select Display.
4 Press 1 / 2 / 3 / 4 to select your
options:
Backlight:
Press 3 or 4 and 2 to select on or off ;
● You can also turn the backlight on or off by
pressing DIM on the remote control
SMART EQ
SAME ARTIST
Contrast:
Press 1 / 2 to reduce or enlarge the contrast.
Selecting languages
1 Press and hold STOP•MENU to enter the
MENU screen (or on remote control, press
MENU)
2 Use the navigation controls 3 or 4 and 2
to select Settings
3 Use the navigation controls 3 or 4 and 2
to select Language
4 Press 3 or 4 and 2 to select:
English, French, Spanish, Dutch, Italian
and German.
20
Page 21

HD
Playing Harddisk (HD)
On WAC5 Center is located a 80GB
hard disk, where music is centrally stored.
Via Wi-Fi, all the stored music can be
streamed and played on Station.
1 Check the Center is switched on or to standby
2 Press SOURCE once or more to select HD
(on Center’s remote control, press
HARDDISK)
➜ Display shows HD and the categories of your
music library: Playlists, Artists, Albums, Genres,
All tracks
➜ Demo tracks are stored in Playlists
Playlists( ): custom collection of your
favorite tracks sorted by the playlists’ name in
alphanumeric order
Artists ( ): collection of albums sorted by
the artists’ name in alphanumeric order
Albums ( ): albums sorted by the albums’
name in alphanumeric order
Genres ( ): artists’ album collection sorted
by music style
All tracks ( ): tracks sor ted by the tracks’
name in alphanumeric order
3 Press the navigation controls 3 or 4 and 2
to select your option
4 Press OK to start playback.
● Press OK on a highlighted ar tist, genre or album
to start playback from the beginning of the item
(orÉÅ on Center’s remote control)
➜ The playback screen shows:
on the top: your HD option (e .g. Playlist, Artist)
in the middle: current track name and some
track information
at the bottom: elapsed playing time
Top
Middle
Bottom
5 To pause playback, press OK (orÉÅ on
Center’s remote control). To resume playback,
press the button again
6 To stop playback, press STOPÇ
Selecting and searching
Selecting a different album or track
English
1 If necessary, press 1 to enter previous option list
2 Repeatedly press the navigation controls 3 or
4 and 2 to select the desired album or track
3 Press VIEW to return to the playback screen, if
necessary
21
Page 22

HD
English
To select a different track in current
album during playback
● In the playback screen, briefly and repeatedly
press the navigation controls 3 or 4 to select
previous or next tracks (or 4 or ¢ on
Center’s remote control)
Using the fast skip 3 or 4
Use this function to find an option (e.g. an album
or a track) in a long option list.
● Press and hold the navigation controls 3 or 4
in the long option list
➜ You will skip the options faster and faster
➜ At the high speed skip, the initial letter of
current options appears for easy identification
Selecting tracks of a particular artist
● During playback, press SAME ARTIST
➜ Playback of current ar tist’s tracks continues
after current track
Selecting tracks of a particular genre
● During playback, press SAME GENRE
➜ Playback of current genre’s tracks continues
after current track
Different play modes: REPEAT,
SHUFFLE
– plays the current track continuously
– repeats all the tracks (under current ar tist,
genre or album )
– repeats all the tracks (under current
artist, genre or album) in random order
– tracks (under current ar tist, genre or
album) are played in random order
1 During playback, press once or more REPEAT
or/ and SHUFFLE to select play modes
2 To return to normal playback, press REPEAT or
SHUFFLE repeatedly until the various modes
are no longer displayed.
Fast search during playback
1 In the playback screen, press and hold the
navigation controls 3 or 4 (or 4 or ¢ on
Center’s remote control)
➜ The HD plays at a high speed
2 When you recognize the passage you want,
release 3 or 4 (or 4 or ¢ on Center’s
remote control; à / á on Station’s remote
control)
➜ Normal playback resumes
22
SMART EQ
SAME ARTIST
Page 23

HD
Creating Playlist: custom
collection of your favorite music
On Center’s hard disk., you can create up to 99
playlists consisting of your favorite tracks in the
desired sequence.
To create a playlist
1 Press and hold STOP • MENU to enter the
MENU screen (or on the remote control, press
MENU)
2 Use the navigation controls 3 or 4 and 2
to select Create Playlist
➜ A new playlist is created (a default playlist
name, e.g. Playlist_001, is assigned). Display
shows: “Playlist created. To add tracks,
select “ Add to Playlist”
3 Use the navigation controls 1 / 2 / 3 / 4 to
select/highlight the desired track (see Selecting
and searching)
4 To select Add to Playlist,
a. Press and hold STOP • MENU to enter the
MENU screen
b. In the MENU screen, use the navigation
controls 3 or 4 and 2 to select
➜ A list of playlists appears
5 Use the navigation controls 3 or 4 and 2
to select the desired playlist
➜ Display shows: Track(s) added to playlist
6 Repeat steps 3, 4 , 5 to select and store all
desired tracks in this way.
Helpful hints:
– You can also create your playlists on your
computer via Philips Digital Media Manager
(DMM). For details, see DMM’s help file. Refer to
the manual Connect to your PC to learn how to
install DMM software.
– You can rename your playlists or edit the track
information via DMM.
Deleting a playlist, album or
track
1 Use the navigation controls 3 or 4 and 2 to
enter a category (Playlist, Artists, Albums, Genres,
All tracks)
● If necessar y, press 3 or 4 and 2 once or
more to enter the album/track list
2 Press 3 or 4 to highlight a selected playlist,
album or track
3 To select Delete Playlist, Delete Album or
Delete Track
a. Press and hold STOP • MENU to enter the
MENU screen
b. In the MENU screen, use the navigation
controls 3 or 4 and 2 to select.
4 Press 3 or 4 and 2 to select Ye s
English
23
Page 24

English
P
r
i
n
t
e
d
S
i
d
e
C
D
(
R
W)
24
HD
Building music library on Center
By Ripping CDs, Importing MP3/WMA
tracks from PC and Recording from
external source you can build your music
library on Center’s hard disk.
IMPORTANT!
– Recording is permissible if copyright
or other rights of third parties are not
infringed upon.
–For CDs encoded with copyright
protection technologies by some record
companies, recording is restricted.
Ripping CDs
With WAC 5 Center, you can rip audio CD
tracks from your pre-recorded CDs and store
them as MP3 files in the Center’s hard disk.
The Gracenote® music recognition service
enables your set to look up from its built-in
database the CD track information (including
album, artist, genre, track information). It allows
the ripped CD tracks to be properly categorized
(for example, under Artists, Albums, Genres
or All tracks) and also merged with the
existing tracks in the harddisk. To update your
Gracenote® music recognition service database ,
more information, visit www. gracenote.com.
CD and music-related data from Gracenote, Inc.,
C
copyright
2000-2005 Gracenote. Gracenote CDDB
Client Software, copyright 2000-2005 Gracenote. This
product and service may practice one or more of the
following U.S. Patents: #5,987,525; #6,061,680;
#6,154,773, #6,161,132, #6,230,192, #6,230,207,
#6,240,459, #6,330,593, and other patents issued or
pending. Services supplied and/or device manufactured
under license for following Open Globe, Inc. United
States Patent 6,304,523.
Gracenote and CDDB are registered trademarks of
Gracenote. The Gracenote logo and logotype, and the
“Powered by Gracenote” logo are trademarks of
Gracenote.
see the manual Connect
to your PC
Music recognition technology
and related data are provided
by Gracenote®. Gracenote is
the industry standard in music
recognition technology and
related content delivery. For
To rip a disc at fast speed (default)
(For audio CDs, MP3/WMA CDs)
1 Insert a CD into Center’s CD slot loader, with
the printed side facing up
➜ Display shows: Reading CD.
➜ List of tracks appears
● MP3/WMA: To enter the track list, press 2 on a
highlighted file folder
2 In the screen of track list, press RECORD
➜ List of track checkboxes appears
3 Press OK to select or deselect the tracks to be
recorded (or MARK•UNMARK on the
remote control)
● To select/deselect all tracks, press and hold OK
(MARK• UNMARK on the remote control)
4 To select Rec quality,
a. Press and hold STOP • MENU to enter the
®
MENU screen (or on remote control, press
MENU)
b. Use the navigation controls 3 or 4 and 2 to
enter Settings menu
c. In Settings menu, use the navigation
controls 3 or 4 and 2 to select
5 To start recording, press RECORD
➜ Display shows CD-Rec and the album
name of the track being recorded.
(a default album name, e.g. Album_001, is
assigned if the CD track information cannot be
found in Center’s built-in Gracenote® music
recognition service database)
Page 25

➜ Center will return to CD mode when ripping is
finished
➜ All the functions are available at this time
6 To rip another CD, repeat the step 1-5 above
(Up to 8 CDs can be ripped consecutively)
7 To stop recording, press STOP/Ç
To rip a disc during playback
(for audio CDs only)
● During playback, press RECORD.
➜ Recording and playback start from current
track
Or
1 Follow the Step 1-3 under To rip a disc at fast
speed
2 Select Normal speed by
a. Press and hold STOP • MENU to enter the
MENU screen (or on remote control, press
MENU)
b. Use the navigation controls 3 or 4 and 2 to
enter Settings menu
c. In Settings menu, use the navigation
controls 3 or 4 and 2 to select Rec
speed
d. Press 3 or 4 and 2 to select
3 To start recording, press RECORD
➜ Recording and playback start
➜ Display shows the album name of the track
being recorded
HD
Important!
– It takes some time to convert the ripped tracks
into MP3 files.
– If power failure occurs during the conversion,
you will lose all the ripped tracks not converted
yet..
To find your ripped tracks
After MP3 conversion is completed, you can find
and playback the ripped tracks in Albums
1 Select HD source
2 In Albums, use the navigation controls 3 or 4
and 2 to enter the album of recorded tracks.
– Only the completely ripped track can be
found on Center’s harddisk
Importing MP3/WMA tracks from PC
The supplied PC Installer CD contains Digital
Media Manager (DMM) software. It will help
you organize the music files on your PC and
import them to WAC5 Center. For details, see
DMM’s help file. Refer to the manual Connect
to your PC to learn how to install DMM
software.
Recording from external source
A maximum of 3-hour recording can be made
from the external source.
1 Check the external device has been properly
connected (See Installation, Connecting an
additional appliance)
2 In AUX mode, start playback from the external
source (see AUX)
3 Press RECORD
➜ Recording starts
4 To stop recording, press STOP/Ç.
➜ The recording is saved as a file under AUX in
Albums. A file name is given, e.g. Aux_xx
(where xx denotes a number)
English
Helpful hints:
– To switch off the sound output temporarily,
press MUTE.
To find your recording
1 Select HD source
2 In Albums, use the navigation controls 3 or 4
and 2 to enter AUX
Helpful hints:
– You can edit your track information via DMM.
25
Page 26

HD
English
Display track information
1 During playback, press VIEW on the remote
control once or more to enter the playback
screen
➜ The display shows:
on the top: your HD option (e.g. Playlist, Artist)
in the middle: current track name and some
track information
at the bottom: elapsed playing time
2 Press 2
➜ The display shows track information (e.g.
track name, file type, file size, bit rate of mp3/
wma files)
3 Press VIEW once or more to return to the
playback screen
Moving in your WiFi network of
Center and Stations
Up to 5 Stations can be to connected to WAC5
Center. Via Wi-Fi, music can be streamed
between Center and Stations. Even in different
places of your house, you and your family will
enjoy and share music with ease.
MUSIC FOLLOWS ME
As you move around at home, let music move
around you, between Center and Station or
between Station and Station.
On the first unit (Center or Station), where
music will leave:
1 During HD playback, select the album or playlist
you wish to play on the second unit (see
Selecting and searching, Selecting a
different album or track)
● To start playback from the selected point on the
second unit, press OK to pause playback on
that point (or ÉÅ on the Center’s remote
control; Å on the Station’s remote control)
2 Press MUSIC FOLLOWS ME to activate
➜ The icon appears.
3 To deactivate MUSIC FOLLOWS ME, press
MUSIC FOLLOWS ME again or other
functional keys (e.g. SLEEP, 1 / 2 / 3 / 4)
● MUSIC FOLLOWS ME will be automatically
deactivated if you do not activate MUSIC
FOLLOWS ME on the second unit within 5
minutes
26
On the second unit (Center or Station),
where music will continue
4 Check you have switched the second unit on or
to standby mode (see Basic functions,
Switch on/to standby and selecting
functions)
Page 27

HD
SAME ARTIST
5 Press MUSIC FOLLOWS ME
● MUSIC FOLLOWS ME will be automatically
deactivated if you do not activate MUSIC
FOLLOWS ME on the second unit within 5
minutes
➜ Selected music stops on the first unit and
continues on the second unit. The icon
disappears
➜ Selected play modes (e.g. , )are
retained on the second unit (see Different
play modes: REPEAT, SHUFFLE)
6 To stop MUSIC FOLLOWS ME, press
STOP/Çon the second unit
SMART EQ
SAME ARTIST
MUSIC BROADCAST
MUSIC BROADCAST allows you to
broadcast music from Center to Station(s).
On Station(s)
1 Check you have switched the Station(s) on or to
standby mode (see Basic functions, Switch
on/to standby and selecting functions)
On Center
2 During HD playback, select the album or playlist
you wish to broadcast to Station(s)
3 Press MUSIC BROADCAST to activate
➜ The icon appears on Center and
Station(s). 5-second countdown starts
English
Helpful hints:
After MUSIC FOLLOWS ME is activated on
the second unit, on the first unit:
– make sure the first unit is switched on or to
standby mode
– you can select other tracks or source for
playback
➜ On Center and Station(s): Selected
music plays simultaneously several seconds after
the 5-second countdown
➜ If connection fails on a Station, the Center
will try to re-establish the connection on the
next track
4 For a station to exit MUSIC BROADCAST,
press STOP/Ç on the Station
● To broadcast music to the station again, you have
to stop MUSIC BROADCAST on Center
and then, activate MUSIC BROADCAST
again on Center
5 To stop MUSIC BROADCAST, press STOP/
Ç on the Center
Helpful hints: MUSIC BROADCAST will
also stop when:
– you switch Center to Standby or Eco power;
– the selected album or playlist has reached
the end.
27
Page 28

HD
English
Station management
Adding a station
You can add a station to an existing Wi-Fi
network of Center and Station. Up to 5 stations
can be connected to a WAC5 Center.
On Center
1 Switch on WAC5 Center and select HD source
2 To select Add New Station on Center
a. Press and hold STOP • MENU to enter the
MENU screen (or on remote control, press
MENU)
b. Use the navigation controls 3 or 4 and 2 to
enter Station Mgnt menu
c. In Station Mgnt menu, use the navigation
controls 3 or 4 and 2 to select
➜ You will enter the Installation Mode.
Searching for the new station starts
➜ Playback stops on the previously associated
Station if you are playing the HD source
On Station
3 Connect the new station to power supply
4 To select Installation Mode,
a. On the remote Control, press MENU
b. use the navigation controls 3 or 4 and 2 to
select
On Center
5 Press STOP/Ç on the Center when all your
stations are found
Helpful hints:
–To change your setting of Wi-Fi connection, see
the manual Connect to your PC.
Deleting a station
1 Switch on WAC5 Center and select HD source
2 To select Delete Station on Center
a. Press and hold STOP • MENU to enter the
MENU screen (or on remote control, press
MENU)
b. Use the navigation controls 3 or 4 and 2 to
enter Station Mgnt menu
c. In Station Mgnt menu, use the navigation
controls 3 or 4 and 2 to select
➜ The Center ‘s display shows the list of
connected stations
3 Press 3 or 4 and 2 to select the station you
wish to delete
4 Press 3 or 4 and 2 to select Ye s
Viewing station status
1 Switch on WAC5 Center and select HD source
2 To select Station Status on Center
a. Press MENU.
b. Use the navigation controls 3 or 4 and 2 to
enter Station Mgnt menu
c. In Station Mgnt menu, use the navigation
controls 3 or 4 and 2 to select
➜ On the Center ‘s display shows the list of
stations connected or ever connected
3 Press 2 to view the connection information
Information about your WAC5
1 Switch on WAC5 Center and select HD source.
2 To select Information on Center
a. On remote control, press MENU (or on
Center, press and hold STOP • MENU)
b. Use the navigation controls 3 or 4 and 2 to
enter Information menu
➜ The display shows: the name of Center or
Station, firmware version and free harddisk space
Firmware
Upgrading firmware
The supplied PC Installer CD contains Digital
Media Manager (DMM) software. It will help
you get the upgrades for WAC5 Center. For
details, see DMM’s help file. Refer to the manual
Connect to your PC to learn how to install
DMM software.
Restoring previous firmware
After the Center’s firmware is upgraded, you can
restore it to its previous version as desired.
1 In Center’s HD mode, press MENU
2 Use the navigation controls 3 or 4 and 2 to
enter Settings menu
28
Page 29

3 Press 3 or 4 and 2 to select Firmware
4 Press 3 or 4 and 2 to select Restore
firmware
5 Press 3 or 4 and 2 to select Ye s .
Re-establishing Wi-Fi connection
After upgrading or restoring the Center’s
firmware , you need to re-establish the Wi-Fi
connection between Center and Stations.
On Center,
● Select HD mode and then, enter Installation
Mode by:
a. Press and hold STOP • MENU (or on
remote control, press MENU)
b. Use the navigation controls 3 or 4 and 2 to
enter Station Mgnt menu
c. In Station Mgnt menu, use the navigation
controls 3 or 4 and 2 to select Add New
Station
➜ Searching for Stations starts
On the Stations,
● Enter Installation Mode by:
a. Remove the Station’s power plug and then,
connect it to the power supply again
➜ “Connecting to Center” appears
b. On the remote control, press MENU to
enter the selection screen of Installation
Mode and Select Server
c. Use the navigation controls 3 or 4 and 2 to
select Installation Mode
HD
English
On Center,
● Press STOPÇto exit Installation
Mode when Center has found all the stations
29
Page 30

English
P
r
i
n
t
e
d
S
i
d
e
C
D
(
R
W)
CD
Discs for playback
With this system, you can play
– all pre-recorded audio CDs (CDDA)
– all finalized audio CD-Rs and CD-RWs
(12cm CD and 8cm 185 or 200 MB CD)
– MP3WMA-CDs (CD-Rs/CD-RWs with MP3/
WMA files)
IMPORTANT!
– This system is designed for regular
discs. Therefore, do not use any
accessories such as disc stabilizer rings or
disc treatment sheets, etc.
About MP3/ WMA
The music compression technology MP3
(MPEG1 Audio Layer 3) and WMA (Windows
Media Audio) significantly reduces the digital data
of an audio CD while maintaining CD quality
sound.
Windows Media Audio® is a registered
trademark of Microsoft Corporation.
IMPORTANT!
– Make sure that the file names of MP3
files end with .mp3.
–For DRM protected WMA files, use
Windows Media Player 10 (or later) for
CD burning/conversion. Visit www.
microsoft.com for details about Windows
Media Player and WM DRM (Windows
Media Digital Rights Management).
Playing discs
1 Check the Center is switched on or to standby
(See Basic functions, Switching on/to
standby and selecting functions,
Switching to Eco power/ on)
2 Insert a CD/CD-R(W) into Center’s CD slot
load, with the printed side facing up
● Make sure you have removed any other disc
from the CD slot loader.
Supported formats:
– Disc format ISO9660, Joliet, UDF (created on
Adaptec Direct CD v5.0 and Nero Burning
ROM UDF v5.5) and multi-session CDs
– MP3 bit rate (data rate): 32-320 Kbps and
variable bit rate.
– 12-cm 650Mb and 700Mb CD-R/ CD-RWs
– Directory nesting up to a maximum of 8
levels
– WMA v8 or earlier (max. 192Kbps cbr)
The system will not play or support the
following:
•Empty albums: an empty album is an album
that does not contain MP3/WMA files, and will
not be shown in the display.
• Non-suppor ted file formats are skipped. This
means that e.g.: Word documents .doc or MP3
files with extension .dlf are ignored and will not
➜ Reading CD is displayed as the player scans
the contents of a disc
➜ Audio CD: the list of tracks appears (track
information appears if it is available after the
lookup of Gracenote Music Recognition Service
database)
➜ MP3/WMA: the list of albums appears
Helpful hints:
– If you have not organized MP3/WMA files into
any albums on your disc, an album “Others” will
be automatically assigned for all those files.
– If the disc contains both audio CD tracks
(CDDA)and MP3/WMA files, “CDDA” will be
automatically assigned for all the audio CD tracks
–“All tracks” is shown as an album for MP3/
WMA CD
be played.
• DRM protected WMA files
• WMA files in Lossless or VBR format
30
Page 31

CD
3 Press once or more the navigation controls 3
or 4 and 2 to select a track
4 Press 2(or OK) to start playback, if necessary.
● MP3/WMA: Press OK on a highlighted album
to start playback of the album (orÉÅ on
Center’s remote control)
● MP3/WMA: Press OK on the highlighted
album All tracks to start playback of all the
tracks on the disc (orÉÅ on Center’s remote
control)
5 To pause playback, press OK (orÉÅ on
Center’s remote control). To resume playback,
press the button again
6 To stop playback, press STOPÇ
7 To remove the disc, press EJECT on Center
Selecting and searching
Selecting a different album/track
1 If necessary, repeatedly press 1 to enter
previous option lists
2 Repeatedly press the navigation controls 3 or
4 and 2 to select the desired album or track
3 Press VIEW to return to the playback screen, if
necessary
To select a different track (in current
album) during playback
● In the playback screen, briefly and repeatedly
press the navigation controls 3 or 4 to select
previous or next tracks (or 4 or ¢ on
Center’s remote control)
Using the fast skip 3 or 4
Use this function to find an option (e.g. an album
or a track) in a long option list.
● Press and hold the navigation controls 3 or 4
in the long option list
➜ You will skip the options faster and faster
➜ At the high speed skip, the initial letter of
current options appears for easy identification
Finding a passage within a track
during playback
1 In the playback screen, press and hold the
navigation controls 3 or 4 (or 4 or ¢ on
Center’s remote control)
➜ The CD plays silently at a high speed
2 When you recognize the passage you want,
release3 or 4 (or 4 or ¢ on Center’s
remote control)
➜ Normal playback resumes
English
31
Page 32

CD
English
Different play modes: REPEAT,
SHUFFLE
– plays the current track continuously
– repeats all the tracks (under current
album )
– repeats all the tracks (under current
album) in random order
– tracks (under current album) are played
in random order
1 During playback, press once or more REPEAT
or/ and SHUFFLE to select play modes
2 To return to normal playback, press REPEAT or
SHUFFLE repeatedly until the various modes
are no longer displayed
Display track information
1 During playback, press VIEW once or more to
enter the playback screen
➜ The display shows:
on the top: CD
in the middle: current track name and some
track information
at the bottom: elapsed playing time
2 Press 2
➜ The display shows track information (e.g.
track name, file type, file size, bit rate of mp3/
wma files)
3 Press VIEW once or more to return to the
playback screen
32
SMART EQ
SAME ARTIST
Page 33

AUX/ SLEEP
SAME ARTIST
SMART EQ
AUX (Listening to an external
source)
You can listen to the sound of the connected
external device through your WAC5 Center.
1 Check the external device has been properly
connected (See Installation, Connecting an
additional appliance)
2 Check the WAC5 Center is switched on or to
standby (See Basic functions, Switching on/
to standby and selecting functions,
Switching to Eco power/ on)
3 Press SOURCE once or more to select AUX
(on the remote control, press TUNER/AUX)
4 Press the PLAY key on the connected device to
start playback.
5 To adjust the sound and volume, use the sound
controls on your external device
SLEEP
You can set a cer tain period of time after which
the Center or Station will switch to standby.
1 On the remote control, press SLEEP
repeatedly to select the desired time period
options (in minutes):
➜ Display shows in sequence: Sleep 15, 30,
45, 60, 90, 120, Off
➜ Display shows the selected option briefly and
returns to its previous status. The icon Z
Z
appears
2 To view the time countdown to the standby
mode, press SLEEP again
To deactivate the sleep timer, press
SLEEP until Sleep Off is displayed.
or
Press STANDBY-ON/ ECO POWER to
switch the set to standby (or y on the remote
control)
English
SMART EQ
SAME ARTIST
33
Page 34

Reset
English
Reset
If desired, you can restore your Center or Station
to their default setting (including the network
setting).
When to reset Center or Station:
● Resetting Center or Station helps to re-establish
the connection between Center and Station.
● To change the way your Center connects to PC,
you need to reset the Center (see the Option 1,
Option 2 or Option 3 in manual Connect to
your PC)
1 Check the set is switched on (See Basic
functions, Switching on/to standby and
selecting functions, Switching to Eco
power/ on)
2 Press and hold STOP • MENU to enter the
MENU screen (or on the remote control, press
MENU)
3 Use the navigation controls 3 or 4 and 2
to enter Settings
4 Use the navigation controls 3 or 4 and 2
to enter Restore settings
5 Press 3 or 4 and 2 to select Ye s
➜ The set is rebooted. Language selection
screen appears
6 Select your desired language: English, French,
Spanish, Dutch, Italian and German
➜ The set enters Installation Mode
➜ The search for Center or Stations star ts. The
Wi-Fi connection is being re-established
If a Station is reset and the Center is not:
● On the Center, select HD mode and then, enter
Installation Mode by:
a. Press MENU
b. Use the navigation controls 3 or 4 and 2 to
enter Station Mgnt menu
c. In Station Mgnt menu, use the navigation
controls 3 or 4 and 2 to select Add New
Station
➜ Searching for Stations star ts
If both Center and Stations are reset:
● Do as you did in the first-time Wi-Fi connection
(see Installation, Set up Wi-Fi connection
between Center and Station)
7 On Center, press STOPÇto exit Installation
Mode when all your Stations are found
If the Center is reset and Stations are
not reset:
● On the Stations, enter Installation Mode by:
a. Remove the Station’s power plug and then,
connect it to the power supply again
➜ “Connecting to Center” appears
b. Press MENU or STOP to enter the selection
screen of Installation Mode and Select
Server
c. Use the navigation controls 3 or 4 and 2 to
select Installation Mode
34
Page 35

Specifications
General
AC Power
WAC5 ........................................................ 230V ±10%
Power consumption
Active
WAC5 .................................................................. < 15W
Standby
WAC5 .................................................................. < 13W
Eco Power Standby
WAC5 ....................................................................... < 1W
Dimensions (w x h x d)
WAC5 ........................................ 360 x 70 x 326mm
Weight
WAC5 ...................................................................... 4.0 kg
LINE OUT
Output level ......................................... 500mV(±1.5dB)
Output impedance ................................................ 3.5k Ω
Distortion ................................................................... ≤ 0.5%
Channel difference ................................................. ≤ 3dB
Channel separation ..............................................≥ 60dB
S/N ratio ................................................. ≥ 76 dBA (IEC)
Wireless
Wireless standard .................................................................
.......... 802.11g, backwards compatible to 802.11b
Wireless security ...................................................................
.................................... WEP (64 or 128bit), WPA-PSK
Frequency range 2412-2462 MHz (CH1-CH11)
HDD/CD player
Frequency range ........................ 30-18000 Hz, -3 dB
S/N ratio ................................................ ≥ 72 dBA (IEC)
MPEG 1 Layer 3 (MP3-CD) .......... MPEG AUDIO
MP3-CD bit rate ...................................................................
.......................... 32-256 kbps, VBR, 128 kbps advised
WMA bit rate ......................................... up to 160kbps
Sampling frequencies ....................... 32, 44.1, 48 kHz
HDD Storage capacity ........................................ 80GB*
Recording quality ...................... 128kbps or 160kbps
Recording speed ....................................................... 1x, 4x
* Actual formatted capacity will be less
Specifications and external appearance are
subject to change without notice.
English
35
Page 36

Troubleshooting
English
WARNING
Under no circumstances should you try to repair the system yourself, as this will
invalidate the warranty. Do not open the system as there is a risk of electric shock.
If a fault occurs, first check the points listed below before taking the system for repair. If
you are unable to remedy a problem by following these hints, consult your dealer or
Philips for help.
Problem
Wi-Fi connection:
During the first-time setup, Station’s
display shows “Searching for Center”
I get interference on my wireless (WiFi)
link between center and station.
The WAC5 operate in the 2.4GHz radio
frequency spectrum. Many other household/IT
devices also operate in the frequency spectrum,
for example: microwave ovens, Dect phones,
Bluetooth devices like Bluetooth headphones,
computer mouse, wireless routers, cordless
phones, WiFi compatible printers, PDAs.
These devices can interfere with the WiFi link
between Center and Station, resulting in such
interference as the pause during playback , the
set’s slow response to your operation. The
severity of interference varies depending on the
extent of radiation from the device and the
strength of Wi-Fi signals in the position.
Remote control:
When I am using the Center’s 2-way
remote control, it starts to show
"connecting to Center" on the display
endlessly.
When you read this message on the 2-way
remote control, there could be the following
interference on your remote control:
1) interference signals from the Plasma TV screen
(if this device is turned on);
2) conflicting IR signals from a nearby WAS5
Station
Solution
✔ Check you have placed the Center and Station
side by side on a flat and firm surface.
✔ Check you have connected the Center to power
supply.
✔ When adding a new station, check your Station
is in Installation mode (See HD, Station
management).
✔ Tu rn off the wireless router nearby if there is
difficulty in connecting your Center and Station.
If you are playing the set, stop playback and take
the appropriate measures as follows:
✔ Keep the Center or Station at least 3 meters
away from such devices.
✔ Use the WEP key when connecting your
Center and Station to an existing wireless PC
network. Refer to the owner’s manual of your
router and Option 2 in Connect to your
PC.
✔ Change the operating channel of your Center
and Station when connecting them to an existing
wireless PC network. To learn about how to
change channels, see the manual Connect to
your PC.
✔ If possible, change the operating channels of
the other Wi-Fi devices at your home.
✔ Tu rn the devices in different directions to
minimize interference.
✔ Check your plasma TV is turned off.
✔ Check you have placed two IR operated devices
(Station) in separate rooms wherever possible.
36
Page 37

Tr oubleshooting
Stations react when you operate
Center’s remote control
x flashes on the sychro display of Center’s
remote control
After the set is switched on, nothing
appears on the synchronous display of
Center’s remote control
The remote control does not function
properly.
CD
“No Disc”/ “Cannot read CD” is
displayed
Sound cannot be heard or is of poor
quality.
✔ Center’s remote control is powerful enough to
operate several Stations within certain distance
or angle. Check you have placed the Stations in
different rooms or place Stations in different
angles.
✔ Use Station’s remote control or the controls on
the set.
✔ Signal error. Check you have pointed the remote
control toward the IR area of the set you wish
to operate.
✔ You switched on the set by using the control on
the set instead of center’s remote control.
Press REFRESH on center’s remote control to
synchronize its display.
✔ Remove the protective plastic tab before using
the Station’s remote control.
✔ Reduce the distance between the remote
control and the set.
✔ Insert the batteries with their polarities
(+/– signs) aligned as indicated.
✔ Replace the batteries.
✔ Point the remote control directly towards the IR
sensor.
✔ Insert a suitable disc.
✔ Check if the disc is inserted with graphics facing
front.
✔ Wait until the moisture condensation at the lens
has cleared.
✔ Replace or clean the disc, see “Maintenance”.
✔ Use a finalized CD-RW or CD-R.
✔ Adjust the volume in the connected audio
system.
English
The disc skips tracks
Sound skips during MP3/WMA playback
✔ Replace or clean disc.
✔ Switch off SHUFFLE.
✔ MP3 file made at compression level exceeding
320kbps. Use a lower compression level to rip
audio CD tracks.
✔ Replace or clean disc.
37
 Loading...