

Page 1

Page 2

目录
1 欢迎
2 重要须知
3 您的数码录音笔
4 开始使用
5 录音
6 录像
7 语音模式
8 音乐模式
9 视频模式
10 调频模式
11 设置模式
12 常见问题
13 技术参数
Page 3

1 欢迎
欢迎来到飞利浦世界!您能选择和购买飞利浦的产品,我们
非常高兴。您可在我们的官方网站上获得飞利浦公司的全方位技
术支持,如:使用手册、软件下载、保修信息等。
www.philips.com
产品特点
• 一键录音:仅仅拨上录音开关即可实现录音,拨下保存录音。
• 一键录像:长按录像键即可实现录像,短按停止键保存录像。
• 以常见的 MP3 格式及 WAV 格式录音。
• 使用高速 USB2.0 快速存取录音文件和数据。
• 声控录音功能。
• 可作为大容量的 USB 存储设备,确保最大的兼容性。
3
Page 4

2 重要须知
安全
• 为了避免短路,切勿将产品放置在触水受潮处。
• 不要将产品放在加热设备附近或阳光直射的地方。
• 请注意,切勿挤压电缆,特别是插头处。
特别声明:使用本产品前请仔细阅读本说明书,如 因人为操
作或不可抗力因素而导致数据丢失,本公司一概不予负责。
特别提醒用户小心操作,注意将资料另外备份。
听力保护
使用耳机时请遵守下列原则:
• 调整至合适的音量,切勿长时间使用耳机。
• 特别需要注意,切勿将音量调至耳朵所能承受的范围之外。
• 切勿将音量调至盖过周边环境的声音。
• 在危险情况下请小心或暂停使用耳机。
• 在驾驶汽车、骑自行车、玩滑板时,切勿使用耳机。否则会
导致交通意外,且违反相关法律法规。
4
Page 5

3 您的数码录音笔
供货范围:
概览:
5
Page 6

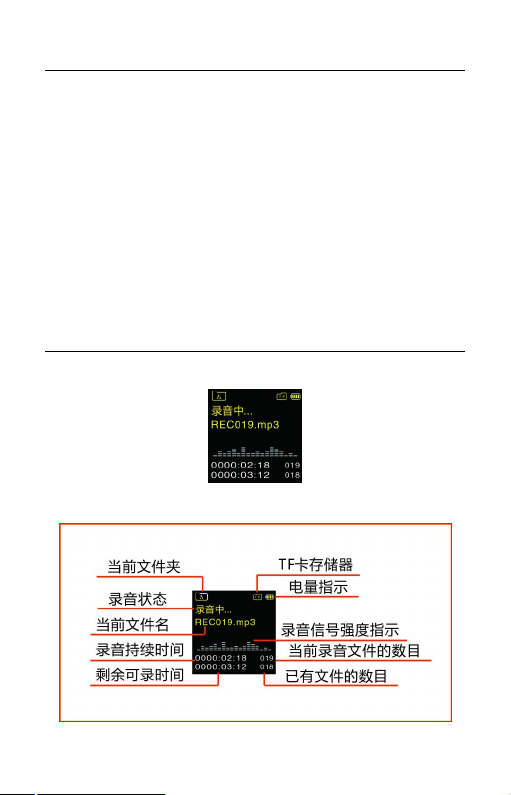
1. 内置麦克风
2. USB 接口
3. 麦克风插孔,Linein 插孔
4. 耳机插孔
5. 电源开/关
6. 播放/暂停键
7. 录音/播放指示灯
8. 上一曲,快退
9. 显示屏
10. 停止键,文件夹切换键
11. 录像键
12. 音量加,菜单项选择键
13. 下一曲,快进
14. 菜单键 MENU
15. 音量减,菜单项选择键
16. 删除键
17. 录音键
18. 锁定开关 HOLD
19. 扬声器
20.TF 卡插口
6
Page 7

4 开始使用
开/ 关机
注意:第一次使用机器时,请对该机器充电三小时以确保机
器有电工作!
(1) 当电源开关处于“关”位置时,则本机断开电源,不能开机。
(2) 当电源开关由“关”拨到“开”位置后,本机立即自动开机,
显示“PHILIPS”,如下图所示。
然后进入语音文件播放停止界面,如下图所示,在此界面长
按 MENU 键约 2 到 3 秒钟,机器返回主界面。
在主界面中包含有五个模块。下 面五张图片分别代表:语音、
音乐、视频、调频和设置模块。
7
Page 8

注意:
除了录音和录像过程中, 在其它任何界面下,长 按 MENU 键约 2
到 3 秒可返回到主界面。
此后,本机的开机/关机由“播放”键控制,具体如下。
关机:在开机状态下,长按“播放”键直到显示“Goodbye”关
机。
开机:在关机状态下,长按“播放”键开机,直至屏幕上显示开
机画面“PHILIPS”。
提示
• 本机使用内置锂电池供电,如果长时间不使用录音笔,请把
电源开关拨到“OFF”位置。
• 如果录音笔无法正常工作,请确认机器是否已没电。
• 机器工作过程中,请勿直接把电源切断,否则会损坏文件或
导致机器导常。
• 当电量指示标志为“ ”时,请及时充电。
• 不要在 PC 端格式化内存和卡,否则会对机器的性能产生影
响。
8
Page 9

充电方法
注意:充电前,请先将电源开关键拨到“ON”位置。
(1) 使用 USB 数据线将本机与 PC 相连接,如下左图所示。
(2) 使用专用充电器充电,如下右图所示。
当采用以上方法连接后,本机进入充电状态。电量指示标志
由空到满循环变化,表示本机现正处于充电状态,充电指示灯橙
色灯常亮。一般情况下,充满电需要 3 小时左右。充满电时,电
池符号显示满格,橙色灯灭。
按键锁定(HOLD 功能)
(1) 将“锁定”开关向上推至锁定位置,锁定录音笔上除了拨动
录音键的所有按键。然后屏幕上短暂显示“Hold” 后,随
即消失,如下图所示。
(2) 要解除按键锁定,请将“锁定”开关向下推至 Off 位置。
9
Page 10

连接电脑
录音笔可作为大容量的 USB 存储设备,并可方便地对文件
进行存储、备份和移动。可使用 USB 数据线将录音笔与电脑相
连,且无须安装软件,录音笔会自动显示为可移动设备,连接电
脑图标如下图所示。
提示:
在文件移入或移出录音笔时,请不要断开录音笔与电脑的连
接。
10
Page 11
5 录音
当您初次使用录音笔录音时,请注意本节中的内容说明!
(1) 把录音键拨到录音状态开始录音;“录音/ 播放”指示灯将
亮红灯; 请将内置麦克风对准音源。
(2) 按“播放”键暂停录音,“录音/ 播放”指示灯红灯闪烁,
显示屏显示“录音暂停”。
(3) 再次按下“播放”键,继续录音。
(4) 把录音键拨到停止状态结束录音,并回到当前录音文件的停
止播放界面。
录音参考界面如下如所示:
录音界面说明
11
Page 12

注意:电池标记符显示空格时 ,表明低电。低电时系统会自
动关机。如果正在录音,系统自动保存录音文件后再关机。电量
不足时,请及时充电。低电关机时提示的图标如下所示。
提示:
• 录音前,请先设置所需的声控功能和录音类型。
• 录音文件可以在 A、B、C、D 这四个文件夹中进行存储,每
个文件夹能存储 99 个录音文件,当一个录音文件夹存满 99
个后,系统会把随后录入的文件自动存储在下一个文件夹中 ,
如果四个文件夹全部录满,要再进行录音,请先删除一些不
必要的文件再录。
• 请先测试录音,以确保录音笔设置是否正确。
• 每个目录最多可存储 99 个文件,总共可容纳 396 个文件。
(99 文件 x4 目录)
• 当录音时间超过录音笔可用容量或达到最大 396 个文件数
量的上限时,录音停止。请删除部分录音或将其移至电脑。
• 录音时请勿断电,否则这会导致录音笔故障,录音文件丢失
或录音文件损坏等问题。
• 如果需要长时间录音,请在录音前充电。
12
Page 13
• 录音笔在充满电后可以录音 10 个小时。
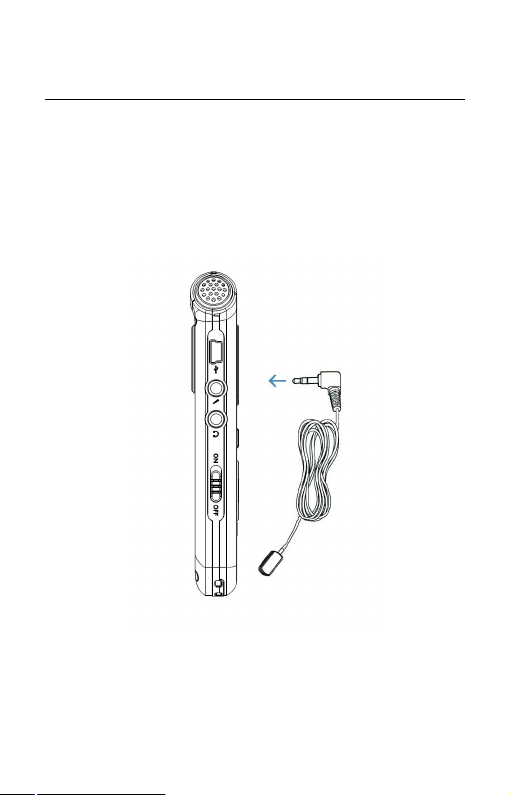
使用外置麦克风录音
当您使用外置麦克风录音时,请先将麦克风插入 Linein 插
座,并按照内置麦克风的录音程序进行录音。当您连接到外置麦
克风时,内置麦克风将自动关闭。注意外置麦克风的接口一定要
是双声道接口,如下图所示。
13
Page 14

6 录像
当您初次使用录音笔录像时,请注意本节中的内容说明!
(1) 注意:录像文件存储在 VIDEO 文件夹中,最多能存储 99
个文件。如果 文件 夹 录满后,要再进行录像,请先删除一些
不必要的文件再录。
(2) 长按“录像”键开始录像,“录音/ 播放”指示灯将亮红灯。
(3) 短按“录像”键暂停录像,“录音/ 播放”指示灯红灯闪烁。
(4) 再次短按“录像”键,继续录像。
(5) 短按停止键结束录像,并回到当前录像文件的列表界面。
提示:
机器使用过程中不要在 PC 端格式化内存和卡,以免对录像
造成影响,如要格式化请使用本机格式化。
14
Page 15

7 语音模式
在主界面下,你可以使用“ ”或“ ”选择语音模式,然
后短按菜单键确认进入。语音停止界面参考图片如下图所示:
语音文件播放界面说明:
语音播放
(1) 在录音文件停止播放模式下,按“停止”键,选择所需文件
夹。
(2) 按“
”或“ ”键,选择要播放的文件。
(3) 按“播放”键开始播放,“录音/ 播放”指示灯将亮绿灯。
(4) 使用 “+”或“-”键调节音量。
(5) 按“停止”键结束播放。在停止播放状态下,长按“菜单”
键约 2 秒返回到主界面。
15
Page 16
(6) 播放过程中,按“播放”键暂停播放,“录音/ 播放”指示
灯绿灯闪烁;再次 按 下“播放”键,将继续先前位置的播放。
(7) 播放 时长按“ ”或“ ”键,可快退或快进当前正在播
放的文件。
提示:
当耳机插入插孔内,录音笔扬声器被关闭。
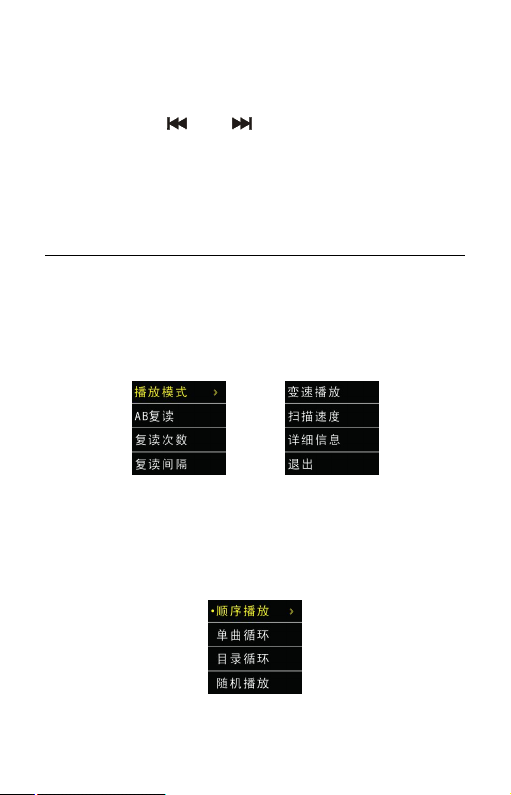
选择要播放的录音文件后,短按播放键播放,在 播 放 过 程中,
短按菜单键,弹出如下播放菜单列表:播放模式、AB 复读、复
读次数、复读间隔、变速播放、扫描速度和详细信息。参考界面
如下:
(1) 播放模式
如上图选中“播放模式”菜单,再按菜单键,将会进入到播
放模式选择菜单,你可以选择你需要的播放模式,参考界面如下
图所示:
顺序播放:顺序播放选中目录的文件,全部播放完一遍当前目录
16
Page 17

的文件后自动停止播放。
单曲循环:一直循环播放选中的当前曲文件。
目录循环:循环播放选中目录的文件。
随机播放:随机播放当前选中目录的文件。
(2)AB 复读
在播放菜单列表中选择“AB 复读”菜单,再按菜单键将进
入复读模式。AB复读的具体操作请参考“音乐播放”部分的 AB
复读操作部份。
(3) 复读次数
在播放菜单列表中选择“复读次数”菜单,再按菜单键将进
入复读次数设置菜单,通过“
”或“ ”键调整次数,参考
界面如下图所示:
(4) 复读间隔
复读间隔意思是两次复读之间的时间间隔。你可以在播放菜
单列表中选择“复读间隔”菜单,再按菜单键将进入复读间隔设
置。通过“
”或“ ”键调整复读间隔时间(单位:秒),参
17
Page 18
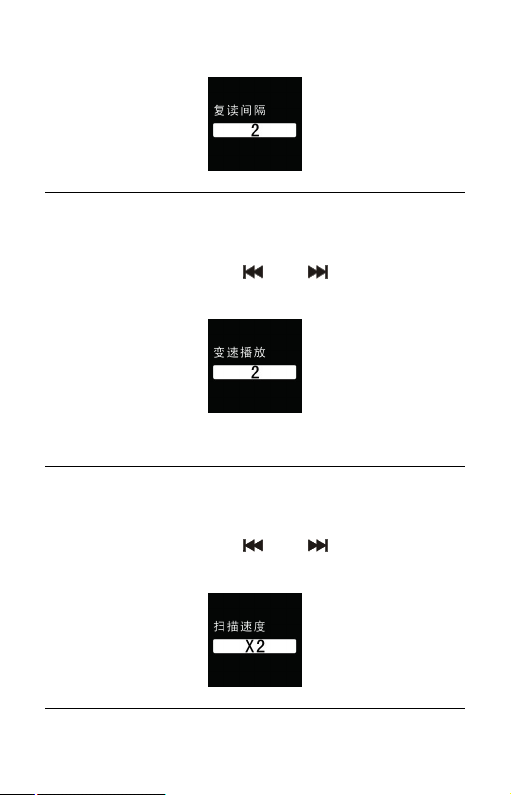
考界面如下图所示:
(5) 变速播放
在播放菜单列表中选择“变速播放”菜单,再按菜单键将进
入变速播放设置菜单,通过“
”或“ ”键调整播放速度,
参考界面如下图所示:
注意:PCM 录音文件不支持变速播放。
(6) 扫描速度
在播放菜单列表中选择“扫描速度”菜单,再按菜单键将进
入扫描速度设置菜单,通过“ ”或“ ”键调整扫描速度。
扫描速度是指快进或快退速度,参考界面如下图所示:
18
Page 19

(7) 详细信息
通过该菜单可以了解播放文件的信息如比特率、采样率和总
时间等信息,参考界面如下图所示:
删除文件
在播放录音文件界面下,按住删除键约 2 秒,将会显示左下
图所示界面。下面为执行删除操作的相关参考图片:
使用“ ”和“ ”选择“YES”确认删除;“NO”保留文
件,按菜单键执行命令。
19
Page 20
8 音乐模式
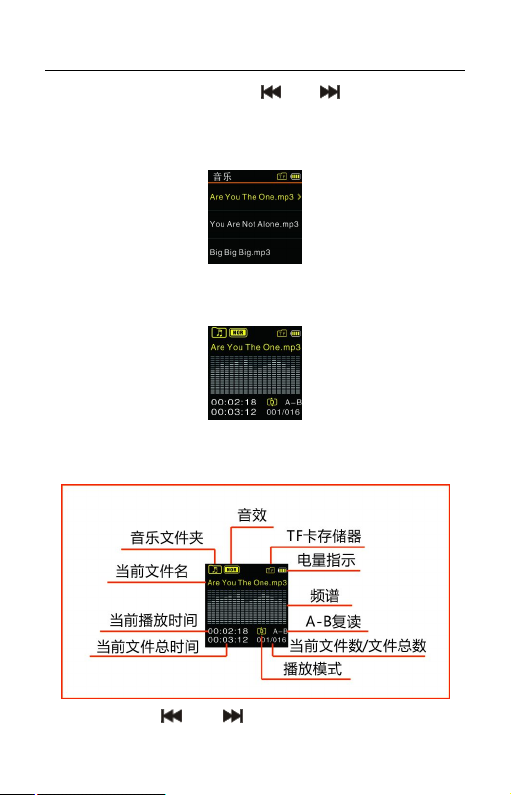
在主界面中,我们可以通过“ ”或“ ”键选择音乐模块,
然后,短按菜单键进入文件列表界面,文件列表参考界面如下图
所示:
短按播放键进入音乐播放界面,音乐播放参考界面如下图所
示:
注意:音乐文件只能放在“MUSIC”文件夹里面进行播放 。
音乐播放界面说明
你可以使用“ ”或“ ”键选择你想听的歌曲,按播放键
20
Page 21

播放。播放过程中短按菜单键,弹出如下播放菜单列表:音效模
式、播放模式、显示模式、AB 复读、复读次数、复读间隔、变
速播放、扫描速度、详细信息。参考界面如下图所示:
(1) 音效模式
在播放菜单列表中选择“音效模式”菜单,再按菜单键将进
入音效模式,音效模式包括以下音效:“自然、流行、古典、柔
和、爵士、摇滚、重低音”,参考界面如下图所示:
在音效模式中,你可以使用“+”或“-”键选择相应模式,
再按菜单键确认。
(2) 播放模式
在播放菜单列表中选择“播放模式”菜单,再按菜单键将进
入播放模式,播放模式的参考界面如下图所示:
21
Page 22

顺序播放:顺序播放选中目录的文件,全部播放完一遍当前目录
的文件后自动停止播放。
单曲循环:一直循环播放选中的一曲文件。
目录循环:循环播放选中目录的文件。
随机播放:随机播放当前选中目录的文件。
(3) 显示模式
在播放菜单列表中选择“音效模式”菜单,再按菜单键将进
入显示模式,显示模式的参考界面如下图所示:
频谱:播放界面将显示歌曲的频谱。
歌词:如 果 机器里有相应的歌词,播放界面就会显示歌曲的歌词。
歌词同步显示
产品支持“*.lrc”歌词文件,实现歌词与歌曲同步播放。
注意:
1. 歌词文件的名称与歌曲文件的名称需保持一致。
2. 如果当前歌曲有歌词文件匹配,播放界面就会显示歌词。
22
Page 23

(4)AB 复读
在播放菜单列表中选择“AB 复读”菜单,再按菜单键将进
入 AB 复读。
设置 AB 复读
• 设置复读起点:在 播 放 状态下,短按“菜单”键进入播放菜单,
然后短按“+”或“-”键选择“AB 复读”选项,再按“菜
单”键进入,返回到播放状态,但此时 OLED 屏中“A-B”
的“A”变成黄色,此时 A 点已确定。如果想重新选 A 点,
短按“
• 设置复读终点:设置复读起点 A 后,短按“
”键确定复读起点 A。
”键确定复
读起点 B,此时 OLED 屏中“A-B”的 B 也变成黄色。当复读
图标“A-B”都是黄色后,开始 AB 点间的反复播放;到达
设定的次数后,播放返回正常播放。如需要在 AB 复读过程
中退出 AB 复读,可通过以下方式退出 AB 复读:
短按“播放”键,将之前设置 AB 复读取消,并暂停播放。
短按“停止”键,将之前设置 AB 复读取消,并停止播放 。
短按“菜单”键,将之前设置 AB 复读取消,并返回正常播
放状态。
(5) 复读次数
在播放菜单列表中选择“复读次数”菜单,再按菜单键将进
23
Page 24
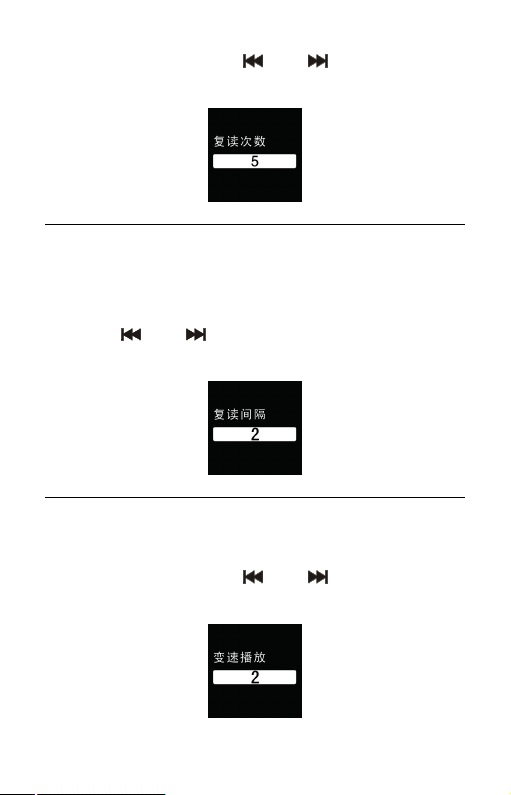
入复读次数设置菜单,通过“
”或“ ”键调整次数。参考
界面如下图所示:
(6) 复读间隔
复读间隔意思是两次复读之间的时间间隔。你可以在播放菜
单列表中选择“复读间隔”菜单,再按菜单键将进入复读间隔设
置。通过“
”或“ ”键调整复读间隔。参考界面如下图所
示:
(7) 变速播放
在播放菜单列表中选择“变速播放”菜单,再按菜单键将进
入变速播放设置菜单,通过“ ”或“ ”键调整播放速度,
参考界面如下图所示:
24
Page 25
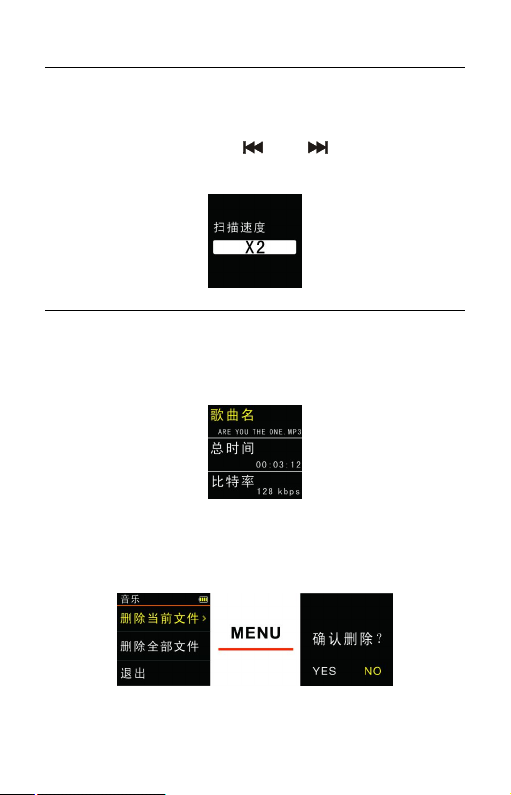
(8) 扫描速度
在播放菜单列表中选择“扫描速度”菜单,再按菜单键将进
入扫描速度设置菜单,通过“
”或“ ”键调整扫描速度。
扫描速度是指快进或快退速度,参考界面如下图所示:
(9) 详细信息
通过该菜单可以了解播放文件的信息如比特率、采样率和总
时间等信息。参考界面如下图所示:
删除文件
在文件列表界面下,按住删除键约 2 秒,将会显示如下界面。
下面为执行删除操作的相关参考图片:
在左边界面,使用“+”键”或“-”键”选择删除单个文件
25
Page 26

或所有文件;在右边界面,使用 “
认删除,“NO”保留文件;按菜单键执行命令。
”和“ ”选择“YES”确
26
Page 27
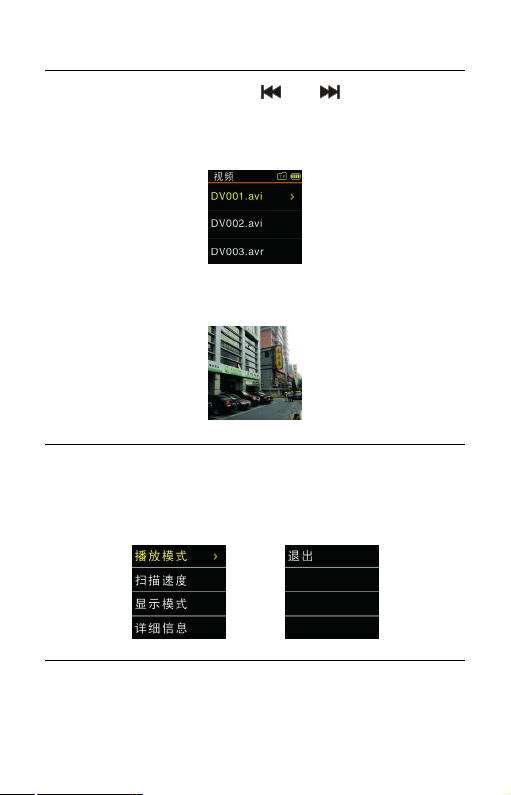
9 视频模式
在主界面中,我们可以通过“ ”或“ ”键选择视频模块,
然后,短按菜单键进入文件列表界面,文件列表参考界面如下图
所示:
短按播放键进入视频播放界面,视频播放参考界面如下图所
示:
你可以使用“+”或“-”键选择你想看的视频,按播放键播
放。播放过程中短按菜单键,弹出如下播放菜单列表:播放模式,
扫描速度、显示模式,详细信息。参考界面如下图所示:
(1) 播放模式
当选中其中一个菜单时,相应的区域将会变成黄色。如上图
27
Page 28

选中“播放模式”菜单,再按菜单键,将会进入到播放模式选择
菜单,你可以选择你需要的播放模式,参考界面如下图所示:
顺序播放:顺序播放选中目录的文件,全部播放完一遍当前目录
的文件后自动停止播放。
单曲循环:一直循环播放选中的文件。
目录循环:循环播放选中目录的文件。
随机播放:随机播放当前选中目录的文件。
(2) 扫描速度
在播放菜单列表中选择“扫描速度”菜单,再按菜单键将进
入扫描速度菜单,你可以使用“ ”或“ ”键选择扫描速度,
按菜单键确定,参考界面如下图所示:
(3) 显示模式
在播放菜单列表中选择“显示模式”菜单,再按菜单键将进
入显示模式菜单,你可以使用“+”或“-”键选择,按菜单键确
定,参考界面如下图所示:
28
Page 29

(4) 详细信息
通过该菜单可以了解播放文件的信息如比特率、采样率和总
时间等信息,参考界面如下图所示:
删除文件
在文件列表界面下,按住删除键约 2 秒,将会显示如下界面。
下面为执行删除操作的相关参考图片:
在左边界面,使用“+”键”或“-”键”选择删除单个文件
或所有文件;在右边界面,使用“ ”和“ ”选择“YES”确
认删除,“NO”保留文件;按菜单键执行命令。
29
Page 30

10 调频模式
在主界面下,选择调频模式,再按菜单键进入调频模式。调
频模式参考界面如下图所示:
频点模式 用户模式
在调频模式下,当已经保存有电台时,则有“用户模式”和
“频点模式” 两个模式,通过短按“播放”键切换模式 ; 当没
保存有电台时,则只有“频点模式”一个模式。在频点模式下,
短按“ ”或“ ” 键选择频点,按菜单键,将会弹出如下子
菜单,包括:保存电台 、自动搜台、电台列表和电台录音。在用
户模式下,短按“
”或“ ”键选择已保存好的电台,按菜
单键,将会弹出如下子菜单,包括:删除电台、自动搜台、电台
列表和电台录音。
当自动搜台菜单被选择时,系统将会自动搜索电台,当一个
电台被检测到时,这个电台将会被自动保存,并把电台号保存在
30
Page 31

电台列表里。在频点模式,你也可以通过选择保存电台菜单手动
保存电台。在用户模式,选择删除电台菜单和可以删除当前保存
的某一电台。机器最多只能保存 40 个电台,当有保存的电台时,
我们进入电台列表可以看到这些电台 ,按“+”或“-”键选择电
台,然后按菜单键可以进入收听选择的电台。如果你选择电台录
音菜单,系统将会执行电台录音功能。电台录音参考界面如右图
所示:
31
Page 32

11 设置模式
在主菜单下,选择设置模块,再按菜单键,系统将会进入设
置界面。设置界面相关参考图片如下图所示,包括:储存介质、
文件夹选择、录音类型、声控设置、监听设置、分段录音、背光
时间、自动关机、系统时间、定时录音、语言选择、高级。
(1) 储存介质
当插入 TF 卡时,就会多出卡存储器这一选项。通过此设置,
可以选择录音文件和录像文件的存储位置。参考界面图片如下:
注意:PCM 录音的时候录音文件只保存在内置存储器。
(2) 文件夹选择
32
Page 33

录音文件存储有 A、B、C 和 D 四个文件夹可供选择。参考
界面图片如下:
(3) 录音类型
在录音类型菜单中有五种录音类型可供选择:“PCM 录音,
SHQ 录音,HQ 录音,SP 录音、SLP 录音”。如 果 选择的是 PCM
录音类型,则在 PCM 录音达到一个小时后,机器自动保存录音
文件,然后进行下一个录音。相关参考图片如下:
PCM 录音:WAV 格式,高音质,比特率为 1536kbps。
SHQ 录音:MP3 格式,高音质,比特率为 192kbps。
HQ 录音:MP3 格式,高音质,比特率为 128kbps。
SP 录音:MP3 格式,较好音质,比特率为 64kbps。
SLP 录音:MP3 格式,一般音质,比特率为 8kbps。
电话录音
将外接电话线及附送的电话连线分别接入电话录音转接器,
操作方式和使用麦克风录音相同。
33
Page 34

Linein 录音:
Linein 录音是通过双声道音频线,将本机与外部音源设备的
音频输出接口正确连接,即可将外部音源的声音转录至本机(音
源设备如收音机、CD、VCD、DVD 等)。正确操作方法为使用附
送的双声道音频线,一端连接外部音源输出口,另一端接本机的
“Linein ”插孔。录音操作方式和使用麦克风录音相同。Linein
录音前,请把外部音源调到一个适度值,否则录出来的文件声音
失真。
(4) 声控设置
声控录音功能一旦被启用,录音过程中,当机器检测到有声
音时,录音笔会自动开始录音;当未检测到声音时,录音笔在 3
秒后将自动暂停录音;再次检测到声音时,录音笔又会自动开始
录音。声控设置参考界面图片如下:
34
Page 35

(5) 监听设置
监听功能打开后,你可以插入耳塞戴上去检测看是否有声音
输入。监听设置参考界面图片如下:
(6) 分段录音
在录音过程中,分段录音功能可在每 30 或 60 分钟自动将
录音文件分段保存并自动进入下一个文件录音。分段录音功能参
考界面如下图所示:
(7) 背光时间
背光时间有五种时长可供选择:15 秒、30 秒、45 秒、 60
秒和 0。如果在设定的时间内没对机器做任何操作,背光将会自
35
Page 36

动灭。如果选择“0”,背光将会常亮。背光设置参考图片如下:
(8) 自动关机
如果在设定的时间内没对机器做任何操作,系统将会自动关
机。如果时长设为 0,将不会自动关机。自动关机设置参考界面
如下:
(9) 系统时间设置
系统时间设置界面,参考图片如下:
在此界面下,你可以设置系统的当前时间和系统时间显示格
式。
例如:选择时间格式“时间格式”菜单,将会显示如下参考
36
Page 37

界面:
此界面下有两种时间显示格式可供选择即12小时制和 24小
时制。系统默认的是 12 小时制。
例如:选择 “当前时间”菜单,将会显示如下参考界面:
在此界面下,按“+”或“-”键可以设置实时时间。按“ ”
或“ ”键顺序选择年、月、日、时、分;按“+”或“-”键改
变相应位置数值。
(10) 定时录音设置
定时录音:先预设一个时间,当系统时间到达预设时间时,
系统将会自动录音。在功能菜单中,选择 “定时录音”菜单,再
按菜单键进入定时录音设置菜单。参考界面如下图所示:
第一个功能是定时录音时间设置功能。定时录音时间设置参
37
Page 38

考界面如下图所示:
在此界面下,你可以设置一个时间,当系统时间到达设定时
间时,系统将自动开始录音。设置方法参照“系统时间设置”。
第二个功能是录音源选择功能。你可以选择麦克风或者收音
电台作为录音源,按“+”或“-”键切换选择,系统默认录音源
是麦克风录音。录音源选择参考界面如下图所示:
如果选择收音电台作为录音源,按下菜单键后就会选择频
点,作为定时录音的电台。
时间长度设置功能:
你可以设置 30 分钟,60 分钟,120 分钟或者没限定录音时
长来设置定时录音时长。时间长度设置参考界面如下:
注:设定定时录音时,在关机状态一定要保证机器电源开关在
ON 位置,否则定时录音时间到时,无法执行定时录音。
38
Page 39

(11) 语言选择
在语言选择菜单中,你可以选择一种语言作为系统语言。语
言选择参考界面如下:
(12) 高级
高级设置界面相关参考图片如下图所示,包括:详细信息、
格式化内存、格式化卡和恢复出厂设置。
详细信息:使用此功能,你可以随时查看固件版本信息和存储器
的大小及剩余容量。
格式化内存:使用此功能,你可以格式化本机器内存。
格式化卡:使用此功能,你可以格式化卡存储器。
恢复出厂设置:使用此功能,你可以重置机器的设置选项。
39
Page 40

12 常见问题
此处列举了常见问题的解答,可帮助解决录音笔出现的简单
问题。如果故障仍无法排除,请咨询经销商或访问我们的官方网
站:www.philips.com/support
无法启动录音笔:
电池电量已耗尽请及时充电。
录音笔无法录音:
超出录音笔允许的最大文件数量或录音笔存储空间已满。请
删除部分录音或将其移至外部存储设备。
录音笔无法播放录音:
(1) 录音笔可能处于锁定模式 (HOLD) 。将“锁定”开关推至
“Off”位置。
(2) 电池电量已耗尽,请充电。
40
Page 41

13 技术参数
存储器
内置存储空间
参考录音时间(8GB):PCM 录音模式约 11 小时,SHQ 录音模
式约 90 小时,HQ 录音模式约 135 小时,SP 录音模式约 270
小时,SLP录音模式约 2120 小时。
内置存储器类型:NANDFlash 闪存
移动存储器 (PC):是
尺寸和重量
宽×高×深:38×104×14(mm)
重量 (含电池):80g
系统要求
操作系统:Windows7/Vista/XP/2000,MacOSX,Linux
接口:USB 接口
录音
PCM 录音:比特率为 1536kbps,格式为 WAV
SHQ 录音:比特率为 192kbps,格式为 MP3
HQ 录音:比特率为 128kbps,格式为 MP3
SP 录音:比特率为 64kbps,格式为 MP3
SLP 录音:比特率为 8kbps,格式为 MP3
运行条件
温度:5°–45°C
空气湿度:10% – 90%, 不凝结
41
Page 42

Content
1 Welcome
2 Important
3 YourVoiceTracerdigitalrecorder
4 StarttoUse
5 VoiceRecording
6 VideoRecording
7 VoiceMode
8 MusicMode
9 VideoMode
10RadioMode
11SettingMode
12FrequentlyAskedQuestions
13TechnicalParameters
42
Page 43

1 Welcome
WelcometotheworldofPhilips!Wearehonoredbyyourchoice
and purchase of Philips’ products. You can have Philips’
comprehensivetechnicalsupportsfromourwebsite,e.g.user’s
manuals,softwaredownloadingandwarrantyinformationetc.
www.philips.com
ProductFeatures
• One-touchvoicerecording:Justturnontherecordingswitchto
startrecording,turnofftosavefile.
• One-touchvideorecording:Longpressthevideorecordingswitch
tostartrecording,shortpressthestopbuttontosavethefile.
• RecordincommonMP3format.
• USB2.0highspeeddataaccess.
• Voice-activatedrecording.
• USBmassstorage,ensuringmaximumcompatibility.
43
Page 44

2 Important
Safety
• Toavoidashortcircuit,donotexposetheproducttorainor
water.
• Donotexposethedevicetoexcessiveheatcausedbyheating
equipmentordirectsunlight.
• Protectthecablesfrombeingpinched,particularlyatplugs.
Attention!BeforeusingthedevicepleasereadthisUser’s
Manualcarefully.Thecompanyshallnotbeliableforanydata
lossduetoerroneousoperationorcausesofaforcemajeure.
Specialattentionshouldbegiventocorrectoperationsand
filesbackup.
Hearingsafety
Observethefollowingguidelineswhenusingyourheadphones:
• Adjusttosuitablevolume,donotusetheearphoneforalong
time.
• Pleaserememberthatdonotturnthevolumeupbeyondyour
tolerance.
• Donotturnupthevolumesohighthatyoucan’thearwhat’s
aroundyou.
• Whenindangerous environment, pleasecarefully usethe
earphonesorstopusing.
44
Page 45

Donotusetheearphoneswhendriving,cycling,andskateboarding
toavoidtrafficaccidentandviolatinglawsandregulations.
45
Page 46

3 YourVoiceTracerdigitalrecorder
What’sinthebox?
Overview:
46
Page 47

1. Built-inMicrophone
2. USBJack
3. MicrophoneJack(Linein)
4. EarphoneJack
5. PowerOn/Off
6. Play/Pause
7. Record/PlayIndicator
8. PreviousTrack/FastBackward
9. Display
10.StopButton,FileFolderSwitchButton
11.VideoButton
12.VolumeUp,MenuSelection
13.NextTrack/FastForward
14.MenuButton
15.VolumeDown,MenuSelection
16.Delete
17.VoiceRecordButton
18.Hold
19.Speaker
20.TFCardPort
47
Page 48

4 StartToUse
PowerOn/Off
Note: pleaserechargethedeviceforthreehoursbeforeusingitfor
thefirsttime!
(1)WhenthepowerswitchisinOFFposition,thedeviceiscutoff
frompowerandcan’tswitchon.
(2)Whenthepowerswitchisslidto “ON”,thedevicestarts
automaticallyandthendisplays “PHILIPS”,Seethepictureas
follow:
Thenthedevicedisplaysthestopplayinginterface.Onthisinterface,
pressMENUbuttonfor2or3secondstoreturntothemain
interface.
Themaininterfaceincludesfivemodes.Thefollowingfivepictures
showthemodesrespectively:Voice,Music,Video,RadioandSetting
Mode.
48
Page 49

Note:
Whennottakingvoiceorvideorecording,userscanpressMENU
buttonfor2or3secondstoreturntomaininterface.
Fromnowon,thedevice’sOn/OffiscontrolledbythePLAYbutton
asfollows:
Switchoff:Wheninthepower-onstate,pressthePLAYbuttonuntil
the “Goodbye” isdisplayed,andthenthedeviceisswitchedoff.
Switchon:Wheninthepower-offstate,pressthePLAYbuttonuntil
thestartuplogo “PHILIPS” isdisplayed.
Note:
• Thedevicehasabuilt-inlithiumbattery.Ifthedeviceisidlefora
longtime,pleaseslidethepowerswitchtothe “OFF” position.
• Ifthedevicecannotworknormally,pleasemakesurethedeviceis
notoutofpower.
49
Page 50

• Whenthedeviceisworking,pleasedonotcutoffthepower,
otherwisedamagedfileormalfunctionmayoccur.
• Whenthebatteryindicator “ ” isdisplayed,pleasecharge
thedevicepromptly.
• DonotformatmemoryandcardonPC, otherwisenegative
impactsmayhappentosomefuctionsofthedevice.
Recharge
Note: pleaseslidethepowerswitchtothepositionof"On".
(1)ConnectthedevicewithPCthroughUSBcable,asfollows.
(2)Usethespecifiedchargertochargethedevice,asfollows.
Whenusingtheabovemethodstorecharge,thedevicewillbeinthe
stateofrecharging.Thebatteryindicatorshowsabatteryicon
turningfromemptytofullrepeatedly,indicatingthatthedeviceis
recharging.Undernormalcircumstance,thedevicecanbefully
rechargedinaround3hours.Whenthedeviceisfullyrecharged,the
batteryiconisfullandtheorangeindicatorlightturnsoff.
Note:
Whilethedeviceisconnectedtoacomputer,itcannotbeoperated
50
Page 51

manually.
KeyLock(HOLDFunction)
(1)SlidetheHOLDswitchtolockpositiontolockallthebuttons
onthedevice,excepttheslideswitchofrecording.Then “Hold”
isdisplayedforawhileanddisappearsasshowninthefollowing
picture.
(2)Tounlockbuttons,pleaseslidethe “HOLD” switchdownto
OFF.
PCConnection
ThedevicecanbeusedasaUSBmassstoragetoconvenientlystore,
backupandmovefiles.LinkthedevicetoacomputerwithaUSB
cable.Thevoicerecordercanautomaticallyberecognizedasamass
storagedevicewithouttheneedtoinstallanysoftware,asshownin
thefollowingpicture.
51
Page 52

Note:
Whenmovingfilesintooroutofthedevice,pleasedonot
disconnectthedevicefromthecomputer.
Whilethedeviceisconnectedtoacomputer,itcannotbeoperated
manually.
52
Page 53

5 VoiceRecording
Before using the device, please read carefully the following
instructions.
(1)Slidetherecordswitchto “REC” tostartrecording;the
“Record/Play” indicatorflickersred;pleaseplacethebuilt-in
microphonetowardsthesourceofsound.
(2)Press “PLAY” buttontopauserecording,thentheredlight
flickers,andthedisplayshows “Pause”.
(3)Press “PLAY” buttonagaintoresumerecording.
(4)Slidetherecordswitchto “STOP” toendrecording,thedevice
returnstothestoppedplayinginterfaceofcurrentrecordedfile.
RecordingInterfaceReference:
53
Page 54

IllustrationofRecordingInterface:
Note:
Whenthelowbatteryiconappears,itmeansthebatteryisnearly
emptyandthesystemwillautomaticallyshutdown.Ifthedeviceis
recording,thesystemwillautomaticallysavetherecordedfilethen
shutdown.Ifthedevicehaslowbattery,pleaserechargepromptly.
Afterthedeviceshutsdownonlowbattery,thefollowingiconwill
display.
Note:
• Priortorecording,pleasepresettherecordtypeyouneed.
• TherecordedfilecanbestoredinanyoftheA,B,C,Dfolder;
54
Page 55

eachfoldercanstoreupto99audiofiles.Ifonefolderisfullwith
99files,thesystemautomaticallystoresthesubsequentfilesinthe
nextfolder.Inthecasethatallfourfoldersarefull,pleasedelete
someunnecessaryfilestoenablerecording.
• MakeatestrecordingtomakesurethattheVoiceTracersettings
arecorrect.
• Eachfoldercanstore99filesatmost,totally396files(99filesx4
folders).
• Iftherecordingtimeexceedstheusablestorageofthedeviceor
thenumberoffilesreachesthelimitof396,therecordingstops.
Pleasedeletepartofrecordingormoveittoacomputer.
• Whenrecording,pleasedonotcutoffpower,otherwiselossor
damageofrecordedfilemayberesulted.
• Ifneedtorecordforalongtime,pleasechargethedevicebefore
recording.
• Afullychargedbatterywillallowyoutorecordfor10hours.
UseanExternalMicrophonetorecord
Whenusinganexternalmicrophonetorecord,pleaseatfirstplugit
intotheLineinjack,andthenrecordaccordingtotheproceduresof
recordingwithbuilt-inmicrophone.Afteryouplugintheexternal
microphone,thebuilt-inmicrophoneisdisabled.Pleasenotethatthe
55
Page 56

plugoftheexternalmicrophonemustbestereoplugasshowninthe
picturebelow.
56
Page 57

6 VideoRecording
Whenyouusethisvoicerecordertorecordvideoforthefirsttime,
pleasereadthecontentsinthissection!
(1)TherecordvideofileisstoredinthefoldernamedVIDEO,
whichcanmaximallystore99files.Ifthefolderisfullyloadedbut
youneedtotakeanothervideorecord,pleasedeletesome
unnecessaryfilesbeforerecording.
(2)Press “Record” tostartrecording; “Record/Play “indicatorturns
red.
(3)PressRecordbuttontopauserecording, “Record/Play “thered
indicatorflickers.
(4)PressRecordbuttonagaintocontinuerecording.
(5)ShortpressStopbuttontostoprecordingandreturntothelist
interfaceofcurrentrecordfile.
Note:
DonotformatmemoryandcardonPC.Pleaseproceedthe
formattingonthedevicesoastoavoidanynegativeimpactstovideo
record.
57
Page 58

7 VoiceMode
Onthemaininterfaceyoucanselectthevoicemodewith “ ” or
“ ” buttons,andthenshortlypressthemenubuttontoenter.
PleaserefertotheVoiceStopinterfacebelow:
VoicePlaybackInterfaceSpecification:
AudioPlayback
(1)IntheStopModeofrecordedfile,pressSTOPbuttontoselect
thefolderyouprefer.
(2)Press “
” or “ ” toselectafiletoplay.
(3)PressPlaybuttontostartplaying, “record/playback” indicator
willturngreen.
58
Page 59

(4)Press “+” and “-” toadjustvolume.
(5)PressSTOPtostopplaying.Whentheplayingisstopped,press
downtheMENUbuttonforabout2secondstoreturntothe
maininterface.
(6)Whenplaying,pressPLAYtopause,pressPLAYagainto
continueplaying.
(7)Whenplaying,press “
” or “ ” forafewsecondstofast
forwardorbackward.
Note:
Iftheearphoneispluggedin,thespeakerisdisabled.
Aftertheaudiofileisselected,pressthePLAYbuttonshortlytoplay.
Whenplaying,pressshortlytheMENUbuttontopopupthe
followingmenulist:PlayMode,ABReplay,ReplayTimes,Replay
Interval,VariableSpeed,Scanspeed,Information.Seethebelow
interfacereference:
(1)Playmode
As"Playmode"menuisselected,thepressthe"MENU"buttonwill
entertheplaybackmodeselection,youcanchoosetheplayback
59
Page 60

modeyouneedtoreferencetheinterfaceasshownbelow:
Sequence:playthefileselecteddirectoryinorder,allplayed
outatimesthecurrentdirectory'sdocumentstobeautomaticstop
playing.
RepeatOne:playcurrentmusicrepeatly.
RepeatFolder:playallfilesintheselectedfolder.
Random:randomlyplaytheselectedfolder.
(2)ABReplay
Choose “ABReplay” fromthePlayingModes,thenpressMENU
buttontoenterABReplay.ForoperationsofABReplaypleaserefer
toABReplaysectionin “Musicplayback”.
(3)ReplayTimes
Select “ReplayTimes” optionfromplaymenulist,thenpressMenu
buttontoenterintosettingmenuofReplayTimes.Adjustthetimes
” or “ ”.Thereferenceinterfaceisshownasbelow:
by “
60
Page 61

(4)Replayinterval
Replayintervalmeansthetimeintervalbetweentworeplays.Youcan
select “Replayinterval” optionintheplaymenulist,thenpressMenu
buttontoenterintosettingofReplayinterval.Adjustthetimeof
Replayinterval(timeunit:second)by “
” or" ”button.The
referenceinterfaceisshownasbelow:
(5)Variablespeed
Select “VariableSpeed” optioninplaymenulist,thenpressMenu
buttontoenterintothemenuofVariableSpeed.Adjusttheplay
speedby“
” or “ ” button.Thereferenceinterfaceisshownas
below:
Notice:VariableSpeeddoesnotsupportPCMrecordings.
(6)Scanspeed
Select “ScanSpeed ” optioninplaymenulist,thenpressMenubutton
toenterintothemenuofScanspeed.AdjusttheScanspeedby “ ”
or “
” button.Scanspeedmeansthespeedforfastforwardorfast
61
Page 62

backward.Thereferenceinterfaceisshownasbelow:
(7)Details
Getdetailedinformationoftheplayingfilefromthismenu,suchas
bitrate,samplingrateandtotaltimeandsoon.Thereference
interfaceisshownasbelow:
DeleteFiles
Ontheplayingmusicinterface,presstheDELETEforabout2
seconds,theinterfaceofthefollowingpicturewillappear.Beloware
thepicturesofthedeletionoperations:
Press “ ” and “ ” tochoose “YES” toconfirmdeletion, “NO”
tokeepfile;pressMENUbuttontoexecute.
62
Page 63

8 MusicMode
Fromthemaininterface,youcanchoosemusicmodewith “ ” or
“ ” buttons,andthenshortlypresstheMENUbuttontoenter.
Fileslistinterfaceisasfollows:
Then,shortlypressthePlaybuttontoenterthemusicplayback
interface.Musicplaybackinterfaceisasfollows:
Note: musicfilescanonlybeplayedwhentheyarein “MUSIC”
folder.
MusicplaybackInterfaceillustration
63
Page 64

Youcanselectthemusicyouwanttoplaybypressing “ ” and
“ ”,thenpressPLAYtoplaythemusic.Whenplaying,shortly
presstheMENUbutton,thebelowmenupopsupwithmodes:EQ
mode,Playmode,Displaymode,ABreplay,Replaytimes,Replay
interval,VariableSpeed,ScanspeedandInformation.Seethe
interfaceasfollows:
(1) EQMode
FromthePlayingMenulist,select “EQMode”,pressMENUbutton
toenter.TheEqualizerincludes:Normal,Pop,Classic,Soft,Jazz,
RockandDBB.Referthebelowpictures:
IntheEQMode,youcanchoosemodewith “+” and “-” buttons,
pressMENUbuttontoconfirm.
(2) Playmode
Fromthemenulist,select “PlayMode”,pressMENUbuttontoenter.
Seetheinterfaceasfollows:
64
Page 65

Sequence:playfilessequentiallyfromselectedfolder.Afterplayingall
thefilesinthecurrentfolder,theplayingstopsautomatically.
Repeatone:repeatcontinuouslytheselectedfile.
RepeatFolder:repeatplayingfilesfromtheselectedfolder.
Random:randomlyplayfilesinselectedfolder.
(3) DisplayMode
Select “DisplayMode” optionfrommenulist,thenpressMenu
buttontoenterintothemenulistofdisplaymode.Thereference
interfaceisshownasbelow:
Spectrum: Thedisplayscreenshowsthespectrumoftheplaying
music.
Lyric:Thedisplayscreenshowslyricsiftherelyricfilethatmatches
withmusicfilesareinthedevice.
Lyricssynchronizeddisplay
Thedevicesupportsfileswith “*.lrc” asfileextensiontorealizelyrics
synchronizeddisplay
65
Page 66

Note:
1.Thelyricfilenameshouldbeinaccordancewithmusicfilename.
2.Thedisplayscreenwillshowsthelyriciftheproperlyricfileis
available.
(4) ABReplay
Fromthemenulist,select “ABReplay”,pressMENUbuttontoenter.
SetABReplay
• Setthestartmark:Whenplaying,shortlypressMENUbuttonto
enterPlayingMenu,thenshortlypress “+” or “-” toselect “AB
Replay” mode,thenpressMENUbuttontoconfirmandreturnto
thestateofmusicplaying.The “A” from “A-B” onOLEDdisplay
turnsyellowandthestartpointisset.Ifyouneedtoresetthe
startpointA,shortlypress “ ” tomakeconfirmation.
• Setthefinishmark:AftersettingmarkA,shortlypress “ ” to
setthefinishmarkandthe “B” in “A-B” onOLEDdisplayturns
yellowaswell.Whenthe “A-B” isdisplayedinyellowonthe
OLED,thesectionbetweenmarkAandBwillbereplayedfor
specifiedtimes.Afterplayingspecifiedtimes,thesystemresumes
normalplaying.IfABReplayisnotneeded,useanyofthe
followingmethodstocanceltheABReplaymode.
Cancellation : Shortlypress “PLAY” buttontocanceltheAB
marksandpauseplaying.
Shortlypress “STOP” buttontocanceltheABmarksandstop
66
Page 67

playing.
Shortlypress “MENU ” buttontocanceltheABmarksand
returntonormalplaying.
(5) Replaytimes
Select “Replaytimes” optioninplaymenulist,thenpressMenu
buttontoenterintosettingmenuofReplaytimes.Adjustthetimes
” or “ ”.Thereferenceinterfaceisshownasbelow:
by “
(6) Replayinterval
ReplayintervalmeansthetimeintervalbetweentwoReplays.You
canselect “Replayinterval” optionintheplaymenulist,thenpress
MenubuttontoenterintosettingofReplayinterval.Adjustthetime
ofReplayinterval(timeunit:second)by “
” or" ”button.The
referenceinterfaceisshownasbelow:
(7) VariableSpeed
Select “VariableSpeed ” optioninplaymenulist,thenpressMenu
buttontoenterintothesettingmenuofVariableSpeed.Adjustthe
67
Page 68

playspeedby“ ” or “ ” button.Thereferenceinterfaceisshown
asbelow:
(8) Scanspeed
Select “ ScanSpeed” optioninplaymenulist,thenpressMenubutton
toenterintothesettingmenuofScanspeed.AdjusttheScanspeed
” or “ ” button.Scanspeedmeansthespeedforfast
by “
forwardorfastbackward.Thereferenceinterfaceisshownasbelow:
(9) Details
Getdetailedinformationoftheplayingfilefromthismenu,suchas
bitrate,samplingrateandtotaltimeandsoon.Thereference
interfaceisshownasbelow:
68
Page 69

DeleteFiles
Onthestoppedplayinginterface,presstheDELETEbuttonforabout
2seconds,theinterfaceofthefollowingpicturewillappear.Below
arethepicturesofthedeletionoperations:
Ifthedeviceshowstheinterfaceontheleftside,press “+” or “-”
buttontoselectindividualorallfiles;ifthedeviceshowsthe
interfaceontherightside,press “ ” and “ ” tochoose “YES”
toconfirmdeletion, “NO” tokeepfile;pressMENUbuttonto
execute.
69
Page 70

9 VideoMode
Onthemaininterface,wecanselectvideomodeby “ ”or“ ”
button,andthenpresstheMenubuttontoenterintotheinterface
offilelist.Theinterfaceoffilelistisshownasbelow:
ShortlypressPlaybuttontoenterintotheinterfaceofvideoplay.
Thereferenceinterfaceofvideoplayisshownasbelow:
Youcanselectyourdesiredvideoby “+”or“-” buttonandpressPlay
buttontoplayit.Whenplayingvideo,shortpressMenubuttonand
thefollowingmenulistwillpopup:playmode,scanningspeed,
displaymodeanddetails.Thereferenceinterfaceisshownasbelow:
70
Page 71

(1) Playmode
Whenanoptionisselected,thecorrespondingareawillturnyellow.
Astheabovepictureshows,whenyouselect “PlayMode” optionand
thenpressMenubutton,itwillenterintoselectionmenuofplay
mode.Youcanselectplaymodeyouwant.Thereferenceinterfaceis
shownasbelow:
Sequence:Playtheselectedfilesofthelistinorder.Itwillstop
automaticallyafterplayingthecurrentfilelistforonetime.
RepeatOne:Playtheselectedfilerepeatedly.
RepeatFolder:Playtheselectedfilesfromtheselectedfolder
repeatedly.
Random:Playtheselectedfilesinthefolderrandomly.
(2)Scanspeed
Select “ScanSpeed ” optioninplaymenulist,thenpressMenubutton
toenterintothesettingmenuofscanningspeed.Youcanselectthe
scanningspeedby “+” or “-” buttonandpressMenubuttonfor
confirmation.Thereferenceinterfaceisshownasbelow:
71
Page 72

(3)Displaymode
Select “DisplayMode” optioninplaymenulist,thenpressMenu
buttontoenterintothemenuofdisplaymode.Youcanselectthe
modeby “ ” or “ ” buttonandpressMenubuttonfor
confirmation.Thereferenceinterfaceisshownasbelow:
(4)Details
Thedetailedinformationoftheplayingfilecanbefoundfromthe
menulist,suchasbitrate,samplingrateandtotaltimeandsoon.
Thereferenceinterfaceisshownasbelow:
DeleteFiles
Intheinterfaceoffilelist,presstheDeletebuttonforabout2
seconds,anditwilldisplaythefollowinginterface.Therelated
72
Page 73

referencepictureshowingdeletingstepsareasbelow:
Ifthedeviceshowstheinterfaceontheleftside,select “+” or “-”
buttontochoosetodeletesinglefileorallfiles.Ifthedeviceshows
theinterfaceontheleftside,select “YES” toconfirmdeletingor
“NO” toretainfileby “
” or “ ” button.PressMenubuttonto
executetheoption.
73
Page 74

10RadioMode
FromthemainmenuselectRadioMode,pressMENUbuttonto
enter.SeethebelowpictureofRadioMode:
frequencymode usermode
Inradiomode,thereare “usermode” and “frequencymode” to
switch,ifsomeradiochannelshavebeenalreadysaved.Shortpress
PLAYbuttontoswitchbetweenthetwomodes;ifnoradiochannels
havebeensaved,thereisonly “frequencymode” available.Inthe
frequencymode,press “
”or“ ”buttontochooseradio
frequency,pressMENUbuttontodisplay:SaveChannel,AutoSearch,
Channel List and FM Record. In the user mode, press
”or“ ”buttontochoosesavedchannel,pressMENUbuttonto
“
display:DeleteChannel,AutoSearch,ChannelListandFMRecord.
Thereferenceinterfaceisshownasbelow:
AfterAutoSearchisselected,thesystemautomaticallysearches
radiochannels.Whenaradiochannelisfound,thechannelwillbe
74
Page 75

savedautomaticallyandtheradiochannelnumberissavedinthe
channellist.Inthefrequencymode,userscansavechannelsina
manualway.Inusermode,userscanchooseDeleteChannelto
deleteacurrentsavedchannelorDeleteallsavedchannels.The
devicecanstore40radiochannelsatmost.Savedradiochannelscan
beseenfromthechannellist.Press “+” or “-” toswitchamongsaved
radiochannelsinsequenceandpressMENUbuttontostartlistening
totheradiochannel.IfuserschooseFMRecord,thesystemstarts
recordingtheradio.Seetheinterfacepicturebelow:
75
Page 76

11SettingMode
FromthemainmenuselectSettingmode,pressMENUbuttonto
enter.TheSettingmodeinterfaceincludes:SelectMemory,Select
Folder, RecordType,VoiceActivateControl,ListenIn,AutoDivide
FeatureRecording,Backlight,Autooff,SystemTime,RecorderTimer,
LanguageandAdvanced.Seetheinterfacepicturebelow:
(1)SelectMemory
AftertheMicroTFisinsertedintothedevice,devicewilldisplaythe
otheroption:CardMemory.Userscanselectthestoragelocation
forrecordedfiles.Seetheinterfacepicturebelow:
76
Page 77

Note:
PCMrecordingsareonlystoredininternalmemoryofthedevice.
(2) SelectFolder
TherecordedfilecanbestoredinanyoftheA,B,C,Dfolder.See
theinterfacepicturebelow:
(3) RecordType
FromtheRecordTypeMenuusershavefiveRecordtypesfor
selection:PCMRecord,SHQRecord,HQRecord,SPRecordand
SLPRecord.IfthePCMrecordtypeisselected,thedevicesavesthe
recordedfileautomaticallywhenPCMrecordingreachesonehour,
andthenstartsthenextrecording.Seetheinterfacepicturebelow:
PCMREC:WAVformat,highsoundquality,bitrate:1536kbps.
SHQREC:MP3format,highsoundquality,bitrate:192kbps.
HQREC:MP3format,highsoundquality,bitrate:128kbps.
SPREC:MP3format,goodsoundquality,bitrate:64kbps.
SLPREC:MP3format,ordinarysoundquality,bitrate:8kbps.
77
Page 78

TelephoneRecord
Connectthetelephonecableprovidedwiththedeviceandexternal
telephonecabletothetelephoneadapter.Accordingtothedrawing,
theoperationisthesameasrecordingwithmicrophone.
LineinRecord:
Lineinrecordingisawayofrecordingsoundbyconnectingthe
devicetoanaudioequipment’saudiooutputviaastereoaudiocable
(audioequipmentssuchasradio,CD,VCD,DVDetc.).Usethe
stereoaudiocableprovidedwiththedevicetoconnecttheaudio
equipment’saudiooutputwith “Linein” jackofthedevice.The
recordingoperationisthesameasrecordingwithmicrophone.
BeforerecordingwithLineinjack,pleaseadjustthevolumeofthe
soundsourcetoasuitablelevel,otherwisetherecordedsoundmay
lackfidelity.
78
Page 79

(4) Voice-activatedRecording
Thisisapracticalfunctionofrecording,nobuttonoperationis
needed.Whenthefunctionisenabled,inthecourseofrecording,if
novoiceisdetected,thedevicewillautomaticallypauserecording
after3seconds;ifvoiceisdetectedagain,thedeviceresumes
recording.Seethebelowrelatedreferencepicture:
(5) TheListenInfunction
AfteractivatingtheListenInfunction,youcanconnectanearphone
tolistenifthere’sanysoundinput.SeetheListeninfunctionsetting
interfacepictureasfollows:
(6) Automaticfilesplitting
Whenrecording,thedevicewillautomaticallysavetherecordingfile
every30or60minutes,andthencontinuetherecording. Seethe
belowrelatedreferencepicture:
79
Page 80

(7) BacklightTime
Thebacklighttimefunctioncanbesetat:15,30,45,60secondsand
Constant.Ifthere’snooperationonthedeviceforthesettime,the
backlightturnsoffautomatically.Ifyouselect0,thebacklightistobe
always.SeethebelowpictureofBacklightTimesetting:
(8) Autooff
Ifthere’snooperationonthedeviceforasettime,thesystem
automaticallyshutsdown.Ifthetimeissetat0,thesystemwillnot
automaticallyshutdown.Seethebelowautooffpicture:
(9) Systemtimesetting
SeethebelowpictureofSystemtimesetting:
80
Page 81

Onthisinterface,userscansetthecurrenttimeandthetimedisplay
format.
Forexample,whenselect” TimeMode” , thedeviceshowsthe
pictureasfollow:
Fromthelist,userscanchooseoneoftwotimedisplayformat:
12-hourclockor24-hourclock.Thedefaultsettingis12-hourclock.
Whenselect “RealTime”,thedeviceshowsthepictureasfollow:
Onthisinterface,press “+”or“-”buttontosettherealtime.Press
“ ”or“ ”buttontoselect"Year","Month","Day","Hour",
"Minute";press “+”or“-” toadjustthevalue.
(10)Recordtimer
Recordtimer:presetthetimeatfirst,whensystemtimereachesthe
settime,thedevicestartsvoicerecordingautomatically.
81
Page 82

Fromthemenulist,select “RecordTimer” toentertosettherecord
timer.Seethebelowautooffpicture:
TheinterfaceofRecordTimeisasfollow:
Onthisinterface,userscansetthetimewhenthedevicestarts
recordingautomatically.Themethodtoperformthesettingrefersto
"SystemTimeSetting".
Recordsource:userscanselecteithervoicesourcefromthe
microphoneorradiobypressing “+”or“-”.Thedefaultsettingtakes
thevoicepicksupbymicrophoneasrecordingsource. Seethe
belowautooffpicture:
Ifthe “FMSource” isselected,theradiowillbethesourforvoice
recording.PressMenubuttontosetthefrequencypoint.
Duration:
82
Page 83

Userscansetthedurationofrecordingto30minutes,60minutes,
and120minutesorunlimited.Seethebelowautooffpicture:
Note:
Afterthedurationwasset,pleasemakesuretheswitchisinthe
positionofONwhenthedeviceispoweroff,otherwisethedevice
willnotstartrecordingwhenitreachesthepresettime.
(11)Language
FromtheLanguagemenuyoucanchoosealanguageassystem
language.Seethefollowinginterfacepicture:
(12)Advanced
TheAdvancedmenulistincludes:Information,ClearInternal
Memory,ClearCardMemoryandResetDefaultSetting.Seethe
followinginterfacepicture:
83
Page 84

Information: userscancheckthedevice’sfirmwareversion and
checktheremainingcapacityofmemorybyusingthisfunction.
Clearinternalmemory : userscanformatthedevice’sinternal
memory byusingthisfunction.
Clearcardmemory:userscanformatthedevice’scardmemory by
usingthisfunction.
Resetdefaultsetting:userscanresetthesystemtodefaultsetting.
84
Page 85

12FrequentlyAskedQuestions
Answerstothefrequentlyaskedquestionsarelistedheretosolve
simpleproblemsthatmaytothedevice.Iftheproblemcannotbe
solved,pleasecontactthedealerorvisitourofficialwebsite:
www.philips.com/support
Cannotswitchonthedevice:
Thebatteryisempty,pleaserechargepromptly.
Cannotrecordwiththedevice:
Themaximumfilenumberisexceededorthedevice’smemoryisfull.
Pleasedeletesomerecordingsormovethemtootherstorage
devices.
Thedevicecannotplayrecordedaudio:
(1)Thedevicemaybeinlockmode(HOLD).SlidetheHOLD
switchtoOFFposition.
(2)Thebatteryisempty,pleaserecharge.
85
Page 86

13TechnicalParameters
Storage
Internalstorage
Estimatedrecordingtime(8GB):11hourswithPCMRecording
mode,90hourswithSHQRecordingmode,130hourswithHQ
Recordingmode,270hourswithSPRecordingmode,approximately
2120hourswithSLPRecordingmode.
Typeofinternalstorage:NANDFlash
Portablestorage(PC):Yes
DimensionsandWeight
Wide × Long × High:38×104×14(mm)
Weight(withbattery):80g
Systemrequirement
OperatingSystem:Windows7/Vista/XP/2000,MacOSX,Linux
Port:USB
Recording
PCMREC:bitrate1536kbps,WAVformat
SHQREC:bitrate192kbps,MP3format
HQREC:bitrate128kbps,MP3format
SPREC:bitrate64kbps,MP3format
SLPREC:bitrate8kbps,MP3format
Operatingconditions
Temperature:5°–45°C
Humidity:10% – 90%,nocondensation
86
Page 87

Page 88

 Loading...