

Page 1

Operating instructions PHILIPS VR850/07
Congratulations ! You now have one of the most sophisticated
and easy-to-use video recorders (VCR) on the market. With
thisVCR you can record and play standard VHS cassettes.
Please take the time to read this manual before you use your
video recorder.
Safety instructions and other notes
ADanger: High voltage!
Do not remove the top cover on the machine. You mayget an
electric shock!
AYou willnot be able to repair any of theparts in this video
recorderyourself. When the machine is pluggedin, some of the
partswill be working all the time.To switch off the video
recordercompletely, you must unplug it.
BThis videorecorder is designed for a powersupply of
220-240V/50Hz.
BMake surethat air can flow freely through theventilationslots
on thevideorecorder.
1. Installing your video recorder 2......................
Connecting your video recorder to the TV set 2.........
Automatictuning (autoinstall) 4.......................
Tuning in your video recorder for the first time 4........
Tuning in your video recorder at other times 4..........
AutomaticTV channel store (FOLLOW TV) 4............
Connecting a decoder or otherequipment 5............
Manual TV channel search 5.........................
Monitorfunction 6..................................
Sortingand clearing TV channels manually 6...........
Settingthe time and date 7...........................
On-screendisplay (OSD) 7...........................
Emergencyinterrupt 7...............................
Saving energy 7....................................
2. Playback functions 8................................
Searching for a tape position 8.......................
JOG and SHUTTLE 8................................
Selecting the picture setting (SMART PICTURE) 9.......
Pictureinterference 9...............................
3. Manual recording 10................................
Recording with and without automatic switch-off 10....
Automaticrecording from a satellite receiver (SAT
RECORDING) 11....................................
Directrecord 11....................................
BDo not allowany objects or liquids to getintothe video
recorder.If you spill anything on it,unplug it immediately and
callour After-Sales Service for advice.
BDo not useyourvideo recorder immediatelyafter moving it from
a coldarea to a hot area or if the roomisvery humid.
Onceyouhave unpacked the video recorder, leaveit to stand
foratleast three hours before you installit. This gives the
machinechance to get used to the room temperature.
C We haveprinted these instructions on environment-friendly
paper.
C Pleasetake your old batteries to proper batterycollection
points.
C Pleasedispose of the packaging from this videorecorder in a
waythat will not harm the environment.
C Thisvideo recorder contains many materialsthat can be
recycled.Please ask about recycling yourold machine.
DVIDEO Plus+and PlusCode are registered trademarksof
GemstarDevelopment Corporation. The VIDEOPlus+ system is
manufacturedunder licence from Gemstar Development
Corporation.
4. Programmed recording 12...........................
VPS (video programming system) and PDC (pro-
gramme delivery control) 12..........................
Programmingwith VIDEO Plus+ 12....................
Manual programming without VIDEO Plus+ 13..........
How to check or change a TIMER 13..................
NexTViewLink 14...................................
5. Other functions 15..................................
Changing the TV system 15..........................
Child lock 15.......................................
Switchingthe remote control command 16.............
Continuousplay 16..................................
Automaticswitch-off 17.............................
Using your video recorder remote control with your
TV set 18..........................................
Audio dubbing 19...................................
Selecting the soundtrack 20..........................
’Synchroedit’ 20....................................
Before you call an engineer 22.......................
SDDHHMMJWWTOPERAT
1
Page 2

1. Installing your videorecorder
Important for the United Kingdom
This machine is fitted with an approved moulded 13 Amp plug.
To change a fuse in this type of plug, please follow these
instructions.
a Take off the fusecover and take out the fuse.
b Put in a new fuse which should be a BS1362 3A, A.S.T.A.
or BSI approved type.
c Refit the fuse cover.
If the plug fitted is not suitable for your socket, cut it off and fit
another type.
If the plug you fit contains a fuse, it should be a 3Amp fuse. If
you fit a plug which does not need a fuse, make sure the fuse
on your fuse box is not greater than 5 Amps.
DNote: Please destroy the plug you have cut off so that it
cannot be used in a 13 Amp socket somewhere else.
How to connect a plug
The wires in the lead from the video recorder are coloured as
follows.
* Blue - ’neutral’ (’N’).
* Brown - ’live’ (’L’).
Connecting your video recorder to the
TV set
To install your video recorder, you will need to read one of the
following.
E Ifyour TV set has ’Easy Link’ or ’NexTView’- the
paragraph ’Connecting with a scart cable and Easy Link
or NexTView’.
E Ifyour TV set does not have ’Easy Link’ or ’NexTView’ -
the paragraph ’Connecting with a scart cable without
Easy Link or NexTView’.
E Ifyou do not use a scartcable - the paragraph
’Connecting without a scart cable’.
Connecting with a scart cable and Easy link
or NexTView
Easy Link and NexTView allow your video recorder to
exchange information with the television. Please follow the
operating instructionsyou received with your television.
d Connect the blue wire to the terminal in the plug which is
markedwith the letter ’N’ or coloured black.
e Connect the brown wire to the terminal in the plug which
is marked with the letter ’L’ or coloured red.
f Do not connect either of the wires to the terminal in the
plug which is marked with the letter ’E’, the symbol \or
coloured green or green and yellow.
Before you refit the plug cover, make sure that the grip at the
bottom of the plug is clamped over the plastic cover of the
lead, not just over the two wires.
a Take the aerial cable plug out of your TV set and put it
into the 2 socketon the back of the videorecorder.
b Plug one end of the aerial cable provided into the TV
socketon the video recorder. Then plug the other end
into the aerial input socket on your TV set.
c Plug one end of the scart cable providedinto the
AV1EXT1 scartsocket on the back of the video recorder.
Then plug the other end into the scart socket on your
TV set.
2
Page 3

d Switch on the TV set.
e Plug one end of the mains cable into the mains socket
4 on the back of the video recorder. Then plug the
other end into the wall socket.
f Your video recorder will automaticallystore all the
TV channels on your TV, in the same order.
This may take several minutes.
When your video recorder has storedall the information
it needs from your TV (TV channels, language, country),
the following text will appear on your TV screen:
’EASY LINK LOADING COMPLETE’.
g Check that the timeand date on the video recorder
displayare correct. If they are not, please read the
paragraph ’Setting the time and date’ in this chapter.
Connecting with a scart cable without
Easy Link or NexTView
e Plug one end of the mains cable into the mains socket
4 on the back of the video recorder. Then plug the
other end into the wall socket.
f If your TV setautomaticallyswitches to a programme
number, a text will appear on your TV screen.
If not, select your programme as shown in the instruction
manual for your TV set.
Connecting without a scart cable
a Take the aerial cable plug out of your TV set and put it
into the 2 socketon the back of the videorecorder.
If your television does not have a scart (EURO-AV) socket,
please see the next paragraph ’Connecting without a scart
cable’.
a Take the aerial cable plug out of your TV set and put it
into the 2 socketon the back of the videorecorder.
b Plug one end of the aerial cable provided into the TV
socketon the video recorder. Then plug the other end
into the aerial input socket on your TV set.
c Plug one end of the scart cable into the AV1EXT1 scart
socketon the back of the video recorder. Then plug the
other end into the scart socket on your TV set.
d Switch on the TV set.
b Plug one end of the aerial cable provided into the TV
socketon the video recorder. Then plug the other end
into the aerial input socket on your TV set.
c Plug one end of the mains cable into the mains socket
4 on the back of the video recorder. Then plug the
other end into the wall socket.
d Switch on your TV set and select the channel number you
have chosen for playing videos.
e You will then see some text on your TV screen.
f Tune in the TV set on the UHF wave band until this picture
appears.
Read the instructions in the manual for your TV set.
CONGRATULATIONS ON THE
PURCHASE OF YOUR NEW
PHILIPS VIDEORECORDER
TO CONTINUE PRESS OK
g Then follow the instructionsshownunder ’Tuning in your
video recorder for the first time’.
3
Page 4
Automatic tuning (autoinstall)
Your video recorder will search forall TV channels. It stores
the TV channels it finds in the following order: BBC 1, BBC 2,
ITV, Channel 4, Channel 5, Sky, others.
Tuning in your video recorder for the first
time
a If you have plugged the aerial into the video recorder,
pressthe OK button on the remote control. Then follow
the instructions below from step e .
Automatic TV channel store
(FOLLOW TV)
Withthis function, the video recorder storesthe channels in
the same order as on the TV set. It only works if the video
recorder(socket AV1 EXT1 )and the TV set are connected with
a scart cable. You must switch off any equipment connected
to socket AV2EXT2 .
DIf you are following the instructions on page 2 under
’Connecting with a scart cable and Easy Link or
NexTView’,this function will start the transfer of
informationbetween the TV and the video recorder.
Tuning in your video recorder at other times
a Switch on the TV set and select the programme number
for the video recorder.
b Press the MENU button. The main menu will appear.
c Select the line ’INSTALLATION’withthe menu buttons
P = or P ; andconfirmwiththe P button.
d Select the line ’AUTOINSTALL’withthe menu buttons
P = or P ; andconfirmwiththe P button.
e Automatictuning will start. This can take several minutes.
INSTALLATION
AUTOINSTALL
SEARCHING FOR TV CHANNELS
03 CHANNELS FOUND
________________________
a Switch on the TV set and select the programme number
for the video recorder.
b Press the MENU button. The main menu will appear.
c Select the line ’INSTALLATION’withthe menu buttons
P = or P ; andconfirmwiththe P button.
d Select the line ’FOLLOWTV’ with the menu buttons
P = or P ; andconfirmwiththe P button.
Check the message on the TV screen.
e Pressthe OK button.
E Ifthe videorecorder recognises that the TV set has been
connected with a scart cable, ’TV 01’ will appear on the
video recorder display.
E If’NOTV’ (no signal from the TV set)appears on the video
recorderdisplay, this means that the TV channels cannot
be tuned in automatically. In this case, please see
’Sortingand clearing TV channels manually’.
f Select channel ’1’ on the TV set.
f When automatic tuning is complete, ’AUTOINSTALL
COMPLETE’will appear on the TV screen.
g To end, press the MENU button.
4
g Confirm with the OK buttonon the video recorder
remote control. The video recorder willcompare the
channel on the TV set and the video recorder.
If the video recorder has found the same channel as the
TV set, it will store itas ’P01’.
h Wait until, for example, ’TV 02’ appears.
i Select the next programme number on the TV set.
j Confirm with the OK buttonon the video recorder
remote control.
Page 5
DIf you have selected the wrong TV channel, you can go
back a step with the menu button Q .
g Select ’ON’ with the menu buttons Q or P .
When you select ’OFF’, the function will be switched off.
k Repeat steps h to j until all TV channels have been
storedon the video recorder.
l To end, press the MENU button.
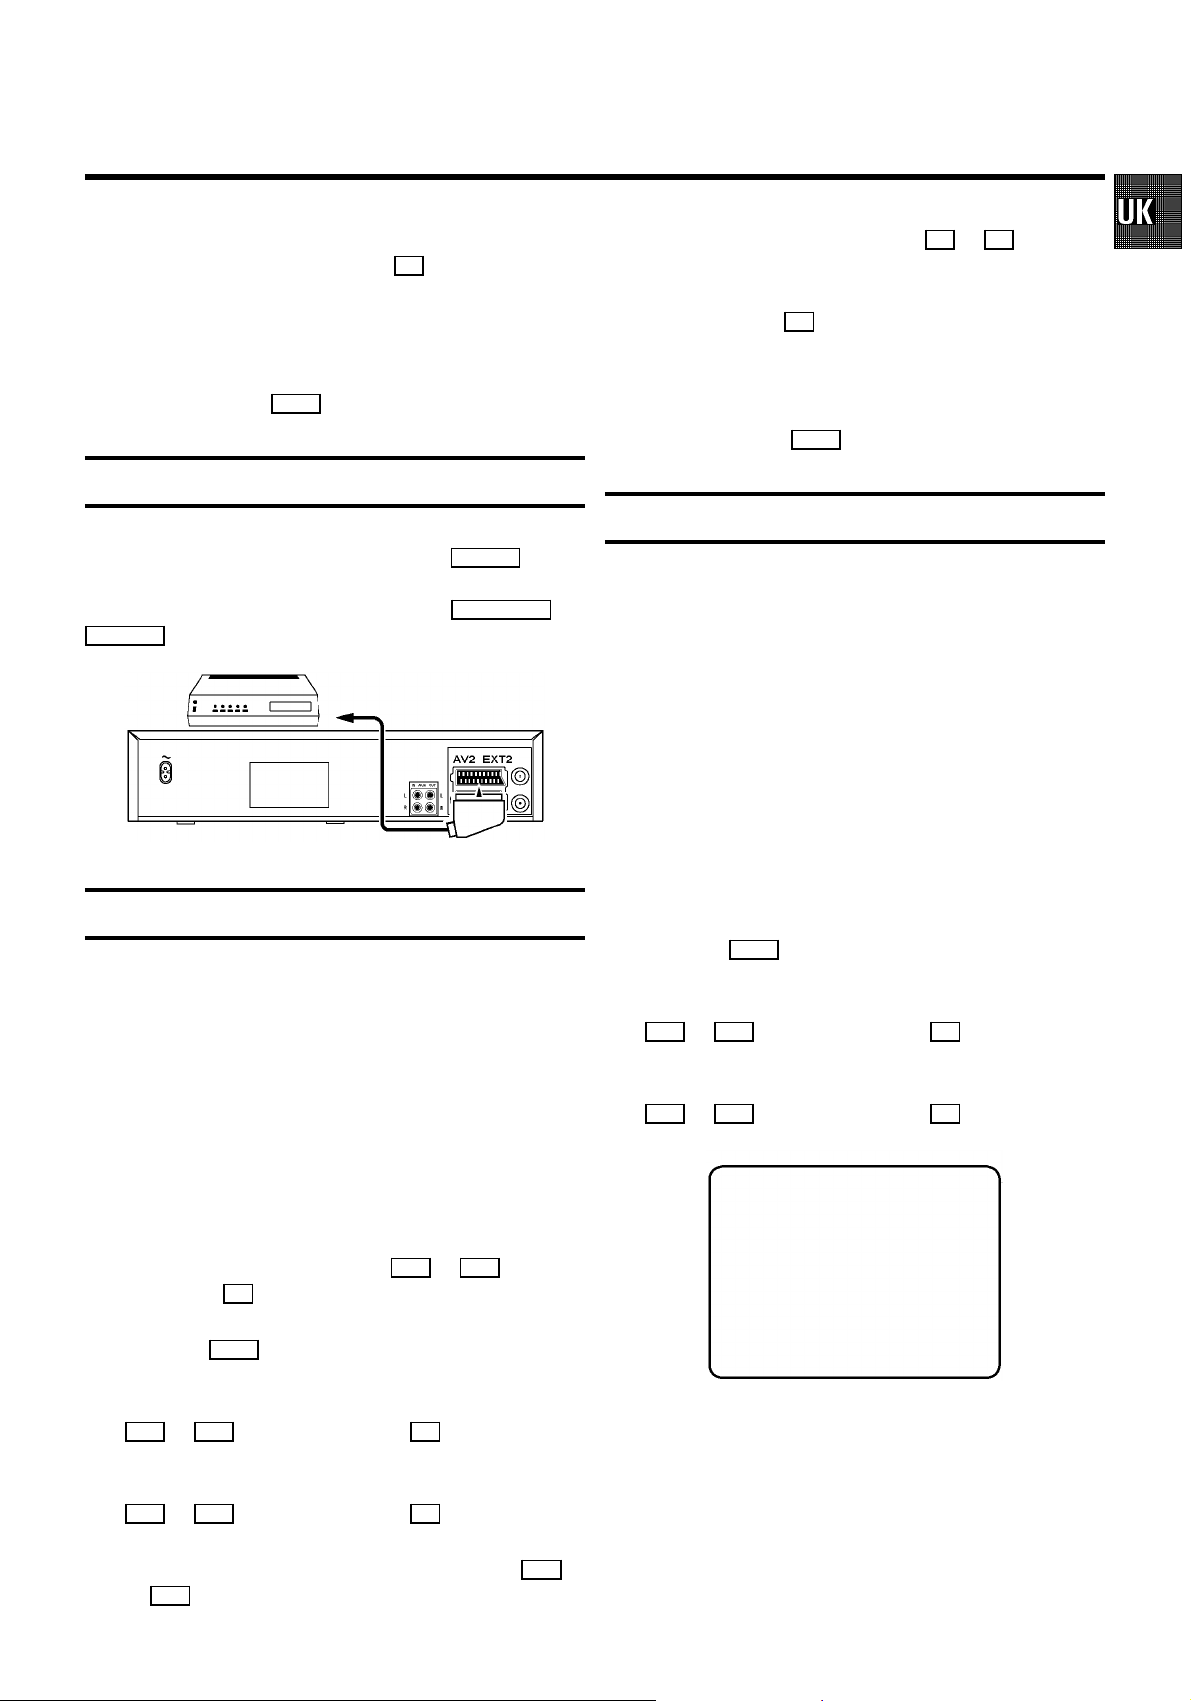
Connecting a decoder or other equipment
You can also connect other equipment to the AV2 EXT2 socket,
for example a decoder, satellite receiver or camera recorder.
And you can connect a hifi set to the sockets AUXOUT L R and
AUXIN L R .
Tuning in a decoder
h Confirm with the OK button.
DWhen the function is switchedon, ’DEC’ will appear in the
video recorder display.
i To end, press the MENU button.
Manual TV channel search
In some cases ’Automatic tuning’ may not be able to find all of
the TV channels (for example, coded TV channels). If this
happens, you can use this manual method to tune in the rest of
the channels.
DIf you are following the instructions on page 2 under
’Connecting with a scart cable and Easy Link or
NexTView’,your video recorder will automatically load
the TV channels from the TV set. So this informationmay
not be relevant.
a Switch on the TV set and select the programme number
for the video recorder.
b Press the MENU button. The main menu will appear.
Withthis function, your decoder will automaticallytune in to
the TV programme you want.
DIf you are following the instructions on page 2 under
’Connecting with a scart cable and Easy Link or
NexTView’,the decoder must be tuned in to the TV set.
a Switch on the TV set and select the programme number
for the video recorder.
b On the video recorder,select the TV channel you want to
tune in to the decoder, using the P ; or P = button or
the buttons 0-9 .
c Press the MENU button. The main menu will appear.
d Select the line ’INSTALLATION’withthe menu buttons
P = or P ; andconfirmwiththe P button.
e Select the line ’MANUAL SEARCH’ with the menu buttons
P = or P ; andconfirmwiththe P button.
f Select the line ’DECODER’with the menu buttons P =
or P ; .
c Select the line ’INSTALLATION’withthe menu buttons
P = or P ; andconfirmwiththe P button.
d Select the line ’MANUALSEARCH’ with the menu buttons
P = or P ; andconfirmwiththe P button.
INSTALLATION
MANUAL SEARCH
CHANNEL/FREQ. CH
ENTRY/SEARCH 34
PROGRAMME NUMBER | 02
TV CHANNEL NAME MTV
DECODER OFF
TV SYSTEM PAL
NICAM ON
FINE TUNING +1
________________________________
e In the line ’CHANNEL/FREQ.’, select the displayfor:
TO EXIT
PRESS MENU
* ’FREQ.’: frequency;
* ’CH’: channel; or
* ’S-CH’: special channel.
5
Page 6

f If you know the frequency or number of the TV channel
you want to tune in, you can enter this informationin line
’ENTRY/SEARCH’with the digit buttons 0-9 .
E Ifyou don’tknow the frequency or number,press the
P button to start the channel search.
g In the line ’PROGRAMMENUMBER’ select the
programmenumber you want to store it under, using the
menu buttons Q or P .
h If you want to change the TV channel name, press the
P button in line ’TV CHANNEL NAME’.
Sorting and clearing TV channels manually
DIf you are following the instructions on page 2 under
’Connecting with a scart cable and Easy Link or
NexTView’your video recorder will automatically load
the TV channels from the TV set. So you cannot select
thisfunction.
a Switch on the TV set and select the programme number
for the video recorder.
b Press the MENU button. The main menu will appear.
E Selectthe letteror number you want to change with the
Q or P button.Change it with the P = or P ; but-
ton. Change the next letter or number in the same way.
E Keeppressing the menu button P untilthe cursor
disappears.
i In the line ’NICAM’, select function ’ON’ or ’OFF’ with the
P or Q button.
j If you want to change an automatic TV channel setting,
selectthe line ’FINE TUNING’ and use the Q or P
button. Important: Fine tuning is only necessaryin special
cases,for example when there are stripes on the picture
with cable TV systems.
k Press the OK buttonto store the TV channel.
DIf you want to search for other TV channels, startagain
from step f.
l To end, press the MENU button.
Monitor function
You can switch backwards and forwardsbetween your
TV picture and video recorder picture with the
MONITOR button. But this only works when you use a scart
cable to connect the video recorder to your
TV set and your TV set responds to this switchover.
c Select the line ’INSTALLATION’withthe menu buttons
P = or P ; andconfirmwiththe P button.
d Select the line ’TV CHANNEL ALLOCATION’ with the
menu buttons P = or P ; andconfirmwith the
P button.
INSTALLATION
TV CHANNEL ALLOCATION
...
P01 BBC1
P02 BBC2
P03 ITV
P04 CH4
P05 CH5
P06 SKY
...
________________________________
TO SORT TO EXIT
PRESS PRESS MENU
e Withthe menu buttons P = or P ; ,selectthe
TV channel you want to give a programme number to,
(startingwith ’P01’) and press the P button.
DIf you want to delete a TV channel, pressthe CLEAR(CL)
button when the cursor is next to that programme
number.
f With the menu buttons P = or P ; , shiftthe TV
channel to the number you want to give to that channel
and press the Q button.The TV channel will be added
to the list.
g Repeat steps eand funtil you have given a number
to all TV channels.
h To store, press the OK button.
i To end, press the MENU button.
6
Page 7

Setting the time and date
E Enteror change: with the Q or P orwith the 0-9
buttons.
If the time shown on the video recorder display is not correct
or ’--:--’ appears on the display,please follow these
instructions.
a Switch on the TV set and select the programme number
for the video recorder.
b Press the MENU button. The main menu will appear.
c Select the line ’INSTALLATION’withthe menu buttons
P = or P ; andconfirmwiththe P button.
d Select the line ’TIME/DATE’with the menu buttons
P = or P ; andconfirmwiththe P button.
INSTALLATION
TIME/DATE
TIME 20:00
YEAR | 1998
MONTH 02
DATE 06
E Store:with the OK button.
E Confirm:with the P button.
E Exitmenu: withthe MENU button.
For more details of OSD, please see ’On-screen display’
in chapter 5.
Emergency interrupt
You can use the mSTANDBY button on the video recorder or
remote control to interrupt any function.
So if you are havingoperating problems, you can just interrupt
the function and start again. And you can practise operating
your video recorder without any worries. No matter which
buttonsyou press, you cannot damage it.
________________________________
e Adjust’TIME’, ’YEAR’, ’MONTH’ and ’DATE’ using the
TO EXIT
PRESS MENU
buttons 0-9 .Switchbetween each one with the menu
buttons P = or P ; .
f Confirm each entry with the OK button.
g To end, press the MENU button.
DIf a TV channel which transmits TXT/PDC is stored under
programmenumber ’P01’, the time and date will
automaticallybe taken from the TXT/PDC information.
On-screen display (OSD)
Withon-screen display the functions appear on the TV screen
as a menu. The most important buttons are shown at the
bottom of the screen.
E Callup the menu: with the MENU button.
Important notes
E Youcan switch on with the STOP h button, the
0-9 buttonsor by putting in a cassette.
E Keepyour video recorder connected to the mains at all
timesso that it can make programmed recordings and the
televisionworksnormally. Your video recorder uses less
than 4 Watts in energy-saving mode.
E Whenthe video recorder is not plugged into the mains, it
will usually store TV channels for a year, and date and
timerinformation for seven hours.
Saving energy
There are two ways to switch to standby.
Normal method : Switch to standbyusing the
mSTANDBY button.The clock time will still be displayed.
If you have not set the clock, ’--:--’ will appear.
To save energy : Press the mSTANDBY buttontwice. The clock
time will disappear from the display.
E Selecta line: with the P = or P ; button.
E Selectwithin a line: with the menu buttons Q or P .
7
Page 8

2. Playback functions
Playing a cassette
a Put a cassette in the cassette slot.
b Press the PLAY G button.
c To stop, press the STOP h button.
d To eject the cassette,press the STOP/EJECT? button
on the machine.
DSome hired cassettes may have a poor picture or poor
sound quality. This is not a fault in your machine. Please
read the section ’Selecting the picture setting (SMART
PICTURE)’,or ’Picture interference’ in this chapter.
DBy pressing the OK button,you can show the present
tape position on the TV screen.
Searching for a tape position with the
picture (picture search)
a While a cassette is playing, press the H (rewind) or
I (wind) button.
b To stop at a certain picture, press the PLAY G button.
DDuring picture search, the picture quality may not be so
good and there will be no sound.
JOG and SHUTTLE
You will find a largeknob o onthe videorecorder and the
remote control.
a Switch the function on by pressing the STILL R button.
You will see a stillpicture.
b Use the inner JOG disc on the remote control to select
the next or previous still picture.
DSome functions switch off automatically after a while (for
example,pause, still picture, picture search). This helps
to protect the cassette and avoidswasting power.
Playing NTSC casettes
Withthis machine you can play cassettes that have been
recorded on another video recorder in the NTSC standard.
NTSC is the TV system used in, for example, America and
Japan. PAL is the TV system used in, for example, Europe. But
thisonly works for PAL-television sets which are suitable for a
picture frequency of 60 Hz.
When you play an NTSC cassette, ’60HZ’ will appear on the
video recorder display.
DSome special features (for example, stillpicture) are not
possiblewhile you are playing an NTSC cassette.
Tape position indicator
a Press the COUNTER button while the cassetteis playing.
c By turning the inner disc continuously to the right or to
the left you can switch to slow motion, forwards or
backwards.
d The outer SHUTTLE ring of the knob allows you to select
differenttape speeds for the forward and reverse picture
search.
Searching for a tape position without the
picture (wind and rewind)
a Stop the tape with the STOP h button.
b Press the H (rewind)or I (wind)buttonor, on the
video recorder, turn the outer ring of the knob o to
the left or to the right.
c To stop at a certain position, press the STOP h button.
b Select one of the following options.
’TIME USED’ to show the time used on the tape.
’TIME LEFT’ to show the time left on the tape.
’COUNTER’ to show the present positionon the tape.
8
Page 9

Instant view
Tracking while a cassette is playing
Withthis function you can switchto picture search during
wind or rewind.
a If you hold the H (rewind)or I (wind) button
during wind or rewind, you will switch to picture search.
b If you release the button, the video recorder will
automaticallyswitchback to rewind or wind.
Automatic search for a tape position
(index search)
At the start of each recording, the video recorder will markthe
tape with an index code mark.
a Press the INDEX E button.Then press the I button to
selectthe next code mark or the H button for the
previouscode mark.
b When the video recorderfinds the code mark or a blank
space it will automatically switch to play.
DYou can only search for a blank space with recordings
made on a video recorder that does not have this index
code mark function.
a Press the MENU button.
b Select the line ’PLAYFUNCTIONS’ with the menu buttons
P = or P ; andconfirmwiththe P button.
c Select the line ’MANUALTRACKING’with the menu
buttons P = or P ; .
d Hold the menu buttons Q or P untilthe picture
qualityis at its best.
e Confirmwith the OK button.
f To end, press the MENU button. This setting will not
change until you eject the cassette.
Tracking with a still picture
If the still picture vibrates vertically, you can improve it as
follows.
a Press the MENU button.
b Select the line ’PLAYFUNCTIONS’ with the menu buttons
P = or P ; andconfirmwiththe P button.
Selecting the picture setting
(SMART PICTURE)
You can change the colour, contrast and sharpness of the
picture while a cassette is playing.
a Press the SMART button. This will show the current
picture setting.
b Press the SMART button again to select the picture
settingyou want.
c Confirm the new setting with the OK button.
This picture setting will not change until you eject the
cassette.
Picture interference
If the picture quality is poor when you play a cassette, please
followthese instructions.
c Select the line ’VERTICALSTABILITY’with the menu
buttons P = or P ; .
d Hold the menu buttons Q or P untilthe picture
qualityis at its best.
e Confirmwith the OK button.
f To end, press the MENU button.
Cleaning the video heads
a While a cassette is playing, press the MENU button.
b Select the line ’PLAYFUNCTIONS’ with the menu buttons
P = or P ; andconfirmwiththe P button.
c Select the line ’HEAD CLEANING’ with the menu buttons
P = or P ; .
d Press the OK button.’HEADCLEANING IN PROGRESS’
will appear on the screen.
e Waita few seconds until the message disappears. Then
pressthe MENU buttonto end.
9
Page 10

3. Manual recording
Recording without automatic switch-off
a Put a cassette into the machine.
b Use the P ; or P = buttonto select the programme
number you want to record from.
DIf you are using ’Directrecord’, select the programme
number on the TV set.Then, with the video recorder
switchedon, press the nRECORD/OTR button.
DIf a TV channel transmitsa channel name, it will show on
the video recorder display.
DProgramme numbers ’E1’ and ’E2’ are for recording from
other sources (through scart sockets AV1 EXT1 and
AV2EXT2 ).Programme number ’E3’ is for recording from
the front sockets VIDEO and L-AUDIO-R .
DProgramme numbers ’AUX’ and ’MIC’ are for audio
recordings(through sockets AUX INL R )andthe
microphone socket ’ MIC. ’.
c Press the nRECORD/OTR button.
Auto-assembling
You can use this functionto join individual recordings without
any major picture disturbance between them.
a While the cassette is playing,search for the correct
positionon the tape.
b Stop the cassette by pressing the STOP h button.
’PAUSE’ will appear on the TV screen.
c Now start recording as usual by pressing the
nRECORD/OTR button.
Choosing the recording speed (SP or LP)
You can reduce the recording speed by half. This makes it
possibleto record, for example, eight-hours instead of
four-hourson an ’E240’ (four-hour) cassette.
d Stop recording with the STOP h button.
Recording with automatic switch-off
(OTR one-touch recording)
a Put a cassette into the machine.
b Use the P ; or P = buttonto select the programme
number you want to record.
c Press the nRECORD/OTR button.
d Press the nRECORD/OTR buttonagain and again until the
displayon the video recorder showsthe end time or
length of the recording you want.
DTo cancel this programme, pressthe CLEAR(CL) button.
Protecting your recordings
So that you don’t accidentally delete an important recording,
removethe special tab on the narrow side of the cassette with
a screwdriver or slide the special tab to the left. Later,if you
no longer want to protectthe recording, you can seal the gap
again with sticky tape or slidethe special tab to the right.
a Switch on the TV set and select the programme number
for the video recorder.
b Press the MENU button. The main menu will appear.
c Select the line ’RECORDFUNCTIONS’ with the menu
buttons P = or P ; , and confirm with the
P button.
d Select the line ’RECORDSETTINGS’ with the menu
buttons P = or P ; , and confirm with the
P button.
e Select the line ’RECORD SPEED’ with the menu buttons
P = or P ; .
f Select the recording speed you want with the menu
buttons Q or P .
D’LP’(long play) gives half the normal recording speed
(double the recording time).
’SP’(standardplay)gives the normal recording speed.
DThe picture quality may sufferwhen you record at half
speed (LP).
DWhen you play back your recording, the machine will
automaticallyselect the correct speed.
g Confirm with the OK button.
10
Page 11

h To end, press the MENU button.
Direct record
Automatic recording from a satellite
receiver (SAT RECORDING)
You can only use thisfunction when you have a satellite
receiverwhich can control other equipment by a
’programming’function.
a Switch on the TV set and select the programme number
for the video recorder.
b Press the MENU button. The main menu will appear.
c Select the line ’RECORDFUNCTIONS’ with the menu
buttons P = or P ; , and confirm with the
P button.
d Select the line ’RECORDSETTINGS’ with the menu
buttons P = or P ; , and confirm with the
P button.
e Select the line ’SAT RECORD’ with the menu buttons
P = or P ; .
f Select the scart socket you want to use with the menu
buttons Q or P .
If you want to switch off the function, select ’OFF’ with
the menu buttons P or Q .
g Confirm with the OK button.
h Use a scart cable to connect the scart socket you have
selectedon the video recorder to the scart socket on the
satellitereceiver.
When this function is switched on and the video recorder is
switchedto standby, the video recorder will automatically
record the programme number selected on the television.
DIf you are following the instructions on page 2 under
’Connecting with a scart cable and Easy Link or
NexTView’,the video recorder will also take the
programmenumber from the TV set automatically when
the video recorder is switched on.
a Switch on the TV set and select the programme number
for the video recorder.
b Press the MENU button. The main menu will appear.
c Select the line ’RECORDFUNCTIONS’ with the menu
buttons P = or P ; , and confirm with the
P button.
d Select the line ’RECORDSETTINGS’ with the menu
buttons P = or P ; , and confirm with the
P button.
e Select the line ’DIRECT RECORD’ with the menu buttons
P = or P ; .
f Select the function ’ON’ with the menu buttons Q or
P .
g Confirm with the OK button.
h To end, press the MENU button.
i Switch off the video recorder withthe
mSTANDBY button.
i Put a cassette into the machine.
j To end, press the mSTANDBY button.The video recorder
is now ready to record.
DWhen this function is switched on, ’x’ appears on the
video recorder display.
j On the TV set, select the programme number you want to
record from.
k Press the nRECORD/OTR buttonwith the video recorder
switchedoff.
DDon’t select another programme number on your TV set
until the ’search symbol’ on yourvideo recorder display
disappears.This can take up to one minute.
DIf ’NOTV’ appears on the video recorder display, this
means the video recorder cannot find that channel. The
video recorder will then switch off automatically.
11
Page 12

4. Programmed recording
To make a programmed recording, your video recorder needs
to know:
• thedate you want to make therecording;
• theprogramme number of the TVchannel you want to record;
• thestart and stop time of therecording;
• whetheryou want to use VPS orPDC (see below); and
• therecording speed (SP or LP).
The videorecorder stores all this informationin a TIMER block.
You canprogrammeup to six TIMER blocksamonth in advance.
VPS (video programming system) and PDC
(programme delivery control)
WithVPS and PDC, the TV station controls the start timeand
length of the recording. This means that the video recorder
switchesitselfon and off at the right time, even ifa TV
programmeyou want to record begins earlier or finishes later
than expected.
Usuallythe start time is the same as the VPS/PDC time. But if
your TV guide gives a VPS or PDC time which is different to the
programme’sstarttime (for example, 20.15 and VPS 20.14),you
mustenter ’20.14’ as the start time.
If you want to programme a time that is different fromthe VPS
and PDC time, you must switch off VPS and PDC.
DWith most TV stations the VPS and PDC time are always
the same as the start time.
d Use the number buttonson the remote control to enter
the PlusCode number printed in your TV guide.
If you make a mistake, you can clear your instructions
with the CLEAR (CL) button.
TIMER
VIDEOPLUS PROGRAMMING
12345678
________________________________
MO-FR/WEEKLY TO STORE
PRESS SELECT PRESS OK
e Use the SELECT button to select dailyor weekly
programming.
’MO-FR’ record every day from Monday to Friday.
’WEEKLY’ record every week on the same day of the
week.
f Confirm with the OK button.Your programming details
will then appear on the TV screen.
DIf VIDEO Plus+ does not recognize the TV channel,
’PLEASEENTER PROGRAMME NUMBER’ will appear on
the TV screen. You can select the programme number
with the P ; or P = button.
Then confirm with the OK button.
Programming with VIDEO Plus+
All the information your video recorder needs is contained in
the PlusCode programming number.
a Switch on the TV set and select the programme number
for the video recorder.
b Press the TIMER s buttonon the remote control.
c Select the line ’VIDEOPLUSPROGRAMMING’with the
menu buttons P = or P ; andconfirmwith the
OK button.
DIf ’PLUSCODE NUMBER WRONG’ appears on the TV
screen,this means you have enteredan incorrect
PlusCode number or the incorrect date. Correct your
instructionsor end with the TIMER s button.
DIf ’WEEKEND PROGRAMMING - NOT POSSIBLE’appears
on the TV screen, thismeans you have entered an
incorrectdate. You can only use daily programming for
recordingsfrom Monday to Friday.
DUnder ’START’, use the SELECT button to switch VPS and
PDC on or off.
DUnder ’END’, use the SELECT button to select the
recording speed SP or LP.
g Confirm with the OK button.
DThe programming information has been stored in a TIMER
block.
h To end, press the TIMER s button.
i Make sure that the cassette you have put in can be
recorded on.
j Switch off the video recorder with the
mSTANDBY button.
12
Page 13

DIf any of the TIMER blocks are in use, ’k’ will light up on
the video recorder display.
DThe programming information has been stored in a TIMER
block.
DIf you reach the end of the cassette during a recording,
the video recorder will automatically eject the cassette.
DIf you forget to load a cassette, ’NO CASSETTE’ will
appear on the TV screen and ’k’ will flash on the video
recorderdisplay.
DIf you have put in a cassette which cannot be used for
recording,the video recorder will eject it.
DProgramme numbers ’E1’ and ’E2’ are not for recordings
from your TV.
DProgramme numbers ’AUX’ and ’MIC’ are for audio
recordings,not recordings from your TV.
Manual programming without VIDEO Plus+
a Switch on the TV set and select the programme number
for the video recorder.
b Press the TIMER s buttonon the remote control.
c Select the line ’TIMERPROGRAMMING’with the menu
buttons P = or P ; and confirm with the P button.
TIMER
TIMER PROGRAMMING
DATE PROG. START PDC END LP
01 01 20:00 21:30
VPS
g To end, press the TIMER s button.
h Make sure that the cassette you have put in can be
recorded on. Switch off the video recorder with the
mSTANDBY button.
DIf any of the TIMER blocks are in use, ’k’ will light up on
the video recorder display.
DIf you reach the end of the cassette during a recording,
the video recorder will automatically eject the cassette.
The TV set will then switch off after a few minutes.
DIf you forget to load a cassette, ’NO CASSETTE’ will
appear on the TV screen and ’k’ will flash on the video
recorderdisplay.
DIf you have put in a cassette which cannot be used for
recording,the video recorder will eject it.
DProgramme numbers ’E1’ and ’E2’ are not for recordings
from your TV.
DProgramme numbers ’AUX’ and ’MIC’ are for audio
recordings,not recordings from your TV.
How to check or change a TIMER
a Switch on the TV set and select the programme number
for the video recorder.
b Press the TIMER s buttonon the remote control.
________________________________
d Select the type of information you want to programme
TO STORE
PRESS OK
with the menu buttons Q or P .
e Enter your information with the menu buttons P = or
P ; orwith buttons 0-9 .
DUnder ’DATE’, use the SELECT button to select daily or
weeklyprogramming.
’MO-FR’ record from Monday to Friday.
’MO’ record every week on the same day.
DUnder ’START’, use the SELECT button to switch VPS and
PDC on or off.
DUnder ’END’, use the SELECT button to select the
recording speed SP or LP.
f Confirm with the OK button.
c Select the line ’TIMERLIST’ with the menu buttons
P = or P ; andconfirmwiththe P button.
d Select the TIMER you want to check or change with the
menu buttons P = or P ; .
e Pressthe menu button P .
f Select what you want to check or change with the menu
buttons Q or P .
g Change any information with the menu buttons P = or
P ; orwith the buttons 0-9 .
h Confirm with the OK button.
i To end, press the TIMER s button.
j Make sure that the cassette you have put in can be
recorded on. Switch off the video recorder with the
mSTANDBY button.
13
Page 14

How to clear a TIMER
a Switch on the TV set and select the programme number
for the video recorder.
b Press the TIMER s buttonon the remote control.
c Select the line ’TIMERLIST’ with the menu buttons
P = or P ; andconfirmwiththe P button.
d Select the TIMER you want to clear with the menu
buttons P = or P ; .
e Pressthe CLEAR(CL) button.
f Confirm with the OK button.
g Switch off with the TIMER s button.
NexTView Link
This video recorder has NexTView Link. If your television also
has NexTView, you can select programmeson the TV for
recording.These programmes will automatically be
transmittedto a TIMER block on your video recorder. If you
cancel the TV programme you have selected on the TV, the
TIMER block on the video recorder will also be cancelled.
For more information, please read the instructionmanual for
your TV set.
14
Page 15

5. Other functions
Changing the TV system
If you play recordings made on another video recorder, it may
lead to problems with the colour of your picture.
a Switch on the TV set and select the programme number
for the video recorder.
b Press the MENU button. The main menu will appear.
c Select the line ’SPECIALSETTINGS’ with the menu
buttons P = or P ; and confirm with the P button.
d In the line ’TV SYSTEM’, select the TV systemyou want
with the menu buttons Q or P .
e Confirmwith the OK button.
f To end, press the MENU button.
DIf you still have problems with the colour of the picture,
you can switch to B/W (black and white) on the ’TV
SYSTEM’ line.
Child lock
a Switch on the TV set and select the programme number
for the video recorder.
b Press the MENU button. The main menu will appear.
c Select the line ’SPECIALSETTINGS’ with the menu
buttons P = or P ; and confirm with the P button.
d In the line ’CHILDLOCK’, select ’ON’ with the menu
buttons Q or P .
e Confirmwith the OK button.
f To end, press the MENU button.
’{’ will appear in the video recorder display.
Keep the remote control in a safe place.
DYou can make programmed recordings while the child
lock is on.
You can also switch on the child lock with the remote control.
Pressthe mSTANDBY buttonon the remote control for a few
seconds until ’{’ appears on the video recorder display.
Switch the child lock off in the same way.
Setting the on-screen display (OSD)
a Switch on the TV set and select the programme number
for the video recorder.
b Press the MENU button. The main menu will appear.
c Select the line ’SPECIALSETTINGS’ with the menu
buttons P = or P ; and confirm with the P button.
MAIN MENU
SPECIAL SETTINGS
TV SYSTEM | PAL
CHILD LOCK OFF
OSD MODE AUTO.
16:9 WIDE SCREEN OFF
VCR 1 OR 2 VCR 1
REPEAT PLAY OFF
AUTO STANDBY ON
DEMO OFF
________________________________
d Select the line ’OSD MODE’ with the menu buttons
P = or P ; .
e Select one of the optionsshown with the menu buttons
P or Q .
’AUTO.’ Shows the OSD for a few seconds only.
’OFF’ Switches off the OSD.
’ON’ Switches on the OSD.
f Confirm with the OK button.
g To end, press the MENU button.
DYou can use the OK button to show the current
operating mode on your TV screen.
TO EXIT
PRESS MENU
g If you want to switch off the child lock,select ’OFF’ in the
line ’CHILD LOCK’. ’{’ will disappear fromthe video
recorderdisplay.
DIf you press a button when the child lock is on, ’{’ will
flashon the video recorder displayfor a few seconds.
15
Page 16

Switching to 16:9 wide screen picture
When you play a cassette that has been recorded in 16:9 wide
screen format, you can switch this function ’ON’. The TV set
will now automatically switch to wide screen. This only works
if you have connected the TV set and the video recorder with a
scartcable and if your TV set is suitable for wide screen.
a Switch on the TV set and select the programme number
for the video recorder.
b Press the MENU button. The main menu will appear.
c Select the line ’SPECIALSETTINGS’ with the menu
buttons P = or P ; and confirm with the P button.
d If you have a wide-screen TV set, select ’ON’ in line
’16:9WIDE SCREEN’. If not, select ’OFF’with the menu
buttons P or Q .
e Confirmwith the OK button.
f To end, press the MENU button.
g On the remote control,press the SELECT button and but-
ton 2 at the sametime to switch the remote control to
’VCR 2’.
DIf you want to switch back to ’VCR 1’, pressthe SELECT
button and button 1 at the same time.
h Confirm with the OK button.
DIf the menu does not disappear, this means the video
recorderdidn’t recognize the remote control command.
Repeat step g .
DIf you change the batteries in the remote control, it will
switchback to ’VCR 1’.
DIf you have entered the wrong remote control command
and you press a button for a few seconds, a message will
appear on the TV screen or ’VCR 1’ will appear on the
video recorder display.
Continuous play
a Switch on the TV set and select the programme number
for the video recorder.
Switching the remote control command
If you have two video recorderswith the same remote control,
you can change the commands of the remote control for one
of the video recorders to avoid sending the message to the
wrong recorder.
a Switch on the TV set and select the programme number
for the video recorder.
b Press the MENU button. The main menu will appear.
c Select the line ’SPECIALSETTINGS’ with the menu
buttons P = or P ; and confirm with the P button.
d Select the line ’VCR 1 OR 2’ with the menu buttons
P = or P ; .
e Select ’VCR 1’ or ’VCR 2’ with the menu buttons Q or
P .
b Press the MENU button. The main menu will appear.
c Select the line ’SPECIALSETTINGS’ with the menu
buttons P = or P ; . Confirm with the P button.
d Select the line ’REPEAT PLAY’ with the menu buttons
P = or P ; .
e Select ’ON’ with the menu buttons Q or P .
f Confirm with the OK button.
g Press the MENU button.
h Put in a cassetteand press PLAY G .
When the video recorder reaches the end of the tape or
the end of the recording,it will rewind and startagain.
f Confirm with the OK button.
16
Page 17

Automatic switch-off
The ’DEMO’ function
If you do not use the video recorder for a few minutes it will
switchto standby automatically. You can cancel this function
to use the video recorder as a television receiver.
a Switch on the TV set and select the programme number
for the video recorder.
b Press the MENU button. The main menu will appear.
c Select the line ’SPECIALSETTINGS’ with the menu
buttons P = or P ; and confirm with the P button.
d Select the line ’AUTO STANDBY’ with the menu buttons
P = or P ; .
e Select ’OFF’ with the menu buttons Q or P .
f Confirm with the OK button.
g To end, press the MENU button.
DA TIMER recording will onlyfunction when the video
recorderis switched to standby.
When the DEMO functionis switched on and the video
recorderis switched to standby, several menus will be shown
on the TV screen. Thisdoes not prevent you fromoperating
the video recorder as usual.
a Switch on the TV set and select the programme number
for the video recorder.
b Press the MENU button. The main menu will appear.
c Select the line ’SPECIALSETTINGS’ with the menu
buttons P = or P ; and confirm with the P button.
d In the line ’DEMO’,select ’ON’ with the menu buttons
P or Q .
e Confirmwith the OK button.
f To end, press the MENU button.
DThe DEMO functionis not possible during a TIMER
recording and during an automaticrecording from a
satellitereceiver.
17
Page 18

Reducing picture disturbance
(’optimizing the modulator’)
You may experience picture disturbance if you have not used
a scart cable to connect your video recorder and TV. This is
because another TV station in your reception area may
alreadybe using UHF-channel CH35 or 583MHz.
Switching off the modulator
If you cannot clear picture or sound interference, you can
switchoff the built-in modulator. You should only do this if you
have connected the video recorder to the TV set with a scart
cable.
DIf you have Easy Linkor NexTView, the modulator will be
switchedoff automatically.
a Switch on the TV set and select the programme number
for the video recorder.
b Make sure that there is no cassette in the video recorder.
On the video recorder, press the STOP/EJECT ? and
the PLAY G buttons at the same time for a few seconds
until a channel frequency appears on the display. The
video recorder will then transmit a test picture on this
channel.
INSTALLATION
OPTIMIZE MODULATOR
OPTIMIZE | CH35
MODULATOR ON
CHANNEL/FREQ. CH
________________________________
c In the line ’CHANNEL/FREQ.’,select’CH’ or ’FREQ.’ using
TO EXIT
PRESS MENU
the menu buttons P or Q .
a Switch on the TV set and select the programme number
for the video recorder.
b Make sure that there is no cassette in the video recorder.
Pressthe STOP/EJECT? and the PLAY G buttons at
the same time for a few seconds until a channel
frequencyappears on the video recorder display.
c Select the line ’MODULATOR’on the TV screen or ’M ON’
on the video recorder display with the menu buttons
P ; or P = .
d With the menu buttons Q or P ,select ’OFF’ on the
TV screen or ’MOFF’ (modulator off) on the display.
e Confirmwith the OK button.
f To end, press the MENU button.
Using your video recorder remote control
d Select the line ’OPTIMIZE’with the menu buttons P ; or
P = .Press the menu button P .
e When the video recorder finds a ’free’ TV channel, it will
show the channel or frequency on the small
video recorder display.
DYou can also enter the channel or frequency using
buttons 0-9 .
f Tune in the TV set to this channel or frequency.
g Confirm the channel or frequency with the OK button.
h To end, press the MENU button.
18
with your TV set
Your video recorder remote control can transmit several
commands to TV sets of differentmakes.
By using the TV buttons on the panel in the middle of the
control,you can:
Sp increaseor reduce the TV volume;
TV y switchoff the sound;
TV m switchoff the TV set; and
P p change the channel
a Point the remote control at the TV set.
Page 19

b Press the TV m button and the relevant number button
at the same time.
Manual audio control
Number button TV make
0 Philips, Radiola (F), Schneider (F)
1 Grundig
2 Panasonic
3 Panasonic
4 Sony
DIf the number shown above does not work with your TV
set,or if the make of your TV is not in the list, you can try
out the numbers one after the other.
Audio record only
You can use your video recorder as an audio tape recorder.
You can record the sound from a hifi unit or a second video
recorder.
a Use an audio cable to connect your hifito the
AUXIN L R socket at the back of the video recorder.
b Select the programme number from which you want to
make the ’audio only’ recording, using the P ; or
P = button(for example,’AUX’ for the
AUXIN L R socket).
Withthe MANUAL buttonyou can switch to manual audio
control.
a Press the MANUAL buttonon the video recorder. The
currentselection will appear in the video recorder
display.
b Keep pressing the MANUAL buttonuntil’MAN’ (manual
audio control) appears on the display.
c With the PROGRAMME ; and PROGRAMME = buttonson
the video recorder, adjust the recordinglevel so that the
’0 dB’ mark lights up during the loudest parts of the
recording.
DAt step b you can switch back to ’AUTO.’(automatic
audio control) with the P button.
Audio dubbing
This function allows you to replace (dub) the soundtrack of an
existingrecording with another soundtrack. To do this,
connect your audio equipment (for examle,a CD player) to the
L-AUDIO-R socket. You can also connect a microphone to the
socket MIC. .
a Switch on the TV set and select the programme number
for the video recorder.
b Press the MENU button. The main menu will appear.
c Press the MENU button. The main menu will appear.
d Select the line ’RECORDFUNCTIONS’ with the menu
buttons P = or P ; and confirm with the P button.
e Select the line ’AUDIO ONLY’ withthe menu buttons
P = or P ; andconfirmwiththe P button.
f To start sound recording, press the nRECORD/OTR button.
g To stop recording, press the STOP h button.
h To end, press the MENU button.
c Select the line ’RECORDFUNCTIONS’ with the menu
buttons P = or P ; and confirm with the P button.
d Select the line ’AUDIODUBBING’ with the menu buttons
P = or P ; andconfirmwiththe P button.
e Select the programme number for the audio equipment
(forexample, ’E3’). Then switch on the audio equipment.
f Find the position on the tape where you want the audio
dubbing to end.
g Press the STILL/JOGON R button. ’STILL’ will appear on
the TV screen.
h Press the CLEAR (CL) button. ’0:00:00’ will appear on the
TV screen.
i Find the position on the tape where you want the audio
dubbing to start.
j Press the STILL/JOGON R button. ’STILL’ will appear on
the TV screen.
19
Page 20

k Press the STOPh button.
l Press the nRECORD/OTR button.The video recorder will
startto record the sound from the audio equipment. The
normal soundtrack will be re-recorded, but the stereo
sound will remain.
The audio recording will stop automaticallywhen the
counter reaches ’0:00:00’.
m To end audio dubbing,press the MENU button.
DTo play back the audio dubbing, read ’Selecting the
soundtrack’in this chapter.
Headphone volume
’Synchro edit’
You can copy between thisvideo recorder and a suitable
camera recorder. Start both machines at the same time and
use the adjustable start delay (preroll time).
Adjusting the video recorder to the camera
recorder.
a Connect the two machineswith a synchro-edit cable
(socket SYNCHRO EDIT on the front left of the video
recorder).
Connect the video or audio source to the input sockets
L-AUDIO-R and VIDEO ofthe video recorder.
a Press PLAY G , then press the MENU button. The main
menu will appear.
b Select the line ’PLAYFUNCTIONS’ with the menu buttons
P = or P ; andconfirmwiththe P button.
c Select the line ’HEADPHONEVOLUME’ with the menu
buttons P = or P ; and confirm with the P button.
d Adjust the volume with the menu buttons Q or P .
e Confirmwith the OK buton.
f To end, press the MENU button.
Selecting the soundtrack
You can select the soundtrackyou want to record. This is
especiallyuseful if the programme is multilingual.
a Press the SELECT button.The current setting will appear
on the TV screen.
b By pressing the SELECT buttonseveraltimes you can
selectfrom the four possibilities displayed (’STEREO’,
’RIGHT’,’LEFT’, ’MONO’).
DWhile a tape is playing, you can select a fifth possibility:
the ’MIXED’ mode. In this mode you can play the mono
sound of the normal audio track together with the sound
of the stereo audio track.
DPlease also read the instructionmanual for the camera
recorder.
b Switch on the TV set and select the programme number
for the video recorder.
c Press the MENU button. The main menu will appear.
d Select the line ’RECORDFUNCTIONS’ with the menu
buttons P = or P ; and confirm with the P button.
e Select the line ’CAMERA LINK’ with the menu buttons
P = or P ; .
f Switch the camera recorder to ’still picture’.
g Confirm with the P button.The video recorder now
checks the camera recorder type.
h When the check is complete, one of the following
messageswill appear on the TV screen:
’VCR CONTROL DETECTED’ if the video recorder controls
the camera recorder; or ’CAMERA CONTROLDETECTED’
if the camera recorder controls the video recorder.
DIf there is no stereo sound recorded on the cassette, the
video recorder automatically switches to mono sound.
20
Page 21

Starting synchro-edit
a Switch on the TV set and select the programme number
for the video recorder.
b Press the MENU button. The main menu will appear.
c Select the line ’RECORDFUNCTIONS’ with the menu
buttons P = or P ; and confirm with the P button.
d Select the line ’SYNCHROEDIT’ with the menu buttons
P = or P ; andconfirmwiththe P button.
Method 2 - If the camera recorder is to
control the video recorder
a Start copying with the relevant button on the camera
recorder.
The camera recorder will start to play and the video
recorderwill start to record.
b Stop copying with the PAUSE or STILL button on the
camera recorder.
c End copying with the MENU button.
e The on-screen display for the connected camera
recorderwill appear on the TV screen.
f Search the beginning of the recording on the video
recorder.
g Press the STILL/JOGON R button. ’STILL’ will appear on
the TV screen.
h Use the SELECT buttontoswitch to the picture of the
camera recorder.
i Search the beginning of the recording on the camera
recorder.Then, switch the camera recorderto ’still
picture’.
The way you start copying will depend on the typeof camera
recorderyou are using.
*Method1 applies if the video recorder is to control the
camera recorder.
*Method2 applies if the camera recorder is to control the
video recorder.
Method 1 - If the video recorder is to control
the camera recorder
Setting the ’preroll time’
This is the time that the tape moves before the recording
starts.If the beginning of the recording is missing, this means
the preroll time was too long. Select a shorter ’preroll time’.
If the recording has started too early, this means the preroll
time was too short. Select a longer preroll time. You can select
a preroll time of between 1 and 5 seconds.
a Press the MENU button.
b Select the line ’RECORDFUNCTIONS’ with the menu
buttons P = or P ; and confirm with the P button.
c Select the line ’RECORDSETTINGS’ with the menu
buttons P = or P ; and confirm with the P button.
d In the line ’PREROLLTIME’, adjust the ’preroll time’ with
the menu buttons P or Q .
DYou can also enter the preroll time with buttons 0-9 .
DBy using the CLEAR (CL) button, you can reset the preroll
time to suit your camera recordertype.
e Confirmwith the OK buton.
a Start copying with the nRECORD/OTR button on the video
recorder.The camera recorder will startto play and the
video recorder will start to record.
b Stop copying with the STOP h buttonon the video
recorder.
c End copying with the MENU button.
f To end, press the MENU button.
21
Page 22

Before you call an engineer
If you have any problems using this video recorder, you may
find the information below helpful. Or you can call the
customerservice centre in your country. You will find the
phone number in the enclosed guarantee leaflet.
If your video recorder does not respond to any button being
pressed, this may be because:
• thereis no power supply;
• aprogrammed recording iscurrently being made;
• thechild lock is switchedon; or
• thereis a technical problem.In this case, switch off the mains
powersupply for 30 seconds, then switchit on again. If this does
not haveany effect, you can:
Switchoff the power supply again. Then switchit on whilst
holdingdown the
the messagedisappears from the display.All the information
storedwill be cleared.
If the cassette is jammed in the video recorder:
• don’tuse force but pull out themains plug for a moment.
If the remote control does not work, this may be because:
• itis not pointed toward thevideo recorder;
• thebatteries have run out; or
• youhave given the wrong remotecontrol command. In this case,
readtheparagraph ’Switching the remote controlcommand’in
chapter5.
If there is no picture when you play a cassette, this may be
because:
• thereis no recording on thecassette;
• youhave chosen the wrong channelonthe TV for playing videos;
or
• thecable connecting the TV and the videorecorder has come
loose.
STANDBYm buttonon the video recorderuntil
If your programmed recording does not work, this may be
because:
• youhave not set the TIMER properly;
• youhave programmed the wrongtime or date;
• youhave loaded a cassette that cannotberecorded on; or
• PDCor VPS is switchedon but the PDC or VPS time is wrong.
If there is picture or sound interference on TV reception:
• turnto chapter 5 and read the sections’Eliminating picture
disturbance(’optimizing the modulator’)’ and ’Switchingoff the
modulator’;and
• haveyour aerial checked.
Please write the serial number of your video recorder here:
Model-number or type: VR850/07
Serial number: ......
Thisproduct meets the requirements of the Directive73/23/EEC +
89/336/EEC+ 93/68/EEC.
Interference
The Department of Trade and Industry runs a Radio
InvestigationServiceto help TV licence holders improve
reception of BBC and ITC programmes which are being spoilt
by interference.
If your dealer cannot help, ask at a main postoffice for the
booklet’How to improve television and radio reception’.
If there is poor picture quality when you play a cassette, this
may be because:
• yourTV set is not properlyadjusted;
• thecassette is badly wornor of poor quality; or
• thetracking is not properlyadjusted or the video heads are dirty.
In thiscase, turn to chapter 2 and read ’Selectingthe picture
setting’or ’Picture interference’.
If your video recorder will not record, this may be because:
• theTV channel you want to recordfrom is not stored;
• youhave selected the wrong programmenumber; or
• youhave loaded a cassette whichcannot be recorded on.
(WwnnNNNwwnwNNnwnWwnNWnNnwwnWnN)
3103166 21554
9062/012 VR850/07
22
Page 23

Remote codes
Acura 02 GoldStar 15, 20, 27 Proline 31
Adyson 20 Goodmans 07, 10, 20, 29, 36 Protech 02, 12, 20, 23, 25, 38
Akai 18, 33 Gorenje 35 Quelle 03, 04, 33
Akura 21, 25 Graetz 33 Questa 07
Alba 02, 07, 21 Granada 10, 18, 20 Rank Arena 07
Allorgan 28 Grandin 26 Rediffusion 33
Amplivision 20 Grundig 17 Rex 25
Amstrad 02 HCM 02, 26 Roadstar 02, 21, 25, 38
Anitech 02 Hanseatic 30, 33 SEG 07, 20, 25
Arcam 19, 20 Hinari 02, 07, 21 SEI 12, 28
Asuka 21 Hisawa 26, 40 Saba 15
Audiosonic 15 Hitachi 05, 07, 08, 13, 15, 20, 22 Saisho 02, 04, 25
BPL 26 Huanyu 19, 36 Salora 33
BSR 28 Hypson 25, 26 Sambers 12
BTC 21 ICE 20, 25 Samsung 01, 02, 20, 25, 27, 35
Basic Line 02, 21 ICeS 21 Sandra 19
Baur 03, 33 ITT 33 Sanyo 04, 07, 10, 18
Beko 35 Imperial 23, 35, 38 Schaub Lorenz 33
Binatone 20 Inno Hit 10 Schneider 21, 23, 37
Blaupunkt 17 Interfunk 23, 33 Sei-Sinudyne 03
Blue Sky 21 Intervision 12, 20, 25 Sentra 06
Blue Star 26 Isukai 21 Sharp 07, 11
Bondstec 23 JVC 07, 09 Shorai 28
Boots 20 Kaisui 02, 19, 20, 21, 26 Siarem 12
Brandt 15 Kathrein 01 Siemens 17
Britannia 19 Kingsley 19 Silver 07
Bush 02, 07, 21, 26, 28, 36, 42 Koyoda 02 Sinudyne 12, 28
CGE 23 Leyco 10, 25, 28 Solavox 05
CS Electronics 19 Lloytron 05 Sonitron 18
CTC 23 Luxor 33 Sonoko 02
Carrefour 07 M Electronic 02, 13, 15, 20, 32, 36, 41 Sonolor 18
Cascade 02 Magnadyne 12, 23 Sony 03, 04, 07
Cimline 02 Magnafon 12 Soundwave 38
Clatronic 23, 35 Manesth 20, 25, 30 Standard 02, 20, 21
Condor 30, 35 Marantz 01 Sunkai 28, 31
Contec 02, 07, 19 Matsui 02, 04, 06, 07, 10, 18, 20, 28, 39 Susumu 21
Crown 02, 35, 38 Memorex 02 Tandy 10, 20, 21
Cybertron 21 Metz 34 Tashiko 07, 20
Daewoo 02, 36 Mitsubishi 07, 14, 16 Tatung 10, 20
Dainichi 21 Mivar 19, 27 Tec 20, 23
Dayton 02 Multitech 02, 12, 19 Technema 30
De Graaf 18 Neckermann 01 Technics 24
Decca 10 Nikkai 05, 06, 10, 19, 21, 25 Telefunken 15
Dixi 02 Nobliko 12 Telemeister 30
Dual 42 Nokia 33, 41 Teletech 02
Dual Tec 20 Nordmende 15 Teleton 20
Elite 21, 30 Oceanic 33 Tensai 21, 28, 29, 30
Elta 02 Orion 28, 30, 31 Texet 19, 21
Emerson 33 Osaki 05, 10, 20, 21, 25 Thomson 15
Ferguson 15 Oso 21 Thorn 06, 10, 33
Fidelity 19, 33 Osume 05, 10 Tomashi 26
Finlandia 18, 32 Otake 29 Toshiba 06, 07
Finlux 10, 13, 32 Otto Versand 01, 03, 07, 20, 30 Uher 30
Firstline 02, 19, 20, 23, 28, 31 Palladium 35, 38 Ultravox 12
Fisher 18, 20, 35 Panama 20, 25 Universum 13, 25, 32, 35
Flint 40 Panasonic 24, 34 Videosat 23
Formenti 30 Pathe Cinema 19, 30 Videotechnic 20
Frontech 23, 25 Pausa 02 Visa 02
Fujitsu 10 Perdio 30 Vision 30
Funai 25, 28 Phase 05 Waltham 20
GEC 10, 20 Philco 23 Watson 30
GPM 21 Philips 01, 36 Watt Radio 12
Geloso 02 Pioneer 15 Wega 07
Genexxa 21 Profex 02, 33 White Westinghouse 19, 30
Yoko 20, 25
Page 24

&
A brief guideto using yourvideo recorder
The remote control
nRECORD/OTR Record and OTR This recordsthe TV channel
that you have selected at that moment.
mSTANDBY Switchoff This switches off themachine. If
you press mSTANDBY itwill automatically
cancel any menu functionyou have chosen
and will stop aTIMER-recording.
P ; Channel and menu button This changes tothe
next numbered TV channel(for example,
2 to 3). Italso moves thecursor up ifyou have
the menu on screen.
P = Channel and menu button This changes tothe
previous numbered TV channel(for example,
3 to 2). Italso moves thecursor down ifyou
have the menu on screen.
Q Menu button This movesthe cursor left.
P Menu button This movesthe cursor right.
MENU Menu button This calls up the main menu or
cancels the menu.
OK Store and confirm This stores or confirms any
programmeyou have entered.
CLEAR(CL) Delete This deletes the lastprogramme you
have entered or clears the TIMER.
TIMERk TIMER This sets the TIMER orchanges or cancelsa programmed TIMER
SELECT Select This activates the menu function you havechosen.
0-9 Digit buttons These are the buttons youuse to selectchannels and programme
the machine.
H Rewind If you have pressed STOPor STANDBY,this rewinds the cassette.
If you have pressed PLAY, this scansthe picture in reverse.
PLAYG Playback This plays a recorded cassette.
I Forward wind If you have pressed STOP or STANDBY,this windsthe cassette
on. If you have pressed PLAY, thisscans the pictureforward.
INDEXE Index search Ifyou use thisbutton with H or I , it searchesfor the
previous or next recordingon the tape.
STILL/JOGON R Still picture and JOG on This stops the tape and shows the picture at that
momentas a stillpicture. It can also switch on the ’JOG’function.
o SHUTTLE Ifyou are holdingthe picture on STILL, the outer dial allowsyou to
select the speed at which the picturewill move on.
$ JOG If you are holding the pictureon STILL, the inner dial allows you to move
the picture on slowly.
STOPh Pause and stop This stops the tape, except during TIMER recording.
SMART SMART This adjusts the picture while you are playinga cassette.
COUNTER Counter Thisshows how muchof the tapeyou have played.
MONITOR TV monitor This switchesbetween the pictureon TV and on your cassette.
This is how you put the batteriesinto your
remotecontrol.
To open the battery compartment:
1. push the dents and
2. slide down thecover
TV controls
Sp TV volume This increases and reduces the volume.
TV m Switch off Thisswitches off the TV.
TV y TV sound off This switches off the soundcompletely.
P p TV programme Thischanges the programmenumber up and down.
Page 25

&
The front of the set
STANDBYm Standby This switches off the set. If you press STANDBY m ,itwill automatically cancel
RECORDn
PROGRAMME;
PROGRAMME=
PLAYG
STOP/EJECT?
STILLR
any menu youhave chosen and will stop TIMER recording.
Record This records the TV channelyou have selected at thatmoment.
Programme number plus This changes tothe next numbered programme (for example,
2 to 3).
Programme number minus This changes tothe previous numbered programme (for
example, 3 to2).
Playback This plays a recorded cassette.
Pause and stop This stops thetape, except during TIMER recording. If you pressit again, it
ejects the tape.
Stillpicture This stopsthe tape and shows thepicture at thatmoment as a still picture.
Rotary control Turn thecontrol left: Ifyou have pressed STOP orSTANDBY, this rewinds
o
the cassette. If you have pressedPLAY, this scansthe picture in reverse.
Turn the control right: If you have pressed STOPor STANDBY, thiswinds the cassette on.
Ifyou have pressed PLAY, thisscans the picture forward.
VIDEO
SYNCHROEDIT
MANUAL
The back of the set
AUXIN L R
AUXOUT L R
AV1EXT1
AV2EXT2
Video input socket This is toconnect the video sockets of a camera recorderor video
recorder.
EDIT input socket This is toconnect a suitable camera recorder.
Manual sound control This is toswitch between automaticsound control and manual
sound control.
4 Mains socket Thisis to connect the mainscable.
Audio input sockets, left and right This is toconnect a hifi set.
Audio output sockets, left and right This is alsoto connect a hifi set.
Scart socket 1 This is toconnect the TV set tothe video recorder.
Scart socket 2 This is toconnect a satellite receiver, decoder, video recorder andso on.
Aerial input socket This is to connect the aerialcable.
2
Aerial output socket This is to connect the aerialcable from the TV set.
TV
MIC.
PHONES
L-AUDIO-R
Behind the flap on the left
Microphone input socket This is toconnect a microphone for dubbing.
Headphones socket This is to connect headphones.
Audio input socket left/rightThis is toconnect the audio sockets ofa camera recorder or
video recorder.
 Loading...